VVVVVV
185 ratings
[WIP] MASTER OF THE UNIVERSE: The Ultimate Survival Guide for VVVVVV (patterns, tips, routes)
By Krauvando
Welcome, noble gamer! If you're reading this, then it means you have a case of OCD as problematic as mine, to the point that you've decided to beat this awesome game in No Death Mode! However, this guide might fit for many people since I'm gonna highlight every single (needed) room in the game and how to deal with all of them, so in case you're struggling into a particular part this guide can help you too!

Just before the action, let me say that English is not my native language so I already apologize in case my explanations are not tight or clear enough. Nevertheless, I'll be using tons of screenshots and even videos so hopefully they'll fix that issue!

So, less talk more RAGE.
7
   
Award
Favorite
Favorited
Unfavorite
INTRODUCTION

About me:

I've played VVVVVV for about 70h and got all the achievements including this No Death mode. I've put a lot of dedication into this game and consider this guide not made from an ignorant. I've studied it pretty much so I'm quite sure about what I'm writing!

About the following guide:

So even though I'll make this guide step by step, I'm assuming that all of you have played and beaten this game at least once. Kinda pointless to even consider a deathless run without knowing what's comming up. If you're still dying more than 100 times during a full run, use this guide to start learning about getting consistant in some patterns, and use this info more seriously if you're dying less than 25 times.

What you'll find in this guide:

- Screenshots of EVERY single room necessary to beat the game (i.e.: I'm not putting tips for Veni Vidi Vici since trinkets are not needed), with a photoshopped path to make things even more clear.
- Short videos of rome rooms that might need a better explanation than a simple screenshot.
- Short explanations about rooms, in case screenshots info is confusing.
- Some minor tips to help you to your journey
- You WON'T find glitch/bug/crack tips to make the run illegitimate easier. That's for losers.

Contact:

If somehow this guide is not clear enough and you need my own help about something you can contact me anytime using the comment section below this guide or simply send me a friend request and I'll try to help ASAP.
GAMEPAD OR KEYBOARD?


Being the kind of 2D platformer as it is, there wasn't any doubt that the endless gamepad vs. keyboard war would appear here too. Nostalgic gamers might prefer the gamepad as that's how they've played everything... but who can deny the precission of a keyboard? Specially if you own a mechanical one. So...

Is any of those better than the other?


...No.

VVVVVV happens two have very basic controls, based only into moving Captain Viridian and making it flip. That's it. Nothing else. For this own reason I'd say that there's no better peripheric for this game, just preference. Only the player decides, and both choices are fine. As for me, I've played this game both styles and got cool results with both of them: I got the hardest achievements using a gamepad and I managed to make a 5-death run with a keyboard without even trying to make a serious run.

So no guys, don't bring this battle here. This game is perfectly playable in any way so simply choose whatever you feel more comfortable with; you won't be in disadvantatge.
LIST OF TIPS

Even though there aren't many tips for this game (basically because of how simple controls are), I'll try to gather any sort of useful information you should take into account before jumping into the hardcore stuff:

1. ROOM RESTARTING

As many platformers out there, VVVVVV has the advantatge that every single time you enter a new room, the same exact pattern occurs. So if for instance a set of moving platforms go up and down and you lost your chance to execute your safe path, simply move into the previous room and then come back.

For that reason, I strongly suggest that if you start learning a pattern always remember how much time you wait before doing the whole thing (for instance: wait until the platform goes up for the third time) until you reach a point where your hands do it automatically.

2. TIME TRIAL AND INTERMISSION PRACTICE

This sounds stupid but playing all Time Trials and Intermissions several times helped me A LOT to learn many stuff I'm highlighting in this guide. Keep in mind that Intermissions have to be played in an specific order and you can't modify it. Intermission 2, also known as The Gravitron, has been the party ruiner for way too many players (including me) in every run, and they definately will need some training from your part before even considering to beat this game deathless.

Also, use this practice to decide what sections you feel more comfortable with, so you can focus into that stuff that makes you scratch your head.

In case of trouble about where are both of them, you can find them here:

From the main menu, go to START GAME


Then go to PLAY MODES


There you go


3. OPTIMIZING THE SENSIBILITY (Gamepad players only)

In case you're playing with gamepad, and mainly if you're playing with the joysticks, you may feel that sometimes Captain Viridian move some more pixels than you were expecting to do, basically because there's a fraction of time before you fully stop pressing the joysticks where they're still responding. This is usually called as Ghosting and it might look harmless for most games, but here we're speaking about a game that demands a very tight precission and this might cause you many, many deaths.

If that happens to you, don't break your gamepad yet. You can set how much sensibility joysticks will have from the options menu, which goes from minimal (Captain Viridian won't move until the joystick is fully into one side) to maximum (Captain Viridian will move as soon as there's some pressure into the joystick). I suggest trying different setting until you find the one you feel the best with.

You can find the joystick sensibility setting here:

From the Main Menu, go to GAME OPTIONS


Then go to GAMEPAD OPTIONS


There you go, do as you want and find your formula!


4. FRUSTRATION

Persistance makes the master. DON'T GIVE UP! DO IT!


Last but not least, never forget that what you're trying here is extremely difficult and you should get ready about doing mistakes right before the goal. So close, yet so far... This feeling can cause you a lot of frustration, like if you're wasting a lot of time.

When that happens, you might wanna keep trying and you'll probably feel that you're doing more and more mistakes. This is basically caused by your frustration, and the longer you try, the easier you'll rage. When people is not focused anymore into the actual run but the one you failed some minutes before, they start playing worse. Less reflexes. Gets distracted faster. Get a constant feeling of annoyance. And eventually... ragequit.


Seriously... Are you freaking kidding me...!?


One wise man reminded me that the best medicine against this feeling is to STOP. Sometimes minutes will be enough, but other times you might need hours or even days. Don't worry doing so; you won't forget any pattern, and you won't play any worse. Instead, you'll restart your experience refreshed and focused again. From all tips, this is the one you should take the most serious, no joking.

And remember: once you learn everything, it's just a matter of time it happens. Might be after 40h, might be after 100h, but trust me, it'll happen. Keep trying and you'll achieve what you seek. DON'T LET YOUR DREAMS BE DREAMS, SO JUST DO IT, MAKE - YOUR DREAMS - COME TRUE!!!

GAME ORDER


Alright, time for the real stuff. Let's get to the point!

As you all know, VVVVVV combines some zones you can choose when to go there and some others must be played in an specific order. Being this irrelevant when you just try to beat the game normally it becomes very important what path you choose when you try to play this game deathless. In essence, people usually prefer to do the harder stuff first, and leave the easy one for the end. However, this is extremely relative, since I might find a zone hard and other people might find it easier. Simply play all of them and by practising you'll eventually know which ones you're comfortable 99% of the time and which ones have rooms that makes you struggle. Also, keep in mind that the order can perfectly change if you eventually feel better with that part you were having issues.

That said, the list of zones you CAN choose the order is:

  • The Laboratory
  • The Tower
  • Space Station 2
  • Warp Zone

Zones you CAN NOT choose when to play them:

  • Space Station 1 (obviously)
  • Intermission 1
  • Intermission 2
  • Final Level

And whatever you do, the order of the whole game will be like this:

  • Space Station 1
  • [Zone you choose]
  • [Zone you choose]
  • Intermission 1
  • [Zone you choose]
  • Intermission 2
  • [Zone you choose]
  • Final Level


Just keep in mind that the order may vary the more you play this game, don't deny change!
As for me, my personal order ended up being the following:

  • Space Station 1
  • The Laboratory
  • Warp Zone
  • Intermission 1
  • Space Station 2
  • Intermission 2
  • The Tower
  • Final Level

And for that reason, this guide will follow this same order.

Finally, before starting the true guide, let me put a list of specific rooms that I found myself more "chokable" than average, and therefore the ones that might make you think which zone is harder and which one is easier (I'm not putting any room from Space Station 1, Intermissions or The Final Level since there's nothing to consider). For instance, The Laboratory is in general pretty manageble, but it has a pair of rooms that gave me many problems if I played them while I was more tense or nervous, so it became my first priority. Check this list, play them and decide for yourself!

Room
Screenshot
Explanation
Square Root (The Laboratory)
The move you have to make in the following 2 rooms after this one can cause you a problem due to Captain Viridian being a little bit tricky to control on the flippers.
Kids His Age Bounce (The Laboratory)
As usual this kind of rooms are more based on reflexes than actual pattern-learning. It can be pretty much harmless if you play it soon enough but it can become a problem when you're nervous or tense.

The Living Dead End (The Laboratory)
19
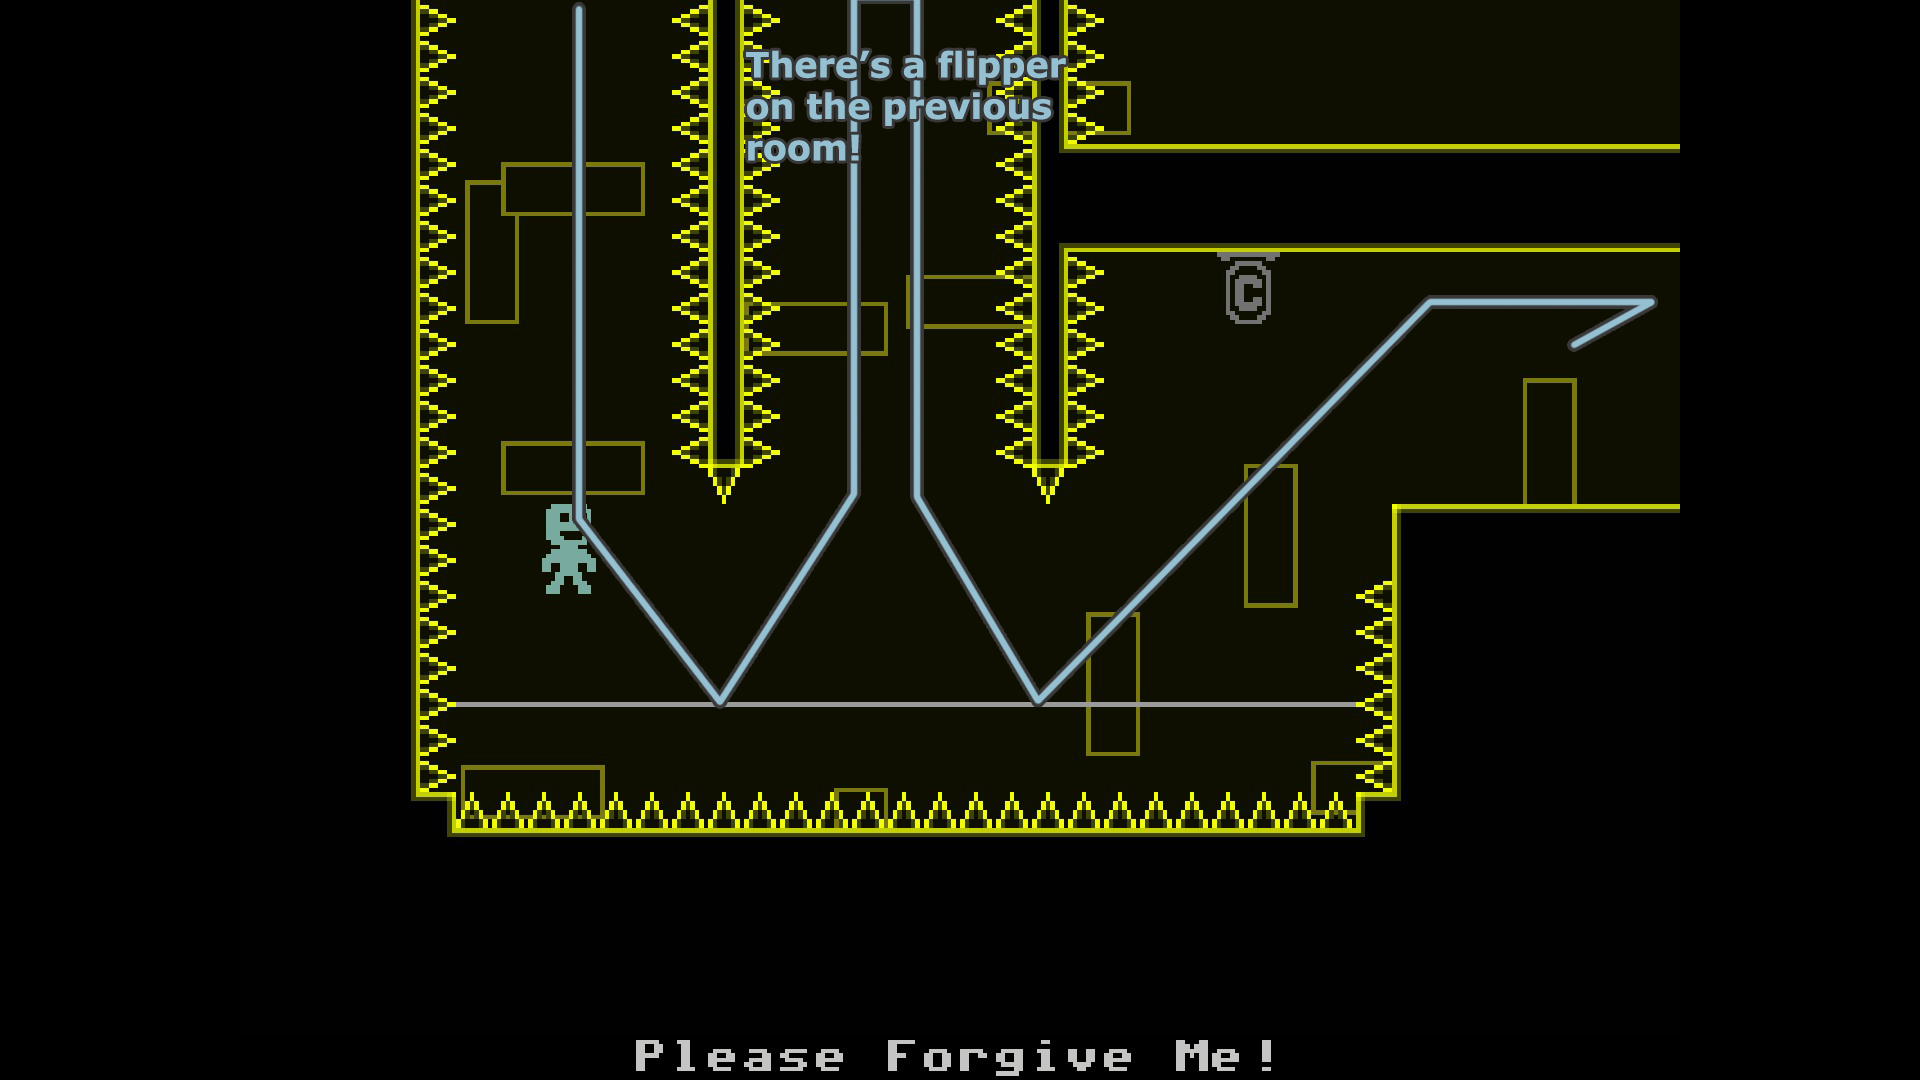
Not dangerous at all but being the last room in The Laboratory it can betray you a lot. Be careful with the last flip from on the right flipper and with the lower left spiked wall when you go down.

Upper Bowel (The Tower)
The Tower itself is probably the least dangerous zone in the game, but it has still some parts that may need some practice. This zig-zag is one of those since you really need to learn when to stop so you don't eat those side spikes and learn to do it fast so the up/down spikes don't come too close.
Spiky Platforms (The Tower)
Usually easy to overpass but be careful since sometimes some of those sets of spikes might surprise you and touch you by a pixel, not even after you flip, but also before doing so.
Lower Bowel (The Tower)
Same warnings as the Upper Bowel, but this is even harder since it's a bit more confusing, specially because you face it after the upper one and your brain keeps saying "FASTER FASTER FASTER". Keep an eye on this part, might kill you few times.
You Just Keep Coming Back (Space Station 2)
Might take a few tries to learn the pattern, and before mastering it, this room can be pretty problematic, mainly due to the fact that both floor and platforms are in constant movement.
Spikes Do! (Space Station 2)
This stupid room gave me more problems than I'd have expected so it comes to the list. Watch out for the las double flip since they can kill you, and if not, LIES will do.
B-B-B-Busted (Space Station 2)
Obviously that little gap there can be tough to reach when nerves are stressing the hell out of you. Practice how much time you need to press the direction buttons until you beat this room almost every time; otherwise it can become a party ruiner.
V Stitch (Space Station 2)
Next room after B-B-B-Busted, and same logic. During my No Death mode runs, I've died here more times than I've have wanted to. Keep an eye on how much time you need for every jump.
I Love You (Warp Zone)
Penultimate Warp Zone room. Most of the flips here are easy enough, but the last one before reaching the warp portal is incredibly treacherous, even if you play it a hundred times.
That's Why I Have To Kill You (Warp Zone)
Last Warp Zone room. Pretty much the same explanation as I Love You, but instead of being the last jump tricky, here it's the first ones. This room is confusing as hell and once you lose your chance to execute your pattern keep in mind that you cannot restart it since you can't go to the previous room. A pure killer.
SPACE STATION 1

Time to start our run. Remember to click on the images to see them in full size!


Hell yeah let's rage!
Obviously move right.
Wow so hardcore, you got this.
As soon as you flip up, go top right.
Like this.
As soon as you reach the top, the first STOP you'll encounter will go down, letting you pass through the gap. Do the same with the second STOP, but wait for the third until you have a clear path. It is possible to go through all three STOP's non-stop but it's extremely risky and pointless unless you're speedrunning. See the video
Unless you wanna go for trinkets, keep moving.
As soon as the lower... er... UFO? Touches the right-side wall and starts moving left again, flip up and fastly flip down over the platform. I apologize the screenshot, it's not accurate at all. See the video
This is possible to do non-stop but again it's very risky, take your seconds.
Go on. The upper platform banishes after a second, so don't stay THAT calm.
I'm sorry to treat you all like idiots.
Obviously wait for the platform to come.
As soon as the first Yes Man starts going up again, do as the arrow says nonstop. See the video
First you need to go down the platforms as if they are stairs, so simply wait until the next platform is below you. Once on safe floor, flip up to the last plaftorm you've been and "reversly stair up" as the arrow says. See the video
No sh*t Sherlock.
Uhh... look at that small gap down there. Fortunately we have a huge one :D
Let yourself going "up" the hole and position yourself right in the middle of it.
Room's name says it all. Platforms dissapear after a second.
Hardest section in Space Station 1. Flip down the hole and once you're inside it put yourself next to a wall and don't stop pressing that direction. The rooms below you are symmetrical so both left or right are fine. I always go right though, dunno why.
And that's the reason to keep holding right (or left if you go left). But before reaching the next room...
... place Viridian into the middle of the hole so he doesn't eat the treacherous spikes. Now you simply have to do all the previous 3 rooms upwards. And don't forget to go right after leaving the hole. See the video
Zzzzzzz...
Harmless ghost, as easy to dodge as the STOP guys.
When you enter this last room, stop moving for like half a second and then do as the arrows say non-stop. See the video
THE LABORATORY (Part 1)

First things first. We need to reach this room from Ship. See the video here
Once you go through the hole, you'll see the main obstacle from the laboratory: flippers. As soon as you touch one of them, Viridian will instantly flip. Multiple flippers can be set in order to make one full tricky jump, so be careful. This one fortunately is easy enough so just go on.
This room will teach you what you will be facing a lot here: the use of flippers to avoid spikes. Take your time familiarizing with their physics and don't rush unless it's needed. Sometimes flipped jumps and manual jumps are mixed so focus. Also, if you stay touching the left wall from the final hole, you'll have a safe entrance for the next room (this is for speedrunners only)
If you chose to be a faster player (A), simply keep pushing Left until you reach the flipper; then avoid as shown. In case you decided to be a slower, safer player (B), drop yourself on that platform and then simply throw Viridian into the first flipper.
Similar to the previous room. My safe path is to put myself on that wall highlighted in the screenshot and hold Left until Viridian moves a bit, enough to land directly into the lower flipper.
Once you land, simply go right. Don't press the Flip Button since flippers will do their job!
Do you like how my Viridian is flying? And please follow the instructions.
As soon as you reach the room, drop into the ground and flip to the flipper. The flipper is very long so it should not give you a problem to cross it safely. Note that it is possible to do the whole thing while you keep holding Right and never stop (faster but obviously riskier). And don't underrate the lower spikes, specially on the first jump!
The first tricky jump of the Laboratory. Notice that this room is symmetrical so this will have consequences on WHEN you pass through the flippers. Taking the first flipper late might give you time for the second one, but this can become a counterback, specially for that lonely spike. Forget to stay on the wall and hold Right, that'd kill you because of that little ♥♥♥♥♥♥. My strategy is to pass the first flipper pretty early and KEEP HOLDING RIGHT WITHOUT HESITATION. With 5-10 minutes of practise you'll do that flawlessly 99/100 times.
This one is not as hard as it pretends to be. I always to the first two jumps while holding Right button until the end. This sounds unnecessarily risky but trust me: the less you think, the less to worry. As soon as I started doing these jumps like this, I didn't die anymore. For the 3 upper jumps though, don't rush and don't hold Left. It is possible to do it that way but it's very very risky. Anyway lose your fear because with some minutes of practise you'll nail this room every time.
I regret underrating this room at first. This jump is trickier than it looks and you should pay attention on Viridian's speed because it's pretty treacherous and somehow I can't explain why. But this room costed me many deaths. My strategy is to jump not too far away from the spike and once in the air, I look at that Point of reference (same as the platform). Once I reach the same height, I instantly press and hold Left. Don't place yourself too close nor too far and you should be fine.
Arguebly the trickiest jump in the level. There are two ways of doing this, and in my opinion both are equally risky. So choose yours by doing some tests. First of all, this jump will connect this room and the following ones, so be sure you remember where the spikes and flippers are placed. For this room, hold Left until you're sure you've crossed the spikes over you and then you can choose to stay up (A) or to start holding Right almost before changing the room (B). B method is faster and theorically riskier, but to be honest that was the method I used every time.
If you chose A method, use the upper flipper and then go to the lower upper, eventually going up. Be VERY careful with the spikes on your right (first flip). Move right too early, and they'll kill you; move to late, and the lower ones will.

If you chose B method, by holding Right in the accurate timing will make you cross the whole room without touching the flippers. Again, this method sounds very risky but to be honest it killed me fewer times than A method. This room is tricky no matter what.
Use the long flipper to go to the shorter flipper and finally reach a safe platform. Remember that if you're afraid of that final straw you can simply don't move and let Viridian go from this room to the previous one (thanks to the flippers) until you're sure.

As I'm pointing out, the next little gap can be crossed by simply running. That way you'll avoid that little spike, but of course be careful with the left spike-wall. And finally, to cross that last part simply Hold Right!
One of my favorite jumps in the game! Simply HOLD RIGHT!
Believe in me!
BELIEVE IN KRAU!!!
Nailed it 8-), but don't forget to stop holding Right when you reach the following room. Otherwise...
...spikes will wreck you!
Let Viridian touch the upper flipper, and then careful go through the next big gap.
Literally the same as the previous room, now just from below.
That was fun :D Now drop yourself as indicated.
THE LABORATORY (Part 2)

Keep going down...
All the way down...
And there we are. From here, go left and flip up.
Keep holding Left until you reach the following room. Then instantly stop holding for your safety!
Land of the upper safe platform and from there do this typical zig-zag you've been doing a lot already. I usually wait some few frames after Viridian touches the flippers before I start moving (I tried to make this as clear as I could on the arrow). Once you're on the second safe platform get ready for the next rooms.
If you squeezed that jump as I said, the first square can be avoided by simply holding Left. For the next 2 squares, let Viridian touch the lower flipper and pass through when he's about to flip again. See the video.
Here we go guys, the second "arguebly trickiest room" in the level. What I always do is to simply hold Left until I reach the following room, and then...
... prove you have some reflexes. There's not much to tell honestly: simply try to avoid them intuitively. What you might want to know is that by holding Left this is a confirmed death. You will have to slow at some point: at the first circle or at the third. I don't have any preference, I just avoid them as they come. Sorry for that. Not sure if that's gonna be useful but see the video
Easier than it looks. First, hold Left as the text indicates, and then careful cross through the top left side so you can go down to the next room.
I'll be honest with you: at first you'll probably suck at these rooms. But give yourself few minutes of practise and you'll master the time to pass from one safe spot to another. You'll be surprised about how easy this room is to get consistent with.
After all this way, please don't die here. Don't mak the initial flip too close to the edge or you'll shamely die!
Very tricky if you don't know the pattern, but if you do, this is very easy. Flip up and from there, flip again. Once you're around that spot I highlighted, simply hold Right until the end. See the video!
You're almost done, don't screw up here. Pass through the first flipper more late than early, and then do as the arrow indicates. For that last turn remember that you have to trigger the flipper only ONCE. You can use the right flipper if you prefer, but I somehow found this method easier to perform. On your way down, be careful not to touch the spikes from both side-walls!
AAAAAAAAAAAA
Almost there...
ALMOST... THERE...!
GGWP.
WARP ZONE (Part 1)

Welp, explaining the Warp Zone will be a quite challenging task, but I'll do my best.

!!!!!!!!!WARNING!!!!!!!!!
You CAN NOT backtrack to the previous room in the Warp Zone, so if you try to remember a pattern and you "lose" your chance to execute it properly, remember that you can't go to the previous room to restart the enviroment!!

Welcome to the Warp Zone, where paths are connected to the infinite unless they're just one-way-to-go! This very first room will be self-explanatory about what's coming to you. Also, see this video to reach this room from the main ship.
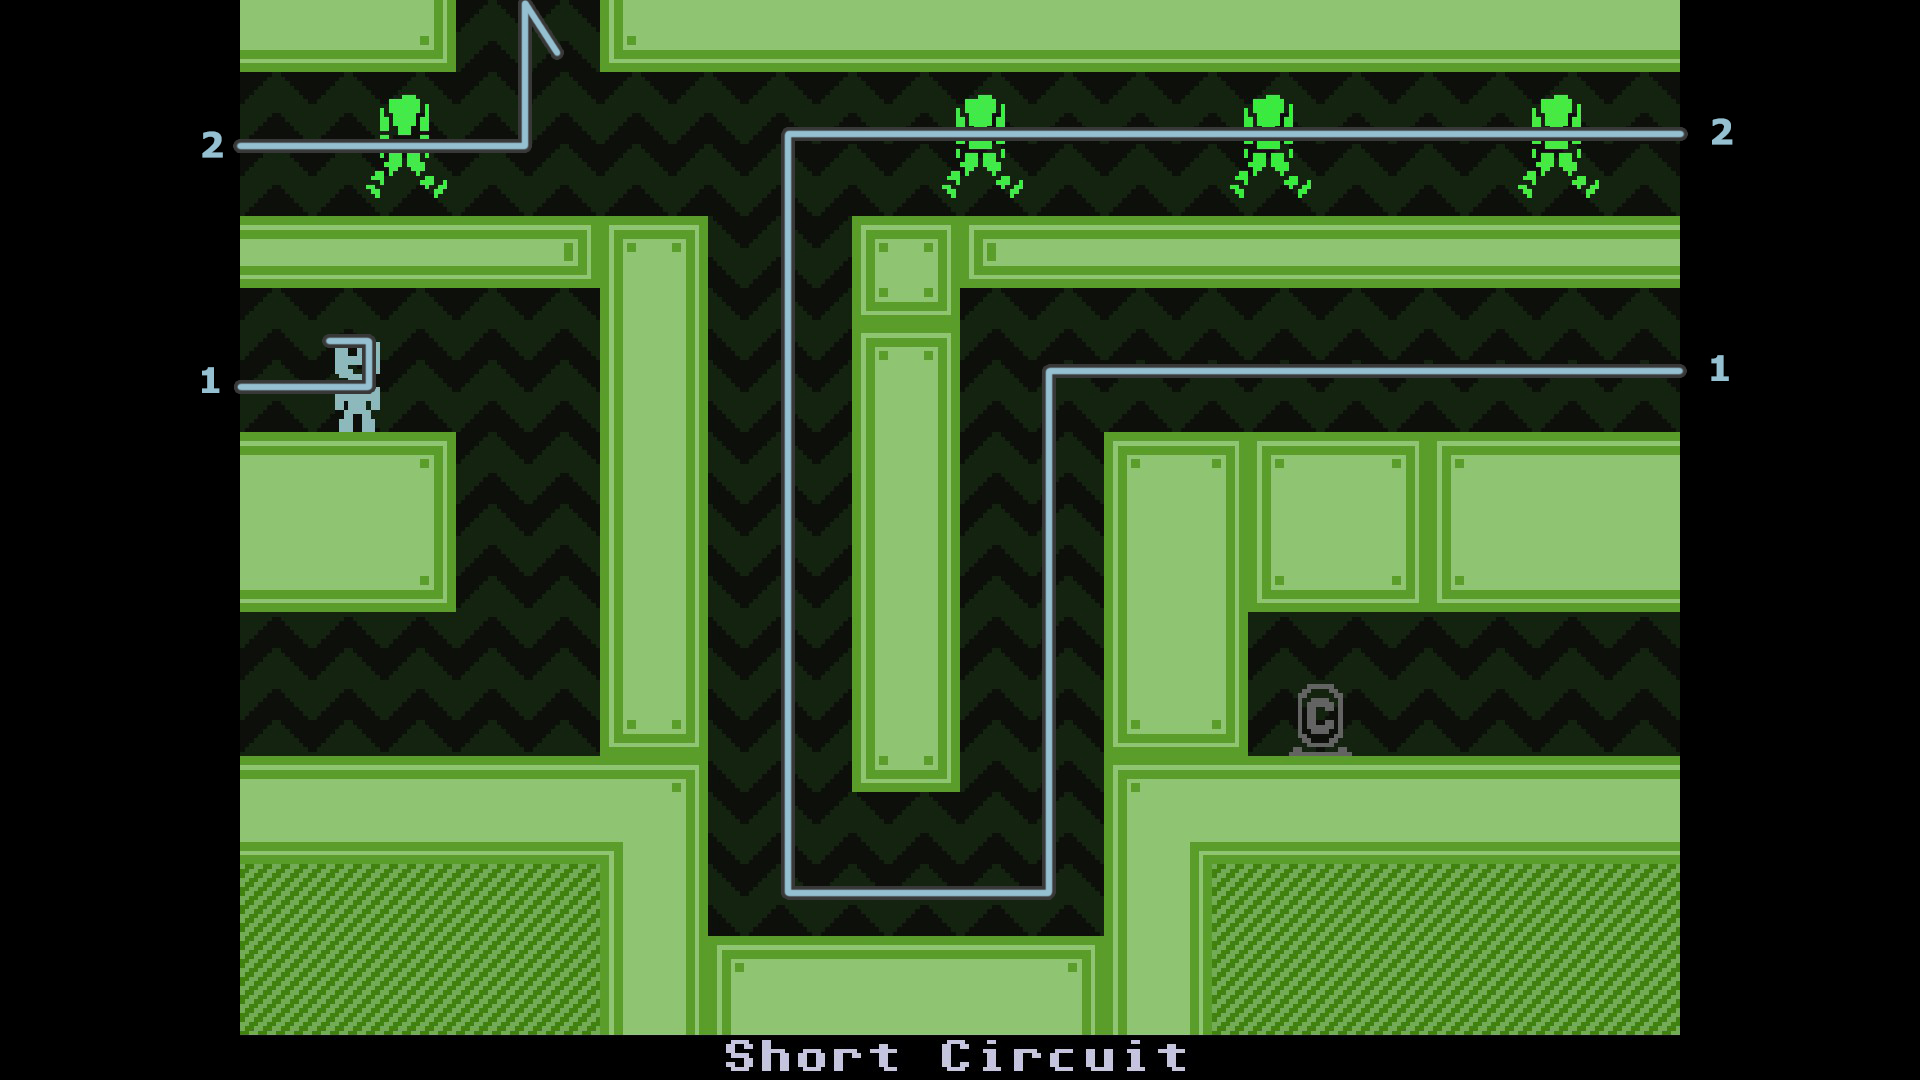
Since this whole level design can get very confusing with screenshots I will be putting numbers in order to clarify where do you end up after crossing the room bounds. So for instance, number [1] takes you to the other number [1], and so on. I hope it's clear enough! This room is still harmless though :)
Place yourself on the lonely platform and wait until the glitch red numbers start moving right. Then, rush all the way through the number [2]. If done properly, the numbers won't catch you once they start backtracking. See the video.
There are many ways to clear this room but the safest one is to wait until the big gap between robots appear and then walk at the same speed to the right. See the video.
This room is tricky until you know... the trick. Firstly, make sure Captain Viridian is flipped as in the pic. Next, just hold Right. On number [1] you can safely rush, but stop for a bit before going to number [2]. Once you're sure you won't touch the spikes anymore (and thus only touch a wall) hold Right again until the end of the room.
Harmless, just a maze :)
This can be tricky at first until you're used about where the platforms are placed. First, before going through number [1], make sure Viridian is not flipped and don't do so either (just as explained in the pic). Simply fall off the platform until you end in the upper one. From there, you will need to flip in every other sequence.
Place yourself into the flipped right platform. From there, "fall up" just as indicated. The pic is already showing when the "OBEY" obstacles won't touch you. Shouldn't take too long to learn the timings. See the video.
Woohoo half way done, too bad the worst rooms are ahead
WARP ZONE (Part 2)

There are two moments to do this room: the first one is doing the whole thing nonstop as soon as you enter the room. The obstacles are accurately placed so you can do the three flips without stopping to move right. If you want to take it easier though, stay on the first platform and once the lower suriken starts moving RIGHT (not left, sorry), do the whole thing as indicated. See the video.
[/tr]
Very confusing room at first. Stay on the safe spot until the lower triangle moves to the right a bit, and then flip through [1]. Then, as soon as the triangle starts coming left, flip through [2] to go to the upper part. Do the similar process here (that is, waiting until the upper triangle starts coming left) and immediately go through [3]. Before the lower triangle catches you, flip again [4] so the upper triangle is on your left, and therefore having a clean path on the right. The Falling triangle parts is very simple: just make sure that the closest one is lower than you and simply do the whole thing nonstop. See the video.
Wait until the closest 0008 is mid-next to you (not so close, not so far away either) and simply do the whole thing nonstop. You won't need too many attempts to see the timing.
Place yourself on the little platform on the roof and wait until the obstacle is a bit over you. Then, simply hold left. Won't take much time to learn either!
Very tough room if you go for the trinket, but if not... Just wait until no foes are approaching the middle tunnel. Flip through it.
Harmless! But after this one, the real stuff begins! Here's a video about all those rooms done nonstop.
Self explanatory. Don't flip when going through [1]. I suggest doing this fast; the more you think it, the more chocky it can be.
Squeeze the first flip a bit, but on [2] be careful not to touch the spikes. Then go right to [3] and do the easy flips.
Start moving left (be careful with those little spikes on the right) and flip to [2]. From there, flip on the right to [3] and land into the low-right platform. Do the same inverted for [4]. On there, squeeze the flip on [5] or otherwise you won't land on the platform. From [6] to beyond is safe!
Welcome to hell! These very last 2 rooms will be the biggest challenge of Warp Zone! Start flipping on [1] when there's no hearts and hurry up to the left (be careful with the falling heart as well). Flip and hold left without worries from [2] to [3], then stop. You're now on the right and be sure that you flip down when the heart is below you AND when the upper hearts won't touch you. Once you jump off, simply hold Right. Don't worry about spikes, none of them will kill you! Go through [5] and stop. That little flip is VERY tricky, one of the trickiest of the game. After many hours I haven't mastered it yet, so good luck! Remember the falling heart as well.
Hell: the sequel. This room is extremely confusing once you "lose" your chance to execute your pattern, leaving you to purely reflexes. As soon as the closest broken heart starts going Up FOR THE SECOND TIME, flip and reflip to the little platform in front of you. From there, fall of and move to the left as soon as the lower broken heart is on your left. Keep running left and nonstoply do the last three flips until you reach the warp (seriously, this is way easier to explain if you rewatch the video).
VICTORY!
DON'T EVEN FLIP THIS ♥♥♥♥
The pain is over... for now!
INTERMISSION 1

Intermission 1 is the second zone in the game you can not choose when to happen. Depending on what membership you've rescued the last, the dialogues will change so it's cool to try it with different characters so you can see all the variations :).

This zone is featured by controlling to characters at the same time: Viridian and the follower. Viridian is controlled as usual. The follower though, doesn't flip and is programmed so he/she runs next to Viridian AS LONG AS HE'S ON THE FLOOR AND NOT ON THE ROOF. And that's me main mechanic you will have to work with: controlling how the follower moves by flipping up and down.

44 Comments
jemyers212 Nov 30, 2023 @ 3:51pm 
having all these screencaps gives me half a mind to print them all out and construct the V6 Master Map
tognaccinimirko2 Sep 1, 2023 @ 4:46am 
cant wait when its finished
ThunderPeel2001 Dec 22, 2022 @ 11:35am 
Nice! Shame it's not complete, but it's still incredibly helpful!
swshi Jul 22, 2022 @ 6:33am 
Proably the most helpful guide for VVVVVV, thx bro :verdigris:
Harri The Head Jun 23, 2022 @ 2:15pm 
I couldn't have done it without this guide, thanks a lot man
cavegol Jun 2, 2021 @ 7:03am 
i only came for the unbock map image, but i need recogniced that this is th best guide about this game, good luck my bro
sorry about my english xD
Sommy Apr 8, 2020 @ 5:17pm 
i managed to do the entire guide deathless (until intermission 1, died 4 times there. ugh) and i'm not sure it could've been possible without your help, thanks!
(also, i found out, after completing the game almost 3 times, that someone out there completed the rooms in the same order as me. :D)
SeYoungKing Dec 25, 2019 @ 9:56am 
thx:dealwithit:
Heav Nov 19, 2019 @ 10:30am 
Shiny The Fox late but when the lower projectile hits the left wall, go and keep holding right , make sure to flip at the end and you will pass
Carth May 27, 2019 @ 10:37am 
Kind of pointless guide since the hardest part is the Graviton. You can do the whole thing perfectly and still die 15 times in the Graviton. Not to mention the final level which is almost impossible not to die on.