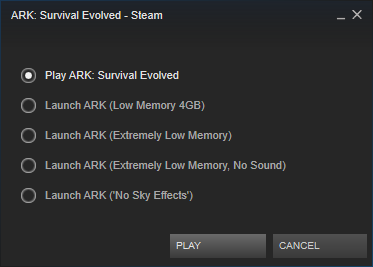
ARK: Survival Evolved

ARK: Survival Evolved

2,318 ratings
ARK: A Beginner's Guide
By Dr Ace Misanthrope
A basic guide for beginners of ARK: Survival Evolved.

This guide has been made with information from personal experience, as well as plenty of research. Some of this information has been sourced from the Wiki, but only provided if it was relevant and plausible. If you notice something that should be changed, please let me know!
6
5
4
22
3
2
3
2
   
Award
Favorite
Favorited
Unfavorite
i. Introduction


Why Am I Making This?
After playing ARK for a while, thought I would provide a guide with some tips and tricks that I have learned over my time playing. I have new clan and community members joining ARK, asking how to play, so I figured this would be easier for myself, to avoid constant repeating of instructions, but also so others who start out on ARK can learn what I learned. I have been disappointed by many survival and early access games in the past. After gaining over 3000+ hours in Arma 2: DayZ Mods, I was excited for DayZ SA, H1Z1, Rust, etc. but they all focus on wrong areas (like guns instead of base building or looting/bugs), take too long to update and fix problems/optimise, or they introduce Pay-to-win... ARK has surprised me and taken the best aspects of those, put it into a game, added Dinosaurs and creatures, improved on what other games lacked, then released it in early access.. Bravo! So basically, despite it running horribly on my PC, the game play is so fun and addictive, that I keep playing and host a server, before they even optimise settings. If that doesn't tell you about the fun game, I don't know what will... Anyway, please let me know how I can improve this guide! It will be updated as new things are discovered / revealed...
1) Getting Started
Settings
ARK: Survival Evolved, usually runs rough, unless you have an extremely decent PC. They are constantly updating and making it run better for people, but for now, you probably have to tweak your settings and launch the correct version of the game to enjoy it the most, without 3 FPS. For new players, I suggest you launch ARK normally. If you find it runs rough, you reduce the settings but it still runs rough, or you increase settings to make it look better, but it's not playable, check out the other options.

No Sky Effects
Launching with this option means that the sky has no moon, start or cloud effects, etc. making it run a lot smoother. It doesn't stop things like trees, dinosaurs, water, etc. from slowing down your speed though. Try this option, if this is not enough for your PC to get above 30 FPS, try "Extremely Low Memory".

Extremely Low Memory
Launching with this option means that you can increase texture slightly and have a better visual to the game, while maintaining better performance. Things are still pretty basic and pixelated though.

Too Dark?
Press TAB to open the command console and enter "Gamma #", where # = 1 to 9 (eg. "Gamma 3"). This alters the darkness in the game so you can see at night, but doesn't work on official servers anymore.

Map
The map that this game takes place on is called "ARK". Below are images of the map that may benefit beginners. You can see the vast scale, as well as adventurous topography.


Spawns
Spawning works by selecting an area of the map from the spawn screen, such as "North Zone 1" and then clicking to spawn in. You will wake up on the beach of that spawn zone, which can be quite large. You can run for a while and still be inside the same zone, however, it is still helpful to respawn in the general area of teammates, away from aggressive players, near your body to retrieve gear, etc.. A map of the spawns is shown here, but this may be out of date or slightly different as they update so frequently.
2) HUD: Status Bar
HUD Intro
First things first, you have joined a server or perhaps singplayer / local play. You need to know what can see. The HUD (Heads Up Display) is explain below. It can be toggled on and off with "Backspace".

Status Bar
Displayed at the bottom right of your screen, your characters status bar is displayed. From Top to Bottom, here is the summary.

Experience
This shows your experience. It will rise up and when full, you level up. For more information about this, see the "Leveling Up" Sub Category.

Weight
This shows your weight. As it fills, you will be more encumbered. This will slowly reduce your speed, eventually to a halt. Try to avoid carrying too much weight. Obtain a Storage Box ASAP.

Thirst
This shows your thirst level. When full, your thirst is quenched. As it reduces you become more thirsty. Once empty you will take damage and eventually die. To replenish your thirst, swim in any water. You can also make a Water Skin and fill in shallow water (not swimming) by "using item". This will replenish thirst and fill the waterskin for you to drink later.

Hunger
This shows your hunger. This works exactly like thirst, but is replenished differently. If you're running low, east some berries or meat. More details on this (which berries) is found further down this guide.

Stamina
This shows your Stamina. It reduces while sprinting, jumping, chopping, fighting, swimming, etc. and when it hits 0, you can only walk. If you are swimming, it constantly reduces, until you drown. You can jog/run (just not sprint) to gain stamina back, instead of waiting for it to run out and force you to walk for a bit.

Health
This shows your Health. Straight forward. It can be replenished easily with lots of cooked meat or blood bags (must be unlocked, learned & pre-prepared with an extractor kit). You lose Health any time you hit something with your hands.
3) HUD: Status Effects
Status Effects
Status Effects inform you how your character is feeling. They will appear to show you your body temperature, as well as when you eat. More in-depth examples are shown below. Before we go into more detail, note that your temperature is affected by many different sources, including: Current Air Temp, Heat Sources (like fires), Swimming, Clothing, and Shelter.


  1. Cold: This is a Temperature status. Hunger increases faster as the ambient temperature gets lower. Make sure you have plenty of food and perhaps cooked meat over berries.

  2. Hypothermia: This is a Temperature status. Hunger increases much faster as the ambient temperature gets lower. Make sure you have plenty of food and perhaps cooked meat over berries.

  3. Hot: This is a Temperature status. Thirst increases faster as the ambient temperature gets higher. Make sure you have plenty of water and avoid using up stamina, as while hot, this uses up water faster, again.

  4. Hyperthermia: This is a Temperature status. Thirst increases much faster as the ambient temperature gets higher. Make sure you have plenty of water and avoid using up stamina, as while hot, this uses up water faster, again.

  5. Exhausted: Can't jump, sprint, run, or swim and movement speed is slower. Caused by using all of your stamina. Stand still until your stamina increases again. Avoid this by jogging between sprints, so you don't have to completely stop.

  6. Encumbered: Can't move. Caused by carrying too much weight. When mounted, remember that your weight is added to your mount's total weight limit. Dropping items from your personal inventory will reduce weight for both you and the mount. Drop some heavy items off.

  7. Starving: You need to eat! You will slowly start to lose health, leading to eventual death unless you eat Food. You lose 1~ HP/5 secs. Eat a lot of berries or better yet, some cooked meat.

  8. Digesting: Eating, hunger decreasing. This is probably because you are eating or recently ate. Eating will restore health, depending on what it may be.

  9. Dehydrated: You need to drink! You will slowly start to lose health, leading to eventual death unless you drink. To fix, swim in any water or fill a Water Skin and drink immediately.

  10. Suffocating: You need air! Most likely, you are drowning. When you swim, you lose stamina and if you run out while swimming, you suffocate and drown. Get to the surface and keep an eye on stamina while swimming.

  11. Food Poisoning: You at raw or rotten food! Your Health is decreasing slightly from it. You should eat berries in an emergency as if you don't cook raw meat before eating it, or you eat spoiled meat, you will get sick and injured.

  12. Tranquilized: This can be caused by the attack of the Pulmonoscorpius (scorpion) or a player's Tranq Arrow.

  13. Dilo Venom: Dilo's spit venom that blinds and disorientates you for a short period. This status effect icon will appear and display a count until it goes away.

  14. Injured: Can't jump, run, recover stamina, slower movement, and Torpidity (risk of unconsciousness) increases faster.

  15. Crafting/Repairing: Can't jump, can't run, and movement speed is slower.

  16. Healing: You are regaining health. A good way to regain health at early levels is blood bags, created from blood extraction kits. Unlock this when you can.

  17. Slow: Your speed is being reduced, due to conditions other than weight/ being encumbered.

  18. Knocked Out/Unconscious: Your Torpor is high and you are unconscious.
4) HUD: Inventory & Chat


Inventory Sections
  1. Main Inventory: This is your inventory. Items you collect or craft will appear here. Try to keep things in full stacks. "Inventory Tips" below will help you with transferring items and keeping inventories neat.

  2. Hot Bar: This is your Hot Bar. Placing items here will allow you to use them by pressing the corresponding number. The image shows how mine is set up. I find this effective.

  3. Other Inventory: This is the inventory of an item/dino that you are accessing. This includes items that allow crafting, such as Mortar and Pestle and Smithy. To craft items (that require you to access something like a M&P), place the items required inside and double click the item engram (or click it and "Craft Item").

  4. Equipped Items: This is your equipped items. These are items such as clothing, glasses, etc.. Clothing acts as armor as well as aesthetics. Drag items into this section once crafted/found to equip.

  5. Character Stats: This is your stats and levels section. This shows you current status, as well as maximums. Once you level up, you can improve these, as well as gain "Engram Points" that can be used to unlock more craftables. See "Leveling Up" For more info.

Inventory Tips

Inventory Hot-Keys
HotKey
Function
H
Extends HUD display
F
Open Others Inventory
Shift-click and drag
Used to split stacks of materials in half.
Control-click and drag
Used to move one item out of a stack.
Double-click
Equips armor or moves in/out of inventory.
Shift + Double-click
Used to take 5 units from a material stack.
Control + Double-click
Used to take 1 unit from a material stack.

Spoiling
Any perishables, such as meat, berries, etc. spoils. Unlike berries, meat provides an alternative item when spoiling. For some items, such as Narcotics, spoiled meat is required to be collected. If you stack items, slowly, one item at a time will spoil. If you wish to spoil meat faster, simply unstack them and they will ALL spoil at the same time, instead.

Craftable Folders
In your craftable section (open inventory and click the tab, or just press "V") you have the ability to create folders. Simply click the "plus sign", give it a name like "Favorites" and then click and drag all the Engrams that you want, in that folder. this does not move them, but rather add the option for organizing copies.

Chat
Function
Key
ALL Chat
Enter
TRIBE Chat
/
LOCAL Chat
Insert
Toggle AutoHide
\
Scroll Up
PgeUp
Scroll Down
PgeDown
5) Leveling Up


Intro to Levels
Throughout your time on ARK, crafting, taming, running, hunting, etc. you will gain XP. As XP increases to certain levels, you will rank up. This does a number of things for you. First it lets you apply an upgrade to any of your attributes (explained in detail below). Next it unlocks certain engrams at different levels, allow you to open your Engrams and you can apply the points you are given, by learning newly unlocked craftables. Examples at low levels are Campfire, Stone Hatchet, etc..

Leveling Tips
Work as a team! If you have friends in the game already, perfect, if not, make some! Working in a team has a big advantage over working alone. Not only do you level up faster in a tribe, because a percentage of XP that Tribe members gain, you gain as well, but also because you don't need to use Engram Points on things that others can research instead and make for you. For example, if several people in your Tribe are online, you level up faster. Also, 1 person could learn buildings, 1 clothing and 1 other items. You can then work together to get, essentially, 3 times more XP than you would alone, just as fast... If you want to make/join a tribe, check the "Tribes" section below.

Engram Points

Level
Engram Points
1
0
2-9
8
10-19
12
20-29
16
30-39
20
40-49
24
50-59
28


Attributes
Health
Standard in many games. Your characters physical condition. Adds 10 to max, each time your level it up. I suggest this one.

Stamina
Reduces while sprinting, jumping, chopping, fighting, swimming, etc. and when it hits 0, you can only walk. If you are swimming, it constantly reduces, until you drown. Adds 10 to max, each time your level it up. I suggest this one, it works well, along with Movement Speed and Health.

Oxygen
When under water, an oxygen icon appears in your Status Bar. This is your ability to hold your breath. Adds 10 to max, each time your level it up.

Hunger
When full, you're full. As it reduces you become hungry. Once empty you will take damage and eventually die. Adds 10 to max, each time your level it up. Not really needed.

Thirst
When full, your thirst is quenched. As it reduces you become thirsty. Once empty you will take damage and eventually die. Adds 10 to max, each time your level it up. Not really needed.

Weight
Strength and cardio.Your ability to carry weight. Adds 10 to max, each time your level it up. I get Dino's to carry my gear instead.

Melee Damage
This is not really needed unless you intend on bare fist fighting a lot. Keep in mind, you take damage doing so. Adds 10% to max, each time your level it up.

Movement Speed
How quickly can a survivor travel on foot. It is useful for just about everything, from running around, to hunting and escaping. Adds 2%, each time your level it up. I suggest this one.

Fortitude
Fortitude provides some resistance from the weather elements and Torpor, makes you lose consciousness. Adds 2, each time your level it up. Level up if you want, but I don't.

Crafting Speed
How fast do you craft objects. If you carry a bit of weight on your from extra resources to repair or craft on the fly, this is for you. If not, leave it alone. Crafting is fast enough for me, already. Adds 10%, each time your level it up.

Torpor
Used to monitor whether your character becomes unconscious and how long it stays unconscious for. When you have a high amount of torpor, you’ll be knocked out and will have to wait for it to decrease before you can function again, though it decreases at a fairly rapid rate. This can not be increased by leveling up. This is what Fortitude is for.
6) Tribes


Why Tribes?
Working in a team has a big advantage over working alone. Not only do you level up faster in a tribe, because a percentage of XP that Tribe members gain, you gain as well, but also because you don't need to use Engram Points on things that others can research instead and make for you. For example, if several people in your Tribe are online, you level up faster. Also, 1 person could learn buildings, 1 clothing, 1 weapons and so on. Also, the above picture is a small Tribe on our server who level up and work together to tame Dinos and "Pimp them out"... They make us saddles so we can ride Dinos we tame that we haven't unlocked saddles for and we give them Keratin as a result. Look at that Trex... Anyone in their Tribe can ride that. Is that not enough of a reason?

Tribe Actions

Make a Tribe
  1. Press "L" to open Tribe Manager and name your Tribe (can be changed later)
  2. Start inviting people (see below)

Invite people to your Tribe
  1. Walk up to each other and press & Hold "E" for Options
  2. Hover over "Invite to Tribe" and click once able
  3. The Second person does the same but "Accept Invite" instead
7) Starting Tools
Basic Tools
Stone Pick
Basic tool that is available on character spawn, once you gather the resources (1 x Wood + 1 x Stone + 10 x Thatch). Works as a weapon as well, but not the best alternative. Gains more Thatch, Raw meat and Flint, than Wood, Hide and Stone. To gain the resources, you must pick up loose rocks, but also punch some trees. Any time you punch something, you lose Health. Be careful!

Stone Hatchet
Basic tool that needs to be unlocked with 2 Engram Points first. Works as a weapon as well, but not the best alternative. Gains more Wood, Hide and Stone, than Thatch, Raw meat and Flint.
Costs 1 x Wood + 1 x Flint + 10 x Thatch.

Torch
Basic tool that is available on character spawn, once you gather the resources (1 x Wood + 1 x Flint + 1 x Stone). This allows you to see at night and should be crafted ASAP. It will become night before you know it and being stuck without the ability to see, is not...what....you... want.


Recommended Items
Waterskin
Basic tool that needs to be unlocked with 6 Engram Points first. This item acts as a water bottle and allows you to replenish your thirst without returning to the water to swim. You can fill it up by entering shallow water and using the item (Hot Bar or main inventory). The downside is that it slowly leaks and you may find yourself with a near empty Waterskin by the time you need to drink, on occasion.

Spear
This is the first basic weapon you are able to unlock. It has the habit to break at the most unfortunate times, so it's a good idea to carry multiple, but be careful, it can weigh you down a bit. You can stab animals/dinos/players with the spear using "Left Click" or throw it using "Right Click". Later you can upgrade to the "Pike", but it can not be thrown, or the bow, but that has no melee option. The Spear will be useful for a while.

Wooden Bow
Able to be used with Stone Arrows or Tranq arrows after level 20, the bow is a must get item, ASAP. Stone arrows are able to be used to kill players or dinos from a distance/height, which can make taking on larger dinos, so much easier. You can also turn Stone Arrows into Tranq Arrows by combining them with Narcotics. Tranq arrows knock animals out for taming or to make them easier to kill. More info about crafting and narcotics, later on.

Campfire
This item should be unlocked and crafted ASAP as well. This allows you to turn Raw Meat into Cooked Meat, which replenishes more hunger and health than berries. It also provides light at night. You can light the fire with Wood or Thatch. Add some wood/thatch and Raw Meat, then light, in order to cook it.

Note: Using certain tools on certain resources has a CHANCE of gaining more of a specific resource. Some times you will get the opposite of what you expect. This happens, do not think it is the either way around and get confused.
8) Collecting & Foraging
Plants
Plants, such as long grass, bamboo, bushes, etc. can be harvested with your bare hands. You must have nothing in your hand, except you may have a torch in one so at night you can still harvest. It does not effect your harvest rates/percentage. Hand picking these plants is the only way to gather fiber, but you also gather different types of berries (including narcoberries) and seeds if you hand pick, or ride a dino and harvest/attack plants (steg swings tail, trike head butts, etc.). Dinos likes this help you harvest faster. See "Taming" for more info". Be careful, full stacks of berries add up and start to weigh you down.


Trees
Trees, large, deep rooted ones, small palms on the sand, drift wood, etc. can be harvested with either a hatchet or pick (other things later levels). Pick gets more Thatch and Hatchet gets more Wood. You can also ride dinos to harvest these things. Mammoths are the only decent wood harvester though. Thatch is ok though. See "Taming" for more info". Be careful, Wood or stacks of Thatch are heavy.

Stone
You can harvest rocks, loose on the ground, by pressing "E" as you run over the rocks. You can also approach large rocks (most, but some are environmental/indestructible) and use a Hatchet for mostly Stone and Pick for mostly Flint. Be careful, Stone is heavy. While harvesting this resources, you may occasionally gain "Metal" shards. Save these, they are needed later and not easy to obtain early on.
9) Hunting & Cooking
Why Hunt So Early?

Hunting is crucial to your survival. It must be done soon after gaining basic tools. Small things like Coel (fish) and Dodo's are easy to get meat. Raw Meat is harvested from dead bodies. You should cook it and eat the resulting Cooked Meat. this is better than berries. Raw Meat is still needed however, to give to pets/tamed dinos and quickly spoil it and make narcotics (see "Taming" below).


Easiest Hunt
Dodo's and Coel (fish) are the best. Simply kill them with your bare hands (be careful, this hurts you) or better yet, a Pick/Hatchet. Once dead, harvest it with the same tools. You can also kill Dilo's. You can easily punch them out if you have full health and avoid their spit (when you get close, the carnivorous Dilo will attack by first spitting it's venom to try to blind you, then run at you). Sometimes punching them will knock them out, so once out, kill and harvest with a better tool. To gain more Raw Meat from any animal/dino/creature use a Pick, for more Hide, use a Hatchet. You will certainly need Hide, but not as much as Raw Meat at this point. I suggest using a Pick for harvesting at this point. For hunting, a Spear for Dilo's and Pick for the small animals.

Cooking
You've killed some poor innocent Dodo's like a heartless barstard (only kidding), or some Dilo's, whatever. Do not eat Raw Meat. Raw Meat should be used to easily turn it to spoiled meat, or to feed Carnivorous Dinos. The rest of the Raw Meat can be cooked for you to eat. This is better than berries, although, you CAN still elect to stick with berries, despite their lower health regen rate.

How To Cook Meat
  1. Craft & Place Campfire
  2. Open Campfire Inventory
  3. Add Wood/Thatch
  4. Add Raw Meat and light fire
10) Crafting
Crafting is the process of creating items you have unlocked, learned and gathered the resources for. Crafting is done in 2 ways. The 1st way is to gather the resources required to craft a certain object and then go to "Craftables" (Default: "v") and craft it. The 2nd way is for specific items, such as Narcotics and Water Reservoir, etc. that require you to gather resources and place them in the other item inventory. Then there should be an Engram Recipe where you can craft it.

Beginner Items

Item
Lvl Required
Engram Cost
Resource Cost
Pick
1
0
1 Stone + 1 Wood + 10 Thatch
Hatchet
2
2
1 Flint + 1 Wood + 10 Thatch
Torch
2
0
1 Flint + 1 Wood + 1 Stone
Spear
2
3
8 Wood + 2 Flint + 12 Fiber
Campfire
2
3
12 Thatch + 1 Flint + 16 Stone + 2 Wood
WaterSkin
3
6
4 Hide + 12 Fiber
Narcotics
5
6
5 Narcoberry + 1 Spoiled Meat
Storage Box
5
6
25 Wood + 20 Thatch + 10 Fiber
11) Taming: Intro


Why Tame Dino's?
Dino's can be used for riding, storage, hunting, harvest, and defending property while you are offline. Most items placed in a tamed creature's inventory also take longer to spoil than they would otherwise. You cam tame as many Dino's as you want, but they continue to eat while you are offline, so make sure you only tame what you can maintain. I suggest starting with some smaller pets first, then eventually get bigger and better. Once you are confident you have the resources and the levels, I suggest starting with a Dilo, then Trike or Steg. Stegs are my recommendation for harvesting berries, fast, but they take a lot of narcotics and time to tame!

How To: Normal Method
  1. Knock the animal unconscious. The more damage inflicted in the process the less Taming Effectiveness. Therefore, the best method is to use Tranquilizer Arrows. It is best to aim the arrows at their head. It seems to leave the animal with 50%-100% HP. Other, less effective ways are punching it or aiming for its head with the slingshot.

  2. Feed them. Open the animal's inventory and feed it by dragging food into it's inventory. The food needed to tame it will depend on the dinosaur. Usually Meat or Berries (See Table).
    Keep plenty of food in its inventory while the taming bar fills up, but don't force feed them. They eat on their own every time their Hunger drops 30 points. DO NOT FEED ANYTHING STIMBERRY (WHITE) OR IT WILL WAKE UP!

  3. Keep them out. Until the Taming Progress Bar is full and they wake up, keep the Dino out. Do this by using Narcoberries / Narcotics. Place them in the animals inventory and "Remote Use Item" / Force Feed them. The Dino has a chance of waking up when the progress / Torpor drops below 50%. It is suggested to keep them above 75% in case it drops below and wakes up when something distracts you for 2 seconds. If it wakes up before you finish taming, everything in their inventory is lost. Only if successful, do you get to retrieve your extra narco's.

How To: Starvation Method
  1. Knock the animal unconscious. The more damage inflicted in the process the less Taming Effectiveness. Therefore, the best method is to use Tranquilizer Arrows. It is best to aim the arrows at their head. It seems to leave the animal with 50%-100% HP. Other, less effective ways are punching it or aiming for its head with the slingshot.

  2. Starve them. Until the hunger level reaches 0, do not supply the Dino with anything other than Narcotics to keep it unconscious. As some Dinosaurs can take a while to tame, it is recommended to do something else and occasionally check it to give it more Narcos, provided you do not leave it so long it wakes up.

  3. Feed them. Once the hunger level reaches 0 (or low enough for your satisfaction), open the animal's inventory and feed it by dragging food into it's inventory. The food needed to tame it will depend on the dinosaur. Usually Meat or Berries (See Table). It is HIGHLY recommended to only use their favorite food as much as possible. Keep in mind that because you are keeping it out while you aren't feeding it, this takes a lot more Narcotics, but the benefit of this method is that once you begin to add the food, because their food level is so low, they wont eat every time it drops 30 points, it will keep eating until full, meaning it can finish in a fraction of the time.


12) Taming: Tips
What are Narcotics?
Narcotics are a more effective version of Narcoberry's. They can be used to keep dinosaurs unconscious during taming. Narcoberry'sdecrease the taming effectiveness while Narcotics do not. Narcotics increase the Torpor of a creature by 40 which is equal to the amount of torpor given by 5 Narcoberry's required to make it. However unlike the berries themselves, the narcotic doesn't spoil, and will grant 2xp from crafting. To craft, unlock at level 5 & use 6 Engram points to learn. If you don't have Mortar & Pestle, you need that too. Simply access the M&P, navigate through folders to "Drugs" & craft with 5:1 (Berries:Spoiled Meat).


Taming Effectiveness
Taming Effectiveness affects the melee damage of a dinosaur, as well as how many levels it gains, after it has been tamed. It does not have any effect on the taming speed of the dinosaur. Taming effectiveness decays every time the dinosaur eats. The rate of decay can be slowed by feeding the dinosaur it's favorite food.


Tips/Notes
  • Taming can take up to several hours, be careful of inventory raids and attacks.

  • Tamed animals will get XP just like the player, even whilst doing nothing.

  • "J" calls your tamed animal to follow and stop them from following you with the "U" key.

  • "T" calls over the tamed animal you're looking at to follow you while the "Y" key tells the tamed animal you're looking at to stop following you.

  • Raw Prime Meat makes taming approximately 4x faster for Carnivores. Cooked Prime Meat makes taming approximately 2x faster.

  • Stimberries DO NOT lower the food level faster, it only makes the Food counter refresh faster and lower Torpor. Do not use these for taming!

  • Your tamed animals can die from starvation even while you are offline, so be sure there is enough food in their inventory. However, like players, inactive animals will use food very slowly.

  • Be sure they have food at all times. When they're empty, their taming meter will fall rapidly. Also, if they awake, you'll lose all taming progress and lose any items in their inventory.

  • When you have two tamed Creatures of the same species and with opposite genders near each other, they will receive a Mate Boost like their wild counterparts.

  • You can level a dino a limited number of times. There is no max level, but they can only level 38 times from the level you tame them at (as of 181.0). This means if you tame a level 1, it will cap at 39 and not level anymore. Ideally, you want to tame a level 30 dino who has good auto-assigned stats. It is common for 'end game' hunters to stalk specific dinos (sometimes with specific colors) between lvl 25-30, knock them out, and then inspect their stats (if the game auto assigned their points to hunger or breath, then the hunter will look for another).

  • "Level Required" for Saddles is only for crafting. You can apply a saddle a ride a Dino made by anyone else/found at any level
13) Taming: Table
What To Tame
Below is a table with information on taming Dinosaurs and other Creatures. Please note, for a complete list of Creatures, including currently non-tamable ones, check the table near the bottom of this guide. Also note, not all of these are rideable, therefore the saddle level will say N/A. This is updated as it changes with patches, community feedback, and I personally test each one. It is best to take this as a minimal guide for level 1 Dino and carry/have access to slightly more than stated.

Dinosaur
Narcoberries Needed
Narcotics Needed
Tranq Arrows Needed
Favorite Food
Time Needed (hrs)
Lvl for Saddle
Ankylosaurus
225 - 275
50 - 100
5 - 25
Mejoberry (Purple)
3 - 4
40
Argentavis
20 - 50
20 - 30
Prime/Raw Meat
1.5 - 2
55
Brontosaurus
250
50 - 210
30 - 50
Mejoberry (Purple)
3 - 6
55
Carbonemys
25 - 40
5 - 10
Mejoberry (Purple)
1 - 1.5
25
Carnotaurus
150
50 - 70
5 - 15
Prime/Raw Meat
2 - 3
50
Dilophosaur
3
1 - 5
1 - 2
Prime/Raw Meat
0.1 - 0.5
N/A
Dodo
1
1
0
Amarberry (Yellow)
0.1 - 0.5
N/A
Ichthyosaurus
0*
Prime/Raw Meat
0.1-0.5
10
Mammoth
200
50 - 100
15 - 50
Mejoberry (Purple)
3 - 4
40
Megalodon
30 - 40
10 - 15
Prime/Raw Meat
1.5 - 2
45
MegaPiranha
N/A
Onychonycteris
N/A
Parasaur
35
5 - 10
5 - 10
Azulberry (Blue) & Mejoberry (Purple)
0.5 - 1
10
Phiomia
10
3 - 10
2 - 5
Mejoberry (Purple)
0.1 - 0.5
5
Plesiosaurus
100 - 200
15-25
Prime/Raw Meat
60
Pteranodon
100 - 300
25 - 50
2 - 5
Prime/Raw Meat
1 - 2
35
Pulmonoscorpius
20
8 - 15
5 - 10
Spoiled Meat
0.5 - 1
25
Raptor
20 - 40
2 - 10
Prime/Raw Meat
0.5 - 1
15
Sabertooth
100
20 - 50
10 - 20
Prime/Raw Meat
1 - 1.5
45
Sarcosuchus
200
40 - 100
15 - 25
Prime/Raw Meat
1 - 2
35
Spinosaur
750
100 - 150
15 - 25
Prime/Raw Meat
4 - 6
60
Stegosaurus
150
40 - 100
5 - 15
Azulberry (Blue) & Mejoberry (Purple)
2 - 3
30
Triceratops
100
30 - 50
5 - 15
Mejoberry (Purple)
1.5-2
20
Tyrannosaurus
200
40 - 100
30 - 50
Prime/Raw Meat
3 - 4
60

* Patch 181.0 introduced the Ichthyosaurus with the non-violent taming method. Place food in slot 0, then press "E" while facing it to feed. This must be done every few minutes when it becomes hungry, until complete.
14) Supply Drops
A supply crate is dropped down from the sky in a beam of light. Each beam of light color, determines the minimum required level for each crate.

Color and Level Requirements

White(Prismatic): 3
Green: 15
Blue: 25
Purple: 35
Yellow: 45
Red: 60
15) Map Tips
Map Basics
As shown in "Getting Started", the map is quite large, but it has a simple grid system. Bring the map up with "M" and take a look. It starts covered with fog and as your venture around, it clears the fog / draws the map. There are some other tips and advice too though. See below.


Nav Tips
  • How to Read Longitude/Latitude
    • Read Up/Down then Left/Right (xx,yy)
    • Corner of 4 grids = x0,y0 (20,40)
    • Vertical border of 2 grids = x0, y5 (10,35)
    • Horizontal border of 2 grids = x5, y0 (25,20)
    • Center of a grid = x5,y5 (15,55)

  • Set Markers
    • Press P
    • Add Longitude, Latitude & a short name
    • Press Ok, then open your map ("M") and view marker

  • Servers can have MapPlayerLocation either on/off, so sometimes you can/can't see your pin on the map, showing your location. If not, don't sweat it, navigation gets easier and when you learn what spawn zones to utilize.

  • You can unlock, learn and craft a compass at level 10, for 5 Engram Points (EP), with 5 Metal, 5 Flint, 30 Fiber. This can be placed in the Hot Bar and when equipped you can see you heading for navigation, as well as "hold right-click" to view it closer.
16) Storage & Base Basics
Intro
So you have gathered some resources, you managed to stay alive for longer than 5 minutes and you want to be able to get more without being over encumbered. It's time for those essential things, that make you a survivor... A loot stash.

Useful Items
Item
Level
Engrams
Resources
Function
Campfire
2
3
12 Thatch, 1 Flint, 16 Stone, 2 Wood
Provides light, warmth & cooks
Hide Sleeping Bag
3
3
25 Hide, 15 Fiber
Single use respawn point
Storage Box
5
6
25 Wood, 20 Thatch, 10 Fiber
Holds 12 stacks (unlimited weight)
Standing Torch
5
6
3 Wood, 8 Thatch, 1 Flint, 1 Stone
Provides light & warmth
Simple Bed
5
8
15 Wood, 80 Thatch, 30 Fiber, 40 Hide
Reusable respawn point for Tribe
Large Storage Box
15
9
50 Wood, 35 Thatch, 25 Fiber
Holds 30 stacks (unlimited weight)

Burn Rates
There are multiple resources that allow you to light fires, cook meat, etc. so I have listed their burn rates below. I left objects such as preserving bins and cooking pots out as they aren't essential base items at this early point. The numbers are 'seconds per unit'.

Object
Wood
Thatch
Sparkpowder
Campfire
30
7.5
60
Standing Torch
400
100
800

My System
Please note, as you level up, you unlock more, you tame Dino's, perhaps join/form a Tribe and eventually, you have a massive base with plenty of loot and Dino's. There will be an "Advanced Guide" with more info on that. That is not what this is. This is a simple camp for storing gear, leveling up and getting started properly. Below are my priorities when it comes to setting up a camp. I have left out leveling up and learning Engrams. If you are following my steps, simply hunt, forage, etc. in order to level up and learnt the items mentioned.

Preparation
  1. Collect wood, thatch, flint & stone (Craft Pick & Hatchet)
  2. Collect berries and fiber (Eat berries)
  3. Hunt Dodo's & Dilo's for raw meat & hide
  4. Collect just enough resources for Campfire & Storage Box
Setting Up Camp
  1. Craft & Place Campfire (Cook & eat meat)
  2. Craft & Place Storage Box(s) (Dump heavy loot)
  3. Begin work on a thatch hut (Thatch Foundations first)
  4. Craft & Place Simple Bed on foundation*
  5. Finish thatch hut (Walls, ceilings, door)
  6. Upgrade Storage Box(s)

* Unlike a Hide Sleeping Bag, a Simple Bed can be reused and by your whole Tribe, but must be placed on foundations, ceilings/floors, etc... I usually skip crafting a sleeping bag to focus on a bed. But it is required to be learnt still, in order to unlock Simple Bed at level 5.

Theft Prevention
When placing an item such as a Storage Box or Door, your Tribe is granted access to it, as is everyone else. In order to lock the Storage Box, add a Pin Code. This can be anything you want, no matter how random, as you never have to enter it, only those you give the Pin Code to, to share items, at which point you can clear or set a new Pin Code, if you desire. Doors are similar but can be locked/unlocked as well as having a Pin Code. This means you can give someone a Pin Code and temporarily open it to public then lock it again without altering/removing the Pin Code. NOTE: Even if no one can access your items, they can still destroy the Storage Box or Doors to grief or gain access to bases, etc.
17) Engrams (1-20)
Levels 1 - 5
Level 2 Items
EP
Level 3 Items
EP
Level 5 Items
EP
Campfire
3
Waterskin
6
Slingshot
6
Stone Hatchet
3
Cloth Gloves
3
Storage Box
6
Spear
3
Cloth Boots
3
Simple Bed
8
Note
3
Cloth Hat
3
Phiomia Saddle
6
Cloth Pants
3
Wooden Sign
3
Mortar And Pestle
6
Cloth Shirt
3
Hide Sleeping Bag
3
Sparkpowder
3
Thatch Foundation
3
Thatch Roof
3
Blood Extraction Syringe
6
Thatch Doorframe
3
Thatch Wall
3
Narcotic
6
Thatch Door
3
Paintbrush
3
Flag
6
Standing Torch
6
Wooden Foundation
6
Wooden Wall
7

Levels 6 - 20
Level 10 Items
EP
Level 15 Items
EP
Level 20 Items
EP
Cooking Pot
9
Hide Pants
9
Hide Gloves
9
Cementing Paste
3
Wooden Fence Foundation
6
Hide Boots
9
Stimulant
6
Hide Shirt
6
Hide Hat
12
Gunpowder
2
Bow
11
Tranquilizer Arrow
15
Flare Gun
6
Stone Arrow
2
Refining Forge
21
Compass
5
Large Storage Box
9
Trike Saddle
12
Spyglass
4
Parachute
6
Preserving Bin
9
Small Crop Plot
9
Raptor Saddle
9
Dinosaur Gateway
9
Parasaur Saddle
9
Stone Irrigation Pipe - Intersection
7
Dinosaur Gate
6
Ichthyosaurus Saddle
8
Stone Irrigation Pipe - Inclined
4
Wooden Catwalk
9
Stone Irrigation Pipe - Intake
5
Stone Irrigation Pipe - Vertical
4
Wooden Trapdoor
6
Stone Irrigation Pipe - Straight
2
Compost Bin
8
Wooden Windowframe
9
Stone Irrigation Pipe - Tap
5
Stone Fence Foundation
6
Bookshelf
15
Wooden Spike Wall
4
Stone Wall
8
Wooden Wall Sign
2
Water Tank
7
Wooden Ceiling
6
Wooden Billboard
4
Wooden Doorframe
6
Wooden Pillar
9
Wooden Door
4
Wooden Hatchframe
9
Wooden Ramp
3
Wooden Ladder
6
18) WIP: Engrams (21-65)
Levels 21 - 36
Level 25 Items
EP
Level 30 Items
EP
Level 35 Items
EP
Smithy
16
Chitin Leggings
15
Chitin Gauntlets
15
Metal Spike Wall
11
Chitin Chestpiece
18
Chitin Boots
15
Metal Pick
12
Chitin Helmet
18
Longneck Rifle
18
Metal Hatchet
12
Water Jar
12
Simple Rifle Ammo
6
Pike
16
Simple Pistol
15
Large Crop Plot
15
Pulmonoscorpius Saddle
12
Scope Attachment
13
Pteranodon Saddle
15
Carbonemys Saddle
12
Simple Bullet
6
Sarco Saddle
15
Medium Crop Plot
12
Stego Saddle
15
Shotgun
18
Metal Sign
15
Grenade
20
Simple Shotgun Ammo
6
Wooden Window
12
Metal Wall Sign
6
Metal Pillar
18
Metal Foundation
24
Metal Ceiling
15
Metal Wall
15
Metal Door
12
Metal Doorframe
24
Metal Ramp
12

Levels 37 - 50
Level 40 Items
EP
Level 45 Items
EP
Level 50 Items
EP
Fabricator
24
Flak Leggings
15
Flak Boots
16
Silencer Attachment
13
Flak Chestpiece
18
Flak Gauntlets
16
Ankylo Saddle
18
Improvised Explosive Device
30
Flak Helmet
20
Mammoth Saddle
18
Metal Irrigation Pipe - Intersection
18
Metal Billboard
15
Metal Irrigation Pipe - Intake
15
Metal Irrigation Pipe - Inclined
12
Metal Window
18
Metal Irrigation Pipe - Straight
12
Metal Irrigation Pipe - Vertical
12
Metal Catwalk
18
Metal Hatchframe
18
Metal Irrigation Pipe - Tap
18
Carno Saddle
21
Metal Trapdoor
14
Megalodon Saddle
18
Electrical Generator
24
Metal Fence Foundation
12
Sabertooth Saddle
18
Straight Electrical Cable
16
Metal Dinosaur Gateway
12
Metal Windowframe
18
Electrical Outlet
16
Metal Dinosaur Gate
8
Metal Ladder
21
Fabricated Pistol
16
Polymer
6
Flashlight Attachment
18
Advanced Bullet
18
Electronics
6
GPS
21
Remote Keypad
18
Lamppost
20

Level 51+
Level 55 Items
EP
Level 60 Items
EP
Level 65 Items
EP
Inclined Electrical Cable
16
Rex Saddle
40
Heavy Miners Helmet
35
Vertical Electrical Cable
16
Spino Saddle
40
Vault
30
Electrical Cable Intersection
24
Rocket Launcher
32
Argentavis Saddle
21
Rocket Propelled Grenade
8
Bronto Saddle
21
Auto Turret
40
Refrigerator
20
Air Conditioner
21
C4 Remote Detonator
24
C4 Charge
12
Assault Rifle
24
Advanced Rifle Bullet
8
Laser Attachment
24
Holo-Scope Attachment
24
Behemoth Gateway
28
Behemoth Gate
15
19) WIP: Dinosaurs & Creatures
Current Creatures
Species
Group
Diet
Temperament
Tameable
Rideable
Ankylosaurus (Ankylo)
Dinosaur
Herbivore
Docile
Yes
Yes
Araneomorphus (Araneo)
Invertebrate
Carnivore
Aggressive
Yes
No
Argentavis
Bird
Carnivore
Short-Tempered
Yes
Yes
Brontosaurus (Bronto)
Dinosaur
Herbivore
Docile
Yes
Yes
Carbonemys
Reptile
Herbivore
Defensive
Yes
Yes
Carnotaurus (Carno)
Dinosaur
Carnivore
Aggressive
Yes
Yes
Coelacanth (Coel)
Fish
Carnivore
Reactive
No
No
Dilophosaurus (Dilo)
Dinosaur
Carnivore
Skittish
Yes
No
Dodo
Bird
Herbivore
Oblivious
Yes
No
Ichthyosaurus (Ichthy)
Reptile
Carnivore
Curious
Yes
Yes
Mammoth
Mammal
Herbivore
Docile
Yes
Yes
Megalodon
Fish
Carnivore
Aggressive
Yes
Yes
MegaPiranha
Fish
Carnivore
Aggressive
Yes
No
Onychonycteris (Bat)
Mammal
Omnivore
Aggressive
Yes
No
Parasaurolophus (Parasaur)
Dinosaur
Herbivore
Skittish
Yes
Yes
Phiomia
Mammal
Herbivore
Skittish
Yes
Yes
Plesiosaurus
Reptile
Carnivore
Docile
Yes
Yes
Pteranodon
Reptile
Carnivore
Skittish
Yes
Yes
Pulmonoscorpius (Scorpion)
Invertebrate
Carnivore
Aggressive
Yes
Yes
Raptor
Dinosaur
Carnivore
Aggressive
Yes
Yes
Sabertooth
Mammal
Carnivore
Aggressive
Yes
Yes
Sarcosuchus (Sarco)
Reptile
Carnivore
Patient
Yes
Yes
Spinosaurus
Dinosaur
Carnivore
Territorial
Yes
Yes
Stegosaurus (Stego
Dinosaur
Herbivore
Docile
Yes
Yes
Titanoboa
Reptile
Carnivore
Aggressive
No
No
Triceratops (Trike)
Dinosaur
Herbivore
Short-Tempered
Yes
Yes
Tyrannosaurus (Rex)
Dinosaur
Carnivore
Aggressive
Yes
Yes

Coming Soon
Species
Group
Diet
Temperament
Tameable
Rideable
Compsognathus
Dinosaur
Carnivore
Unknown
Unknown
Unknown
Dimorphodon
Reptile
Carnivore
Unknown
Unknown
Unknown
Gallimimus
Dinosaur
Omnivore
Unknown
Unknown
Unknown
Gigantopithecus
Mammal
Herbivore
Territorial
Yes
Yes
Meganeura (Dragonfly)
Invertebrate
Carnivore
Docile
No
No
Mesopithecus
Mammal
Omnivore
Curious
Yes
No
Mosasaurus
Reptile
Carnivore
Aggressive
Yes
Yes
Pachycephalosaurus (Pachy)
Dinosaur
Herbivore
Passive
Yes
Yes
Paraceratherium (Paracer)
Mammal
Herbivore
Docile
Yes
Yes
Quetzalcoatlus (Quetzal)
Reptile
Carnivore
Skittish
Yes
Yes
Titanomyrma
Invertebrate
Herbivore
Territorial
No
No
Trilobite
Invertebrate
Carnivore
Defensive
No
No
20) Community Tips
ARK Community Helper Competition
Any member of the community that submits a tip <100 words*, that I think is worth sharing, will be added to this section, with credit, like the example shows!

  • Originally posted by NoggDog:
    TIP: Be careful where you choose to build your housing, as you must juggle the needs of water and food, safety from carnivorous Dinos, and resources.

  • Originally posted by Casper xMapop:
    TIP: Tamed Creatures/Dinos do not need food unless you want them to heal although it is still recommended.

  • Originally posted by Slyther Whitewing:
    TIP: If you press insert, you'll open up local chat (proximity based). Use this so you don't end up clogging global.

* Please note that this does not include ideas that are already being worked on, already. In this case, we would add our work on the idea and anything you mentioned that isn't included, becomes eligible. Also, if the tip is larger than 100 words, it may have it's own section or be added to a pre existing section, instead of here.


168 Comments
Akira.system May 14 @ 1:41pm 
Nice roast, OP.
Dr Ace Misanthrope  [author] May 12 @ 2:10am 
@Hugh Manatee Hahaha, love it! Thanks mate, glad to hear it is indeed still helping people!
Hugh Manatee May 4 @ 5:55pm 
@Dr Ace. Indeed. The manual is outdated. How dare you go out of your way to make the manual at a time in your life when the game mattered to you and not bother updating it after when you got bored of the game. Horsewhipping is too good for you.

However.

Despite your unforgivable crime to avoid updating, I read your grossly out of date manual in August 2023, when I first played ARK. I must admit, I wholeheartedly agree with you about the guide still having relevance for a noob, as its basics of gameplay remain relatively helpful. Who gives a flying monkey if you don't list ALL the animals, you monster you! The important thing is, your guide helped me get started. How do you sleep at night? :steammocking:
Dr Ace Misanthrope  [author] May 3 @ 11:32pm 
[5 Mar 23] MalarOpossum867: This guide is unfortunately outdated.

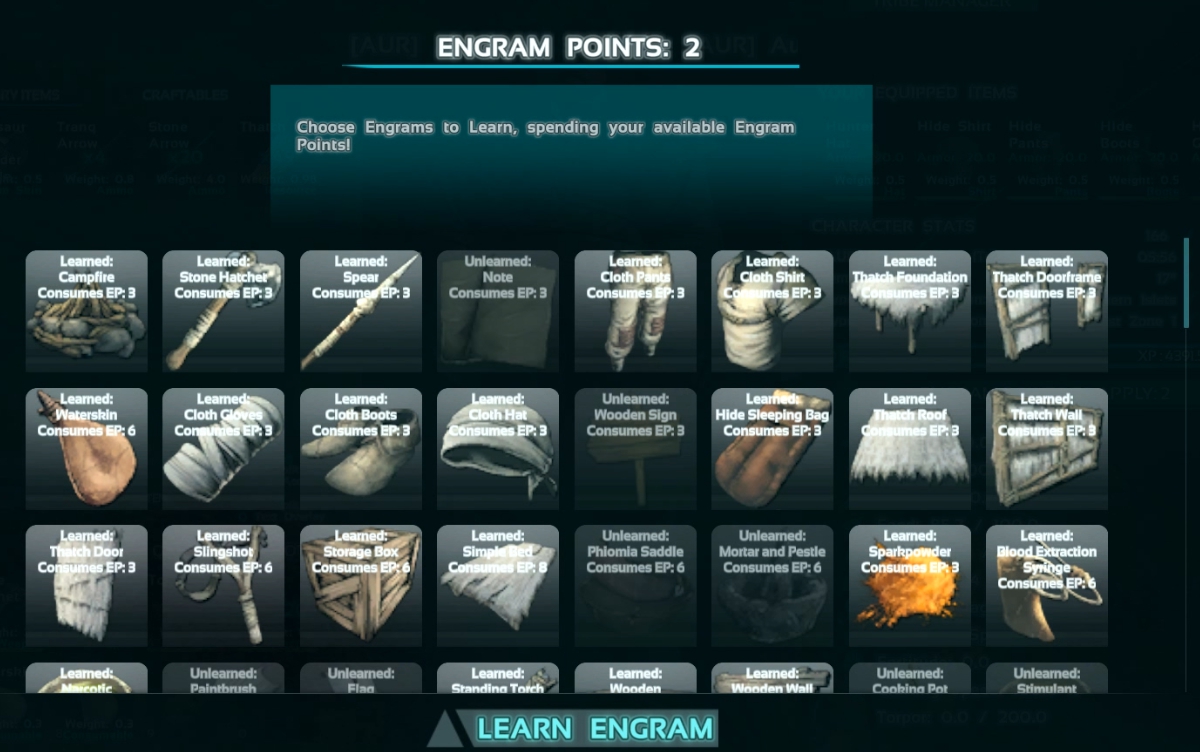
[17 Apr 23] MalarOpossum867: You know that this guide is outdated if the creature count is less than 100, this guide shows all creatures released up to patch 181.0! It also says that the level cap is 65, as of patch 355.3, the level cap is 205. This guide is SO outdated!

[21 Apr 24] MalarOpossum867: This guide SERIOUSLY needs to be updated! It was made around v181.0, which was LONG before the Snow/Swamp update, nevermind the Scorched Earth update!

So after your initial comment that it's outdated, you came back 1 month later to repeat yourself, then again 1 year later. I made this guide in 2015 and haven't played ARK since 2018. So yes, a 9 year old guide that hasn't been updated in 6 years (with 1 small exception), is indeed outdated. But it remains the #1 Top Rated All Time guide for ARK because the information is still helpful to new players. But I look forward to the next annual reminder that it's outdated haha <3
MalarOpossum867 Apr 20 @ 8:07pm 
This guide SERIOUSLY needs to be updated! It was made around v181.0, which was LONG before the Snow/Swamp update, nevermind the Scorched Earth update!
Phoenix_Rising Apr 20 @ 11:41am 
Thank you! I am new to Ark and was so confused. P.s. Those "how to get a GF on ark" need to be told:
(1) Get a job.
(2) Move out of your parent's house.
and
(3) Read books.
Hugh Manatee Aug 23, 2023 @ 3:51pm 
FINALLY! A non-trolling guide to the game. Thank you!

So far, all I've found in the guide section are so-called guides uploaded by baby trolls. Is this an Ark-thing? Because I've never encountered so many. Clearly, they're not very clever or imaginative, since many have copied other trolling guides to the letter. :steammocking:
Someone Jul 3, 2023 @ 8:55pm 
I can not thank you enough for this guide, it's extremely useful and well written :)
MalarOpossum867 Apr 22, 2023 @ 11:11am 
Yes. As of 12/14/2022, the level cap for a player in ARK: Survival Evolved was increased from 190 to 205 with the introduction of the long-awaited Scorched Earth ascension.
Akira.system Apr 22, 2023 @ 8:27am 
your other comment disappeared, but I remember the context at least.