ENDLESS™ Legend

ENDLESS™ Legend

134 ratings
Dust magic and You: The potency of pillars
By neuralnetwork
A step-by-step guide covering everything you need to know about Ardent Mages pillar abilities; what they are & how to use them. A touch of statistics thrown in the mix just for good measure.
   
Award
Favorite
Favorited
Unfavorite
Dust magic and You: The potency of pillars
for v1.0.12

!WARNING! CONTAINS MINOR STORY SPOILERS !WARNING!


Arcana pillars; what they are, how they work and above it all, how to make the most of them.


Table of contents
1. The what & where
2. The how & why
3. The black horse
4. Wouldn’t be dust magic without..
5. The big picture
6. Numbers for the needy
6.1 Dust prices & pillar profits
6.2 City design breakdown
7. TL;DR

Hello and welcome to a little introductory guide on how to use the Ardent Mages pillar abilities. I don't claim to be an expert on the subject and I'm not an experienced guide writer so there might be some things that I've overlooked or are plain wrong.
This guide was originally a set of notes I had for myself and I basically just fleshed it out a little bit so the very basics are included to make the examination a bit more consistent. It's actually only half of a guide as I'll happily ignore the spell portion of arcana skills. Mostly because I haven't playtested the abilities enough to make any kind of meaningful commentary about them.

So, Ardent Mages have access to these powerful traits called arcana pillars and spells (incantations). Lorewise, these arcana abilities are empowered by dust and therefore called as 'dust magic'. Without further ado, let's get started.
1. The what & where
There are five different arcana technologies available through your research. Finishing the techs will unlock their related active abilities that you must use on the strategic world map and in tactical combat. Pillars are used only on world map whereas spells (incantations) are used exclusively in battles. You will find the unlocked abilities below the top left menu banner of your screen, here:


The technologies that unlock the active abilities shown beside are:


Alright! Now we have an idea what are the skills we're dealing with. Out of these five different arcanas, you have to research only three. You begin with both Arcana of Matter and Arcana of Agility researched - assuming you play the default Ardent Mages.
Now let's add a few more technologies so we'll get a nice mix stirring up. In addition to the actual pillar/spell techs there's four separate technologies that improve your pillars and incantations by enhancing their effect passively.


Dust Purifier and Painosphere boost only your spells - the pillars are completely unaffected by these techs.
Dust Mechanics and Sacrificial Amplifiers buff your pillars and do nothing to your spells.

That sums up your basic arcana arsenal. Five pillars, five spells & support of four passives, two for both types of dust magic. Total of 9 tech, 7 requiring research.

Before we go on, let's take a quick peek at the hidden bonus technologies. Even though a custom faction can grab the basic pillars and spells, only Ardent Mages have access to exclusive technologies that enhance their arcana abilities.
You guessed it, they're obtained through their storyline. Unless you're specifically pursuing the story, I recommend you don't aim to grab the second tech although it is incredibly powerful. The problem is that it comes so late in the game that by the time you attain it, the playthrough is practically over. There's only the wonder finisher left to do after you have access to the Secrets of the Virtuals.
The first one though, is good to keep in mind as it's attainable quite a bit earlier, reward for the 5th part - The Secrets of Dust. The bonus it awards is decent and with a bit of luck and timing, it's obtainable without huge difficulties.

The winter versions award an extra +3 FIDS (+1 on pillar of Influence) during winters. This is explained in detail below, read on.
2. The how & why
The pillars act as deployable, immovable objects. You pick any pillar available to you from the top left menu and place it anywhere on the world map. Each placed pillar costs a certain amount of dust and this price keeps increasing by every consequtive pillar that's active on the world map by your hand. The placement tile must be free of other objects, such as city districts & minor faction villages. Water tiles are also unusable. Once placed, a pillar cannot be removed until it expires after 10 turns. You can move armies to tiles occupied by them.
It’s good to keep in mind that you cannot begin a borough production on a tile that holds a pillar so it’s wise to plan a bit ahead with their placements.

The pillars -excluding the pillar of speed which is a special case and will be discussed in length in the next chapter- increase the FIDSI output of their nearby tiles. Range 1 on the tooltip means that the pillar affects a total of 7 tiles; the placement tile itself and 1 in each direction, similar to a new city center. The FIDSI bonus stacks which means you can place multiple pillars close to each other and every single one gives increasing bonuses to the tile(s) affected.

Basically what we want to do with the pillars is to place them next to our cities in a way that awards us the highest possible FIDSI bonus with the least possible (due to dust cost) amount of pillars used. It's important to note that the FIDSI bonus on a city tile is susceptible to all multipliers you gain from buildings, heroes, empire plan, luxuries and traits.
In other words, the more pillar-powered tiles the city can exploit, the better.

Simple enough, no? Now, let's see how the passives add flavor in the mix and how to make sense of the obscure tooltip of the pillars.
Both the pillars and spells have five distinctive levels of power which is not exactly well explained through the tooltips. They begin at level 1 and can attain level upgrade four times bringing them to the level 5 versions of themselves. The passive technologies mentioned earlier (Dust Mechanics and Sacrificial Amplifiers) increase these levels by 1 each. By playing the Ardent Mage storyline you can reach the high levels of 4 & 5 as the storyline finisher tech gives a direct +2 to all your arcana ability levels. This is how the arcana pillar levels work:

• Level 1: +2 FIDS (+1 Influence) within range of the respective pillar. Radius of 1 tile.
• Level 2: +5 FIDS (+2 Influence) within range of the respective pillar. Radius of 1 tile.
• Level 3: +6 FIDS (+2 Influence) within range of the respective pillar. Radius of 2 tiles.
• Level 4: +9 FIDS (+3 Influence) within range of the respective pillar. Radius of 2 tiles.
• Level 5: +16 FIDS (+5 Influence) within range of the respective pillar. Radius of 2 tiles.

Note the level 3 upgrade. You will increase the radius by 1 tile which is huge. You'll jump from 7 potential tiles to a whopping 19, though you rarely can utilize them all. Nevertheless, the bonus is massive but before you begin to shake in excitement uncontrollably, bear in mind that reaching level 3 requires you to either enter Era VI or finish the story so sadly it will stay out of reach for a big portion of the game. It is worthwhile to push up all the way to level 5 at least once, though, just for the amusement factor. The stacking bonuses from overlapping radius 2 pillars elevate your FIDSI gain to outrageously absurd amounts. You have to do it to understand the scope.

Since unlocking the level 3 pillars requires you to either research the two tech tree upgrades with latter being in 6th era or more or less finishing the Ardent Mage storyline, we’ll focus on the practical use of the levels one and two which are what you'll be dealing mostly with.

Now as we understand how the pillars work and what they do the pieces of puzzle begin to come together. We'll see that the Cold Operator technology (#5 storyline quest reward) awards +3 FIDS (+1 Influence) within range of the respective pillar during winter. This is a flat bonus on top of the usual FIDSI increase. It's good. It's not a gamemaker but it's good.
3. The black horse
Oh, yes you've seen it. It's right up there, where the pillar of industry should be. Must be a glitch or some.. practical joke. You tried it once, just once and never went that way again. What the hell is this thing? A tiny little piece of crap you can toss wherever and it stays there blinking and saving you a unbelievable 1 movement point or whatever still leaving you stuck in that forest with the Haunts just uphill. And because of it you can't buyout that library now. And your science pillar costs more!? Who thought this was a good idea? Oh, yes we've all been there.

This here is the pillar of speed and what it does.

• Level 1: -50% movement cost on affected tiles. Radius of 1 tile.
• Level 2: -50% movement cost on affected tiles. Radius of 2 tiles.
• Level 3: -75% movement cost on affected tiles. Radius of 3 tiles.
• Level 4: -75% movement cost on affected tiles. Radius of 3 tiles.
• Level 5: -75% movement cost on affected tiles. Radius of 4 tiles.

The Cold Operator upgrades the movement cost reduction from -50% to -75% on low level pillars. It’s unclear whether this effect should apply only during winter. As of now, the boost is permanent.

The pillar of speed is used very differently than the rest of them. Normally you place pillars next to your cities but this one is fairly the opposite. It is an ability that falls into the realm of "situational gimmick" and it’s easy to write it off as a useless dust sink. The situations where it's worthwhile might be rare and far between but it has its moments. Use it to:

1. Win a settler race for a new region.
2. Escape an overwhelming enemy force.
3. Rush to aid a border town under siege.
4. Enhance mobility between the border of you and your rival when starting a war.
5. Flank your opponent utilizing rough terrain.

One of the major benefits is probably that in MP your rival won't take it into account when planning his move. It is, after all, a situational dust sink gimmick that nobody uses.. Use this to your advantage when the opportunity arises. Also it’s worth mentioning that the pillar gains fairly powerful bonuses as the level increases. Having a level 2 pillar with Cold Operator bonus means you’ll travel 5 tiles with the cost of 1.25, it's nothing to sneeze at.

However, the pillar of speed in its current state has two major drawbacks. First of all, the mechanics are slightly broken. The thing is, each tile on the map has a movement cost tied to it. The pillar reduces this movement cost by its descriptive amount.. Unless we’re looking at a paved road tile.
It seems to be that the movement cost of paved road tiles is fixed to the 0.5 which unfortunately means that the pillar does nothing at all on road tiles. It simply doesn't affect the tile in any way. The road actually slows us down if we’re using -75% reduction on flat land! It’ll get fixed eventually I hope.

Secondly, it's tied to the rest of your pillars that means using it just for the fun of it whenever you feel like getting a little movement bonus, it will mess up your pillar expenses. Which brings us to the next chapter.
4. Wouldn't be dust magic without..
As they say, there is no free lunch. Placing the pillars has a dust cost that’s based on the amount of pillars you’ve put in play. It’s a dynamic system meaning that when there’s none at all, they’re cheap to deploy. When there’s a lot, it’s expensive. When a pillar runs out, the cost decreases again.
What’s more, the cost is elevated when you upgrade the level of your pillars with Dust Mechanics and/or Sacrificial Amplifiers. Don’t worry about the intimidating increase in pillar price due to arcana level up though, the benefits far surpass the nominal increase in the initial placement fee.

Due to the way the pricing of the pillars work, it is strongly recommended to use them in a bulk. If, for example you maintain 3 pillars constantly but re-deploy them all on different turns, you pay the price equal to third pillar for each. If you place all three on one single turn, the price of first and second deployed pillar is less. Here's a simple example to illustrate what I mean:
  • Bulk placement: 40+105+200=345
  • Singular placement: 200+200+200=600
See section 6.1 for more details on pillar dust costs and FIDSI gain.

In most cases it's safe to keep 2 FIDSI pillars up at all times, no matter what type they are and where they're placed. With properly developed cities, 3 and 4 permanent pillars are reasonable to maintain as the multipliers from various sources (hero skills, luxury boosters etc.) push the income of FIDSI over the cost of dust involved.
If you desire, it’s possible to increase your dust revenue by keeping relatively few pillars up (1-2 in most cases). If the total dust cost of “pillar stack” is less than what they produce through their lifetime of 10 turns, the rich get richer!

In addition to the raw resource boost, the pillars add flexibility to your income management; you can essentially trade dust for science, influence and later on, food.
In late game you can churn out substantial amounts of desired FIDSI for your purposes by efficient pillar positioning.
5. The big picture
Ok, so we know what the pillars are and what they do. We know how to use them and how much they cost. Let's finally have a look how to actually place them. Mind you, I’m not entirely certain that these are the very best possible designs but they seem decent enough. As Ardent Mages, you’ll want to build your cities something like this.


Yes, FFVII is a great game, before you ask.

The city designs emphasize balance between strong pillar locations and maintaining a relatively compact form in order to gain advantage of the level 2 districts. Especially noteworthy is the Ardent Cross which gives access to very efficient pillar placements fairly early on.
You might also want to consider building up some specialized cities which utilize high multipliers and the use of exclusive pillar types. In the following picture we'll see an enhanced version of the Ardent Cross for this kind of late game specialization focus.
Building up for Twin Peaks is not recommended, though, if you suspect you cannot maintain high approval rate reliably. The balanced design works remarkably well, as you can see from the breakdown in the next chapter. Even though a form like Twin Peaks has superior amount of 6 tile pillars, it can’t compete with the well-rounded Flawless Star very well.

Now you’ve most likely covered your face with a palm thinking about the optimal district placement design, commonly referred to as the stick or frozen snake. Let's take a look how the cities would look in the classic stick form given the same amount of districts:


We’ll find out, rather surprisingly, that when we compare the efficient pillar town layouts to the classic stick, there is no difference in approval penalty. What's more, the pillar power cities actually exploit a few extra tiles. See section 6.2 where you’ll find a more detailed breakdown of the statistics for each respective city type.

Granted, the transition period to a new shape makes the approval jump up and down in the pillar cities but the difference is not drastic, a mere -10 while upgrading Ardent Cross -> One-winged Angel -> Crown Jewel as you will need two districts in order to finish the new design.
If we keep adding districts, the stick shape will take over in approval benefits but from my experience, the game is usually more or less decided by the time your cities grow over these sizes by any large margin. If, however you wish to build much larger cities, it's probably best to stick to the.. stick. It grants maximum amount of level 2 districts which add considerable bonuses in the endgame.
6. Numbers for the needy
6.1 Dust prices & pillar profits


The influence is placed in brackets because it follows a different growth than science, dust and food. If the net FIDS(I) is over the respective dust upkeep per turn, you’re generating income. Remember to take multipliers (empire plan, buildings etc.) into account.
All FIDS(I) gains are per turn.

The charts work as a handy tool to check how much you need dust for whichever pillar project you're about to undertake for the next set of 10 turns.


Arcana level 1

Pillar
Price,
Price,
Dust upkeep
6 tile pillar
5 tile pillar
4 tile pillar
#
single
total
per turn
FIDS(I)
FIDS(I)
FIDS(I)
1
40
40
4
12(6)
10(5)
8(4)
2
105
145
14
24(12)
20(10)
16(8)
3
200
345
34,5
36(18)
30(15)
24(12)
4
325
670
67
48(24)
40(20)
32(16)
5
480
1150
115
60(30)
50(25)
40(20)
6
665
1815
181,5
72(36)
60(30)
48(24)
7
880
2695
269,5
84(42)
70(35)
56(28)
8
1125
3820
382
96(48)
80(40)
64(32)
9
1400
5220
522
108(54)
90(45)
72(36)
10
1705
6925
692,5
120(60)
100(50)
80(40)


Arcana level 2
[/tr]
Pillar
Price,
Price,
Dust upkeep
6 tile pillar
5 tile pillar
4 tile pillar
#
single
total
per turn
FIDS(I)
FIDS(I)
FIDS(I)
1
75
75
7,5
30(12)
25(10)
20(8)
2
160
235
23,5
60(24)
50(20)
40(16)
3
275
510
51
90(36)
75(30)
60(24)
4
420
930
93
120(48)
100(40)
80(32)
5
595
1525
152,5
150(60)
125(50)
100(40)
6
800
2325
232,5
180(72)
150(60)
120(48)
7
1035
3360
336
210(84)
175(70)
140(56)
8
1300
4660
466
240(96)
200(80)
160(64)
9
1595
6255
625,5
270(108)
225(90)
180(72)
10
1920
8175
817,5
300(120)
250(100)
200(80)


6.2 City design breakdown

I’ve included the total amount of districts, how many of those are lv 2 and their relative percentage value for extra clarity. Then there’s the amount of primary (6 tile) pillars with the potentially useful 5 tile pillars in brackets. The stick form is listed on the right for comparison.
I’ve not listed pillar tiles for the stick form since it cannot compete with the designs that utilize 6 tile pillars.

--------------------------
----------
----------
---------------------
----------
Tower of Power
2(+2)
The Stick
5/1
20%
5/1
20%
Approval
-25
Approval
-25
Exploitable tiles
17
Exploitable tiles
16
Primary pillar tiles
12
Potential pillar tiles
22
Ardent Cross
4(+0)
The Stick
6/2
33%
6/2
33%
Approval
-20
Approval
-20
Exploitable tiles
20
Exploitable tiles
18
Primary pillar tiles
24
Potential pillar tiles
24
One-winged Angel
3(+3)
The Stick
8/4
50%
8/4
50%
Approval
-10
Approval
-10
Exploitable tiles
23
Exploitable tiles
22
Primary pillar tiles
18
Potential pillar tiles
33
Crown Jewel
2(+6)
The Stick
10/6
60%
10/6
60%
Approval
0
Approval
0
Exploitable tiles
26
Exploitable tiles
26
Primary pillar tiles
12
Potential pillar tiles
42
Flawless Star
4(+4)
The Stick
11/7
63,63%
11/7
63,63%
Approval
+5
Approval
+5
Exploitable tiles
29
Exploitable tiles
28
Primary pillar tiles
24
Potential pillar tiles
44
Twin Peaks
8(+0)
The Stick
11/4
36%
11/7
63,63%
Approval
-40
Approval
+5
Exploitable tiles
33
Exploitable tiles
28
Primary pillar tiles
48
Potential pillar tiles
48
[/table]
7. TL;DR
Pillars = rly good. Always keep a few around. Late game, spam them all over, see pics in section 5 for max boost. Speed pillar is bugged on roads. Good buffs in story.


And with that we've covered the basics of pillar arcana. Hopefully this little guide helps you in your endeavor to unveil the mysteries of dust magic. Good luck and happy empire building!
16 Comments
anguta_morbhead Mar 8, 2019 @ 8:39am 
i am sure that would reduce the lvl 2 districts too much
PhailRaptor Feb 3, 2019 @ 5:48pm 
If you were to build a mega-metropolis with the Mages, wouldn't you do something that looks sort of like 2 sticks next to each other? Have a single "bridge" district between the 2 sticks, and leave other middle tiles empty for Pillars.
queenelise9830 Jan 1, 2018 @ 4:34pm 
This is the first place I've seen Secrets of the Virtuals as I've never finished a faction quest other than Morgawr and Walkers. Thinking of setting a game to Newbie so I can try to finish the Mages' quest without being interrupted by powerful AI factions... Might have to do that with some of the others too, just to see what the techs are... Can anyone give me a list of all factions' end-of-questline techs?

I know that the Allayi get total winter immunity and Morgawr function better on land after they finish their respective quests, and the Walkers get production cost reduction on buildings for theirs...
rasputnik Mar 29, 2017 @ 5:06pm 
Great guide - finally taught me how to play the mages.

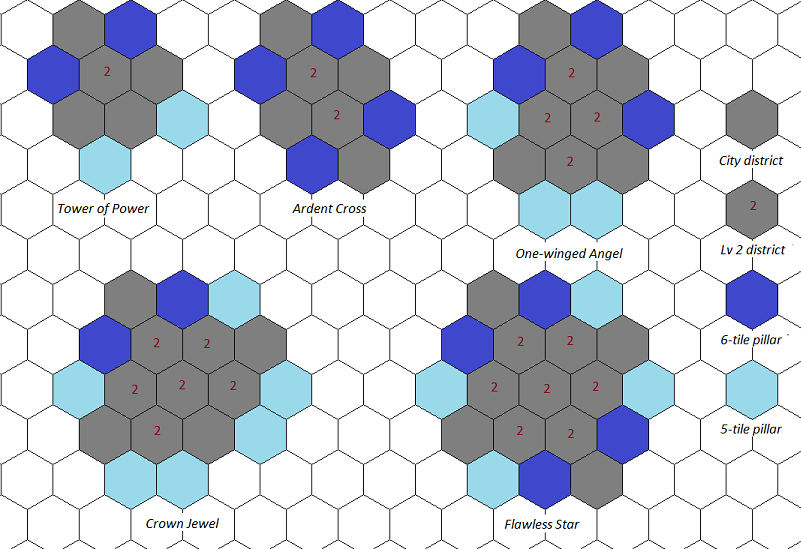
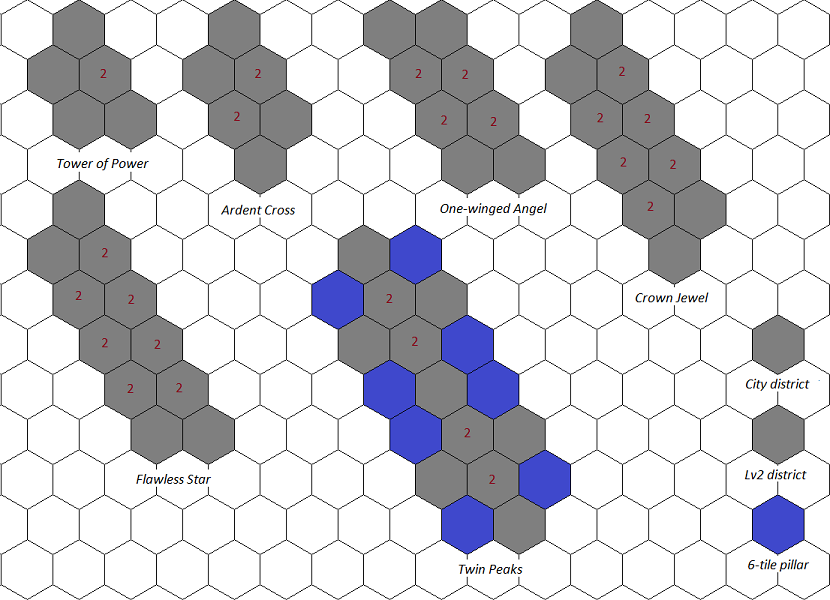
One thing - can you explain what you mean by 5-tile and 6-tile pillars?
madgamer2 Mar 29, 2017 @ 12:12pm 
Note to self: numbers were never my strong point (SIGH)
I do thank you dor trying but its all to much for an old guy who can't add 3+3 and get???
Obsidian Shadow Dec 29, 2016 @ 8:37am 
Great guide to help understand pillars.
Warrior at the Edge of Time Nov 11, 2015 @ 10:52am 
Cold Engineering = Cold Operator?

Nice guide, but I had trouble understanding city designs.
neuralnetwork  [author] Feb 13, 2015 @ 6:38am 
Sorry for leaving your question unaswered Fortigan. Been busy lately.
As for the custom faction thing, I'm not entirely sure. I never got much into using self-tweaked factions as I was pretty content with the basic layouts.
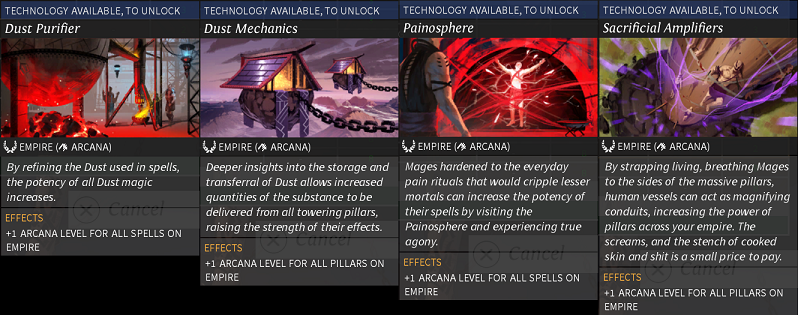
Given the descriptions (Mages get cheaper arcana), it might be an oversight that the icons don't appear. If the issue still persists, try posting to the Amplitude forums about it.
Fortigan Dec 5, 2014 @ 1:21am 
how do you use pillars with a custom race that does not have an affinity to the ardent mages? For example, if I make a custom race that has cultist affinity and I choose arcana of renewal as one of my faction traits, the pillar icons do not show up on the screen.
lpzedu Dec 3, 2014 @ 11:42am 
Very useful, many thanks! I was having some trouble with the ardent mages