S.T.A.L.K.E.R.: Call of Pripyat

S.T.A.L.K.E.R.: Call of Pripyat

29 arvostelua
A Rookie's Guide to STALKER GAMMA 0.9.3.
Tekijältä Dio Aloke
I'm not gonna lie: when I first heard about Gamma I thought it was too hardcore for me. So I tried Anomaly instead and got hooked, it was my entry drug. Now I'm ready to become a Gamma crackhead and if you're reading this you are in the same mindplace. Let's die together in the Zone, my fellow Gammahead!
2
2
3
4
2
   
Palkinto
Lisää suosikkeihin
Lisätty suosikkeihin
Poista suosikeista
INTRO / DISCLAIMER
I'M PLAYING GAMMA v.0.9.3.

Just to be clear, it's not standalone, it requires ANOMALY 1.5.3., but if you play(ed) both, I recommend separate installations.

THIS IS A WORK IN PROGRESS!!!

I'm making this as I learn the game. Not only it's a nice way to organize the information I'm gathering, but it also helps in making a starter guide that's really in touch with the doubts and troubles of a newbie.

There are a lot of resources out there for newbies, from YouTube videos to images, Reddit threads, etc, but many of them are outdated. This will be true of this as well, I realize. Still, not *everything* gets outdated and I prefer written guides since they're so much easier to find what you're looking for.

Feel free to put your own question for me to answer/investigate and provide feedback/tips of your own!
WHY PLAY GAMMA?
It's important to know what makes GAMMA different and why you should play it. This will shed light on some design decisions the devs made and might change your perception on some of its features. Just like STALKER isn't your typical FPS, GAMMA isn't your typical STALKER and it has many significant differences even from the original mod it comes from, ANOMALY.

META-PROGRESSION
Chances are you made the following progression in your STALKER journey:

Original Trilogy (SoC, CS, CoP) > ANOMALY > GAMMA

That's how I got here, anyway. Since ANOMALY/GAMMA are free you might have skipped the original games, but I *strongly* recommend you play them first. Not only will it give you context lore-wise, but it'll also teach you the underlying mechanics the mods improved upon and even changed radically. At any rate, you'll know where the devs are coming from and why they made changes to the original experience.

Actually, that's the first point I want to make: GAMMA isn't tailored for newcomers to the series. It doesn't explain itself, it barely has tutorials: at most you get some info in your PDA and that's it. It doesn't mean you can't start from here, but it'll be like being thrown into the sea to learn how to swim.

HOW YOU'RE SUPPOSED TO PLAY
I'm not a glutton for punishment and I assume many people who try GAMMA aren't super hardcore gamers. Nothing wrong with being one, but keep in mind this whole guide is written by someone who is not super skilled, but loves playing anyways. I PLAY FOR FUN and while I'm willing to meet the devs half-way, I definitely have no problems tailoring the game for my own fun.

And that's the second point: GAMMA is meant to be modular and customizable! So don't worry about purists telling you to play it as it's 'meant to be played'. It's in the ♥♥♥♥♥♥♥ name: Gigantic Automated Modular Modpack for Anomaly. You're supposed to enable/disable/change things to get the experience you WANT.

A REASON TO GRIND
OK, to finalize: this game is made by and for STALKER veterans. In the original games and even in ANOMALY you'll eventually 'plateau'. What that means is: you've got your endgame gear, you have lots of money, you finished the storylines. You can keep playing, but you start to wonder what's the point of hunting for artifacts or doing missions anymore. You don't *need* anything anymore.

There are 2 ways of solving this:
  • #1 - Make progression slower
  • #2 - Create some kind of 'perpetual need'

None of those solutions are perfect, but let's examine them. Making progression slower mainly only postpones the plateau problem: you take longer to get there, but you eventually will anyway. Creating 'perpetual needs' means requiring the player to maintain or gain something: you need ammo, you need to repair your gear, you need some special 'currency' to play a game mode... Unlike the first solution, this one keeps working even in the endgame.

And both of them basically come down to GRINDING. Be it like grinding for levels in a JRPG or farming for riftstones in Diablo 3. I myself don't like grindy games, I hate games that waste my time or are poorly paced. It's a joke, but also true: embrace the grind! ANOMALY and GAMMA have a good kind of grind in that it feels so satisfying 'getting there'.

Part of it comes from its dynamic world. A-Life is truly impressive and you never know what you're gonna encounter as you travel the Zone. Some of the systems implemented in ANOMALY/GAMMA feel obnoxious at first ('What do you mean I can't buy weapons/armor!? That's ♥♥♥♥♥♥♥♥!'), but they *do* have a reason to exist.

And one of the reasons is to make the journey to the endgame rewarding. Not being able to buy weapons or armor means you had to scavenge and restore your gear. In a way, that's their (your gear's) levelling up. Not by kiling a million rats, but slowly replacing and fixing parts. That AK has a history that is closely tied to your own. It's not like hundreds of other AKs you can find in a random bandit. It's your own AK lovingly and painstackingly put together.

I guess some people will regard it as just a ♥♥♥♥-block, but I personally find it one of the more satisfying things about GAMMA. That's completely fine if you don't agree, but I feel that being able to buy stuff brings the plateau boredom a lot faster. And anyway, you can mod the buying of weapons/armor back in the game. (Modular experience, remember?)

Another reason is to give you something to do when the obvious tasks are done. You've reached the top of the food chain: have a fully upgrade rifle with scope and grenade launcher, an exoskeleton, your artifact set is complete, you finished Story Mode. What now? You could start over in a harder difficulty or in another faction. You could go play Warfare Mode. But what if you don't want to throw away all the hard work you put in that save?

Getting ammo and repairing your armor is trivial by this point. That's when exoskeleton batteries comes in, when artifact durability comes in. That makes exoskeletons a powerful tool, but one that requires some work to maintain. That makes hunting for artifacts useful again, you don't need money at this point, so why farm them for selling anyway?

CLOSING THOUGHTS
Ok, fair points, but there's a MAJOR DOWNSIDE to all this. It makes the START HELL. All the difficulty is front-loaded, meaning new players will find a pretty high difficulty wall and many will be discouraged. Veteran players will have learned ways to circumvent this, but newbies have no game knowledge to neutralize this.

That's when, once again, the MODULAR nature of GAMMA sweeps in to save the day. There are many ways to lower that initial difficulty wall, from enabling quick saves to removing whole systems like artifact degradation.

Another hint that goes hand in hand with that: treat your first playthrough(s) as training. You can make it as easy as you want and gradually take the training wheels off. In a way, the progression from the original games to GAMMA is like that. While in SoC you can easily farm money by selling weapons and get endgame gear fast, that's not an option in GAMMA. That training wheel has been removed.

I hope this long-winded introduction gives you a new perspective into why GAMMA is the way it is. It's been a journey for me and I ♥♥♥♥♥♥♥ about lots of things on the way. Now I enjoy many of the things I previously cursed. May it be the same for you too.
INSTALLATION
Honestly, you should head to their Discord and FOLLOW THEIR GUIDE[discord.com].

You'll be able to get help there too if you have any trouble with the process.
UPDATING GAMMA
Same as with installing, just follow THEIR GUIDE IN DISCORD[discord.com].

You'll be able to ask for help if you have any problems.
BEFORE YOU START MESSING WITH MO
MO stands for MOD ORGANIZER.

It's the window that opens before you get into the actual game.

It's where all the mods that make GAMMA are listed and where you can enable/disable them.

Before you go around changing things, take note somewhere of the changes you make.

There are over 500 mods in this list! Not all of them have the most obvious name and even when they have, it might be a problem finding any specific thing in the heap.

That's why I repeat: if you change anything, write down the name/category of the mod you enabled/disabled!

It'll make your life a lot easier if you want to revert some of the changes you've made. GAMMA already works by some mysterious black magic, you *don't* want to complicate things.

You've been warned.
SMALL TWEAKS (IN MO)
While I encourage you play GAMMA mostly as it comes out of the package, there are a few small (or not so small) tweaks I've made to tailor it for a better experience for myself. You're welcome to take these suggestions or not. Most of them are pretty self-explanatory.

DISABLE COMPANION FRIENDLY FIRE
CHECK the box.

COMPANIONS CARRY WEIGHT TWEAK - SNEAKY

G-FLAT'S INDIVIDUALY RECRUITABLE COMPANIONS

RESTORE COMPANION PORTRAITS
I like HUDs and I like character portraits. The 'minimalist' design which is default has the gaping flaw of not allowing you to know exactly which companion is engaged in combat or, worse, has just died.
UNCHECK the box.

UNLIMITED STASHES WEIGHT

DISPLAY CORPSE DOTS IN MINIMAP
CHECK the box.

SMALL TWEAKS (IN MCM / IN-GAME)
Other changes can be made in-game through the MCM (Mod Configuration Menu).

DISABLING THE OBNOXIOUS DEPTH OF FIELD EFFECT
I don't know about you, but I don't like games artificially making depth of field effects. It's usually jarring, not really immersive in any way (unless I drop my glasses every time I aim down sights). DOF is for me as triggering as motion blur is for some people (I also hate motion blur).

DISABLING STUPID BLUR IN SCOPES WHEN USING NIGHT VISION
Until I found out I could disable this I thought night vision overall kinda useless for serious combat: either I could see through the scope, but nothing around me, or I couldn't see INSIDE the scope, which made it pointless. Disabling this restores sense to the Universe.
ENABLING QUICKSAVES
By default you can only quicksave near lit campfires. You do have quicksaves elsewhere, but they're on a 3 min cooldown, so you can't spam them.

GAMMA is pretty stable in STALKER terms - better than ANOMALY at any rate. But it *does* crash. I'd be pretty pissed if I lost a huge chunk of playtime because the game crashed on me, so that's a 'legit' reason to enable quicksaves.

QUICK RANT
Personally, I'm a compulsive quicksaver. I don't care if some people think this is scumming or trivializing the game, I have nothing to prove. What I care about is having fun and not punishing myself unnecessarily.

Honestly, if I couldn't quicksave I probably would have dropped the game, because the start is so ♥♥♥♥♥♥♥ BRUTAL. Unlike Dark Souls, I can't get my stuff back - the time I spent before dying is gone for good. I'd rather quickload dozens of times while I'm LEARNING the game: how not to get wrecked by boars, how to deal with a pack of dogs, what strategies work in a scenario. Quicksaves allows me to run tests without punishing myself.

HOW TO ACTUALLY ENABLE QUICKSAVES
You'll need to head to the Mod Organizer, the screen that opens before getting into the game, the one that lists all the mods.
UNCHECK the box.

Now you should be able to quicksave normally.

If later you're feeling confortable without quicksaves, just check the mod in MO again and that's it.
PROGRESSION
THERE'S A HANDY OFFICIAL PROGRESSION CHART. IT'S FROM 2 YEARS AGO AND SOME OF IT MIGHT BE OUTDATED, BUT MOSTLY IT STILL CHECKS.

Progression in GAMMA is tied mainly to your TOOLS:
  • BASIC TOOLS - early game (light armor, type A weapons, basic equipment)
  • ADVANCED TOOLS - midgame (medium/heavy armor, type B & C weapons, intermediate equipmen)
  • EXPERT TOOLS - endgame (heavy armor, type D weapons, advanced equipment)
NOTES: You can craft Heavy Armor Repair Kits with Advanced tools, it's just super expensive. By equipment I mean backpacks, night vision goggles, detectors...)
WEAPON TYPES: A (pistols, SMGs), B (shotguns), C (assault rifles), D (heavy rifles)


Parallel to that you need to upgrade your gear, but I'll touch on that later.

HOW TO GET TOOLS
STASHES, my friend. You gotta get as many stashes as you can. EVERY 7 STASHES YOU GET A RARE GOLDEN STASH WHICH CAN HAVE TOOLS. Here's a chart for you with the actual chances:
As you can see, in general the further North you go the better TOOLS you can find. In order to find better tools you can't stay in the South - but going North requires better gear. It's a balancing act.

HOW DO I GET STASHES?
You'll usually get stash coordinates as rewards for missions, but also by looting other stalkers and viewing PDAs.

Mission to recover documents/PDAs *always* spawn stashes that contain those items, so they're your best bet.

GUARANTEED WAYS TO GET TOOLS
BASIC TOOLS
HIP'S QUEST FOR TOZ-194 (CORDON)
GIVE SPIRIT BOOZE (YANTAR) - if you give him 20 shots (7 bottles) of Nemiroff Vodka (the red one) [vodka is a common mission reward, just do small jobs and you should get enough]

ADVANCED TOOLS
USE 5 BASIC TOOLS TO CRAFT ONE - a bit expensive, but if you're not having any luck, it's an option

GUNSMITHING KIT (crafts ammo)
FINISH CLEAR SKY'S RETAKE THE SWAMP QUESTLINE - talk to Cold at the Clear Sky base to start. It's a human combat heavy questline and the last mission is against the military, so prepare accordingly (AP rounds, healing items)

PSY-PROTECTION HELMET
Unless you're playing as Monolith/Sin, you can't access the Red Forest and further north until you disable both the Miracle Machine (Yantar) and Brain Scorcher (Radar). And to do that you'll need to buy a PSY-PROTECTION HELMET from Sakharov in Yantar.

This is midgame, so not a initial priority! BASIC TOOLS and some decent gear comes before.

ALL THE OTHER STUFF YOU NEED
  • GUNS IN GOOD CONDITION - here you'll be at the mercy of RNGesus if you didn't pick any weapons at the start screen. You want both a pistol (9x18 or 9x19) and a shotgun (pump is better) or SMG (9.18 and 9x19). Get them to as close to 100% on all parts for full damage and not jamming all the time.
  • ARMOR/HEADGEAR IN GOOD CONDITION - same thing, including the starting gear. Without a good mask radiation will be a constant problem. You want damage denial since you won't have good ways to kill enemies before they notice you
  • HEADLAMP - this game is dark, you won't be able to play at night without some light. You *can* use flashlights/glowsticks, but you'll only be able to use pistols with them
  • DETECTOR - start hunting artefacts, but mostly anomalies will be too risky/costly to access until you have medium gear and some artefacts to increase resistances. With a Grizzly Detector (requires Advanced Tools) you can detect *all* artefacts.
  • BINOCULARS - you want to avoid useless fights or at least be prepared for them, this allows you to scout ahead
  • SCOPED RIFLE - until you get a 5.45 (Warsaw Pact) or 5.56 (NATO) rifle with a decent scope, any serious fights against humans will be a lot more challenging (you'll waste lots of money with repairs/healing)
  • MONEY - for repairs, healing items, the PSY-PROTECTION HELMET, recipe books and crafting ingredients

HOW TO MAKE MONEY
BE EFFICIENT / A SCUMBAG
GAMMA has a slow progression and the economy is tight. That means you need to efficient. Every time you shoot a weapons, that's money spent - keep this in mind if you have the urge to kill everything in sight. Every time you get damaged, that's money down the drain - so avoid damage as much as possible.

TLDR: always make sure you stand to gain something when fighting or going into anomalies.

You don't need to kill everything that crosses your path. If you spend 2 stacks of pistol ammo to kill a random bloodsucker and get a single piece of meat, that's some 3.5K in the waste bin and it would have been cheaper to buy food. So unless its for a mission or you really need to get somewhere guarded by mutants, avoid them or just run away.

Humans are a different story because you need their weapons and armor. If there's a chance to have a mutant do the work for you, take it. If you don't care about reputation or want to roleplay a scumbag, you can shoot neutral enemies (or use disguises for infiltration kills) or take package missions and just open the packages for their contents (pretty good for the artefact retrieval missions).

Check the AMMO and TRADING sections of this guide. Use HP rounds against mutants (it might be more cost effective if you don't miss a lot), AP against humans (except bandits, they don't wear heavy armor), but if you're broke make do with FMJ rounds. Butcher in Garbage sells AP/shotgun ammo at the lowest price in the game, so stock up there.

GIG ECONOMY (WHAT JOBS TO TAKE)
Every time you're near a hub with friendly/neutral stalkers, check the Taskboard in you PDA and take all missions that make sense.

RETRIEVE DOCUMENTS/PDA are your best friends, since they spawn stashes that can contain TOOLS and weapons/armor.

ANY KILL MISSIONS are good choices mostly, since they frequently *complete themselves* thanks to A-Life or emissions.

FETCH QUESTS FOR BADGES since you shouldn't use them for anything else (apart from Aslan's lottery in Dead City, but that's a niche scenario) and they don't weight anything. You'll accumulate them naturally and should cash them whenever possible.

FETCH QUEST FOR RANDOM ITEMS can be worth it if the items are not rare or especially needed at the moment. You get more from those mission than from selling them.

SELL MUTANT PARTS TO BUTCHER/SCIENTISTS. They're used for Artefact crafting, but that at least for midgame and the money will make more difference now than having a ton of parts later. Save the meat to prepare food (check the COOKING section of this guide). Sell Rodent/Snork meat, it's useless.

NEED A GUIDE / UNDERCOVER / ESCORT SCIENTISTS MISSIONS are a good way to get free temporary Companions. If they kill anything, you can loot it. At least they're extra targets and you want every edge you can get.

INTERDICT ENEMY FORCES / DEFEND POSITION missions are ONLY ONCE YOU HAVE A SCOPED RIFLE AND SOME AMMO FOR IT. They pay well, mostly, and are a good way of acquiring a pile of human loot.

OTHER POINTERS
There's ARTEFACT CRAFTING in this game, check the ARTEFACT section. It's only for midgame and beyond. If you won't use the artefact, sell it to the scientists. If you do, you get better prices if they're in 100% efficiency.

Don't sleep on RF Packages! They give a fair amount of ammo and meds. You'll need a RF Receiver. I know they can be a pain, that's why there are a couple sections in this guide with tips and locations!
PSAs & THINGS I WISH I KNEW SOONER
YOU CAN JUMP THE FENCE DIVIDING CORDON thanks to the ledge climb mod. Just do it at one of the 'pillars', nor the barbed wire.

If you disassemble weapons/armor that are upgraded (have the green arrow icon), you have a chance to get the upgrade kit.

GUIDE MISSIONS, the ones where you need to lead a NPC somewhere, ARE A GOOD WAY OF GETTING COMPANIONS ABOVE YOUR LEVEL. Want a Master bodyguard? Just promise to lead them where they want and never do! They won't leave and sometimes they'll pay full price even if you take days to turn the quest in. You can go above the companion limit this way too. Just don't forget to get your stuff from them before dismissing.

SIGHTS, SCOPES, BINOCULARS
You can switch reticules and turn night vision on/off with the '=' key.

You can switch sights with the same key as the grenade launcher ('V' by default).

You can turn off night vision in Binoculars by pressing 'M'.

CRAFTING
CRAFTED ITEMS DON'T CARE ABOUT THE CONDITION OF THE MATERIALS. Save good armor parts for repairing and use the crappy ones at 1% for crafting.

CHANGING PARTS (EVEN BARRELS) AND UPGRADING DON'T CONSUME USES ON THE REPAIR KIT.

YOU DON'T NEED A VICE/WORKBENCH. Simply right-click your TOOLS and select 'open workbench'.

TOOLS INCLUDE THEIR LESSER VERSIONS! That means ADVANCED TOOLS include the BASIC level and the same goes for EXPERT TOOLS. No need to carry all of them.

YOU DON'T NEED RECIPES FOR CRAFTING AMMO/MEDS! Simply use the relevant TOOL and all recipes will be unlocked.

FETCH QUEST ITEMS
THE NPC WILL ALWAYS TAKE THE ITEM WITH THE BEST CONDITION, IF IT'S IN YOUR BELT! So if you've got a quest for an artefact/pelt you're using, stash it or give it temporarily to a companion before turning in the quest. You can also give items with only 1% condition, the NPCs don't mind.

FURNITURE
PICK UP AN EMPTY CONTAINER BY PRESSING THE 'TAKE ALL' BUTTON INSIDE IT! (The container must be empty for this to work)

HOLD 'F' WHILE CLOSE TO A PIECE OF FURNITURE TO BRING UP THE MENU.
COMBAT - DAMAGE/AMMO [unfinished]
BARREL CONDITION
This is the most important thing on your weapon, more than which ammo you're using. The heaviest sniper rifle with a broken barrel will do ♥♥♥♥♥♥♥♥. Always keep this close to 100% so you get 100% damage *and* armor penetration.

AMMO TYPES
GAMMA makes AMMO TYPES matter much more.

Against mutants, you want HP rounds. Even the humble starting pistol can kill mutants more easily (and from range) than a shotgun with this ammunition.


Against armored enemies, you want AP rounds. I managed to kill a bandit wearing an exosuit with my starter pistol early in the game, while my shotgun and regular FMJ ammo did almost no damage. It was a headshot though, you should always go for those!

Notice the number in brackets in the image: BR3 [27]. That's the armor rating this ammo can penetrate. In the example it's low: it'll only be effective against light armor, which usually have BR Class of up to 30.

LIGHT ARMOR
MEDIUM ARMOR
HEAVY ARMOR


FMJ rounds seat in-between: they're not particularly effective against either mutants or armored enemies, but they're cheap and plentiful.

CALIBER
Of course, caliber also counts. An enemy in an exoskeleton will laugh at your pitiable 9.18 SMG, but will feel your 7.62 sniper.
COMBAT - HEALTH SYSTEM
At first, GAMMA's health system might be baffling and frustrating, even infuriating. It's more complex than the systems in the original games or Anomaly, but it's not that hard once you grasp it.

MAIN HEALTH & LIMB HEALTH
There are 2 main components to the system:
- MAIN HEALTH (the body icon): if this reaches 0 you die
- LIMB HEALTH (the bars): condition of arms/ legs, torso and head, reaching 0 in them won't kill you, but you'll suffer penalties


When you take damage, both your MAIN and LIMB health will be drained. MAIN HEALTH is simple enough and you can treat it as in any other game, it's the LIMB HEALTH that's confusing.

Basically, LIMBS with low health won't kill, but will give you penalties depending on how injured they are:
  • LEGS - when injured will damage your MAIN health if you run, if too damaged will *prevent* you from running
  • ARMS - will make you less accurate, increasing weapon sway
  • HEAD - your vision will shake and duplicate, getting a headshot may blind you for a couple seconds
  • TORSO - will lower your carry capacity and stamina pool/regeneration
So damaged LIMBS won't kill you *directly*, but they'll make combat much more challenging. So you need to HEAL them.

HEALING: TEMPORARY x PERMANENT
HEALING itself comes in 2 variants:
- TEMPORARY (in yellow): will degrade over time
- PERMANENT (in white): will 'stay' until damaged again


Items that give TEMPORARY HEALTH (yellow dots) are cheaper and more importantly, they don't impair your combat capabilities.


Items that give PERMANENT HEALTH (white dots) are more expensive and will make you dizzy, making the screen sway sometimes a lot.


That means that while in combat, it's often better to do 'temporary repairs' to your health and properly heal after the enemies have been dealth with.

BLEEDING
There's also BLEEDING to consider. It's been made more dangerous in the last updates. It will 'proc' less often than before, but will drain your MAIN health much faster. It goes from WHITE (light bleeding) to RED (bleeding profusely) with YELLOW (somewhere between).

Depending on the severity of the BLEEDING and how low your MAIN HEALTH is, it's better to HEAL your main health *before* stopping the bleeding.

MAIN HEALING ITEMS
MEDKITS
Your main way to recover MAIN HEALTH.

Scientific (yellow) > Army (blue) > Regular (red)

STIMPACKS
MAIN HEALTH recovery for intense fights. Lighter and more powerful effects than medkits.

Scientific (yellow) > Army (blue) > Improvised (old ass syringe)

BANDAGES/TOURNIQUETS
Your main way of dealing with BLEEDING.


PILLS
Used to turn TEMPORARY LIMB HEALTH into PERMANENT HEALTH

Ibuprofen (blue) - heals ARMS/LEGS
Yadulin (white) - heals ALL LIMBS
Caffeine Tablets - to reduce the wooziness from Yadulin

NOTICE THAT EVERY HEALING ITEM MAKES YOU HUNGRY/THIRSTY, SO ALWAYS BRING EXTRA FOOD/WATER!

RULES OF THUMB
IN COMBAT
HEALTH OVER 50% + WHITE BLEEDING >> Bandages
HEALTH OVER 50% + YELLOW/RED BLEEDING >> Tourniquet

HEALTH AT 30% OR LESS + WHITE BLEEDING >> MedKit then Bandages
HEALTH AT 30% OR LESS + YELLOW/RED BLEEDING >> Medkit then Tourniquet

HEALTH OVER 50% + ARMS/LEGS BROKEN >> couple Bandages should do the trick
HEAD DAMAGED >> Yadulin + Caffeine Tablets

POST-COMBAT
ARMS/LEGS IN YELLOW >> Ibuprofen (if more than 50% damage) or Yadulin + Caffeine Tablets (if less)
HEAD/TORSO IN YELLOW >> Yadulin + Caffeine Tablets
MAIN HEALTH >> if you're not in a dangerous area, you can let an artefact with Health Restoration work over time and/or sit by a lighted campfire (they increase health regen)

(I found a SOUL artefact early game and its Health Restoration saved many a medkit. I only recently found out about the campfires. Maybe do it while you read something in your PDA?)

PSY HEALTH
It's the bar above the body icon and limb bars. If this reaches zero you're dead.

This is drained by psy anomalies and attacks. You'll know you're in a psy anomaly because your screen will turn bluish, the bluer it gets the more intense the psy damage. Some psychic enemies have the same effect, like Psy-Dogs or Poltergeists. The psy field of enemies that damage your psy health directly, like a Controller, turns your screen yellow.

One way of quickly restoring your PSY HEALTH is to use Psyblock pills.

RADIATION
It works like in all other STALKER games: the more severe your radiation poisoning, the more aggressively it drains your health.

It's important to get a minimum of radiation resistance through armor and/or artifacts. Anything that covers your face, be it a mask or an enclosed helmet, will *greatly* reduce the threat posed by radiation.
After that it can mostly be ignored apart from some high-intensity spots in Radar and Pripyat. The Chernobyl NPP, of course, will be highly irradiated, so that's where your regular setup will be tested, but for the rest of the Zone it's fairly easy to get it covered.

Most common ways of reducing radiation poisoning are alcohol and cigarettes. The latter are best weight-wise, as vodka is pretty heavy.

You don't always need to drink vodka or light a cigarette every time the radiation icon appears. If it's grey and you're not taking damage, it'll go away on its own.
DEALING WITH MUTANTS
GAMMA makes AMMO TYPES matter much more. Against mutants you want HP rounds, if available. Even the humble starting pistol can kill mutants more easily (and from range) than a shotgun with this ammunition.

Mutants don't know the concept of cover, so they rely instead on speed, hit & run tactics or sheer tankiness. Weapons with good HANDLING are a good choice, because it affects both time to change weapons and to ADS (Aim Down Sights).

Companions are the best defense, because they attrack or at least split the attacks in case of a group of mutants.

BOAR / FLESH
If you're like me, you're having trouble with the boars for Fanatic's quest. Mutants in general - dogs, cats, everything - just wrecks you. While there's an unavoidable portion of 'git gud' involved, here's some actionable tips that served me.

First, boars in special like to charge you. They get a bit carried away and need a moment to recover. So get out of the way! This is easier said than done, since I feel jumping out of the way is too slow/short to really work, at least until I get the hang of it. What I prefer to do is RUN TO THE SIDE. This also make it easier to ready your weapon. This actually works for most mutants. In firefights against humans too - sometimes it might be more advantageous to zigzag running in front of humans enemies and take the shot while they're reloading, at least at the start.

You can also use objects in the environment to block their path: rocks, pipes, trees... Boars might offer you their sweet sides for a bellyful of buckshot.

I find that staying atop things isn't always guaranteed. It needs to be higher than a person or have something blocking enemies from simply hugging your platform. Sometimes they can damage your feet anyway. And many mutants, even dogs, can jump pretty high, so don't stay too close to the edge.

DOG / PSEUDODOG / CAT
Most of what I said about Boars applies here, but these mutants are much faster, to the point of annoyance. Jump/run out of their charges and if they keep running around like crazy wait for them to change directions: they'll briefly stop, giving you the chance of a clear shot. Also, track your shots, by which I mean don't just reflex-shoot, but 'accompany' their movements to increase your chances of hitting them.

PSYDOG
It's best to identify it from range and snipe it, since that way it won't make illusions of itself. But if it's already charging at you, try to find a dog that's standing farther than the others and not being so aggresive. If you have a rifle or pistol, shooting the illusions will destroy them, just make sure you have enough bullets in the clip to kill the real dog.

CONTROLLER
If you screen turns yellow, you're in his range! Identify his direction and break line of sight and snipe him. If you get too close he'll prevent you from shooting your weapons!

BURER
*DON'T* use greanades against him, he'll just throw it back at you. Best to stick to mid-long range, peeking from cover and taking pot shots at his head with high caliber HP rounds. Shoot once or twice and wait for him to drop his shield, which needs to recharge. Apparently getting your flashlight in his faces does *something*, but I can't confirm.

In GAMMA Burers have both a 'force push' attack and a 'Star Wars Emperor lightning bolt' that are a pain to deal with in the open. Engage from afar or find *something* to block it, since they have a pretty strong aim-block with the thing.

BLOODSUCKER/PSYSUCKER
Any enemy that can become invisible is a pain to deal with. Put your back against something if possible, a wall, a rock, a tree... That way you can get 'backstabbed' and limit the directions the attacks will come. Standing atop something is a good choice too, just be aware they might swipe at your feet, but it can break their pathfinding. Slowly walking backwards might make them reveal themselves too early as they approach you.

Also pay attention to high grass or water, because you can track them with that. If you have crosshair identification enable, it'll turn red when you're aiming at them even if they're invisible. Bloodsucker also make a lot of noise so you can track them that way.

I recommend a shotgun or something with automatic fire. Shotguns are great to shoot from the hip, which gives you more vision of your surroundings and takes advantage of the crosshair identification. Automatic or fast firing weapons allow you to make the most of when they turn visible to attack you.

Companions are invaluable here not only as a distraction, but also to make them reveal themselves, just be careful not to shoot them instead!

CHIMERA/LURKER/SNORKS
All of them have similar leap attacks that are more or less easily dodged, the difference being that a Chimera will rip you if it gets you while a Snork is just an annoyance. They need to recover after pouncing and that's your opening!

Horizontal obstacles work better than altitude here, since they can jump so high. They more change to get stuck in a pile of fallen pipes than of not reaching you atop a container (actually, they can hit you from *inside* the container).

PSEUDOGIANT
Pseudogiants give me the most trouble in GAMMA. In ANOMALY they become pushovers once you get a rifle with a grenade launcher, which should work fine here, but it's costly and dangerous at close range.

Start there: don't get too close! HIs stomp attack affects you from pretty far and the closer it gets the more it damages your leg, preventing you from running away and basically dooming you. You need to get pretty high (like atop a tower) to escape it. You can negate the damage of the stomp by jumping at the right time, but timing it is tricky.

Apart from that, the best I can offer you is to snipe it from afar and try to deal as much damage as possible before it identifies where you are. A pistol with .45cal Hydroshock rounds is surprisingly effective, outclassing even 5.45/5.56 HP ammo. Shotguns don't seem to work that well.
EARLY GAME WEAPONS
I've basically used Cheeki Breeki's excelent video as my guide, with a few additions. It's for version 0.9.2., but it mostly checks out. Go watch it and give them a like & subscribe!


IF A WEAPON ONLY HAS A NAME AND NO INFO/PICS, I HAVEN'T FOUND IT YET. DUNNO IF IT WAS CUT OR JUST RNGESUS AGAIN.

PISTOLS
Pistol are more than decent in this game. You can equip them in the knife or binoculars slots, so you don't have to sacrifice your 'main' choices. Until much later in the game, they're the only weapons you can yield while using hand-held devices.

APS STECHKIN *my choice for starting pistol*
I always go for pistols with large clips, at least 15 rounds. This has 20 and a full auto mode. It doesn't accept sights, but is fairly accurate if shot carefully. I always use semi instead of auto, I feel I can shoot most any weapon fast enough. It lasted me a good while and killed my way into my definitive pistol, just below.


USP MATCH 'OVERWATCH' *my definitive pistol*
My choice in the end, because it holds 17 rounds and you put a sight in it. Don't underestimate the power of Hydra-shock rounds against mutants. I kill pseudogiants and chimeras with this thing. The regular FMJ rounds are good enough for most lighly armored enemies and will save your more expensive ammo in short and middle range combat, especially indoors. Fairly common drop from mercs in Wild Territory.


FN FIVE-SEVEN
Has a nice 20 round clip, but doesn't accept sights. Its AP ammo is good against medium armor, but a little expensive. The other ammo is *much* weaker against mutants than Hydra-shock, so I never used this.


MK23
USP TACTICAL


SMGs
UMP45


MP5A3 'FRASIER'


SHOTGUNS
TOZ-34
Didn't use it, it's pretty accurate (for a shotgun), but only holds 2 shots.

TOZ-106 *honorable mention, hobo shotgun*
I know many will turn their noses at a bolt-action shotgun, but its slow rate of fire is compensated by using a 4 round clip instead of individual shells and using one of the cheapest ammo in the game. If you keep mobile against mutants and aim carefully from cover against humans, it's pretty effective for its cost. I upgraded from it directly to the Saiga.

SPAS-12
Not very accurate, but holds a lot of rounds. If you need to interrupt the long reloads, just sprint.


MP-153 'CARABINIER'

EARLY SNIPERS
SKS TACTICAL

STARTER WEAPONS TO USE LATE GAME
When you have access to EXPERT TOOLS you have some new options when upgrading weapons. These 2 are good choices when you're running early game areas and don't want to spend *expensive ammo on trash mobs*. Plus you probably have lots of 9x18 and 9x19 ammo gathering dust.

PP-19 BIZON
With a couple upgrades and ammo type change, this can shine.

MP5SD6
Using AP rounds it's pretty decent against mid-tier enemies, like Mercs in Wild Territory. It has an integrated suppressor.
MID GAME WEAPONS
The midgame is all about getting a decent scoped assault rifle that will be your workhorse for most of the game. The choice mainly depends on which type of ammo you have more easily available: 5.45 (WP) or 5.56 (NATO).

WP factions: Loners (including Zaton region), Duty, Military, Bandits, Renegades

NATO factions: Freedom (including Jupiter region), Ecologists, Clear Sky, Mercenaries, Monolith, UNSIG

This will hold true for endgame rifles with their own calibers. You *can* switch between them depending on where you're playing more at the moment, but it's gonna be expensive at first and/or involve a lot of hauling ammo around.

5.45 RIFLES (WARSAW PACT)
AK-105 'SHAKAL' [tactical kit upgrade]
I really like this one. You can switch between a nice magnified scope and a ret dot one, it has a 45 rounds clip and a laser sight if you want. A very reliable weapon that feels good to shoot and is flexible for all ranges. You can buy the kit from Duty.


RD-74N (ISG)
Another solid choice after a few upgrades, apparently. Can have 2 sights for extra flexibility. I got the ISG version, which usually is the best of whichever weapon.


AK-12 'MONOLITH' 2.0 *I'm not sure, but I think you can get an AK-12 'Monolith' (not regular AK-12) and use a tactical kit to upgrade it*
Third choice.
AK-74 PMC *PMC also is usually the best version of that weapon*
Third choice.


5.56 RIFLES (NATO)
AK-105 'SWAMP-THING' [tactical kit upgrade]
This weapon is up to the awesome name and I'd say is a little superior to its equivalent, "Shakal'. That's mainly down to the scope: you can switch between 2 levels of magnification and a nice side-mounted red dot sight. Unfortunaly it felt a bit 'quirky' at times, with my shots landing pretty far from the center reticule. I eventually switched to an AK-5C (details below). Even so, it's a pretty good weapon when it behaves. You can buy the kit from Clear Sky.


HOWA TYPE 20
It's Cheeki Breeki's favorite for this section, but I never found it. Comes with built-in adjustable scope and laser aim.

AR-15 HERA
A little worse stats-wise, but has great recoil and a huge 60-round magazine.

AK 5C 'ISG'
I didn't find the ISG version, but the regular one was awesome enough. It just feels great, I didn't even upgrade it and killed a lot of Monolith in Pripyat with it. I'll specifically recommend the scope below: goes from 1.0x to 8.0x and has great visibilty.


M4A1 TACTICAL

M4A1 BUTCHER

RUGER SR-556

SHOTGUNS
SAIGA-12 'NERD' / 'DUSHMAN' / ISG
I only found the 'Nerd' version, which accepts sights and has a 6-round clip. I used it for a time, but aiming down sights felt awkward in it and the magazine felt too small. I switched to another weapon (with an even smaller clip lol), but that felt more effective and versatile to me. If you get the ISG, apparently you're set for life on the shotgun department, but I wasn't so lucky.


RAPTR
Arguably better, but pretty rare. So rare I never found it.

TOZ-34 'CHIMERA HUNTER' *my pick for big game, human or not*
This is truly a hunter's weapon. It only holds 2 shots and reload is kinda slow. It also loses effectiveness pretty quickly with distance, it's a weapon for close quarters, but it's devastating. I use it to kill anything scary that gets close, including humans using top tier Nosorog exoskeletons. Only hip-fire if the enemy is in your face, otherwise take the time to aim for a headshot of at least a good body shot. High risk, high reward - it's extremely satisfying to see mutants and humans flying with the sheer force of this weapon's blast. It's pretty common in stashes in Truck Cemetery, Army Warehouse, Wild Territory and other mid-game areas. You can buy shrapnel ammo (for mutants) cheaper from Butcher in Garbage.
END GAME WEAPONS
SNIPER/ASSAULT HYBRIDS
7.62x39 (WARSAW PACT)
An upgrade to your WP sniper.

CAA AK-ALFA

RD-47

7.62x51 (NATO)
Now for the scary stuff!

SR-25 *Cheeki Breeki's choice*
Will kill almost anything in 2-3 shots, has excellent recoil and can go full auto. Only downside is mag size of 20 rounds.

SA-58 OSW
A little worse, but it's what I've found! It accepts the scope I recommended in the previous section.


SCAR (variants)
This the cheap option until/if you find the previous ones. They do have an important advantage over both weapons above: it accepts a grenade launcher.


9x39 (WARSAW PACT)
An alternative if you can't find 7.62x51 weapons, plays a similar role of sniper/assault rifle. They use subsonic rounds, so bullet drop is more proeminent and needs getting used to.

VVS VINTOREZ 'MERC'
If Scar is your favorite Stalker protag, go no further.

RD 939
Has a mount for side scopes *and* accepts grenade launchers. A very solid option.


SNIPERS
This category is kinda redundant, because the hybrids above can snipe and are much more flexible. Snipers are heavy and so is their ammo and weight is a pretty significant factor. But if you just want to be Soviet Captain Price and crawl in a ghillie shuit, you can!

SVDS & SVDS PMC (WARSAW PACT)


L96 AWSM (NATO)

FUN STUFF
ONE-HANDED SMGs
Why carry a pistol in your knife slot when you can carry a SMG?

MP7
The Zone is now City 17. Change it to 9x18: fight trash mobs with trash ammo.


P90
The classic. Ammo penetration is not the best, but even a Monolith in Nosorog armor won't survive 50 AP rounds this baby can deliver pretty fast.


THE SARCOPHAGUS RAID GUN
ASH 12.7
A sniper shotgun. Sounds awesome, haven't found it yet.

THE FIRE SUPPORT COMPANIONS
Heavy Machineguns are good in Companions. 100 rounds should be enough for them to hit *something*. If they actually decide to use the damn weapon I gave them. I love Companions, they're like cats.

PKM
Another classic. I prefer it to the modern version because it's lighter and my Companions are my mules.


M249 SAW
*cue 'Ride of the Valkyries*


HONORABLE MENTIONS
DESERT EAGLE 'DHAMPIR'
Deagles look badass.

WEAPON REPAIR & MAINTENANCE
WHEN IT COMES TO KEEPING YOUR WEAPONS IN GOOD CONDITION THERE ARE 3 WAYS:
  • FIELD STRIPPING - swapping parts *anywhere*
  • REPAIRING - more complex repairs that require specialized gear
  • MAINTAINING - simpler & cheaper maintenance
Everything will be explained, but it'll take a bit!

Let's start by looking at what the game tells you when you mouse over a weapon.


WEAPON CONDITION
In GAMMA 0.9.3. weapon overall condition has been removed. All you get is the condition for each individual part.

You can tell this at a glance by looking at the colored dots below a weapon's icon. From red to green meaning higher condition for that part.

If you want more details, mouse over the weapon.


The BARREL IS THE MOST IMPORTANT PART of a weapon because it affects DAMAGE AND ARMOR PENETRATION.

The OTHER PARTS AFFECT CHANCE TO JAM.

So if a weapon has a broken barrel and the rest is in perfect condition, it'll not jam, but will not do much damage. If it has a barrel in perfect condition but all other parts are red, it'll do full damage, but will jam often.
FIELD STRIPPING WEAPONS
You don't need to disassemble every weapon you find. You can simply FIELD STRIP it for parts. Just right-click the weapon:

You can pick individual parts or all of them. (note that it tells you the condition of each part)


The parts will go to your inventory on Miscellanous Items (10) tab.

It's best to simply press ALT when looting. This way you'll only pick the good weapon parts (above 60% condition).

Now, people will say to stick to those parts that are 60% or above. They give less chance to jam and the below that threshold your weapon will jam often. But the main thing is that PARTS ABOVE 60% CONDITION ARE EASIER TO MAINTAIN. (I'll explain that below)

The thing is you will not always find parts in good condition for the weapon you're using or want to use. So if you like a weapon, but its parts are in bad shape, keep it, there's a way to repair even a weapon with everything at 1% condition, it'll just BE COSTLY.

Parts with conditions lower than 60% can be sold to Technicians for a little bit of cash. (They won't buy parts at 1% condition)
DISASSEMBLING WEAPONS
Why disassemble weapons? BECAUSE THAT'S THE ONLY WAY TO GET THEIR BARRELS!

Depending on your options, it's best to keep the weapon with the more broken barrel (which will be replaced anyway) and disassemble the other, that way the barrel will be easier to repair. If it has at least 40% condition you'll only need 1 charge of your REPAIR KIT.

You'll also get some other materials in the process, like metal parts.

Disassembling weapons requires and slightly consumes your MULTITOOL. Save it only for weapons and use Grooming Kits and Swiss Knifes for everything else. You can repair your Multitool with SHARPENING STONES - keep it in good condition and you'll only need to buy it once. Grooming Kits/Swiss Knifes are plentiful loot and I never had to buy any after the first ones.

REPAIRING WEAPONS
You've been field-stripping weapons for a while and want to repair your main weapon. You can mouse over the weapon to highlight compatible parts:

To replace parts - EXCEPT THE BARREL - simply drag and drop the part you want to put in over the weapon.

What if I want to replace the barrel? Well, you'll need 4 things:
  • BASIC TOOLS - *at least*
  • RIGHT REPAIR KIT - of the same TYPE as the weapon (I'll explain below)
  • VICE / PORTABLE WORKSHOP - the first is the technician's table in every hub (it's free to use), the second you can buy/craft and carry with you in the field (doesn't make sense, but you *can*)
  • BARREL (61% condition minimum)
WEAPON TYPES

There are 4 types of weapons:
  • TYPE A - pistols, revolvers, SMGs
  • TYPE B - shotguns
  • TYPE C - assault rifles, LMGs
  • TYPE D - sniper rifles
Keep in mind there are a few weapons that don't follow this categorization!
REPAIR KITS
REPAIR KITS are tied to WEAPON TYPES!


They are used both for REPLACING BARRELS and REPAIRING PARTS, but there are a few little details worth noting.
REPLACING BARRELS & OTHER PARTS


*** LIKE YOU CAN SEE, USING THE REPAIR KIT IN THIS SCREENS DOESN'T CONSUME IT! YOU CAN USE A KIT WITH ONLY 1 CHARGE FOREVER! ***
REPAIRING INDIVIDUAL PARTS
You saw in the last image I didn't have a replacement with 100% condition for that last part. There's a way to fix that! SIMPLY DOUBLE CLICK THE REPAIR KIT:


*** REPAIRING PARTS THIS WAY CONSUMES CHARGES OF THE REPAIR KIT!!! ***
(But it's better than using a part with 15% condition that makes your weapon jam a lot)

MAINTAINING WEAPONS
For the third and final way to keep your weapons in top shape: maintaining!

It's more or less the same as repairing an individual part, buts instead of using REPAIR KITS you use CLEANING KITS:


SIMPLY DOUBLE CLICK THE CLEANING KIT:


** YOU CAN ONLY USE CLEANING KITS WITH PARTS THAT HAVE LEAST 60% CONDITION!!! **

ALTERNATIVE - RIGHT CLICK YOUR WEAPON AND CHOOSE 'MAINTAIN PARTS'


It will list the offending parts, but it doesn't display condition for them like when you field strip, a little pet peeve of mine. That's why I prefer to take out the part, clean it and put it back. *Apparently* swapping parts a lot makes the weapon dirtier, requiring more cleaning, but honestly I can't notice a difference.

WHY SHOULD I MAINTAIN PARTS INSTEAD OF REPAIRING/REPLACING THEM?
#1 - IT'S MUCH, MUCH CHEAPER.[/b] A Repair Kit costs 5 times more than a Cleaning Kit, a problem the higher the progression difficulty is.

#2 - IT'S MUCH SIMPLER. Just right click and you're done. You also don't need to find new parts, just maintain the ones you have.

#3 - WEAPONS WEAR OUT ANYWAY. Maintaining is much easier than keeping finding replacements. Besides, weapons in good shape loose condition *very* slowly.

I DON'T LIKE READING
Here's a video that explains the repair system for both weapons and armor.
ARMOR REPAIR
FOR THIS I THINK IT'S NICE TO SHOW STEP BY STEP HOW I RESTORED AN ARMOR. That's how you uprade afterall. In this case it's an extra armor for disguise purposes.

Let's take a look at the armor:

LIKE WEAPONS, Armors have parts with individual conditions.
UNLIKE WEAPONS, Armors have an overall condition.

That's very important because it makes repairing armors simpler than repairing weapons.

There are 2 types of items for repairing armor: Glue Tubes (for small repairs) and Sewing Kits (for big repairs).


FIRST PRIORITY IS TO GET THE ARMOR TO 65% CONDITION! (Because that's the minimum required to use the repair items above)

To get it there we'll need:
  • BASIC TOOLS - *at least*
  • RIGHT REPAIR KIT - of the same TYPE as the armor (I'll explain below)
  • VICE / PORTABLE WORKSHOP - the first is the technician's table in every hub (it's free to use), the second you can buy/craft and carry with you in the field (doesn't make sense, but you *can*)
  • COMPATIBLE PARTS - most armors use the same parts, but some are more specializaed (SEVA Suits and Exoskeletons, for example)
There are 4 types of Armor Repair Kits, one for each type of armor AND TIED TO A LEVEL OF TOOLS:
  • LIGHT ARMOR - BASIC TOOLS
  • MEDIUM ARMOR - ADVANCED TOOLS
  • HEAVY ARMOR - ADVANCED TOOLS
  • EXOSKELETON - EXPERT TOOLS
Same thing as before, mouse over your armor to highlight compatible parts:

Now we have the parts, we'll need to repair some of them and for that there's an specific item: FIELD ARMOR TOOLKIT.


Simply double click the FIELD ARMOR TOOLKIT to repair the parts:

Now let's go to the VICE to switch parts:

Now the armor is at 74% condition and we can use a Sewing Kit to fix it. In case you're wondering why we're not using the ARMOR REPAIR KIT, it's because it's MUCH CHEAPER this way.

TIP #1: Using TARPAULIN has a huge repair bonus, use it to get the armor to 90% condition.


TIP #2: When above 90% condition, use DUCT TAPE. It's dirty cheap and better than using your Glue Tubes.


TIP #2: A middle option is using ARMOR REPAIR KIT (EMERGENCY). It's very efficient with the best ratio repair bonus/cost among the other repair items.


AND THAT'S IT! OUR ARMOR IS AS GOOD AS NEW AND I CAN FINALLY PLAY THE LOTTERY!

I DONT'T LIKE READING
Here's a video that explains the repair system for both weapons and armor.
WEAPON & ARMOR UPGRADES
Upgrading both weapons and armors is very similar to repairing them, only it's much simpler.

ALL YOU NEED IS
  • THE UPGRADE KIT (tab 9)
  • REPAIR KIT (OF THE SAME TYPE AS WEAPON/ARMOR)
  • VICE / WORKBENCH

*** YOU DON'T NEED TOOLS TO INSTALL UPGRADES!!! ****

All UPGRADE KITS are color-coded (you can see the number of 'arrows' the icon has too):


Let's take a look at the upgrade screen:


*** UPGRADING DOESN'T CONSUME REPAIR KIT CHARGES!!! ***
(So always keep at least of each type with a single use remaining and they'll last forever)

*** UPGRADING ONLY CONSUMES THE UPGRADE KIT THEMSELVES ***

WHERE CAN I GET UPGRADE KITS?
  • Looted from STASHES and more rarely, enemies as well
  • Bought from Technicians
  • Crafting

TACTICAL KITS
TACTICAL KITS are items sold by faction traders (Sidorovich for Loners, for example) that can fundamentally change a weapon's functionalities and behavior. They essentially turn a standard version of that weapon into a 'unique' one that doesn't accept other attachments, but offers some options unavailable any other way.

Here's what they look like in the trading screen:


While most kits are tied to specific weapons, some of them are more 'agnostic'.

If you mouse over a Tactical Kit you can see which weapons it's compatible with.


To see if a weapon has a Tactical Kit tied to it, check its details:


Let's take a look at both kits available to the AK-105, a fairly easy to find assault rifle.


And a closer look at an AK-105 modified with the SHAKAL kit:

Here's what the kit has brought to the weapon:
  • Toggleable sights (4.0x magnification or red dot)
  • 45 rounds magazine
  • Laser Aim Module
This turns the AK-105 into a very flexible weapon capable of engaging in all ranges and with a clip size that can sustain prolonged fights, equal in size to the lighter LMGs.

Now let's see the SWAMP-THING version:
Here's what the kit has brought to the weapon:
  • Toggleable sights (scope and side-mounted red dot)
  • 45 rounds magazine
  • CHANGES ammunition to 5.56
  • Laser Aim Module
More or less comparable to the SHAKAL version, but with a few advantages: more flexible scope for even better sniping and makes the AK-105 a more viable option to NATO factions (like Clear Sky and Freedom), since it uses their ammunition type.

Tactical Kits are an awesome addition to your arsenal and should not be overlooked. Unique variants of weapons are cool and powerful, but you're at the mercy of RNGesus. Tactical Kits on the other hand are easily available as long as you raise your goodwill with that faction.
TACTICAL KITS LIST [in-progress]
PISTOLS
WARSAW PACT
SR1MP - Serdyukov SR1M Gyurza

SR1MP ADV. - Serdyukov SR1M Gyurza


ASSAULT RIFLES
WARSAW PACT
AK-105 SHAKAL - AK-105


NATO
AK-105 SWAMP-THING - AK-105
ARTEFACTS [unfinished]
GAMMA has major differences when it comes to artefacts.

It's different from the original games in that artefacts don't irradiate you even while equipped. They may simply lower your radiation resistance.

It's different from ANOMALY in that they don't irradiate you while in your inventory. The whole container system is also gone.

That's great! You don't have to worry about radiation anymore and don't have to carry heavy leaden boxes around, but there's something else.

ARTEFACT EFFICIENCY & DEGRADATION
Now artifacts have an EFFICIENCY value. It works more or less like with condition for weapons and armor: the lower it is, the less effective the artefact becomes. It's also less valuable to sell.

That EFFICENCY can be increased using the ARTEFACT MELTER, but this is for later. EFFICENCY also DEGRADES in the case of perk artefacts (the ones that give a 'power' of some sort).

Now, I'm not a fan of artefacts wasting away, but fortunately there are options! You can nerf or completely disable condition DEGRADATION in MCM.
After spending some time with the new artefacts and learning that you can CRAFT as well EMPOWER them, this doesn't feel *that* bad, but I do think the default degradation rate is too fast. You could put at the minimum value and/or increase the chance of finding artefacts. Here are a few ways:

#1 - MAKE EMISSIONS/PSY-STORMS MORE FREQUENT, since artefacts have a chance to spawn after these events (In the Settings menu)


#2 - INCREASE ARTEFACT SPAWN RATE DIRECTLY (In the Settings menu)


#3 - ALLOW ARTEFACTS TO SPAWN IN CONTAINERS/STASHES, since this is disabled by default; you can also increase the chance for that to happen (In Mod Configuration Menu)

ARTEFACT TIERS
Artefacts come in tiers like in the other games, it's just more explicit here. You'll need better detectors to reveal better artefacts, but the 3rd detector you get, the GRIZZLY, can detect *ALL* artefacts and it's not that hard to get. BUT! Artefact tier is also tied to which map you are in: the further north you are, the better artefacts you can find. So no, you won't find a top tier artefact in Cordon.


As you can see, there are 5 tiers of artefacts. The more 'arrows' it has, the better the artefact is.
  • TIER 0 (PERK) - those are the ones you don't need a detector to see, they degrade over time when equipped(ugh!) and they can't be crafted
  • TIER 1 - closer to the artefacts you're used to in the series
  • TIER 2 - a little better, effectively midtier
  • TIER 3 - the best 'regular' artefacts you can find, they usually increase the cap of resistances
  • TIER 4 - Legendary artefacts which will be familiar to those who played the other games

    EMPOWERING ARTEFACTS

    CRAFTING ARTEFACTS

    BAT
    drop it over an artefact = transmute
    drop an artefact over it = upgrade


CRAFTING [unfinished]
COOKING
In GAMMA you feel hunger. It accrues overtime and when you use most recovery items, like medkits and pills.

Cooking has been made much more important in GAMMA in comparison to Anomaly. 'Imported food' alleviates much less hunger and it's expensive. In the other hand, some cooked food can deal significant radiation, but that is easily remedied with water or cigarettes.

Unfortunately you can't stick a piece of meat on a stick and roast it over a fire like NPCs. You'll need cooking items:

FIELD COOKING KIT
- cheaper
- limited uses (8)
- doesn't require fuel (as long as you're near a lit campfire)
- can only cook low and mid tier food (Roasted/Stewed)

GAS STOVE
- expensive
- infinite uses
- requires liquid fuel (Kerosene, Jerrycan or Gas Balloon) *Kerosene is the most cost-effective
- can cook all foods

Cooked food comes into 3 tiers:
- ROASTED: requires only a Field Cooking Kit or Gas Stove
- STEWED: requires Purified Water (in some cases, Mineral Water instead)
- PURIFIED: requires Putinka Vodka (the white bottle) AND 2 pieces of meat per meal

Here's a spreadsheet of all cookable meals:


There are a few points to make:

Top tier cooked meals can give buffs that LAST OVER 1 HOUR!

Green-colored cells represent the best choices. Putinka Vodka isn't as common as water, so maybe you should save it for the best meals.

Yellow-colored cells represent good choices. Purified meals will always be better than Stewed ones, but like I said, you might not have Putinka Vodka. The reason I highlighted Stewed Dog/Flesh is because you won't lose as much in those cases compared to the other ones. If you make Stewed Chimera instead of Purified Chimera, you're losing the 12kg carry weight bonus and the highest adrenaline regen (and calories, of course).

TLDR:
IF YOU ONLY WANT TO STAY FED, stick to Stewed Dog/Flesh

IF YOU WANT MORE CARRY WEIGHT, stick to Purified Boar, Pseudodog or Lurker (Chimera too, but it's much rarer)

IF YOU WANT PSY RESISTANCE, stick to Purified Psysucker

IF YOU WANT RADIATION RESISTANCE, stick to Purified Bloodsucker

Rodent and Snork meat is worthless, just sell it to Butcher (Garbage) or to one of the scientists in the bunkers (Yantar/Jupiter)
DISGUISE SYSTEM [unfinished]
The DISGUISE SYSTEM is a neat addition to the game and offers so much in terms of immersion, roleplay and pure usefulness.

For example, there's a mission for Freedom that requires you to go the Military Checkpoint near Rookie Village in Cordon and blow up a few APCs. I went in disguised as an Ecologist, planted IEDs on timers and walked out. Didn't fire a single shot.

Unfortunately, it's apparently kinda broken as of writing and less than reliable to work properly. That's in part because reloading, for instance, resets A-Life AI for NPCs and this can break their detection status across reloadings. At least, that's what I gather from my testing. Also, having companions, even if you leave them on the other side of the map when infiltrating a base, seems to mess with the system, as it originally didn't work with it.

My suggestion is to try it and mess with the settings until you feel satisfied with the experience.

Personally, the default settings made it extremely difficult for me to pull off my intention of doing missions for the Bandits as a disguised Loner. After messing with the settings it became braindead and lost much of the fun, at least with the Bandits. When I tried to infiltrate the Military base, though, I couldn't make it work no matter what I did. It did work when infiltrating their base in Cordon. So there you have it, it's unrealiable, but fun.

WHAT INFLUENCES DETECTION
"GAMMA simplifies the system a bit: only your armor condition matters, and doing weird things like always running and aiming at people or staying too close to them for too long."
- Grokitach himself


MY RECOMMENDED SETTINGS
DISCLAIMER: Getting here involved a lot of messing around and I STILL couldn't get reliable results. *NOT* having companions at all (not just waiting somewhere) might help, but I can't be sure.
MISCELLANIOUS TIPS [in-progress]
You can TRADE with random stalkers by pressing SHIFT while in the dialogue screen.

Press ALT while looting to only grab useful items/parts. It's not 100% fool-proof, so check just in case.

Every scope that has a toggle (dual scopes, night vision, LED) can be switched with the grenade launcher key ('V' by default) or '='.

Long pressing 'L' will turn on/off laser sights.

You can extend your reach by low crouching. That dead mutant/artefact is too close to an anomaly? Try this.

If you WALK through/over Burnt Fuzz you won't take damage.

To cancel reload and item usage animations, simply start sprinting.

SUPRESSORS
-33% gunfire sound detection distance
+7% damage
+7% ammo penetration power
+10% impulse
+3% muzzle velocity
-10% spread
-18% recoil (doesn't affect camera movement, only camera climb)
+25% weapon degradation
No more accuracy debuff when moving and shooting with a silencer


If you're having trouble finding 8 SNORK HANDS FOR HIP'S QUEST, go to Yantar. Doing the mission to disable the Miracle Machine guarantees at least a few snorks. You can also save before skinning them and reloading until you get a hand.

Speaking of the MIRACLE MACHINE mission, bring glowsticks since your flashlight will malfunction. Nightvision is highly encouraged, but it's good to have options, since you can't use NV with scopes. Also, to deal with the BURER that spawns after you pull the final lever, simply placed an explosive with proximity trigger at the top of the stairs for an easy, instant kill. As for the CONTROLLER, since it's prevents you from shooting if you get close, you can try using a grenade or slowly approach from as far as away from the door as possible and try to snipe it. Use AP rounds, of course. There's a chance you'll get a high tier artifact in this room, so pop up your detector (Grizzly preferably). Save grenades for dealing with the PSEUDOGIANT in the tunnels. You can also use the explosive barrels in the vicinity or simply run away. If your companion starts running off, simply tell them to 'wait here' so you can catch up.

Easy way to get a free Echo Detector: get the Researchers mission in the Great Swamps and tell him you don't have a detector.


One way to get GUNSMITHING KIT is to complete the Clear Sky swamp reconquest questline. Simply talk to Cold at their base. The last fight is against a squad of military soldiers, bring AP ammo.

The missions where you escort scientist for Clear Sky are a good way to find the anomalies in the Great Swamps. The Professor's questline later stages does the same thing in various regions.

EASY TO MISS MISSIONS
SNITCH at the 100 Rads Bar offers a mission to kill the top 10 stalkers in the Zone. Talk to him BEFORE reaching Legend rank or entering the top #10 yourself.
RF RECEIVER
The RF Receiver... what a neat concept, but what a frustrating experience! This whole thing made me realize I'd never like to work at the SETI Institute, but I digress...

The main problem is that it's poorly explained what you're supposed to do. Yeah, tune-in to the right frequency, but it's a bit more complicated than that.

To dial the receiver up or down the frequencies you can use the mouse buttons:
  • LMB - increases the frequency
  • RMB - decreases the frequency
  • Midldle - scrolls up or down
  • SHIFT - holding it makes increments of 10

FOR THIS TO WORK PROPERLY YOU CAN'T BE HOLDING ANYTHING IN THE OTHER HAND! No knife, no bolts, no pistol. You can use that later as you hunt for the signal.

MAKE SURE YOU DON'T CHANGE FREQUENCIES WHILE SEARCHING! That happens to me from time to time because I get into fights and end up changing the frequency by accident, so keep cheking you're in the right one!

Now comes the more difficult part of finding the damn source of the signal. Apparently the receiver has a range of 200m, which is a lot, but also not. Stick to the smaller maps (Meadows, Wild Territory) to preserve your mental health.

IGNORE ALL THE RADIO NOISE IN CHATTER! THE LITTLE LIGHT AT THE BOTTOM RIGHT CORNER DOESN'T MATTER, IT'S NOT A SIGNAL STRENGTH MARKER!

WHAT YOU'RE LISTENING FOR ARE BEEPS! When you get in range of the source the receiver will start beeping slowly. The closer you get the faster and more complex the beeping becomes.

FINDING THE SOURCE REQUIRES METHOD!

The one I've been experimenting with is using the pins in the PDA map to mark the area of search.

Ideally you would divide in the map in 'sectors' (top left quarter) or walk in a line across it (E to W, N to S). Not all maps will work super well with this, devise a method that makes sense *to you*.

What I do next is I put a pin where I first pick up a signal. I then stop and decide if I should go straight North, East, South or West from there. I recommend sticking to this clockwise order so you don't get confused.

You'll then walk as straight as possible in the chosen direction and notice if the beeps increase or decrease. If the latter, return to the pin and go to the next direction.

If you finally notice a increase in frequency/complexity, put another pin and repeat the process, minus the direction you came from.

For example, the signal increases when you go South of the first beep. From this second pin, it doesn't make sense to go North, because that's where you came from. So go start by going East, then further South or West if this doesn't work.

Repeat this until you find the damn thing.


There's some more tips based on WHAT you're looking for.

RF PACKAGES
RF Packages you get from gaining goodwill with a faction can be tough to find. They're like stashes, the ones that are 'placeable objects' like backpacks or toolboxes. UNLIKE STASHES YOU CAN HOLD F TO HIGHLIGHT IT LIKE ANY ITEM. WEARING A LAMP ARTIFACT WILL MAKE IT SHINE BRIGHTLY, MAKING THIS A MILLION TIMES EASIER. (Unfortunately, it doesn't always work)


Can't find the damn thing? Right-click your PDA to cancel it and get another.


Or you can check possible locations below:
RF PACKAGE LOCATIONS BY MAP[docs.google.com]
RF PACKAGE LOCATIONS (MAP OF THE ENTIRE ZONE)[drive.google.com]


LOST SIGNAL
These are much easier in that you're looking for usually 4 bodies grouped together. If the mission giver was from Duty, look for Duty bodies. YOU NEED TO LOOT ONE OF THE CORPSES FOR A PDA! (It's not a regular PDA, it's the 'quest item' version that goes into tab 10 of the inventory) Sometimes one of bodies will be further away from the others, so if you looted the main group and didn't find the PDA, keep looking close by.


HAVING A PDA v2.0 WITH CORPSE TRACKING (BLUE DOTS ON MAP) MAKES THIS A *LOT* EASIER!


ANOTHER WAY IS TO ENABLE CORPSE MARKERS IN MO (THE GAMMA LAUNCHER). CHECK 'THE SMALL TWEAKS (IN MO)' SECTION.

*** FOR THE MENTAL WELLBEING OF OTHER PLAYERS AND MY FUTURE SELF, I'M REGISTERING EVERY RF MISSION I COMPLETE. APPARENTLY THERE'S ONLY 3-4 SPAWN POINTS IN EACH MAP, SO I'LL TRY TO CATCH'EM ALL ***
TRADING & VENDORS LIST [in-progress]
NAME (Location - Faction) - type

TYPES:
  • GENERAL - sells/buys almost anything, doesn't pay a premium for anything
  • FOOD - food & drink items for cheaper, pays a premium for them
  • MEDICAL - sells recovery items for cheaper, pays a premium for them
  • SCIENTIFIC - a variant of the MEDICAL, they're the scientists in the bunkers, pay *double* for artefacts and almost as well as BUTCHER for mutant parts/meat
  • TECHNICIAN - sells repair items, upgrade kits, parts, pays a premium for those as well as maps
In general, especially at the start of the game when you don't have money, it's best to buy where it's cheapest (recovery items from Medical traders, for example) and sell to whoever pays the best (mutant parts/meat for Butcher, for example).

ARMY WAREHOUSES
SKINFLINT (Army Warehouse - Freedom) - General
SCREW (Army Warehouse - Freedom) - Technician
SOLID (Army Warehouse - Freedom) - Medical

CORDON
SIDOROVICH (Rookie Village - Loners) - General
LORIS (Farm - Loners) - General
XENOTECH (Farm - Loners) - Technician

DARKSCAPE
CUTTER (Abandoned Farm - Loner) - General
POLYMER (Abandoned Farm - Loner) - Technician

DARK VALLEY
OLIVIUS (Bandit Base - Bandits) - General
LIMPID (Bandit Base - Bandits) - Technician
VASEK STURDY (Bandit Base - Bandits) - Medical

GARBAGE
BUTCHER (Train Hangar/Depot) - sells hunting ammo, 'zone food' and pays the best price in game for mutant parts/meat
FLEA MARKET TRADERS (Flea Market - Loners) - General

GREAT SWAMPS
SPORE (Clear Sky Base - Clear Sky) - General
LIBRARIAN (Clear Sky Base - Clear Sky) - Food
NOVIKOV (Clear Sky Base - Clear Sky) - Technician
PROFESSOR KALANCHA (Clear Sky Base - Clear Sky) - Medical

JUPITER
HAWAIIAN (Yanov Station - Loner) - Food
BONESETTER (Yanov Station - Loner) - Medical
ASHOT (Yanov Station - Freedom) - General
CARDAN / NITRO (Yanov Station - Loner) - Technician *they have separate inventories!

PROF. HERMANN (Scientist's Bunker - Ecologist) - Scientific
TUKAREV (Scientist's Bunker - Ecologist) - Technician

OUTSKIRTS
CASHIER (Laundromat - Loner) - General
YAR (Laundromat - Freedom) - Technician

MEEKER (Book Store - Mercenary) - General
TRUNK (Book Store - Mercenary) - Technician/Special (ammo exchange)

ROSTOK
LT. 'ASPIRIN' SOSTRADOV (Duty Base - Duty) - Medical
COL. PRETENKO (Duty Base - Duty) - General
SSGT. 'MANGUN' POTRYKO (near 100 Rads Bar/Arena - Duty) - Technician
BARKEEP (100 Rads Bar - Loners) - Food

ZATON
BEAR (Skadovski - Loner) - Food
OWL (Skadovski - Loner) - General
AXEL (Skadovski - Loner) - Technician
SPLEEN (Skadovski - Loner) - Medical
NIMBLE (Skadovski - Loner) - Special (Tactical Kits, attachments, upgrades)
TOOL QUESTS CHECKLIST [in-progress]
Can't remember who needs TOOLs, DRUG-MAKING KITS or GUNSMITHING KITS? I'll be listing every NPC I know that asks for those items.

OBS: When I write TOOLS, that means all tiers (Basic, Advanced and Expert)

*** BY LOCATION ***
ARMY WAREHOUSES
SCREW (Freedom) - Tools
SOLID (Freedom) - Drug-Making Kit

CORDON
XENOTECH (Loners) - Tools

GREAT SWAMPS
NOVIKOV (Clear Sky) - Tools
PROF. KALANCHA (Clear Sky) - Drug-Making Kit

DARK VALLEY
LIMPID (Bandits) - Tools
VASEK STURDY (Bandits) - Drug-Making Kit

ROSTOK
SSGT. 'MANGUN' POTRYKO (Duty) - Tools
LT. 'ASPIRIN' SUSTRADOV (Duty) - Drug-Making Kit


*** BY TYPE ***
TOOLS (BASIC, ADVANCED, EXPERT)
LIMPID (Bandits) - Tools
NOVIKOV (Clear Sky - Great Swamps) - Tools
SCREW (Freedom - Army Warehouses) - Tools
SSGT. 'MANGUN' POTRYKO (Duty - Rostok) - Tools
XENOTECH (Loners - Cordon) - Tools

DRUG-MAKING KIT
LT. 'ASPIRIN' SUSTRADOV (Duty - Rostok) - Drug-Making Kit
PROF. KALANCHA (Clear Sky - Great Swamps) - Drug-Making Kit
SOLID (Freedom - Army Warehouses) - Drug-Making Kit
VASEK STURDY (Bandits) - Drug-Making Kit

GUIDES (FAST TRAVEL) [in-progress]
ARMY WAREHOUSES - LESHIY (Freedom)
Cordon
Jupiter
Yantar

DARK VALLEY - PUG (Bandit)
Jupiter - container fort
Truck Cemetery

GREAT SWAMPS - IVAN TRODNIK (Clear Sky)
various parts of the Swamps
Cordon - Rookie Village
Agropom
The Bar (Rostok)

JUPITER - GARRY (Loner)
The Bar (Rostok)
Red Forest
Jupiter Underground
Zaton
Pripyat

OUTSKIRTS - TOURIST (Loner)
Chernobyl NPP
Pripyat
Radar
Jupiter
Jupiter Underground
Zaton

ROSTOK - NAVIGATOR (Loner)
Cordon - tunnel near Rookie Village
Garbage
Army Warehouses
Yantar
Jupiter
Great Swamp - NE exit to Cordon

ZATON - PILOT (Loner)
Jupiter
Pripyat
Outskirts


REFERENCE RESOURCES
MASTER SPREADSHEET
HERE[docs.google.com]

RF PACKAGE LOCATIONS
BY MAP[docs.google.com]

THE ENTIRE ZONE[drive.google.com]
MY ENDGAME BUILD
UNISG Nosorog (fully upgraded)
Cz-M10 Spartan Helmet

Heart of the Oasis
Compass
Full Empty
Carbon Steel Plates / Wrenched
Fireball
Chimera Hide
24 kommenttia
wonkis bonkis 9 tuntia sitten 
An important note to add to the health section is that if your arms are too damaged you can't climb anything.
Dio Aloke  [tekijä] 7.4. klo 15.33 
@ShockWaveRadiation as far as I know it's working. If not, just search 'Stalker Gamma discord' and it should be easy to find
is the link to Discord working? @Dio Aloke
Bael 5.4. klo 13.33 
Last time I played it was 0.9.1 or smtn and playing 0.9.3 I went crazy not understanding what the heck they done with weapon's lube and oil and how do I maintain it now (without replacing parts). :lunar2019crylaughingpig:
Thanks for the guide!
S. Gordon 15.3. klo 3.42 
Great guide indeed.

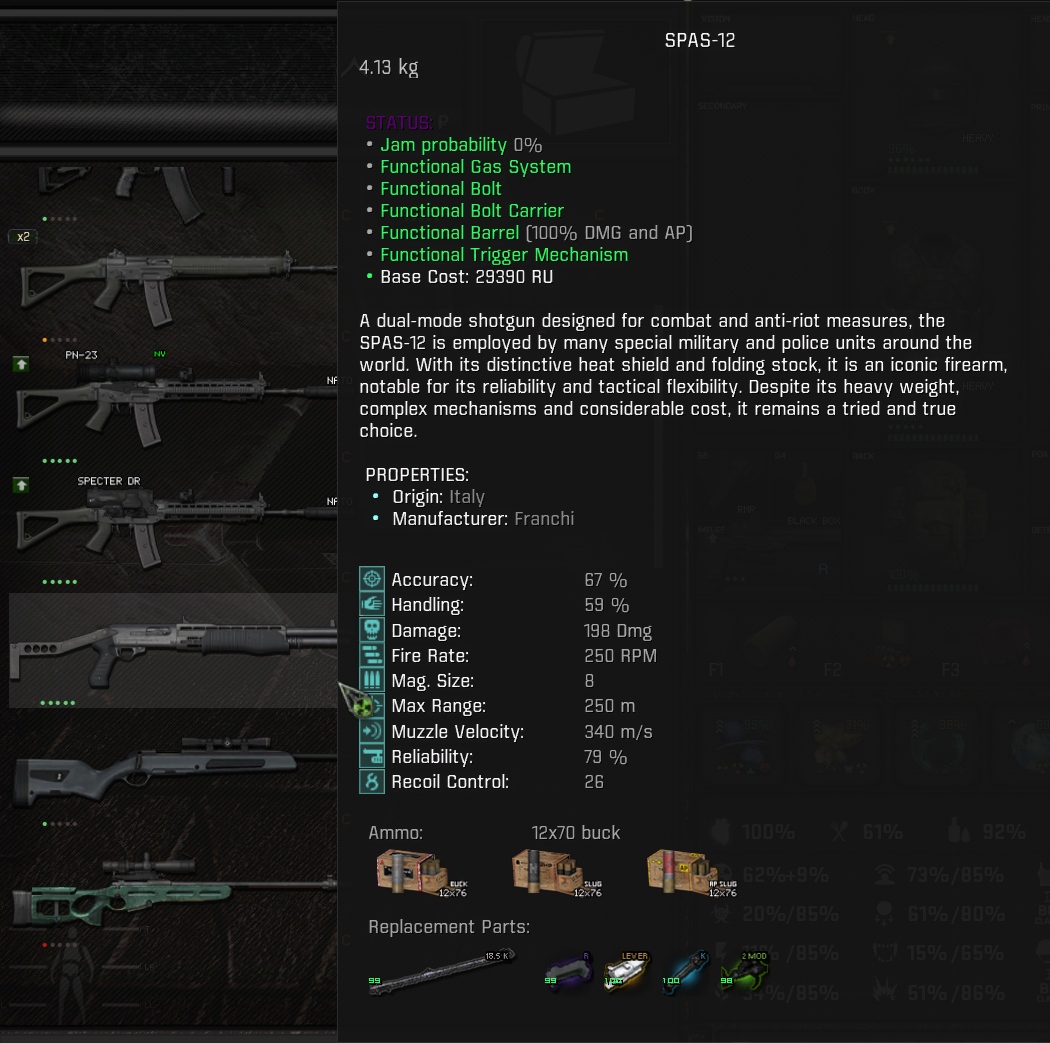
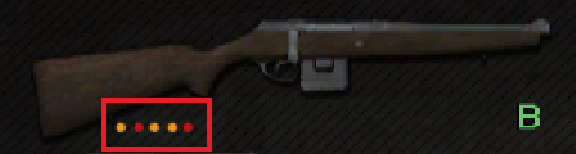
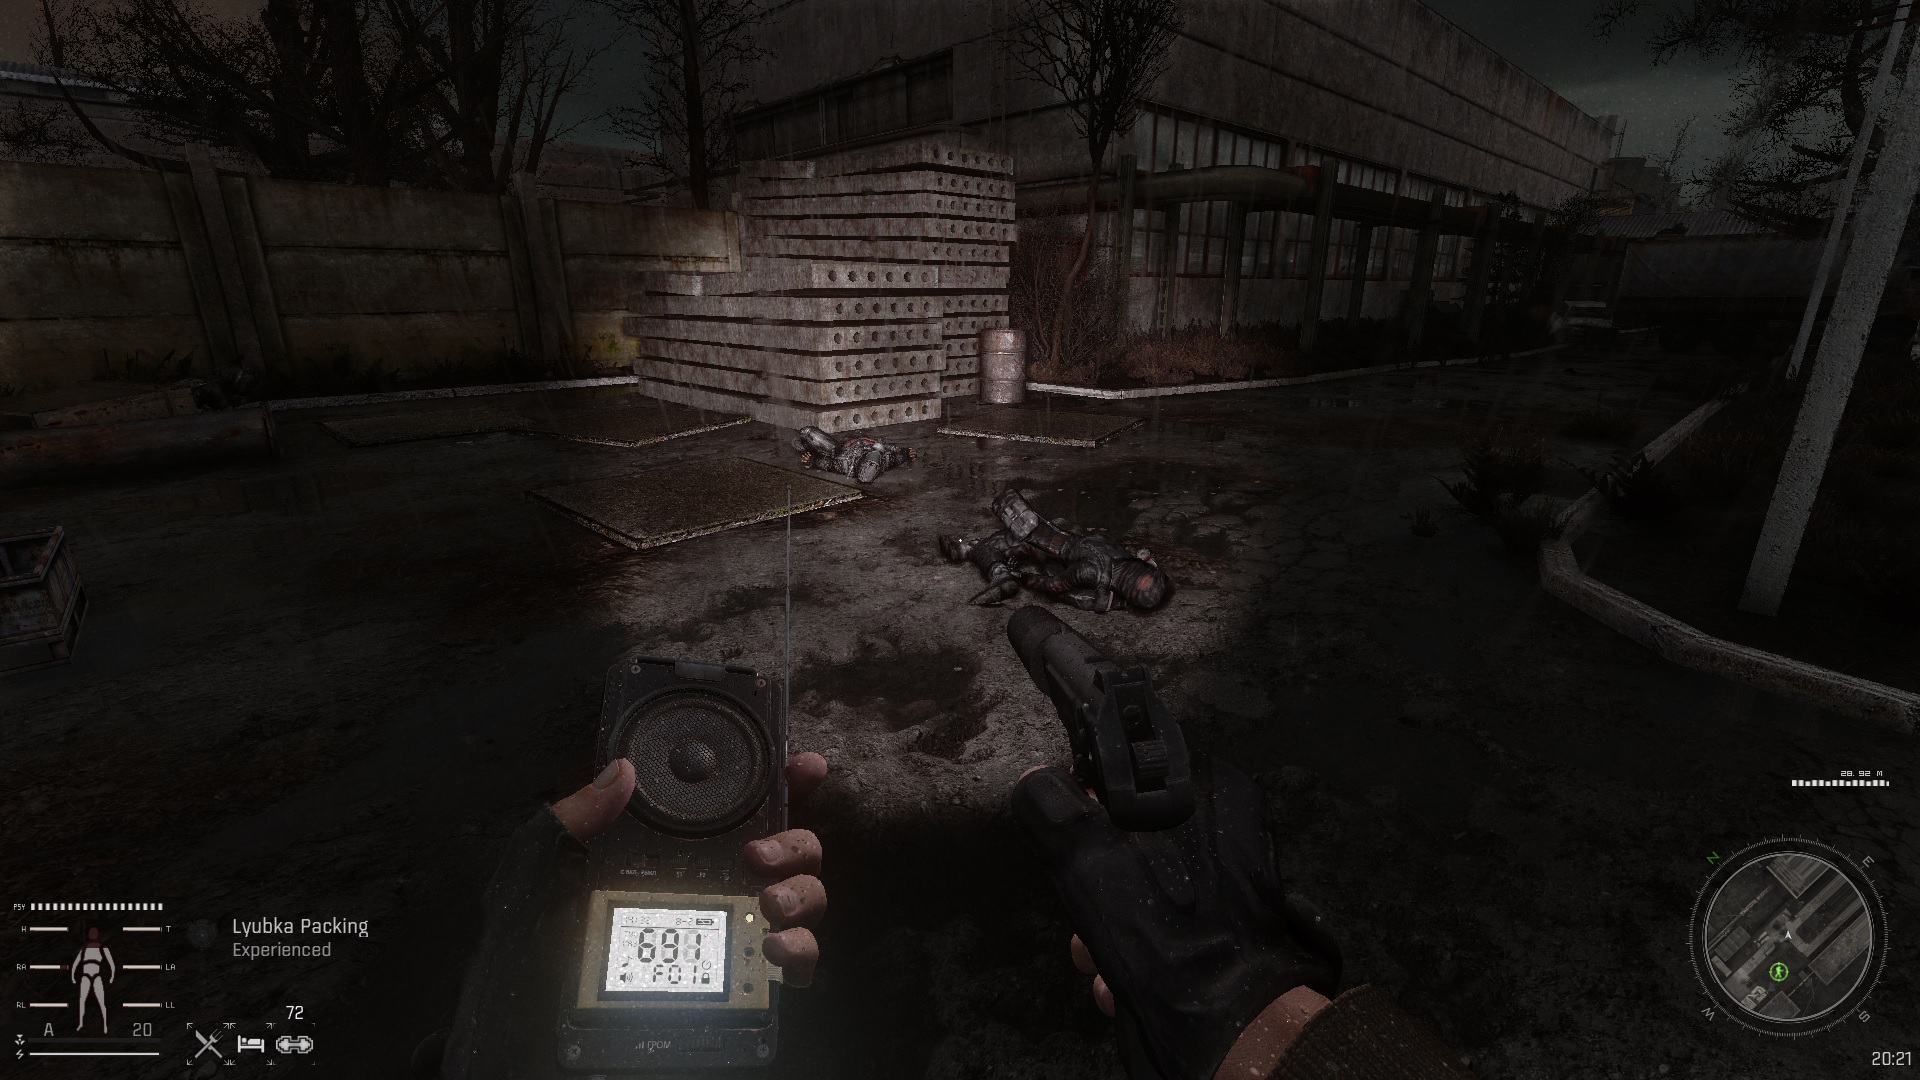
The KS-23 'shotgun' can be very effective against Pseudogiants and Chimeras, although it comes with 4 shots only. The Armsel Striker with slow reload time but possibility to upgrade to automatic fire is the best low-tier shotgun in the game and has a 12 shot magazine. It's only drawback besides slow reload is its cumbersome handling.

Use your environment to shield yourself from Chimera attacks. In the Garbage and in Army Warehouses, there are these metal contraptions (crane cab or truck cab exteriors) you can get into where the Chimera cannot touch you.

Same goes for the concrete square construction girders strewn around in both Garbage, Army Warehouses, Wild Territories and other places. You will have to go prone (both ctrl and shift keys held) to get into them.
GumB 8.3. klo 14.05 
Great guide mate! Really helpful
Really appreciate the effort you put into this.
Cheers
Dio Aloke  [tekijä] 26.2. klo 19.02 
Thanks @xKilroyx and @CRUSHER

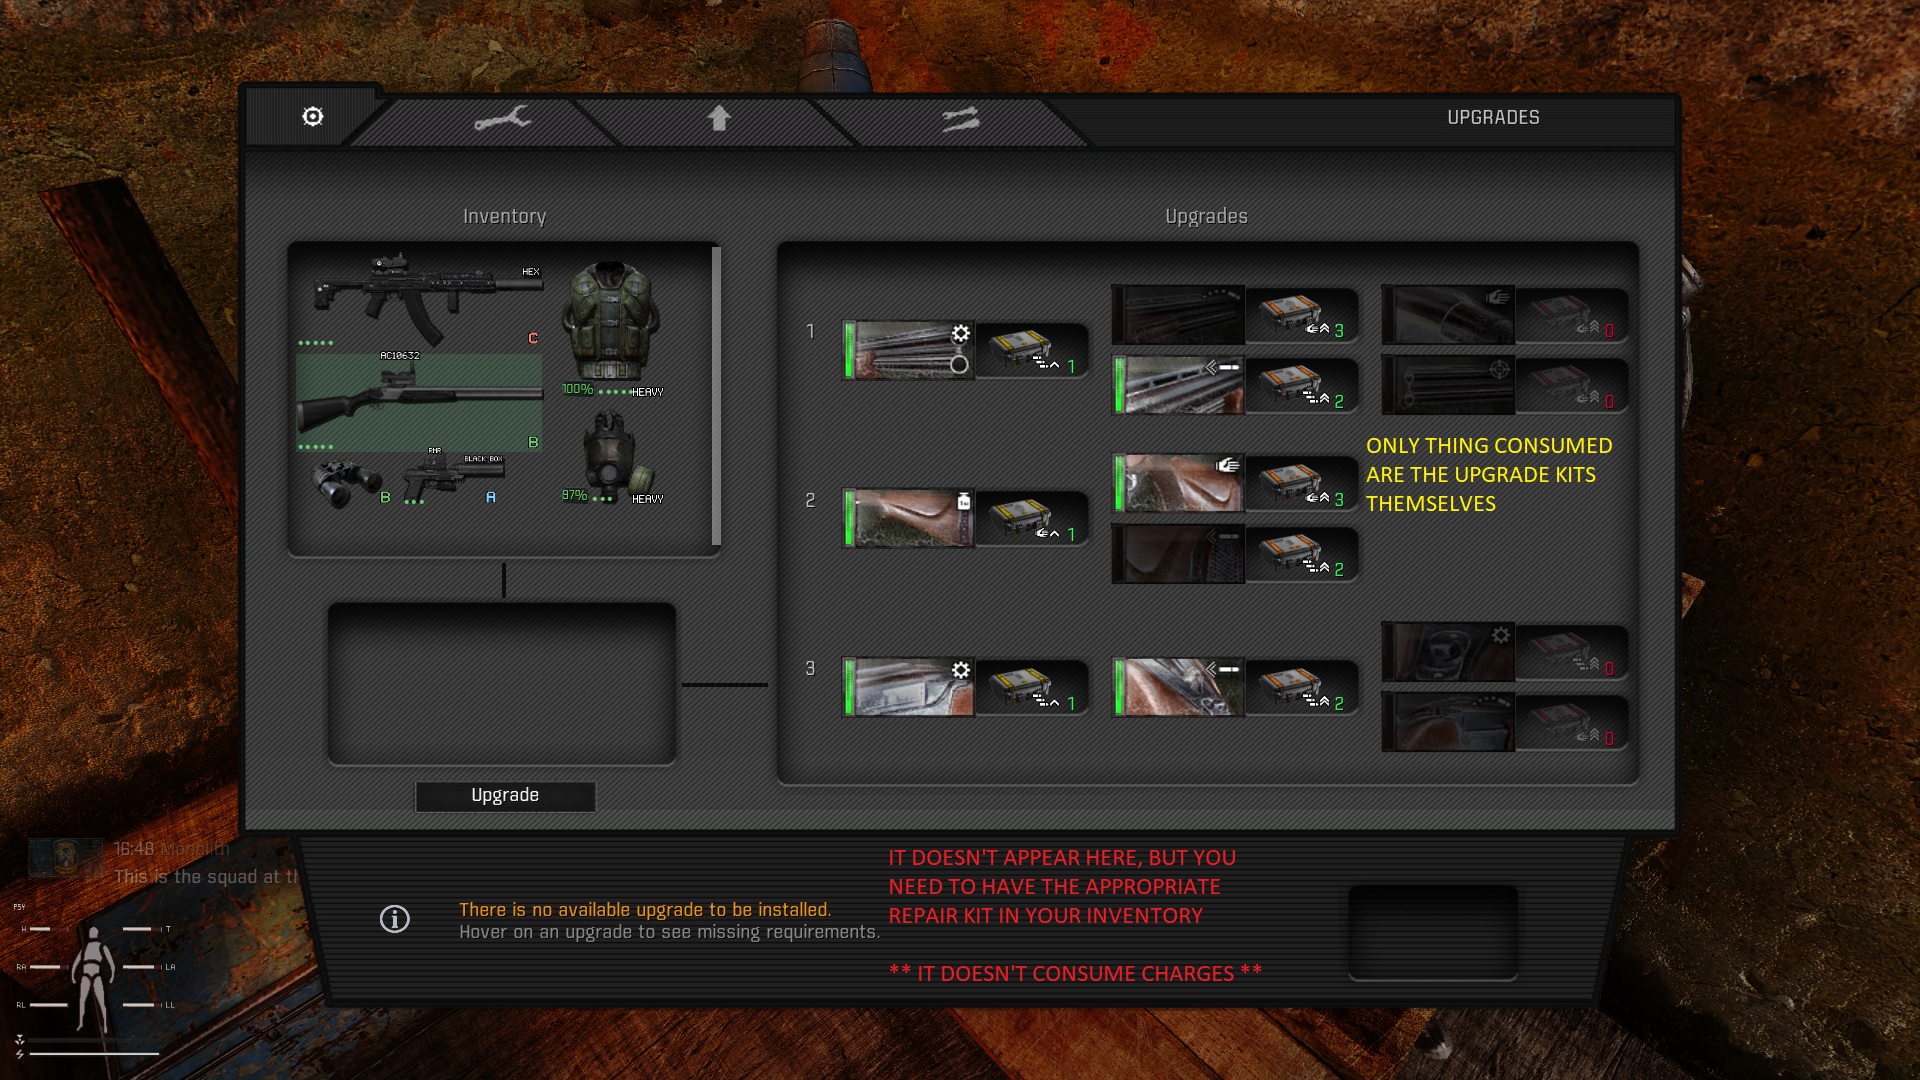
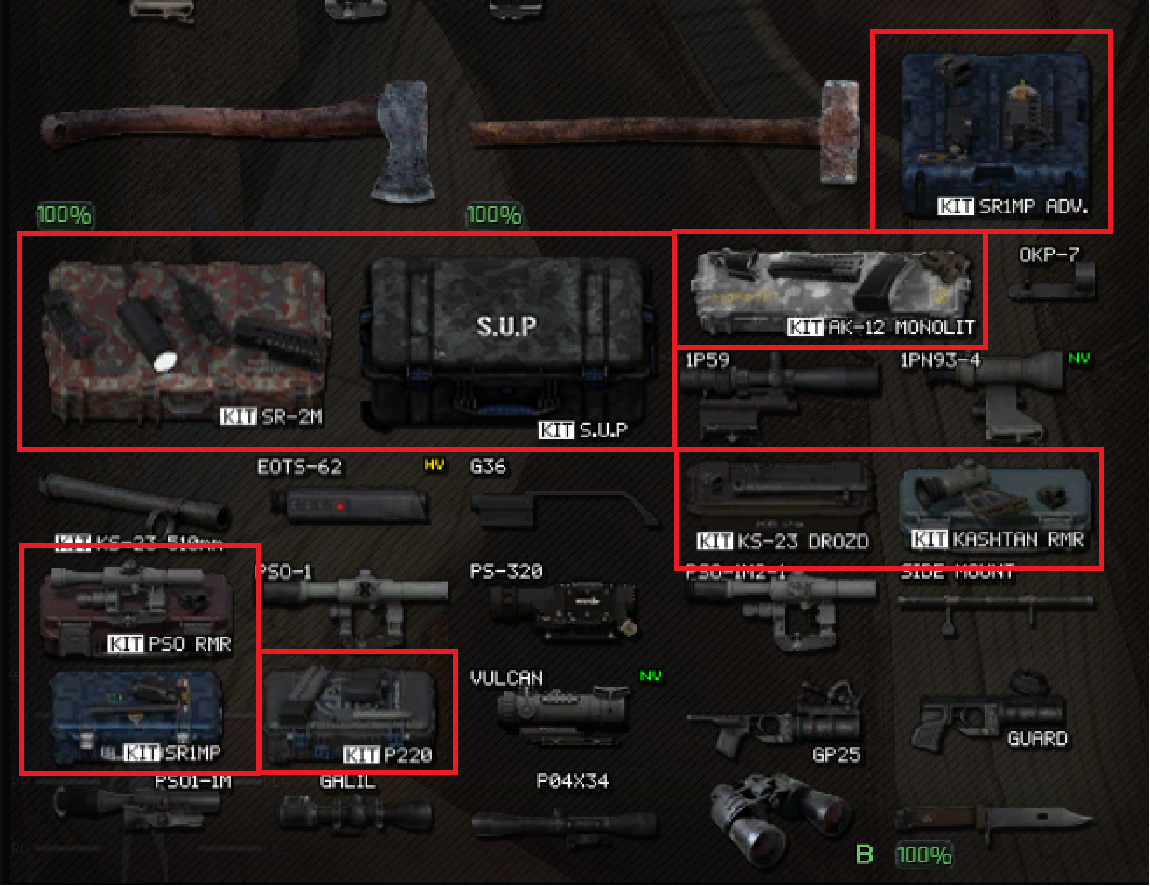
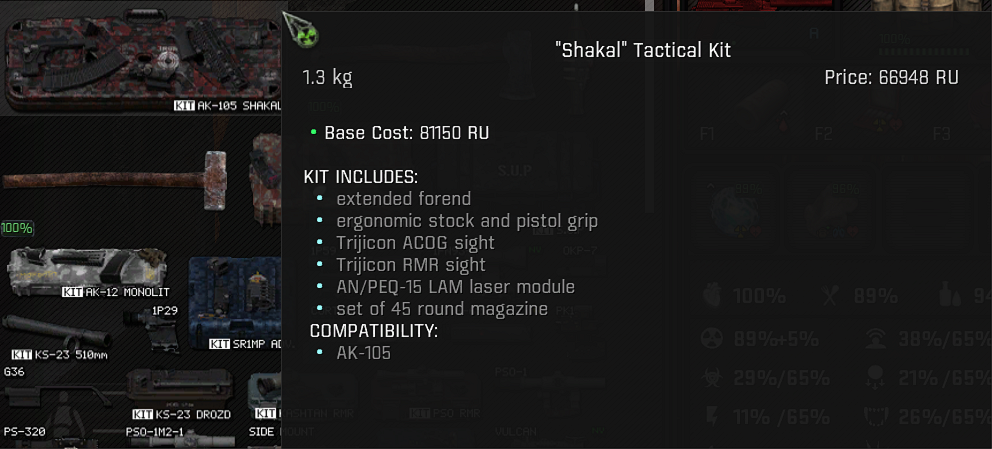
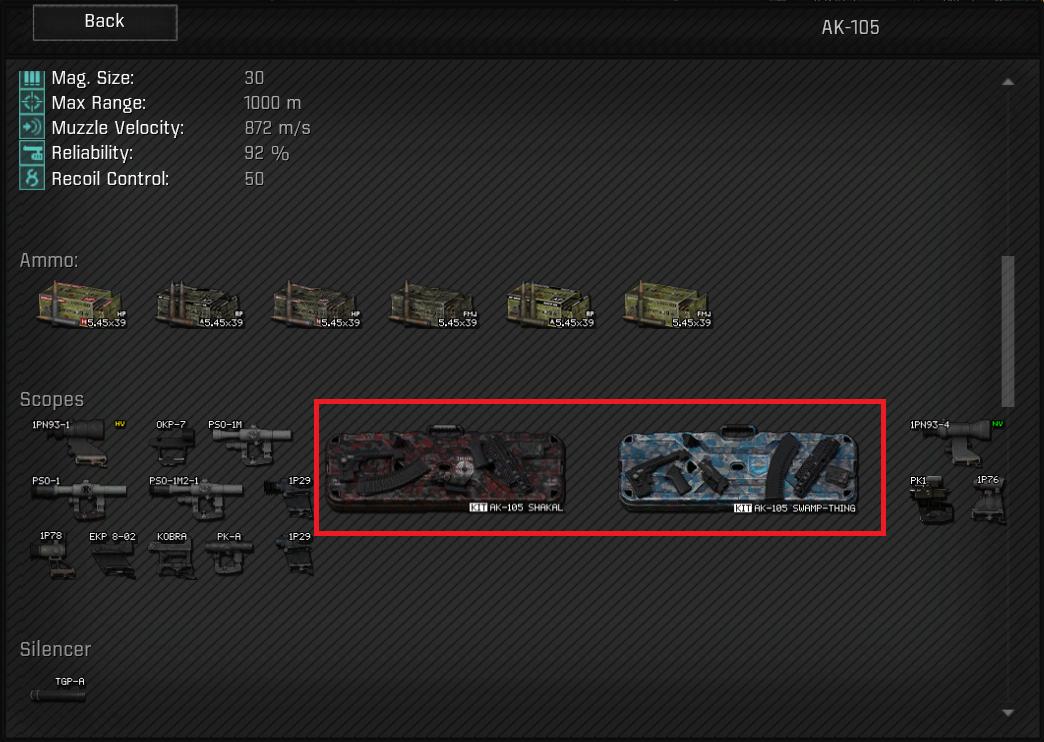
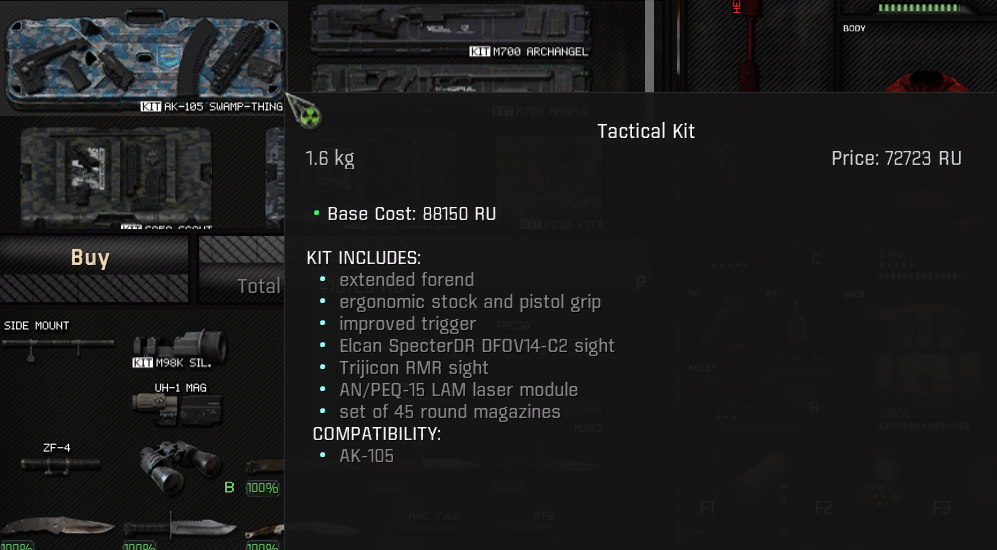
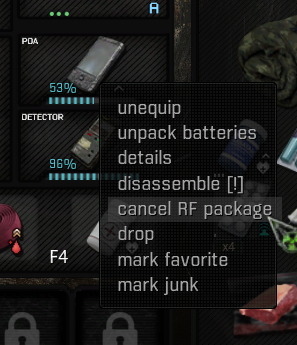
@greebabass the trade-off with tactical kits is that they offer more bang for your buck and some exclusive upgrades at the cost of being a fixed package, ie not being customizable. You either get the whole package or none of it. So if you want to be able to switch between a thermal scope, night vision scope, sniper scope or red dot, you should stick to a 'vanilla gun'. If you don't mind the micromanaging this approach requires, go for it!

Just to add some final details. Tactical Kits are locked behind reputation with factions and their respective traders, so you don't get access to all of them from the get go. Random mods are... well, random. You're at the mercy of RNGesus. You might find a thermal scope on your first day like it happened to me or you might play for 20 hours and only find crappy stuff. But by then you should have access to some nice tactical kits if you focus your tasks. There are options, none of which is necessarily better.
xKilroyx 25.2. klo 17.09 
Great guide!
greebabass 25.2. klo 14.33 
Hi there, thanks for the guide mate! Really helpful :^)

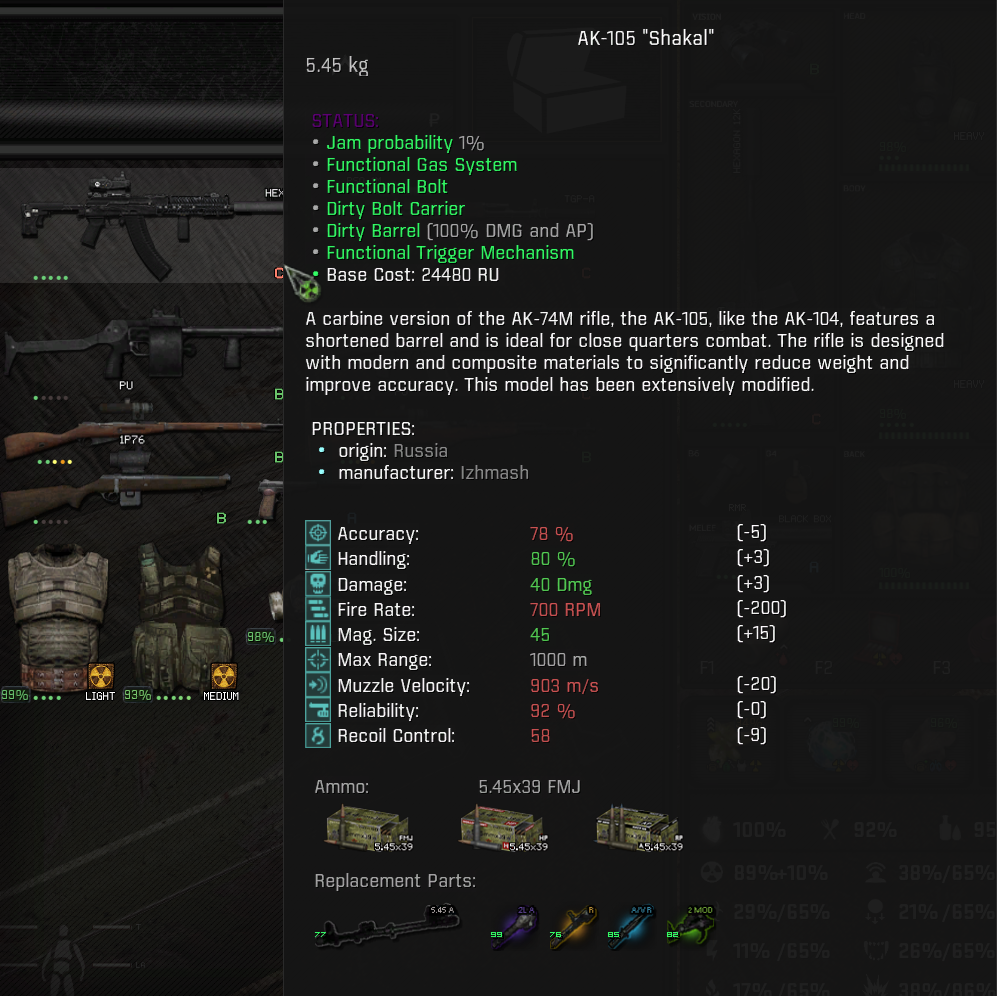
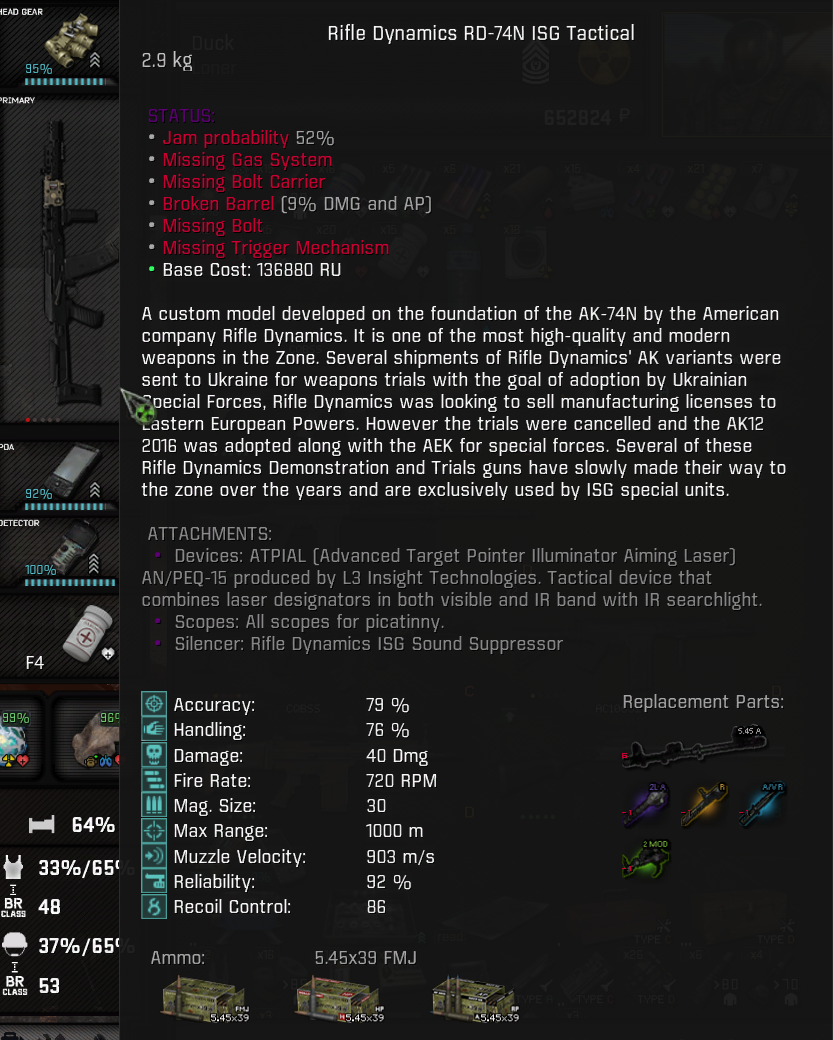
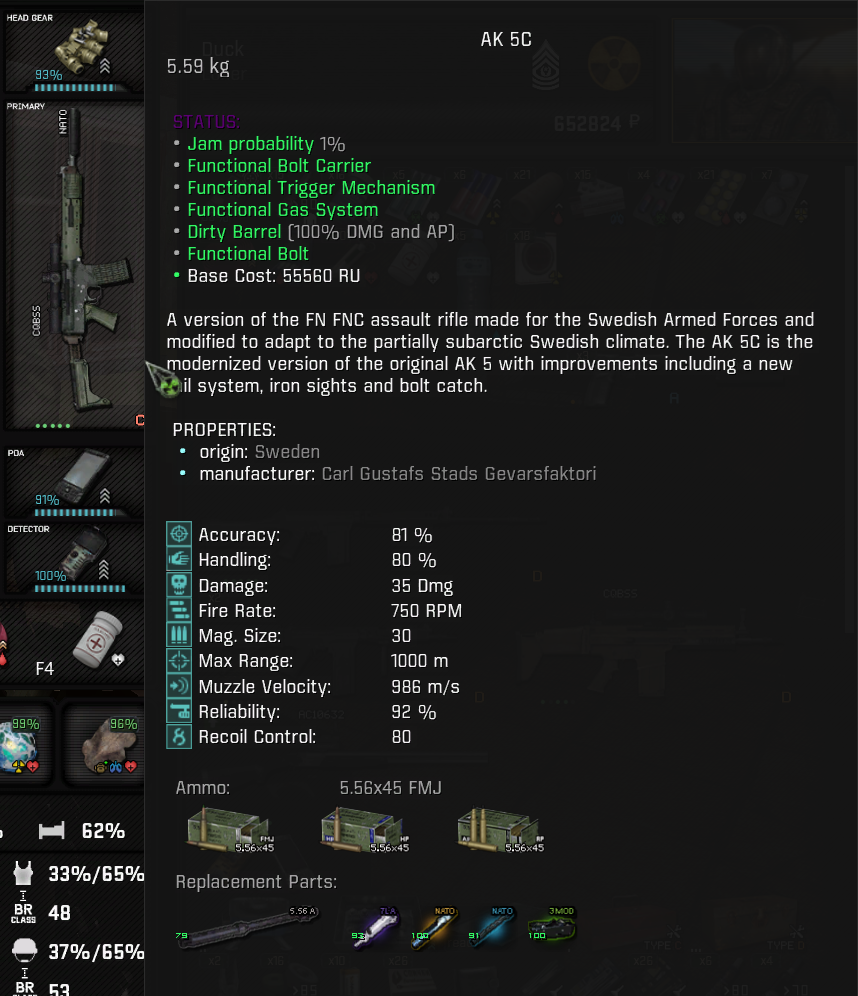
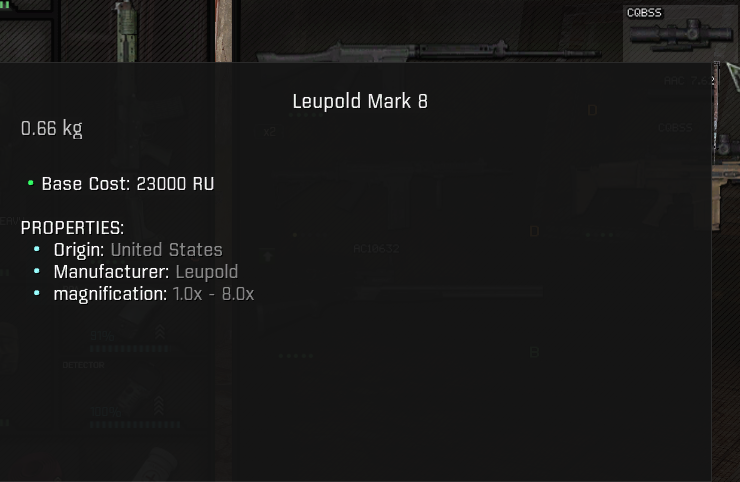
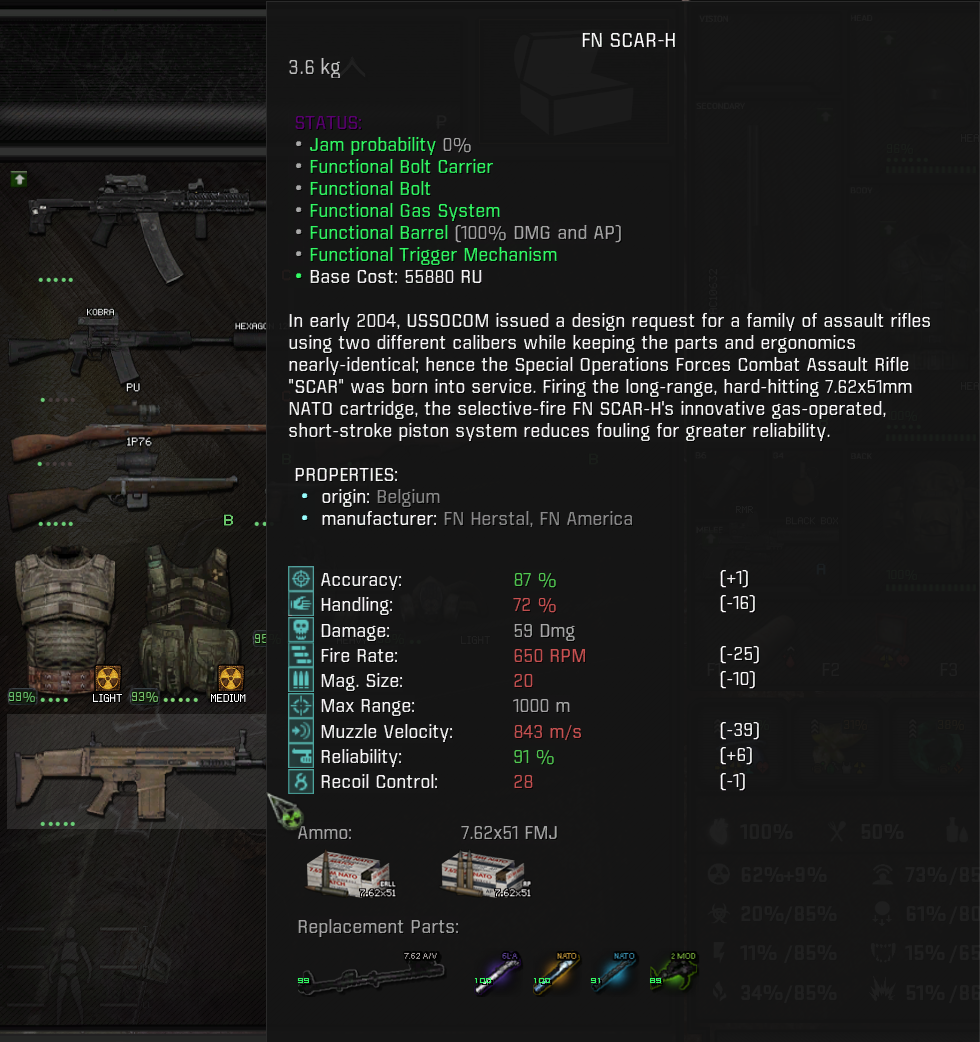
Although, I would love to add a point towards weapons: I was really hunting down for modification kits from traders, soon after to realize that a "regular" gun could have a ton of potential with a variety of changeable scopes. Example - I was about to shut down the Miracle Machine when I found a night-vis scope on one of the enemies in the lab. It said night-vis but actually feels like a thermal scope. Once equipped to my trusty AK-74, the game became so so much better. It wouldn't be possible to apply to, say, the "Swamp Thing" which I had stashed.

The moral? Modified guns can provide plenty of upgrades, but one shouldn't overlook "vanilla" guns also. I hope it helps :) Cheers mate!