Sker Ritual

Sker Ritual

118 Bewertungen
The Ultimate Sker Ritual Guide
Von Snilloc
The Ultimate Guide for Sker Ritual, featuring a walk-through of every map including the Main Objective, Hidden Objectives, and Hidden Music! As well as locations for extras like The Stranger, dolls, generators, rats, statues, symbols, orbs, and more! There is also an explanation of the miracle system and how you can mix your miracles so you can start getting Tier 4's on every run!
15
7
5
5
2
2
2
3
2
2
2
   
Preis verleihen
Favorisieren
Favorisiert
Entfernen
Recommended Settings
I first recommend changing some settings before playing the game, as some of the visual settings make it hard to see. Here is a list of settings I personally recommend changing to make the game easier to play, if only for the sole reason that you'll be able to see better. The settings do appear in this order to make them easier to find.

    Keybinds - I personally prefer setting crouch/slide to Ctrl, that way I don't have to press C for it. This could completely change movement for keyboard players that struggle to slide.

    Interface Options
    I recommend you enable every setting from "Subtitles" to "Allow Seasonal Events", but here are the two really important ones.
  • Show Damage Done Text - On (Important for seeing how much damage you're doing per shot.
  • Show Health Text - On (Very important to have on, it will literally show your health in the corner of the screen, you'll never have to guess when to take your elixir.)
    Graphics Options
    Most of these will depend on what you're playing on and personal preference, but here are some of the settings that I found game-changing.
  • Shadows - Off (If it's too dark do this, it will brighten up all those dark corners that you can't see in.)
    Post Processing Settings
  • Motion Blur - Off (I almost always turn off motion blur, I find it to be a superfluous visual effect that only takes up processing power. Turning this off will make everything easier to see even when moving at high speeds, but might make the game look more "unrealistic.")
  • Lens Distortion - Off
  • Vignetting - Off
  • Film Grain - Off (Turning this off will make it easier to see things in any game in my opinion.)
  • Micro Shadows - Off
  • Contact Shadows - Low
  • Distortion - Off
  • Blur - Off (Again, I almost always turn off the blur on my games, but to each their own.)
  • Volumetric Fog - Off (I can't recommend this one enough. Found at the bottom of the Graphics Options, turning the fog off will make it so you can see the corners of every map. Making it significantly easier to see the enemies and the steps for the Easter Eggs.)

    Audio Options
  • Disturbing Content - If the sound of the goat dying on Cursed Lands of Lavernock bothers you, you're able to turn it off here. There might be more sounds that get blocked out, but the goat sound is the main reason for this setting.
General Tips
Here's some general tips that you can really help turn your game around.
  • Change your settings depending on your device. There's no shame in turning down your graphics if you want the game to run better. You're the only person who's going to see what your game looks like, unless you take screenshots, but even then nobody is going to care. I've compiled a list of some settings that I recommend changing underneath the tips.
  • The official Sker Ritual Discord server has some helpful things from time to time, and if you ask a question there are tons of people that are quick to answer questions on there. Use this link to join: https://discord.gg/CgDPpsk5.
  • Picking up the lanterns and torches will give you a third slot for a limited time. You can't replace this item with a gun, but you don't have to worry about the items replacing your favorite gun when you get to that stage of the story.
  • If you don't like any of the miracles you get, don't pick one! Be patient, when you get your next miracle it will refresh your miracle options. You get a miracle every two rounds so you'll get lots of chances and you don't need to pay to refresh at all.
  • If you've done the hidden objective on the original four maps you'll have access to the God Killer after defeating the boss again. You can also redo the hidden objective whenever you play, simply go through the steps again and put the seal in the right spot.
  • Do you see that bar underneath the God Killer? It's the gun reloading. You're able to reload and switch guns and it'll keep reloading. Even if you die after killing the easter egg boss, before getting to leave through the portal, it still counts towards achieving the God Killer weapon.
  • Pick whichever Sker Pass you want, look for any masks or themes you like, but ultimately you'll get everything out of the passes if you play enough. They will also automatically switch when you finish one, so don't worry if you've forgotten to switch when you finished one.
  • If you're ever stuck, holding your voice line for 2 minutes straight will send you back to spawn. I've noticed when I get stuck out of map the game does a pretty good job at noticing and sending me back, but you can do it yourself if it isn't doing it for you. This is especially helpful for getting stuck as a ghost.
  • There's a bit of a movement glitch ability if you spam the slide and jump in a certain order. After 80 hours it's become second nature, but it might be confusing to do at first. You'll want to be sprinting and then slide, but if you press the slide button again it'll cancel your slide and if you jump immediately you'll keep your horizontal momentum and fling yourself across the map. I've gotten stuck in places that you aren't supposed to go using this, but you can also outrun every enemy, including Balor at his fastest, if you can pull off this slide-cancel mechanic. Specifically on the first map, there's a little notch on the top of the stairs in the Old Library where one can sit outside the reach of all melee enemies, only reachable by utilizing the slide-cancel mechanic.
Gun XP
Every kill will give you an amount of XP, correlating to the number that pops up on the screen. This number is then multiplied and that is what goes towards your leader board score. Your map difficulty changes the multiplier. Normal - x1, Hard - x1.5, Nightmare - x2. So the fastest way to level up guns is to grind high levels with the same gun on Nightmare.

Here is how much XP you get per kill on different levels.
{Denotes 3XP points}
Difficulty
Body
Fake Crit
(Non-Head)
Head
Bosses
Beginner, Easy,
& Normal
90
{270}
100
{300}
115
{345}
1,115
{3,345}
Hard
135
{405}
150
{450}
172
{516}
1,672
{5,016}
Nightmare
180
{540}
200
{600}
230
{690}
2,300
{6,900}
The 3XP does not work on every boss, but it does pop up for some bosses. For example, Squid Lord can give 3,345 points but the Kraken can not.

Blazer explosions, knife kills, molotov, and ultimate kills will give XP towards whatever gun you have equipped at the time the points come in. Thanks to Napalm Zombie for this information.

3XP counts towards your gun XP. So when you get a headshot during 3XP you will get 345, 790 on Nightmare. Again, you get however many points pop up on the screen.
This was a test I personally did with the Auto Blunder. I tracked the XP I had before going into a match, went in and bought the gun, then only used it for one headshot during a 3XP on Normal. When I finished the match I had gained 345 XP for the single headshot.

Every level has the same amount of XP; 400,000. This is roughly 38-40 rounds on Nightmare, but could take longer if playing with multiple people.

Cursed Lands of Lavernock
  • The first mission is to destroy the 4 Power Generators around Lavernock Point. These are easy to spot as they should glow blue with electricity when powered on. Follow the cords on the ground to find them if you're stuck.
  • Proceed underground to the Chamber. My preferred way to go is through the cemetery and then the Morgue, the room you're looking for should be around the corner from here. After getting to the Chamber you'll be tasked with getting the 4 cylinders. The order I recommend is this.
  • The Hero Cylinder is right in the Morgue and is very simple. First, interact with the furnace, this will lock in the cylinder you're working on. To ignite the furnace you will need the Blazeslingers, the overweight lava looking enemies, to either throw fire or explode near the furnace. The value for each differ depending on difficulty, but their explosion does more percentage than their ranged attack.
  • After that you'll need to pick up entrails from killed enemies. This just appears as floating intestines when you kill enemies. Then put them in the furnace. After that you'll need to wait for it to cook, and then when it's done the Cylinder will be available on the wall opposite of the furnace.
  • The Siren Cylinder can be started in the Old Library, and then you will need to run to the surface where the cemetery is. You will now be able to interact with the coffin that isn't buried completely, popping open and giving you the lantern. (Don't be afraid to pick this up as it WILL NOT take a gun slot.)
  • Now go back down to the Old Library, where you will find paintings on the walls with roman numerals at the bottom. The roman numeral is the place that the hidden symbol will have when entering the code. (Use the lantern to see the symbol on the painting.) The symbols can then be entered in the main area of the Old Library.
  • The Medusa Cylinder is how you get the Thunderbolt, the Wonder Weapon for the map. Go back up to the field near the cemetery, and interact with the box on the ground. This will spawn 5 Sirens. After killing them you'll be able to pick up the Thunderbolt, for a price. Use it to shoot the scarecrows that are on metal rods in the field. They can be hard to find, but it's specifically the ones with the METAL rods, and they won't change from run to run.
  • Now you're tasked with destroying the tesla coils in the Laboratory. This can actually be done with any gun, and I recommend using other guns or grenades as they are often faster in my opinion. Following that you'll need to stand in the circle in the control room off to the side of the Laboratory. Once this finishes you can pick up the cylinder in the middle of the stairs.
  • The Cerberus Cylinder, can be tricky, until you turn off Volumetric Fog in your settings. then you should be able to see all four statues with ease. You'll want to destroy whichever one is glowing, it should be obvious which one, and it will rotate. Once destroyed they will become interactable. You can see which one each is supposed to be on the side of the goat's cage, or you might be able to see the glowing symbol on from the statue, making it even easier.
  • After freeing the goat, you'll escort it back to the spawn room where it, out of it's own free will, will walk into the furnace. If this sound bothers you, you're able to turn this sound off in the Audio Options as Disturbing Content. After doing this you'll need to kill enemies in the circle to power up the last cylinder.
  • Now you can put all four cylinders into the Vault Door, but you still won't have it open. You'll need to run over and power it up in the Broadcast Room. This room can be accessed from the Laboratory and the Morgue. Kill enemies underneath the collector until it starts to move, and then hold off on the kills while it moves. Only get kills in the circle while it's not moving to do this as efficiently as possible, unless they start to overrun you. Once you finish this you can now open the Vault Door.
  • Once you get through the vault doors you'll need to destroy the power coils. This is similar to the coffin enemy spawner, in the sense that you need to look for the one that's open and destroy that one until it moves to another one. Do as much damage as possible while it's open. Once this is done the secret doors will open on either side of the entrance, revealing the boss arena with Abraham. My least favorite part about this fight is when he pulls you. That Scorpion-esque grapple will pull you to the worst spots, either in a group of enemies, or onto the hot floor. Stay off the glowing floor, as it will drop your health quickly combined with a hit or two.
Cursed Lands of Lavernock Extras
Hidden Objective
  • Interact with the God Killer machine underneath the purple floating light. This will spawn The Stranger next to the machine, shoot him there and then in 3 more locations. The Stranger emits a radio wave sound that can be helpful when searching for him. (Locations: OId Chapel near the fire, Chapel Grounds in the window, Lavernock Point highest window, Farm Lands past the fence near some trees, Main Chamber behind the Super Charger, Laboratory behind the cracked door)
  • Go to the Old Library and interact with the Medusa Statue. This will spawn a wave of enemies, I've seen Hags and Knights spawn from this which can be challenging in such a tight area.
  • Find 4 individual piles of rats around the map with a glowing symbol near them. Remember the symbol and number of rats for the next puzzle. The amount of rats is the placement of the symbol. (Known Locations: Broadcast Room, Caverns, Chapel Grounds, Farmlands, Hatch Service Entrance, Laboratory, Main Chamber, Morgue Wooden Hallways)
  • Head to the Chapel Catacombs and interact with each statue to get the symbol you saw next to the corresponding number of rats.
  • Locate and power up 5 new generators with the Thunderbolt, this can be done by shooting the cylindrical metal piece on them. I recommend doing them in this order. Locations: Chapel Catacombs, Facility Entrance, Second-Floor balcony, Cavern, and Laboratory. There is an audio cue when it resets.
  • Return to the Catacombs. You'll find the cage containing the black sheep open. Escort the sheep across the map. At the end of the road, the sheep will explode, opening the door to the secret room.
  • Grab the seal on the altar in the secret room. Then defeat all spawned enemies. (Enjoy Draig)
  • Head to Abraham’s Chamber, the boss room, place the seal in the God Killer machine and fight Abraham.

Hidden Music
  • Use a Blazeslinger to destroy the big cross headstone top in the very corner of the graveyard in the Chapel Grounds.
  • Shoot the fuse that has replaced it with the Thunderbolt. The Hawk statues around the map can now be rotated.
  • They will make a different noise when the Hawk statues are rotated in the final direction, most are pointed towards the Radar tower, but not all. (Locations Include: Directly above the blown up headstone in Chapel Grounds, On a roof in the Chapel Grounds, On the Demon Statue in the Woodlands, and Outside of Farmlands near the Broadcast Tower)
  • Once they are all in position there will be a chime and the ghost headstone will appear next to the headstone that was blown up before. Unsure of what to do with it.
  • Kill 3 Phantoms, the invisible enemies, near the ghost headstone. There will be a chime when you get this step finished, so you know when you can walk away.
  • Now you need to go around and find the unlit treble clefs and use your voice line near them to light them up.
    Treble Clef Locations
    • In Spawn on the bench leading to the Lavernock Point door
    • On the door frame of the middle house in Lavernock Point near the well
    • On the right wall of the tunnel leading from the Graveyard to the Morgue
    • Fence post in the Farmland near the building from Lavernock Point
    • On the wall adjacent Shock 'N Load in the Laboratory
    • On the pillar in front of Movement Stallion in the Main Chamber
    • In the Decompression Room between the Morgue and the Living Quarters
    • In the Living Quarters behind the eagle statues opposite of the Pistolet
    • To the left of a statue in the Chapel Catacombs near the demon lamb
    • On a pillar in the lower-level of the Broadcast Room.
      A chime will go off after finding the last music note.
  • Interact with the Jukebox in the Living Quarters, the room where you put the code from the paintings and near Fast Hands, to start the music and spawn 2 Abominations and some dogs.

Dolls
The Ashes of Sker Hotel
  • Start by picking up the device on the ground, and then opening the door on the left. This will give you access to the room filled with purple smoke. WHICH WILL KILL YOU. Make sure you shoot the fans to stop the gas from being pushed into the room. After shooting all 4 you can safely put the device into the refueling machine. Make sure you stand next to it until it's ready to be picked up. Then place this back in its location in the Grand Hall, which can be easily found by following the wires at spawn.
  • Now you'll need to go and find the rest of them. There are three more spread throughout this first building. (Known locations: the Ground Floor Waiting Area opposite the Difficulty Sword, Underneath the big stairs in the Grand Hall, Ground Floor Chapel opposite of Stallion Juice, in the Basement near Quick Reload, Basement Kitchen Storage, Basement near Shock-N-Load)
  • After powering up the Teleporter you can travel to the Library where you'll find the Howler, the Wonder Weapon for the map, and the Elixir of Life. You need to interact with the Howler's chest, spawning 5 Killawatts. After killing them you can pick up the Howler, for a price.
  • Teleport back and wait for a dark round, which happens every 5 rounds. Once it goes dark you'll be able to see the secret code on the wall near the input locations, which are in the Ground Floor Manager's Office and the Basement Kitchen Storage. You have to use the Howler to shoot the code into the heads on the wall.
  • After that you'll be ready to teleport anywhere by interacting with the computer at the top of the stairs to pick the location, and then the portal will take you there. The locations can be identified on the computer as the Void (white light), Theatre (stage), the Labyrinth (goat), Library (books), and later the Boss Room. This is the order I recommend going in.
  • Teleport to the Theatre where you'll need to interact with the middle of the stage to pull the rat up. After waiting for it to come up, you'll need to search for all the parts. The locations and parts of the rat don't change. The Right Eye can be found in the Theatre, the Left Hand is in the Ground Floor Reception next to spawn, the Jaw is in the Basement Storage behind the Super Charger, The Left Eye is in the Basement Room across from Fast Hands, and the Right Hand in the Library. Assemble the rat where you left it.
  • After that you'll need to kill Killawatts, the blue electric enemies, and they will drop their energy. You will then need to give these to the assembled rat on stage in the Theatre. Doing so will give you the punch card for the Theatre.
  • Teleport to the Void where you'll find a button that you can interact with, this will start a challenge to get kills while in the area in the void. The area will move as you get kills so move with it. You will get the punch card at the end of this challenge.
  • Teleport to the Labyrinth to escort the sheep through the maze. You'll first need to interact with the sheep behind you, and then it will follow you around as you make clones of it. You will need to make two copies of clones (4 sheep in total) before you will be able to leave.
  • Here is a map to help guide you through the maze. The flower is the doll and the top hat is the Stranger spawn location.

  • After that you'll need to put all the punch cards into the computer, then you'll need to stand near it for a little bit of time. Once that finishes you'll be able to teleport to Second Floor Great Hall, the boss room, and you'll be ready for the fight with Isaac. The purple gas is poisonous so make sure to avoid that, and the electricity will hurt as well but can be difficult to avoid.
The Ashes of Sker Hotel Extras
Hidden Objective
  • Interact with the God Killer machine underneath the purple floating light. This will spawn The Stranger next to the machine, shoot him there and then in 3 more locations. The Stranger emits a radio wave sound that can be helpful when searching for him. (Known Locations: Basement Office desk, Basement Room window, Ground Floor East Wing Stairs, Ground Floor West Wing stairs, Labyrinth dead-end, Theatre left of the stage, the Void)
  • Go to the Basement Cells and interact with the electric fence, then go left and find a door with a purple symbol on it to get the lamb.
  • Escort the black lamb to the chapel. Once it explodes, go to the Void, and push the red buttons to spawn waves of enemies, including Abominations.
  • After pressing the fourth button, you will have to fight the King of the Rats.
  • Go back to the Labyrinth where the black sheep will be standing near a fuse box on the wall. Get that fuse boxes shot at with electricity from Killavolts, it will turn blue to indicate when it's done, then repeat two more times. (I've found that sometimes the sheep doesn't appear on at least the last one. To tell if you are at the right one, shoot the fuse box. You will either get a hit marker or nothing, the one you should be working on will have a hit marker.)
  • Head to the Library and go up the stairs. Look for a pile of rats near a purple symbol. From left to right there will be 4 piles of rats. Remember the number of rats in each pile.
  • Find 4 statues of heads on the wall in the Library with a purple symbol above them. You need to shoot the heads in order matching the number of rats in piles that you found earlier.
  • If you’ve done the puzzle correctly, the demon lamb will explode. Go to the Basement Cells and grab the seal.
  • Teleport to the Second Floor Great Hall, the boss room, and place the seal in the God Killer machine and fight Isaac.

Hidden Music
  • Use the Howler to shoot into the Dumbwaiter to the left of the Life Token in the Basement Kitchen. You have to hit the right spot, but you'll get a hit marker and then the completion chime.
  • Kill 10 Headless Husks at the Computer at the top of the stairs. You'll also hear a completion chime for all 10 of these kills. These characters are the ones in the white shirt with suspenders, when you shoot their heads off they explode and keep coming at you. They need to die at the Computer.
  • After hearing the completion chime after the 10th Husk, there will now be a button on the far right side of the Organ, in the corner. There is no actual button but there will be a spot to interact.
  • Now you will need to go around and shoot 3 objects with the howler. The spot on the item can be picky, so give it a few tries. The objects include: The sideways barrel in front of the Super Charger room, The metal tin in the Chapel to the left of Movement Stallion, And a wrapped up box in the Library to the right of the Howler.
  • Now you need to go around and find the unlit treble clefs and use your voice line near them to light them up.
    Treble Clef Locations
    • In the middle of the Labyrinth near the carpet and opposite an electric box.
    • In the final room of the Labyrinth near the exit on the right.
    • In the Theatre to the left of the Ammo machine.
    • In the Void on the back of the switch.
    • Second floor of the Library above the stairs behind the Howler box.
    • In Spawn to the left of the door going to the Chapel Hall.
    • On the Piano in the Chapel.
    • On the closet in Basement Storage near the rat part.
    • On the Piano in the Basement near Fast Hands.
    • In the Basement going to the Kitchen.
      A chime will go off after finding the last music note.
  • Now you can start the music by interacting with the Jukebox, located in the Chapel on the opposite wall of Stallion Juice. Be prepared, as this will spawn an Abomination.

Dolls
Sewers of The Dead
  • Start by destroying the Rat Orb, the glowing orb on the wall, this can be done with any damage but meleeing is recommended to save ammo. After opening that door you'll need to turn left and keep destroying orbs as you open doors. Don't forget to look up high for the Rat Orbs.
  • After coming out of the sewers take a right and you should find yourself at the train, destroy the Rat Orb at the top to get in. Make your way about halfway through the train until you get to the Bar Room where there will be a clearing with a chest. Interacting with the chest will spawn some Hags, killing these will make the Plague, the wonder weapon, able to be bought from the chest.
  • With the Plague you'll be able to open up the protected Rat Orbs, which you might've already spotted around the map. They look similar to the Rat Orbs already seen, but have a shield and aren't able to be destroyed, as of yet. Shoot these with the Plague to open them up and then you'll be able to destroy them.
  • After picking up the Plague you'll need to make your way to the Radio Tower, which can either be reached through the train or by turning around and opening the door to the left as you leave the sewer. Shoot the protected Rat Orb on the side of the Radio Tower to open up the stairs, then progress down the stairs to the lower levels of the Radio Tower Control Room.
  • Look around for a total of 8 protected Rat Orbs spread throughout the Radio Tower's lower 2 levels. There are normally 4 on the bottom floor and 4 on the floor above that. The line connecting these to the middle will glow when the connected one that is active, but the best way to look for these is to just run around and search for them.
  • Start the search for the Chamber Keys. I recommend doing them in this order.
  • First, interact with the box next to the Radio Tower. This will start the first Key quest. In order to do this challenge you will need to shoot the signs on the tower in the same order that they appear at the bottom. If it shows a square, circle, triangle, shoot them in that order. You will need to do this on three sides of the Radio Tower to get the key.
  • Go to the Train Station where you will find a ticket dispenser that you can interact with, this will start your next key quest. Kill some Speed Freaks that will spawn and pick up their coins, you will need to deposit 3 in the ticket dispenser then stand near it to move on. After this you will be able to pick up the ticket with the letters N.W. on it.
  • Now go down to the Catacombs, the corner of the sewer past spawn behind the Super Charger, where you will find suitcases on the ground that you can open, labeled with the letters N.W., one of these will have the code you are looking for in the form of the Deities. You will need to enter these into the Second Class Coach in the order they appear to get the next key.
  • Interact with the door on the train and then pick up the mind control helmet to start the escort key challenge. You will then need to go back down to the Catacombs corner where you'll find a quiet one cell that you can interact with. Free the quiet one and then put the helmet on it to start escorting it. While this can be done for free, it is much easier if you keep paying it to run. It will need to run across the entire map to the Radio Tower Clearing where it will go underground to the Flooded Sewer Passage. Interact with both valves on opposite walls to drain the water and pick up the key.
  • Interact with the quiet one on the wall with a rat and wheel in it's chest in the Sewer Chamber to start the mini boss key challenge. This one requires you to shoot the rat inside the wheel with the Plague. This quest will reset after 2 minutes, so if you don't finish in time you will need to restart shooting all four bodies. (Known Locations include: Sewer Chamber, Cove Walkway, Second Class Coach opening, and the Train Station)
  • After doing this you will be tasked with shooting the Purple Shelled Pod in the Rat's Nest, the spawn room. Doing so will spawn the King of the Rats, and killing the mutated rat will give you the key you're looking for.
  • Put all four keys into the doors at the bottom of the Radio Tower Control Room. After opening these doors you will need to get kills while standing in the marked area one floor up. This circle will move as you fill up the fuel, but can be difficult due to the tight spots in the area. After filling up the fuel you will be able to pick it up, then put it in the teleporter down stairs. This will power on the teleporter to The Stranger's Land, the boss arena where the Stranger will be ready and waiting.
  • For The Big Stranger's boss fight he will disappear as you take out chunks of his health, Abominations will spawn when The Big Stranger leaves, so be prepared as it normally spawns multiple. You will need to go underground and shoot the pod with the body in it to get him to come back. These can be hard to spot at first, but follow the cord on the ground to find them and then destroy them and The Big Stranger will reappear within moments. Shoot his eyes to get easy critical hits.
Sewers of The Dead Extras
Hidden Objective
  • Interact with the God Killer machine underneath the purple floating light. This will spawn The Stranger next to the machine, shoot him there and then in 3 more locations. The Stranger emits a radio wave sound that can be helpful when searching for him. (Known Locations: Catacombs in the corner near the Abomination coffin, First Class Coach past the three towers, Radio Tower off to the side, Second Class Coach on top of the water tower, Sewer Entrance South under the stairs, Water Room in a water tunnel above)
  • Go to the First Class Coach and interact with the seal. This will spawn Balor.
  • After that fight, 4 cat statues across the map will illuminate and become interactable, and the red button with the symbols is in the Bar Coach. Interact with the statues to rotate them to get them in the right direction. If the statue is correct, the symbols near the button will light up. (Locations: Radio Tower Clearing, Second Class Coach opening, Sewer Entrance West, Sker Island Train Station)
  • Press the red button to spawn Balor the Undying.
  • Go to the Rats Nest, the spawn room, and escort the demon sheep across the map. Enemies will spawn in the Catacombs and the Radio Tower Clearing. Once you arrive at the First Class Coach, defeat Balor the Undying once more.
  • Grab the seal near the First Class Coach.
  • Head to The Stranger's Land, the boss room, place the seal in the God Killer machine and fight The Big Stranger (Balor, instead of the Abominations, will spawn in between The Big Stranger's phases.)

Hidden Music
  • Shoot 4 small valves on the pipes around the map to make them spin. All valves are on the ceiling. (Locations: Right outside of the valve/door from the Rat's Nest (to the left of the door after leaving spawn), In the top right corner above the door in the Sewer Entrance West (the room with Elixir of Life), Above the door on the right as you enter the Sewer Entrance South (the flooded room), In the Catacombs directly across from the Supercharger)
  • Go to Second Class Coach, the opening in the train near Fast Hands, where you'll see green gas on the water tower and near a spawn area. Use you elixir in the green gas. This step has been reportedly bugged if you have a miracle upgrading your elixir, so it only works if you have the original elixir.
  • Go into the Water Room the room that connects the Radio Tower Control Room back to the Rat's Nest. Some of the tunnels will now be spewing green gas. You need to kill 5 Speed Freak CLONES between the green gas pipes. Get Speed Freaks low and they will stop moving and then clone themselves. You can tell which ones are the clones because they are the ones without hats and shirts.
  • Now you need to go around and find the unlit treble clefs and use your voice line near them to light them up.
    Treble Clef Locations
    • On the floor in the Water Room.
    • On the bottom right corner of the round door leading from the Cove Walkway to the Supercharger.
    • On the pillar to the left of the Pistolette in the Catacombs.
    • In Sewer Tunnels North on the left wall as you head to spawn from Supercharger.
    • Just below the bottom right of the first door out of the Rat's Nest.
    • In the tunnel leading from Cove Walkway/Radio Control Room to the Sewer Entrance South on the right side.
    • In the tunnel leading from the Sewer Entrance South to the Radio Tower near the rocks.
    • On the side of the Radio Tower box on the opposite side of the stairs.
    • On the Public Notice picture on the Train near Swift Death.
    • In Sewer Tunnel West opposite of the frenzy catalyst.
  • Finally, interact with the Jukebox, located on the train in the Bar Coach across from The Plague. This will start the music as well as spawn 2 Abominations and some dogs.

Dolls
Deadly Lover's Fortress
  • Stand near the Castle Gate Winch, will also spawn Balor, which can be a challenging fight so early.
  • After defeating Balor you'll be able to go get through the gate, you'll see a generator and it's power source in the sky that you need to destroy, but be warned as Balor will spawn again after destroying the first generator. After defeating Balor again you'll be able to continue destroying generators, but don't forget to destroy the power source in the sky after every generator. If you can't do any damage to the generator check the power source. (Locations include: right at the entrance to this part of the area, top of the stairs next to the Super Charger, top of the stairs next to Elixir of Life, and past Elixir of Life. These are included in the map below)
  • The next mission will pop up as you progress further into the castle, and you'll be tasked with collecting the oil pots to put them on the Battering Ram in the middle of the room you've just entered. These can be easily found by their audio cues, the gurgling sound, as well as the blue liquid that they are sitting in. Sometimes they don't spawn in the same corner, but there are plenty spread throughout the Castle Grounds.
  • Once the group has collected 4 oil pots you will be able to put them on the Battering Ram and then you will be able to pick up the Torch near the Ice Wall, the wall the Battering Ram is facing. Pick up the Torch and then light it using Balor's Flame, which will be marked. Then return to the Battering Ram, light it on fire, and pull the dragon lever on the wall. Run down the new hallway that you have access to until you come across the door blocking the way, interact with it to get the next quest. From here you can go at least two different ways, but this is the order I recommend.
  • Interact with the portal that has appeared in the Banqueting Hall, then go to the Cloning Laboratory, which can be reached through the door opposite of the Revive Totem in Banqueting Hall. When you get there you'll be able to interact with the Cloning Machine to start the next quest.
  • Search for the chalkboards on the walls, locations can be found in the pictures below. When you find one you'll need to take note the Letter at the top, and then you'll need to figure out what they were trying to write. The symbols that are crossed out don't matter, and the ones with arrows are switched.
    Location:

    On the wall left of the Cloning Machine.
    Solution:

    "Circle, Diamond, Triangle, Circle"
    Location:
    On the second floor opposite of Lucky's box.
    Solution:

    "Square, Square, Circle, Triangle"
    Location:
    Opposite of the Cloning Machine on the first floor.
    Solution:

    "Square, Diamond, Square, Triangle"
  • Putting the last vial into the Cloning Machine will spawn the King of the Rats. After killing the Mutated Rat, you'll have The Stranger's Head and be able to pick up the teleportation fuel, put this in the machine back in the castle to teleport to The Factory.
  • Once you go through the teleportation platform there will be a door that you will need to get kills next to. Specifically, you need to be in the area and the enemy does not, to track this mission.
  • Once you get the door open you will need to run all the way to the end to pick up the chalice, starting the escort mission, and then run all the way back to roughly the middle part of the Dungeon Hallway, where the cell holding a quiet one will be marked and interactable. Let one out and then interact with it to start escorting it. You will need to escort them to the metal squares along the path you just ran along to get to the chalice. After escorting one to it's platform you will need to turn the power on by following the red cord and flipping the switch. This will open a cell door nearby to another quiet one that is chained up. Collect its blood with the chalice. Rinse and repeat 2 more times. You do have to run back to the same cell every time, and it will always go in the same order of platforms.
  • Pour the blood into the 2 bowls at the end of the Dungeon Hallway, and then prepare to fight Balor the Undying when you interact with the door. Kill Balor to be done in the Dungeon for now.
  • Make your way back to the spawn area, where you'll find the Strange Box underneath a wall with a bunch of symbols. (You can do this mission as soon as you interact with the door behind the Ice Wall if you want) Interact with the box to get started. The red symbols refer to the ones that you need to pull, whereas the green ones don't need to be pulled. So you should go around and look for the buttons that need to be pulled. (Make all the symbols green) You can check your progress by coming back to this wall. Interact with the box again to spawn the Clone Abraham. After defeating him you will be able to pick up the Sword from the box.

  • Once you have the sword and have been gone through the Dungeon to defeat Balor, you are able to turn the forge on for the upgraded sword. Go into the castle near the Battering Ram, and use the sword to open the door next to Lucky's Box, then interact with the machine inside. This will start the timed challenge to turn all of the marked valves. At this point all of the doors should be open, if you don't get it in time you'll just need to repeat this step.
  • After this you'll need to forge the explosive parts in the Dungeon. Use the teleportation platform and you'll find the nearby doors interactable. You'll need to start the process if the doors are open, stand by the closed door until it's ready, and then pick it up. There will be 3 pieces, 3 doors, you need to do. Upon picking up the third piece, Clone Isaac will spawn, locking you in this tiny room.
  • Defeating Isaac will then give you the choice to either fight Elisabeth or forge the Shattered Edge, both can be done but the option to leave will be given after the fight with Elisabeth and the Shattered Edge can be completed after the fight. (The Shattered Edge upgrade is not required for the Unguided part where you hit the hanging bodies)
  • Put all four heads in the door and you'll see Elisabeth floating there. Shoot her until her shield comes up at 66%, this will spawn Thomas. Killing Thomas will make the shield go away, then you can shoot Elisabeth again until she's dead. Thomas will spawn in again at 33% of Elisabeth's health.
Deadly Lover's Fortress Extras
Shattered Edge (Wonder Weapon)
  • After killing Isaac you will have the Explosive parts to forge the Shattered Edge. Go back to the room where you turned the forge on before you turned the valves, that you opened with the sword. Lay down the sword on the table to start the next challenge.
  • Collect 5 Metal Shards from the Knights of Sker. The metal guys with swords will drop these metal shards periodically, but every 5 rounds is a Knight round as well. After putting all the shards in you will be able to forge and buy the Shattered Edge.

Hidden Objective
  • Interact with the God Killer machine underneath the purple floating light. This will spawn The Stranger next to the machine, shoot him there and then in 3 more locations. The Stranger emits a radio wave sound that can be helpful when searching for him. (Known Locations: Banqueting Hall upper floor, Banqueting Hall above the room near the dragon statue, Castle Grounds near Elixir of Life stairs, Castle Grounds above the Super Charger, Cloning Laboratory inside a tube on the second floor, Near the murals around Swift Death)
  • Go to the end of the Dungeon Hallway and open the box marked with a purple symbol. Escort the black lamb across the map to The Factory. Ending this will spawn an Abraham and Isaac, and you won't be able to leave this area until the bosses are killed.
  • Head back to the spawn room and interact with the Bio-Pod. Equip the Shattered Edge and hit 5 hanging corpses that are scattered across the Outer Court. Their eyes will stop glowing and they will stop making sounds when you hit them
  • Interact with the Bio-Pod again, spawning the King of the Rats and Balor the Undying.
  • Take a purple lantern from the Dungeon Hallway, the first left after teleporting to the dungeon. Then head to the Dungeon Cells and find 4 purple symbols, each in a different cell near the quiet ones that you interacted with from before. Remember the symbol and the cell number.
  • Go to the Dungeon Laboratory, at the very end of the Dungeon Hallway and arrange the symbols on the wall in the correct order.
  • Grab the seal in the corner of the Dungeon Laboratory.
  • Head to the Lover’s Chamber, the boss room, place the seal in the God Killer machine and fight Elisabeth & Thomas. (and Abraham, Isaac, an Abomination, and Balor as they spawn)

Hidden Music
  • Melee the dead Headless Zombie around the corner from the purple lantern in the first dead end of the Dungeon Hallway.
  • Use the Ice Knights to freeze 4 Red Torches around the map. (Locations: First floor Banqueting Hall in the room behind the teleport battery, Second floor in the Banqueting Hall near the ammo machine, Near the ammo machine in the Castle Grounds where Balor the second spawns, In the corner of the East Corridor outside of the Laboratory in between the door and the Elite Spawner) The red torch will turn blue when you get one activated.
  • Use your ultimate near the empty canister on the second floor of the Laboratory. The flame will appear in the canister when you do this step.
  • Now you need to go around and find the unlit treble clefs and use your voice line near them to light them up.
    Treble Clef Locations
    • At the end of the Dungeon Hallway on the left before the last room
    • In the Dungeon Cells on the right side of the doorway of the second escort pad on the way back
    • Past the Lantern in the Dungeon Hallway
    • In between the statue and the railing next to Movement Stallion
    • On the second floor of Banquet Hall in the dead-end room left of the Dragon Statue - under the torch
    • At spawn on the pillar in the wall near the Worthy Sword and the Button Machine used in the Easter Egg
    • And more!
      A chime will go off after finding the last music note.
  • Finally, interact with the Jukebox, located in the Dungeon in the room after teleporting. This will start the music and a wave of dogs.

Dolls

House of The Damned
  • Look for a way out, I recommend going up the stairs and opening the door for 500 points. Only after seeing there's no way out will you be allowed to start the next mission(s).
  • Restore the Gas Flow by interacting with the pipe on the first floor Kitchen next to the door out, where you'll then be tasked with killing Hags in the circle. Once you kill five hags in the circle you will be able to move on.
  • Find the Gas Levers, or X Marks the Spot, you can finally start putting holes in the walls. Go around and find all of the white "X" marks on the walls and melee them, (you can destroy them in any way but meleeing is recommended.) You're looking for the gas lines with levers, so only some of them will be interactable. Pull the lever when you find them, they are spread throughout the walls on the first and second floor only.
  • The next step will have you equalizing the Gas Pressure. In order to do this you need to see what the meter reads in the Basement. Then you need to go around and find the other meters that have numbers that add up to the total. Known Valve locations include 35 in the first-floor Kitchen, 42 in the second-floor Bathroom, and 73 in the Basement next to the main gas meter

  • Another option when you first start this map is to start here.
  • Interact with the large reddish lever on the wall, which will then give 3 numbers that you need to press in order. The numbers can be found in the same locations. 1 is in the Lounge with the Hanging Man, 2 is at the bottom of the stairs on the first-floor Livingroom, 3 is in the second floor Master Bedroom opposite the bed, 4 is in the second floor Music Room near the Jukebox, 5 is in the Basement near Swift Death, 6 is in the first floor Hallway outside of the Hanging Man's room. (If you lose track you can always go back down to see what number you're on.) After turning them on in the right order you'll be able to flip the power switch, stand in the area to turn the power on to be done here.
  • Open the Furnace, and then you'll be able to find the code in possibly the scariest room in the entire game, the Sub Basement, more commonly known as the Mannequin Room, located in the Basement. When you walk in you'll need to press the red button on the wall to the left, this will turn on a purple light in the room, easily visible from the stairs. This will be timed after you press the button, but you can press the button again to turn on a random light. The code will change from run to run, but won't change every time you press the button. Remember the symbols you see near the purple light, and enter them on the Furnace in the Basement.
  • Open the furnace, and then you'll be tasked with collecting entrails from zombies. Just get kills and they'll drop what you need. After putting the entrails in the Furnace the power will be on, meaning all perks and machines are turned on, and you now have access to the outside.
  • Find the Ritual Site outside near the boss arena. You need to read from the stone to continue the next quest. You can do the next three quests in any order, but I personally prefer this order.
  • The Well has a cross on top that needs to be picked up, and then put in the coffin near the Tomb. This will spawn The Urn. The first one is right next to the grave, but the rest can be found around the outside of the map. Listen for the audio cue to find it easier. (Known locations: a tree near Fast Hands, next to the Front Porch, and the Back Porch, these do not change, but the one you can shoot will rotate. The destructible one is the one that glows. This will then open the grave and you can pick up some explosives from the coffin. Use these to blow up The Well. Drop down to find the Corpse Grinder stuck in the Mother, a handful of hounds will spawn down here. Make sure to have enough points for the weapon and the door.
  • Here's where it gets a bit bloody. After getting the Corpse Grinder you will be able to cut open the bodies laying around the map. Shoot the marked bodies with the Wonder Weapon and you will be able to pull out their hearts. Their locations will move around the house, but they'll always be marked. After getting all three hearts you'll be able to put them in a bowl at the Ritual Site.
  • Open the door to the Mausoleum, or Tomb, on the corner of the map. You will then find the Mother's Head Lantern. Picking this up doesn't replace a gun, giving the user three items for a little bit. Thomas will spawn upon picking up the head. You'll then need to go down to the Basement Tunnel, where Get Up N Go is located and find the Secret Tunnel with the Mother's Head, roughly in the middle of the tunnel. There's a big blue door on the wall if you have the Head out, interact with it to move on.
  • Only in death will you find the way. In order to get through the door (after it's been interacted with) you need to get knocked and be a ghost. While you're a ghost you'll see the wall has a massive opening and a secret room with a book down here. Interact with the book to get revived for free, not losing anything including your self-revive token. (WARNING: This will not work if nobody has a self revive. If it would end the game when you get knocked, it will still end the game if you have an easter egg self revive sitting somewhere.)
  • Now you'll need to find the symbols on the walls around the inside of the house and interact with them to destroy them. These can only be seen with the Mother's Head Lantern out. Locations include in the Basement right next to the Furnace (left side), the first-floor Livingroom next to the stairs, the second-floor Closet opposite wall of the Elixir of Life After getting all three you can pick up the Book of the Dead.
  • Interact with the Family Photo above the fireplace in the Livingroom This will start the boss fight with Abraham, Isaac, and The Stranger. You will need to kill all three, collecting their piece of the picture. Put the photo back together and then get kills in the radius near the fireplace. When it'd finished you can pick up the family portrait and then put it at the Ritual Site. (This is the most difficult task to do enemy wise, I've often found myself fighting all three at the same time unless you can kill them fast enough. Feel free to do this one earlier if prepared for the fight or need the points.)
  • Once all items are put down at the Ritual Site you will be able to escort The Father. He can only be seen when holding the Mother's Head, but he can still move near players that don't have the Head equipped. He will first run to the Mausoleum, where you will then need to stand in the radius and get kills. After that The Father will run to the Hanging Man in the house, where more blood will need to be spilt. And then he will go up the stairs to the Mutilated Pig where even more blood will need to be spilt. The last spot The Father will want more blood to be spilled at is in the Mannequin Room in the Basement. After doing that one he will want to be escorted to the Ritual Site, where you will be ready to start the boss fight with Canwyll Corph.
House of The Damned Extras
Hidden Objective
  • Interact with the green portal outside the boss arena, at the burial ground.
  • Look around for the demon lamb. (Known Locations: on top of the Tomb, Second Floor Master Bedroom next to the bed, Corpse Grinder room)
  • Shoot the Mutilated Pig on the second floor with the Corpse Grinder, then run down to the basement and interact with a pig head on a stick. This is timed so do it quickly. Repeat shooting the Mutilated Pig and interact with a different pig head on a stick near the Difficulty Sword.
  • Interact with the Mutilated Pig and then LISTEN to how many times you hear the animal sounds, yes you have to have sound on to hear them. The pig can be found on the second floor at the Mutilated Pig, the Dog can be found outside of the Tomb, and the Goat can be found in the basement. Count how many sounds before it pauses, and enter that number under the corresponding mask in the Tomb.
  • Pick up the Mother's Head Lantern again, as you will have lost it from the first time. And then go around with it to find the hidden symbols near things you need to pick up. (These locations don't change or rotate and you only need to search until you find where the Lamb's Seal, on a tree stump in between the Tomb and the House, near the wall in between the stairs to the second floor and the basement, and in the Basement on the backside of the stairs.)
  • Insert the Lamb's Seal into the Lamb's Head on the wall in the basement near the Corpse Grinder, which will need to collect souls as you get kills nearby.
  • Next you need to go down to the Sub Basement, the mannequin room, and find the Lamb Box directly to the right of the stairs. You will then escort the Lamb all the way back to the Ritual Site where you started the first boss fight. Canwyll Corph will spawn in the area.

Hidden Music
  • Throw a Molotov at the chimney on the roof, which can be seen easily from the well near the doors of the house.
  • Go inside the doors and kill dogs near the now blue fireplace. Every 5 rounds is a hound round, so it's best to wait for one of those.
  • After that, search for the blue flame near the Tomb. This is an indicator for what you need to do as a ghost, but don't worry you won't lose anything. So you need to get knocked, and while you're dead run to this spot and interact with The Stranger now that he is there. He will disappear as you respawn, and it won't use a life token or anything. You can see the lit-up music note on the tree now.
  • Now you need to go around and find the unlit treble clefs and use your voice line near them to light them up.
    Treble Clef Locations
    • Above the Mutilated Pig.
    • To the right of the Elixir of Life.
    • In the Basement on the staircase.
    • Next to the Bathtub.
    • On the Piano.
    • Next to the Hanging Body.
    • Above the Hanging Body.
    • And more! (I'll work on finding the ones I'm missing and adding them.)
      A chime will go off after finding the last music note.
  • Finally, interact with the Jukebox on the second floor in the corner near the pig to start the music and spawn 2 Abominations.

Dolls
Tides of Terror
  • Start by examining the cannon right next to spawn. This will start the search for the Fuse and the Cannonball. The Cannonball can be found on the East Ship and the Fuse can be found on the West ship. The locations for these change, but will always be marked. After picking these up you'll be able to light the cannon in spawn and open up the Caves.
  • Once you interact with the big door in the Caves you'll have the option to do any of the swords, but here's the order I recommend doing.
  • Start with the closest one in the Caves, located at the door with the Kraken symbol. Interact with this to fill the caves with a poisonous gas. You'll need to shoot the red glowing vents to air out the caves.
  • Now you need to search the little tunnels for the key. If you look closely you can see the key without destroying any of the orbs. Once you destroy all the orbs for one tunnel it will spawn a wave of crabs, and you will be able to grab the key hanging from the chain if you've picked the right tunnel. Put the key into the door and collect the Bronze Sword. Make sure you check the ceiling if you're struggling to find the things to open the tunnel.
  • Interact with the sword on the top of the East Ship. You will then need to shoot the lightning rods until they turn blue and start shooting lightning at the next rod. The first one has a little bit of lightning around the top. You need to shoot the coil at the base of them to turn them.
  • You will then need to flip the breakers in the order that they appear next to the Gold Sword. They are all located on the East Ship. (Locations Include: 1 is on the 2nd floor past Fast Hands, 2 is on the 3rd floor right next to the Maelstrom, 3 is on the 3rd floor opposite side of the stairs as Elixir of Life, 4 is on the 2nd floor opposite side of the stairs as the Life Token, 5 is on the first floor opposite the stairs, and 6 is on the top floor outside the Captain's Quarters.) Pulling the last switch will then start the challenge to get kills near the Gold Sword.
  • Interact with the cage in the Caves to start the quest for the Silver Sword. You will need to find the Cranks in the Red Boxes with "X" on top and destroy them to search for this piece. You will need 3 Cranks and you can find them all before you put the first one in, and all of them are located on the West Ship.
  • Crank Locations: 2 on the bottom floor of the West Ship - 1 in front of the Jukebox and 1 next to the . 2 on the 2nd floor of the West Ship on opposite sides - 1 under the Pistolette near the Supercharger and 1 in the opposite corner. 2 on the 3rd floor - 1 at the stairs landing and 1 in the corner near Movement Stallion. 2 on the top floor - 1 near the crab cage and 1 on near the broken mast. Insert the cranks, one at a time, and then kill enemies while standing in the circle. Upon doing the third circle you will be able to free the crab. Escort the crab back down to the cage that started this quest to finish it.
  • Put all 3 swords in the door to start the mad dash to pull the levers. Luckily, these are marked so they are easy to find. I recommend starting at the on by the boss door and then running up the East Ship and down the West Ship. You will now be able to pick up the Gold Cannonball in the boss door. You can use it on the small Golden Cannon on the plank connecting the two ships.
  • After shooting the Golden Cannonball, you will see the "X" burn into the ground. In the middle of this is the code you will need for the bosses door. Interact with this to spawn the Lord of Squids. This one is different than the normal Squid Lord, as this one has inherited Abraham's pull ability.
  • After defeating the Lord of Squids you will be able to more closely examine the code on the "X" on the Beach. Facing the caves, with your back to the ships, it will read the same way as the door. Keep in mind that the symbols are likely rotated in a different orientation on the door, so they might look different at first. Once the code is put in properly the door will open, revealing "Y Cracen", the hardest boss in the game to this day.
  • Y Cracen, or the Kraken, has some challenging abilities that it'll use. Make sure to avoid the water bubbles and tentacles at all costs. You'll need to keep an eye on your surroundings to make sure a tentacle from the side or a Squid Lord doesn't get you.
Tides of Terror Extras
Maelstrom (Wonder Weapon)
  • Once you interact with the big door and get the quest to start searching for the 3 swords, you can also get the Wonder Weapon for the map.
  • Go into the room with the Super Charger and turn around. Destroy the locks on both sides of this to reveal the location of the key used to unlock the Maelstrom Go and find this location and interact with the dirt mound to reveal the key. Some crabs will spawn when you dig up the key.
  • Now the Maelstrom will be interactable and then purchaseable on the 2nd level of the East Ship, near Elixor of Life.

Hidden Objective
  • Interact with the green portal in the spawn area. You will then need to find the 3 goats hidden around the map. You only need to find 3, but their locations will change. (Locations include: Above the Difficulty Changer in Spawn, On top of the rock behind the Abomination spawner on the Beach, In the room of the Bronze Sword, Next to Fast Hands, Above the West Ship on the cliffs, On the 3rd floor of the East Ship past Elixir of Life.)
  • To unlock the compass, you need to find the symbols of the Deities on the rocks when the lightning flashes on your screen. Shoot the symbol when it appears and then shoot the same symbol on the book in front of the compass. (Locations include: Above Difficulty Sword, Near the rocks where the demon lamb spawns above Movement Stallion.) If one symbol isn't getting a hit marker then do the other one and shoot both books after shooting the other symbol. Thank you, Chief spartan44!!
  • You're now able to interact with the compass, which will make the 4 corners of the compass interactable. The code for this correlates to the buoys out in the water past the ships. Put them in the order from left to right that you see them appear. There are only 3 buoys and only 3 inputs are needed.
  • Now you'll need to shoot the 5 Blue Orbs across the top of the map. This part is timed so it can be challenging to find all the orbs on the first try. (Locations in order: Mast of the East Ship, Rocks above spawn from the East Ship, Mast of the West Ship, On the Cliff, Above the Difficulty Sword in spawn on the Cliffs.)
  • There will be another blue gas in spawn, interact with it for another very challenging boss fight. Canwyll Corph, Squid King, and 2 Abominations
  • Escort the blue crab from the spawn area across the map to different locations, where more crabs will spawn, until it leads you back to the spawn room.
  • You will now be able to start the second boss fight against the Kraken.

Hidden Music
  • Shoot the Lightpost at the very top of the cliff with the Maelstrom. This will turn the fire inside blue.
  • Find the code at the entrance to the Kraken room. You can only reach this point after finishing the main story up to the boss fight. You need to input the code into the door found on the beach where the "X" is first. W stands for West Ship and E stands for East Ship. Shoot the numbers on the masts of the ships as they appear at the foot of the entrance.
  • After shooting the third mast, a blue gas will spawn on the beach. This will spawn a Squid Lord.
  • Now the Kraken symbols have appeared around on the top floor of the West ship and the 3rd floor of the East ship. You need to kill the Squid Lords right next to this symbol to turn them pink. It needs to be the Squid Lords from every 5 rounds, the ones that spawn in from challenges will not work.
  • Now you need to go around and find the unlit treble clefs and use your voice line near them to light them up.
    Treble Clef Locations
    • On the left side of Shock 'N Load.
    • On the post to the right of the door in the Caves that faces the Ammo Blammo machine.
    • On the post directly to the left of the boss door.
    • In spawn on the rock right next to the Ammo Blammo Machine.
    • In spawn on the right side of the split enemy rock spawner next to the cannon.
    • In spawn on the rock in the middle, directly to the right of the fallen log.
    • On the East Ship on the 2nd level on the post in the middle. - Might've moved because I think that post is gone now.
    • On the East Ship in the Captain's Quarters
    • On the West Ship on the wall outside of the Supercharger Room.
    • On the West Ship on the Broken Mast.
    Finally, interact with the Jukebox on the bottom of the West Ship to start the music and spawn 2 Abominations and some dogs.

Dolls

Tier I Miracles
Introduction
The miracles in this game can be super easy when you know how they work, but don't make sense when you're trying to pick them and run away from a sea of enemies. So here's a guide to help you decide which miracles best fit what you want.

You get to pick from 3 miracles every 2 rounds, and if you find all the dolls in a run you'll get another miracle. If you don't see a miracle you like, you can refresh the listed ones by paying 2000, then it increases by another 2000 every time... OR... You can wait for another miracle. Every time you get a new miracle it will replace your last selection. They will also backlog as long as you let them, just don't forget to check them to see if you like one. This is a super easy way to avoid paying ungodly amounts of money on miracle refreshes. Once you pick one you can't change it. You are allowed 5 Tier I's, 3 Tier II's, 1 Tier III, and 1 Tier IV.

The quickest way to get a Tier IV is to pick a Tier IV from the chart in the Tier IV chapter that you like and then pick up 5 DIFFERENT miracles from Deity A and 3 DIFFERENT miracles from Deity B. This should be done as 3 Tier I's from Deity A, 2 Tier I's from Deity B. Then you will want 2 Tier II's from Deity A, and 1 Tier II from Deity B. This will give you the ability to pick up the Tier III from Deity A and the Tier IV from both Deities, if you pick a combo that has one.

The numbers show the different rarities, so the first one is the starting miracle and then every level after that is shown. 1/-/-/-% would be level one and -/-/-/4% would be the final level.

Tier I
Deity
Weapon
Molotov
Elixir
Melee
Ultimate
Taranis
Lightning
Lightning Fire
Adds lightning to your attacks which adds a 1/2/3/4% chance to stun enemies for 2/3/4/5 seconds
Thunder Bomb
Lightning in a bottle which stuns enemies for 4/5/6/7 seconds
Electric Elixir
Fire and Reload 10/12/14/16% Faster for 4/6/8/10 seconds
Thunder Stab
Quick Melee has a 30/40/50/60% chance of stun
Lightning Storm
Creates a lightning storm, which damages and stuns enemies in its radius for 5/10/15/20 seconds
Cailleach
Frost
Frost Fire
Increase damage done by 1/2/3/4%, adds a 15/25/35/45% chance to slow enemies by 30/35/40/45% for 10/12/14/16 seconds
Ice Bomb
Slows enemies within 6.5 meters by 15/25/35/45% for 3/5/7/9 seconds
Ice Elixir
Get an ice shield for 30/32/34/36 seconds, reduces damage received by 10/20/30/40%
Ice Stab
Quick Melee slows down enemies by 4/6/8/10% for 10/15/20/25 seconds
Ice Storm
Creates a winter vortex that damages enemies and makes you take less damage for 15/20/25/30 seconds
Draig
Fire
Fire Strike
Burns enemies and causes a ticking damage for 10/20/30/40 seconds
Fire Bomb
Explosive damage to all enemies within 7.5 meters (Upgrading will increase damage)
Fire Elixir
Creates an aura of fire that deals 20/30/40/50 damage every 1 second to nearby enemies for 20/24/28/32 seconds
Fire Stab
Quick Melee sets enemies on fire, ticking 20/35/50/65 damage for 10/12/14/16 seconds
Fire Tornado
Creates a fire tornado, has a chance to set enemies on fire in its radius for 5/10/15/20 seconds
Brigid
Healing
Solid Shot
Increase weapon damage done by 4/6/8/10%
Health Bomb
Heals all allies within 5 meters for 20/25/30/35 health for 4/6/8/10 seconds
Health Elixir
Health Regenerates 10/20/30/40% Faster for 26/28/30/32 seconds
Healing Stab
Quick Melee has a 20/25/30/35% chance of heal
Invincible
Makes you invulnerable for 5/7/9/11 seconds and deflects all attacks
Goon Brenn
Speed
Speed Fire
Increases Rate of Fire by 5/10/15/20%
Bomb Boost
Adds 5/10/15/20% bonus damage to Molotovs
Speed Elixir
Sprint speed increased by 14/16/18/20% for 10/20/30/40 seconds
Speed Stab
Increase the speed of Quick Melee 10/20/30/40%
Flash Force
Increase movement speed, rate of fire, cooldown rate and reload speed by 14/16/18/20% for 15/20/25/30 seconds
Cyhyraeth
Stun
Scream Fire
Increase damage done by 2/3/4/5% and lower hit enemy damage by 20/30/40/50% for 2/3/4/5 seconds
Phonic Bomb
Stuns Enemies within 5 meters for 3/4/5/6 seconds
Stun Elixir
Adds a 20/30/40/50% chance to stun enemies that damage you for 16/17/18/19 seconds
Hard Stab
Increase quick melee damage done by 5/10/15/20%
Sonar Storm
Mass Stun that makes enemies take more damage by 20/25/30/35% for 3/6/9/12 seconds
Nuckelavee
Poison
Poison Fire
Inflicts poison and causes 30/45/60/75 ticking damage for 4/5/6/7 seconds
Poison Bomb
Inflicts 20/30/40/50 poison damage over time to enemies within 5 meters for 10/12/14/16 seconds
Poison Elixir
For 16/18/20/22 seconds, inflict poison that causes 15/30/45/60 ticking damage to enemies when hit by melee attacks that lasts 4/5/6/7 seconds
Poison Stab
Inflicts Poison on Quick Melee, lasts 10/15/20/25 seconds
Poison Fog
Creates a poison fog that increases the damage you do and reduces the damage you take by 15/17/19/21% for 15/20/25/30 seconds
Mórrígan
Criticals
Critical Fire
Damage increased by 3/4/5/6% and Critical Chance increased by 10/20/30/40%
Critical Bomb
Adds 10/20/30/40% chance to crit on enemies for 3/5/7/9 seconds
Critical Elixir
Increase Critical Chance by 10/20/30/40% for 14/16/18/20 seconds
Critical Stab
Increase the Critical Strike Chance with Quick Melee by 20/35/50/65%
Can't Miss
Auto-aim bullets at enemies in sight for 5/10/15/20 seconds
Tier II & III Miracles
To get higher tiered miracles you have to get miracles from the same deity. It doesn't matter what tier they are, but they must come from the same deity, with Tier IV being the exclusion.

Unlock
Tier II
Unlock
Tier III
Unlock
Tier IV
Miracles from
Deity A
2
5
3
Miracles from
Deity B
-
-
3

Tiers II & III
Deity
Tier II (Need 2)
Tier II (Need 2)
Tier II (Need 2)
Tier III (Need 5)
Taranis
Danger Danger!
Damaging an enemy has a 1/2/3/4% chance of increasing damage dealt by 85/90/95/100%
Lightning Precision
Shooting enemies has a 20/40/60/80% chance to penetrate
Lightning Vengeance
Receiving damage causes lightning to strike attacker for 10/20/30/40 damage
Thunder in Paradise
All lightning effects have the chance to explode on impact causing 100 damage around them
Cailleach
Cold Shoulder
Molotovs have a 4/6/8/10% chance to heal the player when damage is dealt
Ice Skin
Reduces damage from incoming attacks by 5/10/15/20%
Slice and Dice
Sliding Damages enemies near you for 20/40/60/80 damage
Winter Shield
Gain a barrier that negates 50% of incoming damage until it breaks
Draig
Damage Reload
Reloading increases damage by 5/8/10/12% for 2/2.5/3/3.5 seconds
Firepower
Increase radius of fire effects by 20/22/24/26%
Fuel to the Fire
Increase duration of fire effects by 10/20/30/40%
Fire Rage
After killing a foe, your next attack deals 50% more damage
Brigid
Auto Revive
Lethal attacks have 10/15/20/25% chance of restoring 85/90/95/100% of health
Hardened
Increase base health by 5/10/15/20%
Shield Maiden
Gain a shield that reduces incoming damage by 5/10/15/20% and reflects it back to the attacker
Elixir Master
Any elixir also heals friendly players within 2 meters for 33% of their health
Goon Brenn
Fast Hands
Reduce the cost of all purchases by 5/10/15/20%
Surprise!
Deal 10/20/30/40% more damage to undamaged enemies
Time and a Half
Reduce cooldowns of all abilities by 10/15/20/25%
Miracle Maker
Ultimate ability charges 100% faster
Cyhyraeth
Bullet Boy
Stunning an enemy has a 20/40/60/80% chance to recover used ammunition
Five Finger Discount
Increase points earned from enemy death by 5/10/15/20%
Right Stunner
Increase stun duration by 5/7.5/10/12.5 seconds
Stun Master
Stunned enemies have a 33% chance to be stunned for 100% longer
Nuckelavee
Poison Prawn
Increase damage dealt to poisoned enemies by 5/10/15/20%
Toxic
Poison effects cause 10/20/30/40 damage to nearby enemies upon expiring
Venomous Touch
All abilities have 1/2/3/4% chance to apply poison to hit enemies
Poison Master
Become the master of poisons, any poison effect has the chance to leach back 1% of its damage as health
Mórrígan
Clean Kill
Increase critical damage by 15/20/25/30%
Critical Mass
Critical hits increase the chance of the next attacks also being a critical hit by 30/45/60/75% for 1/1.005/1.01/1.015 seconds
Critical Thinking
Increase chance of critical hits by 3/4/5/6%
Critical Rampage
20% chance to crit constantly for 10 seconds
Tier IV Miracles
Deity 1 (3 from this Deity)
Deity 2 (3 from this Deity)
Tier IV Miracle
Taranis
Cailleach
Arsenal Overcharge
All Weapons have a chance to overcharge, which increases their damage by 5/10/15/20% for 10/12/14/16 seconds
Taranis
Draig
Elemental Fusion
All fire and lightning attacks have a 3/6/9/12% increase in damage and a chance to stun and burn at the same time
Brigid
Cailleach
Frozen Mastery
All attacks against you can slow enemies down and has a 1/2/3/4% chance to heal you 10/14/18/22% health
Brigid
Nuckelavee
Biohazard Aegis
Gives you a poison shield that charges with hits, once charged, it explodes with 20/40/60/80 damage sustained
Goon Brenn
Draig
Velocity Overdrive
Your Ultimate and Molotov charge 5/10/15/20% faster
Goon Brenn
Mórrígan
Critical Flare
Adds a critical aura to the player which randomly triggers giving the player 85/90/95/100% crit chance for 3/4/5/6 seconds
Cyhyraeth
Nuckelavee
Soul Syphon
All attacks have a 5/8/10/12% chance of healing you
Cyhyraeth
Mórrígan
Lucky's Favorite
Adds a 2/4/6/8% chance of getting higher tier weapons from Lucky and miracles for the rest of the game
Example Miracle Setup
The miracle setup I lovingly refer to as the Immortal Turtle would be going for the Cailleach Tier III Winter Shield and the Brigid/Cailleach Tier IV Frozen Mastery. This means any combination of 5 miracles from Cailleach (For Tier III) and 3 miracles from Brigid (For Tier IV), but here is my preferred choice when aiming for Frozen Mastery.


And here's in case the images don't work
Weapon
Molotov
Elixir
Melee
Ultimate
Solid Shot
Ice Bomb
Ice Elixir
Healing Stab
Winter Vortex

Tiers II, III, and IV
Tier II
Tier II
Tier II
Tier III
Tier IV
Ice Skin
(2 ice needed)
Cold Shoulder
(2 ice needed)
Shield Maiden
(2 healing needed)
Winter Shield
(5 ice needed)
Frozen Mastery
(3 ice and 3 healing needed)
All Videos by Map
CLoL
Thunderbolt Generators


AoS


SoTD


DLF


HoTD


ToT

All Maps
Here are all the maps in the guide.

Ashes of Sker Hotel Labyrinth -

Deadly Lover's Fortress Mural/Spawn -


I hope you found this guide helpful, please leave a thumbs up if you did. This has been one of my favorite games in a long time and this is literally just the guide I was using for myself and I figured I'd share it with everybody else.

Sorry that it's gotten so massively long. The whole point of it was to have all the information in one convenient place and well, there's a lot of information. I still plan to add more and keep it as up to date as possible. If I add doll locations I'll change the name to Sker Ritual Full Guide. ;)

For Steam users: Copy and paste into your notes section so you can pull up the notes in the Steam Overlay. Set opacity to 20%-40% and you can make it look similar to the story guide.
63 Kommentare
Looneydudette 30. Apr. um 17:25 
Anyone stuck finding music notes on DLF try referring to this YT video and reading the comments. I couldn't find them all until I read the comments. https://www.youtube.com/watch?v=agobnfDsy_o
Snilloc  [Autor] 31. März um 19:09 
@Hunter, I've thought about it because I need to go back through and redo them all for the Musically Minded achievement since they added that in. They're such a pain because they randomly spawn and I'd have to go through multiple runs in the hopes of finding whichever ones I'm missing screenshots of. I'll try to add them in.

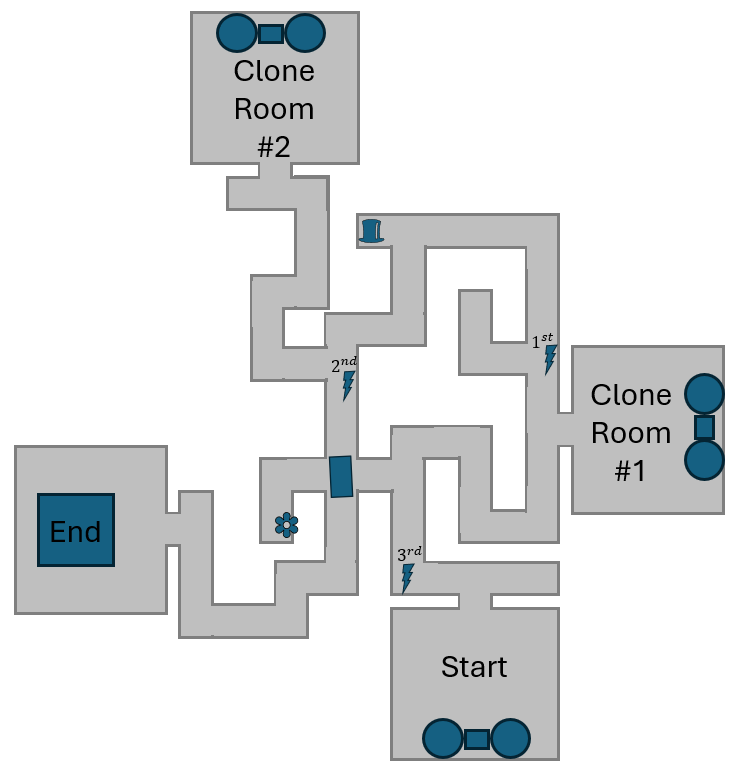
I do know that there were screenshots pinned in the Discord showing all the locations, but people say there are unlisted ones all the time.
Hunter 26. März um 23:32 
You should add some screenshots of music notes locations. That would make the guide stronger
Snilloc  [Autor] 5. Feb. um 20:31 
It is only that button, you can't move at all
🅸🆅 4. Feb. um 22:24 
Anyone know if you can do any other actions when holding the voice line to get unstuck or is it press only that button for 2 min. Because I’m not sure if it’s working anymore.
Paladente 24. Jan. um 11:47 
Is anyone else like me stuck on the music easter egg in DLF? I can't find the last note anywhere, and I'm losing my mind. ALready I had 2 in unlisted areas.
Chief spartan44 16. Jan. um 10:02 
Welcome!:steamthumbsup:
Snilloc  [Autor] 15. Jan. um 19:23 
Sorry for not being active, school has gotten hectic.

I'll try to play and figure things out that haven't been commented, and I'll fix what people have commented. Thank you so much @Chief spartan44 for your comment on the compass steps, that will be the first thing I fix. After that I'll add Maxs Wife <3 comment to the guide as well. Thank you for helping keep this guide up to date! I will still give out profile awards to those that help!!
Maxs Wife <3 15. Jan. um 18:51 
Hello!
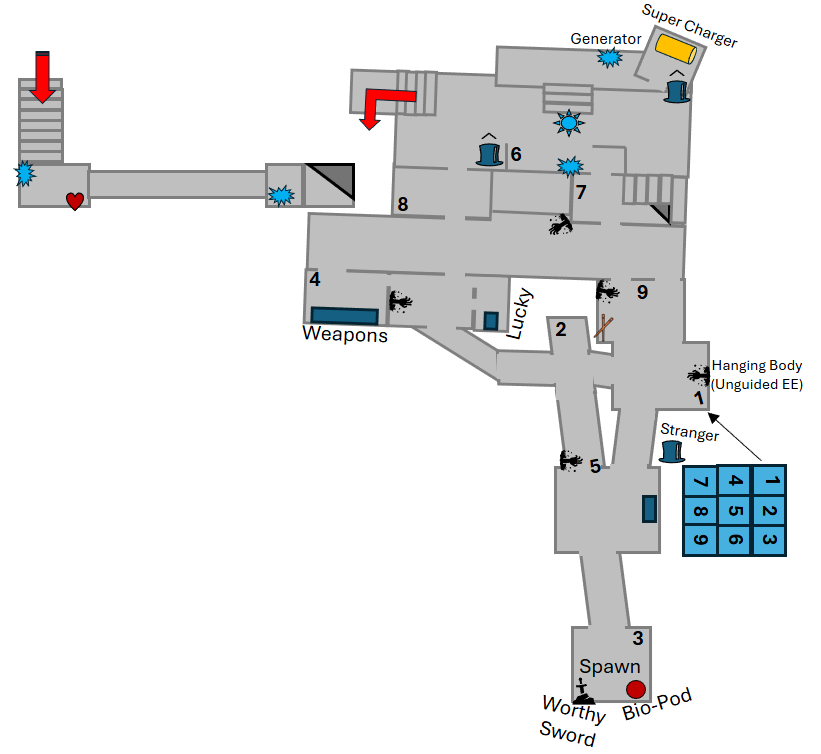
For the Deadly Lover's Fortress map's Music Easter Egg, the blue flame spawns in the "container" above the rat king puzzle after you acquire the sword from defeating Abraham. You need to ult it after it appears after turning the torches blue
:)
KDB Ark 14. Jan. um 10:55 
Hi the compass or the lightening step isn't working for me could it be the game or has the step been changed