Elminage Gothic

Elminage Gothic

125 voti
A Basic Full Game Walkthrough
Di The Weak e altri 1 collaboratori
Here there be spoilers.

This is a Walkthrough to help start you on the right foot in case you are struggling or feel stuck. It features basic information about the game and every dungeon, with annotated maps. Includes Post Game content.
3
2
2
5
2
2
   
Premio
Aggiungi ai preferiti
Preferito
Rimuovi dai preferiti
Purpose of the Guide
This is a basic guide for the game to help anyone who might be struggling to have a good start in Elminage, or pointers in case you feel stuck.

I won't be covering "perfect" min-maxed-6-man-only-post-game-ready parties here. The choices are far too numerous, subject to taste, and post game is an entirely different beast than the rest of the game. That said, I have typed up basic information on the races, classes and EX Skills to help you make decisions if you want to stick with one party, or you can go to an outside resource for a pre-constructed one. There is extra information regarding post game party set ups at the start of the post game section if you think that might help you. The most important thing is to have fun, so use what you want to use.

What I will do is list things that are useful to know about each dungeon, and text instructions on how to get to where you need to be until you find a decent in game map if you need it. Keep in mind as you go that Wizardry-type games have a lot of randomness to them. Sometimes you'll fight what should be a tough enemy, but they will go down without any trouble. Other times you'll face a group of enemies that you think you have a handle on, only to be completely annihiliated in a blink of an eye. And, of course, sometimes you just don't get any useful loot drops for your party. Just remember that the game is made to be this way, and the best you can do is to be as prepared as you can be.

This guide is a monster, but please don't let that intimidate you. You can beat the game without knowing every nook, cranny, and algorithm. Feel free to skip information that you don't feel you need to enjoy the game.
Last Update and Wanted Information
8/27/2017
- Vino has made more lists from the JP Wiki, filling in more gaps in the loot tables for Ishmag Underground Sanctum and Soldier of the Giant Gods. Once again I am amazed at the amount of work this must have taken. Thanks again!


As always, the maps here can be used for anything anyone wants as long as they are made available for free.

If you feel like helping out, I am looking for any loot drops that are missing from the Potential Loot sections. Even if it is "trash" loot, it is valuable information and I will credit you for your find next to the item. Knowing the exact floor you found it on is unnecessary, but I need to know which dungeon you found it in. I am not accepting information, for this guide at least, on items that are impossible to get normally. Also, this guide is only for the PC and PSP version of the game. I cannot verify any information based on the 3DS remake version.

Another bit of information I am looking for is the items you can get from selling Fragments. I remember doing it years ago, before making this guide, and being very disappointed with the rewards (I could be remembering wrong, or didn't look close enough at the equipment), but I do not remember what the items were.

If you see any information that is flat out wrong please let me know and I will fix it and credit you. I love being set straight, so don't think you'll hurt my feelings! I am also interested in any opinions, such as information being too hard to reference or things that are difficult to understand. I am more than happy to reorganize information and/or try to make confusing things easier to grasp, and I will credit you for the inspiration. The only kind of thing I won't add is stuff that goes against the spirit of the guide such as calling certain classes useless, mocking other people's preferences/playstyles, and advice intended for hardcore players that could take hours/days to achieve (like recommending Contracting a Divine Dragon...). If your information comes from someone other than yourself, please site your source.
Steam Guide Issues
There is an issue with Steam Guides that sometimes causes formatting and pictures to go haywire when viewed in the Steam Client. If I could fix it I would, but unfortunately it is out of my hands.

If you experience strange duplicate paragraphs (with the top one having no proper formatting), or pictures/screenshots that are placed underneath the text, I suggest using your Internet Browser to view the guide instead. The guide will load faster outside of the Steam Client anyway.

If you have to use the Steam Client there are two ways to "fix" the issues. One is to either close and reopen the guide, or restart your Steam Client and hope it fixes itself. The other is to simply try and ignore the strange duplicate paragraphs and highlight any text that is over a picture/screenshot so you can read it more clearly.

Sorry for the incovenience.
Useful Tricks - Part 1
You do not have to use any of these tricks to beat the game, but they can save a lot of time if you know about them. Give them a look.

REROLL BONUS ROLLS
Most people will figure this out on their own, but it is still worth mentioning. You can reroll Bonus Rolls at character creation by exiting back to Age Selection and selecting it again until you get the number you want. Fair warning that getting rolls above 15-16 can take a really long time, potentially hours if you are trying for the 40+ points it takes to make an Innocent Lord or Ninja. Getting rolls that high are not necessary to beat the game (not even Post), and a majority of your effort will be erased when they class change. I suggest sticking to the teens.

PUMPING VIT
The only thing you can transfer via multiclassing besides spells and casts is your HP value. Even all the stat gains they had in their previous class are reset to the race/class minimums. Stats also tend to normalize as you level if you don't save scum. For that reason, you might want to consider putting all left over Bonus Roll points into VIT which, with influence from their Race, Class, Level, and RNG, controls your HP gains on level up. Doing this has the potential to get your characters 70-100hp before their first class change, a huge boost to survivability in early game.

BELOW 3 SPELL INHERITANCE
Whenever a character class changes, the number of magic casts they have is recalculated, determined by the class they are changing to and the number of spells known, with a cap of 3 if the class does not learn that magic school naturally (Hunters, the exception to the rule, can keep up to 9 Alchemy casts, but not gain more than their cap as a Hunter). Your character will eventually learn spells they do not know in any rank that they have at least 1 spell in. What this means is that you can actually gain (or lose) casts if you class change at certain times and take advantage of earlier class changing.

Take a Mage, Cleric, or Alchemist to level 13 for at least one spell in rank 7 (see SPELL LEARNING RNG at the top of the Unuseful Bugs section), then class change them to transfer spells. If they have learned 2 spells they will actually gain 1 cast by transferring. As they learn more rank 7 spells, their MP will continue to raise until hitting the cap, all while leveling with a different class. By the time they hit 13 again they will probably have all 3 casts. This can save a lot of time if you want to load up your characters with different magic types.

Because class changing requires stat minimums per class and level 13 is relatively low, if you are short a required point for the class you want you can use the rank 7 Alchemy spell Protectorate (which will become unavailable until the caster levels again) to gain 1 in a stat of your choice, or Unleash Hidden Power of an Ankh of [Stat you need]. If you are afraid of bad stat rolls and want to utilize this trick, you might want to consider save scumming until they reach their final class, or picking a race who's base stats have an affinity for the class you want. Technically you can get the same result class changing at levels 14 and 15, so if you have no means of stat boosting or can't stand the issues with this trick you can go that route as well, but it's not as efficient.

SAVE SCUMMING STAT GAINS
Most people know this, but it is still worth mentioning. If you want to multiclass you need the minimum stat requirement, but sometimes the RNG doesn't work in your favor. If you don't want to get stuck with poor stat rolls on the level you want to class change on, which will happen from time to time if you level normally, take advantage of the save system; save before you rest, level up, and reload if you don't get what you want. Another method that can be used in conjunction is placing Bonus Roll points in the stats you need for your next class (instead of pumping VIT) and save scum to keep those values, though this will only work for the first class change.

CONCENTRATED EP
EP (Experience Points) is split up between your party members when the battle is over. If you only want to level up certain characters, you can concentrate the EP on them by having everyone else run before the battle is over. Kill everything until there is one enemy left. Weaken it if you need to (be very careful), make any Hunters Run (unless you are leveling them), then put it to Sleep with the rank 1 Mage Spell Misama or the Harp of Sleep (Bard/Shaman only). Now Run with every character that you do not need to level; it effects recruits individually and they will return after the battle is over. Kill the last enemy with the remaining character(s). Make sure they can actually hit and damage the enemy enough to kill it. If they are too low you might need to leave one strong character in the party to deal damage until the character(s) you are leveling is high enough to do it themselves.

EARLY GAME LEVEL GRINDING
While the Pause Adventure trick is nice, it is not very fast in terms of pure leveling in early game. For new recruits (back row), paired with more experienced ones to clear the content quickly (front row), try using true-repeatable battles in early game. The less party members you have in your party when the battle is over, the less EP they have to share:

The Chief of Training in the Training School (Talk) is repeatable, but he plays to win, so you might not want to fight him when you first start the game; he will slaughter you. You cannot run from this battle, so you need to engage them with less people if you want to concentrate EP. You get 3,456ep per battle (576ep per character for a party of 6).

The Hole in Tsun-Kurn B3 (12x0y) is the second available method and has the fastest potential of these three. A level 8+ Dragonewt can clear rows efficiently with Breath. You can enter the battle again by inspecting the same spot (F key for keyboards), or moving back and forth. You cannot run from this battle, so you need to engage them with less people if you want to concentrate EP. The amount of EP is determined by how many enemies you get, which is randomized, but it is common to get more than 18,000ep per battle (3,000ep+ per character for a party of 6).

Avi in Guatella Grotto B1 (4x,7y) is the third option. You can potentially get more EP by grinding at the Hole, but it's an option if you prefer to fight a single enemy or just want a fight that you can use the run trick on. It starts the battle with the Sleep Status, so keep that in mind if you have a strong Hunter. You get 7,632ep per battle (1,272ep per character for a party of 6).

MID GAME LEVEL GRINDING
Lesser Demon is a regular enemy in the lower floors of Igdra Underground Church. They are not too tough, have no status resistances, and call reinforcements, making them an excellent source of EP. Use the Sleep/Run technique to concentrate the EP on the characters you want to grind. You get 13,824ep per Demon killed, split between party members.

END GAME LEVEL GRINDING
Greater Demon is a regular enemy found in Ishmag Underground Sanctum, most frequently in the upper three floors. Like Lesser Demons they call reinforcements, making them an excellent source of EP. Use the same Sleep/Run technique to concentrate the EP on the characters you want to grind. You get 46,080ep per Demon killed, split between party members.

POST GAME LEVEL GRINDING
EP flows pretty freely in Post Game but if you want safer grinding, especially for new recruits, the Chaos Demons found in B5 and B6 in the Cave of the Ancients are pretty good. Like the other Demons they call reinforcements, making them an excellent source of EP. You get 78,960ep per Demon killed, split between party members.
Useful Tricks - Part 2
SPIRIT PACT EXPLOIT
If you want to turn your summons into party members, but your current Summoner doesn't have the ability to do so, Spirit Pact works on all summoned creatures no matter which Summoner is their master. Simply make a second level 1 Summoner with Spirit Pact and have your main Summoner summon the enemy you want to convert. When the level 1 Summoner's SP is depleted, dismiss them and make another one.

REPLICA CLONE PERMANENCE
Replica has quite a few bugs with it. Some of it is bad, though since you can use this bug to your advantage I decided to put this information in Useful Tricks.
First, making the Clone while in town will erase the Clone as soon as you go into a dungeon. So never make one in town, even if they are technically allowed there.
If you make a Clone in a dungeon and go back to town, the Clone will still be in your party. From there one of two things can happen:
1. Entering a dungeon again will clear the Clone. This is what is supposed to happen.
2. The Clone will persist even when you re-enter a dungeon. If this happens, the Clone will stay in your party until you disband it or it is forced out for an escort quest, even if it dies or you swap out your original Ninja. If you go to an Inn with a dead Clone they will have HP but still be dead. Enemies will have the potential to waste their turns targeting dead clones with certain skills, such as Summon Judgement or the Death Card. I have been unable to isolate a single trigger for this state, so it might be a combination of things. If you want to trigger it, I have the best luck going to Soldier of the Giant Gods and using Diomente to Mine the static points there until a battle pops up. Keep in mind that having a Pick, Mining, damage or death to the Clone, or even resting at the Inn after you get back are not individual triggers, and you can get this bug to occur anywhere.

INFINITE PICK/AURA PUNCH USE WITH REPLICA
If you have a Ninja with the Replica EX Skill, put an Aura Punch in their inventory and use Replica to create a Clone in the 7th Summon Slot. The Aura Punch does not have to be equipped to the Clone. Go to the static Mining spot at Ibag Tower B3 (19x,3y) and the game will check for Aura Punch. It will use and shatter whatever is in your normal party member's inventories first, but if they do not have an Aura Punch it will use the Clone's inventory. The Clone's items cannot break, despite what the text says, and are usable even if it is dead. With this you can mine the spot for as long as you have inventory space (and Warehouse space if you have the Mysterious Bag EX Skill). You can use this trick with a Pick for static and random mining, though normal static mining spots need to be reset after each use. You do not need Clone permanence for this trick to work, but if you can trigger it the Clone will maintain its inventory so you can safely store or sell the Aura Punch (or Pick) on your original Ninja character to preserve it and save space.

PAUSE ADVENTURE
This trick also comes at the expense of time, so keep that in mind if you have any really old characters.

Get past alignment restrictions:
Make a party with one alignment plus your neutral characters, enter any dungeon and Pause Adventure immediately. Now make a new party with the characters of the opposite alignment, head into the same dungeon and Look for Comrades in the camp menu on the same exact spot you left the first party, merging the two together. Keep in mind that alignments can change as you spare(Good) and/or fight(Evil) friendly monsters, so be careful if you are trying to keep a non-Neutral character an Innocent, or want to multiclass a character to an alignment restricted class.

Refresh guaranteed battles and resources:
Find a spot with a guaranteed battle or a farming point, fight/take it, then Pause Adventure and go right back to your party in the second tab of the World Map Menu. All guarenteed battles and farming spots will be refreshed. You can use a consumable item for the same effect, but why waste inventory space? You can also use stairs to refresh the floor if there are some close by.

Evade Floor Masters:
Trapped in a tight spot by a Floor Master? Use Pause Adventure and they will reset back to their default position, allowing you to continue on without a fight.

Magically transport <Key Items> and pick up Quests:
<Key Items> and Quest Events are linked to all parties. If you have something that you want to turn in or a quest you want to pick up, you don't have to leave the dungeon with your current party to do it. Pause Adventure, make a new party of at least one person, turn in or pick up your quest, then go back to your first party.

FREE MONEY
You can mug new recruits for easy money. Create a new character (or 5) and make a party with them and a character to hold the GP. Sell the new recruit's starter gear, give their money to your GP holder, then dismiss them (don't dismiss the character with the GP!). A group of 5 throw away Fighters will net you 2,025gp and you can repeat the process as much as you can stand it.

SELLING TO SAVE SPACE AND OTHER SHOP EXPLOITS
Jadgebol Shoppe in the Kingdom of Ishmag will list everything you sell them as merchendise, even + equipment, so you can rebuy anything for a price. If you have good equipment that you can't use yet, you can sell it to save inventory and storage space. If you are really cheap you can always create new characters, store equipment on them, then shove them back into the register, but then you'd have to remember who has what, making it a hassle to browse and compare. Any Ore Forged on equipment will be lost, so selling and rebuying equipment is a way to clear Forges before you can build a Master Alchemist with Disassemble as long as you are ok with losing the Ore. Also, be aware that selling regular Ore will bring the AP value down to 5, +1 Ore becomes 7ap, and +2 Ore becomes 10ap, so don't sell anything good. On the plus side, selling an Air Seed with a single digit value and rebuying it will give it an AP value of 10.

TRANSMUTABLE ITEM DUPLICATION BUG
This trick works for any transmutable item that can be made in stacks, which means Dove's Bell, Crow's Bell, and Rock Counter. Make the item you want, then put one in the Alchemy Storage Warehouse in Hosbarn Inn. Now take the item out again and you now you have two. If you make sure that you always leave at least one in the Warehouse you will never run out.

INFINITE UNDERGROUND GOBLIN MAPS
Completing the Kidnapped Children quest in Igdra Village allows you access to a room in the Great Tree Yap Gotz B1 (7x,5y) that holds an Underground Goblin Map, a single map that can be used repeatedly with a chance to break. Any time you do not have one in your current party's inventory the map respawns, so you can come back with a different party to collect another. You can also take it, throw it away, take another one, and repeat up to 10 discards. The tossed maps will end up at the Mountain Refuse Protector in Dezaporlia Tunnel and can be reclaimed for a fee. The maps identify, sell, and can be purchased for 5gp, so the Shopkeeper's inventory at Jadgebol Shoppe is a great place to store any excess maps you might have. Never deal with crappy one-time-use Magic Maps again!

SWALLOW RETURN WHEN INCAPACITATED
A minor bug, but still handy if you like to use Samurai. If a Samurai, or a Swallow return capable Summoned Creature, has a status effect that incapacitates them (sleep, paralysis, petrification) and is targeted by an enemy they still have a chance to activate Swallow Return at their normal rate. You can even Swallow Return a Swallow Return.
Unuseful Bugs
SPELL LEARNING RNG
Technically not a bug, but worth noting. Sometimes Mages, Clerics, and Alchemists will not gain a rank 7 spell/cast when they hit level 13. While there are certain levels where you can expect to learn specific spells and have a specific number of casts, whether you gain or not is actually based on RNG, which is influenced by the character's INT (Mage and Alchemy) and PIE (Cleric). Levels below 15 seem to be affected more. It is important to note here that Summoners gain their casts every odd level (3,5,7,etc.) and a new rank with 3 casts every time their highest rank hits 5 casts. They will never have all spell ranks at level 13 (level 25 for all spell ranks, level 37 for all 9s) There is no RNG involved and it is not a bug.

Save before you level/class change and if you do not get what you want reload and try again. If you accidentally save a level 13 character with 0 rank 7 spells, they usually gain a spell or two once they hit level 14, but if they didn't you will need to take them to level 15. So the situation is fixable, it will just take time. Make sure they have at least 1 spell in the 7th rank before you class change.

ENEMY TYPE DAMAGE MODIFIERS
This might not be a bug since it is present in other Elminage games, but it seems like one to me. If you have two pieces of equipment that modify your damage against a specific monster type but for two different positive values (Does not include X, -, or =), the game will default to the lowest value. For example, if you have a weapon that deals 2x damage to Beast types and a piece of armor that gives you + (1.5) damage to Beast types you will only do an extra + damage to Beast types. Try to keep tabs on your modifiers across all of your equipment to keep this from happening if you can, but because certain equipment sets don't take how modifiers work into account you might not be able to avoid it without losing defenses.

MONSTER ENCYCLOPEDIA BUG
Not game breaking, but useful to know if you are a completionist. Making an enemy your summon will not log that creature into the Monster Encyclopedia, which is odd because even non attackable NPCs are listed as you meet them. This is an issue for unique non-contract immune monsters (like Shadow). Make sure you are ok with having an incomplete reference or don't care if you can access their portrait with the Staff of Transformation before you Contract them.

SLOW FADE/FLASH BUG
The game will freeze if you play in Windowed Mode during a slow fade or flash effect. I only know of two times it can occur (Black Water and getting the 16th Tablet) and have noted them in the guide. If you like to play in Windowed Mode, simply switch to Fullscreen during these times and switch back to avoid it. Save beforehand though, because there is a bug when switching to the different modes.

WINDOW MODE SWITCH GAME FREEZE
If you want to switch between Fullscreen and Windowed Mode sometimes the game will freeze, so save beforehand. It does not happen every time and I have never seen it occur when changing it on the game's main screen options. It seems to happen more frequently if you try to switch in town, rather than a dungeon.

UNUSABLE MOUSE
I was made aware of this one in a thread by pheonix and Smiling Spectre in the Discussion Forum. If you use a mouse to play there are certain conditions where it becomes unusable, such as the announcement that characters are being moved to the temple if you return to town from a dungeon with dead party members. You can bypass this bug by using the Confirm key (Enter on keyboard).
Constructing a Party - Stats and Races
The most important things when it comes to party composition is synergy mixed with your own personal preferences. While there are certainly class/race/skill combos that have an advantage, especially in post game, during the main bulk of the game you can make almost anything work. Every class in this game is good, it's all about how you use them. Start by picking something you want to try out in your party, then build the rest around that. If something isn't working for you, swap it.

If you are having trouble deciding, just try making sure you have at least one character that can heal and one or two that focus on physical damage, then fill the gaps with whatever support classes you'd like to try out. Having one or more characters with access to different spell schools, especially Mage Magic for Diomente, will up your survivability dramatically. Don't neglect Alchemy if you can help it. You don't have to have one in your party all the time, but you will need a class with Thief Skills (Thief, Hunter, Bard, Ninja) to open certain doors reliably. If you want to do all the quests you will eventually need a level 5/10 Bishop, a level 26+ Thief, and a Servant and Alchemist of any level. Also, status effects are gold in this game. The more you have access to, the better.

Be mindful of your characters' lifespan and VIT stat; they can die permanently if they hit 0 VIT. Class changing and being revived after dying will add a year to your age (two years if Ash), which effects your stat gains and losses as you level. Time passes when travelling (including pause/resuming a party), walking in a dungeon, or resting at the inn, which can add up. The only ways to lower age are Kiss of the Goddess traps, found in end/post game, and Ring of Life, a transmutable item that requires two +2 Ore. You tend to lose stats when very young, gain them as a young adult, average them out later in adulthood and to lose them towards the end of your life. If your VIT stat starts to drop too fast when leveling you can use the Protectorate spell or Ankhs to keep them alive. Unless you intentionally make your characters old, forget to age a Spirit Pact character before leveling them, or are constantly dying and failing the resurrections, it is very unlikely that you will have any permadeaths. Just keep an eye on it and your characters will be fine.

One last note is that characters can go beyond their race's natural lifespan. The only thing it effects is stat gain/loss on level up.


STATS
If you've ever played an RPG before, you are likely to recognize these stats. There are a few differences from the usual JRPG fare though:
Strength (STR): Physical power and chance to hit with physical attacks (Bows included)
Intelligence (INT): Mage and Alchemy spell power, with influence on learning speed
Piety (PIE): Cleric spell power, with influcence on learning speed
Vitality (VIT): Influences HP growth and the success rate of Revival
Agility (AGI): Influences attack order in battle and the success of Thief Skills
Luck (LCK): Influences RNG rolls


RACES
The stats of some races lean them toward certain roles, but don't let that stop you from making the combinations you want. Some seemingly odd race/class combos actually work really well. Max stats for each character are based on their Race's base stat value +10.

Human
Average Lifespan: 10-60 years
8 STR, 8 INT, 7 PIE, 9 VIT, 8 AGI, 9 LCK
Average across the board, with slightly less natural magic resistance than others. Their stat spread can make it easier for them to gain what is needed to multiclass into advanced classes earlier (advantage negated by save scumming) and give them very strong stat caps.

Elf
Average Lifespan: 15-500 years
7 STR, 10 INT, 10 PIE, 6 VIT, 8 AGI, 6 LCK
Great casters who also have the best natural magic resistance, though resistances do not stack with equipment.

Dwarf
Average Lifespan: 30-200 years
10 STR, 6 INT, 10 PIE, 11 VIT, 6 AGI, 7 LCK
Great front row physical fighters and decent healers. They make excellent healer hybrids (Valkyrie and Lord), but are a bit on the slow side.

Gnome
Average Lifespan: 25-400 years
7 STR, 7 INT, 12 PIE, 9 VIT, 8 AGI, 7 LCK
Excels at healing, so if you want to focus on that role you can't go wrong with one.

Hotlet
Average Lifespan: 30-80 years
6 STR, 6 INT, 5 PIE, 7 VIT, 12 AGI, 15 LCK
Their AGI and LCK make for great Thieves and Ninjas.

Fairy
Average Lifespan: 5-30 years
5 STR, 9 INT, 9 PIE, 5 VIT, 14 AGI, 9 LCK
Tend toward backrow magic roles, and are great at it due to their high AGI, but their naturally low AC (5) makes them interesting Brawlers. Watch that low HP though; they are hard to keep alive in early game. They have the lowest age cap, so if you get any permadeaths it will probably be a Fairy, and they have the least amount of equipment options of all the races. As a gimmick race, they take a little more EP to level.

Werebeasts
Average Lifespan: 5-60 years
9 STR, 9 INT, 9 PIE, 10 VIT, 11 AGI, 6 LCK
They have a good stat spread and an innate chance to Poison, but are cursed if you equip them with Silver. They make excellent Hunters, and companions to Hunters. Like Fairy, they take a little more EP to level.

Dragonewt
Average Lifespan: 20-300 years
12 STR, 7 INT, 5 PIE, 12 VIT, 6 AGI, 7 LCK
Stats lean toward physical classes, but their special Fire Breath can be great on backrow casters (Damage based on 1/2 of the user's current HP + Fire Attack Attribute and some RNG. Power decreases each time it is used in the same battle. There also seems to be a cap on it, so expect it to do ~200 damage per hit in end/post game). At level 8 it hits the entire front row, which is overpowered in early game. They also take a little more EP to level.

Devilish
Average Lifespan: 3-400
Recruited through Spirit Pact, or gained through a race changing event in end game. Their class, resistances, and innate abilities depend on what they are. Spirit Pact recruits can become more powerful than a regular character, but because they lose a lot of what makes them special if you multiclass it's best to keep them what they are. Race changed characters don't have that issue. They can use a majority of cursed equipment without it sticking to them, but they will still be effected by any negative stats. For Spirit Pact Devlish, their age starts extremely low. You will want to raise it before leveling.
Constructing a Party - Classes Part 1
Fighter
All Alignments
12 STR
Starts strong and stays strong. They have access to an amazing range of equipment. They don't have any special abilities, but tend to have really good HP gains as they level up, and they level up quickly.

Mage
All Alignments
12 INT
Gains Mage spells and casts earlier than any other class that can learn them. This class is the quickest way to access Diomente (levels 13-15), a valuable warp spell, and has the highest potential magic damage. The rank 7 Mage spell Enterook Mista's damage is effected by Elemental Attack Attribute values if cast by a Mage.

Cleric
Good / Evil
12 PIE
Gains Cleric spells and casts earlier than than any other class that can learn them, and has access to some fairly beefy equipment which is suitable for the front row. Comes with Holy Physical Attack (hurt Ghost-type enemies with normal weapons), and Dispel (kills an Undead-type, no EP gain until Soul Release at level 26, when they hit Mastery). Has the highest potential healing and an increased effect when using the rank 7 Cleric spell Immolarati.

Thief
Neutral / Evil
12 AGI, 12 LCK
The best at physically identfiying traps and unlocking treasure (magic is safer) and doors, and also has the Hide skill (puts character into a Hidden status with a boost to the Attack command) with the best chance of all classes to stay Hidden. They also level very fast. They are fairly weak in combat, but when they hit Mastery (level 26) they can Steal and remove enemy equipment (have to remove before stealing). A great companion for a Servant, since most enemies have Herbs. A Master level Thief is required for a quest.

Alchemist
All Alignments
12 INT, 12 LCK
The only class that can learn Alchemy spells and an excellent support character, whether in the party or lounging back at the Tavern. They can Forge upgrades and remove restrictions onto equipment using Ore, and Transmute some useful/gimmicky items at the Alchemy Warehouse in Hosbarn Inn, one of which is required to get through certain areas to finish a few quests. Mastery (level 26) gives them access to High Purity Synthesis, which gives bonus AP when Forging (effected by level), and the ability to Disassemble Forged items to reclaim Ore, freeing equipment for a different upgrade. Highly recommended, even if you don't plan on fighting with one.

Servant
All Alignments
12 INT, 12 VIT
An interesting healing-type class that utilizes Potions and Herbs, with extra natural resistances (does not stack with equipment) and a decent selection of equipment they can use. They have a special Medicine Bag (access with Character Status > Skills > Treatment or Jadgebol Shoppe > Medicine Bag), separate from their normal inventory, which can not only hold Potions, saving space, but automatically use them at the end of each turn (characters with Mark of Ruin cannot be healed this way). Potions with a higher effect are used first, so it can get a little expensive. Treatment is also interrupted by Tackle and Unclean Earth, though Potions used normally work just fine under those conditions. They can also use Mix at Jadgebol Shoppe to create Potions using Herbs and are the only class that can use Magic Herbs directly, which restores 1 spell cast across all ranks for the entire party (2 when they hit Mastery). Having a level 26+ Thief companion to steal Herbs is nice. One of any level is required for a quest.

Bishop
Good / Evil
15 INT, 15 PIE
A caster that can naturally gain the maximum 9 casts of both Mage and Cleric spells, has access to Dispel, and can Identify items on the fly (access with Inspect or Character Status > Skills > Identification). The downsides are that they level/learn painfully slow and will never be as powerful as a more focused class. Also, they do not learn Soul Release so Dispel will never give you EP. Identification has a chance to fail, giving the Bishop the Fear status, but that is a minor complaint since they can cure themselves if they have the means. Because of their slow learning rate it is a good idea to level them as either a Mage, Cleric, or even Alchemist first so they have access to something to make them useful in early levels. You need a Bishop at level 5 for one quest and level 10 for another (can be the same Bishop) if you want to do them all.

Hunter
Neutral / Evil
12 STR, 12 INT, 15 AGI
A very solid back row class that can use bows. The automatic Pursuit ability (Bow only) allows them to attack one enemy afflicted with a status effect at the end of each turn, which becomes all afflicted enemies at Mastery (level 32). Swift Attack (consumes SP) lets you act first, allowing you to snipe any weak enemies before they can attack. They also come with Hide and basic Thief Skills, though they will never be as good with them as a Thief is and they cannot learn Steal. An extra perk is the ability to keep all 9 casts of Alchemy, making Alchemist > Hunter a good multiclass plan. The Werebeast Race is an excellent choice here, as well as having any other Werebeast companions. If you have a Summoner and use status effects to help land Contracts, Hunters will not play nice so watch out for that.

Brawler
Good / Neutral
15 STR, 12 VIT, 12 AGI
A physical front row fighter that has high damage potential if they are lucky. Their main appeal is their Group Attack ability, which allows them chances to combo after each attack to their target. The 4th hit of a combo is a Clean Hit (chance raises when they hit Mastery) which lowers the resistances of their target for the next action, not turn; make sure the person taking advantage of it acts directly after the Brawler. You can easily do this by setting a specific turn order by pressing Page Up on your keyboard while in battle. They are an excellent companion for a Summoner, though you might not want to make them Werebeast for that purpose; Werebeast's innate Poison skill can end the battle earlier than you'd like. They have a quirk that lowers their natural AC every few levels, but it can only be activated by being naked, or equipped with things that have the Lower AC Ability ON (like Cloaks). Having less equipment on means less resistances, so be careful. During early game it won't be low enough to protect them, so equip them with normal gear until they are stronger.

Bard
Good / Neutral
10 INT, 10 PIE, 12 VIT, 15 LCK
An interesting class that can use Instruments (use them like items in battle for special effects, with a chance to break) and slowly learn Mage spells. Their special ability is Tarot, with potential effects too numerous to list here (effects of each card are described in game). It has a chance to fail, increased each time a card is drawn and automatically set to next-to-impossible-to-succeed during Boss battles, that can either switch the intended target or cause nothing to happen; recover your success rate by sleeping at the Inn or using a Magic Herb (Servant only). They also come with Hide and basic Thief Skills, though they will never be as good with them as a Thief is and cannot learn Steal. Because of their slow learning it is a smart idea to start them as another caster class and transfer spells.
Constructing a Party - Classes Part 2
Shaman
Good / Evil
12 INT, 15 PIE, 12 AGI
A love it or hate it class, slow at coming into their own. Their special ability Barrier, which reflects enemy spells and draws enemies to cast at it, is useful, though the drawing effect decreases with use (refresh by Resting). They also have Dispel, but do not gain Soul Release so you'll receive no EP for it. They have the ability to use Instruments, just like a Bard. If you choose to use them, most Charm weapons cannot hit all enemy types (use the rank 1 Cleric spell Harias or Forging to get around this), but they have access to other weapons they can use. They do not learn spells naturally, so multiclassing them from a caster class is a good idea. At Mastery (level 32) they gain the ability to put Charms in every equipment slot. This can allow for some crazy damage, especially with post game equipment, but they are very vunerable.

Summoner
Good / Evil
12 INT, 10 PIE, 10 VIT, 15 LCK
The best utility class in the game if you are willing to put in the effort. Their only ability is Summon Magic, which allows them to make Contracts with enemies (see Contract in the Spells and Tarot by Effect - Part 3 section for more information). They can then Summon that enemy into battle as an uncontrollable AI, taking up a special 7th slot in the party. This is great for filling in any gaps you might have in your setup. Once they hit Mastery, level 32, their Summons get a huge boost in power. When trying to make a Contract, having a Brawler (Clean Hit) in the party is great, but make sure that their turn goes directly after the Brawler. Status effects such as Sleep can also really help in Contract attempts, but watch out if you have a Hunter in the party. Because they do not learn any spells other than Summoning, consider multiclassing some spells onto them so they have a use beyond their AI pet. There is only one slot for Summoned creatures (Replica included), so it is best to only have one Summoner in the party at a time unless you are using the Spirit Pact trick.

Valkyrie
Neutral - Cannot be a Man
12 STR, 12 PIE, 11 VIT, 11 AGI, 10 LCK
A strong class that naturally gains Cleric magic, albeit slow to level and learn. They can hurt Ghosts with normal attacks, Dispel (no EP), and can deal good damage from the back row with Spears. When they hit Mastery (level 32) they can equip two handed spears as if they were one handed weapons, leaving their offhand free to equip something else. Their relatively low stat requirements and Neutral alignment make them excellent candidates to keep Innocent.

Lord
Good
14 STR, 11 INT, 14 PIE, 15 VIT, 11 AGI, 15 LCK
A defensive class who naturally gains Cleric spells, also very slow to level and learn. Once they hit Mastery (level 36) they apply resistances (increased with their level) to the entire party, though it will never hit 100% (75% max) and does not stack with natural resistances or Forging. They can also Dispel (no EP). When it comes to raw power Lords lack quite a bit compared to other advanced classes, and combining that with slow leveling they can be a hard class to start the game with. That said, they can still be useful if you need to Heal or Defend someone in a pinch, as well as making a great target for Bifei when it is needed. Their stat requirements are huge, so multiclassing them is a good way to go.

Samurai
Good / Neutral
15 STR, 12 INT, 14 VIT, 15 AGI, 12 LCK
A strong class that naturally gains Mage spells, though very slow to level and learn. Their Dual Wielding ability, allowing them to equip mainhand weapons in both hands (does not include 2-handed weapons), is really good. When they hit Mastery (level 36) they gain Swallow Return which allows them a chance to counterattack when targeted. Their required stats are a bit high, so multiclassing is a good idea.

Ninja
Evil
14 STR, 15 INT, 13 PIE, 15 VIT, 16 AGI, 16 LCK
The most demanding class when it comes to required stats, so you will probably want to multiclass or use Spirit Pact to get one. They level slowly so it is a harder class to start with. They have a natural chance to Behead (increases with level) and Vigilance (chance to avoid surprise encounters and auto Hide). They have the same Lower AC ability Brawlers have (naked or Lower AC Ability ON equipment only to activate) and also come with Hide and basic Thief Skills, though they will never be as good with them as a Thief is and cannot learn Steal. When they hit Mastery (level 36) they gain the Surprise Attack ability. They are the only class that have access to the Replica EX skill, which has its ups and downs, but there is a very nice bug you can exploit with it in post game.

Summoned Creatures
The abilities of Summons depend on what the creature is; they act as they would if they were enemies, with a few exceptions (they never use Draw, for example). A majority of passive EX Skills, such as Find Treasure, will activate appropriately. You can even use them to examine and remove Treasure Traps. The only penalty if they die is that you have to resummon them again.

Replica
An AI, just like a Summoned Creature, only copies your Ninja instead of a monster. The more magic/skills you have on your original Ninja, the less intelligent your Replica's actions will be.

Spirit Pact
As mentioned under Summoner, if you are willing to do some extra grinding you can use the EX skill Spirit Pact (see the Useful Tricks section for an exploit) to turn contracted enemies into normal party members. They start at level 1 in a predetermined class (not always the one you might think), keeping a majority of their attributes and resistances. They lose extra actions per turn, skills that don't match their class/race, and their alignment and EX Skill randomizes. If you multiclass them they lose a lot, if not all, of what makes them special. Spirit Pact characters can never have the Innocent status. Also, if a Spirit Pact character is Devlish their age starts very low so you will want to age them before leveling. It is still worth a look though, if you want to put in the time.­­­­­­
Multiclassing and Spell Inheritance
Every time you multiclass you lose all of your levels, all non HP stat gains past the minimum required to become the target class (example: If a Fighter with 18 STR becomes a Lord their STR is lowered to 14), any skills that your new class does not have naturally are removed (example: A Thief that becomes a Fighter loses Hide, but a Thief that becomes a Ninja keeps it), the hidden Innocent status is lost, and your spell counts are adjusted. You also gain +1 Age. If the character being multiclassed is a Spirit Pact recruit then they will lose everything that made them special.

The reasons to multiclass are easier access to advanced classes (since you can gain the stat requirements needed by leveling another class), spell inheritance (rules to that listed below), transfering their max HP value (any transfered extra HP will be lost if they are hit with Level Drain or use Miracle), changing their EX Skill, and an opportunity to exchange gp for ep at a 1:1 ratio (can only be done at the moment of character creation and class change).

If you want to be efficient at creating your party, you want to think about what you want their final classes to be or if you even want to bother with multiclassing in the first place. This is not as important in early game, since it will not take too long to catch a character up and being a little low won't hurt you too much. Once you hit mid game your levels make a bigger difference.

Spell Inheritance
For spells, having more casts with a diverse selection on a character, or just giving them a boost to a magic school that they would normally learn a lot slower, is a good idea and can really help with your survivability. Classes that do not learn a specific magic school naturally can bank up to 3 casts per spell rank, the exception being Hunters who can keep all 9 in Alchemy. Those that do learn a specific magic school naturally can transfer up to 9. If a character knows at least 1 spell in a rank when they multiclass they will still eventually learn all the spells in that rank, but not beyond it, even if they change to a class that cannot naturally learn magic (See Below 3 Spell Inheritance and Spell Learning RNG in the Useful Tricks and Unuseful Bugs section for more infomation on that).

It is important to note that while other classes gain their spells via a combination of their class, stats, and RNG, Summoners gain casts every odd level, adding 3 casts into a new rank once they reach 5 casts in their highest rank. If you want all 3s for class changing you would need to take them to level 25, and they won't gain all 9s until level 37.

Min/maxers will want to inherit as much magic as they can on every non-Innocent/Spirit Pact character, though you have to be careful of Blaster Traps later in the game. While it does give you an edge, you can complete the game (even Post, though it is much harder) without such excessive grinding, so keep in mind that having all magics on all characters isn't a requirement.

Learns Mage Spells: Mage*, Bishop, Bard, Samurai
Learns Cleric Spells: Cleric*, Bishop, Valkyrie, Lord
Learns Alchemy Spells: Alchemist*
Keeps all Alchemy Casts: Hunter**
Learns Summon Spells (not as useful to transfer): Summoner***

*Mage, Cleric, and Alchemist have an accelerated learning speed for magic.
**Note that Level Drain/Miracle will recalculate casts to the minimum 3-4 for Hunters, rather than all 3s.
***As mentioned above, Summoner gains casts every other level and always have a minimum of 3 casts in every rank of Summoning magic they know.

Innocence
There is one reason, besides being a Spirit Pact character (which can never be Innocent), not to multiclass: the hidden Innocent status, which allows them to use special equipment. Every character has this when first created and they can lose it through changing their class and/or alignment. Special items that change your class do not cause you to lose it, but equipment that curses you into another alignment does. If you want to keep the Innocent status you have to always act (spare/fight) in accordance to their first alignment to keep it that way, so make them Neutral if their class will allow it for an easier time. A lot of Innocent only equipment is not that impressive considering the effort, but can still give Innocent characters a boost if you happen to find any.
Constructing a Party - EX Skills Part 1
Every character can have one EX Skill, and you can change it if you multiclass. Some are automatic, some cost SP to use (check Skills in battle to see how much your character has), and some are free. They are very powerful and can help your survivability a lot. Like above, don't let what I have typed here stop you from trying anything you want to do. Even the skills that don't seem to have much going for them can be useful.

Note that if a character dies their EX Skill effects go with them until they are revived.


QUALITY OF LIFE EX SKILLS
If you are looking for skills that are useful for your whole party and will let you relax a bit under certain conditions, these are probably what you are looking for. If you use them, try to only have one of these per party setup, with the possible exception of Tackle for a few tough enemies. For Tackle and High Magic Source, the more people you have with them the higher chance it will activate, but when you have so many useful EX Skills to choose from stacking these is not as useful under normal circumstances.

Stronghold: This skill automatically prevents the enemy skill Draw, which swaps your front row with your back row. There is no way to swap it back in battle except if the enemy uses Draw again. It is very useful, but there are ways to protect your party without it, such as the Bifei spell to get enemies to target specific characters, and the Bulafei spell to put weaker party members into the Hidden status.

Tackle: This skill automatically has a chance to prevent enemy HP regeneration. Even though it is not 100%, of these three skills this one will get the most use throughout the entire game. You can easily outdamage the HP regeneration for a majority of the game, so it is not absolutely vital.

High Magic Source: This skill automatically has a chance to prevent enemy Barrier, which reflects your spells back at you. Like Tackle, it is not 100% and is more of an issue in end game. If you stick to physical attacks against enemies who have Barrier you can work around it.


ATTACK BOOSTING EX SKILLS

Mark of Ruin: Boosts power to all damage, including magic, but you lose HP every turn and cannot be healed by a Servant's automatic Treatment (healing by other means works, including Forged Turn Recovery). The damage is a percentage of your current HP, so it will never kill you. Not really safe for the start of the game but later, when you can manage the HP loss, it's a pretty good skill.

Cruelty: The higher your HP, the higher your attack power. Usually easy to maintain.

Glutton for Punishment: The lower your HP, the higher your attack power. Dangerous to maintain.

War Rite: An on use skill that raises the attack power of the party, but only for the turn it is used on. An interesting choice for a back row support character, but it does consume SP.

Counterattack: After getting surprised by the enemy, every turn afterward gives your party an extra attack boost. Later in the game surprise attacks could mean a game over, so its use tapers off as you progress. It can be ok in early to mid game though.

Nocturnal: Increased damage at night. Yes, there is a day/night system.

Drunken Fist: Increases damage when Poisoned. A pretty specific condition that is a bit annoying to work around and makes you vunerable to enemy Hunters. If you are fine with taking damage every turn, take a look at Mark of Ruin instead.


MAGIC/AILMENT BOOSTING EX SKILLS

Magic Essence: Ignores enemy magic school resistance when using Mage magic and effects. An absolutely fantastic skill. Bypassing the first resistance check lets Mage damage spells always hit and gives you a better chance to land status effects, which is great through the entire game. The effect is not limited to magic either. Does not work with Alchemy, Cleric or Summon Spells and effects.

Hand of Kindness: Increases the potency of healing magic. It can keep lower rank Cleric spells relevant. It's a bit overkill on the Cleric class, but if you put it on another healing capable class such as Lord or Valkyrie you can easily turn them into your main healer.

Spirit Contract: Strengthens Mage elemental spells. It stacks with magic boosting Mastery, so a Mage with this skill can do some pretty good damage. Because it does not boost any other magic type its use on non-Mages isn't amazing.


DEFENSIVE EX SKILLS

Swallow Killer: Attack normally while negating Swallow Return, the Samurai counterattack ability. This is a fantastic skill, but it won't become an issue until post game. Consumes SP.

Absolute Barrier: Cleric and Lord only. Nullifies all actions after it is cast, but lets Turn Recovery activate for both sides. Situational and overkill for most of the game. Best used with the Turn Order Function (Page Down for Keyboards). Huge SP Drain.

Brace: Survive fatal damage once. If the Skill is activated during a combo attack, the attack is canceled before it can land a second killing blow. An ok filler choice for early game, but since they survive with 1 HP it is pretty easy for them to die afterwards. Does not protect against Beheading or Instant Death spells.

Last Stand: Defense increases as party members die. Unless your target is almost dead when it activates, if your party members are dropping like flies there is probably not much a single character can do but run away.


ATTACKING EX SKILLS

Chi Wave: 100% accurate non-attributed infinite range damage to one enemy. It is unaffected by attack up skills and the damage amount is based on your weapon, so it's not a great choice for most physical-type characters during the main bulk of the game. It can be a pretty nice pick for a Two-Handed Hammer wielding Cleric (has no attack up skills), or in post game when enemy defenses are very high. Uses SP.

Replica: Ninja only. Summons a copy of the Ninja with half the original's HP value and under AI control in exchange for all SP. It takes up the 7th slot reserved for summoned contracts, so if you have a Summoner this skill will get in the way. It has access to the same Skills, Magic, and inventory that the user had at the time of creation and it is not very smart. Having access to less magic will make the Clone more effective. See Replica Clone Permanence and Infinite Pick/Aura Punch Use with Replica in the Useful Tricks section for details on bugs related with this EX Skill and how you can take advantage of it.

Master Therion: Summoner only. Fuses summons together to make a stronger, uncontrollable creature, but the party can't move for three turns. Huge SP Drain.

Avenge: Attack an enemy when a party member dies. Must be picked in the Skill menu after the death. It seems like the damage is based on your weapon. Since you don't want your party members to die, this isn't the strongest pick. Costs SP.

Imitate: Copies an enemy move if it is copyable. If it is a restricted skill your character will Defend instead. Very dependant on what you are fighting.


STATUS AFFLICTING EX SKILLS

Curse: Has a chance to inflict Fear on one enemy. Will also allow you to read optional cursed books. The chance to inflict is higher than Shout and seems to be based on your level vs. the enemy. Fear triggers Pursuit Skills.

Shout: Has a chance to inflict Fear on all enemies. The chance to inflict is less than Curse and seems to be based on your level vs. the enemy. Fear triggers Pursuit Skills.

Level Drain: Lowers your opponent's level. I once assumed that the chance to resist was based on Drain Resistance, but that is either not the case or I am very lucky. It seems to be a your level vs. the enemy thing. Can be very useful.
Constructing a Party - EX Skills Part 2
SONGS
These are (mostly) party wide buffs that increase in effect if you use them each turn. If you stop singing, the effect is gone and their turn counter bonus is reset to 0. They all seem to share the same effect counter, and every individual song used increases it. Using the same song with multiple characters in a single turn will only use it once, though the effect counter will still increase normally. These are all ok choices for back row party members without ranged weaponry who would have nothing else to do otherwise, but it takes a long time to get them rolling:

Song of Healing: Heals all party members at the end of the turn, except the last one. This skill can carry you through the first dungeon pretty easily.

Song of Protection: Reduces damage when used.

Song of Hope: Attempts to restore status at the end of the turn. I have never seen it cure Petrify.

Song of Destruction: Damages the enemy at the end of the turn. It is not interrupted by Tackle.


INVENTORY MANAGEMENT EX SKILLS

Mysterious Bag: Sends excess items to the Alchemy Warehouse storage as long as you have space there. This is probably the best choice for farming treasure boxes, since it allows you to keep the most loot without having to resort to using the Refuse Mountain Protector.

Pass-Along Theft: If a Master Thief steals and cannot carry another item, he will give it to another party member. It only has use at level 26+. The advantage of this Skill over Mysterious Bag is that you can use the stolen equipment right away, but if no one in the party has space the item is lost.

Find Treasure: Treasure Chests have a chance of appearing after random encounters. A good choice for anyone who likes to bleed each encounter for everything they can, but remember that guaranteed battles always have treasure and are easily farmed using Pause Adventure or stairs.


HP/MP REGENERATION EX SKILLS

Restore Magic: Chance to restore Rank 1 spell casts when attacked with Magic. Servants can restore 1-2 MP across all ranks for the entire party using consumable (and rare until end/post game) Magic Herbs if you want a more reliable solution.

Sun's Blessing: Restores HP when walking during the daytime. Yes, there is a day/night system. If you want a different solution, Forging HP regeneration on your gear (heals in battle) works pretty good, no matter what time it is.


OTHER EX SKILLS

Divination: Bishop, Alchemist and Servant only. It lets you Identify cursed equipment (it shows who gets cursed in red when you view the item's stats), shows the value of the Ore you have found (have to go to the Alchemy Warehouse otherwise) and eliminates the chance to find Weeds and Rocks when gathering, with a few exceptions. Very useful for farming.

Spirit Pact: Summoner Only. Turns a summoned contract enemy into a recruit. A great skill that can be used to make very powerful party members, but there are quirks. There is an exploit you can take advantage of, so this skill never has to be on your combat summoner. Consumes SP.

Oracle: Shaman only. EP and GP values after battle have a chance to switch. It can make you very rich if you are lucky, but there is not a lot to spend GP on so you'll be swimming in it eventually. You have to activate the skill when you want to use it.

Sacrifce: Turns self to Ash in exchange for a full party recovery (HP, MP and SP), including raising the dead. It is exclusive to Yseult, the default Fairy Cleric (and technically a few enemies) and cannot be picked when creating characters.
Enemy Exclusive EX Skills
This is a list of special EX Skills that are only used by enemies. Using Spirit Pact to turn enemies into normal party members will erase these Skills. The order is alphabetical because I am lazy:


SKILLS THAT ARE USED UNDER CONTRACT

Breath+: Removes the # of uses penalty from Breath attacks.

King's Proof: Successful Instant Death effects are cancelled if their current HP value is more than half their maximum HP.

Restore: A high chance of recovering from status effects, separate from Status Recovery Rate. It does not seem to cover Petrification, but I could be wrong.

Self-Destruct: Kills the user to deal damage to an enemy.


SKILLS THAT ARE NOT USED UNDER CONTRACT
These abilities will still be used by Confused and Charmed enemies.

Bells of Judgement: The party has 3 turns to either win the battle or run away. Failing to do so results in a full party wipe. Killing the user of this skill does not make a difference.

Call Reinforcements: Summons enemies matching the user. Technically not an EX Skill, but important enough to list for comparison to Summon.

Dragon's Roar: Increases damage by 3x.

Draw: Swaps your party's front row with the back row. Can be used multiple times.

Inhale: Puts the target into critical HP and absorbs the amount taken.

Lullaby: Chance to put your entire party to Sleep.

Mind Crush: Has a chance to cause several status effects. I never bothered to figure out everything that it can cause.

Mirror Ring: Morphs into an exact copy of your party. You cannot Contract the enemy that uses this ability, nor can you confuse/charm it before it leaves the form that can cast it.

Nap*: Heals the user and puts them to Sleep. I actually do not know if this one is used under Contract or not, so I stuck it here just in case.

Nightmare: Chance to cause Fear status to your entire party. I am not sure of the differences between this and Shout.

Soul Trap: Has a chance to cause several status effects. I never bothered to figure out everything that it can cause.

Strange Miasma Wave: Damages the entire party for half of their current HP.

Summon: Summons another enemy into battle. The enemy summoned depends on which enemy uses the skill, and the summoner does not Summon the same enemy that they are (that would be Call Reinforcements).

Summon Judgement: Instantly kills Contracted Summons and Replicas. The enemy will continue to use this skill if there is anything in the 7th Summon Slot, even if it is dead.

Torrent of Darkness: Increases damage by 2x.

Unclean Earth: Interrupts spell and Treatment based healing/curing. Potions used normally, Turn Recovery, and Song of Healing still work.
Forging and Crafting Recipes
FORGING
Alchemists can Forge one Ore onto individual pieces of equipment in the Alchemy Warehouse in Hosbarn Inn. The effects and AP values of the upgrades depend on the type of Ore being used, its value, and the level of the Alchemist if they have Mastery (level 26+). The effects range from removing conditions and curses to increasing specific resistances, and can make your party very powerful. The types of effects overlap on different Ore, so you have options, and you can use the AP value to cover multiple types of upgrades if you want. Remember that numbers do not stack, unless it is AC, so be sure to check what value your characters have before Forging (See the Equipment Basics section below for more information).

Forging equipment that is currently equipped to a character will remove said equipment from them, so do not forget to reequip it. You cannot forge equipped items if they cannot be removed (ex. character is under a Curse), but you can forge Cursed items normally if they are not equipped. There are some really powerful weapons, mostly in post game, that cannot be Forged.

A Master Alchemist can Disassemble Forged equipment, allowing you to retrieve the Ore in tact and opening up the equipment for a new Forge. For this reason it is very handy to have an Alchemist at level 26 or above around, even if you do not use them in combat. If you do not have a Disassemble capable Alchemist you can remove the Ore buy selling and rebuying the equipment in the shop, but you will lose the Ore forever.


TRANSMUTATION
Another thing Alchemists can do in the Alchemy Warehouse is craft useful/gimmicky items. The thing crafted depends on the combination used. Some items are consumable, while others work just by being in your inventory. Transmuting is a good way to make use of your low value Ore, though for consumables the higher the value of the Ore you use the more you get per transmutation. Selling or trading stacks between characters only sells/gives one at a time, and you cannot stack things you rebuy/trade:

Air Seed
Vectorium + Elvish Iron/Sensolite
Keep in inventory. It is never consumed and you only need one in your inventory for the effect; multiple air seeds do not stack. Adds extra time, relavent to its AP value, to the party's Underwater Air Timer. It only adds to the air timer itself and will not protect you if the timer hits zero. The lowest value is 5 minues (giving 6 minutes total), but if you sell and rebuy it the AP value will give you 10 extra minutes instead (if the AP value was above 10 before you sold it time will be lost instead). This item is required to explore some optional content.

Bone Slippers
Devil Iron + Millstone or Elvish Iron + Sensolite
Keep in inventory, consumed on party wipe. Teleports the bodies of your decimated party to Lohagra Temple, negating the need to pick their bodies up with a different, non-full party (Having a character with Diomente on the bench is good for that).

Dove's Bell
Devil's Lapis + Elvish Iron/Sensolite
Consumable (Duplicable with Warehouse bug). Clears all guaranteed battles on your current floor, though you can still get random battles. This is a very useful item if you just want to get to your objective. Note that if you have a Sheephair Brush, guaranteed battles will still show on your map. They just won't trigger fights when you walk on them.

Crow's Bell
Devil Iron + Vectorium or Sensolite + Millstone
Consumable (Duplicable with Warehouse bug). Respawns all guaranteed battles on your current floor. Useful if the Pause Adventure trick does not appeal to you, or you have very old characters.

Rock Counter
Devil Iron + Sensolite or Vectorium + Devil's lapis
Consumable (Duplicable with Warehouse bug). Shows you the number of solid rock squares on your current floor. If you expect there might be a hidden area, you can use this to figure out if your instincts are right by counting the solid rock squares on your map, then comparing that number to the one the Rock Counter gives you.

Sheephair Brush
Devil Iron + Devil's lapis or Elvish Iron + Millstone
Keep in inventory. It is never consumed and you only need one in your inventory for the effect.
Shows guaranteed battles on your in game map wherever you have stepped before. Useful if you want to farm treasure if you don't have an outside source to look at.

Death's Pinwheel
Vectorium + Millstone
Keep in inventory. It is never consumed and you only need one in your inventory for the effect.
Shows the level of the targeted enemy in battle. Useful information for Summoners, and gives you a general idea of the levels your party members should be for an easier time.

Dice of Fate
Devil's Lapis + Millstone
Keep in inventory. It is never consumed and you only need one in your inventory for the effect.
Shows RNG rolls in battle. It gives you a really interesting look at the inner workings of the game. Try having one when attempting a Contract to see why you'll sometimes have trouble landing it.

Small Chest
Devil Iron + Elvish Iron
Consumable. +1 Age to the target. Useful to age children into teens/adults (like Mysterious Child and Spirit Pact characters) so they don't bleed stats when leveling up, though killing and reviving them repeatedly has the same effect. Age ranges are dependant on the character's Race.

Ring of Life
+2 Devil's Lapis + +2 Sensolite
Consumable. -1 Age to the target. Useful for older characters if you are too lazy to hunt for Kiss of the Goddess traps. As far as I know this is the only Transmutable item that requires +2 Materials.


MIXING POTIONS
A Servant can Mix Potions in Jadgebol Shoppe using preparation materials (Herbs). If you discover a recipe (using Raw Material Mixing), or if it is learned by an NPC, you can use the Recipe Mixing method for quick creation. If an NPC references "Maze Herb," what it really means is Mystery Herb. Magic Herbs can be used by Servants in battle to restore the party's MP and are pretty rare until post game, so consider that before you start making Full-Health Potions and Revival Tonics. There is a chance of failure when using Raw Material Mixing if your Servant's level is very low. I don't know the exact level for the best success, but level 9 can discover all the recipes:

Potion x9 = Sun Herb x2
Potion of Awakening x9 = Sun Herb + Mystery Herb
Antidote x9 = Mystery Herb x2
Mahi Oil x9 = Sun Herb + All Purpose Herb
Night Dew Lozenges x9 = Mystery Herb + All-Purpose Herb
Herb of Tranquility x9 = All-Purpose Herb + Tranquil Herb
Love Flower Crystal x9 = All-Purpose Herb + First Love Flower
Stone Softener x9 = First Love Flower + Illusion Drop
Full-Health Potion x9 = Sun Herb + Magic Herb
Revival Tonic x1 = Illusion Drop + Magic Herb
Equipment Basics
For the most part, it is pretty easy to look at the stats of an item and tell if it is going to be a good match for your characters and playstyle, but there are a few quirks that you should keep in mind:

AC (Armor Class) is your dodge and primary defensive stat against physical attacks. This game uses an old school THAC0 system, meaning the lower/negative your AC is, the better. Some equipment, such as Staves, raise your AC and make you more vulnerable. If you are unlucky with loot and feel your party's AC is too high, you can Forge some or use stackable spells that can manipulate it in battle. AC is the only stackable value on equipment via Forging, with two exceptions. You can see a character's total AC value on their status screen, or an abbreviated version in the corner of their portrait.

Resistances, Magic Attributes, and Turn Recovery, natural or otherwise, do not stack; only the highest value is used. For example, if someone has a natural 10% Resistance to Poison, is wearing a piece of equipment with 5% resistance to Poison, and another with 10% resistance to Poison, they have a total of 10% resistance to Poison. Weapons keep certain attributes to themselves, such as the chance to inflict status effects or hurt Ghosts, and are applied only when that specific weapon connects. Chance to Behead will stack with a Ninja's innate increased Chance to Behead, but not with other Chances to Behead. Positive damage to enemy type modifiers will default to the weakest you have equipped. Buffs cast in battle will stack with equipment values.

Cursed equipment will stick to your characters if they are a potential target of the Curse and equip it. Devlish characters have the least amount of applicable Curses. You can destroy it by paying Jadgebol Shoppe or using the rank 6 Alchemy spell Pendea Coat. If you want to preserve the equipment, you can remove the Curse via Forging in the Alchemy Warehouse with an Alchemist, but you have to apply the removal before equipping the item. Removing the Curse or being immune to it does not negate the negative effects of the weapon. In the case of weapons that cause a character to not move, you can get around it by casting Sama Eyes or Feireed on the afflicted character during battle. The effect will return on the next battle though, so you will have to cure it again. Most Cursed equipment have a redeeming quality to them even if they look like garbage, so look closely.

More information is provided in the Status Screen sections below.
Character Status Screen
As explained in the Equipment Basics section, with the exception of AC (Armor Class) all stats only use the highest value. For example, if you have something with 15% Mage Spell Resist and another thing with 15% Mage Spell Resist your total resist is 15%. But if you equipped something with 20% Mage Spell Resist your total resist would become 20%.


1. What each stat does has already been covered in the Constructing a Party - Stats and Races section. As far as values go, you only start to see a benefit around 15-16+, and it is pretty minor unless the character's level is really high; by that point your stats will probably be naturally capped or close to it, even without save scumming. The exception is VIT; the higher it is the more likely you will have better HP increases when you level up. Higher VIT also makes it less likely for a character to turn to Ash when attempting to resurrect them, but even very high values do not negate the chance completely. For the most part, don't stress how many points you have unless the value goes below their Racial minimum, you want to class change, or you have a very young or old character with low VIT; reaching 0 VIT triggers permadeath when you Rest. That said, unless you forget to age a Spirit Pact character or purposefully make really old characters the chance of getting permadeath is really low.


2. Status Recovery Rate is the % chance a target will recover from status effects that can be naturally recovered from after they have already been inflicted with it. Petrification, Drain, and Behead/Death being the effects you cannot naturally recover from. It does not effect resistance. Strangely, if you or an enemy has a 100% Recovery Rate sometimes status effects will not clear at the end of the turn. It seems pretty rare though.

3. Turn Recovery is the amount of HP recovered after each turn in battle, if any.

4. Breath is the type of Breath attack the character can use if they are a Dragonewt or cast Pomedoon. Non-Dragonewt Spirit Pact characters cannot use the Breath Skill, even if they had one before being converted. There are other Breath attacks besides Fire.

5. The special EX Skills and Abilities the character has.


6. Spell Resist is the % chance that a target will not be affected by spells of specific magic schools. 100% means that they cannot be affected by that magic school, with the exception of Tarot effects and Mage Magic combined with the Magic Essence EX Skill, which gives Mage Magic a penetration effect. Magic Essence does not effect any other magic school, but it does effect items and weapons with Mage Magic effects on them. Penetration does not guarantee a hit with Status Effects and does not effect the target's elemental defenses. Immolarati might be an exception as well, but I have no way to test it.

7. Attack Att (Attribute) is a percent damage of specific element types. This includes adding an elemental attribute to physical attacks and boosting Magic damage of that specific element type. The damage done is affected by the target's defense against specific element types.

8. Defense Att (Attribute) is a % defense against incoming damage of specific element types. It does not effect spell resistance, with the exception of Dark which effects non-Beheading Instant Death resistance. Negative numbers mean that it is a weakness and the target will take extra damage against that element. 100% means the target is immune to that element. 200% means the target absorbs the element, which will heal their HP. 300% means that the target will reflect that element.

9. The Name/Main/Sub with the list of every enemy type in the game shows which enemies the character can attack, with which weapon, and how effective their attacks are against specific enemy types. = means that the damage is normal. X means they cannot attack that enemy type without casting Harias. - means they can attack that enemy type, but damage is halved. + means that they deal 1.5 extra damage against that enemy type. 2 means that they do double damage against that enemy type. There is also a 3 which a few enemies and weapons have, as well as a special ring. Main and Sub weapons are separate and do not effect each other. If you have two pieces of equipment with different positive modifiers (so it does not include X) the game will use the lowest one by default. The status screen reflects the downgrades, so it is easy to see.


10. The Main/Sub columns with the list of Status Effects shows the % chance the characters weapons can inflict certain status effects. Innate Status Effects tend to effect both Main and Sub weapons, but Status Effects on the weapons themselves are counted separately. The only exception is a Ninja's innate Beheading chance, which is added onto the Beheading chance of each weapon.

11. Status Resistances show the % chance you will resist a specific ailment. 100% means immunity.
Equipment Status Screen
Any unmarked information is stuff already covered in the Equipment Basics and Character Status Screen Information section above. As explained in several sections already, with the exception of AC (Armor Class) all stats only use the highest value across all natural stats and equipment.


1. The Classes that can equip it. If you have Divination, red text means that Class will become Cursed if they equip it.

2. The Races that can equip it. If you have Divination, red text means that Race will become Cursed if they equip it.

3. The Genders that can equip it. Gender Neutral characters typically cannot equip items that have a Gender restriction, unless the restriction is for ? only. If you have Divination, red text means that Race will become Cursed if they equip it.

4. The Alignments that can equip it. If you have Divination, red text means that Alignment will become Cursed if they equip it.

5. Where you can put the equipment.
For Weapons: Main = Main Hand only. Sub = Any Hand. Double = Needs Both Hands.
For Armor: The Type tells you what body part you can equip it to.

6. The Physical Range of the weapon. S = Short range that can only attack the first row of enemies from the party's front row and cannot reach from the party's back row without Forging or Yuniwa Coat. M = Medium Range that can attack both rows of enemies from the party's front row and the first row of enemies from the party's back row. L = Long Range that can attack both enemy rows from any position in the party. You cannot hit the enemy's third row until you have eliminated the first or second enemy row, which causes the third row to come forward. In case you didn't know, the first 3 slots in your party are considered the front row and the last three are the back row. Armor does not have Range.

7. Hit Accuracy effects how well you can land a hit with that weapon. The higher the number, the more likely you are to land hits. The lower/negative the number, the less likely you are to land hits. Hit does not mean attack, and is described further next to Attack Rate. Armor does not have Hit Accuracy.

8. The Damage Range of the weapon. It effects how much potential damage you can do per hit in a single attack. See Attack Rate for a simple description of the difference between Attack and Hits. Armor does not have Damage.

9. Attack Rate effects how many hits you can potentially get per single attack with that weapon by being added to the hidden innate Attack Rate value of the character using it (physical classes can have up to 10 gained through leveling, but magic classes do not gain it). The higher the number the better and Main/Sub weapons, which normally have a cap of 10, can be modified up to 15 with the Orath spell (max stack of 5). The Attack Rate cap for Double (two-hander) weapons are a bit more complicated and depend on the individual weapon, but their caps can be either 10 (same as Main/Sub weapons) or 20 (25 with Orath). For those confused, try to think of each single attack as a chance to swing your weapon multiple times (hits) rather than only swinging a weapon once. The Brawler's Group Attack skill gives multiple attacks, each one having their own chances to get in multiple hits. Armor does not have Attack Rate.

10. Lowered AC Ability shows if the equipment is compatible with the Brawler and Ninja Lowered AC ability. ON means that it is compatible and will allow the Brawler/Ninja to use their natural AC. OFF means that it is incompatible and will turn off the Brawler/Ninja's natural AC. If the Brawler/Ninja has even one piece of OFF equipment their natural AC is turned off. Removing OFF equipment turns their natural AC on again.

11. Removed Restrictions shows what kind of restrictions have been removed or added with Forging, if any. If it has been removed, you do not have to worry about it. You can also remove Curses, not shown, making Cursed equipment safely removable but not getting rid of other negative effects.
Battle Screen
I am skipping over the obvious stuff, such at the actions menu at the left side of the screen. The options should be self explanatory. To access the information in the second/right screenshot below, use the inspect key (F on Keyboards) inside of battle.


1. The Party's Front Row. These three slots are in front of the back three slots, which effects what range is needed to attack certain rows and be attacked themselves. If you need any more information on ranges, see #6 in the Equipment Status Screen section above. The number in the lower left hand corner of each character portrait is their abbreviated current AC value, while the larger number in the lower right hand corner is their current HP. The bar undernearth each portrait shows what % of the character's max HP their value is at, with blue being max, green being damaged, and red meaning they are dangerously low. When a party member is afflicted with a status effect(s) their portrait will blink with the symbols showing which status effect(s) they are under.

2. The Party's Back Row. These three slots are behind the front three slots, which effects what range is needed to attack certain rows and be attacked themselves. If you need any more information on ranges, see #6 in the Equipment Status Screen section above. The number in the lower left hand corner of each character portrait is their abbreviated current AC value, while the larger number in the lower right hand corner is their current HP. The bar undernearth each portrait shows what % of the character's max HP their value is at, with blue being max, green being damaged, and red meaning they are dangerously low. When a party member is afflicted with a status effect(s) their portrait will blink with the symbols showing which status effect(s) they are under.

3. The Enemy Party. Shows the amount of enemies in each row and which enemies are effected by status effects (their skull will change color, see below). The bottom row represents the front row, the middle row represents the back row, and the top row represents the hidden farthest back row. Enemies in the farthest back row cannot be seen on the main screen and cannot act in battle. They also cannot be targeted, with a few exceptions (example: enemy party wide debuffs will effect them). When one of the first two rows are wiped out the third row will come forward and be able to act/be targeted. If you need any more information on ranges, see #6 in the Equipment Status Screen section above.

The colors the skulls change to when the enemy has a status effect are:
Sleep = Blue Skull
Poison = Normal Skull with Blue Eyes (A little hard to see)
Silence = Dark Gray Skull
Paralysis = Bright White Skull with Blue Eyes
Confusion = Red Skull
Charm = Pink Skull
Petrification does not change the Skull color, but the enemy's picture will still do a slow blink indicating that they are affected, which happens with all status effects.
Like player characters, enemies can have more than one negative status effect on them.

4. The active Tarot effect, if any.

5. The time of day. If the AM is yellow it is daytime. If it is gray, like it shows in the screenshot, it is nightime. Time passes in game through several actions, including walking, entering and leaving a dungeon, Pause Adventure, or Resting at the Inn. The time of day only effects certain EX Skills, such as Nocturnal and Sun's Blessing.

6. The Party's active magic buffs/debuffs. The top row abbreviations represent effects cast by specific spells, two of which cannot be cast in the battle itself. Flar = Erod/Eroma, Prot = Hallobukarm, Floa = Sosario, Bles = Harias, and InfRan = Yuniwa Coat. Active buffs are yellow, and inactive buffs are gray. Change All AC (Hallobukan/Hallobukarm/Hallobuti), Spell Resistance (Rapoolfei/Rapidos), Attack Rate (Orath), and Change Speed (Skorekh/Lascorek) shows the amount of temporary modifications via spells that have been made in the current battle. Drain Barrier (Psi Drain) and Breath Barrier (Psi Breath) show the number of times a Drain or Breath effect can be absorbed if any active protection against them is up. Magic Release shows the total amount of spells that have been cast during the current battle. Using the magic spell Ramialf will revert all of the information on this screen to their default state and erase all magic buffs/debuffs for both sides.

7. The Enemy's active magic buffs/debuffs. Same as #6, only for the enemy party.
Why HP Gains "Suck"
The way the game calculates a character's HP gains on level up is this:
- First, it rolls for a maximum HP number based on Class, Level, VIT, and RNG. By using the character's Class and Level to influence the roll the game is able to balance HP by creating an average for each class/level combination.
- After the roll, it compares that number with the character's current max HP.
- If the number rolled is higher than the current max HP then it is replaced with the new number and the game outputs the difference/gain on the screen.
- If the number rolled is less than or equal to the current max HP then the rolled number is tossed and 1 HP is added to the current max HP instead, also shown in the level up window. The game will always give a leveling character at least 1 HP unless the character somehow has 9999hp, which is not going to happen through the course of a normal game, so they will always get something.

If a character has had great HP gains for a few levels (especially if you've save scummed, no judgements), or has a high HP value due to multiclassing carryover, you can expect that character to only have +1 HP gains for at least a few levels, if not more, due to the way the algorithm works. On the other hand, if your character has had some awful HP gains for a few levels, and you haven't been save scumming or multiclassing, you can expect a big HP boost sooner rather than later. So don't panic over +1s, it is just the game balancing itself.

As a side note, if a character is hit by Level Drain their current max HP is removed entirely and the game rolls for a new max HP value regardless of what their original value was. The calculation happens immediately after the battle ends. This will cause you to lose any extra HP that you gained through lucky rolls, multiclassing, or other means. On the plus side, if you really suspect a character's HP is somehow less than what it should be you can use Level Drain to reroll their max HP value, "fixing" the character at the cost of 1 level and all unused EP if your assumptions were correct (save before you try this intentionally, for obvious reasons). So no character is ever beyond hope.
What "+1" Means on Equipment and Skills
If you are unfamiliar with Wizardry-type games, or games that use D20 rulesets as their base in general, the best way to describe +1 (or any + number) on equipment and skills is that it simply means that it is stronger than a normal item/skill of the same type. The extra strength gained from a "+1" is not necessarily a set percentage increase across all stats on a piece of equipment/skill, and also influences negative effects. It does not mean +1 literally.

For example:
Flame Charm has 15% Fire Attack Attribute, 15% Fire Defense, and a -2% Weakness to Water and Thunder.
+1 Flame Charm has a 30% Fire Attack Attribute, 25% Fire Defense, an a -7% Weakness to Water and Thunder.
+2 Flame Charm has a 60% Fire Attack Attribute, 35% Fire Defense, and a -12% Weakness to Water and Thunder.

So when you see that +1, don't write it off as being weak. It isn't. Things like the Physical Attack Power Up +1 Skill are really good.
Status Effects
Here is a list of Status Effects, what they do, and what spells can cause or cure them. All status effects can be cured at Lohagra Temple in exchange for GP. I am not listing anything a party cannot control (enemy only abilities that are not used when Contracted and Traps), enemies that start battle with ailments, and innate Spirit Pact abilities. All Tarot Cards bypass resistance checks. If you are interested in equipment that can cast magic effects, look at the Equipment With Spell Casting Abilities section.

Sleep:
Spells/Tarot to Cause = Misama, Ramisama, Fool Card
Spells/Items to Cure = Mirror Eyes, Sama Eyes, Feireed, Potion of Awakening, All-Purpose Herb
+ Affected by Magic Essence
+ Can be Cured with Status Recovery Rate and Song of Hope
+ Cured after Battle
Makes an afflicted target incapable of action. Sleeping Characters will not be woken from attacks. It is a very strong and safe affliction throughout the game.

Poison:
Spells/Tarot to Cause = Venom, Ravenom, Priestess Card
Spells/Items to Cure = Venom-Fei, Sama Eyes, Feireed, Antidote
+ Affected by Magic Essence
+ Can be Cured with Status Recovery Rate and Song of Hope
- Persists after Battle
Deals damage to afflicted targets after every turn of battle. It can kill the character.

Paralysis:
Spells/Tarot to Cause = Rood, Rarood
Spells/Items to Cure = Rood-fei, Sama Eyes, Feireed, Mahi Oil
- Not Affected by Magic Essence
+ Can be Cured with Status Recovery Rate and Song of Hope
- Persists after Battle
Makes an afflicted target incapable of action. Sets AC to 10, no matter how much AC the character has. AC is recovered once the effect is cured.

Silence:
Spells/Tarot to Cause = Tashif, Latashif, Emperor Card
Spells/Items to Cure = Mirror Eyes, Sama Eyes, Feireed, Night Dew Lozenges, All-Purpose Herb
- Not Affected by Magic Essence
+ Can be Cured with Status Recovery Rate and Song of Hope
- Persists after Battle
Makes an afflicted target incapable of casting magic. Does not effect Breath attacks or EX Skill Songs.

Fear:
Abilities and EX Skills to Cause = Curse EX Skill, Shout EX Skill, Failed Bishop Inspection
Spells to Cure = Mirror Eyes, Sama Eyes, Feireed
- Not Affected by Magic Essence
+ Can be Cured with Status Recovery Rate and Song of Hope
- Persists after Battle
Gives an afflicted target a 50% chance to do nothing for a turn, no matter which action is chosen.

Confusion:
Spells/Tarot to Cause = Karacha, Makaracha, The Tower Card
Spells/Items to Cure = Mirror Eyes, Sama Eyes, Feireed, Herb of Tranquility, All-Purpose Herb
- Not Affected by Magic Essence
+ Can be Cured with Status Recovery Rate and Song of Hope
+ Cured after Battle
Gives an afflicted target a 50% chance to attack themselves or party members with your chosen action. Defending negates, but does not cure, the effect.

Charm:
Spells/Tarot to Cause = Pinto, Rapinto, Lovers Card
Spells/Items to Cure = Mirror Eyes, Sama Eyes, Feireed, Love Flower Crystal, All-Purpose Herb
- Not Affected by Magic Essence
+ Can be Cured with Status Recovery Rate and Song of Hope
+ Cured after Battle
Takes control away from the afflicted target and gives them a 100% chance to attack themselves and party members.

Petrify:
Spells/Tarot to Cause = Stoma, Rastoma
Spells/Items to Cure = Feireed, Stone Softener
+ Affected by Magic Essence
- Cannot be Cured with Status Recovery Rate and Song of Hope
- Persists after Battle
Makes an afflicted target incapable of action. Because it cannot be cured naturally it is a very strong status affliction throughout the game, though more enemies have higher resistance to Petrify than Sleep.


The effects listed below this point are technically status effects, though due to their nature I refer to them specifically throughout the guide, rather than lump them in with everything else.

Drain:
EX Skill/Spell to Cause = Level Drain, Casting Miracle (Self)
Spells to Prevent = Psi Drain (One prevention per cast), Miracle effect (Does not protect against Level Loss due to casting Miracle itself)
- Not Affected by Magic Essence
- Permanent until you level again
The affected target loses a level and all unused EP. Also has their HP and magic casts (refill) recalculated to their class average. A Hunter with more Alchemy casts than the number of spells known will lose their extra casts. Almost every enemy in the game has a natural 70-100% resistance to Drain. Characters created in the Training School do not have that luxury.

Beheaded:
Class to Cause = Ninja
Spells/Items to Cure = Rizefus, Rezefeid, Miracle effect, Revival Tonic
- Not Affected by Magic Essence
- Cannot be Cured with Status Recovery Rate and Song of Hope
- Persists after Battle
Technically it is the same as Death. Beheading is just the physical way of inflicting it instantly.

Death:
Spells/Tarot/Etc. to Cause = Zeifeifus, Razefeis, Argeiss, Death Card, HP reaching 0
Spells/Items to Cure = Rizefus, Rezefeid, Miracle effect, Revival Tonic
- Not Affected by Magic Essence (Except Argeiss)
- Cannot be Cured with Status Recovery Rate and Song of Hope
- Persists after Battle
A dead target cannot act until they are resurrected. Successful resurrection gives +1 to the target's age.

Ash:
Cause = Failure to Resurrect a Dead Target
Spells/Items to Cure = Rizefus, Rezefeid, Miracle effect, Revival Tonic
- Cannot be Cured with Status Recovery Rate and Song of Hope
- Persists after Battle
The same as Death, only now it is harder to resurrect the target and they gain +2 age per attempt, successful or not.
Spells and Tarot by Effect - Part 1
Knowing what Spells and Tarot Cards do increases your survivability by quite a bit and can help you tackle tough enemies. If you ever feel like you are struggling, or find yourself in a tight situation, take a look at what spells you have available; you'll likely have something that can turn the tide. Don't be afraid to get creative. Keep in mind that Tarot (Bard only skill) has a chance of failure that goes up every time you draw a card and can end up turning the tables on you instead. Also, the chance of success goes down to 1% during Boss battles. The plus side to Tarot is that the effects are not resistable, even to enemies who would normally be immune to certain effects.

Spells that belong in more than one catergory are listed multiple times for easy reference. Some of the information has been corrected from the manual. If you are looking for a list that goes by spell rank, use the manual.


SPELLS THAT LAST UNTIL YOU LEAVE THE DUNGEON

Sosareo - Mage Rank 4: Party floats over traps, cast again to remove. (Out of combat)

Eroma - Cleric Rank 3: Increases ability to see hidden doors. (Out of combat)

Hallobukarm - Cleric Rank 4: -2 AC to party (Can cast in town. Use it before you Rest to save casts).


EXPLORATION SPELLS

Dioseed - Mage Rank 1: Displays map. (Out of combat)

Diomente - Mage Rank 7: Warp to anywhere you have been. (If used in combat, Warp to random location. This CAN kill you if you warp into solid rock.)

Sosareo - Mage Rank 4: Party Floats over traps, cast again to remove. (Lasts until you leave the dungeon. Out of combat.)

Erod - Cleric Rank 1: Increases ability to see hidden doors. (Lasts a short time. Out of combat)

Eroma - Cleric Rank 3: Increases ability to see hidden doors. (Lasts until you leave the dungeon. Out of combat)

Zomperi - Cleric Rank 2: Shows corpses of wiped parties. (Out of combat)

Honey Restorer - Cleric Rank 4: Warp out of dungeon, regardless of anti-warp conditions (Spell is forgotten, but can be learned again by leveling.)


TREASURE TRAP SPELLS

Portal - Alchemy Rank 1: High chance of identifying treasure traps (not 100%).

High Portal - Alchemy Rank 7: Removes treasure traps. Unaffected by spell prohibition conditions.


ITEM/EQUIPMENT SPELLS

Harias - Cleric Rank 1: Party can attack enemies that can normally not be hit by their weapons, regardless of equipment and abilities.

Yuniwa Coat - Alchemy Rank 4: Party has infinite weapon range regardless of equipment and abilities.

Pendeku - Alchemy Rank 5: Repairs all broken items and equipment.

Pendea Coat - Alchemy Rank 6: Destroys Cursed equipment.


RUN AWAY!

Mahamaha - Alchemy Rank 1: All party members escape battle, works on Floor Masters.

The Moon Card - Bard's Tarot: Enemies have a 50% chance to run. (Failure = Party has a 50% chance to run)

Miracle - Rank 7 Mage: Pray for one of several overpowered effects in exchange for one level and all unused EP, though the effect is randomized. One of the random effects is to cause the enemy party to run away. (The level lost works like Level Drain, so your casts will be refilled and HP resets to their class average.)


BUFF SPELLS

Hallobukarn - Cleric Rank 2: -3 AC to party. (Stackable)

Hallobukarm - Cleric Rank 4: -2 AC to party. (Lasts until you leave the dungeon and can cast out of combat)

Robukand - Cleric Rank 5: Makes one ally's AC -20. Do not cast this spell on anyone who has lower AC than this.

Chariot Card - Bard's Tarot: Makes all party members defense exactly -10 AC. Will raise AC to that number if it is lower. (Failure = Makes all enemies defense exactly -10 AC)

Rapoolfei - Alchemy Rank 5: Raises Magic Resistance of party. (Stackable)

Bulafei - Alchemy Rank 2: Gives Hidden status to one ally. (Removes them from enemy target list, including multi-target spells)

Bifei - Alchemy Rank 4: One ally becomes the primary enemy target.

Psi Drain - Cleric Rank 5: Barrier against one Drain attack. (Stackable)

Psi Breath - Cleric Rank 6: Barrier against one Breath attack. (Stackable)

Skorekh - Alchemy Rank 2: Raises Speed of party by 50%. (Stackable)

Orath - Alchemy Rank 3: +1 Attack Frequency to party. (Stackable to 5/Frequency max of 15 with most weapons, 25 with certain Double type weapons)

Harias - Cleric Rank 1: Party can attack enemies that can normally not be hit by their weapons, regardless of equipment and abilities.

Yuniwa Coat - Alchemy Rank 4: Party has infinite weapon range regardless of equipment and abilities.

The Star Card - Bard's Tarot: Attacks have 100% accuracy for party for the rest of the battle. (Failure = 100% accurate attacks for all enemies)

Strength Card - Bard's Tarot: Physical Attack doubled for party for the rest of the battle. (Failure = Doubled for all enemies)

Justice Card - Bard's Tarot: Physical Attack doubled for Good enemies and allies for the rest of the battle. (Failure = Nothing)

Temperance Card - Bard's Tarot: Physical Attack doubled for Neutral enemies and allies for the rest of the battle. (Failure = Nothing)

The Devil Card - Bard's Tarot: Physical Attack doubled for Evil enemies and allies for the rest of the battle. (Failure = Nothing)

Magician Card - Bard's Tarot: Magic Attack doubled for party for the rest of the battle. (Failure = Doubled for enemies)

Miracle - Rank 7 Mage: Pray for one of several overpowered effects in exchange for one level and all unused EP, though the effect is randomized. (The level lost works like Level Drain, so your casts will be refilled and HP resets to their class average.)

Protectorate - Rank 7 Alchemy: Grants a permanent +1 increase in a chosen stat for the target, changes alignment if all stats are capped. (Out of combat. Spell is forgotten, but can be learned again by leveling.)


DEBUFF SPELLS

Robuti - Mage Rank 3: +7 AC to one enemy. (Stackable)

Hallobuti - Mage Rank 5: +4 AC to all enemies. (Stackable)

Rapidos - Alchemy Rank 6: Lowers Magic Resistance of all enemies. (Stackable)

Lascorek - Alchemy Rank 3: Lowers Speed of all enemies by 30%. (Stackable)

Empress Card - Bard's Tarot: Physical Attacks cannot be used for the rest of the battle battle for enemies or allies. (Failure = Nothing)

Hierophant Card - Bard's Tarot: Skills cannot be used for the rest of the battle for enemies or allies. (Failure = Nothing)

Hanged Man Card - Bard's Tarot: Removes all Resistance to Status Effects and abilities for the rest of the battle for enemies and allies. (Failure = Nothing)

The World Card - Bard's tarot: All Magic Resistances become 0%, even weaknesses, for enemies and allies for the rest of the battle. Does not effect chance to Contract. (Failure = Nothing)

Miracle - Rank 7 Mage: Pray for one of several overpowered effects in exchange for one level and all unused EP, though the effect is randomized. (The level lost works like Level Drain, so your casts will be refilled and HP resets to their class average.)
Spells and Tarot by Effect - Part 2
HEALING SPELLS

Feiria - Cleric Rank 1: Small HP recovery for one ally.

Feirima - Cleric Rank 3: Fair HP recovery for one ally.

Rafelima - Cleric Rank 4: Small HP recovery for party.

Rafeireed - Cleric Rank 7: Fair HP recovery for party.

Feireed - Cleric Rank 6: Full HP and status recovery for one ally except Death and Ash.

The Sun Card - Bard's Tarot: Full HP recovery for party. (Failure = Full HP recovery for all enemies)

Rizefus - Cleric Rank 6: Low chance to recover one ally from Death, fair HP recovery on success. (Failure = inflicts Ash on target)

Rezefeid - Cleric Rank 7: High chance to recover one ally from Death, full HP recovery on success. (Out of combat. Failure = inflicts Ash on target)

Miracle - Rank 7 Mage: Pray for one of several overpowered effects in exchange for one level and unused EP, though effect is random. (The level lost works like Level Drain, so your casts will be refilled and HP resets to their class average.)


AILMENT RECOVERY SPELLS

Venom-Fei - Cleric Rank 2: Recovers one ally from Poison.

Roodfei - Cleric Rank 3: Recovers one ally from Paralysis.

Mirror Eyes - Cleric Rank 4: Recovers party from Sleep, Silence, Confusion, Charm and Fear.

Sama Eyes - Cleric Rank 5: Recovers party from all ailments except Petrify, Death, and Ash.

Feireed - Cleric Rank 6: Full HP and status recovery for one ally except Death and Ash.

Rizefus - Cleric Rank 6: Low chance to recover one ally from Death, fair HP recovery on success. (If failure, inflicts Ash on target)

Rezefeid - Cleric Rank 7: High chance to recover one ally from Death, full HP recovery on success. (Out of Combat. If failure, inflicts Ash on target)

Miracle - Rank 7 Mage: Pray for one of several overpowered effects in exchange for one level and all unused EP, though the effect is randomized. (The level lost works like Level Drain, so your casts will be refilled and HP resets to their class average.)


AILMENT INFLICTING SPELLS

Misama - Mage Rank 1: High chance to Sleep a single enemy.

Ramisama - Mage Rank 2: Chance to Sleep enemy row.

Fool Card - Bard's Tarot: Sleep all enemies, ignoring resistance. (Failure = Sleep party)

Venom - Mage Rank 2: High chance to Poison a single enemy.

Ravenom - Mage Rank 3: Chance to Poison enemy row.

Priestess card - Bard's Tarot: Poison all enemies, ignoring resistance. (Failure = Poison party)

Stoma - Mage Rank 4: High chance to Petrify one enemy.

Rastoma - Mage Rank 6: Chance to Petrify enemy row.

Rood - Alchemy Rank 1: High chance to Paralyze one enemy.

Rarood - Alchemy Rank 2: Chance to Paralyze enemy row.

Karacha - Alchemy Rank 3: High chance to Confuse one enemy.

Makaracha - Alchemy Rank 4: Chance of Confusing enemy row.

The Tower Card - Bard's Tarot: Confuses all enemies, ignoring resistance. (Failure = Confuses party)

Pinto - Alchemy Rank 5: High chance of Charming one enemy.

Rapinto - Alchemy Rank 6: Chance of Charming enemy row.

Lovers Card - Bard's Tarot: Charms all enemies, ignoring resistance. (Failure = Charms party)

Tashif - Cleric Rank 1: High chance of Silencing one enemy.

Latasif - Cleric Rank 2: Chance of Silencing enemy row.

Emperor Card - Bard's Tarot: Silences all enemies, ignoring resistance. (Failure = Silences party)

Zefeifus - Cleric Rank 5: High chance of instantly killing one enemy.

Razefeis - Cleric Rank 7: Chance of instantly killing enemy row.

Death Card - Bard's Tarot: Random enemy is instantly killed, can be resisted. (Failure = Kills one ally)


DAMAGE SPELLS

Balad - Mage Rank 1: Fire damage to one enemy. If used in a Dark Zone it can briefly show enemy artwork.

Balados - Mage Rank 2: Fire damage to enemy row. If used in a Dark Zone it can briefly show enemy artwork.

Mabalad - Mage Rank 3: Fire damage to enemy row. If used in a Dark Zone it can briefly show enemy artwork.

Rabalad - Mage Rank 5 - Fire damage to enemy row. If used in a Dark Zone it can briefly show enemy artwork.

Glass - Mage Rank 2: Ice damage to one enemy.

Maglass - Mage Rank 4: Ice damage to enemy row.

Raglass - Mage Rank 6: Ice damage to enemy row.

Ziakal - Mage Rank 3: Lightning damage to one enemy. If used in a Dark Zone it can briefly show enemy artwork.

Ziakalad - Mage Rank 6: Lightning damage to one enemy. If used in a Dark Zone it can briefly show enemy artwork.

Elnam - Cleric Rank 6: Holy damage to one enemy.

Pomedoon - Alchemy Rank 1: Breath attack to enemy front row. (Damage based on 1/2 the current HP of the caster + some RNG. Power decreases each time it is used in the same battle.)

Argeiss - Mage Rank 5: Earthquake (Dark) damage to all enemies, with a low chance of instant death.

Enterook Mista - Mage Rank 7: Non-elemental damage to all enemies. (If used by a Mage their Element Attack Attributes affect the damage amount. Unaffected by the EX Skill Spirit Contract)

Zeo Nadar - Alchemy Rank 7: Attacks a single enemy with damage based on number of spells used during that battle.

Immolarati - Cleric Rank 7: Removes set amount of HP from all enemies in exchange for all MP. (Use by Cleric class has the strongest effect)

Hermit Card - Bard's Tarot: Enemies or Allies who Defend or do not land a hit have a chance to take a percentage of their maximum HP as damage for the rest of the battle. (Failure = Nothing)

Judgement Card - Bard's Tarot: Reduces all enemy and ally HP to 1, can be resisted. (Failure = Nothing)


EFFECTS BOTH ENEMIES AND ALLIES

Ramialf - Alchemy Rank 5: Erases all ally and enemy magic and ability effects and effect counters used in battle.

Fortune Card - Bard's Tarot: Attack order is randomized for the rest of the battle. (Failure = nothing)

Justice Card - Bard's Tarot: Physical Attack doubled for Good enemies and allies for the rest of the battle. (Failure = Nothing)

Temperance Card - Bard's Tarot: Physical Attack doubled for Neutral enemies and allies for the rest of the battle. (Failure = Nothing)

The Devil Card - Bard's Tarot: Physical Attack doubled for Evil enemies and allies for the rest of the battle. (Failure = Nothing)

Empress Card - Bard's Tarot: Physical Attacks cannot be used for the rest of the battle for enemies or allies. (Failure = Nothing)

Hierophant Card - Bard's Tarot: Skills cannot be used for the rest of the battle for enemies or allies. (Failure = Nothing)

Hanged Man Card - Bard's Tarot: Removes all Resistance to Status Effects for the rest of the battle for enemies and allies. (Failure = Nothing)

The World Card - Bard's tarot: All Magic Resistances become 0%, even weaknesses, for enemies and allies for the rest of the battle. (Failure = Nothing)

Hermit Card - Bard's Tarot: Enemies or Allies who Defend or do not land a hit have a chance to take a percentage of their maximum HP as damage for the rest of the battle. (Failure = Nothing)

Judgement Card - Bard's Tarot: Reduces all enemy and ally HP to 1, can be resisted. (Failure = Nothing)
Spells and Tarot by Effect - Part 3
SPELLS FORGOTTEN AFTER USE - CAN RELEARN BY LEVELING

Honey Restorer - Cleric Rank 4: Warp out of dungeon, regardless of anti-warp conditions.

Protectorate - Rank 7 Alchemy: Grants a +1 increase in a chosen stat for the target, changes alignment if stats are capped. (Out of combat)


SPELL WITH LEVEL LOSS

Miracle - Rank 7 Mage: Pray for one of several overpowered effects in exchange for one level and unused EP, though effect is random. You can cast the spell as many times as you want, but each cast costs a level. (The level lost works like Level Drain, so your casts will be refilled and HP resets to their class average.)


SUMMONER SPELLS

Contract - Summoner Rank 1-7: Chance to form a Contract with an enemy and linking it to the spell rank used, rank has no effect on chance of success (Using Contact on a rank that already has a Summon will replace the old one). A successful contract removes the target from combat, so it can also be used to clear tough enemies with low resistance to Summon magic. The number of summon magic resistance rolls made depends on the enemy level as compared to the summoner level.

If an enemy is 10 or more levels higher than your summoner, they get 4 chances to resist your summoning magic. If they're 10 or more levels below your summoner, they only get 2 chances. The rest of the time, enemies get 3 chances to resist the contract. The individual dice rolls can be seen if your party carries the dice of fate. You can effect the enemy's level with the Level Drain EX Skill. The only thing that effects the enemy's % resistance to Contract is a Brawler's Clean Hit.

Summon - Summoner Rank 1-7: Summons Contracted enemy to the 7th party slot, spell rank has no effect on power.

Return - Summoner Rank 1-7: Returns Summoned enemy from the 7th party slot.
Equipment With Spell Casting Abilities
This is a list of special equipment that cast a spell when you use them in battle. Every time an item is used in this way it has a chance to break, repairable by Pendeku or at Jadegbol Shoppe. Keep an eye out for these items when you are treasure hunting. This list only has items that are listed in the Potential Loot sections of this guide. More probably exist.


Swords
Lightning Sword: Single-target Lightning Damage
Flamberge: Multi-target Fire Damage
Freeze Sword: Single-target Water Damage
Dragon Emperor Sword: Casts Pomedoon (Breath Attack)

Daggers
Azoth Dagger: Casts Rood (Single-target Paralyze)

Katanas
Ame Shikou: Casts Zeo Nadar (Multi-target damage based on # of spells used)
Fushun: Casts Mahamaha (Run from Battle)

Spears
Demon Spear: Casts Elnam (Single-target Holy Damage)
Yashahime: Casts Ravenom (Multi-target Poison)

Maces
Silver Ram: Casts Psi-Drain (Protects against one Drain. Stackable.)
Pope's Mace: Casts Erod (Easier to find Hidden Doors. Time Limit.)
High Priestess Mace: Casts Zomperi (Show dead parties on map)
Mjolnir: Casts Eroma (Easier to find Hidden Doors. No Time Limit.)

Clubs
Rizefeyd: Casts Rezefeid (High chance death recovery)
Mandragora Club: Casts Rood (Single-target Paralyze)

Bows
Fairy Bow: Casts Lascorek (Lowers enemy speed 30%)
Reverse Bow: Casts Rapinto (Multi-target Charm)

Whip
Thunder Lord Whip: Attack a single enemy with lightning

Weapons
Gravity Ring: Casts Argeiss (Multi-target Dark Damage + Low Chance of Instant Death)

Scythe
Witch of Death: Casts Enterook Mista (Multi-target Non-Elemental Damage)

Books
White Scriptures: Casts Feiria (Single-target small Heal)
Black Scriptures: Casts Misama (Single-target Sleep)

Shields/Armor/Accessories
Hollow Shield: Casts Makaracha (Multi-target Confuse)
Midsummer Garb: Attacks a row of enemies with Fire
Recovery Ring: Casts Rafelima (Multi-target small Heal)

Instruments
Holy Flute: Removes Curses cast by Ghosts and Undead. I have never tested this, so I don't know what they mean by Curse.
Harp of Sleep: Casts Misama (Single-target Sleep)
Horn of Surprise: Casts Hallobuti (Multi-target +4 Enemy AC)
Kagura: Casts Harias (Party can hit All Enemy Types)
Captivating Lute: Casts Pinto (Single-target Charm)
Puppet Maracas: Casts Bifei (Single-target Enemy Focus)
Fissure Drums: Casts Argeiss (Multi-target Dark Damage + Low Chance of Instant Death)
Zero Flute: Casts Ramialf (Wipe All Party and Enemy Buffs)
Healing Fork: Heals all allies of mild status effects
Thunder God's Harp: Attack a single enemy with Lightning
Magic Stahl: Casts Makaracha (Multi-target Confuse)
Equipment With Unleash Hidden Power
This is a list of special equipment that allows you to Unleash Hidden Power when you attempt to equip it. Doing so will turn the item into Junk in exchange for an effect. The character must be able to equip the item in order to activate the effect; you can get around anything but Class restrictions via Forging. Keep an eye out for these items when you are treasure hunting. This list only has items that are listed in the Potential Loot sections or as Quest Rewards. More probably exist.


Stat Increases
Ankh of Strength: +1 STR
Herculean Ankh: +1 STR
Power Axe: +1 STR
Muramasa: +1 STR
Ankh of Wisdom: +1 INT
Intelligence Ankh: +1 INT
Item Encycopedia: +1 INT
Magical Wreath: +1 INT
Temperance Club: +1 INT
Cult Ankh: +1 PIE
Holy Sword: +1 PIE
Ankh of Stamina: +1 VIT
Life Ankh: +1 VIT
Tower Lance: +1 VIT
Divine Charm: +1 VIT
Ankh of Speed: +1 AGI
Keen Ankh: +1 AGI
Youbokuten: +1 AGI
Shuriken: +1 AGI
Ankh of Luck: +1 LUCK
Ankh of Divine Fortune: +1 LUCK
High King's Sword: Increases Max HP by a small, random amount
Life Stealer: Increases Max HP by a small, random amount
Small Chest: +1 Age
Empress Whip: +10 Age

Stat Decreases
Murasame: -1 STR
Emperor's Axe: -1 PIE
Curse Charm: -1 PIE
Hanged Man's Whip: -1 LUCK
Ring of Life: -1 Age

Alignment Change
Death Chopper: Evil Alignment Change
Demon's Wing: Evil Alignment Change
Shield of Truth: Good Alignment Change
Mirage Lance: Neutral Alignment Change

Class Change
Hermit's Knife: Class Change to Ninja
Philosopher's Stone: Class Change to Alchemist
Medal of Power: Random Class Change
Mirage Shield: Random Class Change

Breath Change
Devil Club: Changes Breath Attack to Dark
Syphon Ring: Randomly Changes Breath Attack Type

Other Positive Outcomes
Devil Gun Boanils: Full MP Recovery to User
Magic Shield: Full MP Recovery to User
Ghost's Book: Full MP Recovery to Party
Blue Strike: HP and Status Recovery to Party
Kutneslika: HP and Status Recovery to Party
Soul Eater Sword: Learn Summoning Magic Rank 1 (3 casts) if not a Summoner

Other Negative Outcomes
Rune: Reduces User's MP to 0
Mana Burn: Entire Party's MP Reduced to 0
Oldest Book: Petrifies User
Cursed Spear: Kills User
Epetam: Turns User to Ash
Blue Gale: Turns User to Ash
Judgement Book: Turns User to Ash
Yashahime: Turns the User and Someone Else to Ash
Basic Battle Advice - Part 1
It's difficult to give battle advice for this game due to different party setups, randomized loot, and the fact that I have no idea how you play or what you don't know about the game. That said, I'll try my best to cover some things to consider if you are having trouble, though some of it won't come into play until mid game. Most of this advice can be found in bits and pieces throughout the guide as well if you feel like skipping this section.


Party Recovery
Not a battle tactic, but no matter how good you are the need to recover will happen to you eventually. When your entire party dies their corpses will be at the location they wiped at unless you had Bone Slippers, in which case their bodies will be transported to Lohagra Temple. Whether you need to go collect them or not, make a rescue party so you can revive them. It will take multiple trips. You only need one person with Diomente and revival spells (Rizefus, Razefeid), but you might want to have a full party on hand in case you do not have revival spells or the money to revive them at the Temple. You can maintain the second party without too much extra grinding by swapping between two parties for each floor/dungeon, or just swapping a few members in and out of one party as you go. Note that Diomente does not work in the last post game dungeon, so plan accordingly if you want to explore it.

If you are having money problems, a Bishop for inspection saves a lot of money. If you are willing to sacrifice EP, a Shaman with Oracle can make you rich pretty quickly. You have to activate the skill in the battles you want to use it and it is random whether it procs or not. You can also rob new recruits, but the further you get into the game the less efficient that option gets.

Another option is to save after every battle and reset when things do not go your way, though the game will "punish" you by passing time relative to which dungeon you are in and respawn all guaranteed battles. If you don't want to constantly save scum but are worried about Age, you could save before any revival attempts and reset if they become Ash. No judgements from me. Play in whatever way is fun for you.


Set Your Own Turn Order
If you are using a keyboard, press the Page Up key in battle to set a specific turn order when you need it. Doing this is pretty essential for some things, such as utilizing a Brawler's Clean Hit (only the person who goes directly after the Brawler can take advantage of it) or the Absolute Barrier EX Skill. You can also use it to ensure that damage buffs go up before your characters attack. Keep in mind that you cannot change enemy turn order in this way.


Defend
The Defend command is really useful. While Defending your AC gets a little bonus and anyone can Defend whoever you'd like. In early game when your HP is really low and you don't have the magical means to control who gets targeted, have your front row Defend while the back row takes tough enemies out or vice versa if your back row can handle the damage. As you get further into the game, when preparing your defensive buffs during boss battles you can have characters with nothing to do Defend while the spells are being applied.


Plan Your Targetting
Try to keep tabs on how much damage your characters can do, their individual attack ranges, and how fast they usually are in battle, then target enemies accordingly. If you just slam the attack button on the first enemy your characters will be at the mercy of the not-so-smart AI targeting once it dies.

For example, if one of your characters is strong enough to one shot a specific enemy you probably don't need to target the same enemy with a faster-but-weaker character as well. That would be wasted damage that could go elsewhere unless you need to shut down said enemy with a status effect first. But if you have a character that can't quite kill an enemy on their own, pairing them on a target with the above faster-but-weaker character is a good choice. Keep in mind that enemy HP values listed in the Monster Encyclopedia are only their potential maximums. There will be some variance in battle due to RNG.


Run When You Need To
Running is a staple tactic of all Wizardry-type games and you should do it if you are in over your head or have been dealt a bad hand by the RNG. The Run command is individual, but Mahamaha (Rank 1 Alchemy) effects everyone and The Moon Card (Bard's Tarot) has a 50% chance to make enemies run instead. There are a few fights you cannot run from with Mahamaha, but they are mostly in post game and the Moon Card can still work if it procs. Don't use Diomente in battle if you can help it, unless you are out of options or want to attempt to Warp ahead in a dungeon you have not explored for fun/speed. Warping into solid rock is an instant party wipe and they will be permanently irrecoverable unless you have Bone Slippers in your inventory.


Pay Attention to Enemy Placement
If you are up against a strong enemy but they happen to be short range and in the second row, keep them there by leaving an enemy alive in the front row (use status effects to keep them controlled if needed). Use ranged attacks/Yuniwa Coat to pick off such enemies from far away and keep your party safe. There are quite a few enemy arrangements meant for you to screw yourself over. Don't be tricked!

You can abuse rows in boss fights as well if they have a chance to randomly spawn extra enemies. Getting two rows of spawns means the boss will be pushed back to the third row where it cannot take action. Keep one enemy alive in each row, then cast as many buffs and enemy wide debuffs as you can before killing them off and pulling the boss into the battle. This tactic will trivialize the fight.

Keep in mind that Summoned creatures, Replicas and Escort Quest characters can get in the way of these kinds of tactics.
Basic Battle Advice - Part 2
Pay Attention to What is Killing You. Utilize the Equipment Option in Battle.
It is fairly easy to figure out what you need to adjust by what is killing your party. Having an Alchemist around for Forging really helps with this, especially when they hit Mastery and have access to Disassemble; you can swap Forges in town when you need to. Keep in mind that the game can be very random and put you in situations that you might not be able to recover from every once in a while; keep a Bone Slippers in your inventory if you are worried about it.

Party being overwhelmed? Try to learn what enemy weaknesses are and use status effects to control fights.

Non-mages dying to physical attacks? Lower your AC.

Specific enemy using a spell that wipes your party? Up your defenses against that element.

Certain non-Tarot induced status effects causing you to lose control, but have limited equipment options for resistances? Farm for or Forge an accessory to protect against the status effect you need to be safe from, then swap it in battle when enemies that use it show up. Remember that Behead and Instant Death from magic (protect yourself with Dark Defense) are two different effects. Options to protect yourself from Behead are very few at the beginning of the game.

Damage too low or can't hit the enemy? Use weapons with a higher Attack Rate/Hit Accuracy. Cast AC raising Debuffs (Robuti, Hallobuti) and Orath (Alchemy). In case of being unable to hit specific enemy types, check your weapons for Xs against that type or use the Harias spell (works on everything, not just Ghosts).

Enemy back row killing you? Cast Yuniwa Coat or give your characters medium or long range weapons.

Swallow Return destroying your party? Use Bifei to have a single front row character eat the attacks if they have the HP/-AC to deal with it. Get someone with the Swallow Killer skill, which costs SP and penetrates Swallow Return on use (SP is refilled with the expensive option in the Inn). Remove Summoned creatures from the party so their attacks do not activate it; remember Swallow Return does not necessarily attack the person who triggered it.


Bifei and Bulafei/Hidden Status
Bifei (Rank 4) and Bulafei (Rank 2) are both Alchemy spells. Bifei causes enemies to focus on one character if they can reach them. You can get the same effect from the Puppet Maracas Instrument if you have a Bard or a Shaman. Bulafei gives the target Hidden status, which removes them from the enemy target list, including multi-target spells (not including Tarot), and they cannot be Defended. You can get the same effect from Thief, Hunter, Bard, and Ninja's Hide Skill, which costs nothing but the turn you use it on and has a possibility of failure. Ninjas have a chance to start a battle Hidden through the Vigilance Skill. Hidden status also gives a bonus to physical attacks. At the end of each turn there is a chance that any Hidden characters will be found, wiping the status away. Ramialf will wipe both Hidden Status and Bifei, so watch out for that.

If you are dying to heavy hitting physical attackers or Swallow Return, utilize Bifei to create a tank. Equip the best -AC armor you have on one front row character. Don't put them in the back row because if a short range enemy cannot target them they will attack someone else. Put -AC Forges on their equipment when/where you can, though don't neglect other things if they are needed. If they normally use two-handers or dual wield put a good Shield in their inventory. Cast Bifei on said character, have them swap to their Shield if needed, then Defend. Cast additional buffs (Robukand unless their AC is -20 or more, Hallobukarm) if necessary for them to survive. This setup makes most of game's content easily survivable.

If an enemy uses Draw, you can cast Bifei on one of your backrow characters, who are now in the front row, and have your tank, now in the back row, Defend them until the rows are switched again.

If you have a high level Ninja or Brawler with their Lowered AC Ability ON in end/post game they can make a great Bifei target without the need for equipment/shield swapping and Defending, as long as they are out of Hidden status. If you have a Samurai you could try and take advantage of Swallow Return by making them your Bifei target. And yes, you can Swallow Return an enemy's Swallow Return. A Petrified Samurai also still has a chance to Swallow Return.

If you need a character to live in a dangerous situation and Defend isn't going to cut it, cast Bulafei on them (it helps if the caster is a fast character) or use the Hide Skill if they have it and hope it is successful. Being in Hidden status is handy against enemies who cast multi-target spells or if the party rows have been swapped due to Draw. Having all three front row characters hidden effectively shuts down any close range non-magic using enemies. Keep in mind that if everyone is Hidden you cannot use the Defend command, meaning you have to take another action. This is important if you are trying not to kill an enemy for Stealing or Contract purposes.


Bard's Tarot Skill
The Tarot Skill is pretty underrated due to the risk factor. That aside, the effects cannot be resisted with two exceptions (Death and Judgement), can turn the tide quite easily, and can help you save resources. It only gets better once the Bard hits Mastery. If you are struggling a lot on non-boss enemies, give it a try. Because of the risk, save Tarot attempts for fights you know you have trouble with and/or Floor Masters. Boss fights automatically make the success rate 1%, so don't use it unless you want to try for a Reverse (failed) effect. Remember to watch your success rate as you explore and that you need to rest or have a Servant use a Magic Herb to regain it.

Enemy too fast? Try your luck with Fortune.

Hard time hitting things? Star.

Need crowd control on enemies with high status resistances, or just want to easily deal with really strong enemies like Floor Masters? Fool (Sleep), Tower (Confuse), Lovers (Charm), or Hanged Man if you are feeling really lucky since it effects you as well.

Does the enemy have strong/annoying magic attacks? Emperor.

Are you a Magic based party against Physical-only enemies, or the enemy's magic is not as damaging? Empress.

Magic resistances got you down? World, though it does effect you as well.

Enemy has an annoying Skill (Tarot!) and you don't mind losing your own Skill access for that battle? Heirophant.

In end/post game against an enemy with an AC much lower than -10 and stuck with a low Tarot success rate? Reverse Chariot (failure) is a quick way to make them much more managable.

There are more things you can do with it, but you should get the idea by now.


Equipment Removal and Weapon/Armor Break
Equipment Removal is a Master Thief Skill. Weapon and Armor Break can only be had by Contracting and/or Spirit Pacting certain enemies and have an automatic chance to proc with every successful hit. Some things cannot be removed, such as Slash and Charge, but everything has a chance to be broken. Physically strong enemies can be crippled by landing these on them, so if you are in need of an extra edge give them a shot.
ONE SKULL DUNGEONS
The Kingdom of Ishmag
After the opening cutscene you will find yourself in the Kingdom of Ishmag. You can either go to Dondun's Tavern to pick up the default characters or head to the Training School to create characters at the Adventurer's Register, though do not talk to the Chief of Training there yet. There is nothing wrong with the level 4 default characters. The Cleric even has the EX skill Sacrifice, which you cannot get anywhere else. However, there is something satisfying about assembling your own team. If you are the extremely cautious type, you can use the Free Money trick before you make your real recruits, then use the money you gather to invest some GP for EP (1:1 ratio) when you create them (rest at the Inn to level up). Keep in mind that you can only invest when you first create them or the moment they class change.

If you can't decide yet, or have a setup in mind that requires a bit of grinding and just want a filler party to get you to a good spot, here is a very easymode/sustainable setup of 4 melee fighters and 2 mages that can attack and heal for free while working your way to the level 5 Bishop quest and a good grinding spot. You can dump them once they have served their purpose, or keep whoever you'd like. Put any left over points from Bonus Rolls into VIT (if you want to know why, check the Useful Tricks - Part 1 section):

Fighter / Stronghold:
Your basic front row meatsack. They have an excellent selection of gear they can equip, so they are a good choice for the front row. Stronghold will prevent Mork Cricketers from using the Draw skill (switches rows) before you have good spells and HP values to deal with it effectively.

Brawler / Tackle:
Another free damage meatsack that potentially deals really good damage on the cheap, if they are lucky with combos. Tackle will help prevent enemy HP Turn Recovery on B3, which can drag out fights this early in the game.

Thief / Mysterious Bag:
The best at dealing with treasure traps before you get spells to do it, so they are good for early gearing. Use Skill > Hide > Surprise Attack for front row Thieves, though it will be hard to maintain the Hide status this early in the game. If you are uncomfortable with them being in the front row, buy a Shortbow for the Thief, give their Leather Armor to the Valkyrie, and swap their positions. If you want them in the back row, but prefer more damage over trap safety, you could go with Hunter instead.

Valkyrie / Swallow Killer:
Valkyries must be Neutral, so it is easy to keep them Innocent (do not multiclass or change alignment); it doesn't hurt to start one now. Swallow Killer is a good skill to have later in the game if you decide to keep them, though Hand of Kindness can turn them into a decent main healer once they learn Cleric spells. Can fight in either row with Spears and can hurt Ghosts. They are in the back row for more potential damage if/when the front row has to Defend, but you can swap positions with the Thief if you want.

(Non-Neutral) Dragonewt Mage / Song of Healing:
This character will be used for their Dragonewt Breath (Racial Skill, overpowered in early game and hits the entire front row at level 8+) and Misama (Sleep). If you keep them you can use them to get Diomente (Warp spell) as soon as possible, and they'll make a good character to grind new recruits (see Concentrated EP in the Useful Tricks - Part 1 section). Normally, two characters with the same EX Song is a waste, but they have it to use if the Bishop is put to Sleep or dies. It can be changed if you multiclass (make them Non-Neutral if you want to pick up Cleric spells). If you want an even safer pick for level 1 party exploration, go with Alchemist for Mahamaha (escapes battle).

Dragonewt Bishop / Song of Healing:
This character will be used for Song of Healing (uneffected by Silence, so keep singing if you are afflicted), inspecting early loot (Identify or Skills > Identification), and possibly Breath after the first few levels. If you get the Fear status from inspecting loot, it can be cured at Lohagra Temple, by certain spells (that you probably don't have now), or you can walk around in a dungeon and it will eventually cure itself. Starting as a Bishop isn't the most efficiant idea, but there is an early quest in the first dungeon you can take once they hit level 5. If you want to speed up the process of getting quests you can take advantage of the default Bishop, who starts at level 4, but not having the extra Song and Breath can make things a tad more difficult if you are running a level 1 party. If you do not care about free inspection, getting quests as soon as possible, or don't like using characters that will most likely be benched, I recommend using an Alchemist for Mahamaha (escapes battle) with the same Race/EX Skill.

Now that you have made 6 characters, or chosen to use the defaults, form your first party in Dondun's Tavern by selecting Call Allies. If you have any alignment problems you can fix it shortly (see Useful Tricks- Part 2.

Next, it's time to go over equipment. Every character has their own personal inventory and gold. Default characters start with quite a bit of stuff which is already equipped (feel free to poach it to save money), but created characters are completely naked with only an armor and a weapon in their inventory. Equip them by selecting Character Status > the character's portrait > Equipment. If you have any Mages, consider going bare handed for extra loot space. The regular Staff is not great since it cannot reach from the back row, offers very little in terms of magic boosting (you have very few casts), and adds AC (you want low/negative AC numbers). If you want a boost to magic, buy a Talisman.

Once you have made sure everyone has something on, return to the main plaza where you will be tasked by King Jaldan's messenger to investigate the recent happenings in the Caves of Tsun-Kurn. Before you head out, step into Jadgebol Shoppe and Talk to the Skilled Blacksmith. He will give you the quest "His Finest Work" and a free Pick, which you can use to mine Ore if you keep it in your inventory. Don't worry about the quest for now, since you cannot complete it until much later.

While you are in the shop, buy some Magic Maps (a single use item) to use if you get lost and a few Antidotes. There is a small chance you can get Paralyzed in B1, so if you can afford it a Mahi Oil or two is good as well. You can also be Silenced, which does not stop Song of Healing or Breath Skills, or put to Sleep in B2 and B3. Take a look at the equipment if you'd like. It is not completely necessary if you have a decent party setup and there is plenty of loot in the Caves, but having lower AC sooner certainly helps. If you find yourself low on cash you can always rob new recruits until you are satisfied (see Useful Tricks- Part 2).

If you want to be really overkill, make an Alchemist and buy 6 easily swappable accessories (Cape/Obi) and 6 Ore (Devil Iron, Elvish Iron, and Vectorium all work). Pay to use the Alchemy Warehouse in Hosbarn Inn and Forge Turn Recovery onto the accessories. The Ore you can buy at the shop will only give you 2hp per turn with 1 AP left over, but when you only have 8hp that is a huge number. If that sounds like a hassle, Song of Healing will work just fine on its own if you have it.

After you are done supplying your party, go to the World Map. Select the second tab from the left to save, then head back to the first tab and select Caves of Tsun-Kurn. If you had any alignment problems you can use the handy Pause Adventure trick listed in the Useful Tricks - Part 2 section of this guide.
Caves of Tsun-Kurn B1


To see the full size map, click the thumbnail above. Sorry the thumbnail is so small, but it was a compromise I had to make to get around the Steam Guide bug.

ENEMIES
All enemies listed are only those I have confirmed on the floor and are listed by level. Rare enemies exist, and some enemies have a lower chance to appear on certain floors, so there are certainly some that I have missed.

Key: Enemy Name (Special notes, if any):
Level (% Resistance to Summon Contract) - Special Abilities and Spells that might not be obvious, if any. For example, if the enemy is obviously a Ghost, I won't type that it is a Ghost. Abilities marked with a * are not used if they are Contracted. If you want more details, use the in-game Monster Encyclopedia after you have defeated one.

Spore Balls:
Level 1 (30%) - Immune to Poison/Behead
Uiwakshia:
Level 1 (30%)
Earth Worm:
Level 2 (30%)
Slime:
Level 2 (30%) - Immune to Behead
Zombie Hound:
Level 2 (30%) - Immune to Drain, -50% Weak to Fire/Holy
Zombie Lady:
Level 3 (30%) - 5% Chance to Paralyze, Immune to Drain, -50% Weak to Fire/Holy
Red Slime:
Level 4 (30%) - Immune to Behead
Mork Cricketer:
Level 5 (30%) - Draw*
Chicken Bomb:
Level 6 (30%)
Locust (Quest - One Time Only):
Level 3 (95%)


While you explore the caves keep in mind that those Magic Maps you hopefully bought are one-time-use items, so conserve them for when you feel lost. You could always use the rank 1 Mage spell Dioseed, which acts like a map, but it may be best to save Mage casts for Misama (sleep) which can be a life saver at lower levels. Until a better map becomes available I will give step by step instructions to get to objectives, avoiding as many battles as I can. Spots on the map above marked with a skull are guaranteed battles with a 100% chance of a treasure box. You can Transmute a Sheephair Brush (Devil's Lapis + Devil Iron) and keep it in your inventory if you want them marked on your own map, but they will only show up in places you have already been.

If you chose to make your own characters, battling while level 1 can be tough, but getting through this floor is doable. For those who are using my temporary example party, if you are attacked by more than one enemy and/or the enemy is level 3 or higher, Defend with your front row, Sing with your Bishop (Skills > Song of Healing), Breathe with your Mage (Skills > Breath), and attack normally with whoever is left. Let your back row do all the work. Depending on how many enemies you get in each random encounter it can take a while, since Breath will start to deal only 1 damage after a few turns (if it doesn't start that low from the first use), but you'll be relatively safe in most fights. If you don't have Song of Healing and someone's HP gets dangerously low you could consider trying to escape with that character. Run is individual, so you can still continue to fight and they will return after the battle is finished; they will not earn any ep, but anyone still in the party will take their share. Most of the enemies are manageable, but watch out for Mork Cricketers; they can use the Draw ability that will Swap your rows if you do not have Stronghold. Groups of Chicken Bombs can also be very deadly. Zombie Ladies are easy, but have a small chance to Paralyze. If you have an Alchemist, the rank 1 spell Mahamaha can be used to escape any battle that looks too tough.

When you are ready, follow the corridor and you will come across a party of adventurers (2x,1y). You can choose either option when talking to them. Neither choice matters. Go through the first door and turn east/right. You will see a Healing Spring (4x,2y). If you drink the water you will restore a little bit of health for free. You might not need it if one of your party members uses Song of Healing every turn, but it is still nice to have it available. If you are not confident enough with low level adventurers this is a great spot to grind out some loot and EP. Almost all battles, including bosses, have a random number of enemies though, so be careful. You could find yourself facing an army. If you have a Bishop you can inspect loot (Identify or Skills > Identification) without having to return to town, though you'll have to deal with the Fear status (50% chance to do nothing in battle) if it fails.

From the Healing Spring there are three ways to go. The western door (2x,3y) leads to two dead ends, though there is a party of adventurers (0x,11y) hanging around that complain about their party balance. There is no need to talk to them if you want to skip it. The eastern door (4x,3y) leads to a few dead ends and a Soldier (16x,1y) who is part of a quest that you can pick up later past the northern door, so you can ignore that for now as well.

Go through the northern door (3x,4y) and head through the next northern door as well (4x,6y). Follow the path until you see two doors on either side of you; take the eastern door, the one to your right (8x,11y). Walk north, your left, and follow the path until you reach a dead end with a door to the west (14x,14y) which you should enter. Then follow the corridor through one last door facing south (10x11y). You might want to save here, but you can certainly charge in if you are confident.

Head toward the blue glowing light (10x,9y). Choosing Leave will allow you to ignore the event, which I suggest you do for now if you do not have Song of Healing and are at a low level (come back later after gaining a few levels). If you have the EX skill though, you should be able to pull it off, even at level 1. Choosing Investigate leads to a battle against some Locusts.

Focus on one at a time and use Song of Healing every round if you have it. If there is a large amount of enemies in the front row, let your back row thin them out before attacking with your own front row. One of your characters might be killed if you are unlucky, but this fight is doable even for a level 1 party only using starting gear as long as your composition is decent. The rank 1 Mage spell Misama (sleep) is really helpful if you are feeling overwhelmed. If you have a Bard or Shaman and happened to have bought a Harp of Sleep and/or a Horn of Surprise this is a good time to use them (select them in the Item menu in battle). After the battle you will find a Confused Man, but unfortunately you can do nothing for him right now. This starts your first optional quest, "Confused Adventurer".

Whether you need to head to town or not, it is time to trek all the way back to the room with the Healing Spring (4x,2y). After you have retraced your steps go through the eastern door this time (4x,3y) and follow the winding path until you reach 2 doors. Take the southern most one (11x2y) and keep following the path through 2 more doors, until you see a person in front of you. Talk to the Soldier (16x,1y) to get the <Key Item> Medicine and head all the way back to the Confused Man (10x,9y). Give him the Medicine and he will reward you with a pair of Tough Leather Shoes. Quest complete!

If you have a level 1 party, make your way back to Ishmag
Level 1 Party Intermission
With the good deed done it is time to take a rest at Hosbarn Inn, assuming you went in with a level 1 party. If you went straight to the objectives, depending on your luck with encounters, your characters should have enough EP to be halfway to level 3 or more.

If you don't have a Bishop, create one or use the default and go to Dondun's Tavern to identify any loot you picked up. Be aware that if "you touched it" while identifying items, your Bishop will get the Fear status and will be unable to identify until it is cured. If you are using a Bishop you created just for Inspecting, you can dismiss him and recruit another one to get around the Fear (keep in mind that creating/dismissing is only effective for Inspecting low level loot). Otherwise, you will have to pay Lohagra Temple to have it removed or walk around in Tsun-Kurn and wait for it to cure itself, since you probably don't have a spell to cure it yet.

Sell and resupply, then head back into the Caves. If you want to do all the quests as soon as possible the next goal is to get a Bishop to level 5, unless you already have one, in which case go to Lohagra Temple > Talk > Confessional > Sobbing Woman. This guide will assume you don't have one yet, so it is time to explore.

Before you leave, if you are using the temporary example party check the HP values of your back row Dragonewts. Whoever has the most HP now has Breath duty. The weaker one should use Song of Healing.

Head back into Tsun-Kurn. This is a great time to map out all of B1 for EP if you haven't already, and I suggest doing so if you have not hit level 3 yet with most of your party members. To get to B2, it is easier if you just look at the map in the previous section and follow the green line to the stairs, but in case you need written instructions:

At the Healing Spring, head north through the door (3x,4y) and go through the western door in the next room (3x,6y). Exit the cramped room you are in to the north and you will be face to face with a column with four doors. Walk around the column in either direction and exit the room north (2x,9y), leave the short hall you just entered from the next door facing east (2x,11y) to another room with a four door column. This time walk around it to your left and take the first door to your left, facing north (4x,12y). Go through the short, winding corridor until you see a door on your left/north and enter it (6x,13y) into a series of cramped rooms where you will pass through two more northern doors and one facing east. From here (7x,16y) pass through three rooms and upon entering the fourth there should be a northern facing door to your left (15x16y). Enter that and follow the path until you see two more doors; take the one on your left, facing north (18x,18y). Go down the rather long path until you come across two more doors and pass through the one to your right, facing north (1x,17y), then again through the door to your left, facing west, and one last door to the north to finally be at the stairs leading to B2.
Caves of Tsun-Kurn B2


To see the full sized map, click the thumbnail above.

ENEMIES
Spore Balls:
Level 1 (30%) - Immune to Poison/Behead
Slime:
Level 2 (30%) - Immune to Behead
Collosal Roach:
Level 3 (30%)
Kobold:
Level 3 (50%) - -50% Weak to Sleep
Fighter:
Level 3 (50%)
Mage:
Level 3 (80%) - Spells (Balad, Misama)
Priest:
Level 3 (90%) - Spells (Feiria, Tashif)
Red Slime:
Level 4 (30%) - Immune to Behead
Barbarian:
Level 4 (50%) - Thief Skills +1
Goblin:
Level 4 (50%) - Find Treasure
Twin Cobras:
Level 4 (90%) - 2 Actions Per Turn, 20% Chance to Poison, Resists Poison/Paralysis
Mork Cricketer:
Level 5 (30%) - Draw*
Polyp:
Level 5 (30%)
Skeleton:
Level 5 (30%) - Immune to Drain, -50% Weak to Fire/Holy

If you want to do the quests as soon as possible, the goal of this floor is to get enough EP for a Bishop to reach level 5, which you should be able to reach (or be really close) by completely mapping out this floor and the previous one, unless you are really unlucky. I'll still type out directions to get to the stairs though, for those who do not care to fully explore the area.

Now that you have a few more levels under your belt you can be a little less careful, but don't let your guard down. Mork Cricketers are still pretty bad with their Draw skill, and Twin Cobras have 2 actions per turn with a 20% chance to poison. Enemy casters will also Sleep and Silence your party members. If you happen to meet a large group of Skeletons you could use a Cleric/Bishop/Shaman/Lord's Dispel skill to help clear them one by one, but you will get no EP for it.

To get to the stairs to B3 there are two branching paths that will take us the direction you need to go. They both have the same amount of encounters and steps, so the path I will guide you through is simply the easiest one for me to type:

Go through the door on your right, facing south (2x19y). Turn left/east and enter the next 3 east facing doors. Turn right/south and enter the door there (5x,17y). You know you have the right place if you get a battle. Head through the southern door and keep following the hallway. If it is your first time here, you will come across a Boy you can speak with, but neither choice matters. Keep walking to the end where you will see two doors (11x,6y). Take the one on your right/north, and north again into a battle. Turn right and go through two east facing doors, then follow the hallway until you reach a west facing door (9x,11y). Enter it, turn left/south, and walk a few steps until you see another door. From here, go through 2 south facing doors, then a right/west facing door. There should be a door directly in front of you on a column (6x,8y) but don't enter it. Walk around the column in either direction until you see a west facing door. Enter it, follow the path, and enter the right/north door at the end. There should be a battle here. You will be facing another door attached to a column (1x,10y). Once again, go around the column in either direction, taking the first pathway north to three doors (1x,15y). Take the left/western door to reach the staircase to B3.

For those of you who are mapping out the whole floor here are a few highlights:

A Soldier just a few steps south of the stairs to B1 (2x,17y) will give you a single Magic Map if you don't have any. Not amazing, but decent in a pinch.

An Herbalist hanging out in a room in the NE corner of the dungeon (16x,18y) will randomly tell you some Mix recipes for a Servant to use. You have to keep talking with him though, and he will repeat himself a lot. These are the recipes that you can get ("Maze" means Mystery Herb):
Potion x9 = 2 Sun herbs
Antidote x9 = 2 "Maze" Herbs
Potion of Awakening x9 = Sun Herb + "Maze" Herb

There is a Young Boy you can speak with at (17x,12y), but neither choice matters.

And finally, there is a spot that looks like someone is living there (12x,1y). This will be important for the optional quest we are working toward, so remember it.

Once you have the floor mapped out, head back into town to level up, identify loot, and resupply. At this point, if you've been unlucky finding equipment from chests you might want to think about buying some for your front line if you haven't already. Also, if your Bishop has not yet hit level 5 you can go back into the dungeon and grind for some treasure.

When they hit level 5 it is time to put your Bishop to work! Go to Lohagra Temple and Talk. Choose Confessional and have a chat with the Sobbing Woman. After she shares her woes you will now have a new optional quest, "Demon's Child". If you are using the temporary example party you can retire the Bishop now, but hanging on to them until the end of Tsun-Kurn is a good idea so you can keep using their Song of Healing and Breath. We'll be accessing a great spot for early grinding soon.

When you are ready, go back into the caves. Visit the living space in B2 (12x,1y) to catch a glimpse of a Purple-Skinned Child and start the next phase of the "Demon's Child" quest. From now on, until you find the thing he wants, he will follow you around. In the comments section below this guide, pixie had this to say:

Messaggio originale di pixie:
hi just in case someone is wondering: if you find the locket on B3F (x6y16) before you meet the child at the place with scrambled books and stuff at x12y1 on B2F, he might give you the book before you have to go down again to B3F (i just met him at x9y11 B2F)

Many thanks to them for the contribution.
Caves of Tsun-Kurn B3


Click the thumbnail above for the full sized map.

ENEMIES
Spore Balls:
Level 1 (30%) - Immune to Poison/Behead
Slime:
Level 2 (30%) - Immune to Behead
Collosal Roach:
Level 3 (30%)
Kobold:
Level 3 (50%) - -50% Weak to Sleep
Fighter:
Level 3 (50%)
Mage:
Level 3 (80%) - Balad, Misama
Priest:
Level 3 (90%) - Feiria, Tashif
Barbarian:
Level 4 (50%) - Thief Skills +1
Red Slime:
Level 4 (30%) - Immune to Behead
Poltergeist:
Level 4 (30%) - 5% All Element Attack Attribute, 5% Chance to Sleep/Poison/Silence/Confuse/Charm, Immune to Drain, 100% Dark Defense, -50% Weak to Holy
Goblin:
Level 4 (50%) - Find Treasure
Twin Cobras:
Level 4 (90%) - 2 Actions Per Turn, 20% Chance to Poison, Resists Poison(50%)/Paralysis(20%)
Mork Cricketer:
Level 5 (30%) - Draw*
Polyp:
Level 5 (30%)
Skeleton:
Level 5 (30%) - Immune to Drain, -50% Weak to Fire/Holy
Chicken Bomb:
Level 6 (30%)
Orc:
Level 6 (50%) - Tackle, 2% Chance to Poison, 15% Resist Confusion, -50% Weak to Sleep
Troll:
Level 6 (60%) - 5hp Turn Recovery, 50% Status Recovery, 30% Resist All Ailments, 50% Resist Behead, -100% Weak to Fire
Gremlin:
Level 6 (95%) - 80% Dark Defense
Locust (Repeatable):
Level 3 (95%)
Vovalketer:
Floor Master - DO NOT ENGAGE

This is the last floor for the Caves of Tsun-Kurn.

If you are interested in Post Game there is an item that can only be found on this floor called the Pushke Tablet. It is completely random where you find it; it can even end up in places you have already explored if you exit the floor or use the Pause Adventure trick. Because of that I suggest mapping the entire floor in one sitting, or at least until you find the Tablet. That way you can see exactly where you have checked as your Magic Maps (don't forget them) fill out.

This floor will be your first encounter with a Floor Master, marked by a big red dot on your map in the southwest corner or as a glowing red man if you are looking directly at it. Floor Masters are end/post game boss-like creatures that are found in every dungeon, each with their own patterns of movement. Take care not to touch them directly, or you will be forced into battle. If you do accidently bump into them, the best thing you can do is run with the a rank 1 Alchemy spell Mahamaha. If you are using the temporary example party you won't have access to this yet, so be careful. If you have a Bard you can use Tarot to cheese it, but you will miss out on Stealing/Contracting opportunities.

As for other enemies to be on the lookout for, Poltergeists can only be hurt with abilities that harm Ghosts; if you are using the temporary example party your Valkyrie's normal attack and Dragonewt's Breath can do the job. Damage Spells and the Flamberge weapon, if you managed to buy it already, can also hurt them. Casting the rank 1 Cleric spell Harias will allow normal weapons to connect, so you can deal with them that way as well. Orcs can disrupt HP regeneration with their Tackle skill, and Trolls naturally heal 4-5 health per turn which you can prevent automatically with a Tackle of your own. Just so you know, even though Tackle will occasionally interrupt Song of Healing it will not remove the turn stacks, so keep singing.

Another random event to look out for is the "Demon's Child" quest if you started it. The Purple-Skinned Child will pop in and out of view from time to time as you explore. What you are looking for is the <Key Item> Silver Locket, indicated by a circle of blue light, at (6x,16y). Since it is on the way to the main objective I will note where to take the detour if you use the text directions below. Once found, the next time the Child approaches give it to him; he will hand you an Unidentified Book and leave. Afterward, if you visit him in his home in B2 (12x,1y) you will have the option of recruiting him. Choose Yes and he will join your roster. He has a bit of a quirk though, which I will detail in the next section of the guide. If you forgot to visit the Child's home on B2 before taking the Locket, simply go visit it later and he should pop up for you shortly.

For anyone who wants to go directly to the main objective it is a bit complicated giving text instructions, so once again using the map above is easier. But I'll still do it for those in need, so here we go: When you come down the stairs from B2 you will be facing south (0x,12y). Take 2 steps east, 1 step north, 1 step west, 1 step north, 1 step east, 1 step north, 1 step east, 1 step south, 4 steps east, and 1 step north. If you are doing the "Demon's Child" quest take one step west and one step north to pick up the Locket, then 1 step south and 1 step east to get back on the main path. Continue 2 steps north, 1 step east, 1 step south, 1 step east, 1 step north, 2 steps east, 2 steps south, 1 step east, 1 step south, 1 step east, 1 step south, 1 step east, 1 step north, 1 step east, 2 steps north, 1 step east, 1 step south and 1 step east. If you can investigate bloodstains here you are now at (17x,15y) and on the right track. Go 1 step east, 2 steps south, 1 step west, 1 step south, 1 step west and 2 steps south. There should be a door to the east. Go through it to find a person.

There is an Exhausted Samurai in the tiny room at (17x,10y) who talks about a hole that needs to be closed before passing out. There are quite a few guaranteed battles in the next section. Take it slow and be careful of saving here, since you could get yourself stuck between a lot of battles.

From the Exhausted Samurai go 2 doors south, 1 door west, 1 door south, 1 door east, 2 doors south and 1 door west. There should be bones and meat here (16x,5y) if you need to get your bearings. Take another door west, 2 doors south, 1 door west and 1 door north. You should be in a 2x2 room (14x,4y) with a door heading west in the northwest corner that you should enter. Follow the corridor all the way south until you see a dead end with a blue light coming out of a crack in the wall (12x,0y). Heal up and step into the light when you are ready. Choose Approach the hole.

It's our friends, the Locusts. Sometimes they bring a few Gremlins along, but it doesn't really make the fight much harder. Just like your first encounter, focus on one at a time and keep your HP up with Song of Healing. As for status effects you can utilize, once again the rank 1 Mage spell Misama (Sleep) and the Harp of Sleep are very useful if you are feeling overwhelmed. If you have a Mage you are likely to have the rank 2 Mage spell Ramisama, which can potentially put a row of enemies to Sleep, or the rank 3 Mage spell Ravenom, if Poison is more of your thing. The rank 2 Cleric spell Hallobukan, which lowers the AC of the whole party by three, is also pretty nice; it is stackable so you can cast it multiple times. All of the early Alchemy battle spells are useful as well, and they will remain so throughout the game.

When you have defeated the enemies, congratulations! You have completed the first main story quest and have access to the Hole, a very good early game grinding spot. Make your way back to the town.

If anyone is curious about the Floor Master, this is Vovalketer. Pardon the giant cursor. He walks in a counter clockwise pattern around his room, ducking into the little cubby as as he passes, so he is very easy to avoid.
Potential Tsun-Kurn Loot
This is only a list of loot from Treasure Boxes, not from mining Ore or picking Herbs.

Keep in mind that other places will have this loot, and rare items here can pop up more often in later dungeons. Even if you are unlucky, if you keep moving on at a steady pace you'll get better stuff eventually.

Loot marked with a * was found by Vino and the JP Wiki.


TRAPS
Rockslide
Poison Needles
Magic Drain

CAVES OF TSUN-KURN B1
? Sword = Short Sword, Longsword, Rusty Longsword*
? Spear = Spear
? Axe = Hand Axe
? Mace = Mace, Morningstar
? Hammer = Pick
? Gauntlet = Mittons, Leather Gloves
? Shoes = Shoes, Leather Boots
? Cape = Cape
? Medicine = Potion, Antidote
? Scroll = Magic Map
? Junk = Dagger, Star Fragment, Sun Herb*, Mystery Herb*, All Purpose Herb*

CAVES OF TSUN-KURN B2
? Sword = Claymore
? Axe = Broadaxe*
? Katana = Tachi
? Club = Konbou, Flail
? Bow = Shortbow
? Whip = Whip
? Staff = Staff
? Helm = Leather Helm
? Cap = Fur Cap
? Leather = Leather Armor
? Robe = Robe
? Belt = Obi
? Medicine = Potion, Antidote
? Scroll = Magic Map
? Junk = Star Fragment, Sun Herb*, Mystery Herb*, All-Purpose Herb*

CAVES OF TSUN-KURN B3
? Sword = Short Sword, Beastbone Blade
? Club = Konbou, Flail, Onbei, Furious Cudgel, Quenstene*
? Weapon = Stone
? Shoes = Shoes, Leather Boots, Fire Shoes
? Medicine = Potion, Antidote
? Scroll = Magic map
? Junk = Dagger*, Junk, Weed*, Star Fragment

THIEF EQUIPMENT STEALS (LEVEL 26+)
You are very unlikely to have a level 26 Thief at this point in the game, and by the time you do this equipment will be outdated. This list is more for completion's sake than anything. I am only listing Equipment that can be stolen, not Potions and Herbs. Remember that you have to use Equipment Removal before you can Steal equipment, and if they have multiple equipped items the one you remove is random, so you may have to use it multiple times to get what you want:

Dagger = Barbarian, Goblin, Skeleton
Short Sword = Kobold
Longsword = Fighter
Konbou = Troll
Morningstar = Priest
Orc Axe = Orc
Trickster's Rod = Poltergiest

It is not Tsun-Kurn loot, but you can Steal the following from the Chief in Training at the Training School in Ishmag: Longsword, Plate Helm, Plate Armor, Gauntlets, Plate Leggings, Cloak
Return to the Kingdom of Ishmag
Once you are back in the Kingdom of Ishmag head to Ishmag Castle and Arrange Meeting with the King. He will reward you with 5,000gp and ask that you go to Igdra Village and talk to the Priest there about the situation. There are a few things you can do before you go, but if you are not interested feel free to skip to the next section.

The first thing is that there is a random chance to see optional battles at Dondun's Tavern. Technically you can get one as soon as you enter Tsun-Kurn, but more often that not your first one will happen after you have finished it. If you want to fight, make sure you are prepared every time you enter and choose the most conflicting response. Winning will give you a stack of whatever item is tied to whichever event you get.

Second, if you picked up the Unidentified Book from the "Demon's Child" quest you can get it identified into an Item Encyclopedia. This is a great subweapon for Bishops with a lot of resistances and a 30% boost to elemental spells. If you Unleash Hidden Power you will consume the book for a single INT stat point (not worth it at this point). Your Bishop will have a hard time identifying it at a low level, so another option is to have the Shopkeeper at Jadgebol Shoppe do it for 34,500gp when you have the money. If you have that kind of cash on hand, you can also consider buying the Flamberge at 22,000gp. The Flamberge is a two-handed sword that can be used as an item to cast fire on a row of enemies, though it has a chance to break. These items can give you an edge this early in the game, and you can use the Free Money trick to get both with little effort, but you can survive without them.

And then there is the Purple-Skinned Child, now known as Mysterious Child, also from the "Demon's Child" quest. He is a level 1 Neutral Ninja with Magic Essence, has 200gp, no starting equipment, and 5% extra status resistance due to his Devlish race. He isn't the best Ninja, but he can do an ok job. The real problematic thing is his age, which is only 3, so he will take a huge blow to stats every time he levels; if you plan on using him it would be to your advantage to raise his age. There are traps later in the game and consumables that can do it (Small Chest, Transmutable), but the easiest way right now is to kill him off and resurrect him a few times (+1 per normal raise, +2 if ash), which costs 300gp at level 1. The Chief of Training in the Training School is a good place to get that done; make a solo party with the Child and the game will send his body to the Heal option in Lohagra Temple when he is killed. To pick him up after resurrection choose the Withdrawl option while having an empty space in your party. I have never tested the exact age where he stops bleeding stats, but around age 20 always seem to work out alright.

The next thing to decide is if you want to make new recruits and grind out some levels or not. If grinding isn't your thing, your current party setup should do fine if you finished Tsun-Kurn with them. If you decide to level up, you can use the Hole in Tsun-Kurn, as listed in the Useful Tricks section. Personally I like to have at least 1 cast of the rank 7 Mage spell Diomente, if not more, available at this point, though it will take a while to get it; this spell increases your chance of survival by quite a bit as it gives you the ability to warp wherever you have stepped before (with a few exceptions). There is a sneaky trick, mentioned in the Useful Tricks section, where you can level a Mage to 13 and hope to learn 2 spells, one being Diomente, then class change for 2 casts (save before you level and reload if you don't get what you want). If you used the temporary example party, raising your Dragonewts to level 8 will upgrade their Breath Skill to hit the whole enemy front row, making grinding a breeze. If you don't want to grind though, don't worry about it. Diomente helps, but it is not required. Also, if you used the example party and have not already done so, you can swap out the Bishop now or level him to 10 for a quest. If you like the Bishop class, you can make a better/more-useful-in-early-game one by multiclassing some spells onto them with Alchemist, Mage, and Cleric before finalizing their class.

If/When you have a level 10 Bishop, visit Lohagra Temple, Talk and choose Confessional. A Penitent Man tells a sad tale of his lover, who was sacrificed to an evil cult by his village. You now have the optional quest "Sacrifical Lover" but it will be a while before you can complete it.

If you haven't already, make an Alchemist and Forge some Turn Recovery on some accessories (Cape and Obi are good choices) in the Alchemy Warehouse with Devil Iron, Elvish Iron, or Vectorium. If you missed it earlier in the guide, you can buy some from Jadgebol Shoppe with 5 AP value, enough for 2hp regeneration per turn. That might sound low, but it will make things easier. You only get the effect of the highest value Forge, even if you have multiple pieces of equipment with regeneration effects, so keep that in mind. Try to put low value ore on low value equipment for now, since you don't want to be stuck with a great item that has crap on it; it will be some time before you can Dissasemble (lv.26 Alchemist) and the selling/rebuying trick can be pricey this early in the game. Chosing items that can be worn by everyone at this point is useful so you can share equipment if/when you swap characters. Remember to re-equip anything that you Forge, since the game will de-equip it during the process.

As for levels, as long as your party members are around 6-10 for the next part of the main quest it shouldn't be too hard. As mentioned above, if you have a Dragonewt at level 8+ their Breath attack now hits the entire front row of enemies, which is very useful. Damage calculations are based on RNG and influenced by 1/2 their current HP + any Fire Attack Attribute they have. I want to stress again that having access to at least 1 cast of Diomente, if not more, is really helpful. The next dungeon marks the appearance of Ninjas, which can Behead party members; having a quick way back to town to revive them is a good thing. You can also use Honey Restorer, which is a Cleric spell, though it disappears after use and must be re-learned by leveling up again.
Igdra Village
You should have received your next assignment from the King, which is to go to Igdra Village, so head to the World Map and select it. Once there, go to the Church where you will learn that the Priest has been gone for a while. Luckily he left a Journal behind which provides some clues as to where he went and why. Exit the village and go to Dezaporlia Tunnel.

Follow the hallway and go through the door. To your left is a room that houses the Refuse Mountain Protector (8x,5y) who collects the last 10 things that you have discarded anywhere in the game; you can pay him to sift through his trash to retrieve them in their unidentified form, no matter what state they were in when you dropped it. The price is a small percentage of the total amount of gold you have across all characters, including benched ones. Note that items dropped due to having no inventory space will not end up here, and if you haven't dropped anything you get nothing. He will still charge you though.

Ahead of you is an Iron Door; inspect it (F on the Keyboard) to find that it is locked. As your party searches around, someone will approach you and tell you that the Old Man with the key has gone missing, along with a rumor that he may have headed into Guatella Grotto. With nothing else to be done here, return outside to follow up on the information you have recieved.

Before you head into the Grotto, go back to Ishmag and visit Dondun's Tavern. Talk to the High-born Lady there and she will ask you to retrieve a jewel on a demon who lives in an underground lake. This will give you the optional quest "The Underwater Treasure." If you have an Alchemist, buy some Elvish Iron and Vectorium and take it to the Alchemy Warehouse in Hosbarn Inn, which is our next stop anyway, and Transmute an Air Seed. You can exploit the shop if the AP value of your Air Seed is a single digit by selling and repurchasing it, giving it a value of 10. You can hold off on making it for a bit if you don't plan on doing the optional areas of the Grotto right away.

Inside Hosbarn Inn the Innkeeper will call you over and ask a favor; he wants to expand the Alchemy Storehouse and needs some quality wood to start the project. If you find some he will reward you with more storage space. This starts the optional, but very helpful quest "Strong Wood". If you are the type who likes to gather items for quests as soon as possible you can go into Jadgebol Shoppe and purchase a Broadaxe (you can also get one for free later if you are cheap). If you are tight on space don't worry about it for now.

When you are ready, go to the World Map and travel to Guatella Grotto. Make sure you resupply yourself with Antidotes and Magic Maps, and also have a way of hurting Ghost-type enemies before you go.
Guatella Grotto B1


Click the thumbnail above for the full sized map.

ENEMIES
Shell Combine:
Level 5 (30%) - 5% Chance to Behead, 10% Resist Poison, 10% Fire/Water Defense
Ninja:
Level 5 (50%) - 2 Actions Per Turn, Vigilance, Thief Skills, 5% Chance to Behead
Missionary:
Level 5 (90%) - Spells (Tashif, Latashif, Bulafei, Karacha), 10% Chance to Confuse, 5% Chance to Charm, 50% Resist Charm
Ghost:
Level 6 (30%) - Curse, Spell (Glass), 30% Chance to Confuse, Immune to Drain, 100% Dark Defense, -50% Weak to Holy
Lizard Man:
Level 6 (50%) - Brace, 6hp Turn Recovery, 10% Water Attack Attribute
Ghost Ranger:
Level 7 (30%) - Pursuit, Thief Skills, Immune to Drain, 100% Dark Defense, -50% Weak to Holy
Ghost Brawler:
Level 8 (30%) - Group Attack, Immune to Drain, 100% Dark Defense, -50% Weak to Holy
Ronin:
Level 8 (50%) - Swallow Return
Arbink:
Level 9 (80%) - 8hp Turn Recovery, 5% Chance to Poison, 50% Watter Attack Attribute, 3% Resist Poison
Snail Lich:
Level 10 (80%) - Mage Spells (Miasma, Glass, Venom, Ziakal), 5% Chance to Poison, 5% All Element Attack Attribute, 30% Fire Defense, 10% Water Defense
Avi (Repeatable):
Level 15 (100%) - Asleep, 40% Status Recovery, 1hp Turn Recovery, 10% Chance to Sleep

The Guatella Grotto is an interesting dungeon in that a large majority of it is entirely optional. I will cover all of it eventually, but for now I will focus on the main questline.

As you explore, be aware that you will now encounter enemies that have a chance to Behead, which is the instant death that it implies; it will be a while before you have access to suitable protection/Forges against it. Also, more enemies will be able to attack your back row directly. It shouldn't be too much of a problem, but keep an eye on your HP just in case. Do not be afraid to Defend a weaker character with a stronger one if needed. Another thing to watch for is Magic Drain traps on treasures, which will take 1 cast from every spell rank on every character in your party. Remember that you can always skip treasure with traps that you don't want to accidentally trip. If you only have one cast of Diomente, don't risk it.

If you have a Summoner, you can consider making some Contracts with enemies here. Ghost Brawler and Ghost Ranger are very easy to make Contracts with. Both the Ninja and Shell Combine have a small chance to Behead, so watch out for those. Ronin have a lot of health and naturally come with the Swallow Return skill. The Lizard Man is worth a look as well; 6hp turn recovery and the Brace skill at a 50% chance to make a Contract is a really good deal this early in the game. Arbink (8hp turn recovery and a chance to poison) and the Missionary (nice spells and a chance to Confuse and Charm) are both nice, but are highly resistant to Contracts and probably not worth the effort. Speaking of status effects, if someone gets Confused simply have them Defend. Snail Lich (also a tough Contract) is a rare surprise on this floor, so be careful if you run into one.

The objective is to find the Old Man and retrieve the key to Dezaporlia Tunnel. Go up/north until you hit the wall, then west 2 steps, north 3 steps, east 2 steps, south 1 step, east 2 steps, north 2 steps, west 7 steps, and then all the way south to a door. Go through the door and down one step in front of a person (11x,6y), the go right/west until you reach another door. In the next room, go through the southern door, follow the corridor through another north facing door, then go through the door leading south on the east side of the room. Go south and enter the door at the end facing west, again through the door just ahead of you, and take the western facing door at the far end of the hallway. Enter the only door facing south, then north and north again to be at square (1x,3y). Take 1 step north and 1 step east and inspect the wall (F key) to reveal a hidden door. Enter to reach the objective.

The Old Man is hanging out in the hidden room (4x,4y). If you look at your map you will notice some red Xs. That means that you cannot warp onto that space, but you can warp out of it. When you return you can simply warp just outside the door and enter from there. Approach the Old Man and he will request a Fairy Delicacy from the Great Tree Yap Gotz before he'll talk. From here you can return to Igdra Village to continue the main questline and unlock an optional quest which I strongly recommend, but there are a few things which you may wish to check out on this floor before you leave:

One of the highlights is a statue at (4x,7y). Upon examination you are asked if you want to touch it and if you choose Yes you will fight the Sleeping level 15 Avi, a repeatable battle (mentioned in the Useful Tricks section). You don't have to fight it now, but stepping near it will make it faster to get to via Diomente should you want to give it a try later.


There is also a Moss-covered slate at (18x,15y). You can't do anything with it yet, but try to remember that it's there.


OPTIONAL AREAS
If you come back or continue exploring Guatella Grotto then you will want to go to (10x,12y), which you passed on the way to the Old Man, and face the wall. Search there (F Key) and you will find another hidden door which opens up the rest of the floor, as well as the way to the B2 staircase. If it is your first time here I suggest reaching the stairs for Diomente, but not going down just yet. The next optional quest will result in a very useful item for exploration, so it doesn't hurt to wait.
Return to Igdra
After exiting Guatella Grotto return to Igdra Village. Go to the Plaza and Talk to the Bitter-faced Women. You will learn that their children have been stolen by Goblins and taken to the Great Tree Yap Gotz. You will receive the quest "Kidnapped Children." Even if you have been skipping the optional quests up until now I strongly suggest you finish this one. After that, return to Ishmag to identify and restock your supplies.

From here you can go to the Great Tree Yap Gotz to do some quests and find the Old Man his food, or you can go back into Guatella Grotto to explore the optional floors. This guide will assume the former, but the choice is up to you. If you go back to the Grotto, make sure to have an Air Seed (Elvish Iron + Vectorium) and a Pick with you. If you want to do the optional floors of the Great Tree as soon as possible you can buy a Broadaxe from Jadgebol Shoppe, but once again you can hold off if you don't plan on going to F2 right away.

If you decide to persue the main questline you might want to put a Servant with Divination in your party to take advantage of the static gathering spots littered throughout the Great Tree; there is a small chance you can find Magic Herbs. Also, pick up some Antidotes and Mahi Oil, if you don't already have some, for emergencies. Remember, if a party member becomes Confused, Defend with them. If your party members are not level 7-10 yet, you might want to grind a little bit. Also, take someone with Thief Skills to unlock a door.
The Great Tree Yap Gotz 1F


Click the thumbnail above to see the full sized map.

ENEMIES
Slime:
Level 2 (30%) - Immune to Behead
Red Slime:
Level 4 (30%) - Immune to Behead
Giant Nepenthe:
Level 6 (30%) - Cruelty
Koled:
Level 6 (50%) - Vigilance
Alchemist:
Level 6 (80%) - Spells (Pomedoon, Rood)
Shield Centipede:
Level 7 (30%) - Spells (Hallobukan, Robukand)
Madragora:
Level 7 (50%) - Shout, 20% Chance to Confuse
Arob:
Level 7 (50%) - Pursuit, Thief Skills
Amber Roach:
Level 8 (30%) - Immune to Petrify
Ranger:
Level 8 (50%) - Pursuit, Thief Skills
Caterpillar Fungus:
Level 9 (30%) - 20% Chance to Poison

The Great Tree Yap Gotz is similar to Guatella Grotto in that it has a lot of optional areas to explore. If you have been skipping the optional quests so far I highly recommend completing the "Kidnapped Children" quest which I will be covering in the next section. As for anything specific you may need, bring along some Antidotes and Mahi Oil (if you run low, a Servant can use Mix in Jagdebol Shoppe with All Purpose Herb and Sun Herb to make more) for safety. If a party member becomes Confused, have them Defend. For an easier time, I suggest your party members be around level 7-10 for the upper floors and having at least one cast or more of Diomente if you want to be extra careful, though Honey Restorer can also work in a pinch. You might notice that examining treasure correctly and disarming traps is a bit harder here, so be very careful with Magic Drain. Skip treasure with that trap if you don't want to risk it.

Another thing to note is that there tends to be more Friendly Monsters around here than the places you have been before, making this a great location to switch alignments if you need to. Keep in mind that Neutral characters cannot change alignments through battle/sparing.

There is a locked door here, so bring along a character with Thief Skills (Thief, Hunter, Bard, Ninja) if you plan on exploring the upper and lower floors, though you do not need to open it for the main questline. You will need it for the "Kidnapped Children" quest though, and it is a good time to get that done now. As mentioned earlier, a Servant with Divination can take full advantage of the static harvesting points on all the floors of this dungeon. You have a small chance to find Magic Herbs here, which have a special Servant-only use (besides making potions) of restoring 1 cast (2 if they have Mastery) across all spell ranks to everyone in the party. If you find any, save them for later. If you want to farm harvesting points you can use the Pause Adventure trick or go up and down the stairs to reset them.

I also want to mention that there is a decent chance to get a Monohoshizao as loot on this floor. It is a two-handed Katana that has medium range, a great weapon for a Samurai if you have one.

As you explore, watch out for Arobs. They dual wield bows and they probably attack faster than you. Enemy Alchemists can Paralyze the party, which can be cured by Mahi Oil and the rank 3 Cleric spell Roodfei. Caterpillar Fungus has a chance to Poison on hit and Mandragoras have a chance to Confuse.

This will be the last major step-by-step text instructions I will give, for reasons that will become clear later. I'll be covering optional quests along the way:

When you are ready to traverse the long and winding path, go west through the door. From here, follow each path to the end and go through the next 3 north facing doors to (1x,11y). At the very end of this corridor is two cubbies with doors that technically lead to the same place; take the door facing east (northern most one) for a faster trip. Once again, take the south facing door all the way at the end of the hallway. Take two steps and look to your left to see a person in front of you (10x,17y). Whether you talk to him or not, head east all the way to the end to enter the east facing door, and again all the way to the very end through a south facing door. In this next place you can once again take either door, but going though the first door to your left/east is a hair shorter. Keep going south and you will find 2 south facing doors. Take the western most one to arrive at (18x,6y). Travel south until you see a door leading south in the southwest corner of the squarish area. Take 2 steps west and 1 step south to see another south facing door, then enter and look to your right/west to see a man.

The man at (13x,0y) is an Herbalist Doctor who is desperate for a special kind of wood oil that can only be obtained inside the tree. After you finish talking with him you will have the optional quest "Glittering Sap." Go back out of this little room and head through the door to the north that you came in from. You should be in a square-ish room again. Take one step north, turn west and inspect the wall (F key). You will find a secret door (16x,4y).

When you are ready to move on, head to the very end through the next 4 doors to reach (6x,3y). Take 1 step north, 1 step east, go through the east facing door there and pass another person (Herbalist) to go through another east facing door which will let you avoid a battle. Turn west/left and go to the end though an east facing door, then enter the next 2 north facing doors you find to reach (14x,14y). Take 2 steps left/west, face south, and search to reveal a second hidden doorway (12x,14y). Step through and again go all the way to the end and enter the south facing door there. Go 1 step west, enter the north facing door, go through the west facing door at the north side of this room and through the door directly in front of you. Take 2 steps forward/west and turn right/north to face a cubby housing a Fairy.

Help the Injured Fairy (7x,14y) and you will receive the <Key Item> Great Tree Delicacy and the optional quest "Budding Life."

Don't leave yet though. We still have one more quest to finish.
The Underground Goblin Map
This section of the guide is assuming that you are still in the Great Tree Yap Gotz F1 after helping the Injured Fairy.

From the Injured Fairy go back where you came through the 2 east facing doors to reach (11x,13y). Take 2 steps south, face west and search for the third and final secret door (11x,11y). Go through and take a few steps forward to a door that looks gray on your map. When you inspect it (F key), it will ask if you want someone to try to open it, which you can do with Thief Skills. There are no consequences, so keep trying until you are successful. A Thief has the best chance, with Hunter, Bard, and Ninja close behind. When you are through, go east into the south facing door at the end, and down the staircase to B1.

I suggest you save and head directly to the objective. There are a few enemies here that are fairly tough at this point in the game, unless you have been grinding. You can use the map in the Great Tree Yap Gotz B1 section of this guide to reach (3x,1y), but here are some text instructions for the fastest route if needed. If you want to try and avoid guaranteed combat, use the B1 map to take a longer route around (go toward the Switch):

Take 2 steps south, 1 step west, 1 step south, 1 step west, 1 step south, 2 steps west and 2 steps south. You should get a guarenteed battle here. Kill them, or run/cast the rank 1 Alchemy spell Mahamaha. Then walk 1 step west and 2 steps south (3x,1y). Before you enter the door here be prepared for a battle. It's pretty easy, but better safe than sorry.

You'll be facing a random amount of goblins. Take them down one at a time or, if you have a level 8+ Dragonewt or two, Breathe all over them and watch them fall. Follow the path past two doors with two more battles each. Kill them just as you did before.


Go through the next door and, surprise! More Goblins. Only this time they have a Goblin Wizard that casts Malabad, a rank 3 Mage spell that hits a row of targets whether they are in the front or the back. It isn't too devastating, but watch your health. Along with the usual status effects you can always try Tashif, a rank 1 Cleric spell that casts Silence on an enemy. Once you are done you will find the missing kids from the "Kidnapped Children" quest and receive a rather annoying free trip back to Igdra Village. Rest up if you need to and head back in.

Now you get to walk all the way back to the Goblin's Den or use Diomente to warp just outside the first door. Keep going through the doors as you did before and enter the one in the back of the den. If you search you will find an Underground Goblin Map, a multi-use map item with a chance to break. If it breaks on use, it can be repaired at Jadgebol Shoppe for 5gp or with a cast of the rank 5 Alchemy spell Pendeku. You can get multiple copies of it with some simple shenanigans, as detailed in the Useful Tricks section of this guide. No more hauling around stacks of Magic Maps!

Now that you can check your map progress more frequently I will be skipping the step-by-step text directions for my own sanity. If you are not into exploring entire floors, just check your location against the maps I provide and you should be fine.

Leave the dungeon to rest and resupply for your next adventure.
Options
Once outside of the Great Tree, go to the Old Man in Guattella Grotto (4x,4y) and trade the <Key Item> Great Tree Delicacy for the <Key Item> Key to the Abandoned Mine; this will open up the rest of Dezaporlia Tunnel and the next destination for the main questline.

If you have been following the guide up to this point, you have a decision to make; you can finish the optional areas of Guatella Grotto and/or the Great Tree Yap Gotz, or go directly to Dezaporlia Tunnel.

Guatella Grotto is fairly easy. This will be the next stop in this guide, but do not feel like you have to follow it step-by-step. There is one quest for this dungeon that we still haven't completed yet ("The Underwater Treasure") and there are two more linked to the area.

The upper floors of the Great Tree Yap Gotz are a little more difficult than Guatella Grotto, mostly due to an enemy with a very high chance of Beheading (Red Cap). There are three quests that still need to be completed there ("Budding Life," "Glittering Sap," and "Strong Wood"), one of which will increase your storage space by 10. There are a lot of static harvesting points for Herbs, so you could go here first if that interests you.

The lower floors of the Great Tree Yap Gotz are the most difficult and can be very brutal at this stage of the game if you don't have a good party setup. If you have finished "Kidnapped Children" there is still one more quest to find in the area. Like the upper floors, there are a lot of harvesting points for Herbs.

Dezaporlia Tunnel is the easiest area until you reach the basement, where the difficulty jumps pretty sharply. There are three quests tied to this dungeon, including the one that continues the main storyline. There are also static mining points for Ore, so you could go here first if that interests you.

The guide will assume that you explore these areas in the order listed above, but you can go wherever you'd like. If one area seems too difficult for you, try another one for a bit. Do what is fun for you.
OPTIONAL: Preparing for Guatella Grotto
If you want to do everything here you will need to bring along an Air Seed (Transmute Elvish Iron and Vectorium). Remember that if the value of your Air Seed is 9 or less you can sell and repurchase it to make it 10, which will give you more air time; it isn't necessary, just more convenient. You only need one Air Seed; it will never be consumed and it does not stack with other Air Seeds. You should also take a Pick. If you don't already have one, the Skilled Blacksmith in Jadgebol Shoppe will give it to you for free. You will also want to have something that can cure Poison and Paralysis, so bring Antidotes and Mahi Oil if you don't have access to the appropriate spells yet. You might also want to pick up a few Stone Softeners if you plan on going through B2 Secret. In B3 and B2 Secret, there is an enemy that can break weapons, rendering them useless until they are fixed. The rank 5 Alchemy spell Pendeku can do this, but if you don't have it you'll have to trek all the way back to Jadgebol Shoppe in Ishmag for repairs.

For levels, if everyone in your party is at least level 7-10 you will be fine. Having at least 2 casts (more is better) of Diomente is also a good idea for safety. If you don't want to bother with Draw, bring along someone with the EX Skill Stronghold for B2 Secret.

If you bring a Summoner, you have a chance to pick up a Mermaid (level 16) during a quest, which is very good Contract at this point in the game. Since you are unlikely to be that high of level it could be pretty tough to get. You can also find them in a later dungeon, so do not feel like you have to nab one now.

For Forging, set a goal of getting each party member 6-10hp Turn Recovery with a priority for the front row. It is not something you have to accomplish now, just build on it slowly as you find better Ore and with luck you'll have good numbers for the basements of the Great Tree Yap Gotz and Dezaporlia Tunnel. As mentioned earlier in the guide, effects do not stack; only the highest value is used. Before you raise a Master Alchemist for Disassemble (level 26), putting Turn Recovery on easily bought and swapped items, such as Cape and Obi, is a good way to go if you plan on swapping party members at any time.

There is some decent loot in this dungeon if you feel up for farming. You can find Ghostly Bow in B3 (watch that air timer) for Hunters and Needle Vambrace for Brawlers and Ninja on B2 Secret. If you have a Fairy you can find Fairy Shield in B3, and Fairy Robe in B2 Secret.

As for enemies, there are a still a lot of Ghost-types around, so make sure you have a way of damaging them. And you still have to watch out for the Shell Combine and Ninja's chance to Behead. The Ronin's Swallow Return does not do too much damage, but Defend with front row characters that have low HP when they are around. Giant groups of Lizard Men, with their Brace skill, are easily taken care of if you have two level 8+ Dragonewts.

On B2 there will be a new enemy, Shaman, that uses Barrier to reflect spells. Simply stick to physical attacks when they are around.

On B3 you'll run into a few new enemies, one of which is the Greater Slime, who has Weapon Break and a chance to Paralyze. If they are in the back row, keep an enemy alive in the front as a shield and poke the Greater Slime with ranged weapons, or use the rank 4 Alchemy spell Yuniwa Coat if you have it. Snail Lichs, also a new enemy, can deal a good chunk of damage with Ziakal, so be careful. They can also Sleep and Poison your party members.

B2 Secret will introduce Bhikkunis, who can cast Stoma (Petrify), Masked Lizards which can Behead, and Snowmen that have a Water based Breath Attack; If you haven't been grinding you probably do not have Psi Breath yet, so be careful. Witches have a huge range of spells to use against you. Devil Cats can Paralyze you with magic and use Draw to swap your rows. You can use Alchemy spells such as Bufalei, Bifei and Yuniwa Coat to help you in that situation if you do not have Stronghold.
OPTIONAL: Guatella Grotto B2 and B3


Click the thumbnails to see the full sized maps. B2 is on the left and B3 is on the right.

B2 ENEMIES
Shell Combine:
Level 5 (30%) - 5% Chance to Behead, 10% Resist Poison, 10% Fire/Water Defense
Skeleton:
Level 5 (30%) - Immune to Drain, -50% Weak to Fire/Holy
Ninja:
Level 5 (50%) - 2 Actions Per Turn, Vigilance, Thief Skills, 5% Chance to Behead
Missionary:
Level 5 (90%) - Spells (Tashif, Latashif, Bulafei, Karacha), 10% Chance to Confuse, 5% Chance to Charm, 50% Resist Charm
Lizard Man:
Level 6 (50%) - Brace, 6hp Turn Recovery, 10% Water Attack Attribute
Ghost Ranger:
Level 7 (30%) - Pursuit, Thief Skills, Immune to Drain, 100% Dark Defense, -50% Weak to Holy
Ghost Brawler:
Level 8 (30%) - Group Attack, Immune to Drain, 100% Dark Defense, -50% Weak to Holy
Ronin:
Level 8 (50%) - Swallow Return
Shaman:
Level 8 (90%) - Barrier
Arbink:
Level 9 (80%) - 8hp Turn Recovery, 5% Chance to Poison, 50% Water Attack Attribute, 3% Resist Poison
Burgler (Quest):
Level 13 (100%) - 10% All Element Defense

B3 ENEMIES
Slime:
Level 2 (30%) - Immune to Behead
Red Slime:
Level 4 (30%) - Immune to Behead
Shell Combine:
Level 5 (30%) - 5% Chance to Behead, 10% Resist Poison, 10% Fire/Water Defense
Lizard Man:
Level 6 (50%) - Brace, 6hp Turn Recovery, 10% Water Attack Attribute
Arbink:
Level 9 (80%) - 8hp Turn Recovery, 5% Chance to Poison, 50% Water Attack Attribute, 3% Resist Poison
Greater Slime:
Level 10 (30%) - Weapon Break, 4hp Turn Recovery, 20% Chance to Paralyze, 5% Resist Poison, Immune to Behead, 10% All Element Defense
Undine:
Level 10 (50%) - Spells (Glass, Feiria, Hallobukan, Feirima), 8hp Turn Recovery, 10% Chance to Charm, 10% Water Attack Attribute, 50% Water Defense
Snail Lich:
Level 10 (80%) - Mage Spells (Miasma, Glass, Venom, Ziakal), 5% Chance to Poison, 5% All Element Attack Attribute, 30% Fire Defense, 10% Water Defense
Mermaid (Quest):
Level 16 (50%) - Spells (Raglass, Skorekh, Orath), 50% Status Recovery, 16hp Turn Recovery, 20% Water Attack Attribute, 50% Resist Confusion/Charm, 200% Water Defense

Welcome back to Guatella Grotto. Because of the connection between floors B2 and B3 I am putting them both in the same section to make the maps easier to reference. This place is about the same difficulty as the upper portions of the Great Tree, so it's not too rough. Here is another reminder to Transmute an Air Seed (Elvish Iron + Vectorium) before you head in (they are never consumed and you only need one). Make sure you have a Pick as well, if you want to do everything.

Here are the highlights of both floors:

A Suspicious Man (9x,14y) with a chest is hanging out near the stairs to B1. He mentions that it only opens with the right key and says that he will give you the contents if you find it. This starts the quest "Thief's Old Tricks".

You can find a Stalagmite with a handle sticking out of it at (14x,10y). If you use a Pick, you get an Unidentified Axe (Orc Axe). It gives whoever equips it the same attack properties as an Orc.

You can enter the Underground Lake, which is B3, at (0x,0y). When underwater you normally only have 1 minute before your entire party drowns; the clock does not stop ticking when you enter battle. However, having a basic Air Seed in your inventory will give you more air time. The amount of extra time is based on the quality of Ore used, the lowest amount being 5 minutes (for 6 minutes total) which is more than enough to stay safe; if you use the selling trick you can turn that 5 minutes into 10 (11 total). The Air Seed only adds extra time to the clock; it will not save you if the timer reaches zero. Just keep an eye on the clock as you explore, and head back up when you have a few minutes left so you don't get caught in a battle with low air. You can use Diomente to get out and return, but you cannot Save or Pause Adventure. The exit is found at (2x,18y).

While still underwater, you can open a hidden doorway if you search the south wall at (2x4y), which gives you a handy shortcut if you ever need to walk back. Unfortunately, you cannot unlock it from the other side of the wall, so you still have to take the long way around.

Back on B2, there is a door at (0x,10y) that leads to a new floor: B2 Secret. Go through the door to unlock a quest you can pick up once you get back to town, but leave the way you came immediately to continue exploring the normal B2 for now.

There is a hidden door on the north wall of (5x,6y) that leads to a staircase back down underwater. Prepare yourself before you go down. Through the only door in this tiny area is a giant bivalve mullusk (6x,9y) that you have an opportunity to invesigate. Doing so will put you in a battle against a Mermaid, sometimes accompanied by a few Undine. She has 16hp regeneration, 50% status recover rate with 50 resist against Confusion and Charm, a 20% Water attack attribute, and 200% defense against Water, but she is not very hard to defeat with Breath. At a 50% Contract rate she isn't too hard to get if you have a Summoner around her level, and she is pretty good at this point in the game, but you can always pick one up in a later dungeon so don't feel like you need one now. Kill or Contract her and you will get the <Key Item> Deep Crimson Pearl.

Head back to Ishmag (or use the Pause Adventure trick) and Talk to the High-born Lady in Dondun's Tavern to give her the Pearl. You will be rewarded with Killer, a very nice Spear, completing "The Underwater Treasure" quest. While you are there, you probably noticed the Gossiping Adventurers. Talk with them to hear some rumors about a monster that was chased down a hole, giving you the "Treasure-guarding Demon" quest.

Pick up any supplies you need and head back to Guatella Grotto.
OPTIONAL: Guatella Grotto B2 Secret


Click the thumbnail above to see the full sized map.

ENEMIES
Slime:
Level 2 (30%) - Immune to Behead
Red Slime:
Level 4 (30%) - Immune to Behead
Poltergeist:
Level 4 (30%) - 5% All Element Attack Attribute, 5% Chance to Sleep/Poison/Silence/Confuse/Charm, Immune to Drain, 100% Dark Defense, -50% Weak to Holy
Ninja:
Level 5 (50%) - 2 Actions Per Turn, Vigilance, Thief Skills, 5% Chance to Behead
Ghost:
Level 6 (30%) - Curse, Spell (Glass), 30% Chance to Confuse, Immune to Drain, 100% Dark Defense, -50% Weak to Holy
Lizard Man:
Level 6 (50%) - Brace, 6hp Turn Recovery, 10% Water Attack Attribute
Leprechaun (Quest):
Level 7 (50%) - Spells (Hallobukan, Orath), 10% Resist Paralysis/Confusion, 20% Resist Charm
Arbink:
Level 9 (80%) - 8hp Turn Recovery, 5% Chance to Poison, 50% Water Attack Attribute, 3% Resist Poison
Greater Slime:
Level 10 (30%) - Weapon Break, 4hp Turn Recovery, 20% Chance to Paralyze, 5% Resist Poison, Immune to Behead, 10% All Element Defense
Masked Lizard:
Level 10 (50%) - Brace, King's Proof, 10hp Turn Recovery, 10% Chance to Behead, 5% Chance to Paralyze, 20% Resist Paralysis, 30% Water Attack Attribute
Undine:
Level 10 (50%) - Spells (Glass, Feiria, Hallobukan, Feirima), 8hp Turn Recovery, 10% Chance to Charm, 10% Water Attack Attribute, 50% Water Defense
Snail Lich:
Level 10 (80%) - Mage Spells (Miasma, Glass, Venom, Ziakal), 5% Chance to Poison, 5% All Element Attack Attribute, 30% Fire Defense, 10% Water Defense
Devil Cat:
Level 10 (80%) - Draw*, Curse, Vigilance, Blood Oath, Surprise Attack, 9hp Turn Recovery, 50% Holy Attack Attribute, 100% Dark Defense
Bhikkuni:
Level 10 (90%) - Chi Wave, Spells (Stoma, Latasif, Feirima, Mirror Eyes), 100% Holy Attack Attribute, 50% Holy/Dark Defense
Snowman:
Level 11 (50%) - Ice Breath, 50% Resist Charm, 10% Water Attack Attribute, 200% Water Defense
Witch:
Level 12 (80%) - Spells (More than I care to list), 5% All Elements Attack Attribute
Akabey:
Floor Master - DO NOT ENGAGE

Before you return to B2 Secret, if you picked up the "Treasure-guarding Demon" quest look at your map of the normal B2 (might as well use Diomente). You will notice a new ! mark at (5x,15y). Go there to find a Leprechaun leaning against a pile of treasure, who immediately leaps into the small hole behind it. This starts the chase! Now warp or walk to B2 Secret.


Like the previous floors housing Floor Masters, B2 Secret is the home of the Eunomia Tablet. Like all Tablets, this one is also found randomly as you explore the floor, changing locations should you leave or Pause Adventure. If you want it for post game, explore the floor in one sitting so you know where you have checked, or at least until you find the Tablet.

Speaking of Floor Masters, the one residing on this floor has the ability to use doors and walks all over their territory, which is around the southwest portion of the dungeon, a bit toward the center. If it goes long enough without encountering you it seems to teleport, resetting its position; it might be a bug. If it sees you, it will give chase until you go through a door. If you hear a door opening, it is probably nearby. When you start to explore that area, make sure you check your map before standing in front of or walking through any doors or you might get a nasty surprise. If you get caught, the rank 1 Alchemy spell Mahamaha is a good thing to use.

When you are ready, begin searching the floor and make note of small holes in the walls. Each hole goes through to the other side and you are far too large to fit though. However, the Treasure-guarding Demon we are chasing is the perfect size; when you find it, it will escape through them. Its location is randomized to one of five spots: (6x,8y), (17x,9y), (13x,19y), (1x,19y), (3x,2y), and it can even reappear in a place you've found it before. The good news is that it will show up on your map as a ! if it is in any square you have walked on before, making it easy to find. After finding it 2 to 8 times (it's random) it will force you into a battle. Defeat or Contract it (it's a common enemy in Dezaporlia Tunnel) and it will leave behind an Unidentified Sword (Palindroma), an excellent sword at this time, completing the "Treasure-guarding Demon" quest.

While you are chasing the Leprechaun, in the northwest area of the dungeon you will find some Clear Water (5x,15y). Touching it will let you draw some, giving you <Key Item>Subterranean Freshwater. Take it to the Moss-covered Slate in B1 (18x,15y) to clean it off. It reads that a key is hidden beneath a certain carving. Go back to B2 Secret and head to the southeast corner of the floor. You'll find an Eerie Statue (19x,0y) and a box with the <Key Item>Azure Key inside. Take the key back to the Suspicious Man on B2 (9x,14y) and he will fight you for it. When you defeat the Burgler, you will open the chest for an Unidentified Whip (Fanged Serpent), finishing the "Thief's Old Tricks" quest.

The last highlight of this floor is the <Key Item>Headless Doll found at (9x,6y). Just hang onto it for now.

For those curious, the Floor Master is Akabey. Like all other Floor Masters, do not engage it for now. Just rememeber that it is here and come back at end/post game.
Potential Guatella Grotto Loot
This is only a list of loot from Treasure Boxes, not from mining Ore or picking Herbs.

Loot marked with a * was found by Vino and the JP Wiki.


TRAPS
Rockslide
Poison Needles
Magic Drain

GUATELLA GROTTO B1
? Bow = Shortbow, Magician's Bow
? Whip = Whip
? Weapon = Stone*
? Gauntlet = Mittons, Leather Gloves, Power Glove, Fairy Gloves*
? Scroll = Magic Map
? Medicine = Potion, Antidote
? Junk = Junk, Weed*, Dagger, Marquis Knife*, Star Fragment*

GUATELLA GROTTO B2
? Sword = Longsword, Claymore, Hundred Sword, Executioner's Sword
? Mace = Mace, Skull Crusher*
? Weapon = Stone
? Helm = Leather Helm
? Cap = Fur Cap, Magician's hat, Electric Cap
? Medicine = Potion, Antidote
? Scroll = Magic Map
? Junk = Junk, Weed*, Star Fragment*

GUATELLA GROTTO B3
? Axe = Hand Axe, Savage Axe*
? Spear = Spear, Demon Spear*
? Bow = Longbow, Ghostly Bow
? Weapon = Stone
? Shield = Small Shield, Buckler, Fairy Shield, Beastbone Shield
? Medicine = Potion, Antidote
? Scroll = Magic Map
? Junk = Junk, Star Fragment*

GUATELLA GROTTO B2 SECRET
? Spear = Lance, Ice Devil's Spear*
? Mace = Morningstar, Smasher Mace
? Weapon = Stone, Brass Knuckle, Needle Vambrace
? Leather = Leather Armor, Tough Leather Armor
? Robe = Robe, Fairy Robe
? Medicine = Potion, Antidote
? Scroll = Magic Map
? Junk = Junk, Star Fragment

THIEF EQUIPMENT STEALS (LEVEL 26+)
Dagger = Skeleton
Spear = Lizard Man, Masked Lizard
Killer = Mermaid (Quest)
Flail = Missionary
Onbei = Shaman
Kodachi = Ninja
Kogarasu Katana = Ronin
Meteor Spindle = Ninja
Shortbow = Ghost Ranger
Staff = Snail Lich, Witch
Trickster's Rod = Poltergiest
Beastbone Shield = Burgler (Quest)
Leather Armor = Burgler (Quest)
Leather Gloves = Burgler (Quest)
Leather Boots = Burgler (Quest)
OPTIONAL: Preparing for Upper Great Tree Yap Gotz
If you want to finish all the quests, make sure to bring a Broadaxe along with you while you explore F2. If you would rather wait for a free one, they are possible loot in F3 or you can pick one up off a body in Dezaporlia Tunnel. Also, take along some Antidotes and Mahi Oil if you do not have spells to cure Poison and Paralysis. Besides the usual Diomente recommendation, having access to the rank 4 Mage spell Sosario (Float that stays until you leave the dungeon) is a good idea to avoid falling traps. For levels, if everyone in your party is at least level 7-10 you should be fine.

A Servant with Divination can make the most use out of the static harvesting points found throughout the floors, giving you a chance to find rare, but valuable Magic Herbs while removing the chance for Junk. A Summoner has a chance at Contracting the unique boss of the upper floors, so bring one along if that interests you. You will also need someone with Thief Skills if you have not unlocked the door yet.

For Forging, it's the same as I typed in the Preparing for Guatella Grotto section. Set a goal of getting each party member 6-10hp Turn Recovery with a priority for the front row. It is not something you have to accomplish now, just build on it slowly as you find better Ore and with luck you'll have good numbers for the basements of the Great Tree Yap Gotz and Dezaporlia Tunnel. If you want, you could also stick some Beheading Resistance on some equipment, but the value of the Ore you have found so far is not likely to be high enough to make a huge difference. As mentioned earlier in the guide, effects do not stack; only the highest value is used. Before you raise a Master Alchemist for Disassemble (level 26), putting regen on easily bought and swapped items, such as Capes, is a good way to go if you plan on changing party members at any time.

As for loot, if you have a Samurai in your party there is a decent chance to find Monohoshizao in F1, if you haven't found one already. There are also armor and accessories that can help out in one of the dungeons in mid game, the Ice Mail (F2) and Frost Cloak (F3), though both seem to be uncommon drops.

As for enemies to be on the lookout for, the worst one is Red Cap. With a whopping 27.9% chance to Behead every time she lands a blow, dual wielding to have two chances every time, a large group of them could easily decimate your party if you are unlucky. If you come across a large group of them you might want to use Mahamaha to run away safely. With a 50% Contract resistance they are a good early Contract and an even better Spirit Pact character if you have a Summoner and want to risk trying. You may also come across Armagolions, a Brawler type with their usual Group Attack ability, meaning that they have a chance to attack multiple times (I have seen up to 7). Watch your HP and Defend or Run when you need to.
OPTIONAL: The Great Tree Yap Gotz F2


Click the thumbnail above for the full sized map.

ENEMIES
Giant Nepenthe:
Level 6 (30%) - Cruelty
Koled:
Level 6 (50%) - Vigilance
Alchemist:
Level 6 (80%) - Spells (Pomedoon, Rood)
Shield Centipede:
Level ­7 (30%) - Spells (Hallobukan, Robukand)
Arob:
Level 7 (50%) - Pursuit, Thief Skills
Madragora:
Level 7 (50%) - Shout, 20% Chance to Confuse
Red Cap:
Level 7 (50%) - Vigilance, 27.9% Chance to Behead, 20% Resist Poison
Zakkum:
Level 8 (30%) - Immune to Drain, -50% Weak to Holy
Armagolion:
Level 8 (30%) - Group Attack
Ranger:
Level 8 (50%) - Pursuit, Thief Skills
Pixie (Random Ambush):
Level 8 (50%) - Tackle, Treatment, Herbology, Spells (Robuti, Skorekh)
Ryubeshal:
Level 8 (50%) - 10% Water Defense
Caterpillar Fungus:
Level 9 (30%) - 20% Chance to Poison

Welcome back to the Great Tree Yap Gotz. In case you need another reminder, bring along a Broadaxe for the Strong Wood quest. To get to F2, walk or use Diomente (unless you only have one cast; if so, save it) to warp just outside the once-locked door to B1, but this time walk south and turn the corner to get to the staircase up.

This is where the difficulty goes up a notch. I mentioned it in the Preparation section, but it's important enough to mention again: beware of an enemy called Red Cap. She has a 27.9% chance to Behead every time she lands a blow and dual wields for two chances. She also has a tendancy to come in large groups. Status effects such as Sleep (Mage: Misama, Ramisama) and Paralyze (Alchemy: Rood, Rarood) can really help out, but don't be afraid to use the rank 1 Alchemy spell Mahamaha if you don't want to risk it.

Another thing to watch for is a slightly increased rate of random battles due to the Pixies that will attack you as you move through the tree. They are not to hard to fight, but they do buff enemies, debuff your party, heal themselves, and almost always come with some buddies.
Also, there are trap chutes that will send you falling to F1; avoid them by casting the rank 4 Mage spell Sosario, which will last until you leave the Tree. Cast it again to cancel the effect if you want to fall for any reason.

The <Key Item> Sturdy Wood we need for a quest is pretty close to the start of the area and on the way to F3. You did rememeber to bring a Broadaxe, right? Use it at (12x,8y) to retrieve it. If you want, you can go all the way back to Ishmag to turn it in right now, or use the Pause Adventure trick to turn it in that way. It is unlikely that you will have a dire need of inventory space at this point though.

For the most part, there is not too much excitement on this floor. Just search for the secret doors at (13x,10y), near the Sturdy Wood, and (5x,9y) to make your way toward the F3 staircase.
OPTIONAL: The Great Tree Yap Gotz F3


Click the thumbnail above to see the full sized map.

ENEMIES
Colossal Roach:
Level 3 (30%)
Koled:
Level 6 (50%) - Vigilance
Shield Centipede:
Level ­7 (30%) - Spells (Hallobukan, Robukand)
Arob:
Level 7 (50%) - Pursuit, Thief Skills
Madragora:
Level 7 (50%) - Shout, 20% Chance to Confuse
Red Cap:
Level 7 (50%) - Vigilance, 27.9% Chance to Behead, 20% Resist Poison
Zakkum:
Level 8 (30%) - Immune to Drain, -50% Weak to Holy
Armagolion:
Level 8 (30%) - Group Attack
Amber Roach:
Level 8 (30%) - Immune to Petrify
Ranger:
Level 8 (50%) - Pursuit, Thief Skills
Ryubeshal:
Level 8 (50%) - 10% Water Defense
Pixie:
Level 8 (50%) - Tackle, Treatment, Herbology, Spells (Robuti, Skorekh)
Caterpillar Fungus:
Level 9 (30%) - 20% Chance to Poison
Yugotrias:
Level 9 (50%)
Doom Mantis:
Level 10 (30%) - 10% Resist Behead
Shadow (Boss):
Level 10 (50%) - Summon*, Nightmare*, 2 Actions Per Turn, 18hp Turn Recovery, Immune to Sleep/Paralysis/Confusion/Charm/Petrify/Behead, 40% Dark Attack Attribute, 300% Dark Defense, -100% Weak to Holy

F3 is a pretty small floor. Just like the last floor, if you plan on venturing outside the direct path cast the rank 4 Mage spell Sosario to avoid trap chutes. Once again, be on the lookout for Red Caps and their innate Beheading ability.

In a small room at (10x,3y) you will find some luminescent Sap. Say Yes when propted and monsters will attack you. Luckily, they are not anything you haven't handled before; kill them to receive the <Key Item> Glittering Sap.

To get to the major objective of this area, you need to discover 2 secret doors on your way to the middle of the tree (9x,10y); one at (12x,4y), close to the Sap, and the other at (7x,8y). Before you step into the blue light make sure you are healed up and prepared for battle. You might also want to consider getting ready to make a Contract if you have a Summoner, so long as you are ok with not having a complete in-game bestiary (see Monster Encyclopedia Bug in the Unuseful Bugs section for more details). At this point, in terms of raw power the Boss is lacking, but it has a decent pool of HP, some great Immunities, and makes an excellent damage sponge. You might want to save in case the Contract attempts fail. When you are ready, it is time for your first proper boss battle, assuming you did not go to the basements of the Great Tree or Dezaporlia Tunnel first:

The Flowered Pixies, out for revenge, merge together to form a Shadow. This creature, along with a random number of tag-a-long Pixies, isn't so bad compared to the armies of Red Caps you've probably already come across. The extra Pixies will do their whole buff, debuff and heal thing so take them out first. Dragonewt's Breath is great for this if they are in the front row, or you can try for status effects; the rank 2 Mage spell Ramisama (sleep) and the rank 2 Alchemy spell Rarood (paralyze) are helpful.

The Shadow has infinite range and is immune to every status effect but Silence and Poison. His signature move is Nightmare, which has a chance to cause the Fear status; this gives the inflicted character a 50% chance to do nothing for a turn. The rank 4 Cleric spell Mirror Eyes can heal it. To top off his abilities, the Shadow heals itself for 18hp per turn. Having anyone with the Tackle ability, Orc summon included, can be useful, but by this point you should be able to outdamage it. Cast any buffs/debuffs you might have and whittle him down, or attempt to make a Contract if you have a Summoner (put any summons you have out away, or they will attack). It is not a difficult fight, though it could be a long one depending on your party setup and overall luck. Once he is defeated, you will get a Bat Belt (once identified) and the quest "Budding Life" will be complete.

There is still one more thing to do in the upper part of the Great Tree. Warp or walk all the way back down to the Herbalist Doctor on the first floor (13x,0y). Give him the <Key Item> Glittering Sap for a reward of one Full-Health Potion. The "Glittering Sap" quest is now complete.

Next, exit the Great Tree to Ishmag and Talk to the Innkeeper in Hosbarn Inn, if you haven't already. Give him the <Key Item> Sturdy Wood and he will give you 10 extra spaces in the Alchemy Warehouse. This completes the quest "Strong Wood."

And finally, go to Dondun's tavern and talk with the Black-clad Man. He needs a special flower delivered to Igdra Village. This gives you the quest "The Igan Flower," but it will be some time before you can complete it.
OPTIONAL: Preparing for Lower Great Tree Yap Gotz
This is the hardest area of early game. Your party members should be around level 10-12. Level 8-ish can work if you have a good setup, but you'll probably have a hard time. If your levels are on the low side you might want to consider Transmuting a Bone Slippers (Devil's Iron + Millstone) and keeping it in your inventory, which will send bodies to the Temple if you wipe, consuming the item. Take your usual supplies, adding Herb of Tranquility if you want something to cure Confusion, and someone with the rank 4 Mage spell Sosario to avoid damage traps. You might also want to take someone along that has the rank 4 Cleric spell Hallobukarm, which lowers the AC of the party by 2 until you exit a dungeon; if you cast it before you leave town and rest it will still be there, giving you an extra cast in that rank to work with while exploring. The rank 6 Cleric spell Psi Breath can be a life saver if you have it, especially on the boss, but it is (painfully) possible to finish it without. A level 8+ Dragonewt is handy for either clearing Breath using enemies out, or at least damaging them enough that the enemy's Breath does not do as much damage. If you don't like dealing with the Draw skill, bring along someone with Stronghold. Tackle can also be useful. Depending on your party setup and luck, you may have to return to town a few times before you are done with the floor; save a cast of Diomente or Honey Restorer if you need to head back.

A Servant with Divination can make the most use out of the static harvesting points found throughout the floors, giving you a small chance to find Magic Herbs while removing the chance for Junk. This is also a really great place for Summoners, as many of the enemies here have special properties.

For Forging, hopefully you have 6-10hp Turn Recovery for each party member by now. You can survive without it, but it helps a lot. As mentioned earlier in the guide, effects do not stack; only the highest value is used. Before you raise a Master Alchemist for Disassemble (level 26), putting regen on easily bought and swapped items, such as Capes, is a good way to go if you plan on changing party members at any time. If a party member's HP dips a bit, Defend and let your HP regen work its magic to save magic casts.

The enemies you should watch for are quite numerous. Pay special attention to Alraune (can break your equipment), Poison Giant (huge amount of HP, 18hp regeneration, Poison Breath, and Unclean Earth which makes it so you cannot heal or cure status effects with spells and Treatment, though Potions used normally, Turn Recovery, and Song of Healing still work), Basilisk (also have a Breath attack and come in large groups), and Minotaurs (Group Attack with a chance to Behead). If a stronger short range enemy (like Alraune or Minotaur) is behind weaker ones, thin the weak enemies out a bit, keeping one or two alive as a shield, and take out the worse ones with range attacks/Yuniwa Coat.
OPTIONAL: The Great Tree Yap Gotz B1


Click the thumbnail above to view the full size map.

ENEMIES
Goblin (Quest):
Level 4 (50%) - Find Treasure
Red Cap:
Level 7 (50%) - Vigilance, 27.9% Chance to Behead, 20% Resist Poison
Armagolion:
Level 8 (30%) - Group Attack
Zakuum:
Level 8 (30%) - Immune to Drain, -50% Weak to Holy
Ranger:
Level 8 (50%) - Pursuit, Thief Skills
Caterpillar Fungus:
Level 9 (30%) - 20% Chance to Poison
Yugotrias:
Level 9 (50%)
Centaur:
Level 9 (50%) - Pursuit, Thief Skills (Bestiary says they are close range, but that is incorrect)
Haunted Wood:
Level 10 (30%) - 15% Resist Sleep/Poison/Silence/Confusion/Behead, 60% Resist Paralysis/Charm/Petrify
Goblin Wizard (Quest):
Level 10 (50%) - Spells (Balad, Balados, Mabalad, Glass, Misama), 5% All Element Attack Attribute, 25% Resist Silence, 5% Resist Sleep/Poison/Paralysis/Confusion/Charm/Petrify/Behead
Ogre:
Level 10 (50%) - Group Attack
Poison Giant:
Level 10 (60%) - Unclean Earth*, Restore, Poison Breath, 18hp Turn Recovery, 20% Chance to Poison, 30% Resist Sleep/Paralysis/Silence/Confusion/Charm/Petrify, 50% Resist Behead
Basilisk:
Level 10 (80%) - Poison Breath, 9hp Turn Recovery, 20% Chance to Poison, Immune to Poison
Alraune:
Level 11 (50%) - Armor Break, 50% Resist Poison/Paralysis/Charm/Petrify, 5% Resist Sleep/Silence/Confusion/Behead, 10% Dark Defense
Deep Dresser (One time event):
Level 16 (30%) - 30% Chance to Paralyze, 100% Water Defense
Zombie Barracuda (One time event):
Level 17 (30%) - 10% Water Attack Attribute, 10% Water Defense, Immune to Drain, -50% Weak to Thunder/Holy
Wise Hammer (One time event):
Level 18 (30%) - Pursuit, Group Attack, 10% Chance to Paralyze/Behead


When you are prepared, head to B1 of The Great Tree Yap Gotz. This is a very big floor, but if you go directly to the objectives it is rather short trip. The first thing you should do is cast the rank 4 Mage spell Sosario so you can float over any Pits you may come across. If you have access to the rank 4 Cleric spell Hallobukarm, another until-you-leave type spell, use that too if you forgot to cast it in town.

If you have not yet completed the "Kidnapped Children" quest, you can finish that up by running through the Goblin den at (3x,0y). The Great Tree Yap Gotz 1F section of this guide has more details, and I strongly recommend you finish it.

The goal of this floor is to find a switch, which is located at (1x,4y). It blends in well, so try not to miss it. Once pressed (F Key), make your way east to (19x,7y) to find a Mortally Wounded Fairy. With its last breath it will give you the quest "Mother Tree," the final objective of the basement. A door to the north of here will be unlocked if you have already pressed the switch, opening the path to B2.


Before you head down you might be interested in a rather odd event. If you are the type to be careful you might want to save before you go there. In the northern part of this floor at (11x,18y) you will hear a strange sound...Joolry... Joolry...and suddenly fish will drop from the ceiling and attack. There will be a random number of level 16-18 Wise Hammers, Deep Dressers, and Zombie Barracudas. They hit hard, so watch your health. Wise Hammers come with the Swift Attack, Pursuit, and Group Attack skills with an innate 10% chance to paralyze and behead, while Deep Dressers have 100% defence against Water and a 30% chance to paralyze. They are decent Summon Contracts, but their high level will make it difficult to pull off if you have not been powerleveling; if you want them early you might consider saving it until your Summoner is at a higher level, but you can encounter them in another dungeon later if you want to wait. I am unsure if completing this event does anything other than give you EP.
OPTIONAL: The Great Tree Yap Gotz B2


Click the thumbnail above to see the full sized map.

ENEMIES
Red Slime:
Level 4 (30%) - Immune to Behead
Koled:
Level 6 (50%) - Vigilance
Alchemist:
Level 6 (80%) - Spells (Pomedoon, Rood)
Arob:
Level 7 (50%) - Pursuit, Thief Skills
Mandragora:
Level 7 (50%) - Pursuit, Thief Skills
Pixie:
Level 8 (50%) - Tackle, Treatment, Herbology, Spells (Robuti, Skorekh)
Ranger:
Level 8 (50%) - Pursuit, Thief Skills
Armagolion:
Level 8 (30%) - Group Attack
Zakuum:
Level 8 (30%) - Immune to Drain, -50% Weak to Holy
Yugotrias:
Level 9 (50%)
Centaur:
Level 9 (50%) - Pursuit, Thief Skills (Bestiary says they are close range, but that is incorrect)
Haunted Wood:
Level 10 (30%) - 15% Resist Sleep/Poison/Silence/Confusion/Behead, 60% Resist Paralysis/Charm/Petrify
Ogre:
Level 10 (50%) - Group Attack
Poison Giant:
Level 10 (60%) - Unclean Earth*, Restore, Poison Breath, 18hp Turn Recovery, 20% Chance to Poison, 30% Resist Sleep/Paralysis/Silence/Confusion/Charm/Petrify, 50% Resist Behead
Basilisk:
Level 10 (80%) - Poison Breath, 9hp Turn Recovery, 20% Chance to Poison, Immune to Poison
Alraune:
Level 11 (50%) - Armor Break, 50% Resist Poison/Paralysis/Charm/Petrify, 5% Resist Sleep/Silence/Confusion/Behead, 10% Dark Defense
Tiger Lady:
Level 11 (50%) - 2 Actions Per Turn, 70% Status Recovery, 10% Resist Confusion/Charm
Minotaur:
Level 11 (60%) - Group Attack, Restore, 50% Combative Instinct, 19hp Turn Recovery, 5% Chance to Behead, 30% Resist All Ailments, 50% Resist Behead
Forest Ranger:
Level 12 (50%) - Pursuit, Thief Skills
Ogre Knight:
Level 12 (50%) - Group Attack, 10% All Element Defense, 10% Resist All Ailment/Behead
High Alchemist:
Level 12 (80%) - Spells (More than I care to list)
Giant Root (Boss):
Level 12 (100%) - Brace, Curse, Summon, Draw, Spells (Robuti, Hallobuti, Lascorek), 4 Actions Per Turn, 38hp Turn Recovery, 462% Fire Attack Attribute, 15% Fire Defense, 30% Water/Thunder/Holy/Dark Defense, 10% Resist All Ailments, 95% Resist Drain, Immune to Behead
Shagai (Boss):
Level 15 (100%) - Brace, Tackle, Group Attack, Restore, Silence Breath, 2 Actions Per Turn, 5% Chance to Paralyze, 30% All Element Defense, 10% Resist All Ailments, 70% Resist Behead, 95% Resist Drain
Neck Chopper:
Floor Master - DO NOT ENGAGE

Hopefully all members of your party are level 10+ by now. With a little luck you can do it lower with a good setup, but being properly leveled makes things a lot easier. The good news is you no longer need Sosario, but you should still cast Hallobukarm to keep your AC down.

Before you start, know that this floor contains the Irene Tablet. Just like the Pushke Tablet in Tsun-Kurn, it is randomly found and can shuffle its location if you leave the floor or use the Pause Adventure trick. If you have any interest in Post Game I strongly recommend filling out the entire floor in one sitting, or until you find the Tablet, so you can check your map for places you still need to look. Watch out for the Floor Master as you search. Check your map before standing in front of doors or it might catch you by surprise. If you hear a door opening, it is probably nearby.

Make your way around the winding path until you reach a dead end at (7x,11y). Search the south wall to discover a secret door. Close by, in a tiny room at (4x,7y), approach the glowing light to find a swollen mass of roots resembling a "while" heart. You then have to fight weak monsters (including Pixies) from F1 and F2, which should pose no problem for you. Continue on toward the center of the floor, to a north facing door at (9x,6y). If you don't like a little risk, you might want to save here.

Step through the door and you will find yourself in a battle with a Giant Root and a random amount of Mandragora and Koled. This boss can Curse, debuff, summon allies, (low%) Paralyze on hit, and has the Draw skill which can swap your front row with your back row if you don't have Stronghold. If that wasn't enough it has infinite range, regenerates 38hp per round (Tackle is useful), and he has the Brace skill (survives fatal damage once). It cannot be Beheaded, but its resistances to other status effects is only 10%, making it worthwhile to try. Even though that might seem overwhelming, the regular enemies on this floor will probably be tougher than this boss if you have a good party setup/EX skills.

If you have one, a level 8+ Dragonewt can take out the Mandragora and Koled as soon as possible while everyone else concentrates on the Giant Root. If you don't, some row targeting Mage spells or Pomedoon can work. The rank 4 Alchemy spell Yuniwa Coat can help short range melee characters reach farther if needed. If you have a Hunter and anyone who has the rank 2 Mage spell Venom, try to poison the Root to kick in the Hunter's Pursuit ability. With a simple Longbow bought from the shop in town, they can do an extra ~20 damage per round. Don't bother trying to counter the debuffs the Root throws at you; if you focus on damage you should take it down pretty quickly.

After defeating the Giant Root, it comes to its senses and begs a favor. Head around to the back of the central pillar in the room you are in to find a door. If you haven't found the White Heart event yet (@4x,7y), now is a good time to backtrack and look for it. You might want to save here too, if you lack confidence. This next battle is going to hurt, especially if your levels are on the low side.

Entering the door begins another battle, this time with Shagai. Unlike most bosses, I have never seen it with other monsters. It has 330hp, 2 actions per turn, Group Attack with a chance to Paralyze, and Brace. It also has Silence Breath that can potentially deal 100+ damage a hit; at low levels if this is one of his opening moves it will probably slaughter your front row, leading to a party wipe. If that were not enough it also comes with the Tackle skill, so be prepared to have your passive healing interrupted. As for resistances it has a flat 30% across all damage types, 10% across all ailments (only 70% Behead resistance though) and 25% against Mage and Alchemy spells.

The fight is pretty straight forward. Use the Rank 5 Cleric spell Psi Breath on the first and second turn, if you have it. Once you damage it and a few turns have passed it gets a lot less deadly. The rank 6 Alchemy spell Rapidos and the rank 3 Mage spell Robuti will help land damage and status effects. You can also use the Horn of Surprise, if you have an instrument using character. I also suggest using the rank 2 Cleric spell Hallobukan. If you are low level, Defend with your front row while you set everything up to try and protect yourself from Group Attack, then hit it as hard as you can. If you can make it past the first few rounds you should be able to take it down. When it is done, the quest "Mother Tree" will be complete and you'll get a Mystery Club (once you identify it), which is a decent subweapon.

The Floor Master for this area is the Neck Chopper. Like Akabey of Guatella Grotto it walks around the floor and goes through doors; it has no specific territory and can Teleport. Tracking its position on your map as you go is a good idea. As with the previous Floor Masters, do not engage it for now.
Potential Great Tree Yap Gotz Loot
This is only a list of loot from Treasure Boxes, not from mining Ore or picking Herbs.

Loot marked with a * was found by Vino and the JP Wiki.


TRAPS
Rockslide
Poison Needles
Magic Drain
Poison Gas

THE GREAT TREE YAP GOTZ F1
? Katana = Nodachi, Monohoshizao
? Spear = Ice Devil's Spear
? Weapon = Stone, Brass Knuckle, Power Sling
? Talisman = Charm, (+1)Flame Charm, (+1)Ice Charm, (+1)Thunder Charm*, Anti-Demon Charm*
? Medicine = Potion, Antidote, Mahi Oil, Potion of Awakening
? Scroll = Magic Map
? Junk = Junk, Weed*, Star Fragment*, Sun Herb*, Mystery Herb*, All-Purpose Herb*, First Love Flower*

THE GREAT TREE YAP GOTZ F2
? Sword = Longsword
? Spear = Lance
? Club = Flail
? Book = Heavy Book, White Scriptures*
? Weapon = Stone, Power Sling*
? Shield = Large Shield, Holy Guard
? Mail = Chainmail, Ice Mail
? Medicine = Potion, Antidote
? Scroll = Magic Map
? Junk = Junk, Star Fragment

THE GREAT TREE YAP GOTZ F3
? Axe = Broadaxe, Giant's Axe*
? Katana = Kodachi, Kogarasu Katana*
? Staff = Staff, Brahma-Deva
? Weapon = Stone
? Cape = Cape, Cloak, Frost Cloak, Innocent Cloak
? Medicine = Potion, Antidote
? Scroll = Magic Map
? Junk = Junk, Star Fragment

THE GREAT TREE YAP GOTZ B1
? Hammer = Pick, Mill Hammer
? Whip = Iron Whip
? Weapon = Stone, Meteor Spindle, Kunai*
? Belt = Obi, Leather Belt, Bat Belt, Tiger Loincloth
? Medicine = Potion, Antidote
? Scroll = Magic Map
? Junk = Junk, Weed*, Star Fragment*, Sun Herb*, Mystery Herb*, First Love Flower*

THE GREAT TREE YAP GOTZ B2
? Weapon = Stone
? Helm = Plate Helm, Kabuto
? Gauntlet = Gauntlets, Knight Gauntlets*
? Shoes = Plate Leggings, Dwarven Leggings*
? Cape = Cloak, Silver Cloak*
? Medicine = Potion, Antidote, Potion of Awakening
? Scroll = Magic Map
? Junk = Junk, Weed*, Star Fragment, Sun Herb*, First Love Flower*

THIEF EQUIPMENT STEALS (LEVEL 26+)
Dagger = Goblin (Quest), Red Cap
Beastbone Blade = Ogre Knight
Mantis Blade = Doom Mantis
Broadaxe = Ogre
Giant's Axe = Minotaur
Shortbow = Arob, Ranger
Longbow = Arob, Centaur
Skylark Bow = Forest Ranger
Staff = Goblin Wizard (Quest)
Beastbone Shield = Ogre
Mukade Shield = Shield Centipede
Preparing for Dezaporlia Tunnel
The first floor of this dungeon, both North and South, is much easier than all the optional content. That changes once you find the basement though, so don't think that it will be an easy ride the whole way through. Party members should be at least levels 8-10 if you have decent HP, a bit higher if you haven't been pumping VIT. Lower is fine if you are sticking to the early floors. Make sure to bring something that can cure Poison and Paralysis. I recommend having the EX Skill Stronghold if you don't like dealing with Draw. Tackle could also be useful, but you should be able to outdamage it by now if you have done all the optional content up to this point. Take someone with Thief Skills to open a required door. Also, bring someone along that can cast the rank 4 Mage spell Sosario. The rank 4 Cleric spell Hallobukarm will be handy as well, and the rank 6 Cleric spell Psi Breath can save your life. You can do it without, but it will be harder. A level 8+ Dragonewt is very handy for either clearing Breath using enemies out, or damaging them enough that their Breath attacks don't do as much damage.

There are quite a few mining spots where you can get Ore, so you might want to take a Pick (you get a free one from the Blacksmith at Jadgebol Shoppe). A character with Divination can be useful if you would like to eliminate the chance to get Rocks and check the value when you get it, rather than wait until you get back to the Alchemy Storehouse.

Like the basement of the Great Tree, hopefully you have 6-10 Turn Recovery Forged for each party member by now. It isn't really necessary until you reach the lowest floor, but it helps out a lot when you get there. As mentioned earlier in the guide, effects do not stack; only the highest value is used. Before you raise a Master Alchemist for Disassemble (level 26), putting regen on easily bought and swapped items, such as Capes, is a good way to go if you plan on changing party members at any time, though by now you should have locked in most of the classes you want to use. If a party member's HP dips a bit, Defend and let your HP regen work its magic to save casts. The exception being if you are fighting an enemy who uses Breath Attacks. You'll want to go all out and damage them as fast as possible.

As for enemies, those on the main floor should be a non-issue, even if you skipped all the optional content. Beasts have a chance to Poison and Tonafers can cast Ziakal (which can hurt), but it shouldn't be a struggle. However, once you decend to the basement there are a few enemies that can give you some trouble. Lanpholynx is easily the worst of them, having a Poison Breath that can wipe out your front row if you are underleveled and unprepared. Skunk Girl also has Poison Breath, but you can manipulate them into using Nap instead (heals and puts them to sleep until the next turn) if you can hit them fast enough. There are not a lot of guaranteed battles in B1, so just take it slow and retreat with Diomente if you need to.

If you have a Summoner you might want to give Golem a look. Like Shadow of the Great Tree it is not a great Summon choice, but as a Spirit Pact fighter it really shines. You won't find an enemy with such great Resistances and Defenses for a while, and with only a 30% Contract resistance it's a steal.
Dezaporlia Tunnel 1F South and 1F North


Click the thumbnails to see the full sized maps. F1 North is at the top and F1 South is at the bottom. Note that the entrance to this dungeon is in F1 South.

F1 SOUTH ENEMIES
Uiwakshia:
Level 1 (30%)
Mork Cricketer:
Level 5 (30%) - Draw*
Leprechaun:
Level 7 (50%) - Spells (Hallobukan, Orath), 10% Resist Paralysis/Confusion, 20% Resist Charm
Amber Roach:
Level 8 (30%) - Immune to Petrify
Golem:
Level 8 (30%) - Brace, 50% Resist All Spell Schools, 50% All Element Defense, 50% Resist Poison/Paralysis/Silence/Confusion/Charm, Immune to Petrify/Behead
Gelita:
Level 9 (30%) - Immune to Drain
Tonafer:
Level 9 (30%) - Spell (Ziakal)
Beast:
Level 10 (30%) - 20% Chance to Poison, 6hp Turn Recovery, 50% Status Recovery, 20% Resist Poison

F1 NORTH ENEMIES
Uiwakshia:
Level 1 (30%)
Mork Cricketer:
Level 5 (30%) - Draw*
Leprechaun:
Level 7 (50%) - Spells (Hallobukan, Orath), 10% Resist Paralysis/Confusion, 20% Resist Charm
Amber Roach:
Level 8 (30%) - Immune to Petrify
Golem:
Level 8 (30%) - Brace, 50% Resist All Spell Schools, 50% All Element Defense, 50% Resist Poison/Paralysis/Silence/Confusion/Charm, Immune to Petrify/Behead
Dead Miner (Event and Quest):
Level 8 (100%) - Curse, Immune to Drain, -50% Weak to Holy, Starts Battle Confused
Gelita:
Level 9 (30%) - Immune to Drain
Tonafer:
Level 9 (30%) - Spell (Ziakal)
Beast:
Level 10 (30%) - 20% Chance to Poison, 6hp Turn Recovery, 50% Status Recovery, 20% Resist Poison

Because of the relationship between these floors, both are being shown in the same section for easier reference. There are mining spots here, so remember to bring a Pick.

When you are ready to continue the main questline, head in and unlock the Iron Door (9x,5y) with the Abandoned Mine Key. You have to use the Inspect function (F Key) every time you want to use this particular door, so keep that in mind if you like to travel by foot. As for the Refuse Mountain Protector nearby (8x,5y), we covered him earlier. If you missed it, he will sell you the last 10 things you discarded in any dungeon (drops due to no bag space do not count). It will be in unidentified form no matter which state it was in when you discarded it, and his fee is based on the total amount of gold you have across all characters, even benched ones. Remember that he is here if you are running low on bag space.

You will have to traverse most of F1 South, so get ready for a lot of winding paths. Your first goal is to hit a switch in the southwest corner of the floor (1x3y). This unlocks a door in the northeast part of this floor, toward the center (13x,10y), which you have to go down through the southeast area and back up to reach. Once you are through, keep following the path until you reach F1 North.

Once in F1 North, cast Sosario for safety and walk to the northeast. You'll find another switch in a small room (17x,14y). Hit it and go back to F1 South. If you come across the Murky Water at (16x,12y), or any Murky Water for that matter, you can take it, but don't give it to the Thirsty Young Man (you'll see him soon) if you want a reward. Also, if you are looking for a free Broadaxe, take a detour to (12x,7y) and you'll find one on a Chained Body.

Back in F1 South, on your way to the now unlocked door at (7x,18y) talk to the Thirsty Young Man (8x,14y) to activate "The Servants" quest. Wind your way north to change floors again.

Make sure you have Sosario on and watch out for one way walls if you plan to fully explore this area. If you keep hugging the left wall, going through doors as you see them, you'll eventually reach the northeast area of the floor. Along the way there is a Cowering man you can battle (9x,15y), but he doesn't matter. Once you are in a tiny room at (13x,13y) face south and Inspect (F Key) for a hidden door. Beyond it is some Clear Water. Take from it for the <Key Item>Clean Water. Haul it back to the Thirsty Young Man in F1 South for a reward, which finishes "The Servants" quest. If you give him <Key Item>Unclean Water from Murky Water instead, you will still complete the quest. You just won't get anything for it. If you took both types of water, the unused one will disappear.

East from the first hidden door is a locked door, which you can unlock with Thief Skills. Enter and read the Journal on the Desk. This is required to finish the dungeon and make another quest available. Exit the dungeon (or use Pause Adventure) and go into the Plaza of Igdra Village to talk to the Waiting Woman. She tells you about her woes and gives you the "Missing Husband" quest. Go back into Dezaporlia Tunnel F1 North, make sure you have Sosario on, and walk your way through the northwest area to an Odd Monster (2x,13y). Kill the Dead Miner for the <Key Item>Faded Charm and return it to the Waiting Woman. Neither choice matters, so pick one and she will reward you with an Ankh of Strength, which completes the quest. If you try and equip this item and Unleash Hidden Power to consume it, the character that uses it gains 1 STR; you might want to save it for multiclassing emergencies.

All the way back to F1 North, near the Desk with the Journal, there are two more hidden doors in painfully obvious spots at (15x,13y) and (16x,15y). Go through them and you will find the staircase to B1.
Dezaporlia Tunnel B1


Click the thumbnail above for the full sized map.

ENEMIES
Kobold:
Level 3 (50%) - -50% Weak to Sleep
Twin Cobras:
Level 4 (90%) - 2 Actions Per Turn, 20% Chance to Poison, Resists Poison(50%)/Paralysis(20%)
Mork Cricketer:
Level 5 (30%) - Draw*
Gremlin:
Level 6 (95%) - 80% Dark Defense
Golem:
Level 8 (30%) - Brace, 50% Resist All Spell Schools, 50% All Element Defense, 50% Resist Poison/Paralysis/Silence/Confusion/Charm, Immune to Petrify/Behead
Tonafer:
Level 9 (30%) - Spell (Ziakal)
Gelita:
Level 9 (30%) - Immune to Drain
Lanpholynx:
Level 9 (90%) - Poison Breath, 2 Actions Per Turn, 20% Chance to Poison, 20% Resist Posion/Paralysis
Beast:
Level 10 (30%) - 20% Chance to Poison, 6hp Turn Recovery, 50% Status Recovery, 20% Resist Poison
Kobold Seargent:
Level 10 (50%) - Song of Hope, 5% All Element Defense
Bistola:
Level 10 (95%) - Spells (More than I care to list), 95% Dark Defense
Skunk Girl:
Level 11 (50%) - Posion Breath, Nap, 95% Status Recovery, 40% Chance to Poison, 10% All Element Defense
Impressionist:
Level 12 (30%) - 25% Holy/Dark Defense, 5% Fire/Water/Thunder Defense
Surrendered Minister (Boss):
Level 15 (100%) - Draw, Shout, Dispel, Glutton for Punishment, Spells (Hallobuti, Hallobukan, Mirror Eyes, Elnam), 3 Actions Per Turn, 30hp Turn Recovery, 5% Chance to Paralyze, 90% Dark Defense, 20% Fire/Water/Thunder/Holy Defense, 50% Resist Paralysis/Confusion/Charm/Petrify/Behead, 10% Resist Sleep/Poison/Silence, 95% Resist Drain

This is the last floor of Dezaporlia Tunnel. Make sure to have Sosario on and watch out for one way walls. Don't forget Hallobukarm as well. If you don't have anything that can cure Poison and Paralysis you might want to go back to town and resupply.

Like all floors patrolled by a Floor Master up until this point, this one contains another randomly found item: the Egelia Tablet. And, once again, I recommend exploring the entire floor in one sitting until you find it if you are interested in post game.

Other than that, there is not much to say. There are very few guaranteed battles here, but some of the monsters can wipe an underleveled and/or unprepared party. If you see a group of Lanpholynx or Skunk Girls, remember the Psi Breath spell if you have it. Take it slow and cast Diomente or Honey Restorer to go back to town if you need to.

Once you find your way to the northwest section of the floor, you will find a Priest (6x,18y). If he is not there and you get a message about a sinister presence that means you forgot to read the Journal in F1 North, so go and do that. Speak with the Priest when you are ready. You might want to save.

The Surrendered Minister is usually accompanied by two Impressionists and a random number of Beasts. He has 30hp turn recovery, 3 actions per turn, can Fear (Shout), has the Draw skill (which Stronghold negates), and gets stronger the lower his HP is (Glutton for Punishment). He also has a small chance to Paralyze on hit and can cast a few Cleric spells. His magic attack (Elnam) hits pretty hard, so watch out for it. He is strong against most ailments except Sleep, Poison, and Silence. It is not a very hard fight, especially if you have already finished the basement of the Great Tree. Just apply the usual buffs, take care of the additional enemies, and smack him down.

After defeating the Surrendered Minister the soul of the Priest will fill you in on what is happening and directs you to the Church. Exit the dungeon to report to the King.

For those curious, Floor Master Bely walks counter-clockwise around the parimeter of an enclosed area, like the one in Tsun-Kurn; this time the room is accessed by a one way wall, trapping you inside until you can find your way out. His pattern makes him very easy to avoid, so just be careful.
Potential Dezaporlia Tunnel Loot
This is only a list of loot from Treasure Boxes, not from mining Ore or picking Herbs.

Loot marked with a * was found by Vino and the JP Wiki.


TRAPS
Rockslide
Poison Needles
Magic Drain
Bomb

DEZAPORLIA TUNNEL F1 South
? Katana = Tachi, Crow Goblin*
? Weapon = Stone
? Gauntlet = Chain Gloves, Virtue Gauntlets
? Shoes = Chain Leggings, Hope Greaves*
? Medicine = Potion, Antidote
? Scroll = Magic Map
? Junk = Junk, Weed*, Star Fragment, Sun Herb, Mystery Herb, Tranquil Herb*, All-Purpose Herb, Holy Flute, Harp of Sleep, Horn of Surprise*

DEZAPORLIA TUNNEL F1 North
? Weapon = Stone
? Shield = Heater Shield
? Plate = Breastplate, Ashigaru Armor*
? Belt = Chain Belt, Innocent Belt
? Medicine = Potion, Antidote
? Scroll = Magic Map
? Material = Devil Iron, Vectorium, Millstone
? Junk = Junk, Weed*, Sun Herb, Star Fragment, Mystery Herb, All-Purpose Herb

DEZAPORLIA TUNNEL B1
? Spear = Spear
? Bow = Shortbow, Magician's Bow
? Armor = Plate Armor, Knight's Armor*
? Ring = Crude Ring*
? Talisman = Light Seal
? Medicine = Potion, Antidote
? Scroll = Magic Map
? Junk = Junk, Sun Herb, Mystery Herb, All-Purpose Herb

THIEF EQUIPMENT STEALS (LEVEL 26+)
Short Sword = Kobold
Longsword = Kobold Seargent, Impressionist
Smasher Mace = Surrendered Minister (Boss)
Large Shield = Impressionist
Wrapping Up Early Game
You have to submit your report before you can investigate further, so return to Ishmag and Arrange Meeting with the King to complete the "Visit the Minister" quest and open a new one: "Mysterious Youth". Now go to the Church in Igdra Village and you'll find a collapsed man who points you toward a carving of the Holy Mother. Your party will automatically put the clues together and discover a secret path to the Igdra Underground Church.

Be careful where you step here, since there are tiles that warp you further into the dungeon with no outward indications. Before you leave, follow the path and take the first left to find a Suspicious Man. Talk to him and he will mention that the ice in the Degus Gila Ice Cave has started to melt. This unlocks that optional area for exploration. Exit the dungeon and note that the Underground is rated at three skulls, while the Ice Cave is only two.

Go to the Plaza in Igdra Village and talk to the Searching Father who will ask you to search for his son. This unlocks the Hastrana Blowhole (another optional two skull dungeon) and the "Find the Son" quest. Now talk to the Suspicious Merchant who asks for five "Nose" (He means Norse) Tyrant pelts, which unlocks the "Monster Pelt" quest. Return to Ishmag and head to Hosbarn Inn, where the Innkeeper will call you over and present you with another opportunity to expand your storage space in exchange for some Sturdy Stone. This gives you the quest "Strong Stone."

All of this marks the start of mid game.

Quests 1-15 should be complete by now, with 7 quests still open. You should also have a good idea about how to battle effectively and what kind of party you like. If you were unlucky in loot and found yourself struggling, you can return to previous areas and attempt to get better Treasure before diving into the new stuff, though there is better potential loot ahead and if you were able to complete all of the optional content thus far you should be fine.
TWO SKULL DUNGEONS
A Note on Changing Format
While updating the guide last time I ran into some issues with space constraints. Rather than redo the entire guide a third time to make it consistant, I've decided to set things up differently from here on to make it easier on me. Given that the floors of each dungeon from this point on tend to link up to the others with more than just one staircase, it'd be easier to reference them this way anyway. Sorry if that throws anyone off.
OPTIONAL: Preparing for Degus Gila Ice Cave
As far as levels go, you can start Degus Gila Ice Cave as low as 10-12 and be ok if you have a solid party setup and have been pumping VIT at character creation. You'll probably want to be in the 14-16 range before you take on the boss rush though. If you have been avoiding healing capable characters, now is a good time to invest in one. There are quite a few enemies that have row damaging spells and Breath, though usually it won't do too much damage unless you are against a Frost Giant or Ice Dragon. However, if you are unlucky your Forged Turn Regeneration might not be able to cut it. The Cleric spell Psi Breath can help mitigate Breath damage if you want to be extra safe (cast it on the first turn, don't bother re-applying if you have damaged the Breath user).

You need to bring along someone who has the Mage spells Balad and Sosario, which is more than covered if you have anyone with Diomente. You can deal without either for most of the dungeon, but it is required to finish it. Sosario will not stop you from sliding on the Icy Floors until you get an item on B3, which you have to traverse B4 to reach, and Balad will let you retrieve it. Speaking of Icy Floors, they can make it a pain to get back by walking; make sure to keep a cast of Diomente for when you need to head back to town.

There are a lot of enemies with Water Defense, so keep that in mind when you are choosing weapons and magic to attack with. Water Defense on your own equipment is a great idea if you can squeeze some in, but you can complete the dungeon without it. Don't forget about Forging if you think you lack anything. Be aware that you will start to see a lot more cursed equipment from here on out.

Sleep (Courtesan), Paralyze (Snow Woman) and Silence (also Snow Woman) are the most common ailments, with a Courtesan's Lullaby ability having the chance to put the entire party to Sleep. Dog Spirits have Nightmare, which can inflict the Fear Status. There are also a few caster types that have access to Stoma (Petrify). One of the bosses also has a pretty decent chance to Poison. Emperor Birds have Weapon Break, and are pretty common, so you can benefit from having access to the Alchemy spell Pendeku. Both Witch and Abbess have a chance to cast Argeiss, which hits the entire party and has a chance to instant kill (use Dark Defense to prevent it, not Behead resistance), so watch out for them when they start showing up.
OPTIONAL: Degus Gila Ice Cave Maps


Click the thumbnails for the full sized maps. B1, with the entrance, is at the top and it goes in order to B4 at the bottom.

On B1, there are actually two fastest paths to hit the first two spots for the "Lifelike" quest, both with the exact same number of squares traversed and guaranteed battles. I chose to route out the path with the least amount of overlaps for easier viewing, even though the other path has more hands off sliding and is technically faster in real time.
OPTIONAL: Degus Gila Ice Cave Enemies
If you are searching for a specific enemy while in the dungeon, the higher their level the more likely you will find it on lower floors. Of course, there are always exceptions. Exploring sections of easier floors (closer to the entrance) that are only accessable from a harder one usually results in higher level enemy encounters. Like in the early game sections of the guide, enemies are sorted by level and resistance to Contract. The information here is only for quick reference. Use the in game Monster Encyclopedia for further details.


Emperor Bird:
Level 10 (30%) - King's Proof, Weapon Break, Spells (Glass, Maglass, Sama Eyes), 40% Status Recovery, 5% Chance to Sleep/Poison/Silence/Confuse/Charm, 5% All Element Attack Attribute, 70% Resist Charm/Petrify, 20% Resist Sleep/Poison/Paralysis/Silence/Confuse, 200% Water defense, 80% Dark Defense

Goblin Wizard:
Level 10 (50%) - Spells (Balad, Balados, Mabalad, Glass, Misama), 5% All Element Attack Attribute, 25% Resist Silence, 5% Resist Sleep/Poison/Paralysis/Confusion/Charm/Petrify/Behead

Snow Woman:
Level 10 (50%) - Ice Breath, Spells (Glass, Maglass, Rood, Rarood), 20% Chance to Silence, 20% Water Attack Attribute, 10% Resist Silence, 200% Water Defense

Frost Giant:
Level 10 (60%) - Ice Breath, 20% Water Attack Attribute, 100% Water Defense, 50% Resist Behead, 30% Resist Sleep/Poison/Paralysis/Silence/Confuse/Charm/Petrify

Courtesan:
Level 11 (50%) Lullaby*, Song of Healing, Song of Protection, Song of Destruction, 2% Chance to Poison

Snowman:
Level 11 (50%) - Ice Breath, 50% Resist Charm, 10% Water Attack Attribute, 200% Water Defense

Uolia (Quest/Normal enemy in B3):
Level 12 (50%) - Stronghold

Witch:
Level 12 (80%) - Spells (More than I care to list), 5% All Elements Attack Attribute

Priestess:
Level 12 (90%) - Spells (Feirima, Sama Eyes, Feireed)

Abbess:
Level 12 (90%) - Spells (More than I care to list)

Norse Tyrant:
Level 13 (30%) - 20% Water Defense, -50% Weak to Sleep *Drops Bulky Hide*

Dog Spirit:
Level 13 (30%) - Nightmare*, Dark Breath, 2 Actions Per Turn, 100% Dark Defense, Immune to Drain, -50% Weak to Holy

Great Lord:
Level 13 (50%) - Stronghold, Counterattack, Swallow Return, 50% Status Recovery

Sorcery (Quest/Normal enemy in B4):
Level 13 (80%) - Spells (8 Fire/Water/Lightning elemental spells and Stoma), 5% Chance to Sleep/Poison/Silence/Confuse/Charm, 5% All Element Attribute

Ice Dragon:
Level 13 (90%) - Ice Breath, 2 Actions Per Turn, 50% Water Attack Attribute, 20% Resist All Ailments/Behead, 100% Water Defense

Saphire Dragon (Boss):
Level 13 (100%) - Silence Breath, Restore, Spells (Ziakal, Ziakalad), 2 Actions Per Turn, 10% Chance to Silence, 55% Status Recovery, Immune to Silence, 85% Resist Paralysis/Charm/Petrify, 35% Resist Sleep/Poison/Confuse/Behead, 90% Thunder Defense, 50% Fire/Water Defense

Water Dragon (Boss):
Level 14 (100%) - King's Proof, Restore, Poison Breath, Spells (Robuti, Hallobuti), 2 Actions Per Turn, 39hp Turn Recovery, 10% Chance to Poison, 60% Status Recovery Rate, Immune to poison, 90% Resist Paralysis/Charm/Petrify, 40% Sleep/Silence/Confusion/Behead, 90% Fire Defense, 50% Water/Thunder Defense

Snow Dragon (Boss):
Level 15 (100%) - Ice Breath, Spells (Maglass, Raglass), 2 Actions Per Turn, 50% Water Attack Attribute, 50% Resist Paralysis/Charm/Petrify/Behead, 20% Resist Sleep/Poison/Silence/Confuse, 90% Water Defense, 50% Fire/Thunder Defense

Dopplegangers (Quest):
Technically Level 60, but Copies Your Levels After Mirror Ring (100%) - Mirror Ring* = Level, Class and number in the battle depend on your own party. They even copy racial abilities. This fight does not give the Monster Encyclopedia entry.

Manmo:
Floor Master - DO NOT ENGAGE
OPTIONAL: Degus Gila Ice Cave Notes
The goal of this dungeon is to reach B4, then find an alternate way back up to B3 to pick up the <Key Item>Airstone from an Ice Wall. This will give your Sosario spell the Flightstone Effect, which allows you to traverse Slippery Ice without sliding. It is needed to completely map out each floor, as well as finish two quests.

Slippery Ice, for those who are not familiar, will cause your party to slide in the direction you step onto it until they hit solid ground or a wall. You cannot use Diomente to warp directly onto the ice, so you will need to solve each puzzle (or just look at the maps above).

Ice Walls are another thing in this dungeon, which you can melt with the Mage spell Balad. Most of them hold Ore and they will refresh if you leave or Pause Adventure, so it is an alternative way of farming for it. Some of them are one time walls that hold static items or enemies.

When you get to B4, remember that you can randomly find the Victoria Tablet there. Its location can be on the Slippery Ice, which can make things a little complicated. Just fill out as much of the map as you can in one go and hope for the best.

You should have picked up the Monster Pelt quest before coming here. Bulky Hides will randomly drop after fighting battles with Norse Tyrants, which are found on every floor. Once you have 5, take them back to the Suspicious Merchant in Igdra Village. You might want to save if you are unsure of what reward you want. First, he will offer you 20,000gp. If that doesn't interest you he will offer an Ice Bow. If you reject him a second time he will automatically give you a Frost Cloak. You can only get one item from him.

You can pick up another quest on B1 ("Lifelike") by talking to a Warrior at (9x,13y). Go to (19x,0y) and defeat the Uolia there. When you get to B2, you will find a Wandering Magician at (9x,9y). You must speak with him to get a Sorcery to appear in B3 (16x,3y), which you need to defeat. Once you have defeated the first two and have the Airstone you can traverse B4 to (7x,0y) and fight a group of Dopplegangers. When the fight starts it will transform into a copy of your party, including number of party members, classes, and levels. You might need to use the rank 5 Alchemy spell Ramialf to get Ninjas, Thieves, Bards, and Hunters out of Hiding if you are unlucky. They copy racial abilities as well, so watch out if you have any high HP Dragonewts. For an easy kill, de-equip your weapons before starting the event, then re-equip yourself in battle. After killing them, go back to the Warrior on B1 to finish the quest, causing the two NPCs tied to it to leave.

The last quest can only be found if you have the Airstone, and is located at B4 (9x,10y). You might want to save here. The Old Man there will tell you about weakening Icicles used to seal 3 Demons and ask if you will defeat them. To finish the quest you will have to defeat 3 enemies in a row without backing out, though the Old Man will give you the opportunity to do so after each one. If you say No at any time, the quest will start over from the first fight. All three have some beefy defense against Mage magic, beyond the element they have affinity with. Mage magic attacks can still work, it's just not going to be as effective as you are probably used to:

The first one is a "Saphire" Dragon. It has 90% Thunder defense and can cast Thunder spells, with a Chance to Silence, Silence Breath, 2 actions per turn, and can target your back row. It also has some resistance to all ailments (completely immune to Silence) and recovers fairly quickly. Use Psi Breath the first few turns to eat any Breath attacks it might throw at you, then use your usual boss tactics to bring it down. Try to make sure you have enough casts to get through two more fights, but keep your HP topped off as much as you can. Having low HP when entering the next fight could kill your party if a Breath attack is used in the first turn.

The second one is a Water Dragon. This one has 90% Fire defense, with a chance to Poison, Poison Breath, and 2 actions per turn. It can also debuff your AC, which can get deadly depending on what actions it takes. It has similar resistances and recovery to status effects as the last Dragon, with Poison Immunity instead. Like the last one, use Psi Breath the first few turns to protect yourself against Breath, make sure to re-buff yourself during the battle if your AC gets too high, and try your best to keep your HP topped off. Having any Poison cleared before the next fight starts is nice, but you can cure it in the next one if you can't find the time.

The third one is a Snow Dragon. It has 90% Water Defense, Ice Breath and Ice Spells, and 2 actions per turn. It only has a 20% resistance against Sleep, Poison, Silence, and Confuse though, with only 20% Status Recovery rate; this time status effects are really worth trying. Other than that, it's the same deal.


When you have defeated all three the Old man will entrust you with a Havok Hammer and fade away, completing the "Trial of Ice" quest.

The Floor Master, Manmo, never leaves their tiny 2x2 room, so it shouldn't be an issue.
Potential Degus Gila Ice Cave Loot
Loot marked with a * was found by Vino and the JP Wiki.

TRAPS
Rockslide
Poison Needles
Magic Drain
Poison Gas
Bomb

DEGUS GILA ICE CAVE B1
? Sword = Short Sword*, Longsword, Beastbone Blade, Hundred Sword
? Axe = Hand Axe*, Savage Axe
? Spear = Spear, Demon Spear*
? Mace = Mace, Smasher Mace, Skull Crusher
? Hammer = Pick*, Mill Hammer
? Gauntlet = Mittons, Leather Gloves*, Power Glove, Fairy Gloves
? Shoes = Leather Boots*, Tough Leather Shoes, Fire Shoes
? Medicine = Potion of Awakening, Mahi Oil
? Scroll = Magic Map
? Junk = Dagger, Sun Herb, Mystery Herb, Star Fragment, All-Purpose Herb, Marquis Knife

DEGUS GILA ICE CAVE B2
? Sword = Hundred Sword
? Shield = Buckler*, Beastbone Shield, Holy Guard
? Mace = Smasher Mace
? Gauntlet = Chain Gloves, Virtue Gauntlets
? Cape = Cape*, Innocent Cloak
? Talisman = Anti-Demon Charm, (+1) Ice Charm, (+1) Light Seal
? Ring = Crude Ring, Sacred Tree's Ring
? Scroll = Magic Map
? Junk = Star Fragment*, Sun Herb, Mystery Herb, All-Purpose Herb, Holy Flute, Harp of Sleep, Horn of Surprise, Captivating Lute, Kagura
? Material = Devil's Lapis, Elvish iron, Vectorium

DEGUS GILA ICE CAVE B3
? Sword = Executioner's Sword*
? Axe = Hand Axe, Rusty Handaxe, Elven Axe*
? Katana = Kodachi, Heshikiri Hesebe
? Club = Quenstene
? Bow = Shortbow, Composite Bow
? Shield = Small Shield, Buckler, Rusty Shield*, Bario Shield, Holy Guard*, Innocent Shield
? Helm = Leather Helm, Phantom Mask
? Armor = Plate Armor
? Robe = Robe, Cursed Robe
? Shoes = Chain Leggings, Bone Leggings*
? Belt = Leather Belt, Bone Belt*
? Cape = Cape, Cloak, Torn Cape, Silver Cloak*, Crescent Cloak*
? Talisman = (+1) Ice Charm
? Scroll = Magic Map
? Junk = Star Fragment*, Tranquil Herb*, All-Purpose Herb

DEGUS GILA ICE CAVE B4
? Sword = Longsword, Rusty Longsword
? Katana = Tachi, Crow Goblin*, Oboro, Nene Kirimaru*
? Spear = Spear, Yashahime*
? Mace = Morningstar, Confusing Mace, Bone Breaker*
? Club = Flail, Furious Cudgel
? Bow = Longbow, Fairy Bow*, Raging Bow, Meltos Comb*
? Whip = Iron Whip, Entwined Whip, Ringschutesher*
? Weapon = Meteor Spindle, Battered Kunai, Tasram*
? Staff = Staff, Ruin Rod
? Armor = Plate Armor
? Shoes = Plate Leggings, Dwarven Leggings*
? Talisman = (+1) Ice Charm
? Scroll = Magic Map
? Junk = Weed*, Sun Herb, Mystery Herb, All-Purpose Herb, Star Fragment

THIEF EQUIPMENT STEALS (LEVEL 26+)
Claymore = Frost Giant
Palindroma = Uolia
Demon Killer = Great Lord
Kogarasu Katana = Great Lord
Mace = Abbess
Morningstar = Priestess
Kunai = Courtesan
Staff = Goblin Wizard, Witch
Trickster's Rod = Emperor Bird, Sorcery
OPTIONAL: Preparing for Hastrana
When you first step into Hastrana your average level can be as low as 11-13 and still do fine if you have a solid party and have been pumping VIT at character creation, but really try to be level 14-16 before you take on the boss. The last floor of this dungeon can be pretty tough. If you still don't have a healer, now is the time where it isn't really optional, even if you outlevel the content. There is an ability (Inhale) and a new trap (Ghost Swarm) that sucks away a character's HP, putting them in critical condition. You need a reliable way to top your HP off.

If you want to do the "Strong Stone" quest you will need to bring a Pick. Also, besides someone with healing capabilities, this whole dungeon is a tutorial on the importance of Diomente. While you can technically do the entire dungeon without it, I would not recommend it. You can also get a few free items by warping out a couple of NPCs. The last boss has a very decent Turn Recovery (70hp), so you might want to think about a character with Tackle if that worries you. Also, bring some Stone Softeners just in case, if you haven't been packing them already.

There are a lot of enemies that have Water and Thunder Defense, so keep that in mind when choosing weapons and magic to attack with. Having Water and Thunder Defense on your own equipment can come in handy. There are new trap types here; if you are a min/maxer pay special attention to the Blaster traps. Spell Blaster has a chance to Paralyze or Petrify anyone with Mage spells, and Cleric Blaster does the same for those who have that type of magic. Ghost Swarm has a chance to bring everyone in your party down to critical HP. Like Degus Gila Ice Cave, cursed items drop here as well, including the White Scriptures; it's one of the few items designed to curse Devlish.

The enemy to watch out for is the Hobbling Strow, who can use Inhale. If you didn't catch it at the top of this section, the ability puts a single character into critical condition and also heals the user. They use it quite often, and they can come paired with other enemy types, so take them out as soon as you can. There are quite a few enemies with Breath attacks here, so be careful. Cockatrice's Petrifcation Breath can be especially deadly, afflicting your entire front row if you are unlucky. A full hp Whirlwind Efreet will probably one shot your entire front row with their Breath if your party has low levels/hp. There are also a few enemies with Weapon Break (Griffin), Armor Break (Lightning and Griffin, again), and several that have a 5-10% Chance to Behead (Wind Elemental, Whirlwind Efreet, Tempest Efreet, Griffin and Hydra). Hydras can be very annoying, since they have 4 actions per turn and have a chance to inflict every status effect; using the keep-a-front-row-enemy-as-a-shield-strategy will cause Hydras to use their Poison Breath 4 times, which is significantly worse if you can't damage them from afar enough to get its attack power down. Another thing to watch out for is the casting abilities of Whirlwind and Tempest Efreets. If they use Ziakalad it could one shot a character without any Thunder Defense, even if they have a bit over 100hp. The last thing I want to note are the Tengu enemies on the bottom floor, who can make what would normally be a simple fight into a battle of attrition. Take a look at their abilities in the enemy list if you want to know why.
OPTIONAL: Hastrana Maps


Click the thumbnails for the full sized maps. B1, with the entrance, is at the top and it goes in order to B6 at the bottom.

There are so many ups and downs to this place that I cannot guarantee that the routes shown are the fastest, but I don't care enough to count the tiles. The routes will get you to where you need to be, and are linked with other objectives so you can easily use Diomente to get around, which is good enough for me.
OPTIONAL: Hastrana Enemies
Uiwakshia:
Level 1 (30%)

Spore Balls:
Level 1 (30%) - Immune to Poison/Behead

Earth Worm:
Level 2 (30%)

Slime:
Level 2 (30%) - Immune to Behead

Zombie Lady:
Level 3 (30%) - 5% Chance to Paralyze, Immune to Drain, -50% Weak to Fire/Holy

Mork Cricketer:
Level 5 (30%) - Draw*

Chicken Bomb:
Level 6 (30%)

Koled:
Level 6 (50%) - Vigilance

Shield Centipede:
Level ­7 (30%) - Spells (Hallobukan, Robukand)

Madragora:
Level 7 (50%) - Shout, 20% Chance to Confuse

Pixie
Level 8 (50%) - Tackle, Treatment, Herbology, Spells (Robuti, Skorekh)

Doom Mantis:
Level 10 (30%) - 10% Resist Behead

Stupalides:
Level 10 (30%) - 50% Resist Sleep/Poison/Paralysis/Silence/Confusion/Charm/Petrify, -100% Weak to Thunder

Mad Jumper:
Level 11 (30%) - Tackle

Fairy:
Level 11 (50%) - Spells (Balad, Glass, Robuti, Hallobuti, Mirror Eyes, Bulafei), 30% Resist Silence/Behead

Tamagon:
Level 11 (90%)- Vigilance, Imitate, Fire Breath, -50% Weak to Sleep

Wind Elemental:
Level 12 (50%) - Lightning Breath, Spells (Ziakal, Skorekh, Lascorek), 4hp Turn Recovery, 5% Chance to Behead, 100% Thunder Attack Attribute, Immune to Behead, 200% Thunder Defense

Hobbling Strow:
Level 13 (30%) - Inhale*

Harpy:
Level 13 (80%) - Song of Healing, Song of Protection, Song of Hope, Song of Destruction, 11hp Turn Recovery, 30% Chance to Charm, 80% Charm Resist

Peryuton:
Level 13 (80%) - 2 Actions Per Turn, 11hp Turn Recovery, 30% Chance to Confuse

Babirusa:
Level 14 (30%) - Tackle, Restore, 2 Actions Per Turn, 50% Status Recovery

Whirlwind Efreet:
Level 14 (50%) - Lightning Breath, Spells (Ziakal, Ziakalad, Robukand, Yuniwa Coat), 11hp Turn Recovery, 30% Status Recovery, 10% Chance to Behead, 100% Thunder Attack, 50% Resist Paralysis/Silence/Confusion/Charm/Petrify, 10% Resist Sleep/Poison, 200% Lightning Defense

Cockatrice:
Level 14 (80%) - Petrification Breath, 12hp Turn Recovery, 20% Chance to Petrify, 5% Chance to Behead, Immune to Petrify

Griffin:
Level 15 (80%) - Weapon/Armor Break, Swallow Return, Restore, 2 Actions Per Turn, 13hp Turn Recovery, 60% Status Recovery, 10% Chance to Behead, 30% Resist All Ailments/Behead, 80% Holy Defense, 40% Dark Defense

Hydra:
Level 15 (90%) - Poison Breath, Restore, 22hp Turn Recovery, 4 Actions Per Turn, 10% Chance to Petrify, 5% Chance to Sleep/Poison/Paralysis/Silence/Confusion/Charm/Behead, 10% All Element Attack, 86% Resist Behead, 10% Resist All Ailments, 10% All Element Defense

Royal Honeybee:
Level 15 (90%) - Summon*, 2 Actions Per Turn, 18hp Turn Recovery, 40% Status Recovery, 60% Chance to Paralyse/Silence, 80% Resist Paralysis/Charm/Petrify/Drain

Lightning:
Level 16 (50%) - Armor Break, Lightning Breath, 12hp Turn Recovery, 50% Chance to Confuse, 200% Thunder Attack, 40% Resist Paralysis/Charm/Petrify, 10% Resist Sleep/Poison/Silence/Confuse/Behead, 200% Thunder Defense, 10% Holy Defense

Storm:
Level 16 (50%) - Silence Breath, Spells (Raglass, Ziakalad, Skorekh, Orath, Lascorek, Yuniwa Coat), 2 Actions Per Turn, 12hp Turn Recovery, 50% Chance to Silence, 200% Water Attack, 40% Resist Paralysis/Charm/Petrify, 10% Resist Sleep/Poison/Silence/Confusion/Behead, 200% Water Defense, 10% Holy Defense

Tengu:
Level 16 (80%) - Lullaby*, Swallow Return, Swift Attack, Chi Wave, Spells (Stoma, Ziakalad, Bulafei), 14hp Turn Recovery, 2 Actions Per Turn, 50% Resist Sleep/Paralysis/Silence/Confusion/Charm/Petrify, 50% Holy/Dark Defense

Tempest Efreet:
Level 16 (90%) - Summon*, Group Attack, 50% Combative Instinct, Lightning Breath, 3 Actions Per Turn, 30hp Recovery, 50% Status Recovery, 5% Chance to Behead, 50% Water/Thunder Attack, Immune to Behead, 90% Resist Paralysis/Confusion/Charm/Petrify, 200% Water/Thunder Defense

Tsarl (Boss):
Level 16 (100%) - Summon*, Tackle, Swallow Return, Swift Attack, Group Attack, 50% Combative Instinct, Restore, Spells (Bulafei, Karacha, Orath, Lascorek), 3 Actions Per Turn, 70hp Turn Recovery, 100% Status Recovery, 40% Water/Thunder Defense, 30% Fire/Holy/Dark Defense, 50% Resist All Ailments, 80% Resist Behead

Giro (Quest):
Level 24 (90%) - Immune to Drain, 50% Dark Defense, -50% Weak to Fire/Holy

Katezina:
Floor Master - DO NOT ENGAGE
OPTIONAL: Hastrana Notes
Littered throughout the dungeon are one way drops (down) and Wind Holes (up). You will have to go up and down the floors a lot as you explore this dungeon. If you get lost, or don't seem to know where to go, take a look at the maps above. Don't use up all of your Diomente casts exploring. Save at least one to get back to town if you need it, or at the very least have a cast of Honey Restorer handy.

The goal of this dungeon is to find all the Crying Stones and kill the boss at the very bottom. The quest itself, "Blowhole Crying," is unmissable and only a few steps into the dungeon. The Crying Stones can be found at B1 (11x,18y), B2 (14x,2y), B3 (4x,1y), B4 (9x,6y), and B5 (8x,5y). Pick them up as you do other quests.

Another quest that can be found on B1 is "Mother's Momento." The item you need is found randomly after battles on any floor of this dungeon, so pick it up as soon as you can to get that rolling.

Once you have dropped to B2 you will randomly come across a Fairy who asks you for help, which gives you the quest "Aid-seeking Fairy." You can advance the quest by finding a Giro with a box in B3 (0x,15y). Don't be too intimidated by it's level; it is very weak to Fire and Holy and has no resistances to status effects, except Drain. After you kill it a Fairy will escape the box and fly away. Randomly wander around B2 again (even up and down a safe hallway works) until you see the Fairy couple, who will reward you with a Star Rod, a very nice Fairy weapon.

As you fill out your map of B2 you will eventually find Pasan Doma, the son of the Searching Father in Igdra Village. Take the <Key Item>Amber Pendant back to him to get a Stampy Stamp and finish the "Find the Son" quest.

Then there is "Strong Stone," which requires you to find three <Key Item>Durable Stones and bring them back to the Innkeeper one by one. You can use the Pause Adventure trick to turn them in if you don't want to leave each time. They are located at B3 (16x,13y), B4 (1x,14y), and B5 (9x,16y), and all require a Pick to obtain. Once the Innkeeper has all three, you can enjoy 20 more storage spaces.

It is not a quest, but there are a couple of NPC adventurers you can save if you have a few extra casts of Diomente to spare. The Magician in B4 (12x,1y) will give you a Bat Belt for your troubles, while the Wounded Warrior in B6 (13x,14y) will reward you with a Griffin Cloak.

Speaking of B6, you can randomly find the Palteno Tablet there. Just look for it as you usually do if you are interested in Post Game.

The Floor Master, Katezina, moves through doors and makes a circle all the way around the floor. It does not chase, so you can walk behind it safely. Check your map periodically for their position and be especially careful when stepping in front of doors. Like all Floor Masters who move through doors, it will make a sound when it does, so listen carefully and you might catch it nearby.


When you have found all of the Crying Stones, the last thing to do is to head to the middle of B6 and engage the boss, Tsarl (9x,11y). Sometimes they are accompanied by a Storm and Lightning; Tsarl has infinite range, so you cannot use adds as a shield. Take the extras out as soon as you can. As far as the boss goes, Tsarl is a very effective Brawler. They have a 15% Swallow Return chance, and it activates their Group Attack ability, so be careful of attacking them with anyone who does not have Swallow Killer. They have very beefy status resistances and will always recover on the next turn, so status effects do not have as much worth this time. If you don't have Tackle you need to make sure you do more than 70hp worth of damage per turn or you will not be able to keep up with their Turn Recovery. Easier said than done, as they love to cast Bulafei and waste your turn. Lascorek can help slow them down so you can get some hits in, and if they won't come out of Hiding you might have to resort to casting Ramialf. All that said, stacking multiple casts of Hallobukan can trivialize this fight if you are having trouble (Do not cast Ramialf if you stack buffs). When you defeat them, you get an Unidentified Bow (Skylark Bow) and the "Blowhole Crying" quest will be complete.
Potential Hastrana Loot
Loot marked with a * was found by Vino and the JP Wiki.

TRAPS
Rockslide
Poison Needles
Magic Drain
Poison Gas
Bomb
Ghost Swarm
Spell Blaster
Cleric Blaster

HASTRANA B1
? Sword = Claymore, Executioner's Sword
? Katana = Crow Goblin*
? Spear = Ice Devil's Spear*
? Axe = Broadaxe, Giant's Axe
? Club = Flail, Konbou*, Onbei*, Quenstene
? Bow = Shortbow, Magician's Bow
? Staff = Staff*, Brahma-Deva
? Whip = Whip*, Fairy Whip
? Cap = Fur Cap*, Magician's Hat
? Helm = Leather Helm*, Electric Cap*
? Leather = Leather Armor*, Tough Leather Armor
? Robe = Robe*, Fairy Robe
? Talisman = Thunder Charm*
? Medicine = Potion of Awakening, Antidote*, Night Dew Lozenges
? Scroll = Magic Map
? Material = Millstone
? Junk = Star Fragment*, Sun Herb, Mystery Herb, All-Purpose Herb

HASTRANA B2
? Katana = Monohoshizao*
? Whip = Fanged Serpent
? Mail = Chainmail*, Ice Mail
? Plate = Breastplate*, Ashigaru Armor
? Shoes = Chain Leggings*, Hope Greaves
? Talisman = (+1) Flame Charm, (+1) Thunder Charm, (+1) Lightning Charm, (+1) Dark Seal
? Belt = Obi*, Tiger Loincloth
? Ring = Bone Ring, Diamond Ring
? Medicine = Antidote, Potion of Awakening
? Scroll = Magic Map
? Material = Elvish Iron, Vectorium, Millstone
? Junk = Sun Herb, Mystery Herb, All-Purpose Herb, Holy Flute, Horn of Surprise, Kagura

HASTRANA B3
? Spear = Ice Devil's Spear
? Staff = Brahma-Deva
? Shield = Buckler, Beastbone Shield, Holy Guard
? Gauntlet = Chain Gloves, Virtue Gauntlets
? Cape = Innocent Cloak
? Talisman = Charm, Anti-Demon Charm, (+1) Ice Charm, (+1) Light Seal,
? Ring = Crude Ring*, Sacred Tree's Ring
? Medicine = Antidote
? Scroll = Magic Map
? Material = Millstone
? Junk = Sun Herb, Mystery Herb, All-Purpose Herb*, Holy Flute, Harp of Sleep, Horn of Surprise*, Kagura

HASTRANA B4
? Mace = Mace, Evil mace
? Spear = Demon Spear
? Whip = Whip, Ancient Ivy
? Weapon = Kunai
? Shield = Heater Shield
? Helm = Plate Helm
? Gauntlet = Mittons, Gauntlets, Holey Gloves, Knight Gauntlets, Magical Gloves
? Armor = Knight's Armor, Plate Armor
? Plate = Breastplate
? Leather = Leather Armor, Rotten leather Armour
? Shoes = Shoes, Glass Slippers
? Belt = Chain Belt, Innocent Belt*
? Scroll = Magic Map
? Material = Devil Iron, Elvish Iron
? Junk = Star Fragment*, Sun Herb, Mystery Herb, All-Purpose Herb, Rusty dagger

HASTRANA B5
? Axe = Hand Axe, Rusty Handaxe, Giant's Axe, Elven Axe*
? Katana = Kodachi, Heshikiri Hesebe
? Bow = Shortbow, Composite Bow*, Exorcist's Bow
? Weapon = Needle Vambrace
? Shield = Small Shield, Buckler, Rusty Shield, Bario Shield
? Helm = Leather Helm, Phantom Mask, Evil Bascinet*
? Plate = Breastplate
? Robe = Robe, Cursed Robe, Ninja Suit
? Shoes = Chain Leggings, Bone Leggings
? Belt = Leather Belt, Bone Belt, Champion's Belt
? Cape = Cape, Cloak, Torn Cape, Crescent Cloak
? Scroll = Magic Map
? Material = Devil iron, Sensolite
? Junk = Sun Herb, Mystery Herb, All-Purpose Herb, Moon Fragment

HASTRANA B6
? Sword = Longsword, Rusty Longsword, Innocent Sword*
? Katana = Tachi, Nene Kirimaru, Oboro
? Mace = Morningstar, Confusion Mace*
? Club = Flail, Confusion Club*, Furious Cudgel, Lundo Flail
? Hammer = Mill Hammer
? Spear = Spear, Yashahime, Tonbokiri*
? Bow = Longbow, Raging Bow, Meltos Comb*
? Whip = Iron Whip, Entwined Whip, Ringschutesher*
? Weapon = Meteor Spindle, Battered Kunai, Tasram*
? Staff = Staff, Ruin Rod
? Book = White Scriptures
? Talisman = (+2) Flame Charm
? Plate = Breastplate*
? Armor = Plate Armor, Knight's Armor*
? Shoes = Plate Leggings
? Scroll = Magic Map
? Material = Elvish Iron, Vectorium, Sensolite
? Junk = Sun Herb, Mystery Herb, All-Purpose Herb, Moon Fragment, Puppet Maracas

THIEF EQUIPMENT STEALS (LEVEL 26+)
Ogre Sword = Giro (Quest)
Whip = Royal Honeybee
THREE SKULL DUNGEONS
Preparing for Igdra Underground Church
Before you go in, if you have not picked up the level 10 Bishop quest in the Confessional at Lohagra Temple, mentioned all the way back at the beginning of the guide, now is the time.

There are many hidden switches in this section which are necessary to unlock doors to progress through the dungeon. You flip them by pressing the inspect button. Be careful not to turn an already-discovered switch off by mistake or you may have trouble proceeding. If the switch "does nothing" that means you turned it off, which is bad, so just flip it again.

You can be around level 12-14 when you start Igdra Underground Church, but you'll want to be at least level 16-18 by the time you are ready for the boss. Once again, having someone who can heal is not really optional at this point due to the Inhale skill, which is used by common Langseils in B1, and Strange Miasma Wave, which is used by Lichs in the lower floors. At this point in the game, pumping VIT becomes less useful since you will now have to deal with Drain, which recalculates your HP value to a class average every time you level down. If you are not the type of person who wants to deal with that you will want to save often once you reach the lowest floor; do so in a separate slot just in case you get stuck.

You will want someone with Thief Skills to unlock a few doors if you plan on doing every quest, but it is not necessary to reach the main objective. There are a lot of Warps here, so you'll also want someone with Diomente for safety, as always. Someone with the Cleric spell Psi Drain can be very helpful as well. Bring someone who can hurt Ghosts; if you have a Bard or Shaman they can make use of a Kagura instrument (allows party to damage Ghosts on use) if you found one in Hastrana. If Draw annoys you, you might want to take someone with Stronghold. The Boss has some very high Turn Recovery for this point in the game, so if you are worried about your damage output take someone with Tackle. There are new types of treasure traps here, some of which can wipe your party if you are unlucky; if you are not running a well leveled Thief you might want to consider bringing characters with access to the Alchemy spell High Portal. Just having Mahamaha could be nice, since the treck to the boss is a bit more of an ordeal than usual, with a long string of Anti-Warp Tiles to traverse to reach him. Other than that, just resupply as you normally do.

There are quite a few enemies with Dark and Holy Defense here, so keep that in mind when choosing weapons and magic to attack with. There are also several spell casting enemies, so any elemental defense you can squeeze in is nice. Like the last two optional dungeons, beware of cursed equipment.

There are many abilities to watch out for, the worst being Drain, used by Vampires. As described above, it makes you level down. Using Psi Drain when you are fighting them is a good idea. Drain doesn't work like Breath, so try and keep Psi Drain up (it's stackable) while any Vampires are alive; better safe than sorry. You'll also have to deal with two HP sucking abilities: Inhale (Langseil), which puts a single character into critical HP, and Strange Miasma Wave (Lich), which cuts the entire party's current HP in half. Another new thing is Charm Breath, used by Charming Lips, so be careful around them. Wraiths have Soul Trap, which can cause various status effects. A few caster type enemies will start using the Mage spell Enterook Mista, and you'll see a lot more Instant Death spells such as Razefeis. And last, but not least, Labor Lord's Self-Destruct can actually work for you because they start the battle Confused, but don't count on it.
Igdra Underground Church Maps


Click the thumbnails for the full sized maps. B1, with the entrance, is at the top and it goes in order to B4 at the bottom.

The colors for the numbers on the warp locations and destinations show the fastest way to move toward objectives (green), backward movement (pink), with everything else being white.

If you see a guaranteed battle in the middle of a No-Warp zone, you cannot warp to that spot. The maps are busy enough as it is and I am too lazy to add the Xs underneath the skulls.
Igdra Underground Church Enemies
Priestess:
Level 12 (90%) - Spells (Feirima, Sama Eyes, Feireed)

Langseil:
Level 13 (30%) - Inhale*, Immune to Drain, -50% Weak to Holy

Screeching fear:
Level 13 (30%) - Spells (Karacha, Makaracha), Immune to Drain, 100% Dark Defense, -50% Weak to Holy

Carcus:
Level 13 (60%) - Fire Breath, 23hp Turn Recovery, 2 Actions Per Turn, 50% Resist Behead, 30% Resist All Ailments

Wraith:
Level 14 (30%) - Soul Trap*, Shout, Magic Essence, King's Proof, Restore, Spells (Zefeifus, Razefeis), 90% Resist Paralysis/Charm/Petrify, 40% Resist Sleep/Poison/Silence/Confuse/Behead, Immune to Drain, 300% Dark Defense, -50% Weak to Holy

Charming Lips:
Level 14 (30%) - Charm Breath, Spells (Pinto, Rapinto), 5% Chance to Charm, Immune to Charm

Edomo Senior *Unidentified Object in Dark Zone*:
Level 14 (30%) - 30% Status Recovery, 2 Actions Per Turn, 70% Resist Paralysis/Charm/Petrify, 20% Resist Sleep/Poison/Silence/Confuse/Behead, 10% Dark Defense

Player:
Level 14 (30%) - Spells (Ravenom, Tashif, Rafelima, Ramialf), 150% Holy Attack, 90% Resist Sleep/Paralysis/Petrify, 50% Holy/Dark Defense, -50% Weak to Fire

Cospriest:
Level 14 (60%) - Armor Break, 2 Actions Per Turn, 5% Chance to Confuse, 5% Chance to Silence (Off hand Only), 5% Chance to Charm (Main hand Only), 35% Status recovery, 50% Resist Behead, 40% Resist Silence, 25% Resist Sleep/Poison/Paralysis/Confuse/Charm/Petrify

Will o' the Wisp *Bright Light in Dark Zone*:
Level 15 (50%) - 12hp Turn Recovery, 50% Status Recovery, 95% Resist Paralysis/Silence/Confusion/Sharm/Petrify/Behead, 100% Holy/Dark Defense

Phantom *Strange Figure in Dark Zone*:
Level 15 (50%) - Vigilance, Thief Skills, Steal, Find Treasure, Nocturnal, 5% Chance to Sleep/Poison/Silence/Confuse/Charm, 5% All Element Attack

Labor Lord *Armored Man in dark Zone*:
Level 15 (50%) - Starts Battle Confused, Self-Destruct, Restore, 2 Actions Per Turn, 50% Dark Defense

Soul Slave *Worn-Out Figure in Dark Zone*
Level 15 (90%) - Spells (Rabalad, Raglass, Ziakalad, Enterook Mista, Zefeifus, Rafeireed, Razefeis, Rapidos, Zeo Nadar), 50% Status Recovery, 50% Resist Silence/Charm/Petrify, 20% Resist Sleep/Poison/Paralysis/Confuse/Behead, 80% Dark Defense

Karsa *Strange Lifeform in Dark Zone*:
Level 15 (95%) - Spells (Balad, Ramisama, Bulafei), 80% Dark Defense

Believer (Event):
Level 15 (100%) - 50% Dark Defense, -100% Weak to Holy

Lich *Skeleton in Dark Zone*:
Level 16 (30%) - Strange Miasma Wave*, Spells (Robuti, Hallobuti, Enterook Mista), 9hp Turn Recovery, 10% Chance to Paralyze, 10% Chance to Petrify (Main Hand Only), 50% Dark Attack, 5% Fire/Water/Thunder/Holy Attack, 90% Resist Charm, 30% Resist Paralysis/Petrify, Immune to Drain, 100% Dark Defense, -100% Weak to Holy, -50% Weak to Fire

Barbarian (The Fighter, not the Thief of the same name):
Level 16 (50%) - Shout, 30% Status Recovery

Brawler:
Level 16 (50%) - Group Attack, 16hp Turn Recovery, 50% Status Recovery

Bard:
Level 16 (80%) - Tarot, Thief Skills, Spells (Misama, Ramisama, Venom), 5% Chance to Sleep

Lesser Demon
Level 16 (95%) - Calls Reinforcements, 90% Dark Defense

Demon Valkyrie *Demon in Dark Zone*:
Level 16 (95%) - Cleric Spells (More than I care to list), 17hp Turn Recovery, 60% Status Recovery, 50% Dark Attack, 95% Dark Defense

Vampire:
Level 17 (30%) - 10% Chance to Drain, Immune to Drain, -50% Weak to Holy

Master Alchemist:
Level 17 (80%) - Spells (Pomedoon, Rood, Rarood, Bulafei, Skorekh, Karacha, Makaracha), 40% Alchemy Spell Defense, 10% Resist Silence

High Sorceress:
Level 17 (80%) - Spells (Misama, Balados, Ramisama, Mabalad, Rabalad, Hallobuti), 5% All Element Attack, 5% Sleep/Poison/Silence/Confusion/Charm, 10% Resist Silence

High Valkyrie:
Level 17 (90%) - Cleric Spells (Sama Eyes, Robukand, Feireed, Elnam, Rafeireed, Razefeis), 50% Status Recovery, 20% Water Attack, 20% Resist Paralysis/Silence/Confusion/Charm, 50% Holy/Dark Defense, 30% Fire defense

Arch Priest:
Level 17 (90%) - Cleric Spells (Latasif, Feirima, Sama Eyes, Feireed, Elnam, Rafeireed, Razefeis), Dispel w/ Soul Release, 10% resist Silence, 50% Dark Defense

Arch Bishop:
Level 17 (90%) - Spells (More than I care to list), 5% Chance to Behead, 10% Resist Silence, 20% Holy/Dark Defense

Spirit (Quest):
Level 17 (100%) - Draw*, Inhale*, 27hp Turn Recovery, 50% Status Recovery, 2 Actions Per Turn, Extra Damage agaisnt all but Devil/Dragon/God, 10% All Element Attack, 80% Resist Behead, 30% Resist All Ailments, 10% All Element Defense

Sacrifice (Quest):
Level 18 (100%) - Inhale*, Brace, Glutton for Punishment, Spell (Ramisama), 2 Actions Per Turn, 10% Chance to Silence, 30% Status recovery, 50% Resist Paralysis/Confuse/Charm/Petrify/Behead, 25% Resist Sleep/Poison/Silence, 80% Holy/Dark Defense, 25% Fire/Water/Thunder Defense

Fallen Youth (Boss):
Level 20 (100%) - Draw*, Summon*, Vigilance, Brace, Shout, Cruelty, 110hp Turn Recovery, 4 Actions Per Turn, 5% Chance to Sleep, 50% Resist Paralysis/Petrify, 20% Resist Sleep/Poison/Silence/Confusion/Charm/Behead, 95% Resist Drain, 90% Dark Defense, 30% Fire/Water/Thunder/Holy Defense

Ritual Worker (Quest):
Level 24 (95%) - Spells (Skorekh, Pinto), 5% Chance to Silence, 5% Chance to Behead, 80% Dark Defense, -10% Weak to Confuse

Vetreyal:
Floor Master - DO NOT ENGAGE
Igdra Underground Church Notes
There are three new trap tiles in this dungeon. The first one is the Warp Trap, which teleports you to another location on the floor. Under normal circumstances, they have no indication that they are there and are unaffected by Sosario. There are a lot of these, especially in B1, so have Diomente handy if you need it.

The second is the Dark Zone (aka Pitch Black), which is exactly as described, and is unaffected by Eroma. Use your map and the sound of your party bumping into walls to navigate it. In battle, you cannot see your enemy or how many there are. You can use characters with long range weapons to count how many are in the first two rows and read the vague description you get when targetting to guess what it is, or you can cast Fire and Lighting spells to catch a very brief glimpse. The Dark Zone descriptions of each enemy are listed in the Monster Encyclopedia if you are interested, but I have also noted which enemies I found there in the enemy section if you prefer a quick reference.

The last one is the Spinner tile, which forces you to face the opposite direction. There are not very many of them here (only on the lower floors), and it is easy to tell when you have touched one if you are watching carefully, but they can still be very disorienting. You can use your map to be sure of the direction you are facing. Like the others, these are not affected by Sosario.

The goal of this dungeon is to reach the bottom and confront the boss, which is easier said than done. There are several Locked Doors which require Switches to be activated in order to continue, so you have to explore carefully (or use the maps above). The 3 Switches in the main part of B1 unlock the Doors in the west side of the area, which you have to come up from lower floors to reach. The 3 Switches there, one behind each locked Door, unlock the Doors to reach the boss in B4. There are also 3 Switches in B2 that must be activated to unlock a single Door on the same floor.

Along the way you can speak with several people, some of which will battle you, and two Mystic Squares where you can pick up some free loot. The only one that really matters is the Cospriest guarding the ladder to B2, so skip the rest if you want.

Also along the way, you can find three red eyed Goat's Head Carvings at B1 (6x,2y), B2 (2x,14y), and B3 (15x,4y). You can do them in any order. When you destroy them all, a Spirit will attack you. Defeating it opens you up to the question of why the Spirits were being gathered, finishing the "Evil Ritual" quest.


The other quest is "Sacrifical Lover" (the level 10 Bishop quest), which has probably been sitting in your event log for some time. You can find an Altar in B2 (14x,2y) behind a locked door (open with Thief Skills). On it is an unconsious woman and some ritual instruments. If you approach her (Yes) you will be attacked by two Ritual Workers and a Vampire. Use Psi Drain to protect your levels while the Vampire is alive. Once they are defeated, the woman regains conciousness and transforms, forcing you into another battle against a Sacrifice. She hits pretty hard, but the biggest threat in this fight is her use of Inhale, which heals her. Defeating her finishes the quest.

Unlike every dungeon so far, the Floor Master, "Vetreyal", is on B3 and not the last floor. It patrols a tiny section in the southern part of the floor and does not go through doors, stopping every once in a while for a few turns. Its movement can trap you in the little cubbies around it's territory, so be careful if you explore there. Luckily, you do not have to be in there for very long, so you can skip exploring it (beyond the one tile necessary to reach a Goat's Head Carving) if you'd like.

A nice enemy in B3 and B4 is the Lesser Demon. They are not too difficult to kill, have no status resistances, and will call allies. They are an excellent source of EP should you feel the need to grind. If your party is not terribly strong and you don't feel like taking on an army, put them to sleep as fast as possible so they can't summon friends.

B4 is the home of the random Tablet, this time the Higea Tablet. Like usual, try and pick it up now if you are interested in Post Game.

When you are finally done with all the Switches, it is time to confront the boss. Once you step past the 3 locked Doors in B4 you will find yourself in a dark fog. Here, you can actually see the Warp tiles as blue circles of light. Make your way through this last section of warps until you reach a door at (11x,9y), which puts you in a giant dome shaped room filled with numerous shadows. "Approach the hole" (Yes) and they will attack, forcing you into a battle against a random number of Lesser Demons and Believers. Clearing them out reveals a lone shadow standing directly in front of you. Walk toward it to see that it is the Young Boy you met all the way back in Tsun-Kurn. Choosing to Approach causes him to transform and forces you into another battle against the Fallen Youth and a random amount of Lesser Demons and Believers.

If you have the first two rows filled with Lesser Demons and Believers (Fallen Youth in the third row) you can use it to your advantage by stacking buffs on your party before you clear them out, trivializing the fight. This is a pretty useful trick if you want to take on tough bosses at lower levels, as long as the additional enemies are weak to status effects and are generally easy to take out. If you don't want to do that, just apply buffs and debuffs normally as you battle. The Fallen Youth can hit pretty hard, has 4 actions per turn, and infinite range. He only has 20% resistance to most ailments, so status effects really shine in this battle. With 110hp recovery you have to do a decent amount of damage to keep up with him if you don't have Tackle. If you do not have Stronghold and he uses Draw, don't forget Bifei, Bulafei, and Yuniwa Coat. Confusion can make him do significant damage to himself, which may help if you lack the damage to beat his recovery.

After defeating the boss, the spirit of a Dark Priest exits the boy's body and fills you in on a little of what has been going on. Time to report back to the King.
Potential Igdra Underground Church Loot
Loot marked with a * was found by Vino and the JP Wiki.

TRAPS
Rockslide
Poison Needles
Magic Drain
Poison Gas
Bomb
Spell Blaster
Cleric Blaster
Cobra Curse
Demon Eye

IGDRA UNDERGROUND CHURCH B1
? Katana = Kogarasu Katana, Nodachi*, Kodachi*, Monohoshizao*
? Spear = Ice Devil's Spear
? Bow = Fairy Bow*, Ghostly Bow
? Weapon = Brass Knuckle, Power Sling, Kunai, Needle Vambrace
? Whip = Fanged Serpent*
? Book = Heavy Book, White Scriptures
? Shield = Fairy Shield
? Gauntlet = Mantis Gauntlets
? Cape = Cloak, Griffin Cloak, Frost Cloak*
? Belt = Leather Belt*, Bat Belt
? Medicine = Potion of Awakening, Night Dew Lozenges
? Scroll = Magic Map
? Junk = All-Purpose Herb, Star Fragment

IGDRA UNDERGROUND CHURCH B2
? Sword = Short Sword, Blunt Sword, Lightning Sword
? mace = Magic Blue Club*
? Club = Konbou, Confusion Club, Deck Cudgel
? Weapon = Stone, Broken Tomahawk, Ice Tomahawk
? Whip = Seijuobi
? Staff = Ruin Rod
? Book = Heavy Book, Black Scriptures, Oldest Book
? Shield = Large Shield, Bent Shield, Mithril Shield
? Gauntlet = Mittens*, Magical Gloves*, Chain Gloves, Old Gloves, Mantis Gloves*, Knight Gauntlets
? Helm = Kabuto*
? Leather = Hunter Guard
? Armor = Plate Armor
? Shoes = Ninja Socks
? Belt = Innocent Belt
? Scroll = Magic Map
? Junk = Weed*, Star Fragment, First Love Flower*, Quick Dagger*

IGDRA UNDERGROUND CHURCH B3
? Sword = Claymore, Bario Sword, Flamberge, Innocent Sword*
? Axe = Broadaxe, Bone Axe, Dwarven Halberd
? Spear = Lance, Spear*, Spiral Spear, Cursed Spear, Tonbokiri*
? Katana = Tachi*, Nodachi, Neck Splitter, Kogitsune, Nene Kirimaru*
? Mace = Morningstar*, Bone Breaker*
? Club = Lundo Flail
? Hammer = Pick, Blood Hammer, Entrei
? Weapon = Brass Knuckle, Bandage, Hawk Talons, Tasram
? Bow = Longbow*, Meltos Comb*
? Whip = Ringschutesher*
?Staff = Flame Rod*
? Armor = Knight's Armor*
? Shoes = Dwarven Leggings
? Scroll = Magic Map
? Junk = Star Fragment, Puppet Maracas*

IGDRA UNDERGROUND CHURCH B4
? Katana = Dawn Sword*
? Axe = Elven Axe*
? Weapon = Kunai
? Bow = Exorcist's Bow*
? Book = Heavy Book, Black Scriptures, Oldest Book
? Shield = Heater Shield, Mukade Shield, Goddess Shield, Innocent Shield*, Fairy Shield*
? Helm = Evil Bascinet
? Gauntlet = Leather Gloves, Ragged Gauntlets, Ninja Gauntlets
? Mail = Chainmail, Cursed Chainmail, Elven Chainmail*
? Robe = Ninja Suit
? Shoes = Leather Boots, Battered Leather Shoes, Woodsman's Boots, Holy Leggings*
? Belt = Obi, Dirty Obi, Warrior's Black Obi, Champion's Belt*
? Cape = Crescent Cloak*, Silver Cloak*
? Talisman = Thunder Charm, (+2) Lightning Charm
? Medicine = Night Dew Lozenges
? Scroll = Magic Map
? Junk = All-Purpose Herb

THIEF EQUIPMENT STEALS (LEVEL 26+)
Palindroma = Barbarian
Ogre Sword = Labor Lord
Fool's Foil = Ritual Worker (Quest)
Mace = Arch Priest, Arch Bishop
Furious Cudgel = Cospriest
Confusion Club = Cospriest
Ice Devil's Spear = High Valkyrie
Cursed Spear = Demon Valkyrie
Azoth Dagger = Master Alchemist
Trickster's Rod = High Sorceress, Phantom
Ruin Rod = Lich
Harp of Sleep = Bard
Mid Game Intermission
After clearing out Igdra Underground Church, head back to Ishmag Castle and Arrange Meeting with the King. While the King is having a private meeting with his Sages, a lone Sage comes out and orders you to investigate a Priest's Mansion, explaining why with the second still-frame cutscene of the game. This completes the "Mysterious Youth" quest, gives you "Shinto Estate Investigation," and opens up Uhlm Zakir Hall for exploration.

We are now going to head into the 4 Skull Difficulty dungeon Uhlm Zakir Hall. The guide is not going to go through it completely at this point in time, though you can certainly ignore the order listed here and explore the whole thing if you want. For those following the guide, we just need to get a new location unlocked. If, for any reason, you decide to stray from the direct path, use Sosario. When you enter, keep walking forward, going through each door, until you run into two staircases. Take the one on the left (west) to F2. Go around the corner, ignoring the two doors, and walk south to the very end of the hall, also ignoring the path going east along the way. Enter the door to your left (east) and you will find yourself in a room with a Soldier of the Kindgom at (10x,3y). He will ask you if you have met Lord Alli Kai and says his help is needed to investigate the mansion (don't worry about that for now). He'll unlock the Rosslie Ruins for you. Head back to Ishmag.

Go to Dondun's Tavern and Talk with a Scholarly Man who asks you to find something to aid his research on the fall of the Cult of Rosslie Ruins, giving you the "Ruined Household" quest. Now talk to the Wealthy-looking man. He seeks a specific potion and gives you the "Cure-all Medicine" quest.

Next stop is Lohagra Temple, where you can Talk with a couple people. Man with Child tells you that his kid is suffering from an unknown disease and gives you a <Key Item>Cracked Transparent Orb and the "Cracked Sphere" quest. The Impoverished-looking man tells you his daughter is sick. He won't give you a quest, since he is tied to one you already have. Remember he is here for later.
OPTIONAL: Preparing for Rosslie Ruins
For levels, try to be at least 14-16 when you enter and 17-19 by the time you are ready to take on the boss for a relatively easy time.

It's time to break out the Air Seed again, or Transmute one with an Alchemist if you haven't made one yet. Other than that, there is nothing special you have to bring. Like the last few dungeons, make sure you have a reliable way to heal. Equip yourself with Water Defense if you can. Sleep Resistance can be very handy on the last floor, but you do not need it to complete the dungeon. The boss has 100hp Turn Recovery, so bring someone with Tackle if you think you might need it. There is also an enemy with Draw (Bahamut), so bring someone with Stronghold if you don't want to deal with it.

There really isn't much in this dungeon that you haven't dealt with before. Watch your HP with Inhale and Strange Miasma Wave, Pendeku is handy for Weapon Break (Ghost Ship, Sedna) and Armor Break (Leviathan), and beware of enemies with Behead (Wise Hammer, Leviathan, Bahamut), etc. Just be careful and you should do fine. If, at any point, you feel this dungeon is too hard for you, try going through F1 and F2 of Uhlm Zakir Hall for a bit of EP and come back. You might want to leave the Hall's basement for later though, since it is considerably harder.
OPTIONAL: Rosslie Ruins Maps


Click the thumbnails for the full sized maps. F1, with the entrance, is at the top and it goes in order to B2 at the bottom.
OPTIONAL: Rosslie Ruins Enemies
Deep Dresser:
Level 16 (30%) - 30% Chance to Paralyze, 100% Water Defense

Bolteguai:
Level 16 (30%) - Chi Wave, 10% Chance to Paralyze, 10% Thunder Attack, 50% Resist Behead, 10% Fire/Water/Thunder Defense

Mermaid:
Level 16 (50%) - Spells (Raglass, Skorekh, Orath), 50% Status Recovery, 16hp Turn Recovery, 20% Water Attack Attribute, 50% Resist Confusion/Charm, 200% Water Defense

Water Elemental:
Level 16 (50%) - Ice Breath, Spells (Robuti, Hallobuti, Latasif, Hallobukan, Feirima, Rafelima, Sama Eyes, Lascorek, Rapoolfei), 20% Water Attack, 200% Water Defense

Bolmophis:
Level 16 (95%) - 30% Status Recovery rate, 80% Dark Defense, -100% Weak to Sleep

Zombie Barracuda:
Level 17 (30%) - 10% Water Attack Attribute, 10% Water Defense, Immune to Drain, -50% Weak to Thunder/Holy

Mahlion:
Level 17 (80%) - 17hp Turn Recovery, 10% Chance to Sleep/Confuse, 50% Water/Dark Defense

Dagonian (Quest):
Level 17 (100%) - Inhale*, Treatment, 2 Actions Per Turn, 5% Chance to Sleep, 90% Resist Behead, 50% Resist Poison, 30% Resist Paralysis/Petrify, 10% Resist Sleep/Silence/Confuse/Charm/Drain, 10% Fire/Water/Holy/Dark Defense, -30% Weak to Thunder

Wise Hammer:
Level 18 (30%) - Pursuit, Group Attack, 10% Chance to Paralyze/Behead

Leviathan:
Level 18 (30%) - Armor Break, 32hp Turn Recovery, 2 Actions Per Turn, 5% Chance to Behead

Bahamut:
Level 18 (80%) - Strange Miasma Wave*, Draw*, Summon*, Lullaby*, King's Proof, Restore, 21hp Turn Recovery, 3 Actions Per Turn, 5% Chance to Inflict All Ailments/Behead, 5% All Element Attack, 30% Status Recovery, 40% Resist Behead, 20% Resist All Ailments, 20% All Element Defense

Otohm (Boss):
Level 18 (100%) - Inhale*, Imitate, Restore, 100hp Turn Recovery. 3 Actions Per Turn, 12.7% Special Resistance UP, 30% Status Recovery, 5% Chance to Sleep, 2% Chance to Behead, 95% Resist Drain, 90% Resist Poison/Behead, 40% Resist Paralysis/Petrify, 20% resist Sleep/Silence/Confusion/Charm, 30% Fire/Water/Holy/Dark Defense, 10% Thunder Defense

Ghost Ship:
Level 19 (30%) - Summon*, Weapon Break, Immune to Behead/Drain, 100% Dark Defense, -50% Weak to Holy

Mermaid Queen:
Level 19 (50%) - Summon*, King's Proof, Restore, Spells (Raglass, Hallobukan, Skorekh, Orath, Yuniwa Coat), 19hp Turn Recovery, 50% Status Recovery, 50% Water Attack, 50% Resist Confusion/Charm, 10% Resist Sleep/Poison/Paralysis/Silence/Petrify/Behead, 200% Water Defense, 30% Fire Defense

Sedna:
Level 19 (90%) - Group Attack, Vigilance, Weapon Break, Spells (Raglass, Sama Eyes, Feireed, Rafeireed), 36hp Turn Recovery, 2 Actions Per Turn, 50% Water Attack, 90% Resist Poison/Paralysis/Silence/Confusion, 50% Resist Behead, 30% Resist Sleep/Charm/Petrify, 200% Water Defense

Grate:
Floor Master - DO NOT ENGAGE
OPTIONAL: Rosslie Ruins Notes
When you see an open doorway with water flowing in front of it, you can pass through it the same way you would a regular door. This dungeon's gimmick is that there are many hidden doorways, but Erod/Eroma/Thief Skills are not useful in finding them here. You can use the maps above if you have trouble discovering their locations, but since the doors follow the flow of the canals they are not too tough to find. There are also guaranteed battle locations that you cannot see on the in-game map and take place underwater with the Air Timer active, so hopefully you took my advice and brought along an Air Seed. And last, there are a few places where you can dive into the canal to check out what is there, using the Inspect button (F Key). Sometimes it will be an unidentified item, and sometimes it will lead to a battle.

There is a Muscular Warrior in F1 (5x,9y) that warns you to leave, talking about how people from his village have gone missing and that you can hear screaming in the ruins. This gives you the "Disappearance Ruins" quest.

Also in F1 there is a World Map Carving (10x,2y) showing various dungeon locations in the form of a mystic square. There is one place that your party does not recognize, which unlocks Afum Zar Light Cave. When you return to Ishmag, head into Dondun's Tavern. A Recruiting man will call you over and tell you that he and his buddies need coins to bait a rare monster that inhabits the cave of Afum Zar, asking if you want in on the plan. Agree to Join you will get the "Gold-eating Monster" quest. If you Talk to him again and say Yes the Man will join your party in the 7th Summon slot and you will be warped directly to B1 of the Afum "Zakir" Cave. Since it takes you to a different dungeon I will be providing information about it in the Afum Zar Light Cave section of the guide, so you can wait until then if you'd like. But if you want to do it now, feel free. If you said Yes and warped but decided to do it later, simply exit the dungeon and the Recruiting man will return to Dondun's Tavern until you speak with him again.

If you look at your map when you find B1, you will notice Floor Master Grate. They are in a tiny 2x2 room, locked with the White Carving, and they never leave it. You have no reason to go there now, so you can stay safe by not going through the door to its territory.


At B1 (15x,15y) you will find two sunken stone carvings, <Key Item>White Woman Carving and <Key Item>Black Mermaid Carving, which are used to open and close the locked doors on this floor. You can only take one at a time or leave them both in, and you can swap them by inspecting the spot again. With the Black Mermaid Carving in your possession, go back to Ishmag and Talk to the Scholarly man, who will return the Carving and reward you with a Revival Tonic, completing the "Ruined Household" quest. Presenting him with the White Woman Carving only causes him to give it back to you and has no effect on the quest.

B1 also has a Crying Woman (1x,14y), who asks that you to destroy the altar of the god of the ruins, giving you the "Lamenting Woman" quest. Go to the Altar in B2 (13x,7y) and destroy it, releasing a white light that asks you why you did it before it vanishes. Return to the Crying Woman and she will reveal her true nature and attack. Defeat the Dagonian to finish the quest.


When you reach B2 there are many strong enemies that can deal quite a bit of damage, so be careful, especially against Bahamuts. They can easily put your entire Party to sleep with Lullaby and then Strange Miasma Wave you to death. While on the topic of B2, the Metis Tablet can be found there. If you are interested in post game make sure to find it before you leave. One more thing about this floor is that you can now find Magic Herbs as ? Junk in treasure here, if you have a Servant who can utilize them.

The objective of B2 is to hit 4 switches to unlock the large room on the east side of the map, approach the glowing ball in the center, and choose to Investigate it. The boss is Otohm, who is usually accompanied by three Dagonian. Otohm uses Inhale and has 3 actions per turn, which can make it difficult to keep up with the damage if you battle recklessly. It can also Imitate your actions. It does have some resistance to status effects, but it is still worth trying Sleep, Confuse, or Charm (Captivating Lute works, if you have a Bard or Shaman). In case anyone is wondering, yes, the Boss and Dagonians can use Inhale on themselves which negates the healing component, making the fight a breeze if a Confused or Charmed AI works in your favor. When you defeat it you will get an Unidentified Talisman (+2 Lightning Charm) and the "Disappearance Ruins" quest will be complete.
Potential Rosslie Ruins Loot
Loot marked with a * was found by Vino and the JP Wiki.

TRAPS
Rockslide
Poison Needles
Magic Drain
Bomb
Poison Gas
Spell Blaster
Cleric Blaster
Demon Eye
Cobra Curse
Ghost Swarm
Treasure Chest
Counter-Punch


ROSSLIE RUINS F1
? Mace = Mace, Evil Mace, Magic Blue Club
? Whip = Whip, Ancient Ivy, Seijuobi*
? Shield = Heater Shield, Knight Shield
? Helm = Plate Helm
? Gauntlet = Mittons, Gauntlets, Holey Gloves
? Leather = Leather Armor, Rotten Leather Armor
? Shoes = Shoes, Glass Slippers
? Belt = Chain Belt, Innocent Belt
? Ankh = Ankh of Strength, Ankh of Wisdom
? Scroll = Magic Map
? Material = Millstone
? Junk = Dagger, Rusty Dagger, Quick Dagger, Sun Herb, Mystery Herb, All-Purpose Herb, Magic Herb*, Star Fragment, Captivating Lute*

ROSSLIE RUINS B1
? Axe = Hand Axe, Rusty Hand Axe
? Katana = Kodachi, Heshikiri Hesebe, Dawn Sword
? Bow = Shortbow, Composite Bow, Exorcist's Bow
? Shield = Small Shield, Buckler, Rusty Shield, Bario Shield, Fairy Shield*
? Helm = Leather Helm, Phantom Mask, Evil Bascinet
? Robe = Robe, Cursed Robe, Ninja Suit*
? Shoes = Chain Leggings, Bone Leggings, Holy Leggings*
? Belt = Leather Belt, Bone Belt
? Cape = Cape, Cloak, Torn Cape*, Crescent Cloak*
? Scroll = Magic Map
? Material = Devil Iron, Elvish Iron, Sensolite, Millstone
? Junk = Star Fragment, Sun Herb*, Mystery Herb, All-Purpose Herb, Kagura, Captivating Lute

ROSSLIE RUINS B2
? Sword = Blunt Sword, Beastbone Blade*, Lightning Sword*
? Club = Onbei, Confusion Club, Deck Cudgel
? Weapon = Power Sling, Broken Tomahawk, Ice Tomahawk
? Book = White Scriptures, Black Scriptures, Oldest Book
? Shield = Bent Shield, Holy Guard, Mithril Shield
? Gauntlet = Old Gloves, Virtue Gauntlets, Mantis Gauntlets
? Scroll = Magic Map
? Material = Elvish Iron, Vectorium, Devil's Lapis
? Junk = Star Fragment, Moon Fragment, Sun Herb, Mystery Herb, All-Purpose Herb, Magic Herb

THIEF EQUIPMENT STEALS (LEVEL 26+)
Killer = Mermaid
Ice Devil's Spear = Mermaid Queen
OPTIONAL: Preparing for Afum Zar Light Cave
The recommended levels for this one are a bit tricky. Starting it as low as level 15-17 is usually pretty safe, but since you can fight the boss very soon after you enter you could wait until you are in the low to mid 20s if you are the careful type. You can avoid the boss until you are ready for it. Also, be aware that the last floor of this dungeon has a bit of a difficulty spike. Take it slow and steady if you need to.

There is a quest item that requires mining, and there are also static mining spots in this dungeon, so bring a Pick. If you haven't been carrying around one already, you might consider keeping a Bone Slippers in your inventory. Having access to the rank 5 Alchemy spell Ramialf can be handy if you are exploring at lower levels, since Hiding enemies can be annoying. You'll also want a way of defeating ghosts without using spell based damage; Harias or a Kagura instrument work well for that. Like Rosslie Ruins B2, there is a chance to get Magic Herbs as treasure here if you have a Servant who can take advantage of it. If you plan on taking the "Gold-eating Monster" quest while you explore, you might want to swap out your Summoner for a bit if you have one since it requires the use of the 7th Summon slot. A class to consider bringing for the quest listed above is a Steal capable Thief (level 26+) with Mysterious Bag, since an enemy you have to fight has a lot of equipment on him. It is nothing unique, but if you have been unlucky with loot every little bit can help. If you have a magic heavy party you could consider bringing someone with High Magic Source. You might also want some Holy, Thunder and Dark Defense on your equipment if you can fit it in.

There are a few Barrier using enemies in the cave (Firefly, Rainbow Dragon), so be careful if you have a magic heavy party. The high elemental defenses of Mirror Ghost and Sign will reflect elemental magic attacks, including Fire Breath if you have Dragonewts. Mirror Ghost also has Summon Judgement, a new ability which kills any active Summoned creature. There are quite a few Breath users (Earth Elemental, Demon Fox, Wyvern Elemental, Firefly, Rainbow Dragon), especially on the lowest floor. Earth Elemental has Petrification Breath, so you might want to use Psi Breath to protect yourself. As far as ailments go, you will have to watch for Sleep (Edelite, High Sorceress, Arch Bishop), Poison (Mimic), Silence (Firefly), Paralyze (Master Alchemist, Arch Bishop), Confuse (Mirror Ghost, Master Alchemist), Petrify (Nagu, Lamia, Earth Elemental, Arch Bishop) and there are several enemies that have a chance to Behead (Bicorn, Unicorn, Arch Bishop). Mirror Ghost has a chance to Drain, so you might want to protect yourself with Psi Drain. There are also a few enemies who cast Argeiss (Nagu, Bicorn, Arch Bishop), Zeifeifus (Edelite) and Razefeis (Bicorn, Arch Priest, Arch Bishop, High Valkyrie), so watch out for Instant Death.

If you have a Summoner and are interested in Spirit Pact, consider grabbing a Mirror Ghost. They have amazing elemental and ailment resistances and a 50% Chance to Confuse on hit, all with a mere 30% Contract resistance. It's a really good deal and a great candidate for a Spirit Pact Fighter, though as a regular Summon it is lacking as it tends to cast a Justice Tarot over and over. Also, if you didn't pick up Shadow from the Great Tree Yap Gotz but really wanted it, the Nerve enemy is comparable. Nerve does not have Shadow's extreme weakness to Holy and acts 5 times per turn as a Summoned creature, but it is not Immune to Sleep and does not deal natural Dark damage like Shadow.

Like with Rosslie Ruins, if you feel this dungeon is too hard for you the deeper you go, try going through F1 and F2 of Uhlm Zakir Hall for some EP. You might want to leave the Hall's basement for later though, since it is a bit harder.
OPTIONAL: Afum Zar Light Cave Maps


Click the thumbnails for the full sized maps. B1, with the entrance, is at the top and it goes in order to B4 at the bottom.

There are multiple ways to reach some of the objectives in Afum Zar. I opted to plot routes that linked with other objectives to minimize backtracking. I didn't count tiles for some of the alternate routes, but I know that some of these paths are definately not the fastest way to individual objectives. The fastest routes are not too hard to find if you look at the map though, so don't feel like you have to follow my lines.
OPTIONAL: Afum Zar Light Cave Enemies
Barbarian (Thief Type/Quest):
Level 4 (50%) - Thief Skills +1

Mork Cricketer:
Level 5 (30%) - Draw*

Phantom (Quest):
Level 15 (50%) - Vigilance, Thief Skills, Steal, Find Treasure, Nocturnal, 5% Chance to Sleep/Poison/Silence/Confuse/Charm, 5% All Element Attack

Earth Elemental:
Level 15 (50%) - Petrification Breath, Spells(Robuti, Stoma, Hallobuti) 20% Dark Attack, Immune to Petrify, 100% Thunder/Dark Defense

Carbuncle:
Level 15 (80%) - 13hp Turn Recovery, 50% Resist All Ailments/Behead 50% All Element Defense

Barbarian (Fighter Type):
Level 16 (50%) - Shout, 30% Status Recovery

Brawler:
Level 16 (50%) - Group Attack, 16hp Turn Recovery, 50% Status Recovery

Rogue:
Level 16 (50%) - Pass-Along Theft, Thief Skills +1, 2 Actions Per Turn, 20% Thunder Attack, -10% Weak to Thunder

Camel Daf:
Level 17 (30%) - Tackle, Song of Protection

High Sorceress:
Level 17 (80%) - Spells (Misama, Balados, Ramisama, Mabalad, Rabalad, Hallobuti), 5% All Element Attack, 5% Sleep/Poison/Silence/Confusion/Charm, 10% Resist Silence

Master Alchemist:
Level 17 (80%) - Spells (Pomedoon, Rood, Rarood, Bulafei, Skorekh, Karacha, Makaracha), 40% Alchemy Spell Defense, 10% Resist Silence

High Valkyrie:
Level 17 (90%) - Cleric Spells (Sama Eyes, Robukand, Feireed, Elnam, Rafeireed, Razefeis), 50% Status Recovery, 20% Water Attack, 20% Resist Paralysis/Silence/Confusion/Charm, 50% Holy/Dark Defense, 30% Fire defense

Arch Priest:
Level 17 (90%) - Cleric Spells (Latasif, Feirima, Sama Eyes, Feireed, Elnam, Rafeireed, Razefeis), Dispel w/ Soul Release, 10% resist Silence, 50% Dark Defense

Arch Bishop:
Level 17 (90%) - Spells (More than I care to list), 5% Chance to Behead, 10% Resist Silence, 20% Holy/Dark Defense

Mirror Ghost:
Level 18 (30%) - Summon Judgement*, Mind Crush*, Imitate, Counterattack, Swallow Killer, Last Stand, Spell (Makaracha), Restore, 3 Actions Per Turn, 50% Chance to Confuse, 10% Chance to Drain, 80% Status Recovery, Immune to Sleep/Poison/Paralysis/Silence/Confuse/Charm, 90% Resist Behead, 50% Resist Petrify, 300% All Element Defense

Unicorn:
Level 18 (80%) - Spells(Enterook Mista, Latasif, Robukand), 16hp Turn Recovery, 50% Status Recovery, 10% Chance to Behead, Immune to Petrify, 100% Holy Defense, 20% Fire/Water/Thunder/Dark Defense

Geed (Quest):
Level 18 (100%) - Brace, 2 Actions Per Turn, 2% Chance to Paralyze, 50% Holy Attack, 30% Thunder Attack, 25% Resist Confusion, 50% Dark Defense, 23% Fire Defense, 15% Thunder Defense, 10% Holy Defense, 3% Water Defense

Sign:
Level 20 (50%) - Spells(Ziakal, Ziakalad, Pomedoon), 16hp Turn Recovery, 70% Resist Paralyze/Charm/Petrify, 20% Resist Sleep/Poison/Silence/Confuse/Behead, 300% All Element Defense

Manhunter:
Level 21 (50%) - Vigilance, Pursuit, Swift Attack, Thief Skills, 2 Actions Per Turn

Nerve:
Level 22 (50%) - 5 Actions Per Turn, 17hp Turn Recovery, Immune to Paralyze/Confuse/Charm/Petrify/Behead, 300% Holy Defense, 200% Dark Defense

Bicorn:
Level 22 (80%) - Nightmare*, Unclean Earth*, Group Attack, Stronghold, Spells (Argeiss, Razefeis, Ramialf), 44hp Turn Recovery, 20% Chance to Behead, Immune to Petrify, 50% Status Recovery, 10% Resist Behead, 200% Dark Attack, 300% Dark Defense, 30% Fire/Water/Thunder/Holy Defense

Lamia (Quest):
Level 23 (80%) - Restore, Spells(Stoma, Rastoma, Tashif, Robukand), 2 Actions Per Turn, 27hp Turn Recovery, 30% Chance to Petrify, 5% Chance to Poison/Charm, Immune to Confuse/Charm, 50% Status Recovery

Demon Fox:
Level 23 (80%) - Mind Crush*, Holy Breath, Spells(Ziakalad, Rastoma, Feireed), Restore, 20hp Turn Recovery, 2 Actions Per Turn, 100% Thunder Attack, 40% Status Recovery, 95% Resist Paralysis/Charm/Petrify, 30% Resist Sleep/Poison/Silence/Confuse/Behead, 30% All Element Defense

Wyvern Elemental:
Level 23 (90%) - Holy Breath, Restore, 3 Actions Per Turn, 50% Status Recovery Rate, 90% Resist Paralysis/Charm/Petrify, 50% Resist Sleep/Poison/Silence/Confuse/Behead, 90% Holy/Dark Defense

Firefly:
Level 24 (90%) - Barrier, Tackle, Holy Breath, Spells(Ziakalad, Rafeireed), Treatment, Stronghold, Hand of Kindness, Restore, 2 Actions Per Turn, 50% Chance to Silence, 80% Status Recovery, 90% Resist Paralyze/Charm/Petrify/Behead, 75% Resist Sleep/Poison/Silence/Confuse, 200% Dark Defense

Rainbow Dragon:
Level 24 (90%) - Barrier, Holy Breath, Spells (Hallobukan, Robukand, Rafeireed, Zeo Nadar), 35hp Turn Recovery, 30% Status Recovery, 90% Resist Paralysis/Petrify/Drain, 50% Resist Charm, 20% Resist Sleep/Poison/Silence/Confuse/Behead, 100% Holy Defense, 75% Dark Defense

Edelite (Quest):
Level 24 (100%) - Spells (Ramisama, Ziakal, Rabalad, Ziakalad, Enterook Mista, Zefeifus, Feireed, Rafeireed), Identification, 2 Actions Per Turn, 200% Thunder Attack, 80% Status Recovery, Immune to Behead, 90% Paralyze/Charm/Petrify, 75% Sleep/Poison/Silence/Confuse, 200% Thunder Defense

Nagu FLOOR MASTER (Boss):
Level 24 (100%) - Magic Essence, Restore, Armor Break, Spells (Robuti, Stoma, Argeiss, Hallobuti, Rastoma, Skorekh, Orath, Lascorek), 2 Actions Per Turn, 2% Chance to Petrify, 50% Status Recovery, 90% Resist Behead, 40% Resist Paralysis/Petrify, 30% Resist Sleep/Poison/Silence/Confusion/Charm, Special Resistance Up 14.7%, 50% Fire/Water/Thunder Defense

Mimic:
Level 30 (90%) - Strange Miasma Wave*, Swift Attack, Vigilance, 2 Actions Per Turn, 50% Chance to Poison, Immune to Behead, 70% Resist Paralysis/Charm/Petrify, 20% Resist Sleep/Poison/Silence/Confuse, 100% Dark Attack, 80% Status Recovery, 50% Dark Defense
OPTIONAL: Afum Zar Light Cave Notes
The gimmick of this cave is that some places are a little darker than others, which is unaffected by Erod/Eroma. It isn't too hard to see though. Just pay attention to any giant black spots on the walls, since those are likely to be staircases down. B1 is deceptively easy, so don't let your guard down too much.

You probably have the "Gold-eating Monster" quest mentioned in the Rosslie Ruins Notes. When you are ready to finish it, go to Dondun's Tavern and Talk with the Recruiting man. Choose Yes -> To Afum "Zakir" Cave and you will be automatically taken to B1 of the Afum Zar Light Cave with the Man in your party. He has decent equipment and is AI controlled, just like a normal Summon creature. You can use him to explore the entire cave (except the Locked Door in B1), open treasure, and even fight the Floor Master if you want. When you are done exploiting him, head to the Locked Door in the northeast portion of B1 at (16x,19y) and the Man will call out to his friends on the other side, even if he is Paralyzed, Petrified, or dead, which unlocks the door and makes him leave your party. If you have a Summoner you can, and should, use your Contracts now. Go through the door and into an ambush by Geed, accompanied by two Phantoms and three Barbarians (Thief type). Geed has a lot of equipment on him, so consider Stealing some of it if you have a level 26+ Thief. Defeat them and explore their hideout until you find their treasure stash (19x,17y), which gets you 5,000gp, an Unidentified Junk (Illusion Drop), an Unidentified Leather (Hunter Guard), and a completed quest.

The Floor Master, Nagu, wanders around the first floor. When it gets close you will "feel a malicious presence," and it will actively try and seek you out, even if it cannot reach you, until you get out of its range. It has no specific territory, walks through doors, sometimes it will stop for a few turns, and it will also take an extra step every once in a while, so try and be aware of its location using your map. Unlike most Floor Masters, you actually want to fight this one now, which is the goal of this dungeon. It hits very hard, and has Magic Essence (Spell Penetration) with Mage spells, is strong to Mage elemental spells, and has a 50% Status Recovery rate on top of his resistances, so treat them as you would any other boss. Luckily it does not regenerate HP. When you defeat them it'll give you a little more flavor dialogue and retreat to the floor below, giving you "The Enemy" quest. Repeat this process in each floor, keeping in mind that it gets more aggressive the lower it is. When you defeat it in B4, Nagu will cry out the familiar name of its master as it crumbles. Your party will search the remains and find an Unidentified Hammer (Entrei), finishing the quest. If Nagu proves to be a little too hard for you, avoid it and continue to explore the Cave until you have gained a few levels.

There is a floating, glowing ball of light in B2 (8x,9y). Unlike the others in this dungeon that do not react to touch, this one does. Say Yes when prompted to battle Edelite. Defeat it for a <Key Item>Glowing Pot and the "Mysterious Shining Pot" quest. Now you can approach the glowing balls of light found at B1 (3x,2y), B2 (10x,18y), B2 (3x,2y), B3 (10x,8y), B3 (16x,5y), B4 (14x,1y), and B4 (13x,18y) to suck them into the pot. When they are all collected the light inside forms into an Unidentified Talisman (+2 Light Seal) and the quest is complete.

If you have the "Cracked Sphere" quest, go to B3 (5x,16y) to find a Lamia with a missing eye. Approach her and she will attack. After defeating her, you note that her eye reminds you of the Cracked "white" Orb. Your party will show it to her and with a little conversation she will pluck out her remaining eye and hand it to you, begging you to give it to the sick child back in Lohagra Temple. Do so, with the <Key Item>Monster's Eye in hand. When you give it to the Man with Child his son will calm and he will give you a +2 Dark Seal as a reward, completing the quest.

The Flora Tablet can be found randomly on B4. Like every Tablet before it, pick it up if you are interested in post game. B4 is significantly harder than the other floors, with enemies that can easily wipe your party if you have low levels, so be careful as you wander around.

Another thing you can find randomly as you walk around B4 is a boulder with some Shining Ore on it. Use your Pick to loose the stone for <Key Item>Meldoa Ore. Take it all the way back to Ishmag and present it to the Skilled Blacksmith in Jadgebol Shoppe. He'll be a tad disappointed, but says that he will make something out of it. Return to him after three days have passed (resting at the Inn/exiting/repeating 3 times, or going to and from a dungeon works) and he will give you a Plate Armor. We still have two more Ore to find, so the quest is not complete yet.

The last thing to mention is that there is a special event at B4 (19x,13y) where something flashes on the ground. Say Yes to pick it up and you will be attacked. The battle always seems to be against 3 Rainbow Dragons, but that could be a coincidence. Win to claim an Unidentified Talisman (Purify Charm).
Potential Afum Zar Light Cave Loot
Loot marked with a * was found by Vino and the JP Wiki.

TRAPS
Rockslide
Poison Needles
Magic Drain
Poison Gas
Bomb
Spell Blaster
Cleric Blaster
Ghost Swarm
Cobra Curse
Demon Eye
Treasure Chest
Counter-Punch
Teleporter

AFUM ZAR LIGHT CAVE B1
? Sword = Longsword, Rusty Longsword, Innocent Sword
? Katana = Tachi, Oboro
? Spear = Spear, Yashahime
? Bow = Longbow, Raging Bow
? Club = Flail, Confusion Club*, Furious Cudgel
? Mace = Morning Star, Confusing Mace
? Weapon = Meteor Spindle, Battered Kunai, Tasram
? Whip = Iron Whip, Entwined Whip, Ringschutesher
? Staff = Staff, Ruin Rod
? Armor = Plate Armor
? Shoes = Plate Leggings, Dwarven Leggings
? Material = Elvish Iron, Millstone
? Junk = Star Fragment, All-Purpose Herb, Magic Herb, Kagura, Captivating Lute

AFUM ZAR LIGHT CAVE B2
? Sword = Hundred Sword
? Axe = Savage Axe
? Mace = Skull Crusher, Smasher Mace
? Club = Quenstene
? Spear = Demon Spear
? Katana = Kogarasu Katana, Crow Goblin
? Shield = Beastbone Shield, Fairy Shield
? Helm = Electric Cap, Kabuto
? Gauntlet = Fairy Gloves, Knight Gauntlets
? Leather = Tough Leather Armor*
? Armor = Knight's Armor
? Plate = Ashigaru Armor
? Robe = Fairy Robe
? Shoes = Fire Shoes, Dwarven Leggings
? Belt = Bat Belt, Innocent Belt
? Cape = Silver Cloak, Innocent Cloak
? Junk = Star Fragment, Marquis Knife

AFUM ZAR LIGHT CAVE B3
? Sword = Executioner's Sword, Flamberge, Bario Sword
? Axe = Bone Axe, Giant's Axe, Dwarven Halberd
? Hammer = Mill Hammer, Blood Hammer
? Katana = Monohoshizao, Neck Splitter, Kogitsune
? Spear = Ice Devil's Spear, Spiral Spear, Cursed Spear
? Bow = Fairy Bow*, Ghostly Bow
? Weapon = Bandage, Needle Vambrace, Hawk Talons
? Whip = Fanged Serpent
? Staff = Brahma-Deva
? Shield = Fairy Shield
? Armor = Knight's Armor
? Robe = Fairy Robe
? Shoes = Dwarven Leggings
? Cape = Innocent Cloak
? Material = Elvish Iron, Sensolite
? Junk = Moon Fragment, All-Purpose Herb, Magic Herb, Captivating Lute, Fissure Drums

AFUM ZAR LIGHT CAVE B4
? Bow = Magician's Bow
? Weapon = Kunai, Hawk Talons
? Whip = Fairy Whip
? Book = White Scriptures, Black Scriptures, Oldest Book
? Shield = Beastbone Shield, Knight Shield, Goddess Shield
? Talisman = (+1) Light Seal
? Helm = Electric Cap
? Gauntlet = Power Glove, Fairy Gloves, Ragged Gauntlets, Ninja Gauntlets
? Mail = Ice Mail, Cursed Chainmail, Elven Chainmail
? Leather = Tough Leather Armor
? Shoes = Tough Leather Shoes, Battered Leather Shoes, Woodsman's Boots
? Belt = Dirty Obi, Bat Belt, Tiger Loincloth, Warrior's Black Obi
? Cape = Silver Cloak
? Talisman = (+1) Light Seal
? Material = Devil Iron, Elvish Iron, Vectorium
? Junk = Moon Fragment, Magic Herb, Captivating Lute, Fissure Drums*, Puppet Maracas*

THIEF EQUIPMENT STEALS (LEVEL 26+)
Dagger = Barbarian (Thief Type/Quest)
Palindroma = Barbarian (Fighter Type)
Lightning Sword = Rogue, Geed (Quest)
Mace = Arch Priest, Arch Bishop
Ice Devil's Spear = High Valkyrie
Ghostly Bow = Manhunter
Tasram = Geed (Quest)
Evil Bascinet = Geed (Quest)
Elven Chainmail = Geed (Quest)
Mantis Gauntlets = Geed (Quest)
Holy Leggings = Geed (Quest)
Griffin Cloak = Geed (Quest)
+1 Lightning Charm = Geed (Quest)
Azoth Dagger = Master Alchemist
Trickster's Rod = High Sorceress, Phantom (Quest)
FOUR SKULL DUNGEONS
Preparing for Uhlm Zakir Hall
You can start this dungeon around levels 16-18, but you will probably want to be 23-25 by the time you reach the last floor for an easier time. If you have any character that has the Curse EX Skill, you will be able to read the books in F1 and F2. They will fill you in on some of the game's lore, but it is not required. Magic heavy parties will struggle a bit in B3, so you might want to make a party that leans toward physical damage equipped to deal with back row enemies should the need arise. A Servant will really shine on the last floor, so consider bringing one. Bard and Shaman, with their Instrumental skill, can also be quite handy. Bring along curative items when you get to the lower basement floors, if you haven't been taking them along already. As always, bring someone with Stronghold or Tackle if you don't want to deal with Draw or too much Turn Recovery, though you should be able to deal with both effectively by now.

For the sake of brevity, I won't be making a long list of anything you haven't already seen a lot before. Check the quick enemy reference below if you want specifics. You will probably want to bring a Bone Slippers while you explore B3 if your levels are low, unless you are a save scummer, since there are circumstances where your party will wipe and there is nothing that you can do about it; One example is Hidden groups of Master Ninjas slowly Beheading your party when you cannot cast Ramialf, and your party members are having trouble escaping. There are quite a few Ghost enemies, so make sure you have the means to damage them. You will want someone who can cast Sosario if you want the fastest path to access the basement, but there is a way around it. More enemies, including the boss, will start using Zeo Nadar; be very careful with how many spells you cast in battle. Unholy Ringer's Bells of Judgement, a new ability, will wipe your party after three turns pass, so either finish those battles quickly or run with Mahamaha.

If you have a Summoner, you might want to give Dullahan a look. She is Immune to two types of Instant Death (Spell Penetration aside) and comes with a Beheading chance of her own, with only a 50% resistance to Contract. She's a great candidate for a Spirit Pact Fighter. Dragonfly is a good choice if you are looking for a Ninja with a decent chance to Charm and Behead on hit, also with a 50% resistance to Contract. There is also Master Ninja, 50% again, that has a better chance to Behead than Dragonfly and a broader range of ailments that he can inflict (10%), but he also comes with Self-Destruct which is either good or bad, depending on what you want. Ghost Priestess isn't an amazing choice, but most enemies with a lot of Cleric Spells have a high resistance to Contract and she has only 30%. Not bad if you are looking for an easy Contract with healing capabilities.
Uhlm Zakir Hall Maps


Click the thumbnails for the full sized maps. They are listed in order, with F2 at the top and B3 at the bottom. The entrance is found on F1, which is the second map from the top.

On B3 I only routed out one of the southern most doors and its switch, since doing both is optional. The paths to the northeast switches go around the Floor Master's territory, which is not the fastest way to reach the switch at (19x,19y) from the switch at (19x,9y) or vice versa. If you want to deal with the Floor Master's pathing you can take a more direct route up or down the far right side of the map.
Uhlm Zakir Hall Enemies
Colossal Roach:
Level 3 (30%)

Mork Cricketer:
Level 5 (30%) - Draw*

Golem:
Level 8 (30%) - Brace, 50% Resist All Spell Schools, 50% All Element Defense, 50% Resist Poison/Paralysis/Silence/Confusion/Charm, Immune to Petrify/Behead

Beast:
Level 10 (30%) - 20% Chance to Poison, 6hp Turn Recovery, 50% Status Recovery, 20% Resist Poison

Bistola:
Level 10 (95%) - Spells (More than I care to list), 95% Dark Defense

Vampire (Quest):
Level 17 (30%) - 10% Chance to Drain, Immune to Drain, -50% Weak to Holy

Homunculus:
Level 18 (30%) - Starts with Poison, Spells (Glass, Maglass, Raglass)

Ultimate Flyer:
Level 18 (30%) - Summon*, 14hp Turn Recovery, 90% Resist All Ailments (Does not include Behead)

Ghost Mage:
Level 18 (30%) - Mage Spells (More than I care to list), Immune to Drain, 100% Dark Defense, -50% Weak to Holy

Dragonfly:
Level 18 (50%) - Vigilance, Thief Skills, Surprise Attack, 2 Actions Per Turn, 35% Chance to Charm, 25% Chance to Behead, 5% Chance to Sleep/Poison/Paralyze

Nine-Eyes:
Level 18 (60%) - Group Attack, Spells(Rabalad, Argeiss, Hallobuti, Feireed, Orath, Yuniwa Coat, Rapoolfei, Pendeku, Zeo Nadar), Forging, 2 Actions Per Turn, 5% Chance to Confuse, 20% Dark Attack, 50% Resist Behead, 30% Resist All Ailments, 20% Dark Defense

Unholy Ringer:
Level 18 (90%) - Draw*, Bells of Judgement*, Spells(Rafelima, Feireed), Dispel, Soul Release

Room Guard (Event):
Level 18 (100%) - Spells(Rapinto, Rapidos, Zeo Nadar), Forging, Transmutation, 20% Resist Silence/Confuse

Book Guard (Quest):
Level 18 (100%) - Weapon Break, 4 Actions Per Turn, 30% Status Recovery, 200% Fire/Water/Thunder/Holy Defense, 80% Dark Defense

Septopod:
Level 19 (30%) - 2 Actions Per Turn 5% Chance to Sleep, 5% Resist Sleep

Gallery Knight:
Level 19 (30%) - 10% Chance to Paralyze

Gallery Beast:
Level 19 (30%) - 10% Chance to Confuse

Poltergeist (Human form, not Ghost-sheet form):
Level 19 (30%) - Immune to Drain, 100% Dark Defense, -50% Weak to Holy

Ghost Priestess:
Level 19 (30%) - Cleric Spells (More than I care to list), Immune to Drain, 100% Dark Defense, -50% Weak to Holy

Ghost Valkyrie:
Level 19 (30%) - Spell(Rafeireed), Immune to Drain, 100% Dark Defense, -50% Weak to Holy

Fendez-Vous:
Level 19 (50%) - Stronghold, 40% Status Recovery, 50% Resist Poison/Paralysis, 20% Dark Defense, -50% Weak to Thunder

Fallen Angel:
Level 19 (95%) - Strange Miasma Wave*, Spells(Rabalad, Raglass, Ziakalad, Enterook Mista, Zeo Nadar), Weapon Break, 10% Chance to Behead, 10% Resist All Ailments/Behead, 100% Holy/Dark Defense

Ghost Chieftain:
Level 20 (30%) - Thief Skills +1, Immune to Drain, 100% Dark Defense, -50% Weak to Holy

Dullahan:
Level 20 (50%) - Last Stand, Restore, Spell(Rafeireed), 16hp Turn Recovery, 15% Chance to Behead/Drain, 200% Dark Attack, Immune to Behead, 40% Status Recovery, 300% Dark Defense

Mill Burner:
Level 21 (30%) - Summon*, Brace, Curse, Song of Destruction, 20% Chance to Drain, Immune to Drain, 100% Dark Defense

Goblin Magician:
Level 21 (50%) - Find Treasure, Spells(Ravenom, Rabalad, Raglass, Ziakalad), -1hp Turn Recovery (yes, it hurts them), 3% Chance to Petrify, 1% Chance to Behead, 25% Resist Silence, -20% Weak to Fire/Water/Thunder

Greater Homunculus:
Level 22 (30%) - Weapon Break, Armor Break, Spells(Glass, Maglass, Raglass), 10% Chance to Poison/Confuse, 60% Resist Petrify, 30% Resist Poison/Confuse, 85% Dark Defense

Chanter Lead:
Level 22 (80%) - Tarot, Spells(Ramisama, Hallobuti, Rarood, Makaracha), Thief Skills, Instrumental, 5% Chance to Silence, 30% Status Recovery

Chimera:
Level 22 (80%) - Strange Miasma Wave*, Fire Breath, Spells(Skorekh, Orath, Yuniwa Coat, Zeo Nadar), King's Proof, Restore, 19hp Turn Recovery, 3 Actions Per Turn, 5% Inflict All Ailments/Behead, 30% Status Recovery, 30% Resist All Ailments (Does not include Behead), 30% All Element Defense

Yokmongy (Quest / Normal enemy in B3):
Level 22 (90%) - Tarot, Curse, Shout, Song of Destruction, Restore, Confusion Breath, 44hp Turn Recovery, 2 Actions Per Turn, 50% Chance to Confuse, 5% Chance to Behead, 80% Status Recovery, Immune to Confuse, 90% Resist Paralysis/Charm/Petrify/Behead, 75% Resist Sleep/Poison/Silence, 200% Dark Defense, 100% Holy Defense, -100% Weak to Fire

Lamia:
Level 23 (80%) - Restore, Spells(Stoma, Rastoma, Tashif, Robukand), 2 Actions Per Turn, 27hp Turn Recovery, 30% Chance to Petrify, 5% Chance to Poison/Charm, Immune to Confuse/Charm, 50% Status Recovery

Joker:
Level 23 (80%) - Mage Spells(Rabalad, Raglass, Ziakalad, Feireed), King's Proof, Restore, 2 Actions Per Turn, 30% Status Recovery, 20% Resist Petrify

Gran Nada:
Level 23 (90%) - Spells(Ziakalad, Feireed, Zeo Nadar), 2 Actions Per Turn, 20% Chance to Paralyze, 20% Resist All Ailments/Behead

Incubus:
Level 23 (95%) - Draw*, Mind Crush*, Soul Trap*, 50% Chance to Charm/Drain, 30% Status Recovery, 95% Resist Charm, 100% Dark Defense

Master Ninja:
Level 24 (50%) - Self-Destruct, Vigilance, Thief Skills, Surprise Attack, 2 Actions Per Turn, 30% Chance to Behead, 10% Chance to Sleep/Poison/Paralysis/Silence/Confuse

Succubus:
Level 24 (95%) - Draw*, Mind Crush*, Spells(Misama, Ramisama, Pinto, Rapinto, Rapidos, Zeo Nadar), 50% Chance to Charm/Drain, 30% Status Recovery, 95% Resist Charm, 100% Dark Defense

Uhlm Zakir (Boss):
Level 26 (100%) - Inhale*, Soul Trap*, Spells (Enterook Mista, Hallobukan, Mirror Eyes, Elnam, Rapinto, Zeo Nadar), Dispel, Restore, 143hp Turn Recovery, 2 Actions Per Turn, 10% Chance to Charm, 100% Dark Attack, 30% Status Recovery, 90% Resist Paralysis/Confuse/Charm/Petrify, 50% Resist Behead, 30% Resist Sleep/Poison/Silence, 100% Dark Defense, 50% Holy Defense, 20% Fire/Water/Thunder Defense

La Flaneuse (Quest):
Level 28 (90%) - 22hp Turn Recovery, 2 Actions Per Turn, 30% Chance to Drain, 5% Chance to Charm/Confuse, 100% Dark Attack, Immune to Drain, 90% Resist Petrify, 20% Resist Sleep/Poison/Paralysis/Silence/Confuse/Charm/Behead, 100% Dark Defense

Immortal:
Floor Master - DO NOT ENGAGE
Uhlm Zakir Hall Notes
The objective in this dungeon is to access the basement and get to the boss. The upper floors are not very hard. In fact, I would say they are easier than Rosslie Ruins, but the basement kicks it up a notch, so be prepared.

At F1 (11x,10y) Lord Alli Kai asks you to find a Red-Leather Bound Book on F2, hands you the <Key Item>Western-style Key, and kicks you out of the room. Every locked door on F2 can be opened with this key. The book you are looking for is at F2 (17x,14y), where a Seated Figure is resting in a study. State your business and it will reveal itself as a Book Guard and attack you. The Book Guard absorbs all elements except for Dark, which it is fairly resistant to, so watch what you attack it with. When you defeat it you get the <Key Item>Red Leather-bound Book. Take it all the way back to Alli Kai and he fills you in on more of the story in the third cutscene of the game, orders you to decend to the basement to do what needs to be done, then leaves. Once you take the nearby staircase down, you've taken your first steps into end game.

While you are on F2, there are a few events where you can battle for some unidentified items. Not required, but every little bit helps. Also, if you haven't done this already, the Soldier at F2 (10x,3y) will unlock the Rosslie Ruins for you.

At F2 (8x,16y), you will come across a Battered Doll that you cannot pick up. This starts the "Broken Doll" quest. Head through the doors a little further to (10x,18y) and you will find the Doll again. Go to the main hall of F1 to find it there as well (9x,5y). Now go to F2 (18x,18y) and fall down the trap chute back to F1 (Cancel Sosario by casting it again if it is active). Make your way south, then west to (11x,0y) to find the Doll hanging on the wall. Finally, go back upstairs to a locked door at F2 (14x,10y). Unlock it with the Western-style Key and enter the tiny room to discover the Doll once again, which will attack. Destroy the Yokmongy and it will drop an interesting Unidentified Weapon (Bitto), finishing the quest.

There is a place where you can Mix potions in B1 (10x,17y) that is useful if your only Servant-type character is a Contracted enemy, since you cannot use them in town. Something to keep in mind if you have a Summoner.

While exploring B1, your party will randomly feel a strange presence and turn around to look. This starts the "Eerie Presence" quest. After a few similar events to build dramatic tension, which will also occur in lower floors so you cannot outrun them, your party will finally see the monsters that have been stalking them (the 5th event): two Vampires and a La Flaneuse. Protect your levels with Psi Drain and defeat them, completing the quest.

Also, in B1 through B3 you will find a lot of altars with corpses on them. Searching them can sometimes get you items or battles. I recommend checking them out if that interests you, especially the one at B1 (7x,3y) which has some medicine that can come in handy later.

At B2 (1x,8y) you will find a table with experimental equipment, barrels filled with an unknown liquid, and a corpse covered in the same substance. Your party will see a man pouring out this liquid nearby. Approach the man (Yes) and he will ask you if you want to be a test subject, then attacks. Defeat the Fallen Angel and two Chimeras, sometimes with 2-5 Greater Homunculus as well, and your party will notice a shining medicine, which turns out to be the <Key Item>Priest's Medicine. You now have a choice to make. You can give it to the Wealthy-looking man in Dondun's Tavern for 40,000gp, or the Impoverished-looking man in Lohagra Temple for 9 First Love Flowers to finish the "Cure-all Medicine" quest. You can follow up with whoever you did not give the Medicine to, but it doesn't make a difference.

B3 has a new trap tile, which Silences and wipes all magical buffs from your party while you are traversing them. If you have heavily relied on magic up to this point this part might prove to be pretty difficult, so be careful. You can cast Diomente to warp onto a Silence tile if you are standing on a regular tile, so if you need to walk to safety you can get back to where you were relatively quickly. You can also use High Portal to open treasure and, as said all the way back in Tsun-Kurn, Silence does not effect Breath attacks, nor does it effect Instruments. There are also Pit traps, which are easy to avoid by only stepping in front of doors or on altars whenever you are in a 2x2 room.

The Iris Tablet is found on B3. As with every Tablet before it, it is random where you find it. Try to get it if you are interested in post game, which is only a few dungeons away.

The Floor Master, Immortal, also in B3 and walks clockwise around a small one square cubby, which it also walks into, in the northeastern section of the dungeon. It does not chase, so just be careful when you are near its territory and you should be fine.

To get to the boss, you must press 7 of 8 switches, 1 to open one of the south-most doors (the other is optional) and 6 to open two doors leading to the center of the floor. When you are able to pass through the double doors, you will enter a large, dark room with an altar, carved with the visage of an evil god. Your party will see someone praying before it, and you will be asked if you want to "approach the hole." Choose Yes and they will slowly step forward and into another cutscene, after which you will be thrust into a battle against Uhlm Zakir himself, usually accompanied by Jokers, or Succubus and Incubus.

You probably want to kill the Jokers and/or Succubus and Incubus as soon as you can. Besides the elemental spells they can cast, Jokers can heal the boss for quite a bit of HP. I probably don't have to tell you how dangerous Succubus and Incubus can be. Uhlm Zakir can be a pain to deal with at lower levels even without any extra minions, with Inhale, Soul Trap, and a number of Spells at his disposal, including spells that heal status effects if you try and subdue any additional enemies that way. He has 143 Turn Recovery, so you have to deal some decent damage each turn to keep up with it if you don't have Tackle. He is fairly resistant to most status effects, which includes Confuse and Charm, so stick with Sleep, Poison and Silence if you want to bother. At lower levels, you will want to raise his AC with Robuti and maybe up your attack frequency with Orath a few times so you can get some decent hits in. If you have a physical focused party you should be able to take him down quickly. That said, be very careful about the number of spells you cast during the fight, since he (and Succubus) can use Zeo Nadar. On the plus side, you can also use it against him if you can cast it yourself, or you can cast Ramialf to bring the damage down to managable levels if you are willing to sacrifice your buffs. Servants, with their Treatment ability, really shine in this fight. If you are struggling, give one a try.

After Uhlm Zakir is defeated, touching the glowing circles at the north end of the room will teleport you out of the dungeon.
Potential Uhlm Zakir Hall Loot
TRAPS
Rockslide
Poison Needles
Magic Drain
Poison Gas
Bomb
Spell Blaster
Cleric Blaster
Ghost Swarm
Cobra Curse
Demon Eye
Counter-Punch
Treasure Chest
Teleporter


UHLM ZAKIR HALL F1
? Mace = Evil Mace, Skull Crusher, Magic Blue Club
? Talisman = Dark Seal
? Shield = Bent Shield, Holy Guard, Mithril Shield
? Helm = Worn Helm, Phantom Mask, Kabuto, Evil Bascinet
? Cap = Torn Hat, Electric Cap, Ghost Crown
? Gauntlet = Old Gloves, Virtue Gauntlets, Mantis Gauntlets
? Material = Millstone
? Junk = Star Fragment, Horn of Surprise, Harp of Sleep, Kagura

UHLM ZAKIR HALL F2
? Weapon = Broken Tomahawk, Ice Tomahawk
? Shield = Beastbone Shield, Bario Shield, Innocent Shield
? Leather = Tough Leather Armor, Rotten Leather Armor, Hunter Guard
? Robe = Cursed Robe, Fairy Robe, Ninja Suit
? Shoes = Bone Leggings, Holy Leggings, Hope Greaves
? Ring = Rusted Ring, Sacred Tree's Ring, Diamond Ring
? Ankh = Ankh of Speed
? Material = Devil's Lapis, Millstone
? Junk = Star Fragment, Moon Fragment, All-Purpose Herb, Magic Herb, Harp of Sleep, Horn of Surprise, Kagura

UHLM ZAKIR HALL B1
? Katana = Heshikiri Hesebe, Kogarasu Katana, Dawn Sword
? Shield = Rusty Shield, Fairy Shield, Ghost Shield
? Gauntlet = Damaged Gauntlets, Holey Gloves, Knight Gauntlets, Magical Gloves, Mithril Gauntlets
? Cape = Heavy Cloak, Silver Cloak, Diamond Colony
? Ring = Sacred Tree's Ring
? Material = Devil's Iron
? Ankh = Ankh of Speed
? Junk = Moon Fragment, All-Purpose Herb, Harp of Sleep, Horn of Surprise, Kagura

UHLM ZAKIR HALL B2
? Bow = Composite Bow, Magician's Bow, Exorcist's Bow
? Plate = Cracked Breastplate, Ashigaru Armor, Mithril Plate
? Shoes = Fire Shoes, Glass Slippers
? Cape = Frost Cloak, Corrupted Cloak, Griffin Cloak
? Belt = Short Belt, Power Belt, Innocent Belt
? Ring = Rusted Ring
? Ankh = Ankh of Speed
? Junk = Moon Fragment, All-Purpose Herb, Harp of Sleep, Horn of Surprise, Kagura, Rusty Dagger, Quick Dagger, Magic Herb

UHLM ZAKIR HALL B3
? Sword = Blunt Sword, Beastbone Blade, Lightning Sword
? Axe = Rusty Handaxe, Savage Axe, Elven Axe
? Club = Onbei, Confusion Club, Deck Cudgel
? Whip = Fairy Whip, Ancient Ivy
? Cap = Magician's Hat
? Belt = Bone Belt, Bat Belt, Champion's Belt
? Cape = Torn Cape, Crescent Cloak, Innocent Cloak
? Material = Vectorium, (+1) Elvish Iron
? Junk = Moon Fragment, Sun Fragment, All-Purpose Herb, Harp of Sleep, Horn of Surprise, Captivating Lute, Kagura, Puppet Maracas

THIEF EQUIPMENT STEALS (LEVEL 26+)
Dagger = Ghost Chieftain, Joker
Marquis Knife = Joker
Longsword = Poltergeist
Blunt Sword = Gallery Knight
Executioner's Sword = Mill Burner
Ogre Sword = Mill Burner
Death Scythe = Dullahan
Crow Goblin = Dragonfly
Dancing Katana = Master Ninja
Kunai = Dragonfly
Hitode Shuriken = Master Ninja
Mace = Ghost Priestess
Havoc Hammer = Nine-Eyes
Lance = Ghost Valkyrie
Describer = Goblin Wizard
Horn of Surprise = Chanter Lead
End Game Intermission
When you are finished with Uhlm Zakir Hall, head to Ishmag Castle and Arrange Meeting with the King. After several explanations about what is going on and what to do about it, the King orders an investigation of the Royal Tomb and Ishmag Underground Sanctum, unlocking both for you to explore. This completes the "Shinto Estate Investigation" quest and gives you "Underground Temple Investigation."

Go to Hosbarn Inn and the Innkeeper will call you over for the third time, asking for Steel in exchange for more storage space which gives you the "Strong Steel" quest.

There is one more non-post game dungeon to open, but it will be unlocked in the Sanctum so don't worry about it for now. Of the two dungeons just unlocked, Ishmag Underground Sanctum leads to the end of the game, so keep that in mind when choosing where to go next.
OPTIONAL: Preparing for Royal Tomb
For levels, late teens to early 20s will do just fine. You probably want to be at least in the mid 20s by the time you finish the dungeon for the easiest time. You need a Servant (handy in Silence zones) or a Summoned creature with Herbalism for a quest. There is a treasure loot item that needs to be identified for a quest so a Bishop can be handy, but you can always exit and use Jadgebol Shoppe's services instead. There are Silence tiles here, so you might want to form a physical-focused party and bring along curative items just in case. If you have a Valkyrie, there are several excellent Spears to be found in the loot table, so it may be worth it to farm for treasure a bit. There are also some great cursed weapons for a Brawler if they are Devlish and/or if you can deal with/Forge away the curse/bad effects.

As for things to look out for, there is nothing in this dungeon, other than the Floor Master gimmick covered in the Notes Section, that you have not seen before. You can check the enemy list if you are worried, but if you have reached this point in the game you shouldn't be having much difficulty beyond the usual randomness. Just keep working on your gear/Forges as usual and you should do fine. Resistance to Behead is particularly useful here.

If you have a Summoner you can pick up a Ghost Herbalist with only a 30% resistance to Contract on the first floor, which can fulfill the Herbalism requirement for a quest. If you are in the market for a Ninja, Ninja Ghost has a whopping 44.7% chance to Behead, also only a 30% resistance to Contract. You might also want to take a look at Nue, found on 3F (also in Nga-Nga). It is a really strong pick, but it comes with the downside of being 80% resistant to Contract (could be worse!). If you want to put in the time to get one, potentially an annoying task considering its resistances to status effects and great recovery, it makes an excellent Spirit Pact Samurai.
OPTIONAL: Royal Tomb Maps


Click the thumbnails for the full sized maps. The maps are listed by height and direction, though Steam Guide restrictions makes it so 1F East and 2F West do not line up perfectly according to how you traverse them. 1F West, with the entrance, is the bottom left hand map.

F1 West is a little crowded in the lower left hand corner, and the directional warps are difficult to read. I apologize for that, but I am not creative enough to come up with a better solution while still retaining the information. I put a text desciption of how to navigate it in the Notes Section if it is too hard to make out on the map.

For the map of F2 East (and every map past it), I did not have enough room to list every single thing on the map via text, so I left out Coffins that only contain a Mummy. The locations are still marked by the magnifying glass icon though. I chose not to mark any quicksand areas that are not falling traps, even though you do get a description of your party escaping when you touch them, because the maps are busy enough as it is.

For the Map of 2F East I did not have enough room to include several map icons in the map's key, so I left text descriptions instead. I apologize for it being so messy. Missing icons from the map key include Stairs going Up, Landing Spots, Forced Direction Tile (New), and the Colors for the two Switch/Door Circuits. The Circuit Colors are also missing from F3's map key.

For the Circuit puzzle in F2 East and 3F it is technically faster to use Diomente to flip switches in F2 East as you need them, using Diomente to Warp between F2 East and F3 until you have to drop down to the Anti-Warp Zone, rather than walk around. That said, I still chose to route out a walking path on the map for those who prefer that.
OPTIONAL: Royal Tomb Enemies
Dragonfly:
Level 18 (50%) - Vigilance, Thief Skills, Surprise Attack, 2 Actions Per Turn, 35% Chance to Charm, 25% Chance to Behead, 5% Chance to Sleep/Poison/Paralyze

Ghost Valkyrie:
Level 19 (30%) - Spell(Rafeireed), Immune to Drain, 100% Dark Defense, -50% Weak to Holy

Rag:
Level 20 (30%) - Dark Breath, Armor Break, 100% Status Recovery, 5% Chance to Sleep, 5% Dark Attack, 50% Resist All Magic Types (except Summoning), 5% Dark Defense

Grape Pitter:
Level 20 (30%) - Draw*, 20% Chance to Paralyze, 5% Chance to Poison, Immune to Drain, -50% Weak to Fire/Holy

Enchantress:
Level 20 (50%) - Thief Skills +1, 50% Chance to Charm, 10% Chance to Sleep/Paralyze, 80% Resist Charm, 20% Resist Sleep/Poison/Paralysis/Silence/Confuse/Petrify/Behead

Ghost Herbalist:
Level 21 (30%) - Tackle, Treatment, Herbology, Immune to Drain, 100% Dark Defense, -50% Weak to Holy

Ghost Daimyo:
Level 21 (30%) - Mage Spells (Rabalad, Argeiss, Hallobuti, Raglass, Ziakalad, Rastoma, Enterook Mista), Swallow Return (15%), Dual Wielding, Immune to Drain, 100% Dark Defense, -50% Weak to Holy

Golden Right Hand *Unidentified Object in Dark Zone*:
Level 21 (90%) - Draw*, Group Attack, 2 Actions Per Turn, 1% Chance to Inflict All Ailments/Behead/Drain, Immune to Behead/Drain

Death Knight *Armoured Figure in Dark Zone*:
Level 22 (30%) - 8% Chance to Confuse (Main hand only), Immune to Drain, 100% Dark Defense

Dragon Lord *Humanoid in Dark Zone*:
Level 22 (50%) - Fire Breath, Spell (Elnam), Dispel, Special Resistance Up 14.1%, Court Sanctuary, King's Proof, Restore, 28hp Turn Recovery, 5% Chance to Behead, 50% Status Recovery rate, 40% Resist Paralysis, 20% Resist Sleep/Poison/Silence/Confuse/Charm/Petrify/Behead, 50% Fire/Dark Defense

Golden Left Hand *Unidentified Object in Dark Zone*:
Level 22 (90%) - Mind Crush*, Spells (Ramisama, Ravenom, Rastoma, Lascorek, Rapoolfei, Ramialf, Rapidos), 2 Actions Per Turn, 50% Status Recovery, Immune to Behead/Drain

Skull Crown *Skeleton in Dark Zone*:
Level 23 (30%) - Spells (Ramisama, Rafeireed), Cruelty, King's Proof, 2 Attacks Per Turn, Immune to Drain, 50% Resist Confuse/Charm/Petrify, 50% Dark Defense

Maharaja Knight *Kimono-Wearing Man in Dark Zone*:
Level 23 (50%) - Mage Spells (Rarood, Zeo Nadar), Special Resistance Up 14.4%, Court Sanctuary, Status Recovery 40%, 30% Resist Paralysis, 14.4% Resist Sleep/Poison/Silence/Confuse/Charm/Petrify/Behead, 30% Fire Defense

Demon Fox:
Level 23 (80%) - Mind Crush*, Holy Breath, Spells(Ziakalad, Rastoma, Feireed), Restore, 20hp Turn Recovery, 2 Actions Per Turn, 100% Thunder Attack, 40% Status Recovery, 95% Resist Paralysis/Charm/Petrify, 30% Resist Sleep/Poison/Silence/Confuse/Behead, 30% All Element Defense

Sphynx *Strange Lifeform in Dark Zone*:
Level 23 (80%) - Barrier, Swift Attack, Spells (Ramisama, Ravenom, Ziakalad, Enterook Mista, Robukand, Rarood, Skorekh, Lascorek, Makaracha, Yuniwa Coat, Zeo Nadar), Court Sanctuary, Divination, Restore, 20hp Turn Recovery, 2 Actions Per Turn, 50% Holy/Dark Attack, 20% Fire/Water/Thunder Attack, 80% Status Recovery, Immune to Confuse, 90% Resist Paralyze/Charm/Petrify, 40% Resist Sleep/Poison/Silence/Behead, 90% Dark Defense, 50% Holy Defense, 20% Fire/Water/Thunder Defense

Linesman *Kimono-Wearing Man in Dark Zone*:
Level 23 (90%) - Summon*, Draw*, Vigilance, Stronghold, Identification, 90% Resist All Magic Types, Status Recovery 50%, 20% Resist All Ailments/Behead/Drain, 10% All Element Defense

Mask of Desire *Unidentified Object in Dark Zone*:
Level 23 (90%) - Strange Miasma Wave*, Shout, Spells (Rafelima, Rafeireed), Last Stand, Steal, 50% Status Recovery, Immune to Behead/Drain, 50% Resist Sleep/Poison/Paralysis/Silence/Confuse/Charm/Petrify

Ninja Ghost:
Level 24 (30%) - Vigilance, Surprise Attack, Thief Skills, Improved Beheading Rate 14.7%, 44.7%Chance to Behead, Immune to Dark, 20% Resist All Ailments/Behead, -50% Weak to Holy

Tetra Mystica:
Level 24 (30%) - Restore, 2 Actions Per Turn, 50% Status Recovery, Immune to Petrify, 95% Resist Behead, 90% Resist Paralysis/Charm, 40% Resist Sleep/Poison/Silence/Confuse, 100% Dark Defense, 20% Fire/Water/Thunder/Holy Defense

Dark Lord *Armoured Figure in Dark Zone*:
Level 24 (50%) - Spells (Zeifeifus, Razefeis), Dispel, Special Resistance Up 14.7%, Court Sanctuary, 8% Chance to Confuse, Status Recovery 50%, 14.7% Resist All Ailments/Behead, 100% Holy/Dark Defense

Master Minstral *Robed Man in Dark Zone*:
Level 24 (80%) - Tarot, Instumental, Thief Skills, Spells(Ramisama, Hallobuti, Karacha, Makaracha), Song of Healing, Song of Protection, Song of Hope, 5% Chance to Charm (Main hand only)

Nue:
Level 24 (80%) - Nightmare*, Barrier, Lightning Breath, Group Attack, Swallow Return (15%), Weapon Break, Spells (Ziakalad, Zeo Nadar), Holy Physical Attack, Counterattack, Restore, 21hp Turn Recovery, 4 Actions Per Turn, 50% Chance to Confuse, 30% Chance to Sleep/Paralyze/Petrify, 300% Thunder Attack, 200% Holy/Dark Attack, 80% Status Recovery, 90% Resist Sleep/Paralyze/Charm/Petrify, 75% Resist Poison/Silence/Confuse, 30% Resist Behead, 200% Thunder/Holy/Dark Defense

Giro:
Level 24 (90%) - Immune to Drain, 50% Dark Defense, -50% Weak to Fire/Holy

Anphis Baena:
Level 24 (90%) - Paralysis Breath, Restore, 2 Actions Per Turn, 25% Chance to Paralyze, 40% Status Recovery, 68% Resist Paralyze/Charm/Petrify, 26% Resist Sleep/Poison/Silence/Confuse/Behead

Hidden Person:
Floor Master's Invisible Form - NOT ADVISABLE TO ENGAGE IN THIS FORM

Prowling Spirit Floor Master w/ Soul-Removing Mirror:
Level 24 (100%) - Tackle, Swallow Return (15%), Swift Attack, Improved Beheading Rate 14.7%, Brace, 57hp Turn Recovery, 3 Actions Per Turn, 14.7% Chance to Behead, 5% Chance to Sleep(Main hand only)/Paralyze/Drain, 120% Dark Attack, 50% Status Recovery, Immune to Drain, 90% Resist Behead, 20% Resist All Ailments, 200% Holy Defense, 180% Dark Defense, 20% Fire/Water/Thunder Defense

Mimic:
Level 30 (90%) - Strange Miasma Wave*, Swift Attack, Vigilance, 2 Actions Per Turn, 50% Chance to Poison, Immune to Behead, 70% Resist Paralysis/Charm/Petrify, 20% Resist Sleep/Poison/Silence/Confuse, 100% Dark Attack, 80% Status Recovery, 50% Dark Defense
OPTIONAL: Royal Tomb Notes
There are Kiss of the Goddess treasure traps from this dungeon on, which can be used to lower the age of your characters. Open it without removing the trap to take advantage of the effect, but be careful of making your characters too young. You will also have to deal with Silence tiles again. A few enemies in the Dark Zone share the same vague descriptions, so if you want to positively identify them you will have to do so by watching their size, actions, and equipped items, or do it the easy way and catch a glimpse with Fire and Lighting spells. Some of the quicksand tiles here are visual only, with a description of your party escaping. You can find randomized Herbs and Ore on these spots, just like a normal tile.

Coffins in this dungeon can be examined with the Inspect button (F Key) and any battles or traps triggered are repeatable as long as an item is not involved. You can use these battles to grind out EP if you want, though there is a better, but more random and potentially dangerous option in the Sanctum.

The Floor Master can be found on every floor. It is invisible, but your party can sense its approach. It tends to stick to Silence and Dark Zone tiles, but it can wander elsewhere too. When you first come across it, it will be known as Hidden Person. Technically, you can kill it in this form, but it is not advisable to battle as it will regenerate 9,999hp per turn. You will get an item to make it visible later, which makes its Turn Recovery much more manageable, so run away from it for now. Doing so will give you the "Royal Curse" quest.

You will randomly, and frequently, come across a muttering cloaked figure, asking where their sword is. Meeting them gives you "The Beloved Sword" quest. When you identify a Worn Sword, keep it in your inventory and the next time the figure appears they will recognize it, take it from you, and disappear, leaving bones and an Unidentified Sword (Crimson Blade) behind, completing the quest. Even if the quest is finished, you can do this as many times as you want. A Worn Sword sells for 450gp, but a Crimson Blade sells for 18,500gp. If you have a Bishop capable of IDing the Crimson Blade you can make a decent amount of gold by doing the quest multiple times as you explore.

If you have an Herbalist in your party while exploring 1F West you will randomly find a Mummy with a bright red flower growing from it. Take it to get the <Key Item>Flower of Igan. Go to the Plaza in Igdra Village and Talk with the Black-clad man who gives you a Curse Charm in exchange for the Flower, finally completing "The Igan Flower" quest.

Also in 1F West, an Old Man (9x,13y) tells you about a coffin with a slate decorated by an orb. He asks you to tell him what the color of the orb is, giving you the "Ominous Sign" quest. Make your way to 2F East and open a Coffin at (14x,8y) to find out that the color is red. Return to the Old Man and tell him the correct color for a bit of flavor text and a reward of a Moon Fragment and a Sun Fragment. If you tell him it is blue you get nothing.

The map of 1F West is a bit crowded, so if you need help understanding what to do I'll describe it: When you reach (4x,5y) you will see a sign that will tell you to look right (south). Ignore the instructions, look left (north), and take a step forward to (4x,6y) to see another sign. This one tells you to look left (west) and once again you should ignore it and look right (east) instead. This will warp you to (9x,6y). Turn left (north) to be warped to (9x,7y). From there, turn right (east) and walk forward to exit the Silence/One-Way Wall trap area and continue on.

In 2F West, investigating the coffin at (6x,17y) will reveal several Small Coffins, one of which houses a Mummy holding a Mirror. Take the Mirror it holds for the <Key Item>Soul-Removing Mirror. This item will allow you to see the invisible Floor Master's true form: Prowling Spirit. Now that you can see it, you can kill it the next time it attacks. Compared to other Floor Masters, it is a push over. The worst thing it can do to you, assuming you keep Psi Drain up to prevent level loss, is land Behead; at a ~15% rate it can trigger quite often if you are unlucky and have no resistance. Use Bifei to force it to attack a character with decent resistance or Immunity to Behead if you have one. Its Turn Recovery has been lowered to 57, which shouldn't be much of an issue. Its resistances to status effects (except Behead) are very low, though its 50% Status Recovery rate will probably make it so you have to recast them often if you choose to use them. As if it wasn't enough of a joke, using a level 26+ Thief's Equipment Removal skill, or any sort of Weapon Break if you have it, will cripple it. A couple casts of Psi Drain (cast more if it eats through them), Robuti, and Orath should be all you need if you have a physical based party, and anything but Holy and Dark for a magic based one. Defeating it will get you the <Key Item>Treasury Key and the "Royal Curse" quest will be officially finished.

The Habe Tablet is randomly found in F3. Pick it up if you are interested in post game.

The switches in 2F East and 3F swap between two circuits; turning on one circuit deactivates the other. Anti-Warp Tiles prevent you from completely exploiting Diomente, though you can still use it up until you need to drop down a Trap Chute on F3. If you want to understand the route on the maps a bit better, here is an explanation: First, you need to activate Circuit A with the switch at 2F East (4x,9y). Go through the now-unlocked door at 3F (5x,8y) and hit another switch, either at (4x,7y) or (6x,5y), to activate Circuit B. Hitting both of the switches will activate Circuit A again, so only use one. Backtrack to the now-unlocked door at (5x,5y) and make your way to the Switch at (10x,11y) to activate Circuit A. Alternatively, when exploring F3 you can Warp to the two switches in 2F East whenever you pass an unlocked door, turn on the next circuit you need, then Warp back to F3 again. Technically, it is much faster and safer that way. Just make sure Circuit A is on before you fall down the Trap Chute at (12x,10y).

If you have not defeated the Floor Master by the time you have dealt with the Circuit puzzle, now is a good time to go back and do that. Treasury Key in hand, find and walk through some Hidden Doors in 3F and unlock the door at (12x,15y). The rest should be easy to understand just by looking at the maps. Go south and follow the path all the way until you return to 1F West to find the last Coffin, which contains an Unidentified Sword (High King's Sword), Book (Ghost's Book), and Cap (Silver Tiara). The sword and tiara are pretty good, but are male (sword) and female (tiara) only. The Sword is the first piece of equipment that most people will get (luck based loot aside) that is really worth using Forging to negate the gender restriction if you only have a female or ? Fighter/Lord. If you are in that situation now, you might not have the high value Ore or Alchemist levels to do so yet unless you have been really lucky or grind a lot, so just hang onto it until you have the means or make a new character.
Potential Royal Tomb Loot
Loot marked with a * was found by Vino and the JP Wiki.

TRAPS
From this point of the game on, each dungeon has every trap in the game.


ROYAL TOMB F1 WEST
? Sword = Worn Sword
? Talisman = Anti-Demon Charm, (+2) Dark Seal, (+2) Light Seal
? Helm = Worn Helm, Kabuto
? Gauntlet = Knight Gauntlets
? Armor = Knight's Armor, Scavenged Armor
? Robe = Cursed Robe
? Shoes = Rusty Leggings
? Ring = Rusted Ring, Sacred Tree's Ring, Diamond Ring, Recovery Ring, Cat's Eye Ring
? Material = Elvish Iron, Millstone
? Medicine = Full-Health Potion
? Junk = Moon Fragment, Sun Fragment, All-Purpose Herb, Captivating Lute, Puppet Maracas

ROYAL TOMB F1 EAST
? Sword = Worn Sword
? Spear = Spiral Spear, Trieina, Saint's Spear, Tower Lance
? Weapon = Ice Tomahawk, Power Blowgun
? Shield = Rusty Shield
? Robe = Cursed Robe
? Talisman = (+1) Flame Charm, (+2) Ice Charm, (+2) Lightning Charm
? Medicine = Full-Health Potion
? Material = (+1) Devil's Lapis, (+1) Vectorium
? Junk = Moon Fragment, All-Purpose Herb, Quick Dagger, Cerebellum, Fissure Drums, Hermit's Knife*

ROYAL TOMB F2 WEST
? Spear = Spiral Spear, Trieina, Saint's Spear
? Weapon = Ice Tomahawk, Power Blowgun, Tasram, Fate Ring, Death Arm, Shuriken, Devil Gun Boanils
? Shield = Bent Shield, Bario Shield, Mukade Shield, Dragon Shield
? Gauntlets = Holey Gloves, Flame Gloves
? Leather = Rotten Leather Armour, Dragon Mail
? Shoes = Glass Slippers, Magical Boots
? Medicine = Full-Health Potion
? Material = Elvish Iron, (+1) Devil's Lapis, (+1) Sensolite
? Junk = Sun Fragment, All-Purpose Herb, Quick Dagger, Bewitching Dagger, Hermit's Knife*

ROYAL TOMB F2 EAST
? Spear = Tonbokiri, Amenonuboko
? Mace = Magic Blue Club, Mithril Mace, Bone Breaker, Silver Ram, High Priestess Mace
? Bow = Exorcist's Bow, The Crow
? Cap = Torn Hat
? Gauntlet = Ragged Gauntlets, Dragon Glove
? Mail = Cursed Chainmail
? Shoes = Battered Leather Shoes
? Cape = Torn Cape
? Belt = Dirty Obi, Mystery Obi
? Junk = Sun Fragment, All-Purpose Herb

ROYAL TOMB F3
? Spear = Tonbokiri, Amenonuboko
? Mace = Magic Blue Club, Bone Breaker, Mithril Mace, Silver Ram
? Weapon = Hawk Talons, Dragon Bright Jamadahal, World
? Helm = Phantom Mask, Dragon Helm
? Plate = Cracked Breastplate
? Shoes = Hardy Greaves
? Cape = Corrupted Cloak, Koynunu Manteau
? Belt = Bone Belt
? Medicine = Full-Health Potion
? Material = Elvish Iron, Vectorium
? Junk = Sun Fragment, All-Purpose Herb

THIEF EQUIPMENT STEALS (LEVEL 26+)
Quick Dagger = Enchantress
Palindroma = Ghost Herbalist, Maharaja Knight
Ogre Sword = Giro
Saga-Bringer = Death Knight, Dark Lord
Skolugy = Dragon Lord
Moon Blade = Prowling Spirit (Floor master)
Lance = Ghost Valkyrie
Malte = Grape Pitter, Skull Crown
Crow Goblin = Dragonfly
Kunai = Dragonfly
Demon Killer = Ghost Daimyo
Dancing Katana = Ghost Daimyo
Vestiges = Ninja Ghost
Bone Spike = Grape Pitter, Skull Crown
Lash = Linesman
Captivating Lute = Master Minstral
Unlocking Nga-Nga Magi Volcano
To Unlock the Nga-Nga Magi Volcano you must run through the first three floors of Ishmag Underground Sanctum and complete an event at B3 (3x,8y). In order to keep the maps together and listed by relative difficulty, I chose not to split the Sanctum into two sections. Skip ahead to the Ishmag Underground Sanctum Section for maps leading to the unlocking point and come back to this section once you can explore it. Sorry that it is a bit awkward.

After unlocking Nga-Nga and exiting the Sanctum, go to the Plaza in Igdra Village and Talk to the Suspicious Merchant who will have a new quest for you. He asks you to cast a stone into a Flame Spring in the Volcano to attract a monster, then retrieve its heart. This gives you a <Key Item>Shining Stone and "The Monster's Heart" quest.

Next, go to the Training School in Ishmag and Talk with the Noble-Bound Soldier who tells you that he is on an assignment from a noble to go into the Volcano. If you choose to Take part in the witch-hunt you will be paid 60,000gp in advance and he will meet you at Nga-Nga, giving you the "Volcano Witch-Hunt" quest.
OPTIONAL: Preparing for Nga-Nga Magi Volcano
For levels, starting in the mid 20s is fine, though you will want to be in the late 20s - early 30s by the last floor for an easier time. You will need a level 26+ Thief, a Pick for some quests and someone who can cast Sosario to deal with Damage Tiles (Lava). If you have a Summoner, there is another escort type quest here that uses the Summon Slot, so you might want to swap them for something else while you do that.

As for things to look out for, like Royal Tomb there is not much here that you haven't already dealt with before so I won't bore you with a long list. Quite a few enemies absorb or reflect Fire, including Fire Breath, so be careful if you use Dragonewts. Be on the lookout for Empusa, a Brawler-type enemy that can hit pretty hard, and Mifune, which can break all your equipment and has a decent chance to Behead. As you have probably already guessed, Fire Defense is very useful here, especially on the main boss, and Dark Defense can help protect you from a quest boss. And, as always, Behead resistance is good to have.

If you have a Summoner you will recognize Nue (80%) from Royal Tomb, which is still a good pick for a Spirit Pact Samurai if you have the patience to capture one. Don Mags is another highly resistant to Contract enemy (80%) that is worth a look, with naturally high elemetal attributes and some decent status resistances. It makes a great Spirit Pact Mage but, once again, it can be annoying to try and capture one. If you are looking for something a little less grindy, Mifune is an excellent choice at a 50% Contract resistance. He comes with both Weapon and Armor break, which is pretty huge on its own, as well as a 30% chance to Behead and some very decent natural elemental defense and status resistance, making him a great choice for a regular Summon or Spirit Pact (loses Court Sanctuary) Samurai.
OPTIONAL: Nga-Nga Magi Volcano Maps


Click the thumbnails for the full sized maps. They are listed in order of height and direction, with B1 at the top and B4 at the bottom. The entrance is found on B1.
OPTIONAL: Nga-Nga Magi Volcano Enemies
Skeleton:
Level 5 (30%) - Immune to Drain, -50% Weak to Fire/Holy

Soul Slave:
Level 15 (90%) - Spells (Rabalad, Raglass, Ziakalad, Enterook Mista, Zefeifus, Rafeireed, Razefeis, Rapidos, Zeo Nadar), 50% Status Recovery, 50% Resist Silence/Charm/Petrify, 20% Resist Sleep/Poison/Paralysis/Confuse/Behead, 80% Dark Defense

Lich:
Level 16 (30%) - Strange Miasma Wave*, Spells (Robuti, Hallobuti, Enterook Mista), 9hp Turn Recovery, 10% Chance to Paralyze, 10% Chance to Petrify (Main Hand Only), 50% Dark Attack, 5% Fire/Water/Thunder/Holy Attack, 90% Resist Charm, 30% Resist Paralysis/Petrify, Immune to Drain, 100% Dark Defense, -100% Weak to Holy, -50% Weak to Fire

Fallen Angel:
Level 19 (95%) - Strange Miasma Wave*, Spells(Rabalad, Raglass, Ziakalad, Enterook Mista, Zeo Nadar), Weapon Break, 10% Chance to Behead, 10% Resist All Ailments/Behead, 100% Holy/Dark Defense

Greater Homunculus:
Level 22 (30%) - Weapon Break, Armor Break, Spells(Glass, Maglass, Raglass), 10% Chance to Poison/Confuse, 60% Resist Petrify, 30% Resist Poison/Confuse, 85% Dark Defense

Cerberus:
Level 22 (80%) - Strange Miasma Wave*, Fire Breath, Restore, 19hp Turn Recovery, 2 Actions Per Turn, 10% Fire Attack, 80% Resist Behead, 50% Fire/Water/Thunder Defense

Demon Fox:
Level 23 (80%) - Mind Crush*, Holy Breath, Spells(Ziakalad, Rastoma, Feireed), Restore, 20hp Turn Recovery, 2 Actions Per Turn, 100% Thunder Attack, 40% Status Recovery, 95% Resist Paralysis/Charm/Petrify, 30% Resist Sleep/Poison/Silence/Confuse/Behead, 30% All Element Defense

Incubus:
Level 23 (95%) - Draw*, Mind Crush*, Soul Trap*, 50% Chance to Charm/Drain, 30% Status Recovery, 95% Resist Charm, 100% Dark Defense

Female Brawler:
Level 24 (50%) - Group Attack, 50% Combative Instinct, 5% Chance to Silence, 50% Resist Charm, 20% Resist Sleep

Flame Elemental:
Level 24 (50%) - Fire Breath, Spell (Rabalad), 200% Fire Attack, 200% Fire Defense

Master Ninja:
Level 24 (50%) - Self-Destruct, Vigilance, Thief Skills, Surprise Attack, 2 Actions Per Turn, 30% Chance to Behead, 10% Chance to Sleep/Poison/Paralysis/Silence/Confuse

Arch Mage:
Level 24 (80%) - Spells (Ramisama, Ziakal, Ziakalad, Enterook Mista), High Magic Source, Spirit Contract, Magic Essence, 2 Actions Per Turn, 95% Resist Silence, 10% Resist Paralyze/Confuse/Charm

Don Mags:
Level 24 (80%) - Summon Judgement*, Spells (Enterook Mista, Rafeireed, Rapidos, Zeo Nadar), High Magic Source, Magic Essence, War Rite, Restore, 3 Actions Per Turn, 300% Fire/Water Attack, 200% Thunder/Holy/Dark Attack, 80% Recovery Rate, 90% Resist Paralyze/Charm/Petrify/Behead, 75% Resist Sleep/Poison/Silence/Confuse 80% Holy/Dark Defense, 50% Fire/Thunder Defense, 25% Water Defense

Necromancer:
Level 24 (80%) - Summon*, Blood Oath, Spirit Pact, 2 Actions Per Turn, 15% Resist All Ailments/Behead, 10% All Element Defense

Nue:
Level 24 (80%) - Nightmare*, Barrier, Lightning Breath, Group Attack, Swallow Return (15%), Weapon Break, Spells (Ziakalad, Zeo Nadar), Holy Physical Attack, Counterattack, Restore, 21hp Turn Recovery, 4 Actions Per Turn, 50% Chance to Confuse, 30% Chance to Sleep/Paralyze/Petrify, 300% Thunder Attack, 200% Holy/Dark Attack, 80% Status Recovery, 90% Resist Sleep/Paralyze/Charm/Petrify, 75% Resist Poison/Silence/Confuse, 30% Resist Behead, 200% Thunder/Holy/Dark Defense

Giro:
Level 24 (90%) - Immune to Drain, 50% Dark Defense, -50% Weak to Fire/Holy

Ritual Worker:
Level 24 (95%) - Spells (Skorekh, Pinto), 5% Chance to Silence, 5% Chance to Behead, 80% Dark Defense, -10% Weak to Confuse

Succubus:
Level 24 (95%) - Draw*, Mind Crush*, Spells(Misama, Ramisama, Pinto, Rapinto, Rapidos, Zeo Nadar), 50% Chance to Charm/Drain, 30% Status Recovery, 95% Resist Charm, 100% Dark Defense

Pirie Laua:
Level 25 (30%) - Counterattack, Group Attack, Restore, 2 Actions Per Turn, 10% Chance to Poison/Behead, Immune to Poison

Fire Drake:
Level 25 (80%) - Fire Breath, 45hp Turn Recovery, 100% Fire Attack, 90% Fire Defense

Cardinal:
Level 25 (90%) - Spells (More than I care to list), Dispel, Identification, 2 Actions Per Turn, 1% Chance to Petrify (Main Hand Only) 40% Status Recovery, 10% Resist All Ailments (except Behead), 30% Holy/Dark Defense, 10% Fire/Water/Thunder

Salamander:
Level 25 (90%) - Fire Breath, Restore, 40hp Turn Recovery, 300% Fire Attack, 45% Status Recovery, 80% Resist Paralysis/Charm/Petrify, 35% Sleep/Poison/Silence/Confusion/Behead, 200% Fire Defense, 25% Water/Thunder/Holy/Dark

Hellmaster:
Level 25 (95%) - Summon*, Group Attack, 50% Combative Instinct, 50% Status Recovery, 10% Resist All Ailments (except Behead), -30% Weak to Behead, 100% Dark Defense

Volcanic Turtle:
Level 25 (99%) - Barrier, Stronghold, Brace, Mark of Ruin, Fire Breath, 2 Actions Per Turn, 60% Fire Attack, 30% Status Recovery, 60% Resist Drain, 20% Resist Behead, 10% Resist All Ailments, 200% Fire Defense

Shogun Guard:
Level 26 (50%) - 15% Swallow Return, Spells (Stoma, Rabalad, Raglass, Ziakalad, Hallobukan, Rafeireed, Orath, Bifei, Yuniwa Coat, Rapidos), Dual Wielding, 40% Status Recovery, 20% Resist Behead, 75% Dark Defense

Red Dragon:
Level 26 (90%) - Fire Breath, 2 Actions Per Turn, 50% Fire Attack, 30% Resist All Ailments/Behead, 100% Fire Defense

Empusa:
Level 26 (95%) - Weapon Break, Armor Break, Group Attack, 50% Combative Instinct, Shout, Cruelty, 2 Actions Per Turn, 10% Chance to Behead, 10% Chance to Poison (Off Hand Only), 10% Dark Attack, 65% Status Recovery, 50% Resist Paralyze, 45% Resist Charm/Petrify, 30% Resist Sleep/Poison/Confuse/Behead, 100% Dark Defense

Mifune:
Level 27 (50%) - Weapon Break, Armor Break, Dual Wielding, 15% Swallow Return, Court Sanctuary, Restore, 2 Actions Per Turn, 30% Chance to Behead, 5% Chance to Confuse, 50% Status Recovery, 50% Resist Sleep/Poison/Paralyze/Confuse/Charm/Behead, 50% All Element Defense

Fire Giant:
Level 27 (60%) - Fire Breath, Spell (Rabalad), Dual Wielding, 2 Actions Per Turn, 50% Fire Attack, 50% Resist Behead, 30% Resist All Ailments, 200% Fire Defense

Hellhound:
Level 27 (80%) - Strange Miasma Wave*, Fire Breath, 48hp Turn Recovery, 2 Actions Per Turn, 10% Fire Attack, 90% Resist Behead, 50% Fire/Water/Thunder Defense

Shogun:
Level 27 (90%) - Draw*, Summon*, Dual Wielding, 15% Swallow Return, Spells (Ziakalad, Tashif), 54hp Turn Recovery, 2 Actions Per Turn, 40% Status Recovery, 80% Resist Paralyze/Charm/Petrify, 30% Resist Sleep/Poison/Silence/Confuse/Behead, 80% Dark Defense

Blue Flame Elemental (Quest):
Level 27 (100%) - Fire Breath, Spell (Rabalad), 2 Actions Per Turn, 300% Fire Recovery, 30% Status Recovery, 200% Fire Defense, 100% Water Defense, 90% Thunder/Holy/Dark Defense

Kuzgua (Boss):
Level 30 (100%) - Strange Miasma Wave*, Swift Attack, Spells (Balad, Mabalad, Rabalad), 15% Swallow Return, Swallow Killer, Spirit Contract, Magic Essence, Restore, 166hp Turn Recovery, 3 Actions Per Turn, 300% Fire Attack, 80% Status Recovery, 95% Resist Behead/Drain, 45% Resist All Ailments, 200% Fire Defense, 50% Dark Defense, 30% Water/Thunder Defense

Katos Dragon (Quest):
Level 40 (90%) - Strange Miasma Wave*, Inhale*, Spells (Stoma, Ziakalad, Enterook Mista, Zefeifus, Ramialf), Death Breath, Restore, Armor Break, 68hp Turn Recovery, 5 Actions Per Turn, 40% Chance to Poison, 20% Chance to Behead, 5% Chance to Drain, 100% All Element Attack, 80% Status Recovery, 90% Resist Paralysis/Charm/Petrify/Behead, 75% Resist Sleep/Poison/Silence/Confusion, 200% Dark Defense, -100% Weak to Holy

Hellfire:
Floor Master
OPTIONAL: Nga-Nga Magi Volcano Notes
There is a new trap tile here, Lava, that is your basic damage floor. It hurts quite a bit every step you take, so use Sosario any time you want to traverse it. Mining spots here can either give you Ore, Rocks (even if you have Divination), or spew lava and damage your party.

At B1 (17x,6y) the Noble-Bound Soldier, Beknoske, will be waiting for you if you took the "Volcano Witch-Hunt" quest in town. He fills the 7th Summon slot as a Samurai and, like the other quests like it, you can take advantage of his presence and even use him against the boss of the area. Just like the others it does not matter if he has status effects or is dead, and he will return to the meeting spot if you try to leave the dungeon. He can get in the way of Stealing, so keep that in mind if you want to finish the "Strong Steel" quest without much hassle. At B3 (8x,8y) you will find a praying Black Robed Woman. If you have Beknoske in your party you will be forced into a battle with an Arch Mage and some Fire Drakes. When you defeat them, Beknoske will give you an identified Crested Robe and leave your party, finishing the quest. If you want to keep Beknoske around for the rest of the dungeon (boss included), avoid the Woman until you are ready to finish the quest.

There is a group of Injured Adventurers at B1 (4x,9y) who tell you that they are there to save their kidnapped daughters, but they are not strong enough to go on. They beg for you to continue the rescue, giving you the "Spirited Away" quest. Finishing the area completes the quest, so keep exploring normally.

The Floor Master, Hellfire, is in B2 North. It patrols its territory in a counter-clockwise fashion and never leaves its room. Unless you really want to take a chance on the Ore spot there is no reason to go there now, so you can stay safe from it.

Once you enter B2 North (possibly B1 as well, but I have never found one there) and beyond you might come across a Volcanic Turtle enemy. If you have a level 26+ Thief you can Steal Sturdy Steel from it. It usually goes into your Key Items directly, but sometimes it doesn't. However, if you fight one more battle with the Sturdy Steel in your regular inventory it will become the <Key item>Durable Steel to free up an inventory space. The next time you exit the dungeon, return to Ishmag and Talk to the Innkeeper of Hosbarn Inn. He will take your Steel and upgrade your storage, giving you an extra 49 spaces for a total of 99, and will also let you use it for free from now on. This completes the "Strong Steel" quest. Even if the quest is complete, you can Steal more Sturdy Steel and sell it for 250gp each if you want to.

At B2 North (13x,19y) there is a boulder with letters carved into it. When you approach it you can hear someone calling for help inside, giving you "The Sealed One" quest. Go to B3 (5x,5y) to find a Narrow Pillar with Carvings. The game asks if you want to pull the pillar out of the ground. Say Yes and the ground will shake. Return to the Boulder at B2 North (13x19y) and Katos Dragon will emerge from it. At lower levels it can be a pretty rough fight. It has 5 actions per turn and several moves to watch out for, such as Inhale, Strange Miasma Wave and Death Breath, and a decent chance to Armor Break, Poison, and Behead. Its status recovery and resistances are pretty high, so you'll probably be better off using your turns to deal damage. Luckily, it is very weak to Holy attacks, so strong Holy Atrribute/PIE magic users with Elnam will really shine here. You might want to open with a few casts of Robuti to make it easier for physical characters to hit. Personally, I think this enemy is much harder than the boss of this area, so you might want to come back later if you are having trouble. When you defeat it you get some Unidentified Shoes (Dragon Greaves) and the quest will be complete.

If you have "The Monster's Heart" quest, drop down to the lava pit in B3 and head to (10x,13y) to find a Volcanic Spring. Approach it and the game will ask if you want to throw the glowing stone in. Say Yes and you will fight a Blue Flame Elemental, which is just a beefed up Flame Elemental with Water Defense so it is not too hard. Defeat if for the <Key Item> Heart of the Flame. Go to the Plaza in Igdra Village and Talk to the Suspicious Merchant. The first thing he offers you is 50,000gp. If you Refuse he will offer you an Ice Tomahawk instead. If you Refuse that, he will give you Midsummer Garb, a cape that attacks a row of enemies with fire when used in battle. You can only choose one item. Once you have made the trade, the quest is complete.

In B3 you have a chance to randomly come across a Hard Black Ore. Use your Pick on it for the <Key Item>Granium Ore. Take the Ore back to Ishmag and present it to the Skilled Blacksmith in Jadgebol Shoppe, once again a bit disappointed, who will turn it into a Mithril Plate after a week has passed. Like with the first Ore, the quest is not finished yet.

Astraea Tablet is randomly found on B4. Collect it if you are interested in Post Game.

There is a health spring at B4 (16x,4y) that works just like the Spring back in Tsun-Kurn. There is no limit to its use, so take advantage of it if you need it. In case anyone was wondering, this spring does not count for "The Monster's Heart" quest.

At B4 (10x,11y), in the center of the volcano, you will find a Young Girl. Speak with her and, after some flavor text, a flame demon will burst out of her and attack, putting you in a battle against Kuzgua, the boss of this area.

Kuzugua is a very strong boss and can be quite challenging if you are not prepared. Everything he does, excluding Strange Miasma Wave, is linked to Fire Damage and his spells are boosted with Magic Essence (making them always hit), Spirit Contract (boosting their damage), and a natural 300% Fire Attack (which also effects magic, if you didn't know that already). The easy thing to do is to make sure every character you have has decent Fire Defense through equipment/Forging. At this point in the game, unless you have been powerleveling an Alchemist and been very lucky with Ore you probably won't have the means to completely trivialize the content, but every little bit helps. Get your buffs up (Hallobukan, Rapoolfei) as soon as possible. Weapon Break is extremely useful to have if you are into Summons/Spirit Pact characters.

Once you defeat the boss the only thing left will be an empty cup. You will get an Unidentified Axe (Power Axe) for your trouble. If you go back to the adventurers that gave you the quest, you will find that they have died, but it's not required.
Potential Nga-Nga Magi Volcano Loot
Loot marked with a * was found by Vino and the JP Wiki.
Loot marked with a ** was found by XT.

TRAPS
Every trap in the game.


NGA-NGA MAGI VOLCANO B1
? Katana = Kogitsune, Kogarasu Katana*, Monohoshizao*, Dawn Sword*, Kotetsu*. Cut Snake Sword*, Chained Star*, Epetam*, Onimaru*, Kutneslika*
? Whip = Dragon Tail, Empress Whip, Seijuobi*, Ringschutesher*, Charm Whip*, Dragon Tail, Vampire Whip*, Hanged Man's Whip*, Empress Whip*, Thunder Lord Whip*
? Shield = Rusty Shield, Mukade Shield, Exorcist's Shield, Shield of Truth*
? Robe = Cursed Robe*
? Talisman = (+2) Flame Charm, (+2) Ice Charm, (+2) Lightning Charm
? Medicine = Full-Health Potion
? Material = Devil's Lapis, Millstone
? Junk = Sun Fragment, All-Purpose Herb, Zero Flute*

NGA-NGA MAGI VOLCANO B2 NORTH
? Katana = Kogitsune, Dawn Sword, Kotetsu, Cut Snake Sword, Onimaru*, Epetam*
? Whip = Ringschutesher, Seijuobi, Charm Whip, Fairy Whip*, Dragon Tail*, Vampire Whip*, Hanged Man's Whip*, Thunder Lord Whip*
? Shield = Bario Shield, Holy Guard*, Bario Shield*, Dragon Shield*, Unholy Shield*
? Gauntlet = Holey Gloves, Flame Gloves*
? Leather = Rotten Leather Armour, Tough Leather Armor*, Dragon Mail*
? Shoes = Glass Slippers*
? Belt = Dirty Obi*, Mystery Obi*
? Medicine = Full-Health Potion
? Material = Elvish Iron, (+1) Devil's Lapis, Sensolite, (+1) Millstone
? Junk = Sun Fragment, All-Purpose Herb

NGA-NGA MAGI VOLCANO B2 SOUTH
? Hammer = Entrei, Spiked Club, Mill Hammer*, Justice*
? Staff = Brahma-Deva*, Flame Rod*, Fairy Staff*, Magician's Staff*, Welsh Cane*
? Book = Oldest Book*, White Scriptures*, Item Encyclopedia*, Judgement Book*
? Cap = Torn Hat, Magician's Cap*, Silver Tiara*
? Gauntlet = Ragged Gauntlets*, Power Glove*
? Mail = Ice Mail*, Cursed Chainmail*, Ramera Armor*
? Shoes = Battered Leather Shoes, Tough Leather Shoes*, Dragon Greaves
? Belt = Bone Belt, Blue Belt*
? Talisman = (+2) Flame Charm
? Cape = Torn Cape, Innocent Cloak*, Midsummer's Garb*
? Ring = Rusted Ring*, Fairy Ring, Recovery Ring, Cat's Eye Ring*
? Medicine = Full-Health Potion
? Material = Elvish Iron, Vectorium, Sensolite
? Junk = Sun Fragment, All-Purpose Herb, Healing Fork*

NGA-NGA MAGI VOLCANO B3
? Hammer = Entrei*, Mill Hammer*, Spiked Club*, Hekatan Hammer*, Justice*
? Staff = Brahma-Deva*, Flame Rod, Fairy Staff, Magician's Staff*
? Book = Oldest Book, Item Encyclopedia, White Scriptures*, Judgement Book*
? Helm = Phantom Mask, Electric Cap*
? Gauntlets = Old Gloves*, Virtue Gauntlets*, Ramera Gauntlets*
? Plate = Cracked Breastplate, Goddess Breastplate*
? Shoes = Bone Leggings*, Hope Greaves*
? Cape = Corruputed Cloak, Griffin Cloak, Koynunu Manteau*
? Belt = Short Belt, Spirit Belt*
? Ring = Rusted Ring*, Fairy Ring, Cat's Eye Ring*, Recovery Ring*
? Medicine = Full-Health Potion
? Material = Sensolite
? Junk = Sun Fragment*, All-Purpose Herb, Healing Fork*, Thunder God's Harp*

NGA-NGA MAGI VOLCANO B4
? Katana = Nene Kirimaru, Crow Goblin*, Ame Shikou*
? Hammer = Spiked Club, Entrei*, Mill Hammer*, Hekatan Hammer*, Justice
? Staff = Brahma-Deva*, Flame Rod, Fairy Staff, Magician's Staff*, Welsh Cane*
? Book = Oldest Book, Item Encyclopedia, White Scriptures*, Judgement Book*, Ghost's Book*
? Weapon = Stone, Murasame*, Muramasa**
? Helm = Worn Helm, Mithril Helm, Kabuto*
? Gauntlet = Damaged Gauntlets, Magic Gauntlets
? Armor = Scavenged Armor*, Knight's Armor*, Crystal Armor*
? Shoes = Rusty Leggings, Magic Leggings, Dwarven Leggings*
? Cape = Heavy Cloak*, Silver Cloak*, Sapphire Cloak*, Midsummer Garb
? Ring = Recovery Ring*
? Medicine = Full-Health Potion
? Material = Devil Iron, (+1) Millstone
? Junk = Sun Fragment, All-Purpose Herb

THIEF EQUIPMENT STEALS (LEVEL 26+)
Dagger = Skeleton
Fool's Foil = Ritual Worker
Ogre Sword = Giro
Vestiges = Shogun Guard
Hitode Shuriken = Master Ninja
Aozasa Katana = Mifune
Dancing Katana = Mifune, Master Ninja
Iwatou = Shogun
Hellmaster = Hellmaster
Shamrock = Cardinal
Ruin Rod = Lich

Not a piece of equipment, but:
Sturdy Steel (Quest Item) = Volcanic Turtle
FIVE SKULL DUNGEON - END GAME
Preparing for Ishmag Underground Sanctum
For levels you can start in the mid-late 20s, but be aware that the enemies here can be tough. As far as making it easier, being early-mid 30s by the last floor works, but since it is the end of the game you might as well take your levels as high as you can get them which will help you later if you plan on going through post game. There is a really good enemy to grind for EP here (Greater Demons) so you can take advantage of that. Like Uhlm Zakir Hall, if you are interested in the game's lore you can bring along a character with the Curse EX skill. You will need a character(s) with at least 5 casts total of Pendea Coat to unlock an optional door, which should also cover Pendeku in case your equipment gets damaged. There is also another escort type quest here, so if you have a Summoner you might want to swap them out while you do the quest if you plan on exploring with an AI stuck in your Summon Slot. Also, the first boss will give Servants (and technically all healers) a hard time, so if you rely on one for their Treatment ability you might want to swap them out. You can trade some specific identified items here, so a Bishop can be handy, but you can always use the shop instead. If you just want to run straight to the Nga-Nga unlocking event having a character or two that can cast Mahamaha or bringing 3 Dove's Bells (Duplicable with the Warehouse bug) is a great idea.

As far as things to watch for, like the last few dungeons there is not a lot that you haven't seen before, so I won't bore you with a long list. Being that it is the last dungeon of the main game there are very strong enemies with good defenses and resistances here that may be difficult for some party setups to overcome consistantly, Tiger Centaurs and Octopus Woman being a few examples. If you have difficulties, the universal solution is to use Mahamaha (as long as you are not on a Silence Trap) whenever a problem enemy shows up. Knowing when to run is a staple tactic of these types of games and you can always get your revenge when you've leveled up a bit. As mentioned way back in the beginning of the guide, you can also use Bifei and Bulafei to protect weaker members. Holy and Dark Defense can come in handy. Like always, Beheading resistance is nice to have as well.

If you have a Summoner and the patience to try for a difficult Contract, Octopus Woman (80%) is a very strong Summon with 5 actions per turn, Sleep Breath, a 30% chance to sleep, Swallow Return, and a whopping 60hp turn recovery. One of the quests in the dungeon also has a guaranteed encounter with one at the end of it, so you can use that to attempt a Contract without the need to search random encounters. It's still a difficult Contract to land though. If you are looking for easier Contracts, Werewolf Archer (50%) has a 25% chance to Behead and becomes a Bishop (Why, StarFish?) through Spirit Pact. Slap a Magician's Bow or a Bishop compatible Whip on them and you can try for Beheads when they are not using spells. If turning things into Stone is your thing, Nunblanalb (50%) is another interesting choice, with Petrification Breath, 40% Chance to Petrify, Armor Break, Repels Dark magic, and a 50% resistance to Behead. However, it comes with -20hp Turn Recovery which would have to be worked around.
Ishmag Underground Sanctum Maps


Click the thumbnails for the full sized maps. They are listed in order, with B1 at the top and B6 at the bottom. The entrance is found on B1.

The B2 Map Key is missing the Description Icon due to lack of space, but the Fragment locations are still shown on the map. A route to the Cursed Swords and Locked Door are not plotted out, because they are not relevent to a quest. It is not difficult to see how to get to them by looking at the map. Also, the routes shown are for minimal backtracking.

Due to the wrapping floor effect on B3 there are a lot of ways to reach the goals that have an equal amount of steps. The quest objective route I chose to plot out avoids the forced direction tiles and minimizes backtracking. Due to space issues the Map Key is missing the Up Stairs, Down Stairs, and "Person" Icons, though they are still shown on the map itself.

The B4 Map Key is missing the "Person" and Landing Icons.

The B5 Map Key is missing Up Stairs, Down Stairs, and "Person" Icons.
Ishmag Underground Sanctum Enemies
Royal Honeybee (Quest):
Level 15 (90%) - Summon*, 2 Actions Per Turn, 18hp Turn Recovery, 40% Status Recovery, 60% Chance to Paralyse/Silence, 80% Resist Paralysis/Charm/Petrify/Drain

Lich *Skeleton in Dark Zone*:
Level 16 (30%) - Strange Miasma Wave*, Spells (Robuti, Hallobuti, Enterook Mista), 9hp Turn Recovery, 10% Chance to Paralyze, 10% Chance to Petrify (Main Hand Only), 50% Dark Attack, 5% Fire/Water/Thunder/Holy Attack, 90% Resist Charm, 30% Resist Paralysis/Petrify, Immune to Drain, 100% Dark Defense, -100% Weak to Holy, -50% Weak to Fire

Vampire (Quest) *Worn-Out Figure in Dark Zone*:
Level 17 (30%) - 10% Chance to Drain, Immune to Drain, -50% Weak to Holy

Cerberus:
Level 22 (80%) - Strange Miasma Wave*, Fire Breath, Restore, 19hp Turn Recovery, 2 Actions Per Turn, 10% Fire Attack, 80% Resist Behead, 50% Fire/Water/Thunder Defense

Hellmaster:
Level 25 (95%) - Summon*, Group Attack, 50% Combative Instinct, 50% Status Recovery, 10% Resist All Ailments (except Behead), -30% Weak to Behead, 100% Dark Defense

Magi's Scout (Event):
Level 26 (100%) - Chi Wave, Spells (Stoma, Rastoma, Feirima, Mirror Eyes, Sama Eyes), 50% Fire Attack, 50% All Element Defense

Twin Scovel:
Level 28 (30%) - 20% Chance to Paralyze

Werewolf Archer:
Level 28 (50%) - Swift Attack, Pursuit Sweep, Thief Skills, 30% Water Attack, 25% Chance to Behead, 30% Water Defense

Soul Tetra *Bright Light in Dark Zone*:
Level 28 (90%) - Spells (Rabalad, Raglass, Ziakalad, Enterook Mista, Zefeifus, Feireed, Zeo Nadar), 22hp Turn Recovery, 2 Actions Per Turn, 10% Chance to Attack, 50% Status Recovery, 80% Resist Paralyze/Charm/Petrify/Behead, 30% Resist Sleep/Poison/Silence/Confuse, 100% All Element Defense

La Flaneuse *Worn-Out Figure in Dark Zone*:
Level 28 (90%) - 22hp Turn Recovery, 2 Actions Per Turn, 30% Chance to Drain, 5% Chance to Charm/Confuse, 100% Dark Attack, Immune to Drain, 90% Resist Petrify, 20% Resist Sleep/Poison/Paralysis/Silence/Confuse/Charm/Behead, 100% Dark Defense

Gargoyle *Demon in Dark Zone*:
Level 28 (95%) - Nightmare*, Stronghold, Court Sanctuary, 36hp Turn Recovery, 10% Dark Attack, Immune to Petrify, 15% Resist Sleep/Poison/Paralyze/Silence/Confuse/Charm/Behead, 90% Dark Defense

Medusa:
Level 28 (95%) - Armor Break, Spells (Stoma, Rastoma, Rafeireed), King's Proof, Restore, 39hp Turn Recovery, 2 Actions Per Turn, 30% Chance to Petrify, 75% Status Recovery, 30% Resist All Ailments/Behead, 200% Dark Defense, 100% Holy Defense, 50% Fire/Water/Thunder Defense

Flasteria:
Level 29 (30%) - Unclean Earth*, High Magic Source, 10% Chance to Paralyze/Silence/Confusion, 90% Resist Poison/Paralyze

Anstacris *Cold Presence in Dark Zone*:
Level 29 (30%) - Strange Miasma Wave*, Mind Crush*, Soul Trap*, Unclean Earth*, Immune to Drain, 100% Dark Defense, -100% Weak to Holy

Tiger Centaur:
Level 29 (90%) - Strange Miasma Wave*, Nightmare*, Barrier, Vigilance, Tarot, Sleep Breath, Spells (Misama, Zefeifus, Karacha), Find Treasure, Last Stand, Restore, 4 Action Per Turn, 35% Chance to Sleep, 60% Status Recovery, 50% Resist All Ailments/Behead

Ruthless Wyrm:
Level 29 (90%) - Spell (Argeiss), 2 Actions Per Turn, 64% Resist Petrify, 24% Resist Sleep/Poison/Paralyze/Silence/Confuse/Sharm/Behead

Octopus Woman:
Level 30 (80%) - Inhale*, Draw*, Barrier, High Magic Source, Spells (Skorekh, Orath, Lascorek), 15% Swallow Return, Swallow Killer, Restore, Sleep Breath, 60hp Turn Recovery, 5 Actions Per Turn, 30% Chance to Sleep, 5% Chance to Paralyze, 20% Resist All Ailments/Behead, 20% All Element Defense

Unknown:
Level 30 (90%) - Strange Miasma Wave*, Mind Crush*, Unclean Eath*, Dragon's Roar*, Vigilance, Group Attack, 2 Attacks Per Turn, 60% Resist All Ailments, 30% Resist Behead

Arachne:
Level 30 (90%) - Draw*, Vigilance, Restore, Paralysis Breath, 30hp Turn Recovery, 3 Actions Per Turn, 30% Chance to Paralyze, 5% Chance to Sleep/Silence/Confuse, 80% Status Recovery, Immune to Poison/Paralyze/Charm, 90% Resist Behead, 20% resist Sleep/Silence/Confuse/Petrify, 90% Dark Defense

Greater Demon:
Level 30 (95%) - Calls for Reinforcements*, Spells (Rabalad, Ziakalad, Enterook Mista), 5% Chance to Paralyze, 30% Resist Paralyze/Charm/Petrify, 10% Resist Sleep/Poison/Silence/Confuse/Behead, 100% Dark Defense

Balbulgis:
Level 30 (95%) - Summon*, Draw*, Dark Breath, Spells (Zeifeifus, Rarood, Pinto), Song of Destruction, Blood Oath, 2 Actions Per Turn, 15% Chance to Behead, 5% Chance to Silence, 200% Dark Attack, 50% Status Recovery, 60% Resist Paralyze/Charm/Petrify, 15% Resist Sleep/Poison/Silence/Behead, 5% Resist Confuse, 200% Dark Defense

Aktora (Boss):
Level 30 (100%) - Unclean Earth*, Weapon Break, Armor Break, King's Proof, 296hp Turn Recovery, 2 Actions Per Turn, 60% Chance to Poison, 10% Chance to Behead, 60% Status Recovery, 95% Resist Paralyze/Charm/Petrify, 45% Resist Sleep/Poison/Silence/Confuse/Behead, 100% Dark Defense, 10% Fire/Water/Thunder/Holy Defense

Cursed Hunter:
Level 31 (30%) - Nightmare*, Death Breath, Spells (Raglass, Zeo Nadar), Restore, 2 Actions Per Turn, 200% Water Attack, 5% Chance to Drain, Immune to Charm/Behead/Drain, 200% Water/Dark Defense, -200% Weak to Holy

Soul Stealer:
Level 31 (30%) - Soul Trap*, Shout, Spells (Zeifeifus, Razefeis), Magic Essence, 10% Chance to Confuse, Immune to Drain, 90% Resist Paralyze/Charm/Petrify, 40% Resist Sleep/Poison/Silence/Confuse/Behead, 300% Dark Defense, -60% Weak to Holy

Nunblanalb:
Level 31 (50%) - Strange Miasma Wave*, Soul Trap*, Unclean Earth*, Armor Break, Petrification Breath, Spells (Rastoma, Rarood), Torrent of Darkness, Restore, -20hp Turn Recovery, 2 Actions Per Turn, 40% Chance to Petrify, 5% Chance to Behead/Drain, 80% Turn Recovery, Immune to Paralyze/Confuse/Petrify, 50% Resist Behead, 300% Dark Defense

Vampire Lord:
Level 31 (90%) - Summon*, Unclean Earth*, Weapon Break, Spell (Enterook Mista), Shout, Absolute Barrier, Court Sanctuary, King's Proof, Restore, 37hp Turn Recovery, 2 Actions Per Turn, 40% Chance to Drain, 20% Chance to Charm, 80% Status Recovery, Immune to Charm, 75% Resist Sleep/Poison/Paralyze/Silence/Confuse/Petrify, 50% Resist Behead, 100% Dark Defense

Insect Lord:
Level 31 (90%) - Summon*, Mind Crush*, Group Attack, Pursuit Sweep, 50% Combative Instinct, Court Sanctuary, King's Proof, Restore, 49hp Turn Recovery, 2 Actions Per Turn, 10% Chance to Petrify (Off Hand Only), 5% Chance to Behead, 5% All Element Attack, 50% Status Recovery, 90% Resist Charm, 40% Resist Sleep/Poison/Paralyze/Silence/Confuse/Petrify/Behead, 90% Dark Defense

Cyclanos (Last Boss):
Level 34 (100%) - Strange Miasma Wave*, Nightmare*, Mind Crush*, Shout, Spells (Stoma, Rastoma, Hallobukan, Feirima, Lascorek, Yuniwa Coat, Rapidos), 15% Swallow Return, Swallow Killer, King's Proof, Restore, 459hp Turn Recovery, 2 Actions Per Turn, 3% Chance to Inflict All Ailments/Behead (except Drain), 100% Holy/Dark Attack, 50% Resist Cleric Spells, 60% Status Recovery, 90% Resist Behead, 75% Resist Paralyze/Confuse/Charm/Petrify, 50% Resist Sleep/Poison/Silence, 200% Dark Defense, 30% Fire/Water/Thunder/Holy Defense

Samael (Quest):
Level 40 (90%) - Armor Break, Restore, 3 Actions Per Turn, 20% Chance to Behead, 30% Status Recovery, Immune to Drain, 80% Resist Paralyze/Charm/Petrify, 30% Sleep/Poison/Silence/Confusion/Behead, 100% Dark Defense

Gaia
Floor Master
Ishmag Underground Sanctum Notes - Part 1
Like in Uhlm Zakir Hall, B3 has books with indecipherable text that can be read by a character with the Curse EX Skill. They only contain lore on the game's world, so it is not necessary to read them. Along with the familar Dark and Anti-Warp Zones, with Pit, Chute, Silence, and Forced Direction Trap tiles, there are new visible Warp tiles and an Infinite Wrapping floor. Visible Warps work just like any regular warp tile, and the Wrapping transports you to the opposite end when you walk past the map's edge.

The Greater Demon enemies here are great for end game grinding. Like the Lesser Demons of Igdra Underground Church, they call for reinforcements. That said, they are more dangerous than Lesser Demons, so be careful.

In B1, head south from the entrance until you find the Jailor (0x,10y), who will give you the <Key Item> Jail Key. You can use that key to open every locked door on this floor and it is necessary to progress.

At B1 (15x,18y) you can find a prisoner behind a locked door. You can choose to Help her and take her away, which causes Layer to join your party in the 7th Summon Slot and gives you the "Captive Beauty" quest. She has a decent amount of HP, access to a few Cleric Spells, and, like Geed in Afum Zar, you can take advantage of her. Approaching the Exit will cause her to leave your party and return to where you found her, and you can pick her up again. If you have her in your party when you walk on the tile at B5 (14x,8y) she will transform into an Octopus Woman and battle you. Defeat her to get an Unidentified Whip (Hanged Man's Whip) and finish the quest. If you don't want to lose her as a party member stop just before you touch that tile, get her to leave your party by going to the entrance, walk past B5 (14x,8y), get her again, then Diomente past the tile. You can use her to fight against the first boss this way. On B6, no matter if you have just decended the ladder or used Diomente to warp there, she will leave your party and not immediately return to her pick up spot in B1, but you can leave and re-enter the dungeon and she will respawn in her usual spot.

The Floor Master, Gaia, is on B2, walking clockwise around a 3x3 room that it never leaves. It is not hard to avoid, so just be careful.


This is not an official quest, but there is a courier exchange event sequence in the Sanctum if you are interested. At B2 (16x,0y) there is a Glowing Ball of Light that asks you if you are the one who "killed it" then gives you an Unidentified Talisman (Dark Seal), which you should Identify right away (Unidentified does not work). I admit that I do not know what "it" is, but it might be some missplaced dialog for the last exchange or each one could have their own requirements. Anyway, keep that Dark Seal in your inventory. When you reach B3, carefully head to (1x,16y) to find another Glowing Ball who will exchange your Dark Seal with another Unidentified Talisman (+1 Dark Seal.) which, once again, you should Identify as soon as you can and keep in your inventory. In B4, go to another Glowing Ball at (2x,15y) to exchange your +1 Dark Seal for another Unidentified Talisman (+2 Dark Seal). Like all the others, Identify it and keep it in your inventory for the last trade, which can only happen after you have seen the game's credits.

At B2 (3x,4y) you will find an Eerie Bell covered in blue rust with a note, "When the thirteen bells ring, I shall awaken." This starts the "Reverberating Bell" quest. The 13 Bells refer to the 13 rooms in the shape of an X on the map of this floor. Enter each one, then return to the Eerie Bell and you will be attacked by Samael, a Royal Honeybee, and an Insect Lord. Despite its appearance, it isn't too difficult. It has 3 actions per turn, Armor Break and a decent chance to Behead, but its status recovery and resistances to many status effects are pretty low (30% Sleep, Poison, Confusion, and Behead) so controlling the fight isn't too hard. It also only has Dark Defense, so magical type characters can deal some decent damage. You can also leave one of the additional monsters alive and keep Samael in the back for additional protection. Defeat them and the bell will vanish, leaving an Unidentified Bow (Calamity Bow) behind.

As a side note to the "Reverberating Bell" quest, before I was able to post this information someone contacted me asking for help with the quest and mentioned something about being told that reading books trigger the fight. This is incorrect, and as far as I know all the Curse books in the game are just for game lore. If I am wrong, I'd really appreciate a correction.

Also on B2 you will find Cursed Swords embedded in the ground, which you can destroy with the spell Pendea Coat. Destroy all five and a door will unlock at (8x,3y). In the room beyond it you can find 3 Unidenified Junk (Moon, Sun, and Space Fragments). The use of the Fragments is revealed in post game, so it doesn't hurt to pick them up for selling.

B3 is a mess of trap tiles, as well as being a classic Wizardry wrapping floor. Recast Sosario after you step off Silence Tiles if you want to avoid Pit Traps. Be careful of the Trap Chute in the center of the floor, because once you go down that way you cannot get back up without Diomente or using an Exit Warp Tile on B4 or B5.

In B3 you will want to find your way to (3x,8y) and talk to a Mysterious Person who brags a bit before attacking. Defeating the Magi's Scout will unlock the Nga-Nga Magi Volcano, a 4 Skull Dungeon, for exploration. Quest pick ups for the Volcano are listed in the Unlocking Nga-Nga Magi Volcano section. Since the Sanctum is the last dungeon of the main game, you might want to explore the Volcano first, which is easier, but you can always do it in post game if you prefer. Do whatever is fun for you.
Ishmag Underground Sanctum Notes - Part 2
In B4, the Trap Chute at (17x,6y) has a Silencing effect on it to wipe Sosario, forcing you to drop. This isn't the first time the game has pulled this kind of trick (there's a Pit Trap in the Royal Tomb that does it as well), but it can still put you in a bad spot if you are not careful.

At B5 (0x,15y) you will find a container of Black Water and a voice telling you that drinking it will bring you "demonic joy." If you choose to drink it, whoever consumes it has their race changed to Devlish. You can change as many characters as you'd like. This can be good for equipping cursed items, but there is no way to reverse the effect.

BUG WARNING
Using the Black Water while the game is in Windowed Mode will cause the game to lock up in a black screen. Avoid this by switching to Fullscreen before drinking it. You can switch back to Windowed Mode afterward if that is your preference.

At B5 (3x,6y) you will find an open door to a room filled with Spider Webs. The game will ask if you want to Advance. Do so if you are ready for a boss fight and Aktora will appear, usually with one or two Arachne along for the ride. The Aktora fight is mostly about managing equipment breakage and Poison, possibly some Beheading if it gets lucky. Its Unclean Earth Skill will put a damper on Servants (and technically any other healing focused character) if you have one, making their Treatment ability ineffective. Remember that even though Unclean Earth interrupts healing spells and Treatment you can still use Potions and Turn Recovery normally. It has a rather high 296hp Turn Recovery, but you should be able to produce higher damage than that per turn by now. If you struggle, putting someone with Tackle in the party can help, but stacking Orath and Robuti casts should be enough to help you out. Magic damage is decent as long as you do not use Dark based damage, so magic users will have plenty to contribute beyond the usual buffs, debuffs and status effects. Weapon Break is very effective, if you have a character capable of it.

After Aktora is defeated, exit the dungeon and head to Dondun's Tavern to listen (Talk) to the Rumour of the man-eating spider and get the "Man-Eating Spider" quest. Go back to the Stone-like Objects in B4 (19x,4y), (5x,13y), (2x,7y), (2x,2y), (14x,6y), and (1x,18y) to figure out that they are actually eggs and burn all six locations, sometimes being attacked by Arachne, Flasteria and Twin Scovel. You will get an Unidentified Weapon (Cancer) after burning the eggs at (19x,4y). Go back to Ishmag and return to the Rumour of the man-eating spider in Dondun's Tavern to complete the quest.

The Besta Tablet is randomly found in B6. Collect it if you are interested in post game, which is coming up shortly. It can be kind of a pain since a big chunk of the floor is behind the last boss, so it may take a few trips to get it if you wanted to grab it before finishing the game.

At B6 (14x,9y) you will enter a vast dome. After some flavor text, the game will ask if you want to "Put an end to it now". Choose to do so if you are ready for the final boss and you will enter a battle against Cyclanos, sometimes accompanied by Balbulgis, Vampire, La Flaneuse and Vampire Lord. I am pretty sure there are always at least two Vampire Lords, but everything else is random. Make sure to keep at least one level 7 Mage cast reserved for Diomente after the fight. If you are underleveled and you have two rows of non-boss enemies (3 total with Cyclanos being the far back row) you can consider keeping one thing alive in each row to stack a ton of buffs on your party to trivialize the fight, but beware of Level Drain. Use status effects to keep things under control. Other than that, the additional enemies are not too bad. Vampire Lord can cast Absolute Barrier, which will let Turn Recovery go through. This can be good or bad, depending on where you are at in the fight, but it's mostly just annoying.

Cyclanos has 2 actions per turn and attacks with 3 weapons per single melee action. It can cast Strange Miasma Wave and hits very hard, so be prepared to heal. It also has plenty of ways to inflict status ailments on you. He has a rather high resistance to Cleric Spells, so if you use offensive magic stick to Mage (but not Argeiss) and Alchemy unless you are a fan of Immolarati, which doesn't trigger resistances. For physical fighters, beware of his Swallow Return/Killer skills. AI Summons can sometimes put you in a tight spot triggering it. The biggest worry is its turn recovery, which is 459hp per turn. If you can't dish out more than that per turn then you'll want to bring someone along with the Tackle EX Skill. If you find youself in need of an edge, Forge Double Damage to Gods on your weapons. The extra damage options vs. enemy types is an easy Forge to overlook and not really necessary through a majority of the game, but it really shines from this point on. If all else fails and you really can't figure out what to do, you can always resort to using the Rank 7 Mage spell Miracle. The buffs it has the potential to give are overpowered and there will be plenty of EP in post game to cover your level loss. Cast it multiple times to get the effects you want, or reset the game and try again if the RNG doesn't want to cooperate.

After defeating Cyclanos you will get a cutscene, then the party will be forced out of his room. You can re-enter it if you want to complete your map, but you can be attacked inside so I strongly suggest going back to town at this point to rest. As a side note, all characters in your current party will now have the Elminage "E" in their status screen. It does not do anything special.
Potential Ishmag Underground Sanctum Loot
Loot marked with a * was found by Vino and the JP Wiki.

TRAPS
Every type of trap in the game.


ISHMAG UNDERGROUND SANCTUM B1
? Sword = Innocent Sword, Lightning Sword, Mixer Blade, Dragon Killer, Foil of Evening Calm, Moon Blade*, Fool's Foil*
? Club = Deck Cudgel, Lundo Flail, Devil Club, Light Den Battledore, Mandragora Club, Lahtskamei*, Crystal Cudgel*, Tempreance Club*
? Shield = Rusty Shield, Exorcist's Shield*
? Robe = Cursed Robe, Crested Robe*
? Talisman = (+2) Flame Charm, (+2) Ice Charm, (+2) Lightning Charm
? Medicine = Full-Health Potion
? Junk = Sun Fragment, All-Purpose Herb, Magic Herb*, First Love Flower*

ISHMAG UNDERGROUND SANCTUM B2
? Sword = Innocent Sword, Lightning Sword, Fool's Foil, Foil of Evening Calm, Mixer Blade, Dragon Killer*, Crimson Blade*
? Club = Deck Cudgel, Lundo Flail, Light Den Battledore, Lahtskamei*, Crystal Cudgel*, Madragora Club*, Temprance Club*
? Shield = Bent Shield, Bario Shield, Mukade Shield*, Unholy Shield*, Shield of Truth*
? Gauntlet = Holey Gloves*, Flame Gloves
? Leather = Rotten Leather Armour*, Dragon Mail*
? Shoes = Glass Slippers, Magical Boots*
? Medicine = Full-Health Potion
? Junk = Sun Fragment, All-Purpose Herb, Tranquil Herb*, Illusion Drop*, First Love Flower*

ISHMAG UNDERGROUND SANCTUM B3
? Sword = Innocent Sword, Mixer Blade, Dragon Killer, Fool's Foil*, Moon Blade*, Foil of Evening Calm*
? Club = Deck Cudgel, Lundo Flail, Lahtskamei, Light Den Battledore, Crystal Cudgel, Mandragora Club, Temperance Club*
? Cap = Torn Hat*, Silver Tiara*
? Gauntlet = Ragged Gauntlets, Dragon Glove*
? Mail = Ramera Armor*, Ramera Armour
? Shoes = Battered Leather Shoes, Dragon Greaves
? Cape = Torn Cape
? Belt = Dirty Obi, Mystery Obi
? Medicine = Full-Health Potion
? Material = Devil Iron
? Junk = Sun Fragment, All-Purpose Herb

ISHMAG UNDERGROUND SANCTUM B4
? Axe = Alakahi, Elven Axe*, Dwarven Halberd*, Power Axe*, Death Chopper*, Emperor Axe*, Diamond Axe*
? Hammer = Hekatan Hammer*
? Bow = Polyte's Holy Bow, Metlos Comb*, Diamond Shower*, Chariot*
? Helm = Phantom Mask, Dragon Helm
? Gauntlet = Ramera Gauntlet*, Old Gloves*
? Plate = Cracked Breastplate
? Shoes = Bone Leggings*, Hardy Greaves*
? Cloak = Corrupted Cloak
? Belt = Bone Belt, Blue Belt*
? Ring = Fairy Ring, Cat's Eye Ring*, Recovery Ring*
? Ankh = Ankh of Wisdom
? Medicine = Full-Health Potion
? Material = Elvish Iron, Devil's Lapis
? Junk = Sun Fragment

ISHMAG UNDERGROUND SANCTUM B5
? Sword = Flamberge, Sun Sword, Holy Sword, High King's Sword*
? Axe = Elven Axe, Alakahi, Diamond Axe, Dwarven Halberd*, Victreim Axe*, Power Axe*, Death Chopper*
? Bow = Diamond Shower, Chairot*, Polyte's Holy Bow*
? Helm = Worn Helm, Mithril Helm
? Gauntlet = Damaged Gauntlets
? Armor = Scavenged Armor, Crystal Armor
? Shoes = Rusty Leggings*, Magic Leggings
? Cape = Heavy Cloak, Saphire Cloak*
? Belt = Short Belt, Spirit Belt*
? Medicine = Full-Health Potion
? Material = Vectorium, Millstone
? Junk = Sun Fragment

ISHMAG UNDERGROUND SANCTUM B6
? Sword = Flamberge, Sun Sword, Holy Sword, High King's Sword*
? Axe = Elven Axe, Dwarven Halberd, Victreim Axe, Alakahi, Diamond Axe, Power Axe*, Death Chopper*, Emperor's Axe*
? Bow = Meltos Comb, Polyte's Holy Bow
? Helm = Worn Helm, Mithril Helm*
? Gauntlet = Damaged Gauntlets, Magic Gauntlets
? Armor = Scavenged Armor, Crystal Armor*
? Shoes = Rusty Leggings, Magic Legging*
? Belt = Short Belt, Spirit Belt*
? Cloak = Heavy Cloak*, Saphire Cloak*
? Ankh = Ankh of Stamina, Ankh of Speed, Ankh of Luck
? Medicine = Full-Health Potion
? Material = Elvish Iron, (+1) Devil's Lapis, Millstone
? Junk = Sun Fragment

THIEF EQUIPMENT STEALS (LEVEL 26+)
Fool's Foil = Balbulgis
Death Scythe = Samael (Quest)
Bone Spike = Samael (Quest)
Ice Bow = Werewolf Archer
Whip = Royal Honeybee
Hellmaster = Hellmaster
Ruin Rod = Insect Lord
Ending the Game
After Cyclanos is defeated, return to the Kingdom of Ishmag and head into Ishmag Castle to Arrange Meeting with the King who will reward you with a Medal of Power (Randomly changes Class if you Unleash Power), Magic Shield, and a Welsh Cane. After some more talking, including a reminder that post game exists, the credits will roll. Congratulations on beating the game!


If you are interested in post game, go back into Ishmag Castle after the credits and Arrange Meeting with the King again to unlock the "Great God battleground," which is actually the Soldier of the Giant Gods dungeon, a 5 skull difficulty area.

Go to Dondun's Tavern and Talk with the Minstral there to hear his song, unlocking the "Weaved Song of Legends" quest.

Next, go to the Plaza in Igdra Village and Talk to the Suspicious Merchant once again. He asks for you to find Lionel's bones, giving you "The Great Sorceror's Bones" quest. (Yes, I am aware of the misspelling, but that is how it is in the game so I am sticking with it).

And finally, if you were doing the Talisman exchange in the Sanctum return to B4 and fall down the Trap Chute at (3x,3y). Talk to the Glowing Ball at B5 (2x,2y), who will take your +2 Dark Seal and exchange it for a +3 Dark Seal. The defensive properties of this accessory will be extremely useful in post game.
Cleaning Up the Floor Masters
If you have been following the guide up to this point, you should have two Floor Masters under your belt (Nagu and Prowling Spirit) with 11 left to defeat if you haven't been picking them off on your own. This section will cover all the Floor Masters we've skipped so far now that you (hopefully) have the levels and equipment to take them on.

Before you start on your killing spree there is one thing to keep in mind: These Floor Masters never respawn. Any loot and/or Contract opportunities die with them. Although you can find the loot elsewhere, it's better to get it now than rely on the RNG later. Make sure that you get what you want out of them before you give them the killing blow. If you want more than one of the loot they carry, run away from them after you Steal what you want to reset it. As for Contracts, it is not impossible, but really unlikely that you will land one. If you think trying is fun go for it, but it is not necessary to beat post game. Also keep in mind that Contracting them will never add them to the Monster Encyclopedia if having incomplete references bothers you. If you have any trouble killing one, move onto the next or level/explore post game for a while and come back later.

As far as strategies go many of them hit very hard, but most do not have strong status resistances. If you can land a good status effect you are very likely to win. Sleep (Misama) and Petrify (Stoma) are excellent choices due to Magic Essence, if you chose that skill, giving you time to remove and Steal their equipment. Paralyze (Rood) is the third best thing, though it does not benefit from resistance penetration. Confuse and Charm can also be nice once you are ready to kill them.

That said, there are a few that might give you a bit of trouble if you fight them at or lower than their level. Immortal regenerates almost as much HP as he has per turn, meaning that if he gets a Turn Regeneration off the fight pretty much starts over. Its status resistances are also very high. If you can't deal a lot of damage you could consider building a Party that stacks Tackle to increase your odds. Hellfire's "weapons" are not removable and it deals so much damage that if you are unlucky landing and maintaining a status effect it can quickly wipe your party. Really high Fire Defense can help combat the RNG, so if you like to play it safe you could look into Spirit Pact characters. Weapon Break is useful as well. Gaia has a little trap set up for Werebeasts or people who like to Poison, with Drunken Fist as well as many other damage increasing EX Skills. Just be aware of it and you should be fine. All that aside, as mentioned all the way back at the beginning of the guide, the Bard's Tarot skill can trivialize every fight if you are ok with the minor risk.

After you have defeated all 13 Floor Masters, go to Dondun's Tavern and Talk with the Mysterious Figure there. He will acknowledge your accomplishment and hand you the Hero's Book of Secrets (a.k.a. <Key Item>Book of Secrets). To use the book's power go to Lohagra Temple and Pray. The game will ask you if you want to change the drop rate of rare items. If you say Yes, the drop rate increases. You can change it back to normal by repeating this process if you want.

Post game Floor Masters do not count toward the reward.
Floor Master Information - Part 1
Because of their nature I am adding a little extra information about them and their special loot that I would normally exclude due to space constraints / laziness.

Vovalketer
Location: Tsun-Kurn B3
Insect-Type
HP = 416
Extra Damage Against Insect
1 Equipment to Remove
Level 26 (99%) - Draw*, Vigilance, Swift Attack, King's Proof, 83hp Turn Recovery, 2 Actions Per Turn, 20% Chance to Behead, 15% Resist All Magic (Except Summoning), 10% Status Recovery, 30% Resist All Ailments/Behead, 70% Resist Drain, 50% All Element Defense

Special Loot = Vorpal Sickle
Sub Sickle
Class: Fighter, Servant, Hunter, Ninja
Race Restrictions: None
Range: S
Hit Accuracy: 5
Attack Rate: 3
Damage: 5-15
Lowered AC Ability ON
Extra Damage: Insect
Can Hit Ghosts
2% Chance to Behead


Akabey
Location: Guatella Grotto B2 Secret
Mythical-Type
HP = 814
Extra Damage Against Fighter and Thief
2 Equipment to Remove
Level 37 (99%) - Paralysis Breath, Armor Break, Vigilance, Group Attack, 54.9% Combative Instinct, 17.3% Swallow Return, Swift Attack, 162hp Turn Recovery, 2 Actions Per Turn, 1% Chance to Paralyze, 1% Chance to Behead (Off Hand Only), 20% Status Recovery, 50% Resist Behead, 30% Resist All Ailments, 70% Resist Drain, 15% Resist All Magic (Except Summoning), 50% Resist All Elements

Special Loot = Aozasa Katana
Main Katana
Class: Samurai, Ninja
Race Restrictions: None
Range: S
Hit Accuracy: 4
Attack Rate: 5
Damage: 8-17
Lowered AC Ability OFF

Special Loot = Hirano Toushirou
Sub Katana
Class: Samurai, Ninja
Race Restrictions: No Fairy
Range: S
Hit Accuracy: 4
Attack Rate: 3
Damage: 3-18
Lowered AC Ability ON
Extra Damage: Fighter, Thief
1% Chance to Behead


Neck Chopper
Location: The Great Tree Yap Gotz B2
Insect-Type
HP = 1014
Extra Damage Against Insect
1 Equipment to Remove
Level 40 (99%) - Vigilance, Swift Attack, Cruelty, King's Proof, 208hp Turn Recovery, 2 Actions Per Turn, 30% Chance to Behead, 15% Resist All Magic (Except Summoning), 10% Status Recovery, 50% Resist Behead, 30% resist All Ailments, 70% Resist Drain, 50% Resist All Elements

Special Loot = Vorpal Scythe
Two-Handed Scythe
Class: Fighter, Servant, Samurai
Race Restrictions: No Fairy
Range: S
Hit Accuracy: 2
Attack Rate: 1
Damage: 10-50
Lowered AC Ability OFF
5% Chance to Behead
Can Hit Ghosts


Bely
Location: Dezaporlia Tunnel B1
Mythical-Type
HP = 836
1 Equipment to Remove
Level 38 (99%) - Vigilance, Spells (Maglass, Raglass), Magic Essence, Swift Attack, Treatment, Herbology, King's Proof, 167hp Turn Recovery, 2 Actions Per Turn, 20% Chance to Silence (Off Hand Only), 180% Water Attack, 10% Fire/Thunder/Holy/Dark Attack, 15% Resist All Magic (Except Summoning), 20% Status Recovery, 50% Resist All Ailments/Behead, 70% Resist Drain, 200% Water Defense, 50% Fire/Thunder/Holy/Dark Defense

Special Loot = Star Rod
Two-Handed Staff
Class: Fighter, Mage, Cleric, Alchemist, Bishop, Brawler, Summoner, Lord
Race Restrictions: Fairy Only
Range: S
Hit Accuracy: -1
Attack Rate: 1
Damage: 4-22
AC Adjustment: 1
Lowered AC Ability ON
10% All Element Attack
20% Chance to Silence
Can Hit Ghosts


Manmo
Location: Degus Gila Ice Cave B4
Animal-Type
HP = 468
1 Equipment to Remove
Level 39 (99%) - Vigilance, Swift Attack, Cruelty, Glutton for Punishment, King's Proof, 93hp Turn Recovery, 2 Actions Per Turn, 15% Resist All Magic (Except Summining), 10% Status Recovery, 50% Resist Behead, 30% Resist All Ailments, 70% Resist Drain, 50% Resist All Elements

Special Loot = Chalk Fang
Two-Handed Fist Weapon
Class: Brawler, Ninja
Race Restrictions: No Fairy
Range: S
Hit Accuracy: 5
Attack Rate: 1
Damage: 4-20
Lowered AC Ability ON
Cannot Hurt Ghosts or Gods
5% Chance to Silence
1% Chance to Petrify


Katezina
Location: Hastrana B6
Beast-Type
HP = 800
No Equipment to Remove
Level 40 (99%) - Vigilance, Swift Attack, Spell (Feireed), Swallow Killer, Dispel, Holy Physical Attack, Holy Lance Art, King's Proof, 160hp Turn Recovery, 2 Actions Per Turn, 50% Chance to Sleep/Silence, 25% Chance to Confuse/Charm, 15% Resist All Magic (Except Summoning), 95% Status Recovery, 50% Resist Behead, 30% Resist All Ailments, 70% Resist Drain, 50% Resist All Elements

Special Loot = Chimera Dagger
Sub Dagger
Class: Fighter, Mage, Thief, Alchemist, Servant, Hunter, Bard, Shaman, Summoner, Valkyrie, Lord, Samurai, Ninja
Race Restrictions: None
Range: S
Hit Accuracy: 2
Attack Rate: 3
Damage: 3-17
Lowered AC Ability OFF
Extra Damage: Beast, Mythical
20% Resist Poison, Paralysis, Silence

Special Loot = Rotten Leather Armour
Hah...


Vetreyal
Location: Igdra Underground Church B3
Chimeric-Type
HP = 574
1 Equipment to Remove
Level 41 (99%) - Vigilance, Swift Attack, Imitate, Cleric Spells (Feireed, Immolarati, Rafeireed, Ramialf), Dispel, Hand of Kindness, King's Proof, 114hp Turn Recovery, 2 Actions Per Turn, 150% Holy Attack, 15% Resist All magic (Except Summoning), 10% Status Recovery, 50% resist Behead, 30% Resist All Ailments, 70% Resist Drain, 50% Resist All Elements

Special Loot = Great Tree Branch
Main Club
Class: Fighter, Mage, Cleric, Thief, Alchemist, Servant, Bishop, Hunter, Brawler, Bard, Shaman, Summoner, Valkyrie, Lord, Samurai, Ninja
Race Restrictions: No Fairy
Range: S
Hit Accuracy: 0
Attack Rate: 1
Damage: 4-14
Lowered AC Ability OFF
Can Hit Ghosts

Special Loot = Wicked Hat
Cap
Class: All Classes
Race Restrictions: None
CURSED: All Classes
AC Adjustment: -2
Lowered AC Ability OFF
5% Chance to Confuse/Silence


Grate
Location: Rosslie Ruins B1
Animal-Type
HP = 504
1 Equipment to Remove
Level 42 (99%) - Strange Miasma Wave*, Nightmare*, Vigilance, Tackle, Weapon Break, Swift Attack, Group Attack, Cruelty, King's Proof, 100hp Turn Recovery, 2 Actions Per Turn, 100% Thunder Attack, 15% Resist All Magic (Except Summining), 20% Status Recovery, 50% Resist Behead, 30% resist All Ailments, 70% Resist Drain, 50% All Element Defense

Special Loot = Great Club
Main Weapon
Class: Fighter, Thief, Servant, Shaman, Ninja
Race Restrictions: No Fairy
Range: S
Hit Accuracy: 4
Attack Rate: 4
Damage: 5-20
Lowered AC Ability OFF
100% Thunder Attack
5% Chance to Petrify
20% Resist Behead
15% Resist Petrify
Floor Master Information - Part 2
Immortal
Location: Uhlm Zakir Hall B3
Undead-Type
HP = 1032
Extra Damage Against Ghost
1 Equipment to Remove
Level 43 (99%) - Vigilance, Swift Attack, Swallow Killer, Restore, King's Proof, 1027hp Turn Recovery, 2 Actions Per Turn, 50% Dark Attack, 30% Resist All magic (Except Summoning), 30% Status Recovery, 90% Resist All Ailments/Drain (Except Behead), 80% Resist Behead, 50% All Element Defense

Special Loot = Hell Sword
Two-Handed Sword
Class: Fighter, Lord
Race Restrictions: No Fairy
CURSED
Range: S
Hit Accuracy: 3
Attack Rate: 3
Damage: 4-56
Lowered AC Ability OFF
Turn Recovery: -5hp
50% Thunder Attack
30% Resist Cleric Spells
Extra Damage: Ghost
Weaker Damage: Devil, God
-10% Weak to Behead

Special Loot = Mysterious Great String Sword
Two-Handed Sword
Class: Fighter, Lord
Race Restrictions: No Fairy
Range: S
Hit Accuracy: 3
Attack Rate: 2
Damage: 4-36
Lowered AC Ability OFF
20% Chance to Poison
5% Chance to Confuse
Can Hit Ghosts


Hellfire
Location: Nga-Nga Magi Volcano B2 North
Dragon-Type
HP = 1496
No Equipment to Remove
Level 44 (99%) - Vigilance, Fire Breath, Swift Attack, Dragon's Roar, Restore, King's Proof, 299hp Turn Recovery, 2 Actions Per Turn, 300% Fire Attack, 30% Resist All Magic (Except Summoning), 45% Status Recovery, 80% Resist Paralysis/Charm/Petrify/Behead, 35% Resist Sleep/Poison/Silence/Confuse, 70% Resist Drain, 200% Fire Defense, 25% Water/Thunder/Holy/Dark

Special Loot = Flame Heresy
Two-Handed Bow
Class: Hunter, Shaman, Samurai
Race Restrictions: None
CURSED
Range: L
Hit Accuracy: 2
Attack Rate: 4
Damage: 9-81
Lowered AC Ability OFF
Turn Recovery: -2hp
80% Fire Attack
Can Hit Ghosts
-40% Weak to Fire Damage


Gaia
Location: Ishmag Underground Sanctum B2
Giant-Type
HP = 1800
2 Equipment to Remove
Level 45 (99%) - Vigilance, Swift Attack, Drunken Fist, Cruelty, Glutton for Punishment, King's Proof, 359hp Turn Recovery, 4 Actions Per Turn, 5% Chance to Silence (Off Hand Only) 80% Holy/Dark Attack, 5% Fire/Water/Thunder Attack, 15% All Magic resist (Except Summoning), 35% Status Recovery, 99% Resist Behead, 30% Resist Sleep/Poison/Paralyze/Confuse/Charm/Petrify, 25% Resist Silence, 70% Resist Drain, 50% All Element Defense

Special Loot = Chancellor's Staff
Two-Handed Staff
Class: Fighter, Mage, Cleric, Alchemist, Bishop, Summoner, Lord
Race Restrictions: None
Range: S
Hit Accuracy: 0
Attack Rate: 2
Damage: 5-50
AC Adjustment: 1
Lowered AC Ability OFF
80% Holy/Dark Attack
Can Hit Ghosts

Special Loot = Pope's Mace
Main Mace
Class: Cleric, Bishop, Lord, Samurai
Race Restrictions: None
CURSED
Range: L
Hit Accuracy: -4
Attack Rate: 1
Damage: 2-20
Lowered AC Ability OFF
Turn Recovery: -1hp
5% Holy/Dark Attack
5% Chance to Silence
-5% Weak to Silence
Can Hit Ghosts
POST GAME
The Soldier of the Giant Gods and Cave of the Ancients sections below have only been checked twice because, as of this writing, I don't have the time to run three simultaneous post game runs. Ibag Tower was only checked with one game, though I used mulitple saves from it to check certain things. There might be stuff that I have missed or information that is slightly inaccurate. That said, it shouldn't steer you too wrong if I made a mistake. If you catch something, let me know and I will fix it.
Thoughts on Post Game
As far as preperations go, things will get a lot tougher from here on out. The first post game dungeon is not so bad and the second is a little harder as most folks would expect, but last post game dungeon is especially brutal and one of the hardest areas I have ever played in a Wizardry-type game. Giving advice with that kind of difficulty is a mixed-bag, since there is always someone out there who will strongly disagree with everything that doesn't fit their own playstyle, even if it has worked for others. That said, here are my general thoughts on it:


Mindset
Accept that your party is going to die. It is inevitable. Even if you have really high levels, defenses, and resistances if a Surprise Attack doesn't wipe you an enemy casting Miracle and wishing your party into solid rock will. If you don't think that is fun, then you might want to skip post game. And I say that with no judgements, because unavoidable death is not fun for everyone. Note that save scumming (once again, no judgements) will be a bit rougher on your party's Age since it will cost you 10+ days every time you do it. Permadeath is still usually not an issue unless you use the Fairy race or forgot to age a Spirit Pact character, but be sure to monitor Ages and utilize Kiss of the Goddess traps.


Equipment
Speaking of defenses and resistances, try not to get stuck in the modern JRPG mindset where you can have everything you want without much trouble and your party is basically a group of undefeatable gods. While it is technically possible to get really close if you put in the time, that scenario doesn't really exist in Elminage Gothic. Just do what you can and keep working on it. Even small numbers can help. Due to the increasing amount of damage going out as you get deeper into post game, resisting and evading (AC) is far more important than taking hits; try and concentrate your equipment efforts on that and do not forget about Hide/Bulafei. Inventory space is going to be tight, but I strongly suggest carrying extra equipment that can cover certain resistances or deals extra damage against certain enemy types and switching to those in battle when needed. This is especially important if you decide not to use a Lord.

Another thing to consider if you are not already doing it, is Forging status effects onto weapons that don't need a Curse or restriction cancelling Forge on them. Being able to try for potential status effects while also dealing damage is pretty good, and with higher value Ore being easier to obtain in post game you can get them up to a decent chance.

As far as supplies go, get the Underground Goblin Map* if you haven't already. You should probably always bring a Pick with you, and not just for the the quest in the Soldier of the Giant Gods dungeon. Ore is important for filling gaps in your defenses and adding weapon properties as you need them. Bring Bone Slippers along for safety. Dove's Bell, which wipes guaranteed battles from your current floor, is an amazing Transmute item that you should consider taking along once you have access to the Tower (See Transmutable Item Duplication Bug in the Useful Tricks section for easy Dove's Bells).
*Also in Ibag Tower is an item called Duma's Gem (? Junk), an unbreakable map, that can be found as loot only on 1F. It is very rare and I never found it myself for the hours I spent grinding loot, but if you are interested in it you might want to farm for it.

Speaking of Bone Slippers, it is a good idea to start a "Bank" character in the event of a full party wipe. Just put money on them every once in a while and take them out when you need a resurrection. A benched Disassemble-capable Alchemist is a good fit for this task.


Magic
When constructing or tweaking a party for post game, the more magic you have access to the better. You may wish to use characters who have class changed into the Mage, Cleric, and Alchemy schools if you decide not to use Spirit Pact.

Some spells are invaluable. The rank 7 Mage spell Miracle, for example, is the perfect tool with its overpowered buffs. The more characters you have that can cast it, the more chances you have at getting the buffs you want faster. It does take a level from the character that uses it, but EP should not be a problem. The rank 4 Cleric spell Honey Restorer is a must in the Tower, where Diomente loses its effectiveness. It is lost after use and can only be relearned by leveling, but as I have said before EP will not be a problem. The rank 6 Cleric spell Rizefus (raise) is very useful for combat and the rank 7 Cleric spell Rezefeid (out of combat raise) is great to have after finishing an unlucky encounter.


EX Skills
Status Effects are still gold, but enemy resistances are much higher. The Magic Essence EX Skill (only useful with Mage school spells and effects) is extremely valuable and feels far more useful on Mages and Bishops than any other choice in terms of magic combat relavence, though I am sure someone out there disagrees with me.

The Swallow Killer EX Skill is the physical equivalent. Swallow Return is extremely deadly, so you will probably want this skill on your physical attackers for safety. Chi Wave is another interesting choice, though more useful on Hammer-wielding Clerics due to their lack of Physical Power Up skills.

The Hand of Kindness EX Skill is more valuable in post game because HP values as you level will get pretty high. Having it on one character, such as a Lord or Valkyrie, can be handy for making non-Feireed spells more useful.

Inventory space is really tight in post game, so having a character with Mysterious Bag is handy. If you want to skip this EX Skill, do not forget that the Refuse Mountain Protector exists! Drop equipment as you get it after battles so you can buy it back later, but remember that he will only carry the last 10 things you discarded. It gets very expensive, but the more chances you take to get stronger loot, the better off you will be.

Divination is still very nice for outing cursed equipment and removing rocks and weeds from the gathering pools.

When micromanaged with a fast acting party, a Cleric or Lord's Absolute Barrier can be an incredibly overpowered ability. Use the Turn Order Function (page up) to get actions in before you use the skill and any enemy or ally attacks that happen after that point will be canceled.

As far as the quality of life type skills go (Stronghold, Tackle, High Magic Source) it is really up to you. They are useful and can save a lot of time and trouble, but post game can be finished without them if you are willing to work around the effects they have a chance to prevent. I will say that having Tackle (stacking can be good) can make your life easier against the hardest fight in the game, which you can attempt after both defeating the boss of Ibag Tower and finding the 16th Tablet, but there are other ways to cheese the fight.

The Ninja only Replica EX Skill has a bug that is incredible once you make it to the 3rd floor of the Tower, giving you the ability to quickly farm for high value +2 Ore. Details of how the bug works can be found in Infinite Pick/Aura Punch Use With Replica in the Useful Tricks section.

If you have any stray characters and don't know what to put on them, give Shout and Level Drain a look. Shout is a great choice for helping clear enemies if you have a Hunter (Pursuit Sweep) and Level Drain is good for adjusting the difficulty or helping a Summoner land a Contract (a large majority of Post Game enemies still have very high resistance).
Post Game Party Composition - Part 1
I hate to say it, but once you hit post game having some specific classes in your party will make your life significantly easier. You should really consider building one or more of them if you don't have them already. Do not forget about the Medal of Power you got from the King, which can save you some time if you are willing to use it. Save, use it, and reset if it does not change your target character to the class you want (do not use it on a Spirit Pact character). Some Spirit Pact characters are really good for their innate resistances/immunities/abilities, but they do come with some downsides (limited magic access, low level and age, random EX Skill). Consider looking into them if you feel like you are struggling too much. Of course, feel free to ignore this advice and go with what you want. Do what is fun for you.

Even though the information below focuses on post game, a lot of it is pretty obvious and much of it can also be found in the Constructing a Party sections all the way back at the beginning of the guide. If you don't think you need it, feel free to skip it.


The "Best" Choices
Having at least one of these classes, if not more, is recommended. You can try to go without if you want to, but you'll have a rough time in late post game:

Ninja
Because Surprise Attacks can lead to wipes, Vigilance is literally a life saver. The fact that they have a chance to be put into Hidden status at the start of battle is a huge plus. They have a small selection of Lower AC Ability On equipment that takes advantage of their naked AC bonus, which gives them plenty of spots to put Forges on. Said equipment is worth farming for if you were not lucky with drops. Their Innate Beheading ability stacks with their highest Beheading stat, which is very useful. There are quite a few great Ninja Spirit Pact choices that are easy to Contract and come with useful innate abilities, so I strongly suggest considering that option.

Note that the equipment bug with Ninja Clones detailed in Infinite Pick/Aura Punch Use With Replica in the Useful Tricks section will really shine once you get to the 3rd floor of Ibag Tower. If you want to create overpowered equipment easily, abuse it. It can also be used to mess with enemy AI, making a few tough enemies much easier to survive.

Lord
Court Sanctuary, which spreads the Lord's natural status resistances across the entire party, is a great skill. It can only reach a max of 75% per resistance type (somewhere in the mid 400 level I think, but I don't remember), so it does not create immunity. That said, it is still a huge and helpful number, freeing up equipment and Forges to cover other things. Note that if they die in combat Court Sanctuary goes with them until they are raised. The fact that they naturally learn Cleric spells covers Honey Restorer and they make excellent main healers with the Hand of Kindness EX Skill if you choose to go that route.

Summoner
A Summoner can fill gaps with their Contracts. You can even swap as needed, such as keeping a summoned creature with Vigilance out before combat to cover Surprise Attacks, then switching to something else after entering it, adjusting to your current battle. If you use a summon to cover Court Sanctuary, keep in mind that when/if they die or are swapped the effect goes away. They can also serve to make Spirit Pact characters if that is something you are interested in.

Alchemist
Everything I have said about them previously still applies. Even with their lacking HP values, Forging (with bonus AP after Mastery) is really good and some Transmutable items are very handy in post game (Bone Slippers, Dove's Bell). Alchemy spells are still very useful. A must have class if you choose to exploit the Replica bug. Even if you do not like the class, consider getting one to Mastery (level 26) for Disassemble, though raising their level higher is very useful; the value of the extra AP is based on a percentage of the value of the Ore used and the Alchemist's level. Also a good candidate for an emergency Bank character if you choose to leave them benched.
Post Game Party Composition - Part 2
The Other Classes
Don't think that just because the above classes have an extra edge on survivability means that other classes are useless. There are no completely worthless classes in this game, only players who do not know how to use them:

Fighter
Fighters get a lot of flak for not having any special abilities, but they are still an excellent class with an amazing selection of equipment, great HP, extra damage skills, and fast leveling. If you are worried about equipment restrictions, make them a man. A large majority of Spirit Pact characters are also Fighters, so saying that they are all "weak" is like saying you hate having innate resistances to Instant Death effects.

Mage
I'll be honest and say that Mages are probably the weakest post game class. Unlike other Wizardry-type games they tend to lack the power to wipe out enemy groups quickly with spells, even when their level is really high. For that reason I strongly suggest getting a Spirit Pact mage with naturally high elemental attack attributes to give them an extra edge. Diomente being locked out in the Tower really hurts. Still, they are not useless. Miracle is an amazing spell and their Status Effects benefit quite a bit from Magic Essence. Using multi-target status effects can feed a Master Hunter's Pursuit Sweep with a little luck, or you can go the safer single target route.

Cleric
In contrast to Mages, Clerics are really good in post game. Cleric spells are very useful, including Honey Restorer. Their class boost to Immolarati is still just as overpowered, even if it does cost all of your MP; now that Magic Herbs are plentiful having a Servant companion for them is an excellent choice. Their equipment choices are pretty decent and they can dish out some physical damage when equipped with a beefy Two-handed Hammer.

Thief
A decent class to have for Stealing and Equipment Removal, which can really weaken enemies, even if their own damage is rather low. Herbs are worth stealing in post game, making them great companions for Servants. There are other things you can Steal, but a majority of items on enemies have a chance of being normal loot. Being able to Hide without using magic is very useful. Note that once you start exploring the Tower landing Steals and Equipment Removals becomes difficult. You will probably need to grind out quite a few levels if you want a Thief to have a good chance. Same thing for unlocking treasure chests, but you should probably be using magic for safety anyway.

Servant
Servants can make up for the lack of inventory space in post game with their Medicine Bag, and their Treatment skill is still very useful. Now that Magic Herbs are not as rare they are great at sustaining your magic users, which means less time spent running back to town. That said, Magic Herbs don't stack, which can add to inventory woes. Divination and/or having a Thief companion is a good idea.

Bishop
Now that EP isn't as much of an issue Bishops really shine with their ability to have caps of 9 on Mage and Cleric spells. Access to more magic is always a good thing, though they won't have the magic damage punch of a Mage or Cleric. Being able to Inspect is also really useful since you can sort through items and use good equipment as soon as you find it. With Magic Essence they make a good companion for Master Hunters, and with Divination you can keep from being accidentally cursed. You could consider Hand of Kindness as well if you don't have another strong healer.

Hunter
Hunters become pretty great in post game due to Pursuit Sweep (level 32), and Swift Attack can help you try and pick off any weaker enemies before they can attack. Being able to Hide without using magic can be nice in some circumstances. With multi-classing they can become your primary Alchemy spell user. Any Mage Magic using character with Magic Essence is going to be a good companion for them. The best bow in the game is Good alignment locked, cannot be Forged, and only found through random loot, but the cursed weapon Flame Heresy, which you can Steal from Hellfire (also a random drop), is strong and Forgeable if you don't want to change them.

Brawler
Brawler is still a potentially strong class due to their Group Attack, and are still good companions to Summoners and ailment focused Shaman for Clean Hit, but they have some quirks. Their natural AC ability is tough to work with, since they do not have as many options as Ninja when it comes to equipment with Lowered AC Ability ON. Less equipment = less resistances, which is a risk. Even if you ignore their special AC ability, their armor selection is relatively poor for a class meant for the front row. Many good Brawler weapons are cursed, so they benefit from being Devlish. You can also use the Black Water in the Sanctum if you don't want to use Spirit Pact.

Bard
Bard is a pretty strong pick in post game. Mage spells are nice, especially if they have Magic Essence, Instruments can help save magic casts if you can afford the inventory space (also effected by Magic Essence if it has a Mage effect), and Tarot is amazing for keeping regular battles and Floor Masters under control, if you don't mind the minor risk, due to the fact that it cannot be resisted if it hits (with two exceptions), even against immune enemies. The fact that they can Hide without magic can be very useful. Servants are excellent companions for Bards, since Magic Herbs restore casts and Tarot success rate. Hunters can also benefit from their status effects.

Shaman
Now that the makers of the game have finally remembered this class exists, Charm weapons are plentiful in post game. This is a high risk, high reward type class that can be amazing due to their Mastery (level 32) ability of equipping Charms in every equipment slot. That means a lot of potential damage, and a lot of chances to inflict status effects if you equip them for it. Swallow Killer is an excellent EX Skill choice and the one I recommend, though Magic Essence is ok if you stick to Mage-type weapon enhancements and are careful about what you are hitting. Make sure you know what you are equipping, since most Charm weapons do not hit all enemy types. There is a charm that can be found at the bottom of the second post game dungeon that can hit everything, and is worth farming for. They greatly benefit from Harias and Forging. All that said, they suffer from a lack of defenses. If you want to use a naked/Charm Shaman, I strongly suggest having a Lord as well. If you don't want to use a naked/Charm Shaman, they can use a few powerful end game weapons, so no worries about them being left in the dust again. Other than that, their Barrier can be handy against certain magic using enemies.

Valkyrie
Quite possibly the most reliable physical damage dealer in the game with their Mastery (level 36) ability to equip Spears in their main hand, freeing up their off hand for another weapon or a shield. Also easy to keep the Innocent status. Swallow Killer is a great EX Skill choice, as well as damage boosting EX Skills if you prefer that, but Hand of Kindness can also make them into a good healer. If you are worried about equipment restrictions make them a Woman.

Samurai
Another good post game class for physical damage. Dual Wielding is really good, as always, and Swallow Return (level 36) is pretty amazing when it triggers. Slap Infinite Range on their weapons, if needed, and Swallow Return has the potential to hit back row attackers as well. Swallow Killer is obviously a great choice for an EX Skill. They naturally have Mage spells, but Magic Essence is not as efficiant of a choice. Still, if you prefer not leaving their magic behind Mark of Ruin is worth a look; it will boost your physical damage as well. If you are worried about restrictions, make them a Man for more armor choices.
FIVE SKULL DUNGEON - POST GAME
Preparing for Soldier of the Giant Gods
As far as levels go, whatever you were at when you beat the game works fine, though if you did a no-grinding-straight-to-objectives run (which would put your level around the mid to late 20s if you finished a majority of the quests) you might want to consider leveling a little bit unless you are enjoying the challenge. You really want your levels as high as you can get them from here on out, even if this dungeon is easier than the other two. The difficulty increases as you go down are pretty even until you get to B7, where it gets harder, and B8, which ramps the difficulty up again. You should be fine if you are prepared for it though.

You will need a Pick for a quest. Static mining spots in this dungeon have a small chance to put you into a battle instead. Unlike Nga-Nga, you don't seem to have a chance at Rocks if you have a character with Divination and you can get some nice + Ore.

Summoners and Servants will have a rough time with the boss. You should already be working on Dark Defense and Behead Resistance, but if you are not now is the time. Water Attack is really useful against the mid boss, but be warned that Brainsly and Squeezer enemies are very strong against it. There are quite a few enemies with very high Holy and Dark Defenses, but Katos Dragon, who is a normal enemy in this dungeon, still has their extreme weakness to Holy. Samael is also a normal enemy now. The last boss of the area is very strong against Thunder, so keep that in mind.

Some enemies will cast Immolarati now, which damages for a percentage of your party's health. It isn't too bad unless a Cleric type enemy uses it, since they get a damage boost. The worst thing to look out for is Miracle, which Brainsly and Arch Demons love to cast. One of the the many effects it can have is a chance to teleport your party into solid rock, permanently killing them with no chance of recovery if you do not carry Bone Slippers, and there is literally nothing you can do to prevent it.

If you have a Summoner, give Maelstrom a look. It only has 50% resistance to Contract and comes with 90% resistance to all elements, 95% resistance to all ailments (Behead included) and a 80% Status Recovery. It's a great deal. Brainsly is another good choice, with only 30% resistance to Contract. It has a 25% Chance to Behead, very high status resistances and recovery, is Immune to Water, absorbs Dark, and comes with the Bulafei and Miracle spells. It has a weakness to Thunder, but besides that it makes a great summon or Spirit Pact Ninja. Ulgel, the mid boss, is also available for Contract attempts with a 90% resistance. That is really high, and I don't really recommend it, but if you want to give it a try (and don't care that you will never get its Encyclopedia entry) you'll have a pretty beefy-but-weak-to-Water Summon with 374hp Turn Recovery if you succeed.
Soldier of the Giant Gods Maps


There are a few points on the paths where taking a slightly different path results in the same amount of steps. These spots are pretty obvious.

On the B6 map there is a spot at (15x,12y) where the path cuts through a battle that can be avoided with a few extra steps if that is your preference. Once again, how to avoid it is pretty obvious if you look at the map.

You might also note that every single map shows the name of the dungeon as Soldier of the Giant God instead of Soldier of the Giant Gods. Missing an S is not going to hurt, so I choose to leave them as is, because I don't want to deal with Steam's uploading if I don't have to.
Soldier of the Giant Gods Enemies
Master Ninja:
Level 24 (50%) - Self-Destruct, Vigilance, Thief Skills, Surprise Attack, 2 Actions Per Turn, 30% Chance to Behead, 10% Chance to Sleep/Poison/Paralysis/Silence/Confuse

Shogun:
Level 27 (90%) - Draw*, Summon*, Dual Wielding, 15% Swallow Return, Spells (Ziakalad, Tashif), 54hp Turn Recovery, 2 Actions Per Turn, 40% Status Recovery, 80% Resist Paralyze/Charm/Petrify, 30% Resist Sleep/Poison/Silence/Confuse/Behead, 80% Dark Defense

Northern Orc:
Level 28 (90%) - Bells of Judgement*, Mind Crush*, Summon*, Group Attack, Spells (Ravenom, Rafeireed, Rapinto), Magic Essence, Cruelty, Hand of Kindness, Identification, Restore, 3 Actions Per Turn, 30% Chance to Charm, 80% Status Recovery, 90% Resist Paralyze/Charm/Petrify/Behead, 75% Resist Sleep/Poison/Silence/Confuse, 200% Dark Defense, 50% Holy Defense

Shapeshifter:
Level 29 (30%) - Inhale*, Vigilance, Swift Attack, Escape, 2 Actions Per Turn, 80% Status Recovery, Immune to Behead, 20% Resist All Ailments

High Cleric:
Level 29 (90%) - Spells (Elnam, Immolarati, Rafeireed, Razefeis), Dispel, Identification, Hand of Kindness, 10% Resist Silence, 20% Holy/Dark Defense

Brainsly:
Level 30 (30%) - Vigilance, Chi Wave, Spells (Raglass, Miracle, Bulafei, Makaracha, Zeo Nadar), Restore, 3 Actions Per Turn, 25% Chance to Behead, 300% Water Attack, 80% Status Recovery, 90% Resist Paralyze/Charm/Petrify/Behead, 75% Resist Sleep/Poison/Silence/Confuse, 200% Dark Defense, 100% Water Defense, -50% Weak to Thunder

Vengeful Spirit (Quest):
Level 30 (99%) - Vigilance, Thief Skills, Surprise Attack, Cruelty, 26.4% Chance to Behead, Immune to Drain, 20% Resist All Ailments/Behead, 100% Dark Defense, -50% Weak to Holy

Organ Lizard Baby (Quest):
Level 31 (99%) - Vigilance, Imitate, Poison Breath, 5% Chance to Poison, Immune to Poison, -50% Weak to Sleep

Parasite Snail:
Level 32 (90%) - Spells (Misama, Glass, Venom, Ziakal, Maglass, Raglass, Ziakalad), Magic Essence, 5% Chance to Poison/Paralyze, 40% Status Recovery, 30% Fire/Water Defense

Mind Sucker:
Level 35 (50%) - Mind Crush*, Vigilance, Spells (Immolarati, Makaracha, Rapinto), Magic Essence, High magic Source, Restore, 2 Actions Per Turn, 40% Chance to Paralyze, 50% Status Recovery, 30% Resist All Ailments (Except Behead), 20% Resist Behead

Arch Demon:
Level 35 (95%) - War Rite, Song of Destruction, Spells (Enterook Mista, Miracle, Immolarati, Rafeireed, Razefeis), King's Proof, Restore, 3 Actions Per Turn, 10% Chance to Poison/Paralyze/Petrify/Behead, 70% Status Recovery, 70% Resist Paralyze/Charm/Petrify/Drain, 20% Resist Sleep/Poison/Silence/Confuse/Behead, 100% Dark Defense

Dark Mistress:
Level 36 (95%) - Soul Trap*, Spells (Feireed, Elnam, Immolarati, Rafeireed, Razefeis), Dispel, Soul Release, Holy Physical Attack, Hand of Kindness, 86hp Turn Recovery, 2 Actions Per Turn, 60% Chance to Drain, 100% Holy/Dark Attack, 30% Status Recovery, Immune to Drain, 20% Resist All Ailments/Behead, 100% Holy/Dark Defense

Metal Mystica:
Level 37 (30%) - Absolute Barrier, Restore, 2 Actions Per Turn, 50% Status Recovery, 40% Fire/Water/Holy/Thunder Defense, Immune to Petrify/Behead, 40% Resist Sleep/Poison/Paralyze/Silence/Confuse/Charm

Samael:
Level 40 (90%) - Armor Break, Restore, 3 Actions Per Turn, 20% Chance to Behead, 30% Status Recovery, Immune to Drain, 80% Resist Paralyze/Charm/Petrify, 30% Sleep/Poison/Silence/Confusion/Behead, 100% Dark Defense

Katos Dragon:
Level 40 (90%) - Strange Miasma Wave*, Inhale*, Spells (Stoma, Ziakalad, Enterook Mista, Zefeifus, Ramialf), Death Breath, Restore, Armor Break, 68hp Turn Recovery, 5 Actions Per Turn, 40% Chance to Poison, 20% Chance to Behead, 5% Chance to Drain, 100% All Element Attack, 80% Status Recovery, 90% Resist Paralysis/Charm/Petrify/Behead, 75% Resist Sleep/Poison/Silence/Confusion, 200% Dark Defense, -100% Weak to Holy

Parasite Tail:
Level 41 (90%) - Brace, Spell (Argeiss), 2 Actions Per Turn, 30% Resist All Ailments/Behead

Right Hand:
Level 41 (90%) - Draw*, Group Attack, 3 Actions Per Turn, 5% Chance to Inflict All Ailments/Behead/Drain, Immune to Behead/Drain

Left Hand:
Level 42 (90%) - Mind Crush*, Spells (Ramisama, Ravenom, Enterook Mista, Lascorek, Rapoolfei, Ramialf, Rapidos), 3 Actions Per Turn, 50% Status Recovery, Immune to Behead/Drain, 80% All Element Defense

Organ Lizard Queen (Quest):
Level 42 (99%) - Lullaby*, Chi Wave, Restore, 142hp Turn Recovery, 2 Actions Per Turn, 10% Chance to Poison, 50% Holy Attack, Immune to Poison, 30% Resist Behead, 20% All Element Defense

Magical Core:
Level 43 (90%) - Strange Miasma Wave*, Shout, Spells (Rafelima, Rafeireed), Last Stand, Steal, King's Proof, 50% Status Recovery, Immune to Behead/Drain, 75% Resist All Ailments (Except Behead), 50% All Element Defense

Sorceror:
Level 44 (80%) - Spells (Ziakalad, Enterook Mista), Spirit Contract, Magic Essence, High Magic Source, 2 Actions Per Turn, 95% Resist Silence, 10% Resist Sleep/Poison/Paralyze/Confuse/Charm/Petrify/Behead

Squeezer:
Level 44 (90%) - Bells of Judgement*, Inhale*, Poison Breath, Weapon Break, Armor Break, Spells (Raglass, Enterook Mista, Rafeireed, Zeo Nadar), Spirit Contract, Magic Essence, Restore, 96hp Turn Recovery, 3 Actions Per Turn, 50% Chance to Poison, 10% Chance to Behead, 150% Water Attack, 80% Status Recovery, 90% Resist All Ailments/Behead, 200% Water Defense, 100% Dark Defense, 65% Thunder Defense, -50% Weak to Fire

Dean:
Level 44 (90%) - Spells (Sama Eyes, Feireed, Elnam, Rafeireed, Razefeis), Dispel, Soul Release, Holy Physical Attack, Hand of Kindness, 20% Resist All Ailments/Behead, 50% Holy/Dark Defense

Maelstrom:
Level 45 (50%) - Draw*, Mind Crush*, Unclean Earth*, Dark Breath, Group Attack, Spells (Argeiss, Rastoma), 57.5% Combative Instinct, King's Proof, 3 Actions Per Turn, 300% Dark Attack, 80% Status Recovery, 95% Resist All Ailments/Behead, 90% All Element Defense

Demon Lord:
Level 45 (95%) - Spells (Enterook Mista, Razefeis), King's Proof, Court Sanctuary, Restore, 130hp Turn Recovery, 2 Actions Per Turn, 50% Dark Attack, 80% Status Recovery, 90% Resist Paralyze/Charm/Petrify, 40% Resist Sleep/Poison/Silence/Confuse, 30% Besist Behead, 300% Dark Defense

Lionel (Quest):
Level 45 (100%) - Strange Miasma Wave*, Soul Trap*, Summon*, Shout, Spells (Hallobuti, Raglass, Ziakalad, Rastoma, Enterook Mista, Zefeifus), Magic Essence, King's Proof, Restore, 2 Actions Per Turn, Immune to Drain, 90% Resist Paralyze/Silence/Charm, 50% Resist Confuse/Petrify/Behead, 300% Dark Defense

Researcher (Boss):
Level 48 (100%) - Summon Judgement*, Unclean Earth*, Strange Miasma Wave*, Mind Crush*, Shout, Absolute Barrier, Spells (Ramialf, Zeo Nadar), 20.8% Swallow Return, Ghost Type, 3 Actions Per Turn, 50% Resist All Spell Types (Except Summon), 60% Status Recovery, Immune to Behead/Drain, 30% Resist All Ailments, 200% Thunder Defense, 90% Fire/Water/Holy/Dark Defense

Ulgel (Mid Boss):
Level 55 (90%) - Draw*, Strange Miasma Wave*, Dark Breath, Armor Break, Spells (Ziakalad, Zeifeifus, Zeo Nadar), Restore, 374hp Turn Recovery, 2 Actions Per Turn, 30% Chance to Sleep, 1% Chance to Behead, 100% All Element Attack, 80% Status Recovery, 90% Resist Paralyze/Charm/Petrify/Behead, 75% Resist Sleep/Poison/Silence/Confuse, -100% Weak to Water
Soldier of the Giant Gods Notes
At B1 (2x,8y) you will find the gag character Boumit who is once again complaining about his health issues, only this time he asks for some medicine. You can give him a Night Dew Lozenges if you want, as many times as you want, but you do not get anything for it.

At B2 (4x,18y) you will find a Monster with Eggs, which starts the "Demon's Egg" quest. There are two ways to finish this quest, one being harder than the other. The easy way is to say Yes to leave her alone, making it so you can no longer choose to battle her for now. You can also choose not to step on her tile at all, which has the same effect as leaving her alone. The hard way is to say No, which puts you into a battle against a single Organ Lizard Queen. Defeat her and the party will destroy some eggs, but you do not get anything for it yet. No matter which way you choose, return to this spot again after you have pulled the Bronze Sword out of the Artery at B7 (6x,11y). If you chose to leave her alone (easy) her eggs will hatch and you will be forced into a battle against a single Organ Lizard Queen and five Organ Lizard Babies. If you chose to kill her (hard) you will be forced into battle against three Organ Lizard Queens and two Organ Lizard Babies in the front row, with a random amount of Organ Lizard Babies filling the other two rows. The Babies are weak to Sleep, so take advantage of that if you need to. No matter which battle you get, defeat them and you will find an Unidentified Junk (Illusion Drop) in their nest.

For those of you on the "The Great Sorceror's Bones" quest, there are 9 types of bones to find. At B2 (3x,12y) you will find the <Key Item> Great Sorceror's Left Hand, B3 (5x,9y) has the <Key Item> Great Sorceror's Pelvis, B4 (15x,7y) has the <Key Item> Great Sorceror's Right Leg, B5 (16x,2y) has the <Key Item> Great Sorceror's Spine, B6 (15x,6y) has the <Key Item> Great Sorceror's Right Hand, B7 has the <Key Item> Great Sorceror's Skull at (11x,13y), the <Key Item> Great Sorceror's Left Leg at (9x,3y), and the <Key Item> Great Sorceror's Sturnum at (16x,1y), and B8 (16x,8y) holds the <Key Item> Great Sorceror's Rib. Once you have all 9 they will combine and Lionel will appear, forcing you into a battle against him and a Maelstrom, sometimes with a few Squeezers as well. Defeat them to obtain the <Key Item> Great Sorceror's Skeleton, then head back to Igdra Village and Talk with the Suspicious Merchant to find that he is gone. A man will tell you what happened to him and give you a Cult Ankh (Unleash Hidden Power to consume for 1 PIE), finishing the quest.

There are two Ghosts in this dungeon that start the same quest; Aygil at B3 (5x,16y) and Vani at B4 (8x,16y). No matter which one you talk to first, he will offer you an Ankh in exchange for killing the other Ghost, giving you the "Fate of the Dead" quest. The type of Ankh you get depends on which Ghost you leave alive; Aygil gives you a Life Ankh (Consumes the item for +1 VIT if you Unleash Hidden Power) and Vani gives you a Keen Ankh (Consumes the item for +1 AGI if you Unleash Hidden Power). Pick one to talk to first, then visit the other Ghost and he will make (a partially untranslated...) counteroffer. Choosing Finish off (Name of Ghost you are talking to) will immediately put you in a battle against a Vengeful Spirit. Choosing Betray (Name of other Ghost) will allow you to go to the other Ghost, or talk to the Ghost you are currently at again to kill them if you change your mind. Do Nothing is just that, and it does not lock you out of the quest, so use it if you change your mind and decide to kill the other Ghost. Choosing You drew your sword on (Name of Ghost you are talking to) will put you in a battle against a Vengeful Ghost. No matter which Ghost you choose to kill, return to the one you left alive to receive your reward and finish the quest.

While exploring B6 you will come across the <Key Item> Lady's Portrait at (9x,7y), which your party will automatically pick up.

While exploring B7 and B8 you have a random chance to come across a white, transparent Ore. Use a Pick to collect the <Key Item> Unnamed Ore. When you return to Ishmag Talk to the Skilled Blacksmith to give it to him. He tells you that he does not know how long it will take (it's 22 Days) but to check in once and a while for your reward, the Full-Bodied Swing. This finally completes the "His Finest Work" quest. If you want anything else out of the Blacksmith you will have to collect and sell 100 of a fragment type (Star, Moon, Sun, Space), which will put new stuff up for sale in the shop. This is not an official quest. I don't remember exactly what the items are because it has been too long since I last did it, but I do remember being a tad disappointed that they could be found elsewhere. Still, if you want to do it the option is available.

The Juno Tablet can be randomly found on B8. If you have been collecting them all you should have two more to go.

There are two places you can activate the "Birth-cry of the Old Era" quest; B2 (15,12y) which is optional, and B8 (11x,11y). Skipping the spot in B2 has no negative effects and the event will erase if you visit the spot in B8 first. Also, you are not required to officially have the quest to activate the boss fight. The only thing you'll miss is some flavor text.

To activate the boss fight, go to B7 (6x,11y) and the party will find a Bronze Sword thrust into an Artery. The game will ask if you want to remove it. Say Yes and the Sword will crumble into dust. Next, go to B5 (13x,17y) and the Swollen Sphere will pop, forcing you into a battle against Ulgel. Check its entry in the enemy list to see its abilities. It is pretty strong and has good Turn Recovery and status resistances, but you can take advantage of his weakness to Water. You might need to cast Robuti and Orath a few times to get some good hits in, depending on the level and equipment of your party. After you win, go back to the Researcher at B8 (11x,11y), who will now fight you. This boss can wipe summoned creatures and Unclean Earth interrupts healing spells and the Treatment skill (remember that Potions used normally and Turn Recovery still work). They also have Swallow Return as well as some pretty good magic resistances and defenses. They love to cast Ramialf, so don't bother buffing too much. If you must use magic don't use Thunder based spells. While he has decent status recovery his resistance to most ailments is pretty low. Forging ailments on your weapons is a good way of taking advantage of that while dealing damage at the same time. Defeat him for an Unidentified Shield (Unholy Shield) and the quest will be complete.

After finishing the Soldier of the Giant Gods dungeon, return to Ishmag Castle and Arrange Meeting. The King and his Sage will ask you to go on a killing spree in the "Caves of Old," unlocking the 6 skull difficulty Cave of the Ancients dungeon and activating 5 quests; "Heart's Desire," "Master of Nothing," "Master of Love," "Master of Beauty," and "Final Master."
Potential Soldier of the Giant Gods Loot
Loot marked with a * was found by Vino and the JP Wiki.

SOLDIER OF THE GIANT GODS B1
? Sword = Silver Rapier*, Antique Sword
? Katana = Komari Benten, Ninja Sword*
? Spear = Spiral Spear, Trieina*, Saint's Spear*
? Weapon = Ice Tomahawk, Power Blowgun, Cancer, Devil Gun Boanils, Death Arm*, Gravity Ring*
? Book = Oldest Book, Item Encyclopedia, Ghost's Book, Judgement Book*
? Talisman = Spell Charm, Purify Charm, Magic Charm
? Robe = Ninja Suit, Crested Robe, Fairy Robe*
? Shoes = Rusted Leggings*, Ninja Socks, Holy Leggings, Magical Boots, Hardy Greaves*
? Belt = Dirty Obi, Mystery Obi*
? Ring = Death Ring*
? Medicine = Full-Health Potion, Potion of Awakening*
? Junk = Illusion Drop, Magic Herb, Sun Fragment*

SOLDIER OF THE GIANT GODS B2
? Sword = Lightning Sword, Fool's Foil, Silver Rapier, Dragon Killer*, Antique Sword*, Foil of Evening Calm*
? Spear = Tonbokiri, Amenonuboko, Youbokuten, Komatsumei, Lon
? Club = Matsukage*
? Weapon = Hawk Talons, Vector Knuckle, Murasame, Dragon Bright Jamadahl*, World*
? Shield = Rusty Shield, Mithril Shield*, Unholy Shield
? Talisman = Charm, Magic Charm, Spell Charm, Anti-Demon Charm*, Curse Charm*, Purify Charm*
? Gauntlet = Holey Gloves*
? Leather = Tough Leather Armor, Hunter Guard*, Dragon Mail*
? Shoes = Mithril Leggings, Magic Leggings
? Cape = Torn Cape
? Ring = Friendship Ring
? Medicine = Potion of Awakening, Herb of Tranquility, Full-Health Potion
? Junk = Sun Fragment, Tranquil Herb*

SOLDIER OF THE GIANT GODS B3
? Sword = Flamberge, Holy Sword*, High King's Sword*
? Spear = Vig, Lon*
? Club = Deck Cudgel, Lundo Flail*, Light Den Battledore, Crystal Cudgel, Ryzefeyd, Madragora Club, Lahtskamei*, Devil Club*, Temperance Club*, Great Club
? Whip = Throned Ivy*, Flame Whip*
? Shield = Innocent Shield, Dragon Shield
? Talisman = Charm, Anti-Demon Charm, Spell Charm, Magic Charm, Curse Charm, Purify Charm
? Helm = Worn Helm
? Gauntlet = Ragged Gauntlets, Magical Gloves, Flame Gloves
? Mail = Ice Mail, Elven Chainmail, Ramera Armour
? Belt = Bone Belt
? Ring = Death Ring
? Ankh = Intelligence Ankh
? Medicine = Potion of Awakening, Herb of Tranquility, Full-Health Potion
? Junk = Sun Fragment, First Love Flower

SOLDIER OF THE GIANT GODS B4
? Bow = Exorcist's Bow, The Crow, Calamity Bow, Reverse Bow, Fairy Bow*, Angel Strike*
? Weapon = Tasram, Fate Ring, Demon's Full Moon Ring
? Whip = Seijuobi, Flame Whip, Thunder Lord Whip, Empress Whip, Charm Whip*, Thorned Ivy*
? Staff = Flame Rod, Fairy Staff*, Welsh Cane*, Magician's Staff*
? Weapon = Tasram*, Wanyudo*, Demon's Full Moon Ring*, Fate Ring*, Poison Sword*
? Talisman = Charm, Anti-Demon Charm, Spell Charm, Curse Charm*, Purify Charm*, Magic Charm*
? Shield = Bario Shield
? Plate = Ashigaru Armor, Mithril Plate, Goddess Breastplate
? Leather = Rotten Leather Armour
? Cape = Heavy Cloak*, Saphire Cloak*, Koynunu Manteau
? Ring = Friendship Ring*
? Medicine = Potion of Awakening, Full-Health Potion
? Material = Elvish Iron
? Junk = Bloody Dagger*, Tranquil Herb, First Love Flower, Sun Fragment*, Magic Herb*

SOLDIER OF THE GIANT GODS B5
? Sword = Innocent Sword, Mixer Blade, Moon Blade, Crimson Blade, Demon Saber, Imperial Sword*
? Katana = Kogitsune, Cut Snake Sword, Onimaru, Chained Star*
? Axe = Hemeid Axe, Manon Axe*
? Bow = Angel Strike*
? Weapon = Wanyudo, Demon's Full Moon Ring
? Shield = Ghost Shield, Exorcist's Shield
? Talisman = Charm, Spell Charm, Purify Charm, Magic Charm, Curse Charm, Anti-Demon Charm*
? Cap = Torn Hat
? Gauntlet = Old Gloves, Ninja Gauntlets, Dragon Gloves*
? Robe = Ninja Suit
? Armor = Knight's Armor*, Neutral Armor*, Crystal Armor*
? Belt = Short Belt*, Spirit Belt*
? Cape = Crescent Cloak
? Ring = Death Ring
? Medicine = Full-Health Potion, Antidote*
? Junk = Sun Fragment, Quick Dagger, Bloody Dagger, Bewitching Dagger, Cerebellum, Happy Seven*, Tranquil Herb, First Love Flower, Hermit's Knife*

SOLDIER OF THE GIANT GODS B6
? Sword = Demon Saber*, Imperial Sword*
? Katana = Izushi Shortsword*
? Axe = Elven Axe, Victreim Axe, Diamond Axe, Menon Axe, Power Axe*, Hemeid Axe*
? Mace = Bone Breaker, Mithril Mace, Holy Mace, Pope's Mace*, Expulsion Mace*, Elemental Mace*
? Hammer = Spiked Club, Hekatan Hammer, Entrei*, Spiked Club*, Justice*, Comet Hammer*
? Bow = Calamity Bow*
? Talisman = Charm, Spell Charm, Anti-Demon Charm, Purify Charm, Magic Charm, Curse Charm*
? Cap = Ghost Crown, Silver Tiara
? Gauntlet = Damaged Gauntlets, Mantis Gauntlets, Ramera Gauntlets
? Armor = Scavenged Armor
? Mail = Cursed Chainmail*
? Leather = Hunter Guard
? Shoes = Battered Leather Shoes*
? Cape = Crescent Cloak, Diamond Colony, Griffin Cloak*
? Medicine = Antidote, Full-Health Potion
? Material = (+1) Devil's Lapis, Sensolite
? Junk = Sun Fragment

SOLDIER OF THE GIANT GODS B7
? Mace = Serpent Mace, Elemental Mace, Bicorn Horn*, Expusion Mace*
? Katana = Dawn Sword, Kotetsu, Epetam, Kutneslika, Izushi Shortsword*
? Axe = Dwarven Halberd, Alakahi, Emperor's Axe, Death Chopper*
? Whip = Ringschutesher, Dragon Tail, Hanged Man's Whip, Alraune Whip, Vampire Whip
? Talisman = Charm, Anti-Demon Charm, Purify Charm, Magic Charm, Curse Charm*, Spell Charm*
? Helm = Evil Bascinet, Phantom Mask*, Dragon Helm*
? Plate = Cracked Breastplate
? Mail = Elven Chainmail
? Gauntlet = Magic Gauntlets, Mithril Gauntlets
? Cape = Griffin Cloak, Diamond Colony, Saphire Cloak
? Ring = Friendship Ring*
? Material = (+1) Devil Iron
? Medicine = Antidote, Full-Health Potion
? Junk = First Love Flower, Tranquil Herb*, Magic Herb*

SOLDIER OF THE GIANT GODS B8
? Katana = Nene Kirimaru, Ame Shikou*, Komari Benten*, Ninja Sword*
? Mace = Magic Blue Club, Camel Mace, Silver Ram, High Priestess Mace*, Bicorn Horn*
? Bow = Meltos Comb, Polyte's Holy Bow, Diamond Shower*
? Weapon = Cancer*, Gravity Ring, Muramasa
? Whip = Queen's Whip*
? Talisman = Charm, Spell Charm, Purify Charm, Magic Charm
? Shield = Goddess Shield, Mukade Shield*, Shield of Truth*
? Helm = Mithril Helm, Mythril Helm*
? Plate = Mithril Plate
? Shoes = Woodsman's Boots, Bone Leggings*, Dragon Greaves*
? Cape = Diamond Colony, Saphire Cloak
? Ring = White Ring, Sara Ring, Friendship Ring*
? Medicine = Antidote, Full-Health Potion, Revival Tonic*
? Junk = First Love Flower, Tranquil Herb*

THIEF EQUIPMENT STEALS (LEVEL 26+)
Fine Dagger = Vengeful Spirit (Quest)
Hell Sword = Demon Lord
Morningstar = Dean
Smasher Mace = High Cleric
Mystery Club = Parasite Snail
Dancing Katana = Master Ninja
Hitode Shuriken = Master Ninja
Iwatou = Shogun
Vig = Organ Lizard Queen (Quest)
Death Scythe = Samael
Sealing Whip = Mind Sucker
Demon's Whip = Arch Demon

STRAY LOOT NOTES
Ame Shikou can be found somewhere on the lower floors as well.
SIX SKULL DUNGEONS - POST GAME
Preparing for Cave of the Ancients
For levels, your party is probably in the late 30s to late 40s range by now unless you've been rushing to objectives, which will work fine to start. You will want to be in the early 50s by the end of this dungeon for an easier time; not only for this dungeon, but for the start of the last one if you choose to unlock it. The more levels you have, the better.

You will need to find the <Key Item> Headless Doll and the <Key Item> Lady's Portrait if you have not done so already. The Headless Doll is at Guatella Grotto B2 Secret (9x,6y) and the Lady's Portrait is at Soldier of the Giant Gods B6 (9x,7y). Both item locations are shown and routed out on the maps in this guide if you somehow missed them.

Hopefully you took my earlier advice and focused on evasion and resistances as you've geared/Forged your party. Of the two, AC in particular is quite nice and will be useful in the last dungeon as well. Behead resistance and chance to inflict, as always, is very handy to have. Sleep, Confuse and Charm resistances will come in handy for bosses if you think you might have trouble, but they are not very hard. You might consider Forging Ailments on your weapons even if it isn't your style, if you don't need to to use anything else. Having the potential for status effects to trigger with each attack is very nice and will help prep you for the last dungeon. If you struggle on any of the bosses take a serious look at your gear and levels. Each boss fight should not take you long to finish if your levels are in the low to mid 40s.

If you have a Summoner you might want to take a peek at Dhampir. Its Contract resistance is rather high at 80%, but it has an 80% resistance to all magic schools, some very nice status resistances, and 100% Dark Defense. Not bad if you have the patience to grab one. Note that it likes to cast Ramialf so if you get one remember to put it away if you need to buff. Minotaur Chief is not a terribly impressive enemy, but it does have a natural 160hp Turn Recovery and only has a 60% resistance to Contract. Juggernaut has only 30% resistance to Contract and a higher Combative Instinct than Minotaur Chief. It also comes with a natural 40% Chance to Poison and 48hp Turn Recovery, but other than that it is fairly lackluster. Another not-amazing-but-easy-to-Contract (30%) enemy to look at is Ghast. It comes with Vigilance, Pursuit, Petrification Breath, 10% Chance to Drain, Immunity to Petrify and Behead, and absorbs Dark. It is extremely weak to Holy though.

If you have a Thief for the purpose of supplying a Servant, Elite Herbalist is a very common enemy that has a lot of Herbs you can Steal, including Magic Herb. Rememeber them if you run low.
Cave of the Ancients Maps


There are a few places here and there where you can travel off the path that I routed out and still have the same number of steps. These spots are pretty obvious, so walk where you want to walk.

There are a two ways to get to the Broken Mirror on B3 quickly. Technically, if all you want is to get the Mirror from the B2 Ladder, taking the western door at (7x,8y) and walking from there is faster. However, I chose to route out a path that linked up with the fastest way to get to B4 the first time for minimal backtracking. No matter which way you choose to go, if you factor in going to the B4 ladder it is the same amount of steps.

The Icon Key for the B5 Map is missing the Blue Destination Icon due to lack of space.
Cave of the Ancients Enemies
Champion:
Level 39 (90%) - Brace, Group Attack, 50% Status Recovery, 50% Resist Charm, 40% Resist Paralyze/Petrify, 10% Resist Sleep/Poison/Silence/Confusion/Behead

Minotaur Chief *Upright Beast in Dark Zone*:
Level 40 (60%) - Tackle, Group Attack, 56% Combative Instinct, 160hp Turn Recovery, 5% Chance to Poison, 30% Resist All Ailments

Elite Herbalist:
Level 40 (90%) - Counterattack, Treatment, Herbology, Apothecary Knowledge, 20% Resist All Ailments/Behead

Vampanic Tutor *Robed Woman in Dark Zone*:
Level 40 (90%) - Curse, Spells (More than I care to list), Dispel, Hand of Kindness, 2 Actions Per Turn, 20% Status Recovery, Immune to Drain, 20% Holy/Dark Resist, -10% Weak to Charm

Dragon Knight:
Level 40 (90%) - Holy Breath, Spells (Rafelima, Elnam), Dispel, Court Sanctuary, King's Proof, Restore, 60hp Turn Recovery, 50% Status Recovery, 50% resist Paralyze, 25% Resist Sleep/Poison/Silence/Confuse/Charm/Petrify/Behead, 50% Fire/Water/Thunder/Dark Defense

White Knight *Armoured Figure in Dark Zone*:
Level 41 (90%) - Brace, Spells (Hallobukan, Feireed), Dispel, Court Sanctuary, 50% Status Recovery, 150% Holy Defense, 100% Dark Defense

Great Sorceress:
Level 42 (90%) - Spells (Ramisama, Mabalad, Rabalad, Hallobuti), 20% Chance to Silence, 10% All Element Attack

Master Swordsman:
Level 42 (90%) - Dual Wielding, 19.2% Swallow Return, Swallow Killer, 2 Actions Per Turn, 30% Status Recovery

Master Of Nothing (Boss):
Level 42 (100%) - Imitate, Group Attack, King's Proof, Restore, Infinite Range, 2 Actions Per Turn, 20% Chance to Sleep, 50% Status Recovery, 80% Resist Behead, Immune to Drain, 60% Resist Paralyze/Charm/Petrify, 20% resist Sleep/Poison/Silence/Confuse, 50% All Element Defense

Imperial Guard *Armoured Woman in Dark Zone*:
Level 43 (90%) - Stronghold, Spells (Sama Eyes, Rafeireed), Holy Physical Attack, Holy Lance Art, 2 Actions Per Turn, 100% Holy Attack, 50% Status Recovery, 19.2% Resist All Ailments/Behead, 90% Resist Paralyze/Charm/Petrify, 45% Resist Sleep/Poison/Silence/Confuse/Behead, 160% Dark Defense

Iron Golem *Giant in Dark Zone*:
Level 43 (90%) - Brace, High Magic Source, Group Attack, 56% Combative Instinct, 60% resist All Magic Schools (Except Summon), 5% Resist All Ailments/Behead

Master of Love (Boss):
Level 43 (100%) - Spells (Sama Eyes, Immolarati, Rafeireed), Hand of Kindness, King's Proof, Restore, Infinite Range, 20% Chance to Confuse, 50% Status Recovery, Immune to Drain, 80% Resist Behead, 60% Resist Paralyze/Silence/Confuse, 20% Resist Sleep/Poison/Silence/Confuse, 50% All Element Defense

Ifrit *Flame-wreathed Figure in Dark Zone*:
Level 44 (90%) - Self-Destruct, Fire Breath, Group Attack, Spells (Mabalad, Rabalad, Lascorek), 2 Actions Per Turn, 200% Fire Attack, 100% Fire Defense, 20% Resist All Ailments/Behead

Magic Armour *Deteriorating Person in Dark Zone*:
Level 44 (99%) - Weapon Break, Spells (Rabalad, Raglass, Ziakalad), Spirit Contract, Court Sanctuary, Restore, Extra Damage Against Chimeric, 79hp Turn Recovery, 50% Status Resistance, Immune to Behead, 60% Resist All Ailments, 100% All Element Defense

Master of Beauty (Boss):
Level 44 (100%) - Song of Destruction, Tarot, Instrumental, Alter Fate, King's Proof, Restore, Infinite Range, 3x Damage Against Dragons, 2 Actions Per Turn, 30% Chance to Charm, 50% Status Recovery, Immune to Drain, 80% Resist Behead, 60% Resist Paralyze/Charm/Petrify, 20% Resist Sleep/Poison/Silence/Confuse, 50% All Element Defense

Patriarch *Robed Man in Dark Zone*:
Level 45 (90%) - Spells (Too many to list), Dispel, Identification, 2 Actions Per Turn, 40% Status Recovery, 20% Resist All Ailments/Behead, 30% Resist All Elements

Gold Statue:
Level 45 (90%) - Vigilance, Barrier, Curse, High Magic Source, Tarot, Group Attack, Extra Damage Against Fighter/Mage/Cleric/Thief Beast, 2 Actions Per Turn, 10% Chance to Sleep, 80% Status Recovery, Immune to Sleep/Poison/Paralyze, 50% Resist Silence/Confuse/Charm/Petrify, 100% All Element Defense

Belphegor *Bewitching Figure in Dark Zone*:
Level 45 (95%) - Inhale*, Lullaby*, Armor Break, 135hp Turn Recovery, 2 Actions Per Turn, 10% Chance to Drain, 5% Chance to Behead, 60% Status Recovery, 50% Resist Behead, 100% Dark Defense, 80% Holy Defense

Father of Love (Boss):
Level 45 (100%) - Summone Judgement*, Vigilance, Silence Breath, Hand of Kindness, King's Proof, Restore, 108hp Turn Recovery, 80% Chance to Behead, 20% Chance to Confuse, 10% Chance to Drain, 20.1% Resist All Ailments/Behead, 30% All Element Defense

Final Master (Boss):
Level 45 (100%) - Unclean Earth*, Equipment Removal, King's Proof, Restore, 0 Actions per Turn (Not a typo), , 75% Resist All Magic Schools (Except Summon), 50% Status Recovery, Immune to All Ailments/Behead/Drain, 300% All Element Defense

Lilith *Bewitching Figure in Dark Zone*:
Level 46 (95%) - Draw*, Nightmare*, Weapon Break, 2 Actions Per Turn, 50% Chance to Charm, 10% Chance to Drain, 30% Status Recovery, 95% Resist Charm, 30% Resist Behead, 100% Dark Defense, 80% Holy Defense

Magic Sword *Deteriorating Person in Dark Zone*:
Level 46 (99%) - Armor Break, 20.3% Swallow Return, Swallow Killer, Cruelty, Restore, Extra Damage Against Chimeric, 64hp Turn Recovery, 2 Actions Per Turn, 5% Chance to Behead, 40% Holy Attack, 50% Status Recovery, Immune to Behead, 30% resist All Ailments, 25% Dark Defense, 20% Fire/Water/Thunder/Holy Defense

Chaos Demon:
Level 47 (95%) - Call for Reinforcements*, Brace, Spell (Enterook Mista), 5% Chance to Confuse, 30% Resist Paralyze/Confuse/Charm/Petrify, 10% Resist Sleep/Poison/Silence/Behead, 100% Holy/Dark Defense, 90% Fire/Water/Thunder Defense

Juggernaut *Upright Beast in Dark Zone*:
Level 48 (30%) - Brace, Group Attack, 58.2% Combative Instinct, 48hp Turn Recovery, 2 Actions Per Turn, 40% Chance to Poison, 5% Chance to paralyze, 50% Status Recovery, 40% Resist Poison

Ghast:
Level 48 (30%) - Draw*, Strange Miasma Wave*, Vigilance, Petrification Breath, Pursuit, King's Proof, 2 Actions Per Turn, 10% Chance to Drain, 200% Dark Attack, Immune to Petrify/Behead, 200% Dark Defense, 50% Fire/Water/Thunder Defense, -100% Weak to Holy

Bokuden:
Level 48 (90%) - Brace, Dual Wielding, 20.8% Swallow Return, Court Sanctuary, Restore, 2 Actions Per Turn, 50% Status Recovery, 50% Resist Sleep/Poison/Paralyze/Confuse/Charm/Behead

Jester *Humanoid in Dark Zone*:
Level 48 (90%) - Spells (Rabalad, Argeiss, Hallobuti, Raglass, Ziakalad, Rastoma, Enterook Mista, Rafelima), Spirit Contract, King's Proof, Restore, 3 Actions Per Turn, 5% Chance to Behead, 30% Status Recovery, 20% Resist Petrify, 10% Resist Behead

Dhampir *Strange Figure in Dark Zone*:
Level 49 (80%) - Draw*, Brace, Barrier, Spells (Enterook Mista, Feireed, Ramialf), 21% Swallow Return, Court Sanctuary, King's Proof, Restore, Extra Damage Against Undead/Ghost, 220hp Turn Recovery, 2 Actions Per Turn, 10% Chance to Behead, 1% Chance to Drain, 100% Holy Attack, 80% Dark Attack, 80% Resist All Magic Schools, 80% Status Recovery, Immune to Poison/Charm, 75% Resist Silence/Confuse/Petrify/Behead, 50% resist Sleep/Paralyze, 100% Dark Defense
Cave of the Ancients Notes - Part 1
Hard to describe this place without giving too much away. Yes, it is supposed to look like this. Just in case someone is really unfamiliar with this look, the squares on the walls are doors and squares on the floor indicate events or ladders, which are also shown as squares on the ceiling. A quirk to this dungeon is that Event markers will not disappear, even when the Event is gone. One last thing to note is that the normal encounters are much harder than the boss battles. Normally I skip describing events that are not important to finishing the dungeon, and there are quite a few events here that only seem to be lore, silly references, and 4th-wall-breaking RP speak; just in case I have missed a connection to something I will note where to find them below.

At B1 (18x,3y) you will come across a Cloaked Figure that tells you, in "RP speak", that things are about to get much harder as you go. You can find more Cloaked Figures at (1x,7y), (6x,9y), and (10x,13y). You can skip all of them.

At B1 (17x,10y) you will find an old man who tells you to place the Doll and the Portrait next to the Sundial and kicks you out of the room if you have not done so already. Go around the corner to (16x,10y) to find an Old Rod, which is the Sundial. If you have the <Key Item> Headless Doll and the <Key Item> Lady's Portrait your party will auomatically place them on the ground. Now the Old Man will let you pass to B2.

In B2 there are more talkative Cloaked Figures at (19x,12y) and (2x,8y). You can skip them.

At B2 (4x,14y) you will find the <Key Item> Woollen Shoes.

At B2 (5x,12y) you will find Doubleman, who is literally two men. They will tell you that their Masters have no intention of fighting and will kick you out of the hall if you don't have the Woollen Shoes. If you do, they will let you pass. Follow the path to come across a Sleeping Sheep at (10x,12y), which your party will move out of the way. Continue on and enter a tiny room at (12x,11y) where you will find the Master of Nothing. When asked if you want to fight you can say No if you want to back out. Saying Yes will put you in a battle against him. He's a Brawler type that has infinite range, 20% chance to Sleep, and the ability to copy your moves, but the fight is not very hard. If you are having trouble, stack a few casts of Hallobukan and Robuti. While he does have a decent status recovery rate he is not very strong against Sleep, Poison or Confusion. After you beat him the "Master of Nothing" quest is complete and you can access the ladder to B3.

There is an increase in difficulty once you enter B3, so be prepared for it. The next two floors are linked, so you will need to find your way to B4, then back up to B3, then back to B4 again to proceed.

On B3 there is another skippable Cloaked Figure at (9x,2y).

At B3 (11x,11y) your party will accidentally step on something, then be asked if they want to take it. Do so for the <Key Item> Broken Mirror.

At B4 (13x,4y) you will find a Rabbit with a Collar. You'll find even more Rabbits at (19x,7y), (2x,1y), (16x,10y), (2x,10y), (16x,18y), (18x,13y), (8x,15y), and a dead Rabbit at (7x,15y). You might want to touch the (16x,10y) tile for warping purposes so you can pick up a key item later. You will also find a Cloaked Figure at (9x,13y) if you are interested in what he has to say about Rabbits. You can skip all of these events.

Back in B3 (15x,19y) you will find the Mother of Love who is apparently fine with you fighting her son, the Master of Love. Talk with the Master of Love at (3x,15y), then return to the Mother of Love and she will take the Broken Mirror from you if you have it. Once she has the Mirror, return to the Master of Love and you will be forced to battle him and the Father of Love. Once again, it isn't too hard. The Master of Love has a chance to Confuse and access to Immolarati, but since he does not count as a Cleric it doesn't take away too much health. He can also heal with Rafeireed and remove status effects with Sama Eyes. The Father of Love is much more of a threat and I suggest killing it or locking it down with Sleep, Charm or Petrify first if you can. Even if the Master of Love heals its ailment, just taking away its turns is a good thing; it has Silence Breath, Summon Judgement, 20% chance to Confuse, 10% chance to Drain, and a whopping 80% chance to Behead. It does not have Infinite Range, so load up your front row with Behead Resistance or Bifei someone with proper resistance/immunity if you have one. You should cast Robuti to lower its -20 AC if needed. It only has 540hp so you should be able to take it out in one turn with a well prepared party, bypassing its 108hp Turn Recovery. Magic focused parties might have a tougher time, since it is not weak to any particular element. You should know this by now, but if someone becomes Confused have that character Defend until the status effect is removed/gone. After you win the "Master of Love" quest will be complete and you will have access to another ladder to B4.

At B4 (2x,18y) you will find the Master of Beauty who tells you that the rabbits are dying because of your presence, then kicks you out of his room. Search the Jumping Rabbits at (16x,10y) to find the Collared Rabbit again (if you even bothered to find him before), only this time it has something in its mouth. Take it for the <Key Item> Dragon Flute. Now make your way back to the Master of Beauty to fight him. Like the the Masters before him, he isn't hard if you are prepared. Just watch out for his 30% chance to Charm and Lullaby ability. He can pull unresistable Tarot Cards, such as the Lovers, but they can also work against him if they reverse. His attacks can also hit pretty hard; if he focuses on one character they will probably die unless you have been going overboard with AC and HP values, or have been grinding out levels. Like with the Father of Love, tagging him with a status effect like Sleep, Charm, or Petrify can be helpful if you can get it to stick. When you defeat him the "Master of Beauty" quest is complete and you will have access to B5.
Cave of the Ancients Notes - Part 2
There is another increase in difficulty once you enter B5, so be prepared for it once again. From here you can come across Chaos Demons who, like Lesser and Greater Demons, summon reinforcements. They are not as dangerous as most of the enemies you can find here, so take advantage of them if you need to level up.

You can find a dirty insect catching net on the floor at B5 (2x,18y), but your party won't take it. If you come back to this spot after finding the Beehive there will be some butterflies around, even if you mess with the Cocoons near the next boss, but nothing special happens and the event erases. Once you've landed at B5 (8x,8y), after taking the warp at (2x,1y), you will notice an event in the corner of the room that asks if you want to inspect some Cocoons on the wall. Opening it reveals some beads that your party will not take, and leaving them alone does just that. If you come back here after defeating the Final Master the event will be gone no matter what you did, even if you chose to skip the event. Skipping both of these events will not prevent you from finishing the dungeon.

The Final Master is at B5 (8x,10y) and you do not have to do anything special to trigger the fight, which is the easiest battle in the entire game since he literally has 0 actions per turn. The only way you can lose is if you kill yourself, since he reflects all magic damage, so stick to physical attacks and be careful of what you Summon. Even though he does not fight back you might want to cast Robuti a few times just to speed things up. Once defeated, the Final Master says he understands and disappears, completing the "Final Master" quest and leaving you free to take the ladder down to B6. After going down the ladder to make an easy Diomente spot, go back to Ishmag Castle and Arrange Meeting to update the King on your progress. He will remotely unlock four doors in B6 and sends you back in to retrieve "it".

The Pallas Tablet is found randomly in B6. The moment you collect your 15th Tablet you can unlock the last dungeon, so you will need to go back and collect any that you have missed if you wanted to do it.

If you have a Shaman built to be a glass murder/ailment machine, you can rarely find Divine Charms as loot in B6. It's a very good Charm that can deal damage to all types, so you won't have to worry about swapping Charms or spreading your damage types out. This is the floor I remember farming them at when I ran a Shaman in one of my playthroughs two years ago. There may be other places, but I haven't found them elsewhere.

When you first enter B6 you might notice that your map has a few darkened tiles that are marked at (9x,9y), (9x,17y), (5x,12y) and (1x,15y) even through you have not been there yet; two of them are impossible to reach without casting Diomente in battle (don't do this) and having very bad luck. Walking over the other two tiles just brightens them up, marking them as explored. They do not seem to do anything special.

The Cloaked Figure at B6 (8x,12y) will remind you that you are a jerk. There are more talkative Cloaked Figures at (1x,13y), (18x,1y) and (7x,3y). You can also find some writing on the wall at (9x,13y). All of these are skippable.

The Cloaked Figure at B6 (2x,8y), past a hidden doorway, is much more helpful and gives you the <Key Item> Staff of Transformation. This item can be used with the Change Register option in the Training School to change the appearance of your characters and can even make them look like the enemies and NPCs that you have encountered so far. You can also access it when making new characters. The effect is only cosmetic.

Another useful Cloaked Figure is found at B6 (13x,16y) past a locked door, opened with Thief Skills, who offers to sell you a legendary weapon for 1 million gp as many times as you want. If you buy it you get an Aura Punch, an interesting fist weapon that can't hit anything without Forging or Harias. Its main purpose is mining in the next dungeon. That doesn't mean that it isn't useful as equipment though. For example, if you have a Summoner and are trying to make a Contract with a Hunter in the party you can equip it to them to get around the Pursuit ability (as long as it is not Forged or Harias is active). It also has an amazing hit and attack rate, which is great for applying status effects.

At B6 (13x,2y) you will find a Beehive, which gives you the <Key Item> Bee Hive. Go back to Ishmag Castle and Arrange Meeting to show it to the King who gives you a short speech for your trouble, finishes the "Heart's Desire" quest, and waves you away.

For those of you who went through the trouble to collect 15 Tablets, head to the Church in Igdra Village to find a mysterious black robed man who points to your Tablets and tells you to go to the Tower of God, giving you the "Revelations" quest. He disappears, unlocking Ibag Tower in the World Map menu. This 20 floor, six skull difficulty dungeon is the last in the game. Congratulations for making it this far.
Potential Cave of the Ancients Loot
Loot marked with a * was found by Vino and the JP Wiki.

CAVE OF THE ANCIENTS B1
? Sword = Rusty Longsword, Bario Sword, Moon Blade, Hell Sword, Holy Sword, High King's Sword, Freeze Sword
? Spear = Cursed Spear, Trieina, Saint's Spear
? Axe = Rusty Handaxe, Power Axe
? Hammer = Blood Hammer, Spiked Club, Justice, Hekatan Hammer, Head Craze
? Staff = Fairy Staff, Magicina's Staff, Chancellor's Staff
? Shield = Pinpoint Shield, Demon's Wing
? Belt = Mystery Obi, Charm Obi, Crimson Obi
? Medicine = Mahi Oil, Full-Health Potion
? Material = (+1) Sensolite
? Junk = First Love Flower, Magic Herb

CAVE OF THE ANCIENTS B2
? Sword = Blunt Sword
? Katana = Neck Splitter, Cut Snake Sword, Onimaru
? Axe = Bone Axe, Alakahi, Death Chopper, Emperor's Axe, Plackio Axe
? Mace = Pope's Mace
? Bow = Raging Bow, Diamond Shower, Chariot, Elnabeis
? Weapon = Bandage, Dragon Bright Jamadahal, Vector Knuckle
? Whip = Entwined Whip, Hanged Man's Whip
? Shield = Hollow Shield
? Belt = Blue Belt, Judgement Obi, Force Robe
? Medicine = Mahi Oil, Full-Health Potion
? Material = (+2) Devil's Lapis

CAVE OF THE ANCIENTS B3
? Sword = Bario Sword, Sun Sword, Holy Sword, High King's Sword
? Spear = Trieina, Cursed Spear, Trischula, Tower Lance, Gungnir
? Hammer = Blood Hammer, Justice, Hekatan Hammer, Head Craze
? Mace = Evil Mace, High Priestess Mace
? Staff = Ruin Rod, Fairy Staff, Magician's Staff, Welsh Cane
? Whip = Ancient Ivy
? Shield = Demon Shield
? Belt = Champion's Belt, Spirit Belt, Demon King Belt, High King's Belt
? Medicine = Mahi Oil
? Material = (+1) Devil Iron, (+1) Sensolite, (+1) Devil's Lapis
? Junk = Space Fragment, Rusty Dagger, Cerebellum, Hermit's Knife*

CAVE OF THE ANCIENTS B4
? Katana = Oboro, Neck Splitter, Cut Snake Sword, Chained Star, Kusanagi Sword
? Axe = Bone Axe, Alakahi, Emperor's Axe
? Club = Furious Cudgel
? Bow = Raging Bow, Diamond Shower, Chariot
? Weapon = Bandage, Battered Kunai, Fate Ring, Vector Knuckle, Poison Sword, Murasame, Blue Strike
? Talisman = Purify Charm, Holy Charm, Curse Charm
? Armor = Neutral Armor
? Cape = Griffin Cloak
? Medicine = Mahi Oil, Full-Health Potion
? Material = (+1) Devil Iron, (+1) Elvish Iron, (+1) Vectorium, (+2) Devil's Lapis
? Junk = Space Fragment, First Love Flower

CAVE OF THE ANCIENTS B5
? Sword = Bario Sword, Sun Sword, Holy Sword, High King's Sword
? Katana = Epetam
? Spear = Cursed Spear, Trieina, Saint's Spear, Tower Lance
? Hammer = Blood Hammer, Spiked Club, Hekatan Hammer, Head Craze
? Club = Confusion Club, Devil Club
? Weapon = Devil Gun Boanils
? Staff = Ruin Rod, Fairy Staff, Magician's Staff, Welsh Cane, Chancellor's Staff
? Talisman = Curse Charm, Purify Charm
? Medicine = Mahi Oil
? Junk = Space Fragment, First Love Flower

CAVE OF THE ANCIENTS B6
? Katana = Neck Splitter, Cut Snake Sword, Chained Star, Kusanagi Sword, Youringen
? Spear = Yashahime, Youbokuten
? Axe = Bone Axe, Alakahi, Barbarian Axe
? Bow = Composite Bow, Raging Bow, Reverse Bow, Polyte's Holy Bow
? Weapon = Bandage, Dragon Bright Jamadahal, World, Vector Knuckle
? Talisman = (+3) Lightning Charm, Anti-Demon Charm, Purify Charm, Divine Charm
? Medicine = Mahi Oil, Full-Health Potion
? Junk = Space Fragment

THIEF EQUIPMENT STEALS (LEVEL 26+)
Fine Dagger = Jester
Marquis Knife = Jester
Fine Sword = Imperial Guard, White Knight, Dragon Knight
Holy Sword = Magic Sword
Named Sword = Master Swordsman, Bokuden
Barbarian Axe = Minotaur Chief
Expulsion Mace = Vampanic Tutor
Star Rod = Great Sorceress
Crystal Armor = Magic Armour
Preparing for Ibag Tower
I'll be honest and say that there is no real way of preparing yourself for Ibag Tower before experiencing it yourself. Everything up until this point has been pretty fair to the point where, with a little luck and preperation, you can get through without wiping once or having to grind. This dungeon is different though. There are many encounters that are specifically designed to wipe your party, especially once you reach F15. It's not unplayable or impossible, but it can be a very rough time if you've been slacking.

As for levels starting in the early to mid 50s is ok, but it will be very tough. Once your party members reach level 120-150 things will start to feel a lot more survivable, so if you are not a careful or patient player you might want to spend a little time grinding before you enter. You will want your level as high as you can get it. I suggest taking things 3-5 floors at a time rather than trying to blow through the whole Tower in one sitting. Unlocking the Elevator Doors along the way will help with backtracking, which you will need to do at least once for a quest. Bring along Bone Slippers for safety. Dove's Bells (Duplicable with the Warehouse bug) are really good for clearing out guaranteed battles if you want to rush to an objective. You might also want to bring Aura Punch for F3; there are more details about that in Useful Tricks and the Notes section for this dungeon. You might want to listen to the Minstral's song again in Hosbarn Inn. It details what you will be doing in the Tower as well as giving a hint about a puzzle, though how to solve it is in the Notes and Quests sections.

As far as equipment goes, you should be familiar with how to adjust it depending on what you are struggling with. Too much physical damage coming in? Raise your AC and try to control battles with status effects, if it is possible for the enemies you are facing. Hit by certain status effects? Raise your resistance or swap accessories with the proper resistance in battle. Don't forget that Instant Death effects from Magic require 100% Dark Resistance to be immune. Etc. Etc. One of the nice things about taking exploration a few floors at a time is that you can tailor your equipment to face your current challenges rather than trying to cover all 20 floors at once. If you are willing to take advantage of the Replica bug there is a relatively quick way to beef up your equipment through Forging, but you have to reach F3 first.

Speaking of things you can get in the Tower itself, there is an item called Duma's Gem (? Junk found by Vino) that can only be found as random treasure loot on F1. It is an unbreakable map item, which is pretty nice. However, it is very rare. I have never seen it drop in person, for all the hours I spent grinding loot for the loot lists. That said, if the item appeals to you it doesn't hurt to try to get it. The Tower can be completed just fine without it though, so don't feel like you have to get it.

Diomente cannot be used here. The best way to escape is Honey Restorer, which is forgotten after use though it can be relearned. Like all spells, it is not guaranteed that your characters will relearn it every time they level, so if you are worried about it save beforehand. If you do not have a Servant and feel like you need MP while exploring you can abuse Miracle's Level Down effect for a full refill, though it will recalculate your HP. Mahamaha is also a very good spell to have available, but there are some enemies that you cannot use it on (Doppleganger, Great Wall). However, The Moon Card from Bard's Tarot will still work if you win its RNG roll so you have that option. If you have a Cleric, Immolarati can be pretty devastating to tough enemies with high HP. You can get around the bad side of the spell by having a Servant use Magic Herbs or, as mentioned above, abusing Miracle. The spell is not as great on non-Clerics, but still usable if you really want to. One last piece of magic advice: If you have been avoiding Bifei up until this point, I strongly suggest that you start using it. A properly set up tank character will make things a lot easier.

As far as potential Contracts go, I do not recommend it if you value your time. There are some very powerful enemies here that would be excellent additions to your party, but every single enemy has 90% or more resistance to Contract, with the extremely powerful ones sitting at 99%. Even under the best circumstances (Weak to certain Status Effects, Status Effects hitting and staying, Level Drain skill successful, Brawler getting a Clean Hit before every attempt) it could take you hours or even days to get what you want and to claim otherwise would be dishonest. That's great if you are into bragging rights, but you do not need them. All that said, if searching around for specific enemies and having to travel back to town several times because you ran out of MP for attempts sound like a good time to you, go for it! Always do what is fun for you.
Ibag Tower Maps


Click the thumbnails for the fullsized maps. The maps are listed in descending order even though you are technically climbing the Tower, because the maps line up very well and there isn't any reason to force people to scroll through 19 maps to get started. F1, the top most map, is where the entrance is.

Pressing an Elevator Switch on floors 1,5,10, and 15 activates the Elevator shortcut for their respective floors even if you do not walk to the Elevator first. This can make reaching some stairs and quest events faster if you leave the Tower and return via Elevator. The routes on the maps do not take advantage of this and just show a quick route to reach everything by walking normally through the dungeon.

On F4 it is faster to reach the Mystic Square by starting at the F5 Elevator and working your way backwards.

On F5 it is faster to go to the God of Fate event when you first reach the floor, hit the Elevator Switch, then warp (via Honey Restorer) and use the Elevator to reach the Sick Man and the Stairs to F6. It is also faster to use the F5 Elevator when backtracking for the Mystic Square, if that wasn't obvious.

On F6 there are two ways to go with the same amount of steps and battles. Go the way you prefer.

On F8 it is faster to use the F10 Elevator to backtrack to the Mystic Square.

On F9 there are many ways to walk with the same number of steps and battles. Walk where you want to walk.

On F10 the route on the map shows the fastest ways while avoiding encounters that do not cost more steps. The battles you can avoid are pretty obvious, so walk around them if you want to.

On F13 there are a few fast routes with the same number of steps and battles. The diverging points should be obvious if you look at the map. There is also a slow route to the stairs that has no guaranteed battles at all.

On F14 taking the F15 Elevator is faster when backtracking to the Mystic Square.

On F15 there is one avoidable guaranteed battle on the fastest way to the Switch. Walk around it if you want to. You technically save one whole step (including steps taken on F1) if you warp out and walk to the God of Truth from the Elevator once you hit the Elevator Switch, but because Honey Restorer takes you all the way back to town it is not faster in real time. In case it is not obvious to you, the quickest way to reach the stairs from the Elevator is using the nearby hall with the one way wall.

On F18 you might notice that the route takes an extra step to go through the second staircase from the top. This is only to set up a straight shot to one of the staircases to F20 on the next floor and doesn't really save you time over using the top staircase. Take whatever staircase you want.
Ibag Tower Enemies F1-F5
Vampanic Tutor:
Level 40 (90%) - Curse, Spells (More than I care to list), Dispel, Hand of Kindness, 2 Actions Per Turn, 20% Status Recovery, Immune to Drain, 20% Holy/Dark Resist, -10% Weak to Charm

Imperial Guard:
Level 43 (90%) - Stronghold, Spells (Sama Eyes, Rafeireed), Holy Physical Attack, Holy Lance Art, 2 Actions Per Turn, 100% Holy Attack, 50% Status Recovery, 19.2% Resist All Ailments/Behead, 90% Resist Paralyze/Charm/Petrify, 45% Resist Sleep/Poison/Silence/Confuse/Behead, 160% Dark Defense

Imperial Swordsman *Armoured Woman in Dark Zone*:
Level 50 (90%) - Spell (Rafeireed), Dispel, Holy Physical Attack, Holy Lance Art, 2 Actions Per Turn, 200% Holy Attack, 40% Status Recovery, 80% Resist Paralyze/Charm/Petrify, 30% Resist Sleep/Poison/Silence/Confuse/Behead, 80% Dark Defense

Apostate (Quest and normal enemy):
Level 50 (100%) - Strange Miasma Wave*, Draw*, Mind Crush*, Swallow Killer, 21.2% Swallow Return, Sacrifice, Spells (Rafeireed, Bulafei, Skorekh, Orath, Yuniwa Coat, Rapoolfei,), Dispel, Restore, 20hp Turn Recovery, 2 Actions Per Turn, 200% Holy Attack, 150% Fire/Water/Thunder/Dark Attack, 1.5x Damage to All Types, 50% Resist Cleric Spells, 40% Status Recovery, 95% Resist Behead/Drain, 80% Resist Paralyze/Silence/Petrify, 70% Resist Sleep/Poison/Confuse/Charm, 80% Dark Defense, 20% Fire/Water/Thunder/Holy Defense

Thunderbird (Quest and normal enemy):
Level 50 (100%) - Lightning Breath, Spells (Ziakal Ziakalad), Magic Essence, Restore, 3 Attacks Per Turn, 5% Chance to Paralyze, 300% Thunder Attack, 50% Resist Cleric Spells, 40% Status Recovery, 50% Resist Behead, 30% Resist All Ailments, 30% All Element Defense

Nago *On-Rushing Beast in Dark Zone*:
Level 51 (99%) - Strange Miasma Wave*, Weapon Break, Swift Attack, 21.4% Swallow Return, Pursuit, King's Proof, Restore, 295hp Turn Recovery, 2 Actions Per Turn, 10% Chance to Confuse, 100% Holy Damage, 2x Damage to All Types, 80% Status Recovery, 300% Holy Defense

Nemea (Quest and normal enemy) *Stange Lifeform in Dark Zone*:
Level 51 (100%) - Tackle, Ice Breath, Spells (Maglass, Raglass), Magic Essence, Restore, 2 Actions Per Turn, 5% Chance to Behead, 300% Watter Attack, 50% Resist Cleric Spells, 40% Status Recovery, 50% Resist Behead, 30% Resist All Ailments, 30% Resist All Elements

Ramu Ramu (Quest):
Level 52 (100%) - Vigilance, Tackle, Imitate, Spells (Ziakal, Zaikalad), Magic Essence, Restore, 301hp Turn Recovery, 4 Actions Per Turn, 30% Chance to Sleep, 150% Thunder Attack, 50% Resist Cleric Spell, 99% Resist Behead, 95% Resist All Ailments, 100% Fire/Water/Holy/Dark Defense

Master Herbalist:
Level 53 (99%) - Imitate, Treatment, Herbology, Apothecary Knowledge, 30% Resist All Ailments/Behead

Weapons Master *Armoured Figure in Dark Zone*:
Level 53 (99%) - Brace, 21.8% Swallow Return, Dual Wielding, 2 Actions Per Turn, 40% Holy Attack, 30% Status Recovery, 10% Resist All Ailments/Behead, 25% Dark Attack

Galeskegul *Armoured Woman in Dark Zone*:
Level 54 (99%) - Weapon Break, Spells (Sama Eyes, Robukand, Feireed, Rafeireed, Razefeis), Dispel, Holy Physical Attack, Holy Lance Art, 15.3% Court Sanctuary, 151hp Turn Recovery, 2 Actions Per Turn, 3% Chance to Behead, 2x Damage Against Devil, 1.5% Damage Against God, 300% Dark Attack, 50% Status Recovery, 50% Resist Behead, 20% Resist All Ailments, 300% Dark Defense

Tomoku *Kimono-wearing Man in Dark Zone*:
Level 55 (99%) - Unclean Earth*, Self-Destruct, Vigilance, Surprise Attack, Group Attack, Thief Skills, King's Proof, 132hp Turn Recovery, 2 Actions Per Turn, 40% Chance to Behead, 10% Chance to Sleep/Posion/Paralyze/Silence/Confuse, 3% Chance to Petrify (Off hand Only), 2x Damage to Fighter/Magic/Cleric/Thief/Beast, 40% Resist Behead, 10% Resist All Ailments

Terror:
Level 57 (99%) - Group Attack, 22.5% Swallow Return, Spell (Enterook Mista), 16.4% Court Sanctuary, 300% Holy Attack, 80% Resist All Magic Schools (Except Summon), 50% Status Recovery, 300% Resist All Elements

Emerald Colony *Strange Lifeform in Dark Zone*:
Level 58 (90%) - Barrier, Brace, Spells (Enterook Mista, Immolarati), 16.8% Court Sanctuary, 63hp Turn Recovery, 2 Actions Per Turn, 90% Resist All Magic Schools, 30% Status Recovery, Immune to Poison, 95% Resist Silence/Confuse/Charm/Behead/Drain, 50% Resist Sleep/Paralyze, 10% Resist Petrify

Black Sun:
Level 58 (99%) - Strange Miasma Wave*, Swallow Killer, 22.7% Swallow Return, King's Proof, 2 Actions Per Turn, 1.5x Damage Against Devil/God, 100% Holy/Dark Defense

Skillving:
Level 61 (99%) - Draw*, Dragon's Roar*, Tackle, Group Attack, Spells (Feireed, Rarood), 23.2% Swallow Return, Drunken Fist, Restore, 87hp Turn Recovery, 4 Actions Per Turn, 50% Chance to Sleep, 25% Chance to Petrify, 20% Chance to Charm/Behead, 5% Chance to Drain, 40% Resist Alchemy Magic, 95% Status Recovery, 90% Resist Paralyze/Charm/Petrify/Behead, 75% Resist Sleep/Silence, 20% Resist Confuse, 300% Dark Defense, -100% Weak to Poison (It's a Trap)

Sentinal:
Level 66 (99%) - -5hp Turn Recovery, 2 Actions Per Turn, 10% Chance to Behead, 1.5x Damage to Ghost (Off Hand Only), 50% Dark Attack, Immune to Drain, 100% Dark Defense, -100% Weak to Fire/Holy, -10% Weak to Behead

Aggressive Mimic:
Level 70 (99%) - Strange Miasma Wave*, Vigilance, Tackle, Swift Attack, 2 Actions Per Turn, 50% Chance to Poison, 5% Chance to Behead, 200% Dark Attack, 80% Status Recovery, Immune to Behead, 70% Resist Paralyze/Charm/Petrify/Drain, 20% Resist Sleep/Poison/Silence/Confuse, 100% Dark Defense

Eternal Puppy (Event):
Level 99 (99%) - Vigilance, Sacrifice, Holy Breath, Breath+, Spells (Rabalad, Argeiss, Raglass, Ziakalad, Feireed, Elnam, Immolarati, Zeo Nadar), Spirit Contract, Magic Essence, Infinite Range, Spirit Pact, Restore, 476hp Turn Recovery, 3 Actions Per Turn, 200% Holy Attack, 50% Status Recovery, 80% Resist Behead, 50% Resist All Ailments, 50% All Element Defense
Ibag Tower Enemies F6-F10
Note that the enemies from F1-F5 still have a chance to appear. It's possible that some of these enemies could appear earlier, but I have not witnessed it.

Worker Wing (Quest):
Level 30 (100%) - Infinite Range, 2 Actions Per Turn, 50% Status Recovery, 30% Resist Paralyze/Charm/Petrify, 10% Resist Sleep/Poison/Silence/Confuse/Behead

Doppleganger *Dazzling Figure in Dark Zone*:
Level is 60 in the Monster Encyclopedia, but changes to match your party members (100%) - Mirror Ring* (Copies all party members, including all equipment, skills, spells, stat values, defenses and weaknesses).

Hekankale *Giant in Dark Zone*:
Level 75 (99%) - Tackle, Group Attack, Song of Destruction, Song of Protection, Restore, Weapon Break, Armor Break, Reserve Breath, 165hp Turn Recovery, 6 Actions Per Turn, 80% Status Recovery, 90% Resist Paralyze/Charm/PetrifyBehead, 75% Sleep/Poison/Silence/Confuse, 100% Dark Defense

Wargod:
Level 79 (99%) - Vigilance, Chi Wave, Cruelty, 63.9% Combative Instinct, 26.7% Improved Beheading, 3 Actions Per Turn, 26.7 Chance to Behead, 5% Chance to Confuse, 2x Damage Against Fighter/Magic/Cleric/Thief/Beast, 50% Resist All Ailments/Behead, 80% Dark Defense

Death Scythe *Skeleton in Dark Zone*:
Level 82 (99%) - +26% Swallow Return, Infinite Range, Restore -1hp Turn Recovery, 2 Actions per Turn, 30% Chance to Behead, 3% Chance to Petrify, 100% Dark Attack, 30% Status Recovery, Immune to Drain, 80% Resist Paralyze/Charm/Petrify, 30% Resist Sleep/Poison/Silence/Confuse/Behead, 100% Dark Defense, -20% Weak to Fire/Water/Thunder

Archer Polete *Strange Figure in Dark Zone*:
Level 85 (99%) - Soul Trap*, Tarot, Swift Attack, Pursuit Sweep, Spells (Ramisama, Latasif), Thief Skills +1, Restore, 2 Actions Per Turn, 30% Chance to Poison, 10% Chance to Behead, 45% Holy Attack, 40% Resist All Magic Schools (Except Summon), 80% Status Recovery, 90% Resist Paralyze/Charm/Petrify/Behead, 75% Resist Sleep/Poison/Silence/Confusion, 100% Dark Defense

Green:
Level 94 (99%) - Spells (More than I care to list here), Dispel, Identification, 20hp Turn Recovery, 2 Actions Per Turn, 10% Chance to Drain, 1% Chance to Behead (Main Hand Only), 2x Damage Against Magic Type, 95% Resist Drain (Undead are usually Immune), 20% Resist All Ailments, 100% Dark Attack, 20% Fire/Water/Thunder/Holy Defense, -80% Weak to Dark

Shadow Wing (Quest):
Level 95 (100%) - King's Proof, Restore, 722hp Turn Recovery, 3 Actions Per Turn, 5% Chance to Behead, 50% Status Recovery, 90% Resist Paralyze/Charm/Petrify, 50% Resist Sleep/Poison/Silence/Confuse/Behead

Angel:
Level 101 (99%) - Summon*, Barrier, Absolute Barrier, Summon Judgement, Spells (Ziakalad, Feireed), Court Sanctuary 28.4%, King's Proof, Restore, 646hp Turn Recovery, 2 Actions Per Turn, 5% Chance to Charm, 50% Resist Cleric Spells, 80% Status Recovery, Immune to Charm, 75% Resist Sleep/Poison/Paralyze/Silence/Confuse/Petrify, 100% Dark Defense

Great Wall F8 FLOOR MASTER:
Level 103 (99%) - Unclean Earth*, Tackle, Brace, Stronghold, Spell (Rastoma), 2 Actions Per Turn, 10% Chance to Petrify, Immune to Petrify/Behead, 50% Resist Sleep/Poison/Paralyze/Silence/Confuse/Charm, 200% Dark Defense

Salome:
Level 110 (90%) - Tarot, Barrier, Spells (Ziakalad, Rastoma, Enterook Mista, Rapinto), Magic Essence, 2 Actions Per Turn, 50% Status Recovery, Immune to Charm, 90% Resist Paralyze/Petrify, 40% Resist Sleep/Poison/Silence/Confuse/Behead, 90% Dark Defense, 30% Fire/Water/Thunder/Holy Defense

Green Dragon *Dragon in Dark Zone*:
Level 111 (99%) - Poison Breath, 2 Actions Per Turn, 90% Resist Poison, 30% Resist Sleep/Paralyze/Silence/Confuse/Charm/Petrify/Behead, 80% Dark Defense, 30% Fire/Water/Thunder/Holy Defense

Blue Dragon*Dragon in Dark Zone*:
Level 133 (99%) - Confusion Breath, 2 Actions Per Turn, 30% Resist All Magic Schools (Except Summon), 90% Resist Confuse, 40% Resist Sleep/Poison/Paralyze/Silence/Charm/Petrify/Behead, 80% Dark Defense, 30% Fire/Water/Thunder/Holy Defense8
Ibag Tower Enemies F11-F14
Note that the enemies from previous floors still have a chance to appear. It's possible that some of these enemies could appear earlier, but I have not witnessed it.


Arch Demon:
Level 35 (95%) - War Rite, Song of Destruction, Spells (Enterook Mista, Miracle, Immolarati, Rafeireed, Razefeis), King's Proof, Restore, 3 Actions Per Turn, 10% Chance to Poison/Paralyze/Petrify/Behead, 70% Status Recovery, 70% Resist Paralyze/Charm/Petrify/Drain, 20% Resist Sleep/Poison/Silence/Confuse/Behead, 100% Dark Defense

Demon Lord:
Level 45 (95%) - Spells (Enterook Mista, Razefeis), King's Proof, Court Sanctuary, Restore, 130hp Turn Recovery, 2 Actions Per Turn, 50% Dark Attack, 80% Status Recovery, 90% Resist Paralyze/Charm/Petrify, 40% Resist Sleep/Poison/Silence/Confuse, 30% Besist Behead, 300% Dark Defense

Kongoushin:
Level 92 (99%) - Summon Judgement*, Unclean Earth*, Barrier, Group Attack, Mark of Ruin, Restore, 2x Damage Against Devil/Dragon/Giant/God, 2 Actions Per Turn, 10% Chance to Silence, 50% Resist Cleric Spells, 25% Resist Mage Spells, 5% Resist Alchemy Spells, 90% Resist Behead, 50% Resist All Ailments, 80% Dark Defense

Pheonix:
Level 129 (99%) - Calls Reinforcements*, Fire Breath, Breath+, King's Proof, Restore, 967hp Turn Recovery, 2 Actions Per Turn, 300% Fire Attack, 50% Resist All Magic Schools (Except Summon), 90% Status Recovery Rate, Immune to All Ailments/Behead/Drain, 300% Fire Defense

Drath Gloria:
Level 140 (90%) - Strange Miasma Wave*, Fire Breath, Breath+, 294hp Turn Recovery, Court Sanctuary, King's Proof, Restore, 3 Actions Per Turn, 100% Fire Attack, 20% Resist All Magic Schools (except Summon), 60% Status Recovery, 90% Resist Paralyze/Charm/Petrify, 40% Sleep/Poison/Silence/Confuse/Behead, 95% Dark Defense, 30% Fire/Water/Thunder/Holy Defense

Belial:
Level 152 (99%) - Torrent of Darkness*, Brace, Group Attack, Weapon Break, Armor Break, Mark of Ruin, 2 Actions Per Turn, 25% Resist Mage and Alchemy Schools, 5% Resist Cleric Magic, 80% Status Recovery, 90% Resist Paralyze/Charm/Petrify/Behead, 75% Resist Sleep/Poison/Silence/Confuse, 100% Dark Defense

Red Wisp F11-F15 FLOOR MASTER (Can also be a normal enemy from F14 on):
Level 160 (99%) - Swallow Return 32.9%, Restore, 544hp Turn Recovery, 2 Actions Per Turn, 30% Chance to Confuse, 300% Fire Attack, 20% Resist All Magic Schools (Except Summon), 50% Status Recovery, 95% Resist Sleep/Paralyze/Silence/Confuse/Charm/Petrify/Behead, 300% Fire Defense, 50% Water/Thunder/Holy/Dark Defense

Blue Wisp F11-F15 FLOOR MASTER (Can also be a normal enemy from F15 on):
Level 161 (99%) - Court Sanctuary, Restore, 547hp Turn Recovery, 2 Actions Per Turn, 30% Chance to Charm, 300% Water Attack, 20% Resist All Magic Schools (Except Summon), 50% Status Recovery, 95% Resist Poison/Paralyze/Silence/Confuse/Charm/Petrify/Behead, 300% Water Defense, 50% Fire/Thunder/Holy/Dark Defense
Ibag Tower Enemies F15-F19
Note that the enemies from previous floors still have a chance to appear. It's possible that some of these enemies could appear earlier, but I have not witnessed it.


Star Gazer:
Level 160 (99%) - Armor Break, Swift Attack, Pursuit Sweep, 32.9% Swallow Return, Thief Skills +1, 384hp Turn Recovery, 3% Chance to Behead, 10% Holy Attack, 2x Damage Against Beast, 5% Resist All Magic Schools (except Summon), 35% Status Recovery, 40% Resist Poison, 30% Resist Sleep/Paralysis/Silence/Confuse/Charm/Petrify/Behead.

Gold Dragon *Dragon in Dark Zone*:
Level 166 (99%) - Charm Breath, 2 Actions Per Turn, 40% Resist All Magic Schools (Except Summon), 90% Resist Charm, 50% Resist Sleep/Poison/Paralyze/Silence/Confuse/Petrify/Behead, 80% Dark Defense, 30% Fire/Water/Thunder/Holy Defense

Emerald Dragon:
Level 170 (90%) - Lightning Breath, Spells (Ziakalad, Zeo Nadar), Breath+, Infinite Range, Restore, 3 Actions Per Turn, 100% Thunder Attack, 20% Resist All magic Schools (except Summon), 55% Status Recovery, 85% Resist Patalyze/Charm/Petrify, 35% Resist Sleep/Poison/Silence/Confuse/Behead, 95% Dark Defense, 80% Holy Defense, 40% Thunder Defense, 25% Fire/Water Defense

Black Dragon:
Level 170 (99%) - Summon Judgement*, Brace, Silence Breath, Breath+, Cruelty, Glutton for Punishment, King's Proof, Restore, + Damage to Devil, 8 Actions Per Turn, 50% Dark Attack, 40% Resist All Magic Schools (Except Summon), 50% Status Recovery, 90% Resist Behead, 50% Resist All Ailments, 30% All Element Defense

Archangel:
Level 183 (99%) - Summon*, Spells (Ziakalad, Feireed, Immolarati, Rafeireed), Spirit Contract, Magic Essence, High Magic Source, Court Sanctuary, King's Proof, Restore, 1244hp Turn Recovery, + Damage Against Beast, 2 Actions Per Turn, 10% Chance to Charm, 50% Resist Cleric Magic, 25% Resist Mage Magic, 5% Resist Alchemy Magic, 80% Status Recovery, Immune to Charm/Behead, 75% Resist Sleep/Poison/Paralyze/Silence/Confuse/Petrify, 100% Dark Defense, 30% Fire/Water/Thunder/Holy Defense

Legion (Quest):
Level 209 (100%) - Draw*, Brace, Chi Wave, Armor Break, Group Attack, 76.7% Combative Instinct, Spell (Ramialf), Glutton for Punishment, Ancient Rites, 2257hp Turn Recovery, 3 Actions Per Turn, 5% Resist All Magic Schools (not a typo), 40% Turn Recovery, Immune to Drain, 99% Resist Behead, 60% Resist Paralyze/Petrify, 30% Resist Sleep/Poison/Silence/Confuse/Charm, 100% Holy/Dark Defense, 20% Fire Defense, 10% Water/Thunder Defense
Ibag Tower Enemies F20
Note that the enemies from previous floors still have a chance to appear. It's possible that some of these enemies could appear earlier, but I have not witnessed it.


Nordetanit (Boss):
Level 250 (100%) - Draw*, Inhale*, Strange Miasma Wave*, Summon Judgement*, Holy Breath, Weapon Break, Armor Break, Group Attack, Spells (Robuti, Rafeireed, Makaracha, Rapinto), Torrent of Darkness, Nocturnal, Soul Release, Restore, 3400hp Turn Recovery, 3 Actions Per Turn, 60% Chance to Paralyze, 50% Chance to Charm, 30% Chance to Drain, 150% Holy/Dark Attack, 50% Resist Cleric Spells, 25% Resist Mage Spells, 5% Resist Alchemy Spells, 80% Status Recovery, Immune to Behead/Drain, 95% Resist Paralyze/Charm/Petrify, 45% Resist Sleep/Poison/Silence/Confuse, 300% Dark Defense, 200% Holy Defense, 50% Thunder Defense, 40% Water Defense, 30% Fire Defense

Ancient Dragon:
Level 312 (99%) - Draw*, Brace, Death Breath, Breath +, Court Sanctuary, King's Proof, Restore, 1497hp Turn Recovery, 2x Damage Against God, 3 Actions Per Turn, 5% Chance to Confuse/Behead, 300% Fire Attack, 20% Resist All Magic Schools (Except Summon), 60% Status Recovery, 90% Resist Paralyze/Charm/Petrify, 50% Resist Sleep/Poison/Silence/Confusion/Behead, 300% Fire Defense, 90% Dark Defense

Divine Dragon:
Level 500 (99%) - Strange Miasma Wave*, Unclean Earth*, Barrier, Lightning Breath, Spells (Ziakal, Ziakalad), Magic Essence, King's Proof, Restore, , 2400hp Turn Recovery, 2x Damage to All Types Except Fighter/Magic/Cleric/Thief, 3 Actions Per Turn, 5% Chance to Sleep/Poison, 300% Thunder Attack, 20% Resist All Magic Schools (Except Summon), 60% Status Recovery, 90% Resist Behead, 50% Resist All Ailments, 90% Dark Defense, 40% Fire/Water/Thunder/Holy Defense


Because of its nature, I am showing all the information about the final Floor Master below in an easier to read format, even stuff I would normally skip due to space constraints and laziness. If my tips in the Notes section don't help you, comb through its information and see if you can make a better strategy:

Incarnation:
Level 1249 (100%)
God Race, Gender Neutral, Neutral Alignment
-57 AC, 63 in All Stats
43,715 HP, 2,185hp Turn Recovery
6 Actions Per Turn, Infinite Range, 10% Chance to Inflict All Ailments, 5% Chance to Behead/Drain
Skills = Shout, Spells (Raglass, Ziakalad, Elnam, Immolarati, Rafeireed, Ramialf), Spirit Contract, Magic Essence, Physical Attack Power Up+1 (87.5%), Magic Power Up +1 (174.9%), Holy Lance Art, King's Proof, Restore
Magic School Resistances = 50% Cleric Resistance, 40% Mage/Alchemy Resistance
100% Status Recovery Rate, Immune to Everything Except Sleep (50% Resistance)
Elemental Defenses = 300% Fire/Water/Thunder/Holy Defense, 200% Dark Defense
Ibag Tower Notes F1-F10
As has been mentioned several times already, you cannot use Diomente in this Tower or in Battle. If you want to exit the Tower safely I suggest relying on Honey Restorer rather than walking all the way back. The amount of EP you get while exploring should more than cover the fact that it erases after each use, since you have a chance to relearn it on each level up. I suggest unlocking the Elevators as soon as you can. The shortcuts they provide will really help you out and you do not have to find the Elevator door first to use them, just the Switch. You can find the Elevator Switches at F1 (10x,9y), F5 (3x,4y), F10 (13x,10y), and F15 (8x,15y). If you just want to unlock the shortcuts and are having difficulty reaching the Switches consider using Dove's Bells (Duplicable with the Warehouse bug). They will be very handy from F15 on.

Before you can start exploring the Tower in depth you will have to complete a small Trial; it serves as a good test to see if you are ready for the Tower. If you find you cannot complete it, take a really good look at your equipment first, then your levels. If you can complete it, even if you struggled, you will be fine to try and keep pushing forward. At F1 (7x,1y) you will find a Brown Robed Man who immediately challenges you to a fight. If the Apostate gets the first hit his target might die if your levels are in the 50s, but in terms of the difficulty of this Tower the fight isn't that hard. If you can remove his equipment or break his weapon the fight is a lot easier. After you win, follow the path and into a room to find another Apostate at (3x,2y). Talking to him immediately starts a gauntlet fight, starting with a Thunderbird. When you kill that, he will throw you into another battle against a Namea. Kill that and be forced into one last battle against a Ramu Ramu. After defeating the last one, the Apostate will finally accept your presence and open the doors at (8x,3y) and (11x,3y). Go past the doors to the Cloaked Figure at (10x,4y) who will give you the "Trials of the Tower" quest and disappear. You will need to finish this quest before you can explore the final floor.

A quick note that Apostates have an item called Syphon Ring. If you have a Thief and manage to Steal one (must be removed first) you can randomly change a character's Breath Attack Type if you Unleash Hidden Power, including the Ailment and Death inducing ones; It is worth it if you have Dragonewts and/or Pomedoon users. Be sure to save before you do it if you are looking for something specific.

As you explore, if you come across a Skillving be very careful if you have a Werebeast party member or a Chance to Poison with weapons. It is already a strong enemy, but it has the Drunken Fist EX Skill and Poison has a 100% chance to hit it. On a more positive note, Master Herbalists hold a lot of tasty herbs, Magic Herb included, so if you have a Thief and need potion supplies take advantage of them.

Duma's Map is random F1 loot if you are interested.

At F2 (8x,5y) you will find a Mystic Square with a barrier around it. Remember this spot for later. You can find more Mystic Squares at F4 (15x,10y), F5 (17x,16y), F8 (11x,19y), F10 (4x,3y), F14 (12x,2y), and F16 (12x,10y). You do not need to visit these seals until you start the second step of the quest associated with them, so feel free to skip them for now.

In a tiny room at F3 (19x,3y) your party will find something shining in the floor. If you have an Aura Punch (buy as many as you like in B6 of the Cave of the Ancients for 1 million GP each) you can permanently sacrifice one for a shot at a single high value +2 Ore or (very rarely) a Fragment. You can do this as many times as you have Aura Punches. Don't bother using a Pick if it prompts you to do so. It will permanently shatter it and you won't get anything. If you are interested in using an exploit to make things easier check out Infinite Pick/Aura Punch Use With Replica in the Useful Tricks section. If you decide to activate the Replica Permanence Bug, note that even if the Replica is dead you can still use their Pick/Aura Punch if they have one.

When you reach F5 you can activate the elevator with the switch at (3x4y). Don't forget it. The Elevator Door itself is at (9x,9y) and you can access it from the F1 Elevator as soon as you hit the switch.

At F5 (2x,16y) you will find a Cloaked Figure calling himself the god of fate. After some flavor text they will hand you the <Key Item> Medicine of Fate and disappear. Head to (19x,16y) and you will find someone who looks like a Langseil. They say their body feels like it's on fire and beg for help. The game will ask if you want to give them the Medicine of Fate. It does not matter what you choose to do, but it is important to remember what you did. Either way, the man will disappear.

Once you enter F6 the difficulty will increase quite a bit. Dopplegangers (like the ones in Degus Gila, they copy your party) are particularly nasty, giving you no EP and you cannot use Mahamaha to run from them, though the Moon Card still has the potential to work. On a very minor plus side, defeating them in the Tower unlocks its entry in the Monster Encyclopedia. A good way to deal with them is to remove your weapons, reequip them every battle, then remove them again afterwards; though it can get tedious it is extremely effective. I do not suggest removing your armor in case you get surprised by an enemy. As for other enemies to be on the lookout for, beware of the speed and damage of Archer Poletes. They get 2 actions per turn and in each action they can attack you 4 times.

In the middle area of F8 you will come across Great Wall, a Floor Master which is not marked on the map and you cannot run from them with Mahamaha, though the Moon Card still has the potential to work. It has the Unclean Earth skill, so be careful and have Petrify resistance and healing potions available if you want to explore the entirety of this floor. You only have a 50/50 chance to inflict most status ailments on it (it is immune to Petrify/Behead), but it is worth it to try if you don't think you can deal 1751 damage quickly. This Floor Master will randomly respawn elsewhere when you kill it, including right in front of you. It does not count toward the Heroes Book of Secrets event.

Worker Wings will come rushing forward and force you into a battle at random intervals while in F8. There are a lot of them, but they are very easy to kill. When you defeat them the first time you will get the "Dragon of the Tower" quest. There will be two more random attacks, with the third being against both Worker Wings and their boss, Shadow Wing. The only thing Shadow Wing really has going for it is a 722hp Turn Recovery. You should be able to use the rows of Worker Wings as a defense while you stack buffs/debuffs before fighting the boss if you think you will struggle. When you defeat it an Unidentified Junk (Space Fragment) will fall from its mouth, finishing the quest.

When you reach F10, do not forget the Elevator Switch at (13x,10y).

At F10 (9x,7y) you will find a Cloaked Figure, flanked by a Ghast and a Death Scythe, calling himself the god who wields the power. He talks about how the weak are oppressed by the strong and asks who you side with. If you choose Those Without Power the Ghast will join your party in the 7th slot. If you choose Those With Power the Death Scythe will join your party in the 7th slot. If you have a Summon or Replica in your 7th slot it will be replaced. No matter what you choose, you will be forced to battle the enemy that did not join you. The enemy that joined you does not have to survive the fight. Defeat them and the God of Power will say he understands, then leaves. Like the first God event it does not matter what you choose, only that you remember what you did
Ibag Tower Notes F11-F17
There is another big difficulty increase when you reach F11. Be on the lookout for Pheonix, who has almost 2k HP and can call reinforcements. They are immune to all ailments, including Behead and Drain, so you can't crowd control them unless you have a Bard and can draw a successful Tarot. Even worse is Belial, who is incredibly strong. Anyone who does not have really low AC (-50 or less) will probably die if they get hit. If you feel you absolutely must fight it you might want to use Bifei on a front row character (have the Bifei target Defend and buff their AC with magic), though beware of Armor Break; a very high level front row Ninja or Brawler with their Lowered AC Ability On can be handy here. You will also have to cast Robuti/Hallobuti a few times times to bring Belial's -92 AC down, or if you have a Bard and your Tarot success rate is really low you could risk a Reverse Chariot. There are other Tarot shenanagans you can use depending on how your party is set up and if there are other enemies still alive. It has no Holy defense and very little Cleric spell resistance (Besides Instant Death) so you can try to take advantage of that. It can only attack from the front row, so if the Belial is in the back try keeping the enemy in front alive and slowly pick it off from afar. You can run/Mahamaha from both Pheonix and Belial, and I suggest you do if only to preserve your resources. You can always battle them later.

F11 through F15 introduces two new Floor Masters, Blue Wisp and Red Wisp, and you can see these on the map once they spawn. I have never tested what makes them spawn, but it might be steps taken since they don't seem to spawn if you reach the next floor quickly. They can walk through doors, so listen for it. Blue Wisp has no resistance to Sleep, so it's not very hard if you take advantage of that weakness. If you kill it, it will still be on the map and stick to the tile it was defeated on, but you can walk right through it without a fight. Red Wisp is a bit tougher, with a ~33% chance to trigger Swallow Return and the only status effect it is not resistant to is Poison; Swallow Killer comes in handy if you have access to it. Unlike Blue Wisp, it does not stay on the map after it is defeated. When you reach F14 Red Wisps can appear as normal enemies in battle. Blue Wisps become normal enemies at F15, but it is possible that they can appear in F14 as well and I just never ran into one there. You can run/Mahamaha from both. Like Great Wall, these Floor Masters do not count toward the Heroes Book of Secrets event.

At F14 (9x,9y) you will find a platform with 4 figures and a map. The game will ask you to place the figures. Remember the Minstral's song? The Demon is in the East, the God is in the West, the Human is in the South, and the Sword is automatically placed in the North if you got the first three right. Don't worry if you make a mistake. You can try again. Once placed, the map will glow, sink into the platform, then rise again with an Unidentified Junk (Space Fragment) on it. Not a great reward, but the "Weaved Song of Legends" quest will be complete.

Once you reach F15 the difficulty goes up again. Now is the time to start breaking out the Dove's Bells if you want to preserve your resources. You will start to run into Star Gazers, which are basically a beefed up Archer Polete. They are extremely fast, deadly, can break your armor, and have Swallow Return. Like Archer Polete they can strike their target 4 times per attack. If you get surprised by a group of them it will likely lead to a party wipe, and even if it is a normal battle someone is probably going to die. They have very little resistance to magic schools (except Summon), status effects, and Instant Death, so try to land some if you don't have the means to kill them in one turn.

If you want access to the last Elevator Door the Switch is found at F15 (8x,15y). Another note about F15 is that it seems like it would be easier to squeeze blood from a stone than to get any good loot from this floor, though that may be because I am very unlucky.

At F15 (2x,0y) you will find a Cloaked Figure calling himself the God of Truth who introduces you to the ghost of a woman who does not know... something (the untranslated part says the only part that was translated) and that because of that something she is bound to the Tower. Then you are asked if you will tell her the truth. If you choose Don't Tell Her her soul will remain bound to the Tower. If you choose Tell Her it is revealed that "he" betrayed her and she vanishes. Either way, the Cloaked Figure will tell you he understands, then disappears. Like the last two God events it does not matter what you choose, just remember what you did.

F16 starts to introduce Black Dragons, which have 8 actions per turn. They love to use Summon Judgement, which you can abuse by having a Replica under the Clone Permanance bug. All you have to do is drag a Replica's corpse around with you. It's pretty funny watching them waste their turns. Otherwise you will have to deal with them just like you would any other multi-attacking enemy, and it is extremely deadly when not exploiting its AI. You also have a chance to run into Archangels who have a max 6,222hp, 1,244hp Turn Recovery, and -55 AC. They are not as bad as Belial in terms of damage output, but are still pretty annoying. You will probably have to cast Robuti on them a few times to get some decent hits in.

At F17 (16x,16y) you will find a giant bound in "golden chains. golden chains." While observing it, a Robed Figure will appear and give you a bit of flavor text, starting the "Chained Giant" quest. Remember all those Mystic Squares you have been passing by? Those are the seals you need to break, but don't backtrack just yet. You still need something to deal with their barriers.
Ibag Tower Notes F18-F20 Minus Boss
Cast Sosario as soon as you reach F18 if you have not done so already. There are three Trap Chutes here that will drop you all the way back to F1, and one that takes you to F2. On the plus side, you can save yourself a Honey Restorer cast by using them as a short cut back when you need to leave. In case you have forgotten, if you cast Sosario a second time it will clear the effect so you can drop. The northern most Trap Chute will drop you in F2 where you can find the body of an Armored Knight at (10x,18y). When you investigate the body the party reads their note about giving up and are then suddenly attacked by an Eternal Puppy. Defeat it and you will get a powerful Unidentified Spear (Blue Gale). This event is not a quest, but if you have a Valkyrie it is probably worth the trip.

At F18 (3x,3y) you will find a pedestal with a giant gold key stuck in it. Choose to remove it for the <Key Item> Golden Key. With this item in hand you can now backtrack to all of the Mystic Squares and break the seals. For every one you break you will have to fight a battle. There isn't anything in these battles you haven't faced before (unless you have been Dove's Bell-ing your way through the Tower), though some of the formations can be can be very annoying. If you need a reminder, the Mystic Squares can be found at F2 (8x,5y), F4 (15x,10y), F5 (17x,16y), F8 (11x,19y), F10 (4x,3y), F14 (12x,2y), and F16 (12x,10y). When you break the last seal the mysterious voice will lament your actions, signaling that it is time to revisit the giant. You can do it after you've explored the rest of the Tower, but the last part of the quest isn't that hard in comparison to other stuff you have to deal with on a regular basis; I suggest doing it after a stop in town to rest. Head back to F17 (16x,16y) when you are ready and the Cloaked Figure will babble at you a bit before the giant, Legion, breaks free and forces you into a battle.

Legion has 11,286hp, -50 AC, 2,257hp Turn Recovery, Armor Break, Group Attack, and he hits very hard; Glutton for Punishment makes his attacks even worse as his HP goes down. He also has access to Ramialf, so don't rely too much on buff/debuff stacking; you can Silence him if you think its a big deal. All that said, he hardly has any resistances to status effects. Stick him with Sleep (30%), Charm (30%), Paralyze (60%), or Petrify (60%) and the fight is so easy you will wonder why the Gods had so much trouble with him.

Once you defeat Legion, he will crumble into dust. The chain that once held the giant will fuse with your Golden Key and become an Unidentified Whip (Sealing Whip) that just happens to be a regular drop on this floor, completing the "Chained Giant" quest. Hoorah.

While you explore F19 be on the lookout for ? Ring treasure. One of them could be a Drim Ring which gives the wearer a 3x multiplier against Gods (so long as they don't have a lower multiplier currently equipped...). It will be a handy accessory to have soon.

At F19 (9x,9y) or (9x,10y) you will find another Cloaked Figure who inquires if you want to go to the top of the Tower, then asks you three yes or no questions that should sound familiar. Choose the answers that match your previous actions with the events tied to the three Gods to get a reward (+3 Light Seal) and finish the "Trials of the Tower" quest. Now you will be able to pass and explore the middle area of F20. If you don't choose the right answers you will be teleported to the Tower entrance and will have to do the quest all over again from the three God events.

You might notice that there are Anti-Warp tiles on F19 and F20. Considering they do nothing since Diomente is worthless here, I think the developers of the game are just laughing at you at this point.

Beware of Divine Dragons once you reach F20. They are a tad rare, but are very nasty with -50 AC, 12,000hp, 2,400hp Turn Recovery, Strange Miasma Wave, hard hitting Thunder spells/Breath, and because it has Unclean Earth you won't be able to heal with spells and Treatment (as said many times before, potions used normally and Turn Recovery still work). If you want to fight them, I suggest giving your Bifei-tank as much Thunder Defense as you can, then hit it hard and hope for the best. Having status effects attatched to your weapons can help; a confused Divine Dragon that casts Strange Miasma Wave on itself can take a lot of the pressure off. Another rare-ish enemy is the Ancient Dragon, though he isn't as bad in comparison; at least you can heal around it.

The Cres Tablet can be randomly found in F20. Once you find it all the Tablets will glow, then vanish, and a voice will call out to you in your head telling you that you have found all 16 pieces of God and that they are waiting for you at the top of the Tower... where you already are. You do not need to find this tablet before you take on the boss and you can't see the results from completing your collection until after you kill it anyway.

BUG WARNING
The game will get stuck on a white screen if you are playing in Windowed Mode when you get the last Tablet. If you want to be careful, play in Fullscreen mode until you have the item in hand, then you can switch back if that is your preference.
Ibag Tower F20 Boss
At F20 (15x,10y) you will find an old altar and are prompted to pray. If you do you will be treated to a lengthy speech and a contracted God, Nordetanit, will decend from above to test you, just as they did for other humans long ago. Enjoy the music.

Nordetanit has a lot of things going for it, including -50 AC, 17,000hp, and 3,400hp Turn Recovery. It has Draw, so if you do not have Stronghold be prepared to do some Bifei tank-swapping. It has both Strange Miasma Wave and Inhale, so having a strong healer or multiple characters with Feireed is recommended. It can also wipe your Summons with Summon Judgement, but you can get it to waste a few turns if you have been exploiting Replica. It has both Weapon and Armor Break, so hopefully you have access to several casts of Pendeku. Note that it has Nocturnal, so try to engage it during the daytime if you can. You can see what time it is by pressing F in any battle and looking at the AM in the upper right hand corner. If AM is in yellow text it is day and if it is gray it is night. As you might expect, Nordetanit hits very hard. It also has a high chance to Paralyze (60%), Charm (50%), and Level Drain (30%) on hit along with spells that have the potential to Confuse and Charm the whole party; protect yourself with the proper resistances and Psi-Drain. If you have been neglecting it, Status Recovery is very useful to boost if you can't find the space to fit in good resistances. Watch out for Robuti as well, expecially if it hits whoever is tanking.

Now for the good news. Nordetanit does not have access to Ramialf so you can stack as many buffs/debuffs as you want. Along with the usual AC Buff/Debuffs and Orath I highly recommend using Skorekh/Lascorek a few times as well, if that is something you normally don't do. It has high Status Recovery, but if you have Sleep and Confuse Forged onto your weapons it will sometimes stick. If your characters are fast enough you can get it to lose turns this way. Of course, you can try casting spells to get those effects off as well, but due to the nature of this boss it is unlikely you will find the turns to do that unless you have been powerleveling/powerforging. And last, but not least, it is possible to defeat it without Miracle (or Immolarati spamming) and it is pretty satisfying when you pull it off, but the fight will be considerably harder. If you are not interested in the challenge, cheese it.

Once defeated, the God will give you two Unidentified Junk (Space Fragment and Medal of Power), an Unidentified Weapon (Philosopher's Stone), and an Unidentified Talisman (Rainbow Charm). The "Revelations" quest, and the entire quest log if you have done everything up to this point, is now complete. Congratulations!

...but we are not done yet.
Ibag Tower F20 Floor Master
After both defeating Nordetanit and collecting the last Tablet, exit the Tower. Simply going up and down a floor will not work. Rest, resupply, and do whatever else you need to do, then go back in and make the trek all the way back to F20. If you look at your map you will notice a new Floor Master. When you engage it a voice in your head will tell you that it will test your strength, then a battle against Incarnation begins.

The Incarnation fight can be unwinnable even if you can set up everything to the point where it is very unlikely that you will die, depending on your character's magic/skills, equipment, and levels. If you do not have Tackle and cannot manage to deal more than 2,185 damage per turn the fight could literally go on forever. 2k does not seem like a high number, but Incarnation's defenses are high, it casts Ramialf to wipe buffs/debuffs often, and it uses Shout repeatedly. All that said, there are ways to cheese the fight.

Put as much Thunder, Water and Holy resistance on your equipment as you can, 100% if possible. I also recommend 100% Status Recovery or as close as you can get. Having a very high level Lord can help give you coverage for any ailments you cannot cover with your equipment. As far as damage is concerned, try to get extra damage against Gods on as many characters as you can. Drim Ring (x3) and Angel Sandals (+) are easy ways to achieve this if you cannot Forge 2x on your weapons, and God Slayer is a cursed sub-weapon spear (can be Forged) with 3x that Valkyries, Fighters, and Samurai can equip; there are other options as well, but be sure not to equip any armor with a value lower than your highest value.

Other than the Forging recommendations above, the best advice I can give for surviving this encounter is to use Miracle buffs, especially Avoidance and Infinite Magic. This might be a bug, but Ramialf does not seem to wipe Miracle Avoidance. Also, like all other Floor Masters, you can cause Incarnation to run from you with an unlucky Miracle cast, which means no "reward". It is probably possible to defeat it without Miracle but I have never tried it, nor do I care to grind/farm to a point where it could be done. If you have a high level Thief you can attempt to remove Incarnation's weapons, which will dramatically decrease the incoming damage, but unless you have been powerleveing the chance is fairly low. You could also bring a Break capable Spirit Pact character and hope for a proc. Incarnation has three pieces of equipment on that give it +15 AC each. I am unsure if it lowers its AC properly when removed/broken, but I can tell you that it is still possible to beat after removing/breaking all three. If you have a Bard, just like all Floor Master fights his Tarot success rate is normal and not the lowered boss rate which is good news for folks who like the risk/reward of that class (I suppose this would be easy strat #3).

Choosing not to attempt to control Incarnation's targeting through Bifei before your defenses are up makes this fight a crap shoot. I suggest making a high level Ninja (~250+) your main Bifei-tank if you have one, due to the low AC it can attain and the fact that you can farm for Lowered AC Ability ON Ninja Gear + Ghost Crown for Forging in every equipment slot. You could use a Brawler as well and they will be more useful in dealing damage, but their lack of Lowered AC Ability ON equipment options count against them. Another good choice is to Bifei a high level Samurai and hope that Swallow Return triggers. Be prepared to bounce Bifei around a bit due to deaths before you can set up Miracle/removal or breaks. As far as status effects go, a fast character with Sleep attached to their weapons can be a life saver. Incarnation has a 50% resistance to Sleep and 100% chance to recover from it at the end of every turn*, but if you are lucky enough to get Sleep to stick you can get him to lose a few of his 6 actions. A fast/high luck Master Shaman is a great choice to try and pull this off if you can keep them alive. If you didn't have good luck finding high attack rate weapons to help land status effects, don't forget Aura Punch; you can Forge it with a Devil's Lapis to get x2 against God types with chance to Sleep and because it is a purchase you don't have to rely on random loot. Of course, you can always have a fast magic user try to cast Misama as well.

Fear status is a real killer; whether your get afflicted or not is level based and as far as I know there is no equipment based prevention for it. The best you can do is Forge extra Status Recovery (*note that even 100% Status Recovery will rarely not remove status effects, even from enemies), but that only helps you at the start of each turn; Incarnation is likely to apply it again before you can move. One way you could try and manage it is to set your own Turn Order and hope you can pull off a Mirror/Sama Eyes with a slow character before your other characters act, allowing Incarnation to use up his turns beforehand; this tactic gets in the way of trying for a fast Sleep though.

For easy strat #1, Tackle stacking is extremely effective in this fight for combating turn loss due to Fear and you can consistantly cheese the battle with it. You can do this fight without having any Tackle (or using the other cheesy methods), but expect the battle to last a really long time if you didn't powerlevel/powergear with a focus on dealing damage; when I did it without Tackle/Immolarati/Tarot the fight dragged on for well over 2 hours before the RNG favored me and could have easily taken longer. It is likely that you will need to stack buffs and/or debuffs in order to get good damage to combat its Turn Recovery, which is where using Infinite Magic from Miracle comes in (recast when you need), but if you are unlucky it will cast Ramialf frequently; in this situation without access to Tackle you can get stuck in an infinite fight. Since Incarnation is immune to Silence, unless you use a Bard's Emperor Card, I don't have a non-Tackle answer for this other than to use a weaker character or a magic user, maybe two, to apply buffs/debuffs every single turn and just hope you get lucky.

For easy strat #2, like everything, Incarnation is susceptible to Immolarati. You can use the spell with other classes as well, but Clerics make it so much faster. Bring a little army of Clerics and use a custom Turn Order to have a Servant feed them Magic Herbs or cast Miracle for Infinite Magic as the last action each turn and you can complete the fight in a couple of turns. You can do the same thing with non-Clerics, but it will take longer. It is not a very satisfying strat, but it works and you can still brag that you beat the toughest enemy.

I already mentioned easy strat #3 earlier in this section, but Tarot really deserves more attention here. Because Incarnation is a Floor Master and not a boss you have very reasonable access to everything in a Bard's bag of tricks, and the best part is that you can fit it into any strat to make it better. One really clever thing Vino posted was to remove Incarnation's immunities and use a Ninja's Beheading ability to insta-kill it at half health. And that's only one idea. If you really want to mess with it, try Tarot!

Your reward for beating it? Nothing but its Monster Encyclopedia entry, which means you can use the Staff of Transformation to make everyone look like Incarnation. You can also climb the Tower and kill it again if you want, because it respawns. If you want bragging rights, you could try stealing the Mirage Lance (Fighter, Valkyrie, Lord, Samurai, Ninja) and Shield (All classes) that can only be equipped by Innocent Men and Women, though there really isn't anything you need it for at this point.


Congratulations!
Potential Ibag Tower Loot - Part 1
Loot marked with a * was found by Vino and the JP Wiki.

IBAG TOWER F1
? Sword = Skolugy, Silver Rapier
? Club = Joker Club, Devil Stick, Matsukage, Eimal
? Talisman = (+4) Ice Charm
? Cap = Wicked Hat, Magical Wreath
? Armor = Crystal Armor
? Robe = Lunar Feather Robe
? Shoes = Spulunker Shoes
? Belt = Power Belt, Demon King Belt, High King's Belt
? Ankh = Ankh of Divine Fortune
? Medicine = Night Dew Lozenges, Full-Health Potion, Revival Tonic
? Junk = Magic Herb, Chimera Dagger, Vile Sword Ramshanock, Happy Seven, Fissure Drums, Duma's Gem*

IBAG TOWER F2
? Axe = Describer, Hemeid Axe, Lavlus
? Mace = Unicorn Horn, Pain
? Whip = Silent Whip, Flame Whip
? Gauntlets = Ruin Gauntlets, Rose Gauntlets
? Plate = Goddess Breastplate
? Leather = Ruin Leather Armour, Luci Koynunu
? Shoes = Dark Boots, Black Lacquered Shield
? Cape = Magical Cape
? Belt = Judgement Obi, Blue Belt, Force Robe
? Ankh = Intelligence Ankh, Keen Ankh, Ankh of Divine Fortune
? Medicine = Night Dew Lozenges, Full-Health Potion
? Junk = Space Fragment, Illusion Drop, Magic Herb, Vorpal Sickle, Zero Flute

IBAG TOWER F3
? Katana = Hirano Toushirou, Izushi Shortsword, Demon's Kitchen Knife
? Axe = Golden Axe, Aas Shifter
? Hammer = Comet Hammer
? Helm = Transform Helm, Skull Helm
? Gauntlet = Black Lacquered Gauntlet
? Mail = Ramera Armour, Bronze Corset, Shiny Chain
? Cape = Wings of Destruction, Self-changing Cloak
? Belt = Mystery Obi, Charm Obi, Crimson Obi
? Ankh = Intelligence Ankh, Cult Ankh, Keen Ankh, Herculean Ankh, Ankh of Divine Fortune
? Medicine = Night Dew Lozenges, Full-Health Potion
? Junk = Star Fragment, Moon Fragment, Sun Fragment, Space Fragment, Illusion Drop, Magic Herb, Vorpal Scythe, Witch of Death, Healing Fork

IBAG TOWER F4
? Bow = Wargod Bow, Angel Strike
? Weapon = Obsidian Boomerang, Gravity Ring
? Talisman = (+3) Flame Charm, (+4) Ice Charm, (+3) Lightning Charm, (+3) Dark Seal, (+3) Light Seal
? Plate = Demon Breastplate, Magic Plate
? Leather = Dragon Mail
? Cape = Dark Cloak, Master Cloak
? Ankh = Cult Ankh, Keen Ankh
? Medicine = Night Dew Lozenges, Full-Health Potion
? Junk = Space Fragment, Magic Herb, Illusion Drop, Thunder God's Harp

IBAG TOWER F5
? Spear = Malte
? Bow = Herculean Bow, Silver Bow, Flame Heresy
? Club = Great Tree Branch, Sickening Flail, Great Club, Yaglesi
? Talisman = (+4) Flame Charm
? Helm = Golden Kabuto
? Gauntlet = Heavy Hand, Force Glove
? Armor = Shadow Armor, Saphire Armor
? Robe = Crested Robe
? Shoes = Red Sabo, Angel Sandals
? Other = Black Lacquered Mask
? Ankh = Life Ankh, Keen Ankh, Ankh of Divine Fortune
? Medicine = Night Dew Lozenges, Full-Health Potion, Revival Tonic
? Material = (+1) Devil Iron
? Junk = Space Fragment, Illusion Drop, Magic Herb, Magic Stahl

IBAG TOWER F6
? Sword = Saga-Bringer, Imperial Sword
? Spear = Romulus, Lon, God Slayer, Amenonuhoko
? Cap = Wicked Hat, Magical Wreath
? Robe = Lunar Feather Robe, Snake God Robe
? Shoes = Spulunker Shoes, Hero Greaves
? Cape = Magical Cape, Nightmare Cloak
? Ring = Friendship Ring, White Ring, Sara Ring
? Ankh = Life Ankh, Keen Ankh
? Medicine = Herb of Tranquility, Full-Health Potion
? Junk = Space Fragment, Magic Herb

IBAG TOWER F7
? Whip = Demon's Whip, Blind Love, Queen's Whip
? Staff = Star Rod, Deaths's Staff, Chancellor's Staff, Tilns
? Talisman = (+4) Ice Charm
? Gauntlet = Ruin Gauntlets, Rose Gauntlets, Black Lacquered Gauntlets
? Leather = Ruin Leather Armor, Luci Koynunu
? Shoes = Dark Boots
? Cape = Wings of Destruction, Self-changing Cloak
? Ring = Friendship Ring, White Ring, Sara Ring
? Ankh = Intelligence Ankh, Cult Ankh
? Medicine = Herb of Tranquility, Full-Health Potion
? Junk = Illusion Drop, Magic Herb

IBAG TOWER F8
? Weapon = Bitto, Chalk Fang, Dark Claws, Raptor, Thunder God Particle
? Talisman = (+4 Flame Charm)
? Helm = Skull Helm, Transform Helm
? Mail = Bronze Corset, Shiny Chain
? Shoes = Saphire Leggings, Salamander Leggings
? Other = Black Lacquered Mask
? Cape = Dark Cloak, Master Cloak
? Ring = Friendship Ring, White Ring, Sara Ring, Death Ring
? Ankh = Ankh of Divine Fortune
? Medicine = Herb of Tranquility, Full-Health Potion
? Junk = Illusion Drop, Magic Herb

IBAG TOWER F9
? Katana = Aozasa Katana, Ninja Sword, Obokolope, Hebi no Soushou
? Mace = Giro's Thigh-bone, Elemental Mace
? Gauntlet = Dark Mittons, Light Mittons, Death's Gauntlets
? Plate = Demon Breastplate, Magic Plate
? Armor = Black lacquered Plate
? Shoes = Red Sabo, Angel Sandals
? Ring = Friendship Ring, White Ring, Death Ring, Sara Ring
? Ankh = Herculean Ankh, Cult Ankh, Keen Ankh
? Medicine = Herb of Tranquility, Full-Health Potion
? Material = (+1) Vectorium, (+1) Sensolite
? Junk = Space Fragment, Illusion Drop, Magic Herb

IBAG TOWER F10
? Sword = Mysterious Great String Sword, Freeze Sword, Dragon Emperor Sword, Gram
? Katana = Iwatou, Kusanagi Sword, Doujigiri Yasutsuna
? Club = Devil Stick
? Helm = Golden Kabuto, Saphire Armet
? Gauntlet = Heavy Hand
? Armor = Saphire Armor
? Ring = Friendship Ring, White Ring
? Belt = Power Belt, High King's Belt
? Ankh = Life Ankh, Cult Ankh, Ankh of Divine Fortune
? Medicine = Night Dew Lozenges, Full-Health Potion, Revival Tonic
? Material = (+2) Vectorium, (+1) Sensolite
? Junk = Illusion Drop, Magic Herb, Chimera Dagger, Happy Seven

IBAG TOWER F11
? Club = Matsukage
? Mace = Serpent Mace
? Shield = Exorcist's Shield, Magic Shield
? Ring = Sara Ring
? Ankh = Herculean Ankh, Life Ankh, Cult Ankh
? Material = (+1) Devil Iron, (+1) Devil's Lapis
? Junk = Space Fragment, Illusion Drop

IBAG TOWER F12
? Spear = Lon, Amenonuhoko
? Mace = Elemental Mace, Mjolnir
? Weapon = Blue Strike
? Whip = Queen's Whip
? Staff = Chancellor's Staff
? Talisman = (+4) Lightning Charm, (+3) Light Seal, (+3) Dark Seal
? Shield = Hollow Shield, Shield of Truth, Autoguard
? Ring = Friendship Ring, White Ring, Sara Ring, Death Ring, Angel's Ring
? Ankh = Herculean Ankh, Cult Ankh, Keen Ankh, Ankh of Divine Fortune
? Medicine = Love Flower Crystal, Full-Health Potion
? Material = (+1) Sensolite
? Junk = Space Fragment, Illusion Drop, Magic Herb

IBAG TOWER F13
? Sword = Imperial Sword
? Club = Great Club
? Bow = Angel Strike, Garndiva
? Talisman = (+3) Dark Seal
? Ring = Friendship Ring, White Ring, Death Ring
? Ankh = Cult Ankh
? Medicine = Love Flower Crystal
? Junk = Space Fragment, Illusion Drop, Magic Herb

IBAG TOWER F14
? Sword = Freeze Sword
? Katana = Ninja Sword, Kusanagi Sword, Totsuka Sword
? Axe = Plackio Axe, Golden Axe
? Weapon = Demon's Full-Moon Ring, Thunder God Particle*
? Shield = Demon's Wing, Dragon Shield, Tri Shield
? Ring = Friendship Ring, White Ring, Sara Ring, Angel's Ring
? Ankh = Life Ankh, Intelligence Ankh, Cult Ankh, Ankh of Divine Fortune
? Medicine = Love Flower Crystal, Full-Health Potion
? Junk = Illusion Drop, Magic Herb
Potential Ibag Tower Loot - Part 2
Loot marked with a * was found by Vino and the JP Wiki.

IBAG TOWER F15
? Ring = Friendship Ring, White Ring, Death Ring, Sara Ring
? Ankh = Life Ankh, Keen Ankh
? Medicine = Love Flower Crystal, Full-Health Potion
? Material = (+2) Devil Iron
? Junk = Illusion Drop, Magic Herb

IBAG TOWER F16
? Sword = Skolugy, Silver Rapier, Soul Eater Sword*
? Axe = Hemeid Axe, Lavlus
? Club = Matsukage
? Mace = Serpent Mace
? Talisman = Rainbow Charm
? Ring = Friendship Ring, White Ring, Death Ring, Sara Ring
? Ankh = Intelligence Ankh, Ankh of Divine Fortune
? Medicine = Stone Softener, Full-Health Potion
? Junk = Space Fragment, Illusion Drop, Magic Herb, Happy Seven, Kalun Wen Han

IBAG TOWER F17
? Spear = Lon
? Mace = Elemental Mace
? Weapon = Blue Strike
? Whip = Silent Whip, Sealing Whip, Flame Whip, Queen's Whip, Yamata
? Staff = Chancellor's Staff, Tilns
? Talisman = Rainbow Charm
? Ring = Friendship Ring, White Ring, Sara Ring, Hercales Ring
? Ankh = Cult Ankh, Intelligence Ankh
? Medicine = Stone Softener, Full-Health Potion
? Material = (+1) Elvish Iron, (+1) Devil's Lapis
? Junk = Space Fragment, Magic Herb

IBAG TOWER F18
? Sword = Laevateinn
? Katana = Izushi Shortsword, Fushun
? Hammer = Comet Hammer, Aas Shifter, Despico Hammer
? Club = Great Club
? Bow = Silver Bow, Angel Strike
? Ring = Friendship Ring, White Ring, Death Ring, Sara Ring
? Talisman = Rainbow Charm*
? Ankh = Cult Ankh
? Medicine = Stone Softener, Full-Health Potion
? Junk = Space Fragment, Illusion Drop, Magic Herb

IBAG TOWER F19
? Sword = Freeze Sword, Life Stealer
? Axe = Plackio Axe
? Katana = Ninja Sword, Kusanagi Sword, Totsuka Sword, Hebi no Soushou
? Weapon = Obsidian Boomerang, Gravity Ring, Demon's Full Moon Ring, Mana Burn, Thunder God Particle*
? Ring = Friendship Ring, White Ring, Death Ring, Sara Ring, Drim Ring
? Talisman = Rainbow Charm*
? Ankh = Herculean Ankh, Life Ankh, Intelligence Ankh, Keen Ankh, Ankh of Divine Fortune
? Medicine = Stone Softener, Full-Health Potion
? Material = (+2) Devil Iron, (+1) Elvish Iron, (+1) Vectorium, (+2) Millstone
? Junk = Space Fragment, Illusion Drop, Magic Herb

IBAG TOWER F20
? Spear = Malte, Gungnir, Rune
? Ring = Friendship Ring, White Ring, Sara Ring
? Talisman = Rainbow Charm*
? Ankh = Keen Ankh
? Medicine = Full-Health Potion
? Material = (+1) Sensolite

THIEF EQUIPMENT STEALS (LEVEL 26+)
Bloody Dagger = Skillving
Skolugy = Master Herbalist
Foil of Evening Clam = Skillving
Holy Sword = Weapons Master
Hell Sword = Sentinal
Imperial Sword = Imperial Swordsman
Holy Sabre = Apostate, Incarnation
Demon Sabre = Black Sun
Silver Rapier = Angel, Archangel
Ninja Sword = Tomoku
Izushi Shortsword = Tomoku
Malte = Galeskegul
Mirage Lance = Incarnation
Describer = Death Scythe
Polyte's Holy Bow = Archer Polete
Silver Bow = Star Gazer
Death's Staff = Green
Shield of Truth = Archangel
Mirage Shield = Incarnation
Syphon Ring = Apostate, Incarnation
Hunter's Guard = Skillving
Robe = Apostate
Energy Flux = Incarnation
QUESTS
This is a reference of quests, known as events in game. They are listed as they appear in the Event List in the World Map Menu and not when you can receive them in game. Their number is a rough idea of when the game expects you to complete them, though there are some exceptions. Required quests are marked with a *.
Early Game Quests
No1. Cave Investigation*
When: After forming your first party
Where: Kingdom of Ishmag > Main Plaza
Reward: 5000gp
Go to Tsun-Kurn B3 (12x,0y) and fight the Locusts there. Return to the Kingdom of Ishmag and go to Ishmag Castle to arrange a meeting with the King and advance the story.


No.2 Confused Adventurer
When: After beating Locusts in Tsun-Kurn B1 (10x,9y)
Where: Same spot the Locusts were in
Reward: Tough Leather Shoes
After killing the nest of locusts on B1 (10x,9y) you will find a Confused Man. Talk to the Soldier in Tsun-Kurn B1 (16x,1y) to get Medicine. Return to the Confused Man and give him the Medicine.


No.3 Demon's Child
When: You have a level 5 Bishop in your party
Where: Kingdom of Ishmag > Lohagra Temple > Talk > Confessional > Sobbing Woman
Reward: Item Encyclopedia (weapon), Neutral Ninja
Go into Tsun-Kurn and search B3 (6x,16y) for a Silver Locket. When the Purple-Skinned Child approaches you (when and where is random) give him the Locket and he will give you an Unidentified Book. You can also get him to join your party if you return to his home in Tsun-Kurn B2 (12x,1y).


No.4 Old Man of the Mine*
When: After unlocking Dezaporlia Tunnel
Where: Inspect the Iron Door (F Key) in Dezaporlia Tunnel
Reward: <Key Item> Key to the Abandoned Mine
Go to Guattella Grotto B1 (4x,4y) and speak with the Old Man there. Then go to the Injured Fairy in the Great Tree Yap Gotz F1 (7x,14y) and help them. Return to the Old Man.


No.5 Thief's Old Tricks
When: After unlocking Guatella Grotto
Where: Talk to the Suspicious Man in Guatella Grotto B2 (9x,14y)
Reward: Fanged Serpent
Go to the Clear Water in B2 Secret (5x,15y) to get Subterranean Freshwater. Take that to the Moss-covered Slate on B1 (18x,15y). Then go to the Eerie Statue back in B2 Secret (19x,0y) for the Azure Key. Return to the Suspicious Man (9x,14y) and defeat the Burgler.


No.6 Treasure-guarding Demon
When: After stepping into Guatella Grotto B2 Secret (19x, 10y)
Where: Kingdom of Ishmag > Dondun's Tavern > Gossiping Adventurers
Reward: Palindroma
Go to Guatella Grotto B2 (5x,15y) to start the chase, then go to B2 Secret. Search various holes there until you find your target, which will escape (it's random) so you will have to find it again. There are 5 places it can be: (6x,8y), (17x,9y), (13x,19y), (1x,19y), (3x,2y); it will show up as a ! on your map if it is anywhere you have walked before and can return to a spot it has already been found. After about 2 to 8 times, you will enter a battle with a Leprechaun. Defeat or Contract it.


No.7 The Underwater Treasure
When: After unlocking Guatella Grotto in the Dezaporlia Mines
Where: Kingdom of Ishmag > Dondun's Tavern > Talk > High-born Lady
Reward: Killer
Buy/farm an Elvish Iron and a Vectorium, then make an Alchemist and use the Alchemy Warehouse in Hosbarn Inn to Transmute an Air Seed. Go to Guatella Grotto B3 (6x,9y) and defeat or Contract the Mermaid. Return to the High-born Lady.


No.8 Budding Life
When: After unlocking the Great Tree Yap Gotz in Guatella Grotto
Where: Given automatically by the Injured Fairy in the Great Tree Yap Gotz F1 (7x,14y)
Reward: Bat Belt
After helping the Injured Fairy for the required quest "Old Man of the Mine", head to the Great Tree Yap Gotz F3 (9x,10y) and kill or make a Summon Contract with the boss, Shadow.


No.9 Glittering Sap
When: After unlocking the Great Tree Yap Gotz in Guatella Grotto
Where: The Herbalist Doctor at the Great Tree Yap Gotz F1 (13x,0y)
Reward: Full-Health Potion
Go to the Great Tree Yap Gotz F3 (10x,3y). Choose Yes and fight a battle for the Glittering Sap, then return to the Herbalist.


No.10 Strong Wood
When: After unlocking Dezaporlia Mines in Igdra Village
Where: Kingdom of Ishmag > Hosbarn Inn
Reward: 10 more Storage Spaces
Buy a Broadaxe and head to the Great Tree Yap Gotz F2 (12x,8y) to get some Sturdy Wood. Return to the Innkeeper.


No.11 Mother Tree
When: After unlocking the Great Tree Yap Gotz in Guatella Grotto
Where: Mortally Wounded Fairy at Great Tree Yap Gotz B1 (19x,7y)
Reward: Mystery Club
Go to the Great Tree Yap Gotz B2 (9x,7y) and defeat the Giant Root. Then go to (9x,9y) and kill Shagai.


No.12 Kidnapped Children -RECOMMENDED-
When: After unlocking the Great Tree Yap Gotz in Guatella Grotto
Where: Igdra Village > Plaza > Talk > Bitter-faced Women
Reward: Moon Fragment, Access to Underground Goblin Map
Go to the Great Tree Yap Gotz B1 (3x,0y) and fight your way to (6x,3y). You will be teleported all the way back to Igdra Village and the quest will be complete. Return to (7x,5y) to loot an Underground Goblin ­Map, which respawns any time your current party is not carrying one.


No.13 Visit the Minister*
When: After completing "Cave Investigation"
Where: Kingdom of Ishmag > Ishmag Castle > Arrange Meeting
Reward: The next quest in the storyline...
Go to the Church in Igdra Village to unlock Dezaporlia Tunnel. Check the Locked Door there to get the "Old Man of the Mine" quest. Finish that quest for the Key to the Abandoned Mine. Go back to Dezaporlia Tunnel and read the Journal on the Desk at F1 North (14x,15y). Next, make your way to B1 (6x,18y) and kill the Surrendered Minister. Return to the King.


No.14 The Servants
When: After completing "Old Man of the Mine"
Where: Thirsty Young Man at Dezaporlia Tunnel F1 South (8x,14y)
Reward: All-Purpose Herb (Clean Water) or Nothing (Unclean Water)
There are four locations you can get water in Dezaporlia Tunnel F1 North. You can only take one of each type of water. Haul it to the Thirsty Young Man:
Clean Water from (15x,12y) gives you the reward.
Unclean Water from (16x,12y), (5x,9y) or (8x,19y) gives you nothing.
No matter what you do, any water you didn't use will disappear and the quest is completed.


No.15 Missing Husband
When: After reading the Journal entries in Dezaporlia Tunnel F1 North (14x,15y)
Where: Igdra Village > Plaza > Waiting Woman
Reward: Ankh of Strength
Go to Dezaporlia Tunnel F1 North (2x,13y) and defeat the Dead Miner. Return to the Waiting Woman. Neither choice matters.
Mid Game Quests - Part 1
No.16 Lifelike
When: After unlocking Degus Gila Ice Cave in Igdra Underground Church (16x,8y)
Where: Warrior at Degus Gila Ice Cave B1 (9x,13y)
Reward: Nothing
After talking with the Warrior, go to (19x,0y) in B1 and defeat the Uolia Doppleganger. Next, talk with a Magician in B2 (9x,9y). Go to (16x,3y) in B3 and defeat the Sorcery Doppleganger. After you find the Airstone, go to (7x,0y) in B4 and defeat a party of Dopplegangers, who mimicks your own party in number, classes and levels. Return to the Warrior in B1 (9x,13y).
You have to talk with the Warrior to start the quest, but you can do the first two fights in any order so long as you talk to both people, since that is what spawns them. If you only talk to the Magician the B3 Doppleganger will spawn, but you cannot talk with it to start the fight. The Doppleganger group in B4 will only appear if the first two are defeated.


No.17 Monster Pelt
When: After unlocking Degus Gila Ice Cave in Igdra Underground Church (16x,8y)
Where: Igdra Village > Plaza > Suspicious Merchant
Reward: You can choose between 20,000gp, Ice Bow, or Frost Cloak
Fight Norse Tyrants in Degus Gila Ice Cave for a chance to get Bulky Hides. When you have 5, take them to the Suspicious Merchant. He will offer you 20,000gp. If you decline, he will offer you an Ice Bow. If you decline, he will give you a Frost Cloak.


No.18 Trial of Ice
When: After finding the Airstone in Degus Gila Ice Cave B3 (2x,0y)
Where: Old Man in Degus Gila Ice Cave B4 (9x,10y)
Reward: Havok Hammer
The Old Man will ask if you are willing to defeat 3 sealed demons. Say Yes and defeat the Saphire Dragon. Say Yes again and defeat the Water Dragon. Say Yes a thrid time and defeat the Snow Dragon. If you say No at any time the quest will start over again from the first fight.


No.19 Find the Son
When: After unlocking Degus Gila Ice Cave in Igdra Underground Church (16x,8y)
Where: Igdra Village > Plaza > Searching Father
Reward: Stampy Stamp
Go to Hastrana B2 (16x,13y) to find Pasan Doma, who gives you the Amber Pendant. Bring it back to the Searching Father.


No.20 Blowhole Crying
When: After unlocking Hastrana
Where: Confused Man in Hastrana B1 (10x,2y)
Reward: Skylark Bow
Find Crying Stones at B1 (11x,18y), B2 (14x,2y), B3 (4x,1y), B4 (9x,6y), B5 (8x,5y). Go to B6 (9x,11y) and defeat Tsarl. You have to find all 5 for the boss to spawn.


No.21 Aid-seeking Fairy
When: After unlocking Hastrana
Where: Randomly in Hastrana B2
Reward: Star Rod
After the Fairy approaches you and gives you the quest, go to B3 (0x,15y) and fight the Giro there to release another Fairy. Walk around B2 randomly until you see the pair of Fairies. The chance to meet them on B2 is rolled every step you take, not a specific square, so you can walk up and down a safe hallway until they show up.


No.22 Mother's Momento
When: After unlocking Hastrana
Where: Magician in Hastrana B1 (4x,4y)
Reward: Magic Herb
The Mother's Momento can be found randomly after any battle in Hastrana. Take it back to the Magician.


No.23 Strong Stone
When: C ompleting Strong Wood and entering Igdra Underground Church the first time.
Where: Kingdom of Ishmag > Hosbarn Inn
Reward: 20 more Storage Spaces
Use a Pick to get Durable Stones in Hastrana at B3 (16x,13y), B4 (1x,14y), and B5 (9x,16y). You can only carry one at a time, so drop off each one by talking to the Innkeeper as you find them. You can use the Pause Adventure trick to save time.


No.24 Mysterious Youth*
When: After completing "Visit the Minister"
Where: Kingdom of Ishmag > Ishmag Castle > Arrange Meeting
Reward: The next quest in the storyline...
Defeat the Fallen Youth in Igdra Underground Church B4 (7x,9y), then Arrange Meeting with the King.


No.25 Sacrifical Lover
When: You have a level 10 Bishop in your party
Where: Kingdom of Ishmag > Lohagra Temple > Talk > Confessional > Penitent Man
Reward: Nothing
Go to the Altar in Igdra Undergound Church B2 (14x,2y). Approach it by choosing Yes and fight one battle against 2 Ritual Workers and a Vampire, and another immediately after against a Sacrifice.


No.26 Evil Ritual
When: After unlocking Igdra Underground Church
Where: Goat's Head Carvings in Igdra Underground Church
Reward: Nothing
Destroy the Goat's Head Carvings at B1 (6x,2y), B2 (2x,14y), and B3 (15x,4y) to cause a Spirit to attack you. You can destory them in any order.
Mid Game Quests - Part 2
No27. Disappearance Ruins
When: After talking with the Solider of the Kingdom in Uhlm Zakir Hall F2 (10x,3y)
Where: Muscular Warrior in Rosslie Ruins F1 (5x9y)
Reward: +2 Lightning Charm
Defeat Otohm in B2 (17x,10y).


No28. Ruined Household
When: After talking with the Solider of the Kingdom in Uhlm Zakir Hall F2 (10x,3y)
Where: Kingdom of Ishmag > Dondun's Tavern > Talk > Scholarly Man
Reward: Revival Tonic
Pick up the Black Mermaid Carving from Rosslie Ruins B1 (15x,15y) and show it to the Scholarly Man. He will react to the White Woman Carving if you bring that instead, but it does not affect the quest. You keep the Carvings, so no worries about losing them.


No29. Lamenting Woman
When: After talking with the Solider of the Kingdom in Uhlm Zakir Hall F2 (10x,3y)
Where: Crying Woman in Rosslie Ruins B1 (1x,14y)
Reward: Nothing
Destroy the Altar in B2 (13x,7y). Return to the Crying Woman and defeat the Dagonian.


No30. His Finest Work Part 1
When: After forming your first party
Where: Kingdom of Ishmag > Jadgebol Shoppe > Talk > Skilled Blacksmith
Reward: Free Pick, Plate Armor (Meldoa Ore), +
Randomly walk around Afum Zar Light Cave B4 until you are prompted to use a Pick to loose an Ore from a boulder for a Meldoa Ore. Give the Skilled Blacksmith the Ore as you find it and pass time until he is done for your rewards. You can eventually get every reward, so this quest is not completed in mid game.


No31. The Enemy
When: After unlocking the Afum Zar Light Cave in Rosslie Ruins F1 (10x,2y)
Where: Floor Master Nagu in Afum Zar Light Cave B1
Reward: Entrei
The Floor Master of Afum Zar Light Cave is safe to fight at the appropriate levels for this dungeon. It starts on B1 and retreats to the next floor each time it is defeated. Push it down to B4 and kill it one last time.


No32. Mysterious Shining Pot
When: After unlocking the Afum Zar Light Cave in Rosslie Ruins F1 (10x,2y)
Where: Touch the glowing ball of light in Afum Zar Light Cave at B2 (8x,9y)
Reward: +2 Light Seal
After you touch the specific glowing ball of light (location above) you will have to battle an Edelite. When you defeat it you will receive a Glowing Pot. Fill it by approaching the glowing balls of light at B1 (3x,2y), B2 (10x,18y), B2 (3x,2y), B3 (10x,8y), B3 (16x,5y), B4 (14x,1y), and B4 (13x,19y). Once you have all seven you will get your reward.


No33. Gold-eating Monster
When: After unlocking the Afum Zar Light Cave in Rosslie Ruins F1 (10x,2y)
Where: Kingdom of Ishmag > Dondun's Tavern
Reward: 5000gp, Illusion Drop, Hunter Guard
The Recruiting man will automatically talk to you when you enter the tavern. Agree to Join. If you choose Not Interested instead, you can Talk to him again with no consequences. After Agreeing to Join, Talk to him in the Tavern again when you are ready and choose Yes -> To Afum "Zakir" Cave, which recruits him into the 7th Summon slot and automatically warps you to Afum Zar Light Cave. He has the same equipment and AI as a boss coming up, and you can use him to explore the cave as long as you avoid the next step. Leaving the Cave before reaching the next step will reset the quest, so you will have to Talk to him again. Bring him to the Locked Door in B1 (16x,19y), which will unlock the door and cause him to leave your party. It does not matter if he is under any status effect that would cause him to be unable to move or Dead. Enter and defeat Geed, Phantom x2, and Barbarian (Thief Type) x3. Enter the room at (19x,17y) to find a treasure stash.


No34. Cracked Sphere
When: After completing "Mysterious Youth"
Where: Kingdom of Ishmag > Lohagra Temple > Talk > Man with Child
Reward: +2 Dark Seal
Go to Afum Zar Light Cave B3 and approach the Lamia at (5x,16y). Defeat her and she will give you a Monster's Eye. Return to the Man with Child.
End Game Quests - Part 1
No30. His Finest Work Part 2
When: After forming your first party
Where: Kingdom of Ishmag > Jadgebol Shoppe > Talk > Skilled Blacksmith
Reward: Free Pick, Plate Armor (Meldoa Ore), Mithril Plate (Granium Ore), +
Randomly walk around Afum Zar Light Cave B4 until you are prompted to use a Pick to loose an Ore from a boulder for a Meldoa Ore. Do the same in Nga-Nga Magi Volcano B3 for Granium Ore. Give the Skilled Blacksmith the Ore as you find it and pass time until he is done for your rewards. You can eventually get every reward, so this quest is not completed in end game.


No35. Shinto Estate Investigation*
When: After completing "Mysterious Youth"
Where: Kingdom of Ishmag > Ishmag Castle > Arrange Meeting
Reward: The next quest in the storyline...
Meet Lord Alli Kai in Uhlm Zakir Hall F1 (11x,10y) for the Western-style Key. Go to F2 (17x,14y) and defeat the Book Guard there for the Red Leather-bound Book. Give the book to Alli Kai to access the basement, then make your way to B3 (9x,3y) or (10x,3y), both locations leading to the same event, and defeat Uhlm Zakir. Arrange Meeting with the King.


No36. Cure-all Medicine
When: After completing "Mysterious Youth"
Where: Kingdom of Ishmag > Dondun's Tavern > Talk > Wealthy-looking man
Reward: 40,000gp (Wealthy-looking man) or First Love Flower x9 (Impoverished-looking man)
Go to Uhlm Zakir Hall B2 (1x,8y) and approach the man there to battle a Fallen Angel, two Chimeras, and sometimes some Greater Homunculus. Take the Priest's Medicine you find afterward to the Wealthy-looking man in Dondun's Tavern, or the Impoverished-looking man in Lohagra Temple. The reward depends on who you give it to. You can follow up with the person you didn't choose, but it doesn't make a difference.


No37. Broken Doll
When: After completing "Mysterious Youth"
Where: Battered, One-eyed Doll at Uhlm Zakir Hall F2 (8x,16y)
Reward: Bitto
After finding the first location, find the Doll in the following locations, in order: F2 (10x,18y), F1 (9x,5y), F1 (11x,0y), F2 (14x,10y). Defeat the Yokmongy.


No38. Eerie Presence
When: After giving the Red-Leather bound Book to Alli Kai in Uhlm Zakir Hall
Where: Randomly while exploring Uhlm Zakir Hall B1
Reward: Nothing
As you explore the basement (random number of steps) you will experience 5 events where your party thinks they are being stalked. During the 5th one you will be forced into battle with two Vampires and a La Flaneuse. Kill them. The events will continue to occur, in order, until you get the final fight, even if you switch floors, Pause Adventure and return, or leave the dungeon entirely and come back.


No.39 Royal Curse
When: After completing "Shinto Estate Investigation"
Where: Your first meeting with the invisible Floor Master, found on every floor of Royal Tomb
Reward: High King's Sword, Ghost's Book, Silver Tiara
Inspect the Coffin at 2F West (6x,17y) and take the Soul-Removing Mirror. Let the invisible Floor Master approach you again on whichever floor you choose and the Mirror will turn it visible. Defeat it for the Treasury Key. Use the Key to open a door in 3F and follow the path to the Treasure Coffin.


No.40 Ominous Sign
When: After completing "Shinto Estate Investigation"
Where: Old Man at Royal Tomb F1 West (9x,13y)
Reward: Moon Fragment and Sun Fragment (Red) or Nothing (Blue)
Go to F2 East and open the Coffin at (14x,8y) to see a red gemstone. Return to the Old Man. The reward, or lack thereof, depends on which color you tell him the gemstone is.


No.41 The Igan Flower
When: After finishing the Great Tree Yap Gotz F3
Where: Dondun's Tavern > Talk > Black-clad Man
Reward: Curse Charm
Take a Servant (Or anyone with the Herbalism skill) into the Royal Tomb and walk around 1F West until you randomly find a Mummy with a red flower growing out of it. Take it to discover that it is the Flower of Igan, then give it to the Black-clad Man who is now in the Plaza in Igdra Village.


No.42 The Beloved Sword
When: After completing "Shinto Estate Investigation"
Where: Randomly from a Cloaked Figure in the Royal Tomb F1 West
Reward: Crimson Blade
Identify a Worn Sword and keep it in your inventory as you move around the Royal Tomb. When the Cloaked Figure appears (random) it will recognize the sword and swap it for an unidentified one (Crimson Blade). This quest is repeatable.
End Game Quests - Part 2
No.43 Spirited Away
When: Unlock Nga-Nga Magi Volcano in Ishmag Underground Sanctum B3 (3x,8y)
Where: Nga-Nga Magi Volcano B1 (4x,9y)
Reward: Power Axe
Go to B4 (10x,11y), speak with the girl, and defeat Kuzgua.


No.44 The Sealed One
When: Unlock Nga-Nga Magi Volcano in Ishmag Underground Sanctum B3 (3x,8y)
Where: Nga-Nga Magi Volcano B2 North (13x,19y)
Reward: Dragon Greaves
Go to B3 (5x,5y) and pull the pillar out. Return to B2 North (13x,19y) and defeat Katos Dragon.


No.45 The Monster's Heart
When: Unlock Nga-Nga Magi Volcano in Ishmag Underground Sanctum B3 (3x,8y) and complete the "Monster Pelt" quest
Where: Igdra Village > Plaza > Talk > Suspicious Merchant
Reward: 50,000gp or Ice Tomahawk or Midsummer Garb
Throw the Shining Stone into the Volcanic Spring at Nga-Nga Magi Volcano B3 (10x,13y) and defeat the Blue Flame Elemental. Return to the Suspicious Merchant in Igdra Village. He offers 50,000gp. Refuse and he will offer an Ice Tomahawk. Refuse and he will give you a Midsummer Garb. You can only choose one reward.


No.46 Volcano Witch-Hunt
When: Unlock Nga-Nga Magi Volcano in Ishmag Underground Sanctum B3 (3x,8y)
Where: Kingdom of Ishmag > Training School > Talk > Noble-Bound Soldier
Reward: 60,000gp up front, Crested Robe
Meet the Soldier, Beknoske, at B1 (17x,6y) and he will join your party in the 7th Summon slot as a Samurai. Like Geed from the "Gold-Eating Monster" quest, you can use him to explore the entire Volcano and even fight the boss as long as you do not finish his quest. It does not matter if he has a status effect or is killed. If you Pause Adventure when he is dead he will revive, but still be at 0hp. Approaching the exit will cause him to leave your party, but you can pick him up again with no consequences. Defeat the Arch Mage and Fire Drakes at B3 (8x,8y).


No.47 Strong Steel
When: After completing both "Shinto Estate Investigation" and "Strong Stone"
Where: Kingdom of Ishmag > Hosbarn Inn
Reward: 49 more storage spaces (99 total) and free use of the Alchemy Warehouse
Steal a Sturdy Steel from a Volcanic Turtle with a Master Thief. Sometimes there is a strange bug where the Steel does not go directly into your Key Items. If that happens you can do one more battle to make it become the <Key Item> Durable Steel, freeing up an inventory space. Take it to Hosbarn Inn and Talk with the Innkeeper.


No.48 Underground Temple Investigation*
When: After completing "Shinto Estate Investigation"
Where: Kingdom of Ishmag > Ishmag Castle > Arrange Meeting
Reward: Medal of Power, Magic Shield, Welsh Cane, Ending Credits, and Access to Post Game
Fight your way to Ishmag Underground Sanctum B6 (14x,9y) and defeat Cyclanos.


No.49 Reverberating Bell
When: After completing "Shinto Estate Investigation"
Where: Eerie Bell at Ishmag Underground Sanctum B2 (3x,4y)
Reward: Calamity Bow
If you look at a completed map of B2 you will notice a giant X made up of 13 2x2 squares (the ladder going up does not count). Entering each of those rooms is what triggers the "13 Bells". Visit the Eerie Bell again after doing so to start a fight. Defeat Samael, with a Royal Honeybee and an Insect Lord.


No.50 Man-Eating Spider
When: After killing Aktora in Ishmag Underground Sanctum B5 (3x,6y)
Where: Kingdom of Ishmag > Dondun's Tavern > Talk > Rumour of the Man-Eating Spider
Reward: Cancer
Burn the Small Stone-like Objects at B4 (19x,4y), (5x,13y), (2x,7y), (2x,2y), (14x,6y), and (1x,18y) in any order. (2x,7y) and (14x,6y) will have you fight an Arachne. (19x,4y) will have you battle a random amount of Flasteria and Twin Scovel and reward you with Cancer. Go back to Dondun's Tavern and Talk with the Rumour of the Man-Eating Spider again.


No.51 Captive Beauty
When: After completing "Shinto Estate Investigation"
Where: Elf at Ishmag Underground Sanctum B1 (15x,18y)
Reward: Hanged Man's Whip
Choose to "Help her and take her away" when given the option and Layer will join your party in the 7th Summon slot as a healer. Like Geed from the "Gold-Eating Monster" quest, you can use her to explore most of the Sanctum as long as you do not finish her quest. It does not matter if she has a status effect or is killed. If you Pause Adventure when she is dead she will revive, but still be at 0hp. Approaching the exit will cause her to leave your party, but you can pick her up again with no consequences. If you Diomente past her quest tile in B5 you can use her all the way up to the Aktora fight, but going down to B6 will cause her to leave your party and not immediately return to her pick up spot; exit and re-enter the dungeon to respawn her. Walking on tile B5 (14x,18y) with her in your party will cause her to transform. Defeat the Octopus Woman.
Post Game Quests - Part 1
No30. His Finest Work Part 3
When: After forming your first party
Where: Kingdom of Ishmag > Jadgebol Shoppe > Talk > Skilled Blacksmith
Reward: Free Pick, Plate Armor (Meldoa Ore), Mithril Plate (Granium Ore), Full-Bodied Swing (Unnamed Ore)
Randomly walk around Afum Zar Light Cave B4 until you are prompted to use a Pick to loose an Ore from a boulder for a Meldoa Ore. Do the same in Nga-Nga Magi Volcano B3 for Granium Ore and Soldier of the Giant Gods B7 or B8 for an Unnamed Ore. Give the Skilled Blacksmith the Ore as you find it and pass time until he is done for your rewards. Meldoa Ore takes 3 days, Granium Ore takes 7 days, and Unnamed Ore takes 22 days. You can get every reward.


No.52 Demon's Egg
When: After unlocking Soldier of the Giant Gods
Where: Monster with Eggs at Soldier of the Giant Gods B2 (4x,18y)
Reward: Illusion Drop
The Easy Way:
Leaving the Monster alone (Yes) will take away the option to battle for now. Not talking with the Monster at all gives the same result as leaving her alone. After you have removed the Bronze Sword from the artery at B7 (6x,11y), return to her to battle a single Organ Lizard Queen and five Organ Lizard Babies. Your party will pick up the reward after you win.
The Hard Way:
Attacking the Monster (No) will put you in a battle with an Organ Lizard Queen. Defeating her now will give you nothing and not complete the quest. After you have removed the Bronze Sword from the artery at B7 (6x,11y), return to the spot you killed her to be forced into a battle with a front row of three Organ Lizard Queens and two Organ Lizard Babies, and the other two rows being filled with a random amount of Organ Lizard Babies. Your party will pick up the reward after you win.


No.53 Fate of the Dead
When: After unlocking Soldier of the Giant Gods
Where: Aygil at Soldier of the Giant Gods B3 (5x,16y) or Vani at Soldier of the Giant Gods B4 (8x,16y)
Reward: Life Ankh (Kill Vani) or Keen Ankh (Kill Aygil)
Go to the Ghost you did not talk to first for the next step. If you choose Finish Off you start a fight against a Vengeful Ghost. If you choose Betray you can go back to the first Ghost to kill him instead, or talk to the Ghost you are currently at again. Choosing Do Nothing is just that and there is no reward, but it does not lock you out of the quest. Choosing Draw Your Sword will start a fight against a Vengeful Spirit. Kill one and talk to the other Ghost for your reward, which is different depending on who you left alive.


No.54 The Great Sorceror's Bones
When: After unlocking Soldier of the Giant Gods
Where: Igdra Village > Plaza > Talk > Suspicious Merchant
Reward: Cult Ankh
Find 9 different types of bones in Soldier of the Giant Gods at B2 (3x,12y), B3 (5x,9y), B4 (15,x7y), B5 (16x,2y), B6 (15x,6y), B7 (11x,13y), B7 (9x,3y), B7 (16x,1y), and B8 (16x,8y). You can collect them in any order. When you have them all you will battle Lionel and a Maelstrom, sometimes some Squeezers as well. Defeat them for the Great Sorceror's Skeleton and return to the Suspicious Merchant for some story and your reward.


No.55 Birth-cry of the Old Era
When: After unlocking Soldier of the Giant Gods
Where: Researcher at Soldier of the Giant Gods B2 (15x,12y) or B8 (11x,11y)
Reward: Unholy Shield, Able to Unlock Cave of Ancients at Ishmag Castle
Both locations above can start the quest, but going to the B8 tile first will erase the B2 event with no consequences and you don't have to go to either spot until the boss fight is activated, because neither of the next two events are tied to having the quest officially activated. Go to B7 (6x,11y) and pull the Bronze Sword out of the Artery. Next, go to B5 (13x,17y) to fight and defeat Ulgel. Go to the Researcher at B8 (11x,11y) to fight him.


No.56 Heart's Desire
When: After completing "Birth-cry of the Old Era"
Where: Kingdom of Ishmag > Ishmag Castle > Arrange Meeting
Reward: Nothing
Finish the "Master of Nothing," "Master of Love," "Master of Beauty," and "Final Master" quests, return to Ishmag Castle and Arrange Meeting. The King will unlock four doors in B6 so you can explore it. Get the Bee Hive at B6 (13x,2y) and return to the King.


No.57 Master of Nothing
When: After completing "Birth-cry of the Old Era"
Where: Kingdom of Ishmag > Ishmag Castle > Arrange Meeting
Reward: Access to Cave of the Ancients B3
Get the Headless Doll at Guatella Grotto B2 Secret (9x,6y) and the Lady's Portrait at Soldier of the Giant Gods B6 (9x,7y). Go to the Sundial at Cave of the Ancients B1 (16x,10y) and your party will automatically use the Key Items, allowing you to pass the Old Man at B1 (17x,10y). Find your way to B2 (4x,14y) to pick up the Woollen Shoes, which will allow you to pass the Doubleman at B2 (5x,12y). Find the Master of Nothing at B2 (12x,11y) and say Yes to fight him. Defeat him.


No.58 Master of Love
When: After completing "Birth-cry of the Old Era"
Where: Kingdom of Ishmag > Ishmag Castle > Arrange Meeting
Reward: Access to the ladder leading to the northwest area of Cave of the Ancients B4
Pick up the Broken Mirror at Cave of the Ancients B3 (11x,11y). Make your way to B3 (15x,19y) to talk to the Mother of Love. Next, talk to the Master of Love at B3 (3x,15y). Go back to the Mother of Love who will now take your Broken Mirror. Return to the Master of Love to start a fight. Defeat the Master of Love and the Father of Love.


No.59 Master of Beauty
When: After completing "Birth-cry of the Old Era"
Where: Kingdom of Ishmag > Ishmag Castle > Arrange Meeting
Reward: Access to Cave of the Ancients B5
Talk to the Master of Beauty at B4 (2x,18y) to change the Jumping Rabbit events. Go to B4 (16x,10y) and take the Dragon Flute. Return to the Master of Beauty and defeat him. You do not have to find any of the Rabbits prior to talking to the Master of Beauty for the first time, including the Collared Rabbit event at B4 (13x,4y), with the exception of the unmissable dead Rabbit at (7x,15y).


No.60 Final Master
When: After completing "Birth-cry of the Old Era"
Where: Kingdom of Ishmag > Ishmag Castle > Arrange Meeting
Reward: Access to Cave of the Ancients B6 and Second Step to the "Heart's Desire" quest
Defeat the Final Master at Cave of the Ancients B5 (8x,10y). Unlike the other Masters, this one has no prerequisites other than what is required to reach his tile.
Post Game Quests - Part 2
No.62 Trials of the Tower
When: After completing the 3x battle event at Ibag Tower F1 (3x,2y)
Where: Cloaked Figure at Ibag Tower F1 (10x,4y)
Reward: +3 Light Seal, Access to Central F20
You need to find the three aspects of the God of Judgement and finish their events. Remember what you choose.

The God of Fate: Found at Ibag Tower F5 (2x,16y). They will give you the Medicine of Fate. Go to the Sick Person at B5 (19x,16y) to be asked if you want to give them the Medicine. If you give it to them they will thank you, and if you don't they will hate you. If you go to the Sick Person before talking to the God of Fate you cannot do anything with them.
The God of Power: Found at Ibag Tower F10 (9x,7y). They will give you a choice to side with those with power (Death Scythe temporarily joins) or those without power (Ghast temporarily joins). If you have a Summon/Replica they will be replaced. After you choose, you will fight the enemy that did not join you. Defeat them. The enemy that joined you does not have to survive the fight and will leave after the battle is finished.
The God of Truth: Found at Ibag Tower F15 (2x,0y). They will ask you if you want to tell the ghost of a woman the truth. Choosing Don't Tell Her causes the woman to remain in the Tower for eternity. Choosing Tell Her will cause her to vanish.

Once you have finished these events, go to F19 (9x,9y) or (9x,10y). A Cloaked Figure will ask you three questions. Choose the answers that match your previous actions:
"If someone is certain to do (pretty sure they mean die), should you help them?"
No (Did not give the Medicine)
Yes (Gave the Medicine)
"A weak person is hopelessly attacking a strong one. Do you help the weak person?"
No (Helped the Death Scythe kill the Ghast)
Yes (Defended the Ghast and defeated the Death Scythe)
"There is a person who lives by the truth. Do you tell them the truth, no matter how cruel?"
No (Did not tell the Ghost Woman the truth)
Yes (Told the Ghost Woman the truth)
If you choose the answers that matched your actions you will get your reward and you can pass. The reward seems unaffected by the decisions you have made, though I did not try every possible combination (nor do I want to).
If you choose an answer that does not match your previous actions you will be warped back to the entrance of the Tower and have to redo the quest from the three God events. I forgot to test going directly to F19 without taking the quest or without talking to the Gods, but I imagine it just kicks you out.


No.62 Revelations
When: After finding 15 Tablets
Where: Igdra Village > Church
Reward: Space Fragment, Medal of Power, Philosopher's Stone, Rainbow Charm
Finish the Trials of the Tower quest and go to F20 (15x,10y). Pray at the altar and defeat Nordetanit. You do not need to find the 16th Tablet to finish this quest.


No.63 Dragon of the Tower
When: Reach F8 of Ibag Tower
Where: Random Event in Ibag Tower F8
Reward: Space Fragment
In Ibag Tower F8 there are three random events that force you into battles. They happen in order and do not reset if you leave or Pause Adventure. The first two are only against Worker Wings, and the third is against Worker Wings and their boss, Shadow Wing. Defeat them. The Eternal Puppy is not part of this quest.


No.64 Weaved Song of Legends
When: After unlocking Soldier of the Giant Gods
Where: Dondun's Tavern > Talk > Minstral
Reward: Space Fragment
On F14 you will find a platform with 4 figures and a map on it. The game will ask you to place them. Part of the Minstral's song gives you the answer: East = Demon (Monster in the song), West = God, South = Human (Hero in the song), and North = Sword (Treasured Sword in the song). The 4th piece is automatically placed. If you place them wrong nothing happens and you can try again.


No.65 Chained Giant
When: Reach F17 of Ibag Tower
Where: Ibag Tower F17 (16x,16y)
Reward: Sealing whip
Get the Golden Key at F18 (3x,3y). Backtrack and release the 7 seals on the earlier floors. You have to fight a battle at each one. I think they are static fights, but it is possible that it was a coincidence that I got the same formations each time:
F2 (8x,5y) = Thunderbird, Apostate, Nemea
F4 (15x,10y) = Galeskegul x2, Pheonix
F5 (17x,16y) = Angel x4
F8 (11x,19y) = Angel x7
F10 (4x,3y) = Archangel, Angel x2
F14 (12x,2y) = Archangel, Angel x2
F16 (12x,10y) = Archangel, Angel x6
Once every seal has been broken go back to F17 (16x,16y) and defeat Legion.
Dondun's Tavern Fights
Not really a quest, but special enough to list here. They technically unlock after you have reached certain points in the game, but they randomly occur so it is hard to pinpoint exactly when you'll trigger them. It gives you chance to back out of them, which puts them back in the event pool. Entering, exiting, and re-entering the Tavern repeatedly can trigger them.

When: Randomly after entering Tsun-Kurn and as you progress in the game
Where: Kingdom of Ishmag > Dondun's Tavern
Reward: A stack of items specific to the event you get, which occur in order

Key: Who you are fighting - Choice to make - Reward

1. A Barbarian and a Fighter are arguing - Mediate - Potion x9
2. A Fighter is angry at a Mage and a Priest fuels the fire - Start a Fight - Herb of Tranquility x9
3. A Priest is proselytizing, Shaman is standing around - Say Nothing - All-Purpose Herb x9
4. An Alchemist wants booze, Hunter wants to rob someone - Warn Them - Full-Health Potion x9
5. An Elf begs a Thief and Samurai to stop harassing them - Help Them - Revival Tonic x1

If you are interested in about when they usually show up, I'm listing the earliest times I have triggered them, but be aware that random is random so it might not be exactly when you get it and it is possible you could get some of these earlier than this:

1. After entering Tsun-Kurn the first time
2. After finishing Dezaporlia Tunnel
3. After finishing Hastrana
4. After finishing Afum Zar Light Cave
5. After finishing Uhlm Zakir Hall
Floor Masters
Also not an official quest, but well worth doing if you decide to do Post Game. When you have killed every main game Floor Master, go to Dondun's Tavern and Talk to the Mysterious Figure who will give you the <Key Item>Book of Secrets for your effort. To activate it, go into Ishmag Temple and Pray. The game will ask if you want to change the drop rate of rare items. Say Yes to increase the rate. If you want to bring it down to normal levels, simply Pray and say Yes again. You can switch it as many times as you want.

Please note that this game isn't Etrian Odyssey. You are not really meant to kill most of them until you reach end/post game and extremely low levels/weak gear will most likely not work in your favor. That said, there are ways to beat them early if you have a Bard using some Tarot shenanagans, but you will miss out on Stealable loot and Contract attempts if that is your thing. Main game Floor Masters do not respawn.

Post game Floor Masters do not count toward the reward.


Main Game Floor Master Locations:
Tsun-Kurn B3 - Vovalketer
Guatella Grotto B2 Secret - Akabey
The Great Tree Yap Gotz B2 - Neck Chopper
Dezaporlia Tunnel B1 - Bely
Degus Gila Ice Cave B4 - Manmo
Hastrana B6 - Katezina
Igdra Underground Church B3 - Vetreyal
Rosslie Ruins B1 - Grate
Afum Zar Light Cave (Defeat 1 time on each floor) - Nagu
Uhlm Zakir Hall B3 - Immortal
Royal Tomb (Every floor) - Prowling Spirit
Nga-Nga Magi Volcano B2 North - Hellfire
Ishmag Underground Sanctum B2 - Gaia
Post Game Tablets
There are 16 special Tablets found in random spots on certain floors of specific dungeons. The location is not set when you enter the dungeon, but only when you enter the floor the tablet is on. If you leave that floor for any reason (or Pause Adventure), even if you stay in the same dungeon, the location randomizes again. In general, the tablets are found on the hardest floor, often whatever floor the Floor Master is or on a secret floor. When you find 15 you will unlock the last post game dungeon, Ibag Tower. When you find all 16 you unlock a special Floor Master that can only be challenged after you defeat the boss of Ibag Tower. Below is a list of the Tablets:

Tablet
Location
Pushke Tablet
Tsun-Kurn B3
Irene Tablet
Great Tree Yap Gotz B2
Eunomia Tablet
Guatella Grotto B2 Secret
Egelia Tablet
Dezaporlia Tunnel B1
Victoria Tablet
Degus Gila Ice Cave B4
Palteno Tablet
Hastrana B6
Higea Tablet
Igdra Underground Church B4
Metis Tablet
Rosslie Ruins B2
Flora Tablet
Afum Zar Light Cave B4
Iris Tablet
Uhlm Zakir Hall B3
Habe Tablet
Royal Tomb 3F
Astraea Tablet
Nga-Nga Magi Volcano B4
Besta Tablet
Ishmag Underground Sanctum B6
Juno Tablet
Soldier of the Giant Gods B8
Pallas Tablet
Cave of the Ancients B6
Cres Tablet
Ibag Tower F20


BUG WARNING
Picking up your last Tablet while in Windowed Mode will cause the game to freeze. Make sure you are in Fullscreen Mode before you search for it.
Old Updates
7/30/2017
- Vino has supplied me with more translated loot from the JP Wiki, covering and Nga-Nga Magi Volcano through Ishmag Underground Sanctum B1, as well as a minor fix to Hastrana B4Fs loot list. The amount of time they have put in is staggering, Many thanks!

7/16/2017
- Thanks to Darklord I have realized that I completely forgot to mention how Summoners gain spell ranks/casts, so I added that fact in a few relevant spots.

7/15/2017
- Mogri found that Snail Lich is a rare encounter in Guatella Grotto B1F. Added it to the enemy list. Watch out for it when you first enter the area. They can be pretty nasty!

7/11/2017
- Darklord poinetd out that one of the ways to cure Fear in early game is to just walk around in a dungeon and eventually it will cure itself. The time it cures is random, so it can take a while, but it works.

7/8/2017
- Vino sent me another loot list from the JP Wiki, this time for all two and three skull dungeons, so I checked that information against my own loot lists and added whatever I was missing. Once again, neither my loot list or the JP Wiki's are complete, but combined together they should be pretty accurate. Many thanks to him! Compiling that information was a lot of work.

7/5/2017
- Darklord pointed out that a Devlish's highend lifespan is 400 and that Spirit Pact recuits also have a randomized alignment.
- Added the fact that characters can go beyond their race's natural lifespan, which I apparently forgot to put in the guide.

6/28/2017
- Fixed an error in the guide that made it sound like you could run from the Hole in Tsun-Kurn (you can't). Thanks to Darklord for pointing that out. Also fixed the information about the Chief of Training (can't run from him either) and tested the Avi fight (you can run from this one) just in case, since I didn't know about that one until today.

6/26/2017
- Added the Swallow Return when Incapacitated bug to the Useful Tricks Part 2 section. It was covered elsewhere in the guide, but I only now took the time to put it into Useful Tricks since I needed to arrange some information to fit it in due to Steam Guide restrictions and I am lazy.
- Fixed a few spelling errors and some wonky english. I am sure more errors are still in the guide, but every little bit helps.

6/24/2017
- Updated the loot lists of all One Skull Difficulty dungeons to include items confirmed by Vino and the JP Wiki. Many thanks to them! Both the JP Wiki and my own loot lists are missing information, but combined we should be able to make them very accurate.

6/17/2017
- Added more floors that Rainbow Charm and Thunder God Particle could be found in. Thanks again to Vino.
Old Updates
6/16/2017
- Added Hermit's Knife to the Royal Tomb, Soldier of the Giant Gods, Cave of Ancients, and Equipment with Unleash Hidden Power sections. Thanks to Vino for that information! I had been looking for confirmation on that item for a while since I was never able to find it myself.
- Added the Transmutable Item Duplication Bug to Useful Tricks. Once again, thanks to Vino for bringing it to my attention.

6/15/2017
- Added the Soul Eater Sword to the Ibag Tower Loot List and Equipment with Unleash Hidden Power sections. Thanks to Vino for that information!

6/13/2017
- Clarified that transmutable items that you leave in your inventory for an effect are never consumed and do not stack, so you only need one. Split one section into two because I needed more space.

6/11/2017
- Added a little more information about status effects to the Battle Screen section, specifically enemy skull colors.

6/7/2017 - 6/8/2017
- Added a link to a Japanese wiki into the Credit section. Wouldn't have thought to seek it out if it were not for Vino. I haven't used any information from it in the guide yet, but I figured it would be a good resource for anyone interested.
- Added the item Duma's Gem, found and confirmed by Vino and the Japanese Wiki, to the Ibag Tower loot list and a few times in the meat of the guide.
- Moved the bulk of the Multiclassing information to its own section for easier reference. Credited qwert_44643.
- Added some basic information about how HP gains work.
- Added some basic information about the battle screen.

6/6/2017
- Clarified some things pertaining to Attack Rate and the Orath spell.

6/5/2017
- I was pretty vague about Tarot being easy strat #3 in the Ibag Tower F20 Floor Master section of the guide, mostly due to space constraints, but Vino posted an idea in the comments section so clever that I decided to rearrange some things to add more Tarot love. Credit goes to him for the Ninja Beheading idea.

6/2/2017
- Added a bug mentioned in the Discussion Forum to the Unuseful Bugs section. Credited the folks in the discussion.
- Fixed a c&p error where I had Confusion and Charm listed as being both affected and unaffected by Magic Essence.

4/6/2017
- Fixed the Great Tree Yap Gotz map B2 to include a Hidden door that bambaladam found. Many thanks for the information!

2/28/2017
- Added the Ibag Tower Maps, making the guide technically complete. Hoorah!

2/24/2017 - 2/26/2017
- Added Ibag Tower text info. Have not had the time to do the maps yet. Sorry about that.
- Clarified that permadeath is triggered by hitting 0 VIT, not just by being too old/young.
- Added more special items with abilities and effects.
- Added a list of enemy exclusive EX Skills.
- Combed through the guide and fixed a few errors, including some information that I had misremembered. This includes information on Miracle. I could have sworn it worked like Wizardry-Wish and disappeared after use but didn't bother to test it because I don't use it (with one post game exception). The only negative effect is the Level Drain, which honestly makes it even more overpowered. I apologize for getting it wrong.
- Apparently the Ishmag Underground Sanctum Enemies section went missing at some point, so I posted it again.

2/20/2017
- Added a Basic Battle Advice section
- Added more potential Ibag Tower loot
- Added more Spell Casting and Hidden Power items
- Reworded and fixed a few things that a few folks found confusing

2/8/2017
- Added Replica Clone Permanence to Useful Tricks, which gives details on a bug that allows a Clone to never leave the party, even when going in and out of dungeons. I haven't been able to pinpoint any single trigger for it yet, but I do have a method of triggering it in post game that works most of the time.
- Added an Ibag Tower loot list for floors 1-5 and updated the special equipment sections. I don't know the next time I will have access to a computer/connection that can bypass Steam bug issues, so I figured I could post some information now rather than sit on it for a few weeks.

2/7/2017
- Found a bug while exploring Ibag Tower and finally figured out that the Ninja Replica EX Skill was the trigger. It has the potential to trivialize post game content, so check it out if it interests you.
- Confirmed the Ring of Life Transmutation.

2/5/2017
- Updated the Character Status Screen Information to include pictures, since there is a new and apparently rare Steam bug that won't allow PDF manuals to be viewed in the Steam Client. If you are effected by this bug, you can still view the manual by going into the Elminage Gothic directory and opening it from there.
- Added an Equipment Status Screen Information section.
- Added a specific section that covers the basics of Status Effects.
- Added a section that details some Equipment With Spell Casting Abilities.
- Added a section that details some Equipment With Unleash Hidden Power effects.

2/4/2017
- Added Cave of the Ancients
- Forgot how fast enemy levels increase in the Tower, so I tweaked my Post Game assessment for Thieves. The level differences if you don't go out of your way to grind make Stealing and Equipment Removal quite a pain. Also clarified that the things really worth stealing in post game are Herbs for a Servant, if you run one. Also fixed up a few minor things.
- Noted that the maps for the Soldier of the Giant Gods is missing an S. Since a minor error is not going to impede anyone's progress and I don't want to deal with the Steam bug if I don't have to, I am leaving it as is.

1/26/2017
- Added some generic post game information and Soldier of the Giant Gods

1/23/2017
- Added the Other Stats section, which I wanted to add last update but forgot about it.
- Added some simple info about the infamous "+1"

1/19/2017
- Added Royal Tomb, Nga-Nga Magi Volcano, Ishmag Underground Sanctum, some basic information on all the Floor Masters and updated the quest section to include all quests through end game. The only thing missing now is post game.
- I had completely forgotten that Thief was also a class required for a quest, so I added that information. Also fixed a few other things and added little bits of information that I took for granted that would be very useful to know*. Sorry about that.
- Found a pretty bad game freezing bug that involves Windowed Mode. Fullscreen does not have the issue.
*Side note that I actually forgot to add some of this information during this update.

1/1/2017
Happy new year!
- Added Rosslie Ruins, Afum Zar Light Cave, and Uhlm Zakir Hall
- Added other tiny updates for Quests and such

12/17/16 - 12/18/16
- Decided to use a different format for information past Dezaporlia Tunnel to make it easier to work around Steam Guide constraints, but keeping the old stuff the same because I am lazy and don't want to do it over a third time.
- Someone (I forget who! Contact me for Credit.) messaged me with a passionate argument against grouping dungeons by "early game" / "mid game", so I changed it to "Skull Difficulty."
- Added Degus Gila Ice Cave, Hastrana, and Igdra Undergound Church.
- Added little bits of information I forgot to mention last update, corrected some things, and removed some tricks that apparently no longer work in the current version.

12/06/16 - 12/07/16
- Remade the old maps, adding Dezaporlia Tunnel.
- Rewrote the guide. Old info hasn't changed much, but some information was corrected and I added quite a bit.
- Sorted optional areas by relative difficulty and not personal preference, because it makes more sense that way. Not sure what I was thinking two years ago.
- Added sections: Useful Tricks, Constructing a Party, Equipment and Crafting, Spells and Tarot by Effect, Potential Loot, etc.
Credits
Names are what they posted as at the time the information/help was received. Many thanks to these folks!

pixie: For confirming the location of the Silver Locket and detailing what would happen if you did things out of order for the Demon's Child quest.

D#: For asking me if I was ever going to finish the guide, inspiring me to try despite all the errors and bugs I get when editing Steam Guides. I never wanted to abandon the guide, so the push was appreciated.

haplok: For opening my eyes to the bare bones basics of the pain-in-the-butt-but-still-efficiant spell inheritance trick, sparking me to test it and really get back into the game. Also provided information on how Contract is affected by the Summoner's level vs. the enemy's.

Owstoni: For letting me use his computer and internet connection to get around various bugs and errors I run into when editing Steam Guides. Also for helping my ancient self learn the current version of Photoshop. He also gifted me with a few icons to use on the maps, the Ice Wall and the Spinner, because mine looked liked garbage. So if you are wondering why they look so much better than anything else, that's why.

XT: Offered to help out with the guide, and they kindly accepted a contributer invite. They also made the nice Post Game Tablet Table, with information taken from the English Elminage Gothic Wiki. I fixed the names of the places to match the Steam translation and added the floor each one can be found on. He also added racial ages and some information on aging/permadeath, important info which I had completely forgotten to add.

Mystery-Person-whos-name-I-have-forgotten: Messaged me with a passionate argument to not use the terms early and mid game to group the dungeons, since they felt that some of the "mid" game dungeons are still teaching you important basic concepts. While I think that is a bit nit-picky, it doesn't hurt anyone to go by the in game "skull difficulty" instead, so I changed it.

bambaladam: Found a Hidden Door I missed at Great Tree Yap Gotz B2 (13x5y) which is a great shortcut back to the stairs to B1F if you don't have access to Diomente.

pheonix and Shining Spectre: Discussed the mouse bug in the Discussion Forum. I have never used a mouse to play so I would not have known about the bug if it were not for them.

Vino: Came up with a clever Tarot + Ninja Beheading combo to use against Incarnation. The best part about this combo is that you can really use it for any Floor Master/tough enemy. Also did an amazing amount of work gathering information and made excel sheets about loot that was missing from my own loot lists, as well as brought the Transmutable Item Dupe Bug to my attention.

qwert_44643: For pointing out that some information was hard to reference or lacking in depth information, so I tweaked some things and added some new sections. The guide is still a monster, but it is now a less confusing one at least.

Darklord: Pointed out that the run trick to concentrate EP does not work at the Hole in Tsun-Kurn, a fact that was not properly shown in the guide (the way it was written at the time made it sound like you could). Also made me notice that I forgot to note that for the Chief of Training as well, and inspired me to check the Avi fight to be sure (can run just fine). He also found the Devlish lifespan by going through the game's files and pointed out that Spirit Pact recruits have randomized alignments. He also pointed out that Fear can cure itself via walking (which is the case in all Wizardry-based games), and made me realize that I forgot to add information about how Summoners gain their spell ranks/casts.

Mogri: Discovered that Snail Lich is a rare encounter in Guatella Grotto B1, which is a pretty tough enemy the first time you enter. Be on the look out for it!

English Elminage Gothic Wiki: XT used some information from this wiki: http://elminage-gothic.wikia.com/wiki/Elminage_Gothic_Wiki. I haven't browsed it much myself yet, but it seems to have some great information. Give it a look if it interests you!

Japanese Elminage Gothic Wiki: Vino mentioned a Japanese wiki so I fished this one out of Google. I haven't personally given it a thorough look yet but on a quick glance it seems to have a wealth of information. With the information Vino took from this guide, combined with my own loot lists, we were able to make the One to Three Skull Dungeon loot lists very accurate: http://spoiler2.sakura.ne.jp/srv2/elg/

Trolling Dude who jumped through hoops to contact me with a very uplifting message: Apparently, I am the worst player ever, so bad that I have no business ever playing any game. But this is great news, because if the absolute worst player in the world can finish Elminage Gothic, you can too!
161 commenti
dustyn.barlow 4 feb, ore 15:19 
Dude this is a Sh** Ton of information and content. Much appreciated, I just started playing after finishing Wizardry Proving Ground remake and still wanting to play something else "wizardry related"
Celerity, Executor of Impunity 13 ago 2024, ore 17:22 
Failnot - Ibag Tower F18.

Weird bow.

Usable by: Fighter, Thief, Servant, Hunter, Bard, Shaman, Valkyrie, Lord, Samurai.
10 accuracy, 3 attacks, 5-45 damage.
AC ON(?)
50% more damage vs Animal, Insect, Fighter, Mage, Cleric, Thief.
10% chance of paralysis.
Celerity, Executor of Impunity 13 ago 2024, ore 13:46 
Black Lacquered Helm - Ibag Tower, F6.
Celerity, Executor of Impunity 12 ago 2024, ore 21:11 
Ibag Tower 3F: Salamander Leggings, +4 Lightning Charm, +2 Elvish Iron. Likely materials are on every level of every dungeon as a rare drop with quality based on dungeon level.

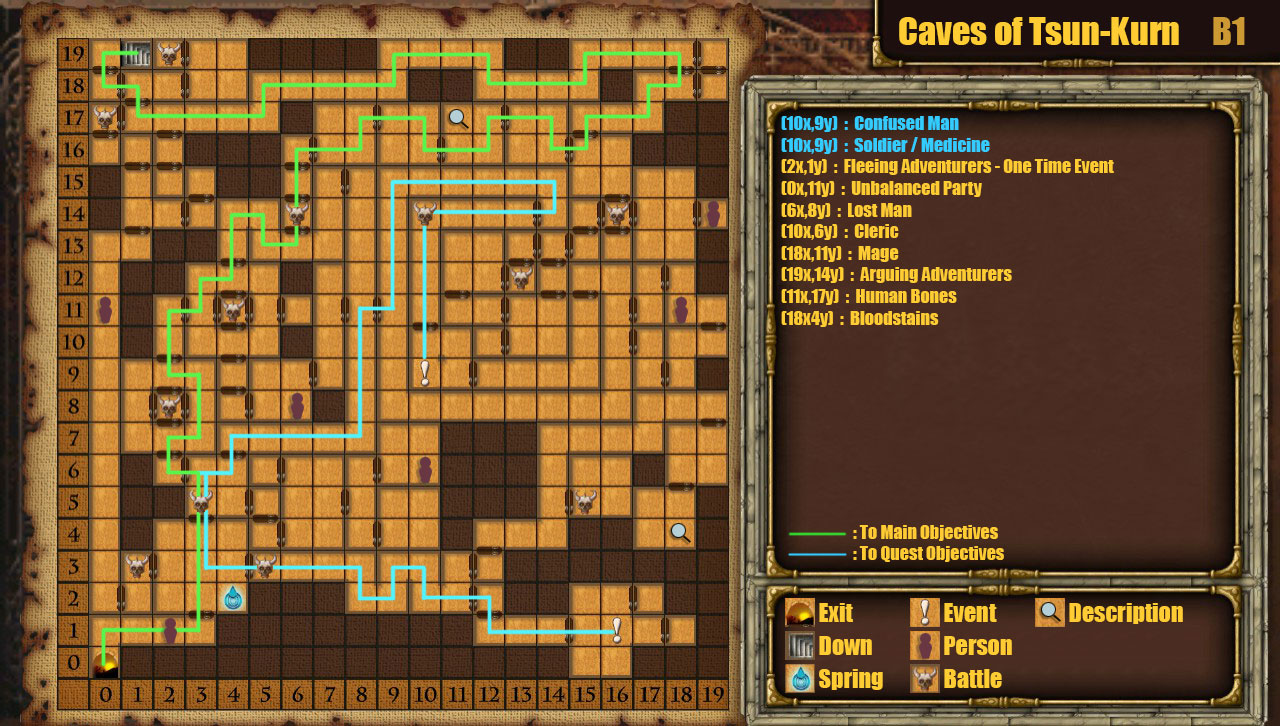
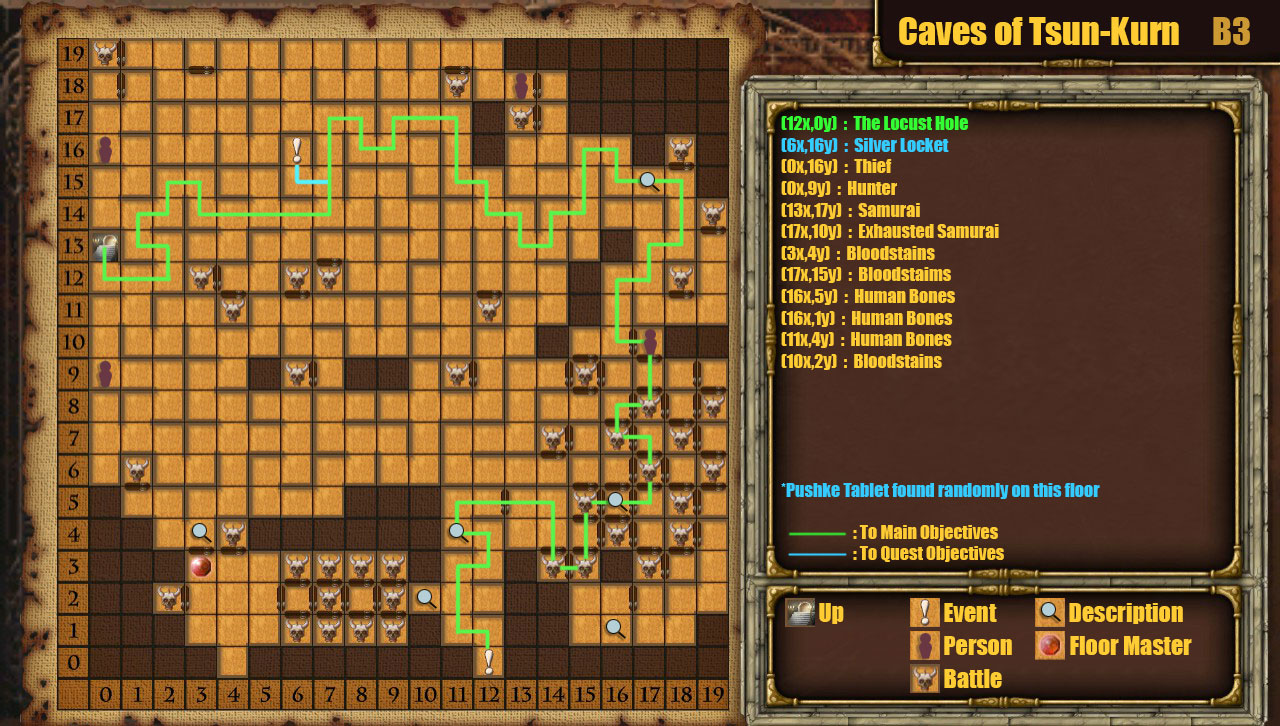
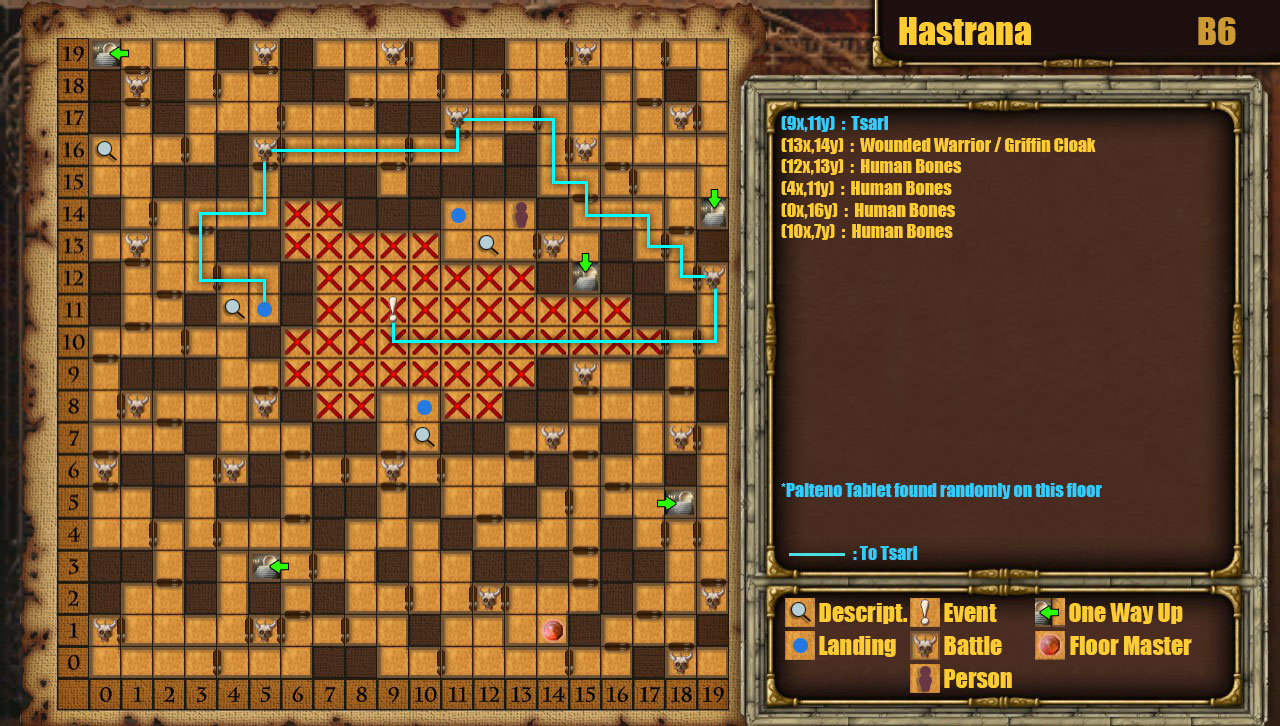
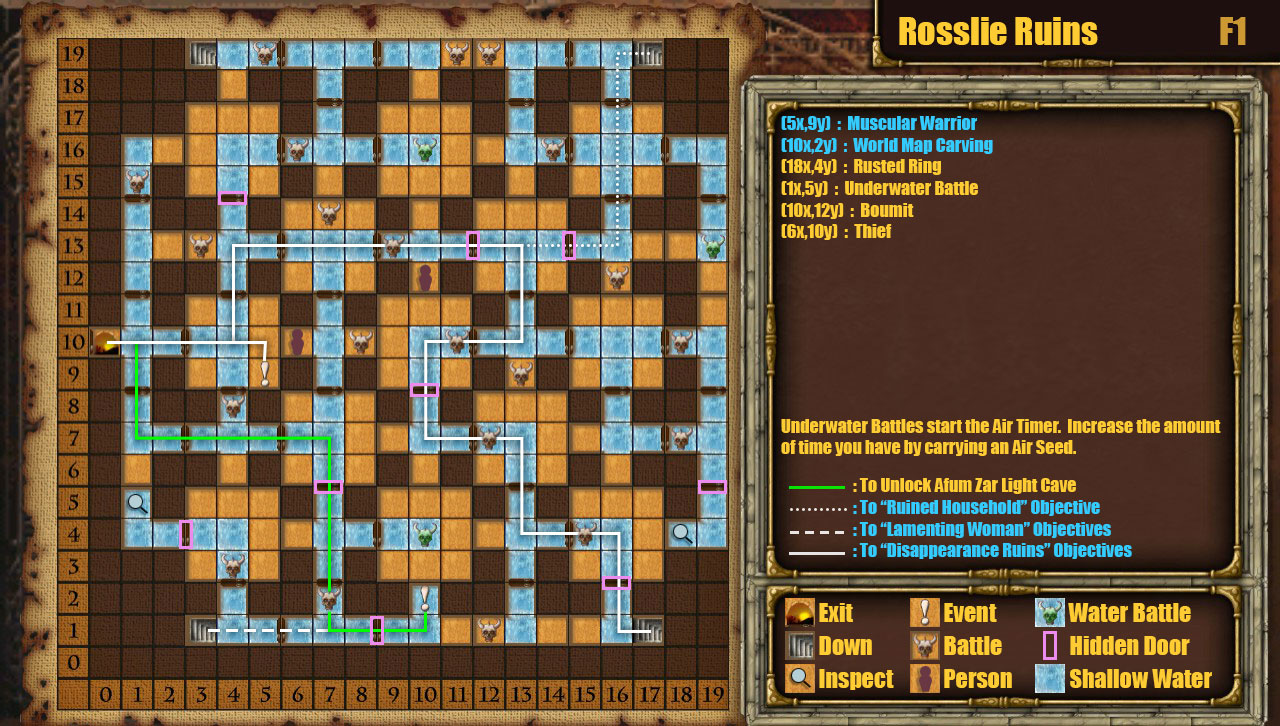
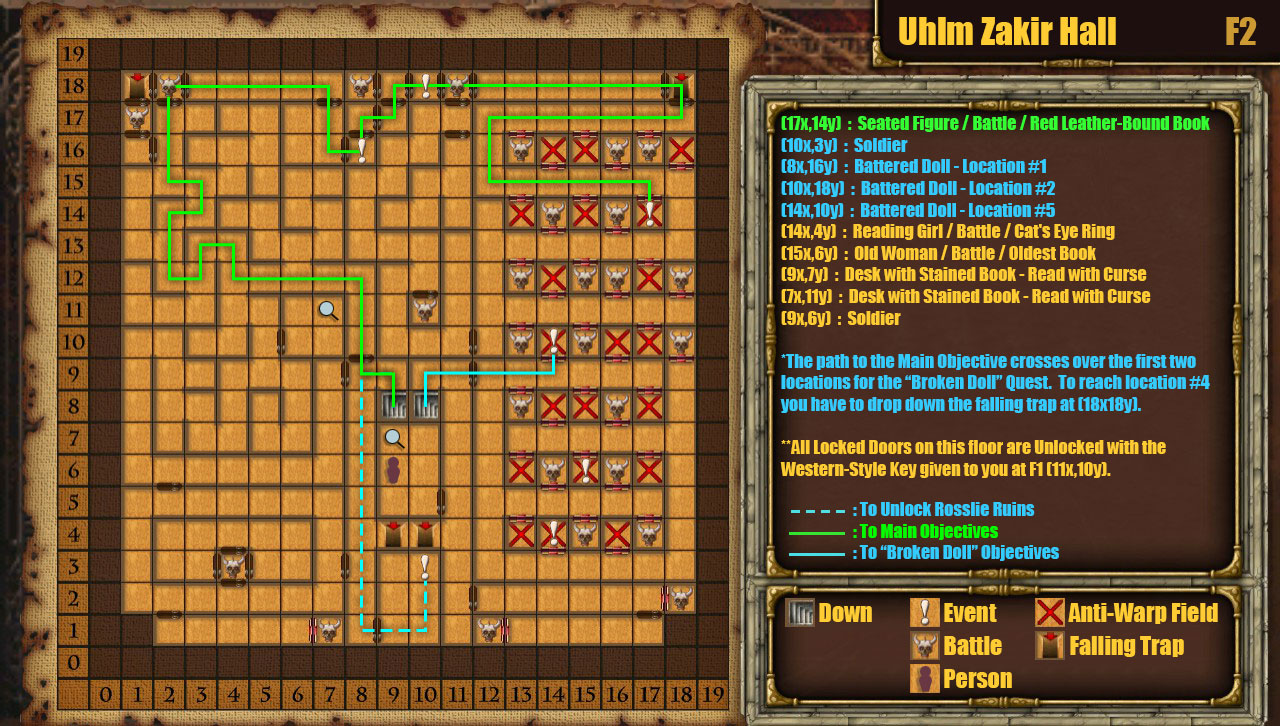
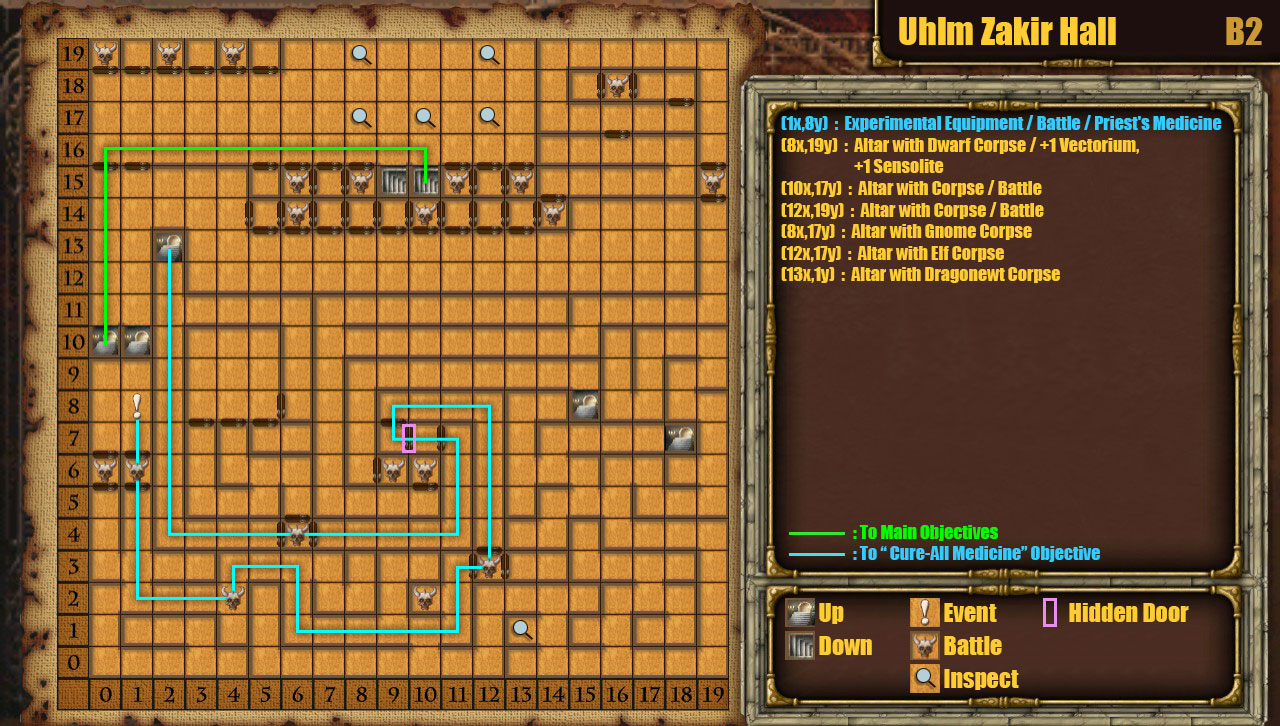
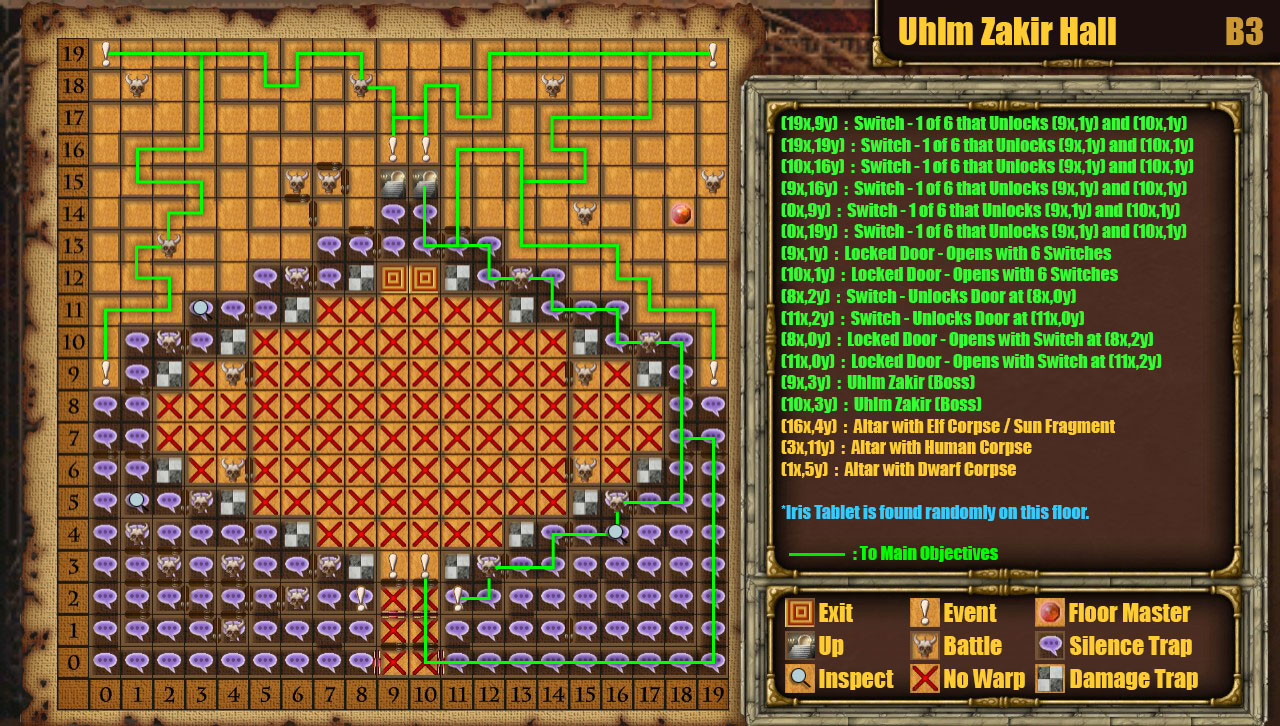
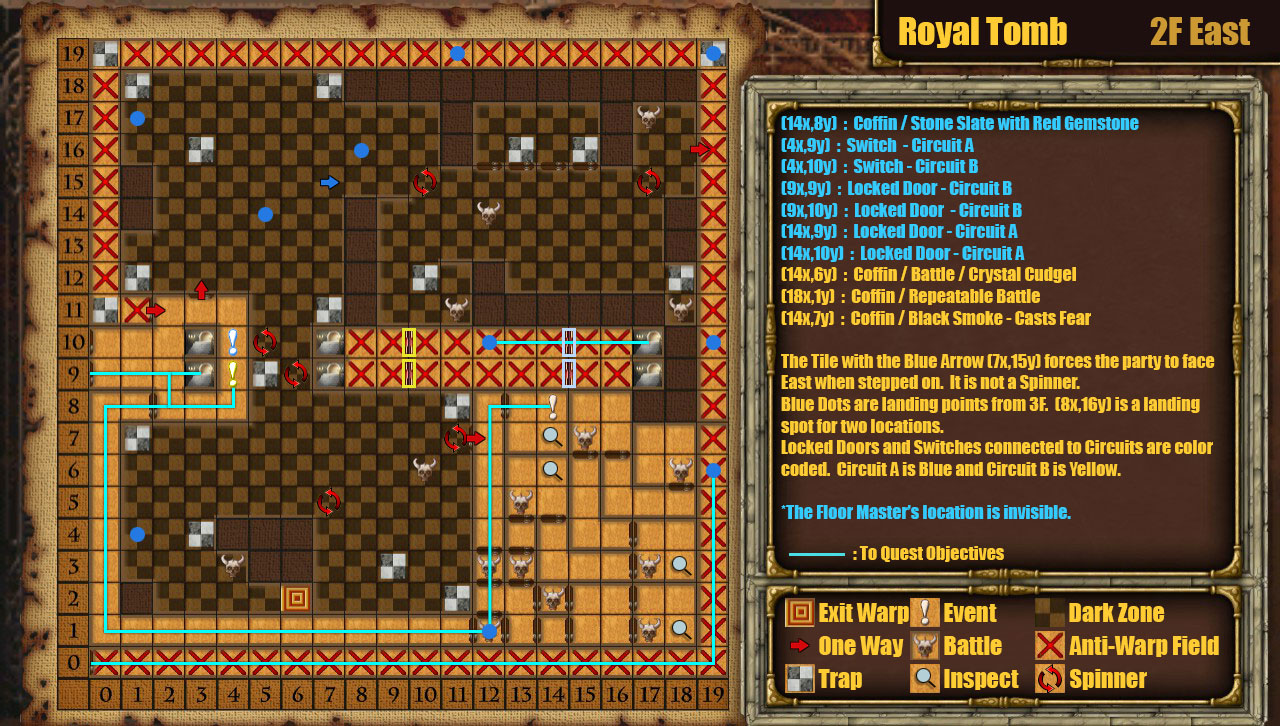
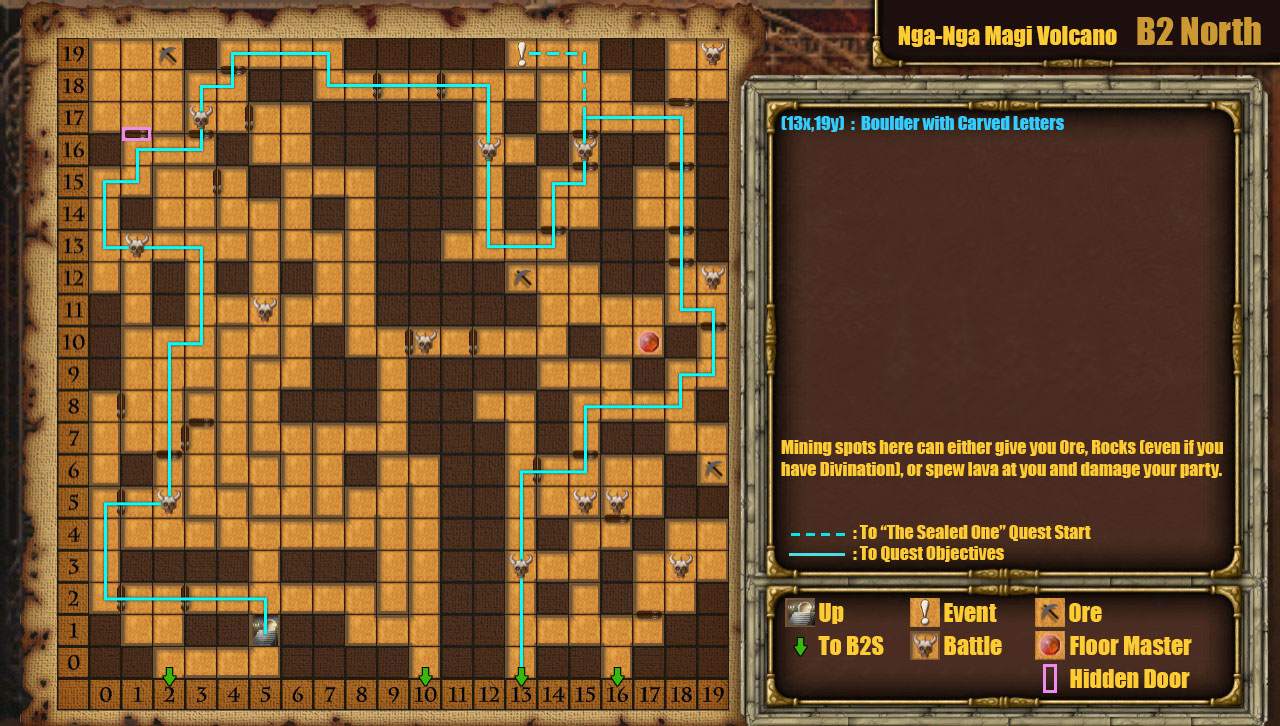
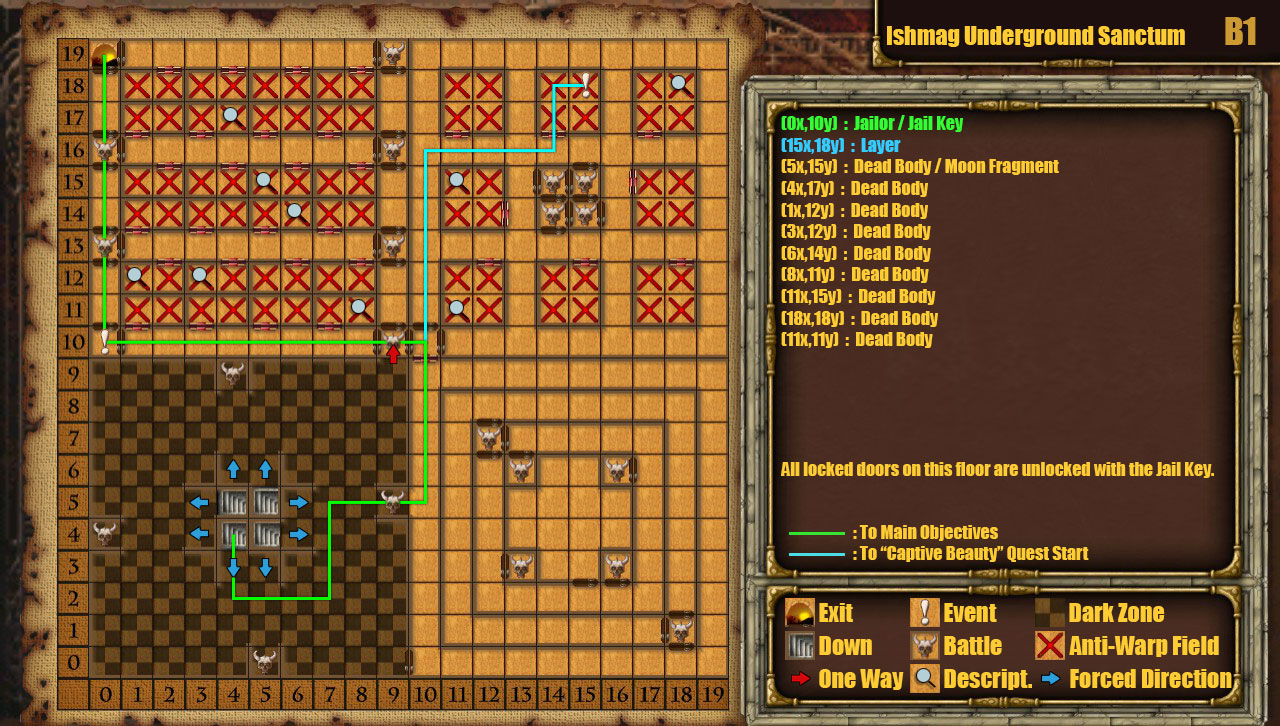
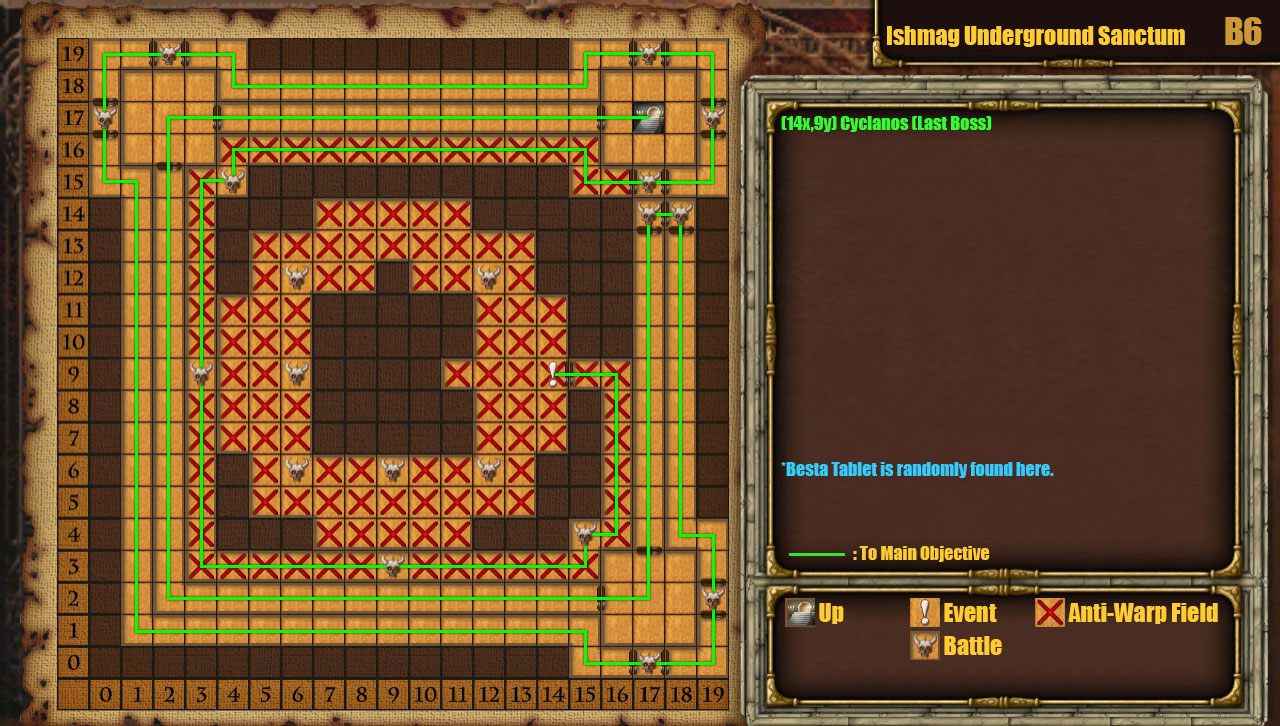
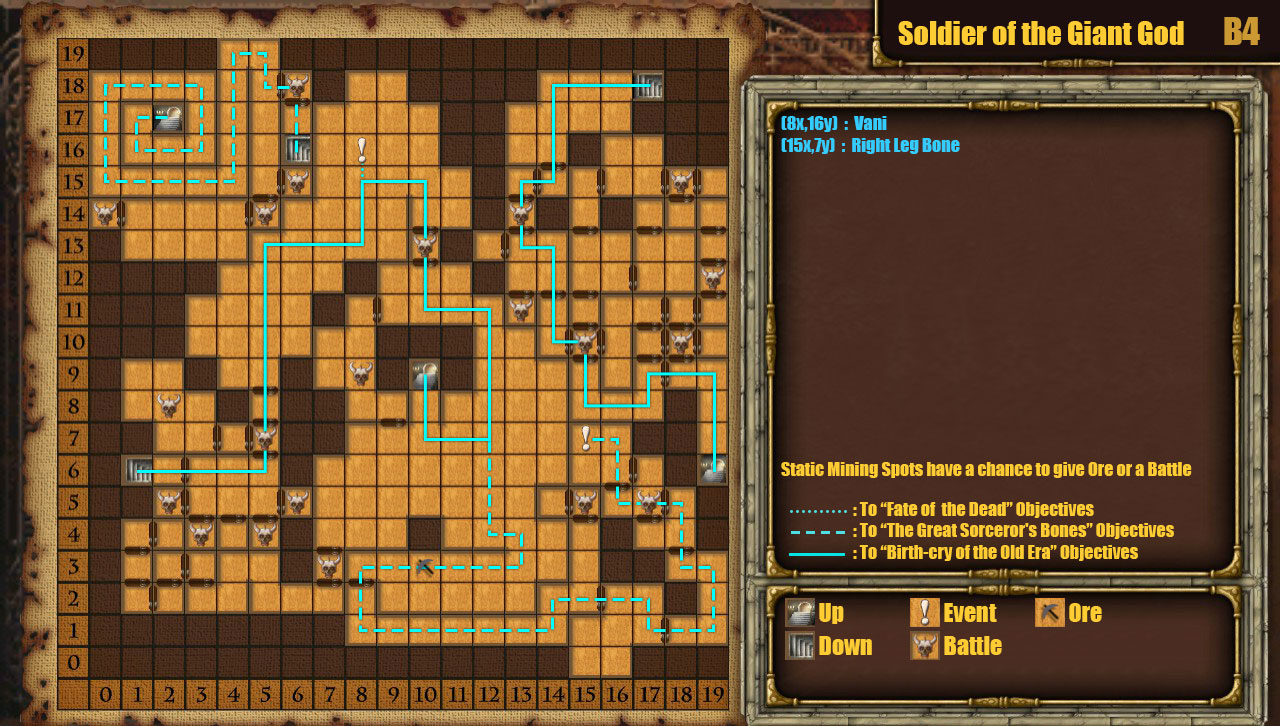
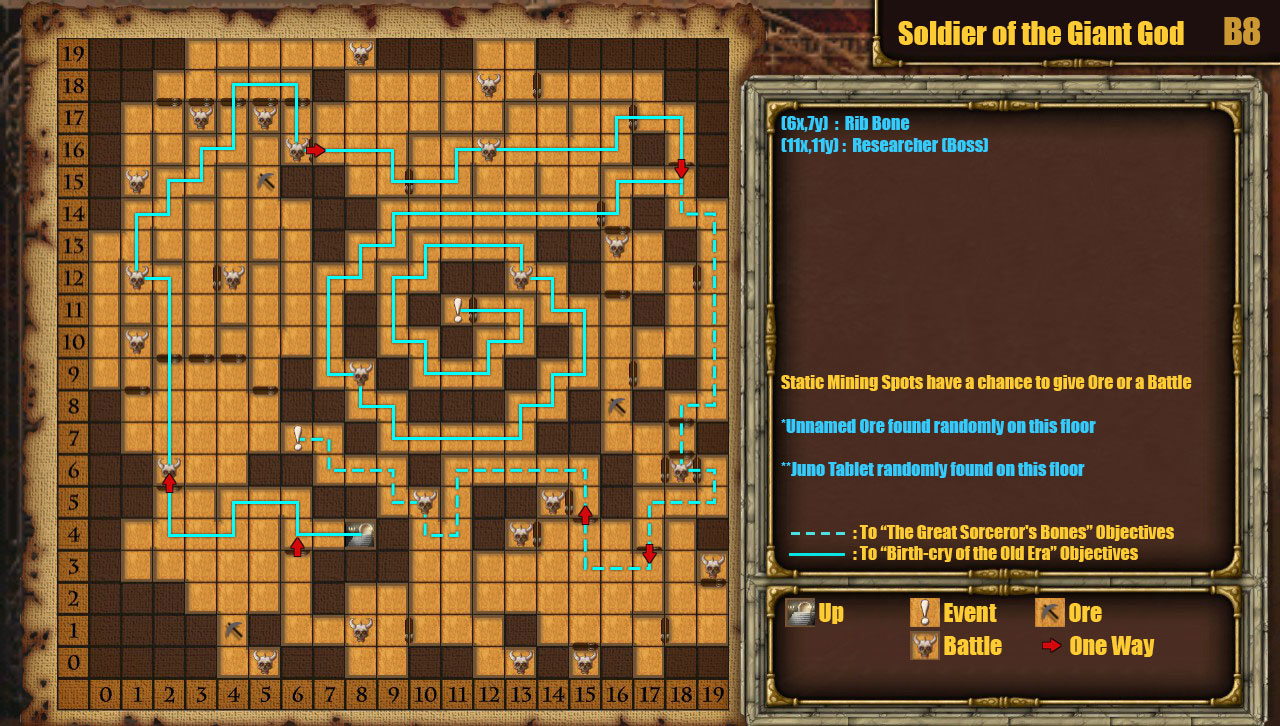
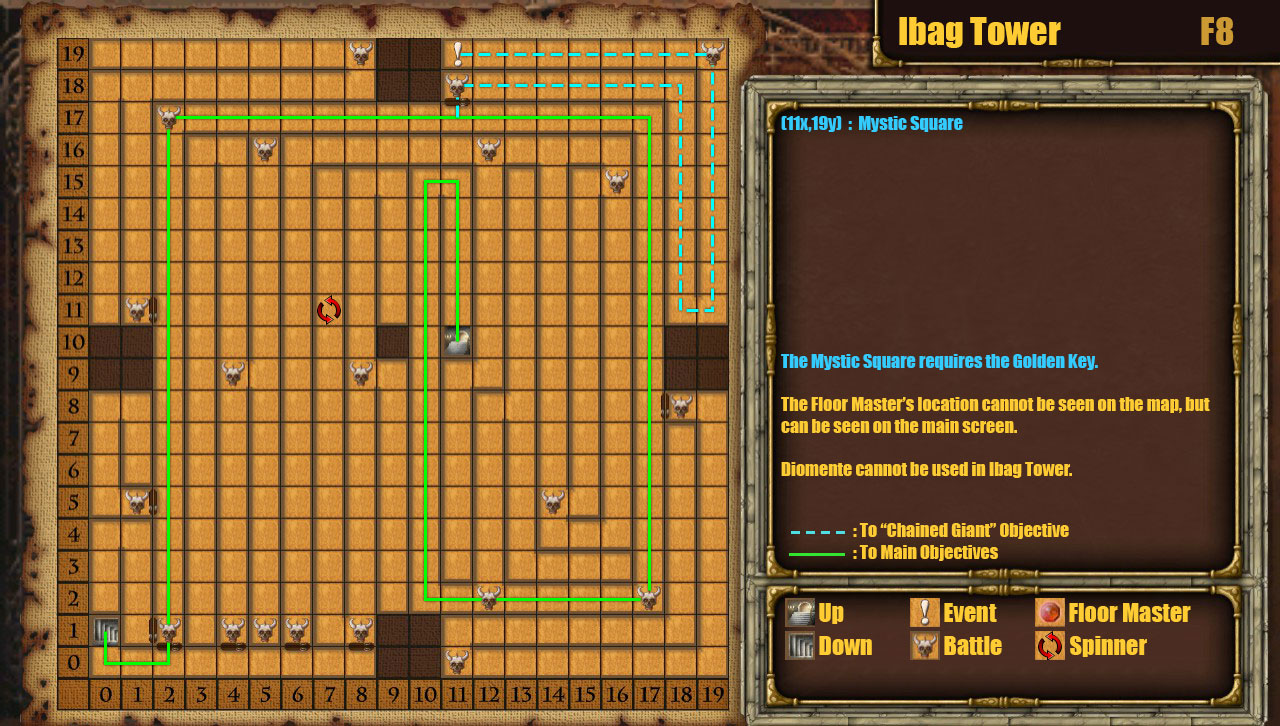
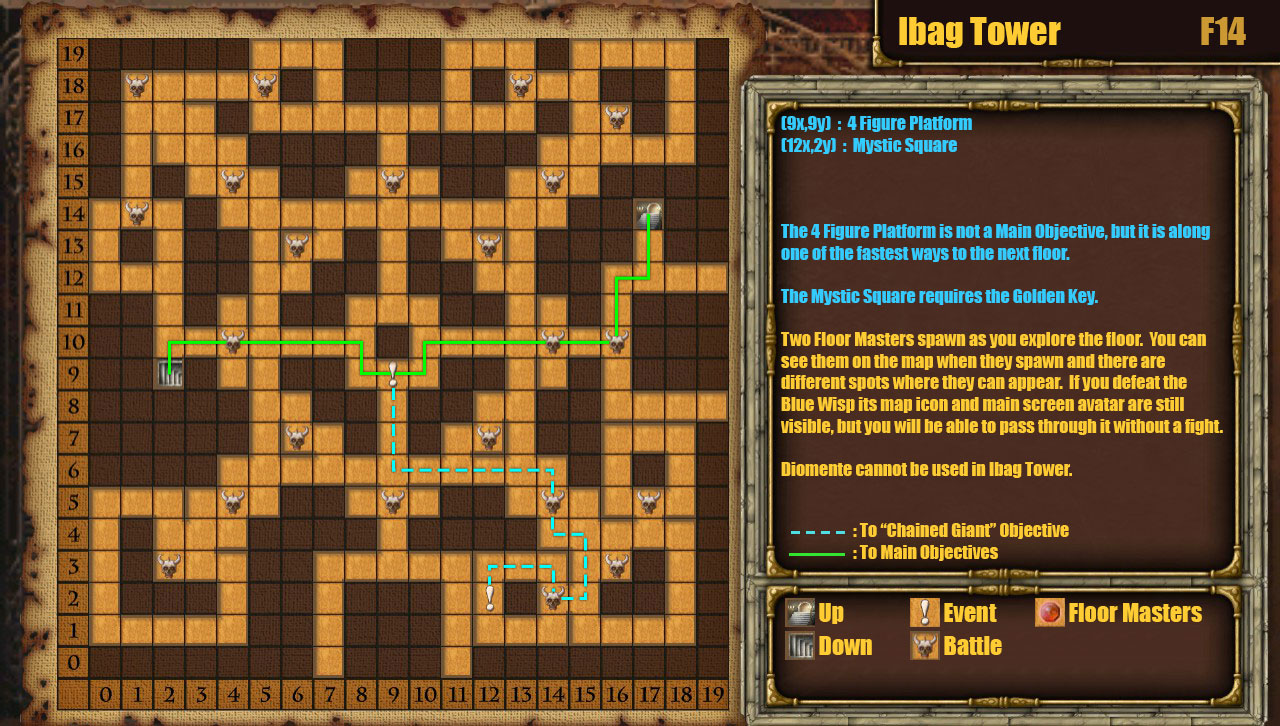
What I did not find anywhere here are Fragments, which was why I was farming so much on this floor specifically. I got plenty by stealing from Nemea, and you can also get some by stealing from Thunderbird or Apostate, but not a single one from random drops. Space Fragments might drop here, I don't remember. But I haven't seen the others at all, only a lot of every other ?Junk item on the list.
Celerity, Executor of Impunity 10 ago 2024, ore 11:31 
Force Glove - Ibag Tower F10.
Celerity, Executor of Impunity 9 ago 2024, ore 23:17 
Heart Breaker (not listed) - Ibag Tower F12.

Brawler only, all races but Faerie.
8 accuracy, 3 attacks, 14-30 damage.
10% chance of charm.

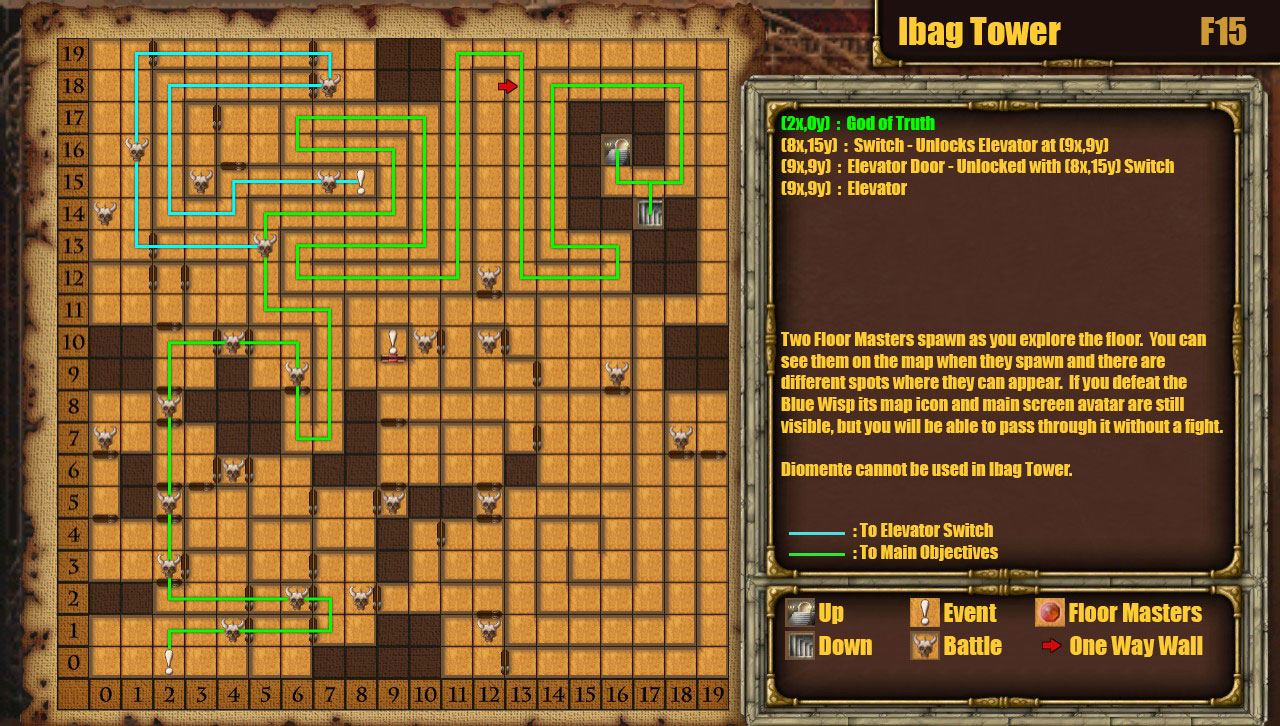
And can confirm F15 drops are atrocious. It doesn't even drop good rings as far as I've seen. At least the stairs are right beside each other.
Celerity, Executor of Impunity 9 ago 2024, ore 17:26 
+3 Ice Charm, Dark Seal +3, Light Seal +3 - Ibag Tower, F12.
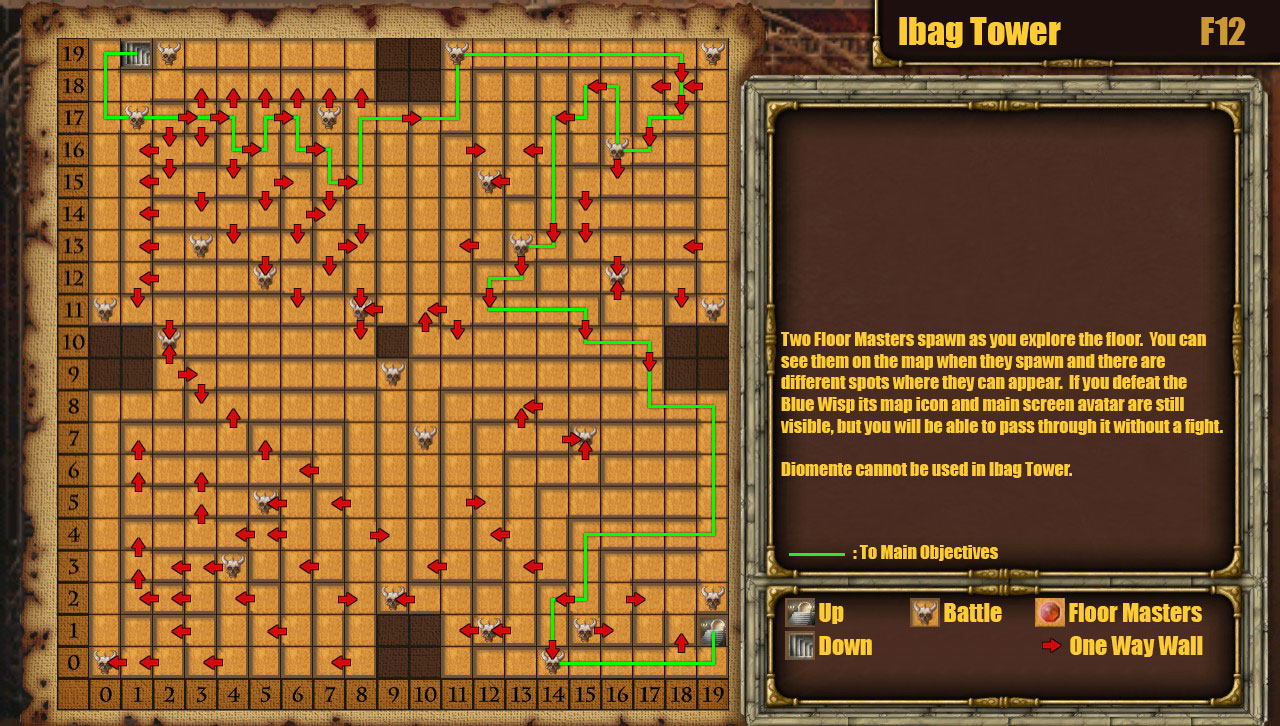
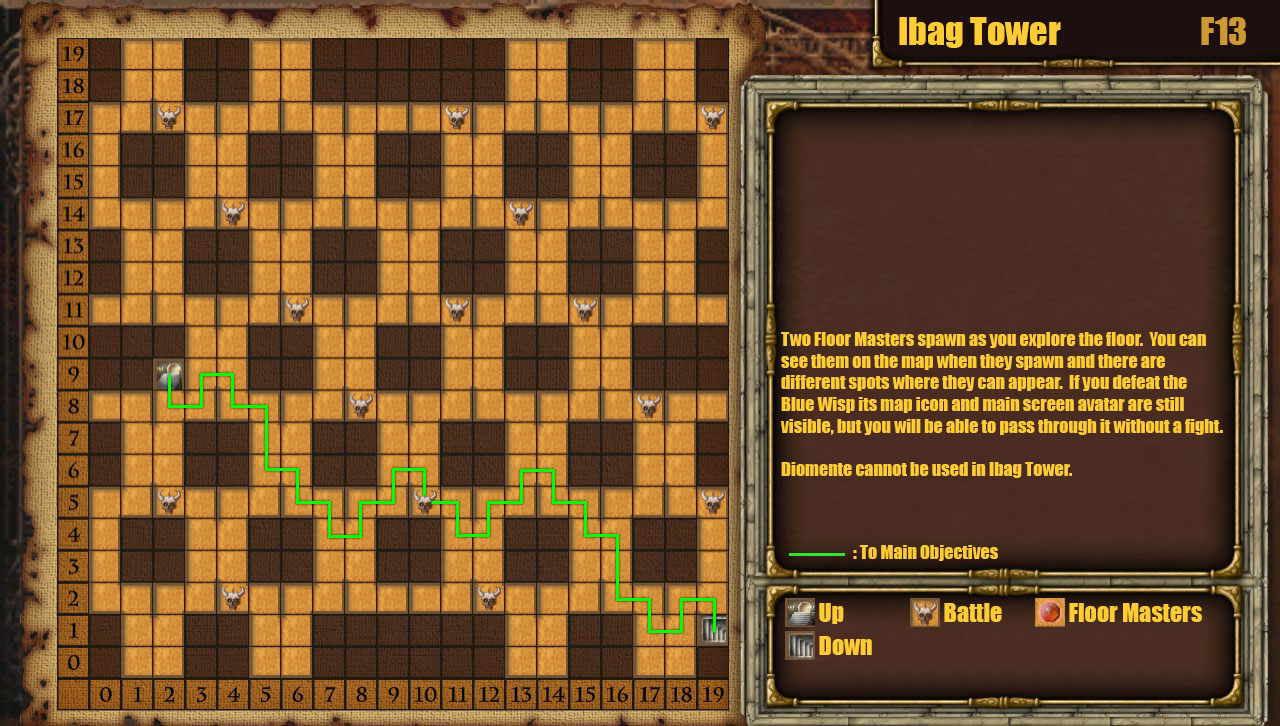
Pinpoint Shield - Ibag Tower F12 or F13.
Yges(!) (not on the list anywhere) - Ibag Tower F12 or F13.

Usable by: Fighter, Lord, Samurai.
All races except Faerie, Devilish.
-6 AC, 40 resist fire/cold/light, 50 resist holy/dark.
25 resist confusion/charm/drain, 20 resist all other statuses.

Quite a few shields on F13, even though they aren't listed as a category.
Celerity, Executor of Impunity 9 ago 2024, ore 11:23 
Blue Strike, Lavlus: Ibag Tower 8F. Found about 6 Blue Strikes actually, and plenty of everything else on the list. Zero Thunder God Particles though.
Celerity, Executor of Impunity 8 ago 2024, ore 18:12 
Gungnir: Ibag Tower, F5.

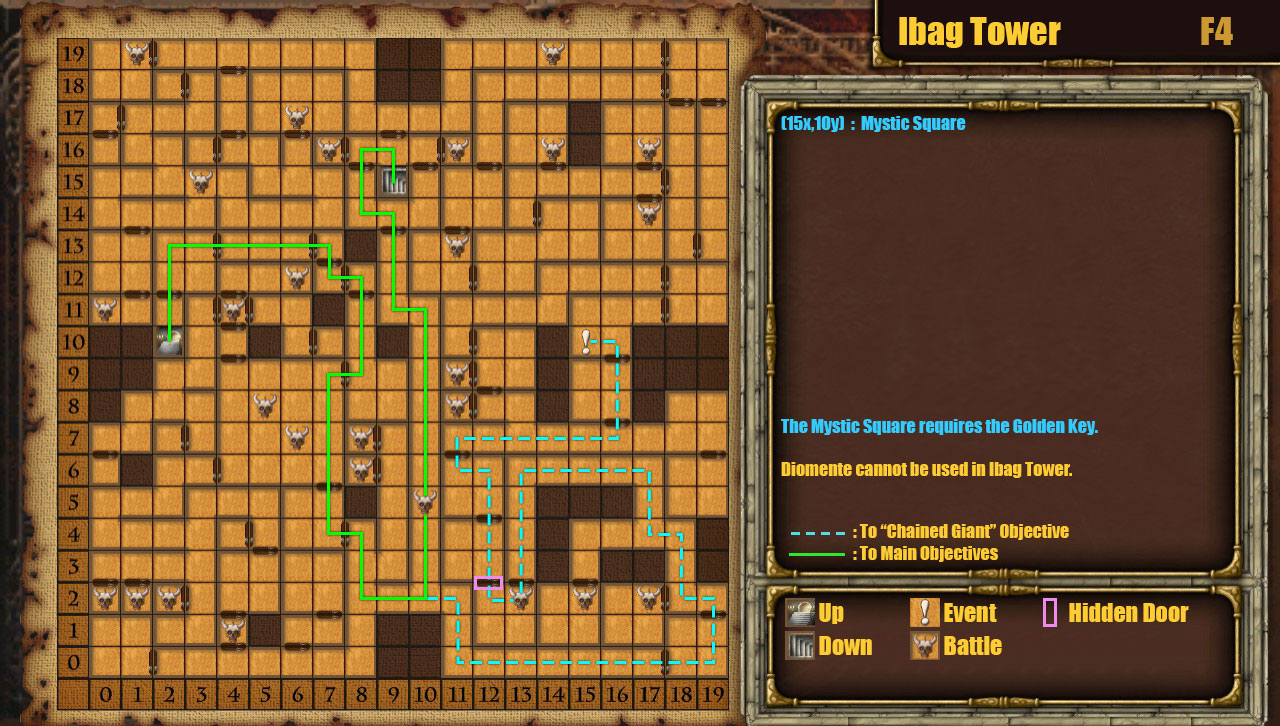
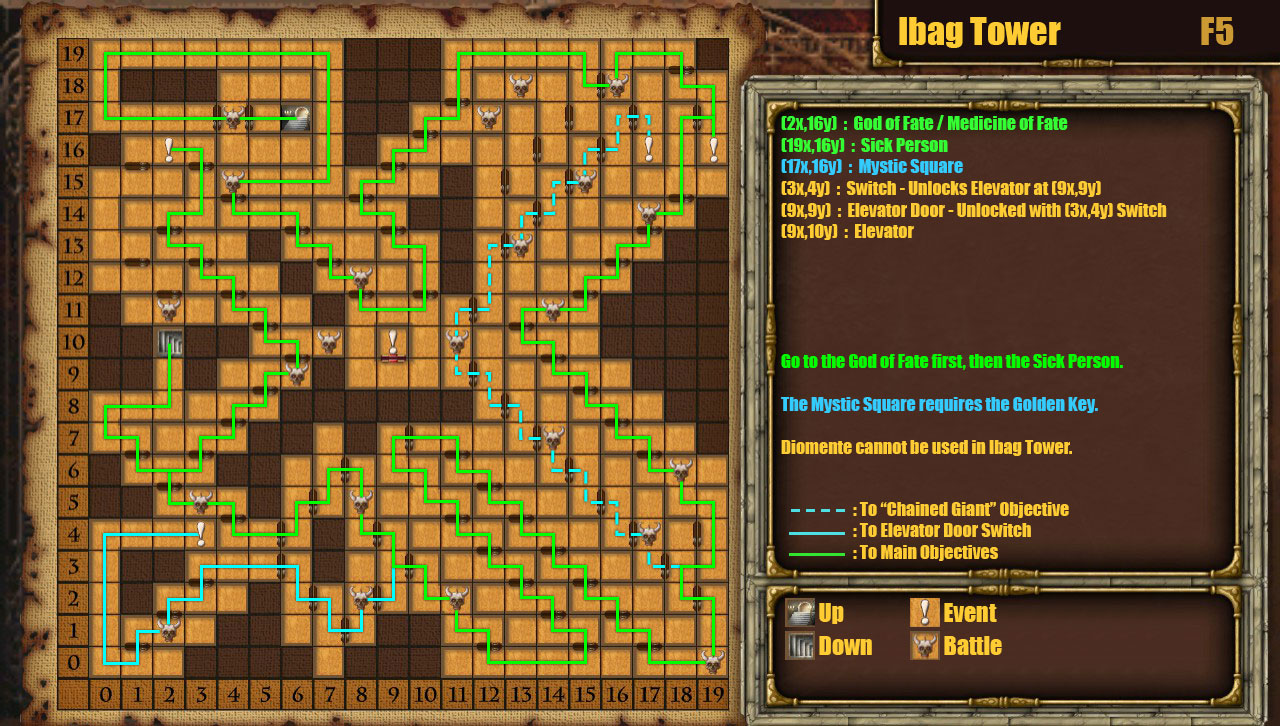
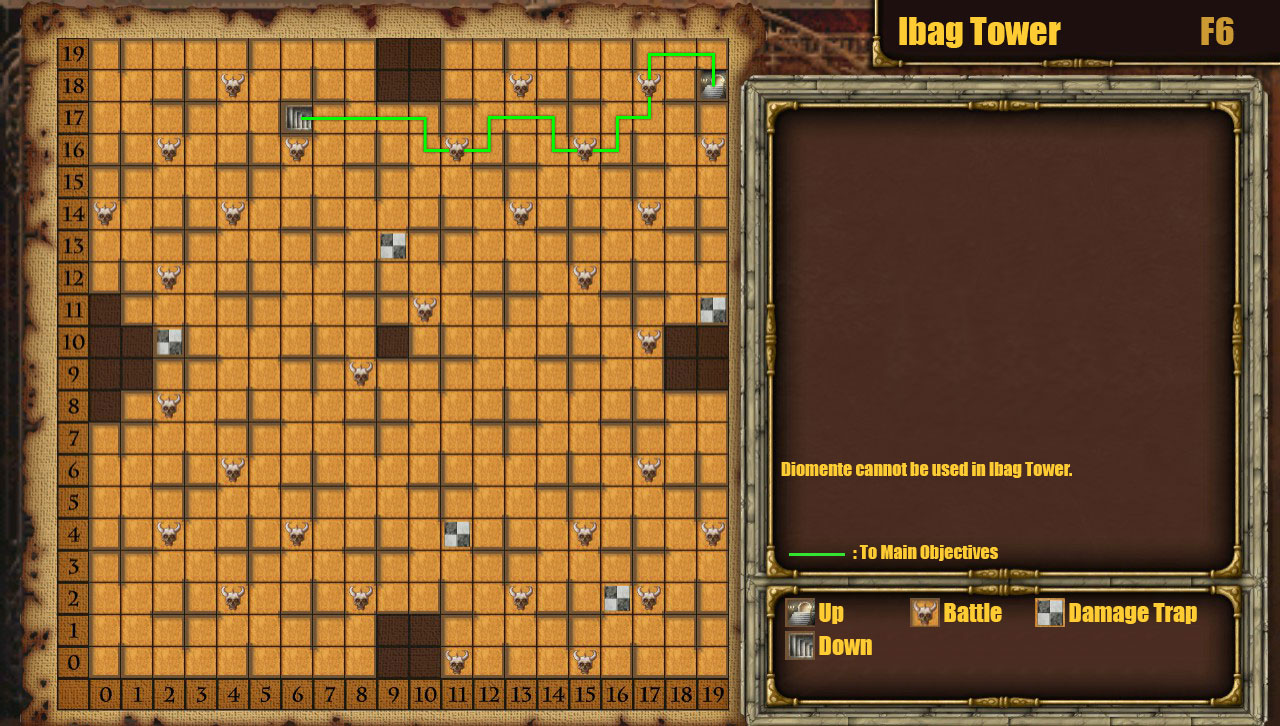
Lightning Charm +4: Ibag Tower, F5 or F6.

Evil Excalibur (not listed anywhere), F5.

Can be used by: Fighters and Valkyries. All races, all non Good alignments.
CURSED
5 accuracy, 4 attacks, 6-48 damage.
+20% dark attack.
-20% holy defense.
+40% dark defense.
Double damage vs Gods.
Celerity, Executor of Impunity 8 ago 2024, ore 11:37 
Also found Immortal Leggings on F2.