HELLDIVERS™ 2

HELLDIVERS™ 2

1,055 평점
Pro Tips from a Skull Admiral
InkiePie 님이 작성
A constantly and consistently updated, professional, articulate, and up to date guide on out of the box strategies, basic tips, and guides for all players. There *will* be something new for you to learn here, and if there somehow isn't, there will be. I will be updating whenever I figure something else out, so check back every once in a while!
62
26
8
55
16
5
6
5
8
4
4
4
4
2
   
어워드
즐겨찾기
즐겨찾기됨
즐겨찾기 해제
Intro
Guide contents are a little messy, unfortunately each "chapter" has a word limit meaning if I have more tips than I can fit in a section, I need to find a new way to fit them in. At the moment it's sorted into individual topical tips, regardless of how complex or simple it is. Where a tip is placed doesn't really matter it's a very loose sorting system, I recommend reading the whole guide anyway, but yeah if it's a little messy or something blame steam for giving me a word limit per section. I also recognise the new highest rank is "Super Private" not "Skull Admiral" but let's be honest I'm not changing the cool ass name of this guide to "Pro tips from a Super Private" any time soon.

The sections are loosely sorted into:
  • Intro: Intro to the guide itself, includes table of contents.
  • Basics: Basic game mechanics for everything except combat.
  • Numbers: Information as to how the game works, dates, times, stats, etc.
  • Environments: What to expect on an alien planet - and how to deal with it.
  • Weapons: General weapon tips, what your gun does and how to use it.
  • Stratagems: General information regarding a variety of stratagems.
  • General Combat Tips: Essentially the "basics" section but combat specific.
  • Killing Bugs: Information specifically relevant to killing the Terminid threat.
  • Killing Bots: Information specifically relevant to killing the Automaton threat.
  • Killing Squids Information specifically relevant to killing the Illuminate threat.
Basics
-
DON'T USE OPEN MIC. Are you getting kicked every game? Yeah, shocker, no one wants to hear a baby crying, or you breathing into the mic, or your fan in the background. Check the setting and make sure your mic is set to push to talk, because there is nothing more aggravating than trying to play with someone who doesn't use their mic the entire game for anything other than sharing the fact that they eat chips with their mouth open. Seriously, this is the biggest tip on this list.
-
Some controls: Just some basic controls not covered in the tutorial. I swear the tips get better, we're just starting slow for the noobs.
  • Ping stuff: Press Q
  • Drop stuff: Hold X
  • Use supply pack on self: Press 5
-
Samples, requisition slips, medals and super credits are all shared no matter who grabs them. On that point, req slips, medals and super credits are all added to your account when you pick them up, meaning you don't actually need to evac to bank them. Samples, obviously, are a different case and require a player to evac while holding them. Either way, all are shared no matter who carries them, so grab what you can!
-
Most resources have caps, so spend them! I know, it's kind of sucky that once you max out your medals and req slips you can't earn anymore. I wish there was some kind of system for you to waste resources on, just for the sake of earning them still. Oh well. Anyway:
  • Requisition Slips: 50,000
  • Medals: 250
  • Common Samples: 500
  • Rare Samples: 250
  • Super Samples: 100
  • Levels: 150
If you collect more once you've hit the cap, they get wasted. So if you're saving medals for the next pass, make sure to spend a couple so you don't lose any from successful daily orders or anything. As far as I'm aware there's no cap on Super Credits, not sure why there would be.
-
Common samples are highest priority when starting, then it's rares. I recognise this is seemingly odd advice but rare samples are surprisingly underused and in difficulties 7-9 any decent player will make sure to grab at least 3 super samples per mission. But almost *every* ship upgrade requires at least 80 common samples, which adds up a LOT. If you have to pick between, say, 10 common samples over 3 super samples, grab the commons. This might change as there's plans for a few new kinds of samples, so I'll update when relevant, but as it stands you want as many common samples as you can get your hands on. Eventually though, once you get to later upgrades, you'll be short on rares by a mile, at which point both have equal value. Point is pretty consistently Super Samples are lowest priority.
-
Try out everything. This is oddly controversial, but try out all the weapons and stratagems. I mean this, what makes a weapon good is the user, not the weapon itself. If you like the feel of a weapon, use it. A player well versed in using the Laser Cannon is more effective than a noob who only uses the Railgun because a youtuber told him to. Pick what you like, and learn to get good with it. Also good to get different loadouts for different situations, bugs, bots and illuminates are all different, with different weaknesses and powers. Some weapons work better against different enemies, some work worse. Try everything once.
-
Once the pelican lands, it stays. As you probably know, if you leave the evac site while calling down the pelican it'll cancel the whole process and countdown and you'll have to start again. This is not the case once it lands. Once the pelican is on the ground, you can just... leave the evac site. So if you've done the main part of the objective but want to do the side objectives without worrying about the stress of calling evac, send one guy to call it down and babysit until it lands, then run back to come help you. I wouldn't recommend doing this with randoms since you can't trust them to not get in the pelican but if you're a group of four, by all means try it out.
-
Dump ♥♥♥♥ at evac. Extra weapons, sentries, samples, a mech if you can spare it. That all stays where you leave it, so if you dump a mortar every time you pass by evac by the time you leave you don't have to worry about having something to team kill your friends lmao. Nah, position mortars near the centre next to the evac terminal and they shouldn't tk. Toss regular sentries on the other side of cover so they don't sweep site and erase 2 teammates and nail the neighbours dog.
-
On fire? Stop, drop, and roll. Or just dive, that works too. Apparently people don't know diving puts out fire but yeah if you're flaming take the fall and you're no longer on fire, yay!
-
Don't join the subreddit, don't talk in the Discord. Seriously, they're both echo chambers of hatred, you'll have more fun just playing the game. A lot of people will ignore this but trust me man - this game is a lot more fun when you don't have someone in your ear telling you how "bad it is." Trust me on this one. Also the subreddit mods tend to ban you if you go against the general community opinion, so if you have to use them try and be as negative as possible. You'll fit right in.
Numbers
Everything has a schedule. Updates and patches are on Tuesdays, sometimes Mondays. These are often just bug fixes and weapon balancing, but sometimes comes along with stealth content drops like new enemies. Warbonds drop on Thursdays, specifically the second Thursday of each month, once a month. Easy.
-
Armour with 100 resistance and above give headshot defence. This is not currently effected by what helmet you wear.
-
The egg drops 2 Super Samples, and 4 rare samples. Information regarding this may change but if you feel like it's worth not being able to use stratagems and being locked to your secondary, then by all means get that egg.
-
Less players doesn't mean less impact. As you can see in the below graph, we can see that less active players converts to higher effectiveness per player. The less players online, the more effective each helldiver is. In turn, the more players online, the less effective they are. Now, this isn't bad or means we do better when less players are online, this just means we're just as effective no matter what the player count is.
-
Environments
Diamonds are loot, pointers are not. If you see a diamond on the map, that means there's loot. Stims, ammo, samples, whatever, diamond means there's stuff for you. Pointer, on the other hand, means there's nothing. This is pretty obvious stuff but people keep asking me to add this and I keep seeing posts online about this so apparently it's not extremely obvious for some people. So yeah. Diamond means loot, pointer means no more loot.
-
Toss a grenade at underground shipping containers for loot. Specifically orange or blue ones, like the image below. Don't just, like, toss grenades at random shipping containers. Anyway yeah you'll spot these around certain maps, they usually contain special loot like Super Credits or medals. Be aware I have had several teammates decide to stand on the grenade while I open these so make sure the area is idiot-free beforehand. Some guns work on it too, like the slugger or the grenade launcher, you really just need to hit it really hard all at once.
-
A single grenade to the monitor will finish the terminate illegal broadcast objective. Simple as that, whilst the game will guide you to activate the terminal and do 2 short steps to finish it, if you're in a rush you can simply throw a grenade at the terminal to finish the mission, destroying it alone is all you need. That's the most resource efficient method though, you can end it by throwing an eagle or an orbital at the monitor, as long as it destroys the monitor the tower will go down and the side objective will be won. You can also take out the tower with an explosive eagle or an autocannon shot to the top of it, but it's a little iffy and doesn't always work so I recommend just using a grenade on the monitor. You can also take out the tower long range using an autocannon shot or similar if you aim well.
-
Super samples always spawn at this rock. It's not consistent where this rock spawns but on difficulties 7-9 it's GUARANTEED to. Super samples also don't spawn anywhere other than this rock. Here's the thing though, there's actually a fake version of this rock, without any samples. Both these rocks have diamond markers on the map, so it's fairly easy to get tricked, but don't worry, the fake often has ammo and stims for you to pick up, just no super samples. There's actually a really rare variant where both rocks will spawn next to each other, and the super samples will spawn in the crevice. That's not super important but y'know that can happen so the more you know. So yeah buttplug rock is good, but if you want super samples you're looking for the one on the left.
-
You get five seconds in water, unless you have a mech. That's it. If you want to cross from A to B, do it in five seconds, or you'll drown and likely permanently lose everything you had on you. In general avoid water it is *extremely* lethal but if you're caught in it, make sure you get out before the clock stops ticking. The exception to this is a mech, which allows you to wade through deepish water without drowning. Obviously, make sure you stay in the mech while doing this or you'll lose it. Anyway yeah, want more than five seconds? Try a mech. Don't want to risk it at all? Take the long way around. Have something valuable on you? Don't even consider getting near the water.
-
SEAF Artillery shells are colour coded. Now, the devs have changed the colours and shapes of these shells a heap of times so this information can change but as of right now they are:
  • Black - Mini-Nuke
  • Yellow - High Yield Explosive
  • Green - Explosive
  • Red - Napalm
  • Blue - Static Field
  • Grey - Smoke
I've listed them in order of priority, try to insert them in this order if possible. Sometimes you can't manage order in chaos so if you have to choose between optimal order or getting it done and running, get it done.
-
The smoke shells from the SEAF Artillery aren't useless. Now what you're probably expecting me to say here is that the smoke is super great against bots, which is half true since it screws with their aim but I wouldn't call it particularly strong. No, what's decent about smokes is their destructive capabilities. The shell itself has to make contact with a surface to explode into smoke, and that actual shell is one big bullet. I wouldn't recommend putting a smoke in the Artillery if there's better options but if you have no choice, these shells can be used to take out structures from Spore Spewers to just bug holes. Not to mention they do good damage to enemies, but you'll struggle to hit a Bile Titan with a direct smoke shell 14 seconds after you threw it down. Doesn't mean I haven't done it though!
-
Stratagem Jammers are easier than you think. Often you'll find there's a bot factory close to one, simply toss a grenade and it'll blow up the stratagem jammer. This isn't always a guaranteed of course, sometimes you'll have to do the terminal and all that, but if you can't be bothered fighting your way to the top without stratagems, then toss in a grenade in the vent and you're aces. Easy.
Weapons
Hold R to see different weapon modes. This is a loading screen tip yet somehow people don't know this. Not every gun has a special setting, and some only have moderately useless ones like the flashlight, but some such as the Railgun or the Machine-Gun have different firing modes that make your gun infinitely more effective. Now, obviously you'll have to use what you feel is most effective, there's no best RPM per machine gun or best fire rate per shotgun but definitely try out all the options and decide what you like best. Trial and error produces results. There's also a setting that makes these changes stick so might be worth turning that on in the settings so you don't have to change the mode every time you respawn.
-
Explosive weapons do double damage to weak points. Non-explosive weapons do a +10% damage increase to weak spots, explosive weapons do a +100% damage increase. Note that by "explosive weapons" I specifically mean a weapon that has the stat "explosive." It's kind of poorly articulated by the devs what that means and if stuff like the auto-cannon qualifies as "explosive" but I assume if you can kill yourself by shooting it at your feet it counts. Weak points, such as the back ends of Chargers, the vents of Hulks, or the flesh underneath destroyed armour plating, take significantly more damage from these weapons. Know what your gun's used for before you equip it. Also note these weapons do self damage so switch to your secondary if you want to kill a bug at your heels.
-
Jump pack is good if you know how to use it. You can use it to reload your support safely mid air, or to use a stratagem without danger. It also allows you to get to places bugs can't usually, and if you climb up a cliff you can use it to jump on top of a titan (which means it can't hit you, and shooting at your feet kills it FAST.) It also allows you to throw stratagems WAY further while mid-flight so if you wanna do that by all means. Can't get to the other side of a tank? Now you can, face to face with the grill after one jump. Try some out of the box ♥♥♥♥ with it. I expect it to get a buff soon despite this due to it's extremely low use rate, expect faster recharge rate and possibly a longer jump.
-
You can shoot behind you while running with one-handed weapons. You use a shotgun or a rifle or something, if you try to shoot behind you you'll fully turn around and it'll halve your speed in that direction, but while using an SMG or a pistol or similar you will turn the top half of your body to fire behind you. To do this just swing the camera behind you and left click while running forward. Boom, moving one way, shooting the other. Cool. Good for when you're carrying mission objectives.
-
Know what your shots do. Red markers aren't always kills, it just means you likely got a head shot.
Stratagems
The resupply stratagem is shared with teammates. Meaning if you're alone in the middle of nowhere and use it while they're on point fighting 6 bile titans and a stalker nest, they can't call down extra ammo and stims. In general you're not really meant to call down a resupply by yourself, since you can typically find ammo and stims and similar around the map. Hell, even if you have no stims or ammo or anything, unless you're in the middle of something, suicide is an option! You'll respawn with either full or half of your resources back (depending on boosters,) over with your team. But yeah in general only call down resupplies if you're on an objective, or if you're with your team.
-
Landing on enemies with the reinforcement pod hurts them. Tanks specifically are durable against the initial impact of a stratagem. But all the other enemies, from Stalkers to Hulks, all take massive damage from being hit with a reinforcement pod. It doesn't always kill, or visually injure enemies, but it does do massive damage. This also applies to certain buildings/towers like artillery cannons. So yeah, hit everything you want dead with your reinforcement pods. Oh, except for drop ships. Landing on drop ships is pointless since they're not really a threat themselves and you'll likely go through and land in an army.
-
Stratagems stick when they land on top of the enemy. So throw at an angle, not directly at the target. It doesn't really matter *where* it lands on the target for it to stick, the ball just has to drop from above. Obviously you want it to land on the target's head, a resupply pod dropping on the head of a bile titan will one shot it, so if you can throw that well, you'll reap the rewards.
-
Sentries go above or behind. Sentries will not hesitate to shoot through you. The solution to this, of course, is to have them shoot from above you. This is shockingly difficult of a thing to get done, since their stratagems tend to bounce off the top of rocks or just instantly crush buildings they land on. Natural cliffs and hills however are fair game, so slap a sentry on top of those and watch them shoot OVER you rather than THROUGH you. Same general concept with cover, you want the sentry on the other side of it so it won't shoot at you. Last thing you want is a gatling sentry in the middle of evac spinning around wiping you all out. Put it behind a wall or shipping container and have it mow down the threats. Mortars are different though I tend to toss them where players are standing.
-
Orbital laser is the skeleton key. This thing is mean. Of course, you only get three of these per mission, but it's so effective it evens out. The orbital laser is entirely capable of destroying and entire large automaton camp, can destroy entire objectives, hell I managed to put one *just* close enough to a stratagem jammer that it crawled over and took it out. That's just objectives though - it also quickly takes down enemies large and small, before moving to the next one, leaving a trail of flames to take out anything it missed. Now listen, I'm not saying this is an essential part of your toolkit, especially not on shorter missions, but if you need to destroy ♥♥♥♥ this is your best option.
-
Sentries can't hit you while you're prone. Literally every player's first death is to a sentry, and to learn to avoid that you need to go prone. Despite this, no one ever remembers. So if you see a machine gun or a gatling sentry spinning your way, take a dive. Also works for tesla towers. Kind of works for mortars since you'll take less explosive damage, but yeah it's still gonna hurt.
-
General Combat Tips
Use the laser dog for bugs, gun dog for automatons. Both poke the bear regularly so if you want to avoid combat then don't bring either, but they're both decent fighters and tend to target the small enemies, which is super useful. The laser dog tends to wipe out all the smaller bugs as the close in, reducing the chances of you getting swarmed so you can focus on the big targets. It also has a way longer up time, so not need to take breaks behind cover or anything. The gun dog is better against automatons due to it's range and ability to shockingly consistently headshot automatons. I personally say test the gun dog out a bit but it's not *that* great and the backpack slot can be used for other things but yeah if you're *going* to use a dog against the automatons, use the gun one. Expect it to get buffed soon, particularly in the ammo department.
-
Make tactical retreats. Particularly through tight spaces. A strafing run, some mines, a gatling sentry, all those thrown behind you will erase bugs while you get away from the danger. My record with a tactical retreat is 64 kills with the tesla tower. Know when you're outnumbered and use it to you advantage, shoot fish in the barrel rather than the lake. Note that it's a lot more difficult to retreat with an Impaler up your ass, since their one job is to kill you when you're retreating.
-
There's several ways to take out spawners. Out of grenades, explosives, eagles? Toss a physical stratagem in/on a spawner, (like a resupply or a sentry,) and the pod will drop and crush it. Best to only do that when there's 1 or 2 holes left in the middle of no where and you're out of grenades, but yeah it's an option that can save your hide. Reinforcement pods also work, but there's a chance you'll get trapped inside the nest or underground or something since it's a little buggy so that's *definitely* last case scenario. Don't want to use pods? Autocannon rockets, grenade launcher shots, expendable rockets, mech rockets, etc. all work wonders on terminid nests if you hit the centre of them, and factories if you get them in the door or at the very bottom of the top vents. Spear rockets are amazing for bot factories, since they can lock on and destroy the factories from far away, allowing you to clear out the whole automaton base without even getting close.
-
Spawns don't work how you think they do. Here's an excellent guide on it, best you can find. This information is directly from there, but is nowhere near as detailed, I highly recommend reading that guide yourself. Anyway: There's this thing called "heat" which determines how many enemies spawn. Objectives/nests are full of heat, and the further away you are from these objectives, the less heat you experience, that is to say, spawns. Finishing objectives and clearing nests for the most part clears out heat- unless its the main objective or more than half the nests. If you destroy more than half the nests or finish the main objective, global heat rises A LOT, meaning WAY more patrols and enemies. You heard that right, destroying nests increases spawn rates. Some other notes on this topic from that guide:
  • Reinforcing *increases* enemy spawn rates for that battle.
  • Time has no impact on spawns. What you do in the match does, but time itself doesn't.
  • *Splitting up increases spawns. You can still go 3/1 or 2/2 but strategize around it.
  • Evac has it's own heat radius, calling the pelican doesn't add to it.
  • Spawners cause most of the location specific heat on the map.
  • Using terminals/using objective materials doesn't effect heat.
*Image diagram of how positioning affects spawns:
-
You can dig holes with Explosions Weird tip, you'll probably never use it, but craters and similar stuff are caused by explosions, live in game. This can be useful in cases like digging underneath a tank to get samples, or digging a trench for a sentry, or something like that. Not particularly important or impressive to know but it's the little things like this that can help when you least expect it.
-
Stances matter for a lot of things. They effect aim, they effect how loud you are, and they effect how much damage you take from explosions. Running/Sprinting is the loudest and worst aim. Standing/walking is slower, stealthier, and allows better aim. Crouching is amazing for aiming, better for stealth, and has the bonus effect of reducing damage from explosions as well as knockback. Prone is good for shooting, better for surviving. You'll take significantly less damage from explosions while prone, so if there's a nuke coming your way run and dive. You're also essentially invisible while prone.
  • Movement: Sprinting > running > walking > crouching > prone
  • Aiming/Explosion Resistance: Prone > crouching > standing > walking > running > sprinting
Killing Bugs
Stalker nests are absolute highest priority. I need you to understand something. These are terminids, an already notably sentient and lethal species of bug, mixed with illuminate technology. These things will run across the map to kill you once they know you're there. They will not stop coming. They're shockingly tough, move quickly and sneakily, have instant ranged attacks and a slow down mechanic, and can jump long distances. And until you take out that nest, they will KEEP COMING. If you see even one of them, hunt down the nest and squash them because stalkers are your biggest, most constant threat. You can typically tell where the nest is by watching which direction the stalkers come from. Oh, and they're all alerted when evac is called, so every remaining stalker nest will send stalkers to evac, where you can't leave to clear the nests themselves out.

Currently there are three types of Stalker Nests:
  • The basic lair, which only has a large bug hole, spawns two stalkers at intervals.
  • The scavenger-stalker lair consists of a large bug hole, a small bug hole that spawns scavengers, and a puddle that can drown you.
  • The double holes lair, as the name suggests, has two large holes with the same structure as the basic one. This lair spawns FOUR stalkers at intervals, high priority target.
-
Chargers are dumb. They'll mow down anything in their path, including enemy bugs. But they're also useful- if they run into a nest, both the nest and the charger itself will INSTANTLY die. Wild. Titans also love team-killing and are good at stomping nests, but don't die from it. Chargers and titans are also Amish apparently, because they prioritise sentries and emplacements over players, so if you need a distraction toss one down and the charger/titan will destroy it in seconds and great now it's over there see if you can book it before it realises you're gone.
-
Flamethrowers melt chargers - but not through their armour. In the Escalation of Freedom update flamethrowers were changed to not pierce armour. Their damage is still fine though, and it's still plenty effective against chargers. You just have to aim at the fleshy bits, not the covered bits. Easy.
-
Mortars are NOT made for bugs. For clarifications sake, EMS mortar is fine, but the standard mortar is dangerous when against terminids. Most terminids focus on melee attacks, meaning they have to get up close and personal to hurt you. Considering the mortar aims wherever there are bugs, that puts you at ground zero of the explosion. Now I recognise the goal is to not let the bugs get close to you, but we all have our moments of failure, and the mortar makes sure that you don't get any kind of recovery if you try to escape them. This tip will also benefit you in not getting kicked since a lot of players will just boot anyone bringing mortars to terminid fights, so uhh you're welcome on that front.
-
Bugs don't like fire. Fire is a volatile aspect of combat, and is constantly buffed and tweaked but it's persistently good at dealing with bug breaches. Napalm or incendiary grenades directly on top of a bug breach will severely damage everything trying to get through, effectively neutering the threat before it gets to you.
-
Bullets remove the "Bile" from Bile Titans. Oh ♥♥♥♥ - Bile Titan, heading straight for you. You don't have any orbitals and your last 500kg just missed, now you're running, not like you can kill it with bullets. But what you *can* do is shoot the soft underbelly until it pops, because with no belly, there's no bile, which means you don't have to worry about the long range acid vomit attack. Now preferably you'd deal with a Bile Titan before that's an issue but if you're stuck, shoot that till you or a teammate has something more lethal, a neutered bug is less of a threat. You'll know you've done it when it's all burst and gross, though there are two sections down there so make sure you get both.
Killing Bots
Tossing a grenade into an open automaton factory door is good enough. Not that exciting of a tip but if you're struggling to get a grenade in the holes on top of a factory, toss one in when the door opens, works the same. Of course, you have to wait for it to open so if it's a skill issue, keep practising tossing the grenades up top. But if you're running impacts or something that don't bounce, wait for the door to open.
-
Tanks and Factory Striders make your stratagems mobile. Toss a HMG on top of it for an unstoppable mounted gun that moves into new sight lines. Toss a tesla tower on top of it for a mobile hoard remover that moves from choke-point to choke-point. Don't put regular sentries on it since they just shoot the tank and explode, but mortars work well enough. You can also dump a shield stratagem and a resupply there but are you really sure you want to hold your ground on top of a target that's probably shooting your team? Tanks can still explode from stratagems slamming into them, mind you, it just takes a couple so don't over do it. Oh and all this applies to Factory Striders too.
-
Downing drop ships is useful. Originally, it was a pointless act. As of more recently bot ships have been made significantly more useful, and the ease of destroying a ship’s engine and downing the whole fleet makes it a good goal to strive for. Shoot down as many ships as you can, Helldiver. Unless you prefer to fight your Hulks head on, that is.
-
The laser cannon shreds automaton weak spots. I kid you not the laser cannon is insane. This thing rewards good aim and patience like nothing else. It's easy to aim thanks to the giant beam, and erases bots when you headshot them. This includes hulks, who upon being lasered in the skull, will die in roughly 2 seconds of consistent headshot heating. That 2 second timer also applies to vents - whether that be the back of a tank, back of a hulk, back of one of those annoying laser tower things, etc. Laser cannon also works wonders against gunships, aim at one of the engines on the side and hold fire, you'll clear out a dozen in seconds. Obviously weapon choices are up to preference, use what you want, you'll play better that way, but I recommend giving the laser cannon a whirl against automatons.
-
Mortars are made for bots. Bots are slow. Punish them for it. Mortars shine in this regard, as unlike bugs, bots tend to shoot at you from range - meaning mortars are low risk at friendly fire. Bots also tend to drop in big groups a decent distance from the fight, meaning more bang for your buck. But wait! Automatons shoot sentries! Oh yeah, that's right, mortars don't need line of sight, so you can tuck them away in a little corner and they'll nuke every tin can on the map without even hearing the whistle of a bullet. Regular sentries can work fine against automatons but if you're gonna bring one, bring a mortar. EMS also works well but I like my stratagems to do the killing for me, not just make it easier.
-
Melee jetpack bots to avoid close range explosions. They'll try their hardest to close the gap and kamikaze your ass, and whilst jumping backwards and planting a bullet in their skull is an option, sometimes it isn't worth the risk. Punch a jetpack bot twice and they'll drop like a sack of potatoes, without the issue of blowing your brains out.
Killing Squids
Shoot them until they die. Illuminate are new, so I can't give you many first hand tips other than the obvious. So yeah. If you see something fishy - shoot it 'till it dies.

Ships are a little special. Small arms fire to destroy their shields, then toss a grenade or similar explosive into the door. I've had a lot of grenades just kind of roll out of the door though so you might have to cook the nade a bit before hand.
댓글 88
HeadHunter996 2025년 3월 18일 오후 6시 20분 
Ever think about adding a section on enemy elite/specialist units we've seen to date? Bot just fielded a bunch of pyromaniacs called the Incineration Corps. Plus we never did secure and delete the Jet Brigaid (can't spell) schematics and the Spore-Burst and Predator Strains of terminids still exist. Knowing what enemy special formations are active, can do, and noted tips when facing them would be invaluable to the new guys and us old hands alike
Dolan:Der_Sammler 2025년 3월 10일 오전 8시 01분 
Really useful guide for me, thank you for that. How about expanding your guide with your latest Squid knowledge asap?
Endercherry 2025년 1월 26일 오전 3시 31분 
i now know what "egg" is
ItsRaven 2025년 1월 25일 오후 8시 36분 
information for squids:
(I can't confirm that this is 100% true tbh i just heard it somewhere)
i think the tripods have explosive resistance or something
Endercherry 2024년 12월 24일 오전 4시 34분 
what is "egg"
HeadHunter996 2024년 12월 14일 오후 11시 17분 
Overseer armor may be light, but it reduces damage to the point of negligible till it's shot off

Currently the squids have nothing a med-ap weapon can't kill, making the MG-43 (with decent aim) the go-to support weapon and the liberator watch dog is a godsend for voteless (cough-Zombie-cough) hoards

The Scythe and Laser cannon tear down everything the Illuminate field ground-pounder wise and fire bypasses overseer armor

SAM sites are everywhere on 7+ squid missions (2-3 on every map so far) and have bailed my squad out of several possible Last Stands and have a high spawn rate for the FRV for anyone looking to score some wheels

MG and Gatling sentries can distract and mow down entire Voteless hoards as well tie-up/shwack Overseers

all I got for now... gonna make more Calamari and help stop the Zombie Apocalypse now...
bronzekey07 2024년 12월 14일 오후 8시 48분 
My Squid tips:

For harvesters, shoot the knee or shoulder joints. It takes one EAT to down without shields, or 20-ish HMG shots (surprisingly consistent too btw).

Commando will down ships in 3 rockets. Mainly an evac defense thing tbh.

Take another look at walking barrages, especially in the city areas. You can easily clear voteless hordes or a medium encampment with them.

Orbital gas is a godsend. Similar CD to EATs and removes voteless in 4 seconds.

Use crossbow. Fulfills every function you need against squid infantry.

Anecdotally, the voteless seem HEAVILY attracted to loud sounds. For example, one tesla tower can bait all voteless away from flag objective.

New armor is a godsend. If you struggle balancing overseer and voteless coverage, use it. Liberator-P feels great with it.

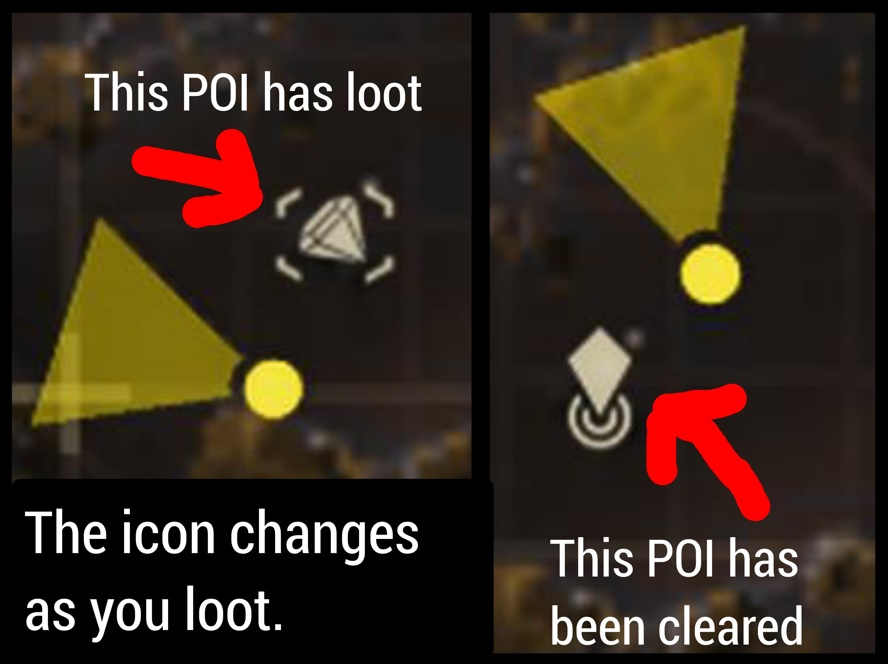
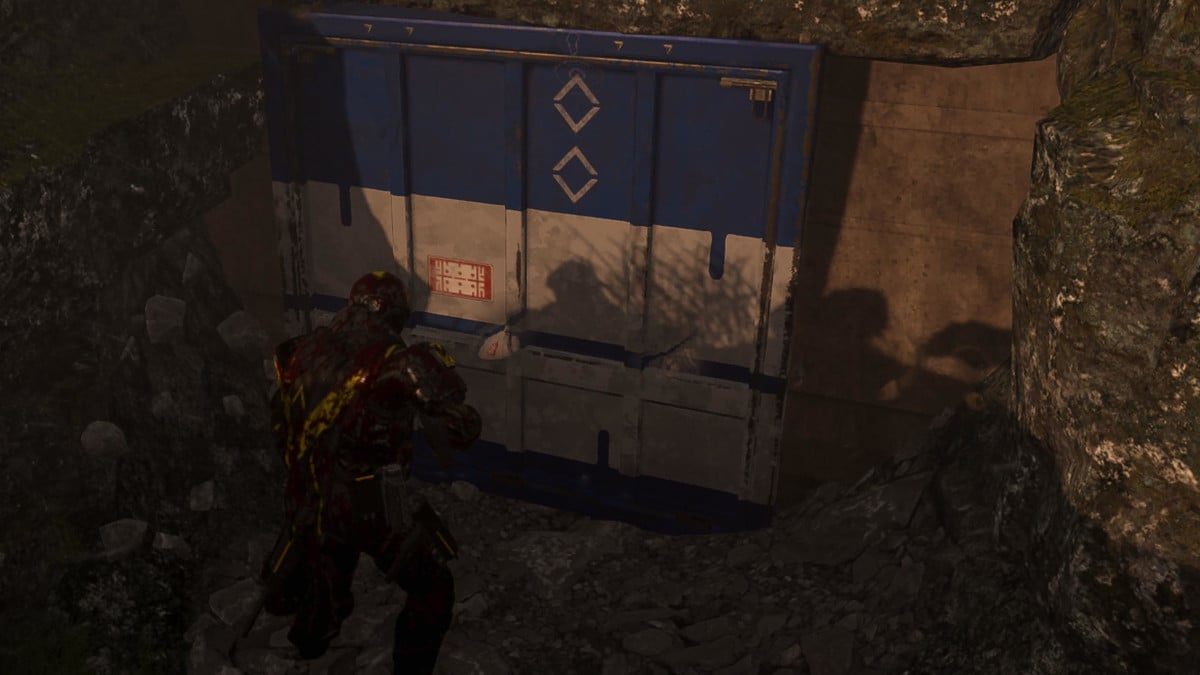
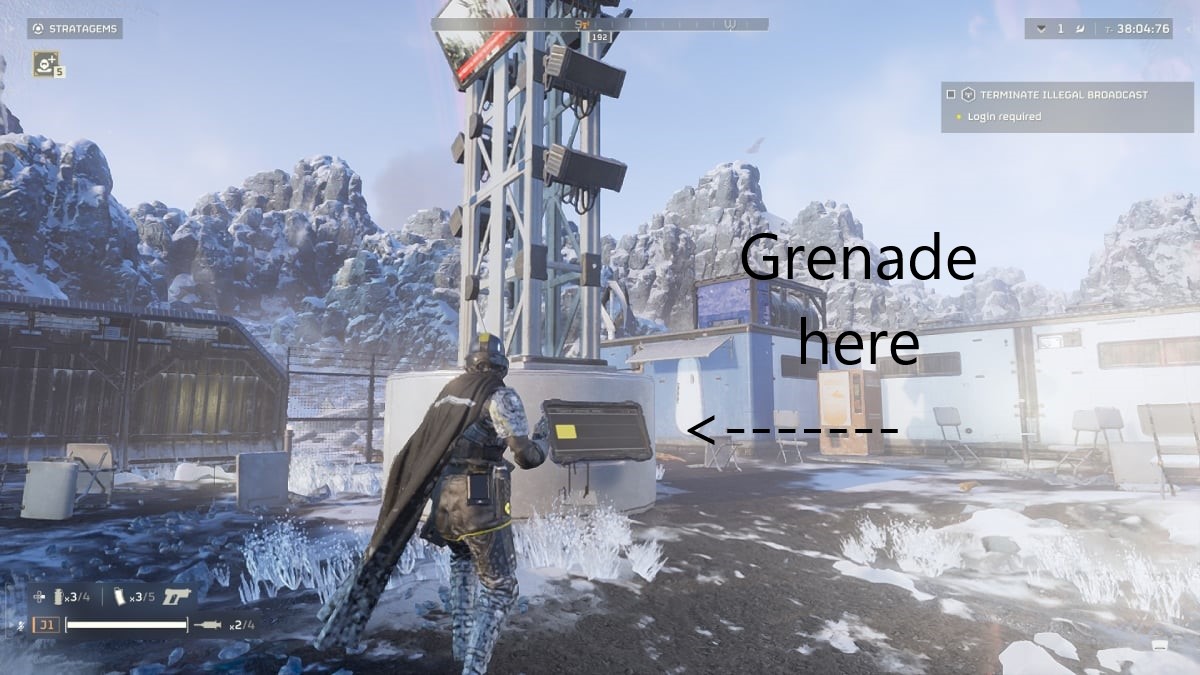
When grenades fails to kill encampments, try the other door.

Shout out to Takibo on Youtube for crossbow & walking barrage tips: https://youtu.be/OiipSpuZkOM?si=xyFm5wQwzgDfuCqO
N*rd 2024년 12월 13일 오후 11시 28분 
Those lance bois can eat an EAT even with their shields down.
:D
InkiePie  [작성자] 2024년 12월 13일 오후 9시 01분 
Guide is currently outdated. Drop any squid hints ya got!
StrawberryDelite 2024년 11월 26일 오전 8시 05분 
I haven't played in a while, what's different about drop ships that makes going out of your way to shoot them down worth it?