Balatro

Balatro

92 ratings
A New Player's Primer to Balatro
By charles leshrac
Are you looking for a written-guide that goes beyond being a compilation of tips, and instead discusses the mechanics and the decision-making skills needed to win in Balatro?

Don't know how to play Poker?

Baffled by Balatro's mechanics?

Intimidated by terms like Rogue-like and deck builder?

Or you simply can't seem to win despite numerous attempts?

This guide will explain the fundamentals and provide you with the proper framework to make impactful decisions in the game.
8
4
5
2
   
Award
Favorite
Favorited
Unfavorite
Introduction


When you see the description "Rogue-like Deck Builder", you're probably under one of two groups.

The first group wonders what does Rogue-like Deck Builder mean?

The second group, on the other hand, might be thinking that they've played Rogue-like games and Deck Builder games before; so why do they struggle at Balatro?

Let's break down the two definitions:

Rogue-like

No need to complicate things. Rogue-like simply means it's run-based, which means nothing carries over from game to game, with the exception of the items that you unlock. The encounters are semi-randomized: theoretically, no single run is identical to another due to the combination of enemies, rewards, and items given to you. (You can replicate other people's runs or your specific run by copying the Seed and entering it at the start of the game.)

There are numerous Rogue-like games like Spelunky, The Binding of Isaac, Dead Cells, and Hades. However, your experience in those games won't help here: those are either action-oriented games and platformers, where your reflexes and memorization of enemy patterns having a significant impact on the game.

That's not the case with Balatro as this is turn-based and the only enemy you're really facing is yourself.

Deck Builders

Deck Builders are games where you draw random cards from a deck and play them. However, over the course of the game, you will be able to modify the cards in your deck, either by adding cards, removing cards, or enhancing them in some ways.

Some popular Rogue-like Deck Builder games include Slay the Spire and Monster Train. However, just because you're good at one Deck Building game doesn't necessarily translate that you'll be good at another. The reason for this is simple: each Deck Building game--at least the good ones--follow its own unique logic. For example, in Slay the Spire, you can get far into the game by making smart tactical decisions--such as picking a few offensive cards at the start of your run and keeping your deck small. Contrast this to Monster Train where you have to be thinking of your game engine as you need synergy and combination of cards to succeed at the final boss. It's even more appropriate to call Monster Train more of an engine builder.

Balatro, on the other hand, can be considered a Deck Builder as you do start out with a deck of 52 cards and able to add, subtract, and enhance them in some way. However, for new players, that's sort of a trap. A better framework is to consider Balatro as a tableau building[boardgamegeek.com] game, where you need to acquire a variety of passive abilities (e.g. Jokers, Vouchers, Planet upgrades) in order to set up an engine that enables you to score a lot of points.

Rather than focusing on adding or removing cards from your deck, a more efficient investment is thinking of which Jokers and Vouchers you should be investing in. That's not to say deck building doesn't make an impact--it does, but that's a more advanced strategy. Suffice to say, there are builds that work even without making changes to your deck, and there are builds where changing your deck is important to making it work. (Compare this to a game like Monster Train where modifying the contents of your deck is essential to winning.)

Players are able to score points by playing Poker hands. Deciding which cards to play, which cards to hold on to your hand, and which cards to discard is all part of the strategy.

Poker

Poker is also another term associated with this game. If you've never played Poker, don't panic. You don't really need to know Poker to enjoy this game. The Poker aspect is knowing which cards you can play in order to score points, such as Straights and Pairs and Two Pairs. If you're unfamiliar with those terms, don't worry, I'll be covering them in a section later in this guide.

On the other hand, if you're a Poker enthusiast, unfortunately your Poker experience really won't necessarily help you with this game. A key skill in Poker is reading the room and knowing when to call other people's bluffs or making your own. That's completely irrelevant here as the only enemy you're facing is yourself. What will help you is understanding the probabilities. But other than that, this is a game where a Flush can beat a Straight Flush, which is why your Poker skills won't necessarily translate to Balatro.


How Scoring Works
Balatro works with a simple premise: you play cards and you score points. The "better" the cards you play, the higher your score.

This is best expressed using this simple formula:

X Chips x Y Multiplier.


However, the devil is in the details, and there are several factors that can affect this "simple formula".

Your scores are expressed as Chips.

I will break down how this is calculated.

I. Your Poker Hand

In Poker, there is a hierarchy when it comes to the cards played. A Straight (five consecutive cards--such as a 2, 3, 4, 5, 6 of any suit) for example beats a Pair (two identical cards of different suits).

In Balatro, that's true at the beginning of the game. See the image below on how the scores are initially calculated:


The numbers in blue is the base value of Chips that come from playing a specific hand. This will be later multiplied by the number in red, which is the Multiplier.

For example, let's compare Pair (10 Chips x 2) with Three of a Kind (30 Chips x 3). By doing some basic math, we come to understand that the latter scores more points than the former (90 Chips vs 20 Chips).

In general, the higher you are in the chart, the rarer it is to end up with those results--hence the higher rewards: every card in your hand is a possible High Card, as that only requires a single card to be played. Three of a Kind, on the other hand, is much more difficult to come by, as you need three cards with the same number.

However, this rule isn't set in stone. Over the course of the game, it is possible to upgrade specific hands. It's possible that what is conventionally an inferior hand in Poker to become your best hand in Balatro.


In the image above for example, we've upgraded (indicated by its level) Three of a Kind to the point that it would score higher than a Straight Flush. By expending Planet Cards, we can increase the scores of specific hands.

It's worth noting that even if all the cards you played are Debuffed, you will still score this part.

II. The Cards You Play

Once we've established the Poker hand we're playing, the next elements that gets added into the equation are the actual cards you play.

For example, a Pair is calculated as 10 Chips x 2. The 10 Chips will be increased based on the cards that we play. In general, cards have a Chip value equal to their number (e.g. a 3 is worth 3 Chips, a 4 is worth 4 Chips, etc.), while Face cards (Kings, Queens, and Jacks) have a Chip value of 10, and Aces have a Chip value of 11.

A Pair of Aces has a much higher value compared to a Pair of 3's.

The Pair of Aces will look like this: 10 Chips + 11 Chips + 11 Chips = 32 Chips.

The Pair of 3's will look like this: 10 Chips + 3 Chips + 3 Chips = 16 Chips.

These numbers can be further modified by other factors in the game. Jokers for example can add to the Chips, as do Enhanced cards from Tarots.

If all of the cards you play are cards that are Debuffed, you will skip this part of the formula calculation.

III. Jokers

Jokers will also be able to modify both the Chips and their Multiplier.

Here are some examples:

  • Devious Joker will add +100 Chips if played hand contains a Straight.
  • Crazy Joker will add a +12 Multiplier if played hand contains a Straight.
  • Joker Stencil adds a x1 Multiplier for each empty Joker Slot (you start the game with 5 slots and Joker Stencil does not count itself).


(Please note the difference between a + Multipler from a x Multiplier, as some new players miss this. The former is in red font, while the latter is white font boxed by a red frame.)

Let's list our hypothetical scenario where you can only have one of the Jokers above. Which one would score higher?

A level 1 Straight is calculated as 30 Chips x 4.

Let's assume we played a 2, 3, 4, 5, 6. So 2, 3, 4, 5, and 6 Chips would be added to 30 Chips. Without any Jokers. that's a total of 50 Chips x 4, or 200 Chips.

With Devious Joker, we would add 100 to 50, so the result would be 150 Chips x 4, or 600 Chips.

With Crazy Joker, we would add 12 to the 4, so the result would be 50 Chips x 16, or 800 Chips.

With Joker Stencil, assuming all five slots are empty, we would multiply 5 to the 4, so the result would be 50 Chips x 20, or 1000 Chips.

If we added all three Jokers to the computation in the same order listed above (noting that both Devious Joker and Crazy Joker occupy a Joker Slot, reducing the Joker Stencil bonus to x3), the calculation would look like this:

(100 Chips + 50 Chips) x ( (4 + 12) x 3) = 7,200 Chips.

However, the order of the Jokers also matter. if the order were reversed (Joker Stencil being the left-most card and Devious Joker being the right-most card), the math would look something like this:

(50 Chips + 100 Chips) x ( (4 x 3) + 12) = 3,600 Chips.


IV. Conclusion

Based on what we've listed above, there are several things we can conclude:

  • Playing more cards leads to higher scores--because the more cards we play, the more Chips are added to the base value.
  • We want a combination of bonuses; we want upgrades that increase the base number of Chips, upgrades that add to our Multiplier, and upgrades that multiply our Multipliers.
  • It's important that we pay attention to the order of cards, as the same set of Jokers arranged differently can lead to a different score.
  • There are several ways to achieve what's listed above. Planet Cards for example improve both the base number of Chips and our Multipliers. However, they can be hard to come by and it takes a long time to stack. Jokers, on the other hand, are very cost efficient in the sense that they can significantly provide massive bonuses as an upgrade under $10.
Developing Your Engine Part I: Maximizing Your Score
In the previous sections, you saw me mentioning about building your engine. Let me elaborate more on that part here.

Building an engine basically means creating combos or synergies that enable you to do more.

However, for new players, because there are several ways to go about it, they might be confused in which direction to head.

I will outline below the areas you can focus your engine on, and which one to prioritize (as this game is very context-dependent, you don't need to be strict in following the hierarchy, but it can serve as a starting point when you evaluate which decisions to make).

Maximizing Your Score

Maximizing your score should be your number one priority, as this can determine whether your run ends or not.

What does it matter if you've saved up $50 if you're dead? Or what does it matter if you can consistently draw Flushes if your Flushes don't score high enough to beat the current Blind?

This is why developing an engine that increases your score should be your highest priority.

Admittedly, at Ante 1, which is the earliest stage, you can probably postpone this part to a certain extent. But by Ante 2 and higher--especially at higher difficulty levels--you should be aiming for upgrades that either increase your Chips, your Multipliers, or both.

To recap what I explained in the How Scoring Works section, you are looking for three things to increase your final score:

I. Something that increases your base Chip value.

This is very important in the early game and relatively common to find.

Let's say you play a Pair. At level 1, this is calculated as 10 Chips x 2 = 20 Chips.

Let's say you obtain Blackboard, an uncommon Joker. It gives x3 Multiplier if all cards held in hand are Spades or Clubs.

If we were to apply it to the Pair, the formula would look like this:

10 Chips x 2 x 3 = 60 Chips.

Compare this to one of the more common Jokers, Sly Joker: +50 Chips if played hand contains a pair.

If we were to apply it to the Pair, the formula would look like this:

(10 Chips + 50 Chips) x 2 = 120 Chips.

So in this instance, when you really have nothing else to work with, Sly Joker has a more significant impact on your score than the Blackboard Joker.

II. Something that increases your Multiplier.

Also quite common are upgrades that increase your Multiplier (additively).

Let's go back to the Pair as an example. Let's say you already have a Sly Joker, which adds +50 Chips to your base. In the hypothetical scenario that you could get another Sly Joker or a Jolly Joker (+8 Multiplier if played hand contains a Pair), the latter would be more beneficial.

Let's break it down again:

In the scenario where you have two Sly Jokers, the formula would look like this:

(10 Chips + 50 Chips + 50 Chips) x 2 = 220 Chips.

In the scenario where you have a Sly Joker and a Jolly Joker, the formula would look like this:

(10 Chips + 50 Chips) x (2 + 8) = 600 Chips.

III. Something that multiplies your Multiplier.

Building on what we've established already, let's say you already have a Sly Joker and a Jolly Joker. You're now getting a minimum of 600 Chips from every Pair you play.

Let's imagine the hypothetical scenario where you could obtain another Jolly Joker or a Blackboard. Here's how the formula breaks down:

In the scenario where you pick another Jolly Joker:

(10 Chips + 50 Chips) x (2 + 8 + 8) = 1,080 Chips.

In the scenario where you pick Blackboard:

(10 Chips + 50 Chips) x (2 + 8) x 3 = 1,800 Chips.

There is some juggling necessary to figure out what is the optimum number of base Chips vs. additive Multipliers vs. multiplicative Multipliers that you need to figure out for yourself based on what your run gives you.

However, based on the examples above, you want some combination of all three. What also gives you a more significant boost will depend on which stage in the game you are in.

If your engine is configured correctly, the ideal play is with a single hand, you are able to defeat the encounter (as opposed to playing multiple hands).

IV. Where to get your upgrades.

During the Introduction, I mentioned that it's best to view Balatro as a tableau building game rather than a deck builder (although it is still technically a deck builder). I will explain my reasoning below.

In general, there are three ways to increase your score:

  • Jokers
  • Planet Cards
  • Tarot Cards (which creates Card Enhancements)
  • Spectral Cards (which creates Seals on cards)

For their corresponding cost, Jokers are the most cost effective methods for increasing your score.

There are two reasons for this. One is that Jokers are computed last. The second is that they give a lot of value.

Compare Sly Joker to the Mercury Planet Card (Levels up Pair by +1 Multiplier and 15 Chips):

Sly Joker:

(10 Chips + 50 Chips) x 3 = 120 Chips.

Mercury Planet Card

(10 Chips + 15 Chips) x (3 + 1) = 100 Chips.

So Sly Joker is more efficient in this specific case. Other Jokers, like Blackboard, on the other hand, aren't limited to just Pairs and applies to other hands as well.

This doesn't mean that you shouldn't obtain Planet Cards when you can. They can increase your scores, and amassing a lot of them does help in some specific builds. However, also be aware that the cards you obtain from Planet Cards are random, so you could be getting increases to hands you never or seldom play. Or that their bonuses are restricted to specific hands (while it's easier to pivot with some Jokers--just sell your existing ones and replace them with new ones).

Both Tarot Cards (those that create Card Enhancements) and Spectral Cards (those that apply Seals to your cards) do qualify as Deck Building aspect and can enhance your build.

However, they are not as efficient as the other two above for two reasons. One reason is you need to have those specific cards in hand in order to benefit from them. The second is that they are counted first in the formula, so any Multipliers they apply aren't as effective when compared to Jokers.

Again, this does not mean you should ignore Tarot Cards and Spectral Cards completely. It just means that their use case is more situational or limited in comparison to Jokers and Planet Cards--unless you somehow increase your odds of drawing them.

Card Enhancements also make it possible for various decks to be viable. For example, some new players might be wondering what Stone Cards are for (and why you would ever want them in your deck), and in general, they are helpful for hands that use less than five cards, such as Pairs and Three of a Kind.

Developing Your Engine Part II: Improving Your Odds and Optimizing Wealth
Improving Your Odds

The next component you should consider building your engine around is improving your odds of success.

For example, if you play a Flush, it's possible for you to score the 250,000 points you needed to win the game--but how can you guarantee that you are able to gather the cards needed for a Flush?

This is where the Deck Building components come in, although not necessarily all the methods revolve around modifying your deck.

In general, there are four ways to increase your odds:
  • Change how the rules work
  • Increase your Hand Size, Hands and/or Discards
  • Add/Remove cards from your deck
  • Change the cards in your deck

I. Change how the rules work.

There are some Jokers that alter how specific hands are calculated.

Four Fingers for example makes it so that All Flushes and Straights can be made with 4 cards.

II. Increase your Hand Size, Hands and/or Discards.

There are Vouchers and Jokers that increase your Hand Size, number of played Hands before you fail, and how many Discards you have.

Wasteful for example gives Permanently gain +1 Discard per Round.

III. Altering the contents of your deck.

In general, if you want to gain more deck consistency, you should be focusing on Tarot Cards and and Spectral Cards as they can add, destroy, or change the contents of your deck.

Just be aware that it can take several Blinds before you are able to fully customize your deck.

For example, if you're starting out with the standard 52-card deck, playing The Hanged Man (XII) only destroys up to 2 selected cards. So going down from a 52-card deck down to 50 isn't a massive change.

However, if you persist at it, it's probably possible to trim down a 52-card deck to 40 cards, or perhaps create a scenario where there are two dominant Suits in your deck (as opposed to four).


Also be aware of Jokers that let you destroy cards (Trading Card, as well as Decks that start you out with a smaller deck to begin with (Checkered Deck).

A dilemma for new players though is figuring out how to modify their deck. For example, while it's clear how to optimize how to draw Flushes, what adjustments to your deck do you need to do in order to draw more Full Houses or Four-of-a-Kind?

Optimizing Wealth

The last component is optimizing your wealth.

On one hand, there's no difference between ending your run at Ante 8 with $0 in comparison to ending it with $25.

On the other hand, you need money in order to afford all the upgrades we've mentioned above, whether it's to increase your scoring potential or to increase your odds of success.

Most of the methods for optimizing wealth, at best, has an opportunity cost, or at worst, entails a gamble or risk. I will tackle them below.

I. Beating your enemies.

The most straight-forward method is to go through the game and win every encounter. Each enemy you face rewards a certain amount of $, with Small Blinds giving the smallest rewards and the Boss the highest rewards.

However, also be aware that in higher difficulties, Small Blinds don't reware $, so it's worth considering the other options I'll be mentioning below.

II. Tags

Tags are the rewards you get for skipping Blinds.

Some Tags provide more rewards than if you had beaten the Small Blind or Big Blind yourself. Other Tags might be a gamble.

Suffice to say, it's worth looking at the Tags rather than opt to never skip Blinds. If you're poor for example, the Coupon tag can be a boon, as it makes the initial Jokers and Booster Packs free. (On the other hand, it might give you Jokers or Booster Packs you're not looking for, so there is nonetheless an element of risk here.)

Hands

At the end of each encounter, for every Hand you have remaining, you earn one $1.

So in that sense, Balatro rewards efficient play. And upgrades that increase your Hand also indirectly boosts your economy.

Interest

At the end of each encounter, for every $5 you have unspent, you earn $1. This mechanic is called Interest.


This encourages not spending your money early on, but this can also be a trap.

Some players take unnecessary risk in saving up $25 before they start purchasing anything in the shop. There is some risk in this approach, as you could end up dying due to lack of any upgrades.

Also if you end the game with $25 in the bank, that's $25 that you could have spent purchasing upgrades for yourself to make the game easier for you.

On the other hand, $25 in reserve will recoup your initial investment after five encounters (i.e. you'll earn $25 over the course of five encounters) so it's also another strategy in managing your wealth.

Suffice to say, it's a judgment call here on whether to spend your money or whether to save it for Interest. A general piece of advice here is you find a useful Joker in the shop, it might be worth spending on, even if you only have $10 saved so far.

Tarot Cards/Spectral Cards

Specific Tarot Cards and Spectral Cards can provide you with money but you are gambling on obtaining those specific cards by spending money.

Jokers

Various Jokers can also help you with money, some immediate, some conditional, and a few that increases the sell value of your Jokers for when you cash out and sell them.

The immediate opportunity cost here is that it's taking up a Joker slot, but you can always sell that specific Joker once your economy has stabilized to focus on Jokers that increases your score.

Be flexible in your decision-making and sometimes it's worth taking a Joker that boosts your economy in the first few rounds and then replacing it with something else later in the game.

Selling

Various items in the game can be sold so always keep this in mind. This extends to Jokers, Planet Cards, and Tarot Cards you don't find particularly useful.
Scouting and Risk Analysis
For new players, Balatro might seem like a game that is too RNG-dependent. They will use the excuse that the reason they failed in their run is because of RNG.

This is a common misconception among Rogue-like games.

The reason individual skill in these type of games is because of the RNG; the skilled players are able to showcase their skills through their analysis, understanding, and ability to improvise given the specific situation.

On the other hand, even the most skilled players sometimes lose to RNG.

However, what sets skilled players apart is that they don't necessarily blame the RNG for their loss, understand that it is part of the challenge, and look for ways to improve their gameplay.

Leveraging Balatro's RNG in your favor.

The RNG presents itself in two ways: on the strategic level and on the tactical level.

The strategic level is the overall flow of the game, such as the specific bosses you encounter, the Jokers you end up discovering, etc.

The good news is that on the strategic level, there are ways to mitigate the RNG, and it works on a simple principle: scouting.

At the start of the game and once you beat the boss at each Ante level, you can preview the Small Blind, the Big Blind, their corresponding Tags, and the Boss.

This means that you can preview ahead of time whether you will be encountering a Boss that specifically counters your deck ahead of time or not. If you foresee yourself encountering a Boss whose special ability isn't a significant hindrance, you can relax. Otherwise, you have two options:

  • You have two rounds to look for a solution in the Shop, even if it means making multiple re-rolls.
  • Some Tags let you mitigate the Boss's special abilities, or even avoid them completely by providing you with a Boss re-roll.
What I've listed above is not necessarily a perfect solution, but it does provide you with tools to overcome challenges.
For example, The Pillar (Cards played previously this ante are debuffed) can be an annoying Boss to contend with. If you see this boss, you can either:
  • Skip the Small and Big Blinds, or
  • Play single hands during the Small and Big Blinds to minimize the cards that get debuffed.

Another element where the strategic layer comes is in obtaining coveted Jokers. Sometimes the Shop will never show you the Jokers you want to get but there's a way to circumvent that: Tags.

Some Tags either provide you with Uncommon or Rare Jokers (which is still a gamble in some situations), but there are Tags that guarantee Joker Editions and these don't necessarily need the special abilities of the specific Jokers to be beneficial to you.

For example, if you are looking for a Joker that multipliers your Multiplier, then any Polychrome (x1.5 Multiplier) Joker will work as a (hopefully) temporary solution. If you end up with a Joker that's both useful and Polychrome, then that's already a significant win for you.

RNG on the tactical level--that is the individual hands you play--has either been covered in the Improving Your Odds section, or understanding the mathematics behind Probability (which I will cover in a section below).

Before we proceed there, however, it's important to understand that you are constantly making important decisions in Balatro. Some decisions might provide you with short-term benefits that ensure your survival, while others might risk the short term in order to benefit the long term (the concept of Interest is one example).

There is no general advice here other than during each run, you will have to make these decision for yourself and weigh the corresponding risks and rewards. Sometimes, going for the short term benefit is the correct answer, while at other times, going for the long term benefit is the best decision to make.

You also shouldn't be afraid to pivot your strategy, as sometimes what worked for you in the first few rounds of your run will not be sufficient to let you attain victory in the succeeding rounds.

Here is a good rule of thumb: does your build enable you to beat the current boss in one or two hands? If the answer is no, then do you have an upgrade path before you get to the boss?
Establishing the Baseline
Before we proceed with the Math behind Balatro, it's best to establish what the baseline is, so that we can understand what are upgrades for us.

They are the following:

  • Hand Size: 8
  • Hands: 4
  • Discards: 3
  • Starting Money: $4
  • Joker Slots: 5
  • Item Slots: 2
  • Deck Size: 52
  • Vouchers: None

It's important to understand that baseline when we select the decks we play with.

For example, most of the "gateway" decks--the Red/Blue/Yellow Deck--essentially works with the baseline above and gives you $10 to work with.

With the Red Deck, you are given an extra Discard--which is the equivalent to starting out with a Wasteful (Permanently gain +1 Discard per round) Voucher that costs $10.

The same logic applies to the Blue Deck while the Yellow Deck flat out gives you $10.

And then you have the more "advanced" decks which breaks the rules in some way. The Black Deck gives you an extra Joker slot for example, but comes at the expense of a Hand slot. The Abandoned Deck lets you start out with a smaller Deck Size, which can be a positive or negative aspect depending on your disposition.
Balatro Math and Understanding Probability
A common beginner question in Balatro is: for five-card hands, is it easier to do Flushes?

There are three ways I can answer that question: how the UI presents it, fuzzy Math, and actual Math.

User Interface (UI)

In terms of the UI, it's easier for newer players to grasp flushes because there is literally a button on screen that sorts cards according to Flushes.

Unfortunately for the other card combinations, such as Straights, Full Houses, etc., there is no easy way to immediately see this (depending on the cards you are given). You can order the cards by Rank, but this won't immediately isolate Straights, Full Houses, etc.


Fuzzy Math

Fuzzy Math is what I would call eyeballing the Math without going deep into the mechanics.

In Five Card Draw Poker, among the 5-card hands, Straights are technically the most probable of the card combinations, with Flushes being the second most probable. However, be aware that Five Card Draw Poker starts out with an opening hand of 5 cards, while Balatro starts out with 8 cards.

A term in Texas Hold Em Poker used to describe the probability of obtaining a winning hand is called "Outs". If they say your hand has 4 Outs, it means that there are 4 possible cards that can win you the game.

In the context of Balatro, if in your opening hand, you drew 4 Spades, and 4 of something else; we can claim that you have 9 Outs (basically the 9 other Spades in your deck).

So viewing the game from a lens of Outs can make calculating probabilities easier for you, even if the actual Math is not quite accurate.

The Math

If you want a thorough breakdown of Math behind Poker hands, you can check out The Probabilities of Poker Hands[allmathconsidered.wordpress.com].

But for our purposes, here's the main difference between Poker and Balatro.

Poker has 2,598,960 possible opening hands (13! / 5! 8!).

Balatro has 752,538,150 possible opening hands (52! / 8! 44!).

And this would only get more muddled if you add/subtract cards from your deck, as well as if you change your deck's composition.

So in Balatro, what are our chances of drawing a Heart Flush in our opening hand?

To do so, we would need to add up all the possible combinations:

5 Heart Cards and 3 Non-Heart Cards: (13! / 5! 8!) x (39! / 3! 36!) = 11,761,893

6 Heart Cards and 2 Non-Heart Cards: (13! / 6! 7!) x (39! / 2! 37!) = 1,271,556

7 Heart Cards and 1 Non-Heart Card: (13! / 7! 6!) x (39! / 1! 38!) = 66,924

8 Heart Cards: (13! / 8! 5!) = 1,287

So if we add all of them and divide them by the total number of possible opening hands, it would look like:

(11,761,893 + 1,271,556+ 66,924+ 1,287) / 752,538,150 = .01740996120927556961730112951749

Now what would the math look like if we were using the Checkered Deck: (which has twice the amount of Hearts)?

5 Heart Cards and 3 Non-Heart Cards: (26! / 5! 21!) x (26! / 3! 23!) = 171,028,000

6 Heart Cards and 2 Non-Heart Cards: (26! / 6! 20!) x (26! / 2! 24!) = 74,824,750

7 Heart Cards and 1 Non-Heart Card: (26! / 7! 19!) x (26! / 1! 25!) =17,102,800

8 Heart Cards: (26! / 8! 18!) =1,562,275

If we add them all up, it would look like:

(171,028,000 +74,824,750 + 17,102,800+ 1,562,27) / 752,538,150 = 0.35150088404155988636589387528061

That's actually a lot of calculations and if you really wanted to optimize how much your percentages increases by the miniscule changes you make to your deck, you can apply and/or derive the formulas you need based on the example above.

But that's also a lot of work and why I prefer "Fuzzy Math" during actual play.

In general, here's a rule of thumb:

  • For Flushes, try to increase the Suit you want, and/or decrease the Suits you don't want.
  • For Pairs/Three-of-a-Kind/Full House, you do benefit from getting multiple copies of the same number.
Poker Hands
For those unfamiliar with Poker, I will go through the various Poker Hands. I will also mention the differences between Poker and Balatro.

These are ranked in terms of scoring and probability.

High Card

This is the lowest scoring hand you can play in Poker and occurs when no cards are matched. The lowest cards are 2's, while the highest scoring are Aces. The face cards--Kings, Queens, and Jacks--are ranked in that order.

In Balatro, to score a High Card, you can play anywhere between 1 card to 5 cards. Playing 1 card for example is advisable if you want to keep the other cards in your hand, while playing 5 cards is useful if you wanted to virtually discard the four other cards and cycle through your deck faster.

For example: you play a 10.

One Pair

This is the second lowest-scoring hand and occurs when you play two cards that have matching numbers.

In Balatro, to score a Pair, you can play anywhere between 2 cards to 5 cards.

For example: you play a 10, 10.

Two Pair

This occurs when you play two different Pairs.

In Balatro, to score a Two Pair, you can play anywhere between 4 cards to 5 cards.

For example: you play a 10, 10, 9, 9.

Three of a Kind

This occurs when you play three cards that have matching numbers.

In Balatro, to score a Three of a Kind, you can play anywhere between 3 cards to 5 cards.

For example: you play a 10, 10, 10.

Straight

This occurs when you play a set of five cards that are in chronological order. The suit does not matter. Aces connect to both 2 (e.g. Ace, 2, 3, 4, 5) and to Kings (e.g. 10, Jack, Queen, King, Ace).

For example: you play 6, 7, 8, 9, 10.

Flush

This occurs when you play a set of five cards that are all in the same suit.

For example: you play 2, 4, 6, 8, 10 that are all Diamonds.

In Balatro, you can also unlock other sub-decks connected to the Flush, such as a Flush House (see Full House below).

Full House

This occurs when you combine a Pair and Three of a Kind.

For example: you play a 10, 10, 10, 9, 9.

Four of a Kind

This occurs when you play four cards that have matching numbers.

In Balatro, to score a Four of a Kind, you can play anywhere between 4 cards to 5 cards.

For example: you play a 10, 10, 10, 10.

Straight Flush

This occurs when you play a Straight that is also a Flush.

For example: you play 6, 7, 8, 9, 10 that are all Diamonds.

Royal Flush--a term in Poker for when you score the highest possible hand, which is a Straight Flush that is composed of 10, Jack, Queen, King, Ace--is considered a separate hand type in Balatro.

Other Hands

Balatro will also have other hands not possible in Poker, such as Five of a Kind and Flush Five.
Glossary
Balatro uses a lot of terms (some based on Poker for flavor but no relation to the actual Poker mechanic) and special abilities, so here is a compilation.

Ante: The effective "stage" you are in. You "complete" the game if you beat the Boss Blind at Ante 8, although you have the option to continue in Endless Mode.

Blind: When you choose to face an enemy (instead of skipping them) in an Ante. There are three Blinds in an Ante--a Small Blind, a Big Blind, and a Boss Blind.

Booster Packs: Purchasable at the shop and each gives you a number of cards to choose from. These are usually themed according to card type (e.g. Joker Booster Pack, Planet Card Booster Pack, etc.).

Discard: Number of times you can discard cards from your hand. After which, you draw a number of cards to fill up your maximum Hand Size.

Edition: This can affect Playing Cards and Jokers.

  • Foil: +50 Chips
  • Holographic: +10 Multiplier
  • Polychrome: x 1.5 Multiplier
  • Negative: +1 Joker Slot

Enhanced Cards: Cards that have been enhanced via Tarot Cards. Each card can only have one enhancement (applying a new one will overwrite the previous one).

Face Cards: The King, Queen, and Jack are considered Face Cards.

Hand Size: The number of cards you initially draw.

Hands: Number of times you can play your hand before losing the game.

Jokers: Cards that usually provide some sort of bonus. Each one can have one Edition.

Planet Cards: Cards that increases the Chip and Multiplier bonuses for a single hand type.

Playing Cards: The cards that go into your deck and hand. These cards can be further modified with one Enhancement, Edition, and Seal.

Spectral Card: These cards can drastically alter your game, such as altering an entire hand to one random suit. This is usually the only way to obtain Seals and Legendary Jokers.

Tarot Cards: These are cards that either Enhance Cards, provide you with money, or create random Jokers.

Vouchers: These are permanent upgrades.

Seals: These are applied to cards in your deck. They usually have a special effect associated with discarding, holding, or scoring the said card.

Stakes: Indicates the difficulty level of the game.

Interest: The extra money you earn for beating a Blind. Accrues $1 for every unspent $5, maxes out at $5 (e.g. you gain $5 if you have $25 saved).

Tags: The rewards you get for skipping a Blind.
Bonus Tips and Recommended Reading
I. Jokers and most of the consumables like Planet Cards and Tarot Cards are unique. You can use this fact to increase your chances of obtaining them by keeping the consumable you do not want in the inventory. For example, if you are looking to farm the Mercury Planet Card, you should keep the non-Mercury cards in your inventory to increase the chances of Mercury showing up in the shop or a Booster Pack.

II. Cavendish is a potent, Common Joker. However, it can only appear once the Gros Michel Joker has been destroyed.

III. During the early game, you are straddling the line between short term builds vs. long term builds. Sometimes, it's best to purchase a Joker that will benefit you in the short term (and then sell it at a later date) even if you have to give up a Joker that would have helped you in the long term. And sometimes you are lucky enough that you were able to obtain a Joker that helps you both in the early game and late game.

IV. For Boss Blinds that obfuscate your Playing Cards, you can still sort them according to Rank and/or Suit. When sorting them by Suit, they are always in this order: Spades, Hearts, Clubs, Diamonds. You can also click on your deck to see what cards are still in your deck, and through deductive reasoning, realizing what cards you actually drew--at least in your initial hand if you're not keeping track of your discards.

Recommended Reading

Balatro Wiki[balatrogame.fandom.com]

A Joker guide for crushing the first difficulty by /u/Zeeterm

Here are tips on how to beat the Jokerless Challenge

A thorough guide to beating Balatro

Tags that cannot spawn on Ante 1


Balatro University

Frequently Asked Questions
What happens if you run out of cards? Do you reshuffle?

You lose the game.

When does the game "end"?

The game "ends" when you beat the Boss Blind at Ante 8. However, the game gives you the option to continue to Endless Mode.

Some of the numbers go up too high and I don't know how to interpret/read them.

See E Notation under Scientific Notation[en.wikipedia.org].

Basically the number after E dictates how many "times ten raised to the power of" it is. E+21 means x 10^21 for example.

How do you obtain Seeds?

The Seed to your game is provided to you when you beat it or when you die, whichever comes first.

(Please note that consoles and the PC version have subtle differences so their Seeds may not be identical.)

How are Stone Cards used?

Stone Cards are usually played with hands that are less than five. For example, if you play 2, 2, 2, 3, 4, normally only the Three of a Kind (the 2's) would score. If instead you played 2, 2, 2, Stone Card, Stone Card, then all five cards would score.

What are Eternal Jokers?

These are Jokers that cannot be sold. They are a handicap available at higher Stakes.

Are Unlocks available on Challenge Mode?

No.

I checked the Wiki and the text there is different from my game.

The Wiki is generally based on the PC version of Balatro.

The Console ports are different, and there are some subtle differences, including unlock conditions for specific decks, Stake order, and how much Chips you gain from a Foil.

How do Ante numbers work?

The Ante Number is basically the "stage" or "level" of the game. Ante 1 will be way easier than Ante 6 for example.

Each Ante has a Base Number (e.g. for Ante 1, it is 300). The Small Blind is 1x that base (Ante 1 Small Blind is 300), the Big Blind is 1.5x that base (Ante 1 Big Blind is 450), and the Boss Blind will have anywhere from 1x, 2x, or 4x the Base, depending on its special ability.

How do I use Planet Cards? When I use it, it immediately disappears.

Planet Cards are permanent upgrades. Look at Run Info on the left-hand side and you can see the level and formula for the various Poker hands.


Intermediary Mechanics Part I: When Do You Add/Subtract Cards Your Deck
This Intermediary Mechanics series is here to help advance your game once you've become acquainted with the basics. The goal of each section here is to focus on one gameplay mechanic and discuss they impact (or don't impact) your game.

If you are coming from deckbuilder games like Slay the Spire and Monster Train, you know the value of adding/reducing the cards in your deck: they help make your deck more consistent.

For those new to such type of games, let me explain their value:

One of the reasons to add cards to your deck is to make drawing them more consistent. Most decks for example contain 4 Aces (one from each Suit). If you add an additional 4 Aces to your deck, you've increased your chances of drawing an Ace.

On a similar track, if you remove cards from your deck, you'll also have a likelier chance of drawing the card that you need. It's easier to fish for the Ace that you need if there are only 40 cards in the deck, as opposed to 60.

Or in the case of Discards, more importantly, eliminating cards that you don't want can save you on Discards as the cards you dislike never show up. For example, if you have a Joker that gives bonuses for playing Face Cards, and you've eliminated all the non-Face cards from your deck, then all the cards you play henceforth would obtain the Face-related bonus.

So adding/subtracting cards seems like a good thing, but like everything else in Balatro, it needs to be balanced by the opportunity cost it comes with. I'll be discussing below the framework that comes into making such a decision.

I. Can You Afford It

In terms of priority, adding/subtracting cards from your deck falls under the Improving Your Odds category.

So before you think about modifying the number of cards in your deck, the question you should be asking is whether you can afford it.

If your scoring potential is good enough to get you through the current Ante (and/or the succeeding one) and you have some money lying around, then yes, it's worth considering this option.

However, if you have difficulties completing the current Boss Blinds, adding/subtracting Playing Cards from your deck won't change the outcome--unless you are adding cards that affect your scores, such as Enhanced, Edition, and cards with Seals.

II. Jokers

If you can afford to add/subtract cards from your deck, you need to decide which specific cards you want to add/subtract.

One guideline here is to check what Jokers that you currently have. If you have Jokers that give you bonuses to Face Cards, then you want to either add Face cards or subtract non-Face cards. If you have Jokers that give you bonuses when you play Clubs, then you want to either add more Clubs or remove non-Clubs from your deck.

In the absence of a Joker that synergizes with your build, you can decide to hold off on that decision and let your unspent money accrue Interest.

However, while risky, you can also "prepare" your deck for Jokers that you might run into the future. For example, if you are playing the Checkered Deck which has all your starting cards as Hearts and Spades, you can presume you will run into either a Lusty or Wrathful Joker (Played cards with Heart/Spade suit give +4 Multiplier when scored) eventually, as they are of Common rarity. So in this instance, you just need to pick either Hearts or Spades, and hope that you encounter the Joker that you want to obtain.

III. Boss Blinds

What can end most runs are the special abilities of the bosses. Thankfully, you can scout them ahead of time.

When deciding which cards to add/subtract, you can keep track of either future Boss Blinds or those you've already encountered.

For example, if you see an incoming The Club Boss Blind (All Clubs are debuffed), you can alter your deck to contain less Clubs.

Or on the opposite end of the spectrum, if you've already encountered The Club, you might want to alter your deck to contain more Clubs, as it's unlikely you'll come across The Club twice in the same run.

IV. Where You Want to Specialize

Lastly, while ideally you should be adapting your decisions to what the game nudges you to lean towards to, at the end of the day, players have their own favored playstyle or go-to builds in the absence of more overt cues from the game.

So at this stage, go with what you think is best.

If you want to play Flushes, decide on which one or two Suits to lean towards to.

If you want to increase your Pairs/Three-of-a-Kind/Full House/Four-of-a-Kind, then increase the number of copies of the high-ranking cards you have and reduce the copies of the low-ranking cards that you have.
Intermediary Mechanics Part II: Scaling Upgrades and Long-Term Costs
Not all players immediately grasp the risks and benefits involved with taking short-term benefits over long-term benefits. Or on the opposite end of the spectrum, some players always choose the long-term decision (such as not spending their money in order to accrue Interest) without taking into consideration whether they will survive in the next round or two.

While there is a meaningful discussion to be had in comparing taking a Joker that optimizes wealth (theoretically a long-term decision) vs a Joker that maximizes your score (theoretically a short-term decision, depending on the Joker picked), that is a topic for another day. This section is here to solely focus on upgrades that increase your score--and what the short-term vs. long-term benefits are.

Infinite Scaling Jokers

As far as Jokers are concerned, the "best" ones to obtain are the ones that have infinite scaling potential. You only have 5 slots, so the ideal is you have a Joker that "levels up" along with you.

Take for example these two Jokers: Crazy Joker (+12 Multiplier if played hand contains a Straight) and Ceremonial Dagger (When Blind is selected, destroy Joker to the right and permanently add double its sell value to this Multiplier).

The Crazy Joker, in your best case scenario (e.g. you played a Straight), will always give you a +12 Multiplier. It doesn't matter whether you got it at Ante 1 or Ante 8. If you have 5 Crazy Joker, they would give you a total of +60 Multiplier.

Contrast this to Ceremonial Dagger. In its worst-case scenario, it could give you a +0 Multiplier. However, there is no ceiling on your best case scenario; it depends on how much Jokers you fed to it and how many Rounds have passed. It could easily get a +60 Multiplier at the cost of one Joker slot. Or +120 Multiplier. It really depends.


Another way of looking at things is how many Joker slots are consumed. Crazy Joker gives you a +12 Multiplier. Let's say you combine it with Cavendish (which gives a x 3 Multiplier). These two Joker cards combined give you a total of +36 Multiplier. A Ceremonial Dagger "fed" over the course of 9 rounds, on the other hand, can easily get a +36 Multiplier. In this specific scenario, it's effective as two Joker cards while it only takes one Joker slot.

However, Ceremonial Dagger has an opportunity cost as well. It needs time to build up and costs money to grow. If you are at $0.00, you cannot increase it. If you come across it at the start of Ante 8, unless you have an Egg (Gain $3 of Sell Value at the end of Round) waiting in the wings, it's not going to contribute much in comparison to coming across a Crazy Joker.

However, obtaining one infinite-scaling Joker early in the game can really make a difference. Be sure to keep an eye out for them and value them accordingly. The earlier in the run you are in, the more value infinite-scaling Jokers provide, while the later in the game you encounter them, the less value they provide.

Also don't limit yourself in terms of Multipliers. Infinite scaling Jokers come in various forms, such as:

  • Space Joker (1 in 4 Chance to upgrade the level of played Poker hand before it's scored)
  • Wee Joker (This Joker gains +8 Chips when each played 2 is scored. Starts at +10 Chips)
  • Burnt Joker (Upgrade the level of the first discarded Joker hand each round)

But also watch out for "misleading" infinite scaling Jokers. Hiker (Every played card permanently gains +4 Chips when scored) might seem good but the problem is that the bonus is spread over your 52 cards, so it's difficult--but not impossible--to create an overpowered build with this Joker.

On the other hand, keep an eye out for "combos". An Eternal (Joker cannot be sold) Egg (Gain $3 of Sell Value at the end of Round) might seem "useless" for example, but if you combine it with Swashbuckler (Adds the sell value of all owned Jokers left of this card to Multiplier), it creates an infinite-scaling combo--although you also need to ask yourself whether a +3 Multiplier every round is worth the investment of 2 Joker slots.

How to Infinitely Scale Without Jokers

So what happens if you don't have an infinite scaling Joker? Should you quit your run?

No. Various runs have been completed without infinite scaling Joker. What's important to learn here is the concept of constantly upgrading/improving your engine.

So let's say by Ante 6, you have your ideal set of Jokers (that do not have infinite scaling). And let's say the bonuses you get are enough to get you through the end of Ante 6. How do you survive Ante 7 and Ante 8 with your current set-up?

The answer is to look to upgrades in three areas: Special Editions, Planet Cards, and Playing Cards.

Unlike Jokers, these do not come with an opportunity cost outside of spending money.

Special Editions

Your Jokers can each gain one Edition: Foil (+50 Chips), Holographic (+10 Multiplier), Polychrome (x1.5 Multiplier), and Negative (+1 Joker Slot).

You either "fish" for these cards (especially Negative) in the shop as an upgrade path to your existing set-up, or gamble on The Wheel of Fortune Tarot Card to apply these (except Negative) upgrades to your existing Joker setup.

Planet Cards

Planet Cards upgrades the hands you play at a linear rate (e.g. leveling up Straight three times is three times as good of an improvement, leveling up Pair twice is two times as good of an improvement)--usually by increasing the base Chips and Multiplier.

For example, Saturn increases Straights by 30 Chips and +2 Multiplier.

While this isn't as "cost-effective" of an upgrade in comparison to Jokers, it's still an upgrade, especially in conjunction with all the other upgrades.

If at Ante 6 your Jokers are all set, upgrading the bonuses you get from Planet Cards can be one way of further increasing your potential score.

Playing Cards

While not as consistent as all of the upgrades above, since you need to draw the Playing Cards with upgrades that you need, upgrading your Playing Cards is your next option in order to increase your scoring potential. (In fact, upgrading Playing Cards and Planet Cards is how you clear the Joker-less Challenge.)

Playing Cards can be upgraded in three ways (these all stack):

  • Special Editions (see above example except instead of Jokers, it applies to Playing Cards)
  • Seals (Red Seals to be specific)
  • Card Enhancements

An explanation of the specific Seals and Card Enhancement can be found at the Wiki[balatrogame.fandom.com].

Please note that Red Seals trigger for both cards played and cards kept in hand, so it works well with both Steel Card and Mult Card.

Edge Cases

There are also very specific scenarios where you can obtain an infinite-scaling mechanic via other means.

For example, the Voucher Observatory makes it so that Planet Cards in your inventory give x1.5 Multiplier for their specified hand. The Legendary Joker Perkeo creates a Negative (i.e. it doesn't consume a slot) copy of 1 random Consumable in your possession at the end of the shop. This combo thus creates an infinite x1.5 Multiplier, limited by how many times you leave the shop.
8 Comments
The Briarfox Mar 12 @ 9:47pm 
So is The Fish basically just an inevitable failure or....?
charles leshrac  [author] Mar 11 @ 2:46pm 
@Nantes

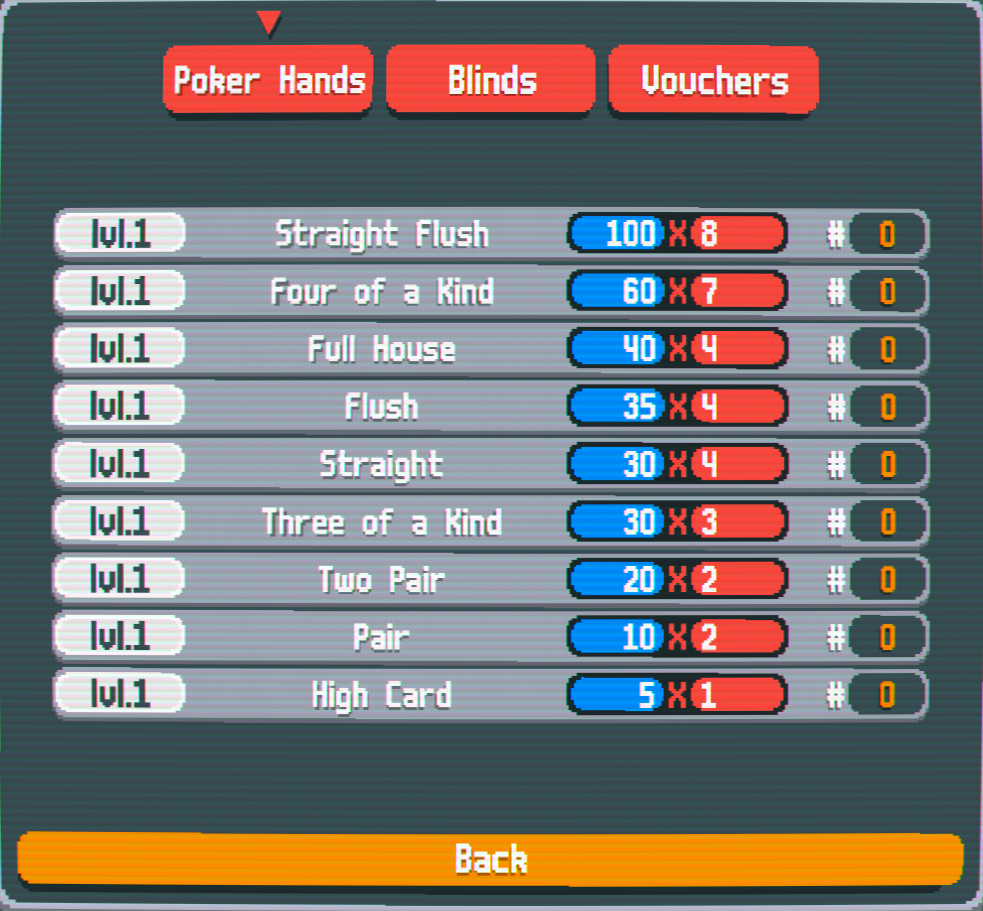
The math is correct but the x3 is a typo. It should be x2.

(The base formula for Pairs is 10 x 2.)
Nantes Mar 11 @ 12:27pm 
"Let's say you obtain Blackboard, an uncommon Joker. It gives x3 Multiplier if all cards held in hand are Spades or Clubs.

If we were to apply it to the Pair, the formula would look like this:

10 Chips x 2 x 3 = 60 Chips.

Compare this to one of the more common Jokers, Sly Joker: +50 Chips if played hand contains a pair.

If we were to apply it to the Pair, the formula would look like this:

(10 Chips + 50 Chips) x 3 = 120 Chips."

=============

Where does the "x 3" in the second formula comes from? In the first formula it comes from the fact that Blackboard Joker gives a x3 multi, but in the second formula we are considering Sly Joker instead, which has no such multiplier...
BullTrue560 Mar 10 @ 11:51am 
All summarized in one place with good explanation, concepts and all we need for the beginners, good job lad
Bog Wraith Mar 5 @ 12:51pm 
Outstanding & extremely thorough!
Thank you for taking the time to do this and present it in an easy to navigate doc.
Chronos Mar 3 @ 10:02am 
Detailed but accessible. Thank you.
Beacon Mar 2 @ 8:18pm 
Very detailed guide, thx a lot
Boisleduc1968 Mar 2 @ 3:31am 
Great guide!