Grand Theft Auto IV: The Complete Edition

Grand Theft Auto IV: The Complete Edition

545 оценки
GTA 4 COMPLETE EDITION: THE DEFINITIVE MOD GUIDE
От michaelscott22
If you really want to play Grand Theft Auto 4 using Vulkan and having the best performance possible, here's your guide!
22
7
3
19
4
5
4
2
2
3
3
2
   
Награда
Добавяне към любими
В любими
Премахване от любими
INTRODUCTION


https://store.steampowered.com/app/12210/Grand_Theft_Auto_IV_The_Complete_Edition/

Do you want to play Grand Theft Auto 4 using Vulkan, adding nice features like fixing the VRAM limitation, and, besides that, having the best performance possible? Welcome to this guide; you came to the right place.

After so many hours trying to find a guide online (and on Steam too), that really can help ourselves, I needed to create one that allows you to fix some problems I experienced myself and could be useful for all of us.

All I had in mind when I wanted to create this guide was to make the most comprehensive one, so everyone can understand what you are doing when you mod and tweak your game.

And now, without further ado, let's work on it, shall we? This guide also works for The Lost and Damned and The Ballad of Gay Tony too!
VRAM LIMITATION FIX


As happens with every old game, you know that sometimes It's really rough to fix some things. When you open Grand Theft Auto 4, you will find that inside the game, you only have 512MB of VRAM. That's annoying, but how can I fix it? It's easy and only will take you less than 2 minutes!

Firstly, select on Steam Grand Theft Auto IV: The Complete Edition and then right-click, select Manage, and then Browse Local Files.


You will be inside GTA 4's folder.


Click to GTAIV and you will be inside GTAIV's main folder.


Now create a file called commandline.txt and add the next lines:

-noresctrictions
-nomemrestrict
-noswapdelay
-availablevidmem 12086.0
-noprecache
-windowed

To create a txt file, you can use a useful app called notepad++[notepad-plus-plus.org]


12086 is for 12 GB of VRAM, but If you have 8 Gb or even more, please, go to dxdiag, and on Display Tab, you will find the Display Memory (VRAM) of your graphics card. Keep in mind that you must always end up adding .0 as you see there.

Save the commandline.txt file and continue with the next step.

Here is a video that will make everything easier for you:


WARNING: Keep in mind that this game is an x32 app, so the game itself will only be able to use 3 GB of VRAM or 4 GB at most. If It were an x64 app, things would be completely different, so remember this once you tweak your game.
DXVK (VULKAN RENDERER)


The next step is pushing Grand Theft Auto 4 into a new horizon where we will have excellent performance. For that, we will need DXVK (Vulkan Renderer)[github.com].

Download the latest release of the DXVK renderer that you will find there:


Once you are there, download the archive dxvk-2.3.tar.gz:


Open the archive you downloaded:


Then go to x32 folder:


Select dxgi.dll & d3d9.dll and copy those files over this route:
C:\Program Files (x86)\Steam\steamapps\common\Grand Theft Auto IV\GTAIV


You will have installed the Vulkan renderer!


Now in the same route (C:\Program Files (x86)\Steam\steamapps\common\Grand Theft Auto IV\GTAIV), create a file called dxvk.conf, and, inside that file, add the next lines:

d3d9.maxFrameLatency = 1
d3d9.presentInterval = 1
d3d9.numBackBuffers = 3


To create a txt file, you can use a useful app called notepad++[notepad-plus-plus.org]


Save this file as dxvk.conf and go back to Steam.

Select Grand Theft Auto IV: The Complete Edition, then right click and go to Properties


Go to General, and inside LAUNCH OPTIONS, copy the next line:

-width 1920 -height 1080 -refreshrate 60


Change the width and height to your screen or TV resolution, and also change the refresh rate to the same as your screen or TV.

We officially finished adding the Vulkan renderer to Grand Theft Auto 4: The Complete Edition. With these two previous steps, we were sure that the game would run fine without causing problems with your screen resolution and refresh rate!
FUSION FIX


Now comes the interesting part of this guide: adding FusionFix[github.com] to Grand Theft Auto 4: The Complete Edition to have the best version possible!


Download the latest version of Fusion Fix[github.com]


Download the archive GTAIV.EFLC.FusionFix.zip


Once you downloaded it, go to the main route of Grand Theft Auto IV: Complete Edition (C:\Program Files (x86)\Steam\steamapps\common\Grand Theft Auto IV\GTAIV) and drag all the update and plugins folders plus dinput8.dll (also known as ASI Loader), and leave them there.


VARIOUS FIXES


Next stop: Various Fixes! This will allow you to improve some textures of the game and some things that were broken in the original game, adding even some sweet things from the console ports too!

In this case, we will download our files and install them manually. Like that, you don't need to worry about anything more than dragging your files to one folder; overwrite all files, and all will be done in a matter of minutes!

For that go to Various Fixes and download the latest version[github.com]

If It doesn't work properly, you have a fix for it here[drive.google.com]


Download GTAIV.EFLC.Various.Fixes.v1.81.zip.001 and GTAIV.EFLC.Various.Fixes.v1.81.zip.002. As the website says, the files are split into two files due to GitHub's file size restrictions.


Don't panic just yet. It's easy to open those files; just open GTAIV.EFLC.Various.Fixes.v1.81.zip.001 once you downloaded both of them using WinRar or 7zip[www.7-zip.org] and we are good to go!

Go to the main folder of Grand Theft Auto IV as you did before (C:\Program Files (x86)\Steam\steamapps\common\Grand Theft Auto IV\GTAIV) and go to the update folder.


Next to GTAIV.EFLC.FusionFix


You will be inside this folder, where you will drag all your files from Various Fixes.


Open the archive GTAIV.EFLC.Various.Fixes.v1.81.zip.001 and click into the Manual Installation folder.


Over there, you will find the next folders: TLAD (The Lost And Damned), TBoGT (The Ballad Of Gay Tony) and IV (Grand Theft Auto IV).


Drag all those folders (TLAD, TBoGT and IV) and paste them inside the GTAIV.EFLC.FusionFix folder. Overwrite If Windows asks about it.

Close and open again the GTAIV.EFLC.Various.Fixes.v1.81.zip.001 archive to install the 1.81 Update.


Just follow the previous steps you did to install all the files from Various Fixes: drag the TLAD, TBoGT and IV folders, and paste them into the GTAIV.EFLC.FusionFix as you did before.


Lastly, do the same with the Late Addition folder


In this case, just two folders: TBoGT and IV


And with this, we are done with Various Fixes!
COLACCEL

This mod drastically improves the loading times on SSDs and HDDs. It's something that may help some and doesn't hurt anybody.

Go to ColAccel's GitHub to download Its latest release[github.com].


Once you downloaded the IV.EFLC.ColAccel.zip file, open it, and you will find an IV.EFLC.ColAccel.asi file.


You need to put that file in the following route: C:\Program Files (x86)\Steam\steamapps\common\Grand Theft Auto IV\GTAIV\plugins


Drag the IV.EFLC.ColAccel.asi file and paste it there.


And that's it! You are good to go!
INCREASED DRAW DISTANCE


We know that the PC port of Grand Theft Auto 4 was a mess, right? How about increasing the draw distance a little bit? For this, we will need a NexusMods account, but the fix is so tiny that you will download it in a matter of seconds!

Go to NexusMods to download the increased draw distance mod[www.nexusmods.com]

Once you downloaded the mod, open the archive where you will find a folder called draw distance. Double click.


Inside this folder, you have the following folders: TLAD, TBoGT, pc and common.


Select every single folder, drag and paste them over GTAIV's main folder (C:\Program Files (x86)\Steam\steamapps\common\Grand Theft Auto IV\GTAIV).
Overwrite If Windows asks it.


And we are done! Now you can have a crisp draw distance and a beautiful game too!

STEAM TWEAKS


Some users also reported a few things that you can do to improve Grand Theft Auto 4's performance.

One of them is to just Enable the Steam in-game Overlay. For that, go to your Library and select Grand Theft Auto 4: The Complete Edition, right-click and choose Properties.


Once you are there, Enable the Steam Overlay while in-game.


Another improvement you can make is disabling the Shader Pre-Caching on Steam. Inside the app, go to Steam and, later, select Settings.


After that, go to Downloads and Disable Shader Pre-caching.


It's something that, as I previously said, some users reported that helps to improve the game's performance, but I left this here to have the best guide possible to help as many people as I can to fix their problems with this awesome game.
KEEP THE FRAME RATE AT 60 FPS, NIKO!


I know this section can be a bit rough for some users, but let's be clear here: not every old game runs well above 60 FPS. In this case, It's a game from 2008, so, don't expect wonders and keep the game at 60 FPS. It can be annoying for some, but remember: old games were designed to run at a certain frame rate, which tied everything related to the game. Don't do anything stupid, like Roman does calling Niko to go bowling, OK?

Inside the game, go to Graphics and set up the FPS Limiter at 60


WARNING: Frame rates above 60 cause some bugs, like buggy vehicle physics and motorcycles getting extremely slippery (and some missions too, remember that choppa?). The mods and patches (FusionFix and VariousFixes) do not fix those problems (the game engine is tied to a certain frame rate, like every old game).
IMPROVING THE GAME'S PERFORMANCE

Ok, It's time to get into the game itself and do some changes to improve It's performance and also have the best experience possible!


To have good and smooth performance, I recommend changing the View Distance & Detail Distance set to 50 since It's the most demanding feature in terms of performance. Don't forget to set up the Antialiasing to SMAA (more demanding, but crisp image) or FXAA (less taxing, but losing a bit of image quality).

Also leave the following presets on High:

Reflection Resolution, Water Quality, Shadow Quality

Presets on Medium:

Night Shadows

* You can always change it to Very High and see how it goes for you, but It's a recommendation, and you can always see If you need to lower it to High.

Leave Texture Quality Filter to Anisotropic x4.

Lock View Distance and Detail Distance to 50.

If you want to have a similar experience playing GTA 4 like you were playing on consoles (PS3/XBOX 360), you can set Vehicle Density to 50.


Tweak the settings and every preset until you see that it works for you, and you have smooth performance. Being an x32 game, unless Rockstar does something about it, It's hard to improve this, in part due to some limitations that the architecture has (updating to x64 would be nice, but I believe we would have to wait until we have a Remaster of some kind, and you know what happened with the latest Remasters... right?).
RADIO STATIONS RESTORATION

Next step: Restoring the radio stations and songs that were deleted due to licensing issues (Rockstar being extremely lazy and not paying to renew them).

Go to the Various Grand Theft Auto Downgraders[downgraders.rockstarvision.com] website and download the Radio Restauration mod for Grand Theft Auto 4: Complete Edition.


Once you have finished downloading the GTA IV Radio Restoration Mod, open the file IVCERadioRestauration.exe using WinRar or 7zip[www.7-zip.org]


The installer will start, click to Next


Again, click on Next


Over here, leave it as it is, since we already installed FusionFix and also VariousFixes too


The installer will ask us where the game is located; in this case, just copy the following route:
C:\Program Files (x86)\Steam\steamapps\common\Grand Theft Auto IV\GTAIV

Click to Next


Let the installer finish and... we are done!


We have already restored all the radio stations! Easy, huh?
COLORED RADIO STATIONS


As the name of this section of the guide implies, now It's time to give some color to all our Radio Stations! It's an easy mod to install, so it won't take us too much time.

Go to Liberty City Website to download the files you need for this mod: https://libertycity.net/files/load/172373-b46d91c9440bc5b65ba932fbb340ed18/

We will have a 30 seconds countdown, wait until It's over


Once It's over, click to download


Open the file you downloaded, and inside of it you will find a folder called GTA IV МОД РАЗНОЦВЕТНЫЕ ИКОНКИ РАДИО, double click to go next.


Over there we will have, again, 3 folders:TLAD, TBoGT and pc.


Drag and paste them over here C:\Program Files (x86)\Steam\steamapps\common\Grand Theft Auto IV\GTAIV. Overwrite If Windows asks about it.


Now we have our colored Radio Stations, not only for Grand Theft Auto 4, but also for The Lost and Damned and The Ballad Of Gay Tony too!
WHY SHOULD YOU NOT DOWNGRADE GTA 4: THE COMPLETE EDITION?

This is a controversial topic for some users, but I believe using the latest version of the game will always be the best way to play Grand Theft Auto 4: The Complete Edition. Also, as you can see, everything's easy to install, and you don't have to do really complex tricks to make this awesome game work as It should.

Here's a video that explains it really well and tells you the differences between each version of the game and why you should stay with the Complete Edition.


The only problem we have here is that we don't have the multiplayer anymore, but for Grand Theft Auto 4: The Complete Edition we have new ways to play the multiplayer mode using HappinessMP[happinessmp.net] without downgrading our game.

Don't worry, I'll be covering HappinessMP in the future, adding how to install it and play online with friends.
HAPPINESSMP - MULTIPLAYER IS BACK!

HappinessMP[happinessmp.net]  is the new way to play Multiplayer Mode using the latest version of Grand Theft Auto 4: The Complete Edition, but doesn't support FusionFix and other mods (for now), but the developer says that it will have support in the future.

The client of HappinessMP[happinessmp.net] was released at the end of last year (2023), so, we only expect good things in the future to keep the online mode alive again!


HAVING PROBLEMS WITH THIS GUIDE, AMIGO?

In case someone has some problems with some parts of this guide, watch this video. It's super useful!

IT'S SHOWTIME!

BEFORE YOU LEAVE, NIKO!

Did you like this guide? Consider giving a thumbs up or some Steam Points, commenting or whatever you like! Enjoy your stay in Liberty City, Niko! Remember to hang up the cellphone every time Roman wants to go bowling!

https://youtu.be/fVQyYJ8Rl7o?si=fcZlQ_-_YvsHs8bL

I do not accept friend requests unless It's someone I know for a bit. If you have any issue with the game (If It's related to this guide in particular), you are more than welcome to tell what happens to you in the comments, but I'll not go further than that.


I'm not here to solve ALL THE ISSUES YOU HAVE using all the mods and apps in this guide. If you use a mod or any app for this guide, It's your responsibility, not mine. I'm not your full-time tech guy on Steam. Be patient or use pcgamingwiki[www.pcgamingwiki.com] If you have any problems.

Thanks for your understanding.


SPECIAL THANKS TO: Borgri for the VariousFixes fix.
72 коментара
curyybred1113 2 апр. в 6:08 
Happy.
Ren 17 февр. в 15:09 
My radios won't revert back to the old songs after following the guide. I still hear EFLC songs in IV. Can someone help ?
RIP Mr. Toriyama 22 ян. в 10:14 
Seeing a lot of people struggle with the memory.

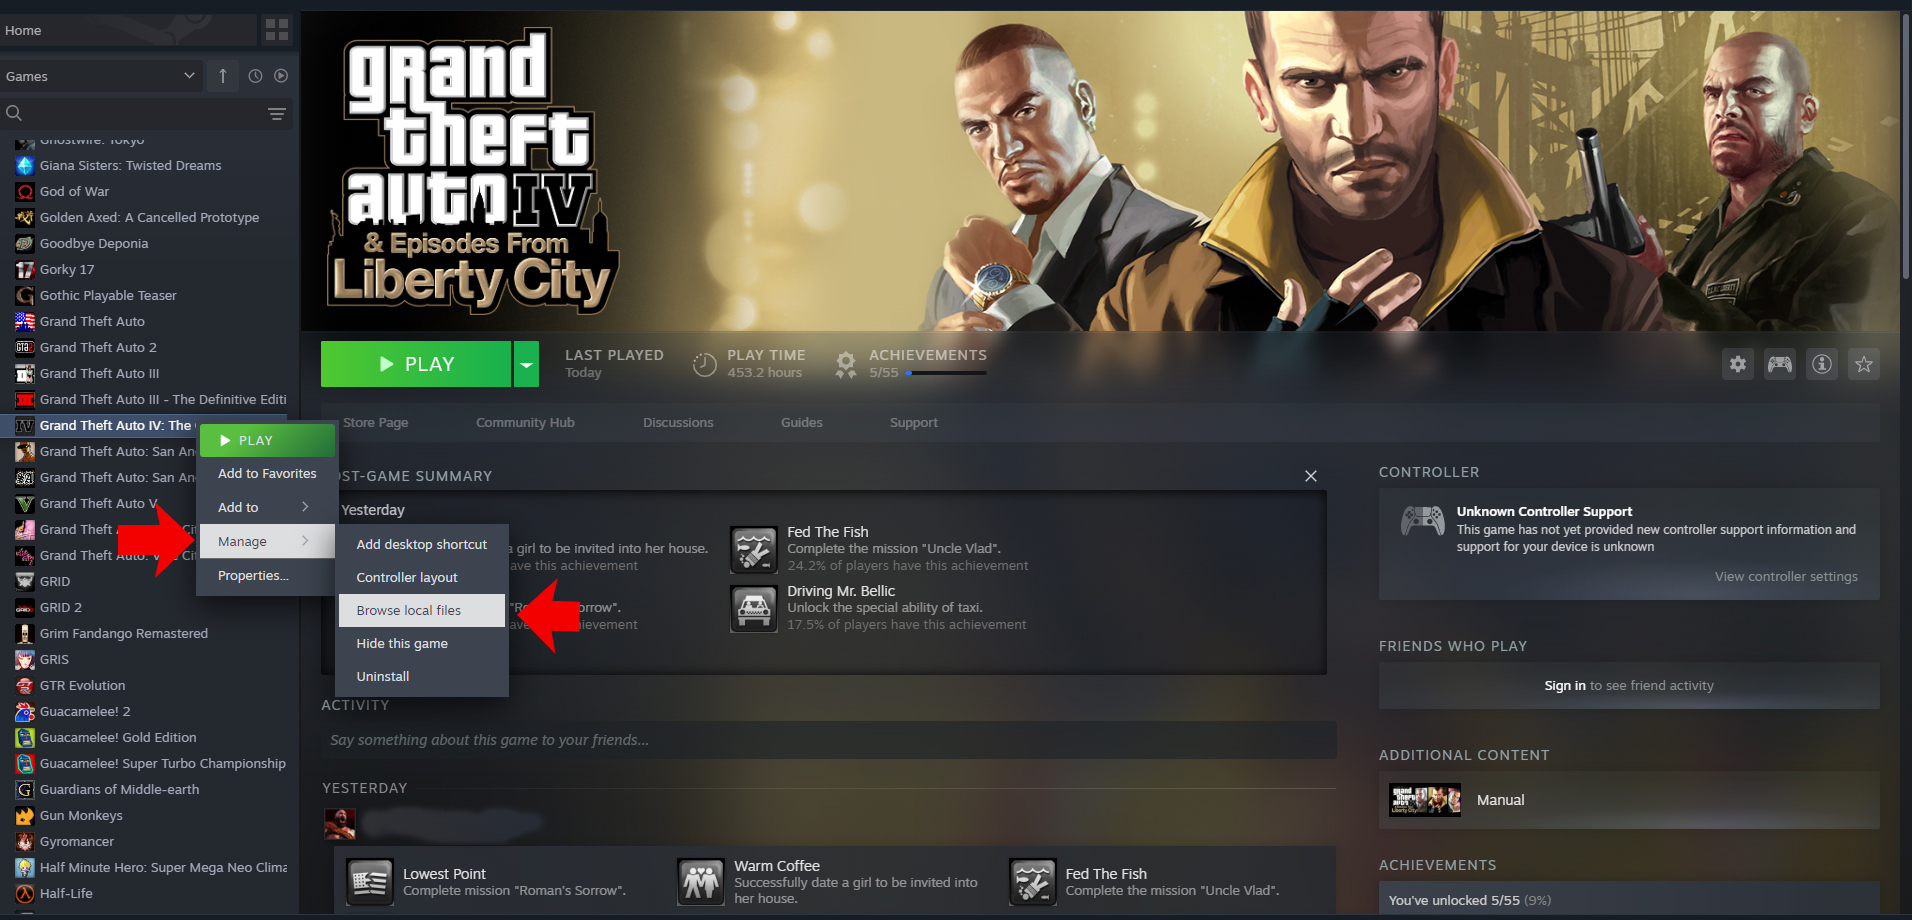
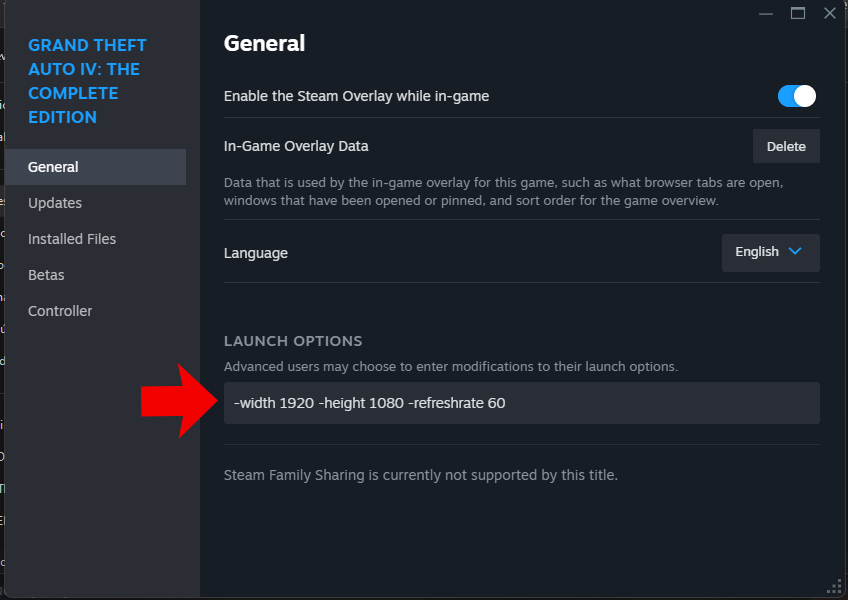
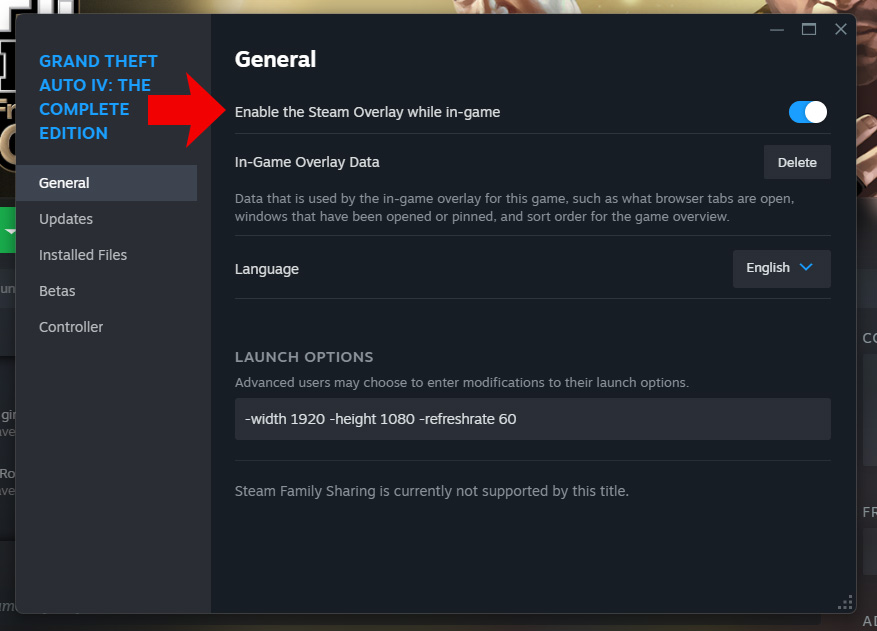
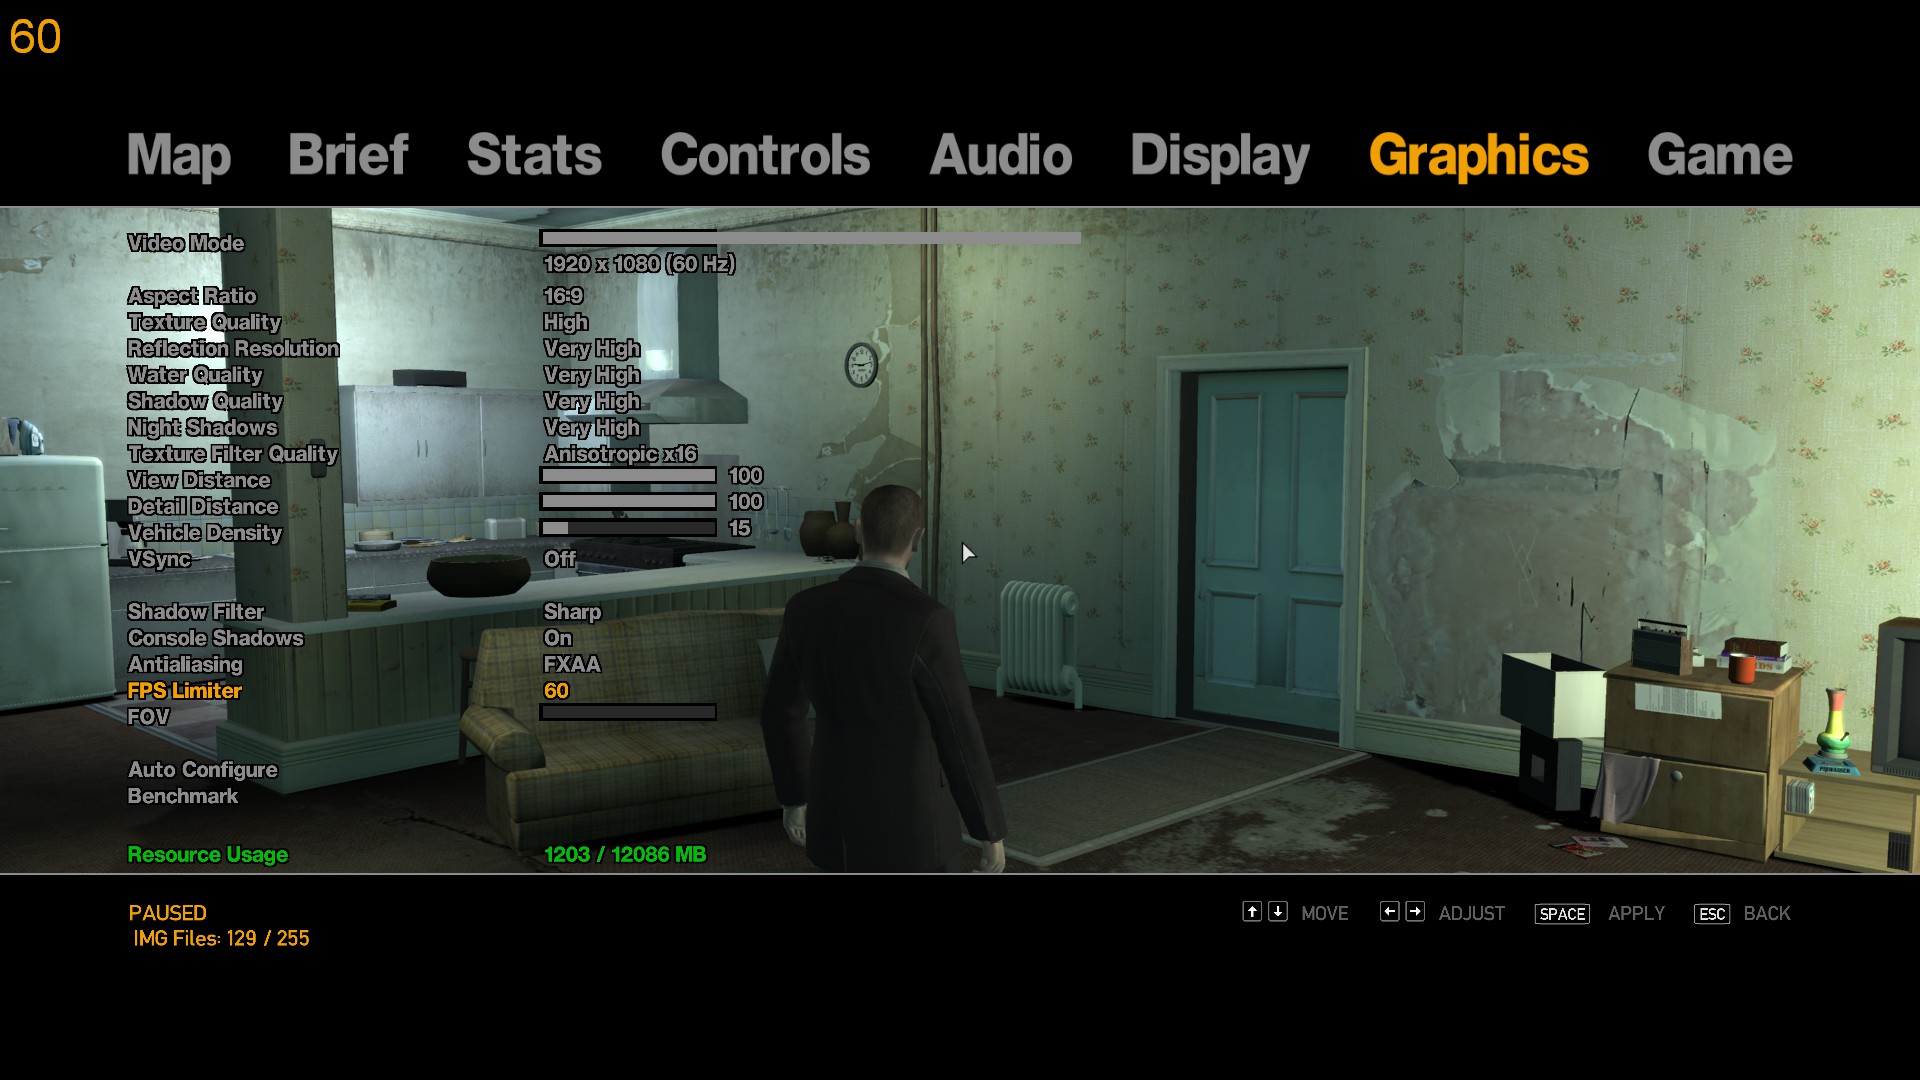
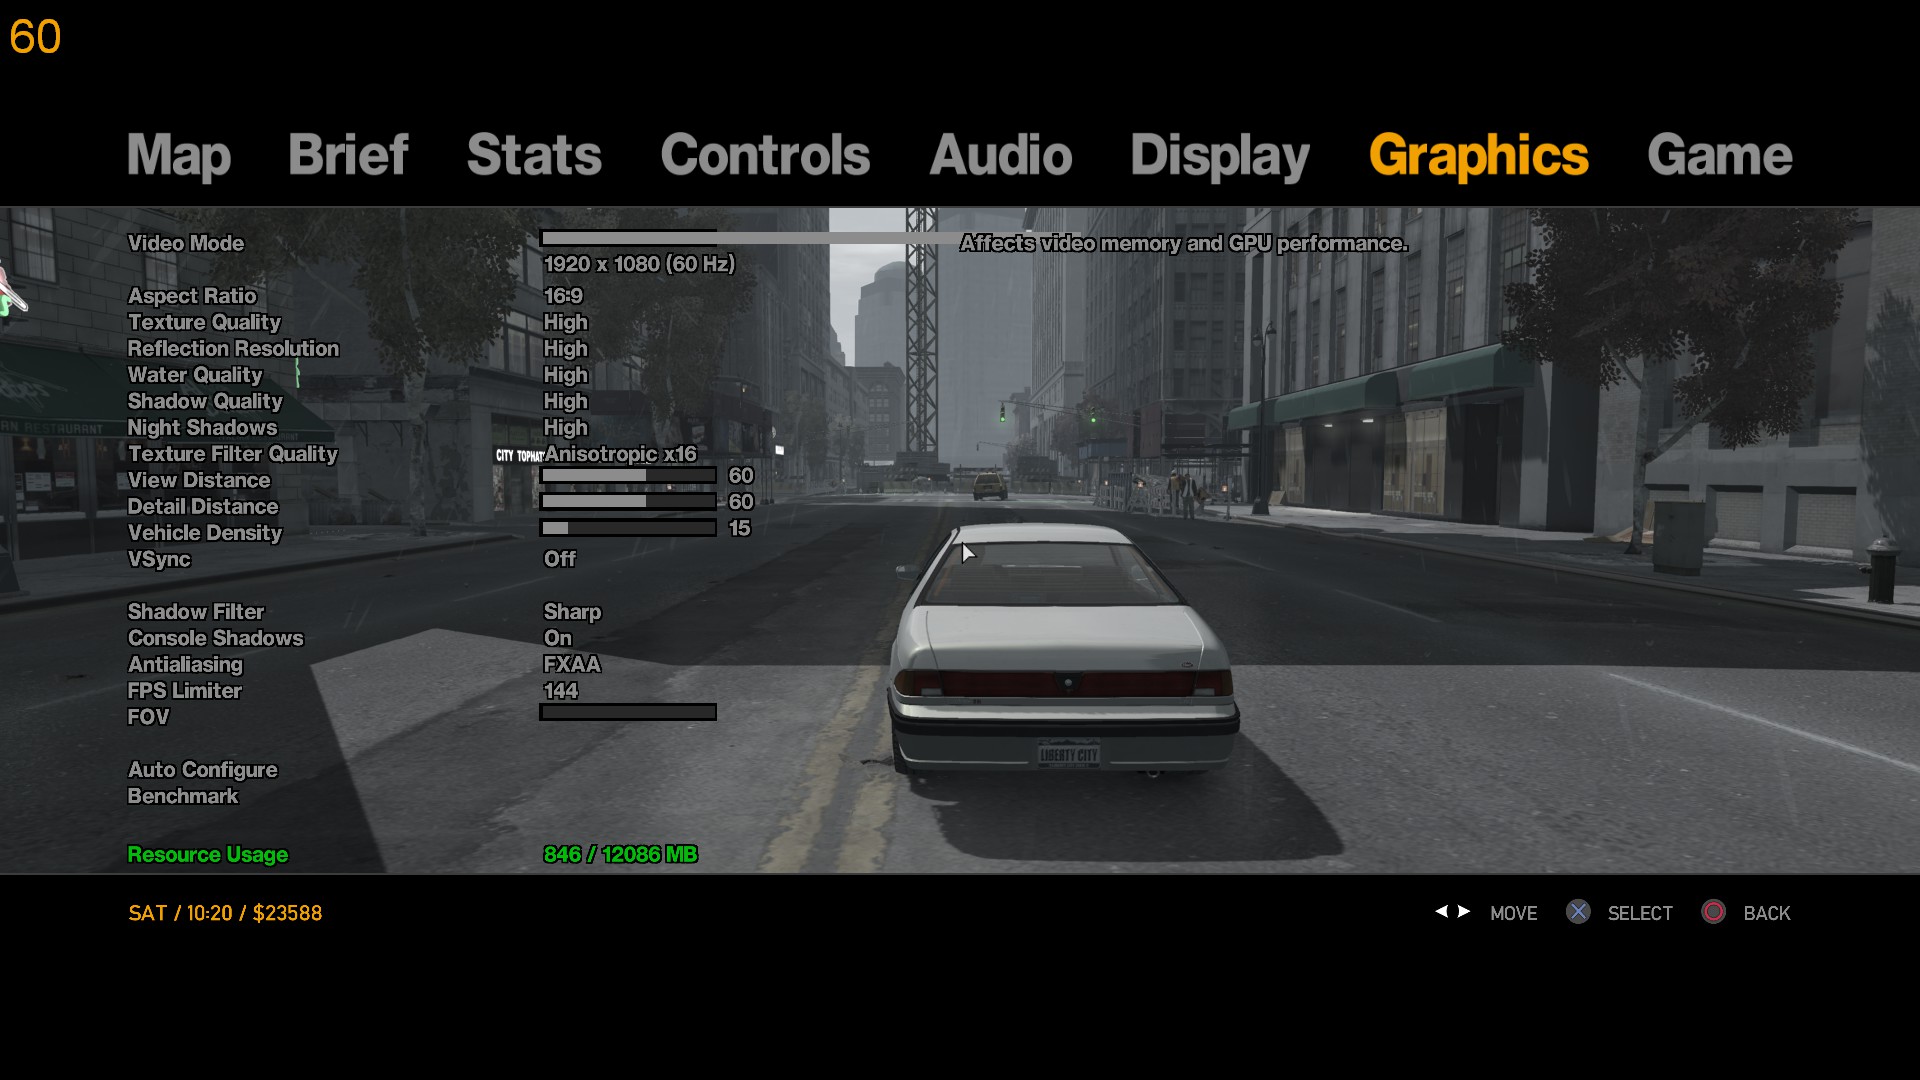
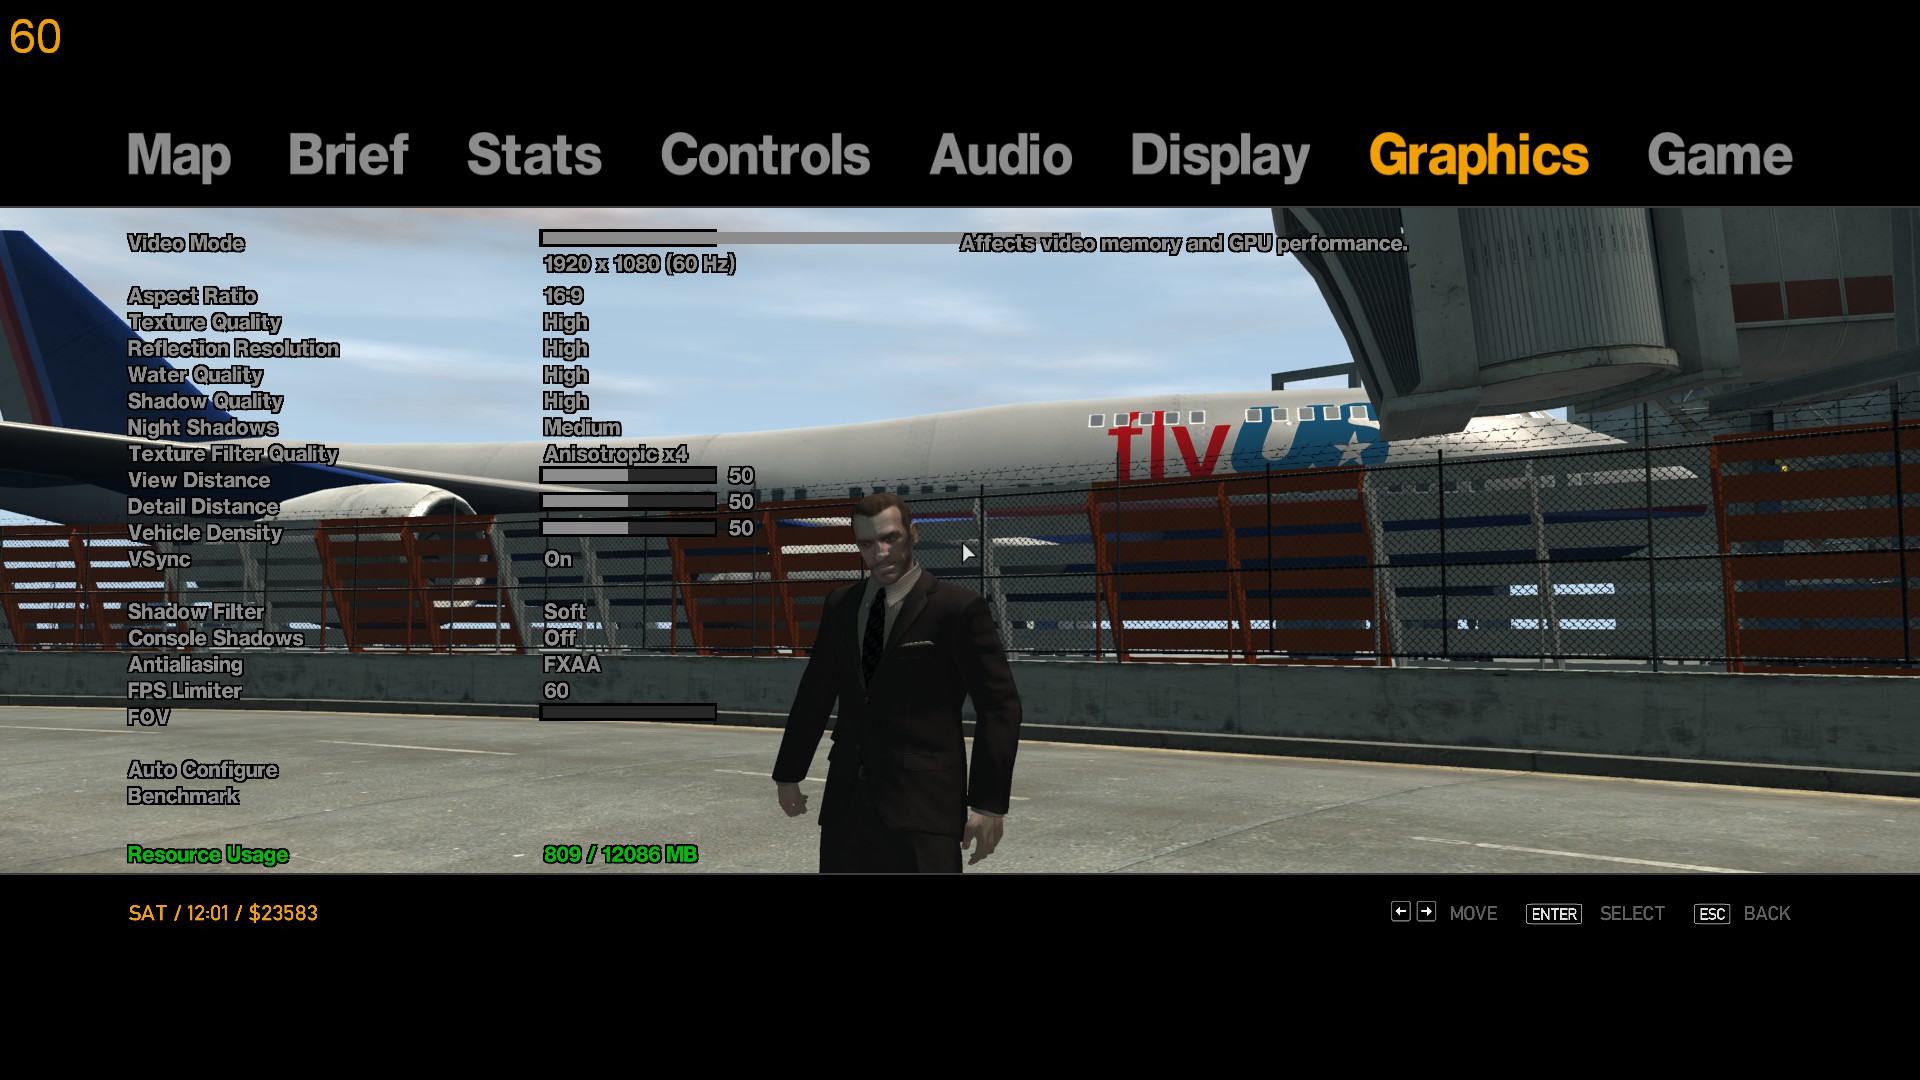
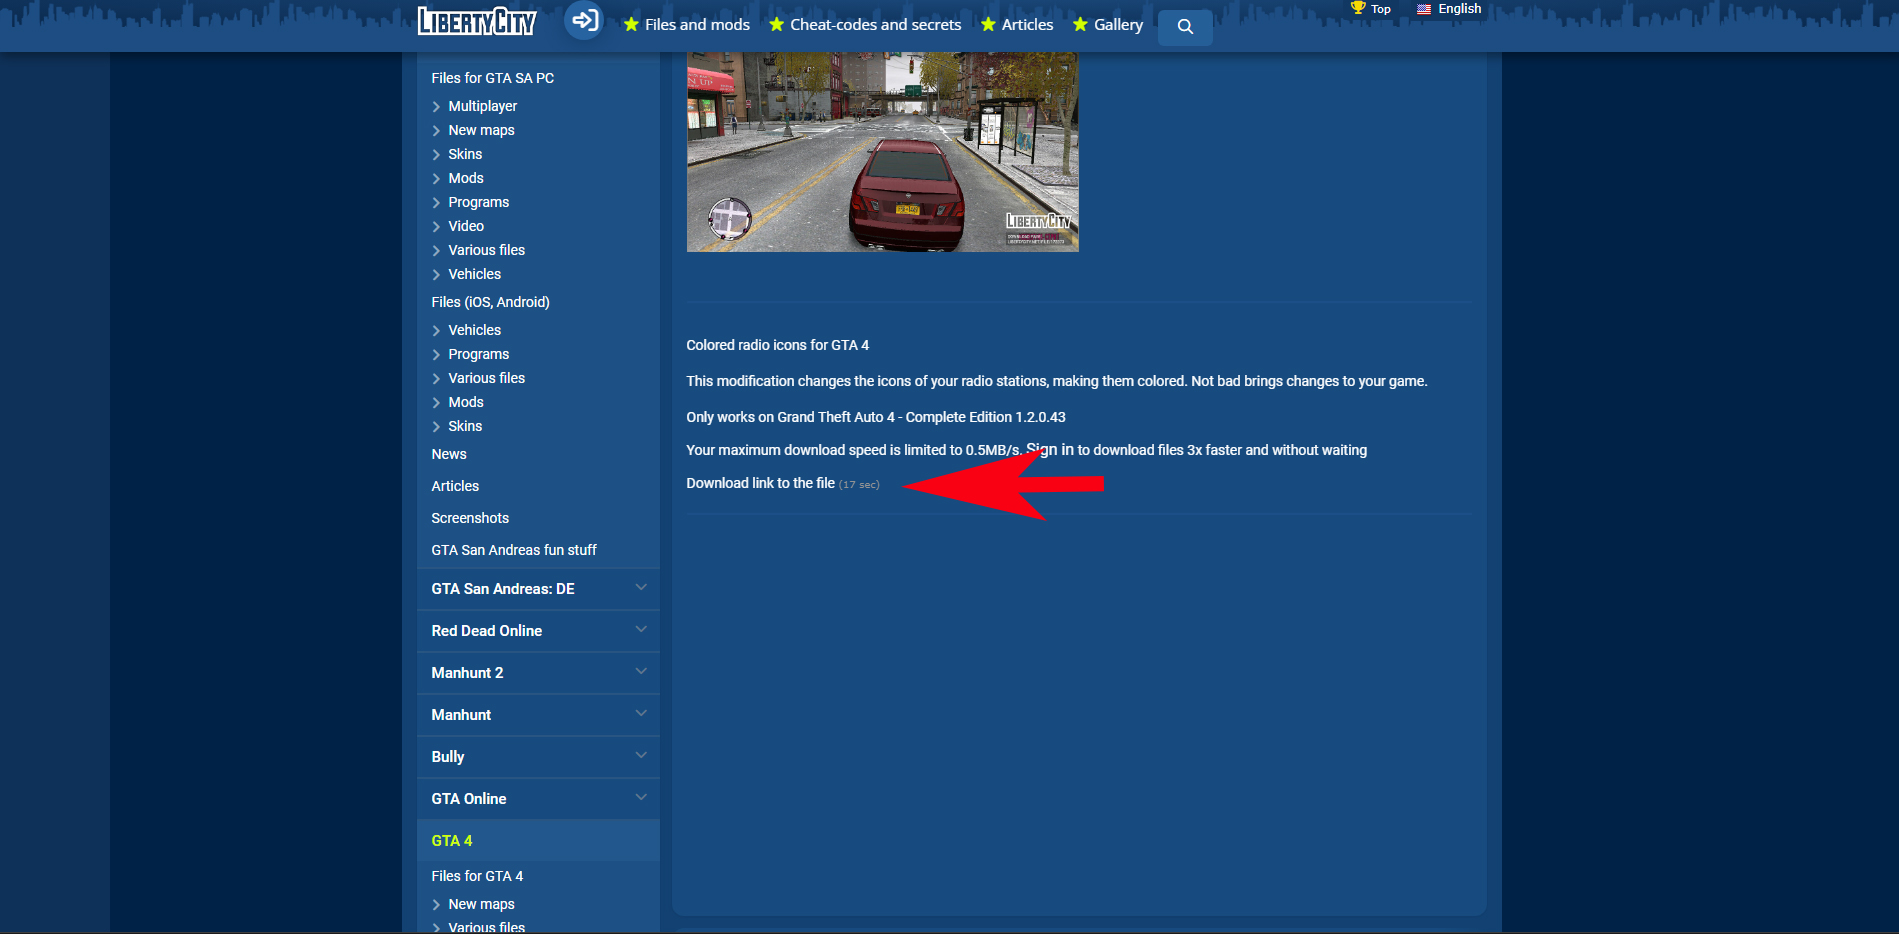
HERE IS THE FIX FOR MEMORY AND SETTINGS!!!!!!!!!!!!!!!!!!!!!!!![/b]

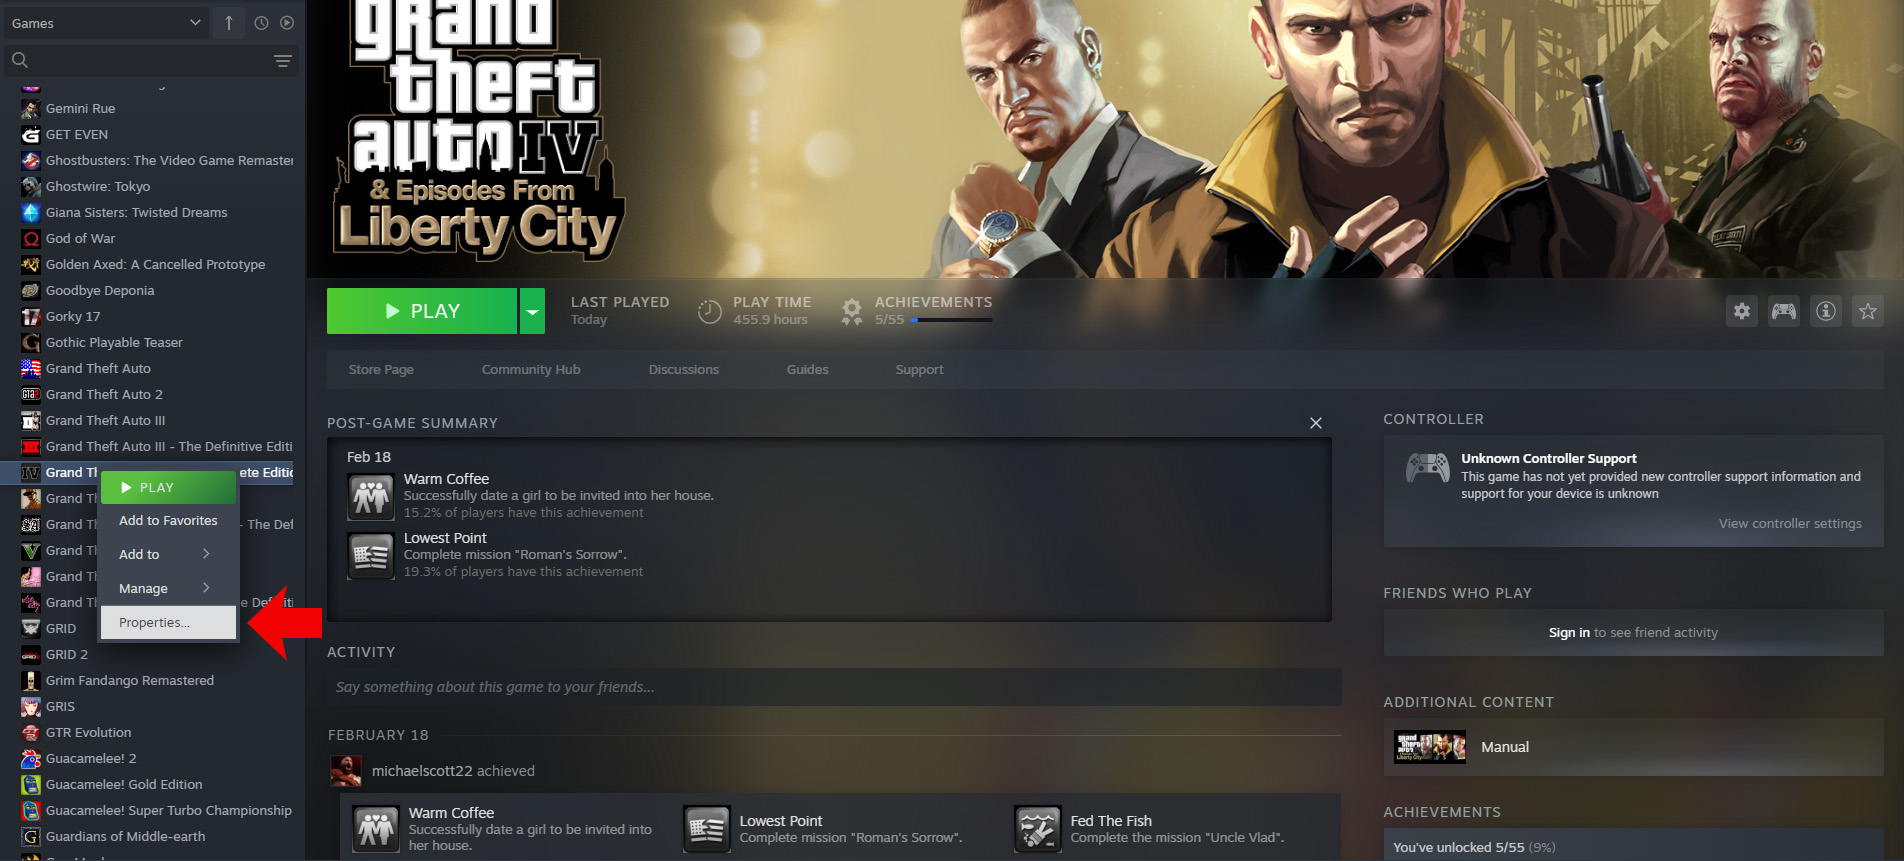
Your LAUNCH COMMANDS ON STEAM

(Right click game in steam>Properties...>General>Launch options)

YOU MUST ADD THE FOLLOWING:[/b]

-availablevidmem YOURVRAMHERE -norestrictions -nomemrestrict


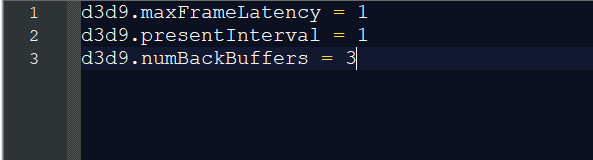
Once these arguments are MET the game will no longer have any settings restrictions. TEXTURES DISAPPEAR (or can do so) ABOVE 60FPS. I use RivaTuner Statistics Server to lock the FPS to 60 since it gives me better frame timings than locking through the game alone.

after this, your game should be butter. I prefer this over the downgrading method


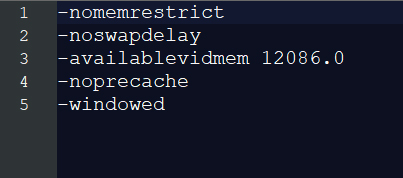
Here is what MY custom arguments look like:
-width 3840 -height 2160 -refreshrate 120 -availablevidmem 12086 -norestrictions -nomemrestrict

I set refreshrate to whatever my monitor can do, And then lock it to 60 through a chosen method. (RivaTuner for me)
Nesquik 10 ян. в 23:02 
this fixed everything for me thanks king:cozytf2mug:
Arnold Braunschweiger 10 ян. в 14:19 
Solid guide, but one issue that I bumped into is that using Vulkan API causes the available memory in graphics menu to be limited to 512 MB, which means that I could only play it on low settings. I couldn't figure out how to fix this, as forcing the available memory with command line workaround didn't do anything, and using older or alternative versions of dinput8.dll only caused a variety of different issues that completely prevented me from playing the game.

In the end, I decided to get rid of Vulkan and use the default renderer, which is a viable option because on my current rig the performance is smooth anyway. Even with additional texture and visual mods installed it's around 500 FPS unlocked and stable 60 when limited. Frame pacing isn't perfect but it's nothing that you'd even pay attention to during gameplay so it's acceptable.

Would really love to figure out what's wrong with Vulkan that causes it to clash with Fusion Fix.
xxBeTTx🧃🌎₉⁹₉ 23 дек. 2024 в 21:31 
not saying your guide doesn't work btw just don't understand what I could've done wrong
xxBeTTx🧃🌎₉⁹₉ 23 дек. 2024 в 21:27 
Followed your guide to add vulkan step by step and all it did was made my game freeze on launch every single time lmao
kulikale000 15 дек. 2024 в 12:44 
thanks fam
ardi_albania01 3 дек. 2024 в 6:17 
W guide
Pablithough 26 окт. 2024 в 12:33 
did you read the title? an definitve MOD guide