Counter-Strike 2
Оценок: 1,660
How to: Scripting, Binds and Configs
От Pumkin
This guide will explain how to Script in CS:GO, create your own Binds and Configs, as well as show you some useful(maybe) examples. This guide is compatible with all Source games.

NOTE: This guide was written for CS:GO. It hasn't been updated for CS2 yet, but most information should still be relevant. Check comments.
2
2
5
   
Наградить
В избранное
В избранном
Удалить
Introduction
Ingame scripting for CS:GO consist of creating binds and configs to make the game suit your preference more. It is not cheating or gaining an advantage over others since you're restricted to doing only what everyone can normally do using the console but it does make using some commands faster and more convenient.

Using scripts will NOT get you VAC banned!
If you do get vac'd it's for a different reason. With that said if you are playing in a competitive league you should double check with them before using any because they might have specific rules against scripts.
The Console
The Console is where all (most) of the scripting magic happens. It allows you to execute actions, assign keys and change settings which are often missing from the main options screen.

But before you use the console you need to enable it. To do that go to your In-game Options > Game settings and set Enable Developer Console (~) to Yes


You can also add -console to your CS:GO launch options in steam by going to the game's Properties > Set Launch Options. This way the game will launch with the console open.


Now that your console is enabled you can start creating various binds and aliases. To open the console press the tilde key (~) (that's the key to the left of the 1 key, under escape and above tab; you can't miss it now.)
Bind
bind is the command you use to link a console command to a key. When you press the key, the command is executed. All actions done with the keyboard have commands bound to keys using a config file that binds all of them to your keys when you start the game.

Binding keys can be done via the console ingame or .cfg files outside the game. More on .cfg files in a later section.

Binding keys in console is really simple. Open the console (~) and use the bind command.
The syntax is:
bind <key> <command>
For example:
bind F11 kill
This will bind the command kill to the F11 key. Pressing F11 will kill you.

If your command takes a variable and/or has a space in it you will need to enclose it in double quotes, for example:
bind t "buy ak47"
This will buy an AK-47 when you press T.

These commands can be chained by separating them with a semicolon (;) You can chain as many commands as you want.
The syntax is:
bind <key> "<command1>;<command2>"
For example:
bind t "buy ak47;slot1;drop"
This will buy an ak47, switch to it and drop it when you press T.

Note: To check what a key is bound to use the bind command without any command:
bind mouse1
This will give you the console output of:
"mouse1" - "+attack"

With that said, there is a limit to how many commands can be chained in one line. Commands after the limit will be ignored. To get around this you'll have to break up long chains into aliases. More on them later.

Unbind
To unbind a key you have to use the - you guessed it unbind command. This will leave the key blank. Pressing it will not do anything, to set it to default you need to bind it manually to whatever command it has bound to it by default.
Alias
Alias is a command that is used to give a command or a chain of commands a custom name. Look at it like creating your own console commands using existing commands.
The syntax is:
alias <name> <command>
For example let's write the buy-and-drop-ak bind above using an alias:
alias buydrop "buy ak47;slot1;drop" bind t buydrop
Note: You can't have spaces in alias names.

Clearing Aliases
To clear an alias you need give it a blank command.

For example:
alias test "echo I exist"

Typing test into the console will output "I exist". Now let's clear the alias.
alias test
Typing test into the console now will output "Unknown command". This is useful when when creating more complex scripts and toggles.

You can use an alias to set and clear another alias
alias cleartest "alias test"
Typing cleartest into console will clear the test alias from earlier

Note: Aliases can be overwritten.

Important: Aliases are temporary, they will get cleared once you close the game. To avoid having to enter them in every time you start the game you will need to put your aliases into your autoexec.cfg file. More on that in later section.
Find and Help
Find

Find is a very useful command used to find commands based on a search term you give it.
The syntax is:
find <string>
For example, typing:
find volume
Will find and display commands with the word volume in the command name or their description.
The console output will be:
"dsp_volume" = "0.8" cheat "nav_lower_drag_volume_max" game cheat - Lower the top of the drag select volume. "nav_lower_drag_volume_min" game cheat - Lower the bottom of the drag select volume. "nav_raise_drag_volume_max" game cheat - Raise the top of the drag select volume. "nav_raise_drag_volume_min" game cheat - Raise the bottom of the drag select volume. "playvol" - Play a sound at a specified volume. "snd_ducktovolume" = "0.55" archive "snd_musicvolume" = "0.000000" ( def. "0.7" ) min. 0.000000 max. 1.000000 archive - Music volume "snd_musicvolume_multiplier_inoverlay" = "0.1" min. 0.000000 max. 1.000000 archive - Music volume multiplier when Steam Overlay is active "snd_set_master_volume" - Sets the master volume for a channel. snd_set_master_volume <guid> <mastervolume "soundfade" server_can_execute - Fade client volume. "soundscape_radius_debug" = "0" client cheat - Prints current volume of radius sounds "suitvolume" = "0.25" game archive "voice_mixer_volume" = "1.0" archive "volume" = "0.04" ( def. "1.0" ) min. 0.000000 max. 1.000000 archive - Sound volume

Help

Help displays usage information for a console command.
The syntax is:
help <command>
For example:
help connect
This gives us this output:
"connect" - Connect to specified server.

Note: find displays help for every command it finds as well.

Clear

Clear is used to clear the console. Just thought it was useful to put this here.
Wait
"Rurre, help! Scripts from other Source games I have are broken in CS:GO!"

That might be because of the wait command. The wait command is used to make the game wait a certain number of ticks before executing the next command in the chain.
For example having:
bind mouse4 "+attack; wait 20; -attack"
Will have you fire a bullet or two when you press mouse4 then stop even if you continue holding down the button.
There is a server command to disable the wait command in some source games such as Team Fortress 2.

However, the wait command doesn't work in CS:GO,
probably due to the competitive nature of the game and the unfair advantage some complex scripts would offer. I'm not sure but I think it can be enabled server side but is disabled by default.

Because of the lack of this command loops and complex scripts are not possible.
Exec and .cfg's
Config files
Config files or .cfg's are text files that have commands and settings in them. All commands inside .cfg files can be executed ingame using the console.
You can create these files yourself by copying an existing config file or by saving a text file as "(*) All types" and giving it the .cfg extension in the file name.

Unlike the console where commands are separated by semicolons (;) .cfg's can also separate commands by new lines.
Config files are located in the /csgo/cfg/ folder (default: C:/Program Files/Steam/steamapps/common/Counter-strike Global Offensive/csgo/cfg/)
This is no longer the case! Configs have moved to "...\Steam\userdata\<YOURID>\730\local\cfg" and are now independent between accounts, meaning you can have different configs for different accounts on the same computer.

.cfg's can have comments inside them for easier readability.
Comments are created by prefixing a line or a string of words using two forward-slashes (//).
A comment lasts till the end of the line so you can't have commands after comments on the same line.

For example:
//Buydrop script <- All this line is ignored by the game alias buydrop "buy ak47; buy m4a1; buy m4a1s; slot1; drop" //this creates an alias to buy one of the guns, switches to it and drops it //this //is //ignored //by //the //game bind t buydrop //this binds the alias to the T key //Jump-throw script alias "+jumpthrow" "+jump;-attack" //buy ak47; kill <- these 2 commands will not be executed because this whole line, starting from the 2 slashes is a comment and is ignored by the game. alias "-jumpthrow" "-jump" bind "h" "+jumpthrow"

Some .cfg files are special in the sense that the game treats them in special way based on their file name. They are:

Autoexec.cfg
This cfg file gets executed when you start the game. Put your aliases and settings such as binds and crosshair settings in here for them to be executed every time you start the game and overwrite all the changes you made.

Note: Sometimes autoexec.cfg doesn't get executed. If that's the case you might need to add +exec autoexec to your csgo launch options.
To do that go to your Steam game library, right click on CSGO and pick Properties, then go to Set launch options.

config.cfg
This file stores binds for all your keys including default ones. If your settings don't save when you quit the game something is probably overwriting it, check to see if your autoexec doesn't overwrite anything. To force changes to be written to config.cfg use host_writeconfig either manually or at the end of your autoexec.cfg.

config_default.cfg
This file contains all default binds and is executed when config.cfg is missing. If config.cfg is missing it will be created when you start the game based on this file.


Exec

exec is used to execute a .cfg file (all commands inside of it)

The syntax is:
exec <filename>
The default folder path for your cfg files is "...\Steam\userdata\<YOURID>\730\local\cfg"

NOTE: The config path used to be ".../Steam/steamapps/common/Counter Strike Global Offensive/csgo/cfg" but it has changed to the one shown above!

For example:
exec myconfig
This will execute myconfig.cfg ingame if it exists in the cfg folder.

host_writeconfig

This command is used to write your current ingame config including all settings and binds to a .cfg file inside your cfg folder.
The syntax is:
host_writeconfig <filename>
For example:
host_writeconfig diff_crosshair
You can give it a name if you want to, this way it will be saved to a config file that you can exectute yourself using the exec command ingame. Useful for different crosshairs and binds.
However you don't have to give it a filename, in that case it will just default to config.cfg.
Note: File names can't have spaces
Debugging and the Echo command
echo
echo is a command used to output text into the console. It servers no ingame purpose but is useful for debugging complex scripts.
alias +alt "echo alt pressed" alias -alt "echo alt released" bind alt +alt
This will tell us when we press and when we release alt in console.
It is also useful in .cfg files.For example, let's make a cfg file with the following commands[pastebin.com] and call it echoTest.cfg

key_findbinding
key_findbinding is a command that can be used to check what keys are bound to a specific command. Imagine this scenario. You bind something to a key to temporarely test something and then forget what key it was. Surely you can just press all the keys and see what happens. But what if it's a command that you wouldn't want to accidentally execute? What if someone bound quit to a key you often use and you are not sure which key it is?
In this case you can use this command to check what keys are bound to a specific command.
The syntax is:
key_findbinding <command>
For example typing:
key_findbinding +attack
Will give you this output:
MOUSE1 = "+attack" MOUSE2 = "+attack2"
As you can see an incomplete command can be entered and it will show everything starting with that command.

Getting command variables
To get the value of a command you need to simply pass in the command without a variable. This is useful for debugging and displaying data. For example try this script:
echo ===Displaying crosshair settings=== cl_crosshair_drawoutline cl_crosshair_outlinethickness cl_crosshairalpha cl_crosshaircolor cl_crosshairgap cl_crosshairsize cl_crosshairstyle cl_crosshairthickness cl_crosshairusealpha echo ====================================
This will display the crosshair settings you are currently using.
Complex binds
+commands and -commands
+Commands are commands that are called when you press down the button. They are bound just like normal commands.

For example:
bind mouse1 +attack

This is a default bind, when you press mouse1 you will shoot. You will continue shooting until -attack is called.

-Commands are commands that are automatically called when you release a button. They don't have to be bound to anything. The only requirement for a -command to work is that a +command with the same name has to be present.

The reason this is useful is because you can create - & + aliases that act the same was as - & + commands.

For example:
alias +altwalk "+speed; slot3" alias -altwalk "-speed; lastinv"

This will make it so when you press and hold alt you will walk but also pull out your knife. When you release alt -altwalk gets automatically called, you stop walking and switch to your last held weapon.

Toggle (command)
This command allows your bind to toggle a setting between two or more values. It is really only useful if bound to a key.

The syntax is:
toggle <command> <value1> <value2>

For example:
toggle sv_cheats 1 0
Note: If no values are given the command will default to switching values between 0 and 1.

BindToggle
BindToggle works the same as toggle but also binds it to a key.

For example:
bindtoggle F11 "sv_cheats 1 0"

IncrementVar
Increment var is used to increment a setting between 2 given values by a given number.

The syntax is:
incrementvar "<command> <startvalue> <endvalue> <incrementAmount>"
It is only really useful when bound.

For example:
alias incrementColor "incrementvar cl_crosshaircolor 0 5 1" alias bindminus "bind - incrementColor" alias +altcolor bindminus alias -altcolor unbind - bind alt +altcolor

This will make it so when you hold down alt you can switch you crosshair color by pressing the - key. When you let go of alt it will unbind the - key so you don't accidentally press it and change your color.

Important: You can never have more than 2 quotes in one command, the engine stops reading after it has me a closing quote. To have more complex commands you will need to split each step of the command into an alias.
alias bindminus "bind - "incrementvar cl_crosshaircolor 0 5 1""
This will not work

Note: IncrementVar will have the value wrap around if it gets too big or too small. For example after it reaches 5 the next value will be 0 again.
Note 2: You can also use negative values.

Toggle
It is possible to turn some actions where you need to hold down the button into toggles using aliases.

For example:
bind alt toggleDuck; alias toggleDuck "enableDuck"; alias enableDuck "alias toggleDuck disableDuck; +duck"; alias disableDuck "alias toggleDuck enableDuck; -duck";

This will make it so when you press alt you crouch and stay crouched even if you let go of the button. Pressing the button again will make you stand back up.
You can use this same toggle script to do anything you want, just replace the underlined commands to what you want your toggle to do.

Note: You can't have aliases named after existing commands.
Reference - Key, Bind and Buy names
Now before you bind something you need to know what to bind it to. Some key names are obvious such as "T" and "Shift" but what about those more obscure ones?

Key names
The fine folks over the Official Team Fortress 2 wiki have a pretty nifty diagram thingy showing you all the key names. Find it here
Just mouse over to see the key name.

Item names (for buyscripts)
You can get the list of valid item names to pass to the buy command by checking your autobuy.txt file located in your csgo folder. I'll quote it here for convenience anyway.
Автор сообщения: autobuy.txt
galil
galilar
ak47
scout
sg552
awp
g3sg1
famas
m4a1
m4a1_silencer
aug
sg556
scar20
ssg08
glock
deagle
elite
fn57
hkp2000
usp_silencer
p250
tec9
taser
xm1014
mag7
mac10
ump45
p90
bizon
mp7
mp9
m249
negev
nova

vest
vesthelm
defuser

flashbang
hegrenade
smokegrenade
molotov
incgrenade
decoy

Note: You only need the name of one weapon in a loadout slot to buy all of it's alternatives, including other team ones.
For example if you want to buy a silenced m4 you can use buy ak47. Or if you want to buy a cz75 you can just use buy tec9.

Common Binds
Here are some common bind commands you might want to know and their default keys.

Combat Actions:
Action
Command
Default key
Attack
+attack
Mouse1
Secondary Attack
+attack2
Mouse2
Reload
+reload
R
Use
+use
E
Next Weapon
invnext
Mouse wheel Down
Previous Weapon
invprev
Mouse wheel Up
Next grenade
invnextgrenade
none
Next item
invnextitem
none
Switch between primary and secondary
invnextnongrenade
none
Switch to Primary
slot1
1
Switch to Secondary
slot2
2
Switch to Melee
slot3
3
Switch to Grenades
slot4
4
Switch to Bomb
slot5
5
Switch to HE Grenade
slot6
none
Switch to Flashbang
slot7
none
Switch to Smoke
slot8
none
Switch to Decoy
slot9
none
Switch to Incendiery/Molotov
slot10
none
Switch to last used
lastinv
Q
Inspect Weapon
+lookatweapon
F
Drop Weapon
drop
G

Movement
Action
Command
Default key
Move Forward
+forward
W
Move Backwards
+back
S
Strafe Left
+moveleft
A
Strafe Right
+moveright
D
Jump
+jump
Space
Crouch
+duck
Ctrl
Turn Left
+left
none
Turn Right
+right
none
Walk
+speed
Shift

UI & Communication
Action
Command
Default key
Scoreboard
+score
Tab
Open Chat
messagemode
Y
Open Chat (team)
messagemode2
U
Voice chat
+voicerecord
V
Open Buy Menu
buymenu
B
Open Team Menu
teammenu
Autobuy
autobuy
F1
Rebuy
rebuy
F2
Take Screenshot
screenshot
F6
Take Jpeg Screenshot
jpeg
F5
F.A.Q. - Check here before asking
This section will be dedicated to the questions I mostly get in the comments.

I don't have a file called autoexec.cfg in my cfg folder. What do I do?
It's simple. Just make a copy of any .cfg file in the folder and rename it to autoexec.cfg. Open it with notepad and delete everything inside.

There's a script in your guide I want to use, how do I do that?
To use a script from this guide (or anywhere else for that matter) you will need to put it into a config file. We're mainly looking at autoexec.cfg. Check the Exec and .cfg's section for more info.

I've put a script into my autoexec.cfg but it doesn't work. Why?
There are multiple reasons the script doesn't work. It could be a problem with the script itself but the most common problem is that your autoexec.cfg doesn't get executed when the game starts.
To check if that's the case the easiest solution would be to add some echos in it. Check the Debugging and the Echo command section for more info. After you've done that you should see your echos appear in the console. If they don't then it doesn't get executed.

To make sure that the game doesn't execute the autoexec but it's in the right place and all the scripts in it work you would need to manually execute it by typing exec autoexec into the console. If that doesn't work then something is wrong with your autoexec.
The most common problems are:
  • Your autoexec is in the wrong place.
    Make sure it's in steam/steamapps/common/Counter-Strike Global Offensive/csgo/cfg
  • Your autoexec is the wrong format.
    The most common problem is your autoexec's file extension being .txt so your autoexec is named autoexec.cfg.txt. This will not work.
  • Your game went rogue on you and doesn't want to execute it.
    This is actually more common than you'd think. The reason is unknown. At least to me.

    There's a few things you could try. Firstly try going to your csgo properties in steam and add +exec autoexec to your launch options.

    If that doesn't work go to your config.cfg in the same folder as your autoexec and add exec autoexec at the end.
Useful scripts
These scripts go into Autoexec.cfg unless stated otherwise.

Grenade binds

"But I can use 4 to scroll through my grenades just as well, why would I need a script"
There are plenty of reasons to have binds to quickly selecting the right grenade you need. Take a look at someone who can explain better than me.

The script:
alias altE "bind e slot7" alias alt1 "bind 1 slot6" alias alt2 "bind 2 slot10" alias alt3 "bind 3 slot8" alias alt4 "bind 4 slot9" alias defE "bind e +use" alias def1 "bind 1 slot1" alias def2 "bind 2 slot2" alias def3 "bind 3 slot3" alias def4 "bind 4 slot4" alias +altbinds "alte; alt1; alt2; alt3; alt4" alias -altbinds "defE; def1; def2; def3; def4" bind alt +altbinds //change your bind here if you want //slot6 - HE Grenade //slot7 - Flashbang //slot8 - Smoke Grenade //slot9 - Decoy Grenade //slot10 - Incendiery/Molotov

This is the grenade bind script I wrote. The way it works is while you hold down alt you can select grenades using 1-4 keys and the E key.
  • Alt+E for Flashbang
  • Alt+1 for HE Grenade
  • Alt+2 for Molotov or Incendiary Grenade
  • Alt+3 for Smoke Grenade
  • Alt+4 for Decoy
When you let go of alt it rebinds your 1-4 and E keys back to normal.


Jump-throw script

Jump-throw allows you to jump-throw smoke grenades consistently every time. Explanation to why would you want to use it and script taken from:

The script:
alias "+jumpthrow" "+jump;-attack" alias "-jumpthrow" "-jump" bind "h" "+jumpthrow"

Note: If playing in a league check the rules before using.

Numpad buy script

//==============Numpad buyscript================ //Aliases - Customize these alias num0 "buy vesthelm" alias num1 "buy p250" alias num2 "buy tec9" //buys a tec9 or five seven or cz75 alias num3 "buy deagle" alias num4 "buy famas" //buys a famas or galil alias num5 "buy ak47" //buys an ak47 or an m4a1 or an m4a1_silencer alias num6 "buy aug" //buys an aug or an sg552 alias num7 "buy nova" alias num8 "buy mag7" //buys a mag7 or a sawedoff alias num9 "buy ssg08" alias num/ "buy hegrenade" alias num- "buy smokegrenade" alias num+ "buy molotov" alias numenter "buy awp" alias num. "buy vest" alias num* "buy flashbang" //Binds - Leave these alone bind kp_ins num0;bind kp_end num1;bind kp_downarrow num2;bind kp_pgdn num3;bind kp_leftarrow num4;bind kp_5 num5;bind kp_rightarrow num6;bind kp_home num7;bind kp_uparrow num8;bind kp_pgup num9;bind kp_slash num/;bind kp_minus num-;bind kp_plus num+;bind kp_enter numenter;bind kp_del num.;bind kp_multiply num*;

The following script buys weapons by tiers as numbers increase on the numpad. For example:
  • Num1 - P250
  • Num2 - CZ75/Tec9/FiveSeven
  • Num3 - Deagle

  • Num4 - Famas/Galil
  • Num5 - M4A1/AK47/M4A2 Silenced
  • Num6 - Aug/Krieg

  • Num7 - Nova
  • Num8 - Mag-7/SawedOff
  • Num9 - Scout

  • Num/ - He Grenade
  • Num* - Flashbang
  • Num- - Smoke grenade
  • Num+ - Molotov

  • NumEnter - AWP

Note: You only need to specify one weapon in a slot to buy, the game will automatically buy the right weapon in the slot depending on your team and loadout. (For example "buy galil" will buy a famas if you are on the ct team)

Practice script

alias practice "sv_cheats 1; sv_infinite_ammo 2; sv_grenade_trajectory 1; mp_buy_anywhere 1; mp_roundtime 60; mp_roundtime_defuse 60; mp_roundtime_hostage 60; bot_zombie 1; bot_freeze 1; bot_stop 1; mp_autoteambalance 0; impulse 101; mp_warmup_end; mp_buytime 900000; sv_regeneration_force_on 1; sv_showimpacts 1;ammo_grenade_limit_total 6; give weapon_flashbang; give weapon_decoy; give weapon_smokegrenade; give weapon_incgrenade; give weapon_hegrenade"

Typing practice into console will stop all bots, give you all grenades, turn on bullet impacts, grenade trajectories, stop bots from moving, turn on regeneration, set the round time to 60 minutes, give you max money and enable you to buy anywhere. It's pretty self explanatory, edit it as you wish.


Buy and drop

This is the same script I used in my early examples in the guide. It's pretty simple but can be useful when you are in a hurry.
alias buydrop "buy ak47; buy m4a1; buy m4a1_silencer; slot1; drop" bind t buydrop

This will buy either an ak47, m4a1, m4a1s, switch to it and drop it. Since you can only buy one of these guns at once it will only buy the one you can buy. If you can't afford it it will simply drop your primary so don't do that.

Toggle between 2 crosshairs

bind mouse5 changeCrosshair alias changeCrosshair secondCrosshair alias firstCrosshair "alias changeCrosshair secondCrosshair; exec crosshair1" alias secondCrosshair "alias changeCrosshair firstCrosshair; exec crosshair2"

This just uses the toggle script but since a lot of people have asked for this exact thing I've decided to include it here. To make it work you need two cfg files in your /.../csgo/cgf/ folder with your crosshair settings named crosshair1.cfg and crosshair2.cfg


Toggle between mouselwheel jump and weapon switch

bind alt toggleHop alias toggleHop toggleHopOn alias toggleHopOff "alias toggleHop toggleHopOn; bind mwheelup invprev;bind mwheeldown invnext" alias toggleHopOn "alias toggleHop toggleHopOff; bind mwheelup +jump;bind mwheeldown +jump"

This toggles between having the mouse wheel switch weapons or jump.

Toggle Walk, cancelled by Shooting

alias toggleWalk walkOn alias walkOn "alias toggleWalk walkOff; +speed" alias walkOff "alias toggleWalk WalkOn; -speed" alias +wAttack "+attack; walkOff; spec_next" alias -wAttack "-attack" bind shift toggleWalk bind mouse1 +wAttack

This script makes your walk a toggle, meaning you press shift and it walks until you press shift again, but it also stops walking when you start shooting, as well as pressing shift.

Note: Toggle walk needs to be disabled in the settings in order for this to work!

Teamchat on Enter, Allchat on Shift+Enter

This isn't really a script, but it's quite a useful bind. It lets you open team chat by pressing enter, and allchat by pressing shift+enter, just like in dota.

alias +walkchat "+speed; bind enter messagemode2" alias -walkchat "-speed; bind enter messagemode" bind shift +walkchat bind rshift +walkchat bind enter messagemode

Note: It binds both left and right shift to walk and chat

Toggle mute of voice chat

There are two ways to do this. A simple way would just toggle voice chat on and off using a toggle:
bind k "toggle voice_scale 0 1"
Voice_scale is used because it mutes the voice but still shows you when your teammates try to voice chat. 0 after voice_scale can be replaced with 0.1 to make them still audible, but very quiet.

If you want to tell your teammates in chat that you muted your voice you can use a toggle script for it like this:

alias toggleVoice voiceOff alias voiceOn "alias toggleVoice voiceOff; voice_scale 1; say_team Unmuting voice chat." alias voiceOff "alias toggleVoice voiceOn; voice_scale 0; say_team Muting voice chat." voiceOn bind k toggleVoice
That's it!
Thanks for taking your time to read my guide. Remember that fancy scripts and binds won't make you better at the game alone, they definitely do help but in the end it's all up to you.

I will add more to this guide as time passes so check back once in a while.
Feedback and suggestions are welcome in the comments.

You can also check out my sticker guide if you're interested in creating stickers:
http://steamcommunity.com/sharedfiles/filedetails/?id=232666246
Also if you enjoy my guides perhaps you would like some of my skins. Have a look.
http://steamcommunity.com/sharedfiles/filedetails/?id=303806458
http://steamcommunity.com/sharedfiles/filedetails/?id=359624717
http://steamcommunity.com/sharedfiles/filedetails/?id=243148310
http://steamcommunity.com/sharedfiles/filedetails/?id=248921082


Update notes
This is the updates section, if you check back to this guide once in a while and want to quickly find out what was added or changed check this section.
Note: The date format is DD-MM-YYYY.

Before:
  • Added Numpad Buy script
  • Added Key Reference
  • Added shameless self plugs
  • Added missing bind (to alt) for grenade script

04-10-2014:
  • Added default bind and key reference table
  • Added 'Update notes' section - check here for quick updates to this guide

14-12-2014:
  • Moved 'Echo' to a separate section to due character limit.
  • Corrected minor mistakes here an there.

02-05-2015:
  • Changed the 'Echo' section into 'Debugging and the Echo command' section.
  • Added key_findbinding to the 'Debugging' section.

20-07-2015
  • Added F.A.Q. section. Check here if you have any problems before asking in the comments.

12-09-2015:
  • Added script to toggle between two crosshairs with a button to the 'Useful Scripts' section.

10-01-2016
  • Updated default config paths to reflect the new path the game uses.

04-11-2016
  • Added script to switch mousewheel between switch weapons and jumping.

12-01-2017-
  • Added script to toggle walk, which can be cancelled by shooting.

18-09-2017
  • Added script to toggle mute voice chat.

15-12-2017
  • Fixed mistake preventing "Toggle between mouselwheel jump and weapon switch" script from working.
Комментариев: 1 012
Pumkin  [создатель] 7 фев в 12:56 
This guide was for csgo so i'm not really sure how cs2 handles configs and I don't have the game installed to check right now.
zombdale | CSGOSKINS 7 фев в 12:33 
i got game on disk F HDD and steam on C SSD and i cant find in any of locations my config. can u help me with that ?
zeira 21 окт. 2023 г. в 5:40 
great content!
Pumkin  [создатель] 15 окт. 2023 г. в 15:55 
I'll look into updating this for cs2 at some point, thanks.
Bogwandi 👈( ̿Ĺ̯ ̿ ̿👈) 15 окт. 2023 г. в 9:57 
this jumpthrow script works so the one in the guide should still work aswell

//JUMPTHROW SCRIPT
alias "+jumpaction" "+jump; ";
alias "+throwaction" "-attack; -attack2";
alias "-jumpaction" "-jump";
bind "alt" "+jumpaction; +throwaction;"
Bogwandi 👈( ̿Ĺ̯ ̿ ̿👈) 15 окт. 2023 г. в 9:39 
another edit... now shift is "+sprint" and the autoexec only works with it either... wtf... it changed after i reset my keybinds
Bogwandi 👈( ̿Ĺ̯ ̿ ̿👈) 15 окт. 2023 г. в 9:15 
THANK YOU so much man!
i had no clue about Source Engine Console Language at all, just a bit about other programming languages and started to just for fun learn it today.

now some additions you might want to add for cs2:
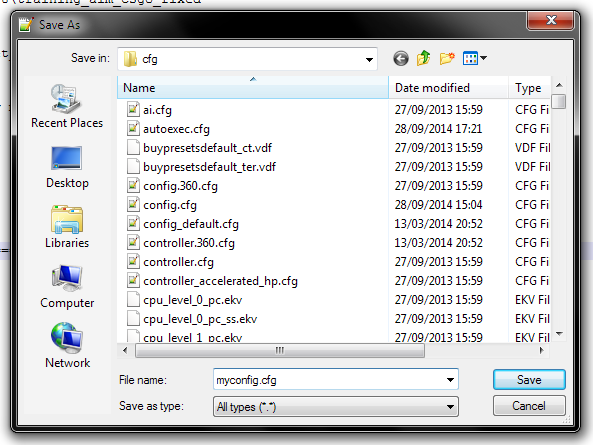
-the current folder location for autoexec must be in C:\Program Files (x86)\Steam\steamapps\common\Counter-Strike Global Offensive\game\csgo\cfg (NOTE: there is "game" now in the url. in csgo era it was in a different folder!)
-jumpthrow script doesnt work anymore. no script needed anymore according to valve, since they made it consitent by player input now
-in cs2 "+speed" was renamed to "+walk"
-i was able to bind commands which contained a space without the ", like bind cl_crosshaircolor 5. a command which worked thatfore for me also was the following: bind L incrementvar cl_crosshaircolor 0 5 1. no need to sum it up as an alias
Pumkin  [создатель] 30 июн. 2023 г. в 10:36 
Thanks!
Sure, go ahead and link it.
b4rn3y 30 июн. 2023 г. в 1:13 
And by the way, may i link to this guide from a guide i am writing ? My guide is about specific case of setting up practice environment - your guide is far more comprehensive regarding the essentials of binds/scripts etc.
b4rn3y 29 июн. 2023 г. в 14:01 
This is such a professional piece of work.
You well deserve more than 5 stars.