Satisfactory

Satisfactory

55 Bewertungen
Max Graphics Guide
Von Anal Pounder with Cheese
A True Max Graphics Guide (work in progress)
2
   
Preis verleihen
Favorisieren
Favorisiert
Entfernen
INTRO
CHECK OUT THE NEW ENGINE.INI!, better clouds and better light shafts, better performance!

VIRTUAL SHADOWS NOW HAS A PROPER TOGGLE LOCATED IN THE GAMEUSERSETTINGS BELOW

-march 2025


Recommend reading the entire guide before committing to using it.

THIS IS NOT A PERFORMANCE GUIDE.
THIS IS A GUIDE FOR MAXIMUM FIDELITY. (4090 CLASS FIDELITY.)
(however, there are a lot of performance related optimizations in this guide.)


all work in this guide is my own. all commands used in this guide belong to epic games.

I do not recommend using any mods to change graphics (grass, overhauls, dlss mod and any other mod that edits the engine.ini file.) with this guide as those mods touch files that this guide uses. This guide is meant as a standalone reference for my own graphical configuration that i use on my own machine. I recommend always making changes manually because that gives you the highest level of control over your personal configuration.

Always check test machine specs to be sure the guide you are using fits your needs.

This guide is meant for users with 40 series or newer nvidia card AND a top end cpu. (7800x3d equivalent or higher)
Also, this guide is meant to push my personal system to the limit. This is meant to be a reference for how I set my settings and if I should ever need to reinstall the game ill be able to reference this guide to achieve the same fidelity. i only have the following test machine to test on so your mileage may vary.


test machine specs
4090, 7800x3d, 64gb DDR5, 1440p, 120fps target, freesync/gsync disabled, Frame-Gen enabled. i typically use around 30-60% gpu depending on the location and scene density. some locations push 70%, that last 30% is reserved for encoding and overhead for the factory. :)

This config has the following effect from the base game maxed graphics settings:
  • INCREASES VIEW DISTANCE
  • BETTER PIPE REFLECTIONS (metallic paint primarily, also effects most material reflections like coated concrete.)
  • BETTER WATER REFLECTIONS
  • BETTER GLASS REFLECTIONS WITH LIGHTS (including seeing billboards reflecting in glass when the billboard is off-screen)
  • EXTENDS FOLIAGE TO MAX (no cardboard pop-in for trees with these settings)
  • MAKES GRASS THICKER AND RENDER FURTHER! (like a thick green carpet, also increases density of tiny rocks on ground in rocky desert)
  • INCREASES SHADOWS TO THE MAX! (virtual shadows are enabled without a console command with this guide.)
  • MAKES SIGN LIGHTS RENDER MUCH FURTHER & AROUND CORNERS!
  • MAKES FOUNDATIONS AND BUILDINGS RENDER MUCH FURTHER!
  • MAKES CLOUDS THICKER, CLOUDS NOW HAVE A SLIGHT SHADOWING EFFECT, ENHANCES FOG, AND GIVES FULL RESOLUTION SUN RAYS THROUGH CLOUDS.
  • LOCKS THE MAX AMOUNT OF PARTICLES TO PREVENT HEAVY LAG WHEN BUILDING HUGE AMOUNTS OF OBJECTS! (WATCH THE ITEMS GO ZOOM WITHOUT LAG! to a point, infinite zoop still takes time XD)
  • ENABLES FRAME GEN! (OPTIONAL)
  • RENDERS EACH FRAME FASTER WITHOUT WAITING ON FACTORY BASED UPDATES.(lots of optimization commands in this guide!)
  • GETS RID OF CAMERA STUTTER and MOST TRAVERSAL STUTTER (optimizations to loading logic built in.)

if you want to test this config, but you dont have a high end cpu, please consider removing grass and foliage settings from the engine.ini as well as setting the shadow resolution to 512 from 4096.

Some have stated they ran just fine on the following:
"Looks and plays great at 120 fps on a 11700k and 4080 Super"

"watched a user install it on a 4070, stated they had 0 lag and ran at 105fps without frame gen."

Others have stated it does not run good on their system:
"Doesn't run good on my 3060 ti, i only get around 13-25 fps" - Anonymous Discord User "pre-shadow bug fix, it might work now?"
HOW TO APPLY
PLEASE IGNORE DX 11 DEPRECATED MESSAGE IN MENU WHEN APPLYING IN-GAME SETTINGS, note that these options work even if the game gives error that dx11 isnt supported, known issue.

1. Set Nvidia Control Panel settings according to the Nvidia Control Panel section.

2. Set High Priority CPU (optional) according to the High Priority CPU section.

3. Set the launch options in steam according to the Launch Options section.

4. Apply in-game settings & in-game graphics in the "IN-GAME SETTINGS" section and then close game via game menu with those settings.

5. Apply GameUserSettings.ini settings to your GameUserSettings.ini file and set GameUserSettings.ini to "read-only" ONLY after saving the GameUserSettings file. BE SURE to complete step 4 first otherwise you will need uncheck "read-only" on the GameUserSettings.ini and have to start this guide over from step 4.

6. Apply engine.ini settings to your engine.ini file and set engine.ini to "read-only" ONLY after saving the engine.ini file.

7. Launch the game!

Note: If Using DLSS Frame Gen, make sure to run "r.Streamline.DLSSG.Enable 1" in the games console when the game launches to smooth out DLSS FRAME GEN each boot. this setting is overridden by the games internal frame gen toggle and must be applied each boot.

ALTERNATIVELY ENABLE REFLEX WITH DLSSG

you can enable reflex with boost and forced dlssg on (instead of auto) as well with these commands, just copy and paste the entire line into your console each game boot to apply, no need to copy each code individually:

t.Streamline.Reflex.Enable 1 | t.Streamline.Reflex.Mode 2 |r.Streamline.DLSSG.Enable 1
NVIDIA CONTROL PANEL SETTINGS (Satisfactory)
This is for the satisfactory profile in the Nvidia Control Panel profile, not the Global Profile.

Vsync is broken in game as of patch 1.0.0.7 so i recommend using the nvidia control panel to set vsync if you do not want screen tearing.

Anisotropic filtering -16
AA Gamma - off
AA - off (dlss and fsr upscaler will still work and do AA, dlss 4 transformer is king imo. also no point in doing AA twice, unless its a combination of dldsr + dlss to achieve better than in game AA)
AA transparency - off
Max Frame Rate - your monitor's max refresh
low latency mode - ultra
MFAA - off
power management - max performance, gpu power throttling can cause high latency.
Texture filtering anisotropic sample - off
Texture filtering Negative LOD bias - clamp
Texture filtering Quality - high quality
Texture filtering trilinear optimization - off
vsync - on
virtual frames - 1 frame
HIGH PRIORITY CPU
To permanently set Satisfactory to run at high priority using the Windows Registry Editor (regedit), follow these steps:

1. Open the Registry Editor by pressing Win + R, typing "regedit", and pressing Enter

2. Navigate to the following key: HKEY_LOCAL_MACHINE\SOFTWARE\Microsoft\Windows NT\CurrentVersion\Image File Execution Options

3. Right-click on "Image File Execution Options", select New > Key, and name it exactly as the game is in the installation folder ("FactoryGameSteam-Win64-Shipping.exe" for steam users, change accordingly for epic users)

4. Right-click on the newly created key ("FactoryGameSteam-Win64-Shipping.exe" for steam users, change accordingly for epic users), select New > Key, and name it "PerfOptions"

5. Right-click on the "PerfOptions" key, select New > DWORD (32-bit) Value, and name it "CpuPriorityClass"

6. Double-click on "CpuPriorityClass" and set the Value data to 3 (hexadecimal) for High priority.

should look similar to this, note that the exe name will change for epic users.
LAUNCH OPTIONS
Paste into launch options for satisfactory in steam and close the window.
-dx12 -NOSPLASH -NoVerifyGC -USEALLAVAILABLECORES -NO_OES_OVERLAY -nothreadtimeout


this is an example of what that might look like, note that settings in the image are not up to date.

For a list of all usable launch option commands as well as how to apply these settings on Steam & Epic Games: https://satisfactory.wiki.gg/wiki/Launch_arguments
IN-GAME SETTINGS
set in game graphics to max settings, then set your upscaler to dlss if available, then set screen percentage (i like 50-60%)> enable frame gen only if using a monitor that is at 120fps or above. (if you enable frame gen at 60fps cap the game will run at 30fps and frame gen will be super laggy.)

set in game frame rate to: your monitors frame rate

disable or set to low the following:
Anti-aliasing, motion blur, Hierarchical Z-Buffer Occlusion, LOD dithering, vsync
(enable vsync via nvidia control panel according to the nvidia control panel section, IN-GAME VSYNC IS STILL BROKEN AS OF 1.0.0.7, causes large input lag. I will update this section when this is fixed.)

SET ALL OTHER GAME RELATED AND AUDIO RELATED SETTINGS NOW. IT WILL BE DIFFICULT TO CHANGE AFTER SETTING THE CONFIG TO READ ONLY.

SAVE SETTINGS

THEN


CLOSE GAME VIA IN GAME MENU.
ENGINE.INI
(Located in AppData\Local\FactoryGame\Saved\Config\Windows\Engine.ini)

the "windows" folder may vary in name.

Paste into the bottom of your engine.ini, set any variables that have a comment added to them in the settings below as needed, what is there should be fine if you are on a 4090, and then set the ini file to READ-ONLY after saving to prevent overwrite.

updated March 26 2025
[SystemSettings] r.pathtracing=1 ; ENABLED IN CASE THERE ARE ANY LATENT PATH TRACING SETTINGS foliage.ForceLOD=-1 ; stops billboard trees, 1 or 0 can cause crashes on some parts of the map? strange bug foliage.LODDistanceScale=7 ; controls window draw distance on some mods? set foliage in game to default or far, cinematic is too heavy. r.StaticMeshLODDistanceScale=0.01 r.SkeletalMeshLODBias=-10 grass.MaxAsyncTasks=9999 grass.TickInterval=1 grass.DensityScale=3 ; DEFAULT 1 r.MipMapLODBias=0 r.volumetricfog=1 ; DEFAULT 0 r.VolumetricFog.ConservativeDepth=1 ; DEFAULT 0 r.VolumetricFog.InjectRaytracedLights=1 ; DEFAULT 0 r.VolumetricFog.Emissive=1 ; DEFAULT 0 r.MaterialQualityLevel=3 r.ViewDistanceScale=10 r.Shadow.MaxCSMResolution=4096 r.Shadow.MaxResolution=4096 r.Shadow.DistanceScale=2 r.ShadowQuality=1 r.Shadow.PreShadowResolutionFactor=1 r.Shadow.CachePreshadow=1 r.Shadow.PreshadowExpand=0.33 r.DetailMode=2 r.AOGlobalDistanceField.NumClipmaps=64 r.VolumetricCloud.ReflectionRaySampleMaxCount=160 r.VolumetricCloud.ViewRaySampleMaxCount=4000 r.FastVRam.ShadowCSM=1 r.FastVRam.ShadowPerObject=1 r.FastVRam.ShadowPointLight=1 r.Fastvram.volumetricfog=1 r.FinishCurrentFrame=0 r.OneFrameThreadLag=0 r.GPUScene.ParallelUpdate=1 r.DFShadowAsyncCompute=1 tick.AllowAsyncTickDispatch=1 tick.AllowAsyncTickCleanup=1 AllowAsyncRenderThreadUpdates=1 AllowAsyncRenderThreadUpdatesDuringGamethreadUpdates=1 AudioThread.BatchAsyncBatchSize=9999999 AudioThread.UseBackgroundThreadPool=1 AudioThread.EnableBatchProcessing=1 fx.ParticlePerfStats.Enabled=false fx.EnableCircularAnimTrailDump=0 fx.Niagara.DebugDraw.Enabled=0 fx.EarlyScheduleAsync=1 fx.AllowAsyncTick=1 fx.BatchAsync=1 fx.BatchAsyncBatchSize=1024 fx.AllowGPUSorting=1 niagara.CreateShadersOnLoad=1 memory.logGenericPlatformMemoryStats=0 [/script/engine.renderersettings] r.Shadow.Virtual.NonNanite.IncludeInCoarsePages=1 r.Shadow.Virtual.UseFarShadowCulling=0 r.Shadow.Virtual.ForceOnlyVirtualShadowMaps=0 r.Shadow.CSM.MaxCascades=8 r.Shadow.Virtual.Cache=1 r.Shadow.Virtual.Cache.KeepOnlyRequestedPages=1 r.Shadow.Virtual.Cache.MaxUnreferencedLightAge=30 r.Shadow.Virtual.Cache.AllocateViaLRU=1 r.Shadow.Virtual.Cache.InvalidateUseHZB=1 r.Shadow.NaniteUseHZB=1 r.Shadow.Virtual.UseHZB=1 r.Shadow.Virtual.NonNanite.UseHZB=1 r.Shadow.Virtual.Nanite.MaterialVisibility=1 r.Shadow.Virtual.NonNaniteVSM=1 r.Shadow.Virtual.Cache.StaticSeparate=1 r.DFShadowAsyncCompute=1 r.AOGlobalDistanceField.MinMeshSDFRadius=5 r.Lumen.TraceMeshSDFs=1 r.Lumen.TraceMeshSDFs.Allow=1 r.Lumen.SkylightLeaking.Roughness=0.5 r.Lumen.TraceMeshSDFs.TraceDistance=2000 r.LumenScene.FarField=1 r.LumenScene.GlobalSDF.ClipmapExtent=1500 r.LumenScene.GlobalSDF.Resolution=256 ; 1024 is fatal. alternatives are 64/128/256/512 r.Lumen.Reflections.SmoothBias=0.8 r.Lumen.Reflections.RadianceCache=1 r.Lumen.ScreenProbeGather.TracingOctahedronResolution=8 ; DEFAULTS TO 8 r.Lumen.ScreenProbeGather.Temporal.MaxFramesAccumulated=40 ; DEFAULTS TO 10 r.LumenScene.Radiosity.Temporal.MaxFramesAccumulated=16 ; DEFAULTS TO 4 r.Lumen.ScreenProbeGather.DownsampleFactor=16 ; DEFAULTS TO 16 r.Lumen.TranslucencyReflections.FrontLayer.Enable=1 r.Lumen.SampleFog=1 r.LumenScene.GPUDrivenUpdate=0 r.LumenScene.SurfaceCache.CardTexelDensityScale=64000 r.LumenScene.Lighting.AsyncCompute=1 r.Lumen.DiffuseIndirect.AsyncCompute=1 r.Lumen.Reflections.AsyncCompute=1 r.AutoExposure.IgnoreMaterials=true r.AutoExposure.IgnoreMaterials.UsePrecalculatedIlluminance=false r.AutoExposure.IgnoreMaterials.LuminanceScale=0.25 r.SSR.Quality=4 r.ContactShadows=1 r.Nanite.MaterialVisibility=1 r.Cache.DrawDirectionalShadowing=1 r.Shadow.Denoiser.TemporalAccumulation=0 r.AmbientOcclusion.Denoiser.TemporalAccumulation=0 r.GlobalIllumination.Denoiser.TemporalAccumulation=0 r.Reflections.Denoiser.TemporalAccumulation=0 r.NGX.DLSS.DenoiserMode=1 ; ai denoise 1, off 0 r.ShaderPipelines=1 r.ShaderPipelineCache.AlwaysGenerateOSCache=1 r.ShaderPipelineCache.GameFileMaskEnabled=1 r.ShaderPipelineCache.PreOptimizeEnabled=1 r.ShaderPipelineCache.SaveBoundPSOLog=1 r.ShaderPipelineCache.SaveUserCache=1 r.ShaderPipelineCache.StartupMode=2 r.AsyncPipelineCompile=1 r.Shaders.Optimize=1 r.Shaders.FastMath=1 r.ForceAllCoresForShaderCompiling=1 r.DepthOfFieldQuality=4 r.Water.SingleLayer.VSMFiltering=1 r.Water.SingleLayer.ShadersSupportVSMFiltering=1 r.Water.SingleLayerWater.SupportCloudShadow=1 ; DEFAULT 0 r.VolumetricCloud.EmptySpaceSkipping=1 ; DEFAULT 0 r.VolumetricCloud.EnableLocalLightsSampling=1 ; DEFAULT 0 r.VolumetricCloud.ShadowMap.MaxResolution=4096 ; default 2048 r.VolumetricCloud.ShadowMap.RaySampleHorizonMultiplier=4 r.VolumetricCloud.ShadowMap.RaySampleMaxCount=512 ; default 128 r.VolumetricCloud.ShadowMap.SpatialFiltering=4 ; DEFAULT 1 r.VolumetricCloud.SkyAO.Filtering=4 ; DEFAULT 1 r.VolumetricCloud.SkyAO.MaxResolution=4096 ; default 2048 r.LightShaftQuality=5 r.LightShaftBlurPasses=4 r.LightShaftDownSampleFactor=1 r.LightShaftRenderToSeparateTranslucency=1 [/script/engine.streamingsettings] r.Streaming.PoolSize=10000 ; This will use RAM, set to 10000 for 64gb, 6000 for 32gb s.LevelStreamingComponentsUnregistrationGranularity=1 s.LevelStreamingComponentsRegistrationGranularity=1 s.LevelStreamingActorsUpdateTimeLimit=15 s.UnregisterComponentsTimeLimit=15 s.PriorityLevelStreamingActorsUpdateExtraTime=15 s.MinBulkDataSizeForAsyncLoading=0 s.ForceGCAfterLevelStreamedOut=0 s.MaxIncomingRequestsToStall=0 s.AsyncLoadingUseFullTimeLimit=0 s.AsyncLoadingThreadEnabled=1 s.AsyncLoadingTimeLimit=15 s.IoDispatcherCacheSizeMB=10000 ; This will use RAM, set to 10000 for 64gb, 6000 for 32gb

All of these commands are public facing and owned by Epic.
feel free to copy my commands as a baseline to tweak your own version!

here are the resources for almost all the settings used in UE5

https://framedsc.com/GeneralGuides/ue5_commands.htm

https://forums.unrealengine.com/t/unreal-engine-5-all-console-variables-and-commands/608054/1

i also reference AI search engines to explain settings and interactions more clearly.

this image is an example of how to set your engine.ini to read-only
GAMEUSERSETTINGS.INI
(Located in AppData\Local\FactoryGame\Saved\Config\Windows\GameUserSettings.ini)
the "windows" folder may vary in name.

Edit the GameUserSettings.ini to reflect the settings below and then set the ini file to READ-ONLY after saving to prevent overwrite.

ONLY set these settings in gameusersettings AFTER setting in-game settings and closing your game VIA in-game menu. If you do this BEFORE setting in-game settings you risk being unable to save your in-game settings and they will revert upon relaunch of game. i.e. resolution, graphics, sensitivity, GI, etc etc. Also, most of the settings at the top of this file only show after changing at least once in game and only after shutting the game via in game quit menu.

(to re-enable the ability to set in-game settings, begin from step 4 of "how to apply" after unchecking "read-only" from this file [GameUserSettings.ini], additionally you can edit the game user settings manually and set the file back to "read-only" after saving. make sure the game isnt running when you do this.)

Look for the Gamma, Global illumination, and Upscaler and Cloud settings somewhere in the mess at the top of this file after setting it in game and edit the number according to the Gamma, Global illumination, Upscaler and Cloud settings listed below. These settings will be added if you change any of them in the menu in game and click apply. If they aren't there add them in using the format ("example", #.##), DON'T FORGET TO ADD IN A COMMA IF USING MULTIPLE COMMANDS HERE.

This is also where you can add in virtual shadows so that you do not have to put in a console command each time. refer to the format below to enable!

Here is an example of how mine looks, yours may look different depending on what settings you apply in the in-game menu. Settings only show up here if they have been changed at least once in the game menu. change a setting in game to toggle visibility in the file.


Edit or add the following commands, do not add duplicates. place in correct location.

Values will be either under
mIntValues= for solid numbers(1, 2, 3, 7, 69, 420) or mFloatValues= numbers that can be decimals (1.0203)
Gamma Setting
("r.TonemapperGamma", 1.000000)
this setting does not save when setting in game for some reason, so if you want to force gamma this is the setting to use, it defaults to 2 and doesn't seem to go lower than 1. recommend testing in game before setting permanently.

Global illumination setting:
("sg.GlobalIlluminationQuality", #)
This describes the GI presets and their in game setting.
0. off
1. low
2. medium
3. high (recommended)

Upscaler settings:
("sg.TSRPreset", #)
This describes the TSR presets and their in game setting.
0. Performance 60% (lower quality, higher FPS)
1: Balanced 75%
2: Quality (higher quality, lower FPS) 90%
3: Ultra Quality (max quality, no upscaling) 100%


("FG.UpScalingMethod", #)
This setting allows you to specify what type of upscaler to use
0.None
1.TSR (epic's)
2.DLSS (nvidia's)
3.AMD FSR (amd's)
4.XESS (intel's)


("sg.CloudQuality", 5)
This setting makes clouds thick as butter.
this should be in your mintValues= if you have set the in game graphics already. if not, place under the mIntValues= as shown above, remember to format correctly.

("r.Shadow.Virtual.Enable", 1)
This setting forces virtual shadows in game without needing to put into console each time.
place under the mIntValues= as shown above, remember to format correctly.

("sg.ShadowQuality", 1)
Set this to 1. required.

the following settings are located lower down in the file. copy this and overwrite yours.
[ScalabilityGroups] sg.ResolutionQuality=0 sg.ViewDistanceQuality=5 sg.AntiAliasingQuality=0 sg.ShadowQuality=1 sg.GlobalIlluminationQuality=3 sg.ReflectionQuality=5 sg.PostProcessQuality=5 sg.TextureQuality=5 sg.EffectsQuality=5 sg.FoliageQuality=5 sg.ShadingQuality=5


DO NOT FORGET TO SET TO READ-ONLY BEFORE STARTING THE GAME ONCE YOU ARE DONE EDITING THE FILE.

when everything is done, it should look similar to this:


this image is an example of how to set your gameusersettings.ini to read-only.

UPSCALERS & FRAME GEN
Upscaler:
Refer to gameusersettings.ini section for locking in your upscaler settings and screen percentage.

Frame Gen:
40 series cards and AMD have access to frame gen! I recommend enabling frame gen with amd or dlss ONLY if the screen percentage doesn't bring you up to where you want to be framerate wise. You can push things further by using Lossless Scaling on top of frame gen to push your frames even further! (not saying its pretty, but it works!)

2X2=4X FRAMES! or you can do 3x or 4x, going from (2x) times (4x) is 8x the theoretical frames! so if you get only 30 fps, you can double to 60 fps with in game frame-gen, then 4x to 240 fps with Lossless Scaling.

You can now achieve 20x. why? why not?

if using DLSS frame gen, place this command into the console each boot to force framegen from "auto" "2" to "always on" "1". This ensures consistent frame gen. Disabling and re-enabling frame gen seems to reset this setting. This setting fixes frame gen stutter!

r.Streamline.DLSSG.Enable 1


NOTE: YOU MUST ENABLE HARDWARE-ACCELERATED GPU SCHEDULING FOR FRAME GEN TO WORK!
NVIDIA APP SETTINGS
The Nvidia app has one issue that can destroy up to 15% of your performance.

Please disable the option in the red box to fix this issue as shown below.

SIGNS & LIGHTS
Lights: You can set lights to "50% brightness" to reduce blocky flickering.

Signs: You can set signs to "50% brightness" and "1-2 emission strength" to reduce blocky flickering. Signs can be set to 50% brightness by adjusting the black-to-color slider to 0.5 in the color picker (bottom color slider for the backdrop of sign) and you can achieve emission brightness control that way. i suggest testing materials as well with this method to see what works for you. 3 seems to be too much emission for smaller signs.

Billboards: Emission "3" seems to run brighter than other smaller signs, and the light can even reflect around corners while the billboard isn't in view!

The smaller signs can emit light around corners! These settings are included in the config below.
r.Lumen.TraceMeshSDFs=1 r.Lumen.TraceMeshSDFs.Allow=1 r.Lumen.TraceMeshSDFs.TraceDistance=2000

r.Lumen.TraceMeshSDFs.TraceDistance setting allows smaller signs to project light just far enough to see around corners. Recommend staying at 2000 and not going higher for r.Lumen.TraceMeshSDFs.TraceDistance, otherwise it can reflect the skybox off screen and that doesn't look right inside a factory.

here is an example of tracemesh on (left) and off (right) using glossy black billboards as a mirror.
Tiny lumen flicker-blocks from signs still appear on super shiny/bright surfaces and they also appear with bright "3" emission strength on other surfaces. I'm positive this is an issue with Lumen limitations. play around with different materials to see the difference!
ADDITIONAL NOTES
  • "nosplash" gets rid of game logo splash on start and loads game window faster.

  • "noverifyGC" lets the game clean memory faster, but doesn't check if the memory is in use, so less lag on memory management.

  • "sg.Globalillumination 4" pulls a ton of power from the GPU, almost 100 watts more than the "high" setting for me. USE AT OWN RISK

  • If you find you cant save in-game settings after reboot, this is INTENTIONAL to prevent overwrite of config settings. to change anything you will need to uncheck read only on the gameusersettings.ini and the engine.ini and start from step 4.

  • If you find you want to revert all settings to default, simply delete the engine.ini file and the gameusersettings.ini and the game should remake these files upon game startup.

  • The following can be applied in console to achieve higher fidelity lights and shadows. These commands aren't applying in my engine.ini so I am leaving them here for anyone who wants to manually put them into console each time.

    Effects Lights:
    r.Lumen.HardwareRayTracing.LightingMode 1
    r.AOGlobalDistanceField.FastCameraMode 0

    Effects Shadows:
    pool.light.shadowquality 4
  • (devs have spoken recently about megalights, this looks to be experimental so they are waiting to see if it is worth upgrading the engine in the future to add this feature in with an upgrade to ue5 v5.5. Megalights (RTXDI) will bring better lights and shadows that blow away the current implementation of lumen. lumen is limited to a certain number of lights before performance degrades and megalights will break that barrier to allow millions of lights to cast shadows in real time. It will also replace all shadowing techniques and ambient occlusion techniques. RTXDI is a light and shadow algorithm.)

    goodbye CSM which only reaches out 16 tiles away, goodbye lumen that doesn't calculate small light sources right, goodbye virtual shadow maps that don't work right with certain geometry. Goodbye SSAO that wont reflect off screen objects and terrain, DON'T LET THE DOOR HIT U IN THE ASS ON THE WAY OUT.

    Hello Realism.

  • (devs stated that they are adding in rain effects with the upgrade to ue5 v5.5, this will come after the console release, as stated per the live stream this month (march 2025). we can expect 1.1 to be photomode overhaul, additional buildables and bug fixes. after should be console release target, then we will look to 5.5 and having true max graphics. get ready folks, it is confirmed. 1 million light factory here we come.)

    leaf the trees for the bees so they may rest their knees...
OUTRO
I have 0 input lag on an end game save with these settings.
Enjoy high quality lighting and low input lag building with your high end rig!

Perhaps there is still room on the 4090 to add in an ada ai chatbot to talk to while i build? haha (that's in the works XD )

I will continue to update this guide as time goes on.

Please leave any additional commands, notes or bugs you find below and i will test rigorously and add in if applicable.

-still need to work on entity distance settings (mobs,, vehicle lod's, train lod's, FART ROCKS)

-wish we had MEGALIGHTS (UNLIMITED LIGHTS AND SHADOWS)
-wish we had rain (MOOD & VIBES)

Dont forget to like the guide if you found it useful!
Gallery & Video
Video Showcasing the lighting effects of this guide
https://youtube.com/shorts/Gx5uBdzpN-0?feature=share

Pretty Pictures!


18 Kommentare
Anal Pounder with Cheese  [Autor] 26. Apr. um 10:30 
@dark so it looks like it could be a driver issue. the last few driver updates have been really bad for performance so i would look into that as well.
DarkFNC 7. Apr. um 10:57 
I think it has something to do with 1.1 (as this guide is for 1.0) or i've screwed up a setting somewhere. I'll get my hands on DLSS 4 and see how that goes.
Anal Pounder with Cheese  [Autor] 2. Apr. um 9:06 
@ DarkFNC, i cant speak to playing at 4k as i only have a 1440p screen, I know of a streamer (@pobkac, on twitch)that uses the guide and plays at 4k and sometimes 8k just fine. Not saying its perfect but it is playable.

Also, What do you mean "feels like 25" but says 70? That doesnt give me much to go on.

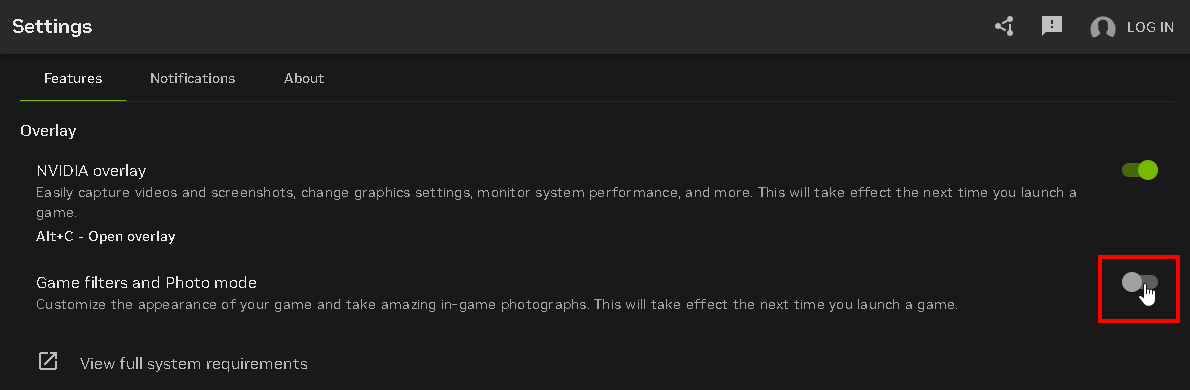
Also have you tried switching the dlss to the new dlss 4 transformer model in satisfactory?
there are reddit guides that can show you how to do that if you havent done so already, im not sure if the nvidia app allows you to select it but you can force it that way for much better image quality and performance over the old dlss 3.
DarkFNC 1. Apr. um 10:05 
It's extremely early days so fee free to disregard this - would 1.1 experimental have anything new going on with lighting? Followed this guide and I have sup 40 FPS (9800X3 RTX5090). I am gaming on 4k - switching to 1080p i get 140 FPS. Funnily enough my FPS counter doesn't go lower than 70 but it feels like 25 FPS.
Anal Pounder with Cheese  [Autor] 23. März um 11:39 
devs stated that they are adding in rain effects with the upgrade to ue5 v5.5, this will come after the console release, as stated per the live stream this month (march 2025). we can expect 1.1 to be photomode overhaul, additional buildables and bug fixes. after should be console release target, then we will look to 5.5 and having true max graphics. get ready folks, it is confirmed. 1 million light factory here we come.
Anal Pounder with Cheese  [Autor] 23. Dez. 2024 um 7:20 
@oriken, it does. It's a stark contrast to the base game max graphics.

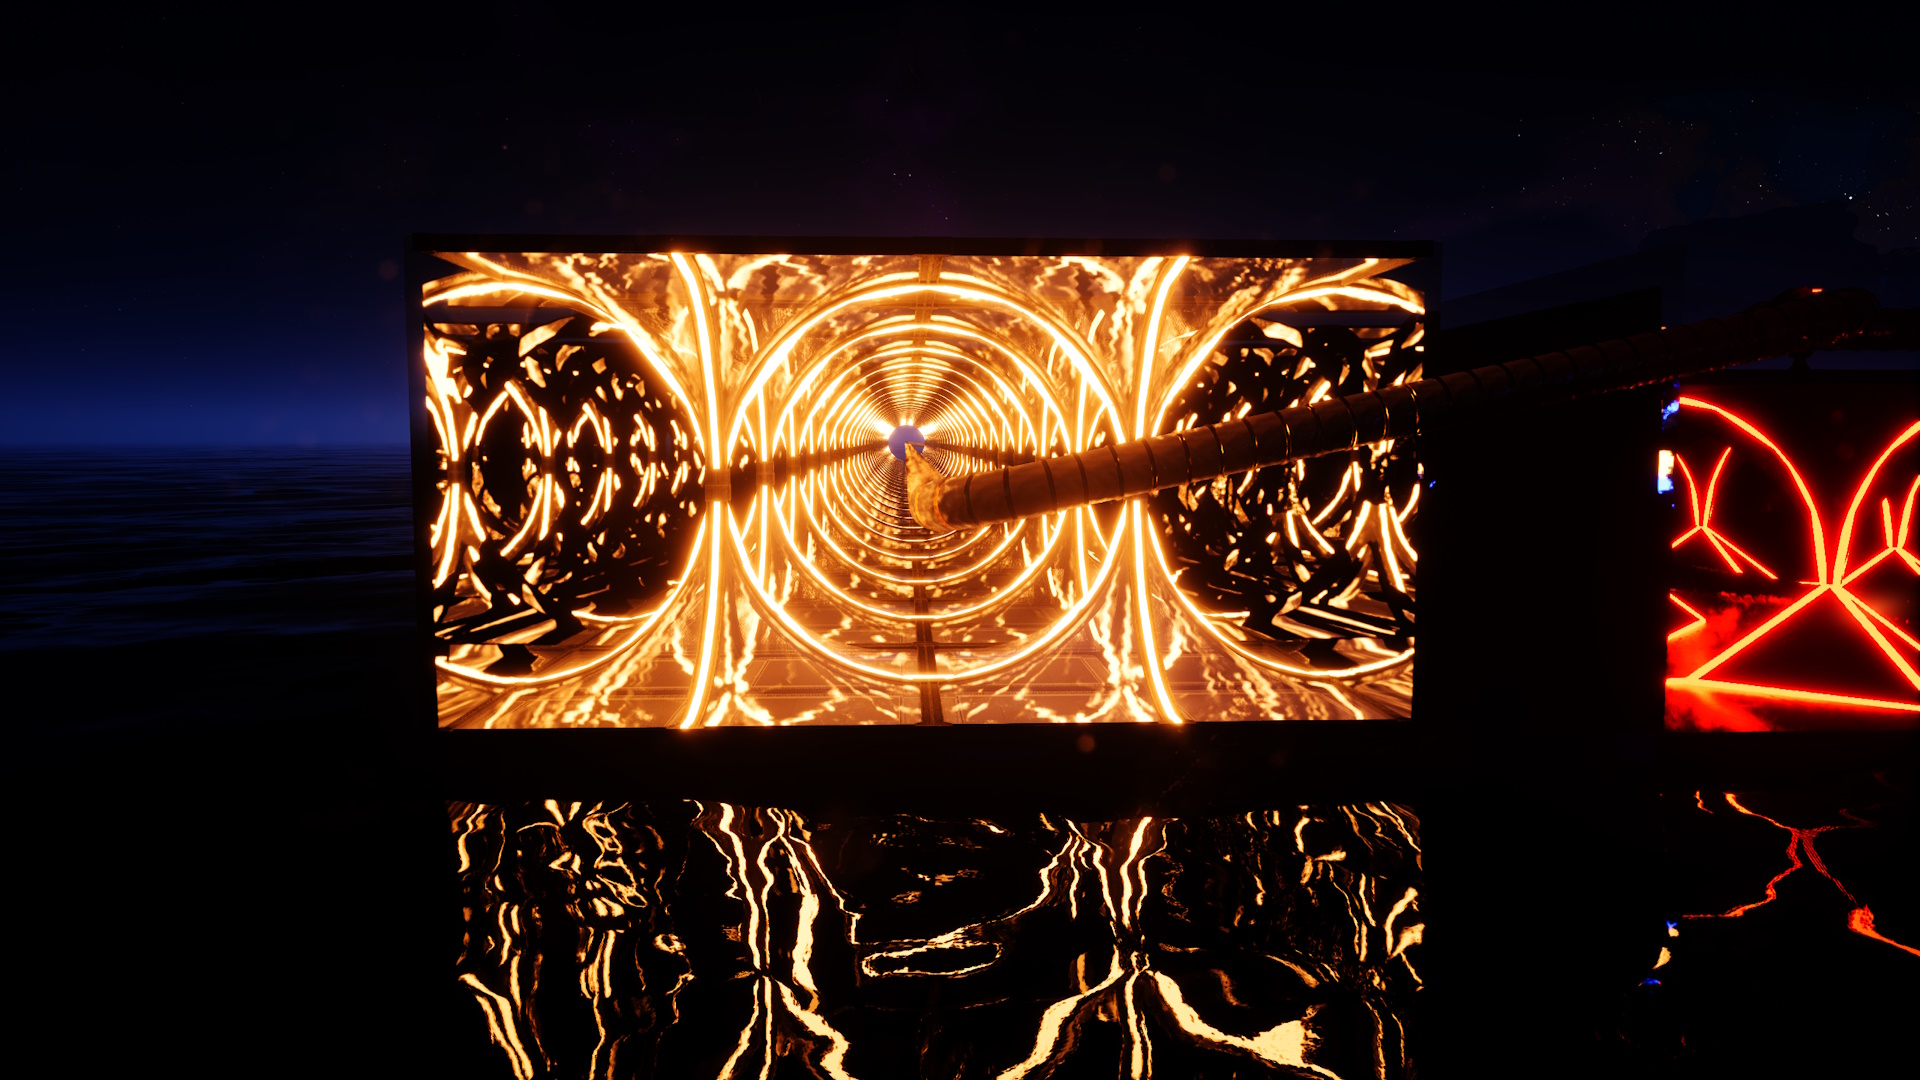
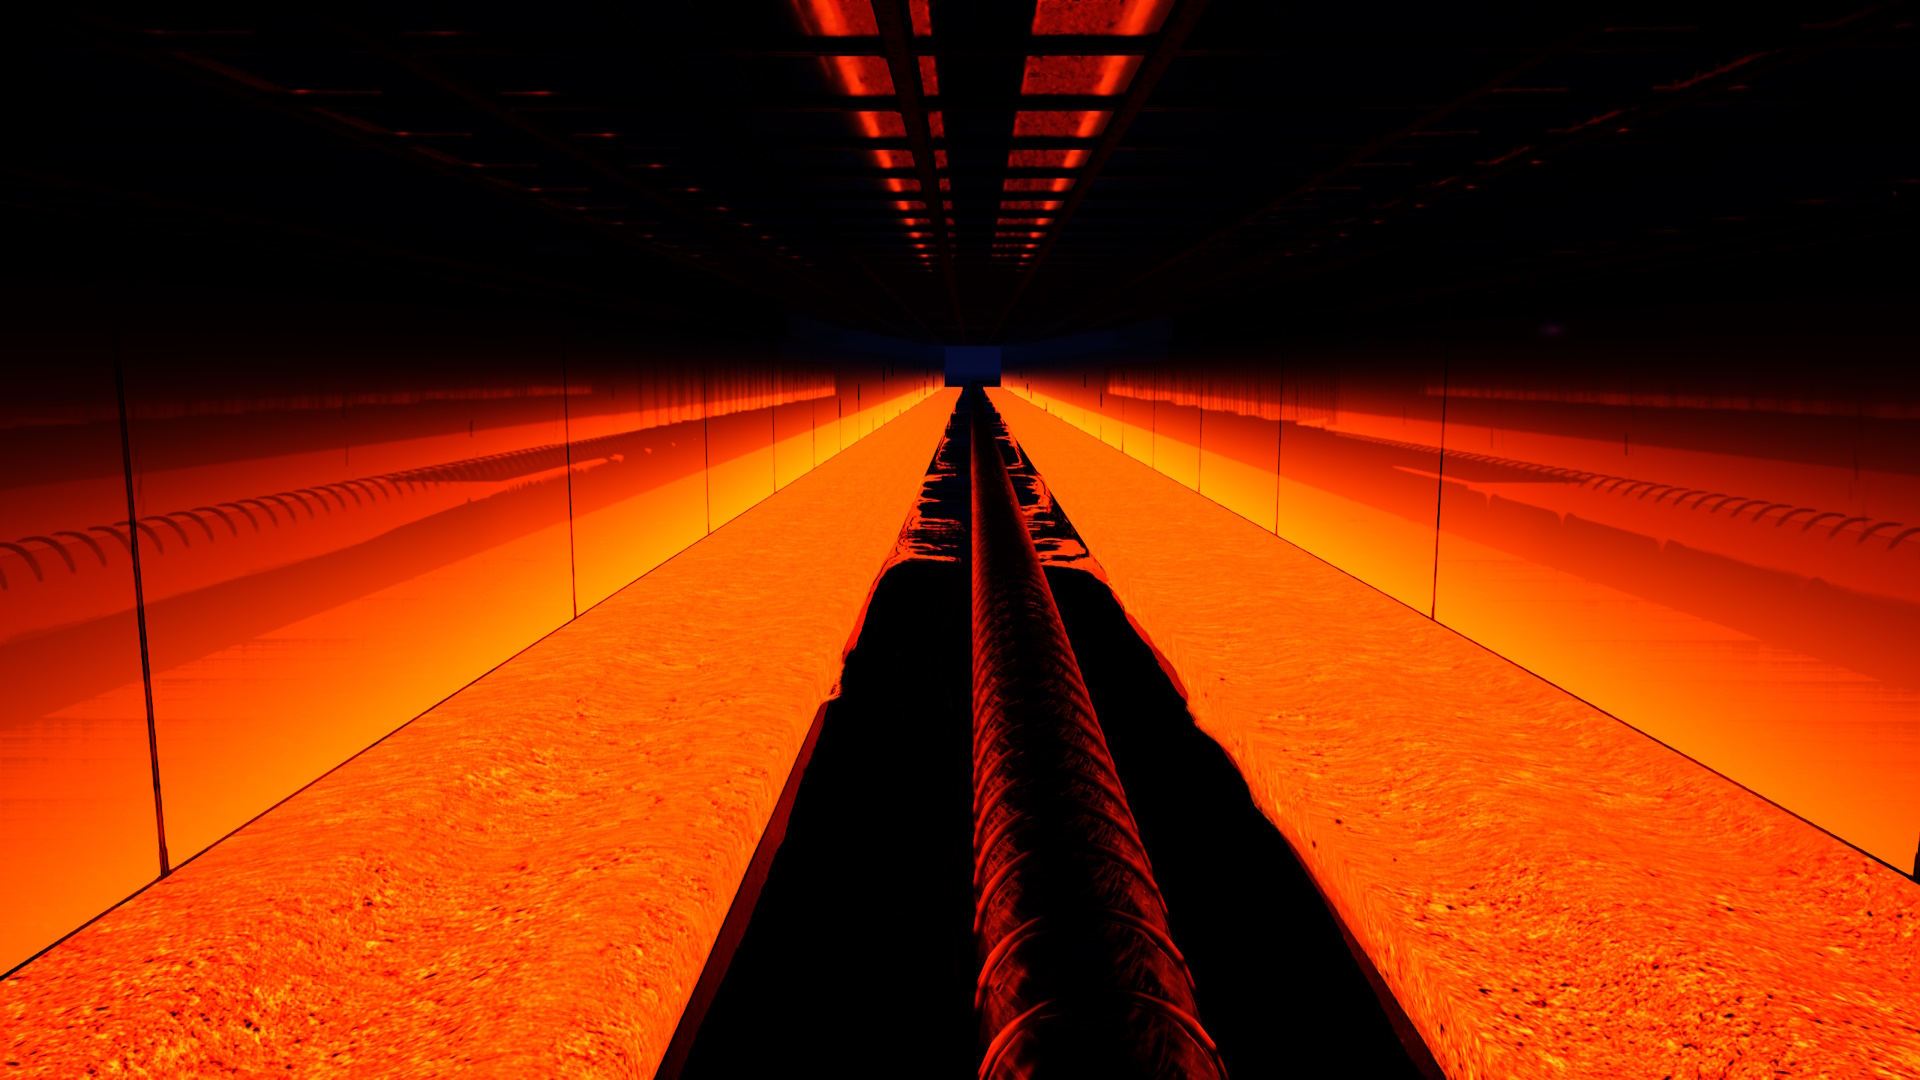
the grass is thicker and renders further and more efficiently, the trees render much further and never billboard in the distance, the shadows are higher resolution and sharper than the base max, sign lights can render around corners and reflect off screen, they cant do this in the base max config.

there are several optimizations to performance and considerations for overhead that many would find useful.

lumen still has limitations but this pushes the limits of lumen as far as im willing to take my system.
Oriken 22. Dez. 2024 um 20:29 
Admittedly speaking as someone who can't run max graphics but does plan to upgrade in the future, my question is do your settings make a major difference from base in game max settings? Is it worth to go through with the effort for all this compared to just using base settings in your opinion?
Anal Pounder with Cheese  [Autor] 19. Nov. 2024 um 10:54 
If you have anymore id be happy to check those as well.
Anal Pounder with Cheese  [Autor] 19. Nov. 2024 um 10:52 
r.Shadow.MaxCSMResolution
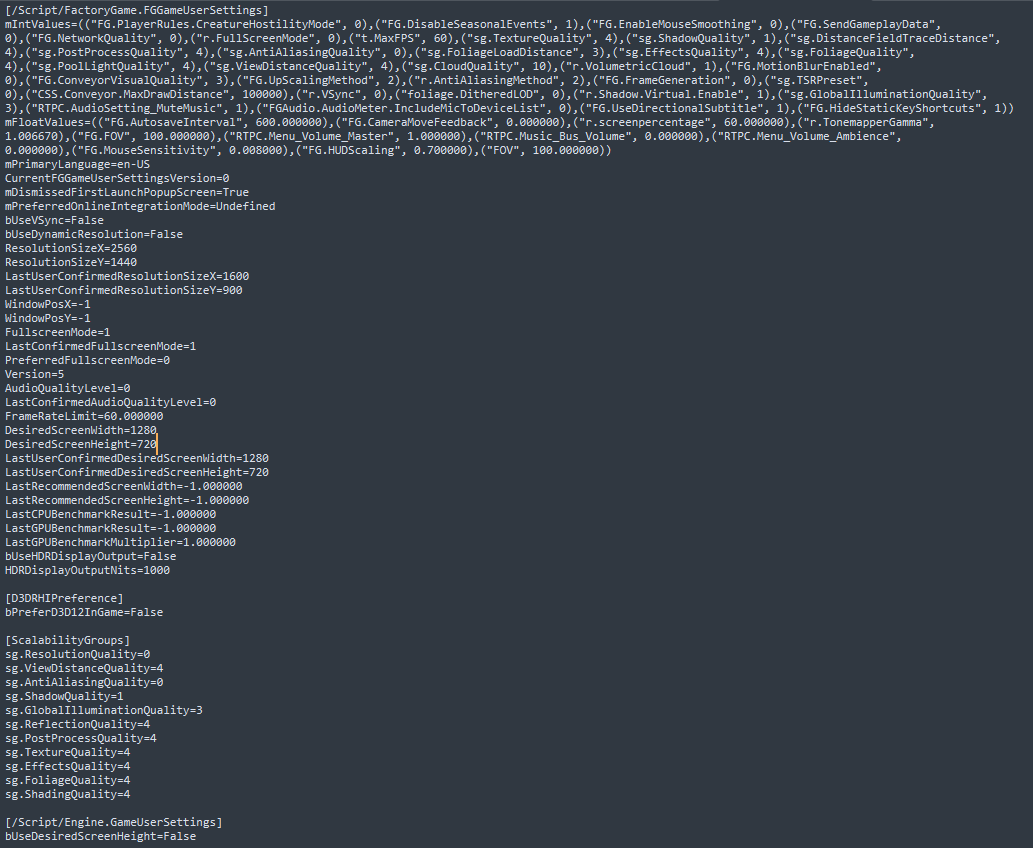
this sets for all Cascaded Shadow Maps

r.Shadow.MaxResolution=4096

This one applies to all other shadow sources.

this is why you dont see a difference, im just covering all the basis with that command in case someone applies the following after the fact:

r.Shadow.Virtual.Enable 1
pool.light.shadowquality 4

the r.Shadow.MaxResolution should cover those 2 settings while MaxCSMResolution does not.
CMDR Shepard Shadow 19. Nov. 2024 um 8:27 
for example, i tested r.Shadow.MaxResolution on update 8 and see zero difference. Only r.Shadow.MaxCSMResolution increases the shadow map