Jagged Alliance 3

Jagged Alliance 3

88 avaliações
Yosharian's JA3 Builds
Por Yosharian
Useful information on the game and builds for mercenaries.
5
2
2
   
Premiar
+ favoritos
Nos favoritos
- favoritos
Introduction


Welcome to my Jagged Alliance 3 Steam page. On this page you'll find useful information on how to make character builds for the game. I made this page mainly for my own amusement, and for me to refer to. I shared it to be helpful to others. If you have any questions, please post them in the comments section.

Update (August 2024): updated Buns' build to remove broken perk. Will be adding a new set of builds soon.
♠ Operation Mongoose: Overview ♠
Stealth is utilised heavily, trivialising many levels right off the bat as you can just move around the entire map picking off squads of enemies one by one. Snipers are also heavily used, forming 50% of the entire team - this weapon type is a little too strong in JA3 honestly, allowing you to dominate firefights from relative safety. Finally it's worth mentioning that Barry is pretty much a one-man army, with his explosive capabilities often destroying entire enemy squads without the help of anyone else on his team.

Note: these builds are not meant to be used with Audaki's Training Overhaul or Rato's Gameplay Balance mods, but you could if you wanted to.

Squad Roles
  • IMP: Stealth Sniper
  • Blood: Melee Striker
  • Barry: Heavy Grenadier
  • Meltdown: Overwatch Specialist
  • Ice: Combat Sniper
  • Buns: Support Sniper

Order Of Merc Acquisition
I recommend picking up Barry and Buns first, for the maximum amount of days in order to get the best daily rate. Then hire Livewire for the minimum number of days possible. You should be able to afford this and have $1121 remaining (as long as nobody haggles you... grrr!). Barry provides insane combat benefits, destroying entire groups of enemies with his grenades which is very useful for clearing Ernie Island. He also allows you to easily clear minefields. Buns offers excellent marksmanship at a very affordable price, so she should be your second pick. She also has some healing skill which you will need eventually. Livewire is the only starting merc that can find the hidden terminal in the complex at the top of the hill, and this terminal can yield $1500 as a reward, plus she has a set of lockpicks which our IMP will 'borrow'. Try not to let her get hurt, so that you can reclaim her medical costs.

After that you should probably pick up Blood, then Ice (bear in mind you need at least $10k to hire Blood). Together they should give you enough power to finish Ernie Island completely. You should hire Meltdown before you liberate Fleatown, or at least before you ask Lalee about the meaning of life.

Bear in mind that some mercs sometimes refuse to join your squad no matter what - this is determined at the start of the game and it doesn't change, unless they have a mitigation factor that you can fulfill. For example, there is a 20% chance when you start a new game that Fox will be unavailable for the entire game - whenever you contact her, she will say something about being busy, and she'll only accept being hired if you have Wolf on your team. So when you start a new game, check that Meltdown will actually talk to you, otherwise you'll need to wait until you have $50k before being able to hire her (not a huge deal but pretty annoying). Also check that none of the mercs you want are offline.

Some Alternative Options
If you prefer not to get Mechanical on your IMP, you could explore some different options for your starting mercs. For example, swapping out Blood and Ice for Dr Q and Vicki gives you roughly similar strengths in terms of having a melee merc and a good ranged merc, but gives you very high skills in MEC and MED. These two mercs are much, much more expensive than Blood and Ice, so obviously you have to be a lot tighter with your budgeting. They also have some locked perks that don't quite fit the builds I've designed, so you would have to tweak them a bit, but they are very strong mercs so you should be fine.

Mid-to-Lategame Options
I personally prefer to keep my starting mercs and invest in training them. In addition, I like the high degree of control you get with recruits/veterans over what perks they have. If you care less about this, or would like to explore some different mercenaries for other reasons, then there are a few powerful mercs you could look at hiring when you have more cash. There are many options to choose from, take a look at my merc tier list if you want some ideas.

A Note On Mobility
I've chosen Flanker, rather than Fast Runner, on a lot of my mercs because I like to have them armored up a bit more heading into the midgame (and you can't benefit from Fast Runner if you equip medium/heavy armor). If you prefer to run a more risk/reward strategy, you can opt to take Fast Runner instead. It's entirely your choice. I know a lot of people in the Discord favour light armor exclusively.

Ammo Utilisation Reference
  • 7.62x39mm (Warsaw Pact) used by: IMP/Meltdown (AK-74), Ice/Buns (Dragunov)
  • 7.62x51mm (NATO) used by: IMP/Ice/Buns (PSG1), Meltdown (HK21)
  • 5.56x45mm used by: Barry (G36)
1A: "GHOST" (I.M.P.) [Stealth Sniper]
A stealthy sniper who can roam the map and take out unsuspecting enemies who are separated from their comrades, while also being a devastating combat sniper. Initially Stealth Kills are a bit challenging, but once your Marksmanship has improved a bit and you have a good sniper rifle, you'll be able to dispatch enemies from range, extreme range even once you have the right perks. In combat, you'll have tons of free movement in order to reposition, and re-engage stealth.

You have two different weapons which have different benefits - the PSG1 offers significantly higher damage and a night-vision scope; it's better versus harder targets where you aren't sure if you will succeed on the Stealth Kill, so you'd better do enough damage to kill them outright. The AK-74 does less damage so you should use it versus weaker enemies who are guaranteed to get Stealth Killed, that way you'll have extra AP remaining to reposition, or even take another shot. It also has a 40mm grenade launcher for those extra-special moments.

This build is definitely designed to exploit the 'bootcamp' meta, that is to say you want to spend a good bit of time training your mercs up so that they have powerful stats. If you dislike (some might use the word 'hate') doing this, then you might want to alter some of it.

Attribute Distribution


Health:
  • 30. Health isn't that important initially for this build because you're not meant to be getting hit that much. It's still important to survive hits, but it can be trained up later by other mercs.
Agility:
  • 65. Agility is really important for AP and is somewhat slow to develop by itself. However, 85 Mechnical skill is needed for this team composition, so Agility has to come down to 65. You want this maxed on your IMP as soon as possible so that you can train your other less agile mercs quickly, so when you can spare some time, get Blood to train you up.
Dexterity:
  • 85. Pretty important for both melee Stealth Kills and ranged attacks generally.
Strength:
  • 30. It's really useful to have this maxed because having a small inventory is really annoying, but other attributes have to be prioritised over this - train it later on.
Leadership:
  • 85. One of the most important attributes in the game. Heavily modifies travel speed on the map, and controls lots of other things too such as training militia, and how effective your squad is. It also heavily affects how quickly you teach other mercs.
Wisdom:
  • 85. Wisdom is a god stat in JA3 because it controls how quickly you develop your own skills. This attribute cannot be trained, although you can level it up by being the person who discovers wild herbs, and possibly other hidden items.
Marksmanship:
  • 85. Obviously needed in order to hit things with ranged weapons.
Mechanical:
  • 85. This skill is not the best one to have on your IMP mercenary as it is just for skill checks and doesn't offer any combat perks. However, it's quite hard to get a competent MEC mercenary early on unless you hire Livewire (who I've grown to dislike, mainly because her unique talent is way too powerful, but also because... her voice lines get annoying after hearing them for 20+ hours). So unfortunately we have to invest in this skill. The upside of this is getting to pick by far the best starter team of mercenaries in the game. Don't be tempted to lower this to 65 in favour of maxing your agility - you need this skill maxed. One other thing to note is that having this on your IMP makes it really easy to teach it to free mercs like Larry, who can then go off and hold important sectors by themselves independently because they can repair their own gear after fighting off patrols.
Explosives:
  • 0. Barry will have this skill covered, but this skill is useful on several mercs in the team. This is because there are a ton of different and very useful Explosives items, and one character cannot use them all. These include flashbangs, smoke grenades, flares, and so on, not to mention the many, many different types of explosive items. Once you have some diamond mines and a bit of breathing space, set aside some time to train Blood, Meltdown and your IMP mercenary with this skill. Later on you can wield an AK-74 with an underslung 40mm launcher and 60+ EXP allows you to use this with 0% mishap chance. For reference, a merc with 65 EXP skill has about a 5% mishap chance with a stick grenade.
Medical:
  • 0. This skill will be covered by teammates. Not very competently, but you don't really need a high score in this skill for most situations. The only time you really need high MED is for specific skill checks such as identifying Larry's medical problem. For this purpose you can hire MD for a week or so - he's useful to have around anyway to train militia groups.
Personal Perks & Tactical Perks
Perk
Notes
Scoundrel
First weapon swap per turn is free. Unlocks dialogue options.

This perk is nice to have for conversation/quest options, but the value doesn't end there - being able to switch weapons for free every turn is absolutely amazing for this build.
Stealthy
Harder to spot while sneaking, slightly better chance for stealth kills.

This perk has a tremendous effect on your ability to remain undetected, to the point where it's almost not worth bothering with unless you have it. It also grants +10% chance to Stealth Kill.
Teaching
Increases the amount of experience gained in mercenary training operations, grant 10% extra XP to the squad (doesn't stack).

The ultimate tactical perk to have on your IMP merc. Allows you to effectively teach all your very high attributes/skills to your team - works better if they have high Wisdom. The effect this has on teaching experience gained is quite good.

Recommended Equipment
Primary Weapon Slot:
  • PSG1 Rifle: Heavy Stock, Thermal Scope, EE Mag, Bipod, UV Dot, Suppressor (2 chips, 1 pipe)
    • Location: You can get one PSG1 as a quest reward from the Landsbach questline (give the diesel to Bounce, not Siegfried), and another in the Fort of the Colonel, the last one will be random loot.
Secondary Weapon Slot:
  • AK-74: Suppressor, Grenade Launcher, QP Scope, Tac Device (1 chip, 2 steel pipes, 1 lens)
    • Location: D17 (high loyalty needed), B17, or B10 (prepare for a tough fight).
Armor Slots:
  • Light Camo Armor
  • Night Vision Goggles
  • Flak Leggings
1B: "GHOST" (I.M.P.) [Stealth Sniper]
Main Perks

Perk
Notes
Fast Runner
Free Move range increased when unarmoured or lightly armoured.

Fast Runner can be a dangerous feat to take as you head into the lategame, but with this character's Stealth capabilities you should be able to create distance between you and the enemy easily and then engage Stealth to hide from them.
Frogleaping
Increased Free Move range when starting a turn behind cover.

Frogleaping is an extremely powerful perk, especially when combined with Fast Runner. You will get a ridiculous amount of Free Move and be able to reposition easily.
Lightning Reactions
Dodge first enemy attack by dropping Prone. Once per combat.

This perk is gonna save your ass if/when enemies get the drop on you. If you're feeling frisky you could go for Vantage Point instead, but it only adds like 10% extra aim and is kind of situational.
Total Concentration
Attacks deal 30% more damage after a kill until you miss.

Your initial Stealth Kill will guarantee this is activated every fight, and... well, you're not gonna miss a shot, are you?
Untraceable
Slower enemy detection while sneaking, & +20% damage on failed Stealth Kills.

This is actually a very powerful perk. To explain, it is necessary to understand that some powerful enemies in the game have immunity to Stealth Kills. They can still be affected by a stealth attack, however - they instead sustain what is called a Stealth Crit. This is effectively a Stealth Kill attack against such an enemy, that automatically fails but can instead critically strike them. Untraceable boosts this damage, and it can be quite significant. It's also nice quality-of-life when sneaking around.
Deadeye
Gain 5% crit chance per Aim level (AP spent to increase accuracy).

This is a straightforward boost to your damage. Simple and effective.
Ambusher
An extra 10% chance for Stealth Kills while sneaking & enemies surviving Stealth Kills are suppressed.

Every little bit of Stealth Kill chance helps, especially when you go into the later stages of the game and enemies become much harder to kill this way. The suppression is nice when you fail.
Sharpshooter
Allows 2 extra Aims on your first attack each turn. 27% extra damage on first attack each turn.

A very simple but effective perk. Makes your first attack devastating, which obviously on a sniper build is extremely good. Note that this perk does not work out of combat so you cannot use it for your initial stealth strike.
Assassination
Adds 15% to your chance to Stealth Kill/Stealth Crit.

This is very important to keep your SK/SC chance high versus stronger enemies. See the Tips & Tricks section for more details on how Stealth Kills work.
2: "SLAYER" (Blood) [Melee Striker]
Blood makes an insanely powerful infiltrator/striker mercenary using the Slayer build. His Throwing talent allows him to use Flying Daggers for 1AP each turn (3AP if used a 2nd time during the same turn), which gives him excellent movement while marking enemy targets for destruction by Buns or Ice. He can also throw a grenade for halved AP instead which again gives him a ton of free movement (once he gets some Explosives training, thanks Barry!). When he gets into melee he will absolutely wreck fools with The Thing. He can also run behind targets to open them up for flanking shots, boosting his allies' damage just by standing there (watch out for friendly fire though!). Note: you can choose either of the two gold perks marked in pink, since they basically do the same thing.


Recommended Equipment
Primary Weapon Slot:
  • The Thing
    • Location: Follow a questline beginning in Fleatown, regarding 'Luigi'.
Secondary Weapon Slot:
  • Endless Knives (fixed equipment)
  • Any explosives or tactical grenades that you like
Armor Slots:
  • Light Camo Armor
  • Night Vision Goggles
  • Flak Leggings
3: "SAPPER" (Barry) [Heavy Grenadier]
Barry is extremely tough with the Deathsquad Armor set but still has enough mobility to get into good positions to drop explosives onto the enemy, and then retreat to safety. Total Concentration increases explosive damage, and can trigger from Explosive kills. He can do decent ranged damage from cover and if the target doesn't die, it'll be marked for the team snipers to finish off. Just be careful not to miss completely because you'll lose your TC buff.


Recommended Equipment
Primary Weapon Slot:
  • G36: Heavy Stock, Grenade Launcher, Thermal Scope, Expanded Mag, Extended Barrel, Red Dot (2 chips, 2 pipes)
    • Location: The G36 can be a little hard to find so you can also use an AR-15 with the same upgrades. It's basically the same but with less range & damage, and more crit chance.
Secondary Weapon Slot:
  • Shaped Charges & any other explosives or tactical grenades of choice
Armor Slots:
  • Deathsquad Armor
  • Deathsquad Helmet
  • Deathsquad Leggings
    • Location: Speak to the shaman in the refugee camp and give him some metaviron.
      Later, he'll reward you with this set. Make sure you get this before the refugee camp event.
4: "GUNNER" (Meltdown) [Overwatch]
Meltdown can sit in Overwatch in complete safety because of Hold Position, while she still has AP remaining. She can do this in cover using the AK-74, or lying prone out of cover with the HK21, with Vanguard providing Grit. Either way, she will have fantastic resilience. She can also mark targets with her AK for the team's snipers to take out, or use the 40mm grenade launcher. Note that Reactive Fire doesn't trigger while Meltdown is in overwatch, but it can trigger if the enemy runs out all your overwatch AP, so it's still useful. If, or when, Meltdown sustains wounds, she'll won't lose as much AP as others do, and she'll do more damage - just don't let it get too out of hand.


Recommended Equipment
Primary Weapon Slot:
  • AK-74: Recoil Booster, Grenade Launcher, Reflex Sight, Expanded Mag, Light Stock, Red Dot (2 chips)
    • Location: D17 (high loyalty needed), B17, or B10 (prepare for a tough fight).
Secondary Weapon Slot:
  • HK21: Heavy Stock, Reflex Sight, Expanded Mag, Tactical Grip, Flashlight, Extended Gain-Twist Barrel, Compensator (1 chip, 1 steel pipe)
    • Location: You can get one from a lootbox in Fleatown. It's only a chance - you might also get a different gun, such as an AUG or an AK-SU.
    • You can also keep an RPG on hand in her inventory for those special situations.
    • You can use UV Dot on this gun now because Haemimont patched it to work with Overwatch.
Armor Slots:
  • Heavy Armor
  • Heavy Armor Helmet
  • Heavy Armor Leggings
5: "DEADEYE" (Ice) [Sniper]
Ice and the I.M.P. mercenary work as a tag team to initiate battles. IMP fires first, and if his Stealth Kill attempt is successful then the enemy will be surprised. Ice can then take out another enemy from stealth, and regardless of whether it succeeds technically as a Stealth Kill, he will do enough damage to take out the second enemy for sure thanks to Untraceable. This strategy ensures every fight starts with at least 2 enemies down, and if you find two enemies who are separated from the rest of their comrades, then you can easily take them both down without alerting the rest of the map. Ice's Ice Storm ability is kind of insane and allows him to take out an enemy easily for very little AP cost. Overall a great merc and not too expensive at all.


Recommended Equipment
Primary Weapon Slot:
  • Dragunov: Heavy Stock, Thermal Scope, Expanded Mag, Bipod, Suppressor (1 chip, 1 pipe)
    • Location: You can buy a Dragunovs with Thermal Scopes attached at C5.
Secondary Weapon Slot:
  • PSG1 Rifle: Heavy Stock, QP Scope, EE Mag, Bipod, UV Dot, Suppressor (1 chip, 1 pipe, 1 lens)
    • You can get one PSG1 as a quest reward from the Landsbach questline (give the diesel to Bounce, not Siegfried), and another in the Fort of the Colonel, the last one will be random loot.
Armor Slots:
  • Medium Camo Armor
  • Kevlar Helmet
  • Kevlar Leggings
6: "EXEMPLAR" (Buns) [Sniper]
Buns can perform heavy damage shots regularly in order to trigger Inspiring Strike and keep the squad's morale up no matter what happens. When Blood is in CQC and moves behind a target, that will open them up to a flanking damage bonus, and Buns can then destroy them without Blood even having to lift a finger - it's a 35% damage boost just having him stand there. Lightning Reactions and medium armor should keep her safe from enemy fire while giving her some mobility via Frogleaping.


Recommended Equipment
Primary Weapon Slot:
  • Dragunov: Heavy Stock, Thermal Scope, Expanded Mag, Bipod, Suppressor (1 chip, 1 pipe)
    • Location: You can buy a Dragunovs with Thermal Scopes attached at C5.
Secondary Weapon Slot:
  • PSG1 Rifle: Heavy Stock, QP Scope, EE Mag, Bipod, UV Dot, Suppressor (1 chip, 1 pipe, 1 lens)
    • You can get one PSG1 as a quest reward from the Landsbach questline (give the diesel to Bounce, not Siegfried), and another in the Fort of the Colonel, the last one will be random loot.
Armor Slots:
  • Kevlar Armor
  • Kevlar Helmet
  • Kevlar Leggings
Free Merc #1: Larry Roachburn
Spoilers for recruiting Larry:
You can recruit Larry by clearing the camp at F7, identifying his illness by passing the Medical check (MD is useful for this), and then giving him some metaviron. You can use MD to pass the check, and you can get metaviron from a variety of places but the easiest is probably from Lalee in Fleatown, in one of his lootboxes. Later you can take Larry to the hospital at H12 and get his illness healed, which improves his stats - note that you do not need to complete the quest at this location first. Larry is a pretty funny character and well worth bringing along for missions.

Here's a recommended build for him:
Free Merc #2: Jacques "Flay" Bohen
Spoilers for recruiting Flay:
You can recruit Flay by heading to C5 and killing all the Legion soldiers there, then speaking to the leader of the poachers, who'll tell you about a guy who's been bothering them. Then visit C6 & B4, interacting with the corpses there. Flay will then appear, and you'll need to pass a Wisdom check of 90, then ask him if he wants to hunt with you.

Here's a recommended build for him:
Free Merc #3: Alejandro "Smiley" Diaz
Spoilers for recruiting Smiley, the most popular merc in JA3:
You'll need to gather various clues about Smiley's location by visiting the brothel at Pantagruel Slums (D7) and the bathhouse nearby, speaking to NPCs in Fleatown (H9) and Fleatown La Boue (H8). You'll also need to go to see Blaubert at Rimville (I9) and you might want to complete the Luigi quest first, apparently if you complete this quest some of Blaubert's guards might die which will be very helpful. Anyway, you'll need to go get Smiley from H8 by talking to the priest, then there will be a fight right there at the church. Then go to Blaubert and assist Smiley in the confrontation. This is a very tough fight, but I figured out a pretty good strategy to win it, I created an image to summarise the strategy here: <click>[ibb.co].

Here's a recommended build for him:
♣ Operation Rolling Thunder: Overview ♣
This team is designed to be played all of my recommended mods installed. The goal of these mods when combined is to produce an extremely challenging playthrough that will test your tactical and strategic abilities. It achieves this by using Rato's Weapon and Balance Overhaul to alter the way most weapons work in order to make them more realistic and less overpowered, especially sniper rifles. The Tactical AI mod will change the way enemies behave so that they are much more difficult to defeat. Finally, Audaki's Training Overhaul dramatically reduces the power of training operations so that you can't just make super soldiers easily.

I'll be using a few personal rules for this playthrough. I won't re-use any of the mercs from the previous team, to keep it fresh and also make it more difficult. I'll use LionCat's editor to tweak personal/tactical perks and starting perks/stats (as long as they still fit the personality of the merc), that's just to make it a bit more fun for me - I wouldn't do that in a vanilla playthrough because it would be too easy, but with all these mods, that isn't an issue.

Squad Roles (*: modified from vanilla)
  • Grizzly: Point Man (MG/AR, Explosives/Heavy Weapons)
    • Personal/Tactical: Heavy Weapons, Throwing*, Auto Weapons*
    • HLT: Hit The Deck
    • AGI: Flanker, Frogleaping, Lightning Reactions, Total Concentration
    • STR: Recoil Management, Breach and Clear*, Ironclad, Collateral Damage
  • Nails: Grenadier (Melee, Grenades)
    • Personal/Tactical: Psycho, Throwing*, Mr Fixit*
    • HLT: Full Body Contact
    • AGI: Hit and Run, Fast Runner, Frogleaping, Total Concentration
    • STR: Breach & Clear*, Sudden Strike*, Line Breaker, True Strike
  • Raider: Marksman (AR)
    • Personal/Tactical: Negotiator, Teaching, Auto Weapons*
    • AGI: Flanker, Frogleaping, Lightning Reactions, Lucky Streak, Total Concentration, Anatomical Precision
    • STR: Recoil Management*
    • WIS: Distracting Shot*, Inspiring Strike
  • Raven: Overwatch Specialist (AR, MG)
    • Personal/Tactical: Auto Weapons, Night Ops*, Heavy Weapons*
    • HLT: Beefed Up, Hit The Deck, Vanguard, Hold Position
    • DEX: Deadeye, Opportunistic Killer, Fire Routine, Killzone
    • STR: Recoil Management
  • Wolf: Heavy Sniper (HPR, AR/Mortar/MGL/RPG-7)
    • Personal/Tactical: Teaching, Auto Weapons*, Heavy Weapons*
    • HLT: Hit The Deck*, Beefed Up, Vanguard, Calm Under Fire
    • DEX: Opportunistic Killer, Deadeye, Reactive Fire, Sharpshooter
  • Fox: Stealth Sniper (PR/Dual Revolvers)
    • Personal/Tactical: Scoundrel, Stealthy*, Ambidextrous
    • AGI: Flanker, Frogleaping, Lightning Reactions, Total Concentration, Anatomical Precision
    • DEX: Untraceable*, Deadeye, Ambusher, Sharpshooter

Ammo Utilisation Reference
  • 7.62x39mm (Warsaw Pact) used by:
  • 7.62x51mm (NATO) used by:
  • 5.56x45mm used by:

Mod Settings
Nearly all of these are set to default, I've included all the settings here in case one of them gets changed by accident. Remember that the In-Game Merc Editor mod must be disabled during initial merc selection/IMP merc creation.
  • Descriptive Chance To Hit
    • Everything ON except the Wisdom/Marksmanship labels
  • Audaki's UI Enhancements
    • Everything ON
  • Nocturnal Beauty
    • Default (Melancholy Calm, Strong)
  • Tactical AI Project
    • 60%, 60%, 200%, ON, ON, OFF, OFF, OFF
  • Smart Overwatch
    • ST_Wisdom, ON, OFF, OFF
  • Sir Ni's Hat of Tricks
    • OFF, OFF, ON, ON, ON, ON, ON, Default, OFF, ON, Disabled, rest all Default
  • Rato's Gameplay and Balance Overhaul
    • All set to Rato's default; Persistent Recoil Aim Cost %=100, Multiplier Rounding=ON
  • JA3_Commonlib
    • ON
  • C-UAE Cross-Mod Universal Armament Expansion
    • ON, ON, ON, ON, 0, 0, OFF
  • Audaki's Training Overhaul
    • 90 (Easy), 100% (Balanced)

Difficulty Settings
  • Difficulty: Mission Impossible
  • Forgiving Mode: No
  • Active Pause: Yes
  • Dead Is Dead: No
  • To The Bitter End: Yes
  • Lethal Weapons: No
    • These game rules provide a nice blend of tension in combat, especially some late-game combats which are extremely long and punishing where death means restarting from the beginning, without turning the game into Ironman which I personally am not a fan of.
  • Body Count: Yes
  • A.I.M. Always Online: Yes
  • Heavy Wounds: Yes
  • All other advanced rules: No
    • I personally find the game economically challenging enough early on, and I don't much care to have tension in that element of the game for the entire playthrough, so I keep Union Rules off - if you prefer the opposite, I recommend turning it on. Body Count is a nice way to increase the difficulty of the game.

How To Survive The Early Game (WIP!)
The first few hours of this playthrough are going to be rough. Right from the start of the game, enemies are trained and deadly; they shoot with excellent accuracy, avoid overwatch cones, throw grenades at you and generally use advanced tactics. If all you've ever played is vanilla Mission Impossible, you're in for a rough ride. Here I'll document some of the strategies I've used to overcome those initial hours.

First of all, you will need to hire as many cheap mercs as possible to liberate Ernie Island. Don't even think about trying to save money. The objective here is to be able to pass the missions, not to succeed in style. I started with Grizzly, Fox, Igor, Livewire and Barry. Ensure Livewire doesn't get hurt so that you can reclaim her medical costs. You don't need to hire her until you've completed the first map and gotten the extra cash from Emma LaFontaine.

  • Fox: $6320 (14d)
  • Grizzly: $5040 (14d)
  • Barry: $4940 (14d)
  • Igor: $5630 (14d) [Sometimes haggles]
  • Livewire: $2750 (3d) [Medical: $1100]
  • Total: $24680
1: "GLADIATOR" (Grizzly) [Point Man]
Built to cause mayhem and destruction a variety of different ways. Can use grenades, RPGs, machine guns, underslung grenade launchers, or just plain assault rifle burst fire to massacre the enemy. Little need for DEX because typically you don't spend much AP aiming. This build is used instead of the free IMP merc, so I use that point to justify tweaking Grizzly quite a bit to make him more fun to use (yay rationalizing). First of all I get rid of his trash unique perk and replace it with Fauda's, which allows him to free move while wearing cumbersome gear & weapons, and gives him Grit generation. Then I take those useless 32 points in MEC and MED and redistribute them to AGI (80), WIS (80) and EXP (50). A little bit overpowered? Maybe, I don't care!


Personal Perks & Tactical Perks
Perk
Notes
Throwing
Higher throwing range, dramatically reduced AP cost (-3) for grenades once per turn.

This improves grenade throws a lot, but the reduced AP cost is the best aspect, reducing smoke grenades and flashbangs to 1AP, which then gives you another free move. Standard grenades are reduced from 6AP to 3AP.
Auto Weapons
Reduces the accuracy penalty when using burst and autofire modes.

This perk is even more important when you're playing with Rato's balance mod.
Heavy Weapons
Reduces AP cost of firing and setting up Heavy Weapons & Machine Guns.

Very flexible tactical perk, reducing AP cost for firing certain weapons but also helping to set up as well. Plays very well with this build's core focus which is mass destruction.

Recommended Equipment
Primary Weapon Slot:
  • Machine Guns, Assault Rifles
Secondary Weapon Slot:
  • Frag Grenades
  • Flashbangs/Smoke Grenades
  • RPG-7
Armor Slots:
  • Heavy Armor
  • Heavy Armor Helmet
  • Heavy Armor Leggings
2: "ROUGHNECK" (Nails) [Grenadier]
Fast access to True Strike, which massively boosts melee damage. Build up mobility with perks like Hit and Run. Nailed It and Total Concentration both improve melee/explosive damage and trigger from melee/explosive kills. Extremely squishy, be careful around large numbers of enemies. Use smoke grenades or flashbangs for 1AP to keep moving. Needs AGI training as soon as possible.


Personal Perks & Tactical Perks
Perk
Notes
Psycho
Bonus AP (+1) when wounded, very small chance to use burst fire when selecting single shot. Unlocks dialogue options.

This perk is nice to have for conversation/quest options, but the other bonuses are very minor. Note that the AP bonus when wounded does not eliminate the morale penalty, it merely negates it.
Throwing
Higher throwing range, dramatically reduced AP cost (-3) for grenades once per turn.

This improves grenade throws a lot, but the reduced AP cost is the best aspect, reducing smoke grenades and flashbangs to 1AP, which then gives you another free move. Standard grenades are reduced from 6AP to 3AP.
Mr Fixit
Grants a bonus of +15 to disarming traps, hacking devices, and lockpicking.

Nails' MEC and EXP skills are a little low initially, so this is pretty much mandatory to allow him to fulfil those roles effectively.

Recommended Equipment
Primary Weapon Slot:
  • The Thing
    • Location: Follow a questline beginning in Fleatown, regarding 'Luigi'.
Secondary Weapon Slot:
  • Frag Grenades
  • Flashbangs/Smoke Grenades
Armor Slots:
  • Leather Vest (locked equipment)
  • Night Vision Goggles
  • Flak Leggings
3: "OPERATIVE" (Raider) [Marksman]
Utilises Raven's overwatch marking ability to get easy critical hits with burst fire attacks which then trigger Inspiring Strike. Boosts overland travel massively with high LDR. Is very tanky but retains decent mobility, thanks to the Deathsquad Armor. Note: will need a bit of a WIS boost in order to get the 2nd Wisdom perk, either make sure he discovers lots of herbs and hidden stuff, or just give him a few points in the editor (take them from the useless points allocated in MED/MEC/EXP). Needs AGI training as soon as possible.


Personal Perks & Tactical Perks
Perk
Notes
Negotiator
Cheaper sector operations and boat travel. Unlocks dialogue options.

This perk is nice to have for conversation/quest options, and the decreased cost makes Raider a good choice for training militia, when time isn't a factor (otherwise Wolf is a better choice).
Teaching
Increases the amount of experience gained in mercenary training operations, grant 10% extra XP to the squad (doesn't stack).

The effect this has on teaching experience gained is quite good.
Auto Weapons
Reduces the accuracy penalty when using burst and autofire modes.

This perk is even more important when you're playing with Rato's balance mod.

Recommended Equipment
Primary Weapon Slot:
  • Assault Rifle
Secondary Weapon Slot:
  • Assault Rifle
Armor Slots:
  • Deathsquad Armor
  • Deathsquad Helmet
  • Deathsquad Leggings
    • Location: Speak to the shaman in the refugee camp and give him some metaviron.
      Later, he'll reward you with this set. Make sure you get this before the refugee camp event.
4: "SENTINEL" (Raven) [Overwatch]
Overwatch specialist that marks targets for others in the squad to get free crits and bonus accuracy. Killzone puts out a huge amount of damage. Very tanky thanks to armor and perks. Lacks STR so that's a priority for training.


Personal Perks & Tactical Perks
Perk
Notes
Night Ops
Halves accuracy penalties during night operations or underground areas.

Useful perk that allows Raven to remain effective in dark conditions without having NV goggles or a Thermal Scope.
Auto Weapons
Reduces the accuracy penalty when using burst and autofire modes.

Reduces the effect of recoil from burst attacks and repeated attacks on the same target.
Heavy Weapons
Reduces AP cost of firing and setting up Heavy Weapons & Machine Guns.

Very important perk for using Machine Guns effectively.

Recommended Equipment
Primary Weapon Slot:
  • Machine Gun
Secondary Weapon Slot:
  • Assault Rifle
Armor Slots:
Armor Slots:
  • Heavy Armor
  • Heavy Armor Helmet
  • Heavy Armor Leggings
5: "SPARTAN" (Wolf) [Heavy Sniper]
Intended to wear heavy armor and carry cumbersome rifles such as the M82. Operates as a standard Sharpshooter sniper, landing critical hits at long range from behind cover. Can also operate out of cover in the prone position relatively safely thanks to great Grit generation and armor. Reactive Fire potentially creates a lot of damage output, and works much better than in vanilla thanks to Smart Overwatch. Has the option of using heavy weapons such as the MGL, RPG-7 or Mortar.


Personal Perks & Tactical Perks
Perk
Notes
Teaching
Increases the amount of experience gained in mercenary training operations, grant 10% extra XP to the squad (doesn't stack).

Allows Wolf to more effectively teach his attributes/skills to the team. The effect this has on teaching experience gained is quite good.
Auto Weapons
Reduces the accuracy penalty when using burst and autofire modes.

Useful for wielding an assault rifle, which this build will want to do from time to time. It also reduces the effect of recoil, which comes into play when Reactive Fire triggers.
Heavy Weapons
Reduces AP cost of firing and setting up Heavy Weapons & Machine Guns.

This perk is specifically chosen to allow the merc to deploy heavy weapons like the MGL, Mortar or RPG-7 easily. You can use Machine Guns if you want but that's not the focus of the build.

Recommended Equipment
Primary Weapon Slot:
  • Scoped Rifle, especially heavy rifles such as the M82 or PSG1.
Secondary Weapon Slot:
  • Assault Rifle with underslung Grenade Launcher
  • MGL, RPG-7, Mortar
Armor Slots:
  • Heavy Armor
  • Heavy Armor Helmet
  • Heavy Armor Leggings
6: "SIREN" (Fox) [Stealth Sniper]
Functions as the initiator for the squad, able to take out at least one enemy with a precision shot and doesn't care whether the Stealth Kill was successful or not. Can be used for scouting. Able to function in close-quarters combat with dual revolvers if needed. Biggest issue early on is her lack of MRK, will need some training in that department to truly shine. Also needs some STR training to be able to wield the bigger rifles effectively.


Personal Perks & Tactical Perks
Perk
Notes
Scoundrel
First weapon swap per turn is free. Unlocks dialogue options.

This perk is nice to have for conversation/quest options, but the value doesn't end there - being able to switch weapons for free every turn is very useful for this build.
Stealthy
Enemies find it quite a bit harder to spot you when you're sneaking. Increases Stealth Kill chance by about 10%.

This perk is very useful for sneaking around safely, and the increased SK chance, while not crucial for this squad, is still useful.
Ambidextrous
Reduces AP & accuracy penalties when dual-wielding firearms.

Allows Fox to remain effective in close quarters if the enemy gets too close for her to use her scoped rifle. Note that dual-wielding is much more effective with Rato's mod.

Recommended Equipment
Primary Weapon Slot:
  • Scoped Rifle
Secondary Weapon Slot:
  • Dual Revolvers
Armor Slots:
  • Kevlar Armor
  • Kevlar Helmet
  • Kevlar Leggings
EXTRA: Merc Tier List
I sourced most of this tier list from Trolleur_Durden's list on the Steam discussion forums, so feel free to check out his list first if you like. There's lots of good info in that thread about various mercs, and it helped inform my judgements on some mercs that I haven't used much. That said, I found some specific mercs to be inaccurately placed so I made some adjustments of my own.

S-Tier
  • Livewire
    • Livewire's unique perk is incredibly powerful, and she has very high WIS which means she can quickly develop extremely high levels in MRK and other attributes. She is also is dirt-cheap for what she brings to the table. Knowing where every enemy is just fundamentally changes the way you play the game.
  • Raven
    • Raven's ability to mark large groups of enemies is incredibly powerful and makes her pretty much the best overwatch merc in the game. She is a little pricey, but worth the cost for the free crits she hands out to the rest of your squad.
  • Fox
    • Fox's unique perk is extremely powerful, fundamentally changing the way your squad will open fights and giving them a huge advantage. She's also a decent Doctor, and very cheaply-bought. Ahem.
  • Thor
    • Thor's unique perk creates consumables that any mercenary can use at any time to restore their energy levels and gain grit. This is a very powerful at-will buff that carries very little risk. In fact, you don't even need to have Thor in your current squad in order to use his perk.
  • Barry
    • Barry just represents insanely high value for money, being another high WIS merc with very decent attributes and a very powerful unique perk that produces grenades which not only are free, but do more damage than standard grenades and have a more optimal blast shape.
  • Ivan
    • Quite simply the most broken merc in the game. The ability to generate AP on-kill, when combined with the right perks and equipment, has the potential to completely trivialise nearly every encounter in the game. Almost needs a separate tier above S, just for him. Is very expensive which is the only thing keeping him remotely balanced.
  • Ice
    • Ice earns his spot simply due to being dirt-cheap for the high attributes he has and his very decent unique perk. He also 'likes' Blood, which makes him even better because of how powerful Blood is. He simply makes the game very easy from start to finish.
  • Blood
    • Inexpensive, insane mobility from his unique perk, uses the most broken weapon type in the game, perfect starting perks, and most importantly, he's just very cool. This guy trivialises most fights, and unlike Ivan, you can get him right from the start of the game. Simply one of the best mercs in the game.
A-Tier
  • Wolf
    • Excellent unique perk, and good attributes. He has to go down a rank purely because he's missing a good LDR score, so you have to fix that in order to realise his full potential. Also, his WIS is lacking, and he's a little pricey.
  • Vicki
    • A great merc, but she has at least one wasted perk, she's very expensive, doesn't 'like' any other mercs, and is Claustrophobic. If you desperately need a mechanic, you can do a lot worse, providing that you have a fat wallet. One trick with her is to switch out the whole squad's weapons and armor while travelling, in order to save money by getting free repairs; if you're willing to do this, then she's probably closer to S-tier because of how much money you'll save.
  • Dr. Q
    • His unique perk is not the best fit for a melee playstyle since he can't use The Thing, and he has a useless WIS perk allocated. Still, melee is always strong, and he's a great Doctor.
  • Buns
    • Buns, similar to Ice, brings very powerful marksman abilities for an extremely cheap salary, and has the rare Negotiator perk along with capable Doctoring. What puts her lower than Ice is the fact that her unique perk is a little underwhelming, and she hates Fox who is a very good merc, so she doesn't fit into some meta team comps.
  • Igor
    • Igor is mostly great because he's a melee archetype. His unique perk is a little weird since Full Body Contact is a standard pickup for melee builds, and they don't typically need extra damage once they have access to True Strike. He's friendly with Ivan which is a big benefit since Ivan is so strong, and his stealth abilities are useful.
  • Meltdown
    • The second best overwatch merc, a very solid pick for that role and also the heavy weapons role. Since machine guns are so good in this game, this raises her up somewhat despite her average unique perk.
  • Len
  • Sidney
  • Shadow
  • Nails
B-Tier
  • Raider
    • Raider is a great merc to fill that Leadership hole you might have, but the issue is that typically IMP builds tend to fill that role. His stats are also a little low for how expensive he is. If you're not running a LDR IMP build, then he's much more valuable, probably high A-tier.
  • MD
    • Superb WIS and a great Doctor, but his unique perk is a little lacking. He has the potential to become a great merc with a little training, and he's dirt-cheap. He can also teach MED to other mercs effectively. The issue is that you really don't need a very high MED skill most of the time, aside from a few key moments during certain quests. He's also competing with Buns, who is a much better shot and isn't too expensive.
  • Reaper
    • Reaper's unique perk is pretty decent, but there are many ways to generate crits quite easily in this game, and the panic effect that results has quite a small radius. He's also very expensive.
  • Grizzly
    • Very underwhelming unique perk, but he earns this spot simply by virtue of being dirt-cheap, and pretty good at using machine guns, which are a powerful weapon type. If you can get him on a team with Wolf, and spend some time boosting his weaker stats, he can be decent.
  • Red
    • A great explosives expert, but pretty expensive, and Pessimist is annoying.
  • Scope
  • Scully
    • A very powerful merc with good starting perks, but he is just way too expensive to get a higher tier. When you're drowning in cash, he's a good option - one of the best, in fact.
  • Mouse
  • Hitman
    • Has some use as a temporary merc to train up your main mercenaries' MRK attributes. Other than that, is really underwhelming with his terrible DEX. His unique perk is quite good.
C-Tier
  • Gus
    • Insanely expensive, hard to obtain, terrible perk allocation. Overall a very overrated merc.
  • Magic
    • His unique perk is incredibly overrated, and his perk allocation isn't the best. Too expensive.
  • Kalyna
    • Pretty terrible stats, although her unique perk has some uses. Can get surprisingly expensive.
  • Fauda
    • Too expensive. Goofy perk allocation.
  • Fidel
    • This guy is such a pain to deal with.
  • Steroid
    • A walking meme, and not a good one. It doesn't help that his abilities are pretty terrible.
  • Omryn
    • Has an interesting unique perk, but ultimately is just too underwhelming.
  • Grunty
    • This guy's unique perk is almost always either useless or a detriment to the team. His dialogue is also really annoying. He is very cheap though. He could rise a tier or two if you intend on not using Stealth Kills, but there are much better mercs.
  • Tex
    • His unique perk has some potential, but his terrible attributes and high cost bring him down significantly.
EXTRA: Tips, Tricks & Useful Info
Biff Rescue & Refugee Camp Event Triggers
Courtesy of Dreepa. Link.
This guide explains what triggers two key story events that can occur quite a ways into the game, or quite early, depending on what actions you take. It can certainly feel like the story is progressing very fast, not giving you the breathing space to do the content you want to do (although it actually doesn't affect the game world until you do the camp event, and you have all the time you want to go and visit the camp once you get the invite - however if you haven't gone to the camp yet and done the quests there, e.g. the Deathsquad Armor, you might lose those forever). So it's useful to know the triggers. I have summarised the important part here in as spoiler-free of a manner as I can:
Corazon will invite you to visit the Refugee Camp if any of these is true:
1) You have captured 12+ cities.
2) You have captured four diamond mines. Depleted mines count towards this total.
3) You currently have possession of 70+ sectors.

Relationships Guide
Courtesy of JVA's guide here. Please give him an upvote.

Salvage Guide - When To Keep Or Sell Items
Courtesy of chr_isso on YouTube, please give him some love on his channel, he produces excellent videos and has helped me a lot understanding the game.


Stealth Kill Mechanics Guide
Fantastic guide explaining the mechanics of Stealth Kills, in particular how the Wisdom of enemies plays a huge role in how effective they are. They have also made a mod to show the Stealth Kill chance.

Natural Stat Gain Mechanics
Mercenary statistics can naturally increase based on actions taken either in combat or on the map. Each statistic increases after a number of times that this action is taken; e.g. it may take several times discovering herbs before you see an increase to your WIS stat. Some of the actions have a limit to how many times they can trigger per map. This info is courtesy of Audaki.

HLT
  • 80 HP accumulated damage
  • Recovered from a Wound (10% extra chance to fail)
AGI
  • Move 7 voxels (ONCE PER MAP)
  • Open Combat while Hidden
  • Every 20 spent AP (including free move AP)
DEX
  • KILLED an enemy with an aimed shot (75% extra fail chance)
  • KILLED an enemy with Melee (50% extra fail chance)
  • KILLED in stealth (25% extra fail chance)
  • KILLED an enemy with a knife throw
STR
  • KILLED with a melee crit
  • Every 50 accumulated melee damage
  • KILLED 2 enemies in same combat with melee
WIS
  • Discovered Herbs/Salvage (ONCE PER MAP!)
  • Discovered a Trap (ONCE PER MAP)
LDR
  • Every 12 hours spent to train mercs
  • Every 12 hours spent to train militia
MRK
  • Every 110 accumulated damage with firearms
  • KILL an enemy with Single Shot with <= 30% final CTH
MEC
  • Every 24 hours spent repairing items
  • Disarmed a mechanical trap (once per map)
  • Upgraded a weapon
EXP
  • Hit 2 enemies at the same time (10% extra chance to fail)
  • Craft explosives
  • Disarm explosives (ONCE PER MAP)
MED
  • Every 24 hours spend Doctoring Operation
  • Every 25 HP healed with Bandaging
  • Revive a downed teammate
EXTRA: Perks Tier List (WIP!)
Health Perks
Health is a bit of a weird tree because most of the bronze and silver perks aren't really that impactful (Full Body Contact aside). The gold perks are extremely good, but you have to take a whole bunch of weaker perks to get there, so it's a little underwhelming overall.

Perk
Notes
Full Body Contact
Gain 15 Grit on successful melee attack (Grit absorbs hits in place of health).

S-tier on melee mercenaries. This provides a reliable source of Grit to melee-focused mercenaries just by attacking enemies, which of course they are going to do. At the end of an attack chain your merc will have max Grit (30) and be hopefully safe in cover.
Gitte
Hit The Deck
Going Prone costs no AP. 20% less damage from explosives when Prone.

B-tier at best. Going Prone for free is fine, but it's only useful on a few specific builds. 20% DR vs Explosives is situationally good. Note that this perk becomes vastly more useful if you are using the Tactical AI mod, because enemies will use explosives a lot more.
Sussie
Beefed Up
Extra 20% Max HP.

B-tier. Extra HP is bound to be useful, but it's usually not a very impactful perk unless you are constantly making mistakes, or your mercenary is tanking all the time, in which case you'd hope they don't need the extra HP because they have great damage reduction or a good Grit buffer. Still, there isn't much else at bronze for the Health perks (unless you're melee) so this is a solid choice usually.
Rage
Adds 10% damage for every wound you sustain, up to a maximum of 50%.

C-tier. This can be an excellent damage bonus (that doesn't apply to explosives, by the way) but it is a pretty risky business to have many wounds on your merc, not least because you will take a morale penalty which will reduce your maximum AP. However, on a Psycho merc it is slightly better because they get an AP bonus, although they still lose morale.
Revenge
Make interrupt attacks in response to being damaged by enemy attacks. Based on some weird formula nobody understands.

F-tier. When I tested this perk I was completely unable to make it work. Not sure what else to say.
These reaction perks are pretty terrible because the game doesn't seem to understand whether or not the equipped weapon can actually hit the target that is attacking them.
Vanguard
Gain 15 grit when ending turn out of cover or next to an enemy.

A-tier. This is a fantastic perk that gives you amazing survivability when you're out of cover. A great perk for machine gunners.
Calm Under Fire
Carry up to 3 points of unused AP over to the next turn. Gain 5 Grit per AP point.

A-tier on specific builds that don't use Overwatch/Pin Down, but instead want to attract enemy fire in order to return fire using Reactive Fire or Revenge. This perk combined with Vanguard means you can potentially generate 30 Grit per turn (which is the cap).
Hold Position
Up to 50% damage reduction (based on HLT) while using Overwatch or Pin Down.

S-tier on any merc that regularly uses Overwatch, although it only applies while the merc still has Overwatch AP left so bear that in mind. If you always run out of AP then obviously this is useless. Remember that you can control most Overwatch cones so that you don't waste AP on shots you can't make. If your merc not dying is the priority, then just set your cone over a smaller area so that they won't run out of AP.
Battle Focus
Gain +2 to max AP when first hit in combat, lasts until the end of the combat.

A-tier for any merc that's likely to get hit, bonus AP is always excellent. The problem is that the other two gold perks are so good, that you might not be able to afford to get this.
EXTRA: Recommended Mods
Installation Instructions For Nexus Mods:
  • Download the mod and unzip the mod folder.
  • Move the mod folder to Users/<username>/AppData/Roaming/Jagged Alliance 3/Mods.
  • Correct file structure example: Jagged Alliance 3/Mods/FixClaustrophobia/
  • Don't forget to enable the mod in-game in the Mod Manager menu.

Descriptive Chance to hit by Lobo
https://www.nexusmods.com/jaggedalliance3/mods/33, Workshop ID: 3005453998
[Quality of Life] Describes your chance to hit the target using words such as 'Likely' or 'Unlikely'. A nice compromise between vanilla's close-to-zero-information design, and the slightly-too-cheaty percentage CTH mod.

Legion Variety Pack by LionCat
Workshop ID: 3198915410
[Visuals] Introduces 100+ variants of Legion troops with greater variety in outfits, ethnicity, etc. Currently adds on to all Legion classes.

Trustworthy Gunsmith by Lucjan
Workshop ID: 3210326646
[Quality of Life, Balance] A good mechanic is still required to perform all upgrades but losing scraps and the condition of a weapon is impossible. This mod is a little cheaty, but honestly given that you can just reload your savegame upon failure, it makes sense to remove that mechanic. It's also very frustrating that even with 100 Mechanical, you can still fail to perform upgrades, so that's another reason to use this.

Smart Overwatch by Lucjan & Vlsodqwe
https://www.nexusmods.com/jaggedalliance3/mods/151, Workshop ID: 3230569686
[Balance, Fixes] Instead of always firing at the torso, even when it is blocked by an obstacle, units making interrupt attacks will fire at an open body parts or a specifically choosen part for each equipped weapon. It is incredibly annoying that overwatch often fails and hits cover instead. This mod fixes that.

Nocturnal Beauty by MyOneGod
Workshop ID: 3274783005
[Visuals] Allows the choice of a variety of color palettes for night operations, increasing immersion.

Audaki's Training Overhaul by Sir Ni
Workshop ID: 3260806453
[Balance] Rebalances the mechanics in which stat points are gained by field experience and the sector training operation. This mod heavily alters the training mechanic with the goal of dramatically reducing its effectiveness. You will not be able to train every merc in your squad to 90+ in every skill when using it. Training is still effective when your mercenary gets boosts from in-game activities.
Note: there are several versions of this mod on the workshop, make sure you get the right one. Also, you must install JA3_CommonLib by Injto4ka (Workshop ID: 3216215248) in order to use this mod.

Less Intrusive Healthbars by Sir Ni & Morianthi
Workshop ID: 3277519019
[Visuals] Reduces the size of healthbars to make them less visually intrusive.

In-Game Merc Editor by LionCat & Wait4Friend
Workshop ID: 3144009091
[Balance, Fixes, Cheats] Customize the stats and perks of Merc according to your preferences, and also unlock character-specific items (such as Nail's vest), at any time without restarting the campaign. For example, you can replace some of the initial perks of a Merc with some other talents you prefer.
Note: when installing this mod, you must restart the game completely before using it; also, you must not have it active when creating your IMP merc at the start of the game.

Zota6's Weapon Soundpack by Zota6
Workshop ID: 3119118977
[Audio] Replaces most of the game's weapon firing sounds. JA3's weapon sounds are pretty good, but this is an improvement.

Baby Don't You Lie To Me! by Sir Ni
Workshop ID: 3253711922
[Fixes] Voice responses based on likelihood of the shot hitting the target, correspond more closely to the actual chance.

Rato's Gameplay Balance and Overhaul 3 by Rato
Workshop ID: 3021320057
[Balance] This mod aims to provide a balanced but very challenging experience, improving depth of gameplay, increasing lethality and incorporating some realistic mechanics. Auto fire modes have full bullet damage, and single shots have more chance of critical hit. Guns are balanced by their score and are unique; explosives are not perfectly accurate; and fights realistically lead to incapacitation prior to death by new wounding and bleeding mechanics.
Note: you must start a new savegame after installing this mod.

Tactical AI Project by LionCat, MariOlof and Carmine UMF
Workshop ID: 3042581131
[Balance] Overhauls the enemy AI completely to introduce entirely new behaviours, in order to create a dramatic increase in challenge. There are six different options to choose from, so read the page carefully and choose your difficulty.
Note: you must install the mod C-UAE Cross-Mod Universal Armament Expansion (Workshop ID: 3148282483) in order for this mod to work.

Sir Ni's Hat of Tricks by Sir Ni
Workshop ID: 3255590356
[Tweaks] Offers a variety of tweaks and gameplay modifications. I use this mod for the Sort Inventory option and the Shush tweak. It also has a built-in cheats option that's really useful for testing mechanics and builds.

Audaki's UI Enhancements (1.5.1 Compatible) by Lucjan
Workshop ID: 3159404303
[Tweaks, Quality of Life] Shows additional information in the UI regarding tired/rested status, XP and lvl, Free Move AP, morale influences, ammo and option sliders.
EXTRA: Build Summaries
Builds that I've used, summarised in one .JPG that you can refer to easily while you're playing, store on your phone, etc.


These are the builds I was using before I revised them, maybe some of you want this info.

25 comentário(s)
Yosharian  [autor(a)] 2/dez./2024 às 4:49 
Sure but he's a pain if he gets grumpy!
lotnik_xaos 2/dez./2024 às 2:39 
Nice, I liked the comparison and some build ideas, but but... You're a blasphemer! FIDEL "If I die, I come back as big black bird that pick at bodies. I go from war to war just picking at bodies... Dis be good life, no?" DAHAN IS A SWEETHEART, and a hero of this franchise, I loved him since the 90s <3 Also, why would he be such a pain to deal with? He's Fidel! He can blow up stuff, has STR and perks to go face to face with things, and can still burst around, thanks to his high marksmanship and psycho traits, until there's "no one left at bad guy party"
neil 13/set./2024 às 11:24 
`G'day
Thanks
Great work, and thanks for answering
Yours
Yosharian  [autor(a)] 6/set./2024 às 15:58 
@Neil: I appreciate that brother. The yellow merc is always the I.M.P.
neil 6/set./2024 às 15:44 
G'day
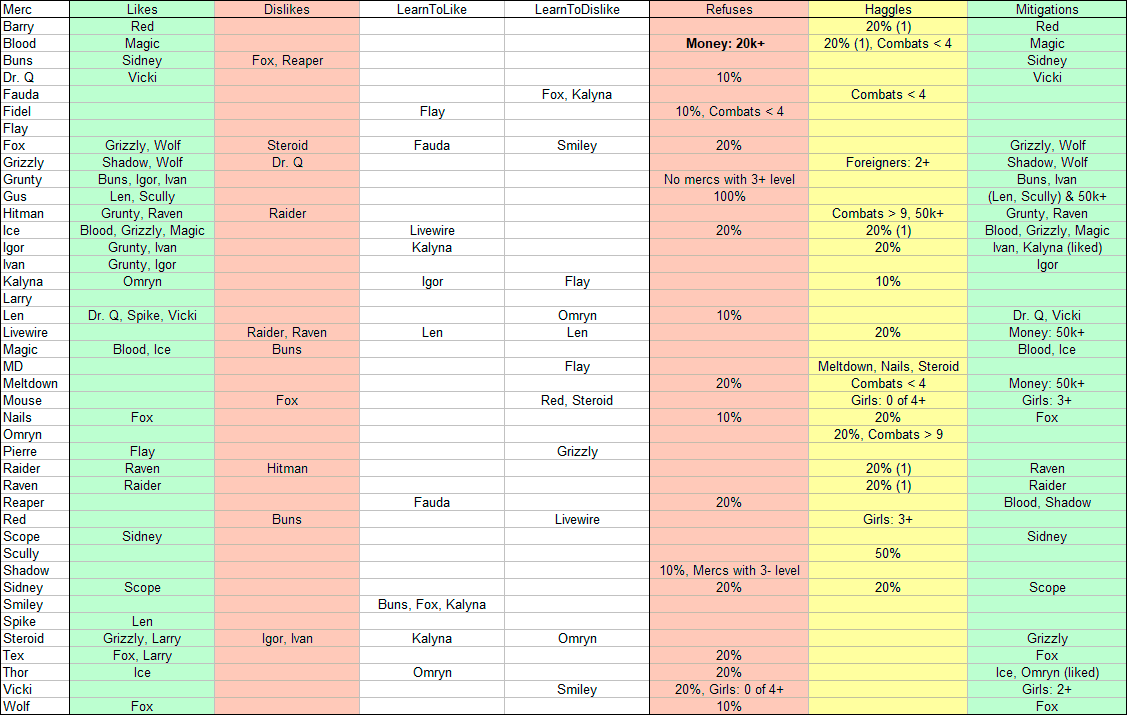
Best guide out there
I consult it all the time.
Just one question if I may ?
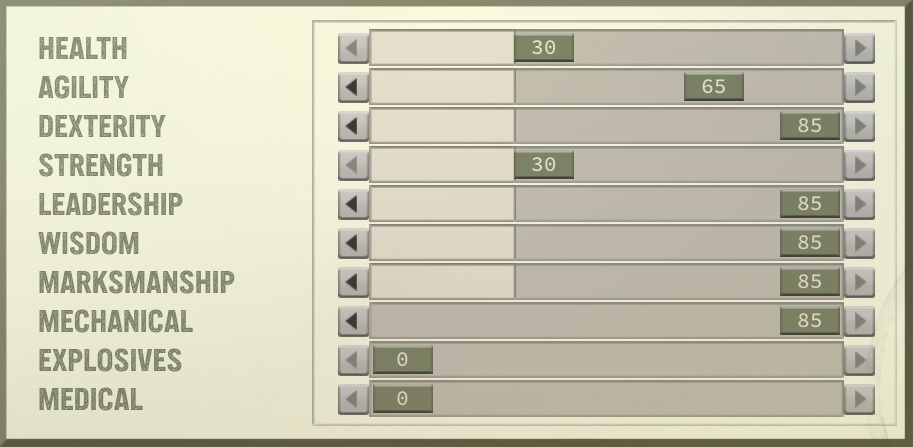
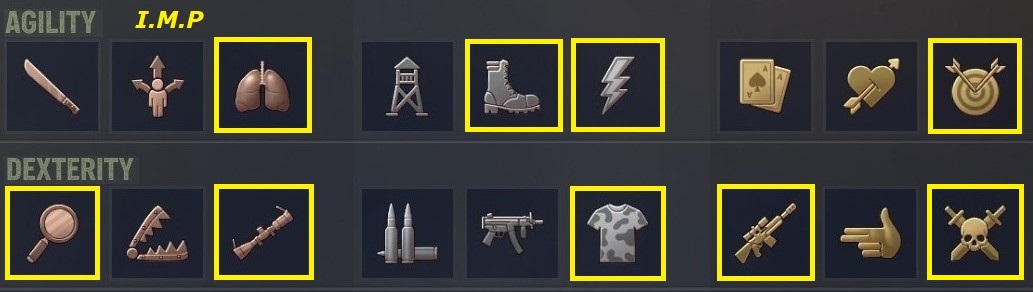
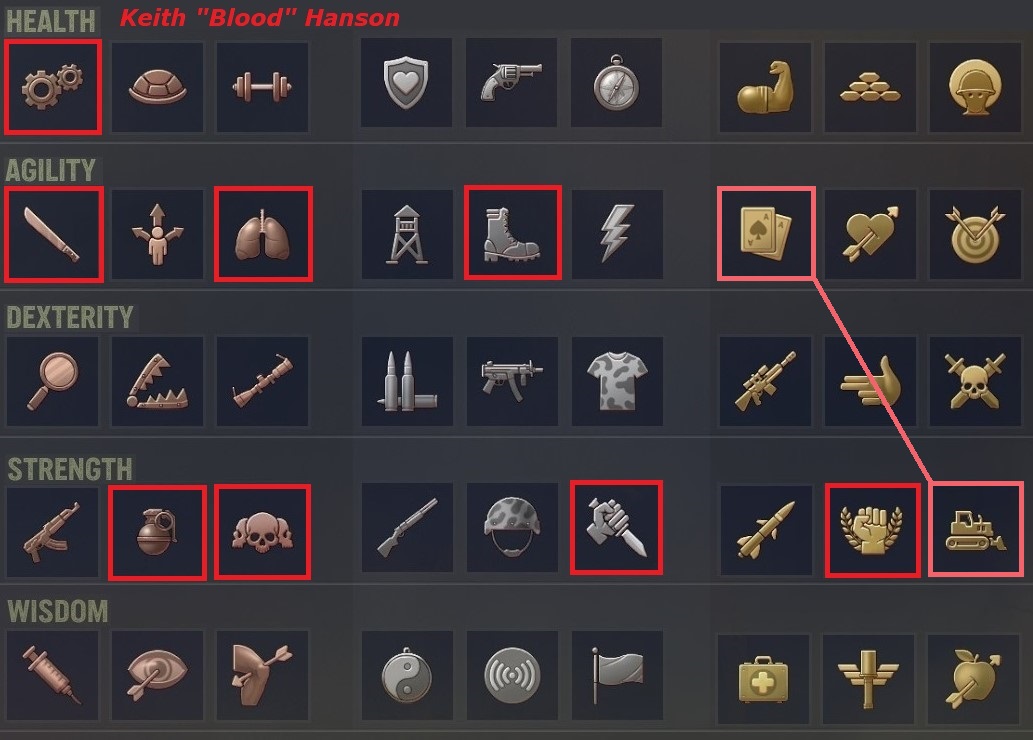
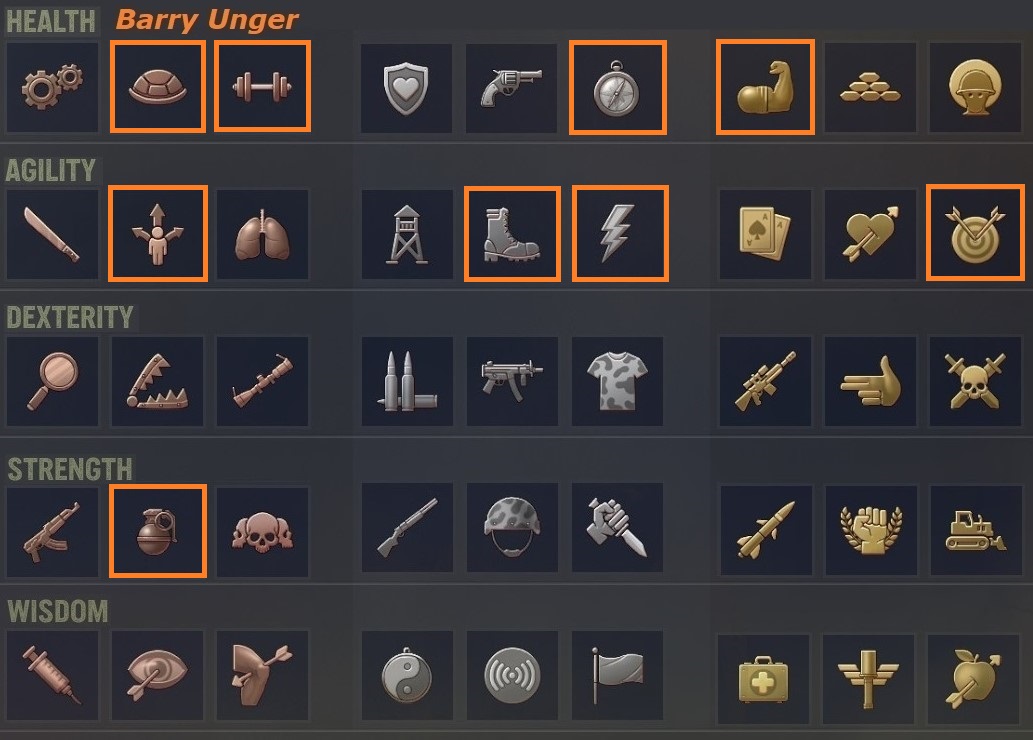
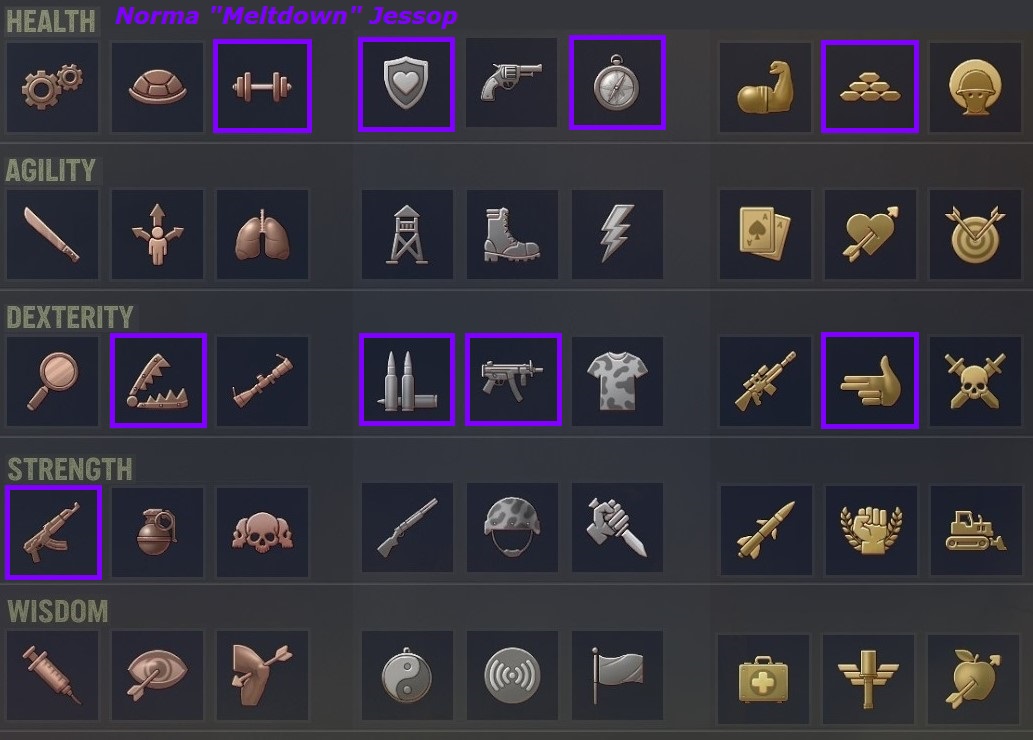
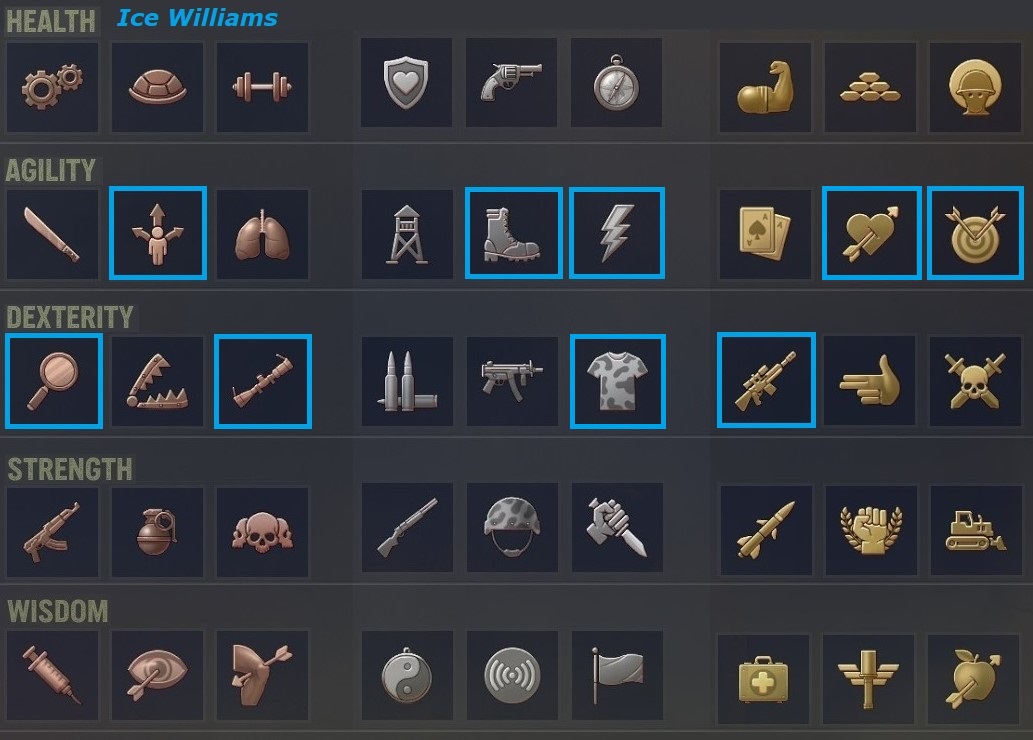
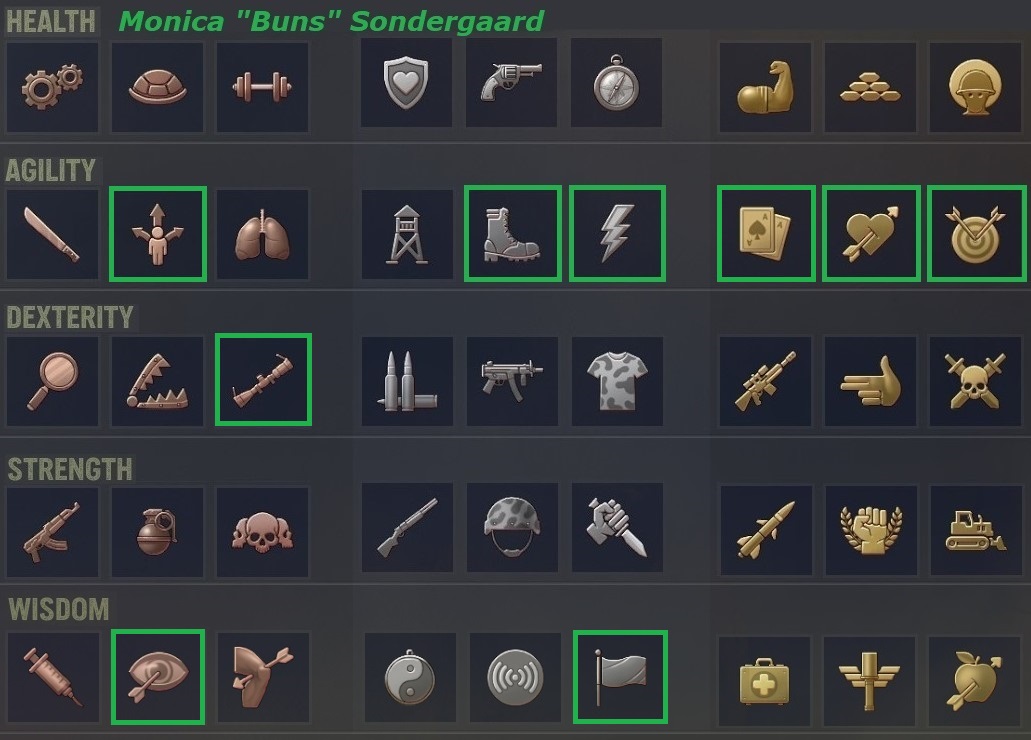
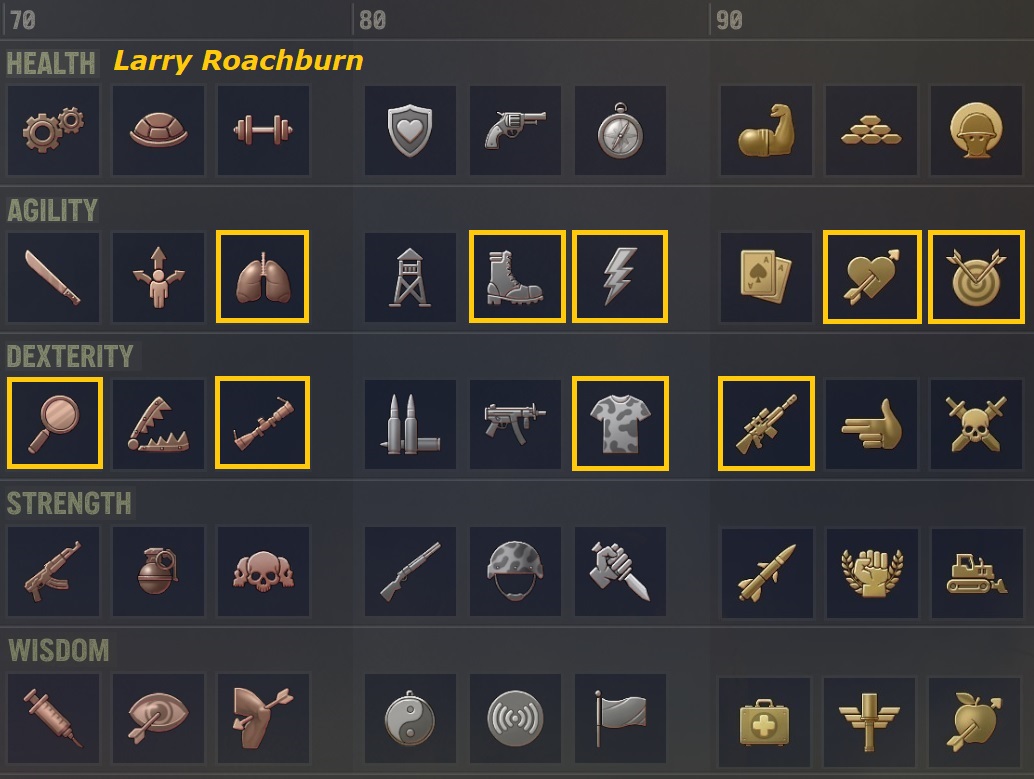
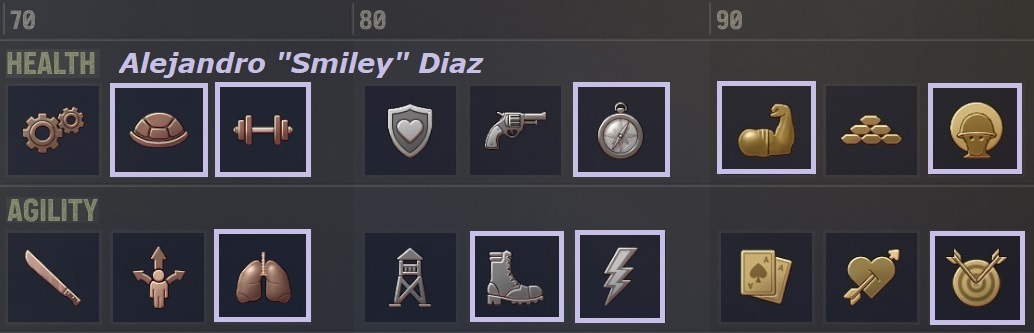
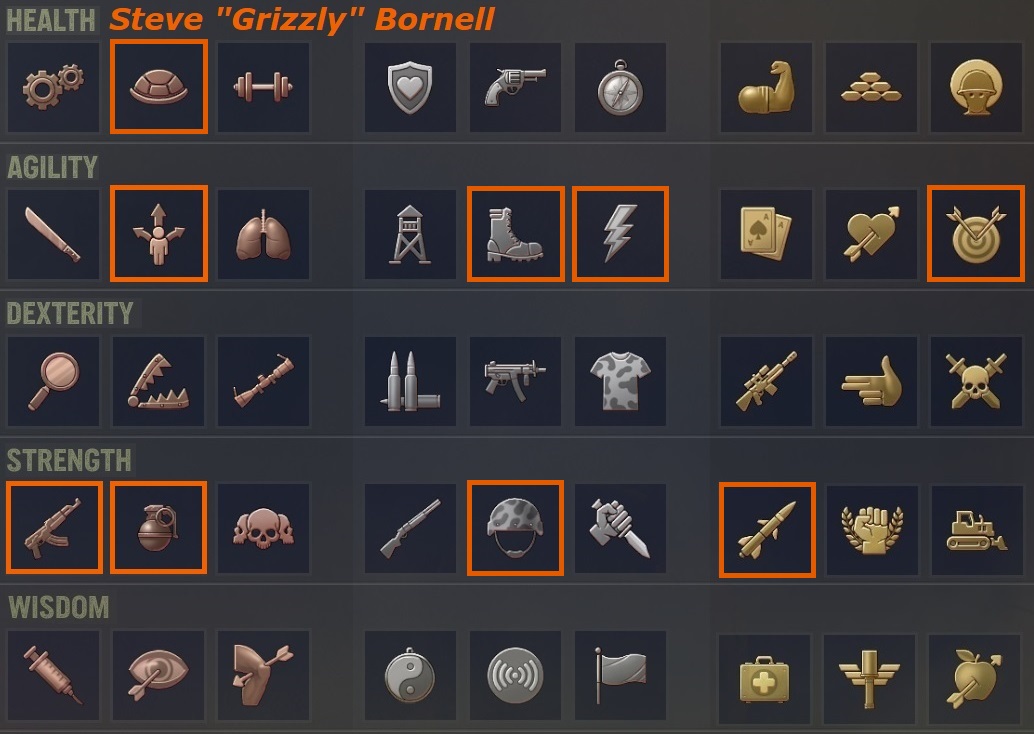
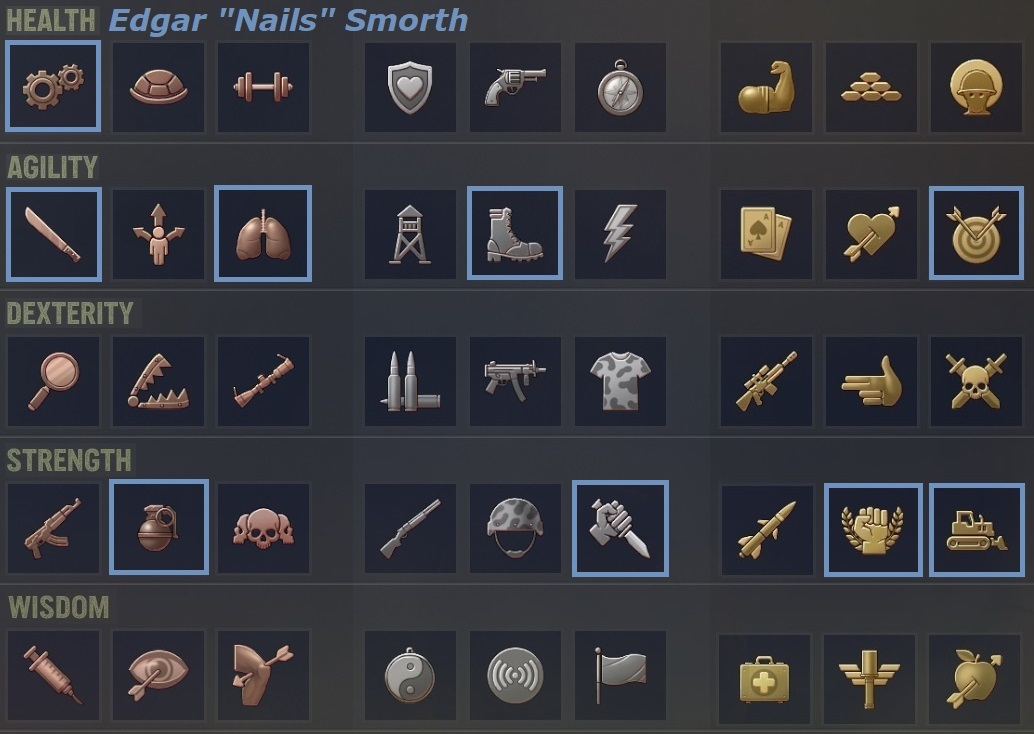
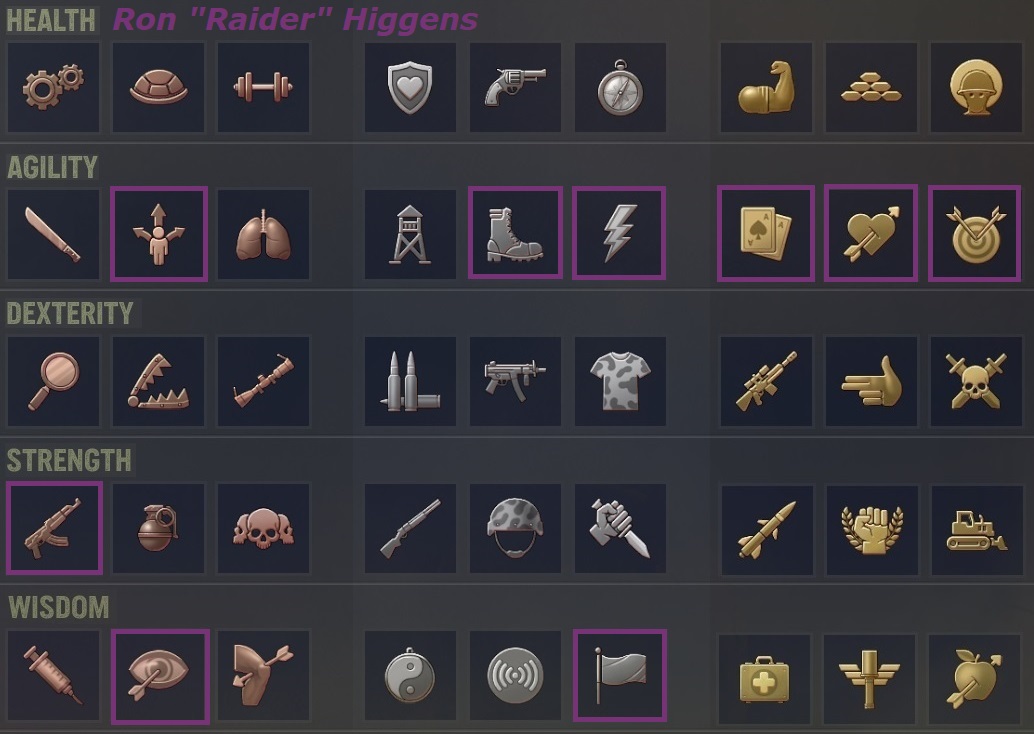
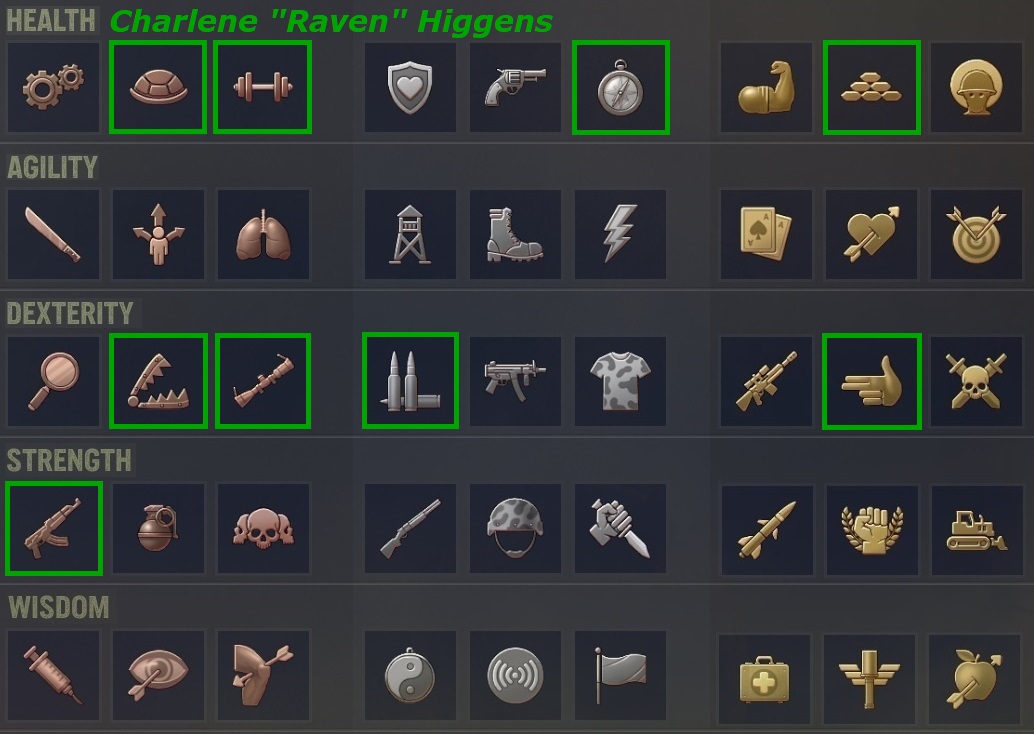
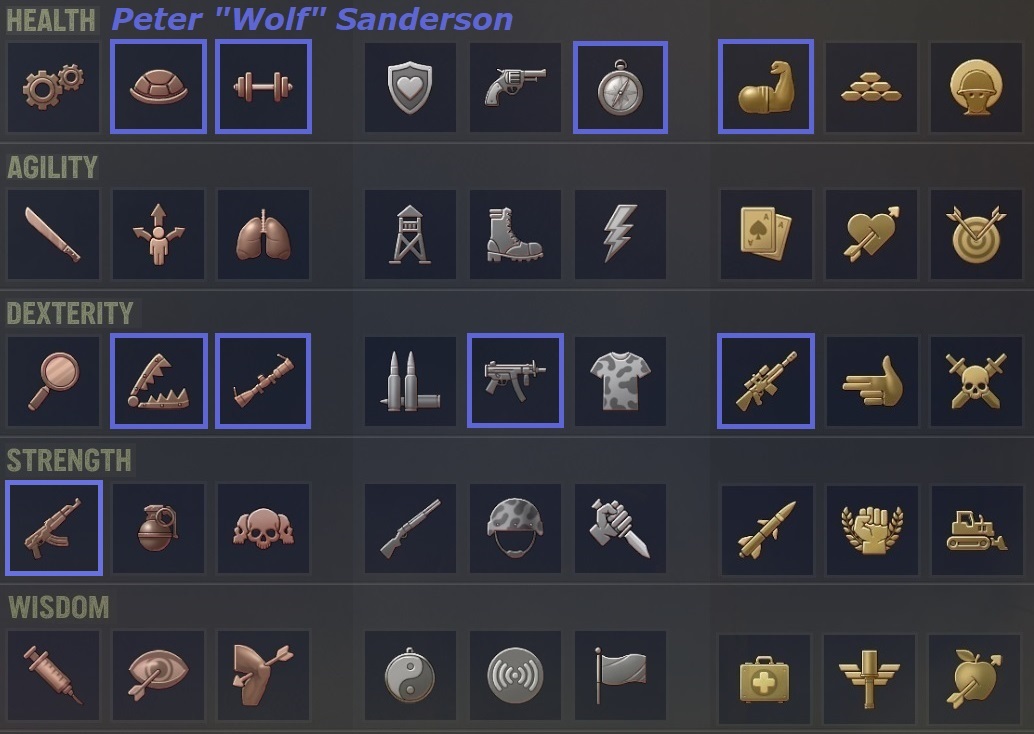
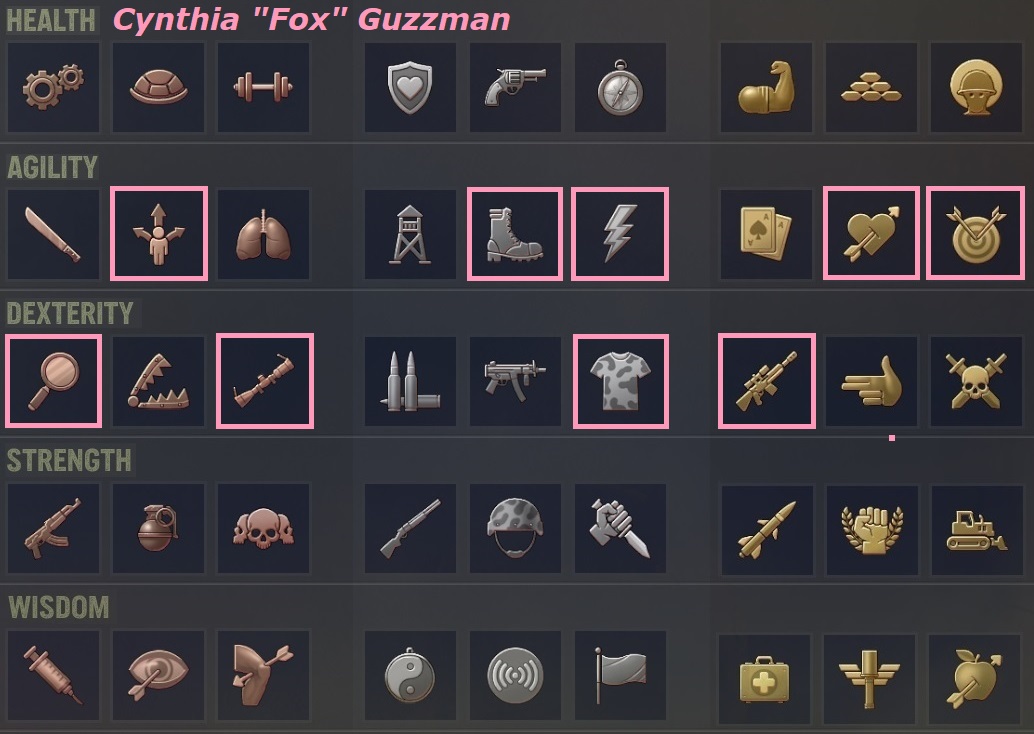
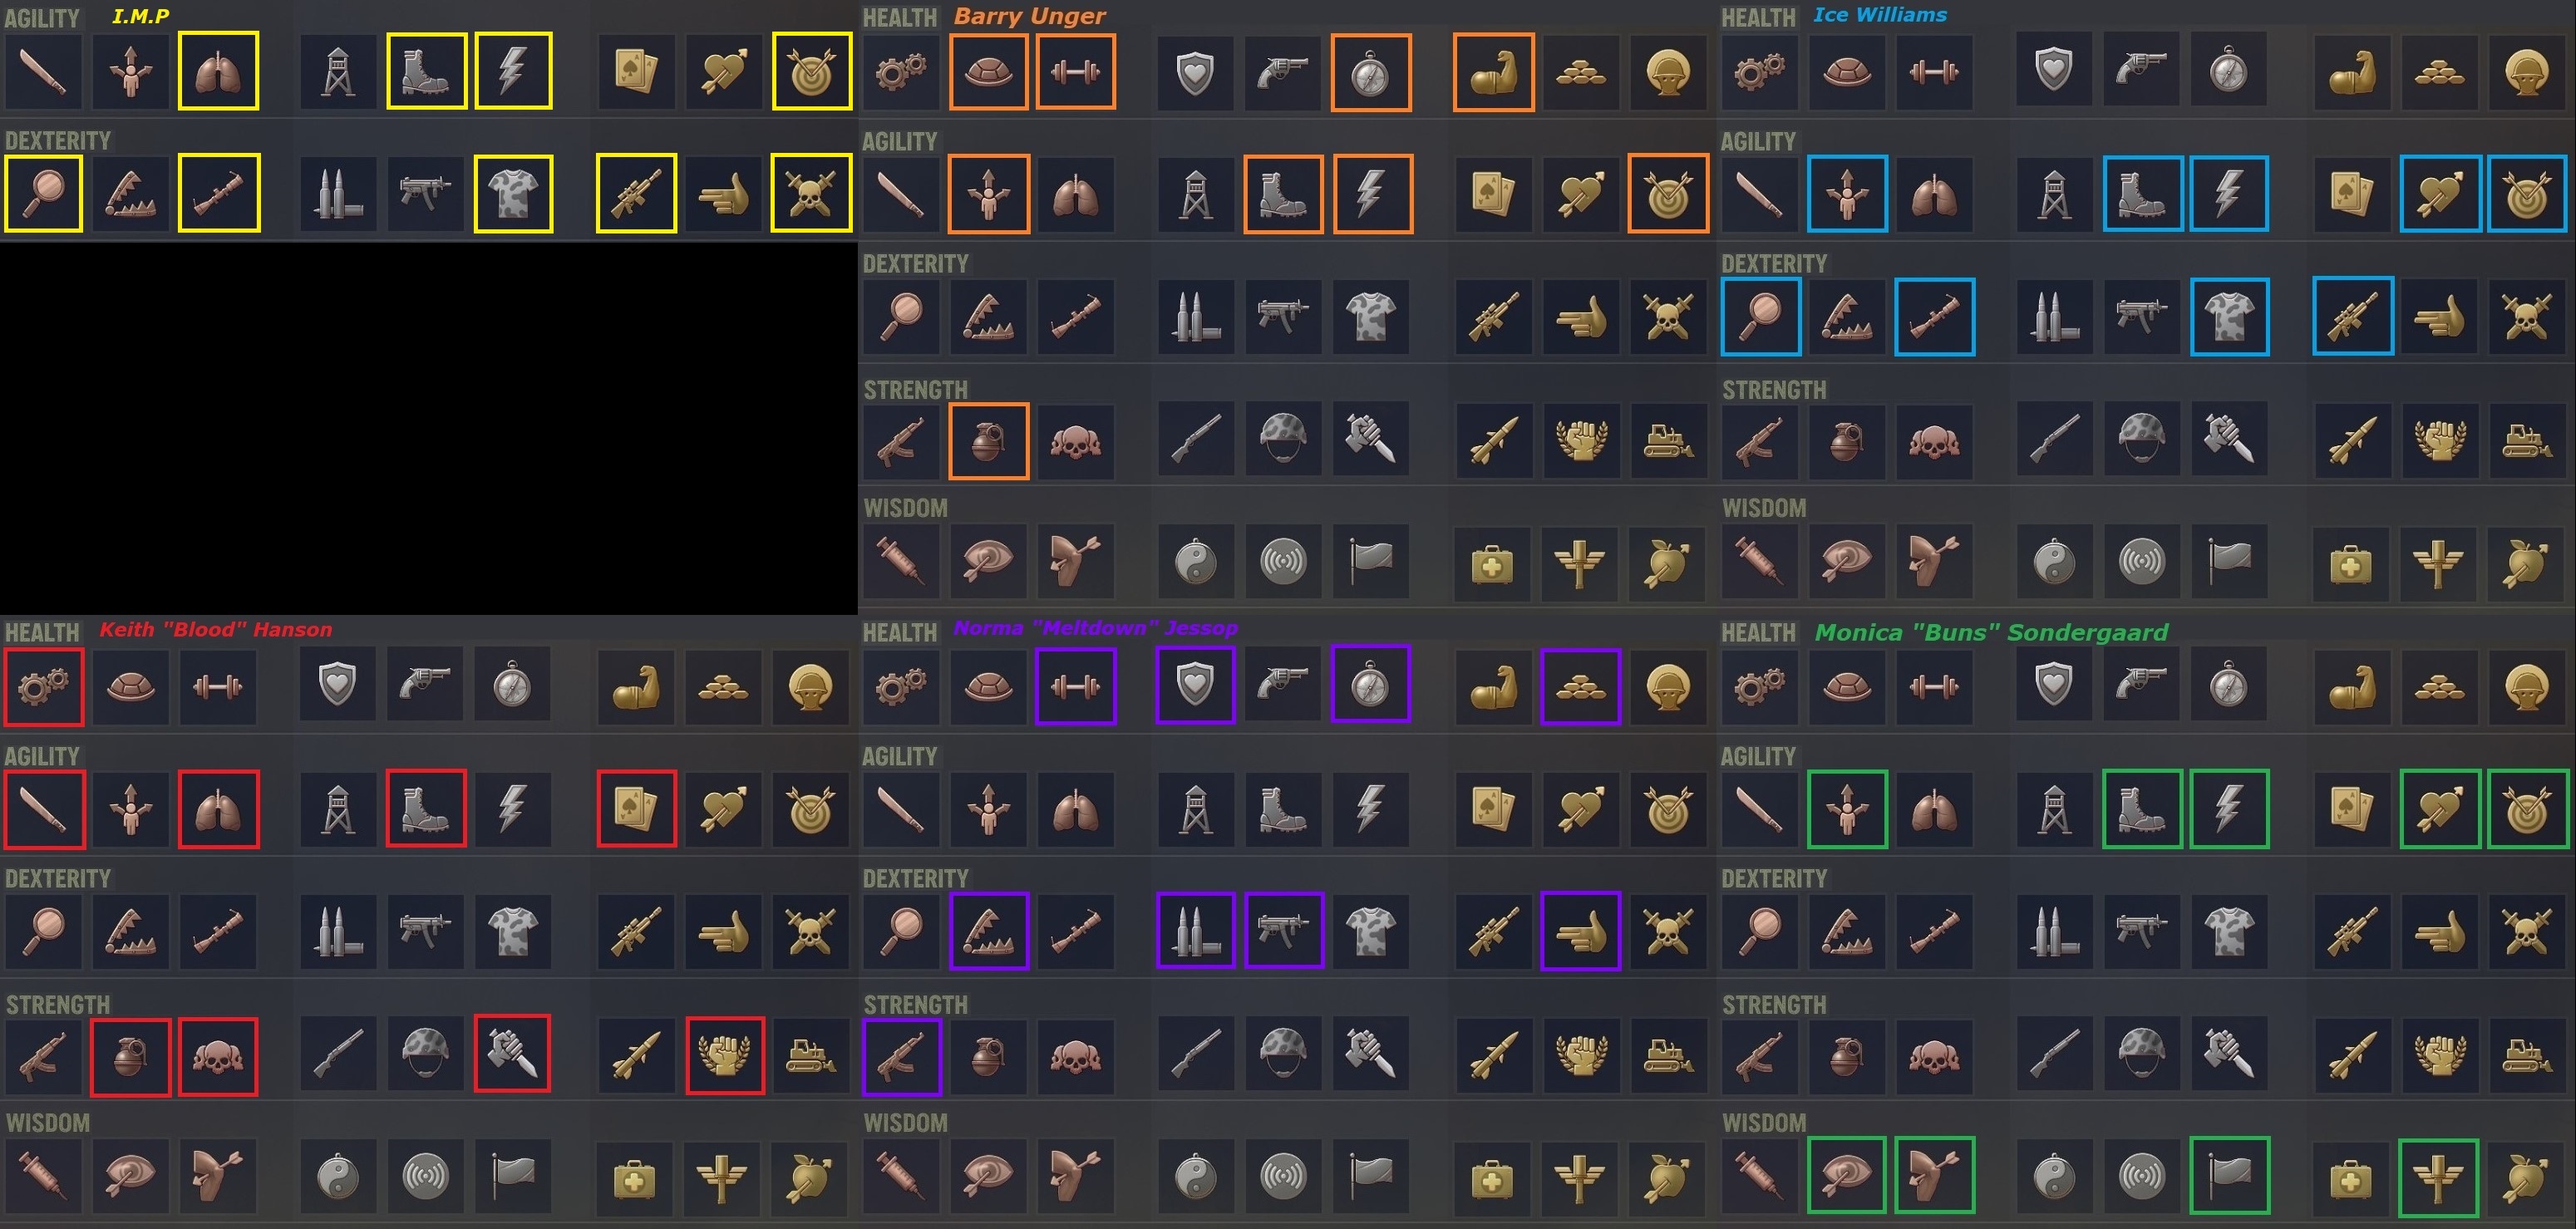
Build summaries, all of them have names of who they refer too. Except for one, Second panel Yellow top Left. Which merc is this for ?

Please keep this up and up to date
Seriously good stuff
Huge amount of work on youre part
Neil
Yosharian  [autor(a)] 1/set./2024 às 12:11 
@Doctor Sandwich: you're welcome dude
Doctor Sandvich 1/set./2024 às 8:01 
Awesome job with your guide, thank you @Yosharian :UDG_Heart:
Yosharian  [autor(a)] 23/abr./2024 às 1:41 
@Timmy: check out the attachments. It's not essential, you can adapt if you like
Timmy the Tooth 21/abr./2024 às 11:23 
Enjoying it so far. Not sure on the significance of having 2 sniper rifles on ice/buns. When should I be using one over the other?
Yosharian  [autor(a)] 2/mar./2024 às 23:46 
Anyway with the team I have built around here I was able to complete most of the game with ease and only stopped because I wanted to experience the latter half of the game at a later date. I never had any issues with the IMP, it just takes a little longer to max out his stats and being able to drop Livewire in favour of stronger (and less annoying) mercs is an absolute win.

(end)