Dragon Age™ Inquisition

Dragon Age™ Inquisition

196 évaluations
100% Achievement Guide: Dragon Age - Inquisition
De Cynic 0055
This is a comprehensive 100% Achievement guide detailing a step-by-step walkthrough to take you from 0 all the way to 100%. If you are looking for a particular Achievement or Collectible, use Ctrl+F & type it into the search bar for more direct help.

I run support & debug help on all my guides. If you have any questions, problems, or find errors in the guide itself, do not hesitate to leave me a comment & I will get back to you as soon as I am able to. Happy Hunting!
10
4
2
5
8
2
2
3
2
2
2
2
   
Récompenser
Ajouter aux favoris
Favoris
Retirer des favoris
Introduction:


Achievement Breakdown: (50)
Story Related: (10)
Missable: (2)
Secondary Objectives: (10)
Character: (4)
Collectibles: (11)
Slay: (6)
Miscellaneous: (5)

DLC Breakdown – Trespasser: (11)
Story Related: (1)
Missable: (4)
Collectibles: (2)
Slay: (4)


We can unlock all but one Achievement in a single playthrough on Nightmare Difficulty; the final Achievement will need a very short run through from a New Game to reaching Skyhold for the Trial of the Fool Achievement. While it technically can be done during our Nightmare Difficulty playthrough, it is highly not recommended.

Over the course of the game, we will collect nine Companions. Take good care to stay on their good sides & gain their Approval. We need to become Friends with 3/9 of them for the People Person Achievement as well as enter a relationship with one to earn the Beloved & Precious Achievement. These are all done by having a high Approval with them & by completing Companion Quests as they become available. Always exhaust their dialogue after completing Main Missions & try choosing dialogue accommodating to their character. For a Female Character, our Romance options are Blackwall, Cullen, Sera, & Solas. For a Male Character, our Romance options are Cassandra & Dorian. The Companions Iron Bull & Josephine can be Romanced by both Male & Female Characters.

While the Jaws of Hakkon & The Descent DLCs are pretty straightforward, The Trespasser DLC is a bit more complicated. The actual DLC story of it will actually take place in Post-Game after we beat the Main Story. What makes this DLC challenging however, is the “Trials” Achievements it adds for us to complete throughout the Base Game. A lot of the Trials are potentially Missable, as they require us to complete Areas, Missions, or even slay certain High Dragons with a specific Trial on. I will explain each Trial ahead of time as they become relevant in the guide/game…

For the Trial of the Fool Achievement, we need to reach Skyhold at Character Level 5 or less. For our Nightmare playthrough, this is highly unrecommended as it will make our early game a living hell… a nightmare one could say. Instead, we will save this for its own short playthrough, where we can blast through the early game on the lowest Difficulty & solely focus on the Achievement.

There are no Achievements regarding playing the Dragon Age – Inquisition Multiplayer… in fact, I have no idea what it even is or why it exists to be honest.

If you have played Dragon Age – Origins or Dragon Age 2, you can import some decisions you have made using the Dragon Age Keep Online function at the start menu. All this does is change some minor lore tidbits, character appearances, & dialogue with no major pros/♥♥♥♥.

For those interested, here is an organized list of all the Achievements/Secret Achievements. This is how I derive my Achievement Breakdowns & the first reference I create before I begin my 100% journeys.
https://steamcommunity.com/sharedfiles/filedetails/?id=3017796932

Before You Play!: It appears that we can only unlock Achievements if we are logged into Dragon Age Online. Whenever you start up the game, be sure that you automatically log in to your EA Account & have it linked to Steam. Save often as we play in case you accidentally void Achievements by not being logged in; it can ruin your entire playthrough if you are not careful!
Even on PC, this game has pretty long loading times. I found now technical fix for it through in game or PC settings though I am sure Mods exist that could optimize the game better. Something I have not looked into & can speak on unfortunately…

*Guide contains major spoilers.
Sequence 1: The Wrath of Heaven
1. Area: Frostback Mountain, Haven
2. Active Trials: Fair-Weather Friends
3. Companions: 3/9
4. Astrariums: 0/15
5. Recipes: 2/14
6. Fade Rifts Closed: 2/75
7. Shards: 0/114
8. Achievements: 5/69
-----------------------------------------------------------------------------------------------------

When we create our Character, keep in mind your Class & playstyle for how it will function during Nightmare Difficulty. In my opinion, Mages are the best since they have a wide variety of utility & damage types. Rogue Archers or Dual Wielders can also become quite broken if built correctly as well. Warriors are probably the worst Class for Nightmare Difficulty oddly enough. Still possible of course, but they have a lot less utility & potential for massive damage like the other two Classes.

When choosing our Difficulty, be sure to select Custom Difficulty. Set the Difficulty to Nightmare & we need to turn on the Trail – Fair-Weather Friends. This Trial needs to be on indefinitely until we reach the Winter Palace during Main Quest – Wicked Eyes & Wicked Hearts to unlock the Trial of the Lovers Achievement. The other Trials will all come into play later on in the game & can be turned on or off at will when we need them.

Do not change the Difficulty, & not turn off Trial – Fair Weather Friends. Save often!

Frostback Mountains:
Companion #1 – Cassandra Pentaghast: When we begin the game, our very first Companion will be Cassandra. Be nice with her & always try to gain her Approval; she is a Romance option for Male characters.

Before getting too far into the game, be sure to double check that the Fair-Weather Friends Trial is on & that the Difficulty is set to Nightmare…

Companion #2-3 – Solas & Varric Tethras: Our next two Companions can be found further ahead through the valley. Solas is only a Romance option for Female Elves & Varric is not a Romance option at all…


Achievement #1 – Synergized: Trigger a cross-class combo with a Character you control in single-player mode.
This can be unlocked as soon as we meet Solas & Varric; chances are it may even unlock for you accidentally. To do this deliberately, enter into combat then go into the Tactical Camera to stop time. Switch to Solas & use his Winter’s Grasp Ability on an enemy, then switch to Varric to use his Long Shot Ability right afterwards. The enemy will Freeze then Shatter if done correctly, unlocking the Achievement.

Fade Rift #1: We will encounter our first Fade Rift around 3/4 of the way through the Prologue. Defeat the Lesser Shades & Wraiths then close the Rift.

For the Marked For Greatness Achievement, we need to close 75 Fade Rifts; we can find more than that over the course of the game…

Fade Rift #2: Regardless of the path you decide to take to reach the Temple of Sacred Ashes, we will need to destroy another Fade Rift along the way.


Achievement #2 – The Wrath of Heaven: Finish the Prologue.
Story Related. Complete Main Quest – The Wrath of Heaven to unlock this Achievement.

Haven:


Achievement #3 – Skilled: Upgrade any Ability once in single-player mode.
After we complete the Prologue, we will reach Level 3 & have a new Point to spend; if you chose to start as a Human you may have already unlocked this Achievement.

All Abilities have two Upgrades that can be purchased for it; buying one Upgrade will buy the other as well. Purchase an Upgrade for an Ability to unlock this Achievement.

You cannot Level Up your Character in combat; you need to use the Disengage Command to exit it. I found this to be buggy during the Prologue but was fine after I got to Haven.

Recipe #1 – Regeneration Potion: After we report in to Cassandra, we need to make a few pit stops around Haven. Select the Side Quest – Haven’s Best & Brightest, & go to the Apothecary where we can find Adan. Speak with him, & we will receive our first Recipe for free.

There are no Achievements for collecting all Recipes, however we need to Upgrade them 30 different times for the Master Alchemist Achievement so having them all at your disposal will make the Achievement much easier.

Recipe #2 – Lyrium Potion: Speak with Adan & ask him if he needs any help to receive the Side Quest – Passing Notes. Exit outside Haven’s walls when you are ready & head over to the hut where our Quest Marker leads us. Enter the hut & use the Search button to hone in on the location of the notes; it will be on a desk with some papers & a wheel of cheese. Take the notes back to Adan, & we will receive this next Recipe.


Achievement #4 – Well-Prepared: Craft a Weapon or piece of Armor in single-player mode.
Go to the Blacksmith’s now just outside Haven & loot around the place for some Crafting Materials. Craft any Weapon, Armor, or Mod to unlock the Achievement.


Achievement #5 – Customized: Enchant or upgrade a piece of equipment in single-player mode.
Now all we need to do is Modify any piece of Armor or Weapon once to unlock this Achievement. It can even be as simple as removing a Mod from an item that already had one equipped.

Speaking With Companions: Be sure to take the time to speak with our Companions & exhaust their dialogue to increase our Approval with them. Due to the Trial – Fair Weather Friends, it is easier to make them dislike us & potentially leave. It is important that we gain their approval, especially if we want to Romance them. If you earn too much Disapproval, consider reloading a Save & choosing different dialogue.
Sequence 2: The Threat Remains
1. Area: Hinterlands, Haven
2. Active Trials: Fair-Weather Friends
3. Companions: 3/9
4. Mounts: 4/5
5. Astrariums: 1/15
6. Recipes: 3/14
7. Fade Rifts Closed: 5/75
8. Shards: 9/114
9. Achievements: 10/69
-----------------------------------------------------------------------------------------------------

Hinterlands (Level 4-12):
When you are ready to use the War Table, go scout the Hinterlands… There is lots to do here in the Hinterlands.


Main Quest – The Threat Remains: Go to the Crossroads below the Outskirts Camp & fight off the waves of Mages & Templars to save Mother Giselle. Speak with Corporal Vale after that to progress this Quest to us needing to go to Val Royeaux where we will stop.

We now have a lot of exploring to do…

Recipe #3 – Antivan Fire Grenade: We can purchase this Recipe from the Merchant we find at the Crossroads for 53 Gold.


Achievement #6 – Trailblazer: Discover a Campsite & establish an Inquisition camp in any wilderness area.
On our Quest Map, we can spot five Campsites. Go to anyone of them, the Upper Lake Camp being the closest just West of the Crossroads, & establish it to unlock this Achievement. Resting at all the Camps found in an Area will mark Fade Rifts for us to close as well.

As we discover new Campsites, make a point of completing at least one Requisition Quest per Camp; we need to complete no more than 20 to unlock the Quartermaster Achievement.

Hinterlands Ocularum #1: We can find our first Ocularum near the Upper Lake Camp. Use it to view the locations of 4 Shards & mark them on our map for us to collect.

Fade Rift #3: South of the Upper Lake Camp, we can find a new Fade Rift to close. From here on, these will be tricker to close. This Rift will have Lesser Shades & Wraiths to fight.

Throw everything you have at it & do not be afraid to burn through your Health Potions; we can Fast Travel back to Camps to restock them at will afterwards.


Achievement #7 – Sharp-Eyed: Find & recover a Shard identified by an Ocularum.
We will unlock this Achievement after collecting any Shard. We need to collect all 114 of them in the game to be able to enter Solasan Temple for a different Achievement.

Fade Rift #4: On our way to collecting the last Shard we discovered, we will encounter a Fade Rift nearby in the Witchwood Region. This Rift is full of Lesser Terrors & can be a bit challenging.

Side Quest – Master of Horses: Start heading West through the West Road until you reach Redcliffe Farms. Here we can find Master Dennet, an important NPC who will sell us Mounts.
Before he will join the Inquisition however, we need to complete the Side Quests – Trouble With Wolves & Farmland Security.

Hinterlands Ocularum #2: Just above the stables at Redcliffe Farms, we can find our next Ocularum that will show us the location of 5 Shards.

Astrarium #1: When we collect the final Shard we uncovered, it will be found near a waterfall above Redcliffe Farms. To get to the Shard, we will pass this Astrarium. Activate it, & draw out the design to complete it.


Completing this Astrarium will begin marking more on our Quest Map.


Achievement #8 – Well-Read: Discover a Veilfire Rune.
From the Astrarium here, head North West over some rocks past the waterfall & up a hill towards a Dungeon Entrance close by; it will probably pop up on your Quest Map. Get a Mage to light the Veilfire outside, & enter into the Dungeon. Take the Veilfire Torch all the way down to the lowermost room & we can find the Veilfire Rune along the wall in the far right corner.

There are multiple Veilfire Runes we can find throughout the game, for the Achievement, we only need to find one.

Fade Rift #5: If you established the Redcliffe Farms Camp, we will uncover the location of two more Fade Rifts. This one can be found North of the farm; this Rift will have Lesser Terrors & Wraiths to defeat.

The Fade Rift located due East of the Redcliffe Farms Camp has Level 12 enemies. We will definitely want to avoid this one & save it for later…


Achievement #9 – Cavalier: Secure a Mount.
We can unlock our very first Mount at Redcliffe Farms. Go to the stables & speak with Seanna to attempt one of her races. We will unlock the Achievement as soon as we mount the Fereldan Forder.

This is our first of five Mounts we will need to acquire.

Haven:

Inquisition Perks: By this point, you may be able to purchase an Inquisition Perk when you access the War Table. To start, we need to make a B-line for the Deft Hands, Fine Tools Perk so we can gain access to Masterwork Locks. The problem is that we need to have 4 Perks purchased in the Secrets Category before it is unlocked. Start chipping away at this; completing Side Quests will boost our Influence Level & unlock more Perks.

Operation – Build Watchtowers: To complete our Side Quests for Master Dennet, we need to complete Operation – Build Watchtowers; it will take some time to complete.

Though we can potentially unlock other Areas with Power, for now let’s stick to The Hinterlands & mop up what is left. We can however begin working on other Operations available on the War Table.


Achievement #10 – Commander: Complete a timed mission on the War Table.
Completing any Operation on the War Table will unlock this Achievement. For an instantaneous one, complete Operation – The “Bog” Unicorn.

Mount #2 – Bog Unicorn: Complete Operation – The “Bog” Unicorn in Ferelden to unlock this Mount.

Mount #3 – Inquisition Barded Charger: Complete Operation – Flames of the Inquisition Charger in Orlais to unlock this Mount.

Mount #4 – Red Hart: Complete Operation – The Red Hart in Orlais to unlock this Mount.
Sequence 3: Restoring Order
1. Area: Hinterlands, Haven
2. Active Trials: Fair-Weather Friends
3. Companions: 3/9
4. Mounts: 5/5
5. Agents: 3/10
6. Astrariums: 3/15
7. Recipes: 5/14
8. Fade Rifts Closed: 9/75
9. Shards: 18/114
10. Achievements: 11/69
-----------------------------------------------------------------------------------------------------

The Hinterlands:


Fade Rift #6: Carry on North from The Crossroads now towards the marked Fade Rift on the Outskirts. It will have Lesser Terrors, Lessor Shades, & Wraiths for us to defeat.

The Ferelden Frostback: Should you venture beyond the Dusklight Camp found North East of The Crossroads, we will encounter the Fereldon Frostback’s lair. Do not progress past here as this foe is well beyond us. Not only is there a Ocularum in this area, but also an Achievement for killing this High Dragon with a specific Trial turned on; we will be returning here much later in the game…

Hinterlands Ocularum #3: We can find our next accessible Ocularum South East from the Upper Lake Camp overlooking a ruined fortress. Use the Ocularum to locate 4 Shards.

Astrarium #2: We can find the next Astrarium South East of the Outskirts Camp; it should already be marked on our map after viewing the previous one.


Fade Rift #7: We can find the next Fade Rift on the Outskirts South of the Outskirts Camp. This Fade Rift will solely be composed of Wraiths.

Fade Rift #8: Resting at Dwarfson’s Pass Camp in the South East corner of the Hinterlands, we will uncover the next three Fade Rifts for us to destroy. The first can be found to the far East of the Camp & will summon Wraiths & Lesser Terrors to fight us.

The Fade Rift to the far South of us here in Dwarfson’s Pass is a Level 12 Rift & should be left until a little bit later…

Fade Rift #9: Our next Fade Rift will actually be found inside a fortress, Winterwatch Tower. It is found South West from the Dwarfson’s Pass Camp. To enter inside, speak with Speaker Anais & we will be tasked with sealing the Fade Rift harrowing the fortress.

Enter inside Winterwatch Cave & close the Fade Rift. This Rift summons Lesser Terrors for us to fight.

This is our last Fade Rift to complete here in the Hinterlands for now; the remaining three are Level 12 & will be left until we are stronger…

Agent #1 – Speaker Anais: With the Fade Rift closed, return to Speaker Anais. In her dialogue options, you must tell her to “Listen & gather information” for her to join the Inquisition as an Agent. Choosing any other dialogue will void her as an Agent; we need to accrue 10 Agents for the Persuasive Achievement.

Agent #2 – Lord Berand: We can find Lord Berand here at Winterwatch Tower as well. Speak with him & if you completed the Side Quest – Love Waits, tell Berand to join the Inquisition. Saying any other dialogue will void him as an Agent.

Haven:

Operation – Build Watchtowers: By this point, an hour should have passed & it will be time for us to turn in this Operation so we can progress our arc with Master Dennet.

The Hinterlands:

Side Quest – Horses For the Inquisition: After the Side Quests Trouble With Wolves & Farmland Security are completed, return to Master Dennet at Redcliffe Farms. Speak to Dennet with Cassandra in our Party & we will convince him to join the Inquisition. We can now purchase Mounts from him at Haven.

Agent #3 – Master Dennet: Completing this Side Quest will unlock Master Dennet as an Agent to the Inquisition.

Astrarium #3: From Redcliffe Farms, begin heading South to our final marked Astrarium on the map. This puzzle is slightly trickier with two “fake” stars thrown into the mix to confuse us.


Recipe #4 – Rock Armor Tonic: From the Upper Lake Camp, make your way East towards a ruined fortress where the Landmark Thelm Gold-Handed, the Dreamer is. Here we need to follow our Search prompt to locate this hidden Recipe. To access it, jump up the remnants of a ruined wall & we can climb down a Ladder. Use the Search button to locate the treasure buried close by the base of the Ladder.

Hinterlands Ocularum #4: For our last order of business in the Hinterlands, go to the final Camp located in the South West corner of the map, the Forest Camp. From here, head all the way South to where the Grand Forest Villa is where we can find an Ocularum just outside its front gates. Gaze through it to locate 5 Shards.

Side Quest – Deep Trouble: On the second floor of the Grand Forest Villa we can defeat the difficult Bandit Leader. On a balcony close by him, we can collect the Key to Valammar. Make your way to the Dwarven ruins & enter inside.

Recipe #5 – Pitch Grenade: Head across the bridge in Valammar & head up the stairs to the next floor. Enter into the first room we pass off our left & we can find a wall that can be Bashed. Use Cassandra to break the wall down & we can enter a secret room where we can loot this Recipe.

Haven:

Mount #5 – Taslin Strider: With Master Dennet now at Haven, we can purchase Mounts from him starting with the Taslin Strider. We will unlock new Mounts for sale the further we beat into the game.


Achievement #11 – Saddled Up: Purchase or secure five different Mounts of any kind.
We will unlock this Achievement as soon as we collect five Mounts; there definitely a lot more than five Mounts we can unlock throughout the game. The starter Mounts we begin the game with from the Game of the Year Edition (the Qunari & Avvar Mounts) do not contribute to this Achievement.
Sequence 4: City of Lions
1. Area: Val Royeaux, Haven, The Hinterlands, Storm Coast
2. Active Trials: Fair-Weather Friends
3. Agents: 5/10
4. Companions: 7/9
5. Astrariums: 3/15
6. Recipes: 6/14
7. Fade Rifts Closed: 9/75
8. Shards: 21/114
9. Achievements: 13/69
-----------------------------------------------------------------------------------------------------

Val Royeaux:


Achievement #12 – Speak Only the Word: Gain access to a major city for the Inquisition.
Story Related. With our business finished in the Hinterlands for now, it is time to travel to the city of Val Royeaux to progress the main storyline. We will unlock the Achievement as soon as we set out; it will cost us 4 Power to access Val Royeaux from the War Table.

Main Quest – The Threat Remains: Have an audience with the Chantry & the Templars which… won’t go so well.

Agent #4 – Merchant Belle: In the central area of Val Royeaux, we can find the Merchant Belle. Speak with her & ask her to join the Inquisition. Should we leave Val Royeaux after our first visit here without recruiting her, she will disappear from the city.

Side Quest – A Friend of Red Jenny: As we go to leave central area of Val Royeaux, an arrow will land nearby us with a letter attached to it. Search around the city for the three hidden Red Handkerchiefs. The Handkerchief found in the Upper Market has to be accessed via the Fast Travel points around the city.

Side Quest – The Imperial Enchanter: Near the exit of the central area of Val Royeaux, we can find a Circle Mage Messenger that will give us an invitation to meet Enchanter Vivienne de Fer; another new Companion.

Main Quest – In Hushed Whispers: When we finally go to leave Val Royeaux, we will encounter Grand Enchanter Fiona who will ask us to side with the Mages Faction. This Quest is tied to an Achievement regarding one of our Trials. Do not initiate it from the War Table until we are ready to do so or we will void the Achievement for our playthrough!

Secluded Courtyard:

Side Quest – A Friend of Red Jenny: If we found all three Red Handkerchiefs scattered around Val Royeaux, we can travel to the Secluded Courtyard to meet up with our contact from Red Jenny.

Companion #4 – Sera: Fight off the Guards in the area & we will find Sera. Speak with her, & when the option arises, ask Sera to join the Inquisition to become a permanent Companion. Sera is a Romance Option for Female Characters.


Achievement #13 – They Who Stand: Recruit your first new Companion.
We will unlock this Achievement after recruiting our first Companion; Solas, Varric, & Cassandra do not count. There are five more Companions we need to recruit to unlock The Brightest of Their Age Achievement.

Ghislain Estate:

Side Quest – The Imperial Enchanter: Next up, travel to the Ghislain Estate to follow through with our invitation to see the First Enchanter of Montsimmard.

Companion #5 – Vivienne de Fer: After the initial gossiping with the party guests, we will speak with Vivienne alone in the upper wing where we can invite her to join our party as a permanent Companion. She is not a Romance option.

Haven:

Side Quest – The Lone Warden: Enter into the Chantry at Haven to initiate a dialogue sequence of what the plan is next (say you want to meet the Templars if you want Approval from Cassandra). After the conversation, Leliana will give us a lead on the whereabouts of a potential Grey Warden recruit. They will become a new Companion for us.

Side Quest – The Captain of the Chargers: Speaking of new Companions, exit back outside the Chantry & we can find the soldier Krem standing outside. Speak with them & we will be asked with meeting their commander, Iron Bull, at the Storm Coast.

Companion Quests: Now that we have multiple Companions, those we have in our Party may change. When we are completing Companion Quests (destroying Red Lyrium for Varric, finding Circle Tome’s for Vivienne, etc.) be sure to have the corresponding Companion in your Party to receive a bigger boost to their Approval than if you complete the Quests without them. Since we have Trial – Fair-Weather Friends on, we need all the Approval we can get!

We also need to max out our Approval with at least 3/9 of our Companions to unlock the People Person Achievement.

Recipe #6 – Jar of Bees Grenade: If you spoke with Sera at the Haven Tavern, we will unlock some Red Jenny Operations on the War Table. Among them, completing the Operation – Red Jenny: Inquisition Needs Beeees! will unlock this new Recipe for us to Upgrade.

Main Quest – Champions of the Just vs In Hushed Whispers: On the War Table, we can see the node for Main Quest – Champions of the Just. Do not begin this Quest! There are no Achievements for siding with the Templars while there is a Missable Achievement for siding with the Mages!

Ignore these Main Quests for now; stay far away from Redcliffe Castle in The Hinterlands until we are ready to continue…

The Hinterlands:

Side Quest – The Lone Warden: Travel to the Upper Lake Camp & head to Lake Luthias to locate the Grey Warden; they can be found near a shack at the opposite end of the lake. Speak with the Warden & assist them in a quick fight where they go from wielding a sword & shield to magically swinging a Greatsword. Oh well.

Companion #6 – Blackwall: Speak with the Warden again, & he will offer to join the Inquisition as a permanent Companion. He is a Romance option for Female Characters.

Again, ignore our Main Quest – In Hushed Whispers telling us to go to Redcliffe Castle… stay away.

Agent #5 – Enchanter Ellendra: If you completed the Side Quest – My Lover’s Phylactery, bring Vivienne with you & go to the Crossroads to find Enchanter Ellendra again. Speak with her & with Vivienne, we can recruit Ellendra as an Agent.

Storm Coast (7-15):
Our next Area to explore is the Storm Coast, it will cost 4 Power to access it from the War Table. It is a good idea to complete the Side Quest – Cleaning House by building the Mercy’s Crest Amulet & dueling the Hessarian Chief so we can recruit the clan as an Agent. Do not approach their camp without this Amulet!


Storm Coast Ocularum #1: When we arrive at the Storm Coast, we can find our first Ocularum immediately East of the Storm’s Solitude Camp on the cliffs edge overlooking the beach below. It will highlight 3 Shards for us.

Side Quest – The Captain of the Chargers: Head down to the beach below us & assist the Bull’s Chargers to fight off some Tevinter Soldiers.

Companion #7 – Iron Bull: After the fighting is done speak with the leader of the Chargers, Iron Bull, & ask him to join us as a Companion permanently. Iron Bull is a Romance option for both Male & Female Characters.
Sequence 5: Perpetual Rain
1. Area: Storm Coast
2. Active Trials: Fair-Weather Friends
3. Agents: 6/10
4. Companions: 7/9
5. Astrariums: 6/15
6. Recipes: 7/14
7. Fade Rifts Closed: 12/75
8. Shards: 31/114
9. Achievements: 13/69
-----------------------------------------------------------------------------------------------------

Storm Coast:


Fade Rift #10: To collect one of our Shards, we will need to head West along the beach & travel across to a peninsula that is isolated from the rest of the Storm Coast. When we approach the Shard here, we can spot a Fade Rift beside it we will need to destroy. This Fade Rift will summon Shades, Wraiths, & a Rage Demon.

Astrarium #4: Travel back up to the top of the peninsula from the Fade Rift & take a left up a trail onto a plateau where we can find an Astrarium.


Storm Coast Ocularum #2: Head up to the highest point on the peninsula & we can find another Ocularum. Look through it to locate 3 Shards.

Astrarium #5: Our previous Astrarium will have marked two more on our Quest Map. Head to the closest one just due East of the peninsula on the large plateau overlooking the Storm Coast beaches.


Fade Rift #11: Return to the beaches & continue along them South to reach our next Fade Rift. This one will summon Wraiths, Lesser Shades, & Lesser Terrors.

Astrarium #6: Make your way over to the final Astrarium found at the Storm Coast just South of the Hessarian Camp.


Agent #6 – Blades of Hessarian: With Mercy’s Crest crafted, wear it on approach to the Hessarian Camp. Enter inside & duel the Chieftain. When he is dead, we can recruit the Blades of Hessarian as Agents to the Inquisition. Entering the camp without the Amulet will result in us having to kill all the Bandits & missing this Agent.

Recipe #7 – Mighty Offence: North West of the Astrarium, we can find a lone cabin on the cliffs overlooking the beach. Enter inside & we can find a Locked Door; interact with the door to receive Side Quest – A Glowing Key. Now at random locations across the Storm Coast, we can encounter the Rebel Mage mini-boss whom will drop the Glowing Key when defeated.

Return to the cabin & use the Key to access the hidden basement where we can collect this Recipe.

Storm Coast Ocularum #3: When we reach the Small Grove Camp, look up above on the cliffs overlooking the ocean to the North of the Camp to find another Ocularum. Use the Ocularum to locate 4 Shards.

Fade Rift #12: Resting at the final Camp, the Driftwood Margin Camp, we will have a new Fade Rift marked on our map at Lyrium Falls. Enter inside the cave past the waterfall & we will find a Rift that will summon Wraiths & a Despair Demon.

These enemies will be Level 12. By this point you should be around Level 9 or 10 & can handle them. If not, save this Fade Rift for later & come back after you Level up once or twice.

Storm Coast Ocularum #4: We can find a new Ocularum inside the cave we are in, just behind where the Fade Rift was. Look through it to locate 3 Shards.
Sequence 6: Uncovering Solasan
1. Area: Fallow Mire, Forbidden Oasis
2. Active Trials: Fair-Weather Friends
3. Agents: 7/10
4. Companions: 7/9
5. Astrariums: 6/15
6. Recipes: 8/14
7. Fade Rifts Closed: 19/75
8. Shards: 46/114
9. Achievements: 15/69
-----------------------------------------------------------------------------------------------------

Fallow Mire (Level 8-15):
With the Storm Coast complete, return to Haven & use 8 Power to access the Fallow Mire.

Fade Rift #13: After we set up the Old Thoroughfare Camp, we will have two Fade Rifts marked on our Quest Map. Go to the first one & we can find a friendly Avvar Skywatcher standing beside a dormant Fade Rift. Open it, & it will unleash Wraiths, Corpses, & a Rage Demon.

Fade Rift #14: Continue West through the mire to reach the next Fade Rift which will summon Corpses, Despair Demons, & a Revenant.

Recipe #8 – Tears of the Dead: Apart from these two Fade Rifts, there is nothing more related to Achievements or Collectibles that are mandatory. Complete the rest of the Fallow Mire at your leisure.

Completing the Side Quests Beacons In the Dark & subsequently Beneath the Mire, will reward us with this new Recipe.


Achievement #14 – Loremaster: Collect 250 Codex Entries in a single playthrough.
This will come naturally as we play through the game looting & killing enemies. Since we essentially need to 100% complete this game to earn all Achievements, we will be exploring most corners of all Areas. There are 548 Codex Entries in total; earning 250 is not even half of them.

This is the soonest we will unlock this Achievement if you have been fully exploring all Areas up to this point…

Agent #7 – Skywatcher: After we defeat the Avvar Leader, we can find Skywatcher standing outside the Avvar Fortress. Speak with him, & ask him to join the Inquisition as an Agent.

Forbidden Oasis (Level 8-20):
The final Area to explore before we continue on with the Main Questline is the Forbidden Oasis; it will cost us 4 Power to access it. Don’t worry about the Level 20 difficulty cap; that comes in to play much later on in the game…


Forbidden Oasis Ocularum #1: As soon as we begin at the Desert Camp, we can spot an Ocularum due North West of our position. Look through it to locate 5 Shards.

Fade Rift #15: Make your way South from the Desert Camp now & we can encounter our first Fade Rift here. It will summon Wraiths, Shades, & Rage Demons.

Fade Rift #16: Return to the Desert Camp & this time head to the Fade Rift North East of its location at the desert edge before entering into the canyons below. This Fade Rift will summon Wraiths, Lesser Shades, & Lesser Terrors.

Forbidden Oasis Ocularum #2: Back at the Desert Camp, follow the canyon edge along West until you find the Wooden Bridge Landmark. Walk along it & climb up a Ladder to an isolated plateau where we can find another Ocularum. Look through it to locate 4 Shards.

Forbidden Oasis Ocularum #3: Begin making your way around collecting the located Shards. If we head East from the Desert Camp & pass through a mine shaft to reach an upper level along the East end of the map, we can find another Ocularum near one of our Shards. Look through it to locate 3 Shards.

Fade Rift #17: The final Fade Rift of the oasis set can be found along the canyon bottom on the way to the Oasis Camp. This one will summon Lesser Shades & Wraiths.

Fade Rift #18: In the far North Western corner of upper Oasis, we can find two more Fade Rifts. The furthest North of the two will summon a whole hoard of Wraiths & a Despair Demon.

Fade Rift #19: Our final Fade Rift can be found at the bottom of an open pit mine shaft. It will summon Rage Demons & Wraiths.

Forbidden Oasis Ocularum #4: Our final Ocularum can be found along the upper walkways just above the Intrinsic Pool of the oasis. Look through it to locate the last 3 Shards.

Solasan Temple: Close to where we found one of the Shards, we can find the entrance to Solasan Temple just above the Intrinsic Pool oasis. To enter inside, we need to use 6 of our collected Shards. We can now expend our collected Shards here in the temple to begin unlocking loot & passive Elemental Defence rewards for our Character.

Which doors you decide to open first is up to you; we will have enough Shards to open them all & there are pros & ♥♥♥♥ to each door. I would stick with one door until it is fully completed instead of bouncing between them to fully capitalize on the higher tier rewards. There are three sections per door that will cost 6, 12, & 18 Shards to unlock.

For the Keymaster Achievement, we will need to collect/expend all 114 Shards in the game on the doors inside Solasan to open the final vault.


Achievement #15 – Focused: Spend 10 Points in a single Ability Tree with any one single-player Character.
By Level 10-12, it will be the soonest we are able to unlock this Achievement. Chances are, you will most likely unlock this Achievement via a Companion as opposed to your own Character. Regardless, after 10 Points have been spent in the same Ability Tree, the Achievement will pop.
Sequence 7: Oblivion Undone
1. Area: The Hinterlands, Haven, Redcliffe Castle
2. Active Trials: Fair-Weather Friends, Travel Light
3. Agents: 10/10
4. Companions: 8/9
5. Astrariums: 6/15
6. Recipes: 8/14
7. Fade Rifts Closed: 31/75
8. Shards: 46/114
9. Achievements: 17/69
-----------------------------------------------------------------------------------------------------

The Hinterlands:

Fade Rift #20: Now that we can adequately take on Level 12 Fade Rifts, it is time to clean up the remaining ones found in the Hinterlands. Head to the Rift at Dwarfson’s Pass & it will summon Wraiths, Shades, & Rage Demons.

Fade Rift #21: Next go to the Forest Camp & travel South West to a small cave that has a Hafter’s Woods Fade Rift inside it. This Rift will summon Wraiths, Despair Demons, & Rage Demons.

Fade Rift #22: The next Hafter’s Woods Fade Rift can be found East of the Grand Forest Villa. It will summon Wraiths, Shades, & Rage Demons.

Fade Rift #23: Go to the Redcliffe Farms Camp & head East to the Fade Rift found in the river ravine. This Fade Rift will summon Greater Terrors & Despair Demons.

Main Quest – In Hushed Whispers: If all other Side Quests & exploration of the Hinterlands, Storm Coast, Fallow Mire, & Forbidden Oasis have been completed then it will be time to finally continue with the Main Questline.

Once again, since no Achievements are tied to siding with the Templars, ignore the Main Quest – Champions of the Just & instead begin making your way to Redcliffe Castle to start Main Quest – In Hushed Whispers. Before we set foot inside the castle grounds & pass through the gate, immediately turn on the Trial – Travel Light. This Trial must be active during this Main Quest or we will void the Trial of the Magician Achievement! To turn on Trials, go into Options – Trials & check off Trial – Travel Light. It is heavily debated on when it is necessary to activate the Trial for the Achievement. In theory it only needs to be active when we go to commence the actual Quest from the Haven War Table; to be safe, it is best to activate it as soon as we begin completing objectives for the Quest.

In game Supply Caches are now disabled & we can only restock on Potions at Camps… which since we will be locked into a Main Quest means that your 8 Health Potions will be all you will have for the whole thing. Ration them wisely…

Fade Rift #24: As we approach the gates to Redcliffe Castle, we will encounter a brand new Fade Rift that will summon Wraiths, Lesser Terrors, & Lesser Shades. Be sure to have the Trial – Travel Light turned on before destroying the Fade Rift & progressing onwards (just in case).

Agent #9 – Smuggler Tanner: Complete the Side Quest – Business Arrangements & locate Smuggler Tanner at Redcliffe Village. Speak with her, & we can recruit her to join the Inquisition.

Agent #10 – Clemence the Tranquil: Enter into the Gull & Lantern Tavern to speak with Enchanter Fiona. Afterwards, we can find the Tranquil named Clemence who will join the Inquisition as an Agent when asked.


Achievement #16 – Persuasive: Acquire 10 Inquisition Agents in a single playthrough.
For this Achievement we need to recruit 10 out of 26 potential Agents to the Inquisition (3 of which are found in the Jaws of Hakkon DLC). Always explore each Area to complete Side Quests & speak with all NPCs in case they are recruitable.

After reaching Redcliffe, we can also recruit Corporal Vale after we find the healer here; Corporal Vale is found Southwest of the Crossroads in a small war camp up a small stone path.

Main Quest – In Hushed Whispers: Go to the Gull & Lantern Tavern & then the Redcliffe Chantry to fully begin the Main Quest.

Fade Rift #25: Enter into the Redcliffe Chantry & we will meet the Mage, Dorian. Here we will also need to close a Fade Rift that will summon a host of Wraiths.

Haven:
Inquisition Perk – Deft Hands, Fine Tools: If you have completed all Side Quests, turned in Research Materials, & destroyed all Fade Rifts up to this point, you should have reached Inquisition Level 6. If you have spent all Perks in the Secrets Tab, we can now purchase the Deft Hands, Fine Tools Perk & can now unlock Masterwork Locks. This is very handy & will now open up secret rooms for us to loot; certain key items we need for Achievements are locked behind Masterwork Locks later on in the game...

Redcliffe Castle (Level 4-7):

Main Quest – In Hushed Whispers: Before we fully commence this Quest, stop in at the Apothecary & equip your best Regeneration Potions since we need all the healing we can get. We should have 8 Healing Potions & 5 Regeneration Potions. If you have not already done so, be sure to Upgrade your Potions, Tonics, & Bombs as well… Make a separate Save before commencing the Main Quest!

When ready, go to the making sure that the Trial – Travel Light is active, & activate the In Hushed Whispers Main Quest at the War Table for 15 Power. Ignore the request to go to the Templars, & commit to the Quest where we will be joined by Dorian.

After we pass through time, we will only have Dorian at our disposal. Be sure to spec him out with powerful Barrier Abilities as using it will be our lifeline to avoid damage if you cannot generate your own Barrier or Guard.

Fade Rift #26: Collect your scattered Companions & fight as defensively as possible to not take any damage so we can retain our healing curatives. When we find Leliana, we will encounter a Fade Rift shortly afterwards that will summon a host of Wraiths.

Fade Rift #27: Pass through the underground prisons & we will exit outside into the Courtyard to encounter another Fade Rift. This one will summon Lesser Shades…

Fade Rift #28: Heading up the stairs beyond the previous Rift we will engage yet another that will summon Lesser Shades & Wraiths.

Fade Rift #29: Pass into the Lower Royal Wing to find another Fade Rift that will summon Lesser Shades, Corpses, & Wraiths.

Fade Rift #30: Collect the 5 Red Lyrium Shards to access Alexius’s throne room & we will have a Boss battle to complete. When Alexius reaches 1/3 of his health, he will summon a Fade Rift we need to destroy; this Rift will summon Lesser Shades & Wraiths. It will only have one wave instead of two.

Fade Rift #31: At 2/3 of his depleted, Alexius will summon yet another Fade Rift we need to close; this one will summon Lessor Shades & Lesser Terrors. It will only have one wave instead of two.


Achievement #17 – Trial of the Magician: Travel Light on for "In Hushed Whispers": finish the Quest.
Defeat Alexius & acquire the help of the Mages in the fight against the Breach. If you had the Trial – Travel Light on before beginning Main Quest – In Hushed Whispers from the War Table, we will unlock this Achievement.

With the Achievement complete, be sure to switch off this Trial…

Haven:

Companion #8 – Dorian: After we return to Haven, we will have the option of recruiting Dorian to our ranks. Of course, ask him to stay, & we will have another new Companion. Dorian is a Romance option for Male Characters.
Sequence 8: Opposition In All Things
1. Area: Haven, Skyhold, Halamshiral
2. Active Trials: Fair-Weather Friends
3. Astrariums: 6/15
4. Recipes: 8/14
5. Fade Rifts Closed: 31/75
6. Shards: 46/114
7. Achievements: 21/69
-----------------------------------------------------------------------------------------------------

Haven:


Achievement #18 – Opposition In All Things: Close the Breach.
Story Related. Before we carry on with the Main Questline be sure to speak with all our Companions & resolve any unfinished business you have to do here in Haven; carrying on will void any Side Quests left unfinished in Haven. When ready, begin this Main Quest – In Your Heart Shall Burn using 1 Power at the War Table.


Achievement #19 – The Brightest of Their Age: Recruit all 9 possible Companions.
After we close the Breach, Haven will be assaulted by the enemy. At the beginning of the siege, we will be greeted by Cole who will join our force right away. Cole is our final Companion to unlock in the game, if you recruited Iron Bull, Sera, Vivienne, Blackwall, & Dorian as well then we will unlock this Achievement.

Main Quest – In Your Heart Shall Burn: We must now defend Haven from the army of the enemy. Since we sided with the Mages, the enemy will be reinforced by Red Templars. It is important to remember that the enemies are not unlimited, even at the very end when we need to aim the Trebuchet. Do not rush & take your time fighting defensively until they are all dead before carrying forward. Save often.


Achievement #20 – In Your Heart Shall Burn: Survive an attack on the Inquisition.
Story Related. Hold out while Cullen evacuates the survivors & defeat the Behemoth boss before Corypheus arrives to steal our thunder. Obliterate Haven to escape & unlock our Achievement…

Skyhold:

Judgement: Sit on the Inquisition Throne to render judgement on our enemies. Be sure to make a Save before performing any judgement as this is an opportunity to boost our Approval with our Companions… or greatly damage them if we choose poorly.

Companion #9 – Cole: As of now, Cole is not a permanent member of our Party yet & will need to be spoken to still for an invitation to join. Vivienne will really not want him to, & we will lose a fair bit of Approval with her for doing this. It is unavoidable, if you have been on her good side so far than it shouldn’t cause you issues.

Side Quest – A Greener Garden: Go to your Quarters now & check for this Quest on your personal desk. We need to acquire 30 Spindleweed, 30 Elfroot, 30 Blood Lotus, & 1 Logging Stand. Completing this Quest will let us Upgrade our Skyhold Garden & let us grow/harvest more Herbs from it; we need to harvest 50 of them for the Botanist Achievement.

The War Table: We now have the entire game world unlocked to us & can go anywhere we want to. For now, there are some places we need to avoid as they have highly Missable Achievements. Do not travel to the Emprise du Lion Area at all! For our entire time there, we need to have the Trial – Rest Easy active. If we go there at any point without it active, we void the associated Achievement; it is going to be one of our final Areas we explore due to its Difficulty.

Ignore the two DLC Areas as well the Deep Roads & Frostback Basin as well…

Winter Palace of Halamshiral (Level 12-15):

Main Quest – Wicked Eyes & Wicked Hearts: Since we are still playing with the Trail – Fair-Weather Friends on, let us complete this Main Quest as soon as possible so we can finally remove it. Be sure that your recruited Cole into our Party as we are required to have all 9 Companions with us before starting this Main Quest. It costs 30 Power to begin.


Achievement #21 – Trial of the Lovers: Fair-Weather Friends always on: enter Halamshiral with all followers.
If you had the Trial – Fair-Weather Friends turned on before we started our game, had it on the enter time we have played, recruited all 9 Companions & lost none of them by accruing too much Disapproval, we will unlock this Achievement as soon as this Main Quest begins.

We can now turn this Trial off & go back to regular Disapproval multipliers making us becoming Friends with our Companions much more easily for the People Person Achievement.

Full Approval At the Orlesian Court: Unfortunately, this doesn’t end our woes as a new troublesome Achievement now takes effect. For the Bell of the Ball Achievement we need to earn 100/100 Approval at the Orlesian Court. This essentially means that ever single decision we make during this Main Quest is railroaded & a lot of our fun is taken out of it for fear of not reaching 100 Approval… Save often.

Starting Approval: We will begin this Quest with 25-40/100 Approval already; if Approval drops to 0 it will be game over & we have to restart. Being a Mage of any Race will give us a -10 Approval. If you are a Qunari of any Class, we will lose -15 Approval & being an Elf of any Class will lose you -10 Approval. Being a Human Warrior or Rogue will give us a +5 Approval. All other variations of Class or Race will give us no bonuses.

Caprice Coins & Scandals: Keep your eyes out for Scandals & Caprice Coins. These are not required for 100 Approval but they can top us up in a pinch if we are short. Scandals can be turned in to Leliana for bonus Approval & Caprice Coins can be tossed into the central fountain found in the Guest Garden for bonus Approval.

Do not use your Coins or turn in Scandals until the very end as we can waste their bonus since we cannot go above 100 Approval. Use these as the final top up in case you are short before we complete this Main Quests’ last event.
Sequence 9: The Lion's Den
1. Area: Halamshiral
2. Active Trials: None
3. Astrariums: 6/15
4. Recipes: 9/14
5. Fade Rifts Closed: 31/75
6. Shards: 46/114
7. Achievements: 21/69
-----------------------------------------------------------------------------------------------------

Halamshiral – Vestibule:

Conversation #1 – Grand Duke Gaspard (0): Our initial conversation with Grand Duke Gaspard has no specific dialogue & can be spoken to however you like.

Conversation #2 – Noblewoman (+10): Off our right after speaking with the Grand Duke, we can find a Noblewoman. Speak with her & say: “Interesting stratagem.” to gain +5 Approval.

Use the Search button to locate Montbelliard’s Ring by a nearby fountain & return it to the Noblewoman. Tell her: “I found it.” to gain another +5 Approval.

Eavesdrop #1 (0): Head up the set of stairs to the front gates to the Palace but do not enter yet. Instead, take the stairs up to our left & interact with a couple who will promptly walk away from us. Lean against the nearby flower sill & we can Eavesdrop on them for some information.

Halamshiral – Grand Ballroom:

Conversation #3 – Josephine (0): Enter into the Palace now & Josephine will speak with us, this dialogue has no Approval so say whatever you like.

Conversation #4 – Empress Celine (+5): Enter the Grand Ballroom & we will speak with the Empress. For dialogue, say: “The weather may turn foul.”, “I can’t do it credit.”

Halamshiral – Vestibule:

Conversation #5 – Leliana (0): Speak with Leliana back in Vestibule; this dialogue is not important.

Eavesdrop #2 (0): Head back up the stairs & we can find two Elves speaking with one another at the back of the room. They will move away from us when we try to talk to them. Approach a couch along the railing the stand beside to eavesdrop on their conversation.

Conversation #6 – Duke Germain (+5): Carry on into the next room which will be a long hallway. Enter into the first room off our left to speak with Duke Germain; choose the dialogue option in the Investigate tab “Gaspard is your nephew?” for +5 Approval.

We can also find a Caprice Coin in this room as well as a Scandal from an Eavesdrop in the hall behind us.

Eavesdrop #3 (0): Go to the far end of the hallway now & we can spot two more Elves speaking together who will walk away from us when prompted. Stand right where we are for the Eavesdrop location.

Conversation #7 – Council of Heralds Vassal (+15): We can find this man wandering around in the hallway room. Speak with them & say: “Phillipe is a jerk!” to gain a whopping +15 Approval.

Cylinder Seal: Enter the room where those two Elves went & exit outside onto a balcony. Use Search to locate the Cylinder Seal.

Halamshiral – Guest Garden:

Conversation #8 – The Three Ladies (0): With the Cylinder Seal found, return to the hallway & we can pass through a set of doors here that will lead us outside. As soon as we exit, we will be intercepted by three ladies. Choose the dialogue: “I’m happy to hear from her.” & “How kind of her.”
Guest Garden Fountain: We can find the Fountain in the center of the Guest Garden. This is where we can toss our collected Caprice Coins for a +1 Approval bonus per Coin.

When facing the Fountain, hop over the railing to our right & we can find an Eavesdrop location that will give us a Scandal. We can find another Eavesdrop location along the other railing for a second Scandal…

Off Limit Zone #1: We are about to enter into an Off Limit Zone, where we will lose Approval the longer we are there. Before we go, make a Save we can reload back to in case we take too long. You can also Save, take as long as you want locating everything, then reload your Save to loot the area much faster once you know where everything is found.

Halla Statue: Climb up the garden trellis beside the Fountain & quickly run around the railing to our right to find a Halla Statue.

A Scandal can be found further down at the end using Search. We can also find an Eavesdrop location along the opposite railing that will gain us another Scandal if you want to risk it.

Letter: Enter into the room directly across from where we climbed up now & go to the far left corner of the room. Use Search on the bookshelf to find a book we can pull to open a secret room. Enter inside it & look on the desk to find a Letter we need.

Recipe #9 – Confusion Grenade: Light the Veilfire in this room now & we will need to solve a puzzle. From where we exit, we can see three Urns on either side of us. This is the order we need to light them: Left 3 (furthest on the left), Left 2, Left 1, Right 3 (furthest on the right), Right 2, Right 1. Once they are all lit, we will open a secret room where we can find this highly missable Recipe in a Chest on the floor.

Negotiations: Quickly exit the room now back outside & use the Halla Statue we collected on the door off our right to unlock it. Here we can collect the Negotiations which is another Item we need.

Halamshiral – Vestibule:

Eavesdrop #4, #5: In the waiting room just outside the Ballroom, we can find two Eavesdrop locations on the second floor next to the railing overlooking the stairs. I am not sure if this was a glitch, but listening to these regained all of my Approval that I had lost while in the Off Limits Zone…?

Conversation #9 – Morrigan: Go to enter the Ballroom & we will speak with Morrigan (yes that Morrigan from Dragon Age – Origins). This dialogue does not matter.
Sequence 10: The Grand Spectacle
1. Area: Halamshiral
2. Active Trials: None
3. Astrariums: 6/15
4. Recipes: 9/14
5. Fade Rifts Closed: 32/75
6. Shards: 46/114
7. Achievements: 23/69
-----------------------------------------------------------------------------------------------------

Halamshiral – Servant’s Quarters:

Off Limits Zone #2: We will be entering another Off Limits Zone again; make a Save before you enter. Follow your Quest Marker to the Servant’s Quarters where we will equip our Weapons & Armor. It is recommended that you skip all the way to the final Quest Marker in this area ignoring all other rooms & fights.

If you are above 55 Approval & are holding onto a number of Scandals then there are Halla Statues, Caprice Coins, Scandals, & other loot to be found in this area if you take the time to search for them. Just pay attention & make sure you reload your Save if your Approval drops too low by taking too long.

Conversation #10 – Ambassador Brialla: Get to the upper floor of the Grand Apartments & defeat some Venatori Soldiers in a hallway to trigger a cutscene with the Ambassador. This dialogue does not matter.

With the conversation done, exit out of the Servant’s Quarters back into the Vestibule.

Halamshiral – Vestibule:

Conversation #11 – Three Guards (+10): Head up the stairs of the Hall of Heroes & we can find three Guards speaking outside the Trophy Room. Speak with them & say: “The stories I could tell!” & “You should talk to Cullen.” for a +10 Approval.

We can loot a Caprice Coin & a Scandal in the Trophy Room if you are quick.

Fashionably Late: Quickly sprint to the Ballroom but do not enter inside it. Wait for a second bell to chime & our Inquisitor will make a remark about being fashionably late. If this doesn’t happen after a few minutes, you have missed your mark & we will lose Approval instead of gaining some.

Halamshiral – Grand Ballroom:

Conversation #12 – Duchess Florianne: As soon as we enter the Ballroom, we will be approached by the Duchess. Say: “May I help you?”, “Let’s dance.”, “Why don’t you educate me.”, “Is that what we both want?”, “Which am I to you?”, “I trust the Inquisition.”, & “Isn’t everyone.” for a massive +35 Approval bonus.

Even if you took a bit in the Off Limits Zero, this will basically get you to 100 Approval. If not, do not fret, there is still more.

Conversation #13 – Josephine (0): Immediately after our dance, we will speak with Josephine. Say: “I got some information.”, “I found Venatori agents.”, “We’re not doing that.”, & “We save the Empress.” There is no Approval in this conversation, but it sets up the “best ending” for this Main Quest for maximum Approval.

Halamshiral – Royal Wing:

Off Limits Zone #3: Our final Off Limits Zone will be in the Royal Wing; Save before entering. Turn in all Caprice Coins & Scandals to reach 100 Approval before starting this (we will still get more Approval through dialogue).

Conversation #14 – Duchess Florianne: When we reach the Quest Marker, we will encounter Duchess Florianne. Dialogue does not matter.

The dialogue when rescuing the Elf woman prior does not matter either.

Fade Rift #32: A battle will ensue after our conversation with the Duchess that will involve us having to close a Fade Rift.

Halamshiral – Grand Ballroom:

Conversation #15 – Cullen: This is the final event & ideally you are above 90 Approval. Speak with Cullen & say: “I’ll talk to Florianne.”

Choosing to speak with Florianne is paramount to unlock our Achievement!

Conversation #16 – Duchess Florianne: When speaking with Florianne say: “It’s over.”, & “Take her away.”


Achievement #22 – Belle of the Ball: Gain the full approval of the Orlesian Court.
Missable. If you had Approval over 90 before entering the Ballroom for the final time, this Achievement will unlock when we decide to speak with Florianne. Ending this Quest in any other way will void the Achievement.


Achievement #23 – Wicked Eyes & Wicked Hearts: Make an impression on the Orlesian Court.
Story Related. After our Achievement, there are a few ways we can complete this Main Quest regarding Briala & Gaspard. Ultimately, it does not really matter & you can choose whichever ending you prefer.
Sequence 11: Like Grains of Sand
1. Area: Skyhold, Val Royeaux, The Western Approach
2. Active Trials: None
3. Liberated Keep: 1/3
4. Astrariums: 7/15
5. Recipes: 13/14
6. Fade Rifts Closed: 39/75
7. Shards: 55/114
8. Achievements: 25/69
-----------------------------------------------------------------------------------------------------

Skyhold:

Companion Time: If you have not already done so, be sure to go around & exhaust all of our new dialogue with our Companions. Save before doing so in case we earn Disapproval with them. Now that we have Trial – Fair-Weather Friends off, earning Approval with our Companions will be a lot safer to do.

We should ideally be able to unlock the Romance Quest with our desired Romance as well if you have earned enough Approval/Flirted with them often enough.

Specialization: By this point, we should have the option to choose a Specialization; you will know if you have the Main Quest – Specializations For the Inquisitor active in the Inquisitor’s Path tab of our Journal. Go to the War Table & select the Operation – Specializations For the Inquisitor just West of Orzammar & it will instantly complete.


Achievement #24 – Specialized: Choose a Specialization Class.
Before selecting a Specialization Class, be sure to look up their associated Powers & gameplay online; we cannot undo our Specialization once it is chosen! Since this Nightmare Difficulty, it is imperative that you choose a Specialization that will compliment how you want to play. Alternatively, you can make a Save before choosing a Specialization, pick one, purchase The Tactician’s Renewal to respect Powers, & go somewhere to test out the new Powers. Tedious, but then you know.

For me as a Mage, I went Knight Enchanter since they can be pretty broken…

Acquiring Thrones: On the War Table, we can see the Operation – Gather Coins. Using Josephine to complete this Operation has the chance of her collecting a piece to a Throne. Whittle away at completing a few of these Operations to start collecting Throne Upgrades. We need to fully max one out for the Regal Achievement.

Upgrading the Skyhold Garden: For the best return on Herbs we can collect from the Syhold Garden, it is best to Upgrade it. The Upgrade will cost us 30 Spindleweed, 30 Elfroot, 30 Blood Lotus, & a Logging Stand. We can purchase all the necessary Herbs from the Merchant at the Crossroads in the Hinterlands if you are short.

Once the Requisition is complete, go to the Skyhold Garden to activate the Upgrade & we will have two choices: the Chantry Garden & the Herb Garden. Aesthetically, the Chantry Garden looks nicer, but definitely go with the Herb Garden. The Herb Garden will give us an additional 4 Pots to plant Herbs in for a maximum of 6. This makes earning the Botanist Achievement much faster.

Always have Herbs on the go & harvest them anytime you return to Skyhold…

Val Royeaux:

Recipe #10 – Spirit Resistance Tonic: Can be purchased from Willvan in Val Royeaux for 53 Gold.

Recipe #11 – Lightning Resistance Tonic: Can be purchased from Willvan in Val Royeaux for 53 Gold.

Recipe #12 – Fire Resistance Tonic: Can be purchased from Willvan in Val Royeaux for 53 Gold.

Recipe #13 – Cold Resistance Tonic: Can be purchased from Willvan in Val Royeaux for 53 Gold.


Achievement #25 – Decorator: Purchase any new Decoration element for Skyhold.
Enter the furniture store across from the tavern & access its inventory. Scroll to the Other tab to look at Skyhold Decorations; purchase any one of them to unlock the Achievement.

Western Approach (Level 11-14):
When you are ready to continue, go to the War Table in Skyhold & enter Orlais. Look for the node that says Investigate the Western Approach & use the 8 Power to activate it; this is the next Area on par with our current Level.


Western Approach Ocularum #1: From where we enter the Western Approach at the Lost Spring Canyon Camp, we can spot a ? on our Quest Map North of our position. Head to it to locate a an Ocularum; use it to find 3 Shards.

Fade Rift #33: Just West of the Ocularum, we can find a Fade Rift in The Canyons. It will summon Wraiths, a Shade, & a Rage Demon.

Fade Rift #34: Travel South from the Lost Spring Canyon Camp to find another Rift in The Canyons. This one will summon Shades, Wraiths, & a Rage Demon.

Fade Rift #35: Get to the Craggy Ridge Camp & head South East from it to find this Fade Rift in the Giant’s Staircase. This Rift will summon Terrors & Rage Demons.

Western Approach Ocularum #2: Continue down South from the Craggy Ridge Camp & we will locate our next Ocularum. Look through it to find 3 Shards.

Fade Rift #36: Keep heading South to find another Fade Rift in Iska’s Stand. This Rift will summon Terrors & Rage Demons.

Fade Rift #37: Construct the Nazaire’s Pass Camp & we will uncover the location of a new Fade Rift at Dustytop Fort. Head there, & defeat the summoned Shades & a Rage Demon.

Western Approach Ocularum #3: Due East of the previous Fade Rift, we can discover a new Ocularum. Look through it to find another 3 Shards.

Fade Rift #38: Return to the Craggy Ridge Camp & begin heading North now towards the Fade Rift found in the Dust Plains. Defeat the summoned Wraiths, Shade, & Rage Demon.

Liberated Keep #1 – Griffon Wing Keep: We can liberate our first Keep here in the Western Approach. Reach Griffon Wing Keep & enter inside it by destroying a Barrier guarding the Outpost Well cave along the Southern base of the Keep. Climb up the Old Well & defeat the Ventori leader, Macrinus. Hoist the Inquisition Flag to claim the Keep.

We need to claim 3 Keeps to unlock the Liberator Achievement.

Astrarium #7: At the top of Griffon Wing Keep, we can find a new Astrarium.


The Poison Mists: There are two locations found in the Western Approach that will require us to complete an Operation to dispel poison mist that blocks us access. Scan around these areas to find a wooden walkway with an Inquisition Stake we need to place to unlock the Operations. For the poison mist section North of Griffon Wing Keep, the Operation can be found near the mist’s center along its outskirts. For the poison mist found East of Griffon Wing Keep, the Operation can be located at its top end close to the Gates of Andoral Landmark.

Fade Rift #39: There is a special Fade Rift that we can find inside The Still Ruins. The Still Ruins can be found through the canyon West of the Lost Spring Canyon Camp; we need to go here for Side Quest – A Manuscript of Some Authority which is given to us by Fredrick. Fredrick is a quest giver found immediately South of the Nazaire’s Pass Camp.

Collect all 5 Keystones found throughout the dungeon to disable the Time Magic & we can return to a now active Fade Rift in the Main Chamber. This Rift summons Greater Terrors, Despair Demons, & Wraiths.
Sequence 12: Undertow
1. Area: Skyhold, The Western Approach, Crestwood
2. Active Trials: None
3. Liberated Keep: 2/3
4. Astrariums: 12/15
5. Recipes: 14/14
6. Fade Rifts Closed: 46/75
7. Shards: 60/114
8. Achievements: 27/69
-----------------------------------------------------------------------------------------------------

Skyhold:


Achievement #26 – Regal: Completely upgrade one Throne.
Keep completing the Operation – Gather Coin with Josephine for the chance to unlock Throne Accessories. The first Throne you will most likely max out is the Inquisitor’s Throne which has two upgrades to collect.

Operation – Crossing the Sulphur Pits: If you located this Operation in the Western Approach, use 5 Power to complete it at the War Table to gain access to new locations.

Operation – Find the Source of Darkspawn: If you located this Operation in the Western Approach, use 5 Power to complete it at the War Table to gain access to new locations.

Operation – Translate the Dragon Text: Our final Side Quest done for Fredrick obtaining the Manuscript from the Still Ruins will result in a new Operation at the War Table. Use 5 Power to complete it to gain access to another new location.

The Western Approach:


The Abyssal High Dragon: With the Manuscript translated, speak to Fredrick & we can lure out the Abyssal High Dragon with bait. Though it is only Level 14, High Dragons are extremely difficult foes & should not be fought lightly. Save this fight for a little bit later when we have become stronger… It is usually best saving these guys until we are around Level 18-20.

Western Approach Ocularum #4: If you completed Operation – Find the Source of Darkspawn, we can now progress through the previously blocked off area full of poison mist to the North of Griffon Wing Keep. Take the walkway across the sulphur pools & we can spot a new Ocularum that will identify 2 Shards.

Astrarium #8: Carry on along the canyon path to the Prison Ruins where the Darkspawn are emerging from. At the top of the Ladders we need to climb, we can find this Astrarium nearby.


Achievement #27 – Hard Hitter: Land a single blow in excess of 1,000 damage in single-player mode.
You may have earned this Achievement a long time ago depending on your build, but by this point you should be able to reliably hit Critical Damage over 1000 damage; you can also use your Companions, but must be actively controlling them.

Fade Rift #40: Pass through the Darkspawn infested ruins of Coracavus & establish the Echoback Canyon Camp. From here head due East to the Fade Rift that will summon Wraiths & a Despair Demon.

Fade Rift #41: The final Fade Rift to find in the Western Approach is located further South in Echoback Canyon on a ledge overlooking the canyon. It will summon Shades, Wraiths, & a Rage Demon.

Western Approach Ocularum #5: Continue South along the same ledge & we will find our final Ocularum as well. Use it to locate the last 3 Shards.

Astrarium #9: Enter into Echoback Fort, defeat the Venatori enemies, & enter into the small cave here to pass through to the other side to find the last Astrarium.


Crestwood (Level 11-15):
With the Western Approach finished, return to Skyhold (harvest some Herbs, we should be around 10-14/50 by now) & locate the node called Find the Warden on the War Table. Use 8 Power, & we can now travel to Crestwood.

Fade Rift #42: When we enter Crestwood, begin making your way to Crestwood Village. From here, we can head to the first marked Fade Rift on our Quest Map North East of us at North Gate. This Rift will summon an Arcane Horror, Corpses, Wraiths, & a Rage Demon.

Liberated Keep #2 – Caer Bronach: To progress in Crestwood, we need to capture Caer Bronach. Defeat the Highwaymen & place the Inquisition Flag on the pole to claim the Keep.

Hold off on draining the lake using the dam controls for now & let’s complete the last random dregs found South of the Keep.

Recipe #14 – Healing Mist Grenade: After we take the Keep, we can now access all the doors in Caer Bronach. Across from the main epicenter, we can enter through a door that will take us to a series of Ladders leading down below the Keep. At the bottom, we will encounter a unique Giant Spider called Snowball. Defeat her, & we can collect this new Recipe from her corpse.

As of now, we have all Recipes in the game. Harvest as many Herbs as you can & Upgrade your Potions, Tonics, & Bombs often. Once we locate the Areas with Rashvine, we should very quickly obtain the Master Alchemist Achievement.

Fade Rift #43: We can find a new Fade Rift at the very far South end of Crestwood in The Black Fens along the cliffs above the coast past the Fereldan Wyvern Statues. This Rift summons Shades, Wraiths, a Despair Demon, & a Rage Demon.

Fade Rift #44: Establish the Three Trout Farm Camp & we can find another Fade Rift just South of it at Old Whitter’s Farm. This Fade Rift will summon Shades, Corpses, Wraiths, & an Arcane Horror.

Astrarium #10: Just below Three Trout Farm Camp, we can find a road that leads up into the mountains to the North West. Follow it up Rocky Slope, passing Red Lyrium deposits, to reach Glenmorgan Mine. At the top above the Landmark, we can find an Astrarium.


Astrarium #11: The next Astrarium can be found South of Three Trout Farms Camp just outside the Forester Homestead.

Main Quest – Here Lies the Abyss: Link up with Hawke outside the Cave at the far Eastern end of Crestwood. Meet the Grey Warden Stroud, & we will progress the Main Quest back over to the Western Approach…

Draining Crestwood Lake: Now it is time to drain the lake at the dam. Make your way along the dam using the Caer Bronach access & enter into the Rusted Horn Tavern. Use the winch controls & drain the lake.

Be warned that with the lake drained, the Northern Hunter High Dragon will arrive to loom over the Fereldan Wyvern Statues. As said before, save the High Dragons for later; though the Northern Hunter is only Level 13 & is the weakest of the 10 we need to slay. It is resistant to Lightning & weak to Spirit damage. It will be the first we are going to kill when ready…

Fade Rift #45: With the lake drained, we can now complete the final few event instances around Crestwood. To start, let’s take out the last Fade Rift found along The Flats. This Rift will summon Wraiths, Corpses, & a Rage Demon.

Astrarium #12: Our final Astrarium in Crestwood can be found on an isolated height of land in the drained lake near the Fisherman’s Hut Landmark.


Fade Rift #46: Enter into the Flooded Caves now & complete Side Quest – Still Waters by closing the massive Fade Rift in the depths of Crestwood Lake. This Rift is different & will have four waves instead of two; it will summon Wraiths, Shades, Lessor Terrors, & a Rage Demon.
Sequence 13: Here Lies the Abyss
1. Area: Skyhold, The Western Approach, Exalted Plains
2. Active Trials: None
3. Liberated Keep: 2/3
4. Astrariums: 12/15
5. Fade Rifts Closed: 51/75
6. Shards: 71/114
7. Achievements: 32/69
-----------------------------------------------------------------------------------------------------

Skyhold:


Achievement #28 – High Commander: Complete 50 Missions or Operations in a single playthrough.
This will come naturally as we playthrough the game. Always have our three Agents (Josephine, Leliana, & Cullen) actively completing Operations on the War Table. On top of this, complete all Side Quests you encounter to contribute to this Achievement as well. After you have completed 50 between the different missions, we will unlock the Achievement.

The Western Approach:

Main Quest – Here Lies the Abyss: Go to the Western Approach now & meet with Hawke & Stroud near the Ritual Tower Landmark. We will encounter a Tevinter Mage controlling some Wardens & have to fight them off; progressing the Quest back to Skyhold for the actual mission.

Adamant Fortress (Level 12-15):

Main Quest – Here Lies the Abyss: Go to the Skyhold War Table & begin the associated mission. It will cost us 20 Power to initiate.

There are no Trials or other associated secondary Achievements associated with this Main Quest. Just follow it through.


Achievement #29 – Here Lies the Abyss: Face your fears in the Fade.
Story Related. Stop the Wardens from summoning a big ol’ boss Fade Demon, & put an end to their mind control by defeating Livius Erimond of a long winded place name that probably doesn’t exist. That guy… just stop that guy.

Enter the Fade & defeat the Aspect of the Nightmare after the big ol’ Fade Demon is killed by someone else… & escape to unlock the Achievement. The decision of who makes the final sacrifice & what you do with the Grey Wardens is up to you; it has no bearing on any Achievements.

Skyhold:


Achievement #30 – Peerless: Level up the Inquisition to Rank 10.
There are many things in game we can complete that will provide us with Influence: Side Quest, Operations, turning in Research, specific decisions, completing Requisitions, Main Quests, etc. If you are being a completionist & fully exploring/completing all you come across, you should have no trouble reaching Rank 10. We are essentially halfway through the game, with another half a game worth of Influence to collect… I beat the game at around Rank 17.


Achievement #31 – Well-Funded: Earn 50,000 or more Gold across all single-player playthroughs.
This Achievement will come naturally as we play through the game; this is most likely the earliest you will unlock it. If you explore everywhere & complete everything, you will be acquiring quite a bit of loot. Loot that if you consistently sell, will start racking you up a lot of Gold. Stick with it & you will eventually unlock this Achievement; it is cumulative, you do not need the whole 50,000 Gold in your Inventory at once.


Achievement #32 – People Person: Become friends with at least three of your inner circle in one playthrough.
This is a very ambiguous Achievement. Unlike previous Dragon Age games, they removed the bar that tracks your Companions current affinity with you… do not ask me why. Not only does your “inner circle” include your Companions, but it also includes Cullen, Leliana, & Josephine as well. Sometimes, but... rarely actually, the tarot card of your Companion seen during the Party Selection screen will change when you have become Friends with them. I unlocked this Achievement with only Varric’ card changing…

Especially since we no longer have to worry about Trial – Fair-Weather Friends, really focus on your Companions Approval. Typically, you will befriend the Companions of your main Party, but not exclusively. I believe I earned this Achievement by befriending Varric, Josephine, & Cassandra… but could have also been Dorian or Sera.

Just always be mindful of Approval, your chosen Romance will count towards this as well. If a decision you make poses too much Disapproval, reload a previous Save & try to find a better outcome.

Main Quest – What Pride Had Wrought: From this point on, do not continue the Main Questline yet; avoid the mission node on the War Table. There are some Missable Achievements involved, not due to lack of exploration, but just during those Main Quests. If you want to skip ahead, check out the Main Quest description in Sequence #17.

Otherwise, we will go & explore/complete the next three Areas…

Exalted Plains (Level 11-16):
Our next Area to conquer is the Exalted Plains. Access it from the War Table on the Investigate the Exalted Plains node in Orlais & activate it for 8 Power. Rashvine is an available Herb in this Area; with this, we have access to all major Herbs in the game for the Master Alchemist Achievement.


Fade Rift #47: From the Path of Flame Camp where we begin, head left (South West) through the canyon into the Halin’sulahn area to find our first Fade Rift. This Rift will summon Wraiths, Corpses, & Rage Demons.

Fade Rift #48: Continue through Halin’sulahn to the West to find the next Fade Rift. This one will summon Wraiths, Terrors, & Rage Demons.

Fade Rift #49: Start heading North along the river to the Ancient Baths to where the next Fade Rift is in the ruins; you will need a Warrior to Bash through a wall to reach it. This Rift will summon Shades, Wraiths, & a Rage Demon.

Exalted Plains Ocularum #1: This Ocularum is a bit of climb to get to & you will need to circle around the cliffs it is found on top of to find a viable path up. It is easiest to ascend to it from the North close to the Ruined Arches Landmark. Use the Ocularum to locate 6 Shards.

Fade Rift #50: Our final Fade Rift in the old plains will be found North of us in the Enavuris. This Fade Rift will summon Terrors, Corpses, an Arcane Horror, & a Revenant.

Exalted Plains Ocularum #2: Head East from the first Orlesian fortification camp to the burnt village of Riel. Here we can climb up another difficult boulder face to reach a new Ocularum. Look through it to find 5 Shards.

Fade Rift #51: Head North East from Riel village & we will encounter our next Fade Rift. This one will summon Wraiths, Shades, & a Rage Demon.
Sequence 14: A Momentary Abatement
1. Area: Exalted Plains, Skyhold, Emerald Graves
2. Active Trials: Grizzly End
3. Liberated Keep: 2/3
4. Astrariums: 14/15
5. Fade Rifts Closed: 63/75
6. Shards: 83/114
7. Achievements: 35/69
-----------------------------------------------------------------------------------------------------

Exalted Plains:


Exalted Plains Ocularum #3: We can find this Ocularum at the Northern end of the Eastern Ramparts; just North East of the Riverwatch Camp. Look through it to find the final 5 Shards.

Fade Rift #52: Follow the river North of Riverwatch Camp into Ville Montevelan to find a new Fade Rift. It will summon Wraiths, Despair Demons, a Rage Demon, & a Revenant.

Fade Rift #53: Continue to follow the river along North to the end of the map to find another Fade Rift. This one will summon Shades & a Rage Demon.

Fade Rift #54: Go to the Riverside Garrison, & we can find our final Fade Rift in its furthest depths. It will summon Corpses, Wraiths, & an Arcane Horror.

Operation – Gain Access to Ghilan’nain’s Grove: If you follow the cliff walls along South East from the Riverside Garrison towards Fort Revasan we will come across a new Operation in front of a caved in entrance. Unlock it, so can open up this new area at the War Table.

Skyhold:
Operation – Gain Access to Ghilan’nain’s Grove: Use the 5 Power to fix the bridge in Exalted Plains to access a new area.

Exalted Plains:

Fade Rift #55: Return to the Exalted Plains & enter into the newly accessible Ghilan’nain’s Grove area to set up the Fens Camp. From here begin making your way through the cavernous passages until we come across this Rift. It will summon Wraiths & a Despair Demon.

Fade Rift #56: Carry on into the Crow Fens to find the next Fade Rift. This one will summon Wraiths, Despair Demons, & Rage Demons.

Fade Rift #57: The last Fade Rift in the Exalted Plains can be found at the back end of the Crow Fens. It will summon Wraiths, Despair Demons, & Rage Demons.

Be very careful as the Gamoran Stormrider High Dragon lurks in this very same area; do not travel East of this Fade Rift or it will find you!

Skyhold:


Achievement #33 – Beloved & Precious: Pursue a romantic relationship.
By this point, if you have been Flirting with them from the start as well as completed their various Inner Circle Quests, you should be able to start a Romance with your chosen Companion/Adviser.

Once you begin a Romance (it will tell you that’s what you are doing) you will have to complete a special Romance Quest typically. Once that is done, the Romance can fully begin & we will unlock our Achievement. If you still do not have the option yet, just continue focusing on gaining more Approval with your Romance. Again, unlike previous Dragon Age instalments, there are no Gift Items to increase Approval with Companions unfortunately.


Achievement #34 – Master Alchemist: Upgrade your Alchemic Potions, Grenades, or Tonics 30 times in a single playthrough.
With all Recipes at our disposal, we can now chip away at Upgrading our Potions, Tonics, & Grenades. Since we have a steady stream of Rashvine now at the Exalted Plains, we should easily be able to unlock this Achievement; certain Merchants sell infinite Herbs if you do not want to go around collecting them by hand!


Achievement #35 – Botanist: Harvest 50 Herbs from Skyhold's Garden in a single playthrough.
Anytime you leave somewhere & return to Skyhold, go to your Garden to harvest Herbs that you planted from it. If you chose the Herb Garden Upgrade, this process will go much faster as you will have 6 Pots to plant Herbs in. Regardless, always pop in to harvest them, & after collecting 50 you will unlock the Achievement.

You cannot Save/reload to farm Herbs; it has to be done over the course of the game with them naturally respawning.

Emerald Graves (Level 15-20):
We can find the Make Contact In the Emerald Graves node in the South Eastern corner of Orlais. It will cost us 8 Power to activate.


Trial – Grizzly End: The first thing to do when we enter the Emerald Graves is to turn on Trial – Grizzly End. While this Trial will upgrade every “Bear-Type” enemy in the game, for the Trial of the Hermit Achievement we need to kill 10 Great Bears upgraded by this Trial. Great Bears are only found in the Emerald Graves…

Great Bears effected by this Trial… are very difficult. Be prepared for mini boss battles anytime we encounter one; they are rare however, so anytime you spot one chase it down! By this point in the game, they should not pose too much of a threat to you… it will just be tedious whittling down their massive health pool. I highly recommend equipping a Fire Rune to your Weapon if it does not already deal Fire Damage.

Fade Rift #58: From the Hill Camp, make your way along the maps edge to the East & we will encounter our first Fade Rift. It will summon Wraiths, Rage Demons, & Despair Demons.

Emerald Graves Ocularum #1: We can find our first Ocularum as well on some rocks just above where the Fade Rift was. Look through it to locate 7 Shards.

Astrarium #13: Our next Astrarium can be found just North East of Watcher’s Reach, down the road from Villa Maurel.


Fade Rift #59: Just North of Villa Maurel, we can find a new Fade Rift in the Briathos’ Steps. It will summon Greater Terrors, & Despair Demons.

Fade Rift #60: From the Briathos’ Steps Camp, head West to find another Rift; this one will summon Wraiths, a Despair Demon, a Rage Demon, & a Pride Demon.

Astrarium #14: Our next Astrarium can be found at the far West end of the Emerald Graves in the Harrow.


Fade Rift #61: Close by the Astrarium, we can find another Fade Rift as well; this one summoning Greater Terrors, Wraiths, a Rage Demon, & a Pride Demon.

Fade Rift #62: North of the Astrarium, we can find a Fade Rift in the Stonewolf Green (what kind of a name is that?); this Rift will summon Shades & a Rage Demon.

Fade Rift #63: On route to the Gracevine Camp, we will encounter the last Fade Rift at the pavilion. It will summon Wraiths, Despair Demons, & Rage Demons.
Sequence 15: The Will of Andraste
1. Area: Emerald Graves, Hissing Wastes
2. Active Trials: Grizzly End, Walk Softly
3. Liberated Keep: 2/3
4. Astrariums: 15/15
5. Fade Rifts Closed: 74/75
6. Shards: 93/114
7. Achievements: 40/69
-----------------------------------------------------------------------------------------------------

Emerald Graves:


Achievement #36 – Quartermaster: Complete 20 Requisition Requests in a single playthrough.
We can acquire Requisition Requests from Requisition Officers in Inquisition Camps we have established in different Areas. There are a variety of Requisition Requests we may receive that revolve around collecting Herbs or Materials that are found in the given Area. Whenever you establish a Camp, take a Requisition Request to complete; by this point we should have around 20 Camps to unlock the Achievement.

Alternatively, to grind out the Achievement, go Area by Area & Camp by Camp collecting Requisition Requests until you can no longer complete them. If you have been a resource hoarder, you should have the needed Herbs or Materials to complete enough. We still have two more Areas worth of Camps to establish as well…

Fade Rift #64: From the Gracevine Camp, continue North to the next Fade Rift found near the Rush of Sighs. This Rift will summon Greater Terrors, Lesser Terrors, Despair Demons, & a Pride Demon.

Fade Rift #65: Follow the nearby river along East towards the next Fade Rift & it will summon Wraiths & a Despair Demon.

Emerald Graves Ocularum #2: We can find the next Ocularum in between the Gracevine Camp & the Direstone Camp. Look through it to find the last 6 Shards.

As of now, we should have enough Shards to complete another one of the elemental doors in the Forbidden Oasis. Only one more left to open!

Astrarium #15: Our final Astrarium can be found just South of the Direstone Camp.


Achievement #37 – Stargazer: Unlock 15 Astrariums in a single playthrough.
We will unlock this Achievement as soon as we complete the final Astrarium puzzle.
Fade Rift #66: From the Direstone Camp, take the bridge East across the river to find a Fade Rift down the road. It will summon Greater Terrors & Despair Demons.


Achievement #38 – Invincible: Defeat 2,500 enemies in single-player mode.
This is probably the earliest you will unlock this Achievement if you have been 100% exploring all Areas up to the is point. We do still have two more Areas to explore as well as three DLCs to complete which should give you ample enemies to slay (wild animals count as enemies).

If you are worried, just make a point of killing any & all things that cross your path from here on; for the Demonslayer Achievement we need to kill 1000 Fade Demons, so that is 2/5 of our kills right there…

Fade Rift #67: Cross the river to the North over to the final area of Emerald Graves & we can find a Fade Rift in Hopwood that will summon Wraiths, Despair Demons, Shades, & a Fear Demon.
Beware that this is a Level 20 Fade Rift!

Fade Rift #68: Our final Fade Rift can be found at the far North West end of the map just on the other side of the river in Stonereach. It will summon Wraith, a Despair Demon, a Rage Demon, & a Pride Demon.


Achievement #39 – Trial of the Hermit: Slay 10 Great Bears promoted by Grizzly End.
It is highly unlikely that you will unlock this Achievement over the course of completing Emerald Graves; at my snails pace going through it for the guide, I only encountered 5/10 naturally.

To farm Great Bears, the best place I found (you may have discovered your own) was to go North from Direstone Camp towards the river. Follow the river up North West until the end of the first bend where an owl statue is off our right. This area is where our first Great Bear spawn is. Turn around & follow the river down South until you reach a small wooden walkway bridge that crosses it; this is where Great Bear spawn two is. Go to each spawner & farm your bears if they spawn then Fast Travel back to Direstone Camp to reset the area. This is the farming run:


August Rams can also spawn at these locations instead, so if you see sheep, then you know the Great Bear won’t spawn.

The Great Bears need to be classified as “Boss” not “Elite” for them to count towards the Achievement; this is guaranteed if you have the Trial on & are playing on Nightmare Difficulty.

Be sure to turn off Trial – Grizzly End once you have the Achievement unlocked.

Hissing Wastes (Level 19-20):
Use 20 Power on the node Stop Venatori Activity in the West to unlock the Hissing Wastes Area.


Trial – Walk Softly: When we enter the Hissing Wastes, turn on the Trial – Walk Softly. For the Trial of the Emperor Achievement, we need to kill any 20 enemies that are upgraded by this Trial. It is a random chance they will be; you will know because random enemies that shouldn’t be will become Elites with Powers they never had before.

This Trial isn’t exclusive to the Hissing Wastes & will affect any enemy in any Area; you can technically farm this in the Hinterlands if you really wanted…

Hissing Wastes Ocularum #1: We can find our first Ocularum on route to the Fade Rifts North of where we begin. Look through the Ocularum to find only 2 Shards.

Fade Rift #69: Our first Fade Rift will be close by the second (this one to the East); this Rift will summon Wraiths & Despair Demons.

Fade Rift #70: The next Fade Rift is found immediately due West of the last; it will summon Rage Demons, Pride Demons, & Wraiths.

Fade Rift #71: Head North East from the last Fade Rift to find the next; this one will summon Greater Terrors, Pride Demons, Lesser Terrors, & Despair Demons.

Hissing Wastes Ocularum #2: Close by, we can locate another Ocularum we can look through to discover 2 Shards.

Fade Rift #72: Carry on to the Sand Crags Camp found in the center of the map; establishing the Camp will mark three Fade Rifts. The next Fade Rift can be found just South East of the Camp & it will summon Greater Terrors & Pride Demons.


Achievement #40 – Veteran: Reach Level 20 in single-player mode.
If you have been a completionist & finished all Side Quests plus fully exploring all Areas up to this point, this is most likely the soonest we will unlock this Achievement. Stick with it & keep completing Side Quests; once again, we still have Emprise du Lion, as well as three DLCs to complete so there is still plenty of Xp to come… I beat the game at Level 27 so there is plenty of Xp to go around.

Fade Rift #73: Head West from the Sand Crags Camp now to the next Fade Rift; this one summoning Rage Demons, Pride Demons, & Wraiths.

Fade Rift #74: The next Fade Rift can be found North East of the Sand Crags Camp, it will summon Wraiths & Despair Demons.
Sequence 16: Fire & Ice
1. Area: Hissing Wastes, Emprise du Lion, Skyhold
2. Active Trials: Walk Softly, Rest Easy
3. Liberated Keep: 3/3
4. Fade Rifts Closed: 75/75
5. Shards: 103/114
6. Achievements: 45/69
-----------------------------------------------------------------------------------------------------

Note that you must enter into a Romance if you have not already done so before we beat the game. All Romances are disabled in Post Game… Use the next two Sequences to gain favour with anyone you can to not void the Beloved & Precious Achievement.

Hissing Wastes:


Fade Rift #75: Across the map, there will be two Camps at the Western edge. The Camp found North of the Logging Camp, The Canyon Camp, will mark another three Fade Rifts on our map once established. The next Fade Rift can be found just South East of this Camp & it will summon Greater Shades & Greater Terrors.


Achievement #41 – Marked For Greatness: Seal 75 Rifts in a single playthrough.
If you have been following along with the guide, this should be the latest you will unlock this Achievement; depending on certain Side Quests or Companion Quests, you may actually unlock this Achievement sooner.

Though we no longer have to close Fade Rifts, there are still a few left here in the Hissing Wastes & Emprise du Lion. Since we need to kill 1000 Demons for the Demonslayer Achievement, I recommend still going around & closing all you come across.

Hissing Wastes Ocularum #3: Just due East of the Mountain Fortress Camp found at center Eastern portion of the Area, we can find a dirt pathway leading up to the Sunstop Mountains. Close by at the top of the path, we can find an Ocularum close to a Venatori guarded Tomb. Look through the Ocularum to find 3 Shards.

Hissing Wastes Ocularum #4: Carry on along the Sunstop Mountains Northward, past the Stone Over Sky Landmark, & we can find another Ocularum just before the path down to the next Camp. Look through it to find the final 1 Shard.


Achievement #42 – Trial of the Emperor: Defeat 20 foes promoted by Walk Softly.
If you started the Hissing Wastes with the Trial – Walk Softly turned on, then this Achievement will unlock for you at some point as we complete the Area. Any random enemy that has now become an Elite… that shouldn’t be, is affected by this Trial & counts toward the Achievement. To check, enter the Tactical Camera & highlight the enemy to see its Attributes.

Wild animals can also be affected by this Trial. Yes… I have come across Elite Fennec Foxes…

Skyhold:

Side Quest – Before the Dawn: Before we continue with the next Main Quest, it is a really good idea to complete Cullen’s Inner Circle Quest; progressing to Main Quest – What Pride Had Wrought will void the Side Quest. Completing this Side Quest will give us access to the Superb Dragon Slaying Rune for purchase in Skyhold making it very important to complete!

Exhaust Cullen’s dialogue & progress this Quest to Emprise du Lion…

Emprise du Lion (Level 19-23):
Before we set foot in Emprise du Lion, you must turn on Trial – Rest Easy. This Trial needs to be active at any point we are in this Area until we liberate Suledin Keep! Go to the War Table & activate the Liberate Emprise du Lion node for 20 Power.


Achievement #43 – Pathfinder: Discover a Campsite & establish at least one Inquisition camp in 10 wilderness areas.
When we arrive in Emprise du Lion, progress Side Quest – Take Back the Lion & drive the Templars out of Highgrove. Doing this will unlock a Camp for us.

If you have established a Camp in all 10 Areas of the base game, we will unlock this Achievement here.

Emprise du Lion Ocularum #1: After we reclaim the third Camp at the Tower of Bone, climb up the Ladders around the tower to find an Ocularum. Look through it to find 6 Shards.

Liberated Keep #3 – Suledin Keep: With the third Camp established, we can now march to Suledin Keep. Defeat Ishmael & hoist the Inquisition Flag to claim the Keep.


Achievement #44 – Liberator: Liberate three Keeps in a single playthrough.
If you claimed Griffon Wing Keep in the Western Approach & Caer Bronach in Crestwood, we will unlock this Achievement after liberating Suledin Keep.


Achievement #45 – Trial of Temperance: Rest Easy Trial always on in Emprise du Lion: claim Suledin Keep.
If you had Trial – Rest East on before you entered Emprise du Lion, we will unlock this Achievement a few moments after we liberate Suledin Keep.

It is now safe to remove this Trial.

Operation – Restore Judicael’s Crossing: Complete Side Quest – They Shall Not Pass to find the Operation to rebuild Judicael’s Crossing. Completing this Operation will let us gain access to the last few Areas of Emprise du Lion, the last Ocularum, & three High Dragons…

Skyhold:

Item – Superb Dragon Slaying Rune: If you completed Side Quest – Before the Dawn in Emprise du Lion for Cullen, we can purchase this key Rune from our resident Merchant, Bonnie Sims for 7294 Gold. Having this will make slaying the High Dragons much easier to manage.

Operation – Restore Judicael’s Crossing: This Operation will cost us 10 Power to complete.
Sequence 17: What Pride Had Wrought
1. Area: The Arbor Wilds, Skyhold, Crestwood, Western Approach, The Exalted Plains
2. Active Trials: None
3. Shards: 103/114
4. High Dragons: 3/10
5. Achievements: 48/69
-----------------------------------------------------------------------------------------------------

The Arbor Wilds:

Main Quest – What Pride Had Wrought: When ready, use 40 Power to activate the Main Quest node found in Orlais, just above the Arbor Wilds. This is not the final mission. If you are Level 19 or 20, we will receive a lot of high Tier crafting Materials, be sure to take advantage & collect all you can.


Achievement #46 – Demonslayer: Defeat 1,000 Demons in single-player mode.
All Demons from the Fade/Fade Rifts contribute to this Achievement; Red Templars (specifically Horrors & Behemoths) as well as Corpses may potential count as well but I cannot confirm that.

Be sure to close all Fade Rifts in the game. If you really need to, we can farm Demons in the Exalted Plains as they are a respawning enemies there, but do not bother doing this until Post Game after we complete the Main Questline in case it unlocks for you from now until then.

The Well of Sorrows (Missable): Enter into the Temple of Mythal as part of the Main Quest & we will have a decision to pursue Samson or go after the Well of Sorrows first. Do not go after Samson & instead pursue the Well of Sorrows! To get to the Well, we need to complete three Rituals to open the door blocking it; do not accidentally fall through the hole in the center of the room! Make a Save here before progressing.

For these Rituals/Puzzles, you need to walk on the tiles to highlight them but cannot walk over the same tile twice. You cannot leave the puzzle area either or they will deactivate. There are light yellowy white tiles within the puzzles that are safe areas for us to walk on, so pay attention to where they are since they will typically be involved in the solution.

All credit goes to the Dragon Age Wiki for the Puzzle solutions.


For the Eastern Puzzle, we must get to the center safe area in the Puzzle & reset the Puzzle so we can begin here instead*


When we enter the Petitioner’s Chamber after solving the three Puzzles, we will be confronted by the Ancient Elves & have to make a decision; all decisions are safe for the moment, even siding with the Elves…

Make your choice & stop Samson at the Well of Sorrows. At the Well, we now have to make our very important decision; the Inquisitor MUST drink from the Well! You must say “I’ll use the Well myself”. Do not destroy it & do not let Morrigan drink from the Well herself!


Achievement #47 – What Pride Had Wrought: Reach an ancient ruin before your enemies.
Story Related. Complete the Main Quest – What Pride Had Wrought to unlock the Achievement.

If we drank from the Well of Sorrows, our next Main Quest will be called The Final Piece. Hold off on completing this Main Quest until we are ready to beat the game; we have to fight a Level 21 High Dragon at the end of it & it is quite the challenge!

Skyhold:

Preparing For Dragons: As of now, we are in our final mop up before the completing the last two Main Quests. Complete all Side Quests you desire, explore, & of course prepare for our grueling 10 High Dragon boss battles.

The High Dragons vary between Fire, Ice, & Lightning immunity or vice versa in weakness. If you are a Warrior or Rogue, be sure to have a Superb Dragon Slaying Rune in your Weapon(s). If you are a Mage, you will want three separate Staffs that deal each of the elemental damages; way more costly, but you cannot afford to deal 1% damage to a Dragon if it is immune to your primary Staff’s element.

I also highly recommend crafting new Weapons (with Dragon Slaying Runes) & Armor for yourself & your chosen Companions as well. For Armor, if possible, try slotting a Fade Touched Obsidian or Fade Touched Silverite into everyone’s Armor as it will generate Guard per attack increasing survivability. Always make sure not to use any elements that the Dragon is resistant to. It is also a good idea to bring along Resistance Tonics & Regeneration Potions for some optional support.

In combat, the High Dragon will move around or use it’s wings to suck in everyone to it. Always go into Tactical Camera & move your Mages & Rogue Archers away from the Dragon to increase their odds of survival. The Companion AI in this game is awful; if you leave them to manage themselves, they are guaranteed to die against the Dragons.

Take every precaution & every advantage against these bosses!

Crestwood:

High Dragon #1 – Northern Hunter: Our first High Dragon to slay will be the Level 13 Northern Hunter, the weakest of the 10 High Dragons. It is resistant to Electricity & weak to Spirit damage. We can find the Northern Hunter in front of the Fereldan Wyvern Statues found at the Southern edge of the map past Caer Bronach.


Achievement #48 – Wyrmslayer: Kill a High Dragon in single-player mode.
We will unlock this Achievement after slaying any one of the ten High Dragons; nine more to go…

Western Approach:

High Dragon #2 – Abyssal High Dragon: Our next High Dragon will be the Level 14 Abyssal High Dragon found in the Western Approach. It is resistant to Fire & weak to Cold. To face the Dragon, we need to have completed a series of Side Quests for The Researcher found near the Nazaire’s Pass Camp.

If you progressed the Side Quest to baiting the Abyssal High Dragon, follow through, & place the five pieces of bait down to summon it.

The Exalted Plains:

High Dragon #3 – Gamordan Stormrider: High Dragon number three will be the Gamordan Stormrider found in the Exalted Plains. It is Level 15, resistant to Electricity, & Weak to Spirit damage.

We can find the Stormrider at the back end of the Fens. Travel to the Fens Camp, pass through Ghilan’nain’s Grove, & get to the far Northern end of the Crow Fens.
Sequence 18: Watch the Skies, Traveller!
1. Area: Skyhold, Emerald Graves, Storm Coast, Hissing Wastes, The Hinterlands, Emprise du Lion
2. Active Trials: Even Ground, Rub Some Dirt On It
3. Shards: 114/114
4. High Dragons: 10/10
5. Achievements: 53/69
-----------------------------------------------------------------------------------------------------

Skyhold:


Achievement #49 – Master Builder: Craft an item from Tier 4 Materials in all Non-Masterwork Slots in single-player mode.
As we kill High Dragons, we will begin receiving the Tier 4 Crafting Materials Dragon Bone, Dragon Scales, & Dragon Webbing. Make a Save beforehand so we do not waste these precious Materials. Then craft any cheap/low level Armor or Weapon Mod to unlock the Achievement.

Not that it is necessary, but if for whatever reason you do not have these Crafting Materials, they can be purchased at the Black Emporium.

Emerald Graves:

High Dragon #4 – Greater Mistral: Our next Dragon to beat is the Greater Mistral in the Emerald Graves. It is Level 17, resistant to Cold, & weak to Fire. We can find the Dragon at the very far Northern corner of the map in Southfinger Watch.

Storm Coast:

Operation – Red Templars on the Storm Coast: If you have not already done so, complete the Operation – Scout the Storm Coast on the War Table. This will unlock a new Scouting Operation that will cost us 4 Power to complete; doing so will unlock the final few Locations found in the Storm Coast… & our High Dragon.

High Dragon #5 – Vinsomer: From the Driftwood Margin Camp, travel North East towards a Cave that was previously closed off to us & enter into the area with the Red Templar Stronghold. At the end of the Stronghold, we can find a lone boat docked at a cavernous coast. Board the boat & we can row it to Dragon Island…

On the island, follow the pathway to the center where we will find the Vinsomer. The Vinsomer is a Level 19 High Dragon that is resistant to Electricity & weak to Spirit Damage.

Hissing Wastes:

High Dragon #6 – Sandy Howler: Now we begin the more difficult High Dragon encounters with the Sandy Howler in the Hissing Wastes. It is Level 20 resistant to Fire, & weak to Cold.

We can find the Sandy Howler on the way to the Tomb of Fairel. Go to the Sand Crags Camp & begin travelling straight East from it to the very edge of the map. Pass through the Dwarven tunnel in the rock formation & follow it along to enter the Tomb of Fairel region; the Sandy Howler will be sleeping in the confluence.

The Sandy Howler has some new abilities then we are used to & can stun us with a scream that summons Dragonlings.

The Hinterlands:
Now, we go back to the Hinterlands. Though the Ferelden Frostback is technically the easiest High Dragon in the game… we need to slay it with the Trial – Even Ground on. This makes the Dragon the same Level we are. Be sure to turn this Trial on before going to fight the High Dragon!

High Dragon #7 – Ferelden Frostback: Travel to the Dusklight Camp & we will find the High Dragon immediately North East of us; note the Ocularum in this area as well… Do not waste any time in the first area we enter & press on through all the Dragonlings to the very back of the region to the Blood Cliffs where the actual boss fight will commence.

The Ferelden Frostback will be Level 20-22 depending on your own Level due to the Trial. It is resistant to Fire, & weak to Cold; it also has the summoning scream ability.


Achievement #50 – Trial of the Empress: Even Ground on: slay a Level 16 or higher Fereldan Frostback.
Defeat the Ferelden Frostback with the Trial – Even Ground on to unlock the Achievement. Be sure to turn the Trial off after the Achievement is unlocked!

Hinterlands Ocularum #5: When the High Dragon is defeated, return to the previous area & look through that final Ocularum to find 4 Shards.

Emprise du Lion:

High Dragon #8 – Hivernal: Now it is time for our final boss rush of High Dragons. Travel to the Tower Camp, & if you repaired the Judicael’s Crossing bridge, we can now go to the final regions. As we cross the bridge, we can spot three colosseum; oh yeah, Dragon fighting arenas. Before we get to the first colosseum however, we need to turn on Trial – Rub Some Dirt On It! Do not defeat the High Dragon without it on our we will void an Achievement!

Make your way to the first colosseum, Etienne’s Ring, to locate the Hivernal. The Hivernal is Level 19, resistant to Cold & weak to Fire. With the Trial on, this can be a very challenging fight. As a work around, be sure to bring fully stocked Regeneration Potions with you. This will be a real test of your build!


Achievement #52 – Trial of the Tower: Rub Some Dirt On It on: slay the Hivernal High Dragon.
Slay the Hivernal High Dragon with the Trial – Rub Some Dirt On It to unlock this Achievement. You essentially need a build that can generate Guard & or Barrier to keep your actual Health intact. Can be challenging.

Be sure to turn the Trial off after the Achievement unlocks.

High Dragon #9 – Kaltenzahn: The next High Dragon, can be found North of the previous one in the next colosseum at Judicael’s Ring. The Kaltenzahn is Level 21, resistant to Cold, & weak to Fire. At half Health, the Kaltenzahn will use the summoning scream ability to lure in Dragonlings.

Emprise du Lion Ocularum #2: At the top of Judicael’s Ring after we defeat the Kaltenzahn, we can find the final Ocularum we need. Look through it to find the last 7 Shards.

These are the final Shards we need to complete Solasan Temple…

High Dragon #10 – The Highland Ravager: Our final High Dragon is the hardest yet, & can be the found in the last colosseum, Leontine’s Ring. The Highland Ravager is Level 23; at this point I had only just turned Level 23 myself having completed almost all Side Quests with heavy exploration to boot to this point.

The Ravager is resistant to Fire, & weak to Cold. Like all difficult High Dragons, the Highland Ravager is no exception & will employ summoning scream at half health.


Achievement #53 – Dragon’s Bane: Slay 10 High Dragons in single-player mode.
Slay all 10 of the High Dragons found across the Areas of the game to unlock this Achievement. For the most part, they are just tanky, though the few effected by Trials can be quite a challenge. It all boils down to your build & your gear with how survivable it is.
Sequence 19: Doom Upon All the World
1. Area: Forbidden Oasis, Altar of Mythal, Skyhold, Finale
2. Achievements: 57/69
-----------------------------------------------------------------------------------------------------

Forbidden Oasis:


Achievement #54 – Keymaster: Enter the heart of the Solasan Temple.
As of now, we can collect all 114 Shards. There are 22 in The Hinterlands, 13 on the Storm Coast, 14 in the Western Approach, 15 in the Forbidden Oasis, 16 in the Exalted Plains, 13 in the Emerald Graves, 8 in the Hissing Wastes, & 13 in Emprise du Lion. To see if you are missing any, go to the Collections tab of your Journal & look at Shards.

With all of them collected, open all three of the doors found in the Fire, Cold, & Spirit sections of Solasan Temple. With that done, go to the central door on the first floor & enter inside to unlock this Achievement.

Altar of Mythal:


Achievement #54 – On Burning Wings: Recruit a powerful ally to even the score.
Missable. Before we begin the next Main Quest, be sure to turn in all collected Research, especially on High Dragons, for a boots to our damage against them…

Go to your World Map & travel to the Altar of Mythal for Main Quest – The Final Piece. Simply interact with the Altar & we will get a pretty crazy throwback to Dragon Age – Origins.

But… we will have to defeat a bonus High Dragon now. The Guardian of Mythal is a High Dragon that will scale to your current Level, it is immune to Fire but vulnerable to Cold. Difficult, but nothing compared to some of the previous High Dragons we have faced. It has very basic abilities & cannot even use Guard; drop it to only 3/4 of its health to tame the Guardian & unlock our Achievement.

Skyhold:

Point of No Return: It is now the point of no return. Though there is Post Game, completing the Main Questline will void certain Side Quests involving our Companions. It will void finding a Romance if you have not already pursued one as well as locking us out of becoming Friends with our Companions. Dialogue with our Companions is removed in Post Game & we can only have a few token sentences with them.

Be sure to wrap up any unfinished business already covered in the guide before carrying on; after this, we move onto the three DLCs…

Finale:
When you are ready, go to the War Table & initiate the final Main Quest – Doom Upon All the World node for 0 Power. It’s time to finish the fight.


Achievement #55 – Doom Upon All the World: End the threat once & for all.
Story Related. Without a lead up, we will engage Corypheus outside of Skyhold. Fortunately, he is no High Dragon, but will scale to your current Level. Having the Guardian of Mythal on our side makes the fight a lot easier since we will not be harassed by the Red Lyrium Dragon.

After getting Corypheus to around half health, we will need to finish the Dragon off; it will be at half health too thanks to the Guardian of Mythal. Return to Corypheus for the final fight & defeat him! This Achievement will unlock after the aftermath, it will unlock after the next two Achievements as well so do not fret.


Achievement #56 – Herald: Finish the single-player campaign on at least Hard without lowering the Difficulty.
Story Related. We will unlock this Achievement as soon as we defeat Corypheus at the end of Main Quest – Doom Upon All the World if you were playing on Hard Difficulty or higher since the very start of the game.


Achievement #57 – Inquisitor: Finish the single-player campaign on Nightmare without lowering the Difficulty.
Story Related. We will unlock this Achievement as soon as we defeat Corypheus at the end of Main Quest – Doom Upon All the World if you were playing on Nightmare Difficulty or higher since the very start of the game.

After we return to our Quarters in Skyhold… we will get a teaser for the Trespasser DLC.

82% Complete
Sequence 20: Jaws of Hakkon
1. Area: Skyhold, Frostback Basin
2. Avvar Approval: 4/5
3. Bonfires: 0/7
4. Winter Shards: 0/8
5. Achievements: 57/69
-----------------------------------------------------------------------------------------------------

DLC Breakdown – Jaws of Hakkon: (4)
Story Related: (2)
Secondary Objectives: (1)
Collectibles: (1)


Skyhold:
We are now in Post Game. A lot of the base game content has been blocked off to us such as Companion dialogue, but we can now fully complete the DLCs with all bonuses that beating the Main Questline will offer us. Since we have earned the Inquisitor Achievement, feel free to reduce the game Difficulty to whatever you prefer if you should choose to.

Solas’s Disappearance: Unfortunately, for story reasons, we will lose access to Solas as a Companion permanently. This sucks, as he was my main Mage. To add insult to injury, we also lose all gear he had equipped as well… The reasons of his leaving will explained in our final DLC, Trespasser, which becomes our new Main Quest.

DLC Quest – Trespasser: Do not begin the new Main Quest – Trespasser by Attending the Exalted Council on the War Table. This begins the Trespasser DLC which IS the final DLC, locking us in to endgame that we will not be able to free roam afterwards.

DLC Quest – Jaws of Hakkon: Jaws of Hakkon is the first of three DLC installations for Dragon Age – Inquisition. When you are ready, use 8 Power to activate the Investigate the Frostback Basin node in the South Western corner of Ferelden.

Frostback Basin:
We will now have another large Area to explore. Fortunately for us, we only have four Achievements tied to this DLC, three being attached to the Main Questline/final Quest.

The biggest thing we need to worry about at the start, is completing the six Side Quests for the Avvar to earn their favour. There is much to explore here in the Frostback Basin, but little is tied to Achievements; complete what you like as extracurricular, or speedrun what is listed in the guide to complete the DLC.

DLC Quest – What Yet Lingers: After speaking with Kenric, travel East to speak with Fisherman Arvid. We will then be tasked with meeting the Avvar Leader; we will unlock a Fast Travel point here at Cloudcap Lake fortunately.

Travel North to Stone-Bear Hold, & speak with Svarah Sun-Hair.

This will unlock Side Quest – Guests of the Hold; completing this will unlock the Legend Marked Achievement.

Avvar Quest #1 – Hakkon’s Trials: While at Stone-Bear Hold, make your way to far North Eastern edge of the base to find Trainer Arrken. Speak with him & deliver 2 Everite & 2 Silverite to him which can be found around the Frostback Basin (if you do not already have some). Travel back to the Basin Floor Camp to use the Requisition Table to make the An Offering For the Arena.

Return to Trainer Arrken & enter into the arena where we will fight waves of Avvar; we need to complete three waves. Speak with Trainer Arrken after completing the trials to earn +1 Avvar Approval.

Avvar Quest #2 – A Father’s Name: Directly below us, at the very bottom reaches of the Avvar base, we can find Gyda Myrdotten. Speak with her to receive our next Avvar Quest. Speak with the Master of the Hunt next to mark three Fade-Touched Creatures we will need to slay…

Fade Touched Creature #1: Travel West of Stone-Bear Hold to the Swampside Camp. From here we can fight the Fade Touched Gurgut.

Fade Touched Creature #2: Travel further West to the River Camp, & we can find the Fade Touched Lurker South West of it.

Fade Touched Creature #3: Travel up to the Ridgeline Camp & move North to find the Fade Touched Spider.

Avvar Quest #2 – A Father’s Name: Return to Stone-Bear Hold & be sure to give the offering to the Master of the Hunt. Doing so will award us +1 Avvar Approval; giving the offering to Finn will not!

Avvar Quest #3 – In Exile: From the Ridgeline Camp, head South of the Camp up a nearby switchback to the top of the hill in the direction of one of the Fade Rifts “along the river”. At the very top of the switchback, we can find a hut with a burning blue fire in its center where we can spot Sigrid the Exile.

Sigrid will drive us away, so we will need to speak with someone back at Stone-Bear Hold. That someone is The Augar, who can be found at the upper Southern end of the base; we can find the pathway up along the cliffs beside the Meat Shop.

The Augur will tell us of a ritual site we will need to investigate just South along the coast from the Hold. Use Search to investigate the four features then return to Sigrid. Complete the Quest either by recruiting her as an Agent or her confessing to the Spirit to earn +1 Avvar Approval.

Avvar Quest #4 – Up & Away: Return to the docks at the Western Riverbank & we can find a new NPC with a Quest, Linna. Speak with her & we will be tasked with locating another woman named Runa. Follow the trail & use Search to find all her axes left behind… how many was this girl packing around!?

Get to the top of the mountain trail & we will find Runa being attacked by a Gurgut. Slay it, & ask Runa to be mentioned in her prayers to gain another +1 Avvar Approval.

DLC Quest – Ameridan’s End: Now complete DLC Quests What Yet Lingers, On Ameridan’s Trail, & Storvacker Caged to initiate the next DLC Quest – Ameridan’s End.
Sequence 21: Oathkeeper
1. Area: Frostback Basin, The Old Temple
2. Avvar Approval: 5/5
3. Bonfires: 7/7
4. Winter Shards: 8/8
5. Achievements: 61/69
-----------------------------------------------------------------------------------------------------

The Old Temple:

DLC Quest – Ameridan’s End: After you have collected at least 4/5 Avvar Approval, speak with Svarah Sun-Har to begin the siege on the Hakkonite Stronghold. Fight through the exterior defences to reach the entrance to The Old Temple.

It is during this Quest that we will begin finding the Bonfires & Winter Shards we need for the Firestarter Achievement.

Bonfire #1: In the Old Temple, we have to worry about Warmth. While there are pre-lit Bonfires, 7 of them are not, & we need to locate & light them all.

At the very first pre-lit Bonfire when we first enter the Temple, take a left down a corridor past the Supply Cache & we can find a Bonfire in the center of the room.

Bonfire #2: From this Bonfire, head up the stairs found in this room along the upper floor to find another one at the end of the walkway.

Winter Shard #1: Jump over the walkway railing now & look behind us to find our first Winter Shard hovering in the center of the large room. These are those freezing Wards we had to destroy outside the Temple prior; those did not count towards the Achievement however.

Bonfire #3: To carry on, we need to find the Ancient Key. From this locked door & pre-lit Bonfire, we can see a pile of rocks off our right leading East. Climb up it back to the upper floor & we can find another Bonfire in a side room up here.

Bonfire #4: The only way we have not explored yet is a hallway on the lower floor that leads to the East. Follow it down to not only find our Key but another Bonfire in the rooms center.

Bonfire #5: Use the Ancient Key to unlock the door to progress; we can find a Bonfire immediately on the other side of the door.

Winter Shard #2: Head down the stairs to the first landing, & we can spot a Winter Shard near a pre-lit Bonfire off our right.

Winter Shard #3: Head down the next set of stairs from here to the East & we can spot another Winter Shard up a small set of stairs off our right.

Bonfire #6: Directly across from that previous pre-lit Bonfire, we can find a door with a Masterwork Lock on it to the East. Pick it open with a Rogue, & we can find a Bonfire inside it.

Winter Shard #4: From that locked door facing back, take a right across a ruined walkway to find a Winter Shard in our way before some stairs leading to a Frost Barrier.

Winter Shard #5: Approach the Frost Barrier & we can find another Winter Shard beside a group of Hakkonites.

Bonfire #7: A Bonfire can be found directly in front of the Frost Barrier; this is our final Bonfire.

Winter Shard #6: When the Frost Barrier dissipates, we will make our way to the final boss of this DLC, Gurd Harofsen. During this fight, the boss will summon three Winter Shards as his health depletes. To be safe depending on your current Difficulty, do not kill him too fast so there is time for him to summon each Shard.

The first Winter Shard will be summoned after he reaches around 9/10 his health bar & freezes one of our Bonfires over; it is near the Northmost Bonfire in the area.

Winter Shard #7: The next Winter Shard summoned during the boss fight will appear after Gurd Harofsen reaches 6/10 of his health bar. The Shard appears near the Bonfire frozen over at the West end of the area.

Winter Shard #8: Our final Winter Shard will appear after Gurd reaches 3/10 his health bar & appears at the Southern end of the area. This is the one you need to be most careful about killing him too fast for!


Achievement #58 – Firestarter: Destroy all 8 Winter Shards & light all 7 fires in the Old Temple.
If you lit all 7 Bonfires & destroyed all 8 Winter Shards in the Old Temple, we will unlock this Achievement as soon as the last Winter Shard is destroyed.


Achievement #59 – Historian: Uncover the secrets of a legendary figure.
Story Related. Defeat Gurd Harofsen & locate what has become of Inquisitor Ameridan to unlock the Achievement.

If you had received 4 Avvar Approval completing Side Quests around Frostback Basin, we will receive a final +1 Avvar Approval for completing DLC Quest – Ameridan’s End.

Frostback Basin:


Achievement #60 – Winter’s End: Dispel a myth of ancient days.
Story Related. Did I say Gurd was the final boss? I guess not, track down Hakkon Wintersbreath & destroy him to complete this DLC. This unique High Dragon is naturally resistant to Frost but weak to Fire; he is pretty weak for a High Dragon.

Defeat Hakkon to complete the DLC & unlock the Achievement.


Achievement #61 – Legend Marked: Impress the Avvar of Stone-Bear Hold & gain their friendship.
With Hakkon defeated, & +5 Avvar Approval, return to Svarah Sun-Hair & speak with her to unlock the Achievement. We are now officially done with the Jaws of Hakkon DLC…

88% Complete
Sequence 22: The Descent
1. Area: Storm Coast Fissure, The Wellspring
2. Achievements: 65/69
-----------------------------------------------------------------------------------------------------

DLC Breakdown – The Descent: (4)
Story Related: (3)
Secondary Objectives: (1)


Skyhold:
Disaster At the Deep Roads: At the War Table in Skyhold, use 16 Power on the Disaster At the Deep Roads node near the Storm Coast to begin our next DLC.

Storm Coast Fissure:

DLC Quest – The Descent: This is a very linear DLC & we have very little to worry about in terms of Achievements. Nothing is Missable, just sit back & enjoy.


Achievement #62 – Giant Slayer: Defeat an Ogre Alpha.
Story Related. Very shortly after we arrive in the Storm Coast Fissure, we will encounter an Ogre Alpha. It is very tanky, so be prepared for a slog. Defeat it to complete DLC Quest – A Warm Welcome as well as unlock our Achievement.


Achievement #63 – Deep Roads Commander: Complete a Mission at the expedition table in the Legion of the Dead Camp
Once we establish the Legion of the Dead Camp, look over at the Expedition Table near by & look at either the Deep Roads or Uncharted Abyss tabs; this is essentially a mock War Table.
At the moment we will only have one Operation available in the Deep Roads tab. Complete it to unlock the Achievement.

The Wellspring:


Achievement #64 – Fact Finder: Help Shaper Valta discover secret Dwarven history.
Story Related. Make your way down through all six levels of the Deep Roads to reach the Wellspring where we will unlock this Achievement.


Achievement #65 – Shaper of Stone: End the earthquakes threatening the surface.
Story Related. Defeat the final DLC base, the Guardian, to complete the DLC & unlock our Achievement. Easy.

94% Complete
Sequence 23: Trespasser
1. Area: Skyhold, Winter Palace, The Crossroads, Elven Mountain Ruins, Deep Roads
2. Elven Caches: 1/4
3. Taken Shape Pieces: 3/4
4. Achievements: 65/69
-----------------------------------------------------------------------------------------------------

Skyhold:

DLC Quest – Trespasser: It is now the beginning of the end. When all other business is finished, it will be time to start the final DLC. Note that there will be no continuing on after this DLC is finished; completing it will end our playthrough…

On the War Table, go to the Attend the Exalted Council node & use 8 Power to activate it, starting the DLC.

Winter Palace:
While there is a couple additional Side Quests & Collectibles throughout this DLC, we only need to worry about finding two different ones for Achievements & just completing the DLC Questline. There is nothing Achievement related to do here in the Winter Palace.

The Crossroads:

Taken Shape Piece #1 – The Hand That Cuts: Pass through the Eluvian in the Winter Palace to arrive at the Crossroads. Follow the blood trail along to our right, but do not enter the next Eluvian it leads to. Instead, follow the wall along to the right of the mirror around a corner to find a different one at the end of a corridor.

Enter the optional Eluvian, & we will enter the Abandoned Chateau. At the end of the library, we can find a Chest to loot. Do so, & defeat the Demons it summons; we will then collect our first of four pieces to the Taken Shape set.

Elven Mountain Ruins:

Anchor Discharge: Pass through the main Eluvian at the Crossroads & we will arrive in the Elven Mountain Ruins. Progress through to the Silent Tower in the Elven Mountain Ruins & we will receive this new Power as a part of the story. This will allow us to safely pass through the purple flames that typically bar us from Chests or optional areas. Note that this does cost us Focus, so try to refrain from using it on other Powers so we always have a back up bar at the ready when we need it…

Alternatively, you can use combos of certain other Powers such as Fade Step, Champion, Barrier, etc. for the same effect to evade the purple fire.

Elven Cache #1 – Arrowwood: Locate the missing bridge piece, & we will be able to cross over to the Forgotten Sanctuary where we will start fighting Qunari. At the very back of the grand temple we enter, we can find a statue of the Dread Wolf. Behind it we can find a brazier to light a Veilfire Torch. Take this torch & then go back face the front of the statue. To our left & right will be two sets of three braziers. Light the brazier that is the second in the row off our left & press the button on the Dread Wolf statue to reveal the first Elven Cache in between the statue’s paws; loot it for it to count.

The Crossroads:

Taken Shape Piece #2 – The Bind That Guides: After we return to the Winter Palace to warn Leliana about the Qunari, we will return back to the Crossroads for the second time. When we enter, we will see some Qunari agents running towards a new Eluvian. Approach it but once again, do not enter it, & make your way around behind the wall off our right instead. Here we can find a strange red bulb we need to discharge to reveal a hidden stairway. Follow it up & we can find a new Eluvian at the top.

Enter into the Forgotten Tower & we can find our next piece of the Taken Shape set in a Chest off our right after we defeat the Demons it summons.

Taken Shape Piece #3 – The Eye That Weeps: Return back to the Eluvian that the Qunari went through, but once again do not pass through it yet. This time, head left up some stairs & pass through yet another optional Eluvian to enter the Hidden Hollow. We can find our Taken Shape piece in a Chest underneath a large Hart statue. Defeat the Demons, loot our Amulet.

Deep Roads:
Our first visit to the Deep Roads has no Achievement related Collectibles or tasks…
Sequence 24: Fen'Harel
1. Area: The Crossroads, Shattered Library, Deep Roads, The Darvaarad, Winter Palace
2. Elven Caches: 4/4
3. Taken Shape Pieces: 4/4
4. Achievements: 68/69
-----------------------------------------------------------------------------------------------------

The Crossroads:

Taken Shape Piece #4 – The Skin That Stalks: When we enter into the Crossroads for the third time, we will chase more Qunari to another Eluvian. At the top of the first set of stairs, not the set that leads to the Eluvian, take a left down a path past a large bird statue. Discharge one of the red bulbs & follow the new pathway along to a new Eluvian that will take us to the Ancient Jail. Interact with the Chest, defeat the Demons, & loot the final piece to the Taken Shape set.


Achievement #66 – Coroner: Find all 4 of the wearable items that make up the Taken Shape.
If you have been following along with the guide, we will unlock this Achievement after collecting the final piece to the Taken Shape set; you do not need to put them all on.

Shattered Library:

Elven Cache #2 – Rime: When we enter the Shattered Library, make your way to the Courtyard shortly after we arrive. From here, enter into the Eluvian off our left & we will arrive at the Broken Tower. Climb the stairs up & enter yet another Eluvian to arrive at the Scholar’s Retreat.

Head up to where some ancient tapestries are & go behind them to see some purple fire. Cross through it however you can & pass up some more stairs to find a Dread Wolf statue with a button on it. When you push it, you need to quickly get back to the Eluvian at the bottom of the area to re-enter the Broken Tower; it is fastest just to leap off of where we are to the bottom of Scholar’s Retreat. Immediately drop down to the lower floor in the Broken Tower & light a Veilfire Torch from the lit braziers. We only have around 25 seconds to pull this off our the Veilfire will disappear & we will have to try again.

Once a Veilfire Torch is lit, return back to the Dread Wolf statue in Scholar’s Retreat; getting past the purple flame with the Torch can be difficult & may require you to have Barrier cast on you if you have no Focus for Anchor Discharge. Light the golden bowl near the statue & we can now loot the Box Chest in between the statue’s paws.

If you push the button & return to Broken Tower but see the braziers are not lit, & you are sure it has been under 25 seconds, wait for a second or two & they should light; there can sometimes be a delay.

Anchor Blast: When we return to the Courtyard after moving some of the walkways pieces in either of the two Eluvian areas, we will unlock this Upgrade for Anchor Discharge when arrive. This Upgrade is essential for obtaining the next Elven Cache.

Deep Roads:

Elven Cache #3 – Heart of Pride: After we finish our business in the Shattered Library, we will return to the Crossroads for the final time. Instead of entering the central Eluvian like we are supposed to however, we must instead return to the Deep Roads. It is found in the Eluvian directly across from us to the South East; it is the second Eluvian down the path off our right, not the one leading to the Elven Mountain Ruins.

When we arrive in the Deep Roads, make your way down & the entire area will be submerged in water. Head to The Grand Stairway, & we can find a caved in section with some Gaatlok Explosives beside them. Use our Anchor Blast Upgrade for Anchor Discharge to blow them up & we can enter secret Eluvian that will take us to the Unknown Ruin.

Light a Veilfire Torch from the lit brazier ahead of us & make your way over to a Dread Wolf statue in the center of the room. Approach the mural behind the statue, & it will turn around to face us. Quickly get behind the statue without looking away from it & press the button on it that will raise a temporary stone walkway up to a brazier on the mural. Run up the walkway & light the brazier to unlock the Chest in between the Statue’s paws.

The Darvaarad:

Elven Cache #4 – Bloody Bargain: Enter the Darvaarad & clear out all the Qunari in the Courtyard. At the Fortress Entrance, we can light a Veilfire Torch; we need to use this to light three braziers in a specific order.

The first brazier is found at the bottom floor of Research Tower, it is on an owl statue. The second brazier is on the Halla statue found at the top floor of the Research Tower with the third being a brazier found on the ground next to a dragon statue.

With the braziers lit in this order, return to the bottom floor of the Research Tower & loot the Box Chest found in the Dread Wolf statue’s paws here.


Achievement #67 – Lateral Thinker: Unlock all 4 Caches watched over by ancient statues.
If you have been following along with the guide, we will unlock this Achievement after looting the final Elven Cache.

Winter Palace:


Achievement #68 – Forever Marked: Progress the Story to unlock.
Story Related. That is all we have to worry about for this DLC now. Make your way to the Elven Ruins & stop Viddasala. Return to the Winter Palace & decide the fate of the Inquisition. They forgot to edit the Achievement text into an actual description for this one...

Que Dragon Age 4 – Dread Wolf… when that comes out.

98% Complete
Sequence 25: Trial of the Fool
1. Area: Frostback Mountains, Haven, The Hinterlands
2. Achievements: 68/69
-----------------------------------------------------------------------------------------------------

Now it is time for our final Achievement & run through of Inquisition. We need to beat the first 1/5 of the game as fast as we can & get to Skyhold under Level 6 with the Trial – Take It Slow active. We will be avoiding any & all combat we can to reduce how much Xp we earn. Do not look at Books, Notes, etc. either.

Start a New Game, select your Race (Humans will give you an extra Point), & Class. For Class, remember that Stealth & avoiding combat is the name of the game. Rogues are the best choice, but realistically, any Class would work even a Warrior since you would be more tanky; I went with Dual Wield Rogue to capitalize on attacking from Stealth. We will still get Xp for kills made by our Party, but if you are fast, they will get teleported out of it as you run away.

When we reach Select Difficulty, be sure to go to Custom Difficulty & turn on Trial – Take It Slow. The actual Difficulty does not matter & I recommend just setting it to Casual for a faster time.

Since we are only going to reaching a maximum of Level 5 for this playthrough, it is imperative that you put thought into how you plan to spend your Ability Points!

Frostback Mountains:
Avoid as much combat as we can during the Prologue; very little is actually mandatory & we can just run past everything we encounter. Disengaging from combat will make us run faster as well so keep that in mind. All the Fade Rifts we come across are mandatory & will be the only actual combat we must partake in.

I am unsure if the decision really matters, but potentially taking the mountain pass & not charging with the Soldiers to the Breach could mean less enemies for us to fight… Both paths will result in a mandatory Fade Rift we will need to close.

Defeat the Pride Demon & temporarily seal the Breach.

Haven:
By this point, we should be a little bit past Level 2; remember, do not Read anything, but looting is okay. Do not complete any Side Quests!

Power #1: After the initial meeting at the War Table, go & speak with Threnn outside the Chantry & collect a Requisition for her. To activate our only two Main Quests for this run, we will need to accumulate 19 Power with as little Xp attached as possible. One of these ways is completing Requisitions.

Loot the 5 Iron & the Logging Stand outside Haven & turn in the Requisition for 1 Power.

Scout the Hinterlands: Return to the War Table next & we will receive a free Power, though it will be used immediately to activate the Hinterlands where we must go next…

The Hinterlands:
Complete no Side Quests, Read anything, or claim any Landmarks while we are here! Do not collect any Requisitions yet either as that will be an important way we obtain Power, though there is a trick involved to doing it repeatedly/successfully. This will be the longest section of our run.

Mother Giselle: As soon as we arrive, make a B-line to the Crossroads & rescue Mother Giselle from the Mage/Templar skirmish.

Corporal Vale: Speak with Corporal Vale to progress the Main Questline to Val Royeaux.

Power #2-6: For our next easy Power to obtain, dismiss your Party Members so they do not kill enemies along the way, & travel to each of the five remaining Camps. Establishing each one will reward us with +1 Power. Ignore all enemies we come across but loot what you can for selling as well as collect Blood Lotus & Elfroot (at least 5 of each). Be sure to collect Iron & especially Drakestone as well!

Power #7-12: Re-collect your Companions now, & we will carefully complete some Fade Rifts to earn more Power. This is a bit dicey as we will earn Xp doing this, but this is the most efficient way to receive a Power boost.

Close all Level 4 Rifts, there should be six. We can close both Rifts on the Outskirts, both Rifts at the Foothold, the Eastern most Dwarfson’s Pass Rift, & the North most Rift on the Farm. All others are too high of a Level for us.

This will most likely bring us to Level 3 in the process…

Power #13-18: For our next six Power, the best way is to farm Requisitions. Go to any Camp in the Hinterlands & make a Save; saving beforehand is imperative. Speak with a Requisition Officer & receive a Requisition. Receiving Hinterlands Drakestone Survey is our best & almost only option as we can easily farm the needed Iron & Drakestone in the Hinterlands.

If you receive Hinterlands Tapestry Requisition, Hinterlands Cage Requisition, Hinterlands Puzzle Box Requisition, Hinterlands Iron Survey, or Hinterlands Field Tent Requisition, reload your Save until you receive the Hinterlands Drakestone Survey. Tedious but effective.

Iron we can find around Haven & in most parts of the Hinterlands; sprinting to the hut outside Haven & in/around the Logging Camp is more than enough Iron per run.

Drakstone can be found inside the Ash Warrior Refuge; there is a high Level Spellbinder in here though so you need to be very careful on your runs & may need to drink Health Potions.


When you loot all the Drakestones in the Cave, travel back to Haven to loot Iron then back to the Ash Warrior Refuge in the Hinterlands to respawn the Drakestone. Rinse & repeat to acquire 60 Iron & 30 Drakestone to complete all the needed Requisitions.

Haven:

Power #19: For our last Power, return to Haven & speak with Mother Giselle & ask if she needs help to acquire an easy Requisition. Elfroot can be found in droves outside Haven & Bloodroot can be found South of the Upper Lake Camp around Lake Luthias in the Hinterlands.
Sequence 26: The Dawn Will Come
1. Area: Val Royeaux, Haven, Skyhold
2. Achievements: 69/69
-----------------------------------------------------------------------------------------------------

Val Royeaux:
Use 4 of our Power to travel to Val Royeaux to progress the Main Questline. Simply arrive, witness the events, then leave. Do not Read anything!

Haven:

Main Quest – Champions of the Just vs In Hushed Whispers: To continue, we need to use our 15 Power to choose one of these two Main Quests. Both have pros & ♥♥♥♥, & we can avoid the bulk of the encounters in either Quest. Since we have already done In Hushed Whispers, I recommend Champions of the Just so you can witness it. At the end of the day, it doesn’t matter which you pick.
Do not Read anything & avoid all combat when possible. Complete either Main Quest as Xp free as possible; you will most likely reach Level 4 during it…

Main Quest – In Your Heart Shall Burn: The final act. Before we begin this Quest, sell literally everything & spec yourself out however you can.

After we close the Breach we will need to escape Haven as it is under attack. Avoid conflict when at all possible & focus on the Trebuchets. We are under Leveled for this Quest & it will be a challenge.

When we need to defend the North Trebuchet, wait for the Inquisition Soldiers to tie up the enemies before engaging them so that they take the brunt of the attacks. There will be three waves we need to defeat to progress; conserve your Health Potions! We can find a Supply Cache near the smithy but do not use it until you are completely out of Potions.

For retaking the South Trebuchet, you need to crank its wheel as fast as you possibly can; easier said than done. Let your Companions take the aggro. When/if everyone falls, quickly escape the area so they teleport away to you. Revive them, then go back in for round 2. There is another Supply Cache in this area nearby as well.

Flee back to Haven ignoring all enemies on route to the Chantry.

The final Trebuchet is the hardest of all. It will take four full cranks on the wheel to prime the Trebuchet; the final one will occur with a boss present & take as long as the first three combined. Ignore all enemies & the boss if you can & let your Companions take the heat. If they fall, run away to find a Supply Cache & restock on Potions for a next assault. Having Stealth for this is very useful so you can avoid getting hit. There is a 10 second or so delay between when you can turn the crank so keep that in mind.

If you are too overwhelmed by enemies & have no more Supply Caches, sprint up the large snowy hill above the Trebuchet to teleport your Companions up to you, then carefully lure enemies away to kill. You should have more than enough leeway to be able to kill them all & not be too worried about the Xp.

After the final Trebuchet is cranked, escape the cavern below Haven & reunite with the Inquisition. You have done it!

Skyhold:


Achievement #69 – Trial of the Fool: Take It Slow on: reach Skyhold at Level 5 or less.
Complete a cringy music number for the second time, speak with Solas by some Veil Fire, & stand on some tall rocks to reach Skyhold in a classic journey montage that probably didn’t take half as long as they make it seem since the daylight never changes. We will unlock the Achievement the moment our montage cut scene ends if you made it to Skyhold under Level 6 with the Trial – Take It Slow on the entire time.

This whole speedrun took me around 3.5 hours to complete.
Conclusion:
Dragon Age – Inquisition isn’t a bad game. It does not hold a candle to Origins, but it does alright. My biggest complaint is the size of the open world maps & how empty they are. I much preferred the smaller scale/linear maps of the first two games because there was no need for “padding”. Unless you have a sprint mechanic or are given more intuitive movement controls, open world is no fun. Besides my whining, combat is very fun & the Companions were well written as well, with the High Dragons of course being the highlight. All in all, a fun 100% that took me around 110 hours to complete.

If this guide helped you achieve 100%, rate the guide or let me know in the comments. Helps me know if I am doing things right!


100% Complete
Thank you for choosing Cynical Guides, & I will see you in the next one!

If you are interested in a little bit of patronage, support my projects & consider buying me a coffee. If not, no worries; my guides are, & will always be free content. Achievement Hunting is my passion, & writing these guides is a way for me to give meaning to a life long hobby!
https://www.buymeacoffee.com/cynic0055

If you enjoy my style of writing guides, be sure to check out my profile for a full list of my works.
https://steamcommunity.com/sharedfiles/filedetails/?id=2992727030

22 commentaires
Kokkinosman9 24 mars à 5h33 
Very great and useful guide!
Anjaris 21 janv. à 19h55 
Very helpful in finding the 5-6 i missed. Basically I forgot to do Jaws of Hakkon and needed to do the Trial of the Fool replay. Thank you.
Cynic 0055  [créateur] 26 nov. 2024 à 17h26 
Wow jcdenton666, that actually means a lot coming from you! Thanks! :steamhappy:

I should probably take another look & re-calculate how I've got the Power listed for Trial of the Fool since you got an extra 7 leftover Power like rdkehoe . Really no sense in making people play the game any longer than is needed, especially for the "speedrun playthrough".
jcdenton666 26 nov. 2024 à 16h55 
Since I'm now done with it (reached Skyhold at level 4, and I think there was one too many power points suggested in this guide – certainly not 7), and this guide didn't stump me at any point (though confuse me in some), but actually held all the required information (quite contrary to the wiki of the game), I'm giving this (the guide, certainly not the game) a rare (I mean it!) thumb up.
rdkehoe 6 nov. 2024 à 18h58 
Trial of the Fool: Followed the guide to the letter and ended up having 7 leftover power lol. Unless it was a bug you can skip a lot of rift/requisitions.
Also, thanks for writing this guide, another 100% in the books.
Ashelaain 23 oct. 2024 à 1h27 
Much appreciated!
Cynic 0055  [créateur] 22 oct. 2024 à 10h08 
Hey Ashelaain, sorry about the confusion, I altered the description to Southwest. :DAI_Qunari:
Ashelaain 22 oct. 2024 à 8h17 
"Corporal Vale is found West of the Crossroads in a small war camp."

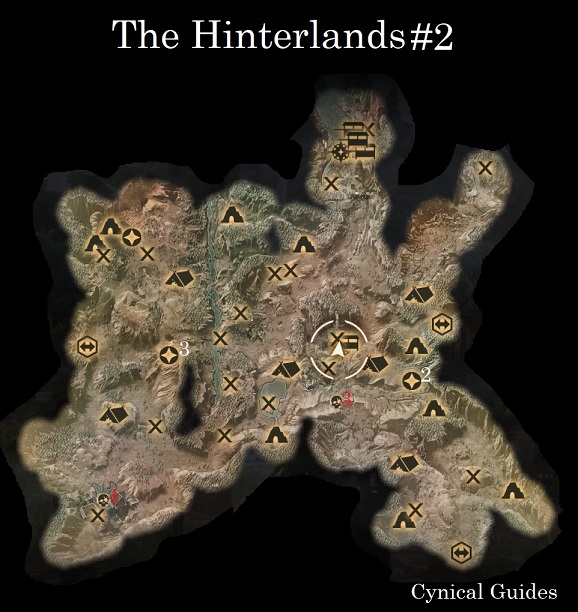
I spent WAY too long trying to find him when the solution was this: Teleport to Crossroads, turn around to the SOUTHwest, and go up the stone path to find him. You said it was west of the crossroads, when he was actually southwest of the crossroads just up a small hill. That made a huge difference in the direction I was looking to find him. Because you said it was west, I was more looking towards Fort Connor when I should've been looking towards the Upper Lake Camp from the Crossroads.
Cynic 0055  [créateur] 9 oct. 2024 à 14h27 
Fingers crossed Veilguard is a banger. I would kill if Dragon Age 2 & especially Origins had Achievements on Steam! Dream guides for me...
bulbulito 9 oct. 2024 à 13h49 
tnx cynic. got 100% just now. in preparation for veilguard