Project Zomboid

Project Zomboid

59 ratings
Project Zomboid Dedicated Server hosting off of your own PC: Full Length Guide
By Major Spellbound
After much trouble of my own, this is a guide to fully make a zomboid PC server, install mods, configure your server, AND merge your base from your single player world.
5
2
2
3
   
Award
Favorite
Favorited
Unfavorite
Step 1: Server installation
First, We will want to download SteamCMD, a developer app made by steam. This can be done by visiting this link here: https://developer.valvesoftware.com/wiki/SteamCMD

Next, scroll down to the windows tab, and click the [1] icon in the corner here:


this should download a file called steamcmd.zip like so


most guides recommend making a folder in programfiles (x86), but personally I like to make a folder on my desktop called steamCMD and extracting the zipped file into that folder there for easier access. To unzip, right click the file and click "extract all" and choose the folder of your choice.


Once extracted, we want to click on the "SteamCMD" icon in this folder, it will bring up a command prompt, and it may take a second to update. First, type "login anonymous" (without parenthesis) and press enter on your keyboard. Next, type "App_Update 380870 validate" (without parenthesis) this step WILL take a a minute or two to load.


Congratulations, you have installed the server.


Step 2: Port Forwarding & Networking
Now that you have installed the server, its time to allow it through the firewall.

IMPORTANT: Please take note if you have a dual router setup, you will need to forward the ports from the first router IP to the second, and then from the second again to the PC IP address.

First, login to your router and find the port forwarding tab.


Next, open the command prompt of the PC you will be hosting on, and type "ipconfig" (no parenthesis) Find the line of text that sats IPv4 address, and copy / remember this address.


Then, add the port range, and your PC IP address to the Local IP or IP address box. Add the following, and ensure the protocol is set to the right UDP or TCP settings:


Save / apply these to your router settings. Next, we will allow these through the firewall.
First, find the windows defender firewall program, and open it. Click on "advanced settings" on the upper left side of the screen.


Next, click on "imbound rules" and then click, "new rule"


Select "port" on the new screen, then click next. Ensure it is set to "UDP" and "Specific Local Ports" and type "16261"


Click next, ensure the "allow the connection" box is checked, and then click next again, ensuring all 3 boxes are checked, and then clicking next again. You should arrive on a "name" page like so. Name this "pzUDP" and click finish.


IMPORTANT: Repeat the same process with port 16262!

Finally, open settings on your device, and head to the "Network and internet tab" like so.


A network status tab should appear. Click on "Properties" You should see a tab that says "Network Profile" Set the connection to private like so.


IMPORTANT: Do this for BOTH host device and playing device on same network.

Now is a good idea to restart your computer as well.

Congratulations, you have allowed zomboid and steam ports through your firewall.
Step 3: Test running the new server
Now that port forwarding is set up, we will be starting the Project Zomboid server for the first time. Navigate back to your steamCMD folder. Click on "steam apps" then "'common" then "Project Zomboid dedicated server". you should see a screen like so:


Click on the file titled "StartServer64". This will begin the first server startup. It will open up a command prompt and load for awhile. The first time around will prompt you for an admin password, type this in, and be sure to remember it! You will need this password for the admin account logon. The server will start up.

Boot up Zomboid on your chosen device.
IMPORTANT: if the device is on the same network, use the earlier copied IP in step 2, if you are on another network, go to the PC you are hosting on, and visit https://whatismyipaddress.com/ and locate the IPv4, this will be what you will give others/friends/yourself to connect from different networks.

Type the information in the following boxes. Login as Admin, and insert the set password from earlier.


If you are able to view the server and logon as admin, the server connection is set up.

Congratulations, you now have a running Zomboid server.
Step 4: Server Settings & Adding mods to the server
If you wish to add mods to the server or edit the base configuration, first you will need to use a file reader. The built in windows notepad works fine, but personally, I use Visual Studio Code, which can be found at https://code.visualstudio.com/ .

Next, find your zomboid server file. This can be found at C:\Users\(your-own-username)\Zomboid\Server, or by pressing WindowsKey+R and typing in the following: %userpofile%/zomboid like so, and then clicking on the "server" folder


You should be greeted by 3 files: servertest. servertest_sandboxvars, and servertest_spawnregions


Right click on servertest, and choose open with your text editor of choice

Studio

(if using Visual Code Studio, make sure to "trust" the tab), and then you can edit and save the configurations. Here you can view server settings such as Ports, Mods, Max Players, Server Passwords, enable the server to be seen publicly or not, etc. Each Line is very self explanatory making things easy to understand. In this step, we will be adding mods. First, locate the "mods=" (no parenthesis) line.


Here you will need to go to the mods workshop page, and find the MOD ID, which is usually towards the bottom of the workshop mod page. In this example, we use @BitBraven's Common Sense mod.


Copy the mod ID line, and paste it into the mods= line, and put a semicolon directly after. Next, we are going to do the same process, except this time with the "Workshop Items" Line.


This time, copy the workshop ID number and insert a semicolon directly after.

Finally click file, then save. This will update the files for the next time the server is opened, and will install the mods.
Step 5: Moving single player data
If you are new to Project Zomboid hosting and want to merge your single player base to your multiplayer server, first, you will need to locate the chunk your base is stored in. This can be done by going to https://map.projectzomboid.com/ , and locating your base. Click on the "map coordinates" tab and move your cursor around, which will give you the coordinates.


These coordinates will coordinate with both chunk data and map files in the folder C:\Users\(username)\Zomboid\Saves\(builder/sandbox/whatever)\(date). In this example, using the coordinates from the prison, we want to start in the upper corner and go down to the lower corner. Looking at the "cell" on the map it starts with 25x39, and ends with 26x40. Using these we will locate the chunk data files.


We will do something similar with the map files as well, as we can see in the example, the coordinates are 7544x11723. We will shave off one number on each side, so we can picture 754x1172. Do this for the lower corner as well, and we will get 789x1198. Then we will once again find that range of map files. You will need to copy ALL files from this range. It can be a lot, depending on the size of the base. If you do not have a vanilla game building base, do your best to estimate the coordinates of the base using the map. In my example, I do not have these exact files as the area has not been loaded, FYI. But if you have visited them they will be.


If you want to also keep the storage contents and vehicle data, this will be in the same file folder. Find the "'WorldDictionary" BIN file, as well as the "Vehicles" DB file, and copy these.

Next, go to your folder C:\Users\(username)\Zomboid\Saves\Multiplayer\(servername) and paste all of the data here, and choose to replace current existing if the option appears. Upon next server bootup, the structures, vehicles, and storage should be placed.

I strongly advise you create a folder to store all this data together, so you can copy it all over at once.

If you wish to merge a whole world, copy EVERYTHING. This can take some time, however.

Congratulations, you have now merged your map data from single player to multiplayer.
Special Thanks
Special Thanks to Zomboid Team Member & moderator "Beard" on the Project Zomboid official discord server, I wouldn't have been able to do this without his help.

In addition, thank you to reddit user ecntv for a detailed guide on the steam CMD instructions.

Also big thank you to Aiterion Modding for instructions on firewall port rules!
7 Comments
Amalie May 6 @ 6:49pm 
Good evening, how are you?
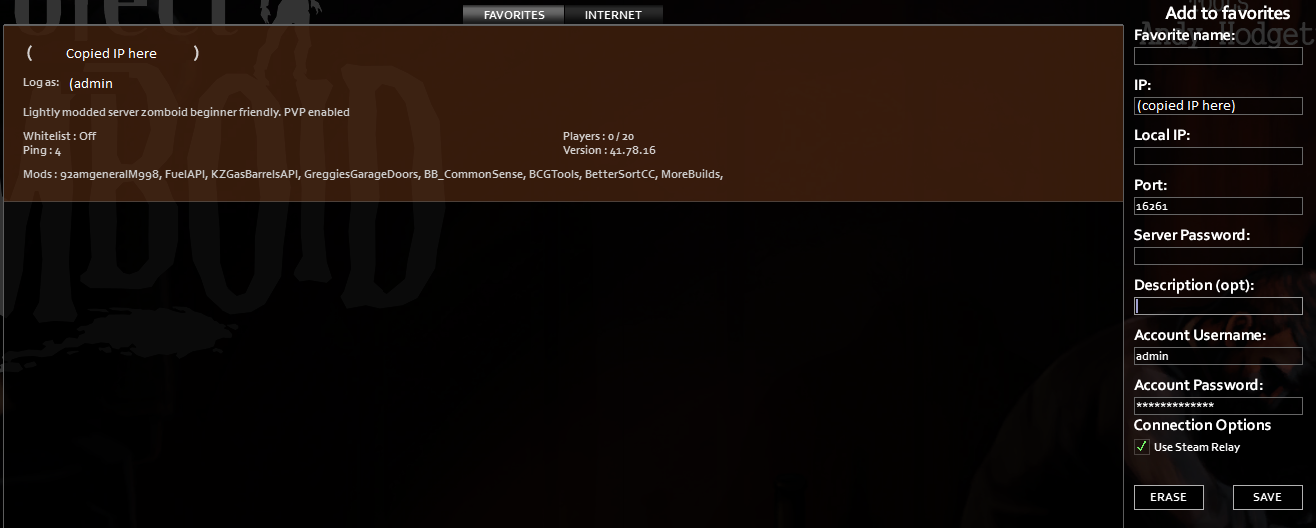
I need help, I followed it step by step, but still, no one can connect to the server.

Can you help me in any way? Nothing I'm doing is helping anyone be able to connect to the server.

Sorry for the bad English, but I'm not fluent.
Major Spellbound  [author] Dec 3, 2023 @ 9:56am 
@Rockstar McKickass sorry for the late response.

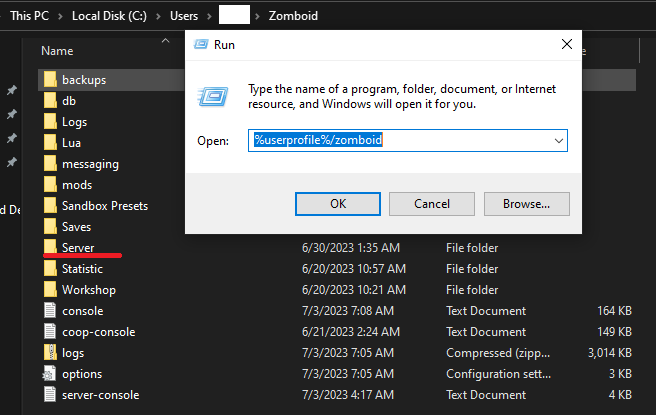
1. to answer your first question, I run it off of a second computer as it does slow performance if I don't, but if you have a beefier PC I don't see why you wouldn't be able to without significant drawbacks.

2. I have a (sorta) dedicated machine, I run it off my laptop and play zomboid on my PC.

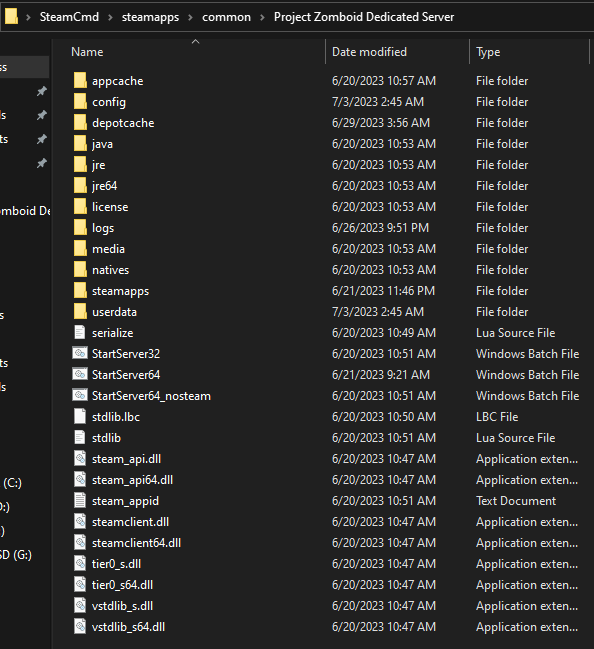
3. I use the same steam account, I run steamCMD, a steam developer tool as aforementioned in this post which allows me to run the server and play on my steam account. Setting this up in the way my instructions go there *shouldn't* be a problem with instance conflict
Rockstar McKickass Sep 29, 2023 @ 12:54am 
@Major Spellbound Thank you for this guide! I have never run a dedicated and it seems rather daunting for my old brain but this will help a ton! Thank you so many much :spacehamster:

These may be silly questions but I can be a silly person at times. I have made peace with that fact, I hope you can as well.

1. Do you notice any significant drawbacks to running the server on the same machine you are playing from?

2. Would it be ideal to have a dedicated machine for running the server, and if so do you know a guide for setting one of those up or what it would take?

I am miles from savvy when it comes to this stuff but I probably have enough parts to Frankenstein a machine together, unsure what specs would be needed though. Or if I would need like another steam account and copy of the game to host on a separate machine, or if it would be worth the trouble.

Thanks again for the guide, stellar work!
Major Spellbound  [author] Aug 16, 2023 @ 2:13pm 
@KizXii good catch! ill make sure to get that fixed. Thanks!
Smaufer Jul 10, 2023 @ 9:54am 
epico
L U C I D Jul 9, 2023 @ 7:34am 
Amazing job putting all of this together, thank you so much!:crtstar:
KizXii Jul 5, 2023 @ 1:08pm 
"AppUpdate 380870 validate" should be "app_update 380870 validate" i was confused for a while until i saw the image

cheers