Ni no Kuni Wrath of the White Witch™ Remastered

Ni no Kuni Wrath of the White Witch™ Remastered

81 ratings
100% Achievements: A Comprehensive Guide
By ErickaUnlimited
An accurate, detailed and complete guide on how to unlock every achievement in Ni no Kuni Wrath of the White Witch™ Remastered.

5
4
3
2
2
   
Award
Favorite
Favorited
Unfavorite
General Achievements
"Prima Donna"
Awarded for learning all of Esther's songs.
Esther will learn her final song, "Anthem", by level 65.


"Gunslinger"
Awarded for learning all of Swaine's trickshots.
Swaine will learn his final trickshot, "Deadshot", by level 68.


"King of the World"
Awarded for defeating the Guardian of Worlds.
This achievement is only availabe post-game. To get started, see Errand №131 below for the full details on the process to do this achievement.


"Little Battler Experience"
Awarded for winning 1,000 battles.
Win 1,000 battles over the course of your playthrough to unlock this achievement. If you work on the achievements as you go and level yourself up proportionally, this will take you roughly 70-80 hours depending on how much you grind for it.

When doing this guide, I unlocked it at 82 hours, but taking into consideration the time it took to write this, I'd put it closer to 70-80 hours. You'll more than likely unlock this in your post-game continuation, so don't worry about it and just work on other ones and you'll unlock this without really needing to grind for it.


"Glim Reaper"
Awarded for gathering 2,000 glims.
Collect 2,000 glims during your battles. These are the little green (HP), blue (mana) and gold (special) orbs that dot the battlefield. Make sure you earn the upgrade to automatically pick them up at the end of battle.

If you need a way to farm them, "Thunderstorm" and "Earsplitter" are solid recommendations to farming them, though you don't really need to, as you'll unlock this prior to completing many of the other achievements needed, such as the grueling alchemy ones.


"Guildering the Lily"
Awarded for amassing a fortune of half a million guilders.
This achievement is more time consuming that it sounds. I highly recommend crafting what you can to save money, but also don't be afraid to buy what you need. Money is a drag until the end-game when errands and bounties really start paying off.

Obviously you'll make a good chunk of it from the above mentioned, the Trials tournament and from selling unneeded resources, but if you still need funds, the Ivory Tower will be the best place to farm at a steady pace, as you can also farm steals and experience.

It isn't necessary, but earning this achievement before you work on the casino one is recommended. You don't want to spend a great deal of money there, lose it, and then have to grind for more guilder.


"Man of Steal"
Awarded for successfully stealing 50 times.
This achievement is very straight forward. Once Swaine joins your party and he obtains the "Mugshot" trick, steal 50 items from enemies over the course of the playthrough. The computer does occasionally use it even if you don't. I didn't use the trick the entire game and only needed about a dozen more in post-game. A very manageable achievement.
Spell Achievements
During your travels, you'll unlock a plethora of new and helpful spells along the way. If you ran into the ghost [Horace] in Ding Dong Dell, his next appearance is in Al Mamoon and he'll appear at various locations throughout your adventure.

After the first encounter, he'll give you a special spell if you can solve his riddles. For those stumped, here are his locations and riddle answers:

  • Ding Dong Dell - First encounter. No riddle required to solve.
  • Al Mamoon - Second encounter. Answer is Dragon of the West
  • Castaway Cove - Third encounter. Answer is Finest Fiber
  • The Fairygrounds (Past the bridge) - Fourth encounter. Answer is Crispy Lettuce
  • Hamelin - Fifth encounter. Answer is 5
  • Yule - Sixth encounter. Answer is Blizzard Bloom
  • Perdida - Seventh encounter. Answer is Jabal Al-Dukhan
  • Ding Dong Dell - Eighth encounter. Answer is Unleash
  • Ara Memoriae - Final encounter. Answer is Wizard's Robes

There is only one achievement linked to learning all the spells for Oliver. Once you obtain them all, you'll be rewarded with:

"Magic Master"
Awarded for learning all of Oliver's spells.
See the below list on when/how to obtain all 52 spells for Oliver.

Rune Number
Spell
Location
Rune №1
Form Familiar
Obtained when you first visit Old Father Oak in the Deep Dark Woods.
Rune №2
Gateway
Obtained at the end of the prologue.
Rune №3
Healing Touch
Obtained when you first visit Old Father Oak in the Deep Dark Woods.
Rune №4
Draw Poison
Obtained when meeting Horace by the milk fountains in Al Mamoon and solving his first riddle. For the answer, see above spoiler-tagged area at the top of the Spell Achievement section of this guide.
Rune №5
Healing Hand
Obtained when you restore Mornstar to its original form in Perdida.
Rune №6
Take Heart
Obtained when you defeat the Forest Guardian in the Deep Dark Woods. Given to you by Old Father Oak before entering Ding Dong Dell.
Rune №7
Give Heart
Obtained when you defeat the Forest Guardian in the Deep Dark Woods. Given to you by Old Father Oak before entering Ding Dong Dell.
Rune №8
Spring Lock
Given to you as a gift for helping the King of Ding Dong Dell get his enthusiasm back.
Rune №9
Travel
Obtained after curing Marcassin's broken heart with of piece of his past self. Probably the most handy spell you'll come across!
Rune №10
Levitate
Given to you by a bird at The Fairyground. The bird is near the inn.
Rune №11
Second Self
Obtained after helping out the Littlies and Mr. Drippy's mother by defeating the monsters inside her.
Rune №12
Vanish
Obtained after helping out the Littlies and Mr. Drippy's mother by defeating the monsters inside her.
Rune №13
Chart Chests
Obtained when meeting Horace in Hamelin and solving his riddle. For the answer, see above spoiler-tagged area at the top of the Spell Achievement section of this guide.
Rune №14
Veil
Obtained when meeting Horace in Perdida and solving his riddle. For the answer, see above spoiler-tagged area at the top of the Spell Achievement section of this guide.
Rune №15
Magic Lamp
Obtained when you fix the broken heart of Mr. Rashaad's daughter.
Rune №16
Nature's Tongue
Obtained when you fix Queen Lowlah's broken heart in Al Mamoon.
Rune №17
Quicken Growth
Found on the floor inside the Golden Grove when you free a trapped Familiar. As a reward, they'll guide you to its location.
Rune №18
Mimic
Obtained after helping out the Littlies and Mr. Drippy's mother by defeating the monsters inside her.
Rune №19
Vacate
Obtained when meeting Horace overlooking the boats in Castaway Cove and solving his second riddle. For the answer, see above spoiler-tagged area at the top of the Spell Achievement section of this guide.
Rune №20
Seek Fortune
Awarded to you from the plunder by the Captain of the Sky Pirates.
Rune №21
Rejuvenate
Given to you as a gift for helping the King of Ding Dong Dell get his enthusiasm back.
Rune №22
Fuse
Obtained after curing Marcassin's broken heart with of piece of his past self.
Rune №23
Breach Time
Obtained when going back in time and obtaining The Mornstar Wand.
Rune №24
Ward
Obtained after curing Marcassin's broken heart with of piece of his past self.
Rune №25
Nx
Obtained by defeating the White Witch and saving the world.
Spell Achievements
Rune Number
Spell
Location
Rune №26
Secret Ingredient
Obtained when you fix the broken heart of Mr. Rashaad's daughter.
Rune №27
Loaf of Life
Obtained after helping out the Littlies and Mr. Drippy's mother by defeating the monsters inside her.
Rune №28
Bridge
Earned as a gift for completing the Sage Trials; given to you by the Supreme Sage Solomon.
Rune №29
Spirit Medium
Obtained via the boy behind the stone ruins before you enter the castle in Ding Dong Dell. Speak to the boy behind the stone to obtain it, then cast it to learn about Horace, your book and the Wizard of Ages.
Rune №30
Puppet String
Obtained when you fix the broken heart of Mr. Rashaad's daughter.
Rune №31
Insight
Obtained after curing Marcassin's broken heart with of piece of his past self.
Rune №32
Open Mind
Obtained after helping out the Littlies and Mr. Drippy's mother by defeating the monsters inside her.
Rune №33
Burden
Obtained when you fix Queen Lowlah's broken heart in Al Mamoon.
Rune №34
Fortune's Fool
Obtained when you restore Mornstar to its original form in Perdida.
Rune №35
Shift Shape
Obtained after helping out the Littlies and Mr. Drippy's mother by defeating the monsters inside her.
Rune №36
Shrink
Obtained after helping out the Littlies and Mr. Drippy's mother by defeating the monsters inside her.
Rune №37
Werecat
Obtained after helping out the Littlies and Mr. Drippy's mother by defeating the monsters inside her.
Rune №38
Werefish
Obtained after helping out the Littlies and Mr. Drippy's mother by defeating the monsters inside her.
Rune №39
Cloudburst
Obtained when meeting Horace by in one of the huts by the frozen pond in Yule and solving his riddle. For the answer, see above spoiler-tagged area at the top of the Spell Achievement section of this guide.
Rune №40
Thunderstorm
Obtained when meeting Horace where it all began in Ding Dong Dell and solving his riddle. For the answer, see above spoiler-tagged area at the top of the Spell Achievement section of this guide.
Rune №41
Fireball
Obtained when you first visit Old Father Oak in the Deep Dark Woods.
Rune №42
Pulse
Obtained when you fix the broken heart of Mr. Rashaad's daughter.
Rune №43
Frostbite
Awarded for rescuing King Tom and recovering his wand.
Rune №44
Arrow of Light
Obtained once you save the Emperor's two sons from danger outside of Hamelin.
Rune №45
Unleash
Obtained when you restore Mornstar to its original form in Perdida.
Rune №46
Evenstar
Obtained after defeating Shadar.
Rune №47
Astra
Obtained when meeting Horace at Ara Memoriae and solving his final riddle. For the answer, see above spoiler-tagged area at the top of the Spell Achievement section of this guide. He does not show up on the map, nor when you first enter until you get closer. This also unlocks Errand №136, so talk to Horace once more before leaving.
Rune №48
Quake
Awarded to you from the plunder by the Captain of the Sky Pirates.
Rune №49
Poison Apple
Obtained after helping out the Littlies and Mr. Drippy's mother by defeating the monsters inside her.
Rune №50
Broom Boom
Earned as a gift for completing the Sage Trials; given to you by the Supreme Sage Solomon.
Rune №51
Ashes of Resurrection
Obtained by defeating the White Witch and saving the world.
Rune №52
Mornstar
Earned after defeating the Vileheart and talking with Pea.
Crypt Casino Achievements
You'll first hear about the casino after helping to restore certain person(s) and tasks from within Hamelin, but you won't be able to access it for a bit yet. Once you make your way to the Sky Pirates' hideaway, you'll meet a skeletal messenger that will inform you that it is now open within Tombstone Trail.

There is a secondary "RIP" ticket you can earn post-game when you visit the casino, which is when I'd recommend actually working towards the achievements link to this area of the game. Honestly, I just ignored it completely until the end-game content. It should be noted that you SHOULD NOT spend an exorbitant amount of guilder until you have completed the achievement to collect 500,000 guilder at one time.

That is the only achievement tied to money; once you earn it, spend money as you see fit. The easiest achievement is simply buying any prize at the casino, either by winning the tokens needed, or simply buying them outright.

"Raising the Stakes"
Awarded for collecting your first prize at the casino.
Claim any prize at the casino (of any rank) to earn this achievement.


"High Roller"
Awarded for collecting all of the tickets for the Mem-O-Vision by winning big at the casino.
This hidden achievement is a post-game one. The Men-O-Vision tickets at the casino don't become available (or the RIP ticket to get in) until you finish the game.
If you have already earned the 500,000 guilder achievement, you can outright buy all the tokens needed to buy each individual ticket. It will cost 3750,000 guilder to buy them all.
Alchemy Achievements
Alchemy and its respective achievements are some of the most grindy you'll encounter in the entire game; I highly recommend working on it the best you can as you play so you can avoid the painful post-game drudges of farming resources. There are a total of formulas that you'll learn as you progress through the game, complete errands, or otherwise. Since you have to complete every errand to get enough stamps for one of the hidden achievements, you'll earn all of the alchemy recipes through normal gameplay except a few.

There are also several regular NPCs you must talk to in order to learn them. These are not errand related. They are the following:

1. Lady in the boat at the harbor. (Castaway Cove)
2. Man outside Swift Solutions. (Hamelin)
3. Soldier in Kublai's ship. (Skull Mountain) or (The Iron Wyvrern) post-game.
4. The fishing tomte (snow person). (Yule)
5. Boy standing with his mother in the doorway to one of the homes. (Perdida, left side)

Talk to these NPCs as soon as you can. Making the formula prior to knowing the recipe will not count! Yes, you will make the item, but it won't count for your total until you learn, Annoying, I know.

There a total of 134 recipes to create and the hidden achievement associated with them requires you to make at least 120 of them. You can tell which ones you've made by the picture when looking at items through the cauldron. If the item is represented as a (?), then you haven't crafted one. If the (?) is replaced with a photo of the actual item, then you've made it before. Items found/dropped do not count towards the crafting total.

"Pop Pop Fizz Fizz"
Awarded for alchemizing 10 different items.
Create any 10 items (either by mixing random ingredients or through formulas) to unlock this achievement. Make sure you're picking up all the spawnable drops in the overworld so you can have a decent stockpile of ingredients to use.


"Mad Scientist"
Awarded for alchemizing 120 different items.
This achievement is extremely grindy. Read the above portion of "Alchemy Achievements" to understand how to obtain all the achievements. See below for locations of any resources you may need to complete your task.
Alchemy Achievements & Formulas
Here is a complete list of all alchemy formulas and what you need to make them:

Alchemy Recipe Name & No.
Item(s) Required
Alchemy Recipe Name & No.
Item(s) Required
Provision & Treats
Recipe 001
Sandwich
White Bread x1
Tender Beef x1
Recipe 024
Carnation Cake
Carrot Cake x1
Dumpty Eggs x2
Angula x1
Recipe 002
Fishburger
White Bread x2
Dumbflounder x1
Crispy Lettuce x1
Recipe 025
Breeze Cake
Cake x2
Caramel x2
Gustplume
Recipe 003
Cheeseburger
Sandwich x1
Crispy Lettuce x1
Glowshrimp x1
Recipe 026
Patty Cake
Breeze Cake x1
Rumblenuts x1
Powerstone x1
Recipe 004
Tonic
Pixie Dew x1
Old Oak Leaves x2
Seeds of Discord x2
Recipe 027
Hot Cake
Carnation Cake x1
Drakestone x1
Crownberries x2
Recipe 005
Pixie Dew
Fogdrop x1
Booster Shoots x3
Springwater x3
Recipe 028
Sour Sundae
Sundae x1
Yogurt x3
Recipe 006
Sprite Dew
Pixie Dew x1
Sour Grapes x1
Slumbernot Leaves x3
Recipe 029
Wildflower Sundae
Sour Sundae x1
Plainswort x1
Rings-a-Bell x1
Recipe 007
Strong Coffee
Iced Coffee x2
Springwater x1
Recipe 030
Toadstool Sundae
Sundae x2
Glowcap x1
Black Truffle x2
Recipe 008
Cappuccino
Strong Coffee x1
Creamy Milk x3
Slumbernot Leaves x1
Recipe 031
Sasparilla Sundae
Toadstool Sundae x1
Booster Shoots x2
Snow Radish x2
Recipe 009
Espresso
Strong Coffee x2
Fogdrop x1
Slumbernot Leaves x3
Recipe 032
Knickerbocker Glory
Wildflower Sundae x1
Crownberries x1
Big Babana x2
Recipe 010
Sage's Secret
Tonic x1
Snowflake x1
Glowcap x3
Recipe 033
Sweetie Pie
Pie x1
Crunchy Carrot x3
Recipe 011
Phoenix Breath
Phoenix Feather x1
Coldstone x1
Plainswort x3
Recipe 034
See-Through Pie
Sweetie Pie x1
Yogurt x2
Springwater x1
Recipe 012
All-Be-Gone
Old Oak Leaves x1
Booster Shoots x1
Plainswort Flower x1
Recipe 035
Game Pie
Sweetie Pie x1
Tender Beef x2
Rumblenuts x1
Recipe 013
Milk Chocolate
Chocolate x1
Creamy Milk x1
Bumbler Honey x1
Recipe 036
Pie on the Bone
Game Pie x1
Sturdy Shinbone x1
Tealwood x1
Recipe 014
Fairy Chocolate
Milk Chocolate x1
Angula x1
Rings-a-Bell x1
Recipe 037
Golden Pie
See-Through Pie x1
Babana x2
Big Babana x2
Recipe 015
Chocolate Bonbon
Chocolate x2
Fogdrop x2
Bumbler Honey x2
Recipe 038
Salted Ice Cream
Ice Cream x1
Booster Shoots x1
Recipe 016
Snowdrop Bonbon
Chocolate Bonbon x1
Caramel x2
Snowflake x1
Recipe 039
Ruby Ripple Ice Cream
Salted Ice Cream x1
Crunchy Carrot x2
Emberstone x1
Recipe 017
Princess Chocolate
Fairy Chocolate x1
Snowdrop Bonbon x1
Crownberries x2
Recipe 040
Soft Scoop Ice Cream
Salted Ice Cream x1
Green Grapes x2
Gnomebeard x1
Recipe 018
Creamy Flan
Flan x1
Dumpty Eggs x2
Bumbler Honey x1
Recipe 041
Snow White Ice Cream
Soft Scoop Ice Cream x1
Yogurt x2
Snowflake x1
Recipe 019
Babana Flan
Creamy Flan x1
Babana x2
Gnomebeard x1
Recipe 042
Tutti-Frutti Ice Cream
Ruby Ripple Ice Cream x1
Sour Grapes x1
Crownberries x2
Recipe 020
Frosty Flan
Flan x2
Snowflake x1
Bumbler Honey x2
Recipe 043
Jumbo Sundrop
Sundrop x1
Sun Crystal x3
Recipe 021
Fruit Flan
Frosty Flan x1
Green Grapes x2
Sour Grapes x1
Recipe 044
Jumbo Stardrop
Stardrop x1
Star Crystal x3
Recipe 022
Fantastic Flan
Babana Flan x1
Fruit Flan x1
Big Babana x2
Recipe 045
Jumbo Moondrop
Moondrop x1
Moon Crystal x3
Recipe 023
Carrot Cake
Cake x1
Crunchy Carrot x
Recipe 046
Jumbo Planetdrop
Planetdrop x1
Planet Crystal x3

Alchemy Achievements & Formulas
Alchemy Recipe Name & No.
Item(s) Required
Alchemy Recipe Name & No.
Item(s) Required
Weapons & Armor
Recipe 047
Champion's Sword
Soldier's Sword x1
Iron Diamond x2
Raw Steel x2
Recipe 071
Tainted Claws
Haunted Claws x1
Tealwood x2
Baneflower x3
Recipe 048
Lost Sword
Tachestone x1
Bass Bell x2
Rings-a-Bell x3
Recipe 072
Crucible Claws
Steel Claws x1
Coldstone x2
Raw Steel x2
Recipe 049
Sainted Sword
Greatsword x1
Meteorite Fragment x2
Powerstone x3
Recipe 073
Six Wind Claws
Woodland Claws x1
Tealwood x2
Slumbernot Leaves x2
Recipe 050
Skyfall Sword
Sainted Sword x1
Star Pearl x2
Meteorite Fragments x3
Recipe 074
Ice Queen Claws
Snow Witch Claws x1
Coldstone x2
Blizzard Bloom x3
Recipe 051
Primordial Sword
Skyfall Sword x1
Kaleidostone x5
Troll's Tears x5
Recipe 075
Ice Crystal Claws
Ice Queen Claws x1
Powerstone x2
Jade Marble x3
Recipe 052
Candle Cutter
Flint Dagger x1
Emberstone x1
Recipe 076
Star Eater's Claws
Ice Crystal Claws x1
Kaleidostones x5
Angel's Wings x5
Recipe 053
Shadowglass Knife
Flint Dagger x1
Shadowglass x1
Recipe 077
Toughened Armor
Rugged Armor x1
Supple Leather x1
Recipe 054
Divine Dagger
Sickle x1
Raw Steel x1
Springwater x1
Recipe 078
Bone Mail
Bass Bell x1
Sturdy Shinbone x2
Recipe 055
Flitwing
Ice Shard x1
Meteorite Fragment x2
Gustplume x2
Recipe 079
Gale Armor
Gale Robes x1
Gustplume x1
Rumblenuts x2
Recipe 056
Planet Splitter
Flitwing x1
Glowstone x5
Evil Eye x5
Recipe 080
Royal Armor
Scale Armor x1
Coldstone x2
Drill Screw x2
Recipe 057
Watchmaker's Ax
Iron Ax x1
Sprocket x1
Recipe 081
Champion's Armor
Grunt Armor x1
Iron Diamond x2
Raw Steel x2
Recipe 058
Clockwork Ax
Watchmaker's Ax x1
Drill Screw x1
Sprocket x1
Recipe 082
Armor of Justice
Enigma Armor x1
Blowpipe x2
Powerstone x3
Recipe 059
Demon's Ax
Grand Ax x1
Black Wings x2
Tachestone x3
Recipe 083
Brilliant Armor
Champion's Armor x1
Medal of Impunity x1
Blowpipe x3
Recipe 060
War God's Ax
Demon's Ax x1
Kaleidostone x5
Scroll of Truth x5
Recipe 084
War God's Armor
Brilliant Armor
Troll's Tears x5
Scroll of Truth x5
Recipe 061
Hammer of Justice
Tower Toppler x1
Iron Diamond x2
Bass Bell x2
Recipe 085
Champion's Tunic
Soldier's Smock x1
Tealwood x2
Gnomebeard x3
Recipe 062
Ninnyhammer
Bubble Pipe x2
Gnomebeard x3
Supple Leather x3
Recipe 086
Wizard's Robes
Old Oak Leaves x3
Ritestone x3
Seed of Discord x2
Recipe 063
Meteor Mallet
Ninnyhammer x1
Blowpipe x2
Meteorite Fragment x3
Recipe 087
Ripple Robes
Blizzard Bloom x2
Wetstone x2
Springwater x3
Recipe 064
Royal Spear
Jade Marble x2
Raw Steel x2
Shadowglass x2
Recipe 088
Goddess's Gown
Glowstone x5
Angel's Wings x5
All-Seeing Eye x5
Recipe 065
Champion's Spear
Soldier's Spear x1
Iron Diamond x2
Bass Bell x2
Recipe 089
Scale Shield
Leather Shield x1
Sturdy Scale x1
Angula x1
Recipe 066
Rainbow Lance
Tachestone x1
Jade Marble x2
Emberstone x3
Recipe 090
Shadowglass Shield
Iron Shield x1
Jade Marble x1
Shadowglass x3
Recipe 067
Giant's Spear
Rainbow Lance x1
Ritestone x2
Seed of Discord x3
Recipe 091
Champion's Shield
Grunt Shield x1
Iron Diamond x2
Shadowglass x2
Recipe 068
Longshank
Giant's Spear x1
Troll's Tears x5
Evil Eye x5
Recipe 092
Mystic Shield
Avenger's Shield x1
Powerstone x1
Glowcap x5
Recipe 069
Knucklebone Claws
Crude Claws x1
Sturdy Shinbone x1
Recipe 093
Goddess's Shield
Mystical Shield x1
Glowstone x5
Angel's Wings x5
Recipe 070
Steel Claws
Bullhorn Claws x1
Jade Marble x2
Sprocket x2
Recipe 094
War God's Shield
Champion's Shield
Kaleidostone x5
Scroll of Truth x5
Alchemy Achievements & Formulas
Alchemy Recipe Name & No.
Item(s) Required
Alchemy Recipe Name & No.
Item(s) Required
Weapons & Armor
Recipe 095
Champion's Helm
Champion's Shield
Kaleidostone x5
Scroll of Truth x5
Recipe 100
Eagle Eye Cloak
Gustplume x1
Blizzard Bloom x1
Supple Leather x2
Recipe 096
Blessed Helm
Coldstone x2
Rings-a-Bell x3
Supple Leather x3
Recipe 101
Champion's Cloak
Steel Scale x1
Iron Diamond x2
Drill Screw x2
Recipe 097
War God's Helm
Blessed Helm
Evil Eyes x5
Scroll of Truth x5
Recipe 102
Phantom Mantle
Caghoul x1
Tachestone x2
Emberstone x2
Recipe 098
Stripy Cloak
Snakeskin Cloak x1
Supple Leather x1
Recipe 103
Cyclone Cloak
Breezy Cloak x1
Fogdrop x1
Blizzard Bloom x1
Recipe 099
Breezy Cloak
Sea Breeze Cloak x1
Angula x2
Recipe 104
Heavenly Mantle
Eagle Eye Cloak x1
Cyclone Cloak x1
Black Wings x2
Alchemy Achievements & Formulas
Alchemy Recipe Name & No.
Item(s) Required
Alchemy Recipe Name & No.
Item(s) Required
Accessories & Important Items
Recipe 105
Poisoned Fang
Giant's Tooth
Baneflower
Recipe 128
Rogue's Revolver
Hog's Cog x1
Drill Screw x1
Raw Steel x2
Recipe 106
Soulfang Necklace
Soretooth Ring x1
Drakestone x1
Baneflower x2
Recipe 129
Highwayman's Handgun
Gyro-Grappler x1
Blowpipe x1
Drill Screw x2
Recipe 107
Crimson Fang
Drakestone x2
Sturdy Shinbone x1
Emberstone x2
Recipe 130
Cad's Cannon
Cad's Clasp x1
Troll's Tears x5
Bubble Pipes x10
Recipe 108
Wyrmfang Ring
Dragonstooth Ring x1
Ritestone x3
Drakestone x3
Recipe 131
Pretty Parasol
Blowpipe x2
Black Wings x2
Rings-a-Bell x10
Recipe 109
White Stag's Tooth
Glowstone x5
Troll's Tears x5
All-Seeing Eye x5
Recipe 132
Bard's Harp
Blossom of the Bard x1
Kaleidostone x5
Star Pearl x10
Recipe 110
Stalwart Scale
Sturdy Shinbone x1
Wetstone x1
Recipe 133
Masterthief's Magnum
Riddle Rivet x1
Scroll of Truth x5
Ritestone x10
Recipe 111
Shadowglass Scale
Jade Marble x1
Shadowglass x3
Recipe 134
Sky Tree Wand
Old Stick x1
Mirror of Truth x1
Recipe 112
Deep Blue Scale
Coldstone x1
Jade Marble x2
Wetstone x2
Recipe 113
Salamander Scale
Drakestone x1
Rumblenuts x2
Emberstone x2
Recipe 114
Wyrm King's Scale
Dragonstooth Ring x1
Star Pearl x2
Drakestone x2
Recipe 115
Medal of Impunity
Star Pearl x1
All-Be-Gone x3
Glowcap x3
Recipe 116
Medal of Dexterity
Soldier's Sword x1
Bass Bell x1
Sprocket x1
Recipe 117
Medal of Steadfastness
Iron Shield x1
Bubble Pipe x2
Bass Bell x2
Recipe 118
Berserker's Badge
Bastion Badge x1
Black Wings x2
Bubble Pipe x2
Recipe 119
Barrier Badge
Iron Shield x1
Meteorite Fragment x2
Sprocket x2
Recipe 120
Bastion Badge
Braggart's Badge x1
Powerstone x2
Fluffy Rice x10
Recipe 121
Ironclad Badge
Adamant Badge x1
Drakestone x2
Rumblenuts x3
Recipe 122
Bracer Badge
Battler's Badge x1
Grunt Shield x1
Fogdrop x2
Recipe 123
Hardheaded Badge
Battler's Badge x1
Soldier's Helmet x1
Tachestone x2
Recipe 124
Storm Seal
Gustplume x1
Gnomebeard x2
Angula x1
Recipe 125
Omniseal
Angel's Wings x5
Evil Eye x5
All-Seeing Eye x5
Recipe 126
Herald's Harp
Cherub's Wing x1
Powerstone x1
Gustplumes x2
Recipe 127
Muse's Harp
Heart of the Muse x1
Pairs of Angel's Wings x 5
All-Seeing Eyes x 10
Alchemy Achievements & Resources
With alchemy, you'll need plenty of resources to complete enough of the recipes to unlock (probably) the last achievement in the game. Grinding 120 different formula is, mildly, annoying. I highly recommend starting early game with what you can, but, regardless, you will need to do it post-game quite a bit.

Below is a list of every needed resource needed for alchemy. There are some not listed that you may find, but that is because they aren't used for alchemy. For example, the wooden sword sold in Ding Dong Dell.

That being said, there will be an in depth portion at the bottom of this section going over some of the rarer and more difficult items needed.

Naturally spawning resources are those that appear on the overworld map. The little golden "sparkly" spots you find outside of town. If the item is found from a "sparkly" spot, this is what I am referring to. They are as follows:

Resource Name
Method(s) of Obtaining
Resource Name
Method(s) of Obtaining
▆▆▆▆▆▆▆▆▆▆▆▆
▆▆▆▆▆▆▆▆▆▆▆▆
▆▆▆▆▆▆▆▆▆▆▆▆
▆▆▆▆▆▆▆▆▆▆▆▆
Adamant Badge
Can be purchased from the weapons shop in Al Mamoon.
All-Be-Gone
Alchemy formula:

X1 - Oak Leaves
x1 - Booster Shot
x1 - Plainswort Flower
All-Seeing Eye & Evil Eye
See the bottom section of "Alchemy Achievements & Rare Drops" under the header "Rare Resources & Gold Enemies: Where to Look?" for a detailed guide on locating this difficult resource.
Angel's Wings
These are extremely rare and it is recommended to avoid recipes that call for them. Since you don't need to craft every recipe.

See the bottom section of "Alchemy Achievements & Resources" under the header "Rare Resources & Gold Enemies: Where to Look?" for a detailed guide on locating this difficult resource.
Angula
This ingredient can be found from sparkly spots on the Ugly Duckling Island, Robinson Islands, or along Shipwreck Shore. These will be the easiest ways to obtain them when you need them.
Shipwreck Shore:
Robinson Islands:
Ugly Duckling Island:
Avenger's Badge
There is a treasure chest on the Tombstone Trail that has one, but they can also be stolen from Spitooligans, which can be found south of the entrance to Skull Mountain.
Avenger's Shield
This shield can be purchased from the peddler in Perdida for 9,500 guilder.
Babana Flan
Crafted from recipe #19 with the following:
Creamy Flan x1
Babanas x2
Gnomebeard x1
Babanas
Purchasable at the Hootique in Al Mamoon for 100 guilders.
Baneflower
Bass Bell
These are regular steals from Chloroboros in the Vault of Tears. You can collect them en
mass here if need be.
Battler's Badge
Purchasable from the weapons shop in Al Mamoon for 400 guilders.
Big Babanas
You can steal them from Hierophants on the island of Nazcaä in your late game, from Aye-Aye Catchers inside the Ivory Tower or buy them from the casino using tokens won (or bought) to claim them as a prize.
Black Truffle
Purchasable from the Hootique in Hamelin for 200 guilder.
Blizzard Bloom
Booster Shots
Bracer Badge
Crafted from recipe #122 with the following:
Battler's Badge x1
Grunt Shield x1
Fogdrops x2
Braggart's Badge
Purchasable at the weapons shop in Al Mamoon for 400 guilders.
Bravado Badge
Purchasable at the weapons shop in Al Mamoon for 400 guilders.
Breeze Cake
Crafted from recipe #25 with the following:
Cake x2
Caramels x2
Gustplume x1


Alchemy Achievements & Resources
Resource Name
Method(s) of Obtaining
Resource Name
Method(s) of Obtaining
▆▆▆▆▆▆▆▆▆▆▆▆
▆▆▆▆▆▆▆▆▆▆▆▆
▆▆▆▆▆▆▆▆▆▆▆▆
▆▆▆▆▆▆▆▆▆▆▆▆
Bubble Pipe & Blow Pipe
Teleport to Ara Memoriae and locate the only spawn for the Fuddy Daddy creature here:
They can be stolen from them using Swaine's Mugshot ability quite easily. They are also dropped as well upon defeat.

Blow pipes: Head to the 3rd or 4th floor of the Ivory Tower and use Swaine's mughost ability to steal them from Beam-Men. They're easy to collect this way.
Bullhorn Claws
You can buy these from the peddler in Castaway Cove for 440 guilder.
Bumbler Honey
Purchasable in Ding Dong Dell at the Hootique.
Caghoul
Purchasable from the weapon shop in Hamelin for 1,260 guilder.
Cake
Purchasable in the Hootique in any town for 20 guilder.
Caramel
Purchasable in the Hootique in any town for 200 guilder.
Carnation Cake
Crafted from recipe #23 with the following:
Carrot Cake x1
Angula x1
Dumpty Egg x2
Carrot Cake
Crafted from recipe #124 with the following:
Carrot x1
Crunchy Carrot x3
Chocolate
Purchasable in the Hootique for 20 guilder.
Chocolate Bonbons
Crafted from recipe #15 with the following:
Chocolate x2
Fogdrop x2
Bumbler Honey x2
Coldstone
You can find these on the The Winter Isles as sparkly spots. You can also steal/earn as drops from Whampire Bats in the Miasma Marshes, Auroralynx in Billy Goat's Bluff (outside Perdida), by boat in The Sea: North of Winter Isles from Strongos, or from
Adamantigers in Jack Frost's Playground.
Creamy Flan
Crafted from recipe #18 with the following:
Flan x1
Bumbler Honey x1
Dumpty Egg x2
Creamy Milk
Purchasable from the Hootique in Al Mamoon for 100 guilder.
Crispy Lettuce
Purchasable in the Hootique for 45 guilder.
Crownberries
These can be found on the island known as Bungler's Bay as a sparkly spot. In post-game, you can buy these from the Crypt Casino with tokens, as well as from gold Draggles/Dragamuffins in The Glittering Grotto. Other enemies such as the Nightcap on Nazcaä island or the Splatterhorn in the Ivory Tower drop them and can be stolen via Swaine's Mugshot ability.

They are also dropped/stolen from gold Draggles on the trail leading up to Old Smoky.
Crude Claw
Purchasable in the weapons shop in Al Mamoon.
Crunchy Carrot
Purchasable from various peddler shops in towns for 45 guilder.
Drakestone
There are several enemies, but I found the easiest way to obtain them is to head over to the Miasma Marshes and find some Wayward Suns. Have Swaine use Mugshot to steal them. You can do the same on The Genie's Steps from Grandsuns and in Billy Goat's Bluff from Gobspeeds.
Drill Screw
Gold sparkle spot by one of the red pirate flags just south of Skull Mountain:
Dumbflounder
Purchasable from the peddler in Castaway Cove for 150 guilder.

Resource Name
Method(s) of Obtaining Item
Resource Name
Method(s) of Obtaining Item
▆▆▆▆▆▆▆▆▆▆▆▆
▆▆▆▆▆▆▆▆▆▆▆▆
▆▆▆▆▆▆▆▆▆▆▆▆
▆▆▆▆▆▆▆▆▆▆▆▆
Dumpty Egg
Purchasable from various peddler shops in towns for 45 guilder.
Emberstone
The easiest way to collect these is outside Perdida, as there is a sparkly spot that spawns them. If you exhaust that one, head to Teeheeti Island and steal them from Mohawks using Swaine's Mugshot.
Fairy Chocolate
Crafted from recipe #14 with the following:
Chocolate x1
Rings-a-Bell x1
Angula x1
Fire Seal
Purchasable from the peddler in Castaway Cove for 600 guilder.
Flan
Purchasable from the Hootique in any town for 20 guilder.
Flint Dagger
Purchasable from the weapons shop in Al Mamoon for 240 guilder.
Fluffy Rice
Purchasable at the Hootique in Al Mamoon or the peddler in Castaway Cove for 150 guilder.
Fogdrop
Located in The Barrens south of Skull Mountain (Need Tengri to access it) on a hill; it is a sparkle spot:
You can find it on Jack Frost's Playground (frozen island) or on Swan Island here:
Frosty Flan
Crafted from recipe #20 with the following:
Flan x2
Snowflake x1
Bumbler Honey x2
Fruit Flan
Crafted from recipe #21 with the following:
Frosty Flan x1
Sour Grape x1
Green Grapes x2
Gale Robes
Purchasable from the weapons shop in The Fairyground for 1,050 guilder.
Game Pie
Crafted from recipe #35 with the following:
Sweetie Pie x1
Tender Beef x2
Rumblenut x1
Giant's Tooth
Purchasable from the weapons shop in Ding Dong Dell for 200 guilder.
Glowcap
Just outside the Golden Grove (desert side), you can find some on the grassy hill that overlooks the forest here:
There's a sparkly spot that spawns them. Additionally, an easy way to collect them is by stealing them from The Pig Iron Plain (outside Hamelin) from Crashing Boars.
Glowshrimp
These are purchasable from the peddler in Castaway Cove for 200 guilder.
Glowstone
You'll get some from Errand 78, but if you want more...See the bottom section of "Alchemy Achievements & Rare Drops" under the header "Rare Resources & Gold Enemies: Where to Look?" for a detailed guide on locating this difficult resource.
Gnomebeard
On the island of Teeheeti, just outside The Fairygrounds is a sparkle spot for this item. You can also find it on the cliffs of Shipwreck Shore here:
Grand Ax
Purchasable from the peddler in Perdida for 14,500 guilder.
Greatsword
Purchasable from the peddler in Perdida for 10,000 guilder.
Green Grapes
Purchasable from the Hootique in various towns.
Alchemy Achievements & Resources
Resource
Method(s) of Obtaining
Resource
Method(s) of Obtaining
▆▆▆▆▆▆▆▆▆▆▆▆
▆▆▆▆▆▆▆▆▆▆▆▆
▆▆▆▆▆▆▆▆▆▆▆▆
▆▆▆▆▆▆▆▆▆▆▆▆
Grunt Armor
Purchasable from the weapon shop in Hamelin for 1,800 guilder.
Grunt Shield
Purchasable from the weapon shop in Hamelin for 1,710 guilder.
Gustplume
Steal them from Major Byrds just outside Skull Mountain, or from Billy Goat's Bluff outside Perdida from Prohawks (they drop them and can be stolen).
Haunted Claws
Purchasable from the weapon shop in Hamelin for 1,800 guilder.
Ice Cream
Purchasable from any Hootique/peddler for 20 guilder.
Ice Shard
Purchasable from the weapons shop in Yule for 6,400 guilder.
Iced Coffee
Purchasable from any Hootique for 200 guilder.
Iron Ax
Purchasable from the peddler in Castaway Cove for 1,000 guilder.
Iron Diamond
Outside Perdida, farm them from Hackrabbots, as it is close to town and they both drop them and can be stolen using Swaine's Mugshot ability.
Iron Shield
Purchasable from the peddler in Castaway Cove for 700 guilder.
Ironclad Badge
Crafted from recipe #121 with the following:
Gale Robes x1
Gustplume x1
Rumblenuts x2
Jade Marble
Located in The Barrens south of Skull Mountain (Need Tengri to access it); it is a sparkle spot along the shoreline. You can also find them on the Giant's Tabletops once you have Tengri. They are just northwest of Ding Dong Dell here:

Jumbo Moondrop
Crafted from recipe #45 with the following:
Moon Drop x1
Moon Crystals x3
Jumbo Planetdrop
Crafted from recipe #46 with the following:
Planet Drop x1
Planet Crystals x3
Jumbo Stardrop
Crafted from recipe #44 with the following:
Star Drop x1
Star Crystals x3
Jumbo Sundrop
Crafted from recipe #43 with the following:
Sun Drop x1
Sun Crystals x3
Kaleidostone
See the bottom section of "Alchemy Achievements & Resources" under the header "Rare Resources & Gold Enemies: Where to Look?" for a detailed guide on locating this difficult resource.
Leather Shield
Purchasable from the weapons shop in Al Mamoon for 260 guilder.
Meteorite Fragment
There is a sparkly spot on Hermite's Shell Island:
They can also be stolen from enemies on Nazcaä, such as the Batterhorn, Full Boar, from Eldritch Empress in Castle Nevermore or in the Ivory Tower from Mermites.
Milk Chocolate
Crafted from recipe #13 with the following:
Chocolate x1
Bumbler Honey x1
Creamy Milk x1

Resource
Method(s) of Obtaining
Resource
Method(s) of Obtaining
▆▆▆▆▆▆▆▆▆▆▆▆
▆▆▆▆▆▆▆▆▆▆▆▆
▆▆▆▆▆▆▆▆▆▆▆▆
▆▆▆▆▆▆▆▆▆▆▆▆
Moon Crystals
A rare drop from Sasquish in The Glittering Grotto. Farm here for Kaleidostones and you'll be swimming in Moon Crystals before you know it.
Moondrop
If you farm for Kaleidostones in The Glittering Grotto, you'll gather so many of these from Sasquish drops that you won't know what to do with them all. This is the place to go to farm them. T
Old Oak Leaves
Teleport to Ara Memoriae. There are several sparkly spots dotted around the small island that have these as drops. Repeat as necessary depending on how many you need.
Patty Cake
Crafted from recipe #26 with the following:
Breeze Cake x1
Rumblenut x1
Powerstone x1
Phoenix Feather
Purchasable from any Hootique (except Ding Dong Dell) for 500 guilder.
Pie
Purchasable from every Hootique/peddler for 20 guilder.
Pie on the Bone
Crafted from recipe #36 with the following:
Tealwood x1
Game Pie x1
Sturdy Shinbone x1
Pixie Dew
Crafted from recipe #05 with the following:
Fogdrop x1
Booster Shots x3
Springwater x3
Plainswort
The Rolling Hills/The Pig Iron Plains have sparkly spots of these, or just steal from Baatenders and Minor Byrdes around the Rolling Hills outside Ding Dong Dell, or in the Golden Grove from Napcaps.
Planet Crystals
Dropped by Puss in Bouts in Billy Goat's Bluff (can also be stolen using Mugshot), Lubber Cub in The Shipwreck Shore, Dumbelemur in The Genie's Steps, Pond Pom in The Winter Isles, Sharper-Parper in Miasma Marshes and Grimpaler in Nevermore.
Planetdrop
Cutpurrse enemies outside Skull Mountain drop these.
Powerstone
Just outside Perdida; head south to the start of the pathway and you'll spot it easily.
Raw Steel
Southern Pig Iron Plain outside Hamelin, there is a sparkly spot that spawns this resource.
Rings-a-Bell
On the island of Teeheeti, just outside The Fairygrounds; you should see a ledge on the far west end of the island. The sparkle spot up top is this item.
Ritestone
Teleport to Ara Memoriae. There are several sparkly spots dotted around the small island that have these as drops. Repeat as necessary depending on how many you need.
Roc Feather
Purchasable from the peddler in Cast Away
Ruby Ripple Ice Cream
Crafted from recipe #39 with the following:
Salted Ice Cream x1
Emberstone x1
Crunchy Carrot x2
Rugged Armor
Purchasable in the weapons shop in Al Mamoon for 280 guilder.
Rumblenuts
There is a spawn of them on Turtle Crag Island:
Salted Ice Cream
Crafted from recipe #38 with the following:
Ice Cream x1
Booster Shots x1
Alchemy Achievements & Resources
Resource
Method(s) of Obtaining
Resource
Method(s) of Obtaining
▆▆▆▆▆▆▆▆▆▆▆▆
▆▆▆▆▆▆▆▆▆▆▆▆
▆▆▆▆▆▆▆▆▆▆▆▆
▆▆▆▆▆▆▆▆▆▆▆▆
Sandwhich
Purchasable in the Hootique.
Sarsaparilla Sundae
Crafted from recipe #31 with the following:
Toadstool Sundae x1
Snow Radish x2
Booster Shots x2
Scale Armor
Purchasable from the weapons shop at The Fairyground for 1,100 guilders.
Scroll of Truth
Sea Breeze Cloak
Purchasable from the peddler in Castaway Cove for 420 guilder.
See-through Pie
Crafted from recipe #31 with the following:
Sweetie Pie x1
Yogurt x2
Springwater x1
Seeds of Discord
A slightly more difficult ingredient to obtain since there are no sparkly spots to collect them from. Seeds of Discord can be dropped by Florid Florets and Nightshades on the island of Nazcaä, or stolen using Swaine's Mugshot ability from Splatterhorns in the Ivory Tower, or from Nightcaps and Starshades on Nazcaä as well.
Shadowglass
Head to Hamelin. To the right of it on the hill is a sparkly spot. Gather some every time you return to collect a decent supply.
Sickle
Purchasable from the peddler in Castaway Cove for 420 guilder.
Slumbernot Leaves
You can find sparkly spots for these just outside Castaway Cove (east side) upon exiting the town, the Robinson Islands southeast of Shipwreck Cove and in Autumnia - The Pig Iron Plain - Southern tip of the map.
Snakeskin Cloak
Purchasable from the weapons shop in Al Mamoon for 100 guilder.
Snow Radish
Frequent drop from enemies around Yule and The Glittering Grotto. The easiest way to obtain them is to simply buy them from the peddler in Yule for 180 guilder.
Snow Witch Claws
Purchasable from the peddler in Yule for 5,760 guilder.
Snow-White Ice Cream
Crafted from recipe #41 with the following:
Soft Scoop Ice Cream x1
Yogurt x2
Snowflake x1
Snowdop Bonbon
Crafted from recipe #16 with the following:
Chocolate Bonbons x1
Caramels x2
Snowflake x1
Snowflake
You can find them in the Winter Isles. There is a spawner just outside Yule here:
Soft Scoop Ice Cream
Crafted from recipe #31 with the following:
Salted Ice Cream x1
Green Grapes x2
Gnomebeard x1
Soldier's Helmet
Purchasable from the weapon shop in Hamelin for 1,350 guilder.
Soldier's Smock
Purchasable in Hamelin from the weapons shop for 1,300 guilder.
Soldier's Spear
Purchasable in Hamelin from the weapons shop for 2,400 guilder.

Resource
Method(s) of Obtaining
Resource
Method(s) of Obtaining
▆▆▆▆▆▆▆▆▆▆▆▆
▆▆▆▆▆▆▆▆▆▆▆▆
▆▆▆▆▆▆▆▆▆▆▆▆
▆▆▆▆▆▆▆▆▆▆▆▆
Soldier's Sword
Purchasable from Hamelin in the weapons shop for 2,000 guilder.
Sour Grapes
Just outside Perdida in the Billy Goat's Bluff (south). Go down the winding walkway and you'll see a gold sparkle on the right side.
Sour Sundae
Crafted from recipe #28 with the following:
Sundae x1
Yogurt x3
Springwater
Located within the sparkly spot just on the right of Ding Dong Dell (by the water) and behind Al Mamoon (by the lake).
Sprocket
The quickes way to obtain these is to steal them from Clinketyclank mk.2s outside of Hamelin (just south of it) using Swaine's Mugshot ability. They are an uncommon item, so it may take a few tries to nab a couple.
Star Crystals
There is a spawn of these in Billy Goat's Bluff. Outside Perdida, Thunderbyrds drop them, Chloroboros in the Vault of Tears do as well. My go to is from normal drops/steals from Supercogductor on Nazcaä.
Stardrop
Can be stolen using Swaine's Mugshot ability by Bighorns outside Skull Mountain. They are also dropped by the following: Tadabout (The Winter Isles), Wishing Whambat (Teeheeti), Megalith (The Vault of Tears), Shonky-Honker (Castaway Coast), Bone Ranger (Ghostly Gorge) and Zombo (The Tombstone Trail)
Steel Scales
Purchasable from the weapons shop in Hamelin for 400 guilder.
Storm Seal
Crafted from recipe #124 with the following:
Gustplume x1
Gnomebeard x2
Angula x1
Strong Coffee
You can either craft it (see crafting section for recipe), or buy it from a peddler, such as Castaway Cove for 720 guilder.
Sturdy Scale
Purchasable from the Hootique in Al Mamoon for 400 guilder.
Sturdy Shinbone
You can find these through drops in The Glittering Grotto from Mama Sasquash (drops/steals), or just go north of Ding Dong Dell here to obtain them from a sparkly spot:

Sun Crystals
Steal these from Billy Goat's Bluff from Gobspeeds, or in Castle Nevermore from the Tin-Man that occupy it.
Sundae
Purchasable from any Hootique from the start of the game for 18 guilder.
Sundrop
The best place to find these is by stealing them from Jackrabbots outside Hamelin, Claptraps in Billy Goat's Bluff or Whambats in Castaway Coast. Just use Swaine's Mugshot to steal them. A common drop/steal is from red Bone Barons in the Ivory Tower.
Supple Leather
The easiest way to obtain these is to use Swaine's Mugshot ability on the Purrloiners outside of Castaway Cove.
Sweetie Pie
Crafted from recipe #124 with the following:
Pie x1
Crunchy Carrots x3
Angula x1
Tachestone
Go to the Ivory Tower and find Honky-Tonkers. You can usually get them from drops, but they also have a regular steal chance as well with Swaine's Mugshot ability.
Tealwood
Steal them from Paladin Partridges in the Ivory Tower, or outside of Yule, where your boat docks is a sparkly spot that spawns them.
Tender Beef
Purchasable from the Hootique in Ding Dong Dell for 60 guilder.
Alchemy Achievements & Resources
Resource
Method(s) of Obtaining
Resource
Method(s) of Obtaining
▆▆▆▆▆▆▆▆▆▆▆▆
▆▆▆▆▆▆▆▆▆▆▆▆
▆▆▆▆▆▆▆▆▆▆▆▆
▆▆▆▆▆▆▆▆▆▆▆▆
Toadstool Sundae
Crafted from recipe #30 with the following:
Sundaes x2
Black Truffles x2
Glowcap x1
Tonic
Crafted from recipe #4 with the following:
Pixie Dew x1
Old Oak Leaves x2
Seeds of Discord x2
Tower Toppler
Purchasable from the weapon's shop in Hamelin for 2,400 guilders
Troll's Tears
See the bottom section of "Alchemy Achievements & Rare Drops" under the header "Rare Resources & Gold Enemies: Where to Look?" for a detailed guide on locating this difficult resource.
Water Seal
One is obtained through a treasure chest on Jack Frost's Playground. You can steal them from from Iron Man on Not Mine Island once you have the Sea Cow ship or Tengri.
Wetstone
On the island of Teeheeti, just outside The Fairygrounds; you should see some west of the town, down by the river. A sparkle spot indicates its location by the adjacent waterfall.
White Bread
Can be purchased from most towns at the Hootique as early as Ding Dong Dell.
Wildflower Sundae
Crafted from recipe #29 with the following:
Sour Sundae x1
Plainswort Flower x1
Rings-a-Bell x1
Woodland Claws
Purchasable at the weapons shop in The Fairyground for 900 guilders.
Yogurt
Purchasable from various peddler shops in towns for 45 guilder.
Alchemy Achievements & Rare Drops

Rare Resources & Gold Enemies: Where to Look?
These are, undoubtedly, the most difficult items to obtain post game. They are only found in a few places, the chances are slim to find the right enemies and the drop rates are abysmal. So, what is the best way of obtaining them? Stealing! Depending on the item, I cannot stress this enough, stealing is the route to go using golden glims and Swaine's Light Finger special ability. Let's look into that in each area and where to steal the item(s) you need.

The Glittering Grotto

  • Scrolls of Truth (Dragamuffin/Dropped)
  • Kaleidostones (Bedraggle/Dropped & Stolen)

There are going to be different methods to doing this and some (in my opinion) have better chances then most. Do note, that every time it is said that a rare item can be stolen, use the golden glims you find with Swaine! First, we'll look into the different ways to obtain these two items. The way I felt was the most effective was farming in The Glittering Grotto for Kaleidostones. I did find two Scrolls of Truth to the 12 Kaleidostones I located.

Head to the bottom (last checkpoint) of the grotto. All the enemy groups down here have a chance of spawning a gold Bedraggle or Dragamuffin; gold enemies will spawn even if the overworld (enemy you see in the dungeon) isn't gold.

If a gold Dragamuffin spawns, simply defeat the group as quickly as you can. Dragamuffins can drop Scrolls of Truth as a rare drop chance (4%) and Bedraggles have a rare chance (4%) of dropping Scrolls of Truth, but also have a rare steal (gold glim) chance of having a Kaleidostone being stolen by Swaine.


Both enemies look identical, but the Bedraggle has bubbles coming out from it's mouth. Before farming, set everyone to "Don't do anything", equip Oliver with the worst wand (to reduce damage), bring a familiar with "Earsplitter" and get to it.

If a Bedraggle spawns, switch to Oliver and spam "Pulse" to get the "Nice" interruption and a chance to spawn a golden glims. If one spawns, switch to Swaine and use his special on the gold Bedraggle to steal a piece of Kaleidostone. Then defeat it as normal for the chance to earn another as a drop.

If you run into a Dragamuffin, just use "Earsplitter" to kill everything and hope for the drop. You cannot use Swaine's special ability to steal Scrolls of Truth. Rinse and repeat until you have your desired amount of Kaleidostone and Scrolls of Truth. The area you need to be in is here:


The Tombstone Trail

  • Evil Eye (Trumpy-Pumper/Dropped)
  • Blowpipe (Trumpy-Pumper/Stolen)
  • Evil Eye (Tokotoko/Dropped)
  • Blowpipe (Tokotoko/Dropped)
  • Troll's Tears (Honky-Tonker/Dropped)
  • Scrolls of Truth(Honky-Tonker/Stolen)

The Tombstone Trail has some old enemies about halfway up; you'll find a cavern with torches that spawns them. Inside you'll find gold Honky-Tonkers and gold Trumpy-Pumpers, as well as, on rare chances, gold Tokotokos. I highly recommend this area for Scrolls of Truth, since stealing them with Swaine's special ability "Light Fingers" is paramount to earning them quickly.


As mentioned in other areas, set everyone to "Don't Do Anything", equip Oliver with his weakest wand to reduce the damage given by "Pulse" and spam this spell to get the "Nice" notice, which gives you a greater chance of spawning a golden glim.

If one spawns, quickly switch to Swaine and use it on whatever enemy you are facing. Check the list above on what can be stolen so you know who to target for whatever it is you're missing.

Rinse and repeat until you have whatever amount of desired resources you're searching for. Be patient. It takes a lot of grinding, but this is the best place to farm Scrolls of Truth, hands down.

You'll be searching in this area:


Old Smoky & Ara Memoriae

  • All-Seeing Eyes (Draggle/Dropped)
  • Glowstones (Dragette/Dropped)

All-Seeing Eyes can only be found on the trail up to Old Smoky by the way of gold Draggles. They drop these as rare items with a very slim chance (5%) on defeat. These are such a pain to farm, so I highly advise against any formula that requires them.

These are extremely rare. You'll find a limited amount from treasure chests on Ara Memoriae. The only enemy that drops them are also on the island by ways of rare drops from Fuddy-Daddy. They spawn in one area on the island and don't walk around like other monster spawns:

Miasma Marshes

  • All-Seeing Eyes (Hog-Goblin/Dropped)
  • Kaleidostones (Gobfather/Dropped)
  • Troll's Tears (Gobfather/Stolen)

In post game, once you re-open the Miasma Marshes, this becomes an excellent place to farm some rare drops like Troll's Tears since you can steal them with Swaine's Light Fingers.

Vault of Tears

  • Scrolls of Truth (Gold Toko/Dropped)

This are remarkably common from what I've seen, but in conjunction with the really low drop rate, I found this to be one of the more ineffective methods to farming Scrolls of Truth and would typically advise against it for other methods like the Tombstone Trail mentioned above.


One thing to remember is, unlike other gold enemies, gold Tokos will run away from you every chance they get, so you must sneak up on them the best you can. The Vault of Tears does not lend itself to be very forgiving and there's a plethora of narrow passages that they can run if they see you coming.

Trend carefully!

Regardless, if you want to search and try your hand at it, you can find them in this area:

Alchemy Achievements & Rare Drops
The Ivory Tower

  • Kaleidostone (Tokotocold/Dropped)

Post game you'll find these little critters roaming around the narrow corridors on occasion. They are more of a great way to farm tremendous amounts of guilder rather than rare items, but they do, technically, have the ability to drop Kaleidostones.

They are extremely rare and not worth the time to farm, so I would highly recommend not going this route at all. For the sake of completion, I did want to mention them regardless.

Nevermore

  • Angel's Wings (Docotoko/Dropped)
  • Evil Eye (Docotoko/Stolen)
  • Glowstone (Gobspeed/Stolen)
  • Gobforsaken (Angel's Wings/Dropped)

Ding Dong Well

  • Glowstone (Shonky-Honker/Dropped)
  • Seeds of Discord (Sharper-Parper/Dropped)

Ding Dong Well isn't really worth the trouble. You can find Glowstones (rare drop) from gold Shonky-Honkers, but there are better places to hunt for them, such as in Castle Nevermore from golden Gobspeeds because you can more easily obtain them through Swaine's Light Fingers ability.

Golden Grove

  • All-Seeing Eye (Inphant/Dropped)
  • Glowstone (Psychophant/Dropped)

Much like Ding Dong Well, the Golden Grove isn't worth the trouble except for trying to tame some gold familiars for the achievement. The only things that are there are from drops only, not from stealing. Still, if you're looking for these items, it is another option out there.
Taming & Familiar Achievements
The taming of familiars comes into the picture after completing the Sage Trials; you'll learn how to do it by the Supreme Sage Solomon. The only one that can tame them is Esther. In order to tame a monster, you'll need to fight them and, if you're lucky, they will be won over by your fighting prowess. You'll know by the pink hearts that pour out. Switch to Esther and "Serenade" them to tame the creature.

As you fight with your new familiars, they will slowly level up and eventually, be able to metamorphoses into bigger and stronger companions. You can tell they are able to evolve by viewing them in the Familiar Menu and seeing this notification:


There are various types of drops that allow you to morph your familiars. There are stardrops, moondrops, sundrops and planetdrops, as well as "jumbo" versions for evolving your familiars to their final form.

There are several achievements related to taming and evolving familiars. Firstly:

"Familiarizer"
Awarded for taming 20 different species.
Taming new species, as well as evolving ones you already have count towards the total amount of species you have. Collect any 20 to unlock this achievement. If you're dedicated to collecting them early on, you can unlock this as early as before entering Old Smoky for the first time.


"Familiarologist"
This achievement will probably be one of the last, if not, the last one you'll earn. It isn't a hard achievement, but it is a time consuming one. You need to, at any one point, be in possession of 250 different familiars.

What this means, is your accumulation of all total through the whole playthrough. Each familiar has four stages, so that will count as four different ones (assuming you have two of the same and evolve one into each final 3rd form).

When you reach post game, you'll encounter new varients (gold); these special variants count as new familiars compared to their normal counterparts. This opens the door to new options. Between the normal enemies you find on the map, the gold variants and the vouchers you earn that you can claim at the Temple of Trials for additional unique familiars, getting 250 is very doable.

If you need to grind them at the end like I did, there are two places I'd recommend doing that. There is a healthy supply of Tokotokos outside Perdida that will fetch around 9,000 experience a piece.

The other, less constant farming technique is heading to the Ivory Tower and making your way to the 3rd or 4th floor and trying to find Tokotocolds, which net around 25,000 experience each and will really level up your familiars.

I bounce between the two and felt both to be very viable, so take your pick, or do your own thing if you've found something that works for you.

If you need a list of all the familiars, check the second part of "Taming & Familiar Achievements" to find a list of all of them to cross reference what you already have. Happy hunting!


"Viva the Evolution!"
Awarded for managing 10 metamorphoses.
If you balance out your familiars while you level them early game, as well as catch several different types, you can unlock this as early as by the time you gain access to your ship. Regardless of when you do, though, evolving 10 familiars is fairly easy; you will probably unlock this without trying.


"Overfamiliar"
Awarded for maximizing a familiar's familiarity.
This achievement requires you to earn all five hearts towards any one familiar. I suggest picking at least one to focus on. The best way to do this is by feeding them their favorite treat (see list below for what they like). The better quality the treat, the more towards their hearts you'll earn.


"Pedigree Breeder"
Awarded for training a familiar to its full potential.
The growth limit (see above photo) needs to be maxed out at 50/50 points to unlock this achievement. You can do this with any kind of treat.
Taming & Familiar Achievements
Familiars have five stages of both affection (familiarity) and stat buffs (potential); there are two achievements tied to these traits. The former refers to the hearts connected to each familiar, which can be increased by feeding them treats. Certain familiars belong to various genus categories and, in turn, like different kinds of treats.

Treats will increase their hearts and each full heart will earn them the ability to raise their base stats by +10 points per heart. While you can feed them any treat, their favorite will increase their hearts. You can tell when it is a familiar's favorite treat by the hearts that show by them when they eat it.

You can also refer to the guide below as a quick reference tool:

Genus Symbol
Genus Group
Familiar's Name
Familiar's Name
Favorite Treat
Milites
Little Bighorn
Bighorn
Batterhorn
Splatterhorn
Purrloiner
Cutpurrse
Puss in Bouts
Puss in Boats
Hog-Goblin
Gobfather
Gobspeed
Gobforsaken
Mite
Mighty Mite
Dynamite
Mermite
Hurly
Burly Hurly
Hurlcules
Hurlabaloo
Chocolates
Bestiae
Ruff
Ruffian
Gruffian
Scruffian
Rhinosaur
Rhinosnore
Rhinobore
Rhinosaw
Jabber
Stabber
Stabberwocky
Jabberguppy
Baatender
Baabarian
Baabie
Baarndancer
Sore Boar
Crashing Boar
Hyperboar
Full Boar
Inphant
Psychophant
Triumphant
Hierophant
Clubber Cub
Lubber Cub
Adamantiger
Elegantiger
Thumbelemur
Dumbelemur
Aye-Aye Sir
Aye-Aye Catcher
Sasquish
Sasquash
Papa Sasquash
Mama Sasquash
Ice Cream
Aquatica
Danglerfish
Stranglerfish
Manglerfish
Spanglerfish
Taddlywinky
Tadolescent
Tadabout
Tadorable
Splisher
Splasher

Snapper
Snipper
Hooray
Hip-Hooray
Grimray
Springray
Sparkee
Wattee
Acee
Deecee
Pies
Aves
Minor Byrde
Major Byrde
Firebyrde
Thunderbryde
Crowhawk
Mohawk
Prohawk
Snowhawk
Whambat
Wishing Whambat
Whampire Bat
Captain Whamtastic
Sleepeafowl
Hippeafowl
Grumpeafowl
Wimpeafowl
Drongo
Strongo
Fluorongo
Electrongo
Fightingale
Knightingale
Paladin Partridge
Bushido Bantam
Tu-Whit
Tu-Whoo
Sharp-Hooter
Hooting-Star
Griffy
Greater Griffy
Griffurnace
Griffrigerator
Ice Cream
Minima
Floret
Flummox
Floret
Horrid Floret
Florid Floret
Rabbot
Jackrabbot
Whackrabbot
Hackrabbot
Tyke
Spike Tyke
Psych Tyke
Pike Tyke
Turbandit
Turburn
Turban Myth
Turban Legend
Idler
Wild Idler
All-Seeing Idler
Evil Idler
Small Fry
Deep Fry
Firefry
Flash Fry
Dinkey
Turnkey
Master Key
Don Key
Spitoo
Spitooligan
Lickety-Spitoo
Sniper Spitoo
Pies
Automata
Monolith
Megalith
Paleolith
Neolith
Sprog Cog
Hot Cog
Supercogductor
Cogdenser
Tin-Man
Iron-Man
Steam-Man
Beam-Man
Clinketyclank
Clinketyclank Mk. 2
Clinketyclank LX
Clinketyclank DX
Fuddy-Daddy
Big Daddy
Grand-Daddy
Baddy-Daddy
Flans
Flora
Lumberwood
Limberwood
Umberwood
Wildwood
Bubbud
Sponge Bubbud
Lotus Bubbud
Tropical Bubbud
Green Buncher
Yellow Buncher
Underripe Buncher
Overripe Buncher
Napcap
Duncecap
Madcap
Nightcap
Flans
Vermes
Worker Bumbler
Drone Bumbler
Soldier Bumbler
Queen Bumbler
Whippersnapper
Trapper Snapper
Snaptrap
Claptrap
Sillymander
Slamander
Pyromander
Petramander
Oroboros
Chloroboros
Obscuroboros
Fluoroboros
Incy
Wincy
Web Master
Weaver Diva
Flutterby
Forest Flutterby
Midnight Flutterby
Midday Flutterby
Sundaes
Nymphae
Lagoon Naiad
Sea Naiad
Lesser Spotted Naiad
Greater Naiad
Airhead
Beachhead
Fountainhead
Thunderhead
Seed Sprite
Sprout Sprite
Sweetpea Sprite
Sugarplum Sprite
Toko
Tokotoko
Tokotocold
Docotoko
Potty
Jackpotty
Crackpot
Hotpot
Cake
Dracones
Plessie
Messy Plessie
Stressy Plessie
Blessy Plessie
Naja
Najalisk
Mahanaja
Najapatra
Teeny Bopper
Big Bopper
Duck-Billed
Bopper
Unibopper
Dinoceros
Destroceros
Demoliceros
Catastroceros
Sapdragon
Flapdragon
Scrapdragon
Napdragon
Draggle
Dragette
Dragamuffin
Bedraggle
Chocolate
Arcana
Sunshine
Grandsun
Wayward Sun
Godsun
Pom Pom
Pond Pom
Pompeii
Pomagranite
Kipper
Red Napper
Sweet Bream
Siestar Fish
Shonky-Honker
Sharper-Parper
Trumpy-Pumper
Honky-Tonker
Hullaballoon
Balloonatic
Hot-Air Balloonatic
Water Balloonatic
Auroralynx
Umbralynx
Astralynx
Dualynx
Cakes
Daemonia
Ice Maiden
Ice Queen
Eldritch Empress
Sinister Sovereign
Lightshade
Sunshade
Starshade
Nightshade
Shrimpaler
Impaler
Grimpaler
Hymnpaler
Relixx
Electrixx
Medixx
Angelixx
Boggly-Boo
Bigger-Boggle
Hoggle-Boggle
Moggle-Boggle
Sundaes
Mortui
Bougie
Boo-Bougie
Bougie-Woogie
Bougieman
Wisp
Ghost Wisperer
Kill-o'-the-Wisp
Wispula
Girlfiend
Ex-Girlfiend
Phantasma
Grandamned
Bonehead
Bone Ranger
Bone Brigadier
Bone Baron
Zombo
Zomboatswain
Cap'n Zombo
Mumbo Zombo
Eggroll
Scrambled
Eggroll
Humpty Bumpty
Eggyptian
Cakes
Nobilia
Mandragorer
Pandoragorer

Mendragorer
Tundragorer
Pies
Treasure Chest Achievements
"Treasure Hunter"
Awarded for finding all hidden treasure chests.

There are a total of 100 treasure chests scattered around the world that are hidden to the naked eye without the use of the "Seek Fortune". You'll need the spell and Tengri in order to explore every nook and cranny, but once you do, cast the spell and check your overworld map for the appropriate markers. 95/100 will be accessible fairy early on once you have the spell to locate them all, but five will be outstanding until the end of the game.

Do note, that you do not technically need the spell, as you can pick up the hidden items without it, but you'll have to do without the marker and the icons on the overworld map guiding you, making the task an absolute nightmare. Here are all the locations in case you're missing some and need something to reference:

Treasure Chest Achievements

Globetrotter Achievement
"Globetrotter"
Awarded for setting foot in all secluded regions.
This achievement requires you to enter every town, cave, dungeon and hidden villages among the trees on the entire map. It isn't a large list and most of the locations you'll visit through the main story, but there are some that aren't linked to the story and will need to be sought out separately. ALl the major islands, towns and most caves/forest dwellings will be entered at one point while you complete errands, bounties and locate hidden treasure chests, so if you're missing some still, it won't be many.

Here are all the caves and forest entrances you'll need to visit at least once to complete this achievement:

Solosseum Series Achievements
The Solosseum Series are trials to test your combat prowess and the strength of your familiars without the use of items during combat. The Solosseum is an area accessible in the Temple of Trials after you have defeated the Candelabracadabra. The difficulties range from Rank E, all the way to Rank S. You can only enter a rank by winning all previous ranks below it.

"Solosseum Slugger"
Awarded for winning your first bout in the Solosseum Series.
This achievement is unlocked by simply completing Rank E in the Solosseum Series in the Temple of Trials. I saved this achievement towards the end; the very end. You have to do so much grinding for other achievements that you will likely max out your level in a few familiars.

I highly recommend and cannot stress this enough, bring a Demoliceros and a Catastroceros with you. I mostly rotated between Catastroceros for attacks, Demoliceros to provide expert defense while the former recharged and I supported them both with a level 99 Puss in Boots for great DPM when needed.

Up until Rank S, the tournament isn't difficult. The first two rounds you need to conserve mana, so I set everyone to "not use abilities" and healed with Oliver as needed; if needed. Round three I set Esther to "keep us healthy" and Swaine stayed on "do not use abilities". I tanked the whole fight with Demoliceros & Puss in Boots.

The last battle I recommend kiting the three enemies with Oliver. At the end, you should still have plenty of mana. I let Esther and Swaine die and would throw out Demoliceros, use "Battle Cry" or "Psych Up", then just pound away. When the timer was running low, I'd switch to Oliver, run to the other end of the arena (all three enemies are slow) and use the 2MP heal as needed. Rinse and repeat.

Demoliceros' defense is so significant that you should be able to take a beating before needing to heal. While this is just one strategy, this is exactly how I did it, but feel free to do what works best for you. There's many, many ways to succeed.

The gear I used was a combination of whatever was the best gear I had at the time. The only thing I made sure to bring was "Nix Gnashers" so I could constantly nix the enemies in the last battle to keep the healing to a minimum.

Here is my team:


"Solosseum Supremo"
Once you complete the final fight (S Rank), you'll be awarded some items in game, a voucher for a unique familiar and the achievement for completing the entire tournament. See my above breakdown of how I finished the last battle rank. Keep in mind there are several different strategies to finishing it; this is just worked for me.


Bounty/Errand Achievements
During your travels you'll be able to do, essentially, side quests for NPCs along the way.

This is a nice way to make some extra cash, experience, resources, or, of course, achievements. You'll need to focus on two things:

  • Bounty Hunt Side Quests
  • Errand Board Side Quests


Both of these can be found in most towns by going to the Taskmaster's Shop, which is marked with the book and quill. Speak to the Taskmaster directly to access the bounty hunts available, or the adjacent board for available errands.

Don't worry about completing them before moving on with the main story; you can go back to them at any point. The same goes for bounty hunts. That being said, there are a lot of them and you may want to chip away at them as you play, otherwise it will be a lot of tedious grinding at the very end. There are dozens and dozens of each type.

To unlock all associated achievements with bounty hunts and errands, you'll need to complete 60 bounty hunts in total and 60 errands as well. There are no mandatory bounties, but for errands, you must complete #121 through #128, then #129 through #131 in order. #129 and onward are only available in the post game.

For the sake of completion, here are ALL bounty hunts and errands in case you need assistance on any one. The way the game numbers errands and bounty hunts are intertwined, so it can be a bit annoying to track in the beginning. For example, bounty hunts start on #86 since the numbers before it are reserved for errands. Weird, I know.

While bounty hunts can be obtained from the boards located in various towns, errands are given to you from the locals. You can find someone in need of assistance by looking at the mini map and locating those that glow bright blue.

Errands and bounty hunts will be necessary to earn all the necessary achievements. The following achievements are linked to these tasks:

"Boy Scout"
Awarded for running 15 different errands.
Complete any 15 errands listed above. If you finish all the ones in Ding Dong Dell, you can unlock this as early as Al Mamoon.


"Humanitarian of the Year"
Awarded for running 60 different errands.
Complete any 60 errands listed above. If you are consistent about doing these as they become available, you can earn this achievement shortly after uniting the stones of Mornstar.


"Bounty Hunter"
Awarded for completing 40 different bounty hunts.
You won't be able to get this achievement until post-game; it requires completing almost every available bounty in the game.


"Super Hero"
Awarded for collecting all the merit awards.
This requires you to complete every errand in the game to earn enough stamps from Swift Solutions. See the errand list below for a guide on how to do each one.


Click on any of the map pictures below for a larger, more easily accessible photo. The list is as follows:
Bounty/Errand Achievements (1-21)
Quest №⠀⠀⠀⠀⠀⠀⠀⠀
Task⠀⠀⠀⠀⠀⠀⠀⠀⠀⠀⠀⠀
Location
Reward⠀⠀⠀⠀⠀⠀⠀⠀⠀⠀⠀⠀⠀⠀⠀⠀
Errand №1
The Procrastinator
Next to errand #42 and the waterwheel is a man lacking enthusiasm. You can find some spare enthusiasm from a resident in Ding Dong Dell. Just check your mini-map for the green dot(s) to indicate some spare traits you can borrow. By the fountain towards the palace will be two candidates.
White Bread (x3)
30 Guilders
Errand №2
The Idle Wife
Talk to the couple near Swift's Solutions. The man's wife is brokenhearted. You can find some spare enthusiasm from some villagers by King Tom's fountain, outside his palace.
Chocolate (x3)
Flan (x3)
30 Guilders
Errand №3
The Sheikh of Spice
Right outside Swift Solutions in Al Mamoon; talk to the man by the door and learn he is broken hearted. You'll need to find some enthusiasm for him to continue doing what he loves: mixing spices.

There is some located in Al Mamoon, or back in Ding Dong Dell if you missed it in the early game. Talk to the cat on the bench outside Swift Solutions in Ding Dong Dell to acquire the needed enthusiasm. You'll need to complete this errand in order to complete Errand №48.

Once you retrieve some enthusiasm, you'll need to gather special ingredients. He'll need "spicy seeds" (Found at the base of Old Smokey), Fluffy Rice & Tender Beef. The rice and beef can be found either has drops from enemies, or purchased from the local Hootique vendor in Al Mamoon.
Sandwich (x2)
100 Guilders
Errand №4
An Overdue Loan
Just south of the kids at the fountain in Al Mamoon, there is a group of three people. Talk to one of the adults to obtain their kindness.
Strong Coffee (x2)
100 Guilders
Errand №5
Ice Cream Dreams

By the fountains in Al Mamoon, you'll find an ice cream entrepreneur who is need of some courage. There is a woman near Swift Solutions that has some to spare.
Carrot Cake (x3)
100 Guilders
Errand №6
The Fisherman's Woe
In Castaway Cove, there is a fisherman who is brokenhearted down by the docks. Conveniently, there is also one on a small fishing boat with plenty of courage to spare. Borrow his and return it to the discouraged fisherman. Easy peasy!
2 Fishburgers
200 Guilders
Errand №7
Shop Till You Drop
Once Swaine joins your party, this errand will be available. Talk to the woman next to the supply vendor in Castaway Cove. She'll need some restraint to fix her broken heart, which can be found down by the docks from a child sitting down by the boats.
Salted Ice Cream (x5)
200 Guilders
Errand №8
Service Without a Smile
After visiting Hamelin for the first time, a fairy in The Fairygrounds will lose his kindness towards his paying customers. Restore his brokenheart with a bit'o kindness when you can to complete this errand.
Ruby Ripple Ice Cream (x3)
300 Guilders
Errand №9
Tactless Timing
After visiting Hamelin for the first time, a fairy in The Fairygrounds will lose his restraint at telling bad jokes at the most inopportune time. Give him some restraint to mend his brokenheart.
Fairy Chocolate (x3)
300 Guilders
Errand №10
A Sister's Savior
A man in the restricted area of Hamelin is missing some kindness to ease his broken heart. You can find some at the lower levels of the city on the way to the palace if you're in need.
Pixie Dew (x2)
500 Guilders.
Errand №11
A Proposal Postponed
Just outside the entrance to the palace in Hamelin, you'll find a citizen in need of some courage to cure his broken heart. If you have been doing all the jobs up to this point, you should already have some courage. If not, check around town and return to him.
Babana Flan (x3)
500 Guilders
Errand №12
Asleep on the Job
Help this shopkeeper's worker from constantly falling asleep on the job by mending his brokenheart with some much needed restraint.
Drowsy Drops Gem
500 Guilders
Errand №13
Piggy Paranoia
Near the inn is a guard who will accuse you of being a spy. He's brokenhearted and in need of some belief to say otherwise. not far from him will be a citizen with belief to spare. Return to cure him.
Game Pie (x3)
500 Guilders
Errand №14
Research on the Rocks
In Hamelin (after saving Prince Marcassin), there is a man pacing back and forth moaning about his assistance. He is brokenhearted and needs a healthy dose of belief. Up the stairs there is a man who has been thrown out by his wife. Talk to him to collect some of his extra belief and return to the researcher down below.
Soft Scoop Ice Cream (x3)
500 Guilders
Errand №15
School's In
Once you save Prince Marcassin in Hamelin, this errand back in Ding Dong Dell will be available. It won't be prior until you complete that part of the main story. Speak to the young girl just outside (right side) of the castle entrance. She's brokenhearted and in need of some missing enthusiasm.
Chocolate Bonbons (x3)
750 Guilders
Errand №16
Strength to Soldier On
In front of the castle in Ding Dong Dell, there is a soldier missing some courage to keep fighting on. He only appears after you assist Marcassin in Hamelin and return to your timeline. Once you do, you can head back and speak with him.

There is a soldier in Al Mamoon that has an abundance of it to give.
Errand №17
A Suspicious Mind
After acquiring Tengri, head back to Al Mamoon. Outside of Swift's Solutions is a man missing some trust to ease his worry about his long distance relationship.
Frosty Flan (x3)
750 Guilders
Errand №18
...Where the Heart Isn't
In Castaway Cove, after obtaining Tengri, head to the bottom docks and you'll see two brothers arguing. One is brokenhearted and in need of some belief.
Rise and Shine Gem
750 Guilders
Errand №19
With Friends Like These
After completing Errand №15 and advancing the story (post obtaining Tengri), head back to Ding Dong Dell to the same girl. This time she'll need some kindness to stop her from insulting her friend.
Cheeseburger (x3)
1000 Guilders
Errand №20
A shivering Wreck
In the frozen town of Yule, head inside one of the huts to find a husband afraid of going outside. He's brokenhearted and in need of some restraint. You can find some in Yule to give him.
Snow White Ice Cream (x3)
1000 Guilders
Errand №21
A Tail of Woe
By the time you obtain Tengri, this errand will be available in Ding Dong Dell. By the fountains, you'll need to lend a villager some confidence to compete in an upcoming tournament.
Breeze Cake (x3)
1000 Guilders
Jumbo Stardrop Recipe

Bounty/Errand Achievements (22-44)
Quest №⠀⠀⠀⠀⠀⠀⠀⠀
Task⠀⠀⠀⠀⠀⠀⠀⠀⠀⠀⠀⠀
Location
Reward⠀⠀⠀⠀⠀⠀⠀⠀⠀⠀⠀⠀⠀⠀⠀⠀
Errand №22
Artist's Block
Once you obtain Tengri, head back to Al Mamoon and speak to Con the Artist inside the inn. He has lost his confidence after making the painting that "looked" like Esther. Bring some back to him to heal his heart.
Phoenix Tear
1000 Guilders
Errand №23
Comedy Gold
Back in Teeheeti on The Fairygrounds, you'll find a comedy duo in need of some confidence. There isn't any on the island to spare, so you'll have to bring some back to help out this brokenhearted pair.
Pies on the Bone (x3)
1000 Guilders
Errand №24
A Crisis of Confidence
In Hamelin, you'll find a man who lost his confidence in his work and his assistance. Bring him some to restore his broken heart. He'll pop up once you have the map of the three stones.
Sage's Secret
1000 Guilders
Errand №25
Big Babana Love
In Al Mamoon, after defeating Khulan's nightmare, you'll find a farmer in front of the weapons shop who has lost his love for babana farming. Instill with him some missing love and repair his broken heart to complete this errand.
Golden Pie (x2)
1500 Guilders
Errand №26
Unrequited Love
In Castaway Cove, after defeating Khulan's nightmare, a woman will appear brokenhearted, missing the love she once had for her husband. Bring back some love to restore her true feelings.
Fruit Flan (x3)
1500 Guilders
Errand №27
A woman's Best Friend
After defeating Khulan's nightmare, return to Hamelin and speak to the woman with the dog. You'll need to bring the mutt some love, which can be found, conveniently, down below at the bottom of town from one of the citizens.
Cheeseburger (x5)
1500 Guilders
Errand №28
Cold As Ice
A husband and wife in Yule are bickering about their sick son. The husband has become brokenhearted and needs a bit of love to set things right. Bring him some to mend his heart and complete this errand.
Snowdrop Bonbon (x3)
1500 Guilders
Errand №29
Mamooni Idol
Recover Oliver's Holy Wood and a woman in Al Mamoon will pop up with a brokenheart in need of some ambition. Restore it to complete this errand. You can find some spare ambition in The Fairygrounds, Perdida or right in Al Mamoon itself.
Patty Cake (x3)
1500 Guilders
Errand №30
The March of Progress
Recover Oliver's Holy Wood and a familiar researcher in Hamelin will have lost his amibtion to continue his studies. Find some extra in Perdida, The Fairygrounds or Al Mamoom and return it to him.
Sprite Dew
1500 Guilders
Errand №31
What Fisherman Want
Recover Oliver's Holy Wood and a fisherman will appear with a lack of ambition in his heart. There is some extra ambition to spare in Castaway Cove, so returning some to him will be easy.
Whirly Whirlies Gem
1500 Guilders
Errand №32
Llapacking It In
Recover Oliver's Holy Wood and the Perdida llama herder needs help. They lack ambition, but you can find some in Perdida or The Fairygrounds as well.
All-Be-Gone (x2)
1500 Guilders
Errand №33
A Half-Hearted Hubby

Head to the vendor just next to (see green dot) the couple to collect the needed enthusiasm for her husband. This is within the city of Al Mamoon.
100 Guilders
Blindness-Be-Gone (x3)
Errand №34
A Heartless Wife
After obtaining passage by the Cowlipha in Al Mamoon, a couple will appear in Castaway Cove. You'll need to collect some kindness for her to cure her broken heart.
Carrot Cake (x3)
200 Guilders
Errand №35
A Weak-Hearted Hubby
After traveling to Hamelin for the first time, a pair of merchants will wonder into The Fairygrounds and need help mending the husband's brokenheart with some courage.
Cheeseburger (x2)
300 Guilders
Errand №36
A Hearty Appetite
There's a couple arguging about eating away their profits. His wife has become brokenhearted and is in need of some restraint. if you don't have some, a guard on the bottom floor has some to spare.
Soft Scoop Ice Cream (x3)
500 Guilders
Errand №37
A Mean-Hearted Hubby
In Yule, you'll see a familiar couple arguing. Looks like the husband has become heartbroken once again. This time he has lost all his belief in their trading prowess. Bring back some belief to restore his heart...again...
Sprite Dew
1000 Guilders
Errand №38
A Down-Hearted Wife
You'll find a familiar couple in Perdida, but this time the wife has become brokenhearted. She's lost her confidence in their peddling and plans to open a shop together. Fetch some to restore the hole in her heart.
Tonic
1000 Guilders
Errand №39
A Cold-Hearted Hubby
That damn couple is at it again in Ding Dong Dell. Her husband has lost his love for his wife. There is a citizen in town with some love to spare. Retrieve it and return to complete this errand.
Nostrum
1500 Guilders
Errand №40
A Change of Heart
Recover Oliver's Holy Wood, in Ding Dong Dell, that familiar peddling couple need help once again. His wife lost her ambition to continue their trade. You can find some in The Fairygrounds or Perdida to fix her right up.
Healing Rain Gem
1500 Guilders
Skyfall Sword Recipe
Demon's Ax Recipe
Meteor Mallet Recipe
Giant's Spear Recipe
Armor of Justice Recipe
Brilliant Armor Recipe
Wizard's Robes Recipe
Heavenly Mantle Recipe
Wyrmfang Ring Recipe
Wyrm King's Scale Recipe
Medal of Impunity Recipe
Berserker's Badge Recipe
Errand №41
A Safe Hiding Place
In Ding Dong Dell, you'll find a young grimalkin wandieng the streets asking for help locating a red earring. You can find it in the pot at this location in town:
50 Guilders
A Leafy Mantle
Errand №42
A Splash of Color
By the armory, next to the waterwheel in Ding Dong Dell, an adult grimalkin will ask you to retrieve some flowers and springwater. You'll need two of each. They can be found outside Ding Dong Dell here:
Wooden Shield
50 Guilders
Errand №43
Hide and Seek
Speak to the mother in the doorway near Swift Solutions in Ding Dong Dell and she'll ask you to find her three sons running around town.

1) Up the spiral staircase right by the mother. Talk to the injured child and heal him.
2) Head towards the location you meet Horace (right of the fountain of King Tom). Talk to the boy and heal him as well.
3) In the Cawtermaster's store. Heal him as well.
Sweetie Pie (x3)
50 Guilders
Errand №44
Forest Folk
The start of this errand is actually in the clump of trees east of Ding Dong Dell. Talk to the boy to start it. You can find the village hidden here:
Iced Coffee (x3)
50 Guilders.
Bounty/Errand Achievements (45-59)
Quest №⠀⠀⠀⠀⠀⠀⠀⠀
Task⠀⠀⠀⠀⠀⠀⠀⠀⠀⠀⠀⠀
Location
Reward⠀⠀⠀⠀⠀⠀⠀⠀⠀⠀⠀⠀⠀⠀⠀⠀
Errand №45
A Lover's Lunch Basket
By the milk fountains of Al Mamoon, you'll see a woman in the shade talking to an older lady. Speak to her to obtain her husband's lunch. He's located in the Golden Grove and will be marked with a flashing blue icon once you enter the area.

Once you speak with her husband, he'll ask you to return to her to deliver a message.
200 Guilders
Blindness-Be-Gone (x3)
Errand №46
Bothersome Boneheads
Next to the woman who gives you her husband's lunch [Errand №45], a woman with a yellow head piece asks you to deal with some skeletal monsters attacking a supply caravan.
Bone Sword
200 Guilders
Errand №47
A Boy and His Birds
In Almamoon, near the exit, there is a boy looking for some carrier pigeons. He will only be there after healing Queen Lowlah's broken heart. One is by the fountains, near the inn, one is by the fountains outside the palace and the last is located on the left windowsill of the Hootique.

Cast "Nature's Tongue" on each one to speak with them.
Phoenix Feather (x2)
400 Guilders.
Errand №48
The King of Curries
Next to the milk fountains in Al Mamoon (next to Horace) is a food cart. Speak to the cook and agree to gather the necessary ingredients for their dish. In order to complete this errand, you'll first need to complete Errand №3. See that section for further on how to do it.

Once you have completed all of Errand №3 and acquired the necessary spices, head back to the food vendor in Al Mamoon and give him the special spicey, tender beef and fluffy rice. Afterwards, you can now buy more of the food for 200 Guilders any time you like.
Tikka Mahala (x5)
200 Guilders
Errand №49
The Snazzier Swimsuit
In Castaway Cove you'll find a woman trying to design the ultimate swimsuit. She'll ask you to fetch her some supplies in order to make it. She needs three rainbow leaves, which can be found in the western region of the Shimmering Sands. You'll need to defeat them with the spell "Frostbite" in order to acquire a leaf from their defeat.
The enemies in question are these little fellas:
400 Guilders
Wildflower Sundae (x4)
Errand №50
A Concerned Crab
After obtaining passage from the Cowliphia in Al Mamoon, a chatty blue crab will pop up at the docks in Castaway Cove. Use "Nature's Tongue" to talk to him; he'll ask you to find his friend.

Once you have access to the ship, you can find the crab's friend on a cluster of islands near the docks of Castaway Cove, here:
Strong Coffee (x3)
400 Guilders
Errand №51
A Comedy of Errors
At The Fairygrounds in Teeheeti (After your visit to Hamelin) is another fairy in need; he lost his partner's slapsticks to some monsters and needs you to retrieve them. You'll need to defeat three Wishing Whambats. You need to blind them, then defeat them to collect each slapstick.
Dryad's Spear
700 Guilders
Errand №52
A Big Splash
Help a fairy find some medicine in the village of Teeheeti on The Fairygrounds. This errand is only available after helping to save the Littlies on the island.

You'll need three ingredients: Booster Shots (west of Ding Dong Dell) in the Rolling Hills, Spring Water just outside Ding Dong Dell (east side), and Slumbernot Leaves (The Bayous - East near Castaway Cove). Just look for the sparkly spot!
Babana Flan (x2)
700 Guilders
Errand №53
Boars in the Bushes
Once you have saved the fairies in The Fairygrounds and they return to the Golden Grove, head to the entrance on the Al Mamoon side. You'll spot a lone fairy there and learn some hyperboars are eating all the mushrooms in the forest. There will be three groups to defeat; they'll be marked on your map.
Pointy Hat
700 Guilders
Errand №54
A Flower in the Fug
In the lower reaches of Hamelin, past thw weapon's shop, you'll see two citizens talking and one will ask you to help solve their wilting flower predicament. Cast "quicken growth" on it.

Once you do, you'll need to have the familiar "Sunshine" from the deserts outside Al Mamoon. If you have it captured already, bring it to her to rejuvenate the flower. If not, you'll need to capture one and return. It is recommended waiting until you have the "Travel" spell to save a great deal of backtracking.

NOTE: Evolving the base Sunshine will make it unable to help the plant. You must have an un-evolved version for it to work.
Purifying Pulse Gem
1000 Guilders
Errand №55
Making Medicine
First, complete Errand №10, then speak to the alchemist and he'll ask you to locate some "Feel-Good Fungus to help him complete the medicine needed for his ailing sister. First, gather three crunchy carrots and one cake, then combine them to make "Car-rock-ache" (carrot cake) to give to the woman before she'll fetch you the needed fungus.
The woman is only there once you travel back to the present, after saving Marcassin in Hamlin, so put a pin in this errand until you have advanced the main plot beyond that point.
Errand №56
Pesky Pirates
First, complete Errand №55, then speak to the same citizen in Hamelin who now needs your help getting the medicine to his sister. He needs the waterways clear of pirates to make a safe trip to Castaway Cove.Take your ship back to Castaway Cove and you should run into the ships fairly quickly. There are four in total. Defeat the three roaming around to spawn the lead ship.
Pirate's Cutlass
1000 Guilders
Errand №57
The Mechanic's Lament
Simply take the worn engine to Mr. Cartwright at the mechanic shop and he'll fix it right up. Return to complete the errand.
Stout Armor
1500 Guilders
Jumbo Moondrop Recipe
Errand №58
The Sky Pirate's Charm
If you don't already have one, a gustplume can be found as a drop from Beachheads in the Sea - Northwest of the Summerlands. You can also obtain it easily by speaking to the Xanadu warrior in Hamelin after saving Queen Khulan in Perdida.
Whirligig Gem
1500 Guilders
Errand №59
Moving On
A girl died southeast of Yule during a blizzard. Head to the cave she inhabits as a ghhost and use "Spirit Medium" to talk to her. She'll ask you to care for her familiar, so make sure you have one slot open to take possession of it. Once you level him up ten levels, return to her to complete the errand.
Snowblower Gem
1500 Guilders
Jumbo Planetdrop Recipe
Bounty/Errand Achievements (60-72)
Quest №⠀⠀⠀⠀⠀⠀⠀⠀
Task⠀⠀⠀⠀⠀⠀⠀⠀⠀⠀⠀⠀
Location
Reward⠀⠀⠀⠀⠀⠀⠀⠀⠀⠀⠀⠀⠀⠀⠀⠀
Errand №60
A Hot New Look
In Yule, there is a woman wishing to acquire a bathing suit so she can visit the warmer, southern lands. Head to Castaway Cove and you should have the ability to talk to the designer again roaming the upper portion of the town. Her last "Snazzy Swimsuit" was stolen it would seem.

The island immediately west of Castaway Cove will have a seagull perched up top. Head up there to retrieve the swimsuit, then return to the woman in Yule and give her the swimsuit.
Sasparilla Sundae (x2)
Snow White Ice Cream (x2)
2000 Guilders
Errand №61
Yule Have To Search
After obtaining the stone in the frozen north, a mother in the small village of Yule will request help locating her lost son. You'll find the lost Tomte child in The Glittering Grotto here:
Medal of Valor
2000 Guilders
Errand №62
Out of this World
IIn Perdida, after defeating Khulan's nightmare, you'll find a young girl by a flowered bush. She'll ask you to fetch a flower from a girl in her dream from Oliver's world after you explain where you've come from. You'll find a girl standing next to three dead potted plants. Cast "Rejuvenate" on them to restore their beauty, collect one and return it.
Carnation Cake (x2)
Wildflower Sundae (x4)
2500 Guilders
Errand №63
Beating a Bad Back
In Perdida, after defeating Khulan's nightmare, you'll find an elderly main in pain. He'll ask you to fetch some cold compresses from a local Totme in Yule. Talk to the Totme by the locked chest in town (blue chest) and he'll ask you to deal with some local "Manglerfish" that have been impeding life around Yule.You HAVE to kill them with the Blazing Blade sold in Yule for it to count.
Tonic
2500 Guilders
Errand №64
The Hungry Llapaca
In Perdida, after defeating Khulan's nightmare, there is a llapaca near the entrance of town (right side) hoping to taste a delicious babana in exchange for some really useful recipes for your familiars.He asks for some babanas from Al Mamoon, a glowshrimp from castaway cove a black truffle from Hamelin, and a snow radish from Yule. They can all be bought from their respective town (or dropped as enemy loot) if you are missing any. Collect them all before returning.
Leech Gem
2500 Guilders
Princess Chocolate Recipe
Fantastic Flan Recipe
Hot Cake Recipe
Knickerbocker Glory Recipe
Golden Pie Recipe
Tutti-Frutti Ice Cream Recipe
Errand №65
The Cat's Whiskers
After defeating the Mutant King Tom and saving Ding Dong Dell from the mana, talk to the guard right at the entrance to the city and help him rescue his stolen cat. There are two sets of footprints outside Ding Dong Dell. One leads north of the city (marked red) and one leads northwest of the city (marked purple).
Radiant Blade
3000 Guilders
Errand №66
An Artist's Muse
In Al Mamoon, after defeating the corruption, speak to the artist in the inn. He needs your help locating his muse to finish his painting. The girl in question is located on the far western island of Turtle Crag in the small forest village shown here:
Shield of the Pure
3000 Guilders
Errand №67
Curry in a Hurry
In Al Mamoon, after defeating the corruption, speak to the food cart vendor, Raj. He needs help delivering his curry to various distant lands, as it has become so popular he no longer has time to deliver it all himself. The order is Al Mamoon, Castaway Cove, Hamelin, The Tomstone Trail (Crypt Casino), and a wooded area west of Ding Dong Dell here:
Tikka Mahala (x20)
3000 Guilders
Errand №68
Wakey, Wakey
After gaining access to the Ivory Castle, this errand in Hamelin will be available. The main is in need of some Sleep-Be-Gone. When that fails to keep him awake, he'll ask for a cappuccino. When that fails, bring a familiar that knows "Rise and Shine" to see if that does the trick!
Dragon Lance
3000 Guilders
Errand №69
The Runaway Fairies
In your post-game, head back to the fairy in the Golden Grove (Al Mamoon side) and he'll ask you to find some missing fairies/spread the word that the Golden Grove is safe for them to return. There are five missing fairies:
  • Skull Mountain - just south of the entrance.
  • Vault of Tears - Inside and to the left (west cell).
  • Motor City - Philip's Workshop.
  • Hamelin Mining Cave - The cave directly east of the main city. You need Tengri to access it.
  • Jack Frost's Playground (Island) - Inside one of the forests you can enter.
Kaleidostone (x2)
5000 Guilders
Star Eater's Claws Recipe
White Stag's Tooth Recipe
Errand №70
The Greatest Treasure
Immediately after finishing the game, a boy in Castaway Cove will ask you to investigate seven locations on a supposed treasure map he located in a storeroom. Examine the seven headstones around the world. They can be found here:
  • Barrens - (located south of Skull Mountain - South)
  • No Longer Mine - (southeast of Autumnia, south of the Spindle
  • Tiny Tim - (southwest of Yule, westernmost island)
  • Bungler's Bay - (island due south of Old Smoky)
  • Shipwreck Shore - (near Vault of Tears along the coastline)
  • Billy Goat's Bluffs - (midwestern tip of Autumnia)
  • Swan Island - (northeast of the Summerlands)
Return to the boy in Castaway Cove and decode the text to spell Kublai 3, then talk to Captain Kublai on the Iron Wyvern, then head to Broken Crown Island. Cast "Rejuvenate" on the headstone to clear up the text. Return to the boy in Castaway Cove a second time to complete this errand.
Evil Eye (x2)
5000 Guilders
Primordial Sword Recipe
Planet Splitter Recipe
Longshank Recipe
Omniseal Recipe
Errand №71
Desert Creatures
In Al Mamoon, by the two fountains (next to the treasure chest on the left one) is a man named Derwin. He'll ask you to tame two desert monsters: (1) Green Buncher & (1) Turbandit. Once you have them both tamed, return them to him to complete this errand.
Stardrop
Moondrop
500 Guilders
Errand №72
Mechanical Creatures
You'll run into Derwin again in Hamelin (by the inn) and he'll ask you to find some mechanical creatures for him to observe. This time, he'll need three: Tin-Man, Clinketyclank & Sprong Cog. All three can be found in the areas outside Hamelin.
Once you have all three, take them to him to earn your reward. All three must be either on your roaster or in your reserves for him to observe.
Sundrop (x2)
Planetdrop (x2)
2000 Guilders
Bounty/Errand Achievements (73-84)
Quest №⠀⠀⠀⠀⠀⠀⠀⠀
Task⠀⠀⠀⠀⠀⠀⠀⠀⠀⠀⠀⠀
Location
Reward⠀⠀⠀⠀⠀⠀⠀⠀⠀⠀⠀⠀⠀⠀⠀⠀
Errand №73
Snow-Loving Creatures
Meet Derwin in Yule for another familiar collecting assignment. You'll need to collect a Sasquatch, Ice Queen and a Lotus Bubbub. The Ice Queen is only found within the grotto, so don't confuse it with the "Ice Maiden" outside the grotto.
Jumbo Stardrop
Jumbo Sundrop
3000 Guilders
Errand №74
More Creatures
In Perdida, after defeating Khulan's nightmare, Derwin asks you to, once again, help him find three new familiars for his continued research. He'll ask for a Wispula, Flash Fry, and Trumpy Pumper. The trick this time is that is the final stage of the three familiars. You'll need the base form known as Wisp, Deep Fry, and Sharper-Parper.

The three base forms you'll need:
  • Deep Fry can be found on the trail of Old Smoky in the form of Small Fry
  • Wispula can be found in the form of Wisp on Tombstone Trail
  • Trumpy Pumper can be found in the form of a Honky Shonker, found outside Castaway Cove to the east or on The Genie's Steps (raised plateaus) separating the desert and the Bayou just a touch north of Castaway Cove.
Jumbo Moondrop (x2)
Jumobo Planetdrops (x2)
5000 Guilders
Errand №75
Fierce Creatures
Once you reach the post-game, meet Derwin by the fountains of Ding Dong Dell and he'll ask you to, once again, deal with some familiars for his studies. This time, though, he wants to observe you fighting them. He'll tell you exactly where they are: Jack Frost's Playground, Genie Steps north of Castaway Cove and the island called No Longer Mine.
Lumberwood Ticket
Relixx Ticket
Dinoceros Ticket
500 Guilders
Errand №76
The Young Alchemist
Talk to the young girl roaming Castaway Cove and she'll ask you to create a candle cutter using alchemy. You'll need two things: a flint dagger, which can be purchased in Al Mamoon, and an emberstone, which is a rare drop from sunshines and small frys in and around the Shimmering Sands.

Craft the weapon and talk to her to earn your reward and a bunch of new alchemy recipes.
Rings-A-Bell (x2)
Wetstone (x2)
400 Guilders
Shadowglass Knife Recipe
Divine Dagger Recipe
Watchmaker's Ax Recipe
Knucklebone Claws Recipe
Toughened Armor Recipe
Scale Shield Recipe
Stripy Cloak Recipe
Breezy Cloak Recipe
Poisoned Fang Recipe
Stalwart Scale Recipe
Errand №77
The Forest Alchemists
Around the southeastern shore of Shipwreck Shore, you'll find some forest dwellers that will teach you several different alchemy recipes if you can make a "Royal Spear". You need two Jade Marbles, two Shadowglass, and two lumps of raw steel. Shadowglass/raw steel are both found just outside Hamelin:
Jade Marble can be found atop the Giant's Tabletops once you have Tengri.
The Barrens:
Jade Marbles also appear in The Spindle and The Genie's Steps. Once you have all the ingredients, return to the forest on the Shipwreck Shore, located here:
Fogdrop (x2)
Coldstone (x2)
1500 Guilders
Champion's Sword Recipe
Royal Spear Recipe
Champion's Spear Recipe
Crucible Claws Recipe
Six Wind Claws Recipe
Champion's Armor Recipe
Champion's Tunic Recipe
Champion's Shield Recipe
Champion's Helm Recipe
Champion's Cloak Recipe
Soulfang Necklace Recipe
Salamander Scale Recipe
Ironclad Badge Recipe
Errand №78
The Master Alchemist
In your post-game explorations, head to the cave atop the Genie Steps here:
Talk to the man in the cave. The formulas are found in your Wizard's Companion (chapter 2). First, make a Demon's Axe (Grand Ax, Black Wings x2, and Tachestone x3). The grand axe is from the shop in Perdida, black wings can be found from enemies on Ara Memoriae or the Ivory Castle. Tachestone can be found on enemies on the Ivory Castle.

Now he wants you to make a War God's Axe using the Demon Axe, Scroll of Truth x5 and Kaleidostone x5. See the section of this guide labeled "Alchemy Achievements & Rare Drops" for a deep dive into how to obtain these extremely rare items and more!
Troll's Tears (x2)
Glowstone (x2)
5000 Guilders
Errand №79
Note From the Hills
Talk to the well-dressed main at the entrance of Ding Dong Dell smoking the pipe. He'll ask you to find his journal for him. You can find it just outside Ding Dong Dell, here:
You must finish this errand for the writer to appear in Almamoon for Errand №80.
Giant's Tooth
50 Guilders
Errand №80
Notes From a Volcano
Once you clear Errand №79, head to Almamoon to find the same writer visiting the city. Talk to him again and he'll, once again, ask you to find his lost journal. He said he lost it at the foot of Old Smoky. You can find it by a tree here:
Hallowed Habit
200 Guilders
Errand №81
Notes From an Island
After visiting Hamelin for the first time, that familiar, well-dressed fellow who keeps losing his diary will show up to The Fairyground and need your help locating it again. You'll find the cave behind a waterfall on the west side of the island and the diary will be by the big log/treasure chest.
Fine Frock
700 Guilders
Errand №82
Notes From the Tracks
It's time to find the snazzy-dressed traveler's diary once again! After you solved his dilemma in Teeheeti on The Fairyground, he'll wind up in Hamelin. His dairy is on some mine cart tracks outside town:
Gaudy Claws
1000 Guilders
Errand №83
Notes From the Snow
Shockingly, our dairy-loving traveler lost his pages again while visiting the cold regions outside Yule. Time to find some papers! Head west to a small clump of trees to find some villagers talking. Speak to the woman to collect the missing diary.
Dress Armor
2000 Guilders
Errand №84
Notes from the Fog
Diary hunting time! Our old friend is at it again and lost his dear ol' diary somewhere on his travels. Find him in Castaway Cove and he'll tell you he left it near a skull on an island. That would be Nazcaä as shown below:
Diva's Mantle
3000 Guilders
Bounty/Errand Achievements (85-92)
Quest №⠀⠀⠀⠀⠀⠀⠀⠀
Task⠀⠀⠀⠀⠀⠀⠀⠀⠀⠀⠀⠀
Location
Reward⠀⠀⠀⠀⠀⠀⠀⠀⠀⠀⠀⠀⠀⠀⠀⠀
Errand №85
Notes From the Center
Diary hunting time! Our old friend is at it again and lost his dear ol' diary somewhere on his travels. Find him in Ding Dong Dell (post-game). There is a new cave that opens up south of town; you'll locate his diary there. Head inside to the patch of forests all the way at the end. The entrance is here:
Angel Wings x2
5000 Guilders
Goddess Gown Recipe
Goddess Shield Recipe
Errand №86
Vegetable Thief
Located just outside Ding Dong Dell. Check your map for the flashing blue icon. Defeat the group of monsters and return to claim your bounty.
Well Worn Sword
50 Guilders
Errand №87
Travelers' Torment
Located just outside Ding Dong Dell, down by the shoreline. Check your map for the flashing blue icon. Defeat the group of monsters and return to claim your bounty.
Salted Ice Cream (x4)
80 Guilders.
Bounty Hunt №88
A Precious Root
Once you accept the quest, just outside the Goldengrove is a "Lumbering Root" enemy. Defeat it to complete this bounty. You can find it here:
Milk Chocolate (x5)
200 Guilders
Bounty Hunt №89
A Duel in the Desert
North of Al Mamoon, you'll find a Bone Brigadier roaming around. Defeat the group to finish this hunt. You can find them here:
Shinbone Shield
200 Guilders
Bounty Hunt №90
Babana Thief
East of Al Mamoon you'll find the thief in question.
Flame Robes
300 Guilders
Bounty Hunt №91
Merchants' Menace
Just outside Castaway Cove, you'll see a flashing blue dot on a smaller part of coastline. Head around, cast to make a bridge and defeat the monsters to collect your bounty. It is recommended to wait until Swaine joins your party, as the extra support is needed to avoid your party being torn apart.
Fishburger (x4)
400 Guilders
Bounty Hunt №92
Magmadness
You can find this enemy at the foot of Old Smoky. You'll need to re-enter the part where you start climbing up the volcano. Just past the first save point at the base, you'll see a marker on the map showing the monster's location.
Bring some familiars with good water-based attacks or other spells. They're extremely well armored against physical attacks.
Fire Seal
600 Guilders
Bounty/Errand Achievements (93-115)
Quest №⠀⠀⠀⠀⠀⠀⠀⠀
Task⠀⠀⠀⠀⠀⠀⠀⠀⠀⠀⠀⠀
Location
Reward⠀⠀⠀⠀⠀⠀⠀⠀⠀⠀⠀⠀⠀⠀⠀⠀
Bounty Hunt №93
A Greedy Pirate Gang
Located on the Robinson Islands, south of Castaway Cove is this bounty. You can find the monsters here:
Poison Pinch Gem
600 Guilders
Bounty Hunt №94
A Starving Sea Monster
Located south of Friday Island, you'll find this monster roaming the general area marked on the map below. Look for a slightly different looking creature than the generic "sea monster" to find your bounty.
Whalefish Tusk
800 Guilders
Bounty Hunt №95
Researchers' Ruin
Once you have access to your ship, head northeast of Castaway Cove to find a gollum blocking access to some ruined sites. Defeat him to clear this bounty. The gollum in question can be found here:
Sacred Dagger
800 Guilders
Bounty Hunt №96
A Ghostly Machine
Located outside Hamelin, this bounty roams the minecart tracks just outside of town. You can't miss'em.
Thunderspark Gem
900 Guilders
Bounty Hunt №97
Cliff-Top Chaos
Located south of Hamelin, near the shoreline on the cliffs here:
Lightning Bolt
1000 Guilders
Bounty Hunt №98
Causing a Stink
Northwest of Hamelin, on the rightmost cliff is this bounty.
Poisoner's Horn
1200 Guilders
Bounty Hunt №99
Magmadder than Ever
Available after helping Marcassin in Hamelin and returning to your own timeline, this bounty is found about midway up Old Smoky. Bring some familiars that have strong water-based attacks to make the battle easier. The monster can be found:
Firewall Gem
1500 Guilders
Bounty Hunt №100
Shell on Earth
Located outside the Sky Pirate's Skull Mountain entrance, you'll find this large turtle roaming near the river. This is the same area that you first obtained Tengri from.
Cappuccino (x3)
1500 Guilders
Bounty Hunt №101
Splash Damage
Near one of the western islands, you'll find this bounty roaming the seas, so approach it using your ship. It will be in and around this area:
Noble Attire
1500 Guilders
Bounty Hunt №102
Fiert Giant
Shortly after traveling back to the present, this bounty near the entrance of Old Smoky will appear. Bring some familiars that have water spells to make short work of the Fiery Ogrrr.
Pure Steel Armor
1500 Guilders
Bounty Hunt №103
Bewitched by the Beast
Once you obtain the map to the three stones, this bounty will become available in Billy Goat's Bluff. You will only be able to access it by flying, or through the shoreline by boat.
Mystic's Robes
1500 Guilders
Bounty Hunt №104
Catch the Fleeting Fiend
This bounty is found in the southern tip of the Barrens, south of the Sky Pirates' hideout where you obtained Tengri.
Stout Armor
2000 Guilders
Bounty Hunt №105
An Island in Crisis
On Swan Island (northeastern corner of the map), you'll find this bounty on one of the small pieces of land.
Medal of Agility
2000 Guilders
Bounty Hunt №106
Sleighbell Hell
North of Yule and grotto, you'll find a cluster of islands and this bounty hunt. Bring plenty of fire-based familiars to make short work of the group.
Snowball Gem
1500 Guilders
Bounty Hunt №107
Icy Giant
Once you complete the Mornstar in Perdida, this bounty will become available outside of the village of Yule in the frozen northwest. Bring plenty of fire magic with you!
Bubble Bath Gem
2500 Guilders
Bounty Hunt №108
A Kingdom on the Brink
Once you complete the Mornstar in Perdida, this bounty will become available outside of Ding Dong Dell, to the northwest.
Fiend's Fang
2500 Guilders
Bounty Hunt №109
Magmageddon
Head to the very top of Old Smoky (where you fought the boss) to find this bounty. Bring with you plenty of cold magic/familiars to sway the fight in your favor.
Heat Ray Gem
2500 Guilders
Bounty Hunt №110
Vicious Venom
On the island known as the Spindle (east of Hamelin), you'll find this bounty after gaining access to the Ivory Castle. This monster deals in poison, so prepare accordingly.
Darkness Beckons Gem
3000 Guilders
Bounty Hunt №111
Save the Researchers
After gaining access to the Ivory Castle, this bounty will appear in front of the bridge on the Island of Nazcaä.
Cat King's Claws
3000 Guilders
Bounty Hunt №112
Terror on the Tundra
After gaining access to the Ivory Castle, this bounty will appear south of Yule on Scrooge Island. Obviously a cold-based enemy, so bring plenty of heat!
Earsplitter Gem
3000 Guilders
Bounty Hunt №113
King of the Deep
This bounty is only available post-game. In the bay of Hermit Island near the most southwestern island is this whale of a bounty.
Dragon King Claws
4000 Guilders
Bounty Hunt №114
Shellshocked!
This bounty is only available post-game. East of Hamelin (you will need Tengri) is this rather large tortoise bounty.
Light Relief Gem
4000 Guilders
Bounty Hunt №115
A Legend Appears
This bounty is only available post-game. Southwest of Teeheeti is Solitary Island, a spec of land that this bounty claims home to.
Celestial Sword
4000 Guilders
Bounty/Errand Achievements(116-130)
Quest №⠀⠀⠀⠀⠀⠀⠀⠀
Task⠀⠀⠀⠀⠀⠀⠀⠀⠀⠀⠀⠀
Location
Reward⠀⠀⠀⠀⠀⠀⠀⠀⠀⠀⠀⠀⠀⠀⠀⠀
Bounty Hunt №116
Wood You Believe It
Speak to the Conductor in the new grove south of Ding Dong Dell (See Errand №131) and you'll be given three new bounties that require you to close three rifts in various areas. This one is in the Deep Dark Woods north of Ding Dong Dell. Defeat the monster to close the rift.
Harrowfang
2500 Guilders
Bounty Hunt №117
A Return to Arms
Speak to the Conductor in the new grove south of Ding Dong Dell (See Errand №131) and you'll be given three new bounties that require you to close three rifts in various areas. This one is in the Ding Dong Well (dungeon in town). Defeat the monster to close the rift.
Starspun Tunic
2500 Guilders
Bounty Hunt №118
A Return to Arms
Speak to the Conductor in the new grove south of Ding Dong Dell (See Errand №131) and you'll be given three new bounties that require you to close three rifts in various areas. This one is in the Golden Grove (Al Mamoon side). Defeat the monster to close the rift.
Shiny Shield
2750 Guilders
Bounty Hunt №119
Back and Unabashed
Speak to the Conductor in the new grove south of Ding Dong Dell (See Errand №131) and you'll be given three new bounties that require you to close three rifts in various areas. This one is behind the Sage's chair inside the Temple of Trials. Defeat the monster to close the rift.
Sorcerer's Soul
3000 Guilders
Bounty Hunt №120
Ready to Blow
Speak to the Conductor in the new grove south of Ding Dong Dell (See Errand №131) and you'll be given three new bounties that require you to close three rifts in various areas. The third is at the top of Old Smoky. Defeat the monster to close the rift.
Griffin's Talons
3250 Guilders
Bounty Hunt №121
Stomache Trouble
Speak to the Conductor in the new grove south of Ding Dong Dell (See Errand №131) and you'll be given eight more bounties that require you to close more rifts. This one is located inside the Fairy Godmother on Teeheeti Island. Once inside, head all the way to the right to activate the rift.
Glorious Lance
3500 Guilders
Bounty Hunt №122
Whole Hog
Speak to the Conductor in the new grove south of Ding Dong Dell (See Errand №131) and you'll be given eight more bounties that require you to close more rifts. This one is located inside the palace of Hamelin where you last fought one of the army's tanks.
Knight's Armor
3750 Guilders
Bounty Hunt №123
Losing Your Wick
Speak to the Conductor in the new grove south of Ding Dong Dell (See Errand №131) and you'll be given eight more bounties that require you to close more rifts. This one is located on the Tombstone Trail.
Bounty Hunt №124
Breathing Fire Again
Head to the entrance to Skull Mountain and you'll find a glowing rift waiting for you just outside the cave.
Ogre King's Axe
4250 Guilders
Bounty Hunt №125
Breathing Fire Again
Head to the Vault of Tears to where you fought the snake, Aapep. You'll find rift waiting for you there.
Sorceress Robes
4500 Guilders
Bounty Hunt №126
Walking the Plank
Head to the Broken Crown Island in the north and you'll find this rift on the far end of the island. (See Errand №131).
Nix Gnashers
4750 Guilders
Bounty Hunt №127
A Loyal Howl
Head to the Glittering Grotto and make your war to the bottom of the ice cavern where you fought the boss. You'll find the rift orb there. (See Errand №131).
Dragon King's Claws
5000 Guilders
Bounty Hunt №128
Heart of Darkness
Head to the Miasma Marshes this time. Head over to where you encountered the Veiled Heart to find this final rift orb. (See Errand №131).
Enigma Armor
5500 Guilders
Bounty Hunt №129
Reckless Soldier
Head to Nevermore Castle, past the Miasma Marshes, for this next rift. It resides all the way in the throne room. (See Errand №131).
Celestial Sword
6000 Guilders
Bounty Hunt №130
Loyal Queen
Head to Ara Memoriae for the final rift and final bounty in the game. This boss as triple the hit points and will not hold back any punches, so make sure you're stocked up on items to heal, regain mana and bring your characters back to life. Spamming Astra and healing items will be your best friend. (See Errand №131).
Star Eater's Fang
7000 Guilders
Bounty/Errand Achievements (131-138)
Quest №⠀⠀⠀⠀⠀⠀⠀⠀
Task⠀⠀⠀⠀⠀⠀⠀⠀⠀⠀⠀⠀
Location
Reward⠀⠀⠀⠀⠀⠀⠀⠀⠀⠀⠀⠀⠀⠀⠀⠀
Errand №131
The Conductor
This errand is only available post-game. Head south from Ding Dong Dell to the new dungeon that has opened up and speak with the Conductor. You can't miss'em, as he is beyond creepy looking. He's found past the entrance here:
He'll ask you to close five rifts (Errand №116 - 120) around various locations (see those errands for more). Just locate the rift, defeat the monster and return once all of them are closed.
⠀⠀⠀⠀
After completing the above errands mentioned, talk to the Conductor once again and he'll tell you that even more rifts have broken through around the lands. Bounty Hunt №121-128 are now available. See those sections for more.

If you complete Bounty Hunt №121-128, speak to the Conductor and he'll mention one more rift that has opened in Nevermore Castle. See Bounty Hunt №129 for more. Once you have completed this bounty, head back to the Conductor after claiming it and he'll give you one final one in Ara Memoriae. See Bounty Hunt №130 for more. Once you defeat the boss at Ara Memoriae, claim the reward and go talk to the Conductor once again.

Now that you severed all the rifts around the world, the Conductor will let you open the door, where you'll fight the Guardian of the World. This secret boss isn't terribly difficult if you're around level 75+. Just bring plenty of resurrection feathers and supplies to re-supply mana to your teammates and you should be able to handle it just fine.
Philmobile 2000
Errand №132
Totally Tidy Tools
Finish the game, then head to the Iron Wyvern and talk to the fairies on board about their weapon shop. Talk to one of the fairies by the comedy stage, then make your way to Drippy's mother (Fairy Godmother) for another idea. Next, head inside the Fairy Godmother and go to the left-most room and examine the wall for a third idea, then return to the airship.

Finally, gateway to your home in Motorville and go to the stove and collect the frying pan. Return to the Iron Wyvern and speak to the fairies to complete this errand.
Blossom of the Bard
Pretty Parasol
10000 Guilders
Pretty Parasol Recipe)
Bounty Hunt №133
Scorching Songstress
This bounty is only available post-game. Go to the base of Old Smoky, right before you enter the "dungeon" section and the save point at the start of the hike upward. You'll find this bounty singing by the lava river.
Glowstone (x3)
5000 Guilders
Errand №134
Order of Illusion
Take Tengri and head back to the Ivory Tower. On the other side of the hallway from the entrance stand three knights: the queen's royal guards. There are three mechs that they want you to dispose over the world. Remember those hunks of scrape you saw here and there during the game? Well, now they're online. There are four:
  • Old Smoky - Enter the trail and it'll be just past the save point on the left side that dead ends.
  • The Tombstone Trail - About halfway up, near the abandoned shack.
  • Golden Grove - Enter from the Ding Dong Dell side; the mech is just around the corner.
  • The Glittering Grotto - Just before the main chamber, at the bottom, where you fought the boss.

    Return to the Ivory Tower and speak to the knights. They'll ask you to dispose of three of the greater magimechs next.

    You'll find the three magimech masters on Nazcaä Island here:
    Before talking to the knights, save it and bring the best-of-the-best you have, because now you'll fight three at once and it can be rather tricky.
Nazcaan Longsword
Nazcaan Armor
Nazcaan Helm
10000 Guilders
Bounty Hunt №135
Grave of the Sailors
The cluster of islands east of Hamelin, known as the Spindle, is home to this bounty hunt. You'll need to head there via ship, as this is a water-based enemy. Their location may differ slightly since they swim around the area.
Evil Eye (x3)
5000 Guilders
Errand №136
The Procrastinator
Solve all of Horace's riddles, taking him all the way to Ara Memoriae, where you will learn the "Astra" spell. After obtaining this spell, speak to Horace once again to start this errand. He'll pose a riddle right off the cuff, the answer being Mornstar. After that, follow Horace to the Tombstone Trail, where another riddle awaits. This time, the answer is Aapep.

Next, head to the Vault of Tears where you fought Aapep and speak to Horace once again. His next riddle is the White Witch. Horace will then head to the Glittering Grotto. Meet him there and answer his next riddle with Bring Hope.

Horace's final meeting spot will be the Ivory Tower itself. He's at the final chamber of the tower. Answer Wizard's Companion to solve his final riddle.
Mirror of Truth
10000 Guilders
Sky Tree Wand Recipe
Bard's Harp Recipe
Masterthief's Magnum Recipe
Errand №137
Incredible Ulk
At the start of your post-game progress, this bounty hunt will become available. The Ulk in question is just northwest of Ding Dong Dell:
Troll's Tear (x3)
5000 Guilders
Errand №138
Warbird of Prey
At the start of your post-game progress, this bounty hunt will become available. The crow is on the island north of Ding Dong Dell, Swan Island.
Angel Wing (x3)
5000 Guilders
Story Achievements
"Out of this World"
Awarded for casting Gateway and travelling to another world.
Story achievement; awarded for completing the prologue and casting your first spell.


"En Guardian!"
Story achievement; awarded for defeating the Guardian of the Woods and bringing him back to his senses.
This secret achievement will be earned once you bring some sense back to the Guardian of the Woods. It is kind of like a miniture boss fight after the main story has concluded.


"Anchors Aweigh"
Awarded for obtaining the Sea Cow.
Story achievement; awarded after setting sail from Castaway Cove for the first time.


"Fly the Friendlier Skies"
Awarded for befriending Tengri.
You'll befriend the dragon, Tengri, from Kublai of the Sky Pirates after you heal him. This achievement will follow shortly once you're in the air for the first time during the tutorial.


"Wonder Wand"
Awarded for restoring the legendary wand Mornstar to its former glory.
Once you collect the three stones of Mornstar and reunite them in Perdida, this achievement will unlock.


"A Tonic for the Djinn"
Awarded for defeating the Dark Djinn.
Once you defeat Shadar, you'll unlock this achievement.


"Council Trouncer"
Awarded for freeing the other world from the clutches of the Zodiarchy.
Once you defeat the White Witch and save the world, this achievement will unlock along with post-game content.
20 Comments
The Abyss Nov 8, 2024 @ 6:35am 
How would one be able to fish? I need to catch one, but I do not have a fishing rod. :cqdark:
ErickaUnlimited  [author] Oct 1, 2024 @ 8:14am 
@Kuro - I always mention if any are in the "Introduction" portion of the guide at the top. Nothing in this particular game is missable.
Kuro Oct 1, 2024 @ 8:09am 
I'm planning to 100% this so I like to ask if there is no miss able achievement?
ErickaUnlimited  [author] Sep 24, 2024 @ 8:26pm 
@Jon.Topps - Something like that. Those are all hidden treasure chests, that, once you have the ability to pop them up on the map, need to be collected. The ones you can physically see in areas don't count. You can miss any amount of those.

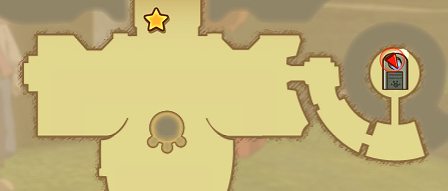
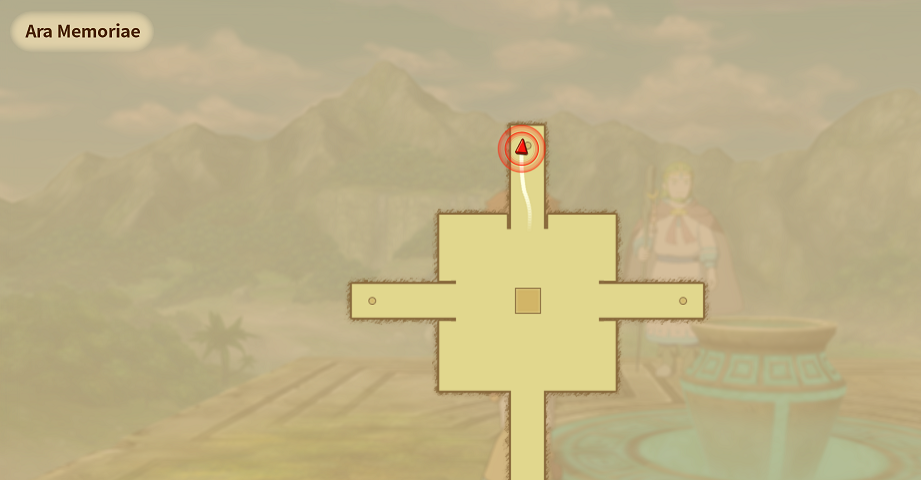
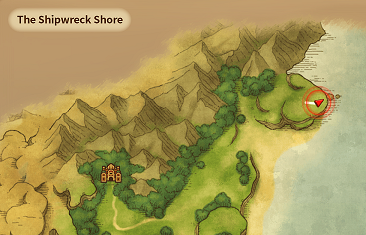
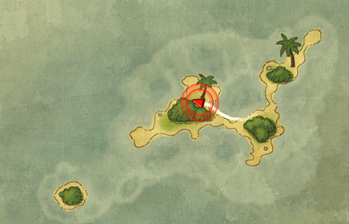
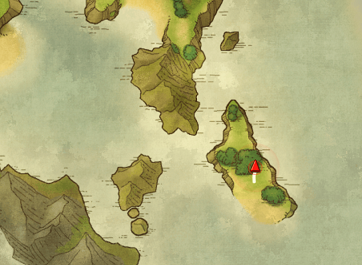
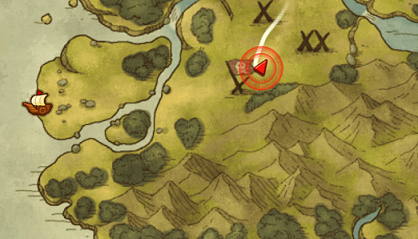
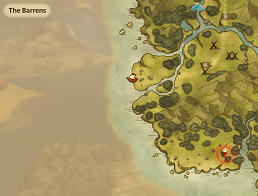
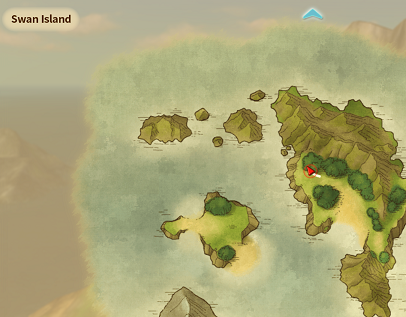
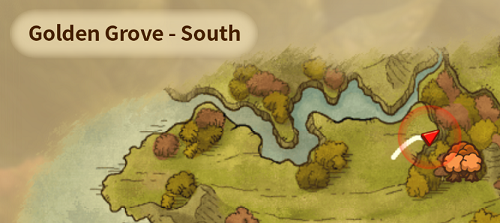
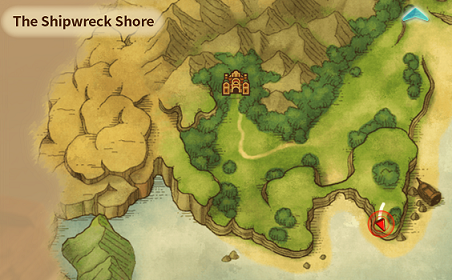
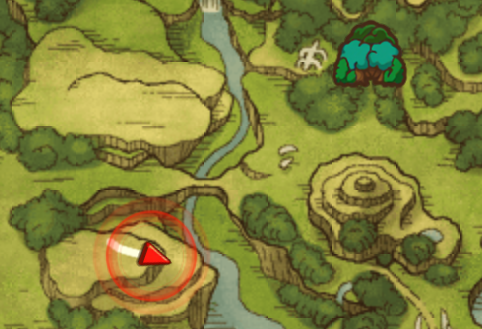
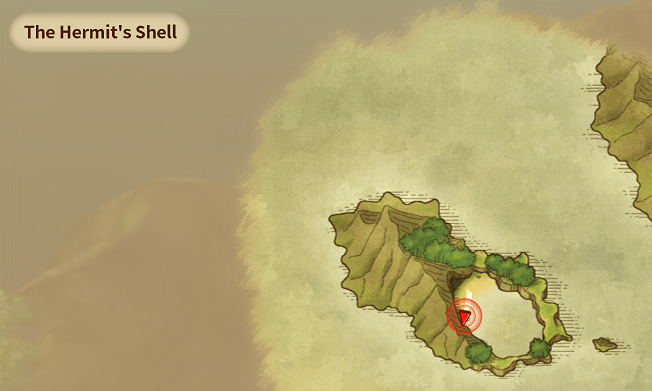
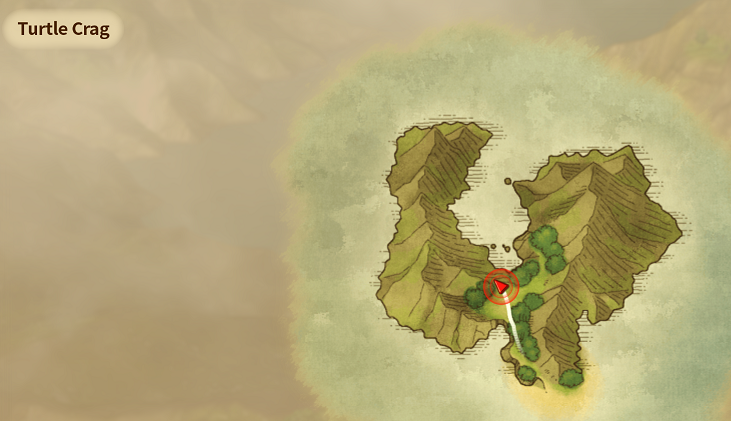
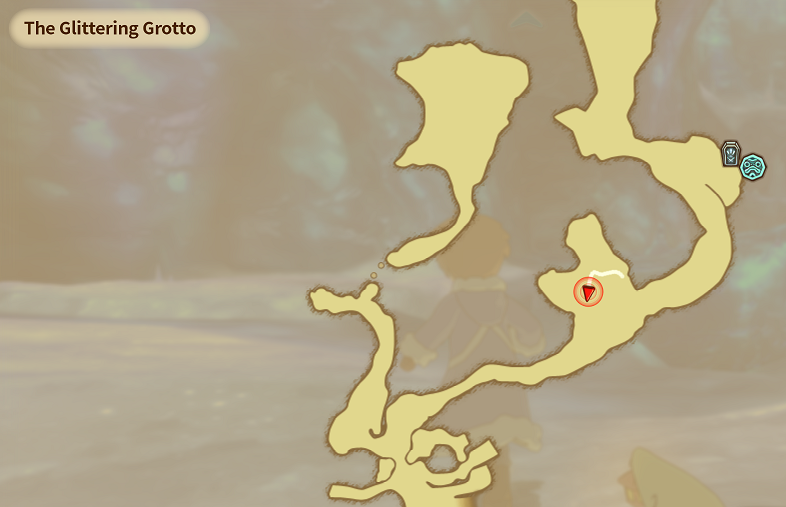
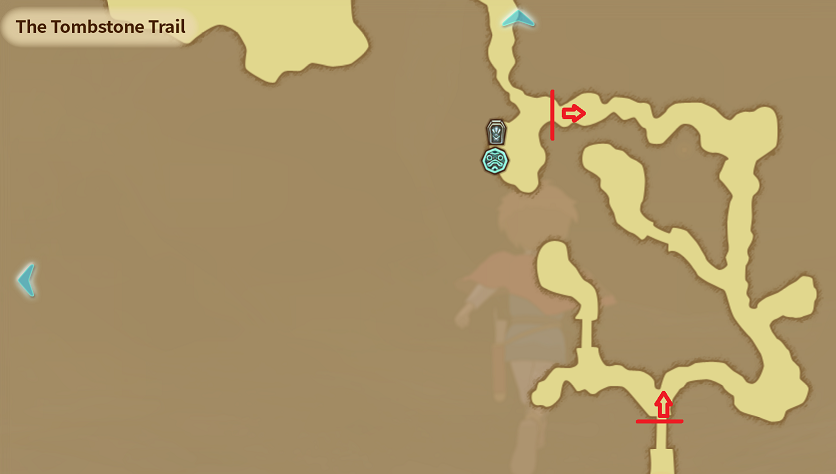
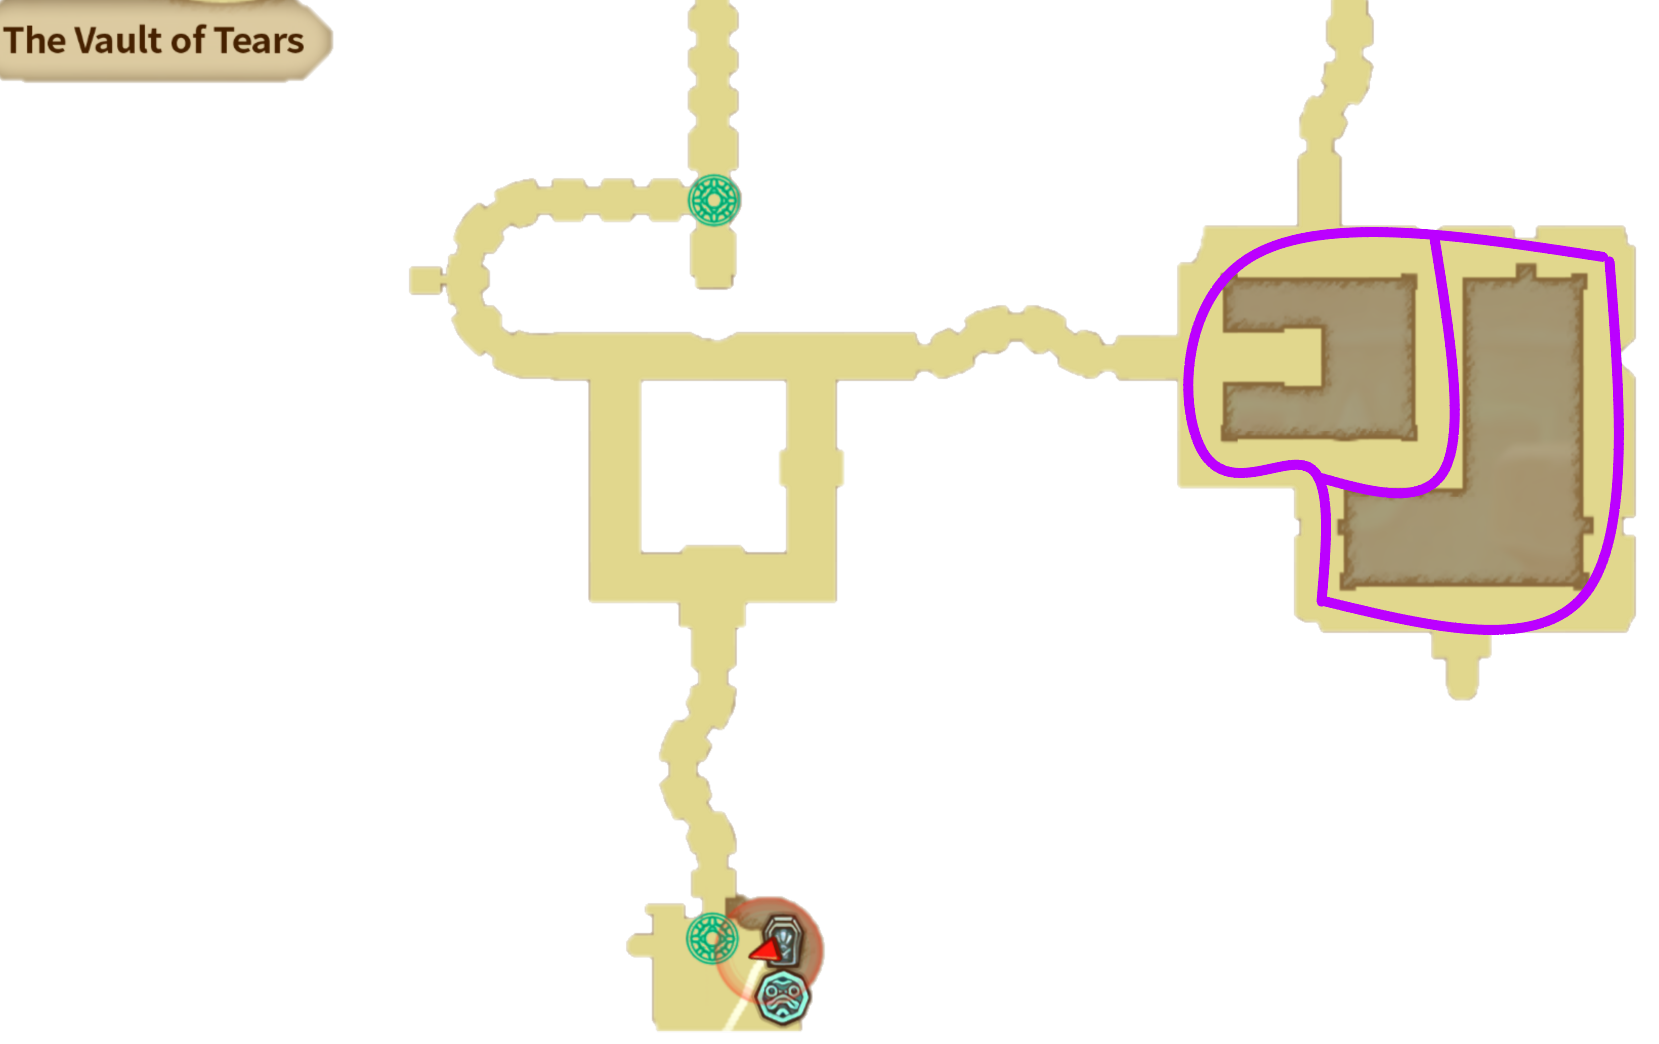
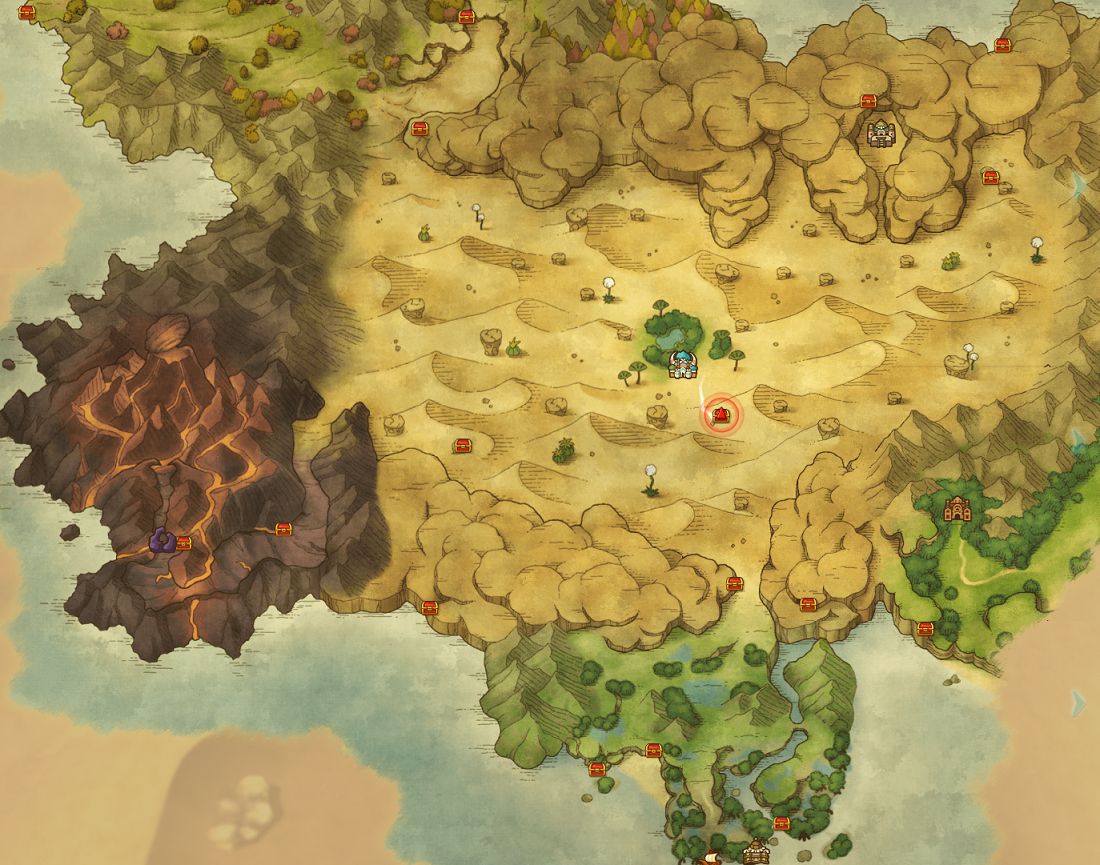
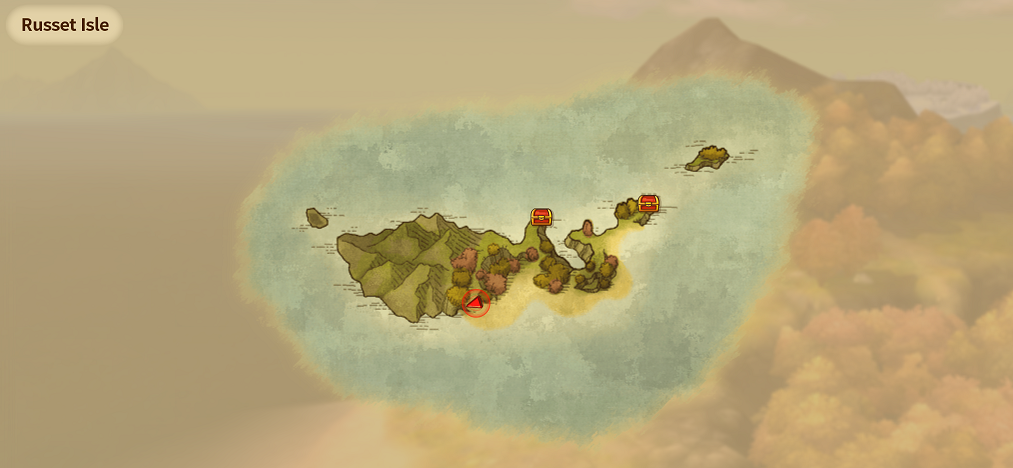
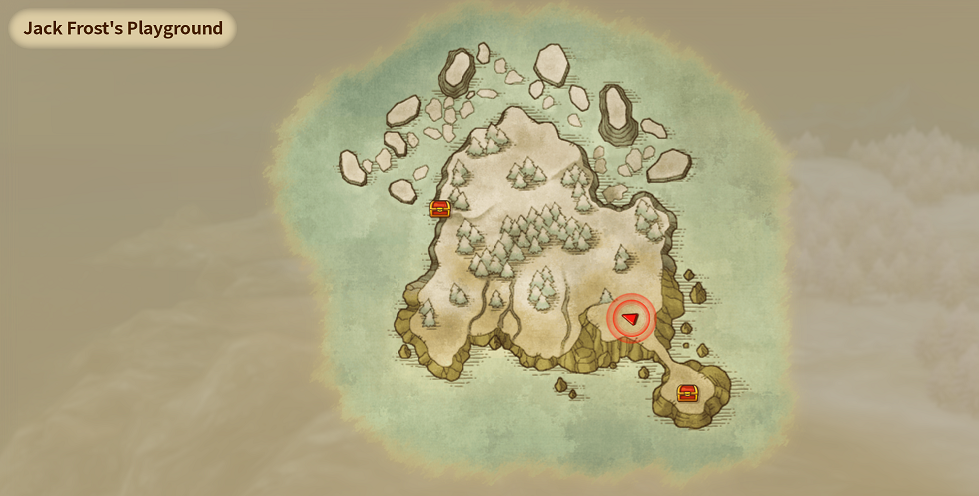
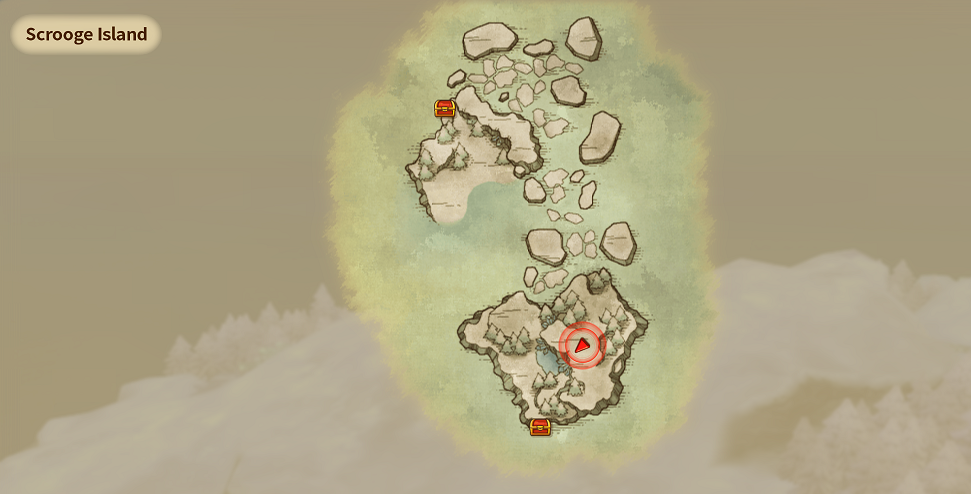
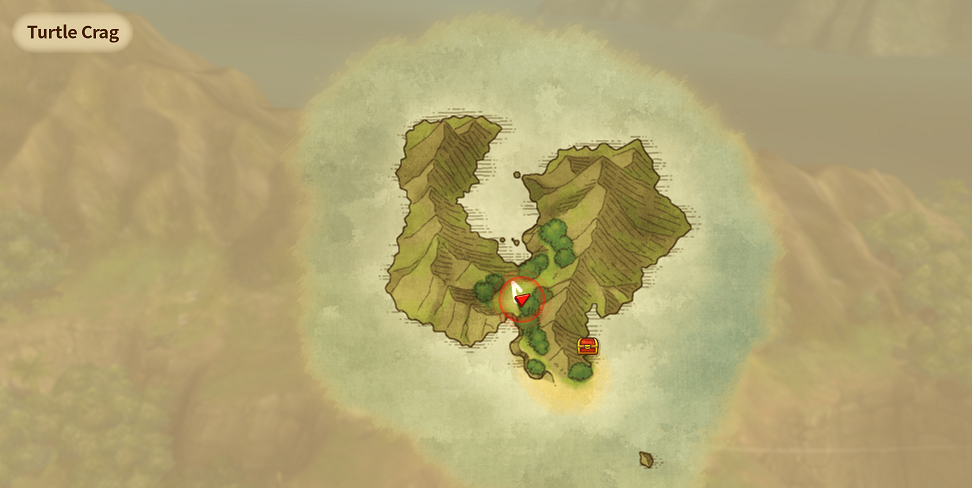
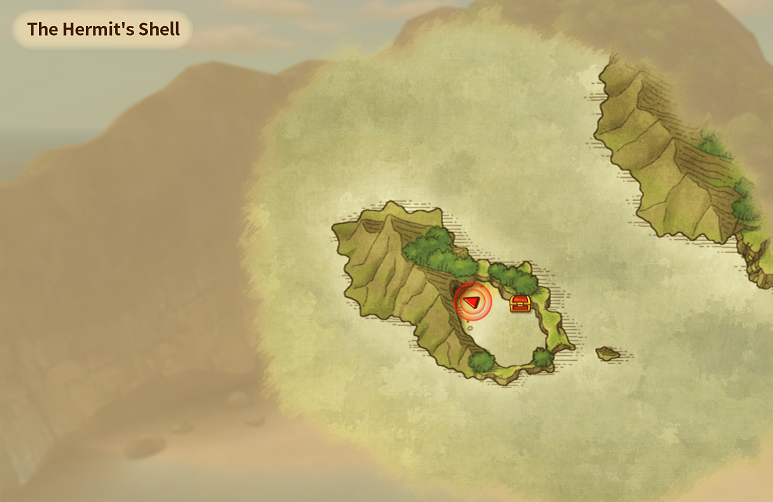
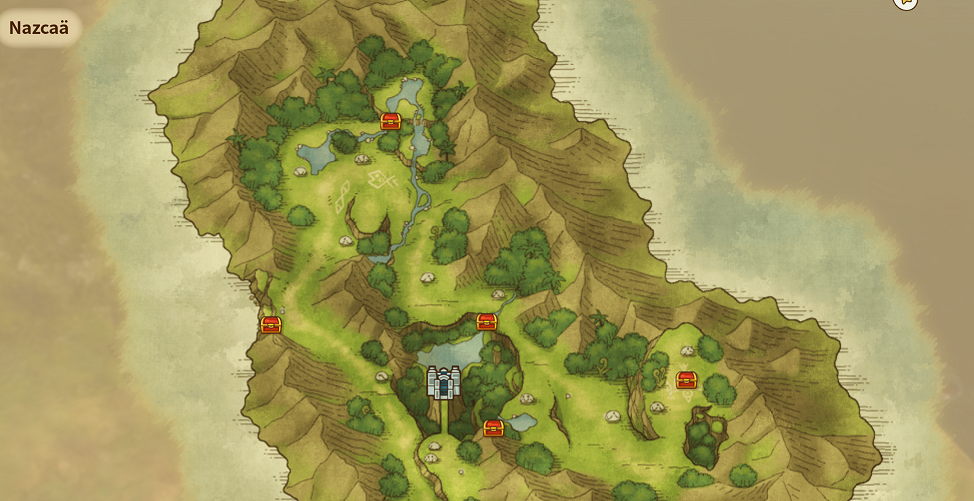
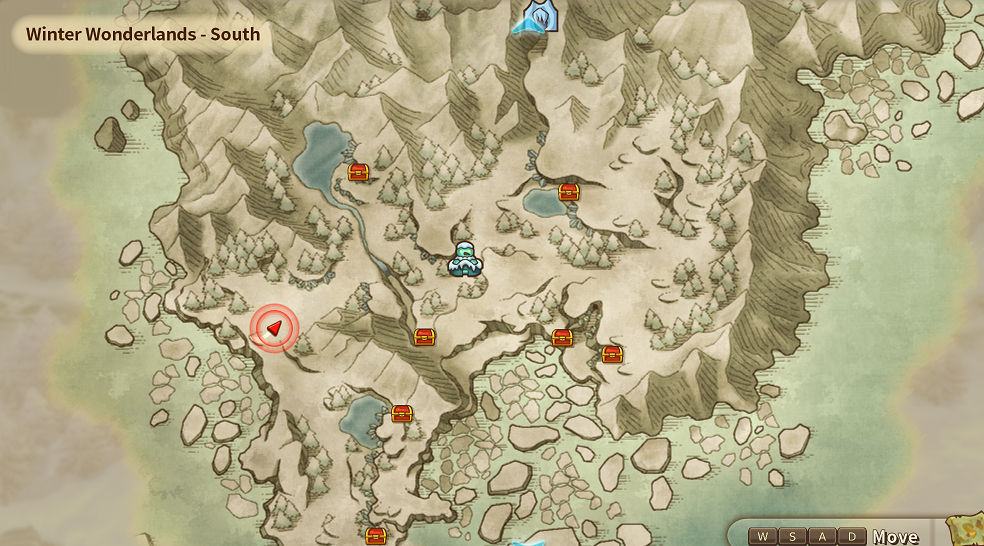
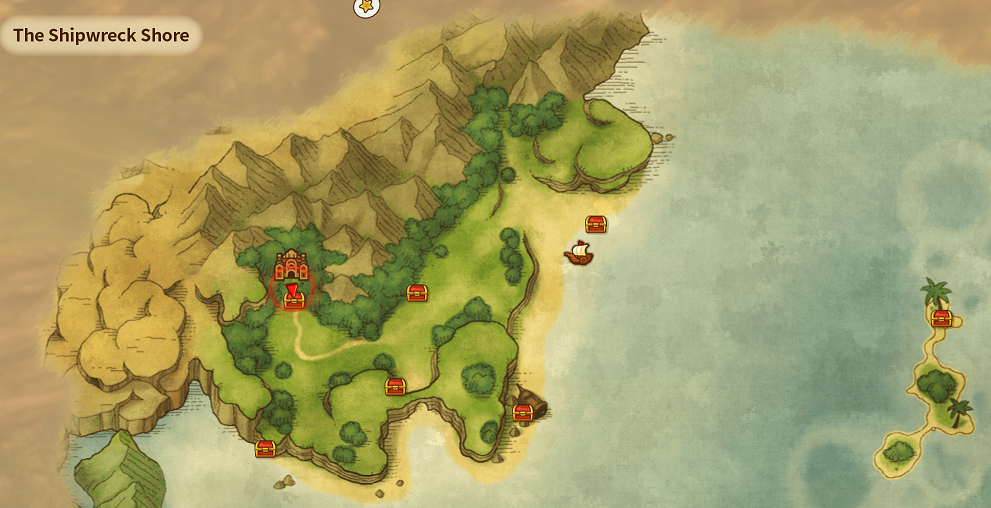
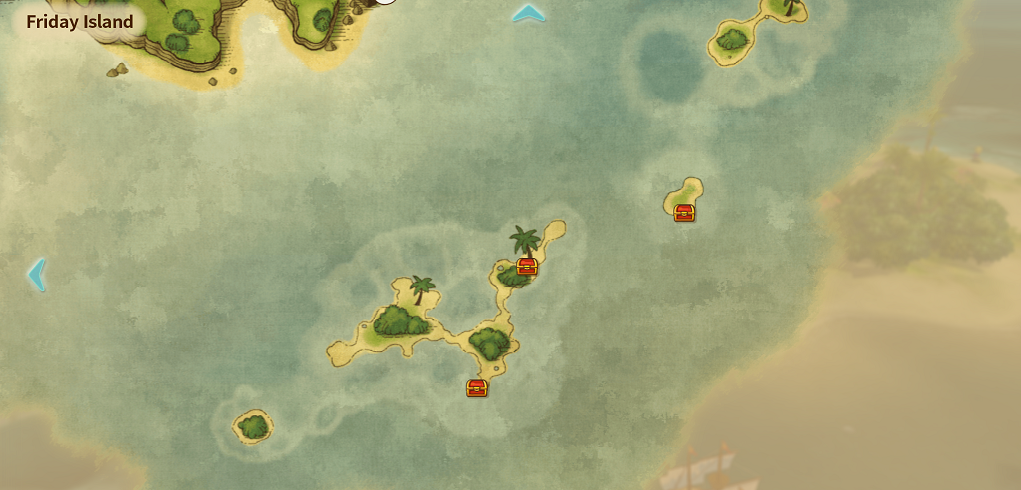
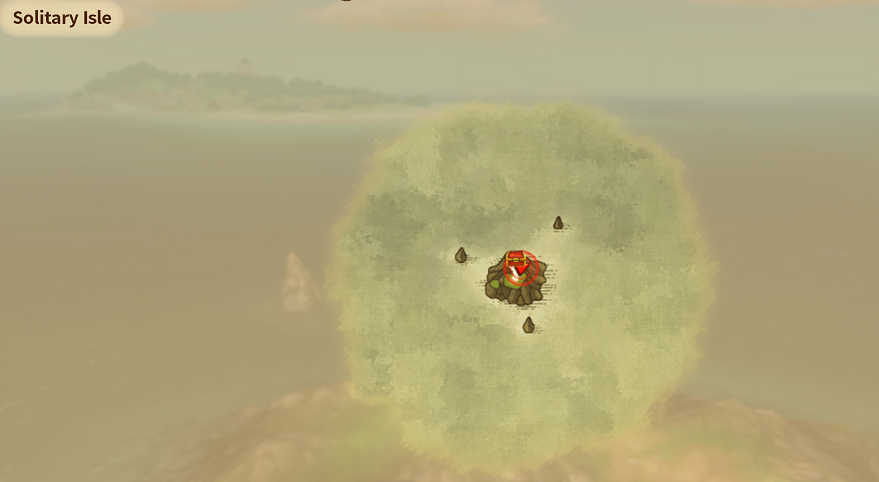
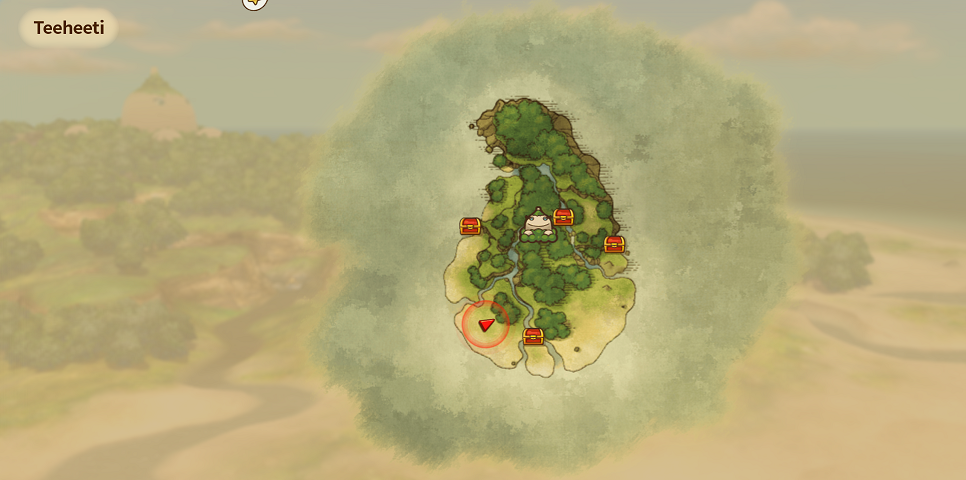
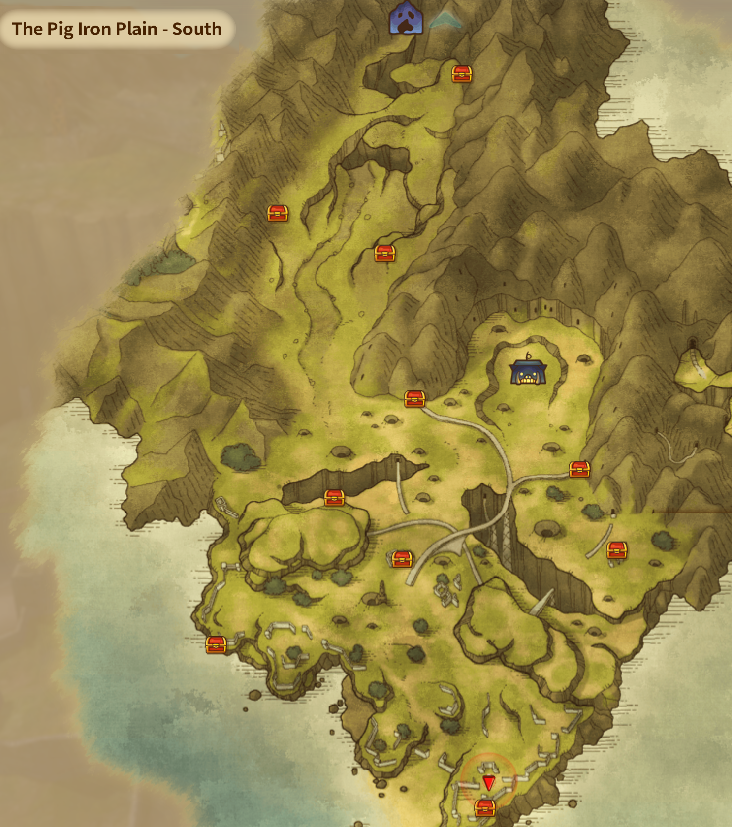
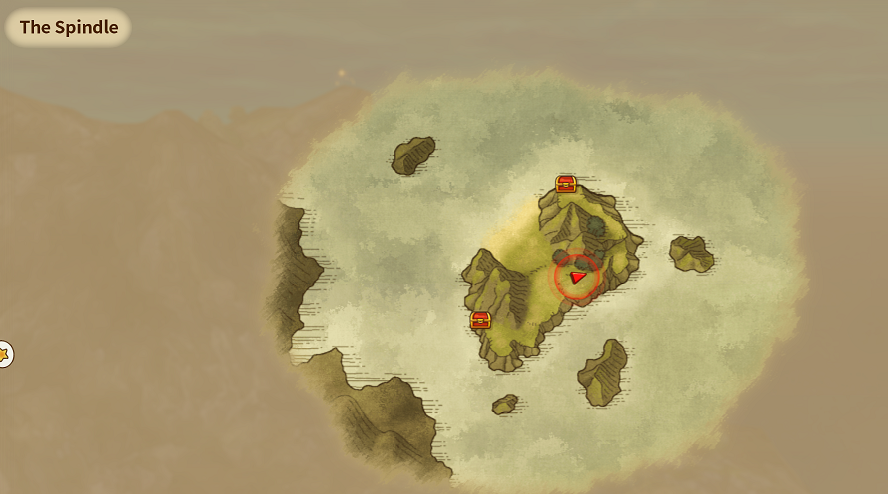
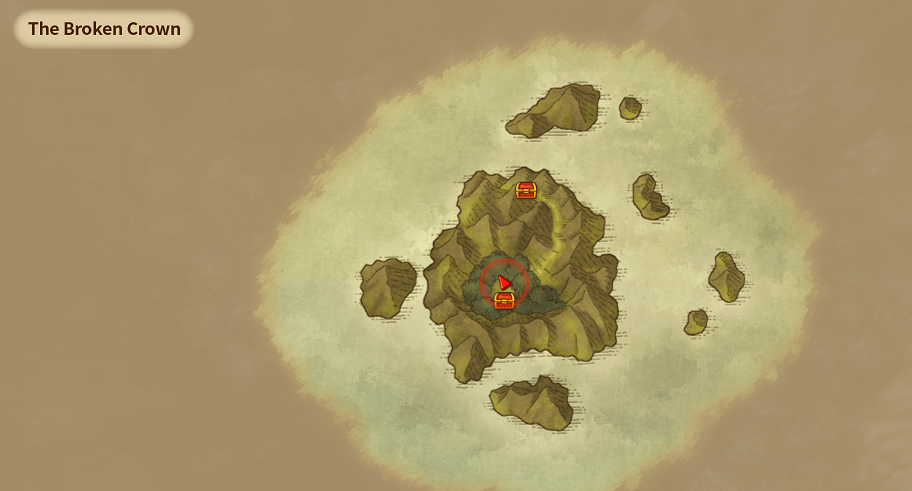
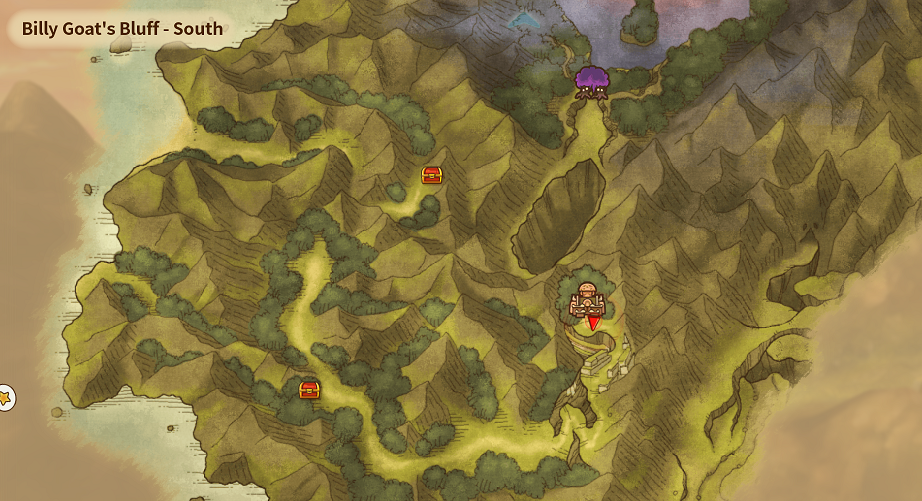
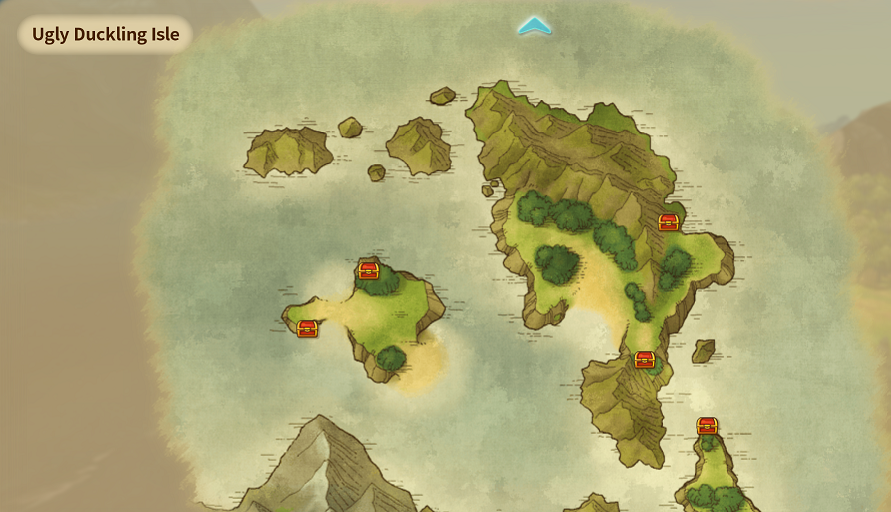
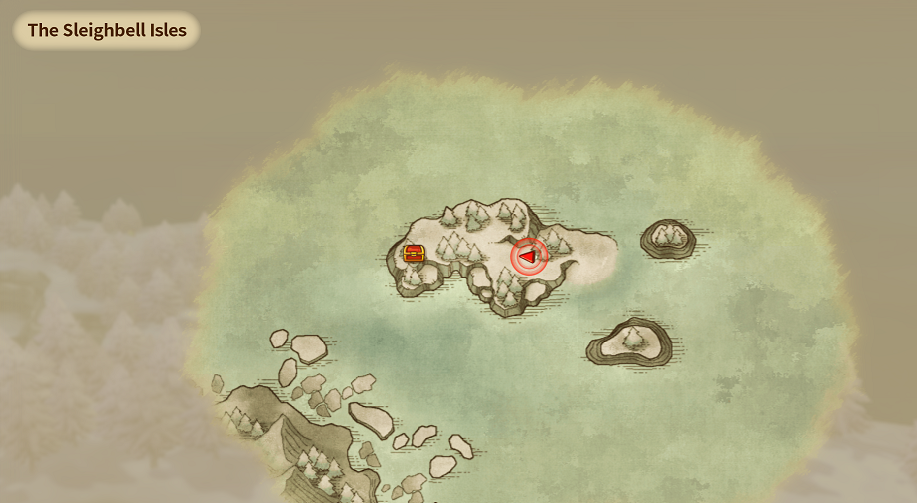
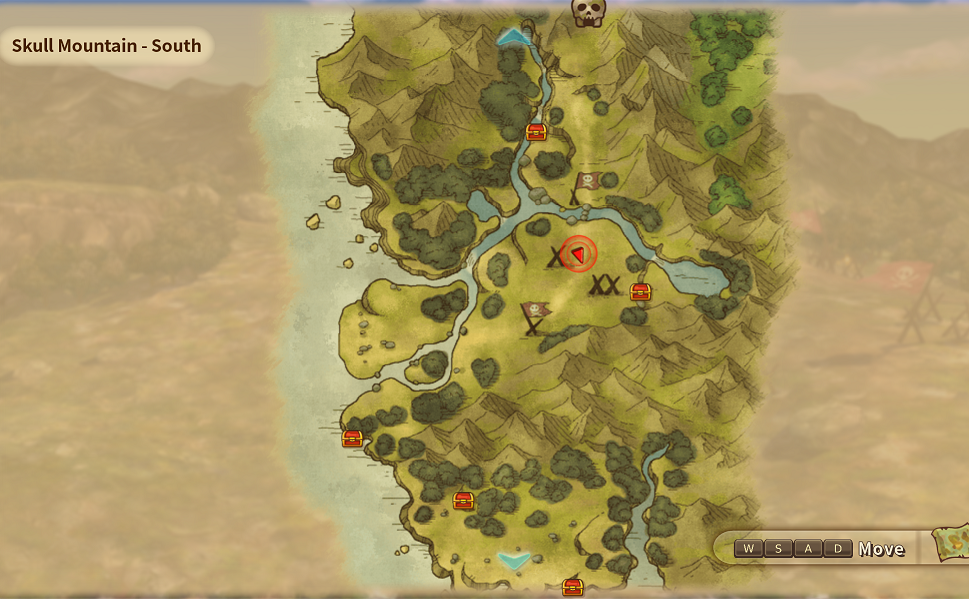
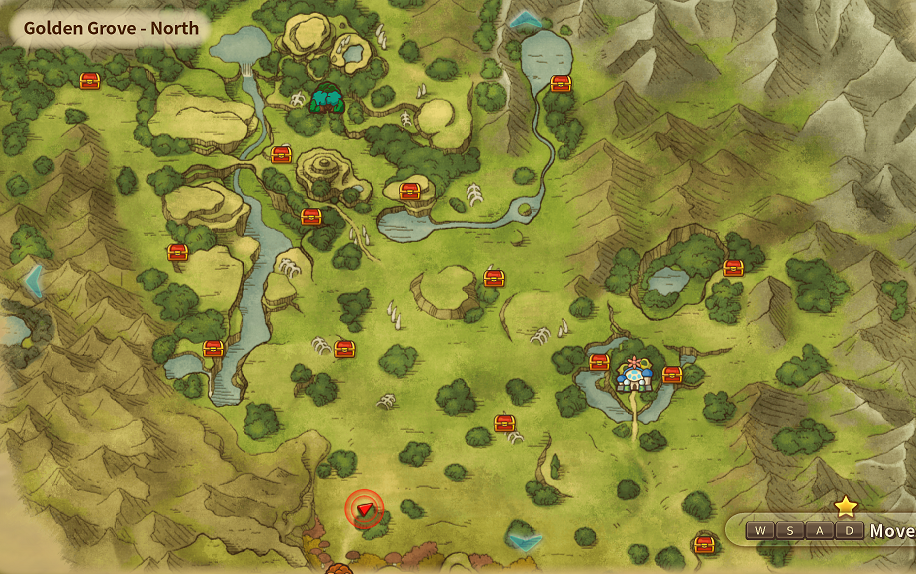
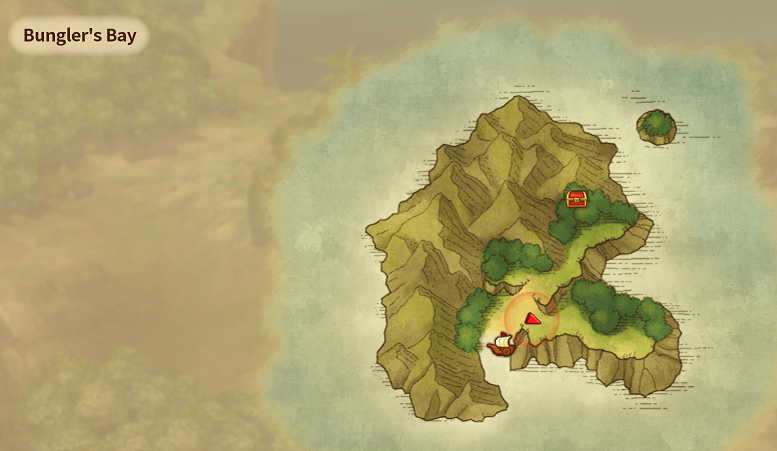
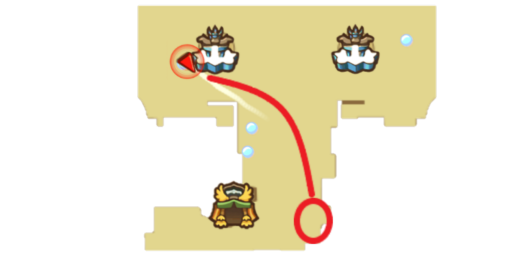
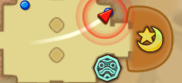
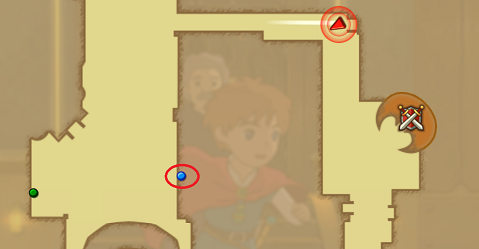
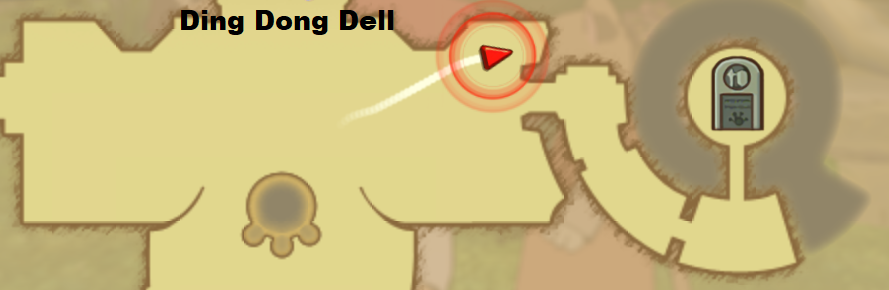
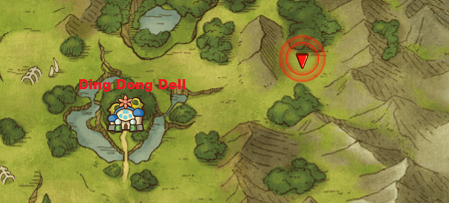
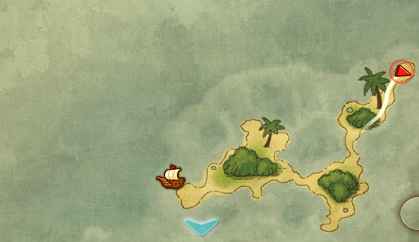
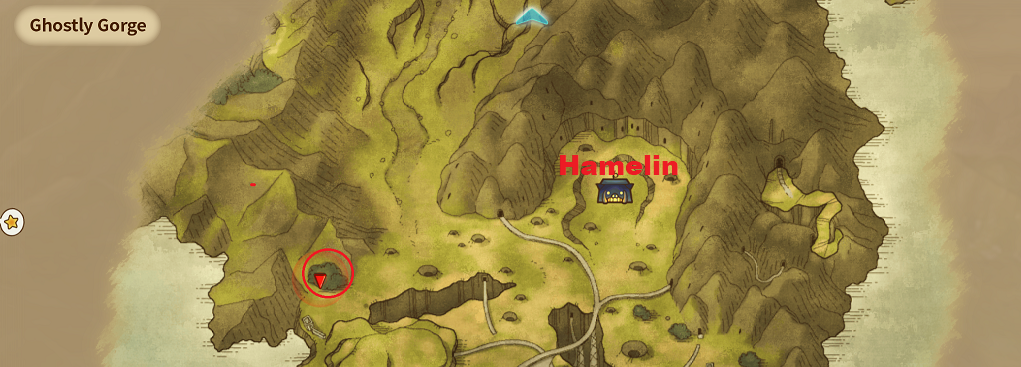
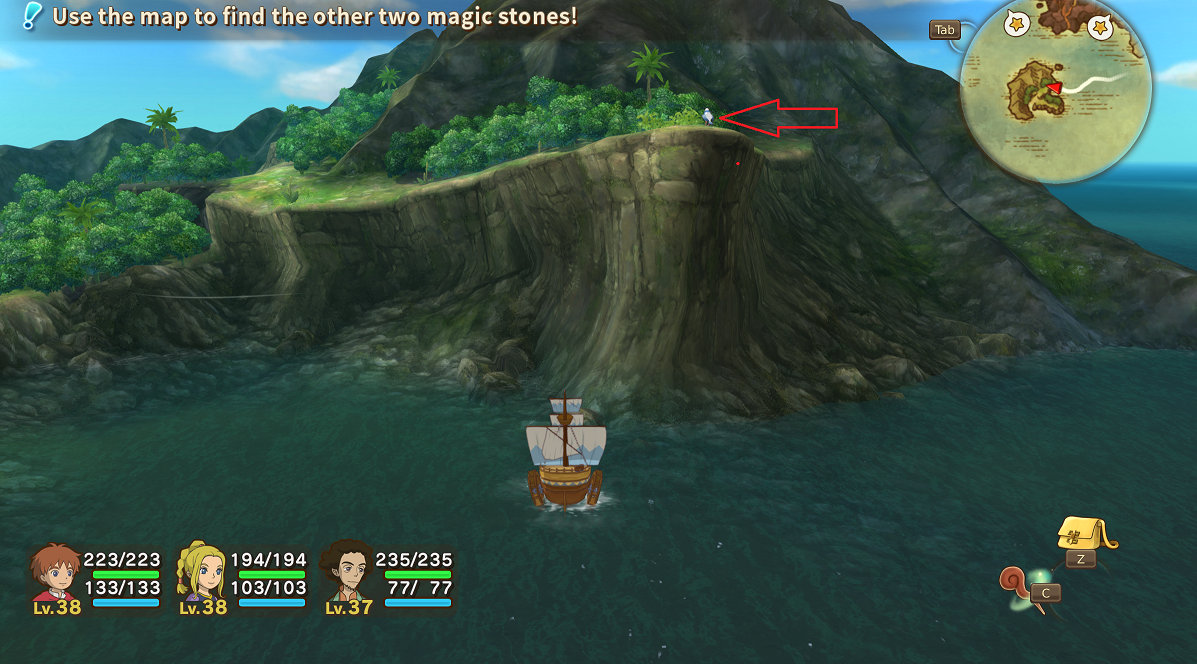
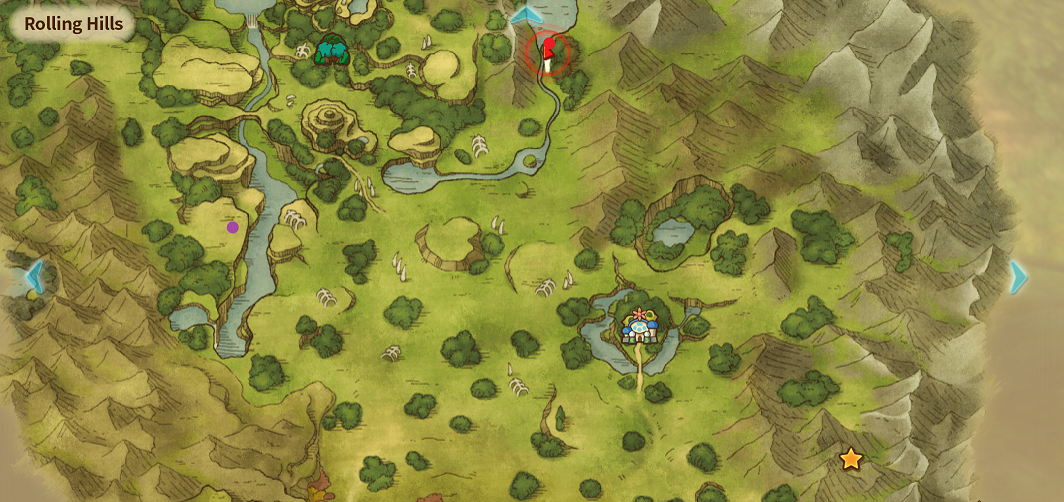
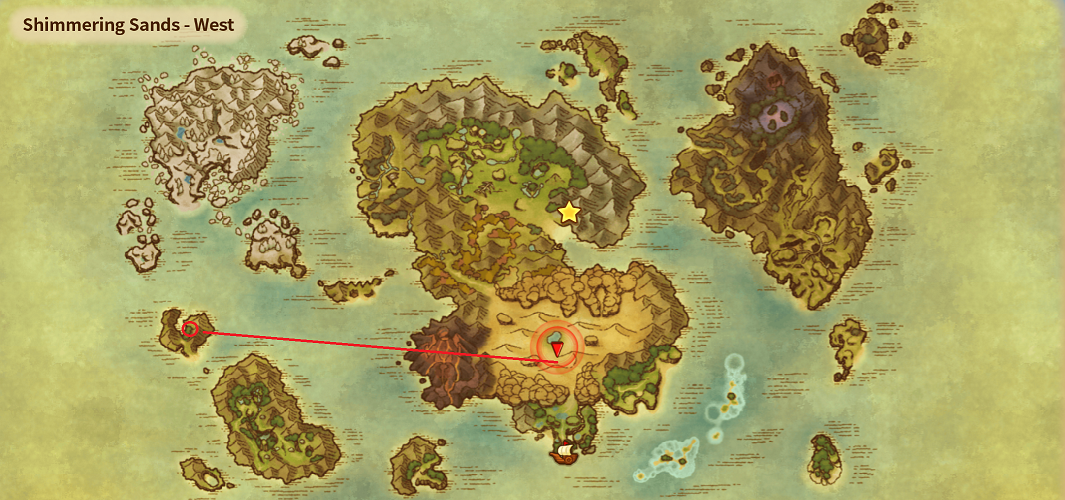
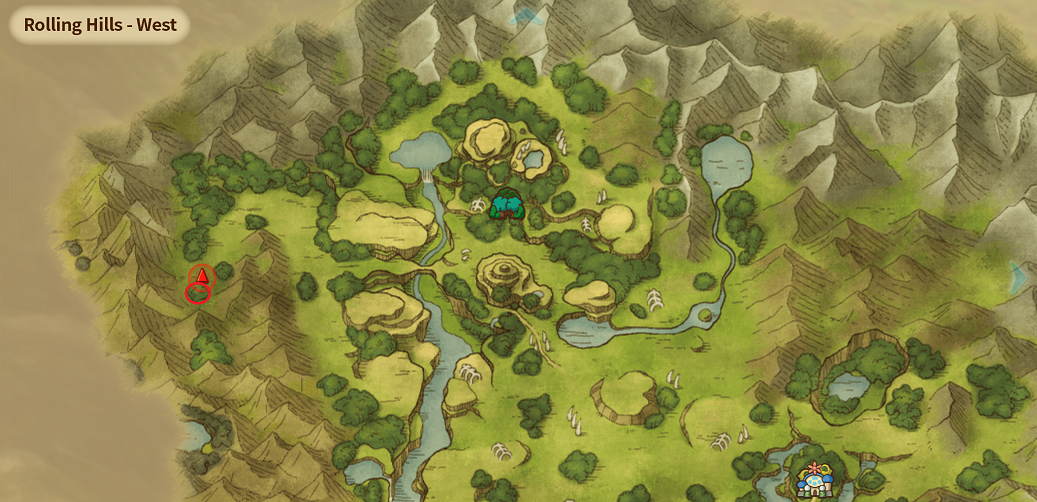
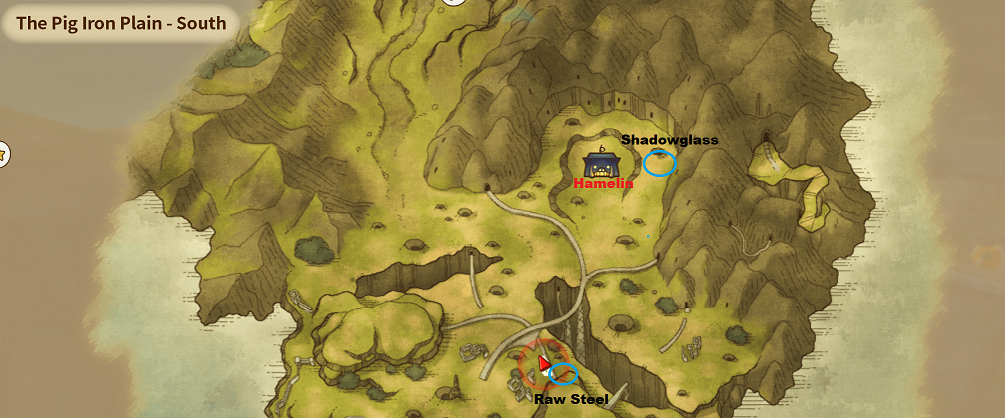
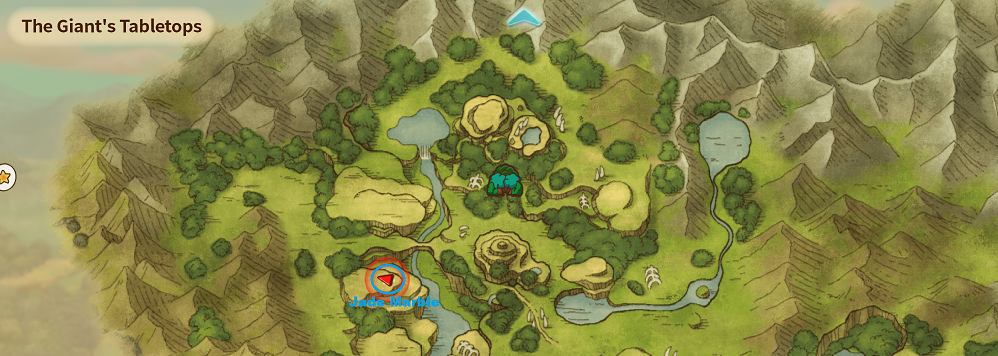
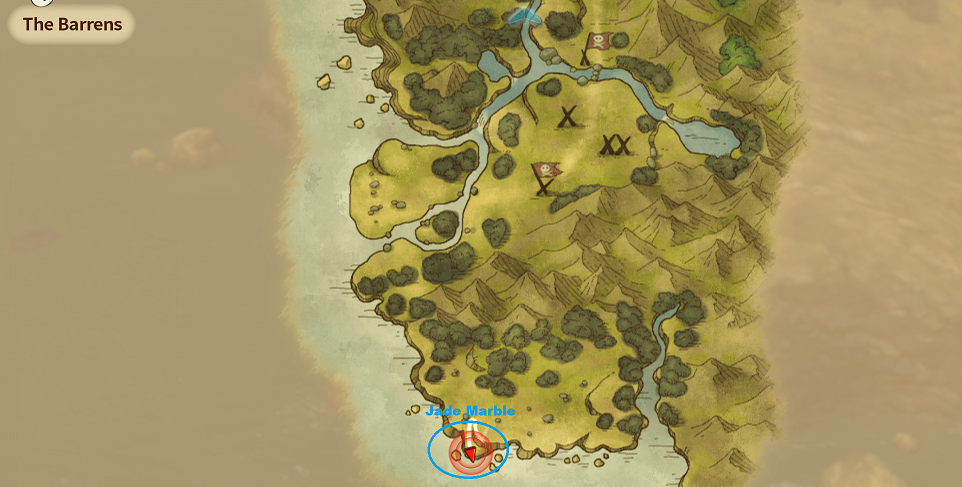
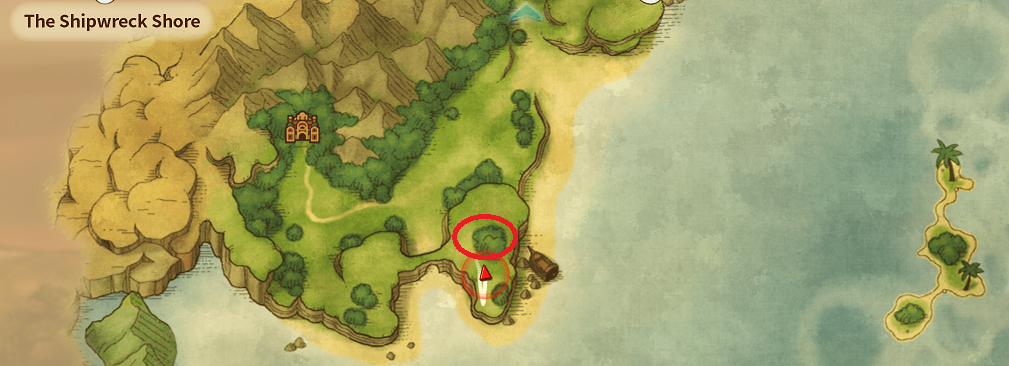
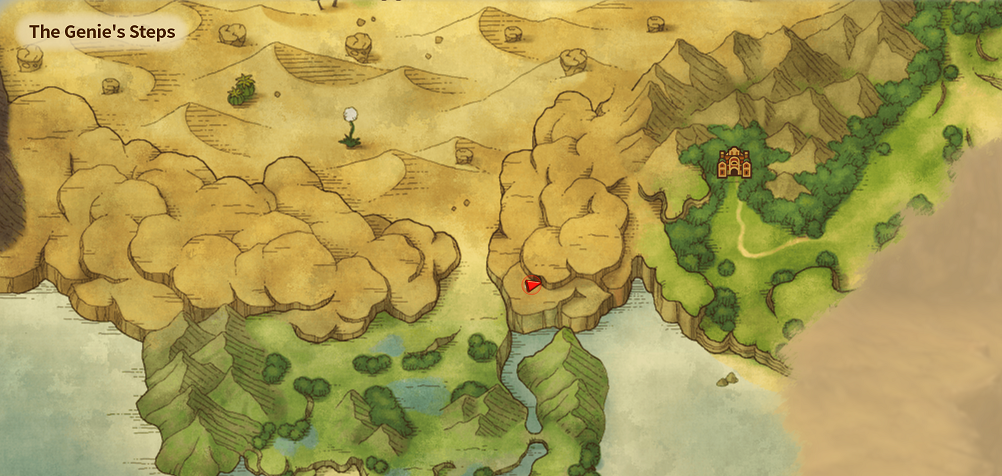
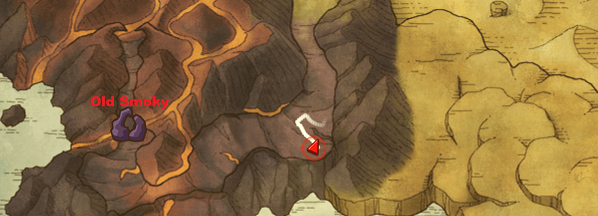
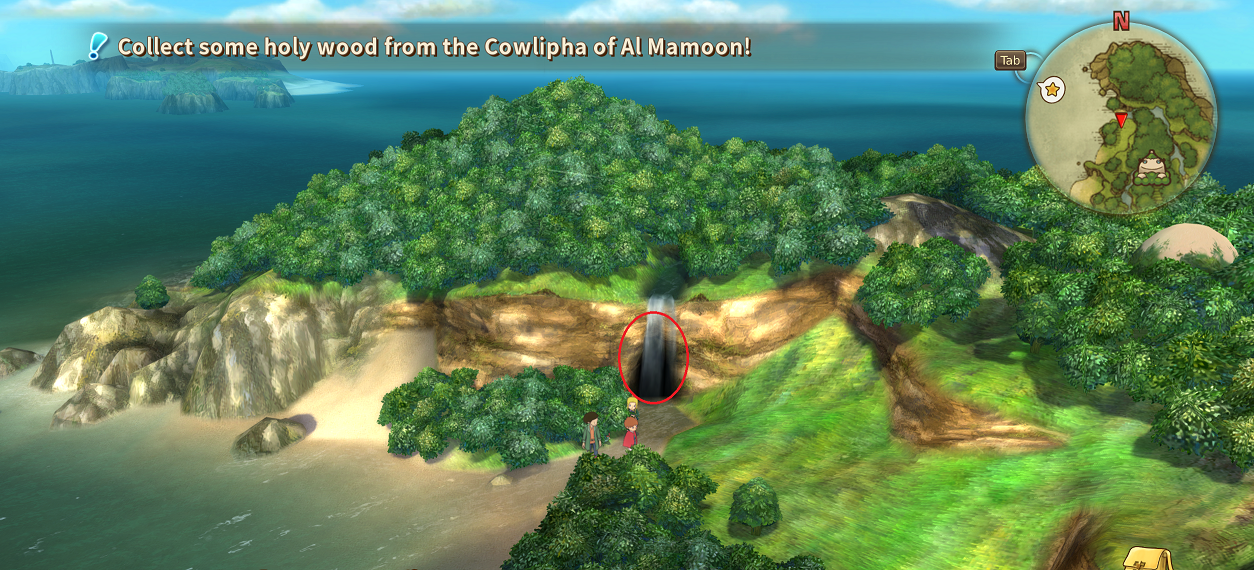
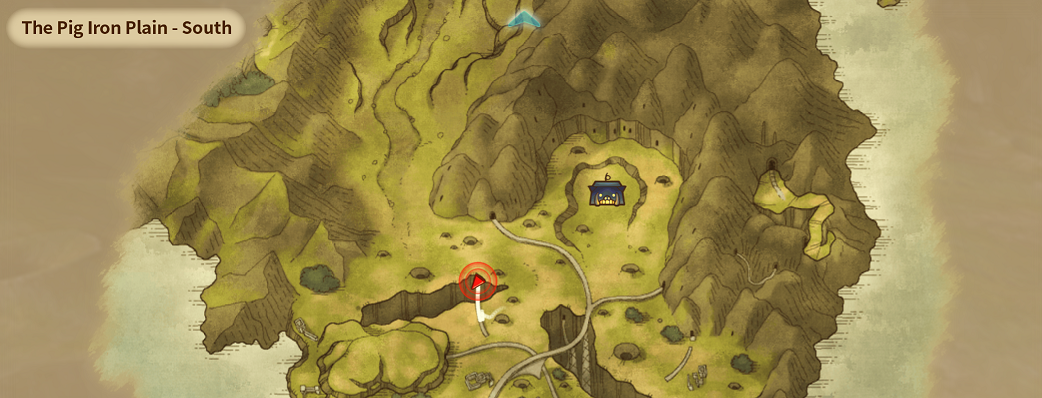
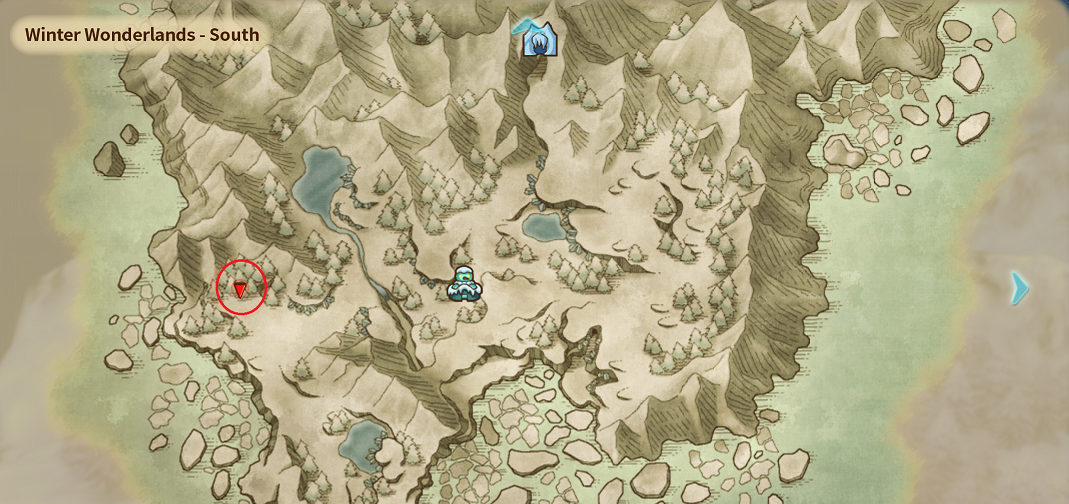
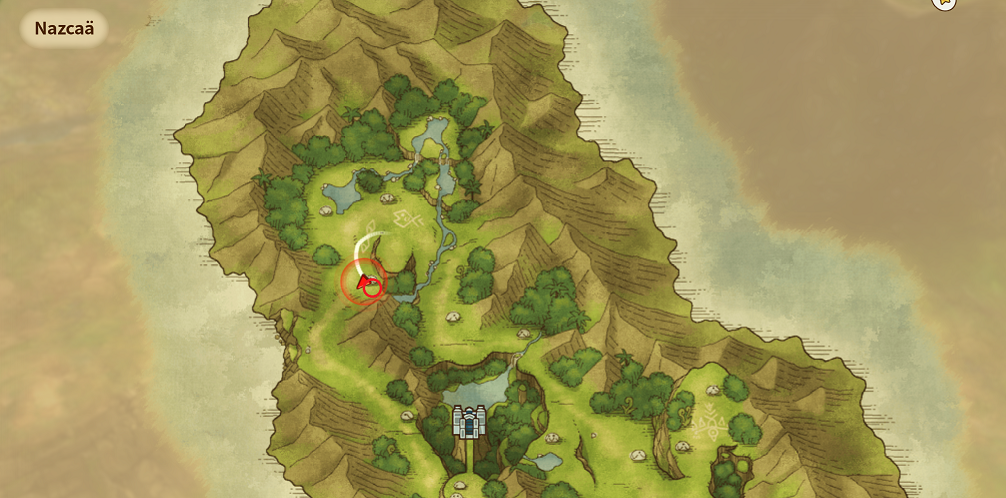
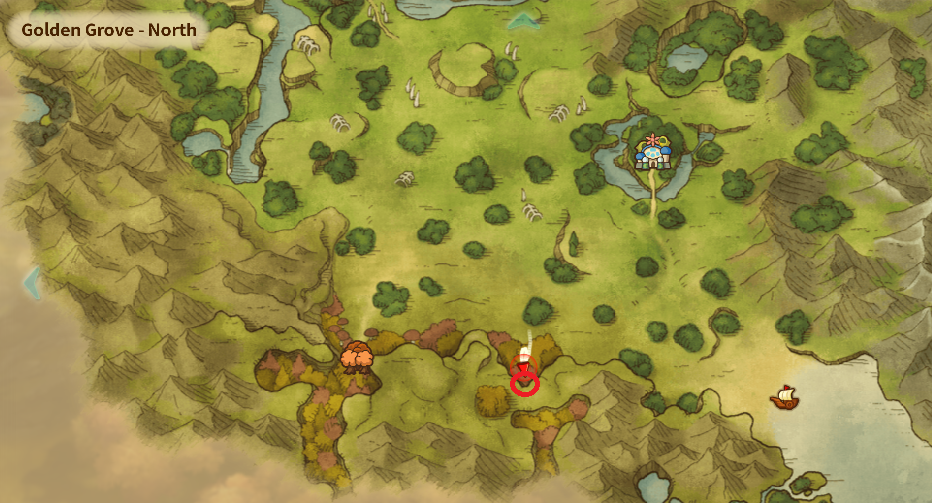
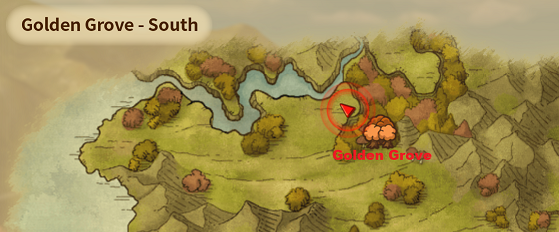
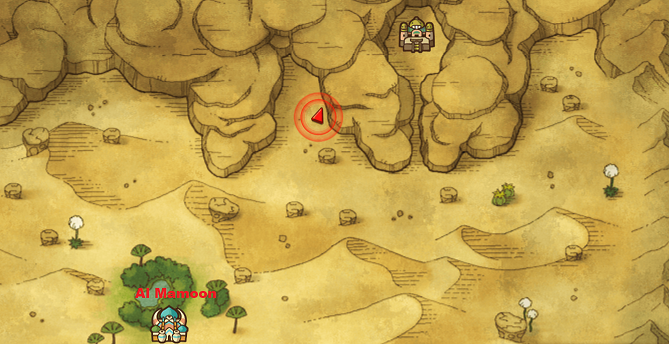
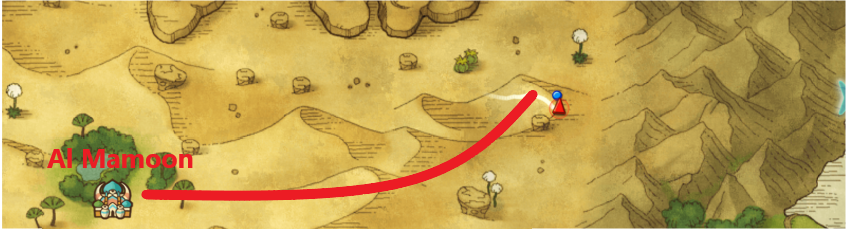
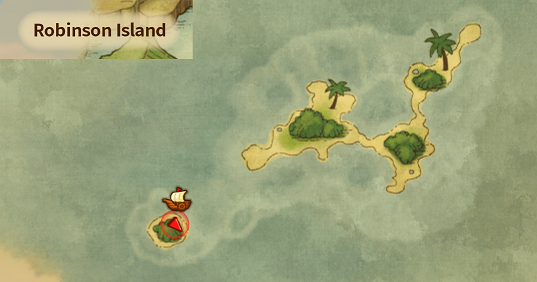
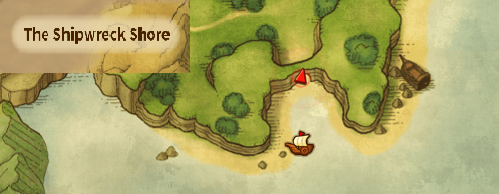
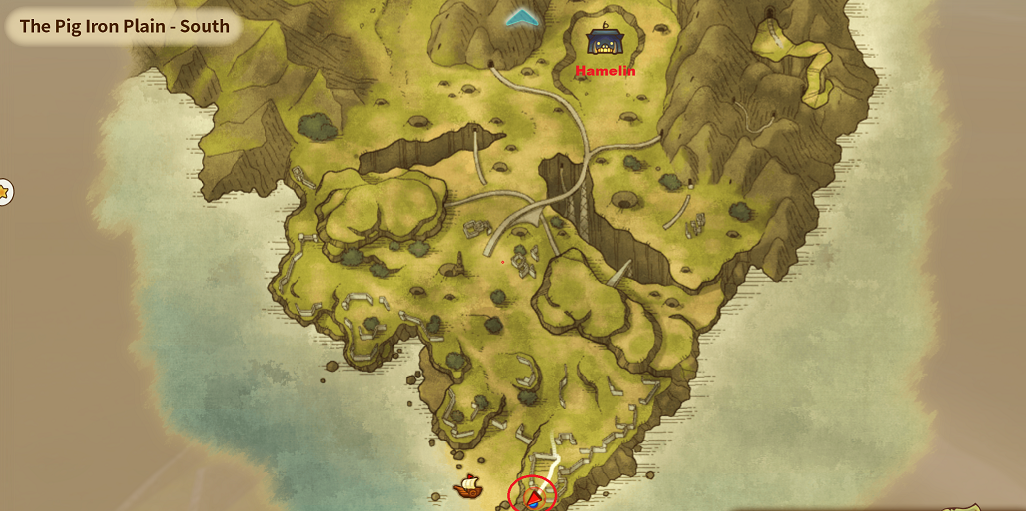
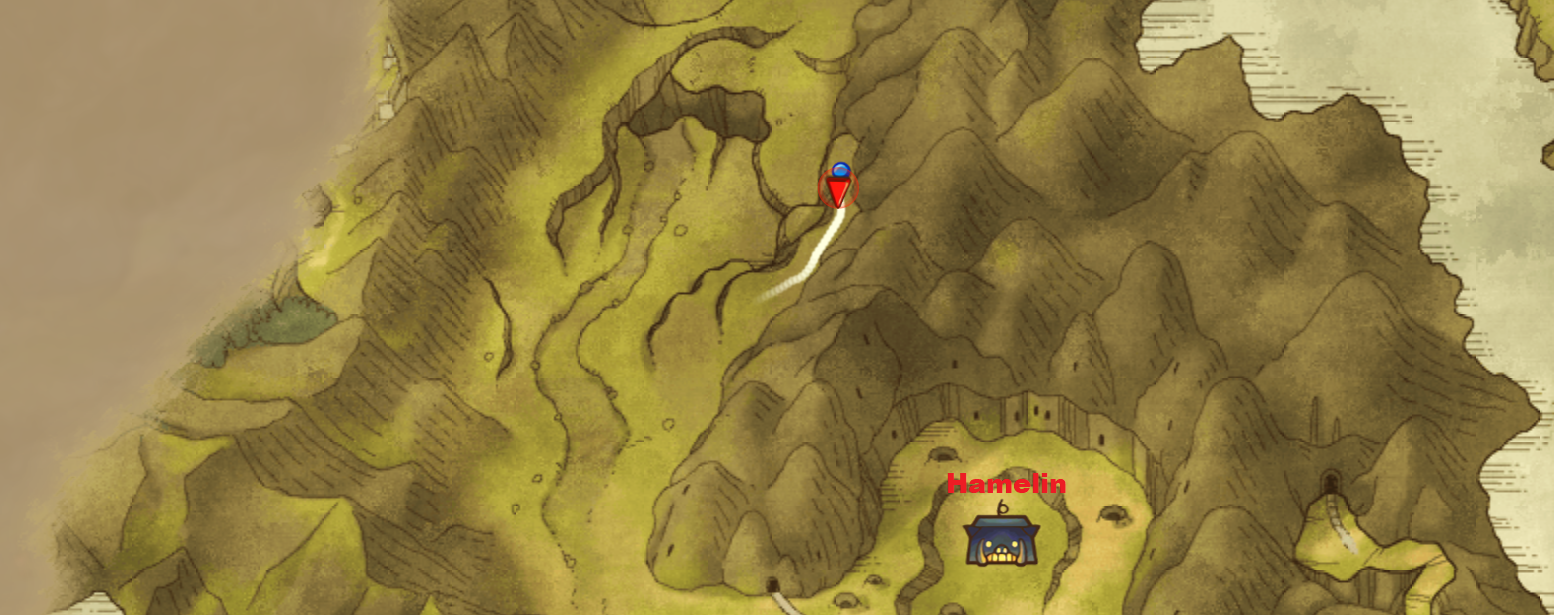
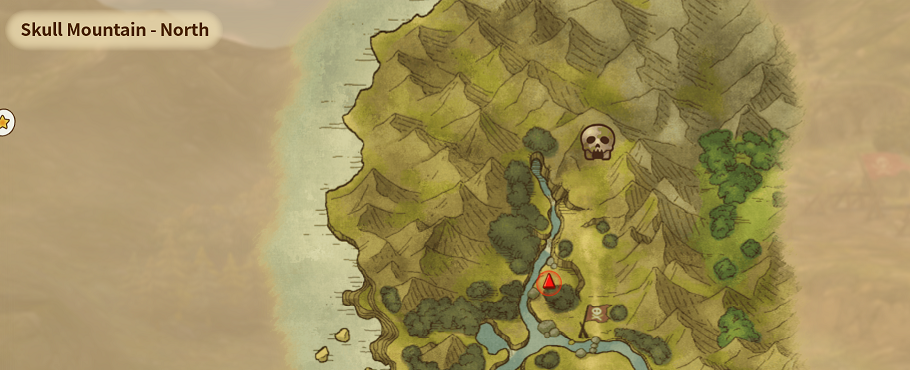
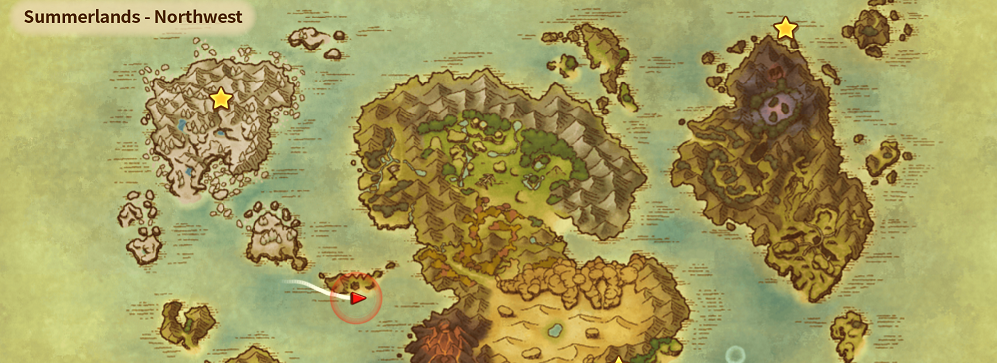
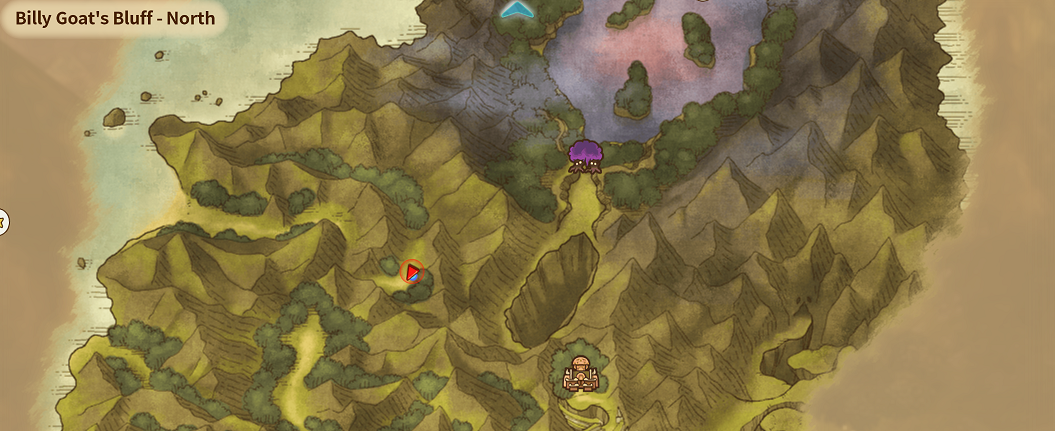
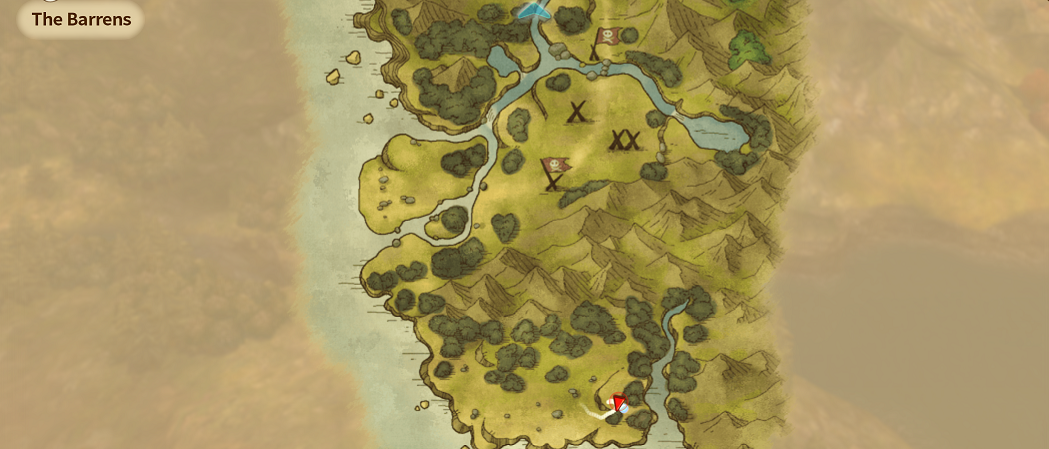
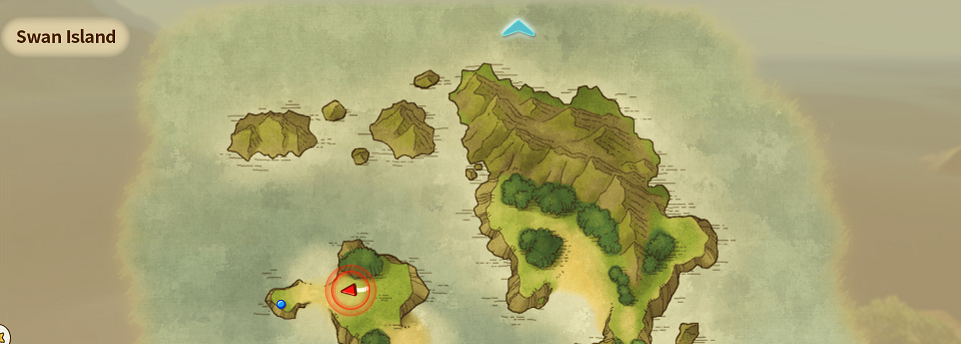
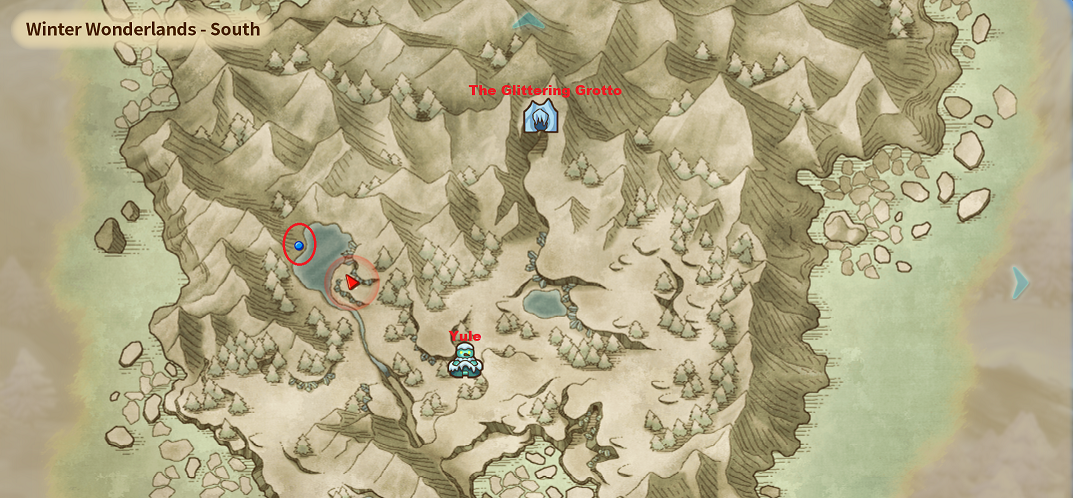
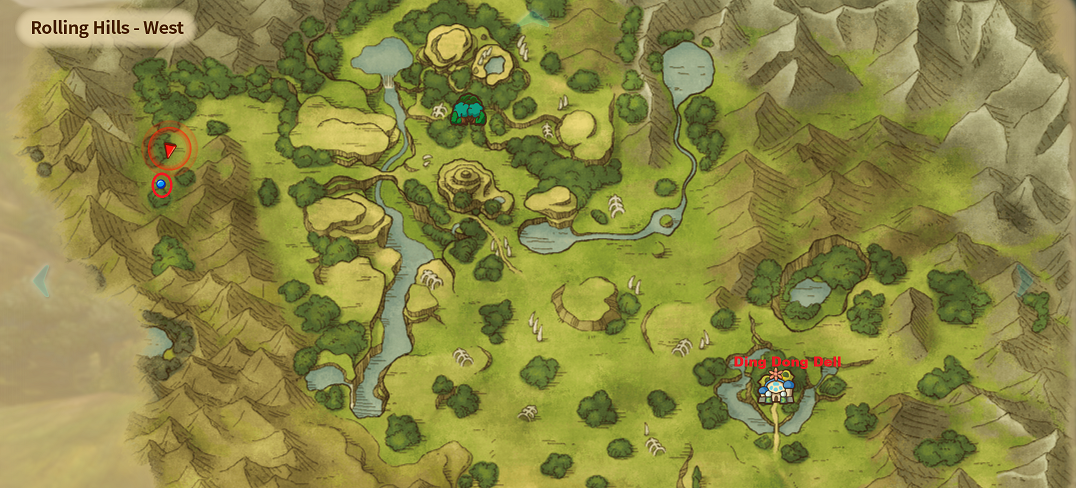
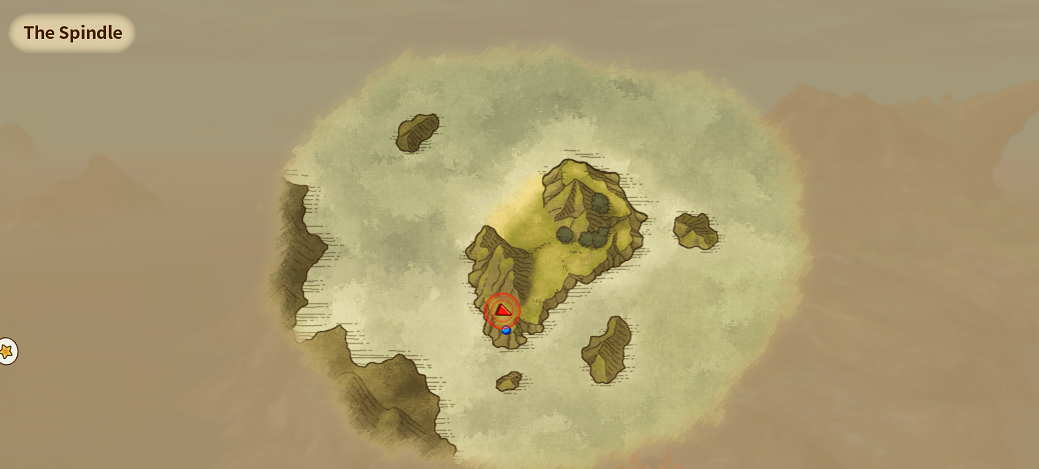
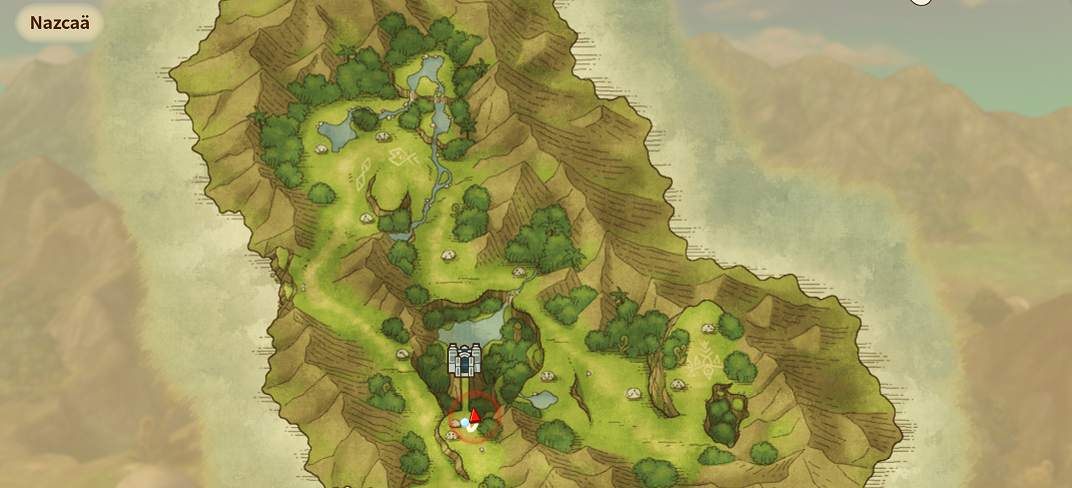
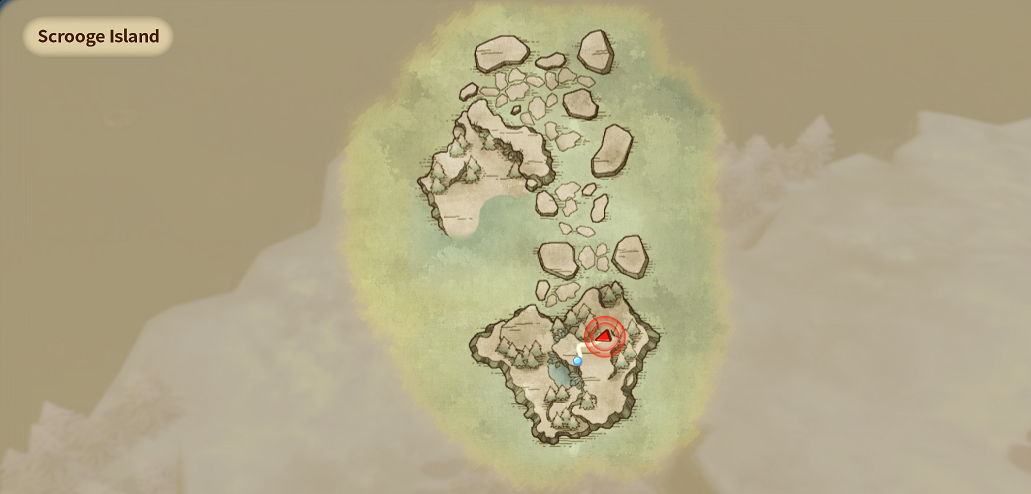
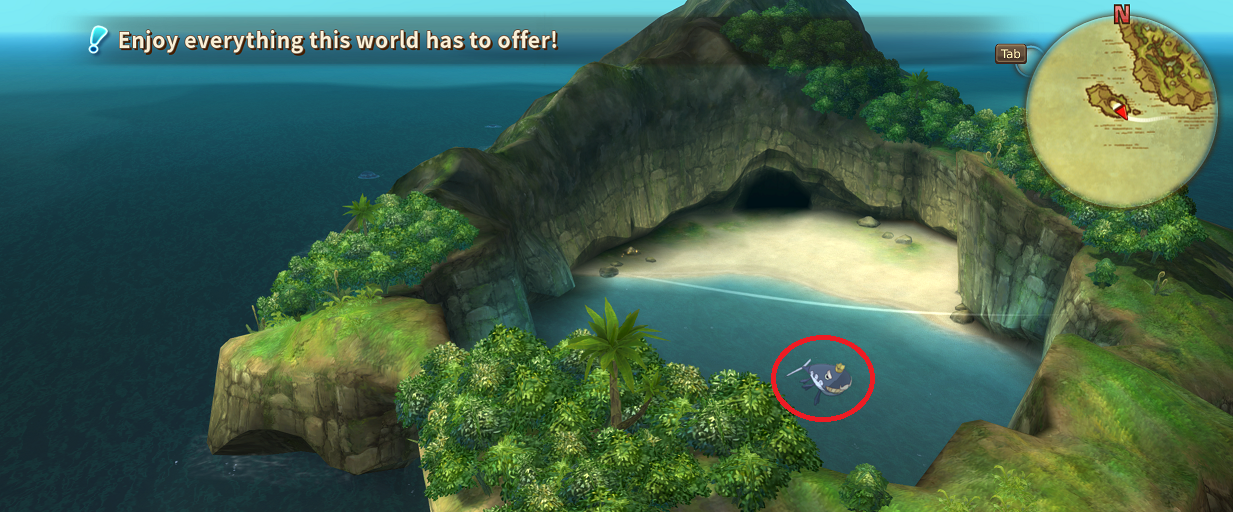
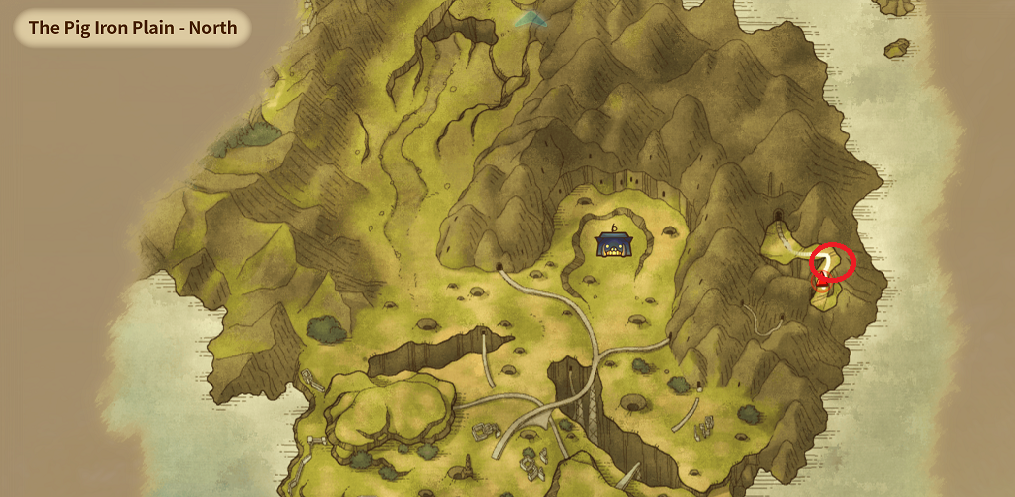
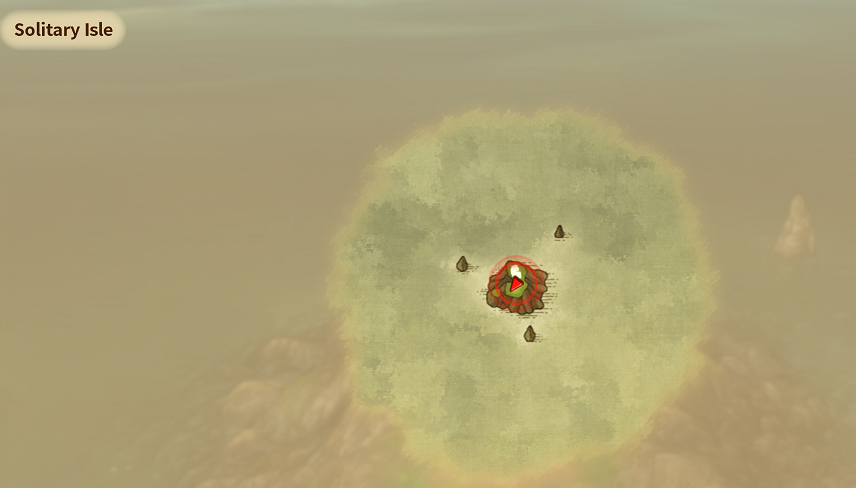
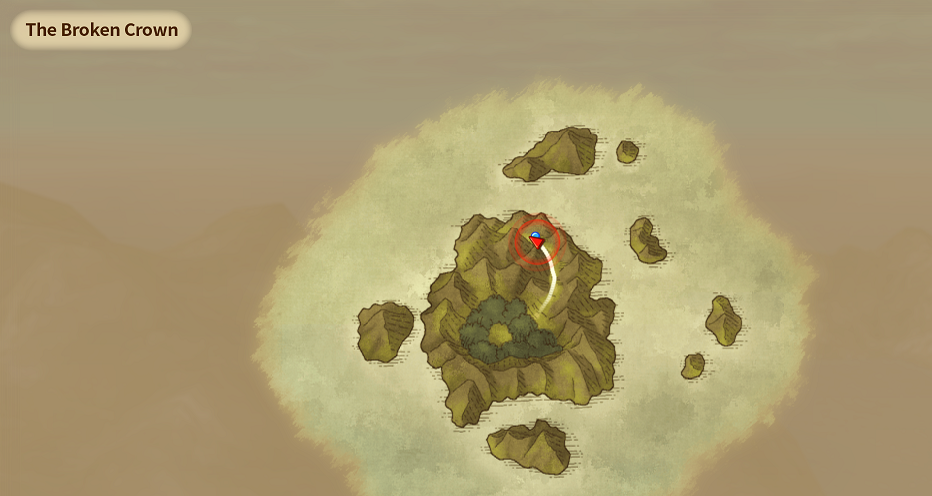
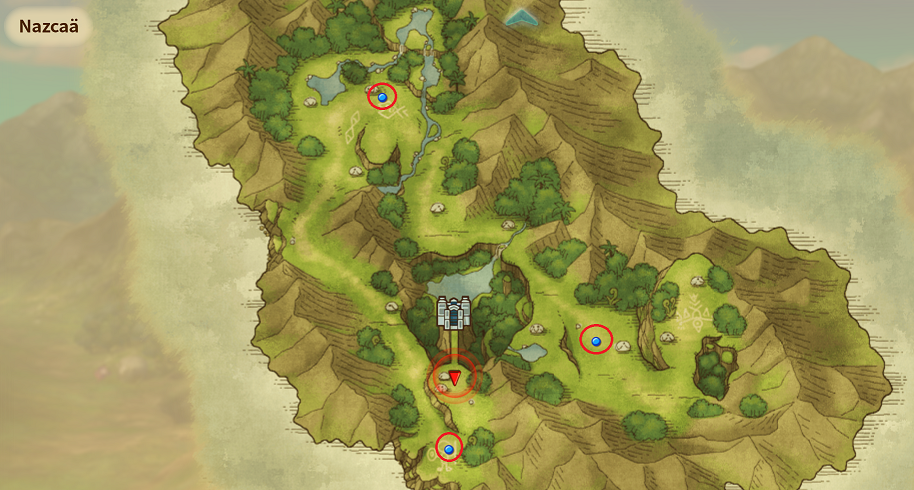
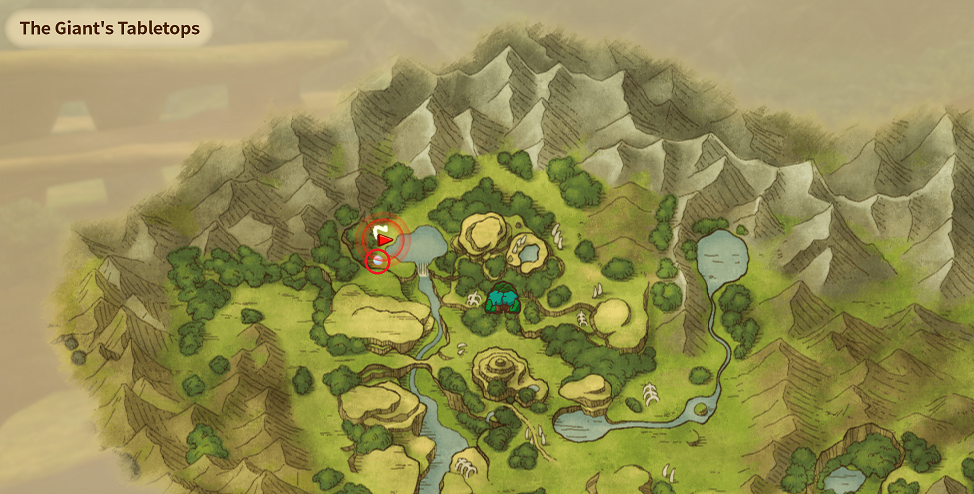
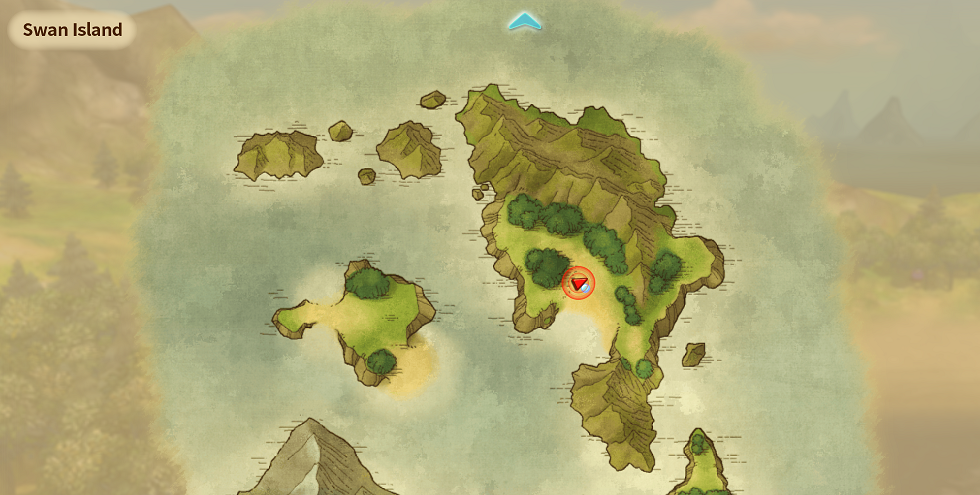
The only ones that do are the over-world treasure chests shown here. Those are invisible, though they can be collected prior to knowing how to find them, but that would make it exponentially harder to track.
Jon.Topps Sep 24, 2024 @ 8:16pm 
Sorry, so the 100 (all) hidden treasures, that's only ones on the map then? So like, I'm in the first area (deep dark forest?), so the treasures there do NOT count?
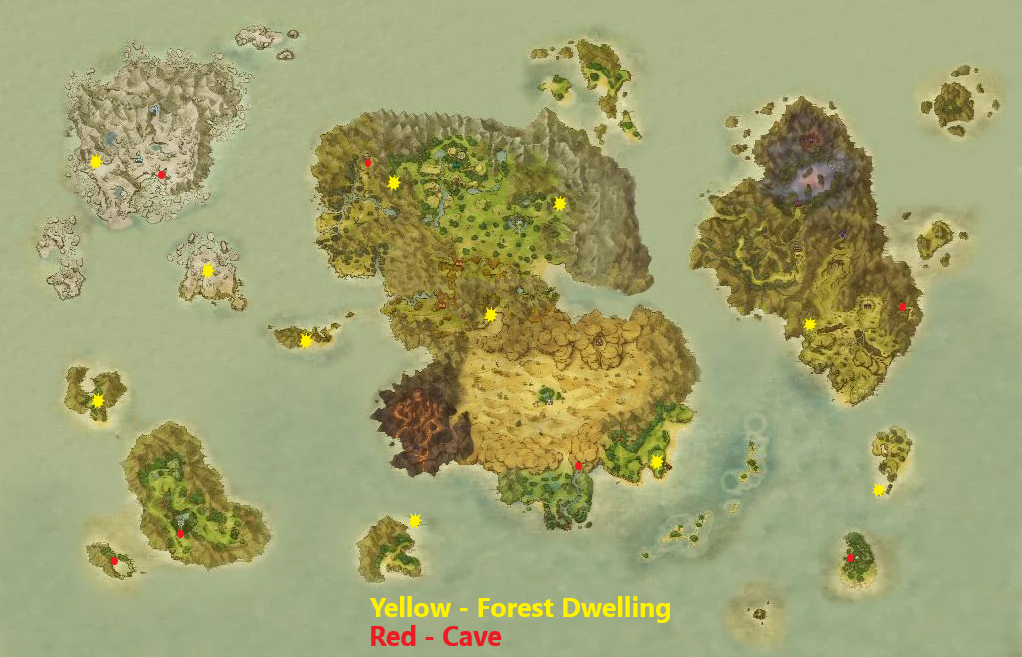
So realistically, if you need this achievement, you just do the spell and can look on each map to see what you need? So keeping a score card or something won't be needed?
The Nothing Man Sep 1, 2024 @ 10:24am 
dont quote me, but I believe no
there are more rng stuffs at higher levels but i dont believe any cheevs tied to it
this is oddly a kids game for just mainly watching a great movie and interacting too

but again dont quote me :P
Avigor Aug 31, 2024 @ 2:55pm 
Makes me wonder, are there achievements where specific difficulty settings might make something easier or more difficult? Especially where, perhaps counter-intuitively, a higher setting would make something easier to pull off?
ErickaUnlimited  [author] Aug 31, 2024 @ 7:08am 
@ Avigor - Correct, there are no difficulty achievements. The second one has some, but not this one.
Avigor Aug 30, 2024 @ 10:05pm 
ctrl-f search suggested no but I'm feeling paranoid: there's nothing that requires specific difficulty levels, right? like one could 100% on easy if you really felt like it?
The Nothing Man Aug 24, 2024 @ 10:12pm 
@30,
it is an awesome guide
however the game is buggy as all hell
so careful on some of the cheevs
hugs