Vampire Survivors

Vampire Survivors

146 avaliações
How to farm gold
Por rabbit.s [MS-DOS][rus]
How to start farming billions of gold AFK while having no eggs (without DLCs or Queen Sigma). Gold-related game mechanics. etc
2
3
4
   
Premiar
+ favoritos
Nos favoritos
- favoritos
Intro
This guide is still "work in progress" and will be updated according to new tests and your comments

Just skip to "Early run example (0 eggs)" section if you don't need extra info.
  • This guide is about how to start gold farming after you have beaten the game.
    You can beat the game in a couple of hours using my other guide:
    https://steamcommunity.com/sharedfiles/filedetails/?id=2953930313
  • I'm focusing on AFK farming.
  • I'm focusing on the main game content only (no DLCs). If you have the Tides of the Foscari DLC, you can farm with Sammy, use Ophion, etc, or just farm eggs on the Abyss Foscari stage (see "Extra" section below).
  • All tests was performed with all the PowerUps maxed.

Additional tests needed:
  • Launching option impact on ingame FPS (Normal/SteamUI/GPUfix);
  • Sarabande of Healing vs Blood Astronomia vs Garlic for fast light sources destruction (and FPS impact);
  • Benefits of using more than 1-2 weapons in late runs (killing speed vs FPS impact).
How gold mechanics work
There are five main ways of getting gold in the game (we're focusing on the first two):
  1. destroying light sources (and picking up Gold Coins / Coin Bags / Rich Coin Bags);
  2. killing enemies while Gold Fever is active;
  3. picking up chests;
  4. completing some weapon evolutions related achievements;
  5. completing the stage by being killed by The Reaper or White Death (in this case you get rewarded with 500 gold and additional gold for each Revivals left).

Light sources spawn
  • The total amount of light sources on screen cannot exceed 10, with the old ones disappear and replaced by the newly summoned.
  • Light sources is a destructible object. The game attempts to spawn destructibles every second in all stages, except The Bone Zone (every 0.5 seconds) and Holy Forbidden (100 seconds).
  • While the maximum amount of light sources are on the map, the game can still attempt to spawn light sources, but the spawn chance is no longer influenced by Luck, causing them to spawn less often. If a light source is spawned at the limit, it will spawn in a location closest to the player and an existing light source is despawned.
  • In some stages (Inlaid Library, Dairy Plant, Gallo Tower), the light sources have predetermined possible spawn locations, whereas in other maps they spawn in an oval shape around the character (just out of sight).

Stage
Spawn interval
Spawn chance
Max spawn chance
Luck needed to max chance
Max destructibles
Mad Forest
1 sec
10%
50%
500%
10
Inlaid Library
1 sec
7,50%
50%
667%
10
Dairy Plant
1 sec
20%
60%
300%
10
Gallo Tower
1 sec
7,50%
50%
667%
10
Cappella Magna
1 sec
20%
80%
400%
20
Il Molise
1 sec
30%
60%
200%
10
Moongolow
1 sec
30%
60%
200%
10
Green Acres
1 sec
10%
50%
500%
10
The Bone Zone
0.5 sec
40%
40%
100%
10
Boss Rash
1 sec
10%
50%
500%
5
Tiny Bridge
1 sec
7,50%
50%
667%
10
Bat Country
1 sec
1%
50%
5000%
10
Holy Forbidden
100 sec
100%
100%
100%
100
Eudaimonia Machine
1 sec
7,50%
50%
667%
10

Light sources drops
When destroyed, light source drops one of the following items:

Pickup
Chance
Min player level
Holy Forbidden
Eudaimonia Machine
The Bone Zone
Bat Country
Comment (in terms of gold farming)
Gold Coin
62.1%
0
yes
yes
yes
yes
Gives 1 gold
Coin Bag
12.4%
0
yes
yes
yes
yes
Gives 10 gold; triggers Gold Fever (if Disco of Gold)
Rich Coin Bag
1.2%
5
no
yes
no
yes
Gives 100 gold; triggers Gold Fever (if Disco of Gold)
Rosary
1.2%
8
no
yes
no
yes
Mostly useless (more tests needed)
Nduja Fritta Tanto
1.2%
0
yes
no
no
no
Mostly useless
Orologion
2.5%
4
no
no
no
no
Decreases farming speed
Vacuum
2.5%
12
no
yes
no
yes
Could be used to collect exp while AFK
Floor Chicken
14.9%
0
yes
yes
no
yes
Mostly useless
Gilded Clover
1.2%
30
no
no
no
yes
Triggers Gold Fever (but it's better to use coin bags + Disco of Gold for this purpose)
Little Clover
0.6%
0
yes
no
no
yes
+10% Luck. Could help in early runs

If the stage is not mentioned in the table above, it means there are no restrictions to light source drop types there.


Gold Fever
There are two ways of triggering gold fever:
  1. picking up Gilded Clover;
  2. pinking up Coin Bag / Rich Coin Bag while having Disco of Gold (XV) arcana.
The second one is what we're interested in.
  • When an enemy is killed during the Gold Fever, there is a 75% chance it drops a Gold Coin that has a value of 0.5 (multiplied by Greed and Stage Modifiers). Coins from Il Molise enemies has a base value of 0.1 instead.
  • Gold Fever lasts for 10-15 sec (depending on character) and can be extended by collecting Gold Coins (both from enemies and light sources), Coin Bags, and Rich Coin Bags.
  • More gold you collect during the Gold Fever, faster the timer depletes (time drain multiplier increases).

Character
Base duration
Duration increase (Gold Coin from enemies)
Duration increase (Gold Coin)
Duration increase (Coin Bag)
Duration increase (Rich Coin Bag)
Big Trouser
15 sec
0.015 sec
0.75 sec
7.5 sec
15 sec
Sammy (DLC)
12.5 sec
0.0125 sec
0.625 sec
6.25 sec
12.5 sec
Any other
10 sec
0.01 sec
0.5 sec
5 sec
10 sec
How golden eggs work
Golden Egg is an item pickup that permanently increases a random stat on the player's current character by a small amount:
  • +1 Max Health;
  • +0.1 Recovery, Armor, Amount, Revival, Reroll;
  • +1% Movement Speed, Might, Projectile Speed, Duration, Area, Luck, Growth, Greed, Curse;
  • -0.5% Cooldown;
  • +0.3 Magnet;
  • +0.2 Skip, Banish.

There is a hard cap on certain stats (further increase will have no effect on these stats):
  • Might - 1000% (+900%);
  • Speed - 500% (+400%);
  • Duration - 500% (+400%);
  • Area - 1000% (+900%);
  • Cooldown - 10% (-90%; equals to x10 attack speed);
  • Amount - 10 (+10; amount stat is 0 by default).
It means, that only useful stats that will keep increasing are - Luck, Growth, Greed and Curse.
Magnet has no hard cap, but at some point will cover entire screen and further increase will make no difference.

You can get Golden Eggs by:
  • killing Masked Guardians (1 egg) - spawns near Rings and Metaglios (stage items);
  • killing Moon Guardians (1 egg) - spawns at 14:00 at Moongolow;
  • killing Death (5 eggs) - spawns at the end of stages (if not in Endless mode);
  • purchasing from the Merchant on any stage (for 10000 gold);
  • purchasing from the Eggman - see info below.

Eggman
The Eggman appears directly north in Moongolow (if you have at least 5000 golden eggs and 1 million gold), and offers Golden Eggs for 10000 gold (similar to the regular merchant), but has an option to spend all of your gold to buy max amount of eggs you can afford at once. There is no need in waiting for the purchase animation to complete, you can close the shop window right away.

Healer
The Healer appears directly south in Moongolow (if you have at least 5000 golden eggs) and offers:
  • Flames of Moonspell - removes 100 Golden Egg bonuses at random;
  • Lantern of Foscari - removes all MoveSpeed bonuses from Golden Eggs (available only if current character has more than 25000 Golden Eggs).
How Enemy spawn & Curse works
Enemies spawn in two ways:
  • based on the current wave;
  • based on the map event.

Waves
  • Each stage has a set number of enemy waves. Waves change every minute.
  • Each wave specifies a target amount of enemies and a spawn interval.
  • Enemies will attempt to spawn until the target amount met.
  • Enemies generally spawn just outside the screen and can despawn if the player moves far enough from them.
  • When 300 or more enemies are alive the game will not spawn more enemies periodically, and only bosses and enemies from map events can spawn.
  • Some waves could contain bosses. Bosses spawn once per wave.

Events
  • Map events spawn additional enemy/enemies based on certain conditions. E.g. swarm of bats, flower walls, etc.
  • Chance of map events occuring depends on character's luck - more luck, less chance (some events have 100% chance regardless of player's luck).


Curse
Curse is one of the player stats. It increases:
  • enemy health;
  • enemy movement speed;
  • frequency of enemy spawn;
  • quantity of enemy waves (target amount).
The player has 100% base Curse, meaning that at +50% enemies will have 150% health, 150% movement speed, and any wave will have 150% enemy target amount.
  • The multipliers to health, movement speed and target amount stack multiplicatively with other effects of the same kind.
  • Curse modifications from character bonuses, PowerUps and items stack additively.
Game options
Game launching option
More tests needed.

Ingame options
Be sure to enable Performance mode and disable Damage numbers / Flashing VFX in the game options menu to decrease FPS drop.
There is no Performance mode in the current game version anymore. Recommended settings:
  • Damage numbers = off;
  • Flashing VFX = off;
  • Disable blood = on;
  • Weapons ScreenShake = off;
  • Show Defanged Enemies = off;
  • Visually Invert Stages = off.
1. Character choice
Your starting choice could depend on how many eggs you have already invested in specific characters.
Here I assume, that you have no eggs on any character.
If we are talking about the basic game without DLCs, there are 2 viable options to perform gold farming:
  1. Big Trouser - this is our choice to invest money in. He gains +1% Greed every level and his Gold Fever lasts longer. In AFK endless runs he gets thousands of levels, so it's an obvious choice.
  2. Queen Sigma - if you just beaten the game, you probably haven't got her yet. She can farm 10+kk gold per 30 min run but cannot purchase eggs for herself, so quickly falls off in terms of profit.
To unlock Big Trouser, collect all 16 standard stage items In Moongolow and raise them all to max level. Then MANUALLY left the stage.
2. Weapons choice
We need to use as few weapons as possible to reduce game lag.
  • Greatest Jubilee - is OK in terms of AOE damage and its attacks has 1% chance of spawning a light source (increased by Luck), which means more gold & more frequent Gold Fevers.
  • Crimson Shroud (early runs only) - helps to survive vs tough waves & bosses while being AFK.

Greatest Jubilee stats
  • Greatest Jubilee has 9 levels. At max level, Greatest Jubilee has +4 Amount, +20 Base Damage, +50% Area, -1.0 seconds of Cooldown, and a finisher effect.
Base stats at level 9
Stat
Value
Damage
30 (+20)
Area
1.5 (+50%)
Amount
5 (+4)
Cooldown
2.0 seconds (-1)
Duration
0.1 sec
Knockback
0.1
Critical Multiplier
2x
Critical chance
5% (light show only)
Max projectiles on screen
100
Projectile Interval
0.2 sec
Hitbox Delay
0.5 sec
Pierce
AOE
Blocked by walls
No
_________________________________
  • Greatest Jubilee summons fireworks at the top half of the screen and a light show at the bottom of the screen (upon reaching level 9).
  • Greatest Jubilee has a 0.5 seconds Hitbox Delay, meaning that the same enemy cannot be hit more often than every 0.5 seconds by the same light show. Firework particles can only hit the same enemy once.
  • Firework ignores Duration and Speed bonuses. Light show ignores Area, Speed, and Amount bonuses.

Limit Break
Upgrade
Chance
Max
Might +1% (Base Damage +0.5)
47.6% (20)
-
Area +2.5%
23.8% (10)
x400 (1000%)
Speed +5%
23.8% (10)
x40 (200%)
Duration +100ms
2.4% (1)
x20 (2 sec)
Amount +1
2.4% (1)
x20 (20)

Crimson Shroud stats
  • Crimson Shroud creates a shield that protects from damage and briefly makes the player invulnerable upon triggering. Limits incoming damage (10 HP). Causes retaliatory damage explosions when a charge is used.
Base stats
Stat
Value
Damage
0
Area
2
Speed
1
Amount
1
Cooldown
8.0 seconds
Knockback
20
Max projectiles on screen
50
Projectile Interval
0.1 sec
Pierce
AOE
Blocked by walls
No
____________________________
  • Deals huge retaliatory damage: damage dealt to you (not reduced by Armor or Crimson Shroud's ability, but not more than 100) multiplied by Might, Curse and Armor (+10% for each armor point).
  • Amount creates more explosions.
  • Cooldown recharges the shields faster.
  • Works well with Divine Bloodline (IX) arcana (could give you millions of max HP).

Limit Break
Upgrade
Chance
Max
Might +1% (Base Damage +0.5)
47.6% (10)
-
Area +2.5%
47.6% (10)
x400 (1000%)
Amount +1
4.8% (1)
x20 (20)
3. Passive items choice
  • Here I list only those items that are somehow useful (so, no Hollow Heart, Pummarola, Bracer and Tiragisú (you can still take Tiragisú if having troubles surviving early and replace it later in the run).
  • Item impact highly depends on the eggs amount. E.g. Clover gives Big Trouser 38.5% of his starting Luck stat with 0 eggs, but only ~0.9% on 100k eggs (starting Luck should be ~5700% at this point).
  • Some stats are hard capped, so at some point respective items becomes completely useless (see "How golden eggs work" section above).

Item
Effect (max level)
Impact (few eggs)
Impact (many eggs)
Forest
Library
Plant
Tower
Magna
Moon-golow
Boss Rash
Empty Tome
-40% Cooldown
very high
none
free
free
free
Candelabrador
+50% Area
high
none
free
free
free
Attractorb
+398% Pickup range
very high
none
free
free
free
Crown
+40% Growth
high
low
free
free
free
Stone Mask
+50% Greed
high
low
free
free
free
Clover
+50% Luck
medium
low
free
free
free
Spinach
+50% Might
medium
none
free
free
free
Armor
-5 incoming damage
low
none
free
free
free
Spellbinder
+50% Duration
low
none
free
free
free
Torrona's Box
+100% Curse; +25% Might, Speed, Duration, Area
very high
medium
Skull O'Maniac
+50% Curse
high
low
free
free
free
Gold Ring
+40% Curse
high
low
free
free
free
free
free
free
free
Metaglio Right
+40% Curse
high
low
free
free
free
free
free
free
free
Silver Ring
+40% Duration, Area
high
none
free
free
free
free
free
free
free
Metaglio Left
+0.8 HP Recovery; +47.7% Max HP
low
low
free
free
free
free
free
free
free
Duplicator
+2 Amount
medium
none
free
free
free
Wings
+50% MoveSpeed
low
none
free
free
free

  • So, on low-eggs runs I focus on getting Empty Tome > Attractorb > Crown > Candelabrador > Torrona's Box > Stone Mask & Skull O'Maniac <> Clover <> Spinach.
  • Rings & Metaglios are free. Metaglios needed for Crimson Shroud.
You should adjust pickup order based on the particular stage free items (take those items when you already have all the slots occupied).
  • On high-eggs runs it doesn't really matter, what items to pick (pick Attractorb if your initial magnet radius is too low).
4. Arcanas choice
  • Only somehow useful arcanas listed below

Arcana
Effect
Impact (few eggs)
Impact (many eggs)
Disco of Gold (XV)
Picking up coin bags from the floor triggers Gold Fever. Obtaining gold restores as many HP.
very high
very high
Wicked Season (XIII)
Overall Growth, Luck, Greed, and Curse are doubled at fixed intervals. The character starts gaining +1% Growth, Luck, Greed, and Curse every 2 levels.
very high
high
Silent Old Sanctuary (XX)
Gives +3 Reroll, Skip, and Banish. Gives +20% Might and -8% Cooldown for each active weapon slot left empty.
high
low
Sarabande of Healing (VI)
Healing is doubled. Recovering HP damages nearby enemies for the same amount.
questionable (FPS drop)
Divine Bloodline (IX)
Armor also affects weapons' damage and reflects enemy damage. Character gains bonus damage depending on missing Health. Defeating enemies with retaliatory damage gives +0.5 Max Health.
high (with Crimson Shroud)
questionable
Boogaloo of Illusions (XVIII)
Overall Area continuously changes between -25% and +25% over 10 seconds. The character starts gaining +1% Area every level.
medium
none
Blood Astronomia (XXI)
Weapons also emit special damaging zones affected by Amount and Magnet. Enemies within Magnet range take damage based on Amount.
questionable
questionable
Mad Groove (VIII)
Every 2 minutes attracts all standard stage items, pickups, and light sources towards the character.
questionable
questionable
Lost & Found Painting (XVII)
Overall Duration continuously changes between -50% and +50% over 10 seconds. The character starts gaining +1% Duration every level.
low
none
Awake (IV)
Gives +3 Revivals. Consuming a Revival gives +10% Max Health, +1 Armor, and +5% Might, Area, Duration, and Speed.
low
none
Beginning (X)
Weapons get +1 Amount. The character's main weapon and its evolution gain +3 Amount instead.
low
none
Slash (XVI)
Enables critical hits for the Greatest Jubilee's light show. Doubles overall critical damage.
questionable (FPS drop)
Heart of Fire (XIX)
Weapon projectiles explode on impact. Light sources explode. Character explodes when damaged.
negative (FPS drop)
negative (FPS drop)

The most useful arcanas for the farming purpose are:
  • Disco of Gold - our main source of income;
  • Wicked Season - helps to level up faster, earn more gold, kill more enemies (cuz Curse), etc.
For early runs extremely helpful arcanas are:
  • Silent Old Sanctuary - helps to survive and kill enemies faster (if weapon limiter set);
  • Divine Bloodline - paired with Crimson Shroud gives huge amount of max HP;
  • You need to collect exp while AFK. So, either do not seal the Vacuum, or just pick Mad Groove.

How to unlock arcanas and other stuff:
https://steamcommunity.com/sharedfiles/filedetails/?id=2850824605
5. PowerUps & Seal choices
It's recommended to have all the standard PowerUps maxed out (including Curse).
Most PowerUps are available from the start of the game, but some requires to perform additional actions to unlock:

PowerUp
Effect
How to unlock
Comment
Reroll
Allows you to get different choices when leveling up or selecting arcanas
To fully unlock, requires to reach Level 80 with Mortaccio, Yatta Cavallo, Bianca Ramba, O'Sole Meeo and Sir Ambrojoe
Could help in early runs, but is not mandatory
Skip
Allows you to skip level up choices and get Experience instead
To fully unlock, requires to survive 15 minutes in Il Molise, Green Acres, The Bone Zone, Moongolow and Boss Rash
Not particularly useful
Banish
Allows you to remove an item from level up choices, for the rest of the run
To fully unlock, requires to fill 100 entries in the Collection
Not particularly useful, but helps to get Seal
Omni
Increases Might, Projectile Speed, Duration and Area by 2% per rank (max +10%)
Get Torrona's Box to Level 9
Could help in early runs
Charm
Increases enemies spawn quantity by 20 per rank (max +100)
Find the Apoplexy at minute 9:00 in Bat Country (follow the green arrow)
Very useful in early runs. Useless in late runs
Seal
Allows to Banish an item from level up choices, or a pickup from light sources (in the Collection menu)
Seal - Banish 10 or more items in a single run. Seal 2 - Banish 20 or more items in a single run (additional banishes could be bought from merchant)
Very useful

It's highly recommended to get Seal (at least the first one), cuz we need to seal all the unnecessary drop from gold sources (to maximize gold drop):
  • seal the Orologion, cuz it deceases farming speed;
  • seal Rosary, Nduja Fritta Tanto and Floor Chicken to get gold instead.
  • seal the Gilded Clover - it starts Gold Fever, but gives no gold on pickup, so is basically worse than any of coin bags (considering using Disco of Gold arcana). Could still help to start Gold Fever more frequently in early runs;
  • for the late runs also seal the Vacuum - it could help in early AFK runs (if not using Mad Groove arcana), but is useless after you get enough magnet radius.
Little Clover could help in early runs, but is almost useless in late runs.
6. Mode choice
All stages have four unlockable, toggleable modes:

Mode
Effect
Hyper
+65-75% character and enemies' move speed; +15-25% projectile speed; +50% gold multiplier. Could also give Luck bonus and increase enemies health on some stages
Hurry
Doubles the Clock Speed of the stage and increases XP gain by 25%. Normal stages reach 30:00 when 15 minutes have elapsed in real time. All time-based events (e.g. enemy wave spawns, evolution chests) occur at their usual timestamps on the in-game timer
Inverse
+200% gold multiplier; +20% Luck; +200% enemies Max Health (+5% additional Max Health and 0.5% movement speed every minute).
Merchant offers additional Arcana, Skips, Banishes, and Rerolls
Endless
Instead of the final wave (Reapers) restarts stage waves from the beginning giving enemies +100% base Max Health, +50% spawn frequency and target amount, +25% damage, and lowering player's max damage cap by 1

For farming runs we're choosing all the modes except Hurry.
7. Stage choice
Each stage applies modifiers to certain player and enemy stats:

Stage
Gold*
Luck*
Enemy HP*
Time limit
Extra
Mad Forest
250%
20%
200%
30 min
Inlaid Library
250%
30%
200%
30 min
Dairy Plant
270%
30%
200%
30 min
Gallo Tower
280%
30%
200%
30 min
Cappella Magna
290%
30%
200%
30 min
Il Molise
250%
40%
260%
15 min
Enemies do not spawn correctly (if character has high magnet radius)
Moongolow
250%
40%
260%
15 min
Extra free items. Moon Guardians spawn
Green Acres
250%
30%
300%
30 min
Random waves
The Bone Zone
300%
20%
200%
30 min
+0.3/min enemy HP multiplier; +0.05/min enemy movement speed multiplier
Boss Rash
250%
30%
300%
15 min
Bat Country
280%
30%
200%
20 min
-75% exp; +0.2/min enemy HP multiplier; +0.025/min enemy movement speed multiplier
Tiny Bridge
280%
30%
200%
20 min
+0.2/min enemy HP multiplier; +0.025/min enemy movement speed multiplier
* stats include Hyper/Inverse modes' modifyers.

I did some quick test runs on Hyper/Hurry/Inverse (having exactly the same build from 0:15):

Stage
Time limit
Enemies killed
Gold earned
Level
Gold coins
Rich Coin Bags
Coin Bags
Little Clovers
Gold/min
Level/min
Mad Forest
30
212364
95130459
1939
166827
1348
172
13
3171015
65
Inlaid Library
30
228248
113822704
2015
187353
1314
180
9
3794090
67
Dairy Plant
30
203536
129344735
2177
174502
1452
198
7
4311491
73
Gallo Tower
30
306434
109040719
1915
237441
1201
182
6
3634691
64
Cappella Magna
30
190601
170596338
2003
191462
2802
422
12
5686545
67
Il Molise
15
342
35169524
54
14610
790
124
12
2344635
4
Moongolow
15
223395
70209957
1634
178750
737
113
4
4680664
109
The Bone Zone
30
289927
91471585
2247
235234
0
4728
0
3049053
75
Boss Rash
15
149572
44959431
1356
109296
381
43
6
2997295
90
Bat Country
20
357478
99566847
1508
267689
1026
161
7
4978342
75
Tiny Bridge
20
164194
73032442
1546
134587
843
110
5
3651622
77

According to this results, we're most interested in Cappella Magna, Moongolow and Bat Country stages.
  • Cappella Magna is great in terms of destructibles' spawn chance and max amount => more coin bags;
  • Moongollow - in terms of exp;
  • Bat Country has lots of low-health enemies => more gold coins (but less exp).

// more tests needed
Early run example (0 eggs)
For the first run you can choose Moongolow on Hyper/Arcanas/Limit break/Inverse/Endless.
You can AFK it since min 15, but it's recommended to get 5th and 6th arcanas as well (Blood Astronomia (XXI) helps to destroy light sources faster, Divine Bloodline (IX) gives a ton of HP to survive later on).

Tips
  • Don't seal Armor, cuz it multiplies Crimson Shroud damage.
  • Set weapon limit to 2. Pick the Greatest Jubilee as your starting weapon.
  • Choose arcanas according to the image below.
  • The second weapon would be Crimson Shroud (so, pick Laurel on level-up if offered).
  • Focus on getting the Greatest Jubilee to max level ASAP.
  • There are 16 free items on the stage, but no Torrona's Box, so do not occupy all the slots until getting it by level-up.
  • Pick up Empty Tome, Duplicator, Atractorb, Crown and Candelabrador. After obtaining Torrona's Box pick up all other free items left on the stage.
  • Pick up Metaglios and be ready to evolve Laurel into Crimson Shroud on min 10.


Stats over time
Minute
Gold (millions)
Kills (millions)
Level
30
3.5
0.4
360
60
15
1.1
680
95
36
2
1015
120
56
2.6
1258
160
98
3.6
1621
260
251
6.1
2484
300
331
7.1
2846
400
591
9.5
3649
762
2017
17.3
6116

Game lag
I went to sleep at 3:03 while ingame timer was "400" and returned at 9:30 ("763" ingame timer).
387 real-time minutes = 363 ingame minutes, which means I had 24 minutes of game lag over this period of time (6.2% time lost).


Further optimisations
  • It may be better to seal the Vacuum and use Mad Groove instead (more tests needed).
  • Sealing Rosary is also questionable (more tests needed).
Extra: DLC eggs farming
If you have the Tides of the Foscari DLC, you can easily farm eggs by killing Guardians, endlessly spawning on the Abyss Foscari stage.
If having troubles with unlocking Abyss Foscari, check out my other guide:
https://steamcommunity.com/sharedfiles/filedetails/?id=2962309583
At the Abyss Foscari travel south through the gates, then go west all the way, then follow the wall north. There would be a fake wall:


Just go inside and follow the path to the Torrona's Box. Guardians will start spawning.
This method could easily earn you ~1.5k eggs per minute.
My other Vampire Survivors guides
https://steamcommunity.com/sharedfiles/filedetails/?id=2953930313
https://steamcommunity.com/sharedfiles/filedetails/?id=2962309583


Please comment down below if I missed something important, or you have any other suggestions.
19 comentário(s)
IbnBattuta 9/dez./2024 às 16:36 
@rabbit.s [MS-DOS][rus] Thanks for clarifying, I kinda forgot that not all have the DLCs, it was one of the rare cases that I bought all DLCs since I came from Mobile, so I kinda thought Sammy was part of the main game so as Trousers. :steamfacepalm:
rabbit.s [MS-DOS][rus]  [autor(a)] 9/dez./2024 às 4:54 
@IbnBattuta
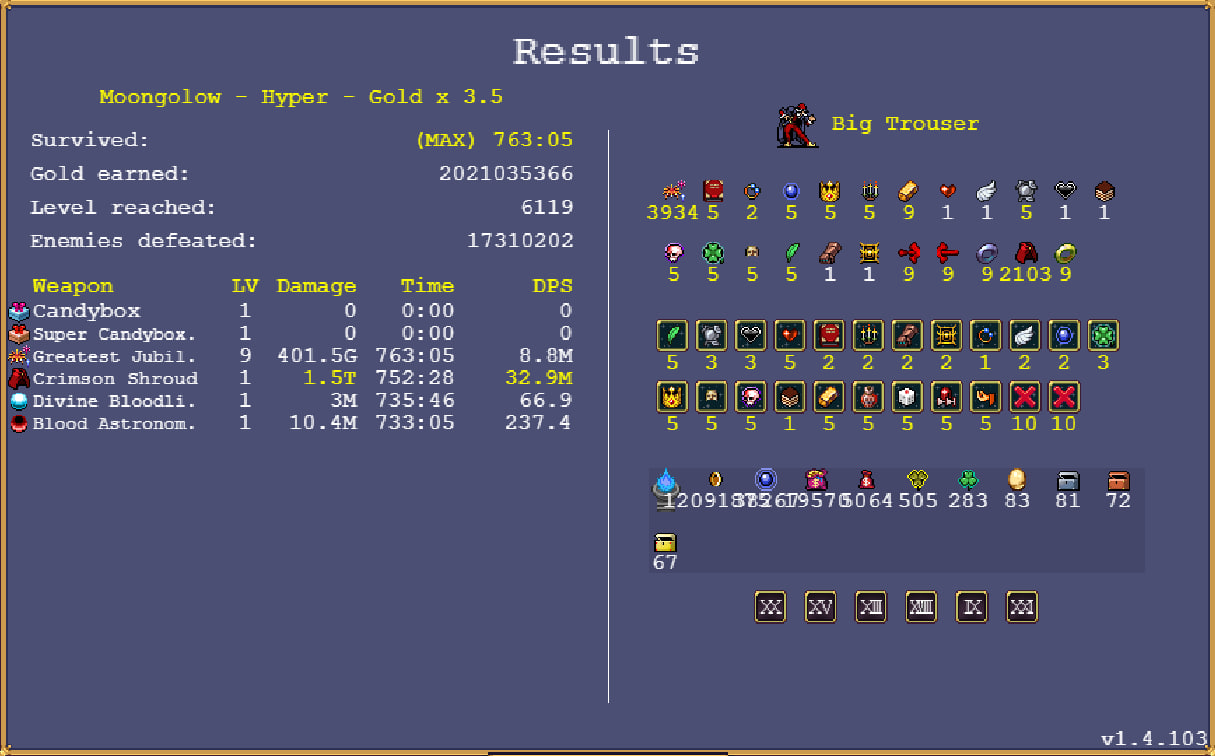
Sammy was obviously better than Trouser even before lag fix
rabbit.s [MS-DOS][rus]  [autor(a)] 9/dez./2024 às 4:51 
@IbnBattuta
That's exactly what I mentioned at the beginning of this guide:
"I'm focusing on the main game content only (no DLCs). If you have the Tides of the Foscari DLC, you can farm with Sammy, use Ophion, etc, or just farm eggs on the Abyss Foscari stage (see "Extra" section below)."
There is a link to my Sammy guide also.
IbnBattuta 8/dez./2024 às 8:46 
Like ain't this guide a bit outdated?

We used to farm with trousers due to the issues with Sammy and it breaking our fps but since the fix, there is no need to use trousers at all.

Just use Sammy, pick arcane for gold, farm as much as you can then go to Yellow Merchant and buy max eggs, leave the game, and repeat, and in like 30 minutes or an hour max, you've a Sammy that can generate you 20 billions in 2 minutes. :steammocking:
Vermilisix 2/jan./2024 às 9:11 
Scientist in the new DLC is also pretty good because it can get +5% greed per level
NayNaySan 20/ago./2023 às 13:19 
@XCYST The Great Turbini Returns
There is an option to purchase in the powerups tab called Seal, which allows you to go to the collection screen and "seal" a weapon or passive item, preventing it from showing up during your runs.
XCYST The Great Turbini Returns 11/ago./2023 às 19:53 
Sorry, only doubt I have is when you say sealing this or sealing that. What do you mean by sealing a passive or a weapon?
rabbit.s [MS-DOS][rus]  [autor(a)] 24/jul./2023 às 0:26 
@Gendor Skraivok
According to my experience, Gorgeous Moon adds too much lag to the game, but maybe the devs have made some performance optimisations since I tested it
Gendor Skraivok 23/jul./2023 às 5:26 
I am a little old school still and don't keep track of all the things, but why not Gorgeous Moon? The drop in EXP getting Pentagram can be a slow roller, but given how Moon grants extra EXP it could make up for it to level up. Especially if you get Super Candy Box 2 Turbo skipping pentagram entirely.
Lyoria 23/jun./2023 às 11:41 
Ty for amazing details, you can also use cheat engine