Generation Zero®

Generation Zero®

132 ratings
12 Facts Often Forgotten (Nov 2023: .50 FMJ and AP have changed)
By ❌️▶️👱
(Author has over 7,300 real-time hours in the game)

Purpose:
To give new players a shortened overview of game's combat but not to the point of hand holding them.
To highlight the more important points that are often taken for granted.

* Be aware that many of the combat elements are constantly changing so I will update this guide as needed.
12
2
6
3
3
2
   
Award
Favorite
Favorited
Unfavorite
Things new players should know.
Read: Save yourself a lot of un-needed troubles.


VERY IMPORTANT:
Although this game is supposed to be "open world", stick to the quest line, especially if you have already started a mission. I don't recommend doing bunker network mission as it throws you to many destinations all over the map.

1. Fact One: MANUALLY BACKUP YOUR SAVE FILES OR USE THIRD-PARTY AUTO-SAVE\BACKUP
This game writes on the same savegame and savegame.bac files, making it impossible to replay a previous mission. If corrupted you'd totally lose everything.

Steam's "Keep save file in cloud" feature only copies save files from your PC. If your PC saves have problems, Steam will copy it also — so useless.

Your only one chance in replaying any previous mission stage is to immediately exit the session, rename the savegame file to anything and rename the savegame.bac file to savegame, then play the game. If not, once you exit and play again the previous mission will have been over-written,

Back up your save files by using Winzip, Winrar or 7-zip will also save you from a destructive crash that can wipe out all of your progress in one instance. You can manually name your compressed file to have a clue what game stage it is about.

Use Game Save Monitor autosave\backup. I recommend manually configuring it to save every 10-60 minutes, and make use of 10-50 rotating backup files. Read this https://www.nexusmods.com/generationzero/articles/8 (not a mod as it does not change any game file). The link is provided at the bottom section.

Always make backup before hosting or joining a multiplayer session.

I personally manually make a backup and name them at least at the start of every mission and configure my autosave\backup to use 50 rotating files.

VERY IMPORTANT: Before making a manual save, make sure to open at least 2 containers while in the game to ensure it made a save, better (if possible) fast travel to at least 2 safehouses, open any 2 containers each time and then save and name your compressed file.

2. Fact Two: ADVENTURE (EASY MODE), SKIRMISH (MEDIUM MODE) AND GUERRILLA (HARD MODE).
These elements change from Adventure to Guerrilla mode: (You can switch difficulty anytime without exiting the game.)
— Player infliction of damage on bot components and armor goes down by around 37% each.
— Bot's infliction of damage goes up by around 25%
— Bot's vision, hearing and speed in creating leveled bots goes up by around 60%.

When Auto-scaling is "On" during multiplayer (example: adventure mode):
  • Single player : 2 damage power by the player vs 0.5 by the bot.
  • Two Players : 1.67 each (combined 3.34) vs 0.67.
  • Three players : 1.33 each (combined 3.99) vs 0.83.
  • Four players : 1 each (combined 4) vs 1.

If auto-scaling is "Off" each player has more damaging power than bot (AI), so the game becomes a lot easier compared to Auto-scaling "On".

3. Fact Three: DIFFICULTY WILL SPIKE ONCE YOU TRAVEL OUT THE FIRST ISLAND.
The archipelago (the first island you'd be playing on) can be regarded as a tutorial island to learn the mechanics of the game under the easiest combat condition.

The Archipelago is where the bots are weakest at most stupid state as 97% of the bots here are the prototypes (rust color).

Difficulty level will spike upon entering Farmlands or any other region, where you'd encounter much stronger and smarter bots (see Fact Seven image: Meet your enemies).

Make use of the Archipelago region to earn as much experience points (XP) as possible by killing bots (bots respawn in many areas all over the islands after you had destroyed them) and completing missions, which will increase your Character Level and earn you Skill Points to buy more skills.

COMBAT

4. Fact Four. DON'T ATTACK HEAD ON. THERE IS NO PENALTY FOR DYING.
Many bots can one-shot dead your Character no matter what kind of protection you craft into your apparel, while player can only one-shot the weakest of the bots if you're a good shot.

When your Character is down, you can hit "E" to use adrenaline to recover some health, or press "Esc" to spawn (in full health) in any safehouse you had activated or to any temporary travel point (field radio you have deployed).

Note: You can't respawn within a combat area (this changes after a game update sometimes). Spawn far away then fast travel to target destination or field radio (can only use 3 times or 6 if the correct Support Specialization in Skill Tree is unlocked).

Because there is no penalty in dying, many experienced players purposely get their Characters killed to quickly level up the bot that killed the Characters. See Fact Eight for details as to why.

The damage you have inflicted on the bots will stay even if you start a new session, so you can make use of situation to replenish supplies.

5. Fact Five: "HIT AND RUN, HIT AND RELOCATE" TACTICS.
Based on Fact Four, the "hit and run, hit and relocate" tactics should be seriously taken into account in whatever combat strategy you will adopt later on, as well as in improving your Character through Skills\Reward Tree or apparel improvement. See this for an overview of available improvements https://steamcommunity.com/sharedfiles/filedetails/?id=2661251412

Lure enemies to large safehouses so when Character dies, just respawn outside the combat area then fast travel to the combat safehouse. Or lure them in settlements with lots of cover, deploy a field radio to fast travel to it.

NOTE: The bathroom or any enclosed space can not be penetrated by any type of gas.

6. Fact Six: WEAK SPOTS (there are more weak spots which you'll discover as you play).
Fuel and gas containers and weapons (except reapers) are weak spots, destroy them first. Destroying knee caps of reapers, tanks (big 2-legged thing with no shields) and harvesters (big 4-legged) supplement your ability to destroy bots.

7. Fact Seven: MEET YOUR ENEMIES.

1. Scout class variant of Russian bot is the weakest and Spetsnaz is the deadliest.
2. Swedish and Russian bots fight against each faction and the player.


— Reaper
Reaper is not affected by your ammo when its 4 shields are active (glowing). Priority is to destroy the 4 shield generators when shields are inactive or hit other weak spots if you can't hit the shields. Once shields are destroyed, reapers will be a lot easier to destroy.

When weak, it will use its deadly thermobaric explosion (greenish gas covering a wide area that will ignite). Reaper can get destroyed by thermobaric explosion, especially when its health is around 7%. When that happens, the quality of loot it will provide will be very poor.

— Firebird
Deadly with their guns and the Area of Effect (AOE) of their bombs.

Its guns and thrusters are weakest spots but are more difficult to hit. With this in mind, the wings are good alternatives as they the easier to hit and destroy. It will eventually weaken the firebird allowing you to hit more easily any part of its spherical body and its weak spots.

Or using PVG90, take out the wings and thrusters (weak spots) from a distance. Use machine guns and automatic rifles on close range.

For excellent shooters, destroy the main gun's protective cover and once exposed take out the main gun (its weakest spot)

— Wolf
Wolf can heal itself and lynxes (round bots) it creates. Destroy healing capability by shooting at the 2 round disks that look like a gas tank cover located on both sides of body near the head.

— Stop harvester from calling for new reinforcements by leaving one of the hunter reinforcements alive (just destroy one of hunter's weapon) to make it less deadly. Stop wolf from creating new bots by leaving one of the lynxes alive.
Exp Guns-Ammo, Missions, Base Building, etc.
8. Fact Eight: YOUR WEAPONS ARE YOUR BEST FRIENDS.
NOTES:
1. Experimental weapons are usually dropped by leveled bots. The higher the level and the bigger they are the better (by observation only). The higher your character level, around level 23, is even better (by observation only). Also come as a reward for a successful base defense or destroying Fnix base.
2. 12ga slug and 12ga Slug-Corrosive ammo will explode close to your face when fired from Exp Pump Shotgun.
3. Exp KVM 59's chain gun effect damages bots, the player and teammates in close proximity. The damage is more severe when using shock or tar ammo.


NOTES:
1. Experimental ammo can only be crafted.
2. Explosive ammo's (.50 cal) long delay effect makes it practically useless, but .44 version for Magnus is good.
3. Tar and radioactive ammo also damage the player when fired from any gun.
4. Shock ammo's tether is deadly to player and small bots in contact with it.


SPECIAL NOTES ON NORMAL AMMO:
FMJ vs AP (not shown above):
FMJ Base Damage for 9mm-handgun is 28 and for SMG is 24, for 5.56mm is 20, for 7.62mm is 33, and for .50 is 100. The Armor Piercing inflicts 25% more damage on armor but 25% less on organs. For FMJ the damage is even at 1:1.

FMJ vs HP (not shown above)
FMJ Base Damage for ACP32 is 25 and for .44 is 60. The Hollow Point inflicts 25% less damage on armor but 25% more on organs. For FMJ the damage is even at 1:1.

As of November 2023:
.50 FMJ
Damage on armor increased by 25%, damage on organ the same as before.

.50 AP
Damage on armor increase by 60%, damage on organ the same as before.

I am not confident about the base damage of .243 and .270 but their SP versions inflicts 25% less damage on armor and 25% more on organs.


Low quality weapons, normal ammo (non-experimental), ingredients and many other items can be looted from many containers all over the islands but the best loot are dropped by the bots you destroy.

Collectable locations: https://steamcommunity.com/sharedfiles/filedetails/?id=2619794622

Many experienced players purposely get their Characters killed to give the bot that did the killing more experience points so they can quickly level up.

They destroy the leveled bots later because the bigger the bots and the more levels they have (max level is 4) the better the loot they provide (by observation only). Leveled bots are more difficult to destroy..

The loot quality will be even better the higher your Character have, say, level 23 and above (by observation only)

IMPORTANT:
— Destroying non-leveled bots increases regional threat level but destroying leveled bots or rivals decreases threat level.
— Reaper can only spawn on high regional threat level.

9. Fact Nine: PLAY A MISSION IN ORDER OR IT COULD BUG OUT
If you visit the Generation Zero Steam forum you may run across many posts complaining about a mission being bugged as they could not complete them. The reality is that some missions do get bugged after almost every game update, but it is also true that missions could not be completed because the proper mission steps were not played in order. Let me be clear: I am not blaming the players.

Beware: Activated main or side missions may get deactivated and replaced by another mission as you move around the region unconsciously triggering other missions. Should that happened, you'd need to manually reactive your previous mission.

Some Assignments provided by the FmTel station get bugged after practically every game update (some are new or some were old resolved issue that re-appeared).

It is not recommended to wonder aimlessly until you completed all missions unless you can keep track of all stages of your unfinished missions.

10. Fact Ten. BASE BUILDING, BASE DEFENSE, FNIX BASE, COMMAND POINTS
With the February 2023 update, base building is triggered by the "Building Block" mission, which gets activated when you enable the Vesslan Bunker safehouse and warboard (part of the Home Team mission in the Archipelago region).

Follow the 3 mission stages. After you destroyed the Fnix base at Sjoglimten in the Farmlands you earn 20 command points (you earn 10-20 command points for destroying every succeeding Fnix base), which is enough to claim the base as your own and build on it. Once you had built on it other locations for Fnix (red icon on the map) or neutral bases (blue icon with a minus sign on the map) will start showing up on the map as you kill more bots.

Base Defense. There are Easy, Medium and Hard mode to choose from but the rewards you'd get is determined not by the difficulty level but by chance.

Base defense and Fnix bases will only activate and reactivate if your regional threat level is high enough. After you had successfully defended your base and got the rewards, your regional threat level will fall and you'd need to destroy more bots (destroying leveled bots decreases threat level) or destroy more Fnix base to increase threat levels to be able to reactive a new base defense.

11. Fact Eleven: Containers re-spawn loot after around 30-45 minutes of real-time hours.
It means you can re-loot containers. Weapons and mission-related items do not re-spawn. Re-lootable items also re-spawn after starting a new session.

Bots respawn in many areas after you had destroyed them when starting a new session. One way to force respawn loot and bots is to (first manually save your save files as a precaution) exit to the "Main" screen (not Exit to Desktop) and then press "Continue" to get back to the game. This works 90% of the time.

12. Fact Twelve: You Bought It, You Can Play It As Your Wish BUT...
On Multiplayer session, please do not use one-shot kill weapon or any extremely ramped up damage weapon and\or automatized single-shot weapons (such as automatic launcher) as they can really ruin the fun in the game.

The game developers are aware many players use mods, trainers or cheat engine to adjust the game to suit their own play style but they don't provide support for it.
Schematics, Crafting and others
SCHEMATIC POINTS AND CRAFTING {Modified Dec 23, 2023]
Schematic Points are needed to unlock the recipe to craft item via the Schematics Tree (can be accessed through Consumable Station).

Once you had unlocked any recipe quality (range from Q1-Q5), you will need crafting ingredients to craft, for example, craft apparel improvements through Apparel Crafting Station, using required ingredients.

Experimental and ordinary ammo, as well as equipment and DLC items are crafted through Consumable Station.

Companion items are crafted though Companion Station.

You will get to learn the basics of using crafting through Consumable Station when you do the Therese mission very early in the game. Crafting through Apparel Station should come to you quite naturally after the Therese mission. Crafting through Companion Station should be easy as you will be guided in the game

NOTES:
— Schematics Tree. Unlocking recipes are sequential so at least 1 point must be spent on the first
in line before you can move to unlock (fully or partially) the second in line and so on.
— Spending schematic points and crafting are done in order. You can't jump from 1 to 3.
— You'd most likely encounter the "can't craft bug" for some items if your save file was created
before December 12, 2022.
— Some items can't be crafted if you do not have the required ingredients in you carry inventory.

Acquiring schematic points for all 5 categories.

1: Apparel Schematic Points: Acquire 1 point by destroying a rival (leveled bots).

2. Experimental Schematic Points: Acquire 1 point by destroying a Fnix base (Base Assault) or defeating attacks on your base (Base Defense).

3: Equipment Schematics Points. Acquire 1 point by crafting an equipment item or finding them in the world. The first schematic point will be for a simple first aid kit, which you can pick up at Iboholmen church safe house, when you do the Therese mission. (Triggered by listening to the recording at Yttervik safe house during the first mission, Break of Dawn).

NOTE: After you crafted an equipment item ,1 schematic points will be added to your Equipment Schematics Point. You can continue crafting the same thing or another item as long as you have the needed crafting ingredients to continue getting additional points.

4. The same process of earning equipment schematic points applies to ordinary ammo and DLC items (if you own the corresponding DLC). The first ordinary ammo point will come from .32 ACP Hollow Point ammo, which should already be credited to your schematics as you should have already picked the ammo at Yttervik during the Break of Down mission.

5. Companion points are are earned by teaming up with your Companion to defeat battles with the bots. The armor and other companion improvements are crafted through the Companion Station but you will not get additional companion points after crafting.

5. Apparel improvements are done through the Apparel Crafting Station.


1. ARE WEAPONS DLC WORTH IT?

DLC weapons are, overall, inferior to the vanilla weapons or weapons built-in the game, especially when compared to the experimental variants of built-in game weapons. Base Building related weapon DLCs are also about useless because the game limits base turrets to only 5 per base no matter how many base-turret DLCs you have. The portable turrets in the Tactical Equipment Pack DLC despawn after about 40 seconds in combat.

I consider Alpine Unrest DLC, which opens up another island to play on and continues along the original story line, as the best DLC. Fnix Rising DLC is second best because it adds a number of missions and also continues along the original story line.

To make an intelligent purchasing decision, (even if this guide says which ones are not worth buying), you can try out the weapons DLC by purchasing them and really play with them for not more than one hour and then immediately ask for a refund and do not spend close to 2 hours of play within 14 days to ask for refunds.

Valve will, upon request via help.steampowered.com, issue a refund for any title that is requested within 14 days of purchase and has been played for less than 2 hours. Even if you fall outside of the refund rules we've described, you can submit a request and we'll take a look at it.
Many players make the mistake of playing for several days thinking 14 is the limit, it's the 2 hours of play that determines the refund.
https://help.steampowered.com/en/faqs/view/784C-923B-A4A1-C825
11 Comments
Myst Leissa Mar 30, 2024 @ 11:47am 
Two Things: First and foremost, you forgot the ball-roller bots (which I have no clue who's side they're on but they seem to be neutral to you and fight against the Fnix-deployed Bots) in the meet your enemies image; secondly, your refund recommendation should note that if you refund DLC current steam policy is to refund the entire GAME along with DLC in one fell swoop; meaning you'd need to rebuy the base game.
❌️▶️👱  [author] Jan 31, 2024 @ 4:07pm 
@Buck Rogers
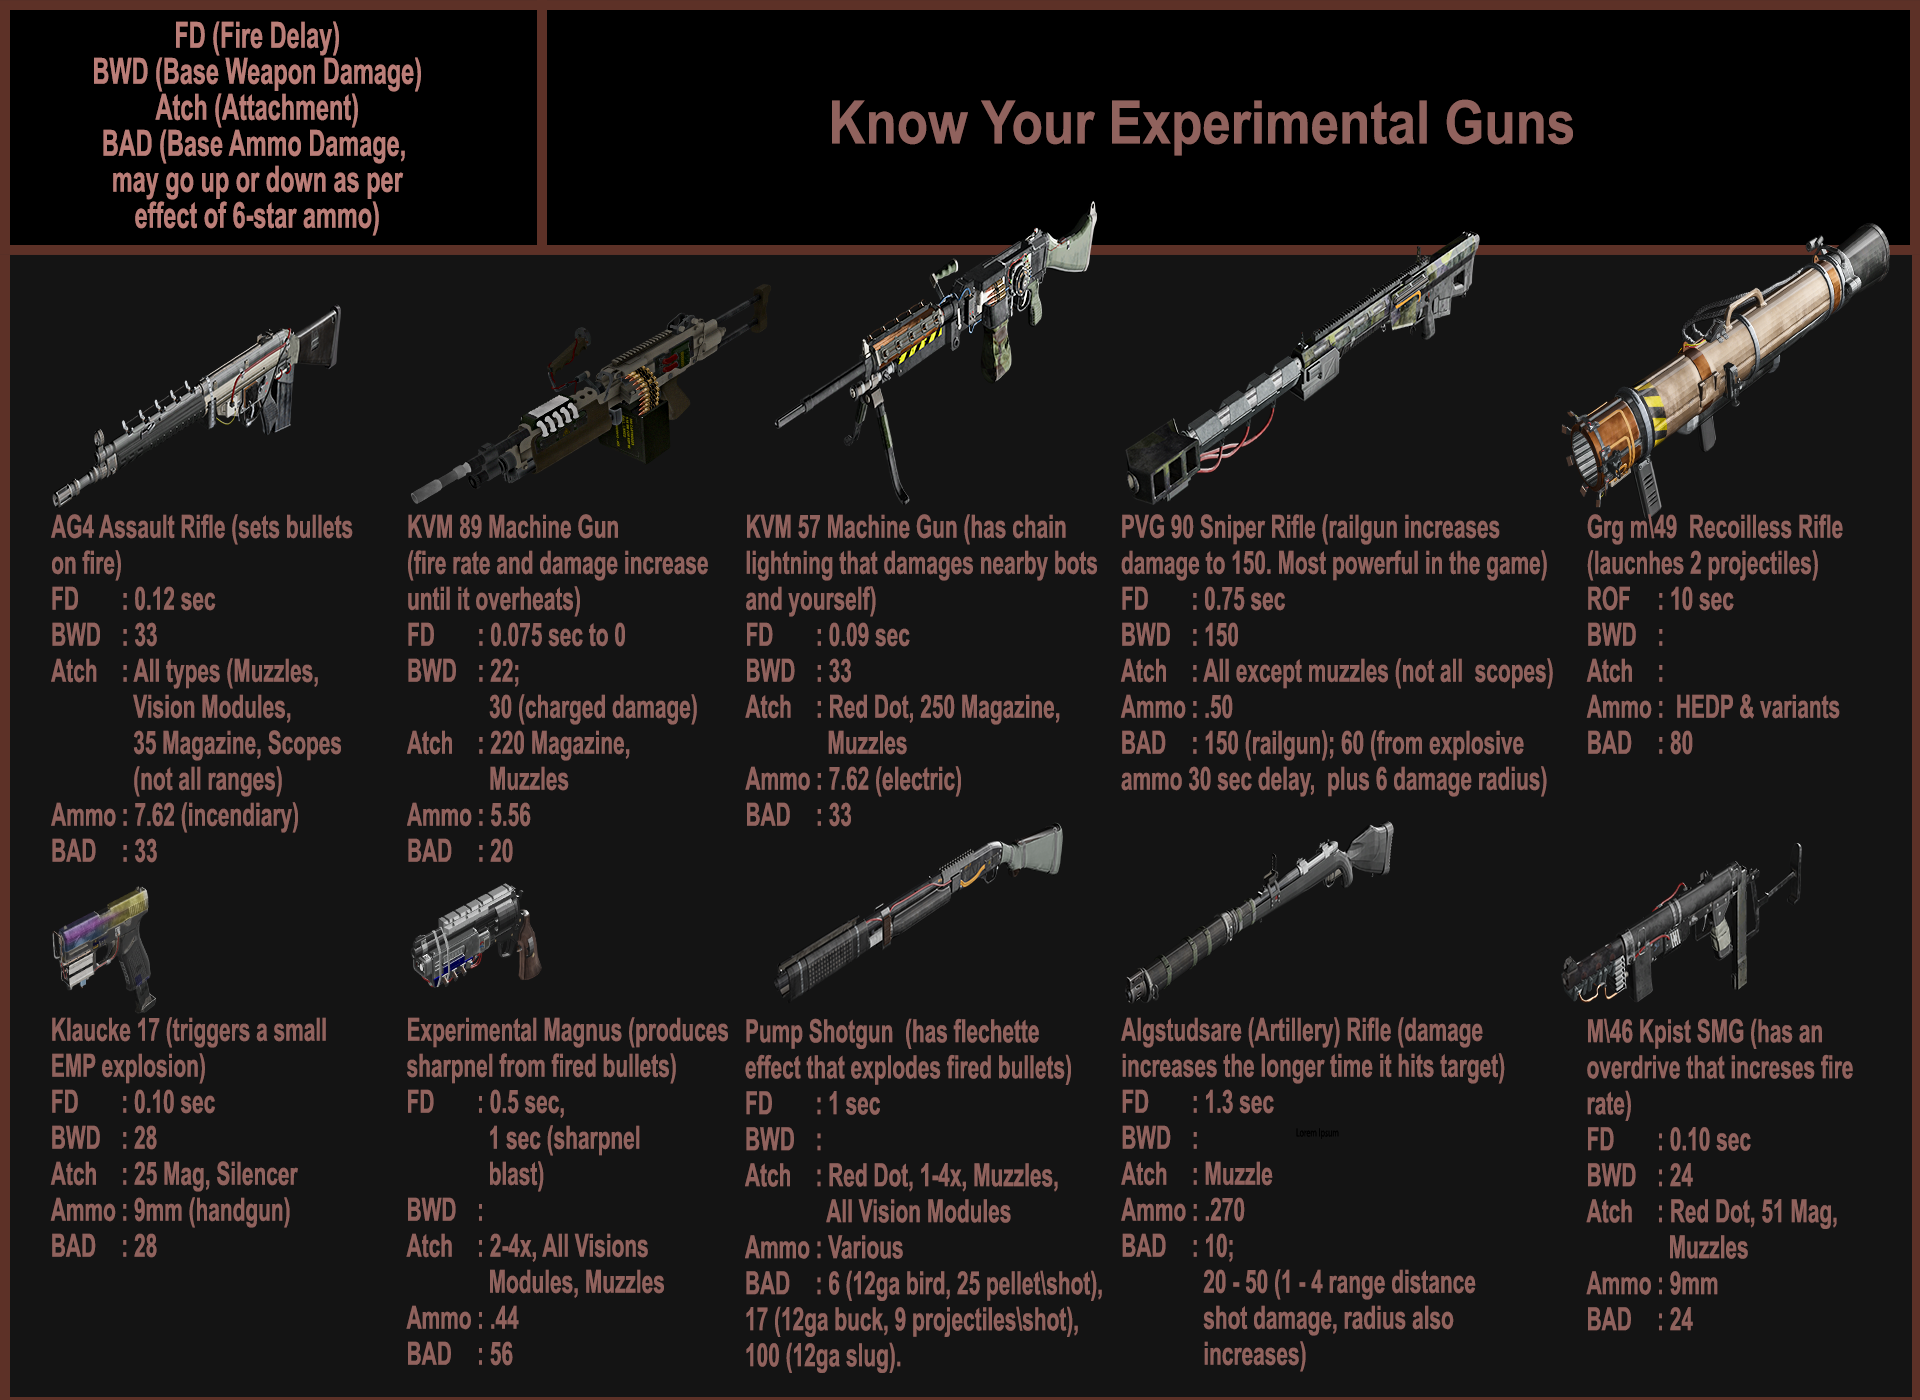
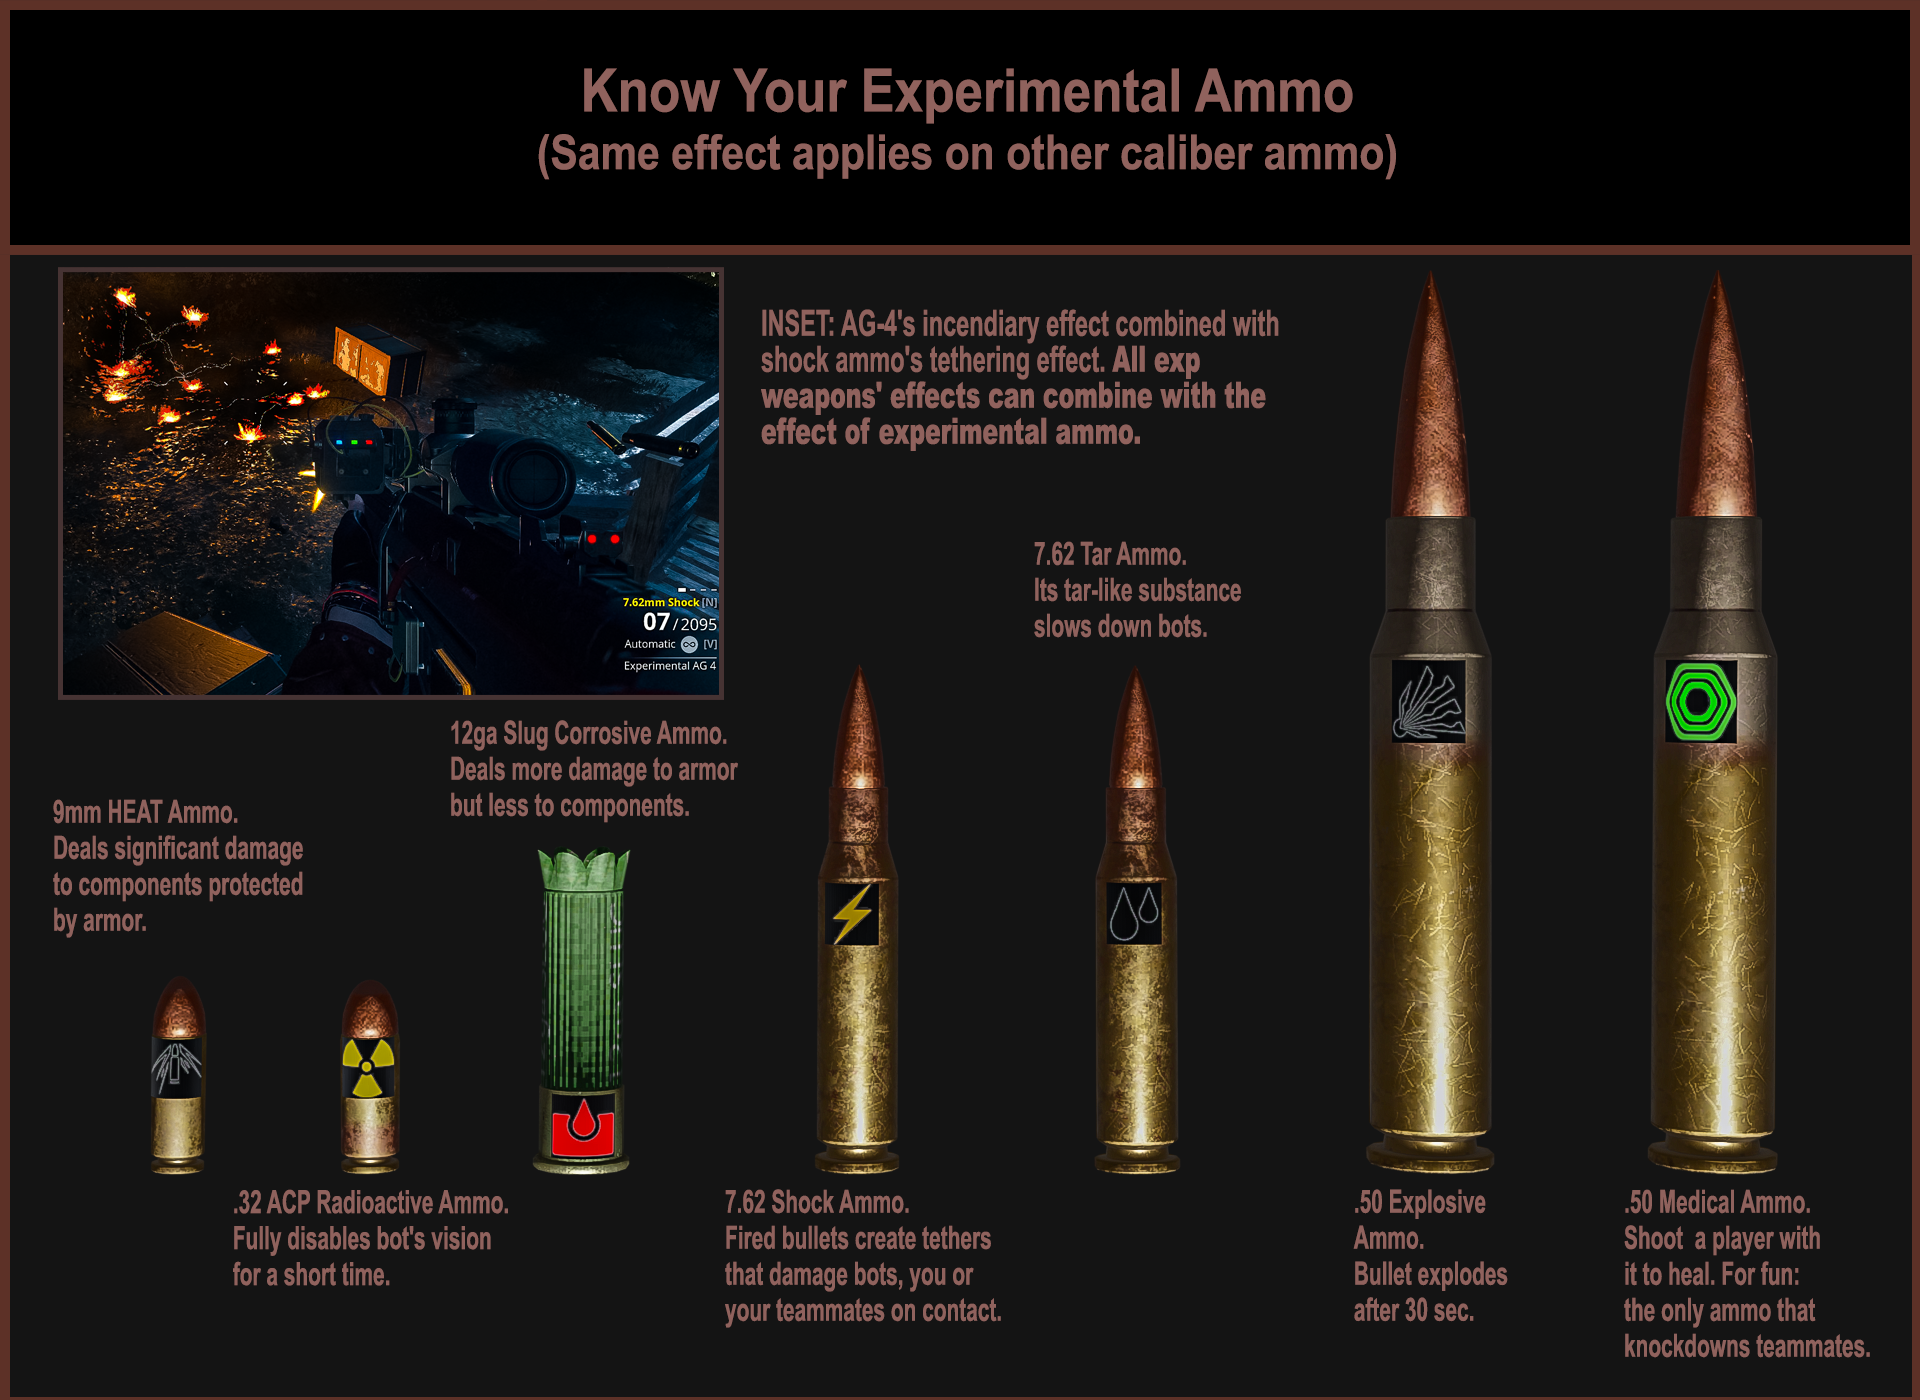
I base my damage statement on the actual damage values of weapons and ammo so it is normal that actual experience by different players may vary in their assessment.
Buck Rogers Jan 31, 2024 @ 6:58am 
Well one thing you got wrong due to my experience is the DLC for the PM-71 7.62 mm machine gun .it's deadly and by far surpass any weapon in game for taking down Firebirds to Tanks Apoc.class .It has an unmatched DMG and rate of fire and handling is mitigated with sites and such. Also the RG-7 isn't bad it's better than the recoiless rifle vanilla 5 star version And My game was deleted and im started another game level 32 now and the games not dropping anymore experimental weapons which really sucks because i lost my experimental PV90 and M49 and those two weapons are game changers also , Plus the Turrets like the mortar one are top notch.
Born2BGod Sep 5, 2023 @ 2:11am 
Good guide. Good info. Good to know.

Very good job :steamthumbsup:
gpcstargate Aug 28, 2023 @ 10:44am 
Interesting reading and Thank you for your time and for putting this together
wilrk05 Jun 10, 2023 @ 4:22pm 
Sounds like someone did their homework. Although I would like to point out that maybe you could add the Experimental Sledgehammer to the overview of Experimental weapons (even though it's not a "gun" per se)? Anyway, this and the "GZ Jack of All Trades" guide are probably the best GZ guides on Steam. Nicely done!:cupup:
Magnus Apr 12, 2023 @ 10:04am 
DLC weapons inferior? Well, someone hasn't tried the PM-71.
VasWolf Mar 9, 2023 @ 11:34am 
OK, that's good to know... at the first safe house and haven't died yet, but have gone through a TON of healing items trying to avoid death. Was super stressful. Thanks.
⭐SEA Sniper⭐ Mar 6, 2023 @ 8:11pm 
Good post. Many new players tend to avoid their characters getting killed when there is no real penalty for dying. Players can actually use dying in the game as a means to level up rivals, which they can farm later for a better loot or use the "spawn anywhere" after death to travel anywhere and loot or do something else.
🤪CrazyWolf🐺 Mar 6, 2023 @ 12:53am 
If I have to choose the one item that I consider as the most important I will vote for Fact 12. A single instance of game save corruption can wipe out all of your hours of game play in one go, which could have been prevented by simply making backup of his/her save files.