The Flame in the Flood

The Flame in the Flood

Not enough ratings
A more accurate guide to The Flame In The Flood
By VakarisJ
A thorough guide to achievements, animal specifics, afflictions, inventory management, raft upgrades, regions & locations, campaign strategy, bugs and general gameplay tips.
Written for v1.3.005.
   
Award
Favorite
Favorited
Unfavorite
Achievements (1)
Achievements can be split into two categories: milestones and challenges. Former you'll get without even trying – just by playing the game. The latter you'll need to put in some extra effort for.

Also, sorry for the three-way split of this section (and the other one). Steam has an unwritten character limit per section.

Milestones
Pack Rat
Expand your inventory to the maximum

This is a survival game. In other words: a hoarding game. Whether you want to or not, the first thing you do in every run is expand your bags.

You start with 12 bag slots. Maximum is 28. You get 4 slots for each Pouch you craft, which means you need to craft 4 of them. That's 8 Rabbit Pelts and 4 Stitching Kits.


Seafarer
Fully upgrade your raft in a single playthrough

In pretty much every single run, after expanding your bags, your second primary goal will be to fully upgrade your Raft. It doesn't take much effort and is immensely helpful, so there's no avoiding it.

Check the Raft Upgrades section for details.


Crafty
Craft every item

This one's slightly tricky simply because you probably aren't keeping a list of what you have and haven't crafted. There aren't that many items you can craft, so you'll get this eventually.

Last item I crafted before I got this was a campfire. As it turns out – with the abundance of Camp Locations, the campfire the very first quest gives you and the Raft Stove upgrade, I never had to actually craft one my self.

Even though the achievement says to craft 'every' item, you don't actually have to. The White Wolf Jacket does not count towards this achievement. Elder Wolf is probably similar, but I couldn't confirm it.


Chatty
Speak with every river resident

You will get this in a single full run of the Campaign. It's so inevitable, that I won't even bother listing the residents.


The Grey
Kill a wolf

Check the Animal Specifics section for details of killing wolves.


Can Bearly Take It
Killl a Bear

Yes, that's three 'l's. There are nine typos that I managed to catch. This is one of them.

Check the Animal Specifics section for details of killing bears.


I been everywhere, man
Visit every location type

Check the Regions & Locations section for details.


Mechanic
Repair 1000 points of raft health

That sounds like a lot of points, but it really isn't. One Repair Patch repairs 40 points, so you need 25 of them.

This game has a really annoying old-school camera that often doesn't show you the hazard you're about to ram straight into, so it's just a matter of time.


Speed Boat
Travel 20 miles with the raft motor running

20 miles is actually a lot, but you don't have to do it all in one session. It adds up across multiple playthroughs, so even though it takes a rather long time if you're just doing Campaign, you'll get there eventually – it's also just a matter of time.

It's especially true since there are entire Regions with slow streams in Endless Mode, where you'll definitely want to use the Motor as much as possible.


Hallelujah
Sleep in 20 churches

Like the 20 miles achievement, this will also take a rather long time. In an average run of the Campaign, you'll find about 13 churches and you probably won't be able to get to every single one.

I hear you can sleep 20 times in a single church, but I couldn't confirm it.


Pay It Forward
Start a new game with items in Aesop's bag

This just means you have to die, with at least 1 item in the dog's inventory. Once you start a new run, you'll get this.


Stay Warm
Build a campfire

You get a campfire from the first quest: make a Stone Knife and a Stone Hammer, then just pick up the campfire from a mailbox and find an opportune time to deploy it. That's it.


Seamstress
Make 50 articles of clothing

Torches count as clothing, but you won't need to make 50 Torches. Just by crafting every item in the game will get you at least 21 articles of clothing.

In fact, you won't need to make any unnecessary Torches, because in 3-4 runs you'll probably make enough clothing anyway. By comparison, it took me 10 runs of the Campaign and 2-3 attempts at Endless to get all the achievements.


Locusta
Poison 20 wolves with tainted meat

Tainted Meat is probably the easiest way to cull Wolves. They like to spawn in packs of three at night and swarm you like locusts. If you visit 5 Locations at night, chances are you'll encounter Wolf packs in at least 3 of them.


Snake Charmer
Lure a hostile animal into a snake

Chances are, you won't even make a conscious effort to get this. Snakes bite anything that gets close to them and animals don't specifically avoid them.


Forager
Eat every type of plant

I got this so easily I don't even know which plants you need to eat to get this, however, all the plants are: Cattail, Dandelion, Yucca, Corn, Garlic, Mulberry, Devil's Trumpet.

The cooked derivatives may or may not count: Ash Cake (Corn), Dandelion Tea, Cooked Yucca. Mulberries also spoil to make Moldy Lump, which is used to craft Penicillin.

Given the ease with which I got this one, you can probably exclude uncooked Yucca, Devil's Trumpet, Moldy Lump and Penicillin, as those are either mildly poisonous or medicine.


High Ground
Reach High Ground in the Campaign Mode

You need to get to the 4th Region in the Campaign. There's only one Location there you can visit and that is it.


The Path Up
Reach Angel Yards in Campaign Mode
You need to get to the 7th Region in the Campaign. You'll get there in a cutscene.


The Kingdom
Reach The Kingdom in Campaign Mode
You need to get to the 10th Region in the Campaign. That's the end.
Achievements (2)
Challenges
In Wolf's Clothing
Equip a full set of Wolf Hide clothing

The only reason this and 'Artic Survivor' aren't in the milestones section, is because you need to have the entire set equipped at the same time.


Artic Survivor
Equip a full set of Bear Hide clothing

Yes, that's 'Artic', not Arctic.
The only reason this and 'In Wolf's Clothing' aren't in the milestones section, is because you need to have the entire set equipped at the same time.


Iron Stomach
Eat all the bad stuff in a single playthrough (tainted bait, spoiled fish, raw meat, spoiled meat, devil's trumpet)

It was nice of them to list what you have to eat. These aren't even all the 'bad' things that can be eaten in the game.

Tainted Bait and Tainted Meat are two recipes that lead to the same thing – the one this achievement needs. It's just that one uses cooked Meat, the other – raw.

Spoiled Meat is what you get when you can't eat through your vast reserves fast enough. Typically, when you start encountering bears, that clear the whole map for you.

Devil's Trumpet gives you Food Poisoning. Don't mind it, it's a joke of a condition.

The hard part is the Spoiled Fish. You can only find it in Bear caves and at a very low chance at that. In 80 hours of playing this game, I've only seen 5 of these, 4 of them were in my final Rivergod run. Good luck, may RNGesus look upon you.


Dead-Eye
Kill every animal type with arrows

Crow, Rabbit, Snake, Boar, Wolf, Bear. You don't need the King Boar, White Wolf or Elder Wolf. In fact, you don't even need the Crow. Shooting it doesn't actually kill it, just chases it away, but if you have the other 5 animals and still didn't get this achievement – that's what you're looking for.

Rabbits get killed in one shot – no strategy needed. Just keep in mind that arrows can get snagged on corpses and won't reach their target.

Snakes also get killed in one shot. They don't drop anything, so this is the only time you'd bother.

Boars get killed in two, but get enraged after the first and will chase you anywhere you go, other than a campfire and the wharf. A hit from an arrow staggers them and they take a while before they charge, so just aim and loose twice at a leisurely pace.

Wolf takes three hits to die, but is a coward and will try to run after the first. You'll probably need to chase after it.

Bears are the hardest, however only the last hit is needed for it to count as an arrow kill. You can approach the Bear to anger it, lead it into three Traps, Snakes (or a combination of) and then finish it off with an arrow. Alternatively, you can use my favorite tactic: approach the cave, build a Spear Trap just out of aggro range and step back. Shoot the Bear once to aggro it, once again as it starts to charge and the final time after it gets staggered by the Trap. It's the cleanest method if you have Flint to spare. Final tip: have a Torch handy. Pulling it out will deaggro the Bear if something goes wrong.


Invincible
After 20 days of travel, have every stat at 100% and no afflictions

There's a running theme with all the '# days' achievements – the ingame clock lies. If you sleep through midnight, you might find that the game has skipped a day. It was the night of 18th, but after you sleep 8 hours it's the morning of 20th. Achievements still count that as the 19th day, but won't tell you.

How I got this achievement was: I maxed my meters on the 20th a few times without getting the achievement. Waited until the 22nd and tried again without any luck. Went off to do other things and on the 26th, almost a real-time hour later, the achievement popped out of nowhere after a condition 'Wet' got cured, even though my meters weren't full at the time. I have similar stories with every achievement that needs a certain number of days – they tend to pop much later than they should – so don't be surprised.


Field Medic
Cure 30 afflictions in a single playthrough
The challenging part of this is to have a playthrough last long enough, otherwise it's a milestone.
You can cheese it with a Wolf and three stacks of bandages, if you really want to.


By A Thread
Have 10 stacked afflictions

All afflictions stack without limit. Afflictions of the same type get hit with diminishing returns, however, having a stack of 10 will probably kill you anyway.

Best done on a throwaway run: start a new run (Endless or Campaign, doesn't matter), grab a Jar from the crate, Raft your way over to the nearest Location (whatever is it) and start filling the Jar with Polluted Water right there at the shore. Drink that ten times and you'll get this, and probably also all four varieties of Polluted Water based sicknesses. Afterwards your run is pretty much over, just wait to die from Dehydration. This will also get you the following achievement:


Death on the Trail
Die from dehydration with suffering from dysentery

Yes. This is the first of the needless failures you'll need in the following achievement:


Learned the Hard Way
Die in every possible way

The challenge in this is knowing all the ways there are to actually die, and they are:
  • Dehydration – Have the Thirst meter reach 0 and wait a bit. Probably in combination with the former achievement.
  • Starved – Have the Hunger meter reach 0 and wait a bit.
  • Hypothermia – Have the Body Temp meter reach 0 and wait a bit.
  • Exhausted – Have the Fatigue meter reach 0 and wait a bit. Don't press the 'Collapse' button.
  • Drowning – Crash your Raft to the point it runs out of durability.
  • Sepsis – Final destination for all untreated infections. Ants or hostile animals will get you there, just avoid the Bear.
  • Snake Bite – Get too close to a Snake and don't drink any Tea.
  • Gored – Get hit by a Boar so much that you run out of fatigue. Don't press the 'Collapse' button.
  • Wolf Attack – Get hit by a Wolf so much that you run out of fatigue.
  • Mauled – Get hit by a Bear so much that you run out of fatigue. You can find Bears early in Endless Mode. In the Campaign they're really rare until the 7th Region.
Achievements (3)
Sickly
Contract Every Affliction

Like 'Learned the Hard Way' just above, the challenging part of this is knowing what afflictions there are – you probably won't naturally run into all of them, simply because there are four different ones for Polluted Water alone, but if you've been following my guide – you probably already have most of these.

The list (separated by tier) is thus:

Polluted Water
  • Parasites – You can get this from Polluted Water or eating something you shouldn't: Moldy Lump, Spoiled Meat or Raw Meat.
  • Giardia – Only from Polluted Water. Which of the four you get is random.
  • Listeria – Only from Polluted Water. Which of the four you get is random.
  • Dysentery – Only from Polluted Water. Which of the four you get is random.

Survival meter exhaustion
  • Starvation – Have the Hunger meter reach 0. You can eat something to survive.
  • Dehydration – Have the Thirst meter reach 0. You can drink some water to survive.
  • Hypothermia – Have the Body Temp meter reach 0. You need a campfire on hand to survive this.
  • Exhaustion – Have the Fatigue meter reach 0. Least dangerous, you won't die from this unless you either have a Wolf/Bear attacking you or somehow fail to hit the big button called 'Collapse'. You might get Hypothermia while collapsed, if your clothing is insufficient, which may or may not be all according to plan and may or may not kill you anyway.

Boar and Penicillin
  • Broken Bone – Get hit by a Boar or a Bear (don't recommend). There's a chance to get Laceration instead.
  • Laceration – Get hit by a Wolf. Can also be Boar or Bear.
  • Staph Infection – Let Laceration lapse without treatment.
  • Sepsis – Let (Staph) Infection lapse without treatment. Make sure to have Penicillin to cure this, you'll die otherwise.

Ant-based
  • Ant Bites – Step into an Ants terrain hazard.
  • Infection – Let Ant Bites lapse without treatment. Cure with Penicillin, else it will lapse into Sepsis.

Food
  • Food Poisoning – You get this by eating Devil's Trumpet, Tainted Meat or uncooked Yucca. Probably that last one.
  • Blood Flukes – You get this by eating Spoiled Fish. That super-rare thing from Bear caves previously mentioned in 'Iron Stomach'.
  • Drunk – You get this by drinking one flask of Alcohol.

Other
  • Snake Bite – Get too close to a snake. You'll need Dandelion Tea to cure this, failure is death.
  • Poison Ivy – Step into a Poison Ivy terrain hazard.
  • Tiny Cuts – Step into a Brambles terrain hazard.


Animal Friend
Complete the campaign without killing any animals

This is probably the second-hardest achievement in the whole game. In the past, any animal death from any source counted against the player, but I heard they fixed that. Didn't make a difference for me though, because I ran this three times before I got it.

First time, I used Box Traps to grab Rabbits live and "deploy" them into Snakes. Didn't get it, figured that Box Traps count as kills.

Second time, I didn't build any Traps at all and simply led Snakes in the 3rd Region on a Rabbit hunt with a Torch. Didn't get it, was at a loss. Figured the Elder Wolf probably bugged out the run... somehow...

Third time, I used drastic measures. I loaded up with two stacks of Jerky, a stack of Clean Water and the rest with Bear clothing. Then got to the end of the campaign without stopping anywhere other than Bait Shacks and Marinas, with the sole exception of the 7th Region, where you're forced to step off the Raft. There, I avoided alerting all animals by running through the right side of the compound and grabbed the Bear-guarded-note from just outside its aggro range by locking on to the note with Right-click and using [W][A][S][D] to step just barely in range. Then I ran back using the same route, finished the rest of the run while avoiding land and got the achievement right as the credits appeared. Good luck, don't crash your Raft.


Vegetarian
Survive the first 20 days in Endless Mode without killing any animals

Just like 'Animal Friend', this one is annoying, though not as difficult. It is quite buggy though. Just like I mentioned in 'Invincible' – '# days' doesn't count the days you see in the buggy top right corner, but the actual days that pass. The way I did this was to load up Aesop with Jerky and Water, and sleep in a Bait Shack for 26 "days" before the achievement popped.

I also confirmed that shooed Crows do not count as kills, which was one of my suspicions while doing 'Animal Friend'. Given that arrows don't actually kill them in 'Dead-Eye', that was a legitimate concern for a time.


Terraphobia
Travel 10 miles on the river without stopping

Do yourself a favor: don't be like me and try to do this in Campaign on Survival difficulty. The four meters drain so fast that under such conditions it can only be done by the skin of your teeth, assuming you were speeding on every rapid stream you could find and are sufficiently lucky.

Either do this on Traveler Campaign difficulty or wait until you hit a Region with the high waters modifier in Endless Mode.


Paleo Diet
Survive the first 40 days in Endless Mode without eating any plants

I got this along with 'Under the Stars', 'The Longest River' and 'Rivergod' achievements in a single Endless Mode run.

I am happy to report that drinking Dandelion Tea to cure Snake Bite does not count against the achievement.


Under the Stars
Survive 40 days in Endless Mode without sleeping in a shelter

I got this along with 'Paleo Diet', 'The Longest River' and 'Rivergod' achievements in a single Endless Mode run.

I am happy to report that sleeping in the Raft upgrade 'Shelter' does not count against the achievement.


The Longest River
Survive 100 miles in Endless Mode

It took me 51 game days to reach this. By this point, the game is already over – I'm effectively invincible with what amounts to a nuclear arsenal in my pockets, but...


Rivergod
Survive 200 miles in Endless Mode

...this achievement exists. It's a true waste of life, even more so than shooting 200 Pigeons in a certain game. Just for reference, rushing specifically for it, the final 100 Mi stretch took me 2 hours 9 minutes and 52 seconds of nothing other than beating an already-putrid horse. So here's a video of it:
Animal specifics (1)
There are six types of animals in the game. They have various interactions with each other and also the player. Here are their specifics:


Crow
Description
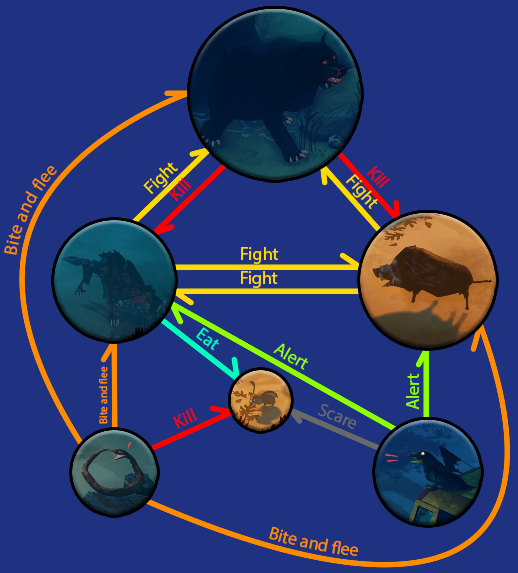
Crows sit around on branches and rooftops. If Scout gets too close, they alert Wolves and Boars, and scare Rabbits.

Survivability
They cannot be killed in any way: shoving and arrows only scare them away.
Gassing them does nothing – they just sit right there in the green smog without a care in the world.

Loot
Scaring them away by staff or arrow will cause them to drop a feather, which is needed to make arrows.

Notes
Important to know: Feathers tend to get stuck on level geometry – trees, buildings, inaccessible terrain. You can pull them off their perches by having an animal die nearby or by throwing Tainted Bait. Crows will land right on top of them and stay there, even if you walk right by them. This makes it so that, when they're scared away, the feather would drop on level ground.


Rabbit
Description
Rabbits wander aimlessly around their burrows. If they become scared by Crows or by Scout getting too close – they will try to run to a burrow and hide inside. Rabbits are active during the day and hide in their burrows at night.

Survivability
A Snare will kill a Rabbit instantly.
A Box Trap will capture one live and still have some durability left. Never pick it up without a Rabbit inside, as this will waste one of its two charges.
A single arrow is enough to kill.
A Gas Bomb will cause any Rabbit that enters the cloud to die a few moments later, even if they duck into their burrows.
A snake can kill them in large numbers, as snakes do not flee after biting Rabbits.

Loot
Raw Meat x1
Rabbit Pelt x1

Notes
Burrows may sometimes be hidden under roads and other terrain.

When Rabbits emerge from their burrows, they do not trigger any Traps set up above the burrow it self. You will need to wait for them to move some distance away from the burrow before scaring them. If they're too close to the burrow, they'll just dig down where they are. If they're too far, they will run back and get clipped by the Trap.

If you have set up a Box Trap in the wrong spot, it's better to try scaring Rabbits into it, than picking it up.

Sleeping at night causes Rabbits to momentarily emerge from their burrows. You can use this to Trap Rabbits when you're not supposed to.

Using a Box Trap to capture a live Rabbit allows you to "deploy" (as in throw) them. This is supposedly to distract Wolves, however it doesn't do anything if they're already aggroed on you. You can also "deploy" Rabbits into snakes to kill them without using the durability of your Stone Knife. Whether doing so will count against you in the two pacifist achievements, I haven't been able to confirm with certainty.

If you're using arrows to hunt, take note that arrows can get caught on already-dead Rabbits.

If you scare a Rabbit, but are too close to its intended burrow, it will run away from the burrows altogether. If scared again, it may choose a new burrow. You can use this to force several Rabbits into a single burrow, which makes it easy for a single Gas Bomb to kill three or more Rabbits in one go.

The range at which Rabbits feel safe to emerge from their burrows is slightly longer than the maximum throwing range. The best way to use a Gas Bomb is to move to near-maximum throwing range, throw it and run away. Try not to throw at the absolute maximum range, as this may cause the Gas Bomb to land without shattering.

If a Rabbit has been tagged by the Gas Bomb, but then hid, you can still recover the loot in the usual manner, even if the corpse isn't visible.

Occasionally, the game might bug and Rabbits will become immune to gas.


Snake
Description
Snakes are defensive in nature. They will lay wherever they are and hiss at most creatures coming close. If the creature comes even closer, they'll get bitten. In most cases, Snakes flee after a single bite. Other than fleeing, Snakes will only move from their spot if they get attracted by flame from a campfire or Torch.

Survivability
Snakes die to a single arrow.
Snakes are immune to gas.

Loot
Snakes drop no loot.

Notes
Sleeping on a map with Snakes, causes their positions to be randomized. You can use this to recover Snakes that had already fled.

Rabbits are the only creature Snakes will not flee from after they bite. You can use this to get a lot of Meat and Pelts for almost no cost.

Snake Bite is the most deadly affliction Scout can experience. Always have Dandelion Tea on hand as a cure, preferably an entire stack of it!

When a Snake is attracted by a Torch, it will maintain a respectable distance from Scout, however, this may end up blocking the path back.

You can use a Torch to pull Snakes into positions, where they'll bite animals of your choice.

Snakes cannot bite while moving. If they are, you usually have to take a risk of putting away the Torch to get them to bite.

A Snake's bite deals as much damage as an arrow to other animals.

After a Snake bites a Rabbit, it will become pacified for a few seconds. Throwing a second Rabbit on them in this interval will cause the Rabbit to escape unharmed.

If more than one Snake at a time bites the same animal, it may cause the animal to get stuck in place, becoming unkillable and unresponsive. This usually happens because multiple Snakes came to occupy the exact same space, after following a Torch. Wolves are the most susceptible to this, while Bears only become stuck occasionally.

Animal specifics (2)
Boar
Description
Boars are aggressive, but territorial. They will attack Scout, but only in a specific area. They attack by charging at their target after a loud growl.

Survivability
Two arrows are required to kill a Boar (Boar King untested).
Two Snake bites will kill a Boar (Boar King untested).
One Spike Trap will kill a Boar (Boar King variant takes 3).
Gas only stuns Boars (Boar King untested).
Will get killed by a Bear.

Loot
Raw Meat x1 (Boar King variant drops 4)
Boar Hide x1 (Boar King variant drops 3)

Notes
Boar charge is very telegraphed and extremely easy to dodge. You don't even need to sprint, just a step sideways is usually enough.

Boar charge has a lengthy cooldown – long enough to loot crates and cars. Buildings, however, take longer than the cooldown, so you may consider running out of the Boar's territory to get it to back off and then making a dash for the door, so as to give you more time.

A Torch will force the Boar to keep some distance. There is no way it can damage you when you have one out. It will even cancel out of its charge.

An arrow will stagger a Boar, giving you enough time to land a second shot to kill it.

If a Boar is wounded, it will stop being territorial. It will chase you everywhere, other than the wharf or campfire.

If a Boar meets a Wolf (or even a pack of them), they will start an eternal war, as they cannot deal damage to each other. This can keep both parties occupied, while you make off with the loot.

Once in a playthrough, you might encounter a Boar King. It is a bigger variant of the Boar and takes more to kill. You will get a quest to kill it, if it has spawned, but there's no reward for doing so, other than the loot.

Like the regular Boar, the Boar King is afraid of Torches.

I've only seen the Boar King spawn in the 'Small Town' Region.


Wolf
Description
Wolves are just plainly aggressive. They rest during the day and hunt at night, come either alone or in packs of three and may spawn in at night.

Survivability
One Tainted Bait (50% chance of not being consumed) will lure over a Wolf and subsequently kill it.
Three arrows are needed to kill a Wolf.
Three Snake bites are needed to kill a Wolf.
One Spike Trap is enough to kill the Wolf, it is also the only way to kill the Elder and White variants.
Gas only stuns Wolves (Elder and White variants untested).
Will get killed by a Bear, regardless of numbers.

Loot
Raw Meat x1 (Elder and White variants drop 2)
Wolf Hide x1 (Elder variant drops Elder Wolf Hide; White variant drops White Wolf Hide)

Notes
During the day Wolves rest and will only attack you if you open a container nearby or get too close.

Tainted Bait is the easiest way to kill Wolves. It's also the most efficient, as the Meat used will be replaced by the dying Wolf and the Bait might not even be consumed. In some cases, a single piece of Bait is enough to kill an entire pack of Wolves. The only two limiting factors are the availability of Devil's Trumpet and your own luck.

If a Boar meets a Wolf (or even a pack of them), they will start an eternal war, as they cannot deal damage to each other. This can keep both parties occupied, while you make off with the loot.

If a Wolf gets bitten by more than one Snake at a time, it will always get locked in its idle animation and become unkillable.

Wolves tend to get semi-stuck in tight areas. 'Semi', as in they can get unstuck if conditions are right, as opposed to Snake-stuck, where they'll play their idle animation until the end of time.

Shooing a Wolf with a staff will cause it to stagger, prolonging the time left until its next attack.

Wounding a Wolf will cause it to retreat for some time, before it reengages.

Holding up a Torch will cause all Wolves to back up and shadow you from a distance slightly longer than a Snake's follow distance.

Once a Wolf starts its attack it cannot be stopped by shooing it with the staff, dodging or bringing out a Torch. Hitting a Wolf that has already started an attack with a Gas Bomb will stun it, but when the stun wears off it will follow through on the attack, potentially leaping great distances in doing so.

Both Elder and White Wolf variants need only one Spike Trap to kill, but will flee and despawn if hit with anything else or eat Tainted Bait. The White Wolf in particular will flee if you so much as run in its direction.

Like with the Boar King, the presence of an Elder or a White Wolf will cause a quest to be issued. There is also no reward for competing them, but unlike the Boar King, these two will hound you throughout the whole Region you're in, if not killed.

I've only seen the Elder Wolf spawn in the 'Wasteland' and White Wolf in the 'Small Town' and 'Wasteland' Regions.

Elder Wolf Jacket has a chance to prevent damage from Wolf attacks.

White Wolf Jacket has a chance to prevent damage from "all animal" attacks. Whether that includes Snakes is something to ponder.

Animal specifics (3)
Bear
Description
Bears are defensive. They will sit in their cave until they are either attacked or something comes too close. Once they're angered, they will charge forward and beat down whatever was the source of their anger.

Survivability
Any combination of Spike Traps, arrows and Snakes will kill a Bear, so long as four hits are dealt.
Gas only stuns Bears.

Loot
Raw Meat x2
Bear Hide x1
Whatever spawns in the accompanying cave

Notes
Once a Bear kills its primary target, it will check if anything is close by. If so – the next target is set, if not – then it will return to its cave.

Wolves and Boars will prioritize the Bear over Scout if they come close enough.

Of all the animals, only the Snake can deal damage to a Bear. Wolves and Boars deal no damage at all, often creating situations where a single Bear will clear out the entire Location before you've even looked through half of it. This, of course, is heavily in your favor, because now you've potentially three Wolves and a Boar worth of Meat and Hide laying around for you to pick up at your leisure.

While the Bear is chasing other animals around, you can run over to its cave and clear it out, without killing the Bear.

Like the Wolf and the Boar, the Bear is afraid of the Torch. If you have it out, you can walk right past the Bear and into its cave, take whatever you want and leave.

If you get attacked by a Bear, you can just take out a Torch and the Bear will lose aggro a few seconds later, returning to its cave.

Sleeping tends to cause Bears to get stuck.

A Bear cave sometimes spawns with a Boar attached. In this case, either one or both of them become stuck. They will become unstuck if either one is successfully disturbed.

The cave Bears spawn with is essential for the 'Iron Stomach' achievement, as they're only place to find Spoiled Fish. The chance for Spoiled Fish to spawn is very low, however, the cave almost always has Boar Hide and often – Jars or Repair Patches.

My favorite way to kill Bears is to set up a single Spike Trap close to the Bear's cave and shoot it with three arrows. First arrow aggros it, second hits it as it starts to charge. It gets staggered by the Trap and then the final arrow kills it.

Afflictions
Health conditions
You don't have a health bar, but Lacerations, Broken Bones and Snake Bites will dock a chunk of your fatigue, which is what may cause you to die. Healing these will instead return the docked fatigue back to you.

In addition to docking fatigue, Health conditions also drain your meters at an increased rate:
Not draining
Ant Stings
lasts ~10 minutes; lapses into Infection
Cure with Aloe
Food draining
Tiny Cuts
234%; lasts ~10 minutes
Cure with Aloe or Bandage
Laceration
234%; lasts ~9 minutes; lapses into Stapth Infection
Cure with Bandage
Broken Bone
234%; lasts ~19 minutes
Cure with Splint
Poison Ivy
234%; lasts ~20 minutes
Cure with Aloe
Parasites
166%; lasts ~14 minutes
Cure with Sumac Tea
Water draining
Infection
200%; lasts ~20 minutes; lapses into Sepsis
Cure with Penicillin
Giardia
350%; lasts ~19 minutes
Cure with Dandelion Tea
Food and Water draining
Listeria
234% and 200%; lasts ~8 minutes
Cure with Penicillin
Dysentery
167% and 351%; lasts ~7 minutes
Cure with Penicillin
Food Poisoning
234% and 200%; lasts ~5 minutes
Cure with Dandelion Tea
Staph Infection
234% and 200%; lasts ~5 minutes; lapses into Sepsis
Cure with Penicillin
Sepsis
234% and 200%; lasts ~6 minutes; lapses into Death
Cure with Penicillin
Snake Bite
234% and 350%; lasts ~7 minutes; lapses into Death
Cure with Dandelion Tea
Special
Blood Flukes
Drunk

A game day is ~17 minutes.

Conditions stack. If you get bitten by 4 snakes, you get 4 snake bite conditions and need 4 dandelion teas to heal. The draining effects and immediate Fatigue damage receive diminishing returns. If your fatigue is full, you can (theoretically) take about 6 bites before you die.

If any one of your 4 survival meters reaches 0, you will die. However, if there are no Wolves or Bears currently directly attacking you, fatigue reaching zero will cause you to fall into a crawl, in which case a new button appears above Scout's portrait, labeled "Collapse". Press it and you fall asleep right there, until your fatigue becomes full. If your clothing is insufficient, this may drain your temperature and you may end up dying to hypothermia after you're fully rested.

By running out of one of the other three main meters, similar to fatigue, so long as you're not in direct combat, you fall prone and have a good 10-30 seconds before you actually die. However, since you are forced into a crawling state, unless you have on you everything you need to survive – you'll die. There is no convenient button to refill those meters.

Blood Flukes is a unique condition caused by eating the rarest item in the game: Spoiled Fish, which you get by looting Bear dens. It docks fatigue, lasts for a short duration before it heals on its own and you need it for the Iron Stomach achievement.

The other unique condition is Drunk. You get it by drinking Alcohol and all it does is dock fatigue and thirst for its very short duration.

In cases of docked meters, the amount docked might not necessarily be the same as the amount returned. Snake Bite, for instance, docks 20 fatigue the first time. Drinking Dandelion Tea will heal the Bite and return 30 fatigue.

Wet and Ill-Equipped
Wet and Ill-Equipped will allow your body temperature to drop.

Ambient temperature depends on Region and time of day. So long as your Gear Rating is above the ambient temperature, being Wet will only have minor effect on your body temperature. However, in the coldest Regions at night, even the best clothing in the game will merely not give you the Ill-Equipped condition, instead of keeping you warm.

You can either sit at (or stand near) a campfire or sleep in a shelter to remove both of these conditions, as well as restore your body temperature. Ill-Equipped, however, will come back if your clothing isn't good enough.
Inventory management
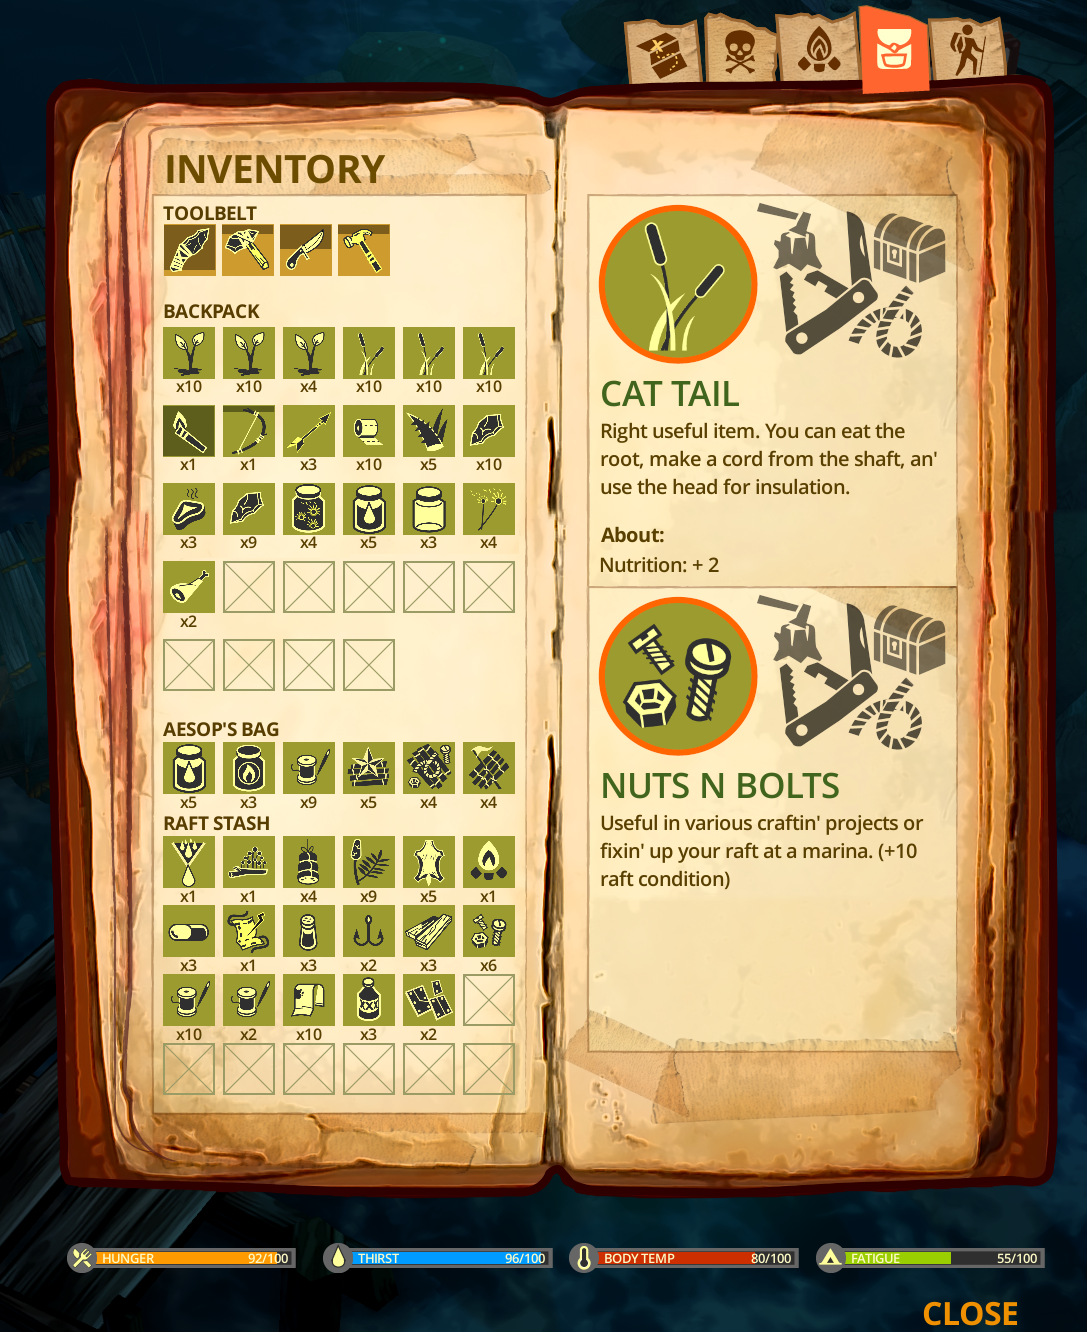
If you know what you're doing, you'll always be prepared for anything and won't die easily. However, when you do die, it will be surprising, quick and impossible to anticipate. Aesop's inventory should always be prepared for your eventual demise, so that the next run starts more smoothly. Aesop only has 6 slots. Here's what you shouldn't put on him in most cases:
  • Pouches and clothing don't stack. For Pouches in particular, it's better to put the materials to craft them on Aesop instead.
  • Tools are status effects, rather than items in your inventory and thus can't be given to Aesop.
  • A single stack of Raft upgrade tokens. You get them at similar rates, having only one of the three is a waste of space, while having all three takes up half of Aesop's capacity.
  • Bow and arrows might be tempting, but that's two slots and you won't have a Steel Knife very early on, making it impossible to replenish arrows until you find a Boar, 2 Nuts N Bolts and a workbench.
Best things to give Aesop are items that you'll always need:
Jars (Rare and absolutely necessary; I recommend two stacks – clean water and fuel)
Stitching Kits (Uncommon and multipurpose; Besides Jars, there's nothing in the game more important)
Raft Schematic, Hardware and Frame (With 10 of each, you can get a nice combo of Motor, Rudder, Storage, Stove and Sturdy Frame. That leaves only Shelter and Water Purifier for later)

Scout/Raft inventory recommendations:
  • Flint
  • Stitching Kits
  • 30 (3 stacks) Saplings
  • 30 (3 stacks) Cattails (don't make these into Cord or Tinder ahead of time)
  • 3 (1 stack) Spike Traps (condensed Saplings and Cattails, useful to have ready in case of White/Elder Wolf)
  • 5 (1 stack) Torches (amount can be ignored with the infinite Torch bug)
  • 5 (1 stack) Cooked Meat (your primary food, don't bother with extra stacks – they spoil too fast)
  • 5 (1 stack) Tainted Meat (you don't actually need that many ready-made, 1 or 2 will do)
  • 1 Bow
  • 10 (1 stack) Arrows (don't restock when low on Flint!)
  • 10 (1 stack) Bandages (for Lacerations and Tiny Cuts)
  • 10 (1 stack) Penicillin (for when you're REALLY having a bad day. Cures Dysentery, Listeria, both types of Infection and Sepsis)
  • 5 (1 stack) Aloe (for Ant Stings and Poison Ivy)
  • 10 (1 stack) Devil's Trumpet (to replace Tainted Meat as needed)
  • 10 (1 stack) Sumac (to make Sumac Tea for Parasites and Blood Flukes. Also Gas Bombs, if you have too many Jars or need to kill Rabbits)
  • 5 (1 stack) Jars of Dandelion Tea (for Food Poisoning, Giardia and Snake Bite. Also nutrition and hydration)
  • 5 (1 stack) Jars of Water
  • 10 (1 stack) Rags (for Splints and Bandages)
  • 5 (1 stack) Alcohol (for Bandages)
  • 5 (1 stack) Old Lumber (for Repair Patches)
  • 10 (1 stack) Nuts N Bolts (for Steel Knifes, Repair Patches and high-tier clothing)
  • 5 (1 stack) Boar Pelts (for Steel Knifes)
  • 20 (2 stacks) Feathers (for Arrows)
  • 5 (1 stack) Repair Patches (best way to repair the Raft)
  • 10 (1 stack) Jerky (or other non-spoiling rainy-day food)
(Total: 30+ of the maximum 52 stacks)

You don't need all of these right away. The loot you get is random and these are just the maximum amounts you should keep around. Any excess can be immediately eaten or discarded.

Most of the listed essentials at a glance:


You can sort your inventory by clicking and dragging the icons around.

You might be wondering why I recommend Jars of Fuel on Aesop and Water on Scout. It's for security. If you drink Water from Aesop's inventory, you get an empty Jar. If you're in a zone with little rainfall, you might end up drinking 4. If you were to die at that point, you'd be left with only one Jar in the next game. I recommend keeping a separate stack not in Aesop's inventory to mitigate this problem. If it happens anyway, in the new game you can empty some of the Fuel to increase your Water storage. Though Jars are reusable, they are rather rare and very useful – better safe than sorry.

The reason I recommend Fuel specifically, is to reduce temptation to use it. Also because I think that the Motor is the most vital Raft upgrade.

Fishing Lines and Fish Hooks should be crafted into Stitching Kits as soon as you get a pair. Likewise, Moldy Lump should be crafted into Penicillin as soon as you get two. These things have only one recipe and no other uses. Although Moldy Lump can be eaten for paltry nutrition (and also parasites which make it pointless), you don't even need it for the Iron Stomach achievement, which would have you "eat all the bad stuff in a single playthrough".

Cattails convert into Cord or Tinder at a 1 to 1 ratio and have the same stack size. Cord and Tinder are not edible. Don't do it, unless you need it.

Wolf and Bear Leather are only needed if you don't have the respective clothing yet. Rabbit Pelts are also used to make said clothing, in addition to Pouches, and can be thrown away afterwards, as clothing doesn't have durability.

Raft Schematic (found), Hardware (made with Nuts N Bolts) and Frame (made with Old Planks) are only useful until you fully upgrade your Raft. The only reason to keep them past that point would be to pass them down to your next playthrough via Aesop.
Raft upgrades
Motor
Allows the Raft to mostly ignore the river's pull, improves steering (too much so on rapids) and increases speed. All while you have fuel to spend.

The motor is the most important, because it's a near-guarantee that if you see a Location icon on your screen – you can go there. Unless there's land in the way.

Costs: 3-3-3.


Rudder
Improves steering slightly.

Rudder is the second most important, because it's cheap. The steering bonus stacks with the Motor. It is not the first, because without the Motor, the stamina powered dodge already does what a Rudder does well enough.

Costs: 1-1-1.


Storage
Double's the Raft's storage capacity from 12 to 24 slots.

Storage is third, because is cheap and this game is a survival game – a game all about hoarding. Given what you're collecting, 12 slots fill up very quickly, while 24 give you a good amount of space for all the necessities.

Costs: 1-1-1.


Stove
Provides a permanent campfire that works during rain and provides heat. Removes Wet, but not Ill-Equipped. Needs to be kindled with Tinder like a regular campfire.

Stove is fourth, because it means you won't have to waste Flint and Old Lumber on a campfire ever again. Once lit, it will always tend to appear lit. Also, if you save and load while it's kindled, it will take an incredibly long time to burn out.

Costs: 2-3-3.


Shelter
Allows the player to sleep at the Raft. Removes Wet and Ill-Equipped.

Shelter is fifth, because abandoned buses, buildings and churches are everywhere. Do not use in case of hypothermia – it'll kill you. Also, it doesn't actually count as 'shelter' as far as achievements are concerned.

Costs: 2-2-3.


Water Purifier
Makes clean water. Works exactly like a well, but requires time to charge up. If drinking directly from it, it charges faster than the water meter drains on survival by default. It is not affected by rain.

Purifier is last, because it's only useful in the Wasteland. Everywhere else it rains often enough for a stack of Jars to keep you fully hydrated.

Costs: 2-3-3.


Total: 11-13-14.
That's:
11 Schematics, which you find. Mainly in Hardware Stores.
13 Hardware, that you make from 2 Nuts N Bolts, using a Stone Hammer. 26 Nuts N Bolts total.
14 Frames, that you make from 2 Old Lumber, using a Stone Knife. 28 Old Lumber total.
Regions & Locations
Not counting Campaign-related ones, the game has four Regions with one possible modifier each and ten Locations.


Regions
Deep country.
Farms, Camps and a lot of Wilderness.

Varied Locations, however, lacks Filling Stations and stores, which makes Nuts N Bolts very rare.


Small town.
Plenty of shops to loot.

Many stores and Filling Stations. A good place to quickly upgrade the Raft. Jars are sometimes found in buildings and the occasional abandoned car.


Industrial zone.
Little food, lots of danger.

"Little food" is the exact opposite of "lots of danger", as danger equals food. What this means in practice, is that you won't find any Farmsteads, however, Cattail is as plentiful as ever. Abandoned cars are very common here, so Nuts N Bolts are an easy find. Biggest issue is that Flint is extremely rare here – you'll be lucky to find one or two in the entire Region.


Desolate wasteland.
Occasional camps and churchs [sic].

Mainly Wilderness all the way through. Even though you won't find many upgrade materials, there are plenty of animals to eat. Biggest issue is that rain is extremely rare here – it might take five days for any rainfall to appear at all. Raft Water Purifier upgrade is rather useful here.


Locations
You should memorize the Location icons, as you'll need to make swift decisions while traveling downstream. The ones for Filling Station, Hardware Store and Liquor Store in particular are very similar to each other.

Marina

The safest place in the game. No animals spawn here and there's always a Raft upgrade station and enough fuel to fill up one Jar.

Bait Shack

The second-safest place in the game. Only animals that ever spawn here are Crows and the occasional Snake. Despite the game telling you that it's a good place to get Stitching Kits (or rather materials for them), they're rather rare here. Looting the building and bait box will usually only get you Night Crawlers and Lumber. At the base of the shack it self, however, you'll find lots of plants and, sometimes, a terrain hazard. A good place to quickly fill up on basic supplies, as the walking distance is next to none. Better place to sleep than the Church.

Camp

Your main source of Flint. Though it's still rare and might fail to appear, you may find up to three here. Always has a campfire, but it's only lit when there's no rain.

Wilderness

No buildings, but you'll find cars in Small Town and Industrial Regions. Animals and all types of plants are common.

Church

Always has a church building and often – materials for Bandages or Torches.

Farmstead

The only place to find Corn. Other than that, there's not much reason to go here, rather than anywhere else.

Clinic

Filled with medical supplies. Splints, Bandages and Penicillin are common.

Filling Station

Other than the Marina, this is the only place to get fuel. Has a higher chance of Raft upgrade materials. Always has a workbench.

Hardware Store

Always has a workbench. Raft upgrade materials are more common here than anywhere else.

Liquor Store

Lots of Alcohol. That's about it.


Modifiers
These are four, what I call, modifiers. They appear in Endless Mode appended to the Region's description and change its characteristics.


Slow river, clear skies ahead.
The most deadly of the lot. Causes the river to flow at minimum speed. Designed to be an absolute waste of your time. Motor and constant dodging forward recommend. The allusion to there being no rain can be ignored, because it's a Wasteland anyway.
Only appears in desolate wasteland Regions.

Heavy rain ahead.
The most annoying one. Causes permanent rainfall. Raft Stove is a necessity if you plan on spending any amount of time here, as campfires will never be lit. Raft Shelter might also be necessary. Torches are almost completely unusable. The rain will stop occasionally, but will start again immediately after.
Only appears in small town Regions.

High water ahead.
The most useful one. Causes the entire Region to be one massive rapid. Unlike in regular rapids, there aren't as many obstacles and the river's width isn't restricted. Easy rapid progress.
Only appears in industrial zone Regions.

Cold weather ahead.
The most insignificant one. Reduces the normal temperature of the area.
Only appears in deep country Regions.
Campaign strategy
In the Campaign, the Regions are set in the order they appear. Other than the three Campaign-only locations, the names of the rest are randomly taken from a list. The distance at which each Region appears varies slightly in every run.

Campaign Regions:
  1. (00.7 Mi) Deep country. Farms, Camps and a lot of Wilderness.
  2. (03.6 Mi) Deep country. Farms, Camps and a lot of Wilderness.
  3. (06.1 Mi) Small town. Plenty of shops to loot.
  4. (11.4 Mi) Hill Country – Deep country, few docks.
  5. (12.8 Mi) Industrial zone. Little food, lots of danger.
  6. (18.7 Mi) Small town. Plenty of shops to loot.
  7. (23.9 Mi) The Yard – Severe rapids ahead. Boating hazard.
  8. (25.3 Mi) Desolate wasteland. Occasional camps and churchs.
  9. (32.3 Mi) Small town. Plenty of shops to loot.
  10. (37.6 Mi) The Gulf – Open water, nowhere to stop

While you are at the starting Location, before you can get on your Raft, your meters do not drain. Take some time to gather up everything around.

Less than a mile after you set out, you enter the first Region. Typically, there are only Rabbits and plants here, with Wolves and Boars usually appearing starting in the second Region. In the first two Regions, I recommend stocking up on Flint and other basic resources, as well as crafting Pouches with the goal of 28 inventory slots.

The third Region changes into a small town and it is here that you first run into Snakes. If you're trying for the Animal Friend achievement and aren't making a mad dash for the end, then this will be where the game truly begins, as you can start using the Snakes to deal with Rabbits and Boars. This is an other Region I recommend to thoroughly ransack for resources, as here you'll find plenty of the things you need to upgrade your Raft and you can gather up enough Boar Hide for a full set of clothing.

The fourth Region is a story one. It never rains, there is only one Location and that Location has a lit campfire. There is also a trader there that might give you a good trade, such as giving you a Raft Schematic for a nearly-used-up Box Trap, however, it's luck based, because he may very well just rip you off instead. He'll offer up to three choices one after an other the first time you meet him and one more on the way back, if you choose to talk to him again. That means you can potentially trade with him twice.

The fifth Region is Flint-starved. This is also the Region, where I expect your Stone Knife to run out of durability. Make sure you have enough Flint to replace it, as without a Stone Knife, you can't make Traps or Raft Frames, kill Rabbits in your inventory or rip up clothing into Rags. Despite the Region description saying there would be "lots of danger", this Region is no more dangerous than the third.

The sixth Region is just more of the same, however, you should fully upgrade your Raft by the end of it. If you don't, things will get rather troublesome later on.

The seventh Region is the second story beat. It is an arena with 3 Snakes, 3 Wolves, 1 Boar and 1 Bear. Chances are that this is the first time you'll encounter the Bear, as even though it may spawn in earlier Regions – it's a rare sight. Bears will be common from here on. If you're going for the Animal Friend achievement, check the achievements section, otherwise, the best method is to prepare a Torch and run straight to the Bear. This will aggro the Wolves, which will then fight the Bear and give you lots of free Meat. If, at that point, a remnant Wolf or the Bear aggros on you, you can pull out the Torch for safety. You may also use the Torch to lure Snakes in to kill the Boar in the Eastern-most area of the compound. Careful not to pen yourself in with the Snakes. Sleeping will not reset the Snakes in this area, but there are plenty of resources for you to deal with the Bear in any way you wish.

The eighth Region is one with very little rain. On my runs, it rained every 5 days or so. There aren't many Raft upgrade materials here, but by this point, your Raft should be fully upgraded anyway. The Elder Wolf will make its appearance and will hound you throughout the Region. While it takes a single Spear Trap to kill, you may also opt to just not bother with going slow from this point on – rush straight for the end. The temperatures will drop rather quickly, but a Boar set is good enough, so long as you use your Raft Stove to warm up every now and then.

The ninth Region is the final bit left before the end. The only real hazard here is the cold.

The tenth Region is the final bit of story. Just keep going forward and the game will tug you towards the final goal on its own. If your Raft Motor has fuel, you can vastly speed up the final boring journey, otherwise it will take a while of staring into empty space.
Bugs
This game has a lot of bugs. Even The Elder Scrolls series would give it a blank look. Don't be afraid of using them. The game came out in 2016, now it's 2023. Any bugs they haven't fixed for so many years are already a part of the game.

So here's a list of the ones I found in my 80 hours playing the game:
  1. Animals get stuck at random, after Scout sleeps or after being bitten by Snakes.
  2. Crow Feathers often get stuck on inaccessible terrain and buildings.
  3. Rocks on the river might have a collision box bigger than their models.
  4. The Raft can get hit in the side by an object floating parallel.
  5. Location wharves can get clipped into terrain.
  6. Due to buggy culling, Locations may vanish ahead of the player.
  7. It is possible to Motor your way so far backwards that you enter an unloaded part of the river.
  8. A building's door might be unusable, even though the interaction prompt is displayed.
  9. Quests might complete themselves at random.
  10. Invincible achievement was given to me an hour after I met the conditions.
  11. Filling a Jar at a water pump with a full inventory destroys the Jar.
  12. Dropping items, that stack into a box, on the ground resets their uses and durability.
  13. A Torch can be manually put away once it is exhausted, before Scout throws it on the ground, creating an infinite Torch.
  14. If an infinite Torch is equipped when you get on the Raft, the Torch icon will continue to hang above the Raft, while it goes downriver.
  15. A Snake may spawn right next to an abandoned bus Scout is sleeping in and try to attack during the exit animation.
  16. A Spike Trap may gain an additional use after it spears a Wolf.
  17. Developer commentary subtitles get paused by tutorials, while the commentary it self doesn't. This makes it go out of sync.
  18. The tutorial on how to collect rain with Jars appears for all of 6 seconds the first time it rains and never again. It doesn't pause the game and even blends in with the inventory screen's appearance.
  19. Quick deploy tutorial mixes up Torch, Tainted Bait and Gas Bomb keys.
  20. Pressing [W] while trying to access the quick inventory with [1], [2] and [3] causes Scout to continue running in the same direction until [W] is tapped again. Other methods do not work.
  21. While using [LMB] to steer the Raft, pressing [RMB] to pick up loot will cause the game to stop detecting [LMB]. At this point the player needs to temporarily release [LMB] for it to work again.
  22. Once you leave the Raft, you cannot interact with it again until you walk a certain distance away (unless you're in a Marina). If you lock on to the Raft with [RMB] move out of range and back, then interaction happens automatically without you pressing anything.
  23. If you refuel the Raft Motor, the Raft interaction box with come up again on its own, unprompted.
  24. Mousing over an item you can interact with causes the interaction's name to appear at the wrong location and then quickly readjust to where it should be.
  25. Crafting multiple Pouches with the "Create All" button causes only the first Pouch to be added to your inventory space total. Others are placed in your inventory as items instead.
  26. Broken Bone icon may be shown next to the "inventory full" message, instead of the usual Pouch.
  27. If you enter a Location as soon as you enter a Region, the title card of the Region and that of the Location will overlap with each other.
  28. Once enough Regions have passed, it is possible for blank Region names to start appearing.
  29. Crows that land on corpses may have the red blood projected over their bodies.
  30. If you play the game long enough, in the animation where Aesop catches Scout's lantern staff, the staff might become invisible.
  31. If you talk to Flimflam on the way back from the radio tower, a cutscene will play where the water gate opens. Once you exit the Location, the water gate will open a second time.
  32. Using Raft Motor on river rapids causes the Raft to accelerate into turns much faster than expected.
  33. Aesop may randomly run off the side of the wharf and into the river.
  34. It is possible to crash land on top of a small island in the river and take multiple ticks of damage before getting free.

Other than bugs, this game also has a lot of typos or style mistakes in it.
  • Campfire is called 'Camp Fire' in the journal. It's a weird thing, because 'campfire' is the usual way to write it. When you mouse over it, it says 'USE FIRE', leaving out the 'camp' part entirely. When building a new campfire, the prompt says 'BuildFire', without a space.
  • While it says 'USE FIRE' to use a campfire and, likewise, capitalizes most interaction prompts, when you enter the Marina Location, it just says 'Use Marina', without all capitals.
  • Cattail is written as 'Cat Tail' in the journal, but while mousing over one growing on the ground it says 'CATTAIL'.
  • When entering the Wasteland Region, the description says: 'Occasional camps and churchs.' The plural of church is churches.
  • Among the game's Steam Achievements, 'Can Bearly Take It' achievement's description has 3 'l's in the word 'kill' and 'Artic Survivor' is missing a 'c'.
  • When entering The Gulf, the description says: 'Open water, nowhere to stop' – it is the only Region without a period at the end.
  • When entering Bait Shack and Marina Locations, their descriptions have a period at the end, when no other Location description does.
General gameplay tips
Clean rainwater tutorial is garbage. Mentions vital mechanic in passing. Lasts for 6 seconds, doesn't pause the game, blends in with the inventory screen. Easy to miss.

Water sources that give you the choice of 'drink' or 'fill' will top up your hydration if you drink, regardless of how low it was. Drinking from a filled Jar only gives 50 points.

If you have a stack of Jars, rain comes often enough in most Regions, where you won't need any other source. This makes Charcoal a waste of space.

Box Traps cost more than Snares, but if you don't pick one up before it catches its first Rabbit, you can use it a second time. This makes it more efficient than the Snare and also gives you a living Rabbit, that you can deploy or kill.

A Box Trap placed over a Rabbit burrow will not catch Rabbits going out, only Rabbits going back in, but not if they're too close to the burrow.

You can rotate Traps while placing them by holding the Left Mouse Button (LMB).

You can set up Traps, while your Torch is up.

Clicking the Right Mouse Button over or near something you can interact with will lock-on to it and cause Scout to run towards it. Moving Scout with [W][A][S][D] keys will not break the lock-on and the interaction will begin as soon as Scout gets in range. To cancel the lock, click [RMB] again, but not near anything intractable.

Using mouse and keyboard, use the mouse to sweep past locations that may contain loot. If you're not locked on to anything, interaction prompts will appear through walls and foliage.

Raft can slow down and speed up with S and W keys. Damage the Raft takes is dependent on speed. Don't rush on the rapids with a beaten up Raft.

When leaving a Location, the Raft spawns in the exact place on the river you left it.

You can sprint past Ants and Poison Ivy without getting hurt. The same does not apply to Brambles.

Sleeping causes animal positions to change. This can stop Wolves camping the wharf and angry Boars. In some cases, however, animals may despawn or get stuck while doing this.

Sleeping also causes animals to heal back to full.

Dropping some items on the ground refills their durability. Notable examples: Water Filter and Bow. Traps, Torches and food are protected from this, because they don't go in a box when dropped.

All pieces of clothing give the same amount of insulation. Craft the pieces that require the least amount of resources first – hat, gloves, boots.

Don't make Rabbit clothing. Boar is a better choice, because it requires the same Stitching Kits and doesn't require Rabbit Pelts, which are needed for Leather Kits. Don't make Wolf clothing because it isn't much of an upgrade over Boar and Bear requires the same Leather Kits. Elder and White wolves are the exception, as they are the best in slot. That said, both Wolf and Bear sets are needed for their respective achievements and the others are needed for the "craft everything" achievement.

Penicillin is time-consuming, but very easy to get. It's also rarely needed – an entire Campaign can easily go by without you ever needing one, but when you do – it's urgent. You can make them by spoiling mulberries.

Hoard Flint (especially for 5th and 8th Campaign Regions) and Stitching Kits.

Keep an eye on your tools! Stone Knife and Steel Knife are not interchangeable and rapidly go through durability. In the Campaign, the Stone Knife will likely run out of durability in the 5th Region, where you'll be lucky to even find a single piece of Flint in the entire thing. Make sure you have enough Flint in reserve, don't overproduce arrows and campfires! Without the Stone Knife you can't craft Traps or Splints and can't kill Rabbits in your inventory or rip up clothing into Rags.

Cattail is good food – they provide 2 nutrition each and are found in large numbers in most areas. Dandelions can also be eaten, though aren't as nutritious if not made into Tea.

The Wilderness is not as light on supplies as the game suggests. There tend to be plenty of animals, Cattails, Dandelions, Mulberries and Saplings. Yucca, Aloe, Garlic, Sumac and Devil's Trumpet might also spawn. In some Regions, there may also be ruined cars that usually have Nuts N Bolts, Old Lumber and sometimes even Jars in them.

Tainted Meat and Tainted Bait are the same. Both crafting recipes produce the same item, it's just that one of them uses Raw Meat, while the other – Cooked Meat.

Torches are a must. Keep one with you at all times. They give you a tiny bit of warmth; prevent Boars, Wolves and Bears from attacking you; pull Snakes toward you. That last one might sound as a negative, but the Snakes try to keep a respectable distance – unless you corner yourself (causing snakes to block your path back) there is no downside to them following you. The Snakes are roughly as useful as arrows against animals!

Torches are extinguished by rain, infinite Torches will stay lit if they were up before the rain started, but cannot be brought out during rain.

If you die, Aesop's inventory carries over, however, if you finish the Campaign successfully, then you technically don't die – on the following playthrough Aesop will have nothing.

Standing near a campfire is enough to unlock fire crafting. You don't actually have to sit at it.

Gas Bombs are great early, when you need Rabbits for Pouches and Snakes aren't readily available.

Always keep Dandelion Tea on hand. Snake bites kill you very quickly and the game likes to hide Snakes with shifty camera angles.

If you know there are Snakes about, don't move around during a storm. They're rather difficult to spot in the dark.
2 Comments
Testymagic Feb 1 @ 3:47pm 
For Terraphobia: You can eat, drink and refuel gas on the raft with the quickslots.
You can also collapse from exhaustion during the 10 miles and still get it.
I collapsed twice in endless and still got it..
The raft seems to stop when collapsing, you don't drift into island during this time.
After 10 miles, you need to stop somewhere for the achievement to pop when the animation of stepping on the platform is done.
Larrius King Jan 8 @ 3:10pm 
Excellent Guide! Probably the most complete and thorough, as well as information dense guide to this game I've seen. :NanogelArmor: