东方夜雀食堂 - Touhou Mystia's Izakaya

东方夜雀食堂 - Touhou Mystia's Izakaya

98 valoraciones
Mystia's Izakaya Journal
Por Paper Rabbit
Covers base game and the 3 DLCs. I won't go over the nitty gritty gameplay mechanics because there are 2 other Steam guides that already got that covered. This is a more a tool to help you streamline your Izakaya running. I will mention what I think are helpful
3
6
2
2
   
Premio
Favoritos
Favorito
Quitar
The usual blah blah blah before anything
Covers base game and the 3 DLCs. I won't go over the nitty gritty gameplay mechanics because there are 2 other Steam guides that already got that covered. This guide does contain spoilers for your future partners and all the areas of the game. Other than shield your virgin eyes and clicking away from this, not much I can say to that. While I do spoiler tag available partner for each area, the Partner section is obviously spoiler city.

Here's what I do cover:
  • Map
  • Basic details of each zone
  • Shops
  • Rare guests
  • Partners
  • A very very long list of Tasks
  • A less longer list of News
  • Very general tips. For detailed stuff check Suika Ibuki or nobody's fault but mine's.

What I DON'T talk about:
  • Gameplay mechanics because 2 other guides cover it
  • List of recipes & ingredients. Check wiki. Shops section should cover the necessary stuff
  • The special guests such as Rinnosuke and the collab characters.

https://steamcommunity.com/sharedfiles/filedetails/?id=2821007691

https://steamcommunity.com/sharedfiles/filedetails/?id=2730526153
The Lay of the Land


You start out at Youkai Trail and each area unlocks like so:
Youkai Trail > Human Village > [DLC 1] Forest of Magic > [DLC 1] Youkai Mountain >
Hakurei Shrine > [DLC 2] Former Hell > [DLC 2] Palace of the Earth Spirits >
Scarlet Devil Mansion > [DLC 3] Myouren Temple > [DLC 3] Divine Spirit Mausoleum >
Bamboo Forest of the Lost

If you are only concerned about maxing bond level, towards the end my travel route is to back track from Palace of the Earth Spirits and then make my way towards the west side of the map. Passing through the Village and make my way down towards the Mausoleum. Finally back up towards the Youkai Mountain. By the time I end up at either Scarlet Devil Mansion or Forest of Magic, I'll still have 30 minutes left to invite someone or get ingredients. Doable if you have no need to make anything for quests. (But you won't be able to ask Wriggle to get stuff for you :( )

However this route is not usable once Bamboo Forest of the Lost is available. You simply will not have enough time to go to each location. I'd prioritize on maxing bond levels for residents of Youkai Mountain and Forest of Magic first just so you don't need to go that way unless I need certain ingredients.

Because you almost always start out at Youkai Trail, it's easy to talk to the 3 characters here to slowly raise their friendship just through dialogue once you hit level 4. Keep in mind with the exception of Chen, Rumia and Wriggle can also appear as rare guests in Forest of Magic sometimes. (Although the forest itself is easy to stall progression-wise early on...) You will always go through Human Village if you hope to get to the left side of the map, so I also wouldn't spend too much time here after other areas have opened up. Has the same geographical advantage of Youkai Trail so you have plenty of opportunity to talk to the rare guests here. I would stock up on Akyuu's reward card though as early as possible. There's a particular NPC in the Village who wants Akyuu's reward spell card that generates Signed Washi. The NPC will trade 3 Signed Washi for 3 premium meat/fish or high level beverage choice. She will make a posting in the newspaper so just keep an eye on that.
Tips
Smart shopper
The farther away from Mystia's home, the more expensive ingredients tend to be in shops. Shangai Doll in Forest of Magic's ingredients are very reasonably priced though. Hakurei Shrine's fairy maid's meat ingredients while fluctuate somewhat in price, she has the best deals because... they are nearly expired. But this is video game. Expiration date doesn't exist in Gensokyo (or common sense.) Region specific specialties like Black Salt will be the cheapest from their place of origin Youkai Mountain. Though mundane items such as Radish will be doubled in price if purchased in Hell rather than from the Human Village. (Or you got scammed by the scalper merchant on Youkai Trail)

Cheapskate scavenging
But shopping costs money, if you can scavenge for free why not scavenge. It's why maxing someone like Wriggle's bond can be very beneficial. For the cost of 30 minutes she can collect everything on Youkai Trail in one go for you at the end of the day. Each area has someone like Wriggle who can do this kind of job. Akyuu in Human Village. Suika in Hakurei Shrine. So on so forth. You will have to buy most drinks though.

Fairies are not made of money. Cheap and steady wins the race
Everybody has a budget. On one end of the spectrum there's Marisa, who's filthy rich and then there's Cirno on the other end. As tempting as it is to throw your most expensive dishes at your special guests, there's no way someone like Cirno can afford a deluxe sushi boat with her meager fairy allowance. Because I prefer maxing my guests's level first over squeezing them for money, I will serve them cheap dishes stacked with extra ingredients. They pay the same price regardless of how premium your added-on ingredients are. You may lose money in the short run, but the perks or recipes they offer down the line would be worth it.

Happy guest or repeat orders?
Regarding guest preferences, Night Sparrow set ignores rare guest's request if the food is made during Hyper mode. Useful if you can meet all the other tags but not the one that's requested. But if you want them to increase chances of sticking around, try the Suspicious set kitchenware. Guests are 30% more likely to order if you serve them food made with these. Night Sparrow series is available very early on while Suspicious series only becomes available once you've reached the third base game area.

The special menu
It is not necessary to set a dish on the menu to be able to cook it. As long as you remember what the needed ingredients and the corresponding kitchenware you need, you can make it. Putting an item on the menu just makes it easier to select really. Of course, nobody could order outside of the standard menu this way.

Mini game call back
The rhythm mini game during the Izakaya phase is worth mastering. One of the spell card you generate from succeeding the game is "Toss Serving." Unless your partner can teleport or throw knives, this is the fastest way to serve guests. Getting this spell card or entering Hyper mode will be necessary for the final part of the game. The mini game's pretty forgiving compared to actual rhythm games at least.

Good things do happen if you are generous
Feel like donating to the shinre is a scam? Maaaybe. Though there's secret service once you do donate enough. Teleportation service for a very nominal fee. You just need to donate 25500 yen to Reimu to unlock it ;) Teleporting this way does not cost any time at the cost of some chump change.

Achievement farming
If you want to get all achievements, there are 2 points you may want to keep separate save points for. One for when Mystia is dragged into an unavoidable event on 3/14. The event's outcome will net your 1 of 2 possible achievements. The other achievement will be missed if you continue the main story after this. Another save for once the final mission is available. Earliest point for this is 3/24 but you still go on with your main game until you feel you are ready for it. This is a good spot to farm all your punishment cards. In a sense, it's also possible to miss another achievement here. Lose intentionally in the final fight. Tewi also stops scalping you once you've become a good friend with her. So if you haven't been scammed by her 25 times, there's that final mission save you can always load back to.

Sakuya has a counter based achievement where you need to trade with her X amount of times to unlock it. There's no easy way to get around this one. Save/Reload doesn't work. Loading from an older save doesn't work. Loading a newer save on a later date but same item requests doesn't work. Loading the old save from after you've made progress on the new mission also doesn't work. Fastest way is to sleep for days until she posts an ad in the papers again. Repeat until you hit 30... Earliest you can get this achievement if you didn't miss any Sakuya's quest is 5/23. Unless...

You feel like editing your saves. Hishiro Chizuru has a guide on modifying the save files for Sakuya's errands. The same method can be applied for Tewi's shop too. Yes it's in Chinese. But the screenshots are fairly self-explanatory. It involves copy pasting the specific entry X number of times. Do backup your save files before you attempt this.

https://steamcommunity.com/sharedfiles/filedetails/?id=2760195446

Closet-ful of goodies
Do you remember Mystia has a basement? In addition to the Closet to change her costumes, there's also a Presents Cabinet that allows you to turn on/off the cool stuff you got from your friends. By default, all the goodies you receive are not active until you've enabled them in the basement. I entirely forgot about the existence of this thing until I already beat the game. Oops... Oh. There's also a record player that's the BGM player of this game.

I like it, okay?
If there's one particular BGM you particularly love and would love to hear it played even during Mystai's work phase, you can set it from her record player in the basement. You are given the option of looping one song or the whole set from an area.

Some friends are just worth it more than the others
There are 3 types of gifts you can get on each map: costumes, scavenging service, and useful passive items. If you have DLC 1, I highly recommend gunning for Nitori ASAP. At max bond she gifts you a phone and it does what you expect a phone to do. Contact people to: Invite them, commission them, or even do some shopping. Sadly Kappa technology hasn't quite got that mobile aspect down pat so you are stuck with a very 80s vintage phone at home. The phone will not show up until you enable it from the Present Cabinet. You cannot call anyone you haven't reached at least level 4 bond with. Multi-invite or commission doesn't allow you to bypass the 30 minutes requirement for each guest. If you ask 2, you spend 1 hours to do so. If you invite everyone, you spend .5 x the number of you invited.

If you don't feel like spending a LOT of money over a period of at least 26 days to unlock the secret service, this is a good alternative.

Bamboo expansion
For Twei's level 3 quests where you need to give her [Sweet] and [Small Portion] tag, you can just give her the Mochi from Human Village's merchant. For Chen's final upgrade for this region you can just get her Lunar Dango from Ringo in the Human Village. You could also placate Twei with the Mochi after adding some tag easily as well with the store bought snack should she drop in uninvited.
Foundation dishes to build up on
These are some of the basic and easy dishes I like to use to build up on to please the rare guests. Due to menu restraint some obviously can't make it.


Base game recipes:
  • Fresh Tofu: You start with this! An oldie but a goodie. Good for vegetarians, those with small appetites and oddly, Suika. Since there are no X tags to turn this into Dark Matter, you can easily stack meat ingredients and other stuff on top of this. [Vegetarian], [Homecooking], [Mild], [Good with Alcohol] and [Small Portion].
  • Rice Balls: Good for poverty red white and Rinoosuke
  • Miso Tofu: It's an easy one from Akyuu very early on. [Vegetarian], [Homecooking], [Mild], and [Japanese]. On the rare occasion Akyuu asks for something with [Soup] tag, this is perfect for her.
  • Falling Blossoms: A goodie from Akyuu. Takes only 1 Premium Tuna but has some really specific tags for those with discerning taste: [Japanese], [Photogenic], [Small Portion], [Sea Delicacy].
  • Tofu Stew or Roasted Mushroom: For Mokou's [Hot] tag mainly. These 2 are cheap and have plenty of space for something [Fruity] or [Spicy] for Mokou. You can get Tofu Stew from Kasen. The Roasted Mushroom [recipe] is from an NPC's quest at Youkai Trail near the beginning of the game.
  • Pink Rice Ball: An alright dish from Reimu. [Homecooking], [Filling], [Japanese], [Vegetarian] and [Hot]
  • Power Soup: The easiest way to get the [Strength-Boosting] tag. Beware the [Hot] tag is a nono for certain cat tongued individuals such as Chen (even though she's the one who gives you this recipe) and Kogasa.
  • Imitation Bear Stew: Without dipping into DLC territory, this fake bear stew from Rumia's the other reliable source for the [Strength-Boosting] tag sans the [Hot] tag.
  • Pork Rice Ball: Takes only 1 Pork. A very early beginner dish to placate the meat lovers. No way to turn this one into Dark Matter too. Keine will give you this recipe once you finish her quest for school lunchboxes.
  • Rose-like Daikon Salad / Carved Rose Salad: Tenshi's entry level recipe is great for those looking for [Vegetarian], [Mild], [Photogenic] and [Cool] tags. Useful for Tenshi herself (likes Vegetarian, Mild and Photogenic) and Cirno (likes Cool and Photogenic.)
  • Scholar's Ginkgo: For the scholarly types who loves [Cultural Background]. It being also [Sweet] and [Vegetarian] are just a bonus. A recipe given by Keine once you reach level 3 bond with her. Good for Keine, Kasen, Akyuu on some occasion, Alice and Narumi depending on what they are asking for and if you plan on tag stack.
  • Udumbara Cake: It's a premium cake with an elusive ingredient that won't be easily accessible until much later in the game. But this cake's the 'easiest' way of getting [Legendary], [Photogenic] and [Dreamy]. It easily hits a number of Patchouli's tags, a good base for Tenshi if she's asking for [Legendary]. Given to you by Wriggle for reaching level 4 bond.
  • Mochi: Tewi when you start running into this scammer. Before you get the recipe from her you could also just buy this ready made from the Human Village. Fresh Tofu would work too for Tewi with the proper ingredients.
  • Pork Stir Fry: It's got [Meat], [Good with Alcohol], [Homecooking], and [Chinese] tags. Although anyone specifically looking for Homecooking tends to not want the [Greasy] tag. And Suika the weirdo oni also doesn't like [Greasy] food. Fulfill the granny NPC's quest at the Hakurei Shrine to get this recipe.
  • Tangyuan or Dumplings- Kourindou recipes that can be purchased with Silver Froggy Coins. Good to appease the Taoists and Meiling when they ask for Chinese, Vegetarian, Homecooking or Cultural Background. I think these are in the base game...?
  • Niten Ichiryu: The damned [Aura Bursting!] tag. While the priciest of all the food with this tag, it's possibly the easiest one to be used to satisfy Yuugi or Futo's needs. Sichuan Boiled Fish could also be used as a cheaper alternative for Yuugi too. You get this recipe from Suika.


DLC recipes:
  • Lion's Head: It's a piss easy meat recipe for any carnivores or heavy drinker. (careful with Rumia though, since she hates that [Good with Alcohol] tag.) Since it already comes with [Meat], [Good with Alcohol], [Savory], [Signature] and [Specialty] for the low low price of only 1 Beef; it's a great dish to serve as a base. The only downside is this will require you owning DLC 2 since Yuugi's the one who can give you this recipe.
  • Golden Crispy Fish Cakes: A decent one given by Momiji. It has [Good with Alcohol] and [Strength-Boosting]. Still got the pesky [Greasy] tag since it's fried food. But under the right circumstances this can be good for some.
  • Nigiri Sushi: Used for Narumi usually. I like to modify this for Kaguya as well. [Mild], [Japanese], [Savory], [Cultural Background]. Narumi's first recipe, requires DLC 1
  • Okonomiyaki: Possibly the earliest time you can get easy access to something with [Photogenic] and [Small Portion]. The [Japanese] tag is really just a bonus. I usually use this for Sanae unless she's talking about the 2 gods at Moriya Shrine. Requires DLC 1.
  • Sakura Pudding: It would be a [Sweet], [Fruity] and [Cool] alternative to Okonomiyaki, the downside is you won't have access to this until you reach Satori in DLC 2's map.
  • Instant☆Death: Yet another special mention for anything with the [Strength-Boosting] tag. This one's courtesy of Utsuho. On top of [Strength-Boosting], it also has [Mountain Delicacy], [Expensive]. Could be used for Yuugi and Futo.
  • Smoked Buccaneer : It's a really late game recipe given to you by DLC 3's Minamitsu from Myouren Temple. One last one for recipes with [Strength-Boosting] tag. Roughly around the same price point as Instant☆Death but it trades off [Mountain Delicacy] and additional ingredient slot for the [Legendary] tag and slightly cheaper price. While it ticks off a lot of Minamitsu's own tags, Futo, so so for Kogasa due to her budget, to some degree Yuugi if she's asking for the right tag. Meiling's disregarded due to her small budget.

Usually recipes associated with the specific rare guests themselves tend to be well received by them, but this is not an iron clad rule. As Keine's first recipe, Deep Fried Tofu, given to you will have the Greasy tag she hates. But the Scholar's Ginkgo tends to be well received by her even if served in its default state. Always check their preferences first if you are not sure. Tags with particular taste such as [Sweet], [Strange] can be easily stacked with extra ingredients. But cultural types such as [Homecooking], [Japanese] or [Chinese] will be trickier. Anyone with such preferential tags it's best to filter tags based on these first. A filter for [Homecooking] can root out some very affordable food for Kogasa when she's asking for said tag. Pork Bowl or Beef Bowl would be good bases for her when she's not asking for [Strength-Building].
Youkai Trail


Wriggle Nightbug
Prefers: Sweet, Meat, Raw, Strange
Dislikes: Vegetarian, Mild, Cool
Drinks: Low Alcohol, Chillable
Budget: 200 - 400 yen
Rewards: Dew Runny Eggs [Recipe], Fried Cicada Sloughs [recipe], Udumbara Cake [recipe], resource gathering for Youkai Trail
Frequently seen at: Youkai Trail, Forest of Magic

Reward spell card: Lamp Sign "Firefly Phenomenon"
Summon a large group of fireflies to enhance your atmosphere. Guests are 30% more likely to appear

Punishment spell card: Wriggle Sign "Nightbug Tornado"
Summons bugs to drive away every single guest

Rumia
Prefers: Raw, Signature, Meat, Filling, Trend - Popular, Strange
Dislikes: Expensive, Good with Alcohol, Trend - Unpopular
Drinks: Bitter, Soda
Budget: 150 - 350 yen
Rewards: Stinky Tofu [recipe], Fried Lamprey [recipe], Imitation Bear Stew [recipe], Black Suit costume
Frequently seen at: Youkai Trail, Forest of Magic

Reward spell card: Moon Sign "Moonlight Ray"
Randomly gives you 3 meat ingredients already recorded in the notebook

Punishment spell card: Darkness Sign "Demarcation"
Darkness covers your kitchen area for 20 seconds

Cheeeeeeeeeeeeeeeeeeen
Prefers: Aquatic, Barbecued, Sweet, Meat, Greasy, Trend - Popular
Dislikes: Hot, Vegetarian, Trend - Unpopular, Strange
Drinks: Fruity, Dry
Budget: 400 - 600 yen
Rewards: Secret Dried Fish Crisps [recipe], Pork & Trout Kebab [recipe], Power Soup [recipe], Maneki-Neko item
Frequently seen at: Youkai Trail

Reward spell card: Hermit Sign "Fenghuang Egg"
Randomly gives you 3 fish ingredients already recorded in the notebook

Punishment spell card: Direction Sign "Kimontonkou"
Reduces chance of new guests arriving with the power of cute kittens


Rare guests: The 3 residents + Marisa

Accessible partner: Kyouko


Resource:
Seaweed, Salmon, Lamprey, Dew (10-11:30), Cicada Slough, Potato (Radish occasionally spawns from the same item point), Honey, Udmbara (16:00 from Hakurei Shrine), Boar Meat, Sparrow Sake (11:30 on the path towards the Bamboo Forest), Dassai (starts appearing at 16:00 after a particular NPC quest), Lunar Herb (17:30 from Bamboo Forest)


Grocer [Scalper] shop:
Compare to Human Village pricing it's a smidge more expensive. Although far away locations such as Divine Spirits Mausoleum or Palace of the Earth Spirits will have more jacked up pricing

Egg - 2 yen
Pork - 4 yen
Beef - 6 yen
Tofu - 3 yen
Potato - 4 yen
Onion - 5 yen
Pumpkin - 6 yen
Radish - 7 yen
Seaweed - 1 yen
Chili - 1 yen
Fruity Highball - 5 yen
Mio - 8 yen
Fruity Sour 5 yen
Bamboo Shoot - 17 yen


Youkai Trail is a very atypical area for ingredients collecting unlike everywhere else. Dew will only spawn the first 1.5 hours of the day. Then Sparrow Sake will show up at 11:30. Udumbara can only be collected at 16:00 and you must get there from the Hakurei Shrine's other path. Lunar Herb's like the rare flower. You must grab it at 17:30 from the pagoda that only be reached from the Bamboo Forest's other entrance. The merchant here DOES have higher price compared to Human Village's but it's only slightly. Compared to latter areas this is still pretty reasonable. Mystia herself will mention ingame that she knows she's being scalped by the merchant here. Focus on ingredient collection yourself until you have access to the next area since you got time to burn anyway.

It's advised to max Wriggle's friendship ASAP. Once maxed you can request her to gather Youkai Trail ingredients for you. The alcohol she picks up can also be REALLY good level 4 beverage. Chen while not as important, her drink choice does occasionally include some level 4 beverage. Though her selection is not as diverse as Wriggle's. Maxing Chen does give you the item Maneki-Neko, which includes tip rate by 5%. Could be worth maxing early on if you are looking to fill in the time. If you want to save scum for good beverage drops from either characters you absolutely can. They are close to the starting point and it's a quick thing, tedious, but doable if you are that strapped for extra cash. Most high level beverages are not available until MUCH latter in the game after all.

Sonanoka Rumia has......... nothing of particular value really. Her costume's hilarious though. I find it very distracting though during work phase. Does ever spinning googly eyes terrify you or make you giggle like a school kid?


Noteworthy recipes:
Wriggle's level 4 Udumbara Cake's pretty worth. Though sadly the main ingredient for the same cake's not easily accessible until quite a bit down the line.Eventually there will be a kid on Youkai Trail whose reward completion is 2 Udumbara and 1 Ramune, allowing you to complete Wriggle's quest very early. Akyuu's fan will sometimes reward Udumbara

Chen's level 4 Power Soup is a really cheap way to get the pesky Strength-Boosting tag. Useful for certain Oni and one particular Mausoleum ghost.

Rumia's level 4 Imitation Bear Paw's decent, IF ingredient's not an issue. But all the ingredients can be hard to gather early on. Iberico Pork, Bamboo Shoot and Pufferfish are not stuff you can find easily until you reach Human Village or have access to DLC 1's Youkai Mountain. Rinnosuke's shop in the Human Village is very hit and miss in terms of stuff he carries too so you cannot rely on him for Bamboo Shoot.
Human Village


Hieda no Akyuu
Prefers: Japanese, Mild, Cultural Background, Soup, Premium, Sweet, Trend - Popular
Dislikes: Greasy, Salty, Hot, Trend - Unpopular
Drinks: Sake, Heatable
Budget: 500 - 800 yen
Rewards: Miso Tofu [recipe], Vegetable Salad [recipe], Falling Blossoms [recipe], resource gathering for Human Village
Frequently seen at: Human Village, [DLC 3] Myouren Temple

Reward spell card: Writing "Is This All The Work Of Youkai Too?"
Obtain a signed washi by a famous novelist. Useful for trading for rare stuff

Punishment spell card: Symposium "Unscrupulous Restaurant's Dark History"
Drops the atmosphere to 0

Kamishirasawa Keine
Prefers: Cultural Background, Vegetarian, Homecooking, Mild, Chinese, Japanese, Trend - Popular
Dislikes: Greasy, Trend - Unpopular, Large Portion, Salty
Drinks: Liquor, Sake, Shochu
Budget: 400 - 800 yen
Rewards: Deep Fried Tofu [recipe], Scholar's Ginkgo [recipe], Shirayuki [recipe], Chinese School Uniform costume
Frequently seen at: Human Village, [DLC 1] Forest of Magic, [DLC 3] Myouren Temple

Reward spell card: Land Sign "Three Sacred Treasures"
  • Three Sacred Treasures - Sword: Randomly gives you 2 kind of vegetables
  • Three Sacred Treasures - Mirror: For 15 seconds new dishes will not cost any ingredients
  • Three Sacred Treasures - Orb: Randomly reveals a special guest's unknown secret/tag
  • Three Sacred Treasures - Country : Keine sensei approves of your izakaya. Customers will flock to your establishment
Punishment spell card: Land Sign "Secret Skill - Headbutt"
You are bonked and KOed for 20 seconds. Smash movement keys to recover faster

Ibaraki Kasen
Prefers: Cultural Background, Japanese, Good with Alcohol, Homecooking
Dislikes: Cheap, Raw, Spicy
Drinks: Mild Alcohol, Vintage, Neat
Budget: 400 - 600 yen
Reward: Tofu Stew [recipe], Beef Bowl [recipe], Hunter's Casserole [recipe], Fortune Peony item
Frequently seen at: Human Village, [DLC 3] Divine Spirits Mausoleum

Reward spell card: "Artistic Expression For Fierce Beasts"
Kasen's pet tiger's performance will cause your guests to tip you a random amount between 1-30 yen

Punishment spell card: "Karma Meditation Training For Mortal Desires"
All your customers will only order the cheapest food and green tea for the next 30 seconds


Rare guests: 3 residents, Rinnosuke (appears under special guest tab), Marisa

Partner: Motoori Kosuzu


Resource: Seaweed, Tuna, Ginkgo Nut, Egg, Onion, Pumpkin, Radish


Shops:

Shops:
Farmer:
Egg - 1 yen
Pork - 3 yen
Beef - 4 yen
Tofu - 2 yen
Potato - 3 yen
Onion - 3 yen
Pumpkin - 4 yen
Radish - 4 yen
Seaweed - 1 yen
Chili - 1 yen

Ringo
Lunar Dango's price isn't always the same
Lunar Dango* - 43 yen
Ramune - 16 yen
[The dango will expire at the end of the day because it's counted as a dish]

Seiran:
Mochi - 10 yen
Milk - 6 yen
Grapefruit Juice - 8 yen
[The mochi will expire at the end of the day because it's counted as a dish]

Vintner:
His price isn't set in stone and may fluctuate around this range
Umeshu - 15 yen
ZUN Beer - 9 yen
Sangetsusei - 16 yen
Mio - 9 yen


Kourindou [RNG city]
By default his pricing is the most expensive unless you have his discount coupon from his reward spell card: 20% discount and expires upon usage. Still not recommended considering even the Youkai Rabbit from Bamboo Forest is on par with him AFTER the 20% discount. This guy's the biggest scammer after Tewi. What's worse is his pricing is wildly inconsistent]

Lamprey
Mushroom
Peach
Sticky Rice
Bamboo Shoot
Bamboo
Ice
Cassia Wine
[will update as I go through the game]


All 3 residents have some chance of giving your decent alcohol. Kasen will even occasionally give you DLC 2's drink selection (if you have the DLC.) Keine occasionally Full Moon's Eve, a level 4 VERY EXPENSIVE drink that's worth 440 yen. Although I think it's probably easier to just roll the dice for Chen or Wriggle if you want drinks. Akyuu's a good choice to max first because she's the same as Wriggle, once maxed she can collect Human Village's ingredients for you. Getting her reward spell cards also allows you to get some extra premium ingredients on the side from a rabid fan of hers. Keine's level 5 reward's a rather drab costume. Kasen's level 5 reward is a passive item that increases guest satisfaction by 15 each time they eat a dish. In terms of difficulty, these 3 are all very easy to max since their favorite tags are easy to hit with cheap food or very accessible ingredients.

Noteworthy recipes:
Akyuu's recipes are all pretty solid and easy to remember. I frequently use her Level 2 recipe Miso Tofu to satisfy Japanese or Homecooking tags. The fact that you only need one Tofu to make it means I can just save one precious recipe slot for something much more lucrative. (Remember that you don't need to select the recipe during prep phase to access this. Once unlocked you just need to remember the necessary ingredient(s) + have the necessary cookware) Very versatile since you have 3-4 slots to easily tag stack. The Level 3 Vegetable Salad she gives you is also decent since the ingredients are very common place. May not be the best choice for rare guests however, decent as a placeholder until you get something better. Level 4's Falling Blossoms requires Premium Tuna, but it's just the tuna and cutting board. Very easy to remember. Tag-wise not a bad choice, though getting a steady supply of the Preimum Tuna would be your bigger hurdle.

Keine has 2 pretty simple recipe, but I honestly don't use her Level 2's Deep Fried Tofu at all. The Greasy tag is a big downside as 2/3 Village residents HATE this tag, including Keine herself. Her Level 3 Scholar's Ginkgo is much more useful, requiring just the titular nut and honey. Early on this is one of the easiest recipe to get that Cultural Background or Chinese tag. Good for them scholarly types with a sweet tooth. The level 4 Shirayuki's expensive, but Pufferfish's not an easy one to get until you get to Hakurei Shrine, Scarlet Devil Mansion or DLC 1's Youkai Mountain.

Kasen's recipes are just ok. Level 2's Tofu Stew is usually outdone by Akyuu's Miso Tofu in terms of usefulness. Usually the Hot tag isn't the main requirement to request. Level 3's just an ordinary Beef Bowl. Pretty basic tags. Level 4's Hunter Casserole has the same issue as Keine's Shirayuki, Iberico Pork commonly bought from merchants much later in the game: Hakurei Shrine and DLC 2's oni merchant in Former Hell.
[DLC 1] Forest of Magic


Alice Margatroid
Prefers: Cultural Background, Homecooking, Premium, Western, Sweet
Dislikes: Meat, Filling, Greasy, Strange
Drinks: Western, Modern, Alcohol
Budget: 500 - 800 yen
Rewards: Cream of Mushroom Soup [recipe], Ordinary "Eat Me" Cupcake [recipe], Seven-Colored Yokan [recipe], ingredient gathering in Forest of Magic
Frequently seen at: Forest of Magic

Reward spell card: "Watlz Between Children & Dolls"
Alice's dolls will transform into guests and fill all remaining empty seats.

Punishment spell card: Magic Sign "Artful Sacrifice"
Blows up random kitchenware. Takes 60 seconds to repair it

Kirisame Marisa
Prefers: robbing people, Japanese, Greasy, Trend - Popular, Legendary, Fungus, Hot
Dislikes: Trend - Unpopular, Strange
Drinks: Chillable, Low Alcohol
Budget: 3000 - 5000 yen. Richest of them all
Rewards: Pork & Mushroom Stir Fry [recipe], Secret Savory Mushroom Hot Pot [recipe], Mushroom Maiden's Tip Tap Pot [recipe], Witch Dress costume
Appears everywhere

Reward spell card: Shooting Star "Super Perseid"
Randomly gives you 3 mushroom ingredients. Chance of Truffle too

Punishment spell card: Magic Spell "I'll Take That!"
Randomly steals 2 items. Could be completed dishes, ingredients or even drinks. She also runs without paying...

Yatadera Narumi
Prefers: Cultural Background, Mild, Japanese, Mountain Delicacy, Specialty
Dislikes: Filling, Greasy
Drinks: Vintage, Low Alcohol, Chillable, Neat, Mild Alcohol
Budget: 300 - 600 yen
Rewards: Nigiri Sushi [recipe], Shrimp Stuffed Pumpkin [recipe], Buddha Jumps Over The Wall [recipe], Jizo Figure item
Frequently seen at: Forest of Magic, [DLC 3] Myouren Temple

Reward spell card: Magic Sign "Instand Bodhi"
For the next 60 seconds guests will pay 50% more tips at checkout

Punishment spell card: Jizo "Hellfire Salvation"
Summon Karmic fires that burn three random buffs, removing them and ending their effects


Rare guests: 3 residents, Sanae, Reimu, Keine

Partner: Yumeko


Resource: Fairy Dew, Mushroom, Dew, Ginkgo Nut, Radish, Peach


Shop:

Shanghai Doll:
Cream - 3 yen
Egg - 1 yen
Beef - 5 yen
Pumpkin - 5 yen
Truffle - 16 yen
Mushroom - 6 yen
Ginkgo Nut - 2 yen
Honey - 5 yen
Sticky Rice - 5 yen
Flour - 3 yen
Coffee - 20 yen
Ice Cream Smoothie - 14 yen
Ordinary Fitness Tea - 32 yen


I would not spend too much time here early on unless you use a lot of mushrooms in your dishes or need something from the Shanghai Doll. She's a very reasonable merchant to shop from at least. I'd get Narumi's level 2 Nigiri Sushi recipe and move on. Alice is the ingredient gather of the Forest of Magic once you've maxed her friendship. There's a problem however. One of the key ingredients needed for her quest is Grape, which is not available until much later in the story. So progress-wise you'll be stalled here for a long while. Marsia's got a rare chance of giving you rare beverage. Her level 5 costume's pretty neat if cosmetic's a big factor for you. Marisa is the easiest of everyone to max due to her quirk of showing up everywhere. Surprisingly, she's the richest guest with the biggest budget in this game. If you can I'd throw the most expensive dish and drink at her. Narumi at max bond does reward you with a Jizo Figure. It allows Mystia to get offerings from visitors everyday. Interact with it outside her home to receive goodies. The secret partner won't become available until you've maxed ALL 3 residents' bonds.


Recipes:
Narumi's own level 2 recipe's really good at hitting most of her favorite tags. Nigiri Sushi's easy enough to remember too. Another good choice for the Cultural Background or Japanese tag. Level 3's Shrimp-Stuffed Pumpkin's so so. Her level 4's Buddha Jumps Over The Wall though, it's a doozy in terms of ALL the deluxe meat ingredients + truffle. Won't be a dish you will be making everyday unless you have easy access to Wagyu Beef, Premium Tuna, Iberico Pork, Pufferish and Truffle. Think I used this dish to meet one of Mausoleum resident's quest? Probably Futo's.

Marisa's love for mushrooms is reflected in all her recipes. They are basically tailored to herself. The good thing at least being Marisa herself can easily afford her most expensive dish and even more. Her budget is between 3000 to 5000 yen after all. Not even Tenshi's as rich as Marisa! Marisa's reward spell card also has a chance of giving you Truffle so you can come out even or ahead.

Alice loves western dishes. All her recipes are western and the last 2 have Cultural Background tag. Unfortunately these 2 dishes specifically call for Grape, not available until you made some progress in Scarlet Devil Mansion. Her level 3 "Eat Me" Cupcake's a great way to hit Cultural Background, Photogenic and the Premium tags. Level 4's Seven-Colored Yokan's a popular seller, but in addition to Grapes it also calls for Udumbara. If you can get past that supply hurdle, it's got some really good tags for certain very picky rare guests: Cultural Background, Dreamy, and Wonderful. Which the Udumbara Cake lacks unless you have a spare Lunar Herb.
[DLC 1] Youkai Mountain


Kochiya Sanae
Prefers: Japanese, Photogenic, Dreamy, Homecooking, Sweet, Trend - Popular
Dislikes: Hot, Strange, Raw, Greasy
Drinks: Modern, Sweet, Low Alcohol, Neat, Soda, Sake, Fruity, No Alcohol, Bitter
Budget: 400 - 600 yen
Rewards: Okonomiyaki [recipe], Takoyaki [recipe], Sea Urchin Sashimi [recipe], Winter Sailor Suit costume
Frequently seen at: Youkai Mountain, [DLC 1] Forest of Magic, [DLC 3] Myouren Temple, [DLC 3] Divine Spirit Mausoleum

Reward spell card: Divine Virtue "Bumper Crop Rice Shower"
Generate 3 drinks and 3 ingredients

Punishment spell card: Miracle "Daytime Guest Stars"
Blocks all buffs for 30 seconds

Inubashiri Momiji
Prefers: Meat, Large Portion, Mountain Delicacy, Greasy, Good with Alcohol
Dislikes: Strange, Mild, Vegetarian
Drinks: Neat, Mild Alcohol, High Alcohol
Budget: 300 - 400 yen
Rewards: Deep Fried Shrimp Tempura [recipe], Golden Crispy Fish Cakes [recipe], All-Meat Feast [recipe], ingredient gathering for Youkai Mountain
Frequently seen at: Youkai Mountain

Reward spell card: "Tengu Routine Sips"
A lot of white wolf tengus will come and dine for a short period of time

Punishment spell card: "Martial Law"
Forbids any new guests from coming in for next 30 seconds

Kawashiro Nitori
Prefers: Premium, Good with Alcohol, Salty, Signature, Strange, Aquatic
Dislikes: Vegetarian, Cultural Background, Mountain Delicacy
Drinks: Neat, High Alcohol, Sake, Mild Alcohol
Budget: 400 - 500 yen
Rewards: Pickles [recipe], Creamy Crab [recipe], Imitation Shirikodama [recipe], Kappa Heavy Duty Telephone
Frequently seen at: Youkai Mountain

Reward spell card: Kappa "Exteeeending Aaaaarm"
For the next 120 seconds partners can serve food and drinks using kappa technology

Punishment spell card: Water Sign "Kappa's Flash Flood"
A flood washes away 3-5 random guests dining at the izakaya


Rare guests: 3 residents, Cirno (after you've unlock Scarlet Devil Mansion), Suika (after you unlock Hakurei Shrine), Marisa

Partner: Kagiyama Hina


Resource: Salmon, Crab, Trout, Cucumber, Potato, Black Salt, Ginkgo Nut, Boar Meat


Shop:
Daiginjo will always be available. Everything else is random in terms of stock

Kappa Merchant:
Octopus - 5 yen
Black Salt - 1 yen
Crab - 4 yen
Sea Urchin -
Daiginjo - 84 yen


Assuming you bought DLC 1, Youkai Mountain's your very first place to have a more consistent supply of rare meat and fish. Eventually you'll also be able to access Scarlet Devil Mansion from one of its other exits.

Momiji is the main ingredient gather for this area. Most of her tags are easy to satisfy: Large Portion, Meat, Good with Alcohol, and Greasy. Mountain Delicacy may be slightly trickier, but at this point you have access to Truffle and Iberico Pork. Nitori is the trickier one because occasionally she does ask for Premium tag dish and HATES Vegetarian food for some reason. So her own level 2 recipe Pickles sans tag stack is a no go, WTF? Sanae herself's easy to please with her own easy to make dish, although her level 5 reward's just a costume. Miso Tofu with proper tags can easily satisfy her request too. Plus she also travels unlike the other residents, easy to max. Nitori's gift is worth maxing her for. She gifts you a phone that allows you to contact rare guests to invite them, commission them to scavenge for you, or even call the merchants. Yes you CAN do bulk calls. Allowing to shop and receive scavenged items from the comfort of your home. Kappa technology is AMAZING! You'll need to enable this from Mystia's Present Cabinet in her basement after receiving it though.

How or why does it work? It's Gensokyo, disregard common sense.

There IS a catch though. You can't call your buddies until you've reached at least level 4 with them.

The secret partner here will not join you until you've maxed everybody's bonds here.


Recipe:
Sanae's level 2 recipe reward Okonomiyaki's tags is great if you are looking for Japanese, Photogenic, Signature, or Small Portion. Requiring rather common ingredients such as Flour, Egg and Radish. Level 3 recipe Takoyaki much less useful and Octopus can mainly only be purchased from the Kappa Merchant. Okonomiyaki is easier to use honestly. The level 4 Sea Urchin Sashimi while easy to make, suffers the same problem as the Takoyaki. Sea Urchin can only be purchased from the Youkai Mountain merchant.

Momiji's level 2 Deep Fried Tempura's rather forgettable. Her level 3 reward Golden Crispy Fish Cakes though, Good with Alcohol AND Strength-Boosting tags? Pretty good. The ingredients needed are easy enough to collect too: Trout, Flour and Honey. The level 4 All-Meat Feast like the common level 4 recipes, suffer from difficult to obtain ingredients. It's also mainly tailored for her exclusively.

Nitori's level 2 Pickles dish is an interesting one. It's a dirt cheap level 1 cuisine but its ingredients can only be found or bought in Youkai Mountain and NOT in a generous quantity. I primarily use it to fulfill Suika's pesky Good with Alcohol and Small Portion tags after some tag stacking. So not very useful for general guests. Level 3's Creamy Crab is slightly better in terms of tags, but again, Youkai Mountain exclusive ingredient. Level 4's Imitation Shirikodama's such a weird thing that even the kappa themselves won't exactly flock to buy despite kappa lore saying they are crazy for this thing. Expensive and not useful.
Hakurei Shrine


Hakurei Reimu
Prefers: Wonderful, Premium, Filling, Cheap, Sweet, Trend - Popular
Dislikes: Expensive, Good with Alcohol, Trend - Unpopular
Drinks: Heatable, Low Alcohol, No Alchol
Budget: 150-300 yen. Second poorest of the rare guests
Rewards: Pink Rice Ball [recipe], Hodgepodge [recipe], Daimyo's Feast [recipe], Faded Miko Attire coustume
Frequently seen at: Hakurei Shrine, Human Village, Forest of Magic, Youkai Mountain

Reward spell card: Dream Sign "Duplex Barrier"
Creates a protective barrier that can completely negates the next special guest's Punishment Spell Card

Punishment spell card: Spirit Sign "Fantasy Seal"
Disable 3 random dishes on your menu for 30 seconds

Ibuki Suika
Prefers: Strength-Boosting, Good with Alcohol, Small Portion, Meat, Japanese, Trend - Popular
Dislikes: Greasy, Trend - Unpopular
Drinks: Neat, High Alcohol
Budget: 600 - 800 yen
Rewards: Fried Pork Cutlet [recipe], Energy Skewer [recipe], Niten Ichiryu [recipe], ingredient gathering for Hakurei Shrine
Frequently seen at: Hakurei Shrine, Youkai Mountain

Reward spell card: Shuten Ultimate "Oni's Drinking Invitation"
A mini Suika gives you a bottle of alcohol

Punishment spell card: "Night Parade of a Million Demons"
3 mini Suika will steal 3 bottles of your most expensive alcohol

Hinanawi Tenshi
Prefers: Fruity, Expensive, Legendary, Photogenic, Mild, Vegetarian, Sweet, Trend - Unpopular
Dislikes: Meat, Homecooking, Greasy, Trend - Popular
Drinks: Cocktail, High Alcohol
Budget: 2000 - 3000 yen. Second richest
Rewards: Rose-like Daikon Salad [recipe], Peach Tapioca [recipe], Peach & Shrimp Salad [recipe], Lucky Peach item
Frequently seen at: Hakurei Shrine, Former Hell, Youkai Mountain, Divine Spirit Mausoleum

Reward spell card: "Sky of Scarlet Perception of All Humankind"
Raises every dining guest's satisfaction level to 85%

Punishment spell card: "Pillars of Divine Punishment"
Destroys a dining table and scare off whoever was eating there. No table or guest at that location for 60 seconds


Rare guests: 3 residents, Marisa

Partner: Komano Aunn


Resource: Potato, Peach, Cicada Slough, Mushroom, Ginkgo Nut


Shop:
Fairy Maid Selling Leftovers:
Price fluctuate around this range
[rare] Bloody Remy - 17 yen
Puffer Fish - 16 yen
Iberico Pork - 13 yen
Premium Tuna - 13 yen
Boar Meat - 10 yen
Wagyu Beef - 15 yen
[rare] Truffle - 19 yen


Kappa Tea Merchant:
Price fluctuates around this range
Tengu Tango - 39 yen
Divine Wheat - 25 yen
[rare] Jade Dew Tea - 26 yen


Home of the red-white miko Reimu. Suika's always loitering by the pond in the back while a delinquent celestial's at the front entrance harassing you. Resource-wise, not too spectacular. The merchants here do finally sell some better meat and beverages though. Once this opens up you are finally given access to Udumbara yourself instead of relying on Wriggle. Worth noting for this specific location is that this is the only location to obtain the Silver Froggy Coin. Moriya's branch shrine donation box has a chance of rewarding you random cooked dishes or drinks, but it will always give you 1 Silver Froggy Coin for interacting with it. There's a cap to using the box too daily, 4 froggy coins maximum. You can trade the coin at Rinnosuke's for 2 really simple Chinese recipes, cosmetics, or getting more tracks for the juke box.

Suika once reaches max bond, becomes the ingredient gatherer for the shrine. Problem being she's a picky eater and not a big roamer. If you don't operate at Youkai Mountain or the Shrine often enough, she can be a hard one to max if you aren't mindful of her budget or know all her favorites. Being an oni you'd assumed she's a big eater, nope. She likes small portions and also hates Greasy food while Kasen's fine with it. Reimu can be an ass to please too because she's notoriously poor but still demands Premium or Wonderful things sometimes. (Only one step above Cirno in terms of budget by 50 yen) I'd honestly just take advantage of the Night Sparrow set during Hyper mode to bypass her pickiness. Reimu's level 5 reward's a faded miko outfit, really fits the theme of the poverty miko. Meanwhile Tenshi compared to the other two is loaded. She's the second richest after Marisa with a budget of 2000 - 3000 yen. She likes the finer things in life so she will request Legendary or Expensive tags. Being a delinquent she also likes Unpopular Food. Easiest of the 3 to please IMO. Tenshi's level 5 reward's the Lucky Peach. Customers have a 15% chance to give a perfect review regardless of enjoyment. Not bad at all.


Recipes:
IMO Reimu's only good recipe is the level 2 reward Pink Rice Ball. If regular Rice Ball won't do, I'll use this to tag stack. Great for Mokou once you applied proper tags.

Suika the oni weirdo's level 2 recipe Fried Pork Cutlet's a very cheap way to have Homecooking, Meat, Filling and Greasy tags. Not too shabby for the carnivores that require specific tag stacking with this base. Her level 3 Energy Skewer's... ok. I can see it as a base for meeting Soga no Tojiko's needs. (the ghost who goes 'biribiri' in Mausoleum) Although if I'm only after Barbecued tag I can use cheaper dish to go off that. On the other spectrum I can also use Utusho's Instant*Death as well for better effect. Suika's final recipe Niten Ichiryu's the earliest time you can have access to the very elusive 'Aura Bursting!' tag. Lore-wise said to be a favorite among oni. It's definitely good for ticking some of Yuugi's boxes and she does have more money (600 - 1000 yen) than the others to spend.

Tenshi's dishes are pretty great for vegetarians and those who like Photogenic and Sweet tags. Her first recipe reward Rose-like Daikon Salad requires just a simple Radish but gives rarer tags like Cool and Photogenic. Good to please herself and Cirno. Peach Tapioca's a pretty dish with the downside of requiring Ice. Until you meet Cirno you won't have a steady supply of the stuff unless you get lucky at Rinnosuke's shop. The final recipe award Peach & Shrimp Salad in terms of a final reward dish, isn't too bad to make compared to some others. Well, it also requires Ice though.
[DLC 2] Former Hell


Kurodani Yamame
Prefers: Savory, Raw, Photogenic, Strange, Sweet, Trend - Popular
Dislikes: Salty, Greasy, Hot
Drinks: Beer, Low Alcohol, Sweet, Mild Alcohol
Budget: 250 - 400 yen
Rewards: Crispy Spirals [recipe], Ceiling-Longing Pie [recipe], Kabuto Steamed Cake [recipe], Yamame's Letter of Recommendation + ingredient gathering for Former Hell
Frequently seen at: Former Hell

Reward spell card: "Underground Idol's Party Night"
For the next 30 seconds queuing guests will be attracted by the idol and they won't leave even if business ends

Punishment spell card: Small Thread "Kandata's Rope"
Movement speed decreased by 80% and lasts for 30 seconds

Mizuhashi Parsee
Prefers: Meat, Salty, Savory, Trend - Unpopular, Fruity, Sour, Spicy
Dislikes: Sweet, Trend - Popular
Drinks: Dry, Neat, Bitter, No Alcohol, Heatable
Budget: 300 - 400 yen
Rewards: Misery Cheese Sticks [recipe], Gloomy Fruit Pie [recipe], Agony Oden [recipe], Parsee's Letter of Recommendation + Straw Effigy item
Frequently seen at: Former Hell

Reward spell card: "Jealousy and Overdraft"
Increases all current guests' budgets to be the same as the richest customer present

Punishment spell card: Malice Sign "Shrine Visit in the Dead of Night"
Cause your partner's salaries for the day to be doubled. (what if I wasn't paying them though?)

Hoshiguma Yuugi
Prefers: Signature, Large Portion, Legendary, Good with Alcohol, Aura Bursting!, Japanese, Strength-Boosting, Trend - Popular
Dislikes: Vegetarian, Strength, Small Portion
Drinks: Vintage, Beer, High Alcohol, Sake
Budget: 600 - 1000 yen
Rewards: Lion's Head [recipe], Giant Tamagoyaki [recipe], Oedo Boat Feast [recipe], Yuugi's Letter of Recommendation + Flower of Yukata coustume
Frequently seen at: Former Hell, Palace of the Earth Spirits

Reward spell card: "From Song to Dance"
Uses the Hoshiguma Dish to level up a set amount of beverages
Max chance to level up 3 Lv1 beverages
75% chance to level up 2 Lv2 beverages
50% chance to level up 1 Lv3 beverages

Punishment spell card: Big Four Arcanum "Knock Out in Three Steps"
Yuugi creates 3 zones limiting your movement for 60 seconds
First Step: Safe zone
Second Step - Sinner's Shackles: Movement speed decreased by 50% when inside the zone
Third Step - Spirits and Anomalies: Entering this zone immediately stuns you for 30 seoncds


Rare guests: 3 residents, Tenshi

Partner: Kisume


Resource: Cicada Slough, Lemon, Salmon, Iberico Pork, Wagyu Beef, Bingdi Lotus, Egg


Shop:
Oni Merchant:
The Grocer from Youkai Trail's actually cheaper for some of the items

Beef - 8 yen
Iberico Pork - 20 yen
Trout - 4 yen
Salmon - 13 yen
Bamboo Shoot - 22 yen
Radish - 9 yen
Chili - 1 yen
Cassia Wine - 34 yen
Oni Killer - 179 yen
Tengu Tango - 39 yen
Dassai - 73 yen
Fire Rat's Robe - 235 yen


Shop here's a bit on the expensive side, but good place to buy expensive booze. Former Hell has a hot spring that allows you to boost your partner's work efficiency for the duration of the night. It costs a bit of money but may be worth it. (also has unique CG for each character who goes into the spring)

Yamame once maxed can gather ingredients for you. Yuugi gives you a nice yukata. And Parsee jealously gives you a Straw Effigy. It allows you to make one combo-ending mistake. Same with DLC 1 areas, maxing all 3's bonds will unlock the secret partner for this area.

Recipes:
You are in Former Hell now, expect the cuisine from here to be otherworldly and drastically different from the surface world's. Yamame's certainly going to give you a bunch of very weird recipes. All her recipes are guaranteed to have the Strange tag, and the last 2 being considered Expensive. You probably won't be using her recipes much outside of Former Hell or Palace of the Earth Spirits.

Parsee's recipes while lacking in Strange, makes up for it in ingredients that require DLC 2 exclusives: Cheese or Lemon. Her final recipe the Agony Oden's such a mish mash of tags that's it going to be difficult to be used for rare guests. As a common guest cuisine though, it's very doable since all the ingredients can be bought from the Village NPC. Takes a long time to cook though.

Yuugi's definitely the go big or go home type. Her first recipe the Lion's Head requires a very modest Beef and that's it. But it's got great tags to build off of with Good with Alcohol, Meat, Savory, Signature, and Specialty. Shame it doesn't have Strength-Boosting, as by this point a lot of your carnivorous rare guests will want Strength-Boosting tag. Her next level recipe Giant Tamagoyaki does have that tag but... I only have one slot left to add on. Yuugi's final recipe Oedo Boat Feast is very expensive for your guests. Not likely to be used for the special guests, but at this point Premium Tuna and Ice may not be a problem for you.
[DLC 2] Palace of the Earth Spirits


Komeiji Satori
Prefers: Sweet, Small Portion, Dreamy, Specialty, Strength-Boosting, Homecooking
Dislikes: Meat, Mountain Delicacy, Hot, Strange, Large Portion
Drinks: No Alcohol, Bitter, Soda, Stimulating
Budget: 500 - 600 yen
Rewards: Sakura Pudding [recipe], Energy Pudding [recipe], Burn-out Pudding [recipe], Satori's Letter of Recommendation + Third Eye item
Frequently seen at: Palace of the Earth Spirits, Bamboo Forest, [DLC 3] Myouren Temple

Reward spell card: Recollection "Happy Memory"
Activates a random Reward Spell Card from a rare customer that has already been unlocked

Punishment spell card: Recollection "Unhappy Memory"
Activates a random Punishment Spell Card from a rare customer that has already been unlocked

Kaenbyou Rin
Prefers: Aquatic, Sea Delicacy, Savory, Dreamy, Strange, Sweet, Trend - Popular
Dislikes: Raw, Hot
Drinks: Low Alcohol, Sake, Fruity
Budget: 500 - 700 yen
Rewards: Neko-manma [recipe], Salmon Tempura [recipe], Dragon Carp [recipe], Rin's Letter of Recommendation + ingredient gathering for Palace of the Earth Spirits
Frequently seen at: Palace of the Earth Spirits, Former Hell, [DLC 3] Myouren Temple, [DLC 3] Divine Spirit Mausoleum

Reward spell card: Cat Sign "Cat's Walk"
For next 30 seconds serving drinks tagged with "Mild Alcohol" will result in the best rating

Punishment spell card: "Rekindling of Dead Ashes"
When Orin leaves a vengeful spirit will be left at her table which will continue to place orders based on Orin's preferences. The vengeful spirits cannot be kicked out nor will they pay. They will only disappear once satisfied like a normal guest

Reiuji Utsuho
Prefers: Meat, Greasy, Salty, Spicy, Hot, Strength-Boosting
Dislikes: Mild, Fungus
Drinks: Cocktail, Mild Alcohol, Heatable
Budget: 500 - 800 yen
Rewards: Cheese Omelette [recipe], Instant☆Death [recipe], CAUTION! Hellish Special [recipe], Utsuho's Letter of Recommendation + Stardust Cape coustume
Frequently seen at: Palace of the Earth Spirits

Reward spell card: "Hell's Tokamak"
For the next 60 seconds nuclear power overloads the boiling pot and steamer, allowing them to cook dishes instantly.

Punishment spell card: Hell's Light "Diffuse Hellfire"
A nuclear explosion will occur the next time you fail to sing a perfect Sparrow Tune, disabling the kitchenware for the night. The explosion will also cause a portion of queuing customers to run for their lives.


Rare guests: 3 residents, Yuugi, Patchouli

Partner: Komachi


Resource: Udumbara, Cheese, Truffle, Mushroom, Ginkgo Nut, Salmon, Puffer Fish, Jade Dew Tea, Godfather, Akatsuki


Shop:
Hell Raven:
Tofu - 4 yen
Butter - 4 yen
Lunar Herb - 39 yen
Ginkgo Nut - 4 yen
Cheese - 10 yen
Lemon - 4 yen
Ribovitan - 25 yen
Komeiji Ice Cream - 20 yen


Palace of the Earth Spirits'a treasure trove of goodies. There's a wine cellar, cheese attic, a nice resourceful garden and very helpful pets. It's definitely worth the long trek to pick things up here. Rin the ingredient gatherer of this zone is also a roamer who can be found in Former Hell, Myouren Temple and Divine Spirits Mausoleum. This makes her VERY easy to max. Her tags aren't too terrible. The tricky ones such as Dreamy and maybe Sea Delicacy can be bypassed with the Night Sparrow set if you do lack those ingredients. Meanwhile her owner and fellow pet likes to be home bodies. Satori's easy to please until she wants Dreamy stuff. Utsuho's your standard carnivorous meat loving youkai, also easy to please.

In terms of bond rewards, Rin is the resource gatherer of this area. Utsuho gives you a cool cape. And Satori gives you an item that allows you see customer's budget.

Recipes:
Neko-manma's probably the only recipe you'd realistically use from Rin. By this point you'll have better alternatives in term of pricing and availability. Her final recipe Dragon Carp calls for Lunar Herb too. Not the easiest thing to get usually.

Utsuho's recipes more usable. Cheese Omelet is ok, but you really want that level 3 Instant*Death. It's got decent tags for the carnivores and the ingredients list ain't too shabby either: Boar Meat, Venison and Onion. Her final recipe 'CAUTION!! Hellish Spice!' though... Maybe if you have Cheese and Chili to burn for common guests.

Satori's first recipe is pretty simple and easy with a decent set of tags. A Honey and Peach for Cool, Fruity, Photogenic, Small Portion, Specialty, and Sweet. It would be a good fit for Cirno and Tenshi if Tenshi's Daikon Salad doesn't exist. Her next 2 recipes are less usable however. Both require Lemon and Grapes if you don't have a decent supply of them. Satori herself will love them, but not necessarily good for other rare guests unless Tenshi or Cirno. But Cirno's even more broke than Reimu...
[DLC 2 content] Beating the Bizarre Cooking Competition
In order to participate in BCC you'll need to obtain Letter of Recommendations from 6 people. Basically the rare guests from Former Hell and Palace of the Earth Spirits. Once you max their bonds and obtain the letters, you can get the ball rolling by talking to Rin. You can also try the competition again even after winning it the first time. Satori will even have a difficulty selection should you feel daring enough.

For the BCC I suggest getting a Notepad or pen and paper ready for part 1. If you've been overly reliant on Suspicious or Night Sparrow kitchenware set, these items' effects have been disabled by Koishi for the duration of this competition. So just take your fastest kitchenware. Keep in mind there's also no saves or checkpoint between competition phases. Set aside at least... 1.5 hours for this competition. It took me quite a while because I went in completely blind but should be much shorter if you are reading this guide.

Part 1 Order obfuscation
Random nameless youkai you've ever served will have all their orders obfuscated. Your job is to get their orders right/please them 20 times. Preparation-wise... Easy recipes with lots of empty slots for tag stacking.

These are just some of the notes I made for when I went through BCC:

Youkai Fox: JP, CN, Meat, Signature, Small Portion
Falling Blossoms + Lamprey + any meat
Sangetsusei

Tsuchigumo: Greasy, mountain delicacy, filing, savory, sweet, raw, large, strange
Fried Pork Cutlet + Honey + Lamprey + Egg + Cicada Slough
Wind Priestess

Oni: Meat, premium legendary, alchol, savory, strength, aura, specialty, popular
Power Soup + Wagyu Beef + Lamprey
Fire Rat's Robe or Sangetsusei

Hone-onna:
Carved Rose Salad + Cicada Slough, Lamprey + Mushroom + Lemon
ZUN Beer

Youkai Leopard: Meat, mountain, sea, greasy, premium, raw, hot, specialty, popular
Lion's Haed + Iberico + Egg + Butter
Sangetsusei


Part 2 Musical chair with random seasoning
Part 2 of BCC is when things get slightly tricky. Though I consider this the easiest portion. All the guests that show up are rare guests, with the caveat of you need to satisfy them while at the same time add the random ingredient with the appropriate tag. In short, their request + the random flavor of the moment.

There's a timer in the bottom right counting down with a random seasoning tag. If it says [Salty], you add something [Salty] to whatever is being cooked and serve it to the guest before the timer resets. If [Sour], you add Lemon to the dish and serve it quickly. Remember that some dishes may not be compatible with specific seasoning, turning them into Dark Matter once the incompatible ingredient is added. Similar to part 1, completely satisfy your guests' orders 10 times.


Part 3: Koishi? Koishi? Koishi?
Your only customers are Koishis. Yes, plural. Only 1 Koishi's order will be obfuscated. The trick to this part is to feed the other Koishi what they order + the requested random seasoning. So part 2's gimmick + Konishi. Get the regular Koishi's orders right the hidden tag above them will reveal one of the obfuscated order's tags.

After revealing all the tags and making the appropriate dish for the hidden Koishi's tags, she'll enter into a brief vulnerable state. During this brief phase you need to feed her as much food and drinks as possible to wear her down. Rather than aim for complete customer satisfaction just treat this as force feeding. Quantity over quality. Speed is of the essence because there IS another timer on the top counting down.

Information regarding Koishi's damage mechanic courtesy of Suika Ibuki
Publicado originalmente por Suika Ibuki:
For DLC 2, additional information that's important, but is NOT mentioned in the game, is that "damage" to Koishi directly corresponds to the level of the recipe that you are giving her. Using Rice Balls, which is level 1, only does "1 damage" to her "health" during damage phase. This is especially important if you're redoing the Lunatic Version, as time is very tight if you're only doing 1 damage every time. Instead, cooking high level recipes during the "tag investigation" phase, then storing it until you reach damage phase to use, is a good idea to maximize your time and damage dealt for a much easier time. I hope this also helps anybody doing DLC 2's Boss!

On paper it's easier than phase 2 of the final mission. In terms of chaos though, it's complete ♥♥♥♥♥♥♥♥ insane. Because all the Koishis DO NOT order from the menu you provided. They can order anything from all the recipes you've unlocked. The only consistency you'll have is she will not ask for anything that takes 5 ingredients to cook. Because you need that 1 slot for the random seasoning. There's a chance she'll still ask for full size dishes according to the comments. Definitely have a separate window with all the recipes open.

Even though Koishi's orders are completely random, I'd still put in tricky recipes you have difficulty remember into the menu to save you some time when making selections. If you are lucky she may order from one of them.

I doubt you'll get the same tags I did, but here's what she threw at me.

Alcohol, Specialty, Salty, Savory
Chillable
X Homecooking X Legendary

Raw, Salty, Savory, Greasy
Sake
X Sea X Fruity

BBQ, Greasy, Mountain, Meat
Beer
X Aquatic X Mild
Scarlet Devil Mansion

Hong Meiling
Prefers: Strength-Boosting, Meat, Filling, Chinese, Trend - Popular
Dislikes: Western, Strange, Fruity, Trend - Unpopular
Drinks: Stimulating, Vintage, Heatable
Budget: 200 - 400 yen
Rewards: Kabayaki Lamprey [recipe], Golden Ribs Soup [recipe], Rainbow Pan-fried Pork Buns [recipe], Humpty Panpty item
Frequently seen at: Scarlet Devil Mansion

Reward spell card: Flower Sign "Gorgeous Sweet Flower"
Meiling performs circus tricks for the next 60 seconds, increasing the atmosphere by 1 point every 2 seoncds

Punishment spell card: "N0ver say no to p0nda"
An angry panda destroys a dining table and scares off the guest at that table. Decrease atmosphere points by 10 and makes the table unusable for the next 90 seconds

9 Cirno
Prefers: Photogenic, Sweet, Cool, Strange, Trend - Unpopular
Dislikes: Expensive, Cultural Background, Good with Alcohol, Trend - Popular
Drinks: Sweet, Fruity, Chillable
Budget: 100 - 200 yen. Poverty fairy, poorest of the poor rare guest
Rewards: Real - Seafood Miso Soup [recipe], Sashimi Platter [recipe], Ino-Shika-Chou [recipe], ingredient gathering at Scarlet Devil Mansion
Frequently seen at: Scarlet Devil Mansion, [DLC 1] Youkai Mountain

Reward spell card: "Sweet Ice Fairy"
Randomly gives you 3 common drinks with "Chillable' tag and 2-5 ice cubes

Punishment spell card: Freeze Sign "Perfect Freeze"
Randomly freezes 3 kitchenware. Any unfinished dishes in those kitchenware will be frozen and shattered. Lasts 30 seconds

Patchouli Knowledge
Prefers: Sweet, Premium, Western, Photogenic, Dreamy
Dislikes: Raw, Hot, Strange, Salty
Drinks: Soda, Cocktail, Liquor
Budget: 600 - 1000 yen
Reward: Eggs Benedict [recipe], Italian Risotto [recipe], Beef Wellington [recipe], Pajamas costume
Frequently seen at: Scarlet Devil Mansion, [DLC 1] Forest of Magic, [DLC 2] Palace of Earth Spirits

Reward spell card: Knowledge Bizarre Adventure "Cultural Atmosphere"
For next 30 seconds all dishes with a "cultural" tag will receive the highest rating

Punishment spell card: Metal & Water Sign "Mercury Poison"
For next 30 seconds all dishes have a 50% chance of becoming Dark Matter.


Rare guests: 3 residents, Marisa

Partner: Sakuya


Resource: Tuna, Dew, Shrimp, Grape, Ice


Shop:
Goblin Merchant:
Price may be different
Butter - 6 yen
Flour - 7 yen
Wagyu Beef - 29 yen
Puffer Fish - 30 yen
Premium Tuna - 25 yen
Pork Stir Fry* - 11 yen
[Pork Stir Fry will expire at the end of the if not used]

Anonymous Fairy Maid:
Negroni - 49 yen
Godfather - 88 yen

Koakuma:
Affogato - 17 yen
Scarlet Mist - 37 yen
Scarlet Tea - 12 yen


Finally the elusive Grapes for Alice's quest is within reach. Scarlet Devil Mansion's the only place where you can scavenge for Grape and Ice (if no DLC). The NPC here also sells good meat and western beverages. After a certain point you can also fulfill Sakuya's requests for 6 level 4 alcohol. Try not to talk too much to Cirno as you (the player) do lose some brain cells from her idiocy. Unfortunately, you do want to max her if you hope to have her gather the ingredients here for you. Maxing Patchouli's bond gets you a Pajama costume, Meiling's gives you an item, Humpty Panpty, that let's all guests tip 1-20 yen every 15 seconds.

Recipe wise, I won't go into details because at this point you have a really good selection when it comes to tags and pricing already. Though Patchuli's level 4 recipe Beef Wellington has the necessary tag for a particular quests. I think it's Koakuma's and the reward wasn't super great. Meiling's level 4 Rainbow Pan-fried Pork Buns is also really easy to make ingredient-wise for a high level dish.
[DLC 3] Myouren Temple


Murasa Minamitsu
Prefers: Meat, Premium, Filling, Salty, Savory, Specialty, Strength-Boosting
Dislikes: Vegetarian, Sour, Strange, Small Portion
Drinks: Chillable, Western, High Alcohol, Dry
Budget: 400 - 600 yen
Rewards: [recipe] Biscay Biscuits, [recipe] Smoked Buccaneer, [recipe] Buddha's Delight, Pirate Costume
Frequently seen at: Myouren Temple

Reward spell card: "Lingering Phantom of the Ship"
Gives you the Ship Phantom Possession buff that lasts for 15 seconds. With this buff in effect, all your current active reward spell cards (excluding this one) will have their duration extended

Punishment spell card: Drowning Sigh "Deep Vortex"
For 5 seconds you can't move. You can smash your movement keys to recover faster. The 20 seconds after this your movements will be reversed

Houjuu Nue
Prefers: Savory, Signature, Wonderful, Specialty, Strange, Raw, Meat, Photogenic, Trend - Unpopular
Dislikes: Sour, Western, Trend - Popular
Drinks: Vintage, Neat, Heatable, Shochu
Budget: 300 - 500 yen
Rewards: [recipe] Unzan Cotton Candy, [recipe] Pure White Lotus, [recipe] Star Lotus Ship, UFO Slot Machine item
Frequently seen at: Myouren Temple

Reward spell card: Delight "Touhou RGB"
Spins the UFO with a guaranteed prize. The result will be one of the following:
3 red UFO: For the next 15 seconds regardless of the dish they will get the highest rating
3 green UFO: For the next 15 seconds your ingredients and beverages won't be used
3 blue UFO: For the next 15 seconds your income will be increased by 100%
Red green blue: You will obtain all 3 above buffs

Punishment spell card: Disgust "Touhou RRB"
Spin the wheel with guaranteed miss, the result will be one of the following:
Red red green: For the next 15 seconds regardless of the dish they will get the lowest rating
Green green 0: For the next 15 seconds you will consume 3 times the amount of ingredients and beverages
Blue blue 0: For the next 15 seconds your income will be reduced by 66%
Red red blue: Obtain all 3 above debuffs

Tatara Kogasa
Prefers: Wonderful, Homecooking, Filling, Sweet, Strength-Boosting, Trend - Popular, Photogenic, Strange
Dislikes: Hot, Soup, Spicy
Drinks: Fruity, Mild Alcohol, Chillable, Vintage
Budget: 150-300 yen
Rewards: [recipe] Baked Sweet Potato, [recipe] Yashouma Dango, [recipe] Heart-Throbbing Surprise!, ingredient gathering for Myouren Temple
Frequently seen at: Myouren Temple

Reward spell card: Rain Sigh "A Rainy Night's Ghost Story"
For next 30 seconds any food with "Strange" tag's cooking speed will be increased by 30% and costumers also has +30% chance of re-ordering

Punishment spell card: "Jumbo Phantom Umbrella"
Kogasa scares off all the queuing guests


Rare guests: 3 residents, Akyuu, Keine, Rin, Narumi, Sanae, Marisa

Partner: Ichirin


Resource: Sweet Potato, Bingdi Lotus, Lotus Seed, Shrimp, Honey, Udumbara


Shop:
Nezurin:
Black Salt - 2 yen
Cheese - 9 yen
Honey - 8 yen
Cream - 5 yen
Chili - 1 yen
Dassai - 68 yen
Mango Pomelo Sago - 26 yen
Sweet Potato - 4 yen


Kogasa gathers resources here. You get pirate coat from Minamitsu. Nue gives you a... UFO Slot Machine. Enabling it puts a slot machine in Mystia's basement. There's a chance of winning NOTHING, ingredients and beverages. Typical gacha crap but there's actually daily limit. First draw costs 100, second 200, 3rd 400, 800, 1600... Total costs 3100 if you are rolling everyday.


Same with SDM, at this point you have a good repertoire to satisfy your rare guests' needs. Although I do use Minamitsu's Smoked Buccaneer fairly often. Level 2 cuisine but requires Black Salt from Youkai Mountain, also has only 1 slot left for tag stacking. Nue's first recipe Cotton Candy does have the rare Wonderful tag using only Honey and Peach. Both very easy ingredients. Great for a base tag.
[DLC 3] Divine Spirits Mausoleum


Mononobe no Futo
Prefers: Japanese, Premium, Legendary, Mild, Mountain Delicacy, Aura Bursting!, Trend - Popular
Dislikes: Trend - Unpopular, Western, Raw
Drinks: Neat, Heatable, Soda, Mild Alcohol
Budget: 600 - 900 yen
Reward: [recipe] Pine Nut Cake, [recipe] , [recipe] White Deer Unyielding Pine, [recipe] Eight Trigram Fish Maws, Ebony Flame grill
Frequently seen at: Divine Spirit Mausoleum

Reward spell card: Saint Girl "Sun Goddess's Sacrifice"
For the next 10 seconds, depending on customer's rating: "regular" rating rewards you with Lv1 beverage, "Satisfied" rewards you with Lv2 beverage, "perfect" rewards you with Lv3 beverage.

Punishment spell card: Torch Passing "Tray Basked in Flames"
For the next 30 seconds you are only allowed to use one slot to serve customers. Any items remaining in the banned slots will be destroyed.

Kaku Seiga
Prefers: Chinese, Vegetarian, Legendary, Sweet, Wonderful, Small Portion, Specialty, Trend - Popular
Dislikes: Greasy, Filling
Drinks: Fruity, Low Alcohol, Sake, Modern
Budget: 400 - 900 yen
Reward: [recipe] Honeyed Chestnut, [recipe] Tianshi's Stewed Mushroom, [recipe] Fish Lotus Lamps, Costume
Frequently seen at: Divine Spirit Mausoleum

Reward spell card: Wicked Arts "No Walls Beneath Heaven"
For the next 30 seconds Mystia gains the noclip ability and can pass through any obstacles or customers.

Punishment spell card: Demonify "Zouhuo Rumo"
For the next 30 seconds your rare guests will go on a rampage. Every time they pay the bill regardless of the original rating, there's a 30% chance of them casting a punishment spell card. If they were already casting a punishment spell card, they'll cast it again.

Soga no Tojiko
Prefers: Strength-Boosting, Signature, Filling, Homecooking, Greasy, Japanese, Barbecued
Dislikes: Sweet, Cool
Drinks: High Alcohol, Beer, Shochu, Bitter
Budget: 500 - 600 yen
Reward: [recipe] Candied Sweet Potato, [recipe] Golden Two-Shroom Wrap, [recipe] Tempura Platter, Ingredient gathering for Divine Spirit Mausoleum
Frequently seen at: Divine Spirit Mausoleum

Reward spell card: Thunder's Shadow "Lighting Speed"
For the next 30 seconds Mystia and her partner's movement speed will be increased by 30%

Punishment spell card: Retribution "Heavenly Thunder Strike"
The next time you didn't perform a perfect Sparrow Tune it will trigger a divine punishment and knock out one partner for 30 seconds.


Rare guests: 3 residents, Tenshi, Kasen, Rin, Marisa

Partner: Yoshika


Resource: Pine Nut, Chestnut, Bingdi Lotus, Shrimp, Lamprey, Tuna, Salmon, Lotus Seed, Ice, Dew


Shop:
Taoist:
Wagyu Beef - 24 yen
Venison - 12 yen
Mushroom - 11 yen
Truffle - 30 yen
Salmon - 14 yen
Tuna - 18 yen
Puffer Fish - 25 yen
Kirin - 107 yen
Divine Wheat - 27 yen
Cassia Wine - 36 yen
Chestnut - 6 yen
Pine Nut - 9 yen
Dew - 6 yen


In terms of rewards, Seiga gives you a costume. Tobiko volunteers to help you gather ingredients. Futo gives you a new cookware that allows you to cook 15% faster, immediately finishes anything with [Meat] tag, and has a 30% chance of refunding your ingredient. Really good stuff.

Same with SDM, at this point you have a good repertoire to satisfy your rare guests' needs. Seiga's Honeyed Chestnut could be good for Small Portion tag with no particular banned tag but so's Fresh Tofu. It would had been good for Suika if not for her other requirements of Strength-Boosting, Good with Alcohol or Japanese. Not something I can stack onto. For Seiga or Satori I can easily use Fresh Tofu instead without coming to Mausoleum for the Chestnut too.
Bamboo Forest of the Lost

Inaba Twei
Prefers: Small Portion, Dreamy, Legendary, Sweet, Trend - Popular, Cool
Dislikes: Greasy, Mountain Delicacy, Strange, Trend - Unpopular
Drinks: Fruity, Sweet, No Alcohol
Budget: 200 - 400 yen
Rewards: Mochi [recipe], Peach Yatsuhashi [recipe], Lunar Dango [recipe], Lucky Rabbit? item
Frequently seen at: Bamboo Forest of the Lost, and all around as a pushy scammer merchant until you are on good terms with her

Reward spell card: Vitality "Luck From The Forty-Leaves Clover"
All ingredient collection points' cooldown are instantly refreshed and gives you 1-2 extra ingredients when you collect them the next day

Punishment spell card: Memory "Remember That Year's Rabbit Horror"
Activates forced sale again. If you refuse she will activate another punishment spell card.

Punishment spell card2: Trick "Combo Disappearance Jutsu"
Reset your Combo and prevents you from accumulating new Combo for the next 30 seconds

Houraisen Kaguya
Prefers: Wonderful, Cultural Background, Legendary, Japanese, Trend - Popular
Dislikes: Large Portion, Signature, Strange, Trend - Unpopular
Drinks: Modern, Sake, Vintage
Budget: 1000 - 1500 yen
Rewards: Steamed Egg & Bamboo Shoots [recipe], Lunar Lover Biscuits [recipe], Hourai Branch [recipe], Visitor's Wafuku costume
Frequently seen at: Bamboo Forest of the Lost

Reward spell card: "End of Imperishable Night -Rising World-"
Turn back time and increase operation hours by 30 seconds

Punishment spell card: Divine Treasure "Jeweled Branch of Hourai -Dreamlike Paradise-"
Fast forward time and decrease operation hours by 30 seconds. Will forcibly end operations if it reaches midnight

Fujiwara Mokou
Prefers: Fruity, Aura Bursting!, Hot, Spicy
Dislikes: Expensive, Premium, Wonderful
Drinks: Shochu, Bitter, Dry
Budget: 300 - 600 yen
Rewards: Mapo Tofu [recipe], Sichuan Boiled Fish [recipe], Fuji's Lava [recipe], ingredient gathering for Bamboo Forest of the Lost
Frequently seen at: Bamboo Forest of the Lost

Reward spell card: Undying "Fire Bird -Feng Wing Ascension-"
For the next 20 seconds dishes can be completed 50% faster.

Punishment spell card: Fujiwara "Wounds of Metsuzai Temple"
For the next 30 seconds regardless of how good the dishes are, guests will only give at most a "fair" raiting


Rare guests: 3 residents, Marisa

Partner: Reisen


Resource: Moon Rocket, Premium Tuna, Mushroom, Bamboo Shoot, Bamboo


Shop:
Youkai Rabbit Gourmet:
Price not set in stone

Full Moon's Eve - 227 yen
Cassia Wine - 31 yen
Sticky Rice - 8 yen
[rare] Lunar Herb - 32 yen
Wagyu Beef - 21 yen
Puffer Fish - 22 yen
Premium Tuna - 18 yen
Beef - 10 yen


Tewi the scammer rabbit is officially recognized as a rare guest once you reach Bamboo Forest. All the tags I unlocked before hand apparently meant nothing because she functioned only as a scamming NPC merchant??? Pretty quickly upon arriving here you will get caught up in a typical spat between Mokou and Kaguya. It is advised to make an extra, backup save for this point if you are into achievement hunting. Tewi's max bond item is a Lucky Rabbit? It has a 15% chance to make cooking a dish use no ingredients if it's active. Kaguya gives you a costume for max bond. Mokou volunteers to collect ingredients for you here.

Fretting about the final cart upgrade? Buy the Lunar Dango from the Human Village.
Kitchenware:
The tools of the trade. Very important stuff. As you progress in the main quest Kourindou will have more available, basically each time you unlock a main area that results in Mystia stuck with another debt. For obvious reasons, only Mystia can activate the cookwares' special effects if they possess any.


Your start out with these. For whatever reasons, you can choose to buy more of them. But if you got the money to burn you might as well invest in the next tier the Super sets.


With the power of money, now your cuisine can cook 5% faster and guests are 3% more likely to order again with the Super series kitchenware.


Night Sparrow set requires you trading in Bizarre Rocks instead of buying things with money. Starting from this point all your future kitchenware requires trading with the NPC currency of each zone. For Youkai Trail it's Bizarre Rocks.

Night Sparrow set is pretty special. While it has the downside of taking 25% longer to cook, but food made during Hyper mode ignores rare guest's orders. Instead they will review them based on their preferences. Very good if you encounter a guest who wants a rare tag. Keep in mind since this is for rare guests obviously assistant cook NPC can't benefit from this effect. This set can last you until end game if you don't mind the extra cooking time.


Xtreeeeeeeeeeeeeeeeeeeeeeeeme series. Each piece costs 5000 yen and 7 Quaint Coin to purchase. You get the coins from completing quests in Human Village. Food now cooks 10% faster and guests are 8% more likely to order again.


Nucular Nuclear series requires Torn Tailsmans from completing Hakurei Shrine's NPC quests. Cooks food 50% faster but has a 40% of creating Dark Matter if used outside Hyper mode. If used during said mode however, this chance is reduce to 5%. Pretty worth it if you are good with the rhythm game. I would use these as supplemental cookware rather than the primary, 40% chance of Dark Matter is pretty high if you are using expensive ingredients outside Hyper mode.


Suspicious series. Suspicious on the account of each item takes 7 Ruby to trade. What a scam. Available once Scarlet Devil Mansion is unlocked. Food takes 10% longer to cook but guests are 30% more likely to order again. I trade in the Sparrow set for this to try to raise the rare guests's level quicker. Seems to work pretty well?


Do you like money? The Tsukimi series has a 40% chance to summon a bunny when cooking. Each bunny increases tips by 5% and lasts 20 seconds. Becomes available once Bamboo Forest of the Lost is accessible. Requires Shining Bamboo to be traded for. Though this is near the end point of the game. At this point I'd prioritize the Nuclear or the Suspicious series instead.


DLC 3 only. Futo will gift you Ebony Flame after you max her bond. Cooks food 15% faster, instantly finishes anything with [Meat] tag, and 30% chance of refunding used ingredient.
Tasks - Main Quests
Usually involves Chen threatening to break Mystia's kneecaps should she fail to pay back the debt at the end of the deadline. If you fail to complete the main base game's quests, it's GG. DLC stuff also falls under this but because they are optional content, no deadline for these.

Paying Off Debt - Youkai Trail -
Have 3000 yen by end of 1/15

Get Operation Permit - Human Village -
Talk to Keine by the end of 1/17

Detective Mystia Lorelei! - First Case -
Examine the shiny spot by the Dragon God statue in the Human Village on 1/23

Detective Mystia Lorelei! - Second Case -
Examine the shiny spot by the Dragon God statue in the Human Village on 1/25

Detective Mystia Lorelei! - Third Case -
Check the chicken coop in the top right part of Human Village on 1/27

Paying Off Debt - Human Village -
Have 6000 yen by end of 2/3

Oni's Sake
Give 3 Fruity Sour to Suika by the end of 2/13
Reward: 8 Fire Rat's Robe

Heavenly Cuisine
Give 1 Wagyu Beef to Tenshi by the end of 2/14
Reward: 8 Peach

Paying Off Debt - Hakurei Shrine -
Have 10000 yen by end of 2/17

Get Operation Permit - Scarlet Devil Mansion -
Talk to Meiling by the end of 2/19

Obtain Permit - Vineyard -
Talk to Meiling by the end of 2/26

Objective! Obtain Meiling's Autograph!
Give 1 cuisine with [Chinese] tag to the Meiling by end of 2/26
Reward: Hong Meiling's Autograph
There's a Goblin merchant towards the bottom right of the map who sells Pork Stir Fry for 11 yen if you don't want to cook

Free Grapes For All!
Talk to the goblin NPC after getting Meiling's Autograph by end of 2/26
From this point on you can pick the grapes behind the goblin NPC

Find A Wine-making Jar
Talk to Rinnosuke with 2000 yen available. Return to Sakuya after this
Complete this by the end of 2/28
I wonder if it's possible to talk to him and still get the jar if you have no money...

Where is Miss Sakuya
Talk to Meiling by the end of 3/1

Report to Miss Sakuya!
Talk to Sakuya by the end of 3/1
She's chilling on the right side of the mansion past the path towards Patchouli

Pick Up The Finished Product!
Talk to Sakuya by the end of 3/23
Reward: 1 Akatsuki, 1 Full Moon's Eve, 1 Fire Rat's Robe

Paying Off Debt - Misty Lake -
Have 15000 yen by end of 3/5

The Destiny Between The Immortals
Sell Immortal Turkey and/or Kaguya-hime in the Izakaya
Quest will be completed on 3/17
Make a separate save point if you want to see the other party win. You don't have to sell both items at the same time so you can absolutely rig this contest

Paying Off Debt - Bamboo Forest -
Have 20000 yen by end of 3/22

The Original Aspiration ~ Part I ~
This appears after you've defeated the boss of the base game
Talk to Chen
Tasks - Side Quests for base game
Early on you need to wander aimlessly on Youkai Trail to find the NPC with a ! above their head for quests. Once News is accessible it'll inform you where the quest giver is. The quests are sorted in the order I completed them so they are chronologically listed.

Youkai Trail:
1/8
I Want To Trade With Humans...
Requirement: Talk to Grocer NPC
Reward: 50 yen, 10 Cicada Slough, 7 Bizarre Rock

1/9
Fading Eyesight Due To Old Age
Requirement: Hang lanterns on various poles around the trail
Reward: 50 yen, [Recipe] Roasted Mushroom, 8 Bizarre Rock
*Roasted Mushroom is required for one of Tojiko's quest. No way you can possibly miss this quest...

1/11
Mysterious Parties At The Youkai Trail
Requirement: Pick up the bottles from the trail south of Mystia's home and bring them back to the NPC
Reward: 3 Dassai, 7 Bizarre Rock
From this point on you can start picking up Dassai at this location after 16:00

1/13
Those Idiotic Humans!
Requirement: Make 2 Dew Runny Eggs and give to Wriggle. You need to reach level 2 bond with her for the recipe.
Reward: 150 yen, 3 Cicada Slough, 8 Bizarre Rock

1/13
To Protect The Human Village And Youkai Trail From Devastation!
Requirement: Give 3 food with [Meat] tags to the quest giver
Reward: 100 yen, 5 Cicada Slough, 7 Bizarre Rock

1/14
Looking For A Cook For Cats!
Requirement: Give 3 Grilled Lamprey to Chen
Reward: 150 yen, 5 Umeshu, 8 Bizarre Rock

[EXPANSION]
Youkai Trail Branch Expansion
Requirement: Give 4 cuisine with [Aquatic, Barbecued] tags and have 5000 yen
Reward: Unlock Youkai Trail Izakaya
4 Grilled Lamprey


Human Village

[EXPANSION]
Human Village Branch Expansion
Requirement: Give 4 cuisine with [Aquatic, Small Portion] tags and have 3000 yen
Reward: Human Village Cabin unlocked

1/16
The Way Of Human Entertainment
Requirement: Give 1 Sparrow Sake to the NPC
Reward: 13 Quaint Coin

1/18
Looking For Miss Akyuu's Signed Washi
Requirement: Give 3 Signed Washi
Reward: 1 Lunar Herb, 2 Udumbara, 3 Premium Tuna

1/20
Turns Out, There Might Be Free Lunch!
Requirement: Serve Dark Matter to Rinnosuke when he comes to eat
Reward: 500 yen, 5 Boar Meat, 14 Quaint Coin

[EXPANSION]
Human Village Branch Expansion Plus
Requirement: Give 4 cuisine with [Aquatic, Cultural Background] tags and have 8000 yen
Reward: Human Village Izakaya unlocked

1/25
Bounty: Inari God's Tribute
Requirement: Give 5 Deep Fried Tofu to the kid
Reward: 150 yen, 5 Umeshu, 9 Quaint Coin

1/26
Bounty: Lunchboxes for School
Requirement: Give 5 Pork Bowl to Keine
Reward: 150 yen, [Recipe] Pork Rice Ball, 9 Quaint Coin
Mystia learns the Pork Bowl recipe at level 8

1/26
Looking For Miss Akyuu's Signed Washi
Requirement: Give 3 Signed Washi
Reward: 3 Pufferfish, 3 Truffle, 3 Wagyu Beef

2/3
Looking For Miss Akyuu's Signed Washi
Requirement: Give 3 Signed Washi
Reward: 3 Godfather, 3 Dassai, 3 Jade Dew Tea


Hakurei Shrine
[EXPANSION]
Hakurei Shrine Branch Expansion
Requirement: Give 2 cuisine with [Cool] tags and have 5000 yen
Reward: Shrine Cabin unlocked

2/5
Looking For Strength-Boosting Food
Requirement: Give 2 food with [Strength-Boosting] tags
Reward: [Recipe] Pork Stir Fry, 9 Torn Tailsman
Chen's level 4 recipe should be a good one for this...

2/5
Suspicious Altar
Requirement: Interact with the suspicious altar and report back to Reimu
Reward: that 1 Silver Froggy Coin you got from interacting with the altar...

Find A Way To Deal With The Annoying Rabbit
Requirement: Talk to Reimu
Reward: What reward? You can donate to Reimu but Tewi can still show up...

2/7
Bounty: Lunchboxes for Hakurei Shrine's Volunteers
Requirement: Give 5 food with [Filling] tags
Reward: 9 Torn Tailsman
Easy peazy. Make some Rice Balls.

2/7
Supply and Demand
Requirement: Talk to Reimu, Suika and Tenshi then report back to the kappa merchant
Reward: 9 Torn Tailsman

2/7
Looking For Miss Akyuu's Signed Washi
Requirement: Give 3 Signed Washi
Reward: 1 Akatsuki, 1 Full Moon's Eve, 1 Fire Rat's Robe
Yep it's that one rabid fan standing next to Kourindou again...

[EXPANSION]
Hakurei Shrine Branch Expansion Plus
Requirement: Give 3 cuisine with [Fruity] tags and have 10000 yen
Reward: Shrine Izakaya unlocked

2/9
Bounty: Jealousy Between Housewives
Requirement: Give 1 food with [Photogenic] tag
Reward: 150 yen, 15 Ice Cube, 9 Torn Tailsman

2/10, 2/15, 2/18, 2/23, 2/26, 3/3, 3/7, 3/13, 3/16, 3/20, 3/23, 3/27
Looking For Miss Akyuu's Signed Washi
Requirement: Give 3 Signed Washi
Reward: ???
After a certain point I think her quests just loop back to the beginning in terms of reward drops.

2/13
Alcohol Surrogate Shopper
Requirement: Give the NPC 24 ZUN Beer
Reward: 1500 yen, 9 Torn Tailsman
ZUN will be proud?


Scarlet Devil Mansion

2/21
Haunted Mansion's Scary Rumor
Requirement: Check out the frozen lake surface. Poor Daiyousei...
Reward: 6 Ruby

Cirno's Perfect Math Class
Requirement: Give 3 Trout to Patchouli
Reward: 6 Ruby, you loses some brain cells
This is a lead-in from Daiyousei's quest.

Mystia's Perfect Cooking Class
Requirement:
1. Give Cirno 1 food with [Sweet] tag
2. Give Cirno 1 food with [Photogenic] tag
3. Give Cirno 1 food with [Fruity] tag
Reward: 7 Ruby
Same as above

[EXPANSION]
Scarlet Devil Mansion Branch Expansion
Requirement: Give 2 cuisine with [Western, Meat] tags and have 8000 yen
Reward: Mansion Cabin unlocked

[EXPANSION]
Scarlet Devil Mansion Branch Expansion Plus
Requirement: Give 5 cuisine with [Dreamy] tags and have 15000 yen
Reward: Mansion Izakaya unlocked

2/21
Help! I Need To Provide Special Cuisines For An Important VIP...
Requirement: Give 3 food with [Premium, Sweet] tags
Reward: 5 Negroni, 6 Ruby

2/24
I Want To Know About Lady Meiling's Homeland Cuisine!
Requirement: Give 5 [Chinese] tag food to the goblin NPC
Reward: [Recipe] Cantonese Char Siu, 6 Ruby
Gawwwwwwblins

2/25
I'm Once Again Asking For Your Cooking Support
Requirement: Give 3 food [Western, Sweet] tags to the Fairy Maid NPC
Reward: 5 Godfather, 7 Ruby

3/2
Chief Maid's Shopping List
Requirement:
1. Give 30 Pork
2. Give 20 Beef
3. Give 10 Boar Meat
4. Give 5 Ibarico Pork
5. Give 2 Wagyu Beef
Reward: 6 Fire Rat's Robe

3/5
Chief Maid's Shopping List
Requirement:
1. Give 30 Tofu
2. Give 20 Radish
3. Give 10 Mushroom
4. Give 1 Truffle
5. Give 1 Udumbara
Reward: 6 Full Moon's Eve

2/23
Finding The Perfect Lady Patchouli's Weakness
Requirement:
1. Give 2 food with [Western, Premium] tags
2. Give 2 food with [Photogenic, Sweet] tags
Reward: 5 Affogato, 7 Ruby
#1's the hardest to fulfill. I didn't finish it until I got Beef Wellington recipe from Patchuli's level 4 bond reward.


Bamboo Forest of the Lost

[EXPANSION]
Bamboo Forest of the Lost Branch Expansion
Requirement: Give 3 cuisine with [Hot, Spicy] tags and have 10000 yen
Reward: Bamboo Forest Cabin unlocked

3/9
Take Back The Stolen Natural Spring
Requirement: Give 5 Roasted Mushrooms
Reward: 11 Shining Bamboo
wao who could've predicted it was her all along...

3/11
Looking for A Philosopher Book
Requirement: Give 10 Bamboo
Reward: [Recipe] Flowing Somen, 11 Shining Bamboo
Somen is delicious

3/8
Chief Maid's Shopping List (X5)
Requirement:
1. Give 30 Trout
2. Give 20 Lamprey
3. Give 10 Salmon
4. Give 2 Premium Tuna
5. Give 2 Pufferfish
Reward: 6 Akatsuki
At this point reward table loops back to the start I think. Same quests on 3/14, 3/17, 3/20, 3/22, 3/25, 4/1

3/12
Short Concert In The Bamboo Forest
Requirement: Give 5 food with [Cultural Background] tags
Reward: 11 Shining Bamboo

3/14
It's Kind of Lonely Here In the Pond
Requirement: Give 5 Lamprey
Reward: Shining Bamboo 12
RIP local pond's ecosystem
Tasks - Side Quests DLC portion
[EXPANSION]
Forest of Magic Branch Expansion
Requirement: Give 5 Fairy Dew and have 3000 yen
Reward: Forest of Magic Cabin unlocked

[EXPANSION]
Youkai Mountain Branch Expansion
Requirement: Give 5 cuisine with [Specialty] tags and have 3000 yen
Reward: Youkai Mountain Cabin unlocked

[EXPANSION]
Forest of Magic Branch Expansion Plus
Requirement: Give 3 cuisine with [Fungus, Specialty] tags and have 5000 yen
Reward: Forest of Magic Izakaya unlocked

[EXPANSION]
Youkai Mountain Branch Expansion Plus
Requirement: Give 5 cuisine with [Mountain Delicacy, Premium] tags and have 5000 yen
Reward: Youkai Mountain Izakaya unlocked

[EXPANSION]
Streets of Former Hell Branch Expansion
Requirement: Give 5 cuisine with [Strange] tags and have 5000 yen
Reward: Former Hell Cabin unlocked

[EXPANSION]
Palace of the Earth Spirits Branch Expansion
Requirement: Give 3 Cheese and have 5000 yen
Reward: Palace Cabin unlocked

[EXPANSION]
Streets of Former Hell Branch Expansion Plus
Requirement: Give 5 cuisine with [Strange, Specialty] tags and have 10000 yen
Reward: Former Hell Izakaya unlocked

[EXPANSION]
Palace of the Earth Spirits Branch Expansion Plus
Requirement: Give 5 cuisine with [Sour] tag and have 10000 yen
Reward: Palace Izakaya unlocked
Better hurry up with raising Parsee's bond :x

[EXPANSION]
Myouren Temple Branch Expansion
Requirement: Give 5 Mango Pomelo Sago and have 5000 yen
Reward: Myouren Temple Cabin unlocked
You can buy it from the NPC in the Mausoleum

[EXPANSION]
Divine Spirits Mausoleum Branch Expansion
Requirement: Give 3 cuisine with [Pine Seed] ingredients and have 5000 yen
Reward: Divine Spirit Mausoleum Cabin unlocked

[EXPANSION]
Divine Spirit Mausoleum Expansion Plus
Requirement: Give 12 Kirin and have 10000 yen
Reward: Divine Spirit Mausoleum Izakaya unlocked

[EXPANSION]
Myouren Temple Branch Expansion Plus
Requirement: Give 5 cuisine with [Strength-Boosting, Meat] tags and have 10000 yen
Reward: Myouren Temple Izakaya unlocked

[DLC 3] A Very Busy Hakurei Miko
Talk to Reimu
Available on 2/20 with no deadline

[DLC 3] Beware of Tanuki!
Talk to the mystery tanuki standing outside Mystia's house
She will only spawn after you talk to Reimu first
Available on 2/20 with no deadline after finishing the previous task

[DLC 3] A Matter of Life and Death for Beast Youkai?
Go to Myouren Temple and talk to Kyouko
Available on 2/20 with no deadline after finishing the previous task

[DLC 3] Tanuki Espionage Operation!
Reach Bond level with the 6 DLC 3 rare guests. This allows you to participate in the DLC 3's special event

[DLC 3] The Tanuki Boss's Battle Plans
Talk to Mamizou after enlisting partners at the Hakurei Shrine and Human Village.
Tasks - Bond base game part 1
Youkai Trail
Rumia

Spicy Dark Matter?!
Requirement: Give 1 Tofu
Reward: [Recipe[ Stinky Tofu

Have Rumia Try the [Stinky Tofu]!
Requirement: Serve the dish to Rumia
Advance to next bond level

Spicy Dark Matter?!
Requirement: Give 1 Tofu
Reward: [Recipe[ Stinky Tofu

Have Rumia Try the [Fried Lampreys!
Requirement: Serve the dish to Rumia
Advance to next bond level

Dark Matter?! Part One
Give 1 Iberico Pork

Dark Matter?! Part Two
Give 1 Bamboo Shoot

Have Rumia Try the [Imitation Bear Paw]!
Requirement: Serve the dish to Rumia
Advance to next bond level


Wriggle
A Date Between Morning Dew and Egg?
Requirement: Give 1 Dew
Reward: [Recipe] Dew Runny Eggs

Have Wriggle Try the [Dew Runny Eggs]!
Requirement: Serve the dish to Wriggle when she visits at night
Advance to next bond level

Have Wriggle Try the [Fried Cicada Sloughs]!
Requirement: Serve the dish to Wriggle when she visits at night
Advance to next bond level

Please Help This Thoughtful Young Youkai
Requirement: Give 4 Grilled Lamprey
Reward: 2 Udumbara , 1 Ramune
You can use this towards Wriggle's next request, quest's given by a different NPC

The Flower of The Insect Race
Requirement: Give 1 Udumbara
Reward: [Recipe] Udumbara Cake

Have Wriggle Try the [Udumbara Cake]!
Requirement: Serve the dish to Wriggle when she visits at night
Advance to next bond level


Chen
Have Chen Try the [Secret Dried Fish Crisp]!
Requirement: Serve the dish to Chen at night
Advance to next bond level

Drunk Cat - Pork Chapter
Requirement: Give 1 Pork

Drunk Cat - Trout Chapter
Requirement: Give 1 Trout

Drunk Cat - Pork & Trout Chapter
Requirement: Give 1 Pork and 1 Trout

Have Chen Try the [Pork & Trout Kebab[!
Requirement: Serve the dish to Chen at night
Advance to next bond level

Operation Stray Cats ~ Part One
Requirement: Give 1 Seaweed

Operation Stray Cats ~ Part Two
Requirement: Give 1 Seaweed and 1 Boar Meat
Reward: [Recipe] Power Soup

Have Chen Try the [Power Soup]!
Requirement: Serve the dish to Chen at night
Advance to next bond level


Human Village

Akyuu
Have Miss Akyuu Try the [Miso Tofu]!
Requirement: Serve the dish to Akyuu at night
Advance to next bond level

Pick The Right Vegetable For The Right Job
Requirement: Give 1 Potato and 1 Pumpkin
Reward: [Recipe] Vegetable Salad

Have Miss Akyuu Try the [Vegetable Salad]!
Requirement: Serve the dish to Akyuu at night
Advance to next bond level

Have Miss Akyuu Try the [Falling Blossoms]!
Requirement: Serve the dish to Akyuu at night
Advance to next bond level


Kasen
Have Miss Kasen Try the [Tofu Stew]!
Requirement: Serve the dish to Kasen at night
Advance to next bond level

Prepare The Izakaya For The God of Fortune
Requirement: Give 1 Beef
Reward: [Recipe] Beef Bowl

Have Miss Kasen Try the [Beef Bowl]!
Requirement: Serve the dish to Kasen at night
Advance to next bond level

Learn From The Sage's Beast!
Requirement: Give 1 Pumpkin
Reward: [Recipe] Hunter's Casserole

Have Miss Kasen Try the [Hunter's Casserolel]!
Requirement: Serve the dish to Kasen at night
Advance to next bond level


Keine
Have Keine-sensei Try the [Deep Fried Tofu]!
Requirement: Serve the dish to Keine at night
Advance to next bond level

Have Keine-sensei Try the [Scholar's Ginkgo]!
Requirement: Serve the dish to Keine at night
Advance to next bond level

Ingredients From Across The Sea!
Requirement: Give 1 Pufferfish
Reward: [Recipe] Shirayuki

Have Keine-sensei Try the [Shirayuki]!
Requirement: Serve the dish to Keine at night
Advance to next bond level


Hakurei Shrine
Reimu
The Hidden Warmth In A Rice Ball?
Requirement: Give 5 Onion
Reward: [Recipe] Pink Rice Ball

Have Miss Reimu Try the [Pink Rice Ball]!
Requirement: Serve the dish to Reimu at night
Advance to next bond level

Have Miss Reimu Try the [Hodgepodgel]!
Requirement: Serve the dish to Reimu at night
Advance to next bond level

The Most Expensive Ingredients
Requirement: Give 1 Iberico Pork, 1 Wagyu Beef, 1 Pufferfish
Reward: [Recipe] Daimyo's Feast

Have Miss Reimu Try the [Daimyo's Feastl]!
Requirement: Serve the dish to Reimu at night
Advance to next bond level


Tenshi
Class and Elegance?
Requirement: Give 5 Radish
Reward: [Recipe] Carved Rose Salad

Have Miss Tenshi Try the [Carved Rose Salad]!
Requirement: Serve the dish to Tenshi at night
Advance to next bond level

Have Miss Tenshi Try the [Peach Tapioca]!
Requirement: Serve the dish to Tenshi at night
Advance to next bond level

Heavenly Peach vs Earth Peach
Requirement: Give 3 Peach
Reward: [Recipe] Peach & Shrimp Salad

Have Miss Tenshi Try the [Peach & Shrimp Salad]!
Requirement: Serve the dish to Tenshi at night
Advance to next bond level


Suika
This Pork Is Different From That Pork!?
Requirement: Give 3 Pork
Reward: [Recipe] Fried Pork Cutlet

Have Miss Suika Try the [Fried Pork Cutlet]!
Requirement: Serve the dish to Suika at night
Advance to next bond level

Have Miss Suika Try the [Energy Skewer]!
Requirement: Serve the dish to Suika at night
Advance to next bond level

The Super Cuisine That Every Oni Knows!?
Requirement: Give 1 Iberico Pork, 1 Boar Meat
Reward: [Recipe] Niten Ichiryu

Have Miss Suika Try the [Niten Ichiryu]!
Requirement: Serve the dish to Suika at night
Advance to next bond level


Scarlet Devil Mansion
Meiling
Lamprey Dishes From Afar
Requirement: Give 2 Grilled Lamprey
Reward: [Recipe] Kabayaki Lamprey

Have Miss Meiling Try the [Kabayaki Lamprey]!
Requirement: Serve the dish to Meiling at night
Advance to next bond level

Have Miss Meiling Try the [Golden Ribs Soup]!
Requirement: Serve the dish to Meiling at night
Advance to next bond level

Find The Right Meat For The Perfect Buns
Requirement: Give 3 Iberico Pork
Reward: [Recipe] Rainbow Pan-fried Pork Buns

Have Miss Meiling Try the [Rainbow Pan-fried Pork Buns!
Requirement: Serve the dish to Meiling at night
Advance to next bond level


Cirno
Lawsuit From An Idiotic Fairy!?
Requirement: Give 3 Salmon
Reward: [Recipe] Real - Seafood Miso Soup

Have Cirno Try the [Real - Seafood Miso Soup]!
Requirement: Serve the dish to Cirno at night
Advance to next bond level

Have Cirno Try the [Sashimi Platter]!
Requirement: Serve the dish to Cirno at night
Advance to next bond level

Looking For The Right Meat For A Cold Plate
Requirement: Give 2 Pork Bowl
Reward: [Recipe] Ino-Shika-Chou

Have Cirno Try the [Ino-Shika-Chou]!
Requirement: Serve the dish to Cirno at night
Advance to next bond level


Patchouli
Have Miss Patchouli Try the [Eggs Benedict]!
Requirement: Serve the dish to Patchouli at night
Advance to next bond level

The Cuisine In The Book
Requirement: Give 1 Roasted Mushroom
Reward: [Recipe] Italian Risotto

Have Miss Patchouli Try the [Italian Risotto]!
Requirement: Serve the dish to Patchouli at night
Advance to next bond level

Don't Get Too Cocky Now!
Requirement: Give 1 Cuisines with [Premium] tag
Reward: [Recipe] Beef Wellington

Have Miss Patchouli Try the [Beef Wellington]!
Requirement: Serve the dish to Patchouli at night
Advance to next bond level
Tasks - Bond base game part 2
Bamboo Forest of the Lost
Tewi
Rabbit's Secret Recipe?
Requirement: Give 1 Cuisine with [Specialty] tags
Reward: [Recipe] Mochi
If you are feeling particularly lazy you can buy the Lunar Dango from the Human Village to give it to Tewi

Have Tewi Try the [Mochi]!
Requirement: Serve the dish to Tewi at night
Advance to next bond level

Asking For A Return Gift Before Sending Yours!? Have You No Shame!?
Requirement: Give 1 Cuisine with [Wonderful] tags
Reward: [Recipe] Peach Yatsuhashi
Again, a store bought Lunar Dango can do the job nicely.

Have Tewi Try the [Peach Yatsuhashi]!
Requirement: Serve the dish to Tewi at night
Advance to next bond level

Companion Rabbit
Requirement:
Give 1 Cuisine with [Sweetl] tags
Give 1 Cuisine with [Small Portion] tags
Reward: [Recipe] Lunar Dango
Buy 2 Mochi from Human Village and call it a day.


Mokou
Bring Out The HOTTEST Stuff You Got!
Requirement: Give 3 Chili
Reward: [Recipe] Mapo Tofu

Have Miss Mokou Try the [Mapo Tofu]!
Requirement: Serve the dish to Mokou at night
Advance to next bond level

Eat Your Sorrows Away!
Requirement:
Give 1 Cuisine with [Aura Bursting!] tags
Give 1 Cuisine with [Legendary] tags
Reward: [Recipe] Fuji's Lava

Have Miss Mokou Try the [Fuji's Lava]!
Requirement: Serve the dish to Mokou at night
Advance to next bond level


Kaguya
Have Miss Kaguya Try the [Steamed Egg & Bamboo Shoots]!
Requirement: Serve the dish to Kaguya at night
Advance to next bond level

"Lunar Capital Expo" Opening Soon!
Requirement: Give 5 Immortal Turkey
Reward: [Recipe] Lunar Lover Biscuits

Have Miss Kaguya Try the [Lunar Lover Biscuits]!
Requirement: Serve the dish to Kaguya at night
Advance to next bond level

The Sixth Puzzle From The Princess
Requirement: Give 1 Cuisine with [Legendary], [Cultural Background] tags
Reward: [Recipe] Hourai Branch

Have Miss Kaguya Try the [Hourai Branch]!
Requirement: Serve the dish to Kaguya at night
Advance to next bond level
Tasks - Bonds [DLC 1]
Forest of Magic
Marisa
Distinguishing Poisonous Mushrooms From Edible Ones
Requirement: Give 3 Pork
Reward: [Recipe] Pork & Mushroom Stir Fry

Have Miss Marisa Try the [Pork & Mushroom Stir Fry]!
Requirement: Serve the dish to Marisa
Advance to next bond level

The Magic Book Containing Mushroom Recipes
Requirement:
Give 2 Truffle
Give 2 Mushroom
Reward: [Recipe] Secret Savory Mushroom Hotpot

Have Miss Marisa Try the [Secret Savory Mushroom Hotpot]!
Requirement: Serve the dish to Marisa
Advance to next bond level

The Witch Dancing On The Tip Of The Tongue!
Requirement:
Give 1 Cuisines with [Legendary] tags
Give 1 Cuisines with [Hot] tags
Reward: [Recipe] Mushroom Maiden's Tip Tap Pot

Have Miss Marisa Try the [Mushroom Maiden's Tip Tap Pot]!
Requirement: Serve the dish to Marisa
Advance to next bond level


Narumi
Have Miss Narumi Try the [Nigiri Sushi]!
Requirement: Serve the dish to Narumi
Advance to next bond level

Tributes to Jizo Buddha
Requirement:
Give 1 Cuisines with [Specialty] tags
Give 1 Cuisines with [Cultural Background] tags
Reward: [Recipe] Shrimp-Stuffed Pumpkin

Have Miss Narumi Try the [Shrimp-Stuffed Pumpkin]!
Requirement: Serve the dish to Narumi
Advance to next bond level

The Foreign Cuisines That Can Save A NEET!
Requirement:
Give 1 Cuisines with [Western] tags
Give 1 Cuisines with [Chinese] tags
Reward: [Recipe] Buddha Jumps Over The Wall

Have Miss Narumi Try the [Buddha Jumps Over The Wall]!
Requirement: Serve the dish to Narumi
Advance to next bond level


Alice
Have Miss Alice Try the [Cream of Mushroom Soup]!
Requirement: Serve the dish to Alice
Advance to next bond level

A Fairy Tale Cake That Can Turn One Into A Giant?
Requirement: Give 10 Grapes
Reward: [Recipe] Ordinary "Eat Me" Cupcake

Have Miss Alice Try the [Ordinary "Eat Me" Cupcake]!
Requirement: Serve the dish to Alice
Advance to next bond level

Find The Suitable Legendary Ingredient For The Seven-colored Cuisine!
Requirement: Give 1 Cuisine with [Udumbara] ingredient
Reward: [Recipe] Seven-colored Yokan

Have Miss Alice Try the [Seven-colored Yokan]!
Requirement: Serve the dish to Alice
Advance to next bond level


Youkai Mountain
Nitori
Mysterious "Cucumbers For Dummies"
Requirement: Give 5 Cucumber
Reward: [Recipe] Pickles

Have Miss Nitori Try the [Pickles]!
Requirement: Serve the dish to Nitori
Advance to next bond level

Have Miss Nitori Try the [Creamy Crab]!
Requirement: Serve the dish to Nitori
Advance to next bond level

The Missing Key Ingredient Is!?
Requirement: Give 1 Fried Cicada Sloughs
Reward: [Recipe] Imitation Shirikodama

Have Miss Nitori Try the [Imitation Shirikodama]!
Requirement: Serve the dish to Nitori
Advance to next bond level


Sanae
Have Miss Sanae Try the [Okonomiyaki]!
Requirement: Serve the dish to Sanae
Advance to next bond level

Challenge From A Living God!
Requirement: Give 1 Octopus
Reward: [Recipe] Takoyaki

Have Miss Sanae Try the [Takoyaki]!
Requirement: Serve the dish to Sanae
Advance to next bond level

The Mysterious Ingredient of The Outside World
Requirement: Gives 1 Sea Urchin
Reward: [Recipe] Sea Urchin Sashimi

Have Miss Sanae Try the [Sea Urchin Sashimi]!
Requirement: Serve the dish to Sanae
Advance to next bond level


Momiji
Have Miss Momiji Try the [Deep Fried Shrimp Tempura]!
Requirement: Serve the dish to Momiji
Advance to next bond level

Hangovers Are Not Good For Your Health~
Requirement: Give 3 Honey
Reward: [Recipe] Golden Crispy Fish Cakes

Have Miss Momiji Try the [Golden Crispy Fish Cakes]!
Requirement: Serve the dish to Momiji
Advance to next bond level

The Working Class Only Need To Worry About Themselves!
Requirement: Give 1 Cuisine with [Meat] tags
Reward: [Recipe] All-Meat Feast

Have Miss Momiji Try the [All-Meat Feast]!
Requirement: Serve the dish to Momiji
Advance to next bond level
Tasks - Bonds [DLC 2]
Former Hell
Yamame
Beware of Food Poisoning!
Requirement: Give 2 Tonkotsu Ramen
Reward: [Recipe] Crispy Spirals

Have Miss Yamame Try the [Crispy Spirals]!
Requirement: Serve the dish to Yamame at night
Advance to next bond level

Have Miss Yamame Try the [Ceiling-Longing Pie]!
Requirement: Serve the dish to Yamame at night
Advance to next bond level

The Underworld's Popular "Strength-Boosting" Dish
Requirement: Give 2 Cuisine with [Strength-Boosting] tags
Reward: [Recipe] Kabuto Steamed Cake

Have Miss Yamame Try the [Kabuto Steamed Cake]!
Requirement: Serve the dish to Yamame at night
Advance to next bond level


Yuugi
Requirement:
Give 2 Cuisine with [Good with Alcohol] tags
Give 2 Beverages with [High Alcohol] tags
Reward: [Recipe] Lion's Head

Have Miss Yuugi Try the [Lion's Head]!
Requirement: Serve the dish to Yuugi at night
Advance to next bond level

The Grand Objects Competition is in Full Swing!
Requirement:
Give 1 Radish
Give 1 Pumpkin
Give 1 Trout
Give 1 Iberico Pork
Reward: [Recipe] Giant Tamagoyaki

Have Miss Yuugi Try the [Giant Tamagoyaki]!
Requirement: Serve the dish to Yuugi at night
Advance to next bond level

Even Birdies Have Grit!
Requirement:
Give 1 Cuisine with [Legendary] tags
Give 1 Cuisine with [Wonderful] tags
Give 1 Cuisine with [Dreamy] tags
Give 1 Cuisine with [Strength-Boosting] tags
Give 1 Cuisine with [Premium] tags
Reward: [Recipe] Oedo Boat Festival

Have Miss Yuugi Try the [Oedo Boat Festival]!
Requirement: Serve the dish to Yuugi at night
Advance to next bond level


Parsee
Have Miss Parsee Try the [Misery Cheese Sticks]!
Requirement: Serve the dish to Parsee at night
Advance to next bond level

Let's Exchange Fruits
Requirement:
Give 2 Cuisine with [Peach] ingredients
Give 2 Grapes
Reward: [Recipe] Gloomy Fruit Pie

Have Miss Parsee Try the [Gloomy Fruit Pie]!
Requirement: Serve the dish to Parsee at night
Advance to next bond level

The Underworld's Most Popular Disk - Unmasked!
Requirement: Give 20 Chili
Reward: [Recipe] Agony Oden

Have Miss Parsee Try the [Agony Oden]!
Requirement: Serve the dish to Parsee at night
Advance to next bond level


Palace of the Earth Spirits
Rin
Cat Rice? Cat Food?
Requirement: Give 1 Beef Bowl
Reward: [Recipe] Neko-manma

Have Orin Try the [Neko-manma]!
Requirement: Serve the dish to Rin at night
Advance to next bond level

Satori-sama's Favorite Food?
Requirement: Give 1 Sakura Pudding
Reward: [Recipe] Salmon Tempura

Have Orin Try the [Salmon Tempura]!
Requirement: Serve the dish to Rin at night
Advance to next bond level

Cuisine with History
Requirement: Give 1 Scholar's Ginkgo
Reward: [Recipe] Dragon Carp

Have Orin Try the [Dragon Carp]!
Requirement: Serve the dish to Rin at night
Advance to next bond level


Satori
Rise and Shine!
Requirement: Give 5 Beverages with [Stimulating] tags
Reward: [Recipe] Sakura Pudding

Have Miss Satori Try the [Sakura Pudding]!
Requirement: Serve the dish to Satori at night
Advance to next bond level

Go Forth! Komeiji Satori!
Requirement: Give 2 Cuisine with [Strength-Boosting] tags
Reward: [Recipe] Energy Pudding

Have Miss Satori Try the [Energy Pudding]!
Requirement: Serve the dish to Satori at night
Advance to next bond level

Energy Pudding Resupply
Requirement: Give 5 Energy Pudding
Reward: [Recipe] Burn-out Pudding

Have Miss Satori Try the [Burn-out Pudding]!
Requirement: Serve the dish to Satori at night
Advance to next bond level


Utsuho
Have Okuu Try the [Cheese Omelette]!
Requirement: Serve the dish to Utsuho at night
Advance to next bond level

Divine Flame Skewers
Requirement:
Give 2 Cuisines with [Hot] tags
Give 3 Boar Meat
Give 3 Venison
Give 10 Onion
Reward: [Recipe] Instant☆Death

Have Okuu Try the [Instant☆Death]!
Requirement: Serve the dish to Utsuho at night
Advance to next bond level

Heat Up Your Brain!?
Requirement: Give 3 Cuisine with [Hot] tags
Reward: [Recipe] CAUTION!! Hellish Spice!

Have Okuu Try the [CAUTION!! Hellish Spice!]!
Requirement: Serve the dish to Utsuho at night
Advance to next bond level
Tasks - Bonds [DLC 3]
Divine Spirits Mausoleum
Seiga
Culinary Magic Trick!?
Requirement:
Give 2 Chestnut
Give 2 Honey
Reward: [Recipe] Honeyed Chestnut

Have Seiga Try the [Honeyed Chestnut]!
Requirement: Serve the dish to Seiga at night
Advance to next bond level

A Chestnut Story~
Requirement: Give 2 Honeyed Chestnut
Reward: [Recipe] Tianshi's Stewed Mushrooms

Have Seiga Try the [Tianshi's Stewed Mushroom]!
Requirement: Serve the dish to Seiga at night
Advance to next bond level

Taoism's Lotus Flower Feast!
Requirement: Give 5 Cuisine with [Cultural Background] tags
Reward: [Recipe] Fish Lotus Lamps

Have Seiga Try the [Fish Lotus Lamps]!
Requirement: Serve the dish to Seiga at night
Advance to next bond level


Tojiko
Buried Sweet Potatoes!
Requirement: Give 5 Sweet Potato
Reward: [Recipe] Candied Sweet Potato

Have Tojiko Try the [Candied Sweet Potato]!
Requirement: Serve the dish to Tojiko at night
Advance to next bond level

Let's Exchange Dishes!
Requirement: Give 5 Cuisine with [Mushroom] ingredients
Reward: [Recipe] Golden Two-Shroom Wrap

Have Tojiko Try the [Golden Two-Shroom Wrap]!
Requirement: Serve the dish to Tojiko at night
Advance to next bond level

Deep Fried Match Made in Heaven?
Requirement:
Give 1 Fried Pork Cutlet
Give 1 Potato Croquettes
Give 1 Pancake with Syrup
Reward: [Recipe] Tempura Platter

Have Tojiko Try the [Assorted Tempura]!
Requirement: Serve the dish to Tojiko at night
Advance to next bond level


Mononobe no Futo
A Treat For The Old-Time Hermit!
Requirement: Give 1 Cuisine with [Strength-Boosting] tags
Reward: [Recipe] Pine Nut Cake

Have Futo Try the [Pine Nut Cake]!
Requirement: Serve the dish to Futo at night
Advance to next bond level

The Symbol of Longevity!?
Requirement: Give 1 Cuisine with [Venison] ingredient
Reward: [Recipe] White Deer, Unyielding Pine

Have Futo Try the [White Deer, Unyielding Pine]!
Requirement: Serve the dish to Futo at night
Advance to next bond level

The Colors of Gensokyo and Taoism?
Requirement: Give 2 Cuisine with [Japanese, Specialty] tags
Reward: [Recipe] Eight Trigram Fish Maws

Have Futo Try the [Eight Trigram Fish Maws]!
Requirement: Serve the dish to Futo at night
Advance to next bond level


Myouren Temple
Nue
Pranking the Old Man!
Requirement: Give 10 Peach
Reward: Unzan Cotton Candy

Have Nue Try the [Unzan Cotton Candy]!
Requirement: Serve the dish to Nue at night
Advance to next bond level

Nue's Mystery Game
Requirement: Give 1 Cuisine with [Dreamy] tags
Reward: [Recipe] Pure White Lotus

Have Nue Try the [Pure White Lotus]!
Requirement: Serve the dish to Nue at night
Advance to next bond level

To Identify the Unindentified!
Requirement: Give 5 Cuisine with [Dreamy] tags
Reward: [Recipe] Star Lotus Ship

Have Nue Try the [Star Lotus Ship]!
Requirement: Serve the dish to Nue at night
Advance to next bond level


Murasa
Have Murasa Try the [Biscay Biscuits]!
Requirement: Serve the dish to Murasa at night
Advance to next bond level

Like Eggs on Scrambled Eggs!?
Requirement: Give 3 Cuisine with [Premium] tags
Reward: [Recipe] Smoked Buccaneer

Have Murasa Try the [Smoked Buccaneer]!
Requirement: Serve the dish to Murasa at night
Advance to next bond level

The Ship Phantom's Debt!
Requirement: Give 5 Cuisine with [Vegetarian, Wonderful] tags
Reward: [Recipe] Buddha's Delight

Have Murasa Try the [Buddha's Delight]!
Requirement: Serve the dish to Murasa at night
Advance to next bond level


Kogasa
Have Kogasa Try the [Baked Sweet Potato]!
Requirement: Serve the dish to Kogasa at night
Advance to next bond level

Shrine Maidens Selling Outside World Dango!?
Requirement:
Give 1 Lunar Dango
Give 1 Mochi
Reward: [Recipe] Yashouma Dango

Have Kogasa Try the [Yashouma Dango]!
Requirement: Serve the dish to Kogasa at night
Advance to next bond level

Let's Make a Heart-Throbbing Dish!
Requirement: Give 5 Cuisine with [Wonderful] tags
Reward: [Recipe] Heart-Throbbing Surprise

Have Kogasa Try the [Heart-Throbbing Surprise]!
Requirement: Serve the dish to Kogasa at night
Advance to next bond level
News
Tasks already cover a majority of the quests stuff so I'll skip those.

1/6
Filling foods are popular. Gives food with [Filling] tags the [Trend - Popular] tag.

1/10
Filling foods are no longer popular. The new tag is removed.

1/11
Chen upgrades your Youkai Trail cart for free.

1/14
Filling foods are now unpopular. Gives food with [Filling] tags the [Trend - unpopular] tag.

1/18
Filling food's trend tag is removed.

1/18
DLC 1 areas Youkai Mountain and Forest of Magic is now accessible along with the base area Human Village.

1/20
Greasy foods are now unpopular. Gives food with [Greasy] tags the [Trend - unpopular] tag.

1/27
Greasy food's trend tag is removed.

2/4
Chinese foods are popular. Gives food with [Chinese] tags the [Trend - Popular] tag.

2/5
Base area Hakurei Shrine is now accessible.

2/5
Notice that Tewi will start terrorizing you during the work phase

2/7
Green Tea prices goes up

2/8
DLC 2's areas Former Hell and Palace of the Earth Spirits are now accessible

2/9
Chinese foods are no longer popular. The new tag is removed.

2/10
Green Tea price returns to normal

2/14
Foods with [Good with Alcohol] tag are now unpopular. Gives food with this tag the [Trend - Unpopular] tag.

2/20
SDM is now accessible along with DLC 3's areas.

2/21
Foods with [Good with Alcohol] tag returns to normal.

2/24
Foods with [Mild] tag are now unpopular. Gives food with this tag the [Trend - Unpopular] tag.

3/3
Foods with [Mild] tag returns to normal.

3/6
Filling foods are popular. Gives food with [Filling] tags the [Trend - Popular] tag. Why do I have a sense of deja vu?

3/9
Bamboo Forest of the Lost is open.

3/12
Filling foods are no longer popular. Loses trend tag.

3/14
Beginning of 2 idiots' contest. I suggest making an extra save point here and do not overwrite this.

3/17
Japanese foods are popular. Gives food with [Japanese] tags the [Trend - Popular] tag.

3/18
End of the contest

3/24
Final mission is available. Talk to Youmu at the Hakurei Shrine
Keep a save here if you want to farm punishment cards. For those after the 50 punishment achievo or looking for a specific character, Wriggle's punishment spell card activates pretty quickly if you leave her alone and she chases out the other guests.

4/1
Filling foods are popular. Gives food with [Vegetarian] tags the [Trend - Popular] tag
Partners
Shield your eyes or skip this section if you don't want to find out about main quest partners or the hidden ones.

Most will join your automatically as per main story progression. A few will only appear once you met certain criteria: maxing certain individual's friendship. They will appear the next day once you've triggered the respective person's level 5 dialogue. Seems to be one partner for each area?

Even though it says commission 0% for the characters, I'm pretty damn sure Reimu charges you for using Aunn. Lore-wise you also need to pay for Kyouko later on. I'm not sure how the fee is calculated.

Kasodani Kyouko
Kyouko joins your automatically at the start
Her stats are average. Medium for both movement and work speed. No particular downside
Movement: Medium
Work: Medium

Motoori Kosuzu
Kosuzu will join your eventually automatically once you've progressed enough in Human Village. Slow movement but Fast work speed. I replace her later on since she usually gets in the way in the kitchen once more partners become available. Useful for those who struggles with getting Hyper mode.
Movement: Slow
Work: Fast

Komano Aunn
Aunn joins your automatically once you've made enough progress in Hakurei Shrine. She's the opposite of Kosuzu, Fast movement but slow work speed. Great for serving food or drinks.
Movement: Fast
Work: Slow

Izayoi Sakuya
Sakuya joins you automatically after you finished paying off the debt for the Scarlet Devil Mansion contract. She's a cheat character basically. The perfect maid who TELEPORTS when she moves, plus her work speed is fast. There's absolutely no reason not to use her unless you are afraid she's going to throw knives at Meiling. She won't. Outside of work? Meling's on her own.
Movement: Teleports
Work: Fast

Reisen Udongein Inaba
Reisen joins you eventually for the Eientei portion. Starting from this point your partner will have gimmicky special effects. For Reisen she increases guest tips by 20%. She moves Fast and her work speed is Medium. Better than Aunn overall in stats plus +20% for tips is pretty sweet.
Movement: Fast
Work: Medium
Perk: Guest tips increased by 20%

Kagiyama Hina
DLC 1 only. Youkai Mountain
Ever spinning Hina will join you after maxing all Youkai Mountain residents' bonds. Not recommended unless you like her character. (Her spinning endlessly even while serving is cute though) Stat is not good and she has a 15% chance of making Dark Matter if she's the one cooking. The cooking is instantaneous, but this game's difficulty is very forgiving so you really don't need her perk
Movement: Slow
Work: Medium
Perk...? Immediately finishes cooking but has a 15% chance of cooking Dark Matter. May be a good combo with Yoshika and the Nuclear kitchenware

Yumeko.
DLC 1 only. Forest of Magic
Need to max the forest resident's friendship level. Consider her the improved version of Kosuzu. Throws knives to deliver food...
Movement: Medium
Work: Fast
Perk:Use throwing knives to deliver food. It's even faster than Mystia's throw.

Kisume
DLC 2 only. Former Hell
Max everyone in Former Hell's bonds. Kyouko with bonus perk.
Movement: Medium
Work: Medium
Perk: No negative effects when kicking out normal guests, but they won't pay.

Onozuka Komachi
DLC 2 only. Palace of the Earth Spirits
The infamous slacker shinigami. Not surprisingly she's slow in everything.
Movement: Slow
Work: Slow
Perk: Will sleep during work, but guests are immediately brought to their tables
On the one hand, she seems pointless. But guest teleportation is pretty alright.

Kumoi Ichirin
DLC 3 only. Myouren Temple
Movement: Medium
Work: Fast
Perk: Summons Unzan to work with her

Miyako Yoshika.
DLC 3 only. Divine Spirits Mausoleum
Well.... She's a zombie. So don't be surprised if she's shambling around slowly.
Movement: Slow
Work: Slow
Perk: Eats Dark Matter to improve your stats
By "your" they mean Yoshika's. Any Dark Matter you put into the Food Storage will be gobbled up by her. The more she eats, the faster she goes. As interesting as it is to stack Hina and Nuclear kitchen set with her, Hina on cooking duty can get in your way especially if your Hyper mode runs out. And honestly it's such a gimmick you are better off using naturally fast characters unless you have to. You are not restricted to any partners at all unless it's a personal preference.


Spoiler protection sparrow let's gooooooo


20 comentarios
Paper Rabbit  [autor] 30 NOV 2024 a las 2:56 a. m. 
Nothing guaranteed atm. Got a lot on my plates lately.
Lost_Kitty 24 NOV 2024 a las 6:27 p. m. 
Hello, Are you going to update the guide for DLC 4 and 5?
Paper Rabbit  [autor] 12 AGO 2023 a las 12:24 p. m. 
There's no information on DLC1 boss because I haven't done it yet. I was hoping to wrap up both DLC 2 and 3 before I 'finish' the base game. Just so I can pretend everybody's celebrating with Mystia in the ending. I'm weird that way. Too bad I then hit a roadblock with Seiga while doing the competition. The burnt out finally caught up to me at that point and the guide stalled.


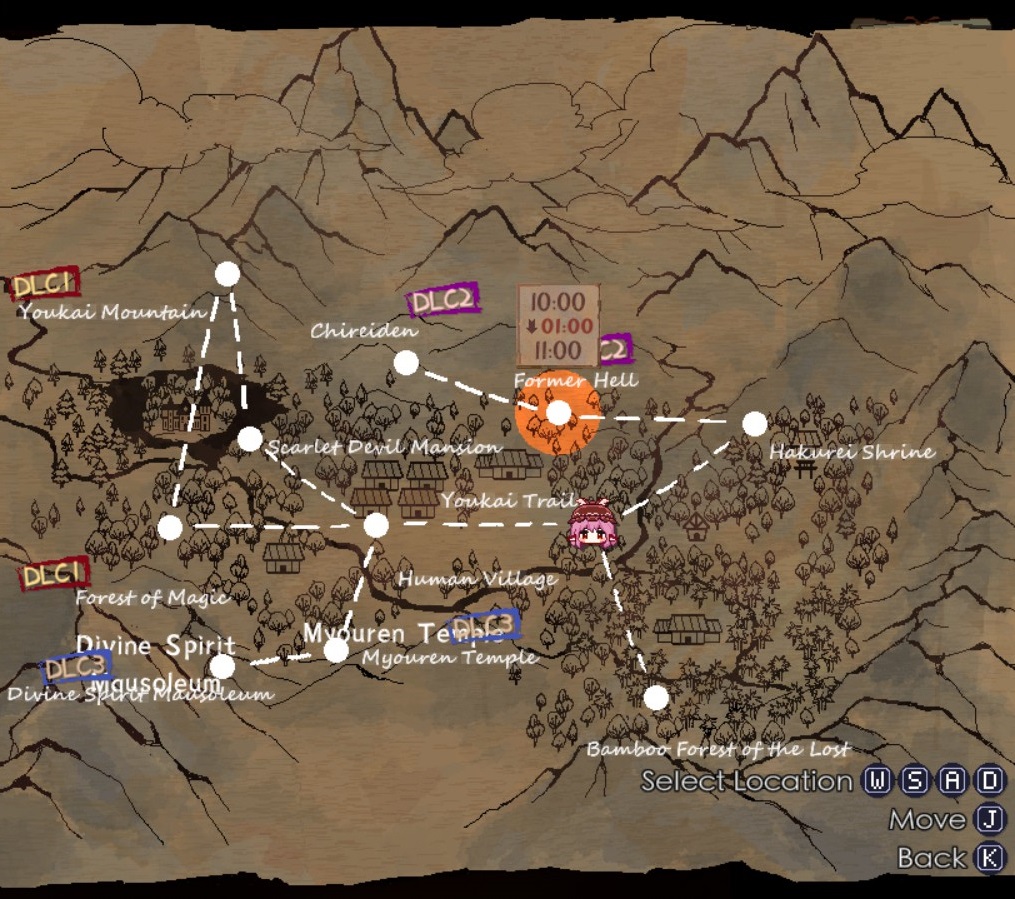
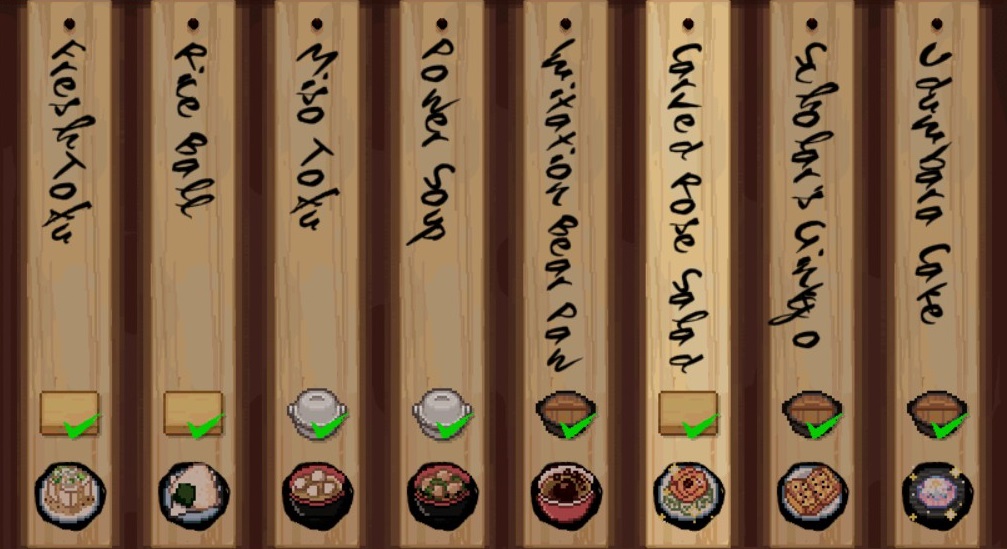
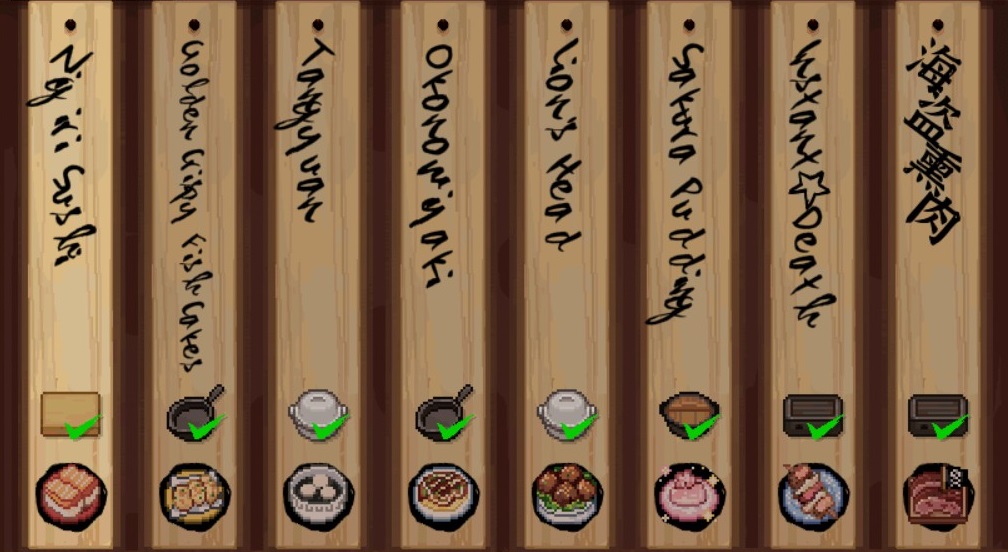
Thank you very much for the info on Koishi's damage! I'll append this to the DLC 2 fight.
Suika Ibuki 11 AGO 2023 a las 8:42 p. m. 
Great guide! And thanks for referring to mine! It's a little strange how you do reference DLC 2's boss, but not DLC 1's. It's not a big deal, and I honestly wouldn't even recommend doing DLC 1's boss until much later, as that particular boss can decide to use DLC 2 and 3 drinks that you may not have anyway.

For DLC 2, additional information that's important, but is NOT mentioned in the game, is that "damage" to Koishi directly corresponds to the level of the recipe that you are giving her. Using Rice Balls, which is level 1, only does "1 damage" to her "health" during damage phase. This is especially important if you're redoing the Lunatic Version, as time is very tight if you're only doing 1 damage every time. Instead, cooking high level recipes during the "tag investigation" phase, then storing it until you reach damage phase to use, is a good idea to maximize your time and damage dealt for a much easier time. I hope this also helps anybody doing DLC 2's Boss!
Beet 5 AGO 2023 a las 10:32 a. m. 
Hope we can get info on DLC 4 soon ^_^
Paper Rabbit  [autor] 4 AGO 2023 a las 9:38 p. m. 
DLC 2 is sort of whatever, but Earth Palace does have a lot of goodies you can raid with Rin being super easy to max compared to the rest. She's the one who collected goodies for you there. Yuugi's first recipe reward is decent too. DLC 3... Futo's gift is super good, but this is a fairly easy paced game so it's not something that's a must have. And by the time DLC 3 areas open up you really don't need anything specifically except to interact with the folks here. If it's busted partners... Base game SDM and DLC 1 Magic Forest.
Paper Rabbit  [autor] 4 AGO 2023 a las 9:37 p. m. 
Whenever you want really. Base game recipes tend to cover your needs very well without needing DLC. If you have access to the DLCs and care about efficiency, early on you can try to 'finish' up DLC 1's Magic Forest or the mountain area for the extra ingredients (early access to rare meat) or recipes (Sanae and Narumi). Try being the key word since you can't get far with Alice until you have access to SDM. Since each DLC area is locked behind base game progression, you can't jump ahead anywhere. Check the start of the guide for unlock order.
苏白 2 AGO 2023 a las 3:51 p. m. 
Thanks for the detailed guide. Question, when will be good time to play DLC content?
Paper Rabbit  [autor] 13 MAY 2023 a las 3:41 p. m. 
It's already in the rewards section after their recipes. I added another mention at the bottom of that section.
exotics at a reasonable price 10 MAY 2023 a las 2:52 p. m. 
what are the rewards for getting max bonds with the bamboo forest residents