Dwarf Fortress

Dwarf Fortress

Not enough ratings
Dwarf Fortress Aquifer Guide and Pond Guide
By Sniper(+)
How to cross aquifers safely and utilise them to your advantage
2
2
   
Award
Favorite
Favorited
Unfavorite
Aquifer Fundamentals.
Edit 1 : smoothing aquifers is not recommended. Water seeps in.
I still personally recommend Stone block walls for aquifers but it consumes time.

Light Aquifer
When embarking on locations with regional information marked aquifers cause early game problems. The problem being that, when you dig deep enough, there will be damp stones. Damp stones have water seeping out from them at a varying rate. This rate is what differentiates between light and heavy aquifer. One can dig straight down a light aquifer and little puddle will form. When it comes to heavy aquifer, things go bad. Dwarfs will drown. This guide explains one method each to overcome them. There are many informative videos and guides out there, after all the problem has been since 20 years or so. This is a simple and short guide to step by step collecting stuff and over coming it.

1. Chop trees and make a carpenters workshop. Near carpenters workshop, make a stockpile. In this stockpile we are going to enable wood and bars.


2. This is how you make a custom stockpile. You select custom option in stockpiles. Go to menu, go to wood and click on all. all wood will be place-able in this stockpile, but, you want cheap and fast wooden blocks. For this go to bars and blocks, go to other materials. There you will see wood. Click on wood. Make some wooden blocks. 1 wood log = 4 wood blocks. So in difficult embarkations, carrying little wood beforehand can help in this process.


Wood and wood block stockpile


3. Now you dig down, you use dig stairway, preferably 1x1 for start or, 3x3. Here I have plenty wood so I will make it a 3x3 route. You dig stairs from surface towards lower levels, until you find damp stone. Once you do, you dig stairs in damp stone as well.

Damp stone detection message


Now we have damp stone, after you reach here, theres three methods, we start by 1, smoothing walls. Simplest method. We dig stairs in to one layer at a time for the aquifers, so we dig a 3 x 3, then we immediately smooth walls. Even if you pause as soon as the stair pieces are carved, it is okay.

In this image, we can see water gathering in a normally dug aquifer, whereas in a smooth wall aquifer, water can't be seen.


The blue square is water, its accumulation comes in from 1 to 7 out of 7/7. basically the level of water in a height level of a block in a layer.

The second method is of using the blocks we made earlier.
We did a one block thick square surrounding our carved stairs.

It looks something like this.


Now we build walls from this construction menu.


Make walls like this


Use your wooden blocks.


Wall being built


Wall Finished.


Now water won't come out any more.
So these are two light aquifer methods of preventing cave flooding.
Heavy Aquifer
Major edit 1 :
22-12-2022
Adding handwritten diagram, this oughta help.


Older Version with in-game photos: At carpenters workshop make a corkscrew and pipe section and wooden blocks.
depending upon the size of stairs, 1x1, 2x2, 3x3, use 1 or 2 or 3 pumps, whatever serves the purpose.
Also, when you do chop trees, you might not want to chop off useful fruit bearing trees, especially in a tight spot in early game. If I have oak/ birch tree, I shouldn't chop off an apple tree or plum tree. They yeild good fruits.
So as you can see, you have all in one stockpile here, we have the carpenters which is making enormous corkscrew and pipe section and blocks. we have an individual stockpile for that. Also we have a region allotted to our dwarves as tavern so they don't get annoyed in the rain. Now we go to the step 2.


Now we hallow a 5 x 1 and a 5 x 1 and get 3 pumps ready with blocks. We go down like this. Start smoothing down walls, where ever possible and as fast as possible, at the same time deploy screw pump. Pump when toggled operate, will remove water from one direction to the other direction. There will be four directions displayed when making a pump.


So this is the layer one of the aquifer, you can see here a ramp of 2x2 on the left side, on the right side is stair. in between and around these is 1x1 space to walk and do stuff. Stuff, I mean is walling off. Our purpose of doing this is making a pump from right to left direction and pumping water out. Following which we go the layer below and to the exact same. While doing this, because of water seeping out, most orders are cancelled repeatedly or suspended. Dwarfs even sleep in aquifer and can die if water is more than 3/7. Here is an image of how miserable it went for me, I have designated to wall because one sector could not be walled off.


Layer 2


Layer 2 - Pump operation enabled until it displays dwarf is tired.


Layer 2 - Aquifer closed off.


Now an important thing to keep in mind is, the water which we pump from the stairs on right to left and the water from the walls on the funnelled ground on the left 2x2 is full. So it is a 2x2 hollow block with 7/7 water so if I were to dig my stairs on the right side below and connect the same 7/7 it can result in exceptionally high amounts of fun very early in the game, so we do this on the right side now. that means, we dig stairs below while pumping water out and we dig 2x2 on the right side. Then we hollow 2 x 2 on the counter side of previous hollow.

See you do it like this.


I understand that it can be hard but yes, it pays off. Lucky for us this is probably a 3 layer heavy aquifer only. I have heard bad luck can grant 7 layers... of heavy aquifer. Now here we have hit upon stone, so stone can be softened easily. So perhaps it is a better idea to go for it and soften stone for the purpose of blocking aquifer off or use the traditional block placement.


If one digs wrongly


(Now we re-load that save and dig open a more area and directly make a workshop)
If at all needed, I am doing it for fun, pump placement and next level digging with 1x1 space blocking with walls


next level repetition


Aquifer crossed over.
15 Comments
Sniper(+)  [author] Apr 3 @ 11:50am 
2016, thank you for your kind words, I'll make more guides when im home in 3 months
SkytheAlicorn Mar 7 @ 12:28pm 
I understand clearly now. How long have you been playing to make an entire handwritten diagram for this?
Sniper(+)  [author] Nov 18, 2023 @ 11:20am 
Yes My Hugh that's my handwriting! Thank you for the kind words!
Hugh G. Rekshun Nov 18, 2023 @ 10:22am 
Dude, you're handwriting is impressive. I'm assuming that's your handwriting?
Sniper(+)  [author] Aug 5, 2023 @ 12:44am 
Should I re-write this guide entirely?
Sniper(+)  [author] Jan 1, 2023 @ 10:18pm 
For new players, no aquifer mod is a blessing. When you raise your difficulty, come back here again. Hope it will help at that time. :steamhappy:
Gribbinski Jan 1, 2023 @ 11:12am 
or you can download the no aquifer mod
Sniper(+)  [author] Dec 21, 2022 @ 11:05pm 
I will accept the fact that making a direct wall is a fuck-up indeed but I would say, before the z+3 dig I'd rather wall to be safe than get submerged suddenly if there is that flooding block. So the self 3x3 wall block.
Sniper(+)  [author] Dec 21, 2022 @ 11:05pm 
1. aquifer absorbs water as well as pump it. This are the exact words from the wiki : " Although annoying, heavy aquifers can absorb an infinite amount of water, meaning they can function as a drain for anything above them ".
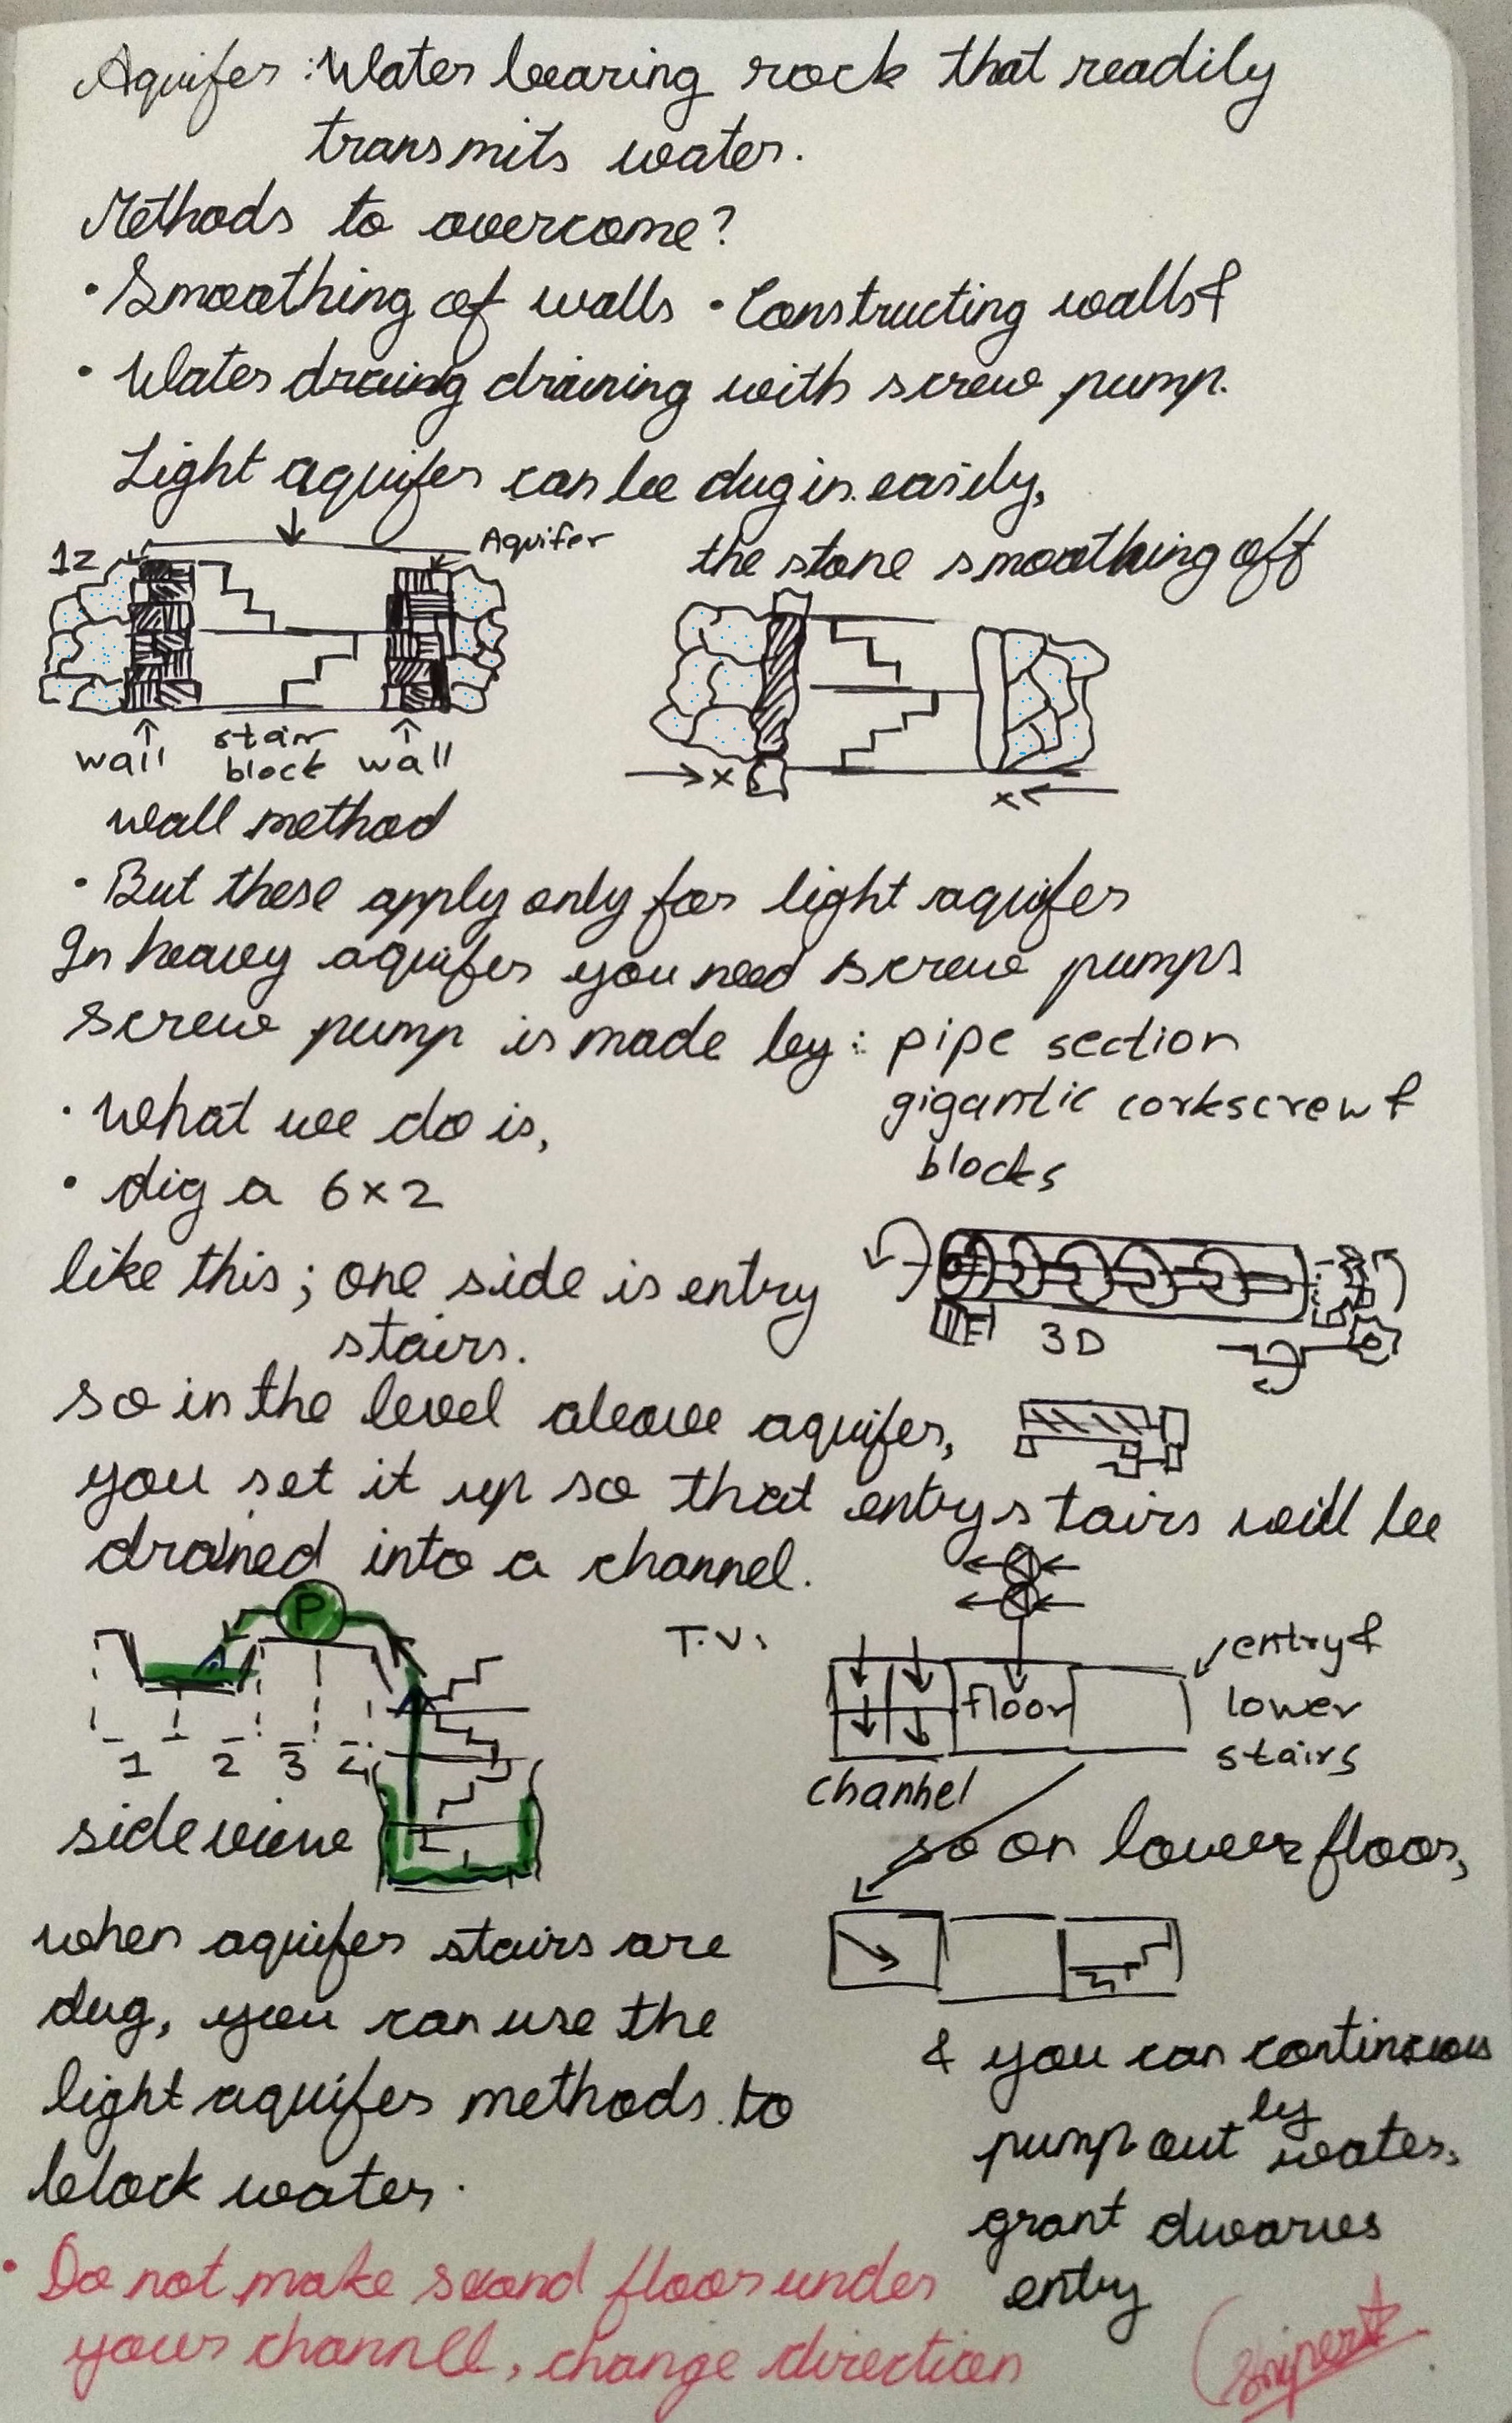
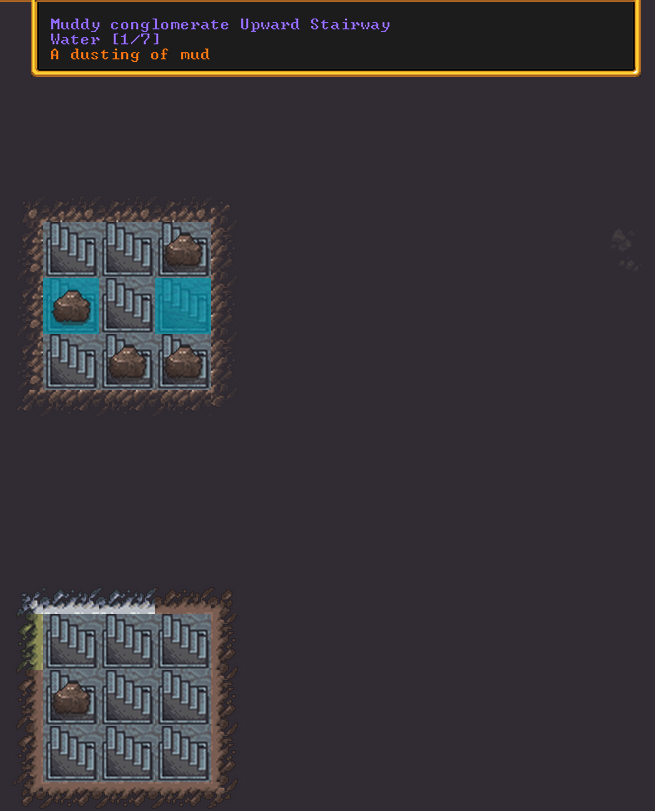
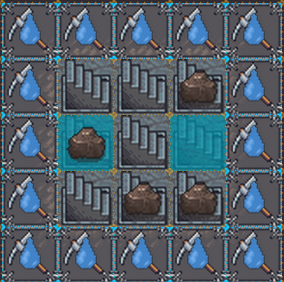
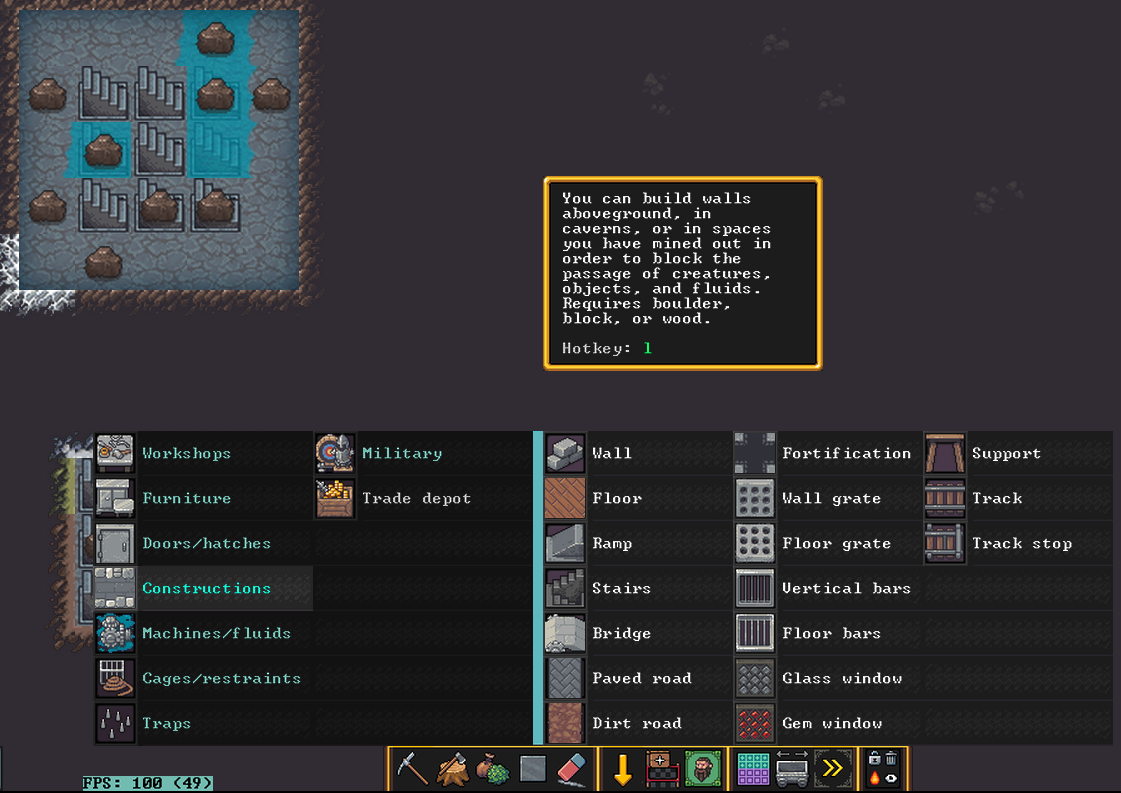
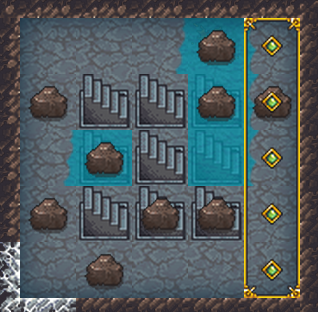
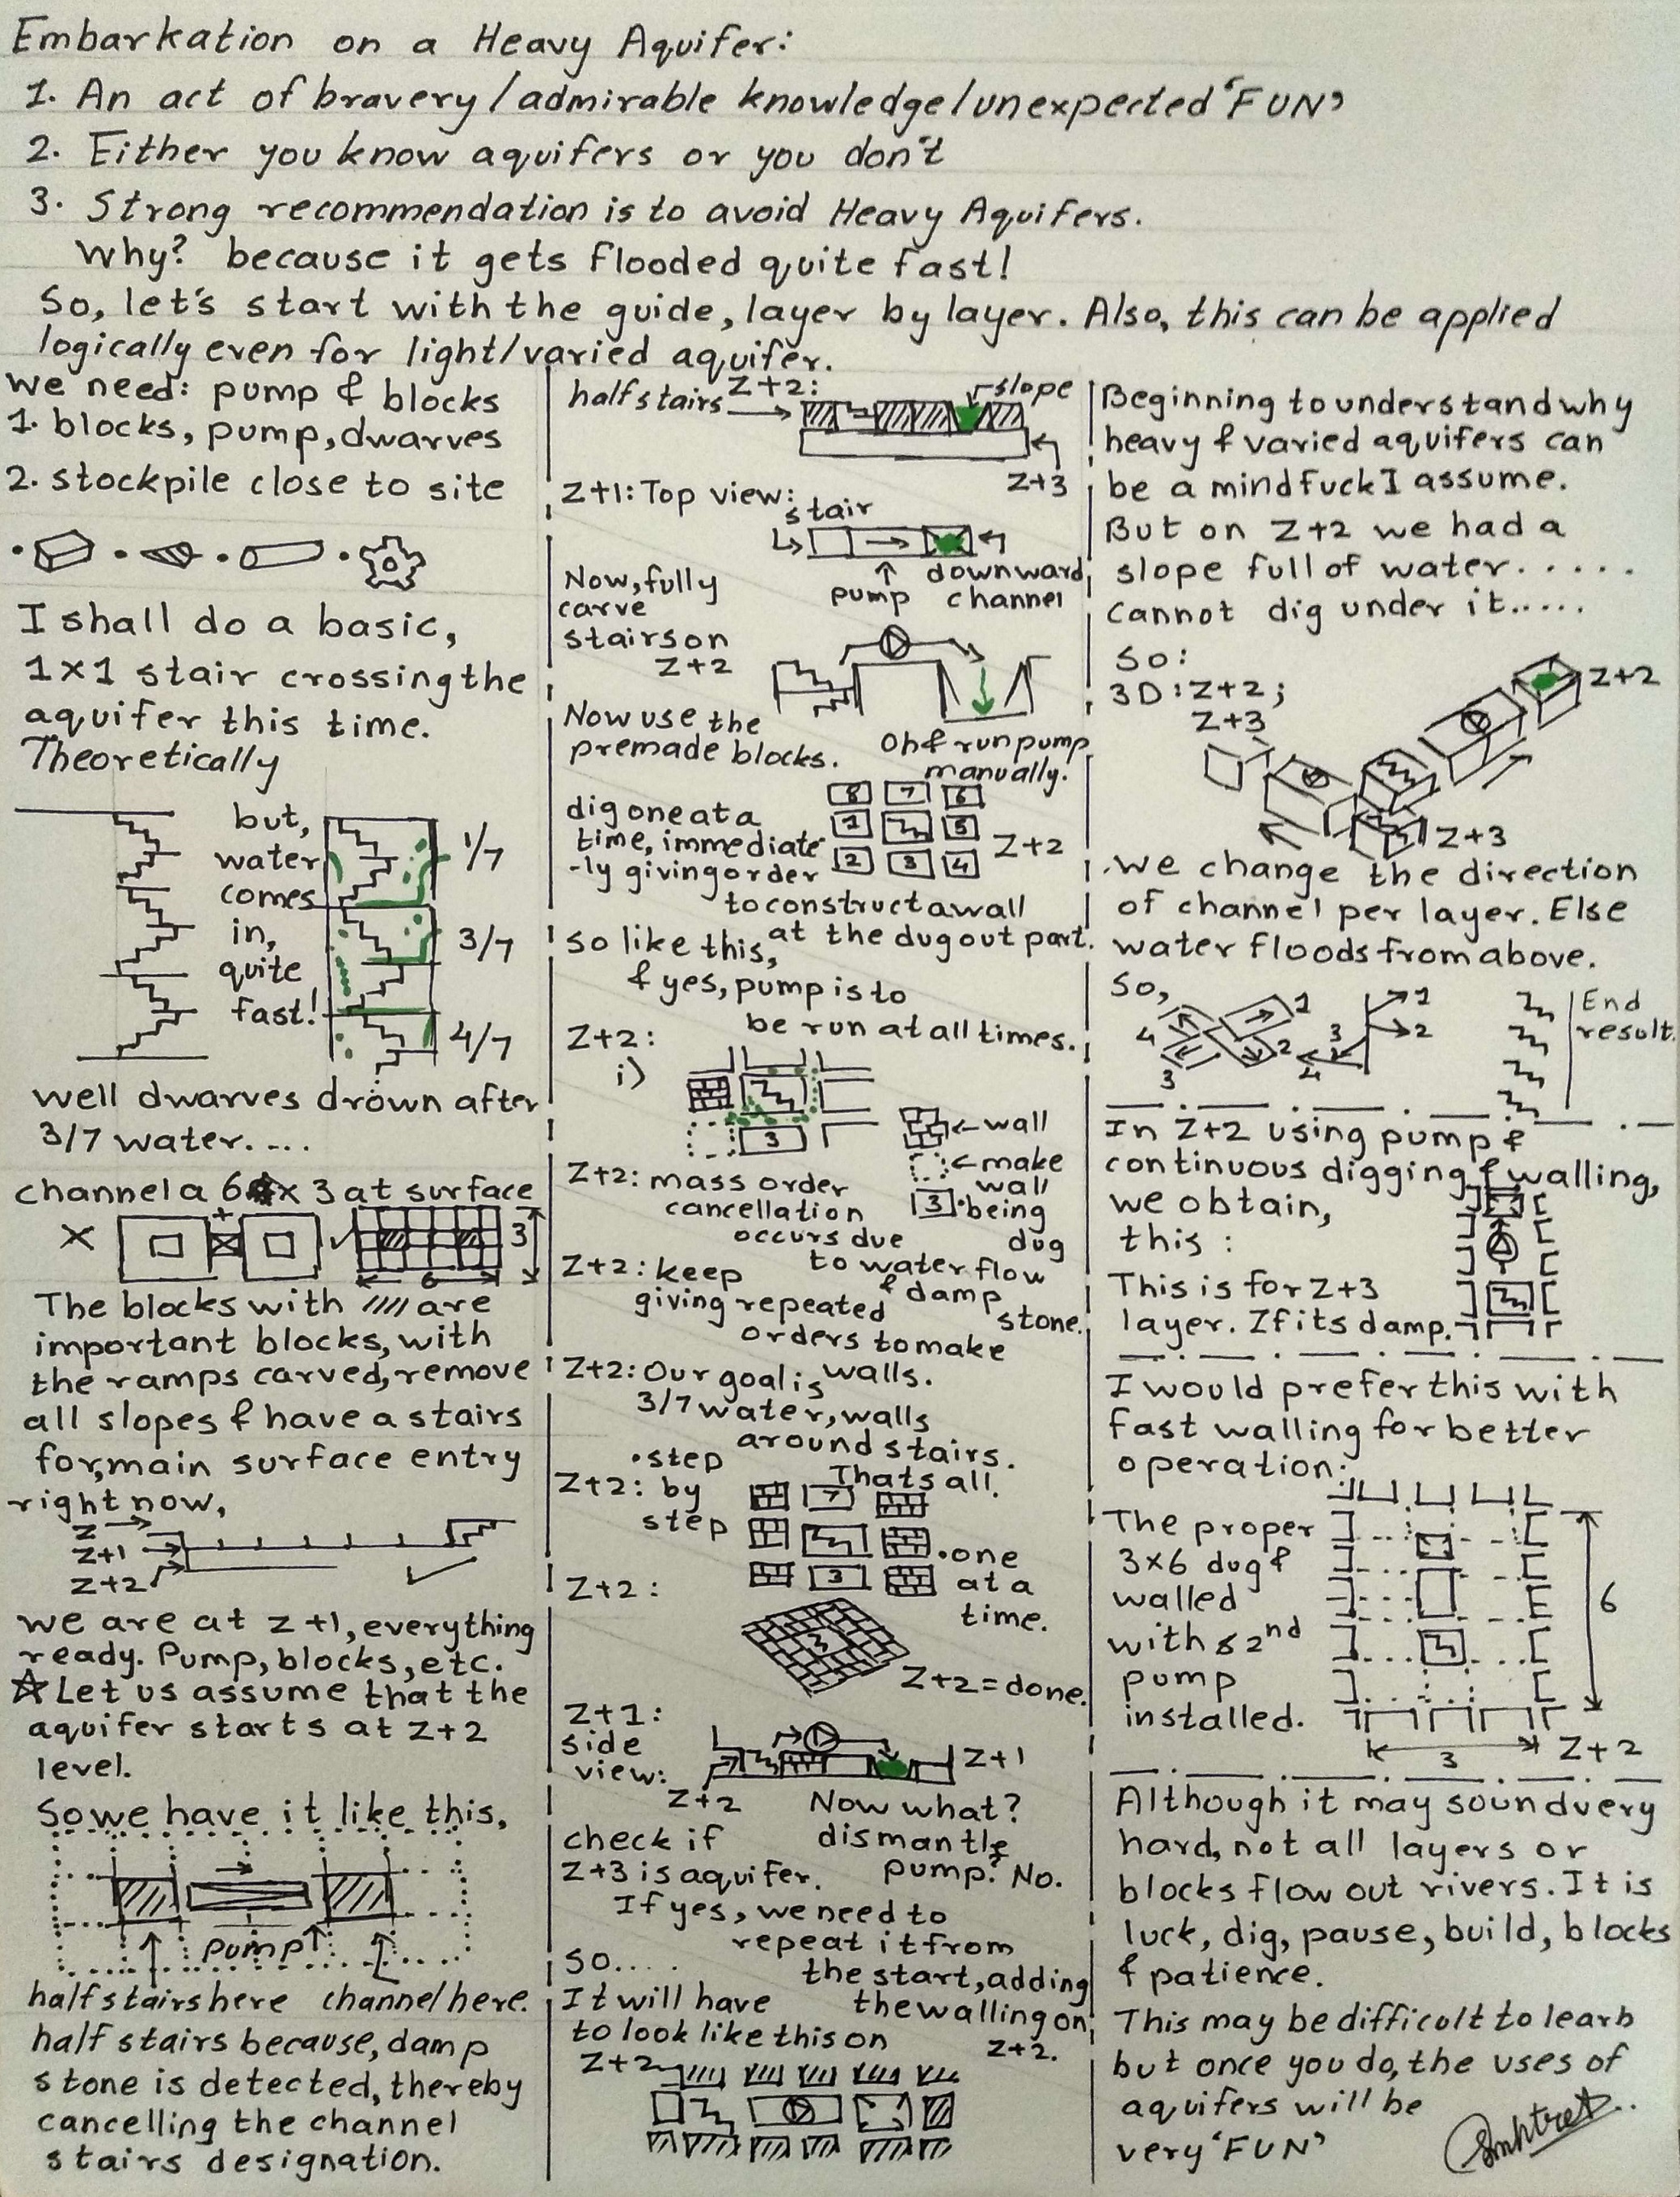
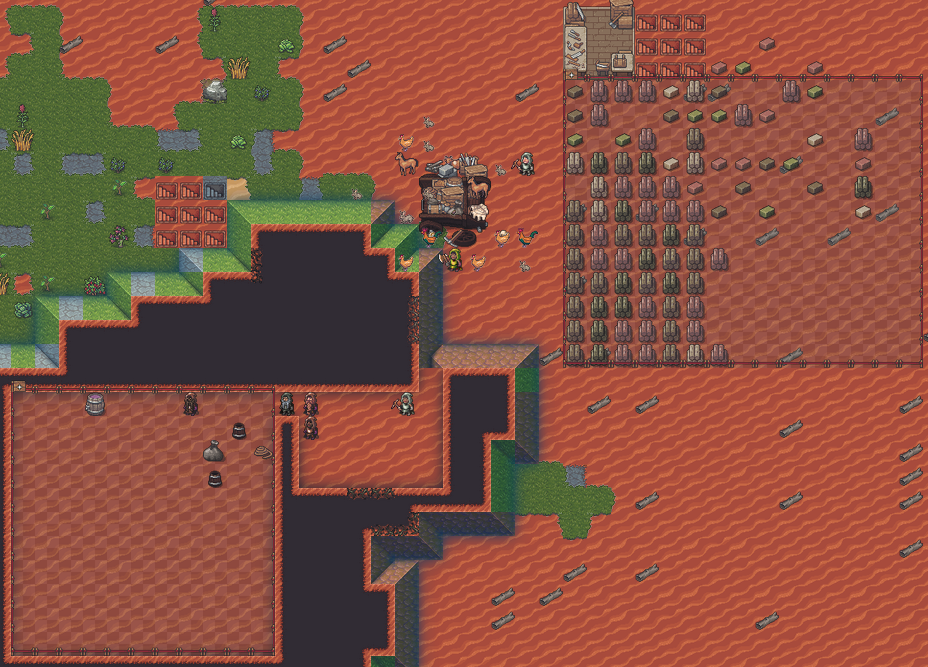
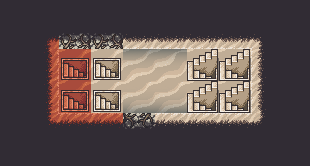
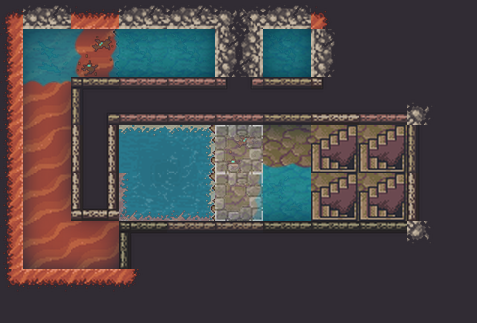
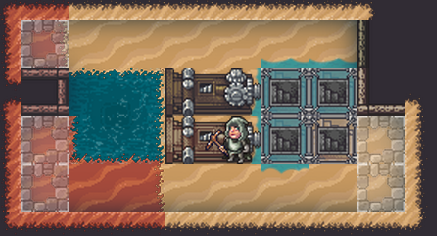
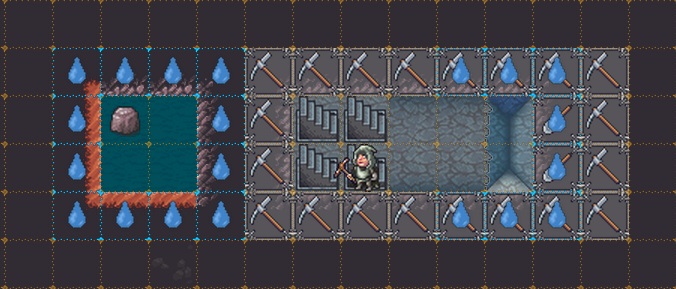
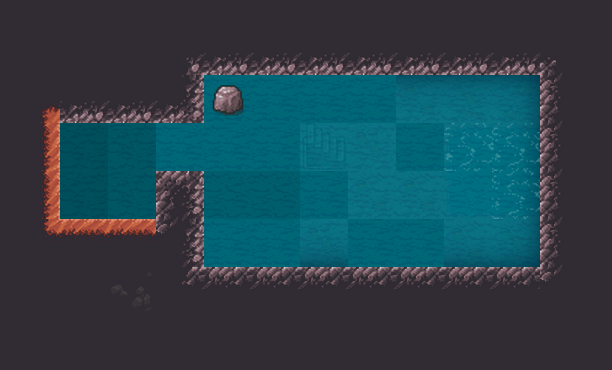
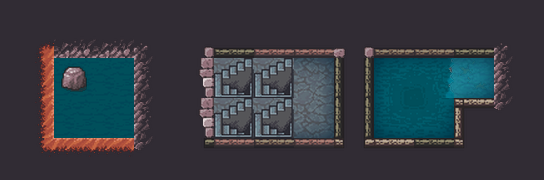
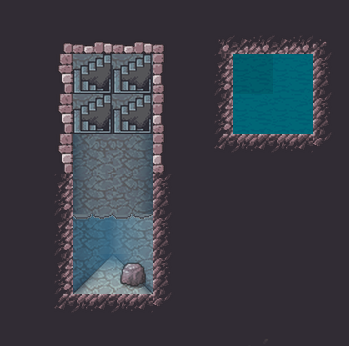
2. Safe-side, before direct down dig, cross check if there is an aquifer during the entire process on-going around the digging and walling. Praise the lord if there isn't an aquifer. If there is, you have to keep on pumping with a 6x3 pattern or 6x2 at least. 6x3 is luxury if there isn't a heavy aquifer block. but either way you gotta dig the 6x2 / 6x3 with walls surrounding em. Then repeat the entire process with a secondary pump. After z + 2 is done, dismantle pump on z + 1 and then yeah, next layer on-wards we go... Due to you I got motivated to make a written version.
LucasUP Dec 21, 2022 @ 10:57pm 
The hand drawn diagram is a bit easier to understand, yes nice work. But I still have 2 big questions

1) Doesn't constantly pumping into the channels cause an overflow or does it just go away into the aquifer?

2)On the next layer down if you still have aquifer, you wouldn't be able to make the pattern you describe without fighting with the aquifer all around you? Wouldn't you have to deconstruct some of the walls you had to frantically build, and build new ones to form a new 6x3 room surrounded by aquifer?