Super Meat Boy

Super Meat Boy

Not enough ratings
Super Meat Boy - Level Editor Guide
By Ghostly Goth and 1 collaborators
This guide will teach you everything you need to know about the Super Meat Boy: Level Editor. From the basics, to the advanced, to the bugs you'll encounter along the way this guide covers it all to ensure you have a smooth, safe and fun experience making levels/chapters for Super Meat Boys world portal known as Super Meat World.
   
Award
Favorite
Favorited
Unfavorite
How to Access the Level Editor
Before we start, you'll need to know how to access the level editor itself so let's get that done.

Go to your steam library, click on games then go to tools and download "Super Meat Boy Editor"

To show uninstalled games/tools, click this button here and the editor should also show up!


Once downloaded launch it and we can now get started.


Before you launch please keep in mind that
- The editor and Super Meat World does not have controller support on the menu's but ingame does
- English is the only language
- You'll need a 2 button mouse with a scroll on it, so using the editor on the laptop will be insanely hard as you wont be able to scroll properly
- You can't change any keybindings in the editor
- Do not use low/ultra low settings as it can mess up the objects due to not being made with those settings in mind
Controls
Now you're in the editor, let's learn the controls while we are here.

Hold Mouse 1 - Use Tile
Hold Mouse 2 - Delete Tile
Scroll Up/Scroll Down - Change Tile
W A S D Keys to move the camera around
Q and E to Zoom in/Zoom Out camera
Hold Ctrl and Mouse 1 - Select Tiles
Hold shift + mouse 1 drag - Select Objects (while selected press delete on your keyboard to delete)
Hold shift + mouse wheel up/down to change the tile angle
Hold space + mouse wheel up/down to rotate the tile
Press ESC - Removes the Coordinates Menu (Bottom right), Press F1 to bring it back

Hold space then mouse wheel up/down - Rotate the Object
Hold ctrl + mouse wheel up/down - Resize Object
Press tab + mouse wheel up/down - Mirror Object

Pressing B on any tile will spawn a Meat Boy shaped B, that is where Meat Boy will spawn
F1 to test your level, F1 again to return to the editor

FAQ -
Q: How do i delete an object in a different layer?

A: To delete an object, you need to select the layer they are in and then hold shift/drag to highlight and delete it by pressing "Delete" on your keyboard.

To figure out what layer a specific object is in, just go through each layer and it'll light up which ones are in what layer, so just do that till the find the object you want to delete.
Basic Tutorial
Now that you're in the editor here are some basics for you to get a hold of before you start building anything.

New - When you're ready click on "New" and you'll have Width/Height which you can change to whichever you need for your level so if it's a small level do 100x100, if it's a large one then 500x500 etc it's all up to you but having a larger size just gives you more room and doesn't matter too much as you'll be using the advanced camera tools later on to lock the camera onto your level hiding everything outside of it so again it's up to you on how you want to handle it.

Palette - is the chapters of each world so The Forest, The Hospital, The Salt Factory, Hell, Rapture and The End. Cotton Alley is made up from bits of these worlds then coloured pink to give the illusion that it's a new world.

Save/Load - is very very important to keep in mind, so when you have your level that you want click on Save and type in a levelname so "test01" for example but you need to keep that level in mind as when you save it again you need to type your level name again, same goes for when you're loading a level so if it helps try to memorize the level names you do aswell as writing it down somewhere as it becomes urgently important as if you overwrite the name by any chance then you've lost the level completely.
Hot Key for Saving: F9 and or ctrl+s

Upload - let's you upload your level to Super Meat World, in order to complete an upload you need to finish your level so the World can understand that it's not an impossible level and can be beaten, if the creator can beat their own level then anyone can which will upload your level to Super Meat World successfully after beating it.

Tiles - This'll be where all the tiles from a world will be kept in, remember to scroll up/down using your mouse to see what each world has to offer. The tiles will contain level geometry, decoration, hazards etc. Depending on the world you select will show the tileset for that world, so The Forest will have grass,wood,rocks etc.
Hot Key: T
Tips: Holding down shift then mouse 1 and dragging it can select all the grids you want to colour with the tile, press F to fill it in. With the selected grids press ctrl C then ctrl V to do a copy and paste.

Objects - These are the hazards in the level, so sawblades,moving sawblades,fire, rocket launcher turrets etc.
Depends on the palette you've selected.

Props - These are the props in the world that be trees, rocks,moss,tents,branches etc.
Depends on the palette you've selected

Ani Props - These are animated props (Ani Props) so that'll be rain, clouds, waterfalls, blood etc anything that's animated pretty much. These are used for backgrounds to make your levels feel more alive.
Depends on the palette you've selected

Lights - These are lights you can use in your level, in the properties you'll be able to change the colour of the lights aswell as the size of it. You can only have a maximum of 3-5 lights so use them wisely as you're very limited.

Animals - Animals that can be used to make a level feel more alive, that either run or fly around and all of them can be killed by sawblades/hazards.
Depends on the palette you've selected

Camera - This'll be one of your important tools after you've finished your level. You'll use this camera to help put the world camera in place so it follows Meat Boy around aswell as slowly reveal the level to you as you progress.

Paralax - This'll be your level background pretty much and can be used when you've finished your level to make it look and feel so much better than it already is.

Layer 1 [Fore General 2] - This is the very front layer, usually used for decorating infront of the level 4 tiles (Objects can't kill you and tiles can't be placed here)
Layer 2 [Fore Tile] - This is behind the very front layer, mostly used for hiding tiles for secrets
(The Hospital 2-18 Destructoid mainly uses this layer to hide the path that leads towards the centre with the bandage in it)
Layer 3 [Fore Tile General] - Another decoration layer, mainly for objects at the front of your tiles
Layer 4 [Active Layer] - This'll be your main layer, so everything Meat Boy interacts with you will use this layer for and make sure everything so tiles,objects, props such as keys etc are set to this layer
Layer 5 [Backtile General] - Used for decorating your backtiles
Layer 6 [Backtile] - This'll be your main background, so the background behind Meat Boy which is commonly used for windows,holes in the wall, etc to make the environments that Meat Boy runs through more better looking.
Layer 7 [Back General 2] - This can be used to place your paralax background into, to give the level a proper background
Layer 8 [Back General 3] - This can be used to colour the very far background to any colour that you wish
Layer Colour - Layers can be colored separately by using the LAYER PROPERTIES window. This way, background tiles can be made to look darker than foreground tiles, and a sky color can be used to make a daytime level pop, or give a muted, dark atmosphere to a nighttime level. For this tutorial, we will be changing the color of layer 4, which affects the character, the foreground tiles, and any objects placed on the layer. Click on the number 4 button at the bottom left of the screen, or press 4 to make this the active layer.

Now, either click the LAYER COLOR button, or press F2 to make the LAYER PROPERTIES window pop up.


Only the RED, GREEN, and BLUE channels actually have an effect on the layer color. Alpha does nothing here, so you can leave it at 255. The possible values range from 0 to 255, where 0 is none of the color, and 255 is the full color. 255 in all three color channels results in white, 0 in all results in black. You can make whatever color you like by mixing these 3 channels appropriately. http://paletton.com is useful for getting the RGB values for a specific color.

AMOUNT determines how much the color you specified mixes with the default layer color. This value goes from 0 to 1, where 0 is none of the specified color and all of the default layer color, and 1 is only the specified color and none of the default layer color.

The three buttons at the bottom of the LAYER PROPERTIES window have the following effects:
GO: applies the new color settings and updates the current layer with the new color. Alternatively, you can press enter while the LAYER PROPERTIES window is open, which will have the same effect.
UPLOAD: applies the new color settings to ALL layers, overriding any existing color setting on those layers. Be careful with this button, as there's no undo function, or confirmation window for this action.
CANCEL: cancels any changes to the color settings and closes the window.

Say I select color values of RED = 255, GREEN = 0 and BLUE = 0, and set the AMOUNT to 0.2, the result will be as follows:


Everything in layer 4 will have a reddish hue to it. However, due to an editor bug, the player character isn't recolored until you reload the level, so if you want to see Meat Boy in the new color, you will have to save and reload. Make sure your AMOUNT is not set to 0 if you want to use colored layers, as that means it will not use any of your set color, and just give the layer its default color.
Advanced Tutorial
Here we will get into the advanced side of things, this is mainly good for if you decide to use the editor for a long time to get a better understanding of it or even just curious as to how alot of features work, it'll all be covered here.

Waypoints: Basics of Waypoints - If you want to animate your backgrounds, move saws back and forth, or have rising lava in your levels, waypoints are the way to go. They allow you to move objects and props over time, and can be used for all sorts of neat tricks. Let’s get into them by making a saw move back and forth across a section of wall.
https://www.youtube.com/watch?v=vkdQBIupyX8&ab_channel=SuperMeatBoy%3ATheLostLevels
21:20
This tutorial will teach you how to properly make waypoints for sawblades


Key Waypoints - Key waypoints can be used make keys float in the air for mid-air jumps to grab them while normally placing a key will have them fall to the ground, this advanced tutorial will show you how to make them float and look like they are being held by an object.


Select the key, go into waypoint mode by pressing G, and place a waypoint exactly over its original position. Give the new waypoint a timer value by scrolling up on the scroll wheel, any value will do really, as long as you placed the key correctly over its original position. I will use 1 second for mine.


Take care that the waypoint you place is precisely over the key’s original position, otherwise it will appear to be jiggling as the animation repeats. If we hit play mode now, the key will be floating in place where we placed it, appearing to hang off of the chain above it.
How to Create a Chapter
To create a chapter you need to follow the progress below -
Step 1: Create your level
Step 2: Upload that level to Super Meat World
Step 3: Repeat Step 1 but do it for the other levels(Level 2, Level 3, Level 4, Level 5 etc upload them)

Once you've uploaded all your levels that you want to put into a chapter open [create ch]


Once opened you should get a list, in this list you'll see 1 , 2 etc press on the blank space on the number that you want your chapter level to be in.
Eg: Name: Fish Tank
Level 1: Diver (I press on the blank space, search for diver and select it) it'll add "Diver" to the 1 box, and you repeat that step for every other level you want in each box.


If you make a mistake just press the "X" on the level you want to select a different one

When you're done just name your chapter click "Upload" and it'll be uploaded to Super Meat World!

Uploading your Level/Chapter
You're now ready to upload your level/chapter, all you need to do is click "Upload" you'll get a message and you need to beat your level/chapter in order to upload it so if it's a really difficult level, be prepared as you need to beat it in order to gain access to upload it.


Once you've beat your level/chapter, you'll get the message above where all you do is name the level/chapter. The level you name, will be the exact name that will be uploaded to Super Meat World so be sure to name it carefully if you want people to find/play your levels easily.

Bugs/Common Issues and how to fix them
The editor was never fully fleshed out, so there’s still a few bugs in it that can give you trouble while making levels. For some of them there are no fixes and we simply have to deal with them existing, but others can be circumvented so they are less of a problem. Below is a list of some well-known bugs and how to deal with them if they occur. I’ve also included some common issues people seem to run into when making levels (that aren’t bugs), with ways to fix them.

Bugs -
Bug: I have recolored layer 4, but my character is still the old color.
Fix: This happens any time you recolor layer 4. Save your level and reload it for the character to switch to the new color.

Bug: Trying to place a prop or select an area freezes the editor for a moment and then nothing happens (no prop is placed, or no selection is made).
Fix: This bug can randomly occur when you click on the screen with the left mouse button. It usually goes away if you move the camera (WASD keys) and change the zoom level a bit (Q and E keys).

Do not confuse this bug with being at the object cap however. Once you reach 400 objects in a level, the editor will ignore any objects you try to place. Be vigilant that you stay well under this cap until you start adding decorations to your level, so that you don’t run into this issue.

Bug: The multi-selection box is trying to select all tiles above and to the right of the cursor, rather than from where I am dragging.
Fix: This bug can randomly occur when you are trying to multi-select tiles. Sadly, the only workaround is to undo your selection (right mouse click somewhere in the level), move the camera (WASD keys) and adjust the zoom level (Q and E keys), and then try again.

Be careful that you don’t accidentally delete a tile when using the right mouse button to undo your selection by having your mouse over a block. Instead, click on an empty section of your level to undo your selection.

Bug: After deleting a hazard from the level and then going into play mode, I still get killed at the position where the hazard was.
Fix: The editor will keep the hitbox of some deleted hazards active after they have been removed from the level. This can be fixed in multiple ways:
Save & reload your level
OR
Place another hazard or prop into the level

Performing any of these actions will remove the lingering hitbox from the level. You can also move the hazard out of the playable area before deleting it, moving the lingering hitbox out of the level with it, where it cannot kill the player.

To check if there are any lingering hitboxes left in the level where they should not be, hold the semicolon key (;), which will highlight the hitboxes of all hazards as red boxes with a single diagonal crossbar.

Bug: Editor doesn't launch with a mouse curser
Fix: This is something that has been normal ever since the launch of the editor sadly. Even after 1-2 years of using the editor, you're still going to have moments where sometimes you'll get a curser, sometimes you wont and there is really no clear fix for this other than launching the editor over n over again till you get a curser.


Common Issues -
Issue: My obstacles move around the level when the camera moves.
Fix: You have accidentally made your objects parallaxed by using shift instead of ctrl to scale your objects. In order to scale your objects normally, hold ctrl instead of shift while scrolling with the scroll wheel. To check if your objects are scaling normally, make sure the numbers after SCALE are changing when you scroll (red box in the image below), and not the third number after POS (blue box in the image below). This third POS number determines parallax level, and should be at 0.00 for every object that isn’t decoration.


Parallax is used to make objects appear to be positioned in 3D when the camera moves, and should generally only be used for parallax objects (background objects placeable by pressing the PARALAX button, or X on your keyboard) and decorative objects in the foreground and background, that the player can’t interact with.

Issue: I cannot place any more objects.
Fix: You have most likely reached the object cap for the editor. Any level can have, at maximum, 400 objects in it. Attempting to place more than that will do nothing. Make sure the number of objects in your level is below 400 / 400 by looking at the bottom right of your screen.


If you reach the object cap, you will have to delete some objects in your level to make room for new ones. Decorations can often consist of a lot of small objects. Try simplifying your decorations first, in order to make room for more gameplay related objects. Decorations that are really minute are often hard to spot while playing anyway, so it’s usually safe to remove some of those.
Extra Links/Features/Super Meat World
These links listed below are extremely helpful links that will be able to help

If you're having trouble understanding this guide, Edmund Mcmillans 2011 Level Editor Tutorial videos can be alot of help while also being very easy to understand.
Edmund’s old editor tutorial videos:
https://www.youtube.com/watch?v=vkdQBIupyX8&ab_channel=SuperMeatBoy%3ATheLostLevels

Jer3my made a tutorial that's voiced and covers alot of useful basics, worth checking out if the Edmund tutorials feel outdated and or unclear for you:
https://youtu.be/dSLMzT_-7g4?si=hwWr3kIMv9zw2jcq

Paletton (tool for comparing colors and getting color RGB values)
http://paletton.com

Hexadecimal to decimal converter (used in conjunction with Paletton to convert color hex values to usable integer values for coloring smoke and particle objects):
https://www.binaryhexconverter.com/hex-to-decimal-converter

Discord join link for the Team Meat server (use the channel #super-meat-world to discuss about the level editor):
https://discord.gg/teammeat

RyokoTK Guide Editor Mini Tutorial Guide:
https://web.archive.org/web/20120521181555/http://supermeatboy.com/forum/index.php/topic,1410.0.html

Super Meat World Info - This'll be the world where all your uploaded levels/chapter will go to aswell as playing other levels made by the community, here are some interesting facts about it that might help

If you know the author of a level/chapter you can type in their name and it'll show their levels (This has to be their steam name in order for it to work)


- The curser is off centre meaning you can have issues trying to navigate the menu, so it's good to keep that in mind

You can access the level editor in the EGS (Epic Games Store) version by:
Go to where it is installed (eg C:/Program Files/Epic Games/Super Meat Boy) and then create a shortcut of "SuperMeatBoy.exe". Afterwards right click the shortcut and go to properties and at the end of "location" write "-devmode" without the double inverted commas and it should work!
How to edit existing levels?
If you loaded up the editor and all you want to do is edit/remix the existing levels from the base game all you do is click on "Load" then type in the number/letter that fits with the world, here are some examples -

First number = Chapter
Second number = Level
x = Dark World
boss = boss

"1-1" will load Chapter 1 - Level 1 Light World named Hello World from The Forest
"1-1x" will load Chapter 1 - Level 1 Dark World named Oh,Hello from The Forest
"boss1" will load Chapter 1 - Boss 1 named Little Slugger

Etc, this works for all chapters Chapter 1 - Cotton Alley

The link below is a list of commands you can type into "Load" to see what levels can be loaded into the editor.
https://pastebin.com/JwkdA4bC
How to open downloaded .smbl files in the editor
You've downloaded a level or chapter from a user or friend and want to look into how it's made through the editor, follow the instructions here!

Once you've downloaded the level (.smbl file), right click Super Meat Boy on your Steam Library, go to properties, local files then click "browse". Once opened, go to the "Levels" folder.


In the levels folder you'll see a list of .smbl files, these are your levels you've made or downloaded so any .smbl files in this folder means you can access them in the editor. Drop your .smbl file into this folder

For this example i'll use one of my levels called "diver" which i've downloaded


Now we are done! so go to your steam library, tools, Super Meat Boy Editor and launch it!. Type in the level name of the .smbl file you put in the "Levels" folder, so example here would be one of my levels i put in


Your level should successful load, enjoy editing it!


Note: If you're using this to re-upload other peoples level, please get permission from the author before you do this!.


Credits
This guide was made to help any and all users try to make levels for Super Meat World which we hope this has helped in someway or form as it was our primary goal to make sure everyone can have a great time making levels/chapters for a game we all love and appreciate.

Credits -

Team Meat: For creating Super Meat Boy, Super Meat World and 2011 tutorials

Ghostly Goth: Creating and writing this document

Gijs: Creating and writing the original document aswell as helping with this one
Original Document: https://docs.google.com/document/d/1-eGVcFfK6iJ75LC5oDNwftfIy0LQqmfN75uRPCbBjn8/edit

Fran189: Providing/archiving Edmund Mcmillens 2011 tutorials

RyokoTK: Providing a mini tutorial on the Super Meat Boy Forums which inspired this document

Jer3my: Providing and creating Super Meat Boy Level Editor Guide Video
21 Comments
Ghostly Goth  [author] Jun 6 @ 3:27pm 
Hello

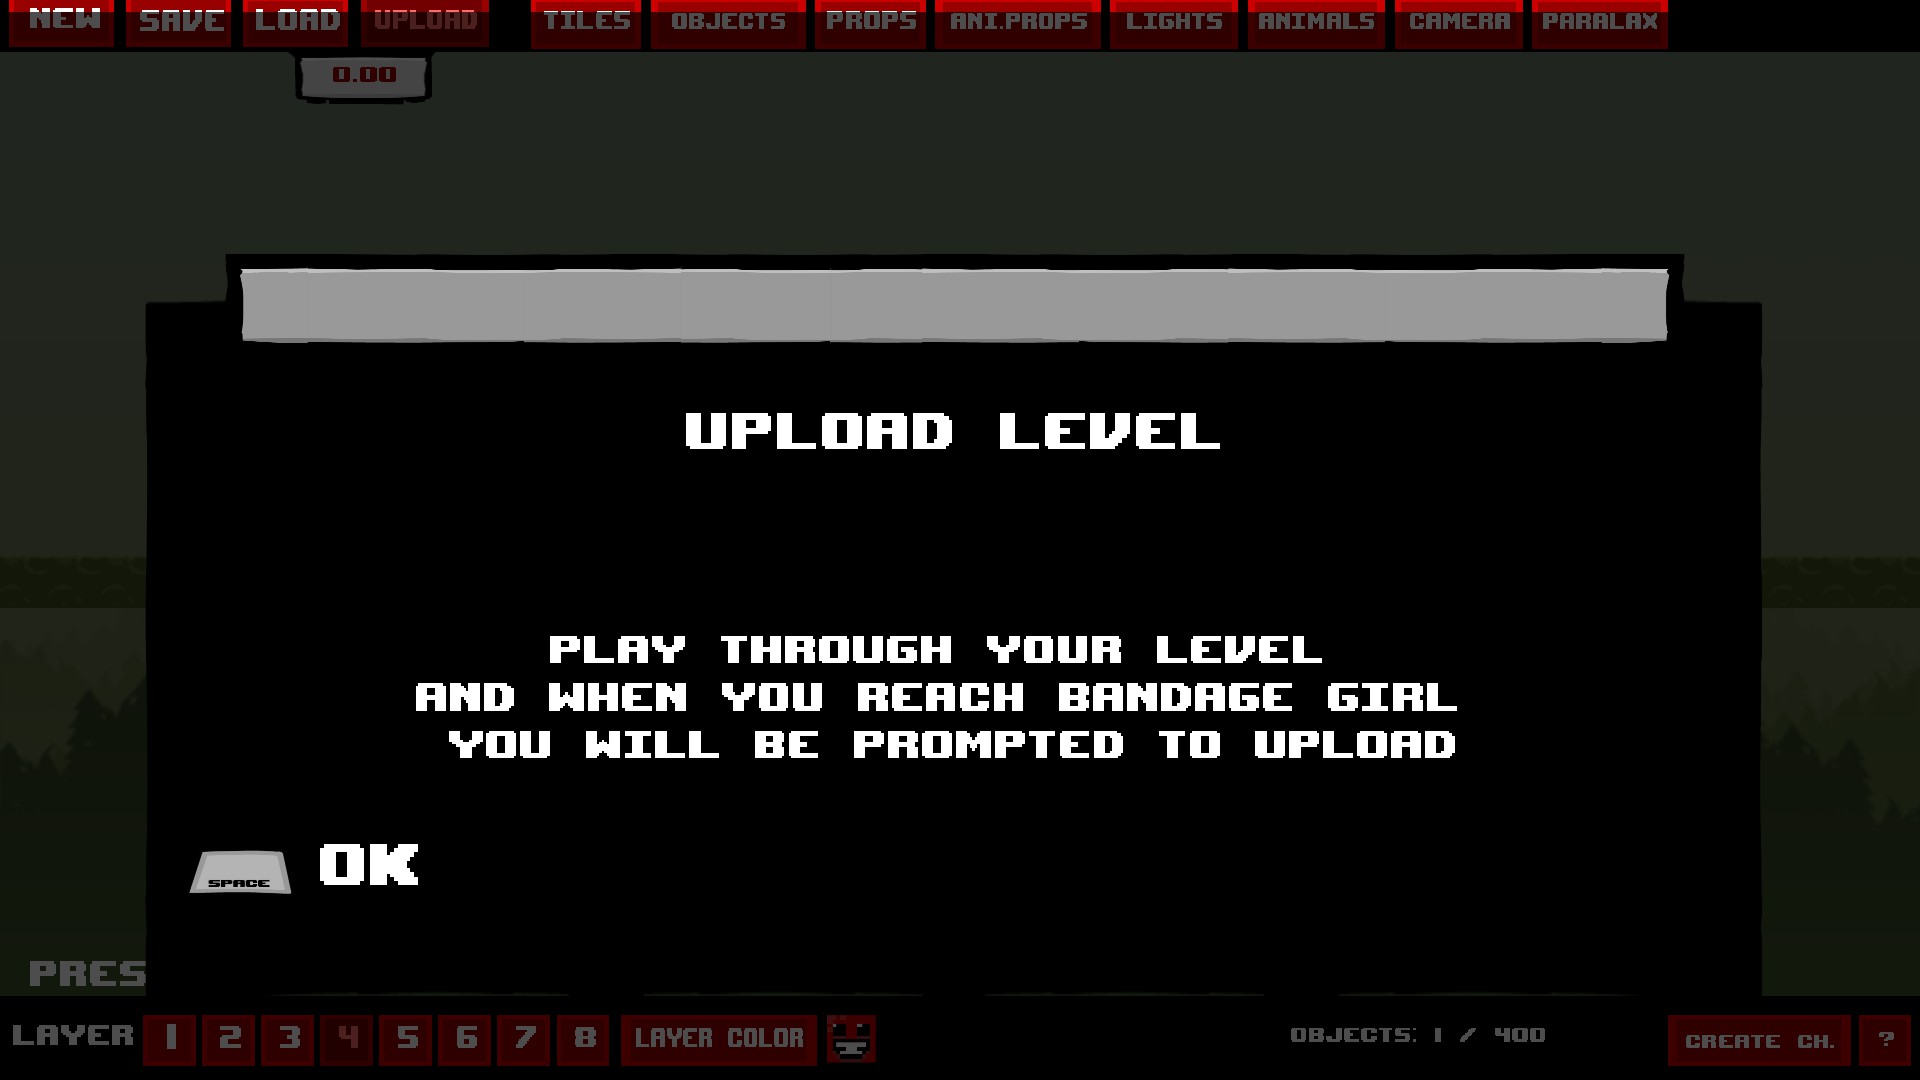
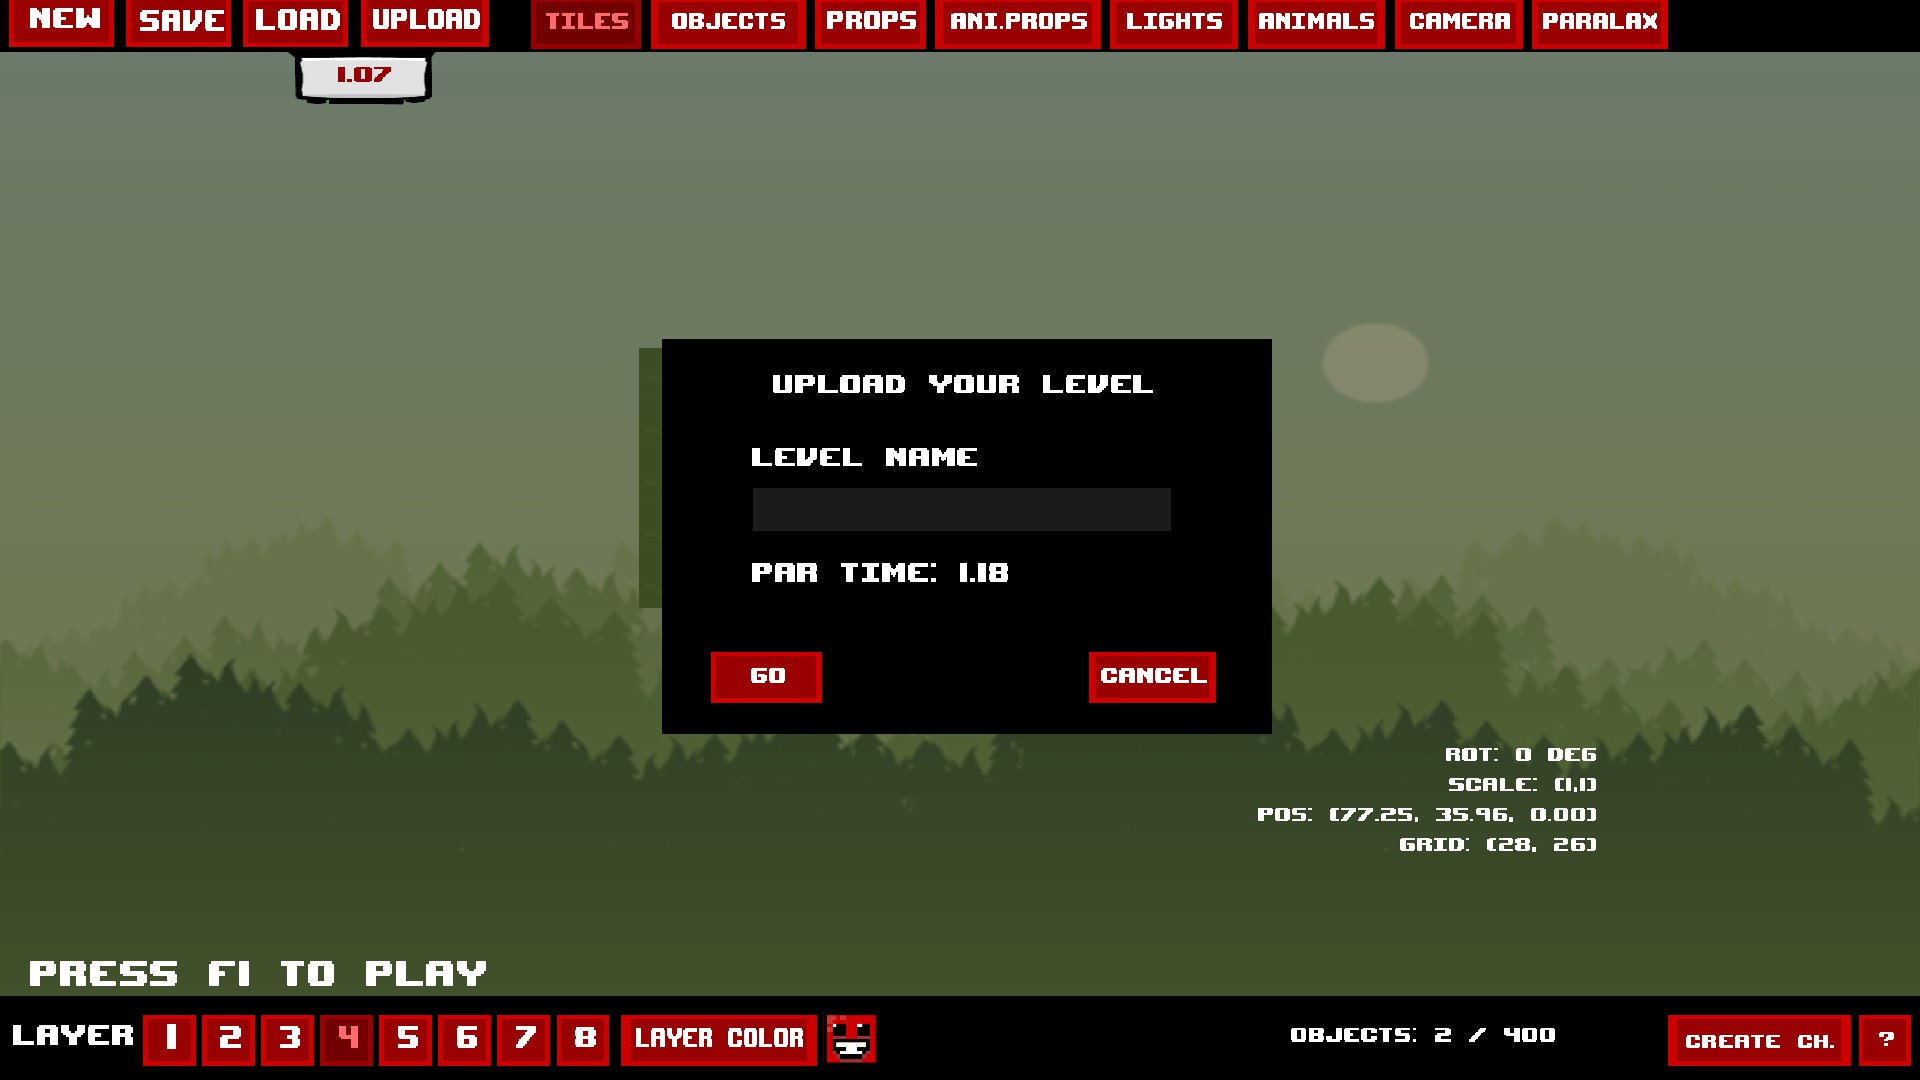
Apple: I don't remember if you can add warp zones or not, if you can then i believe it crashes the game since nothing is coded for it in the editor

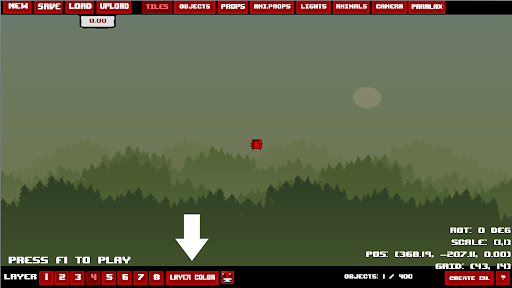
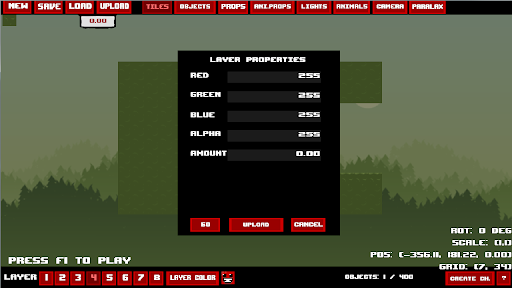
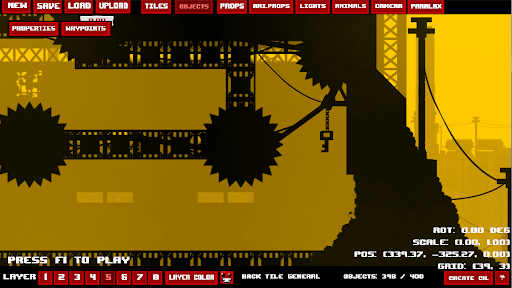
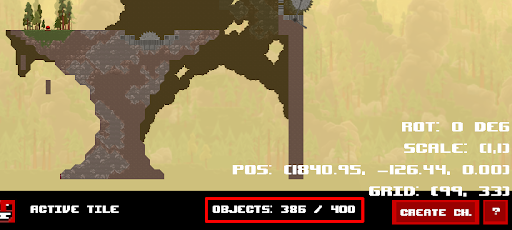
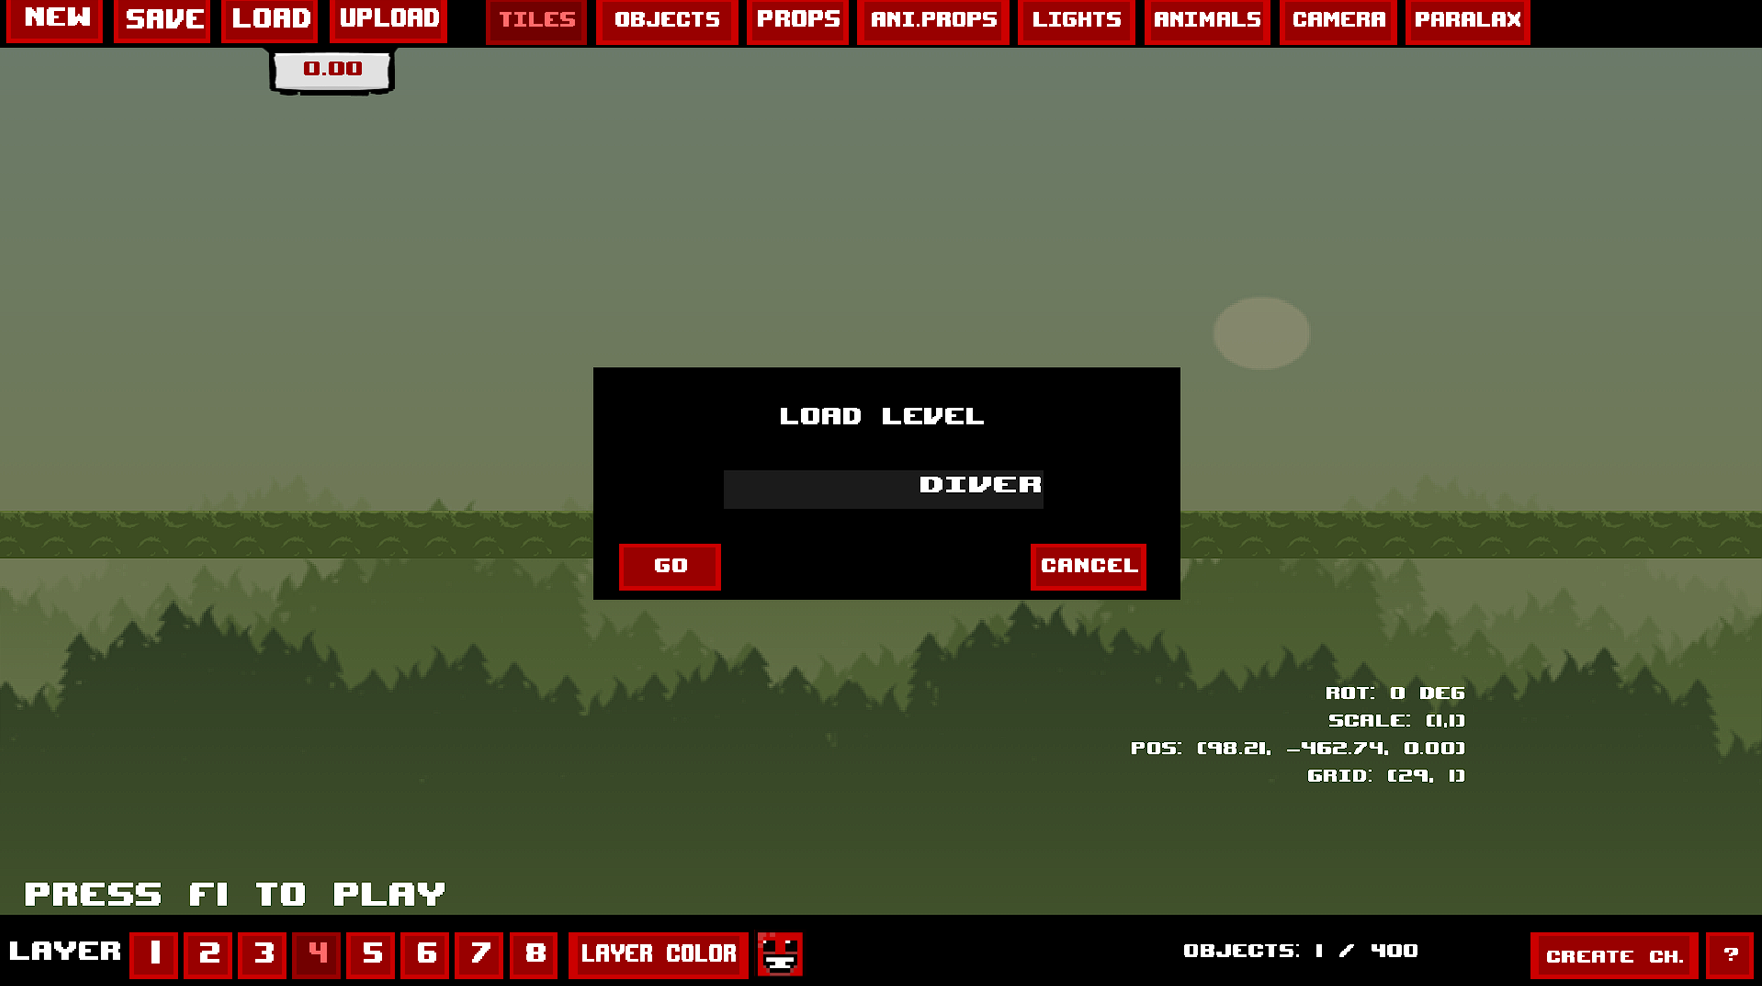
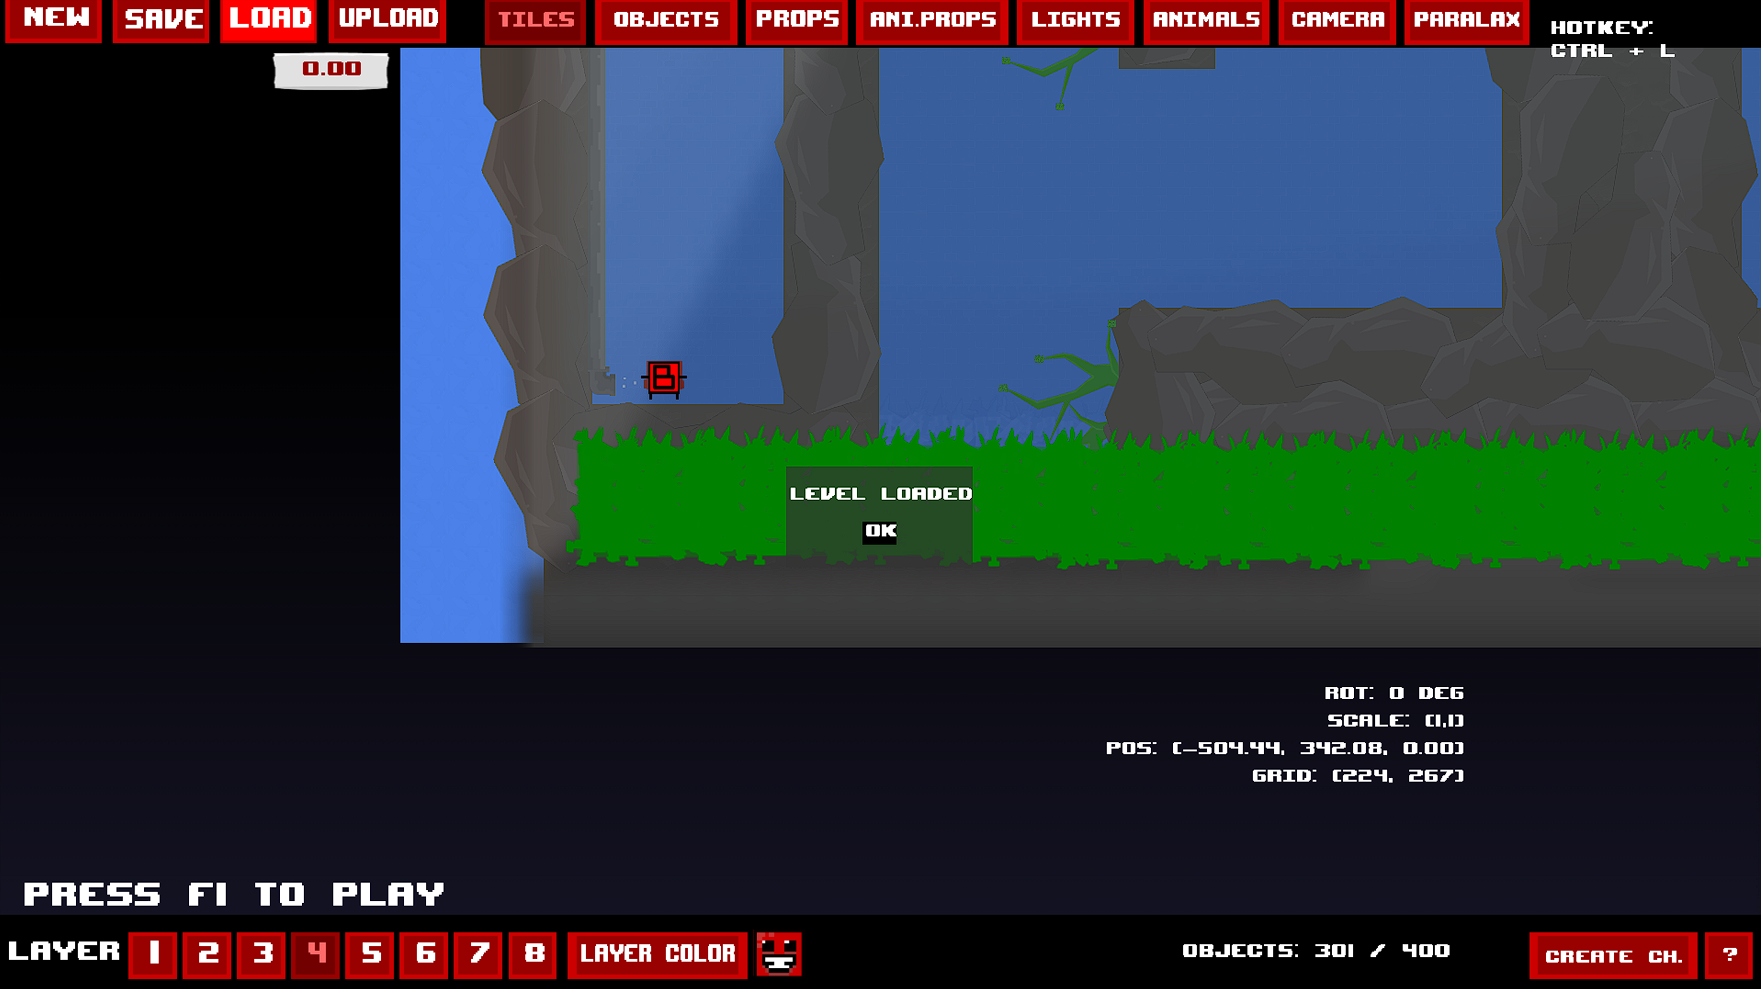
raprtip: You've got layers 1 - 8 on the bottom left of your screen, always keep in mind which layer you put your objects in because you need to select that layer in order to delete.

Example - i put objects in Layer 2, i need to select Layer 2 in order to delete those objects
(hold shift over it to select then delete on your keyboard). If i select Layer 3 then i can't delete objects in Layer 1,2,4 etc.
raprtip Jun 6 @ 7:56am 
I can't delete any objects besides tiles. How do i fix this "bug"?
Apple:D Apr 19 @ 12:04pm 
Can you add warp zones
Apple:D Apr 16 @ 8:12pm 
I FIGURED IT OUT, the problem is the button that says go, If anyone else has this problem, just press enter instead of the in game go button
Apple:D Apr 16 @ 8:08pm 
is there any way I could add custom smbl files to my levels folder?
Apple:D Apr 16 @ 5:54pm 
it happens on first save too though
Ghostly Goth  [author] Apr 16 @ 5:21pm 
Sometimes when typing in the wrong name that can happen, so be sure to have the name of your level remembered say as "level1" for example then keep saving it as "level1" the entire time as sometimes changing names can mess it up sadly.

Alot, i mean ALOT of the editor issues sadly can't be fixed no matter what you do so you sorta need to just get used to the issues as they come up.

But regardless i'll try help when i can! :golden:
Apple:D Apr 16 @ 5:12pm 
If it helps, the save issue would be when I clicked the save button and typed in the name of the level, then clicked GO. It would cause a "Fatal Error" and closes the program, I don't have an adblocker or Firewall, nor do I have any corruption problems. This happens with Uploading too.
Ghostly Goth  [author] Apr 15 @ 6:28pm 
That's totally an editor problem that's been there since launch sadly. Make sure to save regularly though like every 5 min or anytime you make an important change to your level so you don't lose any progress.
Apple:D Apr 15 @ 5:15pm 
Also, whenever I try to save a level, the editor crashes and fails to save said level, is there a solution to this?