BeamNG.drive
187 valoraciones
Slips and slides: How to build the perfect drift config
Por IcedRoad
WARNING: Overdue for rewriting
9
4
16
2
2
2
   
Premio
Favoritos
Favorito
Quitar
Introduction

You want to start drifting. (otherwise why would you even be here?) Sure, the base configurations are okay like the Barstow and the I-Series, but they just aren't the right tools for the job. Maybe you want to slip around in the parking garage in West Coast USA, or maybe you want to pull off a clean run at Gunma Cycle Sports Center. They're both two very different tasks. You just have to know which one you want to do and how to make something to fit those requirements-- and just what those requirements are, as well.

Before I start this guide, here's a few things you should forget before trying to start drifting:
  • The handbrake isn't a "drift button." Either use it at the wrong time or use it too much and you'll just end up nose-first into a wall.
  • Braking doesn't force you to drift like in Need for Speed, obviously. Brake To Drift was designed as an arcade mechanic. Slamming the brakes with ABS off can also send you into a wall if you're careless.
  • Drifting, especially without a wheel, is HARD. Harder than it is to drift in real life. You can't expect to land several flawless drifts after only a little bit of training. It's like learning how to skateboard. You don't learn anything until you land hard on your knees a couple of times. (In the case of BeamNG, get ready for a LOT of this.)
Configuring settings for the task at hand
Now that's out of the way, let's get to business.

Assuming that you've read my other guide (the Bolide 320GTR guide, the only other guide I've made that's useful in any way to the public,) you should know how to change the steering profile.

Your default BeamNG controls are obviously uncalibrated, so you have to adjust them to your liking. The steering, throttle, and brake controls are linear by default, meaning the input is translated to your game in a 1:1 scale. For drifting, quick results are sometimes desirable, but if you don't have somewhat fine control over your thumbsticks, then you may want a slightly relaxed curve. You will also want to set the filter to the Key (Fast) setting. This makes your steering move faster in response to a change in input.


For your other inputs, you want to add another binding to your clutch that matches your handbrake to further prevent stalling. BeamNG tries to keep this from happening by automatically applying the clutch, but this doesn't always happen. Doing this guarantees that the game will apply your clutch at the same time you use the handbrake.


Finding a car
First, you want to find a car that you can work with. You can technically drift anything, but some cars are missing drift steering, which is an important part of a drift car since it gives you all the angle that you might need. As long as you can get a car with rear wheel drive, then you can easily work with it. While drifting with front wheel or even all wheel drive is possible, it's easiest to start with rear wheel drive. Think of it as a rite of passage.

I obviously recommend using a 200BX as your first drift configuration, but you can really use anything. The Miramar, Sunburst, and even the Pigeon can be used for a drift car. My top recommendations for people starting off with drifting are the 200BX, the Sunburst, the K- and I-Series, the early Pessima, and the Cherrier FCV.
Parts you will need, parts you don't need, and what they do
Now you're ready to start putting stuff on your car. You can worry about body panels later: right now, we're talking performance.

In terms of wheels, you will want something within the 17x8-17x9 range. These wheels have the actual drift tires and will be the easiest to use. Just take your pick for the best looking ones. Be sure to put drift tires on both the front and back, since if you have too much grip in the front then the car will be really squirrely. You will also want race brakes to be able to adjust your brake balance as well as semi-race pads for stronger, more durable, and more responsive brakes.

As for engine upgrades, you probably want at least a stage 2 turbocharger. These produce the most power at the engine's high end, which is where you will (or should) be most of the time. You will also want a Race ECU for its adjustability and a performance long block. Aftermarket long blocks allow your engine to endure higher RPMs, which is exactly what you want when building a drift car. However, you don't want to go too overboard with upgrades, since this could be too much for you to handle at first. (Don't take my word for it though, go ahead! Scrape your knees a few times!)

For suspension and drivetrain upgrades, you will want race coilovers and sway bars, quick ratio drift steering, and the shortest final drive available if you don't want to deal with fine-tuning an adjustable final drive. A welded rear differential is also a solid choice for beginners for the same reason. If you can find a strut bar slot, then be sure to add that as well.

All cars can have their seats replaced for lightweight race seats that can be colored, while only some cars come with optional lightweight parts. The Sunburst, for example, has carbon parts like the hood, while cars like the Bolide have lightweight glass panels.

As for parts that you don't need, you can get rid of the driver and passenger door glass. You can also get rid of door panels, which are the plastic parts that make up the interior, and the rear seats. In some cases, you can also remove bumper supports to shed some weight in exchange for some safety. When I talk about safety, though, I'm actually referring to the car remaining driveable after an accident.
Initial tuning
Once you have all of the race parts equipped, you will be able to adjust several things. These options are found in the Tuning menu.

First, start with the sway bars. If you equipped race sway bars, then you will be able to fully adjust both the front and back bars. Their settings tend to mix in with the suspension settings. This determines how much your car wants to oversteer or understeer. In this case, you want the car to oversteer, which is the back of the car flicking outwards. To do this, raise the rate (stiffness) of the rear sway bars to your liking, or just max it out to be safe. This will make the rear wheels want to stay aligned with eachother much, MUCH more, which is how you can get them to break traction with a good stomp of the throttle. In case you're curious, raising the stiffness of the front will encourage understeer. Raising both will reduce overall body roll, but will make hitting bumps painful.


Next, you want to modify the suspension. Don't be scared by the several settings that both race coilovers give you. I'll break down what each setting does. I'll put the entire section into bullets in case you already know what these do.


  • Rebound Damping is how much the coilovers resist extension.
  • Bump Damping is how much the coilovers resist compression.
  • Spring rate is simply how stiff the springs are. This doesn't change how the dampeners behave.
  • Spring height is the resting point of your springs. The bare minimum doesn't always mean that the spring will not go any higher, but it's safe to stay away from the very bottom to allow more travel for your suspension in case worst comes to worst.

You want to lower your car by -0.4 m, but you may want to start at -0.25 to be safe and work your way down from there until you reach a comfortable spot. For your rear coils, raise your bump damping (but don't max it out) and for your front, raise your rebound damping. You should also raise your spring rate (again, don't max it out) to make the suspension less likely to bottom out overall. Adjust this to your taste as well. Be sure not to lower any of the damping options beyond what they originally were.

This is what it should look like afterwards:


Next, you want to adjust your brake balance. This will show up at the top of your tuning options if you have both race brakes installed. You can typically adjust this to taste depending on how you want to use your brake pedal. However, I typically adjust it so that the brakes are more balanced towards the rear tires. This allows your front tires to keep spinning and direct the front of your car to where you want to turn. Remember that if your wheels don't roll, they won't want to go in a straight line. The brakes are typically 71% or so by default, which is terrible for drifting. You want to reduce this to where it's below 50%. Personally, 41% is a comfortable point.


Finally, your engine. You generally want an extremely short RPM Limit Cut Time (how long the rev limiter takes to reduce your RPMs) to keep you from losing power mid-slide. You can safely bring this to the minimum. As for the RPM Limit, this will take experimenting. It's generally safe to raise the limit by 1,000 RPM since you've already added your long block upgrade (hopefully.) As soon as you set your new limit, rev your car to the limit. If you get the over-rev risk warning on the side of your screen, then reduce the RPMs by 100 at a time until you no longer get this warning. If not, then you're safe to increase RPMs by 100 at a time. Be sure not to leave your limit at a point where you risk over-rev damage. This form of damage can stop you in the middle of a drift, so it's best to prevent this from happening before you get to having fun.


This was all of your essential tuning. These will make sure that you can get your car sliding comfortably. Now it's time for the fine tuning.
Fine tuning
This is where it can get a little confusing. Things like camber, caster, trim, and toe aren't very well known terms, but you can still get away with not touching these settings as a whole and still having a solid configuration. In this case, you can ignore these points. However, you will still want to adjust tire pressure at least.

Tire pressure adjusts how much your tires dig into the pavement, or in other terms, how much of a contact patch they make. Basically, the higher your tire pressure, the less tire is touching the ground at once, meaning less traction. If you don't want to adjust alignment settings but feel like your rear tires have too much traction, then you want to increase your rear tire pressure. If you think the front end has too much grip, then do the same with the front tires. On the other hand, if you think your drift tires don't grip enough, then lower the tire pressure. It's as simple as that, and can make a huge difference in handling.

Now, this is where it actually gets complicated.

Camber, as everyone typically knows, is the angle of which your tires sit. Camber comes into play while you are cornering. For example, when turning, your car's body rolls into the side opposite of where you are turning to. Camber compensates for this change by angling the wheels sideways. This angle gives the wheels a greater contact patch while you are getting that body roll. In simple terms, it gives you more grip while you're cornering. Camber, however, sacrifices straight-line grip for this purpose, so you really only want a little of it.
In BeamNG, this value is based on the wheels being at a centered ride height (basically, before you lowered your spring height, when it was still set to 0.) It's simple to adjust without resetting your height, though, using the ancient technique of "Eyeballing." If the bottom of your tires (where they meet the road) poke out further from the fender than the top, then you have negative camber, which is what you want. To reduce how much negative camber you have, just add a positive value for that end of the car.
You generally want to have neutral camber for the rear end of your car, since it will be swinging left and right a lot anyways. This is just for getting up to speed between slides. For the front end, you want to be able to see some (not too much) camber so that your front tires have more influence in where you turn while drifting.
On older cars, you won't have the option to apply camber to the rear since it has a solid, or live, rear axle. This is fine, since the rear wheels typically shouldn't have camber applied to them anyways.

Toe is which direction your tires point outwards, and how far. A positive value points the tires inwards, while a negative value points them outwards. For simplicity's sake, we'll call positive values "Toe in" and negative values "Toe out." Toe in makes the end in question more stable, while toe out makes it less stable. Too much toe gives undesirable effects, such as making the car squirrely and dangerous.
Depending on how and where you drive, you will want different toe for the front and back of the car. However, I find ten degrees of toe out in the front to help with steering, and I generally keep the rear toe neutral. Toe out in the back will make the back want to break traction more often, so I recommend more toe out if you use your car on wide tracks. However, if you have trouble with keeping the car stable, I recommend a little bit of toe in to make the tires try to pull you back into a straight line.
Toe in and neutral toe is good for shorter courses with tighter turns like around West Coast's city, while toe out is good for long courses with looser turns like the roads in Utah.

Don't touch the L/R trim. Just don't. There's no real reason to adjust it. Your alignment is repaired every time you reset, change parts, or change tuning settings. Trim is generally just for super unbalanced cars like the Pigeon.
Trim adjusts which direction your tires are pointing at rest. As in, steering direction. Keep this value at 0 and it will stay centered.

Caster is another camber option strictly for your front wheels. It changes how your wheels behave while you are steering. It tilts the axis where your wheels steer along, making your wheels produce a greater camber angle while steering. This is good for tight courses, but might be counterproductive on looser ones. Once you figure out how to use this option and what it does, then you're pretty much set for making solid, dependable configurations.

Now that you know what each of these do, here's an unmodified wheel alignment section...


...And here's a modified version of the same car. Note that the camber is currently accounting for the camber already caused by a lowered ride height.


End of guide
And that's it, you're done.

It goes without saying that getting your configuration just right is going to take some time. It's only a matter of finding your comfort zone, from the car itself down to the alignment settings. Remember that no car handles the same. Once you know how to handle your car at its worst, then you can find out how to work out the kinks and build a perfect configuration for your own use. Keep in mind that having a slow computer will slow the simulation down itself. You will be in for a surprise if you upgrade your computer between now and later.

If you have trouble digesting written guides, then check out Ermz's guide on tuning in BeamNG. Although his video is based around tuning a car for grip, and he doesn't quite cover everything, you can still apply what you've learned about each setting to your own configuration, and he describes the suspension and alignment settings fairly well.

61 comentarios
strawberrya38 24 MAR a las 6:11 p. m. 
hi
MRFJORD 7 SEP 2024 a las 5:10 p. m. 
AWD Drift for life
D34D 18 JUL 2024 a las 5:23 p. m. 
biasing the brakes toward the rear is a terrible idea? you wont be able to left foot brake? leave the brake bias stock
trulimero trulichina 9 MAY 2024 a las 1:12 p. m. 
me no fuel pls understan pls halp
Carber 5 MAR 2024 a las 5:41 p. m. 
NA is best
IcedRoad  [autor] 14 DIC 2023 a las 7:58 a. m. 
so sorry for the late reply, you probably got it figured out by now but i still wanna make an attempt to say something
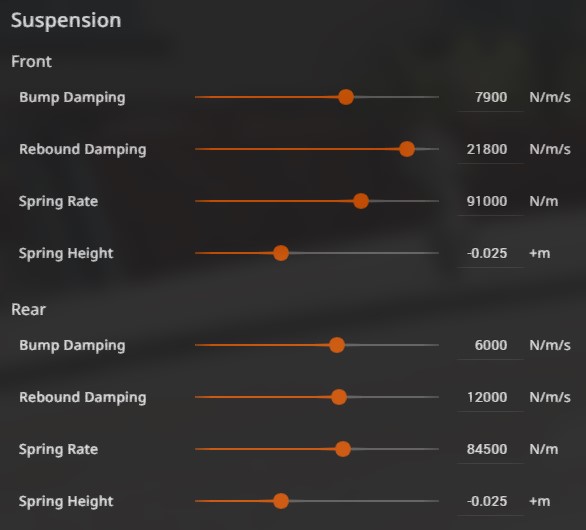
the race awd transfer case should be able to let you adjust the torque bias to the rear. if that fails, use a slightly longer (smaller number) final drive ratio for the rear wheels to make them spin a little faster than the front
internet access is few and far apart, and i really only crawl out of my cave when i catch wind of updates...
Chotato 16 OCT 2023 a las 7:26 p. m. 
So you recommend the Sunburst? Every time I drive this car, I CANNOT make it drift no matter what configuration I use. The thing understeers like crazy as if it's FWD and burnouts seem to also imply FWD bias despite being AWD. Anything specifically you'd recommend to set this car up for drifting? I prefer AWD drifting because I'm on controller but I have plenty of other cars setup perfectly for it but can't figure out any sort of proper config for the Sunburst.

Also want to mention that the Sunburst and no other car that I've found has a bug where the wheel offset setting just doesn't work at all.
IcedRoad  [autor] 16 SEP 2023 a las 10:46 a. m. 
absolutely- always use the wheels debug app. the tuning menu only offers percentages and doesn't tell you the angle your wheels are at.

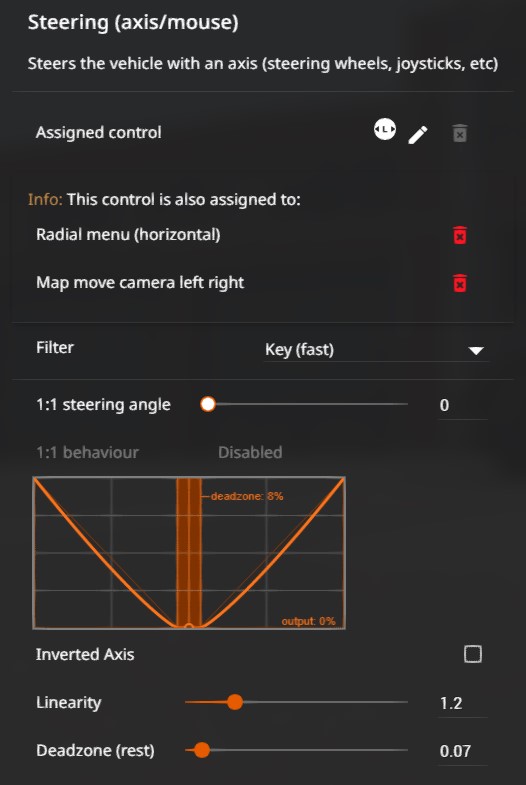
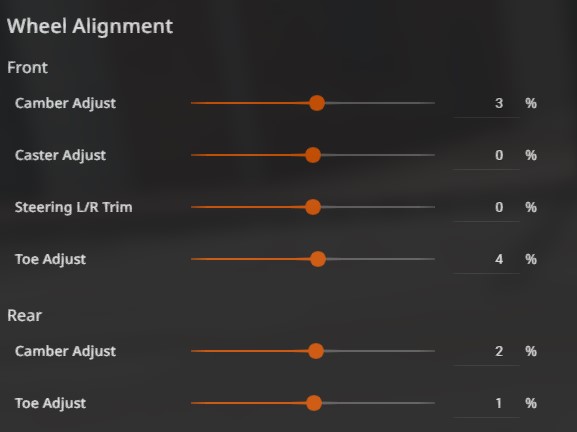
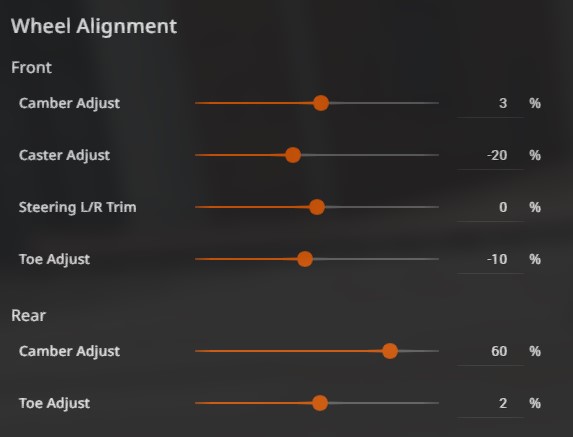
anyways, adding negative caster makes your wheels want to return to the center more aggressively, but i believe it does add *some* negative camber. i didn't check that too closely, but you can just steer with the wheel debug menu open to check this.

i also generally have my wheels set around one or two degrees on the negative side since too much camber just looks goofy to me, and that range works just fine for me.
488 12 SEP 2023 a las 5:40 p. m. 
I have a two questions
Wouldn't adding negative caster add positive camber when turning?
Also in what range do you have your camber at, and why? I'm guessing you use the wheels debug app
IcedRoad  [autor] 21 JUN 2023 a las 9:28 a. m. 
automation test track also has a small area dedicated to drifting.