Phasmophobia

Phasmophobia

82 ratings
General Phasmophobia Guide w/ Apocalypse 15x Guide
By Welcome Mat
This is a guide for you newer players that have difficulty starting out in Phasmophobia. This will clear up misconceptions that cause failures in your investigations. Note that all information is not perfect and may contain constantly changing information as the game is updated. This will become an All-In-One strategy guide at some point (TBA).
2
2
5
   
Award
Favorite
Favorited
Unfavorite
Phasmophobia Guide
Introduction

Hello everyone! Welcome to my guide on Phasmophobia. I hope to one day turn it into an all in one guide containing every bit of information possible within the game. I aspire to be the best of the best in this game as it is my favorite game of all time. Although I may have these aspirations keep this in mind. This guide will contain spoilers for your experience within the game, may not contain up to date information, or it may contain false information. Always cross examine the wiki, patch notes, and other information as you read through this guide. The only information I will not state is bugs, glitches, or exploits which ruin the Phasmophobia experience.

Current Status

This guide is now outdated for the current Ascension update. Most information within the guide will still apply.
Hiding and Looping
Hiding

    Hiding spots can be identified in a couple of ways. They are objects you can get inside of or get behind. A hiding spot can work if it blocks line of sight with the ghost and blocks line of sight with the ghosts main roaming path through the room you are hiding in. Some hiding spots allow you to see the ghost although it breaks line of sight (ex. Bleasdale second floor bedroom rocking chair, Maple Lodge second floor lodge rocking chair, Grafton second floor nursery table beside childs wardrobe.) Normal doors do not break line of sight unless fully closed.

    How to use a hiding spot is not taught in Phasmophobia through the tutorial. You must turn off all electrical equipment in your hands and do not speak. Remember to check your microphone settings as push to talk and toggle are always preferred. If on open mic, make sure your volume test in your journal does not spike but if people say they hear you then do not use open mic. Always turn off your equipment before you enter the hiding spot. If your electronic equipment is always on, then switch to something else or drop it. The ghost will roam to the last known location of an electronic or voice if it was close enough after the grace period from the hunt is over.

    You can check a hunt is over if the ghost suddenly stopped making sound, if you can turn on/off light switches, or open locked doors.

Looping

    Loops are everywhere and there is a surprising amount of them that work. Always bring a smudge stick as you may fail the loop so you may find a hiding spot or continue the loop until the hunt is over. Any object or layout of a walls that can be ran around in full circle is identified as a loop. (Ex. Tanglewood garage vehicle, Camp Woodwind picnic tables, Grafton first floor T section wall of foyer/kitchen/dining room.) Loops that break line of sight are the best loops.

    You may use teamwork loops which are two different loops close to each other. Two players loop trading line of sight of the ghost so that both players are safer spending less time running from the ghost. (Ex. Camp Woodwind picnic tables with tree.)

    Normal ghosts will speed up the longer they have line of sight so keep that in mind in your looping and hiding journeys.
Reporting
The reporting system I think is a great addition into the game which was lawless before running rampant with cheaters and not so great people.

Use the reporting system for those people who do not follow the guidelines who ruin our experiences please. Help keep our community clean!

Report bugs/glitches/exploits to the official Phasmophobia discord.
Sanity Drain
Passive Sanity Drain Formula

0.12 small map / 0.08 medium map / 0.06 large map multiplied by the difficulty 1 amateur / 1.5 intermediate / 2 professional and multiply by 2 again for phantom.

An example would be Bleasdale on intermediate. 0.12 x 1.5 = 0.18. This formula calculated the sanity drain per second on an intermediate Bleasdale.
Ghost Hunting Equipment (Part 1)
EMF Reader

The EMF reader detects ghost activity. Interactions will always be EMF 2,3, or 5. Ghost events will always be EMF 4.

    The following is used to detect EMF levels from the truck off the activity board and any activity cannot equal 0:
  • EMF 1 NA
  • EMF 2 1 bump +/-1 1-2 bump Interaction
  • EMF 3 2 bump +/-1 1-3 bump Thrown object
  • EMF 4 3 bump +/-1 2-4 bump Ghost event
  • EMF 5 4 bump +/-1 3-5 bump EMF 5 ghost

Strategy:

Use this item every time there is an interaction. If you want a photo, walk around the item with the EMF or bring the item itself to the EMF to make sure a photo can be taken of it. Circle doors with this to determine which door was interacted with. Leave this on around the ghost area so that the ghost hunt or events can be easily heard.

Thermometer

The thermometer detects temperature directly in front of the temperature gun. The temperature is delayed up to 5 seconds. Not useful when the power is off.

Strategy:

Especially useful tool on lower difficulties where the investigation begins with the power off. Avoid using the temp gun on professional or higher difficulties until after the building has warmed up enough with the power on if the ghost is difficult to locate or pin down the exact room. <50 degrees Fahrenheit or <10 degrees Celsius means the thermometer is currently measuring the ghost room. Use this tool mid investigation to determine where the ghost is moving.

Spirit Box

This ghost hunting tool allows the ghost to speak when you ask it certain questions. (Ex. How old are you? Where are you? Are you young?) The ghost can hear you if the X indicator lights up after the question is asked. The ghost indicator will light up if the ghost responds.

Strategy:

Be sure the ghost is near your current location when you use it. Folks, please remember that the spirit box is most effective when alone. Only one person should be in the ghost room or by the ghost when you attempt to use it. You may have a ghost that gives spirit box evidence but you or others may refuse to leave the spirit box user alone. Do not be that person as this can be frustrating.

Ghost Writing Book

This ghost hunting tool is the slowest evidence tool in Phasmophobia. Interaction photos can be taken if it is written in.

Strategy:

Place inside of ghost rooms. If the ghost throws the book, rule out ghost writing as ghost writing ghosts always write before tossing the book.

Candle

The candle is the best light source as it protects sanity. Can be used to detect the ghost room.

Strategy:

Use this for sanity control. A good strategy is to leave candles in the ghost room so that players sanity does not drain while gathering evidence or clearing objectives. Detects Onryo as it can hunt on the fourth blow on with a 50% chance so use with a crucifix.

Strong Flashlight

The best light source in the game. Has a slightly larger cone of vision than the regular flashlight. Used with other items as it can be shouldered.

Strategy:

This item finds the bone the easiest on any map.

Flashlight

Has a smaller cone of vision than the Strong Flashlight and has a yellowish tint.

Strategy:

Cheaper than the strong flashlight so use this if you are struggling with cash.

UV Flashlight

A weak light source used for both fingerprints and footprints. It is most effective with fingerprints as it can see further than the glowstick.

Strategy:

If the ghost has interacted with a door, light switch, cooler, etc, UV it. If there are not fingerprints, then it is not a fingerprint ghost. After checking twice then it is likely not a Obake.

Glowstick

Another weak light source used for both fingerprints and footprints. It is most effective with footprints with its large area of effect.

Strategy:

If the ghost has interacted with a door, light switch, cooler, etc, UV it. If there are not fingerprints, then it is not a fingerprint ghost. After checking twice then it is likely not a Obake. Keep this close for photos when salt is down for easier footprint photos.
Ghost Hunting Equipment (Part 2)
Salt

Used to obtain footprints from the ghost. Use UV flashlights or glowsticks to see them. Can be used to identify if the ghost is nearby or wandering. The most useful item for obtaining perfect games with photos that do not contain a Wraith.

Strategy:

Place three salt piles in and around the ghost room with UV nearby. Listen for the footstep then begin UV lighting and start taking photos.

Infrared Motion Sensor

This item detects the ghost when it is wandering or hunting within a couple of meters where it is facing. It emits a light and a noise in the truck when it detects movement from players or the ghost.

Strategy:

Place these within doorways or setup lines to detect where the ghost is roaming or even if at all. The twin decoy will not trigger the motion sensor. The Goryo will never leave its room so it will never trigger doorway motion sensors.

Sound Sensor

Detects sound inside the circle on the map in the truck. The sound sensor will detect any sound from only inside the circle. Sounds that are <5% are ambiance sounds unrelated to the ghost.

Strategy:

Place in areas that cover the most ground that can be easily read. Do not overlap sound sensors if possible unless it helps deducing a location. Rotate sound sensors after some time has passed with no sounds detected.

Parabolic Microphone

Detects sounds in a line in front of the parabolic microphone. This item is effective on medium, large, and outdoor maps because it can narrow down locations quickly after detecting sound. Because of these factors, the parabolic is generally not used especially on small maps or the lack of experience of the investigator with the tool.

Strategy:

Face perpendicular to rooms to detect sound in a straight line. The higher the number, the louder the sound was. Use this item to detect Banshees with the more difficult to confirm Myling. Can cause curses by if a Moroi whispers.

Video Camera/Tripod

Detects ghost orbs in night vision mode. This is also used as a light source as it rivals the strong flashlight in navigation.

Strategy:

Place in the corner of rooms on an elevated surface for the most coverage. With good use, the video camera can be angled for more coverage without a tripod however.

DOTS Projector

Ghosts will travel through this showing a green outline of the ghost model. The Goryo is the only ghost that is not visible with the naked eye when it travels through DOTS.

Strategy:

Place this item where the ghost is most likely to trigger DOTS like the center of the ghost room. DOTS is most easily seen with night vision on video camera.

Headcam

A slightly less effective way to view ghost orbs. Mostly used to watch other players from the truck which emits a faint light in front of the person with the headcam being used.

Strategy:

Always grab a headcam in multiplayer. Communicate with other investigators to look through your headcam when the ghost room has been found and remember to keep still for a better confirmation for your viewer when searching for ghost orbs.

Lighter

This useful item is used with smudge sticks and candles. It is used to light the summoning circle.

Strategy:

Always keep this item on hand, inside the ghost room, or your hiding spots. Always relay the location of this item since it is the smallest ghost hunting tool in the game and easily lost.

Smudge Stick

The best defensive item in the game. Used to prevent ghost hunts, increase ghost activity, and blind the ghost during a hunt. Prevents demons from hunting for 60 seconds, normal ghosts for 120 seconds, and the spirit for 180 seconds. Blinds normal ghosts during a hunt for 6 seconds and Morois for 12 seconds.

Strategy:

Always always always keep this item nearby. This item helps with ghost events and activities for objectives. Use when necessary.

Crucifix

The other defensive item in the game which prevents hunts. It resets the hunt timer by 20 seconds for demons and 25 seconds for normal ghosts. The range of the crucifix can be seen when holding the place key. The range is extended for demons. This item also works in your hands.

Strategy:

Give it the most coverage of rooms possible and/or where a hunt would not be preferable to happen such as a hiding spot. Place these with candles to detect Onryos as they will only hunt when a candle is blown out so the crucifix will be used at the same time.

Sanity Pills

One sanity pill raises an investigators sanity by 50% on amateur, 40% on intermediate, 30% on professional, 25% on nightmare, and 20% on insanity. This item is most useful in solo play and decreases usefulness as more investigators are present but is still an essential item. Cures Moroi curse.

Strategy:

Normally the lowest sanity players will take the sanity pill. Always try to keep the average sanity above 50% for easier ghost detection.

Photo Camera

This helps with obtaining more money and experience within the game. It can take photos of interactions, cursed possessions, fingerprints, footprints, the bone, dirty water, and the ghost. The closer you are when taking a photo, the higher the rating.

Strategy:

Always go for 3-star photos. Interactions go away in 15 seconds, ghost events go away when they are touched or stay too long, air ball ghost events can not be taken a photo of, etc. Keep these in mind when taking photos.


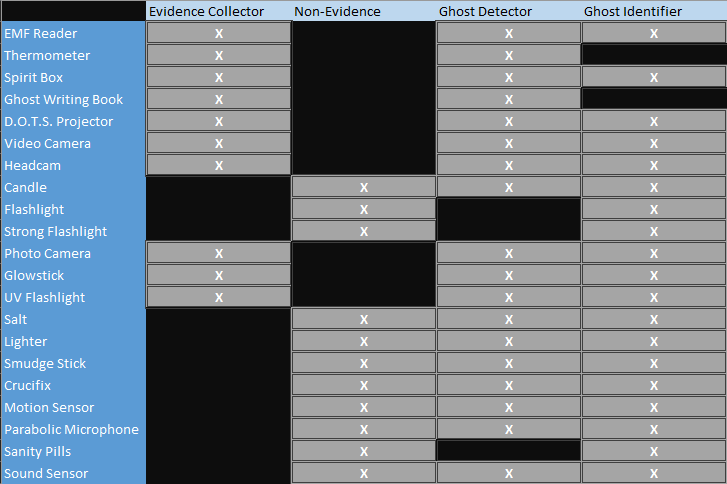
Evidence Collectors are items that can collect evidence to identify a ghost. Non-evidence items are unable to collect evidence to identify ghosts. Ghost detectors are able to locate a ghost through variable means. Ghost Identifiers are able to identify ghost types without evidence. Positive correlations are marked with an "X" and negative correlations are marked with black spaces.


Cursed Possessions
Very quickly, cursed possessions will cause a cursed hunt. These hunts are different from your average hunt as there is no grace period allowing the ghost to instantly kill you if you are on top of it. It is advised to find the ghost’s location before using any cursed possession and having located hiding spots where you are comfortable. The rule of thumb is to always let only one person use them. Remember, these items always have a cost.

Ouija Board

This item is used to obtain information. The important questions are for ex. What is your favorite room? Where is the bone? What is my sanity? Hide and seek. It uses a high amount of sanity per question so use it wisely as it breaks if you do not have enough sanity to get an answer for the question you asked. The location of the ghost and bone requires 50% sanity so you can not ask twice without sanity pills. Always say goodbye and never leave the board as it will break.

Strategy:

Only ask question when necessary. Use sanity pills after asking questions. Ask less important questions for interaction photo or EMF 5 farming.

Voodoo Doll

Pulling a pin will cause the ghost to do an interaction and drain 5% of your sanity. There is a 1 in 10 chance you will pull the heart pin causing an instant hunt.

Strategy:

Use this item when only necessary as it is only useful in finding the ghost room, farming interactions, and forcing a hunt.

Tarot Cards

The riskiest cursed possession to use in Phasmophobia. There are a total of 10 cards that can be pulled. The cards include the Wheel of Fortune, The Sun, The Moon, The Hermit, The Tower, The Devil, Death, The High Priestess, The Hanged Man, and the Fool.

These cards can raise sanity: The Wheel of Fortune green 25% and the Sun to 100%.
These cards can drain sanity: The Wheel of Fortune red 25% and The Moon to 0%.
The Hermit forces the ghost into its room for a period of time.
The Tower forces the ghost to interact with the environment and increases activity for some time.
The Devil forces a ghost event.
Death forces the ghost to hunt.
The High priestess will revive an investigator or the next death if no one has died.
The Hanged Man instantly kills you but has the smallest chance of being pulled out of any card.
The Fool nullifies any card that you just pulled if it turns into The Fool.

Strategy:

Avoid pulling tarot cards right away if you value your items having too much at stake. If you would still like to use these regardless, wait until hiding spots are located for quick retreat. You can die right away again in multiplayer if you revive on nightmare and higher as the ghost will not stop hunting.

The Cursed Mirror

This mirror is used to find the current ghosts location showing the area. It uses 20% on use and further drains it the longer it is peered into. Breaks when the user has 0% sanity and forces a hunt. Only let one person use this.

Strategy:

Peer into the mirror for only a couple seconds at a time taking note of what it is viewing. Look for objects, the color of the wall, the floor, and the location if you are familiar enough. Make note of these to locate the room without needing to peer into it longer than necessary.

The Music Box

This item will force the ghost to sing. If the players listen with 0% sanity then it will break forcing a hunt. If the players toss the music box, then it will break forcing a hunt. If the ghost is close to the spirit box then it will manifest allowing for a ghost photo and begin walking to it forcing a hunt when it reaches it.

Strategy:

Find the ghosts general location to prevent an instant hunt that can kill you before using it. If you only need to locate the ghost, then place the music box gently on the floor. Break the Music Box if you need it to hunt. Bring it close to the ghost if you need a ghost photo.

Summoning Circle

A drawn pentagram on the floor with 5 candles that need to be lit activating it. Once its activated, it traps the ghost inside of it so you can get a ghost event to take a photo and force a hunt. It will hunt from the summoning circle after a few seconds when it is activated. If it is used during a hunt, you instantly die. You drain 17% sanity every time you light a candle on it. If you do not have this much sanity, then the candle will fail to light. If you attempt to light the final candle without enough sanity, then it will force a hunt.

Strategy:

Use this when you either have an objective for a ghost event/ghost photo or you suspect a phantom as they disappear when you take a photo of them.

Monkey’s Paw

This item grants a number of wishes depending on the difficulty multiplier. You can see the amount of wishes available with the fingers lifted. The following wishes that can be made are:


I wish for (weather ex. Snow, rain, etc.): Changes the weather to that weather.
I wish for knowledge: Strikes out one evidence type in exchange for near blindness and deafness.
I wish for life: Revives a player in exchange for a 50% chance for the wish asker to die.
I wish for sanity: Increases the average sanity to 50% in exchange for faster sanity drain.
I wish to see the ghost: Creates a ghost event in exchange for near blindness.
I wish the ghost was trapped: Traps the ghost in exchange for everyone being locked in their rooms forcing a hunt 1 minute after the wish.
I wish to leave: Unlocks the door only for you to escape in exchange for blindness and slowness until you escape.
I wish to be safe: Creates a hiding spot where a hiding spot can be in exchange for that rooms lighting to be disabled.
I wish for anything: Wishes for any of the above wishes.
Ghost Types (Part 1)
Just a quick introduction. Please note that not all ghosts have their sanity hunting threshold listed as I play on Nightmare mode where they are difficult to find the perfect number. They will be known mostly as High Average Sanity Threshold (>50%), Normal Average Sanity Threshold "most ghosts" (<50%), and Lower "Abnormal" Sanity Threshold (<40%). If a sanity threshold not made note of, then take it as a Normal Average Sanity Threshold ghost.

Also, ghosts interact with the environment with a radius of around 5m around them. They can do this through walls but not between floors.

For more information on exact Sanity Thresholds, check the wiki or patch notes for Phasmophobia


Green represents Positive Evidence (Red O), Black Represents Negative Evidence, and Red represents False Evidence (Black X).

Spirit
The most basic ghost in the game with no abilities.

Strength: None
Weakness: Smudge sticks prevent this ghost from hunting for 3 minutes instead of 2 minutes for average ghosts.
Hidden abilities: None

Strategy:
If suspecting a spirit, prepare a 3-minute timer for a smudge stick to check for it.

Poltergeist
An active ghost.

Strength: Can drain players sanities with its poltergeist ability throwing multiple objects at once.
Weakness: Multiple item throws.
Hidden ability: The poltergeist throws much further than other ghosts.

Strategy:
Give this ghost multiple items to throw for a chance of a multi throw and pay attention to item throws. A poltergeist will never always have short throws.

Wraith
The wraith is dangerous as it can be anywhere on the map at anytime where a player is.

Strength: Teleporting to random players.
Weakness: A Wraith cannot step in salt.
Hidden ability: It will always produce an EMF signal to where it teleports.

Strategy:
Place salt in its room and wait outside with an EMF turned on away from interactable objects to detect a teleport. Keep a crucifix close in the case of a teleport hunt.

Oni
One of the more active ghosts in the game when players are nearby.

Strength: Oni ghost events drop more sanity during ghost events.
Weakness: The Oni will be more visible more often than other ghosts during a hunt.
Hidden ability: The Oni will do ghost events more often than other ghosts.

Strategy:
Note the amount of ghost events that happen and watch for ghost blinking during a hunt.

Shade
A low average sanity hunting ghost that is incredibly shy. Holds multiplayer games hostage withholding evidence and objectives.

Strength: Very shy.
Weakness: It cannot hunt if a player is in the same room as it.
Hidden ability: Not as active with interactions as other ghosts.

Strategy:
Have a player stand in the ghost room and others in the surrounding rooms it can roam with the average sanity low. If activity has been scarce and it never hunts with the strategy written here, then it’s a Shade. Sometimes it is worth skipping perfect games with these guys.

Revenant
One of the fastest and most dangerous ghosts in the game.

Strength: Is fast when you are in its line of sight until it reaches your last known location. It always needs to create line of sight first before it can get its speed.
Weakness: Incredibly slow when no one is in its line of sight.
Hidden ability: None.

Strategy:
Stay hidden during a hunt and listen. If line of sight is required then let it only see you for a second then run without electronics or talking to a hiding spot to hear the speed change.

Banshee
This ghost picks an obsession to target until it is dead then switches targets.

Strengths: It ghost events on its target more often. It will hunt when its target is below 50% sanity and will attack anyone if they are outside.
Weakness: Banshees will wail into the parabolic microphone at times.
Hidden abilities: It can start hunts with the target outside with 50% average sanity and below. Average sanity of everyone or other players than the target do not matter. Does more singing ghost events than other ghosts.

Strategy:
Wait with a parabolic microphone and wait for a wail. Count the number of singing ghost events. In multiplayer, keep everyone in the map and have everyone with a smudge. If it does not switch targets and only looks at one person then it is a Banshee.
Ghost Types (Part 2)
Demon
The most aggressive hunting ghost in the game with a high sanity hunting threshold. Can hunt as soon as you enter the map.

Strength: Less cooldowns between hunts.
Weakness: Crucifixes have a larger range against this ghost.
Hidden ability: When a player enters the map, it has the ability to hunt at any sanity% and the chance rises as it is lower.

Strategy:
Place crucifixes slightly outside its room as it will consume them from its room since the range is further for them by a couple meters. Time the intervals between hunts as its cooldown is 20 seconds as compared to 25 seconds for all other ghosts. Instant hunts when you enter the map is immediately a demon.

Yurei
The ghost that randomly wanders further than other ghosts with no destination in mind.

Strength: It can do long roams more often than other ghosts.
Weakness: Smudging this ghost traps it in its room for some time.
Hidden ability: It can do a door slam that drains players sanity by 15%.

Strategy:
Use a thermometer to note the ghost room. Note where interactions are taking place and watch for a door slam without a ghost event. The smudge weakness is unreliable for the most part.

Phantom
Another wandering ghost that targets a random player for its roam.

Strength: Doubles sanity drain when looking at a ghost event.
Weakness: Turns invisible when taking a photo of it.
Hidden ability: This ghost is less visible than other ghosts during a hunt.

Strategy:
Always have a photo camera at the ready. When a ghost photo is taken, a phantom will never distort the ghost photo. Other ghosts will leave a distorted effect on the ghost photo.

Jinn
One of the faster ghosts in the game when the power is on and can also drain sanity when power is on.

Strength: When the power is on, it will speed up to catch up to its target within its line of sight.
Weakness: The Jinn will not be able to use its abilities with the power off.
Hidden ability: When a player is near the ghost, it can drain their sanity emitting an EMF signal at the power box. Will never turn the power off.

Strategy:
Leave the power on and an EMF at the power box while investigating. If it goes off, you have a Jinn. Let the Jinn see you at long distances to check its speed as it will slow down slightly when it reaches you.

Mare
This ghost is a high average sanity hunting ghost when the lights are off in its room and a low one when they are on.

Strength: It hunts more often with the lights off at 60% average sanity in its room.
Weakness: It hunts less often with the lights on in its room at 40% average sanity.
Hidden ability: There is a chance when you turn on a light that a Mare will instantly turn it back off.

Strategy:
Keep the lights on in the Mares room. Turn them off then back on again from time to time to allow the Mare hidden ability to take place. The Mare can turn the power on and off.

Yokai
The highest average sanity hunting ghost in the game if someone is speaking.

Strength: It can hunt at 80% average sanity if a player is speaking beside it.
Weakness: It cannot hear or detect electronics during a hunt as far as other ghosts.
Hidden ability: More easily forgets its target’s location when out of line of sight during a hunt because of its weakness.

Strategy:
Speak near the ghost to provoke a hunt. It will likely hunt as soon as someone speaks. Do the hunting test with a smudge stick in a safe spot.

Hantu
A fast ghost when the power is off and slow when it is on.

Strength: Moves faster the colder a room is.
Weakness: Moves slower the warmer a room is.
Hidden ability: Will never turn the power on.

Strategy:
Leave the power on to listen for fast speed in its room then a slow down when it leaves it.

Goryo
This ghost will never leave its room unless its hunting. It will then return when it is over.

Strength: DOTS are only visible through video cameras.
Weakness: It will never roam from its room.
Hidden ability: It can interact with objects from a further radius than other ghosts.

Strategy:
Look for DOTS both with your eyes and with a video camera. Put motion sensors in its doorways to detect if it is not roaming.

Myling
The quietest ghost in the game during a hunt.

Strength: Much quieter than other ghosts during a hunt which can be sneaky.
Weakness: It makes paranormal sounds more frequently than other ghosts which is not noticeable.
Hidden ability: None

Strategy:
Keep an electronic beneath you during a hunt. When the Myling enters range, you will hear it and the electronic will go off at the same time. You will hear other ghosts first before the electronic is interfered with.
Ghost Types (Part 3)
Onryo
The flame ghost that does not like flames.

Strength: When a fourth flame is extinguished on, it has a 50% chance to hunt.
Weakness: Flames prevent this ghost from hunting like a crucifix.
Hidden ability: The first three extinguished flames cannot be hunted from. The more players that die and the lower the sanity, the more often the flames will be extinguished.

Strategy
Always keep candles around the room with crucifixes. An Onryo will never try to hunt with flames nearby so crucifixes will not be burned with candles lit.

The Twins
The ghost that can be difficult to locate because of the duality between main and decoy twin. They have a higher hunting threshold than other ghosts.

Strength: The Twins can hunt from the ghost room and anywhere nearby.
Weakness: The Twins can do double interactions called Twinterations.
Hidden ability: The main twin spawns from the ghost room and is 10% slower than normal ghosts. The decoy twin is 10% faster than other ghosts and can spawn from anywhere near the main twin.

Strategy:
Listen for Twinteractions and listen for hunting speed from hiding spots. They speed up like normal ghosts during line of sight.

Raiju
This ghost is fast with a high hunting threshold around electronics.

Strength: Increased sanity hunting threshold and speed around electronics.
Weakness: Interferes with electronics at a further distance than other ghosts.
Hidden ability: None

Strategy:
Keep all electronics condensed in one location you can hear the ghost from during a hunt as to hear its speed.

Obake
The shapeshifter ghost that eluded us in the past.

Strength: It has a chance to not leave fingerprints when it interacts. These fingerprints that do appear, disappear at a faster rate.
Weakness: it has a small chance to leave a sixth finger print or a double finger on a light switch.
Hidden ability: It has a 5% chance to shapeshift into a new ghost form during a hunt.

Strategy:
Keep UV lighting doors, windows, light switches, etc. as it interacts with them. Watch its form with a smudge from a safe place or loop.

The Mimic
Potentially the most dangerous ghost in the game as it changes its ghost type often but never evidence.

Strength: This ghost can become any ghost in one-minute intervals.
Weakness: This ghost always leaves ghost orbs even if there is no evidence.
Hidden ability: It modifies some ghosts at random such as the Thaye where it may become any age.

Strategy:
With how many evidence you have allowed in the investigation, always be suspicious when there is ghost orbs, finger prints, spirit box, or freezing temperatures. If any other evidence is present, then it cannot be a Mimic. Listen for substantial changes in ghost behaviors between hunts.

Moroi
The fastest ghost in the game but takes it some time. It can curse with its voice when it is heard.

Strength: Places a curse on whoever hears its voice draining their sanity at double the rate and candles are not even able to stop it.
Weakness: They become blinded by smudge sticks during a hunt for 12 seconds instead of 6 seconds.
Hidden ability: Morois are slower than average ghosts above 45% sanity average and speed up progressively the lower it is below 45% average sanity. They have increased line of sight speed gain than other ghosts.

Strategy:
Wait in a hiding spot and listen for Moroi speed. It should progressively get faster between hunts as sanity drains. With a sanity board, use a candle once you are cursed and watch for sanity drain. Time smudge stick uses during a hunt to check how long the blind is and its line-of-sight speed.

Deogen
The slowest but also the most dangerous ghost to hiding players.

Strength: There is no hiding from this ghost at it will seek you out at high speed directly to your location regardless of if you are hiding or not.
Weakness: It is incredibly slow when it reaches its target.
Hidden ability: It has a 25% chance when you are within one meter of the ghost to make a heavy breathing sound on the spirit box. The Deogen can kill at full speed if a player gets between it and its target so be careful.

Strategy
Avoid hiding. Keep a smudge stick at all times if you are not comfortable looping. Get to a looping spot with this ghost as it is easily looped. Avoid dead ends.

Thaye
The most consistently fast high sanity average hunting ghost at any point in time in the game if no one has gotten close to it.

Strength: This ghost is faster the earlier the game is in without entering its room.
Weakness: The longer you are in its room at 30 second intervals during a “check”, it ages up slowing down, decreasing its activity, and lowers average sanity hunting threshold.
Hidden ability: A Thayes age can change on the Ouija board.

Strategy:
Listen to its speed with the power on and off. Check its age with a Ouija board if one is available. Avoid its ghost room if you want it quick. Slow it down by staying in the ghost room for long periods of time.


Apocalypse 15x Guide
Mindset
So you may be thinking: “Why do this? It’s the hardest thing in the game! It is a waste of time to do this and only the pros can.”

The answer is that this challenge is a little difficult but it is not hard. Planning is everything. Knowledge helps. Experience helps. Anyone can do this. It even took us that play that game a lot quite some time to get our successful attempt. It just may take you longer if you do not have as much knowledge or experience. Planning is key. It is everything. Believe in yourself 😊.

So, your goal is to complete all objectives, get a ghost photo, then survive solo on Sunny Meadows. It is easy.

Strategy

Here are the objectives you should avoid: Ghost event, EMF, Salt, and Crucifix. Everything else is doable. Reroll your game if you have these or the ghost is in the entrance.

The ideal loadout to bring in right away is a smudge stick, lighter, and photo camera. Go to the nearest comfortable hiding spot then listen. From here on, you investigate like you would from any other investigation but with no evidence. Check my ghost guides for strategies for finding them out.

The ghost photo is the most difficult part as you are in danger. Always press the quick item swap to quickly pull the camera back out of cooldown as simply waiting to be able to take a photo takes longer. Waiting increases your chances of missing the photo so do not get cocky. Use all photos possible within your 6 second smudge timer. Hide before those 6 seconds are over with another smudge at the ready.

Here are the next to impossible ghost types to figure out as the behaviors are impossible or it is simply too dangerous: Wraith, Phantom, Banshee, Jinn, Mare, Shade, Yurei, Onryo, and Obake. I may be missing more.

This takes time and patience so good luck out there!
Common Misconceptions
Green Footprints or Salt Pile Footprints are Fingerprint evidence!

They are not Fingerprint evidence. Fingerprint evidence only include fingers and not toes. This is the most common misconception that new players will believe in.

There are ghost orbs/DOTS!

A false positive that can happen during rain/snow, another investigator is looking around with a flashlight, a light source such as DOTS is on the floor or looking too quick. Always check at least twice if you are not experienced with Ghost Orbs or DOTS.

There are no freezing temperatures!

The ghost can roam preventing a room from going to freezing. This can be checked faster with a thermometer as it will see it first. Yurei’s and small maps like Tanglewood are notorious for this.

I just saw freezing temperatures and the ghost hissed at me!

You just saw an "air ball" ghost event. The ghost will always make the same hiss or exhale sound as the air ball arrives at an investigator. This is how you know even if you couldn't see it. This looks similar to freezing breath but once you've seen it, you'll know the difference. They are also bigger than the freezing breath mist. You will know because you can see them traveling towards you if you are lucky enough for it to spawn a distance away and you are watching. Fun fact: You can run away from these if they spawned far enough but smudging is a waste plus it does not work so don't do that.

The ghost hissed at me so it must NOT be an Oni!

This is true and false depending on both what you heard and seen. The ghost can do a couple of hiss audio cues for a ghost event. The "Air Ball" ghost event only plays one hiss audio! If it was a hiss other than that audio cue then Oni cannot be ruled out! If you see the ghost model with the air ball ghost event then it can still be an Oni. The hiss itself does not rule out Oni but the air ball itself does.

Its freezing! I have <3 Celsius/<37 Fahrenheit!

This is the old freezing temperature indicator. This threshold does hold true for the ghost room but remember, no freezing! Now, it can only be freezing if it is <0 Celsius/32 Fahrenheit.

The ghost hunts off the sanity of the people inside the map but the not the ones outside!

The ghost hunts off the sanity of all players! There are exceptions to this such as the Banshee who only hunts off the sanity of its targeted player or Demon that can hunt at any percentage regardless of average sanity. "Truck camping" with low sanity is no better than being in the map!

The ghost turned on the power so it must not be a Mare!

This is the old Mare that I thought still existed today as well. The new mare in relation to power, can only turn lights off. The Mare cannot turn lights on but they can still turn the power on and off.

The Oni can throw far like it always has been!

No, not anymore. This change has been given to the Poltergeist to better reflect its behavior of throwing objects.

Feel free to suggest more common misconceptions as I play mostly single player or with experienced people that are “usually” not fooled by them, but I can be too.

As one final note. I thank you person who has helped me enjoy Phasmophobia as much as I have. After all, this guide is a lot of our work! It has been a long time coming for publishing this guide. Thank you!
15 Comments
LoomisOween Mar 2 @ 1:12pm 
More helpful than Preparation H on a hemorrhoid. :Sebastian:
Collywobbles Oct 15, 2023 @ 3:38pm 
0/10
LilxAZNxGirl Sep 28, 2023 @ 11:34pm 
Still waiting for an updating heh :steammocking:
Welcome Mat  [author] Oct 1, 2022 @ 3:12pm 
Be sure to cross reference with the recent patch notes of Apocalypse! Some of these ghosts have changed so I'll update them very soon! I am happy to help! :D
C̸̎̀u̴͌͊r̷̎̀s̷̥̓e̶ Oct 1, 2022 @ 3:10pm 
extremely helpful, thanks.
Welcome Mat  [author] Sep 28, 2022 @ 5:41am 
I have the Oni hiss in the Oni section but will include that as well in the misconceptions until further notice of any changes! The <3 Celsius reading definitely used to be an old indicator of freezing that returning players may still believe. The ghost targeting the lowest sanity member of the group sounds like a easy misconception that might need proving (although I believe its randomized) as well as the hunts based on sanity of people in the house which is the average of everyone. I will include these in the guide and thanks for bringing them to my attention!
IndigoExe Sep 27, 2022 @ 1:05am 
Some ideas for misconceptions that I have run into:
hiss = not an Oni (mistaking the hiss of any event as air-ball hiss, or even just believing Oni cannot hiss at all - this is definitely very common)
temperature bellow 3°C is freezing! (no idea how this came about, maybe from back when the thermo worked miraculously and you could figure out freezing like this if you ran in with thermo immediately - I have seen a few people believing this and being really confused when they got the ghost wrong)
the ghost targets the player with the lowest sanity and hunts are based on the sanity of people inside the house
Welcome Mat  [author] Aug 29, 2022 @ 9:54am 
Thank you for the appreciation! :D
armpit stench Aug 29, 2022 @ 9:37am 
thanks for this
Welcome Mat  [author] Aug 23, 2022 @ 3:47pm 
Thank you very much! Glad I could help!