Oxygen Not Included

Oxygen Not Included

320 betyg
Oxygen Not Included Early Game guide
Av kroun
Oxygen Not Included Starter Guide. More images will be added.
6
17
2
2
2
   
Utmärkelse
Favorit
Favoritmarkerad
Avfavoritmarkerad
Welcome To Oxygen Not Included
You just bought Oxygen Not Included, and is about to play the game. Or maybe you have already played the game a bit? In any case, I hope this guide will help you understand Oxygen Not Included.

This guide applies to both the base game, as well as the Spaced out DLC.

So click that "New Game" Button and Choose your difficulty and mode, as well as asteroid type.
I suggest you pick "Terra", which will be the first asteroid type presented to you, as it is the easiest and most simple.


Terra as seen when you have "Spaced Out" Activated, classic asteroid style to the left, spaced out style to the right

Terra as seen when you are playing the base game

Once you have made your new world, go on to the next section.
Choosing your Starter Dupes
Once you have made your world, you will be presented with something that looks like this:
This is where you choose your starter duplicants. Duplicants are the characters you control, and each has different stats and traits.
Here's a quick breakdown of what the different stuff means:
You will have to choose 3 starter duplicants, and you can press the reroll button any number of times to get a new duplicant.
If you click the arrow, you can even influence what type of interrests they get.

For starter duplicants, I suggest you pick one with interrest in digging, one with interrest in researching and one with interrest in either building or farming.

Traits doesn't matter too much, but there are a few you should avoid at all costs:
- Anemic: Duplicant will be super-slow
- Mouth Breather: Duplicant will consume a lot more oxygen than normal
- Bottomless stomach: Duplicant will eat a lot more food than normal
- Flatulent: Duplicant will fart, slowly filling your base with natural gas
- Loud Sleeper: Duplicant will wake up nearby duplicants when sleeping.

Once you have picked your three starter duplicants, click the Embark button (Though you should pick a cool name for your world before starting)
A New World
Once you click embark, you should be greeted with this message:
Once you click "Begin", the game begins, and you should see something that roughly looks like this:

Lets do a quick breakdown of what you are seeing:
You can hover your cursor above the tiles in the world to get some information about them.
Considering the game is called "Oxygen Not Included", one may think your top priority would be to get oxygen, but for now you won't need to produce any, as there should be plenty or oxygen at your starter location. Instead, locate a body of water that's close to your Printing Pod, then, using the dig tool, dig a tunnel to the water.
Body of water, near the printing pod


If the water is below or above you, you may want to click on the "Base" tab and place some ladders, so your duplicants can go up and down this tunnel.
Once your duplicants have reached the water, click the "Plumbing" Tab and place a pitcher pump above the water like so:
Once the pump is constructed, your duplicants can use it to bottle water.
Now that you have access to water, the next thing you should do is make a small room for an outhouse, which is also found in the plumbing tab. It's very important to make this before the end of the cycle, as otherwise your duplicants will make "messes" on the floor, which would be very unsanitary.
Next to this outhouse, place a wash basin (found in the medicine tab) to prevent germ spread. Whenever a duplicant walks past a wash basin, they will use it, destroying any germs they were carrying around.
If you have already found some copper, you can place a door to make a room, but this isn't necessary, though it is a good idea, as it gives some bonusses I will explain later.
Obtaining Copper
Once you have made the outhouse, you can begin exploring a bit. For now, all you need to do is finding a reqion of the biome you started in with a bunch of copper in it, if you haven't already found some.

When you have obtained some copper, go to the stations tab and place a Research Station.

All you need now is some electricity to power this thing. For now, the only way to generate electricity is to use Manual generators, so place one or two of those and a battery.


Once you have done this you can connect it all with wire. Be sure to connect the tiles with the socket icons to the wire


If you have any copper left, you can construct an oxygen diffuser (Found in the oxygen tab) to start producing some oxygen. It will consume algae, which should be plentiful for now, to produce much-needed oxygen. Remember to connect it to the battery, though.

Researching
Once you have powered your Research station, it's time to research stuff!
Click on the Research tab in the top right corner of your screen:
This will take you to this screen:
Click on the stuff you want to research to start researching it. This will take some time, and will cost a small amount of dirt.

For now, you should research "Basic Farming", as it will give you access to farms for growing crops. After you have researched Basic Farming, you should start research on one of the following:
- Meal Preperation (More compact farms)
- Advanced Research (Important for later)
- Sanitation (Will be useful later)

While you are waiting for Basic Farming to be completed, you should dig out room for your farms, as to not waste time.
Farms
Once you have researched Basic Farming, you can now go into the food tab where you will find the Planter Box. Place a bunch of these in the room you dug out.

For now, the only plants you have access to are Mealwood and Bristle Blossom. You should have found some seeds by now (You sometimes find seeds in the "cracked" tiles), but if you do not have any, you can use the dig tool on plants found nearby to uproot them, which will grant seeds. Click on the planter box to see which seeds you have available, then click on whatever plant you want to grow, and press the "plant" button.


Mealwood will provide a decent amount of food at the cost of dirt - which should be plentiful, while Bristle Blossom provides a large amount of food, but consumes water, which is a pretty important resource. Bristle blossom also requires light, so you will have to research "Interior Decor" if you want those.
Which one you choose is up to you, though it should be said that mealwood is the easiest one to farm.

New Printables are available
Once you get the notification that new printables are available (Will happen during cycle 3, and every 3 cycles from then on), click on your printing pod (Which should have this cool animation going), then click on the "Choose Blueprint" button. This will take you to a screen that looks a bit like when you chose your starter duplicants.
For now, taking more duplicants isn't actually the best idea, as it means you will need more food, oxygen and whatnot. You can however take a duplicant if they have interrest in farming (If you do not have one with an interrest in farming already), though be vary of bad traits.
If you can choose a food item, that will be the best choice for now.
Skill points
At some point, one of your duplicants will gain a skill point. You will get a notification about this, in the upper left corner of your screen.

Once this happens, click on the "Skills" button, which will take you to this screen:
When your researcher gets a skill point, it should be used to get the "Advanced Research" Skill, as this will make them research stuff faster, and will also enable them to research higher tiers of research.
When your digger gets a skill point, it should be spent on the "Hard Digging" skill, which enables them to dig tougher tiles, such as granite.
If you have a duplicant that is dedicated to farming, it may be a good idea to spend their skill point "Grilling" skill, so you can use electric grills once you get those.

Your duplicants will get more skill points over time, which should mostly be spent on higher tiers of whatever skills you spent their first skill points on.

When your duplicants learn a skill, you may notice that their "Morale Need" goes up. For now, this shouldn't be a problem, but as they get more skills, their morale need will continue to rise. Duplicants get higher morale the better their life is, which comes in the form of better food, better personal stuff (Beds, tables, entertainment) and so on.
What's next?
Now that you have gotten all of the important stuff out of the way, it's time to expand your base and explore the nearby biomes, or just time for more research.
Which one you do first is up to you.
Advanced Research
As you have probably noticed by now, there's some research that requires another type of research points:
To conduct research that requires Advanced Research Points, you will need a super computer, which can be found in the station tab. You will need to research "Advanced Research" before you can make one, however, so if you haven't already researched that, now is the time to do.

Having access to advanced research will be very helpful for when you need to explore other biomes, as well as when you want to upgrade your base.
The Super Computer uses a lot of water, though, so don't research everything right away.
Expanding your base
While you have set up the basic necessities, this won't work in the long-term. Expanding your base and constructing more useful rooms is key to long-term survival. For now, the best course of action would be to construct some basic rooms which will make your duplicants work more efficiently.
You can enable the room overlay to check if the rooms you make fulfill the requirements to be considered a specific room type, which may improve their efficiency.
For a room to count as a room, it has to be enclosed by tiles and doors.

Kitchen
Making a room dedicated to preparing food is a good idea, especially if you place it near your farms, as to cut down on travel time. You will have to research "Meal Preperation", if you haven't already, to gain access to the Electric Grill. Placing a ration box may is also an option, just remember to click on it and choose what types of food should go in it.
Preparing food will increase the amount of kcal's it gives, which means you will need to grow less plants to feed your duplicants.

Barracks
Every duplicant needs to sleep, and the best way to sleep is in a bed. Make a room and place some cots in it, preferably the same number, or more, than the amount of duplicants you have.

Mess hall
Duplicants enjoy being together, and so making a room dedicated to food-consumption is a great way to alleviate this need.
Place down a few mess tables ("Meal Preperation" research required) to make one.
You can even upgrade it to a great hall if you place a water cooler and a decorative plant inside (Requires "Employment" and "Interior decor" Research)
A great hall needs to be at least 32 tiles big, while a mess hall can be much smaller

CO2 Pit
As your duplicants inhale, they also exhale. CO2.
For now, you don't have any ways to deal with it, so digging a pit and letting it accumulate there is the best option.

Storage room
Constructing a storage room can be a good idea, as it will make sure your duplicants won't have to run around picking up small amounts of material when building stuff. It will also reduce the amount of junk on the ground, making your duplicants a bit happier.
It's also simple to make: Just a room with a bunch of Storage bins in it. When you have made it, click on each storage bin and select which materials it should store.

Washroom
The washroom is an upgrade to the latrine. By using lavatories instead of outhouses, and sinks instead of wash basins, your duplicants will save a lot of time. As an added bonus, duplicants will get a morale boost.
The easiest (and best) way to make a functioning washroom is to make a water loop. By connecting the outputs of the lavatories and sinks to a water sieve input, then connecting the water sieve output to a liquid bridge, that connects to the lavatory and sink inputs, you can use the same water, which will be cleansed each time it loops.
The liquid is important, as the water loop will actually produce a bit of water each time it loops. By using the bridge, we can make a water runoff, to prevent the pipe from clogging.
Remember to have the water sieve in a seperate room to get the morale bonus.
The temporary pipe can be deconstructed after you have added some water to your loop to get it going

The room overlay
By clicking on the room overlay, you can check what requirements each room has, what benefits they give, and what type of room your rooms are.
Exploring the nearby area
By now, you have probably noticed some other biomes some distance away from your base. These biomes contain other resources than your starter biome, and some are incredibly useful.
You will need a duplicant with the "Hard Digging" skill to breach the granite barrier seperating the biomes from each other.

The Swamp

The Swamp is one of the biomes found near your starter biome. It contains mostly polluted oxygen, slime and a great deal of algae, as well as sedimentary rock and gold.
Plantlife include Thumble Reed and Dusk cap, and pufts, flying yellow creatures, can be found here as well. In it's many polluted water resevoirs you can sometimes find pacu, a very tasty fish.
At a glance, it looks like a peaceful biome, however, if you press the germ overlay (Found in the upper right corner of your screen), you will see that it is full of slimelung germs!
While not lethal, should your duplicants be infected, they will be a lot less efficient, which could very well be the downfall of your base.
Proceed with caution, and skip ahead to the "Swamp" section of the guide if you wish to enter this biome.

The Jungle

Filled with hydrogen and chlorine, the jungle is not a place you should go unprepared. It's home to the pincha peppernut, balm lily and the Mirth leaf, as well as drecko's. Exploration into this biome should take into consideration the unbreathable gasses.
Proceed with caution, and skip ahead to the "Jungle" section of this guide if you wish to explore this biome.
The Swamp
The swamp is one of the first biomes you should explore, as there's usually a few of them nearby, and they contain many useful resources, such as thumble reed and algae.

Preperation
Before you enter the swamp biome, having these researches completed will help a lot:
- Decontamination

Entering the swamp
Entering the swamp might sound easy: Just dig into it.
However, the swamp contains a lot of slimelung germs, which you don't want into your base.
There's a few ways to prevent the germs from entering your base, but these are the 2 easiest, and most effective, ways to do so:

Decontamination
By placing a wash basin along with some deodorizers at the entrance to the swamp, you will somewhat reduce the amount of slimelung that enters your base. Duplicants may still get sick, though, and polluted oxygen may slip through, which could cause a major outbreak of slimelung to happen. Placing a manual airlock may also help.


Waterlock
By making the only way in and out of the swamp a trip through a water basin, you will effectively stop any slimelung from entering your base. Duplicants may still get sick, though you shouldn't be at any risk of major outbreaks.
Waterlocks are by far one of the best ways to make sure you don't get any slimelung germs into your base.

Other ways to reduce risk of slimelung infection
Here's a list of ways to reduce the risk of slimelung infection:
  • Try to not dig any slime tiles, as this will release large amounts of slimelung into the air.
  • Use deodorizers to purify the polluted oxygen inside the biome.
  • Trap any morbs you find in an enclosed space (Or kill them)

Resources
The main resources of the swamp include Thimble Reed, algae and gold.
Thimble reed is a very useful material, used to make protective suits, as well as fine decoration items.
Thimble reed, however, requires a lot of polluted water to grow when domesticated, so leaving wild plants may be the best option, even if it is slower than if you grew them yourself.
Storing slime
While digging the slime may result in more slimelung, it may be worth it anyway, as slime can either be used to grow dusk caps, a consumable plant found in the swamp, or turned into algae and polluted water, both useful resources. However, if slime is left on the ground, it will slowly turn into polluted oxygen. A simple trick is to simply make a storage container in a body of water, as this will cause the slime to not be able to evaporate.
You can then use it to grow dusk caps, or turn it into algae using algae distillers (Requires "Distillation" Research)

Turning slime into algae & plumbing
If you wish to turn slime into algae, and place down an algae distiller, you probably noticed by now, that it needs a liquid pipe attached to it. Pipes are one of the easiest ways to transport liquids, and it is required for some buildings that produce liquids to work, such as the algae distiller that produces polluted water.
Liquids will enter pipes via the green outputs, then go towards a white input. So, for an algae distiller to work, you will have to connect the green output of the distiller with any white input that accepts polluted water.
The easiest one is a Liquid vent. You can use this to make a polluted water resevoir for later use. Or, if you have access to a water sieve, you can run the pipe through it and convert the polluted water into clean water.
An algae distiller can be used to feed a thimble reed farm, using pipes and hydroponic farms
The Jungle
One of the first biomes you discover, the jungle is home to many useful resources, though they are a lot harder to use than those found in other biomes. It is recommended that you get exosuits or oxygen masks. Though they are not required, it will make it a lot easier for your duplicants to get work done inside the jungle.

Preventing Gas from entering your base
The Jungle contains two unbreathable gasses, and while your duplicants can just hold their breath, it would be preferred if the gasses stayed in the jungle, and didn't enter your base, as it could potentially fill up sections of your base, making them much harder to use for your duplicants.

Waterlock
By constructing a waterlock, you can prevent any of the jungle gasses from entering your base. Simply make the entrance to the jungle in a body of water, either by using a naturally occuring one, or by making one yourself. This way, the gasses cannot enter the base, but your duplicants can walk through.

Avoiding the gas
An alternative to the waterlock is to simply never interact with the gas.
Dig around the biome in a way that lets you avoid the gasses, and you won't have to worry about them. While this means you won't be able to make use of the plants and animals found in the jungle, you can use this approach to simply carve a path through the jungle, letting you check if there's any other biomes worth exploring on the other side.
Optimization: Priorities
If it haven't happened yet, it will happen: Your duplicants seem inefficient, they take long time to complete tasks and barely anything gets done.
This is usually caused by the colony growing big and more machines and stuff being needed. Your duplicants may simply have too many tasks, or they spend a long amount of time travelling between locations.
To combat this, there's a few things you can do:
Priorities
you probably already noticed this tab: The priorities tab. Here you can change what kind of tasks each duplicant should prioritise. By making one duplicant prioritise farming, your other duplicants won't have to do so, meaning they get more time to do other tasks. You can even make them ignore certain tasks altogether.
Left-clicking will make the task a higher priority, while right-clicking will make it lower

Better power supply
While it is fun to watch your duplicants using the manual generator, it takes a lot of time. By making a coal generator, you can free up time for other tasks. Just be aware of it's CO2 production, which will slowly fill your base with CO2. If the CO2 becomes a problem, you can place a Carbon Skimmer near it to deal with the CO2. Digging a pit and placing a carbon skimmer at the bottom also works.

Better food
By clicking on the "Consumables" button, you can choose what types of food your duplicants are allowed to eat. This way, you can disallow eating of ingredients, which means you can cook them at the electrical grill before a hungry duplicant uses them as their next meal. Cooked food usually gives more calories, so you won't have to produce as much food. It also gives a higher morale.

More Duplicants
If you still have only 3 duplicants, you may want to consider printing more. While you don't want to print too many, especially at the start, you will need more duplicants as time goes on.
Morale and stress
For now, if you've made a few of the suggested rooms and made sure your duplicants have a good time, you shouldn't have had problems with stress for now. However, as your duplicants get more skilled, they become more stressed, unless they get more luxery items and whatnot.
Morale
Morale is by far the most important aspect of stress. Having a high morale will reduce your duplicant's stress, while having a low morale will increase it.
By going to the skill tab, you can see how much morale each duplicant has, and how much they need.
Duplicants also gain or lose stress based on other factors, such as temperature, whether or not they are wet and such. The easiest way to reduce stress is by having a high morale.

Stress reactions and overjoyed reactions
When a duplicant becomes too stressed (reaches 100% stress), they will perform their stress reaction. There's a few different stress reactions, but each one can be fatal for your colony. Not only does the stressed duplicant not perform any tasks for the duration, they also make other dupliucants more stressed, or even worse: destroy progress on your base by various means. One duplicant being stressed out can quickly lead to the downfall of a colony if not dealt with swiftly.

There's 5 types of stress reactions in the game:

Vomiter
Duplicants with the vomiter trait vomits all over the place when stressed out, creating polluted water. Other duplicants may then step in this water and become more stressed as a result. Not only that, the polluted water may end up in your water resevoir, potentially infecting it with food poisoning.
When vomiting, the duplicant will also lose calories, which can be fatal. Other duplicants will gain a lot of stress if one of your duplicants die, so this can spiral out of control very, very quickly.

Ugly Crier
Ugly criers will cry when stressed. This will reduce decor around them, which will cause morale to drop for your other duplicants.


Destructive
Destructive duplicants will damage machines and other stuff around them when stressed. This can quickly spiral out of control if they damage something important. Destructive duplicants won't repair buildings when they are above 60% stress.


Binge Eater
Binge eaters will eat a ton of food if they become stressed. While this won't be too much of a problem if you have plenty of food, it can be fatal if you don't have much.

Banshee
Banshee's will scream when stressed.

Stress kills
Stress is one of the fastest ways your colony can die. Managing stress is important, and left untreated it can make quick work of all of your duplicants.


Overjoyed Reactions
Now something much more uplifting: Overjoyed reactions.
Sometimes, if your duplicants have a very high morale, they may become overjoyed. This may increase their productivity or give other benefits.

Balloon artist
Balloon artists will hand out balloons when overjoyed, giving a huge amount of stats to other duplicants, making them much more effective.

Sparkle Streaker
Sparkle streakers gain 8 atheltics, making them very fast, and causing nearby duplicants to gain 5 athletics.

Super Productive
When a duplicant is super productive, they may sometimes perform a task instantly.

Sticker Bomber
Duplicants with the Sticker Bomber overjoy response will put stickers around your colony. This increases decor, which could potentially lead to other duplicants becoming overjoyed.

Jodeler
Jodeler's sing.
What now?
Now that you have successfully survived the early game, it's time ... for what?
Well, that's for you to decide. You can use another guide to navigate through the mid-game, though you can also just try for yourself.
Research, explore, upgrade your colony.
But most importantly.
Have fun.


https://steamcommunity.com/sharedfiles/filedetails/?id=2816839377
23 kommentarer
scsimodem 11 maj, 2024 @ 9:16 
I've tried to get this game started about 5 times now and NEVER KNEW about the room bonuses. This game needs a tutorial. All that to say that this is huge. Assuming I remember to, I'll let you know how this next one goes.
BWheatley 10 jul, 2023 @ 7:52 
I'm still on the struggle bus so thanks for writing this. I'm not giving up yet.
kroun  [skapare] 2 feb, 2023 @ 8:59 
Thanks Shieldflyer!
It's nice seeing a non-new player who thinks this is a good guide.
I really appriciate it.
Shieldflyer 2 feb, 2023 @ 7:47 
@kroun
As a more advanced player I must say this is a great guide. This is the perfect starting point for new players as you cover the basic early game things that the game does not tell you.

To the comments about "no advanced stuff" and "can be better". Just ignore them. You made this for new players, not players that want everything super optimized while getting every advancement and having thousands of dupes. If they want guides for that they can make them.
yoyourdead11 22 dec, 2022 @ 14:59 
this giude helped me a lot
kroun  [skapare] 15 dec, 2022 @ 7:25 
1mbalanced, the runoff works by using the bridge as a way to choose where the water goes first.
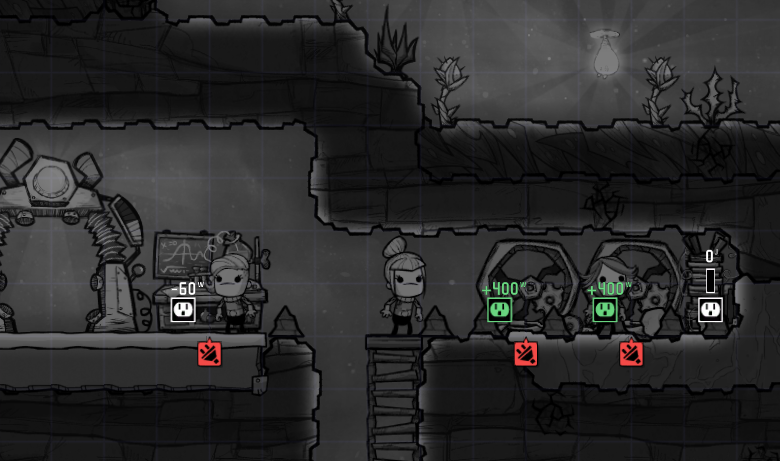
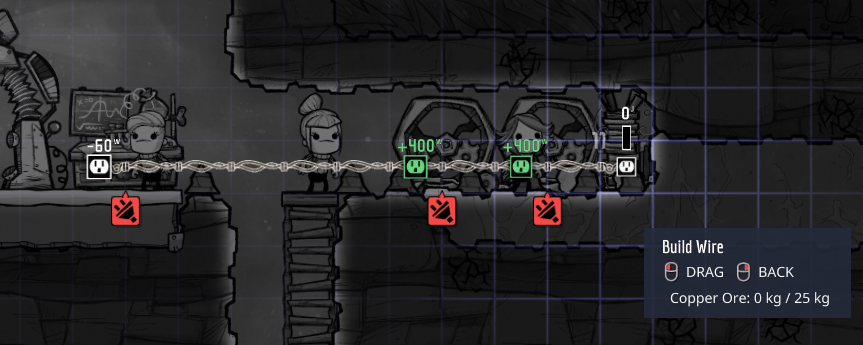
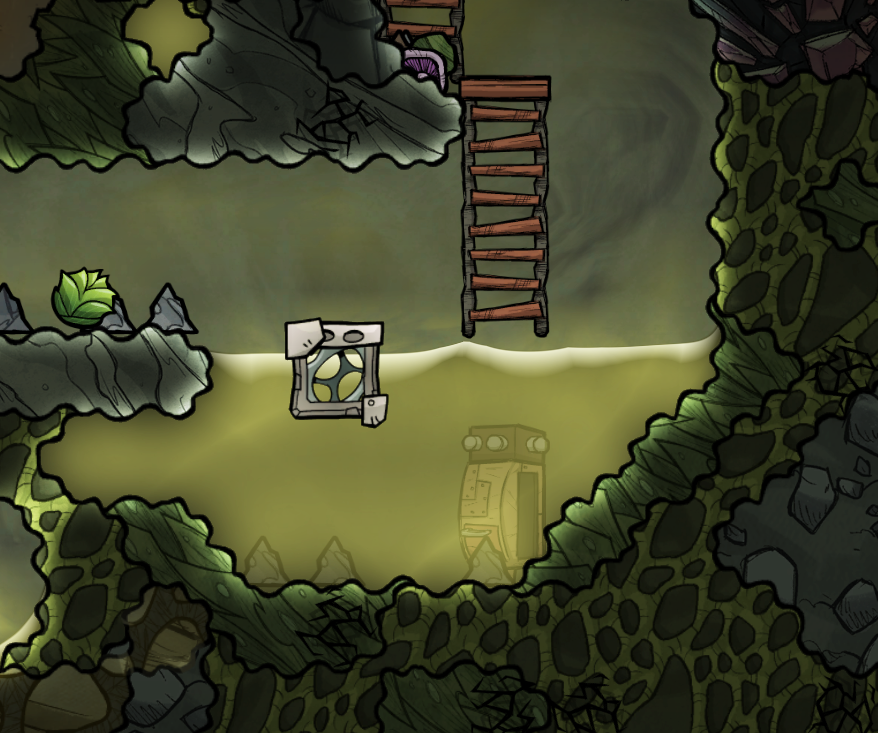
Liquids will always choose to go into a bridge before doing anything else, granted the bridge leads to somewhere the water can then run off / be consumed.

Check if you placed the bridge in the right direction (The white and green input/output arrows).
You could also add me as a friend on steam and send a picture of your liquid overlay, that way I'd be able to tell exactly what the problem is.
1mbalanced 14 dec, 2022 @ 12:04 
Hi there, i dont get it with water bridge runoff. How actually it works? I bulid the same scheme and the clear water from sieve just flow thru this bridge, but not flowing into WCs and sinks, loop is not working
Entropos 10 dec, 2022 @ 3:53 
This is very good, and I learned a few things. However, I do disagree with one facit.

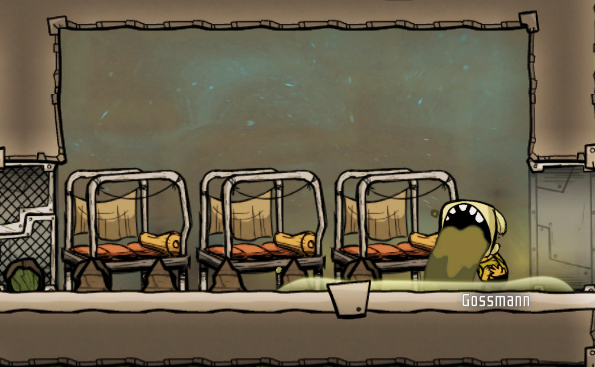
I don't think the "Loud Sleeper" is a major problem.

Assign the cot closest to the door to a loud sleeper, and leave an empty 2x2 space (with or without a cot) between them and everyone else, and it's a complete non issue.

By the time to get to 4-6 duplicants, it makes sense to set up shifts and then someone *can* sleep in the cot next to the loud sleeper - you just put them on a different shift.


It's probably the *least* impacting of all the negatives, in my opinion. It can be entirely mitigated by digging an extra 2x2 space (with or without a cot) during the first two cycles.
Redwing 16 aug, 2022 @ 13:34 
thanks! :steamthumbsup:
WickedIggy 10 aug, 2022 @ 7:59 
The guide was awesome and thank you so much for taken the time to write it. Really has been helping me out a ton! :steamhappy: