Kerbal Space Program

Kerbal Space Program

28 ratings
Helicopter Rotors - Assembly and Programming
By GunsForBucks
An illustrated guide on how to build, place and program helicopter rotor assemblies.

I worked out a method that works for me. I never looked anything up and just figured out my own way to do things.
Although it may not seem "elegant" in how I control them.. it provides a very predictable and stable flying craft.

   
Award
Favorite
Favorited
Unfavorite
Forward
KEEPING IT SIMPLE

There are a lot of steps but I want to try to illustrate things as simply as possible so I will show building an "assembly package" and programming it.

Once you get the idea though it can be applied to larger and more complex craft, but other than understanding some basics of build order it shouldn't be an issue to expand on the concepts.

THINGS TO NOTE

When making the guide I mostly used pictures from a game save with Kerbal experience off.
This game setting allows all SAS function on all craft. Default game settings the rover box does not have a radial out setting. You can add an AI core or build on a different one.. also a pilot of 2 stars has the radial out function. I kind of like the MKII AI core as it has lobes you can put lights and stuff on.

Everything in this guide is based on an unmodded game. I do have both DLC but do not run any mods.

I don't know how other people do things. What I have put in the guide is what I was able to figure out on my own. I have never seen other people play this game, never watched a youtube or anything like that. There may be easier ways to do things I don't know about.

What I do know is ... this works!
BUILD ORDER
Important things to keep in mind when building and programming

1. Never clone a programmed item.
This often leads to programming being lost and having to reprogram everything. A simple helicopter is not a big issue but if you get into more complex robotics it can be a real kick in the pants to lose hours of work and tweaking.

2. Always clone things properly by using Alt and mouse click.
I think some youtubers use removal and Ctrl Z to clone but that can lead to excess ram usage and game instability. Never clone that way... that is the Undo command. Anything you pick off that way should be deleted and not used. People have picked up bad habits from Youtubers there.

3. <suggested> Launch and recover craft before programming.
This isn't needed on smaller and/or simple craft but if you have done a lot of cloning and have multiple robotics assemblies it really is best to "get it all straight" by launching it and recovering it.

A few times I have programmed things only to find it didn't work right after launching. I think launching and reloading the craft sets everything up properly and insures the programming is correct on all the parts.

4. Be methodical in your approach. Take the extra time to do things in a straight forward manner rather than take short cuts that may bite you later.

For example the KAL - 1000 controller unit. Even if I know I will need 2 of them I will only place one at a time. I want the game to see them as individual items. I don't want to give the game any excuse to get "confused" on the programming or lose it. Since doing things like this I have never lost programming even transferring complex robotics between games.

So if something goes wrong think of the method used to build it... try different methods until you find one that works and stick to it.
Rotor Assembly
Place rotor on level surface.


Right click motor for window and set number of nodes desired. Default is 2 but I often use 3 for smaller 4 for larger.


In the lower left set placement mode for number of nodes.

Select helicopter blade. Note what end its attachment node is on. Bring blade in next to rotor and let blades "snap" on the rotor... click to place them.

Right click blade for window.
Deploy Blades.

So that is one rotor assembly built.

Now to clone it.

Change blade deploy direction and rotate.

Rotors do not need to be stacked like this. This is just an easy method to make sure they are balanced, aligned and the motor torque is cancelled out.

Move motors into position. Easiest method to me is just to stack them.

That is all there is to building a stable rotor assembly. Allowing the blades to snap mount and the adjustments done will make programming them a lot more simple.

Programming
Place a KAL-1000 controller.
1. Right click controller to open window.
2. Click "Open Editor" button.
3. In Editor window click "Action Groups" button.


4. Click motor.
Motor will highlight blue.
5. In action group window click on RPM and Torque to move them to center Controller Fields column.
Items in center Controller Fields column will show up in Editor window.

6. Click on Controller Field in Editor to expand.
7. Click on dot to move.
Drag dot on right to maximum.
Default will be a curve, click icon in window to snap a straight line.

Optional - Name change in editor to keep track of controllers.

At this point I will also name the craft and save it. Just to close the windows and get a clean save of that programming.

Place second KAL-1000 Controller
Open in same manner as first controller to get action groups up.
Click on Blades.
Blades placed in a set will all turn blue.
Assign Deploy Angle to center Controller Fields column of action groups.
Program and Rename in same fashion as motors.
-Reminder- Click on Controller Field in Editor to open, click on dot to move.
For Blades Controller you want the default position to be in the middle.
HOW TO FLY
At Launch

Set Throttle

Click on tab in upper right to monitor your electric level.

Right click and pin Motor and Blade controllers.


Verify Blade controller is at mid point and move Motor controller to the right. Go to max and let it wind up to full speed and check charging rate. If you are losing power back off on motor controller until you have minimum charging.

This will be your maximum throttle setting. If needed add more charging, you don't need it maxed but you don't want it less than 85%.


Check minimum lift setting

Turn on SAS

Make sure you have a blue navball or set orientation for "Up".

Check Speed mode is surface. <should be by default>

Set SAS mode to "Radial Out"

The combination of Speed on Surface mode and SAS in Radial Out will ensure the craft will always want to remain upright. For lack of a better term I will refer to this as "Autopilot Mode".

https://steamcommunity.com/sharedfiles/filedetails/?id=2784329035

Autopilot Mode

Move blade controller to the right one tick and check if it can fly. Keep going until you determine how your design will be carried. Very small craft may float at one tick but it may take more.
Assuming center is 2.5 then 2.6 may cause you to go up or it may be a slow fall. You want to determine what your minimum up setting is for your load. This will determine your minimum landing speed.


For low speed / high control you want to use only blade pitch controller to go up and down.
Tap WSAD to move around.
Do not mess with your throttle setting once you have a good spot for it. It can be nice to fine tune a hover but you don't want to mess around too much with it.

Manual Mode

This mode is best used for high speed travel.

Turn SAS on default "Hold"

There is an odd characteristic where if you are at full "lift" the craft will not want to hold a tilt angle.

In order to tilt craft forward for forward motion it can be difficult especially on larger craft.

The solution I found was to first gain some altitude. Have the blade setting a couple of ticks of lift only and tilt forward. The helicopter will stay tilted and accelerate diving into it. Watch the navball or altimeter gauge while you increase the blade lift. Increase blade lift just enough to keep you level or slightly gaining altitude.

So basically the "trick" here is to tilt first then apply the "lift" while it is tilted forward.

If you do it the other way around it will often just not hold the tilt angle.. the only exception I have found were on tiny helicopters with large reaction wheels that could force the issue.

There are limits depending on craft design but this method will get the most out of what you have.
You shouldn't expect too much unless you have jet assist. If you do use a jet system be aware the blades will act as lift. If you go too fast you should neutral your blade pitch to 2.5, the middle setting.
Power Supply Options
LIQUID FUEL
Using the turbo prop engines you can run a helicopter off of liquid fuel.
This is probably the lowest tech level helicopter you can make.

FUEL CONVERTERS
Using electric motors but using liquid fuel and oxidizer for electric generation.
This set up is very fuel efficient. Two small converters can handle two small rotor assemblies.

STANDARD ELECTRIC
Electric charging done with solar panels or nukes,
The advantage of nukes is they will supply power in darkness without running out ever.
For me nukes are the preferred method once I have the tech level up for any size helicopter or robotic device.
I'VE FALLEN AND I CAN'T GET UP
WARNING

IF YOU TILT TOO FAR OR FLIP, THE BLADES GET STUPID

The helicopter blades are set up to auto control pitch, tilt and yaw.
I am not sure if this is a factor or if the game is trying to simulate a "stall" type condition, either way if you tilt or flip the helicopter you lose lift from the air.

You can recover from this.

What you want to do is put it on Radial Out for autopilot mode as described earlier in the guide.
Then use the blade controller and go far left with it.
Basically the idea is to accelerate down to "catch" the air, once you gain air "traction" then move blade controller back to the right for lift.
This is also the method used to "catch" the air during a reentry from orbit.
Wrap up
That is it for the guide, thanks for checking it out!

Hope it helps. If you think I left anything out, or just want to say hi, please leave a comment.

I tried to put in a lot of text as well as the text on pictures to help if people want to translate for another language. Although I have marked the guide as English I hope the pictures and text will be helpful for as many people as possible.
7 Comments
GunsForBucks  [author] Jun 3, 2024 @ 12:25pm 
Just for clarity... normal snap is accomplished by holding left Alt.

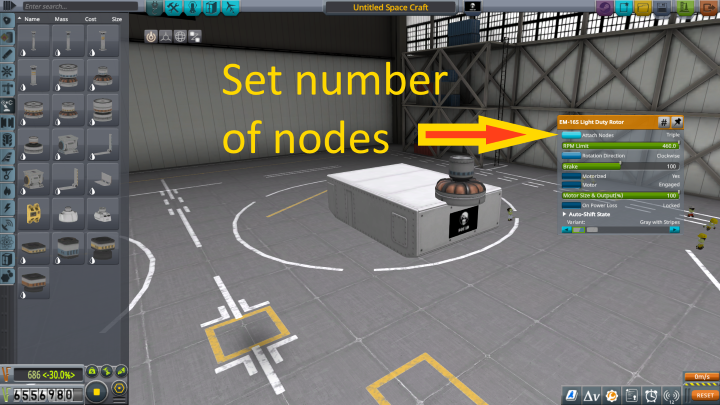
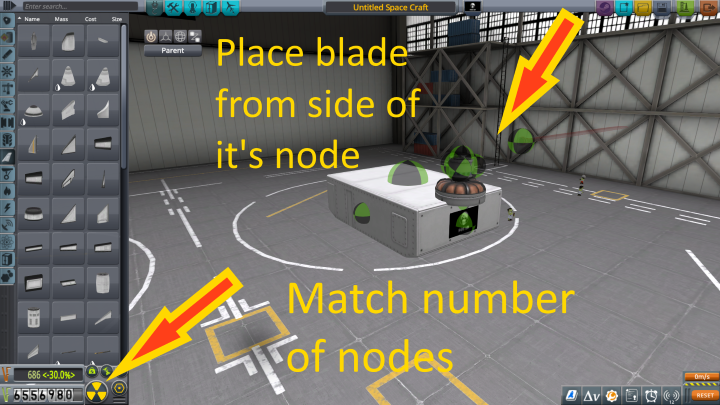
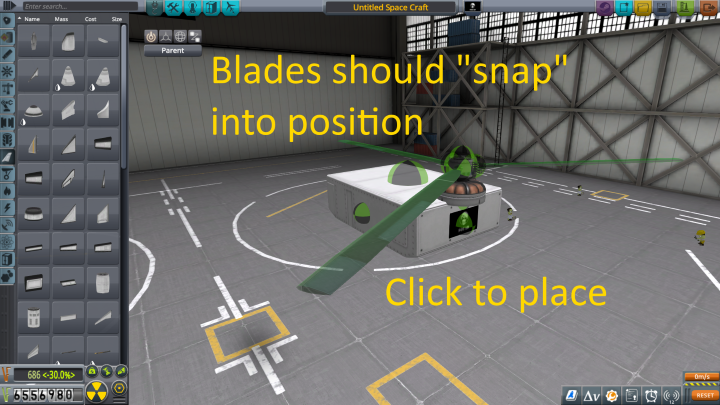
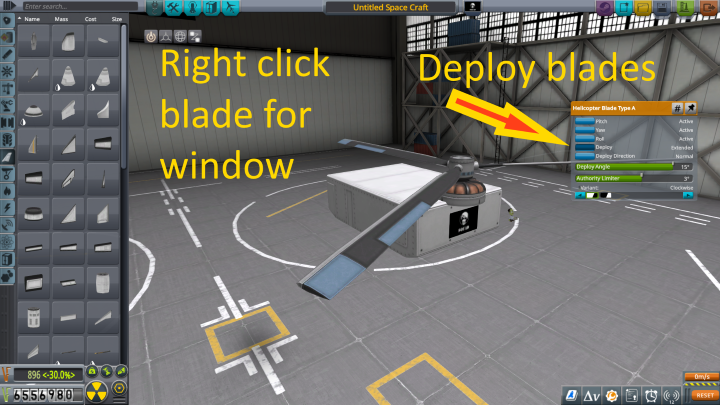
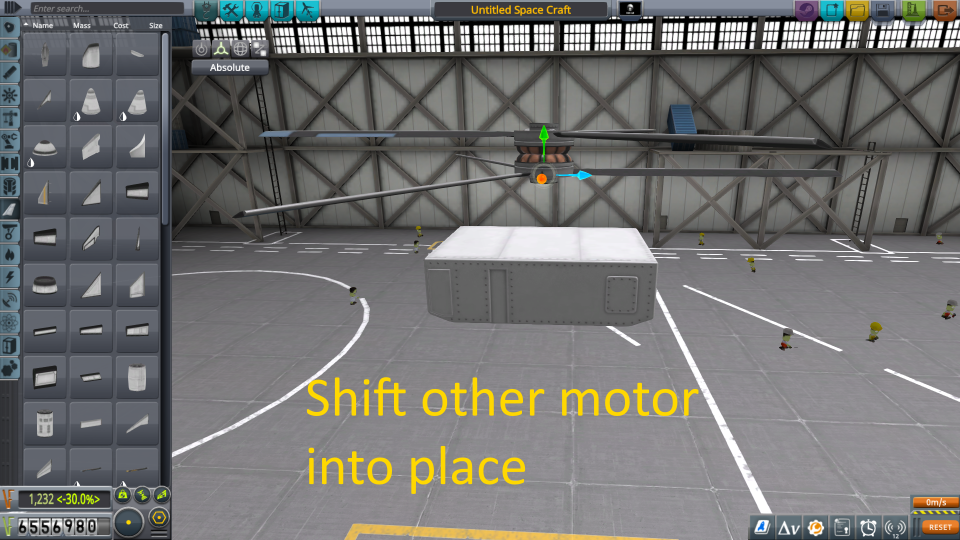
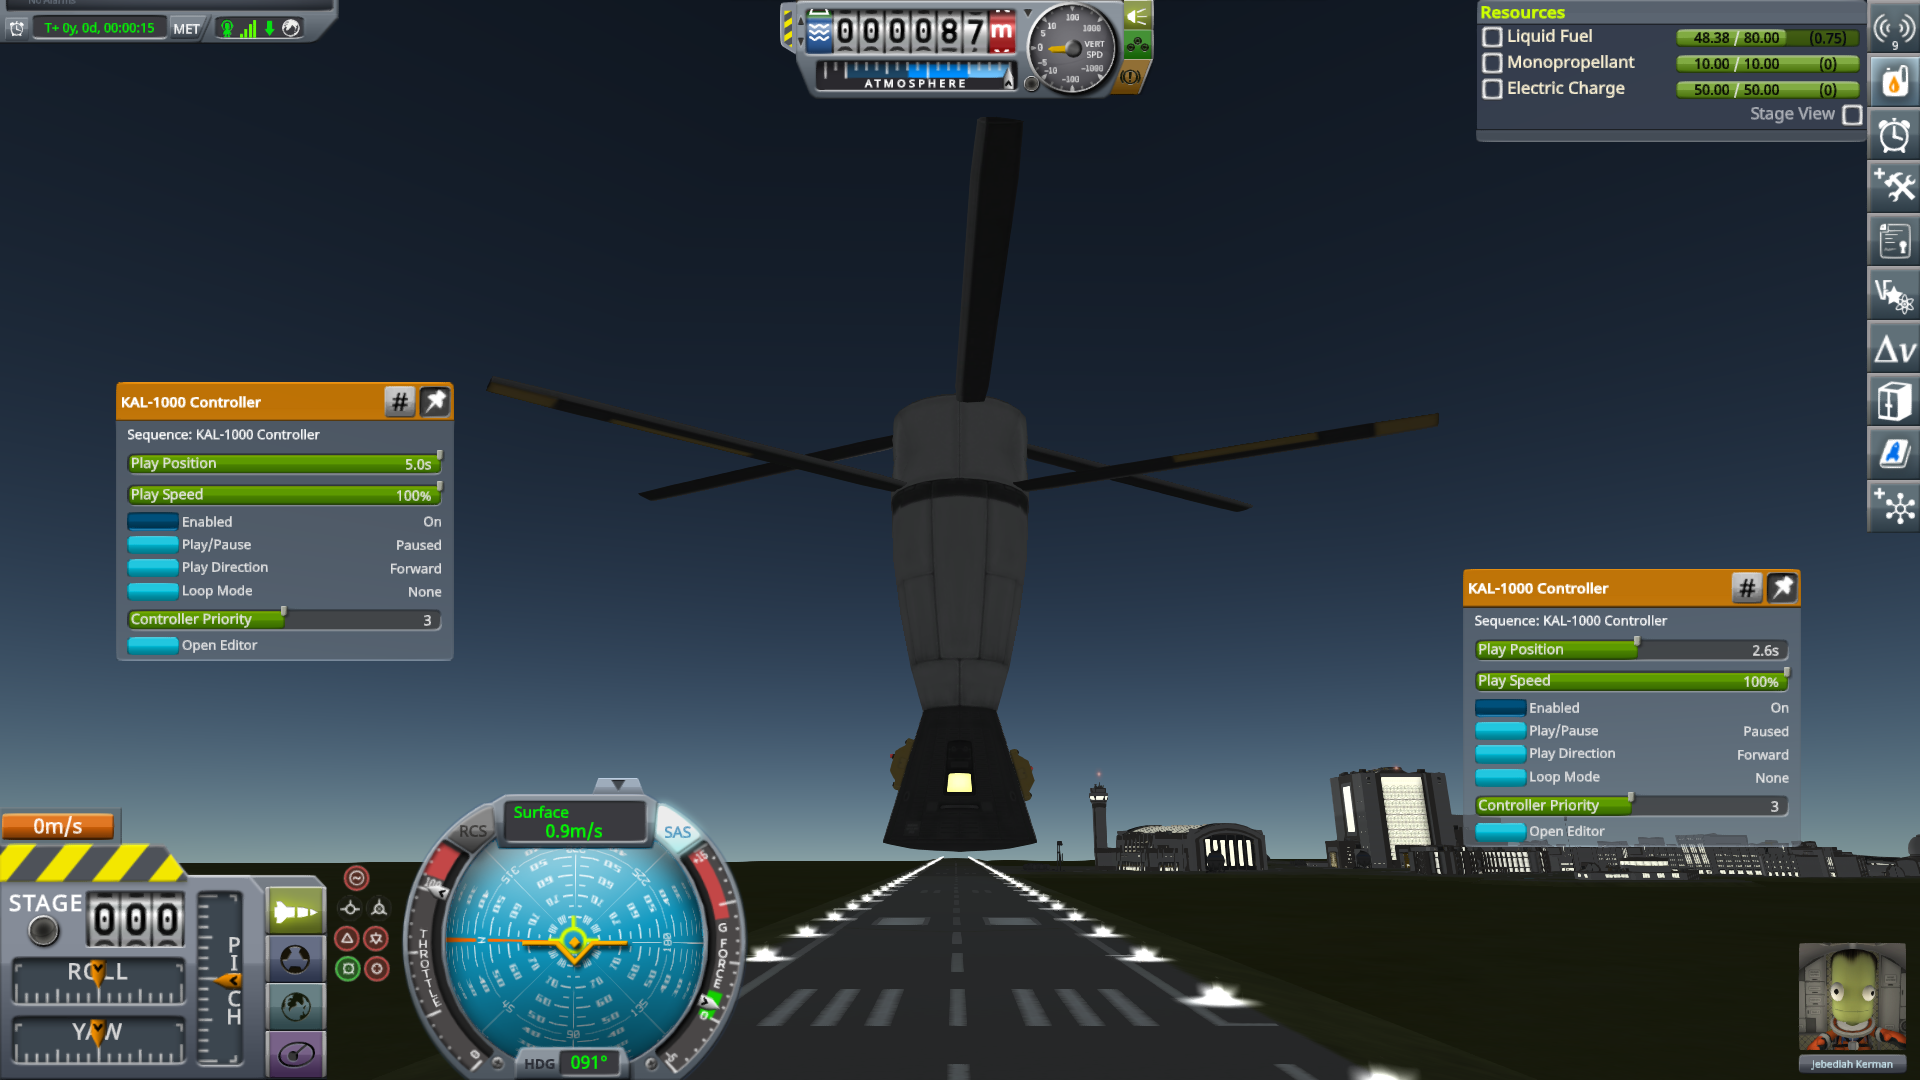
The "snap" for the blades works without holding Alt. You just need to align the green dot end toward the rotor and move it next to it. <place the blade from its node end pic> you know when to click to put them down when they show up in the set selected ghosted.

It works best for me placing the rotor facing up and placing them. If they are forward the snap might be weird or something. You can always rotate the motor to propeller mode <fwd/rev> after you place the blades.
Hope that helps.
Anti-Mustard Jun 1, 2024 @ 4:12pm 
The game doesn't allow me to snap blades to the sides for some reason. I'm trying to snap it in the normal way but there isn't any snap, So is it the game or Am I just bad a placing blades?
GunsForBucks  [author] Apr 7, 2022 @ 8:31pm 
Yes it is part of the DLC that added robotics. Breaking Ground.
Cubic Apr 7, 2022 @ 7:46pm 
Uh, yeah I don't have that build tab at all where the rotors are. Is that part of the breaking ground expansion or something? I was excited to try out rotors since I haven't played in quite a while, thinking they were added recently but I guess not.
GunsForBucks  [author] Apr 3, 2022 @ 11:37am 
Had a good think about your issue and I'll take a stab in the dark. My guess is that the pitch roll and yaw stuff means it has to know what way is "up".

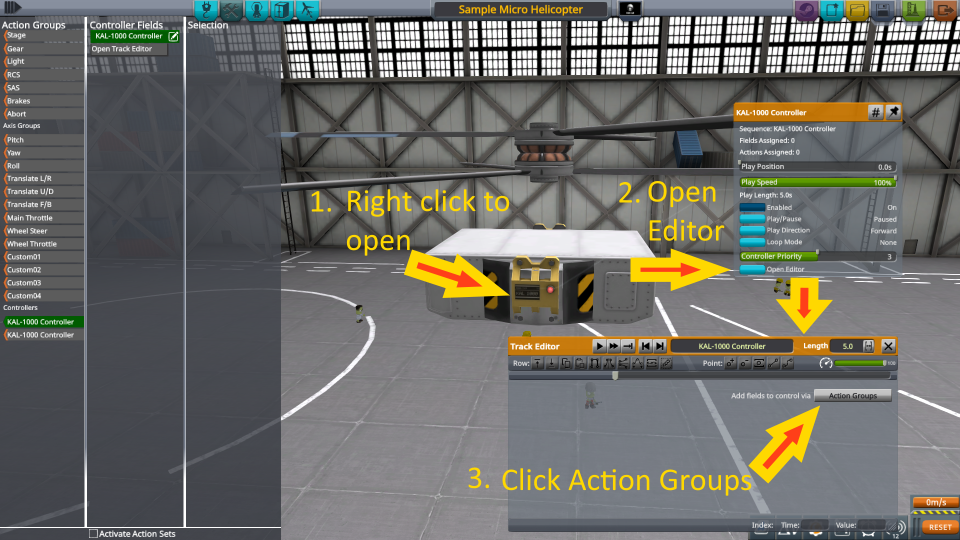
If you tilt too much it gets confused... my guess is one of your rotors is losing it and causing the uneven torque issue.
GunsForBucks  [author] Apr 3, 2022 @ 11:02am 
Take a screenshot of it and I'll check it out. I've made plenty of quad copters but never mapped the controls that way. They always seemed to fly fine as I describe flying in the guide.

As mentioned in the I've fallen and can't get up section I think the pitch and roll stuff gets dumb if you tilt too far. Entering auto-pilot as described above and catching the air again is the only solution I have found when it gets out of control.
8cto Apr 3, 2022 @ 10:26am 
Hi. I've made a quadcopter and I want some help. I've mapped the pitch and roll controls to the propeller blades using the KAL-1000, and made the blades counterract spinning and it works fine with SAS, but the thing goes into a death spiral randomly. Checking the aerodynamic overlay doesn't give me any clues, and my best guess it that drag on the propeller blades while it's moving horizontally is causing the problem.