Batman: Arkham City GOTY
632 оценки
100% Achievement Guide: Batman - Arkham City Part 1
От Cynic 0055
This is a comprehensive 100% Achievement guide detailing a step-by-step walkthrough to take you from 0 all the way to 100%. If you are looking for a particular Achievement or Collectible, use Ctrl+F & type it into the search bar for more direct help.

I run support & debug help on all my guides. If you have any questions, problems, or find errors in the guide itself, do not hesitate to leave me a comment & I will get back to you as soon as I am able to. Happy Hunting!
24
5
24
3
6
3
4
3
2
2
   
Награда
Добавяне към любими
В любими
Премахване от любими
Introduction:

Achievement Breakdown: (44)
Story Related: (16)
Side Missions: (10)
Collectibles: (7)
Slay: (2)
Miscellaneous: (2)
Challenges: (7)

DLC – Catwoman Bundle Pack: (6)
Story Related: (2)
Collectibles: (2)
Challenges: (2)


This is Part 1 of 2 for the 100% Achievement Guide: Batman Arkham City. Part 1 only covers our first playthrough & the locations of all 360 Riddler Collectibles as well as Catwoman’s DLC & Collectibles/Challenges. Part 2, linked in the Conclusion of the guide, covers: NG+, Batman’s Physical Challenges, Harley Quinn’s Revenge DLC, & all levels of Riddler’s Revenge for the four playable Characters.

Batman – Arkham City is going to be a true test of your discipline & combat prowess; it is an extremely challenging 100%. For the Perfect Knight – Day Two Achievement, we will have to beat the game once on any Difficulty (Normal or Hard), beat NG+, beat all 12 Side Missions on BOTH the Base Game & NG+, as well as purchasing all Upgrades/Gadgets, finding all 360 of Riddler’s Collectibles, complete all 40 Physical Challenges, & beating all 72 Ranked Challenge Medals & 108 Campaign Challenge Medals of Batman’s difficult Riddler’s Revenge Challenges. Only the Side Missions need to be completed on both playthroughs; the Gadgets/Upgrades & Riddler Collectibles/Challenges, will remain completed & carry over into NG+ fortunately.

As shown above, there is a ludicrous amount of Collectibles to find in the Base Game. Some will only be accessible after beating further into the Main Story & acquiring new Gadgets. To not overload us all at once, I will include the Collectibles locations as they appear & become relevant. While the indoor locations are straightforward to explain, the outdoor locations in Arkham City proper, are not. I will include progress maps of the Collectibles locations to help us out where possible.

For those that want a more independent approach at finding the 360 Collectibles in the Base Game, here is an incredibly useful guide by gamepressure. Its maps follow along with your own in game Collectibles as they are listed. If you are missing Collectible #5 in the Museum, simply scroll through the guide to see the description for Collectible #5. No Collectible is missable, feel free to beat the Main Story & Side Missions first, saving the tedious Collectible hunting until the very end.
https://guides.gamepressure.com/batmanarkhamcity/guide.asp?ID=12887

For those interested, here is an organized list of all the Achievements/Secret Achievements. This is how I derive my Achievement Breakdowns & the first reference I create before I begin my 100% journeys.
https://steamcommunity.com/sharedfiles/filedetails/?id=2773373426

Normally, Batman’s Skins (if you have the Game of the Year Edition) are only accessible on NG+. We can however use the button inputs: Left, Left, Down, Down, Left, Left, Right, Up, Up, Down to unlock them early for our first playthrough. You will know you did it right because an audio cue will play; the inputs need to be done quickly. You need to complete the Main Story Mission – Bruce Wayne Held Hostage before we can do this when we locate our Bat Suit. With the Bat Suit, quit to the Main Menu & input the code; when you go to resume your game a new set of options will appear where we can pick a Skin.

Before You Play! – Game Stutter Fix!: Arkham City has an awful port to PC. No matter how good your PC is, when you are outside in Arkham City proper you will notice severe lag & drop in FPS; it is not as bad in doors. To fix this without mods you will need to go into your Save File settings & change some code around; this is not as hard as it sounds. First, go into the Computer Folder – Documents – WB Games – Batman Arkham City GOTY – BmGame – & Config. In the Config Folder, look for the Configuration Setting File called BmEngine; this will directly affect your Save File so be careful & only change what I list.

In the BmEngine File, press Ctrl+H to bring up the Find Bar; this will allow us to search for things within the BmEngine File. Type poolsize into the “Find what” bar & select “Find Next” to where the Pool Size is located. Set the Pool Size to 4096 (this translates to 4gb & is safest if you are unsure what your VRAM is). Feel free to set it higher if you have more than 4gb of VRAM.

The next step is to type sizeofpermanentobjectpool into the Find bar (if it says it could not find it, change the direction of the search to up instead of down so it searches above where we are located right now). Double the current value from 1160000000000 to 232000000000. Just change the first three numbers, leave all of the 0s. Lastly, we need to adjust the hysteresislimit & set it to 0.

That is the last adjustment we need to do, but do not close out of BmEngine File just yet. Minimize the File, & right click it & bring up the File’s Properties. In Properties, set the Attributes to “Read-only”. If we close the File without doing this, all of our adjustments will not save; set it to read-only to hard save our changes so it will not reset when we close down the File. With that set, close the File & we can begin playing Arkham City as it was intended… don’t ask me why Rock Steady couldn’t Patch this themselves though…

*Guide contains major spoilers.
Sequence 1: A City In Distress
1. Main Story: Catwoman Episode 1 DLC, Bruce Wayne Held Hostage, Rescue Catwoman
2. Side Missions: 1/12
3. Achievements: 5/64
-----------------------------------------------------------------------------------------------------

To unlock NG+ at the end of our first playthrough you must be playing on either Normal or Hard Difficulty. Playing on Easy Difficulty will not unlock NG+ & will waste your playthrough. I strongly suggest playing on Normal. Unless you are a Batman veteran & want a lot of pain & suffering, I would not recommend playing on Hard. You cannot change the Difficulty once you start a game & it will carry over into NG+ which can be very challenging.

Park Row:


Achievement #1 – I’m Batman: Become the Bat.
Story Related. Complete the Prologue Main Mission – Bruce Wayne Held Hostage & collect your Bat Suit & gear at the top of the Ace Chemicals building to unlock the Achievement.


Achievement #2 – Acid Bath: Save the damsel, but is she in distress?
Story Related. Complete the Main Mission – Rescue Catwoman & free her from Two-Face in the Solomon Wayne Courthouse.

Side Mission #1 – Cold Call Killer 1: After we complete the Main Mission – Rescue Catwoman, this Side Mission will now have the random chance to become active. As we explore Arkham City & make our way to find the Joker, keep your ears open for a ringing phone. If you hear one, quickly track it down & answer it to hear Victor Zsasz on the other end… Ring ring.
I found this first phone in Park Row but it can appear anywhere at any time.


Achievement #3 – Saviour: Save the medical volunteers.
Story Related. During the Main Mission – Tracking Down Joker, enter the Church/Medical Center & dispatch the four Thugs that are holding Aaron Cash & some men hostage.

Follow the Joker’s signal through the Industrial District to the Steel Mill to progress the Main Mission, but do not enter it just yet; we can complete some Side Missions before we do...

Industrial District:

Side Mission #2 – A.R. Training Basic 1-4: At the very beginning of the Industrial District a Mission Marker will appear & we will be notified that this Side Mission is now active. Head to the Waypoint & complete all four Gliding Challenges to unlock the very expedious Grapnel Boost. 60% Complete

Side Mission #2 – A.R. Training Advanced 5-8: With the Basic A.R. Training Missions complete we can now access the Advanced Training Missions. Go to the Waypoints, & complete the four Missions. Some of these can be pretty tricky; especially Advanced A.R. Training Mission #1. 100% Complete


Achievement #4 – AR Knight: Complete all 8 Augmented Reality Training Exercises.
We will unlock this Achievement after completing the final Advanced A.R. Training Mission.

Side Mission #1 – Cold Call Killer 2: As we continue exploring, there is a chance that we can hear another phone ringing. Turning on Detective Mode can help you triangulate the phone; it will have orange semi-circles denoting sound emitting from it. Answer the phone & it we will begin this Side Mission in full. We will be spending a lot of time in Arkham City proper later on so don’t worry if it does not appear for you right away; you may find a ringing phone in 1 minute or 15.

After Zsasz hangs up when we answer the phone, we will be timed to quickly locate the next phone. Follow the Waypoint through the city to a random phone location & answer it before the timer runs out. If it does, we will receive a Game Over Screen & be sent back to our last Checkpoint. When you get to the phone, we will need to trace Zsasz’s signal while he talks. We can only trace up to a certain point before progress stops & we will need to locate a new phone. 19% Complete

Park Row:

Side Mission #3 – Acts of Violence: Make your way to the far West corner of Park Row along the Perimeter Wall & we will find a blue hexagonal shape on our World Map. Get to the Waypoint & we can find Jack Ryder being assaulted by Thugs; dispatch the Thugs to save him.

Speaking with Ryan after he is rescued will now unlock instances of Political Prisoners needing to be saved from abusing Thugs. There are 16 instances that we need to do to complete the Side Mission; they will randomly appear as we play the game. This is the other Side Mission that will have different progress per player with random appearances of encounters. If possible, try keeping track of where you have already encountered an Act of Violence to save yourself backtracking at the end of the game; consult the event map for this Side Mission at the end of Sequence #34. 6% Complete

Side Mission #2 – Cold Call Killer 3: Keep exploring & there is a chance that another phone will start ringing. At the next phone, triangulate more of Zsasz’s position to progress the Side Mission. 32% Complete

Amusement Mile:

Side Mission #4 – Fragile Alliance 1: This entire time, over in the Amusement Mile there is a Side Mission on our World Map that just reads “Distress Flare”. Make your way over to it & we will find the flare outside the Krank Co. Toys building. Dispatch the Thugs outside the building & head inside where we can find Bane.

Speak with him to progress the Side Mission & we will have locate & destroy 6 Titan Containers.

Industrial District:

Side Mission #4 – Fragile Alliance 2: We can locate the first Titan Container in the Industrial District. Set a Waypoint to the Marker on your World Map & locate it; use our Explosive Gel to destroy it. 15% Complete

The Bowery:

Side Mission #4 – Fragile Alliance 3: We can locate the second Titan Container in The Bowery. Set a Waypoint to the Marker on your World Map & locate it; use our Explosive Gel to destroy it. These are the only two we can destroy right away, the other four will become available as we progress through the Main Story. 30% Complete

Park Row:

Side Mission #5 – Watcher In the Wings 1: We can begin another Side Mission before progressing the Main Story. Reach the Mysterious Watcher located in the Screenshot & they will draw a symbol on the ground that we must Scan in Detective Mode.


We will need to locate this Watcher at three more locations to complete the Side Mission; his new locations will appear as we progress through the Main Story. 20% Complete


Achievement #5 – Pay Your Respects: A moment of remembrance.
Before we the Main Story, open up your World Map & place a Waypoint over the middle of the word “Building” in Ace Chemicals Building. Navigate to the Waypoint & we will be outside the Monarch Theater. To the right of the theater entrance, is a chain link fence we can climb over that will take us down the aptly named Crime Alley. Follow the alley down & take a left where we can find the chalk outlines of Bruce Wayne’s murdered parents.

Approach the outlines & “Pay Your Respects” to have Batman crouch down & be depressed. Listen to the emotional music score & let the camera slow pan around Batman twice to unlock the Achievement. This takes around 5 minutes to complete...
Sequence 2: A Reunion of Friends
1. Main Story: Track Down Joker, The Steel Mill, Catwoman Episode 2 DLC
2. Side Missions: 1/12
3. Riddler Trophies: 3/247
4. Catwoman Trophies: 12/35
5. Achievements: 8/64
-----------------------------------------------------------------------------------------------------

Steel Mill:


Achievement #6 – Chimney Sweep: There is only one way in.
Story Related. Enter the Steel Mill through the chimney & make your way out of the furnace room. The Achievement will unlock when we enter the Loading Bay full of Thugs through the crawl space.


Achievement #7 – One-Armed Bandit: Hammer the point home.
Story Related. After collecting the Remote Electrical Charge Gadget, return to the Loading Bay & take out the Mister Hammer Mini-Boss to unlock the Achievement.

Park Row – Catwoman:
Complete the Main Mission – The Steel Mill & we will then get to play Catwoman’s next DLC Mission. Complete the first Objective of the DLC Mission & collect Catwoman’s belongings from her apartment. After that, we can quickly go around & snag her a few of her Trophies scattered around Arkham City to get them out of the way.


Catwoman Trophy #1: Climb out of the cage covering Catwoman’s Apartment & look down into the square alley directly below/South of her building. Drop into the square alley & we can find our first Trophy locked inside a small cage suspended above the alley exit. Walk under the cage & Pounce to Ceiling where we can climb inside the cage & loot the Trophy.

Catwoman Trophy #2: From Catwoman’s Apartment, climb onto the building to the right of her place & leap onto the broken overpass near the Perimeter Wall. Follow this short piece of overpass East & we can see a building near the walls with a water tower & a billboard reading “All Perimeter Walls Are Monitored”. Climb up to the building & we can find this Trophy directly below the billboard.

Catwoman Trophy #3: Set a Waypoint to the very back of the Church/Medical Center on top of the “e” in Medical. At the back of the church, in the alley, we can find a large cage with four Pressure Plates in it; the Catwoman Trophy at the very top floor of the cage on the ceiling. To access it, stand on the first Pressure Plate & it will unlock the Trophy Cage of both the Catwoman & Batman Trophies. Pounce to the Ceiling & climb up to the next floor; Pounce to Ceiling from here to collect the Trophy.

Riddler Trophy #1: While we are here, we can simultaneously pick up this Riddler Trophy to save us some backtracking as Batman.

The Bowery – Catwoman:


Catwoman Trophy #4: Make your way over to The Bowery now in the far East corner of the area. Climb to the top of a tall building with a slanted neon orange “Gotham” sign hanging off it. We can find the Trophy along a wall in between two half circle planters; opposite side as a Riddler Trophy.

Riddler Trophy #2: Look on your World Map & set a Waypoint onto the large rectangular building that is slightly South East of the word “The Bowery” on the Map. Get onto the roof & take out the Gun Thugs & then stand on the circular heli-pad in the center of the roof. Turn around to look South along the roof, & we can see this Riddler Trophy on top of a small archway. To reach it as Catwoman, climb up the nearby radio tower with the red light at the top & leap off it onto the archway. (This is technically easier to collect as Batman since he has the Batclaw).

Catwoman Trophy #5: From the roof we found the Riddler Trophy, make your way directly underneath where we are standing & we can see an underpass with 3 glowing green Question Marks on both walls of the underpass. Make your way to the ceiling of the underpass & climb along to find the Catwoman Trophy directly above one of the Question Mark sets.

Catwoman Trophy #6: Now head to the very South end of the long glass tunnel called the Jezebel Center in The Bowery. At the dead end, climb up the wall to get up to an isolated balcony where we can loot the Trophy.

Catwoman Trophy #7: For the last Trophy we can collect in The Bowery, get onto the Museum rooftop & head to its center where there will be a large lit up glass dome. Follow the dome along, & we can find this Trophy tucked in between this dome & the smaller square dome just to the North of it.

Riddler Trophy #3: From the Museum roof, look out to the North at the monorail tracks & we can see this Riddler Trophy on top of a small iron pillar that we can leap to.

Industrial District – Catwoman:


Catwoman Trophy #8: Enter into the Industrial District & head down the street to the far North West corner of the area where a lone crane is near the waterfront. Hop over a fence & walk up some metal stairs onto a walkway above the water, past the crane to the dead end against the Perimeter Wall. Stand on the walkway’s railing & crouch to lower yourself down into a ceiling climb where we can grab this Trophy underneath the walkway.

Catwoman Trophy #9: Climb on top of the “Super Dodgems” building with all the broken bumper cars & we can find this Trophy underneath the chain link fence roof. Just Pounce to Ceiling to collect it.

Catwoman Trophy #10: Climb onto the roof of the Steel Mill & get to the base of the large chimney we entered previously as Batman. In between the chimney & a square metal radio tower on the roof will be a long chain link cage that has wooden cut outs of a seal with a beach ball on either side of it. Enter this chain link cage from the North & we can Pounce to Ceiling to collect the Trophy inside.

Amusement Mile – Catwoman:


Catwoman Trophy #11: Make your way onto the broke piece of overpass then drop off of its right side to get down to a lower ledge. From down here, Pounce to Ceiling, & climb along the underside of the overpass to get to the Trophy.

Catwoman Trophy #12: At long last, make your way to Poison Ivy’s lair in the top North East corner of the map. Go underneath the walkway leading to her lair & Pounce to Ceiling to climb along its underside to the Trophy. This is almost impossible to miss as we go on to progress DLC – Catwoman Episode 2.


Achievement #8 – Arkham City Sirens: Drop in on an old friend
Story Related. Enter Poison Ivy’s lair & defeat her waves of Possessed Thugs to complete Catwoman Episode 2, unlocking the Achievement.
Sequence 3: Collectibles Blitz 1
1. Main Story: Finding the Cure
2. Side Missions: 1/12
3. Joker Balloons: 3/24
4. Tyger Cameras: 3/48
5. Riddler Trophies: 13/247
6. Catwoman Trophies: 12/35
7. Achievements: 8/64
-----------------------------------------------------------------------------------------------------

Industrial District:
Before we continue on with the Main Story, let’s use this time to blitz through the available Collectibles around Arkham City. This will get a good chunk of them done right away so we only have the Collectibles that are locked by Main Story progression & Gadgets we do not have yet. As we explore, keep your ears open for any ringing phones or Assaults in Progress. As a fair warning... this is going to be very tedious for all of us & not a lot of fun for you; Rock Steady definitely went overboard with its Collectibles this time around…


Riddler Trophy #4: After we are thrown out of the window by Joker, make your way along the waterfront South of The Steel Mill & we can find this Trophy on a small extended overhang a little ways above the water.

The moment we do, if you have not already grabbed one of these before as Batman, we will be interrupted by the Riddler & unlock his thoughtful Riddles tab in our PDA. We can now keep track of things as we go along. Pay attention to the Physical Challenges at the very end of the Riddles tab to chip away at as we play.

Riddler Trophy #5: Make your way to the Steel Mill roof directly in front of the chimney at the South end. Here we can see a Structural Weakness we can blow up with Explosive Gel. Blow up the wall & walk through & you will see a glowing Question Mark. Look behind it, & we will see a Trophy Cage that has our Riddler Trophy in it.

Joker Balloons #1: Walk around to the entrance of the room where the Question Mark is & face inside it once again. From the outside, look up above you to the left & we can see a set of Balloons being held by a nutcracker statue up to the left of the chimney. Take them out with a Batarang.

Riddler Trophy #6: From the Steel Mill roof, look off the edge down into the bay in the South corner of the map. Down below we can see a large submerged cage; inside will be a Riddler Trophy. To get in there, we need to leap off the roof & Dive Bomb to gain speed. When you are ready, pull up & Glide yourself carefully above the water, inside the cage to land on the Pressure Plate at the bottom. Grab the Trophy & Grapple out of the cage.

Joker Balloons #2: Grapple out of the cage in the bay, then grapple up onto the balcony above us to the West. After climbing off the railing, look up & we can see a set of Balloons on the hat of a nutcracker standing in the middle of the road.

Riddler Trophy #7: Across from the nutcracker that had the Balloons on it, we can see a small train engine a little ways down the road. Walk up to it & equip your Remote Electrical Charge; fire a charge into the Industrial Motor to activate the train. The train will only travel a short distance, but when it stops, we can climb onto its roof & use Explosive Gel to blow up a Structural Weakness in the ceiling above it to find the Trophy; you will need to use the Batclaw to grab it.

Tyger Camera #1: Walk back over to where the nutcracker is & enter the compound to the West of it. Grapple or walk up to the second floor of the walkway in its center, & we can spot a Tyger Camera just above a set of stairs leading back down to the ground floor. Take it out with a Batarang.

Tyger Camera #2: Carry on to the far South West end of the Industrial District & we can find a building that has strange conveyor ride that leads inside a flaming clown mouth inside it. Look up to the right of the iron gates barring it to find a Camera.

Riddler Trophy #8: Slide underneath the iron gate barring access to the building ahead of us & we can use our Batclaw to grab a Riddler Trophy attached to the ceiling of the conveyor system.

Riddler Trophy #9: Leave this building & walk down the street North & take a left under an archway reading “Death Ride”. There is a Riddler Trophy in the building that will be ahead of us, but we do not have the required Gadget to collect it. Instead, grapple up to the roof of this building & we can find a Pressure Plate & a Trophy Cage.

Stand on the Pressure Plate & one out of 8 Question Marks will light up ahead of us. Keep your eye on this Question Mark because after a second, they all will light up & begin turning. When they stop turning you will have to throw a Batarang at the initial Question Mark to open the Trophy Cage.

Joker Balloons #3: From the top of this building, walk to the roof edge & face out to the North East. Below us, we can see a crane close to a large hole in the pavement that has a set of Balloons attached to the top of its boom.

Riddler Trophy #10: Drop off the building now & approach the crane; crouch underneath it to locate this Trophy.

Riddler Trophy #11: Directly North of the crane, we can see a long concrete wall that has a chain link top close to a building with piping coming off its walls. Climb over the concrete wall & walk under the chain link top to see three Pressure Plates & a Trophy Cage. We now have to activate all three Plates without touching the floor. To do this stand on the first Plate & press the dodge button to jump Batman over to the second Plate; he jumps way further than you think. Activate all three this way & the Cage will unlock.

Riddler Trophy #12: Grapple onto the roof of the piped wall building beside where we are & we can find another Trophy Cage with five Pressure Plates beside it. They light up in sequence leading towards the Cage before resetting. Start at the far end & wait for it to reset; time it out, & sprint down the Pressure Plates as they light up until you get to the Cage. If done quickly, it will unlock.

Tyger Camera #3: Drop back down into the area with the crane & the large hole & walk across the street from where the concrete wall we found Riddler Trophy #11. Look over to the right of the large square armored vehicle blocking the nearby archway & we can see a Camera beside some flashing coloured lights.

Riddler Trophy #13: Hop over the small concrete wall to the right of the Camera we just destroyed & we can find a Structural Weakness close to a barrel fire. Blow up the wall with Explosive Gel & we can walk in to collect a Riddler Trophy.
Sequence 4: Collectibles Blitz 2
1. Main Story: Finding the Cure
2. Side Missions: 1/12
3. Joker Balloons: 7/24
4. Tyger Cameras: 9/48
5. Riddler Trophies: 20/247
6. Catwoman Trophies: 12/35
7. Achievements: 8/64
-----------------------------------------------------------------------------------------------------

Industrial District:


Riddler Trophy #14: Climb back over the small wall & head across the street to the South from the last Trophy. Grapple onto a girder attached to a lower level of the Steel Mill building. Walk up the small roof & turn on Detective Mode to see some Soft Wood Paneling. Kick it apart & grab the Trophy behind it.

Joker Balloons #4: Look across to the next building to the North, beside the Super Dodgems building, & we can see a set of Balloons on top of a speaker system.

Tyger Camera #4: Drop down into the street directly East of the Balloons & we can see an iron gate in an archway dividing access to the road. We can find this Camera on the North side of this gate on the on pillar closest to the waterway.

Riddler Trophy #15: Walk down the street a little ways North & turn on Detective Mode looking left to find some Soft Wood Paneling in the wall of a Tyger CCTV Relay Tower. To get inside, we will need to launch into the air & Glide through the Panels. Inside the tower, we can find a Trophy Cage, six Pressure Plates on the ground & one Pressure Plate set into the wall. We need to activate the Pressure Plate on the wall without touching any of the six Pressure Plates on the ground or the Trophy Cage will close.

To do this, launch yourself back up into the air & Glide inside the tower to fly into the Pressure Plate on the wall. As soon as you land on the wall, you need to quickly tap A (or Space Bar) to push yourself off the wall back into a Glide to get past the Pressure Plates on the ground. If done successfully, we can walk over to grab the Riddler Trophy.

Joker Balloons #5: Grapple up to the very top of the Tyger CCTV Relay Tower & we can find a Balloon set on top of the neon orange Tricorner Naval sign.

Tyger Camera #5: Drop down off of the Relay Tower just South into the small compound behind us, close to the Super Dodgems building. We can find the Camera on top of the archway leading back onto the street close to a speaker system.

Riddler Trophy #16: Walk through the archway we found the Camera on & walk across the street North over to the next building. Grapple up a concrete wall & drop over to the other side to find three Pressure Plates & a Trophy Cage. The Pressure Plates will light up in sequence moving away from the Trophy Cage. Simply run along the three Plates as they light up & the Trophy Cage will open for us.

Riddler Trophy #17: From the last Trophy, Grapple onto the building right beside us & if you look up to your right, you can see two large chimneys with a small bridge in between them. Grapple up to the bridge & we can find a Trophy Cage; opening it is a little complicated. Located on these two chimneys, facing out towards the East, will be two Pressure Plates; while facing East we can also see another chimney with a Pressure Plate on it slightly off our left.

What we must do to open the Trophy Cage is fly up & Glide into all three of the Pressure Plates without touching the ground or breaking our Glide. With the Grapnel Boost, this is easier than it sounds. Grapnel Boost off one of the chimneys, Glide into one Pressure Plate, push off the wall back into Glide, & Grapnel Boost up another chimney. Rinse & repeat until all three Pressure Plates have been Glided into.

Tyger Camera #6: Glide down to the waterfront & turn around to look at a building with a few bay doors & a neon green beer sign; we can find the Camera on the wall directly in the middle of the bay doors.

Riddler Trophy #18: From where we found the last Camera, climb over the fence near the green beer sign & turn on Detective Mode to find a Structural Weakness in a wall below the Gotham Hardware sign. Destroy it with Explosive Gel, & we can find a strange mini-game involving a rolling Trophy Cage & two Industrial Motors.

Use the Remote Electrical Charge & charge the different Motors to figure out which does what; one Motor pushes & pulls the Trophy Cage while the other changes the Motors position. Move the push/pull Motor to the left side of the mini-game, then move it back to the right side, as soon as you do this quickly charge the push/pull Motor to pull in the Trophy Cage over to the right side of the mini-game as it passes. Release the Cage & it will fall into the lit square box at the bottom where we can break the Cage open.

Riddler Trophy #19: Exit the Gotham Hardware store & Grapple up on top of the nearby crane close to the waterfront. On top of the crane will be an Industrial Motor; use the Remote Electrical Charge to lower the crane hook down into the water. After the hook has fully entered the water & the machine has stopped moving, charge the Motor again & bring the crane hook back up. The hook will now be holding a Riddler Trophy; use the Batclaw to collect it.

Joker Balloons #6: While still on top of the crane, look up above our heads & we can find a set of Balloons on top of the small balcony where the cranes luffing wires are attached to.

Tyger Camera #7: Return down to the streets & begin following the road by the waterfront towards the East. Approach the main entrance to the Industrial District, blocked by an armored vehicle, & look to the entrances right to see a Camera close by building.

Tyger Camera #8: Keep following the road along to the East & we can find another Camera on a building to the right of a blocked archway in the road.

Tyger Camera #9: Climb over the armored vehicle blocking the archway near Tyger Camera #8, & take a left down the road North; we can find this next Camera on the building wall directly off our left.

Joker Balloons #7: Grapple onto this building's roof now & we can find a set of Balloons attached to one of the smalls metal chimneys.

Riddler Trophy #20: Drop back down into the street where we previously were & walk across the road over to the small tower with a long pipe snaking off it. Turn on Detective Mode & walk around to the tower’s North face, & we can find a Soft Wood Panel wall. Glide up & fly through the wall to destroy it & we can find this Trophy on the floor.

Incidentally, we also just opened up this tower to Catwoman so she can come through to collect one of her Catwoman Trophies later on...
Sequence 5: Collectibles Blitz 3
1. Main Story: Finding the Cure
2. Side Missions: 1/12
3. Joker Balloons: 12/24
4. Tyger Cameras: 12/48
5. Riddler Trophies: 28/247
6. Catwoman Trophies: 12/35
7. Achievements: 8/64
-----------------------------------------------------------------------------------------------------

Industrial District:


Tyger Camera #10: Drop out of the tower & carry on East past the crane & we can find another Camera on the last building near the water.

Joker Balloons #8: From the Camera, look to your right & we can see a set of Balloons on top of a nutcrackers head to the right of the neon green Joker’s Funland sign.

Riddler Trophy #21: Grapple onto this building now & begin walking along the roof South. After passing the second small chimney, drop off the roof onto a lower level facing the water. On this lower roof we can find a Structural Weakness in a small square structure; blow it up with Explosive Gel to find the Trophy inside.

Joker Balloons #9: From the last Trophy, facing the water, walk to the edge of the roof to your right & look down to see a set of Balloons on top of a fence near two dumpsters.

Riddler Trophy #22: Grapple up to the next building to the South & on its roof will be a small open-square structure that has a Trophy Cage on its ceiling. On top of this structure will be a Pressure Plate that will open the Cage. Stand on the Pressure Plate & a 6 second timer will start; quickly drop off & use the Batclaw to snag the Trophy.

Joker Balloons #10: While on the same rooftop, walk over to the South side & look at the Ferris Wheel on the next building; we can see a set of Balloons hanging off of a large pipe sticking off the roof near it.

Riddler Trophy #23: Before we climb onto the building with the Ferris Wheel, drop down into the streets instead. On the ground here we can see a Trophy Cage & a Pressure Plate. Standing on the Pressure Plate will open the iron doors ahead of us but only for around 8 seconds. As soon as you step on the Pressure Plate, quickly throw Remote Controlled Batarang & guide it into the Question Mark to your right first. Then immediately throw your second Remote Controlled Batarang & launch it at the Question Mark straight ahead of us (you might also be able just use a regular Batarang if you are quick enough). Lastly, throw one final Remote Controlled Batarang & guide it into the left Question Mark.

This will take a few attempts, try Boosting your Batarangs as often as possible. Time fortunately seems to slow down slightly while you are controlling a Batarang. When all three Question Marks are struck after they have been activated at the same time, the Trophy Cage will open for us.

Riddler Trophy #24: Quickly jog down the street to the North West from the last Trophy to the building behind us. Follow the building around to the left towards an iron bar fence & we can find a series of three Soft Wood Panels that we can just punch through to get to another Trophy.

Joker Balloons #11: Exit the room we found the last Trophy & look through the iron bar fence off our right. Immediately to the South West of us we can find another entrance to Joker’s Funland; we can find another set of Balloons on a nutcrackers head to the right of the entrance.

Tyger Camera #11: Approach where the Balloons were & climb over the armored vehicle blocking the entrance to the Funland. On the other side, turn around & we can find a Camera on the right pillar of the Funland entrance.

Joker Balloons #12: Follow the road South further into Joker’s Funland towards the gates to Sionis Industries; we can find our final Balloons in the Industrial District in the hands of a nutcracker.

Tyger Camera #12: We can also find our last Tyger Camera in the Industrial District directly to the right of the nutcracker that holds our Balloons.

Riddler Trophy #25: Turn around from the gates to Sionis Industries & climb over the small concrete wall off our left. Over the wall will be a strange mini-game maze we will have to crawl through to collect the Trophy. It is rigged with Mines, but they are not an instant kill. The maze is actually simple… just follow the path that does not have Mines in the way, there is only one possible path we can take.

Riddler Trophy #26: Facing away from the maze mini-games entrance, we can drop off this level to a lower down alley off of our right. Down here we can find a Trophy Cage & two Pressure Plates. This is a strange math mini-game. When you stand on the left Pressure Plate, 3 green lights will get lit; standing on the right Pressure Plate will light 5.

The goal is to light all 7 green lights; going over the amount will reset the counter but maintain how many lights you went over by. So, if you stand on the right Pressure Plate twice, you will hit 10. You will be over by 5, so 5 green lights will still be lit when it resets. There are so many ways to beat this, you may even do it accidentally just by walking around on the Plates testing them out. The fastest way from 0 lights is to walk on the left Pressure Plate 3 times (3 lights + 3 lights + 3 lights = 9 lights, 2 lights carry over) then walking on the right Pressure Plate once to reach 7.

Side Mission #5 – Watcher In the Wings 2: Since we completed the Main Story Mission – The Steel Mill, Grapple to the very top of the Ferris Wheel to find the Mysterious Watcher standing there. Scan the Symbol he carves to progress the Side Mission. 40% Complete

Riddler Trophy #27: From the highest car on the Ferris Wheel, drop down two cars on the waterside & turn around to face the second highest car on this side. We can find a Trophy stuck to the cars ceiling; snag it with the Batclaw.

Riddler Trophy #28: Drop off the Ferris Wheel South & land on a lower down landing just to the left of the bridge to Sionis Industries. We have another Remote Electrical Charge mini-game with a rolling Trophy Cage to play. This one is really simple, just charge the corresponding Industrial Motors to guide the Cage to the opposite end to break it open.

By this point you may have progress Side Mission #2 – Cold Call Killer to 45% Complete & Side Mission #3 – Acts of Violence to 12% Complete.
Sequence 6: Collectibles Blitz 4
1. Main Story: Finding the Cure
2. Side Missions: 1/12
3. Joker Balloons: 12/24
4. Tyger Cameras: 13/48
5. Riddler Trophies: 40/247
6. Catwoman Trophies: 12/35
7. Achievements: 8/64
-----------------------------------------------------------------------------------------------------

Amusement Mile:
As we grab more Collectibles, we should be Leveling up more than a few times; make a point of purchasing the Shockwave Upgrade in the Combat Tree. We will need it for grabbing a few Collectibles.


Side Mission #6 – A Shot In the Dark 1: If you look on your World Map, we can see a Side Mission Marker reading “S.O.S. Broadcast Source” where a Political Prisoner is trapped on the rooftop of the Gotham FM building. If you have not already done so, get to the Marker & speak with the man who will shortly be shot.

Set up a crime scene & follow the bullet trajectory back into the Industrial District. Find the shell casing from Dead Shot & we will end the first section of the Mission. Two other murders will appear later on as we progress through the Main Story. 15% Complete

Riddler Trophy #29: Leave the Industrial District & Grapple on top of a crane near the South Eastern end of Amusement Mile in the middle of the water. At the top of the crane, we can find an Industrial Motor that we can activate with our Remote Electrical Charge. Activate it, & pull the crane hook out of the water; the crane hook will have a Riddler Trophy at its end we can collect with the Batclaw.

Riddler Trophy #30: From the last Trophy, look off the side of the crane to the West & we can spot a strange fenced box below us with a Trophy Cage & three Pressure Plates. To open the Trophy Cage, we need to land on each of the Pressure Plates without touching the ground or the fences at all. To do this, we have to Grapnel Boost out of area, Glide around & land perfectly on each Pressure Plate. This can be a little tricky & take multiple tries as your aim has to be perfect. If done correctly, the Trophy Cage will open up for us.

It is easier just letting go of Glide & dropping onto the Pressure Plate then aiming a Dive Bomb onto them I found.

Riddler Trophy #31: Grapple back onto the nearby crane & this time walk over & drop off its East side to find another Trophy Cage. For this challenge, stand on the Pressure Plate underneath the small roof behind the Cage & five Question Marks will light up on the wall ahead of us. We must strike each Question Mark in sequence as they light up on the wall with a Batarang. We need to do this three times.
From left to right:
First Time: 1, 3, 5, 2, 4
Second Time: 4, 3, 1, 5, 2
Third Time: 3, 5, 2, 1, 4
After completing the three sequences correctly, the Trophy Cage will open for us.

Riddler Trophy #32: Grapple on top of the roof of the Krank Co. Toys building & we can find a Trophy Cage as well as a larger cage with two Question Marks inside it. To the right of the Trophy Cage is a horizontal vent that has four shutters opening & closing rapidly. Equip a Remote Controlled Batarang & carefully guide it through the vent to strike the first Question Mark straight ahead. For the second Question Mark, we now have to guide a Batarang left through the vent down a newly opened tunnel. The shutters have fortunately stopped so be sure to use Brake to slow the Batarang down. With both Questions Marks struck, the Trophy Cage will open.

Riddler Trophy #33: Walk to the East end of the Krank Co. Toys rooftop & we can see a large cage with six Pressure Plates & an already opened Trophy Cage. If we stand on the Pressure Plates, the Cage will close. To get back there, Grapnel Boost off a building & Dive Bomb/Glide your way into the cage & over the Pressure Plates.

Riddler Trophy #34: Enter inside the Krank Co. Toys building now & walk into the center room we originally found Bane in. To the right of where we enter this room, we can see a Riddler Trophy in a chair behind the reception desk; grab it with the Batclaw.

Tyger Camera #13: Exit Krank Co, & Grapple over to the GCPD building now & on the outer first floor, we can find a Camera on the wall near an Industrial Motor controlled door.

Riddler Trophy #35: Use the Remote Electrical Charge on the Industrial Motor to open the door; we will need to slide under it. Here we can find the doors into the GCPD Building (where our next Main Mission will take place). Walk down the ramp where we entered & we can find a Structural Weakness. Blow it up with Explosive Gel & we can find a Riddler Trophy.

Ignore entering the GCPD Building for now & exit this area.

Riddler Trophy #36: Grapple up to the second floor of the outer GCPD Building & we can find two Structural Weaknesses. Blow one, or both, up with your Explosive Gel & we can crawl into a small space. Follow it along & we can find a Riddler Trophy underneath a set of stairs.

Riddler Trophy #37: Grapple around to the backside of the GCPD Building & drop down onto a platform in the water. From here, walk back towards the building & we can see a Riddler Trophy upside down in a weird doorway shaped alcove. Use the Batclaw to collect it.

Riddler Trophy #38: We must now find a way into the underground parking lot of the GCPD Building. The entrance can be found on the lower North side of the building, but it is blocked by a Soft Wood Panel (this is easiest seen from the buildings North of the GCPD Building). Glide into the air & go through the Panel to enter the parking lot; we can find the Riddler Trophy inside to the right.

We have also simultaneously cleared the way now for Catwoman to come collect another Catwoman Trophy.

Riddler Trophy #39: Leave the outer GCPD Building now & carry on North to the next building over with a neon orange “Gotham” sign. Look below the “TH” in Gotham, & we can see a platform lower down with a Trophy Cage. Below the fencing, the Cage rests upon is a Pressure Plate inset into the wall of the building. We will need to Grapple off a building into the air & Glide/Dive Bomb over to land on the Pressure Plate. As soon as we touch it, quickly push off the wall & Grapple threw the doors we just opened back up to where the Trophy Cage is.

Riddler Trophy #40: Just to the North East of the last Trophy we can find another Trophy Cage & Pressure Plate on the next building’s rooftop. Simply stand on the nearby Pressure Plate & use the Batclaw to collect the Trophy.
Sequence 7: Collectibles Blitz 5
1. Main Story: Finding the Cure
2. Side Missions: 1/12
3. Joker Balloons: 16/24
4. Tyger Cameras: 23/48
5. Riddler Trophies: 49/247
6. Catwoman Trophies: 12/35
7. Achievements: 8/64
-----------------------------------------------------------------------------------------------------

Amusement Mile:


Riddler Trophy #41: Get onto the building across from Poison Ivy’s lair & we can find a Structural Weakness in a small room behind a billboard. Blow it up with Explosive Gel to find the Riddler Trophy.

Tyger Camera #14: Glide over onto the broken overpass across from Poison Ivy’s lair & look back towards the building we came from; we can find a Camera on the side of the wall just underneath the first level.

Tyger Camera #15: Follow this broken overpass down South; we can see another Camera off our left on a building near the end of this bridge piece.

Riddler Trophy #42: Jump across to the next piece of the overpass & walk over to where the junction in the road is. Drop off the road to your left to land on a L-shaped platform with a Trophy Cage & a Pressure Plate. Stand on the Pressure Plate & look West across the water to see three Question Marks. Use Remote Controlled Batarangs to systematically strike each Question Mark to open the Trophy Cage. As soon as we hit one of the Question Marks, a 7 second timer will begin. Time slows down while Controlling a Batarang; abuse the Boost as often as possible.

Tyger Camera #16: Grapple back onto the overpass & walk a little ways down the road towards the GCPD Building; we can see the Camera on the wall of the building to our left before GCPD.

Tyger Camera #17: Return to the road junction on the overpass & hop over the meridian to the far side towards the building with the “Gotham Casino” sign on it. We can find another Tyger Camera to the left of the casino’s sign.

Tyger Camera #18: Keep following the overpass down South while sticking to the right-hand side of the road & we can find another Tyger Camera on the wall at the end of the Gotham Casino.

Tyger Camera #19: Take the roadway West at the junction & we can find a Tyger Camera off the building across from us to the right of a billboard reading “You Are Under Close Surveillance”.

Joker Balloons #13: Carry on down the road West & we can find a Balloon off our right very close to the last Tyger Camera.

Only a few of the 12 Joker Balloons are available for us in the Amusement Mile (the ones on the overpass from Park Row leading to the Industrial District), the rest will get unlocked as we progress in the Main Story.

Tyger Camera #20: At the end of the overpass piece to the West before entering Park Row, near some Thugs, we can find a Camera off the building to our right.

Riddler Trophy #43: Leave the overpass now & Grapple onto the building just in front of the Gotham Casino. Here we can find a Trophy Cage, & on the surrounding buildings, three Pressure Plates. To open the Cage, we need to systematically land on all three Pressure Plates without touching the ground or other parts of the environment.

Riddler Trophy #44: Grapple up on the part of the Gotham Casino directly to the East/above where we collected the last Trophy to find an elongated fenced box & a Riddler Trophy. The Trophy flips on rotation & can only be collected when it is upside down inside the fenced box. What’s worse, is that we need to run & slide into the box so we must time it right so we slide past the Trophy at the same time as it is flipped into the box. It takes around 5 seconds for the Trophy to flip into the box after it resets…

Tyger Camera #21: Drop down onto the first floor of the Gotham Casino & there will be a host of Thugs we will need to dispatch. Standing on the frozen over pool, we can find a Camera below the second-floor balcony.

Riddler Trophy #45: Turn around from the frozen pool & walk to the far North side of the Gotham Casino to find a small shack with a Soft Wood Panel wall. Give it the ol’ Batman beatdown, & we can find a Trophy behind it.

Joker Balloons #14: Make your way back to the large road junction on the overpass. From the junction, look up at the Gotham City Olympus building & we can find a set of Balloons just above the “Gotham” in the sign.

Riddler Trophy #46: Turn on Detective Mode now & look at the front entrance of Gotham City Olympus to see some Soft Wood Paneling. Climb up to it & punch through it to find a Trophy. Wait if this is the building’s front entrance… where is the door in here? Gotham architecture is way too advanced for me …

Joker Balloons #15: Look to the right of the Gotham City Olympus building & we can see another set of Balloons at the end of an elevated broken girder.
Assisting Catwoman: From where the Balloons were, drop off the overpass below them, & we can see some Soft Wood Paneling. Break it down, & Catwoman can come back here later to collect a Catwoman Trophy.

Riddler Trophy #47: Grapple onto the building behind Gotham City Olympus now & at its Northern end, we can find a Trophy Cage & a cycling Pressure Plate. Simply wait for the Plate to turn green, & stand on it to open the Cage. Even Robin could do that one.

Riddler Trophy #48: Grapple over to the South side of this building now & we can find our next puzzle close to the GCR building. Here we can find a Pressure Plate, an Industrial Motor, & a Rolling Cage. Stand on the Pressure Plate & use the Remote Electrical Charge to pull the Rolling Cage past the first grate. Step off the Pressure Plate & re-engage the Industrial Motor to pull the Rolling Cage to the end where we can break it open & collect the Trophy.

Riddler Trophy #49: Grapple up to the Gotham FM building where that Political Prisoner was killed by Deadshot. Look up at the radio tower & there will be two levels we can Grapple to. Grapple to the bottom one & we can walk around to the side of the “C” to find a Riddler Trophy.

Joker Balloons #16: Return to the overpass & carry on South; we can find these Balloons on top of a light post just outside the highway closure to the Industrial District.

Tyger Camera #22: Turn around from the last Balloon & we can find a Camera off the building wall to our left.

Tyger Camera #23: Turn back around again & walk up to the highway closure & we can find a Camera on the metal beam at the far left.
Sequence 8: Collectibles Blitz 6
1. Main Story: Finding the Cure
2. Side Missions: 1/12
3. Joker Balloons: 17/24
4. Tyger Cameras: 31/48
5. Riddler Trophies: 58/247
6. Catwoman Trophies: 12/35
7. Achievements: 8/64
-----------------------------------------------------------------------------------------------------

Amusement Mile:


Joker Balloons #17: Grapple up onto the elevated roadway at the highway closure & we can see some Balloons at the far end off our left.

Tyger Camera #24: Run to the far end of the elevated roadway & drop off to the overpass below. Turn around to look back at the highway closure & we can see a Camera on the metal beam to our far right (parallel to the last Camera).

Riddler Trophy #50: From the highway closure facing North, Grapple over to the building just off our left to find a Trophy Cage. Encircling the Cage will be three inactive lights that will correspond to three separate Pressure Plates we will need to locate.

The first Pressure Plate to locate is on top of the building to the North of the Trophy Cage (don’t confuse the Pressure Plate with the three used in Riddler Trophy #51). The Pressure Plate we need will be on top of a steel box; the steel box across from it will have a water tower on it.

When we stand on the Pressure Plate, turn around to look back where the Trophy Cage is & we can see our second Pressure Plate on the side of the wall just below it on a billboard. Glide over & land on it, without touching the ground, & immediately push off the wall where we can then land on the third Pressure Plate on the wall behind us.

As soon as we press the third Pressure Plate, a timer of 7 seconds will initiate & we must quickly Grapple up to collect the Riddler Trophy or have to restart this all over again.

Riddler Trophy #51: Make your way over North past the Pressure Plates used for the last Trophy & we can find a new set of three Pressure Plates & a Trophy Cage. Simply walk along & activate the Pressure Plates to get the Trophy. Easy.

Riddler Trophy #52: Navigate along these rooftops North back to the overpass ahead. From here, turn around & look to the right of the buildings we went across to see three Question Marks along the building’s side, with another three below it near the ground.

Drop down to the ground & approach the Question Marks along the wall here; we can also find the corresponding Trophy Cage down here as well. Approach the Question Marks & place Explosive Gel on each of them, but do not detonate them just yet.

Grapple up onto the roof directly above/across from the Question Marks on the top level. Get the Question Marks all into view because we are going to have to act fast. When ready, detonate the Explosive Gel below; as soon as you do, switch to Batarangs & Quick Throw (spam the Left Trigger with them equipped) at the Question Marks above. If done correctly, the Trophy Cage will open for us.

Park Row:


Riddler Trophy #53: Head South from the Church rooftop & we can find a Tyger power station. There will be a Fuse Box electrifying the floor & a Structural Weakness in the wall beside it. Shoot the Fuse Box with the Remote Electrical Charge & blow up the wall with our Explosive Gel to collect the Riddler Trophy.

Tyger Camera #25: Drop off the West end of the rooftop we found the Trophy on down into the streets below. We can find a Camera on one of the Perimeter Wall columns.

Riddler Trophy #54: Hop over the iron fence towards the neon green The Black Canary signs below & we can find a Trophy Cage. Turn on Detective Mode at the Cage, & we can see an electrical line coming off the Cage & leading up the walls of The Black Canary that will lead to a Question Mark. Strike the Question Mark with a Batarang, & we will have 9 seconds to return to the Cage to collect our Trophy.

Tyger Camera #26: Grapple back over the iron fence & walk up the road heading North, with the Church off our right; we can find a Camera on a building corner off our right at the T-junction in the road.

Tyger Camera #27: Follow the road to the West now & the road will be barred by a ramshackle barricade with “We Want You!” signs on it. Grapple over the barricade & we can find a Camera on the building immediately off our left, beside a neon blue Lounge sign.

Tyger Camera #28: Carry on down the road & we can find another Camera on the building wall just to the right of the Solomon Wayne Courthouse.

Riddler Trophy #55: Walk down the alley to the right of the Courthouse & hop over the chain link fence to find a Pressure Plate & Trophy Cage off our right. Just across from the Pressure Plate, we can see Pressure Plates inset into the building walls on either side of the Trophy Cage. To open the Cage, we need to press all the Pressure Plates without touching the ground or objects.

Grapple Boost into the air & Glide into the Pressure Plate on the South wall, push off of the wall & Glide into the Pressure Plate on the North wall, then push off once again to land on the ground Pressure Plate to open the Trophy Cage. It might be easiest Dive Bombing onto the ground Pressure Plate.

Riddler Trophy #56: From the last Trophy, walk East, down the alley to find another Riddler Trophy behind a chain link enclosure with three green arrows above it. Grapple onto the roof above the green arrows & we can see a steel door that needs to be opened by a Pressure Plate; the Plate is located on the building rooftop to the East of the steel doors.

Stand on the Pressure Plate & the steel doors will open for about 5 seconds. Activate the Plate & quickly Glide off & Dive Bomb through the steel doors. Once inside we will land on some Soft Wood Paneling that can be destroyed by a Shock Wave or Explosive Gel to reach the Trophy.

Riddler Trophy #57: Grapple onto the rooftops South of the last Trophy & we can find a Trophy Cage. Turn on Detective Mode & look North from the Cage to see a Question Mark; strike it with a Batarang to open the Cage.

Tyger Camera #29: Drop down to the streets East of the last Trophy & look on the building wall off our left to see a Camera.

Tyger Camera #30: Follow the road up to the North & it will end at some barricades that lead into a Political Prisoner camp. We can find a Camera off our right on a building wall here.

Tyger Camera #31: Climb over the barricade into the Political Prisoner camp & we can find a Camera near the back-left corner.

Riddler Trophy #58: In the Political Prisoner camp, there will be Soft Wood Paneling on two shacks; the one further North will have a Trophy behind it.
Sequence 9: Collectibles Blitz 7
1. Main Story: Finding the Cure
2. Side Missions: 1/12
3. Joker Balloons: 17/24
4. Tyger Cameras: 36/48
5. Riddler Trophies: 73/247
6. Catwoman Trophies: 12/35
7. Achievements: 8/64
-----------------------------------------------------------------------------------------------------

Park Row:


Riddler Trophy #59: Grapple up onto the building above where we found the last Tyger Camera in the Political Prisoner camp, & we can see a Trophy Cage with 3 Question Marks nearby. Walk up to each Question Mark & spray Explosive Gel on them; walk over to the Trophy Cage, detonate the Gel, & collect the Trophy.

Riddler Trophy #60: Make your way over East across some buildings & drop down to a Trophy Cage with 5 Question Marks along the wall beside it. The Question Marks will light up; when they do, we need to strike them with a Batarang. Either time out when to strike them… or just spam Batarang Quick Throw on each Question Mark until they are activated; missing won’t reset the ones you have activated.

Assisting Catwoman: Return to the entrance of the Solomon Wayne Courthouse & look to the left of the building where we can see an iron bar enclosure with a Catwoman Trophy inside it. At the back of the enclosure, we can find a Structural Weakness; destroy it with Explosive Gel. We will return here later as Catwoman to collect the Trophy.

Riddler Trophy #61: Enter into the iron bar enclosure we just gained access to, & we can find an Industrial Motor to the right of the Catwoman Trophy inside. Use the Remote Electrical Charge to open the door it’s connected to find a Riddler Trophy inside a small room.

Riddler Trophy #62: Exit the iron bar enclosure & Grapple onto the building beside us to the West. At the top, near the Perimeter Wall, we can find a Trophy Cage with a Question Mark ahead of it. Turn on Detective Mode to see electrical wires leading off the Question Mark to the left & right. These wires connect to two Question Marks off our left & one Question Mark off our right. When you strike a Question Mark, it will activate a 4 second timer.

To complete this relatively easily, place Explosive Gel on the two Question Marks on the left & one off the right. Stand in front of the middle Question Mark, closest to the Trophy Cage & detonate the Gel. After you detonate the Gel quickly throw a Batarang at the middle Question Mark to open the Cage.

Tyger Camera #32: Drop down into the streets near the far West end of Park Row & we can find a Camera across from the Harvey Dent campaign office.

Riddler Trophy #63: From the Camera, face East down the road & head down the alley to the left of where the Camera was. Hop over a chain link fence towards a barrel fire & slide underneath a fence to our left to find a Trophy.

Riddler Trophy #64: Grapple onto the roof above where we found the Trophy & we can find a Trophy Cage & a Pressure Plate. Simply stand on the Pressure Plate to open the Cage & use the Batclaw to collect the Trophy.

Riddler Trophy #65: Head East from the last Trophy over to the next rooftop where we can find a Trophy Cage & a green Question Mark locked inside a chain link enclosure. To strike the Question Mark, we must guide a Remote Controlled Batarang through the vents beside the Trophy Cage.

Riddler Trophy #66: Make your way along the rooftops South towards the Perimeter Wall & we can find a small isolated room on top of a building. Turn on Detective Mode to find Soft Wood Paneling in its entrance; break it down to collect the Trophy behind it.

Riddler Trophy #67: Carry on South & we should be able to see a Trophy Cage with five Question Marks cycling on & off. Approach the Cage & time a Batarang to strike one of the Question Marks as they become active; the ones at either end are the easiest to strike. Once any of the Question Marks has been successfully struck, the Trophy Cage will open.

Riddler Trophy #68: To the right of the last Trophy, walk down some metal stairs & look over the ledge to see some steel doors we will need to open. Look above us & we can see a Gargoyle that has been painted by the Riddler. Grapple up to it, & the steel doors will open for us. Quickly drop off the Gargoyle through the steel doors to collect the Trophy.

Tyger Camera #33: Drop down into the streets where we can see Finnigan’s Restaurant & the Monarch Theater; we can find a Camera on the building just East of Finnigan’s.

Tyger Camera #34: Look South of Finnigan’s now to find yet another Camera.

Riddler Trophy #69: Immediately to the right of the last Camera, we can find a Riddler Trophy underneath a lifted car in the middle of the road; slide underneath it to collect it.

Riddler Trophy #70: Get back over to the other side of the car, & head down to the end of the street West, where a barricade blocks the road. Turn on Detective Mode & look up to your left to see some Soft Wood Paneling inset into the wall. Grapnel Boost up & Glide through the Paneling to find a Trophy on the ground below.

Destroying the Soft Wood Paneling here will also give Catwoman access to one of her Trophies here in Park Row.

Riddler Trophy #71: Walk around the enclosure we found the last Trophy in to get to the other side & we can find an Industrial Motor operated door. Open the door using the Remote Electrical Charge & collect the Trophy behind it.

Riddler Trophy #72: Grapple onto the building directly above us & we can find a Rolling Cage puzzle with three Industrial Motors. Use the Remote Electrical Charge to guide the Cage up to the top of the puzzle where we can bust it open.

Tyger Camera #35: Drop down into the street now & we can find a Camera next to a flashing Ace Chemicals sign.

Tyger Camera #36: Grapple over some buildings to get over onto the other side of the street where we can find our final Camera in Park Row on the walls of a Liquor store.

Riddler Trophy #73: Get on top of the Tyger Confiscated Goods Vault & we can find a Pressure Plate & a Trophy Cage. This will require the Shock Wave Upgrade.

Grapnel Boost up into the air & Dive Bomb onto the Pressure Plate. As soon as you land on the Plate, activate Shock Wave to charge the Question Mark at the top. You need to generate a lot of force from a great height to charge the Question Mark; Grapnel Boosting off of the top of the Bank of Gotham is a good option. As soon as the Question Mark is activated, quickly strike it with a Batarang to open the Trophy Cage.
Sequence 10: Collectibles Blitz 8
1. Main Story: Finding the Cure
2. Side Missions: 1/12
3. Joker Balloons: 17/24
4. Tyger Cameras: 43/48
5. Riddler Trophies: 85/247
6. Catwoman Trophies: 12/35
7. Achievements: 8/64
-----------------------------------------------------------------------------------------------------

The Bowery:


Tyger Camera #37: Drop down into the street South & we can find a Tyger Camera near the barred entrance to the Jezebel Center.

Tyger Camera #38: Carry on down the street to the East & we can find another Camera on the corner of the Bank of Gotham.

Riddler Trophy #74: Grapple onto the building roof close to our first Tyger Camera here & we can find a Trophy Cage. The Cage will shut if we get too close to it; walk about a meter away from the Cage & use the Batclaw to collect the Trophy.

Riddler Trophy #75: Grapple higher up on the building South, & we can find a Pressure Plate connected to a vent system that has a Trophy at the end. Stand on the Pressure Plate & the vent system will open; quickly run & slide through the vent to get to the Trophy. You will only have 2 seconds after stepping on the Pressure Plate to get into the vent.

Tyger Camera #39: Drop off the building South, & walk up the metal stairs to the Monorail; we can find a Camera attached to the Monorail sign just before the landing above.

Riddler Trophy #76: Drop down off the Monorail platform & head West along the concourse where we can find a large horse statue with some barricades built around it. There will be a Riddler Trophy on the back of the horse statue; use the Batclaw to grab it.

Tyger Camera #40: On the other side of the barricades with the horse statue, we can find a Camera across from an entrance to the Iceberg Lounge.

Riddler Trophy #77: Hop over the chain link fence down the alley to the left of the Camera & we can find an Industrial Motor operated door. Use the Remote Electrical Charge to open the door & crouch underneath it to collect the Trophy on the other side.

Riddler Trophy #78: Grapple onto the building roof where we found the last Trophy & we can find a Tyger security checkpoint built into the Perimeter Wall with a Riddler Trophy behind it. Turn around from the Tyger Sentry Turret & turn on Detective Mode to locate a Structural Weakness in a small room behind us.

Detonate the wall with Explosive Gel & enter the Floor Grate behind it. Follow the crawlspace along in behind the security checkpoint & exit the crawlspace to collect the Trophy.

Riddler Trophy #79: Hop over to the next rooftop just West of our position to find a Trophy Cage, Pressure Plate, & three Question Marks. Standing on the Pressure Plate will activate a Question Mark, but close a fence barring our access. Walk over to all three Question Marks & place Explosive Gel on each of them.

Now go & stand on the Pressure Plate. When you do, the middle Question Mark will activate. Press the Zoom button (right stick) & look at the Question Mark in the middle. Hold the trigger down to detonate our Explosive Gel & you will notice that only the center Gel should be highlighted. Detonate it, then look at the left Question Mark next to detonate, with the right Question Mark being last. If done right (center, left, right) the Trophy Cage will open to us.

Riddler Trophy #80: Make your way over South down the alley beside the Museum to find a Pressure Plate linked to two Question Marks & a Trophy Cage. Stand on the Pressure Plate to activate the first Question Mark which we will strike with a Batarang. When you do, the second Question Mark will activate but iron bars will close blocking us from hitting it. There will be one iron bar missing on the far right side; throw a Remote Controlled Batarang & guide it through the gap to hit the Question Mark. When both Question Marks have been struck, the Trophy Cage will open for us.

Riddler Trophy #81: Now head to the far end of the Museum rooftops to the South; we can find a Ridder Trophy in between one of the glass domes & the Perimeter Wall.

Riddler Trophy #82: Drop down onto the East side of the Museum & we can find this Trophy in an alley; run & slide underneath the barricade to collect it.

Tyger Camera #41: Exit the alley & hop over the chain link fence out onto the concourse. Turn around to look back at the alley to see a Camera to the left of the entrance.

Tyger Camera #42: From the last Camera, look out across the balcony to the East to find another Camera on the opposite side as us.

Riddler Trophy #83: Drop down into the Jezebel Center below & walk North towards the area beneath the Museum entrance to find some Soft Wood Paneling. Bust through it to find a Riddler Trophy in a small room.

There is more Soft Wood Paneling above the first that leads to a different Riddler Trophy; we cannot get it until we have the Line Launcher.

Tyger Camera #43: Follow the Jezebel Center hallway down North & hop over the barring chain link fence to get over to the next side. Shortly after hopping the fence, we can see a Camera off our left.

Riddler Trophy #84: Hop over the chain link fence to the left of the Camera in the Jezebel Center & make your way down the hall; we can find a Trophy right behind the first second pillar holding up the glass ceiling.

Riddler Trophy #85: Across from the last Trophy, we can see another through a chain link barricade obstructing the hall towards the West. To get to it, Grapple up to the concourse above & run along to drop over to the other side.

Ignore the Pressure Plates & Trophy Cage on the other side (that is for a different Ridder Trophy requiring the Line Launcher) & look instead at the electrified fence at the back. To get over this fence, we have to Grapnel Boost off the floor above us to get ourselves into the air & Dive Bomb/Glide over the fence.
Sequence 11: Collectibles Blitz 9
1. Main Story: Finding the Cure
2. Side Missions: 1/12
3. Joker Balloons: 17/24
4. Tyger Cameras: 47/48
5. Riddler Trophies: 95/247
6. Catwoman Trophies: 12/35
7. Achievements: 8/64
-----------------------------------------------------------------------------------------------------

The Bowery:


Riddler Trophy #86: Return back into the Jezebel Center where we found the last Tyger Camera in the main hall & we can see an Industrial Motor-powered door in an Italian Cuisine restaurant. Use the Remote Electrical Charge to open the door & quickly run & slide underneath it to get into the room with the Trophy.

Riddler Trophy #87: Begin heading East through the Jezebel Center down the next hall & we will be obstructed by an iron gate with Proximity Mines behind it. Turn on Detective Mode, & we can see a Structural Weakness in the wall the right of the Mines.

If you have at least one Ability Point put into Ballistic Armor, hop over the gate closest to the wall & only one Mine will explode. Use Explosive Gel to destroy the Structural Weakness & we can find a Trophy in the room beyond.

Tyger Camera #44: Exit the Jezebel Center to the East & we will be outside its second entrance. Across from where we exit, past a monorail column, we can spot a Camera on a horse statue pillar.

Tyger Camera #45: Hop over the gates South into the next area of the Jezebel Center, past the Proximity Mines. Enter the junction area with the Gun Thugs & we can find a Camera on one of the corners.

Tyger Camera #46: Carry on East out of the Jezebel Center & we can spot a Camera to the left of a neon red Hotel sign off our right.

Riddler Trophy #88: Grapple out of the Jezebel Center up to the building above to the West. Here we can find a Trophy Cage with a vent system that leads to a Question Mark. To open the Cage, we must guide a Remote Controlled Batarang through the vents to strike that Question Mark. Guide the Batarang through the first vent & it will exit into a small chain link enclosure; make the Batarang do a U-Turn & guide it into a different vent paralleling the first to get to the Question Mark.

Riddler Trophy #89: Hop off the building towards the West now & drop down to the concourse where we can spot a Trophy Cage & three Pressure Plates; one on the floor beside the Cage, above the Cage on the wall, then across the opposite side of the concourse on the building wall we were just on.

To open the cage, we must activate all three Pressure Plates without touching the ground or any object. Glide off of the building we found the last Trophy on to the Pressure Plate on the wall above the Cage; push off the wall & Glide towards the Pressure Plate on the opposite wall; push off THAT wall & Glide to the Plate on the floor to open the Cage.

Riddler Trophy #90: From the last Trophy, walk down the concourse South & look to your right to see a Structural Weakness in the wall; destroy it with Explosive Gel to get at a Trophy.

Riddler Trophy #91: Grapple onto the building’s roof above us to the West now. At the top, we can see a Rolling Cage puzzle with a Pressure Plate & two Industrial Motors. Use the Remote Electrical Charge to guide the Cage through the puzzle to the end; standing on & off the Pressure Plate to open Grates to let the Cage pass by.

Riddler Trophy #92: Make your way to the bottom South East end of The Bowery & we can locate a Trophy Cage with two Pressure Plates near it; a third can be found on top of the roof South of the Cage. We need to activate all three Pressure Plates without touching the ground or any object. Stand on the isolated Pressure Plate on the roof first, then Glide down to one of the lower down ones. Next, Grapnel Boost up into the air & Glide down onto the final Pressure Plate to open the Cage.

Tyger Camera #47: Make your way over to the front entrance of the Arkham City Processing Center & we can find a Camera up above the sealed doors.

Riddler Trophy #93: Now Grapple up above the Arkham City Processing Center entrance to an upper balcony where a Tyger Security Console is. Look above the Console, & we can find a Trophy stuck to the wall a ways up; grab it with the Batclaw.

Riddler Trophy #94: Head North down an alley close to the Arkham City Processing Center & take a right to see a Trophy stuck in a chain link enclosure barred by a burst pipe jetting steam. There is a very small space in between the chain link walls; pull out the Batclaw & slowly walk back & forth near the space until you see a prompt to use the Batclaw. This is not how we are supposed to get this Riddler Trophy, but it does work (you would normally need to come here with the Freeze Blast to seal the steaming vent).

Riddler Trophy #95: Grapple over the building West of us & drop down into the next alley where a small Thug fortification is. Turn on Detective Mode, & Grapple onto the large vent system above us where we can see some Soft Wood Paneling on a nearby wall. Grapnel Boost up into the air & Glide down through the Wood Panels to access the Trophy behind them.

Smashing these Soft Wood Panels also lets Catwoman access one of her Trophies up above us here.
Sequence 12: Where Were We?
1. Main Story: Finding the Cure
2. Side Missions: 1/12
3. Joker Balloons: 17/24
4. Tyger Cameras: 48/48
5. Riddles: 1/69
6. Riddler Trophies: 104/247
7. Catwoman Trophies: 12/35
8. Achievements: 9/64
-----------------------------------------------------------------------------------------------------

The Bowery:


Riddler Trophy #96: Grapple onto the building just to the North West of our position & we can find a room on the building’s roof that has a Structural Weakness in it. Destroy it with our Explosive Gel to grab the Trophy.

Riddler Trophy #97: Make your way down South now & drop down into the streets below. Hop over a small concrete wall & we can spot a Trophy Cage; turn on Detective Mode & we can see two electrical cables leading off left & right to two Question Marks. First, approach the Question Mark off our left & spray some Explosive Gel onto it. Now walk over to the Question Mark that was off our right, around the corner. Detonate the Explosive Gel & a 3 second timer will initiate; quickly throw a Batarang to activate the second Question Mark & unlock the Trophy Cage.

Tyger Camera #48: Hop onto the concrete wall near us & look up to West. On the building wall to the left of the Bank of Gotham, we can find our final Tyger Camera.

Riddler Trophy #98: From the last Trophy, turn on Detective Mode & look way up to the monorail system to the South. At the end of the broken rail, we can see a lone monorail car with some Soft Wood Paneling blocking its door. Grapnel Boost up & carefully Glide through the Panels to find a Trophy.

Riddler Trophy #99: For the final Collectible of our Blitz, Grapple on top of the monorail system & follow it West underneath a large bridge where we can see three Question Marks on either side of us with a Trophy Cage on the ceiling. Face one set of three Question Marks & use our Batarang Quick Fire & quickly throw three Batarangs. When the first three Question Marks get activated, we will only have 2 seconds to spin around & Batarang Quick Fire at the other set. If done successfully, the Trophy Cage will open & we can claim the Trophy with the Batclaw.

With that, we are finally done the bulk of these Collectibles. There are a few more buildings we can enter for other Collectibles but we will save them as they appear later on.

As of this point, we should also have Cold Call Killer progressed to around 60% Complete & Acts of Violence progressed to around 18% Complete. Your exact percentage may vary plus or minus.

Amusement Mile – GCPD Building:


Cryptographic Sequencer – Municipal Codes: At long last, we can now finally progress the Main Story Mission – Find the Cure. Enter the GCPD Building & dispatch the Gun Thugs inside. When we go to leave, Penguin will trap us in the building & we will download the Municipal Codes to our Cryptographic Sequencer.

Riddler Trophy #100: Before we exit the building, we can snag two Collectibles here at GCPD. Near where we entered the GCPD Building, head left down the hall to find a Riddler Trophy trapped in a containment cell. If you look up go the top right corner of the containment cell door, we can see a small open space above the glass big enough to fit a Batarang. To access the cell, head East in the building towards the Morgue where we will be stopped by some steaming pipes.

This is the tricky bit. Throw a Remote Controlled Batarang past the steam & up to the ceiling where some electricity will be discharging from some wires. Electrify the Batarang, & guide it back through the steam. Now lead the Batarang all the way back to the Trophy containment cell & thread it through the space by the door. At the back of the containment cell will be a Fuse Box; slam the electrified Batarang into the Fuse Box to open the cell doors.

Riddler Trophy #101: Now that we have the Municipal Codes, walk East from the GCPD entrance & we can find a Municipal Security Console on the wall down the hall. Use the Cryptographic Sequencer to solve for the password & open the nearby containment cell.

Inside the cell, we can find a Structural Weakness in a wall; blow up the wall with our Explosive Gel to find a Trophy behind it.

Park Row – Church/Medical Center:


Side Mission #7 – Enigma Conundrum 1: When we exit the GCPD Building on route to The Bowery, we will receive a new Side Mission asking us to locate the missing medical team. Head to the Church in Park Row & head inside where we will be confronted by The Riddler.

We will need to solve the Riddle “I am an instrument whose music always comes from the heart. What am I?”

Go to the far end of the Church & enter Detective Mode; Scan the pipe organ at the back to complete the Riddle.


Achievement #9 – IQ Test: Solve the first Riddle.
Solve the Riddle in the Church/Medical Center during Side Mission #8 – Enigma Conundrum to unlock the Achievement.

Riddle #1: “If you find the name, does the Cash come hand in hand?”
While still in the Church, head to a small alcove in the West end near the entrance to the bell tower. At the end of the alcove, we can find a table with a lit lamp that has Aaron Cash’s ID tag on it as well as a picture of him & his family; Scan the picture frame of his family to complete the Riddle.

Riddler Trophy #102: Grapple onto the Gargoyle above the Church’s front entrance & turn on Detective Mode. Facing back into the Church, we can see some Soft Wood Paneling in the wall to our left. Glide off the Gargoyle & angle yourself through the Paneling to find a Trophy behind it.

Riddler Trophy #103: Go to the South East end of the Church & head to the treatment area past a red Medical Center banner. Turn on Detective Mode here & we can see some Soft Wood Paneling on the side of an old confessional; punch through it to find a Trophy.

Riddler Trophy #104: Enter through the bell tower doors now & Grapple up to the first level below where the bell used to hang. Turn around to look back where we came from & we can spot a Riddler Trophy on the ceiling below the second floor of the bell tower. We can collect it with the Batclaw.

That is every Collectible to be found here in the Church.
Sequence 13: Calendar Man
1. Main Story: Finding the Cure
2. Side Missions: 1/12
3. Joker Balloons: 17/24
4. Riddles: 3/69
5. Riddler Trophies: 106/247
6. Catwoman Trophies: 12/35
7. Achievements: 12/64
-----------------------------------------------------------------------------------------------------

Park Row – Solomon Wayne Courthouse:
As we Level up, make a point of trying to obtain the Cryptographic Range Amplifier & the Cryptographic Power Amplifier Upgrades for later Collectibles.


Side Mission #7 – Enigma Conundrum 2: Immediately after solving the first Riddle in the Enigma Conundrum, The Riddler will tell us that a Hostage can be found in the Courthouse. When we exit the Church, we will be accosted by some of The Riddler’s Thugs; Interrogating the Informant will add the locations of some Collectibles to our World Map. These Informants will now spawn throughout Arkham City…

Enter the Courthouse, & we can find the Hostage being held by a group of Thugs. Dispatch the Thugs, & untie M.P.T. Eddie Burlow. He will then give us the Enigma Machine; open up the Enigma tab of your PDA & solve the Riddle: “If you know me, you’ll want to share me but if you share me, I’ll be gone. What am I?” The answer to the Riddle is “Secret.” After solving the Riddle, we will then be able to locate the next Hostage. 5% Complete

Riddle #2: “BANG! BANG! Order in the court.”
In the main room of the courthouse, approach the glass security room Two-Face was in during the third Main Story Mission. Zoom in to the judge’s mallet on the desk beside the two handguns & Scan them to complete the Riddle.

Riddler Trophy #105: Make your way to the North end of the building & head into the basement. As soon as you begin walking down the stairs, turn around & we can see a Trophy stuck above the doorframe we passed through; use the Batclaw to collect it.

Riddle #3: “Who's crazy enough to date this guy?”
Enter the second room of the basement where the solitary confinement cells are located. In the second cell, we can find Calendar Man sitting on his bed; Scan him to complete the Riddle.

Riddler Trophy #106: In the cell next to Calendar Man’s we can spot a Riddler Trophy. Turn on Detective Mode, & we can follow an electrical wire to a Fuse Box powering the door to the cell. Now quickly run upstairs in the courthouse & take a right to the North exit where we can see some electricity arcing between two steel girders.

Throw a Remote Controlled Batarang & guide it through the electricity to electrify it. Carefully guide the electrified Batarang down into the basement, straight ahead, & into the Fuse Box to open the cell door to the Trophy.

There are no more Collectibles found in the Solomon Wayne Courthouse.


Achievement #10 – Storyteller: Have 12 murderous dates with Calendar Man.
To unlock this Achievement, we must speak with Calendar Man on 12 specific holidays. The game tracks your computer’s clock, so to do so legitimately, you must wait until that holiday. Since it tracks your computer’s clock however, we can exploit this by simply changing the clock to each day manually. As well, the exact day some of the holidays fall on will change per year; if you are changing your clock manually be sure the days are in the correct year. The only holidays with changing dates are Mother’s Day, Father’s Day, Labor Day, & Thanksgiving.

When the date is correct, head down into the Courthouse basement & speak with Calendar Man to trigger a unique set of dialogue for that holiday. Wait until Calendar Man sits back down on his bed & exit the Courthouse into Park Row to Save your game, then Shift + Tab to bring up the Steam Overlay (or whatever you have that set to) & minimize to your desktop. Change your computers date to the next holiday, re-enter your game, enter back into the Courthouse so it registers the change in date... Rinse & repeat. Note that if you are playing this on console, you have to exit the Courthouse to Save & quit the game entirely to be able to change your consoles date.

2022 Holidays:
1. New Years Day – January 1st
2. Valentines Day – February 14th
3. St. Patrick’s Day – March 17th
4. April Fools Day – April 1st
5. Mother’s Day – May 8th
6. Father’s Day – June 19th
7. Independence Day – July 4th
8. St. Roch’s Day – August 16th
9. Labor Day – September 5th
10. Halloween – October 31st
11. Thanksgiving – November 24th
12. Christmas – December 25th

This Achievement can be unlocked cumulatively & does not need to be completed in one sitting & can be done at any point during the playthrough. The calendar beside Calendar Man’s cell will keep track of which holidays you have already completed.

Park Row:

Side Mission #7 – Enigma Conundrum 3: If you completed the Enigma Machine riddle we unlocked, we can now locate our first official Hostage. Approach the Waypoint just West of the Church & interact with the wall of The Black Canary with a green question mark painted on it. Enter into The Black Canary & throw a Batarang at the Question Mark above the door we came through to unlock the way ahead.

Enter the next room to find it full of electrified tiles; the Hostage tied up above us. Directly across from us is a Question Mark that will turn off a pathway through the tiles for 20 seconds; there is another one just to the right of the rooms entrance. Make your way from safe zone to safe zone until you reach the lift at the other side of the room. Strike the Question Mark on the wall to our left to activate the lift & take us to the top. Glide off the top of the lift over to the Hostage & rescue them.


Achievement #11 – Conundrum: Rescue the first Hostage from Riddler.
The Achievement will unlock after we receive The Riddler’s next coded radio broadcast 6-2-5, 9-2-5 from the Hostage, Medic Adam Hamasaki.

Side Mission #7 – Enigma Conundrum 4: Use the Cryptographic Sequencer & if you have completed 80/400 Riddler Collectibles/Challenges, then we can decode The Riddler’s next broadcast to receive the riddle: “The more there is, the less you see. What could I be?”
The answer is “Darkness”. Solving the riddle will let us go & save another Hostage.

Amusement Mile:

Side Mission #7 – Enigma Conundrum 5: If you completed the last Enigma Machine riddle we unlocked, make your way to the next Hostage Waypoint in Amusement Mile. Interact with the wall with the green question mark painted on it & enter the hideout. In the first room of the hideout, stand on the Pressure Plate on the lower floor & we will activate the mini-game to save the Hostage. The Hostage will be hidden behind one of three containers that will be shuffled around. This puzzle is rigged however as you will find out if you turn on Detective Mode as the Hostage is actually shuffled below the containers. Throw a Batarang at the Question Mark below where the Hostage is located & jump over to rescue them.

Failing will kill the Hostage, & give us a Game Over Screen which we can Retry the mini-game from. 30% Complete


Achievement #12 – Mastermind: Rescue the second Hostage from Riddler.
The Achievement will unlock after we receive The Riddler’s next coded radio broadcast 8-6-0, 1-2-0 from the Hostage, M.P.T. William North.

We need to collect 160/400 Riddler Collectibles to be able to decode the next broadcast.
Sequence 14: Going Under
1. Main Story: Finding the Cure, Disable the Disrupters
2. Side Missions: 1/12
3. Joker Balloons: 17/24
4. Riddles: 7/69
5. Riddler Trophies: 118/247
6. Catwoman Trophies: 12/35
7. Achievements: 13/64
-----------------------------------------------------------------------------------------------------

Museum:
Continue with the Main Story & make your way over to the Museum in The Bowery. Use the Cryptographic Sequencer to decode the door lock & head inside. When we try to hack the next Console inside to progress, we will be literally disrupted by Penguin. To carry on in the Museum, we need to first disable Penguin’s Disrupters. Disable the first two Disrupters then make your way underground into the Subway located below the Jezebel Center to find the third.

Subway Station:


Subway Station:

Riddler Trophy #107: When we first enter the Subway, enter into the room at the West end where a Catwoman Trophy is located. In this room, we can find a Vent Cover we can tear down to enter a stone room with a Structural Weakness in the floor. Destroy the floor with our Explosive Gel & we will drop down to a Trophy.

Riddler Trophy #108: Head down the stairs to the lower floor of the Subway Station & we can see a Vent Cover at the bottom off our right. Tear the Cover down, & crawl through the tight spaces to find a Trophy.

Riddler Trophy #109: At the opposite end of the Subway Station’s lower floor will be a line of Floor Grates. Drop through the grates & we can find a Trophy in the middle of them.

Riddle #4: “BOARD at drive-time? I'm not going to broadcast any more clues!”
In the East corner of the Subway’s lower floor, we can spot a Vicki Vale billboard; Scan it to complete the Riddle.

Subway Tunnels:

Riddler Trophy #110: Begin making your way East through the Subway Tunnels & break throughs some Soft Wood Paneling in a wall blocking our way. On the other side of the wall, head West back towards where we entered the Tunnels from on this lower tunnel & drop down off the train car to see a Trophy directly below us on the ground.

Riddle #5: “This question can only be answered from an unusual perspective. Can you get yourself there?”
Grapple back onto the train car we dropped off of & this time drop off its East side, onto the ground. Enter the train car & walk to the back. Turn on Detective Mode & we can see a Question Mark painted on the wall to our right, with a Dot painted on the train’s window off our left. Look at the Dot painted on the window & we can actually see the Question Mark on the windows reflection too; align the two pieces & Scan them to complete the Riddle.

Side Mission #4 – Fragile Alliance 4: Carry on through the Subway Tunnels & we will come across our third Titan Container guarded by a few Thugs. Dispatch them & use our Explosive Gel to destroy the Container. 45% Complete

Riddle #6: “Coming back from the dead is cheating on any day of the week.”
From the Titan Container, look at the large wall painted with Solomon Grundy on it & Scan it to complete the Riddle.

Riddler Trophy #111: Before carrying on through the Industrial Motor operated door, look North & hop over some rubble. Using our Explosive Gel, blow up a Structural Weakness in the nearby wall & we will enter the lower level of the North train tunnel. Ignore the half-opened door with three Trophy Cages inside it & instead walk West to see a different Cage in the middle of the tracks with a Pressure Plate in front of it.

Stand on the Pressure Plate & we can faintly see a Question Mark activate in the train car ahead of us (there are actually three of them in there). To start, throw a Remote Controlled Batarang & guide it to the furthest Question Mark in the train. When we strike it, an 8 second timer will begin & we must quickly take out the other two Question Marks. Throw another Remote Controlled Batarang into the middle Question Mark, then Quick Throw our final Batarang into the closest Question Mark to open the Cage.

Subway Terminal:


Achievement #13 – Communication Break: Clear the airwaves.
Story Related. Enter into the Subway Terminal & dispatch Penguin’s Thugs along with the Communications Disrupter to unlock the Achievement.

Riddler Trophy #112: With the Disrupter taken care of, get up to the upper floor of the Subway Terminal & turn on Detective Mode. Look in the West corner of the Terminal & we can find some Soft Wood Paneling set into the upper wall. Glide off of one of the nearby Gargoyles through the Paneling to collect a Trophy.

Riddler Trophy #113: From the last Trophy, Grapple on top of the West most Gargoyle & drop down onto an isolated platform on the upper level. Walk inside a room & we can find a Riddler Security Console connected to a Trophy Cage. Use our Cryptographic Sequencer to disable the Trophy Cage.

Riddler Trophy #114: Drop down to the ground floor now & head inside the train car directly below where we are. Look on the trains ceiling to see a Trophy attached to it; collect it with the Batclaw.

Riddle #7: “It's vacation time. Where shall I go? Somewhere venomous?”
Exit the train car now & walk over to the North West corner of the lower level; Scan the poster board reading “Visit Santa Prisca” to complete the Riddle.

Riddler Trophy #115: Look to the left of the poster board & we can see an open crawlspace we can enter to find a Trophy.

Riddler Trophy #116: Exit the crawl space from where we entered & look directly above where we were in Detective Mode & we can faintly see a Fuse Box through a hole in the fencing above. Pull out our Remote Electrical Charge & shoot the Fuse Box through the hole. Now head up the staircase to our left & we can collect a Trophy on the floor above the last one.

Riddler Trophy #117: Head over to the South East corner of the Terminal now on the upper floor & we can see a line of Soft Wood Paneling set into the wall. Break down the Soft Wood Paneling to get into a side room where we can head down some stairs to find a Trophy in the open. You can alternatively enter through the nearby Floor Grates to get the Trophy as well...

Riddler Trophy #118: Pass through a door in the North end of the lower level of the Subway Terminal to enter a side area of the tunnels. Look to your right to see an Industrial Motor operated door; open it with our Remote Electric Charge to find a Trophy on the other side.
Sequence 15: A GCPD Rescue
1. Main Story: The Museum
2. Side Missions: 1/12
3. Joker Balloons: 17/24
4. Penguins: 5/12
5. Riddles: 9/69
6. Riddler Trophies: 127/247
7. Catwoman Trophies: 12/35
8. Achievements: 14/64
-----------------------------------------------------------------------------------------------------

The Bowery:

Side Mission #8 – Identity Theft 1: When we exit the Subway after destroying the Communication Disrupter, check your World Map to see a new Waypoint South of the Arkham City Processing Center claiming to be a Crime Scene. Approach the Waypoint & we can find a dead body near a barrel fire here beginning this new Side Mission. Approaching the body will activate the Side Mission; turn on Detective Mode & enter the Evidence Scanner which will allow us to track the victim’s blood on the ground.

Follow the blood trail & it will lead us to a Political Prisoner, progressing the Side Mission. 35% Complete

Museum:


Trophy Room:

Riddler Trophy #119: When we enter the Museum, you will notice some Soft Wood Paneling set into the wall off our left. Punch through it & hop through the hole we make to find a Trophy Cage & three Question Marks on the wall. Simply Quick Throw three Batarangs at the Question Marks to unlock the Cage.

Penguin #1: Enter into the room opposite the one we found the Riddler Trophy in through the glass window where the Municipal Security Console is, & we can find a ceramic Penguin statue in the back corner. Throw a Batarang at it to destroy it.

Riddler Trophy #120: Disable the security system now t& enter the large chamber of the Trophy Room & look to our left after being spooked by a T-Rex to find a Structural Weakness in the nearby wall. Destroy the wall with Explosive Gel to find a Trophy behind it.

Riddler Trophy #121: After dispatching the Thugs holding Officer Jones hostage, Grapple onto a large chain link lift way up near the ceiling in the center of the room to find a Trophy.

Riddle #8: “Who's in control here? The puppet or the puppeteer?”
Drop down to the ground floor & walk over to the North West corner of the room. Here we can find a glass exhibit that has the puppet Scar Face inside it; Scan it to complete the Riddle.

Penguin #2: Now head over to the far East end on the lower level to find a Penguin beside the soon to be Batman exhibit.

Riddler Trophy #122: We will need the Cryptographic Sequencer Range Amplifier for this next Collectible. Near the exit door of the Trophy Room, down the stairs, we can see a small space underneath a large security gate. Run & slide underneath it & pull up short before crossing under another gate. Turn on Detective Mode to see some security lasers barring our way ahead. Pull out our Cryptographic Sequencer & hack the Municipal Security Console near a Trophy to turn off the lasers.

Penguin #3: Turn around from the last Trophy & we can spot a Penguin on top of a glass display case to our left.

Unnamed Hallway:
Riddler Trophy #123: Before using our Remote Controlled Batarang to progress, head left instead & use our Remote Electrical Charge to open a door further down the hall to find a Trophy behind it.

Opening this door will also allow us to come back here as Catwoman to collect one of her own Trophies…

Riddle #9: “Was he framed? Or does it run in the family?”
Use the Remote Controlled Batarang to open the gates allowing us to continue onwards. At the far end of the hall, we can find a painting of Penguin & his family; Scan it to complete the Riddle.

Gladiator Pit:


Achievement #14 – Gladiator: Last man standing.
Story Related. Enter into the Gladiator Pit room & fight off the waves of Penguin’s men; defeat them all & the Titan Thug to unlock the Achievement.

Riddler Trophy #124: To carry on in the Gladiator Pit, look in the South corner of the room & turn on Detective Mode to see a Security Gate Override panel behind the electrified fencing. Guide a Remote Controlled Batarang into it to open the leftmost security gate.

Enter the new area we just unlocked & we can spot a Municipal Security Console, an Industrial Motor, & Structural Weakness behind a security gate off our left. First, use the Cryptographic Sequencer to hack the Console & open the security gate. Next, use our Remote Electrical Charge to send the elevator ahead of us upwards. Now approach the Structural Weakness & destroy it with Explosive Gel to find a Trophy.

Riddler Trophy #125: Send the elevator back down now using the Remote Electrical Charge, climb inside it & send it upwards once again. Look above us in the elevator to find another Structural Weakness. Destroy this one with Explosive Gel as well, & we can climb up to the second floor of the Gladiator Pit. Turn the corner from the elevator & we can see a Valve Cover; tear it open with the Batclaw & we can collect a Trophy behind the Cover with the Claw as well.

Penguin #4: Carry on along the second floor & destroy the Structural Weakness in our way with Explosive Gel. Walk over to the balcony we saw Cobblepot standing on previously & look out to our left where we can see a Penguin inside a hanging cage; take it out with a Remote Controlled Batarang.

Penguin #5: From the balcony on the second floor, head down the stairs off our left behind the electrified fencing to find another Penguin.

Riddler Trophy #126: Now for the tricky part. For reference, run back to the Remote Electrical Charge operated elevator & carry on down the hall past the exhibits filled with water where the hall ends with some iron bars. Look through the bars & turn on Detective Mode to see a Fuse Box tucked in the right corner against the wall. Look to the right of the iron bars ahead of us & we can see a small space in the bars… just big enough to guide a Batarang.

Return to the central room of the Gladiator Pit & look at one of the fences arcing electricity. See where this is going? Throw a Remote Controlled Batarang & guide it through the electricity to electrify it. Now guide the electrified Batarang down the halls, through the space in the iron bars, & into the Fuse Box to overload the circuits & partial raise the center security gate.
Take a running slide underneath the security gate & we can collect a Trophy half submerged in water ahead of us.

Riddler Trophy #127: Look to the right of where we just collected the last Trophy & we can see a breakable glass window. Jump through it into the next hallway & follow it down to find a Trophy in behind the final security gate; we can just walk up & collect it.

If you really want, you can guide an electrified Batarang over & overload this Fuse Box to open the security gate here, but it is unnecessary now that we have the Riddler Trophy behind it.
Sequence 16: The Light & The Glass
1. Main Story: The Museum
2. Side Missions: 1/12
3. Joker Balloons: 17/24
4. Penguins: 9/12
5. Riddles: 13/69
6. Riddler Trophies: 134/247
7. Catwoman Trophies: 12/35
8. Achievements: 15/64
-----------------------------------------------------------------------------------------------------

Museum:


Torture Chamber:

Riddler Trophy #128: After you save Officer Forrester, drop down onto the fragile ice, & very carefully turn around to face the lower East wall of the room where we can find a Valve Cover. Use the Batclaw to open the Cover & use it again to collect the Trophy hidden behind it.

If you wait until after completing the Main Story Mission – Museum, all the fragile ice will have melted & we will have to tediously travel around the room using the Batclaw & a Raft until we get the Freeze Blast later on...

Riddle #10: “This question can only be answered from an unusual perspective. Can you get yourself there?”
After collecting the last Trophy, very carefully begin walking West along the fragile ice. When we reach a narrow piece of the ice, a short event will trigger where Tiny the Shark will bite out the ice beside us. From this position, turn on Detective Mode & look across to the West where we can see a Question Mark painted on the far wall at the back of the room. We can see the Dot on a pillar in the middle of the water surrounded by Anchor Points. We basically need to walk to the far East end of the fragile ice to be able to align the two pieces; when you do, Scan them to complete the Riddle.

Penguin #6: Cut down the Raft in the North corner of the Torture Chamber & rescue Officers Whitman & Strickland encased in ice here. After they are freed, carry on North down the halls of the Torture Chamber & we can find a Penguin sitting on top of a wooden rowboat exhibit.

Riddler Trophy #129: Turn around from the Penguin & we can see an Industrial Motor operated door. Open it using the Remote Electrical Charge & crouch underneath it to find a Trophy Cage & Question Mark puzzle. Watch the circular Question Mark wheel rotate in its activations & time a Batarang to hit it an activated one to open the Cage. You can basically just spam Quick Throw until you hit it…

Armory:

Riddler Trophy #130: Carry on North through the Museum & enter the Armory where we can save Officers Miller, Sanchez, & Michaels. With the room secured, return to where we entered the Armory on the second floor & begin making your way around counterclockwise. Rounding the corner from the entrance, we can see some Soft Wooden Paneling in our way; punch through it to find a Trophy near a hole in the floor.

Penguin #7: From the Trophy, drop down through the hole in the floor to the lower level of the Armory & punch through another wall of Soft Wood Paneling. We can find a Penguin in a broken open exhibit off our left.

Riddler Trophy #131: Carry on North on the lower level of the Armory to the far North East corner where we can spot a Trophy locked behind a security gate. Use our Cryptographic Sequencer to hack the Municipal Security Console to the gates left to open it.

Riddle #11: “See no evil, hear no evil, speak no evil, or there will be explosives consequences.”
Continue around the lower level counterclockwise over to the North West end of the Armory. In the far corner, we can see a glass exhibit with three skeletons inside it all holding frag grenades in front of their faces; Scan the skeletons to complete the Riddle.

Riddler Trophy #132: Go to the far South end of the Armory’s lower floor & we can see a line of Floor Grates. Hop inside them & we can find a Trophy in the middle of one of the crawlspaces; it helps being in First Person View to see it, though it is hard to miss.

Penguin #8: Head to the center of the lower floor where the disturbingly rendered mammoth display is & we can find a Penguin underneath it between its feet.

Riddler Trophy #133: This Riddler Trophy requires the Cryptographic Sequencer Range Amplifier Upgrade.
From the Penguin underneath the mammoth, look up above us to the underside of the bridge in the West corner & we can see a Riddler Security Console connected to a Trophy Cage. Hack it with our Cryptographic Sequencer & use our Batclaw to collect the Trophy.

War Room:

Penguin #9: Leave the Armory back into the Torture Chamber & head South across the fragile ice & down the hall past the Thugs into the War Room. Walk down the hall to the corner & we can find a Penguin on a table immediately to our right.

Riddle #12: “Have Joker's pets laughed themselves to death, or just eaten too much?”
From the Penguin, continue down the hall & up some stairs where our way will be barred by a half-closed security gate. Before sliding under it, look to its left to see an exhibit with two hyenas that have hats on in it; Scan the Hyenas to complete the Riddle.

Side Mission #4 – Fragile Alliance 5: Slide under the gate & make your way to the right of where Mr. Freeze is being kept to find a Structural Weakness in a wall down the hall. Dispatch the second Abramovici Brother & continue down the hall, past the Municipal Security Console, & we can find the fourth Titan Container.

Riddle #13: “Brothers in arms. Brother at war. Who's right? Who's... Left?”
Look to the left of the Titan Container to see a poster of the two one-armed Abramovici Brothers; Scan in it complete the Riddle.

Riddler Trophy #134: Free Mr. Freeze from the Hawaii exhibit, & after basically almost killing him, walk inside the exhibit & we can find a Trophy inside a treasure chest prop. Batman didn’t have his coffee this morning it seems…

Iceberg Lounge:


Achievement #15 – Wrecking Ball: Stop the unstoppable.
Story Related. After acquiring the Disrupter – Freeze Override from Mr. Freeze’s suit in the Armory, head to the Iceberg Lounge & confront Penguin where we will then need to fight the Solomon Grundy boss battle. Disable his electric charges & beat him down twice to defeat him & unlock the Achievement.

Completing the Main Story Mission – Museum will unlock the Disrupter – Firearm Jammer Upgrade for us to purchase. After unlocking the two Upgrades for the Cryptographic Sequencer, this will become our new priority to unlock for some Collectibles.

Park Row:


Side Mission #8 – Identity Theft 2: After tracking down the Assassin & obtaining the Line Launcher, make your way to the Waypoint on the Screenshot above in Park Row where can find our next victim in an isolated alley. Use the Evidence Scanner to collect more information on the killer. 50% Complete
Sequence 17: The League of Assassins
1. Main Story: Wonder City
2. Side Missions: 1/12
3. Joker Balloons: 17/24
4. Joker Teeth: 7/12
5. Penguins: 9/12
6. Riddles: 14/69
7. Riddler Trophies: 143/247
8. Catwoman Trophies: 12/35
9. Achievements: 15/64
-----------------------------------------------------------------------------------------------------

Subway:


Subway Maintenance Access:

Riddler Trophy #135: Follow the Assassin’s signal into the Industrial District & drop into the East entrance to the old Subway. From where we land, we can see some electricity arcing between some iron bars off our left. Further down the tunnel ahead of us, we can see a Fuse Box & a Trophy behind some more iron bars at the end of the tunnel. Use a Remote Controlled Batarang & electrify it with the nearby electricity; guide it into the Fuse Box to be able to access the Trophy.

Joker Teeth #1: As we walk down the tunnel towards the last Riddler Trophy we can see a set of Joker Teeth scuttling around just before a gap we have to jump over. Destroy it with a Batarang.

Joker Teeth #2: Head West down the Subway tunnel & we can spot another set of Joker Teeth in front of the next gap we have to jump over.

Riddler Trophy #136: After dispatching the Joker Teeth, look across the gap to see a Riddler Trophy on an isolated ledge in front of us. Use our newly acquired Line Launcher to reach it.

Riddle #14: Turn around from the Trophy & turn on Detective Mode to see a Structural Weakness in the floor in front of us. Destroy it with Explosive Gel & drop down into a secret hideaway. Scan the pictures of Killer Croc on the wall to complete the Riddle.

Side Mission #7 – Enigma Conundrum 6: If you have been following along with the guide, after collecting some of the Riddler Trophies down in the Subway here you may get a prompt to use the Enigma Machine. This was supposed to trigger after completing 160 Riddler Challenges, but currently we have done around 185 (not including your completed Physical Challenges). I am pretty sure it becomes available after we receive the Line Launcher Gadget plus the 160 Riddler Challenges…

Regardless of when the prompt occurs, open up the Enigma Machine & solve the puzzle. The riddle is: “I have a head, a tail, but never any legs. Do you know what I am?” The answer is Penny. We will unlock the location of the third Hostage, but we will rescue them when we complete the current Main Story Mission – Wonder City.

Joker Teeth #3: Crouch under a lowered iron gate to continue onwards & we can see a set of Teeth scuttling in front of us.

Riddler Trophy #137: Use the Line Launcher to progress down the tunnel & we will see a Hint to fire it again in mid hang to change our course. When we reach the Catwoman Trophy above us, hold the trigger to slow down time & fire the Line Launcher to our right to get at a Riddler Trophy.

Joker Teeth #4: Keep heading through the Maintenance Access & crouch underneath another iron gate to find a set of Joker Teeth just before we bust through some Soft Wood Paneling in the floor to attack some of Joker’s Thugs.

Subway Terminal:

Joker Teeth #5: After we dispatch the group of Thug’s below us, we can find another set of Teeth scuttling around the room here.

After we hack the Municipal Security Console to open the doors into the main Terminal room we will unlock the Line Launcher – Tight Rope Upgrade to purchase; make this our next priority buy…

Joker Teeth #6: Before we follow the Assassin’s signal North through the door out of the main room, quickly jog past where the broken Communications Disrupter is & we can see a set of Joker Teeth in front of the stairs leading up to the second floor.

Riddler Trophy #138: When we reach the gap where we have to use the Line Launcher to get across the water, look up to the left over the water to see a Trophy Cage & a Riddler Security Console. With the Range Amplifier, use the Cryptographic Sequencer to open the Trophy Cage; collect the Trophy with the Batclaw.

Joker Teeth #7: Use the Line Launcher to get across the water now & Grapple up onto the ledge with the exit doors to find a set of Teeth scuttling in front of them.

Wonder City:


Collapsed Streets 1:

Riddler Trophy #139: When we first enter the Collapsed Streets, walk down the hall a little ways & look up to your left to see a room we can Grapple up to. Do so, & we can find a Trophy up here on the floor.

Riddler Trophy #140: Carry on down the hall & we can break through a window straight ahead of us into a small room. Inside here is a Trophy Cage that will close immediately when we enter the room, & open when we exit which means we have to collect it from afar using the Batclaw. In the same room as the Trophy Cage, we can find a Structural Weakness in one of the nearby windows we can destroy with Explosive Gel.

After it is destroyed, exit the room, & use the Line Launcher to maneuver around to the other side of the room by firing a second line off your right. From here, we can look through the window we just opened up & collect the Trophy with the Batclaw.

Riddler Trophy #141: From where we stood to collect the last Trophy, look out across the gap to the South & we can see another Trophy out in the open on an isolated ledge; we can just grab it as well using the Batclaw.

Riddler Trophy #142: While still on this ledge, look up to the right of the wall of the room with Joker’s Thugs in it to see a hole we can Grapple up through. Walk into the room above where the Thugs are & we can find a Trophy on the ceiling that we can also collect with the Batclaw.

Riddler Trophy #143: If you stand back on the other side of the window we jumped through to enter the room with the caged Riddler Trophy #141, look up using Detective Mode to see some Soft Wood Paneling above us. To break it, use the Line Launcher to ride over to the far West end of the room where Dr. Arcadian’s Elixir of Life is painted on large set of steel doors. Turn around back to where we came from & Glide off of the edge over towards the East side now; angling down towards the water. If you get close enough to the other side/far enough down towards the water, we will be able to Grapnel Boost off the top ledge & launch ourselves headfirst through the Soft Wood Paneling. With it broken, we can now collect the Trophy using the Batclaw.
Sequence 18: Master & Apprentice
1. Main Story: Wonder City
2. Side Missions: 1/12
3. Joker Balloons: 17/24
4. Joker Teeth: 7/12
5. Penguins: 9/12
6. Demon Seals: 9/12
7. Riddles: 18/69
8. Riddler Trophies: 151/247
9. Catwoman Trophies: 12/35
10. Achievements: 17/64
-----------------------------------------------------------------------------------------------------

Wonder City:


Wonder Tower Foundations:

Side Mission #4 – Fragile Alliance 6: Enter through the doors into the next room of Wonder Tower & rescue Fiona Wilson. Once she is safe, drop down onto the second floor of the Wonder Tower Foundations to find our fifth Titan Container to destroy. Only one left.

Riddler Trophy #144: Drop down to the first floor now & go to the far South East corner of the room; the Trophy will be out in the open near some Floor Grates.

Riddler Trophy #145: Grapple up to the second floor again & make your way to the far East corner of the room. Turn on Detective Mode, & we can see a Structural Weakness in between The Tea Hut & Ice Cream Candy stores. Destroy it with Explosive Gel to find a Trophy.

Riddle #15: “Crime is a global issue. You'll never stop it, Batman.”
In the center of the room on the lower floor, we can see a rotating globe; Scan it to complete the Riddle.

Demon Seal #1: There is a new type of Collectible we need to destroy in Wonder City called Demon Seals. The Demon Seals look like bat/wolf statue heads that have a circular door knocker on them; they can be destroyed by being pulled down with the Batclaw. We can find the first one on the lower floor in the North West corner under the stairs.

Demon Seal #2: Head up the stairs to the North, up to the second floor & we can see another Demon Seal in between an angel statue & a Gargoyle.

Demon Seal #3: Grapple up to the third floor now & make your way to the South side of the Wonder Tower itself to find a Demon Seal above the entrance to the currently deactivated elevator chamber.

Wonder Avenue:

Demon Seal #4: Follow our Assassin tracking signal North through Wonder City & use the Remote Electrical Charge to open the first two doors. After passing through the room with all the hung Thugs & fighting off the three Assassins, we can see a Demon Seal directly ahead of us above the next door.

Demon Seal #5: After pulling down the last Demon Seal, turn around to look above the door we just came through to find a second Demon Seal here.


Achievement #16 – Lost & Found: Uncover the secret of Arkham City.
Story Related. Uncover the Industrial Motor in the final room of Wonder City Avenue with Explosive Gel, & open the third door to enter Wonder Avenue proper & unlock the Achievement.

Riddle #16: When we walk into Wonder Avenue proper, head down the first street to our right & look to your right to see a stand up sign reading “Gotham City Times Wonder City: Shut Down.” Scan it to complete the Riddle.

Riddler Trophy #146: From the sign we just Scanned, Grapple up onto the ledge ahead of us down the street, leap across to the next chain link ledge, & look at the building wall to our left. Inside the building here, we can see a Trophy Cage & a Pressure Plate. To open the Cage, we need to stand on all three Pressure Plates without touching the ground at all.

To start, stand on the first Pressure Plate in the room with the Trophy Cage. Now look out across from where we entered this room to see another Plate; use the Line Launcher to get over to it. From the second Pressure Plate, look out across Wonder Avenue to the West to spot the third & final Plate we can access with the Line Launcher. If you managed to land on all three Pressure Plates, the Cage will open for us.

Riddler Trophy #147: Head back to the main street of Wonder Avenue & continue North where we will get a small cinematic of Batman trying to deduce how to carry on. Before Scanning the Mechanical Guardian, look at the building to the right of Billingham Butchers to see a small space under a brick wall we can slide under. Slide under the wall to find a Trophy.

Demon Seal #6: Approach the door to the Temple of Wonder City & look above it to find a Demon Seal.

Riddler Trophy #148: Turn around from the door to the Temple of Wonder City & face South. Head down the alley to our right past the Furniture Store & the alley will open up where we can find a Trophy inside a stroller beside a lamp post.

Riddler Trophy #149: From the stroller, head down the alley towards the North West corner of Wonder Avenue. Across from a Question Mark, we can find some Soft Wood Paneling; punch through it to collect a Trophy.

Riddler Trophy #150: Now for that Question Mark. First, we need to Scan the Mechanical Guardians if you have not already done so & open up the Assassin’s Secret Corridor. Enter the passage & we can see a Structural Weakness ahead of us we can destroy with Explosive Gel to find a Trophy Cage.

Remember where that Question Mark was in the North West corner of Wonder Avenue? There are two ways we can do this: one is flying a Remote Controlled Batarang over to strike the Question Mark, or we can walk over to it, spray Explosive Gel on it, & Detonate it back at the Trophy Cage.

Chamber of the Demon:


Achievement #17 – Sandstorm: We are legion.
Story Related. Complete the Demon Trials & defeat Rā’s al Ghūl to unlock the Achievement.

Demon Seal #7: After defeating Rā’s, we will exit outside the Lazarus Pit back into the Chamber of the Demon. We can then find two Demon Seals on the doors ahead of us leading into the next area.

Demon Seal #8: Found adjacent to the last Demon Seal outside the Lazarus Pit.

Riddle #17: “Do these demonic twins pose a threat?”
Turn around to face the doors to the Lazarus Pit & try getting both of the statues of Rā’s al Ghūl on screen; Scan them to complete the Riddle.

Demon Seal #9: Head through the doors into the main room of the Chamber of the Demon & we can see a Demon Seal immediately across from us when we enter.

Riddle #18: “Wanted: Dead... & alive?”
From the Demon Seal, head left, down the street & we can find a “wanted” poster board of Solomon Grundy to the left of the blocked doors; Scan it to complete the Riddle.

Riddler Trophy #151: Make your way to the opposite end of the street now & approach the doors at the dead end. Use our Remote Electrical Charge to open up the door & we can find a Trophy in the center of the room here.
Sequence 19: The Telling Truth
1. Main Story: Mr. Freeze, Rescue Vicki Vale
2. Side Missions: 2/12
3. Joker Balloons: 17/24
4. Joker Teeth: 12/12
5. Penguins: 9/12
6. Demon Seals: 9/12
7. Riddles: 18/69
8. Riddler Trophies: 154/247
9. Catwoman Trophies: 12/35
10. Achievements: 19/64
-----------------------------------------------------------------------------------------------------

Subway:


Subway Terminal:

Joker Teeth #8: Exit out of Wonder City back into the Subway. Our path to the Industrial District will be barred (though we can meet up with Killer Croc down that way) so we will have to exit into The Bowery instead.

Regardless of whether you dispatch the Joker’s Thugs in the Terminal or not, make your way to the room’s West exit & we can find a set of Joker Teeth.

Subway Tunnels:

Joker Teeth #9: Enter into the Subway Tunnels & Grapple onto the train car & head through the hole in the wall into the tunnel leading out where we can see a set of Joker Teeth on top of the next train car.

Joker Teeth #10: Carry on through the Subway Tunnels & drop down to where we enter the Subway Station where we can find some more Joker Teeth below us on the ground.

Subway Station:

Joker Teeth #11: Enter into the lower level of the Subway Station & dispatch the newly recruited Thugs to the Joker’s gang; we can find a set of Joker Teeth near the far West end of the room.

Joker Teeth #12: Use our Cryptographic Sequencer to hack either Municipals Security Console on the lower level so we can take the stairs up to the upper floor. We can find our final set of Joker Teeth in a small office room next to a dead Penguin Thug sitting in a chair.

Riddler Trophy #152: Look across from the room we found the Joker Teeth in to see a room locked by iron bars. Use our Cryptographic Sequencer to hack the nearby Municipal Security Console to unlock the room to us.

The Bowery:


Side Mission #5 – Watcher In the Wings 3: After exiting the Subway, go & interrogate Quincy Sharp for information for the next Main Story Mission. When we fling him away, we can actually see the Mysterious Watcher on the rooftop across from us. Grapple over to him & Scan the next symbol to progress the Side Mission. 60% Complete

Museum:

Side Mission #9 – Remote Hideaway: Once we complete the Main Story Mission – Wonder City, we can see a new Waypoint on our World Map near The Museum reading “Undercover Cops with Gadget Upgrades”. Dispatch the Thugs outside the North entrance to the Museum & head inside.

Speak with Officer Jones & we will be given the Mine Detonator Upgrade for our Disrupter. As simple as that. 100% Complete

Industrial District:

Side Mission #7 – Enigma Conundrum 7: Make your way over to the third Hostage’s waypoint in the Industrial District & head to the spray-painted question mark in the alley near some dumpsters. Sparta kick the wall & enter the lair.

To solve this puzzle, use the Line Launcher to get over to a walkway across the water. From the walkway, look up to see that the water flowing over the two Question Marks can be manipulated by using the Remote Electrical Charge on the Industrial Motors. The Question Mark on the right can be hit with a simple Batarang while the Question Mark on the left will need to be hit by a Remote Controlled Batarang. With the Security Gate disabled, use the Line Launcher to ride past the first set of circular saw traps. Once you are through, fire another Line off to your right before passing through the next set & you will enter the next puzzle room.

For this puzzle, simply use the Remote Electrical Charge to guide a Sionis Steel Pallet over towards a Pressure Plate with the three Industrial Motors nearby. With the next Security Gate disabled, we can now save an unnamed Doctor. The code she gives us is 6-0-6 1-2-0.


Achievement #18 – Puzzler: Rescue the third Hostage from Riddler.
Rescue the unnamed Doctor after completing the third puzzle to unlock the Achievement. This becomes available after we complete 160/400 Riddler Challenges as well as collected the Line Launcher.

GCPD Building:


Side Mission #10 – Heart of Ice 1: Carry on with the Main Story Mission – Mr. Freeze & head to the GCPD Building in Amusement Mile. The final Joker Balloons are available for us here, but we need to collect one final Gadget before we will do the last Collectibles Blitz runs in Arkham City proper. Ignore the Balloons, or just pop them, I will include all of their locations in the last few Amusement Mile Maps so you do not have to worry…

Note that if you have not already been doing so, keep your Physical Challenges in mind as you play. Look for opportunities, like the Thugs trying to break into GCPD, for completing some of the Challenges. By this point, I had 30/40 Challenges completed for Batman. Story made opportunities are easiest to take advantage of, but all Challenges can still be unlocked during Post-Game, just makes for less back tracking for you to do at the end. I will be including a walkthrough for all 40 in 100% Achievement Guide – Batman Arkham City Part 2 after we complete NG+...

Deal with Freeze, & we will obtain the Freeze Blast Gadget, our final Gadget needed for Collectibles. This will also begin the Heart of Ice Side Mission. 0% Complete


Achievement #19 – Hide & Seek: A deadly game of hide & seek.
Story Related. Defeat Mr. Freeze in the GCPD Building to unlock the Achievement.

Riddler Trophy #153: Head to the front exit of GCPD & we will be able to Grapple up to a higher level in the hallway before it. Up here we can see a Trophy Cage & three Pressure Plates; we need to touch all three Plates without touching anything else. To do this, use the Line Launcher to get between the Pressure Plates. This can be a little tricky as we will have to fire a second line to be able to get from/to the Pressure Plate in front of the Trophy Cage; it is best saving this Plate for last.

Riddler Trophy #154: Now that we have the Freeze Blast, head over to outside of the Morgue in GCPD & we can see it is blocked by steam. Use the Freeze Blast to seal off the steam & head over into the room to our left past the steam to find a Trophy on a cleanup table.
This is also near where we will be able to access the new entrance/exit to GCPD.
Sequence 20: Collectibles Blitz 10
1. Main Story: Steel Mill 2-Electric Boogaloo
2. Side Missions: 3/12
3. Joker Balloons: 17/24
4. Penguins: 9/12
5. Demon Seals: 9/12
6. Riddles: 27/69
7. Riddler Trophies: 160/247
8. Catwoman Trophies: 12/35
9. Achievements: 20/64
-----------------------------------------------------------------------------------------------------

Park Row:

Side Mission #11 – The Tea Party: Shortly after we rescue Vicki Vale from the Sniper Thugs, we will receive a new Side Mission in Park Row. Go to the Waypoint marked “Cure drop off point” & go collect the cure… or try to. Batman got a dose of the good stuff instead…


Achievement #20 – Stop the Clock: Time is running out.
Go on your special mushroom trip with the Mad Hatter & defeat him to unlock the Achievement; this is a very straight forward Side Mission… 100% Complete

Side Mission #6 – A Shot In the Dark 2: After we exit the Mad Hatter’s hideout, we will shortly hear a gunshot & a new victim of Deadshot can be located in upper Park Row. Head to the Waypoint, & we can locate the body on top of the broken overpass just above the Political Prisoner Camp in the North end of Park Row. Use the Evidence Scanner to find another clue about Deadshot’s where abouts. Only one body more to go… 40% Complete

Now that we have the Freeze Blast Gadget, we will unfortunately return to our final bout of Collectible hunting in Arkham City proper. It will be much faster than our first Blitz though as the bulk of it has already been completed. Keep the Side Missions Cold Call Killer & Acts of Violence in mind as we explore around the city as well…

The Bowery:


Riddle #19: “You don't have to be crazy to shop here, do you?”
Head to the location on the map & look at the Jezebel Center sign above the gates; Scan it to complete the Riddle.

Riddler Trophy #155: Make your way to the North entrance to the Museum & head to the Perimeter Wall North of the horse statue to find a Municipal Security Console connected to some iron bars. Use the Cryptographic Sequencer to hack the console & let us collect the Trophy behind the bars.

Riddler Trophy #156: Return to the Northern entrance of the Museum & drop off the walkway down into the lower level of the Jezebel Center to the West of it. Down here we can see a Trophy Cage along with three Pressure Plates; it's another Line Launcher puzzle. Make your way between the Pressure Plates without touching anything else to unlock the Cage.

Riddler Trophy #157: Make your way up to Platform #2 at the monorail station & we can see a Municipal Security Console connected to the doors of a monorail car. Hack it with our Cryptographic Sequencer to open the doors where we can find a Trophy inside.

Riddle #20: “Arkham city is not a place for the rich or famous, Bruce Wayne never felt so wanted.”
From the monorail station, drop down back to the North entrance of the Museum again & begin following outside the Museum walls to the East, around the Museum. Around the first corner, before we start running South, we can see a wall of the Museum lined with Wanted posters of Bruce Wayne; Scan them to complete the Riddle.

Riddle #21: “Cowboy, trilby or bowler? Hats off to anyone brave enough to try one on.”
From the Wanted posters, run across the bridge behind us to the East & we can find the Hat Shop (you’ll probably notice the neon “Live Nudes” sign first... the Hat Shop is to the signs right). Scan the sign to the Hat Shop to complete the Riddle.

Riddler Trophy #158: From the Hat Shop, drop down into the Jezebel Center below & look at the wall underneath where the Museum is located to see some Soft Wood Paneling up above us. To get in there, climb on top of the Subway entrance to the East & use the Line Launcher to ride through the Paneling & collect the Trophy.

Riddle #22: “Studies have shown that if you're not on your best behavior, you'll come out crazy. How Strange?”
Make your way, East, through the Jezebel Center & approach the Tyger Inmate Analysis Unit gateway; Scan it to complete the Riddle.

Riddler Trophy #159: Turn around from the Tyger Gate & Grapple onto the large building North of our position with the neon orange Gotham sign on it (the same one we previous found the Mysterious Watcher on). On the West face of the building’s roof, we can see a Riddler Security Console connected to a Trophy Cage. Simply hack it with our Cryptographic Sequencer to open it.

Riddler Trophy #160: Drop down onto the next rooftop East of our location with the “Lethal Force Is Authorized” billboard & we can find another Riddler Security Console connected to some iron bars on a small room. Hack the Console with our Cryptographic Sequencer to remove the bars & let us collect the Trophy behind them.

Riddle #23: “My intellect towers above yours, Batman. I wonder if you'll ever solve this Riddle?”
While this Riddle is in fact located in the Bowery’s Riddle tab of our PDA, it can actually be unlocked anywhere in Arkham City; it is easiest done from this location though marked on the Map above. Simply zoom up at the Wonder Tower & get the entire upper portion of the tower into frame. Scan it to complete the Riddle; you may have to move around to get it all into frame correctly.

Riddle #24: “Was the writing on the wall from the moment you entered?”
Grapple onto the balcony above the front entrance to the Arkham City Processing Center & head over to the far-right side where we can see a commemoration plaque from Quincy Sharp; Scan it to complete the Riddle.

Riddle #25: “Do you need to look SHARP to campaign for change?”
Grapple onto the building close to where the monorail ends in the East & we can find a billboard for Quincy Sharp’s political campaign; Scan it to complete the Riddle.

Riddle #26: “You're a dummy if you don't try & buy one.”
Make your way over to the street side entrance to The Bowery, adjacent to where we entered through the Jezebel Center & we can see the Magic & Props shop; Scan the sign to complete the Riddle.

Riddle #27: “The feuding families always sit down to a good meal. Will there be a massacre?”
From the magic shop, Grapple up to the walkway where the Bank of Gotham is to the West of our location & follow the walkway down South. Past a neon green Beer sign, we can find Sal Maroni’s Italian Restaurant; Scan the restaurant building to complete the Riddle.
Sequence 21: Collectibles Blitz 11
1. Main Story: Steel Mill 2-Electric Boogaloo
2. Side Missions: 4/12
3. Joker Balloons: 17/24
4. Penguins: 9/12
5. Demon Seals: 9/12
6.Riddles: 38/69
7. Riddler Trophies: 168/247
8. Catwoman Trophies: 12/35
9. Achievements: 21/64
-----------------------------------------------------------------------------------------------------

Park Row:


Riddle #28: “Acing the chemistry test will illuminate you.”
Grapple onto a nearby roof across from the Ace Chemicals building & zoom in on the large sign on its roof; Scan it to complete the Riddle.

Riddler Trophy #161: Head around to the North side of the Ace Chemical building & enter the alley across from Finnigan’s to see a chain link cage around a Trophy blocked by a steam vent. Use our Freeze Blast to seal the vent & slide underneath the cage to access the Trophy.

Riddle #29: “I am an actor who can transform a film with the final cut. Who am I?”
Approach the Monarch Theater & look up at the building wall to the left out it see a large movie poster for The Terror. Scan the poster to complete the Riddle.

Riddle #30: “Six legs went in & only two came out. Where am I?”
Go past the Monarch Theater now to the right & hop over the chain link fence to find the sign to Crime Alley; Scan the sign to complete the Riddle.

Riddle #31: “Do you have Strange thoughts? Maybe you should seek help?”
From the Monarch Theater, head down the road North towards the Solomon Wayne Courthouse. When you get to the barricades in the middle of the road, look to your left to see a store with a sign reading Strange Minds hanging off it; Scan the sign to complete the Riddle.

Riddle #32: “This question can only be answered from an unusual perspective. Can you get yourself there?”
Approach the Solomon Wayne Courthouse & Grapple onto the horizontal flagpole directly above the entrance at the top of the building. From here, turn on Detective Mode & look South down the street to see the Top of a Question Mark spray painted on a steel arch with the Bottom painted on the road past it. From this angle, we can easily align both pieces; Scan them once aligned to complete the Riddle.

Riddle #33: “DA campaign special: Get two votes for the price of one.”
From the Courthouse, head down the road to the West & off your right you will see a campaign office for Harvey Dent; Scan the building to complete the Riddle.

Riddler Trophy #162: We need the Disrupter – Jam Firearm Upgrade for this Trophy.
Carry on West from the campaign office, & we can find the entrance to a Tyger checkpoint entrance in the Perimeter Wall. Use the Disrupter to disable the Tyger Sentry Turret & waltz on past it to collect the Trophy behind it.

Riddle #34: “I wonder how you can land an appointment with this milliner? Perhaps it would be best to book?”
Return to the building we found Mad Hatter inside for the Side Mission – The Tea Party. Quickly pop inside the building & we will actually see Mad Hatter himself, crying over his stomped-on hat. Walk over to the table & zoom in to the book of Alice In Wonderland near his feet; Scan the book to complete the Riddle.

Riddler Trophy #163: Exit the Mad Hatter’s hideout & Grapple on top of The Stacked Dice Casino ahead of us. On the roof, to the right, we can see a Riddler Security Console connected to some iron bars on a small room. Hack the console with our Cryptographic Sequencer to get at the Trophy.

Riddle #35: “Has this flower turned a new leaf?”
Head South across the roof top & drop down into the street below. Turn around & we can see the Baudelaire shop that Poison Ivy’s owns; Scan it to complete the Riddle.

Riddle #36: “This den is where the vicious animals take your treasure. Is it theft, if it's already stolen?”
From the flower shop, head down the street to the West & Scan the gate to the Tyger Confiscated Goods entrance to complete the Riddle.

Riddler Trophy #164: We will need the Mine Detonator Upgrade for the Disrupter for this Trophy.
Hop over the small stone wall to the left of the barricades to the South of our location down the road. Here, we can see a chain link enclosure with two Riddler Proximity Mines in the way of our path to a Trophy. Use the Disrupter to detonate the Mines & collect the Trophy.

Riddler Trophy #165: Return to the Solomon Wayne Courthouse & head down the road to the East towards the Church. As we approach a barricade, we can see a neon orange sign reading “The Stacked”…(Dice). To the left of the sign, in an alley, we can see a chain link enclosure blocked by a steam vent. Use our Freeze Blast to seal the vent & collect the Trophy.

Riddle #37: “It's far from PURRFECT, but she calls it home.”
Grapple over the buildings towards Catwoman’s Apartment; Scan the cute kitties on her windowsill to complete the Riddle.

Riddler Trophy #166: Enter the Political Prisoner Camp & head to the far end to the North where the Tyger checkpoint is. We need to use the Disrupter – Firearm Jam to disable the Tyger Sentry Turret inside. If this is too soon after Riddler Trophy #164, carry on to the next Riddler Trophy & come back here to give Disrupter time to reset its uses.
Disable the Sentry Turret, & use our Explosive Gel to blow up the Structural Weakness to its right to access the Trophy.

Riddler Trophy #167: Grapple over the buildings to the East of the Political Prisoner Camp & head to the waterfront dividing Park Row from the Amusement Mile. Along the Perimeter Wall here, we can see a Frozen Riddler Trophy in the water in between two Anchor Points. Use our Freeze Blast to create a platform directly over the Trophy & simply Glide onto the ice to collect it.

Riddle #38: “You've been warned. People aren't the only unstable part of this city.”
Grapple over to the front entrance of the Political Prisoner Camp & approach the gated iron blockade barring entrance to the road leading into Amusement Mile. Zoom into the Catastrophic Subsidence sign on the fence & Scan it to complete the Riddle.

Riddler Trophy #168: Grapple onto the lower rooftop of the Church & we can find a Riddler Security Console connected to a Trophy Cage. Hack the Console with our Cryptographic Sequencer to open the Cage.

Side Mission #8 – Identity Theft 3: Make your way back to the South face of the Ace Chemical building in an alley way & we can find the final body. Use the Evidence Scanner to case the area & follow the bleach trail the killer left behind… past Jack Ryder… & to the Inmate who will tip us off to the killer’s hideout.

Make your way over to the hideout, in the same complex as Catwoman’s apparently, & head inside. Escape the trap to complete the Side Mission. 100% Complete


Achievement #21 – Serial Killer: Track down the serial killer.
Complete the Side Mission – Identity Thief to unlock the Achievement.
Sequence 22: Collectibles Blitz 12
1. Main Story: Steel Mill 2-Electric Boogaloo
2. Side Missions: 4/12
3. Joker Balloons: 22/24
4. Penguins: 9/12
5. Demon Seals: 9/12
6. Riddles: 44/69
7. Riddler Trophies: 173/247
8. Catwoman Trophies: 12/35
9. Achievements: 21/64
-----------------------------------------------------------------------------------------------------

Amusement Mile:


Riddle #39: “This question can only be answered from an unusual perspective. Can you get yourself there?”
First, make your way over to the spot marked on the map where the Tyger billboard is located on top of the building near the Gotham Casino. Walk around to the backside of the billboard & turn on Detective Mode to see the Top of a small Question Mark painted there. Look out across the water past the billboard & we can see a lone Industrial Motor on a building with a water tower on it. Use our Remote Electrical Charge on the Motor, & a steel door will drop down. If you are still in Detective Mode, you will see the Bottom of the Question Mark is painted on this door. Return back over to the billboard with the Top to align the pieces.

Aligning the pieces is a little tricky; walk backwards from the Top of the Question Mark & tilt the camera angle downwards when you Scan to get the pieces together.

Riddler Trophy #169: Head North from the Tyger billboard & drop down onto the next roof where we can see an Industrial Motor puzzle with a Rolling Cage. To access the Motor however, we need to get beneath it. Drop off the chain link platform below & use the Line Launcher to travel over the water. Before getting to the end, use Tight Rope to stand on our line. While standing on the line, use our Remote Electrical Charge & charge the Industrial Motor. Guide the Rolling Cage to the top & make your way back up to break it open.

Joker Balloons #18: Keep heading North along the rooftops & we can find a set of Balloons on top of a smokestack on the final building in this line, just before the Perimeter Wall.

Riddler Trophy #170: Return to where Vicki Vale is in front of the Gotham Casino & head down the passage behind her to the left to see a Pressure Plate. Stand on it, & the iron bars down the other end of the passage will disappear. Use the Line Launcher now to ride down the passage, through two sets of Soft Wood Paneling, over to a Trophy.

Riddle #40: “Which acrobat family gambled with their lives, & has now been left to fly solo?”
Return to where Vicki Vale is standing & look up at the building wall to the South to see a poster of the cancelled Big Gotham Circus performance featuring Nightwing; Scan the poster to complete the Riddle.

Joker Balloons #19: Look up at the very top of Gotham Casino now & we can find a set of Balloons attached to one of the hanging dice on the Casino’s sign.

Joker Balloons #20: Head North from the Casino now onto the Northmost broken overpass piece & we can find a set of Balloons attached to a broken girder off the overpass’s East side.

Riddler Trophy #171: Carry on North along the overpass & look down into the water to see a flooded Tyger checkpoint in the Perimeter Wall. Use the Freeze Blast to create a platform to Glide onto but do not make it too far into the checkpoint as there is a Tyger Sentry Turret inside.

Disable the Sentry with the Disrupter Jam Firearm, & pull your frozen platform inside the checkpoint using our Batclaw & the Anchor Points to get at the Trophy.

Riddle #41: “If she is the ROOT of evil, how could anyone be expected to contain her?”
Grapple your way over to the building across from Poison Ivy’s hideout & climb on top of the Tyger billboard near the buildings edge. From here, look down at the bottom of her building’s right corner & you should be able to see a biohazard containment tank in the water; Scan the tank to complete the Riddle.

Riddler Trophy #172: Start making your way South towards the GCPD Building from Ivy’s hideout & we can see a building with a neon pink dolphin off our left before we get there. On this building we can see a Trophy Cage & a Pressure Plate. When you stand on the Pressure Plate, three Question Marks down above the water below us will activate but become blocked by a chain link fence.

Throw a Freeze Blast down near them & Glide onto the platform. Approach each of the Question Marks & spray down some Explosive Gel on each of them; you can use the Anchor Points at either end to pull ourselves closer with the Batclaw.

After they have been sprayed, Grapple back up to the Pressure Plate & activate the Question Marks. Detonate our Explosive Gel & collect the Trophy.

Riddle #42: “Always a shining example of justice? Not if you ask me.”
Grapple over to the GCPD Building now & get up to the roof where we can find the Bat Signal; Scan the spotlight to complete the Riddle.

Joker Balloons #21: From the GCPD rooftop, we can spot a set of Balloons attached to a loudspeaker system at the South end of the complex.

Riddler Trophy #173: Head over to the area below the Balloons we just destroyed & we can find a Trophy locked in a room by a Municipal Security Console. To be able to hack it, we need to Grapple over to the lower building roof to the West of GCPD & use the Range Amplifier Upgrade for the Cryptographic Sequencer to reach it through the chain link fence wall. Head back over to the room to collect the Trophy.

Joker Balloons #22: From outside the room of the last Trophy, look up at the building South of GCPD to see a set of Balloons attached to a steel pipe near a balcony.

Riddle #43: “Park in his spot & you may just get a ticket.”
Drop down below the GCPD Building near the water at the North end & get inside the underground parking lot. Use the Line Launcher to get across the water to the other side of it & Scan the parking lot reserved for “Conditioner” Gordon to complete the Riddle.

Riddle #44: “Look out! Can you see where the madness began?”
Grapple onto the East side of the GCPD rooftop now & look out across the water to the North East where we can actually see Arkham Island, where Arkham Asylum is. Scan the island to complete the Trophy.
Sequence 23: Collectibles Blitz 13
1. Main Story: Steel Mill 2-Electric Boogaloo
2. Side Missions: 5/12
3. Joker Balloons: 24/24
4. Penguins: 9/12
5. Demon Seals: 9/12
6. Riddles: 47/69
7. Riddler Trophies: 177/247
8. Catwoman Trophies: 12/35
9. Achievements: 23/64
-----------------------------------------------------------------------------------------------------

Amusement Mile:


Riddle #45: “This place has taken a TURN for the worse. Is it a little BEAR for your tastes?”
Grapple over to the Krank Co. Toys building; look up at the main sign & Scan it to complete the Riddle.

Riddler Trophy #174: Head over to the North side of the Krank Co. Toys building & drop down off the side onto a long rooftop near the water. Walk to the edge of this roof & throw a Freeze Blast down into the water to create a platform. Glide down onto it & use the Anchor Points to pull yourself under the roof with the Batclaw towards some iron bars in the water. At the bars, we can see a Frozen Riddler Trophy in the water with a Riddler Security Console off our right just past the bars. Use the Range Amplifier of our Cryptographic Sequencer to hack the Console & open the bars up for us. With the bars gone, pull our platform into the room & collect the Frozen Trophy.

Riddler Trophy #175: Grapple over to the building just West of GCPD, up to the roof where the water tower is located, & we can see a Riddler Security Console connected to some iron bars. Hack the Console with our Cryptographic Sequencer & collect the Trophy behind the bars.

Riddle #46: “Would an invitation to party like the gods be a bolt out of the blue?”
Glide over to the front of the Gotham City Olympus building now & zoom up to the statue of Zeus with his neon blue thunderbolt in his hands; Scan the statue to complete the Riddle.

Joker Balloons #23: Grapple up to the GRC radio building & we can see a set of Balloons hanging off the radio towers second level.

Riddle #47: “If you're afraid, don't be scared to crow about it.”
Grapple up to the top of the drawbridge, above where the Sniper Thugs are, & Scan the remnants of Scarecrow’s mask that a crow will be pecking at to complete the Riddle.

Riddler Trophy #176: We now need to get underneath the drawbridge, drop off the West side of the drawbridge onto a barge lower down & throw a Freeze Blast underneath the bridge. Glide over to it & look up to see a Trophy attached to the underside of the bridge; grab it with our Batclaw.

Riddler Trophy #177: Grapple over to the building West of the drawbridge & head over to the backside near the Perimeter Wall where we can find a chain link enclosure full of Riddler Proximity Mines. There are more than two Mines however so to save us having to wait for a really long time to recharge the Disrupter, we need to choose which Mines we detonate with care.
If we consider the enclosure to be a 5x5 grid, the Mines we need to destroy are in coordinates 2x2 & 3x5. For more clarity, here is a little diagram I quickly whipped up to give you the overview of the puzzle. For reference, “M”s are Mines & “T” is the Trophy…


With the Mines detonated, follow the pathway in to the Trophy & back out.

Joker Balloons #24: Outside the enclosure we found the last Trophy in, look up to the North & we can see our final Joker Balloon set on a loudspeaker system attached to the Perimeter Wall.

Industrial District:

Side Mission #7 – Enigma Conundrum 8: If you have not already done so, enter the code 6-0-6 1-2-0 into our Cryptographic Sequencer, & if we have completed 240/400 Riddler Challenges we will unlock the next Riddle for the Enigma Machine. The Riddle is: “I’ll be right under your feet, in the midday sun; you cannot lose me, no matter how you run. What am I?” The answer is pretty obvious, being your Shadow.

Completing the Riddle will unlock the location of the fourth Hostage in the Industrial District. Head to the Waypoint, & break into the next hideout. Use our Cryptographic Sequencer to disable a path through the Electrified Security Floor tiles to the safe zone. From there, throw a Batarang across the room at a Question Mark to disable another pathway over to the far side of the room. Climb up to the second floor & quickly get across the other end where we can use the Line Launcher to get inside a room to the left of the Hostage.

Turn on Detective Mode here & we can see the Security Gate is being controlled by a Question Mark past a Structural Weakness. Destroy the wall with Explosive Gel, & use your Remote Electrical Charge on the Industrial Electromagnet to move a Steel Crate away from an opening in the fence; we can now deactivate the Question Mark with a Remote Controlled Batarang. Stand on the Pressure Plate in the next room to disable the final Security Gate & use the Line Launcher twice to tackle the Hostage in mid-air & safely take him through a glass window to escape.
He will tell us the next digits for the code which are: 1-1-5 7-8-0. We will be unable to use the code for now as we will need to complete 320/400 Riddler Challenges before it will become available.


Achievement #22 – Intellectual: Rescue the fourth Hostage from Riddler.
Rescue the fourth Hostage after completing 240 Riddler Challenges. 60% Complete

Side Mission #3 – Cold Call Killer 4: As of this point, we can now access all of Zsasz’s phone mini-games to locate him. You need to progress the Side Mission to 80% Complete before we can discover his location. This takes at a minimum of 6 phone mini-games depending on if you can max out your triangulation every time; this can take up to 8 phone mini-games at a maximum if you do not.

To know where to search, access Cold Call Killer from your Side Mission tab & you can see all possible pay phone locations. Ones that are completed will be check marks instead of the phone symbol. Glide around to each of the pay phones still available & one will eventually start ringing. If none do, try entering/exiting a building or quitting to the Main Menu & reloading your game to reset Arkham City.

Zsasz’s Hideout is located near the waterfront in the Industrial District.
Sneak around the room in his hideout & perform a Takedown on Zsasz through a glass window once you get behind him.


Achievement #23 – Dial Z For Murder: Stop the phone booth killer.
Complete the Cold Call Killer Side Mission & complete all of Zsasz’s phone call mini-games & track him down to his hideout to defeat him. 100% Complete
Sequence 24: Collectibles Blitz 14
1. Main Story: Steel Mill 2-Electric Boogaloo
2. Side Missions: 5/12
3. Penguins: 9/12
4. Demon Seals: 9/12
5. Riddles: 53/69
6. Riddler Trophies: 185/247
7. Catwoman Trophies: 12/35
8. Achievements: 23/64
-----------------------------------------------------------------------------------------------------

Industrial District – Zsasz’s Hideout:

Riddle #48: “If you're planning on making your mark in Arkham City, you'll need a special kind of realtor.”
While in the same room as where Zsasz is locked in a cage, look on the nearby table to see some scattered business cards from The Broker; Scan them to complete the Riddle.

Riddler Trophy #178: Above the business cards used in the last Riddle we can see a Sionis Industries control panel. Activate the button & some electricity will begin arcing above the water. Inside the vent we crawled through to get into this room will be a Fuse Box. Use a Remote Controlled Batarang & guide it through the electricity then back over, in through the vent & down the left shaft into the Fuse Box. This will open a Trophy Cage for us just on the outside of the vent in the room we are currently in. You will have to wait for the water to lower before you can pass the Batarang through the electricity.

Riddler Trophy #179: From the Trophy Cage of the last Riddler Trophy, drop down onto the ramshackle bridge ahead of us that gets raised/lowered by the water. Throw a Freeze Blast to the right of the bridge & leap onto the platform. Look around the corner from us & we can see a Riddler Trophy attached to the wall off our left; collect it with the Batclaw.

Industrial District:


Riddler Trophy #180: Exit Zsasz’s Hideout, & head right, across the street & hop over a small brick wall. On the other side, attached to the wall, will be a Riddler Security Console connected to a Trophy Cage. Hack the Console with our Cryptographic Sequencer to open the Cage.

Riddle #49: “Breaking news! Get out while you still can.”
Hop back over the brick wall & we can see a Bill’s Hotdogs stand across the street; Scan it to complete the Riddle.

Riddle #50: “This question can only be answered from an unusual perspective. Can you get yourself there?”
If you turn on Detective Mode & look to the West on the waterfront, you can see the massive Top of a Question Mark painted on the Perimeter Wall. We can locate the Dot on top of a large smokestack tower, East along the waterfront; it is just East of the building being connected by piping. Get on top of the smokestack & align the two Question Mark pieces; Scan them to complete the Riddle.

Riddler Trophy #181: From that spray-painted Question Mark, begin making your way South West along the Perimeter Wall. On the other side of the first building past the crane, down in the alley below, we can see a Pressure Plate connected to a Trophy Cage. For this Plate, we need to gain a lot of velocity & Dive Bomb onto the Pressure Plate & activate Shockwave to activate the Question Mark above.

It is best if you place a Waypoint over the Pressure Plate as accurately as you can because it is extremely difficult trying to align yourself in the air without knowing ahead of time where it is. Use the Grapnel Boost off of one of the large smokestacks to the East of the Pressure Plate & maintain as much height as you can. As soon as you pass over the Waypoint (or just before) begin Dive Bombing & land onto the Pressure Plate, activating Shock Wave right afterwards. If you had enough time spent in Dive Bomb, your Shock Wave should activate the Question Mark above. Strike the Question Mark with a Batarang to open the Cage; do not step off the Pressure Plate before striking the Question mark or you will have to restart! This will definitely take you a few tries to get the time in Dive Bomb right.

Riddler Trophy #182: Continue South along the Perimeter Wall & drop down into the compound we found previously the Titan Container in for the Industrial District. Here, turn on Detective Mode to see a Structural Weakness in a nearby building’s wall. Destroy it with Explosive Gel & we can see a Riddler Security Console connected to a Trophy Cage. Problem is, the Console is not active.

Exit the room & use the Remote Electrical Charge on the Industrial Motor to open the garage door to our left. Head inside this new room & stand on the Pressure Plate here to activate the Console. Use the Range Amplifier on our Cryptographic Sequencer to hack the Console & unlock the Cage.

Riddler Trophy #183: Get to the very South West end of the Industrial District now to see a Tyger checkpoint in the Perimeter Wall guarded by electrified floor tiles. Use the Line Launcher to get past the tiles & over to the Trophy.

Riddle #51: “Did you hear the HOLE story of how Black Mask escaped?”
Head to the far South East end of the area now over to the waterfront near the Steel Mill. Past a nutcracker statue, along a small brick wall, we can see some wanted posters of Black Mask; Scan them to complete the Riddle.

Riddler Trophy #184: Grapple onto the Steel Mill roof & walk to the very East most end of it above the water. If you look to the far South West back over at the Perimeter Wall, we can see an entrance in the wall with a “You Are Under Close Surveillance” billboard right below it. To get inside, we need to Grapnel Boost off a high point of the Steel Mill roof & Glide/Dive Bomb our way over to the entrance; the Trophy will be just inside.

Riddle #52: “Does Zsasz still pose a threat? This guy called to find out.”
Get back over to the Steel Mill & follow the railway tracks under the building North to the other side. Immediately on the other side, we can see a Thug’s corpse slumped over a pay phone; Scan it to complete the Riddle.

Riddle #53: “Was this parasite ratted out, or does he continue to plague Gotham?”
Carry on North over the archway & onto the other side of the street. Dead ahead of us at the intersection we can see a billboard for Otis Flannegan Pest Control on the wall; Scan it to complete the Riddle.

Riddler Trophy #185: From the billboard used in the last Riddle, look off to the East over the waterway across to the Steel Mill’s lower walls. Turn on Detective Mode, & we can see a Valve Cover above an Anchor Point. Use the Batclaw to tear open the Valve Cover & a Frozen Riddler Trophy will fall out into the water. Use the Freeze Blast to create a platform & collect the Trophy using the Anchor Point if needed.
Sequence 25: Collectibles Blitz 15
1. Main Story: Steel Mill 2-Electric Boogaloo
2. Side Missions: 7/12
3. Penguins: 9/12
4. Demon Seals: 9/12
5. Riddles: 55/69
6. Riddler Trophies: 193/247
7. Catwoman Trophies: 12/35
8. Achievements: 25/64
-----------------------------------------------------------------------------------------------------

Industrial District:


Riddle #54: “Which notorious family keeps talking trash?”
Head North all the way back to the waterfront now & Glide onto a barge in the water. Walk over to the “captain’s cabin” on the barge & Scan the Falcone Shipping logo on the outside of the cabin to complete the Riddle.

Riddler Trophy #186: Now begin making your way around the Industrial District’s waterfront to the South East. Get to the backside of the warehouse buildings & drop down to the lower wharf where we can see a neon green arrow guiding us inside the warehouse. Use the Line Launcher twice to get through the building; on the second shot, activate Wire Walk & turn around so we can Grapple up onto the upper level where a Trophy is located.

Use the Pressure Plate past the Trophy to easily exit the warehouse.

Riddler Trophy #187: Get to the location marked on the map above in the streets just to the North of the Ferris Wheel. Here we can see some steam vents inside a building; disable the first vent with our Freeze Blast & there will be a Riddler Proximity Mine in our way. Disable the Mine with the Disrupter Mine Detonator, Freeze Blast the next steaming vent, & once again disable another Mine with our Disrupter; the Trophy will be at the very end of it all.

If your lazy & have a full set of Ballistic Armor you can just run through the Mines to the Trophy as there are only two of them...

Riddle #55: “Air, sea, or land. It would be criminal not to use these wise guys, wouldn't it?”
On the streets still, make your way over to the East side of the building with the Ferris Wheel on top of it. On the building’s East wall, we can see a billboard for Falcone Warehousing & Shipping; Scan it to complete the Riddle.

Riddler Trophy #188: Head to the location marked on the map above & hop over a small brick wall to get behind a fenced in area. At the back, we can find a Riddler Security Console connected to a Trophy Cage; hack the Console with our Cryptographic Sequencer to open the Cage.

Side Mission #10 – Hearts of Ice 2: Now that the Industrial Districts Collectibles are taken care of (minus the final three), head to the North East end of the area to the waterfront. Over where the two cranes here are, turn on Detective Mode & we can see a Door in the building off our left. When we knock on it, we will be turned away by one of Joker’s Thugs. To get inside, Glide over to the Falcone Shipping barge in the water & look back at the building in Detective Mode to see a Structural Weakness in a wall above the water.

Use the Freeze Blast to make a platform & pull yourself over to the wall using the Anchor Points & our Batclaw. Destroy the Weakness with Explosive Gel & continue to pull yourself into the building using Anchor Points. Enter into the building, & we can find Nora on the main floor; dispatch the Thugs inside to progress the Side Mission.

GCPD Building:

Side Mission #10 – Hearts of Ice 3: Return to Freeze in the GCPD Building & tell him that we have now located Nora; remember that we can only enter the GCPD from the East side above the water now…


Achievement #24 – Bargaining Chip: Reunite the separated couple.
Complete the Side Mission Hearts of Ice & locate Nora for Mr. Freeze to unlock the Achievement. 100% Complete

Amusement Mile:

Side Mission #5 Watcher In the Wings 4: When we exit the GCPD Building, make your way to the front entrance of the compound & head to the building over to the West across from us. Turn on Detective Mode as we go & we should see a figure standing below a water tower near a Riddler Security Console; it is the Mysterious Watcher.

Scan the Symbol he leaves behind & we will now get to complete a puzzle aligning the circular emblem over all four of the Symbols we Scanned. When properly aligned, the Symbols will guide us to the Mysterious Watcher’s final location just outside the Church/Medical Center in Park Row.
Head to the location, & there will be a large Symbol on the Church wall; Scan it & the Mysterious Watcher will have an over-the-top entrance to greet us. He will reveal himself as Azrael, he Angel of Death, & leave us with an omen. Foreshadowing for Batman – Arkham 3 perhaps?


Achievement #25 – Mysterious Stalker: Reveal the Mystery Watcher.
Find the Mysterious Watcher in all five of his locations to complete the Side Mission Watcher In the Wings. 100% Complete

Subway:


Subway Maintenance Access:

Riddler Trophy #189: From the Industrial District entrance to the Subway, head down the tunnels until you drop down onto a bridge below. From here, stand on the bridge’s rails & throw a Freeze Blast down into the water to make a platform. Drop onto the platform & we can see a Trophy stuck to the wall above the water underneath the bridge; collect it with the Batclaw.

Riddler Trophy #190: Grapple back onto the bridge & walk into the next tunnel. As soon as we enter, look off your left to see a Structural Weakness in the wall; destroy it with Explosive Gel. Behind the Structural Weakness is a half-closed steel door we can crawl under to enter a trap room with three Trophy Cages inside it & a Pressure Plate.

Stand on the Pressure Plate & throw a Batarang at the Question Mark that will activate on the door. The room will shortly begin filling with steam; quickly spam throw your Freeze Blasts & close off all of the vents, so we do not die. Be sure to step off the Pressure Plate at the back after the first two sets of vents are closed as the final set blasts where the Pressure Plate is.

With the vents closed off, we can freely collect all three Trophies here. Collecting the Trophies will open up the exit for us.

Riddler Trophy #191: Collected along with Riddler Trophies #190 & 192.

Riddler Trophy #192: Collected along with Riddler Trophies #190 & 191.

Subway Terminal:

Riddler Trophy #193: Drop into the Subway Terminal & head into the hall room that leads to the entrance to Wonder City. When you approach the area of the room that is flooded, look below the wooden platform we stand on & we can see a Frozen Riddler Trophy in the water beneath us. Throw a Freeze Blast down to make a platform & drop down onto it to collect the Trophy.
Sequence 26: Collectibles Blitz 16
1. Main Story: Steel Mill 2-Electric Boogaloo
2. Side Missions: 7/12
3. Penguins: 12/12
4. Demon Seals: 9/12
5. Riddles: 58/69
6. Riddler Trophies: 203/247
7. Catwoman Trophies: 12/35
8. Achievements: 25/64
-----------------------------------------------------------------------------------------------------

Subway:


Subway Tunnels:

Riddler Trophy #194: Quickly get into the Subway Tunnels & immediately turn right & hop over some fallen girders. Ahead of us will be another half-closed steel door that leads into a trap room with three more Trophy Cages. To start the puzzle, hack the nearby Riddler Security Console with the Cryptographic Sequencer.

As soon as the puzzle begins, quickly fire your Line Launcher & use Tight Rope to stand on the Line to avoid the tiles that will soon electrify. This is the only place that will be safe as every single tile in the room is going to electrify. Simply hang out on the Line until the tiles eventually burn out. When they do, drop down & collect all three Trophies.

Riddler Trophy #195: Collected along with Riddler Trophies #194 & 196.

Riddler Trophy #196: Collected along with Riddler Trophies #194 & 195.

Museum:


Trophy Room:

Riddler Trophy #197: Exit the Subways into The Bowery & enter through the East entrance of the Museum. In the Trophy Room, head down into the main room & we can find a Ventilation Cover above the Scar Face display. Head through the vent & into the hall beyond where there will be a Tyger Sentry Turret guarding the far end. Disable it with the Disrupter Jam Firearm, & we can collect the Trophy it is guarding.

Penguin #10: As we walk back to the vent from where the last Trophy was, we can see a Penguin on top of a display case directly across from the vent off our right.

Unnamed Hallway:

Riddler Trophy #198: Enter the Unnamed Hallway & take a right at the intersection. After passing under the first archway, we can Grapple up onto the second one ahead of us. From up here, turn around & look back the way we came to see a Trophy & a Catwoman Trophy through a glass window. Use the Line Launcher to get over to them & break through the window.

Torture Chamber:

Riddler Trophy #199: Pass through the Gladiator Pit & into the Torture Chamber. Use the Line Launcher to quickly navigate around the room to the far North side. From here, climb on top of a nearby scaffold tower. Now fire the Line Launcher across to the South; before crossing the center of the room, quickly fire another Line off to the East where the entrance is, & we can get up to a higher level where a Trophy is located.

Riddler Trophy #200: Now use the Line Launcher to get to the West side of the room where the entrance to the Iceberg Lounge is. Look over the railings off your left, into the water, & we can see a Frozen Riddler Trophy. Throw a Freeze Blast over it to make a platform & jump over to it to collect the Trophy. You may need to use the Anchor Points & the Batclaw to navigate over to it…

War Room:

Riddler Trophy #201: Leave the Torture Chamber to the South & enter the War Room. Fight off the Thugs in the main room, & head right, to enter the back room. We can see a steaming vent as soon as we walk into the back room; disable it with a Freeze Blast & crawl through to grab the Trophy.

Armory:

Riddler Trophy #202: Now make your way over to the Armory & head to the far North West end of the room. Break through the Structural Weakness, pass through a vent, or simply walk around to the far corridor that ends with a steaming vent. Disable the vent with a Freeze Blast & we can collect the Trophy behind it.

Iceberg Lounge:

The last Collectibles we can get in the Museum are located in the Iceberg Lounge. We have to exit the Museum & go around to the North entrance to get inside it as the Cops we previously rescued have the main doors barricaded…

Penguin #11: When we enter the Iceberg Lounge, we can see two Penguins on top of a table to the left of the Cops.

Penguin #12: Found on the same table as the last Penguin.

Riddle #56: “How do you protect yourself when it's raining bullets?”
Look at the random Cop standing near the center of the room holding Penguin’s Umbrella-Gun; Scan him to complete the Riddle.

Riddle #57: “Can anyone TOP the Penguin when it comes to the full VIP treatment?”
Head into the side room on the lower floor & look to our right immediately upon entering to see a table with a bunch of top hats on them; Scan the hats to complete the Riddle.

Riddler Trophy #203: Head to the back of this side room & there will be a gate we can slide under blocked by two Riddler Proximity Mines. Use the Disrupter Mine Detonator to destroy the Mines; Slide under the gate & collect the Trophy afterwards.

Industrial District:

Riddle #58: “Can you find this cool couple before romance thaws?”
Return to the Storage Warehouse 5B where we located Nora in the Side Mission Hearts of Ice & we can now see Mr. Freeze & Nora together at last. Scan them to complete this Riddle.
You must have completed Hearts of Ice 100% or he will not appear.

As a side note, by this point I was only around 46% completed through Side Mission #3 – Acts of Violence. Not all instances of this Side Mission will become available right away but will after progressing through certain points of the Main Story. The bulk are unlocked after beating the Main Story completely & we enter into Post-Game. Keep your eyes open & frequently check your World Map as they will sometimes appear as a hexagonal shape you can track.
Sequence 27: Into the Steel Mill... Again
1. Main Story: Steel Mill 2-Electric Boogaloo
2 Side Missions: 7/12
3. Demon Seals: 9/12
4. Harley Heads: 4/12
5. Riddles: 61/69
6. Riddler Trophies: 211/247
7. Catwoman Trophies: 12/35
8. Achievements: 25/64
-----------------------------------------------------------------------------------------------------

Steel Mill:
It is now finally time to re-enter the Steel Mill. Unfortunately, we have the entire host of Riddler Challenges to complete here, but then at least we are in the home stretch with only a few remaining!


Cooling Tunnel – B:

Harley Head #1: As soon as we enter the Steel Mill from its Southern entrance, we can see a Harley Quin animatron straight ahead of us. We can interact with it to have her sass us. To fulfil the Collectible, take out your Remote Electric Charge & shoot her to destroy it. We will need to find & destroy 11 more of these…

Side Mission #4 – Fragile Alliance 7: From the first Harley Head in Cooling Tunnel – B, turn left & we can spot our final Titan Container to destroy for Bane. Do so, & we will finally be able to turn in this Mission when we are finished with the Steel Mill.

Riddler Trophy #204: From the Titan Container, Grapple up to the ledge to our right & turn on Detective Mode to see a Structural Weakness in the wall nearby. Destroy it with Explosive Gel & we can collect the Trophy.

Riddler Trophy #205: Drop down from the railing ahead to the watercourse & we can see a Trophy Cage & a Riddler Security Console across the other side. Either Line Launch across & use the Cryptographic Sequencer to hack the Console or simply hack it from where we stand & use the Batclaw to collect the Trophy.

Riddler Trophy #206: Navigate through the watercourse using our Freeze Blast platforms & the Batclaw until we have to enter through a vent. On the other side of the vent, look North East from where we stand to see a Question Mark above the water. Strike it with a Batarang, & some iron bars above it will open up.

Equip the Line Launcher & ride over to where it guarded to see another Vent Cover we can tear down & enter. Follow this new vent through & there will be a Trophy we can collect at the end.

Riddle #59: “Who can BOYLE & Freeze at the same time?”
Leave the vent & Glide through the window to dispatch the Thugs ahead. Look to our left & we can see a Boyle Cytogenetics advertisement on the wall; Scan it to complete the Riddle.

Harley Head #2: We can find another Harley animatron to the right of the entrance doors to Cooling Tunnel – D.

Cooling Tunnel – D:

Harley Head #3: Dispatch the Thugs we find at the beginning of the room & we can find a Harley Head in the corner to the left of a pit of boiling water (where the Two-Face Thug is or was strung up).

Riddle #60: “This question can only be answered from an unusual perspective. Can you get yourself there?
Across from the Harley Head, having turned on Detective Mode, we can see the Top of a Question Mark on the wall under a balcony. Use our Explosive Gel to destroy a Structural Weakness; crouch & carefully drop to hang off the ledge we opened above the water. As we hang from the ledge, looking back at the Question Mark Top, we can also see the Bottom close to where our hands are on the ledge. Align the two pieces & Scan them to complete the Riddle.

Riddler Trophy #207: Look down into the watercourse below & throw a Freeze Blast across to the far side ahead of us to create a platform. Leap onto the platform & immediately look up above us to our left to see a ledge we can Grapple up to where we can find a Trophy.

Riddler Trophy #208: Create a new ice platform & begin following the watercourse flow down to the East. After ducking under the first wall, look up ahead of us & we can see a Trophy through some fencing on the ceiling. Carefully let the platform get past the fencing & quickly grab the Trophy with the Batclaw before our platform flows into the drills at the end of the channel!

Riddler Trophy #209: Carry on through the watercourse & use an electrified Remote Controlled Batarang to gain access to the second half of the area. Remember where this arcing electricity is as we will need it for a Riddler Trophy later on…

After the way is opened, create an ice platform down below the bridge & begin flowing down the watercourse. Shortly after passing under the arcing electricity, look up to our right to see a Vent Grate in the wall. Tear it down with the Batclaw & Grapple up inside the vent where we can find a Trophy.

Riddler Trophy #210: Hack the Municipal Security Console using the Cryptographic Sequencer at the end of the watercourse; not only will we lower a bridge to carry on, but we will also unlock a door back into the first room of Cooling Tunnel – D. Head back into this first room & we can tear open a Valve Cover with the Batclaw. With the pipe open, we now need to electrify a Remote Controlled Batarang. Throw one & guide it back down the watercourse tunnel we just came from to where the electricity was arcing. With the Batarang electrified, quickly guide it back to us & through the pipe, take a right, & into a Fuse Box to lower some iron bars letting us grab a Trophy. This can be a bit tricky; Boost through the watercourse & back to give yourself more time to Brake & take it slow through the pipe.

Riddler Trophy #211: Head across the bridge we lowered now & we can see a Trophy stuck underneath a mine cart shortly off our right. Look left down the track, & we can see an Industrial Electromagnet. Activate it with the Remote Electrical Charge to pull the mine cart so we can collect the Trophy.

Harley Head #4: Look to the right of the blast furnace & we can see a Harley Head against the wall.

Riddle #61: “Do you really need to hammer it home? Everyone knows Harley is stupid.”
To the right of the Harley Head we just destroyed will be Harley’s wooden sledgehammer, covered in blood; Scan it to complete the Riddle.
Sequence 28: Oh Boy, More Collectibles
1. Main Story: Steel Mill 2-Electric Boogaloo
2. Side Missions: 7/12
3. Demon Seals: 9/12
4. Harley Heads: 10/12
5. Riddles: 62/69
6. Riddler Trophies: 225/247
7. Catwoman Trophies: 12/35
8. Achievements: 25/64
-----------------------------------------------------------------------------------------------------

Steel Mill:


Smelting Chamber:

Harley Head #5: Dispatch the Gun Thugs inside the room & return to where we entered this area. Head left from the doors into a side office where we can find a Harley Head in a corner.

Riddler Trophy #212: While in the same office we can see a Vent Cover at the far end. Tear it down & crawl through onto a conveyor belt. While on the belt here, look up & we can see a ledge we can Grapple to where a Trophy will be.

Harley Head #6: Drop down to the bottom floor of the Smelting Chamber & head to the far North East corner where we can find a Harley Head next to a burning barrel.

Riddler Trophy #213: In the center of the Smelting Chamber, we can see a lava tunnel flowing under a metal structure. In the middle of this structure, we can see a Trophy; take a run & slide underneath the girders over the lava tunnel to collect the Trophy.

Riddler Trophy #214: Head to the South end of the Smelting Chamber’s second floor & we can find a Valve Cover inset into the wall up above us. Tear it open with the Batclaw & we can find a Trophy behind it.

Riddle #62: “Surely someone was clowning around when they qualified this person?”
Head up to the office at the top floor to the South East. Inside, we can see a wall with a bunch of Joker photos along with Harley Quinn’s University of Gotham diploma; Scan the diploma to complete the Riddle.

Assembly Line:

Harley Head #7: Enter the Assembly Line through from the main doors (not the Industrial Motor controlled door) & we can see a Harley Head in the corner of the office we enter.

Riddler Trophy #215: From where we walked into this office, look way up to the North & we can see a ledge we can Grapple up to. Turn on Detective Mode & we can see a Structural Weakness in the wall past a Service Hatch. Destroy it with Explosive Gel to find a Trophy.

Riddler Trophy #216: Dispatch the Sniper Thug, & return to the lower main floor. Look underneath the office we entered & there will be a vent blasting out steam. Block it with a Freeze Blast & crawl under the office to find a Trophy.

Riddler Trophy #217: Across from the Industrial Electromagnet on the lower level, in between the two sets of stairs leading up to the small walkway, we can find a Vent Cover. Tear it down & crawl under the walkway & follow the tunnel down to the end where we can jump up through a Floor Grate to find a Trophy.

Side Mission #12 – Hot & Cold 1: Near the back end of the Assembly Line, we can find Harley Quinn bound & gagged. Take the tape off her & she will tell us of some gear that Joker looted from Mr. Freeze & locked in the Boiler Room.

We will have to go there anyways for some Collectibles…

Harley Head #8: Leave Harley as you found her, & crawl through the conveyor belt over to the other side of a barred room. When we exit into the room, we can see a Harley Head off our right while still standing on the conveyor.

Loading Bay:

Riddler Trophy #218: Enter the Loading Bay & we can shortly find a disabled elevator off our right when we round the corner. Hack the Municipal Security Console with the Cryptographic Sequencer & we can open up the elevator doors letting us collect a Trophy.

Opening these doors will also let Catwoman come through here later on to collect her Trophy as well…

Harley Head #9: Dispatch the Thugs & Sniper Thugs inside the main Loading Bay room. When finished, head to the far North East corner, up a small set of stairs, & we can find a Harley Head near some burning windows.

Riddler Trophy #219: Drop through the Floor Grates in the center of the Loading Bay & crawl into the tunnels under the floor (going into First-Person View can be helpful to find the exit). Follow the tunnel down but do not enter the next crawl space. Instead, look to the spaces right to see some steaming vent. Block the vent with a Freeze Blast & jump up to collect the Trophy it was protecting.

Riddler Trophy #220: Follow the tunnels below the Loading Bay, South, all the way through to the blocked off entrance to Waste Exchange. At the now dead end, look off our right & we can spot a Valve Cover. Tear it open with the Batclaw & we can collect a Trophy.

You may have already collected this Riddler Trophy during our very first visit to the Steel Mill in Sequence 2. To double check if this is the case (& save yourself the tedium of backtracking through the tunnels) look in your Steel Mill Collectibles Tab; Riddler Trophy #220 is recorded in the very top left square.

Riddler Trophy #221: Return to the main room of the Loading Bay & head over to the large Industrial Electromagnet near the center. Use the Remote Electrical Charge to guide the freight hook above us, backwards from the Managers Office & through a fan in the South wall of the Loading Bay. Grapple in through where the fan blocked & we can immediately collect a Trophy.

Ventilation System:

Riddler Trophy #222: Carry on down the tunnel in through the Ventilation System & drop down into the lower level. From here, we can see a Trophy Cage & a Pressure Plate across a lava pit. Use the Line Launcher to ride over the lava to get to the Plate to open the Cage.

Freight Elevator:

Riddler Trophy #223: Once again return to the Loading Bay & this time head to the far South East corner of the room where we can find an Industrial Motor locked door. Use the Remote Electrical Charge to unblock the door & head inside the room beyond.

When we enter, we can spot a Valve Cover off our left. Tear it open with the Batclaw to find a Trophy.

Riddler Trophy #224: Use the Cryptographic Sequencer to hack the nearby Municipal Security Console to open up the elevator shaft to us. Drop down the shaft & lift up the elevator using our Remote Electrical Charge to be able to slip past it & get to the bottom of the shaft.

From down here, look up at the elevator we were not moving, & we will be able to Grapple up inside it to find a Trophy.

Riddler Trophy #225: Drop back down to the ground & turn on Detective Mode to see a Structural Weakness in the floor nearby. Destroy it with Explosive Gel & drop through the hole we made to find a Trophy.

Harley Head #10: Grapple up to where the final two Thugs are in the room & we can find a Harley Head near the room’s exit doors.
Sequence 29: Protocol Ten
1. Main Story: Steel Mill 2-Electric Boogaloo, Catwoman Episode 3, Protocol Ten, Wonder Tower
2. Side Missions: 9/12
3. Demon Seals: 9/12
4. Harley Heads: 12/12
5. Riddles: 64/69
6. Riddler Trophies: 227/247
7. Catwoman Trophies: 12/35
8. Achievements: 30/64
-----------------------------------------------------------------------------------------------------

Steel Mill:


Boiler Room:

Harley Head #11: Enter the Boiler Room & dispatch the large group of Joker’s Thugs inside. When you are finished, look back to the hall we entered the main room from to find a Harley Head at its exit behind some boxes.

Riddler Trophy #226: In the Boiler Room, we can see a cute little penguin target range game. Knock out all of the moving penguins with Batarangs & a Trophy will appear as a reward for our efforts; you can just spam Quick Throw to destroy them.

When the Trophy appears, we will need to collect it with the Batclaw.

Riddle #63: “What's a funnyman without his box of tricks?”
From the penguin range game, look off our right to see a side room with a sign reading “Death Ride” above it. Just as we walk under the arch, look to your left to see a box of random items belonging to Joker; Scan them to complete the Riddle.

Riddler Trophy #227: From Joker’s loot box, turn on Detective Mode & look straight ahead to see a Structural Weakness in the wall in front of us. Destroy it with Explosive Gel to find a Trophy.

Side Mission #12 – Hot & Cold 2: Carry on into the “Death Ride” area & take a left to see a misting crate containing some of Mr. Freeze’s technology. Appropriate it for ourselves & we will unlock the Freeze Cluster Grenade. 100% Complete

Manager’s Office:

Riddle #64: “They say the more things change the more they stay the same. Which dummy said that?”
Return to the Loading Bay & at long last Grapple up into the Manager’s Office. In the far-left corner, we can see Harley’s Arkham Asylum outfit on display with a positive pregnancy test on the floor beside it; Scan them to complete the Riddle. Oh boy... just what this franchise needed, a Joker Jr....

Harley Head #12: We can find the final Harley Head in the corner of the room to the right of Harley’s outfit.


Achievement #26 – Ghost Train: Fight for your survival.
Story Related. Enter the Joker’s lair & defeat him & his Thugs to unlock the Achievement.
Note that this is a very good opportunity to complete some of our Physical Challenges…

Park Row – Catwoman:


Achievement #27 – Pick Pocket: Steal the score of a lifetime.
Story Related. With the Steel Mill complete, we now return to Catwoman in Episode 3; for now, we will ignore her Catwoman Trophies & save those to the end. Give ourselves a break from Collectibles. Break into the Tyger Confiscated Goods Vault & pick up the two briefcases in the vault to unlock the Achievement.

At the end of Episode 3 we will have a choice: rescue Batman from the Steel Mill or leave Arkham City & escape with the money. Choosing to leave Arkham City will give you an “Evil Ending” to the game which will subsequently end with a Credit Roll. It will then reload us back to this decision. Saving Batman is our only option; though for maximum Story I recommend checking out the “Evil Ending”.

Don’t see why she couldn’t take the extra few minutes to stash the briefcases outside somewhere to grab later on though… just a bad multi-tasker I guess.

Amusement Mile:

As we flee the Steel Mill as Batman, (Censored by Steam) is hitting the fan & Strange is making his move.

Side Mission #4 – Fragile Alliance 8: Make your way over to the Krank Co. Toys building as we Scan the Tyger Helicopters to pop in & see good ol’ Bane. With all 6 Titan Containers destroyed we can finish this Side Mission.

Bane will be waiting for us inside. Fight off some Tyger Guards, fight off some Bane, & blow up the remaining Titan to complete the Side Mission. 100% Complete

Completing this Side Mission will also unlock a room for Catwoman to access later for a Trophy…


Achievement #28 – Broken Toys: Destroy it all.
Complete the Side Mission Fragile Alliance & destroy all of the Titan Containers in Arkham City to unlock the Achievement.

Side Mission #7 – Enigma Conundrum 9: By now, we should definitely have 320 Riddler Challenges completed. If you have not already done so, open up the Enigma Machine & the next Riddle to solve will be: “Hit me hard & I will crack but you’ll never stop me from staring back. What am I?”
The answer is Mirror. The fifth Hostage can be found in Amusement Mile.
Enter the next hideout & rescue M.P.T. Anne Bishop. The puzzles here are not that difficult, we basically have to utilize each of our Gadgets one by one to solve mini puzzles to get to her. 75% Complete


Achievement #29 – Brainteaser: Rescue the fifth Hostage from Riddler.
After completing 320/440 Riddler Challenges, save the fifth Hostage in the Side Mission Enigma Conundrum to unlock the Achievement.


Achievement #30 – Fully Loaded: Fully Loaded: Collect all 28 of Batman's Gadgets & Upgrades.
The Tyger Master Program is the final Upgrade we need to unlock this Achievement. All Story locked Gadgets or Upgrades have been collected at this point, if the Achievement did not unlock it means that you need to purchase the last few Upgrades from the Wayne Tech tab of our PDA; we still have quite a bit of XP to go from our final Collectibles & Side Missions. 100%ing our first playthrough will net us more than enough XP to fully Level up both Batman & Catwoman.
Catwoman’s Upgrades do not contribute to this Achievement; it is only for Batman.
Sequence 30: What Doesn't Kill You
1. Main Story: Wonder Tower
2. Side Missions: 9/12
3. Demon Seals: 9/12
4. Tyger Relay Hub: 1/4
5. Riddles: 66/69
6. Riddler Trophies: 239/247
7. Catwoman Trophies: 12/35
8. Achievements: 30/64
-----------------------------------------------------------------------------------------------------

The Bowery:


Tyger CCTV Relay Hub #1: Get to the building rooftop just South of the Ace Chemicals Building & we can find our first Relay Hub.

With the Tyger Master Program we can now hack all Tyger Consoles with our Cryptographic Sequencer.

Riddler Trophy #228: Head to the South end of The Bowery to the Perimeter Wall. Here we can find a Tyger checkpoint & a Tyger Security Console on the wall to our left. Hack the Console & crawl under the half-opened gate; we can collect the Trophy on the ceiling inside using the Batclaw.

Arkham City Processing Center:

Riddle #65: “This question can only be answered from an unusual perspective. Can you get yourself there?”
Get to the Arkham City Processing Center balcony entrance & use the Cryptographic Sequencer to hack the Tyger Security Console to let us inside. Use the Remote Electrical Charge to open the door to the next room & turn on Detective Mode here to see the Top of a Question Mark sprayed painted on the nearby window.

To find the Dot, walk further along the balcony inside & use the Cryptographic Sequencer to hack the Tyger Security Console through an iron bar door to progress on this floor. Enter the next room & turn on Detective Mode to see the Dot spray painted on the concrete windowsill below a fenced window; align the two pieces & Scan them to complete the Riddle.

Riddler Trophy #229: Drop down to the next level below & land on the walkway above some water a ways below us. Use the Freeze Blast & make a platform in the center of the water down there & drop down onto it. From here, we can find a Valve Cover that can be torn open with the Batclaw that will have a Trophy behind it.

Riddle #66: “You don't want to be caught off-guard in this place, do you?”
Use the Remote Electrical Charge to carry on in the Processing Center & save the Political Prisoners from some Tyger Guards; this is another excellent location to complete some Physical Challenges.

With the Guards dispatched, enter into the side room to the left of where the Prisoners are huddled against the wall. Inside, we can find a dead Tyger Guard strapped to a surgical table; Scan them to complete the Riddle.

Riddler Trophy #230: Enter back into the room with the Political Prisoners & look up along the South East wall to see a Structural Weakness up above a side room. Grapple up to it & destroy it with Explosive Gel to find a Trophy.

Riddler Trophy #231: Directly across from where the Political Prisoners are will be a Tyger Security Console connected to an elevator. Hack it open with our Cryptographic Sequencer & we can find a Trophy on the ceiling inside the elevator; grab it with the Batclaw.

Riddler Trophy #232: For our final Batman Collectible in The Bowery, enter the last side room in this area to the right of where the Political Prisoners are. Inside this room we can find a mirror where we can see our reflection; punch through the mirror like Batman usually does when he’s at home & we can find a Trophy on the ceiling in the next room. Grab it with the Batclaw.

Wonder City:


Collapsed Streets 2:

Riddler Trophy #233: Drop through the sewer grate in the Arkham City Processing Center & we will enter into Wonder City. Drop through the hole in the floor to land inside a destroyed building. Walk over to the hole in the wall facing East & we can see a Trophy across the way on an isolated ledge; grab it from here using the Batclaw.

You have to stand at a specific angle to be able to lock on to it… we actually have to Line Launch ourselves over to that platform to progress so it's not the end of the world if you do not grab the Trophy with the Batclaw… we can just pick it up with our hands.

Riddler Trophy #234: Look out across the water from the room we are in & we can see a ledge we can use the Line Launcher to get to. Just below that ledge, is a metal overhang that has a Trophy stuck underneath it. To get it, we need to throw a Freeze Blast down into the water & grab the Trophy with our Batclaw.

Riddler Trophy #235: Line Launch yourself over to the ledge where Riddler Trophy #233 was & look back across the water to the hole in the wall we shot the Batclaw from. To the left of the hole, we can see a Frozen Riddler Trophy suspended in the air by a piece of cable. Cut the cable with a Batarang & the Trophy will fall into the water; create a platform in the water using a Freeze Blast to collect the Trophy.

Riddler Trophy #236: Grapple back up to the platform we were on before & look across the water to the South to see a Trophy Cage attached to a wall. Up above the Cage through a chain link fence we can see a Riddler Security Console. Hack the Console with our Cryptographic Sequencer & use the Batclaw to collect the Trophy.

Riddler Trophy #237: Shuffle along the wall or Line Launch over to the exit of the Collapsed Streets 2. In this final room, we can see a Question Mark on the ceiling; strike it with a Batarang to open up a Trophy Cage below us. To get to the Cage, use Explosive Gel to destroy the Structural Weakness at our feet.

Wonder Tower Foundations:

Riddler Trophy #238: Enter into Wonder Tower Foundations & deal with all of the Tyger Guards. From the elevator entrance to Wonder Tower, look South to see a Tyger Security Console; Hack it with the Cryptographic Sequencer to get access to a Trophy.

Secret Corridor:

Riddler Trophy #239: Before going up the elevator to Wonder Tower, quickly run through Wonder City Avenue & enter into the Secret Corridor. As we follow the corridor down, we can see a Trophy through some iron bars with a Riddler Proximity Mine blocking our way. Use the Disrupter Mine Detonator to destroy the Mine allowing us to run & slide under the bars to collect the Trophy.
Sequence 31: Makes You Stranger
1. Main Story: Wonder Tower, Monarch Theater, Catwoman Episode 4
2. Side Missions: 9/12
3. Demon Seals: 12/12
4. Tyger Relay Hub: 1/4
5. Riddles: 68/69
6. Riddler Trophies: 244/247
7. Catwoman Trophies: 17/35
8. Achievements: 32/64
-----------------------------------------------------------------------------------------------------

Wonder City:


Collapsed Streets 1:

Riddler Trophy #240: Keep ignoring Wonder Tower for now, & quickly Grapple up into the Collapsed Streets 1 area from Wonder Tower Foundations. In the room we enter, walk to the edge of the building we are in & look down into the water to see a Frozen Riddler Trophy; make a platform over it using the Freeze Blast to drop down & collect it.

Riddler Trophy #241: From down here, Grapple up to the ledge to the West & we can see a Tyger Security Console connected to a sealed steel door. Hack the Console with our Cryptographic Sequencer, & we can enter into a stairwell leading down to another steel door. Halfway down these stairs, look up to see a Trophy stuck to the ceiling; collect it with the Batclaw.

Riddler Trophy #242: Now Line Launch ourselves over to the main entrance to Wonder City to the far South of the area. When we approach the entrance/exit doors, look up to see some steam coming out of two pipes on the floor above us. Seal the pipes with a Freeze Blast & Grapple up to the next floor where we can find a Riddler Trophy up here.

Wonder Tower:
Hack the Tyger Security Consoles attached to the elevator in Wonder Tower Foundations to be able to gain access to the final area.

Demon Seal #10: As we take the elevator up to Wonder Tower it will eventually stop & Tyger Guards will be waiting for us on the other side of the doors. Grapple up through the service hatch of the elevator to stand on top of it & we can find a Demon Seal on the North wall of the shaft.

Demon Seal #11: Dispatch the Tyger Guards outside the elevator & look up above the entrance to where the elevator is outside to find another Demon Seal.

Riddle #67: “Where can you get a wonderful view of the past?”
Outside where we fought the Tyger Guards, look South along the railing to see a plaque depicting a picture of Gotham City; Scan it to complete the Riddle.

Riddler Trophy #243: Hack the Tyger Security Console & head around the right side of the tower holding onto the ledge. Make your way all the way around the tower holding onto this ledge, back around to where we were on the opposite side to find a Trophy behind an iron gate.

Demon Seal #12: Keep scaling the Wonder Tower until you get to the ladder that will momentarily lead you inside the Tower. Jump across the gap to the far caged side & turn around to look back above where we dropped from to see our final Demon Seal.

Riddler Trophy #244: From the last Demon Seal, we can actually see our next Trophy up above the caged area we need to walk through to continue. To get to it, simply exit the caged area & Grapple on top of it to grab the Trophy.

Riddle #68: “This question can only be answered from an unusual perspective. Can you get yourself there?”
This is by far our most annoying Riddle to Scan. From the last Trophy, drop down onto the horizontal steel beam stretching out over open air North of the Tower. Walk to the beams end & turn around with Detective Mode on to see the Top of a Question Mark spray painted on the Tower below us. The Dot is just a little ways further down below it.

To Scan the two pieces, we actually need to Glide off the beam & align them in mid-air before we Scan them. Drop off the beam facing the center of the Question Mark & almost immediately we will be able to Scan the pieces. This may take a few tries. Fortunately, if you are quick, you can actually Grapple back up to the beam to try again if you know you messed up; if you are not, you will have to rescale a portion of the Tower to get back to where we were.


Achievement #31 – Freefall: Don't look down.
Story Related. Climb to the top of Wonder Tower & defeat Hugo Strange to unlock the Achievement.

The Bowery:


Achievement #32 – Exit Stage Right: All the world is a stage.
Story Related. Stop the Joker in the Monarch Theater, once & for all, & complete the Main Story of Arkham City.

Museum – Catwoman:
Begin playing through Catwoman’s final Episode & we will eventually have to enter the Museum to confront Two-Face. As we do, we might as well find her Trophies hidden here…


Unnamed Hallway:

Catwoman Trophy #13: Enter into the Unnamed Hallway past the Trophy Room & take a left at the first junction in the hall. Enter a room previously locked up an Industrial Motor & Pounce to Ceiling to get up to the Trophy above through a Service Hatch.

Torture Chamber:

Catwoman Trophy #14: When we enter the Torture Chamber, swing down off the ledge above the water & crawl along the ledge’s bottom toward the North East end of the room. Under the ledge still, climb up through a Service Hatch & we can find another Trophy here.

Catwoman Trophy #15: From the last Catwoman Trophy, we can Pounce to Ceiling from this location & follow the underside of a walkway above, West, through the room; the Trophy will be in our way along the walkway's underside.

Armory:

Collect these next Catwoman Trophies before taking out Two-Face! If we finish Catwoman’s Episode, we will complete the Episode & leave the Museum to return as Batman; we would have to make a special trip back here as Catwoman in Post-Game…

Catwoman Trophy #16: Enter into the Armory now & make your way around the right side of the room on the top floor, avoiding Two-Face's Thugs. When we round the corner, we can Pounce to Ceiling onto an overhang that will take us around the East side of the upper floor. Follow it along & it will take us to a Trophy.

Catwoman Trophy #17: We can find the final Catwoman Trophy in the Museum on top of the glass display case that contained Mr. Freeze’s Suit on the upper floor, West side, of the Armory.
Sequence 32: The Last Hurrah!
1. Main Story: Post-Game
2. Side Missions: 9/12
3. Tyger Relay Hub: 4/4
4. Riddles: 68/69
5. Riddler Trophies: 246/247
6. Catwoman Trophies: 25/35
7. Achievements: 33/64
-----------------------------------------------------------------------------------------------------

The Bowery – Catwoman:
When we regain control of Batman after Catwoman Episode 4, we will see two cute kitties near the edge of the building we are standing on. These cats mark a Character Switch Point between Catwoman & Batman; there is one here in The Bowery, Park Row, & the Industrial District.

Catwoman Trophy #18: Switch to Catwoman & make your way to the building rooftops in between Ace Chemicals & the Arkham City Processing Center. In our first round of Collectibles Blitzing as Batman, we should have destroyed the Soft Wood Paneling blocking Catwoman’s access to her Trophy trapped in a chain link enclosure. Pass through where the Paneling was & Pounce to Ceiling to climb through a Service Hatch to get to the Trophy.

Catwoman’s Jewels: When we switched back to Catwoman for the first time in Post-Game, we will have received a new final DLC Mission for her to obtain all 16 pieces of her stolen Loot. To collect her Loot, switch to Thief Vision & begin looking for Thugs. Thugs that are carrying her Loot will flash orange & have a hovering diamond symbol above their heads. Knock them out however you like to collect +1 Loot. Keep your eyes open for these Thugs as we go around collecting her last few Catwoman Trophies…

As well, when we are playing as Batman, keep your eyes/ears open for any Political Prisoners being attacked for the Acts of Violence Side Mission. As of this point, I only had around 46% Complete for it; we will grind out the last encounters we need at the very end of our playthrough.

Park Row:


Catwoman Trophy #19: Head over to Park Row now as Catwoman & make your way down the street West from the Monarch Theater. A little ways down the street, just below where “Park Row” is written on our World Map, we can find a barricade in the middle of the street. To the barricade’s left will be an iron bar enclosure with a Gotham Hardware sign above it.

There is Soft Wood Paneling below this sign that we should have previously destroyed as Batman. Climb up past the Paneling, & Pounce to Ceiling to collect the Trophy.

Catwoman Trophy #20: Facing the entrance to the Solomon Wayne Courthouse, head over to another iron bar enclosure just to the West of the courthouse. Climb over the nearby fence & walk alongside the enclosure to its backside where we will have blown a hole in a Structural Weakness as Batman. Enter the enclosure & Pounce to Ceiling to collect the Trophy.


Achievement #33 – Family Jewels: Retrieve your stolen goods.
There are 16 Jewels we need to collect off of Two-Face’s Thugs. There is a set amount though which Thugs they spawn on is randomized; you can tell because they will have a floating diamond over their heads if you are in Thief Vision. Two-Face’s Thugs will only spawn in The Bowery & Park Row; Amusement Mile & Industrial District are controlled by The Joker.

If you cannot seem to find anymore Thugs with diamonds, quit to the Main Menu after Saving your progress & reload your game to reset Arkham City/respawn the Thugs. Scour The Bowery & Park Row until you collect all 16 Jewels to unlock the Achievement.

Riddler Trophy #245: Swap over now to Batman & return to that last iron bar enclosure near the courthouse we were just at. Carry on past the enclosure & take a left around the building it’s under to see a Tyger checkpoint in the Perimeter Wall with its entrance electrified. Approach the entrance & use our Cryptographic Sequencer to hack the Tyger Security Console inside to disable the electricity & open the gate; the Trophy will be at the back.

Tyger CCTV Relay Hub #2: Head over to just above the “A” in “Park Row” on our World Map. On top of the building here just in front of the neon blue Bar & Lounge signs we can find a Tyger Relay Hub to hack.

Amusement Mile:


Tyger CCTV Relay Hub #3: As Batman, climb onto the rooftop with the lobster sign on it just to the North West of the GCPD Building & we can find a Tyger Relay Hub we can hack.

To make things less tedious for yourself, consider scrolling down in the guide & collecting all remaining Collectibles in the Industrial District, Steel Mill, & Subway maps as Batman so you don’t have to constantly switch back & forth between him & Catwoman.

Catwoman Trophy #21: As Catwoman, make your way over to the GCPD Building & head underneath the ground floor into the underground parking lot. Pounce to Ceiling & crawl your way along to the far side of the parking lot where we can find a Trophy.

Catwoman Trophy #22: Head over to the Krank Co. Toys building & enter inside. If you have completed the Side Mission Fragile Alliance, we can enter Bane’s Titan Container storage room; Pounce to Ceiling here to collect a Trophy.

Catwoman Trophy #23: To the right of the Gotham City Olympus building, we can find a small room close to the water on a nearby building’s rooftop. If you destroyed the Structural Weakness barring the room with Batman previously, we can collect this Trophy.

Industrial District:

Tyger CCTV Relay Hub #4: As Batman, make your way over to the top of a large building with a neon orange sign reading Tricorner Naval on it where we can find a Tyger Relay Hub in between the two signs.

Riddler Trophy #246: From Tricorner, head North West over towards the Perimeter Wall to find a Tyger checkpoint with an electrified gate. Hack the Tyger Security Console using the Cryptographic Sequencer & we can find a Trophy at the back of the checkpoint.

Catwoman Trophy #24: If you completed the Hearts of Ice Side Mission, head inside the Storage Warehouse 5B near the waterfront as Catwoman & drop below the Floor Grates in the main room with Mr. Freeze & Nora in it. Follow the vent shaft to the lower level where we can Pounce to Ceiling to collect a Trophy.

Catwoman Trophy #25: Exit the front doors of Storage Warehouse 5B, & head across the street to the East, over to a tower with piping leading to its upper level. At the base of the tower, if we destroyed the Soft Wood Paneling previously as Batman, we can jump up into the tower. Here, we can see three Pressure Plates connected to a Trophy Cage on the ceiling. Simply Pounce to Ceiling & drop onto each of the Plates to open the cage; touching the ground will reset the Plates.
Sequence 33: No More Cat Puns!
1. Main Story: Post-Game
2. Side Missions: 9/12
3. Riddles: 69/69
4. Riddler Trophies: 247/247
5. Catwoman Trophies: 35/35
6. Achievements: 34/64
-----------------------------------------------------------------------------------------------------

Steel Mill:
Note that we can enter the Steel Mill from the rooftops now through the hole that was exploded open during the last few Main Story Missions. This saves us a lot of time not having to pass through the watercourse of Cooling Tunnels B & D.


Assembly Line:

Riddle #69: “Once assembled, do these two become one again?”
As Batman, make your way to the Assembly Line in the Steel Mill & enter the office room with the Sionis Industries sign above it. Across from a doorway to the Smelting Chamber will be an open vent we can Grapple into; if you took the long way around you will be facing the vent when you come out of the Smelting Chamber into the Assembly Line.

Follow the vent along, & drop down into the lower level. Turn around & not only can we see the two Ambramovici Brothers… we can hear them. Alive & well. Scan them to complete our final Riddle; at least someone gets a happy ending… though it is extremely irritating that we had to come all the way back here in Post-Game just to get the final Riddle; thanks again Rock Steady…

Ventilation System:

Catwoman Trophy #26: Re-enter the Steel Mill as Catwoman from the rooftop entrance & drop into the main Loading Bay room. From here, leap up through the circular hole in the wall we created as Batman to enter the Ventilation System. Drop down the shaft & Pounce to Ceiling to avoid the magma below; we can find the Trophy in the same room as a deactivated Pressure Plate through a hole in the chain link fencing.

Loading Bay:

Catwoman Trophy #27: Enter back into the Loading Bay & begin making your way over to the Assembly Line. In the room in between the two areas, we can find a Trophy inside an elevator we previously hacked open as Batman.

Assembly Line:

Catwoman Trophy #28: Enter the Assembly Line & head inside the Sionis Industries Office. Near the door that leads into the Smelting Chamber, look up above us to the North to see a ledge we can leap up to. Up here, there will be a Service Hatch we can slip through to access a Trophy blocked off by an iron fence.

Smelting Chamber:

Catwoman Trophy #29: Enter into the Smelting Chamber & dispatch the Gun Thugs inside. From the lowest floor, look up above at the underside of a balcony close to where the top floor office is to see a Trophy stuck to; Pounce to Ceiling to collect it.

Cooling Tunnel – D:

Catwoman Trophy #30: Enter into Cooling Tunnel – D & walk around to where the steel bridge leads across the watercourse. Approach the edge of the bridge & crouch to climb down & hang underneath it where we can find a Trophy.

Subway:


Subway Tunnels:

Riddler Trophy #247: As Batman, head to the Subway Station room & we can find a Tyger Security Console in its lower floor. Hack the Console with the Cryptographic Sequencer & we can open up the large gates into the Subway Tunnels. Take the tunnel to the left & enter the open train car to find our final Collectibles as Batman on the floor. Good riddance…

Subway Maintenance Access:

Catwoman Trophy #31: As Catwoman, head inside the Subway Maintenance Access from the Industrial District, & drop onto the bridge lower down in the tunnel. Climb onto the bridge railing, then climb down (you will have to hold the Crouch button or you will just jump off the bridge) to the underside of the bridge where we can find a Trophy.

Catwoman Trophy #32: Carry on down the Subway Maintenance Access until we have to Pounce to Ceiling to progress where a Trophy will be in our way; it is impossible to miss.

Subway Tunnels:

Catwoman Trophy #33: Quickly get through the main room of the Subway Terminal, past all the Gun Thugs, & get to the entrance to the Subway Tunnels. To enter, we need to Pounce to Ceiling over an Industrial Motor locked door; a Trophy will be directly above us here, it is impossible to miss.

Catwoman Trophy #34: From the last Trophy, drop down & hop over the fallen girders to the North to enter the topmost Subway Tunnel. Follow the tunnel down left a short ways & we will be able to Pounce to Ceiling just before reaching an open train car. Climb through a Service Hatch up here & we can enter the secret room above where we can find a Trophy.

Subway Station:

Catwoman Trophy #35: Our final Catwoman Trophy can be found on the upper floor of the Subway Station in the main admissions office on top of a table.

Arkham City:
With all 35 Catwoman Trophies collected we now just need to complete Catwoman’s 5 Physical Challenges. These are all very simple & can be completed anywhere in Arkham City; Save & quit the game & reload to reset the Thug spawns if you need to…

Catwoman Challenge #1: Use Caltrops to Stun an enemy 3 times.
Cumulative. Simply throw down Caltrops in combat & have Thugs fall to the ground when they come in contact with it.

Catwoman Challenge #2: Perform a Special Combo Whiplash & Special Combo Whip Trip in one Combo flow.
These two Upgrades need to be purchased for Catwoman. Accumulate a larger group of Thugs & build up your Combo twice in combat to activate both abilities while not losing your Combat Multiplier.

See the Waynetech tab of our PDA to see how to perform these two moves...

Catwoman Challenge #3: Complete one Claw Climb using at least 8 separate leaps without missing the timing for a single jump.
Claw Climb is the Catwoman equivalent to Batman’s Grapple. Find a tall building in The Bowery like the Bank of Gotham or a smokestack in the Industrial District & engage Cat Claw. Getting “Perfect” or “Good” on your timing counts but you cannot get a “Too Late”.

Catwoman Challenge #4: Perform a Pounce Attack 3 times.
Cumulative. Simply climb above a Thug & you will get a prompt to perform a Pounce Attack. If you are too close to the Thug or directly above them, the prompt will say "Drop Attack"; for Pounce Attacks you need to be a little further away so she has to Pounce not Drop onto the Thug. Perform 3 Pounce Attacks to complete the Challenge.

Catwoman Challenge #5: Use the Quickfire Whip attack during combat 3 times.
Cumulative. While in combat, simply activate the Quickfire Whip attack 3 times, no Combo necessary; it can even be done all on the same Thug.


Achievement #34 – Sphinx’ Riddle: Complete all 40 of the Catwoman Riddler grid items.
The Achievement will unlock as soon as we collect all 35 Catwoman Trophies & complete her 5 Physical Challenges.
Sequence 34: The Dark Knight
1. Main Story: Post-Game
2. Side Missions: 12/12
3. Achievements: 37/64
-----------------------------------------------------------------------------------------------------

The Bowery:

Side Mission #7 – Enigma Conundrum 10: After we complete 400 Riddler Challenges, we can complete the final section of the Riddler’s Side Mission. Note that Catwoman’s Physical Challenges & Trophies do actually count towards this number. If you do not have all of Batman’s Physical Challenges completed; do not worry as we have an extra 40 to add towards our 400 from Catwoman.

Oracle will tell she has triangulated the Riddler’s hideout location. Get to the Waypoint just below where the Iceberg Lounge entrance is & we will need to Glide over an electrified fence like how we previously did to collect the Riddler Trophy down here. Dive Bomb down towards the Waypoint & quickly pull up & Glide over the electrified fence. On the other side of the fence, we can find a door leading into the hideout.

Carefully navigate around the track where the Riddler has the kidnapped Cops & Doctors walking & get below the Riddler’s position to perform a Takedown. This is actually a pretty simple end to an otherwise irritating Side Mission. 100% Complete


Achievement #35 – Genius: Rescue all Hostages from Riddler.
After completing 400/440 Riddler Collectibles/Challenges (Catwoman’s DLC Collectibles contribute to this number as bonuses), take out the Riddler in his hideout to complete the Enigma Conundrum Side Mission & unlock the Achievement.

Park Row:

Side Mission #6 – A Shot In the Dark 3: After stopping the Riddler, make your way into Park Row & we will hear a gunshot marking the final Crime Scene by Deadshot. The trigger for the final Crime Scene is a bit unknown. We need to be in Post-Game for sure, but other than that it can trigger at any time. For me, it happened after completing the Enigma Conundrum Side Mission.

We can find the Crime Scene at the far West end of Park Row near a Tyger checkpoint in the Perimeter Wall with a bunch of Thugs gathered around him. Investigate the Crime Scene & we will narrow Deadshot’s location to three possible buildings: 12A, 12B, or 12C. To save you the time of guessing… he is in 12A.

Approach building 12A in Amusement Mile & turn on Detective Mode to search for Substation Maintenance Hatches; there will be three to tear down here. Head up the stairs on the building to tear down the Hatch on the back of a small room to find Deadshot’s weapons & PDA. Hack the PDA with the Cryptographic Sequencer to learn of Deadshot’s next target; Jack Ryder.

We will now have 3 minutes to get to Ryder’s location in the upper Bowery. Having completed Cold Call Killer, you will know 3 minutes is quite a lot of time; you could probably run there on foot if you wanted & still make it… (Don’t actually though). Get to Ryder & save him before having to deal with Deadshot himself; just get below where Deadshot is standing & perform a Takedown. Crush Deadshot’s head in between Batman’s thighs! 100% Complete


Achievement #36 – Contact Terminated: Stop the contract operative.
After assessing all three of Deadshot’s Crime Scenes, get to his next target before he kills them to Takedown the assassin himself to complete the Side Mission – A Shot In the Dark Side & unlock the Achievement.

Side Mission #3 – Acts of Violence 2: After you have completed everything previously mentioned in the guide barring all of Batman’s Physical Challenges, we can now grind out the final Political Prisoner Rescues needed to complete this Side Mission.


There are set locations that these assaults take place at, but they may not always spawn. Cycle around Arkham City to all of the locations & if some do not spawn (you may have already done them) quit to the Main Menu to reset the area & cycle through them again. If two assault events are too close together only one of the two events will spawn & you will need to reset the area to spawn the second. Since we are in Post-Game, all possible assault locations will be accessible. 100% Complete


Achievement #37 – Aggravated Assault: Stop the assaults in Arkham City.
There are 16 instances of assault occurring around Arkham City; saving all 16 Political Prisoners will complete the Side Mission Acts of Violence & unlock the Achievement.

That was the last thing we needed to do on our NG playthrough of Arkham City & we can now begin NG+. Starting NG+ will not save over this playthrough, so if you missed anything you can always pop into NG to complete it. This is a lifesaving feature as for the Perfect Knight – Day 2 Achievement we need to complete all 12 Side Missions in both NG & in NG+. So if you somehow missed something we can always return into NG to complete it.
Conclusion:
This first playthrough is absolutely grueling thanks to the 440 Collectibles we had to find. Thankfully, Arkham City has an absolutely fantastic narrative which really makes our playthrough bearable. Fortunately for us, all Riddler Collectibles, Physical Challenges, Upgrades, & Gadgets transfer over into NG+. We do not need to collect all 400 Riddler Collectibles/Challenges over again! NG, NG+, & Riddler’s Revenge all take place on the same Save File & will contribute to our Perfect Knight progress.

Special shout out & thanks to Caelan1963, for meticulously helping me with quality control on the guide & Collectible Maps!

Note that this is Part 1 of 2 for the 100% Achievement Guide: Batman - Arkham City Part 2 is linked at the bottom. Part 2 will cover: NG+, Harley Quinn’s Revenge DLC, & the Riddler’s Revenge Challenges for Batman, Catwoman, Robin, & Nightwing. If you completed everything in Part 1, we will unlock the Perfect Knight – Day 2 Achievement after completing NG+ & earning all of Batman’s Medals in Riddler’s Revenge. Be sure to keep playing on the same Save File for all of this…

If this guide helped you achieve 100%, rate the guide or let me know in the comments. Helps me know if I am doing things right!


57% Complete
Thank you for choosing Cynical Guides, & I will see you in Part 2!

If you are interested in a little bit of patronage, support my projects & consider buying me a coffee. If not, no worries; my guides are, & will always be free content. Achievement Hunting is my passion, & writing these guides is a way for me to give meaning to a life long hobby!
https://www.buymeacoffee.com/cynic0055

Other Cynical Guides:
If you are looking for the guide covering NG+, Harley Quinn’s Revenge, & the Riddler’s Revenge Challenge Maps, click/Favourite the guide below.
https://steamcommunity.com/sharedfiles/filedetails/?id=2772379636
If you enjoy this game & my style of writing guides, be sure to check out my:
https://steamcommunity.com/sharedfiles/filedetails/?id=2434426635
Check out my profile for a full list of my works.
https://steamcommunity.com/sharedfiles/filedetails/?id=2992727030

75 коментара
Miladarmani 6 окт. 2024 в 7:47 
ok lets begin for batman Arkham City achievement :MMDead:
Relyks2000 30 май 2024 в 8:07 
In case it is helpful for anyone else: I thought my game was glitched at first because Riddler Trophy #211 was not present for me under the mine cart. I just finished this guide and got all the collectibles, so I must have picked up that Trophy on my first run through the Steel Mill? Perhaps before it had a mine cart over it? Either way, in case someone reads this and finds themselves in the same situation.
Relyks2000 26 май 2024 в 12:07 
I've went through your FNV and then Asylum guides and now I'm here :)
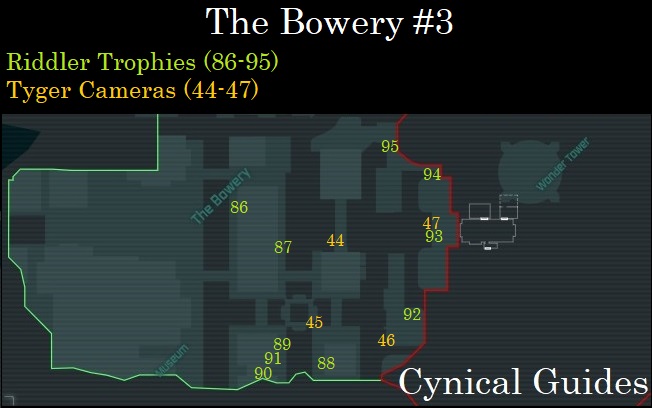
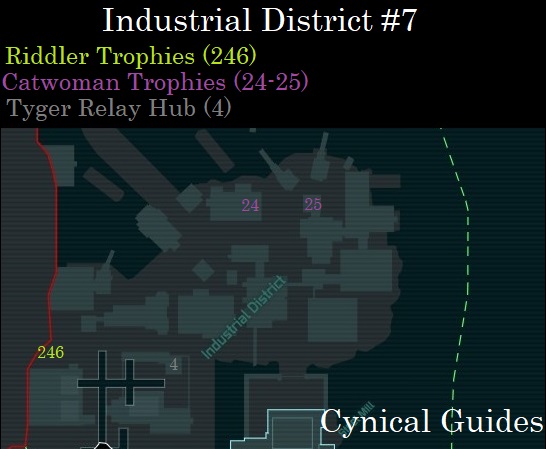
This may not be new info, but just in case: In the description for Riddler trophy #83 you say you "can't" get the trophy above that one until you get the line launcher. That's not true, actually. I was able to glide, dive bomb and pull up to get over the fence and hit that target. It took several tries and I'm SURE the line launcher would be way easier but just an FYI.
Thanks for the guide!
unawedjoker 13 март 2024 в 12:34 
Thanks! NG+ time...
Dolo 11 февр. 2024 в 13:28 
btw on the trophy above Riddler Trophy #83 you dont need the line launcher if you grapple boost and glide into it
Cynic 0055  [автор] 19 ян. 2024 в 20:11 
Damn, thanks for the info Watersheep. I guess there goes that. Annoying from a completionist stand point, but also fine I guess. I never liked Online Achievement farming anyways. :batarang:
Watersheep 19 ян. 2024 в 18:11 
Yeah the Multiplayer servers for Origins got shut down around October 2023 so it's impossible to get the Multiplayer achievements legitimately.
Cynic 0055  [автор] 19 ян. 2024 в 11:57 
Nope all good man, this is exactly what I hoped happened! Glad to hear it worked out.
Mario 18 ян. 2024 в 21:19 
I've found the 12th harley head, it appears i've missed one, sorry for making you loose your time 😔
Cynic 0055  [автор] 18 ян. 2024 в 20:24 
Shoot man, that really sucks. :steamsad: You wouldn't happen to be in Steam Offline Mode or have lost your internet connection when trying to unlock this Achievements? I know for quite a few games, when you lose your internet connection, it prevents Steam from logging Achievements & can mess you up.