Deep Rock Galactic

Deep Rock Galactic

109 ratings
Sludge pump: An extensive guide
By Frontrider
How to make use of this strange weapon.
2
9
2
   
Award
Favorite
Favorited
Unfavorite
Basics
The Corrosive Sludge Pump is what happens when the maintenance staff are left with too much time on their hands. A complicated network of piping, distillation bottles, and safety valves results in a very capable device indeed - lobbing globs of toxic waste at those you disapprove of has never been so fun!

-Item Description


I'll start by saying: The gun is NOT like the sitcky flames of the flamethrower. People make that comparison, but it won't exactly be true.

Treat this as the "ranged option" for the driller. Both the cryo cannon and the flamethrower are short range weapons, while this one's range can be anywhere between 10-50+ meters (or the other side of the largest caverns). You can also think of it as a fast firing grenade launcher if that helps, with the way you'd line up direct hits.

What I write here is based on what worked while I was playing with the gun. I cover a lot of ground (pun not intended), pick what you find useful.

I'll be using "DOT" a lot in this guide, it means "Damage Over Time", the weapond deals most of it's damage like that. Other examples in the game are fire damage, and poision.

Note:
This guide was written over months, and it may repeat the same concepts multiple times. I did not edit those out, because I believe that to be useful to reiterate. (And it takes less time to update and add to the guide) The contents are still valid, and if something needed to be updated due to a change in the weapon, then it was updated.
Some images were taken before Season 2, where the armor melting got merged into the base gun. It was removed from the text, but not all images.


The formalities are out of the way, lets get to it.
Mods
Tier 1:
Name
Effect
Tips
High capacity tanks
+20 Tank Size (Magazine size)
Doubles your magazine size. It gives you more sustained fire, but you can lose some ammo efficiency on charge shots, because when you charge shot with less ammo than its cost, then it will fire properly costing less. If we charge shot with 1 ammo, it will still work as if we had 4-5, saving 3-4 ammo, and yes it does worth going for. The larger tank reaches the ammo for this half the time as normal so we lose out on some of these opportunities.
It might sound like a bigger loss as it is reasonable to reach values where we saved at least a single resupplies worth of ammo, but keep in mind that the sludge pump has a really high rate of fire so that sustain can make quick work of a swarm that got up to us.
Better air pressurizer
+40% Projectile Velocity
The extra speed does 3 things.
  • Increase your range, as the arc of the projectile gets longer
  • Increase the gun's responsiveness by letting the projectile hit the bugs sooner
  • It can also make it easier to aim, because the projectile flies more straight.
I personally see this one as a learning aid, as it can help you to aim, but it may not worth using for that as it also changes how you aim with it (you need to aim a little higher, but I might feel that because I'm used to the normal arc).
The sludge pump is already the longest range primary the driller has (without overclocks), and the range it gives will not matter as much as the other options.
Can be a good pick with AG mixture to complement the extra range with the extra speed.
Air sensitive compound
x1.25 Puddle Size
Larger puddles, no explanation needed, you can cover more ground.

Air sensitive compound is usually a good pick. The other two changes how the gun handles, this one leans into what it already does best.

Tier 2
Name
Effect
Tips
Dyse Nozzle
+24 Charged Splash Damage
This mod is usually less valuable, as charge shots are used for ground coverage most of the time.
These shots deal more damage and that would be good against larger targets, but those are usually dealt with by excessive DOT and not direct damage. I recommend a radioactive cooker for those bugs instead, that can mean poison, radiation and corrosive DOT+ the puddle at the same time.
With sludge blast this is a good pick for more damage, as we can also unload it on those large targets.
Atomizer Nozzle
+4 Charged Fragment Count
More fragments on charged shots. This is a strong pick, as more fragment means that we can cover more ground.

It also means that the fragments will fly out in more directions, hitting more targets directly. This works well against macteras.
In practice if we shoot a large target with a charged shot the fragments probably will not hit anything, but it still increases our chances for that.
Potent Goo Mix
+8 normal shot damage
Normal shot damage, if we abuse the rate of fire and spam normal shots then this mod makes it better. Direct damage is NOT the gun's specialty but it can quickly dispatch the grunts that got too close.

If we want to abuse the fire rate and just open another can of spam with normal shots then this is the pick we need.

These depend on the chosen overclock and the play style we use, pick accordingly.

Tier 3:
Name
Effect
Tips
Supersaturation
+2 Effects Duration,
+6 Puddle Lifespan
Longer effect and puddle duration. Rely on the DOT and the puddles, you need to use that extra duration.
Because we primarily deal damage over time and not for each shot, this mod really is a damage multiplier in disguise.

Note:
Before Season 2, this was a non-option because not picking the ammo ruined the gun so hard that it became unusable. After season 2, the magazine size and the base ammo were readjusted to provide enough sludge to make this work. You might find sources that call this bad, that is the reason.
More Goo Canisters
+40 max ammo
No explanation needed. The extra sandwich space did not worth it.

I recommend more ammo as a baseline, because you can not go wrong with that. If you're comfortable with longer puddles/dot (or even sticky flame) then go for that.

Tier 4:
Name
Effect
Tips
Spillback Extension
-1 Charge Cost
This is kind of an ammo mod in disguise. The more charged shots we use, the more ammo it will save us.

Normally, we can shoot 4 charged shot (4x5 = 20) out of one magazine, this bumps it up to 5. If we charge shot the last single ammo than that becomes 4 charged shot+ 4 normal shots, somewhat "reproducing" the savings that this mod gives us.
Improved Spooling Mechanism
-60% Charge Time
This is a fire rate mod in disguise. Increases the responsiveness of the gun, lets us shoot charged shots faster, reducing our time to kill.
If you play fast, then this is a good choice.

These two depend on what we can handle. If the charge shot feels too long pick spooling, if not pick spillback.

Tier 5:
Name
Effect
Tips
Protein Disruption Mix
x0.75 Movement Speed for Direct DoT Effect,
x0.5 Movement Speed for Puddles
Makes the bugs move even slower when hit/in the puddles. This is a crowd control tool, and we could call it a damage multiplier for your puddles as well, as the bugs will spend more time in them.

If the sludge is combined with any other kind of damage source that is fixed location (radiation field, neurotoxin cloud, plasma trails, fire, IFG etc.) then it will also multiply that damage as the bug will spend more time in that as well.
Fluoroantimonic Acid
+ Increased Corrosive Damage per sec.
(+2 Effect Damage (per tick), +4 Puddle DPS)
A raw damage mod for both puddles and corrosive DOT.

If we use the pump mostly alone fluoroantimonic acid will increase our raw damage, If we combine it with one or more other sources of DOT then slow can boost all of them.


Now that we covered the mods, time for some example builds.
The heavy hitter

I start with the direct damage option, because this is the "least uncanny" build to use. We don't bother with ground coverage, every shot should be a direct hit.

This is also the driller weapon I can whole heartedly recommend for elimination missions. This is more reliable than the other primaries, as we can't set the thing on fire, and freeze has a smaller impact (hard to freeze, easy to miss your damage window if you were reloading at that second).

Possible modifications:
  • On t1, you can take magazine as well. I go with air pressurizer for increased range, because I can reload the gun with born ready.
  • On t2, dyse nozzle can also work if you decide to make most of your shots charged. I go with potent goo mix, because It's better against grunts, and helps with our ammo economy. The gun is also more responsive (we use a lot of normal shots, those are fast to launch), our dps is increased.
  • on t4, we can take spillback, but it will make charged shots more risky, because you have to wait more. If you primarily rely on normal shots, take the extra ammo.
  • on t5, I recommend more damage just to double down on it, but slow can also work.
  • We can also take any of the green overclocks, they won't impact the gun's performance for this use. If you only got greens, treat it as this.
    The optimal overclock is volatile impact mixture.

This build comes with a catch, and I leave a warning for that. You trade faster killing for total maximum damage, the pump's stats are heavily pushed towards the DOT so I only recommend it as a beginner build. If you understand how long it can take to kill something with the dot then you can deal more damage.
This build can still oneshot grunts, if you wait for the dot to finish the job.


The sludge blast can take our charged shot's AOE, and convert it into burst damage.

Possible modifications:
  • on t1, we take the magazine, so we can use more charged shots. Increased velocity means less, because the overclock provides that, and making puddles is not really our goal.
  • on t2, pick your poison. I pick normal shot damage, because those are easily spammable, and it gives me another tool.
  • on t3 we don't rely on puddles, so we take ammo.
  • on t4, I go for faster charged shots for increased burst, saving ammo is also a good choice.
  • on t5, we take damage, slow has less of an effect because we're killing quickly.

The gun responds to weak spots, you deal more damage on them, but it's not vital to it. You can shoot an opressor in the face and kill it.

IF you only have green overclocks, then you can also use this kind of build for puddles, but those are an "investment" into an area that can pay off or not. If you want to cover the ground, I recommend using a gun that maximizes that, so you can minimize your losses.

If you feel adventurous, and want to be more aggressive, the pump fires when you hit the trigger so unloading a lot of goo (lot of direct damage) on your target is easy. IF you do play aggressively, I recommend the colette wave cooker as your secondary, because it supports this playstyle better than the subata or the epc. The continuous fire helps getting the bugs off of us, and it lets us win more as we push in.

This kind of build can also deal reasonable damage to the nemesis, the armor melting will get damage breakable weakpoints, and the armor covering the weakpoints.
.
Ground coverage
These 2 builds are intended to go for surface coverage. I recommend taking some fire with you so you can deal more damage while the bugs enjoy their mudbath.
In terms of ammo efficienty, these builds are beasts. You can handle entire haz5 waves out of a single magazine, if you need to clutch.


I won't take any credit for this one, got this on discord.
With this build we can easily cover areas of the ground in sticky goo. The dispenser compound overclock is mandatory for this to work, we specifically rely on the increased fragment count.

Charged shots create circlular puddles that we can lure bugs into. We can also use mactera as "anchors", try to shoot them to get a puddle directly under them even if there's no suitable surface around.

Possible modifications:
  • on t1, we can take the pressurizer for increased range. Air sensitive compound can be an option, but I personally found it less useful. The puddles already cover enough ground.
  • on t4, we can take improved spooling, but I didn't find charging speed to be a problem. when I was using it.
  • We take the extra slowdown for the fire. Optionally we can take more damage, but the slow helps the fire dps.


Next up is a build I'm personally fond of. This was the one that helped me learn how to use this gun properly. The goo bomber special, we create long lines of goo to cover the ground. The puddles are the easiest to control with it, it won't splash all over the place. But, we also have to mind where we aim as if the projectile hits something too early we lose a lot of our puddles.
I also use this with a fire EPC, the air sensitive compound makes it so that the puddles are perfectly aligned for creating a strip of flames.

If the goo line landed on a bug, then it will have a gap in it. We can fill it back in with normal shots if we still want to burn it.
In corridors (tunnel made by doretta for example) a "V" shape can help us catch a lot of bugs.
In rooms, we can use a triangle, a rectangle or a cross shape as a "trap" we can lure the bugs into. I personally use the cross.

I'll reiterate: the amount control we have on this gun is invaluable. The power from not having the fragments fly around at random should not be underestimated.

Possible modifications:
  • on t1, technically we can take the pressurizer, the further the projectile flies the more puddles we can possibly get, but then we'll also forfeit a large portion of the fire potential.
    IF we take the long range option, then I recommend not going for fire, as it won't spread that well.
  • On t2, we can take the dyse nozzle, but we're not going to be charge shotting into anything. I found that the atomizer nozzle has less impact on the overclock, so that's why we go for potent mix. That gives us more value in that slot, and we can use our normal shots more effectively.
  • on t4, both options are fine.
  • We take the extra slowdown for the fire.

This is a very tight build, I'd only take alterations on t4.
IF we're good enough we can aim almost vertically next to a large target and have all of the fragmens fall on that single target. I don't recommend doing it, it's very hard to pull off but if you can then it can give you some extra burst. If we can pull it off reliably, then we *could* build it for direct damage.


The sludge blast leaves a different puddle behind. This gives us a lot of control, like the goo bomber. This is the only way that lets us use charged shots the cover ceilings. The only mod that we must pick is the t3 ammo, we need to compensate for what we lose out on the overclock.

Gameplay tips: (applies to both of these builds)

Take the aggro of the bugs onto yourself. You want to use yourself as a lure to pull them into the puddle for maximum damage. This is our primary tactic, we can also do this if we're just playing with a driller like this. Both builds create large puddles suited for this. The benefit you get from goo bomber is that you can keep bugs furhter from yourself by using the length of the puddle.

We can ask our engineer to throw lures into the puddles, and we can also build them around their lures. The lure has a cap of~10 bugs, but if the goo kills them off then it can draw away more bugs.

If you're not in the middle of a wave, rely on normal shots to save ammo. I think about each charged shot as "an investment" into that area. Figuring this out is the way you master these builds.
If you're good enough with this, then this weapon is the most ammo efficient gun in the game, you can really hold out while you wait for the scout to gather nitra.

Stack the DOT of the puddles with fire or neurotoxin for a higher output. While the bugs are slowed, we can wait for it to deal the hurt. Don't use both, the toxin is flammable.

DO NOT wait for the DOT on ranged enemies, they need to be taken out imminently. IF you can, make sure that someone else is on the lookout for them.

The ceiling and walls can be difficult to cover. The walls can be partially covered with charged fragments but the ceiling can't be. If you only intend to cover those surfaces use normal shots. Remember, normal shots are also completely capable of making puddles.
If you know you gonna be making a puddle out of less fragments than than the cost of your charged shots then use a normal shot instead. (eg, 1 puddle to kite a few swarmers into)

On escort missions we can specifically ask the team to focus the ceiling. We gonna be dealing heavy damage to the floor already because of how puddles fall.
The Shotgun
(update for season 2 in progress)
I had to include the "controversial" sludge blast on this list. This is one of the hardest, but also one of the most fun builds for this gun. The recipe is simple. We can sneeze giant blobs of toxic goo at the wildlife of hoxes. Great at dealing with large swarms, excellent at covering mactera.
The only issue is obvious when we look at the overclock, it comes with a heavy ammo penalty and I'd say that it's warranted. If it didn't, it could be the one thing you'd need to run.

We want to use charged shots on incoming large swarms. Drop the goo directly on top of them for deletion.

This build is also very tight.

Possible modifications:
  • on t1, we take the magazine to do some over compensation for the overclock's penalty. The projectile is fast enough so that is not a great option, but a valid pick. Increased puddles doesn't really do anything, we won't hit more bugs.
  • on t2, pick your poision. I heavily rely on direct damage from the charged shots, so I chose that.
  • Spillback is a bliss, we can compensate for the ammo capacity loss. We gonna be using charged shots enough that it will grant us more shots.
  • on t5, we take damage
The long range option

This option is good if we struggle against macteras, one of the possible weaknesses of the weapon. It can also help, if we struggle with aiming.

Watch for the projectile's drop, it's different from the base weapon, you might aim too high.

I personally see it as a "meme option", but this is personal opinion.


With minimal alterations, it can also become a quick firing aggressive build. It mostly helps with enemies coming from above us, like the drop pod's area in a salvage mission.
We take the increased magazine, because we don't want to reload that much, then the faster charge to well, charge our shots faster so we can deal damage faster.

With this use the gun is stepping on the territory of the driller's secondary weapon (that is what we usually use for range) so we really need to look out for our ammo consumption.
Maximum duration

IF we're used to very long sticky flame duration then we can make use of this in a similar manner. If we're not, then our ammo will be very tight. Not impossible, but it will be more difficult to ration.

The other thing we can do with it is to maximize the corrosion damage, then use the extra duration as a multiplier. This can pair well with the wave cooker's contagion transmitter, especially if we also take the toxin grenade to double down on it.

Note: Before Season 2 this setup was somewhere between "weapon becomes a liability", and "takes extreme adjustments". After season 2 the extra ammo we got makes it work.
Balance above all else.

The hydrogen ion additive overclock just makes this gun do everything it can better. Stronger dot and slow, good for direct hits and also for puddle damage.

Use the descriptions of the direct damage or the ground covering variants for possible modifications, this build is somewhat in the middle. We can both cover the ground, or just use direct hits. In the case of the latter, use the DOT from the status effect to do the heavy lifting.


Keep an eye out for the charged shot damage. With certain overclocks/mod combinations it can make sense to use charged shots as a stronger attack, but if the damage is almost the same (40 vs 50 here) then it can be wasteful. In these cases we should use charged shots if we want to create more fragments, either to cover the ground or damage multiple enemies. (shoot it at an incoming swarm)

I recommend a subata as the secondary, EPC makes less of an impact. Puddles are not our focus. Speaking of which:


This is another "balanced build". Go for ground coverage, but at the same time we also push for some direct damage.
Compatible EPC builds
This is my personal recommendation, I don't do thin containment field because I think it's less reliable/useful here. We can bring it if we want to, the explosion we get by shooting charged shots can set the goo on fire.

I won't include a build like that, this guide already has enough padding. :P


This EPC is built for fire output and fast normal shots. The overclock is a bit awkward, it is technically for charged shots, but it does not impact the gun's performance and the extra ammo is nice.

A lot of drillers prefer the EPC, but I found it to be really good only as an internal source of fire so we don't need to rely on the team to burn the goo.

Remember to use it on opressors and other hard to burn targets. Primarily so we use more of it's ammo, otherwise we'll get less resources at the resupply pod. The only bugs that are good to shoot with it are the macteras and the occasional spitter on the celing. (too far to reliably hit with the pump)

Possible modifications:
  • We can take heavy hitter, IF we can manage the overheat. It is more fire but I didn't find it to set the goo on fire any faster. (3-4 shots)


If we played engineer, this build is a "mini breach cutter" and we should use it like that. We give up on the fire, but get a different form of crowd control. Can be useful depending on your playstyle, or as a possible learning aid.

I have not used this build much (I like me fire), but I'm still including it for inspiration. This has the same kind of problem as thin containment field, it somewhat overlaps with the crowd control functions of the pump itself, so we get less value from it.

This is an interesting pick. We can use the persistent plasma overclock to stack more dps on top of the goo. This gives us another way to apply more slow and increase our DOT.

This is also the only way with the EPC to stack 3 different kind of DOT in one place, as the plasma won't release any heat, preventing the neurotoxin cloud from exploding.
Still, I recommend not bringing neurotoxin with this, because it can become redundant.
If you'd do this, then I think I'd recommend a cooker instead with the radiation overclock because that is more reliable.

It is also harder to get the kind of burst damage we need out of the EPC. Not impossible, but hard. We can get some with the thin containment field, but that takes a lot of practice that not everyone has the time for.
Subata, the true sidearm
More information in my dedicated guide:
https://steamcommunity.com/sharedfiles/filedetails/?id=2881097154

The only specific recommendation I have for this is that you do not have a "delay" to get to your max damage. EPC's eexplosion takes 2 timed shots, HE has the timer etc. With the pump you want to have something that can kill now.

The direct, normal shot hits between the EPC and the Subata are comparable over time, with the subata gaining an advantage on weakpoint shots.
Colette Wave Cooker
The wave cooker was definitely the gun that was designed alongside the sludge pump. It fills in every role that the sludge pump struggles to cover. (short range dps, and long range sniping)

This gun is more of a "win more" kind of situation. It heavily relies on other effects being applied to the bugs, and it works with pretty much anything. We should prepare the bugs, with the right seasoning before we cook them.

I also recommend to "snipe" spitters with it, it has the range and accuracy.
If we go for a wide range then it can also help with cleaning up swarmers.


The only thing to note is the t5 mod contagion transmitter, it boosts our damage if the bug is corroded and/or poisoned. This is the mod we should pick in my opinion as it's just more raw damage, without any gimmicks. Note, that if you corroded the enemy then it will make it poisoned!
  • on t1, I recommend ammo or damage. The pump is already a strong AOE weapon, we don't need a pistol for that.
  • On t2 anything can work.
  • on t3 we pick what we want. Slow is the only one that will be self contained, but there is so much fire in other classes that we can pick temperture amplifier unless we know 100% that there will be no fire in the team.
  • on t4 I recommend the power supply overdrive as it tightens our fire, letting us be more efficient at longer ranges. Don't forget to put the gun into override with the reload button!


With the gamma contamination overclock, I would note only 2 things:
  • the radiation is extra damage. Because of this, we don't feel the hit to our ammo that much.
  • the smaller aoe can be an upside if we wish to focus our shots to a very small area for a more single target focused gun, especially if we pick power supply overdrive to tighten it further.

This also does something else. With this, we can apply up to 5 status effects (2 slows, corrosion, radiation, and poison) at the same time. That helps us with larger targets, as the damage from our status effects will always be relevant to us no matter how we build.


I personally go for a more "run and gun" approach when using this. If we are good at essentially noscoping them at long ranges consistently then a subata can still be a better choice.
Equipment
Axes

They are nowhere near as good as people will tell you. They are at their best with the cryo cannon, the 3X damage from the freeze really makes them work. But, the fact that the damage is instant (you have no delay between pressing the button and getting it) makes it work out as a compliment.

High Explosive Grenade

It works, but it has a strange niche. It is good at taking down bugs on walls at odd angles, macteras, and clumped up bugs. While most of these can be done by the pump too (bugs on the walls are more difficult) it still works. Check to see if it works for you, and learn to cook it. Precision explosives are still good.

Neurotoxin

Most likely one of the most flexible pieces of equipment in the game. I'll just list the possible uses in no particular order, there are many:
  • Clean swarmers
  • Clean swarmers after killing a brood nexus (I'll say it specifically, so you don't need to make that leap of logic. You'll thank me when you can't freeze it)
  • Block off an area (tunnel)
  • Protect yourself against naedocytes.
  • Use it as a "shield" while running in for a revive
  • Stack the poision with the sludge
  • Set the cloud on fire massive chunk of fire damage
  • Set the cloud on fire to set large amounts of goo on fire (works with fart clouds as well)
  • Slow down the advance of the swarm (poision also slows)
  • Stack damage on dreadnoughts. This one is interesting, as this is the only other DOT that works on them, as they are immune to fire.

Springloaded Ripper

It looks funny, but it does nothing to make the rest of your kit work better. The places where it is good in are handled by the pump already, with no risk of friendly fire.

C4

Use it to kill bugs. It takes less time to trigger it then for the dot to work, so you can get an advantage out of it.

I personally recommend fear, but stun may also work in your favor. If you use it for combat, I recommend not taking the mining upgrade because the holes you make will be too deep.

Together with the axes you can build yourself a "panic button" for bugs that need to die now. This means that you can target more bugs at once, one group soaking in the goo, the second one getting blown up etc.

Drills

A damage focused drill also works well with this. I was surprised, but you can use it to stack something on the goo, and can also fill in for the burst we need.
Gameplay tips
If you stay in an area for an extended period of time, flatten the terrain. The gun works better on flat ground especially if you go for puddles. Rocks sticking our can break your consistency a bit.

Use c4 to extend the rooms you're in if you need to. Especially with goo bomber special. This is a "generic" driller tip, but good to remember.

If you see a chokepoint, it's your spot. Especially if you puddle. The direct shots also have a small "spread", so if you shoot a bug and others were too close they will also get hit and now covered.

When you shoot something, it's immidietly slowed. No questions asked. This makes it an excellent weapon against anything that's hard to freeze.

1 blob is enough to kill the lone grunt. The DOT will finish it off, no need to use more ammo on them. Same applies to lootbugs. If it can wait to die, no need to shoot it multiple times.

Whip out your subata after you covered the ground, the weakspots are easy to hit on the slowed enemies. If you don't use full auto, you should also snipe whatever is out of the pump's range if you don't have a swarm to deal with. Our primary focus is crowd control, but we can do a little more than that.

Be preemptive, shoot where the bugs will be when the goo lands. When you see the digging animation you can strike, you'll hit them as they spawn. Constantly predicting where the bugs will be is a skill you want to pick up for this.

Use normal shots. I see a lot of people spam charged shots, but you don't need to do that, it can become a waste of ammo.

I'll reiterate: Use the dot. Rely on it. If you don't use it, you're just wasting potential. It is one peculiar playstyle, but that is where a lot of your damage is.

Anything that is not a voxel (eg cannot be mined into), can remove your fragments if it lands there. If you played engineer, anything that you can't platform up is a good candidate. Not everything, because you can still puddle on things like the side of the drop pod, but it's a good guideline.

Aiming can be a little tricky. Unless you have ag mixture or faster projectiles, the goo will drop faster than you'd think it does. I don't use those because I already got used to this effect, and now they'd mess with me. If you want the projectile to fly very straight, you can use that overclock and t1 mod to make it work.

The gun will slowly melt armor on any bugs we hit. Use it to create openings for your team. this only applies bugs that we hit directly, not ones walking in the goo.

Because DOT is your primary source of damage, you can be weaker against big targets, prepare accordingly. You can kill them, but you will rely on slowdown effects for them.
"Disruptor" enemies
This game has a "special" kind of enemy, that are designed to disrupt your flow. Not necessarily tough, just annoying to deal with. So, I'll highlight this specifically.

This weapon can be effective at handling them with "minimal" effort.
IF it's moving fast (most of them, really) we can let the dot do the work, we only need to hit them once, and we'll also slow them down.

Shellbacks kneel to armor melting. 1 shot, then we can use any weapon we want to kill them while they are rolling. This is especially good for the adult variant, the armor can be difficult to crack.

The 2 bombing organelles on the side of a goo bomber will pop after a single shot, essentially turning it into a regular mactera. I believe this happens because the gun's "armor melting" just damages whatever is breakable on the bug.

You can also slow down the horror, if it comes to that.
Dreadnoughts
I recommend any of these builds for dreads over any other primary, because:
  • You can have better success with cryo, because of the damage boost you get from freezing, but the window for that is very short.
  • All dreads are resistant to fire/heat, so you will always deal less damage to them.

With the pump:
  • No matter what the dread does you WILL always slow it down, helping your team to dodge its attacks. IF your engi runs turret arc, then you can completely pin them down, the electricity+ the pump's slow is enough for that. (except the twins, the burrowing negates this tactic) Other slow combinations will also work, but this is the most passive one that you can repeat over and over again.
  • The dreads are not resistant to corrosion, nor radiation.
  • The pump's unmodded range is a lot longer than any other driller primary, so you can stay out of their melee range.
"Large" enemies
Grunts and slashers

These are here, because they have more health then others of their kind. grunts/spitters can be easily dispatched with 1 shot.

The pump can usually deal with these with enough slow/DOT. But if we need a bit more, an axe can step in to give us some burst damage. Without ice it is a bit underwhelming, but it can still quickly dispatch of these enemies, if the slow was not enough to keep them in the puddle.
The armor melting also helps with the guards.

If you want or need more, look at the next section.


Opressors and Praetorians

You can kill these "eventually". With the slow, they can be non-threats, especially if you can get them to "walk the line" with goo bomber special. We can also use other means to target their backsides as it is quite slow for them to turn around after a few gooshots.

Armor melting helps with the praetorians, it is not fast, but it works "passively".


A radioactive cooker can help, as it just means that we have more DOT to dish out.
If someone on the team has fire, then heatshock can also be a working option. This gun is somewhere in between being for crowd control and single targets, can be tuned for each.
This can be an optimal choice, balanced between range and high damage, as we can always easily take out spitters on the ceiling.

A damage oriented EPC can work out for this role, even with thin containment field as it helps with the heat. The explosion from shooting a charge shot is more of a crowd control tool, but can work for a delayed burst.

A full auto subata can be our best friend for this. Get born ready, no going around it, and build for maximum weakpoint damage. This is the highest single target burst you can get out of a driller without freezing. If the thing needs to die now and not in the next few seconds then this is the best option.

When I first started with the pump before we had the cooker this was what I landed on, and it is STILL an excellent pairing if we want burst. The base reload is faster than the cooldown on the other 2, so for this role I do not think there's any real competition.
The only drawback, is that we get less utility. EPC has mining/cc, cooker has better long range options.
A full auto subata is bad at long ranges, but t1-1 can make it a somewhat viable option if we tapfire. IF we can master tapfire with this, then we can get faster ceiling kills than with the cooker. If you don't care for mastery/don't wish to bother, cooker it is the choice for those.

If you don't want full auto and don't mind spamming it, you can just roll with one damage mod+t5-2 with the oc of your choice (except homebrew and chain hit). You will deal enough damage to kill them at a reasonable pace.
For the boys in the mines
I highly recommend that the team plays around and with the goo. It will stay on the ground for a while, so anyone on the team can rely on it.

For everyone:
  • "if you got fire, use it on the goo if you can". Anything in the game that deals heat damage can set the goo on fire, I'll only only mention a few highlights.
  • Standing in the goo is extra damage to whatever comes near you. If it's a swarmer wave it will be an extra layer of thorns.
  • A grunt that has the corrosive effect is always already dead. No need to shoot a dead bug. This is the one case when shooting them is a waste of ammo.
  • Slowing something alone can make it a non-threat. Especially if you can get out of the way for the dot to do the work
  • Stay behind the goo, it will help you stay safe.

For scouts:
  • If the driller covered 3+ preatorians in goo, throwing in a cryo grenade is a waste. Those will no longer be a threat, even with the base slow.
  • The agressive venting overclock of the Drak is exellent at setting the goo on fire. Dance around their puddles with it.
  • You can use the Inhibitor field to further slow bugs in the goo to increase the time spent in it
  • The goo is cover for you. It slows down bugs, so you have more time to respond.
  • Standing in it lures the bugs in for more damage. As a scout we're also excellent lures, because we can get out exactly when we need to.
  • The fire bolt overclock of the boltshark can set the goo on fire, and it can also do it if the bug you shot is walking over it as it's constantly radiating heat.
  • any kind of pheromone (grenade, boltshark) can be used to lure other bugs into the goo. This is specifically good with the boltshark's mod, as it will be more targeted.

For gunners:
  • Zipline perching (when you're up on the gunners zipline and shoot from up there) is useful with this weapon. Your aim becomes more accurate from up there. If they don't ask, you can offer the zipline on missions where you'd have to defend, or if you just have a place where you can "sit down" and do it. Especially good if you got burning hell, or like being up close, because now you have someone who's fully effective from that angle.
  • Agressive venting, burning hell and incindiary grenades are great choices for fire.

Gunner with burning hell standing in a large puddle of burning goo. The driller was not carrying any fire in this round. This creates a defensive barrier around the gunner that the bugs will have a lot of trouble going through.

For Engineers:
  • The lure belongs into the goo. The driller usually should act as a lure, but we can automate the process.
  • Neuro lasso can increase the pain a bug gets from the different status effects the driller is going to be inflicting. The overclock is genuenly good for dreadnoughts, so it can become a quite viable strategy to get as much DOT as you can.

For *other* Drillers:
  • IF you carry cryo watch the fires. You can cancel a large amount of possible damage if you're just freezing whatever. This is also a "general" rule, the ice has a large damage bonus, but other classes can still out damage you with fire so be on a lookout.
  • With flamethrower, burn the goo.
Perks
I'll only include some highlights. Basic things like Field medic and Iron will work of course.

  • Dash gives us much needed mobility when jumping around our puddle.
  • Born ready can save us some reloads. This is usualy a bad perk, but only because we can have a primary, a secondary, and a support tool that we don't need to reload. But with the pump we can easily run a kit where both the primary and the secondary can make use of it.
  • Friendly is useful if our charged shots hit our mates. You have to watch out, it can happen a lot, the fragments spread.
  • Because the sludge pump is not a "constant stream of damage" (flamethrower, cryocannon), thorns can help us against swarmers
  • Vampire is viable even without the axe (counts as meelee), if we make use of our drills as a weapon as well.

These work, the rest is going to be your personal preference.
34 Comments
Jiminimi Mar 10, 2024 @ 10:10pm 
Is this updated to season 4 yet
Frontrider  [author] Jan 10, 2023 @ 12:16pm 
Well, for the rest the guide the image separates paragraphs, so it goes like that as well. Added a missing line break above the image to make it more clear :)
Lûte on Vacation Jan 9, 2023 @ 9:03pm 
"This build comes with a catch, and I leave a warning for that."
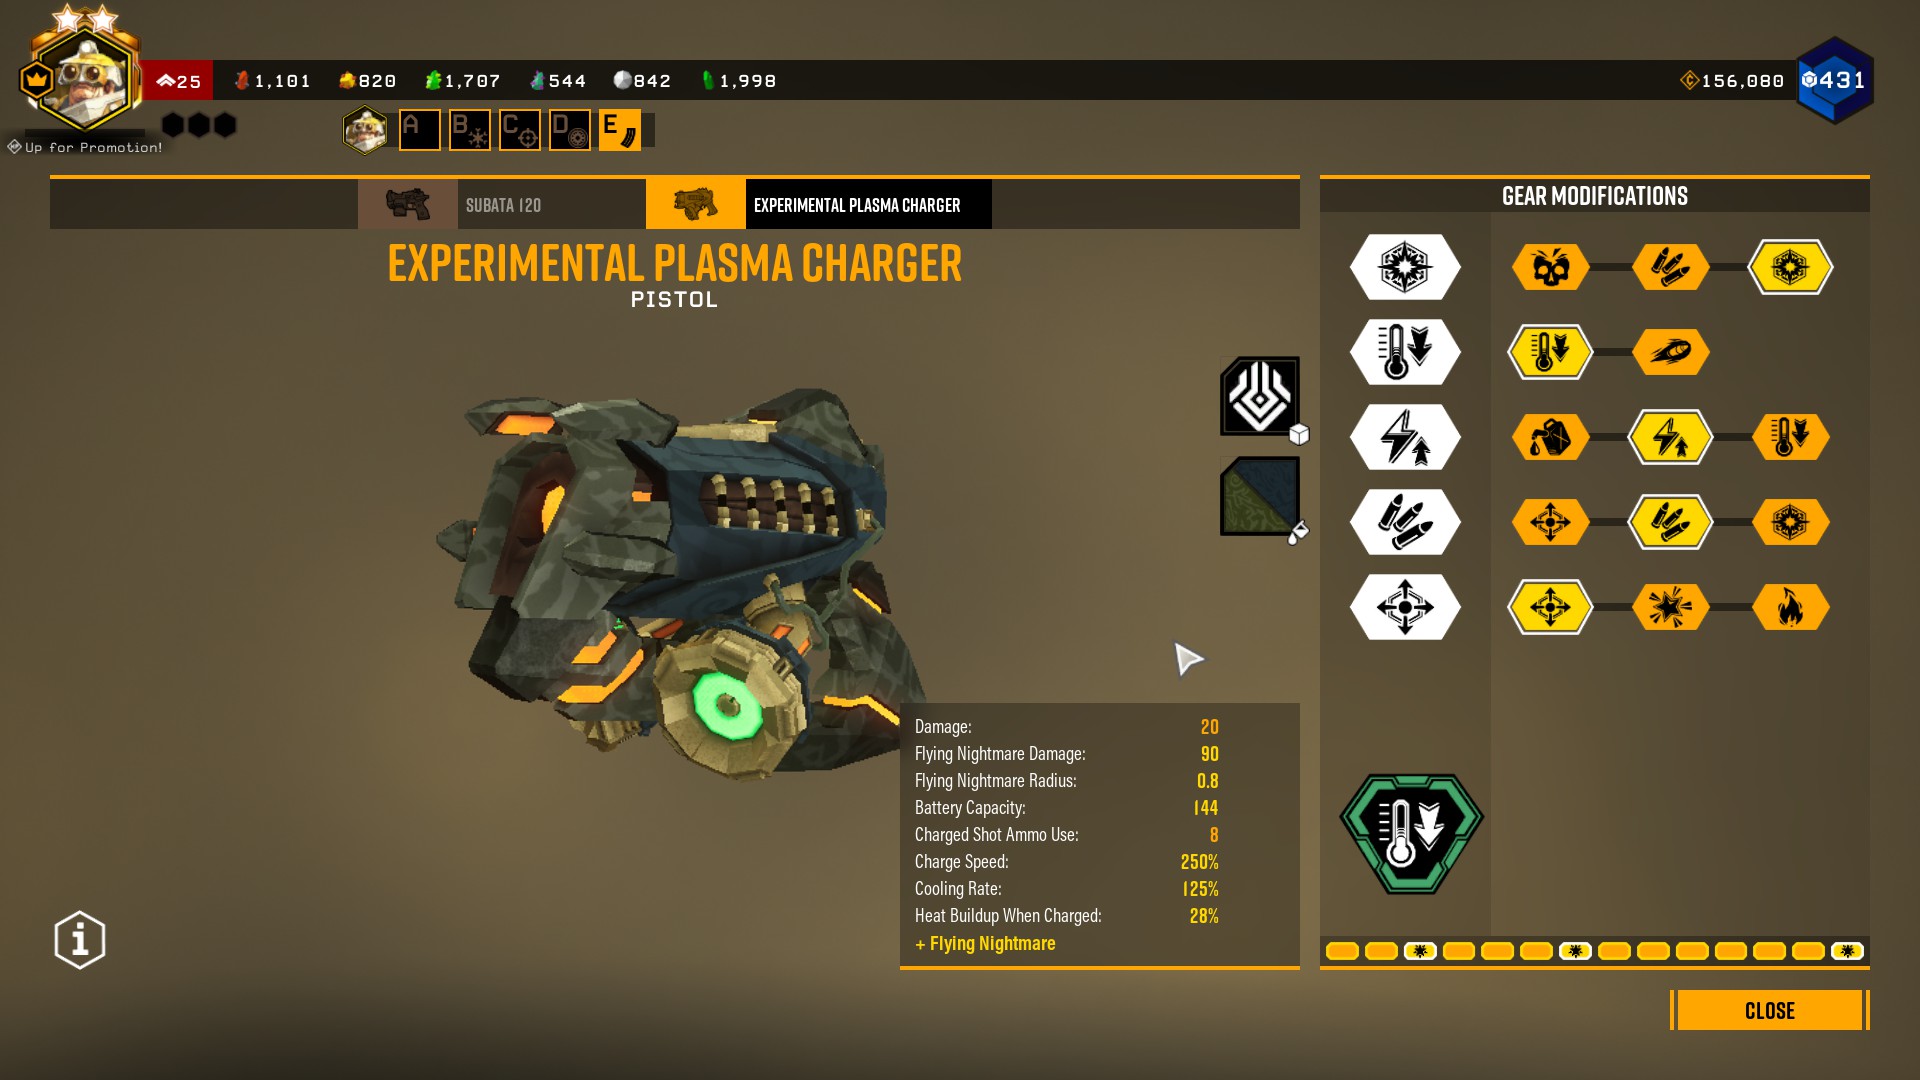
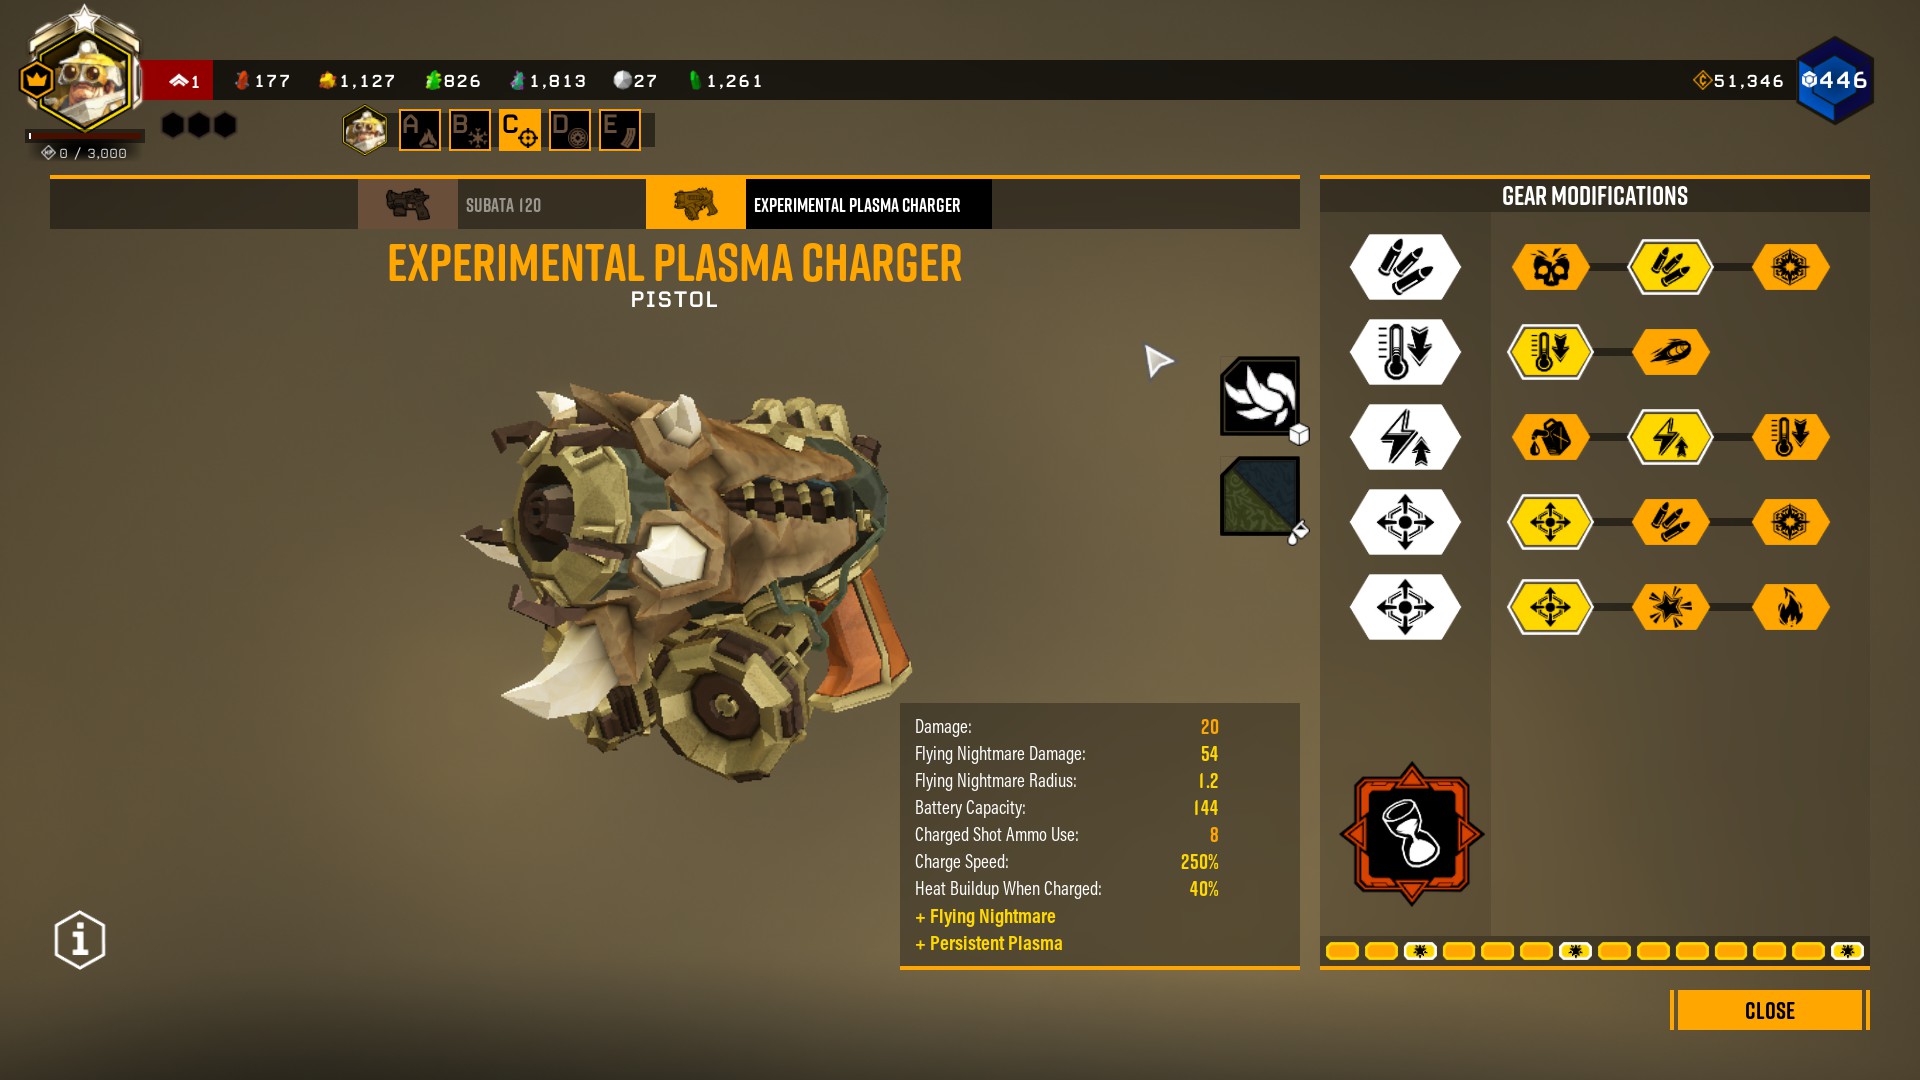
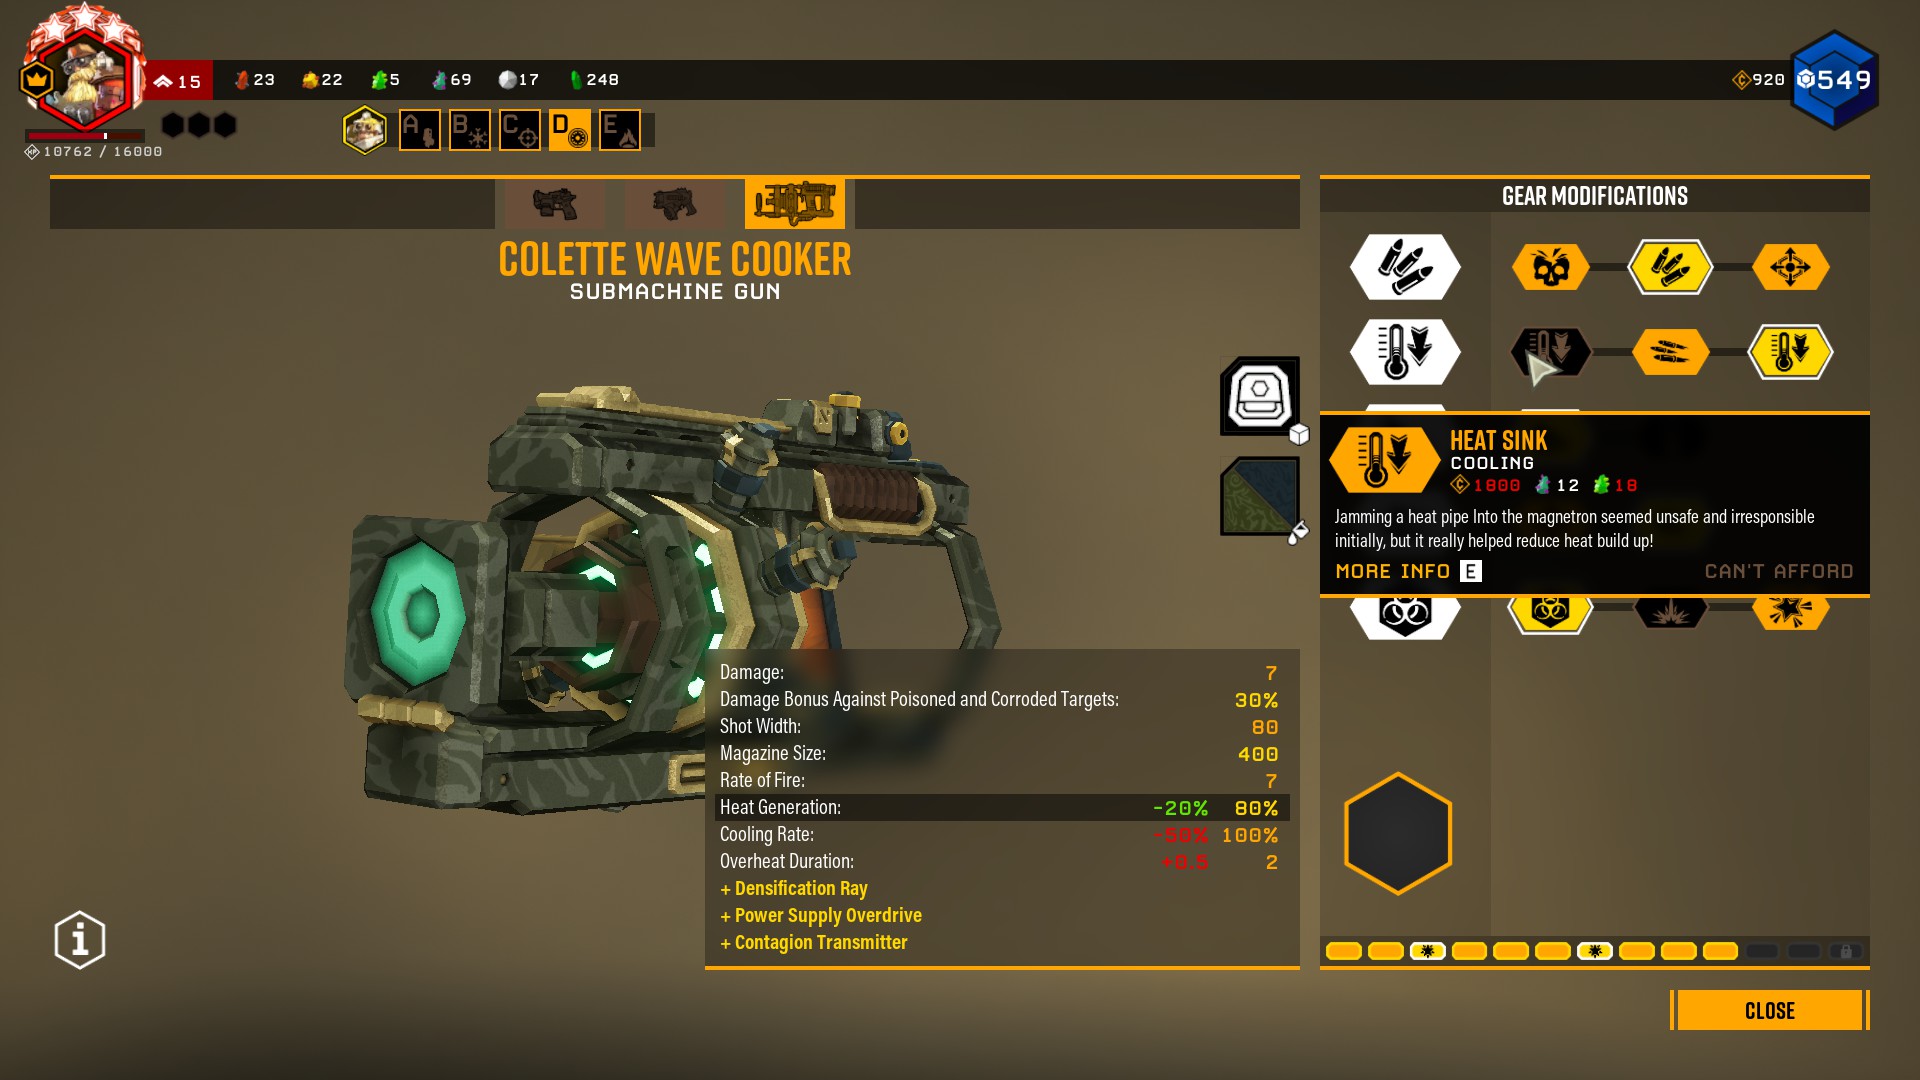
is this paragraph referring to the build above it or below it? There's no new title to distinguish the two builds so it's unclear if this paragraph is the end of the previous or the start of the next.
Frontrider  [author] Oct 28, 2022 @ 1:28pm 
And the guide is officially season 3 ready.
Frontrider  [author] Sep 18, 2022 @ 4:28am 
White testing more I just realized something.
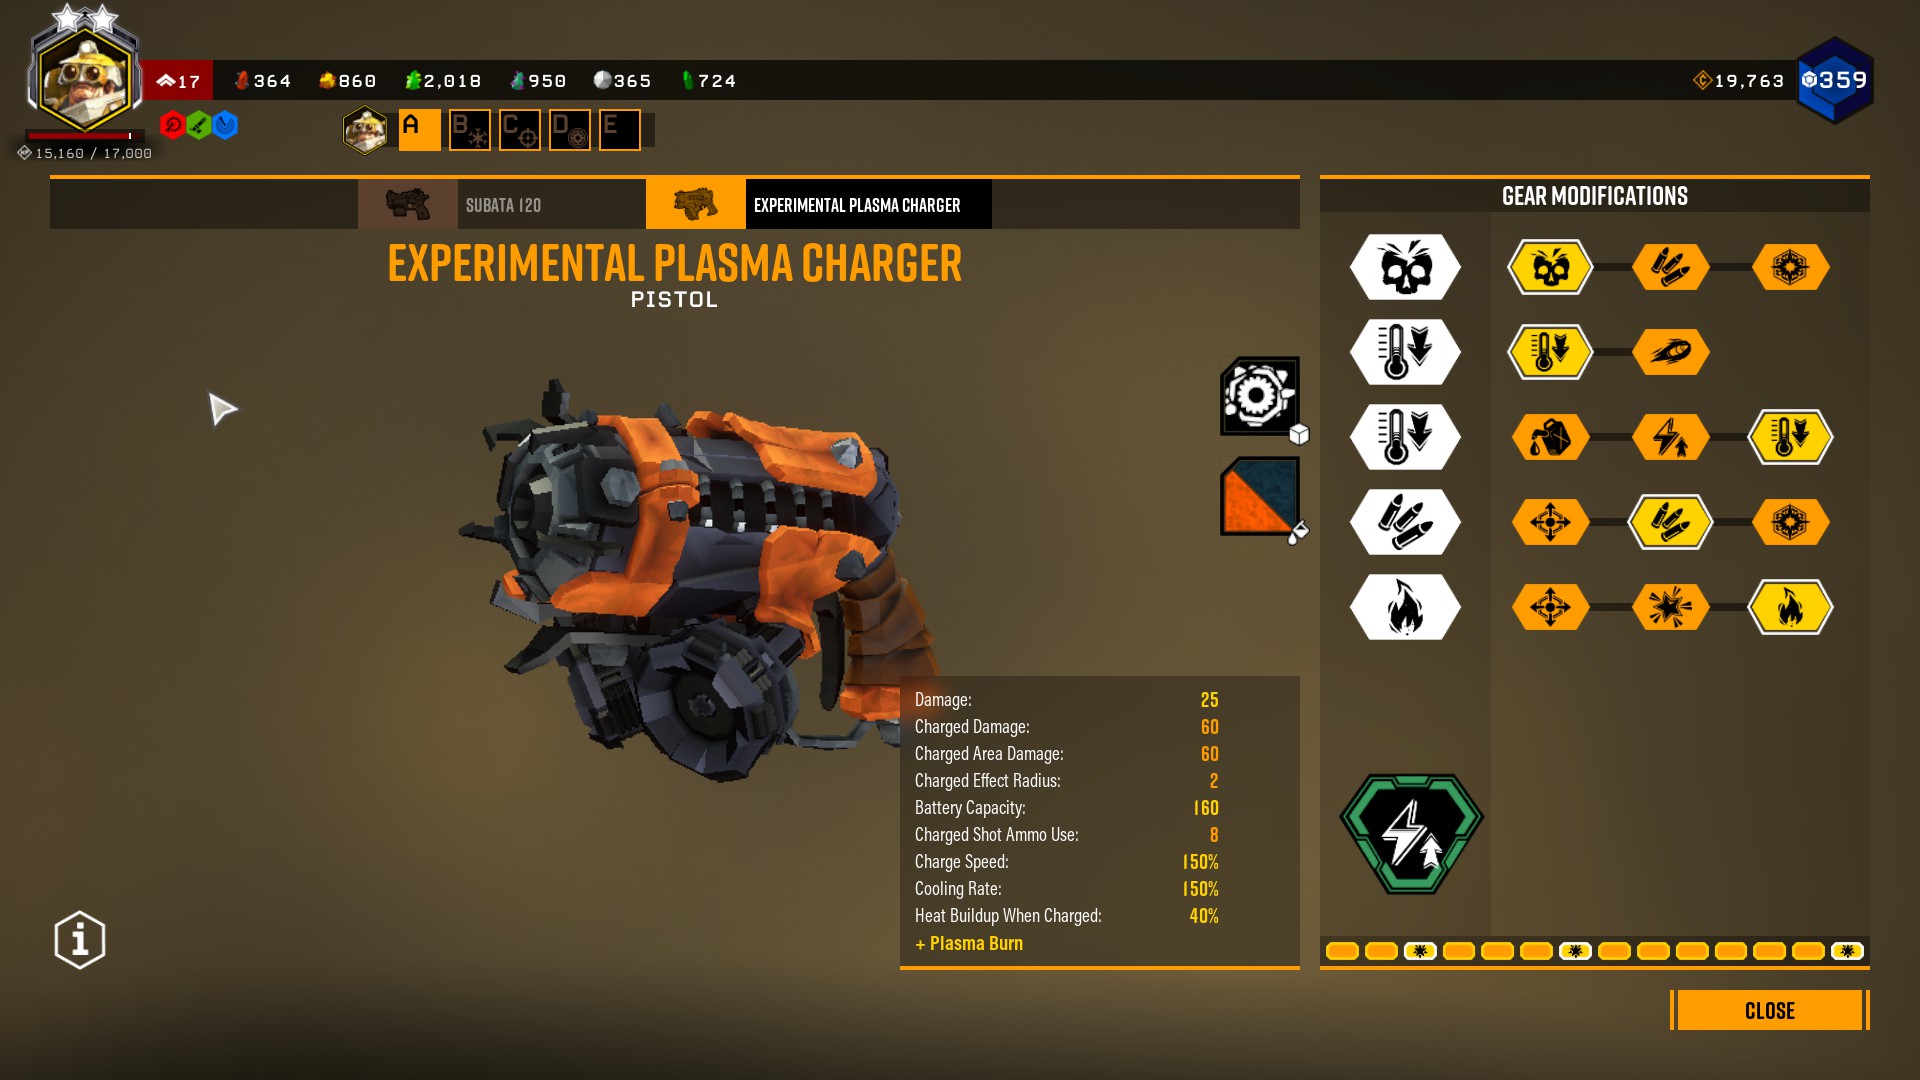
I've been thinking that the subata needs +1 point of damage, but you CAN NOT do that, unless you're willing to let autofire shead everything at extreme speeds and accuracy without fire. Unless you also give an extra downside to that oc, but that would probably still keep it strong relative to everything else.

This pistol is a beast that was put on a too strong leash.
Frontrider  [author] Jul 17, 2022 @ 9:27am 
Thank you!

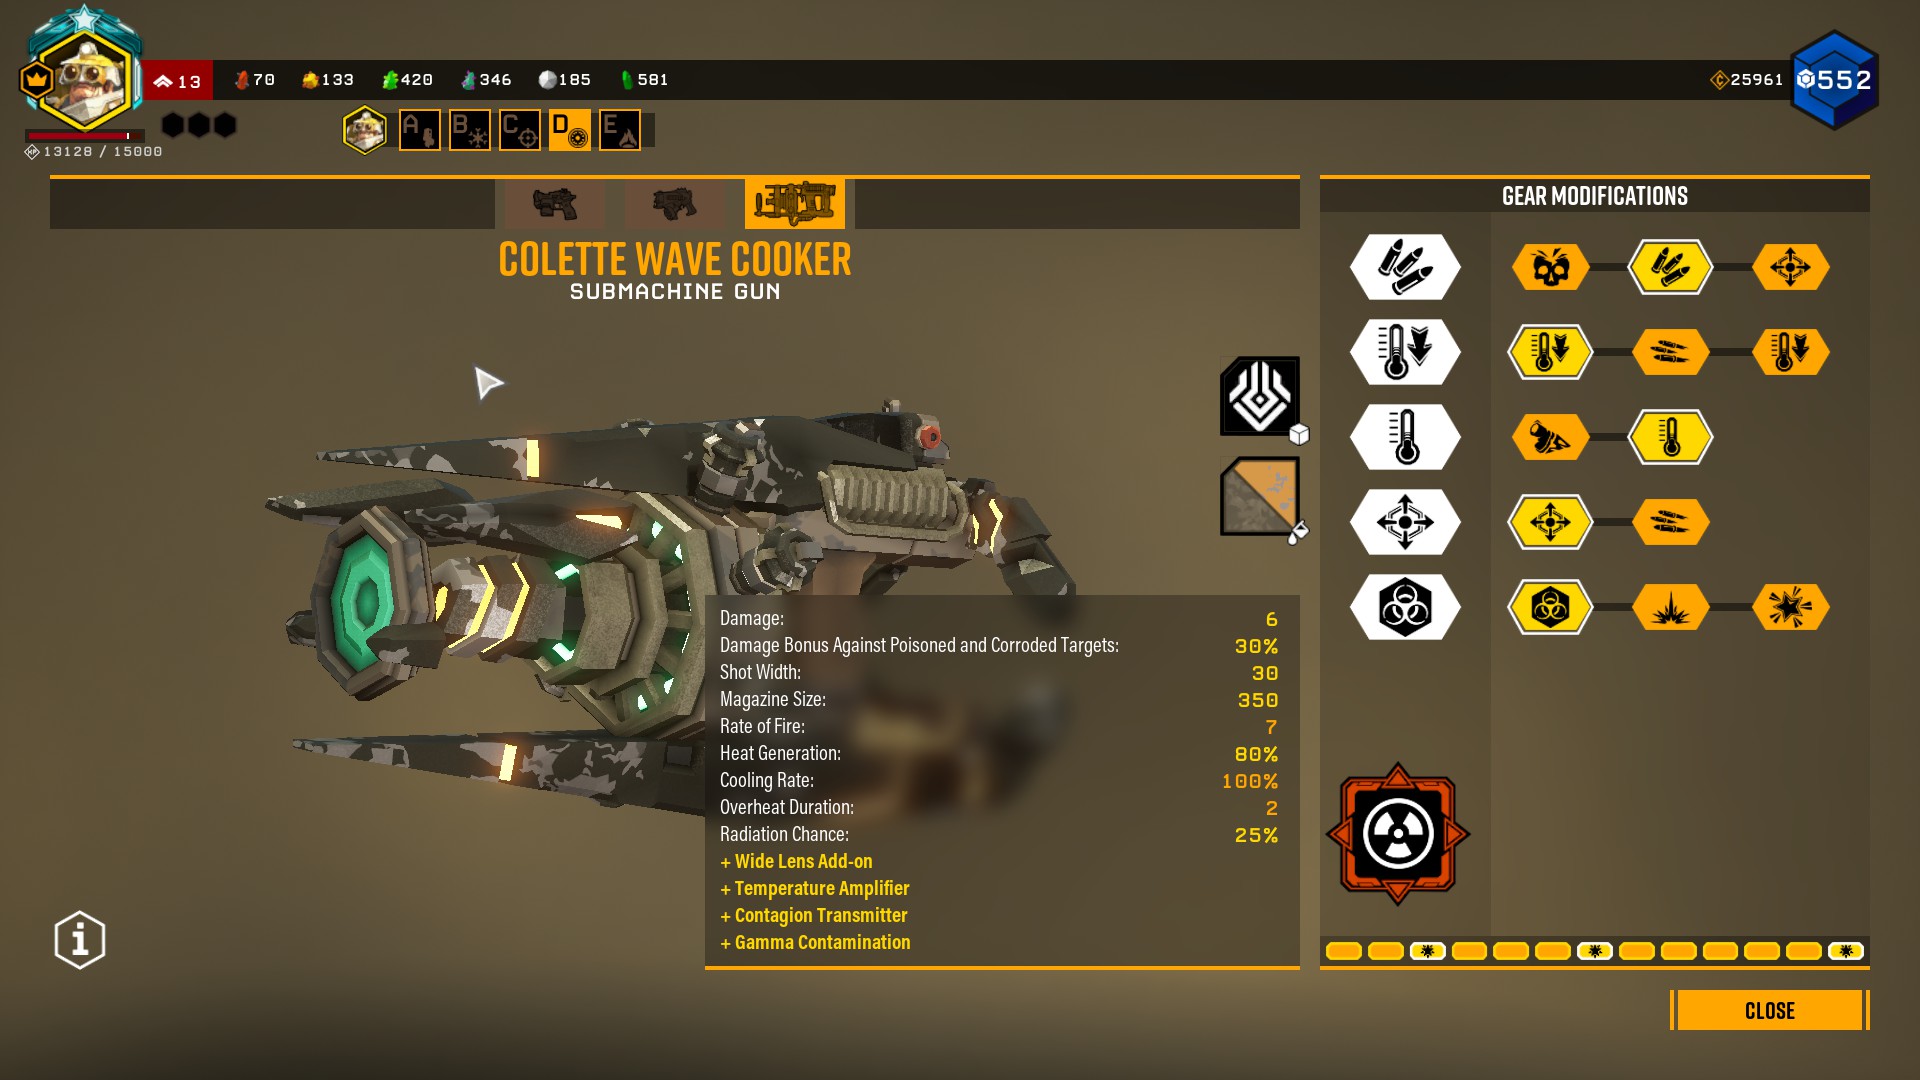
Yeah, I tried to get this out asap, because I started to get a neck for it, and it was getting some bad words at the time :)
Alice Jul 17, 2022 @ 1:48am 
This guide came out literally 3 days after I decided to start using the pump. So it's pretty much been my bible for it. That being said, I've mostly just been using The long range option from the start, with very little variation. The overhaul and the microwave only made it better. I'll try other builds eventually, now that I have all the overclocks. But I mostly play Haz3 so there's no pressing need to get out of my comfort zone. I still use flames for robots, glacier maps and dreadnoughts, but everything else I've pretty gone to maining pump. Anyway, this guide is still the gold standard of how guides should be written, at least DRG guides.
Frontrider  [author] Jul 17, 2022 @ 1:24am 
I am doing small edits here and there. The game seems to be "thin", but there are still things to find.
Frontrider  [author] Jul 17, 2022 @ 1:17am 
I love the overhaul. I can waste ammo, but the gun is just so responsive.

I did not change much. I mostly removed the references to the ammo melting mod, as that is base and added a few builds that now work.
Few people see it/use it because ammo is just good on every weapon but the fire rate was not the largest change. The largest change was that they redistributed the ammo, making supersaturation actually viable instead of making the weapon unusable. Shifted just enough ammo over to do that.
Alice Jul 17, 2022 @ 1:14am 
@Frontrider Just curious, but what do you think of the goo gun overhaul? Overall I like it. Faster fire rate is good but running out of ammo sooner sucks. Did you have to change the guide much because of it?