Call to Arms - Gates of Hell: Ostfront

Call to Arms - Gates of Hell: Ostfront

219 ratings
Defensive Tactics: How to Defend Positions, from a village, to a barrel
By Jeb T. Firefly
Something a lot of new players struggle with is defensive missions. There is a very specific list of things that need to be done to achieve victory, and they are so numerous that it's hard to learn them through trial-and-error.
10
9
15
5
5
5
3
   
Award
Favorite
Favorited
Unfavorite
Introduction
We've all been there - whether it's our first mission upon buying Gates of Hell, or a campaign mission spanning kilometers of trench lines and bunkers. The enemy seems too numerous, your positions are falling one by one, you have no more reserves to stop the enemy advance, and everything comes down to one squad's heroic defense of a farm house.
Unfortunately, this is not a Hollywood movie, and without plot armor, eventually an enemy tank will roll up, and, blasting the house to smithereens, take the objective.
What could have been done to prevent this disaster?
Before the Battle: Unit Selection (mostly applies to Conquest)
One of the most important, in fact, the most important aspect of defense is having the right units for it - you might be able to take a village with a platoon of artillery, but it will be tricky to hold said village against an assault if you forgot to bring additional ammunition. This section will focus on unit selection before the battle.

Now, the first thing to consider is what type of map you'll be fighting on. You can ascertain that by clicking on the name of the map (in Conquest, lower right, in Multiplayer right in the center). In the realm of defense, there are really only 3 main types to worry about: Congested, Semi-Open and Open.

  • Congested refers to maps who are mainly city-based. The only routes of easy advance (at least for vehicles) are all flanked by buildings. These types of maps favor a more infantry-focused approach, since artillery won't have clear lines of fire and tanks will have trouble advancing without fear of ambush. The terrain will likely contain obstacles such as rivers, large hills or large, indestructible buildings.
  • Semi-Open refers to maps who have a mixture of, say, forest, open ground, and village. Different places fit different units better, but there is no defined type of doctrine which will fit the terrain the best. A mixture of the above and below doctrines is recommended.
  • Open refers to maps such as Kursk or Airfield, where there are few (if any) forests, obstacles or major terrain obstacles. These maps favor tanks, ranged weapons such as AT guns or artillery, and infantry performs best safely ensconced in a bunker or trench.

So, firstly: Congested maps. Tanks and armored personnel carriers (APC's) are certainly useful in some situations, but they are extremely vulnerable to infantry due to the close-in nature of the fighting. Artillery is mostly useless (with the exception of mortars), for buildings can absorb its shots. Tripod-mounted machine guns are hard to position correctly. The congested nature of the map makes it harder to spot infantry sneaking around the flank. Make sure the MG is overlooking open ground.
Though these maps are congested, that doesn't mean they are small - so bring some transport vehicles. Infantry squads and towed AT guns can be placed much faster with a truck than if they had to walk to their destination. You may, of course, commit armor if you must, but lower-level, non-veteran units are better utilized. It would be silly to lose your precious Tiger to a Soviet hiding behind a fence with a Molotov. Infantry must be the primary weight of your deployment. They are the finest tool at your disposal for clearing buildings and combating infantry. If need be, they usually have at least one anti-tank grenade-armed soldier to destroy obstacles or eliminate enemy tanks. Armored cars suffer from the same issues as tanks do, but they are cheaper, and it is harder for the enemy to snipe it with an AT gun due to the congested map layout.

Secondly, semi-open maps. With a few exceptions, a heathy mixture of armored units, infantry units and ranged units is recommended. Having an all-infantry force may work well for capturing the first point through a village, but once you come to the open field between you and the last cap, you will have wished you'd brought a tank.
Artillery is optional. Larger maps will definitely suit an infantry gun or SPG, particularly if the points are susceptible to bombardment. Bringing more than 2 medics is recommended. Bringing an ammo crate / fuel truck is optional. Transport trucks will help get your troops into position with maximum speed.

Thirdly, open maps. These are the cream of the crop in terms of defensive, and you should feel lucky that the game has blessed you with such an opportunity. Literally any unit, from mortars, basic riflemen, AT guns, artillery, mounted machine guns to flamethrowers will work on these maps. Okay, maybe not flamethrowers. Mostly. So, these maps favor tanks, ranged weapons like artillery / tripod mounted machine guns, and riflemen squads in particular. Jagers are not a good pick for an infantry squad (they have only short-ranged MP40 submachine guns). An ammo crate / supply truck is absolutely essential, as your units will expend large amounts of ammunition almost continuously at longer ranges. Armored personnel carriers, half-tracks, trucks, really anything that can carry soldiers will be indispensable in getting to your capture zones with haste.

As a final note, researching "Defenses" levels I through III places AI soldiers, machine guns, and AT guns around your points at the start of a defense match. These guys can soak up damage, and spot enemy forces without your own men being put at risk.

Those are the basic guidelines for picking units at the start of the battle.
Before the Battle: Unit Selection Part II: Emplacements
There are many emplacements in Gates of Hell, ranging from the humble Maxim all the way up to the Morser 18 and Karl Gerat. Some are better for defense than others.
  • Superheavy Artillery - I'm talking the Soviet 203mm and its German counterpart, the Morser 18. They are of limited use in defense. The thing about them is that, while, yes, they can decimate an entire infantry column in one hit... they are hard to use. I mean, ridiculously hard to use. You have to have a good enough position with perfectly clear fields of fire so that your shots won't clip anything after leaving the barrel, and their ammo cost to a resupply truck is horrendous. All in all, they're not worth it.
    That said, it is a very good idea to bring at least one accurate artillery piece (the Soviet 122mm M1936 being a good example) with which to snipe any enemy artillery.
    Sniping an enemy artillery piece with your own is the only alternative to rushing artillery in an MG-34 Kubelwagen or some infantry, which can get you heavy casualties.
  • Mortars - Preferably light mortars, as they are easy for your troops to cart around by hand. They have a good ammunition reserve, semi-decent range, decent accuracy, and can pin down an enemy unit in the open. The light mortars (90mm and below) usually also have smoke shells, to cover a retreat. Just make sure they don't get overrun, as they do have a minimum range.
  • Tripod MG's - In a good position, a tripod MG can rack up many of kills - provided it's well supplied with ammunition. Its high accuracy means it can decrew lighter vehicles from range, and its high rate of fire guarantees that enemies caught in the open will not survive. At point-blank range, I have known single machine guns covering chokepoints to mow down as many as 150 enemies, as their pathing told them to all go in a line through one gap in a fenceline. A position that good is hard to find, though, so if you're at a loss in that respect, just stick them on whatever portion of your defense you feel needs a better defense against a flank.
Before the Storm - Pre-Attack Preparations
In Gates of Hell, you always spawn in defensive missions on the opposite side of the map from your capture zones, as if you are rushing reinforcements to a beleaguered position. The following are arranged in chronological order from the start of the battle to the finish.
Your first task must be to get your units to the objective. If you're playing Co-op, assign some units to your friend. They can help micromanage them into position, and focus on one point while you focus on the other.
Once your units have arrived at the objective, you must split them up. They all must dig in facing different directions - you do not know exactly where the enemy will come from.
If you do not have engineers to dig trenches, then your infantry must get out their entrenching tools and dig foxholes to protect themselves. Foxholes will not protect against mortars or artillery, but they do a good job protecting against small arms fire.
If you do have engineers, they should be making trenches, laying mines, setting up barbed wire and making anti-tank obstacles along likely routes of enemy advance.

Tanks can be ready for action the moment their treads touch the zone, so they must be moved to the front to keep watch for any enemy attack before the defenses are ready.

A trick I learned with tripod mounted MGs is that they can be put into a foxhole that infantry dug, with their barrel just barely peeking over the foxhole's edge. This offers them excellent cover.

Your medics must build medical tents close enough to the frontline positions that they can be reached easily, but not so close that they are at risk of enemy fire. Medics should stay back at all times. They are the most valuable specialist unit you have.

After your infantry has finished digging foxholes, make sure that every man is in the best cover available. You will not get another chance once the attack starts. Here is a diagram of what the best types of cover are:


Tanks are not invincible. They are best used in the defense as a 'cork', particularly in some areas where the ferocity of the enemy assault is too harsh for infantry to withstand. For example, a forest. A tank has multiple machine guns, and is fairly well protected; an infantryman could fail to spot a sniper in the bushes. Here is a diagram of how your tanks should be positioned.

Note in the last panel the parentheses. The Three F's. They show the three essential rules of how the land around your capture zone should look:
Flat, Featureless and de-Foliaged.
Bushes can hide enemy infantry. Fences, houses, trees, logs, rocks and the like can all provide cover behind which the enemy can shelter. Since Engineer units do not have a bulldozer (yet), a truck will suffice. Drive it through any fences in front of houses manned by your troops, so they have clear lines of fire. Knock down every tree in a forest if they restrict your spotting ability. Is there a house the enemy could hide in? Drive a tank through it. Gates of Hell is not a game about preserving the landscape - it is a game about killing your enemy.

One last thing about fields of fire; when looking down at a battlefield from above, you see none of the minor terrain deformations, and can even miss the fact that one of your set-piece weapons that is the lynchpin of your entire defense... is blocked by a sandbag.

Apologies for the poor quality, but the gist of this is that you will want to make sure every one of your weapons can target each piece of ground that the enemy might cross.

One final tip courtesy of @Iron Otto: All units composed of more than 1 guy only are counted as 'lost' if every man is killed, and every piece of equipment destroyed.
This means that if you really don't want to lose a particular unit - say, a Tiger - then at the beginning of each battle, you can order 1 of its crewmembers to jump out. He can be replaced with any other man. Order the crewmember who jumped out to hide in some secluded corner of the map in a bush. Then, even if the tank is destroyed and the whole crew killed, you can still pay to get the unit back - because one of its crewmen was still alive, so the game never counted it as totally destroyed.


Weathering The Storm - During The Attack
Unfortunately, Gates of Hell: Ostfront is not a game which will allow you to sit back, relax and let your troops mow down enemies for 20 minutes. For one thing, they don't carry nearly enough ammo!
Also, the enemy is rarely so compliant as to rush over and over through the same avenues of attack.
It is likely that during every defensive mission, you will have a major emergency at least once; some unforeseen dip in the landscape shielding attackers, a unit whose ammo you forgot to refill, a rocket truck that the enemy is using to bombard you, your medics getting killed accidentally... I could go on and on. But the essential thing is this: dig deep and hold your forward positions lightly.

This is the lesson that Germany paid for in blood during the First World War; any initial attack on one, heavily entrenched position would, after horrific hand-to-hand fighting, eventually be held.
Later on in the war, when the first trench was more of a ditch in the ground, with the heavily entrenched positions behind, any infantry in the first line could take a few potshots at the advancing enemy, but then withdraw behind the heavier positions, drawing the Allied troops into the killing field.

During a battle, you must not hold your front lines tightly. You have a very limited number of troops, while the enemy has nearly bottomless reserves of infantry. Once you begin to lose troops, you begin to lose your ability to defend your position!

The one other thing which will preserve the lives of your troops is medics.
Medics are, ironically, the most valuable units in your entire army - regardless of the fact that they only carry a pistol. They are the only units who
a.) Can revive downed troops
b.) Can build medical tents
c.) Start each battle carrying a shipping container's worth of bandages
These three things, in concert, will do more to keep your troops alive than the troops themselves.
Picture this: A single tripod-mounted MG and 2 riflemen are the last line of defense between an entire enemy infantry rush and your last capture point. You have 1 medic left... and your tank is out of ammo. Suddenly, an enemy sniper appears, just 20m away! He gets a headshot on one of your MG gunners before one of the riflemen gets him. But he threw a grenade right before he died! The last MG gunner was in the reloading animation, and so he couldn't get away in time. Both riflemen are reduced to half their HP, and they have no bandages left.

Without a medic, this battle would be lost. However, the medic has been waiting for this moment the entire match, and, drawing in a deep breath, he sprints to the MG position and revives both of the gunners, just at the time when the enemies begin to cross the open ground. As the MG opens up, the medic dives into the slit trench where the two riflemen are crouching. He drops off six bandages, which the riflemen eagerly grab and use. After a few minutes more of fighting, no more soldiers attempt to reach your position. The enemy have exhausted their reserves, and you have won the day.
Medics are of paramount importance, and, as such, must not be used as combat units. The best place for them is behind a house or other obstacle, a good number of meters away from the frontline. Their moment will come once the enemy has downed one of your soldiers or once they require a refill of bandages. The medic now must proceed with maximum possible haste to the trench, where he can revive the downed man and drop a bucketful of bandages on the ground, before sprinting off again.

Besides the medics, keep an eye out on the ammo levels of your riflemen in particular. They are the second most important part of your defense, at least until Barbed Wire adds a squad composed of solely MG gunners. For this, an ammo box is recommended; not only can soldiers simply run over and ammo appears mysteriously in their inventories, it comes with two bonus riflemen! For no extra cost. This is the reason why I prefer the ammo box to the ammo Supply Truck.

So, you've positioned your troops & your medics, dug your trenches, and have just beaten back the first wave of enemies. The next step is to check whether any vehicles you destroyed can be immediately entered by one of your troops; if it is, then make one guy run forward in between waves and grab it. Even if it can't move, it likely still has weapons you can use.
The Aftermath
Congratulations!
Hopefully, you've made it through the waves and waves of enemies, tanks and accompanying dramatic music. If you have, you're in the clear. Thankfully, there is an after-battle salvaging phase; so you can re-crew or repair some enemy vehicles, salvage weapons, and grab some artillery guns the enemy very thoughtfully left on the field of battle. In the unit selection screen after the battle, you can sell repaired vehicles and emplacements for cold, hard cash - meaning that T-26 zerg rush can be turned into a windfall for you. Just keep in mind that any salvaged enemy vehicle that doesn't have one of your guys inside it when you press the FINISH button, IS LOST PERMANENTLY. This is because the game doesn't yet consider it 'yours' until the next battle begins.
One final warning - be wary of further enemy attacks. They might not stop even after you have reached a thousand points.
All that is left after that is to pat yourself on the back, hit FINISH, restock your units in the Conquest Menu, and go on the offensive.

But, wait - one final postscript. What went wrong? Devote a few seconds of thought to this, because it will determine how well you do next time. Did you need more AT potential? Consider getting some more tanks or AT guns. Need more medics? Add another to your squads. You get the point.

Thanks for reading!

-Jeb T. Firefly
Habitual Ranged Combat Enjoyer

(P.S. Thanks to @UnicornPoacher for his very helpful edit recommendations.)
49 Comments
Jeb T. Firefly  [author] Feb 9 @ 2:33pm 
@elevlasova
Good to hear it helped!
I wrote this guide when I was not that good at GoH yet - and at time of writing this guide is over three years old, coming up on four years. Sometimes I worry that what was true in late 2021 is no longer true.
But, come to think of it, until the devs significantly improve AI decision-making, this might not be necessary.
STP_luhury Feb 9 @ 7:55am 
thanks for the great guide! it was really helpful because i tried like a billion times on various difficulties but couldnt. after i read this i could manage a good defence and win [it was on easy mode but still}:airraid:
Jeb T. Firefly  [author] Feb 22, 2024 @ 10:00am 
Thank you
NiftyWolf230 Feb 22, 2024 @ 12:24am 
W guide
Jeb T. Firefly  [author] Feb 3, 2024 @ 3:31pm 
Thanks!
rexyboygamer Feb 3, 2024 @ 1:33pm 
W guide
Iron Otto Nov 23, 2023 @ 12:38pm 
- sandbags are surprisingly good at soaking up AT shells; in SOME situations reinforcing an emplacement with extra layers of sandbags can save your tank from unexpected shot or your cannon - from a cheeky incoming HE shell
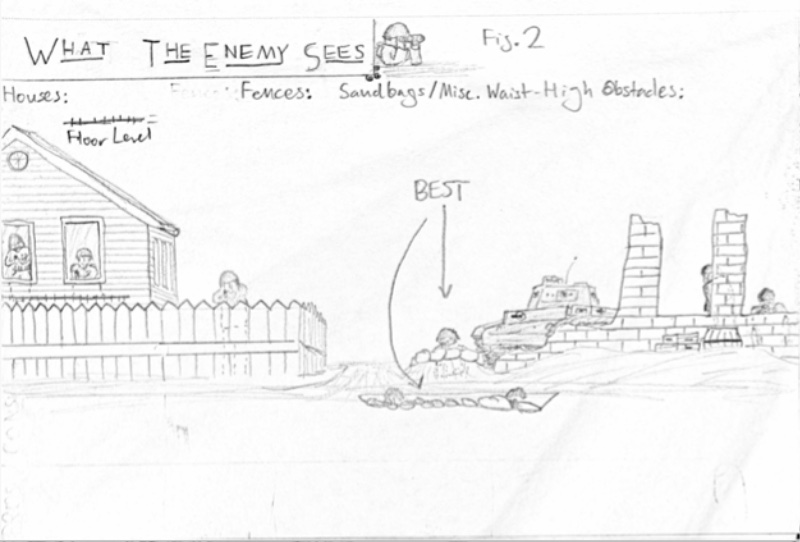
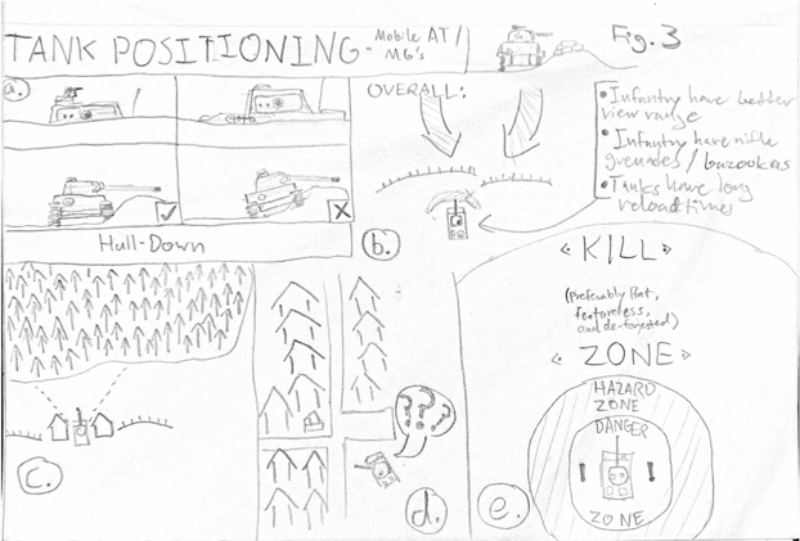
- don't discount scounts. They have 1,25 sight range and being placed in a bush away from enemy attack vector nets you awareness of their movements before they start shooting at you. Bonus points for placing such dude at spawn to see actual composition of the incoming wave.
- wanna make sure not to lose that precious trophy? - at the battle start, leave one crew member behind. as long as at least one survives, you can pay to restore your unit.
Iron Otto Nov 23, 2023 @ 12:38pm 
If I may add my humble observations:

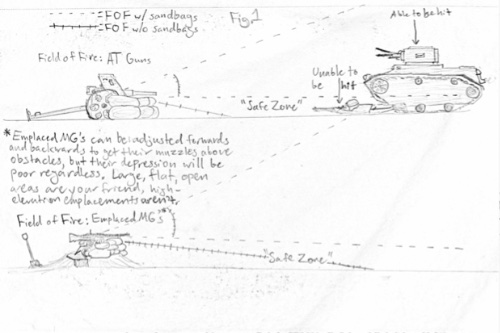
- best static MG for defense is DS-39 (the Soviet one, not the Finnish) - as it has a shield protecting the gunner from small arms fire and assistant gunner is prone (unlike crouched for, say German tripods), the emplacement itself is nigh-impervious to small arms from the front. Combined with a foxhole (offset it slightly to the side so that assistant gunner stays inside when traversing the gun) and it mowes down infantry like crazy. I tend to go to great lengths to acquire those
Jeb T. Firefly  [author] Nov 20, 2023 @ 11:14am 
Yeah, I just failed a couple times on Hardcore... the Soviets just come from so many different directions, and the fact that your tripod MGs only get 50 round drums makes them iffy in terms of usefulness.
On Easy I just barely managed to do it.
UnicornPoacher Nov 20, 2023 @ 5:42am 
my pleasure, thanks for considering my feedback :) Making these updates I would love to point people to your guide from mine.

I have PTSD from that mission. Havent played it in ages, never beat it, need to go back to it maybe today... but yes this is a great example of why its actually really hard to defend the top of a hill (mountain)... direct fire weapons hate to defend downhill!