Blasphemous

Blasphemous

881 ratings
100% Achievement Guide: Blasphemous
By Cynic 0055 and 1 collaborators
This is a comprehensive 100% Achievement guide detailing a step-by-step walkthrough to take you from 0 all the way to 100%. If you are looking for a particular Achievement or Collectible, use Ctrl+F & type it into the search bar for more direct help.

I run support & debug help on all my guides. If you have any questions, problems, or find errors in the guide itself, do not hesitate to leave me a comment & I will get back to you as soon as I am able to. Happy Hunting!
31
7
35
4
9
5
5
5
3
3
2
2
   
Award
Favorite
Favorited
Unfavorite
Introduction:

Achievement Breakdown: (45)
Story Related: (15)
Missable: (5)
NPC Questlines: (5)
Collectibles: (13)
Slay: (4)
Miscellaneous: (4)


Blasphemous will require 2.5 playthroughs to 100%; the added DLCs (The Stir of Dawn, Strife & Ruin, & Wounds of Eventide) though add new Items to the game do not have associated Achievements. All 45 Achievements are strictly based on the Base Game at present.

The first playthrough is a 100% Game Completion playthrough where we will beat the game fully earning both Ending A & B, find all Collectibles, & complete the majority of NPC Questlines. There are a few missable Achievements in this game, but if you are on top of delivering Medicinal Herbs back to Tirso before defeating Area Bosses you should be alright. Certain NPC Questlines are also a bit tricky to finagle, but that is where I come in with this guide. There is a bit of grinding in this first playthrough so we can have enough Tears of Atonement to purchase all of the Abilities as well as Items for sale at Candelaria’s Shops.

The second playthrough will be for mopping up the Achievements missed during our first run through as well as working towards the Requiem Aeternam Achievement for beating all 10 of the Base Game Bosses without using a Bile Flask during the fight (or afterwards). Unfortunately, this has to be completed on a fresh Save & cannot be done during NG+ since NG+ is a DLC addition to the game.

The final half playthrough will be for attempting the Bronze Medal Achievement for passing through the Bronze Door on the Bridge of Calvary in under 3 hours… which is not actually as difficult as it sounds. It is however very important we complete Requiem Aeternam before doing this Achievement as a lot of the tricks & skills we will accumulate for beating Bosses without Bile Flasks will come into play, as speed is of the essence.

Though it is a DLC feature, the Developers have re-worked NG+ Mode. Originally you would not be able to unlock any Achievements if you carried on your save file into NG+; that has changed now. We are now able to unlock Achievements on NG+! After your first 100% Completion Playthrough, you are able to carry on your save file into NG+ & complete the Requiem Aeternam Playthrough as well as Bronze Gate on NG++ if you decide to. This can save you a lot of time as your Penitent One will be much stronger. Be careful though, depending on the Penance you choose in NG+ can seriously effect your success for the Requiem Aeternam Achievement. Special thanks to al_pacione for taking the time to bring this to my attention!

Like most Metroidvania style games, you will typically need to return to Areas after acquiring new power ups or gear to collect hidden Items or Collectibles. Blasphemous is no different.
Some of the Relics we need to use to find certain Items have very wordy names that detract from my Sequence word count limit with how often I have to refer to them. To save me words I have abbreviated them, so if you see a strange acronym you don’t understand quickly pop back up to this legend. Thank goodness there is not that many Relics we are swapping between; it is pretty obvious in game when each one is required.

Shroud of Dreamt Sins (SDS): Used to speak with Corpses.
Blood Perpetuated In Sand (BPS): Creates bleeding sand ledges to jump on.
Silvered Lung of Dolphos (SLD): Allows you to pass through toxic mist without being harmed.
Three Gnarled Tonuges (TGT): Allows you to Wall Jump up twisted roots.
Linen of Golden Thread (LGT): Allows you to fall into open air without dying, opening new Rooms to us.
Nail Uprooted From Dirt (NUFD): Allows us to move through water or mud unhindered.

For those interested, here is an organized list of all the Achievements/Secret Achievements. This is how I derive my Achievement Breakdowns & the first reference I create before I begin my 100% journeys.
https://steamcommunity.com/sharedfiles/filedetails/?id=2592923665

*Guide contains major spoilers.
Sequence 1: The Will of the Miracle
1. Brotherhood of the Silent Sorrow, The Holy Line, Albero
2. Oil of Pilgrims: 0/6
3. Our Lady of the Six Sorrows: 0/6
4. Knot of Rosary Rope: 0/6
5. Mea Culpa Altars: 1/7
6. Relics: 0/7
7. Empty Bile Vessels: 0/8
8. Mea Culpa Hearts: 0/9
9. Prayers: 1/13
10. Corpses: 0/26
11. Rosary Beads: 1/35
12. Children of Moonlight: 1/38
13. Collectibles: 3/44
14. Achievements: 1/45
-----------------------------------------------------------------------------------------------------

Brotherhood of the Silent Sorrow:
When the game begins, we will awaken in the Brotherhood of the Silent Sorrow. Make you way over to the Prie Dieu Shrine in Room 3.


Achievement #1 – A Long Path Ahead: Defeat the Warden of the Silent Sorrow.
Story Related. In the very next Room, we will encounter our first Area Boss, The Warden of the Silent Sorrow. Defeat him to unlock the Achievement & bathe in righteous blood.

The Holy Line:


Prayer #1 – Verdiales of the Forsaken Hamlet: Enter the Holy Line & get to the Prie Dieu Shrine in Room 1. From the Shrine make your way right, all the way down to Room 3; we can find this Prayer out in the open on the piece of land after the first mud pool in the Room.
In Blasphemous, not all Items can be collected right away & we will need to return to Rooms later on after we have acquired new Relics or Prayers to unlock them.

Collectible #1 – Clavicle of Dalhuisen, the Schoolchild: In Room 4, we can find an undead Wheelbroken on top of a stone platform over the first mud pool in the Room. Kill it, & turn around to face where we came from. Behind us lower down, will be a sunken piece of land with rocks on it (in between land with a dead horse & a wagon wheel). Leap off of the ledge to land on the sunken piece of land & our heavy fall will break the ground revealing an underground floor below.

Drop down & we can go left or right. Head left into a large mud pool & we can find this Collectible on the far side.

Child of Moonlight #1: Return to the surface of Room 4 & carry on through the mud to the right. Near the end of this Room, we will see our first Cherub out in the open flying over two Enraged Pilgrims & Wheelbrokens. Destory the Cherub’s flying cage to free it.

Albero:


NPC – Tirso #1: From the Prie Dieu Shrine in Albero, enter the Kisser of Wounds hospital in Room 2 past the water fountain. On the first floor will be a dying man lying on the ground surrounded by healers. The healer leaning against the pillar nearby is a man named Tirso, & he will request that we bring him ingredients for healing ointments.

For his Questline, we need to bring him all 6 Medicinal Herbs before we defeat the Area Bosses of the Areas we find them in. This Questline is missable, if we kill the Area Boss before bringing back the associated Herb, a Kisser of Wounds will die voiding our Achievement until the next playthrough.

Rosary Bead #1 – Dove Skull: While still in Room 2, climb up the ladder nearby to the second floor & we can find this Bead at the top immediately to our left.

Mea Culpa Altar #1: Now climb down two ladders to get down to the bottom floor of Room 2 & we can see a doorway to the left. Head through it into Room 3 to find our first Mea Culpa Altar.
We can now purchase our first 4 Abilities: Last Words 2000 Tears, Sinful Wrath 500 Tears, Weight of Sin 500 Tears, Sacred Thrust 1500 Tears.

Collectible #2 – Calcaneum of Persian, the Bandit: Return back into Room 2 & this time walk to the far right end of the bottom floor. Strike the wall here to reveal a secret doorway into Room 4. Inside, we can find this Collectible just to the right of a doorway in the center Room.

The doorway in the center will take us to The Ossuary where we can store our Collectibles. If you store enough of them, we will receive Tears of Atonement as a reward.

If we carry on ahead we will enter the Desecrated Cistern Area. For now, we will save this Area until later… unless you want to explore ahead.

NPC – Lvdovico #1: Carry on from Room 2 outside into Room 5 of Albero. Outside, we can find a church with a lit candle outside of its window. Approach the window & we can speak to Lvdovico about a burial ritual for the Saint Tentudia. There are 3 Burial Items we need to give to Lvdovico to complete his Questline.

Lvdovico is also tied to a different NPC’s Questline we will meet near the end of the game in the Mother of Mothers Area…

Collectible #3 – Phalanx of Brannon, the Gravedigger: Head past the church in Room 5 to the right & enter Room 6. This Collectible will be right in front of us on the ground.
Sequence 2: Merciful Be the Heart
1. Wasteland of Buried Churches, Bridge of the Three Cavalries, Mercy Dreams
2. Oil of Pilgrims: 0/6
3. Our Lady of the Six Sorrows: 0/6
4. Knot of Rosary Rope: 0/6
5. Mea Culpa Altars: 1/7
6. Relics: 0/7
7. Empty Bile Vessels: 0/8
8. Mea Culpa Hearts: 1/9
9. Prayers: 2/13
10. Corpses: 0/26
11. Rosary Beads: 3/35
12. Children of Moonlight: 3/38
13. Collectibles: 7/44
14. Achievements: 2/45
-----------------------------------------------------------------------------------------------------

Wasteland of the Buried Churches:


Collectible #4 – Phalanx of Arthur, the Sailor: Make your way through the Area until you reach Room 2 in the first church. Head through the church’s upper level over the spike pit & drop down three small stone ledges. Before you climb down the ladder leading down to a doorway, walk to the left side of the ladder’s ledge & press the dodge button to slide under the wall into a hidden location. The Collectible will be in the corner here.

Rosary Bead #2 – Uvula of Proclamation: Drop down the ladder now in Room 2 but instead of going through the doorway off our right into Room 3, head left & down a different ladder to the bottom level of the church. Exit the bottom level through a doorway to the left & we will be underground back in Room 1. Kill the hulking Guardainfante & we can find the Bead behind it near a Log Shortcut.

Collectible #5 – Capitate of Barock, the Herald: Enter outside into Room 3 now & we can eventually see an Item on a stone ledge above us with a crooked tree growing out of it. Leap onto the nearby platform with a rock throwing Damned on it, then leap back over to the Item’s ledge to grab the Collectible.

Child of Moonlight #2: In the middle of Room 3, we can find a Cherub flying around above us. To reach it, we need to climb up a series of stone ledges to the Cherub’s right. Kill the Damned on the highest ledge & leap off it to strike the Cherub.

Mea Culpa Heart #1 – Heart of the Virtuous Pain: When we enter Room 4 there will be three ways we can go; right, up, & down. Take the ladder up first & make your way to the top of the church. Near the top, we can see a spike pit with some hanging ladders that lead to a doorway off our left. Carefully leap across the ladders over the pit to reach the doorway to enter Room 5. We can find the Mea Culpa Heart in the hands of a dead saint outside here. Getting across the ladders can be really annoying…

At the very top of Room 4 we can find the icy entrance to the Where Olive Trees Wither Area. Do not enter through the doorway! Doing so will begin an NPC's Questline that gets progressed if we defeat Bosses. Since we are not quite ready to begin this Area, steer clear of it until later. While we cannot void anything associated to the Questline, it will alter how we obtain an Achievement & a Prayer making us have to wait until much later in our playthrough.

Make your way back down to the pathway junction in Room 4, this time we will take the doorway straight ahead to the right. Follow Room 6 to the end & we will enter The Bridge of the Three Cavalries Area. Rest at the Prie Dieu Shrine here.

Bridge of the Three Cavalries:


Achievement #2 – Power Unleashed: Use a Righteous Riposte 5 times.
This Achievement is a little tricky but stops being an issue once you get a hang of it. Rest at the Prie Dieu Shrine & turn around to enter the Wasteland of the Buried Churches again. In Room 6 here, there will be 3 Shieldmaidens we can farm for this Achievement; resting at the previous Prie Dieu Shrine to quickly respawn them.

A Ritgheous Riposte is a special kind of Riposte we can perform. Approach a Shieldmaiden & Riposte their attack. When you block an enemies attack with a Riposte, the Penitent One will then automatically swing their sword & strike them. To perform a Righteous Riposte, when your sword is at its highest point of its arc just before it strikes the enemy during the automatic attack, quickly press the attack button. If done correctly when your Riposte strike hits the enemy, they will be struck by red electricity & we can then perform an Execution.

If my explanation is not helping, here is a short little video guide by Dylan S which should simplify it for you.
https://www.youtube.com/watch?v=8MZrZWMDD9o
The enemy “electrifying” is what makes the Riposte Righteous; you do not need to follow up with an Execution. After our fifth enemy “electrifies”, the Achievement will unlock. This may take a few tries; take this time to farm for Tears as well so we can purchase the 4 Mea Culpa Abilities at the Albero Mea Culpa Altar.

Go through the last unexplored Area in Room 4 on the bottom path to enter Room 7. Cross the bridge & we will enter Mercy Dreams.

Mercy Dreams:


Collectible #6 – Maxilla of Tarradax, the Cleric: Enter Room 3 directly across from where the first Prie Dieu Shrine is & walk to the edge of the floor with the two spear traps. Across from us, we can see a wooden platform with a ladder going down; on top of the wooden platform is a candle sconce against a wall. Strike the wall behind the sconce, & it will reveal a hidden location with a Flagellant & this Collectible.

Prayer #2 – Següiriya To Your Eyes Like Stars: Carry on through Mercy Dreams to the bottom half of Room 1 after unlocking the first Shortcut back up to the Prie Dieu Shrine. Drop down & head through the doorway on the right & we will enter Room 5. Get past the fireball traps further in the Room & drop down the long ladder to the lower floor. From the bottom of this ladder, enter the Room 6 directly to your right & we can find this Prayer in a Golden Chest at the dead end.

Collectible #7 – Cervical Vertebra of Zicher, the Brewmaster: Return back into Room 5 & continue left through the lower floor until you reach a Flagellant & a floating Spear of the Cathedra. We can find this Collectible on wooden platform directly above us. Head near the end of this floor & leap up across some wooden platforms to reach it.

Child of Moonlight #3: Still in Room 5, make your way left to the very end of this Room to find a Cherub flying directly above us. Leap off the nearby ladder to strike it.

Rosary Bead #3 – Small Bead of Red Wax: Leave Room 5 to enter the lower level of of Room 4 to unlock the second Shortcut back up to the Prie Dieu Shrine. Before climbing down the ladder to the bottom of Room 4, head to the wooden platform with a candle sconce at the far left wall. Strike the wall to reveal a secret doorwy leading to Room 7 where we can collect this Bead.

Collecting this Small Bead will allow us to collect the next two sizes up later on in the game…
Sequence 3: Pathways of the Dead
1. Mercy Dreams, Albero, Brotherhood of the Silent Sorrow, The Holy Line, Wasteland of Buried Churches
2. Oil of Pilgrims: 0/6
3. Our Lady of the Six Sorrows: 0/6
4. Knot of Rosary Rope: 0/6
5. Mea Culpa Altar: 1/7
6. Relics: 2/7
7. Empty Bile Vessels: 1/8
8. Mea Culpa Hearts: 1/9
9. Prayers: 2/13
10 . Corpses: 1/26
11. Rosary Beads: 6/35
12. Children of Moonlight: 3/38
13. Collectibles: 7/44
14. Achievements: 3/45
-----------------------------------------------------------------------------------------------------

Mercy Dreams:


Candelaria Shop #1: Climb down the ladder to the very bottom of Room 4 & we will have a left & right pathway to take. Head left inside Room 8 & we can find a red tent in its center that we can enter. This is our first Candelaria Shop. She has three Items for sale we will need to buy for 100% Completion.

Key to the Chamber of the Eldest: This Item can be purchased for 400 Tears.We need to purchase this right away for a Locked Door back in the Brotherhood of the Silent Sorrow that will let us collect an immensely useful Relic.

Rosary Bead #4 – Hollow Pearl: Purchased for 1000 Tears. This Bead is needed for 100% Completion but can be purchased at anytime, it is not totally useful, just pick this up when you have Tears to spare.

Rosary Bead #5 – Moss Preserved In Glass: Purchased for 1500 Tears. More useful than the Hollow Pearl, but not totally necessary right away.

Just do not forget about these two Beads & be sure to eventually pick them up.


Achievement #3 – Inquisition: Execute 5 different enemies.
This will come naturally as you playthrough Blasphemous. You can Execute enemies by pressing Y (or whatever you have it set to) when an enemy flashes red. This can be triggered by doing a Riposte, Righteous Riposte, Sinful Wrath Charge Attack, or a Sacred Thrust Strafe Attack. A Righteous Riposte is the only move to gurantee an Execution follow up, the other moves/Abilities have a random chance to trigger one. Almost every enemy in the game can be Executed, with some exceptions.

Empty Bile Vessel #1: Take the doorway to the right now at the bottom of Room 4 & make your way through a series of traps & enemies in Room 9. Drop down some wooden platforms near the Room’s end & there will be a lone ladder to our left leading up to a long wooden platform. Another ladder can be found leading down into the next Room below. Head over left, past the bottom of the lone ladder, to a candle sconce leaning against a wall. Strike the wall on the left to reveal a hidden location with another ladder leading down below into Room 10.
Room 10 will be a long corridor full of enemies leading left. We can find this Bile Flask at the very end of the corridor; we will have to fight off an ambush by two Acolytes & a Spear of the Cathedra guarding the Flask.

NPC – Virdiana #1: Carry on through Mercy Dreams from the other ladder leading down from Room 9 & we will encounter a new NPC in the top right corner of Room 11. Speak with her & accept her assistance with “Assent” to start her Questline. Virdiana can be summoned wherever we speak with her in an Area to heal us during Boss fights.

We can find the second Prie Dieu Shrine of Mercy Dreams just below where we find her. Important, do not enter Room 15; we need to first find the Medicinal Herb for Mercy Dreams first!

Take the pathway to the right of the Prie Dieu Shrine & follow the stairs down into Room 12. Fight off the two Wraiths & head straight through the next doorway to the right & we will find our first Teleporter in Room 13. Use it to Travel back to Albero.

Albero:


Medicinal Herb #1 – Bouquet of Thyme: When we arrive in Albero, we can find this Herb in the left corner of Room 7.

Blessing Item #1 – Linen Cloth: With the Bouquet of Thyme in hand, take it to Tirso in Room 2 & he will reward us with the Linen Cloth. With the Thyme delivered, it is now safe to fight the Mercy Dreams Area Boss.

Relic #1 – Shroud of Dreamt Sins: Head over to Room 1 with the Albero Prie Dieu Shrine & approach the nearby fountain. Now that we have the Linen Cloth, we can interact with the fountain & get transported to a wasteland encased in salt. Head to the far right through this frozen Area & we can the statue of the Blessed Lord of Salty Shores.

Speak with the Blessed Lord & give him the Linen Cloth. He will then transform the cloth into this useful Relic. The Shroud of Dreamt Sins (SDS) is essential for the Last Words Achievement & will allow us to interact with Corpses.

Brotherhood of the Silent Sorrow:


Relic #2 – Blood Perpetuated In Sand: With the purchased Key to the Chamber of the Eldest, we can now collect another very useful Relic needed to access many Collectibles in the game. In Room 5, we can find a Locked Door. Use the Key to the Chamber of the Eldest to enter the room; smash the glass display case inside to receive this Relic. The Blood Perpetuated In Sand (BPS) is another mandatory Relic we need.

The Holy Line:


Rosary Bead #6 – Painted Wood Bead: Now that we have the BPS Relic, we can now get a slew of new Collectibles. Make your way through The Holy Line over to Room 3 & we can now leap up across the mud pool onto a previously unreachable stone ledge using bleeding sand ledges. Leap across them to collect this Bead.

Albero:

Corpse #1: With the SDS Relic equipped, head over to Room 5; to the right of the church doors we can find our first Corpse. Interact with the Corpse to listen to its memories.
The Stir of Dawn DLC adds a Corpse found in the new Petrous Area below Room 2 of The Holy Line. It does not count towards the Achievement.

Wasteland of Buried Churches:


Burial Item #1 – Tentudia’s Carnal Remains: Head through The Wasteland of Buried Churches until you are in Room 7, outside the church entrance to Mercy Dreams. Drop below the bridge here & make your way to the far right corner of the Room. Leap across the bleeding sand platform using BPS Relic & we can reach this Burial Item.

Albero:

NPC – Lvdovico #2: Take Tentudia’s Carnal Remains back to Lvdovico at the Albero church. We will receive some Tears of Atonement as a reward. There are two other Burial Items we need to collect to complete Lvdovico’s Questline.

If we return here later on, the church doors will be open. This is another DLC feature where we can donate Tears of Atonement to a Donation Box. There are no Achievements related to this however, we get rewards for Donating: 5,000 Tears, 10,000 Tears, 20,000 Tears, 30,000 Tears, 50,000 Tears, & 100,000 Tears.

None of the Beads received as rewards count towards the Mysteria Lucis Achievement.
Sequence 4: Awake In A Sleeping Body
1. Mercy Dreams, Desecrated Cistern
2. Oil of Pilgrims: 1/6
3. Our Lady of the Six Sorrows: 1/6
4. Knot of Rosary Rope: 0/6
5. Mea Culpa Altar: 1/7
6. Relics: 2/7
7. Empty Bile Vessels: 2/8
8. Mea Culpa Hearts: 1/9
9. Prayers: 2/13
10. Corpses: 2/26
11. Rosary Beads: 6/35
12. Children of Moonlight: 5/38
13. Collectibles: 10/44
14. Achievements: 4/45
-----------------------------------------------------------------------------------------------------

Mercy Dreams:


Collectible #8 – Pisiform of Hernandez, the Explorer: Take the Teleporter back to Mercy Dreams. Exit Room 13 to the left & make your way down the ladder to the lower floor of Room 12. The way to the right will be barred, so we can only take the path to the left. Enter the Room 14 & strafe through to the twisted corridors end, dodging the fireball trap. The Collectible will be at the end of the corridor.


Achievement #4 – No Mercy: Defeat Ten Piedad.
Story Related. If you delivered the Bouquet of Thyme to Tirso, it is safe for us to defeat the Area Boss of Mercy Dreams. Head into Room 15, left of the second Prie Dieu Shrine, & defeat Ten Piedad (my second favorite Boss theme in the game) to unlock the Achievement. If you summoned her, we can see Virdiana in the background standing on top of a broken pillar & she will heal us throughout the fight.

We will be rewarded with the Holy Wound of Attrition in the preceding Room 16…

Desecrated Cistern:


Our Lady of the Six Sorrows #1: From the first Prie Dieu Shrine, enter Room 2 & there will be a doorway straight ahead of us with some ledges leading upwards. Head through the doorway straight ahead to enter Room 3 & we will find our first Lady of the Six Sorrows.

Collectible #9 – Scaphoid of Fierce, the Leper: Make your way up the stone ledges of Room 2, ignore the doorway on the second floor to the left & carry on higher up some more ledges to the right. We can find this Collectible on a long stone ledge at the top of this Room past three dripping toxic pipes.

Child of Moonlight #4: Drop down to the second floor of Room 2 & enter the doorway to the left to enter Room 4. As we walk through the water left, we will eventually find a Cherub hovering above the second water pool in our way.

Empty Bile Vessel #2: Exit Room 4 from a ladder leading up to enter Room 5. Head up some stone ledges higher in the Room, ignoring a doorway to our left on the second floor, & head straight to the top. At the top of the Room, head through a doorway off our right to get to Room 6. Follow this flooded Room along right, through the water, & we can find this Empty Flask in a Steel Chest at the end.

Corpse #2: Carry on through toxic gas filled Room 7 into Room 8 directly afterwards. Climb up the first ladder to the second floor then climb down the ladder to our left. We can find this Corpse resting on a stone ledge at the bottom of the ladder over some water.

Directly across from the Corpse to the left is a doorway leading to Room 9 which has a Bile Fountain in it. We can exchange our Empty Bile Flasks along with Tears of Atonement here for extra Bile Flasks.

Collectible #10 – Humerus of McMittens, the Nurse: Back on the second floor of Room 8, we can head up left or right. Take the stone ledges up to the left & follow them all the way to the top. The Collectible will be out in the open just before the Ladder Shortcut leading up to The Wasteland of Buried Churches.

Carry on through the Cistern until you enter Room 11. To start, jump across the gap & head through the doorway to our left so we can open up a Lever Shortcut that will lead us back to Albero (top left of Room 13). If you come across the NPC Nacimiento, he is a part of the Stir of Dawn DLC & is unrelated to any Achievements. Giving him Quicksilver to enhance our Bile Flasks can be really handy however…

Oil of Pilgrims #1: Return back to Room 11 & begin making your way down the ledges, a ladder to the right, & then a ladder to the left. At the bottom of the left ladder, strike the wall to your left to reveal a doorway leading to Room 14; the Oil will be inside.

Child of Moonlight #5: Back in Room 11, head over to the doorway a little ways off your right, not quite at the bottom of the Room to enter Room 15. There will be small pockets of toxic gas in this room; make your way up the ladder in the center of the Room & we can see a Cherub floating around here. It can a little tricky timing our jump attack to strike it without falling.

Rebirth Item #1 – Black Grieving Veil: In the same Room, there is a Lever we can pull to the right of the Cherub that opens a gate in the top left corner of the Room. Climb up the ladder over to it & strafe under the toxic gas to collect this Item. This Veil is needed for an NPC Questline we discover later on at the very bottom of the Grievance Ascends Area.

That is all we can do for now in the Desecrated Cistern, we now have two Areas we can go through next: Mountains of the Endless Dusk & Where Olive Trees Wither. There is a missable Achievement located in the Mountains that will require us to kill an enemy NPC without dying or it will void the Achievement. To increase our odds of success, we will go through Where Olive Trees Wither first so we can accumulate more strength.
Sequence 5: Purgatory
1. Where Olive Trees Wither, Graveyard of the Peaks, Albero
2. Oil of Pilgrims: 1/6
3. Our Lady of the Six Sorrows: 1/6
4. Knot of Rosary Rope: 1/6
5. Mea Culpa Altar: 1/7
6. Relics: 2/7
7. Empty Bile Vessels: 2/8
8. Mea Culpa Hearts: 1/9
9. Prayers: 2/13
10. Corpses: 4/26
11. Rosary Beads: 9/35
12. Children of Moonlight: 8/38
13. Collectibles: 12/44
14. Achievements: 4/45
-----------------------------------------------------------------------------------------------------

Where Olive Trees Wither:
To get to Where Olive Trees Wither, head to the Wasteland of Buried Churches & head to the very top of Room 4; there will be mounds of ice outside this new Area’s doorway.

Note that when you enter Where Olive Trees Wither for the first time, it will begin the NPC Gémino's Questline whether you speak to him or not. Make a point of defeating Our Lady of the Charred Visage & completing his Questline. While it cannot be failed per say, if Gémino dies before we unthaw him it will alter how we complete his Questline/obtain its associated Items.


Corpse #3: Immediately as we enter Where Olive Trees Wither, we can find this Corpse on the ground just past a dead tree.

Collectible #11 – Radius of Helzer, the Poet: After resting at the first Prie Dieu Shrine, drop down from the landing into the small pit below the next Wall Jump to find this Collectible on the ground.

NPC – Gémino #1: After the Wall Jump, we can find man encased in iron being absorbed inside a tree. This is poor Gémino. Speak with him & he will plead for us to get some warmth from the burning oils of gold at the chapel in the mountain peaks. He will give us a tiny Golden Thimble to fill. We will be able to fill this in the Covenant of Our Lady of the Charred Visage Area at the top of these frozen mountains.

Medicinal Herb #2 – Incense Garlic: Enter Room 2 & leap across the gap to the far side. Pass through the next doorway into Room 3; we can find this Herb directly in front of us in the cave’s dead end.

We need to take this back to Tirso before fighting the Area Boss of Our Lady of the Charred Visage; we get an Elevator Shortcut back to Albero later on so hold onto it for now… can’t go wrong with garlic.

Corpse #4: Return back into Room 2 & climb up to the second level that has a Damned & a Flagellant on the immediate ledge. From here walk to the right & leap off to a far ledge, again to the right, to find this Corpse near a dead tree. It can be a bit of a tricky jump; you can leap from the ledge directly above us as well if that is easier to pull off for you. Just use the Wall Jump to our left to get up to the third level.

Burial Item #2 – Remains of Tentudia’s Hair: Enter the Room 4 & begin making your way up past the urn throwing Bellido. When you reach the lone tree on the ledge near the top left of the Room, we will have two paths: straight down, or up slightly above us. Drop down below & there will be a doorway through the cliff into Room 5. Head left through this Room across the gaps, & we can find this Item at the end against the cliff wall.

Pro Tip: To deal with the egregious bell hovering Cimbalillo, hold up (on whatever you have “Up” set as) & spam the attack button to do an upwards slash “corona attack”. Just spam that attack & the Cimbalillo will just fly into your sword until it dies. It’s extremely useful… unless of course they get below you. Remember, corona kills everything.

Return to Room 4 & Wall Jump back up to where we were before. Exit this Room up to the left to enter Graveyard of the Peaks.

Graveyard of the Peaks:

This Area can be pretty annoying as wind direction effects our movement speed & jumping distance, so pay attention to where it is blowing.


Child of Moonlight #6: In Room 1, slide under the wall ahead of us & enter the doorway to the left into Room 2.

If you have the BPS Relic equipped, we can see a ledge of bloody sand directly ahead of us. Leap up it & we can find a Cherub at the top.

Collectible #12 – Anklebone of Weston, the Pilgrim: Directly underneath the second bloody sand ledge, the floor is actually breakable. Leap off it &/or do a Weight of Sin plunging attack to the ground here & it will reveal this Collectible below.

Candelaria Shop #2: We can find our second entrance to Candelaria’s Shop here in Room 2 as well just past the Prie Dieu Shrine. She will have another 3 Items for sale that we will need to collect eventually for 100% Completion.

Rebirth Item #2 – Torn Bridal Ribbon: Another Item for this Area locked NPC Questline is available at Candelaria’s Shop. It can be purchased for 800 Tears.

Rosary Bead #7 – Bead Calcified Eye of Erudition: Purchased from Candelaria’s Shop for 1200 Tears.

Rosary Bead #8 – Ember of the Holy Cremation: Purchased from Candelaria’s Shop for 5000 Tears. This Bead is very expensive, but I highly recommend farming Tears to buy this as soon as you are able to.

This Bead will be quintessential for our Second Playthrough…

Child of Moonlight #7: Head left from Room 2 to enter Room 3 which is where we can find our Elevator Shortcut down to Albero. Before jumping over to the Elevator, drop down to the ledge below where we entered & we can see a Cherub hovering below us. Wait until the Cherub flies closest to the ledge we are standing on & activate the Verdiales of the Forsaken Hamlet Prayer to collect it.

Rosary Bead #9 – Immaculate Bead: Jump up to the Elevator & enter Room 4 to the left & we can find this Bead in front of a Confessor Statue. This Bead is critical for unlocking Ending B; it will begin to become tainted when we die if we have it equipped. We need it fully tainted to do Ending B, but don’t worry about that right now. We can do all of that at any point in the game, even after we unlock Ending A first, which we will.

Knot of Rosary Rope #1: Enter back into Room 3 & jump up to the ledge that has the disabled Lever on it. From here jump onto the top of the Elevator & leap up to a ledge to the left to grab this Knot.

Albero:

Child of Moonlight #8: Take the Elevator Shortcut down to Albero & we will now be close enough to the Cherub flying above the church in Room 5 to be able to leap over & strike it.

NPC – Lvdovico #3: While in this Room, we can bring Lvdovico the Remains of Tentudia’s Hair; we will receive some Tears of Atonement as a reward.

NPC – Tirso #2: Now is also a good time to drop off the Incense Garlic to Tirso at the Kissers of Wounds hospital. We will also receive some Tears of Atonement as a reward.
Sequence 6: Hell Frozen Over
1. Graveyard of the Peaks, Covenant of Our Lady of the Charred Visage
2. Oil of Pilgrims: 2/6
3. Our Lady of the Six Sorrows: 2/6
4. Knot of Rosary Rope: 1/6
5. Mea Culpa Altars: 1/7
6. Relics: 2/7
7. Empty Bile Vessels: 3/8
8. Mea Culpa Hearts: 2/9
9. Prayers: 2/13
10. Corpses: 7/26
11. Rosary Beads: 13/35
12. Children of Moonlight: 9/38
13. Collectibles: 15/44
14. Achievements: 4/45
-----------------------------------------------------------------------------------------------------

Graveyard of the Peaks:


Corpse #5: Leave the Prie Dieu Shrine & head back to Room 1. Wall Jump up to the second floor of the Room & we can the Corpse in an alcove off our left.

Collectible #13 – Occipital of Tequila, the Metalsmith: Enter Room 5 & make your way up near the top of the room (remember to spam the upwards “corona attack” for the Cimbalillo enemies) & take the path to the right to enter Room 6. From here, use the Wall Jump above us & wait for the wind to blow right. When it does, jump onto the breakable ledges & leap over to the far right to grab the Collectible.

Empty Bile Vessel #3: From the previous Collectible, leap back down to where we entered & get back up to the breakable ledges (or try dropping down below to the Item from where we are instead). Jump over to where the Collectible was, but this time grab the ledge. Instead of climbing up, let go when the wind blows to the right & drop down below to collect this Flask. It can be a pain getting back from here, definitely wait for the wind.

Child of Moonlight #9: Go back into Room 5 & head over to the left side to enter Room 7 now. Jump over the patrolling Sepulcro Errante & Wall Jump up to the second level. With the BPS Relic, we can leap over to some bleeding sand where we can see a Cherub to our right. To get this easily without strafing under the wall & falling down, just activate the Verdiales of the Forsaken Hamlet Prayer.

Corpse #6: Climb up a broken ladder above us to get to the third level now; the Corpse will be behind us on the left side across from where a Wakeful Alcove enemy is in the wall above.

Room 8 has an advantageously placed Bile Fountain in it for us to use…

Collectible #14 – Parietal Bone of Lasser, the Inquisitor: Still in Room 7, climb up to the fourth level now & we can see two Sepulcro Errantes patrolling to the left with an Item at a dead end. Either kill the Errantes or just leap over them to grab the Collectible.

Rosary Bead #10 – Muted Bell: In Room 9, drop down to the lower level & immediately head through the path behind us to the left to re-enter Room 7; the Bead will be just below us.

Oil of Pilgrims #2: Climb up the broken ladder to the right in Room 9 & begin Wall Jumping upwards with the wind. After the Wall Jump, we will be attacked by a Cimbalillo. The path onwards to the left has a Wakeful Alcove blocking our way, but before we carry on, leap over behind us to our right where a frozen body is. Strike the wall behind the body to reveal Room 10 where we can find our next Fervor Upgrade.

Rosary Bead #11 – Piece of a Tombstone: Carry on higher up in Room 9 & get to its top. Before exiting the Room to the left, turn around & we can see an Item behind a little ways down to the far right. Leap off the narrow ledge over to it.

Head through Room 11 to enter the Covenant of Our Lady of the Charred Visage Area. Be extremely careful not to get killed by the Sister of the Charred Visage guarding the hallway before reaching the Prie Dieu Shrine in Room 2. It’s irritatingly easy, & our last Prie Dieu is at the bottom of Graveyard of the Peaks…

Covenant of Our Lady of the Charred Visage:

Corpse #7: From the Prie Dieu Shrine in Room 2, drop down to the bottom floor to see a Corpse lying on the ground in the center.

Take a right now into Room 3 & follow it along which will take us back into the very top of Room 3 in the Graveyard of the Peaks where we can activate an Elevator Shortcut.

Graveyard of the Peaks:


Mea Culpa Heart #2 – Heart Of the Unnamed Minstrel: Before taking the Elevator down to the center of Room 3, carry on into the newly unlocked Room 12. Here we can see the Mea Culpa Heart in the hands of a saint locked behind a steel gate. Approach the gate & hold down whatever button you have “Ranged Attack” set as so that you Sacrifice Blood. Even if you do not have "Ranged Attack" unlocked yet, holding down the button it will become will make the Penitent One cut themselves, spilling blood. If your blood spills upon the blood soaked floor in front of the gate, it will open for you.

Our Lady of the Six Sorrows #2: Take the elevator down & we will now be able to access Room 13 up to the right by leaping on top of this new Elevator to get into the Room. Here we can receive our next max health upgrade.

Covenant of Our Lady of the Charred Visage:


Collectible #15 – Sternum of Vitas, the Performer: Return to the Covenant & make your way through to Room 6. When we enter, we can see a leaping Percherón on a wooden ledge ahead of us. Leap over to it & if you have the BPS Relic equipped, we can jump onto a bleeding sand ledge to get over to the far left side of the Room where the Collectible is. Vitas… oh dear.

Rosary Bead #12 – Piece of a Golden Mask: Enter Room 7 from either the top or bottom entrance (top is much nicer) & get over the wall to the left side of the Room. Drop down to the bottom floor & head to the left wall where we can see a small slot under the wall leading into a section of the Room full of toxic gas. There is a space under the gas however, & we can strafe underneath to get to the ladders on the other side. Get to the top past the gas & open a Shortcut. Slide under the last of the gas to the left & strafe past the Sister of the Charred Visage to snag the Bead.

Rosary Bead #13 – Small Bead of Blue Wax: Drop down into Room 8 & once again get over to the left side of the Room. Fight past the two laser shooting Wax Baronesses & we can see a doorway leading into Room 9 in the bottom left corner of this Room. Head inside & this time there will be three Wax Baronesses we need to fight through. The Bead can be found at the very end of Room 9.
Sequence 7: Sister!!!
1. Covenant of Our Lady of the Charred Visage, Where Olive Trees Wither, Mountains of the Endless Dusk
2. Oil of Pilgrims: 2/6
3. Our Lady of the Six Sorrows: 2/6
4. Knot of Rosary Rope: 1/6
5. Mea Culpa Altar: 2/7
6. Relics: 2/7
7. Empty Bile Vessels: 3/8
8. Mea Culpa Hearts: 2/9
9. Prayers: 3/13
10. Corpses: 8/26
11. Rosary Beads: 16/35
12. Children of Moonlight: 10/38
13. Collectibles: 18/44
14. Achievements: 8/45
-----------------------------------------------------------------------------------------------------

Covenant of Our Lady of the Charred Visage:


Collectible #16 – Phalanx of Miriam, the Counsellor: Head back into Room 8 & get up to the top level. Before climbing the ladder up to Room 10, fight through the enemies right along this platform & we can find the Collectible at the far right wall.

Rosary Bead #14 – Medium Bead of Red Wax: In Room 10, as we climb onto the initial ledge, we can see a lit red candle directly above us. Get over to the left side of the room & leap onto the stone ledges above us. Follow the ledges backwards to the right & they will take us to where the candle is. If you have the Small Bead of Red Wax Bead, we can snuff out this candle for the next size up.

Corpse #8: Wall Jump through Room 11 to the top & head through the doorway to the right to activate the second Prie Dieu Shrine. The Corpse will be on the way over to the Shrine on the floor.

The doorway to the left in Room 11 will take you to the Cloistered Sapphire Bead. It is from the Stir of Dawn DLC & not required for the Mysteria Lucis Achievement.

NPC – Viridiana #2: We can find Viridiana outside Room 13 where the Area Boss is. She has become older since our last encounter… speak with her & “Assent” once more to her companionship.


Achievement #5 – Look Her In the Eye: Defeat Our Lady of the Charred Visage.
Story Related. If you delivered the Incense Garlic found in Where Olive Trees Wither to Tirso, it is safe to fight this Boss. Even maxed out as we are, she is a pretty difficult fight. If you are fast at the beginning, you can take out one of her health bars before the fight even begins as she slowly rises.
We will receive the Holy Wound of Compunction in the Room afterwards.

Golden Thimble Filled With Burning Oil: After receiving the Holy Wound in Room 14, we can find a receptacle full of burning golden oil at the end of the hall. Collect some with the thimble for Gémino.

Mea Culpa Altar #2: After speaking with Deogracias & using the Lever Shortcut, carry on through the doorway to the right to enter Room 15 where our next Mea Culpa Altar is.

We can now purchase Fervorous Blood for 2000 Tears, Sacred Lunge for 2300 Tears, & Ascending Edge for 7000 Tears. Definitely purchase Fervorous Blood but save the rest of your Tears so that we can collect the Ember of the Holy Cremation Bead from Candelaria if you have not already done so.

Where Olive Trees Wither:


Rosary Bead #15 – Frozen Olive: Take the Golden Thimble Filled With Burning Oil back to Gémino in Room 1 & you will see that the tree has started to grow through him. Quickly give Gémino the boiling oil & he will go silent. Reset the Area by entering the Wasteland of Buried Churches & returning to Gémino to see that… he got out. This Bead will be on the ground in front of his iron prison.

If Gémino is dead, still unthaw his body & reset the Area; we should be able to collect this Rosary Bead at his feet as well as the Dried Flowers Bathed In Tears instead of where we normally find it down below. As well, we will be unable to unlock The Desire of the Corrupted Achievement or collect the Saeta Dolorosa Prayer & the Coccyx of Daniel, the Possessed Collectable until we obtain the Linen of Golden Thread Relic in Sequence 12.

Dried Flowers Bathed In Tears: With Gémino free at last, head over to Room 3 where we found the Incense Garlic & a new passage has been opened up at the back of the cave where we can see what is left of Gémino, clutching these Dried Flowers.


Achievement #6 – The Desire of the Corrupted: Visit the tomb of The Lady of the Tailed Gown.
After grabbing the Dried Flowers in Room 6, you’ll see Gémino is also lifting open a stone coffin. Leap into the coffin & we will drop down into Room 7. As soon as we land in the Room the Achievement will unlock.

Prayer #3 – Saeta Dolorosa: While in this new Room, & if you grabbed the Dried Flowers from Gémino above, lay the flowers on The Lady of the Tailed Gown’s grave & we will receive this Prayer.

Child of Moonlight #10: Leave the tomb & enter Room 8 to the right. When we enter, Wall Jump up above us & we can see a Cherub in an alcove to our left. To strike it, use our Ranged Attack we unlocked after finding the second Mea Culpa Shrine.

Collectible #17 – Coccyx of Daniel, the Possessed: Wall Jump back up to where we were & begin heading right, leaping across the gaps & fighting Cimbalillos. Use the BPS Relic to get to a bleeding sand ledge & strafe under the wall; quickly wall grab the Wall Jump directly below us. Launch off over to the far ledge & keep moving to another two bleeding sand ledges to get up to where the Collectible is hidden near the top right corner of Room 8.


Achievement #7 – The Number of the Beasts: Kill 666 enemies.
This will come naturally across our two & a half play throughs of the game. Between natural progression, farming, & of course dying; it is not difficult unlocking this during our first playthrough.

Mountains of the Endless Dusk:
From Albero, make your way down through the Desecrated Cistern & take a left in Room 12 to enter the Mountains of the Endless Dusk.


Collectible #18 – Metacarpus of Hodges, the Blacksmith: Immediately when you enter Room 1, drop down to the lower level below you & drop down a series of breakable ledges to find the Collectible at the very bottom.


Achievement #8 – The Sister: Defeat Perpetva.
Missable. After Room 2 with the Prie Dieu Shrine, we will enter a small Room with a crooked tree in its center. This is where Perpetva will ambush us. We cannot die or she will not re-appear voiding this Achievement!

Once triggered we have to defeat her or else, we have to complete this on a different playthrough. She is not all that difficult however, just play defensively & do not let your health get too low. She calls lightning bolts & does flying jousts from left to right for the most part.

Rosary Bead #16 – Perpetva’s Protection: Received by defeating Perpetva. This is an amazing Bead to have for the second upcoming Boss battle we have later on…

NPC – Redento #1: In Room 4, we will drop down into a large location. A short ways past the ladder leading down into Jondo, we can see a man facing towards an abyss. Speak with him & he will tell us that his voyage has been halted.

When we activate the trolley system on the far side of the abyss, we will return to him to progress his Questline.
Sequence 8: A Bell of Awakening
1. Jondo, Mountains of the Endless Dusk, Brotherhood of the Silent Sorrow, Albero
2. Oil of Pilgrims: 2/6
3. Our Lady of the Six Sorrows: 2/6
4. Knot of Rosary Rope: 2/6
5. Mea Culpa Altar: 3/7
6. Relics: 2/7
7. Empty Bile Vessels: 5/8
8. Mea Culpa Hearts: 3/9
9. Prayers: 3/13
10. Corpses: 8/26
11. Rosary Beads: 18/35
12. Children of Moonlight: 14/38
13. Collectibles: 22/44
14. Achievements: 8/45
-----------------------------------------------------------------------------------------------------

Jondo:


Collectible #19 – Scapula of Carlos, the Executioner: In Room 1 of Jondo, leap down to the lower level from where the ladder we came down was & we will land on a platform with a Carthos “Split-Man” & two Flagellants. The Collectible will be at the far left end of the platform.

In Room 2, leap across the ladders ahead & climb up to the Prie Dieu Shrine.

Collectible #20 – Vertebra of Lindquist, the Forger: Drop down into Room 3 & there will be two ways we can carry on down: left or right. Head down the ladder on the right side of the Room to enter Room 4 first. As you head through Room 4, you will Wall Jump up to a ledge overlooking two bell running Esquilón lower down below us with a ladder above you. Drop past the Esquilón at the bottom of their section to grab the Collectible.

Medicinal Herb #3 – Bouquet of Rosemary: Carry on down using the ladder to the right of where the Collectible was into Room 5 & we can see the Medicinal Herb directly below us. Head down & around past the Herald to collect it.

We need to run this back to Tirso before fighting the next Area Boss in Grievance Ascends.

Child of Moonlight #11: Back track to Room 4 & take the ladder up into Room 6, here we can find the first Tether Statue to destroy, releasing the Jondo Chain. We can find a Cherub flying up to the right of the Tether Statue.

Child of Moonlight #12: Before we backtrack to Room 3, head right, into Room 7 & we will have to leap across of series of very annoying platforms to reach the end. About halfway along these platforms, we can see a Cherub flying over a breakable ledge. Quickly leap up & strike the Cherub before getting back to solid ground.

Mea Culpa Heart #3 – Heart of the Holy Purge: When we reach the end of Room 7, we can find the saint holding the Mea Culp Heart just above us.

If you find it, the entire Echoes of Salt Area is a part of the Stir of Dawn DLC. The Corpse & Rosary Bead found here do not contribute to their associated Achievements.

Collectible #21 – Vertebra of John, the Gambler: Return to Room 3 & this time take the left path down to Room 8. Get past the gauntlet of Carthos “Split-Men”, & we can strafe under a wall at the bottom of the elevator system to grab this Collectible.

Empty Bile Vessel #4: Wall Jump up through Room 9 & we can find this Flask directly below where we kill the Herald.

We can find a Bile Fountain to the left of this Room at the top in Room 10.

Knot of Rosary Rope #2: Destroy the second Tether Statue in Room 11 & carry on up to the top of the Room. Before we climb up the ladder, leap across the gap to the left & strafe under the wall to enter Room 12. Maneuver the sonic urns around & use them to open up the iron gate. The Knot will be inside the Steel Chest behind the gate.

Child of Moonlight #13: Climb up the ladder now into Room 13 & get to the top left corner where we can find the Cherub flying. It’s a bit of a reach but leap off the nearby ledge to the right to strike it.

Climb up the ladder now in Room 13 & we will re-enter Room 4 of The Mountains of the Endless Dusk.

Mountains of the Endless Dusk:


Child of Moonlight #14: At the top of the ladder to our right we can find the Lever to activate the trolley system. Leap onto the first moving platform to our right & leap up to strike the Cherub as it passes above us.

Empty Bile Vessel #5: Keep following the conveyor system to the right & reach the landing in the middle of Room 4. If you have the BPS Relic equipped, we can leap up some bleeding sand ledges up to a Flask above.

NPC – Redento #2: Follow the trolley system all the way back to Redento & speak with him so that he can carry on in his quest.

Rosary Bead #17 – Fourth Toe Made of Limestone: After we activate the trolley system in Jondo & speak with Redento, he will reward us with this Bead.

Medicinal Herb #4 – Dried Clove: Follow the trolleys back to the far left end & Wall Jump up to carry on further into the Mountains. Enter Room 5 & drop down to the lower level where the two Esquilón are. If you have the BPS Relic equipped, leap onto a bleeding sand ledge & we can grab this Medicinal Herb.

Get to the Prie Dieu Shrine in Room 6 & we can enter the lower level of the Brotherhood of the Silent Sorrow.

Brotherhood of the Silent Sorrow:


Mea Culpa Altar #3: Room 6 is a junction to many Rooms. First, head to the first Room ahead of us to the left to find our next Mea Culpa Altar. This will unlock the Holy Wrath Ability for 8000 Tears.

Room 8 directly above this Room will have a Teleporter for us.

NPC – Soledad #1: In Room 9 we can speak with the NPC Soledad. She will take our Knots of Rosary Rope & tie them to our Rosary Belt allowing us to equip more Beads. We should have two Knots that can be added at this point.

NPC – Redento #3: Climb up the ladder into Room 10 & we can find where Redento made it to. Speak with him & he will say that his way is blocked by the boulder ahead.

Collectible #22 – Metatarsus of Rikusyo, the Traveller: Head through the doors in the center of Room 10 & make your way through the series of jumps & strafes in the trap maze. When you get to the other side of the maze & climb down the ladder, we can find this Collectible just off our left.

Rosary Bead #18 – Medium Bead of Blue Wax: When we exit the maze back into the Brotherhood of the Silent Sorrow, we can see the Blue Candle off our right. Snuff it out to collect the next size up of the Blue Wax Bead.

NPC – Redento #4: From the Blue Wax Candle, head to the left wall & strike it to reveal the other half of Room 10… & Redento. Speak with him so that he may progress on his journey.

Albero:

NPC – Tirso #3: Return to the Teleporter & make your way back to Albero. Speak with Tirso & drop off the Bouquet of Rosemary & the Dried Clove.
Sequence 9: Three Born As One
1. Grievance Ascends, Desecrated Cistern
2. Oil of Pilgrims: 3/6
3. Our Lady of the Six Sorrows: 3/6
4. Knot of Rosary Rope: 3/6
5. Mea Culpa Altar: 3/7
6. Relics: 3/7
7. Empty Bile Vessels: 5/8
8. Mea Culpa Hearts: 3/9
9. Prayers: 3/13
10. Corpses: 9/26
11. Rosary Beads: 18/35
12. Children of Moonlight: 17/38
13. Collectibles: 23/44
14. Achievements: 10/45
-----------------------------------------------------------------------------------------------------

Grievance Ascends:
After you have destroyed both the Tethering Statues, make your way to Room 3 in the center of Jondo & strike the hanging bell. When the colossal urn dislodges, our platform will collapse, & we will fall into Grievance Ascends.


Corpse #9: Right from the Prie Dieu Shrine in Room 1 we can find this Corpse below us to the left against the wall.

Oil of Pilgrims #3: Make your way through Grievance Ascends down to the bottom of vertical Room 6, past the blowing toxic mist, & there will be a doorway to the left & right. Equip the BPS Relic & leap across the three bleeding sand platforms to get to Room 7. Inside we can find the oil font.

The toxic mist comes in waves of two. Wait for the second wave to go by for a long pause between the next two waves. The left doorway in the previous Room leads to Room 8 with a Bile Fountain.

Relic #3 – Silvered Lung of Dolphos: Get up to the top of Room 6 then make your way over to Room 10. Here, we must evade the waves of toxic mist as we leap up to the top of the Room. We can find this very useful Silvered Lung of Dolphos Relic (SLD) in a glass display case in the top right corner.

Child of Moonlight #15: This Cherub can be found flying directly across from the SLD Relic in Room 10.

Collectible #23 – Frontal of Martinus, the Ropemaker: Now that we have the SLD Relic equipped, drop all the way down to the bottom of Room 10 & we can find this Collectible in the bottom right corner against the wall.

Knot of Rosary Rope #3: Backtrack over to Room 4 now. With the SLD Relic, leap across the broken ledges at the bottom of the Room & we can grab this Knot on a ledge to the left.

Rebirth Item #3 – Melted Golden Coins: Get to the top of vertical Room 12 so we can enter Room 13 through a doorway to the right. Here, with the SLD & BPS Relics equipped, make your way to the far end of the Room to find the final Rebirth Item for this Questline.

Child of Moonlight #16: We can find this Cherub directly above where we find the Melted Golden Coins. Equip the Verdiales of the Forsaken Hamlet Prayer & wait until the Cherub flies close to the wall on our right side to strike it with the Prayer.

NPC – Altasgracias #1: Return to Room 12 & this time make your way down to the bottom of it into the next level. Enter into Room 15 & we can find a large egg made of hair with three golden plates set in front of it. Place the Melted Golden Coins found here in Grievance Ascends, the Torn Bridal Ribbon sold by Candelaria in Graveyard of the Peaks, & the Black Grieving Veil found in the Desecrated Cistern on the plates.

With all three of the Rebirth Items on the plates, the egg will hatch to reveal the monstrous Altasgracias.

Egg of Deformity: If we release Altasgracias from her egg, she will reward us with this Item. As it is, there is nothing we can do with it until the egg hatches. We must take it to Room 3 in The Mountains of Endless Dusk where we fought Perpetva to hatch the egg.

NPC – Viridiana #3: Back track to Room 12 & head into Room 16 where we can find the second Prie Dieu Shrine & Viridiana standing in front of the doorway to the Boss Room. Assent one final time to receive her help in the fight to come.


Achievement #9 – Danse Macabre: Defeat the Tres Angustias.
Story Related. If you gave Tirso the Bouquet of Rosemary found in Room 5 of Jondo, it is safe to defeat this Boss.


Achievement #10 – Dying Breath: Witness the dying moments of Viridiana.
If you have successfully summoned Viridiana for three Boss battles, wait in the center of the Boss Room for her to appear. Do not leave the Room yet! Speak with Viridiana & she will die… there is no “good ending” for her Questline, only this.

You must summon her for Ten Piedad, Our Lady of the Charred Visage, or Tres Angustias or this Achievement will be void. We can also summon her for Expósito, Scion of Abjuration in The Sleeping Canvases & Melquíades, The Exhumed Archbishop in Mother of Mothers if you 1-2 of her summons. She only lasts three fights before dying of old age.

This Achievement can glitch if you leave the Room too soon for her to appear. If this happens, she will disappear. We can find her later on in front of Melquíades or Expósito’s Boss Rooms to be summoned once more. If this happens, be sure to wait for her to appear in the center of the Room after the Boss is defeated.

Prayer #4 – Zarabanda of the Safe Haven: Acquired after completing Viridiana’s Questline just before she perishes.

If you do not summon her at all throughout the game, she will give us this Prayer right before we fight the final Boss. The Dying Breath Achievement will not unlock however & would need to be collected on our second playthrough.

Desecrated Cistern:
With the final Holy Wound collected after the Boss fight, make your way into Room 16 at the very bottom of the Cistern elevator shaft.


Our Lady of the Six Sorrows #3: When we enter back into the Desecrated Cistern, there will be a lever for the Elevator Shortcut & a doorway directly across from it. Enter through the doorway to get to Room 17 where we can find another bleeding maiden.

Take the elevator up & we will pass by a lot of loot. Until we got the Linen of Golden Thread Relic, we will be unable to collect these for now.

Child of Moonlight #17: Enter Room 18 at the top of the elevator shaft & we can see a Lever Shortcut & a Cherub flying above some water to our right. Pull down the ladder & leap off it, throwing a ranged attack at the Cherub.
Sequence 10: Oh, Sister of Mine...
1. Mountains of the Endless Dusk, Albero, Wasteland of Buried Churches, Bridge of the Three Calvaries, Ferrous Tree, Patio of the Silent Steps, Mother of Mothers, Knot of the Three Words
2. Oil of Pilgrims: 4/6
3. Our Lady of the Six Sorrows: 3/6
4. Knot of Rosary Rope: 3/6
5. Mea Culpa Altar: 3/7
6. Relics: 4/7
7. Empty Bile Vessels: 5/8
8. Mea Culpa Hearts: 3/9
9. Prayers: 5/13
10. Corpses: 10/26
11. Rosary Beads: 21/35
12. Children of Moonlight: 20/38
13. Collectibles: 25/44
14. Achievements: 12/45
-----------------------------------------------------------------------------------------------------

Mountains of the Endless Dusk:


Blessing Item #2 – Hatched Egg of Deformity: Now leave the Cistern & make your way through the Mountains until you reach Room 3 where we fought Perpetva. If you have the Egg of Deformity from Altasgracias, place it in the crooked tree. Leave the Room & re-enter it to find the egg has hatched; grab it to collect the Blessing Item.


Achievement #11 – Warm & Soft: Hatch the Egg of Altasgracias.
We will unlock this Achievement after we hatch the Egg of Deformity. There is still more to Altasgracias’s Questline however…

Albero:

Relic #4 – Three Gnarled Tongues: Head to Albero & enter the fountain near the Prie Dieu Shrine to go see the Blessed Lord of Salty Shores. Offer him the Hatched Egg of Deformity & he will bless it, turning it into the Three Gnarled Tongues Relic (TGT).

With the Three Gnarled Tongues Relic in our possession, we can now access some new Items previously inaccessible. While you are free to go hunt them down, we might as well wait until we collect the Nail Uprooted From Dirt & Linen of Golden Thread Relics near the end of the game first so we can fully clear out all the Items to save us as little backtracking as possible. None of the Items opened up to us by the TGT Relic are game changing.

Wasteland of the Buried Churches:

NPC – Redento #5: If you got Redento out of the Brotherhood of Silent Sorrows, we can now find him in Room 6 in the Wasteland on the way to the Bridge of the Three Calvaries. If you have not already done so, knock down the two Log Shortcuts in the Room & speak with him again so that he can continue his journey onwards.

Rosary Bead #19 – Little Toe Made of Limestone: When you progress Redento’s Questline here in the Wasteland, he will reward us with another one of his toes… thanks man.

Bridge of the Three Calvaries:


Achievement #12 – The Brother: Defeat Esdras of the Anointed Legion.
Story Related. With the three Holy Wounds in our possession, the Bronze Gate will now have opened to us. When you are ready, make your way across the Bridge of the Three Calvaries & we will be intercepted by Esdras. Be prepared for our most difficult Boss fight yet. Be sure to have the Ember of the Holy Cremation & Perpetva’s Protection (if you successfully killed her) Rosary Beads equipped.

Esdras is my favourite Boss as well as having my favourite Boss theme Taranto A La Hermana Mia in the game. “Sister!”

Note that as of the Wounds of Eventide, Esdras is now linked to the DLC. If you meet Esdras here on the bridge it will void your access to the DLC. The DLC is not needed for Achievements of course but is still awesome to experience. We can find an Item in the DLC Area Echoes of Salt accessed through Jondo that will alter our encounter with Esdras. This may be best done on NG+, but I thought I would add the disclaimer all the same.

Prayer #5 – Taranto to My Sister: Story Related. We will receive this Prayer after we defeat Esdras.

Ferrous Tree:
This Area was added with the Stir of Dawn DLC. The Corpse in the first Room does not count towards the Last Words Achievement.

Patio of the Silent Steps:


Corpse #10: In Room 1, we can find this Corpse just below the Prie Dieu Shrine.

Child of Moonlight #18: Carry on down from the Corpse & we can see a Cherub hovering over a spike trap. Leap across the gap & strike it or hit it with a ranged attack.

Collectible #24 – Fibula of Rysp, the Ranger: Enter Room 2 & make your way across the spike traps & up some ladders to the third floor. From here, head left & leap across some breakable flooring to enter back into Room 1. We can find the Collectible in front of us here.

Rosary Bead #20 – Thorned Symbol: Re-enter Room 2 & head across to the far right side of the Room. When you get to the top of some large steps heading down, we can see some twisted roots above us. Equip the TGT Relic & Wall Jump up the roots to the platform above. We can drop off here to reach this Bead on an isolated ledge above the Room exit.

Medicinal Herb #5 – Olive Seeds: In Room 3, head up the central ladder & then make your way to the left side of the Room. We can find this Herb on a ledge below us.

We need to deliver this Herb to Tirso before defeating the Area Boss of the Mother of Mothers.

Collectible #25 – Triquetral of Luca, the Tailor: From the Medicinal Herb, we can spot some twisted roots above us to the left. Equip the TGT Relic & Wall Jump up to the ledge where we can grab this Collectible.

Child of Moonlight #19: Head to the upper far right side of Room 3 now & we can find a Cherub hovering in a wide circle above a spike trap. Wait for it to get close to you & strike it with a ranged attack. You can alternatively get underneath it & use the Taranto to My Sister Prayer.

NPC – Redento #6: Enter Room 4 & we can find Redento immediately in front of us. His path is blocked by a monstrous Amargura. Defeat the beast & return to him so he may continue his quest.

Important! This part of Redento’s Questline is tied to the missable Crossing Souls Achievement we will be unlocking in our second playthrough. Do not worry about it right now but remember this location & mentally flag it to yourself. It will be essential for our second playthrough…

Rosary Bead #21 – Big Toe Made of Limestone: We will receive this Bead as a reward for progressing Redento’s Questline here in the Patio of the Silent Steps.

Mother of Mothers:


Child of Moonlight #20: As soon as we enter Room 1 of Mother of Mothers, we can see this Cherub hovering above us. Equip the Taranto to My Sister Prayer & strike it down.

Knot of the Three Words:
There are no Collectibles in this area.

Mother of Mothers:

Oil of Pilgrims #4: Enter into Room 3 & drop down to the bottom floor. Walk up to the left wall & strike the candle sconce to reveal a secret Room. Head inside to find the Oil font.

Head back into Room 3 & carry on through the doorway to the right on the bottom floor here to enter the Library of Negated Words. There is more to Mother of Mothers, but we should complete these next two side Areas first as upper Mother of Mothers leads to the endgame Areas.
Sequence 11: Love of the High Wills
1. Library of Negated Words, The Sleeping Canvases
2. Oil of Pilgrims: 4/6
3. Our Lady of the Six Sorrows: 4/6
4. Knot of Rosary Rope: 3/6
5. Mea Culpa Altar: 3/7
6. Relics: 4/7
7. Empty Bile Vessels: 7/8
8. Mea Culpa Hearts: 3/9
9. Prayers: 6/13
10. Corpses: 13/26
11. Rosary Beads: 24/35
12. Children of Moonlight: 22/38
13. Collectibles: 28/44
14. Achievements: 13/45
-----------------------------------------------------------------------------------------------------

Library of Negated Words:


Corpse #11: As soon as we enter Room 1, we can find a Corpse at the far end of the floor we are on.

In Room 4, we can find a Prie Dieu Shrine along with the NPC Diosdado. While he does have a Questline that ends with a Rosary Bead, it was added from the Strife & Ruin DLC & does not count towards the Mysteria Lucis Achievement.

Child of Moonlight #21: As soon as we enter Room 5, look above us & we can see a Cherub hovering in the top right corner of the Room. Strike it down with the Taranto to My Sister Prayer.

Collectible #26 – Sacrum of the Dark Warlock: In the same Room, head to the lower far left corner. Before pulling the Lever here, climb the ladder up to the Headless Chamberlain enemy & we can find this Collectible just behind it.

Collectible #27 – Tibia of Alsahi, the Mystic: In Room 6, equip the BPS Relic & leap up some bleeding sand to get up to the next floor. Close to the doorway leading to a Statue of Confessors, equip the TGT Relic & Wall Jump up some roots to reach a ledge above where the collectible is.

This Collectible is required for the Anatomy Tome Puzzle found in Room 13 in the Library of Negated Words.

Empty Bile Vessel #6: Make your way to the bottom of Room 6 past all the Carthos book throwers & get to the very bottom floor. Just after the ladder, & before the two stacks of books, jump up & use a Weight of Sin attack to break the floor to reveal a secret location below. We can find the Bile Flask down here.

Rosary Bead #22 – Amber Eye: Pass through Room 7 but before you get to the end, equip the BPS & TGT Relics. Jump across the bleeding sand ledges & Wall Jump up the twisted roots to reach a doorway up above. In Room 8 we can find a Prie Dieu Shrine.

From the Shrine, carry on left into Room 9 where we will need to equip the SLD Relic to get through the toxic mist. Fight your way left through all the Headless Chamberlains & we can find the Bead in a Golden Chest guarded by a deer thumping Guardainfante.

Our Lady of the Six Sorrows #4: Return to Room 7 & head inside Room 10 next (leap across the way in front of you to strike a lone pile of books to reveal Room 11 with a Bile Fountain inside). As you climb down the second ladder in Room 10, look to your right to see an isolated ledge with a pile of books on the end. Leap over to it & strike the wall to reveal another Guardainfante in front of a doorway. Enter the Room beyond to find the bleeding maiden.

Prayer #6 – Lorquiana: Enter Room 14 & solve the Lever Puzzle to get up into the top right corner of the Room where a Headless Chamberlain & a Golden Chest are. To do so, pull the bottom Lever, then the middle floor Lever to get the two ladder platforms on the far left side of the Room. Climb the ladders to the top of the Room then equip the BPS Relic to leap across some bleeding sand to get back to the middle Lever. Pull it, & the top platform will return to you, allowing us to climb up to the chest to loot the Prayer.

Collectible #28 – Phalanx of Aralcarim, the Archivist: Pull the Levers so you are once more able to get to the top left floor of Room 14 & head into the top of Room 15. We can find this Collectible on a ledge right below us.

We can also complete Diosdado’s Questline up here as well by attacking the “hollow” banging a rock against the wall in the top left corner. The Corpse inside the Room we reveal as well as The Young Masons Wheel Rosary Bead are DLC & not required for their associated Achievements.

Rosary Bead #23 – Drop of Coagulated Ink: Drop down to the next floor of Room 15 & we will face one more hulking Guardainfante. Before climbing down the ladder to carry on, leap off the floor we are on behind where the deer thumper was. We will drop down & land on an isolated ledge where we can loot this Bead.

Child of Moonlight #22: Continue down to the very bottom of Room 15 & we can find a Cherub hovering just above us under the last floor.

The Sleeping Canvases:


Medicinal Herb #6 – Sooty Garlic: From the Prie Dieu Shrine, head into Room 2 & climb halfway down the central ladder. Leap off it to the right to find this Herb on an isolated platform. This is our final Medicinal Herb to collect, it must be taken to Tirso before we defeat the Area Boss here in The Sleeping Canvases.

Corpse #12: In the same Room, drop to the very bottom floor & we can find this Corpse on the ground in the middle of the Room.

Corpse #13: Fight your way through to Room 4 where we can find this Corpse lying on the ground in front of Candelaria’s final shop.

Candelaria Shop #3: We can find Candelaria’s final shop here in The Sleeping Canvases. We need all the Items she sells for the Flea Market Achievement; they are all very expensive & will unfortunately require some grinding.

Rosary Bead #24 – Wicker Knot: Sold by Candelaria for 4000 Tears.

Empty Bile Vessel #7: Sold by Candelaria for 9000 Tears.

Key of the Inquisitor: Sold by Candelaria for 9999 Tears.

As irritating as it is, try grinding for this Key before we reach the Wall of Holy Prohibitions Area found later on. We will need it to open up cells leading to Collectibles & our final Bile Flask there.


Achievement #13 – Flea Market: Buy all 9 Items from the Candelaria Shops.
This Achievement is a grind, Candelaria has three stores that are found in Mercy Dreams, Graveyard of the Peaks, & The Sleeping Canvases. The Achievement will unlock after purchasing the final Item.

These Items can all be purchased at any point in the game; feel free to chip away at them throughout this first playthrough.

Carry on into Room 5 & head straight through the doorway at the far left end to exit into Mercy Dreams on the other side.
Sequence 12: A Wicker Mother's Lullaby
1. Mercy Dreams, Albero, Library of Negated Words, The Sleeping Canvases
2. Oil of Pilgrims: 5/6
3. Our Lady of the Six Sorrows: 4/6
4. Knot of Rosary Rope: 3/6
5. Mea Culpa Altar: 4/7
6. Relics: 5/7
7. Empty Bile Vessels: 7/8
8. Mea Culpa Hearts: 4/9
9. Prayers: 6/13
10. Corpses: 15/26
11. Rosary Beads: 26/35
12. Children of Moonlight: 24/38
13. Collectibles: 30/44
14. Achievements: 14/45
-----------------------------------------------------------------------------------------------------

Mercy Dreams:


Rosary Bead #25 – Big Bead of Blue Wax: When we enter Room 17 of Mercy Dreams, we can find our final Blue Candle in front of us. If you snuffed out the Blue Candles in Covenant of Our Lady of the Charred Visage & Brotherhood of Our Silent Sorrow, we can collect this Bead.

Both Big Blue & Red Beads are needed for the Painting Puzzle in Room 6 of The Sleeping Canvases.

Child of Moonlight #23: This Cherub can be found floating above the Blue Candle, strike it down with Taranto to My Sister Prayer.

Collectible #29 – Kneecap of Sebastien, the Puppeteer: Enter back into Room 12 of Mercy Dreams to open up a Shortcut up to the Teleporter here. We can find this Collectible just before the Shortcut.

This Collectible is required for the Anatomy Tome Puzzle found in Room 13 in the Library of Negated Words.

Albero:

NPC – Tirso #4: With the Teleporter available to us in Mercy Dreams, warp back to Albero & drop off the final two Medicinal Herbs. With these out of the way, the Mediterranean Diet Achievement is no longer missable & will unlock after we defeat the Area Boss up in the Wall of Holy Prohibitions.

Turning these Herbs in along with our gathered Collectibles into the Ossuary will net us a lot of Tears we can use to purchase Items from Candelaria.

Library of Negated Words:


Oil of Pilgrims #5: Return to Room 5 in The Sleeping Canvases & climb up the ladder at the far left end of the Room to reach Room 6. Head through to the far right end of the Room to enter a secret Room back in the Library of Negated Words. The Oil will be in its center.

The Sleeping Canvases:


Corpse #14: Make your way down into Room 8 & get up to the top floor. Up here, leap over the gap & enter Room 9 where we can find a Prie Dieu Shrine with a Corpse to its left.

NPC – Moonchild Jocinero #1: Carry on into Room 10 & we will find a large painting of seven Cherubs & a black bull. Interact with the painting & it will task us with finding all 38 Children of Moonlight.

Relic #5 – Linen of Golden Thread: If you have found 20/38 Children of Moonlight, we will be transported inside the painting to speak with the Moonchild Jocinero himself. We will receive this Relic as a reward.

The Linen of Golden Thread (LGT) is a very important Relic for finding more hidden Items in the game. If Gémino died during your playthrough, we can now access The Desire of the Corrupted Achievement & collect the Saeta Dolorosa Prayer as well as the Coccyx of Daniel, the Possessed Collectable by dropping through the bottom of Room 2 of Where Oliver Trees Wither if we have the LGT Relic equipped. Consult Sequence 7 for the details of these Items but note you will be working backwards through them from the opposite end of the Area.

We can enter secret Room 15 by crouching against the left wall in Room 10 & striking it. Strafe under the wall & we will find a portrait Room full of Easter Eggs to other games…


Achievement #14 – Blind Innocence: Defeat Expósito, Scion of Abjuration.
Story Related. If you have delivered the Dried Clove found in the Mountains of the Endless Dusk & the Sooty Garlic from The Sleeping Canvases to Tirso, it is safe for us to defeat this Boss.

If you did not already summon Viridiana three times, we can find her outside Expósito’s Boss Room. We will receive the Zarabanda of the Safe Haven Prayer from her if it is our third time summoning her.

Library of Negated Words:


Child of Moonlight #24: When we leave the Boss Room in The Sleeping Canvases, we will enter back into the Library of Negated Words at the bottom of an elevator shaft in Room 17. Pull the Lever & bring down the Elevator. Before we take it up, equip the BPS Relic & leap up the bleeding sand ledges. Above the Elevator, equip the TGT Relic as well, & jump on some twisted roots. Carry on up some more bleeding ledges & twisted roots all the way to the top where we can see a Cherub flying across from us. Strike it down with a ranged attack.

Mea Culpa Altar #4: Take the Elevator up to the top of Room 17 & a path left & right will open up for us. Head through the doorway to the left first & we can find our next Mea Culpa Altar in Room 18.

We can now purchase the Sacred Onslaught Ability for 9000 Tears & the Azure Cyclone Ability for 11,000 Tears.

Embossed Mask of Crescente: Make your way into Room 19 now & an archdeacon on a throne will disintegrate before us, dropping this Mask. We need to find two more of these Masks to reach the final Boss of the game.

Rosary Bead #26 – Big Bead of Red Wax: Exit the Room & we will enter back into Room 3, where we can find this Red Candle. If you found the Red Candles in Mercy Dreams & Covenant of Our Lady of the Charred Visage, we can snuff this candle out to collect the final Wax Bead.

Before we leave, return back into Room 17 & take the Elevator to the bottom.

The Sleeping Canvases:


Collectible #30 – Nasal Bone of Charles, the Artist: In Room 17 of Library of Negated Words, equip the LGT Relic & leap off the Elevator down into the mist below. With the Relic equipped, instead of dying, we will fall into the secret Room 12 in The Sleeping Canvases. When we land in the Room, we will crush an urn revealing this Collectible.

Corpse #15: In the same Room, leap across the spike traps to the left & we can find this Corpse lying on the second platform.

Mea Culpa Heart #4 – Molten Heart of Boiling Blood: With the Big Bead of Red & Blue Wax equipped, make your way to Room 13 now. When you enter the Room with the two Beads equipped, you will see paintings of the Red & Blue Candles, lit. (They will not be lit if you do not have the Big Beads equipped).

If the painting candles are lit, hold down the ranged attack button & Sacrifice Blood. Once it is spilled, a secret Room will open up to us where we can find the saint holding the Mea Culpa Heart.
Sequence 13: The Genuflector's Path
1. Mother of Mothers
2. Oil of Pilgrims: 5/6
3.Our Lady of the Six Sorrows: 4/6
4. Knot of Rosary Rope: 4/6
5. Mea Culpa Altar: 4/7
6. Relics: 6/7
7. Empty Bile Vessels: 7/8
8. Mea Culpa Hearts: 5/9
9. Prayers: 6/13
10. Corpses: 18/26
11. Rosary Beads: 27/35
12. Children of Moonlight: 25/38
13. Collectibles: 33/44
14. Achievements: 15/45
-----------------------------------------------------------------------------------------------------

Mother of Mothers:


Rosary Bead #27 – Consecrated Amethyst: Return to Mother of Mothers & we will begin exploring this Area if you have not already. Enter into Room 6 & begin making your way up the ladder & stairs to the very top of the Room. Leap across the ledges past the Custodian of the Stained Glass’ to the top left corner where we can find this Bead on a lone ledge.

Collectible #31 – Trapezoid of Yeager, the Jeweller: From the Bead, drop down & make your way down the stairs on the far left side. Down the first stairwell flowing right, drop down to the next landing & we can see a space beneath the wall we can strafe under into the center of the Room. With the BPS Relic equipped, strafe under the wall to land on a bleeding ledge. Leap across the ledges, dodging the swinging incense censers, & make your way up to the ledge with the Collectible on it in the very center of this Room.

Corpse #16: Before we climb the ladder at the top of this Room up, head back to the upper left side of the Room & follow the stairs down to enter Room 7 that will lead us back into the upper floor of Room 3.

In upper Room 3, drop down to the floor below us & pull the Lever to release a Ladder Shortcut. From the Lever, leap across the gap to the left where we can find this Corpse on a ledge above the doorway to the Knot of the Three Words.

Relic #6 – Nail Uprooted From Dirt: Return to Room 6 & get back up to the very top floor where we can find a ladder up to Room 9. Take a right down the hall past the sprinting Esquilóns & Spear of the Cathedra to enter Room 10 where we can find Redento prostrating in front of a statue. To finish his Questline, equip the three Limestone Toe Rosary Beads he gave us during his quest & the statue will move, revealing a cave. Enter the cave & we can find this Relic in a glass display case.

The Nail Uprooted From Dirt (NUFD) is the final necessary Relic we need to collect; after we meet one final NPC in Mother of Mothers we can quickly backtrack to mop up the few things we missed in the previous Areas.


Achievement #15 – Ultreia Et Suseia: Help the pilgrim reach his destination.
Leave the cave & back into Room 10 & we will hear Redento say a final prayer. Head back inside the cave to find him on the floor, disemboweled. The Achievement will unlock upon re-entering the cave.

Knot of Rosary Rope #4: We can collect this Knot from Redento’s corpse in the cave when we finish his Questline.

Corpse #17: Head down the left side of the hall now & we will enter Room 11. The Corpse will be immediately in front of us.

Mea Culpa Heart #5 – Smoking Heart of Incense: This is where things get really irritating. Head to the center of Room 11 & equip the BPS Relic. Leap up the bleeding sand ledges up to the right & make your way over to Room 12. The infuriating part is dodging the colossal censor swinging across the Room; take it slow & time your jumps. When you get to the fifth bleeding ledge, wait for the censor to pass by as you leap to get over it, then leap across the remainder of the ledges to get to the upper Room.

Unfortunately, our pain does not end here. In Room 12 we now have to make our way up this vertical Room dodging a different censor. Again, timing is everything. Wait until you know exactly how the censor swings before making your move, so you know where is safe to wait & where is not. Be careful when waiting on a Wall Jump, if you take too long, your bleeding sand ledges will disappear if left untouched for a few seconds.

The Mea Culpa Heart will be in the hands of a saint at the very top of the Room.

Collectible #32 – Trapezium of Jeremiah, the Hangman: Backtrack to Room 11 & carry on into Room 13. As soon as we enter the Room, we will see multiple swinging censors & a path to drop down right in front of us. Do so, or Wall Jump down, & we can find this Collectible on an isolated ledge below.

NPC – Cleofás #1: From the Collectible, drop down to the lower floor & quickly pull the Lever on the lower left side to release the Ladder Shortcut down into Room 3. Now leap back across to the lower right side of the Room, just below where the Collectible was, & enter Room 14. At the end of the Room, we can find two NPCs Cleofás & Socorro, The Lady of the Perpetual Agony.

Cleofás has two Achievements but we can only acquire one per playthrough. For this playthrough, we will obtain the Rebirth Achievement. We will need to collect the three Marks of Refuge & offer them to Socorro. We also need to speak with Lvdovico back in Albero so we can save Cleofás after Socorro is reborn. It is important we do the Rebirth Ending first as we will receive a Prayer as a reward. If you choose the Crossing of Souls Ending instead, we will have to re-collect all Prayers again on our second playthrough to unlock the Unwavering Devotion Achievement.

Ending his Questline any other way will result in Cleofás committing suicide. If you decide to interact with Socorro, do not “End Her Suffering” as this will result in Cleofás locking himself away in the Wall of Holy Prohibition Area where he will kill himself voiding both Achievements. For now, we will leave them be…

Child of Moonlight #25: Return to the top of Room 13 & head over to the left side to enter Room 15. Inside, head down the first set of stairs to the landing & we can see a Cherub hovering at its edge. Wait for it to fly up & strike it with a ranged attack.

Collectible #33 – Femur of Karpow, the Bounty Hunter: Drop down to the bottom floor of Room 15 now & make your way to the far left end past the Esquilóns & the Spears of the Cathedra; the Collectible will be against the far wall.

This is the final Collectible required for the Anatomy Tome Puzzle found in Room 13 in the Library of Negated Words.

Corpse #18: Make your way back up to the middle floor of Room 15 & leap across to the left side. Before heading through the doorway into Room 16, carry on up the stairs to the very top floor. Leap across the gaps back over to the top right side of the Room & we can find this Corpse on an isolated ledge above where we first entered.
Sequence 14: The Levitating Bishop
1. Mother of Mothers, Brotherhood of Silent Sorrow, The Holy Line, Albero, Wasteland of the Buried Churches, Where Olive Trees Wither, Graveyard of the Peaks, Covenant of Our Lady of the Charred Visage
2. Oil of Pilgrims: 5/6
3. Our Lady of the Six Sorrows: 4/6
4. Knot of Rosary Rope: 5/6
5. Mea Culpa Altar: 5/7
6. Relics: 6/7
7. Empty Bile Vessels: 7/8
8. Mea Culpa Hearts: 7/9
9. Prayers: 7/13
10. Corpses: 19/26
11. Rosary Beads: 27/35
12. Children of Moonlight: 29/38
13. Collectibles: 34/44
14. Achievements: 17/45
-----------------------------------------------------------------------------------------------------

Mother of Mothers:


Mea Culpa Altar #5: Enter Room 16 & we will find a Prie Dieu Shrine right in front of us. Wall Jump your way to the very top of the Room & enter Room 17 where we can find our next Mea Culpa Altar.

We can now purchase Sacred Blood for 7000 Tears.


Achievement #16 – The Bejeweled Saint: Defeat Melquíades, The Exhumed Archbishop.
Story Related. If you delivered the Olive Seeds found in the Patio of the Silent Steps to Tirso, it is now safe to fight this Area Boss. If she is still alive, we can also find Viridiana outside the Boss Room. This is the last possible Boss fight to summon her for.

Deformed Mask of Orestes: After the Boss Room, enter the next Room & we can find another disintegrating archdeacon holding this Mask. One more Mask left…

Collectible #34 – Coxal of June, the Prostitute: Carry on into Room 20 & pull the Lever to lower the Ladder Shortcut. Head down to the bottom floor past the Esquilón, & we can find this Collectible stashed in some large chalices.

Make your way up into the Archcathedral Rooftops & find the Prie Dieu Shrine. This is one of the final Areas of the game, before we carry on, let’s go back & mop up the last few Items we could not get in the previous Areas.

If you follow Room 20 down to the bottom, we can climb a ladder down into Room 1 of Mother of Mothers. From here, jump past the censor tour right & strafe underneath the wall above the ledge we land on. Leap across a platform past another two censors & we can find a Ladder Shortcut so that we can quickly back up to the Archcathedral Rooftops quickly.

Brotherhood of Silent Sorrow:


Corpse #19: In Room 1, make your way to the very far left end & equip the TGT Relic. Wall Jump up the twisted roots to the ledge above where we can find the Corpse.

Child of Moonlight #26: From the Corpse, we can faintly see a Cherub flying directly above us. Either use the Taranto to My Sister Prayer or equip the BPS Relic & leap up the bleeding sand to strike it.

The Holy Line:

Knot of Rosary Rope #5: Enter Room 4 & make your way down into the underground level. Equip the BPS Relic & NUFD Relic & head right through the muddy waters. Leap up the bleeding sand & strafe under the wall to loot this Knot from a Steel Chest.

Albero:

Cord of the True Burying: If you spoke to Cleofás in Room 14 in Mother of Mothers, go to the Albero church & speak with Lvdovico in the window. He will mention Cleofás & give us some of his backstory along with the Cord of the True Burying. This Item is essential for the Rebirth Achievement we will be working towards.

Wasteland of the Buried Churches:


Child of Moonlight #27: Make your way over the irritating spike traps back into Room 5. Walk past the saint & we can see a Cherub flying off in the distance. If you have not already freed it, strike it down with a ranged attack.

Where Olive Trees Wither:

Child of Moonlight #28: Enter Room 2 & make your way up to the very top floor. Head right, over the gaps, & equip the TGT Relic to walk across the twisted root bridge. At the end of the twisted roots, we can see a Cherub flying directly above us. You know what to do…

Mea Culpa Heart #6 – Heart of Cerulean Incense: Carry on across the twisted roots & leap over to another set of roots we can Wall Jump up. Enter Room 9 & slay the hovering Cimbalillo in our way. With the TGT Relic still equipped, wait for the twisted root bridge to reach us then leap over to it. We can find the saint holding this Mea Culpa Heart at its end.

Graveyard of the Peaks:


Child of Moonlight #29: Head up to the very top of vertical Room 5 & we can find a Cherub flying above us; strike it down with the Taranto to My Sister Prayer.

Burial Item #3 – Tentudia’s Skeletal Remains: Enter into Room 6 now & start making your way to the very top. When you get to the doorway to Room 9 off our left, equip the BPS Relic & leap across the bleeding sand off our right. On the second ledge, equip the TGT Relic & Wall Jump up the twisted roots that spiral down. Leap off backwards over to a ledge from the roots & climb up to a small alcove where we can find the final Burial Item.

Covenant of Our Lady of the Charred Visage:


Mea Culpa Heart #7 – Heart of Saltpeter Blood: Head to the Covenant & go to the bottom of Room 2. Enter Room 16 & equip the SLD Relic to pass through the toxic mist; we can find the saint holding the Sword Heart at the end of the hall.

Albero:


Achievement #17 – True Shrine: Bring all 3 offerings to Lvdovico.
Hand over Tentudia’s Skeletal Remains to Lvdovico, & if you gave him the Carnal Remains in Wasteland of the Buried Churches & the Hair Remains in Where Olive Trees Wither, we will unlock the Achievement.

Prayer #7 – Debla of the Lights: Reward for returning all three of Tentudia’s remains to Lvdovico & completing his Questline.
Sequence 15: The Stains of Sin
1. Jondo, Grievance Ascends, Desecrated Cistern, Albero
2. Oil of Pilgrims: 5/6
3. Our Lady of the Six Sorrows: 4/6
4. Knot of Rosary Rope: 5/6
5. Mea Culpa Altar: 5/7
6. Relics: 7/7
7. Empty Bile Vessels: 7/8
8. Mea Culpa Hearts: 7/9
9. Prayers: 9/13
10. Corpses: 21/26
11. Rosary Beads: 30/35
12. Children of Moonlight: 33/38
13. Collectibles: 36/44
14. Achievements: 19/45
-----------------------------------------------------------------------------------------------------

Jondo:


Rosary Bead #28 – Pelican Effigy: Return to Jondo & get to Room 14, easiest done from the Brotherhood of the Silent Sorrow side. (Do these two Items in reverse if you came from the Desecrated Cistern side). Make your way to the bottom floor of the Room & equip the TGT Relic. Take out the harassing Carthos “split-men”, & leap onto the root bridge to collect this Bead.

Prayer #8 – Soleá of Excommunication: Now head over to Room 1 of Jondo & head towards the doorway to Room 2. Just beside the elevator leading up, we can see a Golden Chest on a ledge above us. Equip the TGT Relic & Wall Jump up the twisted roots to get to it.

Grievance Ascends:


Child of Moonlight #30: Go down to Room 14 & head to the bottom floor. Just above the doorway leading to Room 15, we can see a Cherub flying above us. Equip the TGT Relic & Wall Jump up to it. Alternatively, you can just strike it down with the Taranto to My Sister Prayer.

Rosary Bead #29 – Knot of Hair: Enter Room 15 now & walk over to where Altasgracias used to be. We will find her eggshell empty, with this Bead resting in it.

Desecrated Cistern:


Blessing Item #3 – Severed Hand: Make your way to Room 8 in the Cistern. Head down to the right of the doorway where we enter Room 9 & strafe underneath the wall below where the Corpse rests on a ledge. In this secret location, put on the NUFD Relic & leap up to collect the Item.

Child of Moonlight #31: Now head up to Room 18 & make your way into the water to the end of the hall. We can find the Cherub flying over the final water pool, use the Taranto to My Sister Prayer or the NUFD Relic to strike it down.

Prayer #9 – Zambra to the Resplendent Crown: From where we just took out the Cherub, equip the NUFD Relic & leap up to the ledge ahead of us with the Golden Chest on it; the Prayer will be inside.

Child of Moonlight #32: Now head to Room 19 & equip the SLD Relic to get through the toxic mist & get to end of the hall. Halfway through the hall, we will need to equip the NUFD Relic to progress. Near the middle of the Room we come across a Lever Shortcut, when we pull it, it will also unlock the other half of this Room to us as well. Carry on left down the next hall of Room 19 & we can find a Cherub hovering at the dead end.

Collectible #35 – Hyoid Bone of Senex, the Beggar: Take the ladder down now into Room 20 & make your way to the bottom floor. Head through the doorway off our right to enter Room 21 & equip the NUFD Relic to leap up to the Collectible on the elevated ledge.

As a neat little Easter Egg, if you Dash against the wall dead ahead of us from the Collectible we will enter a secret room with an Arcade Machine. Though not required for any Achievements, if you beat the Arcade game, you can earn the unique Retro Skin.

Corpse #20: Now head over down through the left doorway into Room 22 & we can find a Corpse immediately in front of us with another ahead.

Corpse #21: Found across from the other Corpse in Room 22.

Rosary Bead #30 – Silver Grape: There is a puzzle we need to now solve in Room 22, “Everyone passes, half do not return”. To solve this, walk through the doorway left into Room 16 & back. As we do this, Roman numerals will begin appearing on the canvas in front of us, the left canvas need to have “IV” on it, so walk through the doorway & back 4 times.

Now head over to the right side of Room 22 & walk through the doorway into Room 20 & back only twice until the right canvas has “II” on it or 2. When the left canvas has IV & the right canvas says II on it (or any number combo afterwards such as 6/3, 8/4, 10/5, etc.) a secret doorway will open upon in the center of the Room. Head inside & we can find one of the best Rosary Beads in the game on the ground.

Note that for the Mysteria Lucis Achievement it says we need only the original 30 Rosary Beads. For simplicity sake, I have counted certain Beads multiple times in the guide such as the Small & Medium Wax Beads. Only the Big Beads actually contribute to the Achievement. We will unlock the Achievement when we find 35/35 Beads listed in my guide (we are currently at 25/30 in actuality).

Child of Moonlight #33: Exit back into the large Room 16 & open up the Shortcut. From this side, look up & we can faintly see a Cherub hovering a ways above where we opened the gate. Use the Taranto to My Sister Prayer to strike it down. If you can’t seem to manage, equip the LGT Relic & ride the elevator to the top of the Room, leap off & angle to the right to land on the platform above us where the Cherub is.

Chalice of Inverted Verses: From the Cherub in Room 16 leap across to the doorway on the far side. Enter Room 23 & we can see a clay statue holding the Chalice in its hands. Unfortunately, we need to unlock one more Area before we encounter the conveniently placed Lionheart enemy. Remember this Room… but be sure to grab the Chalice.

Collectible #36 – Navicular of Kahnnyhoo, the Murder: Exit back into Room 16 & leap over to the other side. Equip the LGT Relic & drop down directly below this ledge to land on a different one a ways down the Room on the right side. We can find the Collectible on this ledge.

Albero:

Relic #7 – Incorrupt Hand of the Fraternal Master: With the Severed Hand we found in the Desecrated Cistern, enter the fountain in Albero & speak with the Lord of the Salty Shores. We will receive this Relic after he blesses the hand.

This Relic is kind of useless when your following a guide…


Achievement #18 – Skin & Bone: Get the 7 original Relics.
If you have been following along with the guide, after receiving the Incorrupt Hand, we will have found all 7 Relics in the game.


Achievement #19 – In the Name of the High Wills: Bring all 3 offerings to the Lord of the Salty Shores.
There are three Blessing Items we need to bring to the Lord of the Salty Shores: The Severed Hand in the Desecrated Cistern, Linen Cloth in Albero, & Hatched Egg of Deformity in Grievance Ascends. The Achievement will unlock when the last Item is blessed.
Sequence 16: Perpetual Agony
1. Library of Negated Words, Archcathedral Rooftops
2. Oil of Pilgrims: 5/6
3. Our Lady of the Six Sorrows: 5/6
4. Knot of Rosary Rope: 5/6
5. Mea Culpa Altar: 6/7
6. Empty Bile Vessels: 7/8
7. Mea Culpa Hearts: 8/9
8. Prayers: 11/13
9. Corpses: 21/26
10. Rosary Beads: 30/35
11. Children of Moonlight: 34/38
12. Collectibles: 38/44
13. Achievements: 19/45
-----------------------------------------------------------------------------------------------------

Library of Negated Words:


Prayer #10 – Romance to the Crimson Mist: If you found the Tibia of Alsahli, the Mystic in Library of Negated Words, Kneecap of Sebastien, the Puppeteer in Mercy Dreams, & Femur of Karpow, the Bounty Hunter in Mother of Mothers, head to Room 13 here in the Library. In the Room, unequip all Relics, Rosary Beads, your Prayer & your Mea Culpa Heart as well as also having your Fervor Bar at full (Health can be any level). Stand still for a few seconds & a secret doorway will open up allowing us to collect this Prayer from a Golden Chest.

Aside from the Chalice Puzzle, we have found all Collectibles up until the final two Areas of the game. When ready, return to the Archcathedral Rooftops.

Archcathedral Rooftops:


Collectible #37 – Ribs of Sabnock, the Guardian: From the Prie Dieu Shrine, make your way through the Area until you reach Room 4. In the middle of the Room, we can find a ladder leading up into Room 5. Painstakingly Wall Jump up past the spike traps & flying Winged Faces. We can find this Collectible across a deactivated Elevator halfway up this Room.

Mark of the First Refuge: When we enter Room 6, we will see a large Elevator with three stone faces on it; this is what we need those 3 Masks for. Each Mask will take us up to a new floor with new Rooms. Before heading up to the second floor, carry on right, through Room 6, into Room 7. When we enter, we will be ambushed by a Soldier of the Anointed Legion. Defeat them & we will receive this Mark.

We need to collect all three Marks of Refuge to save Socorro’s life in Cleofás’ Questline.

Mea Culpa Heart #8 – Heart of Oils: Enter Room 8 now & make your way down to the bottom floor. Head left into Room 9 & we can find another Prie Dieu Shrine. We can also find a Ladder Shortcut that will make it easier to get back to Cleofás later on. Carry on into Room 10 now & we can find this Mea Culpa Heart just past two caged Seraphs.

Our Lady of the Six Sorrows #5: Enter back into Room 8 & begin making your way up to the very top floor. After the first Wall Jump section, we will have a left & right path; left under a wall to Wall Jump up or right using the BPS Relic. First, equip the SLD Relic & strafe under the wall left, Wall Jumping up to the very top. At the top, we can see a Shortcut across the way. Strike it, & it will open up an iron gate above us. This will save us some back tracking later on…

With that out of the way, drop down the middle floor of Room 8 & equip the BPS, SLD, & TGT Relics. Leap up the bleeding sand ledges, Wall Jump up, & latch onto the twisted roots, Wall Jumping up to Room 12 where the bleeding lady is inside.

Mark of the Second Refuge: Return to Room 6 & place the Deformed Mask of Orestes on the first statue. With it in place, pull the Elevator Lever to reach floor two. On floor two, head right into Room 13 & we will be ambushed by another Soldier of the Anointed Legion as well as a Seraph. Slay them both to receive our second Mark for Socorro.

Collectible #38 – Lunate of Keiya, the Butcher: Carry on into the very top of Room 8 & if you struck the Shortcut below us in the lower floor of this Room, we can progress onwards into Room 14. Pass through the ambush Room & into Room 15. Take the Elevator up & equip the BPS Relic to leap up some bleeding ledges to our right. At the top of the last ledge equip the TGT Relic & Wall Jump up some twisted roots to reach the Collectible.

Unfortunately, our pain doesn’t end here, similar to Room 8, we need to get to the top of this Room to open up a Shortcut higher up in the Room. Drop down to the middle of Room 15 & begin making your way up the left side to the top. Strike the Shortcut to open up the iron gate on the top floor of this Room.

Child of Moonlight #34: Backtrack to the second floor of Room 6 & make your way left down through Room 16 to re-enter Room 5. Strike the Shortcut to activate the Elevator & leap across to the left side of the Room; the Cherub will be hovering above us here.

Prayer #11 – Cante Jondo of the Three Sisters: Before we carry on, backtrack once again to Room 6 & this time, place the Embossed Mask of Crescente on the next statue. Pull the elevator lever & we will be taken to the third floor. Off our left we can make our way to Rooms 17 & 18 to find a Prie Dieu Shrine & a Teleporter respectively.

After finding those, return to floor three of Room 6 & head right into Room 19. Make your way to the far right side of the Room & reach the other side. Instead of walking through the doorway, equip the LGT Relic & drop down into Room 20. When we land, equip the BPS Relic & leap across the bleeding sand ledges left to below where we entered Room 19. Use the TGT Relic to get across Room 6 into Room 21. Fight off the Soldier of the Anointed Legion & carry on into one of the top floors of Room 5. The Prayer will be inside a Golden Chest in front of us here.

Mark of the Third Refuge: Backtrack once again to floor three of Room 6 & head right into Room 19 over to Room 22. Here we will be ambushed by two Seraphs & our final Soldier of the Anointed Legion. Defeat them, for the last Mark of Refuge.

Mea Culpa Altar #6: Carry on right it into the top of Room 15. If you opened up the iron gate using the Shortcut below, carry on into Room 23 where we can find our next Mea Culpa Altar.

We will unlock Consecration for 13,000 Tears & Wrath of the Twisted One for 15,000 Tears.
Sequence 17: A Priest's Redemption
1. Mother of Mothers, Archcathedral Rooftops, Albero, Wall of Holy Prohibitions
2. Oil of Pilgrims: 5/6
3. Our Lady of the Six Sorrows: 4/6
4.K not of Rosary Rope: 5/6
5. Mea Culpa Altars: 6/7
6. Empty Bile Vessels: 8/8
7. Mea Culpa Hearts: 8/9
8. Prayers: 12/13
9. Corpses: 24/26
10. Rosary Beads: 31/35
11. Children of Moonlight: 36/38
12. Collectibles: 42/44
13. Achievements: 21/45
-----------------------------------------------------------------------------------------------------

Mother of Mothers:


NPC – Cleofás #2: Return to Room 14 in Mother of Mothers & bring the three Marks of Refuge to Socorro. Warning only do this if you have collected the Cord of the True Burial from Lvdovico in Albero! Offer all three Marks of Refuge to Socorro & she will be teleported away… perhaps into another life.

Speak with Cleofás & he will be confused on what to do now.

Archcathedral Rooftops:

NPC – Cleofás #3: Leave Room 14 in Mother of Mothers & hurry up to Room 2 in the Archcathedral Rooftops where we will find Cleofás standing at the edge looking down. If you have the Cord of the True Burial, speak to Cleofás & offer it to him to remind him of whence he came. If you do not have it, Cleofás will leap from the rooftops voiding the Rebirth Achievement!

Note that for the alternative end to his Questline/the Crossing of Souls Achievement, we need to get Cleofás to leap off the rooftops here to his death (by not having the Cord of the True Burial in our Inventory) while Redento is still in the Patio of the Silent Steps… right where Cleofás’ body will land. We will do this in our second playthrough…

Albero:


Achievement #20 – Rebirth: Help Cleofás on his path of redemption.
Missable. After giving Cleofás the Cord of the True Burial, return to Albero & speak with Lvdovico… but there will be no answer. Enter the Albero church & we can find none other than Cleofás standing in front of the Donations Box. Speak with him & he will thank us for saving him, unlocking the Achievement.

Prayer #12 – Tiento to Your Thorned Hairs: We will receive this from Cleofás as a reward if we completed the Rebirth Ending of his Questline.

If you completed the Crossing Souls Achievement or had Cleofás commit suicide, this will void the Unwavering Devotion Achievement for this playthrough.

Archcathedral Rooftops:


Return to the Rooftops & make your way to Room 5 & carry on through Room 24 until you reach the Wall of Holy Prohibitions. Before getting here however, be sure you have purchased the Key of the Inquisitor from Candelaria’s Shop in The Sleeping Canvases. This will allow us to snag a bunch of hidden Items here.

Wall of Holy Prohibitions:


Corpse #22: We can find this Corpse immediately in front of us when we enter Room 1.

Corpse #23: Enter Room 3 & head right, down the hall. Take the Elevator down to the bottom floor & we can find this Corpse at the dead end to our right.

Rosary Bead #31 – Quirce’s Scorched Bead: That last Corpse we found gives a hint to unlock the iron gate above us. Walk over to the Elevator Lever beside us & pull it up & down 5 times. On the fifth pull, climb onto the Elevator & the iron gate will open up on the middle floor above us, letting us collect this Bead.

Key of the Secular: Leap across the elevator shaft to the left side of Room 3 now & head inside the first Unlocked Door in front of us. Inside, there will be an Item ahead of us. When you approach, we will fall through the floor down into a lower level where we will be ambushed by two Lunatics; this Key will be behind us down here.

Collectible #39 – Ulna of Koke, the Troubadour: Make your way back up to the second floor of Room 3 & re-enter the side Room we were in previously. Leap across the gap we fell through & Wall Jump up to grab this Collectible.

Empty Bile Vessel #8: If you have the Key of the Inquisitor, return to the left side of floor two in Room 3 & use it to unlock the Golden Locked Door. Head through the side Room & we will exit into a new location in Room 3. We can find this Bile Vessel inside a Steel Chest here.

Note that we need to fill all our Empty Vessels at a Bile Fountain before The Fountain of Life Achievement will unlock.

Child of Moonlight #35: With the Key of the Secular, take the Elevator to the top of Room 3 & head left down the hall to unlock a Bronze Locked Door. Go inside, & we can find the Cherub to our left near a Flagellant.


Achievement #21 – Bestiary: Defeat the 52 original types of enemies.
Enter into Room 4 from the lower floor of Room 3 & make your way down to the bottom floor. This is where we will find our desired Lionheart for the Chalice of Inverted Verses, remember where he is.

After defeating the Lionheart, we will have successfully killed/have access to every single type of common enemy in the game.

Corpse #24: Before we carry on through doorways, make your way up the left side of Room 4. At a doorway on the middle floor, equip the BPS Relic & leap up the bleeding sand ledges up to where the Corpse is & a Shortcut.

Collectible #40 – Phalanx of William, the Sceptic: Return to the bottom floor of Room 4 & head right, into Room 5. Take the Elevator up & jump off onto the middle floor where the Flagellant is patrolling. From here, leap across the elevator shaft to the left over to an alcove & strike the wall to reveal a secret part of the Room. We can find the Collectible behind the Lionheart guarding it.

Key of the Scribe: Take the Elevator on the left side of the Room up to the top floor & use the Key of the Secular to unlock the Bronze Locked Door. Pass through the side Room to re-enter Room 5 where we can collect this Key.

This is the last Key we need to open every door in this Area.

Child of Moonlight #36: Take the Elevator down to the bottom floor of Room 5 & use the Key of the Scribe to open the Silver Locked Door off our left. Inside the side Room, equip the SLD Relic & strafe under the wall to get the Cherub on the other side.

Collectible #41 – Hamate of Vukelich, the Copyist: Lastly, take the Elevator up on the right side of Room 5 to the top & use the Key of the Scribe to enter the Silver Locked Door at the top; the Collectible will be just inside.

Collectible #42 – Temporal of Joel, the Thief: Backtrack to Room 3 now & get to the top floor. Use the Key of the Scribe to unlock the Silver Locked Door here. Inside the side Room, we can find this Collectible behind the Lionheart guarding it.
Sequence 18: Saviour of Albero
1. Wall of Holy Prohibitions, Covenant of Our Lady of the Charred Visage, Albero, Desecrated Cistern, Brotherhood of Silent Sorrow
2. Oil of Pilgrims: 6/6
3. Our Lady of the Six Sorrows: 6/6
4. Knot of Rosary Rope: 6/6
5. Mea Culpa Altars: 6/7
6. Empty Bile Vessels: 8/8
7. Mea Culpa Hearts: 8/9
8. Prayers: 13/13
9. Corpses: 25/26
10. Rosary Beads: 32/35
11. Children of Moonlight: 38/38
12. Collectibles: 44/44
13. Achievements: 29/45
-----------------------------------------------------------------------------------------------------

Wall of Holy Prohibitions:


Collectible #43 – Jaw of Ashgan, the Inquisitor: Head to the bottom floor of Room 4 & enter Room 6. On the bottom floor here, head to the left side of the Room & use the Key of the Inquisitor to unlock the Golden Locked Door. In the side Room, equip the BPS, TGT, & SLD Relics to get up to the Collectible.

Oil of Pilgrims #6: Take the left Elevator up now in Room 6 & use the Key of the Scribe to unlock the Silver Locked Door. Make your way through the side Room & we will re-enter Room 6 at the top floor. From where we enter, strike the wall to your left to reveal Room 7 where we can find the last Oil of Pilgrims.


Achievement #22 – Baptism of Faith: Achieve maximum Fervor.
If you have been following along with the guide, the Achievement will unlock after locating the Oil of Pilgrims font 6/6.

Corpse #25: This Corpse will be in Room 7 as well, just past the oil font.

Rosary Bead #32 – Sphere of the Sacred Smoke: Return to Room 6 & strafe under the wall behind the Lionheart down to the right side Elevator. Leap across to pull the Lever, then leap back to the Elevator to get to the top right corner of Room 6 where we can find the Bead just past an Unlocked Door.

Collectible #44 – Phalanx of Zeth, the Prisoner: Enter Room 8 now from the middle of Room 4 & head to the end of the lower floor. Defeat the Lionheart that comes down the Elevator & take it up. Before it reaches the top, leap off the Elevator on the middle floor & kill the two Lunatics here. Use the Key of the Inquisitor to unlock the Golden Locked Door & enter the side Room; dodge the spear traps to grab the final Collectible.


Achievement #23 – Warden of the Ossuary: Get the 44 original Collectibles.
If you have been following along with the guide, the Achievement will unlock after locating Collectible 44/44.

Child of Moonlight #37: Take the Elevator to the top floor of Room 8 & head left, using the Key of the Scribe to unlock the Silver Locked Door. We can find this Cherub hovering at the far end of the side Room.


Achievement #24 – Ashes to Ashes: Defeat Quirce, Returned by the Flames.
Story Related. Enter into through the side Rooms of Room 8 to the left & we will fall through the floor into Quirce’s Boss Room. Defeat Quirce to unlock the Achievement.

Key of the High Peaks: After defeating Quirce, make your way back up to Room 8 where we fell down into his Boss Room. Leap up across the ledge over to the right side to collect this Key.

Child of Moonlight #38: With the Key of the High Peaks, make your way up to the surface & head to Room 13. We can find the final Cherub hovering just above the gondola.


Achievement #25 – The Bull & The Moon: Release all 38 Cherubs.
If you have been following along with the guide, the Achievement will unlock after freeing Cherub 38/38.

Use the Key of the High Peaks & take the gondola up to the Covenant of Our Lady of the Charred Visage.

Covenant of Our Lady of the Charred Visage:


Our Lady of the Six Sorrows #6: Leave the gondola & head through Room 18 into Room 19 where we can find the last bleeding maiden.


Achievement #26 – Six Stinging Pains: Achieve maximum Health.
If you have been following along with the guide, the Achievement will unlock after locating the final location of Our Lady of the Six Sorrows 6/6.

Mirrored Mask of Dolpos: Head up to Room 20 now & we can find the final disintegrating archdeacon holding this Mask.

As of now, we can fight the final Boss & beat the game. Before we do, let’s mop up the last few Items & Achievements we can for this playthrough (Ending B).

Albero:


Achievement #27 – Mediterranean Diet: Save all 6 Kissers of Wounds.
Missable. If you brought all 6 Medicinal Herbs to Tirso before slaying the Area Boss they are found in, we will unlock this Achievement by speaking with Tirso after we defeat Quirce in the Wall of Holy Prohibitions.

1. Bouquet of Thyme – Mercy Dreams – Before Ten Piedad
2. Incense Garlic – Where Olive Trees Wither – Before Our Lady of the Charred Visage
3. Bouquet of Rosemary – Jondo – Before Tres Angustias
4. Dried Clove – Mountains of the Endless Dusk – Before Expósito
5. Sooty Garlic – The Sleeping Canvases – Before Expósito
6. Olive Seeds – Patio of the Silent Steps – Before Melquíades

Knot of Rosary Rope #6: We will receive this Knot from Tirso if we successfully saved all 6 Kissers of Wounds.

Note that the Engracia Achievement will only unlock after converting all 6 Rosary Knots are given to Soledad.

As well, if you found all 44 of the Collectibles, place them in the Ossuary & we will receive a really cool Character Skin as a reward!

Desecrated Cistern:


Achievement #28 – The Fountain of Life: Achieve maximum Flask capacity.
If you have found all Empty Bile Vessels, go to any Bile Fountain & fill them all up to unlock the Achievement. We should have 10 Flasks total, though if you gave some to Nacimiento from the Stir of Dawn DLC along with Quicksilver for Flask Upgrades, you’ll have less.

Doing this will not void the Achievement however so feel free to do so…

Brotherhood of Silent Sorrow:


Achievement #29 – Engracia: Achieve the maximum number of Rosary Bead Slots.
With our final Knot of Rosary Rope from Tirso, go to Soledad & let her weave it onto your Rosary to unlock the Achievement.
Sequence 19: Ending B
1. The Sleeping Canvases, Desecrated Cistern, Wall of Holy Prohibitions, Mountains of the Endless Dusk, Archcathedral Rooftops, Deambulatory of His Holiness
2. Mea Culpa Altars: 7/7
3. Mea Culpa Hearts: 8/9
4. Prayers: 13/13
5. Corpses: 26/26
6. Rosary Beads: 32/35
7. Children of Moonlight: 38/38
8. Achievements: 36/45
-----------------------------------------------------------------------------------------------------

The Sleeping Canvases:

Prayer #13 – Campanillero to the Sons of the Aurora: If you found all 38 Cherubs, return to Room 10 in The Sleeping Canvases & enter the painting to speak with Big-Baby Jocinero. He will reward us with this final Prayer for finding all his brothers & sisters.


Achievement #30 – Unwavering Devotion: Get the 13 original Prayers.
If you have been following along with the guide, the Achievement will unlock after locating the final Prayer.

Desecrated Cistern:

Mea Culpa Altar #7: It is now time for the Chalice of Inverted Verses Puzzle. As we slay the three enemies needed to fill the Chalice, we are unable to die & we cannot Teleport, or its contents will empty. No dying, no teleporting. You can however rest at Prie Dieu Shrines however & quitting to the Main Menu will also not empty the Chalice… we will be exploiting this specifically.

For the Puzzle we need to kill a wax giant Sepulcro Insomne in The Sleeping Canvases, the lion headed Lionheart in the Wall of Holy Prohibitions, & the minotaur headed Phalaris in the Mountains of the Endless Dusk.


To start, rest at the Prie Dieu Shrine in Albero as our central location. Try not to rest at other Shrines so that when we quit to the Main Menu we will reload here. Now go to the Teleporter in Room 7 & portal to Mercy Dreams. Do not use the Prie Dieu Shrine Teleport if you purchased the Ability from the Donations Box, this will reset the Shrine we will respawn at when we exit to the Menu & mess up the run.

From here, make your way over to Room 1 of The Sleeping Canvases where we can find the Sepulcro Insomne at the end of the hall to the right. Slay it, & our Chalice will become partially filled with blood. Now quit to the Main Menu & reload to return to Albero.


Reloading back to Albero now, take the Elevator up to Graveyard of the Peaks then up to the Covenant of Our Lady of the Charred Visage. From there go up to Room 17 & take the gondola down to the Wall of Holy Prohibitions & make your way to the bottom of Room 4 to find the Lionheart. Slay it to fill up the Chalice & once again quit to the Main Menu & reload to return to Albero.


From Albero, head down into the Desecrated Cistern & out into the Mountains of the Endless Dusk. We can find a Phalaris in Room 1 just below where we enter the Area. Slay it, & we will have the Chalice completely full.

Make your way through the Desecrated Cistern now down to Room 22. Equip the TGT Relic & enter Room 23. With the full Chalice of Inverted Verses, place it back into the clay statue’s hands & the iron gate will open, allowing us to enter Room 24 where our final Mea Culpa Altar will be.

We can now purchase our final Ability, Bleeding Miracle, for 20,000 Tears.


Achievement #31 – Mea Culpa: Achieve the maximum level of the sword Mea Culpa.
If you have been following along with the guide, the Achievement will unlock after locating the final Mea Culpa Altar. This Altar is definitely the most time consuming to unlock, but abusing the Menu quit system speeds the process up tenfold.

Archcathedral Rooftops:
With everything in the guide outlined previously completed, we now can return to the Archcathedral Rooftops & unlock our first Ending, Ending B.

Corpse #26: Go to Room 6 & place the Mirrored Mask of Dolphos on the Elevator & take it up to the fourth floor. We can find our final Corpse at the top of the Elevator behind us to the left in Room 25.


Achievement #32 – Last Words: Discover the last words of the 26 original Corpses.
If you have been following along with the guide, the Achievement will unlock after locating the final Corpse here at the top of the Archcathedral Rooftops.


Achievement #33 – Duel of Faith: Defeat Crisanta of the Wrapped Agony.
Story Related. Crisanta is very difficult & will require you to play at your best. Use Magic defence Beads such as the Muted Bell & or the Consecrated Amethyst to boost your survivability. Riposting Crisanta’s attacks, though difficult, is very handy to do.

After defeating Crisanta, leave the Area & enter the Deambulatory of His Holiness. This small Area has the greatest theme in the entire game; I play it on repeat all the time...

Deambulatory of His Holiness
:

Achievement #34 – Cvstodia’s Pilgrim: Discover the main Areas of Cvstodia.
After stepping into the Deambulatory, we will have entered every main Area in the game. This Achievement is not the same as discovering 100% of the World Map. There are 20 Main Areas in the game.

This needs to be confirmed, but some people claim that the three new Areas added from the Stir of Dawn DLC count towards the Achievement. In theory they should not, as no other Achievement takes the DLC into account. I ended up locating the three Areas previously however & cannot confirm this for myself if the Achievement can be unlocked without them. For reference the three DLC Areas are: The Petrous Area found below The Holy Line, Echoes of Salt found in Jondo/Desecrated Cistern, & the Ferrous Tree which cannot be missed.


Achievement #35 – Summa Blasphemia: Defeat His Holiness Escribar.
Story Related. When ready, stride up the stairs & enter the palace. Escribar’s first form is a push over, it is his second form that will give you some trouble. High elemental defence Beads such as the Consecrated Amethyst, Quirce’s Scorched Bead, Amber Eye, & the Wicker Knot will be very beneficial.


Achievement #36 – The Path of the Unworthy: Unlock ending B.
Story Related. After defeating Escribar, leave his Deambulatory & we will gaze upon the Turned Throne resting upon a mountain of ash. Stride up to the Throne & we will begin to sink into the ashes until it consumes us. Deogracias will then add us to the rest of the Penitent Ones before us. Note that this Achievement can technically become missable if you overachieved & completed the perquisites for Ending A (which we are doing next).

“Your Penitence is over…”

But of course, our journey does not end here. This was the Untrue Ending. Reload your Save & we will now work towards Ending A or the True Ending. Do not Ascend your game! This will turn our Save into NG+ & undue all the work we have done so far!
Sequence 20: Detestatio Sacrorum
1. Brotherhood of the Silent Sorrow, Mercy Dreams, Graveyard of the Peaks, Grievance Ascends, Mother of Mothers, Library of Negated Words, Wall of Holy Prohibitions
2. Arena Challenges: 7/7
3. Mea Culpa Hearts: 9/9
4. Rosary Beads: 35/35
5. Achievements: 40/45
-----------------------------------------------------------------------------------------------------

Rosary Bead #33 – Weight of True Guilt: To unlock Ending A, we first need to corrupt one of our Rosary Beads, the Immaculate Bead to be exact. To do so, equip the Immaculate Bead (or whatever version of it you tainted it already to)… & begin dying. We need to die three times with it equipped. It will go from the Immaculate Bead to Bead Marked By Guilt, Bead Tainted By Guilt, & lastly the Weight of True Guilt.

Brotherhood of the Silent Sorrow:


Arena Challenge #1: With the Weight of True Guilt equipped, head to Room 11 where we can find a Confessor Statue. Approach the Statue & destroy it with the Mea Culpa. When it crumbles away, & the Bead is equipped, a red aura will appear where the Statue was. Enter the aura & we will be transported to an Arena Room.

Complete the six waves & we will be rewarded with 1000 Tears of Atonement. After completing our first Arena, the Thorn in the Mea Culpa will begin to bud. Every time we complete an Arena, the Mea Culpa Thorn will begin to develop. We need it fully grown to access Ending A.

Mercy Dreams:


Arena Challenge #2: We can find our next Confessor Statue in Room 18. Strike it down & enter the Arena with the Weight of True Guilt. Complete the five waves to receive a Mea Culpa Heart as well as the Grown Sprout.

Mea Culpa Heart #9 – Heart of the Single Tome: We will receive this final Mea Culpa Heart for completing our second Arena Challenge.


Achievement #37 – Heartbreaker: Get the 9 original Sword Hearts.
If you have been following along with the guide, the Achievement will unlock after collecting the final Mea Culpa Heart from the second Arena Challenge.

Graveyard of the Peaks:


Arena Challenge #3: We can find this Statue in Room 4. You know the drill, break the Statue & enter the Arena. Complete the four waves & we will receive 4000 Tears of Atonement & the Thorny Briar.

Grievance Ascends:


Arena Challenge #4: Go to Room 20 where we can find our next Confessor Statue. Complete the five waves & we will receive a Rosary Bead as well as the Bloodstained Briar.

Rosary Bead #33 – Embers of A Broken Star: We will receive this Rosary Bead for completing our fourth Arena.

Mother of Mothers:


Arena Challenge #5: This Statue can be found in Room 22. Complete the six waves to receive 5000 Tears of Atonement as well as the Crimson Briar.

If you have not already discovered it, make your way to the very far right end of Mother of Mothers to Room 6. Go to the top right end of the Room & strike the wall to reveal Room 21, a Bile Fountain. We need to have every Room that is in the Base Game explored for 100% Map Completion.

Library of Negated Words:


Arena Challenge #6: This Statue can be found in Room 20. Complete the six waves to receive a Rosary Bead as well as the Vine Braided In Blood.

Rosary Bead #34 – Scaly Coin: We can receive this Rosary Bead from completing our sixth Arena.

Wall of Holy Prohibitions:


Arena Challenge #7: This Confessor Statue can be found in Room 11. Complete the six waves to receive a Rosary Bead as well as the Cvstodia of Sin.

Rosary Bead #35 – Seashell of the Inverted Spiral: We can receive this Rosary Bead for completing the seventh & final Arena.


Achievement #38 – Detestatio Sacrorum: Complete all the Arena’s Challenges.
Story Related. This Achievement will unlock immediately after completing the seventh & final Arena Challenge.


Achievement #39 – Mysteria Lucis: Get the 30 original Rosary Beads.
After receiving the Seashell of the Inverted Spiral, we should have collected all the Rosary Beads in the Base Game. Note that my guide says there are 35 Rosary Beads but the Achievement only says 30. In the guide I count the Weight of True Sin & the Small/Medium Red & Wax Beads as separate Rosary Beads.

For the actual Achievement, only the Big Wax Beads count towards the Achievement. Immaculate Bead or Weight of True Sin are interchangeable.

Albero:


Achievement #40 – Blood & Tears: Unlock all the Abilities on the Mea Culpa Altars.
With the influx of Tears of Atonement from completing all of the Arena Challenges you should have enough to purchase the remainder of the Mea Culpa Abilities. There are 15 Mea Culpa Abilities to purchase across the 7 Altars.

This is also a good time to buy out Candelaria’s Shops if you have not already done so.

Good places to farm Tears of Atonement are The Sleeping Canvases & the Archcathedral Rooftops. If you donate 20,000 Tears at the Donation Box in the Albero church, we can fast travel between Prie Dieu Shrines. This greatly increases farming speed however tacks on quite a few extra thousands of Tears you have to farm for.
Sequence 21: Ending A
1. Cvstodia, Deambulatory of His Holiness
2. Achievements: 40/45
-----------------------------------------------------------------------------------------------------

Deambulatory of His Holiness:

You will thank me later for this. Before facing down Escribar for the last time, look at your World Map & look at all the squares in the Deambulatory of His Holiness. If there are any black squares on the Map, you need to fill them in. If you are like me, & there are black squares in the final Room of the Deambulatory where the Turned Throne is, you will need to climb up the ashen mountain a little ways & leap backwards down the mountain. We cannot open our World Map in that Room, so you have to be meticulous with making sure you uncovered it before getting to the Throne. Or else we will have to come back here… like I did. This all makes more sense when you read what we have to do for the Witness of the Miracle Achievement down below.


Achievement #41 – The Path of the Believer: Unlock ending A.
Story Related. Now with everything we can possibly complete on this playthrough (apart from Map Completion), return to the Deambulatory & face down Escribar one more time. When he is defeated, return to the ashen mountain & once again climb up to the Turned Throne. This time, we will stride across the ashes unencumbered & be able to reach it (explore the black squares in this Room if you have not already done so first).
Sit upon the Throne, & achieve the True & most metal game Ending ever.

“And thus, your name will be erased from the heavens…”


Achievement #42 – Witness of the Miracle: Beat 100% of the game.
For 100% Game Completion you need to have:

All 6 Health Upgrades
All 6 Fervor Upgrades
All 7 Relics
All 9 Mea Culpa Hearts
All 13 Prayers
All 15 Mea Culpa Abilities
All 6 Knots of Rosary Rope turned in to Soledad
All 30 (35 in my guide) Rosary Beads
All 44 Collectibles
Saved all 38 Children of Moonlight
All 8 (10 total) Vile Vessels filled
Ending A Achieved
100% Map Completion


100% Map Completion is what stumps a lot of people on getting this Achievement. Basically, you need to uncover every single space on the World Map. When you look at all the Rooms, there should be a golden border around them, if all the borders are not touching & there is a black square in the Map, you need to return there & get to that point to fill it in.

For me, I ended up missing the very top square in Room 1 of the Brotherhood of the Silent Sorrow, some open air squares in the Graveyard of the Peaks as well as an open air square in the Deambulatory where you have to leap backwards down the ash mountain to fill it in before reaching the Turned Throne. That last one was really annoying as not only do you have to re-beat Escribar if you were not lucky enough to have filled it in accidentally, but you also cannot open your World Map in that Room. So, you have to be very meticulous in jumping down the mountain to be sure you got it all. Any Area or squares added in by the DLCs do not count towards 100% Completion.

As well, there are Rooms in the game that do not have any Item we need for Achievements. You might have the entire map filled in but are missing a secret Room & cannot find where it is. To help, here is a video by Adddicteddd detailing most of the hidden Rooms you might not have located yourself.
https://youtu.be/AVkxdH_hDXA
After you have collected every Item in the game & fully uncovered the World Map, the Achievement should unlock.

93% Complete!
Sequence 22: Requiem Aeternam
1. Brotherhood of the Silent Sorrow, Albero, Mercy Dreams, Covenant of Our Lady of the Charred Visage, Mountains of the Endless Dusk, Grievance Ascends
2. Bosses Defeated: 4/10
3. Redento: 2/4
4. Cleofás: 0/3
5. Achievements: 42/45
-----------------------------------------------------------------------------------------------------

For this playthrough, we must defeat all 10 Bosses in the Base Game without using a single Bile Flask during the battle. This is a very challenging Achievement & very easy to void by accident as if you use a Bile Flask reflexively & end up beating the Boss, you just voided the Achievement & have to restart the entire playthrough. It is good practice to use all Bile Flasks before entering a Boss Room just in case you do. Obviously do not use all the Flasks inside the Boss Room, even if the Boss is not triggered. That still counts as a void. To be safe, do not use a Flask after defeating a Boss either. Basically, never use a Flask period when you are inside a Boss Room.

It is important to note, that the Achievement is only voided if you beat a Boss having used Bile Flasks, not from using them at all. This means (& has been tested) that if you accidentally use a Bile Flask during a Boss fight, you can die to respawn back at the Prie Dieu Shrine & attempt the Boss again. So long as during all your runs with the Bosses that none are killed while you used a Bile Flask during that fight, you will unlock the Achievement.

Note that this can be completed on NG+ now! While you can do it on a new save file, completing this on NG+ can give you an extra edge. Though be warned as the Bosses will deal extra damage & have more health so it may not actually make for an easier time...

With the addition of Wounds of the Eventide DLC, it is now possible to skip the Boss fight with Esdras if you visit the Resting Place of the Sister in the Echoes of Salt. Doing this will void the Requiem Aeternam Achievement as we MUST defeat Esdras since he is a base game boss. Save Wounds of the Eventide for a different playthrough...

I cannot confirm this personally, but I have heard from some that Bosses defeated without Bile Flasks carry over into NG+. If you accidentally mess up & killed a Boss while using a Bile Flask but kill all other Bosses without them; if you enter NG+ & kill whichever Bosses you missed without Bile Flasks, the Achievement in theory unlocks.

A lot of this playthrough can be glossed over as all we really need to worry about is defeating the Bosses & unlocking the other Ending for Cleofás’ Questline. The hard part about glossing over things, is that our Penitent One will be “under leveled” for the Boss fights. If you want the easiest time possible, considering re-following the first 21 Sequences of the guide. We don’t need a lot of things like Cherubs or Collectibles, but certain Rosary Beads, Health, & Fervor Upgrades will really make a difference.

If you do this, remember to check back in down here before each Boss fight or when we meet up with Redento so you do not miss any information.

Brotherhood of the Silent Sorrow:

Boss #1 – Warden of the Silent Sorrow: This Boss is pretty easy & straightforward. Play defensively & defeat him without using a Bile Flask. There is not a lot to say about this fellow.

Albero:

Rosary Bead – Token of Appreciation: Before fighting Ten Piedad, there is an exceptionally useful Rosary Bead we can collect that was added in the Stir of Dawn DLC. We need to donate 5000 Tears of Atonement at the Donation Box in the Albero church. To enter the church, we need to give Lvdovico one of Tentudia’s Remains. The soonest one we can get is Tentudia’s Carnal Remains found underneath the bridge leading to Mercy Dreams in the Wasteland of Buried Churches.

To get the Remains, we need to buy the Key to the Chamber of the Eldest from Candelaria in Mercy Dreams & grab the Blood Perpetuated In Sand Relic from the Brotherhood of Silent Sorrow.

Give Lvdovico the Remains, leave the Room, then return to find the church doors open. Donate 5000 Tears, leave the church, & return to find the Bead on the floor in front of the Donation Box. This will give us a straight 15% damage boost if we have all our Bile Flasks depleted. Perfect for this playthrough; deplete all Flasks before entering every Boss Room for a decent damage boost.

Mercy Dreams:

Suggestions Before Ten Piedad:
Albero: Mea Culpa Altar, Dove Skull, Token of Appreciation
Mercy Dreams: Small Bead of Red Wax, Moss Preserved In Glass

Boss #2 – Ten Piedad: Ten Piedad is on the easier side as far as Bosses go as well. Keep your distance & attack when there is an opening. The Token of Appreciation will definitely speed this battle up.

Note that we can summon Viridiana for this Boss battle, however we can only summon her for three fights.

In my opinion, Viridiana is best saved for the Lady of the Charred Visage, Tres Angustias, & Expósito as they are very difficult to make through without needing a Bile Flask… or several.

Covenant of Our Lady of the Charred Visage:

Suggestions Before Lady of the Charred Visage:
Desecrated Cistern: Health Upgrade, Fervor Upgrade
Graveyard of the Peaks: Ember of the Holy Cremation, Knot of Rosary Rope, Muted Bell, Fervor Upgrade, Health Upgrade
Covenant of Our Lady of the Charred Visage: Piece of a Golden Mask, Small Piece of Blue Wax, Medium Bead of Red Wax

Boss #3 – Lady of the Charred Visage: This is a very challenging battle to do without Bile Flasks. I highly recommend using Viridiana for this fight. When the Lady is in the center of the Room with her head fairly low to the ground, spam your upwards strike as fast as possible to mow down her health. This fight will probably take you more than a few tries.

Mountains of the Endless Dusk:

NPC – Redento #1: When we enter the Room just above Jondo, we will find Redento standing over the edge looking down. Speak with him to initiate his Questline. We need to progress Redento all the way to The Patio of the Silent Steps.

Progress through Jondo to the far side & send the trolley system back over towards him. Return to Redento & speak with him so he may continue his journey.

Brotherhood of the Silent Sorrow:

NPC – Redento #2: Enter into the Brotherhood of the Silent Sorrow from the Mountains of the Endless Dusk side & make your way up through the new Rooms. At the top we can find Redento with his path blocked by a boulder.

Speak with him & make your way through the trap Room to clear the boulder from his path. Speak with him again & he will continue on his path.

Grievance Ascends:

Suggestions Before Tres Angustias:
Covenant of Our Lady of the Charred Visage: Mea Culpa Altar
Mountains of the Endless Dusk: Perpetva’s Protection
Jondo: Knot of Rosary Rope
Brotherhood of the Silent Sorrow: Mea Culpa Altar, Medium Bead of Blue Wax
Grievance Ascends: Fervor Upgrade

Boss #4 – Tres Angustias: This is another difficult Boss fight that will test you; not as hard as the Lady of the Charred Visage in my opinion though. I do recommend using Viridiana’s help for this fight. Play very aggressively for this fight.
Sequence 23: Whom Shall I Watch Now...?
1. Wasteland of the Buried Churches, Bridge of the Three Calvaries, Patio of the Silent Steps, The Sleeping Canvases, Mother of Mothers, Archcathedral Rooftops
2. Bosses Defeated: 7/10
3. Redento: 4/4
4. Cleofás: 3/3
5. Achievements: 43/45
-----------------------------------------------------------------------------------------------------

Wasteland of the Buried Churches:

NPC – Redento #3: The next time we find Redento he will be in the Room just before the Bridge of the Three Calvaries. Speak with him, & knock down the two Log Shortcuts if you have not already done so. Speak with him again & he will carry on his path.

Bridge of the Three Calvaries:

Boss #5 – Esdras of the Anointed Legion: If you thought Esdras was difficult WITH Bile Flasks… then this fight will be a repetitive kick in the teeth for you. The key for Esdras is to play very defensively. Try being on the opposite end of the Room as him & strike him after his thunder spins. It is exceptionally useful to learn how to Riposte his attacks as well. His basic attacks will allow you to counter-strike but Riposting his thunder spins will only block them. Still worth doing though if you cannot get out of the way.

When Perpetva shows up after 8/10 of his health bar is gone, all strategy goes out the window. You now need to play very aggressively & take him down as fast as possible. Juggling two Bosses at once is not good.

Patio of the Silent Steps:

NPC – Redento #4: We can find Redento again outside the entrance to Mother of Mothers. Do not speak with him at all here! He needs us to slay the Amargura in his way to get into Mother of Mothers. We will have to kill it ourselves to progress, but do not speak with Redento at all here. We need him to stay right where he is for the Crossing Souls Achievement.

For now, completely ignore him so he stays put.

The Sleeping Canvases:

Suggestion Before Expósito:
Mother of Mothers: Fervor Upgrade
Library of Negated Words: Amber Eye, Fervor Upgrade
The Sleeping Canvases: Wicker Knot,
Mercy Dreams: Big Bead of Blue Wax

Boss #6 – Expósito, Scion of Abjuration: Expósito is another very difficult Boss fight, if only because he is very large with a small hit box. This is the last fight I would summon Viridiana for. As hard as Melquíades is, Expósito is much harder. Be sure to equip the Moss Preserved In Glass, Wicker Knot, Piece of a Golden Mask to deal with the elemental damage. Play very defensively & watch carefully where its projectiles are launched. When its head or body are fixed in an ideal position, spam attack & wreck it.

Mother of Mothers:


NPC – Cleofás #1: We can find Cleofás & Socorro in Room 14 of Mother of Mothers. Speak with him to initiate his Questline. Like in our previous playthrough, we need to bring all three Marks of Refuge & save Socorro. Do not “end her suffering” or it will void this Achievement.

As well, after speaking with Cleofás for the first time, we now cannot speak with Lvdovico in the Albero Church at all costs! If we do, he will give us the Cord of the True Burying which will void this Achievement for us. If we have it in our Inventory when we complete Cleofás’ Questline we have no other option but to give it to him. This time, we want him leaping from the Archcathedral Rooftops…

Suggestion Before Melquíades:
Library of Negated Words: Mea Culpa Altar, Big Bead of Red Wax
Mother of Mothers: Consecrated Amethyst, Mea Culpa Altar

Boss #7 – Melquíades, The Exhumed Archbishop: Melquíades is difficult, but is limited in his attacks, they do deal quite a lot of damage, however. Play aggressively for this battle. Since he can only be hurt when the hands are downed you need to be a butcher to defeat him before he whittles you down over time. Try downing him when he is in the center of the Room or at least accessible. It is possible to knock him down when he is off camera & you will not be able to strike him at all. The Muted Bell, Consecrated Amethyst, & Ember of Holy Cremation are very useful for this fight.

Archcathedral Rooftops:


Mark of the First Refuge: Make your way through the Area until you reach Room 7. Slay the Soldier of the Anointed Legion to receive our first Mark.

Mark of the Second Refuge: Place the Deformed Mask of Orestes into the central elevator & make your way into Room 13. Slay the Soldier of the Anointed Legion to receive our second Mark.

Mark of the Third Refuge: Place the Embossed Mask of Crescente into the central elevator & make your way into Room 22. Slay the Soldier of the Anointed Legion to receive our third Mark.

Mother of Mothers:

NPC – Cleofás #2: Return to Room 14 in Mother of Mothers & give Socorro all three Marks of Refuge so that she is saved. When she disappears, speak with Cleofás & he will leave for the Archcathedral Rooftops…

Archcathedral Rooftops:

NPC – Cleofás #3: Go to Room 2 in the Archcathedral Rooftops to the left of the first Prie Dieu Shrine & we can find Cleofás standing at the edge. If you did not speak to Lvdovico at all in Albero & do not have the Cord of the True Burying, speak with Cleofás & he will be having a crisis of faith. Leave the Room & walk back into it & he will be gone… but not without a sound.

If you have the Linen of Golden Thread Relic you can just leap down after him, otherwise you will have to take the long road down…

Patio of the Silent Steps:


Achievement #43 – Crossing Souls: Provoke the meeting between Redento & Cleofás.
Missable. Return to where Redento is still standing & we will also find Cleofás’ corpse splattered right in front of him. Speak with Redento twice & we will unlock the Achievement.

It is not possible to get this Achievement & the Rebirth Achievement in the same playthrough.
Sequence 24: Forever... & Ever
1. Wall of Holy Prohibitions, Archcathedral Rooftops, Deambulatory of His Holiness
2. Bosses Defeated: 7/10
3. Achievements: 43/45
-----------------------------------------------------------------------------------------------------

Wall of Holy Prohibitions:

Suggestions Before Quirce:
Wall of Holy Prohibitions: Quirce’s Scorched Bead, Fervor Upgrade

Boss #8 – Quirce, Returned By the Flames: Compared to the previous Bosses, Quirce is not actually all that difficult. Play defensively & equip the Piece of a Golden Mask & Quirce’s Scorched Bead.

Archcathedral Rooftops:

Boss #9 – Crisanta of the Wrapped Agony: Crisanta is definitely the second hardest Boss in the game. Possibly even the hardest. You will need to channel the skills you learned for fighting Esdras & times them by ten. Riposting is basically mandatory for survival. Play as defensively as possible. You will want the Ember of Holy Cremation, the Muted Bell, & the Consecrated Amethyst for this battle as she does a lot of magic damage.

If you can stomach it, snagging the Silver Grape & unlocking the final Mea Culpa Altar with the Chalice of Inverted Verses will really make a difference in the fight. They are not mandatory though, I did not use either… but I am sure it would have made things easier.

Deambulatory of His Holiness:

Boss #10 – His Holiness Escribar: At long last, we have Escribar to face. You will want the Wicker Knot, Consecrated Amethyst, Amber Eye, & Quirce’s Scorched Bead equipped for this. As always, his first form is a push over. If possible try defeating him without taking any damage at all, we need all the health we can get for his second form…

When his second form arrives you really need to be strategic with when you expose Escribar’s face. Try doing so when you have a definite path up to him. Be defensive right up until he is exposed. Then be a berserker. If you are able to get onto a lower platform just below his face, spam your upwards attack. A lot of this fight is luck based as what spells he decides to use & which platforms spawn for you when.


Achievement #44 – Requiem Aeternam: Defeat the original 10 Bosses without consuming any Bile Flasks.
If you successfully defeated all 10 main Bosses of the game without using a single Bile Flask during any of the fights or in their Boss Rooms, the Achievement will unlock after defeating Escribar.

I actually had a lot of fun completing this second playthrough. The skills we learned we will be employing heavily for our final Achievement & half playthrough…
Sequence 25: Bronze Medal
1. Achievements: 45/45
-----------------------------------------------------------------------------------------------------


Achievement #45 – Bronze Medal: Pass through the bronze door on the Bridge of Calvary in less than 3 hours.
Missable. This Achievement is not actually as intimidating as it appears. I ended up beating this in 1 hour 20 minutes; 15 of those minutes was dying to Esdras because I forgot how to fight him properly. There is quite a lot of room for error, & you have more time to quickly snag Mea Culpa Altars, HP Upgrades, & the odd Bile Flask than you think. I rushed through my playthrough & ended up paying for it a little with Esdras having hardly any extra Abilities or Upgrades. You will definitely be channeling the skills you learned during our Requiem Aeternam run. Be warned, pausing your game (going into the map or menu) does not stop the clock…

This Achievement is unlockable on NG+! It does not have to be done on a new Save File, though it of course can be.

This was a good video guide by Aeshmah that I referenced for the Achievement. I basically just needed it to quickly track through Jondo; everything else is more or less straightforward.
https://youtu.be/2pJcZNe7uaQ

With the addition of the Wounds of the Eventide DLC, we are now able to skip the Esdras Boss fight entirely if we collect the Incomplete Scapular Item found in The Resting Place of the Sister Area. If you find Esdras to be exceptionally challenging; you may want to do this to save you some time on your run.


To get to The Resting Place of the Sister, we first need to get to Jondo. From the first Prie Dieau Shrine in Jondo, make your way to Room 7 on the map above (there is a Quicksilver inside it). Carry on through the two halves of the Echoes of Salt DLC Area & up to The Resting Place of the Sister. Approach the tomb & listen to the Sister's dialogue, receiving the Incomplete Scapular. After defeating the Tres Angustias, get to The Bridge of the Three Cavalries & face Esdras. If you have the Incomplete Scapular in your Inventory, Esdras will not fight us, skipping the Boss fight.

This alternate route should only take an extra 5-10 minutes to complete.
Conclusion:
Blasphemous is an absolutely amazing game & in my top 10 favourite games ever; one of the few Souls-Like games to actually be its own deal without feeling like a knock off. For the most part, the Achievements are not all that difficult, though the game itself might be for some players. Definitely not for the faint of heart… It took me around 40 hours to achieve 100%.

Special thanks to Konkretne Kosteczki for fact checking & helping me clean up a lot of errors on the guide! Merciful be the heart, Penitent One.

If this guide helped you achieve 100%, rate the guide or let me know in the comments. Helps me know if I am doing things right!


100% Complete
Thank you for choosing Cynic, & I will see you in the next guide!

If you are interested in a little bit of patronage, support my projects & consider buying me a beer. If not, no worries; my guides are, & will always be free content. Achievement Hunting is my passion, & writing these guides is a way for me to give meaning to a life long hobby!
https://www.buymeacoffee.com/cynic0055

If you enjoy my style of writing guides, be sure to check out my profile for a full list of my works.

129 Comments
TTD 14 hours ago 
me and my buddy just followed this guide to True Penitance. thank you for your time and effort in creating this <3
Cynic 0055  [author] May 29 @ 10:36am 
:praisesun:
creo qe si May 29 @ 10:29am 
Alright, I'll follow the guide until sequence 10 and then I'll follow the steps carefully to get the crossing souls achievement, thank you so much my friend!
Cynic 0055  [author] May 29 @ 10:01am 
So with that in mind, plus killing the bosses without using the Bile Flasks, you can definitely go on to just start the guide from Sequence 1. I mention all the encounters with Redento as we play, so in Sequence 10 when we get to the Patio, do not speak with him here & make him stay put to set up the Crossing Souls Achievement.
Cynic 0055  [author] May 29 @ 9:59am 
The only thing Sequence 22-24 covers is: bosses without Bile Flasks, & encountering Cleofas & Redento for the Crossing Souls Achievement. The important thing is Crossing Souls, I can give you a quick summary.

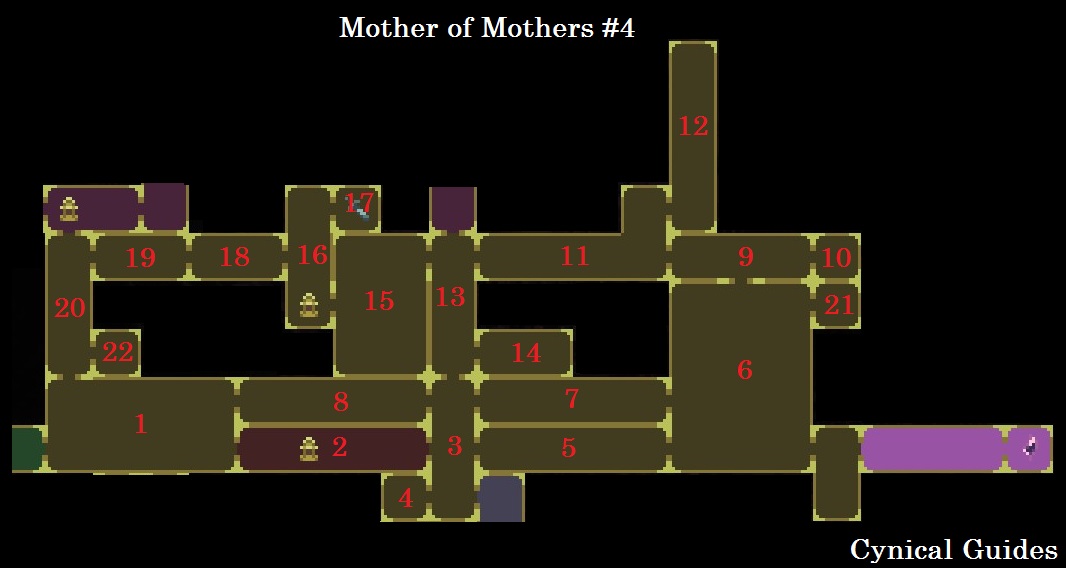
Mountains of Endless Dusk (Redento 1), Brotherhood of Silent Sorrow (Redento 2), Wasteland of Buried Churches (Redento 3), Patio of the Silent Steps (Redento 4 once Redento has mvoed here we do not speak to him at all so he stays here! ).

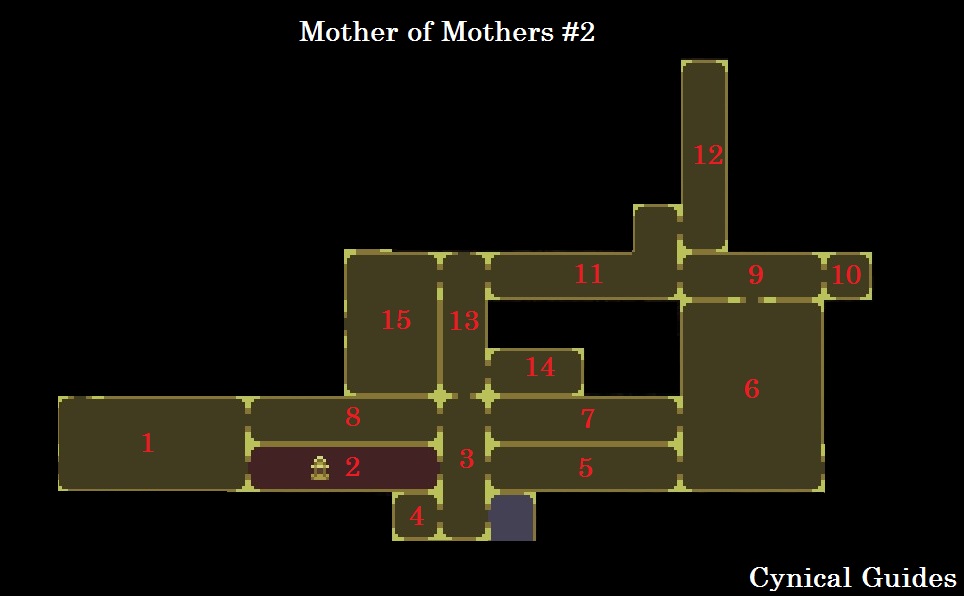
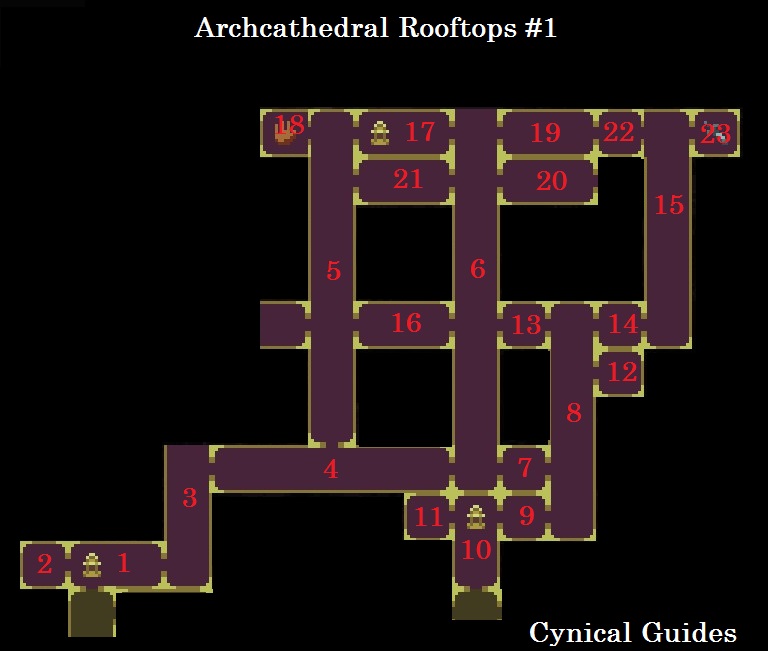
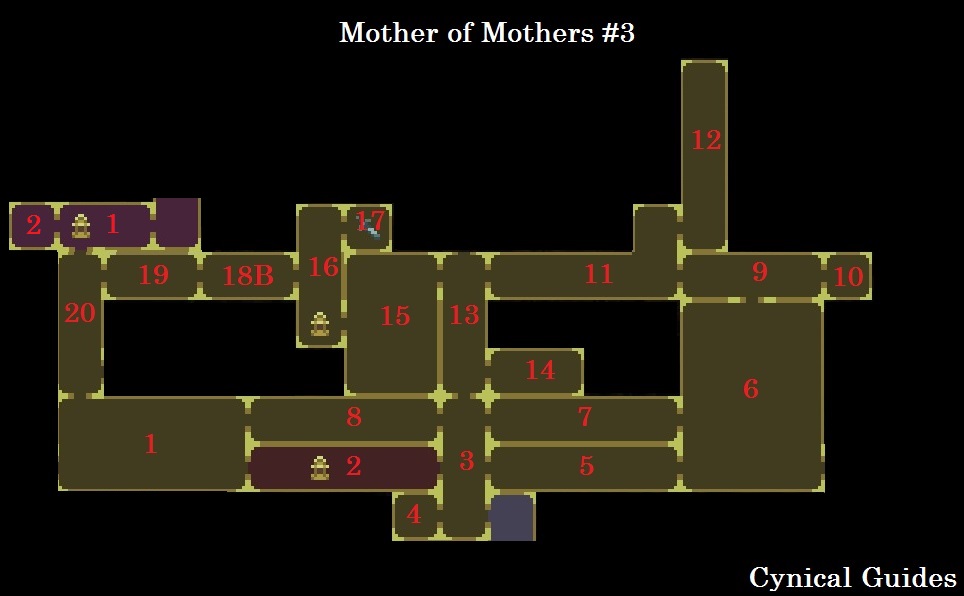
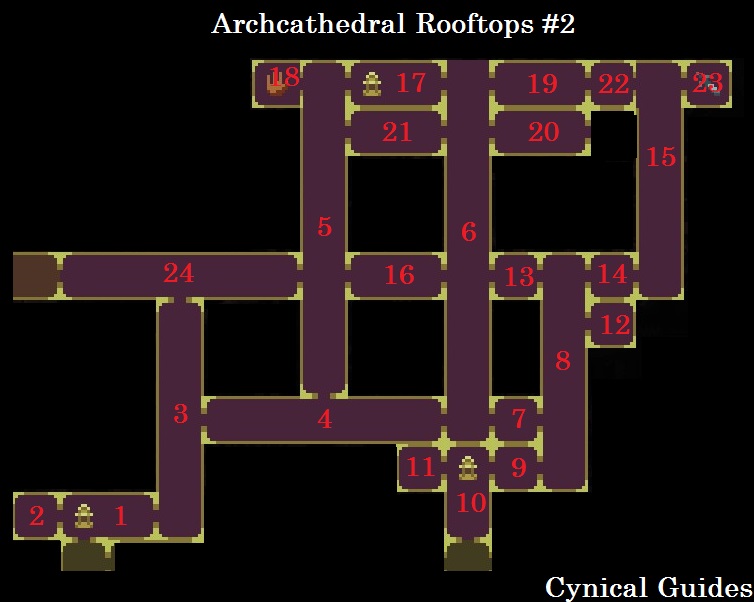
Then we go on to Mother of Mothers (Cleofas 1 & we cannot speak with Ludovico back in Albero at all!), Archathedral Rooftops (find all Marks of Refuge), go back to Mother of Mothers to hand over the Marks to Cleofas, then go up to the Archcatherdral Rooftops when Cleofas jumps off. Then return to the Redento still at the Patio & speak with him to unlock the Achievement.
creo qe si May 29 @ 9:42am 
Won't hesitate, got another question haha, I started my NG+, but I noticed I lack some of the upgrades, if I were to follow the guide from Sequence 22, but that sequence starts with the player already having obtained 100%, does that mean I should first do 100% completion?
Being that starting the guide from sequence 1 in order to follow the steps
Cynic 0055  [author] May 27 @ 3:34pm 
Haha well I don't know about, but I appreciate the sentiment. Happy Hunting man, & don't hesitate to ask if you need anymore clarification on stuff. :blassaint:
creo qe si May 27 @ 1:10pm 
Alright I understood it clear now, thank you so much! I'm totally serious when I say that you should be featured in some kind of way by Steam, a unique badge or something of the sorts would be nice. Take care man!
Cynic 0055  [author] May 26 @ 12:18pm 
So, ignoring the new WoE DLC (Ending C), Ending B is the "false" ending. Without getting into spoiler territory, when you defeat the final boss the Penitent One will fail their mission & you get Ending B. That is the first Ending you will get; your game will bring you back to before you fight the boss so you can keep playing afterwards.

In the same playthrough, after getting Ending B, you will then need to create the Weight of True Guilt Bead, travel to all 7 Confessor's of Guilt & destroy them. With the Weight of True Guilt equipped it will unlock secret arenas you have to complete which will grow the Thorn in the Mea Culpa. I cover all of this in Sequence 20 & requires no set up & can't be missed. Once all have been completed, defeat the final boss again & this time you will get Ending A instead.

If you do Ending A first though, you will be unable to get Ending B! So don't do that; ignore the Weight of True Guilt until the end.
Cynic 0055  [author] May 26 @ 12:18pm 
I structure the guide to do your 100% run (& Ending A/B) in the first playthrough, second playthrough (can be a brand NG or NG+) is for Requiem Aeternam & the Crossing Souls Achievement, & a third brand new half playthrough to earn the Bronze Medal. Bronze Medal gets its own separate run, so don't worry about that until it is your final Achievement to earn.

Like I mentioned before though, you can combine the Requiem Aeternam second playthrough with earning the two Endings & your 100% game completion on NG+. If you follow the guide, start at Sequence 22-24 & earn Ending B. Then go to Sequence 20-21 to earn Ending A & finish your 100% game completion requirements. Hope that makes sense; it is a bit of a confusing process.