Інсталювати Steam
увійти
|
мова
简体中文 (спрощена китайська)
繁體中文 (традиційна китайська)
日本語 (японська)
한국어 (корейська)
ไทย (тайська)
Български (болгарська)
Čeština (чеська)
Dansk (данська)
Deutsch (німецька)
English (англійська)
Español - España (іспанська — Іспанія)
Español - Latinoamérica (іспанська — Латинська Америка)
Ελληνικά (грецька)
Français (французька)
Italiano (італійська)
Bahasa Indonesia (індонезійська)
Magyar (угорська)
Nederlands (нідерландська)
Norsk (норвезька)
Polski (польська)
Português (португальська — Португалія)
Português - Brasil (португальська — Бразилія)
Română (румунська)
Русский (російська)
Suomi (фінська)
Svenska (шведська)
Türkçe (турецька)
Tiếng Việt (в’єтнамська)
Повідомити про проблему з перекладом


It doesn't have to be separated by an empty line for each sentence, but some Enter presses for every few fullstops may help the readability of the guide.
Atm it kind of feels like a wall of text, especially on the first half.
I mean no harm, I really like the information provided here.
1) take 50% extra stun build-up from being hit
2) halve the decay speed of their stun buildup
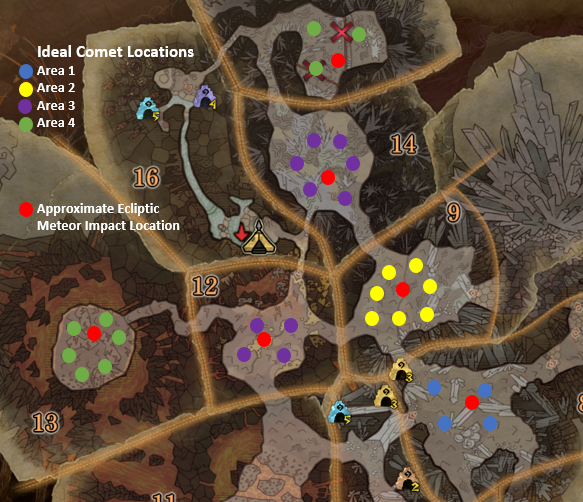
Also, some thresholds for Behemoth's Ecliptic %HP thresholds, so it's easier to tell how close you are to finishing the fight.
A1: 100% - 75% HP
Behemoth:
No Ecliptic/Commets
Extreme:
Commet at : Start of Fight, ~90% HP
Ecliptic at : 75%
A2: 75% - 55% HP
Behemoth:
Commet at : ~65%, ~60%
Ecliptic at: 55%
Extreme:
Commet at : ~65%
Ecliptic at: 55%
A3:
Behemoth:
Commet at: ~45%, ~40%, ~35%
Ecliptic at: 30%
Extreme:
Commet at: NEVER
Ecliptic at: After 5 minutes since phase start, every 30 seconds
A4:
Behemoth:
Commet at: ~10%, ~5%
Ecliptic at: 1 HP
Extreme:
Commet at: ~25%, ~15%, ~5%
Ecliptic at: 20%, 10%, 1 HP
3/3
When someone gets horn charge-pinned in A3, if they're not running flinch free it's possible to just hit them out of the staggered animation. It's similar to flinching someone out of a stun, and it's honestly a bit funny to see behemoth pick up, slam, and throw thin air. More importantly, it gives the pinned person some time to run away and heal themselves, which they will very dearly need, since although it gives some breathing room, Behemoth will still end up aggroing onto the person that was hit.
2/3
Bow Dodge Tank is still a fun option, it was better than spread 3 in base game since lack of Deco/Bowgun Aug slots cost Spread tank a lot of damage, though on a Master Rank set Spread 3 probably goes toe-to-toe or just wins
Extremoth has a 2-flash limit. Use them wisely.
if you can master the timing, FF14 Jump is literally always a good option, except for *one* exception. In Extremoth Area 4, jumping the first 2 ecliptics can cause Extremoth to behega slam as you're coming down, which hit-confirms the damage and has lead to 1-hitting the entire party before.
1/3