Monster Hunter: World

Monster Hunter: World

393 ratings
Improving Game's Potato Visuals (Basic settings + mods) without much FPS loss
By Holneer
In this guide I'll explain how to get rid off of bleached colours, make your game look sharper and less jagged.

My specs: GTX 1060 6 Gb, Ryzen 5 3600 with 16Gb of slow-ass DDR4-2400 RAM.

FPS: In town locations it's 70-80, in the heaviest places of these locations (Astera market and Seliana spot between all the merchants) it's 65-70. Lowest I dipped to was 45 fps when 2 Bowgun manics and two blast DB sociopaths were beating the ♥♥♥♥ out of poor Stygian Zinogre in the Guiding Lands (one of the most poorly optimized locations + lots of lightning effects from the monster + A LOT of explosions) and it still jumped back up really fast.

So, let's get to the point now!
6
4
10
2
   
Award
Favorite
Favorited
Unfavorite
1. Basic in-game settings.

1. First of all, it's really important for you to turn on DirectX 12 as it will MASSIVELY increase your performance.
2. Screen mode may vary depending on how much you Alt+Tab, but Full Screen is gonna give you the best performance since your PC doesn't have to process some of the other stuff.
3. At least for me, game feels a lot smoother without V-Sync or Frame Rate limitations, but you can change that if you want.

4. Quality should either stay Variable with prioritized resolution or "High".
5. Texture quality, for now will stay full, we'll come back to it later.
6. Ambient Occlusion is a fairly power hungry thing, but playing without it completely is a big no-no if you want the game to look decent. Thankfully, the low looks almost exactly like the high (because of the thing that we'll do later), with the exception of some objects that are far away, and also saves us about 8-10 fps.
7. Volume Rendering Quality is the worst thing to ever exist. Don't ever turn it on. Volume Rendering makes your whole game more Soapy and Foggy while also stealing about 10-20 fps depending on the quality you chose. Without it you'll have both better image quality and performance.
8. Shadow quality doesn't improve all that noticably from Low to High, but the it's also a 1 FPS difference between the two, so I would choose high.
9-10. Capsule AO and Contact Shadows are settings which do not really impact performance all that much. They both make the game more lively with the shadows from your player character, so I'd say they are worth those 0-2 FPS changes.
11. I turned off AA in my game because a tool that we'll use later has a far better looking and optimized one. If you do not wish to use ReShade - turn on game's FXAA.
12. LOD Bias is what makes objects that are far away more detailed. This settings should stay at Variable or High. Variable is better in my opinion, because most of the time you fight monsters in enclosed spaces, so you won't really care if the game makes trees outside of the cave less detailed, especially since it can give you a fast FPS boost if you dip low.
13. No limit. -1 makes the whole game look worse at all times.
14. Foliage sway gives a life to Ancient Forest and locations alike. If you can, leave it on, but if you feel like you're lagging in those locations - turn it off, there will be a decent increase in performance.

15. Subsurface Scattering increases the quality of skin on Monsters. Doesn't require much and make them look better, leave it on.
16. Screen space reflections are totally on you to decide. If you need some more FPS - off, don't mind it - on.
17. Antisotropic Filtering actually doesn't even look like it changes anything, but again, it's about 0-1 FPS change, so I still leave it at max, but that's on me.
18. Water reflections make liquids look less dull. Leave it on for quality.
19. Snow Quality can be a performance hungry thing in the Iceborn's frosty location. Low looks really bad and you will probably notice it during the hunts, max looks great but it will take about 8-10 frames away from you. Medium is a good compromise of looks and performance. You will not see the difference during the hunts probably.
20. SH Diffuse quality should be low, end of story. Practically doesn't change much and gives about 5 frames.
21. I cannot truly say anything about it because I have an old monitor that doesn't support HDR. If you're not sure - leave it off. Settings in russian also have a small additional detail which states that you may not see any changes even on a good monitor.
22-24. Motion blur and depth of field are absolute useless and serve no purpose but to take away your 2 frames and make hunts sometimes harder. I myself like Vignette, but because of the changes we'll make later on I leave it Off in the base game.
25. Z-Prepass changes depth calculations. Depending on the system may either increase or decrease your performance. It gives a frame boost in my case, so I leave it on.
2. Tools to push the game even further.
Here I'll list all you need to install/download for the biggest improvements.
Less go:

1. Free High-Res Texture pack on Steam: Steam link
This one speaks for itself. It makes the game textures WAY WAAAAY better. In my cases it goes over the 6GB VRAM my card has, but the game still runs smoothly.

Just go to the game settings and switch "Full" textures to "High Res", it will restart the game. Do it first before any further changes (although it won't change much if you won't).

2. Bloom reduction/removal:
link[www.nexusmods.com]
Bloom has been the bane of my eyes for a long time in this game, especially in the snowy locations where everything just blinds you. I myself choose to download the complete Bloom removal. To install it simply click on "Manual download - slow download", then unpack the .zip file in your game's root folder (the one with .exe), which should be located in E:\Steam\steamapps\common\Monster Hunter World or whatever disc you store it on.

3. (Optional) Handler's face remake:
link[www.nexusmods.com]
Yep. That's all it does...... Just choose to manually download the first file (Cuter Handler Face Model (Post-IB) - Model Only) and unpack it into your game's root folder just like before.

4. Reshade and injector for it to work in DirectX 12 game:

4.1. Reshade: https://reshade.me
This tool is what's gonna transform your game. Open the page in your browser, go down to the bottom
and "Download ReShade 4.9.1". Just leave it in ANY folder you want. It doesn't have to
be in the games root. Now launch it.

This is the first thing you'll see. Click on the "Click here to select a game...", find Monster Hunter: World in the list and click "Use this application" (or something) at the bottom right corner.

You will be met with this selection. You must choose DirectX 10,11,12 one.

After that you will have this long list. Press skip for now, we will come back to it.

You have downloaded ReShade! Just close the window for now.

4.2. ReShade Injector Helper: link[www.nexusmods.com]
At some point devs ♥♥♥♥♥♥ up and made it so ReShade doesn't work with clients that run DirectX12.
This will help us with this little problem. Unpack the .zip into the root folder and replace files if it asks.
Now we need to come back to ReShade's launcher. Open it again, choose Monster Hunter, it will ask if you want to update or delete the reshade, choose "Update".
This time you pick EVERYTHING in that long list by clicking on "Uncheck all" two times.

After press the big edit button you've seen already.

Ignore my preset and screenshot locations. Your effects and textures should now have these locations (maybe different disc), with effects having a really long route. It's normal, my game is on disc E but it says C, it's fine if yours differs too.
Performance mode and Skip Tutorial - checked. Now press OK and close the window.
3. Launch and ReShade settings.
We're getting close, just a little left to do now!

For ReShade to work you'll need to launch your game every time with the Injector that we downloaded at the end of the previous part.

Just make a shortcut to it and place it on your desktop.
Now launch your game with injector, get to the character selection and load into one of the Town locations.
Now you should open the ReShade menu by pressing "Home" on your keyboard (it's above your arrows, a bit lower than Print Screen).
Here's my personal preset that I use:

1. Colourfulness makes the game less bleached and gives colours a new life.
2. AMD settings increases the sharpness without a big FPS hit, it's the best image sharpness tool in ReShade in terms of Quality/Performance.
3. ReShades FXAA is way better than the game's one. So turn off any AA in the game and just use this. Double FXAA (ReShade + Game) will cause it to look blurry.
4. Works really well with Coloufulness by making some colours more defined.
5. Vignette is just what I like to run with. In my opinion it looks better than the base game's one.
4. Fin.
Aaaaaaaaand we're done here!

Results/Screenshots: Imgur Link[imgur.com]
Imgur because Steam won't allow me to upload files that are over 2Mbs. Includes 3 screens + the one featured on this guide's preview.

And that's how I personally run my MH:W. To me the game looks really good, but a fair warning: before all of this I had a relatively low brightness set in-game, so everything looks fine to me. If yours is at the middle of the bar then you might want to lower it a bit.


And please don't forget to rate if this guide was useful!
75 Comments
Tamren Nov 2, 2024 @ 8:50pm 
Yes there are several updated utilities now, I use Reshade Injector Plus, it does not require any manual editing of files you just run it from the base MHW folder.
papi Nov 2, 2024 @ 8:37pm 
regarding reshade injector, just check this video i found https://www.youtube.com/watch?v=vD-sRVQgbGU
Tamren Dec 24, 2023 @ 5:45am 
I did some work on the problem and it turns out reshade 5.9.2 does indeed work with the post-november patch and the reshade injector. Follow this guide, but at step 4.2 after you unzip the reshade injector into the game folder do the following:

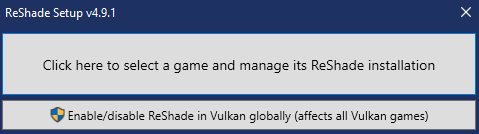
STEP 1: Open the reshade 5.9.2 installer in winrar or 7-zip and copy ReShade64.dll from the archive into the mhw game folder, overwriting the one installed by the injector.
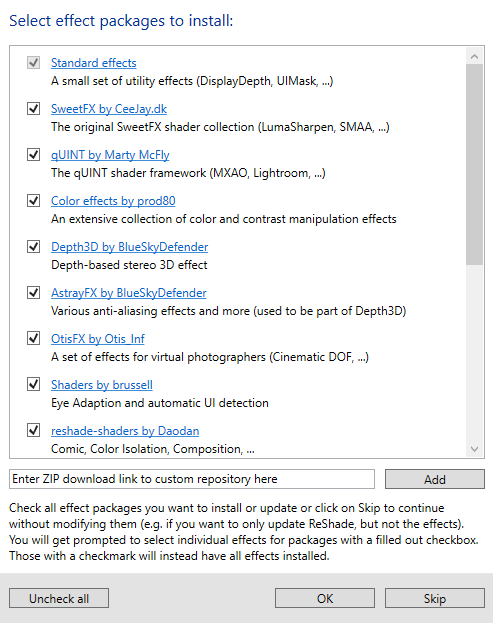
STEP 2: Run the reshade 5.9.2 setup program again and select Modify instead of Update (otherwise it will not download shaders), the setup has changed slightly since this guide was made.
STEP 3: From now on you must launch using the Injector Helper.exe otherwise Reshade will not load.
Tamren Dec 24, 2023 @ 3:56am 
Does this work with the current version of ReShade (5.9.2) or do I need to download 4.9.1 specifically?
AkuNaRahman Nov 8, 2023 @ 7:35pm 
My GTX1650 Cry a bit seeing this... Your workaround was good, but it just not for me right now... After getting 3060 or better I think... XD
Zé Braia Da Silva Jun 16, 2023 @ 12:41am 
Thanks brotther
old banyon Dec 17, 2021 @ 11:14am 
thanks a million! game looks great and runs waaaay better. well done man :steamthumbsup:
Wind Dec 17, 2021 @ 4:09am 
Just to update you on the issue I was having.
If I just run the injector and wait it will take several minutes to reach the main menu from launch.
If however I select the injector window and the game then boots in windowed mode in the background the boot time is almost immediate.
Tbh I have no idea why this is but at least I've got a work around now.
Holneer  [author] Dec 12, 2021 @ 7:49am 
3-4 minutes is indeed not normal, first time hearing about something like that. It should be around 5 seconds, about as much as the normal game launches, maybe 10 seconds tops with injector console opening first.
Wind Dec 12, 2021 @ 6:38am 
I have been doing that. Turns out the boot time for the game is now around 3-4 minutes. I'm assuming this isn't normal?
My hardware is more than enough the run the base game so there must be another problem.
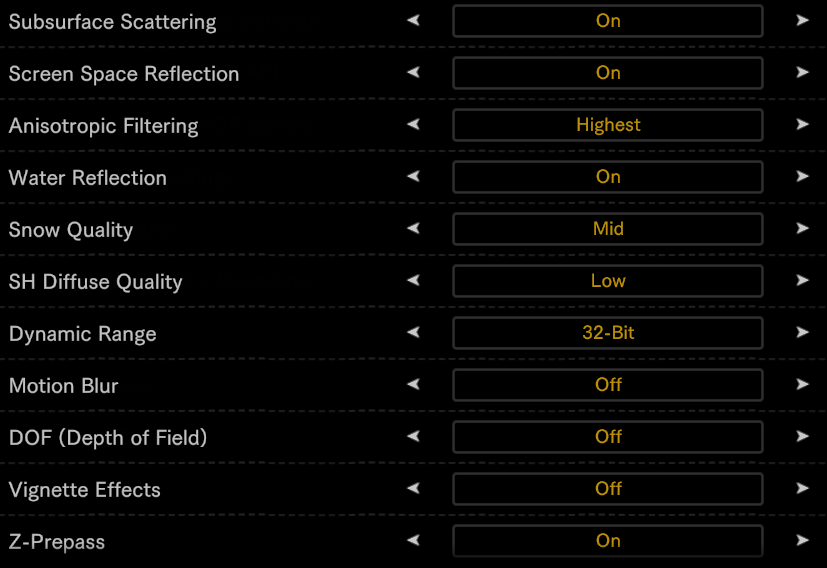
It does look fantastic btw.
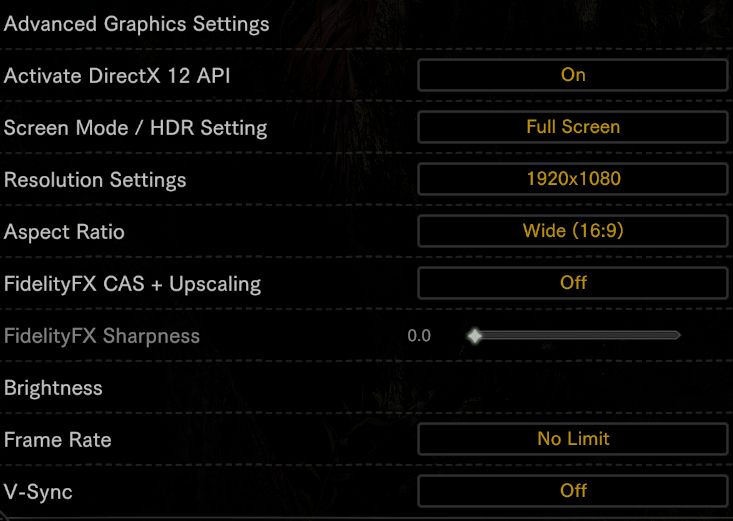
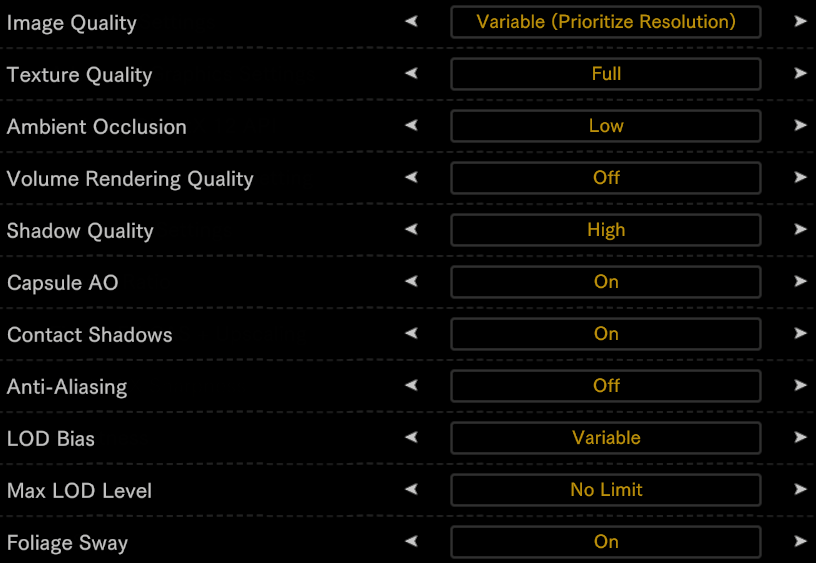
Volume Render being off also makes a World of difference, pun intended.