Spellcaster University

Spellcaster University

26 ratings
Basic Information and Startup Guide
By Sofia Dragon
Basic information about the game to help you start a new game strong and beat the Dark Lord!
   
Award
Favorite
Favorited
Unfavorite
Too Long! Gimmie the short, short version!
Get to the Help Book in game by clicking the gears in the lower left or hitting [esc] to read the tutorial information at any time.

Oh, was that too short? Here’s how I start a campaign:

Pick the Lake location first and select either of the options that give you classrooms. Arcane/Alchemy is a great starter because of the permanent bonuses even lower-level futures can give in those schools, but Light/Shadow is heaps of fun too. It just doesn't give you as many cards as the Arcane/Alchemy start. For beginning of game choices: take nature mana from peasant faction so you don’t start the game with someone angry at you, then round out the last two classroom types using the starter money if possible. Take an advanced room instead of gold from the king, as that doesn't count as a draw that increases the cost of the next card.

Pick star quests that are simpler for the first round: specialize in the magic type you have the most rooms for. For “train a certain number of this profession” quests, the ones with lower numbers are harder professions to get. Twenty Priests is easy, three dragon riders can be tricky, and if it is asking you to get just one forget about it for the first two schools unless you are playing the longest game on the easiest difficulty setting.

The lake quest is completed via the communications on the left hand side, but can be put on hold and accessed any time and failing it doesn’t affect your star rating. For stage one you need either three refectories or an aquarium pet (alchemy deck.) A level three refectory doesn’t count, it must be three rooms. In stage two collect four different dragons (the fairy dragon counts.) The quest unlocks a huge buff to all students until the end of this round, so it can really kick-start your campaign snowball by getting lots of great student futures with permanent bonuses right from the first map if you get it done early enough.

Go to the king to ask him to beat back the forces of evil to stall for time, or get items to make the Dark Lord like you enough to hit 75 reputation to slow him down. The Portal/Demonology combo and graduating Deepfolk also slows him down, but he is inevitable.
Decks and Basic Mechanics
This is a card-based game where you spend one of six deck-specific currencies to draw three cards, picking one to take into your hand. The goal is to build a fantastic school using these cards that turns out highly educated students with bright futures.

Each time you draw a card, the deck becomes more expensive. At the most basic level, the more cards you draw the more options you have so you want to start drawing cards from all decks as fast as possible. At the start you only have gold, which is used for the castle deck. This deck is used for general castle services such as dorms, but also for the general classrooms. Always take a general classroom if you don't have it already so that you can start teaching that type of class and drawing from that specialized deck. Short term, this is your primary goal: make more mana.

For example: the Shadow room is a general classroom teaching all three types of shadow magic (Necromancy, Demonology, and Assassination) at the same time. You get this card from the castle deck, allowing you to start earning Shadow Mana points. It teaches these subjects slower than a specialized room, but the special rooms are only drawn from the shadow deck using Shadow points.
Over time you will get a feel for the themes of the decks. There are a lot of decor items that give bonuses of all kinds and can even tech students while they sleep!

Rarely, you can draw student cards from several decks, giving you 5 new students as soon as it is played: Vampires from Shadow, Elves from Light, Half-Orcs from Alchemy, etc. You also get some new human students every season and can purchase/acquire student cards from different factions on the map if certain events are going on, such as non-human refugees at the merchant camp or vampires from the cemetery. There are even some items that will increase the chances that you will get non-humans in your regular applications. More students, more mana generation, more cards drawn!
What is Winning?
For the campaign, the first six schools you build are all about getting students to graduate and become something amazing. A student with a great future will grant a permanent bonus, like getting mana every time you draw a card or gold every time you speak to a specific person (even if they contact you!) Less prestigious futures, like shepherds and peasants, will grant you an immediate one-time bonus. This is great for that round and can give you tons of mana or reputation to spend right now, but won’t help you when you rebuild at the next location. The end game objective is to complete a bunch of missions in the seventh location, and all of the permanent bonuses you have collected over the course of the game stack so that you can reach those lofty goals.

Think of it as you have students out in the world being awesome Archmages, teachers, Litches and so on, and you get kickbacks. Also, dead or crappy students just get you kicked. More prestige means more students to choose from, so students that hurt your prestige when they graduate are a problem. That goes double for Deepfolk, because high-prestige futures for them push the Dark Lord's progress back.

For each round, you will acquire 3 “Star quests” over the first year of the game through communications pop-ups. There tends to be one to make a whole bunch of mana of one type, one to train certain skills and get a number of specific futures, and one that is story-based. The more stars you get, the better the spell book you collect at the end of the round. Each spell book takes up a place on the shelf in the headmaster’s office and conveys a permanent boost of some kind. There are quite a few. They can be a mild boost to incoming student’s intelligence, an efficiency boost to every room on the same floor as a Rune Scriptorium, or just a heap of money delivered once a year [ostensibly from using Time Magic to cheat at sports betting, which I find hilarious.] I think the best one is reduced cost increases for drawing cards from any deck. The sheer amount of savings that discount provides is staggering, and rolling that one early makes the whole campaign go much smoother.

You also must choose one of three cursed scrolls at the end of each round. As far as I can tell, being utter garbage and getting no stars does not make the curses any worse and playing like a master with three stars before the Dark Lord is even halfway to the school doesn’t make them any better. How well you play only seems to affect the spell books, with the cursed scrolls being completely random. You can pick curses that your existing buffs directly counter, or that your playstyle has no trouble with.

Some spells and curses drastically change the game and others are fairly invisible. Having all the students misbehave more often makes for a chaotic game where Drooler pets, Janitor rooms, and void potions are much more valuable. The bonus for floors with a Rune Scriptorium makes you spam Runes’ classrooms up and down your school, basically meaning you will always be focused on Runes/Alchemy to a certain extent, changing what quests will be easiest to complete.
The Headmaster's Office
Easily overlooked, this room is accessed via the green book in the lower left. The scroll on the desk sets school policy, and it is important to adjust the policy as you move from early to late game. Early game you need money and turnover, so making both dorms and meals paid, taking all students with no or low application fees, and shaving a year off will get you the gold to build from the castle deck and those first few graduations quickly. Later, filtering students to suit your strategy and making dorms or meals free (but more efficient) can get students back to class as quick as possible.

Using the Organic Meals option takes planning ahead: Stables(1 high 2 wide) and Greenhouses (1 high 2 wide, air above w/ no upper connection) next to the refectory increase efficiency, but the upkeep cost is doubled so it costs you gold instead of making it. (Find upkeep costs in the statistics book in the lower left of the main game window.) It can help on higher difficulty levels, but you have to build the school with that in mind and leave empty space around the refectories for the stables and greenhouses to be built later.

On the wall is a listing of all the potential futures your students have achieved. Each time a student graduates as something new, it will unlock the line here. It starts completely blank, but is useful for figuring out the conditions for challenges. Want to know how to train more Archmages [four level 4 skills]? Need to train twenty priests? If you trained one of any profession at any point in a campaign, you could check here to see how to make more. Unfortunately, you don’t unlock this information across campaigns, and need to discover it again each time. I’m hoping that gets changed in an update as it is quite annoying.
Rooms and Capacity
Building rooms can be done without care for the laws of physics so long as they have a valid connection to some part of the existing building or the ground. The only exception is rooms that only connect vertically can’t be put on the ground floor, even if there is a room above them. You can also leave holes to be filled in later. Elves get a bonus when learning on higher floors (floor 4 and above)

Rooms come in several sizes: One tile, two tiles vertical, two tiles horizontal, three tiles vertical, and four tiles square. No room has more than two tiles of ‘useable’ space. Rooms like the Observatory that have a red line above them look like they are two tiles high, but are technically an extra tile higher than they look (for a total of three tiles in that case) and do not connect to rooms above them. They can be built around by stacking rooms next to them, but the “unused” top tiles require a bit more planning or you can bloc yourself from building higher at all. The greenhouse is another ‘red-line’ room, but as the ‘used’ space is two blocks long it functionally takes up four squares. Each room card has markings showing how it connects to other rooms. Doors on the right and left are indicated with grey bars and the black door in the background is a stairwell to go up/down. Rooms without the door only connect side to side and rooms without the grey bars only connect up/down.

Most one-tile wide rooms hold three students and two-tile wide rooms hold five, even if they are multiple tiles tall. Exceptions include the refectory (10) and the psychologist (1.) You can usually count chairs/beds to see the capacity. If you get a second copy of a room card, you can play a room card on top of an existing room of the same type to level it up or place a second copy of the room elsewhere. Students use either copy of the room semi-randomly, preferring closer rooms. They only reserve a seat in class once the teacher starts teaching and that seat is held for them during their travel time to the seat, so organizing rooms together by type can help cut down the time taken up just getting to class. Keep in mind that students will also use dorms and refectories in the same way, so the dorm all the way to the left and the one all the way to the right will likely see different students based on what classrooms are nearby.

While it is nice to get all the rooms built as soon as they get into your hand so they can start making mana, occasionally quests will require you to have a room card in your hand to pick certain options. This guide is more for general information, so I won’t list them all out here, but generally speaking the chances of getting the event isn’t so great that you should be sitting on a handful of rooms unless you are well ahead of the game. Other cards are more commonly needed in hand for quests, like certain potions or décor items, and most quests with a room requirement need you to have built the room in your school.

The Gazebo is a unique shape. It is a 1 by 3 room that only connects to one side on the middle. You place it using the bottom square, clicking one tile below where you want it to connect. Like all rooms, it can hover in the air using magical pillars, but it must connect from the side to the middle of the three tiles it takes up. Also, since it only connects to one side it is a dead end on seven of its eight faces, so look carefully at the card and expect to hold it in your hand for a while before placing it in just the right spot.

Update: Common rooms are 1 by 2 and only connect on the right.

The Trophy Room: I like to leave a one-tile blank in the middle of four general education rooms at the start of the game for a Trophy Room (light mana deck) – a room that gives the bonuses for all the décor items inside it to the four adjacent rooms. Since all gen-ed rooms connect vertically and horizontally this is relatively easy to engineer. Ivy’s area of effect buff doesn’t stack with the Trophy room, it is still limited to adjacent rooms only, so putting that in the trophy room is a bit of a waste. You can also put one down next to the rooms associated with your quests, but having the bonuses for all the items in the trophy room going to four different gen-ed rooms means all or nearly all of the student population will touch those and it is something I can easily set-up before even knowing what the quests will be. I can always set-up a second one next to the quest rooms, especially since I’ll want two of each of those. Jamming it full of items that teach magic and wrapping it in dorms/refectories, libraries, a Portal room, or other rooms without a teacher is also a decent strategy as those rooms are never left idle while the teacher goes to tend their needs. Combining a stuffed Trophy Room with the Priesthood card (light mana) on an adjacent room, which removes a teacher’s needs for sleep and food, or the Mentor Card (alchemy mana,) which makes a teacher much better at teaching students, can boost up one of those Gen-ed rooms into a high-speed learning center rocketing students to the top of their field. Just because you have a quest to focus on a few select types of magic doesn’t mean that you don’t want the students from your other houses to become a bunch of village mages and peasants.

You will want to have a several rooms teaching skills related to your star missions. Need both Herbalism and Sacred magic to train up healers? Having two rooms for each means that if one teacher is taking a break the other one is likely teaching and if one room is full students can fill the other. You can also have more rooms teach these subjects by putting items that teach those skills either in the room of the other type (like putting a stained glass window in a greenhouse) or in dorms, common rooms, libraries, and refectories.

Reasons to level up rooms:
Rooms might have secondary effects that can be unlocked by leveling them up. The portal room, which is especially great because it doesn't require a teacher, will teach demonology as well as portal magic if you level it up. This is awesome because of an item that pushes the forces of evil back for any student who graduates based on the reputation gain of their future if they have levels of both portal and demon magic. Not all rooms have additional effects, and they are not listed on the card – you must click on a room you have placed to inspect it to see what else it can do. Inactive effects appear shadowed with a red number next to them indicating how many levels you must spend unlock the effect. Active effects have a blue-backed number. For example: Enchantment classrooms can make ‘unfinished golem’ statues at level 2. At level 6, a temporal room will occasionally create another temporal room card!

Visually, level 0, 1, and 2 rooms are distinct with level 2 rooms being the ‘complete’ version. This is just cosmetic, as you can improve a room beyond level 2 even though it looks the same. Click on the room to see the efficiency level, which only increases 10% for each level. Room efficiency is also affected by how clean the rooms is, graffiti, any item bonuses, the teacher, and any global modifiers like curses and spell books you gathered in previous locations. A high-level room with a great teacher (or one with a bonus such as Mentor applied to them) near service rooms can match two lower-level rooms with a long commute. There is also a build height and width limit for each map location, so on smaller maps you really need to pick which rooms you duplicate and stack levels for the rest.
The Castle Deck
While the specialized decks seem like where the exciting stuff is, don't neglect that castle deck. It takes less time for students to walk and can be much more efficient to have enough dorms and refectories (cafeterias) to keep most of the students in the castle instead of walking home to eat and rest. Items like the Stained Glass Window (Sacred, Light Deck) teach magic to any “active” student in the room – meaning anyone using the room, but not those passing through. Pop one of those on the wall and students will learn and generate mana while they eat, relax, or sleep! Much better than letting them go home to take care of their needs.

The new House common rooms lets students fill their needs while also giving them a powerful temporary buff. Due to their shape (only connecting on the top, bottom, and right hand side of the 1 wide 2 tall room) I've taken to stacking these along the left hand of the build area and having a bit of a "house floor" where many of their house-specific rooms are clustered. Bonuses that let you start a level with common rooms can really help with organization.

You can also purchase refectories quite cheaply from the local village, so doing that and using the card draw for other things can be a good plan to save gold (especially late game when the card draw costs much, much more than the modest fee the villagers charge.) Keep in mind that map communication is on a timer, so using your magical guinea pig for this means you didn't use it for something else - and on some maps you have missions that take up a lot of the guinea pig time. Getting a pig chamber can speed that up, but you need idle students to fill it up with. You could game the system by turning off all types of magical study for the no-buff "general house" that you start each level with and toss a few of the dumbest students at it, but without study items in dorms and refectories they will have very poor futures. The other option is to move some students who have completed level 5 study into that house, essentially ending their formal studies early.
More Students or Better students?
In the beginning, you need warm bodies filling up every available room slot. The castle will only have a few beds and a single refectory, but since some students will eat/sleep while others are in class you need far less than one bed per student to keep most of them in the school. For large maps like the desert or Forest where you can continue to plop down rooms with little concern for space, going with a “more is more” approach will win the game easily. Students that can’t find a class will go tend to their needs even if their need bars are quite small, so they will be ready to go the distance when a slot does open up. At normal or lower difficulty, the efficiency loss from taking as many students as possible isn’t that big of a deal, so long as you sort them into houses with no more than one forbidden magic type so they can go build some other skills if their high-priority classes are all full.

Houses break up the student body. Rather than keeping them always equal in size, put more students where they have more to do. A house that does three types of magic has more classroom space than a house that does two.

Later in the game when you have enough prestige to get five or so applicants each season, go back into the Headmaster’s office to pre-filter applicants. That reduces the number of applicants, but increases their quality. You may need to do this earlier to counteract certain curses, and which filter you pick can be complimented by the items you have in the school. Diagrams on the walls can make students smarter, repentant beds and inspiring teachers can remove flaws, but it is always better to start off on the right foot than to take on a project if you consistently see students leaving the school to tend needs at home when their needs are not completely empty.

Feel free to dump that Dumb student with unfortunate negative traits instead of sorting them into one of the houses you've made after the first year, especially if they aren't going to be around for a long time. They will just end up in a no or negative prestige future and will have taken up a room slot in the meantime. Students come for a certain number of years, as stated on their application, and you can’t expel them for being a nuisance, so after the first year you really shouldn’t accept students who are set up to fail (dumb and poor in a 3 year course.) When the school is small in that first year the travel times are so short and there are enough open slots that a dumb student can still get enough class time to end up giving you some mana when they graduate, and putting them in an Athletic house with a focus bonus (Chosen by the Light, for example) can help that out further, but in mid- game with a crowded school they may end up dead or with a -1 reputation future no matter what else you've done. Late game you may have stacked enough buffs and collected enough diagrams to increase inteligence that it simply doesn't matter how dumb they are.

Of course, a Dumb student with four positive traits or no negative ones might be worth it anyway even on harder difficulty challenge modes. Like in real life, a wealthy student might get in so they can generate gold despite being an objectively terrible student. Dumping the student can also mean just putting them in the general class with all magic types forbidden so they exclusively use self-study rooms and are forced into contact with diagrams in libraries and Spell Books in dorms to gain specialties and become less useless. After all, more is more in this game and at the very least they can stand around in the Pig Chamber getting you more chances to talk to people.
Setting up the Houses
There are a lot of ways to set up your first houses. I recommend only using one of your starting house cards at the very beginning of the game and just dropping everyone into it for the initial setup phase. You can set up the other house(s) once you know what one or two of your star goals are.
  • You can set up the first two houses with opposing priorities: A Shadow house full of people allergic to crustations forbidden from alchemy and an Alchemist house full of claustrophobics forbidden from Shadow magic, for example, so that the Shadow house members are never taking up slots in the Alchemy classes and vice versa. The other magic types are allowed for when Shadow and Alchemy rooms are full, but students will go out of their way to get to a class from their focus.
  • I once made five houses in a later-game map, each specializing in a different magic type and forbidden from a magic type, but in a pentagram system where every possible combination was available. This can be done with as few as three houses and really gets a wide range of futures for your students. If you have some classrooms and want to use one of your early-game Castle Deck draws to get the third house you can set this up from the start. This is an alternate strategy for the Lake map if you chose to start with four houses. Don't use the General class as a third house for very long or at all if you can help it, the lack of additional traits is a real drag on their productivity.
  • Alternately, you can have one a jack of all trades house (with that perk and something like Athletic, Comic, or Worker) for Dumb or otherwise sub-optimal students to keep classes full outside of your main quest house and go full elitist with only selecting the best for your Ambitious quest house.
  • If you get bad RNG for study traits on your first house, it can likely be set up as a dungeon-busting group of courageous adventurers and then you can get the star quest houses set up later. I'm no expert on dungeons, honestly I tend to forget to do them, and there are some specific guides for that that explain that part of the game better than I ever could. Yes, I've beaten the game on a higher difficulty level without doing a single dungeon. Was it harder than it needed to be? Well, yes. Yes it was. I don't recommend skipping dungeons as a play style. They are very valuable and can really springboard a level from "doing OK" to "winning so much you can't win any harder." So outfit one of your houses (usually the shadow magic one) accordingly.

Color-coding and naming makes sorting students quick and easy, even if you have to re-do your houses after the quest set-up phase. You can also draw a new house from the castle deck after the three star quests have kicked off and resort the entire population if you want. That isn't necessary, really, I'm just saying that you can. Since I tend to only make one house at the start and only play my other house card(s) after I know my training goal I end up pulling the students with the best fit into other houses at that time, but moving a student to different houses can also help you with getting those Archmages - level 4 in 4 types of magic. The buff from them is awesome and you can rub it in the other headmaster's face if you've had one graduate in an earlier level when he comes to gloat about his own Archmage graduates.

I tend to name the houses based on an aversion, like the Green-robed House of “Goth Kids” (Goths have a -50% light magic debuff) that specialize in and prioritize nature magic and are forbidden from any Light magic classroom. You can change class priority, robe color, and the house name at any time, but not the house crest or traits. So, it is extremely easy to re-tool your houses after you get that first quest. Of course, this is harder if you have set up a house with two magic specialty buffs since that locks-in what two types of magic the house will be focused on, so try to just pick one specialty buff if you haven’t gotten your quests yet. Specialty buffs do stack, so putting a Child of Nature student in a house with that trait gives them Child of Nature x2 – a 50% learning buff!

This image is an example of a bad early game setup before the profession quest has been chosen. This is great if I need both Alchemy and Arcane magic specialties for a quest, but it is still early game and I don't know that yet, so this could make getting my quest profession more difficult than it has to be if I need only Arcane or Alchemy focus. (Or worse, none of the three options I have to chose from use Arcane or Alchemy at all!) That second trait could have been a buff like Gourmet, Athletic, or Light Sleeper to get them back into class faster after a break to tend their needs. Also, having no forbidden magic and three priorities on the orange house means that if the Kimir classes are full or not in session they will fill up places in use by the other house's priority. As the old saying goes: if everything is a priority then nothing is, so if I really want to keep the Orange robes out of the Alchemy and Arcane classes I should just forbid one or both of them and possibly drop one of their three priorities to normal level.

Steadfast is great since psychologist rooms have only one bed and you simply will never have enough of the smaller dorms that grant sanity restoration late game on maps that drain it. Ambitious or Diligent are great for a quest house and Comical is good for a Jack of All Trades house to keep the whole school from getting bored. Have fun with this and do a bit of role play with some fun house crests and names, there really are very few bad options for your houses on lower difficulty levels and the best way to figure out your play style is to experiment.

A house without a specialty isn't terrible, but it won't be as good for getting quests done as one with a specialty. That said, no buff is a bad buff except for no buff at all. So just don’t use the general class ‘house’ for long or for many students. The lack of traits makes it very inefficient. It is a good bucket to have to help re-sort students (which might need to happen after you choose the round’s quests) or as a place to put students temporarily when you get a large amount at once and want to go back and even out the numbers using students that could go either way once you get all the students with obvious aversions and specialties sorted out, so it does come in handy. I have left some students in there for a season or so to see if they pick up a specialty when I have the Spellbook decor item that grants random specialties in the refectory. Also, the achievement for having five houses won’t pop if you remove the general class – I think the game checks for six options during a sorting. So that Remove button really isn't worth pressing.

You will want to make one house your ‘quest goal’ house. For Healers you need to train Herbalism (nature) and Sacred (light) so for that quest a house that focuses on, or even better can only study Light and Nature will get that quest completed. For harder profession quests it might even be best to intentionally restrict the range of class types available, skipping over that Stable card every time to stack Greenhouse cards instead so that questing students don’t ‘waste time’ learning beast magic before you've trained enough Healers in herbalism.
12 Comments
Lemures Aug 21, 2022 @ 8:31am 
The forest level is exceptionally good to start, yes the students are poor but you can pilfer diamonds +400 gold from the sleeping troll continually if you started with nature magic. Thanks to your guide I also now know how to make better use of the guinea pigs. My second level I thought started badly because that's all I got but I was talking to the king every minute! Then struggled later levels not getting a single pig room. :cozydarkseer:
Sofia Dragon  [author] Jul 5, 2022 @ 1:57pm 
@worstcase11 Yeah, if I could change one thing I would be able to mirror rooms. The gazebo and common rooms only connecting on one side can be so frustrating! I've taken to making specialized floors, leaving a column on the left side for common rooms, but it can be tough very early game to wait to put down rooms in a better spot when you need those classrooms running! :hardhat:
worstcase11 Jun 27, 2022 @ 1:25pm 
@Sofia Dragon: I see what you mean - though the forest map actually has a slight debuff as in the students being relatively poor. Having less money coming in at the start is a tad bothersome but I think we can both agree that it is nothing compared to that awful learning debuff in the castle town map.
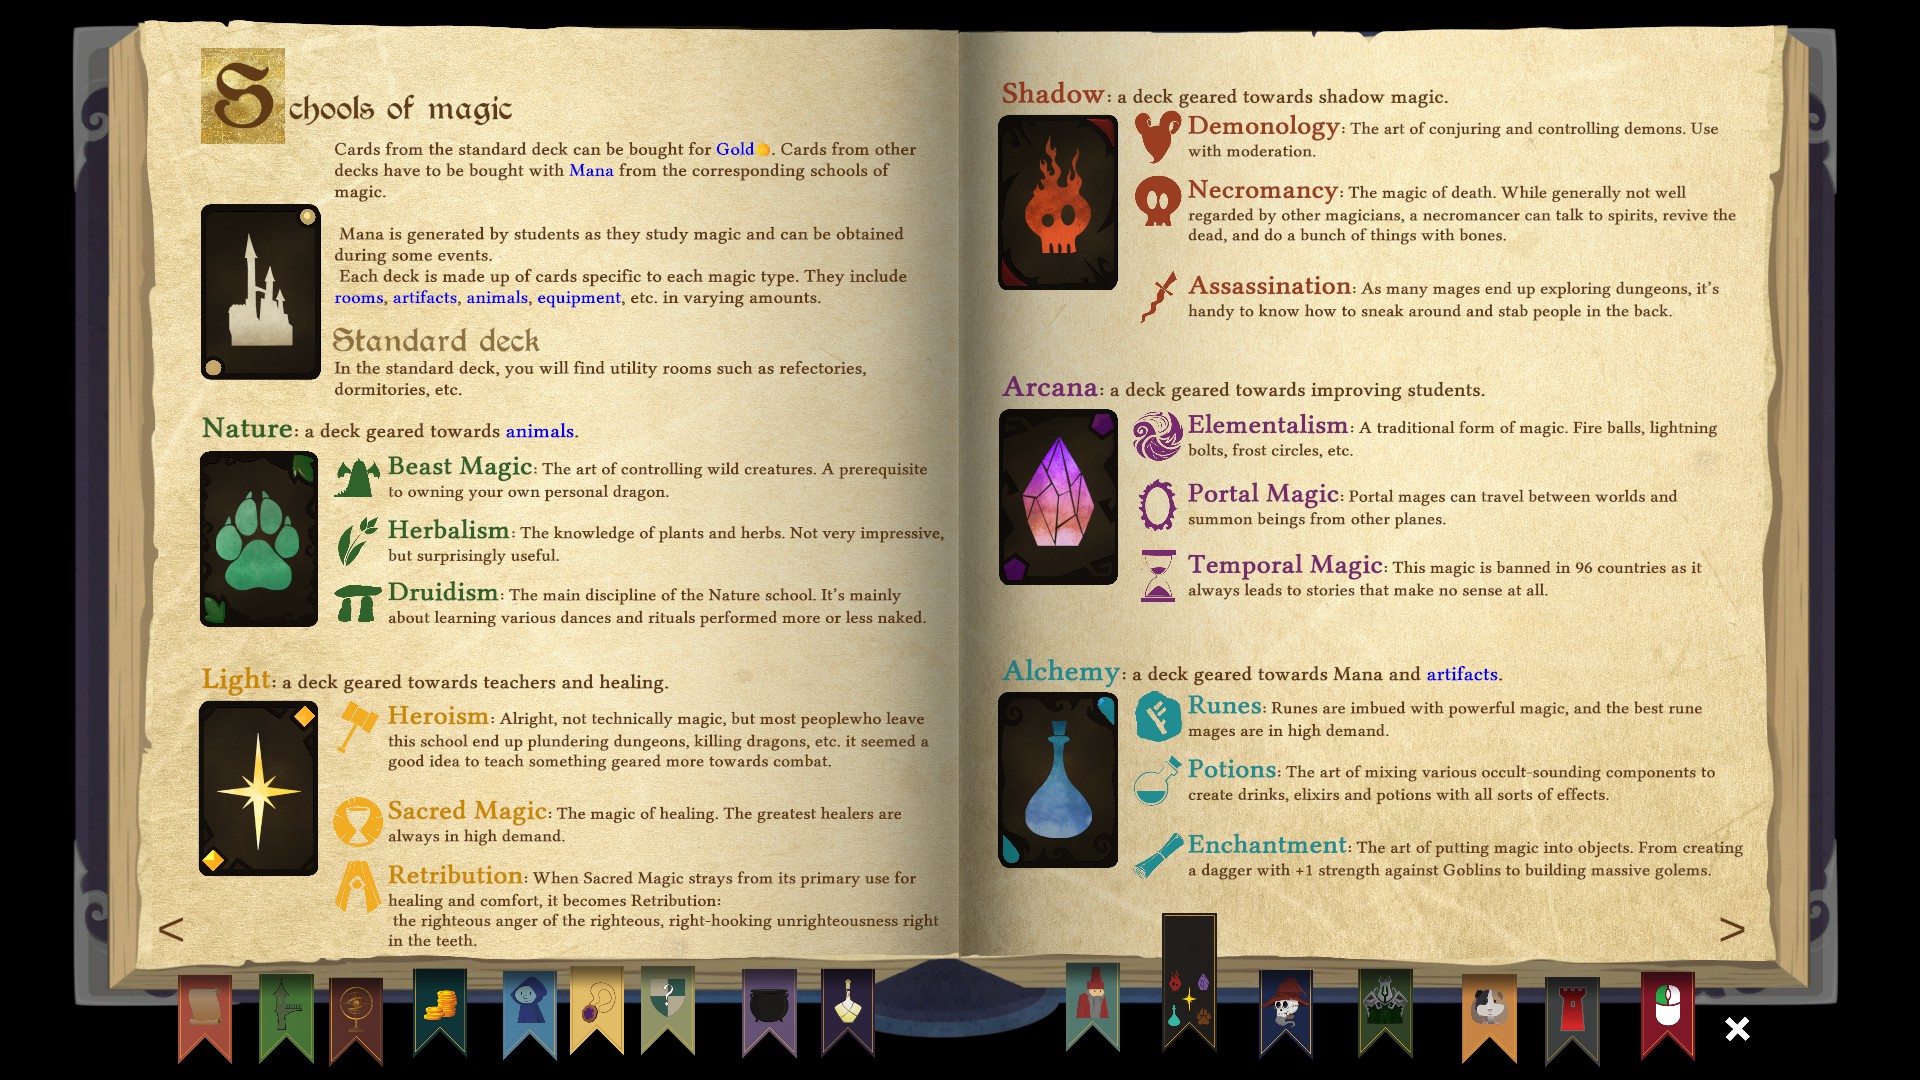
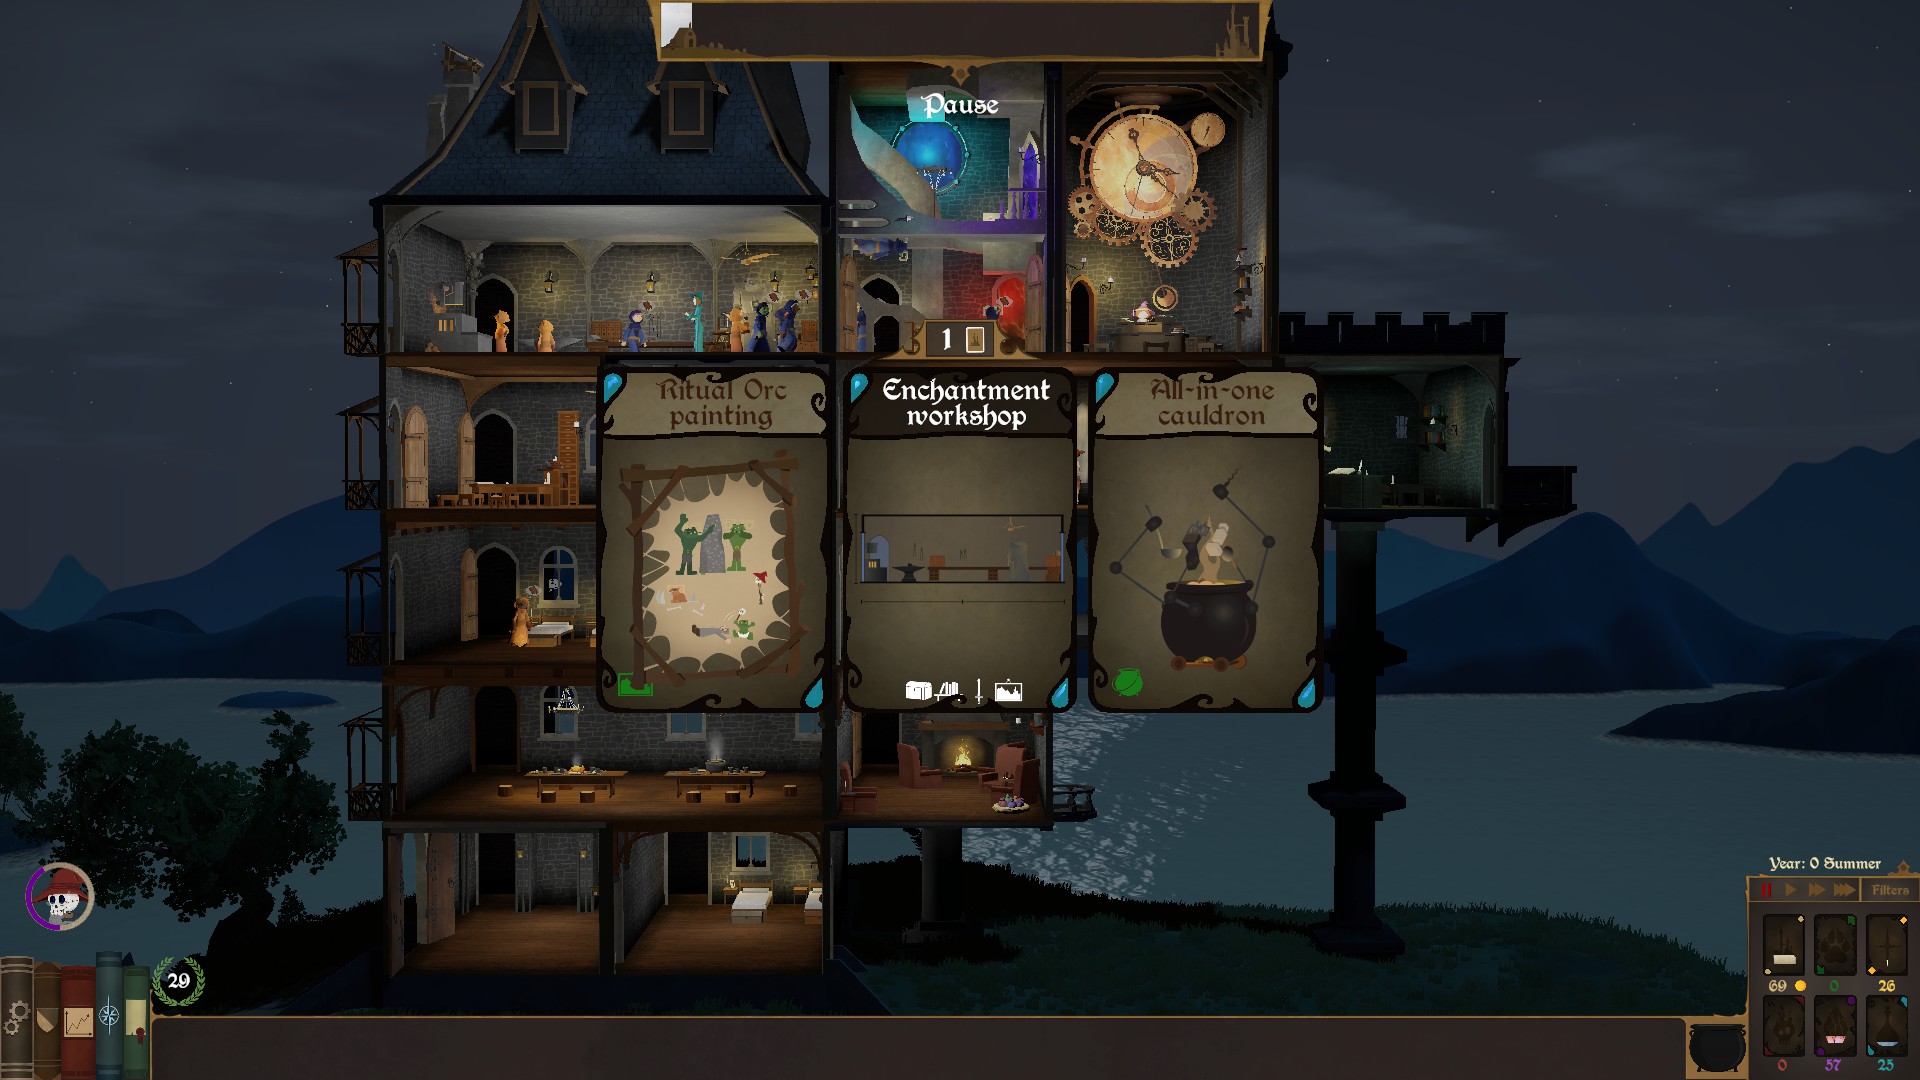
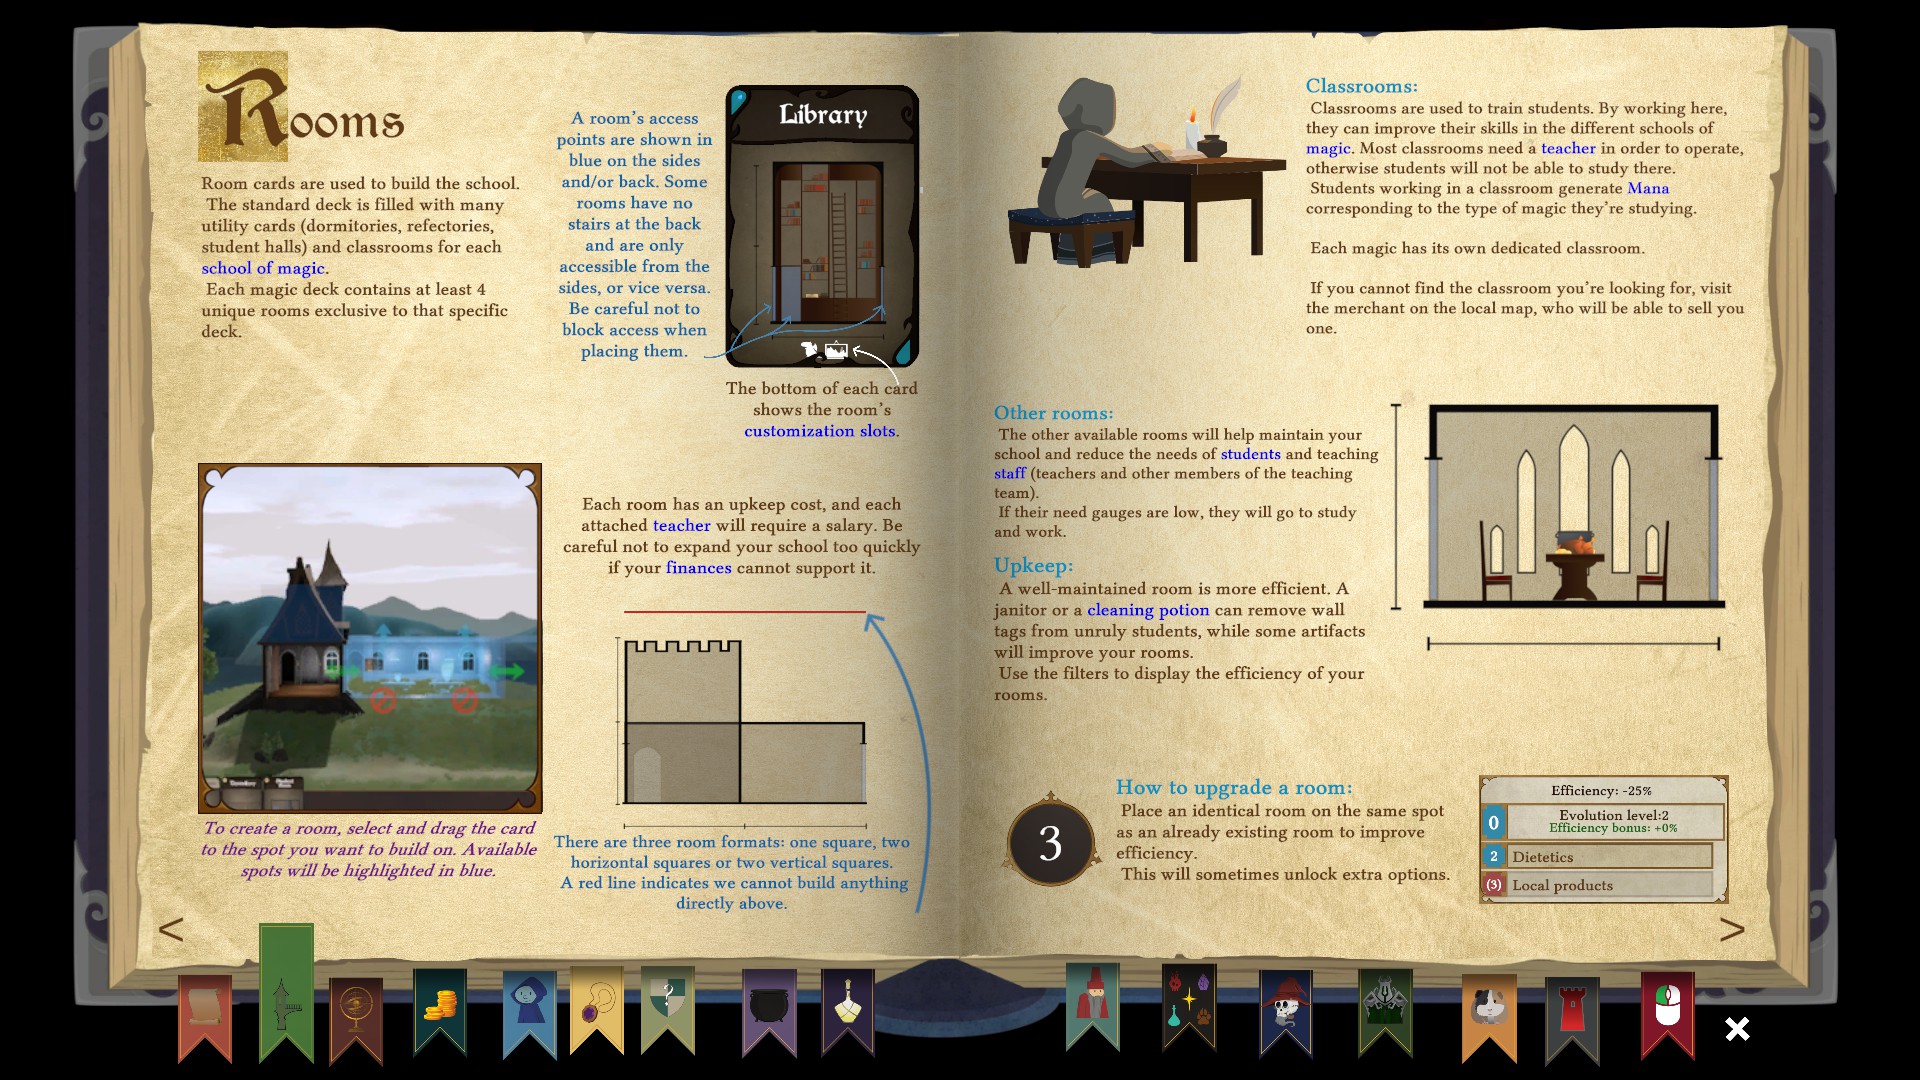
Guess it is a good idea for the starters to learn to puzzle the school together on a space limited map - with the addition of the new common rooms and the stadium it got quite a bit more challenging to not turn the school into a maze that throws the pathfinding off completely.
Sofia Dragon  [author] Jun 27, 2022 @ 1:09pm 
The forest map also has no debuff and is clearly meant as a beginner map since it is one of the first 3 choices given to the player. You just have to visit to lull the forest spirit back to sleep every so often with a relatively tiny bucket of mana, and there is a huge area to build in that a beginning player could never fill as a first map. It's a good sandbox to play in, but I'd suggest it as a second map because it is so open-ended and unfocused. A beginner does better with a clear goal until they understand the game mechanics. I sometimes save the forest until quite late game - even as my level 5 - so I can reap the rewards of all my accumulated buffs with no student debuffs to deal with and stack up archmages to the moon.
Sofia Dragon  [author] Jun 27, 2022 @ 1:08pm 
As a beginner strategy, picking the Lake as a first map is more valuable both as a strategy and as a learning tool. There is no debuff on the lake map, the only downside is the small build area which teaches planning. Nessie has a challenging enough quest that new players will learn a lot trying to complete it, but isn't so hard that they won't figure it out. Even a newbie can get a lot out of the dragon bonus before the Dark Lord attacks. So long as they keep their eyes on the goal and spam the king as I suggest, they are highly likely to get good value out of the dragon buff. While a more advanced player can get the aquarium and those 4 dragons as early as year 3 if picked later in the game, I wouldn't even suggest that to a beginner as a goal.
Sofia Dragon  [author] Jun 27, 2022 @ 1:08pm 
@worstcase11 TL;DR: You suggestion is a good one, but I geared this toward people who have played very little as a way to teach the game's mechanics. The joke in the beginning about reading the in-game tutorial book is semi-serious and that's who I've written this for.
worstcase11 Jun 26, 2022 @ 4:53pm 
Try a campaign once where you start in the Forest area and build a school in the Lake area on the third map instead :) It seems a bit more efficient because later on it is easier to get all the dragons together really early into the level - which allows your students to enjoy the effects of the lake monster blessing for quite a bit longer.
Sofia Dragon  [author] Jul 16, 2021 @ 5:54pm 
@Ontrose Feel free to write a guide specifically for the dungeons - there aren't so many guides for this game and a guide to dungeons would be very useful. As I said, I wrote about the parts of the game I know and enjoy best. I'm sure someone more passionate about the dungeons would do them better justice. There were only three guides here when I decided to write this and I spent a couple days on it.
Sofia Dragon  [author] Jul 16, 2021 @ 5:54pm 
@dbouya I've only played since release, but students look for the closest room with a seat left, by priority. They also seem to reserve their seat, so if someone closer becomes free that student can't snipe the spot and will march all the way across creation to sit in a different classroom (even of the same type.)

I've seen them just stand walking in place stuck on some piece of geometry for multiple game days, so glitches. It is possible that multiple students will reserve their seat on the same game tick and double-seat the class, but the character models have collision. I've never seen one student inside of another. They choose to go to the refectory or home when all classes are full or not in session for the tiniest sliver of a need, so even if it does get to a point where classes will get stuffed with more students then there are chairs it would require all of their needs to be taken care of first. All that travel time is highly inefficient.
Ontrose Jul 10, 2021 @ 7:44pm 
Truth to be told, i fully ignore traits midgame, cos the bonuses you get tend to outweigh them anyways.

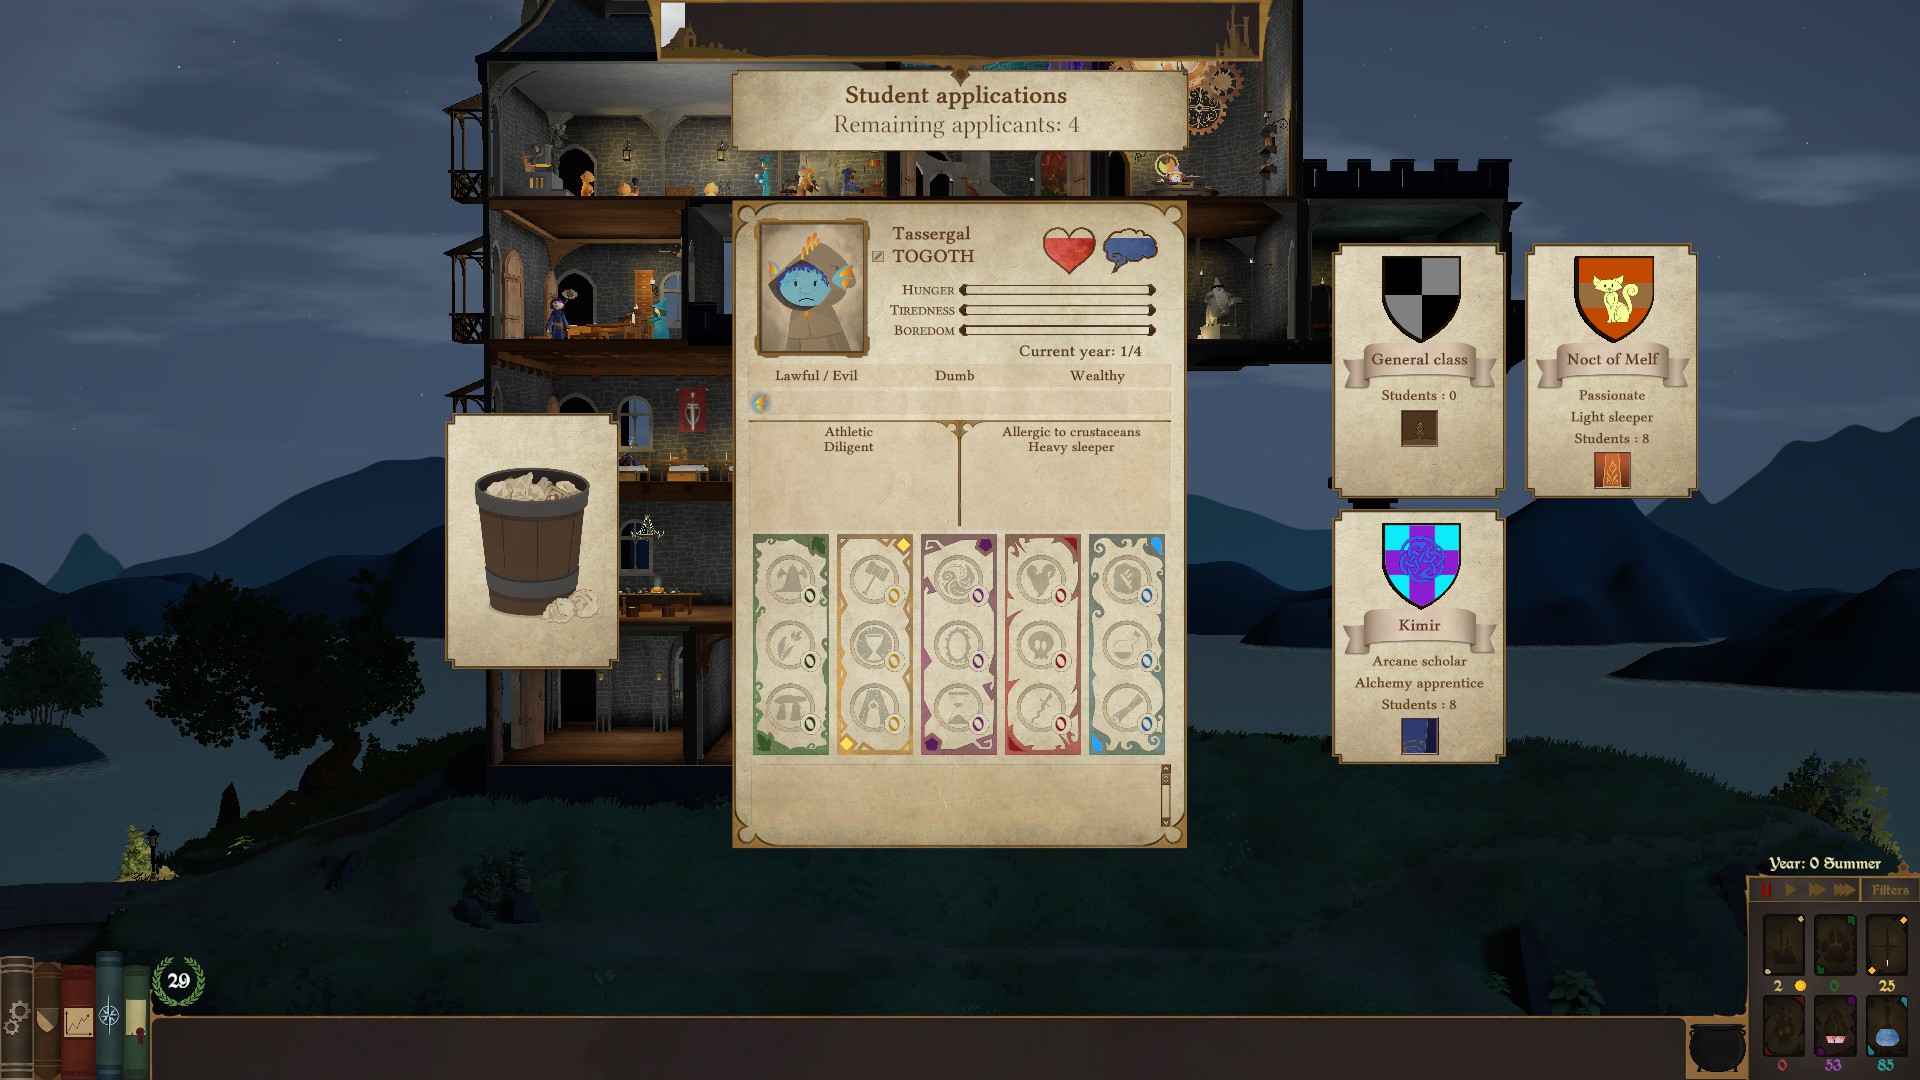
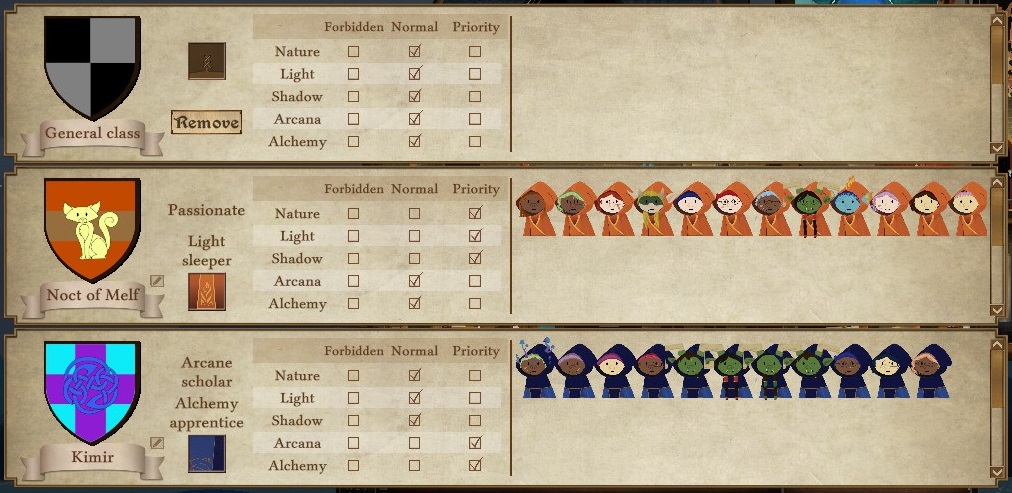
Only traits that matter are the 2 fighting traits for my dungeon groups. Courgeous and Unbreakable. Preferably on the house itself AND on the char so they stack. Best even on a werewolf ;)
If you like the game, you should really try building such a dungeongrp and see how far you can push them. If you want i can write down what i would put into the central trophy room for 4 of the 5 needed magic rooms