Library Of Ruina

Library Of Ruina

199 valoraciones
Silencing the Blue Ensemble to Moderato
Por Snakie
A guide on how to beat the Blue Reverberation Ensemble that includes deck builds, fight explanation, and strategy. Includes the final fight, the final final fight, and the final final final fight.
20
10
3
21
3
2
2
3
3
2
3
2
2
   
Premio
Favoritos
Favorito
Quitar
Introduction
Change Log of Updated Section: Perfectus
To Do: Continue in Limbus Company

Hello. Hi. It's me, ya boi. This intro is quite rushed, because it kinda is, but the information below are not. I just finished updating all of the Blue Ensemble section with the patch 1.1.0.3a1 in mind (28/5/2021 patch). I want to put this out as soon as possible so more people are able to enjoy the final story chapter without having to resort to questionable means. Yes, there will be easier ways and these are not " the most optimal." This works for me when my friends ask me to help them beat these fights, so I'll share it on the internet in hope that someone will find it useful.

By the way, you can't farm these fights. They won't give you more rewards.

Key: Bold and Underline are important so read it. Italic is usually my comment.

I don't think this should be said with how obvious it is, but alas, might as well.
SPOILERS AHEAD. I TRY MY BEST NOT TO SPOIL ANYTHING, BUT BE WARNED.
The Crying Children
Phillip in a Marbled Nut's Shell
OVERALL
  • Take NO damage from Burn.
  • Overheat: At 15 Burn stack, deals more damage while become Fatally vulnerable to all stagger damage.
  • Lots of Burn gonna be applied unto thee. Also all dice gain additional Power to half of his emotion level.
  • B U R N
PHASE 1
  • HP CANNOT GO LOWER THAN 60% [330]. CHANGE PHASE WHEN STAGGERED.
  • Ineffective against all damage, unless overheated, then fatal stagger.
  • While overheating, hit inflicts burn. Getting hit inflicts burn.
PHASE 2
  • HP CANNOT GO LOWER THAN 30% [165]. CHANGE PHASE WHEN STAGGERED.
  • Endured against all damage, unless overheated, then fatal stagger.
  • Spawn 4 Unspeaking Children with Overheat mechanic. Lower Phillip's Power per death.
PHASE 3
  • Normal resistance against all damage.
  • Hit inflicts burn. Getting hit inflicts burn.
  • Going nearly all offense.

Deck Recommendation
Any combination of burn deck works here, so go ham on your pyromaniac soul.

Solo Route

Page: Harold (Alt: Olivier or Hana Fixer)
Deck: Unlock x1, Will of the City x2, Fiery Dragon Slash x2, Fervid Emotion x3
Passive: Anton's Mind Hauler, Yuna's Lone Fixer, Miris's Fervor and Hugging Fire

Normally I wouldn't recommend solo builds in my guide since it is usually not the easiest way to do so, but this time, it *could* be easy, depending on your luck. Happy Memory on Fervid and Gluttony are required for this build, but these ones are common enough for you to get it consistently. Use Phillip's first phase to buff Unlock, then spam at least 1 counter 1 light regen every turn. There is no shame in restarting if your abnormality card selection isn't perfect.

Group Route


Page: Harold
Deck: Unlock x1, Clone x3, Will of the City x2, Fervid Emotions x3
Passive: Chun's Furious Fire Rending Sky, Miris's Hugging Fire Sitting on Brushwood, Sayo's Battle Ready and Dark Cloud Blade

An alternative version of the solo Harold, but this time, we will be using Clone to get the most out of Fervid Emotions and Happy Memories. Chun's passive should work in your favour in this scenario with barely any non-fire inducing card you will get. You want to use Clone as much as you could during his first phase, so you can spam Fervid on subsequent Scenes. Miris's passive is an added bonus so Phillip can get staggered easier.


Page: Nikolai
Deck: Energy Cycle, Unlock, Graze the Grass, Bulky Impact, Quick Suppression, Will of the City, Will of the Prescript, Concentration, Disposal
Passive: Hana Fixer's Four Trigrams, All of Rose's passives

Due to his passive slowly burning you, Nikolai's Finishing Touch should make killing him significantly faster, in addition to +1 STR/END team wide buff. Disposal is somewhat useful here as both panic button and clutch landing the killing blow on Phillip. Standard highlander charge deck with nothing fancy.


Page: Lowell
Deck: Wedging Thorn 3x, Flow of the Sword 2x, Will of the City 1x, Emotional Turbulence 1x, Bi An 1x, Forming Storm 1x
Passive: Carnival's Remembrance, Kurokumo Henchman's Razor Strike, and All of Salvador's passives

Despite not having any burn related passive, Lowell's Mass Attack is much appreciated for the 2nd Phase. Another burn deck to soften Phillip up.


Page: Irina
Deck: Wedging Thorn 3x, Flow of the Sword 2x, Will of the City 1x, Emotional Turbulence 1x, Bi An 1x, Fiery Waltz x1
Passive: Carnival's Remembrance, Liu Fixer's Fervor, Dante's Information Assessment

printf("Another burn deck");
Note: You can switch this with Xiao if you don't plan on using her on Hod's floor


Page: Yujin
Deck: To Overcome Crisis 2x, Unlock 2x, Bi An 2x, Fervid Emotion 3x
Passive: Valerie's Mind Hauler, Miris's Hugging Fire Sitting on Bushwood, Cecil's Firm as a Great Mountain and Fervor

Since Yujin benefits greatly from Fervid Emotion spam, she is a great addition to this floor. On top of that, she could be your dedicated Fourth Match Flame user too for a cost of 1 Light. Try to use Unlock for the first 4 Scenes, so you will be able to keep spamming Fervid later down the line.
Yes, I'm a Boundary of Death addict.


Page: Xiao
Deck: Wedging Thorn 2x, Unlock 1x, Fiery Dragon Slash 2x, Will of the City 1x, Chi Wen 1x, Bi An 1x, Jin Ni x1
Passive: Lulu's Flaming Bat, Miris's Hugging Fire Sitting on Bushwood, All of Crying Children's passives

In case you are not saving her for Hod, you would be using her here (or Yesod for that minion clear). It's another one of those standard burn deck, but you will be able to spam Mass Attack on Phase 2, or Phase 3 if you prefer.

Abnormality Selection: [Happy Memory + Gluttony] - Vital, [Display of Affection, Ashes, Spore, Barrier of Thorn] - Recommended.
EGO Priority: Fourth Match Flame, Wingbeat, The Forgotten, Hornet, Green Stem

Strategy - Burn Baby Burn
The way you are supposed to tackle this fight being out-burning and out-sustaining Phillip, so we are going to do exactly that! The first phase is your set-up phase. Get your Unlock, Happy Memory, and etc ready, but don't stay here for too long since you are running on borrowed time. Get 15 stack of burn on him, then go for stagger. Despairingly Stigmatise is the scariest card this phase, but do not underestimate his other offensive cards. DON'T GET BURNT TO CRISP.

Once you stagger him, he will get into 2nd phase, where he will spawn 4 children that you also need to kill in order to weaken him and end the reception. So yes, target them with mass attack and beat them to ashes. Just like Phillip, they will get softer with more burn. Phillip will begin shooting laser at you too, so be careful of that. Setting Children on fire is going to make this phase a lot easier, but it is not required. Focusing down the Children should be your first priority, second priority being clashing against his lasers, and third being stagger Phillip. Mass Attack for the win. Do note that he can gain +2 STR around the 2nd Scene in this phase, so beware of that.

Another stagger and you will get to his last phase, which he will open with a mass attack. He is significantly weakened in term of defense, but his offense is amplified. Overheat and overpower him until the fight ends. No tactic required here, just kill the man with everything you got. This is the last stretch with straightforward goal: Kill Phillip. Good luck!
The Church of Gears
Eileen in a Smoking Nutshell
  • Cannot be Staggered unless using Mass Attack. Health Threshold: 350 & 150.
  • Spawn with 4 Church of Gear minions, and always spawn more/regen health and stagger when hit HP threshold.
  • Use Mass Attack that when hit, makes nugget immobilise for a turn, whenever minion dies. Weakened during Mass Attack.
  • S M O K E

Deck Recommendation
NOTE: PUFFY BRUME IS RECOMMENDED ON ALL PAGES IF YOU WANT TO PLAY IT SAFE. I didn't put any here since I'm lazy and I didn't need it.


Page: Yan
Deck: Unlock, Sword of Volition, Forward March, Multislash, Will of the City, Will of the Prescript, Baleful Brand, Lock, Distorted Blade
Passive: Bono's Unstable Charge, Zulu's Deep Breaths, Lyra's Health Hauler and Corpse Clean Up (Mind Hauler works too), Arnold's Electric Shock

Mostly a support character for this fight. Baleful Brand and Will of the Prescript should be able to clash against the Mass Attack. Distorted Blade should be ready by third phase.


Page: Hubert
Deck: Frontal Assault, Unlock, Multislash, Flow of the Sword, Somber Procuration, Binding Chain, Great Serpent Impact, Will of the Prescript, Decapitation
Passive: Index Proselyte's Grace of the Prescript and Skim Prescript, Liu Fixer's Fervor, Mo's Electric Shock

Don't be fooled by Decapitation's high singular roll. It's there to Decapitate minions with low stagger/health, not clash with the Mass Attack. Since this fight is going to be fairly long, Proxies will be able to abuse their exclusives a lot more.


Page: Maxim
Deck: Energy Cycle, Unlock, Graze the Grass, Multislash, Bulky Impact, Strike Down, Will of the Prescript, Rhino Ram, Ground Smash
Passive: All of Rudolph's Passive

Standard highlander charge deck. Maximum Crash is super useful for killing minions, and Ground Smash should be used on the last phase only.


Page: Yae
Deck: Unlock x1, Wedging Thorn x2, Smoke Blow x1, Flesh Fillet 1x, Defense Order 1x, Will of the City x1, Bi An x1, Exhale Smoke x1
Passive: Wang's Sooty Wack, Jin's Stimulating Fumes, Puppet Page 2's Puppet Skeleton

Since you will be gaining quite a number of smoke if you get hit, Yae will be able to benefit from it. I made sure to not put too much smoke inflicting cards here since the minions benefit from them too.


Page: Gloria
Deck: Deck: Unlock, Gigigig, Multislash, Execute, Somber Procuration, Binding Chain, Will of the Prescript, Eradicate, Any 2-3 cost card to your liking
Passive: Index Proselyte's Grace of the Prescript and Skim Prescript, Liu Fixer's Fervor, Mo's Electric Shock

Eradicate is spammable all around due to Gloria's passive helping with the cost (sometimes).

Strategy
Kill Minions, Survive Mass Attacks, Beat Eileen. Simple, right? Well...

The difficulty of this fight comes from the high damage you will take from Smoke and the minion wave one after another. Thankfully (or not, depends on what you have on hand), Eileen's mass attack is a Summation that rolls twice instead of Individual.

Mass Attack spam is going to be pretty useful here to thin out the herd. I do recommend ignoring Eileen (unless clashing of course) until she uses mass attack or when there is 1-2 minions left. Do your best to kill minions ASAP and do not let Eileen buff them. Killing all minions will stagger her immediately.

Abnormality and EGO wise, as long as you don't pick Request (due to the fact that you will be locked to Eileen for a while) or Lament (Smoke doesn't count as ailment), you're free to pick any. Dark Flame is a great "no u" card if you get to the third tier.
Good luck!
The Eighth Chef
Greta in a Nutmeg
  • Start with 20 Resilience, and will gain 10 Resilience + Purge debuff every 5 scene.
  • Resilience: Debuff will lower this stack.
  • Always have 3 Protection, but take 3 more damage every hit when have bleed.
  • Can't be staggered, but take 100 damage when stagger reach 0.
  • HP can't go lower than 30% until Phase 2 is triggered, which is at 40% HP or lower [400].
  • Phase 2 has a One Hit Kill mechanic that can only be countered by Mass Attack
  • B L E E D

Deck Recommendation
I've heard Burn works better here, but that never goes well for me, so I'll stick with my extreme bleed build. Oh, and Xiao works perfectly on this fight too if you don't want Denis. Her Mass Attacks can be the insurance you are looking for.


Page: Dong-Hwan the Grade 1 Fixer
Deck: Draw of the Sword, Unlock, Wedging Thorn, Mangle, Snake Prey, Venomous Fang, Seize ya Chance, Will of the Prescript, Disgorge Innards
Passive: Red Mist's Strongest, Myo's Prowess, Gin's Deep Wound and Razor Strike

One of the main bleeder, and somewhat of an interceptor. Disgorge Innards should only be used during Sanguine Desire or against the defensive dices.


Page: Bamboo-hatted Kim
Deck: Draw of the Sword x2, Unlock x1, Serpent Sword Technique x1, Slay x2, Snake Slit x1, Overthrow x1, Bi An x1
Passive: Sayo's Dark Cloud Blade, Anton's Mind Hauler and Corpse Clean Up

Double as a bleeder and clasher. Don't expect him to beat that 8-15 dice, but other than that, he will be able to win most, if not, all the clashes. Ax/Look of the Day + Cocoon + Alertness is an extremely lethal combo that you should strive for.


Page: Purple Tear
Deck - Pierce Stance: Wedging Thorn 3x, Snake's Prey 2x, Gale Kick 1x, Venomous Fangs 2x, Laceration 1x
Deck - Guard Stance: Puppet Blockade, Smoking Pipe, Gigigig, Iron Wall, Will of the City, Will of the Prescript, Sturdy Defense, Serpentine Barrier, Bi An
Passive: Sayo's Battle Ready, Jack's Emergency Ration, Valerie's Mind Hauler and Corpse Cleanup

Pierce stance's double debuff proc is super useful against Greta. While you can make that stance self-sustainable, I went the full debuff route while using guard stance for resource regeneration deck. While Sword stance might be able to deal more damage, I find Pierce stance to be more useful here. In case you prefer the Sword stance, you can copy Kim's deck.


Page: Allen
Deck: Frontal Assault, Wedging Thorn, Extract Fuel, Dagger Press, Gale Kick, Venomous Fangs, Will of the City, Will of the Prescript, Stiletto
Passive: Dante's Information Assessment, All of Oscar's Passive

While Kim being the master of slash, Allen is the master of pierce. Although being less useful than Kim, his kit is useful enough to justify him being here, with Chenk in One's Armour being pretty useful.


Page: Eileen
Deck: Wedging Thorn 2x, Unlock x1, Defense Order 1x, Flesh Fillet 2x, Will of the City 2x, Bi An 1x, Ever-spinning Gearwheel 1x
Passive: Leafet Workshop's Smoke Overflow, Anton's Mind Hauler and Corpse Clean Up

While Smoke does not count for debuff, their universal increase in damage is a great utility to have. If you haven't done Eileen's fight, you should do it first. If you prefer not to, then you can substitute Eileen with either Yae or other page.

Strategy
The hardest fight in Asiyah section, and maybe even of all the fight in the Blue Reverb invitation.

There are two ways to tackle this fight: Bleed and Burn. I'm taking the Bleed route since it's the "intended" way. We don't talk about block and disarm.

How resilience work is simple. Any debuff applies to her removes a stack of it. When it reaches 0, that is when you can apply debuff. Surprisingly, Smoke does not count towards resilience, so you can get more damage in.

Why is this fight so difficult and infuriating sometime? She boasts a 6-10 x3 block that also applies you bleed when you lose clash. And on top of that, she has 6-18 dice on her combat page. To make it worse, she can bleed your nuggets out on top of raw unadulterated strength she got, and maybe even out-heal any damage you have done. Oh, and she can deletes your debuff every 5th scene, so better take note of the scene number.

So how do you tackle this? Well I'll divide it into two sections: Survive and Counterattack.

Survive 1st and 2nd Scene - When she is not beating the meat, do whatever you can to lower her resilience, HOWEVER, prioritise your own health and safety over damage. Block dices will be useful here. If you can overpower her, do so. Any damage in and bleed will stick nonetheless.

Counterattack on 3rd and 4th Scene - When she is beating the meat, REDIRECT MOST OF HER ATTACK. If you can stall her from killing the meat, she will take more time to beat it, and will not sack your nugget. During this, she will only use attack dices, so go ham on the offense. You can ignore the 7-18 dice for the sake of your sanity.

Repeat these steps until you knock her down to 400 HP. If you can put around 13-20 or more bleed onto her, it is wise to use Disgorge Innards on that for extra damage in. Alternatively, Sanguine Desire with a double digit bleed WILL drain her health super quick. I do recommend using Sanguine Desire only once on Phase 1 if you get it early. Using it on Phase 2 with her having at least 10 stack of bleed will secure that victory.

At the start of her Phase 2, she will sack one of your nugget. In order to prevent this, you use a mass attack to clash against it. However, she will continue to use it until one meat bag exist on the screen, so it might not be a bad idea to sacrifice one nugget for the greater good. After all, she will beat that meat until it dies, thus letting you bleed her out faster.

Abnormality pages wise, COCOON IS A MUST HAVE. That card is way too good to pass on since it lowers resilience significantly. I do suggest restarting if you can't get this card unless you want to suffer. Ax on Kim will do him greatly, along with Alertness. Obsession is a double-edge sword, but it might favour you more in the long run. Block-related cards are nice to have to absorb more damage, but you want to be on the offense here. Gooey Waste is your go-to for tier 3, though Well-worn Parasol and Loving Family could be useful for stalling. MEAL IS USELESS IN THIS FIGHT DO NOT TAKE IT.

I HIGHLY recommend getting Sanguine Desire ASAP to guarantee your victory. Red Eye is useful at deleting Resilience stack, and the mass attacks are your insurance when Greta tries to bag your nugget. Good luck!
The Musicians of Breman
Breman in a Shell Trumpet
  • Has three head, which each scene uses different head and deck. Once you stagger him, he will lose a speed dice and that head will not appear anymore and he will restore stagger next scene.
  • NEIGH!!! applies tag next scene, which you can steal a combat page from the enemy when you win any clashes with said page for one turn. These page will be in your deck once you use them.
  • Phase 2: Regain all speed dice, cannot be staggered. After using Mass Attack, will be fatally vulnerable to every type of damage.
  • D E B U F F

Deck Recommendation
Since all of your previously used cards will be unlocked after this fight, might as well use all of your strongest decks here.


Page: Olivier
Deck: Brace Up 2x, Stay Calm 3x, Will of the City 2x, True Trigram Formation 1x, Impugnatio Ultima 1x
Passive: Valerie's Mind Hauler and Corpse Cleanup, Hanafuda's Bottom Deal and Stacking the Deck

The strongest discard deck in this game. You want to use Impugnatio Ultima all the time, though if situation needed, True Trigram Formation is a decent substitution. Brace Up is basically free draw while Will of the City will be your light and secondary draw regeneration. Don't forget to use his passives!


Page: Ester
Deck: Frontal Assault, Unlock, Extract Fuel, Multislash, Execute, Steel Knuckles, Somber Procuration, Eliminate, Castigation
Passive: Index Proselyte's Grace of the Prescript and Skim Prescript, Liu Fixer's Fervor, Arnold's Electric Shock

standard_highlander_deck.txt


Page: Kalo
Deck: Reload 1x, Class and Respect 2x, Bayonet Combat 1x, Shock Round 1x, Will of the City 1x, Focus Fire 1x, Le Regole 1x, Bi An 1x
Passive: Sweeper's Corpse Clean Up, Jack's Emergency Ration, Liu Fixer's Fervor

Although a little hard to use, Kalo is going to stall your team's death a little with his passive. The gun is usually there for the final touching for either stagger or kill. He can also be your dedicated EGO user too.


Page: Bayard
Deck: Wedging Thorn 2x, Unlock 1x, Faultless Strike 1x, Will of the City 1x, Knock Back 2x, Bi An 1x, Ready Position 1x
Passive: Gyeong-Mi's Restfulness, Pamali's Wedge and Piercer, Lesti's Reaction Force and Dimensional Sections

Bayard's Pinpoint Breakthrough can and will stagger Breman at full stagger, paving the road for your team to bully the dog-donkey-chicken hybrid.


Page: Denis
Deck: Unlock 1x, Extract Fuel 2x, Reload 1x, Shock Round 1x, Concentrated Fire 2x, Will of the City 1x, Bi An 1x
Passive: Pamela's Wedge and Jolting Puncture, Rabbit's Sufficient Ammo, Liu Fixer's Fervor

Your dedicated piercer for this floor through Concentrated Fire. Give all of the pierce related passives to this guy and watch that stagger bar go bye bye.

Strategy
Easiest fight of Asiyah section. Kill minions, kill Breman. Simple!

Focus on the Gear minion first since he amplifies damage, then work your way through the puppets due to their annoyance. Mermaid will be your last minion target since she has high health, but you shouldn't have much problem on dunking her after her friends are killed. Remember to clash with Breman with your NEIGH nugget for free support cards, and also block him from buffing his teammates. Since Breman doesn't have a HP threshold, you can dumpster onto him with full force with zero repercussion.

Tentacle will make this fight even easier. Hitting 10 Pierce dice on Breman spells his doom due to his stagger resist bar will drop to 50 permanently, which is small enough for a gang of 5 to hit. Laughing Powder and Token of Friendship are your standard pick for this floor. Yeah that's pretty much it? Oh, and Good Luck!
The 8 O'Clock Circus
Explaining Oswald in a Shellfish Manner
  • Takes half stagger damage from attacks and deflects
  • Stupified: Targeted nugget is instantly staggered (can be countered with Mass Attack). After that scene, they will join Oswald side and targets your own nugget. Takes 5% of max stagger as stagger damage every hit. Once staggered, will join the librarian back again. Last 2 turns.
  • When Oswald's friends dies, he takes 40 stagger damage.
  • This fight is a joke. Pun intended.
  • C L O W N

Deck Recommendation
Strength in number works better than Exodia, but Exodia is funnier to achieve clown-to-clown communication.

Exodia Route
Page: Yujin
Deck: To Overcome Crisis 2x, Unlock 2x, Bi An 2x, Fervid Emotion 2x, Boundary of Death 1x
Passive: Valerie's Mind Hauler, Cecil's Firm as a Great Mountain and Fervor, Free 4 cost passive
Make sure to get Hatred, Despair, Greed, Wrath, and Nix on her to make the Exodia work. You can switch out Boundary of Death to another Fervid Emotion if you want.


Page: Rhino / Mei / Cecil / Udjat
Deck: Harpe 2x, Opportunity Spotted 3x, Stigmatised 1x, The Will of the City 1x, 333... 1973 1x, Unique Gold or any strong clasher 1x
Passive: Any survival passive leftover (like Mei and Cecil), or none at all.
Note that 333... 1973 is there in case your nugget might die.
Please get those negative coins as fast as possible. Leaving your nuggets alive is a good idea to redirect some of the damage from Tiph, but don't be afraid to sacrifice some to gain more negative coins. Stupefy nuggets for obvious reason.

Mob Route

Page: Olivier
Deck: Brace Up 2x, Stay Calm 3x, Will of the City 2x, True Trigram Formation 1x, Impugnatio Ultima 1x
Passive: Valerie's Mind Hauler and Corpse Cleanup, Hanafuda's Bottom Deal and Stacking the Deck

The strongest discard deck in this game. You want to use Impugnatio Ultima all the time, though if situation needed, True Trigram Formation is a decent substitution. Brace Up is basically free draw while Will of the City will be your light and secondary draw regeneration. Don't forget to use his passives! Yes, I copied this comment from the previous section


Page: Nikolai
Deck: Unlock, Graze the Grass, Sword of Volition, Multislash, Bulky Impact, Quick Suppression, Will of the Prescript, Battle Command, Disposal
Passive: Valerie's Mind Hauler and Health Hauler, All of Sen's passives

Finishing Touch is going to be the key here since you can actually kill Oswald BEFORE the Climax. Disposal is best used on Oswald himself when he's staggered, which is actually easier than you think.

Page: Yujin
Deck: To Overcome Crisis 2x, Unlock 2x, Bi An 2x, Fervid Emotion 2x, Boundary of Death 1x
Passive: Valerie's Mind Hauler, Cecil's Firm as a Great Mountain and Fervor, Free 4 cost passive

The only time Boundary of Death is actually recommended being put on. Due to Boundary of Death being a golden card, it is heavily weighted against Fervid Emotion when she is stupefied, thus will only tickle you 1/4 of the time. You want to stupefy her since her damage output is usually bad under AI's influence.


Page: Ester
Deck: Frontal Assault, Unlock, Extract Fuel, Multislash, Execute, Steel Knuckles, Somber Procuration, Eliminate, Castigation
Passive: Index Proselyte's Grace of the Prescript and Skim Prescript, Liu Fixer's Fervor, Arnold's Electric Shock

The Prescript said this is a Highlander deck.


Page: Bayard
Deck: Wedging Thorn 2x, Unlock 1x, Faultless Strike 1x, Will of the City 1x, Knock Back 2x, Bi An 1x, Ready Position 1x
Passive: Gyeong-Mi's Restfulness, Pamali's Wedge and Piercer, Lesti's Reaction Force and Dimensional Sections

Bayard's Pinpoint Breakthrough can punch through Oswald's Ineffective stagger resistance. Since your teammates can stand on their own feet against those three creatures, you can spam Ready Position whenever you have it on hand, then Breakthrough his posture the next turn.

Strategy
Win Clash, Win Game. Yeah that's about it. Win clashes against Oswald will give you buff, while losing makes you take damage. Target Ms. Mermaid first, then Mr. Knife, then dispose Oswald the clown. Yeah this fight is super straightforward with no hidden gimmick while you can bring your own funni gimmick. Even with the Stupified librarian it's not that bad. Have enough dice and you will overwhelm them.

Oh yeah, Wrath librarian can attack Oswald even Stupified.

Alternatively, you can go for Nix route, which will make the fight trivial.

Good luck!
L'heure du Loup
Tanya en une Bref
  • When HP drop to 1, she will regain all of it back at the end of the scene + perma +3 strength and endurance.
  • When no allied Librarians present, Untargettable will become +2 Protection and Stagger Protection instead.
  • Beat Down chain against everyone.
  • S T O N K .

Deck Recommendation
This is one of the way you can tackle this fight, and what's better than having a power-trip with the Red Mist + Mountain of Corpses combo? Oh, dogpiling strategy still work if you want to go that route.


Page: Red Mist
Deck: Level Slash 3x, Spear 3x, Focus Spirit 1x, Blind Faith 1x, Will of the City 1x
Passive: Myo's Prowess, Yuna's Lone Fixer, Lyra's Health Hauler, [Anton's Mind Hauler / Mei's Remain Vigilant in Peace]

The Strongest. You can actually win the fight without teammates with this set too due to Myo's Prowess prowess. Your main tool here is still Upstanding Slash and Spear with Blind Faith to combat against the "Not affected by power" card from time to time. To be honest, you can even forget Focus Spirit that exist.

The deck below is negative coin generator sacrifices in case you want to go for Mountain of Corpses route


Page: Rhino / Mei / Cecil / Udjat
Deck: Harpe 2x, Opportunity Spotted 3x, Stigmatised 1x, The Will of the City 1x, 333... 1973 1x, Unique Gold or any strong clasher 1x
Passive: Any survival passive leftover (like Mei and Cecil), or none at all.
Note that 333... 1973 is there in case your nugget might die.
Please get those negative coins as fast as possible. Even if you're down to only 1 sacrifice, you're fine. Just make sure to get Mountain of Corpse and Shell.

Strategy
Tanya is simple and straightforward; She wants to see Gebura's true power. This is a test of strength between two titans, so there is not much strategy here outside of overpower her and kill her. The stronger you are, the faster and easier you will end the fight.

Beat Down is made specifically to be countered by Vertical Slash or Mimicry. Always use these against it unless you want to take a lotta damage.

Abnormality wise, Vampirism is a great first pick for extra health regeneration. Vengeance got nerfed hard since then, but it is still an okay pick. Role of the Wolf and Prey are decent choices too. For tier 2, Absorption is a must if you want to stay ahead of her. Instinct is probably the only other tier 2 you will be taking. For tier 3, Shell is a standard choice, while Goodbye is a funny pick. Hello? is useless.

To explain more of my insanity of a deck, you ramp emotion up as fast as you can to collect Vengeance + Role of the Wolf + Mountain of Corpse as fast as you possibly could. Once you get Mountain of Corpse with at least 2 sacrifices, you win the fight basically. Oh and take Shell just in case. Yes, there is still the "Beat the living dog out of her" strategy that you can go for with all of your strongest cards, and it works. Have fun, don't let PETA learn about this, and Good luck!
The Puppeteer
Jae-Heon in a String-Wrapped Nutshell
  • Gives Puppet String to his puppets in the first 4 turn, from top to bottom.
  • Every time you win clash with his specified counter dice, Puppet String counter goes down. Tie does not count.
  • Angelica Puppet is the strongest and the hardest to kill.
  • If the Puppeteer dies, all the Puppets with String and is dying will die also.
  • Puppets with Strings cannot die, and will respawn with half health the scene after.
  • FRIENDSHIP IS M A G I C

Deck Recommendation
High stagger resist and Mass Attacks are going to be the key for this fight. To be honest, adding Snipe in might not be a bad idea at all, since you can kill one puppet before it can gain the string. Burn is also not a bad choice here either since you can spread it around quite fast, and can kill Puppeteer immaturely.


Page: Xiao
Deck: Unlock, Forward March, Rush Down, Will of the City x2, Bi An, Chi Wen, Jin Ni, Raging Storm: Love
Passive: Lulu's Flaming Bat, Miris's Hugging Fire, All of Crying Children's passive

Fun fact: Flesh burns. Even though these puppets cannot die until their strings are gone, they can still get staggered, which could result in massive wild fire spreading around. Since these are dots, they also ignore both Jae-Heon and Angelica's resistance. A bonus for using Xiao is her three free mass attacks that you can bully these puppets with.


Page: Yan
Deck: Unlock, Sword of Volition, Forward March, Multislash, Will of the City, Will of the Prescript, Baleful Brand, Lock, Sword of Volition
Passive: Arnold's Electric Shock, Bono's Unstable Charge, Zulu's Deep Breath, Anton's Mind Hauler and Corpse Clean Up

Auxiliary support character for the floor of friendship.


Page: Mirinae
Deck: Unlock 1x, Forward March 2x, Will of the City 3x, Augury Kick 2x, True Trigram Formation 1x
Passive: Liu Fixer's Fervor, Reindeer's Treatment, Emma's High-Level Acrobatic

Mirinae's passive gives your teammates free +3 STR, which is super useful against these puppets big dices. The selection is rather random, but hey, strength is strength.


Page: Bamboo-hatted Kim
Deck: Draw of the Sword 2x, Unlock 1x, Serpent Sword Technique 1x, Slay 2x, Snake Slit 1x, Overthrow 1x, Bi An 1x
Passive: Sayo's Dark Cloud Blade, Anton's Mind Hauler and Corpse Clean Up

One of the best clasher in this game. He'll mostly be Slay-ing Jae-Heon's counter dices for your team, so protect him well. Or don't and let his Unrelenting tank for a turn or two.


Page: Hubert
Deck: Frontal Assault, Unlock, Multislash, Flow of the Sword, Somber Procuration, Binding Chain, Great Serpent Impact, Will of the Prescript, Decapitation
Passive: Index Prostelyte's Grace of the Prescript and Skim Prescript, Liu Fixer's Fervor, Mo's Electric Shock

It's a highlander deck.

Strategy
To make this fight a whole lot easier, target Weighty Puppet at the start of the scene exclusively in order to remove him from the equation. You got 2 scenes to do it, but don't take too much damage from doing so either.

The "correct" way of doing this is to clash with all the puppets while also winning clashes with Puppeteer in order to be able to kill the puppets. Alternatively, you can attempt to kill Puppeteer and end the entire fight, but do beware that he is endured to all type of damage. This is going to be a rather long fight depends on how many clashes you can win (not tie) against Jae-Heon without succumbing to his puppets. Even if you can't kill the puppet, staggering them will still reduces the number of puppet targeting you. Since the puppets will target the one marked with Red Mark, redirection is usually something you will be doing a lot here.

Abnormality wise, Gleaning is a must for this fight due to the high stagger damage. Courage is great all around as long as you can keep the number of nuggets higher than 4. Emerald might save you in a pinch. Other than that, I got no recommendation since I don't use this floor at all outside of don't touch Torn of Wisdom even with a ten metre pole. EGO wise, just take whatever floats your boat. They're all okay.

Good luck!
The Blood-Red Night
Elena in a Bloody Shell
  • Vermilion Cross big burning stick.
  • Elena vampire HP sucky fang.
  • Rampageous Strike will keep hitting random enemy unless it did not hit cough Pillar it.
  • Self-sustain? idk.
  • S U C C

Deck Recommendation
Honestly I find this fight to be a breeze with Fairy mechanic, so I decided to make fun decks to buff Binah even more.


Page: Binah
Deck: You can't change this sadly
Passive: Katriel's Empowering Shot, Valerie's Mind Hauler, Zulu's Deep Breaths, Sayo's Dark Cloud Blade and Razor Strike (Or Battle Ready)

Binah the ex-Arbiter. Her deck set up is questionable, but fairy is stupidly overpowered.


Page: Mirinae
Deck: Unlock 1x, Forward March 2x, Will of the City 3x, Augury Kick 2x, True Trigram Formation 1x
Passive: Liu Fixer's Fervor, Reindeer's Treatment, Emma's High-Level Acrobatic

Free +3 STR to your teammate for the win. Secondary buffer.


Page: Jae-Heon
Deck: Unlock 1x, Forward March 2x, Unforgettable Melody 2x, Will of the City 2x, Bi An 1x, Double-Edged Re-Encounter 1x
Passive: Hana Fixer's Four Trigram, Lyra's Health Hauler and Corpse Clean Up

Put that Red String on Binah and watch her go brrrr. Tertiary buffer.


Page: Breman
Deck: Unlock 1x, Forward March 2x, Will of the City 1x, Rooster's Caw 3x, Bi An 1x, Chorus 1x
Passive: Workshop Affiliated Fixer's Solidarity (or Mind Hauler), Bono's Unstable Charge, All of Sen's passives

Rooster's Caw is probably the best team buffing card you'll ever get in this game. Main buffer.


Page: Nikolai
Deck: Unlock, Graze the Grass, Sword of Volition, Multislash, Bulky Impact, Quick Suppression, Will of the Prescript, Battle Command, Disposal
Passive: Valerie's Mind Hauler and Health Hauler, All of Sen's passives

Finishing Touch, Commander, and Disposal for additional salt to the wound.

Strategy
Surprisingly, none of them have passives outside of Nuovo Fabric and Shimmering. This fight is another test of strength fight I suppose. Elena will keep regenerating health while Vermilion Cross will keep burning all of your nugget.

Do your best to clash against Vermilion Cross and survive. Kill him as fast as possible with Fairy and Sin, or just outright beat the hell out of him. Always redirect the buff from Elena and destroy his counter guard. ALWAYS MAKE SURE TO HAVE ONE PILLAR IN HAND TO DEAL WITH VERMILION SMASH. Yeah that's about it. Elena is pretty weak without Vermilion Cross, so once you dispose of him, she is free real estate.

To be honest, rick rolling Elena before Vermilion Cross is funny because it's so easy to do.

Long Arm and Punishment are pretty good on this fight, same with Judgement and Tilted Scale. The Beast route is overkill, but it's always a good option to have nonetheless. EGO wise, Justitia is a must have, other than that, just pick whatever float your boat.

Good luck!
Yesterday's Promise
Pluto in an Undertaled Nutshell
CONTRACTS
  • Light - Restore all light. Take 10% Max HP x [Number of Light Remaining] if you have any light remain. THIS INCLUDE LIGHT REGENERATION CARDS.
  • Might - Strength +2. If use cards with more than 1 non-counter offensive dice, stagger next turn.
  • Amplification - Passive change value from 0 - 3. Using cards of the same cost with labeled value will get +3 Power. Otherwise, -3 power.
  • Liberty - Passive change value from 0 - 3. Randomise cost of cards in hand. Using cards of the same cost with labeled value will lose 25% Max HP.
  • Swiftness - Haste +3. For every one-side attack, gain Strength & Endurance -1.
PHASE 1
  • Immune to ALL type of damage EXCEPT LEAN BLOODY WING, 13TH TOLL, OR "DEAL X DAMAGE"
  • First turn gives out contract. You can redirect the contract and have more than one contract.
  • Second turn spawn Shades that copies your librarian's page (including passive) and deck. If no librarian to copy, will use a stupidly strong combat card and deck instead.
  • Every other turn, the shade will use a strong combat card, unless winning clash against Shade's specific card, which they will copy it and use it next turn instead.
  • Change phase when all shade dies.
PHASE 2
  • Stagger change to Endure, and can take damage from debuff.
  • Traps a nugget, and eventually two, then spawn a buffed shade of the trapped character.
  • Trapped nuggets can be targeted by Librarians, and can be saved by staggering them.
  • Can swap Librarian's HP with a shade.
  • On 5th scene, will use Mass Attack that deals 5x stagger damage to Pluto each dice he fails to deal damage.

Deck Recommendation - 13th Toll
Escorting Pluto to join his old office fixer mates in the dirt.


Page: Olivier
Deck: High Kick 1x, Serpent Sword Technique 1x, Bi Xi 1x, Bi An 2x, Augury Kick 2x, True Trigram Formation 1x, Divinatory Impact 1x
Passive: Valerie's Mind Hauler, Lyra's Health Hauler, Red Mist's the Strongest, Myo's Prowess
Contract: Light + Swiftness
Abnormality Page: The Thirteenth Toll, Baptism, Advent

With infinite light from Light Contract, additional haste from Swiftness Contract, and draw power from Bi An, you cannot run out of resource, ever. Just make sure to use all of the light before you press space bar. This is your main interceptor and Pluto Killing Unit. You want to proc the 13th roll with Divinatory Impact, so set up the turn before and count your cards. You can never lose clash with this set up due to the absurd amount of power you got.


Page: Ester
Deck: Wedging Thorn, Unlock, Extract Fuel, Multislash, Execute, Steel Knuckles, Somber Procuration, Elimination, Castigation
Passive: Dino's Double Kick, Warp Agent's Dimensional Section, Arnold's Electric Shock, Index Proselyte's Grace of the Prescript and Skim Prescript

Due to Pluto not being immune to true damage, Ester's Castigation will be able to rack up the damage extremely fast, even with garbage roll. He will be the second Pluto Killing Unit of your team. While you don't have Castigation on hand, feel free to kill your shady twin as they are a nuisance.


Page: Yujin
Deck: To Overcome Crisis 2x, Unlock 2x, Bi An 2x, Rapid Gashes 3x
Passive: Dino's Double Kick, Cecil's Firm as a Great Mountain, Valerie's Mind Hauler, Warp Agent's Dimensional Section

This is one of those rare time where I didn't put in Boundary of Death in my Yujin deck. She is mostly here as the shade mop up crew full time, and Pluto Killing Unit part time through Dimensional Section gamble. Despite her shade having full health, their stagger is still pathetic.


Page: Bayard/Udjat
Deck: Puppet Blockade 2x, Will of the City 2x, Serpentine Barrier 2x, Bi An 2x, Ready Position 1x
Passive: Gyeong Mi's Restfulness, Rudolph's Survivor Sweeper's Liquefied Flesh, Walter's Your Shield, San's Calmness
Contract: Might + Amplification | Liberty

Your defensive units. Due to the shade copying your character, this shade will deal minimum amount of damage to your crew while serving as a great distraction.

Foreword
That's a lot of information to digest at once. You have the Contract mechanic that does different thing, which requires specific set up to abuse it, among the second phase's mechanic of locking your librarian in place. So, how do we tackle this funny skeleton? Well, first you DONT sign the "I Agree to Terms and Conditions."

Overall Strategy
The entire story of Yesterday's Promise is unfair contract, thus you outsmart him by tackling him from a different angle. Since second phase is annoyingly painful, you don't want to reach that part, unless you are up for a challenge. Even though he is immune to conventional damage, he isn't immune to true damage (Deal X Damage). You have all the time in the world during Phase 1 until all the Shades are dead, so stalling is a viable option.

Strategy Explanation - Thirteenth Toll
This will use my example set to explain the game plan. You will be staying on Phase 1 for the entire duration for this strat. Moving to Phase 2 is still doable, but highly not recommended.

The concept here is to use Olivier's Divinatory Impact coupled with Thirteenth Toll against Pluto twice to kill him while other librarians focus on killing their Shades. Yujin and Ester should be focusing solely on their respective shades, staggering and killing them as fast as you can. After both of them are down, they can focus more on chipping Pluto out. Leave Bayard and Udjat Shades alive since they do basically no damage.

When the Shades try to copy your card, make sure to give them either a garbage card or exclusively defensive cards so you don't have to worry about them for a turn. If you fail to do so, prepare those Serpentine Barriers or suffer.

Abnormality Priority:
  • The Thirteenth Toll - Baptism - Gaze of Other - Time (only if you are insane)
  • Confession - Advent - A Nostalgic Sound - Silence (+5 Haste on Olivier for stronger Divinatory)
  • Divine Power - Sentinel - Apostles

EGO Priority: Penitence, Heaven, Dead Silence

Alternative Deck Recommendation - Full Block
Since we cannot deal direct damage to Pluto, how about we break his bones with Lean, Bloody Wings?


Page: Purple Tear
Deck: Ferrous Guard 2x, Seize ya Chance 2x, Serpentine Barrier 2x, Bi An 3x
Passive: Sweeper's Liquefied Flesh, Walter's Your Shield, Eri's Art of Defense, Dino's Double Kick
Contract: Swiftness + Light
Abnormality Page: Lean, Bloody Wing + Gaze of Others

This will be your ONLY damage source. Perma block Pluto with this after you get Lean Bloody Wings. Eventually, you will chip him to death.


Page: Any
Deck: Smoking Pipe 3x, Will of the City x1, Seize ya Chance x2, Serpentine Barrier 1x, Bi An 2x
Passive: Same as above

Your other 4 nuggets to minimise damage taken.

Strategy - just block lol
Literally just chip Pluto down with Lean Bloody Wing's block damage until he dies.


Good Luck!
Blue Reverberation
Argalia in a Blue Shell

Black Silence's Deck...?

Passive: Yuna's Lone Fixer, Mei's Remain Vigilance in Peace and Fervor

This is the minimum you need for this fight. Pale Hand + Scar + Sword of Frost are all you need. Lie and Curiosity are useless for this fight surprisingly. Make sure you get Durandal to proc every turn, and save Furioso for the final standoff. Yeah, there's no fancy shenanigans here, just Brother-in-Laws having a heart-to-heart moment. Have fun!
===Post Ensemble Fights===
Gone Angels
The Black Silence in a Ghost in the Shell
PHASE 1
  • Last dice cannot be targeted. Third dice gain +2 Power.
  • Has 2 [4-8 Slash] counter dices. Gain +1 STR & END when emotion level up.
  • Recover 5 Stagger on hit, take 8 Stagger when lose clash.
  • Occasionally uses Furioso.
PHASE 2
  • When minion dies, lose 50 HP then spawn one for each dead minion. Doesn't spawn minion if at 300 or less HP.
  • If target has Suffocating Haze debuff, deals 2 more damage and take 2 less damage from said target.
PHASE 3
  • Gain Soul Link for 3 scenes, with 2 scene interval. While Soul Link is present, cannot be staggered, and regain HP and Stagger equal to the ally with the most health.
  • First three dices will always target nugget with the lowest HP.
  • On third scene, Angelica leaves "Dark Mark" on the nugget that hit Angelica the last. Roland gains +3 Power if he engages the nugget with "Dark Mark".
  • If either dies, the other will use a different, stronger deck.
PHASE 4
  • HP cannot go below 40% (399 HP).
  • On 2nd, 3rd, and 4th Scene, spawn three weapons. If a weapon is not defeated, add 1 dice towards the 5th Scene's Mass Attack.
  • Gain unique passive each scene:
Passive Name
Passive Description
Scar
Reduce incoming damage of a specified type by 2-5 damage, and at 25% chance, take 0 damage from it. Shift every scene.
Blood
Defensive dice gain +1-2 power. Take 3-6 Stagger damage if defensive dice lose clash.
Leer
Gain 1 strength. If an offensive die fails to deal damage, take 3-6 stagger damage. Gain more strength the more scene this passive is active.
Curiosity
On hit, shuffles nugget's 2 random pages back into the deck.
Kiss
Focus on the nugget with Bind. On win clash, adds a stack of Ice Splinter to target. If a nugget has 3 or more Ice Splinter, immobilize next scene.

PHASE 5
Roland becomes untargetable for 3 Scenes and spawns 4 Image of the Bygones on phase start with different passives.
Bygone's Name
Passive Description
Aspiration
Max HP is increased by 15%. Gain 1-2 Speed.
Pulsation
Speed dice -1. On hit, gives +1 STR to all allies. Take stagger damage if no damage is dealt.
Learn
Uses "Learn" on every dices, which copies the dice of the clashed page. On hit, randomise cost of combat page next scene.
Fervent Beats
Dies on 3rd scene. Gain +2 STR & END, 3 Haste, and 4 Protection until death.

Strategy
Honestly, win clash win game. First phase is the hardest, but subsequent ones are cake walks.
Gone Angels - Deck Recommendation
Deck Recommendation
Pick one from the list. I do recommend starting with Gebura or Binah since both can carry through all the stages with ease. Netzach is there in case you somehow lose both floor and you want a literal immortal being through Spring Genesis.

Floor of Language - Mountain of Smiling Gebura
Abnormality Priority: Claws of Savagery, The Role of the Wolf, Mountain of Corpses, Instinct/Laughter, Shell


Page: Red Mist
Deck: Upstanding Slash 3x, Spear 3x, Focus Spirit 2x, Will of the City 1x
Passive: Yuna's Lone Fixer, Myo's Prowess, Lyra's Health Hauler and Anton's Mind Hauler
To be honest, you can use Tiph's Exodia for this too, but it's a bit unreliable in this fight due to Wrath RNG.


Page: Rhino / Mei / Cecil / Udjat
Deck: Harpe 2x, Opportunity Spotted 3x, Stigmatised 1x, The Will of the City 1x, 333... 1973 1x, Unique Gold or any strong clasher 1x
Passive: Any survival passive leftover (like Mei and Cecil), or none at all.
Note that 333... 1973 is there in case your nugget might die.
Please get those negative coins as fast as possible. Even if you're down to only 1 sacrifice, you're fine. Just make sure to get Mountain of Corpse and Shell.

Floor of Philosophy - Binah's Wild Ride
Either go the Beast route or regular is fine.


Page: Binah
Deck: Can't change it
Passive: Zulu's Deep Breaths, Anton's Mind Hauler, Katriel's Empowered First Shot, Sayo's Dark Cloud Blade and Razor Strike


Page: Argalia
Deck: Largo 3x, Allegro 3x, Resonant Scythe 1x, Tempestuous Danza 1x, Trials of Blue/Bi An 1x
Passive: Anton's Mind Hauler, Elena's Bloodfiendish, Dante's Information Assessment


Page: Mirinae
Deck: Unlock 1x, Forward March 1x, Will of the City 3x, Augury Kick 2x, True Trigram Formation 1x
Passive: Liu Fixer's Fervor, Reindeer's Treatment, Emma's High-Level Acrobatic (add mind hauler if you want to play it safe)


Page: Olivier
Deck: Brace Up 2x, Stay Calm 3x, Will of the City 2x, True Trigram Formation 1x, Impugnatio Ultima 1x
Passive: Anton's Mind Hauler and Corpse Clean Up, Zwei Fixer's Keeping in Stride, Dino's Double Kick, Mika's Best Choice


Page: Breman
Deck: Unlock 1x, Forward March 2x, Will of the City 1x, Rooster's Crow 3x, Bi An 1x, Chorus 1x
Passive: Oswald's Splendid Performance, Tanya's Guts

Floor of Art - WHY WON'T YOU DIE
Spring Genesis is a fair and balanced card.

Page: Yujin
Deck: To Overcome Crisis 2x, Unlock 2x, Bi An 2x, Rapid Gashes 3x
Passive: Dino's Double Kick, Cecil's Firm as a Great Mountain, Valerie's Mind Hauler, Warp Agent's Dimensional Section


Page: Ester
Deck: Frontal Assault, Unlock, Extract Fuel, Multislash, Execute, Steel Knuckles, Somber Procuration, Eliminate, Castigation
Passive: Index Proselyte's Grace of the Prescript and Skim Prescript, Liu Fixer's Fervor, Arnold's Electric Shock


Page: Kalo
Deck: Reload 1x, Class and Respect 2x, Bayonet Combat 1x, Shock Round 1x, Will of the City 1x, Focus Fire 1x, Le Regole 1x, Bi An 1x
Passive: Sweeper's Corpse Clean Up, Jack's Emergency Ration, Liu Fixer's Fervor


Page: Bayard
Deck: Wedging Thorn 2x, Unlock 1x, Faultless Strike 1x, Will of the City 1x, Knock Back 2x, Bi An 1x, Ready Position 1x
Passive: Gyeong-Mi's Restfulness, Pamali's Wedge and Piercer, Lesti's Reaction Force and Dimensional Sections


Page: Denis
Deck: Unlock 1x, Extract Fuel 2x, Reload 1x, Shock Round 1x, Concentrated Fire 2x, Will of the City 1x, Bi An 1x
Passive: Pamela's Wedge and Jolting Puncture, Rabbit's Sufficient Ammo, Liu Fixer's Fervor
Encore
One last fight before the final hurrah. They are now fully distorted and the only way to get through this is by euthanising them for the greater good. Their gimmicks resonate with each other which is annoying. Priority targeting is going to be the key here. Even though I say all of that, you get 5 Floors to play with.

Asiyah Breakdown

Philip
  • While alive, all allies' first dice inflicts 1 burn. When dead, all allies get inflicted 1 burn on hit.
  • Takes no damage from burn and get buffed when self burn reaches 10.
  • Every 3 scenes uses Scorching Desperation [Mass-Summation [14 - 20] On hit, inflicts 10 burns].

Eileen
  • While alive, allies deals 10% more damage per smoke stack.
  • Allies gain smoke the same amount that Eileen has.
  • Every 5 scenes uses Thought Gear: Advent [Mass-Summation [16 - 22] On hit, inflict 5 smokes and immobilise target next scene].
  • On death, allies gain 10 smokes and takes 10% more damage per smoke stack instead.

Greta
  • While alive, all other allies gain 1 protection and stagger protection.
  • Gains 3 protection and takes 3 more damage if has bleed.
  • If target has 5+ bleed, first dice inflicts fragile.
  • If takes no damage, heals 10 HP and gain 1 strength.
  • On death, allies gain 5 fragile next scene.

Breman
  • Gives buff to allies equal to self lights count.
  • Loses all light when staggered.
  • Uses cards that buff teammates.
  • On death, nuggets gain 3 strength, endurance, and haste next scene.

Asiyah Strategy
Breman should be your priority target. The faster he dies, the easier your fight will be. Philip should be next mainly because of his absurd dices and burn chip damage. You need to clash with a lot of his cards to conserve health. You need to beat Eileen's Advent mass attack. If not, you basically lost. Greta cards are not as scary as Philip, but it is still better to not ignore the ones with lots of damaging dices.

This is the hardest floor. You will take lots of damage and possibly casualty. You can farm negative coins here, so going for solo route is optimal. Tiph Exodia, Gebura Mountain of Corpses, and Binah the Beast builds.

Briah Breakdown

Oswald
  • At the end of the scene, all nuggets take 3-5 stagger damage.
  • 1st and every 3 scenes spawns Ms. Mermaid & Mr. Knife. Leaves for 2 turns.
  • Ms. Mermaid & Mr. Knife: On death, Oswald takes 70 stagger damage.
  • Cannot lose more than 50% HP per scene.
  • Takes 50 stagger damage when an ally dies.
  • On death, nuggets recover full stagger and halves their bad statuses.

Tanya
  • At the end of the scene, all nuggets take 3-5 damage.
  • While alive, Jae-Hoon deals 1 bleed on hit.
  • When no ally present, gains 1 strength and endurance + 2 speed dices.
  • Uses Beatdown [[29 - 35] On hit, deals 5 damage] while Red Strings is active.
  • On death, all nuggets deal +3 damage.

Jae-Heon
  • All ally rerolls their dices if rolls min.
  • Random nuggets gain 2 binds.
  • If 2 librarians have Red Strings cards for 2 turns, they die.
  • On first turn and every 3 scenes, give Red Strings [ [28 - 28 block] On clash lose, exhaust this page and Jae-Hoon loses 10 staggers] to two nuggets with Red Strings status.
  • When Straining String is used, purge Puppet String status.
  • On death, all nuggets gain 1-3 hastes per scene and gains +1 power.

Briah Strategy
Kill Ms. Mermaid and Mr. Knife as soon as possible. Save your mass attacks to kill those two. It will save you a lot of headache later down the line. Always use Red Strings to counter Tanya's Beatdown. You should always clash with Tanya and slowly chip down Jae-Hoon. When Oswald comes back, prioritise him until he reaches ~100 HP to prevent him from spawning Ms. Mermaid and Mr. Knife again. Ideally, you don't want Tanya to be the last one alive, but it shouldn't ruin the run.

You should use a fresh floor for this because you can set up your stuff here unlike Aziyah.

Atziluth Breakdown

Note: All 3 of them has powerful mass attacks.

Elena
  • On hit, recovers 2 HP. If recovers more than 3 HP this scene, gain 1 strength next scene.
  • Uses Regurgitation [[5 - 9 not affected by power gain/lose ] On hit, inflicts anti-recovery next turn for 2 turns ]

Pluto
  • Every scene, uses Unjust Contract that gives random buff for debuff of sort.
  • Spawn a shade that copy the patron librarian's page and deck.

Argalia
  • Cannot go lower than 100 HP if Elena and Pluto is alive. Gains speed dice per ally death.
  • If speed's difference of vibration is at most 1, gain +2 power on that page.
  • Every 4 scenes, allies gain permanent 1 strength and endurance.
  • All character gains 2 emotion level up at the end of the scene.

Atziluth Strategy
Get rid of your shade ASAP then dump everything on Pluto. Elena should be your next target. Make sure to read Pluto's contract before exhausting it because some gives really good buff. Always clash with Elena's Regurgitation to not get anti-recovery that will kill your nuggets in the long run. Eventually, they will all use mass attacks, and Argalia has a [6 - 10 & 9 - 22 individual] alongside [30 - 40 summation] nuke. Time is not on your side in this fight. Solo doesn't fare well in this fight due to the sheer amount of dices you need to take care of. You will most likely lose a floor in this fight, which is why saving Netzach for this floor as an insurance is so important.

Floor Recommendation
These are floors I recommend starting the Act with. To lessen the reading burden, I decided to put a summary here instead. Please refer to previous sections, specified sections, or return to Gone Angel - Deck Recommendation for deck builds.

Aziyah: Gebura / L'huere du Loup | Binah / The Blood-Red Night

You have to brute force through this one because of the amount of high rolling dices they got. Red Mist + Mountain of Corpses will give enough power to chew through them. Binah can get Long Arm to nullify burn damage, which is huge, and fairy is an overpowered status. Binah's Shockwave could come in clutch in case you need a panic button. The Beast route is recommended for an easier run.

Briah: Malkuth / The Crying Children | Tiphereth / The 8 O'Clock Circus

Compared to Aziyah, Briah is a well-deserved breather. Malkuth and Tiphereth gain a lot from stalling to get their win condition (Nostalgic Embrace & Gluttony | Nix Exodia).

Atziluth: Netzach / The Musicians of Breman

You can either start off with your previous floors or go straight to Netzach. Since you gain 2 emotion levels on new scene, you can fast-track yourself to get Spring's Genesis to secure the win. Be careful though, the trio is still a threat.


Cope. Seethe. Dilate.

Alternatively, you can cheese through the entire fight with this
Coda
Uninvited Guests
Zena the Arbiter of the Head
  • All pages are not affected by power gain or lose, including the page it is clashing.
  • When she reaches emotion level 4 or Scene 7, she will use [20 - 30 Mass Summation].
Luda the Beholder of the Eye
  • On Scene 8, proceeds with the Plan.
Baral the Executioner of the Claw
  • Tri-Serum Cocktail gives him unspeakable strength with many high rolling dices.
  • Blocks any damage/roll more than 30 once.
Strategy
The only thing you can do here is stall until Scene 8. You only need 1 nugget to not lose at the start of Scene 8. On First Scene, clash Serum W with Old Boys Workshop to mitigate some damage or Ranga Workshop to get rid of it early. On Second Scene, Gebura joins the fight, so try to conserve Roland's health by letting Geburah tank some damage. On Third Scene, Binah joins the fight and recovers all stagger to full.

The key to victory is to win as much clash as possible and shedding the least amount of HP.

Here is a checklist of what to keep in mind:
  • Gebura should do her best to redirect as much of Baral's card as possible.
  • Binah should do her best to redirect as much of Zena's card as possible.
  • Roland can take some clashes, but farming for Furioso is his key game plan.
  • Geburah's Vertical and Horizontal Slash should be saved for Baral's 20+ power dice.
  • Try to get Red Mist on Geburah as fast as you can.
  • Binah's Shockwave can be use to tank damage for a scene, make sure you remember to use it.
  • Binah won't be able to reliably win clash against Zena, so landing Chain on her will help a lot.
  • Roland has the highest chance of dying, but you can try to redirect as much dices as possible to him before he dies so those pages will be wasted.
  • On Scene 6, Binah should use and land Lock on Baral to stop him from using at least a dice.

The Arbiter, the Beholder, and the Claw. Without the power of the Library, victory is unattainable. All you can do is survive, and survive you must. The Final Reception commences.
Finale
Ayin is our saviour. Do not listen to your egocentric desire. Let the Seed of Light germinates.

Credits:
- Elijah for having such a straightforward set up for sustain and clashing, and Fourth Match Flame nuke to top it all off.
- Gabriel for practicing discombobulation and God's given 2nd Amendment right in this trying time.
- Michelle for bringing back the cute Laetitia and participating in the Red Cross blood donation program.
- Giovanni for being a fellow alcoholic enjoyer and the cheat code that is Spring Genesis.
- Lisa for having the Exodia set up that is so satisfying to pull off with all the Magical Girls and the Jester.
- Kali for being an absolute unit by showcasing the power of the Red Mist to purge all the heretics.
- Daniel for being a chill dude with good taste in coffee and a throwback to the Land of Oz.
- Garion for being a fellow tea connoisseur and allowing them birds to roam free in the Forest.
- Benjamin for having unrelenting faith towards Ayin and letting us become the Lord himself and his apostle.
- Carmen for continuing Project Moon universe stupendous lore by dying and reborn into intrusive thoughts that transform people into distortion or EGO.
- Ayin for letting his comrades have their closure to their sins.

Notable Individuals:
- Finn for doing his best.
- Pierre for tasty treats.
- Mars and Lulu for adding the NTR tag.
- Isadora for twintail tsundere.
- Olga, Mika, and Rain for surviving the W Train Wild Ride.
- Full-Stop Office for practicing the 2nd Amendment.
- Salvador and Oscar for their magnificent mustaches.
- Pameli and Pamela for victorian twin maid uniform.
- Phillip for being a ♥♥♥♥♥♥♥ coward til the end.
- Tenma and Valentine for doing their best in bringing the glory back to the Shi Association.
- Anton, Valerie, and Lyla for their amazing passives.
- Bamboo-Hatted Kim for yielding his flesh to claim my sclerosis bones.
- Cecil, Mei, Chun, and Miris for being iconic Liu Fixers.
- Lowell and Xiao for their happy marriage soon:tm:.
- Nemo for being the comedic gold character of the century.
- Kalo, Boris, Katriel, and Denis for their dapper mafioso syndicate.
- Myo for being Gebura's top fan.
- Nikolai, Maxim, and Rudolph for making charge team fun.
- Purple Tear for her clairvoyance.
- Esther, Gloria, and Hubert for following the prescript.
- Yan for reciting the entire value of e.
- Mirinae for her amazing buffer role.
- Oliver for being the best bro to Roland.
- Argalia for his outlandish yet elegant plan to follow Carmen.
- The entire Ensemble for making this guide exist.

Special Thanks:
- Yujin for satisfying my gacha addiction with the glorious BOUNDARY OF DEATH.
- Angelica for dying.
- Roland for accompanying Angela and becoming her first ever friend.
- Angela for the Library itself.
- And most importantly, [CENSORED]
26 comentarios
Mosb 25 OCT 2024 a las 8:25 p. m. 
:Roland:
Snakie  [autor] 22 AGO 2024 a las 4:41 p. m. 
Front doors broken, the ensemble has distorted
I've even forsaken my vengeance
I don't know the season or what is the reason
I'm standing here holding my invitation
A shifted ego
Without any regret
It's only the emotion I feel
It's me that I spite as I stand up and fight
The only thing I know for real
There will be blood... shed... :Myo:
The girl in the mirror nods her head
The only one... left... :stress:
Will ride upon the bright light's hall
Because the City don't give back what they take
Oh no, there will be blood... shed... :appleAngela:
It's the only thing I've ever known
Losing my identity
Wondering, "Have I gone insane?"
To find the truth in front of me I must climb this library floor
Looking downward from this deadly height and finally realizing why I fight

:Roland: :LetiHeart: :TeddyAngela:
Jz1207 16 AGO 2024 a las 6:20 p. m. 
@Snakie I apologise author, but you are like the avatar: vanished when the world needed you most. I personally managed to beat the game without the final part of the guide but I thank you for getting me through the emsemble even so.

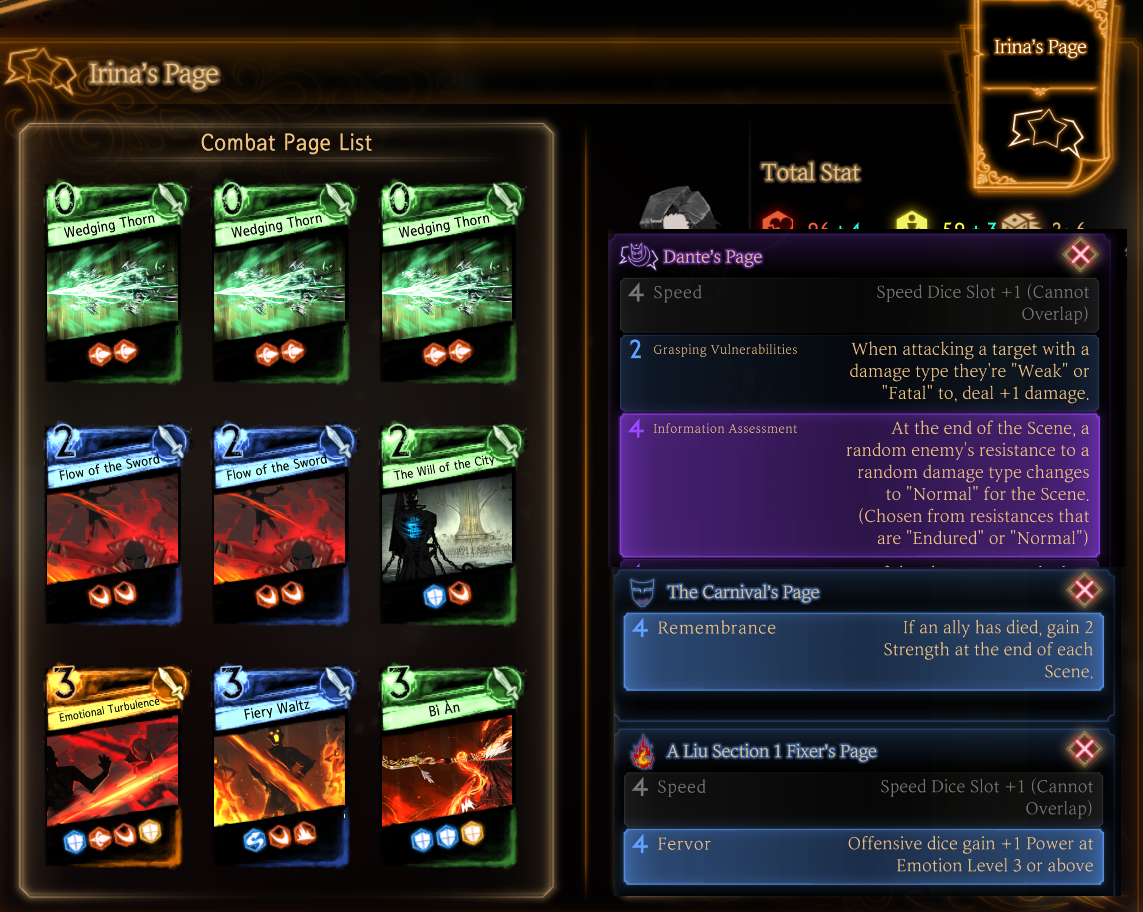
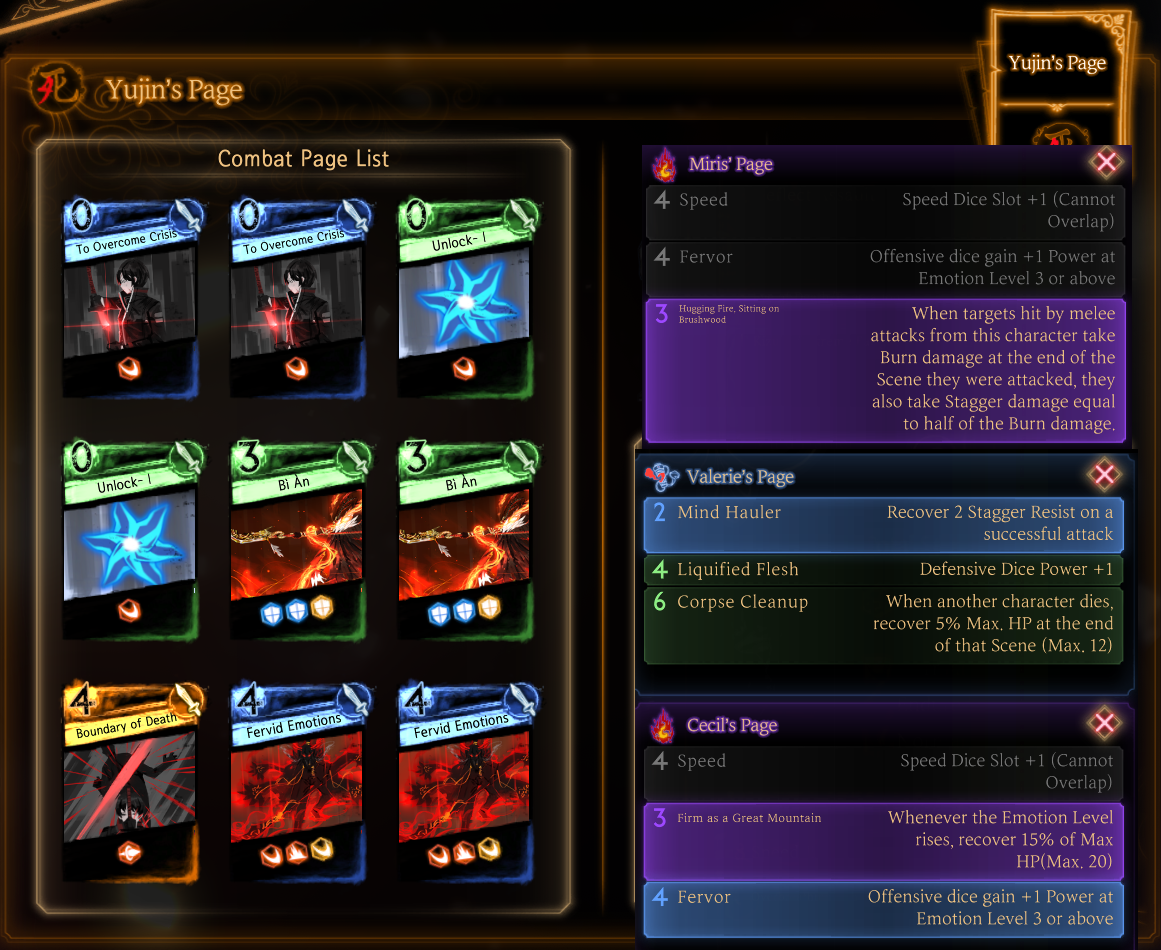
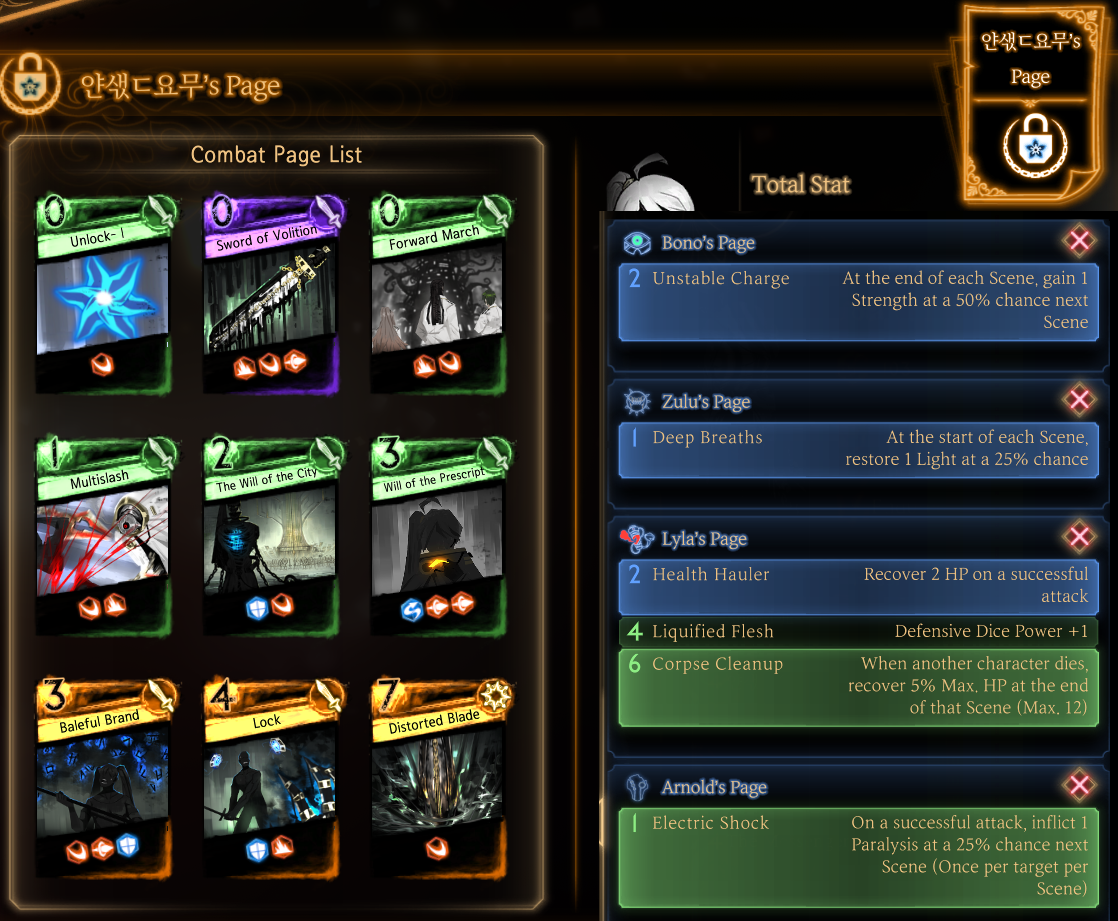
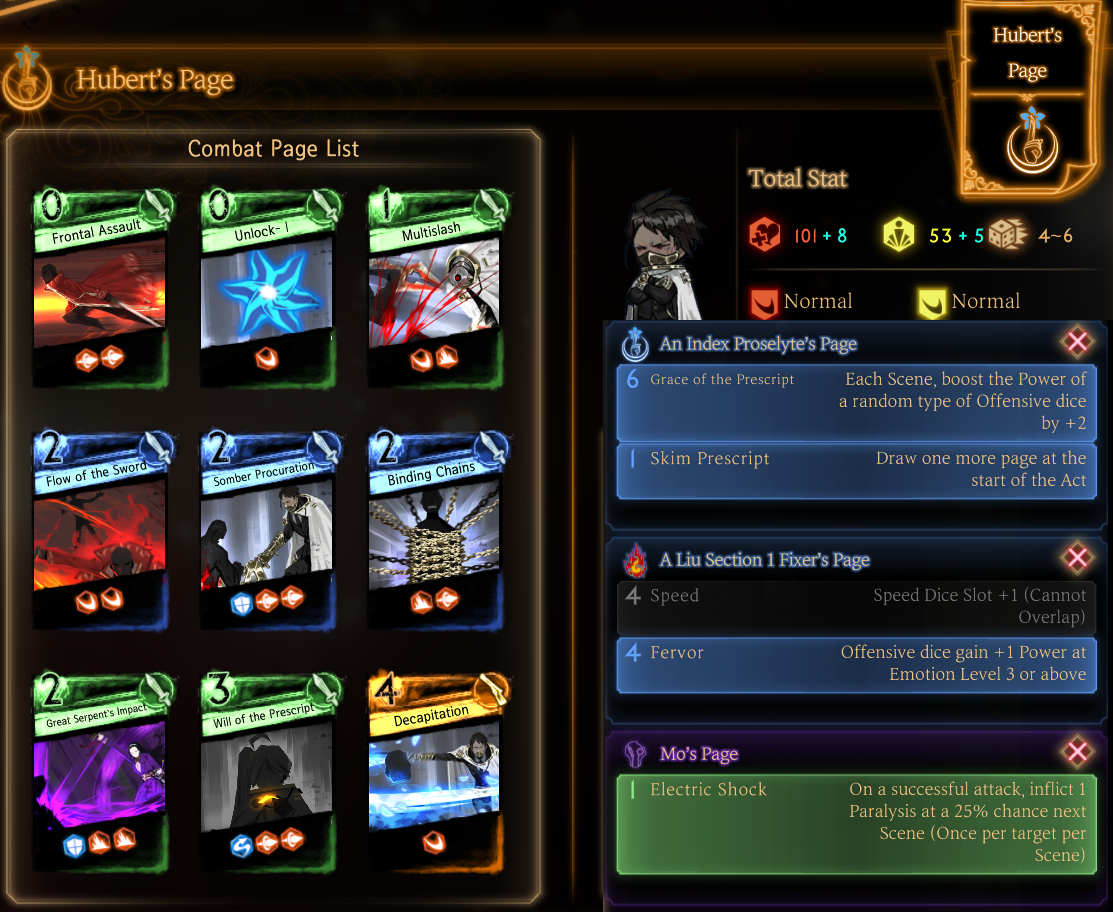
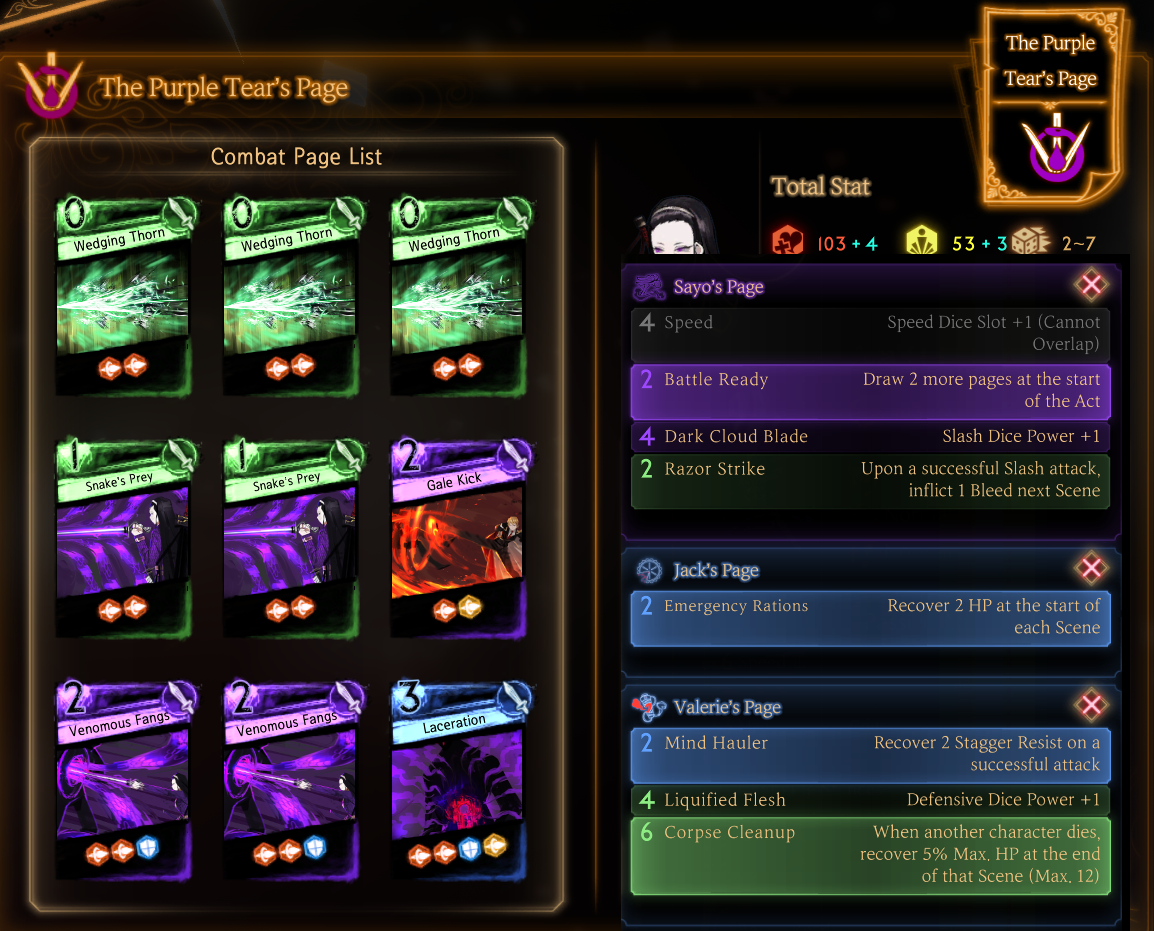
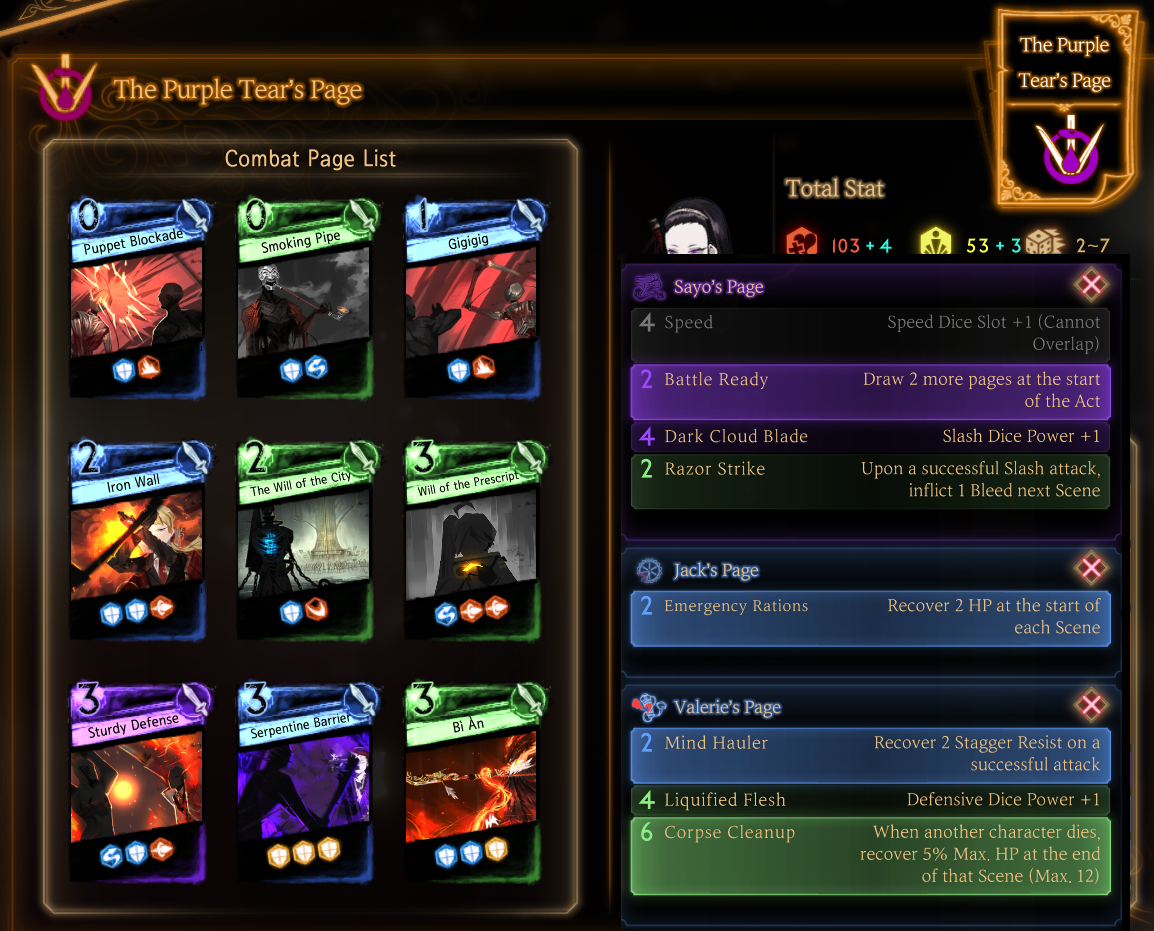
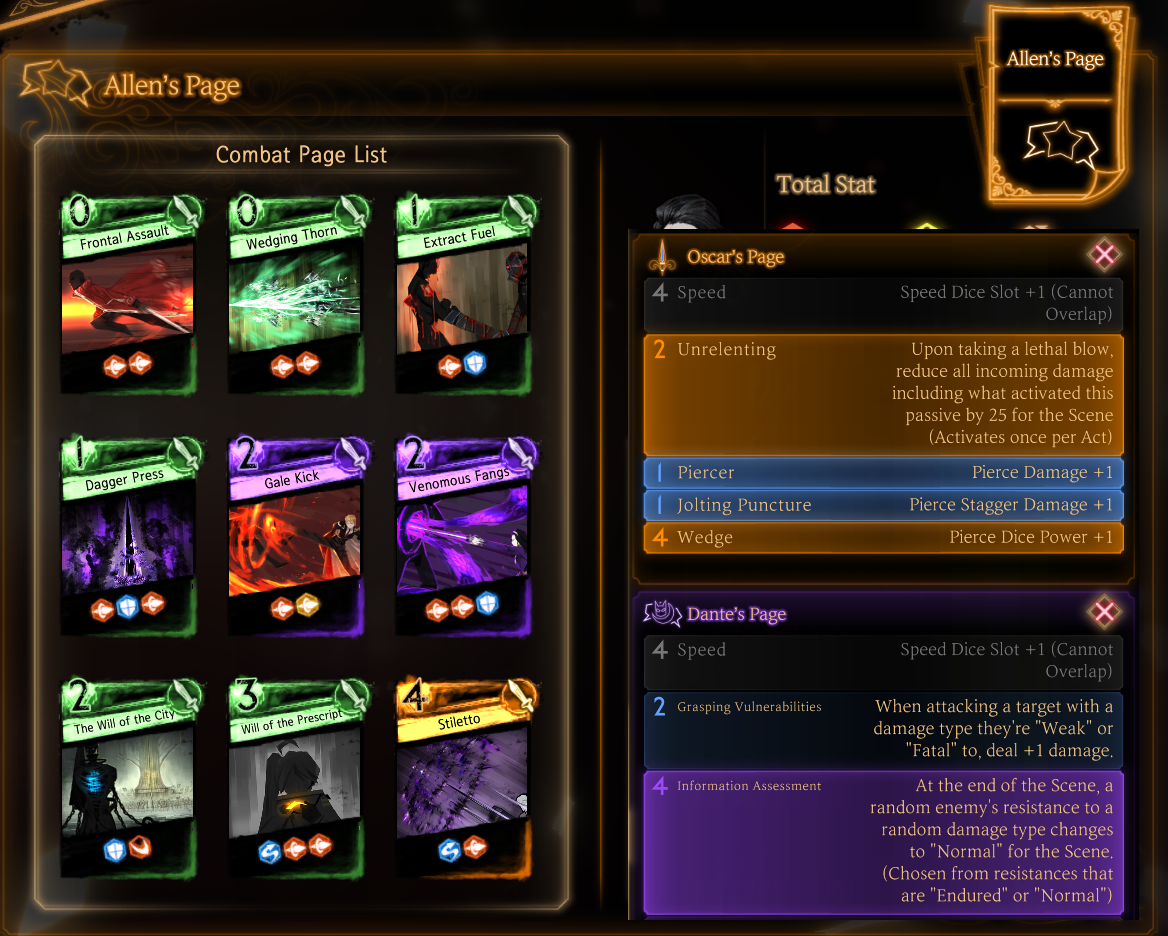
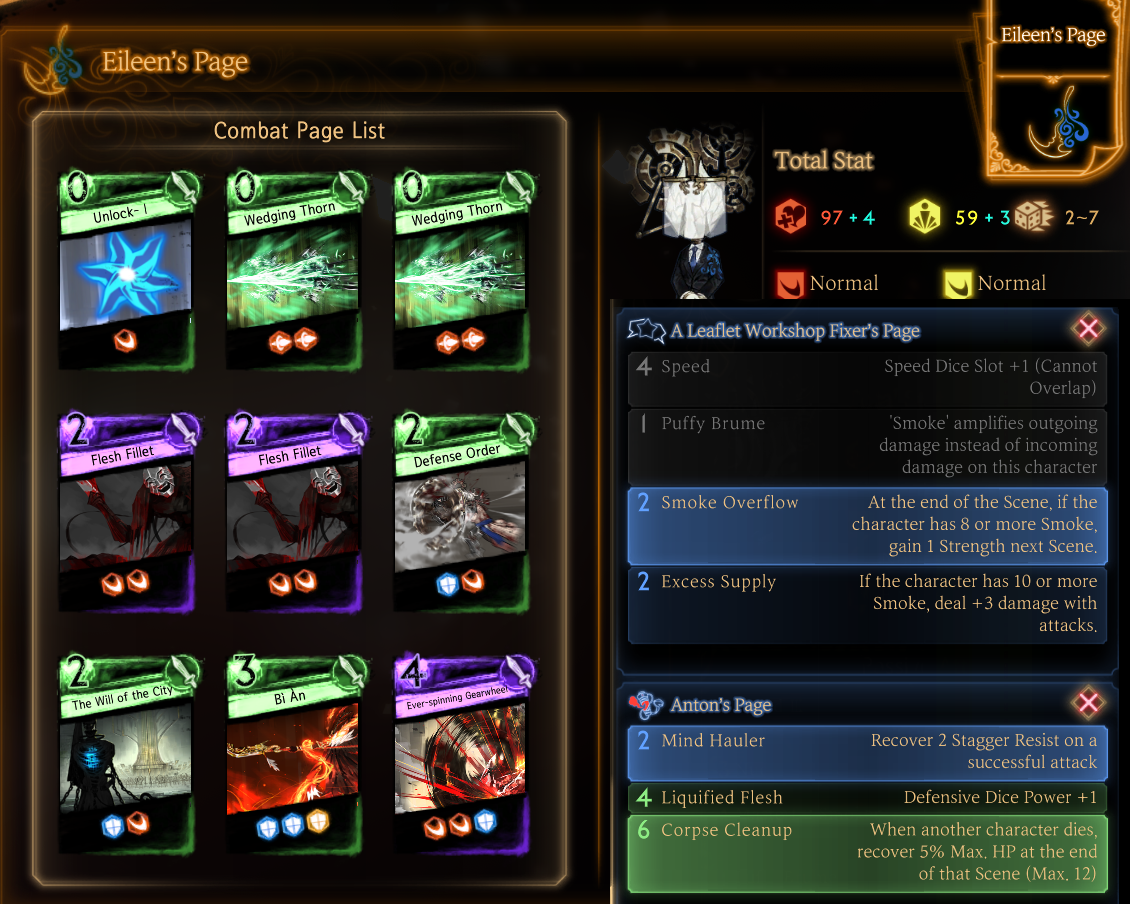
And also the game allows you to rebattle any of the fights after the ensemble if you beat the true ending so if you found a complete file you would not need to go through the ensemble or black silence to reach them.
Snakie  [autor] 16 AGO 2024 a las 5:36 p. m. 
@Jz1207 :stress: Why must you force me out of my procrastination :stress:
TheHimGuy 21 JUL 2024 a las 2:29 p. m. 
this quite literally helped me beat the entire reverberation ensemble i would not have done so without your assistance i cant thank you more oh my god
OCTscan 21 JUN 2024 a las 5:45 p. m. 
thanks s2
Jz1207 8 JUN 2024 a las 6:17 a. m. 
A really good guide that finally allowed me to get through the ensemble and gone angels. Please finish it, the people need help with The Realisation of General works and Distorted Ensemble
GedrickGorbson 21 ENE 2024 a las 3:10 p. m. 
Thank you for this, just made soup out of Greta with this.
GedrickGorbson 1 ENE 2024 a las 12:01 p. m. 
i only have two miris pages
land of illusion hong lu 27 AGO 2023 a las 7:16 a. m. 
your guide has removed my desire to quit playing this game
thank you