Stationeers

Stationeers

283 Bewertungen
Advanced Furnace Automation (Updated 2024)
Von Barsiel und 1 Helfern
A walkthrough of an automated advanced furnace setup that uses two ICs to make all the alloys in the game.
14
13
3
4
3
2
   
Preis verleihen
Favorisieren
Favorisiert
Entfernen
Introduction
So you have used your arc furnace and made some basic ingots then moved up to the next furnace in line and made some of the standard alloys, your base is in order your gasses are sorted and you have an advanced furnace that you want to automate. This advanced furnace build is fairly simple to build and use and gets the job done.

This particular furnace design assumes that you have access to fuel in a gas form which can be obtained by mixing H2 and O2 in the correct ratios or by using any other method like an electrolyzer, also an abundance of another gas that is not Oxygen, Hydrogen (Volatiles) or N2O to be used as a coolant.
Video guide by Largely Unemployed
Largely Unemployed has made this excellent well made video explaining how to put this build together. I have updated the guide since the video was originally posted so it is somewhat outdated but the majority of the info given in the video is correct. This guide explains how to build it with the most recent changes but you could still follow the video tutorial and be mindful of the changes.

Things that I have changed that are outdated in the video include
  • You do not need to set any pins on the ICs now, but you do have to name every device included in the naming section correctly otherwise the script won't be able to interact with it.
  • The ICs housing names have changed to (Hash IC) and (Furnace IC)
  • The furnace is now enclosed in a box of windows/walls instead of frames.
  • Added more devices to the overall build some of which are optional like levers and other are
    important like vents and pipe analyzers.


Devices needed for the build.
1) 1x Advanced furnace
2) 2x volume pumps.
3) 2x Active vents
4) 1x Tank
5) 2x IC housings and IC10 chips
6) 1x Console
7) 1x Dial
8) 1x Botton
9) 2x Pipe Analyzers
10) Bunch of chutes, cables, and pipes.

Optional Parts:
1) 4x consoles (for pressure/temperature display)
2) Lever
3) Led Light
4) Gas sensor
Naming Devices
In one of the recent updates the devs introduced new instructions to mips code that will allow us to use device names to interface with them instead of having to set pins on the IC.

The ICs in this guide no longer require pins, but you need to make sure that you are using your labeler to name the devices correctly. Keep in mind that it is case sensitive.

Device names:
  • Furnace: A Furnace
  • Furnace IC Name: Furnace IC
  • Hash IC Name: Hash IC
  • Fuel pump: FuelPump
  • Coolant pump: CoolantPump
  • Fuel pipe analyzer: Fuel PA
  • Coolant pipe analyzer: Coolant PA
  • Active vents: Vent 1, Vent 2 (order not important)
  • Dial: Ingot Dial
  • Button: Confirm Button
  • Output lever: Flush
  • Depressurize lever: VentLever
  • Status Light: SLight
Fuel Mixer (Optional)
The Hash IC has a section for a fuel mixer to give you the perfect fuel ratio regardless of the pressure/temperature.


You will need to place a pipe analyzer on an Oxygen pipe and name it ("O2 Analyzer") and pipe analyzer on volatiles pipe and name it ("H2 Analyzer").

The mixer should be named ("Fuel Mixer")

Important The volatiles pipe needs to connect to input 1 of the fuel mixer, and Oxygen pipe needs to connect to input 2 of the fuel mixer.

Important The mixer will not run while furnace is active, you should have some buffer tanks in between the mixer and the fuel pump for the furnace to use while running. an inline tank will do for the average use. If you're planning to smelt a lot of ore at once I suggest you expand the buffer.
Putting it all together
The first step that you need to do is to place down your advanced furnace which will be enclosed in a box. if you maneuver your furnace in the right way you can get the panel to stick outside the box while the chamber is inside. In this example I'm using window, but you could have it be any other type of wall.


The next step is to do the plumping in the back, the idea here is to have two pumps joined on the input connection of the furnace so that one can inject fuel and the other can inject coolant.
We also need to have 2 pipe analyzers somewhere along each pipe.

Note: make sure all of your pipes and tanks are insulated unless you know what you are doing.


The pipes don't need to be in that order, you switch their places but they do need to be in that configuration. Make sure the pumps and the pipe analyzers are named correctly (refer to the naming section)

As for the output pipe, It can go to your filtration system or dumped anywhere. Then 2 vents must be installed in the furnace box and named, then they have to be connected together and to a tank to store the furnace box's atmosphere and to regulate the pressure.
You will have to pump some amount of gas into the tank so that it can be used to pressurizer the furnace box, any gas or mix of gases is fine, obviously don't use anything flammable. Nitrogen is a good choice if you have plenty on hand.


In the picture above the green tank is the furnace box's atmosphere tank, make sure you don't fill it all the way to make room for the gasses to expand as they get heated up by the furnace.

(Note: We no longer need a waste tank, the waste can be handled in any manner you like)

For Fuel and coolant in this example I'm using two tanks the blue has Nitrogen and the red has fuel.


Next up are chutes for input and output of the furnace, you can do the chutes however you like as long as you have access to the furnace since it's going to be enclosed.

if you have been following your setup should look something like this.
(Front) (Back)
(Note: In the pictures below, the yellow tank is the furnace box's atmosphere tank)
The picture above shows how to set up the furnace box's pressure system which will aim to pressurize the furnace box to 101 KPA, this pipe network is separate from the furnace exhaust network. In this example I'm using a small tank as a buffer to bleed off excess pressure from the room, it is an overkill to use this much volume so you could get away with canisters or just some pipe segments. The atmosphere used in the furnace box can be anything that is not flammable, so you could just place a passive vent on the outside if you're on a planet with atmosphere like Mars and let the active vents pressurize the box before you run the furnace.

At this point it's a good idea to place a gas sensor inside the furnace box and make sure everything is named correctly before closing it up.

Electronics


1) A Dial that you will use to select which ingot you want smelt, turning the dial will cycle through the ingot type. The dial will be used by the 2 ICs. You should set the upper limit for the dial with your screwdriver to any number over 14. (Device Name: Ingot Dial)

2) A console with a Hash display chip inside of it. You need to configure the console using a DataDisk to read the Hash IC. NOT the furnace. (Device Name: Anything works)

3) A button that will start the smelting process after you have selected which ingot you want to make. (Device Name: Confirm Button)

4) Hash IC This IC will control the dial, the button, and the Hash Console which should be set to read its value as mentioned before. It has to be named correctly (Hash IC). No pins set up needed. just make sure to get the relevant code from the link below.

Code: https://steamcommunity.com/sharedfiles/filedetails/?id=3046529328

5) Furnace IC This IC will control the pumps and the other furnace operations. No pins setup needed. Make sure it is named correctly (Furnace IC)

Code: https://steamcommunity.com/sharedfiles/filedetails/?id=3046529429

6) Optional Lever If pulled while the furnace is idle it will pump all the gasses out of the furnace. (Device Name: Flush)

7) Optional Led Light This light will be Red when the furnace is idle and Green if it is active. (Device Name: SLight)

8) Optional Lever Depressurizes the furnace box in case you need to get access to it without having all the gasses escape.

9) Optional Consoles should have a Gas display chip inside of it and configured using a DataDisk to read the furnace Pressure or Temperature.

10) Optional Consoles should have a Gas display chip inside of it and configured using a DataDisk to read the furnace box Pressure or Temperature.

Load up the codes on the relevant IC's and you are done.


Note: The script will now make sure to pull the correct amount of coolant/fuel to the furnace, which makes it possible to use the furnace output as a coolant if you cool it down enough. But it might be a bit slower.
How to Operate
Rotate the dial to cycle through the ingots types, when the hash display is showing you the ingot that you want to make load up the input with ores for that ingot and hit the button. Then just wait for the furnace to spit out your ingot when it is ready

For basic Ingots, you have to eject them manually to allow you to make big batches if you so desire. if you want the furnace to auto eject basic ingots (Iron, copper, gold,..etc) you need to use the furnace eject script in the follow up guide. it does however limit you to multiples of 50s because its meant to be used with the silos automation.


The lever acts as a hard rest if you pull it manually it will abort the current operation and reset the furnace.
End Notes
This is by no means the only way to automate an advanced furnace, this system can be expanded upon greatly by adding notification lights and sorting systems, and such. This however in my opinion is one of the simplest ways of doing so. Cowsareevil and Elmotrix and other creators have done great furnace builds since I originally posted this build. Make sure to check them out.
Ore delivery
To expand the build and add silos for ore delivery, refer to my ore delivery guide.

https://steamcommunity.com/sharedfiles/filedetails/?id=2428983849
Discord/Help
If you have any issues feel free to ask in discord or in a comment section below. You could also post your save file there.

link:
https://discord.gg/vv3JVdSduq
.
189 Kommentare
GokouZWAR 21. März um 17:32 
@WanderingMadMan - Colder than the lowest you need to smelt stuff. If you're on Mars, outside air works just fine for me. I just suck in the outside air and store it in a large tank. It should be around -10c or so which is more than cold enough. (be sure you handle the liquids by adding a passive pipe drain to your line to bleed off the condensed pollutants).

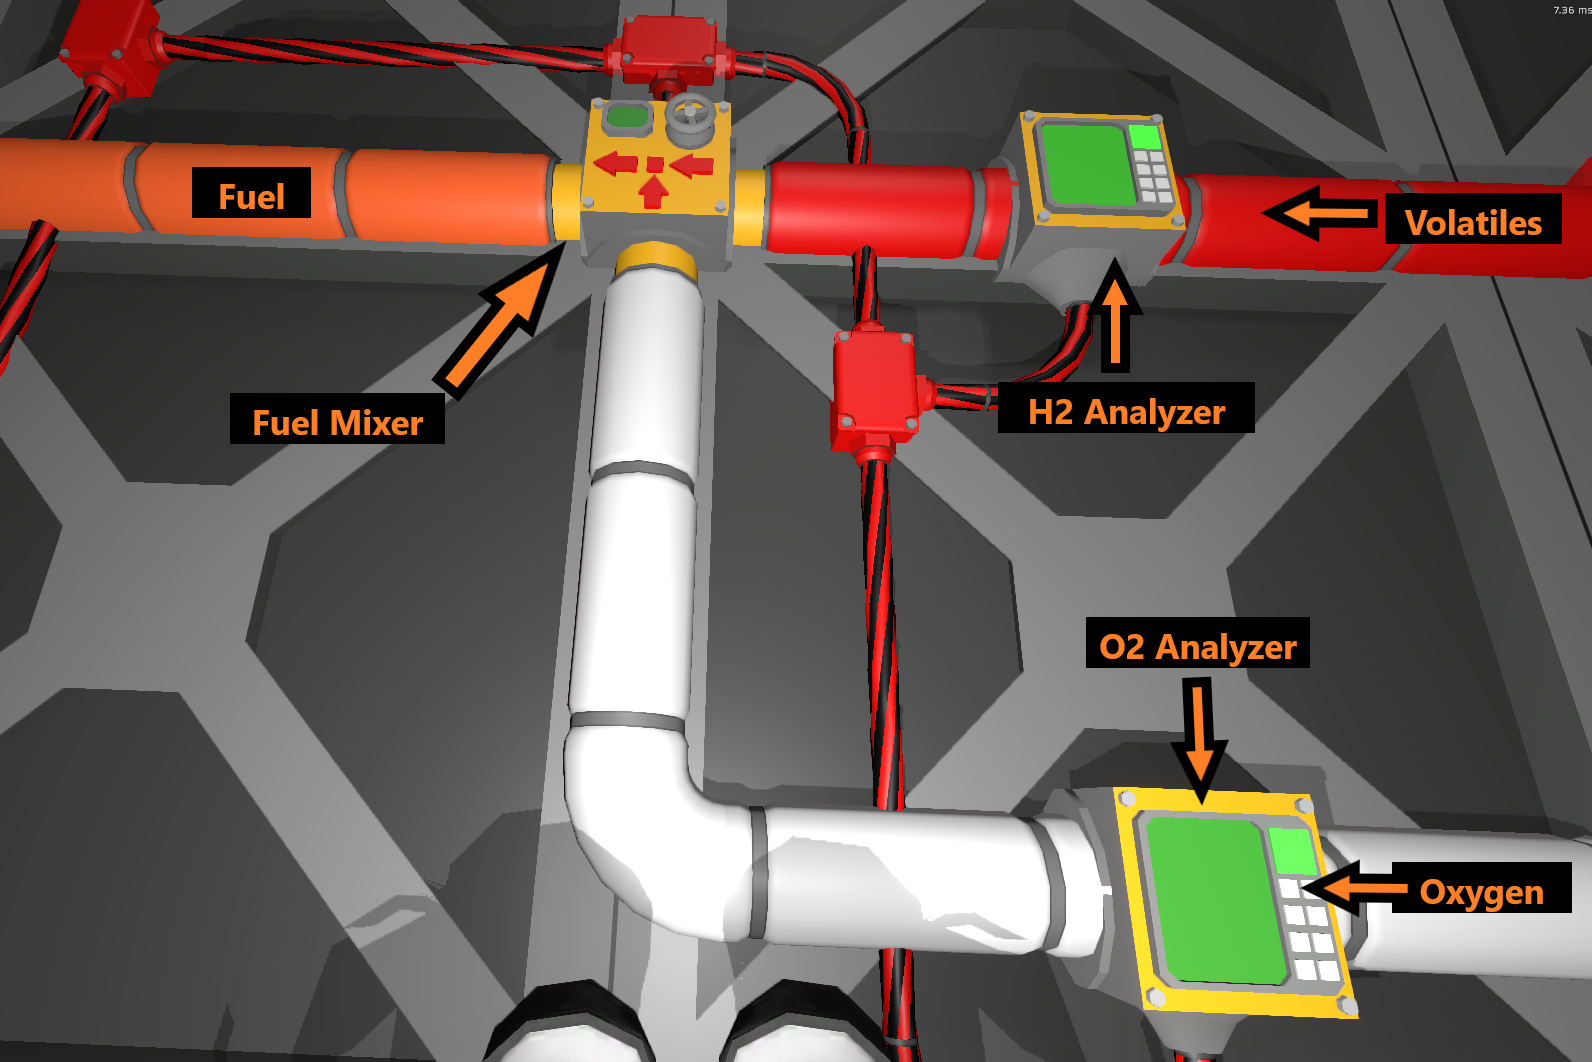
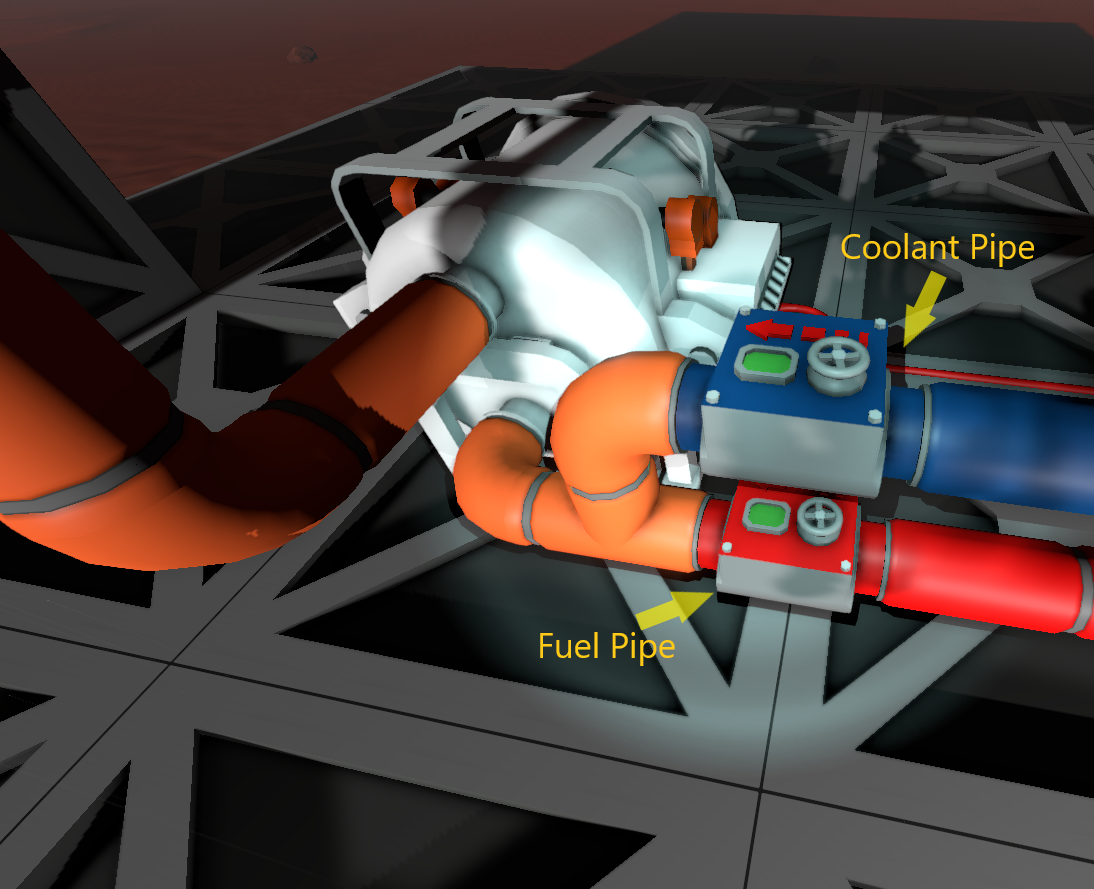
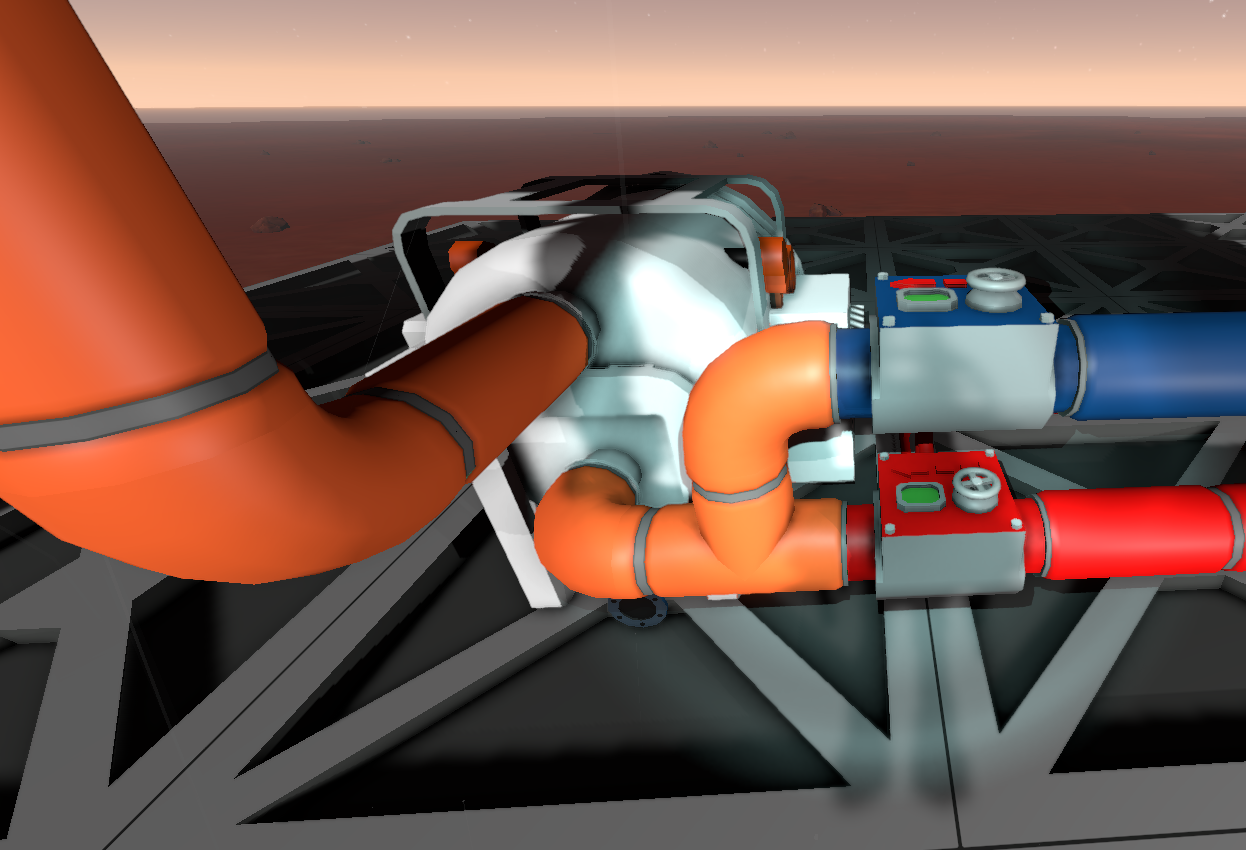
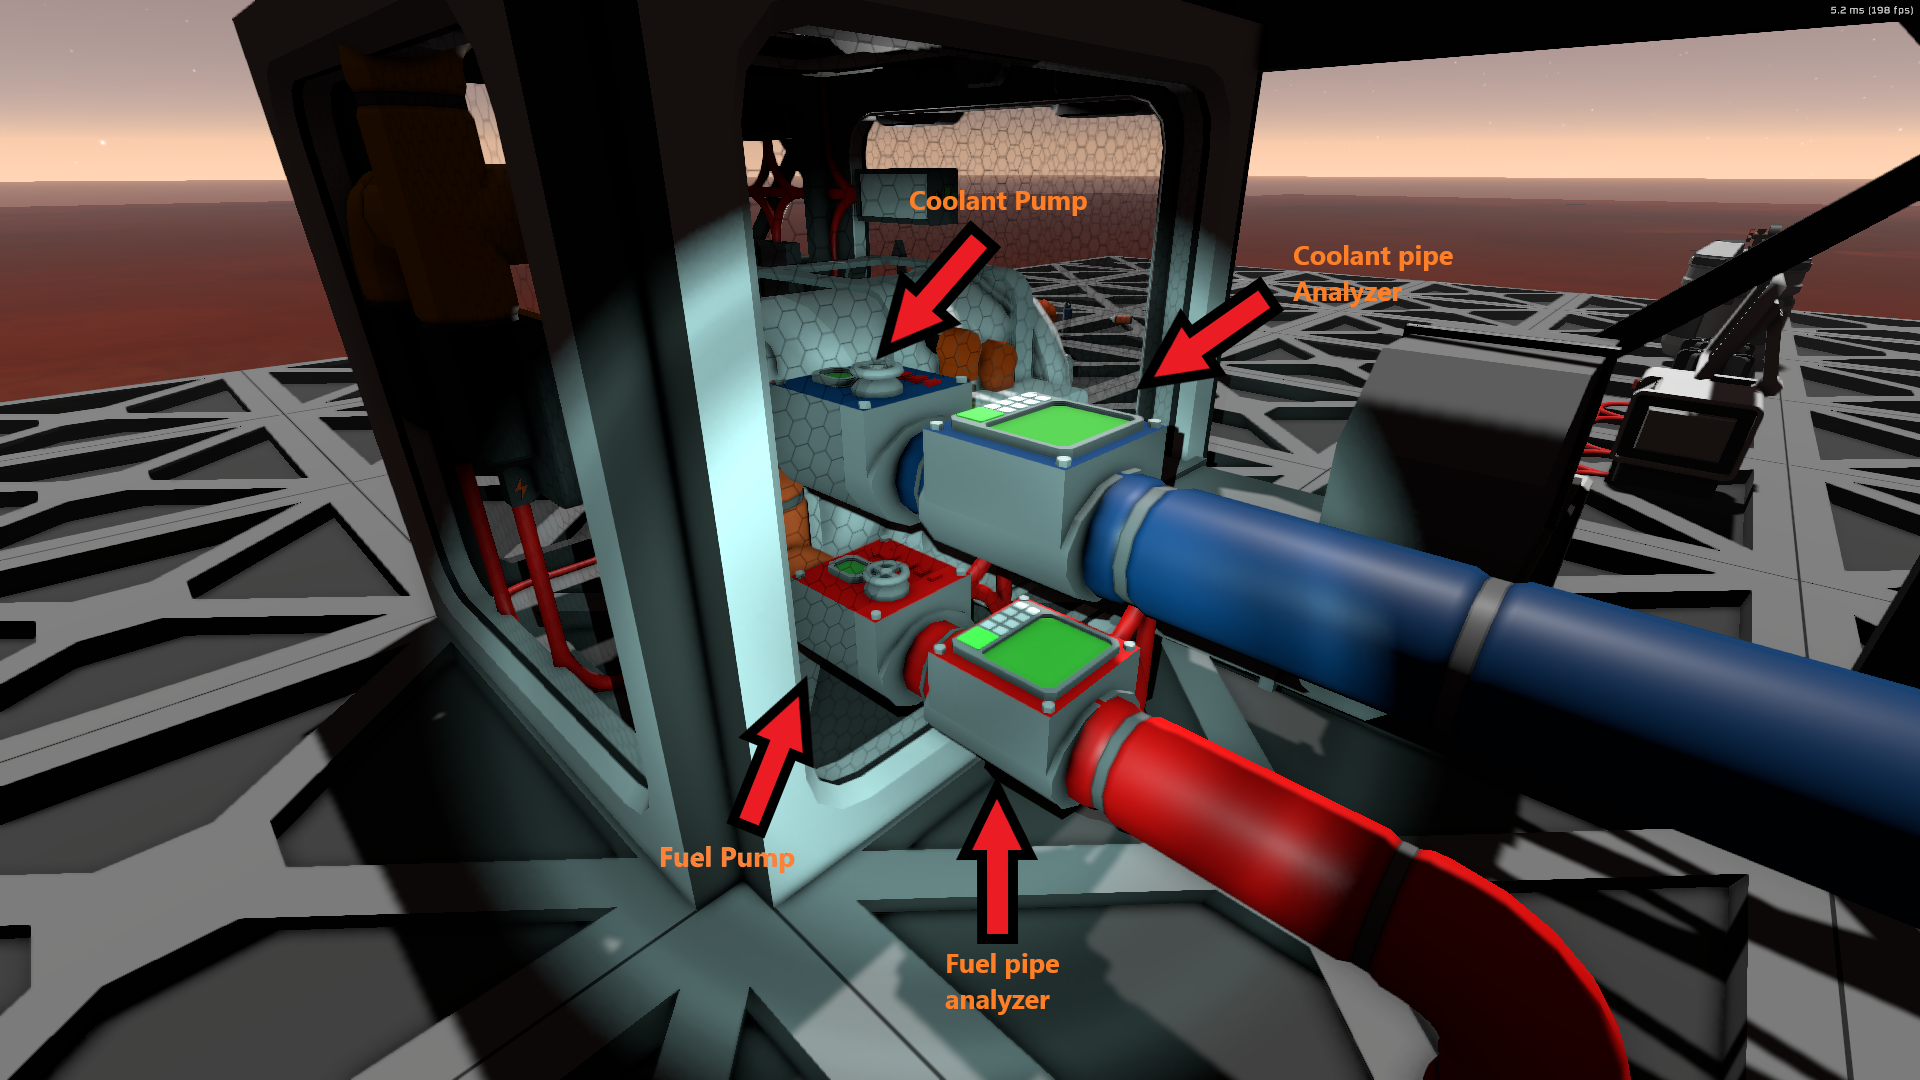
If you're on the moon, or other planet that's hot, just setup a capture for some gas, and cool it down. Ideally you want to store cold gas colder than the coldest required temp for any ingot. Solder requires 78.6C, so that's where I'd aim to get your cold gas to, but anything under 277c is probably "Cold enough" to get it to temp. If need be, buy some cold gasses from the traders and store that specifically for Coolant. All gasses come at 20C from the traders. You won't need much. Most of the time you're using your fuel to heat things up and you don't want to cool off those hot gasses anyway. You'll just waste them.
GokouZWAR 21. März um 17:19 
A bit of an oversight to not talk about setting up the Logic Memory chip called "Link" that's referenced in your code?

Also I've not been able to get the SLight to work while the smelter is running. It just stays white. I have an LED up and I've named it accordingly on the same network as the IC chip. Is that only used if the Silo IC and the Silo CD code is used?
AlphaZed73 13. März um 20:55 
The fuel mixer keeps mixing the fuel with the wrong ratio. I have the inputs connected to ice crushers
WanderingMadMan 4. Feb. um 3:58 
What temperature must the coolant be?
Ghostly 20. Jan. um 18:29 
how do i fill the furnace box with nitrogen for the atmosphere part?
AKnadian907 15. Jan. um 10:03 
I've compiled and named everything correctly straight from here but the dial selector and hash display refuse to work even after reload... I guess i have to learn the IC code now... :D
FreeBee 8. Jan. um 11:21 
Same here, hoping you have a fast and good recovery.
Officer Doofy 23. Dez. 2024 um 6:25 
@Barsiel great work sorry to hear about the health issues hoping you have a speedy recovery
Moomoobeef 22. Dez. 2024 um 19:23 
🫡Thanks for your work thus far. Wishing you a good recovery mate
Barsiel  [Autor] 20. Dez. 2024 um 10:45 
@FreeBee Glad you like it, Unfortunately I'm unable to support this project anymore because of health issues.