Starbound

Starbound

129 ratings
A Guide to Make A Server
By Couch Potato
In this guide, I will show you how to make a Starbound server so you and your family and/or friend could play together.
   
Award
Favorite
Favorited
Unfavorite
Introduction
Hello, my name is Captain Truculent Pizza or known as krisnarocks (my youtube name). Today, I am going to show you how you could play Starbound with your family/or friend with the build-in Starbound server application. I will be using windows 7. If I found a way to make the server work on mac and linux, I will update this guide or make a new one.

I will update this guide when I got home. I still have to add some more images and make some steps clearer. I will also add a port forwarding section soon. I hope you like my first guide. If you have a question, please do not hesitate yo ask.


Sincerely,

Captain Truculent Pizza


Guide Change Log:

  • March 22, 2014
    Updating the guide. Added Linux tutorial, Port Forwarding Basics, and Mac OSX tutorial.

  • March 16, 2014
    Created this guide. Including the windows tutorial.
Windows
In this section I will make the starbound server in windows 7 32bit.

1. Navigate to C:\Program Files\Steam\SteamApps\common\Starbound
or where ever you install starbound

Starbound win3s folder

2. Go to the win32 folder
3. Launch the starbound_server.exe (Don't worry, a new CMD window will open)

The CMD window

4. Wait untill the new CMD window stop outputing message
5. Do a port forwarding. If you do not know how, you could skip this or google "how to port forward [Router Name]"
Note: Change [Router Name] to your router brand name. Google it w/ quotes
6. Go to http://www.ipchicken.com/ and copy your IP. The one under Current IP address and above Advance. The format looks something like thi, xxx.xx.xxx.xx
7. Share that IP to your family and friend. Enjoy playing Starbound with your friend!

Ps: The port that Starbound use is port 21025. You want to make sure that that port is available. This is the port to forward.
Linux
In this section I will make the server with linux. I am using Ubuntu 12.04 32bit. We will be using SteamCMD. To find more information, go here: https://developer.valvesoftware.com/wiki/SteamCMD

1. Open up Terminal. Now, you want to navigate to your home directory.
cd /home mkdir Steam cd Steam

You could change Steam after the mkdir to anyname you want. I will be using Steam.

2. Download the SteamCMD package.


Should look something like this:


3. Remove or keep the tar.gz file. I recommend you to remove it to save space. If you decide not to remove it, you could skip the first line of command.
rm steamcmd_linux.tar.gz ./steamcmd.sh


4. When the download is complete, login to your steam account.
login [steam_username] [steam_password]

Note: The password is not hidden. Make sure no body is watching you.


This act like normal steam. If you are logged in from another computer, the other computer will be logged out from steam. If you haven't logged in to steam from your Ubuntu and you have steam guard enabled, you will need to enter it. Just follow the instruction.

5. Now, install starbound.
force_install_dir ./Starbound


It will make a new directory under /home/Steam/starbound (if you follow along with me)
app_update 211820 validate

This will download and update starbound. This step will take some time depending with your internet speed. So, go grab a cup of coffee first then come back. (Start the download at 14:09 and finished at 15:35)


6. Quit SteamCMD
quit

then launch the starbound server.
Depending on your Linux architecture, you must navigate to the correct folder.

64bit:
cd /home/Steam/Starbound/linux64

or

32bit:
cd /home/Steam/Starbound/linux32

then

./starbound_server.sh
ctrl+z to clode this window
or
screen -S starbound -d -m ./starbound_server.sh

The server will do the first run setup. Wait untill it give no more output.


6. Do a port forwarding. If you do not know how, you could skip this or google "how to port forward [Router Name]"
Note: Change [Router Name] to your router brand name. Google it w/ quotes
7. Go to http://www.ipchicken.com/ and copy your IP. The one under Current IP address and above Advance. The format looks something like thi, xxx.xx.xxx.xx
8. Share that IP to your family and friend. Enjoy playing Starbound with your friend!

Voilà! Your linux starbound server is completed! Continue reading so you will not miss any information.

Server Notes

  • Enter the screen with this command:
screen -d -R starbound
  • use CTRL+a then CTRL+d to exit screen without shutting down the server.
  • To list all the screens, use this command:
screen -ls
  • To shutdown the server, use this command:
If you are using screen mode:
screen -S starbound -X quit

If you are in the default terminal window: CTRL+c
  • To update the server, do the following command
    cd /home/Steam ./steamcmd.sh
    then follow step 4 - 6.
  • To view how many player is online, execute this command on another terminal window
    netstat -nt | grep -c 21025
  • To change your server config, edit the starbound.config. You can find this in /home/Steam/Starbound/linux[architect]/starbound.config

If you encounter an error, leave it in the comment box.
Mac OSX
In this section I will make the server on Mac OSX. I am using OSX Maverics 10.9.2. This will be an easy setup just like the one in windows. Lets go to the tutorial.


1. You want to go to your steam folder. ~/Library/Application Support/Steam/SteamApps/common/Starbound. You could use ⌘+Shift+g and type the location.


2. Right click on Starbound.app (the penguin icon) and click show package content.


3. Navigate through Contents > MacOS. Double click on starbound_server.


4. Wait untill the new terminal window stop outputing message
5. Do a port forwarding. If you do not know how, you could skip this or google "how to port forward [Router Name]"
Note: Change [Router Name] to your router brand name. Google it w/ quotes
6. Go to http://www.ipchicken.com/ and copy your IP. The one under Current IP address and above Advance. The format looks something like thi, xxx.xx.xxx.xx
7. Share that IP to your family and friend. Enjoy playing Starbound with your friend!
Port Forwarding Basics
I will be using windows 7 32bit. Every thing should be the same except for step 1. Read on if you want to port forward.

1. Open CMD/terminal and execute the following command

Windows
ipconfig
You should see you computer network information. Find the one that says IPv4. Copy the default gateway address.


Linux/Mac
ifconfig
Find the line that says "inet addr". On mac its under en0. Find the default gateway address. Copy the IP until the first character of the last digits (192.168.1.101).

2. Paste the gateway address in your browser and press enter. Login when you are prompted. The default login information is usually (user:password) admin:admin, root:admin, admin:root. If it doesn't work, and your admin or reset the router.


3. Locate the forwarding tab. Mine is located under the Advance tab.


4. Add a new entry. Enter this information:

Service Port: 21025
IP Address: Server's IPv4 (Step 1)
Protocol: UDP (If you have the option that says "ALL", use "ALL")
Common Service Port: Leave empty


5. Go to http://www.ipchicken.com/ and copy your IP. The one under Current IP address and above Advance. The format looks something like thi, xxx.xx.xxx.xx


Click "Done"
Resource and Closing
Resource

1. http://www.portforward.com
2. http://www.ipchicken.com

Closing

Thanks for reading my guide until the end. I wish that you enjoy read this guide as much as I had fun making it. If you have any question or error, just post it in the comment section bellow. I will see you in the next guide.
56 Comments
jo7654321 Aug 8, 2024 @ 11:34am 
How does setting up a modded server work? Do you just need to make sure you're subscribed to all of the mods you want before you create a server?

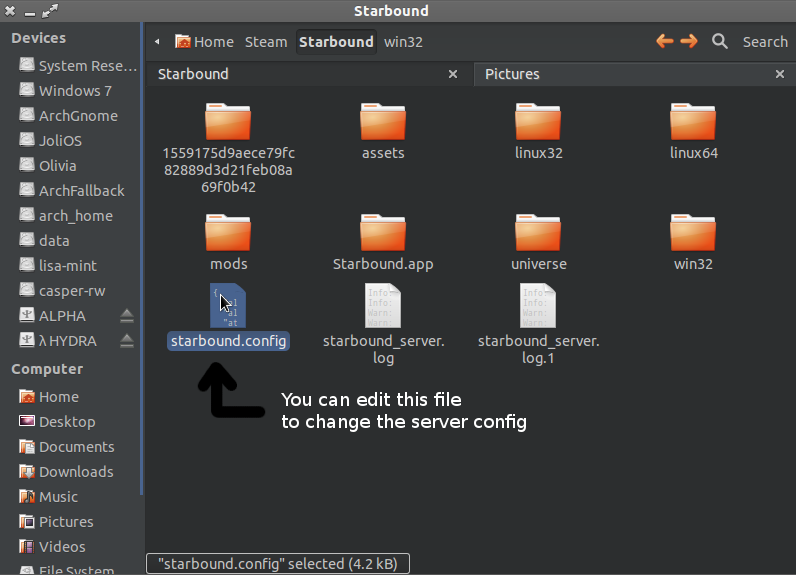
Also, I think we've hosted a separate unmodded server on the computer we're planning to host the new one on. Do we need to replace the old one, and could the old one existing cause any problems when creating a new one?
Caleb Nov 3, 2022 @ 8:27pm 
"... family and/or friend..."

One singular friend.
Calamorro3 Jul 18, 2018 @ 1:54am 
Hi. I've tried it on Windows 10 and it doesn't work. Could you help me, please?
Redlinq Jul 6, 2018 @ 6:59am 
where is for windows 10
pls add windows 10
Kepler Dec 29, 2016 @ 5:11am 
or you know what I know now
Kepler Dec 29, 2016 @ 5:11am 
what is a router name
Spoopy Owl Mar 14, 2016 @ 4:55pm 
when i run the server using the "Launch Starbound Server" button from the starbound launcher, it seems to go fine, except that it force closes. the logs used to say something about not being able to get univverse lock file or something, and now it's not evven giving that.
Spoopy Owl Mar 14, 2016 @ 3:58pm 
i can't seem to get the [code]force_install_dir ./Starbound[/code] to work.it just returns a blank line wich i assume is normal, as is the case with many console commands. but then when i validate i get this [code]Steam>app_update 211820 validate applicationmanager.cpp (1048) : Assertion Failed: Failed to write app state file /home/Steam/Starbound/steamapps/appmanifest_211820.acf[/code] and not what you show at the start of your run. i'm assuming the install dir command failed and it's simply checking the default dir where my regular steam has Starbound installed.
Couch Potato  [author] Jan 3, 2016 @ 2:45am 
@Relativity, As far as I know, there is no way to check router information without reseting the router. You could try hacking in to the router (as far as my router goes) since it will allow infinite login attempts.
PilaMagia Jan 2, 2016 @ 11:19am 
@Potato Solider, thanks, but is there any to check the router information without reseting the router? BTW I know the information by heart, but it seems to not work...