Oxygen Not Included

Oxygen Not Included

332 avaliações
Colony 101: industrialization (late-game)
Por fradow
Learn about the pitfall and hidden mechanisms in Oxygen Not Included, from shipwrecked on a strange asteroid to rocket science.
This part focus on late-game industrialization to prepare for space exploration.
12
6
6
6
3
2
2
   
Premiar
Adic. a Favoritos
Nos Favoritos
Desfavoritar
Introduction
Warning: the last time I played was in June 2022. This guide was up-to-date to the best of my knowledge at that time, but updates may have rendered part of it obsolete or flat out wrong. I will not be updating this guide anymore or answering to comments.

This is a continuation from my previous guide:
https://steamcommunity.com/sharedfiles/filedetails/?id=2348576847
This part assumes you understand everything explained there and have a self-sufficient colony that can run hundreds of cycles with minimal intervention.

The goal is to build infrastructure to support end-game space exploration. This means everything in this part is done without any space materials, in particular no Super Coolant or Thermium.

Most of that infrastructure is optional: you can finish the game without Pokeshell farming, having a Transit Tube network, taming Metal Volcanoes or having a large scale power source. On the other hand, all those structures will make it much easier to have a long-running base.

The only mandatory parts, marked as such, are Kilns for Steel ingredients and having a decent sustainable Steel Production. Rockets and Bunker Doors & Tiles use a lot of Steel.
(Mandatory) Kiln
Kilns are a very easy-to-use building. They don't need any power, and allow you to produce two materials:
  • Refined Carbon from Coal. This is an ingredient to make Steel, which will be covered next. You don't need a lot, you should only make it enough for your Steel production to avoid depleting your Coal.

  • Ceramic from Coal and Clay. Ceramic is the second best insulator in the game, behind Insulation. Yes, there is a material called "Insulation", which makes "insulation insulation" a very awkward term to say, to designate Insulated Tiles/Pipes made out of Insulation material.

Ceramic is the best insulator before space materials, and is useful as a step-up from Igneous Rock. While it's not mandatory for insulated pipes/tiles around 100°C to 200°C, the difference starts to show for temperatures above 1000°C, when you need to transport liquids/gases long distance or in a particularly cold/hot environment.

Kilns have a peculiar heating property: they don't exchange heat with anything but the atmosphere around them. This means there are three main approaches to deal with them:
  • In a heat-insulated box with an atmosphere: while they heat up when refining, the refinement deletes heat above a certain temperature. This means they will actually equalize the temperature around them to around 80°C, depending on input material temperature, meaning you do not need active cooling. Just remember to avoid putting them in a Steam box (explained next section), as they will delete heat that could be used by a Steam Turbine.
  • In a vacuum: since they don't have an overheat temperature, they can heat up until they melt the material they are made of. You can just run them until they melt, then rebuild them.
  • Open-air: by dropping incoming material next to them, on a pressure plate controlled chute, and having a small layer of liquid, Kilns will exchange temperature with the incoming Clay and Coal. Since they have so much mass, Kilns will more or less equalize to input material temperature.

Here is an example of the first method, which has the advantage of preventing any Dupe interaction with the Kilns:
Coal and Clay go in from the right (Conveyor loaders should have a higher priority than Storage Bins, otherwise the Sweeper won't fill them), Ceramic and Refined Carbon are ejected on the left.
It's a good idea to automatically limit Refined Carbon production with a Pressure Plate or Conveyor Receptacle to avoid exhausting your coal. Ideally, ship it next to your Metal Refinery, since it's only used for Steel.

That's about all you need to know about Kiln, they are not a complex subject.
Steam Turbine cooling
Let's get started with one of the most important late-game building: the Steam Turbine. It's mainly used for cooling, as it's the best late-game cooling solution.

Steam Turbines transform heat into electricity, but first you need to understand the basics. It's the most complicated building on the game so I won't explain all the details. The Wiki page explains everything.[oxygennotincluded.gamepedia.com]

I will refer to the room that holds Steam under the Steam Turbine as a "Steam Box", although it's not an actual building: it's a fully insulated space that holds Steam used by the Steam Turbine. For the insulation, prefer Igneous Rock early, and optionally upgrade to Ceramic later for an even better insulation.

Basically, Steam Turbines take in Steam at 125°C or more (there is virtually no upper limit) and output Water at 95°C, generating power while doing so, up to 850W at 200°C with all 5 inlets available. When feeding them Steam hotter than 200°C, you lose efficiency. On the other hand, they will still delete heat.

Note: with a split-turbine design[forums.kleientertainment.com], you can feed them Steam under 125°C as long as one of the inlets has Steam above 125°C. I won't cover this design.

An important detail is that 10% of the heat removed by a Steam Turbine will be transferred to the building. This means you are forced to cool it, or it will overheat in no time.

There are 2 options to cool a Steam Turbine (disregarding other cooling options, because it would be convoluted to use other cooling sources for a cooling source):
  • Passive cooling: SCST (Self-Cooled Steam Turbine): it uses the fact that the output water is at 95°C and has a few degrees available before water vaporization point by using radiant pipes behind the Steam Turbine before outputting the water in the Steam Box. There is a big limit: to do that, Steam must not be hotter than about 135°C, and enough heat needs to be transferred to the water before venting it back in the Steam Box. This solution greatly limits the cooling potential of the Steam Turbine to about 292KDTU/s.
  • Active cooling: ATST (AquaTuner Steam Turbine): it uses a Thermo Aquatuner to cool the Steam Turbine by transferring its heat back into the Steam Box, which will then get deleted. Note that a Steam Turbine produces less power than an Aquatuner uses to transfer heat: active cooling yields less power than a self-cooled Steam Turbine. When using Polluted Water, you need 1 AT to cool 6 STs.
While the screenshot shows an Hydrogen atmosphere, I recommend:
  • 2kg/tile Oxygen and 15 radiant sections for SCSTs.
  • A liquid puddle and 5 radiant sections for ATSTs.
Those are simpler to build and work well.


How much water/steam should I put inside the Steam Box? It doesn't matter much. The amount you put inside the Steam Box will determine its inertia: with more Steam in it, it will heat and cool slower. It's a good idea to put enough Steam to handle spikes, especially with SCSTs, but there isn't much difference between 50, 100 or 500kg/tile, as long as the Steam stays within operating temperature. I recommend aiming for about 100kg/tile.

What coolant to use for active cooling? Polluted Water is your best coolant so far because it has a greater temperature range than Water, and both have the second highest Specific Heat Capacity (SHC) of the game, which is the most desirable feature of a Coolant fed to an Aquatuner. The highest one is the Super Coolant, which requires space materials.

What temperature should the Thermo Sensor be set to? You can set it to "Above 80°C", or anything lower than that. The goal is to keep the Steam Turbine room under 100°C. The operating temperature of that room doesn't matter much as long as it's under 100°C;

What's the double bridge for? A bypass is needed so that when the Aquatuner is not active, coolant still flows through the pipe. The coolant will pick up heat until it's hot enough and the Aquatuner will be activated by the Thermo Sensor. The Liquid Pipe Thermo Sensor must be placed on the tile just before the Aquatuner input. Adding a double bypass instead of a single one totally avoids any issue even if you overfill the coolant loop. Here is a cheatsheet of double bypass (see this thread for more informations)[forums.kleientertainment.com]:


Transferring heat to the Steam Box
You need to transfer heat into the Steam Box so that it's deleted by one of the previous option: hot Steam will be taken by the Steam Turbine, outputted as water, then re-heated to Steam in a closed loop, until it reaches 125°C, the minimum temperature required by Steam Turbines.

You have two possibilities to transfer heat into the Steam Box:
  • Passive Heat Transfer: if the coolant you need to cool is hotter than 125°C and doesn't need to be cooled under 125°C, you can just use radiant pipes in the Steam Box. This is the case for the Metal Refinery (covered next section) and when using Magma as a power source, for example.
  • Active Heat Transfer: if the coolant you need to cool is colder than 125°C or needs to be cooled under 125°C, you need to use an Aquatuner to actively transfer it into the Steam Box. This is the case when you want to cool Oxygen or Water for use in your base, for example. Note that if you use active cooling, a single Aquatuner can be used for both heat transfer and cooling, as long as the temperature is somewhere under 100°C. When using Polluted Water, you need 3 ATSTs or 8 SCSTs to cool 2 ATs with 100% uptime.


What coolant to use for passive heat transfer? Since the temperature must exceed 125°C to transfer to Steam, you cannot use Polluted Water: right now, the best options are Crude Oil or Petroleum. Petroleum is slightly better, but not enough to make a real difference.

When combining cooling and heat transfer options, you have 4 ways to build a Steam Turbine base cooling setup:
  • Passive Cooling / Passive Heat Transfer: the best power efficiency, but limited in use-cases and in cooling capability, meaning you will need to use more Steam Turbines (and more space) for the same amount of cooling. It's perfect for a Metal Refinery, shown in the next section.
  • Active Cooling / Passive Heat Transfer: limited in use-cases to hot things, but not limited in terms of cooling ability. It's perfect for Geothermal power production, shown later.
  • Passive Cooling / Active Heat Transfer: can handle cooling cold things, but limited in terms of cooling ability. It's generally going to be enough for the use-cases you have at this point. It's perfect for base cooling.
  • Active Cooling / Active Heat Transfer: the worst efficiency, but it can handle anything. Only if you do not care much about power.
(Mandatory) Steel production
Let's move on the most important part of this guide: Steel production.

Steel is going to be very important from now on, for 2 reasons:
  • It has a +200°C overheat property (compared to the current +50°C overheat Refined Metals and Gold Amalgam), which will allow you to go past 125°C on all overheating buildings. Incidentally, Steam Turbines only activate with Steam above 125°C, which means anything in a Steam Box that can overheat needs to be Steel or Space materials (except Thermo Aquatuners which can be made of Gold Amalgam to overheat at 175°C since they have a native 125°C overheat temperature rather than the usual 75°C).
  • It is used to construct Bunker Doors & Tiles and Rockets, which are the next (and last) step of the game, covered in the next part.

To make Steel, you need 3 ingredients:
  • Iron: you will find plenty of Iron Ore to refine on your asteroid, perhaps an Iron Volcano too, and there are Iron Meteors which periodically bring a small amount of Iron.

  • Refined Carbon: it's made from Coal in the Kiln, as explained in a previous section.

  • Lime: you will very soon find out that it's the limiting factor of your Steel production. You get Lime by crushing Egg Shells and Molts in the Rock Crusher. The two best producers are Pacus and Pokeshells, as explained in the previous part. Round up every wild one of them, and optionally scale up your Pacus population, as explained in the previous part. We will also see how to ranch Pokeshells next section.

With those 3 ingredients, you can make Steel in a Metal Refinery. It requires 1.2KW and outputs 16KDTU/s, which is a fair amount of heat, but not huge either.

But what about the coolant? Here is the tricky part: the Metal Refinery needs a coolant, in which it will output heated liquid. The amount of heat that generates dwarfs the building heat generation. For comparison, the metal that heats the coolant the least (Gold) generates 264KDTU/s, about 16 times as much as the building itself! And Steel is about 2.340KDTU/s, almost 150 times as much as the building itself.

Clearly, this is going to need a heavy-weight heat-deletion device.

The only realistic option is Steam Turbines, explained in the previous section, to turn all that heat into power. Apart from Gold, which is power-negative, other metals are close to power-neutral or power-positive when using Steam Turbines to delete heat. Note that I advise against relying too much on that power, since it's a byproduct of refining, not the main product: you shouldn't have to refine metals in order to power your base, as your ore supply is limited.

Metal Refineries are the perfect use-case for passive heat transfer, using Crude Oil or Petroleum. I do not recommend using active heat transfer: it uses power for no reason.
On the other hand, Polluted Water coolant can be used way earlier for an unsustainable Metal Refinery without Steam Turbines, way before you reach the Oil Biome or make plastic, as covered in the previous section.

As for Steam Turbines, you have the choice to go with self-cooled or active cooling. Self-cooled has a power advantage, but you will need more than 1 SCST in order to dissipate enough heat.

You would need 8 SCSTs or 3 ATSTs to handle an always running Metal Refinery producing Steel (based on the minimum 40s per batch due to 400kg coolant looping at 10kg packet per second). In practice, since you are going to be limited by Lime, you don't need nearly that much, and 1 might be enough if you accept a limited throughput. I personally build 3 because it fits in my 16 tiles wide structure, or 4 when going for a hot industrial brick (explained next section). Even 3 or 4 is already oversized for a decent Lime production.

If you choose to go for active cooling instead, you will need a first batch of Steel to construct an Aquatuner or limit Steam to 175°C. Note that with an ATST, you will need 3 STs to dissipate enough heat at maximum efficiency for an always running Steel production. Since a single Aquatuner can cool down up to 6 STs running that way (with Polluted Water coolant), you'll have spare cooling capacity.

Once you build the Steam Turbine of your choosing and the Metal Refinery, queue an indefinite Steel production, so that you get it without micromanaging it! There isn't a case where you'd want to keep ingredients for something else.

This is also a good time to kill any remaining Smooth Hatches. From now on, the Metal Refinery is better in every regard at refining metals.

Putting all those choices together, here is the design I advise for your first, which uses a SCST, with a temperature control set to Under 126°C. You will need to make your Steam Box larger according to the number of STs you want.
Since the piping is not clear in the above screenshot, here is an exploded version of the same piping. The order of first ejecting cold coolant, then the double bypass, then injecting new hot coolant is important to avoid clogging.


Note that the temperature control is there because pipes are very short and cannot exchange heat in a single loop. If you have pipes long enough, temperature control becomes optional, and thus you can have a single line without any bridge that goes from the refinery output, into the Steam Box and back to the refinery input.
Cold & Hot Industrial Bricks
In the previous section, the Metal Refinery is outside the Steam Box and needs some cooling.

That's referred to as a "Cold" Industrial Brick, where buildings have to be actively cooled and is the most intuitive way to build your first Brick.

There is another approach: using a "Hot" Industrial Brick, where the Metal Refinery and other industrial buildings are placed inside a Steam Room. This approach is optional, and has several requirements to work properly, but simplifies cooling and has a better power-efficiency.

I will refer to those as simply "Hot" and "Cold" in this section.

The cut-off between Hot and Cold is at 125°C: above that, Hot can be passively cooled by Steam Turbines, which is its main draw.

There are a few other differences:
  • Atmo Suits: Required for Hot, optional for Cold.

  • Steel/Ceramic: Everything that can overheat must be made of Steel or Ceramic in Hot, Cold can use any material.

  • Power efficiency: Cold needs active heat transfer cooling, while Hot uses passive heat transfer, which also means no cooling pipes in the brick.

  • Polluted Water handling: Hot instantly boils any polluted water vented in it which then needs to be condensed while Cold only needs a Water Sieve.

  • Entrance: Cold don't need anything specific, while Hot requires at least a Crude Oil or Petroleum Liquid Airlock, and it's highly recommended to have a heat-insulated airlock.


The main question, when you go for Hot, is what should be placed inside. Here is a non-exhaustive list of what should be inside, what should not, and buildings where there are reasons either way.

Recommended buildings inside:
  • Metal Refinery: With it's very high temperature output, it's what make a Hot Industrial Brick worth it.

  • Thermo Aquatuner: If you need cooling for something else, it's an obvious place to build one (or more), to avoid having to build another Steam Box. Be careful about AT to ST ratio.

  • Glass Forge: While it's used a lot less, it requires a fair amount of cooling for the very hot Glass it outputs, which makes placing it there worth it.

Buildings not recommended inside:
  • Kiln: Kilns equalize temperature to around 80°C, which means you will lose heat that won't be converted to power if placed inside a Steam room. Place them into their own room and use shipping to move Refined Carbon to the Metal Refinery instead.

  • Oil Refinery: It deletes heat if the Crude Oil is hot enough (above 40°C), which makes it a poor fit for a Hot Brick. Like the Kiln, it should be placed in its own room.

  • Molecular Forge: Isoresin melts at 100°C, meaning you need at least one outside to produce Insulation and Visco-Gel once you unlock Space materials. You can have one dedicated to Super Coolant and Thermium inside the Hot Brick though.

  • Electric Grill & Gas Range: While they do produce heat, you will also heat all the ingredients passing through, which will actually move heat into your food pit instead of creating power, creating two problems at once.

  • Compost: Only heats up to 75°C, which is too low. It deletes heat and should stay outside.

  • Research buildings: They don't produce that much heat, and by now you should have nearly researched everything. It makes little sense to use space inside your Hot Brick for them.

Optional buildings:
  • Rock Crusher: Since it's mostly used to create Lime for Steel, it's tempting to place them next to Metal Refineries. On the other hand, the materials in and out absorb about as much heat as the building produce.

  • Coal, Petroleum & Natural Gas Generators: The first two means you now have to deal with CO2 inside the Steam Box. The second two produce polluted water, which means you will have to implement a more complicated system to get some of the water out of the system instead of just Sieving the polluted water. Note that you don't lose heat, as the polluted water will exit at the building's temperature and instantly boil.

  • Hydrogen & Manual Generator / Batteries / Transformers / Exosuit Forge / Oxylite Refinery: While there is no drawback to place them in Steam, that requires a lot of Steel and has a poor return on investment since they don't create a lot of heat. Place them inside only when you have more Steel than you need (for example, more than 15t).

Here is an example of a minimal Hot Industrial Brick using only recommended buildings:


I included a Transit Tube Access because it's SCST cooled, meaning temperature will stay under 135°C. Be careful about that, Plastic melts at 160°C.

The Metal Refinery and Glass Forge need to be made out of Ceramic.

The Liquid Shutoff, Auto-sweeper and Rock Crusher need to be made out of Steel. You can do a first batch of Steel without the Liquid Shutoff to be able to build it. All the other buildings can be added later.

It's simple to add other floors after the fact, for example, here is what a second floor can look like, with a few optional buildings:
Pokeshell Ranch
During mid-game, we had a look at Pacus. So far, they are the main source of Lime.

While it's enough for most purposes, if you want more or for some reason don't want to tame Pacus, the best Lime source is Pokeshells.


Pokeshells eat Polluted Dirt, which is hard to produce in large quantities. On the other hand, their initial calorie supply allows them to live for 9 cycles as adults before starting to starve. In addition, when Happy, they produce an egg in 5.88 cycles.

This means you can starvation-ranch them: they have to be groomed so they produce a single egg, then left to starve. There is a large enough margin for error, and I'll assume they take 7 cycles to produce an egg (accounting for small periods of time when they are Glum).

You still need to scale up the population, which means a Polluted Dirt supply. There are various sources, but a very predictable and easy to set up one is Outhouses: replace your Lavatories with Outhouses to get a constant 20kg/cycle Polluted Dirt per Dupe.

A single Pokeshell breeder requires 70kg/cycle, which means you only need the output of 4 Dupes. If you have more Dupes, you can have more breeders, let the excess off-gas for a marginal Oxygen and Clay production, or submerge and compost it for a marginal Dirt production.

How much Pokeshells do I need? As a general rule, a single Rancher can take care of 4 ranches, which means 32 adults. Since they will spend only 9 cycles as adults, which is about 30% of their total lifecycle, you can get about 100 Pokeshells total if they have a perfect repartition through time. In practice, about 40 to 50 will be more than enough. It's equivalent to more than 300 Pacus (details in next section).

Let's see how they compare to Pacus:
  • Lime: To have the same Lime output, 1 Pokeshell is worth 6.25 Pacus, meaning it will be faster to scale up a Pokeshell ranch. That's an advantage for Pokeshells.

  • Labor: While Pacus can be 100% automated, Pokeshells require grooming when starvation-ranched. That's an advantage for Pacus.

  • Diet: To scale the population, Pacus require Algae, present in large quantities on most asteroids, while Pokeshells require Polluted Dirt, which is easily created from Outhouses. If you want large numbers, that's an advantage for Pokeshells.

  • Food: Pacus produce Pacu Fillets, which are needed for Surf'n'Turf, while Pokeshell don't produce any food. That's a big advantage for Pacus.

  • Game performance: Obviously, less Critters means less calculations. If your computer already struggles, Pokeshells are a smart choice.

As you can see, there is no clear winner, they both serve different purposes and have different requirements. You can also do both and get the best of both critters.

To initiate your starvation ranches, use a breeder room. I recommend using an airlocked room with more than 2kg/tile to avoid polluted dirt off-gassing. You will also need to only allow suited Dupes inside, otherwise their breathing will create pockets of CO2 which will allow off-gassing.

This room is really small and can only house 2 breeders. Feel free to add shipping from your Outhouses and Water Sieves to this room for Polluted Dirt too.

As an example, here is a highly optimized 4 Pokeshells vertical ranches setup, which only requires a single Rancher.

The only somewhat complex part is the pez dispenser, which was explained in the previous part. As a reminder, here is the automation explanation:
Note that in this example, the mechanized door isn't useful, since you are not trying to drown excess Pokeshells. In fact, if Pokeshells become adults in pez dispensers, it will stall that column as Pokeshells will get stuck in the door and the pez dispenser will stop functioning. In that case, kill or move adult Pokeshells manually.

Pez dispensers are highly recommended for Pokeshells, as the adults get aggressive when there is an egg in their path.

With an incubation room, this will happen because auto-wrangle only works on adult critters. If several Pokeshells become adults at the same time, they will attack and injure your Dupes when they come to wrangle them.

Credits to Ishamoridin for this design.

Lime production maths
Pacu lifecycle:
  • 5 cycles as an egg.
  • 5 cycles as a baby.
  • 15 cycles until it lays an egg as an adult.
  • Total: 25 cycles from an egg to the production of the next egg.
Per Pacu, you get 2kg Egg Shell (2kg Lime) every 25 cycles for a total of 0.08kg Lime/cycle.

Pokeshell lifecycle:
  • 20 cycles as an egg.
  • 5 cycles as a baby.
  • 7 cycles until it lays an egg as an adult (depending on how fast Ranchers groom them after they become Glum).
  • Total: 32 cycles from an egg to the production of the next egg.
Per Pokeshell, you get 1kg Egg Shell (1kg Lime) + 1 Small Pokeshell Molt (5kg Lime) + 1 Pokeshell Molt (10kg Lime) every 32 cycles for a total of 0.5kg Lime/cycle.


A Metal Refinery, assuming 40s per Steel batch (that's with an unskilled operator without light), requires 150kg Lime/cycle to have a 100% running steel production.

You would need 1875 Pacus or 300 Pokeshells for that uptime, which would create 1.5t of Steel per cycle.


Another important non-renewable source of Lime is Fossils. Most Terra maps will contain at least 300t of Fossil, which turns into 150t mined Fossil, then 7.5t of Lime, which allows you to create 75t of Steel.

It's a lot of Steel: it's worth scavenging Fossils to kickstart your Steel production.

Special thanks to Tetrikitty for the help with numbers in this section.
Metal Volcano taming
While your map has a lot of Metal Ore, this amount is finite, and Meteorites only bring a tiny amount of Metal Ore. It's also a good idea to keep Ore as-is without refining everything, as some buildings are made out of Ore, and once you are out, the only renewable sources are Meteorites and Space missions, or you need to use Steel instead.

We are going to see a simple method to tame Metal Volcanoes for Refined Metals and a bit of spare Power, so that you don't have to refine too much Ore.

The basic idea is to box the Metal Volcano in Steam, and passively cool that Steam Box with Steam Turbines, down to around 125°C. Liquid Metal coming out of the volcano will instantly solidify into debris, which will be swept up and put on rails to passively exchange heat with the Steam Box until it's cooled down to around 126/127°C and ejected out of the Steam Box.

Why not cool more? More cooling requires a more sophisticated setup with a Thermo Aquatuner, and thus uses some of the produced power. Since Refined Metals have a very low SHC, it's not worth it in my opinion: your base cooling or anything around it will easily overpower the temperature difference.
If you really want to cool more, here is a nice explained setup[github.com].


Before taming them, we need to know how much cooling is needed to cool Metals to 125°C. Luckily, that's easily calculated using ONI Cooling Calculator[oni-assistant.com] and the wiki Geysers page[oxygennotincluded.fandom.com].

For average volcanoes, here are the numbers:
  • Gold Volcano: 300g/s at 2627°C => 97KDTU/s.

  • Copper Volcano: 300g/s at 2227°C => 243KDTU/s.

  • Iron Volcano: 300g/s at 2527°C => 323KDTU/s.

Those numbers are over a full activity cycle, but you need to be able to handle the heat spike when volcanoes erupt. For that, a good rule of thumb is to double the cooling capability, and fill the Steam room as much as possible.

Since Volcanoes overpressure at 150kg/tile, you should fill the Steam room to about 140kg/tile of Steam.

With that said, since a single SCST can cool up to 292KDTU/s, I advise going for 1 SCST for Gold Volcanoes, 2 SCSTs for Copper Volcanoes, 2 or 3 SCSTs for Iron Volcanoes. By experience, 2 SCSTs for Iron Volcanoes might be cutting it very close if you have a small room or an over-average Volcano.

If you wanted to cool Iron from a single volcano down to 30°C, it would take 13KDTU/s (less for other metals), roughly the amount of a single Wheezewort. Using an Aquatuner setup just for this is a massive overkill in my opinion.

Here is what a minimal Metal Volcano tamer looks like:
 
Nothing really complicated, it uses the same cooling loop as the Metal Refinery shown earlier, except this time it's Conveyor rails instead of Pipes.

Important detail: the Steam Turbines floor should be Ceramic. That's because during the Metal volcano dormancy, some heat will leak in through that floor, and the Steam Turbine exchange heat with its floor foundation (in addition to the 15 cells it occupies) and not cool down via its exhaust.
If those tiles go over 100°C, turbines will overheat. Having Ceramic Insulated Tiles prevent that.
The other insulated tiles are less important, you can use Igneous Rock.
Transit Tube network
By now you should have a consequent Plastic supply. Since we are going to focus on Oil and Space biomes next, which are at the far top and bottom of the asteroid, now is a good time to set up a Transit Tube network.

Transit Tube lets you exchange Power for movement speed, which is starting to be a good idea since you now have enough power production for that. Power is extremely cheap late-game, especially as the next steps will be about setting up a large scale power source.


First, let's see how they work: Dupes enter the network with a Transit Tube Access, and exit at another Transit Tube Access or at a Tube end, provided it's a valid exit.


What constitutes a valid Tube exit? As you can see on the image:
  • The landing can be either a tile or a ladder.
  • With a side exit, the landing can be one or two tiles away.
  • Height can be level, 1 tile above or 2 tiles above. It can also be 3 tiles above, but only for side exits.

Should I build Transit Tubes everywhere? No, since entering an Access takes some time, it's best to avoid having short travel options, as it will interfere with pathing and sometimes cause Dupes to take more time than they need to.

To get started, you only need 3 access points: at your base, near the Oil biome and near the Space biome.
It's a good idea to have at least a Tube exit and perhaps even an Access nearby when you are taming a Geyser, since your Dupes will frequently travel to work there.
Add access points as you go at frequently used far off locations.

If you followed my design with 6 tiles wide shafts, retro-fitting those shafts for Tubes is really easy:
Oil Reservoir taming
One of the reasons to reach the Oil Biome is Oil Reservoirs.

Taming an Oil Reservoir is easy, you just have to choose between making the Crude Oil overflow through the Liquid Airlock or add a Liquid Pump inside the room. I prefer the second option, since you have to pump Crude Oil at some point anyway.

Here is a minimal room:
There is nothing complicated on this room:
  • The Oil Well is hooked up to a Hydro Sensor to avoid overflow. This is only useful if you don't use all its output directly.

  • The Gas Pump is hooked up to an Atmo Sensor to avoid pumping partial packets.

  • The Liquid Pump is hooked up to a Hydro Sensor to avoid pumping partial packets as well.

This room is bare bone, but can be improved in several ways:
  • Automated Liquid & Gas Filters can be set up as a security to only let Crude Oil/Natural Gas through. It's optional, but recommended, in case incoming water is vaporized into Steam, breaking pipes and then condensing into Water. If not filtered, Steam and Water would break downstream Natural Gas Generators, Oil Refinery and Petroleum Boiler.

  • A Liquid Reservoir allows storing a bit of Crude Oil at the beginning and adds some safety in your system if for some reason there is an interruption.

  • Transit Access lets Dupes get there faster to release Natural Gas back pressure from the Oil Well.

With all that crammed in, here is an example:
Gas filter is not shown there, as you can merge all your gas lines and only filter once before Generators.
 
An Oil Well uses 1kg/s of water, which by now should be easy to provide from a renewable source (or with a Petroleum loop, as we will see later), and produces 3.33kg/s of Crude Oil and 33.3g/s of Natural Gas.

This means 3 Oil Wells will almost give a full 10kg/s Crude Oil pipe, something that's going to be useful later. They will also provide enough Natural Gas to support an always-on Natural Gas Generator.

Note that it's a very good idea to build Transit Access next to your Oil Wells if it's not inside the room. While errands are infrequent, having an Oil Well awaiting back pressure release and not producing Crude Oil can be disastrous for Boilers, which rely on a constant Crude Oil input.
Petroleum production
There are 3 ways to use the Crude Oil from Oil Wells:
  • Oil Refinery: it's the easiest but least efficient. Oil Refineries only convert 50% of the Crude Oil to Petroleum, and release a bit of Natural Gas. A 10kg/s input will allow producing 5.8KW (5KW from Petroleum and 0.8KW from Natural Gas) and will be water-negative. It also requires labor, contrary to the Boilers options.

  • Petroleum Boiler: almost twice as efficient as Oil Refineries. Heat the Crude Oil up to 402°C to transform it into 100% Petroleum. It's more complex to build and needs to be efficient for it to be worth it, but a 10kg/s input will allow producing 10KW from Petroleum and will be slightly water-positive.

  • Sour Gas Boiler: the most efficient way to use Crude Oil for power, but also the hardest method. Boil Petroleum, but don't stop there: go up to 540° to vaporize the Petroleum into Sour Gas, then cool it to -164°C to get Methane (and useless Sulfur), then heat it again to -160°C to get Natural Gas. A 10kg/s input will allow producing 60KW (using 74 Natural Gas Generator) and will be water-positive.

Summed up in a table, for 10kg/s of Crude Oil (excluding Natural Gas from Oil Wells):
Method
Difficulty
Duplicant Labor
Power
Water differential
Oil Refinery
Easy
Yes
5.8KW
-1050g/s
Petroleum Boiler
Medium
No
10KW
+750g/s
Sour Gas Boiler
Very hard
No
60KW
+2000g/s
Note that all power figures exclude the power draw of buildings required to run the structures. This does not change the conclusions about which structure to use.


Which method should I choose?
  • To get started, there is nothing wrong building an Oil Refinery to have a small-scale Petroleum production to use in Liquid Airlocks, as coolant, for Rockets, and for a bit of power if your other power sources struggle.
  • On the other hand, to have constant large-scale power production, a Petroleum Boiler is worth it, mainly because it doesn't require labor and it's water-positive. Once built, it runs by itself. The added efficiency is the cherry on the top.
  • A Sour Gas Boiler is not advised: it's largely considered a vanity project and it's vastly overkill for most bases. You build one for the challenge of it, not because you actually need that much power.

Here is an example of an Oil Refinery setup, which is a simpler version of an Oil Well room: the output Petroleum is piped and there is no need for security there.

It should also be close to your base because Dupes will need to operate it.
Large scale power sources
Before going for space, the last but the most important optional step is to have a large scale power source.

Power sources we have so far are fine for a small base, but will start to struggle with the power draw of all the buildings we are going to use in the Space biome and to launch Rockets.

There are four main possibilities:
  • Water: taming several water sources to electrolyze and only keeping Hydrogen to burn it off, venting the Oxygen to space.

  • Solar: using the sun to power Solar panels.

  • Geothermal Turbines: using a large heat source (core heat or magma volcanoes) to heat up Steam so that Steam Turbines generate power.

  • Petroleum loop: using a Petroleum boiler as explained previously to create a loop of Water => Crude Oil => Petroleum => Polluted Water => Water. It requires a heat source, but will use less heat than Turbines.

Water based electricity is tempting since you already know every mechanism involved, and it could be built in space to avoid having to pump Oxygen and instead directly vent it to space. On the other hand, Hydrogen has 2 very important other uses: AETN fuel (for cooling), and end-game rocket fuel. During end-game, it's hard to have enough Hydrogen to sustain a Liquid Hydrogen production for Hydrogen engines, thus I don't advise using Hydrogen for power more than you already do. At some point, you will want to stop burning Hydrogen and redirect all of it into Liquid Hydrogen production.

Solar seems the most obvious, but it's in fact riddled with issues:
  • Obviously space access is needed, and so far we didn't venture in space.
  • A solar panel array needs to be protected with Bunker Doors.
  • Bunker Doors have to be opened/closed with automation and Space scanners aren't easy to set up correctly.
  • Regolith tiles need to be mined, which means a proper Robominers setup.
  • A battery array is needed to have power during the night.
  • Cooling isn't as easy in space, there are a few gotchas.
For all those reasons, I think solar is the hardest of all those possibilities, and I won't be showing it, though it's a fun project I encourage you to try out.

That only leaves us with either Geothermal Turbines or a Petroleum loop. By large, the community advice is to go directly to a Petroleum loop, glossing over the fact that it's more complicated. I don't think the choice is that obvious, and I will leave that choice up to you and present both solutions.

Let's start with the similarities: both require a heat source, can be built at this stage with what you have at your disposal and both are more than capable of producing a very consequent amount of power. For a Petroleum loop, that amount is a fixed 10KW (for 10kg/s Petroleum), while Geothermal can be runned on demand and scaled up as you go.

On the other hand, there are a few differences:
  • Heat used: a 10kg/s Petroleum boiler will use around 600KDTU/s of heat. Steam Turbines use roughly 1KDTU/s per Watt, which means it needs 16 times as much heat to generate the same amount of power. Steam Turbines only consume less heat if they are runned under 600W, which is very low.
  • On-demand: a simple Petroleum boiler can't be stopped and will always run at a fixed 10kg/s rate and use ~600KDTU/s of heat. Having a stoppable Petroleum boiler is a design challenge I won't talk about here. A simple Turbines setup will by default be able to be runned on demand.
  • Byproducts: Steam Turbines don't produce anything in addition to electricity. On the other hand, a 10kg/s Petroleum loop will either produce 750g/s surplus Water or 2kg/s surplus Petroleum, both of which are useful.
  • Complexity: both need a heat source and heat bridge. In addition a Petroleum loop needs 3 tamed Oil Reservoirs, a Petroleum power plant and a heat exchanger for an efficient Petroleum boiler (otherwise boiling petroleum uses 10 times as much heat). All that is a lot more complex than a Steam room with some actively cooled Steam Turbines on top.

The most important point here is the heat: if you are using a small heat source, meaning anything that's not Core heat, you won't have enough heat to produce a large amount of electricity using Steam Turbines. We will go over heat sources in the next section.

On the other hand, if you use Core heat, Steam Turbines are a good alternative to a Petroleum loop, and can also be used as a stepping stone until your Petroleum loop is operational.

In the long run, a Petroleum loop is the superior choice, because of useful byproducts and lesser heat usage.
Heat sources
Before comparing heat sources, first let's lay some numbers on the table. There will be a lot of approximations and back of the napkin calculations here, what's important is orders of magnitude.
  • A dumb Petroleum Boiler (which doesn't use a heat exchanger) would use 5MDTU/s for 10kg/s petroleum, excluding energy you'd get back from cooling Petroleum. I consider it a bad idea and won't talk much about that solution.
  • A Petroleum Boiler with a decently efficient heat exchanger, which is going to be shown later, uses about 0.6MDTU/s for 10kg/s petroleum (the actual figure will vary widely depending on the actual design, but that's a good target).
  • Steam Turbines converts about 1KDTU/s into 1W, meaning you need 10MDTU/s for 10KW.
  • According to liyezhang research, it will take about 1230 cycles using a constant 10KW power production to deplete core heat down to 125°C with Steam Turbines.

Let's go over meaningful heat sources and analyze it for both usages:
  • Core: It's made of very hot materials (magma and obsidian at 1600°C+) and is a finite but very large source of heat. As explained above, it can be used for more than 1000 cycles even with inefficient Steam Turbines, and many thousands with a Petroleum Boiler.

  • Volcano: a volcano outputs 1.7MDTU/s when cooled to 125°C meaning they would only provide 1.7KW with 3 STs, which is a bit too low to be really considered large scale. It's 1.4MDTU/s when cooled to 400°C, which is more than enough for a 10kg/s Petroleum boiler.

  • Minor Volcano: half of a volcano output, which means it's even less useful for STs, but more than enough for a 10kg/s Petroleum boiler.

  • Metal Refinery: one batch of Steel every 40s (assuming 0 operating skill) is 2.2MDTU/s, which means you need to run it a quarter of the time constantly to power a Petroleum boiler. This is very demanding in terms of supply chain: this means about 500 Pacus or 75 Pokeshells to get enough Lime, and at this throughput Iron will also be a concern. Since your existing Metal Refinery is already cooled by STs, you can see how its heat output is not enough for large scale power.

  • Metal Volcanoes: we already saw how to tame them with STs, by prioritizing cooling rather than power. If you paid attention, you already noticed the power output is minimal. The one with the most heat potential, Iron, produces less than 0.3KDTU/s when cooled to 400°C, which is not quite enough for a 10kg/s Petroleum Boiler (unless you make a very efficient heat exchanger).

  • Thermium Aquatuner: this requires space materials, but is the best end-game option for Petroleum Boilers: you can easily dump cold into outgoing Petroleum (or elsewhere), which will always be hotter than incoming Crude Oil because of the SHC difference. This is out of scope of this part because of the space materials requirements, but I might cover it in the next part.

  • Rocket Exhaust: this requires a regular space program and tall chimney. This is a very consequent infrastructure project, but can generate an infinite amount of heat. It's only of academic interest though, and won't be covered further in this guide.

As you can see, the Core is the only realistic heat source for Steam Turbines. If you have the Frozen Core world trait on non-Terra asteroids (Terra doesn't have traits), that won't be an option.

It also happens to be easier to tame than Volcanoes, don't have the supply chain requirements of a Metal Refinery, and don't need space materials, which means it's the perfect starter heat source for both Steam Turbines and a Petroleum Boiler.
Core tap & heat bridge
Let's get started tapping into that sweet core heat. While it's intimidating, there is nothing to be afraid of if you take the proper precautions.

Before you start, it's important to vacuum out the area around where your core tap is going to be, and sweep out anything that could change state, especially any liquid that could have found its way there. Having liquid vaporize there would destroy the vacuum and conduct heat, which would be disastrous.

The liquid airlock can be Crude Oil or Petroleum without any issue, since the core heat will be insulated with vacuum.

Once that's done, you can start digging down into the core. Be careful about which materials you use: you should only use materials that stay solid until at least 1700°C. This means:
  • Ladders and other buildings made out of raw minerals must be made out of Ceramic or Obsidian. Prefer Obsidian if you have some, because Ceramic is best used as an insulator.
  • Heat-conductive tiles can be Metal Tiles out of Steel or Tungsten, or Window Tiles out of Diamond. The least useful material here is Diamond, followed by Steel. Tungsten should be kept for Thermium production later.
  • Wires and other metal buildings must be made out of Steel or Tungsten. I advise Steel, again because Tungsten will be used later to craft Thermium.

Dig down until you reach Magma, and build a geothermal spike with heat-conductive tiles to tap into that core heat: this will conduct the heat from the core to where you want to use it.

How tall and wide should my spike be? It doesn't matter all that much, especially at the beginning when the core is so hot. As your core gets colder, you might want to make the contact between the spike and hot material larger to extract more heat out of it. As a rule of thumb, if it touches magma, you are good to go. Extend it as the magma solidifies.

Once that's done, enclose that spike and build a heat bridge on top of it.

A heat bridge is simply a Mechanized Airlock linked to a Temperature Sensor.
The goal of the Mechanized Airlock is to conduct heat when it's closed, and create a vacuum when it's opened to prevent heat transfer.
Here we want to heat up the area above up until a certain temperature, which is why we use a Temperature Sensor on top of the tile above the door. The temperature will vary depending on its usage, but will always be set to "Above".
It's important to place solid heat-conductive tiles on top of the door so nothing falls into the door, which would conduct heat despite it being opened.

Another option if you'd rather not use a Mechanized Airlock heat bridge is to use a Steel Conveyor Rail with Diamond debris on it to conduct heat, using a temperature sensor controlled Conveyor Shutoff so that Diamond is railed at the top only when temperature is too low and below when it's hot enough to avoid conducting heat. This option doesn't offer any advantage, is more expensive in terms of materials and more complex to build, but it works just fine.

And we are done taming the core! On top of the heat bridge, we can build either a Steam Box for Geothermal Turbines power, or a Petroleum Boiler for a petroleum loop.
Geothermal Turbines power
Once your core tap and heat bridge are in place, we can directly use those to create large amounts of power using Steam Turbines.

There isn't any new concept here, since we already covered Steam Turbines in depth in the Steam Turbine cooling section. This time though, we are using them for power rather than cooling.

The heat transfer is already figured out: it's passive and done via a heat bridge. The only choice is to go for self-cooling or active cooling.

In this case, I really advise active cooling. Self-cooling is not a great match, since that means 3x more STs for the same amount of power, and temperature control needs to be more precise to avoid STs overheating.

A single Steel Aquatuner with Polluted Water can cool up to 6 Steam Turbines.

On the other hand, it's a good idea to only build 3/4 Steam Turbines per Core tap, and instead have 3/4 Core taps spread across the Core. This allows an uniform Core usage, and more importantly creates redundancy: if one of your Geothermal power plants fails for any reason, you still have power from the other ones.

This also allows scaling it up as you go instead of having to complete a full infrastructure upfront.

On the example on the right, I chose to place the Smart Battery and Large Transformer in the Steam Box because there was some free space here. As a result they are made of Steel. The Transformer is there to allow passing a wire through tiles for the Mechanized Airlock.

The Transformer is optional, but recommended: if you don't power your Mechanized Airlock, they will take more time to open and close, which means either you lose efficiency (when Steam gets above 200°C) or maximum power (because you have to set the temperature sensor lower).

The Temperature Sensor is set at Above 195°C to allow running Steam Turbines close to the maximum power efficiency, which is at 200°C Steam. The Liquid Pipe Thermo Sensor is set at Above 75°C. The exact temperature doesn't matter all that much there as long as Steam Turbines are kept under 100°C.
Heat exchanger & Boiling chamber
Using Core heat (or any other heat source as detailed above), it's easy to see how to boil Crude Oil into Petroleum: drip some Crude Oil on a 402°C+ Heat Bridge, and you get Petroleum!

That's great, but now you have 402°C+ Petroleum that's totally unusable, since prior to Space, you cannot pump 400°C liquid: it's above the overheat temperature of Steel Liquid Pumps. That method also uses a lot of heat capacity to heat up Crude Oil from 95°C all the way up to 402°C.

Both of those issues are solved with an important component: a counterflow heat exchanger. There are several designs of counterflow heat exchangers which all work the same way: a cold fluid (in our case Crude Oil) enters from one side, while a hot fluid (in our case Petroleum) enters from the other side. They exchange temperature with each other, and when they exit, the cold fluid is now hot, and the hot fluid is now cold.

They can be both in pipes and exchange heat through the environment, or one can be in a pipe and the other in the environnement. For a petroleum boiler, it's going to be the second option, since it requires less materials to build and is more efficient.


There are 3 main designs for this type of counterflow heat exchanger (full-size screenshots are in the next section):
  • Layers: This is the most common pattern: it's easy to build and it fits really well with a Core Tap, as well as being the most stable, which will lessen the risk of pipes breaking. On the other hand, it's the least efficient per number of pipe segments, which means more materials and more space than other designs.

  • Staircase: This design uses stairs rather than layers: in a vacuum, each step is perfectly isolated from the others, making it way more efficient than layers where each segment interacts with its neighbours. It's not hard to build, but if you want to use it with a core tap you need to build a tall geothermal spike to move heat to the top of the stairs, which makes it impractical. It also suffers from a bad temperature range, which means you cannot make it too efficient or temperature fluctuations will break your pipes occasionally.

  • Waterfall: This design uses a waterfall, which has a very similar (just slightly worse) efficiency to Staircases and uses the least space and materials. Its shape can also make it very easy to fit in some places. On the other hand, it has the worst temperature range, needs an even taller geothermal spike, and creating an artificial waterfall is not obvious. Read more on how to create a waterfall.[forums.kleientertainment.com]

For your first petroleum boiler, I advise you to use Layers.
In each layer, each Petroleum tile interacts with its neighbours, except when it's on a different layer: to build a more efficient heat exchanger, more layers is way more efficient than wider layers.

On the other hand, height doesn't make any difference since any tile above the first will be vacuum. Having 2 tiles high rather than 1 means you can have Dupe access in case something goes wrong. In particular, with a 1 tile high heat exchanger, any gas leak will stall the counterflow and cause more damage, while it just has to be vacuumed out if there are 2 tiles or more.

If you choose to use a Staircase or Waterfall design, instead of having a tall spike, you can also pump magma, see this screenshot and save file from Angpaur. This is a complicated technique I don't recommend for your first boiler, thus I'm not going to explain it further.

Once you have chosen which counterflow heat exchanger design you want to use, you need to design the boiling chamber: that's the part that interfaces the heat bridge with the counterflow heat exchanger.

In practice, it can be designed however you want, as long as it's large enough so that Crude Oil doesn't find its way in the heat exchanger when you initialize the boiler. Since a door is 2 tiles, it's popular to do a 2 tiles wide chamber. You should then make it at least 3 tiles height to avoid any reflux when you initialize it. I've also done 4 tiles wide and 2 tiles height in the past with no issue.

Dripping crude oil from above is considered suboptimal by some experienced players and nicknamed a burping boiler. That's why the vent is at the bottom, which makes use of mechanics I won't explain there, read more about why you should submerge your liquid vent here.[forums.kleientertainment.com]

The reason the floor is Obsidian or Ceramic tiles is it reduces the amount of heat being transferred when the heat bridge closes, avoiding transferring too much heat and thus improving performance by having a more stable temperature. It also allows to have a longer counterflow without fear of boiling Crude in pipes because of temperature spikes in the boiling chamber. Thanks to Angpaur for that improvement.

A last but important detail: you must ensure all Crude Oil packets are the same size: if you have some smaller packets going in from time to time, they will exchange heat faster and increase the risks of boiling in the last radiant pipe sections before the boiling chamber, breaking them in the process.

How much Crude Oil can this boil? As long as your heat source is hot enough, there are 2 main limitations: a pipe can only carry up to 10kg/s, which is the hard limit, and you have to provide enough Crude Oil. We are going to get back to this in the Petroleum loop section, but if you have 3 Oil Wells, either you need to add a bit of Crude Oil from somewhere else to have a full 10kg/s pipe, or have a valve limit the flow to around 9.5kg/s, to avoid empty packets.

My Petroleum comes out much hotter than the Crude Oil is going in! That's normal: Petroleum has a higher SHC than Crude Oil. This means no matter what, you cannot cool Petroleum down to the same temperature as Crude Oil going in. It should be cool enough not to break a Steel Liquid Pump, which is all that matters.

Once everything is built, all that's left is to initialize it: you must do it slowly so that Crude Oil has the time to heat up and state change to Petroleum. The initialization consumes a lot of heat, which takes time to transfer. If you try to rush it, Crude Oil will not properly boil and go in your heat exchanger, which will break things downstream, so be patient!

Before you initialize your petroleum boiler, you must have a way to use all that petroleum, because a simple design like that cannot be easily stopped, and will break if it gets clogged.
Heat exchanger details
Let's get into more details to determine how many pipe segments are needed.

This depends on a lot of factors, including the design you chose, pipes materials, input Crude Oil temperature, what temperature the heat bridge is configured to and how efficient you want the heat exchanger to be.

On the other hand, if most of those are constants, designs can be compared. Let's define some sensible values:
  • Copper pipes: Gold or Iron will be very similar, other materials will change that a lot depending on their TC, see the Refined Metal wiki page.[oxygennotincluded.fandom.com]
  • 95°C input Crude Oil: Oil Wells will produce Oil at 90°C and, unless you use tricks, Water will be under 100°C, so 95°C is a nice middle-ground.
  • 600KDTU/s used: for Crude Oil, this means a 35.5°C temperature difference, meaning Crude Oil must come out of the vent at about 372.5°C provided a 408°C boiling chamber. Note that both can be higher or lower, what's important is the delta between both.
  • Petroleum flowing left: this shouldn't matter, but since this bug[forums.kleientertainment.com] is still not fixed, mirrored design will have a way worse efficiency (up to twice the heat usage for the same staircase design mirrored).

After experimenting a bit in Sandbox, here is an example of each design that's close to 600KDTU/s:
 
  • Layers have 4 layers each of 25 width, for a total of 106 radiant pipe segments, use 576KDTU/s and have 3°C of temperature variation. For comparison, 3 layers of the same width use 808KDTU/s, while 5 layers use 458KDTU/s.
     
  • Staircase has 25 steps, for a total of 50 radiant pipe segments, uses 594KDTU/s and has 16°C of temperature variation.
     

  • Waterfall has a 50 radiant pipe height, uses 632KDTU/s and has 20°C. For comparison, removing 10 pipe height pushes the heat usage up to 768KDTU/s.

On all those designs, you can easily get more efficiency by adding a few radiant pipe segments in the boiling chamber. For the sake of comparison, I made that part insulated.

An alternative design: Z-shape This was proposed by Saturnus on Discord: combining the stability of Layers with the efficiency of Staircases allows to get the best of both worlds. The main drawback of this design is that there are 2 big dead spaces on either side of the staircase that are hard to use.

As far as performance goes, it's 20 tiles wide, there are 81 radiant pipe segments, it uses only 525KDTU/s and has 3°C of temperature variation. To be only at around 600KDTU/s , you probably only need around 17/18 width, since the same design with 15 width performs at 676KDTU/s.

This makes it a narrower but taller version of layers, which isn't a great trade-off for a core tap, which is why I'd only advise it if you have a lot of space or use another heat source.

If you want to know more about heat exchangers, read my write-up about testing those designs, as well as experienced players feedback.[forums.kleientertainment.com]
Petroleum power plant
To use all that Petroleum, you are going to need enough Petroleum generators. Assuming you went for a 10kg/s Petroleum boiler, that means 5 Petroleum Generators using 2kg/s each.

Since 3 Oil Wells produce 33g/s of Natural Gas, you also need to burn that off: one Natural Gas Generator will burn off 90g/s, so you will either need 2 Generators or something to burn off the 9g/s excess, for example a Gas Range.

All those generators are going to produce:
  • Heat: 5 Petroleum Generators alone account for 100KDTU/s, not even counting the fact that you have hot Petroleum coming in and Natural Gas Generators.
  • Polluted Water: Polluted Water will come out of the Tile of Interest and drip below.
  • Carbon Dioxide: CO2 is piped for Natural Gas Generators, and released in the environment for Petroleum Generators.

Cold or Hot Petroleum power plant? While a cold Petroleum power plant works well with a small scale production and save up on Steel, it doesn't work very well with a Petroleum Boiler, for a few reasons:
  • The main one: Petroleum is coming in hot, because of the SHC difference with Crude Oil in the boiler heat exchanger. That means a lot of heat would have to be cooled.
  • CO2 comes out at 110°C+ out of the Petroleum Generator.
  • That means a lot of cooling, which will eat into the power efficiency and make the build more complicated. When I tried it, one Aquatuner with Polluted Water was not enough to keep up.
  • A cold power plant is more complex, both because of cooling and because you need to pump and sieve Polluted Water, rather than letting it boil and getting clean water out of Steam Turbines.

For all those reasons, I advise a hot Petroleum power plant. Hopefully, by now you should have enough Steel for that.
Since it's going to get quite hot and you will have tons of power anyway, it's a good idea to use actively cooled Steam Turbines.

Here is an example with all the required buildings:
 
How many Steam Turbines are needed? The amount of cooling you need is going to depend on incoming Petroleum temperature and what target temperature you want, but the bare minimum is 2 Steam Turbines because 10kg/s of Petroleum means 3.75kg/s of Polluted Water/Steam. I recommend at least 3, but there is no harm in using more.

In my example, Water is re-injected in the Power plant to cool it if it's too hot, then sent to Oil Wells. Any excess from Oil Wells needs to be handled as well, for example by sending it to your SPOM.
 
How to initialize it? Unlike a petroleum boiler, the power plant doesn't need special considerations apart from perhaps pumping some polluted water away: while polluted water will off-gas some polluted oxygen, it should get deleted automatically at some point. After reaching 122°C, polluted water will turn into Steam, and above 125°C your Steam Turbine will start converting it to water.

You need an external source of water for your Oil Wells until that happens.

CO2 handling has already been explained in the "Base Atmosphere" section of the previous part, but this time, you will have a much higher amount created, so let's go over your options again:
  • Not handling it for a while: since your power plant room should be airlocked and Petroleum Generators don't overpressure, you aren't forced to handle CO2 and can let pressure build up in the room until 1000kg/tile, the Liquid Vents overpressure limit. Note that Natural Gas Generators CO2 still need some handling, but it's so low you can just dump it outside.

  • Slicksters: if you still have some hatches fed on non-renewables, now is a good time to replace them entirely by slicksters. 5 Petroleum Generators can feed up to 75 tame and happy Slicksters. Since it's unlikely you'll need that many slicksters for food and they require grooming, you'll likely want to use another method as well for the rest of the CO2.

  • Carbon Skimmer: it can be used to pollute water if you want to set up a Pincha Pepper, Thimble Reed or Arbor Tree farm. On the other hand, the Polluted Dirt output of Water Sieves is very low, and using Skimmers just to remove CO2 is more complicated and power intensive than just pumping to space.

  • Pumping to space: if you don't like any of the other options or still have some excess, getting rid of the CO2 by pumping it to space is a very valid option that doesn't use a lot of power or space. You'll need one pump per Petroleum Generator. You will also need one Gas line for every 2 pumps, which means a total of 3 Gas lines for 5 Gas Pumps if you want to handle all the CO2. Be sure to connect them to Atmo Sensors to avoid pumping partial packets.

Here is an example which uses all three methods: Slicksters consume some CO2, but not all of it so pressure forms. Carbon Skimmers are active as long as farms (not shown there) need some Polluted Water and there is excess water sent to them. Gas Pumps will dispose of any excess by venting to space. There is also a Liquid Pump for Polluted Water created during the initialization as well as Crude Oil and Petroleum from Slicksters.
I won't explain the details of those, as it's outside of scope of this part. There is a packet stacker[forums.kleientertainment.com] and liquids are filtered by type in different reservoirs.
Petroleum loop
Let's sum it up:
  • 3 Oil Wells take in 3kg/s Water and output 10kg/s Crude Oil and 99g/s Natural Gas.
  • A Petroleum boiler refines those 10kg/s Crude Oil into 10kg/s Petroleum.
  • 5 Petroleum Generators transform that into 10KW, 2.5kg/s CO2 and 3.75kg/s Polluted Water
  • Steam Turbines transform the Polluted Water that flashed to Steam into 3.75kg/s Water
  • Optionally, CO2 disposal provides Meat and pollutes Water, if you need that.

As you can see, there is an excess of 0.75kg/s Water available for other projects.
Instead, you can also skim 2kg/s Petroleum for Plastic or Rockets and still have a constant 3kg/s of Water to feed back to your Oil Wells.
 
 
What can make the loop stop?
  • Heat source failure: It's the main failure cause when using a non-renewable or Dupe operated heat source. It is advised to add an automated notifier if the heat bank gets too cold.
  • Water vaporization: Another failure possibility is Water evaporating to Steam if pipes get too hot when transported to the Oil Wells. With a bare bone Oil Well taming, this can cause issues downstream, but with an improved one, those issues will stay localized.
  • Skimming too much: Using more Petroleum or Water than just the excess will starve the system. I advise limiting the Petroleum skimming to 2kg/s using a valve, and only using an overflow for Water.
  • Sour Gas/Steam inside Petroleum boiler: If for any reason Sour Gas or Steam form inside your boiler, it will no longer be a vacuum and either efficiency will take a hit or it will clog entirely. Place Steel Gas Pumps inside it to pump gases out until it's a vacuum again. You can even leave a few Steel Gas Pumps inside the coldest parts of your Petroleum Boiler for safety.

Before you start your loop, here is a small checklist:
  • Double-check all sensors values everywhere as you go.
  • Oil wells gas pumps send Natural Gas to Natural Gas Generators.
  • Those Natural Gas Generators have a vent for their CO2.
  • Oil wells liquid pumps send Crude Oil to the Petroleum Boiler.
  • The Petroleum boiler sends Petroleum to Petroleum Generators.
  • (Optional) There is a valve up to 2kg/s to skim Petroleum from the loop.
  • (Optional) Power plant is either over 2kg/tile of gas or 100°C+ (to avoid Polluted Oxygen).
  • Steam Turbines send Water to Oil wells.
  • There is enough Water to initialize the system.
  • There is an overflow for excess Water.
  • Steam Turbines have a cooling loop setup and initialized.
  • (Optional) CO2 handling is set up or you have a plan to add it later.

Once the full loop is built, it's time to start-up the Petroleum boiler. Hopefully if everything was done right, it should work without any hiccup for thousands of cycles.

Power is now a worry of the past!
End of late-game base state
During this part, we actually didn't change anything in the core base. Instead, a lot of industry has been built up outside the core base.

When getting in the last part of the game, rockets, you now have everything that's needed to tackle those new challenges at ease:
  • Steel is now under regular production and should be considered a common building material.
  • Refined Metals are now considered renewable (assuming your seed has at least one Metal Volcano).
  • Power is no longer a concern.
  • Petroleum is readily available for Petroleum Rockets.

Where are the screenshots of the base state? They are not done yet, as the "demo" colony I used for the previous part is still at the state where it was at the end of the previous part. I'll post screenshots when it's ready, after I continue that colony up to this point. On the other hand, the core base didn't see any change, so it won't be very interesting.
Conclusion
That's it for now, feel free to leave a comment if I made a mistake, if you think there is a better option that doesn't add complexity, or if there is something I forgot to explain.

Special thanks to all the super-friendly guys in the Unofficial ONI Discord[discord.gg] who helped me understand the game mechanics.

Happy building!

If you enjoyed this guide, read the next part, which mainly explains rocketry:
https://steamcommunity.com/sharedfiles/filedetails/?id=2438442383

You are also now at a stage where you can use most designs in this list:
https://steamcommunity.com/sharedfiles/filedetails/?id=2736463085
50 comentários
Ninevah 2 de abr. às 13:41 
I am trying to setup a hot petroleum power plant with my generators up top and some slickster ranches down below. How much initial water should I be using to create steam at the start? I originally started with a lot, but it gets generated at the bottom of the brick, then fills up the bottom 2/3 of the brick and never rises to the top where the steam turbines are. Then, I went to an older save and redid it with a much smaller amount of water, but it did the same thing just with a smaller cloud of steam that wasn't rising.
CRoads 24 de fev. às 10:58 
Also pump the pwater that dripped down to the bottom up again with the carbon skimmer pwater.
CRoads 24 de fev. às 10:57 
Awesome guide! I followed many builds here.

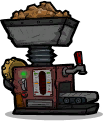
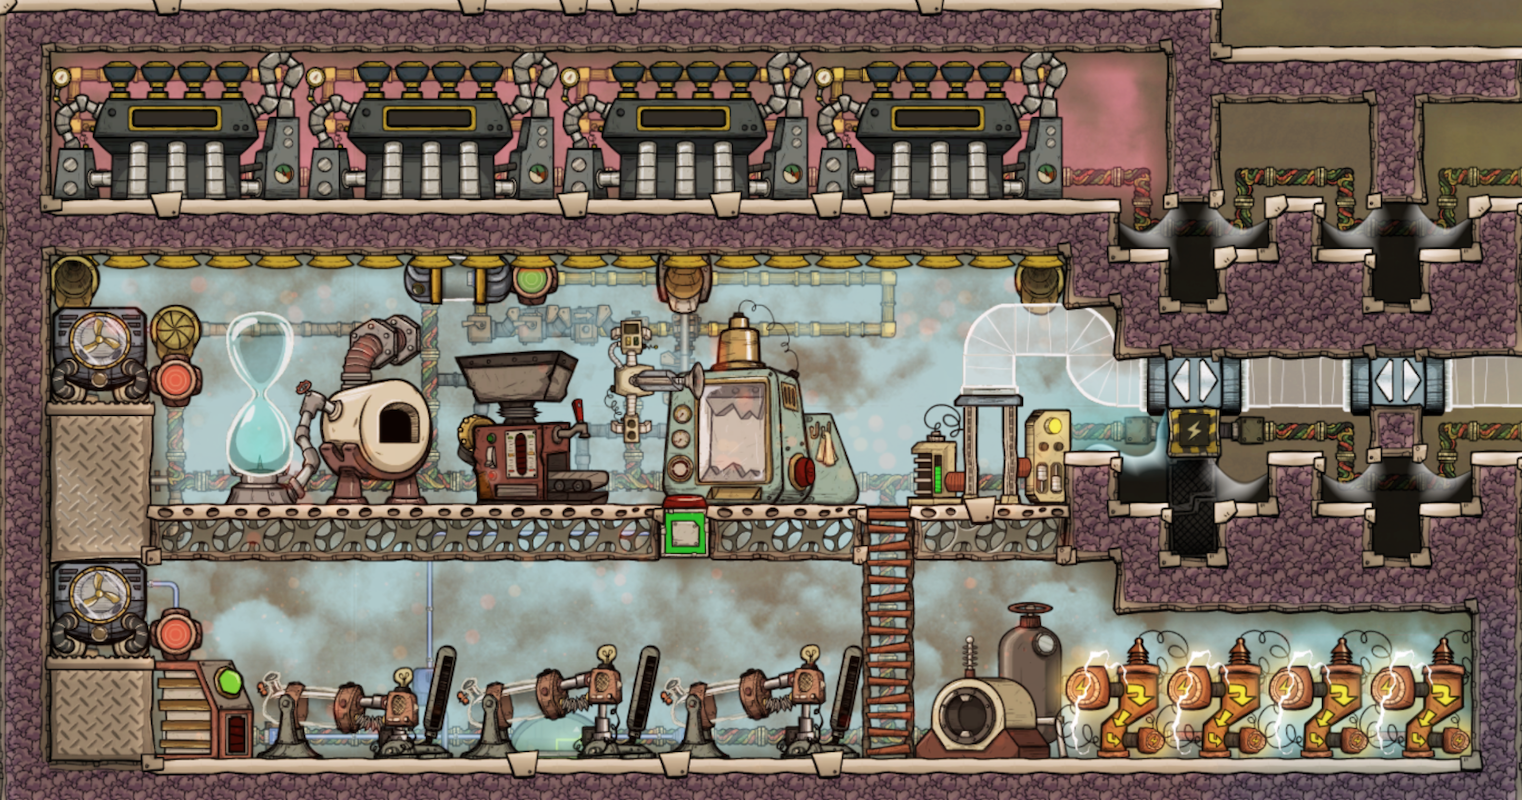
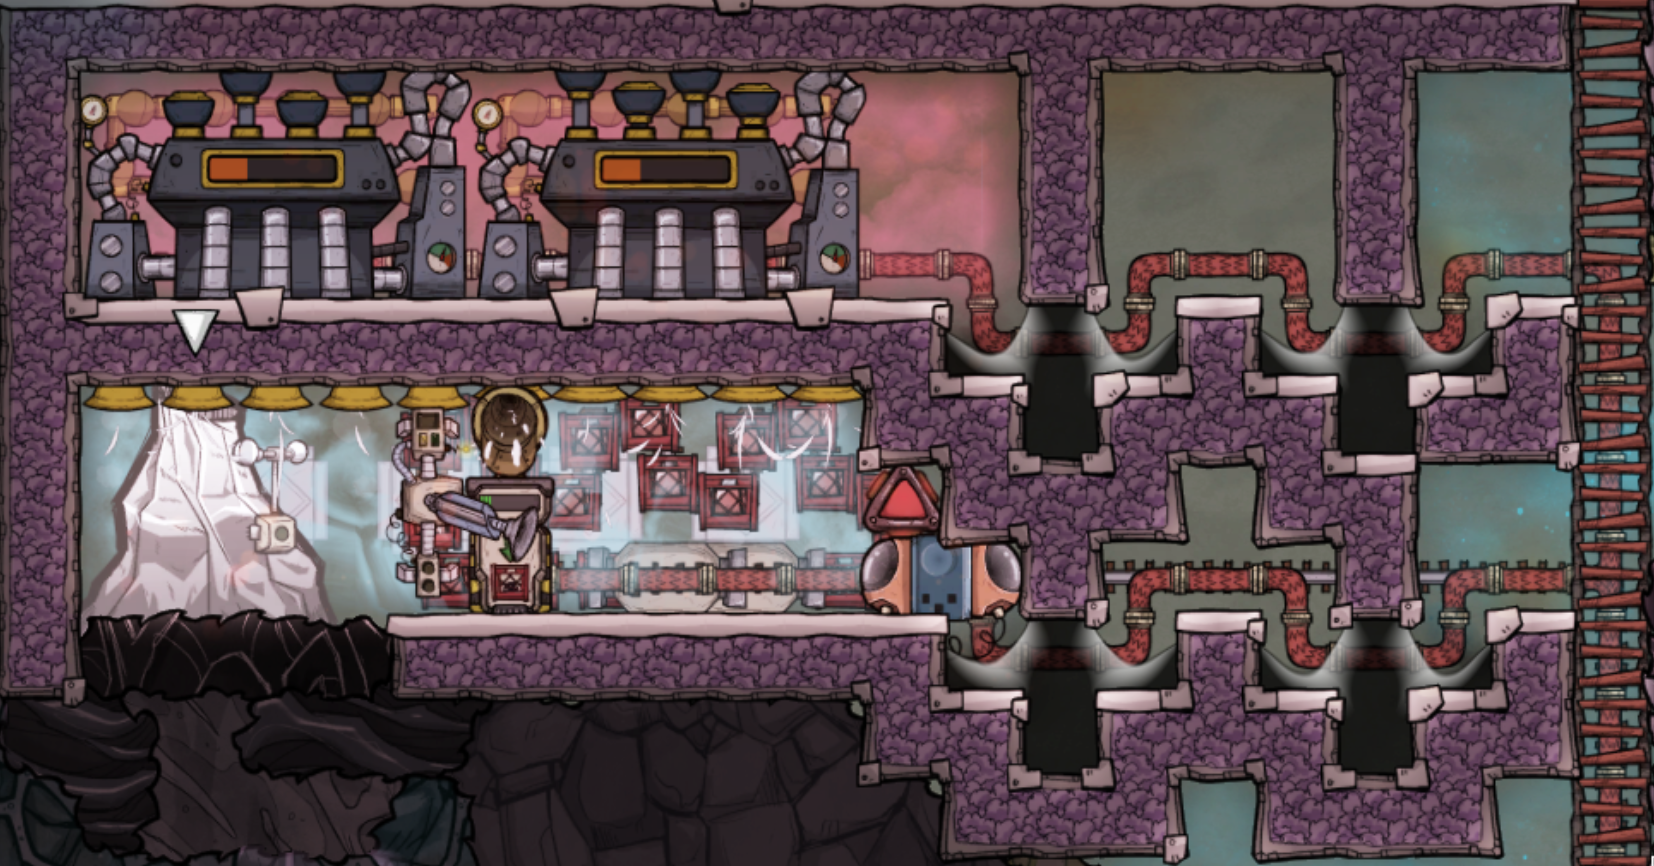
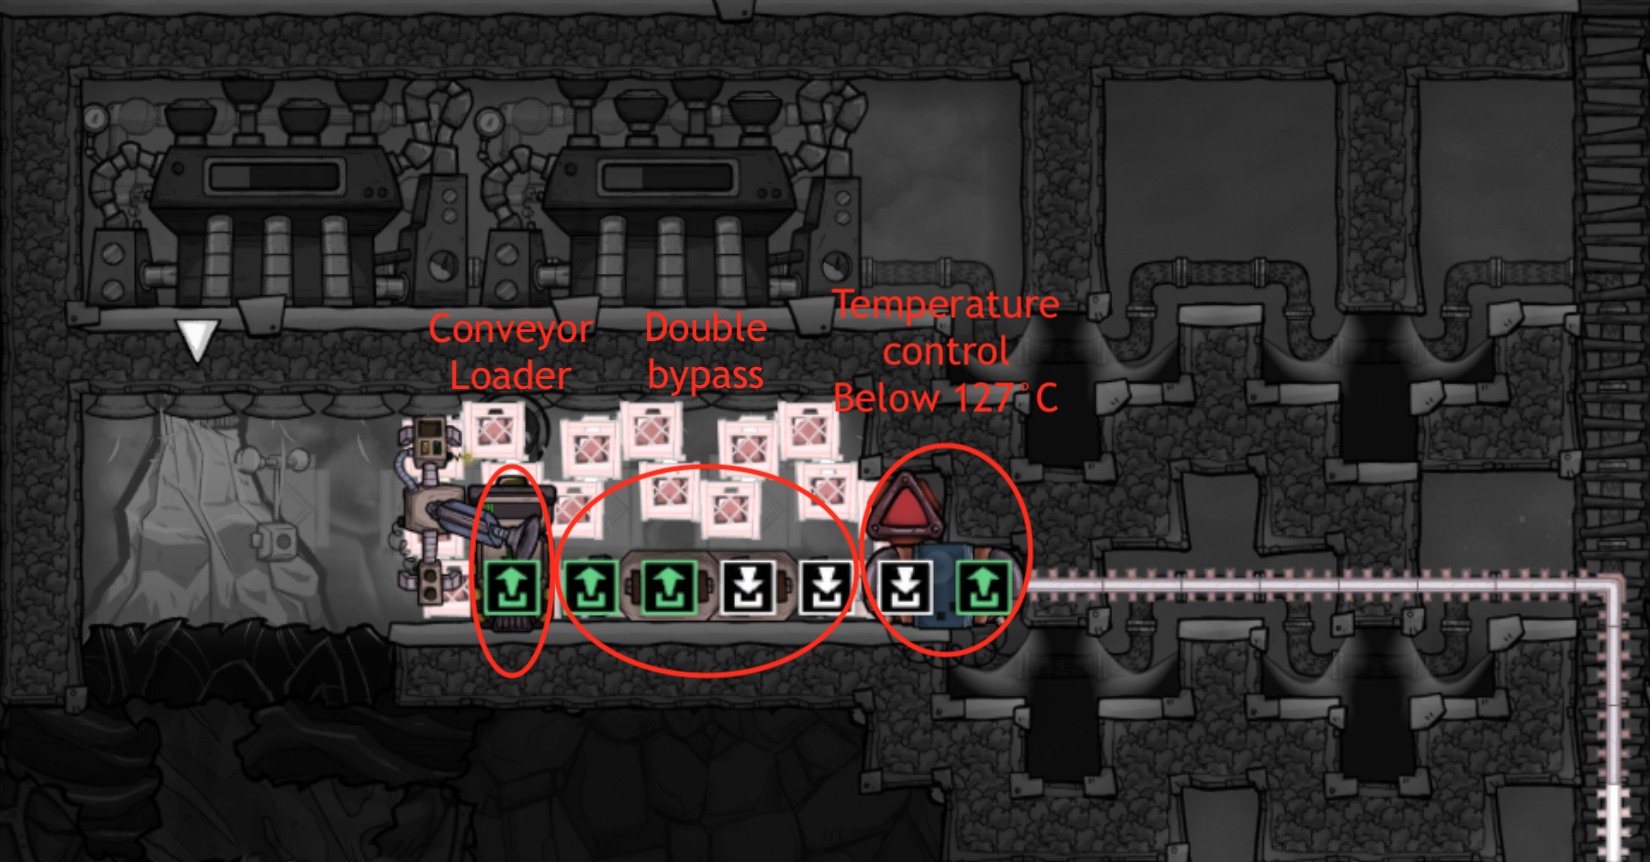
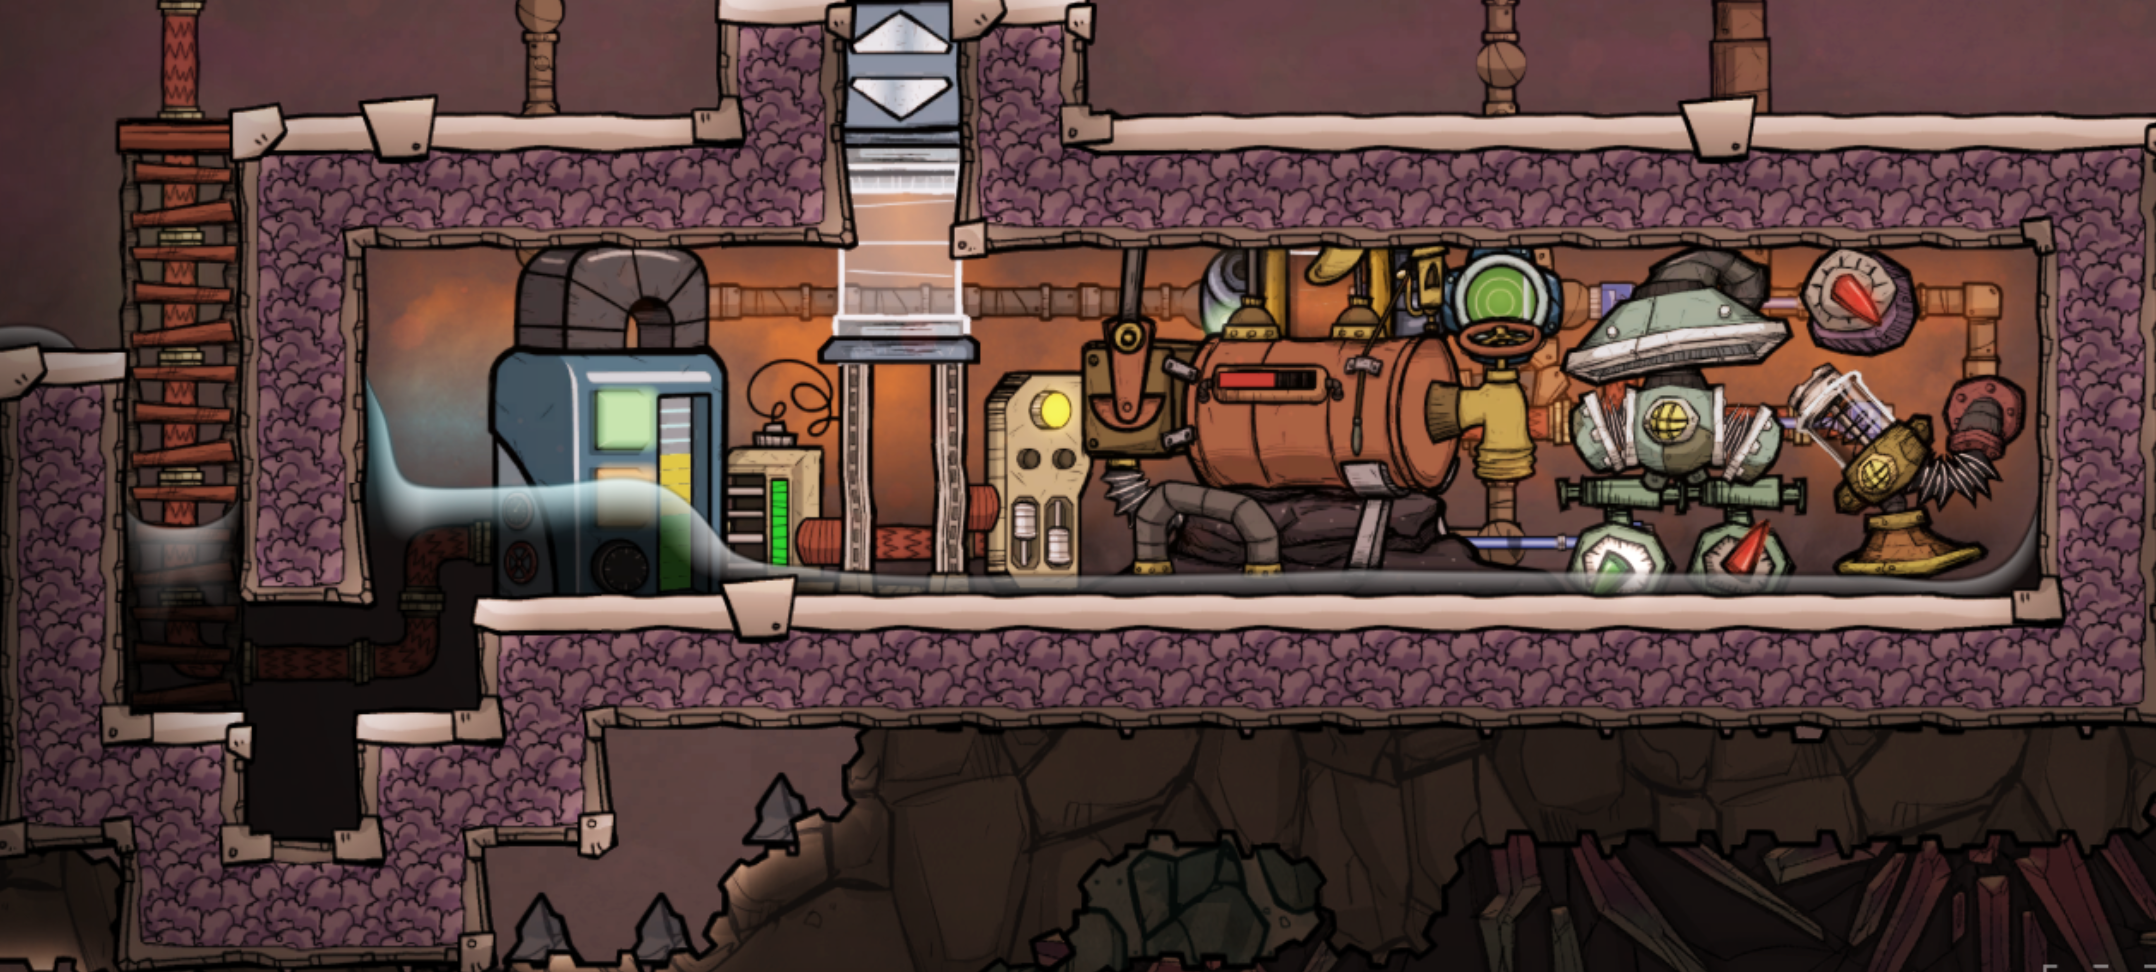
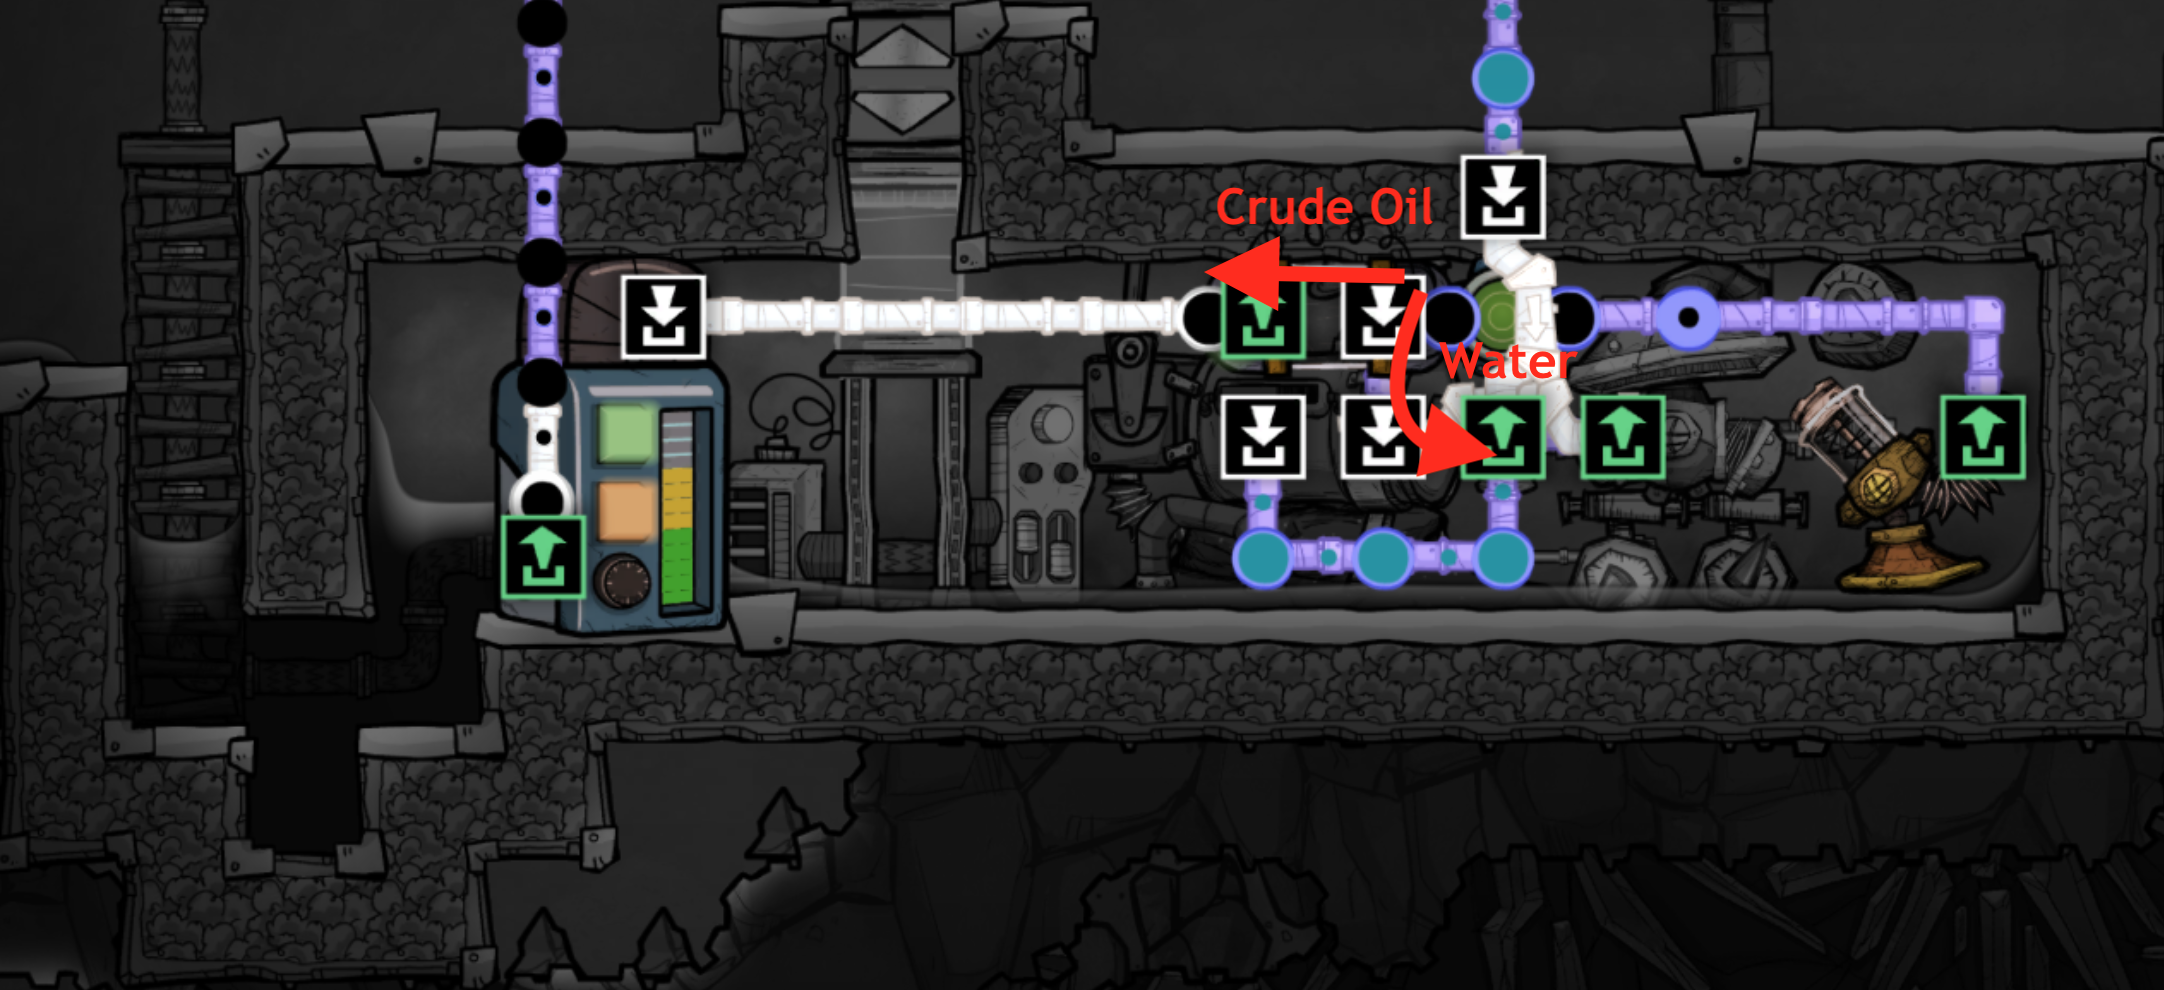
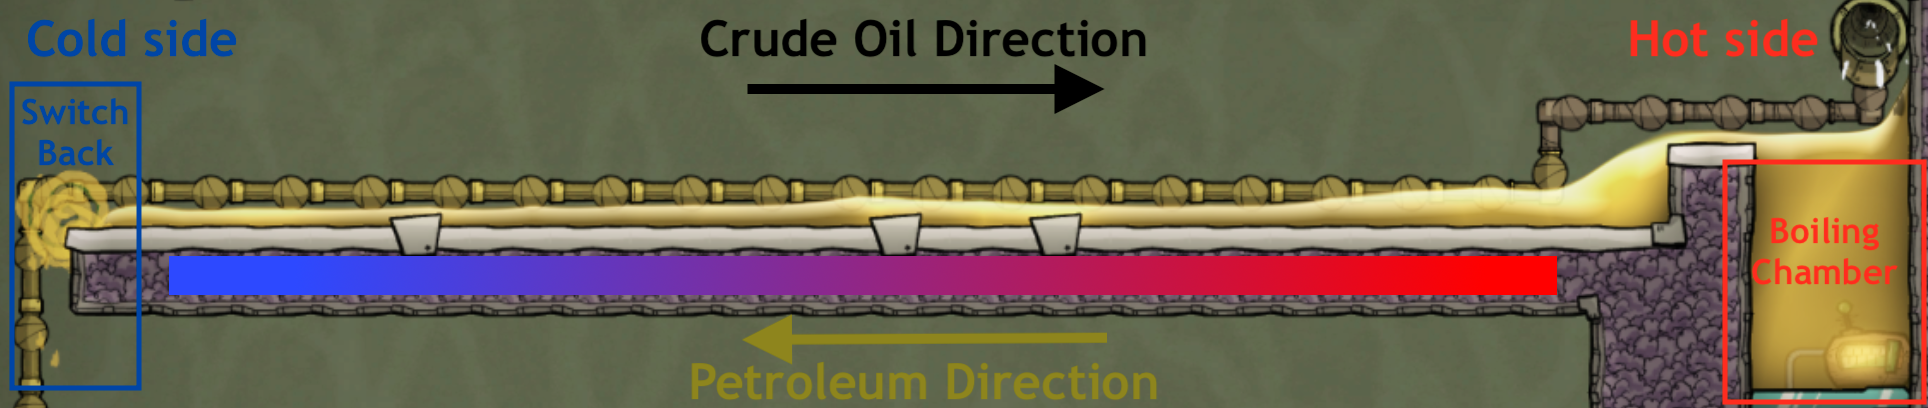
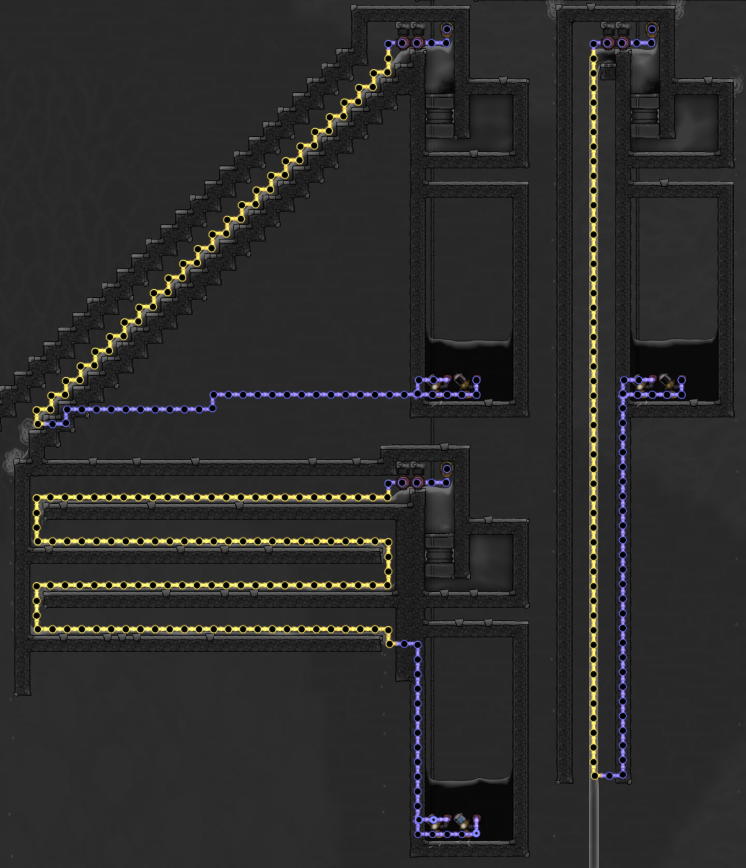
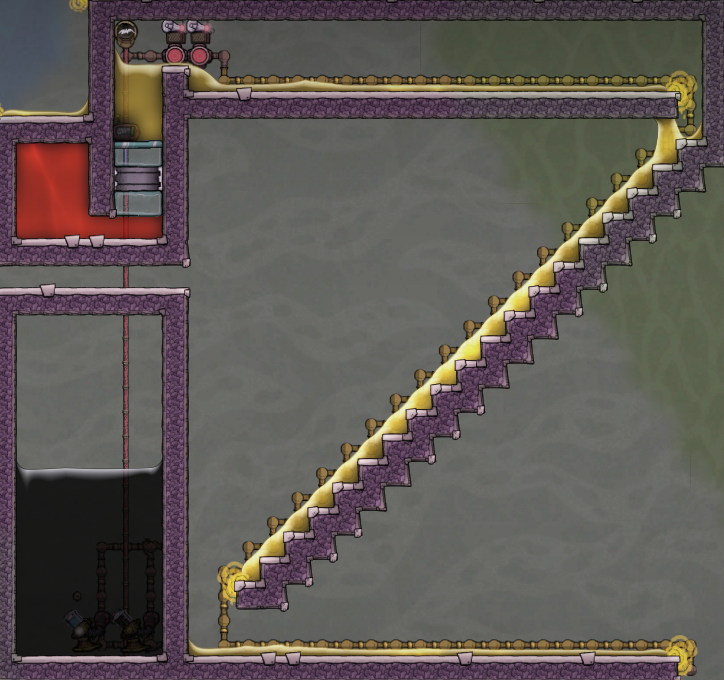
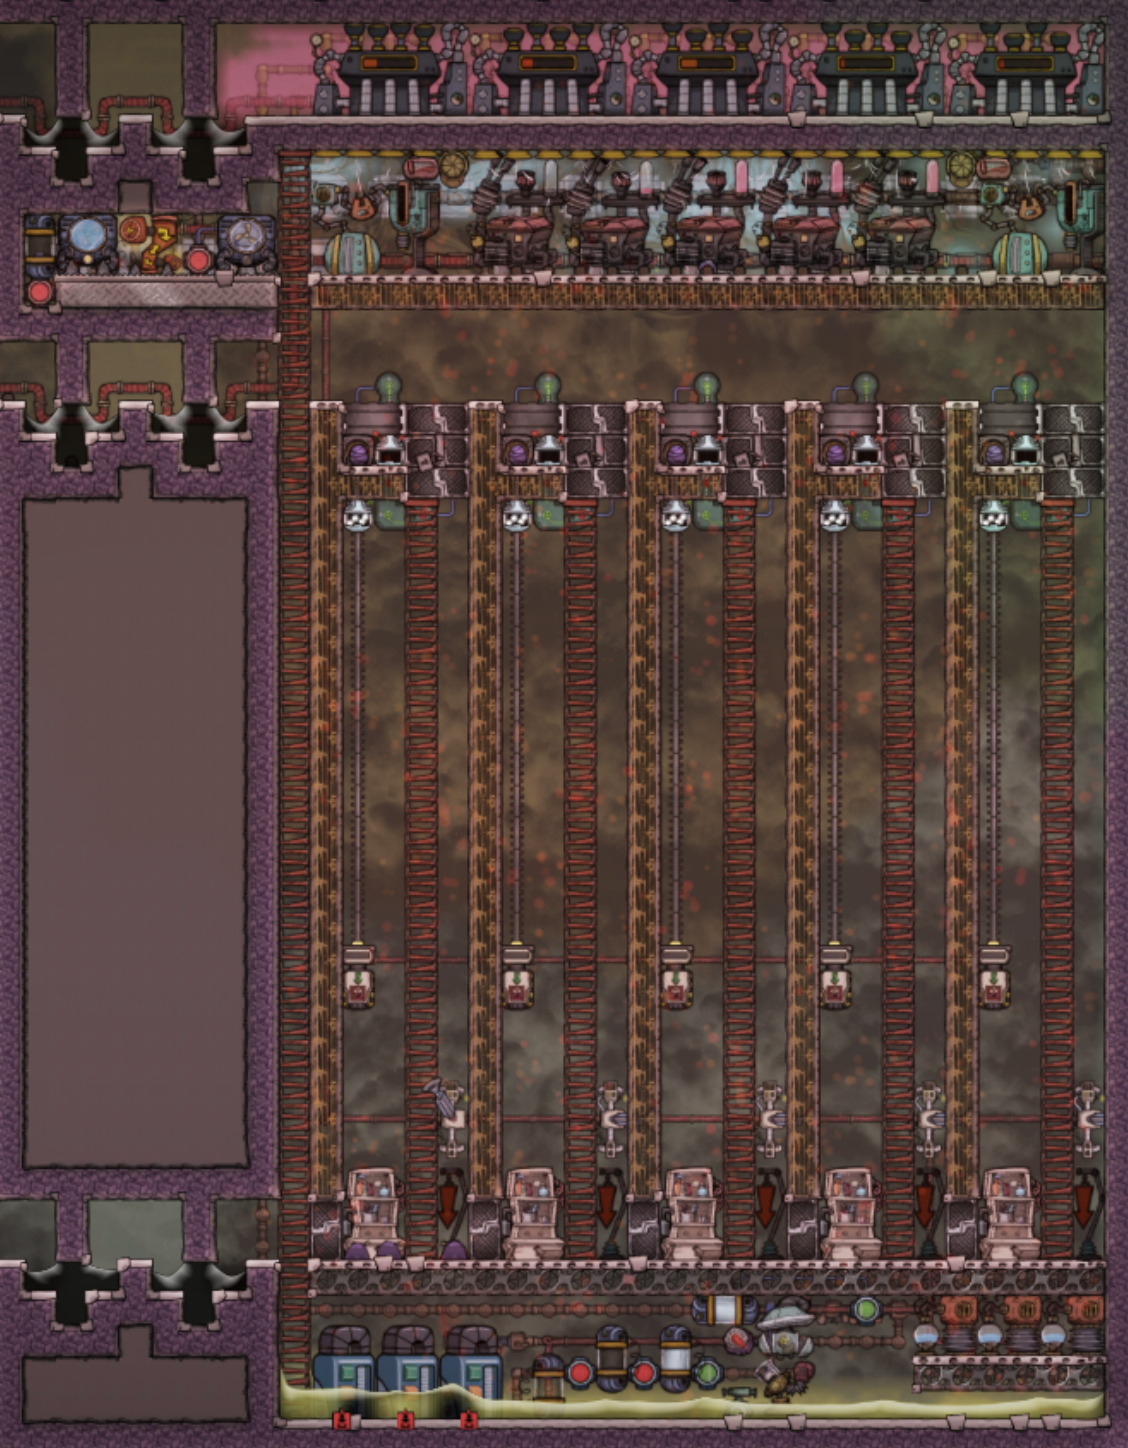
Small note to the Petroleum Power Plant: Build 6-7 carbon skimmers at the bottom immediately and pipe back the resulting pwater to the top and let it drip at >140 degrees. Then only move out water, if the carbon skimmers do not take more. Why? Because if it is excess of co2, a lot of steam gets deleted when dripping in the airflow tiles below the generator.

A forum threads also notes this to be an issue. I additionally made a second floor with airflow tiles and the petroleum plants' floor mesh.
fradow  [autor] 18 jan. 2024 às 6:53 
Warning: the last time I played was in June 2022. This guide was up-to-date to the best of my knowledge at that time, but updates may have rendered part of it obsolete or flat out wrong. I will not be updating this guide anymore or answering to comments.
YeetGrenade 19 mar. 2023 às 20:32 
The turbines for the petroleum loop are putting all the water into the steam box to cool down the room, leaving no excess water to go to the oil wells
Zaddek Vandread 31 jan. 2023 às 14:40 
Nevermind. I'm not sure what I did wrong but I swapped out the coolant with Super Coolant so I could run the aquatuner for a few cycles without worrying about blowing out my pipes since I couldn't get the turbines to turn on long enough to heat the pwater coolant I was using. That pushed my heat over the 125 hump and it seems to be sustaining well enough now. For anyone else with similar issues, I have the pipe thermo sensor set at above 10C for now. I was leaving it at above 0C when I was trying to get rid of all the excess steam.
Zaddek Vandread 31 jan. 2023 às 9:46 
Thanks for the guides, they've been very helpful. I have a question about the Petroleum power plant. I can't get the temperature inside above 122 and the area below the generators (where I have the slickster ranch) is beginning to fill with steam. Any ideas why I can't get my temperature up high enough to activate the turbines?
Veets 23 jul. 2022 às 1:23 
Ah OK, so if I have it right by forcing the cooling loop for the metal refinery to recycle until it's under a value (in the small SCST example, 126) what we're doing is forcing the STs to eat up that excess heat until we hit that target temperature (and allowing it back in to the refinery). I think I finally understand the mechanics of the steam rooms a bit more now - I was so used to cold industrial brick designs and ATSTs where those are things you barely even consider (just YOLO all the heat in to the room, because everything can handle the temps).

Cheers for the series!

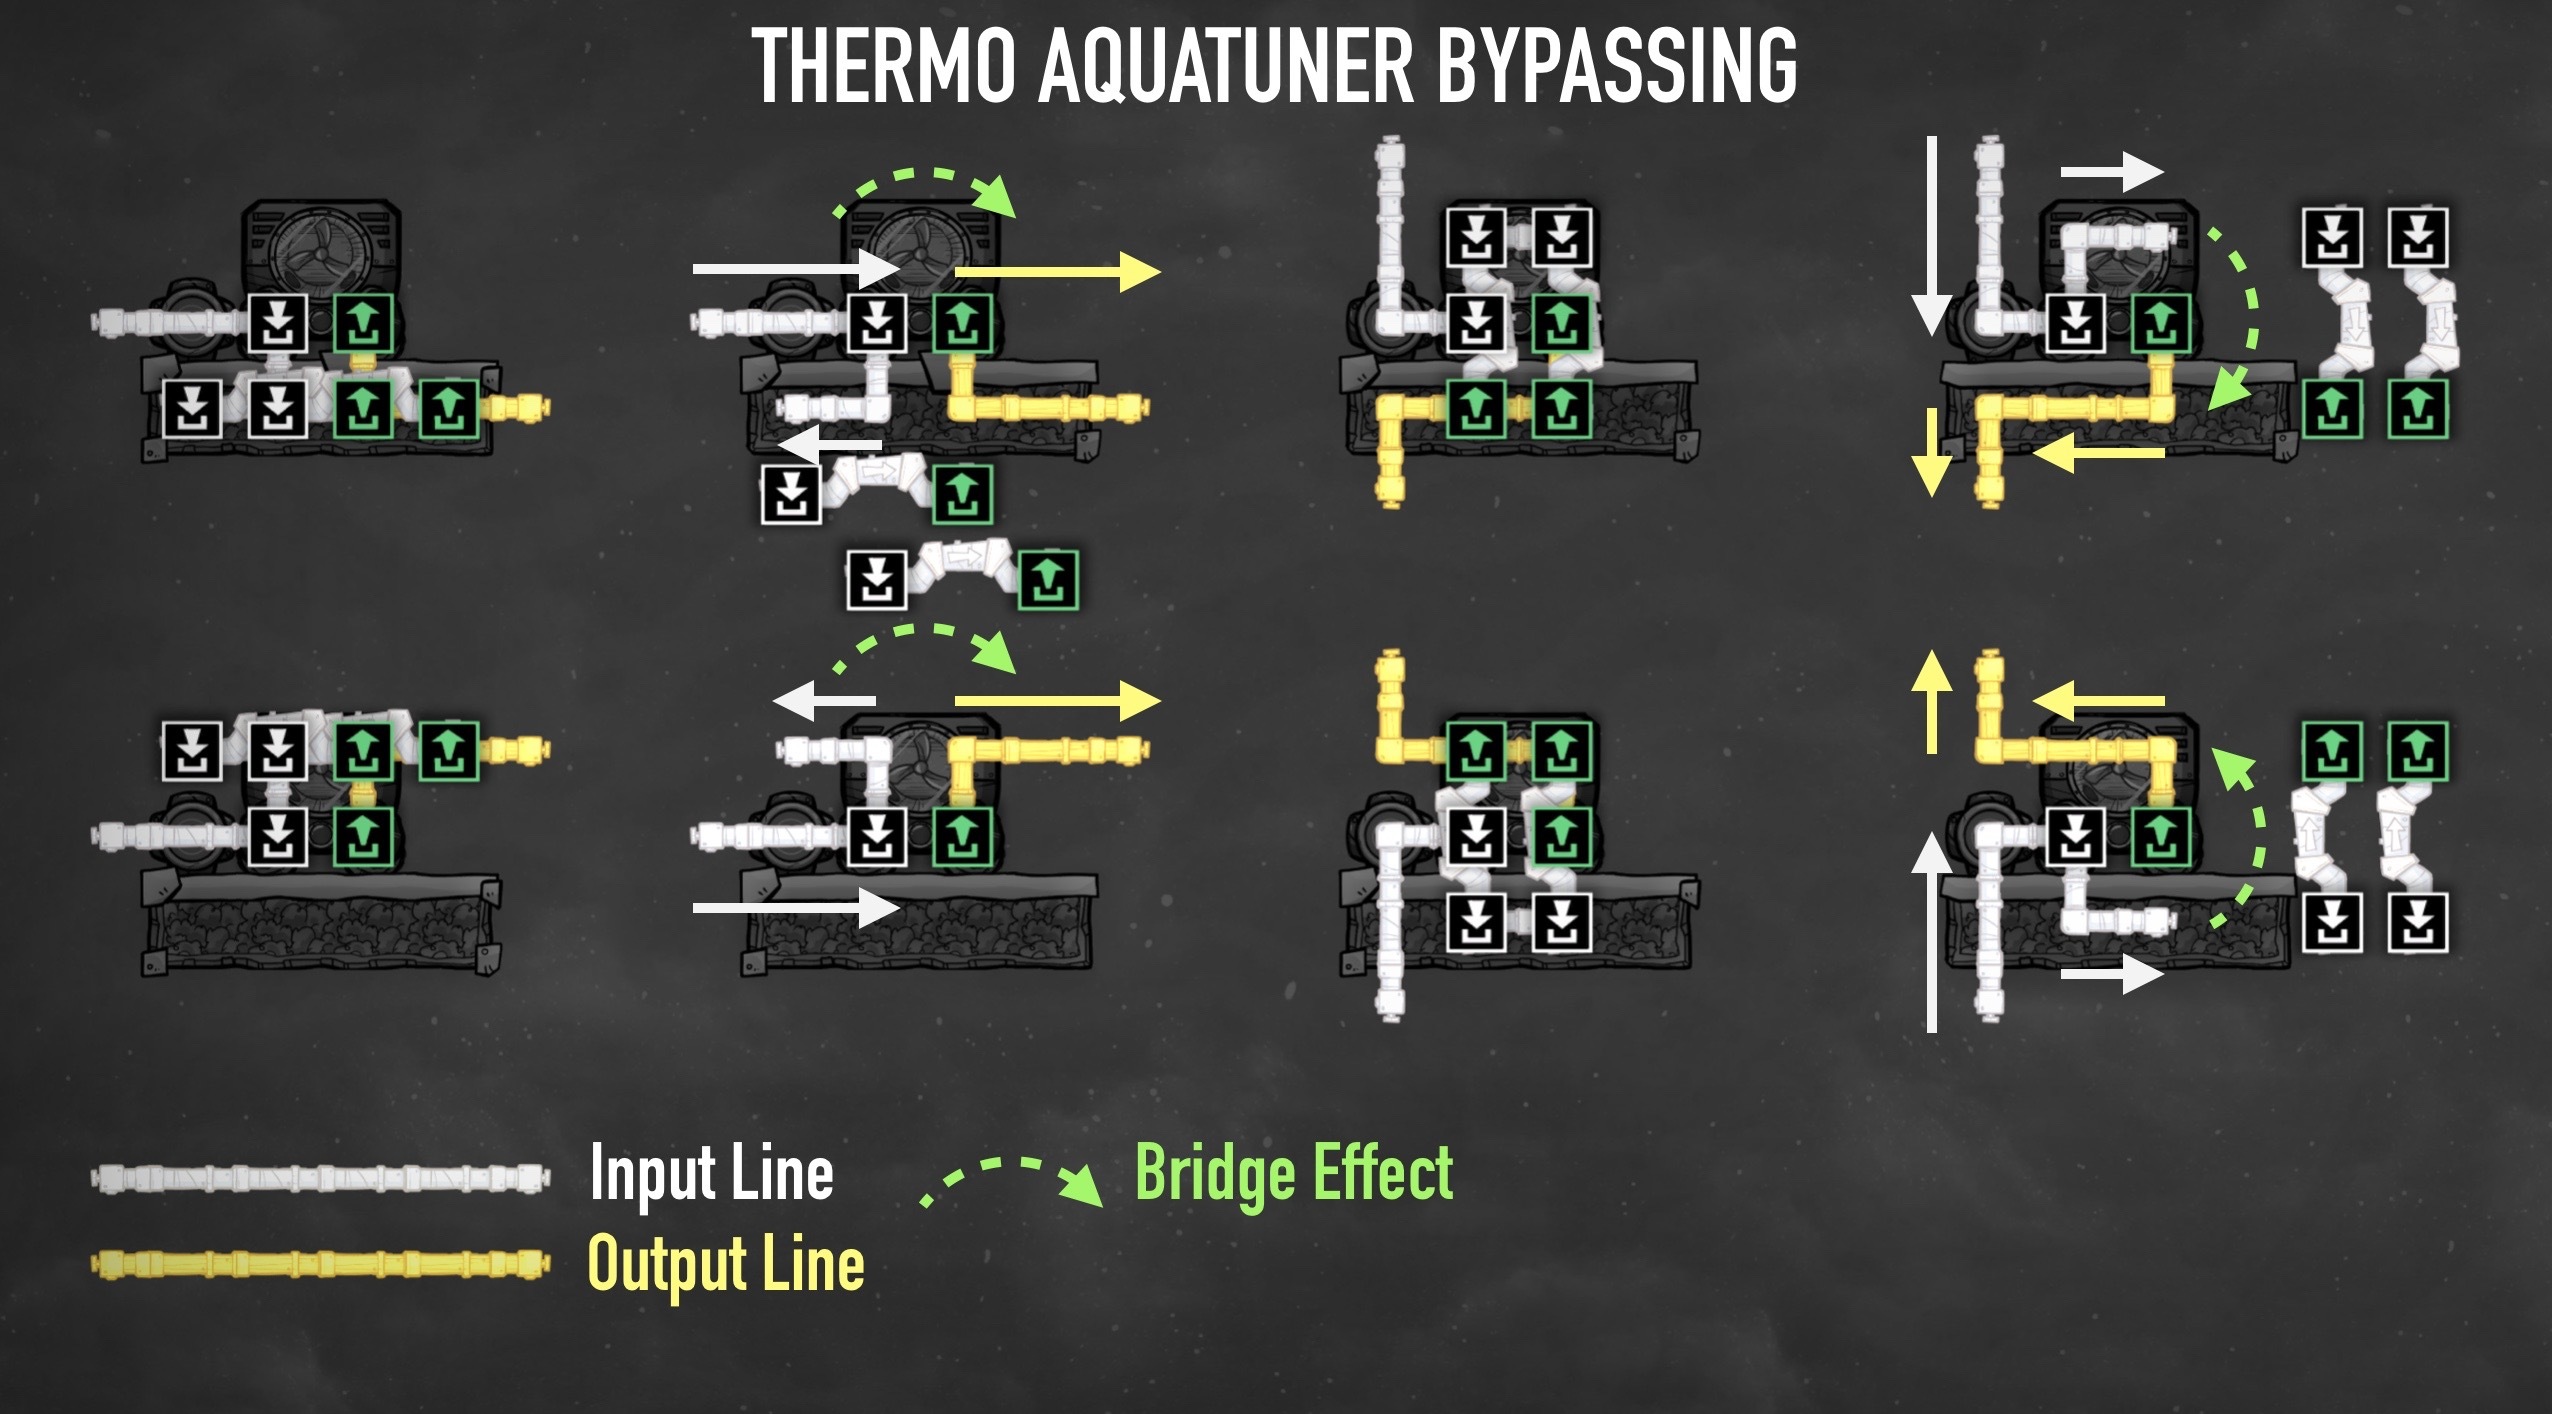
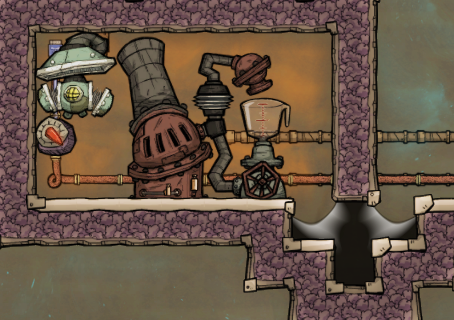
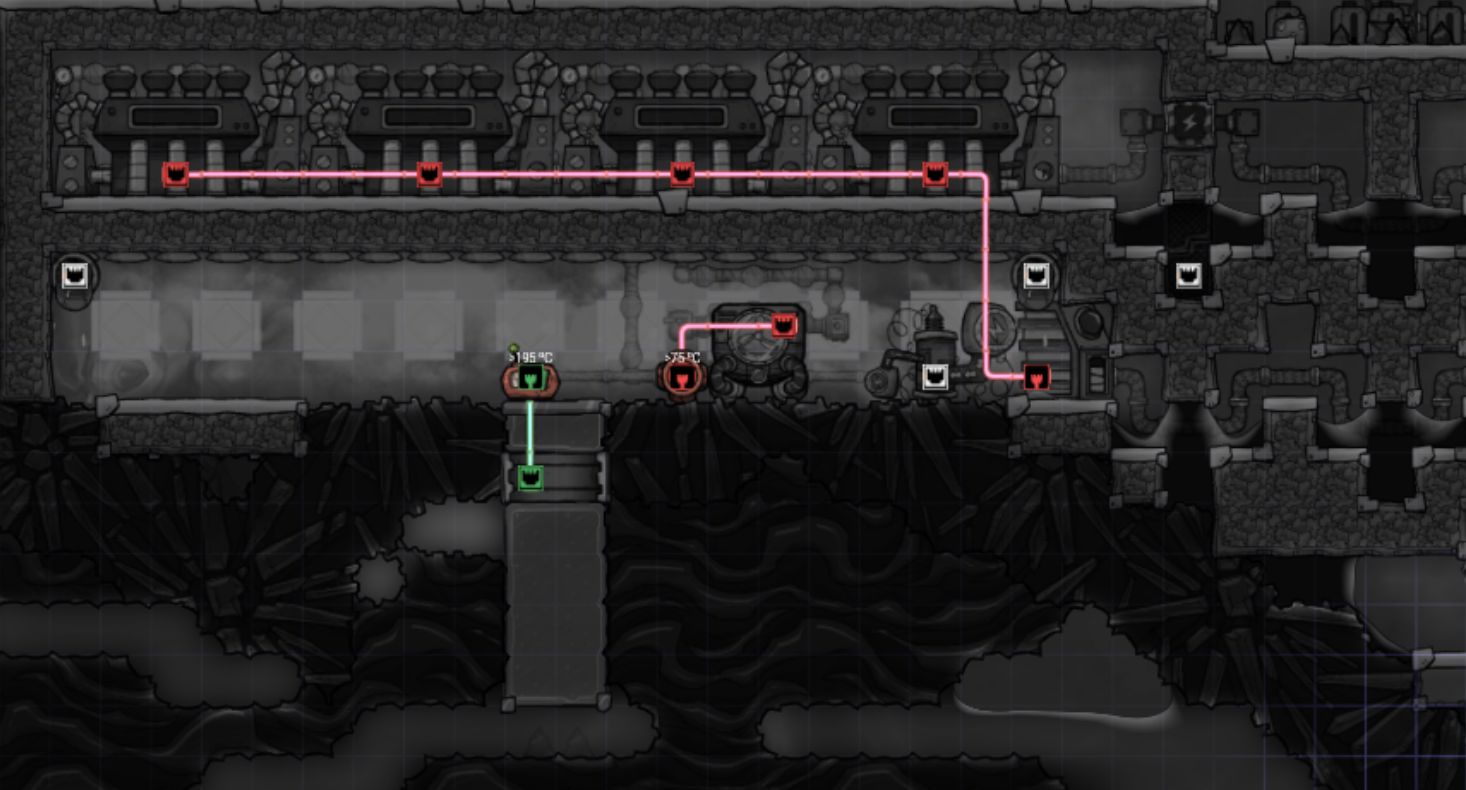
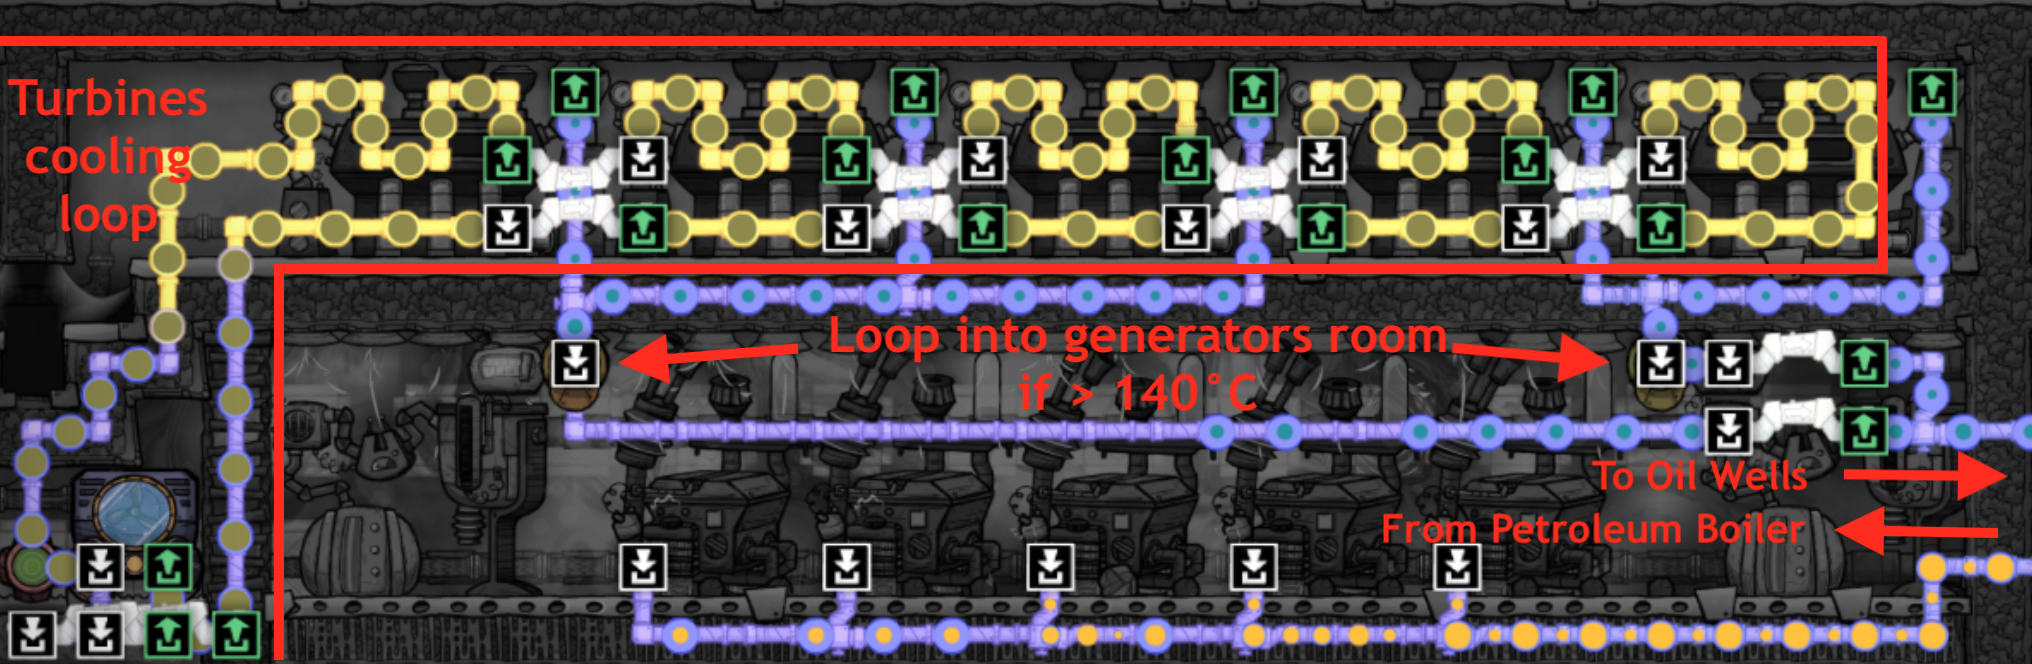
(re: glass - the reason I was thrown is because it looks like the vent is shut off from a automation wire going from the pipe sensor, to vent and back across to the AT... that really made me scratch my head!)
fradow  [autor] 22 jul. 2022 às 22:34 
The ATs aren't used for anything in the box. They are used to cool something else. For example base cooling or cooling a farm. The glass doesn't go through it, liquid glass it vented as soon as possible, and quickly solidify because it has very little SHC

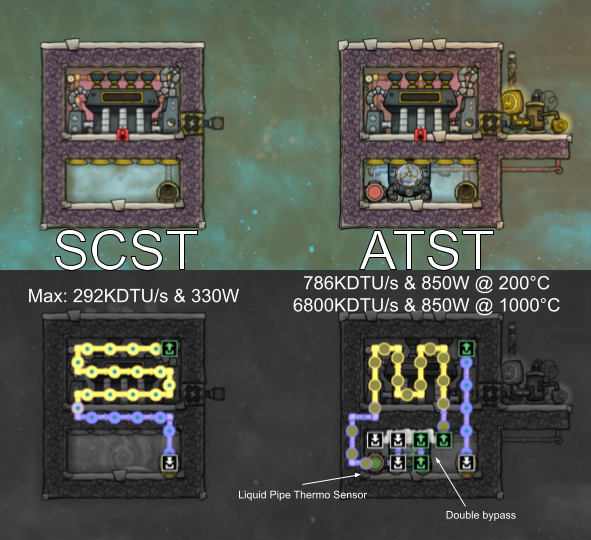
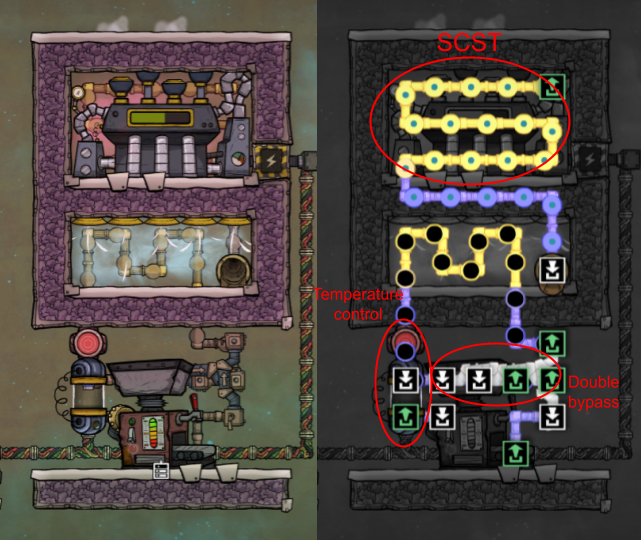
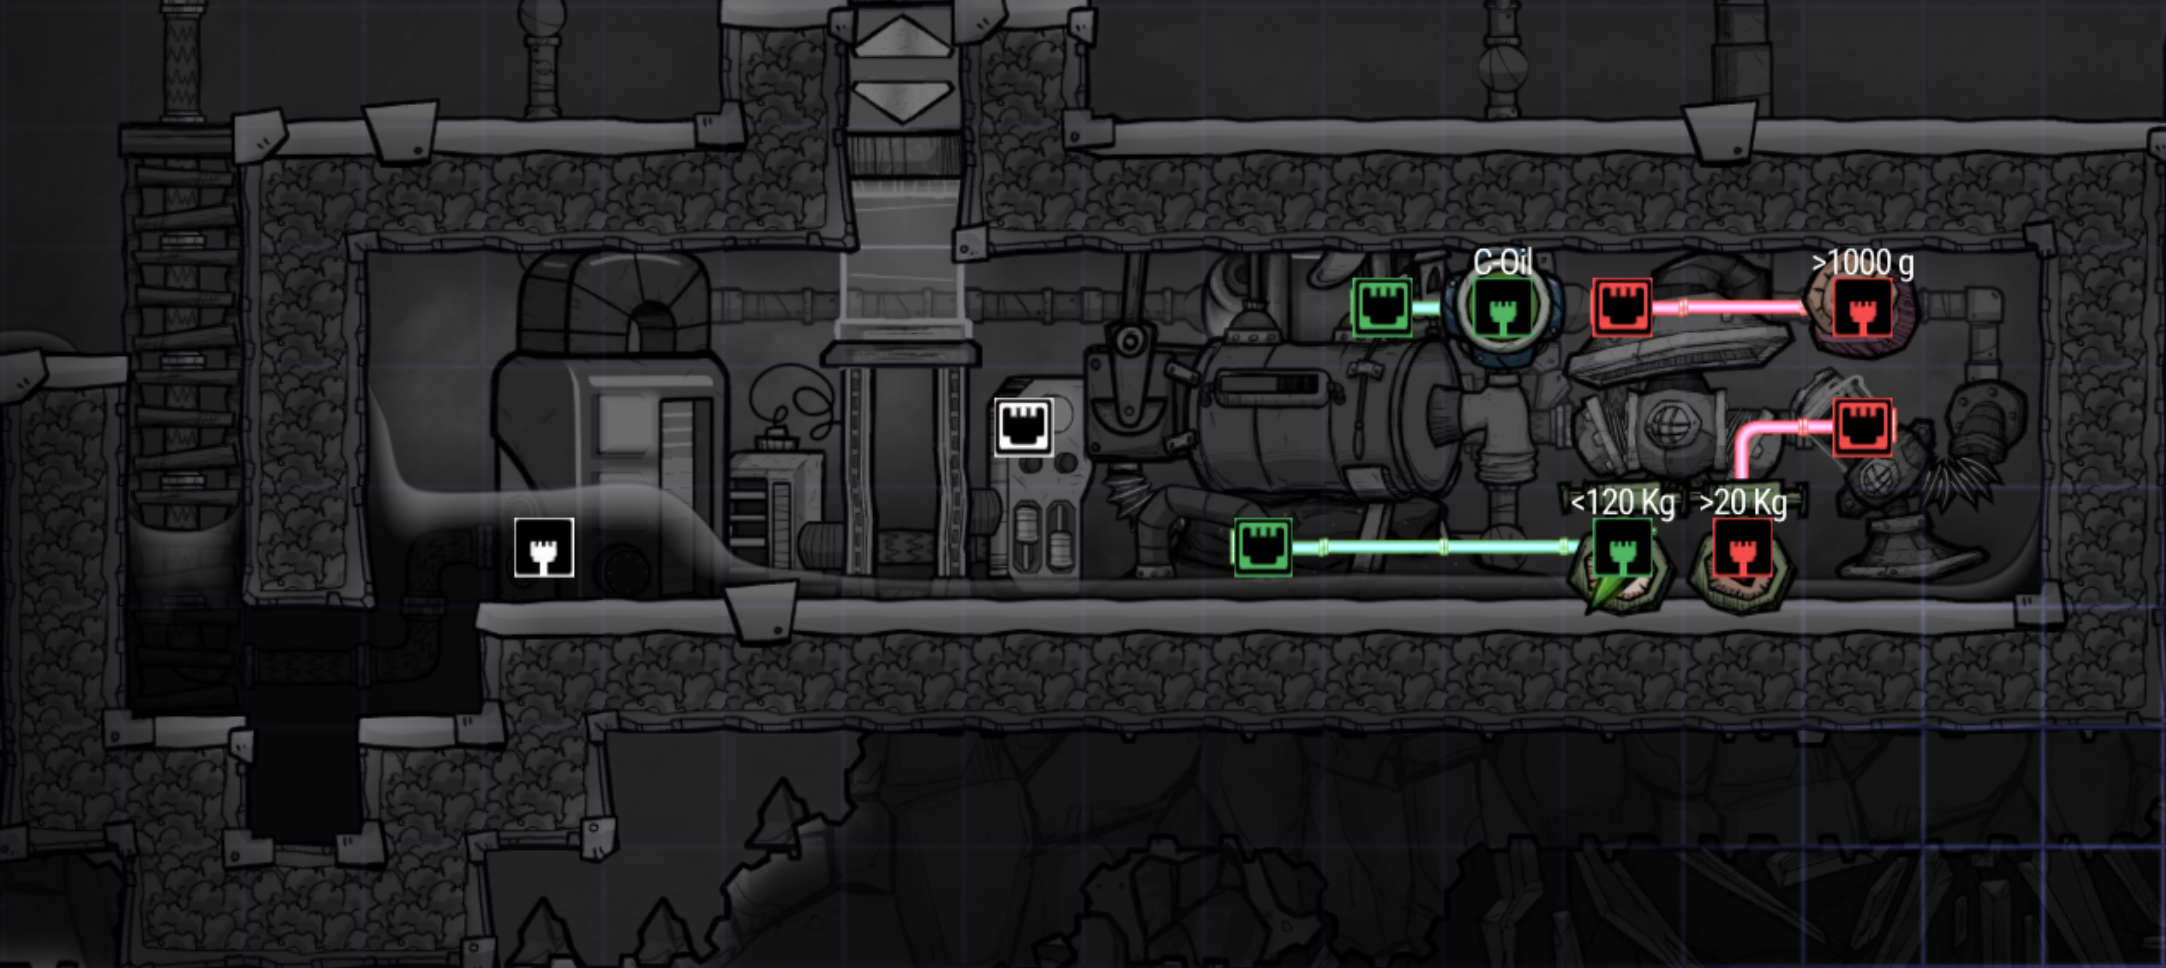
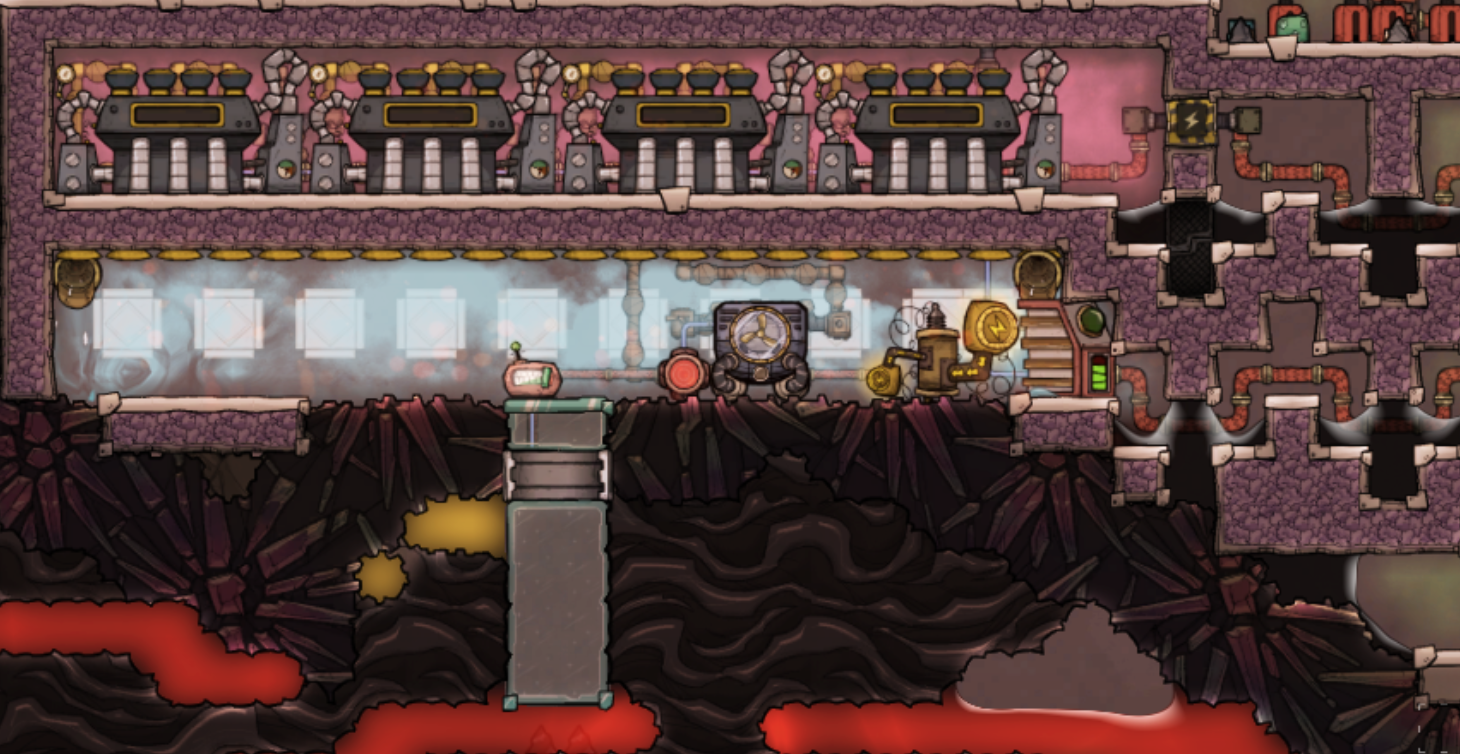
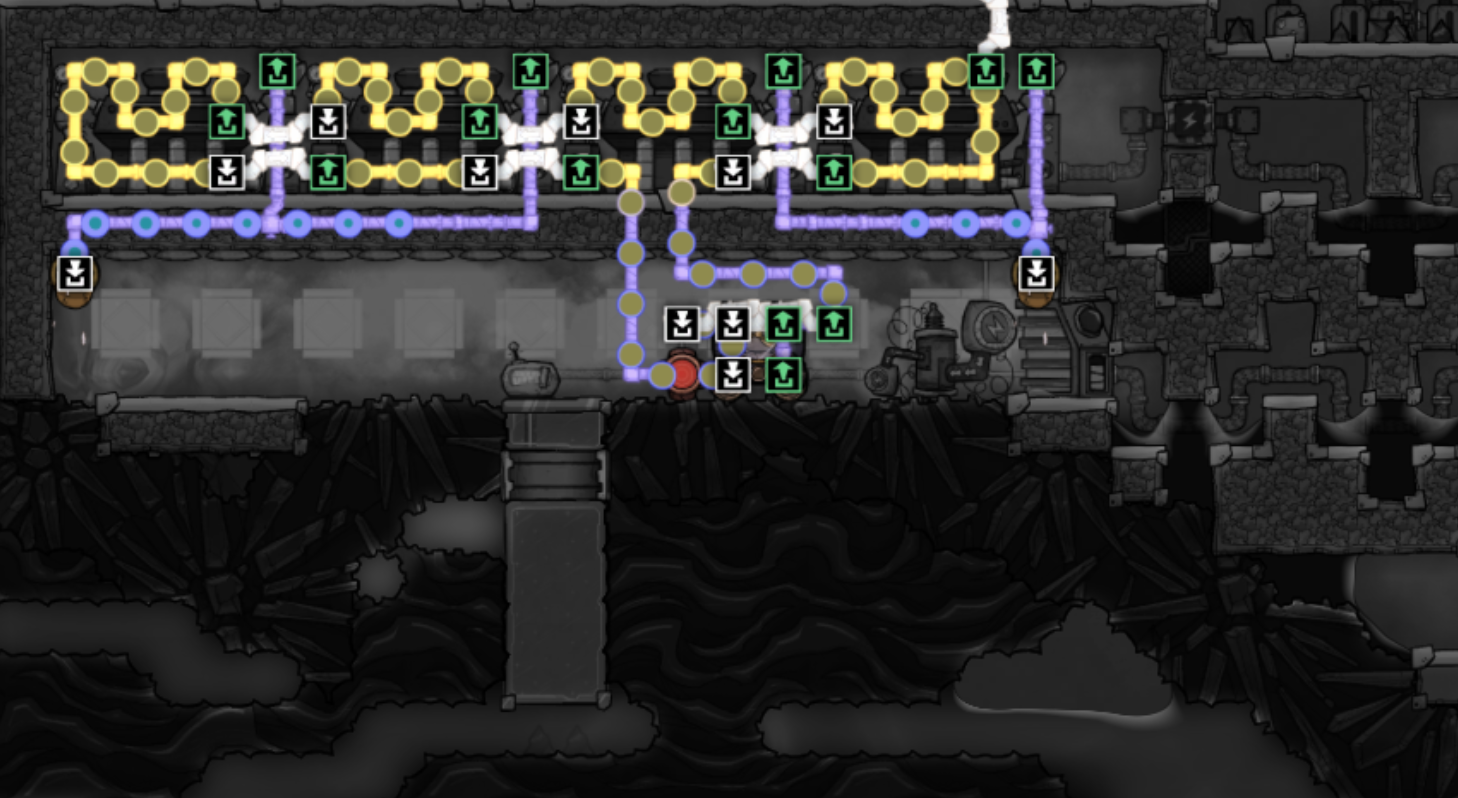
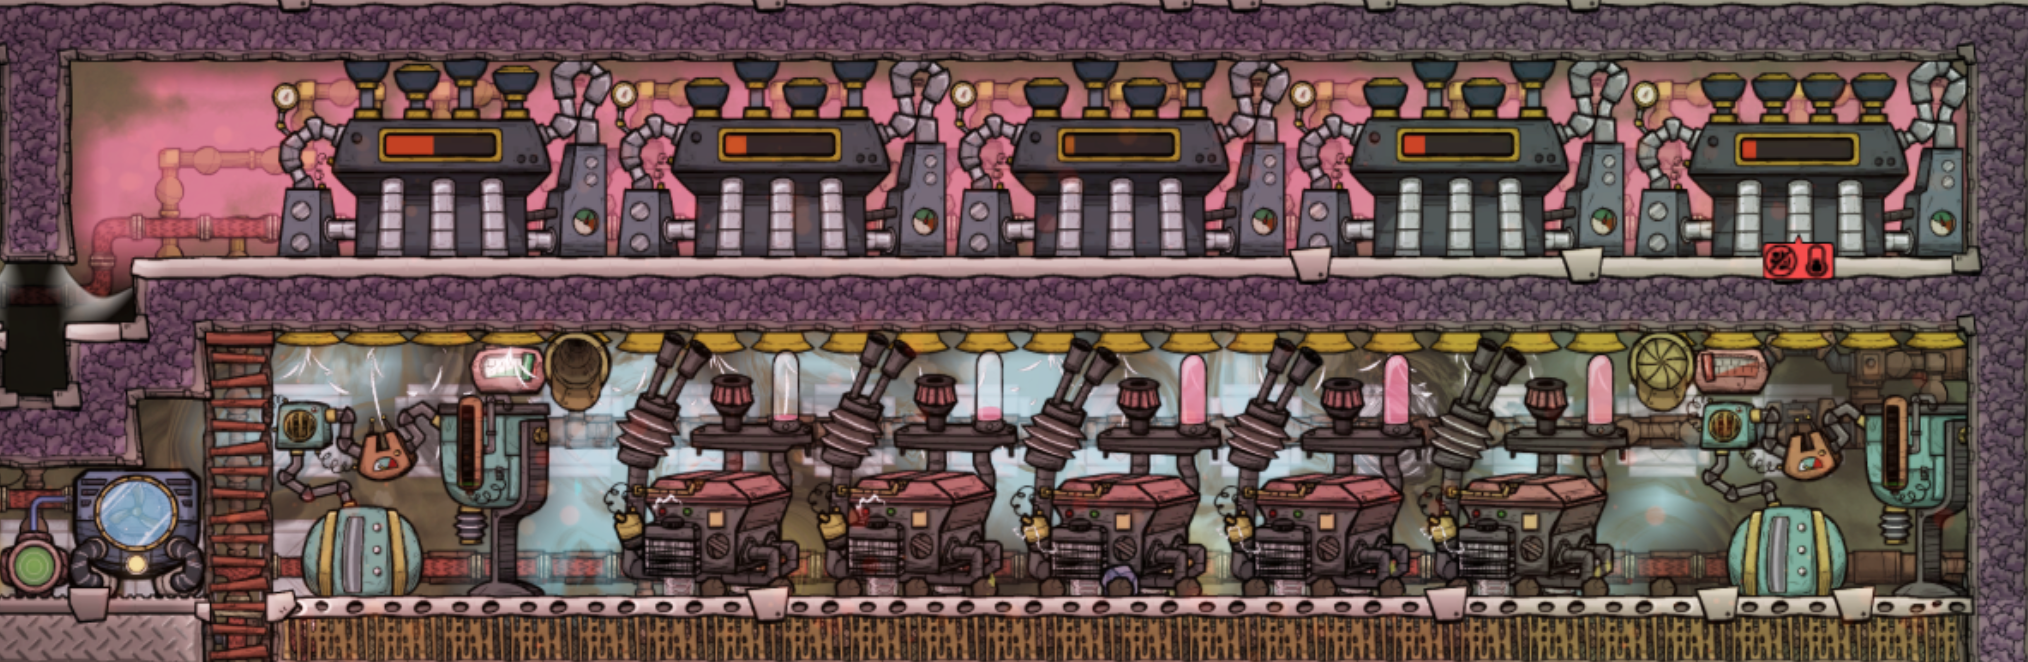
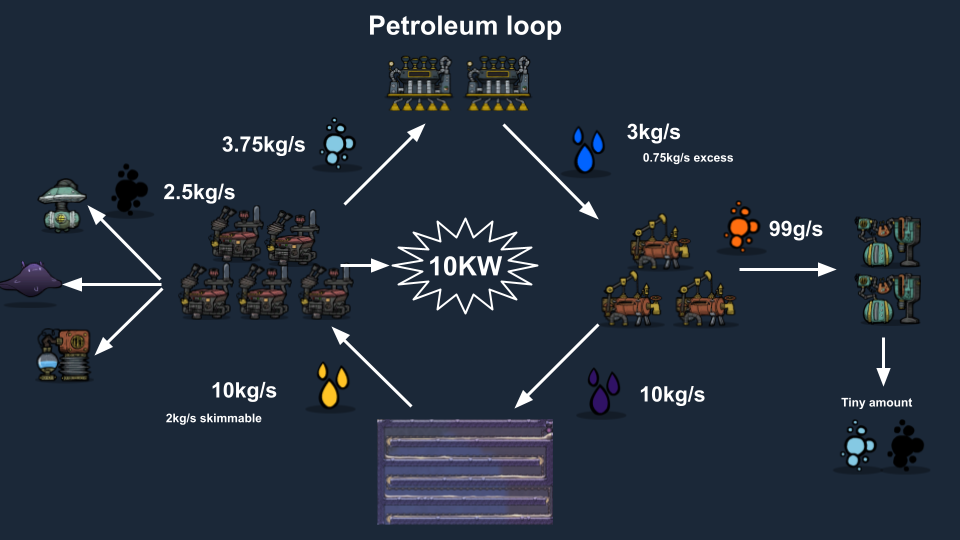
It's just an example. You can have ATSTs rather than SCSTs for a better steel uptime, and you can add more of them if you want. In general, your Steel production will be limited by Lime anyway.

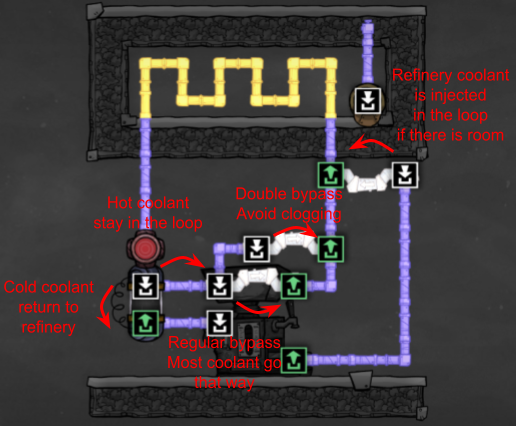
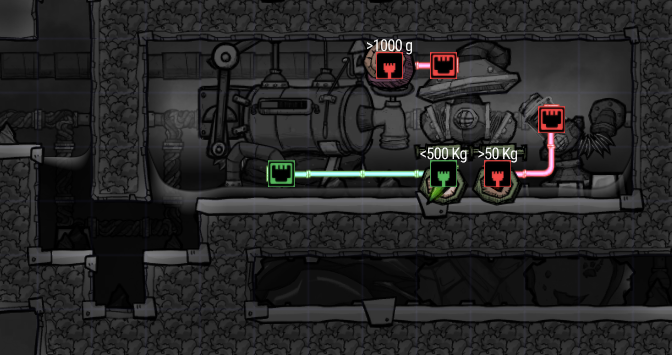
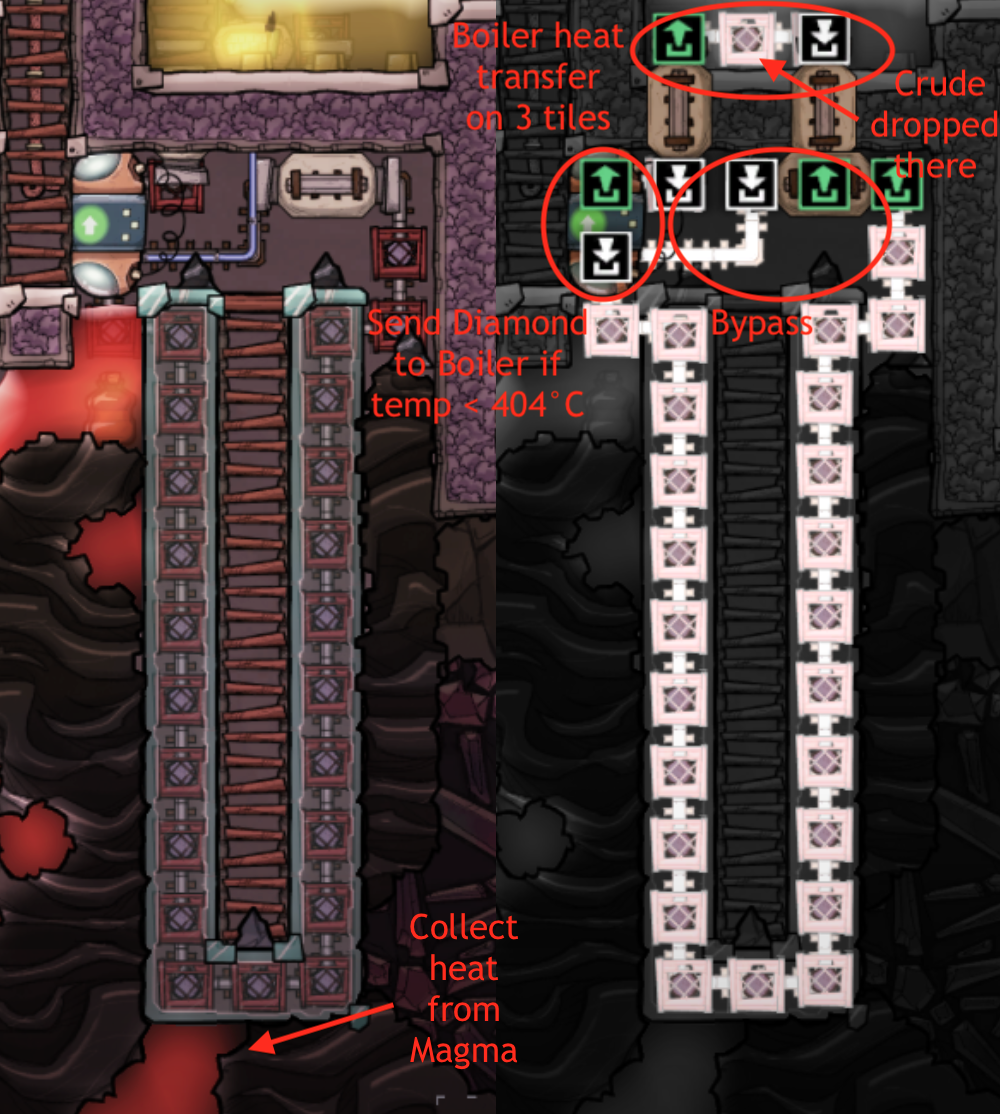
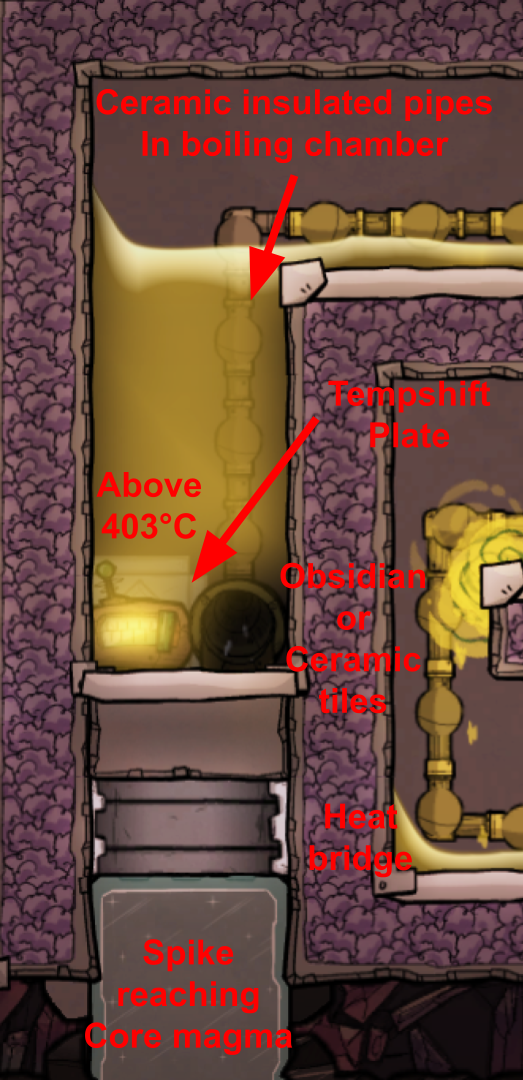
As for the 135°C limit, refer to the previous section to see how the compact refinery build is setup with temperature control. It's the main heat producer, and since it's restricted to about 130°C, the temperature won't ever get over that (unless you have a high AT usage).
Veets 22 jul. 2022 às 4:26 
In the example of the Hot industrial brick I'm a bit confused by the design. I've successfully set up a hot steam room before, but I'm curious about the AT as you say "I included a Transit Tube Access because it's SCST cooled"; I assume you're using the AT with the metal blocks as a kind of heat stabliser, but the piping isn't provided so it's not clear how/why it's being utilised in the room. My best guess based on what I can see of the pipes and thermal sensor is you're passing the glass through the AT as a quick-and-dirty way of dumping heat in to the AT/metal blocks.

Also based on your previous notes I'd expect to see more than 4 SCSTs (unless it's only meant to handle steel at half the speed).

In short it's unclear how that example is an SCST; what the AT is doing/is set up; and how the temperature is being kept under 135