Sea of Thieves

Sea of Thieves

527 个评价
The Complete Captain's Guide (v1.2)
由 Analog 制作
This is a long and comprehensive guide on how to be the best captain possible all throughout the Sea of Thieves, from a captain that has set standards for pirates and other captains alike. It will cover everything that you need to know as the captain of the ship, some helpful tips for both you and your crew-mates, as well as an overview of other game knowledge that is sure to help you stay afloat.

Huge thank you to everyone that has helped make this the current #5 Sea of Thieves Guide on Steam!

If you want to take these tips and conquer the seas, make sure to check out our Steam Group where you can find many friendly and skillful crew-mates to sail with.

Click here to join!
30
11
17
22
4
6
4
3
3
   
奖励
收藏
已收藏
取消收藏
BEFORE YOU SET SAIL
This section includes everything that you need to know about and/or do before you raise the anchor.

A Captain's Job
All too often I see pirates rushing to the helm anxious to be captain, but often they don't have a mic or are extremely shy. Rule #1 of being a good Captain is to always communicate efficiently with your crew. Never forget that. Especially if you are in an open crew, a mic is the most vital part of any good Captain, as communication is truly what makes or breaks your ability to rule the seas. It is also important as a crew-mate to have a mic, but a Captain that can't communicate is sure to lead you to the sea floor.

Another important aspect of being a good and successful Captain is knowing the game. In my opinion, the Captain should be the most knowledgeable man (or woman) on deck. We will go over each of these in-depth, but briefly, this includes,
  • Being able to properly read the wind in order to gain the most speed.
  • Taking advantage of each ship's strengths and weaknesses.
  • The ability to read a situation and adapt effectively.
  • Efficient maneuvering, resource management, etc.
  • Knowing how to properly use the compass,
  • and many, many more.
Now, this might scare you away from taking the wheel, but don't let it. Being a Captain is genuinely one of the most awesome experiences you can have in gaming. At the very least it's worth a shot, so keep reading and stay motivated.

Knowing Your Ship
A Captain and his crew need to know each part of their ship so that they may quickly move from place to place and accomplish various goals. It is also important to know the nautical terms of orientation. You may think that it isn't important to use these and instead simply go with left and right, but you can quickly get disoriented in the heat of a battle or even worse when you've gone overboard. Here is a crude illustration of the different sides of a ship.


There are many different ways on how to easily remember port and starboard, but the one that I use personally is that there are four letters in (port) and four letters in (left).


The next part of knowing your ship is learning where all of your resources are on board. The Sloop is by far the smallest ship you can sail, but ironically has the most confusing layout of resources. On the Sloop, the cannonball barrels are on the main deck on the port side of the ship, closer to the stern. Directly under the helm are the map table, voyage table, and weapon and ammo chest. Everything else on the Sloop is in the hold (bottom deck). The Brigantine (Brig for short) is even easier as everything is in the hold of the ship. On the Galleon everything is in the hold except for the voyage table, which rests in the captain's quarters that can be found under the helm.

The final part of knowing your ship is being able to identify and determine both when you are faster/slower than an enemy ship and when you have more/less firepower. The identifying part is easy as you can simply count the number of masts a ship has even from a long distance. A Sloop only has one mast, a Brig two, and a Galleon three. The firepower part is also easy to remember, as it's very simply two, four, and eight cannons in order of Sloop, Brig, and Galleon. You don't want to go head-on against a ship with greater firepower, but it may be okay to attack a Galleon with a Sloop provided you know the crew is away from their ship.

Speed is a more complicated topic, though it doesn't have to be. Before we begin, the wind's direction can be told by the direction of the wind lines if you look up while sailing. The main wind types are headwind (coming towards the ship), crosswind (coming across the port or starboard side), and tailwind (coming from the stern of the ship). Remember that even though it may seem counter-intuitive, whenever you are facing headwind it is always faster to point your sails flat against the wind. There are also occasional glitches that make the wind lines disappear. In this case, you can either leave the server and rejoin, or if you already have loot aboard then you can climb to the Crow's Nest (always located atop the tallest mast on your ship) and raise a flag from the box. This flag and emissary flags always flow with the wind, however, the waves do not so never try to match your sails to the waves. The main thing that you need to remember is that the Sloop is the fastest against the wind and the Galleon is the fastest with the wind. With this information, you can quickly turn your Sloop into the wind and you will ALWAYS outrun your adversary. Same with the Galleon going with the wind, you will ALWAYS catch them provided you both stay with the wind. The Brigantine is where things get a little tricky. It is the middle ground of speed both with headwind and tailwind, but is the fastest in crosswind situations. This of course means that again if you catch a crosswind in the Brig, you will ALWAYS be the faster ship.

Stocking Up On Supplies
The last thing to cover before you can make a course for your first Island is the supply run before you raise the anchor. Both the Captain and their crew need to search the Island's barrels and crates for as many supplies as they can get before setting sail. In the Sea of Thieves you never know what or who you may run across and the extra Planks or Cursed Cannonballs that you find may be the difference between sinking or sailing to the next destination.

In terms of food, there are certainly better options. Keep in mind that health regeneration will not activate until 10 full seconds of not taking any form of damage.

Food
Health
Regen
Banana
20%
None
Cocount
30%
None
Pomegranate
40%
None
Mango
50%
None
Pineapple
100% x2
None
Cooked Fish
30% x2
10%
Cooked Trophy Fish
75% x2
33%
Cooked Chicken, Pig, Snake, and Shark
50% x2
25%
Cooked Kraken and Megalodon
100% x2
50%

Planks are thankfully very simple in that you just bring as many aboard as possible.

Cannonballs can be a little more complicated. There are normal Cannonballs, Chain-Shots, Firebombs, Blunder-Bombs, and Cursed Cannonballs. These will be covered in both combat sections farther down.
SETTING SAIL
This section covers what to do as you start your voyage.

Leaving Port
Now that you have a grasp on the basics before setting sail, it's time to get behind the wheel and take your crew to conquer the sea. First things first, double-check that your ship has a healthy amount of supplies. Next, make sure that your ship isn't too big for your crew. It can be incredibly difficult to manage a Galleon with three people, and nearly impossible to manage with only two. If you don't have enough crew-mates to fill up the Galleon, it is perfectly fine to step down to a Brig or even a Sloop. As long as you keep this guide in mind, even a Sloop will be perfectly fine to defend itself against the toughest situations in the Sea of Thieves. Have at least one of your crew help you raise the anchor to save some time, and then lower the sails and direct your course.

Organizing Your Crew
A good crew typically has somewhat designated roles for each of the crew members. There is the Captain of course, but the other three crew-mates aren't so defined. There are quite a few roles that you can assign to your crew, or that they can assign to themselves.
  • Cannonmen
  • Repair Hands
  • Boarders
  • Scavengers (Scavs)
  • and many more custom ones that you can design yourself.
Cannonmen are the designated cannon shooters of your ship, and will likely always be near a cannon unless needed elsewhere. Repair Hands are responsible to keep water out of the ship and keep all holes patched up. This is a less exciting job, but also one of the most important. Boarders are the members that will leave the ship when an opportunity arises to board the enemy. Whether it be to stop a target for an easy sink or to stop a pursuer from stealing your loot, these are the people who get up close and personal. Finally, the Scavs are the crew-mates that gather extra resources for the ship when passing an island or floating barrels. This can be done by fully emptying your inventory before leaving the ship, and then catching a mermaid to get back on deck with the newly acquired supplies.

Each crew member can be any of these roles depending on their play style, what they want to do, and what you as the Captain need them to do. None of these roles are concrete under any circumstances. Even you as the Captain may need to relinquish the command for a moment because you got taken out by a flying Cannonball or otherwise. Remember that one of the most important things about being a good Captain is the ability to adapt to the situation at hand.

Now that has been laid out, you can form your crew to their likeness at the beginning of your journey, and change things around as you see fit for the circumstance. On a Sloop and have a Galleon chasing you? Turn the ship to headwind, turn the sails flat against the wind, and keep an eye out for any other trouble while your boarder jumps off the back and makes a boarding attempt. Likewise, were you caught off guard and caught a volley of Cannonballs with your face? Tell someone to take the wheel and YOU let them know the best course of action until you can come back from your trip to the Ferryman. Just because you're not at the wheel doesn't mean you can't still lead like a Captain.
HAZARDS
This section is about miscellaneous things that may cause you or your ship harm.

Barrels

There are a couple of hazards that you may come across when you're on the seas. The first and arguably most dangerous to a new Captain are the Floating Barrels. These are indicated by a small flock of birds flying above the waves (not to be confused with the large flock that flies above Shipwrecks) and are often a nice way to get supplies and maybe even some rare loot for your ship. In these barrels can sometimes lie Gunpowder Kegs (in the image above), which are extremely dangerous for any ship to come across. An unaware Captain can easily hit one of these in the water and doom the ship to sink, so keep an eye out.

Storms
On every server, there is a constantly moving storm that can wreak havoc on your ship if you sail into the winds. Your compass will cease to work properly, there will have to be someone on the wheel at all times or else you risk getting completely turned around, there is a chance to get struck by lightning (make sure to put away your sword), and your ship will slowly start to fill with water that must be dumped occasionally else you risk sinking. As a Captain, your job is to try and keep your bearings by keeping track of your location, direction, and speed by looking at nearby Landmarks or Islands that you will become familiar with.

Volcanoes

Inside The Devil's Roar some volcanoes will occasionally erupt and do some heavy damage to your ship. They launch fireballs at your ship that will set the whole top deck ablaze and will surely do hefty damage to your crew. It is best to steer clear of ones that are currently erupting, but if you have to go in the direction of one, go below deck and fill your buckets with water from the water barrel beforehand. Don't forget that you can also use your secondary action (Mouse 2 by default) to splash yourself if you get too close to the flames.
MANEUVERING
This section will cover all of the basics of maneuvering your ship.

Arriving At An Island
There are three main ways to dock at an island while on your quest to gain more gold. Two of these I would consider "correct" (however, do take that term loosely) and one objectively worse way.

We will begin with the way that you do not want to dock or park near an Island. Simply pulling up to the Island and dropping the anchor. This is ironically the most common way that captains leave their ships, especially among newer captains. It may seem somewhat natural to drop the anchor as that is it's entire purpose, but in reality, all it does is make your ship an easy target. Remember earlier in this guide I mentioned that a well-versed Sloop can take out a Galleon in certain situations? This is one of those situations. By dropping anchor and leaving your ship, you leave it completely open for passerby crews to unleash some Cannonballs into your hull with no real challenge of aiming or even getting shot back at since you're busy digging up chests.

Now we have one of two proper ways to do stop at an Island. The first is both mine and most other captains' favorite assuming that there are crew-mates to help with sails. Whenever you start getting close to the Island, just as the Island Banner comes across your screen, raise all sails immediately. It won't work perfectly on every Island, but it gives you much more control while trying to park in a safe space, and cuts down on the annoyance of having to raise the anchor. You will gradually perfect the timing with experience in the game, but until you get the technique down, you can use the Harpoons on the bow of the ship to pull yourself closer if need be. This is explained in more detail below. Remember to straighten your wheel so that it doesn't spin in the water while you are away, and then head overboard to get your treasure.

This brings us to the second method which is often much faster and used by most speedrunners. You simply drop anchor as close as physically possible without hitting the Island by doing a Handbrake Turn. You can perform a Handbrake Turn by turning the wheel before the anchor touches the sea floor. It will make your ship do a 180-degree turn if the wheel is turned all the way to the left or right, and the severity of the turn will vary depending on how far you turn the wheel which gives you great control over your ship. While the ship is turning and coming to a stop, begin to raise the sails fully. Straighten the wheel out and then raise the anchor.

These two methods are better for one simple reason. If you need to leave the Island in a hurry you only have to drop the sails and set your course. With the first method the extra time it takes to raise anchor, especially on the Galleon, can very easily get you killed or sunk.

Keeping The Wheel Straight
It may seem simple enough to just straighten the wheel based on the indicator, but often the waves and the wind in the seas will push the ship off course. There's no real definitive way to fix this reliably as every situation moves your ship in different ways and at different speeds, but with experience, you will grasp how your ship will stray off course.

The basic fix to this issue is to frequently revisit the helm and make sure that you stay on course. But, especially if you are going solo on a Sloop, this is not always possible. In those cases, look at which direction the wind is blowing and then which direction the waves are pushing your ship. If they conflict, (i.e. the wind is blowing east but the waves are moving west) then you can more than likely get away with leaving the wheel straight without getting too far off course. However, if the wind and sails are pushing in similar directions, turn the wheel opposite of whichever direction your ship is being pushed. Normally the sweet spot is one handle over from the central handle. The central handle is the handle with the most decoration. Everything else is unfortunately not so easy to correct for, but in time, you can learn quite easily how to adjust.

Harpoons
These are essentially grappling hooks and are some of the most useful things on the top deck of your ship. They can be used to retrieve treasure faster, pick up barrels as you sail by, wrangle your crew-mates back aboard if they get knocked off, and much more. However, one of the most useful features of the Harpoons often goes overlooked. If you are in the heat of a chase and your pursuer is gaining on you, you can perform a Harpoon Turn in the opposite direction to make a quick turnaround that they often won't see coming. To do this, simply man the Harpoon on the same side as you intend to turn, point it straight down and to the left or right depending on the direction of your turn, fire and then use secondary action (Mouse 2 by default) to reel in the Harpoon. This will make your ship tilt and turn in the direction that the Harpoon is shot, assuming that it makes contact. If when you fire the Harpoon it does not grab onto anything, the sea floor may be too deep to reach and you will have to use a large rock or get closer to an island to perform your maneuver.
DEFENSE
This section is all about how to defend your ship from adversaries.

Pursuing Ships
Now that you know how to park your ship, what happens if the adversary is still following after you've left the island? Refer back to your knowledge of the speed and firepower of each ship and make a decision. Do you have more firepower than the ship in question? If not, where are you faster than the opponent? Once you have your answer there, set your course for whatever action you want to take.

If they still follow, you have a few options. Assuming that you're in a position to consistently outrun them, you could easily just play the game of patience and wait for them to give up once they realize they can't catch you. However, this can go on for a very long time and is hardly a fun way to spend your possibly limited time in the game. This leads us to more conclusive options.

Think back again to when you or your crew assigned roles. There should be one that chose or was given the role of "boarder". This is their time to shine. Just have them jump off the stern of your ship, grab the pursuing ship's ladder, climb up, and drop the anchor. Once that is done, you or your boarding crew-mate has bought your crew a lot of time. This more often than not discourages the adversary enough that they will stop giving chase.

Assuming they are still following, attempt to break the line of sight with the pursuing ship. This can be done with Islands and Outposts, but works much better with the large rocks that are out in the open waters. Once line of sight is broken, perform a full 180 degree Handbrake Turn. This will put them way off course relative to you and by the time they notice that you are going the other way, they will be well enough behind that they will likely stop chasing. However, if they continue, move on to the next and final method.

If your new friends are stubborn and refuse to accept defeat, it is time to get them out of your hair permanently. Have a member climb the Crow's Nest and keep an eye out for the small flock of birds that were mentioned in the Hazards Section. Adjust your course to sail near the barrels, and check to see if there is a Gunpowder Barrel in the water. If there is, then you won't be seeing the pursuing crew for very much longer. Have your boarding crew jump into the water and grab the Gunpowder Barrel. Make sure to keep your ship sailing in the same direction that it was when your crew-mate jumped overboard. The closer to straight you are, the better the odds that the chasing crew will follow in your wake and the kill-shot will be landed. Once they have the barrel, have them board just as they would normally. Once on board, light the fuse with primary action (Mouse 1 by default) and run to the lowest deck possible. They should drop the barrel before it explodes to try and save themselves so they can guarantee the sink and pick off any survivors. Once the explosion goes off, you can either continue sailing or turn around and pick up their loot to add to your haul.

Getting Caught Off-Guard
The best Captains always have their guard up, but the best Captains also make mistakes sometimes. Now you're caught in a bad situation because you and your crew were singing shanties and having a grog together. Get to the wheel as soon as possible and have your crew attend whatever stations that they were assigned to. Have your repair hand double check that they have a full stack of Planks in their inventory. Likewise with the cannonmen and their Cannonballs. Also, make sure that the sails are down and catching speed as best they can. If possible, use one of the two best Cursed-Cannonballs and have an Anchor Ball or a Rigging Ball find it's way into the opponent's hull. This will likely buy you enough time to get yourself into a runaway situation. If that doesn't work, just steer in the opposite direction that the pursuing ship is until you can get into a situation where you are faster than them, or where you can pull off one of the maneuvers above to take them out of the chase.

Preventing Boarders
This part is a lot easier than most crews and Captains make it out to be. The best anti-boarder weapon is by far the Blunderbuss, but truthfully any weapon can be used with success. Both the Captain and the rest of the crew should have an eye open for boarders at all times which makes the next part extremely easy. If you have the opportunity, all you have to do as the Captain to keep boarders away is just turn your ship away from whatever side of the ship they are attempting to board on. They will miss their board and have to waste time finding the mermaid to get back to their ship.

Now, what happens if you don't notice the boarder jump off the ship or shoot out of the cannon? Listen for the sound of a boarder whenever you are in a chase or a battle with an opposing ship. Whenever they grab your ladder you will hear the splash of them coming out of the water, the gasp for breath if they have been underwater for an extended period, or even the mermaid spawning for them to catch a ride back. If you hear any of these, have a crew-mate start watching the ladders with their Blunderbuss. Patience is king here because the boarder can't do anything until they are on deck, meanwhile, you have all the time in the world. Just wait for the moment that they set their feet on deck and blast them away from point-blank range.

Okay, somehow a boarder managed to get on deck without getting noticed. You're still okay. Priority number one is to make sure that the anchor is not dropped, and priority number two is to kill the boarder. If they are smart they will drop the anchor immediately, in which case you will hear it begin to drop. Get to it as fast as possible, because a dropped anchor can quickly lead to a sunken ship. As long as you interact with the anchor before it hits the sea floor the ship will not be stopped. You now need to either have a crew-mate kill the boarder or less preferably, do it yourself. If you succeeded in keeping the anchor up, congratulations! If the boarder got the better of you and your crew, kill the boarder, raise the anchor, and continue to fight.
OFFENSE
This section includes tips on how to get the better of your opponent, how to get fast sinks, take advantage of opportunities, and how to be better overall in naval combat.

How To Gain Advantage
Whenever you are sailing in the Sea of Thieves, you are bound to run across other crews that may or may not be friendly. It is then up to you to decide whether or not you want to play peacefully and make an Alliance, or take your skills that you've learned from this guide and take their treasure for your own.

An Alliance can be formed by raising the Offer Alliance "heart" flag in the Crow’s Nest, and then changing that to the Join Alliance flag once in range of another ship with their own heart flag raised.

However, if you decide that you want to live life as the most fearsome pirate crew around, then one of the easiest ways to sink an opposing ship is to use the element of surprise to your advantage. Whether that be preying on inexperienced players that park their ships incorrectly at Islands, or taking advantage of a Galleon that happens to be in the middle of a Kraken fight. If you can catch the other crew off guard, you've already won the battle. A common misconception is that all fights in the Sea of Thieves have to be these long and grandiose battles lasting for 20 minutes or more. In reality, the best captains can win a fight before it even begins. If you are out hunting for other pirates (whether that be literally with the Reaper's Bones or just for fun), make sure to keep an eye out for a crew in a bad situation.

Cannons
Traditional Cannonballs are used to just put as many holes in the other crew's ship as possible. There is still a proper way to use them, and they are not used correctly most of the time. When the game first released, each ship just had a standard hit point scale. As those hit points reduced, holes started to appear in the ship, and once the ship filled with water it would sink. Now there is a more advanced system that many players still don't know about.

First off, water will only flow into holes that are actually below the water line on the ship. This means that when fighting a Galleon hits to the middle deck are nearly pointless as that deck is often above the water line anyways, so you should always aim as low as possible without missing your shot. Holes are also dynamic and can increase in size if they are hit multiple times, causing the repair time to double in certain situations. More importantly, however, is that hitting different parts of the ship will do damage to that specific part. You can remove up to 3 handles from a ship's wheel , with each Cannonball blowing 1 handle off at a time. You can also take down the mast and make the ship slow down by killing its sails. Though, this particular one is best reserved for Chain-Shots detailed below. Finally, you can immediately stop a ship in its tracks by hitting its anchor, which will also remove a handle from the capstan until there is only one handle left, limiting the crew from having multiple people lifting the anchor quickly. This specific hit is devastating against a Galleon.

The next type of Cannonball is the Chain-Shot. This ammo is perfect for slowing down a ship trying to run away from you or even to slow the assault of a pursuing crew. It does less damage to the hull than a normal Cannonball, but if you can manage to hit the mast, it will down it instantly instead of the normal 2-3 that a normal Cannonball would take. You can also use these to further slow down the time it takes for a crew to leave the Island, giving you time for a few extra Cannonballs that might sink the ship.

Boarding
This is a brief sub-section that covers one of the most important but simple parts of any PvP scenario, which is the ability to get aboard the opposing ship and either shut down their cannons, drop the anchor and stop the ship, or even to pull off a heist and steal a known high-value item off an unsuspecting Athena Emissary. The easiest way to board a ship (besides when they are giving chase as explained in the Defense section) is to turn away from the other ship so that your Boarder crew-mate can launch out of the cannon, in front of the other ship. Remember that you are heavier than a Cannonball so adjust accordingly. A trick to keep from getting one-shot by the Blunderbuss while boarding is to pretend to climb the ladder and bait their shot, then actually climb aboard while they reload. Once on deck, just have them drop the anchor and then unload Cannonballs into their hull while the boarder keeps them distracted.

The Death Spiral
The superlative method to quickly sink opposing ships is known in the community as the Death Spiral. This is a challenging maneuver that only the most experienced Captains can pull of consistently. I would recommend trying to perfect this method outside of real naval combat to ensure you can control the ship as needed. Below is an awesome video by Blurbs that explains it well.


In essence, once either your boarder has dropped the anchor or you have successfully landed an anchor ball on the target ship, slow your ship significantly and turn the wheel in order to sail a perfect circle around the target like in the image above. Think of how a shark circles its prey before it attacks. Once you are in the Death Spiral, unleash cannonballs until the target is sunk.
PLAYER VS PLAYER
This section includes how to hold your own in one on one or crew combat.

Gunplay And Swordplay
There are four different weapons that you can use in Sea of Thieves. The Sword, Flintlock, Eye of Reach, and Blunderbuss. You can equip any 2 of these at a time. Each one has a distinct usage that can play a big role in winning a fight against an opposing boarder or when boarding another ship. Here is a table of each one and all of their damage values.

Weapon
Damage
Flintlock
50% per shot
Eye of Reach
70% per shot
Blunderbuss
10% per pellet, Max. 100%
Trident
30%, 60%, or 90% per shot depending on charge level
Sword
25% per Slash, 60% Lunge


First with the Flintlock, note that this is the fastest of the guns in the game. It has the fastest reload time by a fair margin. This means that even though it does less damage than the Eye of Reach, the overall TTK (time-to-kill) is slightly faster. The aim on the stock Flintlock is slightly above the rounded barrel's tip, however, many will buy one of the Sea Dog Skins like the one pictured above for their Flintlock as the pointed barrel makes it much easier to aim precisely.


The Eye of Reach is the best weapon for PC players as with good aim, you can fire off a shot and finish the opponent with 2 Sword Slashes extremely fast. In fact, this combo has the fastest TTK on a full health player not including double-gun loadouts. Not to mention that if they have taken basically any damage, the Eye of Reach will often one-shot an unsuspecting pirate.


If you play on a console or with a controller then the Blunderbuss will likely be your favorite weapon of the lot. With it's one-shot potential and a spray pattern to help with bad aim, firing off a Blunderbuss at point-blank range and finishing them off with a Flintlock or Sword Slash is probably the most beginner friendly PvP strategy around.


The Trident is one of two new weapons that can not be acquired from the weapon locker on your ship. The most consistent way to acquire one is to kill Megalodons or Siren Leaders. It has 30 charges that you can use to fire off small, medium, or large blasts of energy, consuming 1, 2, and 3 charges from the Trident respectively. Note that if the trident doesn't have enough charges to reach a level 2 or 3 blast, the trident will simply not charge to higher levels. You can tell roughly how many charges you have left by the intensity of the glow from the blue crystals. It also has a hidden 2.5x damage multiplier against creatures and skeletons, allowing for massive damage against most enemies.


By far the weapon we know the least about in terms of raw numbers, the Ashen Winds Skull is the legendary fire-spitting skull that you can find from defeating Ashen Lords. There are no definitive damage figures for the skull, which is why it is excluded from the table above. It does approximately 33% of a player's health when they are hit with the fire, and it takes roughly 45 seconds of continuous use for the skull to be completely drained. Despite this, it's typically much better much better to just sell the skull as it goes for up to 25,000 with a Level 5 Order of Souls or Reaper's Bones emissary grade. Keep in mind that the value of the skull will go down according to how much it been used to spit fire before the sale.


Finally, the Sword. The only weapon in the game that doesn't require ammo, is also the only weapon that has practical utility outside of combat and is the most advanced of the weapons. The Sword Lunge is a slightly more advanced technique that allows you to travel very fast in the water, letting you get onto Islands faster or board whenever the ship is too close for a cannon launch. Just simply use secondary action (Mouse 2 by default) to block, and while blocking hold primary action (Mouse 1 by default) to initiate a Sword Lunge. If you jump as you start lunging forward you will keep your momentum. If you land in water, your momentum will stay with you for a few seconds allowing much faster travel than normal swimming. There is also a much more advanced technique than you can use in combat which is alternating between a normal jump, holding block, and hitting the jump key again to Dodge. This is hard to pull off, but with practice it can make you incredibly difficult to hit.

Bombs
As mentioned before, there are Firebombs and Blunder-Bombs that you should be stocking up on as you continue your voyage. You may wonder why they are covered here in the PvP section and not the Offense section with the other two types of Cannonballs, but the answer is quite simple. You can carry and throw both of these bomb types in PvP without having to fire them from a cannon. This means that once you board a ship you can set the whole deck ablaze with a few Firebombs. Alternatively, before you even get aboard a ship you can knock back the boarding defenders with a well-placed Blunder-Bomb, buying you plenty of time to get on deck.
RETURNING TO PORT
This section includes what to do at the end of your voyage.

Where To Park
This is another thing that may seem easy and self-explanatory, but in reality, it isn't. This is just because on some islands, the dock that is the obvious main place to take port at an Outpost may not always be the closest you can get to the Trading Companies that give you gold in exchange for your hard-earned goods. If you were lucky enough to find a Rowboat when passing an Island, or better yet a Rowboat with a Harpoon Gun, now would be the time to take advantage of that.


If you are the Captain of a Captained Ship, a feature recently introduced that allows you to customize and name your ship, you gain access to a new faction named the Soveriegns. When available, you should always sell your loot to them instead of the individual Trading Companies, as they will deliver everything to the respective company for your for no additional cost! The only exception is that they will not deliver Reaper's Bounty items, and they will deliver Hunter's Call items for a small fee.

How To Efficiently Deliver Loot
Once you learn all of the Outposts this next part becomes a lot easier, but try to get as close as you can to the different Trading Companies depending on what loot you hold the most of. Then just load all of your treasure into the Rowboat and manually row it to shore, again as close as you can get to where you need to sell the items. This will cut down on time before you can carry on to the next voyage, but it will also give you the most protection from thieving pirates trying to steal your loot at the last moment and take it for themselves.


After you have beached the Rowboat, there is a technique that you can use to effectively run at the normal sprinting speed while carrying an object. There is no formal name for this technique, but it works very well when trying to outrun someone attempting to steal your loot and is well worth the time it takes to master. It is easier to practice this in the water as you don't have to move your mouse to be able to pick up the item again consistently. Go to Settings - Accessibility Settings - Reduce Held Interactions, set this to On. This will allow you to simply tap the Interact key (F by default) instead of having to hold it for the full duration. Once you have changed that, pick up an item and head into the water. Simply drop the item (X by default), sprint (Shift by default), and then pick the item back up immediately. If you did it correctly you will Sprint Swim for about a second and then the item will reappear back in your hands. Just repeat this process until you get where you need to be, and it will cut down dramatically on the time it takes for you to carry objects from one point to the next. If you're still having issues figuring out the timing, watch the video linked for a visual representation.
GENERAL TIPS
This section will include less specific tips that will help you with miscellaneous things on your voyage.

Cooking and Hunting
Near the beginning of this guide, you can see in the table that cooked fish, Kraken, and Megalodon meat are vastly better than the fruits that you will find in barrels and crates. The only real downside to these better foods is that you have to cook them, which many players make more confusing than it actually is. Here is a table showing the time it takes to cook each type of food in the game, but don't bother memorizing this information as I have 3 helpful tips that can bypass this process below.

Food
Under-cooked
Cooked
Burnt
Bait
N/A
N/A
10s
Fruit
N/A
N/A
15s
Fish
30s
40s
80s
Meat
50s
60s
120s
Trophy Fish
80s
90s
180s
Kraken and Megalodon
100s
120s
240s

Now for the tips I was talking about. First off, every food that can be cooked will at some point turn a nice golden-brown color that will indicate that it is properly cooked. This trick is even more helpful with fish, as the eye of the fish will turn completely white alongside the golden-brown color of the body. However, there are still two ways to get cooked meat even easier than that.

The first of these two methods involves going to a Shipwreck. Often inside of a Shipwreck and it's barrels, you will find both cooked and un-cooked food items. Sometimes even cooked Kraken or Megalodon meat! In the worst case, you will only find some raw meat that saves you from having to kill creatures on island. However, this is where the third trick comes into play.

The last tip that you can use is actually really helpful for grabbing food quickly and efficiently, as it completely eliminates the time it takes to cook the food. The only real downside is that it is fairly inconsistent, and to my knowledge nobody has figured out a way to make it less so. Regardless, if you kill a land animal (pigs, chickens, and snakes) with a Firebomb, you can often get a perfectly cooked piece of meat from them. As stated the outcome is somewhat random and can also produce burned or un-cooked meat, but in a pinch this is a great way to get some regen-food without having to wait.

Getting Treasure More Effectively
Whenever you arrive at an Island, it should often be your goal to get off of that Island as quickly as possible unless you are hunting for Ancient Skeletons. Using the map linked in the subsection below, you can find the POI (points of interest, or the different places that you are told to go when doing a riddle quest) on each Island very quickly. When you reach the final POI, instead of guessing that you have traveled the correct distance to find the chest, use secondary action (Mouse 2 by default) and it will bring the compass closer to you. Then if you walk forward, you can count the steps as "paces" in order to hit gold the first time, every time.

Once you've found your loot, whether it be an "X marks the spot" quest or the aforementioned riddle quest, you can dig that chest up at nearly twice the speed with an easy trick. Just hit your stow key (X by default) twice rapidly as soon as you hear the sound of the chest being unearthed. The ability to speed dig has been removed from the game in a recent patch.

Finding Your Destination
Slowly as you add hours onto your total playtime in the Sea of Thieves, you will learn where all of the Islands and Outposts are. Until that point though, many new players struggle significantly finding the correct Island for their quests. Luckily, the community made a tool for that long ago. It is a fan-made website where you simply type in the name of the Island you are looking for and it will tell you the "code" for the Island. The code can be used as map coordinates to find your destination.

Click here to go directly to it![maps.seaofthieves.rarethief.com]

It is genuinely one of the most helpful things for beginners to the game, and to make it even better, there is also a mobile companion app called "SoT Companion" which works in the same way without you having to tab out.

https://steamcommunity.com/sharedfiles/filedetails/?id=2301677411
Alternatively, until you get familiar with the Sea of Thieves, you could have one or both of these excellent guides open to help you along your voyage. Credits to @ShqrKK

https://steamcommunity.com/sharedfiles/filedetails/?id=2304041443
GENERAL TIPS (CONT.)
Fishing
This is a very simple and fun mini-game for when you're on the water with no target in sight, need reputation with The Hunter's Call, or just need food and going to an Island would take you too far off course. All fish give you the same amount of food and regen when cooked. To wrap it all up simply, pull out your fishing rod and bait it with the appropriate bait for the type of fish you're trying to catch. Then simply cast it in the water and wait for a fish to swim up and take a bite. A small tip if you plan to play on your phone or do something else while you wait, move your camera all the way to the left or right so that you can no longer see the bobber in the water. Then, whenever a fish swims up, the camera will automatically move itself so that you don't miss it.

It can also be helpful to use the newly added Bait Crates to stock up on bait for your fishing adventure!


Now you have a fish on the line! What next? Well, it will immediately start to swim and try to get away from you. Here it is important to note that your instinct will tell you to hit a button to try and fight it, but don't hit anything yet. All you have to do is move your mouse in the opposite direction that the fish is swimming and eventually it will tire out. From there, it will stop swimming, and all you have to do is hit primary action (Mouse 1 by default) to start reeling it in. It will slowly be reeled in, you will more than likely not get it onto your boat in one go, meaning that you will have to repeat this process a couple times until the fish is fully reeled in.

In terms of the specific kinds of fish, that can get pretty complicated. The thing that you need to remember is that if you're trying to sell them to The Hunter's Call, you need to try and catch Battlegills, Wreckers, and Stormfish. These are the three most valuable types by a large margin. In fact, the rarest and most valuable Stormfish sells for nearly 17,000 gold. The names are pretty self-explanatory so they are all easy to remember, but Battlegills can only be found near Skeleton Ships and active Skeleton Forts. Both of these events are detailed lower in the guide. Wreckers can only be found at Shipwrecks. Be careful trying to catch these as if the line crosses any part of the Shipwreck, the line will break and you will lose the fish. Finally, Stormfish are only found in the open waters of heavy storms detailed in the Hazards section above.

https://steamcommunity.com/sharedfiles/filedetails/?id=2310736158
The rest of the different fish and all of their skin variants are all less valuable and as such will not be covered in this guide. However, @ShqrKK has made a wonderful guide on every different type of fish, the specific regions where you can find them, and how much each fish will sell for.

https://steamcommunity.com/sharedfiles/filedetails/?id=2505829516
There is also this incredible guide by @Bardlord Lutemaster that shares how to run peacefully along the Sea of Thieves and fish to your heart's content. However, there is a vital piece of information that is now incorrect in this guide. That being the Ghost Ships from Captain Flameheart's event will now target Rowboats due to the recently added cannon Rowboat.

Gain Reputation Easier
Once per update, you can buy a "letter of recommendation" from Larinna for 30 doubloons. This will increase your reputation level with the respective trading company by one level. This works with the Gold Hoarders, the Order of Souls, the Merchant Alliance, The Hunter's Call, and the Sea Dogs. However, you can not buy one of these letter for either the Athena's Fortune or the Reaper's Bounty.


If you are struggling to find doubloons, you can get 5 from random encounters such as books that you find along your journey, but this is very slow and as such you shouldn't actively hunt these to increase your doubloon amount. A much faster way to gain doubloons is to steal one of the Reaper's Chests which are indicated by a red mark on the map (indicated above) and red/green light beams (indicated below) on the horizon.


You can also more than double the amount of doubloons that these chests give you by flying the Reaper's Bounty emissary flag. Here is a table showing the values.

Emissary Grade
Doubloon Reward
No Emissary
25
Level I
25
Level II
33
Level III
41
Level IV
50
Level V
62

Using Storage Crates Effectively
Whenever you are on an Island, you may stumble across a few different kinds of crates that you can pick up. These being the Cannonball Crate, the Storage Crate, the Firebomb Crate (which is both less useful and only available from Mercenary Contracts) and the Ammo Crate. Each of these crates can hold 50 of the respective item. If you find any of these while on your voyage you should always bring them aboard you ship.
A bit of advice is that if you dock at an Island or Outpost and need supplies, make sure to bring a crate with you in order to bring back a lot more supplies than you would have otherwise. Also, with the Ammo Crates, you can refill them at the Ammo Crate in your ship infinitely. With strategic placement on your ship, this can help you deny boarders much more effectively since you have 10 full sets of 5 bullets compared to their single set of 5. Likewise, with Cannonball Crates set up near your cannons, you can keep a near constant volley of fire while your adversary has to run below deck to get more Cannonballs.

Getting Extra Gold and Doubloons
Listed below is an excellent guide by @Jenceno on how to collect The Maiden Voyage tutorial treasure and give yourself a little boost in the game. It will only take around 10 minutes to complete, and will award you with 25,000 gold as well as 200 doubloons.

The doubloon reward was heavily exploited and as such, Rare have removed them from the rewards.

https://steamcommunity.com/sharedfiles/filedetails/?id=2132105977

Achievement Hunting
If you're a completionist like me and have an itch to perfect this game, @Artoriaz and @ThePugHybrid have created an excellent guide outlining every single achievement for you to collect and the details you need to be able to get them.
https://steamcommunity.com/sharedfiles/filedetails/?id=2418816932
SERVER EVENTS
This section will include all of the major events that you may find on your voyage.

World Events
Many world events can happen on a server at any given moment, but it is important to remember that only one of these can go on at a time. This is the ever-growing list of server events you can participate in. To begin with, look to the sky and see if there are any strange looking clouds around. If you see one, try to identify the shape a figure out what event it is.

Skeleton forts are indicated by a large skull cloud with green thundering eyes. An active Skeleton Fort can appear at any of the fortress type Islands, upon which the fortifications and cannons on the Islands will become manned by skeletons, who are trying to defend the fortress vault that will be locked for the duration of the event. Only one Skeleton Fort can be active at a time. A Skeleton Fort will stay active for half an hour when not disturbed. When you are within range of a Skeleton Fort, you will hear the Skeleton Fort Theme. Once on the Fort, twelve waves of skeletons of varying types will have to be defeated for the last three Skeleton Captain Waves to appear. The first boss wave spawns a Skeleton Captain that drops a Villainous Bounty Skull, the second Boss Wave spawns an Ashen Key Master and Ashen Guardian that allow players to get an Ashen Key and Ashen Chest. The final Boss Wave summons one of the three Skeleton Lords: The Mutinous Helmsman, The Two-faced Scoundrel or The Duchess. Once the Lord is killed, it will drop a Stronghold Skull, a Skeleton's Orders Quest leading to a Rag & Bone Crate and the Stronghold Key, which can be used to open the vault below the main fortress tower. The vault will remain locked while the key is still physically in the server. A Skeleton Fort event is fairly profitable, with the vault hiding away one of each stronghold rarity item, a handful of various other treasure, a couple Gunpowder Barrels, Mermaid Gems, Gifts, and an Ashen Chest. Molten Sands Fortress rewards crews with an additional Chest of Rage for the increased risk that stems from the volcanic region, however this extra reward is not worth the extra difficulty.

A Skeleton Fleet is an open World Event that is indicated by a large ship cloud with green lightning. A Skeleton Fleet Cloud can either appear in the middle of the Sea of Thieves or deep within The Devil's Roar and will disappear in half an hour unless activated. A Skeleton Fleet will become active after a ship sails into the range of the cloud. Upon activation, three waves of 1-2 Skeleton Ships will appear around your ship. Each of the defeated regular Skeleton Ships will count toward Skeleton Ship commendations and will also drop loot from regular Skeleton Ship loot tables. During the last wave, one of the Skeleton Ships will spawn with a Skeleton Captain on board. After the Captain's Galleon is sunk, the event is over, even if the other ship from the last wave is still up. A Skeleton Captain's Ship will generally drop four Skeleton Captain's Chests, four Skeleton Captain's Skulls, three Ritual Skulls, and three Ashen Chests in addition to regular Skeleton Ship loot.

A Ghost Fleet is an open world event that is indicated by the appearance of Captain Flameheart in the skies. This event sees Flameheart send a fleet of Ghost Ships to attack a single large Island in the three main regions. When approached, Flameheart will taunt players and crews throughout the whole event. The event consists of four waves: two Grunt Ghost Ship waves and two Ghost Captain Ship waves. The first and third wave require players to take down seven of the fragile Grunt Ghost Ships, the second wave requires crews to take down two ships sailing the sails of the Ashen Dragon and the final wave sees crews face off against Flameheart's own ship The Burning Blade. The Captain Ships will drop a variety of ghostly treasure, with Flameheart's Ship leaving behind a guaranteed Captain Skull of the Damned and a Cannonball Crate of the Damned that allows players to use Ghostly Cannonballs of the ships themselves.

The Ashen Winds world event is indicated by the appearance of a massive red tornado on the horizons. This tornado leads players to the site of an Ashen Lord summoning ritual performed by Ashen Skeletons. The World Event consists of a three phase battle against one of the four Ashen Lords: Red Ruth, Old Horatio, Warden Chi, or Captain Grimm. The Lords, while similar to Skeleton Lords from other encounters, possess various unique fire themed attacks, gaining more powerful skills as the fight's phases progress. Upon defeat, the Lords leave behind an Ashen Winds Skull and 15 Devil's Roar variants of treasure items. The Ashen Winds Skull is a special Bounty Skull that can be sold or used as a flamethrower type weapon.

While different from the other open World Events, The Kraken's Attack is also considered one of them as a Kraken can only spawn when no other open World Events are active. A Kraken does not have a cloud indication, instead a Kraken will attack one of the first ships to be in open sea right after a World Event is completed. While not confirmed, it is believed that Krakens are more likely to target ships with the most treasure on board, because generally, the crews that defeat a Skeleton Fort or Fleet and set sail right after are the most likely to be in open waters. This is especially true to crews that defeat a Skeleton Fleet as they are generally on the edges of maps in open water and no Islands to take cover at. A Kraken does not attack a ship that is within the title card range of an Island, Sea-Post or a Shipwreck, so it is advised to stay close to a Landmark and wait for the next Fort or Fleet cloud to appear if one wants to escape the Kraken. A Kraken's spawn is indicated by an ominous sound and the surrounding waters of a ship suddenly turning black with ink. After this, the Kraken's many tentacles will appear from within the waters and start battering and grabbing the ship. Depending on the size of the crew or ship a different amount of Kraken tentacles need to be killed to make the Kraken turn away. A Sloop needs to defeat 2-3, a Brigantine around 5-6 and a Galleon around 7-8 tentacles. A Kraken can also be fled from if the ship is sailed outside the Kraken's Ink. Each tentacle drops one piece of Kraken Meat and 1-2 random treasure items.
SERVER EVENTS (CONT.)
A Fort of Fortune is an open world event that is identical to the Skeleton Fort event, but is much more challenging. The key differences include Skeleton Captains now dropping Skeleton Orders for armaments, and the bosses for the fort now include all 3 aforementioned Skeleton Lords and one of the 4 Ashen Lords as the final boss. The rewards found in the fort vault include high value treasures, including Athena Treasures.

Raids
Raids are unique events in that while they share some elements with World Events, they have to be activated by a crew and are active at the same time as other World Events.

The Fort of the Damned is currently the only Raid type World Event that can be activated at any time. An active Fort of the Damned is indicated by a massive red-eyed skull cloud appearing in the sky above the Fort. To activate a Fort of the Damned Raid, a crew needs to light the lanterns of the 6 Ferryman Statues inside the Fort with each Flame of Fate and place a Ritual Skull on the headless skeleton inside the ritual cage. The start of the Raid is signaled by a massive red skull cloud above the Fort of the Damned, after which, 12 waves of Shadow of Fate Skeletons will start spawning on the players. After the last wave, Ghost of Graymarrow will appear, who needs to be killed for the Fort of the Damned Key. The vault of the Fort contains various treasure for all trading companies (even Athena's Fortune and Reaper's Bones).

To acquire all 6 Flames of Fate you must die in specific ways and take the flame from the Ferry of the Damned. Here is a list of each color and how to get it.
  • White - Die from lightning (Pull out your sword in the storm)
  • Red - Die from burning (Fire or Volcanoes)
  • Green - Die from Skeleton
  • Blue - Die from Shark (The Megalodon also counts)
  • Purple - Die from Snake Poison
  • Pink - Die from another player (A friend can explode a barrel)

Emergent Encounters
These encounters can occur at any time, no matter if another is also occurring. They can cross over into other encounters listed on this page, adding greater danger and challenge for the crew involved.

A Skeleton Galleon or Sloop can either appear roaming the open seas or as a random spawn beside a player ship. These ships can be identified from afar with their tattered sails, unique green and blue lanterns, and are sailed by a crew of skeletons. Viewing a Skeleton Ship through a spyglass provides a unique audio cue to further distinguish it from another crew's ship. They are armed with one type of many green or purple Cursed Cannonballs. They will usually roam from Island to Island, staying still for a moment until moving to another Landmark. They can be aggressive immediately, or passive until you approach too closely or you shoot it with cannons, then becoming aggressive, firing upon and following your ship. The skeletons on the ship can fix holes with Planks and put out fires but they can't bail water. Once a Skeleton Ship sinks, 3-12 pieces of treasure items that were onboard will float to the surface. Skeleton Ships have a high chance of dropping skeleton quality loot.

Megalodons are huge sharks the size of Sloops who prey on unsuspecting crews in the open seas. There are five Megalodons of different colors, behavior, and rarity who can appear from out of the sea to a musical cue and start circling the crew's ship. If you see a pale one with pinkish fins like the one in the image above, STOP EVERYTHING YOU ARE DOING AND KILL IT. This Megalodon is the legendary "Shrouded Ghost" and is the rarest thing known in the Sea of Thieves. Like Krakens, these Megalodons can only appear in the open water. When players get too close to Landmarks or Islands, the Megalodon will often give up the chase, lying in wait for the ship to return from the shores. Now and then, a Megalodon will charge at the ship, knocking the ship around along with crew-mates close enough to the charge and leave the hull broken. Megalodons have to be fought off with cannons and have differing health depending on the ship's size. In addition to the Megalodon meat, they have a similar reward pool to Skeleton Ships.

Ancient Skeletons are the final type of server event and extremely rare, though still not as rare as the "Shrouded Ghost". They will spawn near players on any Island or Fort, in both Adventure Mode and The Arena. They have been rumored to spawn in more frequently based on the concentration of players in an area of the map, but this is entirely unproven.

When they do spawn in, there is a sound cue of clattering coins. If you hear this, immediately stop what you're doing and find the Ancient Skeleton. They are the only way to get Ancient Coins through gameplay and with the rarity of them, it may very well be your only chance to buy micro-transaction items without spending real money. Make sure that you act quickly as well, because from the moment the coin sound plays, you only have 10 seconds to kill the Ancient Skeleton before it returns into the ground and is gone forever. Luckily, they are easily distinguishable from other skeletons because of their vibrant gold and blue bones alongside a large sack of Ancient Coins on their backs.

If you can manage to kill it before it burrows back into the sand, then you will be rewarded with anywhere from 100-800 Ancient Coins and a small pop-up will inform you what tier stash you just claimed from the Ancient Skeleton. These tiers have no real meaning, but each one does come with a unique name and graphic. The tiers in order are the Skeleton's Ancient Stash (100-200 coins), the Skeleton's Ancient Fortune (200-400 coins), and the Skeleton's Ancient Hoard (400-800 coins).
CONCLUSION
Now that you know what you need to be doing both as captain of the ship and as a player in general, you have more than enough knowledge to either defend your ship effectively, or steal other pirates loot viciously. Either way, you are now prepared to sail across the Sea of Thieves without having to worry about other pesky pirates getting in your way. Spread this knowledge to your friends by either sharing this guide, or just letting them know the key points in bold that are spread throughout. In any case, make sure that you and your crew are having fun. See you on the Sea!

If you enjoyed this guide, please consider giving it a thumbs up, favoriting, or even an award! A LOT of time went into making this guide and it would be greatly appreciated if you could spread the word. If you have any more questions, leave a comment below and I will respond as soon as possible. Also, if you know something helpful that isn't in this guide, leave that as a comment as well and it might be added in to help aspiring captains even more.

71 条留言
Analog  [作者] 2024 年 1 月 2 日 下午 2:46 
@vee-kay Thanks for the compliment! I'm happy the guide could help. Double thanks for helping explain some things in the comments as well.

Sorry that I haven't kept the guide up to date. Just having a hard time staying involved with the game long enough to research and format new content. Hopefully some day soon though! :)
vee-kay 2024 年 1 月 1 日 上午 1:04 
@Analog: Excellent guide, thanks! Please add some info for newbies on how to get a crew, and on the underwater shrines and such special places.
vee-kay 2024 年 1 月 1 日 上午 1:03 
@Icikus: The underwater temples are special shrines created by the merfolk. You can spot them on the horizon by the swirling blue & purple swirls at that spot. The sea can get rough there, so make sure you anchor your ship further away, and use your rowboat to row to the blue spot.

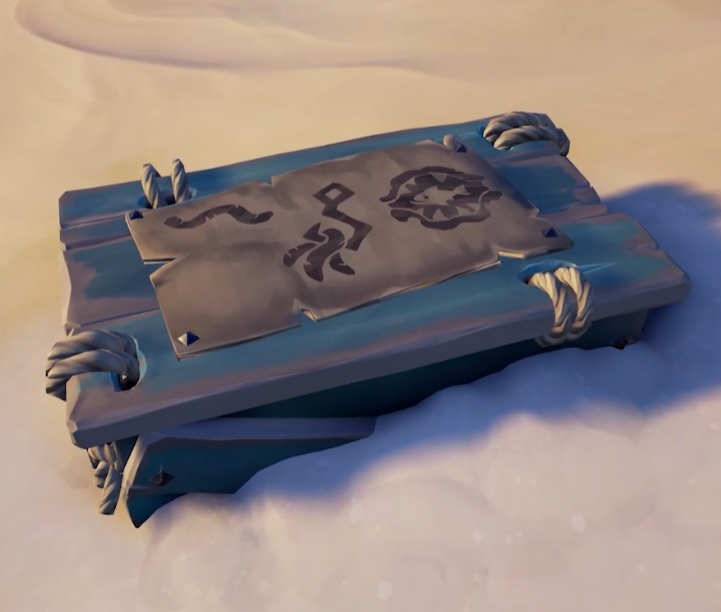
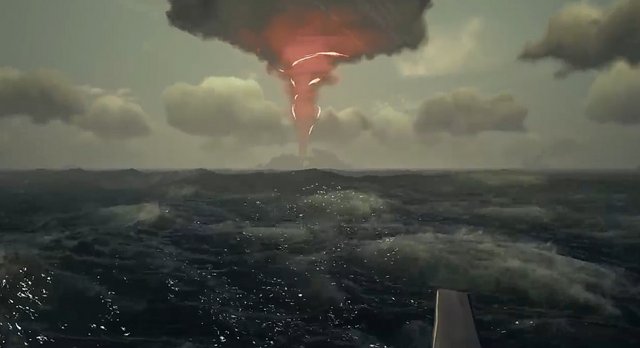
You then dive in, make sure you stay inside the blue funnel as your breath will last longer inside the funnel and in the brightly lit zone at the bottom. Swim to the circular platform visible near the end of the funnel, and there will be a stone staircase leading to a stone door. Pull the level in the staircase, to open the door, then swim in and finish your exploration inside the underwater cavern, and claim your prize from the shrine. While swimming back up to your ship, remember to stay in the funnel, and beware of any sharks lurking nearby.
Analog  [作者] 2023 年 6 月 11 日 上午 9:31 
@Icikus I will look into adding the underwater temples in a future update to the guide soon. Sorry I couldn't help at the moment
Icikus 2023 年 6 月 10 日 下午 10:47 
I don't see any mention here about the under water temple/cave that gives off a pure glow on the surface. What is it and what do I do with it? How do I brake through the barrier and get inside?
Analog  [作者] 2023 年 5 月 8 日 下午 7:09 
@Riggs Of course! Really happy to be helping new players get into the game
Sheep500 2023 年 5 月 8 日 下午 5:42 
Excellent guide. Thank you for your hard work.
I’m a new player and found it extremely useful!
Analog  [作者] 2023 年 2 月 20 日 上午 11:31 
@TheGJ90 Thank you for explaining. The game has improved substantially over the past couple of years
TheGJ90 2023 年 2 月 20 日 上午 7:25 
@Late-Night Dog Poker

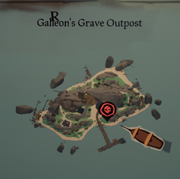
Ships have multiple respawn points and not all of them are outposts. Combine that with mermaids making it easy to return to a respawned ship, and if someone camps an outpost, they are likely to get shot at by a vengeful and fully armed crew coming in from the horizon.

This isn't the Closed Beta anymore.
George Pwn'es 2022 年 10 月 4 日 下午 7:48 
People are still gonna camp outposts Lol
Fundamental flaw in the game. Add Safe spaces. its that easy.