Thief
534 ratings
Complete Guide to Collectibles, Map Locations, and More!
By dimmu1313
Guide to 100% Collectibles, Points-of-Interest, and hidden quests. Also 100% Documents guide for Stonemarket and South Quarter documents. **Please Rate Thumbs Up if you like the guide and/or found it helpful! This will ensure that it stays on the front page so that people won't have to hunt it down, and the nod in my direction is also nice ;) Also be sure to add to your favorites and leave a comment here or on my profile if you have any questions or suggestions**

Be sure to check out my other guide, How to Beat the Final Boss with Unseen and No Damage rewards:

http://steamcommunity.com/sharedfiles/filedetails/?id=233566241
8
2
   
Award
Favorite
Favorited
Unfavorite
Chapter Entrance/Replay Locations
Note: these maps simply show the location of the Chapter entrances, typically a door with a white orb in front of it that you interact with. The location of the entrance is indicated on each map by the standard "Player Location" arrow marker. Also note that, while the compass was inadvertently cropped from each screenshot, every map shown here is in a North-Up orientation.

CHAPTER 1

You can reach this entrance by heading from the west through an alleyway in the southeast of Stonemarket proper. It's a "squeeze through the crates and lift the piece of wood out of your way" style of area transition. Turn immediately right before exiting the alleyway on the other side. This alleyway is also directly across (to the west) from the sniper tower in the Stonemarket portion of Baron's Way South.

Chapter 1 Entrance


CHAPTER 2

In the graveyard at the north end of the map. Head through the Crippled Burrick map area, then exit into the graveyard. Across from the old woman who sells Focus Points.

Chapter 2 Entrance


CHAPTER 3

In the South Quarter, Riverside section. The fastest way is probably to head to the open street to on the southeast side of the map. Look for the stairwell with the tell-tale red light. Hang a right down another flight of stairs, then you'll need to hit a lever that drops a bridge.

Chapter 3 Entrance


CHAPTER 4

In Stonemarket, Baron's Way North.

Chapter 4 Entrance


CHAPTER 5

In South Quarter, at the docks just outside the Siren's Rest.

Chapter 5 Entrance


CHAPTER 6

In Stonemarket, Market Street section to the north of Stonemarket Baron's Way South. Note that this is accessed from the Baron's Way South section of Stonemarket and doesn't require a map change. Just head north along the main open street. Stay to the left when you are in the area of the burning buildings.

Chapter 6/7/8 Entrance


CHAPTER 7 AND 8

In Stonemarket, southern end of Grandmauden. There are two gates (interaction points) here: the left gate takes you to Chapter 7 and the right gate takes you to Chapter 8.

Collectibles Index by Location
Collectibles By Location

Chapter 1
Serendi Stone Circles: Amethyst Circle
The Mortal Coils: Sootback Bracelet
Client Loot: Jewelled Mask
Unique Loot: Lyegrove's Jewelled Mask


Chapter 2
Memories of the Dead: Charity's Memory
Flowers Eternal: Daisy Brooch
Unique Loot: Soul of the Automaton
Serendi Stone Circles: Diamond Circle
Client Loot: Cornelius' Ring


Chapter 3
The Pinned Castinets: Jewelwing
Serendi Stone Circles: Emerald Circle
Unique Loot: Ancient Figurine
Memories of the Dead: Stonemason's Memory
Client Loot: Ritual Book


Chapter 4
Serendi Stone Cirles: Lapis Lazuli Circle
Unique Loot: Morendrum Medal
The Court of Montonessi: The Abundance of Emptiness
Memories of the Dead: Soldier's Memory
City Heritage Plaques: The Keep
The Mortal Coils: Shale Snake Bracelet


Chapter 5
City Heritage Plaques: Moira Asylum
The Court of Montonessi: The Repulsion of Civility
Flowers Eternal: Rose Brooch
Serendi Stone Circles: Ivory Circle
Memories of the Dead: Child's Memory
Unique Loot: Mechanical Eye


Chapter 6
The Pinned Castinets: Greater Ruststain
City Heritage Plaques: Elias Northcrest Statue
Serendi Stone Circles: Sapphire Circle
Unique Loot: Heart of the Lion
The Court of Montonessi: The Married Spinster
Memories of the Dead: Braggart's Memory


Chapter 7
Unique Loot: City Artifact
The Mortal Coils: Bronzehead Bracelet
Memories of the Dead: Elder's Memory
Serendi Stone Circles: Amber Circle


Chapter 8
The Pinned Castinets: Mourning Bell
The Court of Montonessi: Compassion, Foul


Ector Client Job 1: Hand Tailored
Client Loot: Mechanical Hand
Whiteridge's Duty: The Statuesque Lady
The Court of Montonessi: Guilt has Black Wings


Ector Job 2: Silence is Golden
The Court of Montonessi: The Grace of Insecurity
Whiteridge's Duty: The Observant Lady
Client Loot: The Voice Box


Ector Client Job 3: Heartbroken
Whiteridge's Duty: The Burnished Lady
Client Loot: Automaton's Heart


Vittori Client Job 1: Happy Medium
City Heritage Plaques: South Quarter Sluices
Whiteridge’s Duty: The Constant Lady
Client Loot: The Talking Skull


Vittori Client Job 2: The Carnal Connoisseur
The Court of Montonessi: What is There Cannot be Seen
Client Loot: The Octopuss
Whiteridge's Duty: The Virtuous Lady


Vittori Client Job 3: Sideshow Attraction
City Heritage Plaques: Watch Station
Whiteridge’s Duty: The Porcelain Lady


City Collectibles

Unique Loot: Golden Keep

The Pinned Castinets
  • Ghost Girl
  • Dawn Gauzy
  • Oilbox
Flowers Eternal
  • Hydrangea Brooch
  • Iris Brooch
  • Sunflower Brooch
  • Lilac Brooch
The Mortal Coils
  • Marsh Adder Bracelet
  • Wellpool Viper Bracelet
  • Harlequin Bracelet
The Court of Montonessi
  • The Dangers of Seduction
  • The Arrogance of Nobility
  • Living a Lie
  • Rutting Out of Season
  • The Insatiable Appetite
City Heritage Plaques
  • The Crippled Burrick Tavern
  • Stonemarket Clock Tower
  • Customs House Bridge
  • Carlysle's Mill
  • Our Lady of the Iron Litany Chapel
  • The Siren's Rest
  • Ulysses Northcrest's Obelisk
  • Obediah Northcrest's Obelisk
  • Barnabus Northcrest's Obelisk
  • Archibauld Northcrest's Obelisk
  • Stonemarket First Bank
Collectibles Index by Category
84 Items Total

Serendi Stone Circles (7 Total)
  • Amethyst Circle (Chapter 1)
  • Diamond Circle (Chapter 2)
  • Emerald Circle (Chapter 3)
  • Lapis Lazuli Circle (Chapter 4)
  • Ivory Circle (Chapter 5)
  • Sapphire Circle (Chapter 6)
  • Amber Circle (Chapter 7)

The Pinned Castinets (6 Total)
  • Jewelwing (Chapter 3)
  • Greater Ruststain (Chapter 6)
  • Dawn Gauzy (City)
  • Oilbox (City)
  • Mourning Bell (Chapter 8)
  • Ghost Girl (City)

Whiteridge’s Duty (6 Total)
  • The Constant Lady (Vittori Client Job 1: Happy Medium)
  • The Virtuous Lady (Vittori Client Job 2: The Carnal Connoisseur)
  • The Porcelain Lady (Vittori Client Job 3: Sideshow Attraction)
  • The Observant Lady (Ector Job 2: Silence is Golden)
  • The Statuesque Lady (Ector Client Job 1: Hand Tailored)
  • The Burnished Lady (Ector Client Job 3: Heartbroken)

Flowers Eternal (6 Total)
  • Daisy Brooch (Chapter 2)
  • Rose Brooch (Chapter 5)
  • Hydrangea Brooch (City)
  • Iris Brooch (City)
  • Sunflower Brooch (City)
  • Lilac Brooch (City)

Memories of the Dead (6 Total)
  • Stonemason's Memory (Chapter 3)
  • Charity's Memory (Chapter 2)
  • Soldier's Memory (Chapter 4)
  • Child's Memory (Chapter 5)
  • Elder's Memory (Chapter 7)
  • Braggart's Memory (Chapter 6)

The Mortal Coils (6 Total)
  • Marsh Adder Bracelet (City)
  • Sootback Bracelet (Chapter 1)
  • Wellpool Viper Bracelet (City)
  • Shale Snake Bracelet (Chapter 4)
  • Harlequin Bracelet (City)
  • Bronzehead Bracelet (Chapter 7)

City Heritage Plaques (16 Total)
  • The Crippled Burrick Tavern (City)
  • Stonemarket Clock Tower (City)
  • Customs House Bridge (City)
  • Carlysle's Mill (City)
  • Our Lady of the Iron Litany Chapel (City)
  • The Siren's Rest (City)
  • South Quarter Sluices (Vittori Client Job 1: Happy Medium)
  • Watch Station (Vittori Client Job 3: Sideshow Attraction)
  • Ulysses Northcrest's Obelisk (City)
  • Obediah Northcrest's Obelisk (City)
  • Barnabus Northcrest's Obelisk (City)
  • Archibauld Northcrest's Obelisk (City)
  • The Keep (Chapter 4)
  • Moira Asylum (Chapter 5)
  • Elias Northcrest Statue (Chapter 6)
  • Stonemarket First Bank (City)

The Court of Montonessi (12 Total)
  • The Dangers of Seduction (City)
  • The Arrogance of Nobility (City)
  • The Repulsion of Civility (Chapter 5)
  • The Abundance of Emptiness (Chapter 4)
  • Compassion, Foul (Chapter 8)
  • The Married Spinster (Chapter 6)
  • Living a Lie (City)
  • Rutting Out of Season (City)
  • The Insatiable Appetite (City)
  • What is There Cannot be Seen (Vittori Client Job 2: The Carnal Connoisseur)
  • The Grace of Insecurity (Ector Job 2: Silence is Golden)
  • Guilt has Black Wings (Ector Client Job 1: Hand Tailored)

Unique Loot (9 Total)
  • Lyegrove's Jewelled Mask (Chapter 1)
  • Soul of the Automaton (Chapter 2)
  • Ancient Figurine (Chapter 3)
  • Morendrum Medal (Chapter 4)
  • Mechanical Eye (Chapter 5)
  • Heart of the Lion (Chapter 6)
  • (City) Artifact (Chapter 7)
  • The Glittering Plumage Prologue
  • Golden Keep (City)

Client Loot (8 Total)
  • Jewelled Mask (Chapter 1)
  • Cornelius' Ring (Chapter 2)
  • Ritual Book (Chapter 3)
  • The Talking Skull (Vittori Client Job 1: Happy Medium)
  • The Octopuss (Vittori Client Job 2: The Carnal Connoisseur)
  • Mechanical Hand (Ector Client Job 1: Hand Tailored)
  • The Voice Box (Ector Job 2: Silence is Golden)
  • Automaton's Heart (Ector Client Job 3: Heartbroken)

Bank Heist Loot (2 Total)
  • The Star of Auldale (The Bank Heist)
  • Southrye's Watch (The Bank Heist)
Chapter 1 Collectibles
CHAPTER 1 COLLECTIBLES
(4 Total)


Amethyst Ring


Literally lying on the street next to a cart. I missed this one several times because there is otherwise no reason to drop down here. This is the first street you come across after first climbing to the rooftop after the opening cutscene. Drop down on the overhang and turn left to see the cart against the wall.


Map with approximate location of cart indicated:


The Mortal Coils: Sootback Bracelet


On the first floor of the Jeweler's house/shop, in the wall-safe (lockpick) behind the snoozing guard (sorry I already KO'd him when I took the screenshot):


Client Loot: Jewelled Mask


This is the "fake" version of a mask the Jeweller is hiding elsewhere. It is found on the first floor in a window drawer to the left as you face the front door.


Unique Loot: Lyegrove's Jewelled Mask


In the basement, in a wall safe (combination) hidden behind a painting. The code is in a note written by Lyegrove (the first number next to 3 consecutive paragraphs; shown on the screenshot of the safe, below).


Chapter 2 Collectibles
CHAPTER 2 COLLECTIBLES
(5 Total)


Memories of the Dead: Charity's Memory


In the second courtyard, where you climb the pipes to get inside, there is a hidden room accessed from a hatch on the rooftop in front of the wall you scale. Climb up on the the winch structure to jump over to the roof, then crouch under a few pipes to get to the hatch. The Ring is in a desk drawer down below.


Flowers Eternal: Daisy Brooch


After the first ride on the corpse hook, pass through the first room after the corpse conveyor room, and you'll come to a corridor with a couple of stair cases. There are two patrolling guards in this corridor (if you reach the mannequins you've gone too far). Ascend the first set of stairs, turn right, and look up. You should just barely be able to make out this small ring with your Focus Vision. The map location below shows where you'll be standing to look up and see the ring. Just before you get to the first set of mannequins is a cabinet for hiding. On the ceiling high above is an anchor point for a rope arrow. Shoot the arrow, climb on the cabinet to reach it, then climb onto the planks above the hallway. The ring is back the way you came on a second set of planks.


Unique Loot: Soul of the Automaton


Continue down the hallway of mannequins as far as you can go. In the room at the end is a staircase ahead that seemingly goes nowhere. On the right is a hole you can look through to see into an eastern office that seems to be inaccessible. To the left of the stairs beyond some vertical planks is a ventilation shaft on the floor. Crawl through here to reach the eastern office. The item is in a wall safe (combination) across from a seemingly non-functional Automaton, though you might get a fright :) A clue to the combination is found in a note and on the back of the Automaton (correct combination spoiler: 314 ).


Serendi Stone Circles: Diamond Circle


There is a side room connected to the furnace area, just outside the Thief-Taker General's office. As soon as you climb up from crawling below the furnace area, you'll see a doorway to the left across from the furnaces. The ring is resting on a ledge ahead to the left above a conveyor. The map shows the player location in the approximate location of the ring.


Client Loot: Cornelius' Ring


This ring is a required mission item. You'll find it in the Thief-Taker General's office after solving the puzzle, and cannot proceed until you acquire it.
Chapter 3 Collectibles
CHAPTER 3 COLLECTIBLES
(5 Total)


The Pinned Castinets: Jewelwing


Right at the the start, this item is in a hidden crawlspace behind a barred door to your left. To open the door climb up onto a pipe ahead to the left and cut the wire (i would say "disarm the trap" since it's that type of box, but it actually unbars the door and there is no apparant trap).


Serendi Stone Circles: Emerald Circle


From the first floor, head to the west staircase, and climb up the grapple point from the first landing. This leads to an attic area above the southwest bedchamber. The item is on the floor ahead to the right (sorry I forgot to circle the spot). I meant to get a shot of the map from the first floor; the map below shows the location from the second floor. I believe there is more than one way into the attic area, but this is how I discovered it.


Unique Loot: Ancient Figurine


After you make your way into the underground area that you unlock with the first set of symbols, you'll squeeze through some debris and head down another staircase. Ahead and to the left on the far wall is a locked door. Down a few flights of stairs, and after the first pair of alcoves, look on the next two pairs of alcove walls for new symbols (symbol locations marked on the map, along with the location of the item you'll uncover). This is another pedastal puzzle that activates a hidden statue straight ahead of the pedastal.


Memories of the Dead: Stonemason's Memory


After you make your way down past the waterwheel -- stay on the lower path -- you'll enter an ancient library (they all look like libraries to me, but I believe Garrett makes a comment here). Immediately to your right is a bookshelf with a hidded switch. Use Focus Vision as soon as you enter the room and you should see it. The ring is on a statue right in front of you as soon as you enter the hidden chamber. There is no other exit so you'll have to activate the book switch again to get out.


Client Loot: Ritual Book


Like Cornelius' Ring, this book is a mission item and you can't progress without it, so no explanation needed. You are granted the collectible entry as soon as you unlock it. Before leaving the area, though, there is loot hidden on statues reveal with some book switches. One of them is stuck and you need to circle around the outside perimeter hopping over some beams to get to it.
Chapter 4 Collectibles
CHAPTER 4 COLLECTIBLES
(6 Total)


Serendi Stone Cirles: Lapis Lazuli Circle


Work your way over the roof tops until you come to a window across the way, and an explosion in the distance. The camera forces the view of the explosion so you can't miss it. DO NOT climb through the window as you can't backtrack after that. Instead, shoot a rope arrow at the anchor point below and to the left of the window. Climb down, turn, and head to the pair of benches. The ring is barely noticeable on the ground beneath the right bench.


Unique Loot: Morendrum Medal


Depending on how you got into the house, you may be on the first or second floor to start with. If you started on the second floor, head to the south end for the Painting first (see next item). On the first floor, there is an office to the right as you face the main door of the house. On one side of the desk is a button that opens a false wall to reveal a wall safe (lockpick).


The Court of Montonessi: The Abundance of Emptiness


From the second floor, head to a rear staircase that leads to the barricaded door of the Keep Designer's sanctum. Take care as you head up the stairs as there is a guard pounding on the door. The Painting is at the top and to the left of the stairs (technically the third floor).


Memories of the Dead: Soldier's Memory


Later on in the chapter you will make your way into the keep from the bottom. The first collectible in the keep is AFTER you wind your way though the hazards of the unstable building's basement. You'll know you are in the right area when Garrett can finally breathe normally, and you see blood smeared on the floor ahead of you. The ring is clutched in the hand of a dead soldier lying on the floor ahead as you enter the room. The image below marks the ring's location as well as the collectible Plaque on the wall behind (see next item).


City Heritage Plaques: The Keep


In a straight line from the door you came in through to the dead guard with the collectible ring (see previous item), you'll find the Plaque on the wall just beyond. The image below marks the Plaque's location relative to the dead soldier with the Ring.


The Mortal Coils: Shale Snake Bracelet


In the final area of the Keep, after the cutscene that follows your initial attempt to open the vault, there is an upper walkway. Climb up using one of the grapple points to the east to avoid the patrolling guards. There is a guard that patrols east-to-west who passes in front of a dark area in the center-north of the area. Take him out or sneak past him and head into the dark alcove at the north end. To the right as you enter the alcove is a crate, and the Bracelet is resting on top at the back edge.

Chapter 5 Collectibles
CHAPTER 5 COLLECTIBLES
(6 Total)


City Heritage Plaques: Moira Asylum


After you climb the hill at the beginning, head to the left around the stairs. The Plaque is on the wall dead ahead.


The Court of Montonessi: The Repulsion of Civility


This is an interesting one. Right on par with the various creepy things that happen in this place. If you go to the map location, in the Men's wing upper floor after first entering the building, you'll see an empty picture frame. PIck the lock on the room directly south and there will be a peep hole on the north wall. Look through and, eerily enough, the Painting is there!


Flowers Eternal: Rose Brooch


Over in the Women's wing, there is an elevator shaft in the room to the west of the women's wing. You can either use a rope arrow to climb down (anchor point marked with red circle in the picture looking at the elevator shaft opening), or (probably with the fall height upgrade as I have) you can simply follow the prompt to drop down. Climb down into the room below, then climb up on the furniture to the left. The item is sitting atop a pipe above.


Serendi Stone Circles: Ivory Circle


In the medical wing after you leave the women's wing, and once you turn on the power, you can enter the southeast room. There is a wall safe (combination) there. This was an interesting puzzle. There is a note you find in which someone complains about the banging on the pipes. Apparantly the rhythm of the pipe banging subliminally influenced them when they set the combination :) The correct combination is shown below.


Memories of the Dead: Child's Memory


This is a difficult one to find if you aren't paying close attention to the loot flashing or have it turned off. There have been other instances in the game where loot was hidden in a vase you have to break, and I can only think of one other time a Collectible was hidden in the vase, but this is one of those cases. I found it best to shoot the vase from a distance as the patrolling Gloomwalker will be alerted by the sound. When the coast is clear, run up and grab the item now resting on the floor.


Unique Loot: Mechanical Eye


An homage to the previous games or an heirloom left by another Garrett? Whatever the reason for this Unique Loot item being found in such a dreary place, you'll need a rope arrow to get to it. Jump from your rope to the one already in place, then jump onto the high landing just to the west in the middle of the room. Move around the pillar and grab the item resting in a hanging cage above two gloomwalkers foraging below. Unforunately I forgot to bring a spare rope arrow with me this time around so my screenshot only shows where you need to go, as I couldn't actually get up there. Good thing I got it the first time around because I do NOT want to have to come back here =P

Chapter 6 Collectibles
CHAPTER 6 COLLECTIBLES
(6 Total)


The Pinned Castinets: Greater Ruststain


This item is in the starting area of the chapter. If you aren't concerned about remaining undetected, you can head straight east from your starting position and climb up the far grapple point (indicated in the image below), though there is a caged dog on the way that will start barking and alert the patrolling gaurd nearby. To get this undetected, you'll have to sneak south through the water, then east, waiting for the guard to come to a stop on the stair landing. Take him out, or if you are going for Ghost ranking, wait for him to pass by and then hop over the railing. Quickly sneak around the pillar and climb up top before the dog starts barking. The item is over on the south pillar that you'll have to jump over to.


City Heritage Plaques: Elias Northcrest Statue


This Plaque is on the west face of the statue overlooking the waterfall. The most direct approach is to climb up the middle straight to the plaque which is in shadow, but you'll have to time things right to remain undetected.


Serendi Stone Circles: Sapphire Circle


On the first floor in the west den, in a wall safe (combination). You'll find a note somewhere with the exact combination, but I seem to recall that it was a bit later on. The picture below shows the correct combination.


Unique Loot: Heart of the Lion


In a secret chamber that's actually fairly easy to get to, though accessing the item itself is a bit more challenging. Open a false wall behind the painting shown (hidden switches), and you'll automatically head inside. There are no guards to worry about so you can take a breather in here. To unlock the glass case in which the item is on display, you'll need to turn a series of cylinders on either side of the table such that they align to form the correct image. On the far side of the table, there is a crack that you can peer through to see how the wheels should be turned on the south puzzle. The final image is shown below. The north puzzle is a bit easier. The correct image has a bit of red (as opposed to all black) on each cylinder. Again, the final image is shown below. The map shows the location of the painting.


The Court of Montonessi: The Married Spinster


Later, once the building is overrun by Orionist guards after your encounter with the Baron, stay on the second floor (unless you are trying to gather all loot) as both the Collectible Painting and the exit to the next area are up here. Enter into the west hall, and circle around to the western corridor. The painting is on the wall here past the open doorway as you round the corner. You can use the crawl space to the south in the center room to proceed to the next area. There is also another passage to the next area on the first floor directly below.


Memories of the Dead: Braggart's Memory


In the final area or the chapter, in The Baron's Laboratory, there is a platform to the north of the giant glass container. Use a rope area to climb and then jump onto the lower platform to the west. The item is sitting on a crate. Once again I forgot to bring a rope arrow along the second time around so I could only get a screenshot of the spot overlooking the platform with the item =P Fortunately I picked it up the first time around. I really need to invest in some rope arrows...

Chapter 7 Collectibles
CHAPTER 7 COLLECTIBLES
(4 Total)


Unique Loot: City Artifact


The first Collectible is fairly far into the chapter. You'll be in the area once you exit the freight elevator. Climb over and down to the first landing and head around and up through the tunnel until you come back out to the open area. You need to climb down (not sure if you can just climb down right away after you first get here) to the wooden platform with the wheel crank. Lower the bridge and get across it right away as it will start raising up as soon as you let go of the wheel. Once you are off the bridge, turn left and head into the room straight ahead. The item is cleverly tucked on the side of a large crate on your left. I'm actually surprised I found this the first time around, as you have to think to look behind the box.


The Mortal Coils: Bronzehead Bracelet


Working you way through the cave system, you'll come to your first encounter with gloomwalkers. Garrett notes that it's "just like back at the asylum" or some such line. At that point, immediately turn left and head down a flight of stairs. You'll need a rope arrow to get to the landing across from the bottom of the stairs as it is a bit too far to jump. Unlock the door immediately to your left after jumping onto the landing. Instead of opening the chest first (it's trapped), disarm the trap using the panel on the right. The item is inside the chest.


Memories of the Dead: Elder's Memory


After you finally make it out of the underground area, you'll come to a large "rotunda" building. There is a mini-cutscene in which Garrett says "inside that rotunda Orion is administering his cure". Using one of the various routes, make your way to the Rotunda wall and turn right. There is a large crate held in the air by a pulley to the east, which you need to shoot with a blunt arrow. Climb up the crate onto the south landing above, and find this very-easy-to-miss Collectible lying on the ground just to your left, in a patch of glowing flowers against the railing. If you leave that first landing headed for the grapple point to get inside the Rotunda, you've gone too far. The map show the location of the crate


Serendi Stone Circles: Amber Circle


An easy one to miss unless you are an avid pickpocket, this item is actually looted off the "boss" you fight inside the rotunda. As you have the choice to skip the encounter, more or less, it is possible you would have passed up this Collectible as well. Either pickpocket the boss, which is difficult since he moves around frequently and unpredictably -- though note that he has more than one pouch so this may take more than one attempt; or you can stun him and pickpocket the item, or even kill him and loot his corpse.
Chapter 8 Collectibles
CHAPTER 8 COLLECTIBLES
(2 Total)


The Pinned Castinets: Mourning Bell


After entering the caves, look for a crawlspace on the north side of the first room. This will lead to a lower pathway and is an alternate route to proceed to the next area. The hidden path is the dark section of the map shown below. The item is in a locked chest you'll find on the way, at the player location indicated on the same map below.


The Court of Montonessi: Compassion, Foul


In the second area of the ship, before the final sequence, there is an office on the lower deck in the northwest corner. The Painting is dead ahead on the wall as you enter from the east door.

Ector Client Jobs Collectibles
Job 1: Hand Tailored
(3 Total)

Entrance to Mission

In Baron's Way North section of Stonemarket at the east end.


Client Loot: Mechanical Hand


This is the item you are seeking for the contract, so you have to find it no matter what. It's in a wall safe (lockpick) in the basement.


Whiteridge's Duty: The Statuesque Lady


In an upstairs bedroom, in a locked nightstand drawer on the south side of the bed.


The Court of Montonessi: Guilt has Black Wings


In the upstairs office, on the east wall.


Job 2: Silence is Golden
(3 Total)

Entrance to Mission

In the South Quarter, above and across from the red-lit stairwell that leads to the entrance to Chapter 3. You need to climb up a rope arrow a ways down the street to the west, then climb in through one window (crowbar) and back out another window (crowbar) from the same house, and make your way along two narrow beams to the platform with the open window through which you access the entrance to this mission. The map below shows the location of the mission entrance, while the image shows the view from the final platform looking west towards the rope arrow anchor point and two closed windows.


The Court of Montonessi: The Grace of Insecurity


On the first floor, on a wall in the south office.


Whiteridge's Duty: The Observant Lady


In the upstairs bedroom, in a wardrobe drawer.


Client Loot: The Voice Box


On the first floor, in a wall safe (lockpick, trapped) in the west storage room. Disarm the trap via the panel in the upstairs bedroom. This same panel disarms the trapped chest in the basement.


Job 3: Heartbroken
(2 Total)

Entrance to Mission


Whiteridge's Duty: The Burnished Lady


On the second floor, in the south bedroom, inside the wardrobe.


Client Loot: Automaton's Heart


This is the target of the mission, and there are a few puzzles to reach it. The wall maze is fairly self-explanatory, though it may take a few tries to get it; you are looking for buttons that look like light switches to activate sliding false walls. Eventually you'll make your way to an elevator, and in the hidden upstairs room there will be another puzzle. The goal is to get all portions of the puzzle pushed in. It's difficult to explain, but I found it easiest to simply start at the top and push each consecutive section in. If you go in order, ignoring what the pieces actually do, when you get to the last section they will all be pressed and open the wall. For the floor puzzle, you can find the symbols you need to step on in the documents you find around the house. I've laid out the proper path below. Step on the rightmost tile in row 1, then step forward 1, left 4, forward 2, right 1, forward 1.

Vittori Client Jobs Collectibles
Job 1: Happy Medium
(3 Total)

Entrance to Mission


City Heritage Plaques: South Quarter Sluices

To the northwest of the lady you have to drop into sewage is a well-lit alley with the Plaque attached to the north wall.


Whiteridge’s Duty: The Constant Lady

On the second floor of the Eelbiters' Warehouse, in one of the chests. The Talking Skull is in another chest in the same room.


Client Loot: The Talking Skull


Job 2: The Carnal Connoisseur
(3 Total)


Entrance to Mission

In the South Quarter, just south of the gate to Stonemarket. You'll need to climb into the building on the west from the west alley. Climb through the window onto the upper platform and skirt around across the street. You'll see the entrance on the east side of the street up high, and will need a rope arrow to climb up and jump to it.


The Court of Montonessi: What is There Cannot be Seen

In the kitchen on the first floor, on the east wall.


Client Loot: The Octopuss

In the basement, reveal the hidden door by entering the correct combination on the lock hidden behind the painting on the west wall. The document entitled "Father's Testament", found elsewhere in the house, gives the son's age as of the year the document was written. The correct combination code is the son's birth year. spoiler: 812 The item is found in a wardrobe on the south side of the room.


Whiteridge's Duty: The Virtuous Lady

On the north side of the same room as the Client Loot, there is switch on the wall near the corner, concealed as a stone in the wall. This slides the bear display back to reveal a hidden opening in the floor. The item is in a chest at the north end of this lower room.


Job 3: Sideshow Attraction
(2 Total)

Entrance to Mission

NOTE: There are actually two entrances to this mission. This entrance starts you on the first floor, while the second starts you in the basement, which is the exit you'd use to get out at the end. There are two ways to get to the basement entrance also. One is to the northwest along the main road via a vent grate, and the other is via a rope arrow to drop down to the mission entrance inside the watch area just northwest of this main entrance.


Both Collectibles are on the first floor. The Plaque is on the east wall of the the northwestern alcove. The other item is in the southeast office in a chest near the northeast corner.

City Heritage Plaques: Watch Station


Whiteridge’s Duty: The Porcelain Lady

City Collectibles Part 1
CITY COLLECTIBLES
(27 Total)

**NOTE: In order to gain access to all the areas indicated on the maps below, you must unlock all City areas and pickup certain Basso jobs. Thanks to Iainhoca for pointing this out.

Unique Loot: Golden Keep


There are 4 Documents found throughout the city called "Bait and Switch (1-4)". The documents depict one of 3 Obelisk's and an associated number. Removing a Collectible Plaque (requires the Wrench to remove; see Collectible Plaque section) reveals a button, and doing so in the correct order unlocks the Golden Keep collectible inside Ector's workshop. Below are map locations in the order in which the buttons need to be pressed.

Obelisk Locations
(1)
(2)
(3)


The Pinned Castinets
(3 Total)

Ghost Girl

In Muddler's Row, Stonemarket, from the rooftops near this location, enter the room with the barred window through a vent grate, open the bars on the window with the button, then climb down to the lower window with a rope arrow.


Dawn Gauzy

On the opposite side of the street, use a rope arrow to climb into the room. Unlock the door in the room, and then unlock the painting to reveal a panel to use wirecutters. This allows you to get across the street on the platforms. Use a rope arrow to get into the room above the map marker indicated below.


Oilbox

In the South Quarter, at the east side, enter the corrridor at the map location, pick the lockbox, hit the switch, then hit a second switch to open a hidden door. The item is on the counter to the right in the room below.


Flowers Eternal
(4 Total)

Hydrangea Brooch

Just northwest of the clock tower, use a rope arrow to get up to the window above. The Brooch is in a wardrobe on the lower floor.


Iris Brooch

Near the South Quarter gate, head down the west alley. There is an opening you can climb up into with a rope arrow at the location indicated on the below map. Open the window, and inside there is a cupboard that has a button hidden behind a vase. This opens a hidden space on the west side of the room.


Sunflower Brooch

In the South Quarter, near one of the entrances to Erin's Mill. You can approach from the north by unlocking the gate with a lever or approach from the south where there is a large crate that can be dropped with a blunt arrow (though not necessary to reach this area. The Brooch is lying on the ground past a railing you'll have to jump over.


Lilac Brooch

Sitting out in the open on a crate next to the sniper tower on South Baron's way in Stonemarket.


The Mortal Coils
(3 Total)


Marsh Adder Bracelet

There is a closed window directly above Garrett's location on the map below, in Blackfurrow, Stonemarket. Climb up from the south and cross a short beam to reach the window. Inside is Lady Marigold's Apartment, and you'll find the braclet hidden behind a painting in the bedroom.


Wellpool Viper Bracelet

In South Quarter on the east side, above a building marked "South Quarter Postmaster", there is an open window you can reach with a rope arrow. Inside, hit a button on the edge of the countertop to open a hatch leading into the room above. Unlock the door there to find the Bracelet in a chest to the right.


Harlequin Bracelet

In a house in Mourningside, just before the Graveyard. Look for the two men standing near a fire, and climb up the nearby crates to reach a closed window. Inside is Archie Maxwell's House, and you'll need to head to the basement. Crawl through a vent duct, and you'll come to a wine cellar. Look up and use blunt arrows to hit a button above each of the 4 ceiling buttresses (diagonal wooden beams); two of the buttons are visible in the picture below. This will open a floor hatch through which you climb with a rope arrow. In the crypt below, the Bracelet is situated atop the sarcophagus ahead to the right of the model of the city.

City Collectibles Part 2
The Court of Montonessi
(5 Total)

Typically these Paintings are fairly obvious. They are are always found in a small rectangular frame on a wall. Unless otherwise noted, the Paintings are easily found on a wall inside locations shown below. The map markersindicated by Garrett's position shows the entry point for each location (though the entrance is usually above street level).

The Dangers of Seduction


The Arrogance of Nobility

There is a window high up above where the location indicates. You need to approach from the rooftops starting northeast of this location. You need 2 rope arrows to reach the ledge, and the window is around the corner after the rope arrows


Living a Lie


Rutting Out of Season


The Insatiable Appetite

There is a hard-to-see duct in the basement you need to crawl through, and a barrel on the other side with a button on it. The painting is in a hidden room below.


City Heritage Plaques
(11 Total)

Unless otherwise noted, the Plaques listed below are fairly obviously attached to the building for which the Plaque is named, so to save space, only those in less obvious locations are shown. If anyone asks for specific locations not given, I'll update to add it.

The Crippled Burrick Tavern

Stonemarket Clock Tower

Customs House Bridge


Carlysle's Mill


Our Lady of the Iron Litany Chapel


The Siren's Rest

Ulysses Northcrest's Obelisk

Obediah Northcrest's Obelisk

Barnabus Northcrest's Obelisk

This obelisk is actually a smaller version of the other 3. You'll find this plaque in the basement of the house on Baron's Way South in Stonemarket, as part of a Basso Job.

Archibauld Northcrest's Obelisk

Stonemarket First Bank

City Documents
Stonemarket Documents
(33 Total)

The list below is complete, but some documents are not numbered and marked on the map because i am in the process of completely playing through the game again in order to re-discover the documents' locations since i failed to make note on my first play through. I will be numbering Documents and marking them on the map as I locate them in-game.

Map of Document Locations


Document List
  • John Tallow's Blacklist (1)
  • Bookbinders Register (2)
  • Boris' Debt Register (3)
  • Lady Christina's Will (4)
  • Closet Note (5)
  • Sculptor's Diary (6)
  • Manuscript (7)
  • New Instructions (8)
  • Graven Notes (9)
  • Hangman's Memoirs (10)
  • Letter to Sick Willy (11)
  • Moira Release Letter (12)
  • Painting Order (13)
  • Tear-Soaked Diary (14)
  • Sloop Recipe
  • Register of Stolen Goods (16)
  • Candlewax Ritual Book (17)
  • Petty Thief Diary (18)
  • Traitorsgate Report (19)
  • Thief-Taker General's Report (20)
  • Last Warning Letter (21)
  • Archie Maxwell's Notes (22)
  • Archie Maxwell's Diary (23)
  • Miss Scarlett's Diary (24)
  • Sick Willy's Register (25)
  • Wax Witch's Journal (26)
  • Watch Report 3-498 (27)
  • Bait and Switches 1
  • Bait and Switches 2 (29)
  • Bait and Switches 3 (30)
  • Bait and Switches 4 (31)
  • Smuggler's Map: Blackfurrow (32)
  • Smuggler's Map: Muddler's Row (33)
  • Smuggler's Map: Eel's End (34)*

*NOTE: The Smuggler's Map: Eel's End is listed as a South Quarter document, and there are only 33 documents listed for Stonemarket, but I list it here as Document #34 under Stonemarket because that's where you actually pick it up.


South Quarter Documents

Map


Document List
(14** Total)
  • Levack's Debt Register (1)
  • Little Lucy's Last Letter (2)
  • Jeb Chokes' Notebook (3)
  • Poem Fragment One (4)
  • Poem Fragment Two (5)
  • Poem Fragment Three (6)
  • Poem Fragment Four (7)
  • Poem Fragment Five (8)
  • The Shady Vein (9)
  • Watch Captain's Orders (10)
  • White Sail Captain's Notes (11)
  • Ollie Widow's Letter (12)
  • White Sail Goods Census (13)
  • Smuggler's Map: Eel's End (Stonemarket #34)

**NOTE: The game lists 16 documents for South Quarter, but there appears to only be 13 possible documents in-game. Unless someone finds them and lets me know, this seems to be another case of missing assets.


Newspapers

No Old Gods for the New City! (N4)
Clock Tower Stops Again (N1)
Star of Auldale Necklace (Home)
Who Watches the Watch Hounds (N5)
The Benefits of Strict Curfew (N6)
Lockdown! (N2)
Treason! (N3)
Break-in! (N7)
Northcrest Unbowed! (N3)
The Bank Heist Collectibles, etc.
There are 2 Collectibles in this mission, which is a DLC you can either purchase or got for free if you pre-ordered the game.

Entrance Location

At the northern-most gate in Baron's Way North, Stonemarket.


Easy-to-Miss Loot Items

Before you head over the wall, there is a loot item on the ground next to a crate that many people miss. You'll have a chance to scour the entire map before you leave and you come back the way you came in to exit the mission if you do miss this one. While outside, two other loot items often missed are a bottle on the bannister next to the guard at the west balcony. There is also a loot item on the bench at the north end of the east alleyway, where there is also an open window.

If you choose to climb up with the rope arrow into the open second floor window, there is a loot item on the pipes to the south of the window you climb in through that is often missed as well.

On the first floor, there is a loot item in the southwest next to the chair that has a sleeping guard (if you didn't wake him). On the floor in the alcove next to the east stairs is another often-missed loot item. Also, don't forget items on the outer ledges around the room (I assume these are supposed to be teller windows).

In the vault antechamber, where you'll actually open the vault, there is an upper ledge that has the panel to disarm the floor traps. To the right of this panel on the floor is a loot item.

In the vault, there is a loot item on the floor to the east of the vault door (the door you enter through, not the locked gate with the Collectible).


Bank Heist Loot: Southrye's Watch

On the second floor, you will find a note that kicks off an optional objective. It is on the bottom shelf of a bookshelf near the northeast corner of the second floor, shown below. Note that this isn't required but it is a document you'll have to grab if you are trying to find all documents.


Save yourself some time and don't go around bashing every vase you find like I first did. The vase in question is rather obvious inside the actual vault, on the first floor north office. The location and vase in question is shown below.


Bank Heist Loot: The Star of Auldale

This is your primary target and you can't complete the mission without grabbing it. Getting to it, however, can be a bit tricky. First things first, you need to actually open the outer vault door. There are clues to the combination in a few notes you may come across. Putting the pieces together, you'll find that the second digit of combination was changed because of a finicky dial. One note gives the first two digits and still another gives all three, and agrees with the note showing only two digits, leading you to believe that the latter is the ultimate code. However, there is a maintenance note near the door indicating that service is needed and another note else where tells you that the second digit was changed. The image below shows the correct combination.


Inside the vault, you have a lot going against you. There are floor traps, which can be disarmed by a panel in a crawlspace below the center stairs. Also, unless you brought 4 water arrows to diable all the "cameras" (not sure what you'd call them), you have to avoid being spotted or the room will fill with poison gas.

If you disabled the floor trap, getting into the center cage is fairly easy. Hit one lever, then sprint to the other. The levers must be activated within a few seconds of each other. If you choose NOT to disable the floor trap, this is a bit trickier. I have not successfully managed to get from one lever to the other in time with the floor trap still active.

Talking Candles Overview
Introduction

Throughout the Stonemarket areas of the city there are many "Talking Candles" placed in various, mostly unreachable spots, largely on high, out-of-reach rooftop locations, with a few exceptions. There are 36 candles to light in all. They are only found in the 3 map instances of Stonemarket (4 map areas if you count the Watch Customs Yard area as separate from Baron's Way South as I do) and are not found in South Quarter .

I haven't recorded everything the Candles say when lit (using fire arrows), but the mystery seems to point to the "Wax Witch" of Muddler's Row. The story so far, based on the voices and the note found during a side mission for Basso, is that the Wax Witch trapped the souls of some poor unfortunates in the wax of these candles, and lighting them appears to set them free. She seems to have done this as a way of warding off The Gloom, an affliction you encounter both in name and physical manifestation throughout the game. Also, when you approach the landing to see Candle 1, you overhear a conversation in which one person states that they heard candles were made out of people. Unfortunately, it turns out that all this is little more than back story. This is a very long, and -- if searching for these candles unaided -- somewhat tedious hunt. A word of warning: you may be disappointed by the ultimate outcome and this quest is really recommended for completionists or if you'd like to get a thorough tour of Stonemarket.

WARNING: Spoiler ahead! Many might be disappointed to see the ultimate outcome of this quest. I had fun figuring it out, but I certainly won't be doing this again on a future play-through. If you'd like to see what happens at the end, scroll to the end of this section and hover over the spoiler text.

An interesting anecdote: it turns out that the devs left a tiny piece of information out in the text of the Wax Witch's diary >:( Special thanks goes to Ludipe for pointing out that in the Spanish edition, the diary explictly states that there are 3 dozen, or 36, candles in all. Here's a screenshot of the diary page in Spanish:

Good one devs.  Maybe give the info in all languages next time??


Talking Candle Map Locations

The following are maps of each map instance showing the candle locations from ground-level. Note that the red "x" marks approximately where the candle is, but you'll have to refer to the map and screenshot for a given candle number to see where to stand to be able to see it and light it.


Stonemarket Proper/Blackfurrow/Moorsditch


Grandmauden/Muddler's Row


South Baron's Way


Watch Customs Yard


The Final Result

So what did all that work get you? Hover over the spoiler text below to find out!


Upon lighting the final candle, you are awarded 1 Focus Point (FP). I know, a bit anti-climactic :/


Talking Candles Locations (1-10)
Talking Candles 1 - 10

1

2

3

4

5

6

7

8

9

10
Talking Candles Locations (11-20)
11

12

13

14

15

16

17

18

19

20
Talking Candles Locations (21-30)
21

22

23

24

25

26

27

28

29

30
Talking Candles Locations (31-36)
Candle 31 wasn't actually visible for me, I'm guessing due to some graphical glitch. It is on the east side of the Clock Tower. You need to zoom in and it is atop the right-hand beam that is sticking out. It wasn't visible in Focus Vision either, but here you can see the small orange dot that is the candle flame after it was lit. Target the spot with your fire arrow and it should lock on.
(special thanks to LoatheMe and Vizael for helping me find this one)

31

32

Candle 33 was another that doesn't show up for me. It is found atop a water tower above the Muddler's Row area. (special thanks to SoulSavant for pointing this one out)

33

Another special thanks to Vizael for finding this difficult-to-spot candle 34. You pretty much have to stand exactly where the map shows, on the rooftop facing north. The candle is visible between the two roofs atop a chimney.

34

Thanks to Vizael again for finding #35. Climb a rope arrow and look down into a bucket.

35

HUGE thanks to ElricEhran for posting the location of the last and final candle #36. This one is tricky as you have to shoot *through* the bars on the gate leading to Chapter 6.

36
Smuggler's Maps Walkthrough
In Stonemarket there are 3 maps, called Smuggler's Maps that lead to an associated cache of sorts. The following maps and screenshots show the locations of the maps and caches.


This first location is what kicks the whole thing off. In an office above ground level there is a painting that appears to be unlockable. You'll find that you can't actually trigger any levers on it. Instead, hit the hidden switch underneath the desk to open the painting (I actually thought the painting was broken =P). Open the wall safe (lockpick) to find some loot and an interesting map.


Smuggler's Map: Blackfurrow


To reach this location, use the rooftops and head north from where you found the map. Look for the building, as noted on the map, called Printshop and Newspaper. You'll need to deftly drop down onto a beam that doesn't quite reach the wall below, and you may fall off a few times before getting it down. Drop onto the next lower beam, and climb into the window. Per the drawing on the map, you'll find a switch behind the head of the bed. This opens a wall next to the bed with some loot and -- you guessed it! -- another map!


Smuggler's Map: Muddler's Row


This one may make you want to head straight to Muddler's Row in the Grandmauden Street area to the west, but you'll actually stay on the same map instance. Just a little northwest of the last cache, there is a vent grate at ground level, found at the location indicated on the map below. Head inside, and look for a concealed switch under the wooden stairs. This opens another wall to reveal a chest with some loot and a third map.


Smuggler's Map: Eel's End


There is some debate currently as to whether this part is bugged (which is what I believe personally). If you look at the map there are two parts pointed out: a rope arrow anchor beam, and what is generally agreed to be a waterfall. There is a spot, as indicated by the location marker on the map below, that matches the layout exactly as depicted by the map.

Many many players have scoured the area, and the only thing of note is that there is a room accessible only by way of the rope area in the loft above. There are only a few small loot items and nothing else of note.

Furthermore, the map clearly shows the same symbols that have indicated a switch on the other maps, so it is reasonable to believe that there would be some concealed switch or switches somewhere around the waterfall, but none at the time of writing this have been found. However, in seemingly the exact spots that the map picture shows you would find switches are two pieces of jutting wood. The fact that no switches are present seems to indicate that there is a bug currently in game such that the switches were not rendered in-game. Another thought is, though, that if the two pieces of wood are the places where the switches should be located, and that the loft isn't related, why does the map even bother to show the rope arrow anchor?

I will give further details on this as I find them.

156 Comments
dimmu1313  [author] Jul 7, 2021 @ 1:49pm 
@affaire It's possible I got it wrong originally, but this guide was made 7 years ago when the game came out. It's likely some patch along the way moved things a bit. Thanks for the correction!
affaire Jul 6, 2021 @ 5:24pm 
I found some errors in "City documents" : https://zupimages.net/up/21/27/gasl.jpg This documents are in the Watch Council Office
dimmu1313  [author] Feb 24, 2021 @ 1:38pm 
@tigerpoetry thanks! to be honest I only ever played the one or two times it took to get all the screenshots, etc. hard to believe this guide has been up for 7 years!
tigerpoetry Feb 24, 2021 @ 11:56am 
Just brilliant (:

I've played the game several times but still come back to this for the few 'Talking Candles' that I can't find. I'm a compltionist, I'm afraid to say. I also end up missing a few of these. I refer to your screenshots for reference.

I've given you all the points I can at the moment on Steam. To take this much time and effort to help others deserves more, but I can't do that, I'm afraid.

ON Nexus I'd give you Kudos. Take it from me, I award you Kudos informally here and now!

Thanks.
MrSantos1992 May 1, 2020 @ 1:33pm 
Thank you for the Guide you (and a few other people that helped with tips) pulled up. Really helped in a few things I need to complete all the achievements.

Cheers.
babai Feb 20, 2019 @ 8:51pm 
and thanks for your guides, see it serves even for those who waited so long to try that game.
babai Feb 20, 2019 @ 8:50pm 
http://steamcommunity.com/sharedfiles/filedetails/?id=233717834

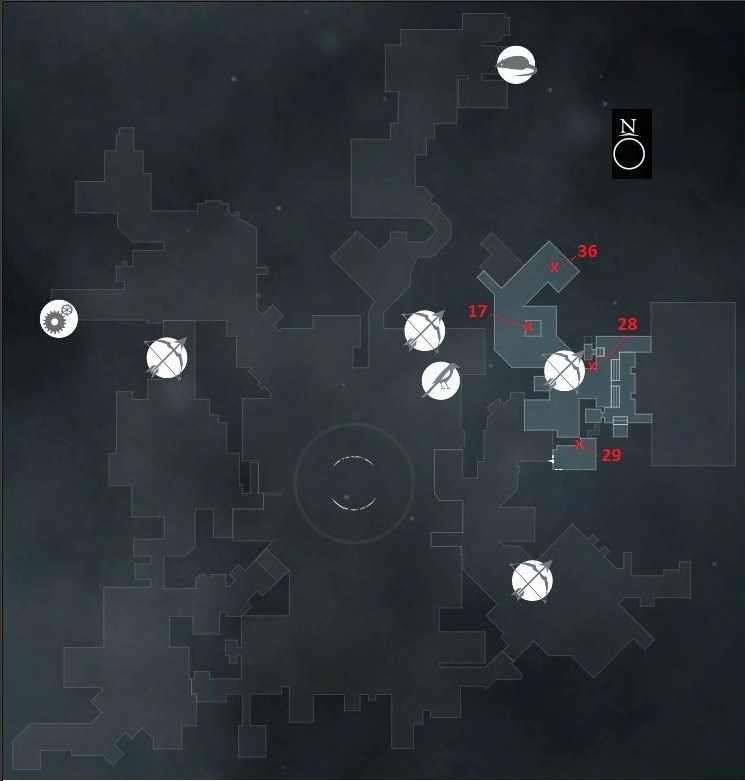
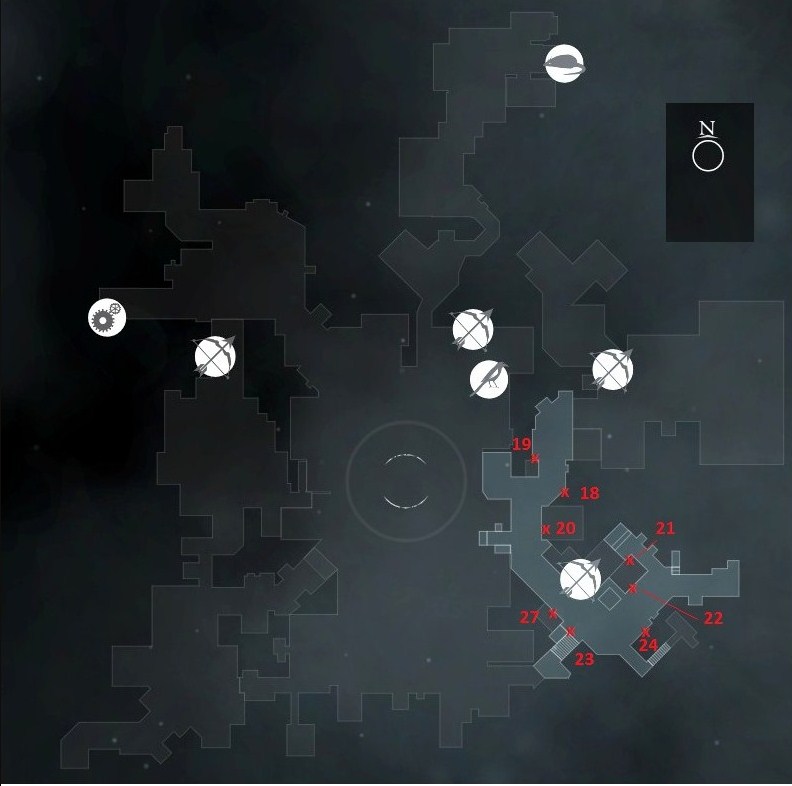
[quote=georgejoem;540743128823938866]This guide helps so much. Thank you. Took me a while to find the Sloop Recipe but I got it and here's a link.
Sloop Recipe Location Thief --> http://i.imgur.com/fw50Vi8.jpg [/quote]

i am not learned with respect to post cross-referencing-quoting-pasting-extracting. never know what is interpreted or not in those text boxes.
babai Feb 20, 2019 @ 8:28pm 
i found it. i could upload a screenshot or two and point to it. maybe... we'll see...if i feel altruistic enough later.
dimmu1313  [author] Feb 16, 2019 @ 6:21am 
@babai, I haven't played the game in 5 years so unfortunately I can't be of much help at this point.
babai Feb 14, 2019 @ 10:54pm 
any marker on the map for Sloop Recipe? in stonemarkets documents?