The Dungeon Of Naheulbeuk: The Amulet Of Chaos

The Dungeon Of Naheulbeuk: The Amulet Of Chaos

160 ratings
Dungeon Master's Guide [ENG]
By Xeeran and 1 collaborators
This Guide gives info on how to solve every floor 100 %, get all books, open every chest and find all secrets.
7
8
10
2
13
3
3
2
2
   
Award
Favorite
Favorited
Unfavorite
Introduction

This guide is mostly just a translation from a French Guide made by FEF. Not everyone speaks french, so I decided to make the effort and translate most of it. I played the game in German, therefore you might find a few mistakes - Excuse me. Actually there are no information about the Ruins of Limis DLC, because I didnt bought it so far. I will update the information as soon as I get it.
This guide contains huge spoilers! If you want to figure it out by yourself: DON'T USE THIS GUIDE!
General Information
First of all you can miss some stuff, because you can't go back to the "Great Library of Unspeakable Knowledge", "Urik`s Depths" and "The Temple of Big Anvil". To get full access at "Under the Den" you need to do some quests for the priestess. I sorted the sections on the right (Table of Contents) like they are listed ingame!

Just a small legend:
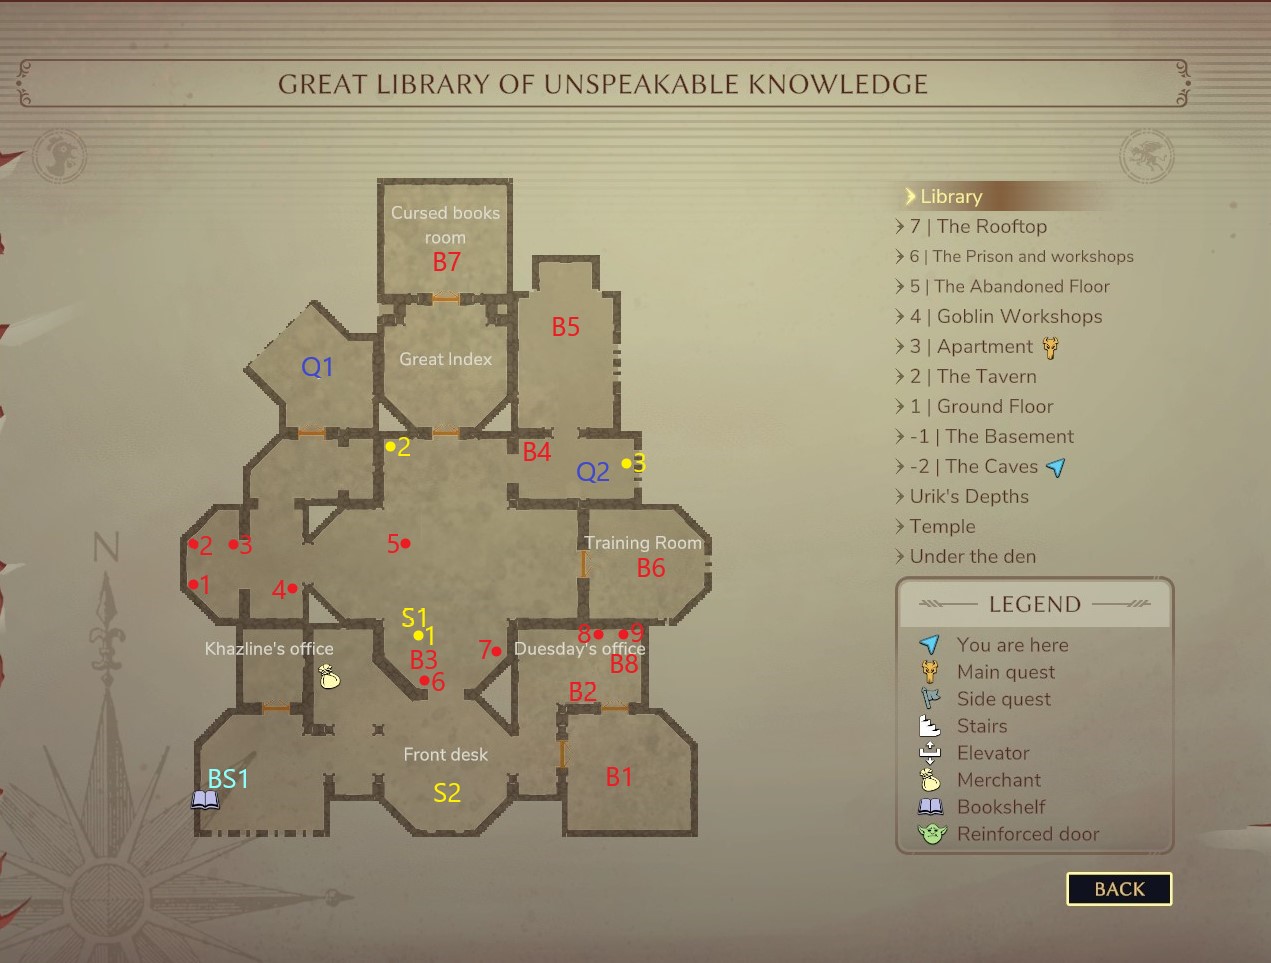
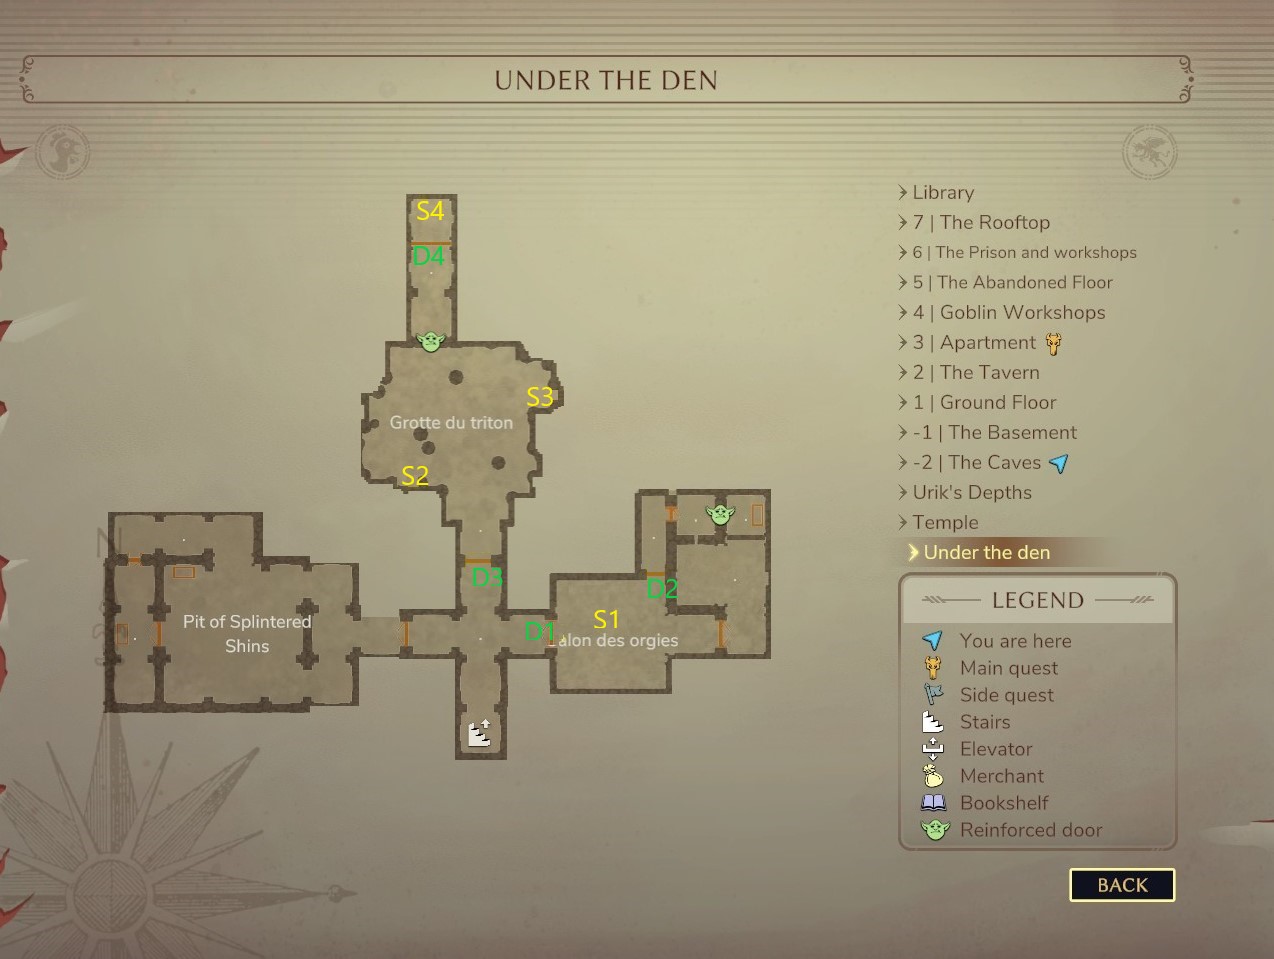
  • Red = B = Book
  • Yellow = S = Secret
  • Green = D = Door
  • Blue = Q = Quest
  • Turquoise = BS = Book Shelves
  • Turquoise = X = Riddle of the isolated statues (Demonicon)
Traps (red lines) and reinforced doors (Ogre) are also marked. If you have any trouble to identify something, feel free to ask.
Library
First of all: You cant leave this stage until you finished the main quest and you cant come back, if you have left it. Keep that in mind, especially for the Menzorian Bookshelfs!

  • BS1 - Menzorian Bookshelf "Cursed Knights for Dummies" (All books can be found on this floor!)
  • B1 - Demonology : Randomai (2/4) - As a fight reward
  • B2 - Cursed Knights for Dummies (2/3)
  • B3 - Cursed Knights for Dummies (1/3)
  • B4 - Cursed Knights for Dummies (3/3)
  • B5 - The Theory of Traps (4/4) - As a fight reward
  • B6 - Demonology : Tuff'luk God of Fail (3/4) - As a fight reward
  • B7 - Basic Spells for Basic Wizards (4/4) - As a fight reward
  • B8 - Secrets of Chicken (3/4)
    You have to push some levers which starts in the west and following the red dots.
  • Q1 - It starts "Star crossed lovers" where you have to deliver love letters to Duesday and Khazline, find the witch and it ends in an ambush where you have to fight.
  • Q2 - It starts "The Book Worm" where you have to bring back a manual. There are guards you have to avoid, but in your inventory is a small map which shows you the right way.
  • S1 - A witch start teleporting and you have to follow her to get a reward
  • S2 - Here is the portal that brings you back after you have finished the main quest
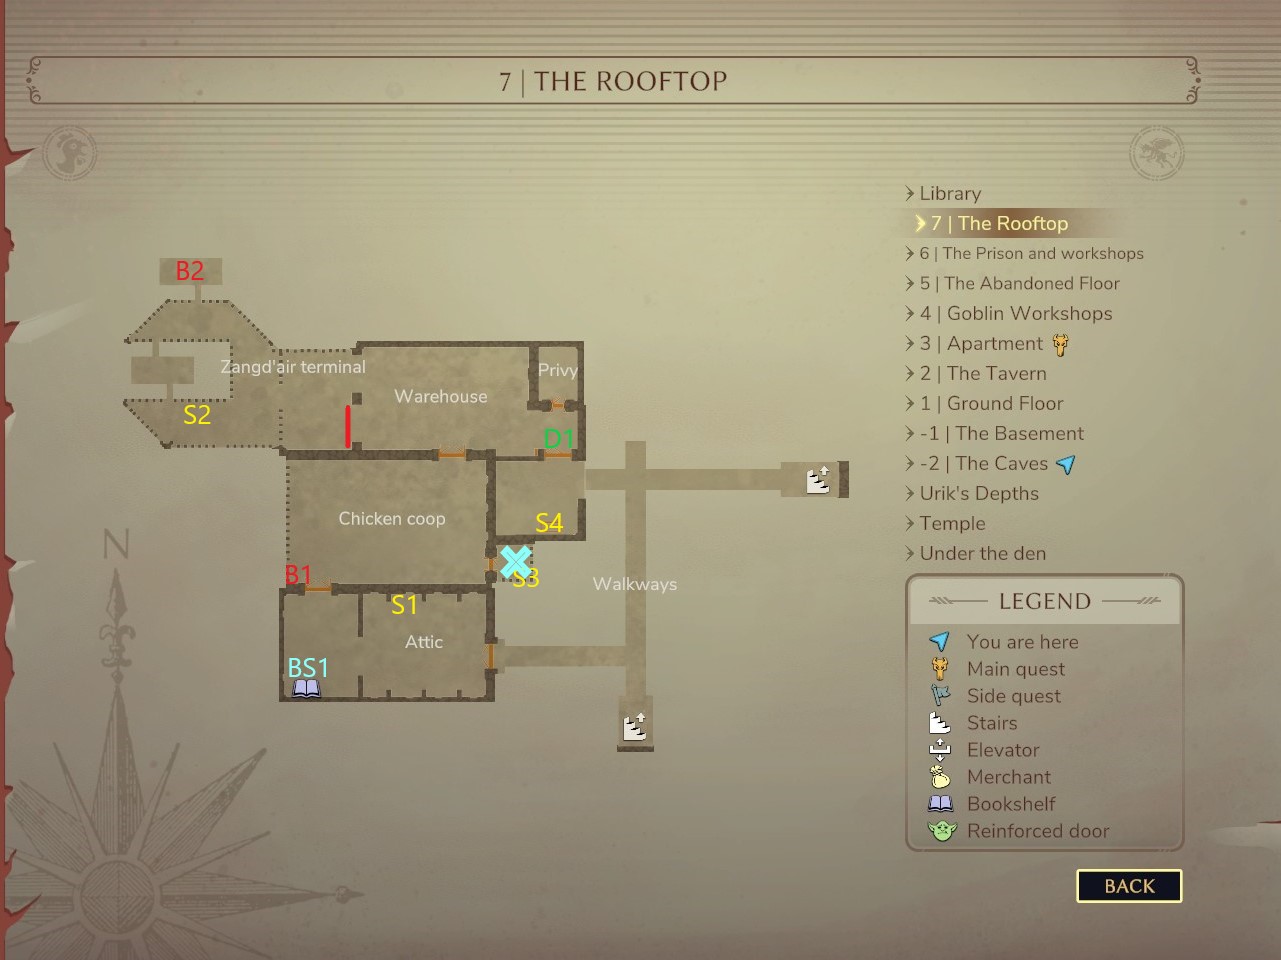
The Rooftop

  • BS1 - Menzorian Bookshelf "Secrets of Chicken"
  • B1 - History of Elves in Fangh (3/3)
  • B2 - On Adventure (3/3)
  • D1 - You have to anwser a riddle and the anwser is: "Future"
  • S1 - Poster Naheulbeuk
  • S2 - You have to use some levers in the correct order: Red - Red - Green - Yellow - Blue - Yellow
  • S3 - Unlocks the chest at S4
  • S4 - Is locked until you use the lever at S3
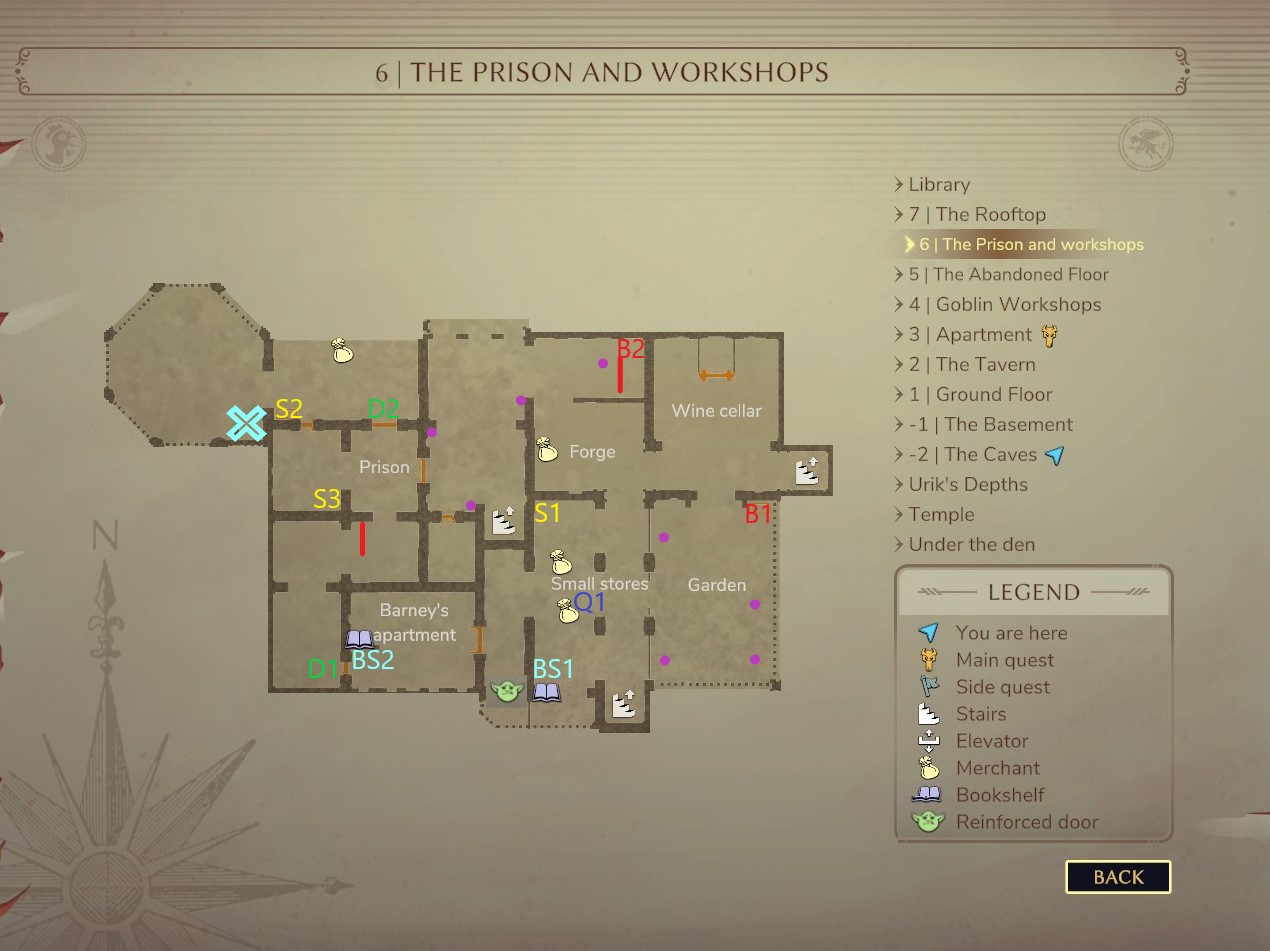
The Prison and Workshops

  • BS1 - Menzorian Bookshelf "History of Elves in Fangh"
  • BS2 - Menzorian Bookshelf "On Adventure"
  • B1 - History of Elves in Fangh (2/3) - Use the four levers in the garden to unlock it
  • B2 - On Adventure (2/3)
  • D1 - This door requires the "Private Key of Gerard"
  • D2 - This door requires the "Key of dungeon cells"
  • S1 - Naheulbeuk poster
  • S2 - Is locked until you use the levers at S3
  • S3 - Unlocks the chest at S2 - If you stand in front of the levers the correct order is 3-2-1-4
  • Q1 - It starts "Hoses before sows" where you have to find some stolen plumbing and bring it back to the herbalist.
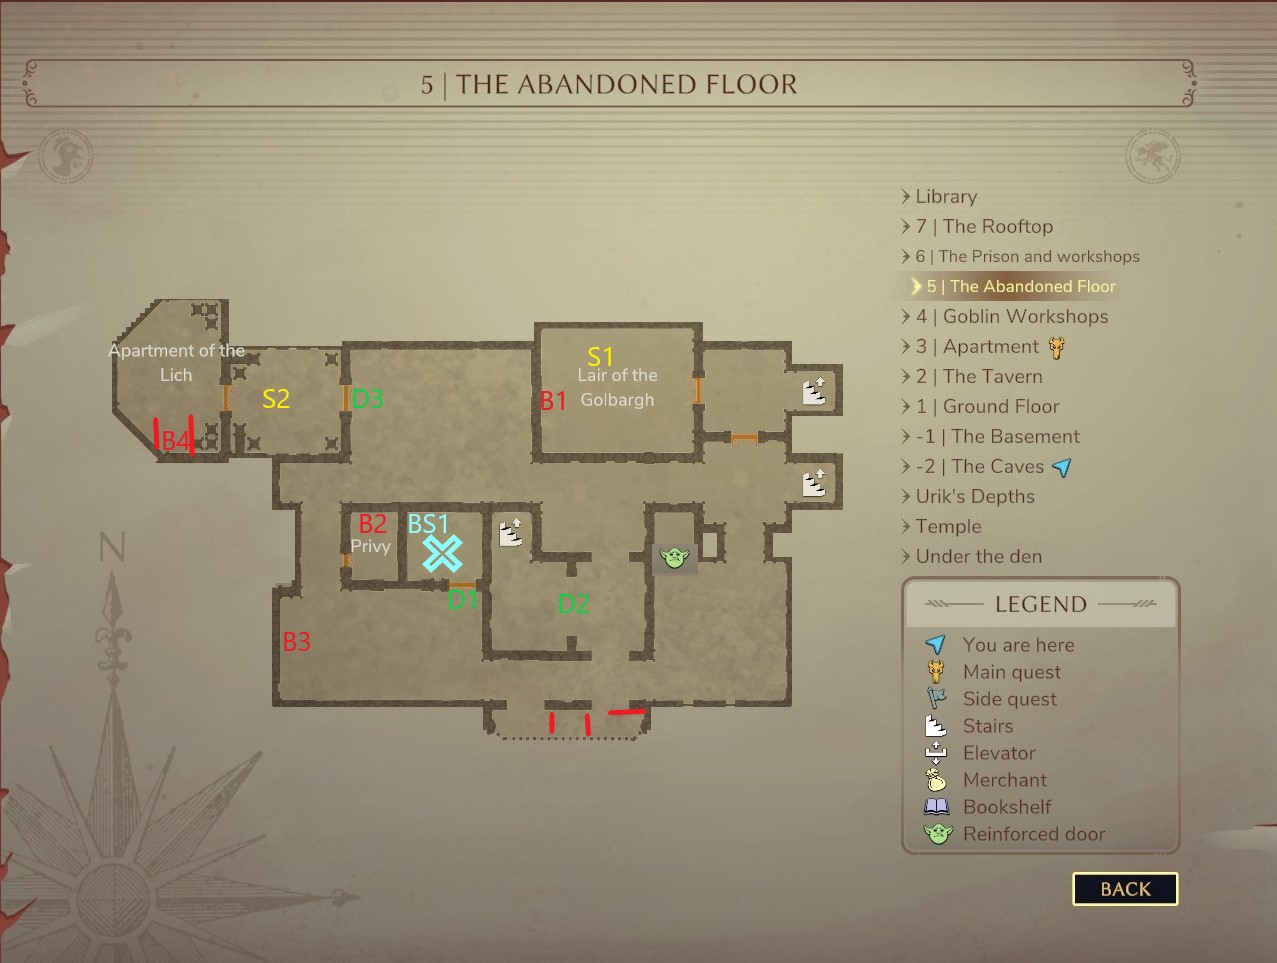
The Abandoned Floor

  • BS1 - Menzorian Bookshelf "What of Golbarghs" (Both books can be found at this floor)
  • B1 - What of Golbarghs (1/2)
  • B2 - Basic Spells for Basic Wizards (3/4)
  • B3 - Ogrish Cuisine (1/3)
  • B4 - What of Golbarghs (2/2)
  • D1 - The anwser for this riddle is "Well"
  • D2 - This door unlocks if you get access to chapter 6
  • D3 - You have to offer a "Throwing Hen" from your inventory (Consumeables)
  • S1 - A portal that will port you to the "Library of Unspeakable Knowledge"
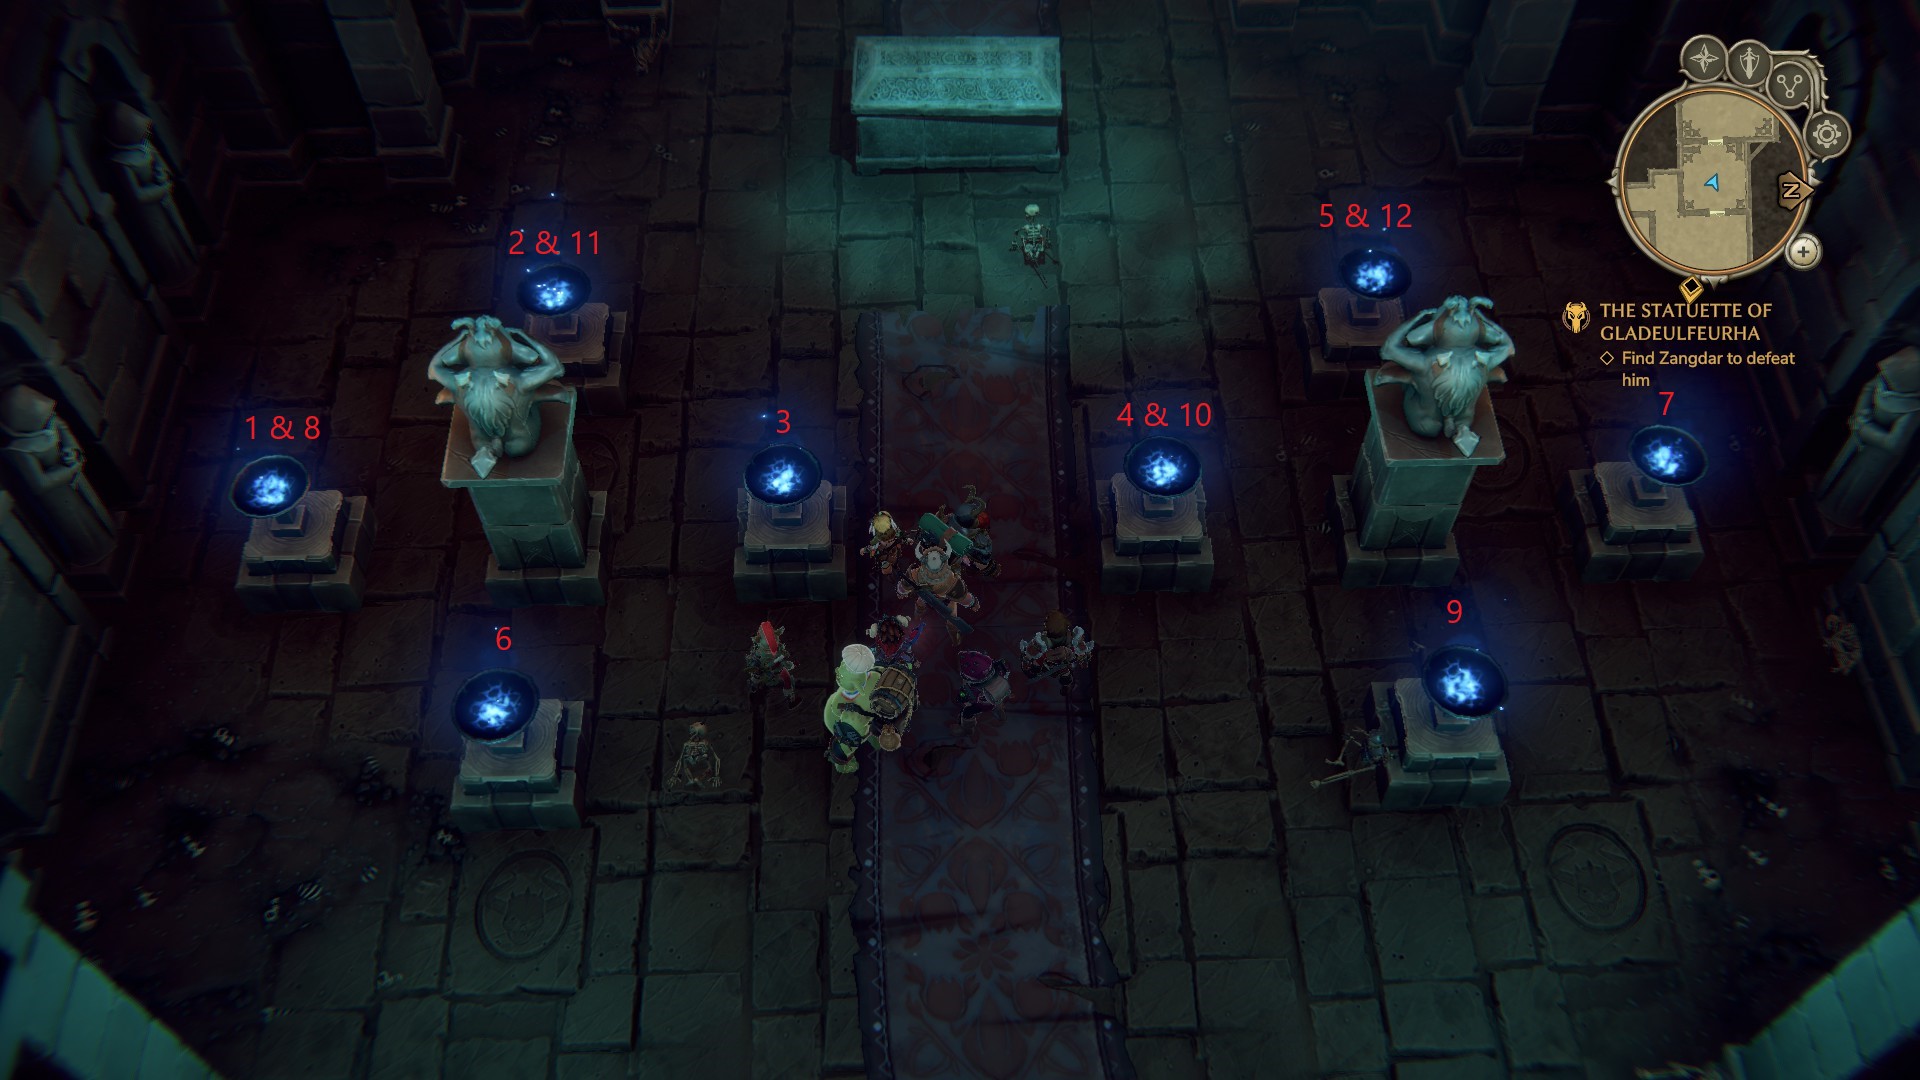
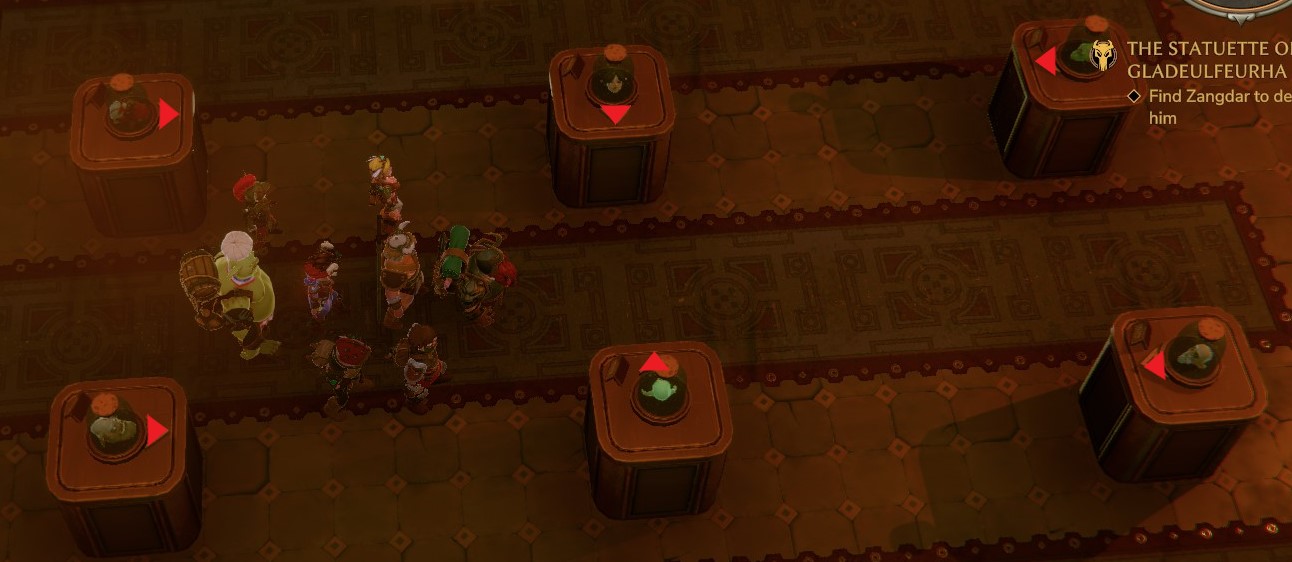
  • S2 - You have to activate the statues in a certain order by three sequenzes which will be more difficult every time (see screenshot below)
  • 1st sequence: 1-2 left - left
  • 2nd sequence: 3-6 left - right - right - left
  • 3rd sequence: 7-12 right - left - right - right - left - right
Goblin Workshops

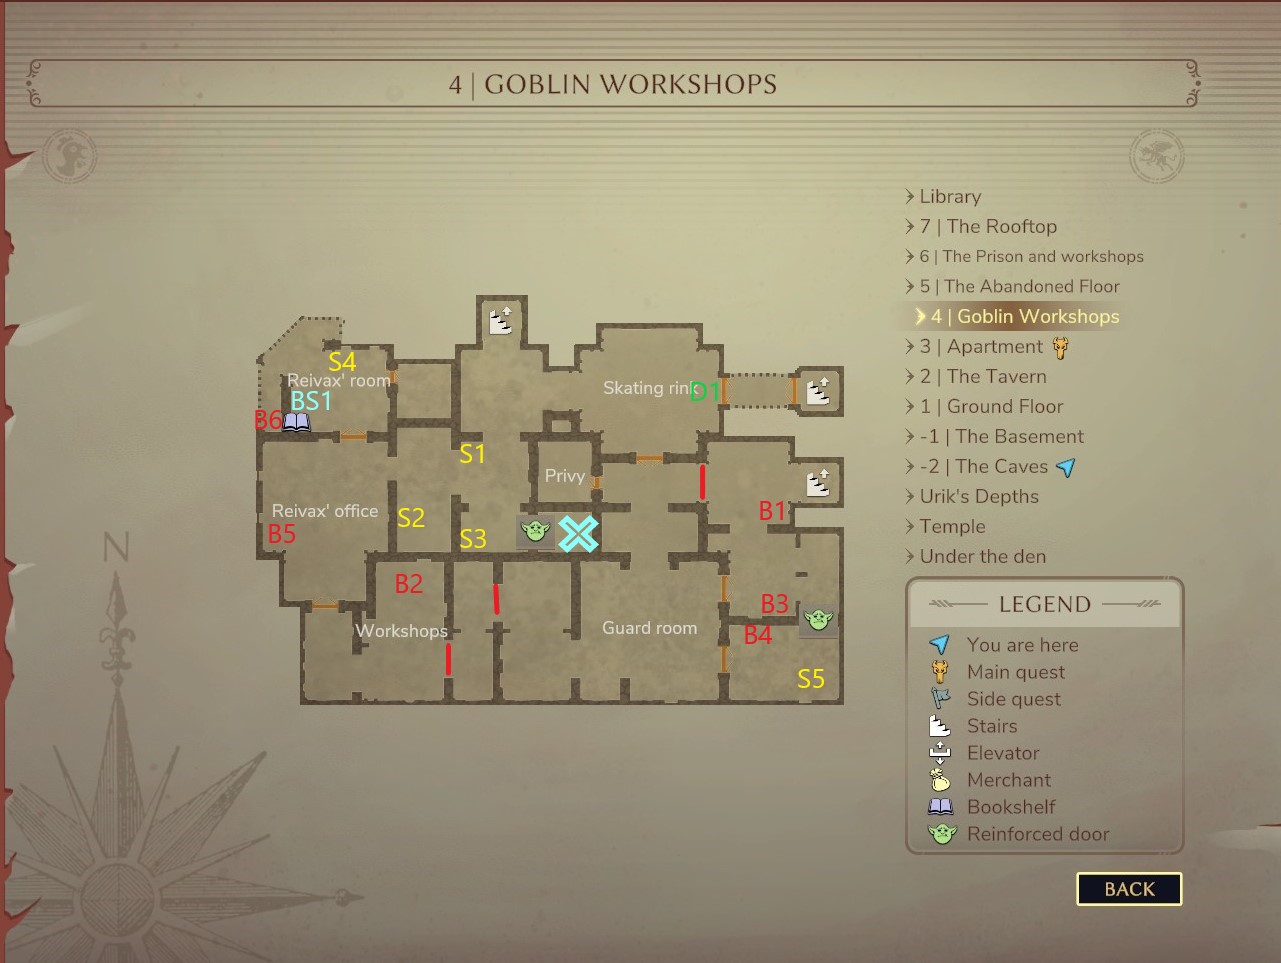
  • BS1 - Menzorian Bookshelf "Anthopological Function of the Goblin"
  • B1 - Anthopological Function of the Goblin (3/3)
  • B2 - Secrets of Chicken (4/4)
  • B3 - Ogrish Cuisine (3/3)
  • B4 - Anthopological Function of the Goblin (2/3)
  • B5 - Demonology : Tuff'luk God of Fail (1/4)
  • B6 - Demonology : Randomai (1/4)
  • D1 - You need "Reivax`s Secret Key" to open it
  • S1 - Here you find a book which gives you hints about colors you need at S3
  • S2 - Here you find a book which gives you hints about colors you need at S3
  • S3 - The correct order: green - blue - yellow - red - green
  • S4 - Here you`ll find "Reivax`s Secret Key"
  • S5 - Here you find something for "The Quest for the Priestess"
Apartment (Zangdar`s Lair)

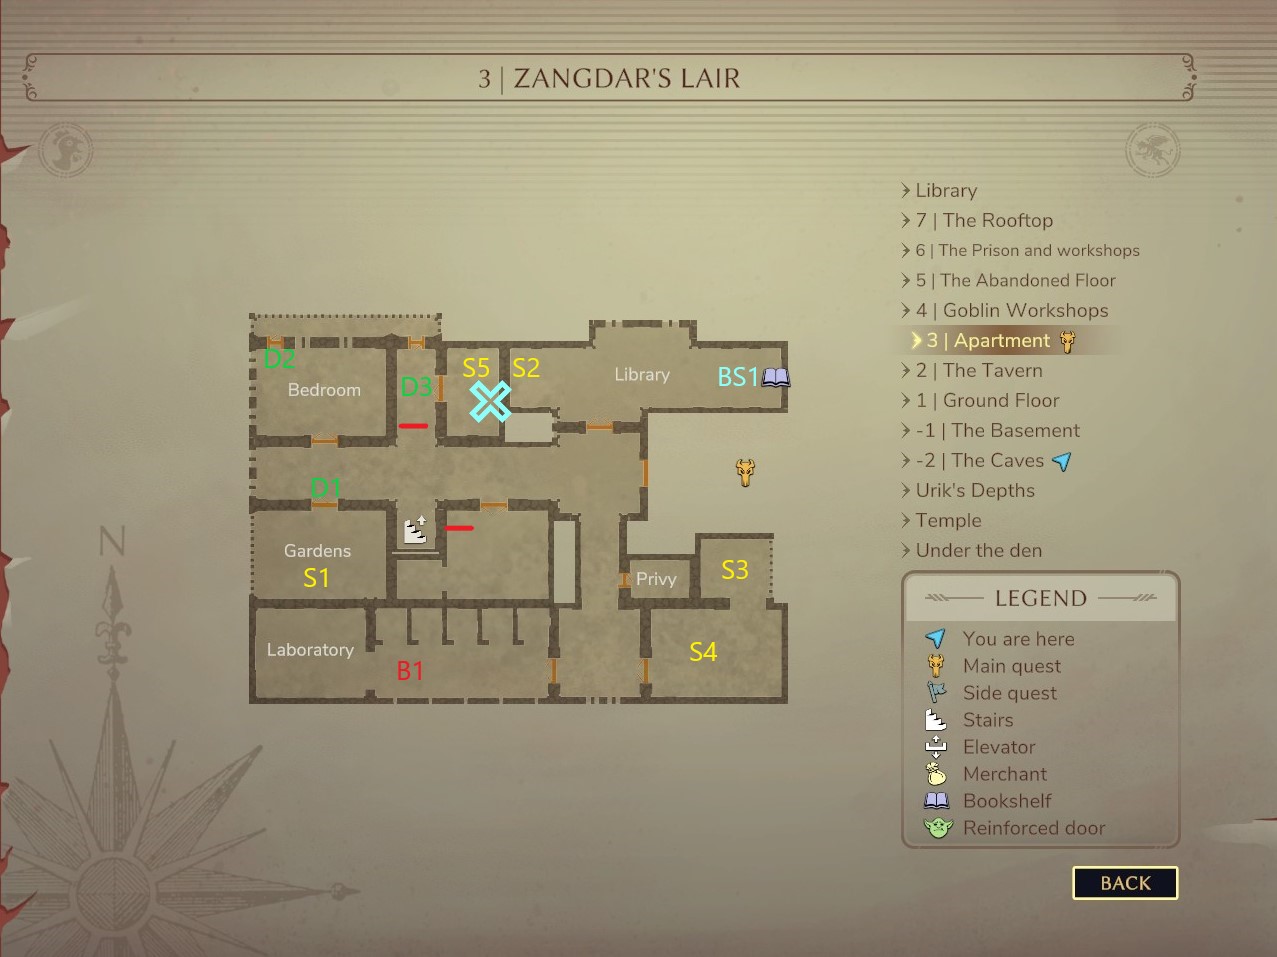
  • BS1 - Menzorian Bookshelf "Demonology : Randomai"
  • B1 - Demonology : Randomai (4/4) - As a fight reward
  • D1 - To solve this riddle you need a rope. You can get one from the dealer at this floor.
  • D2 - This door requires the "Zangdar`s Key". It can be found at S3.
  • D3 - The anwser for this riddle is: "Air"
  • D4 - This door requieres, that you have read about the weakness of Zangdar at S2.
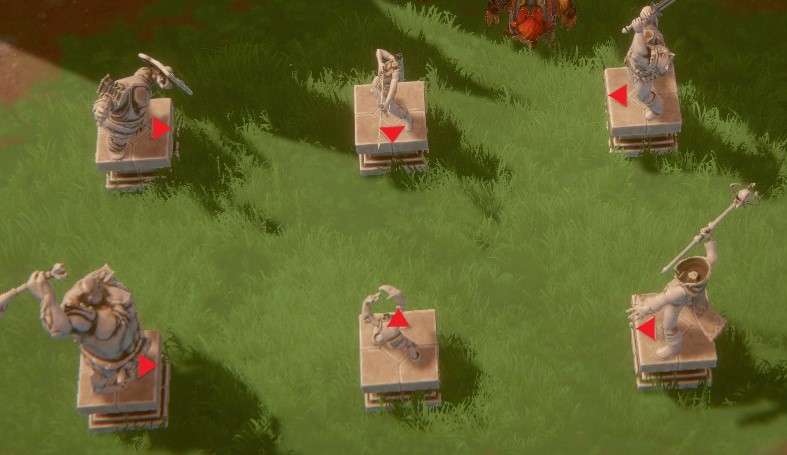
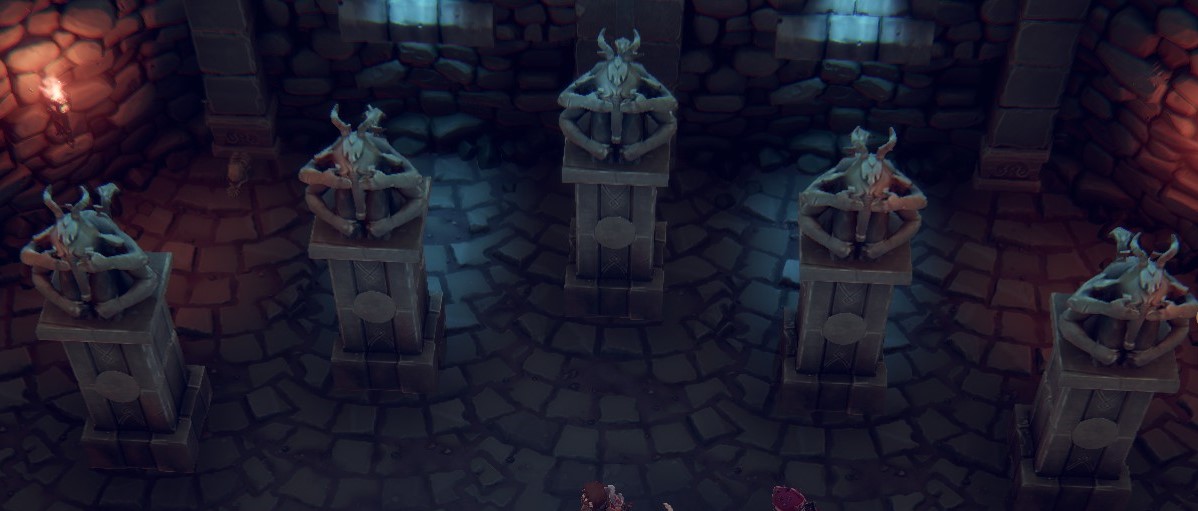
  • S1 - Watch the statues and their alignment. You`ll need it at S4.
  • S2 - Here you can read about the weakness of Zangdar which is neccessary to open D4.
  • S3 - Here you find "Zangdars Key" to open D2.
  • S4 - Remember the statues from S1 and make the same alignment. (see screenshots below)
  • S5 - Here you`ll find the demonicon which gives you some hints about the "Riddle of the Isolated Statues" (Turquoise X)
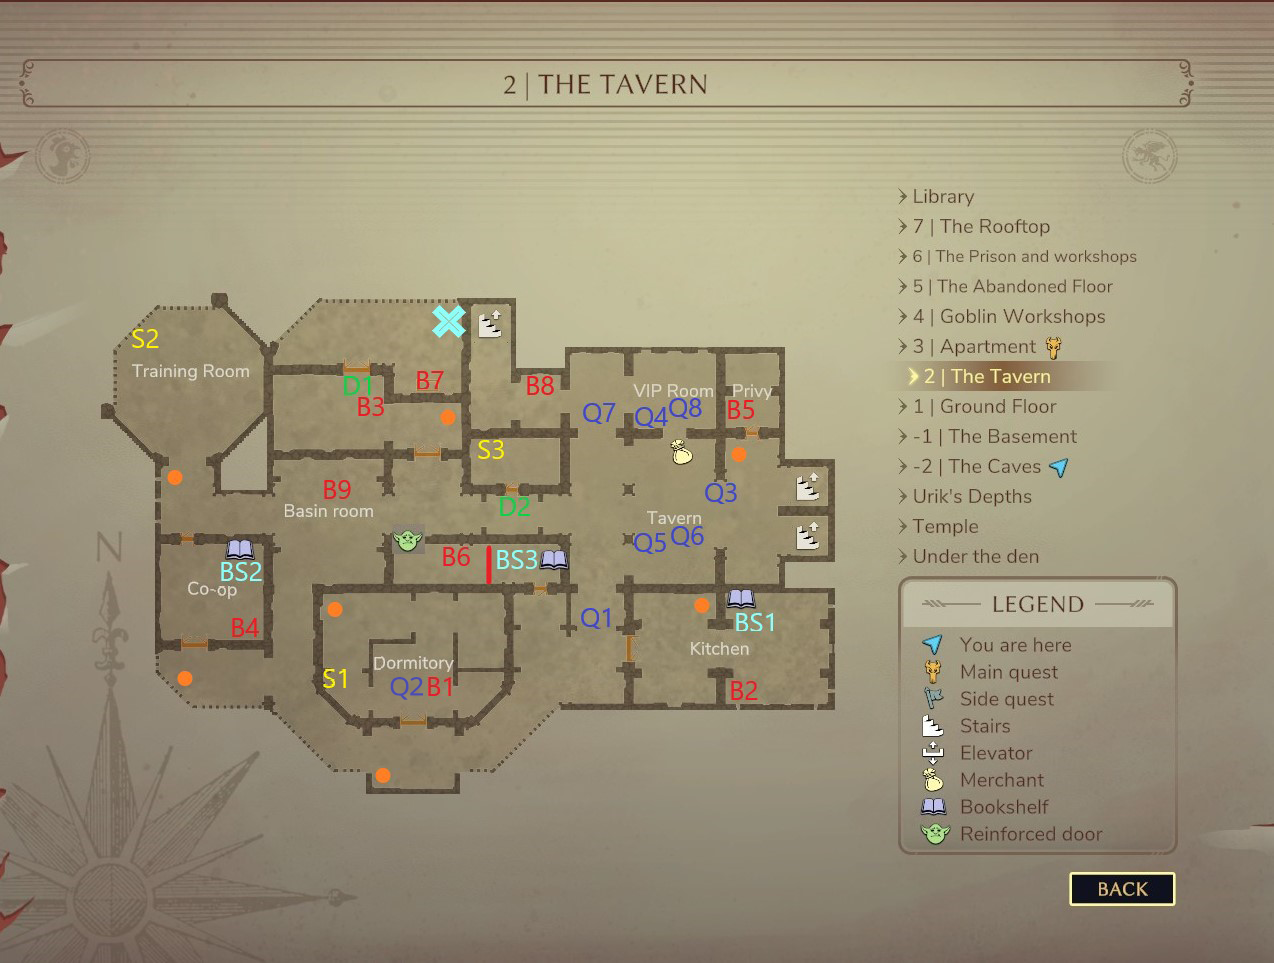
The Tavern


  • BS1 - Menzorian Bookshelf "Ogrish Cuisine"
  • BS2 - Menzorian Bookshelf "The Barbarians" (All books can be found on this floor)
  • BS3 - Menzorian Bookshelf "Basic Spells for Basic Wizards"
  • B1 - The Barbarians (1/3)
  • B2 - Ogrish Cuisine (2/3)
  • B3 - Basic Spells for Basic Wizards (2/4)
  • B4 - Secrets of Chicken (2/4)
  • B5 - The Barbarians (3/3)
  • B6 - The Barbarians (2/3)
  • B7 - History of Elves in Fangh (1/3) - The lever is in the garden
  • B8 - Anthopological Function of the Goblin (1/3)
  • B9 - The Theory of Traps (1/4) - As a fight reward after Chapter 6
  • D1 - This door requires the "Hidden Garden key" (Reward for doing Q2)
  • D2 - Automatically opens in chapter 8 as part of the main quest
  • S1 - Naheulbeuk poster
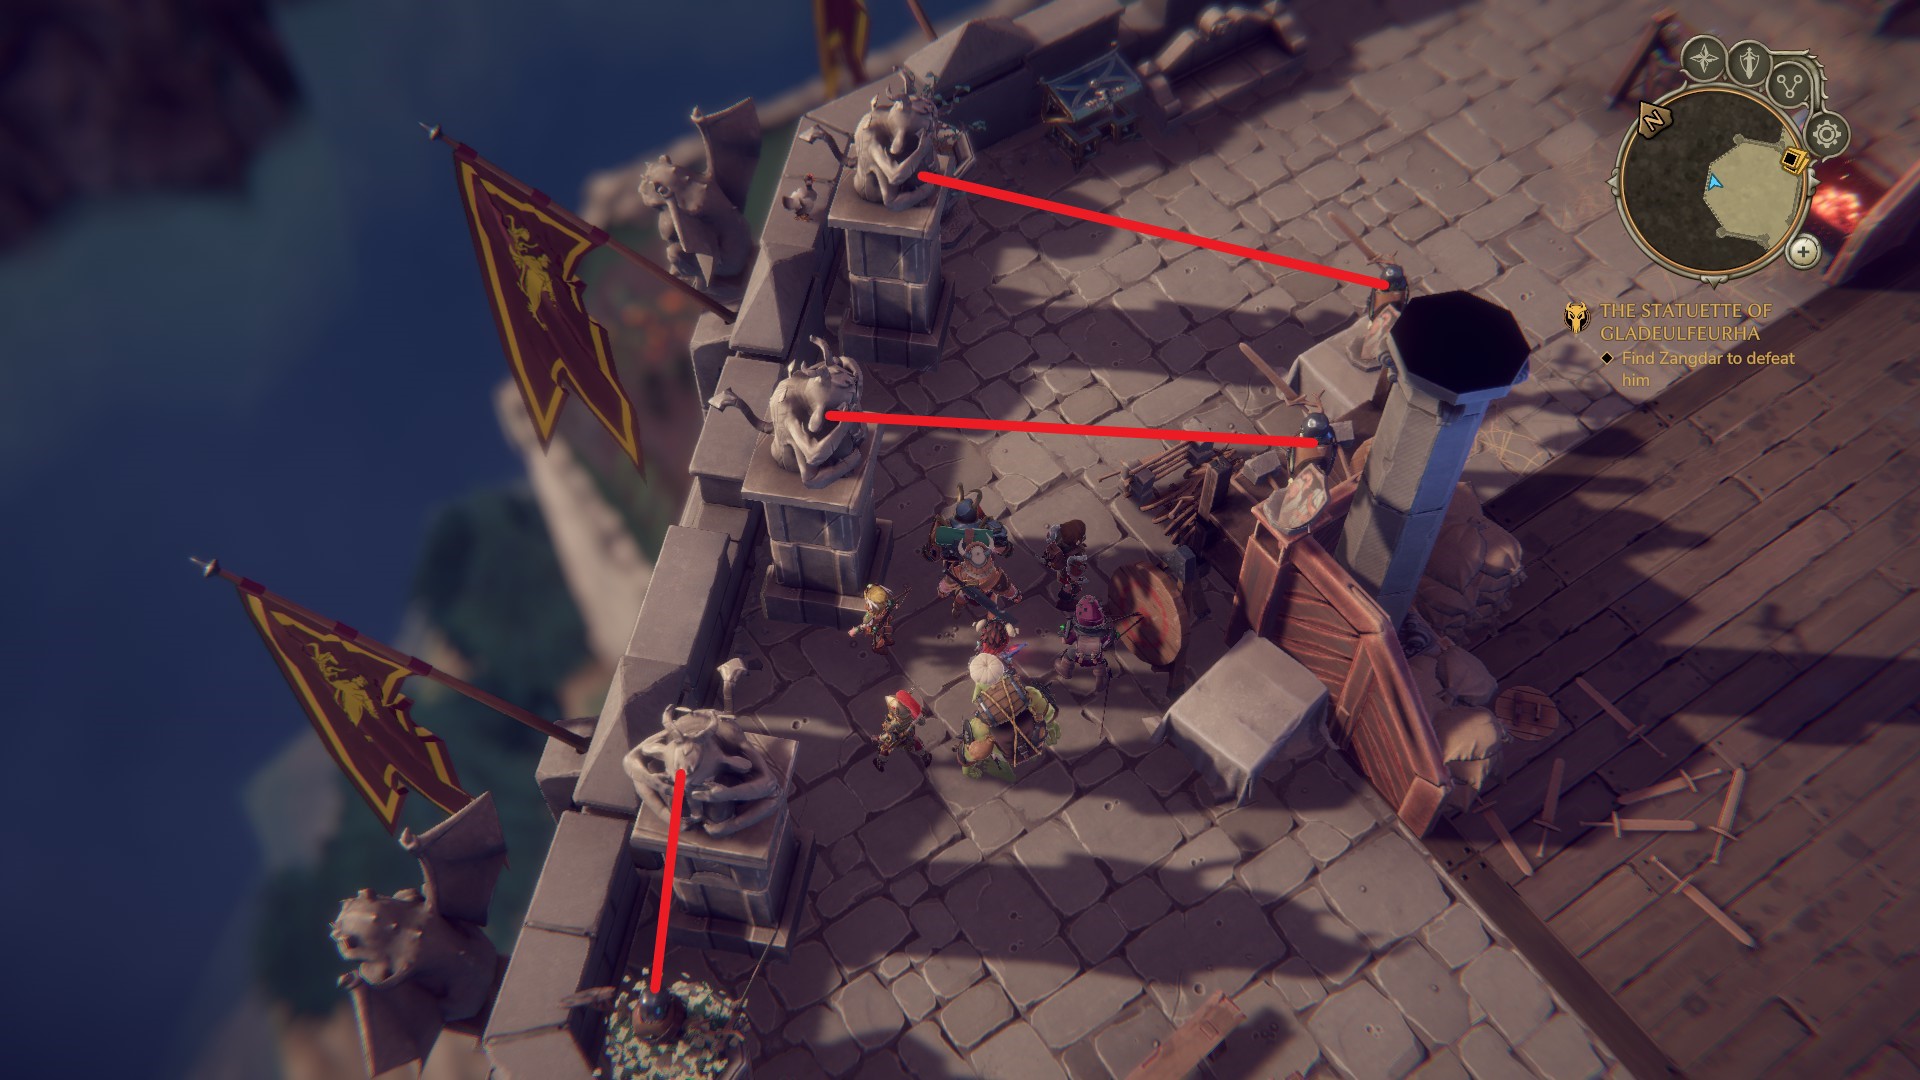
  • S2 - Position the statues so that they look at the dummies (see screenshot below)
  • S3 - Naheulbeuk poster
  • Q1 - Starts "Poultry-farming tournament" where you have to bring back the seven chickens (orange dots). Its available in chapter 2 after doing the quest "Help the Paladin".
  • Q2 - Starts "The cultists of Dlul" which is a available in chapter 3 and where you get the "Hidden Garden key"
  • Q3 - Starts "The bottle of Château Les Louzères" which is available in chapter 3 and where you to go to "The basement (-1)", use the received key and bring back the bottle.
  • Q4 - Starts "The Magic Faucet" which is available in chapter 4 and where you have to go "The Goblin Workshop (4)" and at position S5.
  • Q5 - Starts "The Bear and Ale stew recipe" which is available in chapter 4 and where you have to talk to the cook in the kitchen and then go upstairs at the privy.
  • Q6 - Starts "Co-op heist" which is available in chapter 6 and where you have to go to the "Basin room" and fight some thieves.
  • Q7 - Starts "Absolute Expertise" where you have to buy a potion from the merchant which is located at "The Basement (-1)". Important notice: If you dont drink the antidote and finish the game, you`ll recieve an achievement.
  • Q8 - Starts "Turn the coat" which is available in chapter 8 where you have to find four buttons which where located at floor "The Prison and Workshops (6)" and marked with purple dots outside of the garden! With the original party it should be availeable at chapter 6.
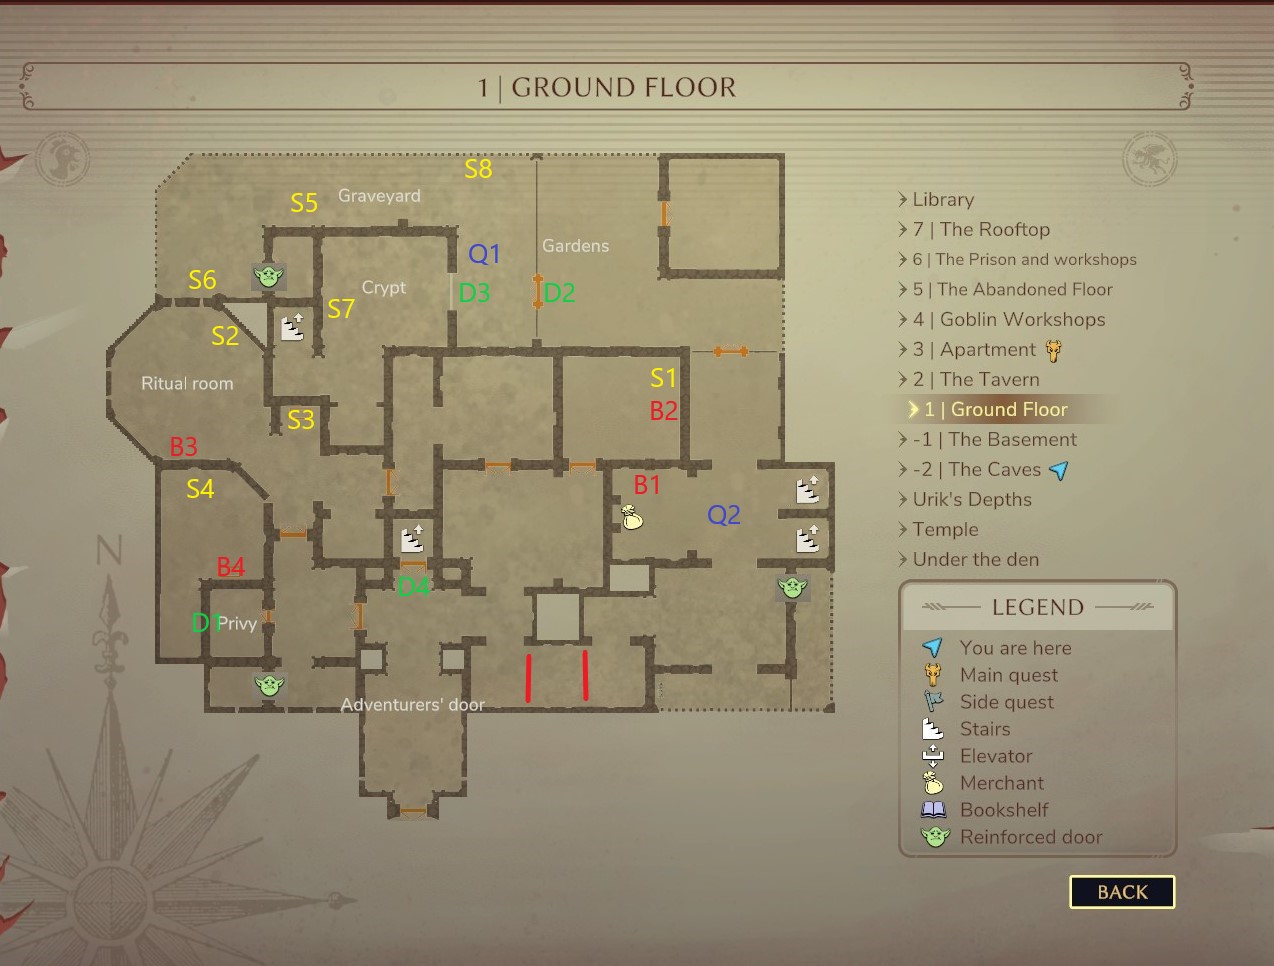
Ground Floor

  • B1 - Secrets of Chicken (1/4)
  • B2 - A Brief History of Orcish Culture (1/2)
  • B3 - Basic Spells for Basic Wizards (1/4)
  • B4 - On Adventure (1/3)
  • D1 - You can sneak into this room with the Elf and Dwarf after you`ve started "Binsc and Moo" and can find S4
  • D2 - You`ll need the "Key to the cemetry" given you during chapter 4.
  • D3 - Use the lever S5 to open the door
  • D4 - Opens after some quest
  • S1 - Poster Naheulbeuk
  • S2 - Available after using the lever S3
  • S3 - Use it to get S2 available
  • S4 - Here you find the Hamster Moo for the quest "Binsc and Moo" given you at "The Basement (-1)"
  • S5 - This lever opens the door D3
  • S6 - Here you find the stagnant water for the "The magical assistant" main quest in chapter 4.
  • S7 - Here you find the bone powder for the "The magical assistant" main quest in chapter 4.
  • S8 - Here you find the butterfly wings for the "The magical assistant" main quest in chapter 4.
  • Q1 - Starts "Organic gardening" available in chapter 4 and where you have to go to "The Caves (-2)" at position S2 and collect some organic giant spider eggs.
  • Q2 - Starts the side quests for your companions if you accepted one.
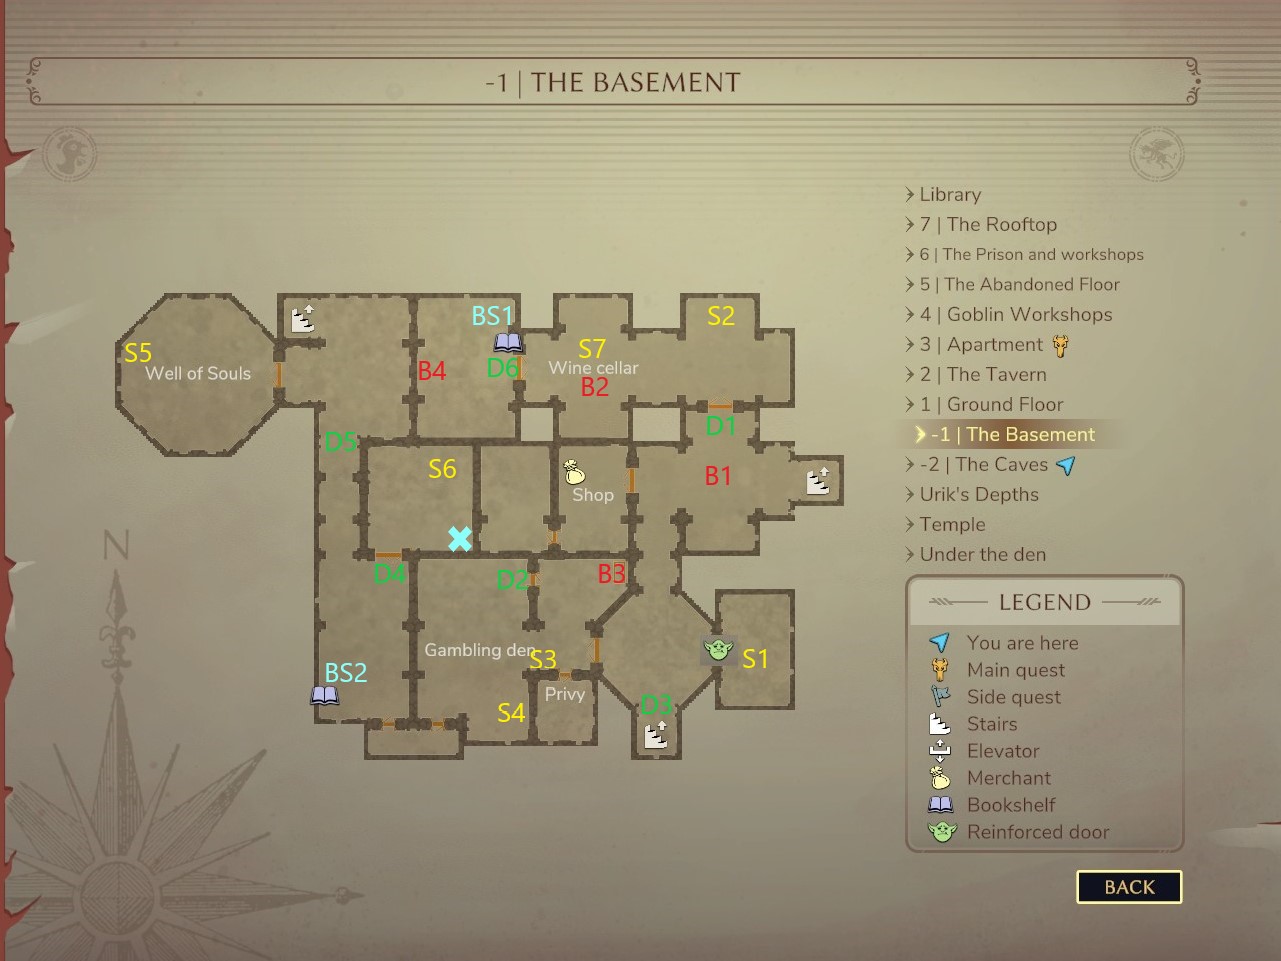
The Basement

  • BS1 - Menzorian Bookshelf "Demonology : Tuff'luk God of Fail"
  • BS2 - Menzorian Bookshelf "A Brief History of Orcish Culture"
  • B1 - The Theory of Traps (3/4) - As a fight reward
  • B2 - Demonology : Tuff'luk God of Fail (2/4) - As a fight reward
  • B3 - A Brief History of Orcish Culture (2/2) - Use the lever at S4
  • B4 - Demonology : Randomai (3/4)
  • D1 - This door requieres the key you get starting the quest "The bottle of Château Les Louzères"
  • D2 - This door requieres the key you get starting the quest "The VIP room wizard" when you help Midranthir.
  • D3 - Use the lever at S3 to open it
  • D4 - You need to donate an egg (Consumeables) to solve this riddle.
  • D5 - Opens later when you come up from the crypt.
  • D6 - Opens automatically within chapter 8.
  • S1 - The using of the following order will appear a chest: Fox - Rabbit - Wolf - Goat - Boar - Deer - Elk
  • S2 - Here you`ll find the bottles for "The bottle of Château Les Louzères".
  • S3 - This lever opens D3
  • S4 - This lever opens B3
  • S5 - You need to turn the statues until they look all at the same direction (see screenshot below)
  • S6 - This trap door leads you to "Under the den"
  • S7 - As part of chapter 8 you`ll take a fight here and get epic stuff.
  • Q1 - Starts "Binsc and Moo" available at chapter 3 and where you have to defeat the Orcs at "Under the den" and later finding Moo in "The Ground Floor" at the privy.
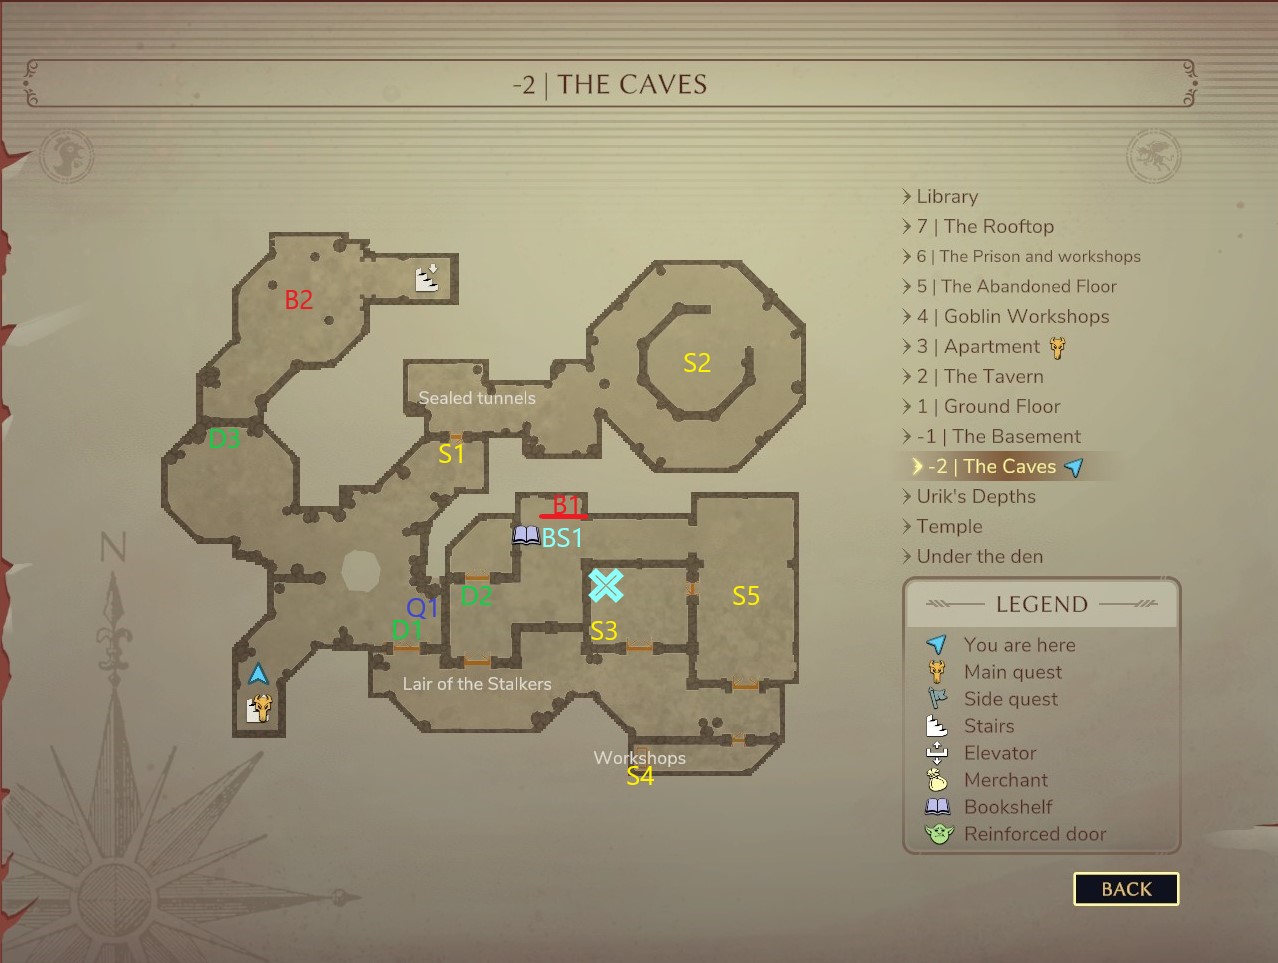
The Caves

  • BS1 - Menzorian Bookshelf "The Theory of Traps"
  • B1 - The Theory of Traps (2/4)
  • B2 - Demonology : Tuff'luk God of Fail (4/4) - As a fight reward
  • D1 - Opens after checked S1
  • D2 - Requires the key you get at S5
  • D3 - Opens as part of chapter 6 and leds to "Urik`s Depth"
  • S1 - Corps with a medaillon need to open D1
  • S2 - The spiders here have the organic giant spider eggs which were needed for the quest "Organic gardening".
  • S3 - Lever opens the gates at S4
  • S4 - A chest where you have to use the lever S3 first
  • S5 - You`ll get the key to open D2 as a fight reward
  • Q1 - Starts "Matrimonial Marauding"
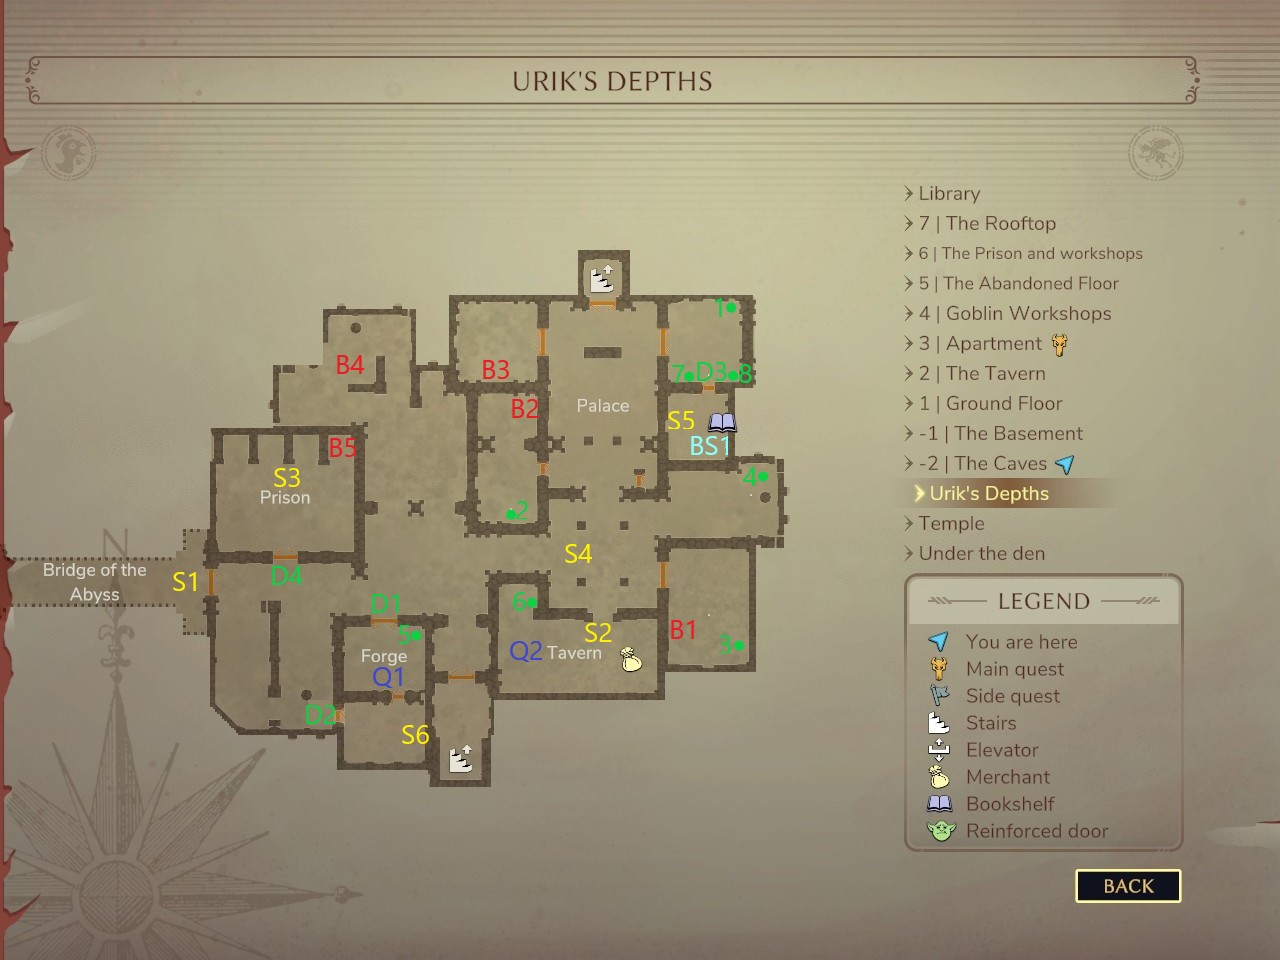
Urik`s Depths
Remember and keep in mind, that you cant come back to this location after leaving it. So maybe make a save!


  • BS1 - Menzorian Bookshelf "Dwarven Strikes and Social Movements" (All books are on this floor!)
  • B1 - Dwarven Strikes and Social Movements (2/5)
  • B2 - Dwarven Strikes and Social Movements (1/5)
  • B3 - Dwarven Strikes and Social Movements (4/5)
  • B4 - Dwarven Strikes and Social Movements (3/5) - As a fight reward after Q1
  • B5 - Dwarven Strikes and Social Movements (5/5) -
  • D1 - Opens after the main fight S1
  • D2 - Requires the key obtained by Q2
  • D3 - You need to activated some levers in the right order (green dots) and let the statues at dot 7 and 8 look south.
  • D4 - Requires the "Dwarven cell key"
  • S1 - Main fight opens D1
  • S2 - Here you can do a battle of insults which leds in two achievements (one if you win and one if you lose - so maybe save and load)
  • S3 - Here you have the choice of helping the prisoners and the rebellious dwarves or with the king. But it didnt make any difference.
  • S4 - Place of the battle S2
  • S5 - Chest
  • S6 - Chest
  • Q1 - Starts the quest "The Sacred Axe of Dwalin One-eye" where you have to find the fragments of his axe. After you`ve finished this one, Q2 appears.
  • Q2 - You`ll get an key and get access to D2. You forge Dwalin`s Axe which is part of the epic equipment for the Dwarf.
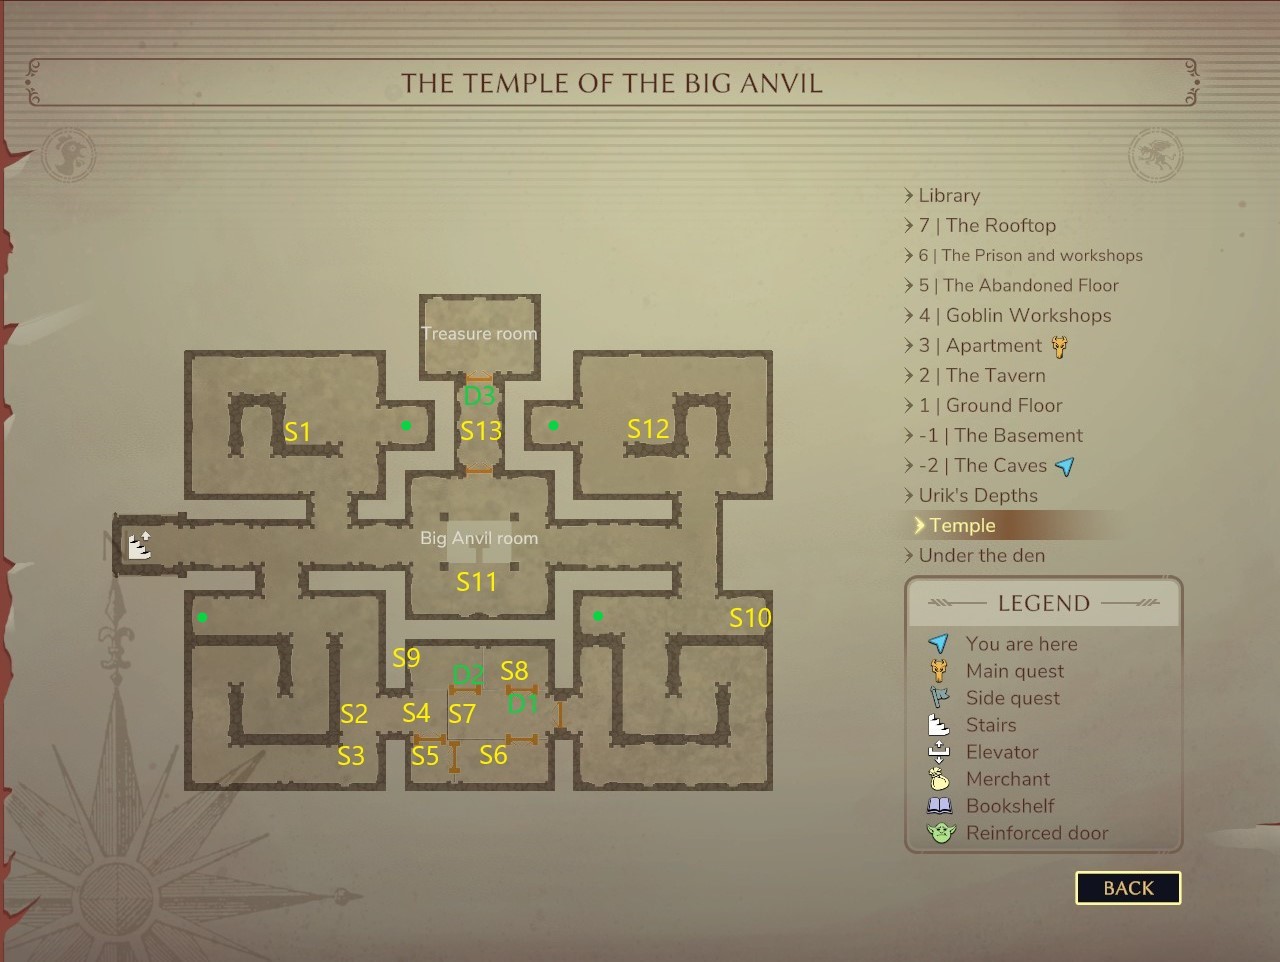
The Temple
Remember and keep in mind, that you cant come back to this location after leaving it. So maybe make a save!

  • D1 - Opens after doing S7
  • D2 - Opens after doing S8
  • D3 - Opens after you turned the statues (green dots) like the Dwarf at S13 told you: They have to look away from the party and at the wall.
  • S1 - Chest
  • S2 - A book that gives you hints about how to solve the upcoming riddles with the statues.
  • S3 - Chest
  • S4 - The statues here have to look to the east - Opens the gate to get access to S5
  • S5 - The statues have to look to the south - Opens the gate to get access to S6
  • S6 - The statues have to look to the south - Opens the gate to get access to S7
  • S7 - The statues have to look to the west - Opens the gate to get access to S8
  • S8 - The statues have to look to the north
  • S9 - Chest
  • S10 - Chest
  • S11 - A fight and a choice
  • S12 - Chest
  • S13 - The dwarf gives you the hint what to do to open D3 (statues have to look away)
Under the den
This location is only full available if you compare for your companions you can choose.


  • D1 - Opens during "The Quest for the Priestess"
  • D2 - You`ll receive a key finishing "The Quest for the Priestess"
  • D3 - Opens during "The Quest for the Mistrel"
  • D4 - Use the lever S2
  • S1 - Main fight for "The Quest for the Priestess"
  • S2 - Lever to open D4
  • S3 - Lever to open S4
  • S4 - Chest which is available by using S3
Menzorian Bookshelves
There are several bookshelves around and you need to find the different books to complete a shelf and get the bonus.


A Brief History of Orcish Culture (party +1 Impact)
Location: The Basement
Book 1/2: Ground Floor
Book 2/2: The Basement

Anthopological Function of the Goblin (party +2 Dodge)
Location: Goblin Workshop
Book 1/3: The Tavern
Book 2/3: Goblin Workshop
Book 3/3: Goblin Workshop

The Barbarians (Barbarian +2 Str.)
Location: The Tavern
Book 1/3: The Tavern
Book 2/3: The Tavern
Book 3/3: The Tavern

Basic Spells for Basic Wizards (Wizard +2 Int.)
Location: The Tavern
Book 1/4: Ground Floor
Book 2/4: The Tavern
Book 3/4: The Abandoned Floor
Book 4/4: Library

Cursed Knights for Dummies (Party +2 Physical Resist)
Location: Library
Book 1/3: Library
Book 2/3: Library
Book 3/3: Library

Demonology : Randomai (fills randomai meter)
Location: Apartment (Zangdar`s Lair)
Book 1/4: Goblin Workshops
Book 2/4: Library
Book 3/4: The Basement
Book 4/4: Apartment (Zangdar`s Lair)

Demonology : Tuff'luk God of Fail (Party +1 Precision)
Location: The Basement
Book 1/4: Goblin Workshops
Book 2/4: The Basement
Book 3/4: Library
Book 4/4: The Caves

Dwarven Strikes and Social Movements (Dorf +2 Con.)
Location: Urik`s Depths
Book 1/5: Urik`s Depths
Book 2/5: Urik`s Depths
Book 3/5: Urik`s Depths
Book 4/5: Urik`s Depths
Book 5/5: Urik`s Depths

History of Elves in Fangh (Elf +2 Agi.)
Location: The Prison and Workshops
Book 1/3: The Tavern
Book 2/3: The Prison and Workshops
Book 3/3: The Rooftop

Ogrish Cuisine (Ogre +2 Str.)
Location: The Tavern
Book 1/3: The Abandoned Floor
Book 2/3: The Tavern
Book 3/3: Goblin Workshops


On Adventure (Ranger +2 Char.)
Location: The Prison and Workshops
Book 1/3: Ground Floor
Book 2/3: The Prison and Workshops
Book 3/3: The Rooftop

Secrets of Chicken (Party +1 Sprint)
Location: The Rooftop
Book 1/4: Ground Floor
Book 2/4: The Tavern
Book 3/4: Library
Book 4/4: Goblin Workshops

The Theory of Traps (Thief +2 Courage)
Location: The Caves
Book 1/4: The Tavern
Book 2/4: The Caves
Book 3/4: The Basement
Book 4/4: Library

What of Golbarghs (Party +2 Magic Resist)
Location: The Abandoned Floor
Book 1/2: The Abandoned Floor
Book 2/2: The Abandoned Floor
Closing Words
⠀⠀⠀⠀⠀⠀⠀⠀⠀⠀⠀⠀⠀⠀Spotted a mistake? Please let us know - It will be fixed asap!
⠀⠀ ⠀⠀⠀⠀⠀⠀⠀⠀⠀⠀⠀⠀You want to support our work? Follow our Curation. Thanks!

⠀⠀⠀⠀⠀⠀⠀⠀⠀⠀⠀⠀Our "The Dungeon Of Naheulbeuk: The Amulet Of Chaos" review

⠀You find this guide helpful? Please upvote it or give an award.
26 Comments
Frothel May 11 @ 6:52am 
For the secret boss statues:

Caves – East
Basement – East
Ground floor – South
Second floor – West
Third floor – West
Fourth floor – East
Fifth floor – South
Sixth floor – West
Seventh floor – South
Xeeran  [author] Jan 17 @ 10:41am 
Thanks. Changed it.
RedMilan02 Jan 17 @ 10:03am 
you did a mistake in the Menzzorian bookshelfs section Tuffluck book 4 is in the caves (b2)
You did it right on the Caves map tho.
RedMilan02 Jan 13 @ 4:02am 
Q8 is available in Chapter 6 if you have the original party
bibot888 Jan 5 @ 1:49pm 
great job thanks
anonbc2000 Dec 10, 2023 @ 4:55pm 
I was also able to purchase the Demoniconfor 9000 gold from inn/bar-keeper of the great library of unspeakable knowledge. I chose Paladin as the 8th member of my team and selected wizard to talk with the barkeep in case any of that makes a difference? Thanks for guide! :roach_jim:
Dam Mar 14, 2023 @ 2:04am 
@Xuupi with regards to Finally Free it's only in the Splat Jaypack's Arena DLC, NOT the main game.

I just published a guide, over here ;)
https://steamcommunity.com/sharedfiles/filedetails/?id=2946801002
Feremir Oct 3, 2022 @ 7:40pm 
Awesome guide,thanks !
Xuupi Mar 15, 2022 @ 6:15am 
@Hansell1001 "Hey. On 6th floor, how can I open the gate of the chest up where it says wine cellar?"

You can only open that one if you chose to get alcohol for Barney the Terrible, afaik.
Xuupi Mar 15, 2022 @ 6:11am 
Does anyone have info on the "Finally Free" (Fire the Elf and the Dwarf to recruit the three companions) achievement? Do you have to reject all companions before this options shows up?