Killing Floor 2

Killing Floor 2

117 ratings
Large Zed Takedowns / Combos ~ 6p HoE ~ v1135
By Holy Crap
~~CONFIDENTIAL EMPLOYEE MANUAL~~FOR USE BY SECURITY FORCES ONLY~~

Welcome to the large specimen neutralization guide. In the following video, you will learn both basic and advanced methods used to dispose of the specimens code-named "Scrake" and "Fleshpound", which pose a critical threat to our operations here at Horzine Biotech. As a member of our security forces, it is your duty to protect our interests. Therefore, you must study these techniques closely, they may save your life!
2
3
2
   
Award
Favorite
Favorited
Unfavorite
Large Zed Takedowns: A Video Guide
    Enjoyed the guide? Please consider supporting me by leaving a thumbs up 👍 on the top of the page and the video itself, plus sharing it with anyone that might find it useful. Thank you!


Timestamps for each perk section:
  • Berserker ------------------- 03:32
  • Commando ----------------- 09:23
  • Support --------------------- 12:16
  • Field Medic ----------------- 20:55
  • Demolitionist --------------- 23:49
  • Firebug --------------------- 32:06
  • Gunslinger ------------------ 35:49
  • Sharpshooter --------------- 42:44
  • Sharpshooter (Mobile) ------ 47:33
  • SWAT ------------------------ 55:55

Music used:
  • "All Of A Sudden" by Ultramarine ------------------------------------------ 03:32
  • "Zoft Broiled Ed" by Bola --------------------------------------------------- 09:49
  • "Felting Bogrow" by Roel Funcken ----------------------------------------- 14:46
  • "Influx" by Higher Intelligence Agency ------------------------------------- 19:41
  • "Aligning the Daemon" by Monolake --------------------------------------- 26:04
  • "X Rale" by Boc Scadet ----------------------------------------------------- 30:53
  • "With Each Step" by dnn --------------------------------------------------- 35:30
  • "T-E-L-E-G-R-a-M" by Byetone -------------------------------------------- 40:45
  • "Printed" by Quench -------------------------------------------------------- 47:08
  • "Dogma" by Objekt --------------------------------------------------------- 53:55
  • "grantz graf" by autechre --------------------------------------------------- 58:15


IMPORTANT INFO:
    On top of the video footage that shows the techniques themselves, I've included detailed text descriptions on each section which add more information about subtleties, tricks and tips to perform these takedowns better and more consistently. I've also occasionally described specific situations where a technique may come in handy.

    However, I decided to add these descriptions as the footage plays, because otherwise the guide's total run time would've been ridiculously long. Due to this inconvenience, I recommend pausing the video liberally every time you need to read each fragment.

    Additionally, you may get confused by some of the footage shown because of slight gameplay differences, like the Parry skill having a longer duration. This is because many of these clips were recorded in 2020 and 2021. Since then there have been several gameplay changes, such as the Parry boost duration nerf. I've kept these clips because those changes do not affect the takedowns in any significant way. However, if any major changes are made which may end up affecting these techniques, they will be updated and released as individual clips in the future.

Revised / Additional Takedowns
    Here's where I will be gradually adding new or revised takedowns, as per your suggestions, as well as when new weapons and gameplay changes arrive. My intention is to keep this guide updated for as long as I can, despite the fact that the video itself might become outdated after a while. If you notice that a takedown doesn't work anymore or has significantly changed from what's shown in the video, let me know in the comments and I'll list the changes here.

Revision #01:
I can't tell if it's an intentional change, but the Compound Bow can't stun Fleshpounds anymore, even if you use the Ballistic Shock skill. Now, the only way to kill them with the skill setup that's used in the video is to freeze them with 2 cryo bolts, then shooting 3 fully charged arrows at its head to get the decap before the thaw animation finishes. Or you can spec into max damage skills and get the kill in 2 headshots without having to use any afflictions.


Information / Disclaimers


A Guide Focused on 6-Player Hell on Earth:
This is a video guide that showcases many techniques to quickly and efficiently kill both Scrakes and Fleshpounds (also known as large zeds or big zeds) on 6-player Hell on Earth difficulty with all perks. These takedowns are meant for level 25 players, however, most of them can still be done at level 20+ with minor differences.


What is Considered a Takedown or Combo?
A takedown is essentially a technique consisting of a series of steps that allow you to kill a Scrake, Fleshpound or a Quarter Pound on your own or with the assistance of another player, while also attempting to meet the following criteria as closely as possible:
  • The large zed must not hit you at all (the Berserker is an exception because you have to activate the Parry skill by taking a hit)

  • The large zed must not initiate attack animations, unless you purposely bait its attack as part of a combo

  • The large zed must die before initiating the rage animation or before it finishes in the case of Fleshpounds and Quarter Pounds (Scrakes don't have a rage animation)

  • The large zed must die near the spot where it raged, taking the least amount of steps towards you as possible (none is ideal), so that the team is not forced to backpedal severely out of position, letting other zeds overrun the holdout spot


A Trimmed-Down But Detailed List:
Due to the existence of dozens of possible variations of these combos, this is not a complete list. The idea is to compile a wide array of takedowns that show off as many different mechanics, tricks and techniques as possible in a single video, without it getting too repetitive. Hopefully, this will give you the knowledge to experiment and discover more takedowns that you find useful for your particular gameplay style.

I have purposely excluded duplicates with similar weapons, as well as combos that I personally consider to be too difficult, inconsistent, risky, slow and / or inefficient to perform in real HoE matches with how chaotic the gameplay is. Here's what I mean by these last few terms:
  • Too difficult: has too many hard to reproduce steps and / or a very small margin of error
  • Too inconsistent: has too many random variables associated which may lead to failure
  • Too risky: it can easily get you or others killed if it fails or while you are still completing it
  • Too slow: there are infinite ways to kill large zeds, but only some are truly fast enough
  • Too inefficient: uses way too much ammunition and / or too many grenades in the process

Any takedown that suffers from too much of any of these descriptors will be left out of the list. An example of this is Fleshpound "melee locking". The technique itself can be really useful if you master it, giving you an efficient way to deal with FPs without using any ammunition. However, it's very difficult to pull off right because of the microscopic margin of error. The tiniest mistake in your timing will cause the takedown to fail at least partially, as is the case for other very advanced combos.

I personally think of takedowns as tools, I don't care about flashiness or skill flexing. Even though I might find some extremely advanced combos fascinating to watch, I'm not interested in learning them if it's near impossible to use them in a realistic gameplay scenario, such as vanilla public HoE or CD matches.


Takedowns Intended to be Performed by One Player:
Even though I've already mentioned that these techniques are intended for use in online co-op gameplay, they are not designed to be assisted takedowns, meaning two or more players dealing damage and afflictions to a large zed at the same time. The reason is that you never know what kind of teammates you are going to get, so you have make sure that you at least pull your own weight. Occasionally you're also going to have to do everything yourself if your team is useless.

If a takedown relies on some particular affliction triggering in a specific way, like Freeze, having another player assist you can be fatal because they can inflict unpredictable afflictions that can mess up your timing or even rage the large zed prematurely. Players may have good intentions, but the outcome is usually a disaster if their aim is not up to par or if they are not committed enough to finish killing the large zed if the takedown fails.

For example, a Gunslinger may try to kill a Scrake using their Deagles by applying the Gun Hit affliction, flinch-locking the Scrake in place for a brief moment and giving them ample room to miss a few shots without causing the takedown to fail. However, a fellow Support may try to assist in dealing damage so that the Scrake dies faster, but in the process they will end up inflicting Stumble on it, overriding Gun Hit due to the higher affliction priority. This will generally cause the Gunslinger to miss shots, forcing a weapon switch or a reload, wasting time and ammunition if the Support was never actually committed to killing the Scrake in the first place or if their aim sucks. This can sometimes lead to a player getting killed if their situation is unfavorable enough.

More often than not, focusing on specific perk roles and / or dividing tasks achieves a better outcome than both teammates trying to do the same thing at the same time. For example, a Commando or a SWAT can indirectly assist you by killing trash zeds surrounding a large zed so that you can kill it without any disturbance, effectively recreating a calm, "testmap-like" scenario to some extent.

This is not always the case though, which is why assisted takedowns exist. You can check out a few examples in the first additional guide that appears on the Addendum #1: Basic Guides section (Suicidal and Hell on Earth: A Guide). The general principle is this: if you want to directly assist in takedowns, you have to learn the best ways to do so without disturbing the player that initiates the combo, or the one with the perk that better fits the large zed killer role.

There are a few ways to help deal damage without interfering with another player's combo:
  • Shooting at a large zed's head while it's stunned or frozen. You can't disrupt combos this way because recovery animations will always play in their entirety.

  • Shooting at a large zed's head after the player that initiates the combo inflicts their respective afflictions such as Stumble, Gun Hit, Knockdown, etc.

  • Shooting at a Fleshpound's head during the rage animation. No matter what your affliction power may be, the animation will play in its entirety (unless the FP skips it altogether, like when it rages after stumbling too close to the player that it's targeting).

  • Shooting at a Scrake's head if you can inflict Stun as a Sharpshooter. Even if you override other afflictions, Stun leaves zeds completely vulnerable for a few of seconds by immobilizing them, leaving their heads unobstructed and easy to hit. It's usually a very safe way to kill them, even if the player that started the combo misses a few shots because the stun triggered at an unpredictable moment.

  • Shooting at a raged Fleshpound's head while it's sprinting if you won't inflict afflictions like Fire Panic (Firebug) or Stumble (Firebug w/ Heatwave or Support w/ Concussion Rounds via Boomstick/Doomstick). Remember that raged FPs have 75% resistance to all afflictions, so it's ok to shoot at their heads with most perks while they're sprinting.

If you learn how to properly assist others during takedowns, you may be able to apply many of the techniques shown in my video when focus firing at a large zed with a teammate.


Information / Disclaimers (cont.)
No Multiple Skill Choices:
I've decided to stick with one set of skills for each perk to simplify things further. My choices are the ones I use regularly when I play, and they are the ones that, in my experience, have given me the most consistent results. An example of this is taking Quick Draw instead of Steady for the Gunslinger. The recoil reduction makes both Scrake and Fleshpound takedowns relatively trivial and I personally use hip fire 90% of the time, so Steady's bonuses are useless to me, on top of ironsights not receiving the extra recoil reduction and giving you tunnel vision. Also, the 7.5% damage increase doesn't make a tangible difference on the takedowns, the time to kill is only slightly faster.

Another example would be taking Butcher instead of Vampire for the Berserker. If you don't take Butcher, then most combos lose their already small margin of error, making them much more difficult to pull off right in a real match. However, you should take Vampire if you see that your teammates are unreliable, especially the medic. In that case, you'll trade off the consistency of your takedowns (plus, you lose the Zweihander+2 combo against Scrakes) for the improved survivability that you need.

The only exception to this is the Sharpshooter due to how drastically different the two gameplay styles are (mobile and stationary). I have included separate sections for these two skill setups so that every base is covered.

Feel free to deviate from this formula and experiment to accommodate your particular skill choices. I do occasionally swap skills depending on team composition, map played and if I'm using a particular perk during the boss wave. However, I generally stick to the same setups.


Upgrades Let Many Low / Mid Tier Weapons Kill Large Zeds:
Thanks to the weapon upgrade system, a variety of low tier and / or low damage weapons can kill large zeds one way or another. However, most of them are still very inefficient and slow, which is why I've left most of these out as well. I've only included upgrades that are necessary to reach specific damage breakpoints in late-wave setups, such as Boomstick+2 / HZ-12 / M4+1 for the Support perk. I would never use an upgraded Winchester 1894 in a real match ever, for example.


Quarter Pound Takedowns Have Been Excluded:
Quarter Pound takedowns have also been ignored due to them being much easier and faster versions of Fleshpound combos. With some minor testing, you'll be able to figure out quick and efficient ways to deal with them after you've practiced all techniques against FPs and you have a firm grasp of the affliction system.


Limited Stun / Freeze Takedowns:
Another compromise I made is limiting the amount of takedowns that rely on the Stun and Freeze afflictions. The reason for this is not that they are bad ways to take out large zeds, on the contrary, they are fool-proof and consistent methods to do so. However, they are often slower than the rest of the combos and tend to be initiated by using grenades such as Cryo Nades, Flashbangs and Dynamite, which are a very limited resource.

Relying solely on your nades doesn't make you an avid large zed killer because it's common to waste most of them in chaotic encounters that require urgent zed immobilization or otherwise risk someone dying. After that, you would suddenly become useless against them. Additionally, the concept behind all those takedowns is the same regardless of what perk you pick: basically learning all the stun / freeze recovery animations for both big zeds and aiming for the head.

The exceptions to this are the Sharpshooter and the Demolitionist due to their abilities to deal with multiple Fleshpounds using nades, as well as the SWAT, since its nade combos are the easiest and most consistent takedowns for that perk and there's also no need to backpedal. So, these perks will feature several different techniques with these two afflictions.

I will ignore the HRG Winterbites for both the Gunslinger and off-perk use because they don't offer any particular advantages gameplay-wise, other than maybe freezing raged Scrakes. They limit your loadout options and they set you up to perform slower takedowns instead of forcing you to learn the more difficult but much faster combos. The same goes for the Frost Fang.

The Freezethrower however will make a brief appearance as an off-perk weapon for the Field Medic, because having ample access to the Freeze affliction provides some utility for teams that can't kill large zeds fast enough. The only drawback is that it limits your healing capabilities considerably. Carrying the Freezethrower+1 allows you to carry only the HMTech-401, no HMTech-101 and HRG Healthrower. Because of this, you could decide not to upgrade the Freezethrower, so you can also carry the HMTech-101 for a bigger healing darts supply. However, without the upgrade you can't reliably kill 6-player HoE large zeds on your own. Therefore, in that case, you should use the Freezethrower only to freeze these targets for your team to easily take them down.


Your Feedback and Questions are Welcome:
These decisions are based on my personal experience with the game after playing for many hours on both public games with random players, as well as in organized teams (both vanilla HoE and Controlled Difficulty). However, I am obviously not completely free of bias as is any regular person. Having said that, I've indeed tried my best to be as impartial and as objective as I can be.

Consider this guide as me wanting to share the techniques I've learned over the years and trying to teach them in an intuitive way, all in a concise package with a decent presentation (a redo of the old Meet The Zeds trailers from 2014).

So, if you have some well mannered, constructive criticism, such as me ignoring some takedowns that you think are important to learn because they give you a particular gameplay advantage, let me know in the comments and we'll discuss it. I can potentially add supplemental videos in this guide if I consider that something useful is missing.

I will never claim that I am a master of any of these perks. Even though I am very confident in my skills, I always have room to improve and learn new things. That's what still keeps Killing Floor 2 interesting to me. My intention is to help as many people as possible to become better players and be more useful in a team, not to brag about how much I know.

Lastly, I've never stated nor will I ever state that I invented any of these takedowns. I've learned many of them from players such as Fat Cat, Duck, RykerZzZ, Deltakai, dandyboy66, Rango and others, but I've also discovered a wide array of them through my own experimentation.

Addendum #1: Basic Guides


This video guide assumes that you are familiar with most of KF2's mechanics, such as:
  • Reload / Swing Cancelling
  • Boomstick Recoil Boosting
  • Afflictions, the concept of meters and cooldowns
  • Resistances to specific afflictions / damage types
  • General zed AI behavior and aggro
  • Zed body and head health pools
  • Scrake and Fleshpound rage criteria
  • Scrake and Fleshpound behavior changes when raged
  • Memorizing zed movement and attack animations
• NOTE:
    I've included an introductory section in the video where I explain in detail all the different methods you can use to perform both Reload Cancelling and Swing Cancelling. Apart from being basic requirements for some takedowns, these techniques are useful for general gameplay scenarios like trash killing, which is why I decided to showcase them in detail.

So, if you feel like you don't know much about some of these subjects, I would also recommend checking out some of the basic guides showcased down here. Don't feel ashamed or anything, much of this is nerdy technical knowledge. However, it becomes really important knowledge if you do want to improve your skills and properly learn the gameplay nuances.


Basic Reading Material:
All of these takedowns are not too useful by themselves if you don't know how to play cooperatively in a team, where different positive and negative interactions between perks exist, or if you don't have game sense or situational awareness.

If you are still relatively new to Killing Floor 2, I strongly suggest you check out the complete guide to Suicidal and Hell on Earth by FeelZeSchadenfreude to learn what works best in a team. Not only that, but you'll also learn why knowing your chosen perk's takedowns is mandatory if you want to be a valuable teammate when playing HoE, plus many other important facts: https://steamcommunity.com/sharedfiles/filedetails/?id=834945919 The guide is somewhat outdated due to weapon changes that slightly switch up the meta and perk roles / effectiveness, but the most important information is still perfectly relevant. It will impart a specific mindset on you that will make it easier to understand the basics of cooperation, game sense and situational awareness. After that, you'll be free to deviate from that to find a balance between efficiency / effectiveness and your personal enjoyment.


Additionally, you should check out Tamari's KF2 Survival Handbook guides for more in-depth info on how most game mechanics work. Pay close attention to the Afflictions and Universal Offensive Tactics guides in particular:
https://steamcommunity.com/sharedfiles/filedetails/?id=1633641281 https://steamcommunity.com/sharedfiles/filedetails/?id=1650828185 https://steamcommunity.com/sharedfiles/filedetails/?id=1656947151

Finally, the official KF2 wiki is another great resource, especially the "Mechanics" section:


Addendum #2: Practice Your Takedowns
The Test Map:
As you can probably guess, all these techniques require a substantial amount of practice before you can master them and apply them correctly in real Suicidal or Hell on Earth matches. To do this, you can use any map that you like, but I suggest using Fauxy's KF-TestingMapRedux:
https://steamcommunity.com/sharedfiles/filedetails/?id=1545251419 In it, you will find some decently varied environments to practice, including tight hallways, open spaces and stairs to practice your aim in uneven surfaces. You can press the use key on every zed miniature to spawn one. You can even spawn bosses to experiment and discover efficient ways to deal with them. Subscribe to the map to download it and then continue with the next steps.

IMPORTANT NOTE:
    The following testing method works on any map if you use manual commands to spawn zeds. Fauxy's map is just a specialized environment for testing, so that you have more tools at your disposal, like dedicated zed spawning with the press of a button, as well as comfortable combat arenas.


Another Necessary Addon:
To test with more than 1-player health zeds, you need to subscribe to the CD - Eternal addon:
https://steamcommunity.com/sharedfiles/filedetails/?id=1554427429 With it, you can control many variables to your liking, such as trash zeds, Scrake, Fleshpound, Quarter Pound and bosses HP separately, zed movement speed and you can also disable event zeds to turn them back to their original models and animations.

EDIT:
Currently, CD is partially broken, a few numbers and info boxes will get stuck on your screen permanently while using it. A solution to this is using the Yet Another Scoreboard mutator:
https://steamcommunity.com/sharedfiles/filedetails/?id=2521826524 This will remove said visual bugs, allowing you to test normally. I've edited the console parameters to start the testing environment with this mutator active.


How to Start Up the Testing Environment:
Copy the following command line in your console (accessed by the "~" key) and then press Enter:
    Open KF-TestingMapRedux?Game=ControlledDifficulty_Eternal.CD_Survival?Difficulty=3?GameLength=0?Quarterpoundhpfakes=6?Fleshpoundhpfakes=6?Scrakehpfakes=6?Trashhpfakes=6?Bosshpfakes=6?FakesMode=ignore_humans?Mutator=YAS.YASMut
    NOTE: This is equal to a 6-player HoE game (this command line includes the Yet Another Scoreboard mutator to fix the issue with CD - Eternal).

You can modify the difficulty by changing the ?Difficulty parameter (0=Normal, 1=Hard, 2=Suicidal, 3=HoE) and individual zed health (for example, ?Scrakehpfakes=3 fixes Scrake HP to 3 players). You can also add extra command lines to further customize your environment, such as:
  • ?MovementSpeedMod=1.0000 ----------> Changes global zed movement speed
  • ?DisableEventZeds=True ------------> Disables seasonal / event zed models
  • ?DamageMessages=True --------------> Enables damage pop ups
  • ?LimitedPerkSwitch=False ----------> Switch perks without restrictions

Alternatively, you can edit the "KFControlledDifficulty.ini" file and tweak each individual command to your liking. You can find the file in:
    C:\Users\*NameOfYourUser*\Documents\My Games\KillingFloor2\KFGame\Config

NOTE: The option to disable event zeds doesn't seem to work in KF-TestingMapRedux, it will only replace the sounds, not the skins, hitboxes or animations. If you want to disable them, use this mod:
https://steamcommunity.com/sharedfiles/filedetails/?id=1564532641


Additional Commands For Testing:
Once you enter the test map, you should input the following line:
    enablecheats | imrich | opentrader

With this, you can perform several actions like switching perks without any restriction and be completely immune to damage (opentrader), buy anything you need from the trader (imrich) and use manual zed spawning commands:
  • spawnzed fp ------------------> Spawns a Fleshpound with no AI
  • spawnai sc -------------------> Spawns a regular Scrake
    You can replace the "sc" and "fp" portions to spawn different zeds, both brain dead or with AI, such as:
  • minifp = Quarter Pound
  • clotc = Cyst
  • clots = Slasher
  • clota = Alpha Clot / Rioter (elite zeds spawn at random)
  • gorefast = Gorefast / Gorefiend
  • stalker = Stalker / E.D.A.R. Trapper
  • husk = Husk / E.D.A.R. Bomber / E.D.A.R. Laser


Useful Binds:
To improve the efficiency of your testing, it's possible to create binds that can speed up the whole process, such as:
  • setbind x killzeds ---------> Kills all live zeds, including bosses
  • setbind x opentradermenu ---> Opens the trader menu anywhere
  • setbind x dramaevent 1 3 ---> Initiates Zed Time for 3 seconds
  • setbind x clearcorpses -----> Removes corpses, they can block shots
  • setbind x clearsplatters ---> Clears blood splatters, can be annoying
  • setbind x demigod ----------> Your HP can go down to 1 and you won't die

      NOTE: Input these lines in your console to set up the binds. Change the "x" to the key that you like. Also, you can change the last number of the "dramaevent" command to customize the length of the artificial Zed Time.

      NOTE: The "demigod" command won't work if you input the "opentrader" command, because it irreversibly gives you god mode.


Prevent Zed Time From Triggering with Sharpshooter Weapons:
Once you reach level 25 as a Sharpshooter, both of your last skills grant you a chance to trigger Zed Time every time you headshot a zed, which will happen very often as you perform takedowns, making it difficult to practice them without the help of the slow motion. To bypass this, you can use the following bind to initiate Zed Time artificially before you start the combo so it doesn't trigger during it:
    setbind x dramaevent 1 0.1
This will trigger a 0.1 second long Zed Time. The time is meant to be short so that it doesn't disrupt your movement coordination, which is important for some takedowns that are highly dependent on positioning, like the Centerfire SPX combos against Fleshpounds. Obviously, replace the "x" parameter with the key of your choice.


Addendum #2: Practice Your Takedowns (cont.)
DLC Weapons:
Fauxy's KF-TestingMapRedux features DLC weapon spawners next to the trader pod. Simply walk up to them, press the use key and you'll receive the weapon. However, there are several new weapons missing from that roaster, so you'll need to spawn them via console commands. After enabling cheats, input the following lines in your console to receive a DLC weapon (ignore the text after the hyphens, it's just to clarify which weapon is spawned due to a name difference):
  • GiveWeapon KFGameContent.KFWeap_AssaultRifle_Doshinegun
  • GiveWeapon KFGameContent.KFWeap_AssaultRifle_FAMAS
  • GiveWeapon KFGameContent.KFWeap_AssaultRifle_G36C
  • GiveWeapon KFGameContent.KFWeap_AutoTurret --------------> Sentinel Drone
  • GiveWeapon KFGameContent.KFWeap_Blunt_ChainBat -----------> Road Redeemer
  • GiveWeapon KFGameContent.KFWeap_Bow_CompoundBow
  • GiveWeapon KFGameContent.KFWeap_Edged_IonThruster
  • GiveWeapon KFGameContent.KFWeap_Edged_Scythe --------------> Blood Sickle
  • GiveWeapon KFGameContent.KFWeap_Edged_Zweihander
  • GiveWeapon KFGameContent.KFWeap_GravityImploder
  • GiveWeapon KFGameContent.KFWeap_HVStormCannon
  • GiveWeapon KFGameContent.KFWeap_LMG_MG3 -------------------> MG3 Shredder
  • GiveWeapon KFGameContent.KFWeap_Mine_Reconstructor
  • GiveWeapon KFGameContent.KFWeap_Minigun
  • GiveWeapon KFGameContent.KFWeap_Pistol_Blunderbuss
  • GiveWeapon KFGameContent.KFWeap_Pistol_ChiappaRhinoDual
  • GiveWeapon KFGameContent.KFWeap_Pistol_DualBladed ------> Piranha Pistols
  • GiveWeapon KFGameContent.KFWeap_Pistol_DualG18 ----------> Dual Glock 18c
  • GiveWeapon KFGameContent.KFWeap_Pistol_G18C ------------------> Glock 18c
  • Giveweapon KFGameContent.KFWeap_Rifle_FrostShotgunAxe -------> Frost Fang
  • GiveWeapon KFGameContent.KFWeap_Rifle_MosinNagant
  • GiveWeapon KFGameContent.KFWeap_Rifle_ParasiteImplanter ---> Cor. Carbine
  • GiveWeapon KFGameContent.KFWeap_RocketLauncher_ThermiteBore
  • GiveWeapon KFGameContent.KFWeap_ShrinkRayGun ---------------> Reducto Ray
  • GiveWeapon KFGameContent.KFWeap_SMG_G18 ---------> Riot Shield & Glock 18
  • GiveWeapon KFGameContent.KFWeap_ZedMKIII


Addendum #3: An Alternative Test Map
Another, more straightforward and easier way to test your takedowns, is using the map
KF-SomeTestMap_v2 and the accompanying custom game mode (originally created by Willis, re-uploaded and fixed by NEXT): https://steamcommunity.com/sharedfiles/filedetails/?id=2247658747
This custom game mode will give you a few interesting advantages:
  • No need to use Controlled Difficulty, or cheats (if you use the manual zed spawners)
  • The trader is always open, allowing you to buy gear and switch perks without restrictions
  • You already have a lot of Dosh, allowing you to test an infinite amount of setups
  • You can buy all DLC weapons at the trader as if you owned them, no need for cheats
  • There's a custom menu that lets you kill zeds, enable demigod, damage messages, and more
  • You can easily change Zed HP by adding or removing fake players through the menu
  • You can disable Fleshpound raged spawns by editing the corresponding .ini config file
  • You can disable Zed Time by editing the same config file so that it doesn't disrupt your sharpshooter takedowns


IMPORTANT NOTES:
    The disadvantage compared to KF-TestingMapRedux is that you don't have Quarter Pound spawners and the arenas are more limited. That being said, I rarely practice QP takedowns due to the reasons explained in the Information / Disclaimers section. Knowing how to deal with FPs will let you deal with QPs without any problems. In any case, you can just spawn them via cheat commands.
    Another problem of using this method is that the custom game mode might stop working correctly as KF2 continues to receive updates, which is why the previous method is more robust in the long run. However, if the maintainer of this map chooses to keep it updated and fixes it when it inevitably breaks, you won't have any problems (also, CD - Eternal might eventually break as well).


How to set up 6-player Hell on Earth Testing:
Once you've subscribed and downloaded the map, input the following line into your console:
    Open KF-SomeTestMap_v2?Game=stm.SomeTestMap?Difficulty=3
    You can change the difficulty just like before


Now, you have to create a bind to open the custom menu. Input this line in your console:
    setbind x stmoptions
    You can replace the "x" with any key of your choice


Next, open the menu via your chosen key and increase the fake player count to 5 on the lower right corner, then save. You can write the number 5 or increase it manually with the arrow:


Finally, you can bind the following command that allows you to kill zeds instantaneously:
    setbind x stmkillzeds


And that's it, you are ready to practice and test. If you want some additional useful changes, you can enable Demigod mode to avoid dying and damage messages to help you design your own takedowns (these two are enabled through the STMOptions menu shown earlier).


Additionally, you can disable both Fleshpound rage spawns and Zed Time to reduce tedium and make your practice a smoother experience. To do this, open the following folder:
    C:\Users\*NameOfYourUser*\Documents\My Games\KillingFloor2\KFGame\Config


Next, find the file "KFstm.ini" and open it with Notepad. Then find the following lines, set them up like this, close it and then save the changes.
    bDisableZedTime=True
    bAllowSpawnRaged=False


Some Troubleshooting:
In my personal experience, every time I try to use this map for offline practice, all zed spawners stop working, as well as the health pickups. If I play the map through a dedicated server, everything works correctly, which seems strange.

But anyway, the way I solve this is by enabling cheats and spawning the zeds I need manually like it was explained in the previous testing method. I'm clarifying this in case anyone runs into the same issue.


A New Expanded Version of SomeTestMap:
https://steamcommunity.com/sharedfiles/filedetails/?id=2499917137 This new v3 version has added extra areas where you can practice takedowns in a multitude of ways, with multiple large zed spawns, as well as large zed spawns with random trash zeds mixed in for example. You can find the full list of changes in the Workshop item description to see if you find them useful.

Do note that it still requires you to subscribe to the original version shown at the top of this section since it probably uses its assets for the STM menu and other things. It also appears to use the same KFstm.ini file for configuration, so all your settings will be consistent across these two versions. Finally, this version is more appropriate for solo testing since all its arenas are different to allow for more complex group spawning. If you want to practice online with your friends, version 2 is the most appropriate.


To use this new version, you need to start the original first by using the line shown previously:
    Open KF-SomeTestMap_v2?Game=stm.SomeTestMap?Difficulty=3
    then, exit to the main menu and use this command:
    Open KF-SomeTestMap_v3?Game=stm.SomeTestMap?Difficulty=3?Mutator=stm3.stm3
    NOTE: You only need to start the original v2 version once. You can then directly use the second command to play the new v3 every time you want to practice.


NOTE: If there's a Summer / Halloween / Christmas event going on, you'll see the zeds in their seasonal skins in these two test maps as well. To disable them, use the same mod mentioned previously:
https://steamcommunity.com/sharedfiles/filedetails/?id=1564532641

Addendum #4: Another Useful Mutator
Another extra you can use to help you practice combos is the PerkLevelManger mutator by peelz:
https://steamcommunity.com/sharedfiles/filedetails/?id=1862573749 It allows you to artificially set your perk levels to whatever number you need, such as level 25 if you still haven't reached it legitimately or if you've recently prestiged some of your perks and you want to keep practicing your takedowns as a level 25.


How to Set it Up:
First, subscribe to the addon to download it. Then, in order to use it in conjunction with KF-TestingMapRedux, KF-SomeTestMap_v2 or KF-SomeTestMap_v3, you have to add the following line to the corresponding console startup parameters shown earlier:
    ?Mutator=PerkLevelManager.PerkLevelManagerMutator


If you have another active mutator, such as Yet Another Scoreboard when used with Controlled Difficulty, you can use PerkLevelManager in conjunction with them by adding its startup parameter next to the one used by YAS, separated by a comma. This obviously works for any combination of mutators that you may want to use in your server.
    ?Mutator=YAS.YASMut,PerkLevelManager.PerkLevelManagerMutator


Here's an example: the complete command line you need to start KF-SomeTestMap_v2 with its custom gamemode, plus PerkLevelManager:
    Open KF-SomeTestMap_v2?Game=stm.SomeTestMap?Difficulty=3?Mutator=PerkLevelManager.PerkLevelManagerMutator


Another example: the complete command line you need to start KF-SomeTestMap_v3 with its custom gamemode, plus PerkLevelManager:
    Open KF-SomeTestMap_v3?Game=stm.SomeTestMap?Difficulty=3?Mutator=stm3.stm3,PerkLevelManager.PerkLevelManagerMutator


A final example: the complete command line you need to start KF-TestingMapRedux with Controlled Difficulty, Yet Another Scoreboard and PerkLevelManager:
    Open KF-TestingMapRedux?Game=ControlledDifficulty_Eternal.CD_Survival?Difficulty=3?GameLength=0?Quarterpoundhpfakes=6?Fleshpoundhpfakes=6?Scrakehpfakes=6?Trashhpfakes=6?Bosshpfakes=6?FakesMode=ignore_humans?Mutator=YAS.YASMut,PerkLevelManager.PerkLevelManagerMutator


The default configuration will force all your perks to be boosted up to level 25. If you want to change this behavior, check the Workshop page shown earlier for detailed instructions on how to configure it to your liking.


Addendum #5: Extra Guides / Videos


Here's an additional compilation of Steam guides and YouTube videos that feature useful techniques, takedowns and general useful info about advanced KF2 mechanics. There's also high level gameplay footage using CD to increase the challenge way past vanilla settings.

This will give you more insight on how to play each perk more efficiently in general, when dealing with trash or large zeds, during public vanilla matches or organized, hardcore CD matches.


IMPORTANT NOTES:
    Make sure you check out most of the videos uploaded by each channel. They have a lot of useful stuff to help you improve your skills with all perks.

    Also, do keep in mind that some older videos or guides may be outdated, so several details may not be accurate for KF2's latest build. However, the most important information, concepts and techniques are still intact and will serve you well if you modify and adapt them correctly given the more recent changes in the game.


Steam Guides:
https://steamcommunity.com/sharedfiles/filedetails/?id=1860067942 https://steamcommunity.com/sharedfiles/filedetails/?id=2158513336 https://steamcommunity.com/sharedfiles/filedetails/?id=1279693748 https://steamcommunity.com/sharedfiles/filedetails/?id=878222672


YouTube Videos and Channels:


One Last But Very Important Disclaimer


It's critical to understand that a test map is a controlled environment. It's actually relatively rare to find yourself against a single, non-raged large zed, alone, without any trash zeds chewing you up and messing up your aim, or teammates dealing unpredictable afflictions such as Stumble, Knockdown, Fire Panic, EMP, etc.

You can spawn something like a Crawler next to you while practicing takedowns to try to focus and tune out the disturbance, but even then you won't get very far if you only stick to the test map. You have to bypass your fear of failure or death during an online match and try to perform your takedowns anyway, or else you'll never truly learn how to properly kill large zeds. It's normal to die many times when you are still honing in your skills.

The idea of using a test map is to practice all takedowns in the cleanest way possible, and then to use them as you see fit during real matches, where utter chaos is usually unavoidable, especially in pubs with random players. For example, you can kill a 6-player HoE Scrake with an AA12 as a Support with 18 shots, but you can also do it with 11, which is what you should strive for.

Another example: you can kill a 6-player HoE Fleshpound as a Gunslinger by emptying your Double Magnums and finishing it off with a a few shots of your Desert Eagles. However, this forces you to reload both guns if you want to attempt a second takedown on another FP that spawned close to the first one. If you instead learn the Magnum only and Deagles only takedowns, you can kill those two FPs without reloading once, greatly increasing your kill speed.

If you settle with practicing sloppy and inefficient combos in a test map, you'll probably have a very tough time playing online with random players. The reason, as explained before, is that takedowns become much more difficult to complete with all the chaos. The better you are at performing your combos in the most immaculate and efficient way possible, the higher your chances will be of successfully completing them during a public match.

Here's an example of how you can apply these techniques in a realistic situation: as a Support, before engaging a calm Fleshpound you can ask a fellow Commando to clean the trash around it and cover your back as you perform the takedown, or kill the trash yourself if nobody can help you or if you are kiting. If there is no other way, then you can also do the takedown anyway, even though the chance of failure increases significantly. Trash zeds can disrupt your aim, block your shots, move the large zed to a different position (like when it gets hit by a Husk's fireball or when it bounces on a Crawler) or sometimes even rage it prematurely (usually Husks or E.D.A.R.s dealing damage to calm Scrakes).

If you have a decent medic, then you can ask them to boost you with their darts to increase your damage by 20% (therefore increasing your chances of completing the combo successfully) and to heal you as soon as the Fleshpound hits you if the takedown fails. It's also important to try to initiate takedowns on even surfaces, definitely not on stairs or inclines unless there's no choice.

It's all a matter of good team communication and cooperation, identifying patterns and creating large zed engagement opportunities that reassemble an ideal testing environment as closely as possible (no disturbance from trash zeds, no multiple big zeds when possible, no uneven surfaces and zed aggro focused on the player that will initiate the takedown). This is how you correctly apply the techniques you've memorized and practiced thus far.

If you want a good map to practice takedowns in a real online gameplay environment, Zed Landing is a great choice. The reason for that is because it has many small imperfections on the ground that create subtle height differences, forcing you to compensate your aim. If you can master most of the takedowns there, then you'll become a very capable large zed exterminator.

Remember: mastery is achieved with practice, so get to it!


Final Comments
    Finally, I hope this guide will give you the knowledge to experiment by yourself and discover more interesting techniques that you can share with everyone.
    Thank you for watching and reading. If I was able to help you in any way, I'd really appreciate it if you could leave me a thumbs up at the top of the page so that this guide reaches more players. You could also share this with a friend of yours who might be interested and add it to your favorites as well, so you always have it at hand. This will really help me out! 👍


Thank you for choosing Horzine Biotech as your employer.

We are driving the renaissance of science. We reap the progress of bioengineering. We are the vision of technology.

We are hope. We are the future.

We are Horzine


15 Comments
Holy Crap  [author] Feb 27 @ 3:19pm 
I don't know what is the current best loadout, the meta may have changed since I played which was a while ago. Also, the zerk has many different loadouts that each one adapts better to the situation you are in when playing online. If you are in an organized team with a focus on ballistic perks, then using the VLAD+Zwei combo that I show in the video (with the same skills) to focus more on takedowns and not creating too much chaos is a good choice. If you need more resistance maybe go for Vampire if your medic doesn't keep you healed well enough. But if you want to zerkwall or your team is more chaos oriented (firebug, demo, etc.) prioritize weapons that allow you to tank better and still dish out damage without having to perform complex takedowns.
PeenBoyAce Feb 25 @ 7:28pm 
Current best loadout for Zerker?
Andy- Jan 18, 2023 @ 7:43pm 
Thank you :100:
Holy Crap  [author] Jan 18, 2023 @ 10:41am 
Thanks for the kind words!

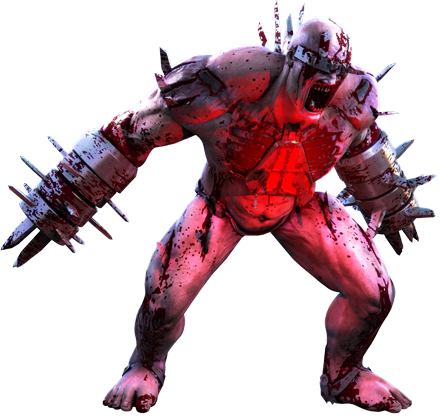
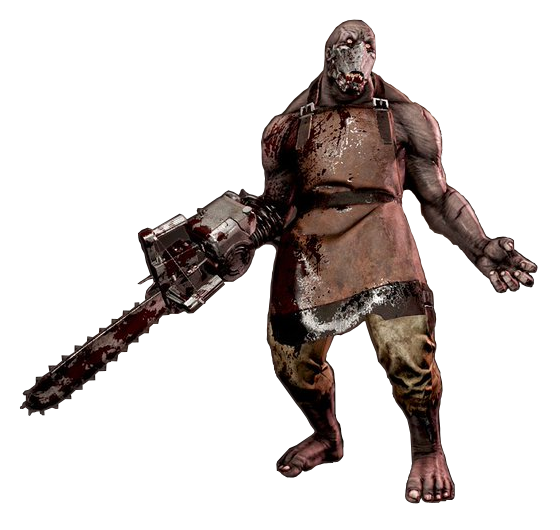
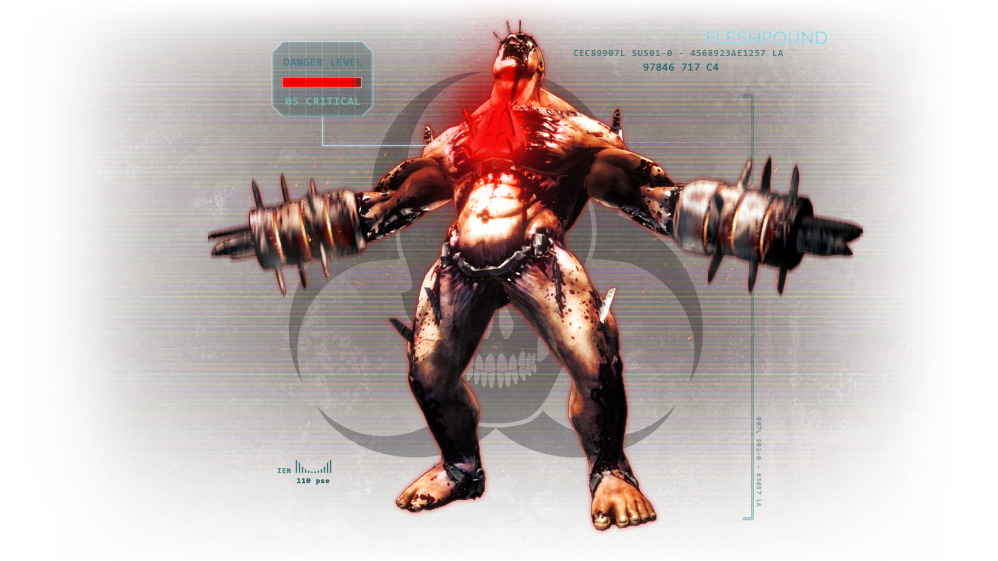
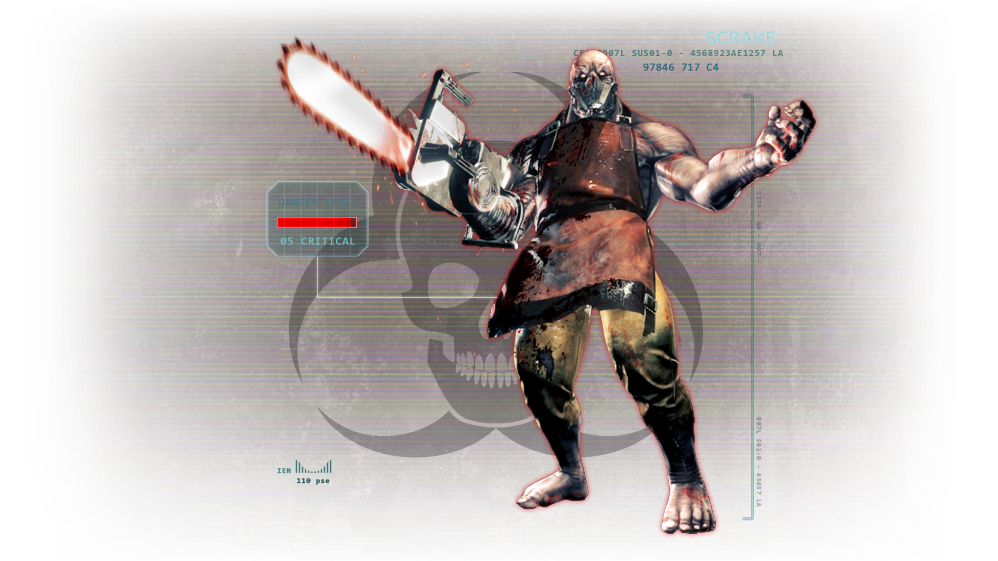
The gunslinger's nail bomb has always been inconsistent since I've started playing KF2 (early 2017). I have tried multiple ways or techniques to improve its consistency at stunning scrakes and fleshpounds but I found nothing. It's basically always a coin toss, so only use them against groups of enemies and maybe sometimes scrakes in emergencies (stll not recommended), but avoid using them against fleshpounds at all costs, as they can easily become enraged due to the damage.
Andy- Jan 15, 2023 @ 6:51am 
hey, i just wanna ask if they nefted the gunslinger's nail bomb. I used to bomb stun scrake & non-raging fleshpound then take them down quite easy, can't seem to do that anymore. Very nice & detailed guide btw
mejwen Jan 13, 2023 @ 2:26am 
a e s t h e t i c
Prass ALT F4 Dec 31, 2022 @ 11:37am 
Great. I'm clapping.
Holy Crap  [author] Sep 22, 2022 @ 11:31am 
Thanks!
KM89 Sep 22, 2022 @ 8:19am 
Brilliant guide mate. I was pissing myself at the end there.
Holy Crap  [author] Mar 28, 2022 @ 10:37am 
It looks like someone hacked into Horzine's servers and deleted them :lunar2019grinningpig: