Satisfactory

Satisfactory

138 ratings
A Relative Short Guide for New Players. (Out of Date as of Update 5)
By Jansen
These are some tips that I wish I knew about before I started playing the game.
These will make it a lot easier to navigate the world and build a good, productive factory from the start.


Hello.
I hope this guide will bring you some new insight in the world of Satisfactory.
If there are sections that could be explained differently and in an easier manner, please leave a comment.


I am currently updating this guide/walkthrough.
The goal is to make it simpler, easier to follow and up to date with Update 4.


I would also like to thank those of you who have deemed my guide worthy of rewards.
This has helped me in keeping the motivation up.

Seriously, thank you.
19
5
3
   
Award
Favorite
Favorited
Unfavorite
What to unlock first in Tier 1 & 2
Tier ONE - Logistics
With this you can split and merge your conveyor belts, making it possible for one miner to access
multiple smelters and those smelter to access multiple constructors.

Tier TWO - Logistics Mk. 2
In order to maximize production as early as possible, we'll need faster conveyor belts.

Tier ONE - Field Research
This will unlock the MAM which you can use to gain various upgrades and utilities.
Some of these researches are increased inventory, explosives, alternate recipies and the option
to clock your factory.
(clocking: You can increase and decrease production, will get back to this later)

Tier TWO - Obstacle Clearing
That Solid Biofuel is your best fuel early game.

Tier ONE - Base Building
With foundations you'll have a grid-based system when building your factory machines.
With walls you can build multiple storied buildings for your factory.
You can get more walls and different foundations with the help of your
Resource Sink, Tickets and Awesome Shop. More on those later.

Tier TWO
Whatever remains.


Note: These are my personal choices and way of playing. I am in no way saying that this is the optimal rout to take.
Exploration; A way to increase Production and survivability
You'd think that getting your factory all automated as early as possible would be the best way to go... It is not.
The goal for early exploration is to kill creatures for their hide and guts. Find Power Slugs (important) and crashed pods to gain access to their hard drives and acquire new recipes.

Before you go exploring, set up a production line so that you get some items as you explore the area around your base.
You may also want to bring some beacons (if you've unlocked them) to place down if you find a point of interest.

Set up a miner for both Copper and Iron.
Here's a picture for reference. This one is for Iron. You can use this for Copper as well, just change the production.
S = Splitter
M = Merger

Keep in mind that this is not an optimal setup, this is only so that you produce items while exploring.
You may of course build it however you desire.

Now then, time to explore.


M.A.M. - Upgrades and Utilities
I'll point out the the upgrades that are easier to get to and you really should focus on as early as possiblle.

Hard Drive
Around the world you'll find crashed pods. These contains a hard drive which you can analyze and receive an alternate recipe for 1 out of 3 choices once analyzed.
Note: each pod require repairs in order to access the hard drive.


Alien Organisms
  • Expanded Toolbelt - Can hold more tools
  • Rebar Gun and Ammunition - To shoot those pesky aliens
  • More inventory Space
  • 16 Alien Carapace
  • 09 Alien Organs
  • 3000 Copper Wire
  • 50 Rotors
  • 500 Screws
  • 200 Iron Rods


Caterium
Note: Caterium Ore can not be scanned until Tier 6. You'll have to find this on your own

  • Blade Runners - Increased movement speed, jumping height and less fall damage.
  • More Inventory Space
  • Power Pole Mark 2 - Can hold more wires.
  • 60 Caterium Ore
  • 50 Caterium Ingots
  • 750 Quickwire
  • 500 Copper Wire
  • 50 Reinforced Iron Plates
  • 50 Copper Sheet
  • 10 Iron Frames


Power Slugs

  • Power Shards - Needed to overclock machines.
  • Overclocking machines - gives you the option to overclock and underclock machines.
  • 1 Green Powerslug
  • 1 Yellow Powerslug
  • 100 Iron Rods
  • 150 Copper Wire
  • 150 Cables
  • 25 Reinforced Iron Plates


Get the most out of your ingots. (Will receive an overhaul soon-ish)
Preparation (things that need unlocking)
  • Power Shards - See M.A.M.
  • Overclocking - See M.A.M.
  • Conveyor merger - Tier 1 Logistics
  • Conveyor splitter - Tier 1 Logistics
  • Conveyor Belt Mk. 2 (Tier 2 Logistics) or better

Setting up your first machines
Deposits comes in three purities. Impure, Normal and Pure.
A miner mark 1 can generate 30, 60 or 120 ores per minute from each deposit.
On a pure deposit, you'll need a conveyor belt mk. 2 in order to maximise the amount of ore the miner can produce.

When you look at the UI of a constructor, you'll see the amount of ingots it requires per minute to create the desired item.
  • 30 IPM (Ingots per minute) for iron plates
  • 15 IPM for Iron Rods
  • 12.5 IPM for Screws (alternate recipe, see M.A.M. section for more information)
This equals 57.2 iron IPMs. (which leaves 2.8 IPM in the backlog on a normal deposit)

Note: A video will be posted here for for better explanation and visual representation

So what we do is this:
PS: After each CB MK.2, always use CB MK. 1, and use CB MK. 1 to connect splitters etc. unless told othervice.

Normal vein (60 Ingots per Minute)

Miner Mk. 1 -> CB MK. 1 -> Splitter -> 2x Smelters (30 IPM each)

CB MK. 1 from each smelter to a merger -> CB MK. 1 -> Splitter -> 3x Constructors.

Now, this is where we'll be using the overclock function (see M.A.M. section to unlock this).

Since the splitter splits equally, each side will get 20 IPM, and as we know, the Iron plates at 100% need 30 IPM.
So what we do here is that we underclock the iron plates, and overclock the Irond rods and screws

Iron Plates - 66% = 19.8 IPM
Iron Rods - 133% = 19.95 IPM
Screws - 160% = 20 IPM

Pure Vein( 120 IPM)

Miner Mk. 1 -> CB MK. 2 -> Splitter -> 2x Splitters -> 4x Smelters (2 smelters for 1 splitter) (30 IPM each)

Now connect all these smelters with 2x Mergers, then merge those two mergers with another one that goes into a splitter. (use a MK2 CB to connect the last merger with the splitter)

Connect then this splitter with three constructors. Each constructor now get's 40 ingots per minute.

Iron Plates - 133% = 39.90 IPM
Iron Rods - 250% = 37.50 IPM
Screws - 250% = 31.25 IPM

(Best way is to have six constructors on one pure vein (But build a lot more for the future))

This should give you an idea on how important it is to get the overclock upgrade as fast as possible.
Building a proper factory
Build in the present, but aim for the future.
Two rows of nine furnaces is a good place to start when building your factory.
This will give you a good amount of furnaces to produce ingots for a long time.
I also suggest having seven blocks of foundation between the walls of each row of furnaces.
This will give you enough room to sort out your conveyor belts.
(One splitter can evenly supply nine furnaces per split. Two rows per main splitter is recommended)
Main Splitter = The splitter that is connected directly to your Miner.

I have nine constructors on each side for every floor made for production.
They may not all be necessary, but whenever I am full on everything created in the facility, I will be given a boost of items when I need a certain item from the facility.
You can also downclock your constructors to consume less power.

This is probably the most important tip I can give; Build your buildings on the same grid.
This will make it possible to build bridges / walkways between your facilities that connect to one another.
The only way to make sure everything is connected to the same grid is to build foundations or walls (I suggest foundations) between each facility. You can remove the path you've built when you've reached your destination or keep it. Builders choice.

You can see that i've done exactly this in the videos beneath.

Factory Showcasing
These videos are simply there to give you an idea on how to build a working factory that looks nice, is functional and hides the clutter.

Iron Production Facility
https://www.youtube.com/watch?v=F0QQSxJZRog
In this video I am using the alternative recipe to make screws.

Copper Production Facility
https://youtu.be/oJfPjBhDaS4

Steel Production Facility
https://youtu.be/NJsuDg0rons
under editing this video I noticed that there is an issue with some of the conveyor belts. Do you see it?


Note: I am suffering from a prolapse in my neck, and this affects my voice which is noticeable in the videos.
I might update the videos down the line, but I make no promises.
AWESOME SHOP, things to get.
Awesome Shop
26 to 31 tickets required for all of the items listed below:
  • Wall Power Outlets Mk. 1 (4 tickets) - Having cables along the walls cleans up your factory.
  • Conveyor Walls of your choosing (7 or 5 tickets)
  • Foundations Expansion Pack (It has glass floors (3 tickets))
  • Conveyor Wall Mount (2 tickets)
  • Pipeline Wall Attachments (3 tickets)
  • Walkways (6 tickets)
  • Factory Railing (1 ticket)
One last tip
Here i'll toss in everything that doesnt need a section of it's own.
Although, this will make this guide a bit lengthier and not live up to it's name. I am sorry.

Option Wheel
(This is shown on screen, but just in case you havent seen it, here it is)
When holding for example conveyor belt, splitter, merger etc. Press E to bring up an option wheel with everything in that catergory for quick access. Saves you space on the hot bar.

Replace/Upgrade Power Poles / Wall OutletsYou can upgrade Mk 1 and Mk 2 by simply placing a higher ranked pole / outlet on top of the old one.
This way you dont remove the cables that connect to it.

Splitting a stack of items
Holding Right Click on an item for two seconds will allow you to split that stack however you like.

Transfer all stacks of a certain item
Holding control (CTRL) and Left Clicking an item will move all those items to storage or player inventory.

Slide-Jump
Holding crouch as you land from a jump (as you move forward) will give you a speed-boost next time you jump.

Jet-Pack Speed Boost
Performing a Slide-Jump with the Bladerunners equipped then switch to the jetpack will increase your forward momentum as you stay in the air (tapping the thrusters).
For even more speed, do this on a conveyor belt.

How much is in your storage conainers?
Press F and hover over your containers to see if they are full or not.

What's in your containers?
Have a short conveyor belt (preferably Mk1) come out of your containers to show you what they containt (Only works if they store one item)

Colour Gun
With this gun alongside it's colour cartridges you can paint your base (Anything at all) and give it a personal touch. Can be researched in MAM under Flower Petals.

Power Hub
This requires a lot of research in the Caterium branch in M.A.M., but could be well worth it.
Having a Power Hub means you can with the flip of a lever turn off power to a power grid.
You connect up the grid from i.e. Iron, copper, steel factory to separate power switches, and if you're having power issues you can turn some facilities off in order to keep, for example, Water and oil extractors going.

16 Comments
TheMadMan Mar 19, 2023 @ 4:24pm 
I wish i found this sooner :steamsad:
Lucky Jun 19, 2021 @ 10:56pm 
this is my advice wing it you learn along the way its easier to see then someone tell you in my opinion if you fuck up then fix it
tok3n Jan 20, 2021 @ 4:55pm 
what about a floor for assemblers and manufacturers ?
DarkEternal Dec 6, 2020 @ 10:14pm 
The first Hard Drive does not always give you the recipe for Iron Ingots to Screws. I got 3 options and none of them were II > Screws. It's random.
Elkor Nov 22, 2020 @ 1:02pm 
So, overclocking. I have so many green slugs I end up just using them on the resource I'm currently weighing the spacebar down for (as a metaphor), why wouldn't you? It's not like there is a penalty
Tantric Sep 27, 2020 @ 4:53am 
Game is painful to play until you get blade runners, always such a dramatic improvement
adriancott Sep 9, 2020 @ 3:36am 
I would argue a bit about powershards... IMO should only ever be used on miners and only after coal power... or spend half your time chopping trees etc. due to the large increase in power consumption... 2 machines running at 75% use less power than 1 at 150%

Would also get biomass production automated as early as possible... 2 storage, 1 for wood and 1 for leaves... into 2 constructors to biomass, into a storage then out to a constructor for solid biomass (once unlocked) then into a storage bin right next to all those hungry biomass power plants
Pak0tac Sep 5, 2020 @ 9:08am 
about splitters, is there a diefferecne from:

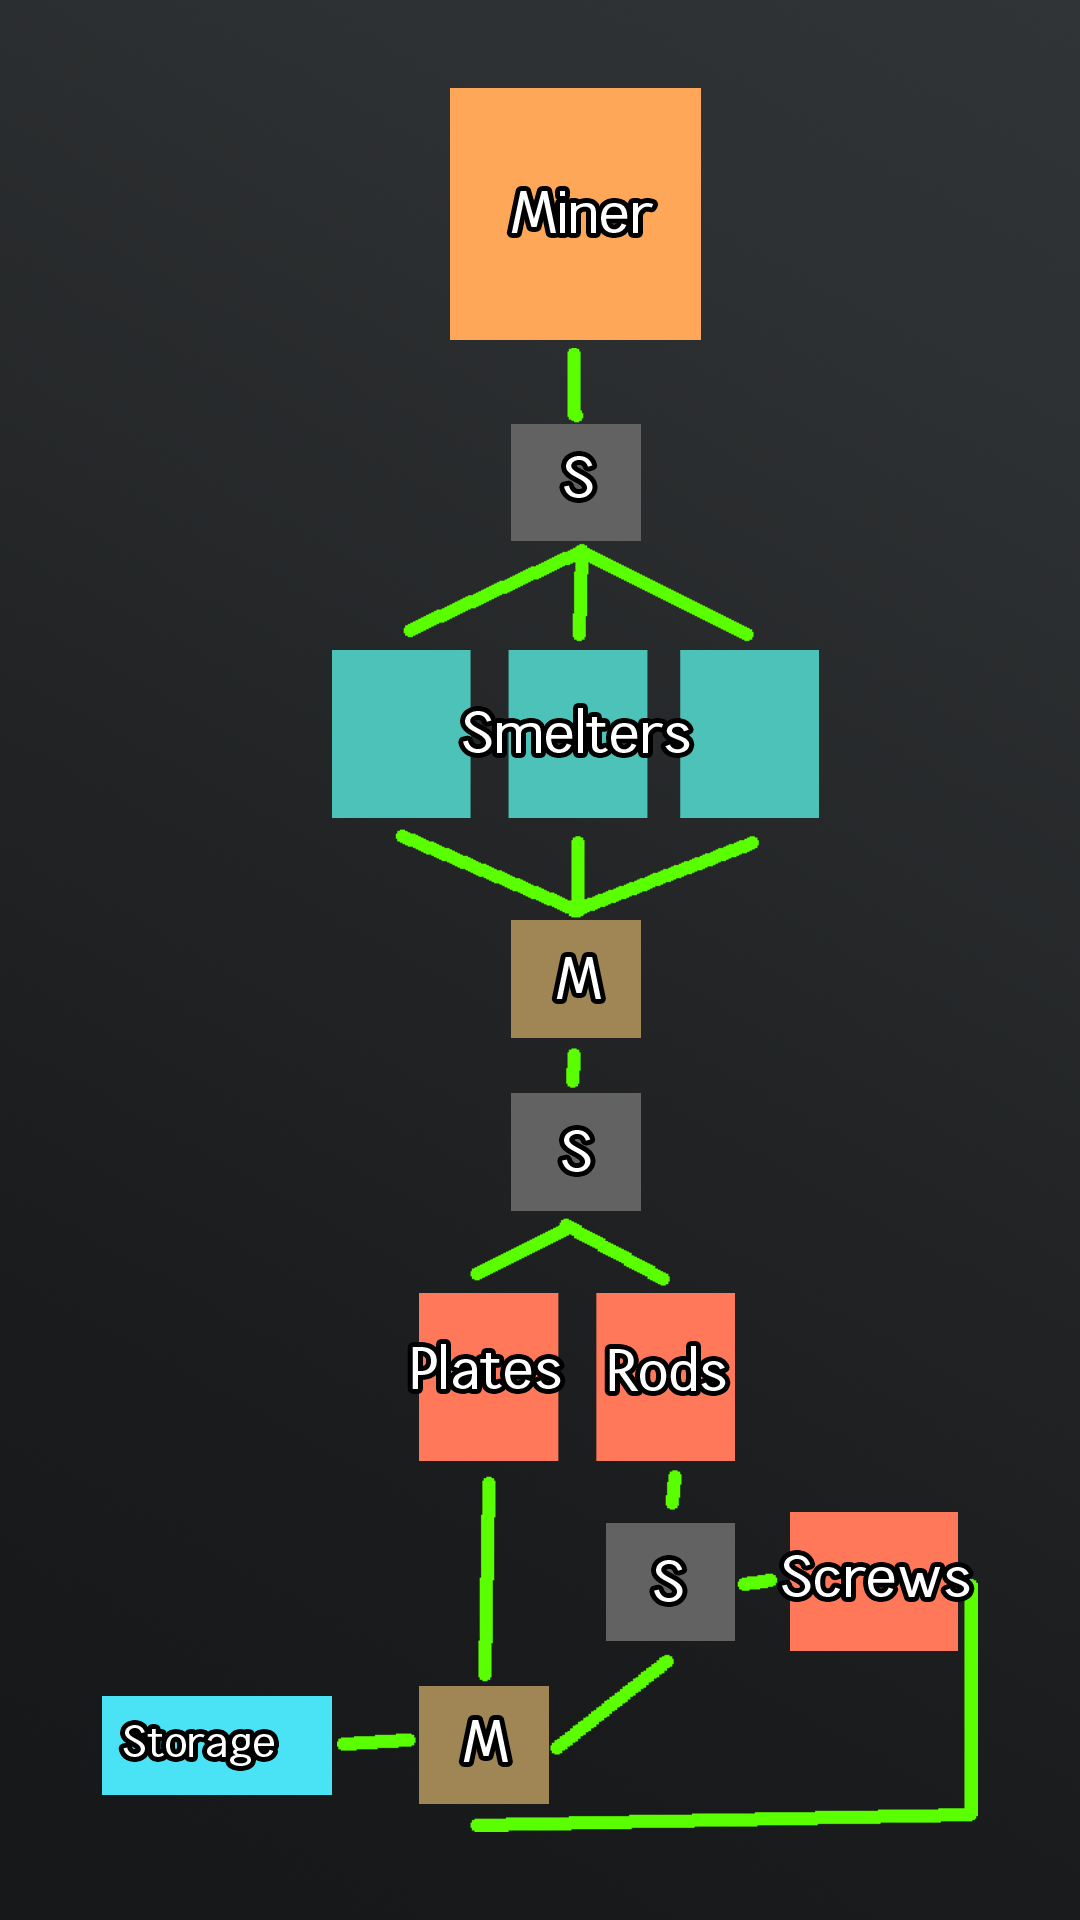
belt Mk2 (from pure ore miner)
----OOOO->
----^
>>>OOOO->
----v
----OOOO[S]OOO->
--------------v>OOO->

as you can see the first splitter cuts the main line in 3 directions
but then one of them is beein cut again so that i get 4 outputs that go into 4 furnaces
will it work?
bruteforceoap Sep 3, 2020 @ 7:07am 
280 hours in.....wish I'd thought about the alternate recipe for screws!
Mr.Titan Aug 20, 2020 @ 2:33pm 
I wish I had read this before I played the game for 10 more hours straight..... :|