Conan Exiles
27 คะแนน
CE Modding: Combat Adjustments
โดย Dread Swoop
Beginner-oriented guide for modding Conan Exiles' combat systems.
2
2
3
   
รางวัล
ชื่นชอบ
ชื่นชอบแล้ว
เลิกชื่นชอบ
Introduction
Welcome to my guide on creating a combat mod.

As you may have guessed, I'll be detailing the basics on how to create a combat-related mod for Conan Exiles. I am assuming as little experience with Conan Exiles modding on your part as possible for this guide to be the most broadly-useful.

Before we begin, I need to preface the guide by mentioning this: despite the inclusion of phrases such as "you should / you will / you must" or "do this / do that", this guide has NOT been made with the intention of dictating to you what to do. I assume to some extent that my knowledge is flawed and my techniques not optimal. As well, I do not claim to be an expert in this particular field, as I have no formal training with this software. I am only telling you how I go about performing these tasks, with the understanding that you may glean enough insight to be successful in your endeavors.

In addition, updates made by Funcom may make the following information obsolete and incorrect. I began writing this guide in July of 2020, and since then (as I'm writing this in mid- February 2021) there have been multiple structural changes to the combat system which have required me to reformat my mods. I will update this guide as I am able.

(This guide has not been properly updated to reflect changes that have been made to the combat system in 3.0 and beyond.)

In an effort to keep this as brief as I can, let's begin.

Obtaining (and Installing) the DevKit
To create mods for Conan Exiles, you will have to pick up the Conan Exiles DevKit from the Epic Games Store.


To find it, search for 'Conan Exiles' on the store page. Navigate down on Conan Exiles' page to find the DevKit, available for free.

While provided at no charge, there is still a cost to the DevKit: a whopping 192 240 250 gigabytes. Ouch.

If you can afford the space and are interested in that brick sitting on your hard drive for God-knows how long, download it at your leisure.

Depending on your download speed, it should be ready sometime between that afternoon and next month.

First Steps
Before launching the DevKit, you should know that there are two ways to fire it up. First is the conventional method of launching the DevKit via the Epic Games Launcher; it's pretty self-explanatory. The second method is to launch the DevKit via a .bat file located in the contents of the DevKit installation.

To find this file, navigate to wherever you chose to install the program (by default it's usually in Program File -> Epic Games). The file we are looking for is RunDevKit.bat in the ConanExilesDevKit folder. You can start up the DevKit by double-clicking this file.

There are a couple reasons why you might want to launch the DevKit this way:

1. Launching the DevKit via Epic Games Launcher will require you to update the DevKit, which has the potential to mess with mods you are working on. You can avoid having to update with the bat method. (A 50 gig update when you want to work out a couple tweaks is a bit of a buzzkill.)

2. You distrust Epic Games and their [RED CHINESE] overlords, and don't want their application open longer than necessary.

Choose which method you prefer and fire up the DevKit.

The process of loading the application can take some time, depending on the speed of the drive it is installed on. If it's on an SSD, it should be a couple minutes. If not, turn on a movie because it will take a while.


Once the DevKit is fully loaded, you will be greeted by something akin to the screen above.

Imposing, isn't it.

Learning how to navigate your way around the DevKit is important, so I recommend thinking of some aspect or facet of the game and trying to find it in the Content Browser (on the top bar). This can help you quickly construct a mental map. Keep in mind that navigating certain sections of the DevKit will require assets to load for thumbnails, which can severely slow down responsiveness.

Giving it the time necessary to get through loading these assets is recommended, though you can also check the 'skip compiling materials' box in the Editor Speedup section in the top right of the window (it doesn't remember that setting, so it'll need to be done every time the DevKit is launched).

Do not make any changes yet. You are currently loaded into a test mod and will want to create a new mod with a new name.

To do so, navigate to the arrow to the right of 'Conan Exiles Dev Kit' (at the top of the window) and select 'Create a New Mod'.


Type a memorable and unique name for the mod (this is not for the display name of the mod, only for the final pak file). It is possible to change the name later, but is rather technical and can break your mod if done incorrectly, so be sure to give it a name you won't regret.

Confirm the name and the DevKit will be loaded up again (a recurring theme), though this time it should load somewhat faster than before.

After the DevKit loads up again, use the Content Browser to navigate to the folder of your mod. This can be found, as you may have guessed, in the 'Mod' folder.

It is advised to avoid directly editing base game assets when possible, as doing so can create compatibility conflicts with other mods, as well as open up the possibility for a DevKit update to undo your changes.

The next several sections of the guide will outline the process of accomplishing that.

Data Tables
The most interesting aspects of Conan Exiles' combat system are handled by data tables, which are glorified spreadsheets. The two most important tables for the combat system are ItemTable and DT_ComboRules.

ItemTable contains data related to individual weapons, such as:

* Base damage + stamina costs (differentiated between types of attacks)
* Armor penetration
* Durability
* Encumbrance weight
* Weapon class designation

among other stats. ItemTable adjustments can be very granular and refined, ideal for balancing weapons within their tiers as one example, but broad projects may require a massive amount of edited entries on your part. The ItemTable can be found in Content/Items.

IMPORTANT: As an anti-theft measure, DLC items are not available to edit through conventional means via the ItemTable. See the 'Control Table' Addendum for information on how to edit them.

I've personally found DT_ComboRules to be more interesting when adjusting combat. Within lies the structure of the combo-based combat system, involving:

* Animations (which include their own host of values)
* Damage + stamina cost multipliers
* Status effects
* Knockback effects

and other assorted values. Because these combos are designated to specific weapon classes (such as one-handed sword, daggers, or two handed axe), all weapons of that class, including ones introduced via mods and DLCs, will be affected by our changes. DT_ComboRules can be found in Content/Systems/Combat/ComboSystem.

To avoid compatibility issues, I would highly recommend making a new table that can be merged with the base game's, as opposed to simply editing the original. Creating a new data table can be accomplished by right-clicking within the DevKit's mod folder window to open the creation menu, navigate to 'Miscellaneous', then 'Data Table'. From here, there will be a selection of table structures; the structure for ItemTable is 'Item Table Row' and for DT_ComboRules it is 'STR Combo Step'.

For the purposes of instruction, I will show you how to work with both of these tables.

Data Tables: ItemTable
We'll work with ItemTable to start.

As outlined earlier, create a new data table with the 'Item Table Row' structure. Remember to give your new table a memorable and distinct name.

Upon opening your new data table, you may notice that it's empty. You'll likely want to fill it with whatever weapons, armor, or other items you would like to add/edit. To acquire entries to edit, search for, or navigate to, the ItemTable with the Content Browser (searching can cause the DevKit to lock up sometimes, but that's normal and it should eventually be resolved). I've found that searching 'mtab' helps bypass much of the initial clutter results.


With access to the main table, items can be searched by name to narrow results, though irrelevant results pinged by descriptions will need to be sifted through. When the proper entry has been found it can be copied by right-clicking on it and selecting 'Copy Rows'. You can left-click and then use Shift with the downward directional arrow to select multiple rows at a time. Back at your new table, right-click and select 'Paste Rows' to incoporate the entries. With the data successfully copied over, we are free to make changes.


As you will see, there are a lot of values to change here, but keep in mind that accomplishing your goal with the fewest necessary edits reduces the risk of unforeseen issues cropping up. That being said, learning how certain values function sometimes requires trial and error; as much as you might learn from this or any other guides, they pale in comparison to the educational impact of direct impressions.

Since detailed descriptions of each value would take far too much space for this section, I may relegate that to a future addendum.

As a demonstration, I shall edit the Two-Handed Iron Sword. In particular, I shall change the weapon's damage values for light and heavy attacks, its armor penetration value, its encumbrance weight, and its durability. As well, I'll adjust the Shemite and Relic Hunter turbans to act as sandstorm protection.

Adjusting entries in ItemTable (and most other data tables, for that matter) is very easy; for most it's just a case of typing in the desired value. While I don't think it's necessary to include in the guide, I will do so for the sake of completeness.

The weapon's base damage values are found under the 'Attack Data' wedge, and I'll input the perfectly-balanced value of '69' into the entry boxes. As an aside, it's important to keep in mind that weapon attacks often have damage and stamina cost multipliers applied via DT_ComboRules, so it may be useful to see what values those are before trying to balance specific weapons.

The armor penetration entry is further down in the 'Attack Data' subset, and you may notice that it reads '0.2025'. This value uses the decimal system, which in this case equates to 20.25%. Remember that so you don't accidentally put in '20' and get full penetration (unfortunately going over 100% does not add bonus damage). I'll set it to 12%, so an input of 0.12.

The weight of the item can be found under the 'Stamina Cost' wedge, in particular 'Encumbrance Weight'. I'll set it to 0.1.

The item's durability can be found under the conveniently-named 'Durability' wedge, the specific value 'Max Durability'. With a value of 1337, she is sure to be impressed.

For the turbans, you may have noticed that there were two entries in my data table for each. This is because there are separate IDs for the normal and Epic tiers of armor, and if I want to be consistent I need to make the adjustment for both.

Since the function for sandstorm protection already exists with the Sandstorm Breathing Mask, I can navigate to its entry in the base ItemTable, and we will see that its 'Item Class' is a blueprint called 'BP_SandstormBreather'. The blueprint can be inspected by clicking on the magnifying glass icon to the right of the entry to find its location. For our purposes, I am satisfied with the BP, and from the ItemTable I can right-click on the entry and copy it, pasting it into the fields for the turbans, which will save some time over using the search bar.

With your changes made, be sure to save the file by navigating to 'File' in the top left and hitting 'Save'.


Data Tables: DT_ComboRules
As mentioned in the previous section, DT_ComboRules will be the main focus in making changes to combat.

When making a new table to be paired with DT_ComboRules, remember to select the 'STR Combo Step' structure.

(NOTE: When working with attacks, I generally like to make an additional data table to act as my workbench. This helps keep the main modded tables clear of unintended changes made over the course of tinkering with the attacks.)

Copying over entries works in the same manner as the ItemTable; right-click for single entries and left click with Shift plus the downward directional arrow to select multiples. Sometimes weapon attack entries become scattered throughout ComboRules, so I would recommend searching by the desired 'WeaponComboLead' value (for example, typing 'Sword_2h' for two-handed swords) which should allow them all to be copied over in one motion.


As you can see, each attack has a large amount of information that can be edited, such as the animation, damage and stamina multipliers, status effect applications, and knockback degrees. In addition, note the 'Combo Step Next' setting, as it is used to determine how a character progresses through the combo tree.

For detailed descriptions of the contents of DT_ComboRules, please visit the 'DT_ComboRules In Depth' Addendum.

For this guide, I will be replacing the animations for two-handed swords with those of the Katana. For more information on the process of working with animations, check the Animation sections of this guide. In addition, I will adjust damage and stamina cost modifiers, adjust knockback effects, and apply Bleed status effects to various two-handed sword attacks.

Adjustments to animations are covered in the following two sections of the guide, so I won't go into detail here.

I have returned from roughly an hour into the future. After I have adjusted the animation copies to my liking, it is time to add the animations into the combo table. To do so, simply navigate to the 'Combo Montage' setting, click on the existing option, and search for your desired animation. If you chose to give them unique names, then they should be pretty easy to find. If not, check the file paths for the options to make sure it's the correct montage.

To better judge how the attack animations will perform with 2H Swords, I will navigate to 'Damage Modifiers' with the intent to set it to base damage (1.0) for each attack. Each attack can have multiple damage multipliers applied for various damage types, with by far the most common being health damage, referencing 'DmgTypeHealth_BP'.

While I could simply delete the modifier entry by clicking the trashcan icon next to it, thus achieving base damage for the attack, doing so will delete other damage multipliers applied which you may or may not want to get rid of. Setting it to 1.0 achieves the same outcome, and keeping the entry makes it easier to adjust the multiplier later.

As far as damage multipliers are concerned, they will have no effect if the weapon in question does not do any of that particular damage; 10 times 0 is still 0, and a two-handed mace will not benefit from buffing concussive damage for its attacks if it hasn't been given any in ItemTable.

Stamina cost multipliers are very straight-forward, located just under the damage modifiers, just keep in mind that the amount of base stamina used per attack varies not only between light and heavy attacks, but also between individual weapons. Looking up the values of weapons of a particular class can be beneficial when trying to balance stamina costs.

Stagger effects are located in 'Knockback Class', and reference blueprints which govern how the struck actor will react. Two-handed swords have been set to use their own proprietary knockback blueprints and I want them to use generic stumble effects. While I could search through the list to find the right one (whether I want quick, lengthy, or extra lengthy), finding an entry which already has the stumble effect I want in DT_ComboRules, right-clicking on it and selecting 'Copy', then going through each attack and pasting it in is significantly faster.

While custom knockback effects can be made, this isn't the focus of the section, and it may be covered in a future Addendum.

Status effects, such as bleeds, sunders, and cripples, are covered by the 'Combo Effects' entry, which you may notice looks quite a bit like the damage modifiers. A specific effect BP is referenced (and yes, custom ones can be made, but again it's not the focus of this section), with a potency setting that, to my knowledge, does not work.

I should mention that the array elements of the damage modifiers and status effects can be copied and pasted in whole, which can make applying them to a multitude of attacks far faster.

After going through all the light, heavy, and offhand attacks, adjusting what I've deemed necessary, I have accomplished my goal. I'll have to remember that, presuming I was using a second table as a workbench, that those rows are copied over to the first modded table; they won't do you much good if they don't get merged.

After a detailing of working with base game animations, we will move on to merging our main data tables with DT_ComboRules and ItemTable via the ModController we made at the start of the guide.

Base Game Animations I
As you might imagine, attack animations are integral to the combat system.

The animations we are primarily concerned with are animation segments (usually designated with an A_ prefix) and animation montages (usually designated with an AM_ prefix). Animation montages are comprised of one or more animation segments, and include within themselves notifiers for features such as collision detection windows, attack speeds, weapon trails, HyperArmor coverage, and sound effects (animation segments may also contain such notifiers, but less often).

Weapon animations for humans can be found in Content/Characters/Humans/Animations/Combat, subdivided further into folders for each weapon class. There are some animations compatible with the human skeleton in the Content/Characters/NPC folder (such as for the Kinscourge) as well.

IMPORTANT: I highly recommend making copies of the animation montages and their constituent animation segments in your mod's folder and editing those. This avoids complications with future DevKit updates undoing your work, as well as greater compatibility with other mods.

There are two ways that I am familiar with for copying animations to your mod folder. First, you can use the Source Panel (found by clicking the icon under the green 'Add New' button in the Content Browser and the left-pointing arrow) to allow you to drag-and-drop the assets into your mod folder (DO NOT 'MOVE', ONLY 'COPY'). You can use Shift and the directional keys to select more than one animation at a time. To find which animation segments go to which montage, you'll have to open the specific montage and look there.


The second method involves copying over the files to your mod's folder via the file browser on your computer. You can find the location of the files by going to:

(Your Drive)\Epic Games\ConanExilesDevKit\Games\ConanSandbox\Content

and navigating through the folders from there. I would recommend only doing this when the DevKit is not loaded in, just to err on the side of caution. Be extra careful not to move assets from the DevKit's folders. Just copy them over into your mod folder (preferably into an Animation folder for orderliness). For me, my mod folder would be:

ConanExilesDevKit\Games\ConanSandbox\Content\Mods\ILoveShrek\Local\Animations

Be sure to save the animations in your mod folder once you have finished the copying process. Afterwards, feel free to rename the animations / montages to something more memorable. This will help with assigning them to attacks in the combo table later on, but it is not required.

<<< CONTINUED IN PART II >>>

Base Game Animations II
Now that we've acquired the animations and placed copies of them in our mod's folder, we can begin working with them.

Most work with animations will be done via the animation montages (with the blue line underneath them) as they contain the majority of the adjustable features. For this guide, I will open up the light_c0 attack montage.

IMPORTANT: When working with animations, the used character mesh can vary. In some instances, it's Conan, in others the Kinscourge. However, in most cases it's a bald, naked lady. Exercise situational awareness so the wrong people don't get a peek.


This is what you'll see when opening an animation montage (minus the censoring). At center-screen, you'll see several horizontal green bars. These are the animation segments that comprise this montage. By clicking on one, you'll see settings pop up on the right side of the screen. Here you can change the animation in that slot, how far into the animation to start and how far in to stop, and what its playback speed is (usually 1.0x).

If you have also copied over the animation segments that go along with each montage, I would recommend replacing the existing references with your copies. To do so, click on the Animation Reference, which will bring up a list of replacements. If you haven't changed the name, it should be the exact same, but with a different file path, making it pretty easy to find. Swap them out for all animation segments, both for 3rd person (usually top row) and 1st person (usually bottom row). This helps to avoid a potential T-posing issue when using animations not intended for a specific weapon class.

I would recommend not adjusting the playback speeds for the animation segments unless you intend to shorten that segment specifically. Doing so can mess with the placement of notifiers further down and completely screw up the attack.

To speed up or slow down the entirety of the animation montage (without risk of screwing with the notifiers), refer to the 'Rate Scale' setting at the top left of the screen. I would generally advise not messing with any other setting on the left side unless you know what you're doing.

Sections (located below the animation map) are often not of much use to us, so there's no real point to mess with them unless you're making structural changes to the montage itself.


Below this, however, is the Notifier section. This controls most of the features we would be interested in when making adjustments to the attack animations. Each notifier also has an array of settings associated with it, however only a few will be important to us. This animation does not include every possible notifier reference, but I will list out some of the more important ones and what functions they perform:

* Combo / Queue Windows: these notifier windows are used to recognize when an input is permitted to prepare the next attack in a combo. Combo windows are used to progress to the next attack in the chain while Queue windows are used to cycle back to an opening attack.

* CancelAttack / CancelDodge / CancelMove Windows: this notifier is used for delineating when the attack is allowed to end, whether by progressing to another attack (CancelAttack), by pressing the dodge key (CancelDodge), or with movement key inputs (CancelMove). These notifiers are very important for creating a refined, smooth attack. Note the interplay between CancelAttack and the Combo / Queue windows.

* CollisonNotifyState: this is used to determine when your weapon is permitted to damage an enemy. Multiple of these notifiers means multiple chances to deal damage to an enemy with the same attack. The notifier defaults to using the weapon mesh for hit detection, but can be overridden for detection on specific bones (a foot for a kick attack, for example), and expanded from there. With some exceptions, the x-value for collision transforms affects the detection in front of / behind the weapon, the y-value affects the detection to the sides, and the z-value up through the tip. This notifier only works with regards to the player character. See SweepAttack for NPC hit detection.

* SweepAttack: this is used to determine when an NPC's weapon is permitted to damage an enemy. Note that it is a single point as opposed to a window. However, these notifiers have collision boxes associated with them standard, as opposed to CollisionNotifyState, which defaults to using the weapon mesh. The boxes can be translated, rotated, and scaled by clicking on the notifier and working with the settings on the right side of the screen. Multiple notifiers mean multiple opportunities for an NPC to hit an enemy.

* HyperArmorWindow: this notifier is used to designate when the animation is protected from outside interruption (getting hit by an attack, generally). Most attacks have HyperArmor coverage, usually situated around the 'execution' phase of the attack. It's important to keep the amount of coverage balanced as to not make the attack under- (or over-)powered.

* WeaponTrailNotifyState: this notifier is used for determining the type of weapon trail associated with the attack, in addition to when it is active. There are several permutations of this notifier corresponding to different types of effects (bleeds, sunders, block bypassing, etcetera). This is best used when coupled with an appropriate status effect in the combo table.

TIP: to swap between these easily, right-click on the notifier and select 'Replace With Notify State' and then choose from the selection, generally located near the bottom. Remember to look through the settings at the right side of the screen to make sure the weapon socket and trails used are appropriate.

* CapsuleSlideWindow: this notifier window is used when an attack moves the character's position to any significant degree. This helps prevent the character from passing into the meshes of other things, such as NPCs or rocks. The 'Trigger Lock Distance' associated with it is the distance at which the capsule becomes effective.

* SFX: these notifiers, usually noted by their purple appearance, play arrays of sound effects at specific points during the animation. In addition, there are also notifiers with a yellow appearance that govern sound effects such as footsteps, foleys, or character noises (these do not play while in the animation, unlike the purples). There are quite a lot of them, so you may need to do some digging to find the one that works for you.

The 'window' notifiers can be expanded or contracted by dragging one of their edges, and moved by dragging on the body of the window. Certain notifiers have settings that can be adjusted on the right-hand side of the screen, so watch out for those.

You may want to experiment with different settings while you're here, just be cautious and remember to use the 'Undo' function if accidentally delete / change something you can't fix. For now, I will be returning back to our modded combo table to add our animations to the attacks.

IMPORTANT: DO NOT SAVE ANY CHANGES MADE TO THE SKELETON.

The ModController
We have now reached the point where we will merge our data tables and turn our project into a functioning mod.

To do so requires the creation of a ModController blueprint file to allow for the merging of data tables.

To create a ModController, right-click in the folder to open the creation menu. Select 'Blueprint Class' from the list of options and then find the modcontroller option by typing 'modcontroller' into the search bar in the pop-up window.


Remember to give it a unique name.

Load up the ModController (it tends to take a while the first time in a session). From the window where it first puts you (usually the Viewport), use the tabs at the top of the window to navigate to 'Mod Data Table Operations'. From here we will be able to merge the tables.


The amount of functions we are able to perform in this tab are limited, but enough to accomplish what we are looking to do. Right-click anywhere in the window to bring up a list of options. We will be given five options; we have the commands 'Clear Data Table', 'Merge Data Tables', 'Merge Data Table with Control Table', 'Remove Data Table Rows', and creating an array for removing specific table rows. We will not generally be using the 'Clear' function.

Select the 'Merge' function, which should create a block with some input lines. The 'Target' option isn't useful for what we're doing, but for the 'Merge Into' option, select the game's table (in our case either Itemtable or DT_ComboRules). For the 'To Be Added' option, select the modded table that corresponds to that table's structure. If you want to perform another data table merge, simply create another Merge block and repeat the process.

You can merge as many tables as you'd like with this method. For example, when Glory of Combat was still under construction, I was merging around 20 tables with no adverse side effects.

If you would like to remove rows from a specific table, select the 'Remove' function. For the 'Remove' function to work, you will need to connect an array with the IDs you want to remove listed inside. To do so, either select 'Make Array' or drag a line from the Row ID icon, which will automatically create an array. Click 'Add Pin' to create another ID slot.

The process of merging with a control table is outlined in its own special Addendum and will not be covered here.

You will now have to connect these blocks to the starting block for the ModController to know what to do. Simply drag a line from the icon of the starting block to the 'Merge' block, and then from that block to the next, if there are any more.

Always remember to save.

Congratulations, the data tables should now merge when the mod is loaded into the game.

Cooking and Testing
Now that our ModController is correctly configured to merge the data tables, we have only one last task to perform to get the mod in operating condition.

We will have to 'cook' the mod, which essentially bundles all the loose files into a compressed and encrypted .pak file. To do so, click the wand and plug icon which says 'Conan Exiles DevKit' at the top of the main window. This will open up the Mod Info window, which can be used to assign a name, organize the version number, add a description, select a picture, and ultimately upload the mod to the Steam Workshop.


Once you have assigned the mod a name, version number, and given it a description, select the 'Build Mod' option. This will start the 'cooking' process. This can take several minutes, so keep that in mind. You can select the 'Compress Pak' option if you want, but it seems to compress the size anyway.

Once the cooking process is complete, a small window will pop up saying one of several things; the process was successful, it was successful with warnings, or it was unsuccessful because of an error. In most cases there shouldn't be any errors, but if there are, make sure to look through the Output Log to see specifically what the problem is. In addition, check the Basic Troubleshooting Addendum for some help.

Once the mod is successfully built, there are a couple ways to get it from the DevKit to your game. I generally use the now-accessible 'Built Mod Folder' button to find the location of the .pak file, copy it, and navigate to my Conan Exiles mod folder. The pathway to the game's mod folder is:

Steam\steamapps\common\Conan Exiles\ConanSandbox\Mods
(if the folder doesn't exist, feel free to make it)


With that done, you can go in-game (Singleplayer) and enable the mod, or enable it via modlist.txt (also in that folder). With the introduction of the Funcom Launcher, the mod can also be enabled there.

The game can also be simulated in the DevKit itself by pressing the 'Play' button at the top of the window, but there are some downsides, most notably that it runs like ass. The first time it is launched, it can take a considerable amount of time for it to properly load, which may leave you wondering whether it bricked your machine. However, it does not require you to cook the mod, only to save the relevant assets, which can be a plus for some people. As a tip, I would mention that the Admin Panel can be opened via in-playtest by pressing SHIFT and INSERT, and closed by pressing the same (resist the urge to press Escape to close menus, as it will end the playtest).

For projects which require multiple people to test, you can upload the mod to the Steam Workshop and subscribe to it there. If you are doing so, I recommend keeping the mod set to 'Hidden' until you are ready to share it with the public. It's obnoxious having to wade through a sea of "TESTINGG DO NOT USE PLEEZ!!!" mods in the Workshop. Don't contribute to it.

If you have a relatively powerful computer, you could leave the DevKit running while starting up Conan Exiles (I usually do that and nothing bad has happened... yet). If not, closing out of the DevKit is always an option, even if you have to eat the several minutes to get back in the DevKit. Either way, once you're in-game and the mod is enabled, it's time to test if everything works as intended.


And it works! Mostly. I have an issue with the Heavy attack animation (which is known for being annoying to work with) not progressing to the execution phase, but that's an issue to solve for another time (in the WeaponUseTable Addendum). In addition, the sword is being held backwards during the attack animations (addressed in the Additive Layer Track Addendum).

If it works for you, congratulations! If not, you can always go back to the DevKit and iron out the issues.

Conclusion and Additional Resources
Well there you have it! Hopefully this guide has been helpful to you, at least to some degree. If some sections were not clear enough or didn't go into enough detail, let me know and I will expand upon them.

Have a good one!


Dread Swoop


I would ask that, if you have further questions, you place them in the comments section and I will try to address them.


ADDITIONAL RESOURCES:

* https://www.conanexiles.com/mods/ - this is an official collection of modding guides on the game's website.

* https://conanexiles.gamepedia.com/Category:Modding - this collection of modding guides on the wiki can help with modding endeavors outside the scope of this guide.

* https://discord.gg/66jB9dN - this is the Conan Exiles Modding Discord server. There are a large amount of modders who participate in helping each other out with modding projects. I do not frequent it very often, but you may be able to find assistance with whatever you're looking for there. Remember to follow the rules.

In addition, the AllGuides.zip modding guide compendium can be found pinned in the Conan Modding Discord under the Tips, Tricks, and Tutorials subsection.

Addendum: Basic Troubleshooting
In this addendum, I will be covering a couple ways to fix issues that have arisen in your mod project.

Beginning with:

I accidentally edited and saved a base game asset. How do I undo this?

When you edit a base game asset in the DevKit, it doesn't actually overwrite the file itself. Instead, it makes a copy in your mod's Content folder. To solve the issue, the copy simply needs to be deleted. To find it, navigate to:

Epic Games\ConanExilesDevKit\Games\ConanSandbox\Content\Mods\(YourMod)\Content

This can also be quickly accessed from the DevKit by selecting the 'Active Folder' option in the Mod Info window.

There will always be at least two folders (Collections and Developers) in the Content folder. If you edited an asset, it will show up in a third folder. You can delete the entire chain of sub-folders from the Content folder to solve the issue.


When I cook the mod, it says there are warnings.

In my experience, this is often caused when the DevKit can't find certain files in your mod's folder (likely because you deleted them). There is often a trace left of this file still in the folder that needs to be removed. Navigate to:

Epic Games\ConanExilesDevKit\Games\ConanSandbox\Content\Mods\(YourMod)\Local

and search the folders for any tiny file remnants. I recommend sorting by size to easily identify them (they are usually 1-2 KB in size). Make sure to not accidentally delete any small data tables or the modcontroller.


When I cook the mod, it says there are errors.

In my experience, errors are generally caused when a particularly important base game asset is edited, causing the links it has to other assets to break. This can be solved the same way as the first issue above.


I would like to change the name of my mod's folder.

That is a somewhat technical process, I would recommend looking at the specific guide to do that located here:

https://conanexiles.gamepedia.com/Rename,_Merge_or_Split_Mods

Be sure to make a backup of your mod projects in the event that you break your mod.


One of Funcom's game updates has broken my mod.

This is likely due to changes Funcom has made with the structure of certain data tables (such as DT_ComboRules). The only way to address those is to find out what the changes are and to make appropriate changes so that your mod is compatible with the new structure.


When I give a weapon different attack animations, the weapon is sideways / backwards / upside-down.

I would read through the Additive Layer Track I Addendum for information on adjusting the weapon.

Addendum: The WeaponUseTable
If you remember back to earlier in the guide when I had tested the demonstration mod, you'll know that I was not able to get the Heavy Katana animation to function correctly with 2H Swords. Specifically, the animation would begin, but the attack would not reach its execute phase.

This is because the game does not recognize that the addition of the Light input while holding the Heavy input should progress the animation montage.

We can, however, allow the game to recognize this combination by merging a data table entry with a lesser-known table called WeaponUseTable.

This data table handles several aspects of the combat system that are absent from DT_ComboRules, such as Cross Inputs, Held Inputs, Overrides, equip animations, and whether the weapon can be held while mounted (I have no idea if that last one actually works).


Cross Inputs are concerned with executing an attack with more than one input. Held Inputs, as the name would suggest, allow for the prolonging of specially-designed attacks (for example, aiming the Bow Heavy) or the progression of combos (how tools can continuously swing with the input held). Overrides are generally not used (aside from the Bow Offhand), but are intended to allow for a specific input to translate to another (Light to Heavy, Offhand to Light, etc.).

For my project, I am primarily concerned with both the Cross and Held Inputs and their interactions with my Heavy attack.

To make the changes, go to create a data table (as we've done several times before in this guide), but this time select 'STR Weapon Use Table Row' as the structure for the table.

There a couple ways that this process could be done.

Option 1 would be to copy over the Sword_2h entry to our new table and copy the Katana's entries for Cross and Held Inputs. Simply copy / paste the Sword_2h row. We can move the Cross and Held Input entries quickly by right-clicking on the '1 Array Element', copying, and pasting by right-clicking on Sword_2h's '0 Array Elements' and selecting Paste.

Option 2 would be to copy over the Katana row and refit it to the 2H Sword. Once the row has been copied, change the Row Name to 'Sword_2h' and replace the equip animation with that of the 2H Sword. If the weapon can be used while mounted, make sure that is selected.

Once the entry has been adjusted and saved, it's time to merge the tables in the ModController. It's the same process as the other tables previously mentioned in the guide.

Now, all that's left is to test the changes and see if the Heavy attacks are now functioning properly.


And it works!

Addendum: Additive Layer Track I: Weapon Adjustments
In addition to the Heavy Katana attacks not functioning properly for the 2H Sword, I also ran into an issue where the Sword was being held with the edge facing the wrong way for both Light and Heavy attacks. This is not an isolated case, as weapon sockets do not often cooperate when an unintended weapon is being used for an animation.

This can be solved without any drastic changes via the use of the additive layer track, or 'keyframing'. (It sounds spookier than it actually is.)

The additive layer track is used to make indirect adjustments to animations, such as manipulating limbs, translating or rotating the entire character, adjusting the seating of the equipped weapon, and much more.

The additive layer track is only accessible in animation segments (A_ prefix designations), the building blocks of animation montages. This is one of the reason why it pays to also copy over the segment files, as opposed to simply the montage.

For the purposes of demonstration, I will be using the additive layer track for the segments that comprise Katana Light 4. Refer to the montage to see which segments to adjust. For me, those are A_combat_2h_katana_light_c3_charge, _execute, and _settle. Typically, additive layer adjustments are easier with single-segment attacks (especially for translating the character), but don't let that dissuade you.


We have arrived in the first segment, greeted by Conan sniffing his armpit. You'll likely want to pause the animation by using the scrubber at the bottom of the screen. From here, we will turn our attention to the left-hand side of the screen, specifically toward the 'Skeleton Tree' tab beneath 'Save'.


The Skeleton Tree provides a list of all the bones and sockets attributed to the specific skeleton we are working with. We can select a bone in this list and see it referenced in the viewport. For the positioning of the weapon, we would be concerned with b_R_prop or b_L_prop (items held in the right or left hand).

To see how a weapon would actually factor into this animation, we can select a mesh to preview by right-clicking b_R_prop or b_L_prop (depending on where the weapon is held), select 'Add Preview Asset', and search for any relevant weapon. I'm going to select the Dragonbone 2H Sword as it has a clearly-defined front and back side (most 2H Swords tend to be unhelpfully symmetrical). After a second or two of loading, it should be visible and in-hand. You can slide the scrubber through the animation to see how the weapon is positioned at each point. With a weapon in hand for a handy visualizing tool, we can be more accurate in our additive layer adjustments.

For the weapon to always be correctly positioned, we will need to scrub to frame 1 at the very beginning of the segment. How we proceed next can vary depending on the weapons and animations used. In some cases, you'll want to be in World Space (denoted by the globe icon in the viewport) or Local Space (denoted by the cube icon). For this specific circumstance, I want to be in Local Space, as it will allow me to rotate the weapon on its relative x, y, or z axes. However, there are cases (such as flipping the right-hand Dagger forward) where both World and Local space are suitable. For translating the weapon (moving it up / down / sideways), utilizing the Local Location values on the right side of the screen is recommended.

With the proper space selected, rotate the weapon by grabbing and dragging the proper axis with the mouse. The rotation snaps at specific intervals, making it very easy to get a clean 180-degree rotation. In addition, you can input a value for the rotation on the right-side of the screen, however that would require some math to work out the proper value.

With the weapon in the correct position and at the beginning of the animation, we are ready to make our first key. To do so, navigate to the 'Key' button at the top of the screen (a large plus icon). Doing so will create a graph at the bottom of the screen, which is our additive layer track.


To save the additive layer track, hit 'Apply' at the top of the screen, or simply save the animation segment (apply will not save the animation). If you aren't content with the change and would like to try again, simply click on the button directly to the right of the additive layer track and select 'Remove Track'. You can also disable tracks from here if you don't want to delete them.

Congratulations, the weapon is now correctly rotated! At least for this segment. You'll have to repeat this process for as many segments as the attack has (and for as many attacks that need the adjustment), but it's not too hard. Once you do a couple, it'll be very quick and easy. I'll spare you the tedium of going through the next two, though.

Just remember this: for additive layers, ADJUST FIRST, THEN KEY.

- CONTINUED IN PART II -


Addendum: Additive Layer Track II: Movement Adjustments
- CONTINUED FROM PART I -

However, I would be remiss if I neglected to show you how to adjust the animation movement with the additive layer track.

For the purpose of demonstration, I will show two examples, one with the Katana attack we've been working on and one later with an attack in Glory.

To adjust movement, it makes the most sense to go to the segments where the most movement occurs. For Katana Light 4, those would be the charge and execute segments.

When we let the animation play, we will quickly realize that the character does not move forward or backward in the viewport. This is because of two settings in the 'Asset Details' tab called 'EnableRootMotion' and 'EnableRootLock'. Without going into too much detail, they are intended to prevent snap-back when an animation ends after the character moves any significant distance. We want those turned off so we can see the actual movement of the character, but make sure to turn those settings back on when you're done, if they were already enabled.

With the settings temporarily off, we can scrub through the animation and visualize the distance covered. To help us acquire a precise gauge, we will go back into the Skeleton Tree and select b_root (usually the top-most bone). This bone is what actually moves a character around, so any changes we want to make movement-wise should go through here. With it selected, refer to the Local Location on the right-hand side of the screen, in particular the y-value. This is the forward / backward distance. It's probably best to keep it in World Space, but Local Space will likely also work.


We will be reducing the distance traveled by this attack. To do so, we have to determine where the significant motion of the attack begins, as to avoid any odd sliding backward. Not every animation has clear points where significant motion begins, so it's up to you to make the call. When you've found a spot, make a Key without any changes.

Now, scrub through to find where the motion significantly slows or ends. For me, the motion continues on into a second animation, so the end of this one is what I'm looking for. Once you're in position, subtract the amount of distance you want removed thus far from the y-value. I'm going to arbitrarily set it to 90. Create a new Key and hit Apply / Save. You can always mess around with the y-value if you need to make adjustments. (Make sure the RootLock and RootMotion settings are re-enabled.)


Now I must move on to the second animation. Jumping in right away, I see that the animation is moved forward as far as the previous animation went originally. I must apply the new, shortened distance by selecting the root bone, scrubbing to the beginning, and typing in my y-value (the 90 from before), and creating a Key. From here, I will repeat the same process as before. However, something to keep in mind in actual modding is that we want the velocities from each segment to be very similar so it doesn't look off to the player. That will require some math and some planning, but I won't make you suffer through that here. Again, I'll set the y-value arbitrarily, this time to 100 (for a gain of 10 from this segment). Create the Key, hit Apply, and now we have it set.

[NOTE: Since writing this, I've determined that you don't actually need to input the y-value from the end of the previous animation segment, as the root lock / root motion settings render discrepancies irrelevant.]

Now, onto the Glory example.

I'm sure you're familiar with the base game's 1st Heavy attack for the 1H Sword, the one where you thrust forward. Some people have complained that the character goes too far forward, but I couldn't disagree more. In fact, quite the opposite. I want the character to become a missile when performing this attack.

While in Glory and referencing the montage, my animation segment is A_combat_1h_sword_combo_light_01. Navigating there, I am greeted again by a conveniently-clothed Conan. It appears that this attack covers around 400 units (~ 4 meters) of distance, but that's kiddie-pool ♥♥♥♥.


40,000 sounds good to me.

Significant forward motion starts roughly 23% of the way in, so I'll plop down an unchanged Key there. This motion ends around 45% of the way through, so here I will adjust the y-value ever so slightly to our desired outcome.


Create a Key, Apply, Save, and done (always make sure to change the settings back once you're done).

From here, all that remains is to get the mod test-ready. I personally prefer testing in-game, so I'll meet you there.


Alright, I have arrived in-game. Dear Luba will act as a starting point that I may use to see how far I've traveled. I have my trusty Practice Sword and I'm ready to go.


Well that was a blast. 40,000 units translates to approximately 400 meters, and that was over the course of roughly 0.6 seconds, coming to approximately 666 (no I did not make that up) meters per second.

This is an example of the power at your fingertips with additive layer tracks. Use it wisely.


Addendum: DT_ComboRules In Depth
Due to space constraints, I did not mention every granular detail of the ComboRules table in the main portion of the guide. However, in this Addendum I will delve more into the intricacies of the table to hopefully shed more light for those who don't understand the mechanisms at work.

Here is a picture of the ComboRules table for reference (not every setting can be fit into a single screenshot):


The first and foremost facet of a table row is its ID. Most vanilla attacks operate on a numerical ID system, however, there are instances of letters and words being used to designate attacks (especially for certain non-humanoid NPCs and mounted attacks). If you add any attacks beyond what currently exists for a weapon (or are making attacks for a completely new class), you'll likely want to ensure the IDs you select won't be unintentionally-overridden by another mod. Adding prefixes is a good way to mitigate the potential for conflicts.

ComboInput is pretty self-explanatory. Attacks are classified as Light, Heavy, or Offhand. This setting also tells the game which attacks are eligible for certain bonuses (for example, the Strength perk that increases Light attack damage by a % amount). The opener of a particular classification will be performed upon pressing its input.

WeaponComboLead and WeaponComboSupport relate to what weapon class that attack is performed by. An attack intended for use with 1H Swords will have the Sword_1h ComboLead. (This is complicated specifically with Offhand attacks for 1H weapons, in short those are superseded by the Unarmed Offhand.) However, if we only want this attack to be performed when a Shield is also equipped, we would select Shield_Offhand for the ComboSupport.

ComboOpener is fairly self-explanatory as well. Mark the first attack in a combo chain as an Opener and all others as not.

ComboStepNext, however, is the beating heart of the combo system. Recently added to the table with Siptah's launch, ComboStepNext allows for combos to be manually mapped out, as opposed to the old system of Light / Heavy 1 leads to Light / Heavy 2, and so on. This allows for much greater latitude with what kinds of combos can be made, with additions such as the Shortsword flurry combo as an example.

The setting allows for the recognized input (Light, Heavy, Offhand) that progresses the combo to the next attack and the ID of the attack to progress to. Note that the input and the next attack's ComboInput don't need to be the same. You can also reference the same or prior attacks in the combo, creating loops (for Glory of Combat, that means endless Whirlwind hell). I would not recommend making more than one Array Element for each input.

ComboMontage is the animation montage that is performed as the attack. We already went over that in the main section of the guide, but it's, again, self-explanatory. ComboMontageWater relates to what should be played while swimming, but very few attacks have entries for this.

KnockbackClass is essentially the stagger effect that will be dealt to the struck target with this attack. The main types are flinches (no attack interruption), stumbles (attack interrupted, but can dodge out of stagger animation), and stuns (interrupted, cannot dodge out of animation), but there are others that can launch enemies into the air, push them backwards, etc. You can even create your own fairly easily (just make sure to save it to your mod's folder). You'd likely want to look at others for inspiration.

The following three, led by BlockerHitConfirm, are tied to what additive animations should play when the attack strikes a shield. They're almost always the same for all attacks, so it's not generally something to work with.

The DamageModifiers entry allows for multipliers to be set for damage of different types. The main damage type we'd be concerned with is DmgTypeHealth_BP, which is health damage (if you couldn't have guessed). This multiplier can be used to adjust the damage of the attack across all weapons of that class, making it very useful for broad-scale balancing. DmgTypeStamina_BP and DmgTypeConcusive_BP (yes, it's spelled wrong in the DevKit) are also notable, just keep in mind that a weapon will need to have some amount of base stamina or concussive damage to be affected by the modifiers.

The DamageModifier setting breaks into two subsections: DamageValueModOnHit and OnBlk (Block). These values interplay with some settings further down, but for normal attacks, the OnHit value is what is most pressing. With regards to adjusting stamina damage dealt to a blocking target, you'd want to use OnBlk.

StaminaCostModifier is pretty straightforward. However, there have been recent changes to the combat system which have affected this setting. Previously, attacks with multiple hit detection windows calculated stamina usage via base amount X the modifier X the number of hit windows. However, with Update 2.2, the number of hit detection windows is no longer being factored in. Adjust the stamina costs accordingly.

ComboEffects allows for the application of buffs / debuffs to the struck target. These include effects like Bleeds, Sunders, Cripples, but can also apply custom effects you create (I'm not going into the process here). The effect(s) can apply as many times as the attack strikes. The potency setting refers to how many applications to apply at a time, but it may be non-functioning, I haven't tested it in a while.

BlockIgnore and BlockDeflectionIgnore relate directly to how the attack will interact with shields. Normal attacks (neither of these checked) will cause the attacker to recoil and stop the combo. BlockDeflectionIgnore will allow the animation to progress as normal and will also apply the OnBlk damage multiplier(s) to the target. BlockIgnore completely ignores the shield, striking the target as normal with the OnHit multiplier(s). If both are checked, BlockIgnore supersedes and will respect the OnHit multiplier. If you don't want the attack to deal health damage to the blocker, set the matching multiplier to 0. For adjusting stamina damage dealt to the blocker, use the OnBlk multiplier. (Complicated enough?)

CanQueueSameCombo just allows for an attack to queue itself, as its name suggests. It's checked for almost every attack.

JourneyTrigger allows for the completion of Journey Steps with the attack. Specifically, this is intended to award the 'Perform a Heavy Finisher' and 'Kick' Steps. There's a list of valid entries somewhere in the DevKit, but I'm not sure where. HeavyFinisher and Kick are recognized, though, so place them on appropriate attacks.

AutoFace adjusts the direction of your attack to wherever the player's camera is facing. Useful for non- target lockers.

CanTargetLock allows or disallows the attack to be performed while in Target Lock. Leaving this unchecked causes the character to exit Target Lock upon performing the attack.

The ConditionTagQuery function is intended for allowing conditions-based attacks (directional attacks, sprint attacks). Recognized condition tags can be found in DT_ComboConditionGameplayTags. Sprinting is the only condition that is recognized for player characters, but it may be possible to allow for the other listed conditions by un-checking the 'IsForNPCOnly' box for the relevant rows found in DT_ComboConditionDefinition (I haven't personally tried so I'm not sure). Most condition-based attacks use the 'All Tags Match' expression, so I'd just stick with that.

Well, there's a 'quick' rundown of the settings for attacks in DT_ComboRules. I don't imagine there's much space left, but I'll elaborate more if I can.


Addendum: Control Table Merging and Editing DLC (or Mod) Items
With the 2.4.6 game update, a new ModController function regarding data tables has arrived: Merge Data Tables with Control Table. As the name would suggest, this function is accompanied by a new Control Table.

This new feature allows for merging specific column entries into specific rows, which means precise adjustments to table elements without causing compatibility issues with other mods that adjust the same rows. It also allows for adjusting DLC items, as normal merges for those specific IDs would previously just break them. Suffice to say that these additions represent a major improvement in the capabilities of mod authors.

The Control Table itself is the most complicated piece, so it's reasonable to start there.

To make a Control Table, you'll have to pick the structure 'Data Table Merge Control Row' from the list of Data Table options. You'll be greeted by a mostly-empty data table upon opening it, with only one column, ColumnsToOverride, outside of the Row ID.

The Row IDs can be handled in multiple ways. If you wish to adjust the same columns for a large swath of IDs, it's recommended to use a special ID called MergeControl_Default. This will set the columns in use for every ID in your modded table that is not directly included in the Control Table. Using MergeControl_Default is not required, but you would have to input each ID's columns manually. If there are IDs in your modded table that you don't wish to merge the columns specified with the Default entry, these IDs can be manually input into the Control Table and will only merge the columns specified in their row. Any row that is not found in the to-be modified table will be merged in the conventional manner.

The ColumnsToOverride section is fairly straightforward, but it is important to input the correct spelling of the column name for the merge process to work correctly. Check along the top of the modded table for proper spellings. Note that some columns use British / Commonwealth spellings (such as ArmourValue) while others use American spellings (ArmorPen, for example). Keep an eye out for these discrepancies.

For illustration, I have assembled a small list of DLC items of which I want to change various aspects; the armor value for certain armor pieces, the encumbrance weight for a sword, and the armor penetration value, as well as the Light and Heavy base damage values, on a two-handed axe.


To handle the armor values on the DLC armor pieces, I have set the MergeControl_Default row to only perform a merge with 'ArmourValue'. I then specified the ID of the axe I want to adjust and then the three columns I'm concerned with. Finally, I typed the ID of the sword and set the merging process to only recognize the weight value.

With the table set, it's time to finish the process in the Modcontroller.


Within the Mod Data Table Operations tab of the ModController, a new function, 'Merge Data Tables with Control Table', can be selected. Doing so will provide a block with three table inputs. The 'Merge Into' section is for the base game table and the 'To Be Added' section is for the modded table, just as would be the case in a normal merge. The 'Merge Control' section, as you might have guessed, is for our new Control Table.

Once the ModController is saved and the mod cooked, we can test to see if the changes are present in-game. First we check the armor...


then the sword...


and finally the axe...


and everything works!


For modding DLCs or other mods, here are some various nuggets of information:

* For by-column merging, only the ID and the column's new value are required. Everything else in the row can be blank / default. Because the new column values are generally whatever you came up with, you will usually just need to look for the appropriate IDs.

* ID numbers for DLC / mod items can be found by hovering over an icon while in Admin mode in-game. IDs can be found for items (in inventory of in the Admin Panel), recipes (in workbenches or in the inventory's crafting menu), and feats (in the Feat menu).

* IDs for certain table entries in mods (such as for attack combos) would be much more difficult to acquire, essentially requiring the mod author to publish the IDs if they deviate from the base game.

Addendum: Damage Balancing I
With significant changes to weapon combos comes the necessity for proper damage balancing, insofar as much as you actually care about balance. There are many potential approaches towards this end, and while I won't presume to extol the virtues of the 'one true way', I will relay how I would go about (and have gone about) doing so in my projects.

I: Which Avenue to Take?
Depending on the changes you have made to the game, it may be more appropriate (or expedient) to choose to execute those changes via the ItemTable or the combo table (DT_ComboRules). Adjustments to weapons on a case-by-case basis via the Item Table allows for much greater control, with the added bonus of access to a wider array of stats to tinker with. This comes at the cost of a prohibitively more grueling process for large-scale projects, where hundreds of weapons (or armor pieces) may be involved. As well, adjusting gear added by mods and DLCs cannot be done in the conventional manner (they can be adjusted via Control Table merger, mentioned in greater detail in the relevant Addendum).

Adjustments made through ComboRules, however, are sweeping and elegant. All weapons belonging to that class, whether from mod, DLC, or otherwise benefit equally from the same multiplier adjustments. However, as the progression of damage values for weapons is not even or consistent across other weapon classes, the balancing will be uneven and quirky, with outlier weapons at each tier. A hybrid model makes up for the shortcomings of one system, but introduces the issues of the other.

II: Establishing a Baseline
For any reasonable degree of balancing to be possible, baselines must be established to which the weapons / weapon classes may be tuned. Tying your modded changes to the base game's damage standard would be ideal for broad-scale mod-compatibility and avoiding unintended consequences from other game systems, but if your goals are to deliberately move away from what the base game does, then some other method must be devised.

As an example, for the latest (and currently final) update to Glory of Combat, I re-tied the damage balancing to the base game via 1H and 2H Swords. The damage multipliers for the full Light and Heavy combos were to be roughly equivalent to their base game counterparts, with all other weapons in their respective grouping then adjusted via a somewhat laborious series of calculations (which we'll get into) to be at near-parity with the Swords across all tiers.

Swords make a decent baseline in that respect as they are typically middling in their groupings with regards to armor penetration, which means that the adjustments made to the weapons at either end will be less severe than if Axes or Maces were selected for the baseline.

In addition, you may want to consider, if you want the classes to reach parity, against what enemies and at what damage resistance value they should do so. A solution I would recommend would be to come up with a composite damage resistance value of the average enemy a player could expect to face, and preferably one of these composites for each item tier (Iron, Steel, Hardened Steel, and Star Metal / Epic have the most representation, but use whichever you'd like). I don't think there will be room in this Addendum, but I will provide a list somewhere of rough damage resistance values of various humanoid and animal NPCs I calculated during field testing which you may use to work out average amalgam values.

III: Calculations
The first calculation will involve establishing how much damage a particular weapon will do against a particular enemy at base damage, without any modifiers. For this calculation, you will need the following values:

* The item's base damage
* The item's armor penetration value, decimal form (0.05 for 5%, for example)
* The enemy / composite damage resistance value, decimal form

I did the calculations by weapon class, but in theory you could go by item tier as well.

The equation is as follows:
base damage x (1 - damage resistance) + (base damage x (armor penetration x damage resistance))

The first half of the equation (before the +) deals specifically with the amount of damage that reaches the target without any armor penetration, while the second half is exclusively the damage that come directly from the weapon's armor pen value.

Using the Iron Broadsword as an example with my composite damage resistance for Iron-tier enemies at 27%, I would get the following:
16 x (1 - 0.27) + (16 x (0.085 x 0.27)) = 12.0472

so roughly 12 damage per strike without taking into account other modifiers.

Axes will be much easier to calculate as they, in almost all cases, have no armor penetration (for whatever dumb reason), so only the first half of the equation will be necessary for them.

Once you have run the calculations for the relevant weapons at the relevant tiers, I would recommend averaging the values together by weapon class to get a game-wide view of the relative power between weapon classes (if you wanted to balance individual weapons, this would be a good opportunity to see how weapons at each tier compare to each other as well). Something to consider is that if you favor the game being more balanced at the end-game as opposed to the early game (for PvP purposes, most likely), you can skew the average by double-representation of the star metal tier, just make sure to have the appropriate number by which to divide if you do skew.

An element of balancing that may be overlooked is attack speed, as it is not located among the other values pertinent to the process. If we were to forget about this aspect, fast-striking weapons like shortswords, daggers, and the like would be far too powerful.

At this point, you can either go through the process of accounting for attack speed next or balance the damage values against each other, doing attack speed later. The process for balancing would simply involve comparing each averaged value against the baseline and working out by what value it should be multiplied / divided by to reach parity with the baseline. I just used inverse proportions (1 / #) to work out the multiplier buff / nerf, it may get skewed in certain circumstances and in more pronounced adjustments, but any issues like that can be cleaned up in the finishing touches.

To calculate either the average speed of an attack or the overall combo length per weapon class, you'll have to delve into the relevant animation montages. I would recommend taking the point of the earliest CancelAttackWindow or ComboAdvanceWindow (you can hover over the notifier to see at what time it starts). However, if the animation montage has a rate scale multiplier other than 1.0x, you'll have to multiply that value by whatever time length you find, as it does not take that into account among the notifiers.

Once you have your combo / average attack speeds, you can compare them to the baseline weapon's value and work out by what value to multiply / divide them to balance them out.

With the ultimate adjustment value now in your possession, the time has come to multiply it against the overall combo damage multiplier of the baseline. For the base game's 1H Sword Light combo, that value would be 4.8x base weapon damage (or base weapon damage for each attack in a 4-part combo + 0.8x to distribute among them). Your resulting value for other weapons (for example, 5.2x, 3.5x, etc.) can then be divvied up between the attacks of the relevant combo at your discretion. Keep in mind that some attacks strike multiple times, and as such those will need to be divided by however many times they hit.

CONTINUED IN PART 2
Addendum: Damage Balancing II
IV: Finishing Touches
With the multiplier values distributed, I would very much recommend running field tests with a wide array of weapons across all stages of the game to gauge if anything needs to be tweaked. Ideally, you should focus on the enemies closest to your damage resistance amalgam (probably humanoid NPCs), as those should be the best gauge of parity. Certain weapons will still out-perform others at the extremes due to the nature of the weapon classes, as well as the individual outliers in each tier, but there's not much to do about that if you're focused on broad-scale changes. Even then, each weapon class having a special identity helps to make the game feel more varied and compelling.

You may find at this stage that certain weapon classes that inflict status effects more frequently (Daggers, 2H Maces) may be comparatively more powerful than the rest of their groupings. In these cases, I'd recommend incremental damage reductions until you achieve an acceptable level. However, with the way Bleed functions, it will necessarily be much more powerful in the early-game than late-game, so take that into account.

V: Enemy Damage Resistance Values (Approximate)
I worked out the following values by creating a 100-damage sword with no armor penetration, ensuring any modifiers were reduced to base damage. The amount of deviation from 100 damage inflicted by a strike would be the damage resistance of the target, rounded of course to the nearest percent. For calculating it in the DevKit, you can use the equation:
damage resistance = armor value / (armor value + 500)

Here are the values:

NOTE: The damage resistance calculation changed slightly between the time this section was written and Age of Sorcery (part of the divisor changed from + 250 to + 500). The following numbers may not be accurate anymore.
HUMANOID NPCS (NON-THRALL) Exile Fighters: T1 - 12% T2 - 15% T3 - 19% T4 - 26% Black Hand Fighters: T1 - 22% T2 - 29% T3 - 35% T4 - 39% Dogs of the Desert Fighters: T1 - 23% T2 - 31% T3 - 37% T4 - 39% Heirs of the North Fighters: T1 - 40% T2 - 50% T3 - 57% T4 - 71% Forgotten Tribe Fighters: T1 - 44% T2 - 51% T3 - 58% T4 - 65% Relic Hunter Fighters: T1 - 53% T2 - 63% T3 - 69% T4 - 81% Votaries of Skelos Fighters: T1 - 53% T2 - 63% T3 - 69% T4 - 79% Miscellaneous: Unnamed City Skeleton - 20% Wight - 22%

ANIMALS (NON-PET) Turtle (Normal) - 9% Turtle (Corrupted) - 19% Turtle (King) - 24% Hyena (Spotted) - 8% Hyena (Striped) - 13% Crocodile - 10% "Alligator" (Siptah) - 20% Rocknose (Normal) - 92% Shoebill (Green) - 11% Shoebill (Grey / Pink) - 12% Panther - 9% Lynx (Siptah) - 9% Jaguar - 10% Tiger (Normal) - 15% Tiger (Siptah) - 17% Mountain Lion (Siptah) - 20% Gorilla (Normal) - 17% Gorilla (Silverback) - 19% Man-Ape - 20% Rhino (Grey) - 95% Rhino (Siptah) - 95% Rhino (Siptah Two-Horn) - 96% Elephant - 94% Reptile Beast - 96% Elk (Normal) - 10% Elk (King) - 15% Wolf (Normal) - 23% Wolf (Dire) - 20% Bear (Brown) - 76% Bear (Black) - 82% Sabertooth - 17% Mammoth - 95%
Addendum: Damage over Time Effects
Damage-over-Time effects (DoTs), as they are commonly applied by weapon attacks, are important to understand for the purposes of properly balancing a combat mod project.

DoTs are comprised of five main values:

* damage per tick
* number of ticks
* frequency of ticks
* effect stack size
* the 'damage stack exponent' value

The number and frequency of ticks combine to form the overall duration of the DoT effect. Combined with the base damage per tick, the values for overall damage and damage per second can be found.

However, the number of stacks interacts with the damage stack exponent in a manner that makes the previously straight-forward mathematics less simple. The stack count is increased by the power of whatever the damage stack exponent happens to be, which can increase or decrease the value of additional DoT applications beyond a linear progression.

An equation to determine the resulting tick damage has been provided here:

damage dealt per tick = base tick damage x (stack count ^ damage stack exponent)

The base game Bleed effects typically have a base tick damage of 1 with an exponent value of 1.1. On a single Bleed stack, this is irrelevant as a stack of 1 ^ 1.1 is still 1. However, on 2 stacks of Bleed, the value becomes:

1 x (2 ^ 1.1 = 2.14) = 2.14 damage per tick

That certainly doesn't seem like a lot more, and given any rounding that may take place the exponent might not have made any difference! However, at higher stacks, or with higher base damage, this effect becomes much more pronounced. At 5 stacks, the damage dealt is 5.87/tick, at 10 stacks 12.58/tick, and at the max 20 stacks it reaches 26.98 per tick.

A table will be provided further below with a full breakdown of the resulting values.

For most poison effects, the base tick damage is also 1 (the scorpion queen poison item does 2 per tick), however the damage stack exponent is raised to 1.5. Thus additional poison stacks applied provide greater and greater value in comparison to bleed effects.

As the ultimate illustration of this, the max (10) stacks of scorpion queen poison does:

2 x (10 ^ 1.5 = 31.62) = 63.24 damage per tick

Which will kill most things very quickly.


BLEED DAMAGE PER TICK BY STACK

Note: These values may be subject to rounding.

Stack Count
Damage/Tick
1
1
2
2.14
3
3.34
4
4.59
5
5.87
6
7.17
7
8.50
8
9.84
9
11.21
10
12.58
11
13.98
12
15.38
13
16.80
14
18.22
15
19.66
16
21.11
17
22.56
18
24.03
19
25.50
20
26.98

POISON DAMAGE PER TICK BY STACK

Stack Count
Damage/Tick (Normal)
Damage/Tick (Scorpion Queen)
1
1
2
2
2.828
5.65
3
5.196
10.39
4
8
16
5
11.18
22.36
6
14.697
29.39
7
18.52
37.04
8
22.627
45.25
9
27
54
10
31.62
63.24
31 ความเห็น
Dread Swoop  [ผู้สร้าง] 27 ก.พ. @ 2: 48pm 
@Refictulus You may want to ensure you are looking in the 'Built mod' folder, rather than 'Active mod'.

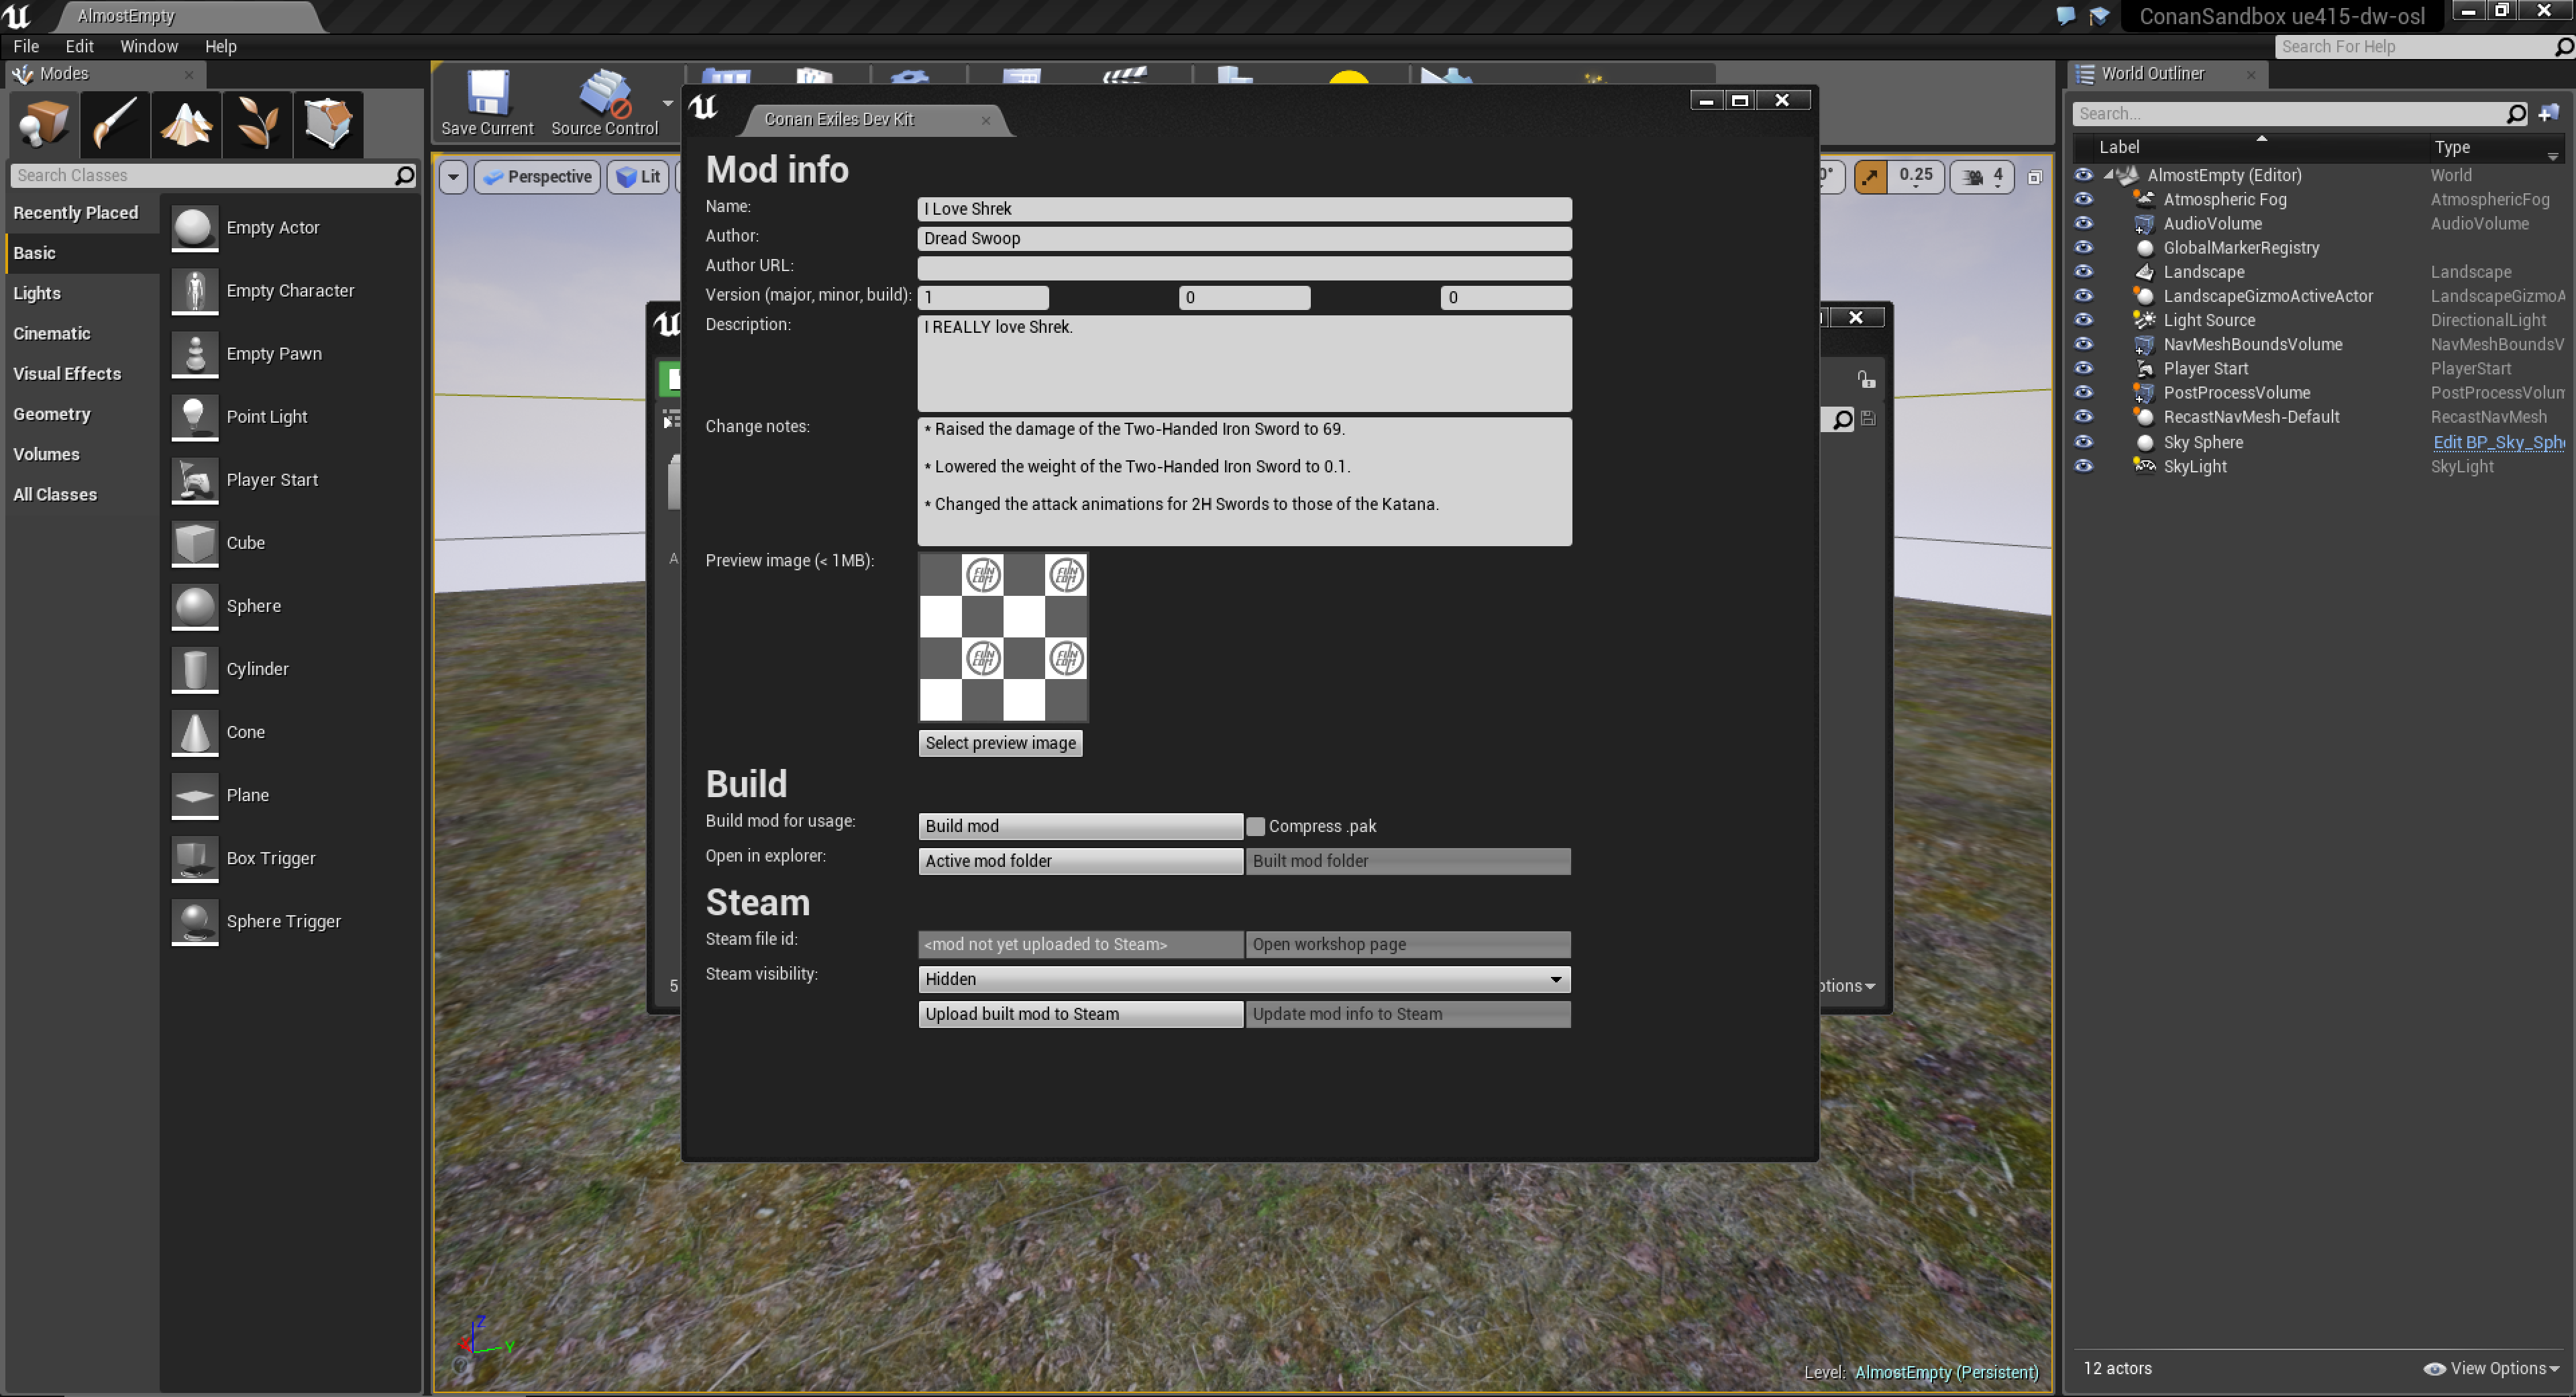
The Active folder contains all the loose files for the mod, separated into the Content, Local, and Shared sub-folders. This is located within the DevKit installation.

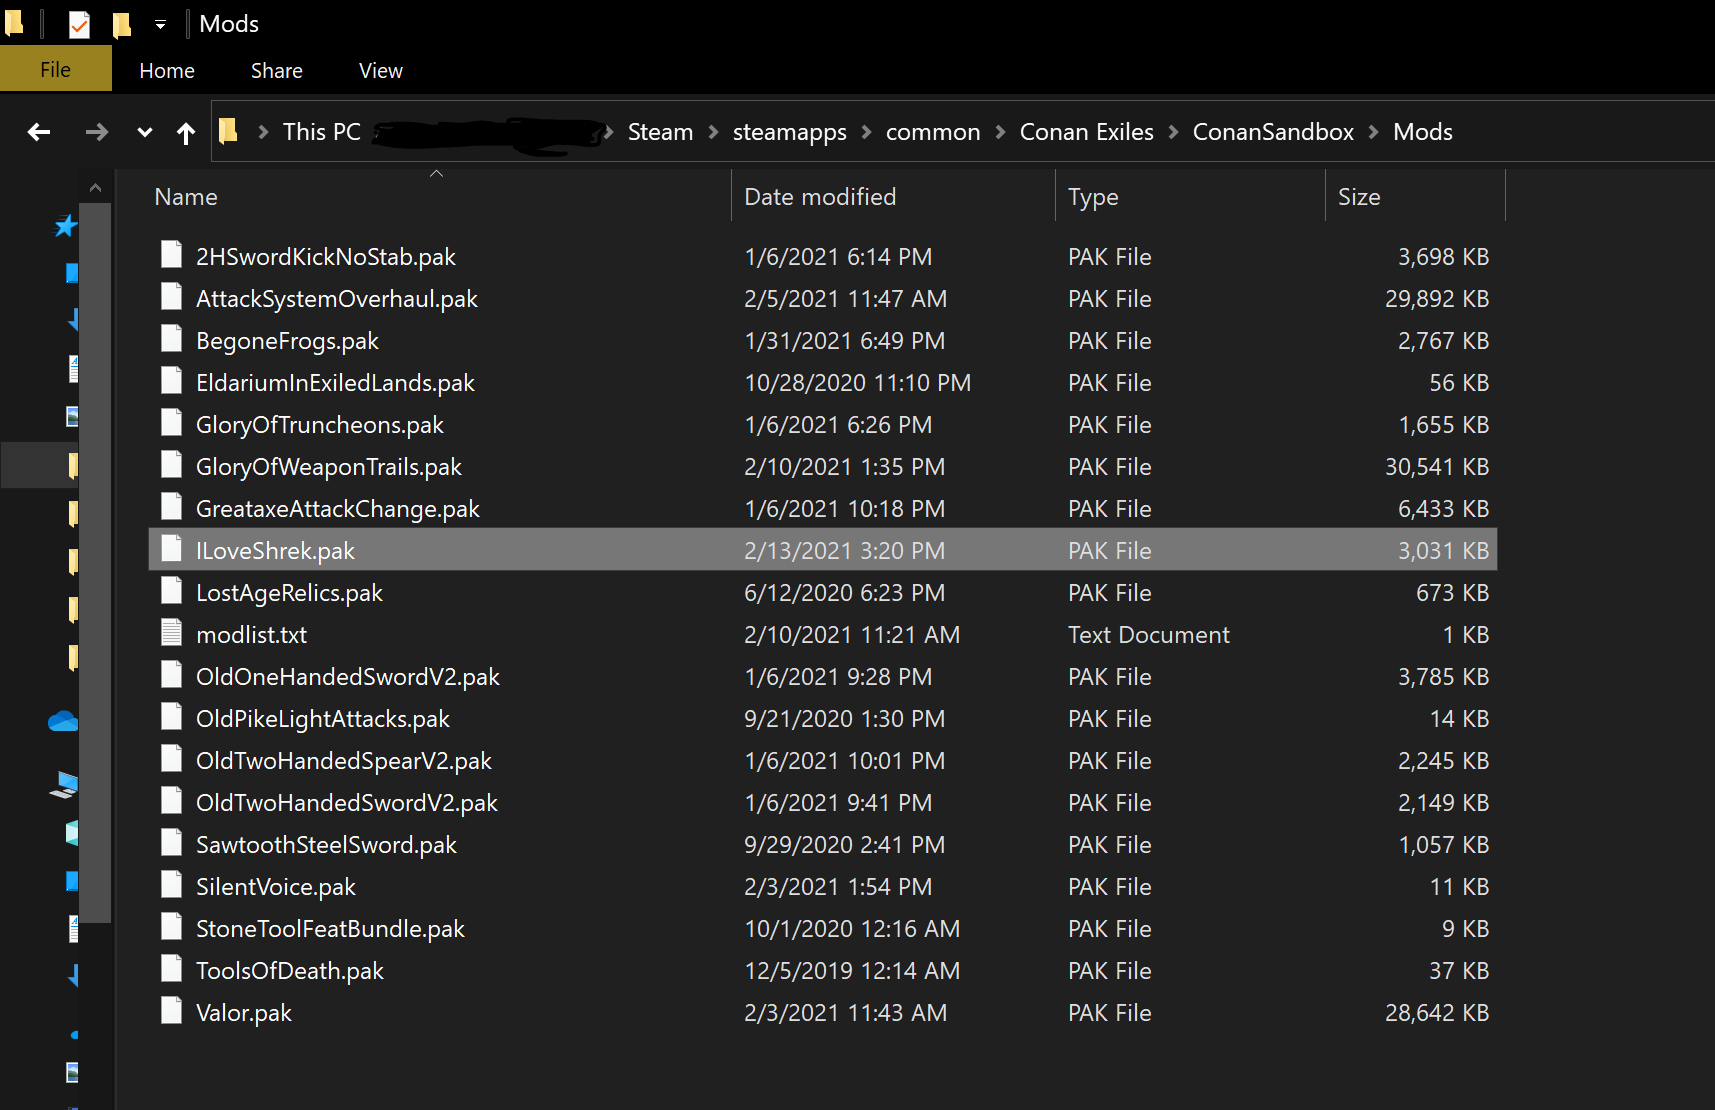
The built folder should contain the pak file after the 'building' process has been completed. This folder should be located in your AppData folder, for example the path would look like:

C:\Users\[USERNAME]\AppData\Local\ConanSandbox\Saved\Mods\ModFiles\[MOD NAME]

The buttons for the active and built mod folders in the DevKit's mod information panel should help access those locations quickly.
Refictulus 27 ก.พ. @ 8: 43am 
Hi. My mod does not save with the .pak extension, but as an entire folder. What am I doing wrong?
Dread Swoop  [ผู้สร้าง] 16 เม.ย. 2024 @ 7: 43pm 
I would recommend that people who are interested in modding the game should read through the official modding guides found at https://www.conanexiles.com/mods/

There is a very wide scope of information that can be found there, including much of what is written in this guide.
Dread Swoop  [ผู้สร้าง] 12 มี.ค. 2024 @ 1: 26pm 
A section pertaining to how Damage over Time effects behave has been added.
Dread Swoop  [ผู้สร้าง] 25 มิ.ย. 2023 @ 3: 10pm 
Hello everyone,

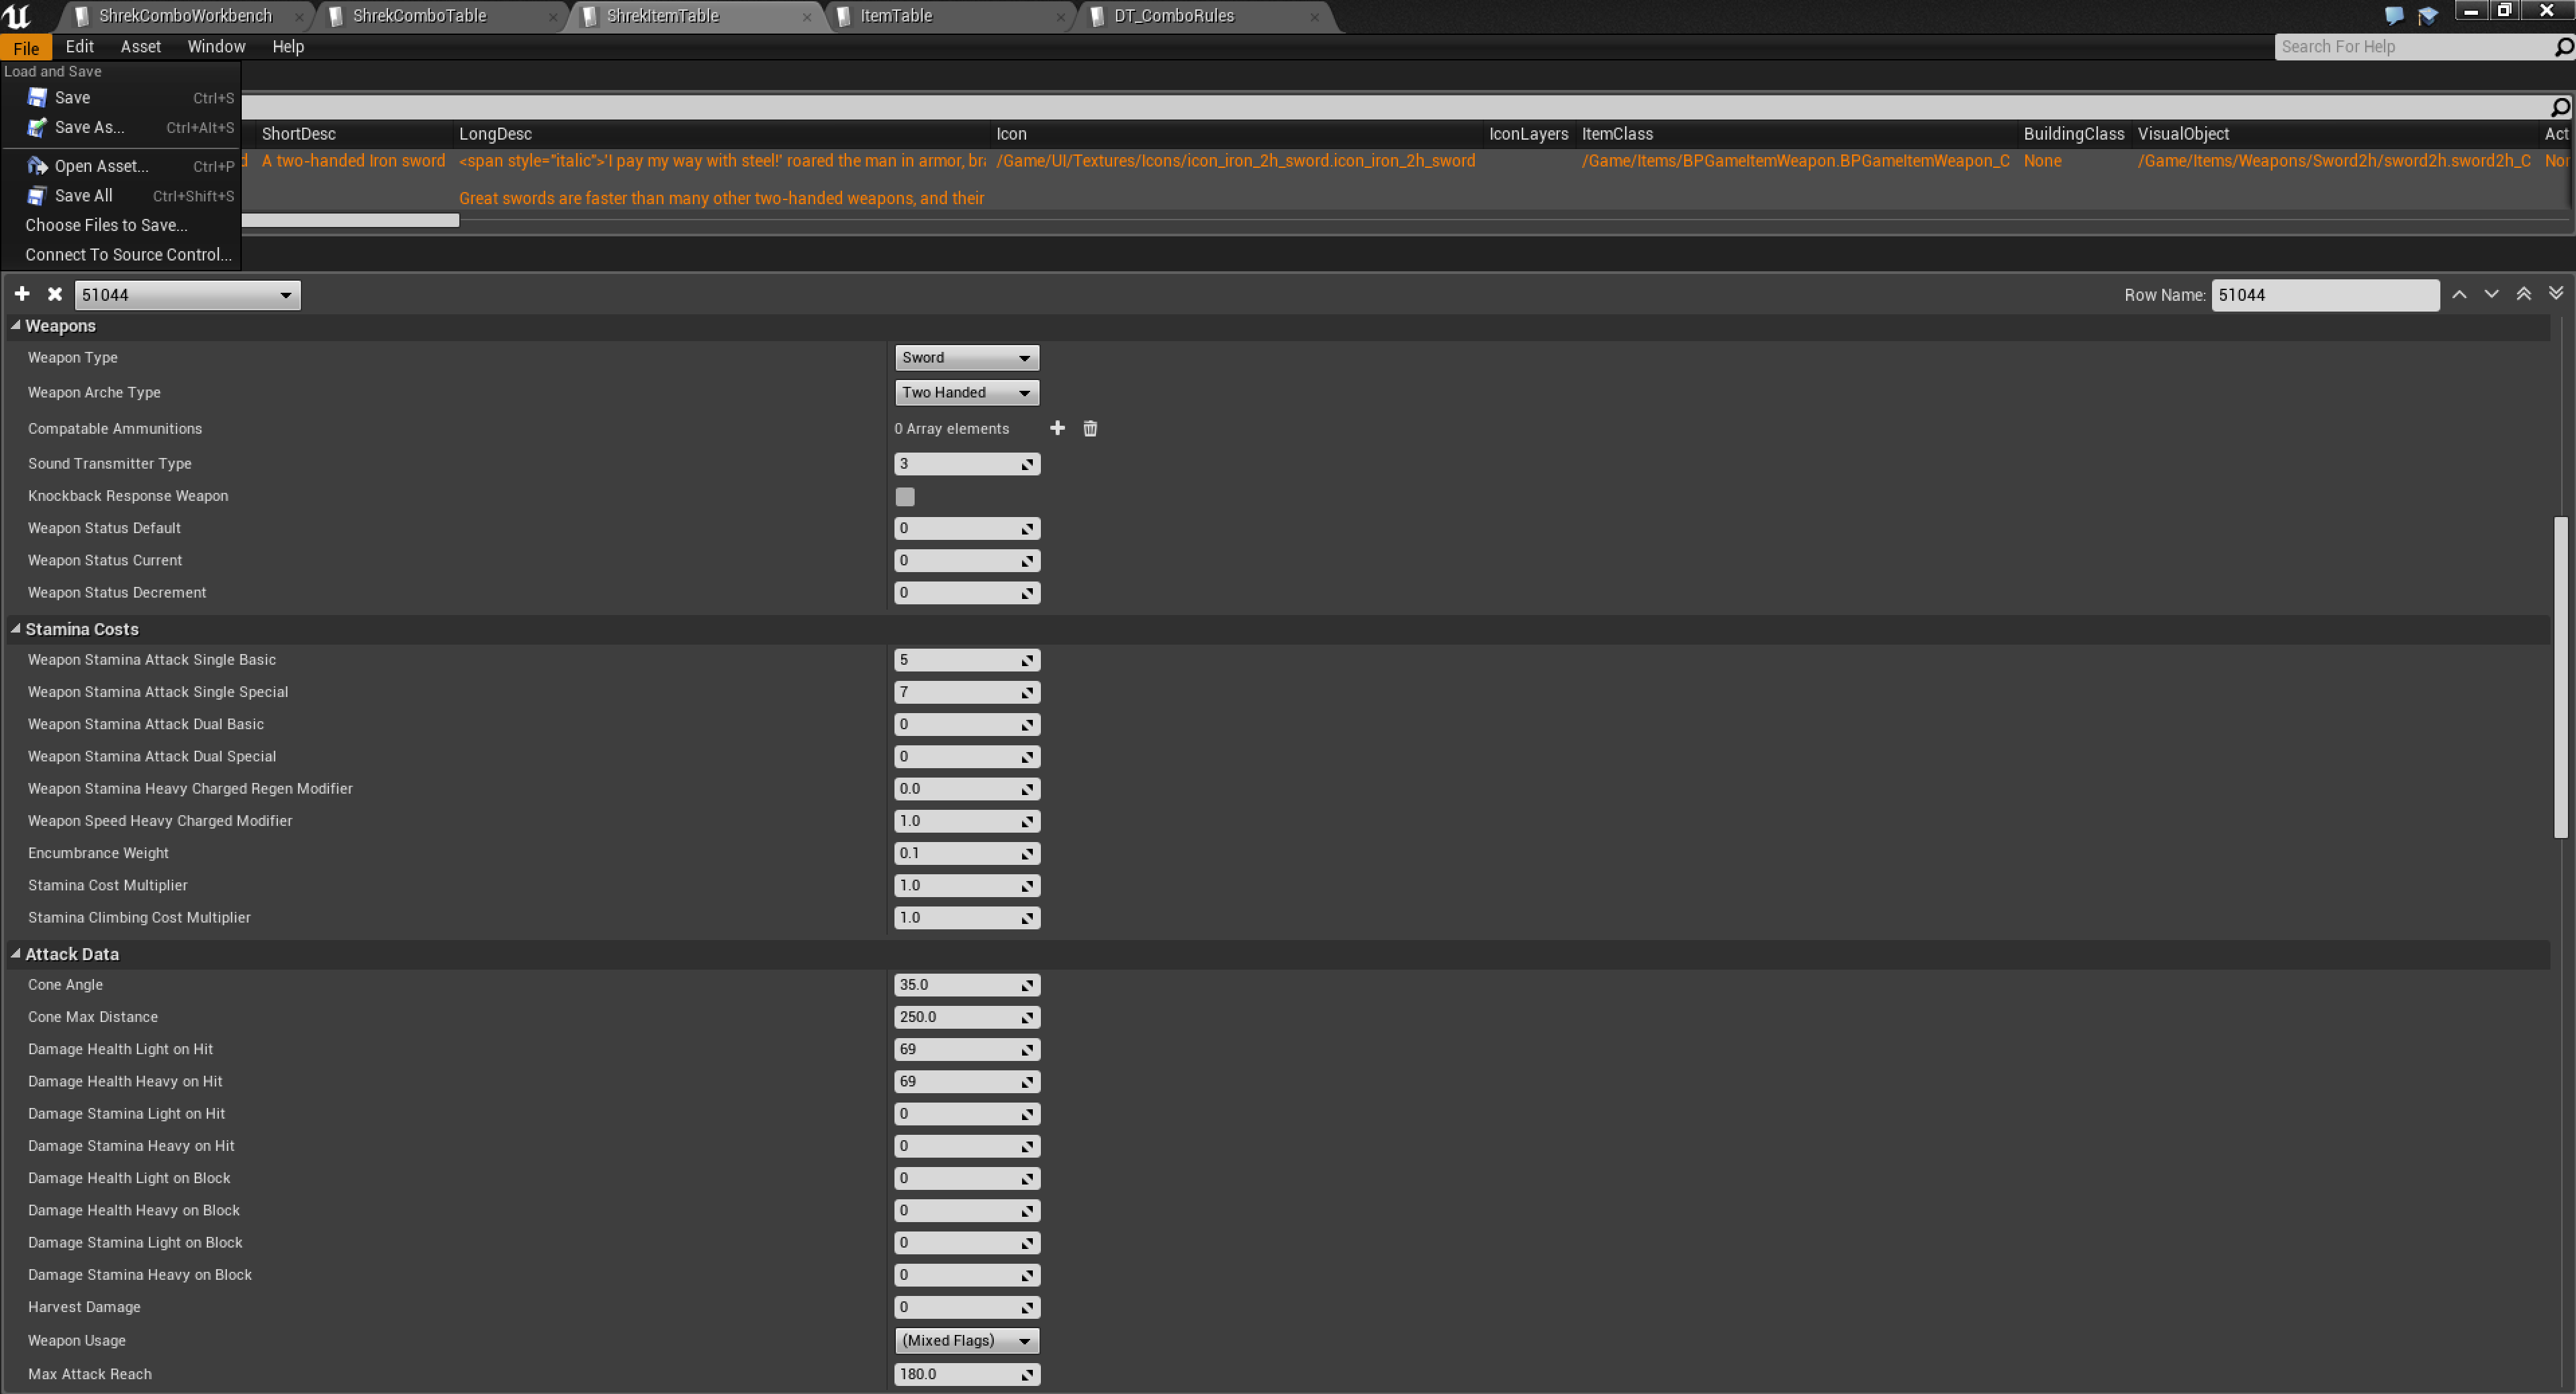
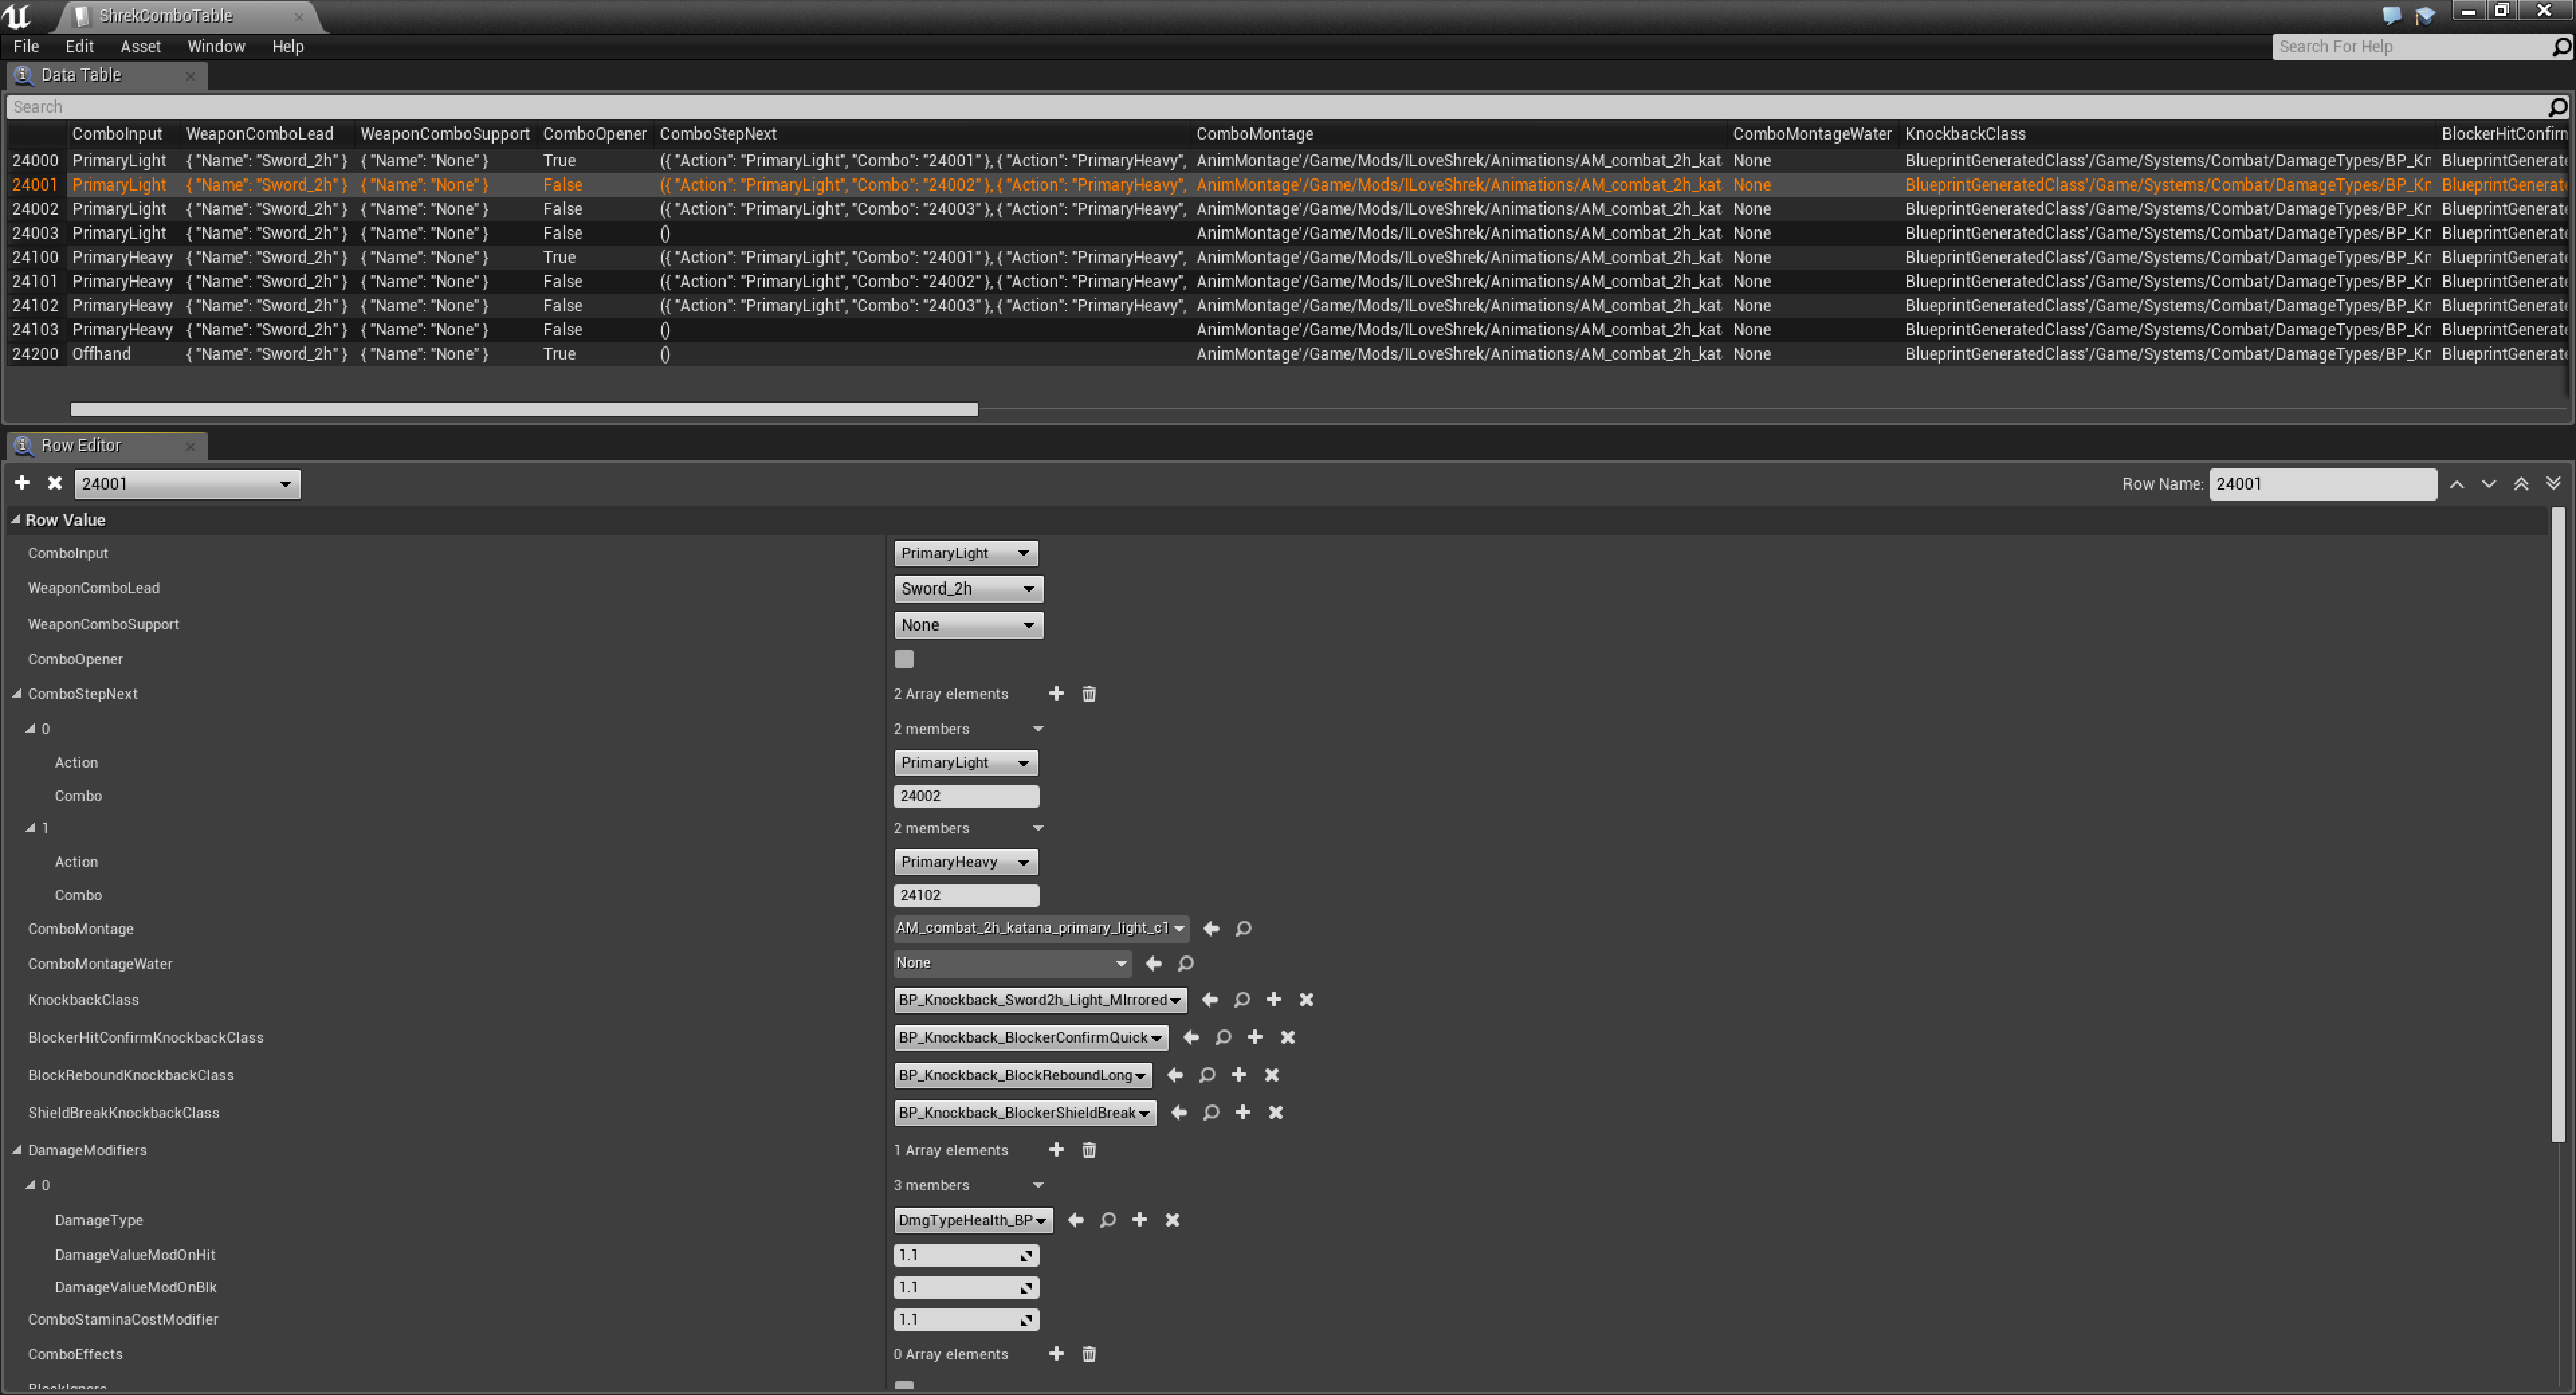
I finally got around to updating the DevKit to compare the changes from Age of War. What I find rather 'interesting' is that Funcom decided to change the base stamina costs of all weapons instead of simply adjusting the stamina cost multipliers per attack, which would've been far less time-consuming and carried the benefit of easier tweaking in the future.

In fact, they seem to have gone out of their way to remove any variance in stamina costs in ComboRules. I'm not sure why, maybe whoever did it just wanted 1.0s for their OCD.

I like the idea of raising stamina costs (in fact, I had done that with Glory), but their implementation leaves a bit to be desired. To avoid being the backseat critic, I'm half-tempted to get the mod back in good condition, but we'll see.
Dread Swoop  [ผู้สร้าง] 11 มิ.ย. 2023 @ 10: 40am 
Hello everyone,

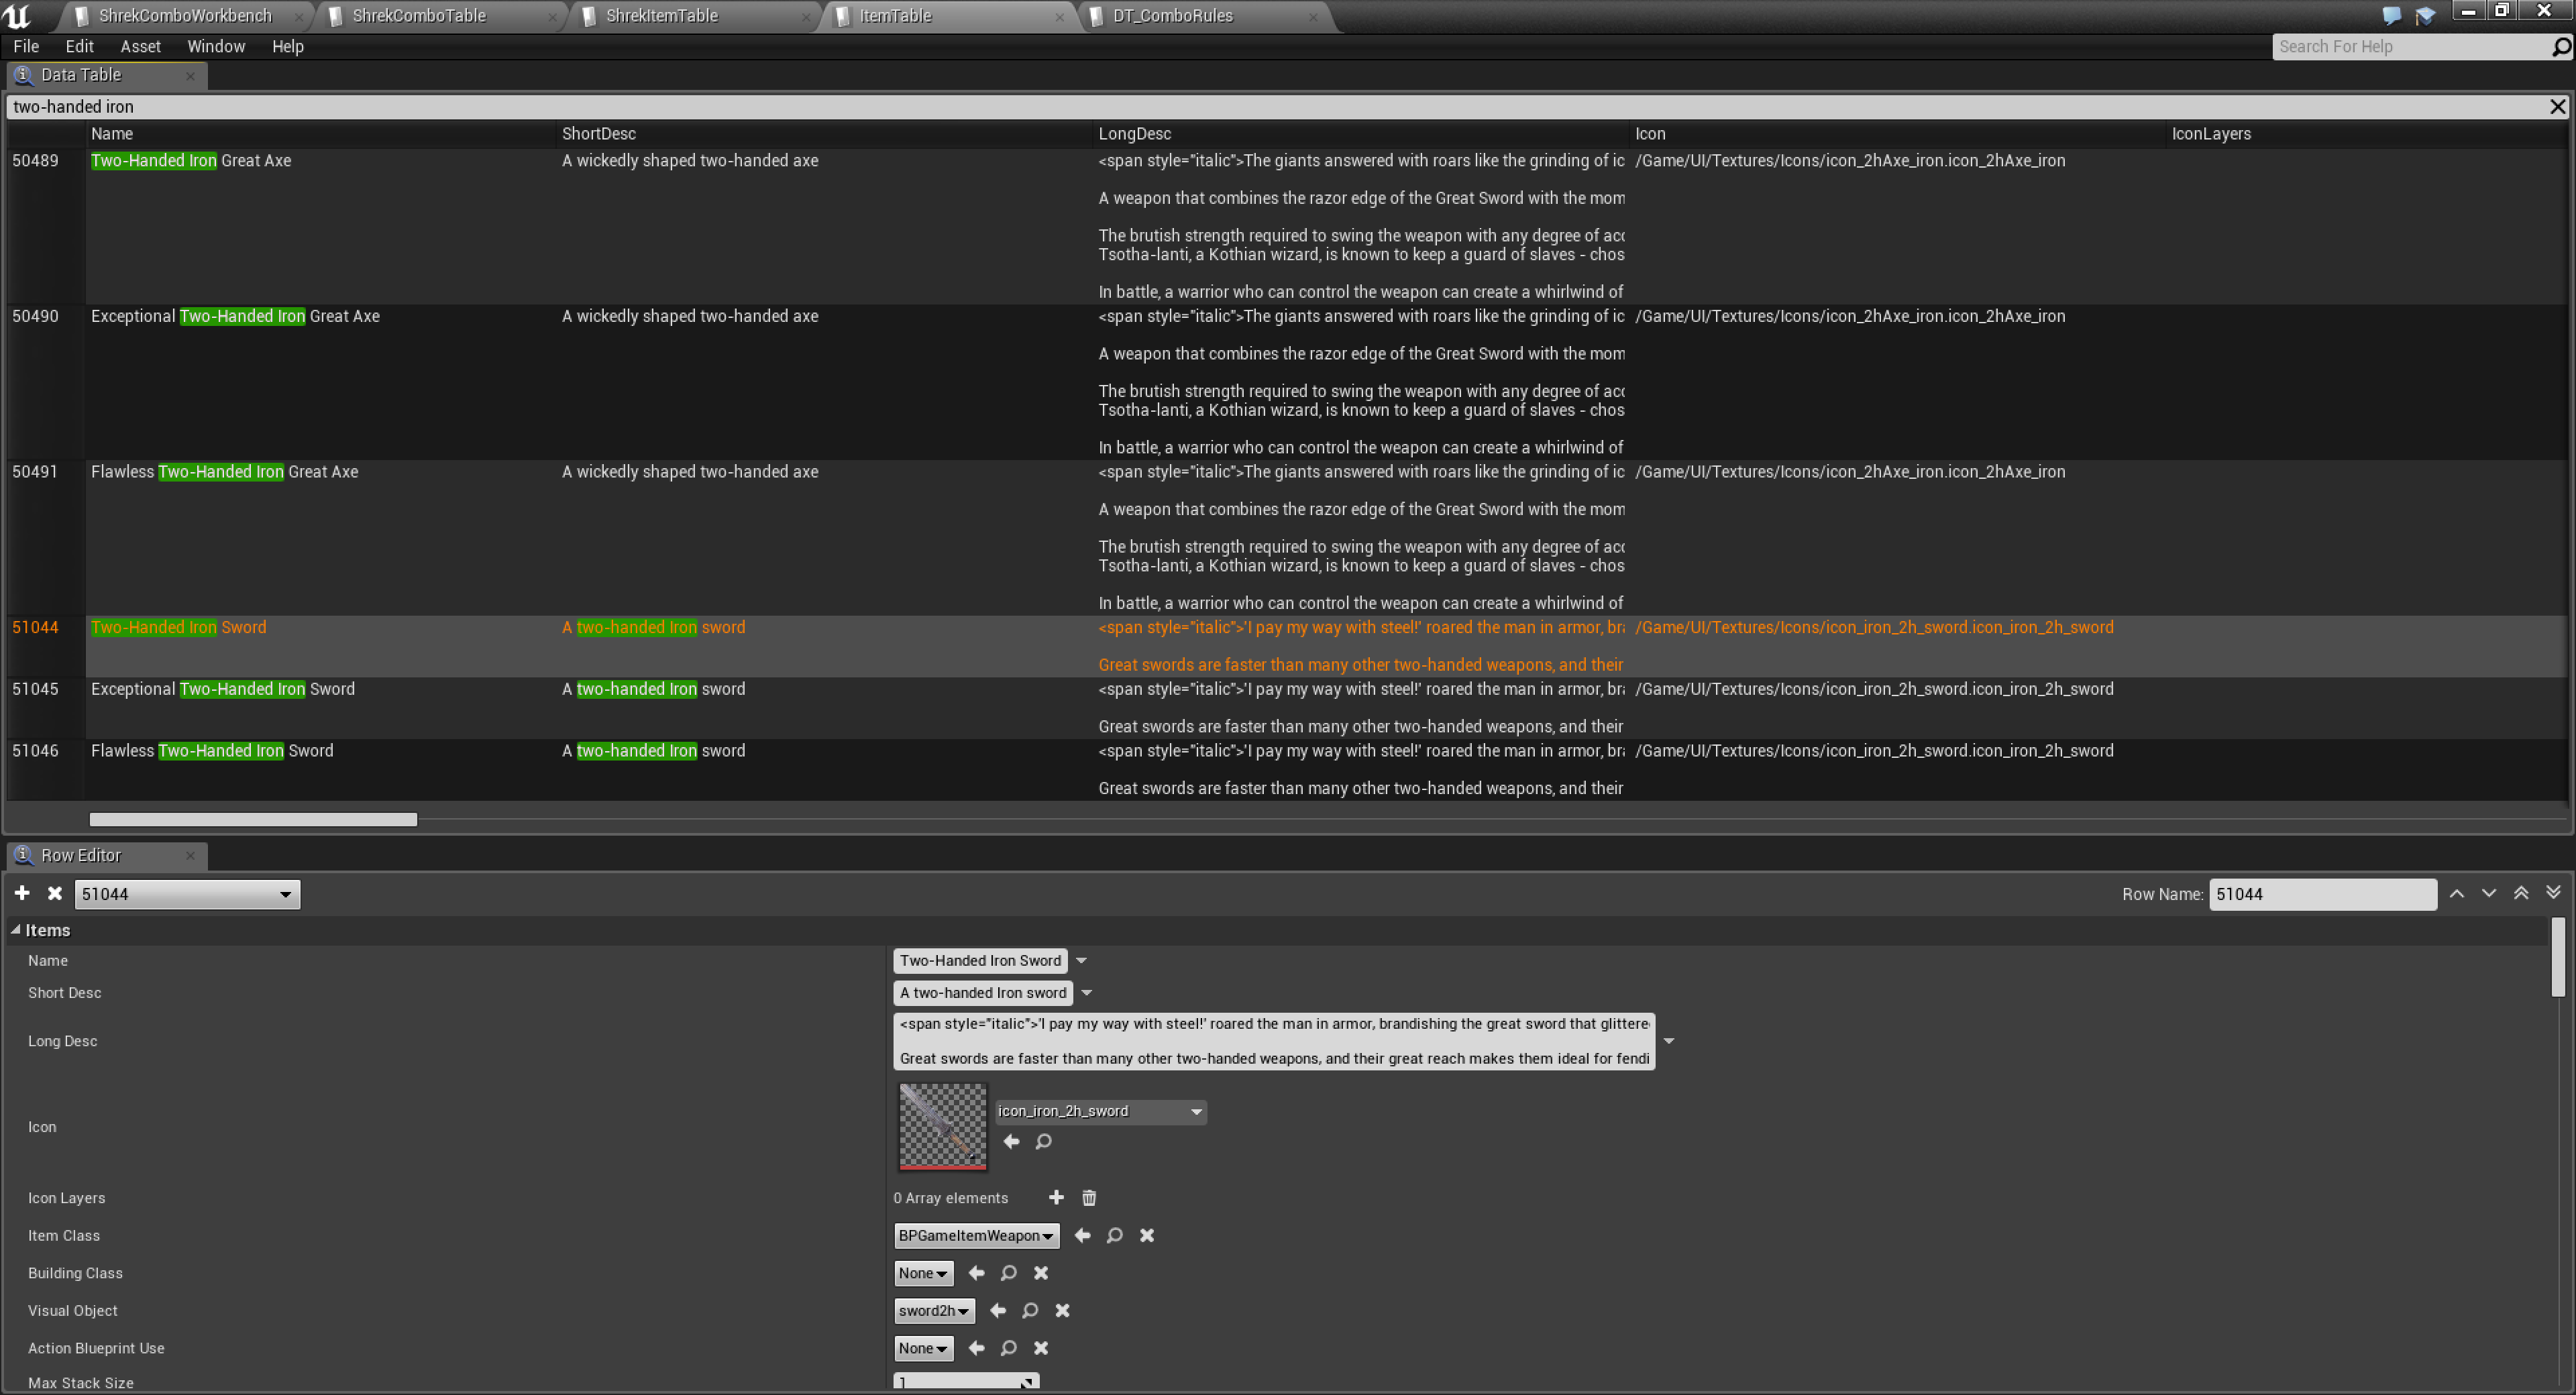
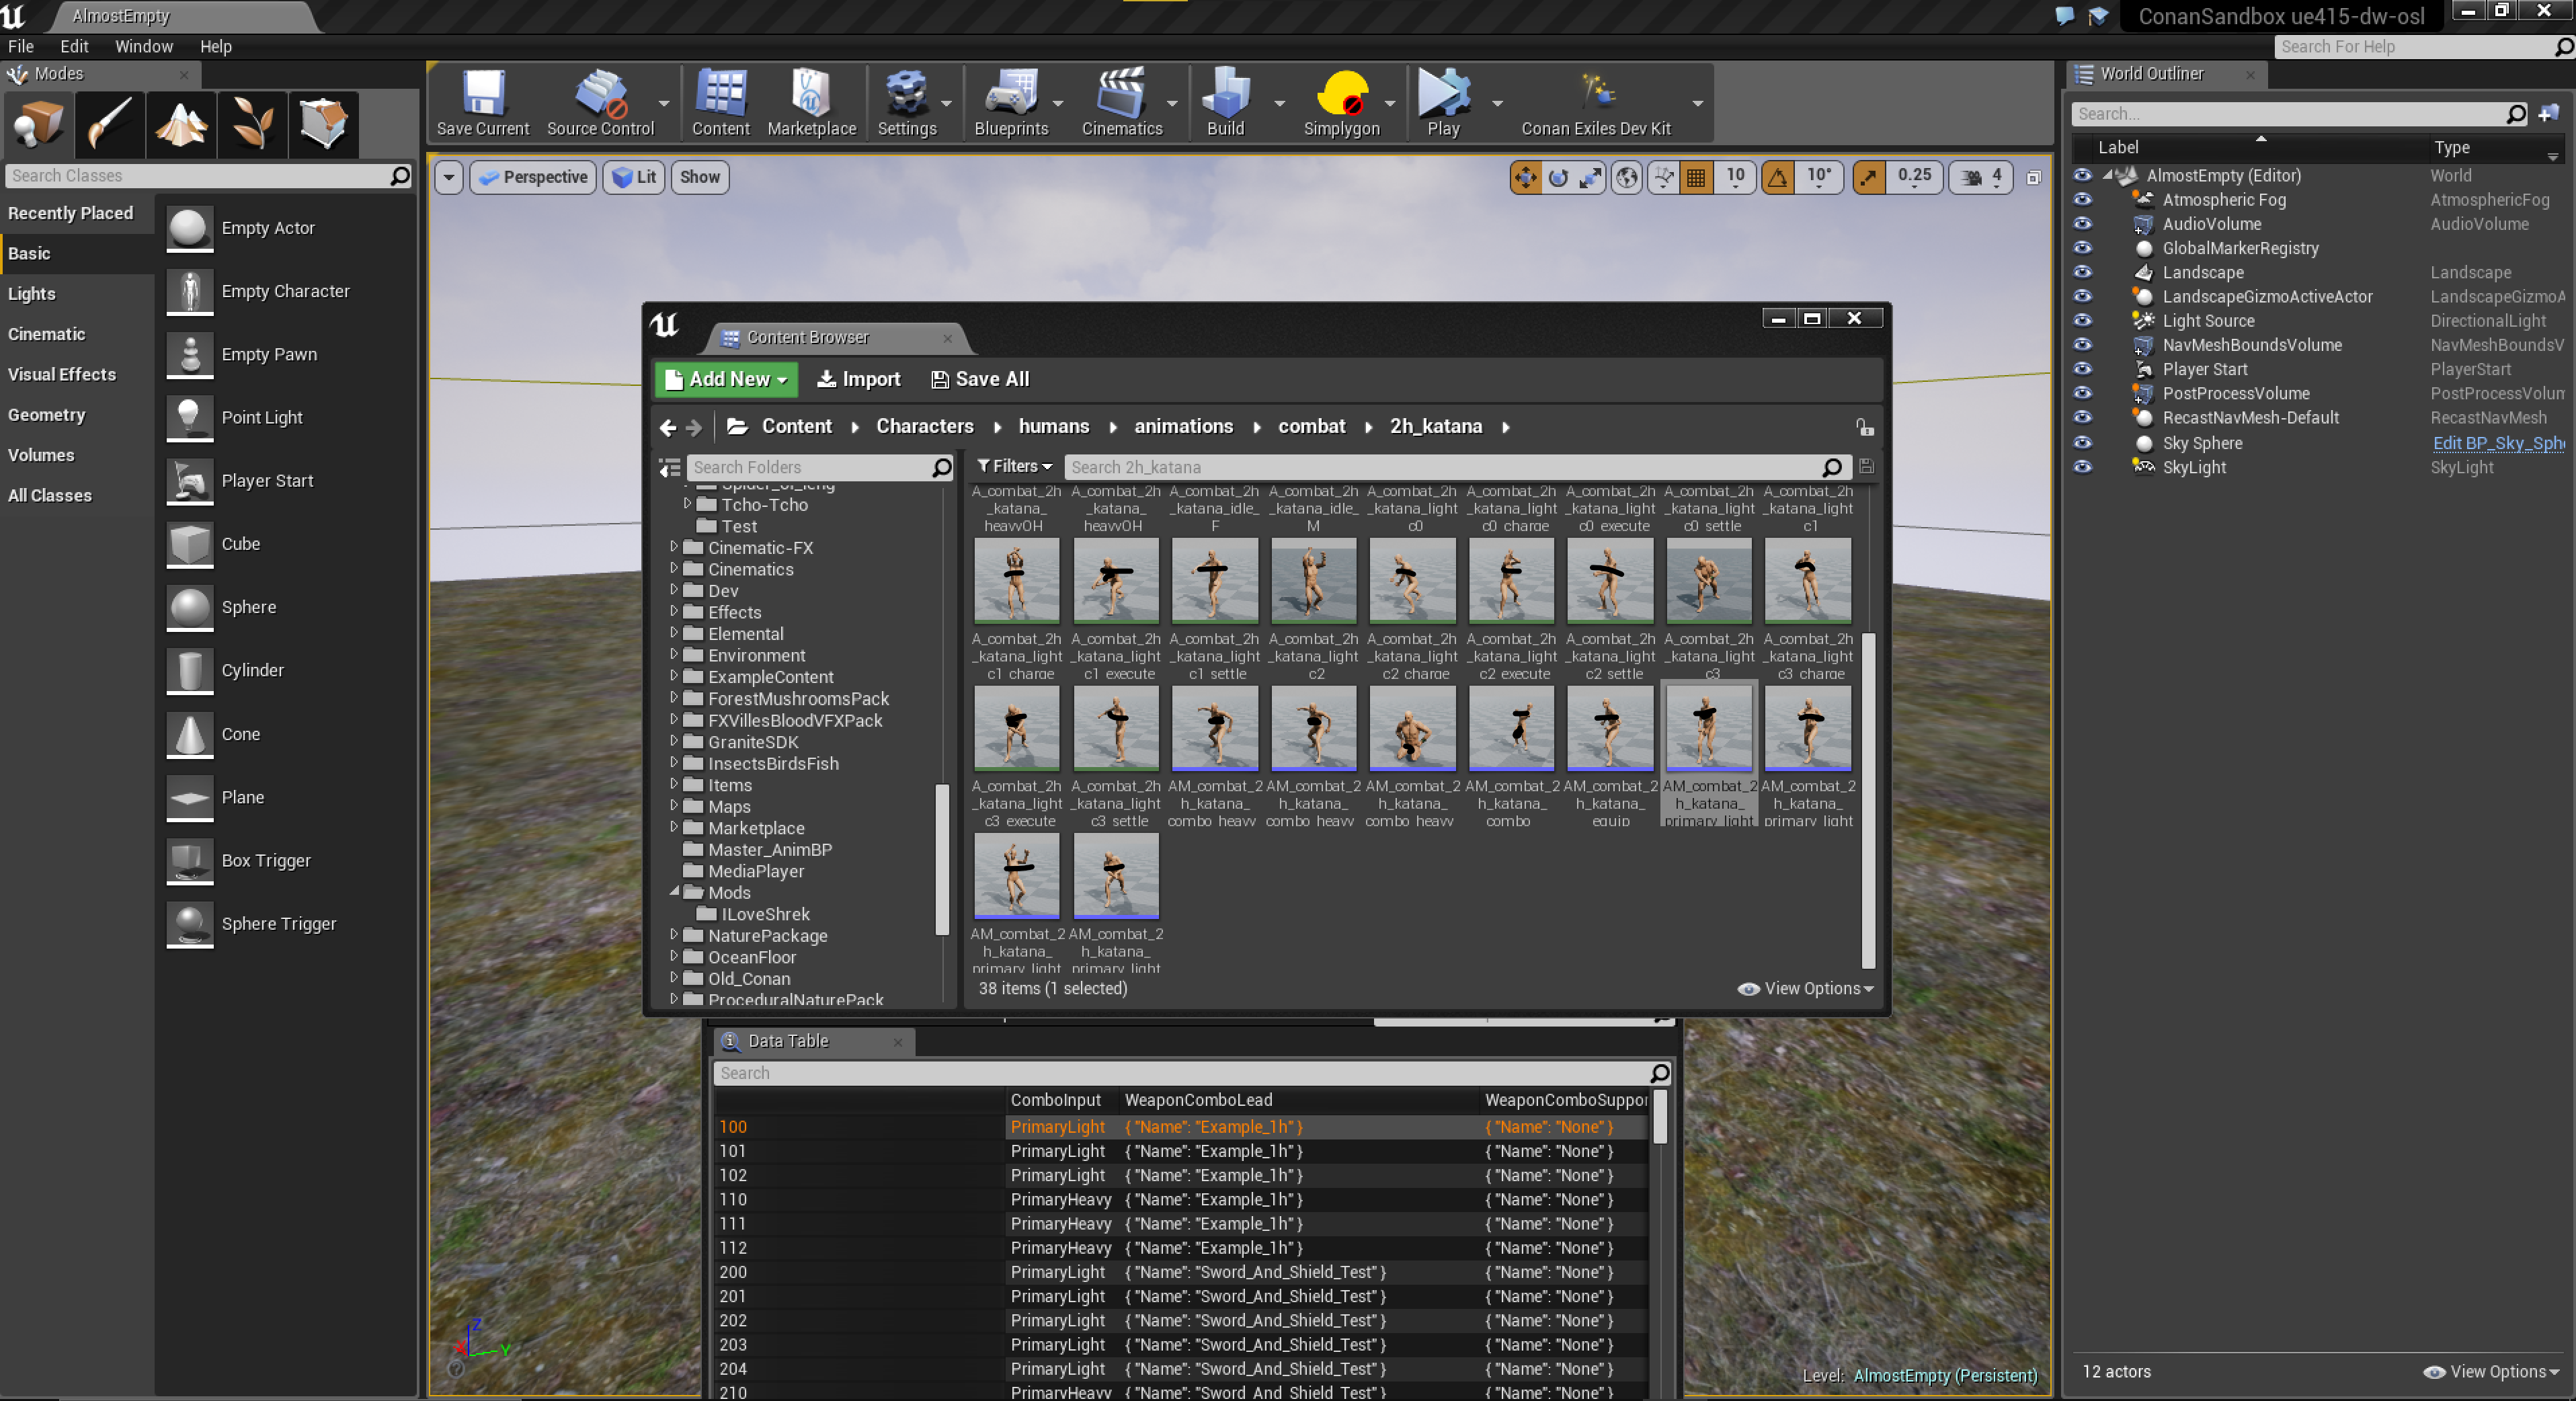
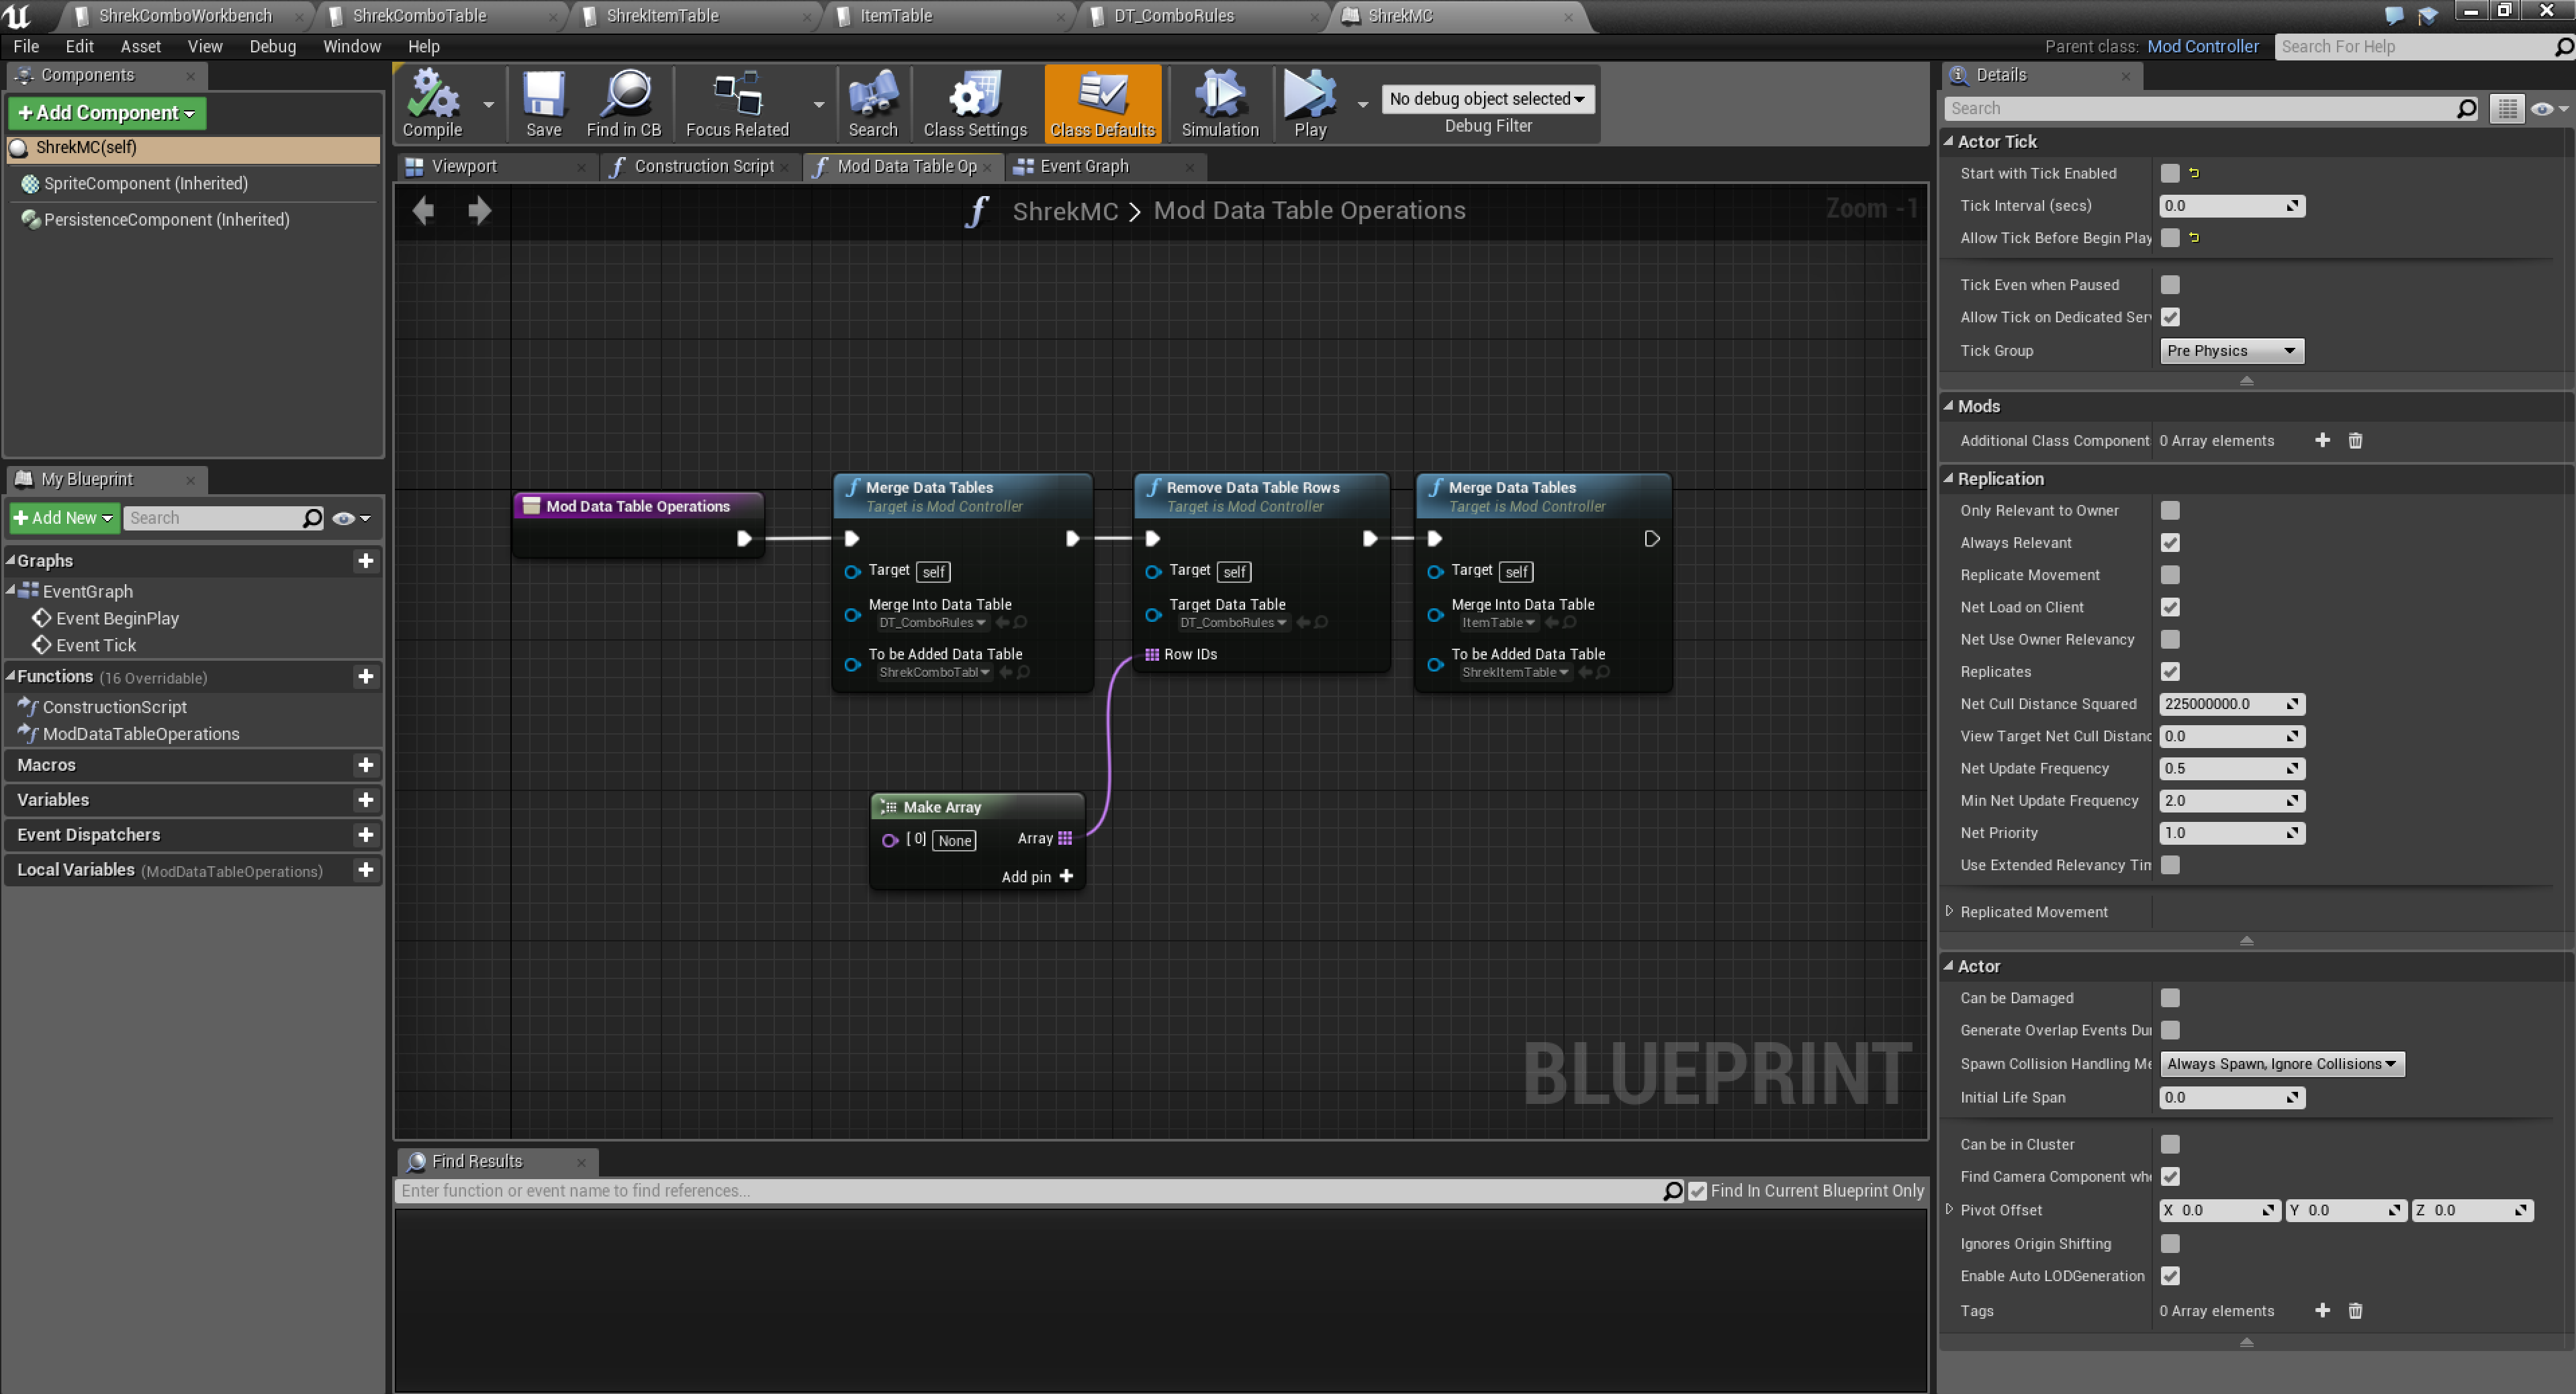
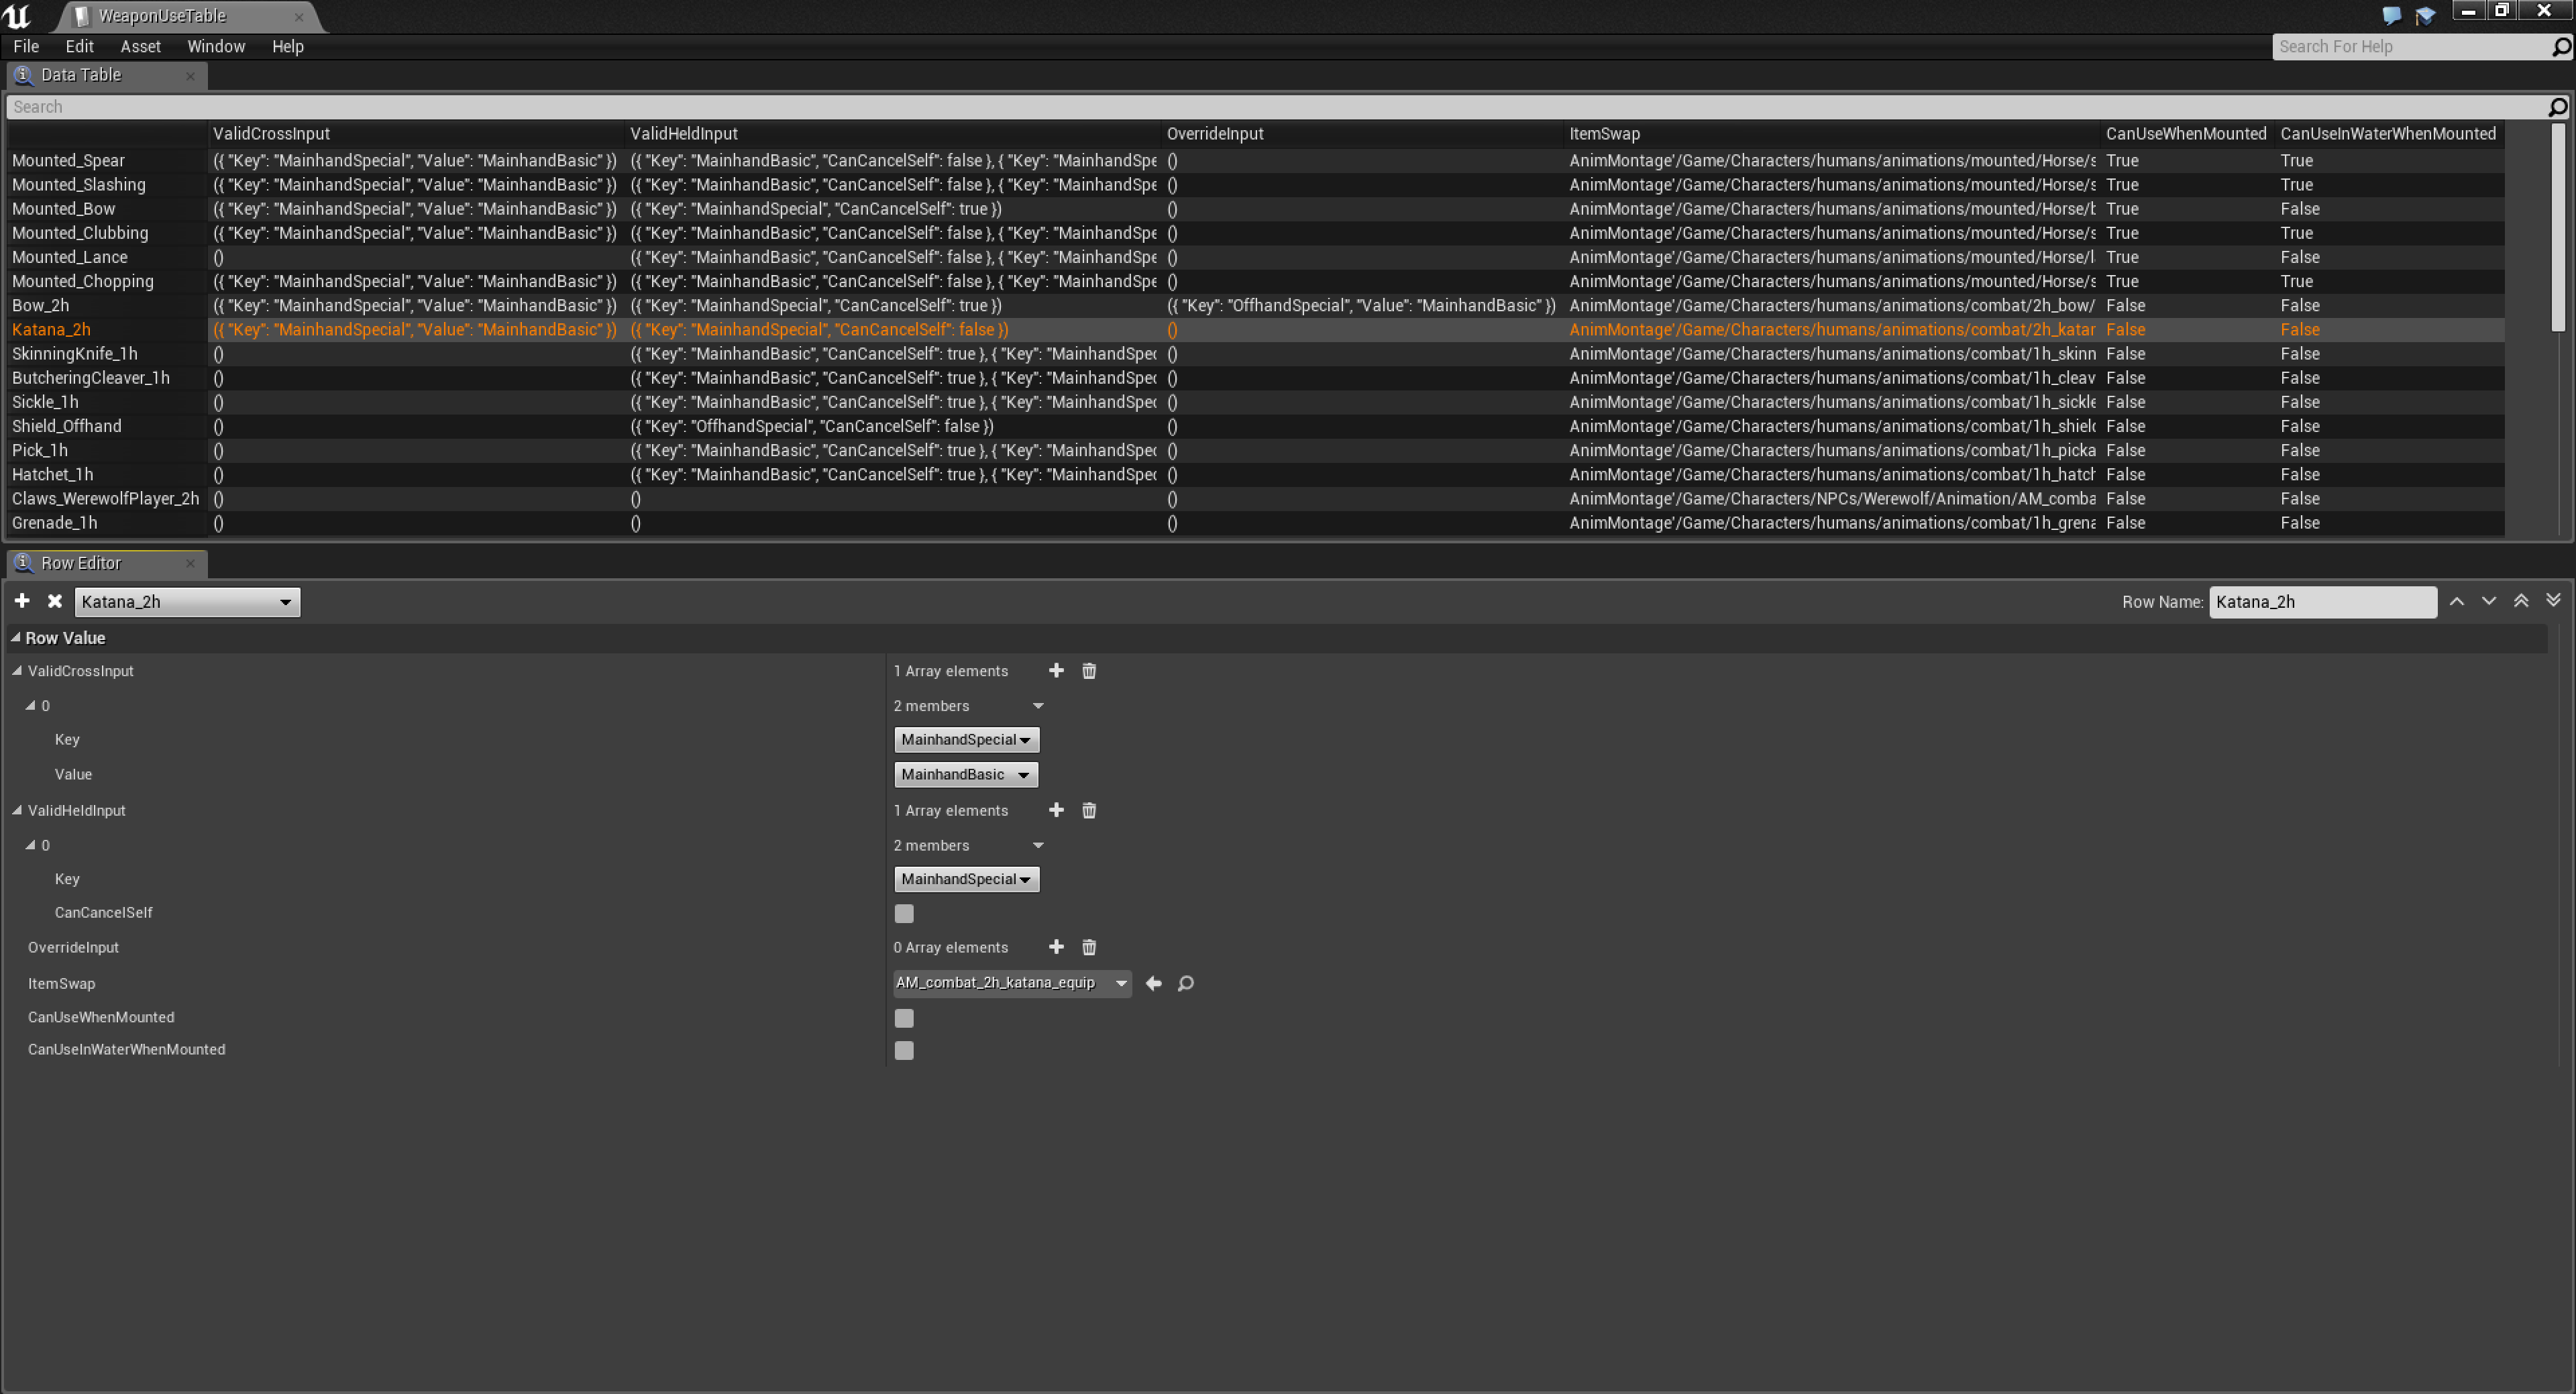
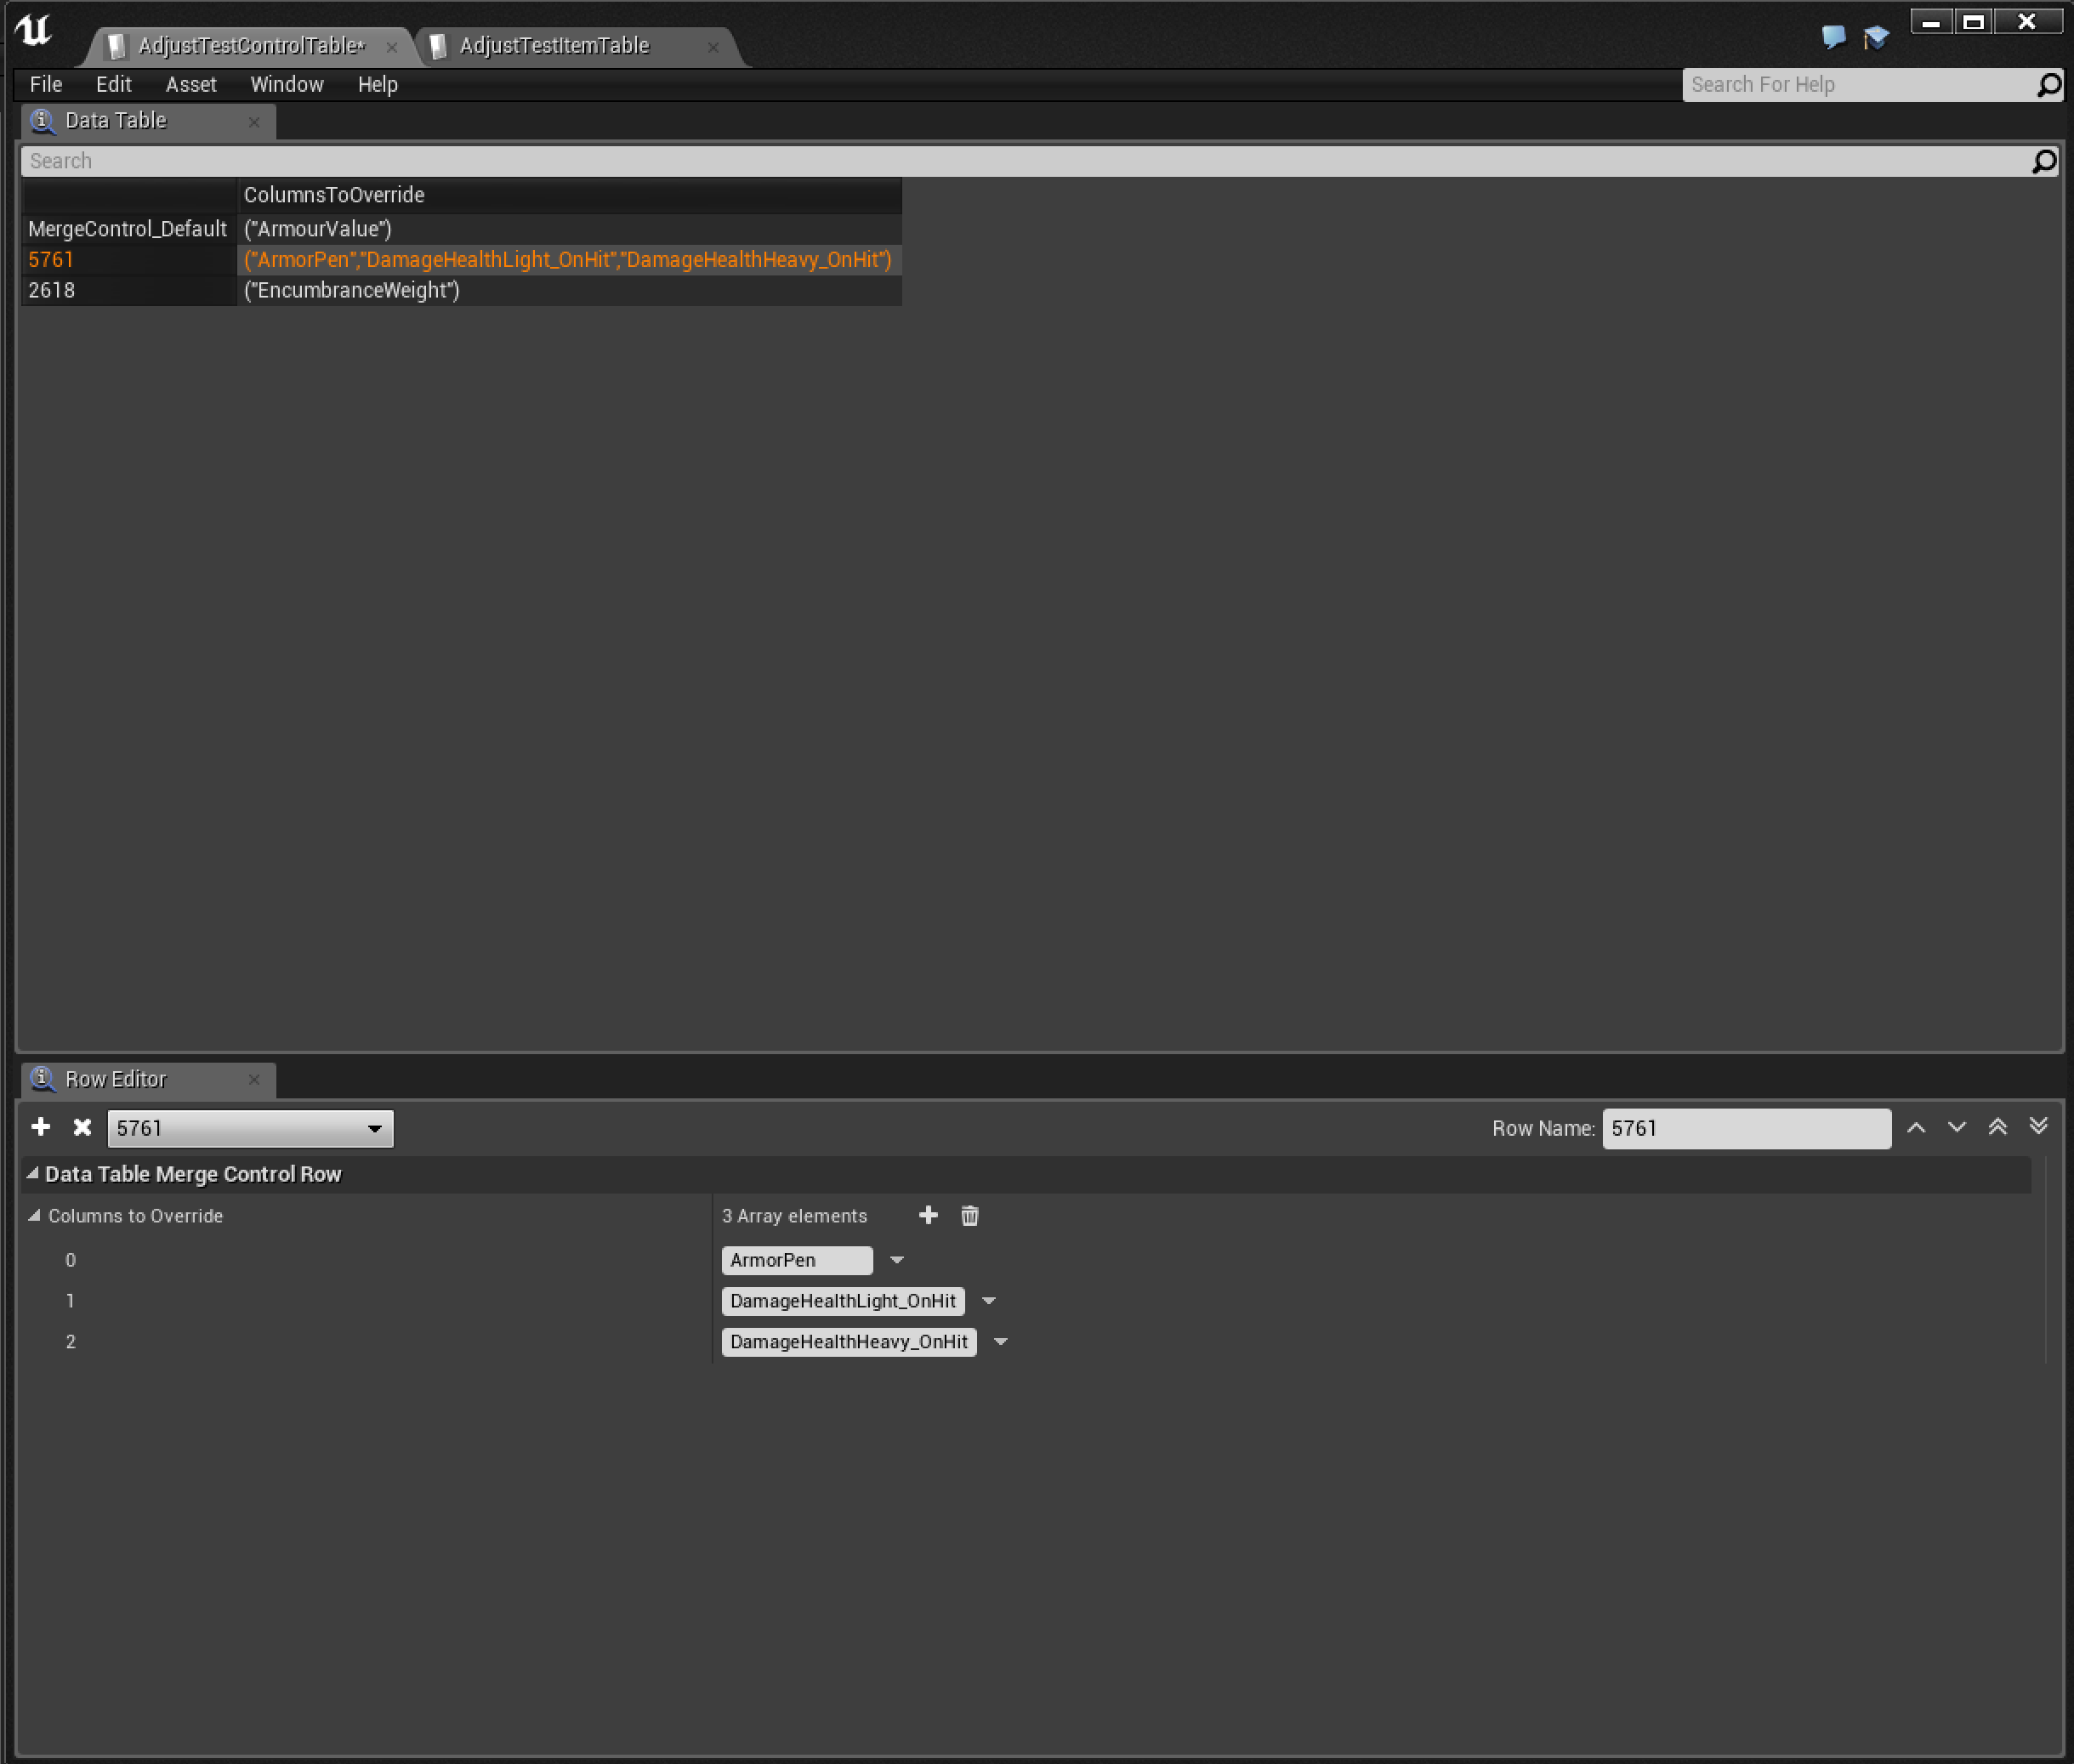
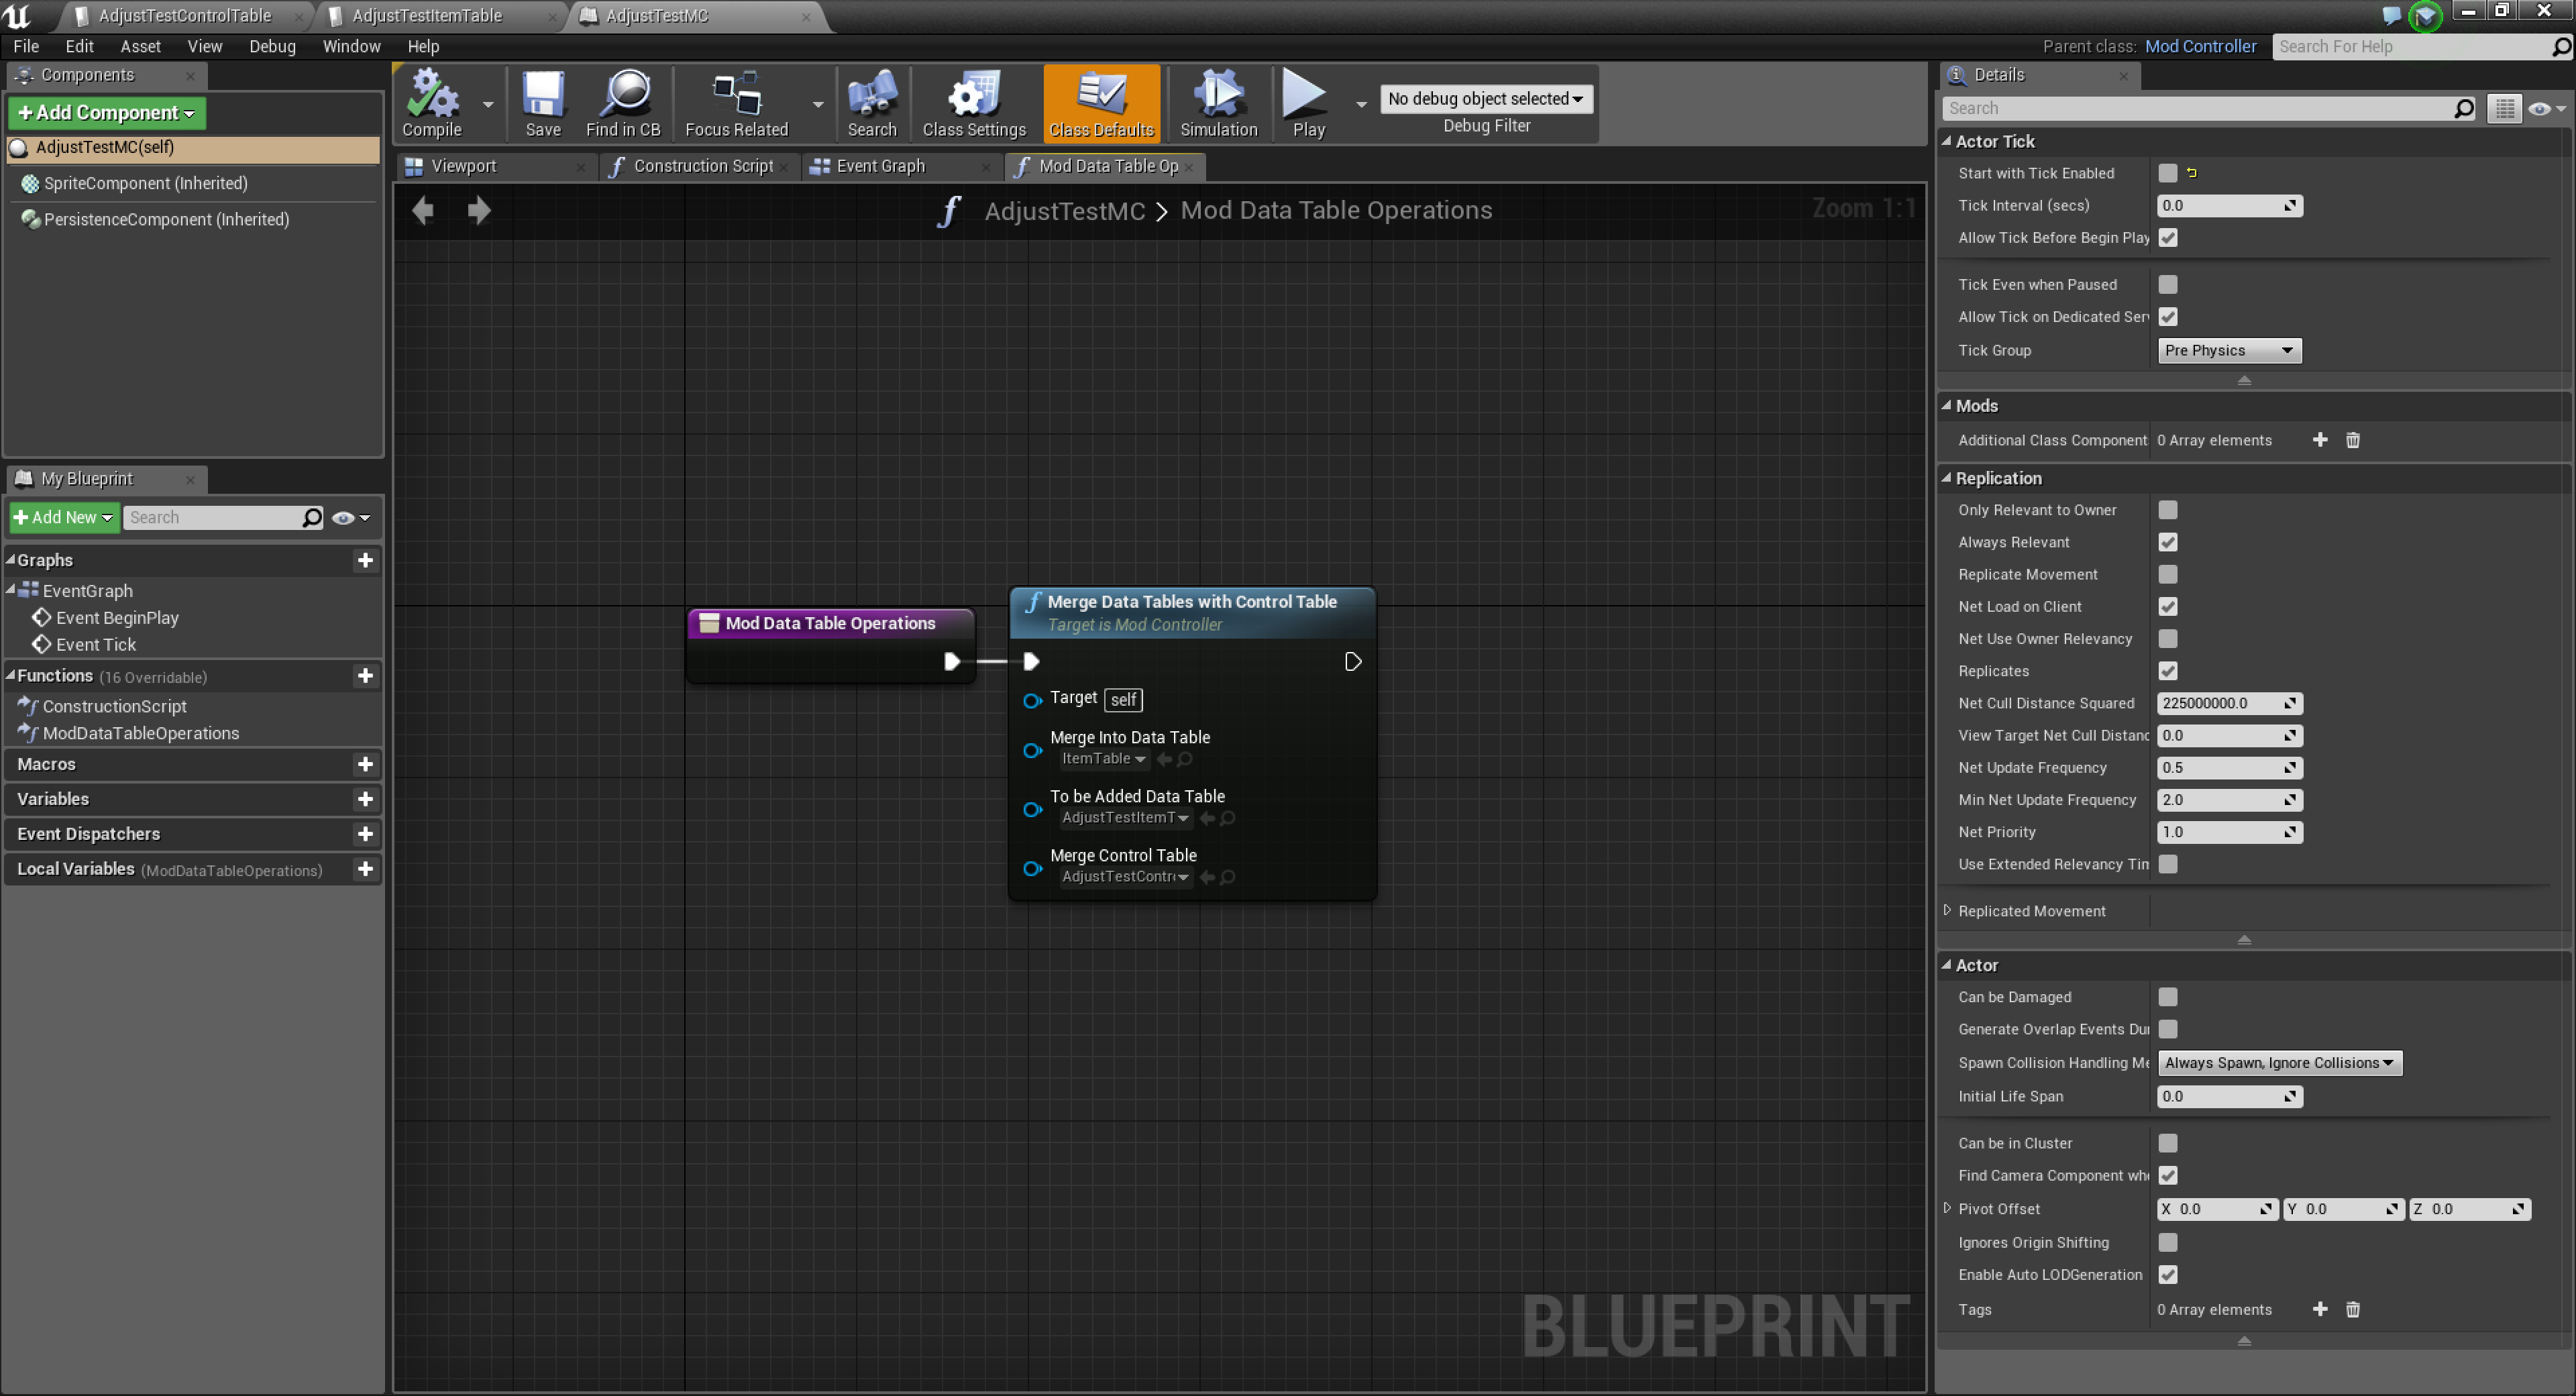
Part 1 of the rewrite has arrived, focused on data tables. A new section has been added detailing the creation of modded data tables in general, while the space saved from the existing ItemTable and ComboRules sections have been spent with adding more information. An 'ItemTable in Depth' Addendum may arrive, but I haven't decided to include it yet.

I may go over it again to smooth out any awkward sentences / typos.
Dread Swoop  [ผู้สร้าง] 1 มิ.ย. 2023 @ 4: 36pm 
Reading through their change notes, I don't believe it will affect the guide or the actual process.

The structure selection appears to make searching Data Table structures easier, but likely nothing beyond that.

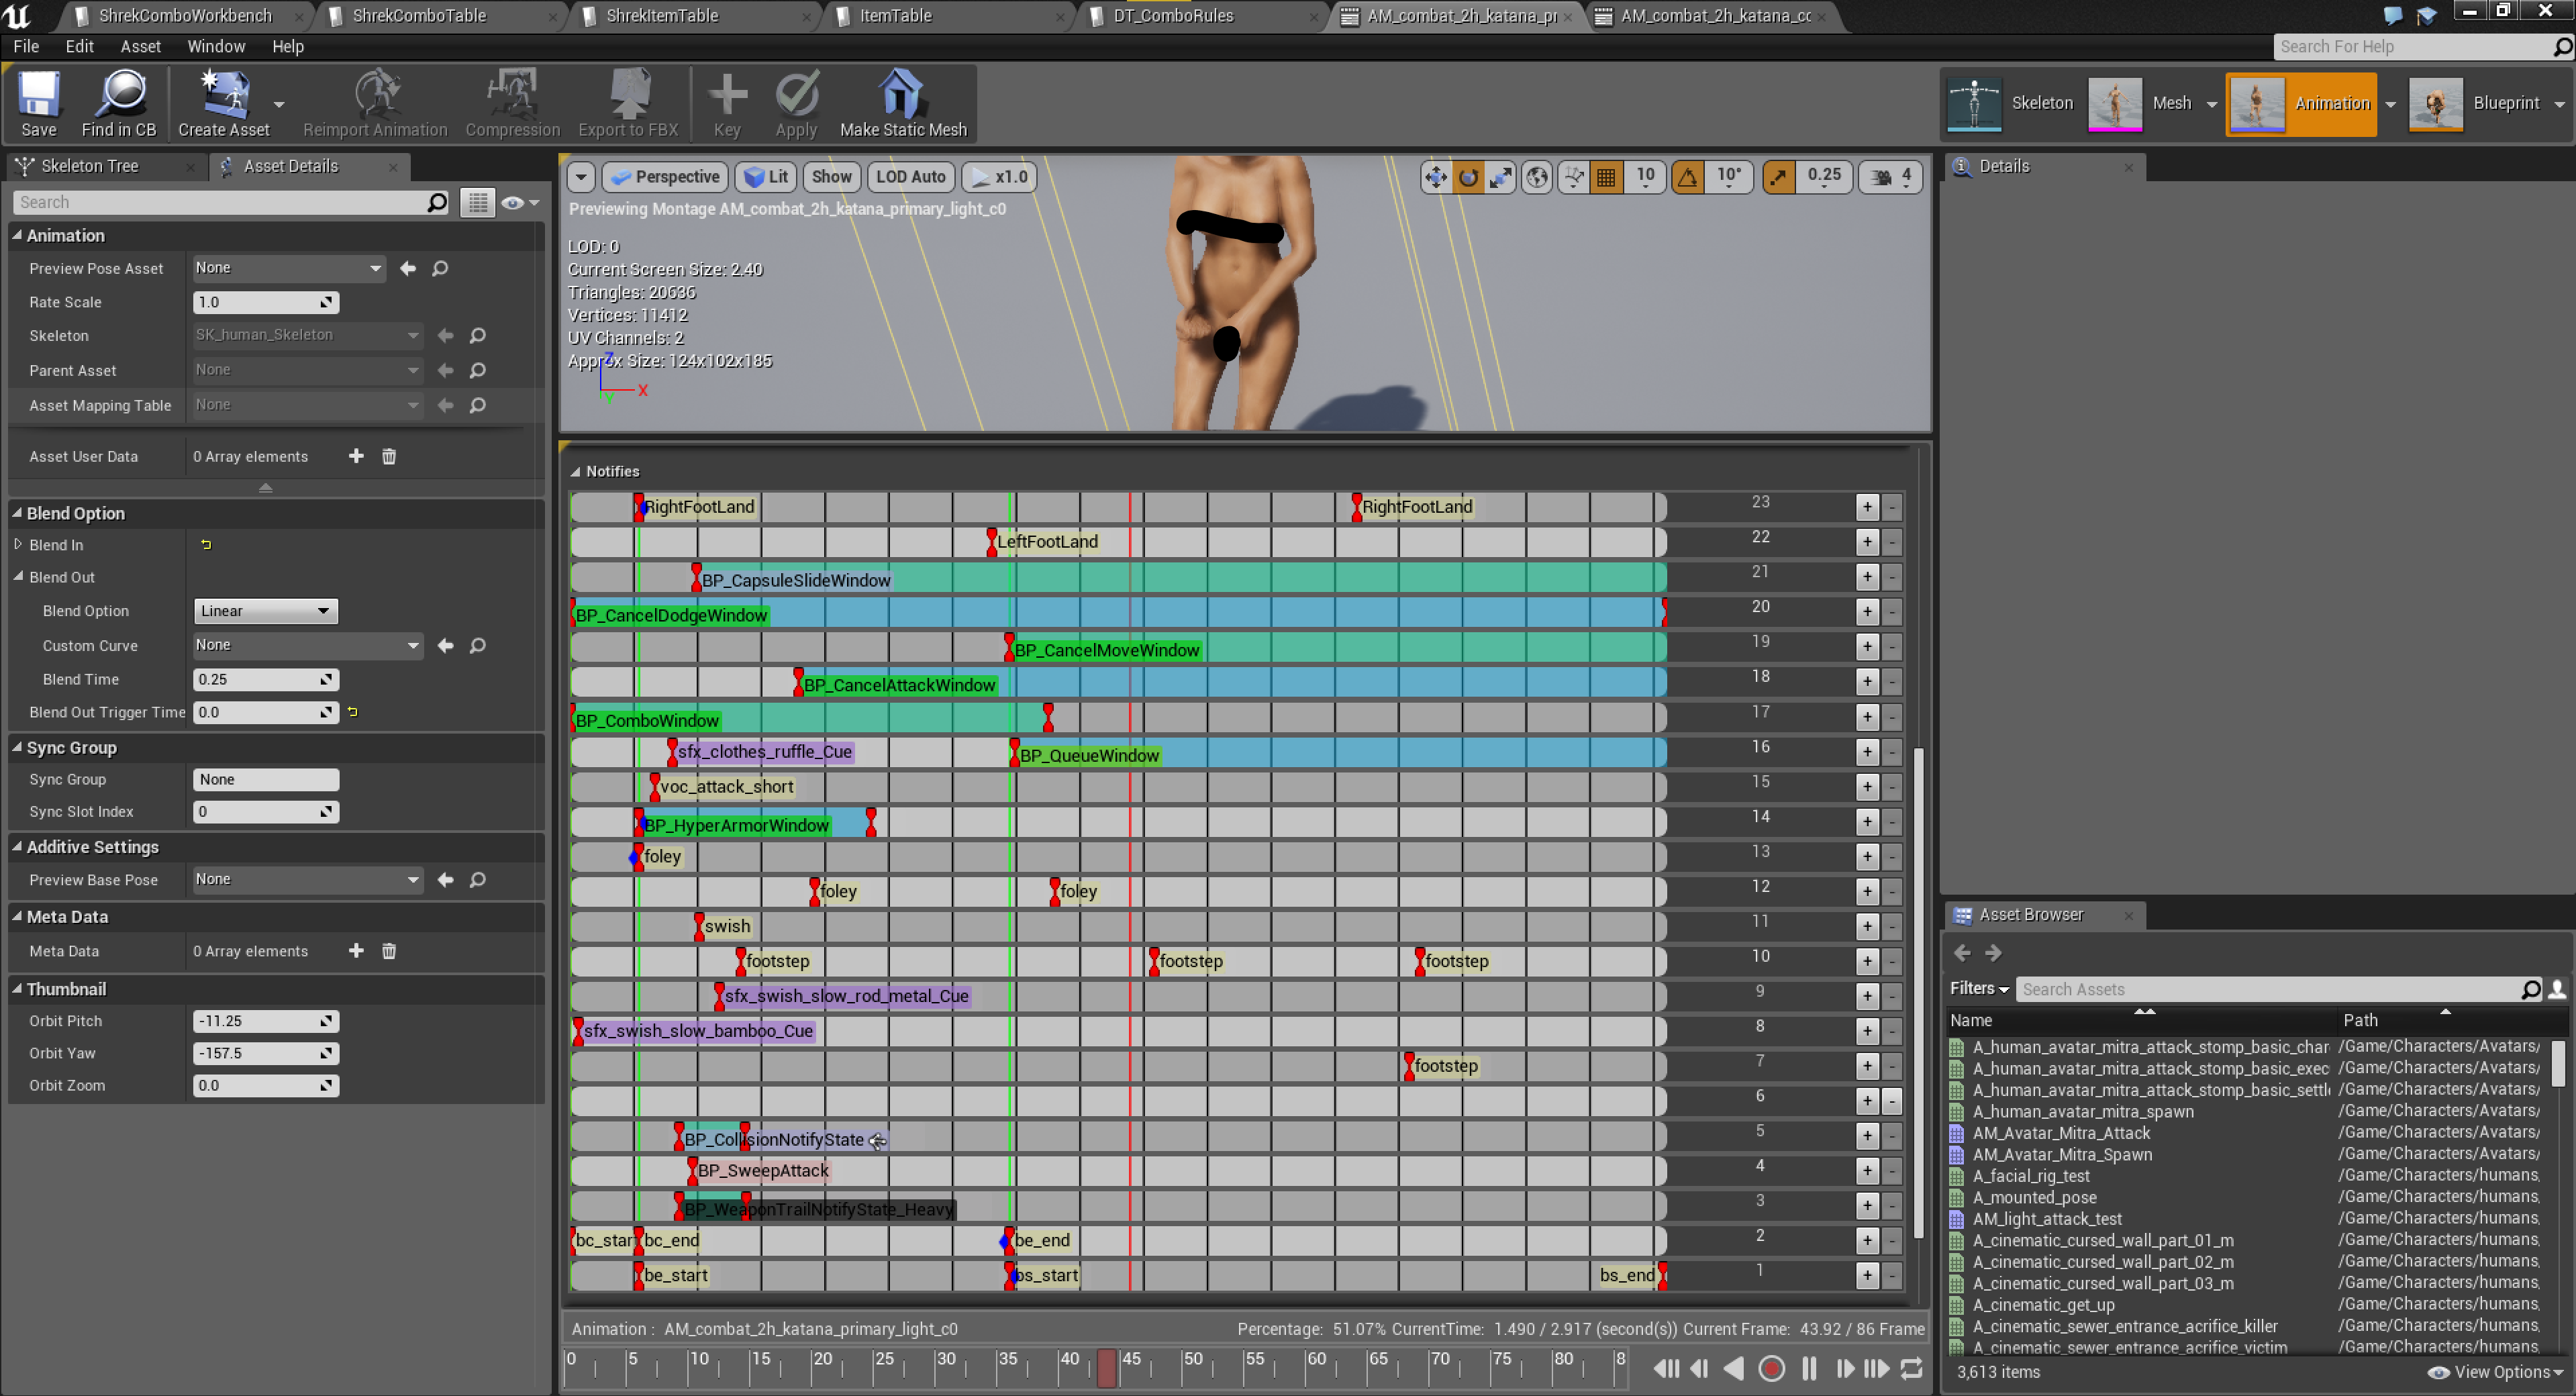
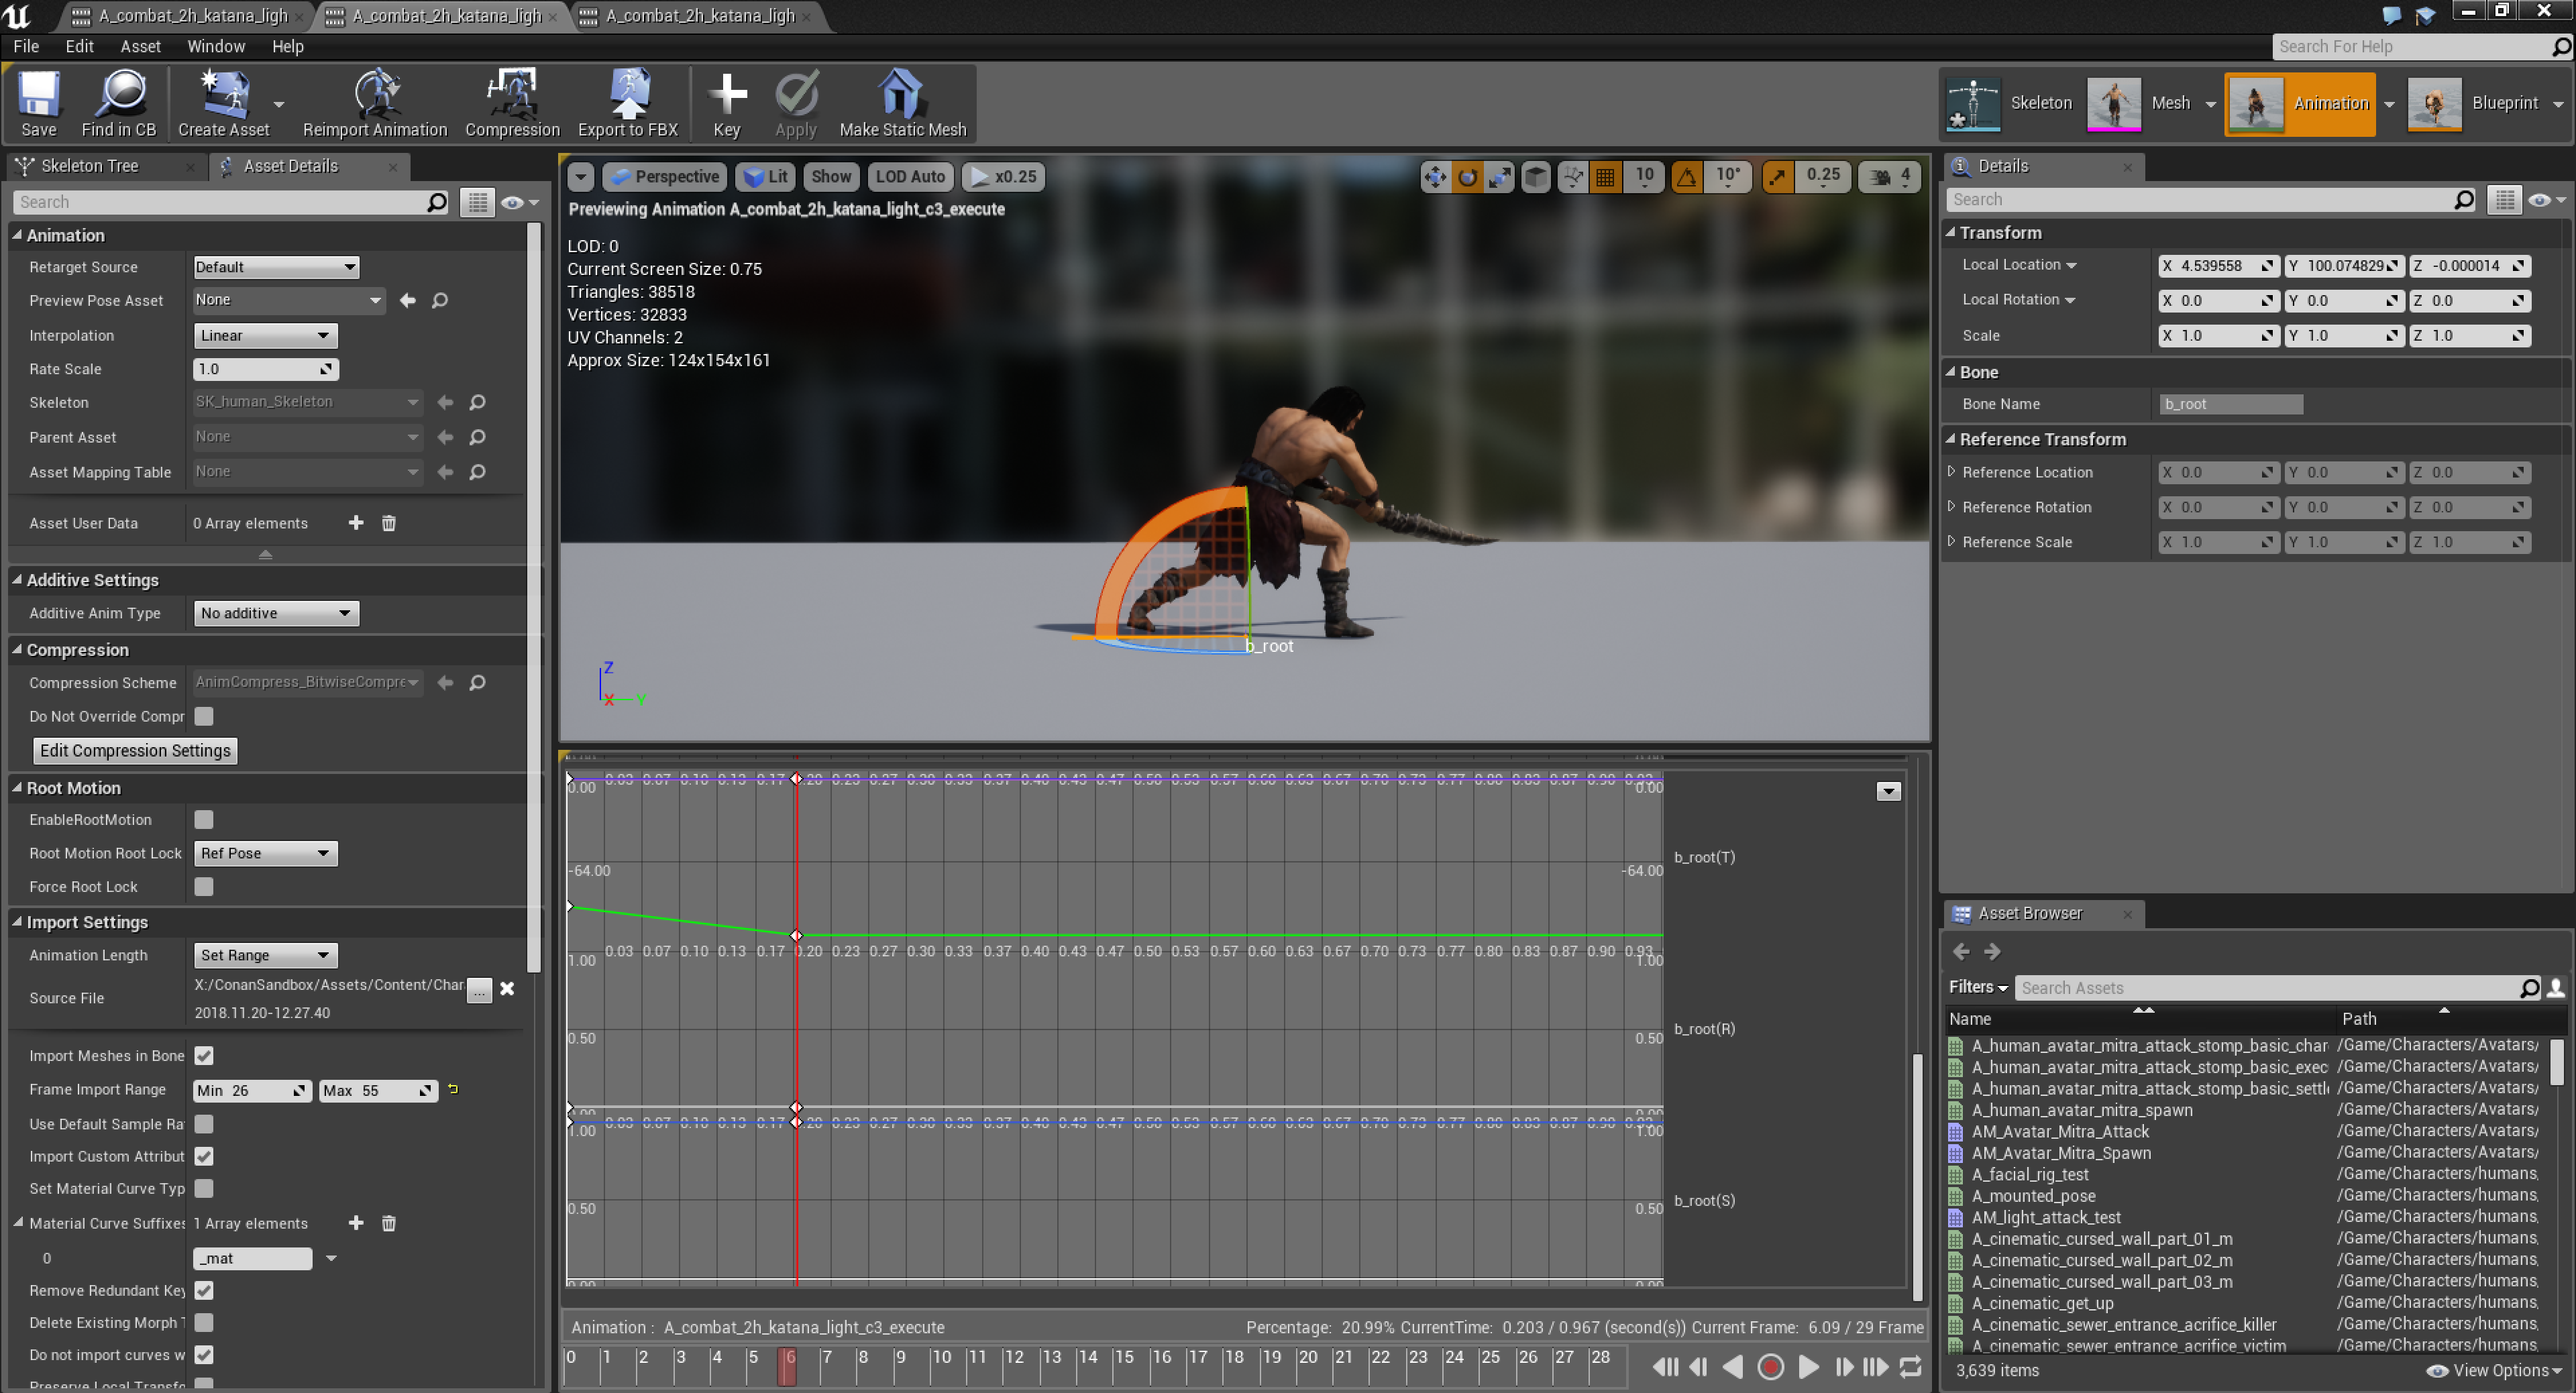
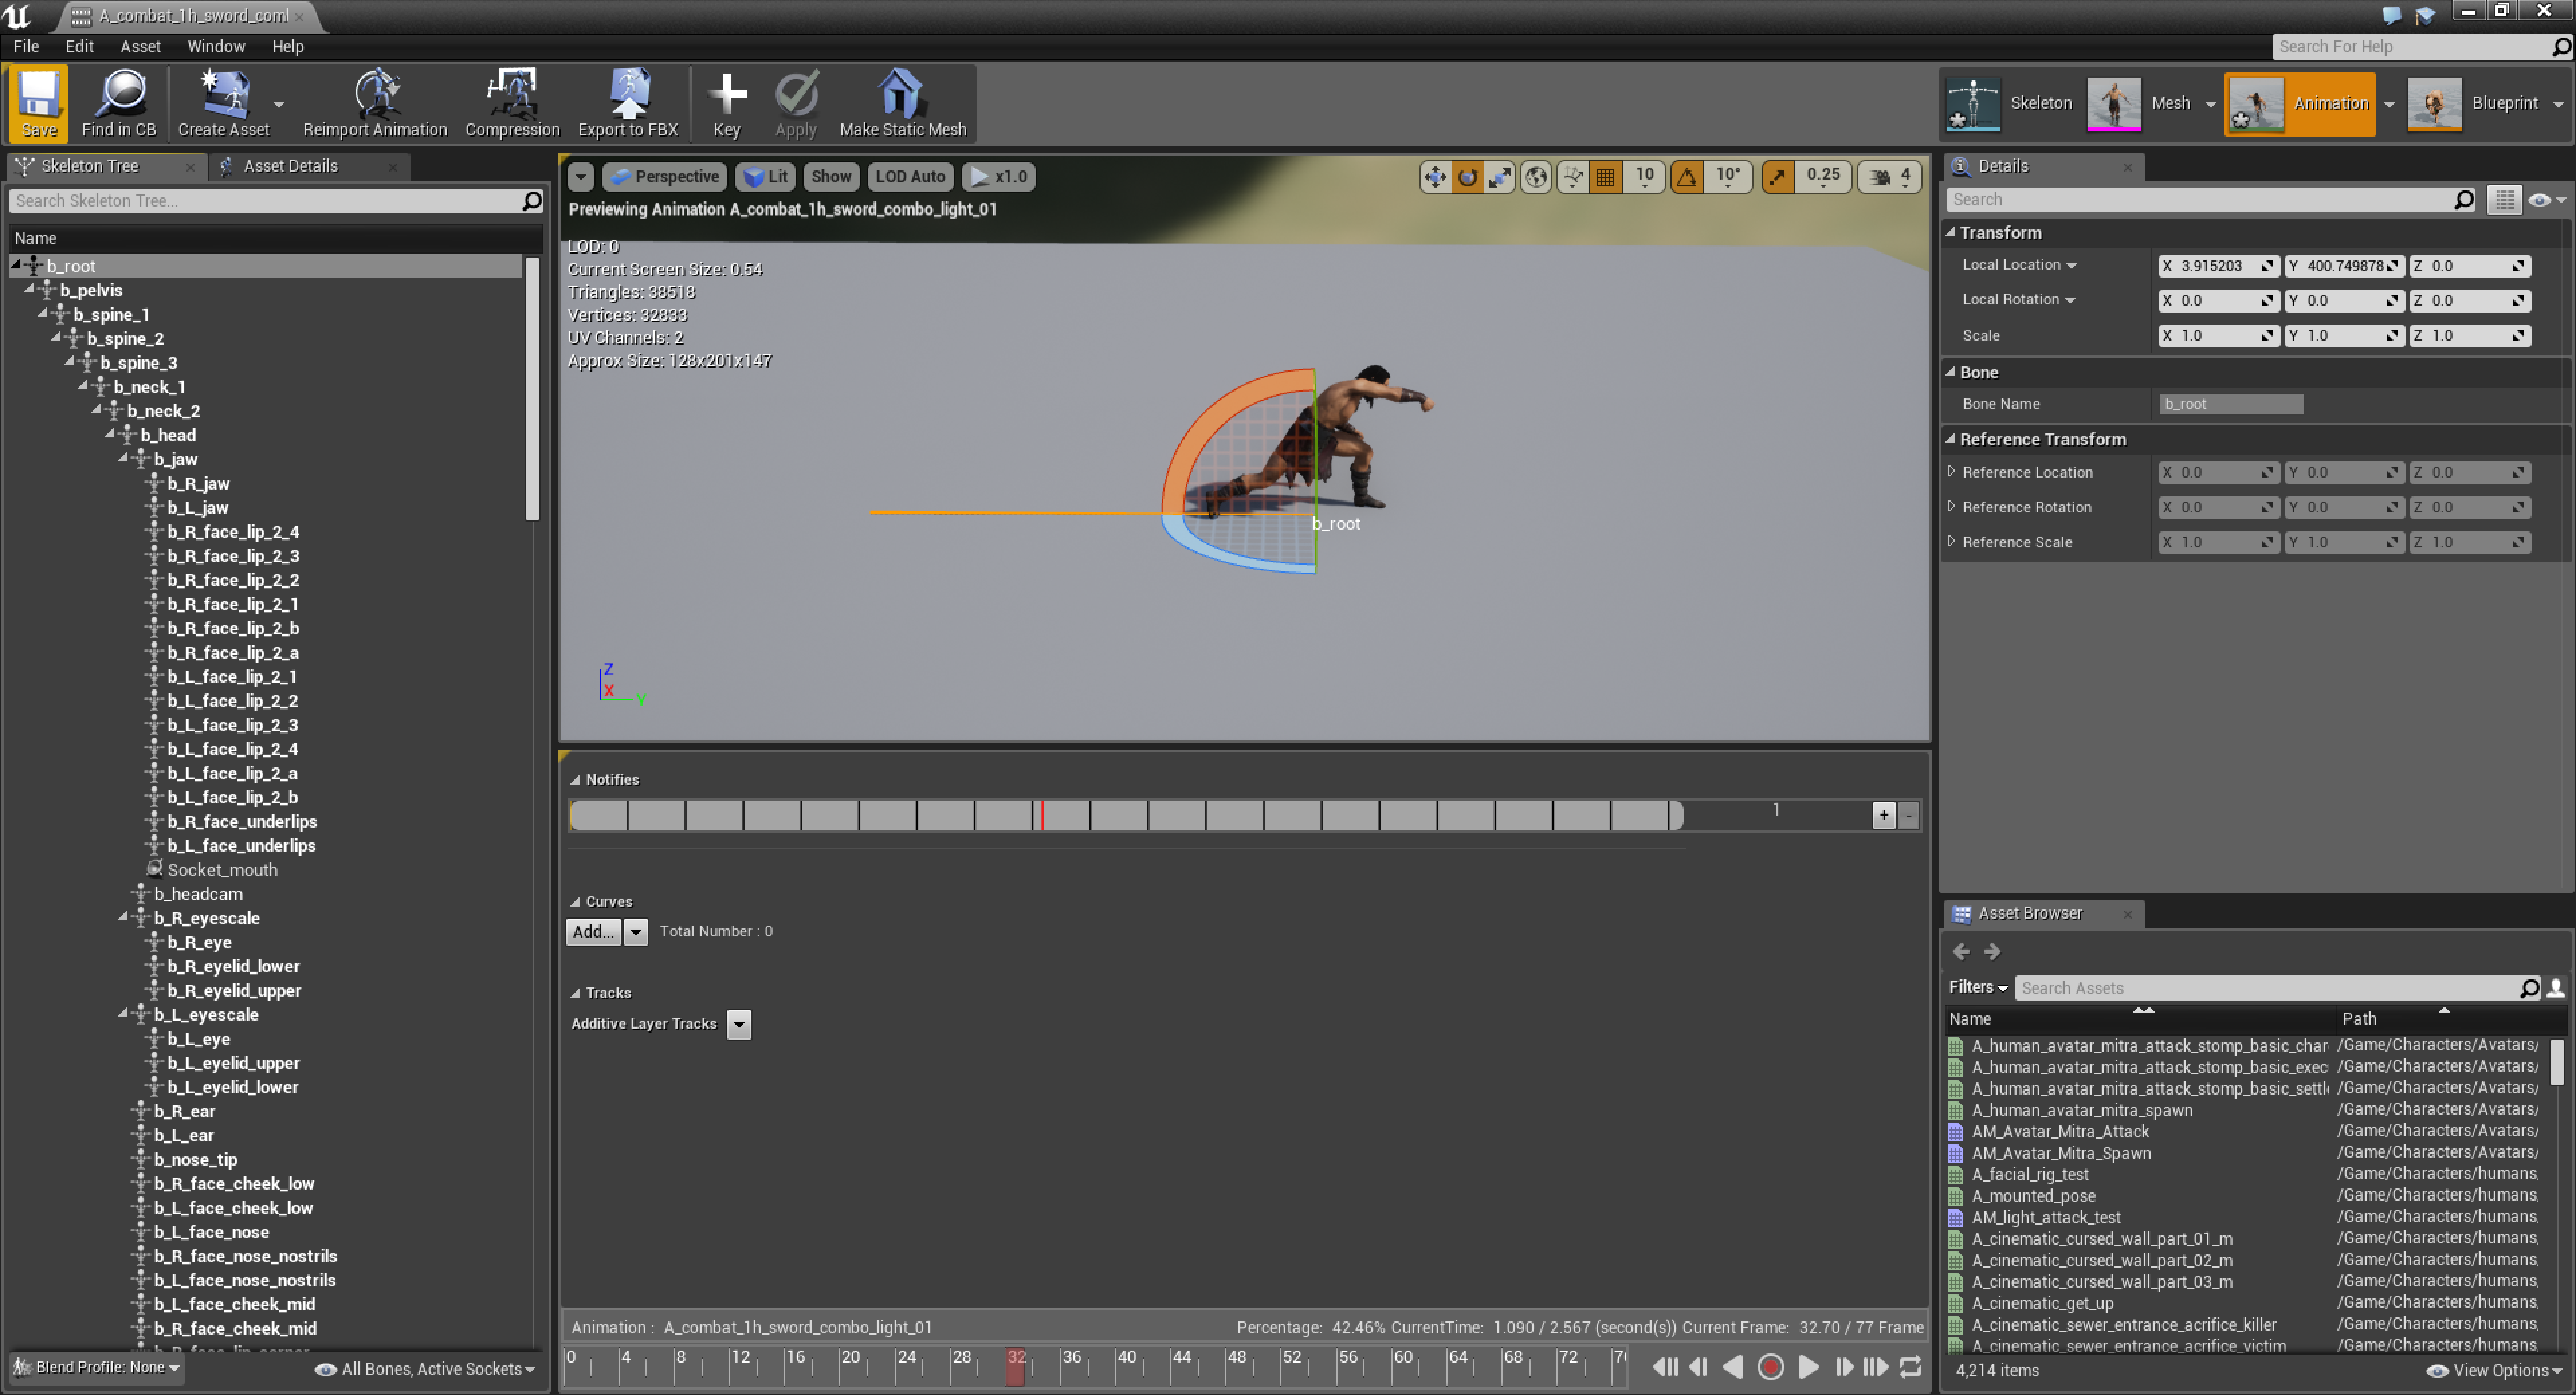
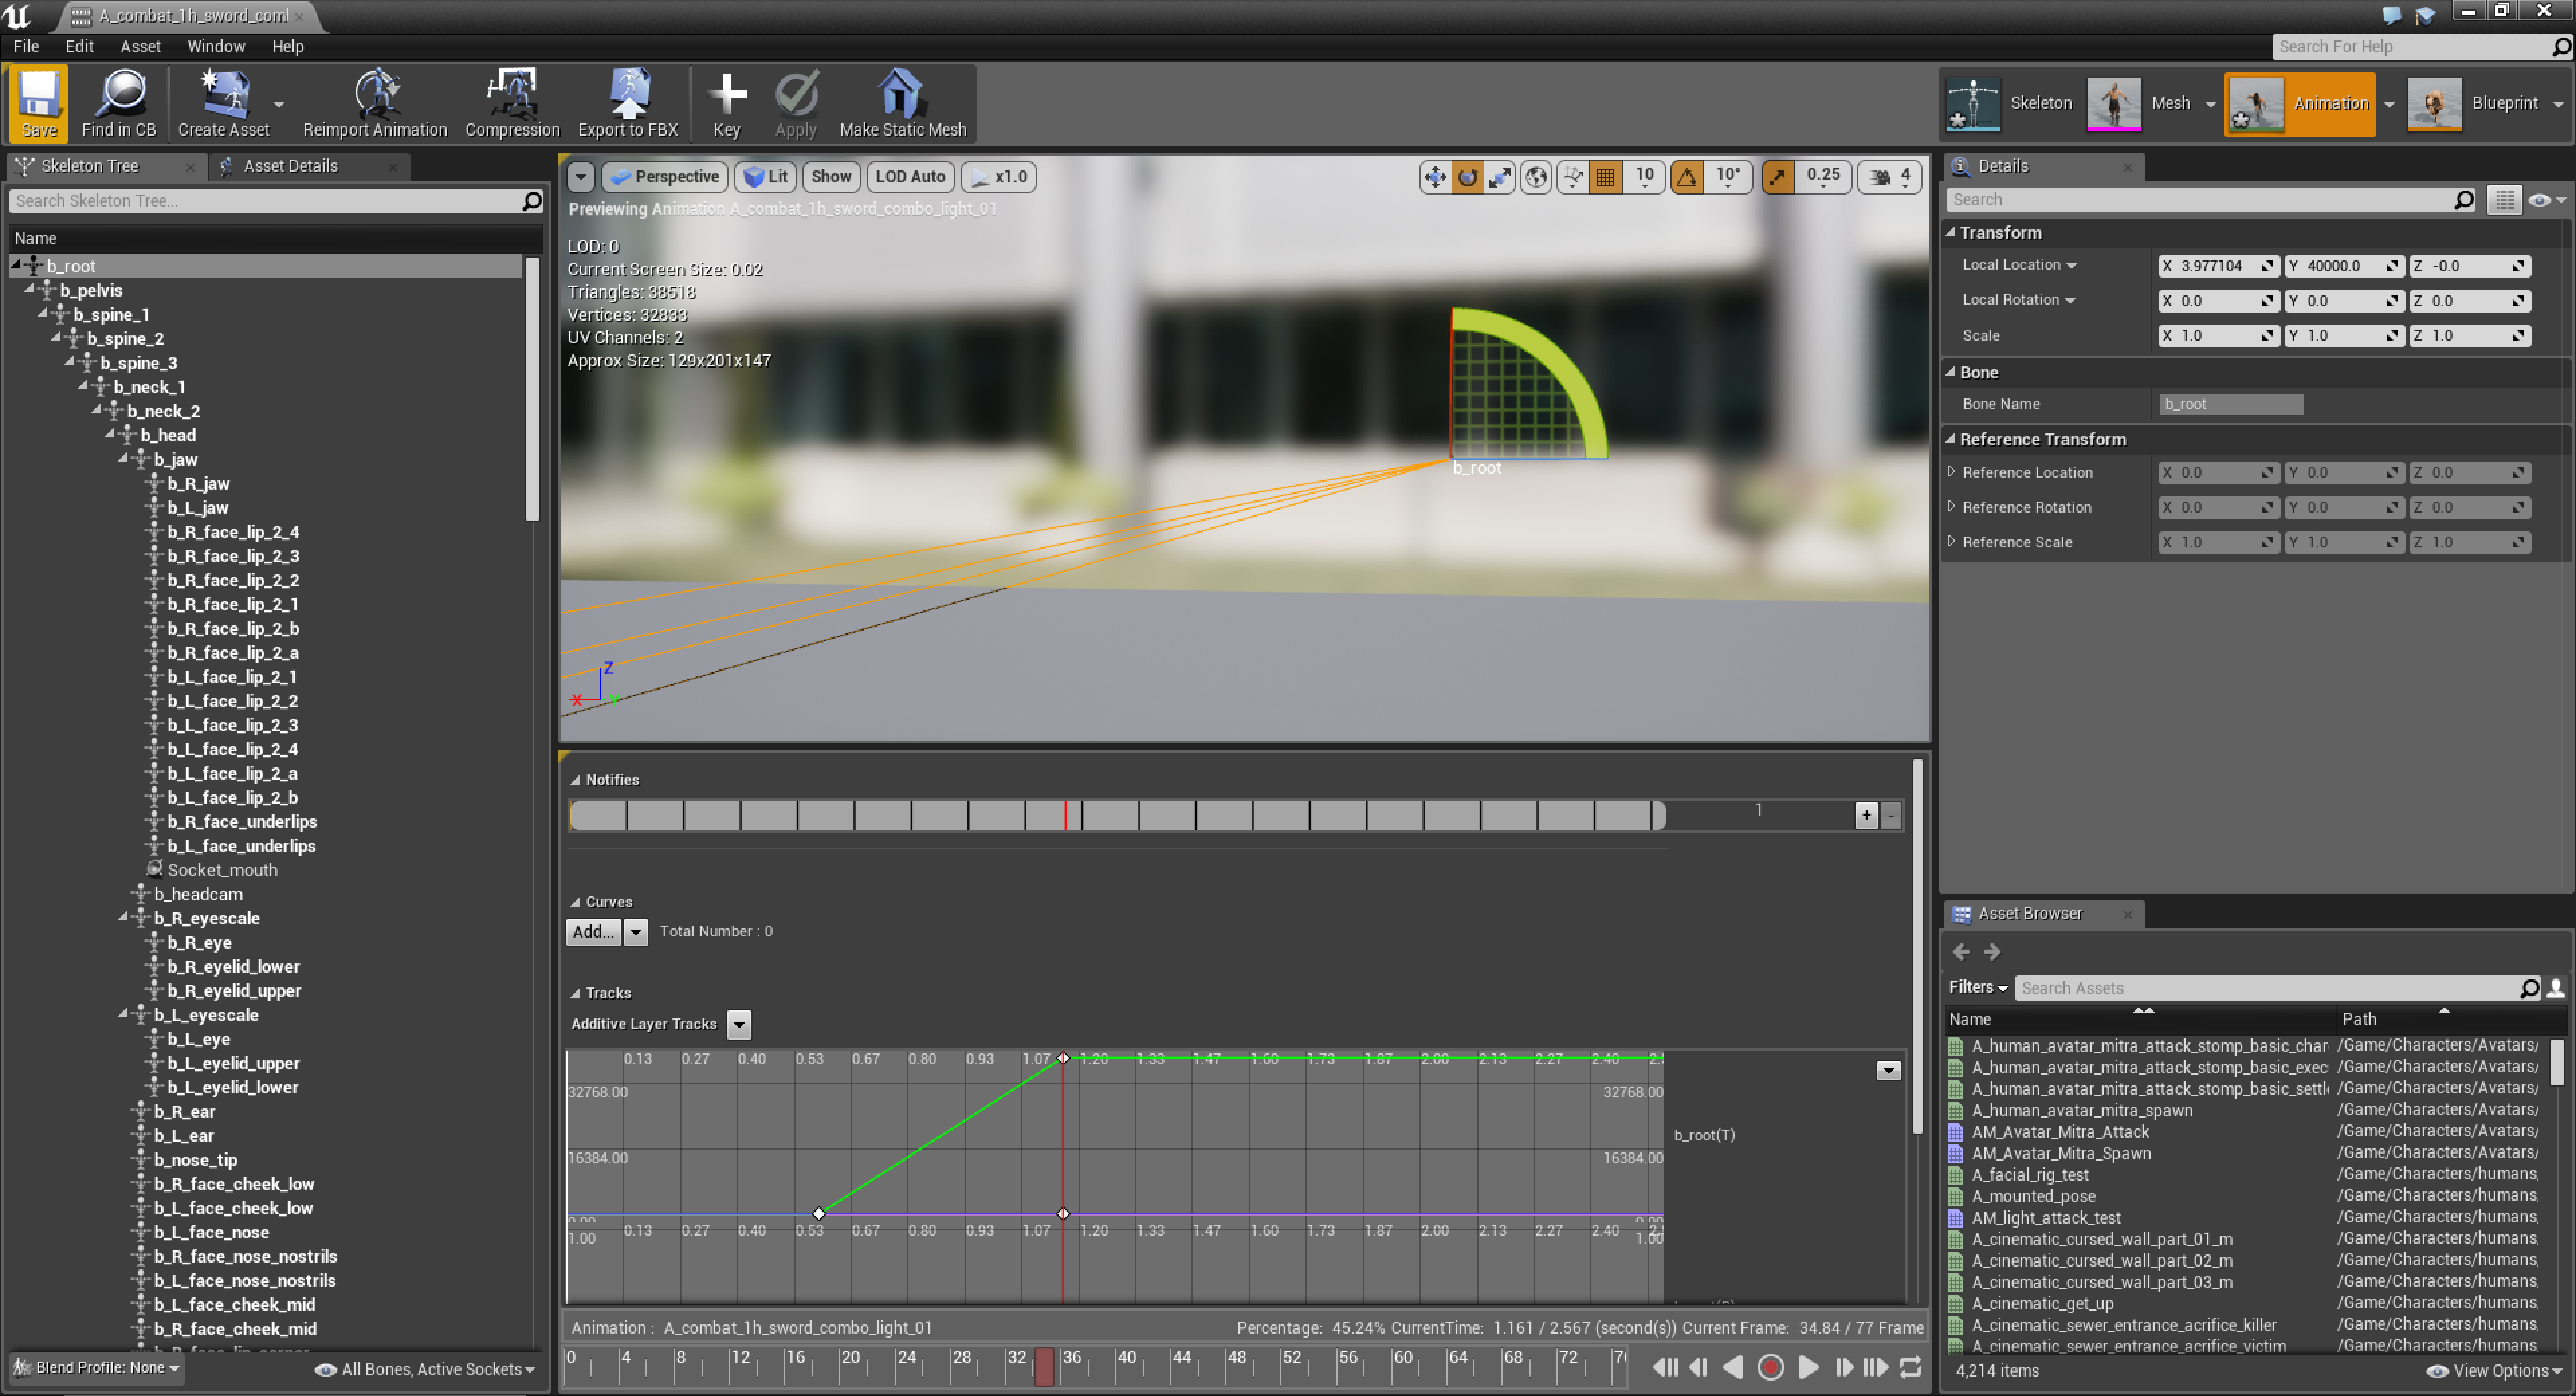
The thing about the mannequin is a little vague, it sounds like it would be for animations that are imported (not animations that are already in the DevKit). I may have misread it, though.

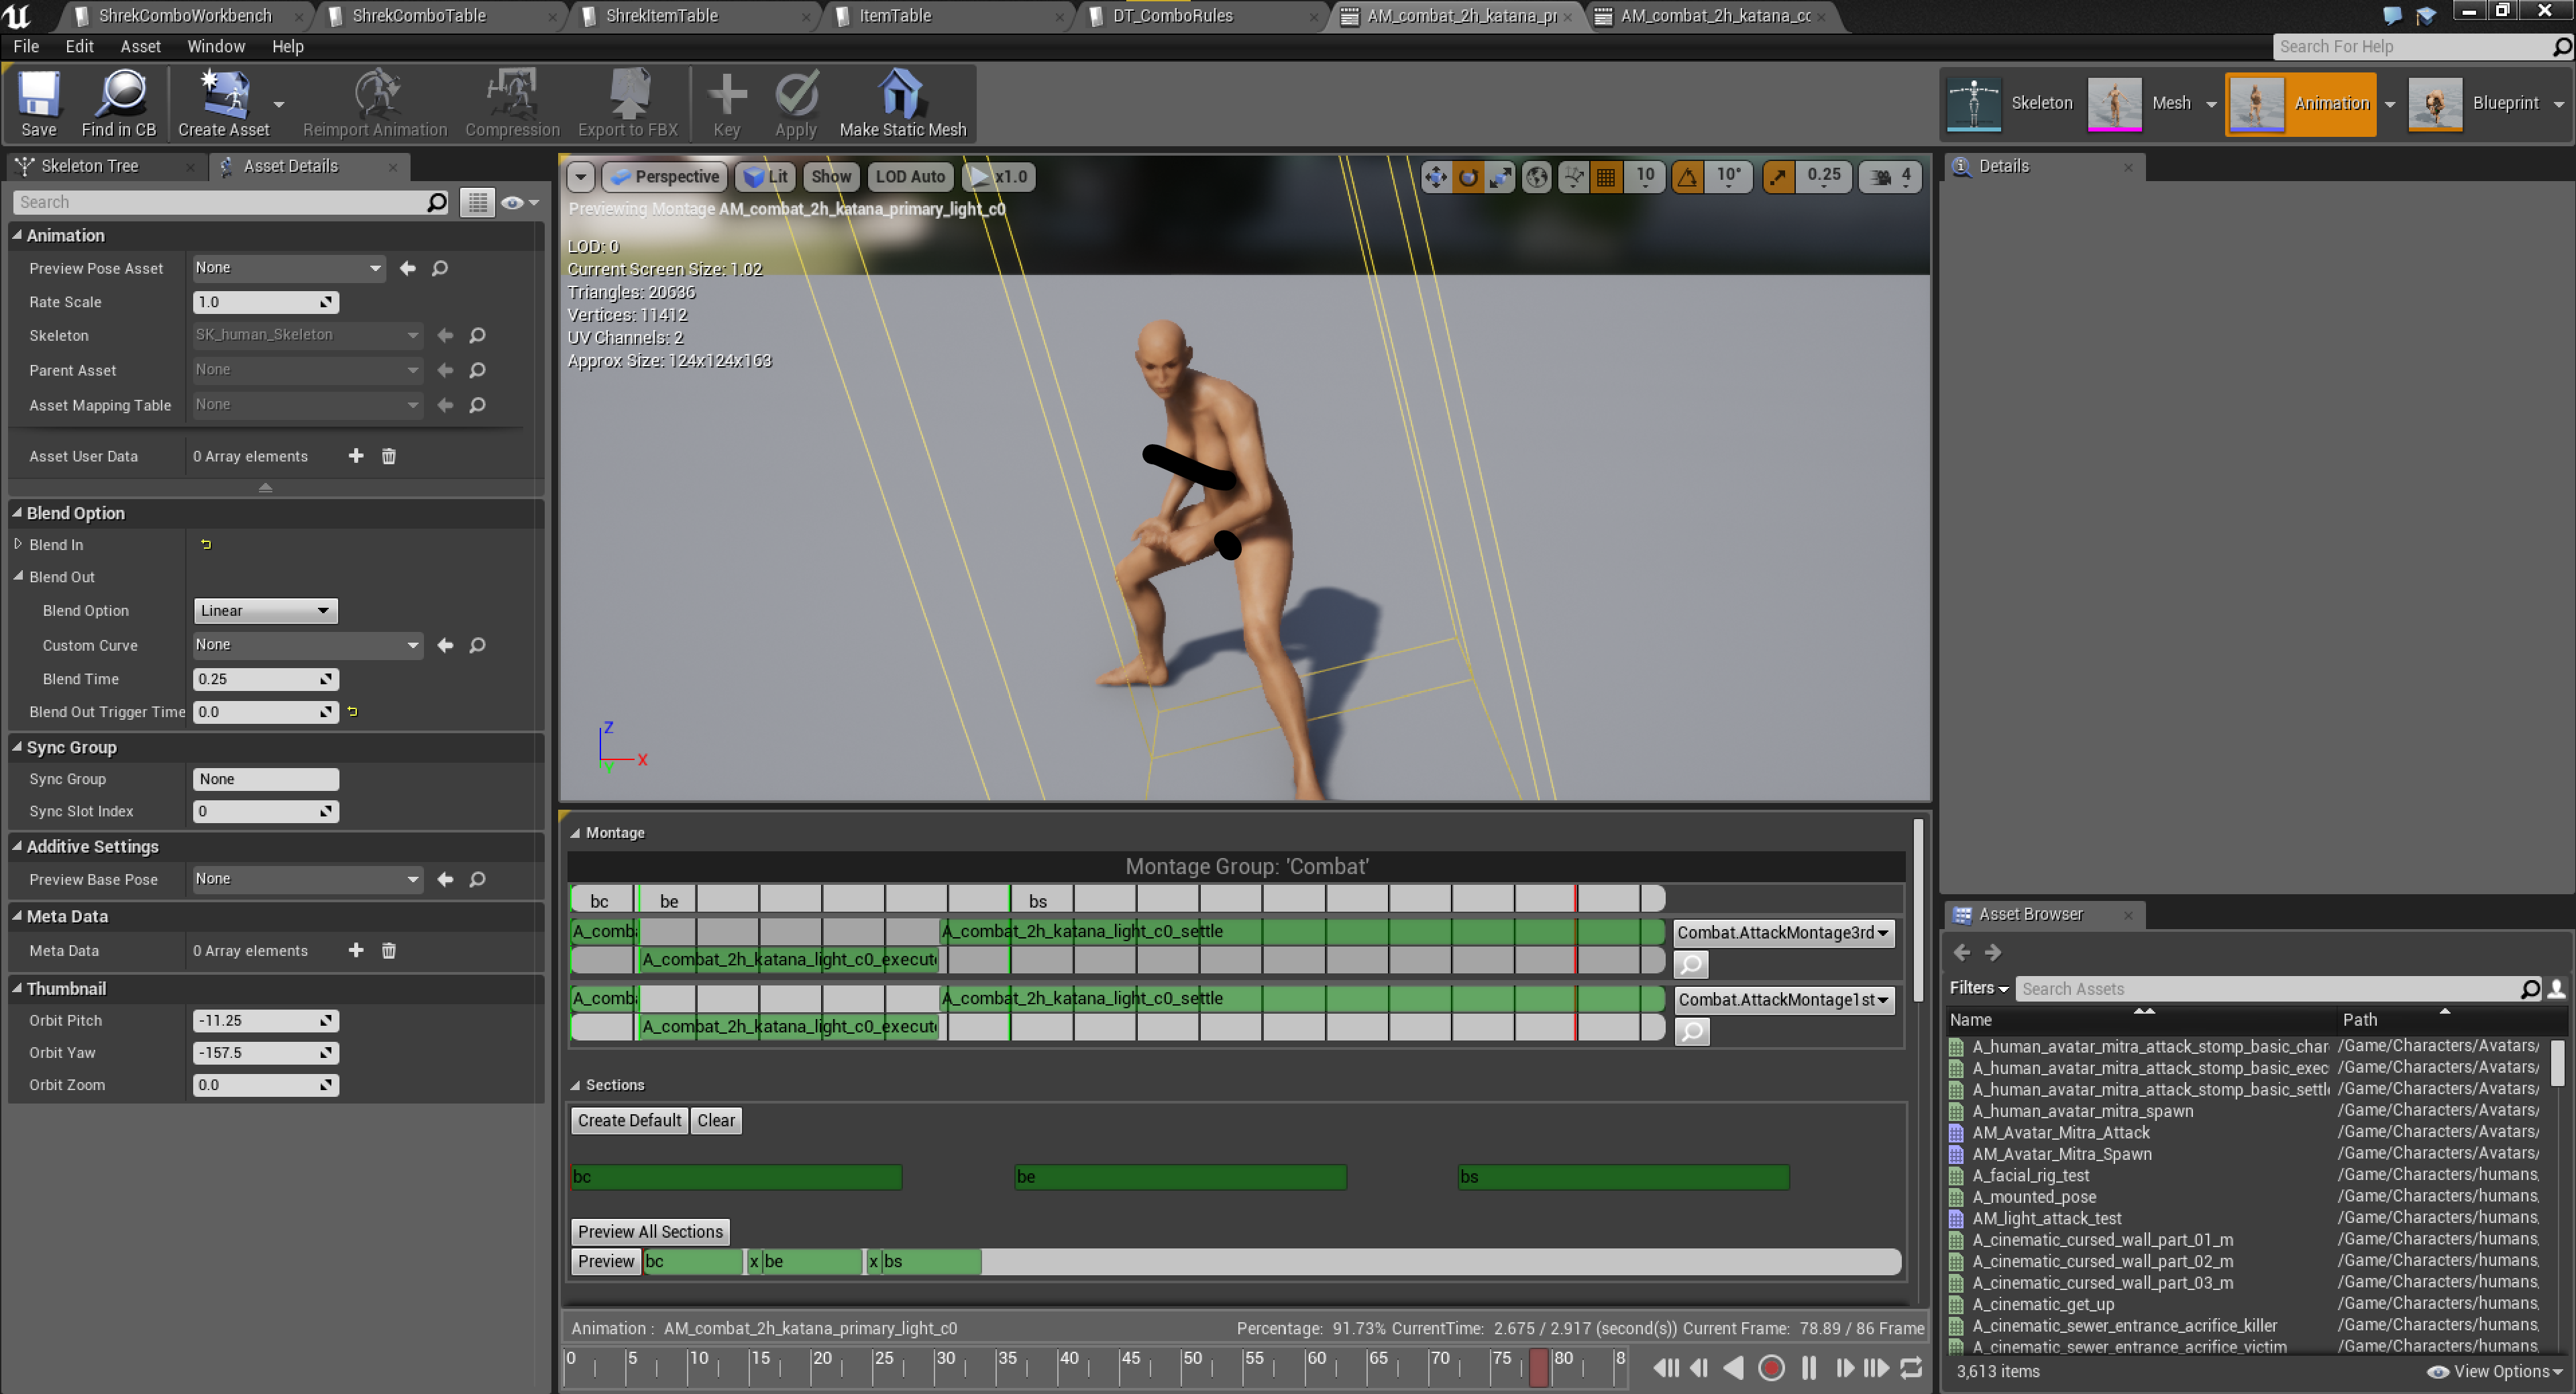
The text file with specific edited assets, at least with regards to combat, seem to be focused primarily on the dual wield weapon animations, probably to address NPCs not hitting with their offhand weapon (something I fixed for my mod a year ago), but either way nothing too crazy.

I'm not sure if the DevKit update will cause issues when new mods are loaded into the pre- Age of War version, but to be safe I'd recommend waiting (or avoid the update using the .bat method as described near the top of the guide).
Melekaiah 1 มิ.ย. 2023 @ 6: 06am 
some animation changes incoming with the next update - have a look at the devkit updates noticed they have a proper mannequin now? and moved some structs around? anything that affects this?
Dread Swoop  [ผู้สร้าง] 29 พ.ค. 2023 @ 6: 35pm 
@Melekaiah I had asked a similar set of questions in the main CE Steam forum, and the responses there were consistent, with some exceptions, with your experience.

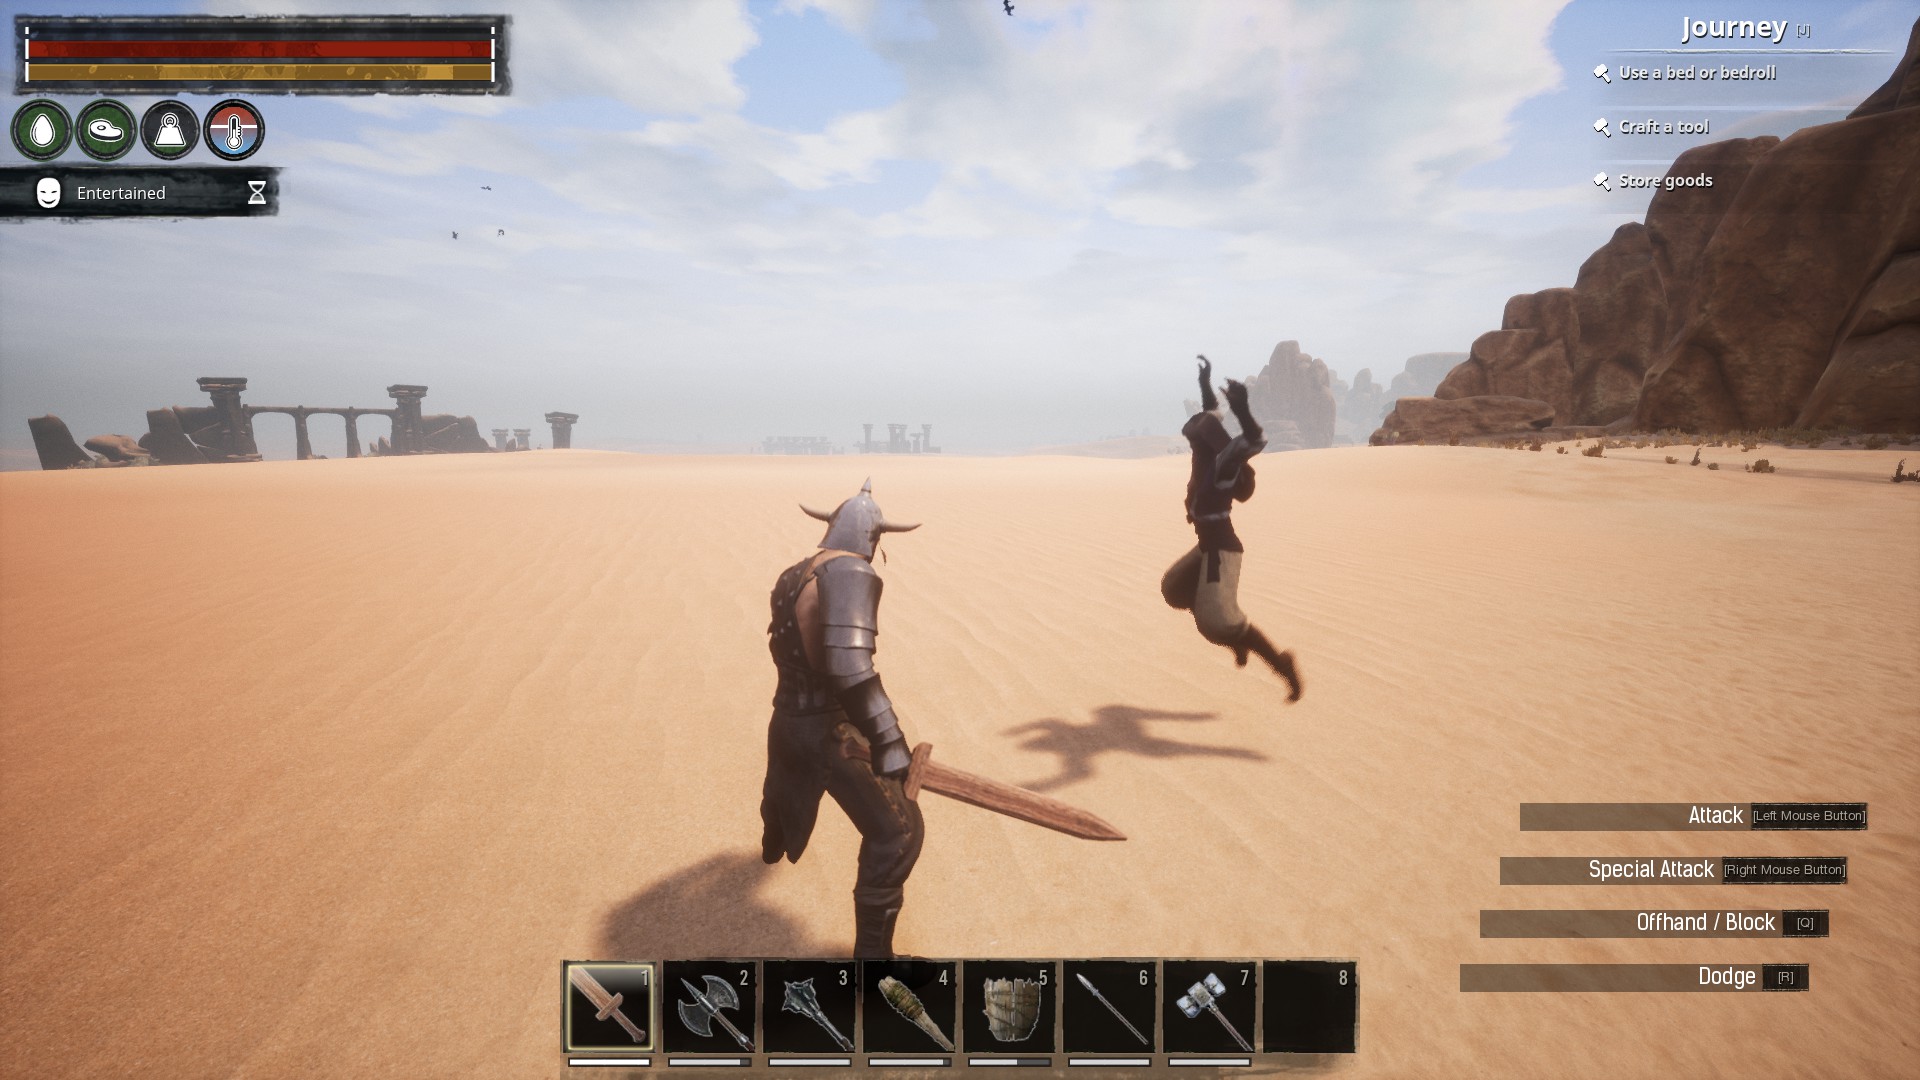
I'm still bothered by the state of the Shop, some of the prices I saw appeared exorbitant based on what was included. I haven't done a deep-enough dive into the features added since 3.0 to determine for myself whether the gameplay side has really improved, though at the very least the new idle animations are alright.

As it turns out, not very much had actually changed within the DevKit for the combat system, so Glory of Combat only needed a basic re-cooking for it to function again. It's still, in my opinion, an improvement over the base game, and while I think it would pair nicely with the changes in Age of War, I'm hesitant to release it back into the public until there's some change to monetization.
Melekaiah 29 พ.ค. 2023 @ 12: 53pm 
I am personally enjoying the changes, and some of the battles passes have been worth it.
(generally speaking the prices have been way to high but they seem to be moving in the right direction)

I do like the addon and the new features, and if it keeps going long term, i think some of the new stuff is adding less reliance on mods in a pretty good way. overall it seems more moddable.

I would personally appreciate and update to this guide. and combat/animations/interactions is one of my favorite kind of things. granted i would have loved that they had remade the game to a UE5 engine beast rather than stick with what they have.. but hey. cant have it all apparently.