Terraria

Terraria

Not enough ratings
Terraria Boss Ideas 6: Reborn
By Okami Tomato
So, Boss Ideas 6 was a fairly strange page; far 'edgier' than my normal stuff. So I thought one day 'Hey, why don't I remake it?', and this is the result.

As usual, this is not a 'guide', but just a place where I can organise my information clearly and have it all laid out. Plus, with the original Boss Ideas 6 being a guide, keeping them in the same place makes sense.

Anyways, enjoy :)
3
2
   
Award
Favorite
Favorited
Unfavorite
Overview:
Arterion was somewhat fun to make before, as it allowed me to actually use 'edgier' designs that were too 'far' for regular Boss Ideas to use. Wanted to bring it back for a while, as addressed in the 'Lost Ideas' page, but have only just gotten around to it.

Page has been enhanced overall, with newer and better bosses, enhanced fights for returning bosses, and generally more (and better hopefully) content to witness.

Admittedly, the sprites aren't animated for the most part this time, but this is because this is more of a mini-project than a full Boss Ideas page... and also because the Tomato Event really took it out of my with their sheer quantity of sprites and because some of these sprites, like Arterion and Depths, would be a pain to sprite.

[Disclaimer because I apparently forgot to do this: Designed more for a mod theme anyways as Terraria's had its last major updates now and because these would probably be too edgy for vanilla anyways.]

Anyways, edgy content aside
Enjoy :P
Debuffs:
Heavy Gravity
Applied by: Wyrmwood, Garden, Arterion
Effect: Reduces flight speed by 33% and max flight time by 50%. Infinite flight, either from wings or mounts, is also disabled.
Tooltip: Your wings feel weaker.

Acid Burns
Applied by: Wretched, Depths, Arterion
Effect: Deals 15 damage per second, reduces defence by 20, reduces max flight time by 30%
Tooltip: Acid eats away at your armour, wings, and body

Crimson Flames
Applied by: Callie, Tower Keeper
Effect: Deals 32 damage per second
Tooltip: You are engulfed in flames!

Monstrous Presence
Applied by: The Depths, Arterion
Effect: Reduces visibility, increases damage taken by 5% and reduces movement speed by 8%
Tooltip: You've seen something terrifying and are in shock

Toxic Venom
Applied by: Corpse Flower, Wyrmwood
Effect: Deals 8 damage per second. If re-applied while still in effect the timer will reset and the damage will stack. Damage can stack as 16, 24, 32, and caps at 40 damage per second.
Tooltip: Injected with potent venom

Bloodflare
Applied by: Arterion
Effect: Deals 40 damage per second, increases damage taken by 10%
Tooltip: Your blood burns...

Vitality
Applied by: Arterion
Effect: Player's heal is drained 5 HP per second. Player will take 15% more damage and will also receive a 10% damage penalty on all of their attacks. Player cannot regenerate life.
Tooltip: Arterion's aura wounds you.
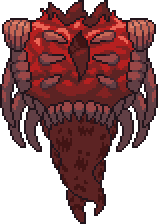
01 - Grimace

Appearance: A large, fleshy mouth lined with uncannily human teeth. The mouth seems to be giving an unnerving grin. Within the mouth there is an eye; only exposed when the mouth is open.

Summon: Use the Tooth Clump at night. The boss can be summoned anywhere, but will despawn if it reaches daytime.

Fought: Pre-Hardmode
Specification: Post-EoW/BoC
Special?: No
Progression: Yes

Stats:
Health: 3,500 (6,000) (7,650)
Attack:
-30 (55) (Melee)
-20 (40) (Red Sludge, Bouncy Sludge)
-N/A (60) (Acid Rain)
Defence:
-30 (60) (Mouth Closed)
-5 (Mouth Open)

Attacks:
Phase 1:
Grimace will fly after the player in a fashion akin to EoC, keeping its mouth closed until its ready to attack.
Once ready to attack, Grimace will open its mouth, revealing its eye, and perform one of its attacks. It is most vulnerable when attacking, as its defence is reduced immensely.
-It may charge at the player 3 times. The time between each charge is noticeably shorter than EoC's, making the attack feel faster.
-It may vomit out 2-3 (3) Red Slimes; which will already be aggressive to the player due to the time.
-It may spit out a cluster of Red Sludge clumps. These are heavily affected by gravity, and despawn on contact with solid blocks.
Once down to 40 (50)% health, Grimace will enter its 2nd phase
Phase 2:
Grimace will fly at the player, perform its charge attack, then perform one of the other attacks. It keeps its mouth shut during the charges as well now
It retains its previous attacks, but gains additions:
-It can spit out 2 (2-3) Demon Eyes at the player. This attacks does not replace the slime variant.
-It can spit out 3 (4) clumps of bouncy, red sludge. These bounce like Flower of Fire projectiles, but despawn after the 3rd time it hits a solid object.
-(In Expert Exclusively, it may fly above the player and open its mouth, raining down red droplets onto the player from above similar to an Angry Nimbus. After a few seconds, it will stop.)

Defeat:
Explodes into gibs. Any minions it spawns remain, however, as they are not tied directly to the boss.

Drops:
A boomerang-like throwing weapon, a spear, and a bow. In Expert it may also drop a summoner staff that summons a mini Grimace to clamp onto and damage enemies.

Hints:
-Moving away from it in one continuous direction can make dodging many of its attacks far easier, and can distance the player from the minions it spawns.
-The bouncy projectiles pass through semisolids, so making a high-up platform can make them fall through and thus make them far less dangerous.
-There is little point in attacking it while its mouth is closed, due to the defence buffs it gets. However, if the player has weapons capable of piercing its moderately high defence such as grenades or generally high-damage attacks, attacking it like this may still prove effective.

Extra Info:
-Grimace was the first of the new Arterion bosses to be designed, and has not changed much since its conception
-Grimace shares similarities with both EoC and WoF. Its general attack pattern is closer to EoC, but in appearance it's more akin to WoF's eyes and mouth.
[Added: 24/6/20]
02 - Fury Slime

Appearance: A large, red slime with a skull-like pattern at its core. Its appearance is virtually identical to that of its original appearance.

Summon: Use the Fetid Sludge anywhere at the surface. The boss can be spawned at any time of day and in any biome, but still despawns if the player gets too far away from the boss.

Fought: Pre-Hardmode
Specification: Post-Skeletron
Special?: Returning Boss
Progression: Later Bosses

Stats:
Health:
-1,200 (1,650) (2,104) (Slime Body)
-3,500 (5,750) (7,331) (Slime Core)
Attack:
-45 (90) (Body Melee)
-40 (80) (Core Melee)
-30 (55) (Sludge Ball)
Defence: 5

[All of this boss' attacks can inflict Bleeding - 33 (50)%]

Attacks:
Phase 1:
The Fury Slime will alternate between its 'A' and 'B' patterns. It starts on 'A' by default and switches to 'B' once its body is destroyed. After 30 (20) seconds of being in pattern 'B' it will reform its body and switch back to 'A' again, continuing the cycle until it reaches Phase 2.
Phase 1a:
Hops after the player, as expected. Has access to 3 attacks, 2 of which are also used by Biome Mimics:
-It may jump up above the player before dropping down in an attempt to land on them
-It may perform a triple-jump, with each jump potentially being higher and faster than the last
-It may launch numerous Sludge Balls at the player. They are affected by gravity and thus have fairly short range
When switching its core will burst out of its slime body, stay motionless briefly, and then fly up
Phase 1b:
Will hover above the player, raining down Sludge Balls on them roughly one per 2 (1.5) seconds at first.
As its health gets lower the frequency of these sludge balls will gradually increase.
Once the necessary 30 (20) seconds has passed, it will reform its main body and land on the ground again.
If its Core is reduced to 1,500 (2,000) health, it will enter Phase 2.
Phase 2:
Will no longer switch between forms, simply staying in its 'Core' form at all times. It will still rain down sludge balls, but has 3 more attacks it can use also. While using these other attacks it will still rain sludge balls.
-It may dash horizontally in the direction the player is moving. While the boss' core won't hit the player, the sludge it drops can
-It may charge at the player. The charge actually has a slight homing effect; with the Fury Slime's core curving as the player moves.
-It may launch sludge balls at the player, like it can in Phase 1a

Defeat:
Will shake around for a few seconds before exploding into a shower of sludge balls. These can still deal damage.

Drops:
A flamethrower, a sword, a bow, and a summoner staff that summons mini Fury Slimes. Will drop Enraged Gel; a material for a few items and to upgrade a few dungeon items slightly. In Expert Mode it can drop the Furious Jelly; which releases sludge balls when the player takes damage, and produces them slowly if the player is under half health even when not attacked.

Hints:
-For Phase 1a, most strategies that work for Biome Mimics will also work here, provided that the tools needed can be obtained Pre-Hardmode.
-For Phase 1b and parts of Phase 2, moving away from the boss constantly in 1 direction will usually mean the player doesn't ever have to deal with it dropping sludge. However, be wary of your arena size and, in Phase 2, of its other attacks.

Extra Info:
-The Fury Slime's animated sprite is almost identical to its original sprite from Boss Ideas 6. However, it has had a few changes to make it a little better.
[Added: 14/9/20]
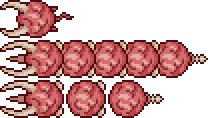
03 - Brainworm

Appearance: A large worm seemingly made of a brain-like fleshy substance. It has 3 teeth protruding from its front, and a few pairs of seemingly bone-like 'ribs' down its segments. It is 42 segments long.

Summon: Use the Brain Food in either the Crimson or Corruption. The boss will despawn if the player leaves the biome for too long.

Fought: Pre-Hardmode
Specification: Post-Skeletron
Special?: No
Progression: No

Stats:
Health:
-20,520 (50,000) (63,760) (Worm)
-75 (120) (165) (Clasper)
Attack:
-85 (140) (Head Melee)
-60 (100) (Body Melee, Clasper Melee, Clone Melee)
Defence:
-10 (Head)
-25 (Body, Clasper)

Attacks:
Phase 1:
Burrows through the ground, though is capable of temporary flight to reach the player if they are too far away.
Damaging the Brainworm will cause it to gradually move faster, as well as lose segments for every 513 (1,250) (1,594) health lost; starting from the tail. These segments become enemies called 'Claspers' that simply chase the player. (In Expert Mode, if Claspers are not killed fast enough then they will eventually re-attach to the boss and heal it for 1,250 health (1,594 in Master Mode)).
After being taken down to around 50 (65)% health it will enter Phase 2.
Phase 2:
The Brainworm gains the ability to fly at all times, but otherwise retains all of its previous properties from Phase 1. It loses a lot of speed when transitioning into this phase, but can regain it as it takes damage.
At 20 (40)% health the boss will summon a clone of itself. The clone is entirely red and partially transparent, and cannot be harmed by the player.

Defeat:
Explodes into gibs and 2 Claspers. While the clone will despawn at the end of the fight, any remaining Claspers will simply continue to attack the player (though, obviously, cannot reform after the boss is defeated).

Drops:
A summoner whip, a magic staff that launches Clasper-like projectiles, and a very weak version of the Vampire knives. All of its weapon drops have healing effects, though they are weak. In Expert Mode it can drop an accessory that summons a Clasper to attack enemies that get close to the player, like a summoner minion.

Hints:
-Having Claspers re-attach and heal the boss in Expert Mode cannot cause the boss to revert back to previous phases.
-Piercing weapons are highly effective against this boss, as it lacks any sort of piercing resistance.
-In Expert Mode, it is recommended to prioritise any Claspers over the boss itself, as if they return to the boss they will heal it; making some of the player's damage futile.

Extra Info:
-The Brainworm is a mix of both the Brain of Cthulhu and Eater of Worlds. It is summoned in the world evil, is both a worm and a brain, and is summoned with an item that is basically a combination of their drops in terms of name and design.
--Additionally, it creates minions from its body as it is damaged which, in Expert Mode at least, will return to the boss. And once low on health it will begin creating clones of itself, lose segments and move faster.
[Added: 14/9/20]
04 - Bone Meal

Appearance: Three skeletal worms, each with strange heads. The first is vaguely human, but has more antlion-like jaws. The second is almost vice-like, but has unusually human teeth. The third looks like a Man Eater, and seemingly still has an 'eye' in-tact.

Summon: Use the Gravedigger's Shovel in the dungeon. All 3 will spawn at once, and will only despawn if the player leaves the dungeon and goes to the surface, or dies.

Fought: Hardmode
Specification: Post-WoF
Special?: Returning Boss
Progression: No

Stats:
Health:
-11,500 (20,500) (26,138) (Skull-head)
-10,000 (15,000) (19,125) (Vice-head, Eater-head)
Attack:
-80 (140) (Eater-head Melee)
-65 (100) (Skull-head Melee, Vice-head Melee, Eater-head Bones)
-55 (85) (Skull-head Bones, Vice-head Bones)
Defence:
-35 (50) (Vice-head)
-20 (Skull-head, Eater-head)

Attacks:
The three of them will pop up at seemingly-random times from blocks near the player to attack them. After attacking they will burrow back into the ground and, after a few seconds, emerge elsewhere.
-They may pop up to hit the player with contact damage, usually from beneath
-They may launch an arc of 3 cross-bones at the player. These aren't affected by gravity
-They may flail around, launching several bones in random directions. These bones are affected by gravity, and can bounce once off of a solid block
-They may launch a skull at the player, like Skeletron's, complete with mild homing capabilities.
As their health gets lower they will take slightly less time to use their attacks before burrowing again, however this change is barely noticeable until they are very low on health.
Defeating any one of the three will make the others attack faster, and will enhance their attacks by increasing their projectiles' velocity.
Once only 1 is left, they will also gain 2 more new abilities including their cross-bone attack now launching 5 projectiles, and releasing more bones during the 'bone flail'

Defeat:
Bursts into skeletal gibs, though the skull usually remains in-tact.

Drops:
A summoner whip, a flail, an enhanced version of the Book of Skulls, and a lot of Souls of Night and Bones. In Expert Mode they will also drop the Broken Bone Sword; used to upgrade the Bone Sword to a stronger, hardmode version.

Hints:
-Each one of the three specialises in a different aspect; with Skull-head having higher HP, Vice-head having higher defence, and Eater-head having higher attack. Eliminating them in order of annoyance may be recommended.
--For example, defeating Eater-head may remove the one with the most damaging attacks, but the other 2 will gain attack speed and enhance their attacks so that they themselves are more likely to hit the player. Whereas defeating someone like Skull-head removes a high-health target earlier-on so the more hectic part of the fight doesn't last as long
---Waiting to defeat all 3 at the same time also works, as it minimises the changes throughout the fight in exchange for more targets

Extra Info:
-Originally, Bone Meal consisted of 3 worm bosses who would attack the player at the same time. This was changed due to the introduction of the Brainworm, and due to their new placement putting them weirdly close to the Destroyer in terms of progression
--Other aspects from the original fight, like each having a specific stat they specialised in, remains however.
[Added: 14/9/20]
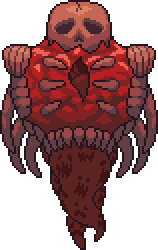
05 - Arterion?

Appearance: A fleshy and skeletal being, with a body seemingly consisting predominantly of a large humanoid skull. It has 4 small limbs at its sides that twitch infrequently. Its lower body seems to be little more than a clump of meat around its jaw.

Summon: Use the Ominous Skull at night. The boss will despawn if the player flees too far away or dies, and during the day will become enraged; having massively increased defence and almost 1,000 damage.

Fought: Hardmode
Specification: Post-Plantera
Special?: Pseudo-Returning Boss
Progression: Yes

Stats:
Health: 50,000 (72,250) (92,119)
Attack:
-65 (110) (Melee, Flesh Ball)
-50 (85) (Sludge)
-100 (165) (Laser)
-999 (1,500) (Enraged Attacks)
Defence:
-20
-85 (Enraged)

[All of Arterion?'s attacks can inflict Bleeding - 50 (100)%]

Attacks:
Phase 1:
Arterion will spend most of the fight looming above the player, attacking with increasing frequency as he loses health
-He may rotate around the player in a loop 1-3 times before charging at the player. He can stop at any time during the loop, and will charge from that position.
-He may rain blobs of sludge down upon the player
-He may fly a little higher and drop 'Flesh Balls' from its body. These fall down, though have slight horizontal homing capabilities as they will try to move left or right to land on the player. Upon them hitting the player, a solid block, or having lingered for too long they will explode into sludge that is launched in all 4 cardinal directions.
At half health it will transition to Phase 2
Phase 2:
Will begin directly chasing the player, having formed its head into a mouth. Its old attacks are enhanced for this phase.
-Its 'loop and charge' is now a simple charge. He gains a lot of speed for the charge but cannot turn until after he has slowed down again.
-The blobs of sludge are now launched at the player directly
-'Flesh balls' are now left as he moves instead of being dropped and are immobile until they explode. More are summoned at a time.
-Arterion will gain 1 attack in this phase. He will become motionless but faces the player. After a brief moment he will launch a giant stream of red sludge, almost like ML's deathray, at the player. He can do this up to 4 times in succession.
Arterion's base movement and attacking speed in this phase will gradually increase as his health gets lower. (He will also spawn more projectiles during attacks utilising them)

Defeat:
Explodes into gibs. A status message saying 'This encounter has been watched...' will appear, but nothing else will seem to happen.
Additionally, its defeat message will say 'A false Arterion has been defeated'
-The Post-Moon Lord boss summoners will now work if the player has any

Drops:
A sword, bow, shotgun, magic tome and summoner staff, all usually based either around blood or 'Arterion' itself. Will additionally drop Souls of Night and Fright. In Expert Mode it will additionally drop the Ominous Tome; which despite its name is actually an accessory that increases magic damage and crit chance, as well as providing an extra minion slot, in exchange for increasing the mana cost of weapons.

Hints:
-As it spends much of the fight above the player in Phase 1, then begins chasing in Phase 2, it is recommended to immediately start moving downwards if possible once Phase 2 starts to minimise the chance of receiving near-immediate contact damage.
-Dashing out the way of its charges can work, though keep in mind this is dependent on the angle of his charge.

Extra Info:
-Originally, this boss was simply a weakened version of Arterion, though was later changed to being its own somewhat-separate entity.
--In some aspects, it shares similarities with Calamitas; being a roughly Plantera-tier boss with a mostly red and brown colour scheme, who themselves is actually just a clone of the main boss of the mod.
[Added: 18/9/20]
06 - Corpse Flower

Appearance: A large, red flower with brown spots. Its flowers and vines are all a dark purple colour, and it moves using a series of purple vines with jagged brown hooks on the ends.

Summon: Use the Twisted Bulb in either the Crimson or Corruption. The boss will despawn if the player gets too far away or dies, and is unaffected by being taken out of its biome. It also doesn't enrage at the surface, unlike another similar plant-like boss.

Fought: Hardmode
Specification: Post-Golem
Special?: No
Progression: No

Stats:
Health: 65,750 (95,000) (121,125)
Attack:
-45 (80) (Melee)
-42 (75) (Toxic Seeds, Vilethorns)
-50 (88) (Bones)
Defence:
-40 (Phase 1)
-32 (Phase 2)

[All of this boss' attacks will inflict Toxic Venom - 100%]

Attacks:
Phase 1:
Flower will slowly approach the player in a manner near enough identical to Plantera's; using its 3 claw-like vines to grip nearby blocks while moving towards the player. The possible length of these vines is immense, so Flower can continue to move after a player even if they are not near any blocks.
-It may launch a rapid but accurate barrage of purple 'toxic seeds' at the player. The barrage can consist of anywhere from 3 to 15 of these seeds before another attack is chosen
-It may release several spore clouds around itself. These will decelerate over a few seconds, and then linger in-place for a long time
-It may speed up for a few seconds, attempting to simply ram the player, before slowing down again
-It may make a strange, screech-like noise and launch vilethorn-like projectiles outwards in random directions. These thorny vines are a lot longer than the vilethorn's, however, and linger for longer
Once down to 40 (55)% health the fight will enter Phase 2
Phase 2:
Flower will ditch its 'claw vines', and will now simply keep itself horizontally-aligned with the player instead of outright chasing them. It will retain its previous attacks, but also gains some new ones.
-It may release its vilethorn-like thorns again, though this time they are released horizontally and towards the player. Up to 3 can be made, roughly 0.5 seconds apart from each other
-It may throw a large cluster of bones towards the player. These are affected by gravity and are all launched at varying angles and at varying speeds.

Defeat:
Explodes into gibs of both the plant and skeleton inside.

Drops:
Will drop Corrupted Nectar, Arcane Bones, and Crimson Petals; dropping more of the Nectar in a Corrupt world and more Petals in a Crimson one [or more of both on a world with both]. All 3 of these are used as materials and are useful even Post-Moon Lord. Initially they are used for some decently-powerful weapons and armour at this point in progression.

Hints:
-As it doesn't have the same limitations as Plantera, taking this boss to the surface is actually recommended. Do remember, however, it doesn't share Plantera's movement limitations despite its design.
-Moving away from the boss proves highly effective, as most of its moves are slow or lack range. Bear in mind, however, that it can keep up with the player quite easily in Phase 2.
-If the player is inflicted with Toxic Venom, it may be recommended to play defensively until the debuff fades, as its ability to stack with itself can cause its damage-over-time to the player to become extremely potent

Extra Info:
-As the name would suggest, this boss is based on the Corpse Flower plant, made most famous for its large size and pungent smell
--It is also based on the idea of a Plantera-like creature inflicted with Corruption and/or Crimson, hence its red and purple colour scheme
[Added: 18/9/20]
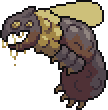
07 - The Wretched

Appearance: A large, grey and brown insect. It has a yellow-ish set of wings attached just beneath a yellow collar of fluff beneath its head. It has a row of spikes on its lower body. It drips acidic saliva from its mouth constantly.

Summon: Use the Perfume Bag at the surface. The bag consists of a lot of usually gross items, including the world evil powders and Vertebrae/Rotten Chunks, alongside Beetle Husks. The boss will despawn if the player gets too far away or dies, as expected.

Fought: Hardmode
Specification: Post-Golem
Special?: No
Progression: No

Stats:
Health:
-78,000 (113,500) (144,713) (Wretched)
-50 (75) (100) (Swarmers)
Attack:
-70 (105) (Melee)
-65 (100) (Bile Chunk)
-55 (83) (Bile Splashes, Swarmer Melee)
Defence: 0

[All of its attacks inflict Acid Burns - 33 (66)%]

Attacks:
Phase 1:
The Wretched in this phase will simply just keep flying around above the player, never explicitly trying to make contact. It attacks quite slowly compared to other bosses fought at this time.
-It may fly to either the left or right, then fly to the other side; dropping Bile Chunks down that, upon hitting something, explode into Bile Splashes that are launched randomly.
-It may stop briefly before charging at the player once. Afterwards it returns to its normal position.
-It may vomit out a large cluster of Swarmers. Swarmers are fly-like enemies that will simply chase after the player like Bees. (Once killed, however, they drop a single Bile Splash downwards.)
-It may launch a barrage of bile splashes at the player. These are inaccurate, but are launched in the player's general direction for a few seconds.
After reaching 50% health its lower half will explode and it will enter Phase 2.
Phase 2:
It will no longer fly above the player; instead charging at the player with 3 short-range charges before using its attacks.
It drips bile splashes from the remains of its lower half constantly that can still harm the player.
It retains most of its Phase 1 attacks, though no longer releases bile chunks or performs the charge attack. It also gains new attacks to replace the lost ones.
-It may launch 3 arcs of bile splashes at the player; each arc consisting of 7 splashes each.
-It may hover above the player, rapidly dropping bile chunks down at them
Additionally, below 15% health, Swarmers will begin being released from its destroyed lower half, with gradually-increasing frequency as its health gets lower and lower

Defeat:
The Wretched will explode into gibs, and lots of globules of acid that land everywhere. Fortunately, these acid globules are purely aesthetic and cannot harm the player. (In Expert Mode it also releases lots of Swarmers as it dies.) Swarmers alive at the end of the fight remain until they are killed or despawn.

Drops:
Oozing Chunks; consumables that can summon large bug-like enemies in other areas with their own drops, though the Wretched can also drop them itself. Its drops include a spear, magic tome, summoner staff, sentry staff, gun, bow and rocket launcher. In Expert Mode it will drop the Foul Pendant, which reduces enemy spawn rates and periodically summons Swarmers to assist the player that work like friendly bees.

Hints:
-Like Arterion, Wretched will spend a lot of Phase 1 loitering above the player. Though, unlike Arterion, it will move back and forth and generally will not stay still. However, most movements that work against Arterion will work for Wretched here.
-Swarmers should be dealt with as soon as possible. While they themselves are weak, the Acid Burn debuff itself is very dangerous.
-Being underneath Wretched in Phase 2 is generally a bad idea, so either keep to the sides of it or above it

Extra Info:
-Wretched was originally planned to be an event boss, fought after swarms of various bug enemies had been defeated. While this never happened, this plan went elsewhere, and Wretched became its own entity.
-Despite seeming to produce young and having a large abdomen, Wretched's gender is never confirmed
--Additionally, if the event idea had been used, it would have essentially acted as their 'queen', though still no confirmation
[Added: 18/9/20]
08 - Callie

Appearance: A red-haired human wearing a black dress and a red scarf. Her hair is nearly floor-length, and can be seen as being up in a ponytail.

Summon: If she has not been defeated before use the Cracked Pendant. After she has been defeated, the Pendant will simply only cause her NPC to respawn. After her NPC is spawned she can be challenged again by selecting the option in her dialogue menu.

Fought: Post-Moon Lord
Specification: Post-Moon Lord
Special?: Returning Boss
Progression: Yes

Stats:
Health: 185,000 (300,000) (382,500)
Attack:
-120 (195) (Melee) (Inflicts Crimson Flames - 0 (100)%)
-100 (168) (Fireball) (Inflicts Crimson Flames - 20 (40)%)
-150 (264) (Explosive Fireball, Flame Pillar) (Inflicts Crimson Flames - 50 (80)%)
Defence: 35

Attacks:
Callie will use flames to 'levitate' and will move either through dashing or, infrequently, teleporting. She will not attempt to ever melee the player, even with the dashes, and uses them solely for movement.
-She may align herself horizontally with the player and launch fireballs at them for a few seconds
-She may summon a horizontal 'bullet-hell' of fireballs. The fireballs are only summoned for about 2 seconds, however, so it is quite short
-She may launch 2 arcs of fireballs at the player; the first made of 9 fireballs and the second of 8
-She may release a 'burst' of 8-16 fireballs outwards from herself in random directions
Once below half health she will gain 2 new attacks, though this is not 'signalled' by any sort of phase change
-She may throw 2-4 large fireballs at the player. These are homing and explode after a short time, releasing anywhere from 6-12 fireballs outward in random directions
-She may summon a pillar of fire around herself. After around a second several thinner versions of these flame pillars will erupt randomly nearby. After a few seconds they will all fade in unison.

Defeat:
Falls onto one knee, visibly exhausted, and teleports away.
-She will become a town NPC after this point, selling weapons as well as purifying and strengthening the 'cursed' weapons dropped by other bosses.
--If you 'challenged' her NPC form, her NPC will immediately return to its housing without having to wait for it to respawn.

Drops:
Has no actual drops aside from the standard boss drops. All her items are exclusively sold to the player, including a sword, flail, spear, magic tome, magic staff, summoner staff, sentry staff, bow, gun, rocket launcher, flamethrower, and an armour set. In Expert Mode she will have a single drop after her fight, the Cursed Locked, which does nothing until her NPC purifies it.

Hints:
-Callie's fight has a lot of horizontally-moving projectiles, so vertical movement is very important in this fight
-Keep away from the explosive fireballs if possible, as not only are they dangerous on their own, but also release additional fireballs once destroyed.

Extra Info:
-Callie's design looks less similar to the Calamitas design she was originally based on in this fight, and actually looks closer to Ember; a boss that debuted in Boss Ideas 4
--Callie has similar aspects to both of these inspirations. She uses purely-red fire and has some attacks similar to Calamitas, though has a design closer to Ember, and similarly specialises in fire-based attacks.
-Originally, Callie had a smaller role in the remake, planned to originally just return as a vendor. However, she was given more lore presence and relations to other bosses, as well as additional aspects to her NPC such as the ability to rematch her or purify 'cursed' items
[Added: 18/9/20]
09 - Wyrmwood

Appearance: A large worm-like creature made of wood. It has numerous holes in its body, revealing it to be almost entirely hollow. At the end of its tail are a series of roots, intertwined with each other.

Summon: Use the Hangman's Branch at night. The item is made out of Spooky Wood predominantly, though combined with a few other Post-Moon Lord materials. The player will be inflicted with Heavy Gravity throughout the fight.

Fought: Post-Moon Lord
Specification: Post-Moon Lord
Special?: No
Progression: No

Stats:
Health:
-325,850 (700,000) (892,500) (Wyrmwood)
-40,000-60,000 (75,000-100,000) (95,625-127,500) (Wyrmlings)
Attack:
-120-155 (195-275) (Head Melee)
-95-138 (160-220) (Body Melee, Wyrmling Melee, Lasers)
-88-120 (150-195) (Toxic Water) (Inflicts Toxic Venom - 67 (100)%)
Defence:
-50 (Wyrmwood)
--66 (75)% Damage Resistance applied vs piercing weapons for each segment pierced
-50-120 (Wyrmlings)

[All attacks can inflict Toxic Venom - 20 (33)%]

Attacks:
Burrows, as expected for a worm boss. It doesn't have many attacks, but it uses those it has effectively. It will try to ram the player, and can fly temporarily if the player is deemed to be out of its reach.
-It may release water bolt-like projectiles towards the player from the holes in its segments. As its health gets lower it will fire these projectiles more frequently and more plentifully.
-It may slow down significantly before releasing large lasers outwards from both sides of some of its segments. The segments that fire these lasers are random, though are displayed briefly before they shoot by a purple glow from inside the holes. As its health gets lower more and more segments will fire at the same time, leaving less safe spaces.
-It may summon a Wyrmling from one of its segments. Up to 3 can be alive at any time. As its health gets lower it will release stronger Wyrmlings.
As it loses health it will also begin moving faster, as expected for a worm boss.

Defeat:
Explodes into gibs of its body. Any Wyrmlings alive when it dies will flee and despawn.

Drops:
Hollow Wood; a material for a broad range of items. Will also drop a series of 'cursed' weapons that are weaker until purified, such as a sword, flail, magic staff, bow, and a gun. In Expert Mode it will also drop the Hollow Heart; an accessory that trades the player's regeneration and max health for increased defence, damage, and mobility.

Hints:
-Trying to fight the boss head-on without a proper arena will usually result in death, as the boss becomes incredibly challenging at lower health
-Dodging the lasers is usually quite hard to do reliably, but it can usually be done either by staying close to a segment not firing, or finding a place where Wyrmwood curves away from the player and staying at a distance.
-It can inflict Toxic Venom, much like the Corpse Flower. As with that boss, waiting for the debuff to fade may be recommended as it can stack up quickly if the player is too reckless

Extra Info:
-The boss, due to being a worm, has damage reduction against any weapons that hit more than 1 of its segments with the same projectile. This 66 (75)% damage resistance is re-applied per segment pierced, being 0% for hitting 1 segment, 66 (75)% for hitting 2, 88.4 (93.75)% for hitting 3, 96.1 (98.4)% for 4, and so on.
--Combined with its 50 defence, even some of the more powerful piercing projectiles may be reduced to only 1 damage after only around the 3rd or 4th segment pierced.
[Added: 18/9/20]
10 - The Garden

Appearance: A large, skeletal tree seemingly made entirely of bones. It has a skull at the front, and another at the back that remains mostly obscured.

Summon: Use the Bone Bloom at night. The screen will dim a little upon use, and the player will also be inflicted with Heavy Gravity. During the day the boss will teleport away and despawn.

Fought: Post-Moon Lord
Specification: Post-Moon Lord
Special?: No
Progression: No

Stats:
Health: 250,000 (358,500) (457,088)
Attack:
-135 (218) (Melee)
-100 (168) (Bones)
-120 (195) (Roots)
Defence: 40

Attacks:
Phase 1:
The Garden will usually be stationary, occasionally moving by 'teleporting' onto another flat surface roughly every 10 seconds. It will usually attack 1 or 2 times between teleports
-It may create 'waves' of its bony roots that travel both ways across the ground that usually need to be jumped over
-It may throw a cluster of bones at the player that are affected by gravity
-It may summon roots directly underneath the player with a short delay. It may do this up to 8 times in a row in rapid succession
-It may create a large version of its roots, aimed at the player from a random angle, that after a second is lunged towards the player
At 60 (64)% health it will transition into its 2nd phase, unrooting itself from the ground with a 'cracking' noise
Phase 2:
Can now walk around, usually running at the player. It retains all its previous attacks, but can also now lunge at the player to gain distance quickly. It can still teleport, but this is now rare.
As its health gets lower, the player's visibility gradually gets worse as everything becomes dimmer.

Defeat:
Rattles around for a few seconds, falls over, and explodes into gibs. Its effects, such as the Heavy Gravity debuff and darkness, lift after it is defeated.

Drops:
Will drop Ancient Bones; a material for a few different items. Will also drop a series of 'cursed' weapons that are weaker until purified, such as a spear, magic tome, summoner staff, rocket launcher, and sentry staff. In Expert Mode it will drop the Dried Heart; which has a chance to revive the player after death but, if the revive is successful, the player's max health and defence is cut in half until they die.

Hints:
-The boss' darkness effect is unconnected to the Darkness and Blackout debuffs, so the Ankh Charm will not bypass the screen-darkening effect the boss has.
-Hunter and Dangersense potions prove extra-helpful during this fight, as they can reveal where the boss is much easier in the darkness. Shine and Night Vision potions are also helpful.

Extra Info:
-The Garden was the first new boss boss to be designed for the Arterion remake, and was almost replaced with the Corpse Flower until it was given its own, unique gimmick
-The boss technically shares similarities with the Bone Meal boss; being a partly-buried skeletal boss that attacks by throwing bones and burrowing
[Added: 18/9/20]
11 - Pincussion

Appearance: A human-sized doll in a purple dress with purple hair, and a large purple spherical entity with a partially stitched-up mouth and a button eye. The doll is actually called 'Indigo', with 'Pincussion' itself being the latter of the duo.

Summon: Use the Ominous Doll at night. Only Indigo will appear at first when the boss is summoned. The boss will despawn if the player dies or moves too far away, as with most bosses, or if it becomes daytime.

Fought: Post-Moon Lord
Specification: Post-Moon Lord
Special?: No
Progression: Yes

Stats:
Health:
-145,000 (200,000) (255,000)
-138,000 (187,500) (239,063)
Attack:
-120 (195) (Indigo Melee, Needles)
-130 (208) (Pincussion Melee) (Inflicts Shadowflames - 67 (100)%)
-100 (168) (Shadow Orbs) (Inflicts Shadowflames - 30 (50)%)
Defence: 25

Attacks:
Phase 1/Indigo:
Only Indigo will be present at the start of the fight, and will usually just float near the player.
-She may summon several needles near herself before launching them all towards the player. Either these will be all aimed directly at the player's last location, or a random spread only in the player's general direction
-She may summon several needles aimed at the player from a distance. These will eventually accelerate towards where they were aimed
-She may summon 5 'shadow orbs' in a ring around herself and then launch them all at the player, still in ring formation. She may do this up to 4 times in succession
At 50% health Pincussion will also appear alongside Indigo and also begin attacking
Phase 2/Indigo & Pincussion:
Indigo will continue doing what she had done before, though attacks less frequently due to the addition of a new enemy.
Pincussion will appear near the player, attack, and then disappear before re-appearing again elsewhere. It cannot move outside of its teleportation.
-It may release shadow orbs out from its mouth in random directions. It summons lots of these in quick succession.
-It may launch 12 needles, all evenly-spaced, out in all directions
-It may release a 'burst' of 8 shadow orbs that rotate either clockwise or anticlockwise from its mouth
Defeating Indigo first will grant Pincussion access to her attacks, as well as increase its attack speed to a little faster than how Indigo attacked in Phase 1.

Defeat:
Both will explode into stuffing when defeated. However, there are different results depending on the order they are defeated.
-Defeating Indigo first will cause the fight to continue as expected until Pincussion is defeated
-However, if Pincussion is defeated first, Indigo will flee and eventually become a town NPC

Drops:
Will drop 'Cursed Fabric', a material used for crafting a few different items, as well as weapons usually based on fabric or needles, such as a vampire knife-like melee weapon, a sword, bow, magic tome, and a summoner staff. In Expert Mode they will also drop the Lost Doll; an accessory that doesn't do anything on its own.
Most of these items are also sold by Indigo's NPC, and the Lost Doll can be given to her to make her sell additional items.

Hints:
-Focusing on either one of the duo may be recommended, as removing one of them from the fight will reduce the amount of targets for the player to watch
--If the player wants the NPC, it is best to solely focus down Pincussion and ignore or actively avoid hitting Indigo anyways

Extra Info:
-Due to some 'technically-unused' dialogue, Indigo and Callie seem to know each other, and also that Indigo herself used to be a human
-Technically, the boss' health can be reduced to a total of 210,500 (287,500) (366,563) by purposely avoiding hitting Indigo in Phase 2 and instead focusing Pincussion
--This is also deemed the 'good ending' of the fight, seeing as Indigo herself seems to be freed from Pincussion's control according to her NPC
[Added: 19/9/20]
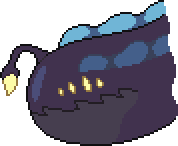
12 - The Depths

Appearance: A colossal sea monster with 8 eyes and a glowing lure in front of its face. It has fins on the top of its body that are a light blue colour. It has a dark grey jaw full of teeth.

Summon: Use the Enchanting Lure at either ocean. The player is inflicted with Monstrous Presence, it will begin raining heavily, and the sky will become dark blue. The boss only despawns if the player dies, and will chase them anywhere.

Fought: Post-Moon Lord
Specification: Post-Pincussion
Special?: No
Progression: Yes

Stats:
Health: 675,000 (914,250) (1,165,669)
Attack:
-180 (300) (Melee)
-140 (230) (Acidic Sludge) (Inflicts Acid Burns - 50 (80)%)
-140 (230) (Junk)
-200 (332) (Laser)
Defence: 64

Attacks:
Phase 1:
Depths will appear, attack, and then retreat back into the darkness before repeating this cycle. While it doesn't have many attacks, its projectiles are plentiful and the monster itself is highly mobile despite its size.
-It may lunge at the player, trying to bite them
-It may appear above the player, and will then spew acidic sludge down upon the player. It can move horizontally, its movement is heavily limited
-It may launch numerous arcs of acidic sludge projectiles towards the player. The arcs all consist of either 4 or 5 projectiles each, alternating between each subsequent arc
-It may appear close to the player before vomiting up a large assortment of 'junk', including items such as rocks, fishbones, etc. This is all affected by gravity slightly, and the projectiles are all launched at varying angles and speeds, though are generally fast-moving.
Once below 36 (45)% health The Depths enters its 2nd phase
Phase 2:
The Depths gains new additions to its old attacks. Additionally, the screen will darken a little further at this point.
-The lunge is faster in both preparation and movement
-The angles in which the sludge can be dropped on the player is increased, as is the amount released
-The arcs of sludge consist of either 5 or 6 sludge now
-The 'junk' is no longer affected by gravity, and more of it is released at a time
-The Depths' final new attack has it launch a massive deathray-like laser at the player. The angle can be adjusted mildly as it is fired, though it is only fired for about 1-1.5 seconds before Depths disappears again
As Depth's health gets lower it will begin to gradually attack faster and faster, and will linger for less time before disappearing between each attack cycle.

Defeat:
The Depths' lure will shatter, leaving a bright glow. Depths will retreat into the darkness again, and both its visual effects and debuff will disappear.
-Callie's NPC will now sell the Hallowed Locket, which provides a few buffs to stats, as well as a special effect against [a certain boss]

Drops:
Will always drop the Hallowed Fragment, which Callie can use to upgrade an assortment of weapons into 'Holy' variants; which are more powerful and have a special property against [a certain boss]. Additionally, it can drop a spear, magic staff, bow, summoner staff, or rocket launcher. It can drop the Sunken Medallion; which provides the player a series of buffs and majorly increased mobility in water. In Expert Mode it can drop Storm Wings; a powerful set of wings with a lot of flight time, increased underwater mobility, and the ability to hover.

Hints:
-Dashes and teleports, or any other form of quick acceleration/movement, is recommended for this fight. The Depths can teleport anywhere and will do so depending on its attack, so having a means to get away from wherever it appears is amazingly helpful
-Weapons with fast projectiles become gradually more and more helpful in its 2nd phase, as it will begin hanging around for shorter and shorter periods of time as it loses health

Extra Info:
-Depths almost received a different design at one point, though this was re-purposed into another boss elsewhere.
-Depths is one of the only bosses in this page to not have some sort of link to Arterion itself; not being related to it, nor having even encountered it.
[Added: 19/9/20]
13 - Arterion

Appearance: Arterion itself. A large, fleshy amalgam of things that has some vaguely-humanoid qualities, such as its skull. It has a hole in its chest, fairly notably, which its sunken head sits just above.

Summon: Use the Cursed Skull. Whenever it is used, the sky will turn a dark red and Arterion will appear. The player will also be inflicted with Monstrous Presence, as well as a debuff known as 'Vitality' if the player doesn't have the Hallowed Locket equipped at any point during the fight.

Fought: Post-Moon Lord
Specification: Post-Depths
Special?: Returning Boss, 'Final Boss'
Progression: Yes

Stats:
Health:
-420,000 (600,000) (765,000) (Body (Phase 1, Phase 3))
-200,000 (344,500) (439,238) (Head)
-175,000 (300,000) (382,500) (Heart)
-225,000 (380,000) (484,500) (Core)
Attack:
-265 (415) (Melee, Hand Melee) (Inflicts Bloodflare - 100%)
-225 (350) (Bloodflare, Homing Skulls)
-240 (375) (Arterion Guardian)
-255 (402) (Deathray)
-220 (342) (Acidic Sludge) (Inflicts Acid Burns - 50 (100)%)
Defence:
-85 (Body, Heart)
-120 (Head)
-150 (Core)
--+33% Damage Resistance (Vs Non-'Holy' weapons)

[All of Arterion's attacks can inflict Bloodflare - 33 (50)%]

Attacks:
Phase 1:
Arterion will usually fly towards the player at a moderate pace, firing off attacks as it does so. When using attacks it will briefly stop moving, but begins moving at the player again once the attack is finished. It can also charge at the player and teleport, independent of its other attacks.
-It may launch 2 arcs of projectiles towards the player. One of 18 Bloodflare projectiles, and the following of 15.
-It may summon a large, fleshy hand that lunges and swipes at the player a couple of times before disappearing
-It may make 2 hands appear, at opposite sides of the player to each other, before slamming them together in an attempt to hit the player
-It may launch numerous skull-like projectiles from its chest; all of which with homing properties that slowly fade as they travel.
-It may release a large skull that chases the player similar to the Dungeon Guardian for a few seconds. Eventually, it will disappear on its own.
At roughly 45% health Arterion will enter its 2nd phase; with its body falling away from its head and its head continuing its assault.
Phase 2:
Arterion's head usually tries to keep above the player, much like how the false Arterion's had.
-It may charge at the player, usually downwards due to its positioning
-It may fly a little higher than usual before raining chunks of acidic sludge downwards. These are affected by gravity.
-It may release a cluster of homing skulls from its mouth
-It may stop and begin firing a large, red deathray-like laser at the player. The deathray's angle is slowly adjusted to try and follow the player until Arterion's head stops firing the beam.
Once the skull is at 0 health it will shatter. For a few seconds, nothing will seem to happen after the skull is destroyed, before its body will suddenly be seen rising up in the background. After a few seconds it will return to the foreground and begin Phase 3
Phase 3:
Arterion's body will begin fighting the player. It will retain its Phase 1 attacks, but also gains a series of new attacks to use.
-It may fire 2 lasers from its chest; 1 up and 1 down, before rotating them both 90 degrees clockwise or anticlockwise. Both will rotate in the same direction.
-It may release up to 3 'bursts' of Bloodflare projectiles from its chest. Each burst can consist of up to 30 projectiles each, and they are randomly spaced-out in each burst
-It may launch dozens of acidic sludge projectiles upwards from its 'neck', which will all rain down shortly due to being affected by gravity.
Once the body's health reaches 0, the body will begin breaking apart. Its heart will escape and continue fighting the player.
Phase 4:
Arterion's heart will dash 3 times at the player before attacking. It uses a new assortment of attacks, much like Phase 2. The player is inflicted with Heavy Gravity in this phase specifically.
-It may release a deathray every second at the player for a few seconds. They cannot be re-adjusted once fired, fortunately.
-It may create horizontally-travelling and vertically-travelling bullet-hells of Bloodflare projectiles
-It may launch a deathray upwards, and then rotate it 360 degrees either clockwise or anti-clockwise.
Finally, once this form is beaten, the heart's outer shell will break away; revealing the 5th and final phase of the fight
Phase 5:
Heavy Gravity is lifted, and the boss will now teleport around instead of dashing. It retains all its Phase 4 attacks, but also regains the ability to summon homing skulls and its 'Arterion Guardian' attacks from Phase 1. Additionally, it gains 3 new attacks
-It may launch 6 deathrays from the red mouths at its sides. Each is evenly-spaced, as expected.
-It may launch countless Bloodflare projectiles out all around itself in random directions in a 'death blossom'
-It may launch 4 lasers in a '+' shape, then 4 more in a 'x' shape. Afterwards, it will teleport closer to the player, and then launch 8 lasers at once in both a '+' and a 'x' shape.
Notably, this phase specifically has increases resistance against any weapons that haven't been upgraded with the 'Holy' effect from Callie.

Defeat:
There are 2 different outcomes for beating this fight, depending on what weapons were used for its final phase.
-It the player did not land the finishing blow on its 5th phase using 'Holy' weapons, Arterion's core will disappear with a bright flash of red, and will leave red particles behind as it disappears.
-If 'Holy' weapons were used to deal the finishing blow, red particles are still released, but there is no flash of red. Instead, its core will slowly turn grey before it crumbles away into dust; the 'true' ending of the fight.

Drops:
Arterion will drop the Reflective Mirror in Normal Mode; an item used to start the Boss Rush, as well as the Morbid Fragment. If defeated without 'Holy' weapons it will also drop the Tower Key; an item used to open a secret doorway and to fight an additional boss. It drops a Cursed Keystone in Expert Mode, which Callie can also purify.

Hints:
-Bring the Locket and 'Holy' weapons. The locket ensures the player won't have their health drained and take more damage throughout the fight, and the 'Holy' weapons will ensure good damage against its final phase.
-If going for the Tower Key, the only necessity is to not land the finishing blow with a 'Holy' weapon, therefore they can still be used until its health gets low.

Extra Info:
-Formerly known as Arterion Prime, Arterion is the final major boss of the mod, though there are still 1 or 2 'extra' bosses after him
-Arterion is the only boss to have 2 exclusive debuffs; Bloodflare and Vitality
-Originally, it was planned to be immune to all damage outside of 'Holy' weapons in Phase 5, though this was scrapped due to becoming an impossible fight if the player didn't think to get any of those weapons
-The Eye on Arterion's heart in Phase 4 is near identical to the one that appeared on the original Boss Ideas 6's picture
-Phase 5 was also originally based on Castlevania 3's Dracula fight, specifically the 2nd phase.
[Added: 19/9/20]
14 - Tower Keeper

Appearance: A mysterious man in a red jacket, wearing a red hat over his head. His entire head is obscured in shadows.

Summon: Use the Tower Key. The Keeper only despawns if the player gets too far away or dies. There are no restrictions to using the Key.

Fought: Post-Moon Lord
Specification: Post-Arterion
Special?: Superboss
Progression: No?

Stats:
Health:
-400,000 (624,500) (796,238) (Crystals)
-1,412,000 (2,180,000) (2,779,500) (Keeper)
Attack
-320 (465) (Crystal Melee, Keeper Melee, Sword Slashes, Energy Instability)
-300 (438) (Energy Orbs)
-350 (500) (Deathray)
Defence: 200

[All of the Keeper's attacks can inflict Crimson Flames - 50 (75)%]

Attacks:
Phase 1:
The Keeper is encased in crystal at this point in the fight, and additionally has a ring of 4 small crystals orbiting him. The 4 smaller crystals share a health bar, and destroy piercing projectiles on-hit. The Keeper will either dash or teleport around in this state.
-The 4 crystals may rapidly fire energy orbs at the player for a few seconds
-The 4 crystals may fire 3 Energy Instabilities each over a few seconds. These will move for a second, then stop for half a second, move, stop, move, and then finally stop and explode. They can re-adjust their trajectory every time they stop.
-They may fire 4 energy orbs based on where the player is moving towards. It may do this up to 5 times in a row
-The crystals may orbit the Keeper rapidly before a deathray is shot from the Keeper's crystal. The deathray sweeps, like Moon Lord's, but is significantly faster
Once the crystals are destroyed, the Keeper will break free of his crystal and begin Phase 2
Phase 2:
The Keeper himself will also move with dashes and teleports, though has a different arsenal of attacks than the crystals
-He may create a bullet-hell of energy orbs, all moving horizontally at varying speeds
-He may charge energy into his sword and swing it, creating 3-5 Energy Instabilities. He can do this up to 3 times in succession
-He may dash at the player with his sword up to 4 times in a row. These dashes are fast and cover lots of ground quickly
-He may release 8 deathrays from himself; in 'x' and '+' shapes
-He may release 4 deathrays in a '+' shape, and then rotate them all 90 degrees either clockwise or anticlockwise
-He may call down energy orbs from the sky. They will begin falling either to the left or right of the player, with the general area they fall moving in the player's horizontal direction from the start of the attack.
Once down to half health, he will re-summon 2 of his crystals.
Phase 3:
Crystals' health is regenerated, with the Keeper becoming invulnerable again.
Instead of gaining any new attacks the Keeper will alternate between using one of his Phase 1 attacks, and then one of his Phase 2 attacks.
Once the Crystals' health is reduced to 0, they will shatter again, and the Keeper will enter Phase 4.
Phase 4:
The Keeper begins by regenerating back 10 (25)% of his health. He moves and attacks the same ways as in Phase 2, but all of his attacks are enhanced.
-The bullet-hell attack now has vertical projectiles mixed in as well
-He will summon more Energy Instabilities with each sword swing, and for the third he will teleport closer to the player before swinging the third time
-At the end of each dash he will swing his sword at the player, releasing an arc of 3 energy orbs aimed at the player, before dashing again
-Now fires 16 lasers during the first deathray attack
-Will now cause the 4 deathrays to rotate a full 360 degrees around himself
-When the projectiles rain down the Keeper will shield himself and, indirectly, the area directly beneath him. This is the only truly safe point in which to dodge the 'rain' attack. The attack is also significantly faster.

Defeat:
The Keeper will fall to the ground before being re-sealed within his crystal. He will then disappear into the same portal he was summoned from.
-The Keeper will now appear as a penultimate boss in the Boss Rush as of his first defeat

Drops:
Can drop Ruby Fabric, which can be used to create his vanity set. Will also always drop the Crimson Fragment. In Expert Mode he can also drop his sword; a powerful, projectile-less weapon that works similar to the Starlight.

Hints:
-The Keeper is an entirely optional boss, and doesn't need to be defeated for completion. If you don't want to fight him, he can be skipped without losing out on much
-The Keeper's first 2 phases can be studied somewhat to make getting used to the latter 2 a lot easier as the attacks are essentially the same, even if a little enhanced.

Extra Info:
-The Keeper's defeat animation is based on that of Galacta Knight; a similarly Post-Game boss similar in appearance to the protagonist who utilises a sword and numerous powerful attacks.
-The Keeper shares some similarities with Ebony Flame; having a large cloak and hat obscuring his face. However, there is no linked similarities between the two.
[Added: 19/9/20]
15 - Boss Rush
There is, additionally, a Boss Rush that can be faced after Arterion is defeated.
It mainly consists of bosses from this page, though does have a few fitting Vanilla bosses thrown in also.

All bosses will have enhanced stats to make them all threatening even in the Post-Game, such as health, damage, defence and mobility. However, they may also have other, extra changes.

01 - Eye of Cthulhu
Servants of Cthulhu are now projectiles instead of minions that fade after a short time. Dashes cover more ground.

02 - Grimace
Takes nearly no damage when its mouth is closed.

03 - Brain of Cthulhu & Eater of Worlds
Both fought at the same time.
Eater can fly temporarily if the player is too far away and will leave enhanced Corruptors on death.
Brain has significantly increased knockback resistance in its 2nd phase and may dash at the player.

04 - Fury Slime
Massive mobility increases, especially for its slime form.

05 - Skeletron
Hands will regenerate after reaching half health, though its skull doesn't gain back its defence nor lose its ability to shoot skulls

06 - Brainworm
Can fly after the player when they are too far away. Claspers can re-attach themselves and regenerate its health back even in Normal Mode.

07 - Bone Meal
Projectiles are significantly faster and stronger. Each ones' respective buffed stat is even more distinct.

08 - Dreadnautilus
Generally faster and more aggressive. Projectiles are faster and minions more plentiful.

09 - False Arterion
Projectiles are more plentiful and generally more aggressive.

10 - Corpse Flower
Generally faster and its projectiles are larger. Seeds have a very mild homing effect.

11 - Wretched
Significant speed boosts. Minions explode into a shower of droplets upon defeat, even in Normal Mode.

12 - Lunatic Cultist
Faster movements, will always create a clone after attempting to summon a Dragon or Vision, even if unsuccessful at summoning.

13 - Moon Lord
Moon Bite is never inflicted upon the player. Can still fire deathrays from its top eye, even after it is defeated.

14 - Garden
Capable of flight by pretending to walk along blocks. Darkness effect is far more noticeable.

15 - Wyrmwood
Capable of flight if it cannot reach the player. Fires deathrays instead of giant lasers.

16 - Callie / Callie Clone
Clone will replace Callie if she has been defeated and moved in as an NPC
Attacks generally utilise more projectiles

17 - Indigo / Indigo Clone
Clone will replace Indigo if the 'good end' of the fight has been achieved
Even if one of the duo is defeated, it will continue to attack the player until both are defeated

18 - Depths
Made slightly larger, gains most Phase 2 attack buffs even in Phase 1. Phase 2 transition happens at higher health.

19 - Tower Keeper
(Only faced if the Tower Keeper has been defeated)

20 - Annihilus
Replaces Arterion
Will not try to inflict Vitality upon the player, even if they lack the Locket
33% damage resistance applies to all weapons, even 'Holy' weapons, in Phase 5
Has a series of special attacks during phase transitions:
-Releases acidic globules from its body when its head detaches when entering Phase 2
-Releases 2 'bursts' of bloodflare projectiles are released from the head back-to-back as the head is destroyed just before Phase 3
-Releases deathrays from its body as its body is destroyed when entering Phase 4
-Releases 5 'bursts' of bloodflare projectiles in rapid succession when entering Phase 5


After clearing the event, the player will receive the Abominable Fragment; the final Fragment piece used to craft the Acrimonious Medal.

Extra Info:
-Annihilus no longer has its insta-kill abilities, though the fight is still gruelling due to Annihilus' buffs over regular Arterion
-Notably, the event has some variations depending on the player's actions. Callie and Indigo will be replaced with clones of themselves if the player has their NPCs, for example.
--The most notable is that, if the player hasn't defeated the Tower Keeper, he will not appear in the event at all.
-The Tower Keeper is the only boss in the event that isn't buffed in some ways, due to already being a Post-Arterion boss
-The Medal that can be crafted using the 3 'End-game' fragments references Acrimony in name and tooltip. This is because, while Acrimony is referenced in Arterion's lore as being the creator of Arterion, he never appears in the mod itself on either page.
[Added: 19/9/20]
Final Notes:
Well, that was the remake of Project: Arterion

Admittedly nowhere near the most popular Boss Ideas page, it was something so drastically different from the norm that I wanted to bring it back and enhance it as much as I could, and thus I finally have

Not got much news aside from going back to Uni again for another year, so Boss Ideas may have to slow down a little again, but not much else to say except that


Feel free to check out Boss Ideas 10's 3 parts, by the way, I appreciate it

Anyways, hope you enjoyed this, despite the edginess :)
32 Comments
Okami Tomato  [author] Feb 14, 2024 @ 7:42am 
Update: Yep, yep I did give 'em permission I just forgor
Okami Tomato  [author] Feb 11, 2024 @ 4:35am 
So I got informed today that a mod called the Malignant Mod is using some of the Arterion sprites, so those people that said 'these should be in a mod' can now be satisfied

...I can't remember exactly but I imagine I gave them permission or not but assuming I did (Given permission to a few people over the years and haven't quite kept up, whoops)
Twylitefox Oct 19, 2020 @ 5:14pm 
for a second, thought it said "furry slime"

there can only be one anyway ;)
Okami Tomato  [author] Oct 11, 2020 @ 4:15pm 
Oh I've been gone for a short bit but all I can really say is... uhh...

Thanks :)
Sinner8Ishmael Oct 11, 2020 @ 7:17am 
OMFG THIS IS AMAZING
TheSillyDudeIg Oct 7, 2020 @ 9:36am 
DO IT AS A MOD I MUST PLAY IT!
Ham Man Oct 5, 2020 @ 5:29pm 
This is awesome!
nichos9 Oct 5, 2020 @ 1:23pm 
i hope there's a mod that has a mini cultist
Lrjg11 Oct 4, 2020 @ 10:42pm 
amazing
BradLad Oct 4, 2020 @ 12:13pm 
it perfect