Creativerse

Creativerse

40 ratings
Everything about Arc Signs
By hobukastan
The arc sign is one of the most versatile and powerful objects in the game. It can be used for displaying anything from nicely formatted world rules to custom images to movies. This guide attempts to cover everything it is possible to do with arc signs, from changing text size and color to text placement and wiring.
3
   
Award
Favorite
Favorited
Unfavorite
Introduction
Arc signs, like other signs in Creativerse, can be used to display text. Unlike other signs, they are wireable and have a lot larger character limit, so they are a lot more versatile. While the main purpose of an arc sign is to display text, people have also used them for custom images and decorations. Here's an example of some of the non-text things I have used arc signs for:

The aim of this guide is to cover everything you need to know about arc signs (and probably quite a bit you'll never need to know as well). It mostly mirrors the content of my arc sign tutorial adventure, so if you'd like to be able to immediatly try things out as you go along, you can use the adventure instead: http://sharing.creativersegame.com/w?k=c328743eaa7011eaacdf42f9f412b992
Arc sign basics
To edit an arc sign's contents, you need to equip a wiring tool, aim at the arc sign and press N. The text you want to display goes into the Output Message section:


The other five fields in the UI are wiring inputs, which are covered at the end of this guide. An arc sign can hold up to 10 000 characters, including any formatting tags, and can be turned on and off by either right-clicking or aiming at it and pressing F.
Formatting short overview
To change the appearance of your text, you can use tags that look something like <tag>. For example, <b> will make the text bold. The effects of most tags can be ended by adding a slash to the beginning of the tag name, like </tag>. This section lists all usable tags with a short summary of the effect of each, detailed explanation for each tag will follow in the next sections.

Tag
Description
<offset>
Moves bottom of the text area up or down
<zoffset>
moves text area forwards or backwards
<width>
changes width of text area
<align>
text alignment
<indent>
indentation of all lines
<line-indent>
indentation of manual line breaks
<line-height>
distance between lines of text
<voffset>
moves text up or down from the baseline
<pos>
position of the next character
<space>
space to the next character
<cspace>
spacing between characters
<mspace>
amount of space a single character takes (monospace)
<margin>, <margin-left>, <margin-right>
space between side edge and text
<rotate>
character rotation
<font>
font used
<color>, <alpha>
color and transparency of text
<size>
text size
<b>,<i>,<s>,<u>
bold, italic, strikethrough, underline
<sub>, <sup>
subscript, superscript
<lowercase>, <uppercase>, <smallcaps>
makes text lowercase, uppercase or smallcaps (lowercase letters become small uppercase)
<mark>
highlight text
<nobr>
prevents word wrapping if possible
<noparse>
prevents parsing of tags
<sprite>
insert predefined sprite
<offset>
The <offset> tag is used to move the bottom edge of the arc sign's text area up or down. No arc sign contents can ever go below this bottom edge. The default offset if none is specified is around 0.55. The <offset> tag can only be used once per arc sign.

Usage:
<offset=X>, where X is any number between -8 and 8. The unit is blocks, so increasing X by 1.5 will raise the text by 1.5 blocks.

Example:
<offset=2>This text has offset 2
will look like the arc sign on the right:

<zoffset>
The <zoffset> tag is used to move the arc sign's text area forwards or backwards. The default offset if none is specified is 0, which places the text directly above the arc sign. The <zoffset> tag can only be used once per arc sign, so you cannot have text in multiple planes with the same arc sign.

Usage:
<zoffset=X>, where X is any number between -8 and 8. X is in blocks, so e.g. <zoffset=2.5> will move the text area 2.5 blocks forwards.

Example:
<zoffset=-0.5> This text has zoffset -0.5, and sits snugly on the wall
will result in the arc sign text sitting nicely on top of the block directly behind the arc sign, as shown by the arc sign on the right:


Same two arc signs from the side:


Note: all of the following examples will have <zoffset=-0.5> added to make the example text sit nicely on the wall behind the arc sign.
<width>
The <width> tag is used to change the width of the arc sign's text area. The center of this area is directly above the arc sign. Lines of text that exceed the width will get wrapped to a new line. The default width if none is specified is 3. The <width> tag can only be used once per arc sign - if you want different sections of your text to have different widths, you can use the <margin> tag instead.

Usage:
<width=X>, where X is any number between -8 and 8 (although only positive values are useful in most cases). X is in blocks, so e.g. <width=2.5> will set the text area width to 2.5 blocks.

Example:
<width=1><zoffset=-0.5>This text has width 1
will result in:


<align>
The <align> tag is used to change whether the arc sign text is aligned left, right, centered, justified (character/word spacing is adjusted to make text touch both edges, except last line before a manual line break) or flush (same as justified, but all lines are adjusted, including last line before line break). By default, text is centered. Different parts of an arc sign can have different alignment.

Usage:
<align=X>, where X is either left, right, center, justified or flush
</align> will end the effect of an <align> tag and go back to the previous alignment

Example:
<zoffset=-0.5> <align=left>This text is aligned to the left of the text area <align=right>This text is aligned to the right of the text area <align=center>This text is centered <align=justified>This text is justified - word spacing is adjusted if necessary to align text with both edges <align=flush>This text is flushed - word spacing is adjusted if necessary to align text with both edges, including last line before manual line break</align>
will result in:


<indent>
The <indent> tag makes every line following it have a space in front of it. Different parts of an arc sign can have different indents. It works best on left-aligned text - centered text will only move half of the value specified, and right-aligned text will not be affected at all.

Usage:
<indent=X>, where X is either a non-zero number (in blocks) or a percentage of the width of the arc sign
</indent> will end the effect of an <indent> tag

Example:
<zoffset=-0.5><align=left> This text has no indent <indent=0.5>This text has indent 0.5 <indent=50%>This text has indent 50%</indent>
will result in:


Extra details: It is possible to go outside of the defined width using indent. You can have an indent close to -100% (exact value seems to depend on font size) without any odd effects. This means that you can get an effective arc sign area width of close to 16 blocks if you set width=8. Any more than that, or a positive indent over 100% will work, but every character will get pushed to a new line.
<line-indent>
The <line-indent> tag works exactly the same way as the <indent> tag, except it only affects manual linebreaks, not word-wrapped lines.

Usage:
<line-indent=X>, where X is either a non-zero number (in blocks) or a percentage of the width of the arc sign
</line-indent> will end the effect of a <line-indent> tag

Example:
<zoffset=-0.5><align=left> <line-indent=10%>This text has line-indent 10%. This is a long line, so it gets word-wrapped, and the wrapped lines are not indented. This is a manually started new line, and gets indented.
will result in:


Extra details: If you have a left-aligned sign with no word-wrapped lines and no lines with less than 2 characters, you can move the whole image left or right any amount by removing the <align> tag, adding "<line-indent=X><#0000>. </color>" (the space is important!) as the first line and "<#0000>.." as the last line of the sign. I honestly have no idea why this works, but it does.
<line-height>
The <line-height> tag changes how far apart the lines of text are.

Usage:
<line-height=X>, where X is any number or percentage including 0. For some reason, the unit for line-height is not exactly blocks - setting <line-height=1> will leave about 1.01 blocks between lines. Negative line-height will place the next line above the current line instead of below it.

</line-height> will return the line spacing to 100%

Example:
<zoffset=-0.5>Normal space between lines <line-height=50%>50% of normal space between lines <line-height=1>1.01 blocks between this and the next line </line-height>Back to normal spacing.
will result in:

<voffset>
The <voffset> tag moves the following text up or down relative to its baseline. It cannot move text below the bottom line of the arc sign, specified by the <offset> tag. Useful for moving text higher than the offset tag would allow, or creating lineart.

Usage:
<voffset=X>, where X is a non-zero number. For some reason, the unit is not exactly blocks, so setting <voffset=1> will move the text 1.01 blocks above the baseline.
</voffset> will return the voffset to 0

Example:
<zoffset=-0.5>Normal text<voffset=0.1>voffset 0.1 <voffset=-0.1>voffset -0.1</voffset>
will result in:


Extra notes:
  • The voffset units do not correspond exactly to blocks - increasing voffset by 1 is equivalent to increasing offset by 1.01. This can make a noticeable difference when using large voffsets.
  • The voffset of the baseline of the first character in the sign is always relative to the bottom edge of the arc sign - everything else gets positioned relative to it. If the rest of the lines don't fit between the specified voffset and the bottom edge, it gets moved upwards. This means that when using a single voffset to move the whole arc sign text, you are moving the top edge, not the bottom edge as <offset> does.
  • With large font sizes, you may notice that setting a small voffset to a single line of text will not have any visible effect. This is because the voffset of the first character is never 0 - there needs to be space between the baseline and the bottom edge for the tails of descender characters like g or j. Setting a voffset smaller than where the baseline would be with no voffset specified will not have any effect.
  • When using fixed line-height, the next line is positioned relative to the end of the previous line. Otherwise, it is positioned relative to the lowest part of the previous line.
  • It is best to use fixed line-height when using multiple voffset tags, or things can get confusing. With non-fixed line-height, the positioning only cares about the difference in voffsets in the same line, not the actual voffset values, so an arc sign with content:
    <voffset=1>Line 1 <voffset=2>Line2
    will look exactly the same as an arc sign with content:
    <voffset=1>Line 1 Line2
    because there is no variation in the voffset of the second line in the first sign, and it does not care about the actual voffset value of the second line.
<pos>
The <pos> tag moves the cursor on the current line to the specified position. Works best with left-aligned text. Useful for creating tables.

Usage:
<pos=X>, where X is a number (in blocks) or a percentage of the sign width. X is relative to the beginning of the line, not the current character - if you want to leave a certain amount of space with the current character, use <space> instead.

Example:
<align=left><zoffset=-0.5> No pos <pos=2>At pos 2 <pos=30%> At pos 30%
will result in:


Extra details: Like with <indent> and <line-indent>, using <pos> to put the next character outside of the defined sign width will have odd effects.
<space>
The <space> tag leaves the specified amount of space between the current character and the next one. Can be negative. Works best with left-aligned text.

Usage:
<space=X>, where X is a non-zero number (in blocks).

Example:
<align=left><zoffset=-0.5> There is <space=0.5> 0.5 blocks of space.
will result in:


Extra details: Like with <indent>,<line-indent> and <pos>, using <space> to put the next character outside of the defined sign width will have odd effects, but there is no limit how far to the side you can put a single character. Combined with <line-height=0> and <voffset>, allows for easy manual positioning of every character in the sign - useful for creating art.

The <space> tag word-wraps together with the words it touches - if you do not want that, leave spaces around the tag.
<cspace>
The <cspace> tag changes how much space is left between characters. It does not affect the width of the character itself.

Usage:
<cspace=X>, where X is a non-zero number (in blocks)
</cspace> will return to normal character spacing

Example:
<zoffset=-0.5> This text has normal character space. <cspace=0.05>This text has 0.05 blocks between characters. <cspace=-0.01> This text has -0.01 blocks between characters.</cspace>
will result in:

<mspace>
The <mspace> tag changes the font to monospace, meaning each character takes up the specified amount of space. The difference with <cspace> is that cspace changes the space between characters (the space between the end of one character and the beginning of the next character), but <mspace> changes the sum of the character width and the space between characters (the space between the beginning of one character and the beginning of the next character). A negative mspace will effectively mean writing right-to-left instead of left-to-right.

Usage:
<mspace=X>, where X is a non-zero number (in blocks)
</mspace> will return to normal character spacing

Example:
<zoffset=-0.5> This text has normal spacing. <mspace=0.2>Mspace is 0.2.</mspace> cspace 0.15: <cspace=0.15>Text</cspace> mspace 0.15: <mspace=0.15>Text</mspace>
will result in:

<margin>
The <margin> tag changes the amount of space left between the text area edge and the text. If you want to change the space only on one side, you can use <margin-left> or <margin-right>.

Usage:
<margin=X> or <margin-left=X> or <margin-right=X>, where X is a non-zero number (in blocks) or a percentage of the width. While negative margins are valid, they don't actually have any effect.
</margin> will return to no margins.

Example:
<zoffset=-0.5><align=left> This text has no margins <margin=1>This text has margin 1 on both sides</margin> <margin-left=10%>This text has 10% margin on the left</margin> <margin-right=0.5>This text has 0.5 margin on the right</margin>
will result in:

<rotate>
The <rotate> tag rotates characters around their midpoint. Positive rotation rotates characters to the left (counter-clockwise), negative rotations to the right (clockwise). Note that it rotates characters, not words.

Usage:
<rotate=X>, where X is a number (in degrees).
</rotate> will return to no rotation.

Example:
<zoffset=-0.5> <rotate=45>Rotation 45 <rotate=-22.5>Rotation -22.5</rotate>
will result in:


Extra details: The characters rotate around the midpoint of their visible part. This does not matter much in the default font, where all characters are capitalized and hence the same height anyway, but in other fonts, characters like p will have a much lower center of rotation than characters like d.
<font>
The <font> tag changes the font of the characters. There are a few known fonts, although the developers have warned that non-default ones might change or disappear. Even so, "Arial SDF" is widely used due to not having a white outline and actually having lowercase letters.

Usage:
<font=X>, where X is one of
  • "default"
  • "Arial SDF"
  • "LiberationSans SDF"
  • "SourceHanSerifSC-Bold SDF"
  • "SourceHanSerifSC-Regular SDF"
(credit goes to Xoff for discovering these)

</font> will return to the previously defined font

Example:
<zoffset=-0.5> Default font <font="Arial SDF">Arial SDF</font> <font="LiberationSans SDF">LiberationSans SDF</font> <font="SourceHanSerifSC-Bold SDF">SourceHanSerifSC-Bold SDF</font> <font="SourceHanSerifSC-Regular SDF">SourceHanSerifSC-Regular SDF</font>
will result in:


Note: while the quotation marks around the font name do not seem to be strictly necessary, I have encountered cases of odd behavior when leaving them out, so it is safer to use them.
<color>
The <color> tag is used to change the text color and transparency. It accepts both color names and RGB hex codes (you can use any color picker on the internet to get these hex codes). The actual percieved color depends on the font - e.g. the default font has a whitish border and makes all the colors somewhat washed out as well. For changing only transparency, the <alpha> tag can be used.

Usage:
<color=X>, where X can be either:
  • a color name: one of black, blue, green, orange, purple, red, white, yellow
  • a six-digit RGB code, where first two digits show amount of red, second two digints amount of green, and last two digits amount of blue, e.g. #FF0000 would be red
  • a three-digit RGB code - a short version of the six-digit option when both digits of all colors are the same, e.g. #123 is exactly the same as #112233
  • an eight-digit RGBA code, where the first six digits are the RGB code, and the last two digits show the transparency (or alpha) of the text, with 00 being full transparent and FF being fully opaque, e.g. #00FF0077 would be a half-transparent green
  • a four-digit RGBA code, which is a shortened version of the eight-digit one, e.g. #1234 is the same as #11223344

<#X>, where X is a RGBA code - when using any of the hex code versions of the color tag, the "color=" part can be omitted, so e.g. <#123> is the same as <color=#123>.

<alpha=#X>, where X is a two-digit hex code (00 is fully transparent, FF is fully opaque) - sets the text transparency without changing color. It is not possible to use a short (single-digit) version of the hex code.

</color> will return to the previously defined color

Example:
<zoffset=-.5> <color=red>Red in default font<font="Arial SDF"> <color=red>Red in Arial <#00FF00>Long color code: #00FF00 <#0F0>Short color code: #0F0 <#00FF0022>Long color code with alpha: #00FF0022 <#0F02>Short color code with alpha: #0F02 <alpha=#77>Alpha to #77 without color change
will result in:

<size>
The <size> tag changes the font size. Negative sizes will turn the characters upside down, size 0 will turn the text invisible. The default text size is 1.2 - how large this appears depends on the font.

Usage:
<size=X>, where X is any number or a percentage of the original font size. Note that signed numbers are considered to be relative to the default font size, so <size=-1> is the same thing as <size=0.2> and <size=+1> is the same thing as <size=2.2>, since the default font size is 1.2 - to get upside down text the same size as the default, you'd need to use <size=-2.4>.

</size> will return to the previously defined size.

Example:
<zoffset=-0.5> Default size text in default font <size=0.5>Size 0.5 text in default font</size><font="Arial SDF"> Default size text in Arial <size=200%>Size 200% text in Arial
will result in:

Text formatting (bold, italic etc)
There are a number of tags for formatting your text - making it bold, italic, underlined, strikethrough, superscript, subscript, lowercase, uppercase or small capitals.

Usage:
  • <b> - makes text bold, closed by </b>
  • <i> - makes text italic, closed by </i>
  • <u> - adds underline to text, closed by </u>
  • <u color=#X>, where X is a hex color code - make a colored underline
  • <s> - adds a line through your text, making it strikethrough, closed by </s>
  • <s color=#X>, where X is a hex color code - colored strikethrough
  • <sup> - makes text superscript, exact location depends on font
  • <sub> - makes text subscript, exact location depends on font
  • <lowercase> - makes text lowercase (does not have an effect on default font), ended by </lowercase>
  • <uppercase> - makes text uppercase (does not have an effect on default font), ended by </uppercase>
  • <smallcaps> - makes lowercase letters uppercase, but slightly smaller than ordinary uppercase letters, ended by </smallcaps>

Example:
<zoffset=-0.5><font="Arial SDF"> <b>Bold text</b> <i>Italic text</i> <u>Underline and</u><u color=#FF0000> colored underline</u> <s>Strikethrough and </s> <s color=#0000FF> colored strikethrough</s> Text with<sup>superscript</sup> and<sub>subscript</sub> <lowercase>This Text Becomes Lowercase</lowercase> <uppercase>This text becomes uppercase</uppercase> <smallcaps>This Text Becomes Smallcaps</smallcaps>
will result in:


Note: as can be seen from the example, it seems that the underline and strikethrough for Arial still uses the default font for some reason, so it doesn't really look that good.
<mark>
The <mark> tag is used to highlight text. Since the highlight is on top of the text, you can make the mark color somewhat transparent for better legibility, although the highlight is somewhat transparent by default.

Usage:
<mark=#X>, where X is a 6-digit RGB code or a 8-digit RGBA color code. Short codes won't work with <mark>, and will end up with a white highlight, as will not specifying a color at all.

</mark> will return to previous mark color.

Example:
<zoffset=-0.5> Normal text, <mark=#FFFF0099>text highlighted slightly transparent yellow, <mark=#007700>text highlighted green,</mark> back to yellow
will result in:


<nobr>
The <nobr> tag is used to prevent word-wrapping between words. If the text you want to keep together does not fit onto a single line, it will still get wrapped.

Usage:
<nobr>Text you want to keep together</nobr>

Example:
<zoffset=-0.5>The following word is kept together: <nobr>I M P O R T A N T</nobr>
will result in:


If the <nobr> tag is removed, the result is:
<noparse>
The <noparse> tag is used to prevent parsing of tags, so you can display e.g. <b> instead of it making text bold. Does not work on <offset>, <zoffset>, <width> and </noparse> tags. Usually not very useful, unless you are attempting to write an arc sign tutorial with arc signs.

Usage:
<noparse>Text you want to not parse</noparse>

Example:
<zoffset=-.5><noparse><i>This text is not italic, because the <i> is not parsed.</noparse>
will result in:

<sprite>
The <sprite> tag is used to display predefined images called sprites. The currently available sprites are creativerse icons and some smiley faces. Most tags work on sprites as well, except <color> will only work if "tint=1" has been set, otherwise the sprite will ignore the current text color. The size and positioning of sprites don't really match text all that well, so be prepared to do some fiddling if you want to mix text and sprites.

Usage:
  • <sprite index=X> or <sprite=X>, where X is a number between 0 and 15 - inserts a smiley.
  • <sprite="X" index=Y>, where X is either "icons_00" or "icons_01" or "badges" and Y is a number - inserts a creativerse icon from either the icons_00, icons_01 or badges set
  • <sprite="X" name="Y">, where X is either "icons_00" or "icons_01" and Y the name of an icon in that icon set - inserts a creativerse icon from either the icons_00 or icons_01 set. Somewhat more reliable than the previous version, since sprite names change rarely, but indexes can change more often when new sprites are added.
  • <sprite="X" anim="Y,Z,W">, where X is an icon set name and Y,Z,W are numbers, will loop through sprites from index Y to index Z at frame rate W. A negative W will loop backwards.
  • adding tint=1 to any of the above will tint the sprite with the current text color
  • adding color=#X, where X is a 6-digit RGB code or 8-digit RGBA code, will tint the sprite with the specified color. Short color codes will not work with this usage.

To find out the names and indexes of a sprite, you can use Entuland's Sprites Picker:
http://entuland.com/creatisprites/

Example:
<zoffset=-0.5><font="Arial SDF"><line-height=0.3> Arc sign sprite using name: <voffset=0.2><size=4> <sprite="icons_00" name="arc_sign"></size></voffset> Sprite from badges set using index:<voffset=0.2><size=3><sprite="badges" index=9></size></voffset> Smiley face, colored blue: <size=3><sprite=14 color=#0000FF></size> Animation: <voffset=0.2><size=4><sprite="icons_00" anim="62,68,1"></size></voffset> Sprite using text <#0B05>color:<voffset=0.2><size=3><sprite="icons_00" name="arcstone" tint=1></size></voffset></color>
will result in:


(The animation loops through different breads, which you can't see from a screenshot)
Custom images
While there is no direct way of showing a custom image in an arc sign, there exists a very good tool created by Entuland called the CreatiSign Generator that will take any image, convert its pixels to colored dots and give you code that you can copy-paste into arc signs to get a custom image:
http://entuland.com/creatisign/

Keep in mind though that an arc sign can hold max 10K characters, so to get an image with good resolution, you will need quite a few arc signs.

Example
Overlapping
When creating arc sign art or text effects, you may want to position things so that parts of text or sprites overlap each other. In such a case, it is usually important which one is shown on top of the other.
  • When the things overlapping have the same font or same icon set in the same sign, the one that comes later in the arc sign text is shown on top.
  • In any other case (different fonts, sprites of different icon sets, text overlapping a sprite, overlapping text in different arc signs), which one is on top seems to depend on player position. This makes it hard to create art that looks good from all positions.

Example:
<font="Arial SDF"><size=2><zoffset=-0.5><offset=1> <#600><space=0.03>Text with shadow <line-height=0><#FFF> </line-height>Text with shadow <#600><space=0.03>Second line overlaps first <line-height=0><#FFF> <line-height=-0.2>Second line overlaps first <size=6><sprite="icons_00" name="block_goo_purple"><size=1.5></line-height> Text overlapping sprite - try jumping to see how which is on top changes:
will result in:


The same sign seen from one block higher - notice how now the sprite is under the text:
Wiring
Arc signs have five wiring inputs. The "Enabled" input turns the sign on if the input signal is true (or a non-zero number) and off if it is false or 0.The values of inputs 1-4 can be used in the arc sign text area by putting the input number between curly braces, e.g. {1}. This value can be used both for simply displaying the input, and in arc sign tags that take a number as an argument, like color, size, sprite index etc. You can use e.g. levers or number pads to send the input signals. In addition, you can display the name of the player looking at the sign by writing {PlayerName}.

Wiring has the side effect of not being able to simply use curly braces in your text - if you want to show {, you have to type {{, and same for } - you have to type }}, otherwise you will end up with a sign format error.

Usage:
{X}, where X is either 1, 2, 3 or 4 - shows/uses the value of the input X. A true signal is shown as 1, false as 0.
{PlayerName} - shows a player reading the sign their name. Every player will see their own name, regardless of how many players there are in the area.

Example:
I would highly recommend checking the adventure for wiring examples for interactivity, but here are some ways you can use inputs:
  • <size={1}> will change the text size depending on the value of input 1 - if you connect input 1 to a switch, the switch will show/hide the text by setting the text size to 0 when the switch is off and to 1 when the switch is on
  • <#{2}{2}{2}> will use the input from input 2 (e.g. from a number pad, counter or memory gate) to set the brightness of the text - if the input is 0, the text color is <#000> or black, if the input is 9, the text color is <#999>, which is pretty white.
  • <sprite="icons_01" index={4}> will use the value from input 4 as a sprite index
References and additional resources
Here are links to sources I used and additional tools and references:
Conclusion
Hopefully you found this guide useful in getting to know all the wonderful things you can do with arc signs. If you actually read through everything, congratulations, you can call yourself a master of arc signs now! Any feedback welcome, whether on typos, mistakes, missing things or simply confusing explanations.
9 Comments
RSoM LuckySheep Aug 5, 2021 @ 10:46am 
Those all show up for me. You might try reloading the page.
Mirky Aug 5, 2021 @ 7:47am 
An excellent and informative guide! Thanks!
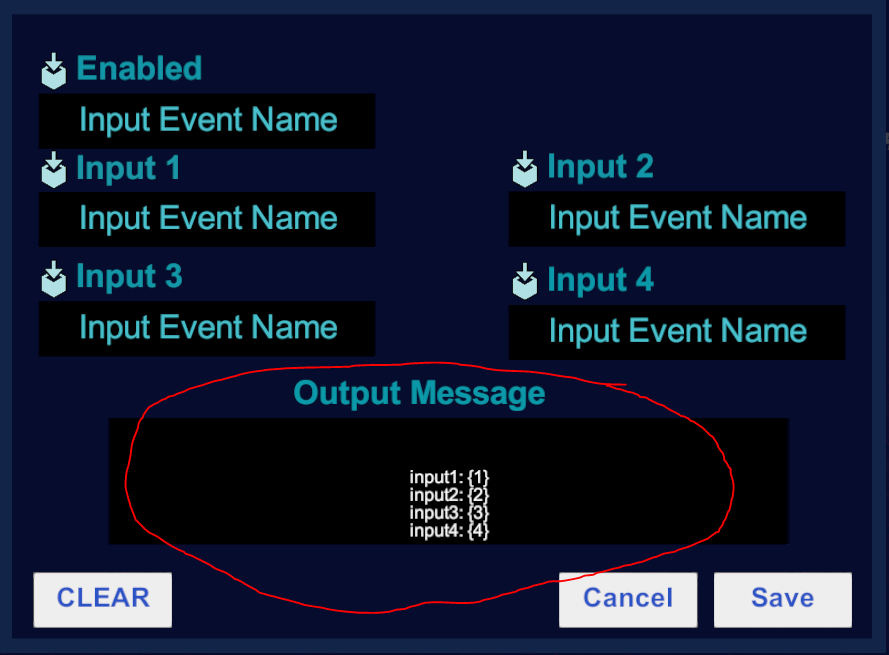
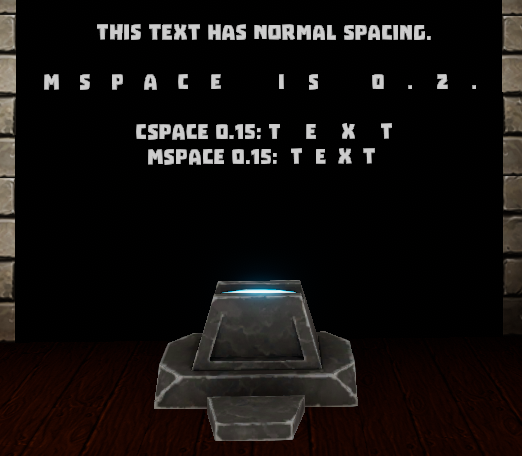
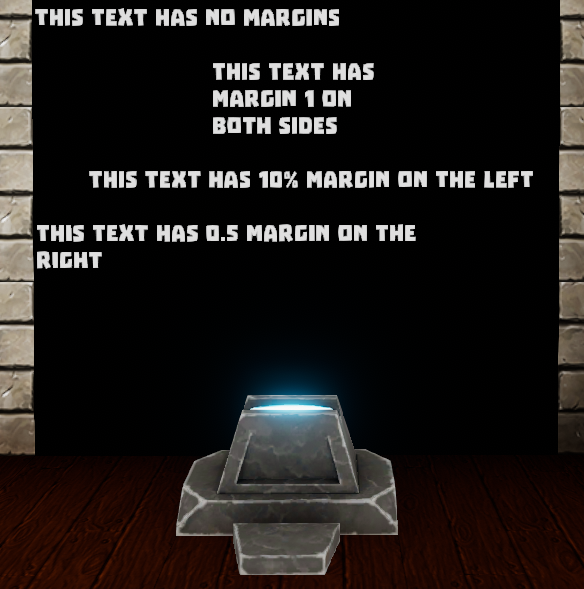
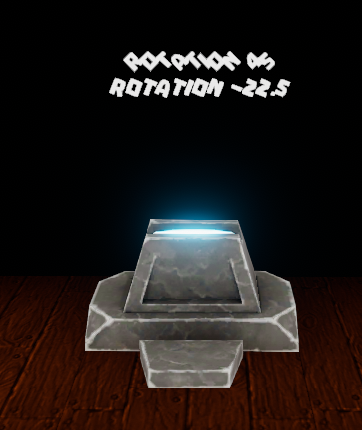
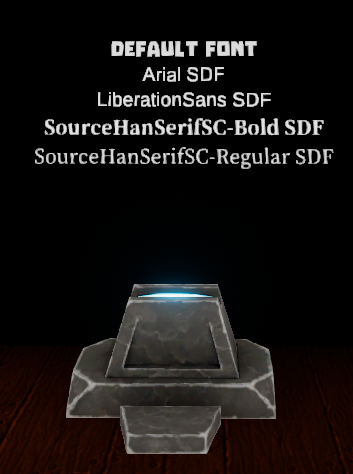
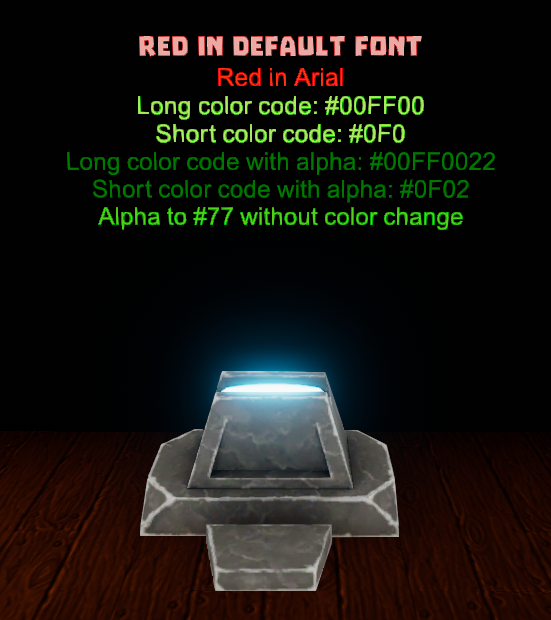
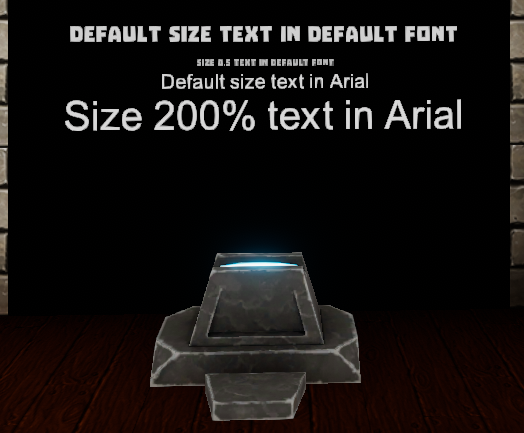
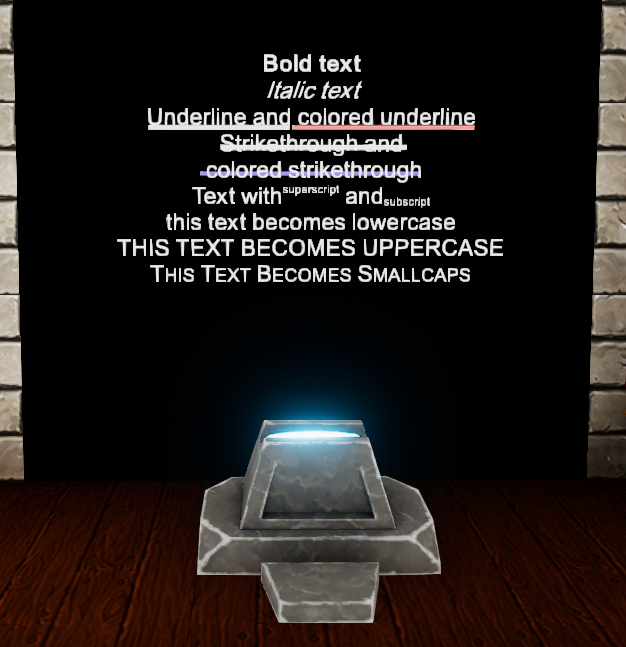
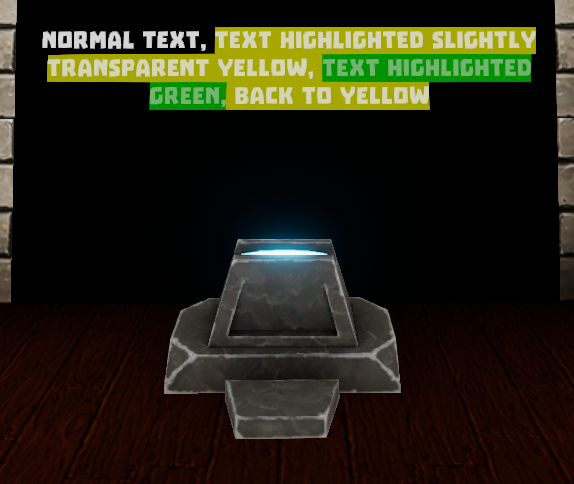
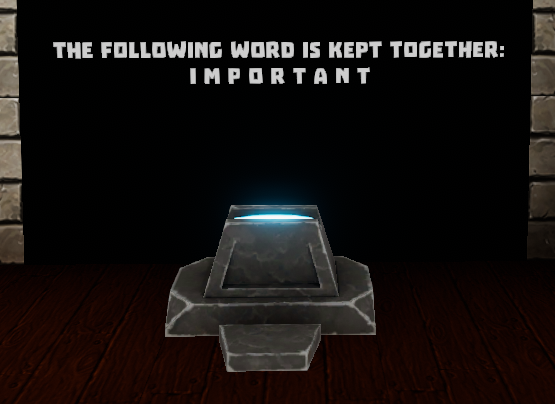
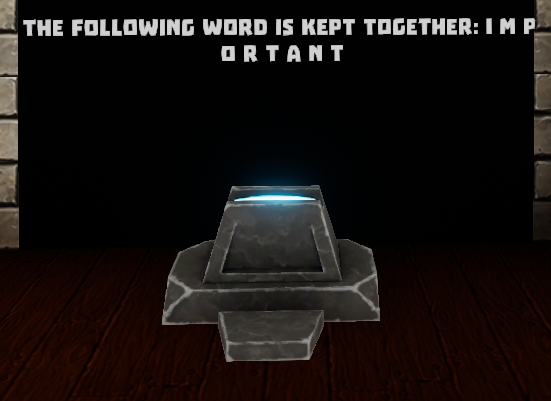
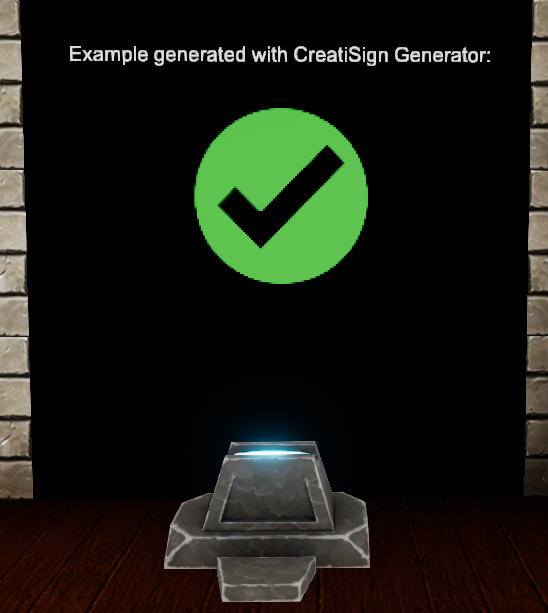
One technical glitch: from the section, "Text formatting (bold, italic etc)", to the end of the guide, all the "will result in" illustrations do not display. Perhaps there is a constraint on the number of attachments allowed per article?
This guide is very helpful. Thanks again!
Maitre Malterre Sep 21, 2020 @ 11:54am 
Excellent guide
The ArchiTex Sep 16, 2020 @ 9:48am 
I was concerned this was difficult. With the right information, it's easy as pie. I'm all over it with some in world examples from a friend and this guide. Thanks
Well play Jul 4, 2020 @ 4:44am 
emmmmmmm
Tsax Jun 18, 2020 @ 11:17pm 
excellent guide, thanks a lot!
hobukastan  [author] Jun 17, 2020 @ 10:10pm 
@Prince You mean adjust from how far away you can see the text of the Arc Sign? I'm not aware of such a parameter, if there was, it would likely be a game setting, not an arc sign command. The rendering distance seems to be a bit over a claim away, at least on my settings, which is far enough for most uses. Note that you also need to have the arc sign block itself loaded to see the text. There was a time when different fonts had different rendering distances, but that seems to have been fixed at some point.

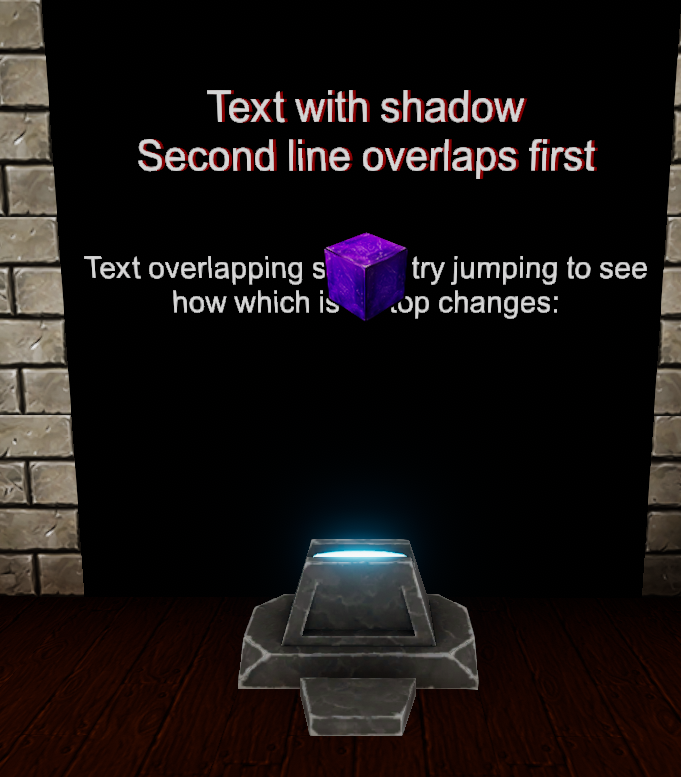
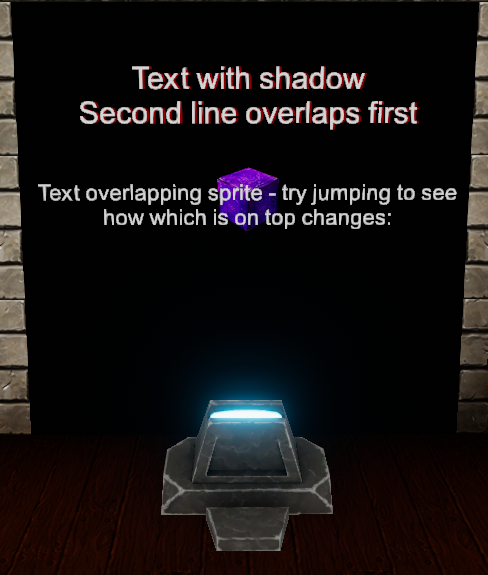
If, on the other hand, you only want people to see your arc sign text when they're close to it, you can use sensors to turn it off and on.
Prince Jun 17, 2020 @ 6:23am 
The great manual! Thank you very much!

P.S. Is there any parameter to adjust viewing distance of Arc sign?
XxSTOZZYxX Jun 13, 2020 @ 1:50pm 
Awesome. Simply awesome.