Borderlands 3

Borderlands 3

72 ratings
"A Hundred Names for Sand" Achievement: Pandora Named Locations
By DALCOhstangultion
This guide lists and maps all 78 named locations on Pandora in Borderlands 3. I produced it because the game currently tends to refuse giving the "A Hundred Names for Sand" Achievement for finding all of Pandora's locations. This is happening even though a person's Pandora planetary map lists all 78 out of 78 named locations found and each of the individual Pandora local maps also shows all named locations found. It's an attempt to make retracing tracks through that world a bit easier.
2
8
2
   
Award
Favorite
Favorited
Unfavorite
Introduction
A Hundred Names For Sand:
Discover all named locations on Pandora.

Objective:
I've seen many posts that the "A Hundred Names For Sand" Achievement in Borderlands 3 is bugged and is not getting awarded even though Pandora's Planet Progress statistics show 78/78 named locations found. Because of this, many people (including me) are having to revisit all 78 locations in an attempt to get the Achievement to pop. I've done my best to design this guide to help those people revisit all those name locations and get the Achievement. Of course, people who just need a bit of help here and there with the Achievement can use it too, but I tend to assume the player is way overpowered for the areas and has full access to all locations.

Important Note:
  • As I write this, it looks like Borderlands 3 is resetting the "discovered" status of all named locations when the player visits Sanctuary or quits the game (either to the main game menu or entirely). So, if you're trying to get the Achievement, you'll need to revisit all 78 locations in one session (and don't go to Sanctuary in the middle of things).
  • Also, if you've finished the game at least once and are going through just to get the Achievement, I highly recommend you turn Mayhem Mode off (either in Sanctuary or from your character's menu). That will drop enemies back down to the normal area level caps instead of bringing them up to yours. IOW, running straight through the enemies instead of fighting them will be much easier.

References:
If you want a slightly different look at Pandora's named locations, I recommend Powerpyx's work at:

https://www.powerpyx.com/borderlands-3-pandora-all-named-locations/

The maps I'm using are from:

https://mapgenie.io/borderlands-3/maps/pandora

I definitely recommend that site since you can interact with the maps and customize them in many ways. Note that some of the location markers are incorrect on my screenshots. I have no control over their placement, but will try to mention it when I can. Also, in the material below, I'll refer to the cardinal directions as north, east, south and west as they appear on those screenshots. AFAIK, our main maps in the game don't indicate cardinal directions (though the mini-map does show "N" for north).

Be warned that this guide contains major spoilers since it shows every named location on Pandora and what the maps look like.

Also, in case you're using a 21:9 resolution (as I do) and can't see the full legends/instructions on the maps, you can find your total number of found named locations on Pandora by doing the following:
  1. Hit "M" to bring up the local map
  2. Hit "X" until you get to the Galaxy map
  3. Select Pandora
  4. Hit "R" to bring up the Planet Progress statistics.
You can also hit "R" on any of your other maps to see that map's Progress statistics.

Pandora's Zones:
There are 13 zones listed on Pandora's planetary map in Borderlands 3. In the order they show up in my map, they are:
  1. Covenant Pass (3 named locations)
  2. The Droughts (13 named locations)
  3. Ascension Bluff (5 named locations)
  4. Devil's Razor (13 named locations)
  5. The Splinterlands (6 named locations)
  6. Carnivora (5 named locations)
  7. Guts of Carnivora (5 named locations)
  8. Konrad's Hold (12 named locations)
  9. Sandblast Scar (4 named locations)
  10. Cathedral of the Twin Gods (5 named locations)
  11. The Great Vault (2 named locations)
  12. Destroyer's Rift (4 named locations)
  13. The Slaughter Shaft (1 named location)
Though that order is what the game shows me, it might not be the best order to try going back through to get the Achievement. But, I'll try to note any difficulties below. I've ordered the sections below the same way. Also, I've ordered the named locations in those areas by my best guess at a good way to run through the area and visit all of them. In general, I'm assuming the best starting point is a Fast Travel location near a Catch-A-Ride.
Covenant Pass (3 named locations)
The 3 named locations in Covenant Pass are:
  1. Propaganda Center
  2. Confession Chamber
  3. Shiv's Sanctum
The Fast Travel location is at the west of the map. The locations in this zone are easy to find. Just do a run from the Fast Travel location straight through to the back (in the east).
The Droughts (13 named locations)
The 13 named locations in The Droughts are:
  1. Crimson Command (should pop as you fast travel into The Droughts - if not, go to the offices upstairs where Lilith waits)
  2. Varkid Valley
  3. Sun Smasher Camp
  4. Warchief's Domain

  5. Bloodbucket's Chapel
  6. Ellie's Garage
  7. Ellie's Scrapyard
  8. Super 87 Racetrack

  9. Eridian Dig Site
  10. Raider's Drydock

  11. Road to Ascension
  12. Pit of Fools
  13. Dahl Orbital Control
Note that the location symbol at the upper-left is for a different zone and should be ignored.

There's no obvious way to handle the named locations in The Droughts. I've clumped them into four fast travel (ish) areas and have listed them in a way that seems reasonable to me. But, feel free to change things if you see something better.

There are two Fast Travel locations on this map. I'm starting from the plain old "The Droughts" one at the south of the map. As you fast travel into The Droughts, you should get the Crimson Command location. If not, head up into the offices behind you (the one next to where Lilith awaits).
Grab a vehicle and head past the skags to the west until you get blocked. Get out of your vehicle and continue west until Varkid Valley pops. Get back in your vehicle and head east and then north to the Sun Smasher Camp. You'll have to get out of your vehicle (probably just south of the ramp that jumps the ravine). Then, run through to where you initially found Vaughn hanging around. That's Warchief's Domain.

Fast travel directly to your vehicle and make the jump to the north until you get to the tall "building" that's Bloodbucket's Chapel. That should pop as you start climbing the stairs. Then make the jump back south and go east to Ellie's Garage. You'll have to get out of your vehicle and continue northeast from the BACK of her garage to Ellie's Scrapyard. Continue to the end of that to where you first hijacked a vehicle. That's the Super 87 Racetrack.

Fast travel directly back to your vehicle outside Ellie's Garage and continue northeast up the road until you get to the peninsula leading to where Tannis camp was. Just in front of her tent, the Eridian Dig Site location should pop. Get back in your vehicle and continue north up the road until you get to the door to where Sanctuary was located. Walk into that area and you should get Raider's Drydock.

From there, fast travel to "The Droughts - Highway." Grab a vehicle and head northeast to the Road to Ascension. Then head northwest and then southwest to the Pit of Fools. Go east from there and head towards Dahl Orbital Control. You'll have to get out of your vehicle and go through some tunnels to get there.
Ascension Bluff (5 named locations)
The 5 named locations in Ascension Bluff are:
  1. The Sty
  2. Spit Respite
  3. Puttergunk's Perch
  4. Path of Sacrifice
  5. Holy Broadcast Center
The Fast Travel location on this map is at the far west. Grab a vehicle and head east and a bit north to The Sty. It should pop as you enter the base of the Crimson Radio tower. As you head east and a bit south from there, you'll hit the little compound where you grabbed the Heavy Outrunner vehicle. Spit Respite should pop as you enter that compound. Puttergunk's Perch is a little "town" a bit north from there (there's a ramp that leads up to it from its rear). You'll have to actually go into the "town" towards where the locked safe and fridge are. Continue to the northeast to get Path of Sacrifice just as you enter the gate to the Holy Broadcast Center's peninsula (east side of the screenshot). And, the Holy Broadcast Center should pop as you enter the facility all the way at the end of that peninsula.
Devil's Razor (13 named locations)
The 13 named locations in Devil's Razor are:
  1. Roland's Rest
  2. Dusty Acres
  3. ECHONet Hub37
  4. Phalanx Pass
  5. Buff's Bluff

  6. The Sin-A-Plex
  7. Bollock's Niche
  8. Sheega's Kennels
  9. Dahl Refinery

  10. Cave-in Point
  11. Avie's Fort (you need to have had the Boom Boom Boomtown side mission at some point)
  12. The Lonely Pillar
  13. Mesa Marron
Devil's Razor looks to be a bit daunting. But, in general, all you have to do is go around the map in a clockwise direction (with little jags off to the sides) starting from the Roland's Rest Fast Travel location at at the southwest of the map (you should get that location as you spawn in). I've broken things up artificially just for readability.

From Roland's Rest, grab a vehicle, go directly across to the northeast and make the little jump to Dusty Acres (the Spiked Technical is on the roof of the building). From there, jump your vehicle to the northwest back to the road. Just north of Roland's Rest, ECHONet Hub37 should pop. Just a bit north from there, there'll be a little ramp on the right heading southeast down to Phalanx Pass. From there go back to the road and almost directly across to a ramp heading up to Buff's Bluff (Buff Film Buff will be up there).

From there, head east across a "road" to The Sin-A-Plex location. Go north towards the gate to The Splinterlands and you should get Bollock's Niche. Go east and a bit north to Sheega's Kennels and then across the road to the southeast for the Dahl Refinery.

Continue the circle clockwise just across the bridge and take the ramp on the left down to the north. That should get you to the Cave-in Point. Continue south on the road to the turnoff on the left for Boom Town. Enter there and go north to Avie's Fort. It's a shack on the right before the end of that northern peninsula. You'll have to actually enter the shack to get the location to pop. Get back in your vehicle and continue down the road until you see a turnoff to the left (east) marked by some balloons. You're heading for the house where the birthday party was. Go east and then northeast up that peninsula and cross the footbridge towards that house. You should get The Lonely Pillar there. Back in your vehicle, head west on the road to a small turnoff on the left and that should be Mesa Marron.
The Splinterlands (6 named locations)
The 6 named locations in The Splinterlands are:
  1. Pitt's Stop (doesn't register for some players - you might have to revisit repeatedly and check both the left and right walls just outside the Fast Travel location)
  2. Logan's Spar (seems to be a common problem area - again, check left and right wall around the road)
  3. The Homestead
  4. The Rave Cave
  5. Sifted Mar
  6. Big Danny's Chop Shop
From what I've seen on the internet, this zone seems to be the most common problem area. Sometimes the Achievement will pop (assuming your Pandora map is showing 78 out of 78 found) by simply driving up and down the road from Pitt's Stop to Big Danny's Chop Shop repeatedly.

There are two Fast Travel locations on this map. Us the Pitt's Stop on at the north of the map. You might have to examine the left wall outside the spawn point or possibly the right wall near the Catch-A-Ride to get the location to pop. Grab a vehicle and head down the road to the southwest for Logan's Spar. That should be just as the map opens up. It should be one "indent" in the cliff wall before a little "town" where a Typhon Log is on the right. I usually get the location to pop when I'm near a cactus patch or clump of rocks on a hill near the right wall. But, I've had it pop across the road on the left wall. From there, head west across the map to The Homestead. That should pop as you approach the gate into their area. Head south for The Rave Cave. That's a "building" built into the wall on the right and will have a Children of the Vault sign on it. You'll have to get out of your vehicle and go inside to get the location. Get back in your vehicle and go straight east until you hit the main road between Pitt's Stop and Big Danny's Chop Shop. Turn south and follow the road down. As you travel down the road, you should get Sifted Mar (it's not necessarily at the location shown). Continue all the way to the end of the road and, as you hit the gate, you should get Big Danny's Chop Shop. If you didn't get Sifted Mar, just turn around and head back up the road. It should pop someplace near the middle of the map.
Carnivora (5 named locations)
Because of the way the interactive maps at mapgenie.io are laid out, this screenshot includes both Carnivora and Guts of Carnivora. But, I've broken both zones out into their own sections.

The 5 named locations in Carnivora are:
  1. Festival Grounds
  2. Stacked Deck
  3. La Cage 'O Tinks

  4. Carnivora's Playground
  5. Azlan's Stash
The Fast Travel location is at the east side of the map and you'll head west into the town. In general, this is a straight shot right through the town to get the first three locations (Festival Grounds, Stacked Deck and La Cage 'O Tinks). As you leave the town for the big open area, you should pick up Carnivora's Playground. Then make a run almost to the opposite side of the map (by a Typhon Log) for Azlan's Stash. It'll be in a bit of a cave.
Guts of Carnivora (5 named locations)
Again, just because of how the maps are laid out at mapgenie.io, this screenshot shows both the Guts of Carnivora and the Carnivora zones.

The 5 named locations in Guts of Carnivora are:
  1. Gassup Garage
  2. The Gutworks
  3. Windshaken Catwalks
  4. Mack's Head Room
  5. The Main Stage
The Fast Travel point is on the east side of the map. Getting the named locations here are simple.
Just run straight through the area and you should pick up all of them.
Konrad's Hold (12 named locations)
The 12 named locations in Konrad's Hold are:
  1. The Arrogant Approach
  2. Unused Escape Tunnel

  3. Turntide Shed
  4. Fallback Tracks
  5. Traitor's Mess

  6. The General's Perch
  7. Chapel of Unheard Prayers
  8. Last-Stand Yard

  9. These are No Mines (you need to have had The Demon in the Dark side mission at some point)

  10. Bleedout Smithy
  11. Crawling Dungeons
  12. Angel's Light
This zone's a bit more complex. The Fast Travel location is at the northeast part of the map. As you leave it, you'll pick up The Arrogant Approach. Head across to the southwest and down into the tunnels for Unused Escape Tunnel.

Then come back and head across to the left for the next three locations (Turntide Shed, Fallback Tracks and Traitor's Mess -- there's a slide you run up into a building for Traitor's Mess).

After riding the elevator up, head to the left and into a building. The General's Perch is up a set of stairs to the left (it's easy to miss those stairs). Go back down the stairs and jump across a little gap in a bridge to the southeast. Enter the building for Chapel of Unheard Prayers. Then go out the side door to the south for Last-Stand Yard.

From there, jump down into the area below (southwest corner) and into the tunnel where Wren's Head was found for the "These are No Mine" location. Then back up and east to Bleedout Smithy.

Note that the entrance to the Cistern of Slaughter is just before the Smithy to the left (north). If you haven't entered that yet, you might want to do so. That way you can clear the Slaughter Shaft location and be able to fast travel to the arena later if you want.

The last two locations in Konrad's Hold (Crawling Dungeons and Angel's Light) are right on the continuing path from the Smithy.
Sandblast Scar (4 named locations)
Sandblast Scar is just a long winding noodle of a zone (ignore the larger Splinterlands map that's next to it).

The 4 named locations in Sandblast Scar are:
  1. Tannis' Garage
  2. The 'Cade
  3. Diggit Canyon
  4. Reckless Risers
From the Fast Travel location at the south in Tannis' Garage, just take a vehicle right through until you pick up all remaining locations.
Cathedral of the Twin Gods (5 named locations)
Because of the layout of the maps at mapgenie.io, this screenshot includes both the Cathedral of the Twin Gods and The Great Vault zones.

The 5 named locations in Cathedral of the Twin Gods are:
  1. Fateward Walk
  2. Outer Sanctum
  3. Courtyard of the Damned
  4. Altar of the Twins
  5. Eridium Sluice
The map is a bit misleading. It shows the first named location, Fateward Walk, as being quite a ways away from the Fast Travel location at the northeast. It's really not. Just drop down from the spawn point and walk to the southeast towards the nearby Catch-A-Ride and it should immediately pop. Then go back up and through the tunnel to the southwest from your spawn point. Go to the end of the area and you should pick up the remaining locations.
The Great Vault (2 named locations)
Because of the layout at mapgenie.io, the screenshot includes the Cathedral of the Twin Gods as well as The Great Vault.

The 2 named areas in The Great Vault are:
  1. Dig Site
  2. Vault of the Architects (in Vault after boss fight)
The markers are not correct on this screenshot. If you fast travel in, you should appear just north of the drop to the boss fight area (in the southern part of the middle open area). You'll have to head north a bit to pick up the Dig Site location. If you enter directly from the Cathedral of the Twin Gods, you should enter at the north of the map and pick up the Dig Site as you head south towards the boss area. The screenshot shows the Vault of the Architects as being near the Fast Travel location. But, it's not there. Instead, it's in the Vault after beating Troy.
Destroyer's Rift (4 named locations)
The 4 named locations in Destroyer's Rift are:
  1. Treacherous Path (have to enter from Pyre of Stars on Nekrotafeyo)
  2. Treacherous Drop
  3. Crown of Tyrants
  4. Vault of the Destroyer (in Vault after boss fight)
Note that Treacherous Path is not reachable if you fast travel directly into the zone (it's up a cliff on the path to your north). You'll have to go to Nekrotafeyo and enter the rift they opened at the start of Pyre of Stars. Then just run through the zone, beat Tyreen, enter the Vault and you'll have all the locations.
The Slaughter Shaft (1 named location)
The 1 named location in The Slaughter Shaft is:
  • The Slaughter Shaft (initial entry through Konrad's Hold)
Basically, as you approach the door past the mission-giver, it should pop. Note that you'll have to have entered via Konrad's Hold at least once to let you fast travel directly here.
Text List of Pandora Named Locations
In case anyone wants a text list of just the named locations to print out (as a checklist), I'll put this here:

Pandora:
The 3 named locations in Covenant Pass are:
  1. Propaganda Center
  2. Confession Chamber
  3. Shiv's Sanctum
The 13 named locations in The Droughts are:
  1. Crimson Command (should pop as you fast travel into The Droughts - if not, go to the offices upstairs where Lilith waits)
  2. Varkid Valley
  3. Sun Smasher Camp
  4. Warchief's Domain

  5. Bloodbucket's Chapel
  6. Ellie's Garage
  7. Ellie's Scrapyard
  8. Super 87 Racetrack

  9. Eridian Dig Site
  10. Raider's Drydock

  11. Road to Ascension
  12. Pit of Fools
  13. Dahl Orbital Control
The 5 named locations in Ascension Bluff are:
  1. The Sty
  2. Spit Respite
  3. Puttergunk's Perch
  4. Path of Sacrifice
  5. Holy Broadcast Center
The 13 named locations in Devil's Razor are:
  1. Roland's Rest
  2. Dusty Acres
  3. ECHONet Hub37
  4. Phalanx Pass
  5. Buff's Bluff

  6. The Sin-A-Plex
  7. Bollock's Niche
  8. Sheega's Kennels
  9. Dahl Refinery

  10. Cave-in Point
  11. Avie's Fort (you need to have had the Boom Boom Boomtown side mission at some point)
  12. The Lonely Pillar
  13. Mesa Marron
The 6 named locations in The Splinterlands are:
  1. Pitt's Stop (doesn't register for some players - you might have to revisit repeatedly and check both the left and right walls just outside the Fast Travel location)
  2. Logan's Spar (seems to be a common problem area - again, check left and right wall around the road)
  3. The Homestead
  4. The Rave Cave
  5. Sifted Mar
  6. Big Danny's Chop Shop
The 5 named locations in Carnivora are:
  1. Festival Grounds
  2. Stacked Deck
  3. La Cage 'O Tinks

  4. Carnivora's Playground
  5. Azlan's Stash
The 5 named locations in Guts of Carnivora are:
  1. Gassup Garage
  2. The Gutworks
  3. Windshaken Catwalks
  4. Mack's Head Room
  5. The Main Stage
The 12 named locations in Konrad's Hold are:
  1. The Arrogant Approach
  2. Unused Escape Tunnel

  3. Turntide Shed
  4. Fallback Tracks
  5. Traitor's Mess

  6. The General's Perch
  7. Chapel of Unheard Prayers
  8. Last-Stand Yard

  9. These are No Mines (you need to have had The Demon in the Dark side mission at some point)

  10. Bleedout Smithy
  11. Crawling Dungeons
  12. Angel's Light
The 4 named locations in Sandblast Scar are:
  1. Tannis' Garage
  2. The 'Cade
  3. Diggit Canyon
  4. Reckless Risers
The 5 named locations in Cathedral of the Twin Gods are:
  1. Fateward Walk
  2. Outer Sanctum
  3. Courtyard of the Damned
  4. Altar of the Twins
  5. Eridium Sluice
The 2 named areas in The Great Vault are:
  1. Dig Site
  2. Vault of the Architects (in Vault after boss fight)
The 4 named locations in Destroyer's Rift are:
  1. Treacherous Path (have to enter from Pyre of Stars on Nekrotafeyo)
  2. Treacherous Drop
  3. Crown of Tyrants
  4. Vault of the Destroyer (in Vault after boss fight)
The 1 named location in The Slaughter Shaft is:
  • The Slaughter Shaft (initial entry through Konrad's Hold)
24 Comments
arfsz Aug 20, 2024 @ 4:03am 
Thanks for the website bro its really good :BL3Thumbsup:
Malevolent ▲ Jul 27, 2022 @ 1:54pm 
Thank you so much! Azlan's stash was the one I needed.
riddLedSKL Dec 23, 2020 @ 10:02am 
I have re-visited all those locations without logging out from the game, spent 180 minutes for this achievement. Still bugged...
Red May 16, 2020 @ 12:25pm 
hiya, first of all thank you for this guide. it made backtracking allot easyer. unfortunatly for some reason after going through pandora 3 times now double checking every single location and not going offline/travel to sanctuary i still do NOT have this bloody achievement. so just a headsup to other people. even if you do everything correct the damn thing still might not work >.<
Narval (PT) May 9, 2020 @ 4:34pm 
yo Rascal my advice would be to re check areas that people on the comments had issues with

best of luck dude
DALCOhstangultion  [author] May 2, 2020 @ 8:43am 
Yeah. These named locations really have problems. I'm writing another guide and just ran into something similar with Slaughterstar 3000. That location should pop just as soon as you fast travel in. But, it didn't for me. I looked all around and even started the mission to look around the arena (twice - after fast traveling out and back). I even restarted the game. No luck. My wife started up a game, went there and the location popped up without problem. I had to go to Sanctuary, quit the game, restart it, and then fast travel to Slaughterstar 3000. Then it popped right up as I spawned.

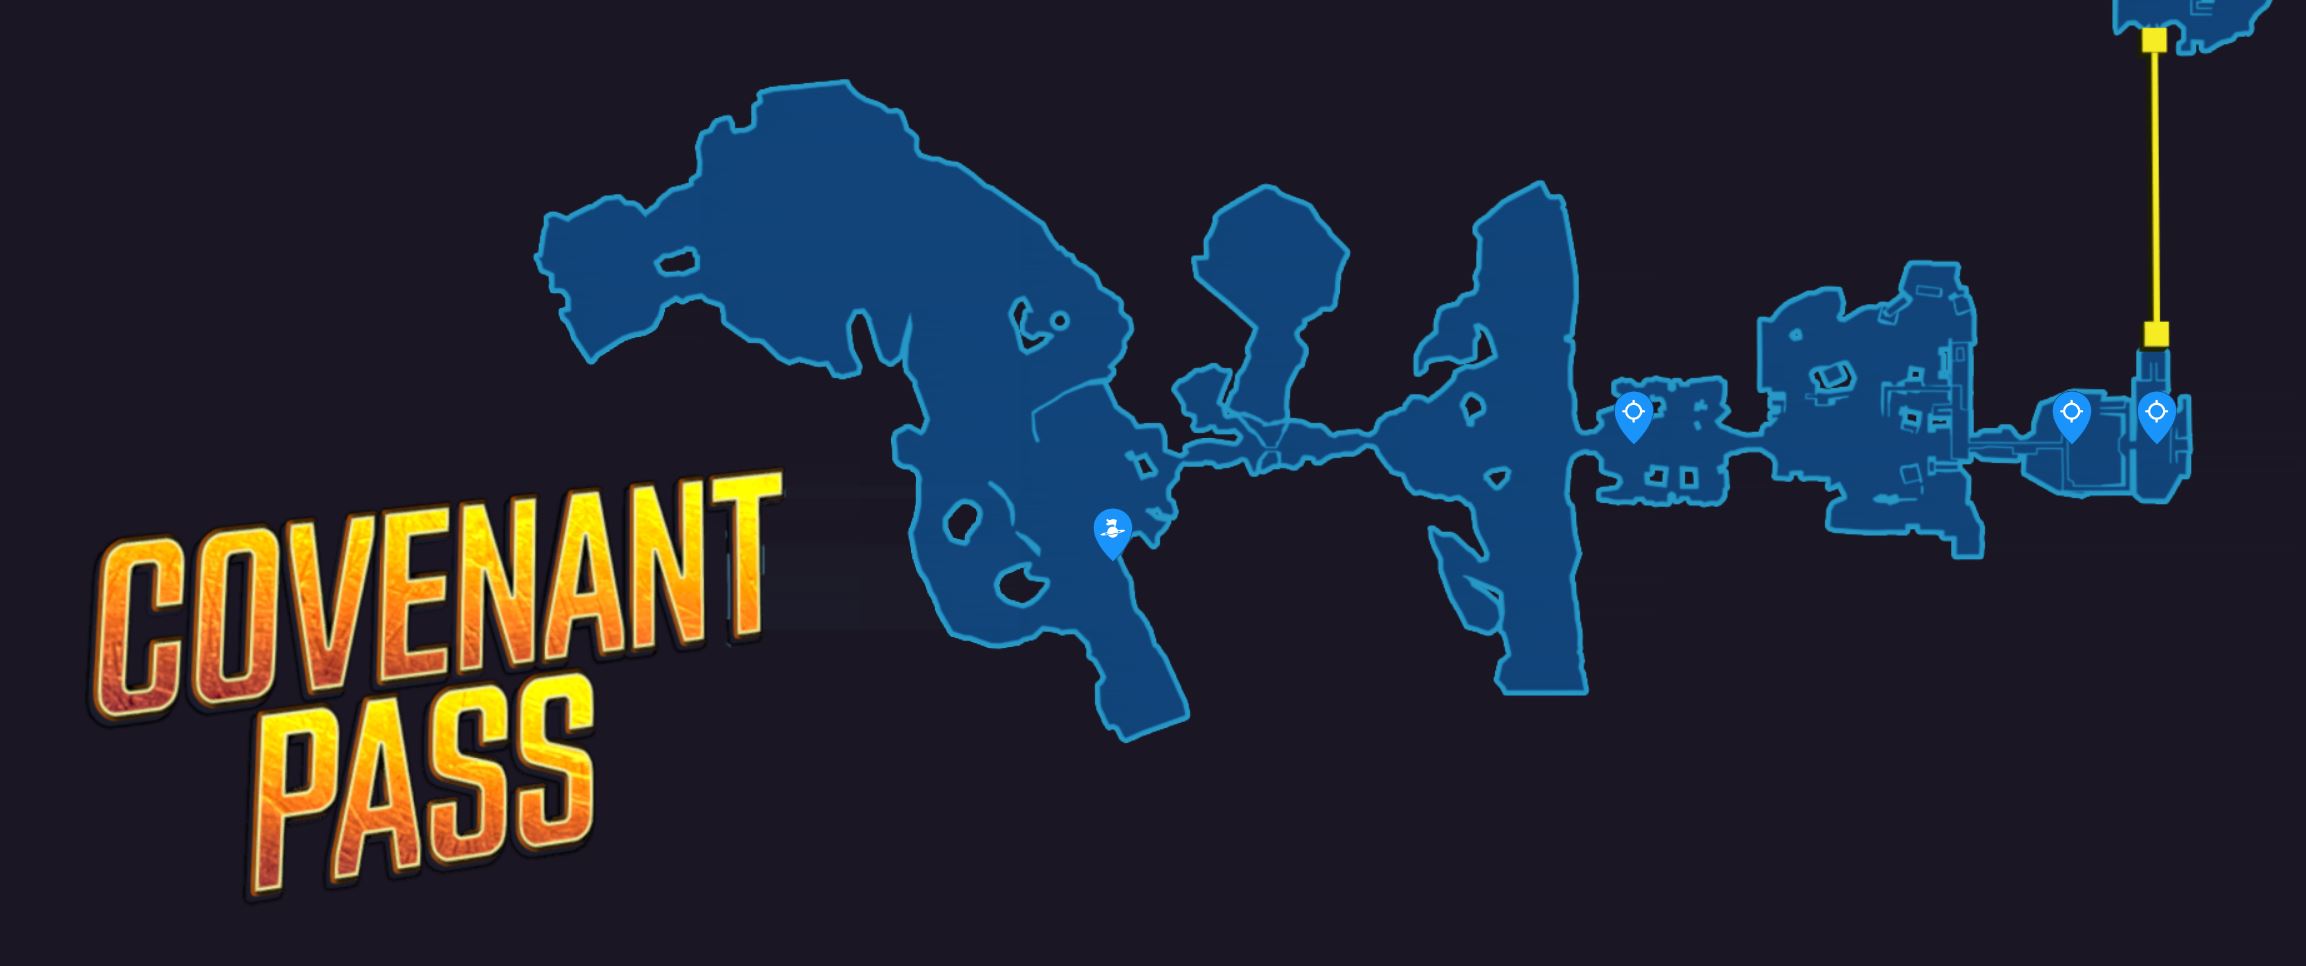
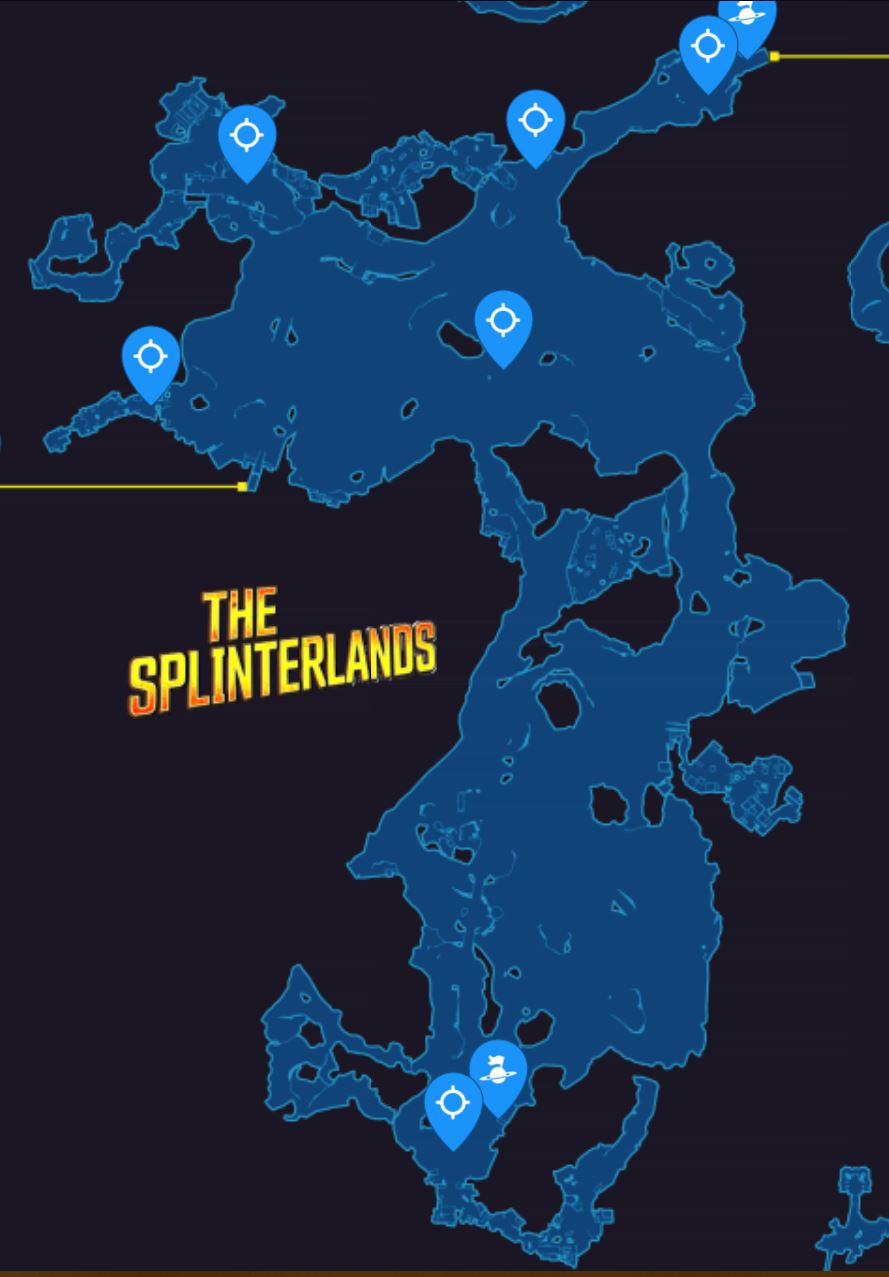
It's just such a pain that we have to pay full attention to location names popping up on the screen (let alone doing everything in one session without visiting Sanctuary).
Narval (PT) May 2, 2020 @ 8:14am 
so i thought i had discovered everything, but after revisiting several areas...
apparently the location "dig site" didn't pop after i got to it through the Cathedral of Twin gods, but i went from The Great Vault, after i fast travel and go to its beginning, it actually pop.

sharing cause might be causing trouble to more people
DALCOhstangultion  [author] May 1, 2020 @ 11:04am 
If anyone needs a guide for the Eden-6 version of this Achievement (Swamped), I just finished a similar guide:

https://steamcommunity.com/sharedfiles/filedetails/?id=2079683335
Xeph Apr 30, 2020 @ 9:04pm 
Thanks so much for the reply. Great work on the guide!
DALCOhstangultion  [author] Apr 30, 2020 @ 8:11pm 
We mostly used fast travel into and out of the maps. On a couple, since we were right by the normal transitions and they led to the same place as fast travel, we used those, too. There were several areas where we couldn't remember seeing locations pop up and we fast traveled back to the start and re-ran it to make sure. No problems. We just never went back to Sanctuary and never quit the game until we were done.