Red Dead Redemption 2

Red Dead Redemption 2

403 ratings
Complete Challenges Guide (Story mode)
By Zalihvast
Walkthrough of all 90 challenges of the Red Dead Redemption 2 story mode: Bandit, Explorer, Gambler, Herbalist, Horseman, Master Hunter, Weapons Expert, Sharpshooter, Survivalist.
5
28
2
4
4
2
2
2
   
Award
Favorite
Favorited
Unfavorite
Introduction
Howdy, partners.

This guide details how to complete all 90 challenges of the Story Mode of Red Dead Redemption 2.

It explains what exactly the game requires to pass each of the challenges, and various solutions are offered.

The guide contains minor spoilers (the locations of some collectibles, bandit hideouts, mission names, etc.), and can be used safely during the first walkthrough.

The Russian version of this guide on Steam.
https://steamcommunity.com/sharedfiles/filedetails/?id=2049401127
What you get after completion
  1. Ability to 100% complete the game. Passing all 90 challenge is the most difficult of the conditions required to achieve the “Best in the West” achievement. Thanks to the Challenges (+ also the "Wildlife Art Exhibition" and "Exotic") "Best in the West" remains one of the rarest achievements.

  2. 10 sets of Reinforced equipment for weapons (belt, holster, bandoleer and second holster). 1 set of equipment will be unlocked by complete each of the Challenges branches, +1 bonus set "Legend of the East" will be unlocked by complete of all 9 branches. Unlocked during the Challenges equipment becomes available for purchase from the trapper.

  3. Maximum levels of Health, Stamina, and Dead Eyes will become available. This is also directly related to 100% walkthrough. By purchasing unlocked equipment, you can add 2 additional tanks to each attribute respectively. The table shows how attribures relates to the sets.


    To raise the attributes to level 10, you need to buy all unlocked equipment from the trapper.

  4. $675 in total for all the challenges.

  5. 1425 XP for each of the attributes. This amount of XP is enough to raise each of the attributes to the maximum 8th level. The remaining 2 levels are unlocked without experience, after purchasing Reinforced equipment.
How to start
You can start the challenge branch in any way:

  • Wait until the game itself offers to start passing the challenge (this happens as the Story progresses).

  • Forcibly unlock a branch by fulfilling the condition of the first of 10 challenges.

Challenges can be completed in free roam, during missions and during missions replay (via Menu > Progress > Story). If you pass the challenge during the replay, be sure to complete the mission to the end, if you abandon the mission and return to free roam, the challenge progress may roll back.
--------------------------------------------------
Bandit
1. Hold up 5 townsfolk

It is required to rob 5 people inside а city borders. Robbery outside a city borders and at stations outside settlements will not count.
  • Better choose unarmed people. Armed people like to fight back and beat Arthur's face.

  • Press the "Rob" button until the victim's money is gone. If there's an argument like "I've got nothing!" keep insisting.

  • Also, train passengers are considered citizens when the train stops at a station within the boundaries of a settlement.

  • If, while this challenge is active, you have been robbed (a random event, a pickpocket encounters you at the entrance to the building, and clears your pockets), you can catch up with the thief and take stolen money back. This will also count towards the challenge, without losing honor. A pickpocket can be encountered: at the gunsmith and tailor's in Saint Denis, at the saloon in Van Horn Trading Post.

2. Rob 2 coaches or return 2 stolen coaches to a Fence

Any of these conditions must be met:
  • Steal a wagon and sell it to the fence at Emerald Ranch.

  • Open a locked box at the rear of a stagecoach and steal at least one item from there. In that case, you can avoid losing honor. If you have a lockpick (can be bought from a fence), the option "Break" will be available. If there are no lockpicks, it's okay, draw any weapon, and Arthur can bring down the lock.

  • Do a stagecoach robbery mission (following Olden's tip from the "discouraged men union", or at the request of someone in the camp). In this case, it will be possible to avoid losing honor. Plus, it is often possible to sell the stagecoach left over from the robbery.
The easiest option: take the stagecoach to Emerald station (through the poll for fast travel), upon reaching open the box at the rear of the stagecoach, immediately hijack the stagecoach and sell it to the fence.


3. Rob the cash register in any 4 shops in 1 day

It is required to rob any 4 shops that have a cash register. Right-click on a salesman, press the left button to draw a gun, press "Rob register". Hotels and saloons can't be robbed, they don't have cash registers. Be careful with robbing gun shops, salesmen there like to draw guns too. In order not to get caught in the eyes of the lawmen and avoid bounty, do not waste time intimidating witnesses, immediately run away from the search area.

The obvious ways:
  • 2 any shops in Valentine, 2 shops in Rhodes.
  • 3 shops in Valentine and the shop at Wallace Station.
  • If you want to take some risk, you can rob any 4 shops in Saint Denis, it will not be so difficult to escape from the police in the alleys.
All the shops need to be robbed in one go, loading the save will reset the challenge progress.


4. Rob 3 coaches or return 3 stolen coaches to a Fence in 1 day

Same as Bandit Challenge 2. Use any of the methods:
  • Stagecoach to Emerald Ranch.
  • Stagecoach robbery missions.
  • During the daytime, wagons regularly drive alongside Emerald Ranch. Grab any and give to the fence, he'll be happy.

5. Amass a $250 bounty in one state

To raise a bounty for Morgan's head:
  • The most obvious option is to get into a brawl or a shootout with the lawmen. The whole "price list" of crimes is in the table, choose.


  • If you want to do without killing, rob several trains. You can buy a ticket to any city (e.g. Valentine), rob a train right in the city and run away from the lawmen. Repeat that 5 times, and you'll get a $250 bounty without firing a shot.

  • There will be regular bounties for Arthur's head when you move on the story. If you don't rush to pay it, this challenge will eventually be completed on its own.
Bounty hunters are not representatives of the law. For their murder, the reward will not grow by any cent.


6. Steal 5 horses and sell them to the Horse Fence at Clemens Cove

The horse fence appears in Clemens Cove (northwest of Rhodes) in Chapter 3, after completing the "Horse Flesh for Dinner" mission. It will not be possible to complete the challenge before that.
  • All horses will do: legally bought, stolen and wild. The condition of "steal" is not mandatory, absolutely any horse sold to the fence goes to the challenge.

  • If you want to avoid losses of honor, sell horses from the stables, wild horses or horses left by enemies.

  • A stagecoach for fast travel is harnessed by four horses. Take the stagecoach to Emerald Ranch, hijack it, bring it to the horse fence. On the spot, one horse at a time, unharness and sell them, it will be possible to sell 4 horses in one go. The same trick can be done with other wagons.

7. Rob $50 worth of cash and valuables from townsfolk and travellers

Robbing cattlemen in Valentine is a lost cause. There are more interesting options:
  • Rob a train. Best option: buy a ticket to Riggs station, right behind the station there is a long suspension bridge (Bard's Crossing). Jump into a locomotive, hijack the train and stop it in the middle of the bridge. The lawmen won't be able to ride up to you and will only yell from below, "Surrender, you're surrounded!" You'll have enough time to get everything out of the train. Each passenger in first class carriages will have about $10. Leave your horse at the station so it doesn't fall off the bridge or be killed by the lawmen, it's easy to run from the crime scene on your feet. To order your horse to wait, move away from it a few steps, press the right button and choose "Stay". Do not forget to take dynamite to blow up the safes.

  • Rob a train, option 2 (worse). There is a long tunnel in Grizzly Mountains north of Annesburg, but it is a very long trip. You can stop a train there.

  • Wealthy citizens of Saint Denis like to stroll in the park on the outskirts of the city (east of the last letter E in LEMOYNE, next to Algernon's pavilion). There is no police around. You can shake about $3 out of a wealthy citizen.

  • Random pickpocket encounter. If you have been robbed (a random event, a pickpocket encounters you at the entrance to the building, and clears your pockets), you can catch up with the thief and take stolen money back. This will also count towards the challenge, without losing honor. A pickpocket can be encountered: at the gunsmith and tailor's in Saint Denis, at the saloon in Van Horn Trading Post.


The condition of "rob valuables" is not correct. Money received from the sale of robbed valuables to a fence does not counts for the challenge. Only cash counts.


8. Steal 7 wagons and sell them to the Fence at Emerald Ranch

Same as Bandit Challenge 2 and Bandit Challenge 4. Use any method:
  • Stagecoach to Emerald Ranch.
  • Stagecoach robbery missions (after which there are wagons that can be sold).
  • During the daytime, wagons regularly drive alongside Emerald Ranch. Grab any and give to the fence, he'll be happy.

9. Hogtie someone and leave them on the railroad 3 times

Just tie a person and put on the rails, no need to wait for trains. You can untie him right away and apologize. Repeat three times with different people.


10. Complete 5 train robberies without dying or being caught

Any of these conditions is considered train robbery:
  • Steal at least one item from a train.
  • Rob at least one passenger.

The easiest option: buy a ticket to any station. Arrive, go to the rear freight car, steal a tin can or cigarettes. After a dashing "robbery", happy with yourself, get off the train. Buy a ticket for the next train. Repeat five times.

Or, if you want to rob a train big, check the Bandit Challenge 7.

Explorer
1. Find a treasure map

2-10. Find a treasure

The first Explorer Challenge will be considered passed as soon as you find any of the treasure maps (in fact, you will start immediately with the second challenge). You can complete the remaining 9 challenges in one of the following ways:
  • Find the treasure using any 3 treasure maps.

  • Complete any 9 search steps (for example, if for some reason you don't want to pick up the treasure in the final step).
The instruction shows where to find treasures on 5 maps, this is more than enough to complete the challenge.


There are other treasure maps in the game, but they do not give +1 to the challenge progress.

Gambler
1. Win 5 hands of Poker

The goal is obvious, no explanation required.


2. In Blackjack, double down and win the hand 5 times

Instead of hitting, always press "Double". Double all hands with 19 points or less.


3. Win 3 games of Five Finger Fillet

It is required to win 3 rounds, not necessarily in a row.
  • The first round (first opponent) is always the easiest.

  • During an opponent's turn, hold down the right button to see in advance which buttons will need to be pressed.

  • If there is no one at the Five Finger Fillet table, rent a room, get some sleep and come back, the opponent will appear.


4. Bust one Poker location out in each location (Flatneck Station, Saint Denis, and Valentine)

In each of these regions, you need to bankrupt one of the players (win all of his chips). Just play poker, raise more often, with a good hand try to increase the pot on the table and go all-in.


5. Win 3 rounds of Dominoes without drawing any tiles against 2 or fewer opponents

You can play anywhere: gang camp, Saint Denis, Emerald Station. You have to win 3 rounds using only the starting tiles (without drawing tiles from the stock).
  • Victory over three opponents does not count, in such game there are no tiles for drawing.

  • Play "doubles" as early as possible.


6. Beat the Blackjack dealer in two locations (Rhodes and Van Horn)

It is required to win one hand each against dealers in Rhodes and Van Horn, the simplest challenge.


7. Beat the Five Finger Fillet player in every location (Strawberry, Valentine, and Van Horn)

Same as Gambler Challenge 3.

It's enough to win one round in each city.


8. Win 3 hands of Blackjack with 3 hits or more

Remember the RC helicopter mission from GTA:VC and the RC plane mission from GTA:SA, which many players consider too complicated? It seems that R* themselves had a challenge: let's do something new so that it also goes down in history as an outstanding game challenge. But something went wrong, and they did this: “Gambler Challenge 8”. The worst challenge in RDR2, full random, nothing depends on you.

Tips on how to make it easier to complete this gamedev nonsense:
  • Come to Rhodes, rent a room, sleep until morning. Save, load. This will reset the saloon to "morning state", with no visitors or blackjack players. Sit down at the table alone, start playing.

  • Always bet minimum, always hit.

  • If there are 16 or more points in the starting hand (and if you hit three cards, there will obviously be a bust), get up from the table and immediately sit back. You will lose your bet, but save some time.

  • Split doesn't help much. If there are two same cards in the starting hand, you can split them and play them as two separate hands, but you must hit at least 3 cards in at least one hand.

  • When you win with five cards, get up from the table and save manually. Just in case.

  • Since this “challenge” requires 0.003% of brain activity, you can do something on the background, for example, pet a cat or watch some TV shows.

Completion may take from 15 minutes to 3 hours, be patient. Save loading does not reset progress.


9. Win 3 games of Dominoes in a row

You can play anywhere: gamg camp, Saint Denis, Emerald station.

The simplest version of dominoes for this challenge is "All Five" (in Saint Denis). At the end of your turn, the sum of the values ​​at the ends of tiles must be a multiple of 5 (10, 15, etc.). It's easier to count, and easy to keep track of who is ahead.

If you have a 5:5 tile in your starting hand, immediately play it, this is +10 points.

If an opponent has a strong lead on points, get up from the table, this is not considered a defeat. You will lose the bet, but not the progress of the challenge. Sit back and continue with the new game.

The challenge progress will be reset if you load a save.


10. Win 3 hands of Poker in a row

Three times in a row, you go all-in, steal blinds, the challenge is done.
Or, you just play poker, the challenge will eventually be completed on its own.

The chellenge progress will be reset if you stand up from the table.

Herbalist
1. Pick 6 Yarrow

Yarrow grows all over New Hanover. The map shows where to find it.


2. Pick and eat 4 species of berry

The map shows where to find all 4 species of berries.
  • Wintergreen Berry grows in the ground, looks like a flower.
  • Blackcurrant and Golden Currant for some reason are not considered berries (R* logic).


3. Craft 7 items using Sage as an ingredient

The simplest recipes, available from the beginning of Chapter 2, no pamphlets required:
Potent Bitters: 1x Hummingbird Sage/Desert Sage + 1x Burdock Root.

Potent Horse Stimulant = 1x Hummingbird Sage/Desert Sage + 1x Common Bulrush.

The map shows where to get the ingredients. Common Bulrush grows in abundance along the banks of the rivers.


4. Pick 5 mushrooms and feed them to your horse

It just needs to be fed. It is not necessary to collect new mushrooms, those that are collected earlier and are in your satchel will do.

The map shows where to find Parasol Mushroom, it is suitable for completing the challenge.


5. Craft 9 items using Indian Tobacco as an ingredient

The simplest recipe, available from the beginning of Chapter 2, no pamphlets required:
Potent Snake Oil = 1x Indian Tobacco.
The map shows where to find Indian Tobacco.


6. Pick 15 different species of herb

The map shows where to find all 43 species of herbs. For this challenge it is enough to collect any 15.

The challenge is not retroactive, i.e. any 15 species should be picked up again, even if you have already collected them before and they are unlocked in the compendium.


7. Craft and use 5 special miracle tonics

The location of the recipe and ingredients are shown on the map.
To create 1 tonic you will need:
6x Yarrow, 6x Burdock Root, 6x Black/Gold Currant.

All you need:
30x Yarrow, 30x Burdock Root, 30x Black/Gold currant.
The "Legend of the East" satchel, in which up to 99 ingredients can be stacked, will help in this challenge. If there is no "Legend of the East", that's okay, but you have to collect the ingredients in a few trips.


8. Use Oleandar to craft 6 poison weapons

The location of the Poisoned Throwing Knife pamphlet and oleander are shown on the map.
Poisoned Throwing Knife recipe: 1x Throwing knife + 1x Oleander.


Throwing knives are available for purchase from a fence and the trapper after completing the “Paying a Social Call” mission (Chapter 2). Prior to completing this mission, throwing knives can be found at Six Point Cabin.


9. Pick one of each species of herb

The map shows where to find all 43 species. This challenge can only be completed in the Epilogue, when unhindered access to New Austin opens.


  • The challenge is not retroactive, that is, each type of plant needs to be picked up again, even if you have already collected it. The challenge does not have an in-game checklist, but with using a map, there should not be problems.

  • Plants 1-37 can be picked up at any time. Plants 38-43 aren't possible to reach until the final part of the game (due to a script imitating a sniper shot when entering New Austin).

  • You can combine the challenge with the mission of collecting exotic items ("Duchess and other animals"). If so, all 13 species of orchids will be collected during the mission.

  • Plants found during a corpses looting are not count.

10. Season and cook all 11 types of meat

To cook seasoned meat, you can use any of the herbs: Creeping Thyme, Oregano or Wild Mint. The “Ram Horn Trinket” allows you to reduce the time to collect these three herbs, you can pick up 2 plants at once.

The map shows where to find plants for seasoning.


The table shows where to get all 11 types of meat.

Butcher
Meat
Animals
Habitat
+
Pork
Boar, Peccary, Pig
At the butcher's counter
+
Prime Beef
Bison, Bull, Cow, Oxen
At the butcher's counter
+
Venison
Buck, Deer, Elk, Moose, Pronghorn
At the butcher's counter
Exotic Bird Meat
Parakeet, Parrot, Pelican
Plump Bird Meat
Chicken, Goose, Turkey, Rooster
Big Game Meat
Alligator, Bear, Cougar, Panther, Wolf
Succulent Fish
Sockeye Salmon, Steelhead Trout
Game
Duck, Pheasant, Rabbit
Flakey Fish
Redfin Pickerel, Perch, Chain Pickerel, Rock Bass, Muskie, Lake Sturgeon, Northern Pike, Largemouth Bass, Smallmouth Bass
Crustacean Meat
Crab
Mutton
Goat, Ram, Sheep

Horseman
1. Kill 5 rabbits from horseback

Rabbits habitate everywhere, they can always be found near the first gang camp.


2. Jump over 3 obstacles in 15 seconds

Any obstacle such as a fence or a stone will do. You can jump 3 times over the same obstacle.


3. Ride from Valentine to Rhodes in less than 5 minutes

The shortest way between the cities — the railroad tracks.

From time to time, press the "Calm" button, this will return your horse some stamina. For horses with trust level 3-4, this is most effective.

To be safe, you can order "Horse Care Package" in the stable and use tonics.

The challenge will not count and you will have to ride again if:
  • The horse has entered the water along the way (river, lake, swamp, stream).
  • You fell off the horse.

4. While mounted, drag a victim 3300 feet (1006 m.) with your lasso

It is required to throw a lasso on someone alive and drag 3300 feet (1006 m.). As a result of such actions, the poor fellow will naturally die, this will not affect completing the challenge. The main thing is that the victim must be alive at the beginning of the journey.

The challenge progress will be reset if you get off the horse, let go or lose the victim. Dragging people corpses or animals carcasses does not count.


5. Trample 5 animals while on horseback

Any animals, birds and fish will do. The simplest options are:
  • Plump flightless turkeys.
  • Flocks of ducks sitting on the banks of rivers.
  • Fish in shallow water.

6. Ride from Strawberry to Saint Denis in less than 9 minutes without touching any water

Same as Horseman Challenge 3, use the railroad tracks as the shortest path.


7. Kill 7 enemies from horseback without dismounting

Enemies are marked with red marks on the radar. For this challenge, human enemies or aggressive predators (wolves, bears, cougars, etc.) will do.

Challenge progress will be reset if you get down or fall off the horse.


8. Kill 9 predators from horseback

Predators are:
  • Animals: wolves, bears, foxes, alligators, cougars, panthers, coyotes.
  • Birds: crows, gulls, eagles, hawks, condors, owls, vultures.
The easiest method is to go to the swapms in Bayou and kill 9 alligators.


9. Ride from Van Horn to Blackwater in less than 17 minutes without touching any water

Same as Horseman Challenge 3 and Horseman Challenge 5.

Ride to Owanjila Dam, cross the river over the dam and turn onto Blackwater.


If you want to complete this challenge before Epilogue, stock up on tonics for Arthur and for the horse, there are a lot of lawmen around Blackwater.


10. Break every wild horse breed

It is required to break horses of 10 breeds, the challenge has a checklist. You can break a wild horse with one of the options:
  • Slowly approach it, stopping and pressing “Calm” every time the horse starts to get nervous.

  • Catch up with a wild horse on your horse, throw a lasso, and without letting go of the rope, get off your horse and ride on the wild one.

Riding a horse, hold the “Back” key, and turn in the opposite direction to the horse’s movement so that Arthur does not fall.

The map shows where to find horses of each breed. The Arabian White and Tiger Mustang are unique horses and are not required to complete the challenge.


Master Hunter
1. Skin 3 deer

Deer habitate almost everywhere, they can always be found near to the first gang camp or around Valentine.


2. Collect 3 perfect quality rabbit pelts

It is required: to find a perfect rabbit (while aiming, perfect animals are indicated by 3 stars), kill it with a small-caliber Varmint rifle with headshot, skin it. Repeat three times.

Initially, rabbit tracks are showed as "Unknown animal". To learn how to see the quality of a rabbit (the number of stars) by tracks, study the rabbit with binoculars (take out the binoculars, aim at the rabbit, hold on "Study"). This will make finding perfect ones easier.

Rabbits habitate almost everywhere, they can always be found near the first camp.


Not considered:
  • Bad and good pelts. One can't get a perfect pelt from a lousy rabbit.

  • Rabbits killed from other weapons. Large-caliber bullets spoil the pelts, the carcass of a rabbit killed by inappropriate weapons can turn into a "good" or even a "bad" one.

  • Rabbits trampled by a horse. These are always "bad."

If you have the "Buck Antler Trinket" (can be made from the Legendary Buck antler), it can help in obtaining perfect pelts. With it, the carcasses of animals killed in an inappropriate way often don't lose quality (for example, when killing an animal with no headshot).


3. Track 10 different animal species using your binoculars

Take out the binoculars, point at an animal, and hold on "Track".

If the animal is marked as "Unknown animal", it must first be "Study", and then "Track".

It is impossible to track horses, domestic animals, and flying birds.


4. Call an animal and get a clean kill 5 times

It is required to aim at an animal, and click "Call". The animal will turn its head to the sound, at this moment you need to shoot and kill it with one bullet.

Kills of animals for which it took more than one shot are not considered.

Legendary animals are always considered “one-shot killed”, even if there were actually 10 shots.


5. Skin 3 black or grizzly bears

The habitats of bears are shown on the maps. A grizzly bear can always be found west of Wallace Station.


The method of killing is not important, the main thing is to skin the bear.


6. Kill 5 cougars with your bow, then skin them

The hardest Master Hunter Challenge.

Cougar habitats are shown on the map. Cougar is guaranteed to be found in the westernmost part of West Elizabeth, below the trapper's camp. Watch the radar, as soon as you notice the red mark, this is the cougar. In other locations, the probability of encountering a cougar is rather random.


  • An understanding of the mechanics of archery with Dead Eye assist will greatly help in passing. Hold the right button, turn on the Dead Eye and DO NOT PULL the bowstring (do not hold the left button). The bow will work as a single-shot bolt rifle — point at an enemy, put one mark, press the left button to fire. Arthur himself will pull the bowstring and shoot almost instantly. This method is also super effective at shooting flying birds with bow.

  • When using poisoned arrows, it does not require a headshot, hitting any part of the body will be fatal.

  • Ride a horse. This will give a better visibility and additional time for aiming. If you failed to kill the cougar from the saddle and the horse threw off Arthur, the cougar will begin to make a U-turn for the further attack, you will have enough time to get up and take aim.

  • After killing the cougar, camp nearby. The next cougar will appear in these places after at least 48 hours. Sleep twice, save manually, and check if a new cougar has appeared. If there are no new cougars, return to the camp, sleep again and save. Saving is useful in case the cougar kills you and then disappears. In order not to wait and not to look for a new one, you can load the save with the state of the world while it is still in place.

  • Alternatively, after killing and skinning, you can take a ride on the map and look at other possible places for cougars to appear. Or do other things and return to the challenge later, respawn of new cougars will take time.

  • If the cougar jumps on you, there is a chance to throw it, as soon as possible press [F] ("Break Free"), if successful, the cougar will be thrown and will run back for the further attack.

7. Use bait to lure and kill both a herbivore and a predator

The bait can be bought at any general store, at the trapper, or made at a campfire.

Place the bait somewhere in the wild, away from the road, stand back and bend down. When the animal appears, kill it in any way. Repeat with the bait for representatives of another species.

A good place for hunting is in the western part of West Elizabeth, next to the trapper's camp, there are plenty of predators and herbivores here.

The bait does not spawn animals, but lures those in the immediate area. If there are no animals nearby, no one will come to the bait.


8. Catch 3 fish without using a fishing rod

It is required to pick up a fish that died from any cause other than a fishing rod from the ground.

Options:
  • Kill a fish with any firearms or throwing weapons.
  • Trample a fish by horse or wagon.
  • Blow up a fish with dynamite.
  • Just pick up a fish thrown by the water flow in shallow water.
Show some imagination.


9. Catch an opossum playing possum

The hardest part about this challenge is actually finding a possum. Opossum habitats are shown on the map, they can always be found at night around Riggs Station.


Catch up with the possum and chase it until it pretends to be dead. After that, grab or kill the animal, any of these actions count towards the challenge.


10. Find and kill the legendary panther “Giaguaro”

The legendary Panther Giaguaro appears only after the completion of Master Hunter Challenge 9, until then it is impossible to find it. The Panther will appear east of the Braithwaite Manor.

Be careful, unlike the rest of the legendary animals, after studying all 3 tracks, the panther itself will begin hunting you.


Weapons Expert
All the Weapons Expert Challenges require someone to be killed. In order not to repeat myself, there is the Gang Hideouts map at the beginning of the section. There you can always find someone to shoot at.


1. Kill 3 enemies with a knife

The challenge will be be completed on its own during one of the stealth story missions.

If you want to complete it earlier, any bandit camp or hideout will do. You just need to kill 3 enemies with a knife, not necessarily stealthly.


2. Kill 3 enemies in 10 seconds using only throwing knives

Targets for throwing can be found:
  • In any of the story missions. For example, “Paying a Social Call” from Chapter 2, where we visit O'Driscoll's hideout. If it has already been completed, you can replay it from the menu (Progress > Story).

  • In any bandit camp or hideout. You can make this challenge very easy by tying 3 enemies and putting them in a row.

  • The pharmacist in Valentine has a shady business, if you rob him, there will be 3 O'Driscolls in the back room, so conveniently crowded in one place.
Throwing knives are available for purchase from a fence and the trapper after completing “Paying a Social Call” mission (Chapter 2). Prior to completing this mission, throwing knives can be found at Six Point Cabin.


3. Kill 3 birds of prey using only a tomahawk

Throwing a tomahawk at a flying eagle is a lost cause. Better options:
  • Kill an animal (or human), leave the corpse in the wild. Ravens, vultures and other birds of prey will not keep themselves waiting.

  • Birds of prey regularly sit on the railing of the suspension railroad bridge (Bard's Crossind) east of Riggs Station.

  • Gulls sitting on the banks of the rivers are also great.

Birds of prey are: ravens, gulls, eagles, hawks, condors, owls, vultures.

Tomahawks are available for purchase from a fence and the trapper after completing "Americans at Rest" mission (Chapter 2). Prior to completing this mission, tomahawks can be found at Six Point Cabin.


4. Kill 10 enemies with a shotgun using crafted ammo

The map shows where to find the recipe pamphlets. It is required to craft 10 any ammo:
Incendiary Buckshot: 1x Moonshine + 1x Shotgun Shell (Regular)

Explosive Slug : 1x Animal Fat + 1x Shotgun Shell (Slug)


Moonshine is sold by a fence. Animal fat can be obtained from animals: bear, wild boar, beaver, pig, duck, goose, pheasant.

Targets for shooting can be found in any of the story missions, or in a bandit camps and hideouts.


5. Kill 5 mounted enemies, using 1 throwing knife per kill

Any throwing knives will do. Using poisoned throwing knives does not require headhot, hit with one knife in any part of the body will be fatal.

Targets for throwing can be found:
  • In the states where bounty is assigned for Arthur's head, bounty hunters appear. The higher the reward, the more hunters. If there are no bounty hunters around, set up camp and get some sleep, these guys will show up. When killing bounty hunters, honor does not fall.

  • It can be combined with Bandit Challenge 5. After Bandit Challenge 5 there remains $250 bounty for Arthur's head. Accordingly, the state will have bounty hunters.

  • On the road, any armed stranger riding a horse. Stop him and start swearing until he becomes hostile and pulls out a weapon (also his mark turns red on the radar). After that, kill the poor fellow with a throwing knife. Honor, of course, will fall.

  • During story missions.

6. Kill 4 enemies with a single stick of dynamite

It is better to use volatile dynamite, it has larger range, the pamphlet for volatile dynamite can be found using the map or bought from a fence.
  • Any bandit hideouts will do. Murfree's cave hideout is especially good, they are packed there like herring in a barrel.

  • Aggressive animals are also will do. If you're lucky, you can blow up a pack of 4 wolves.

  • The simplest option: tie four bandits and place them together.

7. Kill 4 consecutive enemies by throwing and retrieving the same tomahawk

Throw а tomahawk at an enemy, pick it up, throw it at the next one.

In order for the tomahawk to register as “retrieved”, you need to drop it and pick it up, only after that the kill counter will begin to count down. If you first throw the tomahawk at an enemy, then the kill counter will still be 0/4, because the tomahawk has not yet been registered as “retrieved”. After you pick it up, it will become "retrieved", and all the next killings will count towards challenge. It's weird, but that’s exactly how it works.

Throw the tomahawk into the ground (tree, etc.) and pick it up, then it will register as "retrieved", and from the first kill the counter will be 1/4. This is useful if you want to pass the challenge in a random bandit camp with 4 enemies.

Enemies are considered people or aggressive wild animals (wolves, bears, cougars, etc.) marked with red dots on the radar.

Challenge progress will be reset if:
  • You fired from any weapon.

  • The enemy was killed not by a throwing tomahawk.

  • The enemy was killed by another tomahawk (you did not pick up the tomahawk after the murder, and threw another one).

  • You picked up another tomahawk (not the one you just thrown).
Some players have noted issues that this challenge is not progressing. In this case, it helps to leave only one type of tomahawks in the inventory, throw out the rest (you can throw them in the nearest tree, then pick up).


8. Kill 15 enemies using a long barrelled sidearm

A long barrelled sidearm is considered a revolver or a pistol with the installed "long barrel" modification.

Enemies are considered people or aggressive wild animals (wolves, bears, cougars, etc.) marked with red dots on the radar.


9. Kill 9 unaware enemies from behind using the bow

Targets for bow shooting can be found:
  • In any of the stealth story missions. For example, “Paying a Social Call” from Chapter 2, where we visit O'Driscoll's hideout. If it has already been completed, you can replay it from the menu (Progress > Story).

  • In a random bandit camp. Only one enemy can be killed silently. After the first kill, the alarm always starts.

  • In a bandit hideot. You can silently kill several in one go, choose single targets and watch for the enemies' field of view.


  • If you want to pass this challenge faster, go to a bandit hideot (for example, the Hanging Dog Ranch). Kill silently as many as you can. As soon as the alarm starts, leave the area until the red sectors disappear from the radar, and then come back. New enemies will appear on the places of the killed ones, they can also be killed silently.

10. Kill a grizzly bear without taking damage using only throwing knives

A grizzly bear can be found near the Wallace Station. Small black bears are don't count.

The simplest way: craft 2 poisoned throwing knives (preferable more, just in case). Track the bear, throw the poisoned knife in the bear's forehead. Catch up with the fleeing bear, finish off with the second throwing knife.
Poisoned Throwing Knife Recipe:
1x Throwing knife + 1x Oleander.
The location of the recipe and oleander are shown on the map.


Throwing knives are available for purchase from a fence and the trapper after completing the “Paying a Social Call” mission (Chapter 2). Prior to completing this mission, throwing knives can be found at Six Point Cabin.


Sharpshooter
1. Kill 3 flying birds

The goal is obvious, no explanation required.


2. Kill 2 different species of animal in 1 Dead Eye use

Any animals or birds will do. The easiest way to kill a flock of ducks (usually a flock consist of ducks of different species), or other birds.


3. Kill 5 flying birds while on a moving train
  • In order not to look for a train, you can buy a ticket at any station.

  • If you shoot a flock of 5 birds in one activation of the Dead Eye and immediately jump off the train, you are likely to avoid a bounty.

  • There is a random event, O'Driscoll Boys rob a train near the Valentine. Having dealt with the bandits, you can get in the train and do anything with it. For example, to shoot birds from it, without any bounty.

4. Kill someone 80 feet (25 m.) away with a tomahawk

Tomahawks are available for purchase from a fence and the trapper after completing "Americans at Rest" mission (Chapter 2). Prior to completing this mission, tomahawks can be found at Six Point Cabin.

A target for the throw can always be found in bandit camps and hideouts.


To determine the distance required for the throw, move away from the enemy, aim with the tomahawk and begin to approach. As soon as the reticle changes color from white to red, you can throw, the distance will be more than sufficient.

The throw at an animal does not count.


5. Kill 6 animals without switching or reloading your weapon

Birds also will do. The easiest variant is flocks of ducks sitting along the rivers.


6. Kill someone at least 660 feet (202 m.) away with a long scoped rifle

Strange challenge, considering the game has a limited rendering distance. Sniper rifles are: Bolt Action Rifle and Carcano. The length of the mounted scope does not matter.

Climb higher, or choose a target located on the tower, this will help increase the distance of the shot.

The screenshot shows a good position for shooting, from which the challenge is guaranteed to be completed: the Hanging Dog Ranch hideout, stand on a small island, shoot the bandit on the tower.


7. Get 7 headshots in a row

Not a challenge, but a gift. Kills of people, animals and birds will do.

The challenge progress will be reset if you miss the headshot. If you hit the head, but don’t kill the target (for example, hit an Elk from the Varmint rifle), this will not reset progress, and will not add +1 to the kill counter either.

If you killed a deer (or other animal) with a headshot, and progress was reset — you probably didn’t hit the head, but the neck or another critical point.


8. Disarm 3 enemies without reloading or switching your weapon

To force an enemy to drop the weapon, you need to hit the hand (usually the right one) or the weapon itself. There are two ways to go.
  • With the Dead Eye assist. You need to put marks on the hands of three enemies and knock out all 3 weapons in one activation of the Dead Eye. If you fail to disarm all three enemies at once, when you exit the Dead Eye, your weapon will automatically reload and the challenge progress will be reset.

  • Without the Dead Eye assist. Just aim with the right button and shoot hands until 3 enemies drop their weapons. Challenge progress will be reset if you reload the weapon.

The most suitable weapons for passing the challenge are high capacity carbines or 2 personal weapons (revolvers or pistols). For obvious reasons, single-shot bolt rifles and double-barreled shotguns will not work.


9. Shoot 3 people’s hats off in the same Dead Eye use

You will need: a shotgun + regular shotgun shells (buckshot). Further, depending on your Dead Eye rank:
  • If shooting in slow-mo (without marking) has not yet been unlocked: shoot from an average distance, put marks on heads. Damage will not be fatal due to the scutter of buckshot, but the hats will be blown away. If you accidentally kill someone, increase the distance.

  • If shooting without marking is unlocked: quite simple, activate the Dead Eye, manually shoot above the heads from an average distance.

10. Kill 3 flying birds with 3 consecutive long scoped rifle shots

Sniper rifles are: Bolt Action Rifle and Carcano. The length of the mounted scope does not matter.

You can go in and out of scope, you do not need to constantly hold the right button.
Survivalist
1. Catch 3 Bluegill fish

Bluegill fish habitate in any rivers, lakes or swamps. Prefers cheese.


2. Hand 5 animals into camp or trapper

Any 5 animals, birds or fish will do.


3. Kill 5 animals with a varmint rifle

Any 5 animals, birds or fish will do (no matter how strange it sounds).


4. Craft a dynamite, fire, improved, poison, and small game arrow

Immediately ready to craft (from the beginning of Chapter 2): Improved, Fire and Small Game arrows. The locations of the remaining pamphlets and ingredients are shown on the map.


Also, the missing pamphlets can be ordered from a fence (availability depends on your story progress).


5. Catch a fish in the Bayou from a riverboat and while standing on train tracks

Saint Denis and the surrounding swamps are considered the Bayou region.


A boat can be found on the piers (for example, next to Caliga Hall or Lagras), or it can be “borrowed” from someone sailing along a river.


6. Kill a scavenging animal while it is feeding a corpse 5 times

It is required:
  • Kill an animal (or human), leave the corpse in the wild as a bait.

  • Wait until some other animal or bird appears and begins to eat the remains. Kill the corpse eater.
The killing of an animal is not considered until it has begun to eat.


7. Kill 8 small game animals with consecutive shots, using small game arrows

It requires very small animals (such as squirrels) — those that Arthur puts in the satchel. You need to do 8 kills in a row, each with one shot (8 shots, 8 carcasses).

To make sure that the animal is considered small, aim at it and push "Show info", it should say "Use a bow with small game arrow for clean kill". Rabbits and animals of a similar size will not do, they are considered "moderate".
Suitable animals:
Squirrel, Rat, Bat, Chipmunk, Bullfrog, Toad, Snake.

Suitable birds:
Jay, Cardinal, Waxwing, Crow, Oriole, Pigeon, Thrush, Songbird, Sparrow, Woodpecker, Chicken, Duck, Loon, Parrot, Pheasant, Quail, Gannet, Rooster, Seagull.

Good hunting spots:
  • There is a cave behind the waterfall in the Elysian Pool, here you can find a large number of rats and bats.

  • In North Roanoke (to the right of the letters ROA in the word Roanoke Valley), small birds always sit on stones during the daytime. At the same time, you can collect carcasses for "Wildlife Art Exhibition".

  • In the saloon of Saint Denis (in the one next to the fence and the trapper) a random event occurs several times. Rats appear in the saloon, and the owner asks us to help kick the rodents out of the pub.

  • Any farm with domestic chikens. This is the easiest option, but honor will drop and you can earn the bounty for animal cruelty. Chickens can be found: on the Emerald Ranch, in Valentine, at an angry old lady from the Watson's Cabin, and many other farms.

The challenge progress will be reset if:
  • a small game animal is not killed in one hit;
  • a small game animal is not killed by a small game arrow;
  • not a small game animal was killed (for example, a rabbit).

8. Craft a homing tomahawk, improved tomahawk, volatile dynamite, and volatile fire bottle

The map shows where to find all the pamphlets. Alternatively, you can buy them from a fence (if they are already unlocked).


Moonshine is sold by a fence. Animal fat can be obtained from animals: bear, boar, beaver, pig, duck, goose, pheasant.

The habitats of eagles, hawks and owls are shown on maps. Eagles and hawks can be found sitting on the rocks (for example, on the Twin Stack Pass under the letter W in the name NEW HANNOVER).


Look for an owl in the night sky or sitting on roofs and high structures. If you did not find an owl at one spot, check the other ones (sometimes the owl can be seen in places not marked on the map, for example, sitting on the roof of Emerald Ranch or on the gallows in Valentine).


Tomahawks are available for purchase from a fence and the trapper after completing "Americans at Rest" mission (Chapter 2). Prior to completing this mission, tomahawks can be found at Six Point Cabin.


9. Catch a fish that weighs at least 19 lbs (8,62 kg)

Will do: Muskie, Lake Sturgeon, Northern Pike, Longnose Gar, Channel Catfish. Choose any fishing spot on the map.


Lake Isabella is a great place for catching large fish, it is full of hefty Muskies.

The legendary fish caught also goes to the challenge.


10. Catch one of each type of fish throughout the world

It is required to catch fish of all 15 species, the challenge has a checklist. Use the fish overview and the habitat map for large species.


Small fish (Redfin Pickerel, Perch, Bullhead Catfish, Chain Pickerel, Rock Bass, Bluegill) do not have specific spots and can be caught in any water suitable for its habitat.

The legendary fish caught also goes to the challenge.


--------------------------------------------------
Early completion of the challenges
Is it possible to complete all the challenges before the Epilogue?

The short answer is no. The trouble is Herbalist Challenge 9, some of the required plants are growing only in New Austin. Unfortunately, a script imitating a sniper shot on the border of the state of New Austin will not allow to get there.

Previously, there was a glitch that allowed avoiding the “sniper shot” and getting to New Austin before the Epilogue, it was fixed with the PC game release.

The table below shows the necessary conditions for early completion.

Rank
Challenge
Chapter
Requirement
Mission
-
Explorer
-
-
-
-
Horseman
-
-
-
-
Master Hunter
-
-
-
-
Weapons Expert
-
-
-
1
Gambler 1
Chapter 2
Table games
Who is Not Without Sin
1
Survivalist 1
Chapter 2
Fishing + fishing rod
A Fisher of Men
3
Bandit 3
Chapter 2
Wagon fence
The Spines of America
6
Bandit 6
Chapter 3
Horse fence
Horse Flesh for Dinner
6
Sharpshooter 2
Chapter 2
Rolling Block Rifle
The Sheep and the Goats
9
Травник 9
Epilogue
Access to New Austin
-


Сhapter 2: 83/90 challenges can be passed, that is, the majority.

For some challenges, preparation in the form of completed missions will be required to unlock the items and features required for passing the challenge.

Сhapter 3: 88/90 challenges can be completed. Bandit Challenge 6 cannot be completed before Chapter 3, when horse fence become available.

Epilogue: all 90 challenges can be completed. Some of the plants required to pass the Herbalist Challenge 9 grows only in New Austin, unhindered access to which will be opened only in the final.

All the maps from this guide
All the maps in one place so you don't have to search.


All the maps + sourse files also avilable on Google Drive [drive.google.com].
Feel free to use, translate and share wherever you want.

Special thanks to
/r hoffmanng25 for the 43 plants map.

/r northernscript for the crafting herbs map.

Piggyback Interactive Limited for "The Complete Official Guide to Red Dead Redemption 2".
Hats off to these guys. They are legends.

Disclaimer
This guide is current at the time of writing. Some of the information provided here may become outdated or irrelevant after the release of new patches.

29 Comments
DerPeet May 17 @ 4:21am 
Thanks a lot
Quentin May 10 @ 9:00am 
Thank you very much for the complete guide !
Morpheus.King.Julien.GR.88 Oct 13, 2023 @ 2:59am 
So many thanks's to everyone who helped to this one, so we the rest of us to can be helped properly!!!! 🙏🙏
Sevych Jun 14, 2023 @ 7:25am 
I wish all Steam guides were like this one. Thanks a lot!
FireTruckSezMoo Mar 22, 2023 @ 9:16am 
This helped me out way more than anything else I’ve found on the internet. Well done.
Caeliestus Feb 8, 2023 @ 2:58pm 
I shot the card dealer after blackjack challenge
Firence Oct 18, 2022 @ 11:48am 
Gambler 9 is either inaccurate or my game is bugged. When I get up from the table it DOES reset my challenge progression.
LordJumz Sep 1, 2022 @ 7:46pm 
nice guide! one of the best i must say, just want to ask if someone encountered a bug on not obtaining the Legend of the East Outfit itself, i finished my bandit 10 challenge by the load save way. Shows my challenge are done, but i did not received LOTE outfit, any insights on how to fix this?
Alcoholic Aug 29, 2022 @ 8:48am 
Addition for people who have problems with master hunter 6
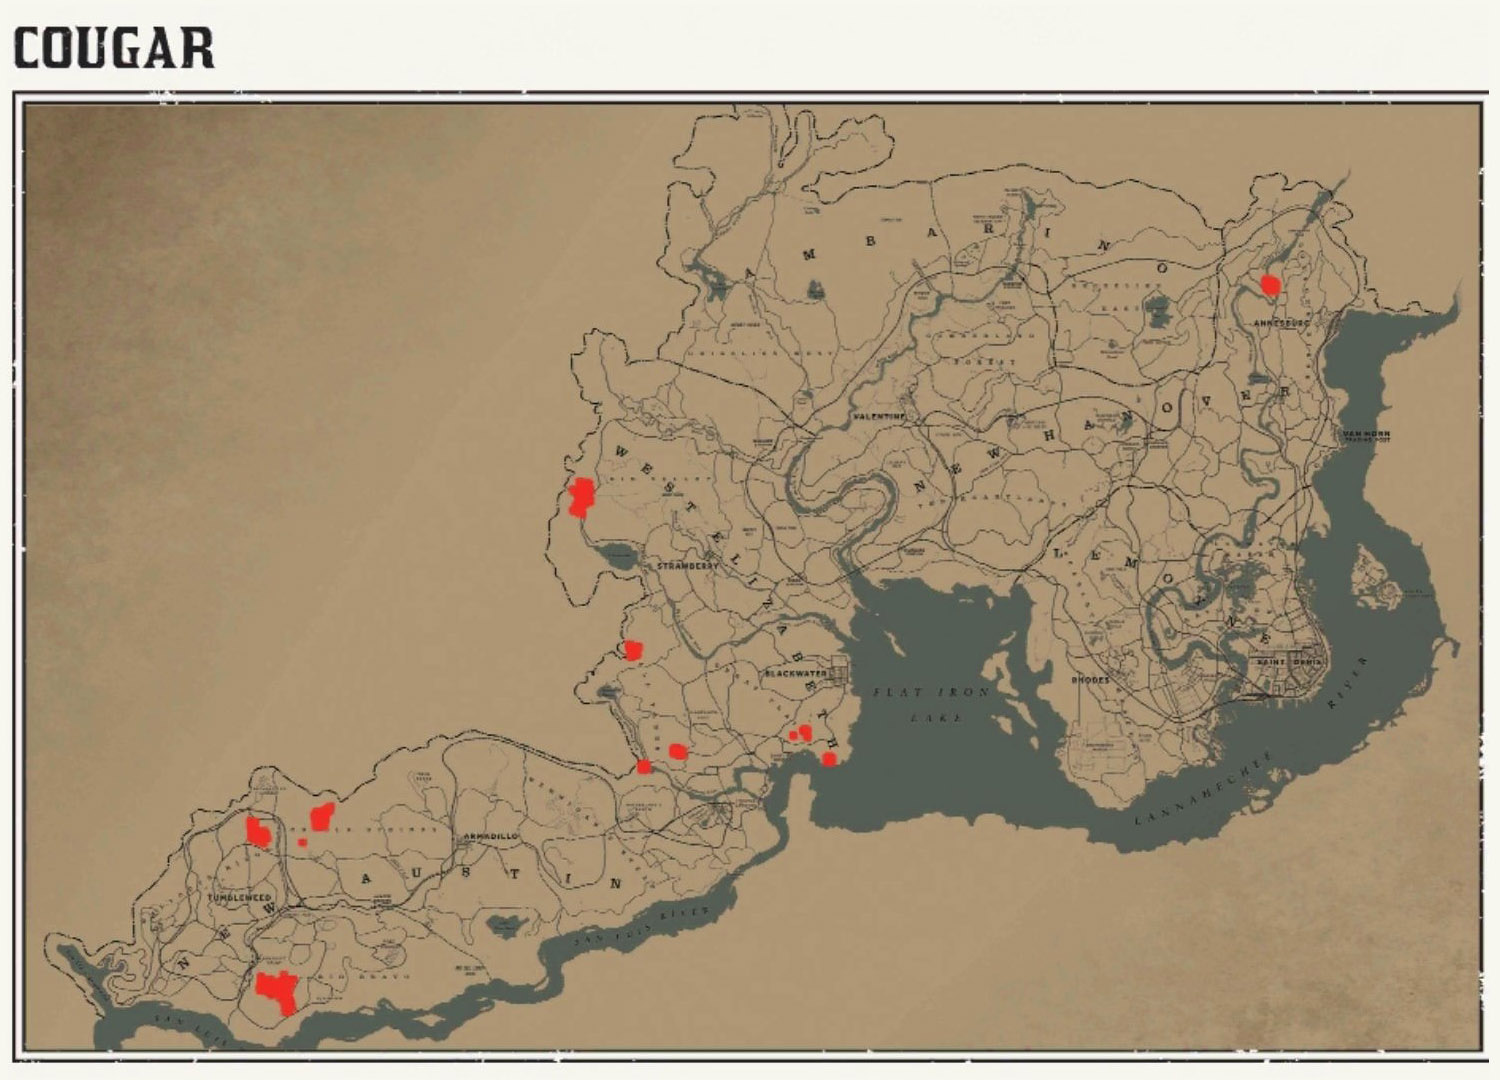
Try to ride at night on west elisabet plain near hunter and bandit camps, cougars love to hunt on this time, and usually just running around for some rabbit or something
After you kill one, go sleep for 2 days till the other night and do it till you compleet challange
🔻Laura🔻FREE PALESTINE! Feb 8, 2022 @ 5:46am 
Thank you for this amazing guide!