Deus Ex: Human Revolution - Director's Cut

Deus Ex: Human Revolution - Director's Cut

270 ratings
Commentary Locations
By Xazuki
This guide helps you find all 280 commentary locations in Deus Ex: Human Revolution - Director's Cut.

These pieces of commentary were added to the Director's Cut version of the game and consist of the game designers discussing the creation of Deus Ex: Human Revolution in substantial detail.
4
   
Award
Favorite
Favorited
Unfavorite
How to Use the Guide
This guide is designed to help you find all the commentary locations in Deus Ex: Human Revolution - Director's Cut.

To enable the commentary audio you need to open the menu and go to EXTRA > COMMENTARY and turn this option on.


Since the very first intro cutscene has commentary I recommend doing this before starting a new game. Also, I don't recommend activating commentary if this is your very first time playing Deus Ex: Human Revolution; the team regularly discuss spoilers and talk over most of the cutscenes in the game.

There are two types of commentary. The first type automatically activates during cutscenes and the second type you have to locate yourself and press a button to play. In this guide the locations are shown on the various area maps with the following icons:

A round icon indicates a cutscene commentary. In the general area a cutscene will or will have happened with a commentary in it.


A rectangular icon indicates a commentary that has to be manually activated. Go to this location to and activate it yourself.


You will know you're in the right location when you can see this:
The "Play Commentary" key can be changed in your control settings.

Each commentary is documented in this guide with the following details:
  • The number shows which it is according to the maps in this guide.
  • A description of where it is located.
  • A quick overview of its content.
  • The length of the commentary in minutes and seconds.
There are 280 pieces of commentary in the game. This totals 7 hours and 50 minutes of commentary. However 3 of these can not be found in the game and do not play over the cutscenes they discuss. This is most likely a glitch. I have inserted the missing commentaries directly in to this guide as videos so you don't have to miss out.

The sections of this guide are laid out in order of a complete play through of the game from start to finish. Several times during the game you will return to a previous area and new commentary may be available so make sure to follow the guide section by section to not miss anything.

1: Prologue


NOTE: There is no map available for the prologue section. However, these commentary nodes are relatively easy to find due to the linear nature of this first level.

(1) CUTSCENE - Bob Page talks with the Illuminati.
The team introduce themselves and discuss the return of Bob Page. (1:16)

(2) CUTSCENE - Introducing Adam Jensen and Megan Reed.
Some problems with the design of Megan's attire. (1:53)

(3) Inside Megan's office.
The team discuss their dissatisfaction with Megan's idle animation and also mention the Old School Gamer achievement. (2:44)

(4) CUTSCENE - The walk and talk.
An unused alternative to the walk and talk is discussed. (5:16)

(5) Near the windows in Sarif's office.
Various details around Sarif's office are discussed. (3:07)

(6) After exiting Sarif's elevator.
The original intentions to go back through the walk and talk level. (1:07)

(7) Before Barrett kills a scientist.
Some problems with players looking in the wrong direction. (0:45)

(8) In the room where two black ops kill a scientist.
The difficulty in creating this scripted event. (1:31)

(9) Before Federova kills some guards.
Problems with some players missing the Federova event. (2:36)

(10) CUTSCENE - Jensen gets attacked.
Some dissatisfaction with this cutscene. (0:53)

(11) CUTSCENE - Jensen gets augmented.
A lot of information on the creation of this cutscene. (2:04)

2: Sarif Industries [1st Visit]
.png]

NOTE: Due to the time limit on the hostages survival you may want to complete the Sarif Manufacturing Plant quest first as these commentaries are still around when you return during the 2nd visit to Sarif Industries. However, letting the hostages live or die has no effect on the commentary nodes.

Sarif Industries: Floor 1 [North]
(1) CUTSCENE - Arriving at Sarif Industries.
Jensen arrives at Sarif Industries and the team discuss the significance of him closing his shades in this scene. (0:30)

(2) Seating area behind the stairs.
The team discuss the bathroom joke that is a reference to the original Deus Ex. (1:04)

Sarif Industries: Floor 2 [North]
(3) Near the Final Fantasy poster in Pritchard's office.
Some information on the creation of the Final Fantasy XXVII poster. (1:03)

(4) Outside office 20.
The reason behind the names on the offices is explained. (0:45)

(5) Outside office 23.
One name has a different reason for being on the offices. (2:10)

(6) Inside office 23. NOTE: Requires Hack Level 2 or code 3716.
How the large number of e-mails were created for the computers throughout the game. (2:56)

(7) Outside office 27.
Some information on the music used throughout the Sarif building. (1:40)

(8) Near elevator sign.
The team discuss some problems with the original elevator sign. (0:51)

Sarif Industries: Floor 3
(9) Near Jensen's computer in his office.
The original ideas behind the e-mail side quest are discussed. (1:53)

Sarif Industries: Floor 2 [South]
(10) Next to the pizza box.
The reason for the design on the pizza box. (0:33)

(11) Approaching the doors to helipad.
The team discusses adding consequences to not saving the hostages. (3:57)

Sarif Industries: Floor 1 [South]
(12) Near Faridah Malik and the VTOL.
Some information on the design of the VTOL and the creation of Malik's character. (3:23)

(13) CUTSCENE - Jensen getting into the VTOL.
The reason why some scenes are pre-rendered instead of using the in-game engine. (0:25)

(14) CUTSCENE - Discussion with Sarif in the VTOL.
The casting of Steve Shellen as David Sarif. (1:41)
3: Sarif Manufacturing Plant


Shipping and Receiving: Floor 3
(1) Near yellow paint inside the building.
The team finally answers the question of why the world is so yellow. (0:55)

(2) Near SWAT team member who gives you information.
How the team changed the area to feel actively under siege. (1:37)

Shipping and Receiving: Floor 1 [South]
(3) Near the burning barrel on a forklift.
The reasons behind the location of Sarif Industries in Detroit. (2:00)

(4) Just past the entrance to the warehouse.
Some of the original ideas for the Purity First terrorists. (1:55)

(5) Corridor near the toilets.
AI problems that occur during this map are discussed. (1:41)

(6) Near the conspiracy radio.
The creation of the conspiracy radios that are located throughout the game. (3:18)

Shipping and Receiving: Floor 1 [North]
(7) Inside the locker room.
Lockers, lockers and more lockers. (1:28)

(8) Corridor before your first hack.
This area is familiar to certain team members. (0:49)

(9) Near the first hack.
The creation of the hacking mini-game. (2:43)

Assembly Labs: Floor 2
(10) Entering the assembly labs.
The importance of closely following concept art. (2:35)

(11) Near the gas bomb.
The team discuss the alternative methods to disable the bomb. (1:24)

Assembly Labs: Floor 1
(12) Load room door.
The difficulty of having to load the next area without making it too obvious. (1:33)

Factoring Labs: Floor 1
(13) Outside the air vent before the camera and turret.
The team discuss the large amount of effort that went into the air vent doors. (2:27)

(14) Near the turret.
How to defeat a turret in a unusual way. (0:56)

(15) CUTSCENE - Interrupting the hacker.
The difficulties the team faced in not having Jensen holding a gun during cutscenes. (0:49)

Admin Building: Floor 1
(16) Glass bridge.
A discussion about the AI difficulties in the fight below the bridge. (1:59)

Admin Building: Floor 2
(17) Stairs overlooking office.
More information about the problems with computers and e-mails. (1:55)

Admin Building: Floor 4
(18) Area before Zeke Sanders.
Difficulties in the balancing of the game due to the implementation of the Praxis Kit system. (1:50)

NOTE: A commentary will only appear later in the game if Zeke Sanders is still alive by the time you're tracking down Isaias Sandoval. If you want to listen to it make sure not to kill Zeke here.

(19) CUTSCENE - Zeke Sanders.
The team mention the problems they had trying to add more diverse body types. (2:50)

(20) Near Josie Thorpe's computer.
The creation of the Nigerian spam e-mails. (0:48)

(21) Near Malik's VTOL.
The team discuss the option for the player to go back to through the map for extra details. (1:45)

4: Sarif Industries [2nd Visit]
.png]

Sarif Industries: Floor 1
(1) After exiting the VTOL.
The importance of adding more meaningful dialogue choices to the game. (1:38)

Sarif Industries: Floor 3
(2) Near two security guards overlooking Jensen's office.
The reason behind adding the word VISION to the side of Jensen's office. (0:41)

Sarif Industries: Floor 4
(3) CUTSCENE - Sarif talking to Darrow.
The importance of baseball to Sarif's character. (0:40)

5: Detroit [1st Visit]
.png]

Streets: Floor 1 [South]
(1) Near the bench Megan Reed's mother uses.
The problems with some of the side quests. (2:56)

(2) Near the light sculpture outside Sarif Headquarters.
The meaning behind the name of Sarif Industries. (1:10)

(3) In the road near some store-fronts.
The development of the miscellaneous products in the stores. (1:55)

(4) Near Letitia.
The controversy surrounding the character Letitia. (3:15)

(5) Outside the southern subway station entrance near "Line 2" sign.
An explanation of "Media Architecture". (0:42)

(6) Outside gas station.
The meaning behind the name of the gas station. (0:40)

(7) Inside gas station.
The history of creating the gas station asset. (1:08)

(8) Near the electric car charging station.
Some regrets regarding the design of the electric car charging station. (1:51)

(9) Outside the LIMB clinic at the bottom of some steps.
The complexities of creating an in game riot. (1:56)

(10) Under the vertical red Motokun street sign near some steps.
The team discuss a problem with imperial/metric measurements. (1:17)

(11) Approaching the road block by the conference center.
The difficulties in creating believable world boundaries. (1:52)

(12) Conference center lobby.
Some information on the original ideas for a larger amount of side quests. (1:57)

Apartments: Floor 1
(13) Near Detective Chase inside the apartment building behind the gas station.
The team discuss their satisfaction with the Detective Chase character. (1:19)

Apartments: Floor 3
(14) Outside Josie Thorpe's apartment on the 3rd floor of Detective Chase's building.
Some information on the creation of the apartment environments. (1:59)

Streets: Floor 1 [North]
(15) Near posters outside the entrance to Detective Chase's apartment building.
The creation of the posters throughout Detroit. (1:01)

(16) Basketball court.
The large amount of work that went in to creating the basketball. (1:43)

(17) Near the multiple parked cars somewhat close to the Chiron building.
Some information on A.I. ideas that weren't implemented. (1:57)

(18) In the road outside the Chiron building.
The team discuss some ideas they had for a cyber-renaissance district. (1:04)

(19) In front of the working girl called Charlotte who is near Jenny Alexander.
The reason behind the name Charlotte for one of the working girls. (1:20)

(20) Eliza poster outside northern subway entrance.
The team talk about creative ways to show more diverse attire for Eliza Cassan. (1:23)

(21) Dancer inside the subway station.
The team discuss their dissatisfaction with the strange dancer inside the subway station. (3:15)

(22) Outside the convenience store opposite the police station.
The effort that went in to the creation of authentic convenience stores. (0:53)

(23) Near a white car outside of the MDM building.
The meaning behind the choice of name for the MDM building. (0:52)

(24) Near the police station monument.
The development history of the police station. (1:35)

(25) Outside the electric corridor.
Adding more diversity to alternate paths. (1:39)

(26) At the end of the street near a chain link fence.
The effort that went in to the extra detail on objects outside the world boundaries. (1:14)

6: Detroit LIMB Clinic


LIMB Clinic: Floor 1
(1) In the middle of the main lobby.
The problems with chaos management. (4:01)

(2) Outside surgical room B.
Some information on a cutscene that was re-purposed for later in the game. (1:14)

7: Police Station


NOTE: A commentary will only appear later in the game if you win the social battle with Wayne Haas at the front desk.

Police Station: Floor 1
(1) In front of Wayne Haas in the lobby.
Details about the creation of Wayne Haas and the social augmentation. (4:56)

(2) Near the restricted double doors.
The problems in creating a restricted door. (1:48)

Police Station: Floor 3
(3) Outside Det. McCann's office.
Some information on the names used for the offices. (1:46)

(4) Inside or near the air vent in the interrogation room.
The team discuss the included remnants of an old side quest. (1:22)

Police Station: Floor -2
(5) Stairwell on the bottom floor.
An interesting way to bypass the laser beams. (0:51)

8: Chiron Building
.png]

Chiron Building: Floor 2
(1) Just inside Jensen's apartment.
How the design of Jensen's apartment reflects on his character. (1:27)

(2) Kitchen area.
Some details about the cereal boxes throughout Jensen's apartment. (1:26)

(3) Near bed.
The reason for the get well cards still being around. (1:35)

(4) CUTSCENE - Analysing the neural hub. NOTE: Cutscene will play during main quest to analyse the neural hub.
How they added a more dramatic feel to this cutscene. (0:42)

9: Derelict Row


NOTE: While this area is accessible when you first reach Detroit, the commentary nodes will only be usable after receiving the main quest to disable the antenna.

Detroit Streets: Floor 1
(1) Around the main entrance to Derelict Row.
The creation of the Derelict Row area. (2:11)

(2) Near the burning barrel and barriers.
Some technical problems integrating Derelict Row in to Detroit. (1:10s)

Old Textile District: Floor 2
(3) Between some barriers and a red shipping container.
How this environment was originally used for testing game mechanics. (0:38)

Old Textile District: Floor 5
(4) Close to the hackable antenna.
Information on the original antenna design and completing objectives ahead of time. (1:43)

10: FEMA Facility


Abandoned Factory: Floor 1
(1) Near some gang members at landing zone.
The problem with recording dialogue to far in advance. (1:25)

(2) CUTSCENE - Watching the Tyrants move out.
The more ambitious plans for this cutscene are discussed. (0:52)

(3) At a crate near a large metal fence.
The team discuss some subtle details in this area. (0:43)

(4) Near some yellow forklifts and boxes.
The team discuss more details about the area including the train outside the fence. (1:05)

FEMA Detention Center: Floor -1
(5) Inside the first elevator.
The team discuss the effort that went in to the reveal of the box guard. (1:15)

FEMA Detention Center: Floor -4 [North]
(6) Near crates just after exiting first elevator.
Designing the FEMA camp while keeping function in mind. (0:52)

FEMA Detention Center: Floor -4 [South]
(7) Entering the interrogation area.
Implementing the detail required to convey that the FEMA camp is still under construction. (1:24)

(8) Near two FEMA officials.
The process of adding the two neutral FEMA officials. (1:53)

FEMA Detention Center: Floor -5
(9) In the room which has box guards stored on the shelves.
The creation of the box guard robot. (2:57)

(10) Corridor before fighting Barrett.
Some of the original ideas for the Barrett boss fight. (1:52)

(11) CUTSCENE - Barrett's death.
The casting of the voice actor who plays Barrett. (1:11)

11: Sarif Industries [3rd Visit]
.png]

Sarif Industries: Floor 3
(1) In front of Pritchard in Adam's office.
The complications involved in the creation of Adam's history side quest. (1:36)

Sarif Industries: Floor 4
(2) Near William Taggart in Athene's office.
Some details on the first meeting with Taggart. (2:11)

(3) Just after entering Sarif's office.
The team discuss the creation of the Sarif social battle. (1:44)

12: Lower Hengsha [1st Visit]
.png]

Streets [Kuaigan District]: Floor 3
(1) CUTSCENE - Flying towards Hengsha.
The production details of this cutscene. (0:55)

(2) The roof of the Hung Hua Hotel.
The reason for setting this part of the game in Hengsha. (1:49)

Streets [Kuaigan District]: Floor 2
(3) Near ground floor entrance to the Hung Hua Hotel.
The difficulties caused by having some characters speak in Mandarin. (2:11)

(4) Near the green "Got taste mate?" sign.
Creating credible stores and the products inside them. (1:38)

(5) Next to gap between buildings filled with lots of air conditioners.
The team discuss the creation of some contemporary art in this area. (1:18)

(6) Close to the toll booth.
The problem with animating billboards. (1:27)

(7) Near the Hive building.
Reasons for moving the Hive. (1:17)

(8) In front of one of the storage lockers.
The team discuss revealing a password without using pocket secretaries. (1:25)

Streets [Kuaigan District]: Floor 1
(9) In the road near two concrete blocks.
The team discuss their dissatisfaction with the NPC reactions to the augmentation glitch. (1:37)

(10) Close to the Osprey Ammunition building.
The design of the various gun manufacturers. (3:12)

(11) Near secluded garden seating area.
The original plans for the green building in the background. (2:05)

Streets [Kuaigan District]: Floor -2
(12) Near a ladder in the sewers.
Some information on the advanced shader used in the sewers. (1:48)

Hung Hua Hotel: Floor 4
(13) In the room with the smart card quest item.
The placement of the smart card and some cancelled ideas. (2:07)

Streets [Youzhao District]: Floor 1
(14) Near directions sign.
Changes from the original Hengsha design. (1:49)

13: Hengsha Court Gardens


Hengsha Court Gardens: Floor 1
(1) After exiting the elevator in Hengsha Court Gardens.
Integrating areas from the cancelled Upper Hengsha in to Lower Hengsha. (2:23)

(2) In front of the stuffed lion toy.
The creation of Chubie the lion plush doll. (1:37)

(3) Near the hole in the wall next to a overturned table and chair.
Relocating the Lower Hengsha vista. (1:26)

(4) Inside the hole in the wall.
Some details about another hacker in Hengsha. (1:11)

(5) In the bathroom.
The team explain some of the more strange details and references in the game. (2:39)

14: The Hive


The Hive: Floor 1
(1) Just after entering the Hive.
Ideas behind the creation of the Hive. (3:55)

(2) In front of the 1st floor bartender.
The team discuss fan comedy videos. (1:59)

The Hive: Floor 2
(3) In front of the 2nd floor bartender.
Details on the Tong social battle. (3:42)

The Hive: Floor -1
(4) Inside the room with the dead body.
Ideas for a fight club in the Hive. (1:45)

(5) Inside Tong's office. NOTE: To get in to Tong's office you need to do the social battle with him. If instead you sneak in to the vent to listen to him talk to Narhari Kahn the door won't open.
The attention to detail that went in to the creation of Tong's office. (0:53)

15: Alice Garden Pods


Alice Garden Pods: Floor 2
Alice Garden Pods - Floor 2(1) Just after entering the open area near some food vendors.
Design ideas for the Alice Garden Pods. (1:16)

Alice Garden Pods: Floor 4
Alice Garden Pods - Floor 4(2) In the section containing Arie van Bruggen's pod.
Small tricks the development team used in the creation of the pods. (2:42)

(3) Very close to Arie van Bruggen's pod.
Some cancelled ideas for Arie van Bruggen's pod. (1:13)

(4) CUTSCENE - Talking with Arie van Bruggen when enemies attack.
The creation of Arie van Bruggen's character. (1:11)

Alice Garden Pods: Floor 1
Alice Garden Pods - Floor -1(5) Before door to the locker room.
The team discuss their satisfaction with the area you escape through. (1:07)

16: Tai Yong Medical


Augmentations Storage Area: Floor 2
(1) Outside the glass windows of the room with the gas accident.
The difficulties in creating this event. (1:45)

(2) Catwalk control room.
Some of the scrapped ideas for a vertical assembly line area. (1:44)

Assembly Lines: Floor 5
(3) After climbing a ladder and near a window showing trams under the Pangu.
The ideas behind the area that separates Upper and Lower Hengsha. (2:29)

(4) Near the elevator button.
The difficulties the team encountered putting objects inside elevators. (1:10)

Laboratories: Floor 1
(5) Near the window that overlooks Upper Hengsha.
Detailed information on the Upper Hengsha area that was cut. (3:24)

(6) By the safety zone.
Problems with mixing together neutral and enemy zones. (1:39)

Laboratories: Floor 2
(7) Overlooking the laboratory.
Putting a new spin on a commonly used location in video games. (0:45)

Laboratories: Floor 3
(8) Inside data core room before the laser.
The difficulties making elaborate defences that fit with the location appropriately. (2:05)

Laboratories: Floor 4
(9) Inside elevator that looks out on to Upper Hengsha.
Creating believable reasons behind people directly contacting you. (2:00)

Penthouse: Floor 3
(10) In front of the scale model of the Tai Yong Medical building.
Using the model to show the player what the Tai Yong Medical building looks like. (1:13)

(11) Just after entering the room with the red sculptures.
How the style of this room reflects on Zhao Yun Ru. (1:22)

(12) In between the stairs.
The creation of the Hyron Project suit. (1:01)

(13) CUTSCENE - Adam is tricked by Zhao Yun Ru.
Some original intentions for this scene. (1:51)

Penthouse: Floor 2
(14) Entering the hangar area.
A cut idea to use Narhari Kahn here as a mini boss fight is discussed. (1:51)

17: Picus Communications


Online News Division: Floor 8
(1) CUTSCENE - Flying to Montreal.
Why Montreal was chosen as a location. (0:32)

(2) On the helipad.
Original plans for Montreal and the origin of the Picus building. (2:14)

Online News Division: Floor 7
(3) Entering the upper level above the office area.
The meaning behind the name Picus. (0:50)

Online News Division: Floor 6
(4) Near the end of the stairs leading down to the office area.
The creation of the e-mails in Picus. (2:17)

(5) Near the entrance to room 404.
The meaning behind the room 404 and 802-11. (1:46)

(6) CUTSCENE - Adam talks to Eliza.
Casting the voice actor for Eliza Cassan. (1:09)

Online News Division: Floor 3
(7) Entering the newsroom.
Cutting down the scope of the newsroom. (1:02)

Online News Division: Floor 1
(8) In the locker room.
Lockers cause some more problems for the team. (1:54)

(9) In front of the funicular door.
Some cut plans regarding the funicular. (1:39)

Restricted Area: Floor 2
(10) In front of the hand sculpture.
A homage to the monument from the original Deus Ex. (0:30)

Restricted Area: Floor 1
(11) In the room with a dome and hologram.
The accidental inclusion of a hologram in this area. (1:22)

(12) In front of the large monitor in the editing room.
Showing how Picus manipulates the news. (0:39)

(13) CUTSCENE - Eliza's secret is revealed.
Some details on Eliza and Federova. (1:07)

(14) CUTSCENE - Federova dies.
Some cut ideas on letting the player spare the bosses lives. (1:06)

(15) In the entrance to the arena area.
Details on Federova's character and the boss fight. (2:27)

18: Chiron Building [2nd Visit]
.png]

NOTE: This is the first of three commentaries that exist in the game files but don't activate during the game. It was most likely supposed to play over the cut-scene in which Adam and Faridah fly back to Detroit during the riots. Below is a video of that cut-scene with the missing audio commentary added.

1st MISSING COMMENTARY - Flying back to Detroit during the riots.
The team discuss how this cut-scene was used to convey the tension of the riots in case later plans to have the riot in game were cancelled. (0:56)

Chiron Building [Roof]: Floor 2
(1) On the roof near the guard.
Limitations regarding the view from the roof of the building. (1:07)

Chiron Building: Floor 2
(2) CUTSCENE - Jensen and Sarif talk.
How this cutscene shows the tension between Jensen and Sarif. (2:25)

(3) In front of the elevator near where the augmentation glitch occurs.
The augmentation glitch was originally more subtle. (2:40)

Chiron Building: Floor 1
(4) Just after exiting the elevator. NOTE: This commentary will only be available if you won the social battle with Wayne Haas when you visited the Police Station earlier in the game.
The team wanted to make the Wayne Haas follow up better. (1:50)

19: Detroit [2nd Visit]
.png]

City Streets: Floor 1
(1) Just outside the Chiron Building.
The ideas behind the return to Detroit. (0:52)

(2) On the stairs near the police truck that's outside the southern subway entrance.
Technical problems adding rioting NPC's in Detroit. (2:07)

20: Convention Center


Convention Center: Floor 1
(1) After entering the convention center.
Some information behind the reason for Taggart holding his conference here. (1:21)

(2) Near workers repairing the elevator.
The reason for the only Asian voice actor in Detroit. (1:37)

(3) Near the pro-augmentation woman talking to the crowd.
Some cut ideas for this pro-augmentation character. (1:17)

Convention Center: Floor 3
(4) Before the door with "Delegate Badge Required" and "Meeting Hall" signs on it.
The difficulty of balancing main and alternate paths. (1:38)

(5) On the stage after Taggart social battle. NOTE: You must engage in the social battle with Taggart to access this commentary.
The creation of the Taggart social battle. (2:54)

(6) Near Taggart's computer.
The repercussions of the different choices. (1:31)

21: Purity First Hideout


Downtown Apartments: Floor 3
(1) Inside Isaias Sandoval's apartment near the EMP trap. NOTE: This commentary will not be available if Zeke Sanders was killed earlier in the game.
The team discuss the cut Utah content. (2:01)

(2) Near to secret sliding wall.
The team wanted to add more secrets like this to the game. (1:18)

Purity First Hideout: Floor -1
(3) In Isaias Sandoval's office.
The team discuss regrets on Jensen's lack of reaction to Isaias Sandoval's death. (1:45)

22: Sarif Industries [4th Visit]
.png]

Sarif Industries: Floor 2
(1) Near two women in the corridor outside the cafeteria.
Creating an e-mail on Pritchard's computer. (1:38)

Sarif Industries: Floor 4
(2) CUTSCENE - Meeting Hugh Darrow.
Finding a use for the augmented bodyguards and conveying Darrow's mysterious character. (1:36)

23: Construction Site


Construction Site: Floor 2
(1) CUTSCENE - Shot down in Hengsha.
Some background details on the creation of this cutscene. (0:48)

Construction Site: Floor 1
(2) Inside the construction site elevator.
The multiple possibilities of Nahari Khan and the possible death of Malik. (2:10)

24: Lower Hengsha [2nd Visit]
.png]

Streets [Kuaigan District]: Floor 1
(1) Near a bike rack In front of the Hengsha Limb Clinic.
Some details on the optional recall chip. (1:26)

Streets [Kuaigan District]: Floor 2
(2) Near the man who demands a bribe.
Some original intentions for this idea. (1:25)

Streets [Youzhao District]: Floor 1
(3) Near southern entrance after Hugh Darrow contacts you.
Giving Hugh Darrow more of a presence in the game. (1:10)

25: Harvester's Hideout


Harvester's Hideout: Floor 1
(1) After entering the main door to the Harvester's Hideout.
Some of the original ideas for the Harvesters. (1:35)

Harvester's Hideout: Floor -2 [North]
(2) In the surgery room.
The creation of the black market surgery room. (1:34)

Harvester's Hideout: Floor -2 [South]
(3) Near Tracer Tong's computer.
Linking the game to the original Deus Ex with Tracer Tong. (1:24)

(4) Inside Tong's boiler room.
The difficulty with Tong's dialogue in this area. (3:05)

26: Old Noodle Factory


Old Noodle Factory: Floor 1
(1) Just after entering the area.
Relocating cut content to this area. (1:44)

Old Noodle Factory: Floor -1
(2) Outside cells near Tracer Tong.
Carefully designing a reference to the original Deus Ex. (1:43)

27: Hengsha Seaport


Hengsha Seaport: Floor -1
(1) Near the seller and his street thugs.
Making the seaport seem further away. (0:57)

Hengsha Seaport: Floor 2

(2) After climbing out of the sewer using the ladder.
Some information on the Hengsha vista. (4:13)

(3) In the small room before entering the hangar.
Creating the box guard that drops in via helicopter. (1:58)

28: Hei Zhen Zhu


NOTE: This is the second of three commentaries that exist in the game files but don't activate during the game. This commentary is supposed to play over the introduction cutscene for the Missing Link. Below is a video of that cutscene with the missing audio commentary added.

2nd MISSING COMMENTARY - The Missing Link Introduction.
How the team added a new storyline within the time-line of the main game. (1:16)

Forward Section: Floor 3 [East]
(1) Near the EMP chair at the start.
Creating a reason to disable Jensen's augmentations. (2:05)

(2) Entering the corridor with the security camera.
The subtle hints of Jensen receiving outside help. (1:18)

(3) Approaching a ladder.
Using enhanced shadow details. (1:13)

Forward Section: Floor 4
(4) Near "Immersion Suit" poster.
Conveying the feeling of a rocking boat. (1:18)

(5) Near "Safety First" sign.
Creating diverse alternate paths. (0:52)

(6) Next to Jensen's equipment.
Creating your equipment based on earlier dialogue choices. (1:51)

(7) In the corridor before the Cargo Hold.
The difficulty in adding a side quest. (2:04)

Forward Section: Floor -1
(8) Near the side quest pod.
Drawing the players attention to the broken pod. (2:40)

Forward Section: Floor 5
(9) On top of the moving container when it's in the default position.
The creation of the moving container. (1:50)

Forward Section: Floor 3 [West]
(10) Inside (or on top of) the slanted red container.
Showing that Jensen put up a fight when he was discovered in the pod. (1:40)

Topside: Floor 1
(11) After climbing the ladder to the deck of the ship.
Creating the illusion of the boat moving. (1:49)

Topside: Floor 2
(12) Near the fishing rod and fish.
Creating the fishing kit. (0:59)

Aft Section: Floor 6
(13) In the white corridor.
Creating a stark visual contrast between areas. (0:47)

(14) Near the holographic table.
The shaders used to create the holographic table. (1:23)

(15) Next to the security hub inside the C.I.C.
Creating the cutscene of Jensen talking to a mysterious helper. (2:12)

Aft Section: Floor 2
(16) Near the gas leak.
Adding storytelling through the environment. (0:55)

Aft Section: Floor -1
(17) After exiting the elevator.
Making the players previous actions affect the enemies status. (1:20)

(18) Before the biometric scan.
Using the loading sections for story purposes. (1:45)

29: Rifleman Bank Station [1st Visit]
.png]

Loading Bays/Admin: Floor 1 [West]
(1) Near a large cargo door/ramp.
Creating a more interesting transition between the boat and station. (0:53)

(2) In front of the main entrance.
The change in enemy procedure based on past actions. (1:31)

(3) Before a Typhoon turret.
Creating the Typhoon turret. (1:21)

Loading Bays/Admin: Floor 2 [North]
(4) Near the security hub.
Creating camera vision for a turret. (0:44)

Loading Bays/Admin: Floor 1 [East]
(5) Before entering the vent to see Netanya Keitner.
Creating a different type of air vent. (0:43)

(6) Inside the small area with Keitner.
Creating this area and the Keitner conversation. (1:56)

Loading Bays/Admin: Floor -1
(7) After exiting the elevator to see Quinn.
Using more advanced environment modelling techniques. (1:05)

(8) In front of Quinn and his store.
The complexity of the dialogue with Quinn. (2:11)

Loading Bays/Admin: Floor 1 [South]
(9) Inside an admin room.
Adding extra unique details to rooms. (1:18)

(10) Near an alarm panel by the Logistics room.
An important e-mail depends on your actions. (1:03)

(11) Outside operations security room near some lasers.
Creating the glowing signs around the base. (1:11)

(12) In front of the Detention Camp 5 doors.
Adhering to both player freedoms and a controlled story. (1:20)

Loading Bays/Admin: Floor 2 [South]
(13) Inside Keitner's office.
The creation of Netanya Keitner's character. (1:09)

(14) Inside Burke's office.
Having the players actions affect a boss fight. (2:23)

Detention Camp: Floor 1
(15) Just after entering the detention camp.
Creating the detention camp. (3:17)

(16) Inside the secret vent.
Creating the secret method to save everyone from the gas. (1:56)

Detention Camp: Floor 3 [North]
(17) Next to one of the Typhoon turrets.
Adding a hidden Praxis kit. (0:49)

Detention Camp: Floor 3 [South]
(18) In the glowing red corridor.
Making the environment feel ominous. (0:41)

(19) Next to the playable audio log.
Creating the audio log player. (0:55)

Detention Camp: Floor 2
(20) In front of Nina the prisoner.
Creating the character of Nina to make the player choice more difficult. (1:14)

(21) CUTSCENE - Listening to Burke, Savage and Kavanagh.
The many reasons for making this part a cutscene. (1:28)

(22) In the morgue area.
The team apologises for the backtracking section. (1:36)

(23) Inside the elevator that leads to the underwater facility.
Designing the view from the elevator. (1:23)

Underwater Facility: Floor 1
(24) In the tunnel with robot arms behind glass.
Creating the robotic arm. (1:05)

(25) Near the living test subject.
Using this area to show things they couldn't in the main game. (1:41)

(26) Near Tiffany Kavanagh.
Coping with some limitations when designing this area. (1:46)

30: Rifleman Bank Station [2nd Visit]
.png]

Restricted Area: Floor 1
(1) After climbing the emergency elevator ladder.
Designing the elevator to stop abruptly. (1:47)

Detention Camp: Floor 1
(2) In front of the computer that controls the gas.
Implementing the gas choice. (3:26)

Loading Bays/Admin: Floor 1 [East]
(3) Inside the security checkpoint that Burke stops you in.
The casting of Burke. (2:22)

(4) After exiting the security checkpoint.
The idea of making the progression to Burke feel like part of the boss fight. (1:12)

Loading Bays/Admin: Floor -1
(5) Near entrance to Quinn's room.
Creating the possible rewards from Quinn. (1:34)

Loading Bays/Admin: Floor 1 [West]
(6) In front of the door before Burke's area.
Making a different kind of boss fight. (1:04)

(7) CUTSCENE - Jensen talking to Quinn. NOTE: Only activates after Burke has been dealt with.
The difficulty of one actor doing two voices. (2:08)

NOTE: This is the last of three commentaries that exist in the game files but don't activate during the game. This commentary is supposed to play over the in-game cutscene at the end of the Missing Link. Below is a video of that cutscene with the missing audio commentary added.

3rd MISSING COMMENTARY - The Missing Link Ending.
The team had to create this cutscene using the in-game engine due to not having any more FMV cutscene budget. (0:47)

31: Omega Ranch


Omega Ranch - Main Facility: Floor 1 [South]
(1) Near the boxes and shelves where you start.
How the start of the Omega Ranch was heavily changed. (1:26)

(2) Outside at the top of a ramp.
Creating the alternate way to disable the antenna. (0:59)

(3) Outside near some benches.
Cutting down the Omega Ranch. (1:27)

(4) In the barracks.
Combining some of the cut Belltower information in to this area. (1:12)

(5) After passing through the decontamination machine.
Implementing a vertical challenge for the player. (0:44)

Omega Ranch - Main Facility: Floor 2
(6) In the room with Nia Colvin.
Some information on the voice actress who plays Nia Colvin. (0:37)

Omega Ranch - Main Facility: Floor 3
(7) In the room with Eric Koss.
Details on the voice actor who plays Eric Koss. (1:57)

Omega Ranch - Main Facility: Floor -1
(8) After exiting the elevator to this area.
Some cut ideas to show the horrific experiments being conducted here. (1:09)

(9) In the operating room near Declan Faherty.
The renaissance inspired operating room. (1:39)

(10) In the morgue.
Conveying the large amount of deaths due to the experiments. (0:38)

Omega Ranch - Main Facility: Floor 1 [North]
(11) In front of the disk reader and security hub.
Ensuring the player knows they are coordinating with a team. (1:40)

Omega Ranch - Restricted Area: Floor -1
(12) CUTSCENE - Talking with Zhao before the Namir boss fight.
The team discuss balancing the two possibilities of this fight. (1:35)

(13) In Namir's boss fight area.
The design of Namir. (3:06)

(14) CUTSCENE - Adam talks with Megan.
The compromise of having to put a lot of information in to this cutscene. (2:17)

(15) In the white room.
The difficulty encountered in creating the white room. (2:07)

Omega Ranch - Restricted Area: Floor 1
(16) Near the red button.
Problems creating the end of this map. (1:29)

(17) In the secret room with the computer.
Including a reference to Megadeth. (1:56)

(18) Before going up some small stairs.
Information on the LEO shuttle. (1:25)

(19) CUTSCENE - Adam uses the LEO shuttle.
The original plans to have the cutscene be interactive and its relation to the Icarus myth. (1:13)

32: Panchaea


Panchaea - Landing Pad: Floor 1
(1) At the top of the ramp leading down from the helipad.
Some unused alternate ideas for the start of Panchaea are discussed. (2:56)

Panchaea - Port of Entry: Floor 2
(2) Near a stack of crate pallets.
Creating an eerie atmosphere. (1:58)

Panchaea - Tower Section: Floor 1
(3) Near a dead woman after exiting the elevator.
Creating the icebergs seen in the distance. (1:31)

(4) In the corridor between the cafeteria and store room.
Some regrets regarding the "crazies". (2:15)

Panchaea - Tower Section: Floor 2
(5) After the broken window.
The team discuss some regrets with the Hugh Darrow social battle. (2:55)

Panchaea - Ring Section: Floor 2
(6) Inside the Checkpoint Beta room.
Creating interesting e-mails in Panchaea. (1:13)

(7) Near William Taggart.
Some of the original ideas for a more customised ending. (1:12)

Panchaea - Ring Section: Floor -4
(8) In Sarif's room.
The team wanted to have these conversations be more interactive. (1:35)

Panchaea - Ring Section: Floor -1
(9) Approaching the long bridge in a huge room.
Creating the inside of Panchaea. (1:50)

(10) Before the large elevator.
Creating the elevator and surrounding environment. (4:06)

Panchaea - Hyron Core: Floor 1
(11) CUTSCENE - Zhao tries to control the Hyron Project.
Details on the Hyron Core. (2:18)

(12) CUTSCENE - Zhao dies.
Some of the original ideas for Jensen to be seriously hurt in the ending. (0:29)

(13) In front of the message buttons.
Creating the final room and some regrets with the process of selecting an ending. (4:27)

(14) Near the button that sinks Panchaea.
Some more unused ideas for the ending area. (1:54)

27 Comments
KanineSnow Apr 4, 2020 @ 8:58am 
Holy shit this is great!!!
Sirorco Feb 9, 2019 @ 12:43pm 
Thanks !:cozyroe:
Eldridge Misnomer Feb 1, 2018 @ 7:42am 
This is a fantastic resource, you're to be highly commended.
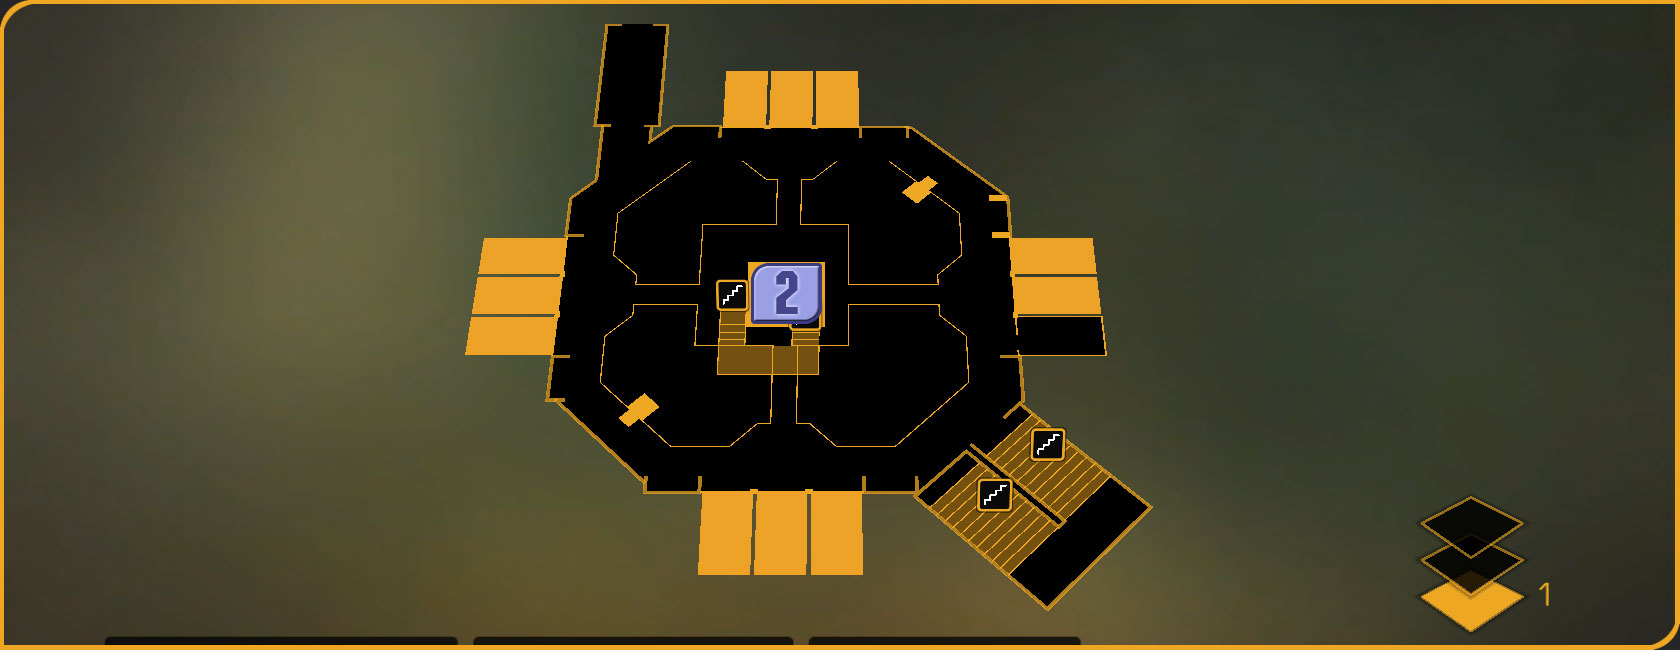
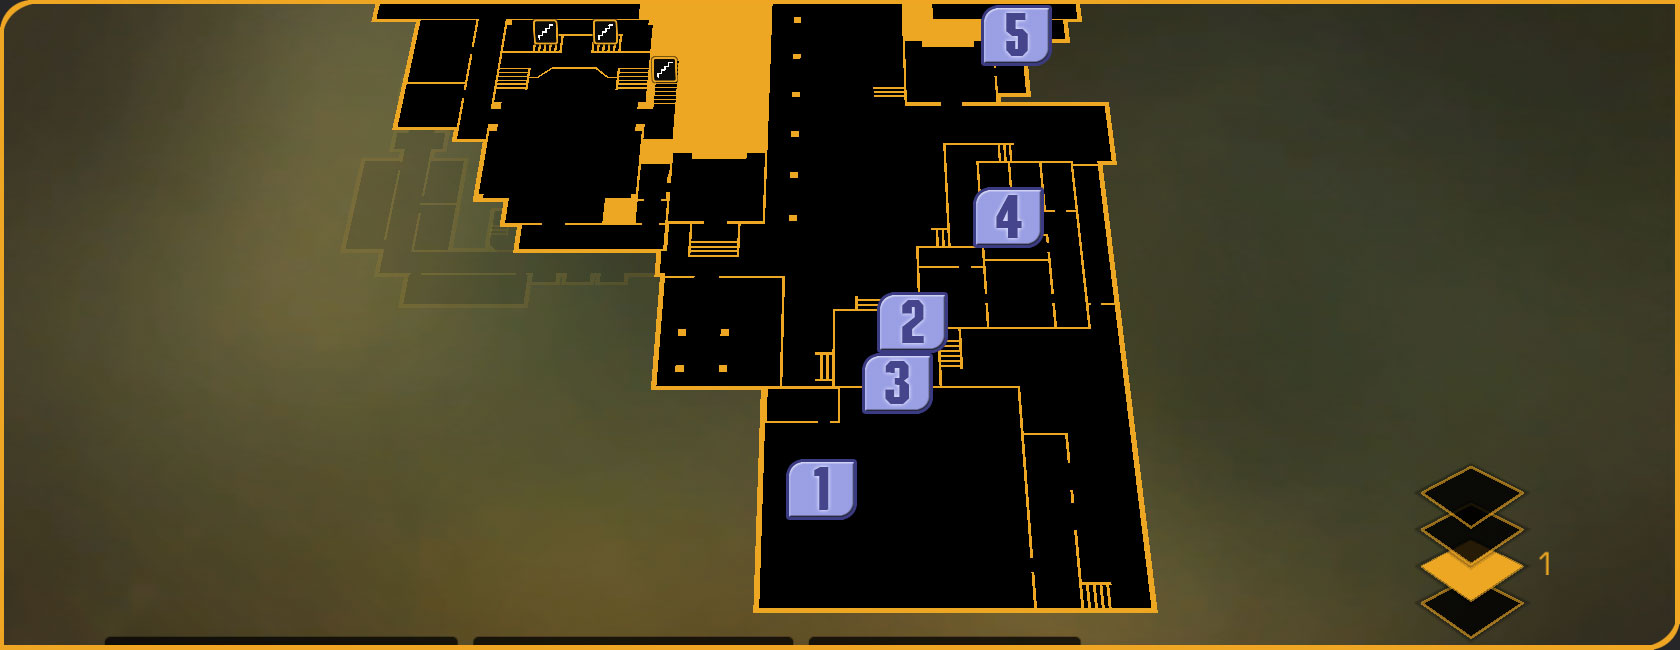
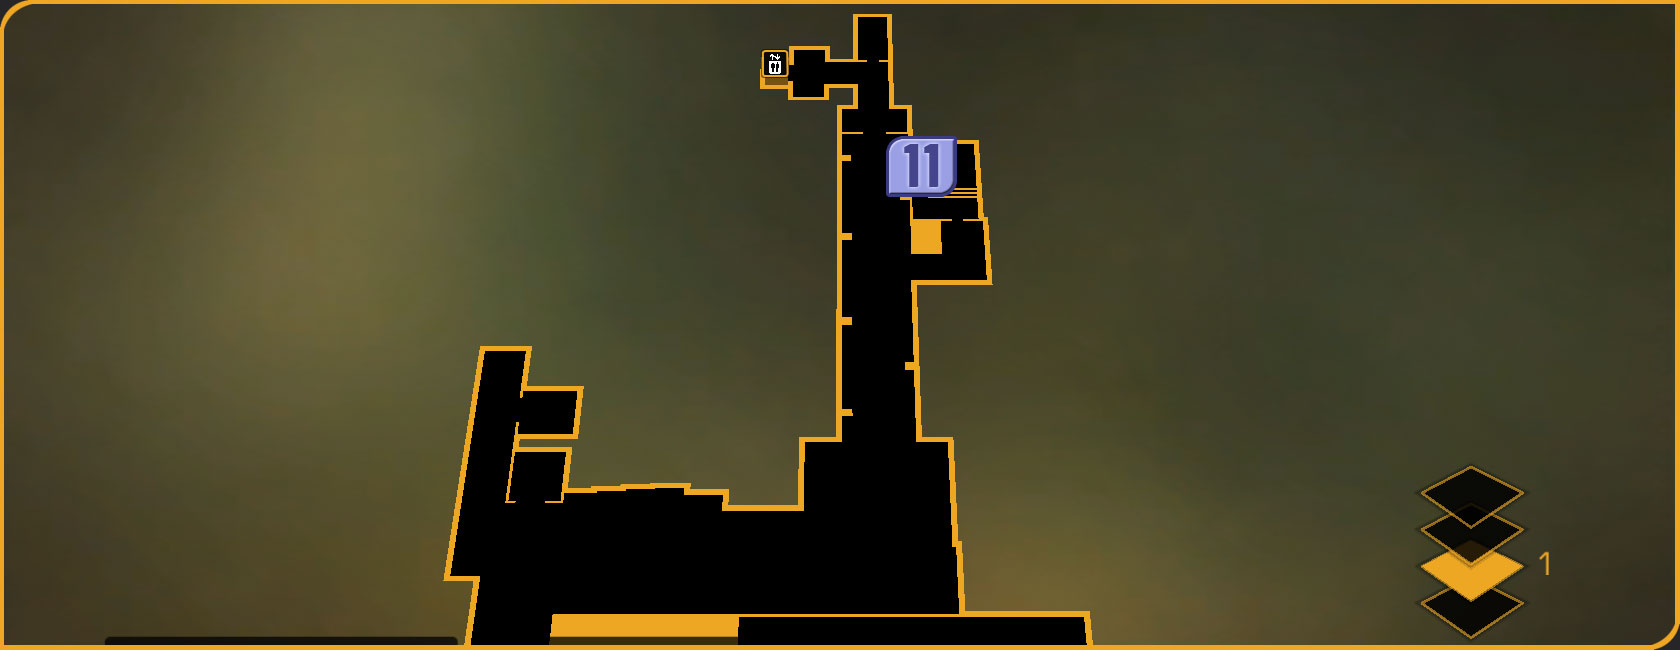
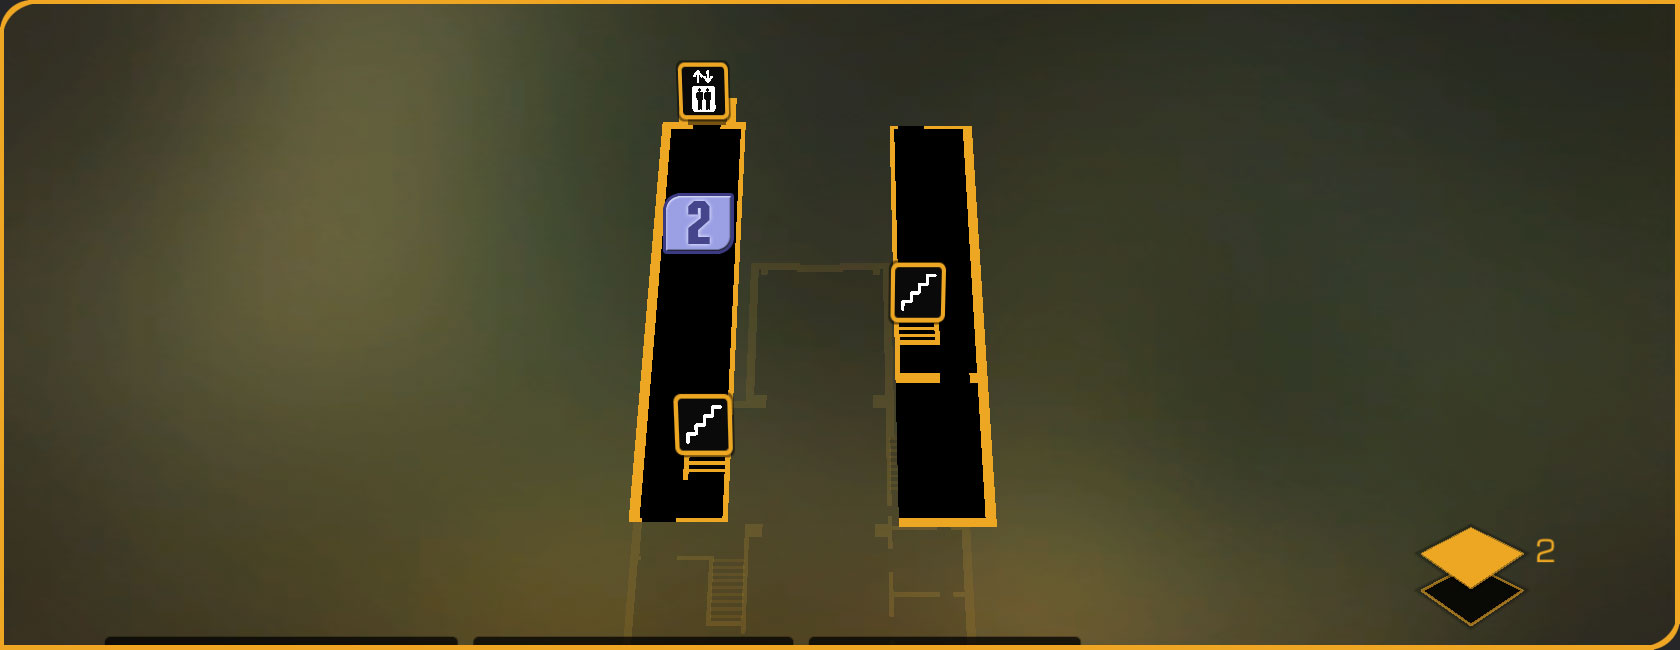
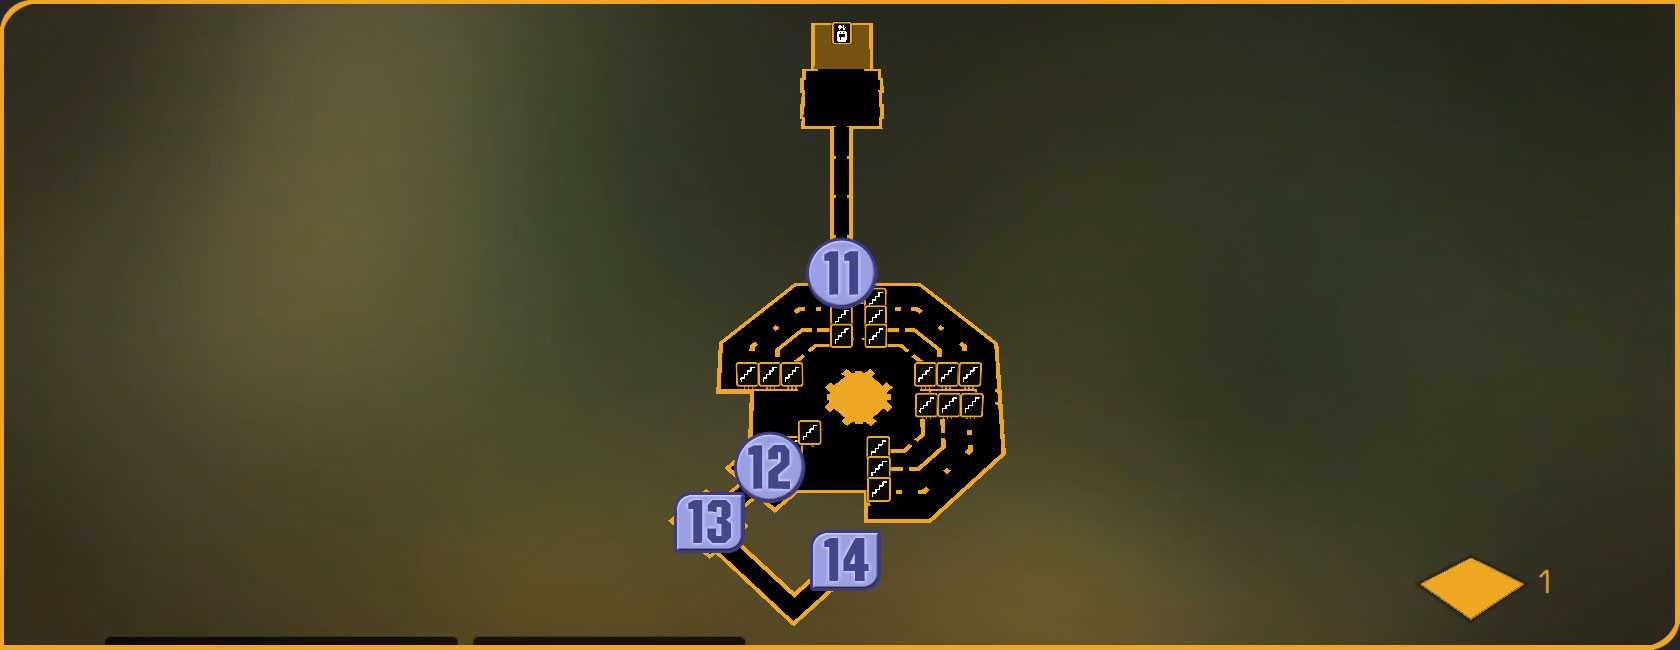
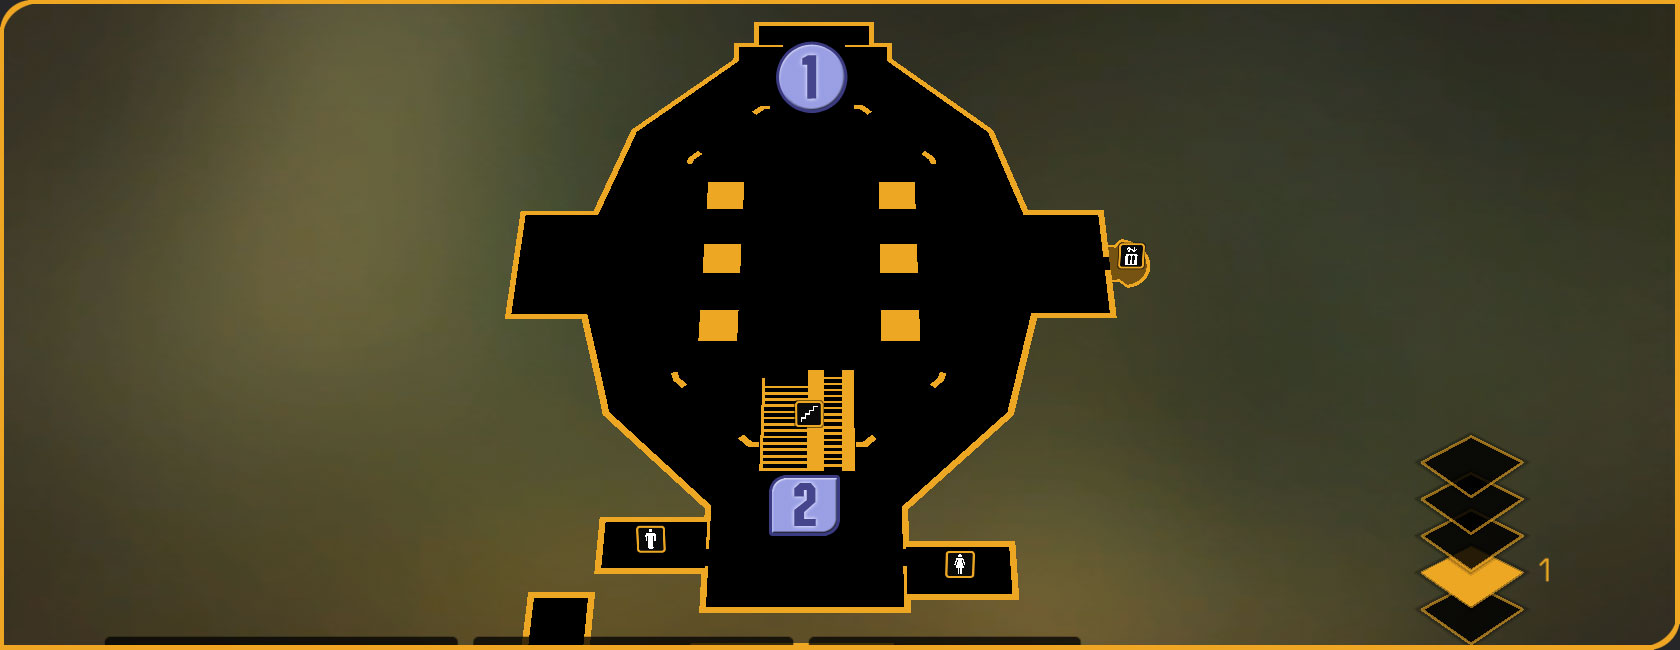
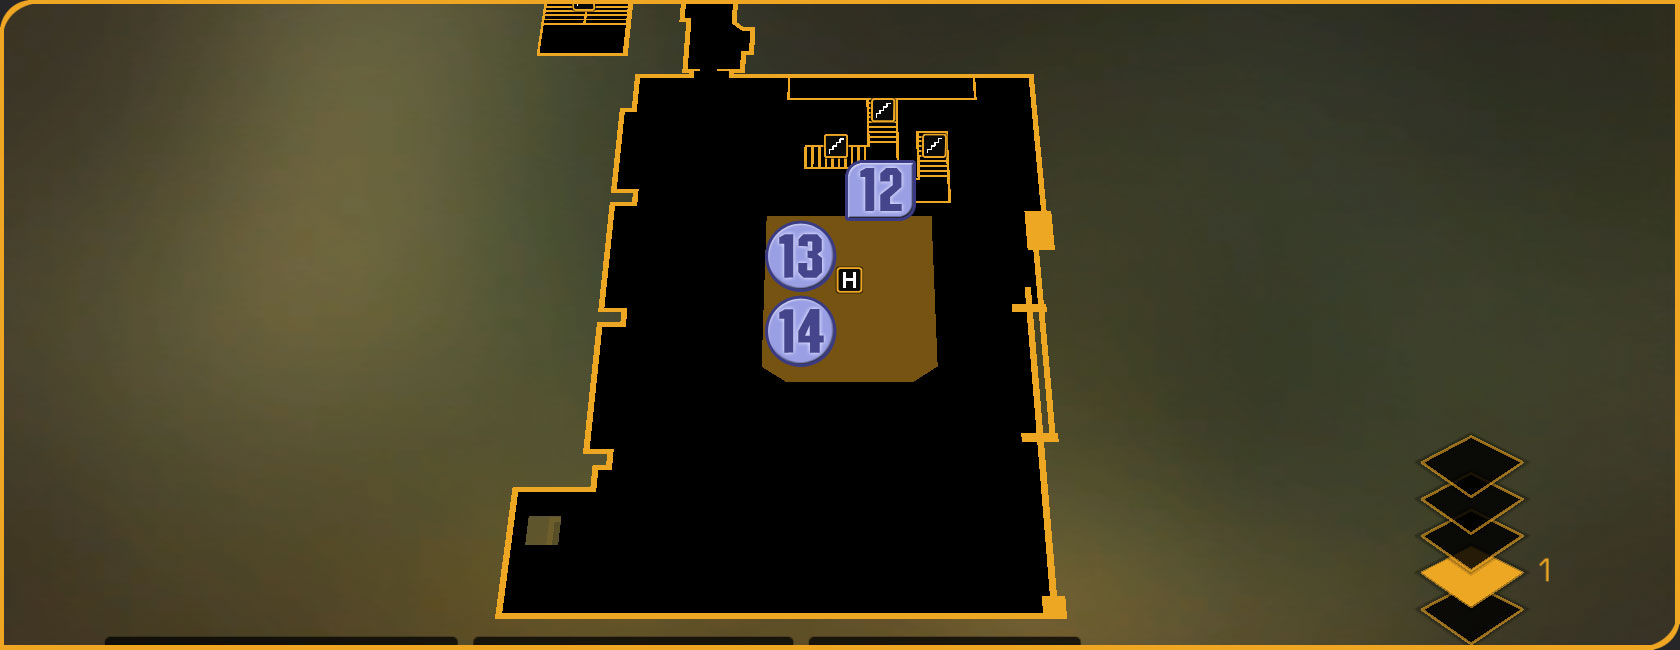
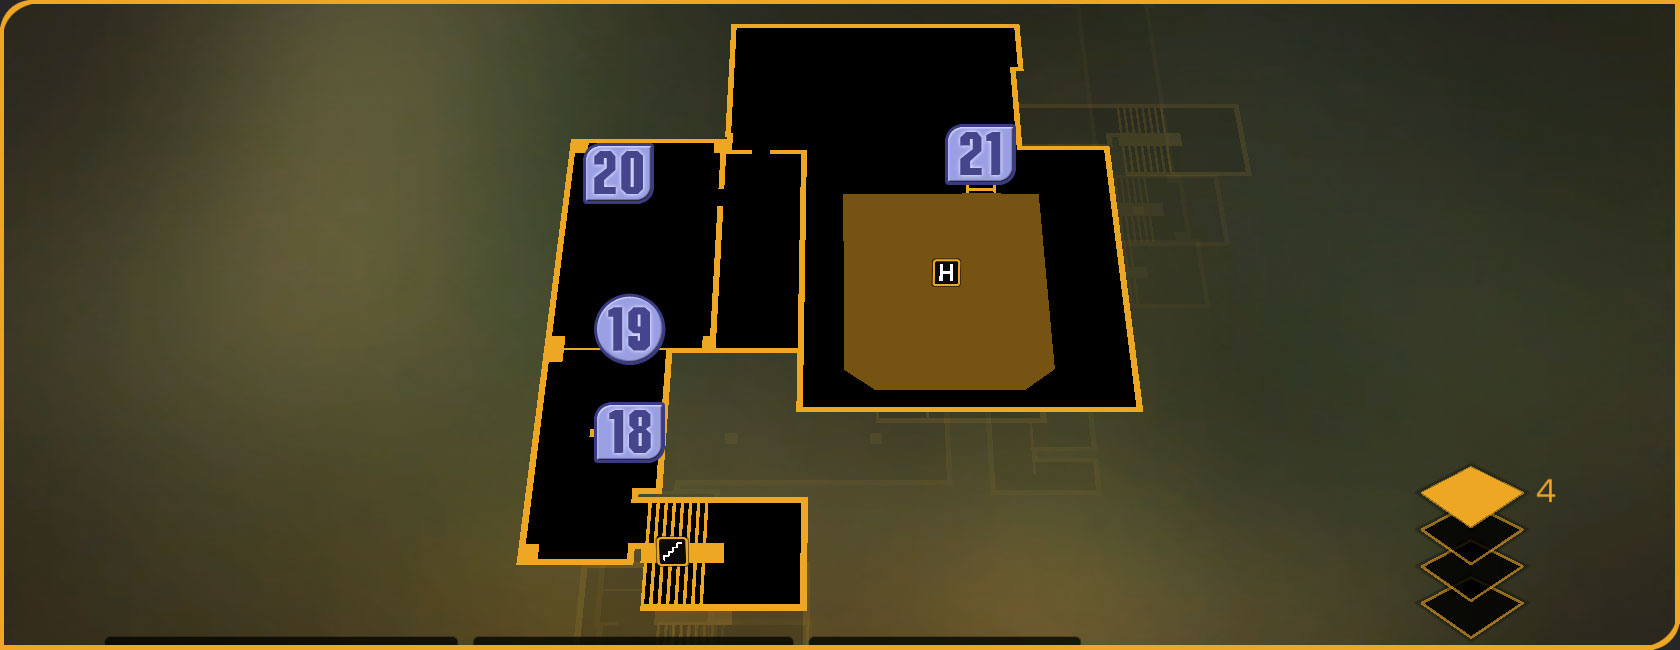
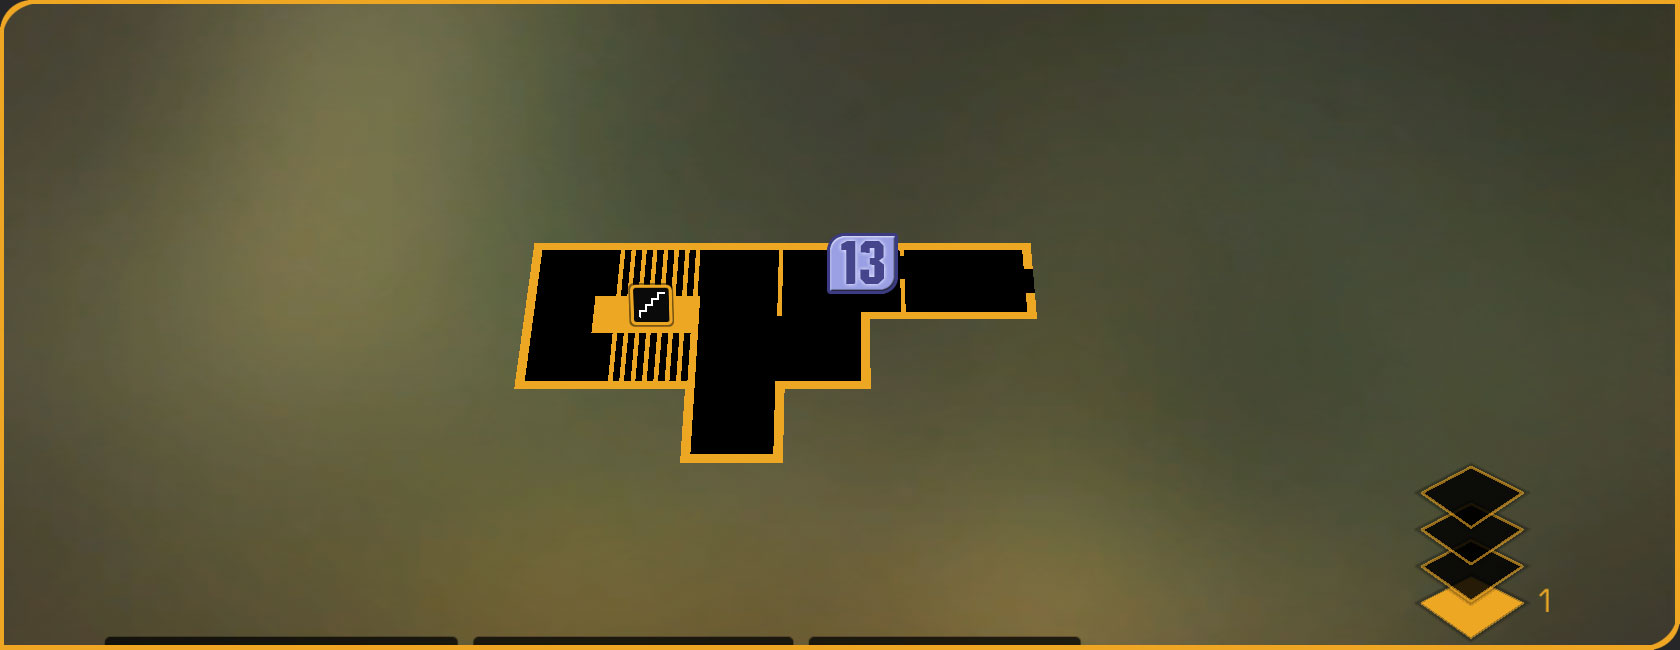
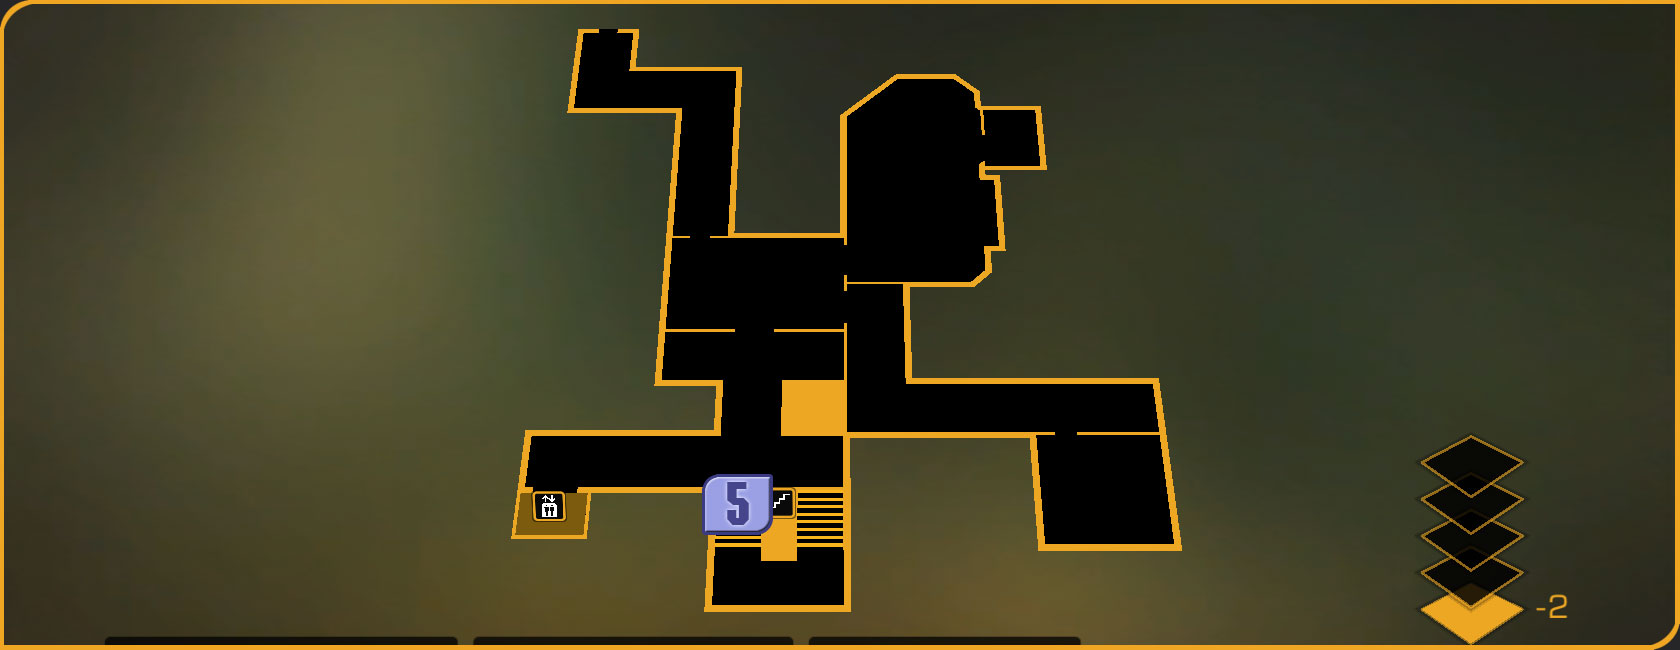
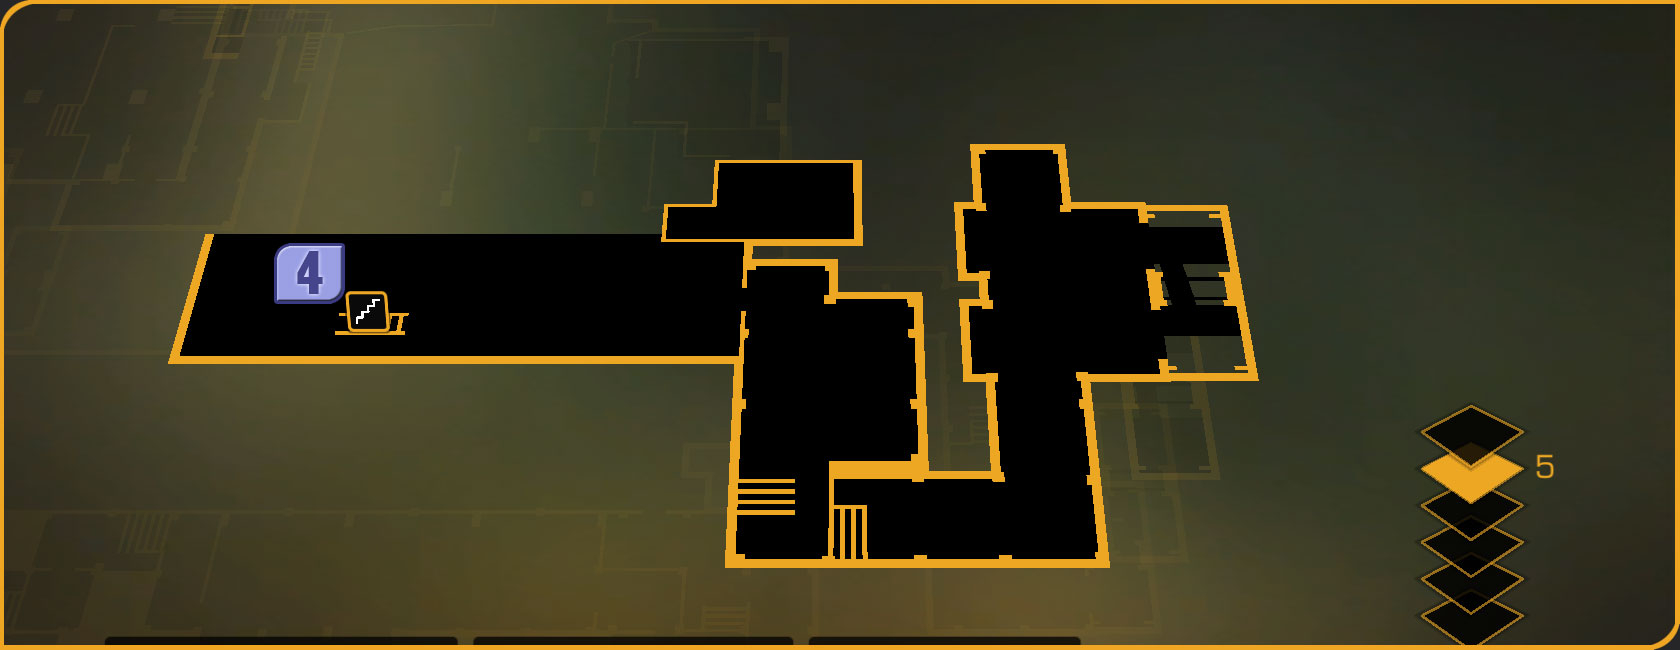
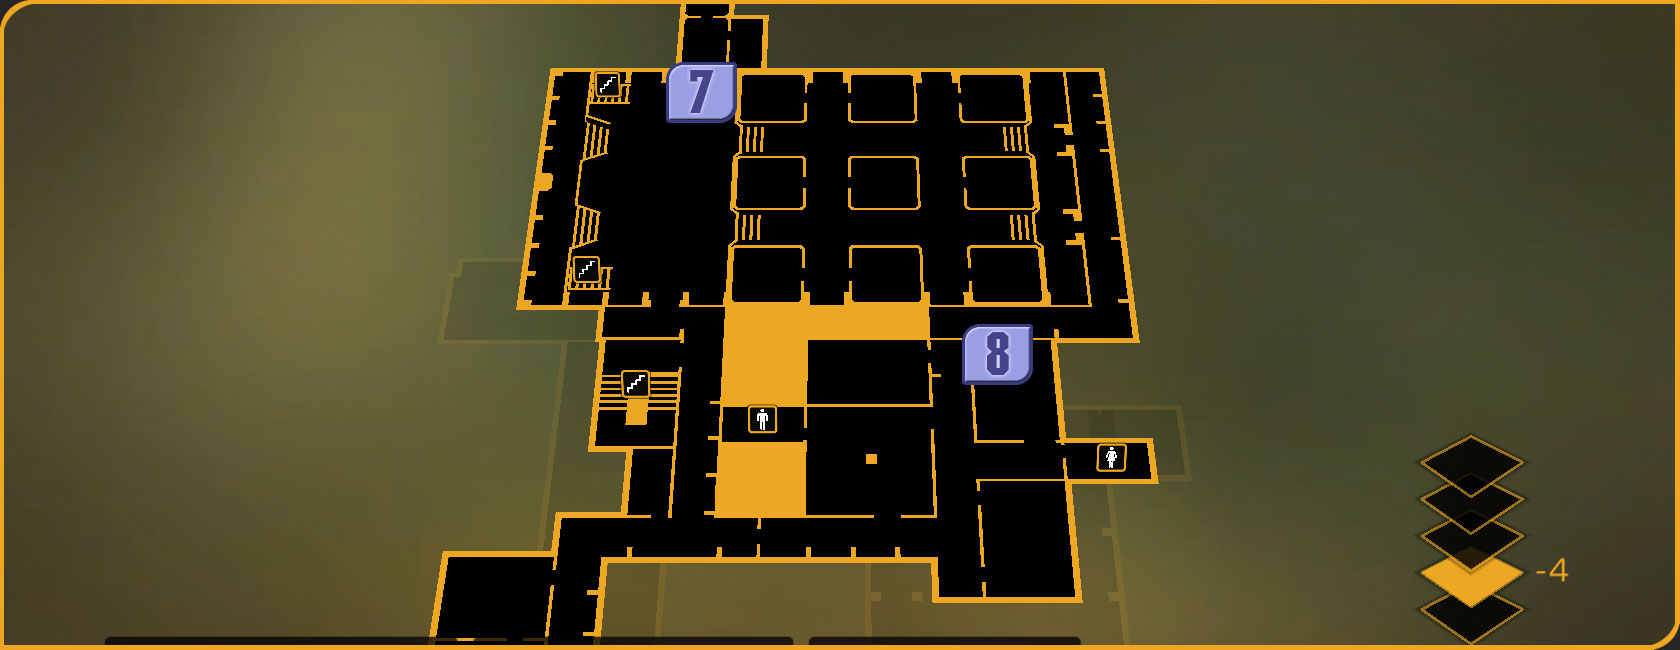
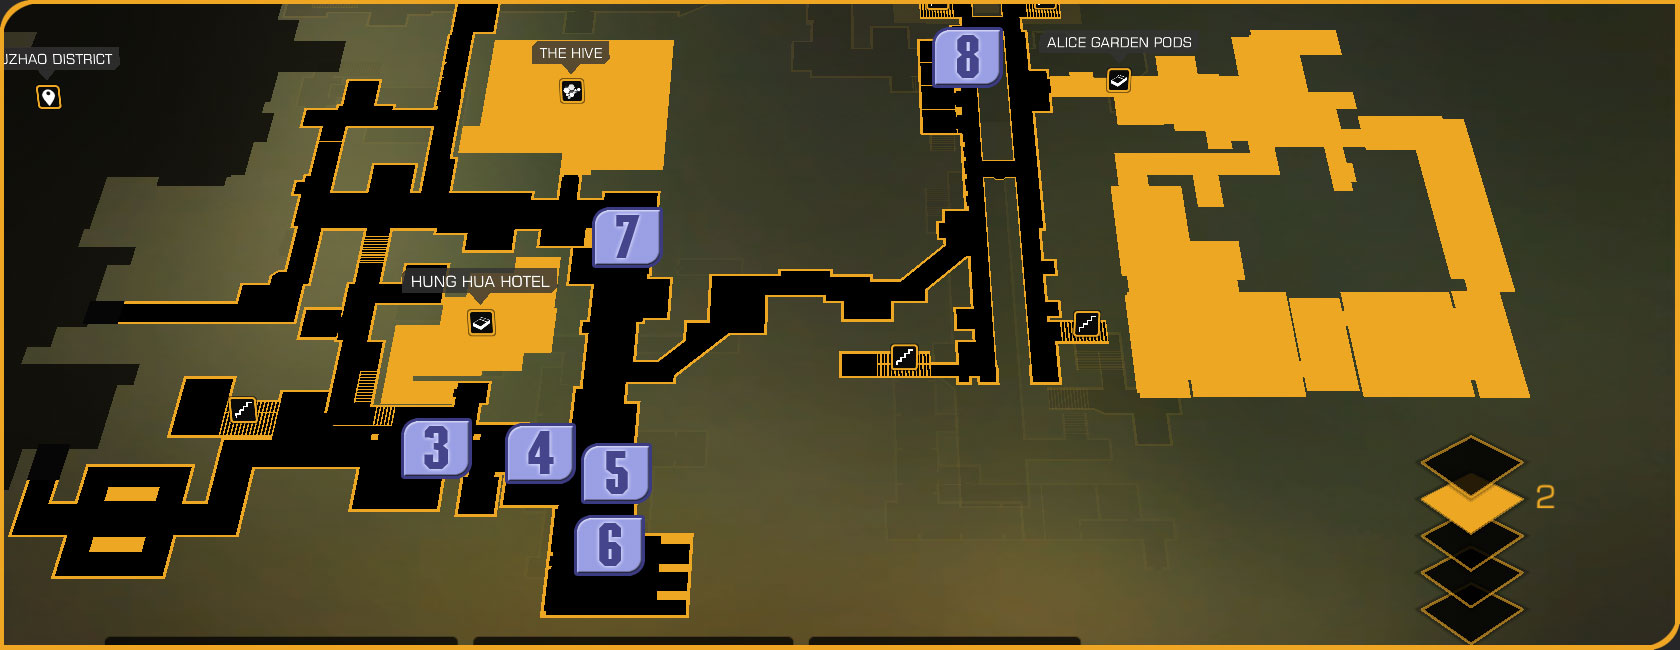
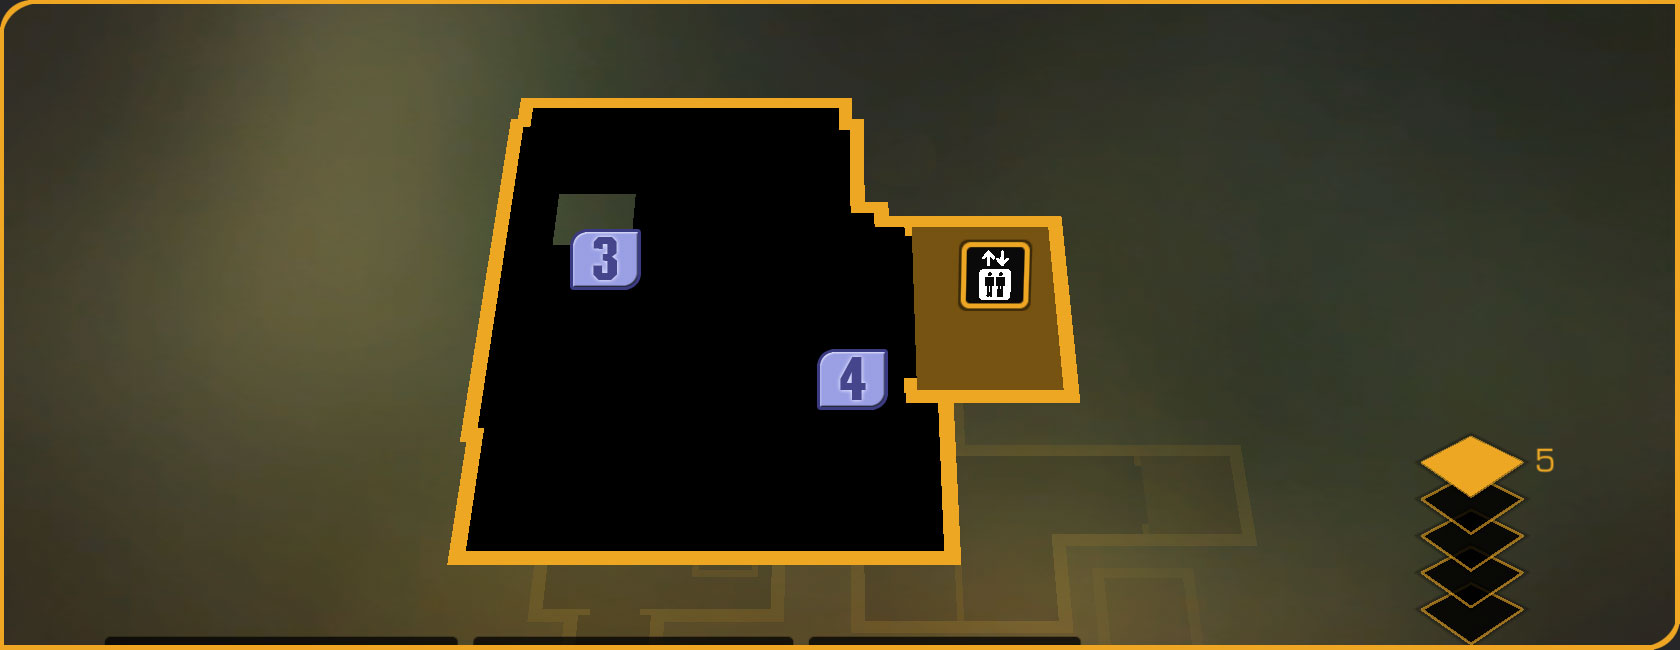
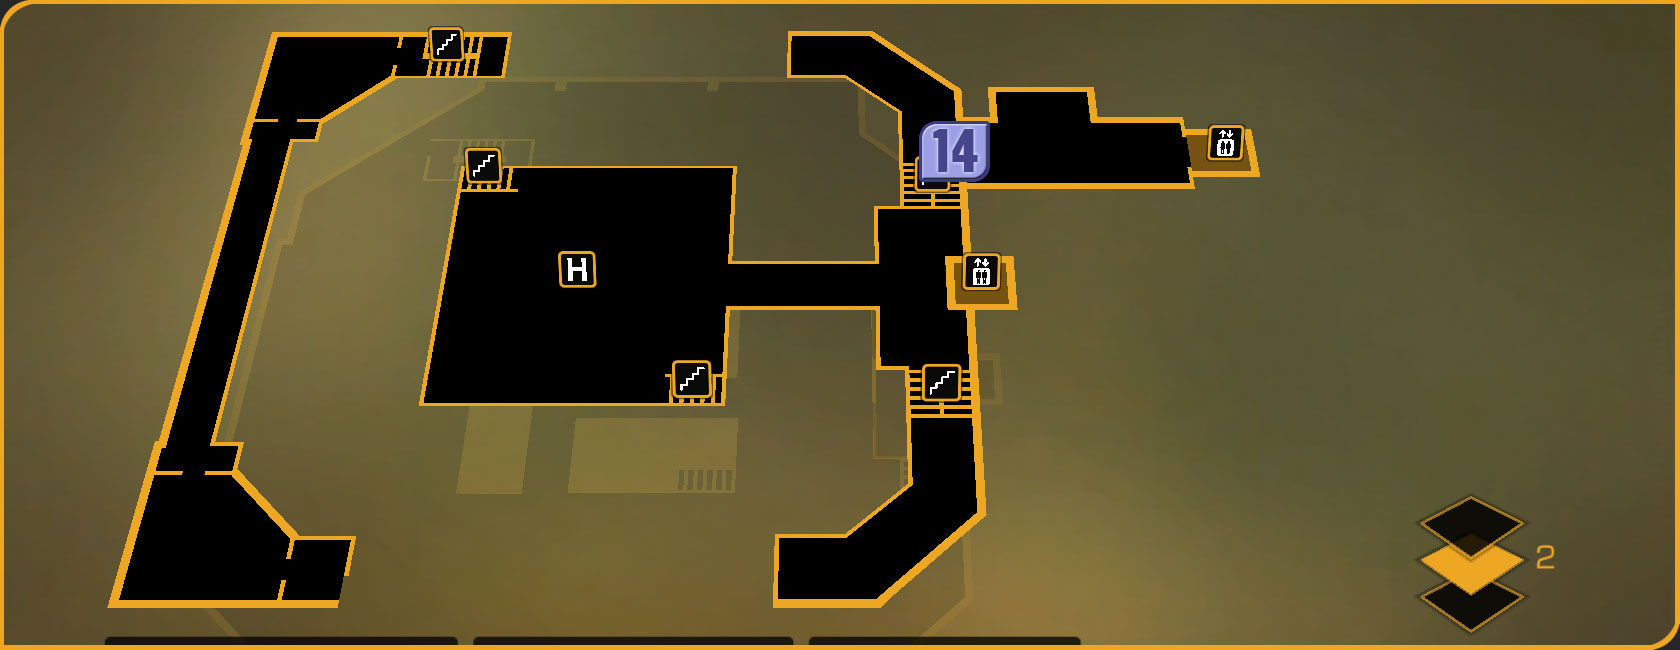
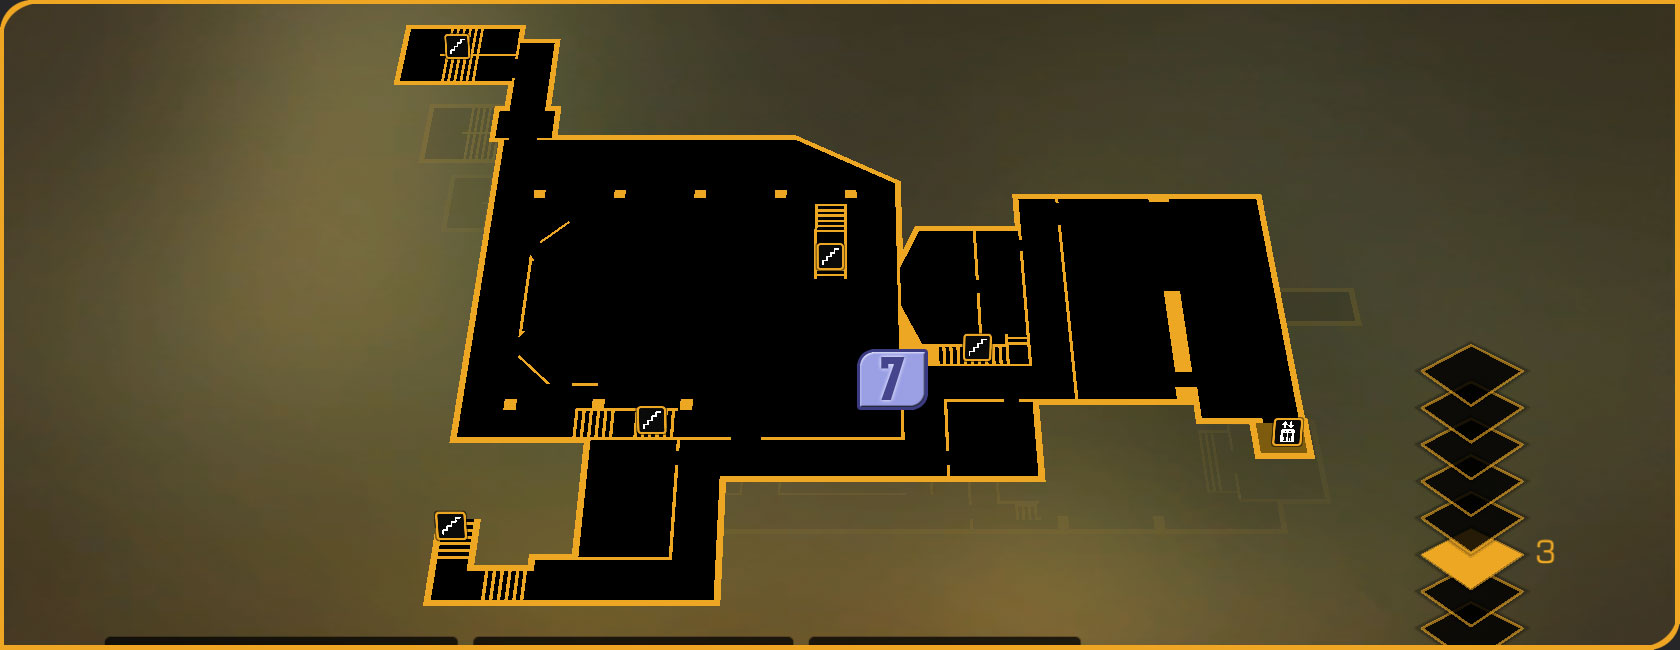
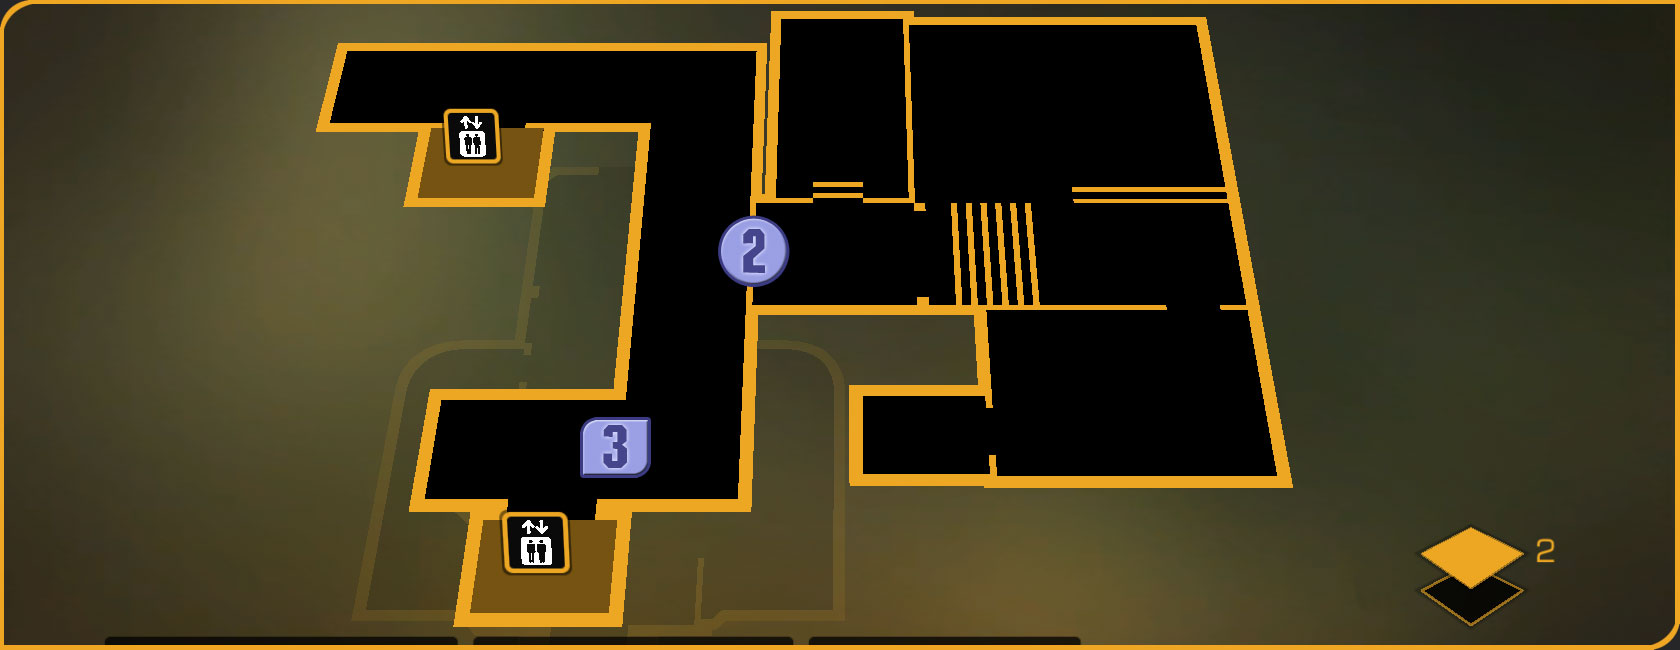
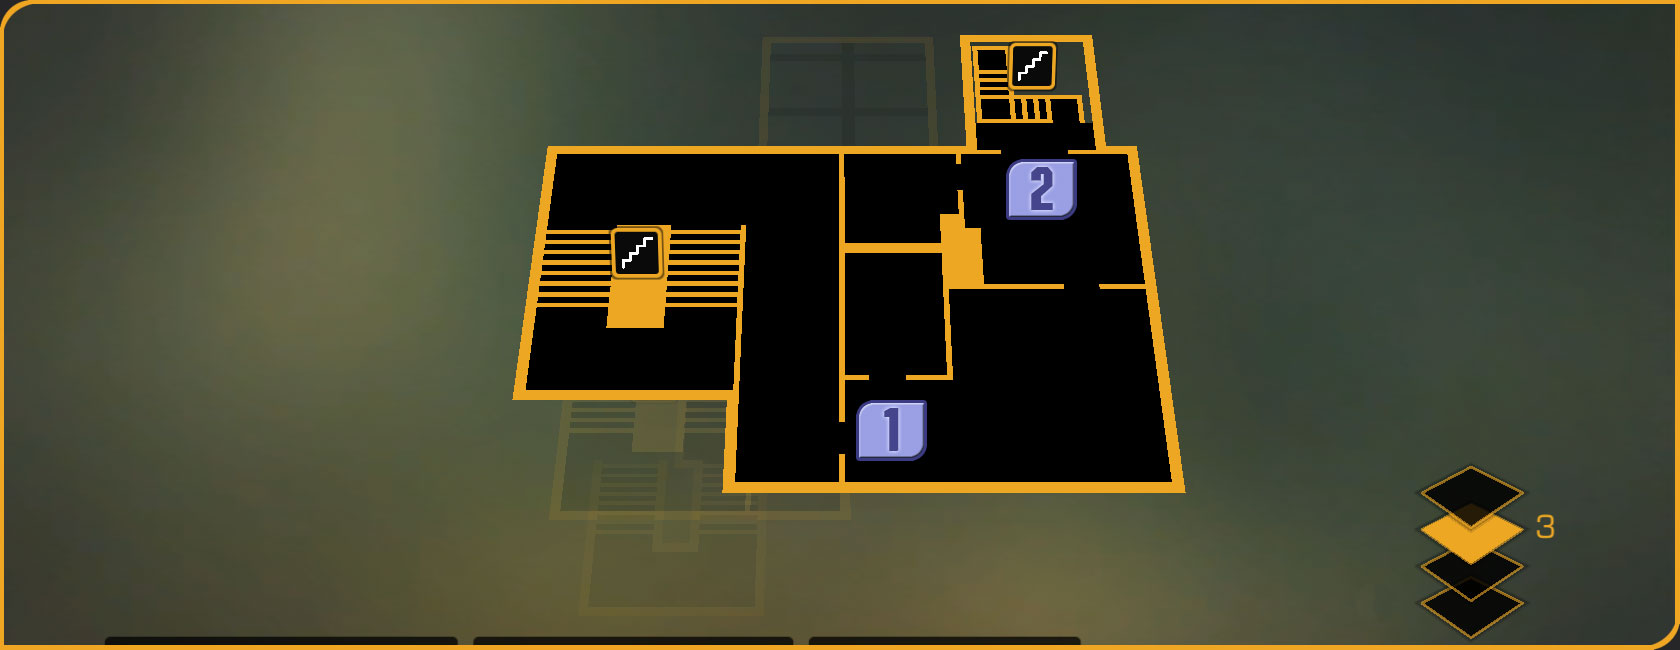
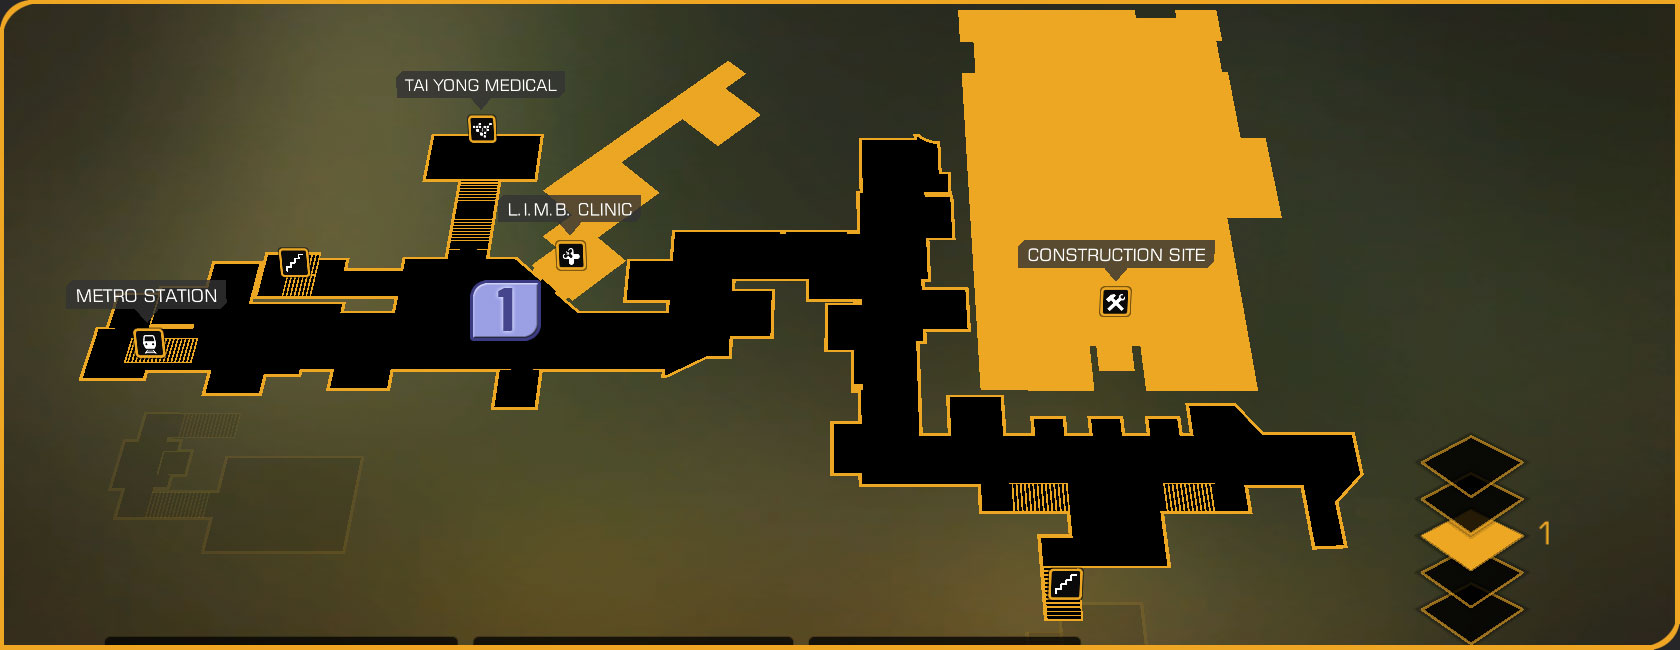
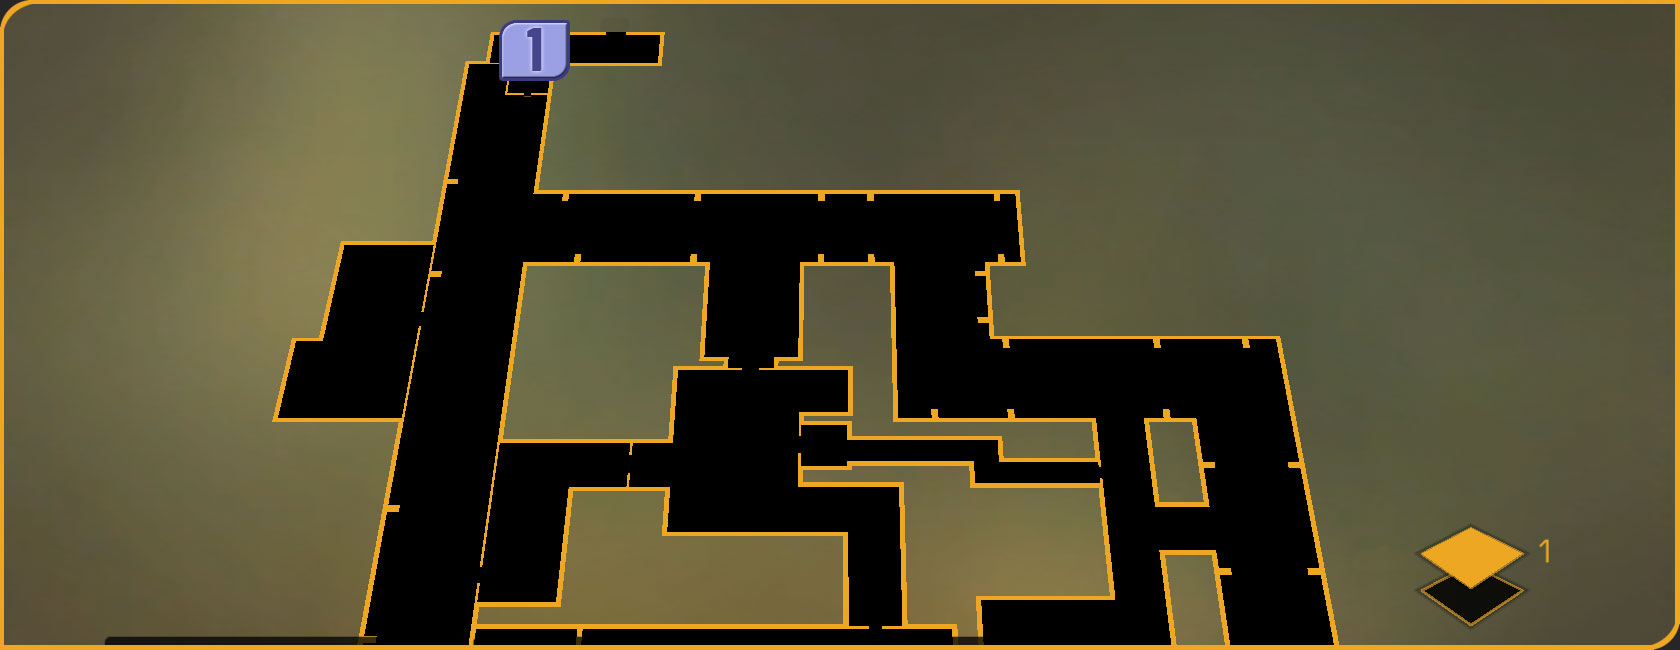
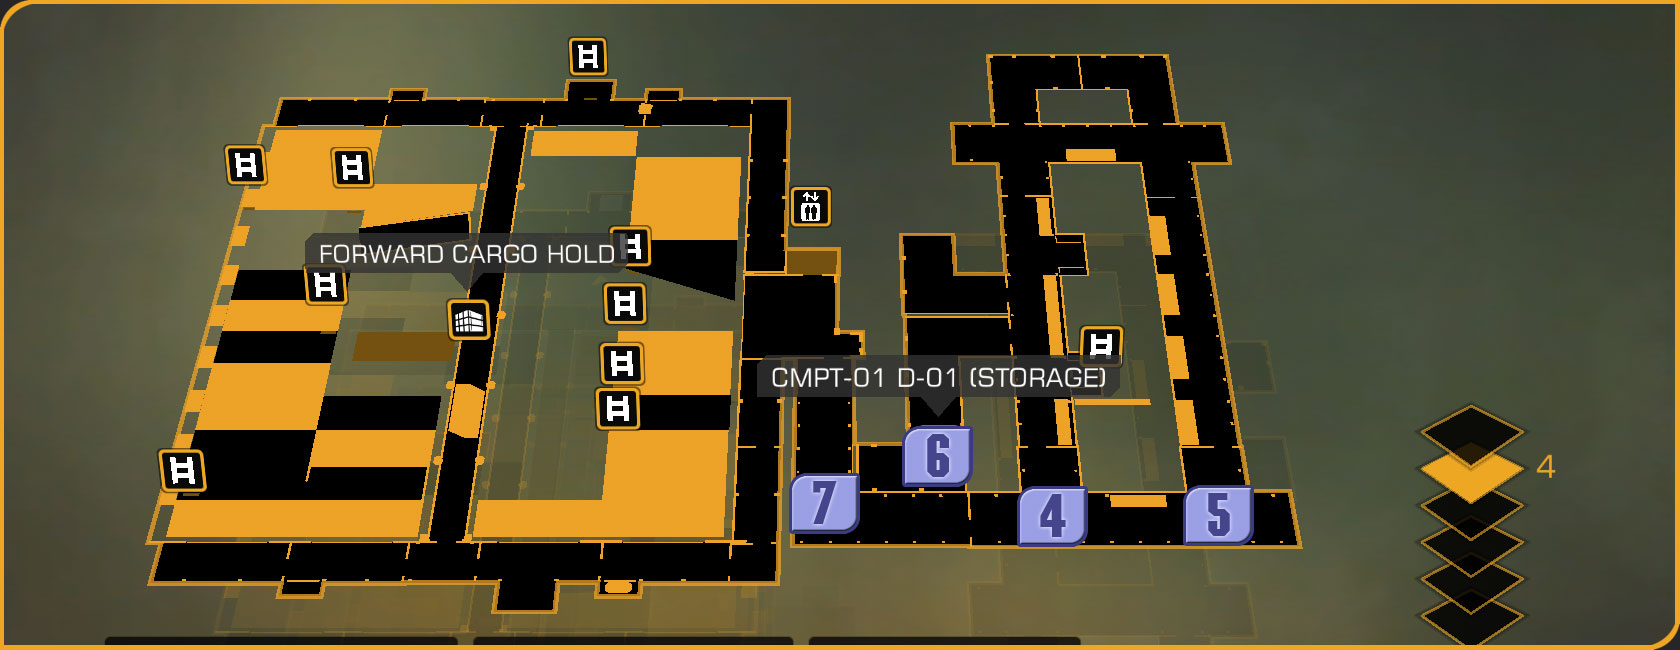
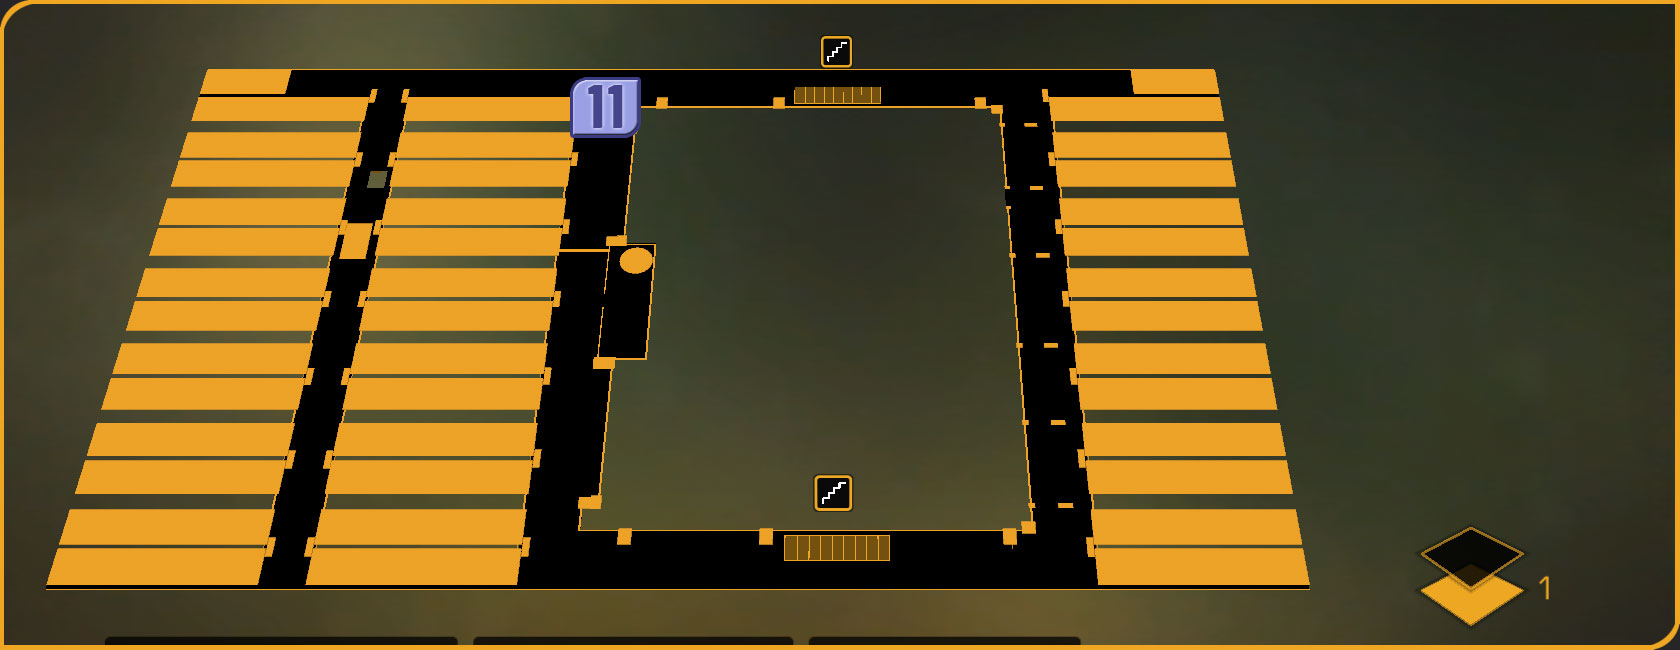
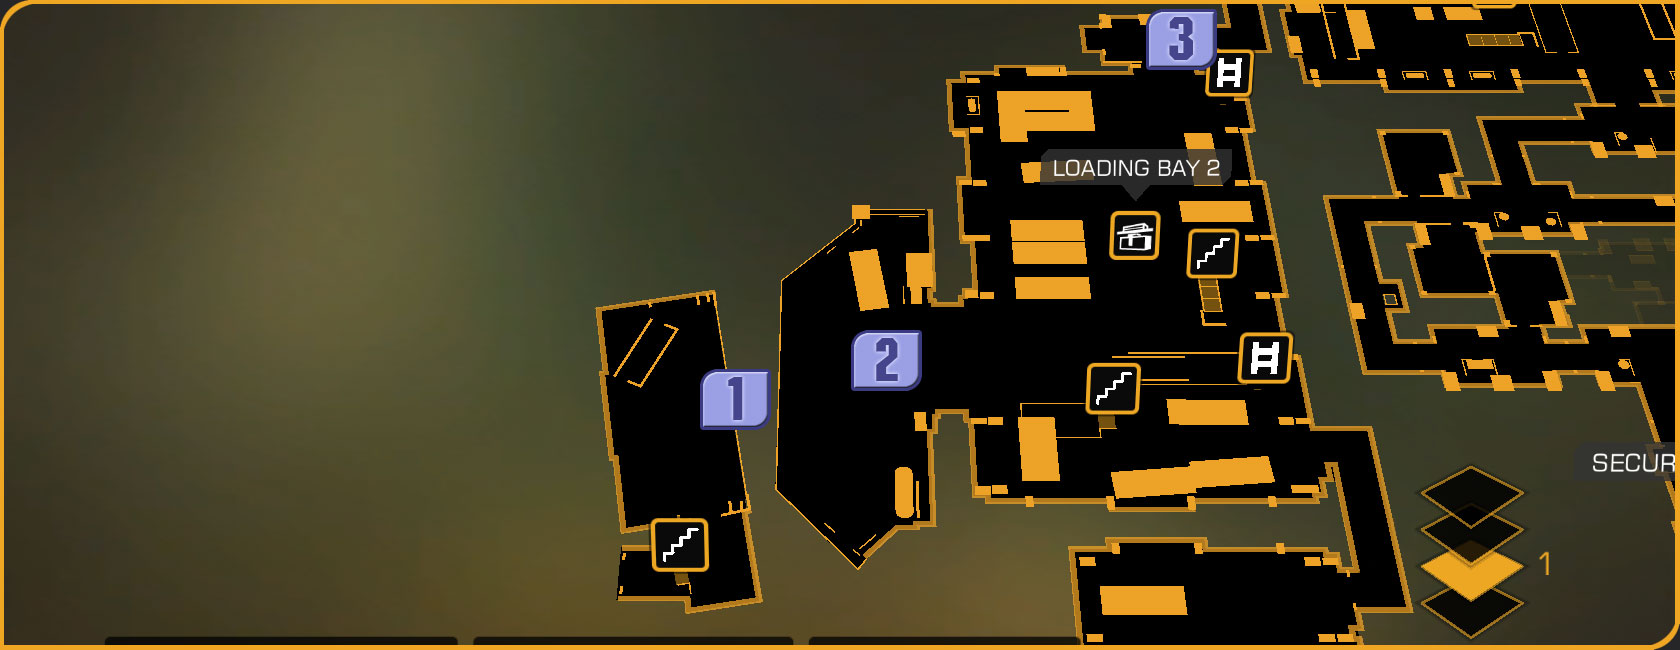
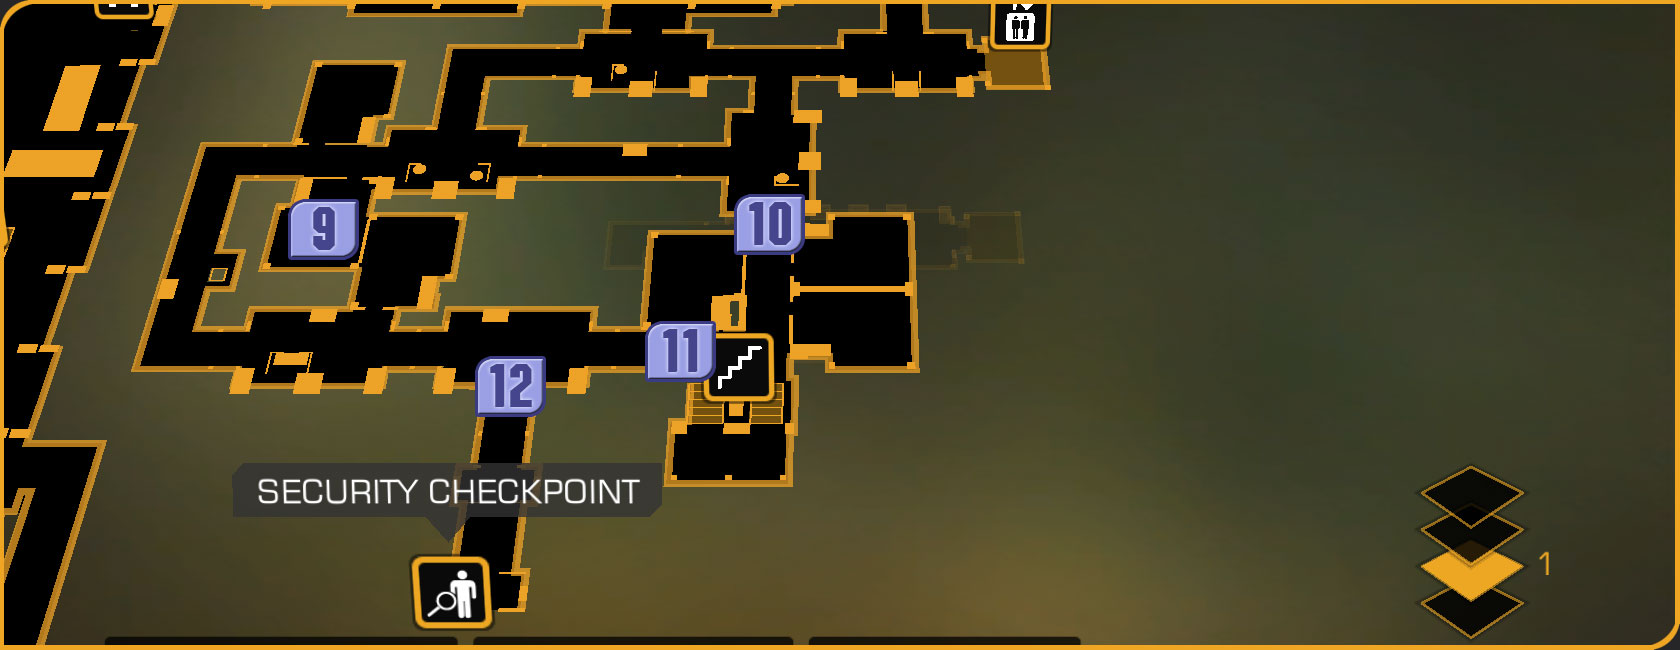
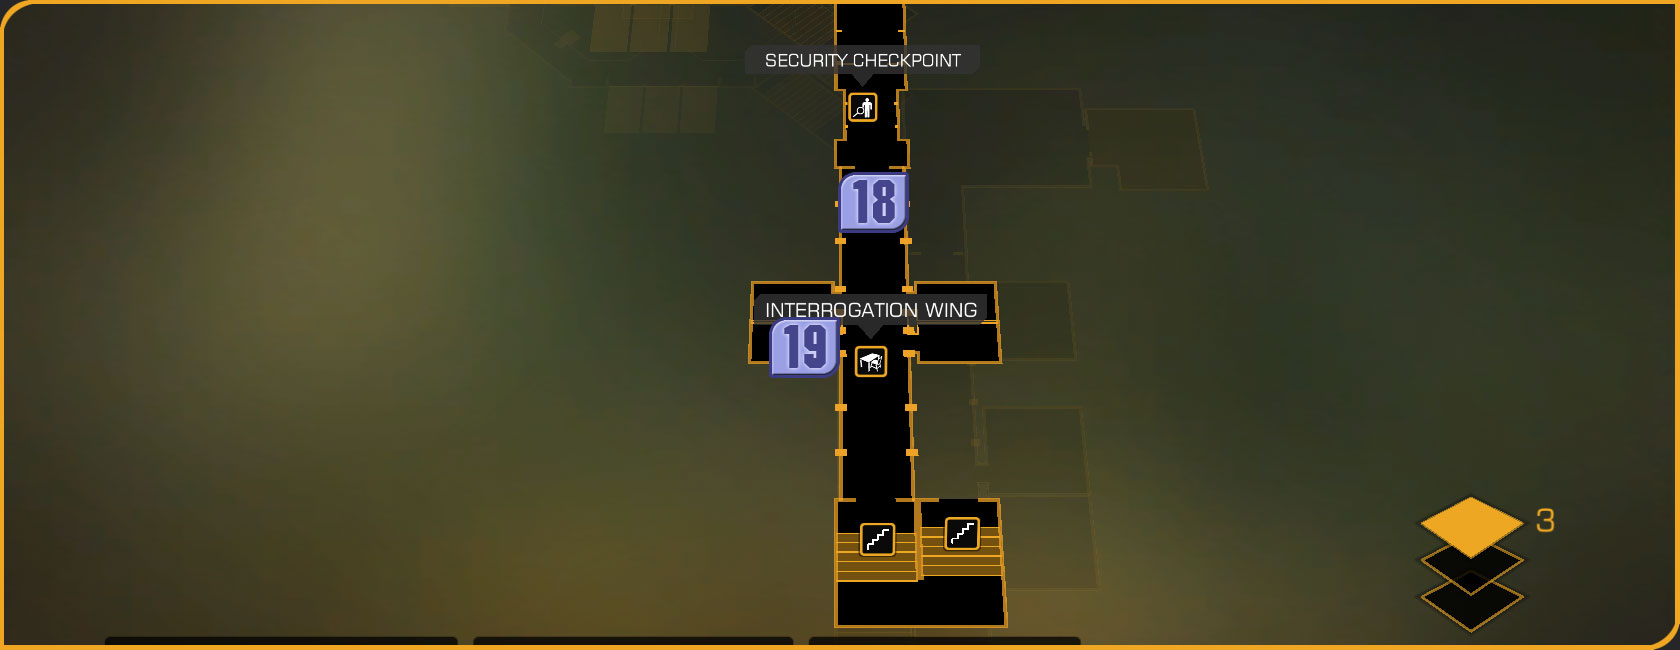
I've just played through using it and found it invaluable.
Cheers. :steamhappy:
Artoriaz Dec 12, 2016 @ 7:57am 
Good Job :D
Kassad Oct 23, 2016 @ 3:33am 
Great job. Must`ve been painstakingly hard collecting all of them (EXCELLENT WILLPOWER)
CyberPioneer Oct 22, 2016 @ 9:00am 
Excellent work! Nice guide :47_thumb_up:
Xazuki  [author] Aug 24, 2016 @ 4:20am 
Glad you found it useful. Thanks for pointing out my spelling mistake too, that one must've slipped past me... 17 times, including the index and header!
Jepp Aug 24, 2016 @ 2:32am 
Listened to every single one with a friend. Thanks for this!
My only criticism is the spelling of Panchaea on here ;0
HeppuV Aug 9, 2016 @ 2:45pm 
Thank you so much
Bropalm Oct 26, 2015 @ 5:07am 
Thank you for this, very helpful.