
Установить Steam
войти
|
язык
简体中文 (упрощенный китайский)
繁體中文 (традиционный китайский)
日本語 (японский)
한국어 (корейский)
ไทย (тайский)
Български (болгарский)
Čeština (чешский)
Dansk (датский)
Deutsch (немецкий)
English (английский)
Español - España (испанский)
Español - Latinoamérica (латиноам. испанский)
Ελληνικά (греческий)
Français (французский)
Italiano (итальянский)
Bahasa Indonesia (индонезийский)
Magyar (венгерский)
Nederlands (нидерландский)
Norsk (норвежский)
Polski (польский)
Português (португальский)
Português-Brasil (бразильский португальский)
Română (румынский)
Suomi (финский)
Svenska (шведский)
Türkçe (турецкий)
Tiếng Việt (вьетнамский)
Українська (украинский)
Сообщить о проблеме с переводом


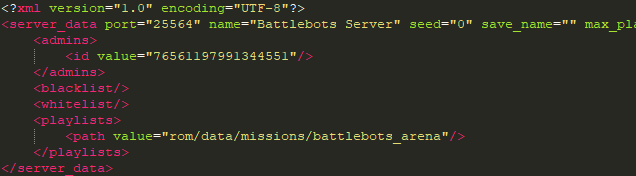


<path path="rom/data/missions/default_ai"/>
<path path="rom/data/missions/default_ai_aircraft"/>
<path path="rom/data/missions/default_cargo"/>
Or would this severely hamper the game experience on the server?
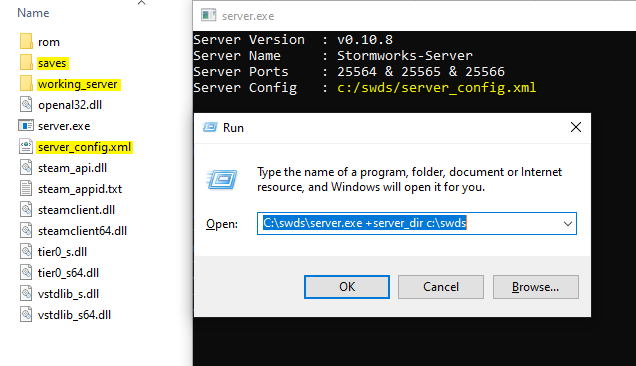
How can I add add-ons from the workshop to my server?
If I put it in <mods> in the xml of server_comfig like any other mod, it will not be added and worked.
I would be happy to answer again if you don't mind.
The correct is that my internet speed has been slow ever since I opened the server, it won't go faster than double digit KB/S.
The person who set up the server takes a few seconds to connect, but my friend takes tens of minutes to connect.
I could not find anything related to internet speed in the server settings.
What should I do?
OK,I'll play with it in this state for a while and wait until the development supports it.
However, when my friend connects, the internet speed drops only on the server and it takes a long time to load.
Other apps and browsers work fine as usual, only this server at StormWorks is very slow.
Is there a solution?
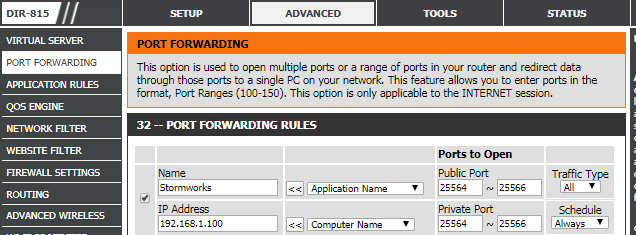
The local port is to your PC, and the external port is what others will use. I think they can be the same.
You can set the protocol to both if you are unsure which is needed.
also i don't know what to put as local ip, would it stay the same?