Counter-Strike 2

Counter-Strike 2

1,975 értékelés
All Mirage Smokes (64 Tick - 2020 Update)
Készítő: wølf
Every Mirage smoke that you will ever need (maybe).

Includes:
  • Territorial Smokes for Beginners,
  • Situational Smokes for Intermediates, and
  • Psychological Smokes for Advanced Players.

128-tick version here: All Mirage Smokes (128 Tick - 2020 Update)
11
   
Díjazás
Kedvenc
Kedvenc
Törlés
Introduction

Howdy

This guide covers over 80 smokes that will help to improve your competitive edge.

Herein you will find a variety of smokes for different strategies including:
  • Territorial Smokes
  • Situational Smokes
  • Psychological Smokes

From the noob to the professional player, this guide will have a little something for everyone:
  1. For Beginners
    Territorial smokes will allow you to acquire or maintain the necessary map control to beat the opposition.
  2. For Intermediates
    A multitude of peculiar smokes and one-ways will allow you to gain the element of surprise.
  3. For Advanced Players
    Add a series of smokes to your repertoire that will allow you to assist your team from across the map or cunningly deceive your opponents.

The smokes in this guide are categorised based upon the general location from which they are thrown.

Number
Location
1
T-Spawn
2
CT-Spawn
3
A-Site
4
B-Site
5
Middle
6
Palace
7
Apartments

Disclaimer eredeti hozzászólása:
These smokes are designed for 64-tick matchmaking servers and may not necessarily transfer accurately when playing on servers with a different tick rate. This guide is accurate as of its publication on 06/02/2020.

For my guide on 128-tick Mirage smokes, click here.
Jump-Throw Bind
Why do I need a jump-throw bind?

The vast majority of these smokes are thrown while stationary, making it incredibly easy to replicate and find success when executing.

However, many of these stationary-thrown smokes take advantage of a jump-throw bind which allows you to jump and throw smokes in the exact same fashion each time.

Setting up a jump-throw bind.

1. Navigate to your Counter-Strike: Global Offensive config (cfg) directory.
By default, it is usually located in: Program Files (x86) > Steam > steamapps > common > Counter-Strike Global Offensive > csgo > cfg.

2. Inside this folder, create a new text file with notepad (or similar) and enter the following:
alias "+jumpthrow" "+jump;-attack"
alias "-jumpthrow" "-jump"
bind "key" "+jumpthrow"
echo "Jump-throw bind is now set."
NB: Here, "key" can be replaced with any input that you would prefer i.e. bind "z" "+jumpthrow" is what I use. For those that are not experienced with making their own config files, I recommend that you choose a key that is not bound to anything else as this code will overwrite any antecedent function.

3. Save this file as "name.cfg" where "name" is whatever you prefer i.e. "jump.cfg" (you must include the .cfg suffix) and ensure it is saved in the "any files" format, not a "text document."
This file will remain even if you update your game, so long as you do not uninstall Counter-Strike: Global Offensive.

4. Launch Counter-Strike: Global Offensive, open up the developer console and type "exec name" where "name" was what you titled your cfg file earlier - your jump-bind is now working.
Make sure you have enabled developer console in your game settings. The jump-throw bind works by first pulling the pin on your grenade and then pressing your allocated jump-throw key. You may need to repeat this step each time you launch CS:GO.

1. T-Spawn
Window / Sniper's Nest
  • Crouch, walk and throw.
  • Crouch in the corner and aim at the spot indicated.
  • Move forward while crouched and jump-throw at the level indicated.
  • Perhaps the most difficult smoke in this guide.

Middle Cross / Short
  • Throw.
  • Stand on top of the garbage bin and in the corner.
  • Protects from enemies in window / sniper's nest.

Middle Cross / Short Alternate
  • Throw.
  • Stand on top of the garbage bin and in the corner.
  • Protects from enemies on short.

Short
  • Jump-throw.

Underpass / Lowers
  • Jump-throw.

Connector
  • Jump-throw.
  • Aim in the middle where the two coloured patches meet.
2. CT-Spawn
A Main / A Ramp
  • Jump-throw.
  • If you aim too far left, the smoke will hit tetris and bloom short of the ramp.
  • Great to help extend the utility of your A-site teammates.

Palace
  • Jump-throw.
  • Aim just to the right of the vent on the roof.
  • Great to help extend the utility of your A-site teammates.

Short Peek
  • Jump-throw.
  • Allows a B-short player to peek connector and lower-mid with cover.

CT-Ramp / Ticket Booth
  • Jump-throw.
  • Great for retaking A site.

Deep Apartments
  • Jump-throw.
  • Great when the enemy is shift-walking up to apartments; not so much on B rushes.
  • Requires great precision; you need to aim just on the fine right edge of the wooden peg as the gap is only a few inches across.

Palace
  • Jump-throw.
  • Great for retaking A site.
3. A-Site
A Main / A Ramp
  • Throw.

Palace
  • Throw.

Underpass / Lowers Peek
  • Throw.
  • Great for peeking at the start of the round with cover from top mid.

Palace
  • Run and jump-throw.
  • Stand up against the ticket booth and the crate. Run forward a couple of steps and then jump-throw; you do not need to be overly accurate.

Palace
  • Throw.
  • Great to help your teammate when you are playing in dark / under palace.

CT-Ramp / Ticket Booth
  • Throw.
  • Stand on the floor next to the boxes.
  • Useful when your teammate misses their CT smoke or when it has already dissipated.

Jungle
  • Jump-throw.
  • Stand on the floor next to the boxes.
  • Useful when your teammate misses their jungle smoke or when it has already dissipated.

Stairs
  • Throw.
  • Stand on the first box.
  • Useful when your teammate misses their stairs smoke or when it has already dissipated.

A Main / A Ramp
  • Throw.
  • Aim in-line with the top of the concrete door frame on the top of stairs.
  • Allows a mid player to throw an accurate A Main / Ramp smoke to assist their team.

Palace
  • Crouch and throw.
  • Great for helping your teammate when you are playing at firebox.

Tetris
  • Throw.
  • Useful at stopping enemies from jumping over tetris and into sandwich, funneling them into your line of fire.

Stairs
  • Crouch and throw.
  • Helpful for when you are trapped in sandwich and a player is at stairs.

CT-Ramp / Ticket Booth
  • Throw.
  • Helpful for when you are trapped in sandwich and a player is at CT-ramp / ticket booth.

Palace
  • Throw.
  • Just a general throw; it is quite simple and does not need to be overly accurate.

One-Way Connector / Middle
  • Underarm throw (default RMB).
  • Stand just into the connector and underarm throw. Good for getting a cheeky pick and moving.

Jungle
  • Throw.
  • Position yourself in the corner closest to the palace wall.
  • Great for post-plant defence, however, there is a small gap towards the CT-side of the smoke. Good for forcing players to peek from stairs.

Stairs
  • Throw.
  • Position yourself in the corner closest to the palace wall.
  • Great for post-plant defence.

CT-Ramp / Ticket Booth
  • Throw.
  • Position yourself in the corner closest to the palace wall. Aim at the top centre of the angled part of the wall.
  • Great for post-plant defence. Prevents players from jumping onto the box to see over the smoke.
4. B-Site
Deep Apartments
  • Jump-throw.
  • Similar to the smoke thrown from CT-spawn to deep apartments, only much easier.

Apartments
  • Throw.
  • Aim where the left part of the shadow ends on the roof cover.
  • Great to throw at the start of the round if you want to hold up close in apartments.

Apartments
  • Run and throw.
  • Throwing the smoke virtually anywhere through the window will work, however, the best results are usually when thrown in this manner.

Apartments
  • Throw.
  • Useful for getting back onto balcony or to discourage enemies in kitchen from going B.
  • Throwing a flash afterwards and in the same way can be particularly effective.

Apartments
  • Throw.
  • Very easy but one that you cannot afford to mess up.
  • Allows you to get back into position on balcony or to push up.

Apartments
  • Throw.
  • Very easy but one that you cannot afford to mess up.

Apartments
  • Throw.
  • Very easy but one that you cannot afford to mess up.

Short Peek
  • Medium throw (default LMB and RMB simultaneously).
  • Line up with the right side of the outer concrete door frame; this is just enough cover to not be shot from chair in middle.
  • Allows a B-short player to peek connector and lower-mid with cover.

Short Peek Alternate
  • Throw.
  • Aim at the depression in the ground at the bottom of the metal sign.
  • Allows a B-short player to peek top mid with cover from bench and underpass.

Short
  • Throw.
  • Just a general throw; it is quite simple and does not need to be overly accurate.

Short
  • Run and throw.
  • Quite a simple little run and throw. Aim in-line with the small gap through to short under the archway and release at the top of the balcony.
  • Great for post-plant defence.

Market Window / Cross
  • Throw.
  • Great for post-plant defence.

Market Door
  • Throw.
  • Great for post-plant defence.

Murderhole / Vent
  • Crouch and jump-throw.
  • Stand in the shallow recess where the two walls meet. While crouching, aim where the high roof's boundary meets the low roof's chimney and jump-throw.

Jungle / Market Ramp
  • Throw.
  • Stand with your back against the wooden crates and aim on the inside edge of the second large leaf.
  • Takes a while to land so only useful for post-plant defence if you gain early control of the site.

One-Way Market
  • Throw.
  • Great when utilised quickly after taking B site and getting a cheeky pick on an enemy rotating through market.
5. Middle
Short
  • Crouch and jump-throw.
  • Aim in-line with the left edge of the carpet.

Tetris
  • Jump-throw.
  • Good for faking an A execute. I personally hate this smoke for trying to take A site as a terrorist which is why I left it out of the palace set smokes.

Jungle
  • Crouch and jump-throw.
  • Good for helping your teammates on A or providing cover from an AWPer at ticket booth or triple.

Window / Sniper's Nest
  • Throw.
  • A must know for when you are pinned down in middle.

Short
  • Throw.
  • Useful for mid-to-A plays.

Short
  • Run and throw.
  • Does not need to be overly accurate. Aim roughly at the bottom left of the metal sign while running. Best thrown from the start of the catwalk in top mid.
  • Useful for mid-to-A plays.

Short
  • Throw.
  • Great at pushing back the short player and reducing angle cancer.

Window / Sniper's Nest
  • Medium throw (default LMB and RMB simultaneously).
  • Easy throw to ensure there is no gap for a player in window to shoot from.

Connector
  • Throw.
  • Aim in-line with the panel and about halfway up to the powerline.
  • Still leaves some exposing angles from connector but provides decent coverage if you hug close to connector.

CT-Ramp / Ticket Booth
  • Jump-throw.
  • Aim roughly at the bottom right of the rectangular patch where the paint has been worn away.

Short
  • Throw.
  • Useful for when you are pinned down underneath window / sniper's nest and want cover from short.

Connector
  • Jump-throw.
  • Still leaves some exposing angles from connector but provides decent coverage if you hug close to connector.

Palace
  • Jump-throw.

One-Way Window / Sniper's Nest (Left)
  • Medium throw (default LMB and RMB simultaneously).
  • Great to get a cheeky pick as they cross mid. Use sparingly otherwise they will prefire the corner of the smoke.
  • Works well in a combination of left-side and right-side one-way smokes.

One-Way Window / Sniper's Nest (Right)
  • Throw.
  • Aim at the small black scratch mark on the tile.
  • Great to get a cheeky pick as they cross mid. Use sparingly otherwise they will prefire the corner of the smoke.
  • Works well in a combination of left-side and right-side one-way smokes.
6. Palace
CT-Ramp / Ticket Booth
  • Jump-throw.
  • Line up with the middle of the door.
  • An effective CT-ramp / ticket booth smoke when done right; it will prevent enemies from being able to use it as a one-way when jumping onto the box.

Jungle
  • Throw.
  • Line up with the middle of the right window.
  • An effective jungle smoke when done right that mitigates the gap between the smoke and stairs.

Stairs
  • Throw.
  • Stand on the first step and in-line with the edge.
  • Goes hand in glove with a good jungle smoke.

Short
  • Jump-throw.
  • Stand on the highest platform, just along its edge. Stand in the centre of the concrete edging.
  • Aim where the two halves of the casement window meet.

Window / Sniper's Nest
  • Crouch and jump-throw.
  • Stand with your back against the centre of the first wooden scaffold leg.
  • Crouch and aim where the powerline meets the right edge of the wall, then jump-throw.
7. Apartments
Market Window / Cross
  • Jump-throw.
  • Useful when there is an AWPer sitting in market.

Market Door
  • Jump-throw.
  • Aim at the top of the third window.

Default Site
  • Jump-throw.
  • Aim where the powerline meets the right edge of the wooden peg.
  • Helpful for a safe plant; can be particularly effective when you just need to get the bomb down.

Left Side Site
  • Throw.
  • Aim midway between the wooden peg and the powerline.
  • Helpful for a safe plant; can be particularly effective when you just need to get the bomb down.

Short
  • Jump-throw.
  • Stand at the right side of the window.
  • Aim at the top of the tower's first window.

Market Window / Cross
  • Jump-throw.
  • Stand at the right side of the window.
  • Aim in the middle of the tower's row of four windows.

Back Site
  • Jump-throw.
  • Stand at the right side of the window.
  • Aim at the bottom of the tower's fourth window.

Bench
  • Throw.
  • Aim in-line with where the corner of the concrete "ring" around the tall tower is.

Balcony / Van
  • Throw.
  • Aiming in terms of wooden pegs: second column, third row.
  • Be mindful that this does take a while to land but is great for players that are causing trouble at balcony or van.

Short / Arch
  • Jump-throw.
  • Aim in-line with the bottom of the window and just on the right-hand side of the wooden peg.
  • When done correctly, the smoke will bounce off the roofing.

Jungle
  • Jump-throw.
  • You need to aim a bit left of where the antenna branches
  • Good for protecting your teammates in middle from an AWPer at ticket booth or triple.

Connector
  • Throw.
  • You need to stand on the ledge, just where the red and white walls meet.
  • Great for helping your teammates out in middle for a split B-site take.
Final Remarks
I hope that you found this guide useful and perhaps learnt a smoke or two that you did not know before.


🔥 Happy smokin' 🔥

Regards,
Jack (wølf).
98 megjegyzés
N0kizzz 2023. márc. 26., 6:43 
+1
ladiesman217 2022. dec. 21., 7:06 
fubuki 2022. márc. 23., 3:11 
nice
wølf  [készítő] 2020. dec. 24., 14:55 
Changing Tick Rate
1. Navigate to your "Library" on the Steam application.
2. Right click on "Counter-Strike: Global Offensive."
3. Select "Properties."
4. Go to the "General" tab and then "Launch Options."
5. Write "-tickrate 64" or "-tickrate 128" as desired, without the quotation marks.
6. Relaunch Counter-Strike: Global Offensive.

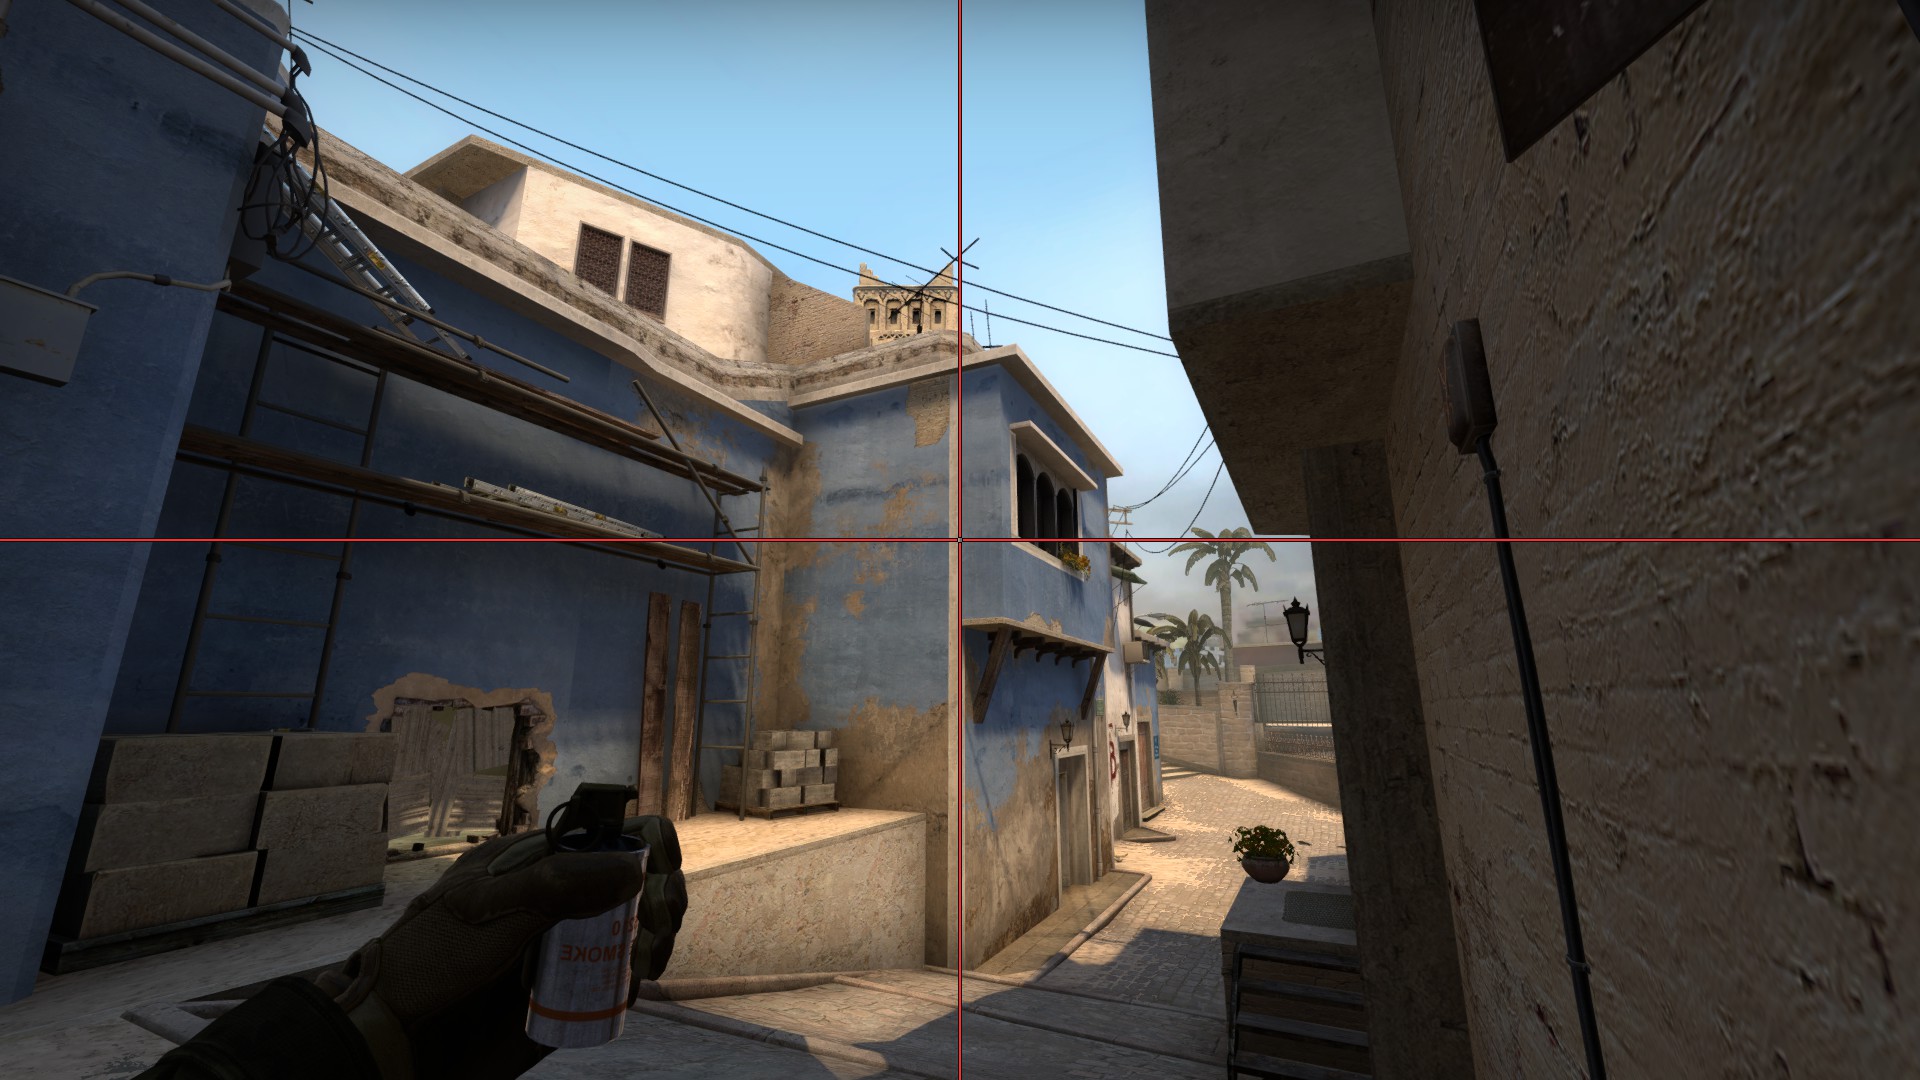
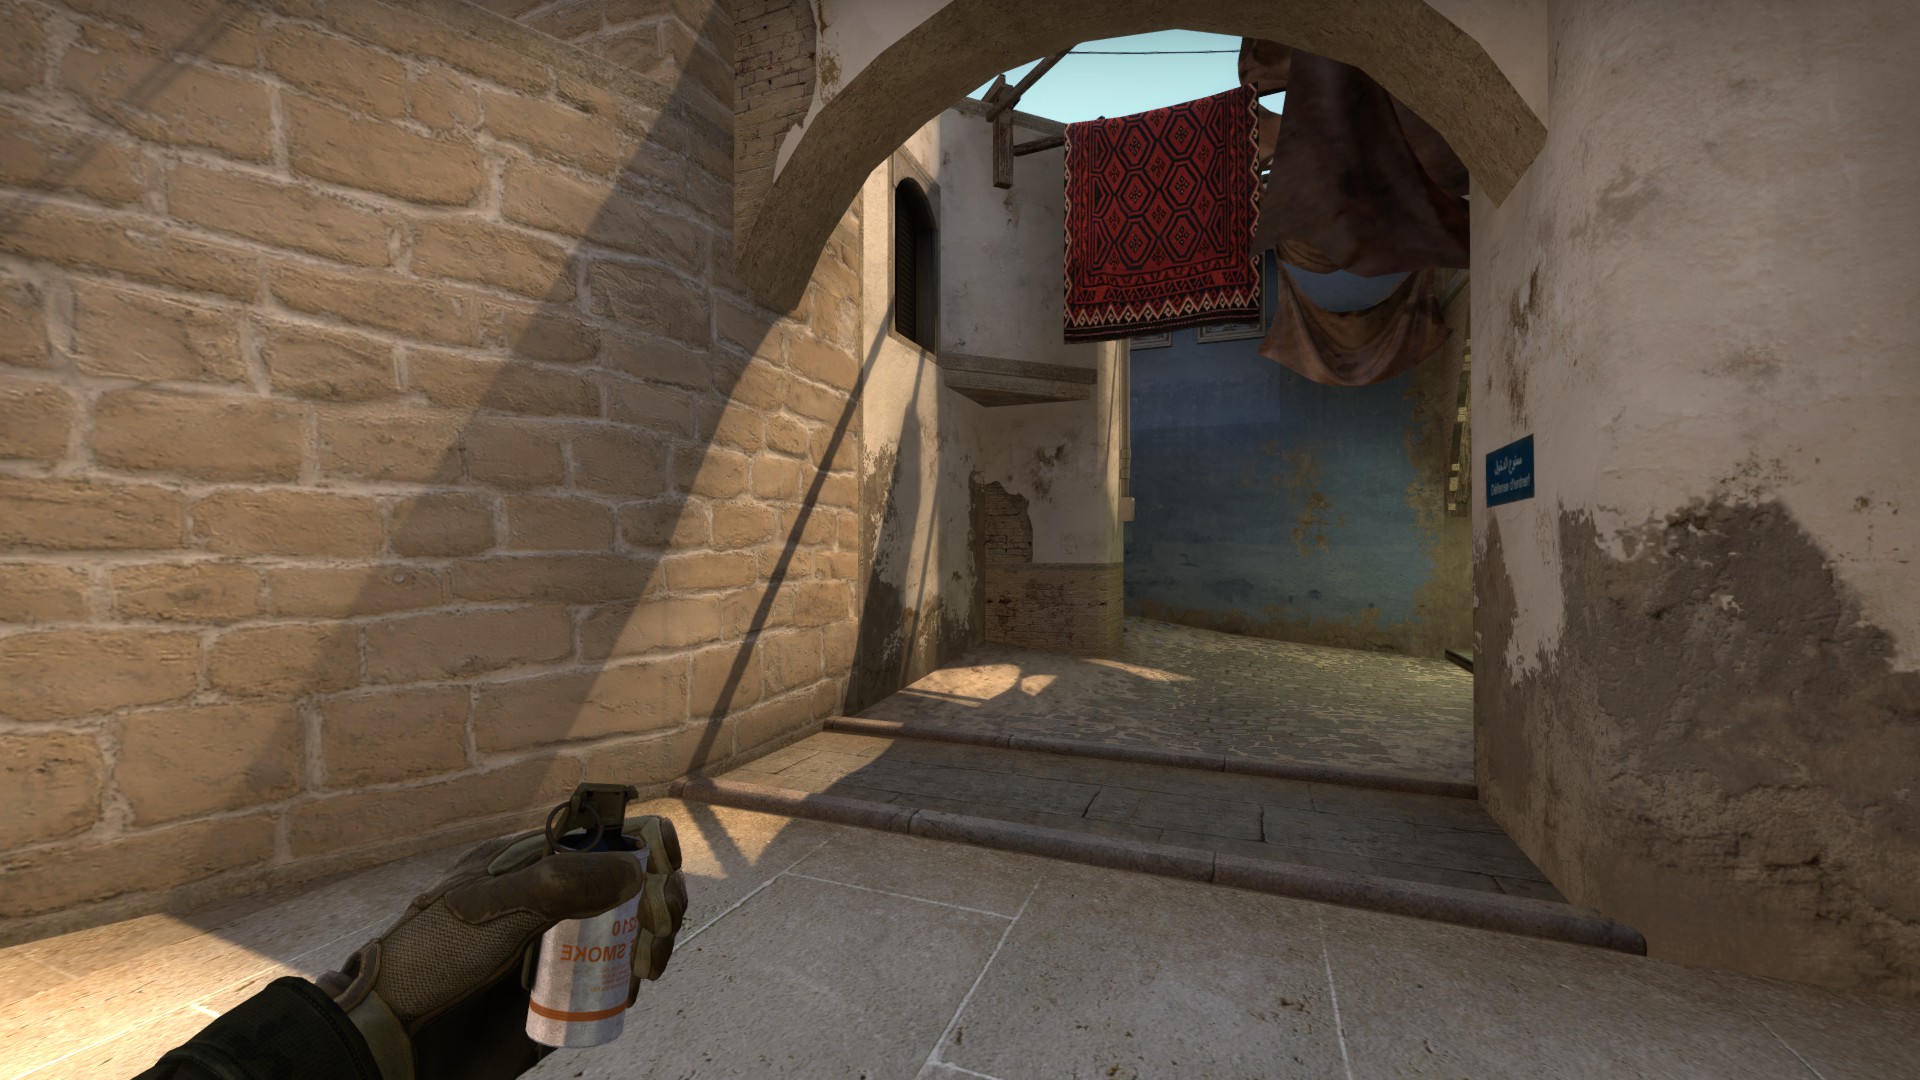
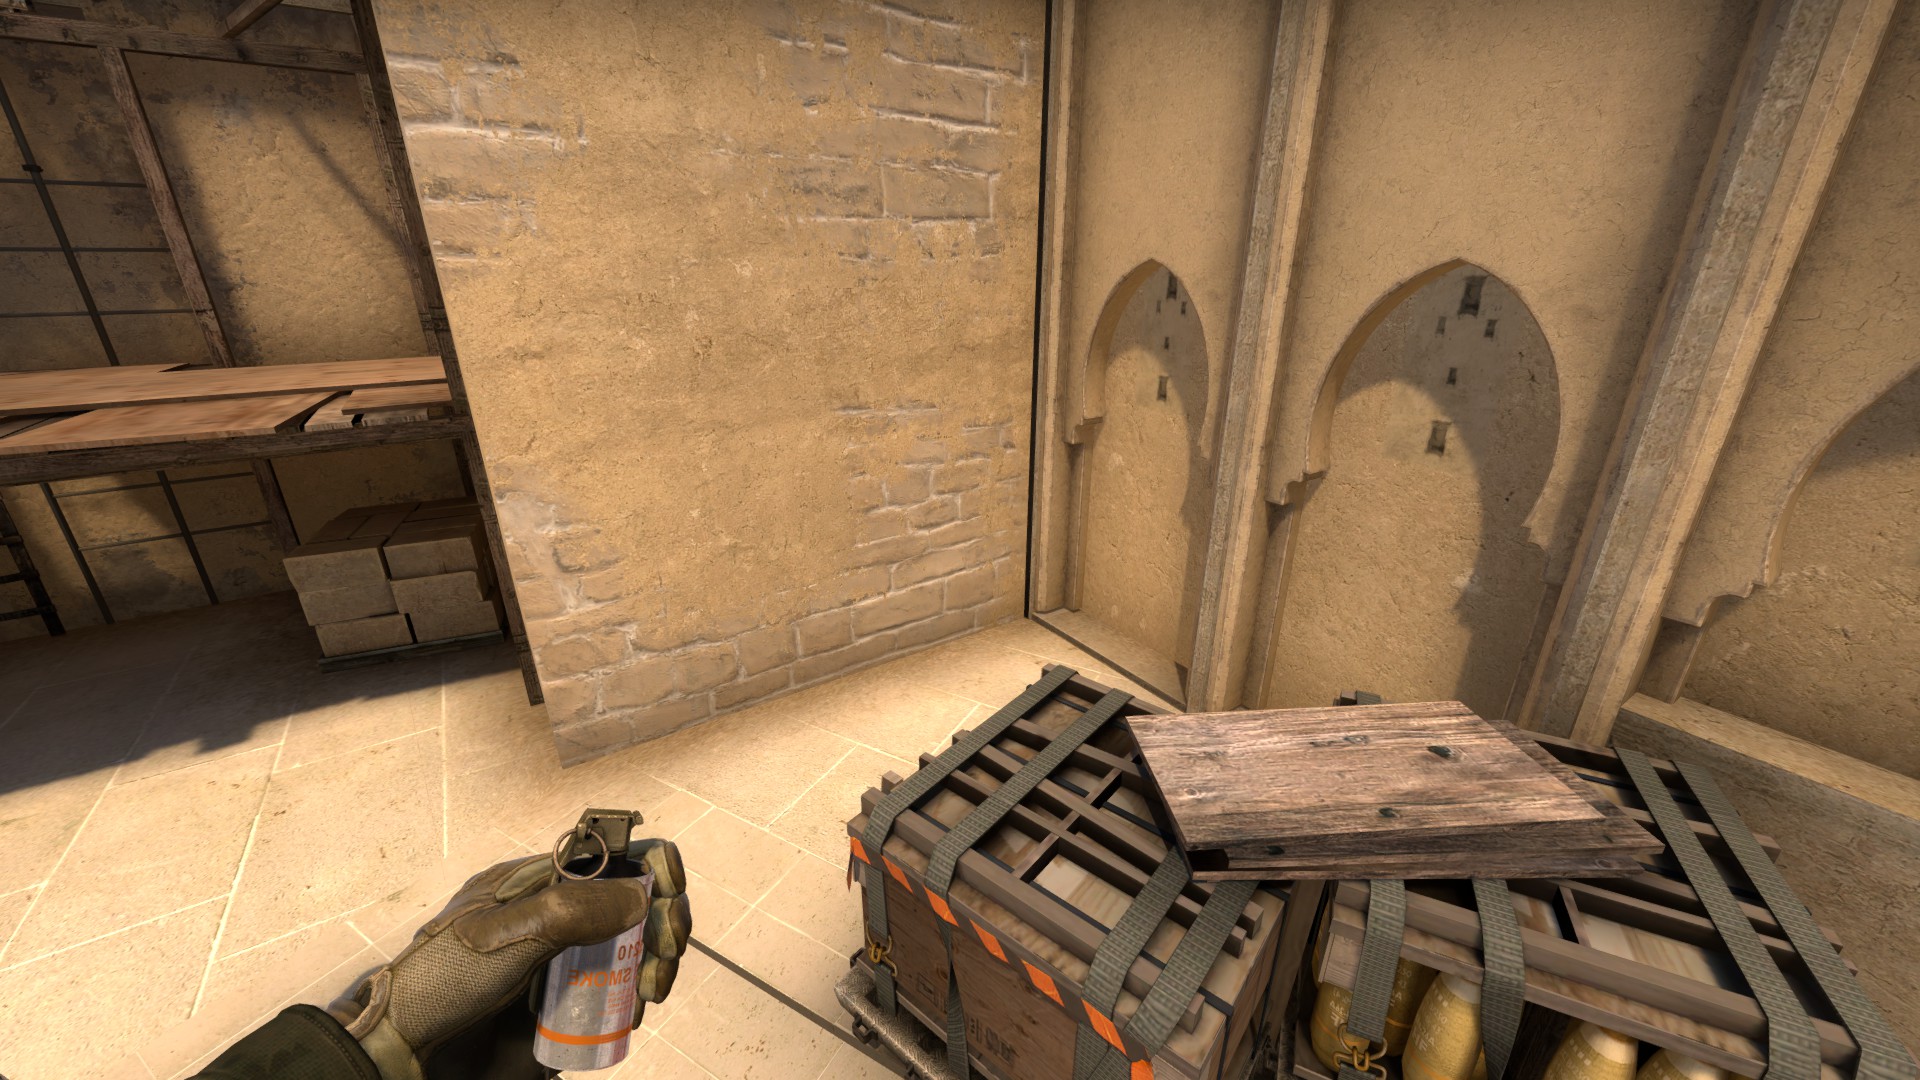
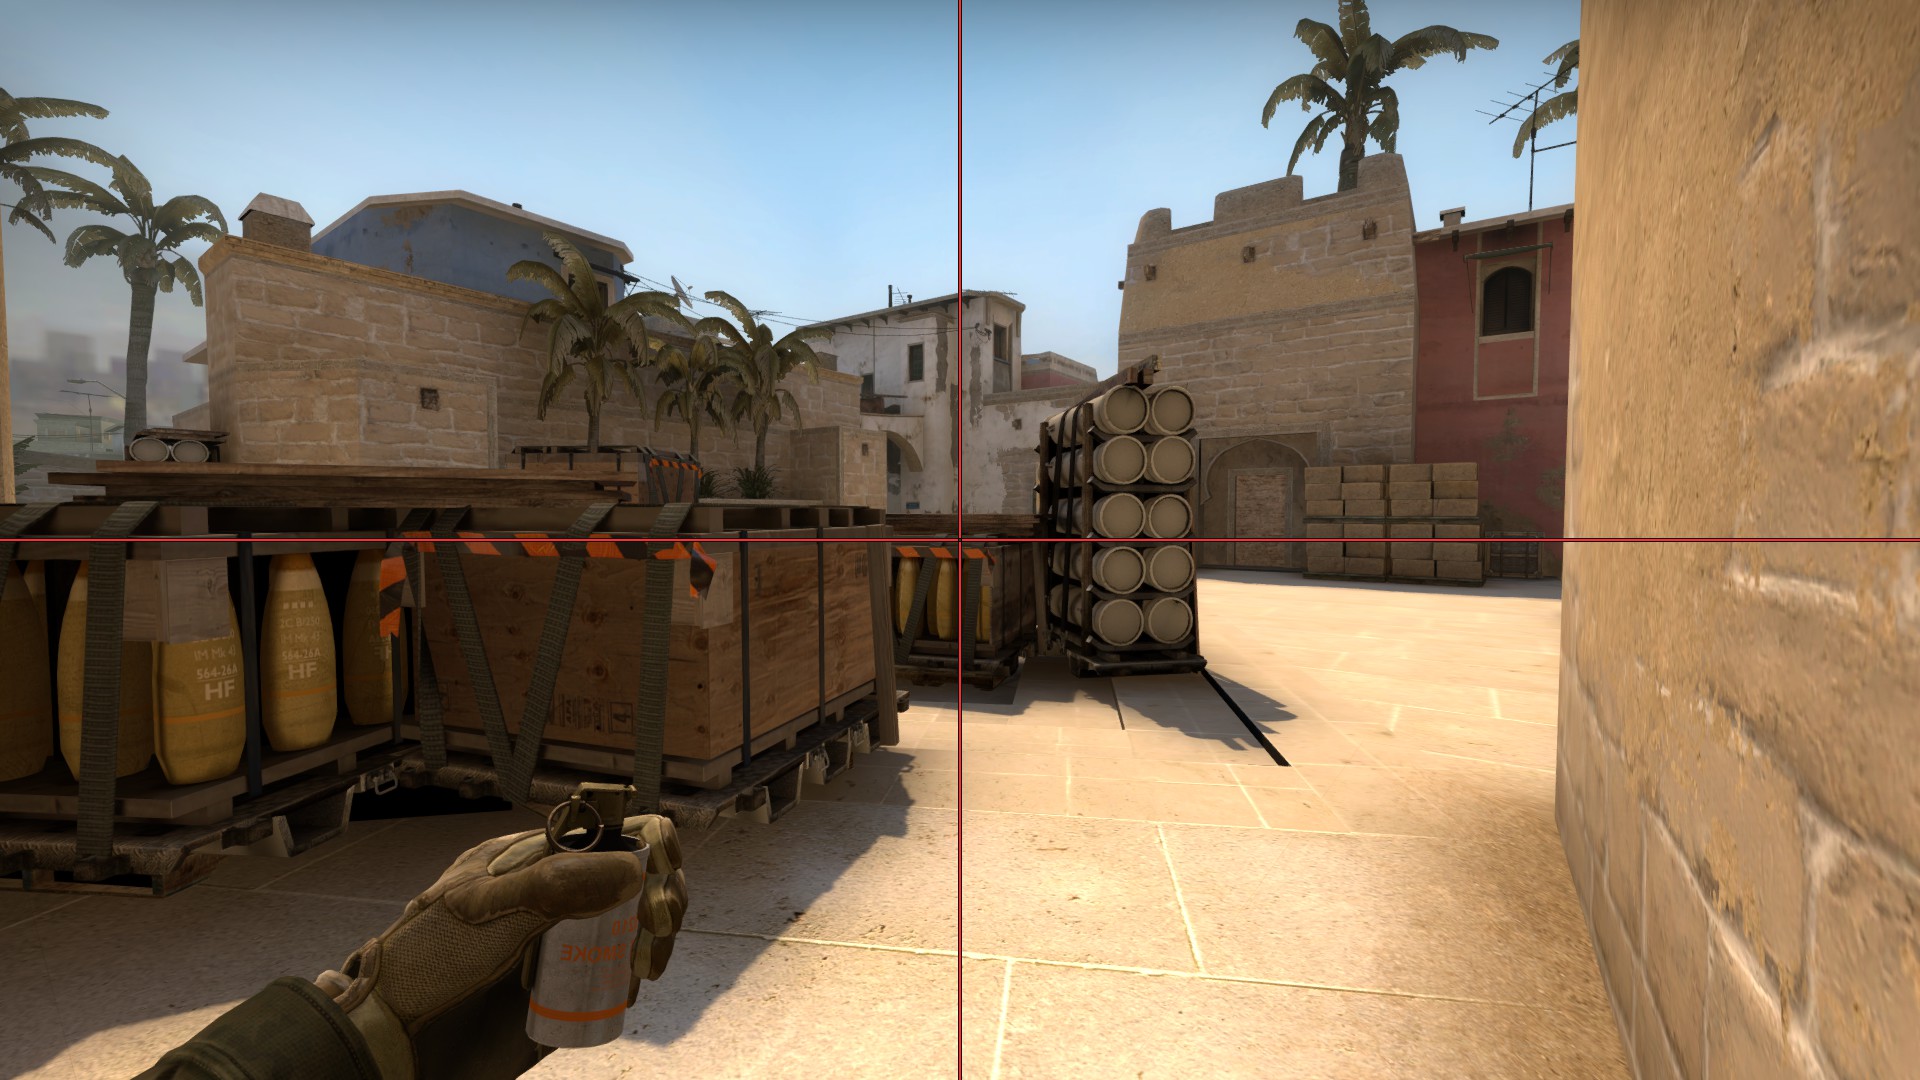
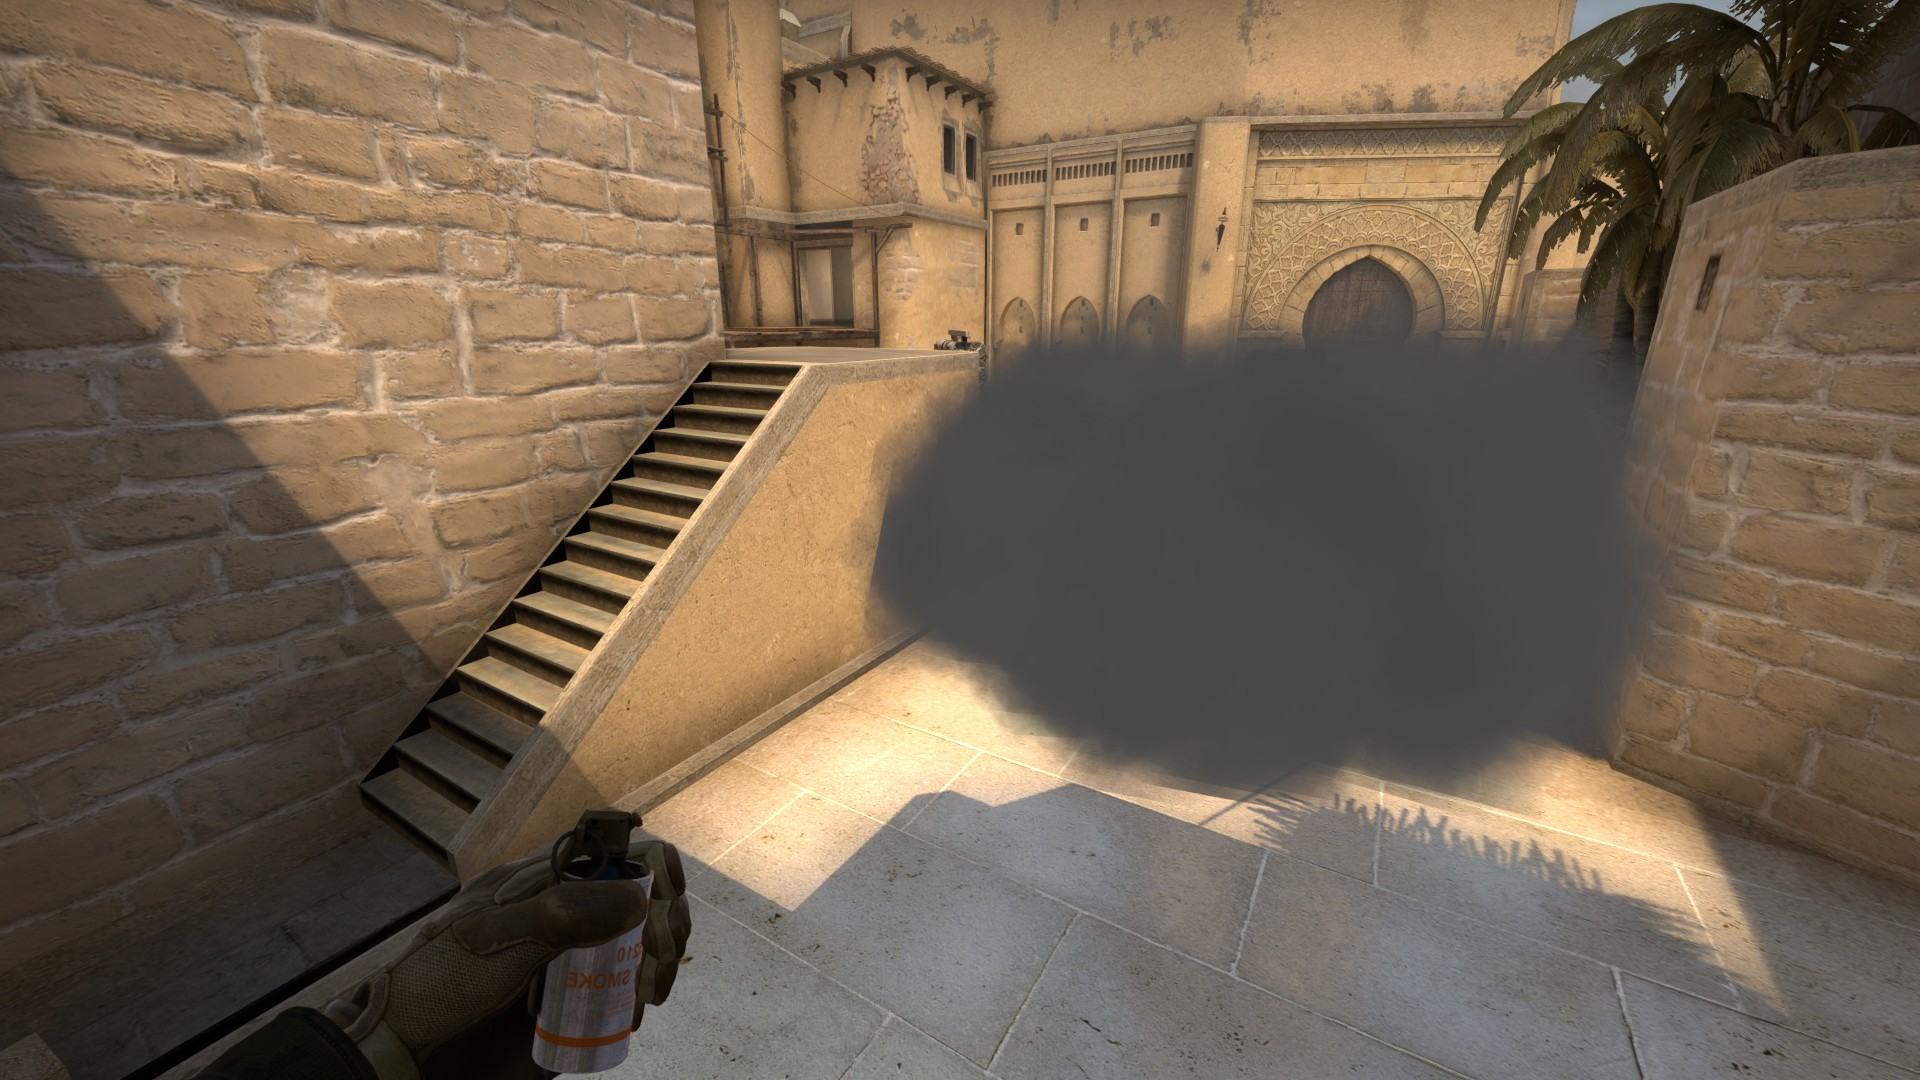
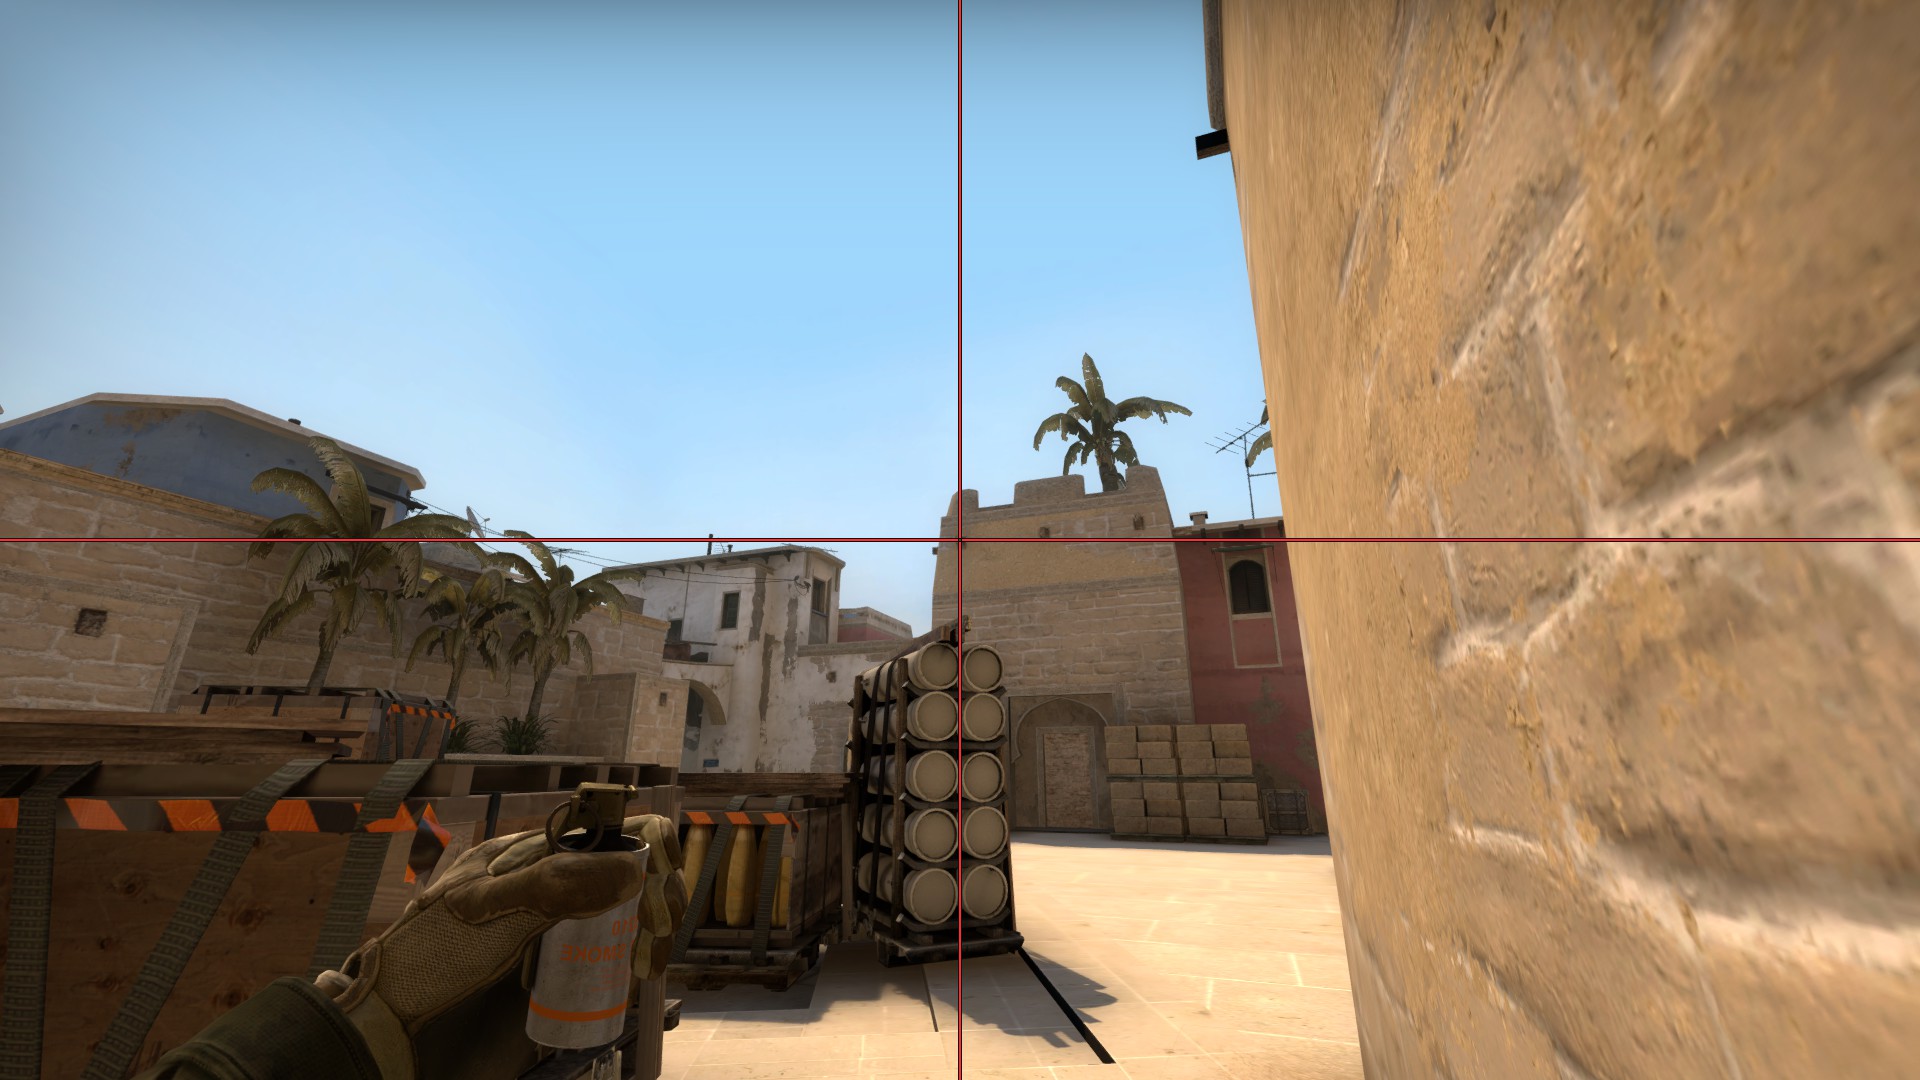
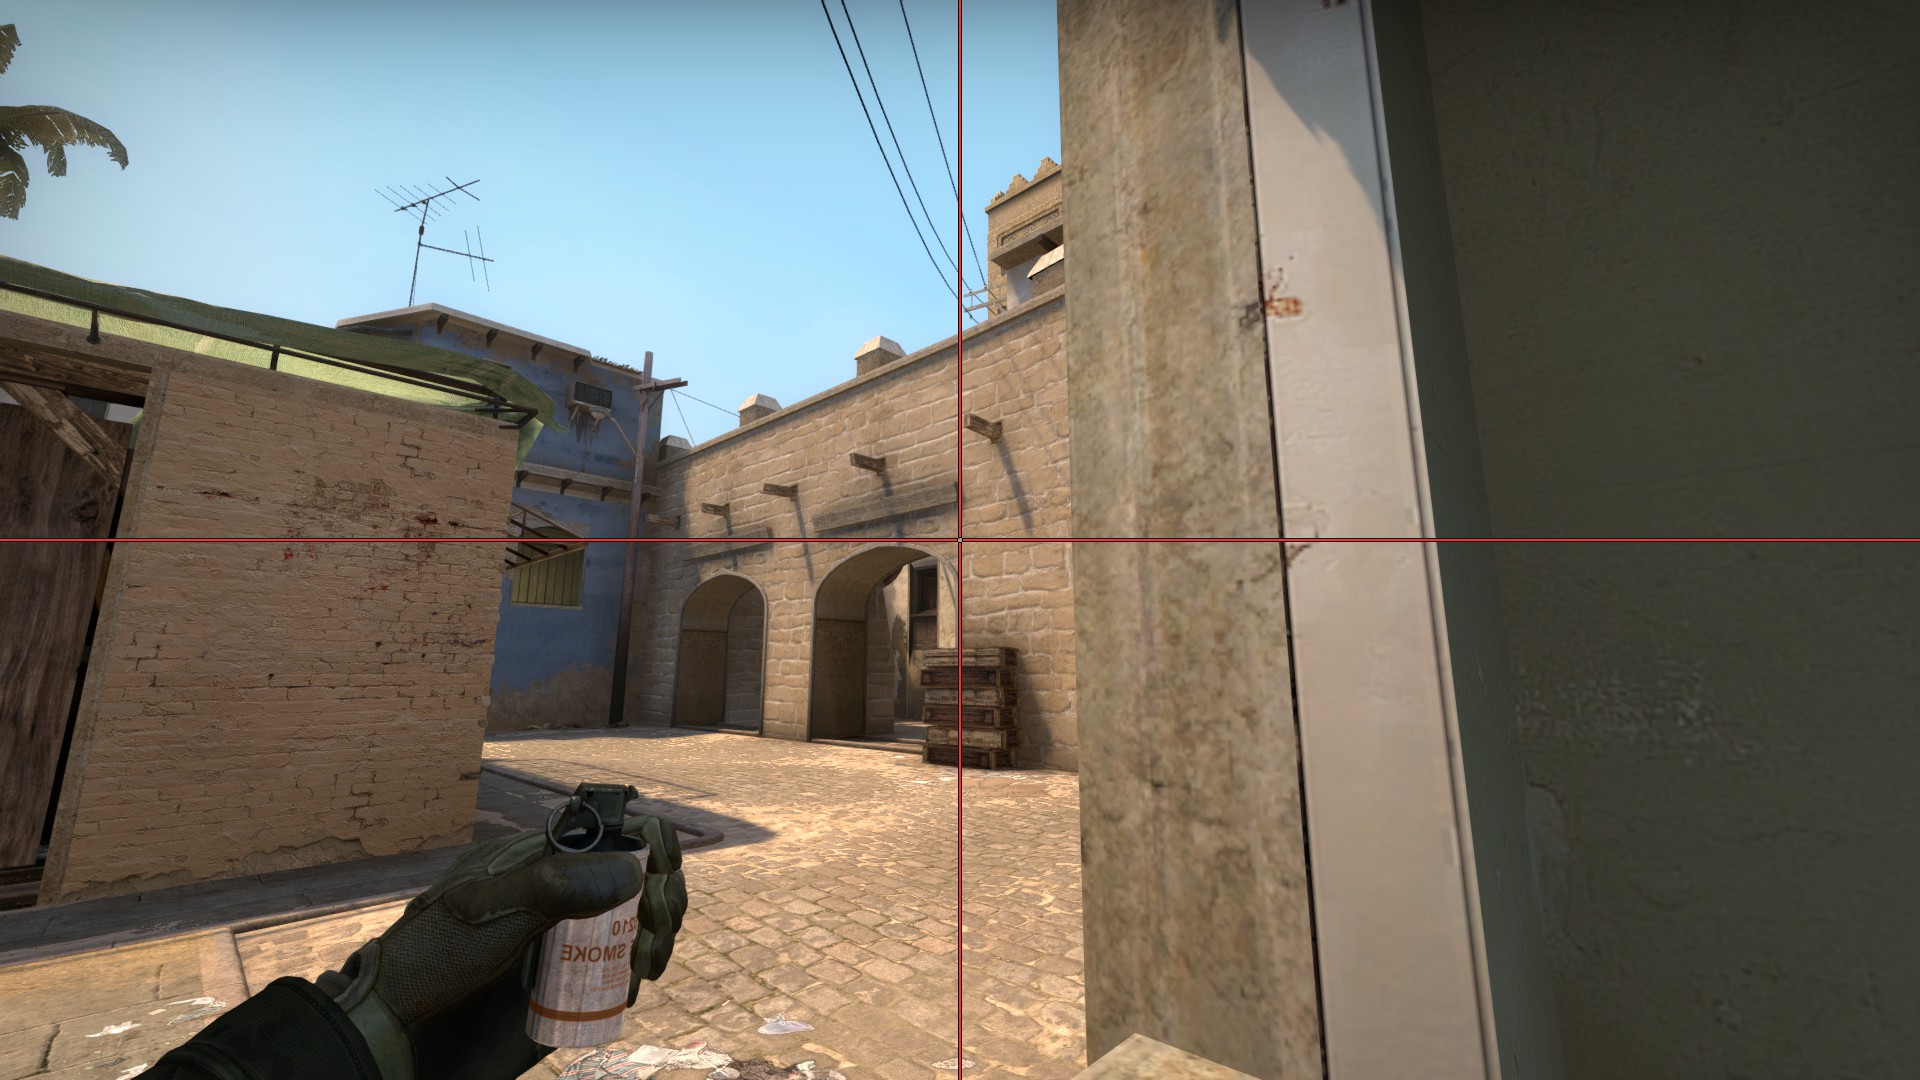
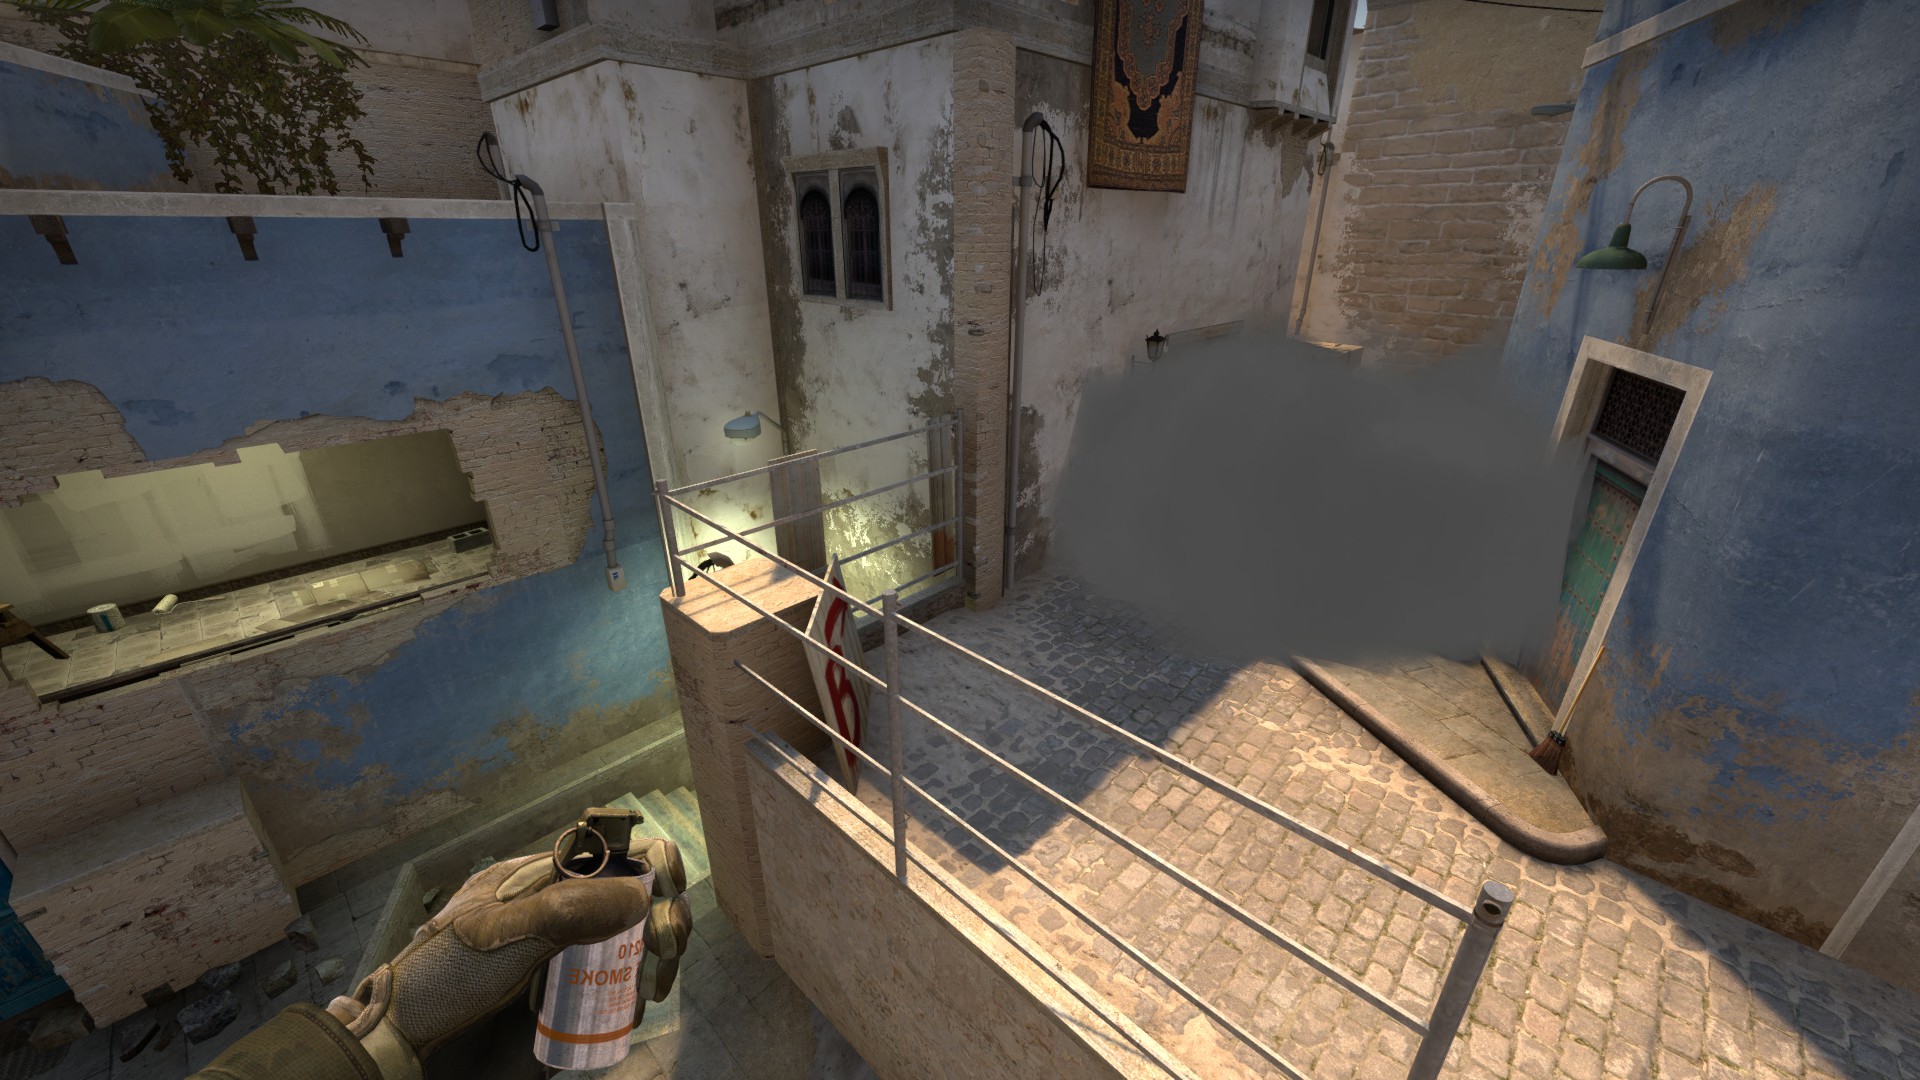
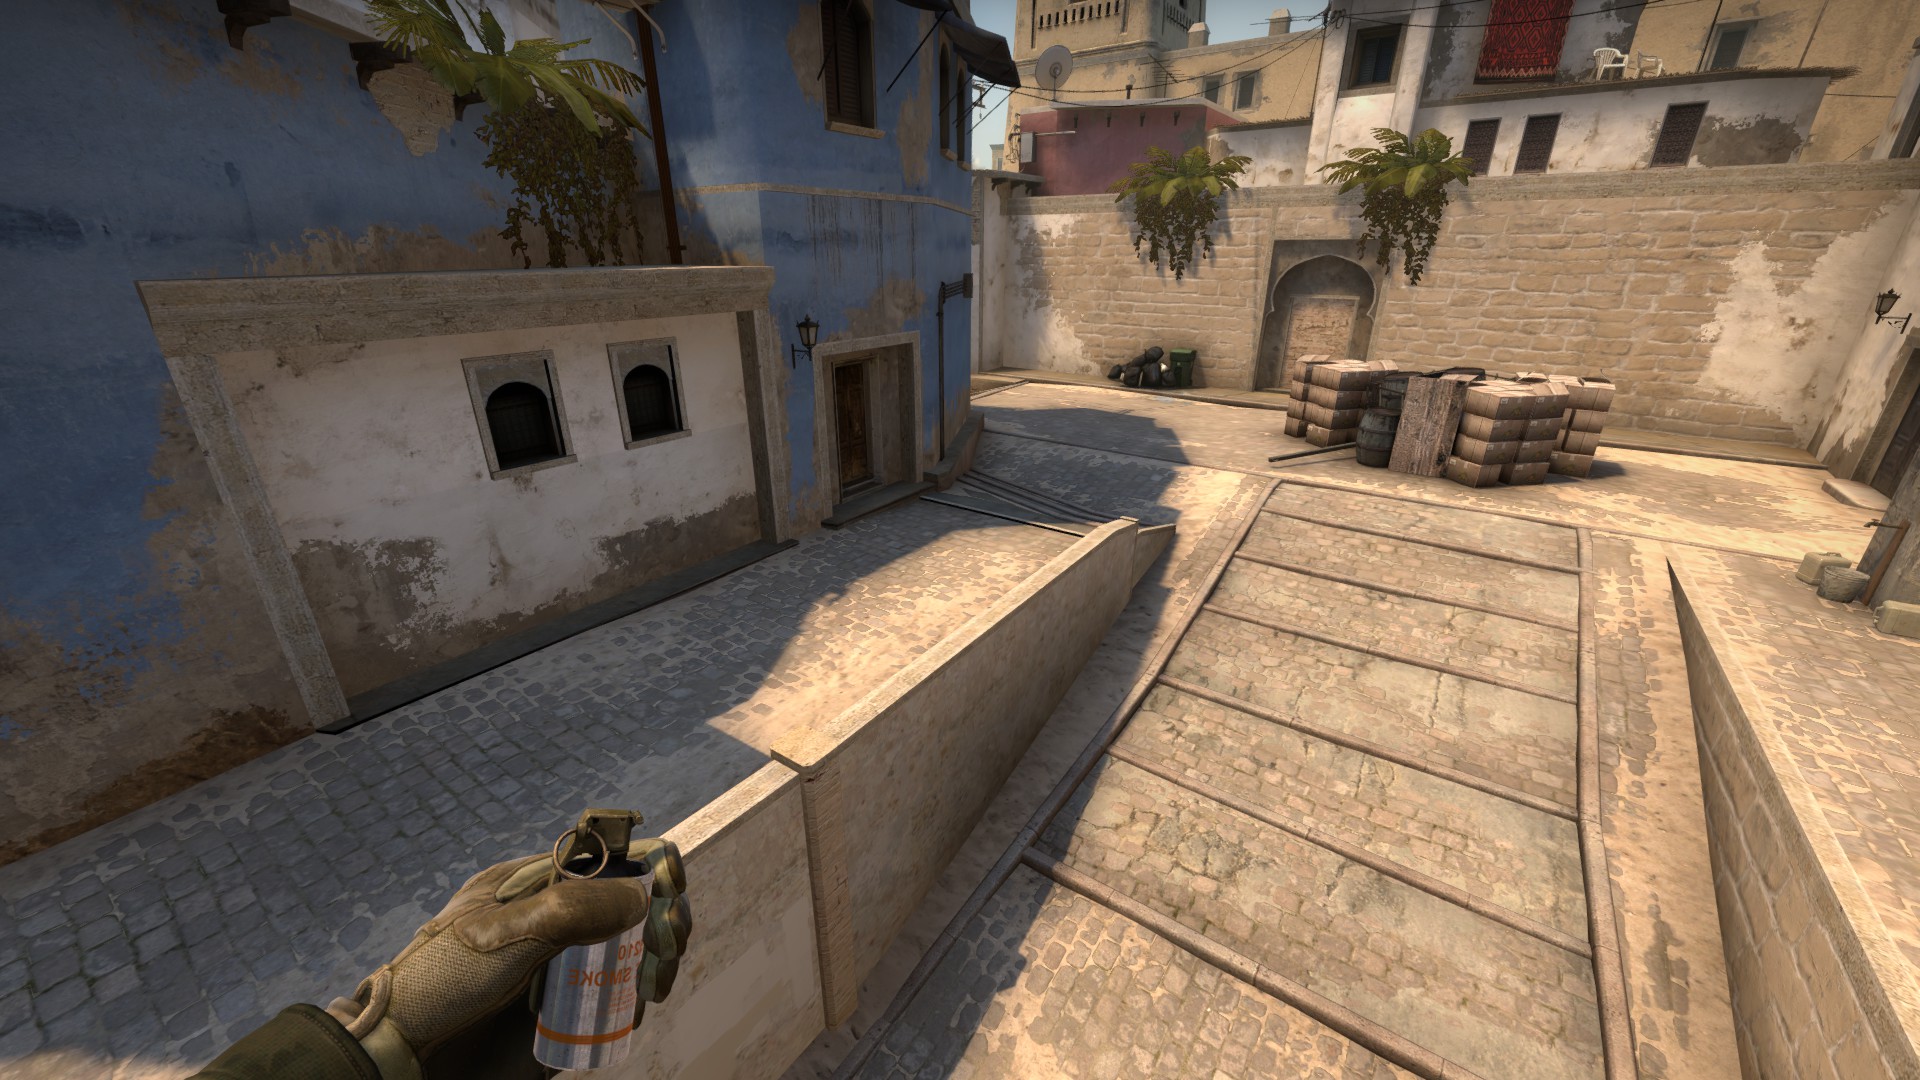
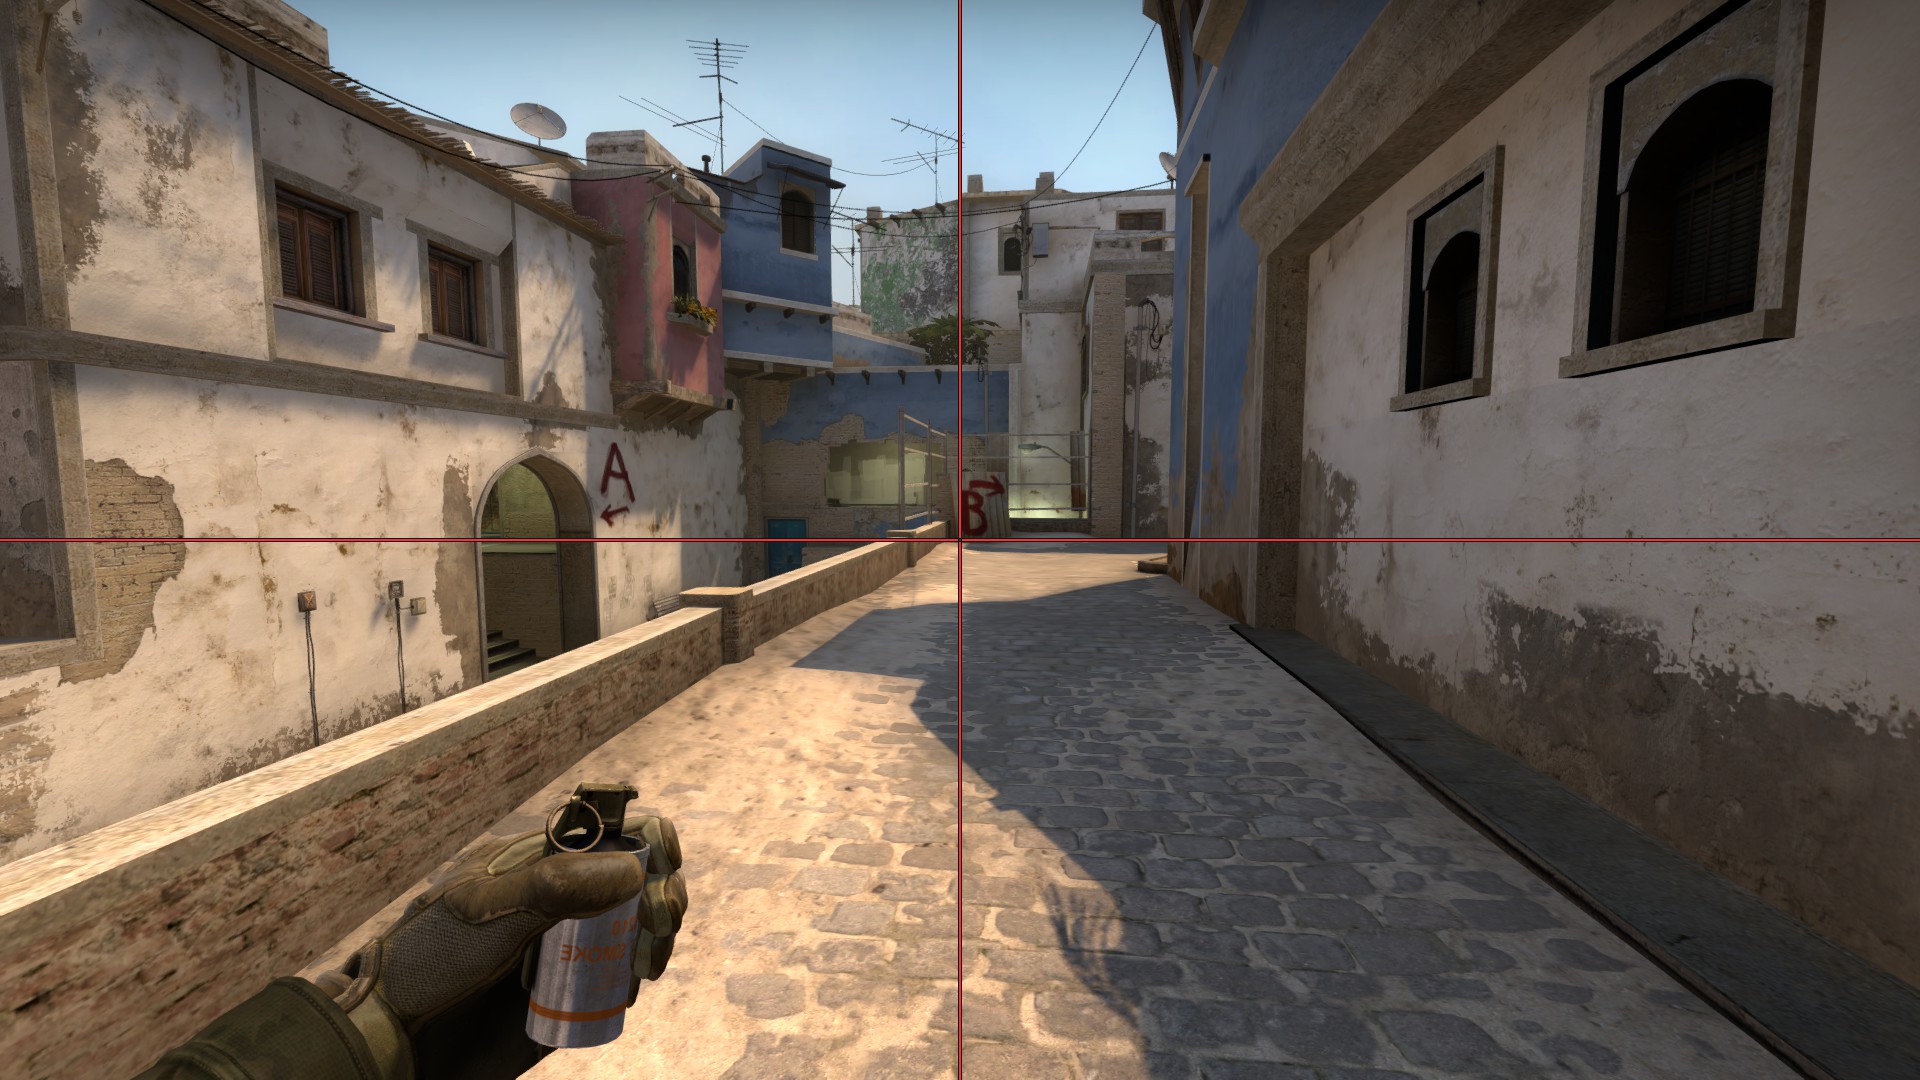
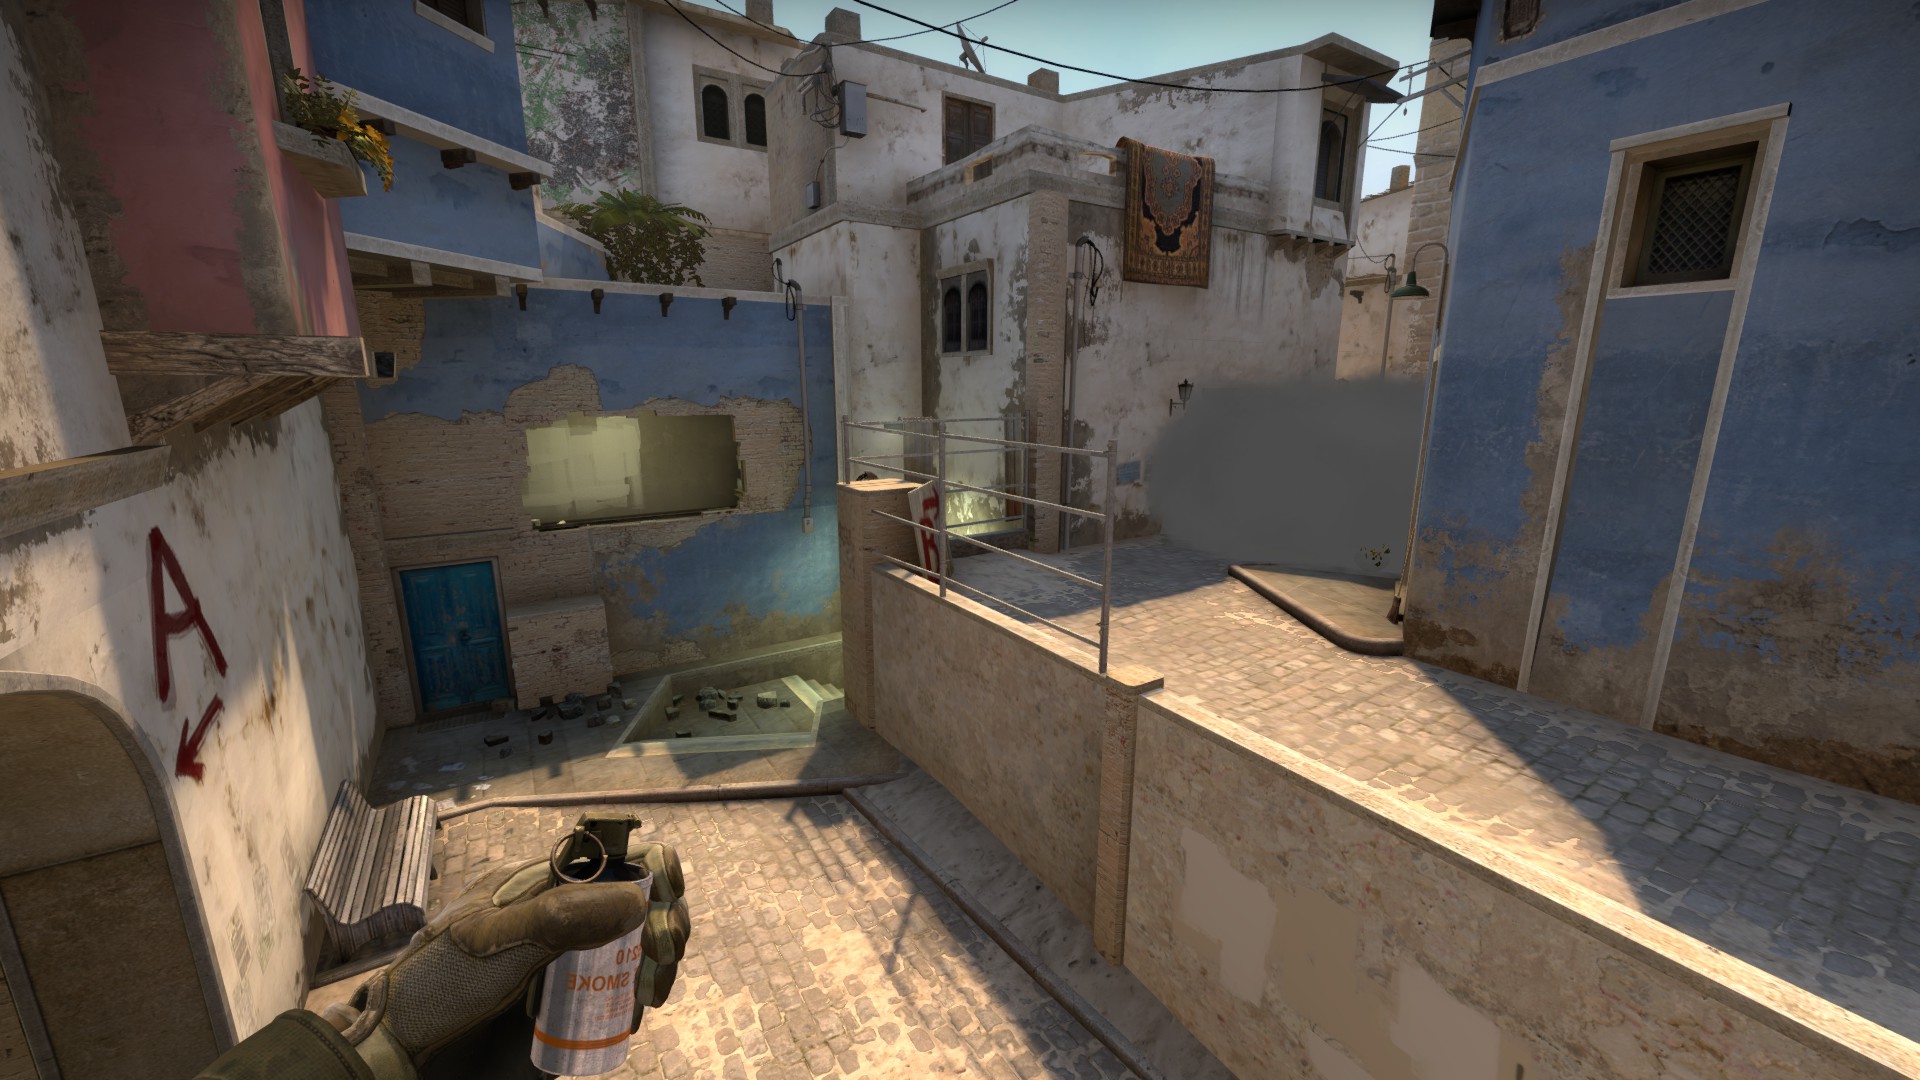
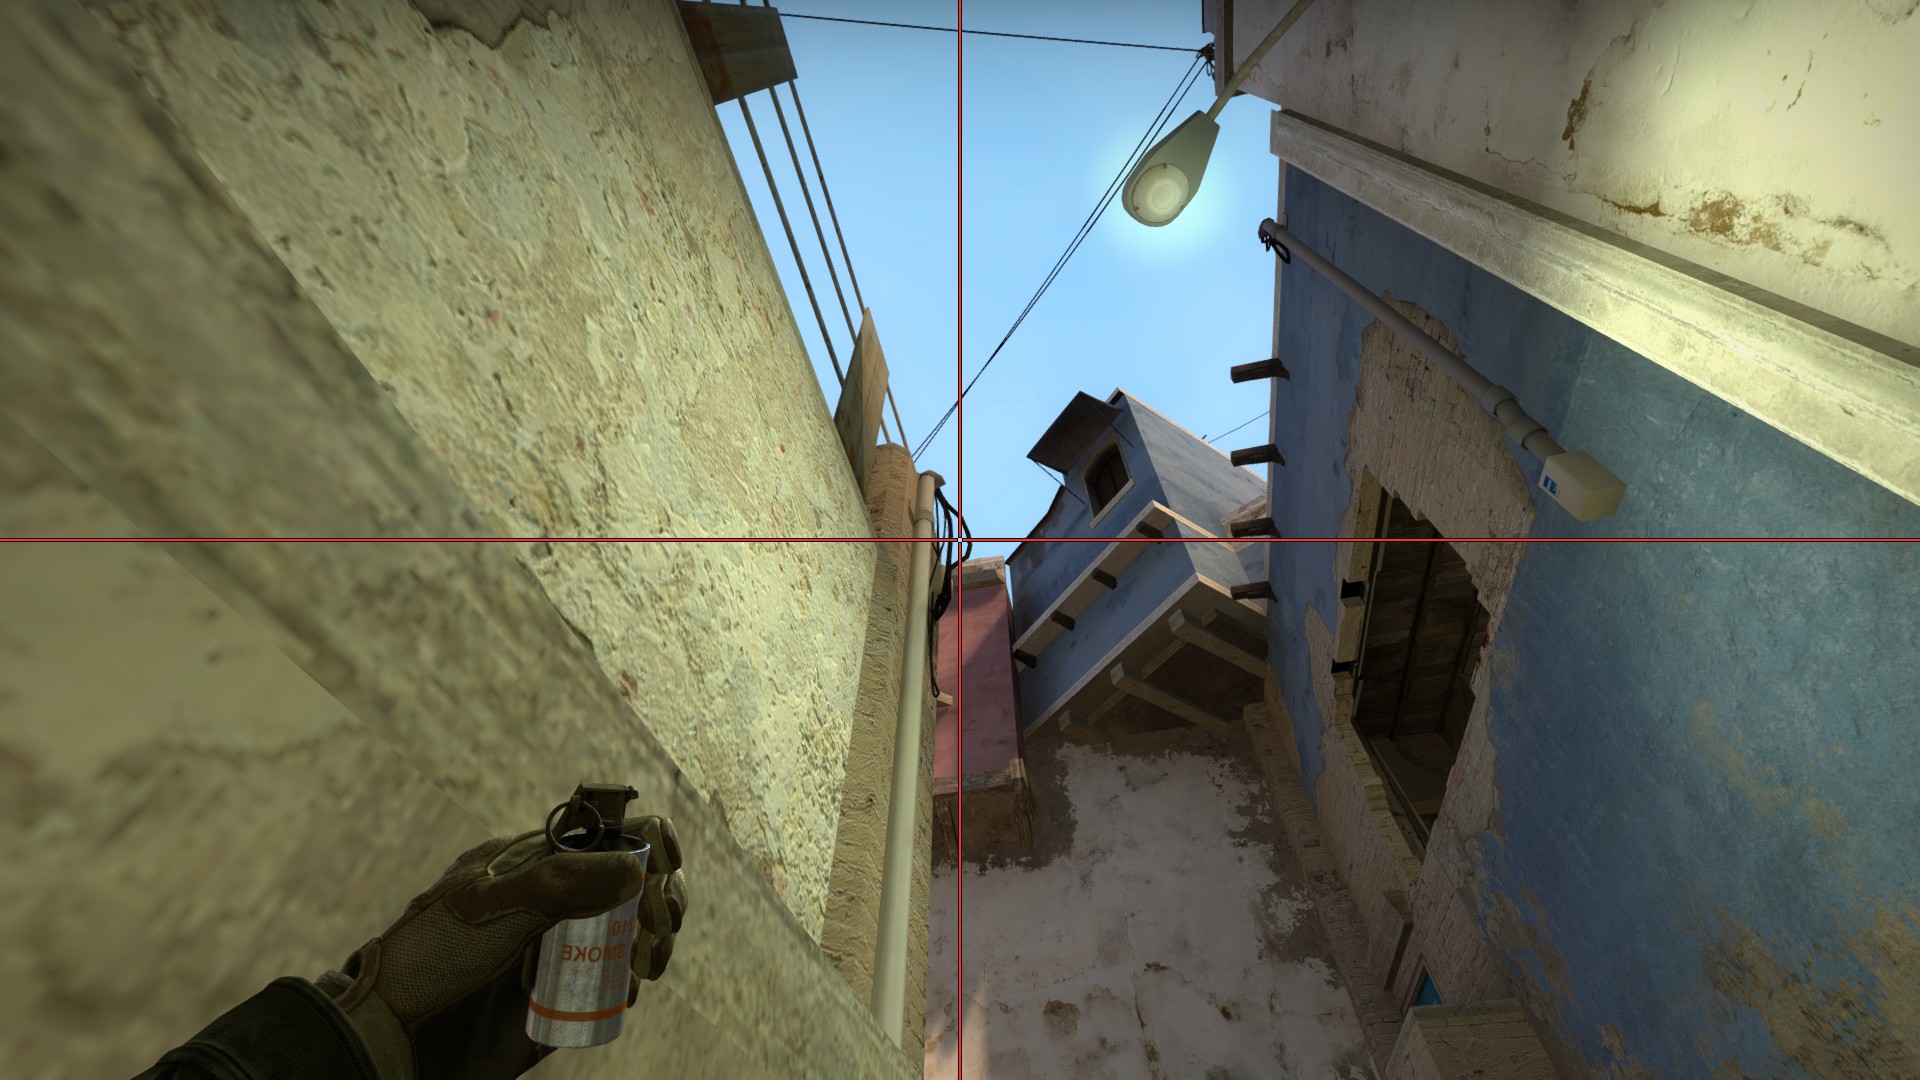
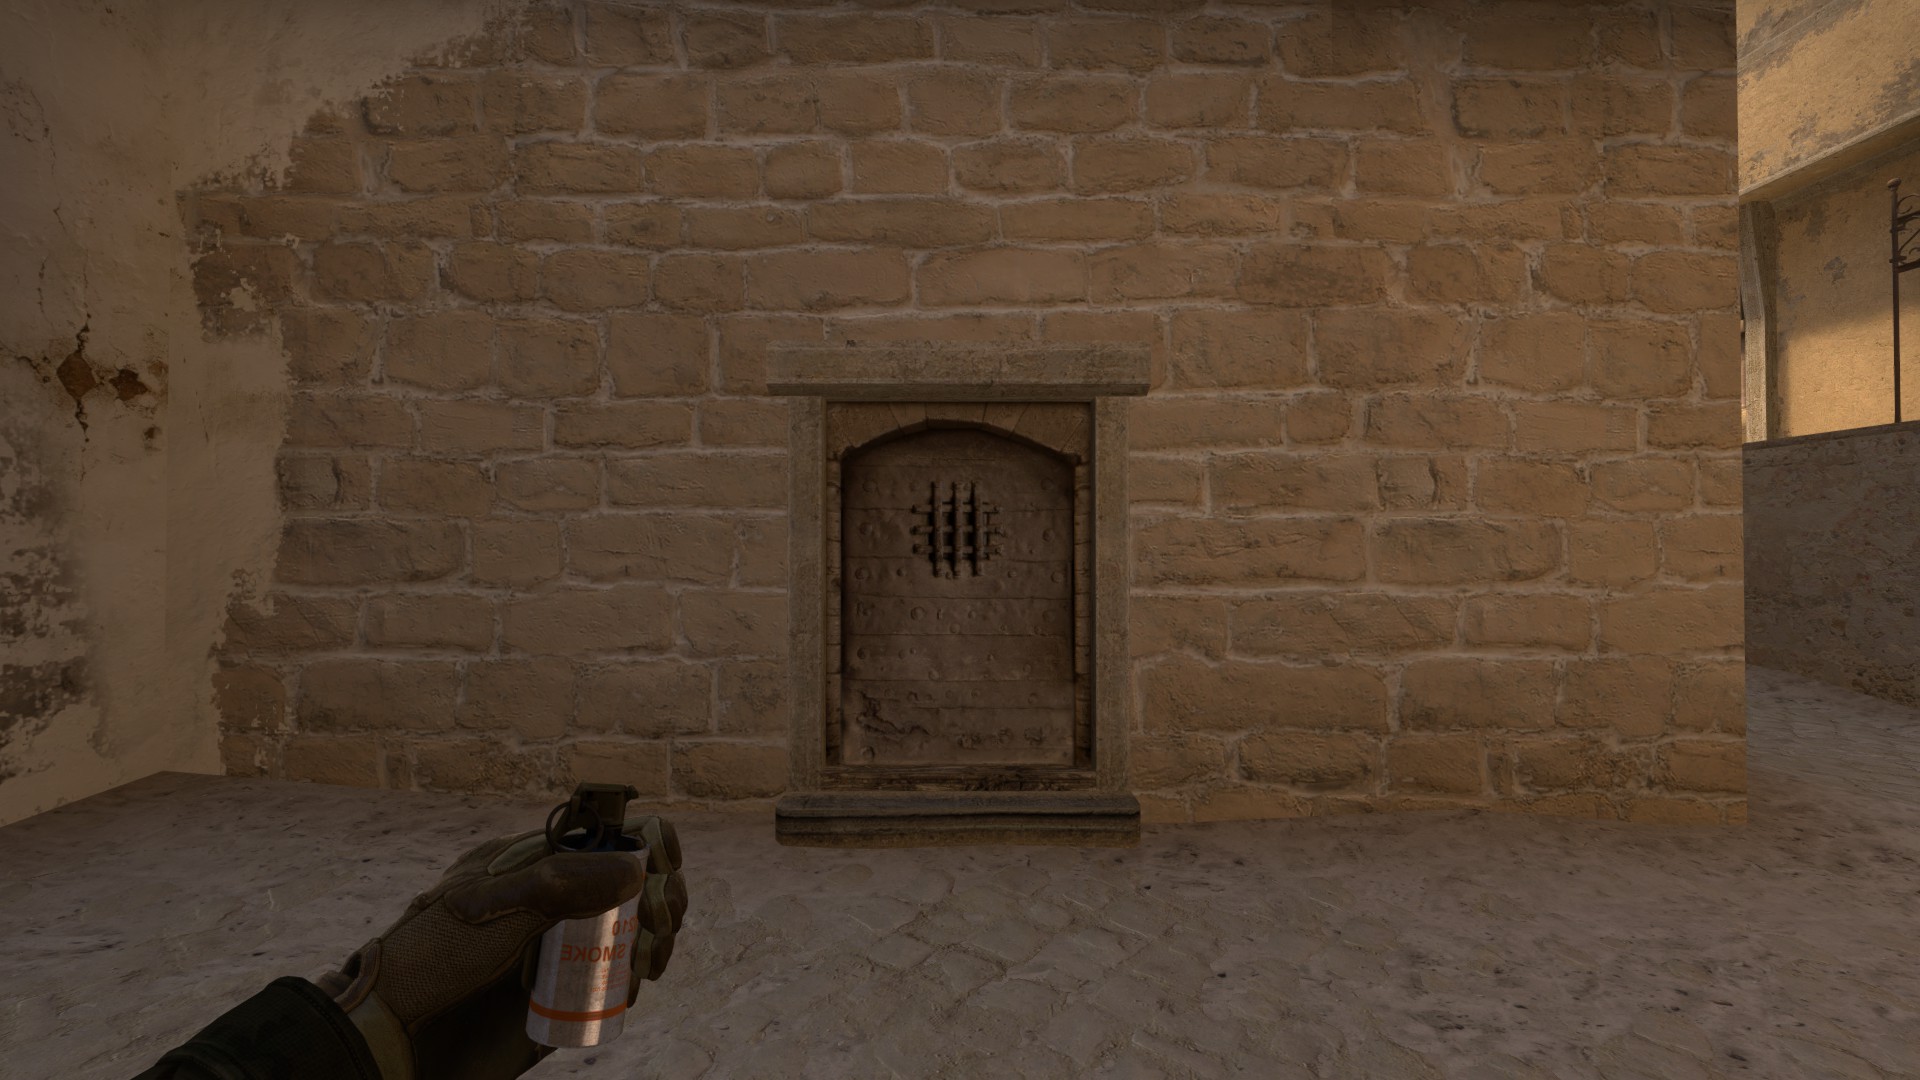
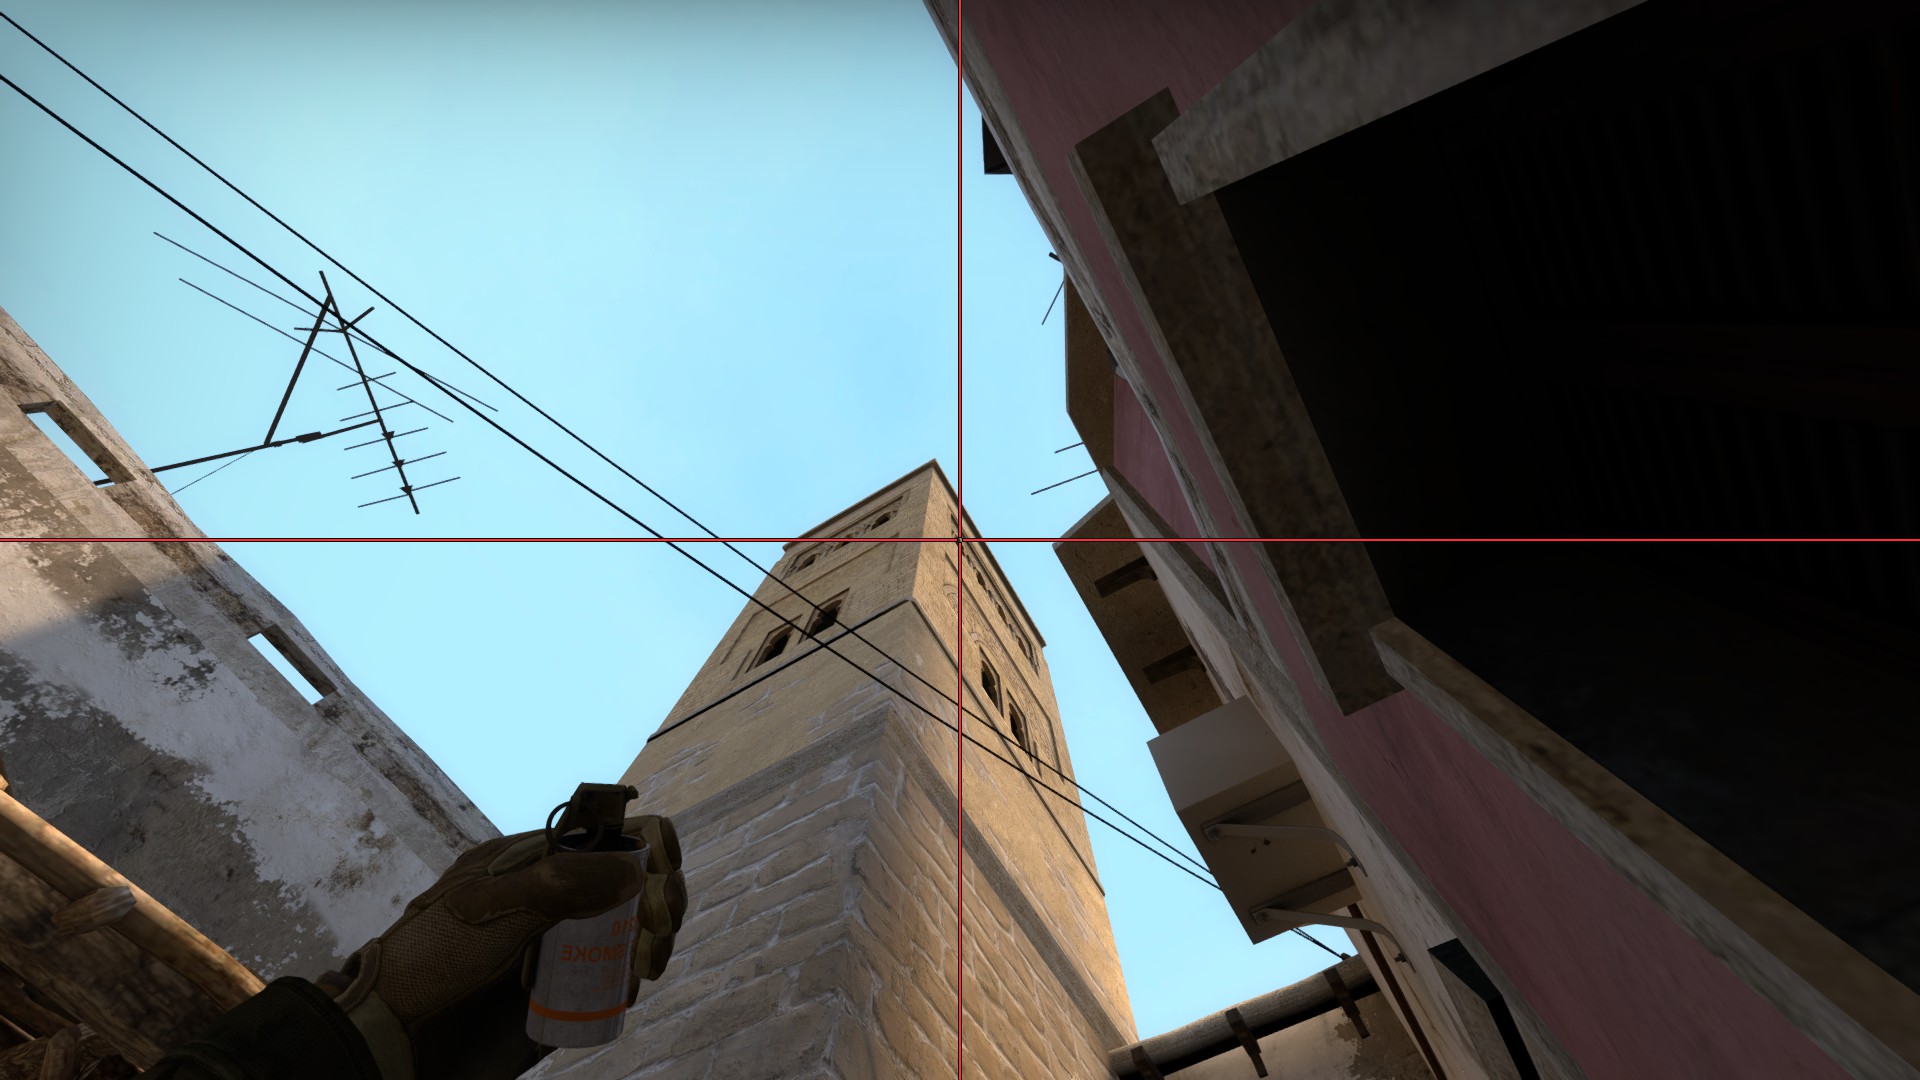
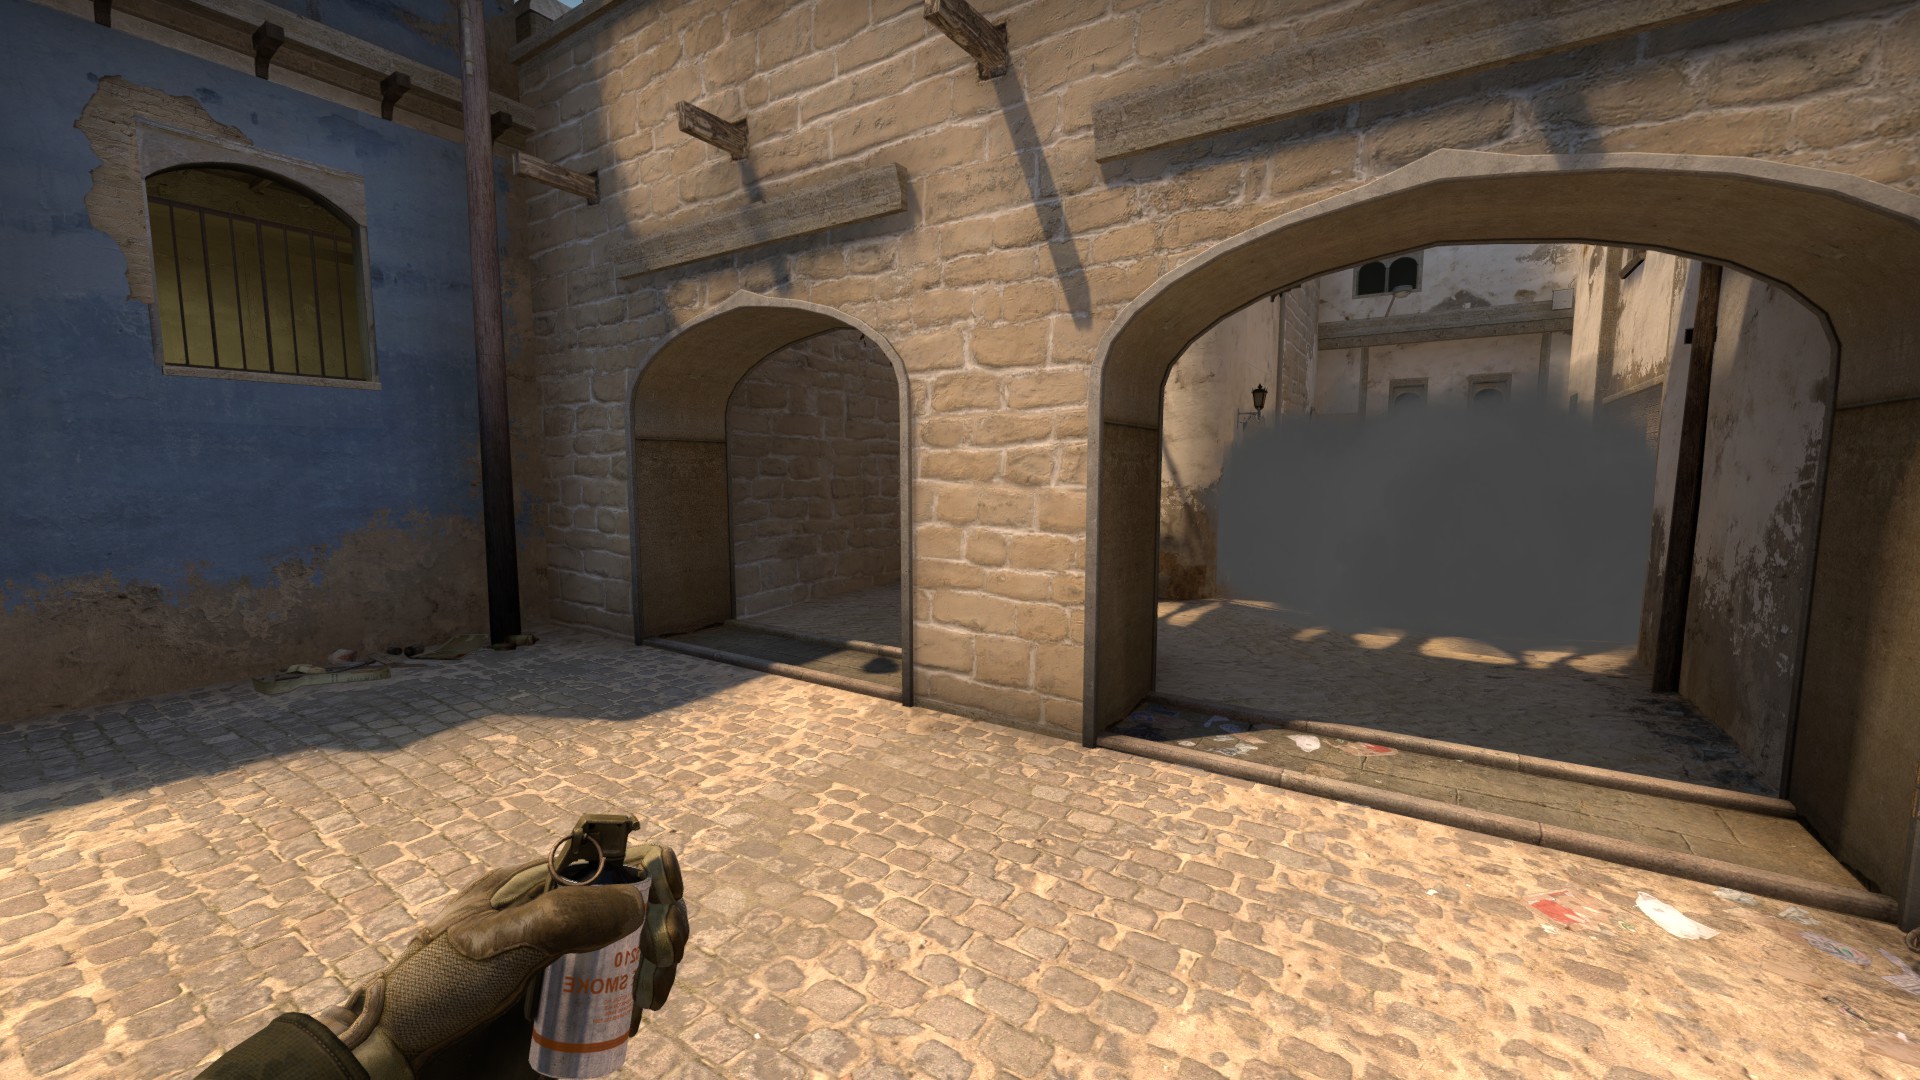
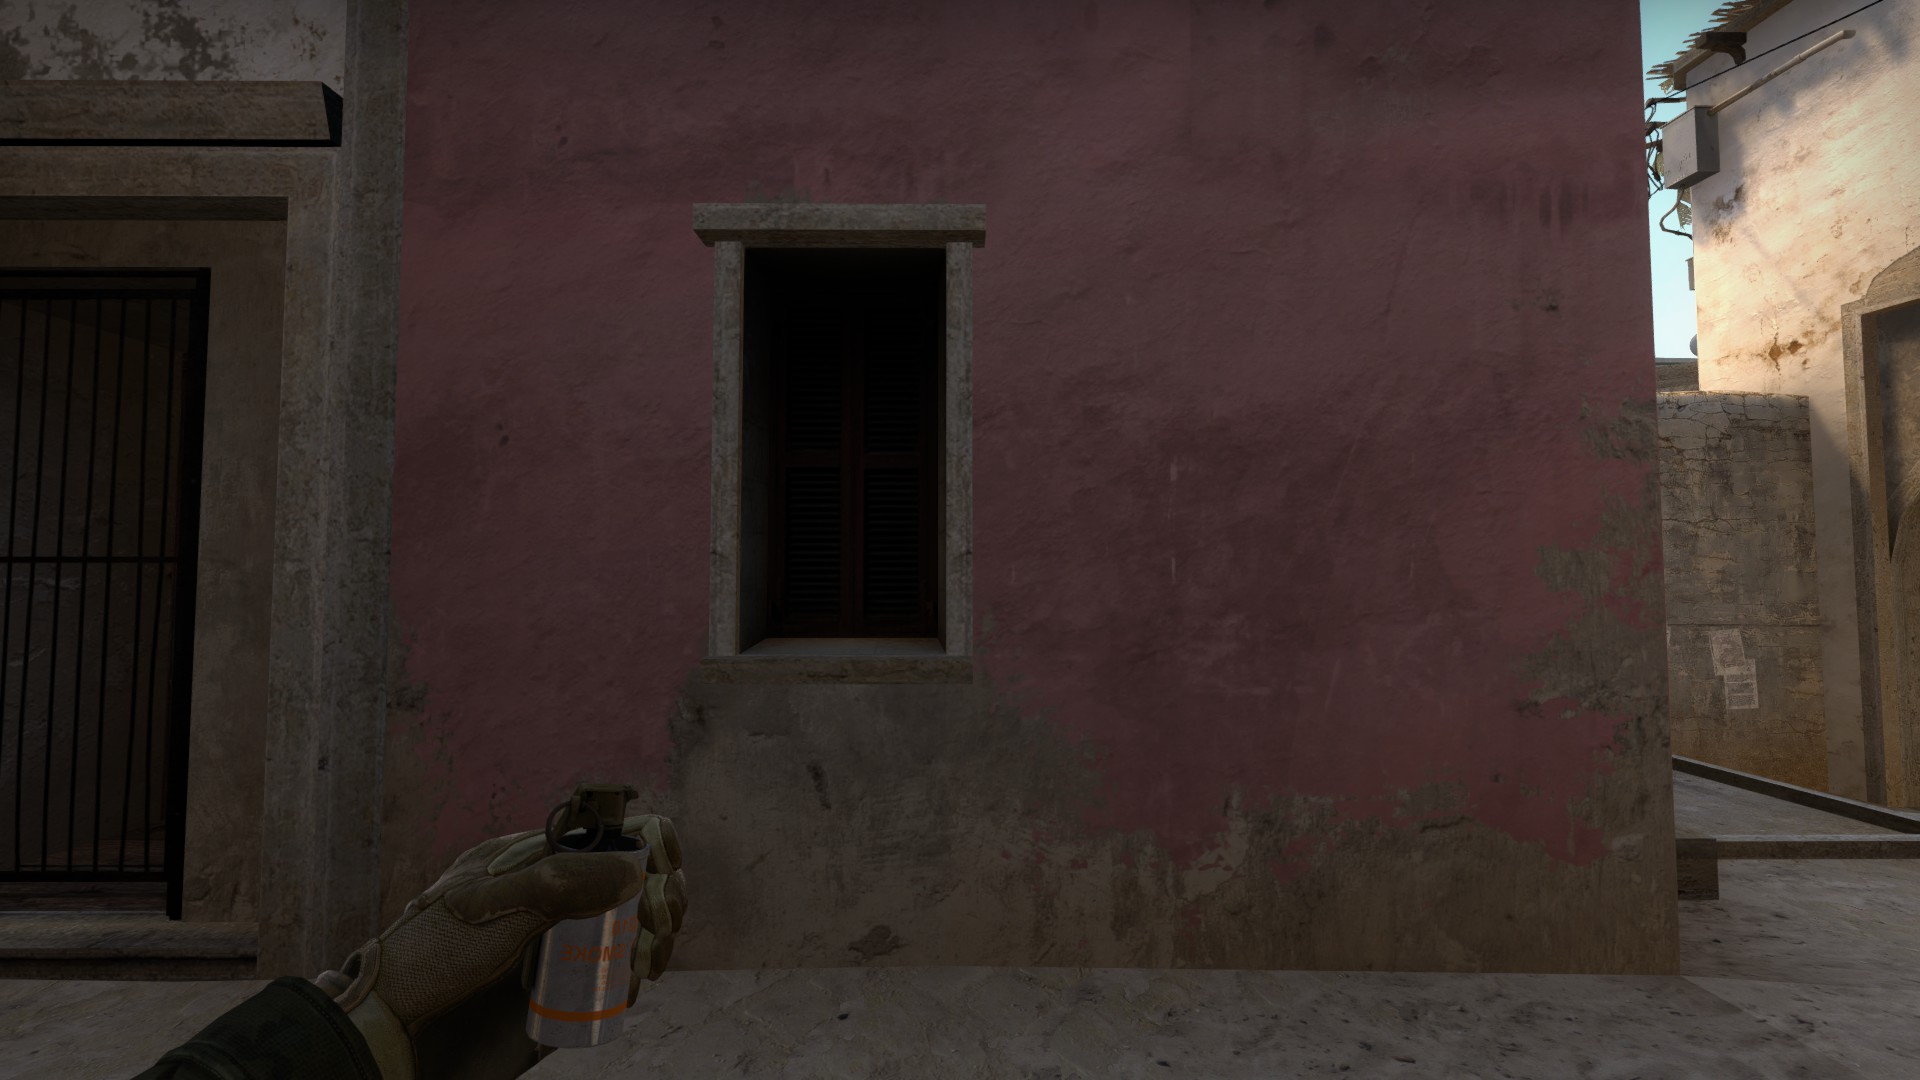
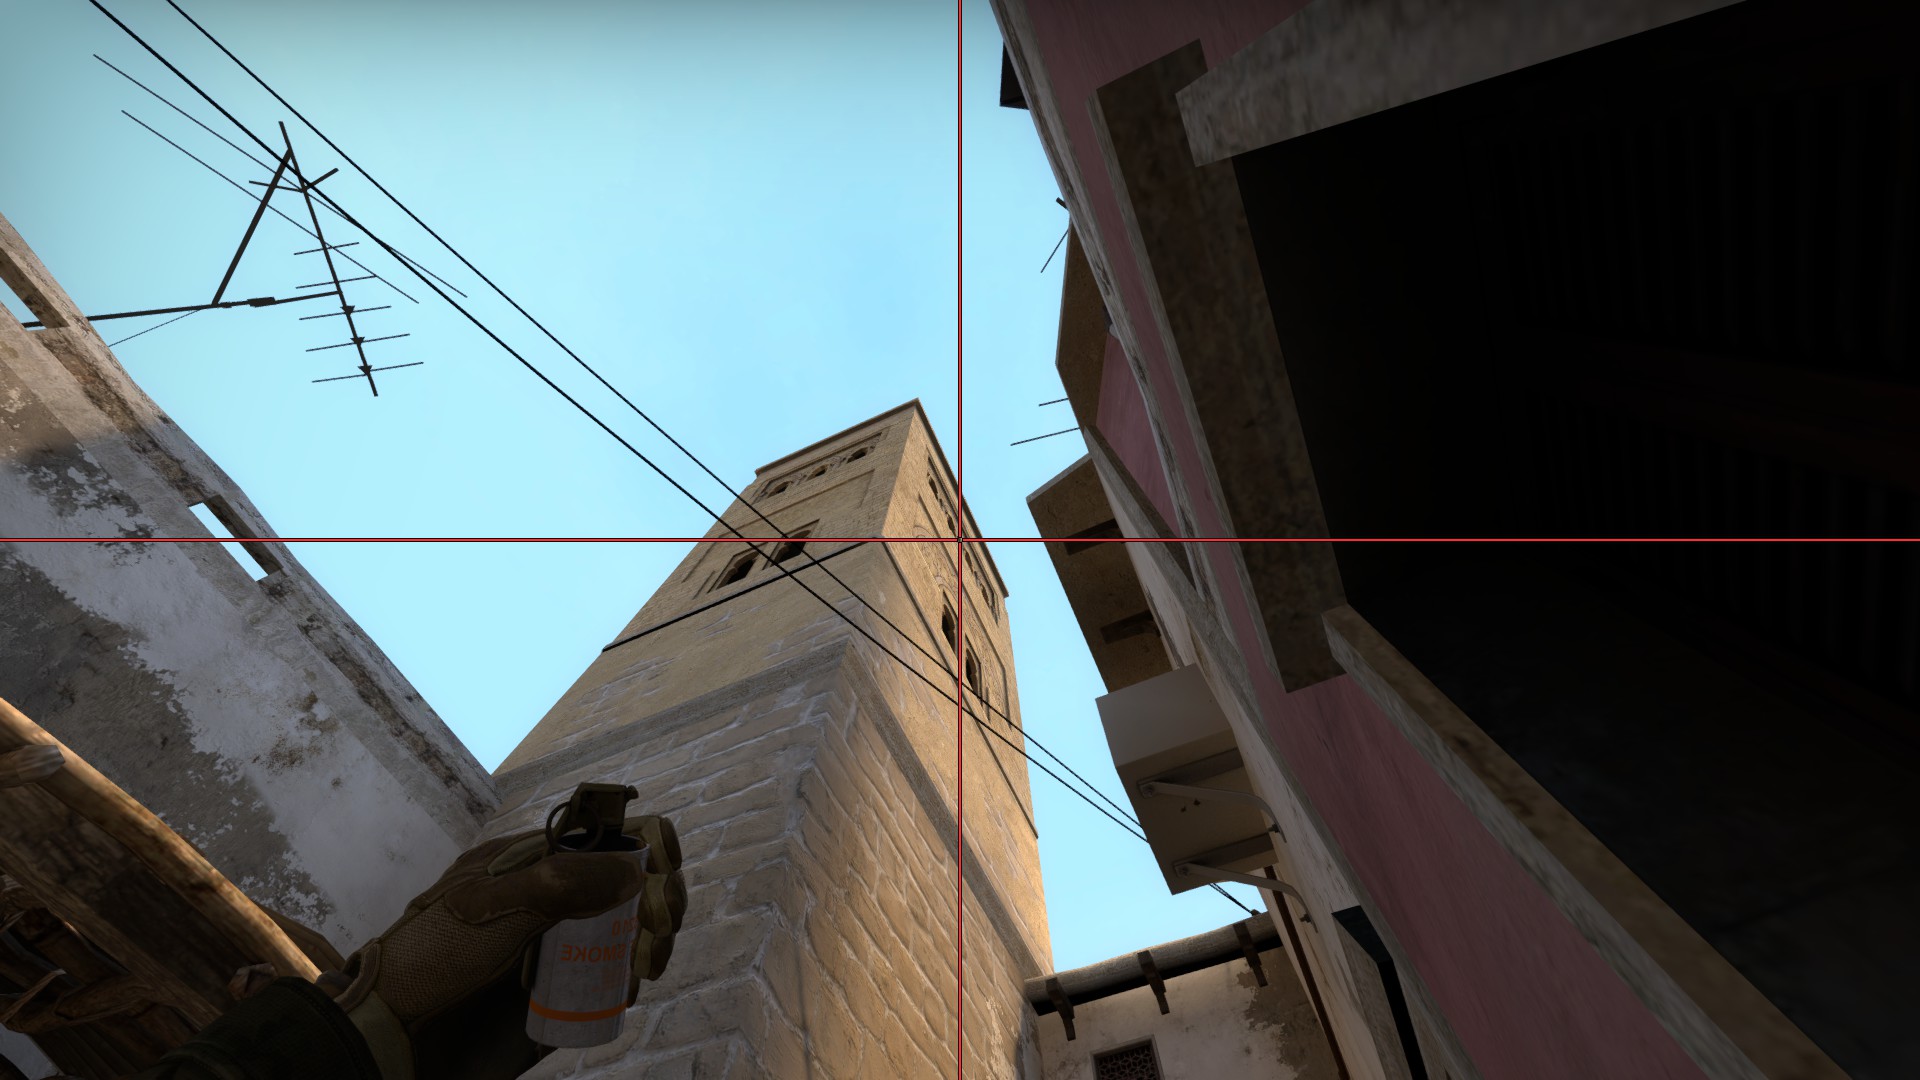
You can then start a private session on any official or downloaded map by opening the console and typing:
"map MAPNAME"
without the quotation marks and where MAPNAME is the file name for the map that you desire.

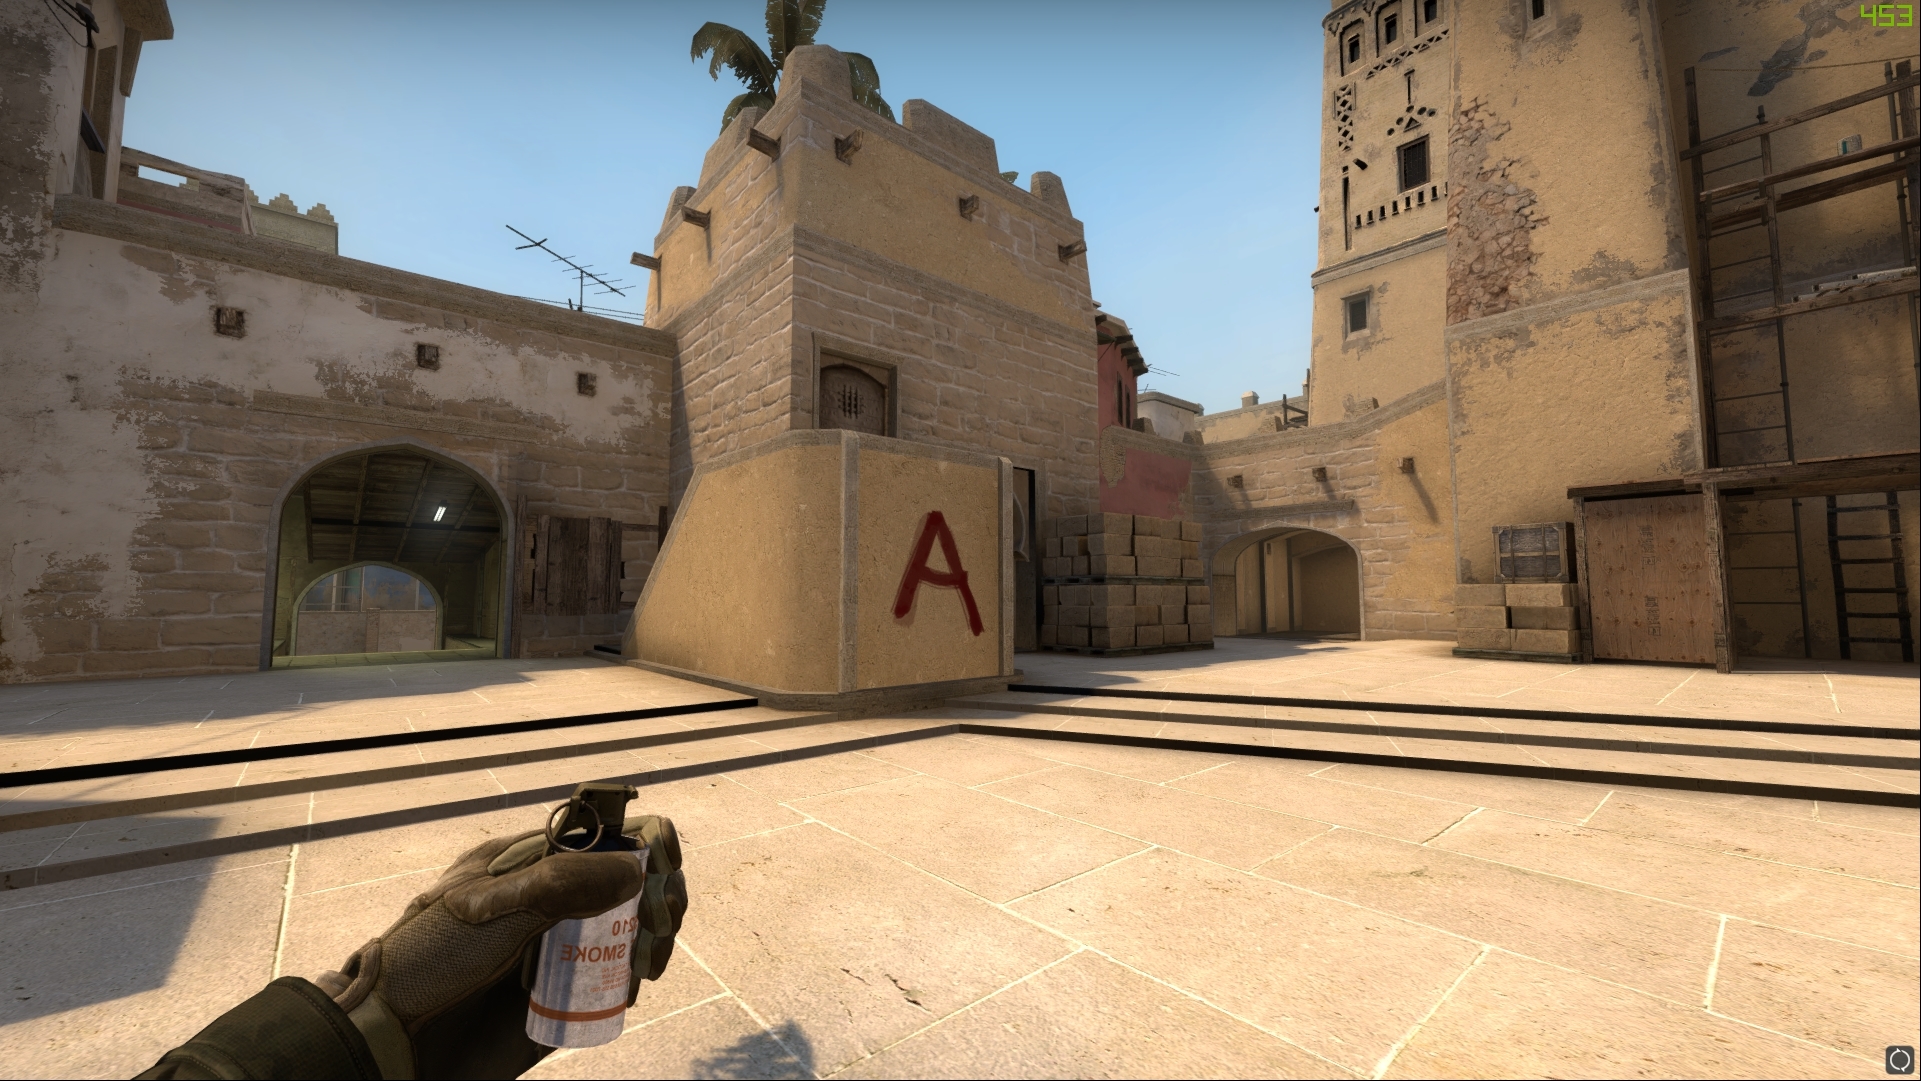
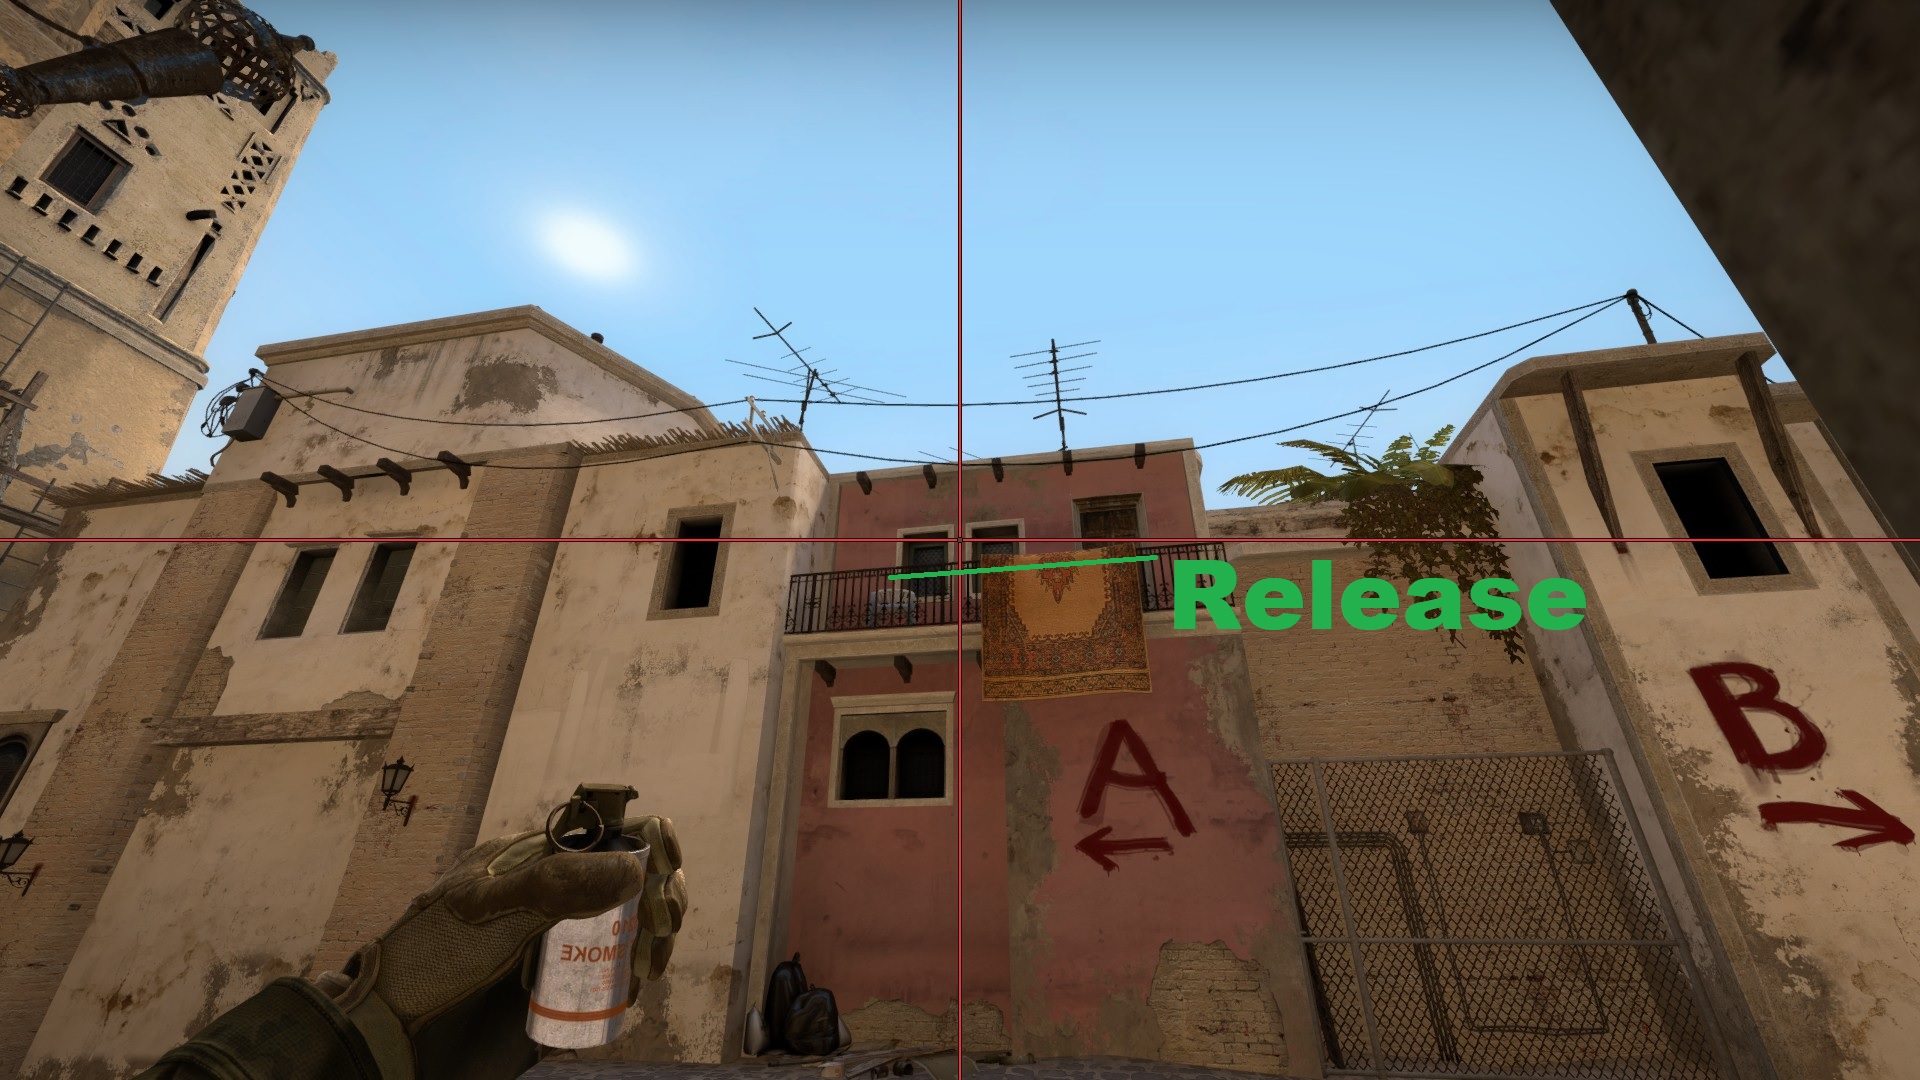
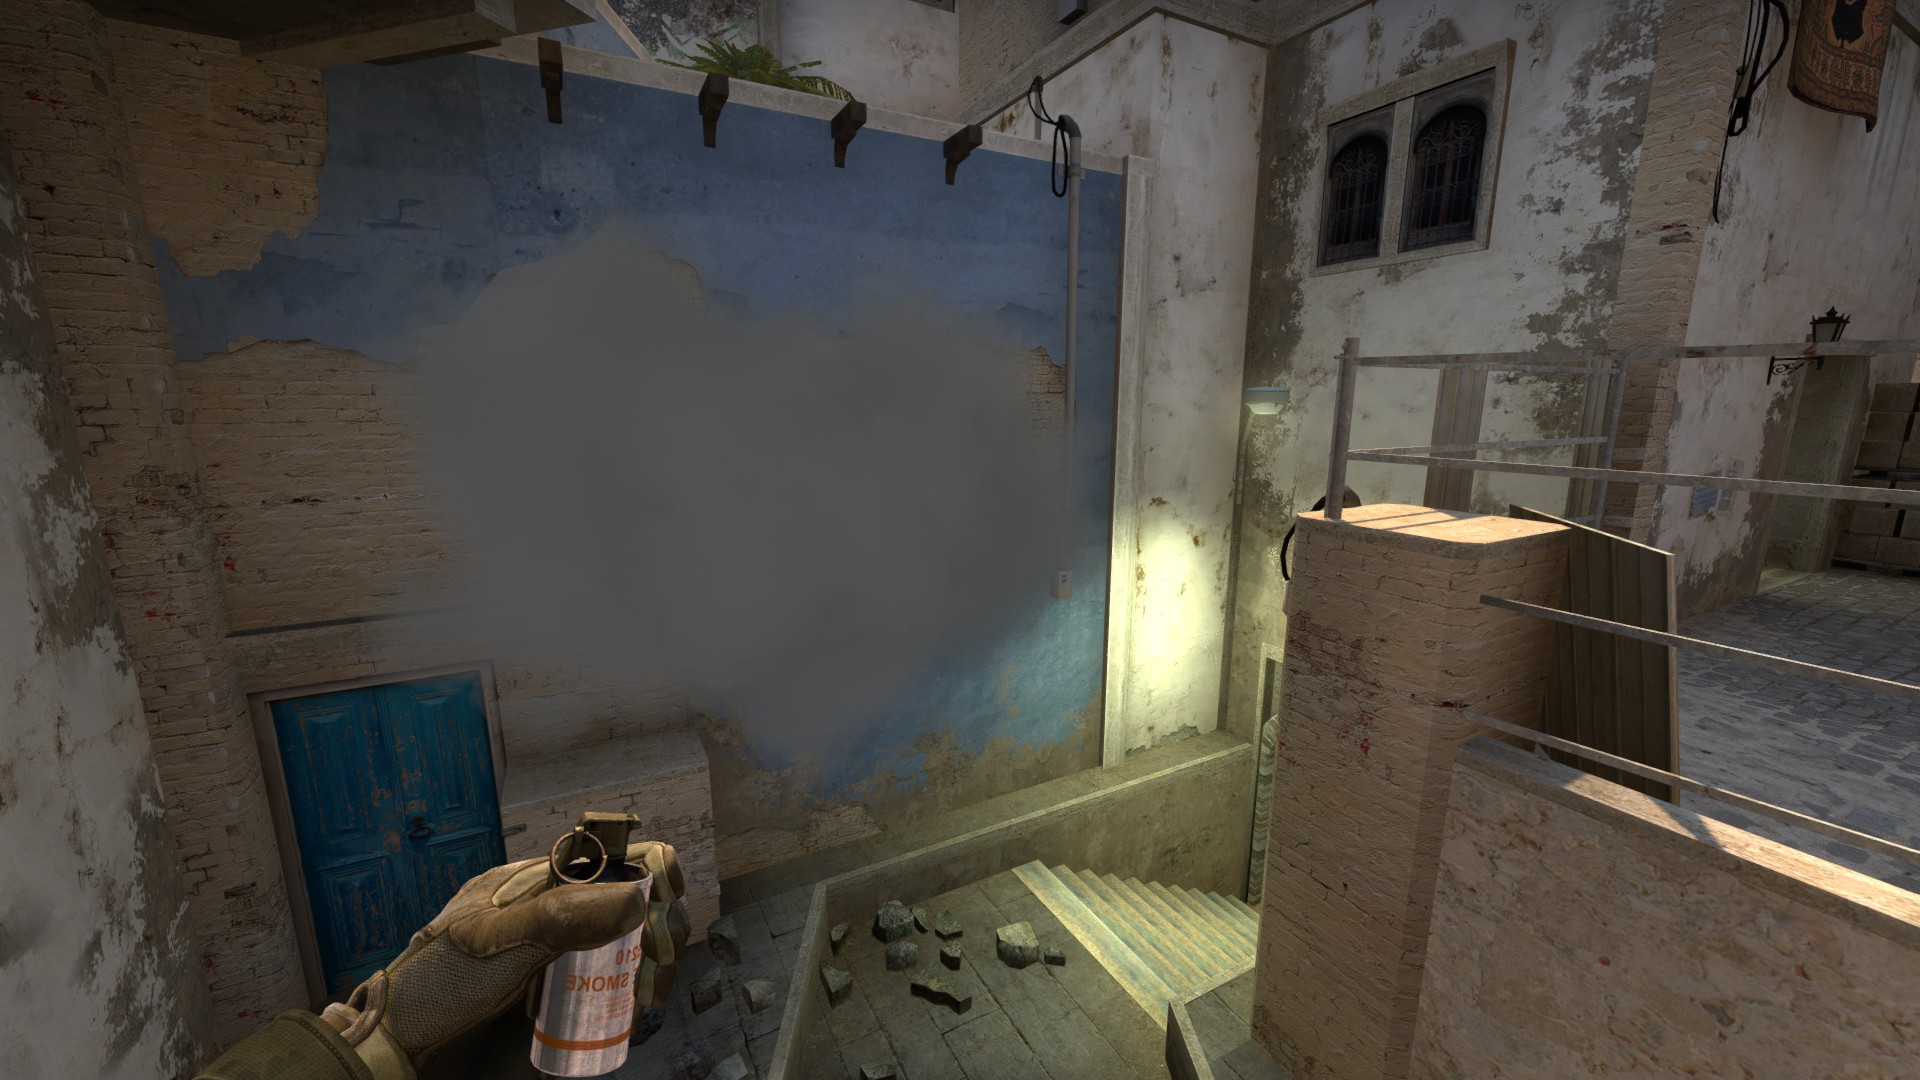
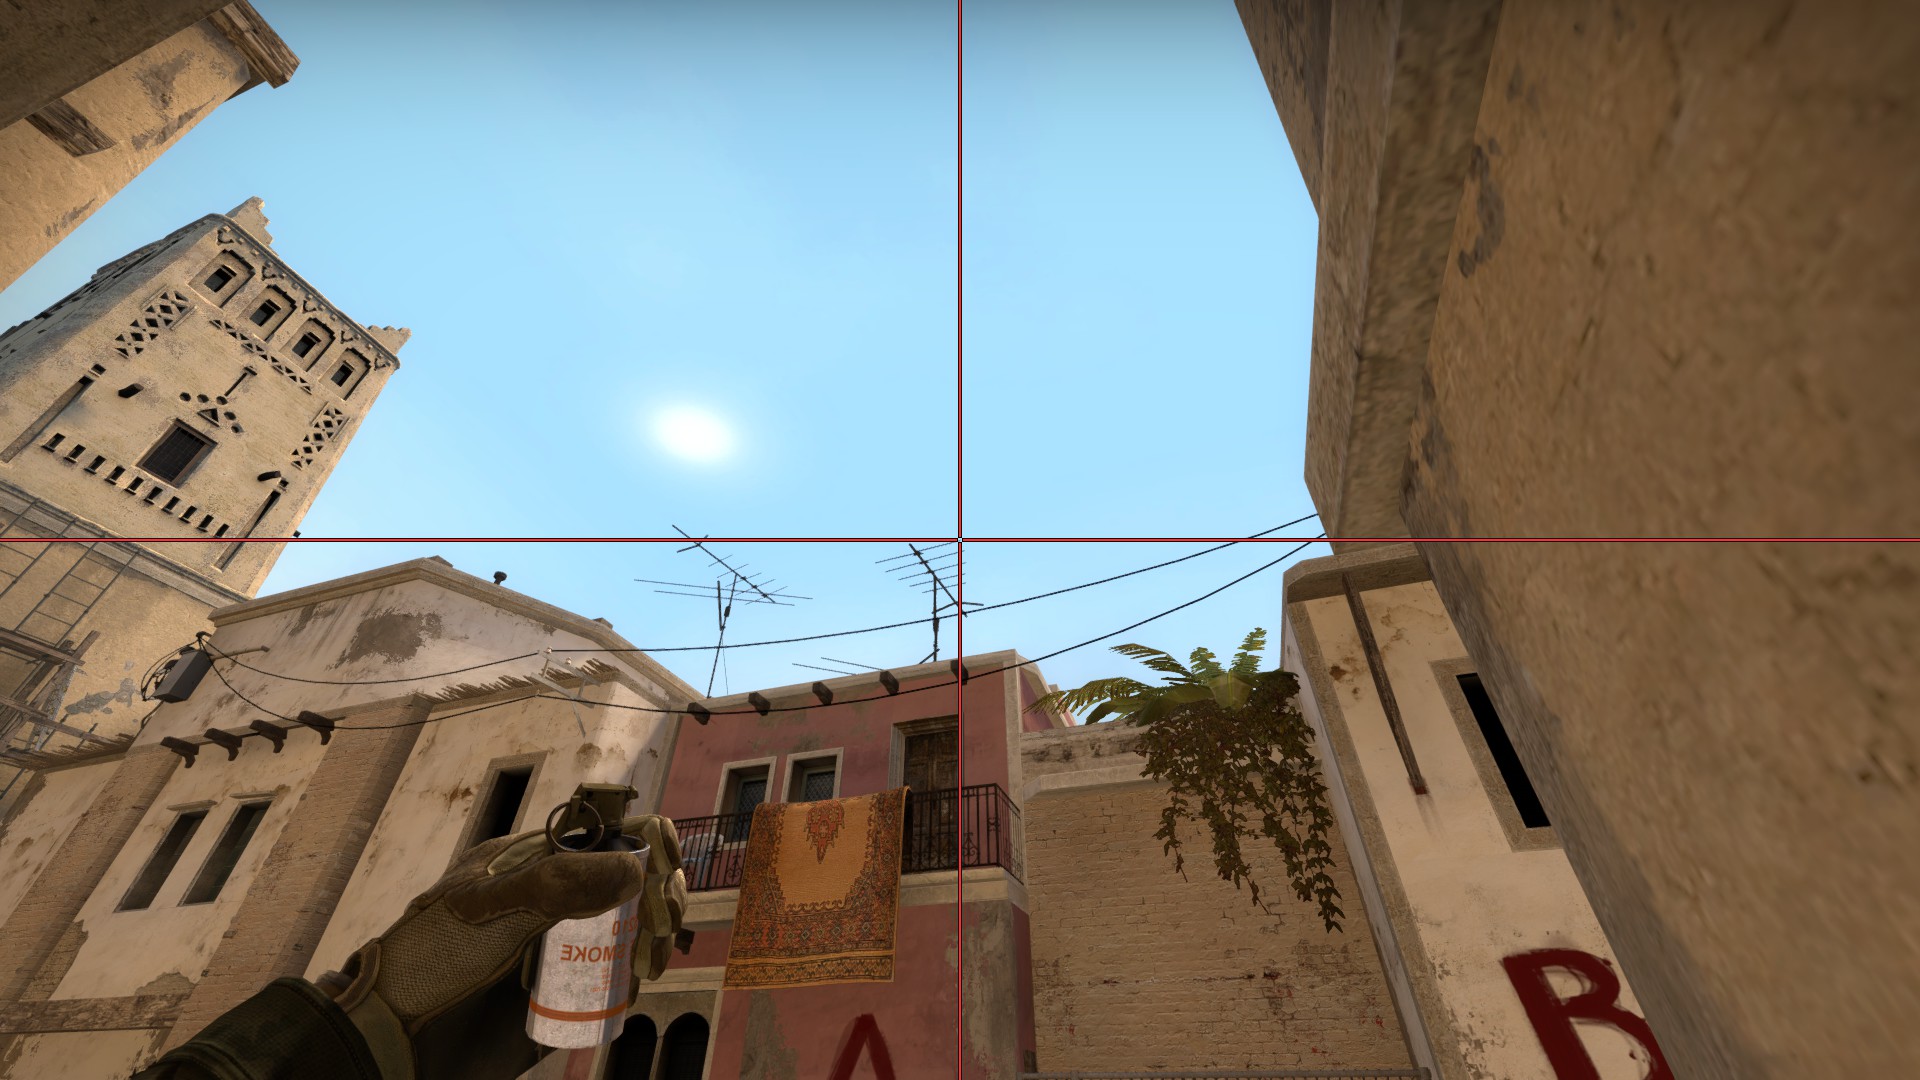
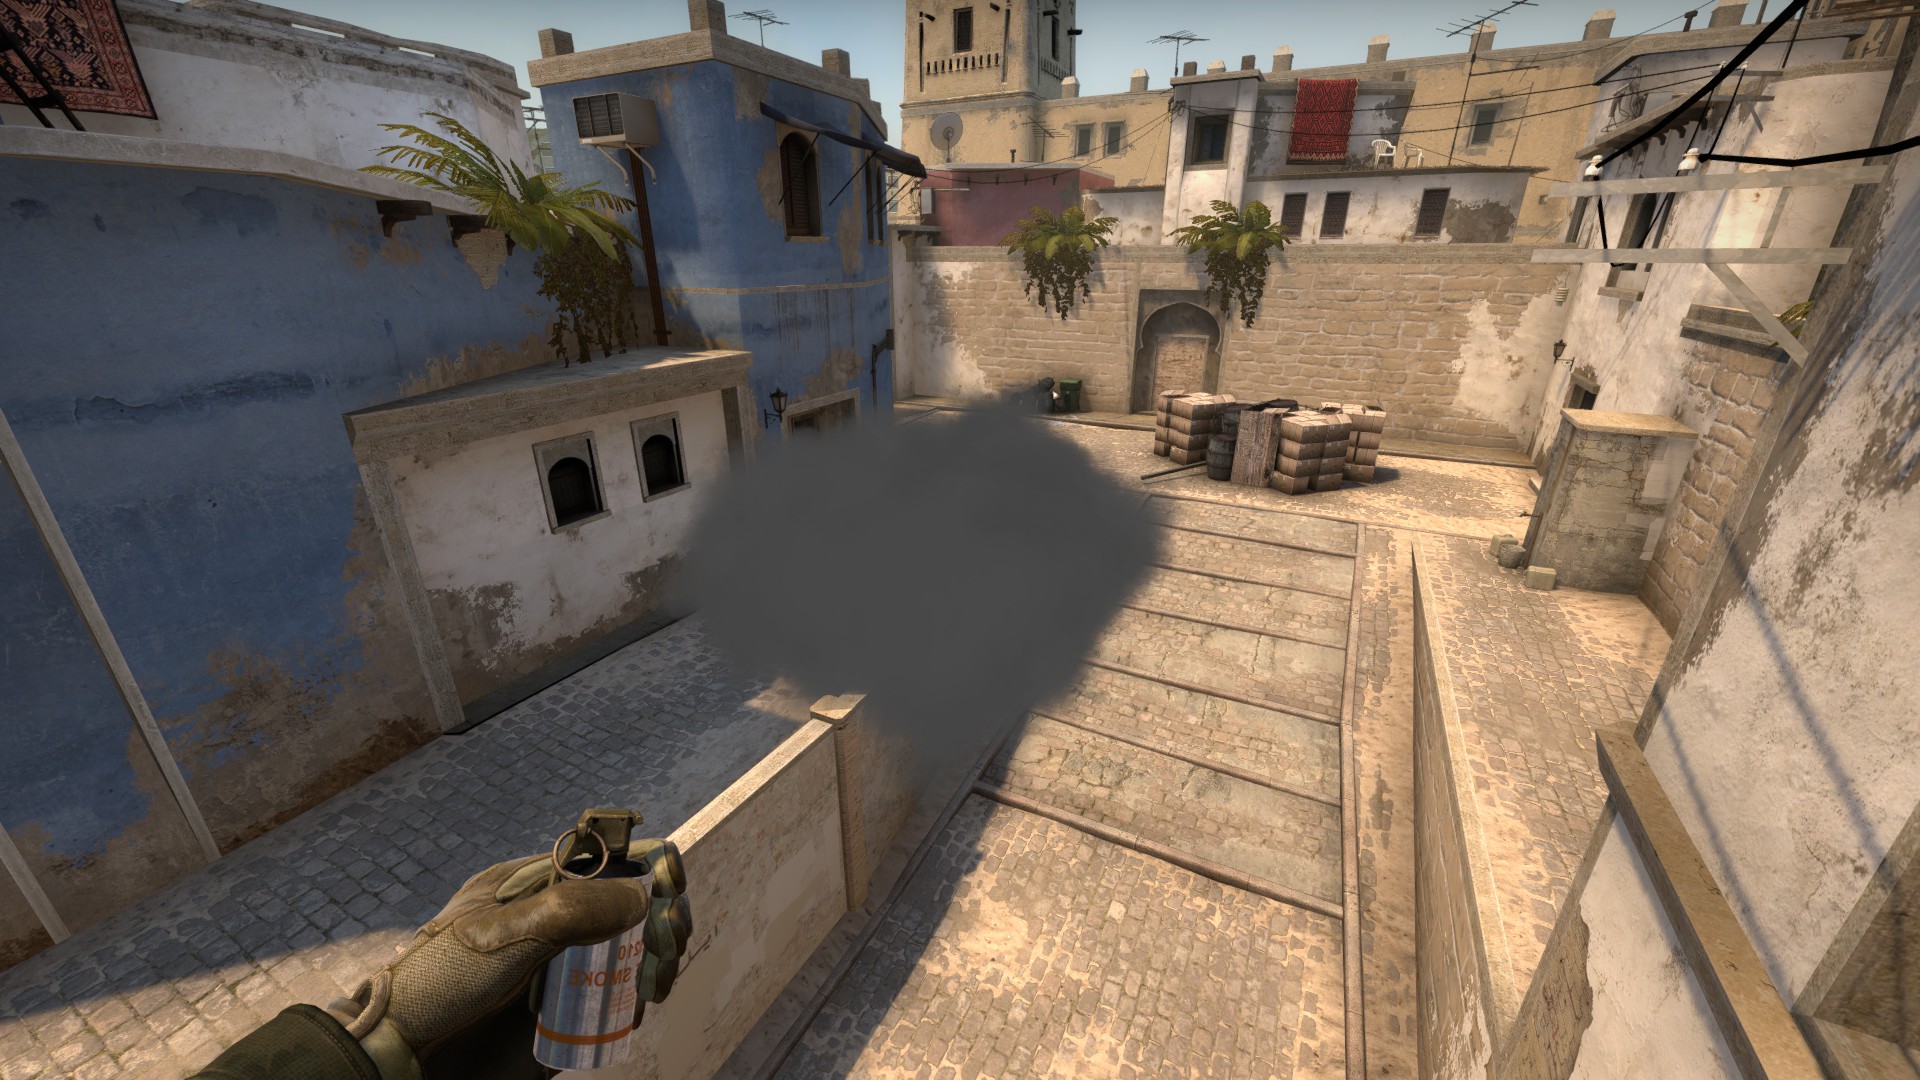
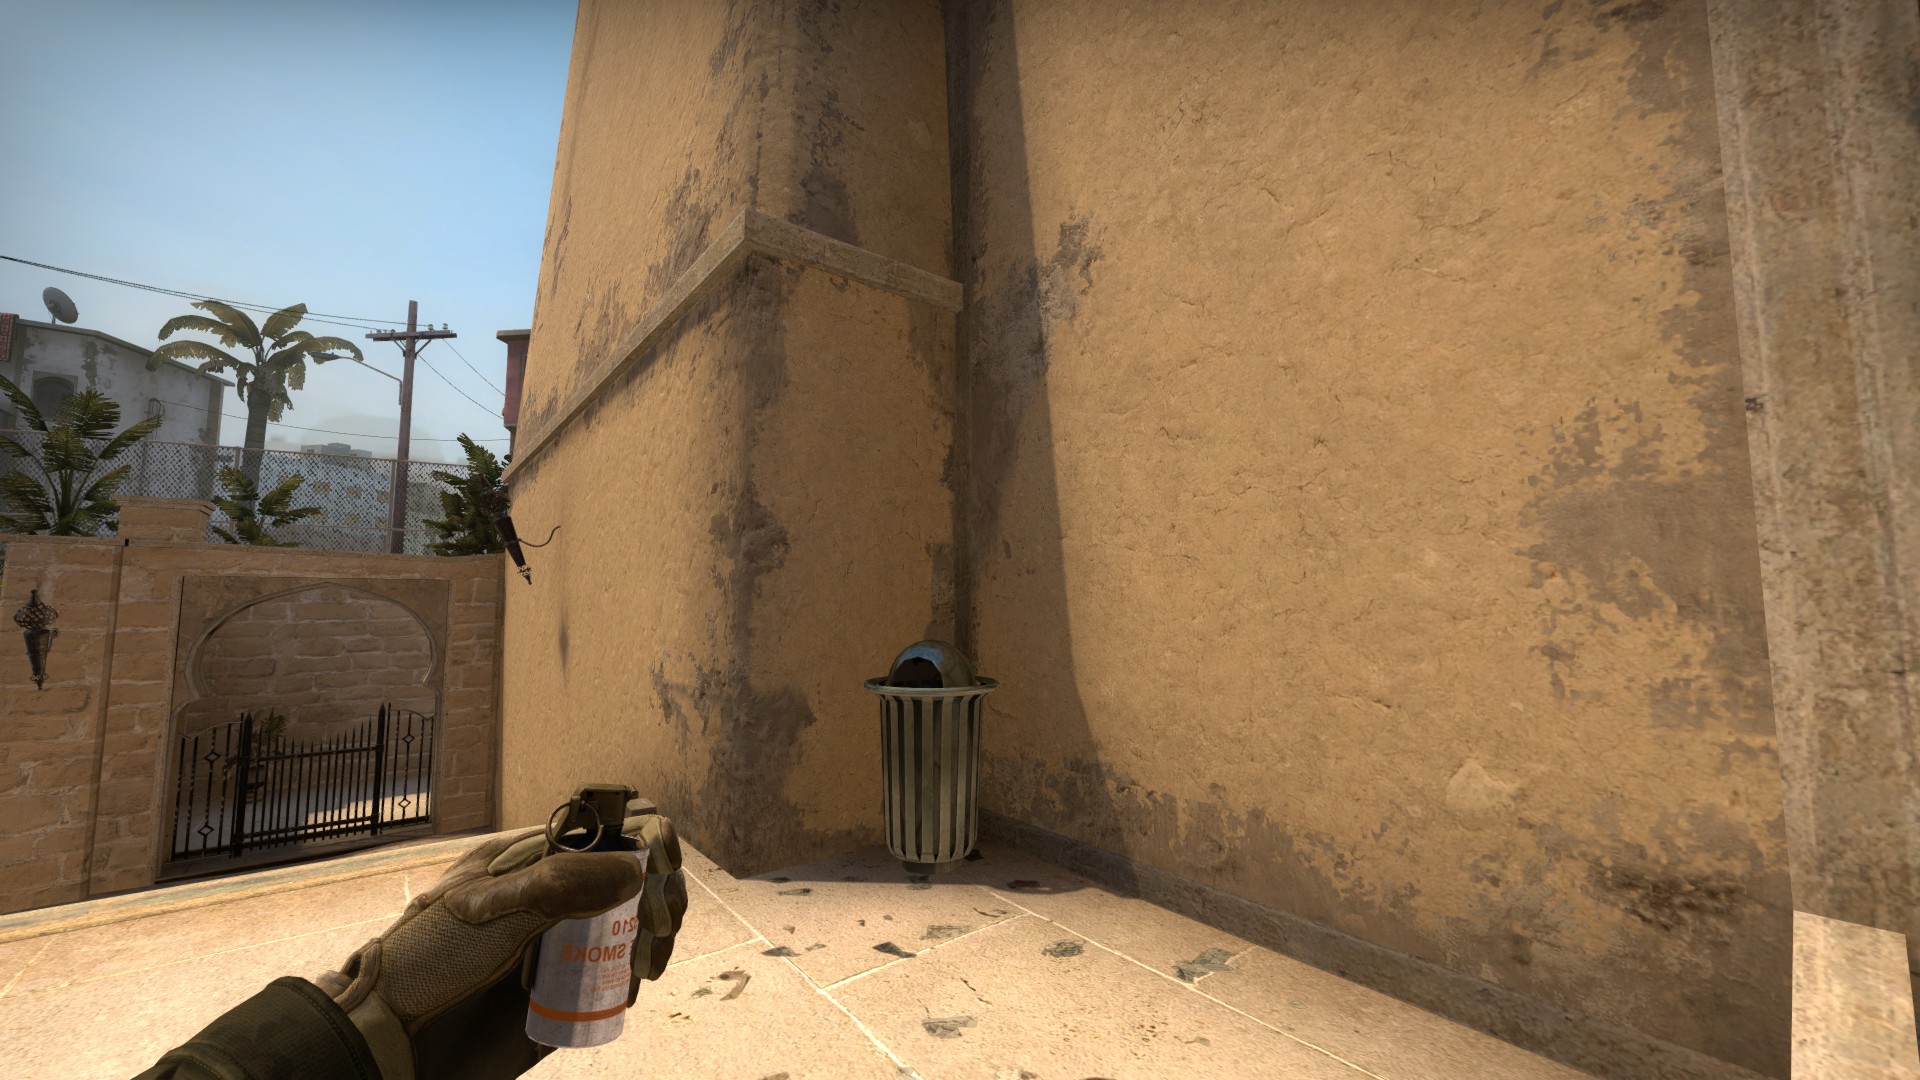
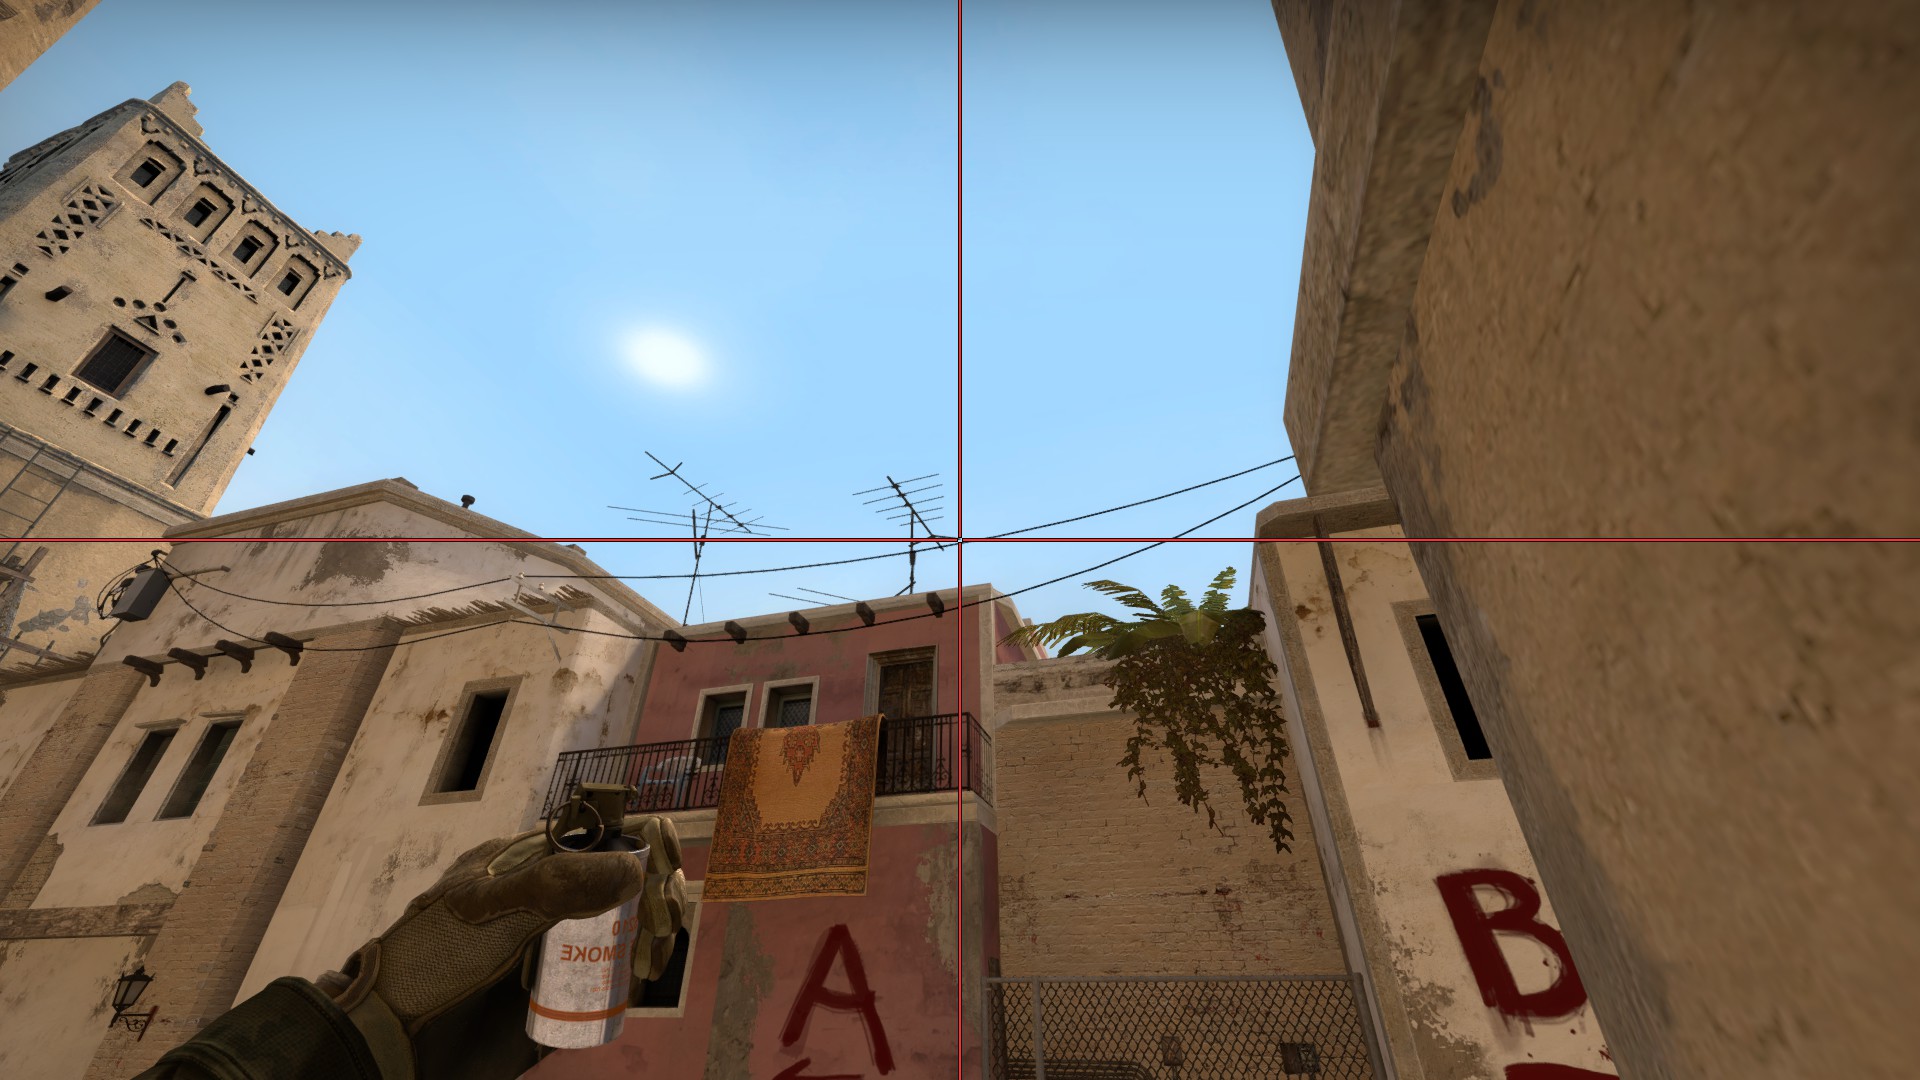
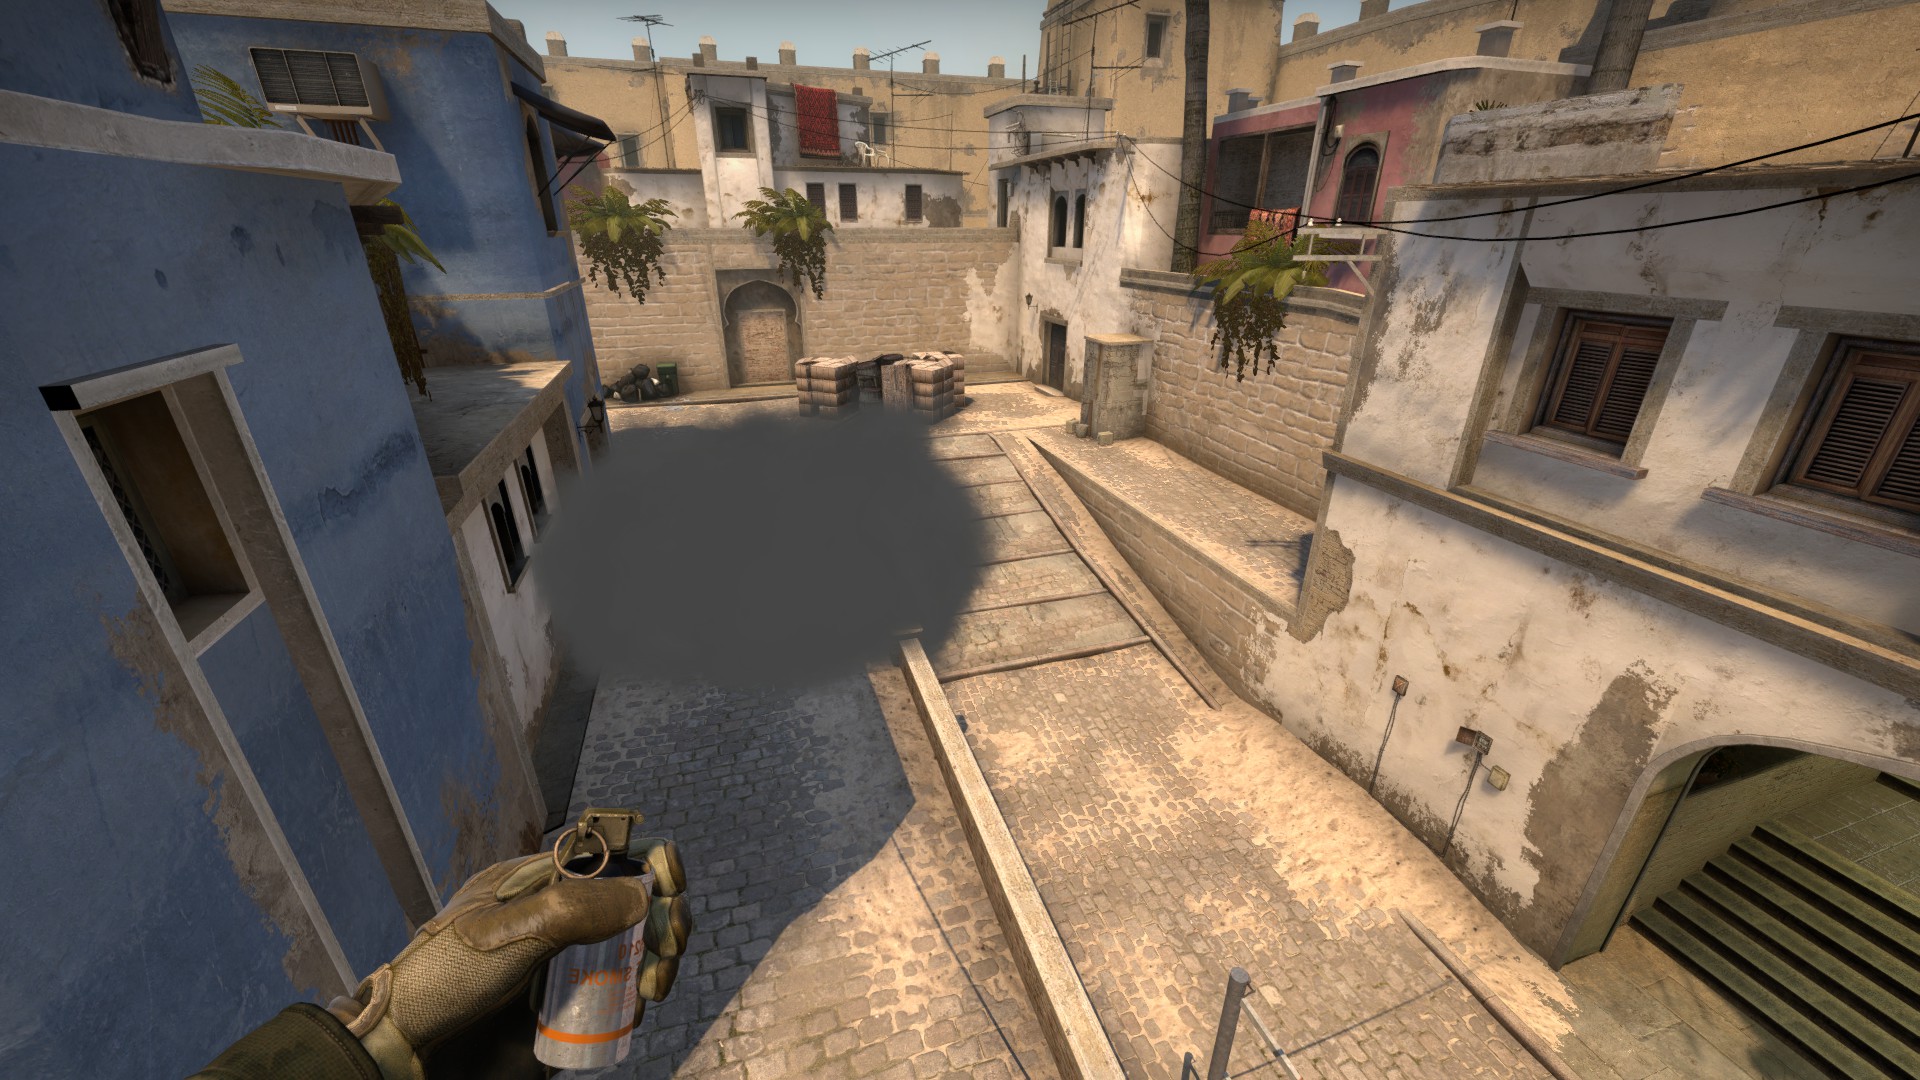
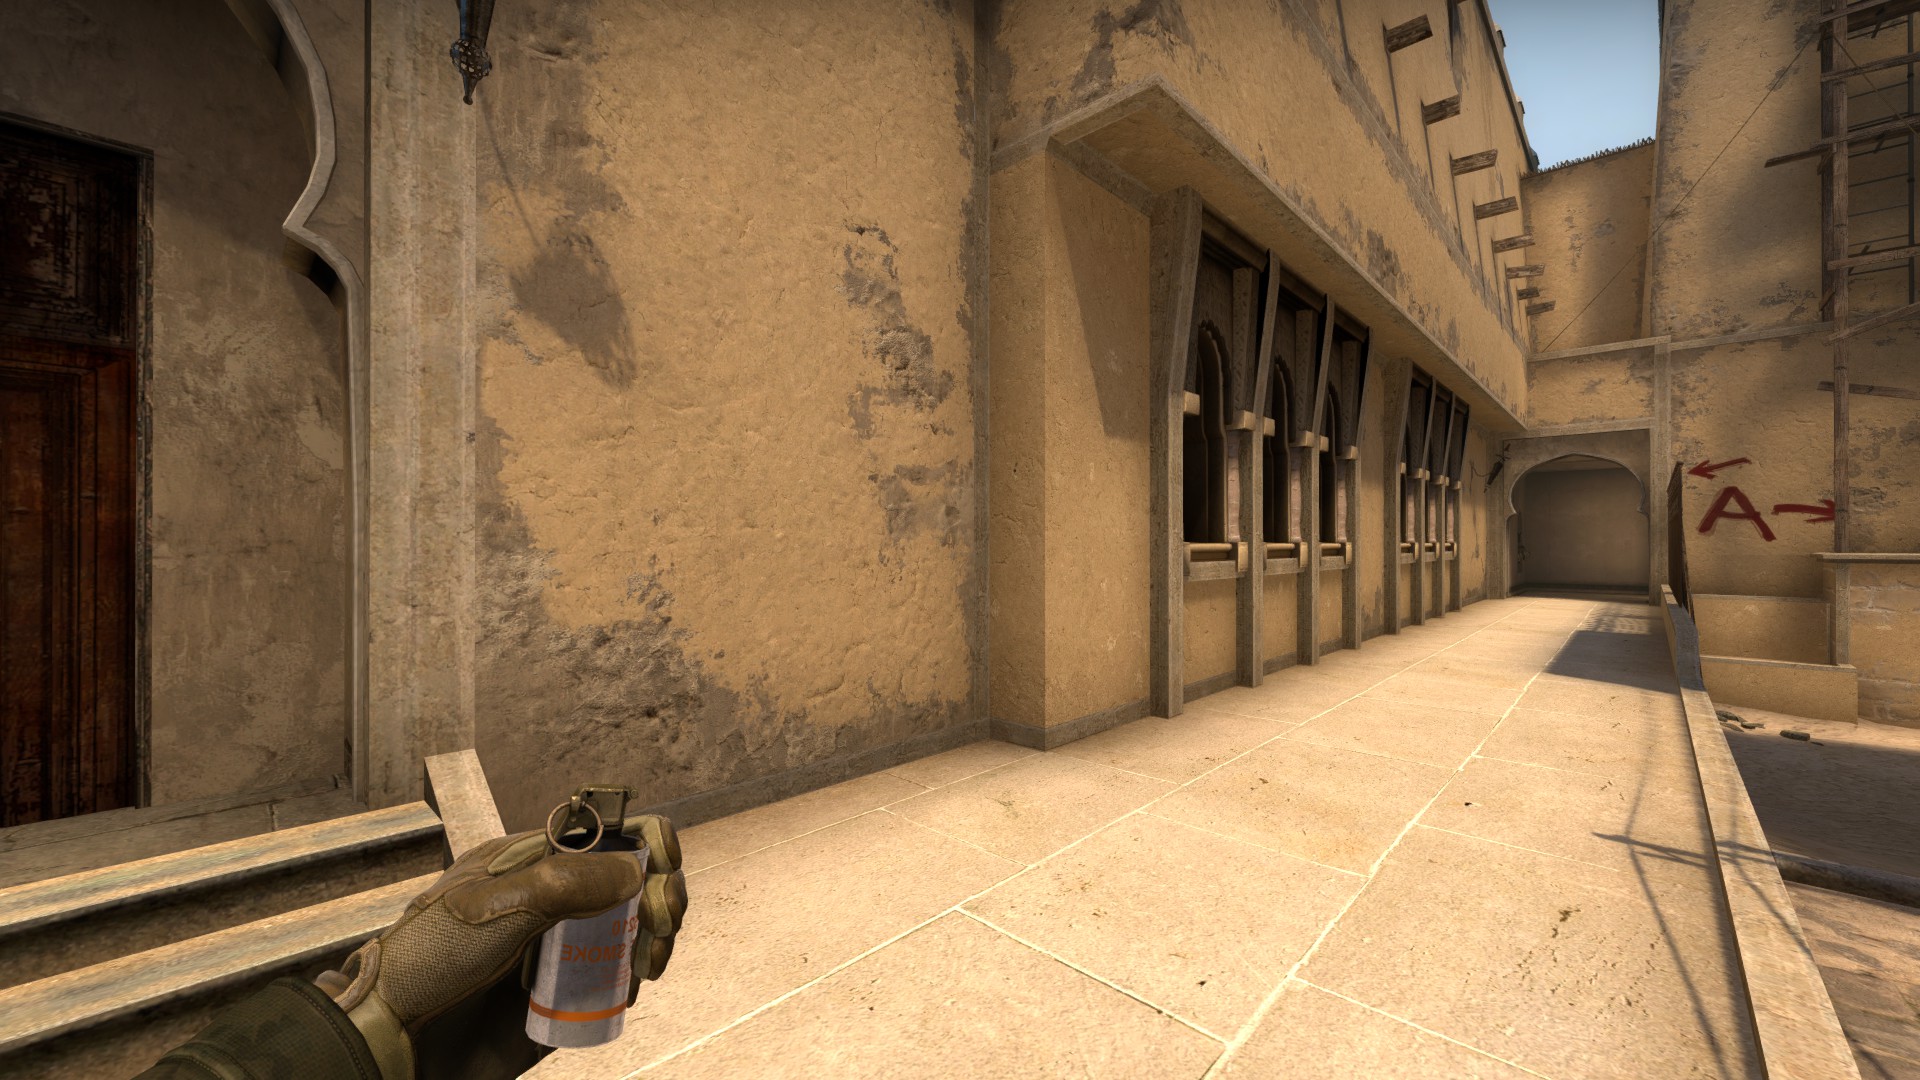
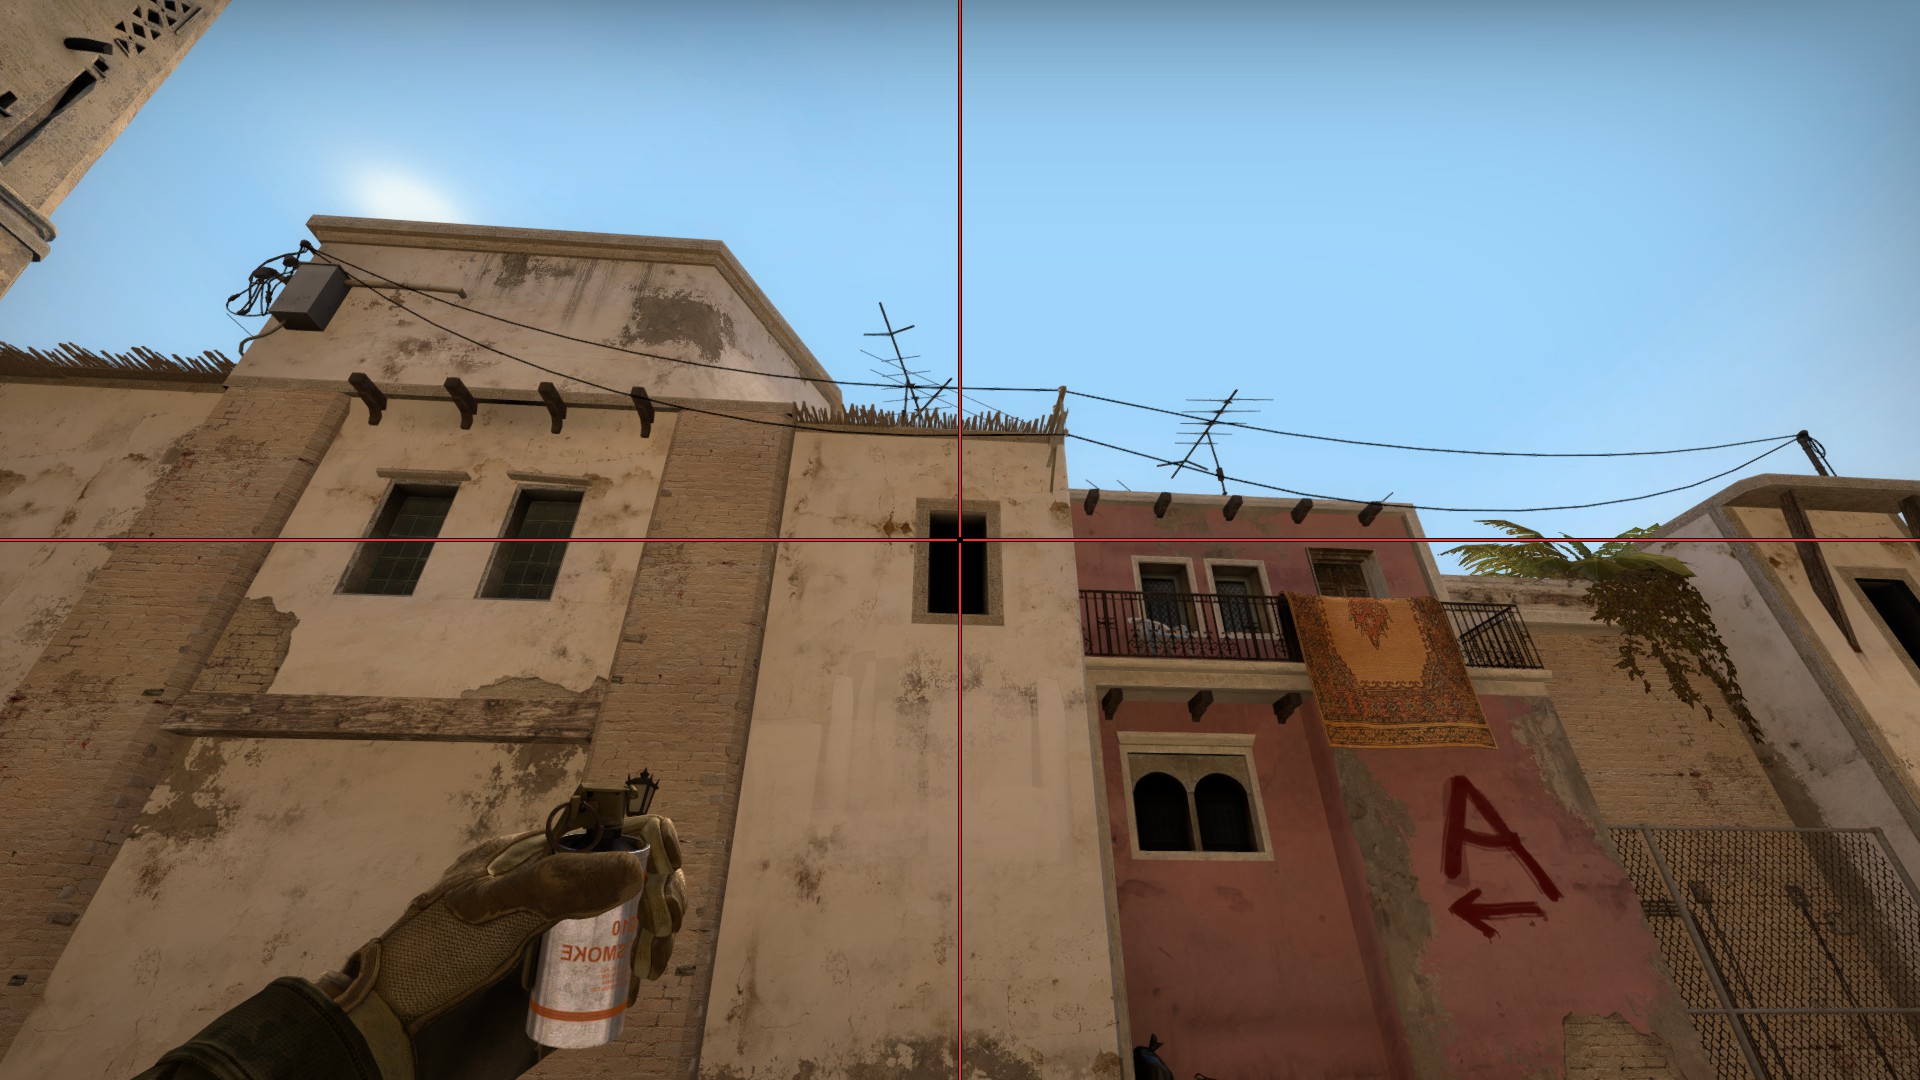
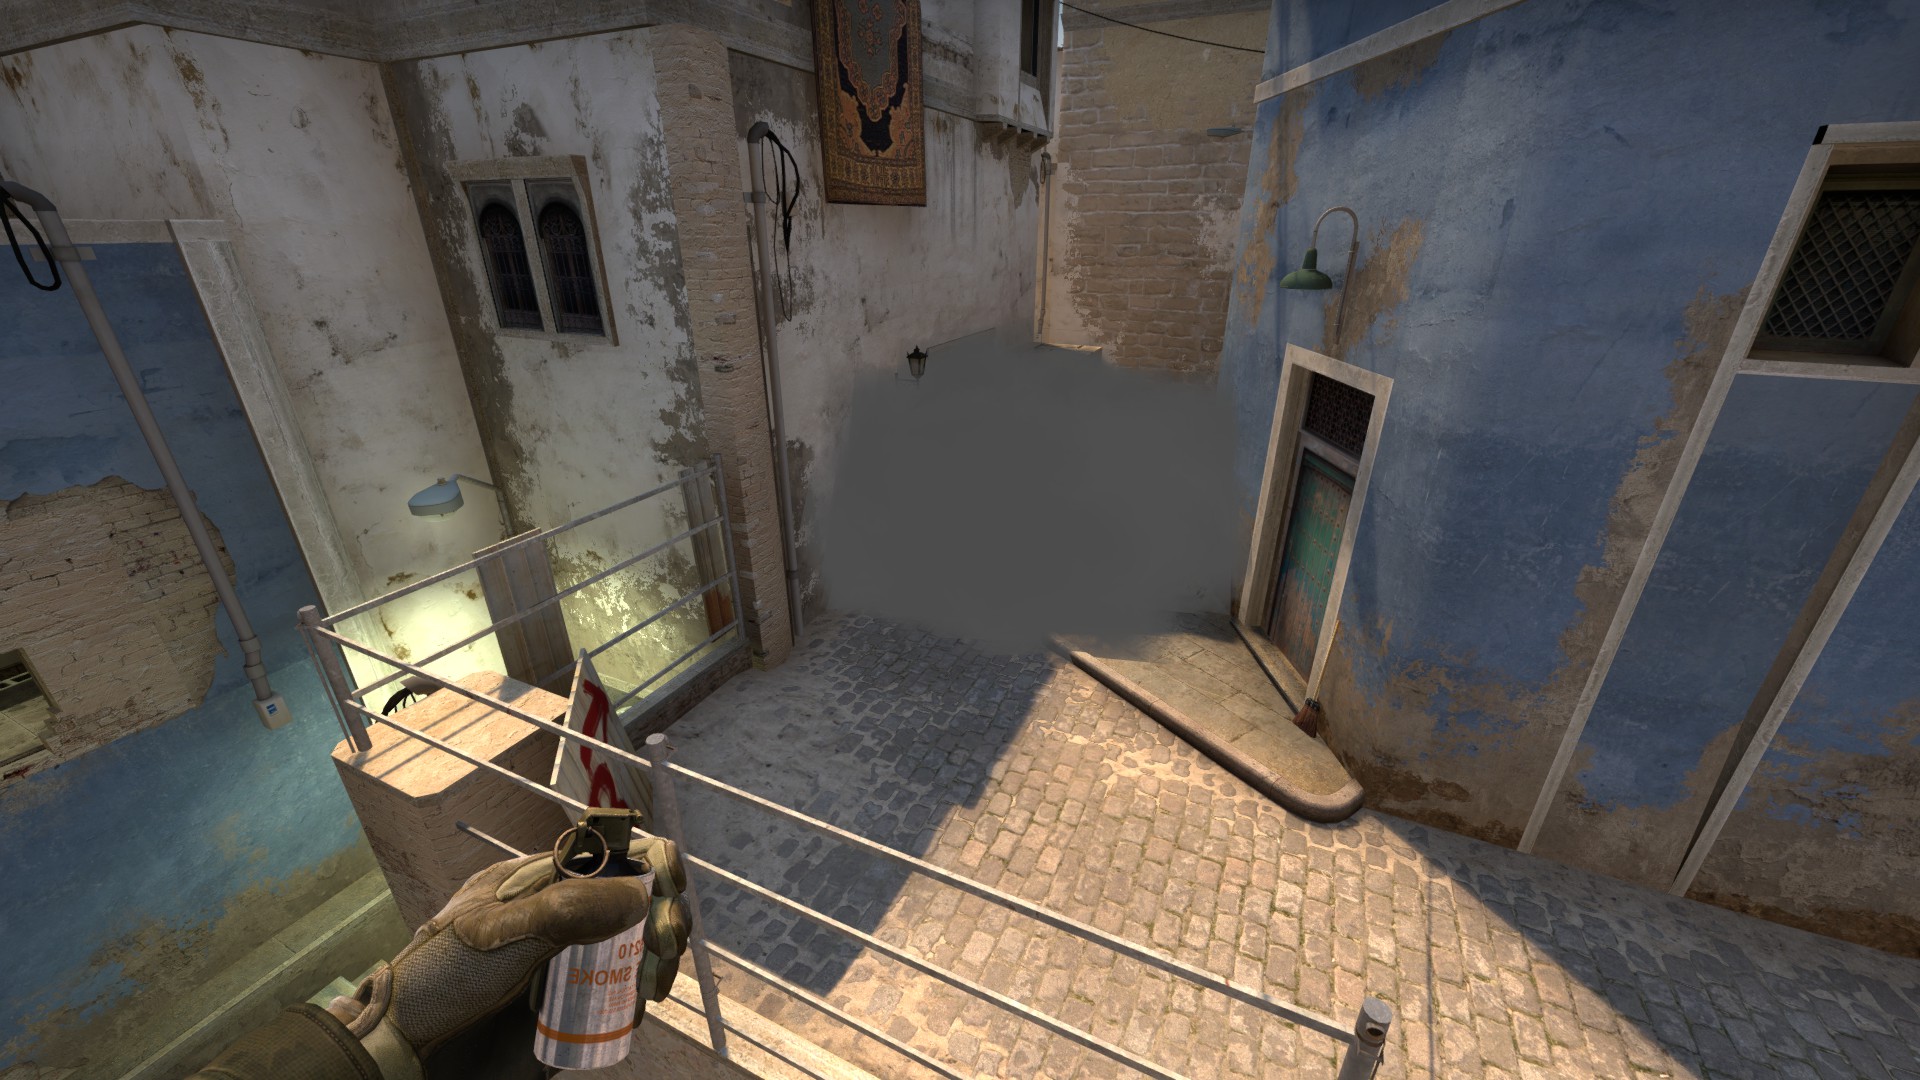
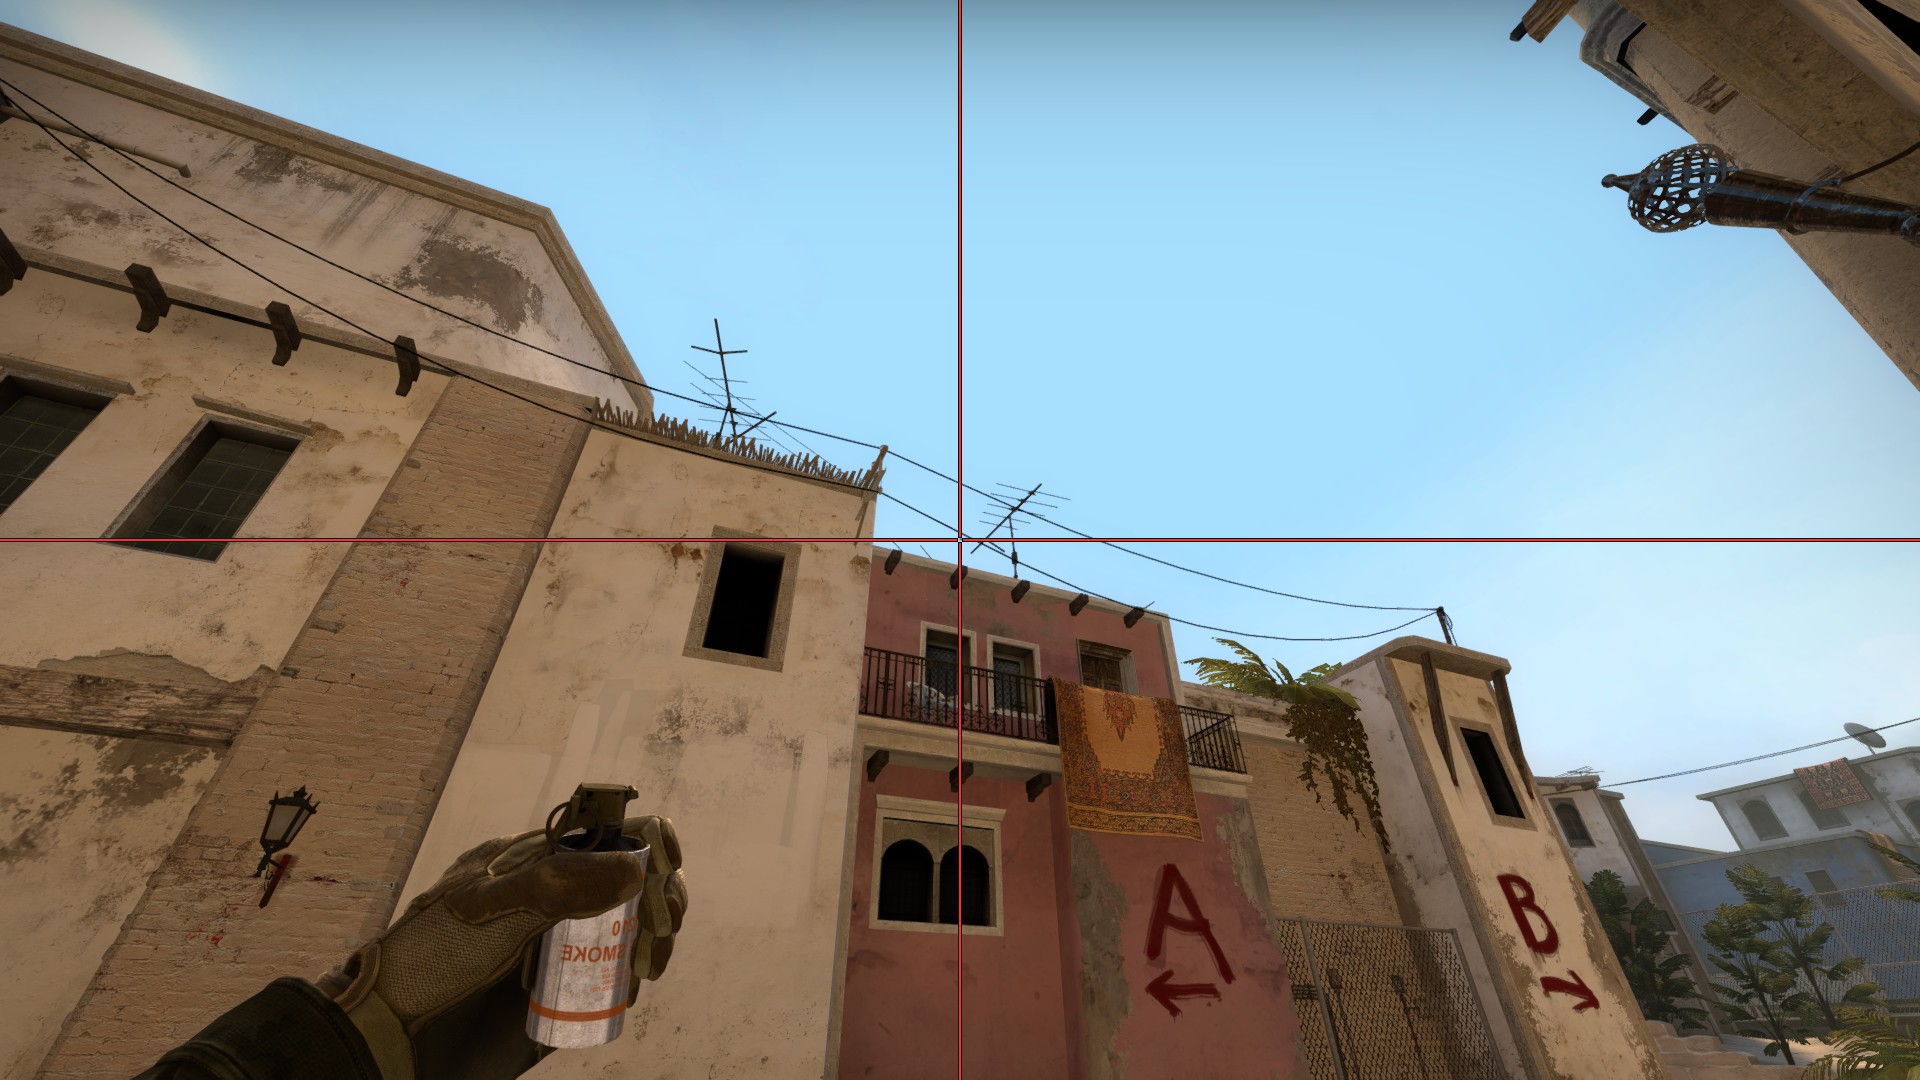
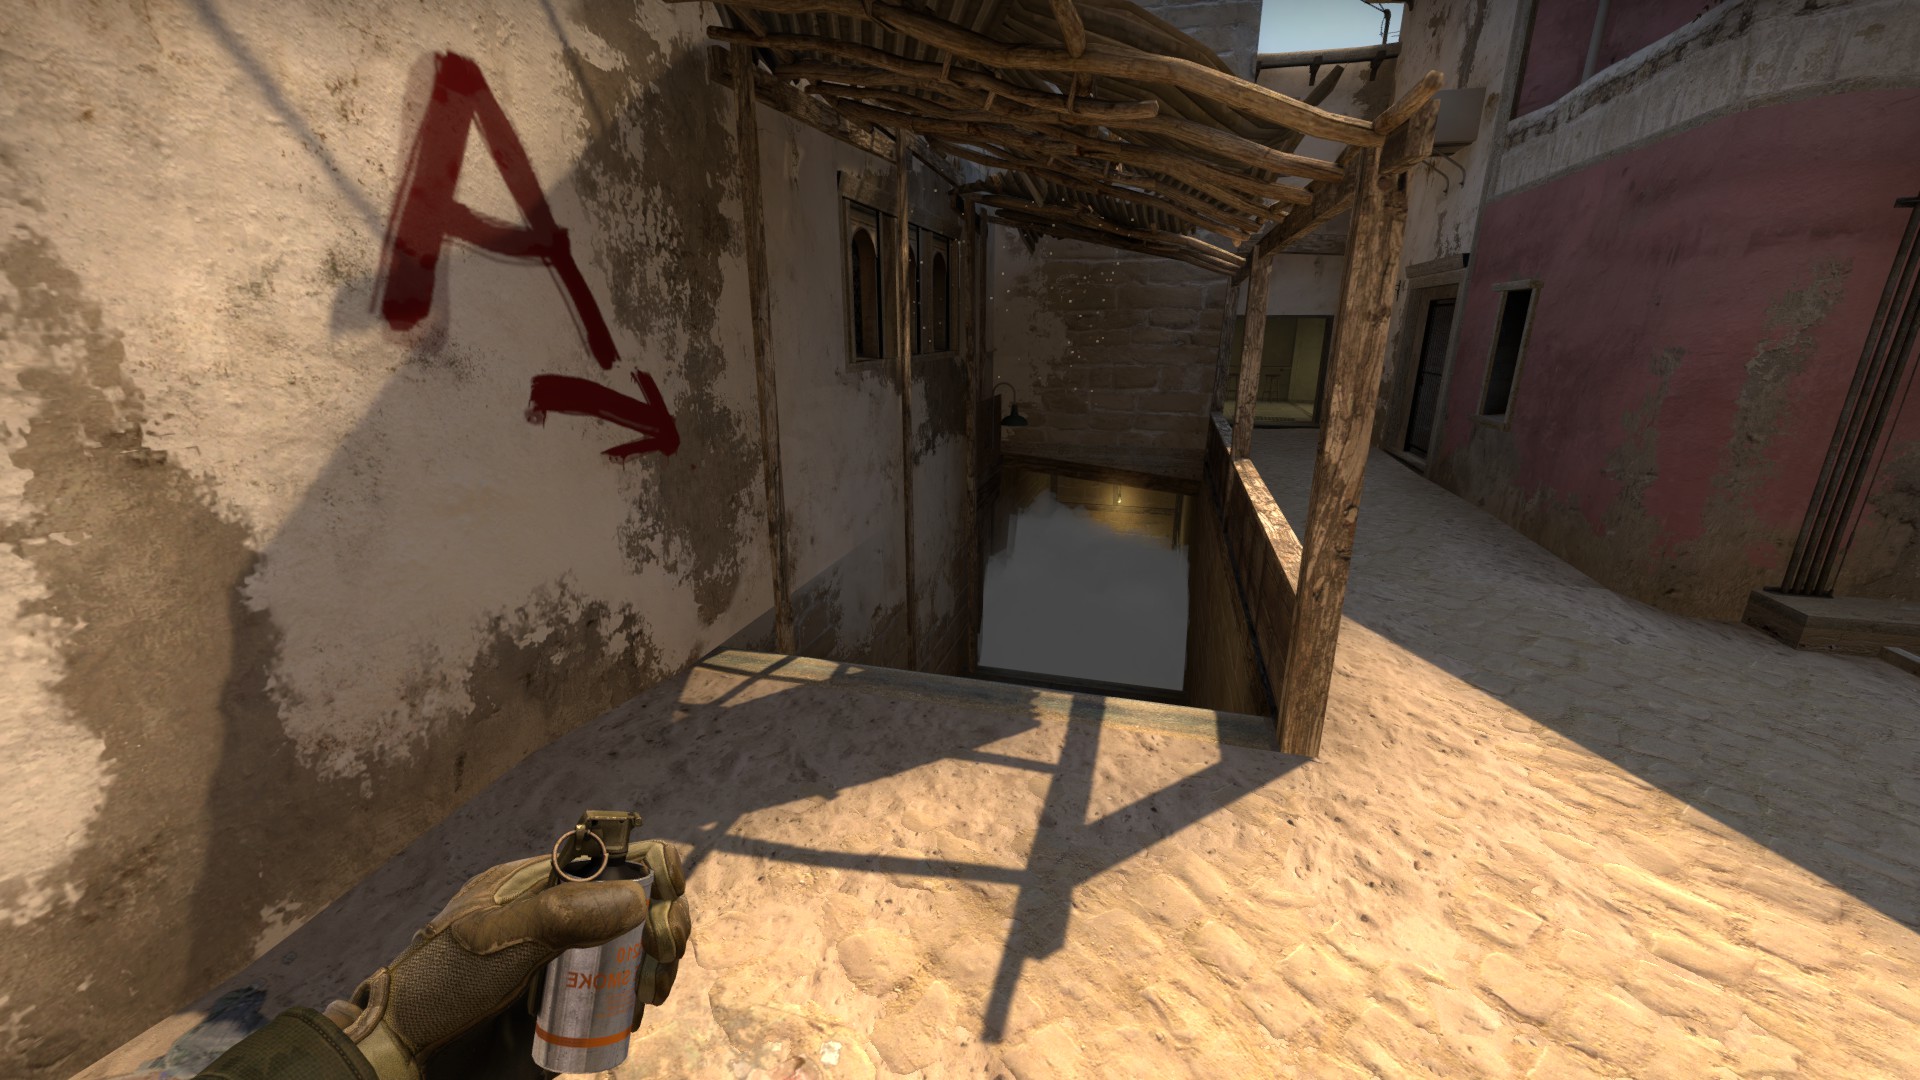
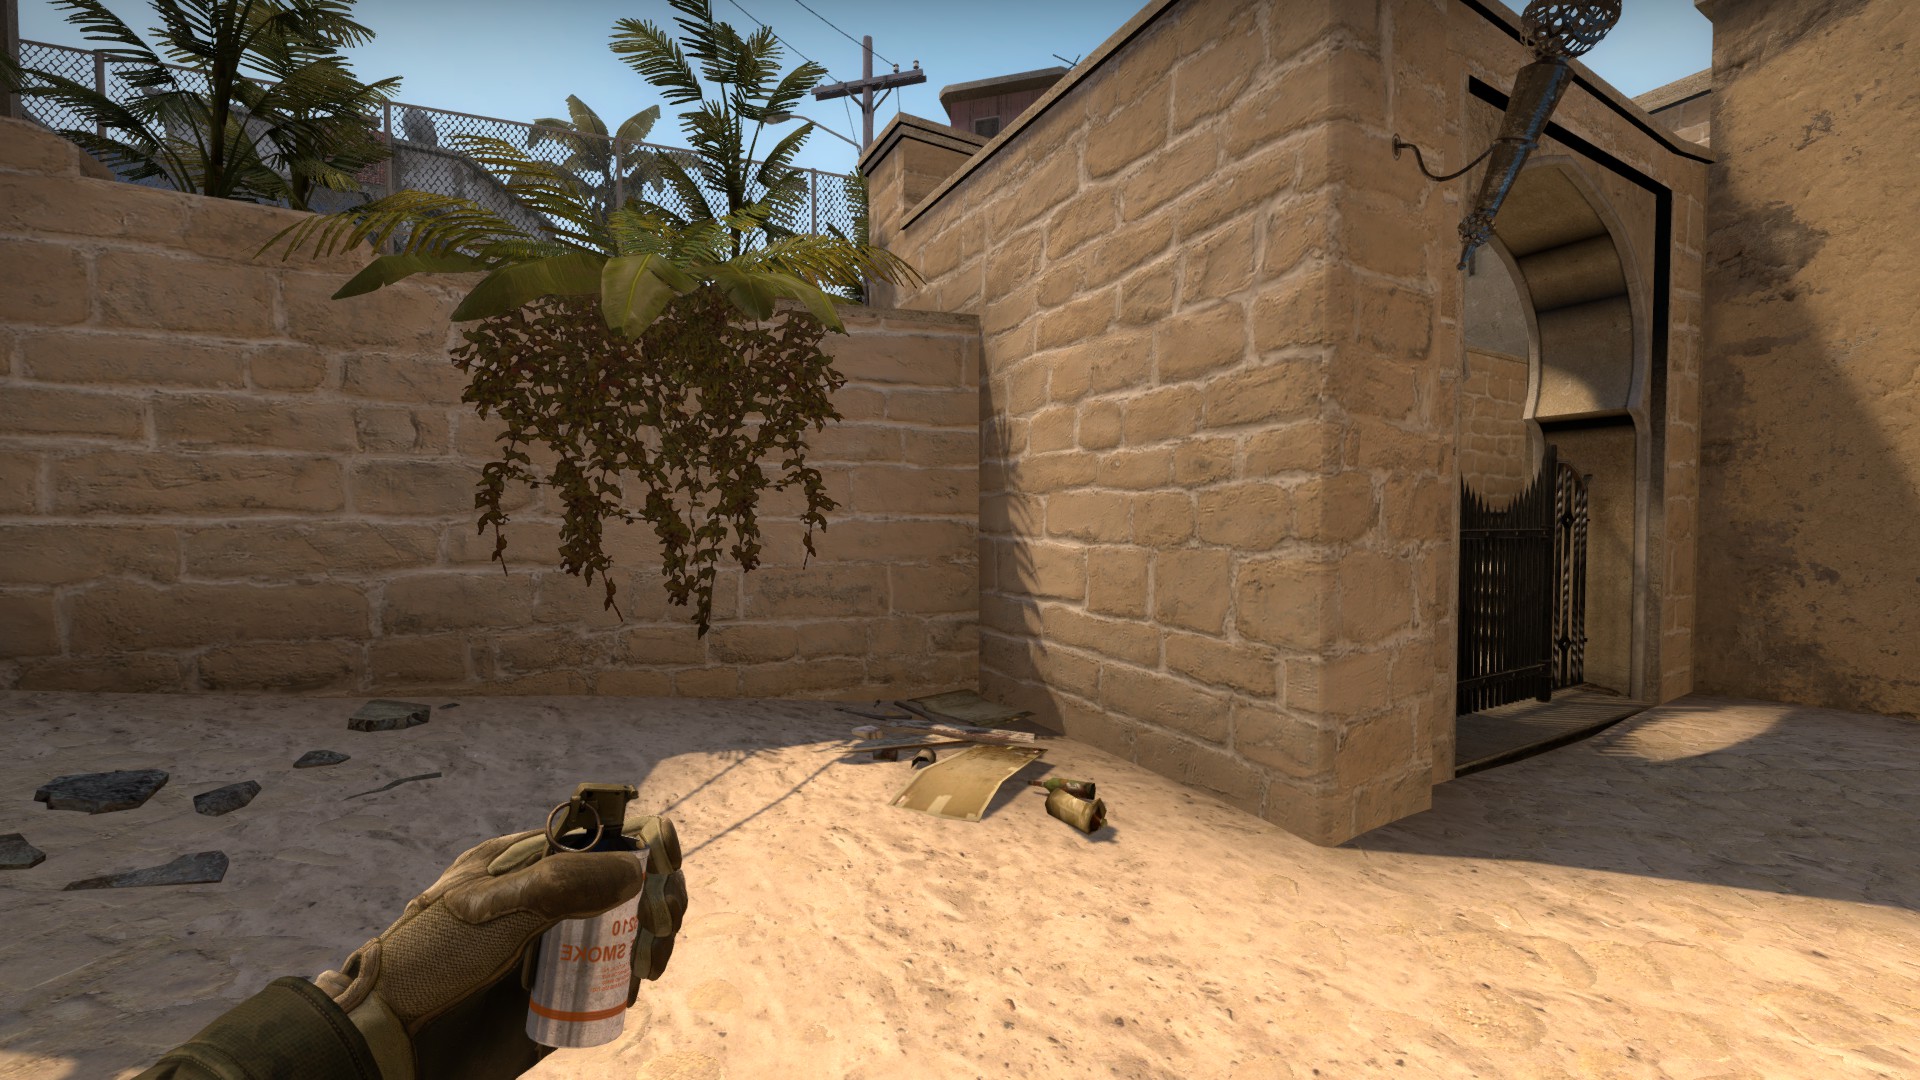
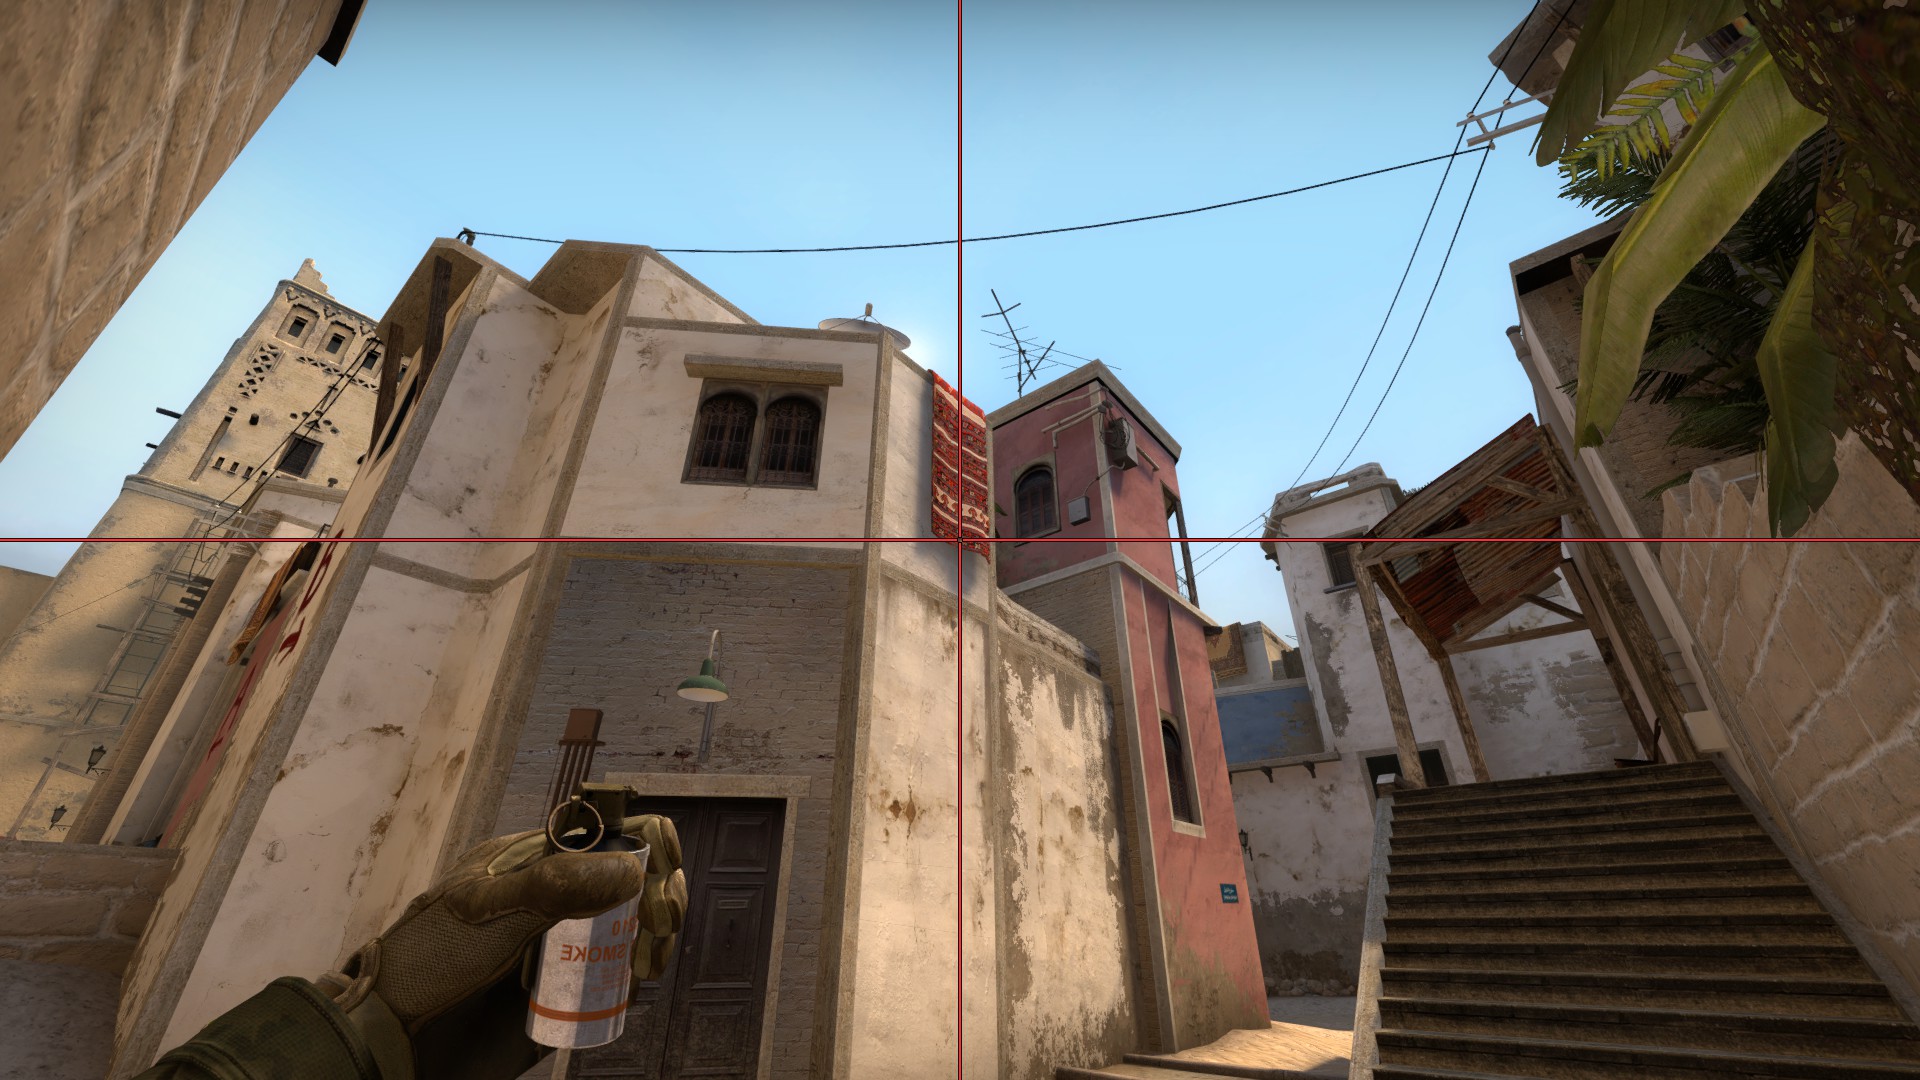
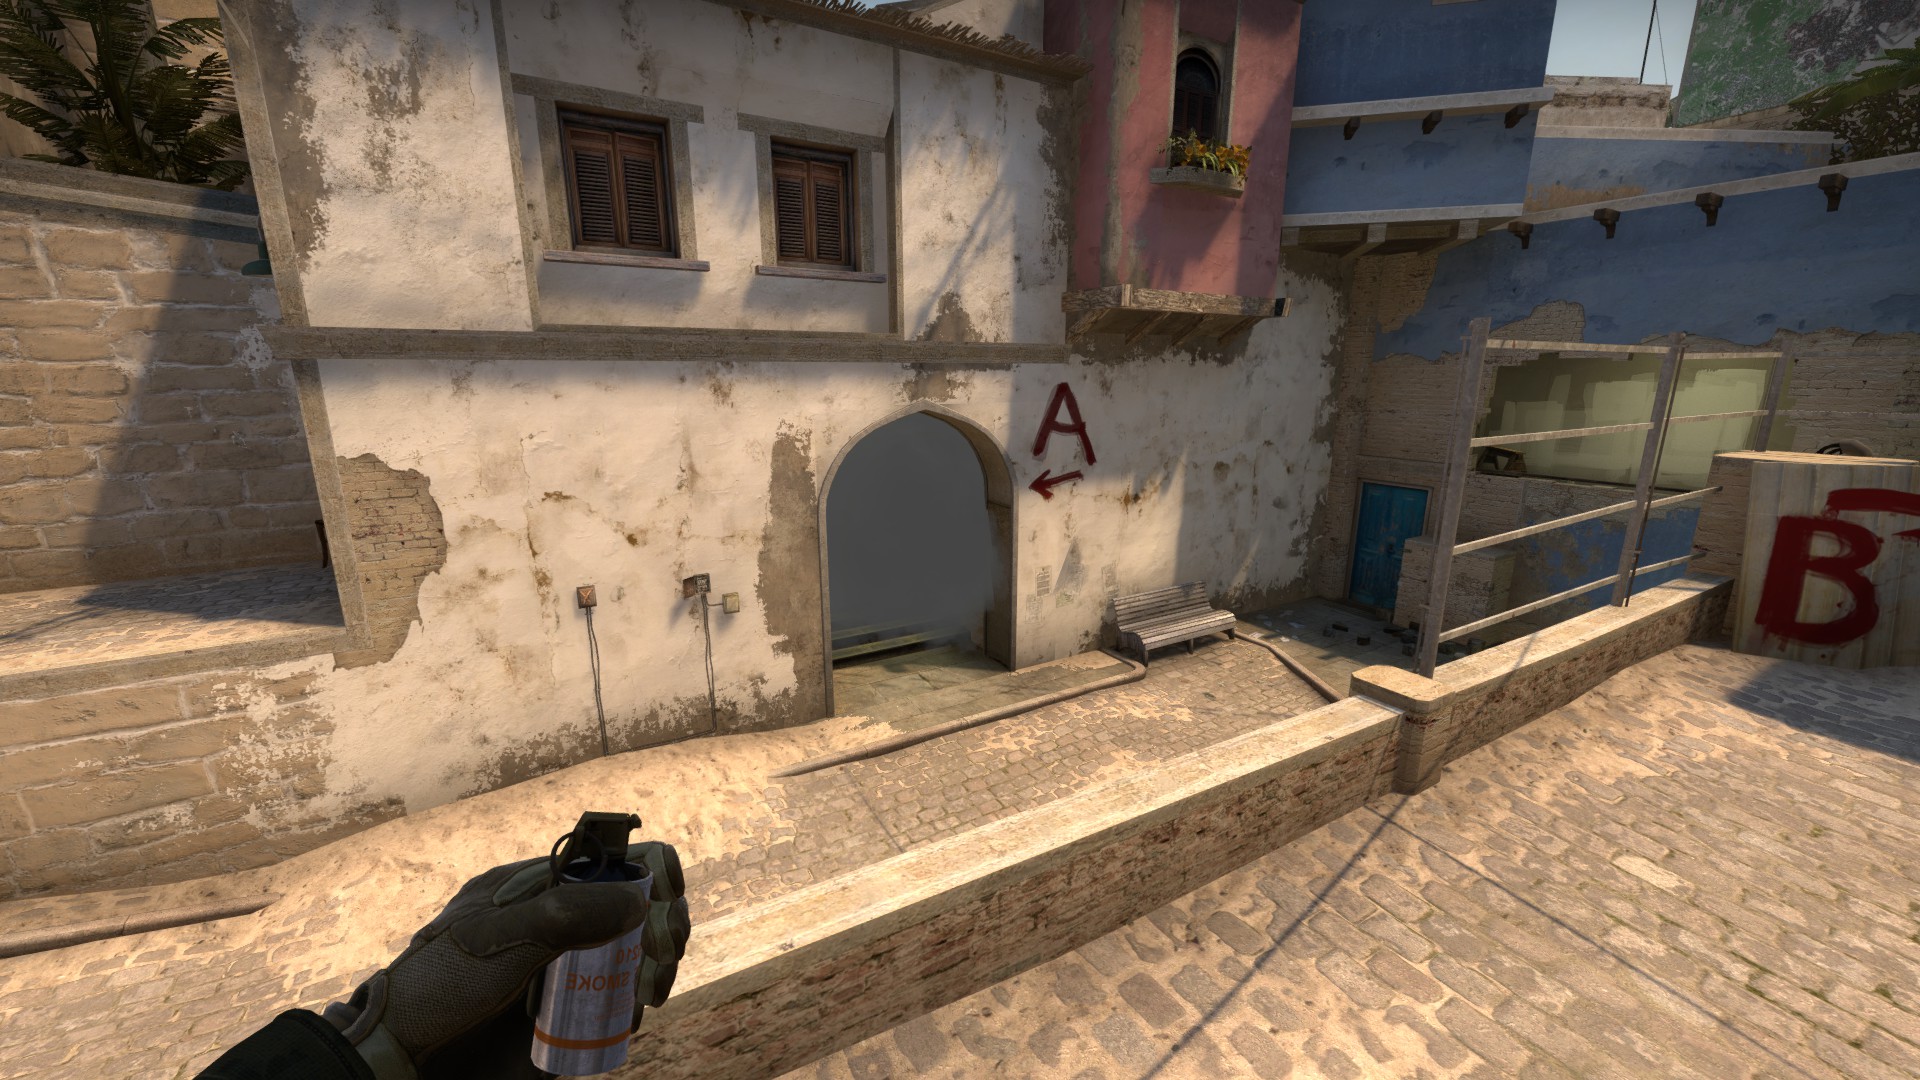
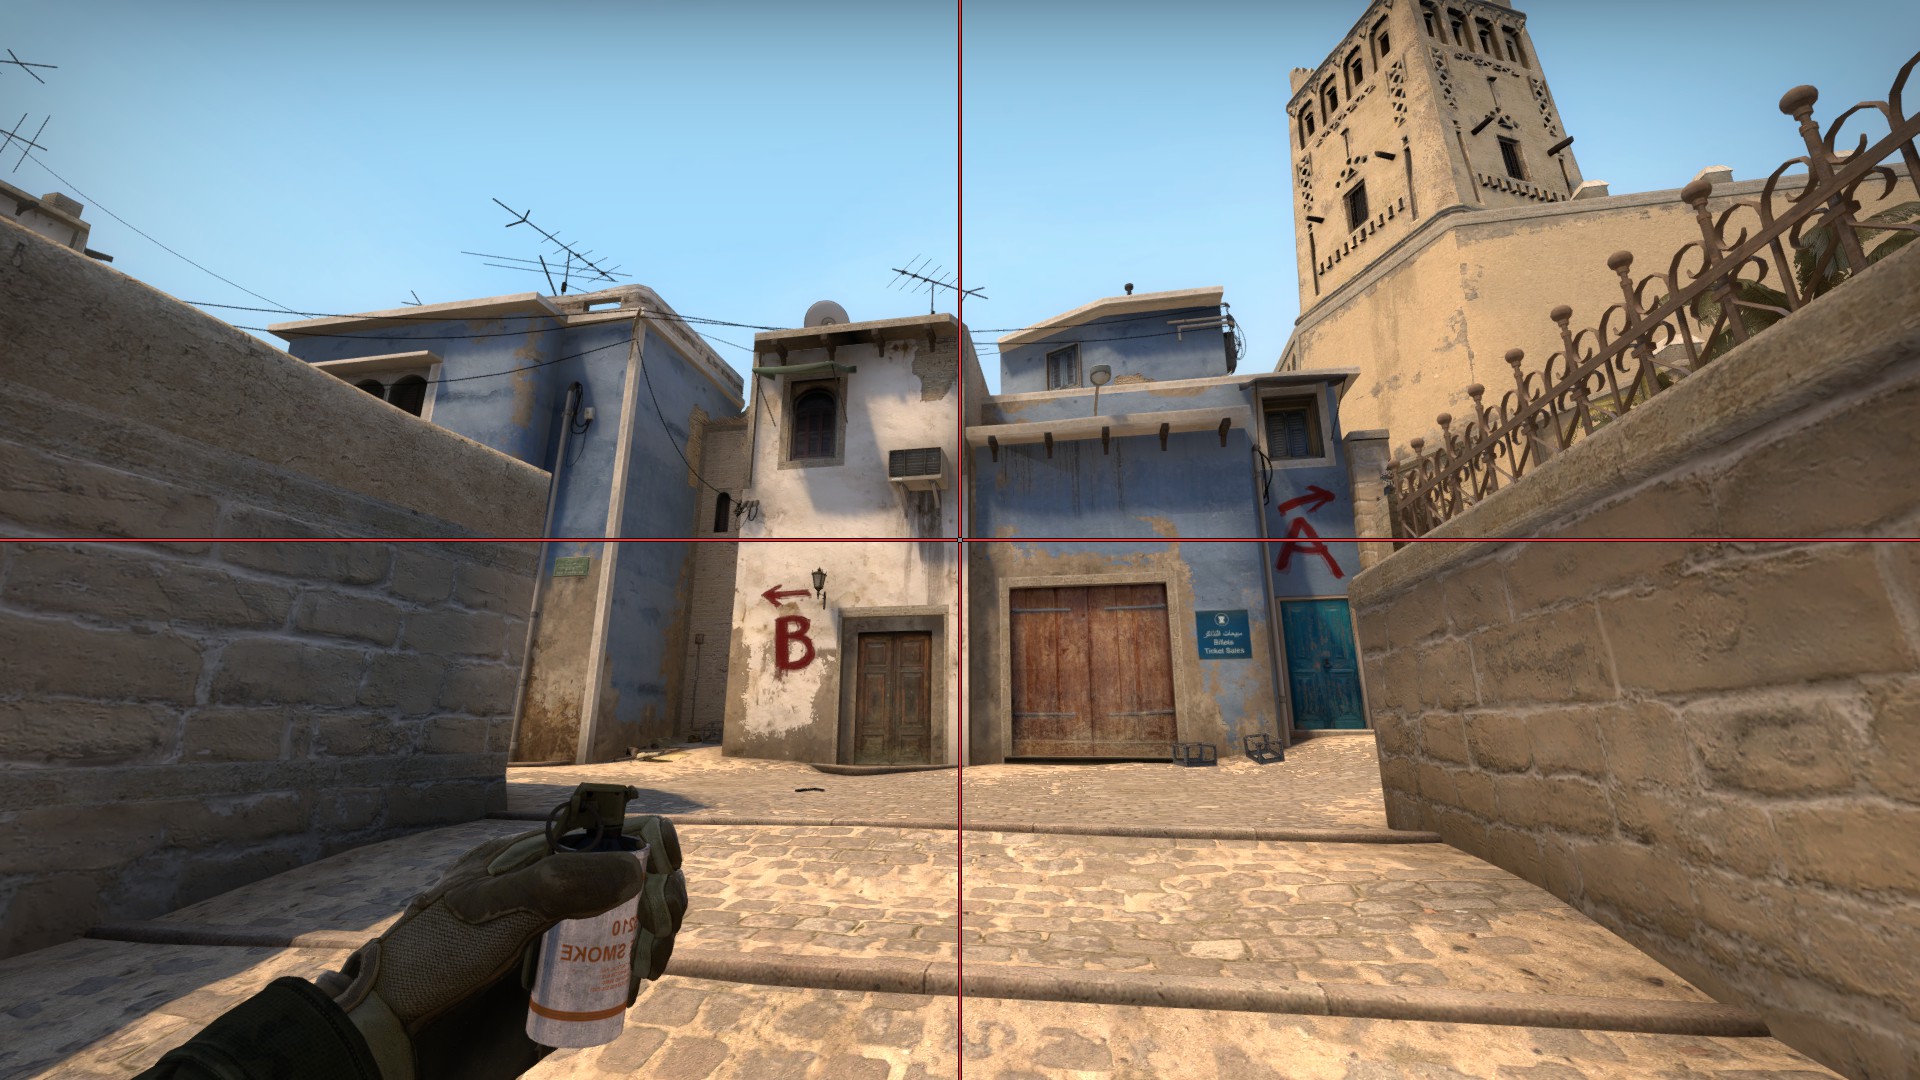
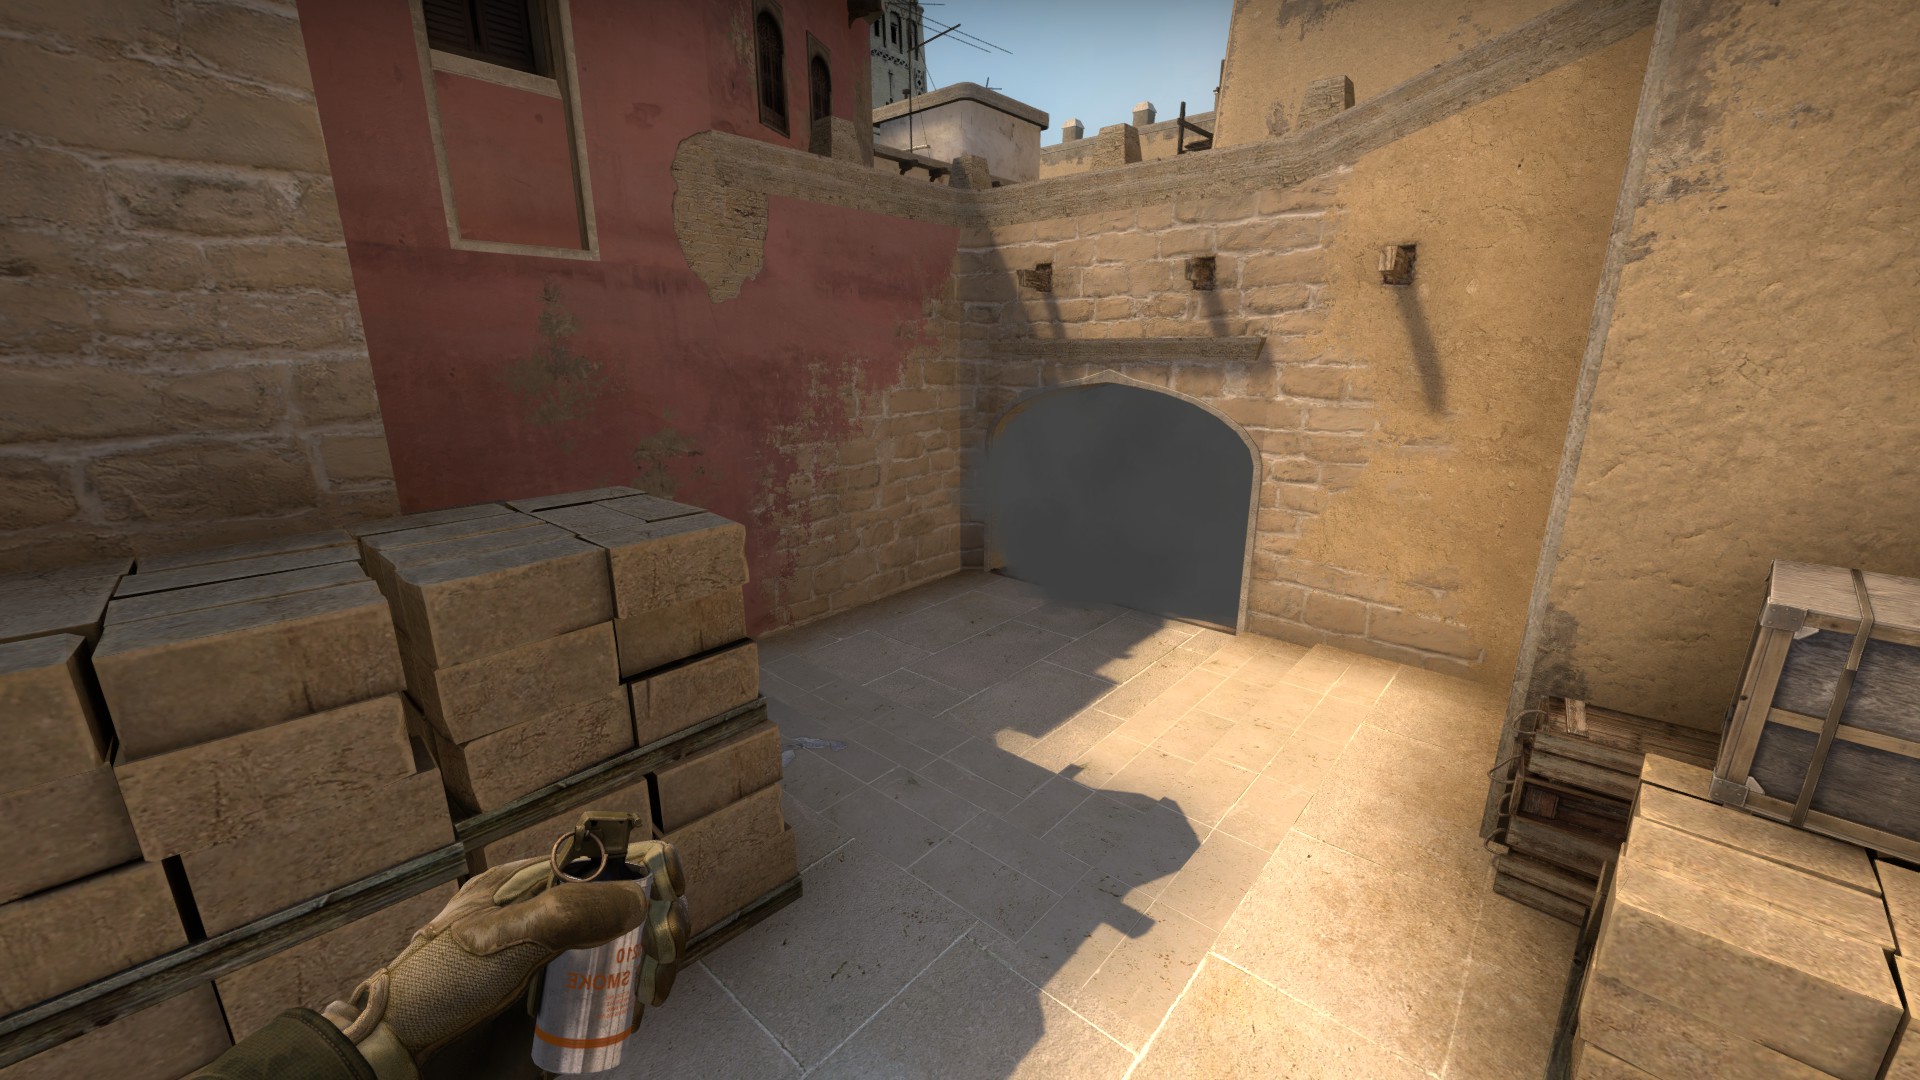
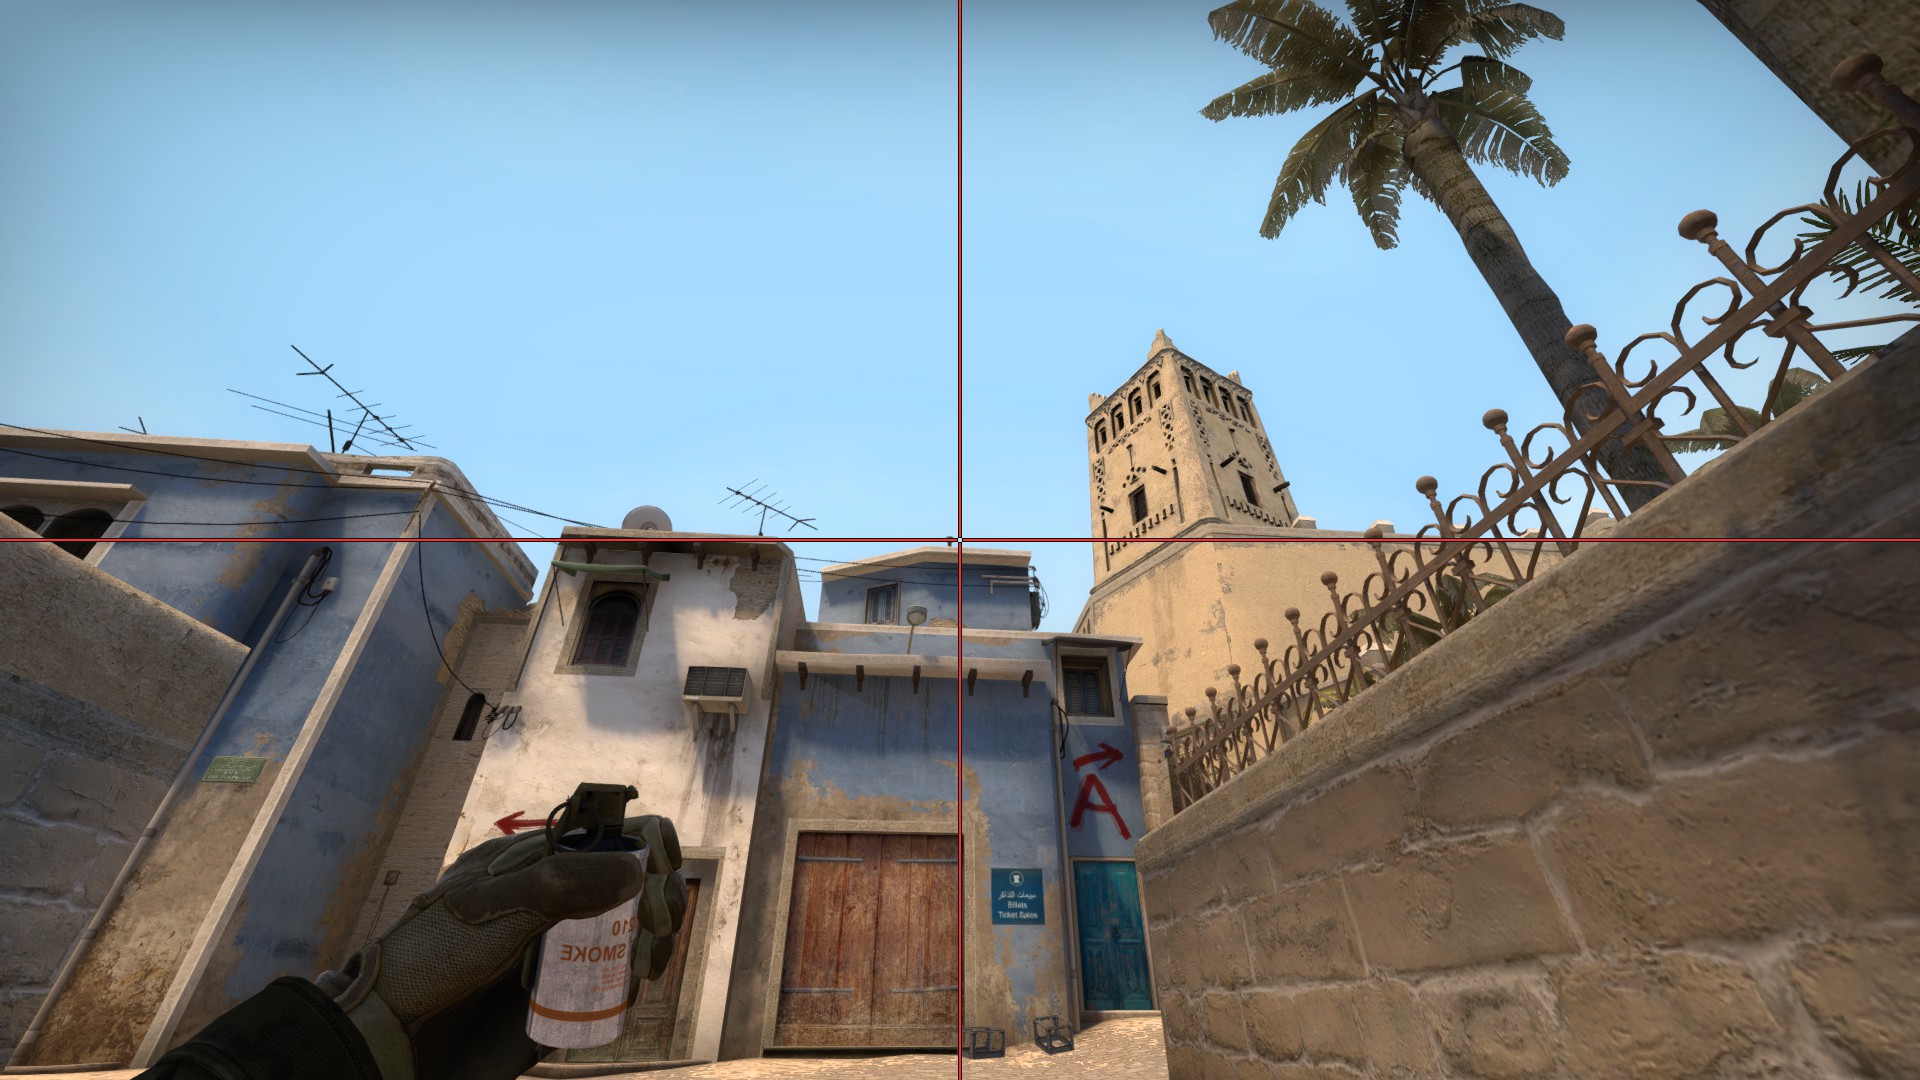
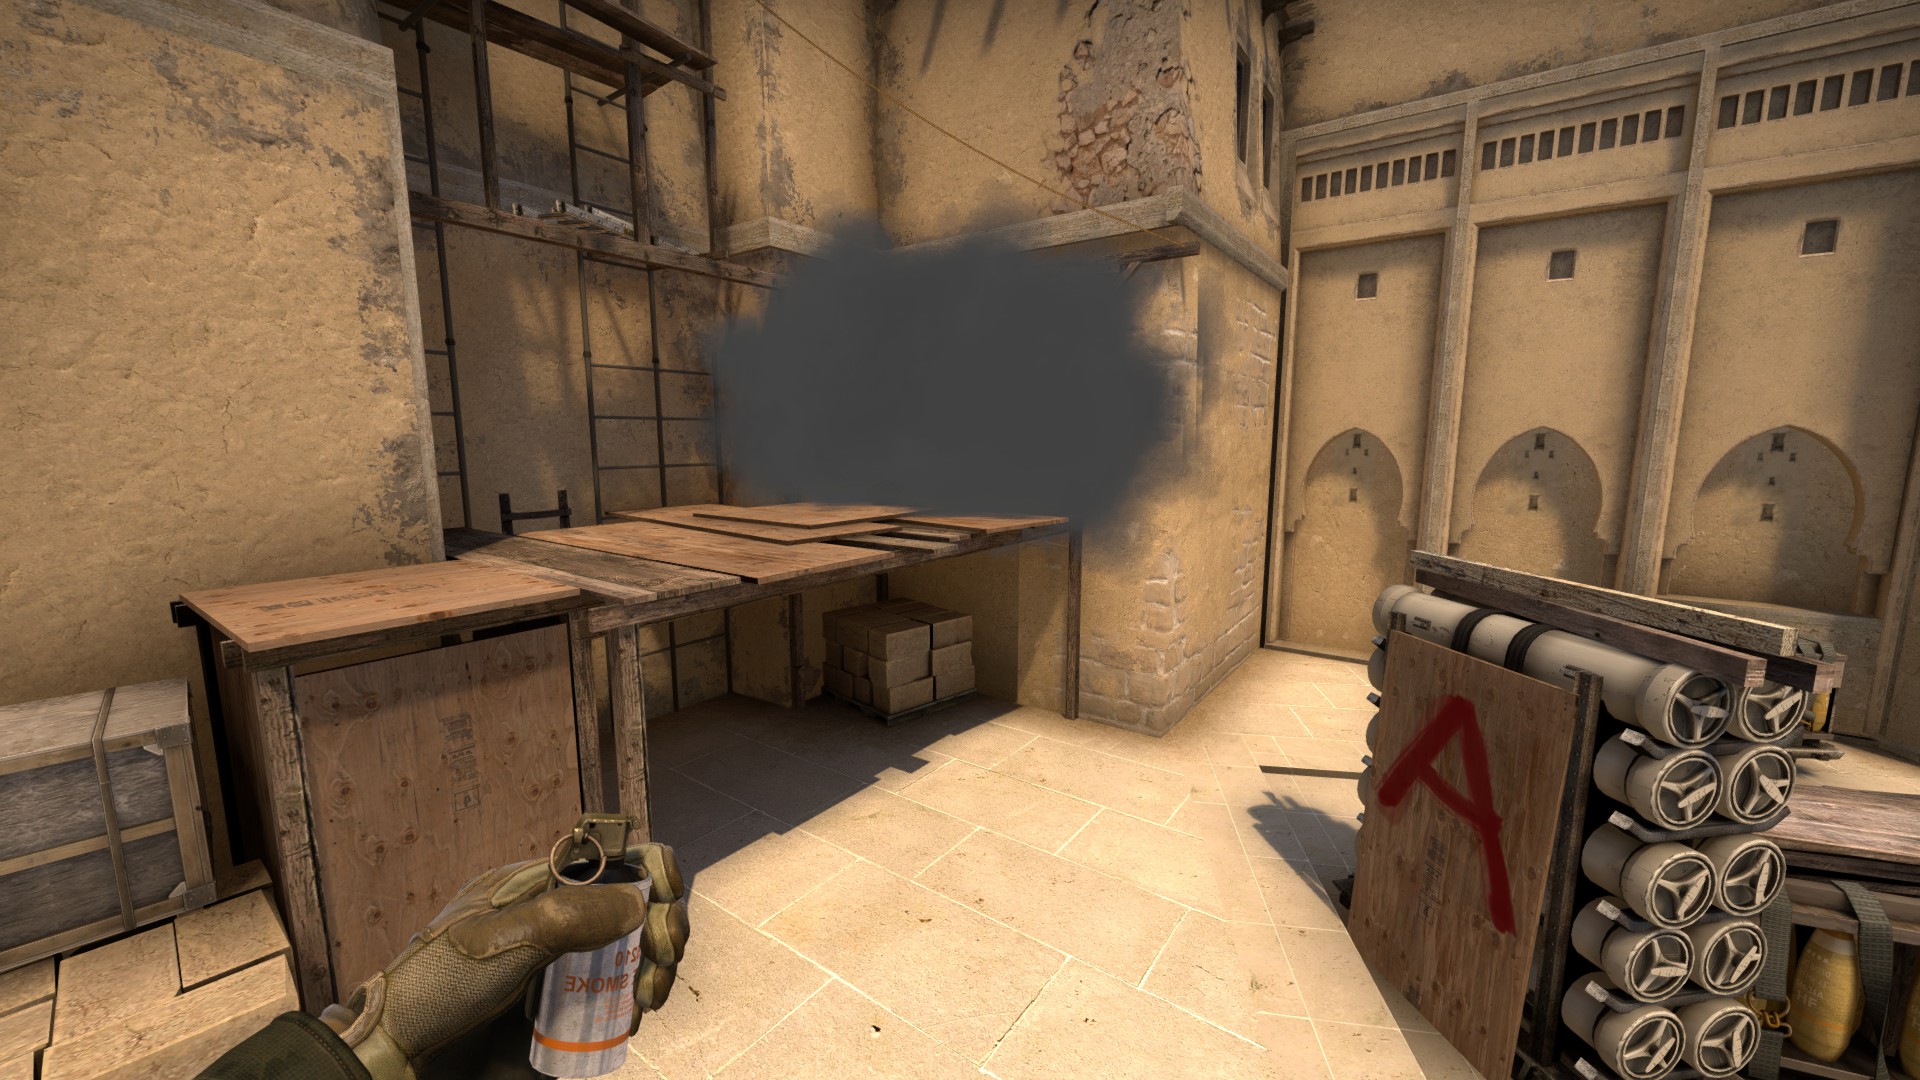
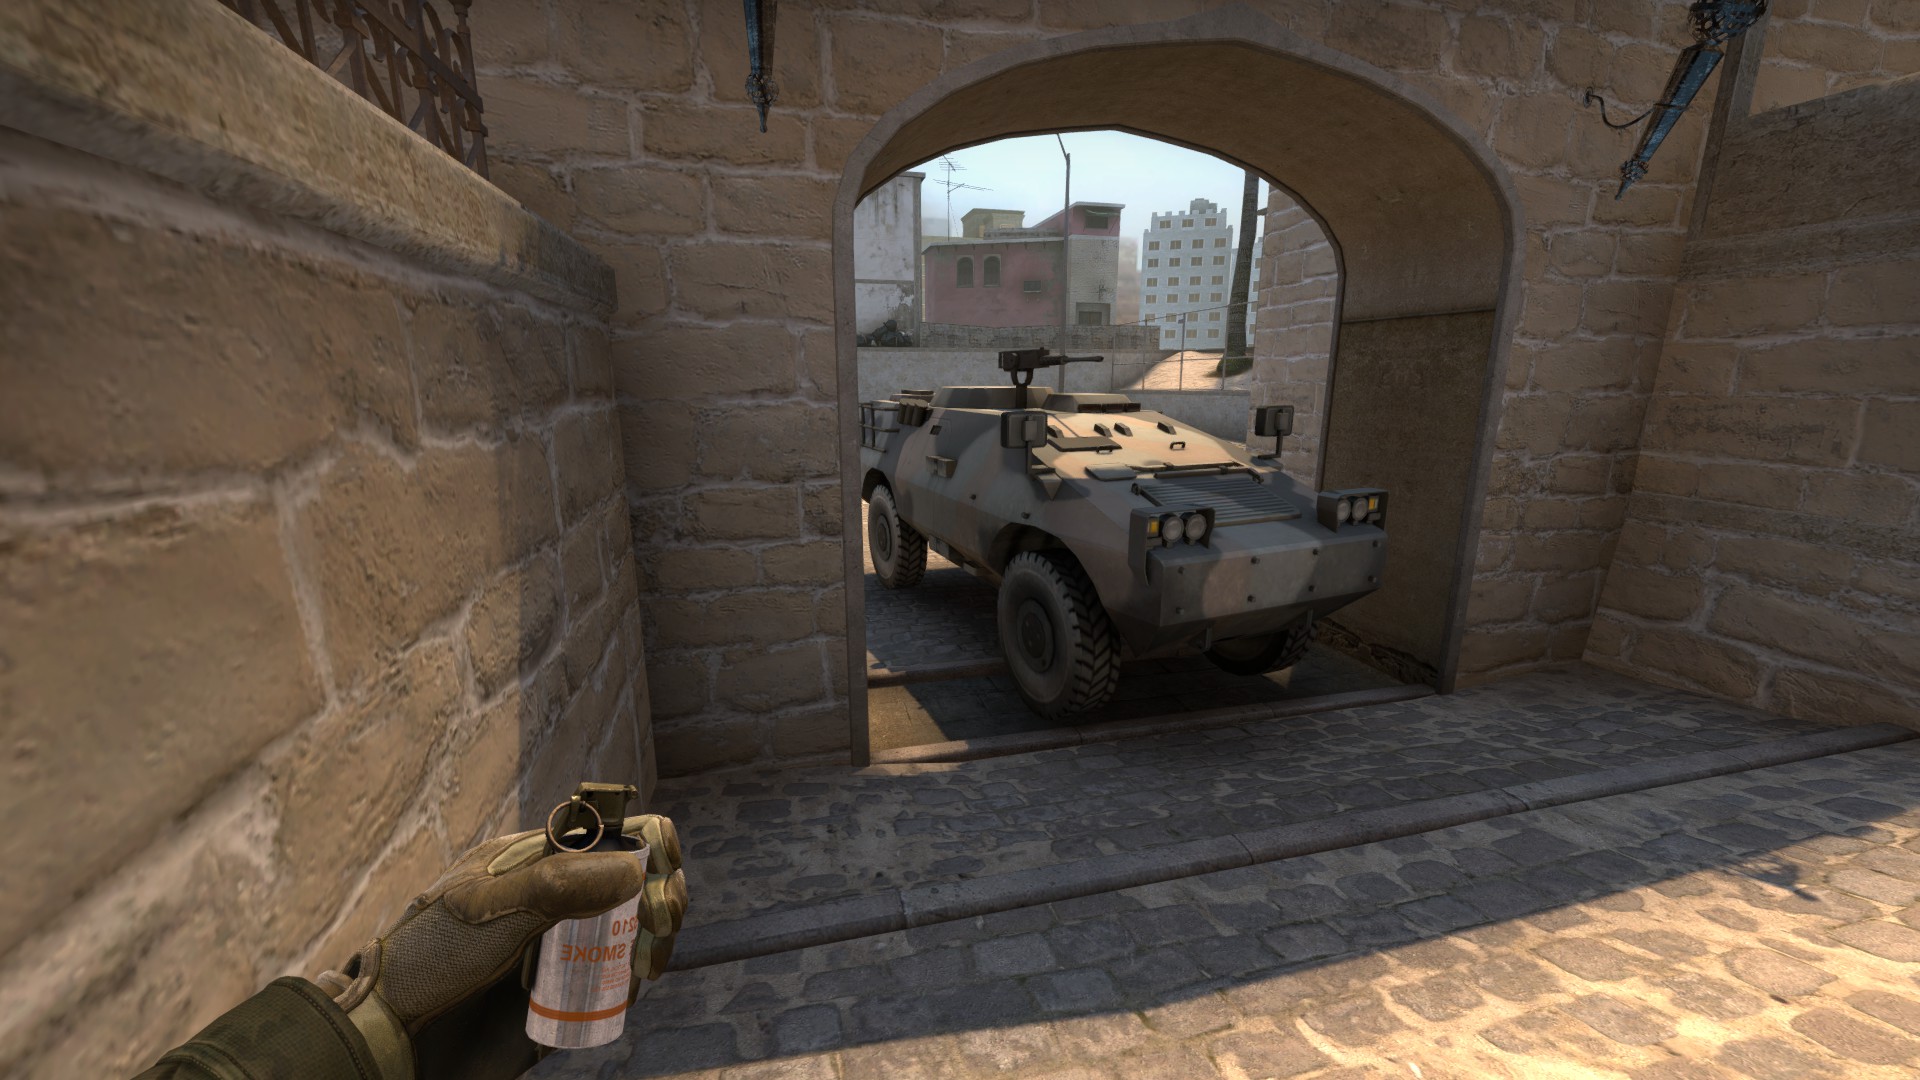
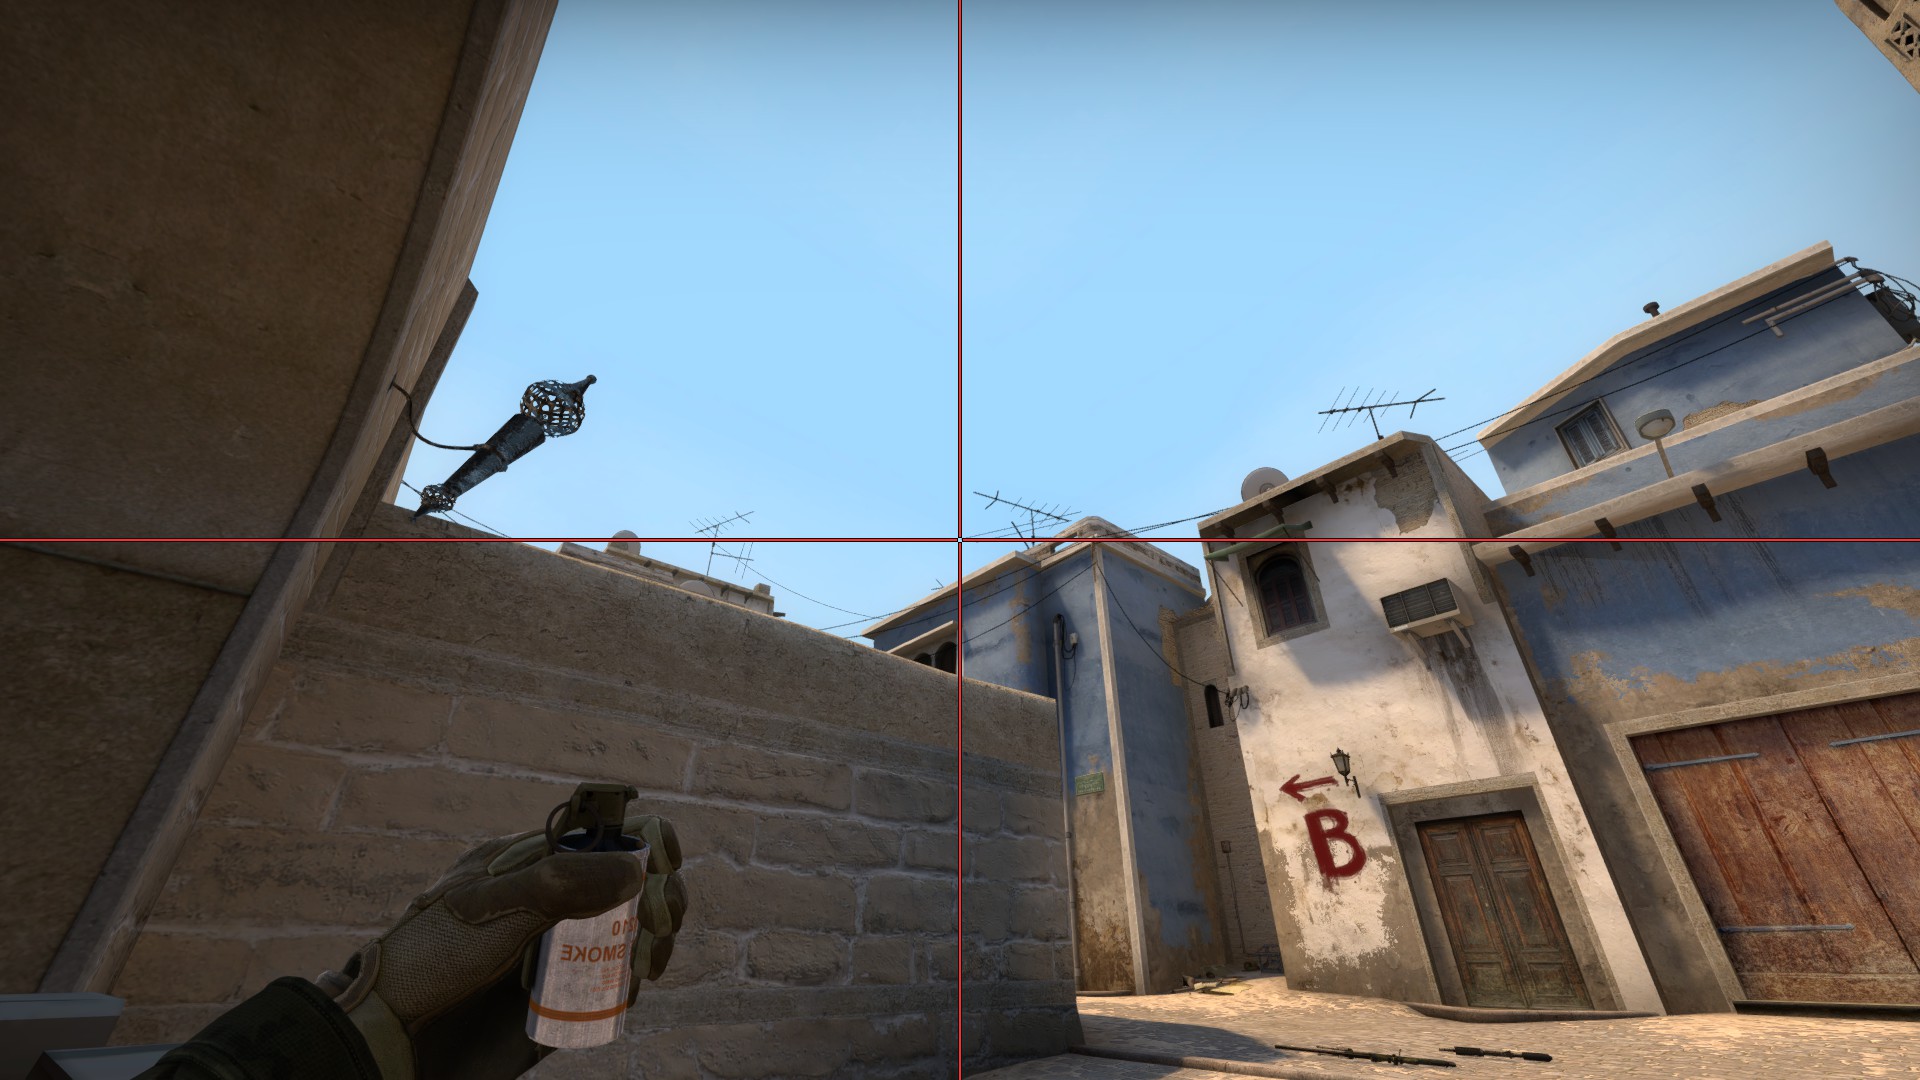
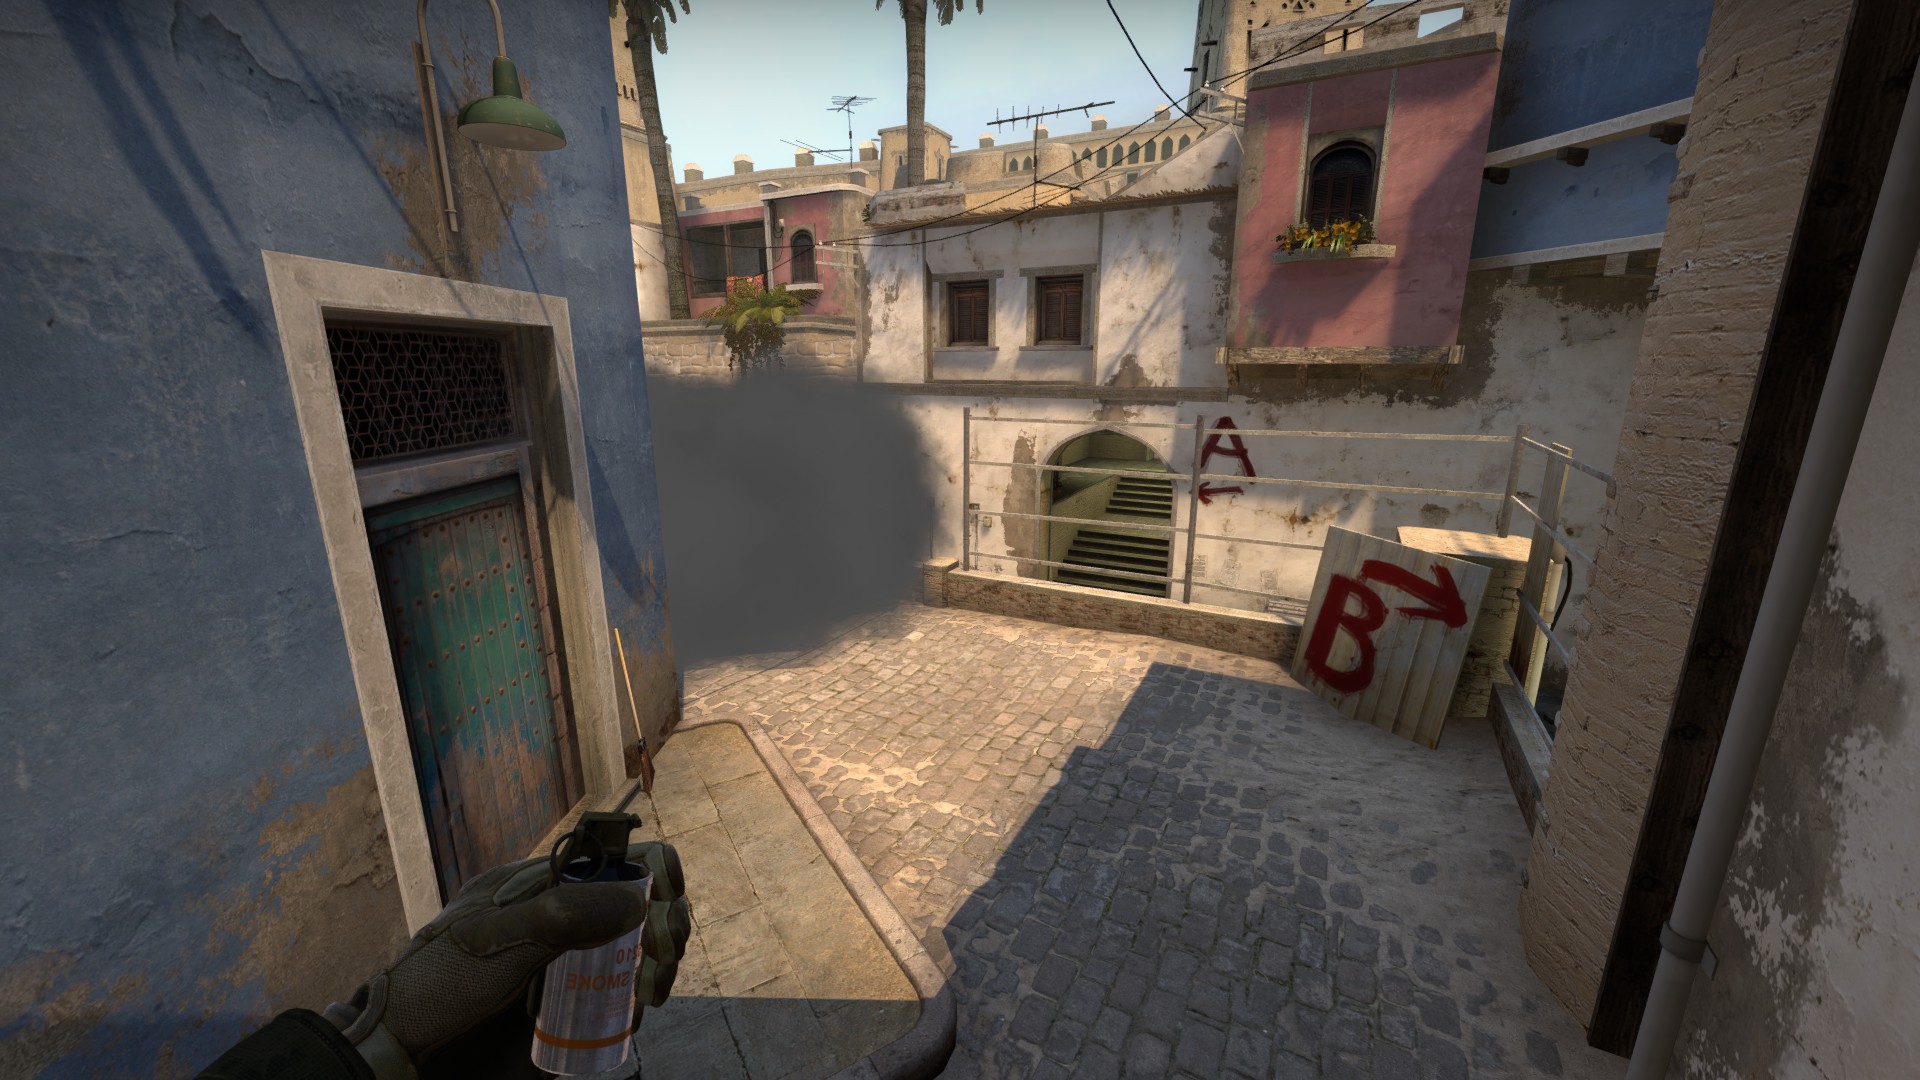
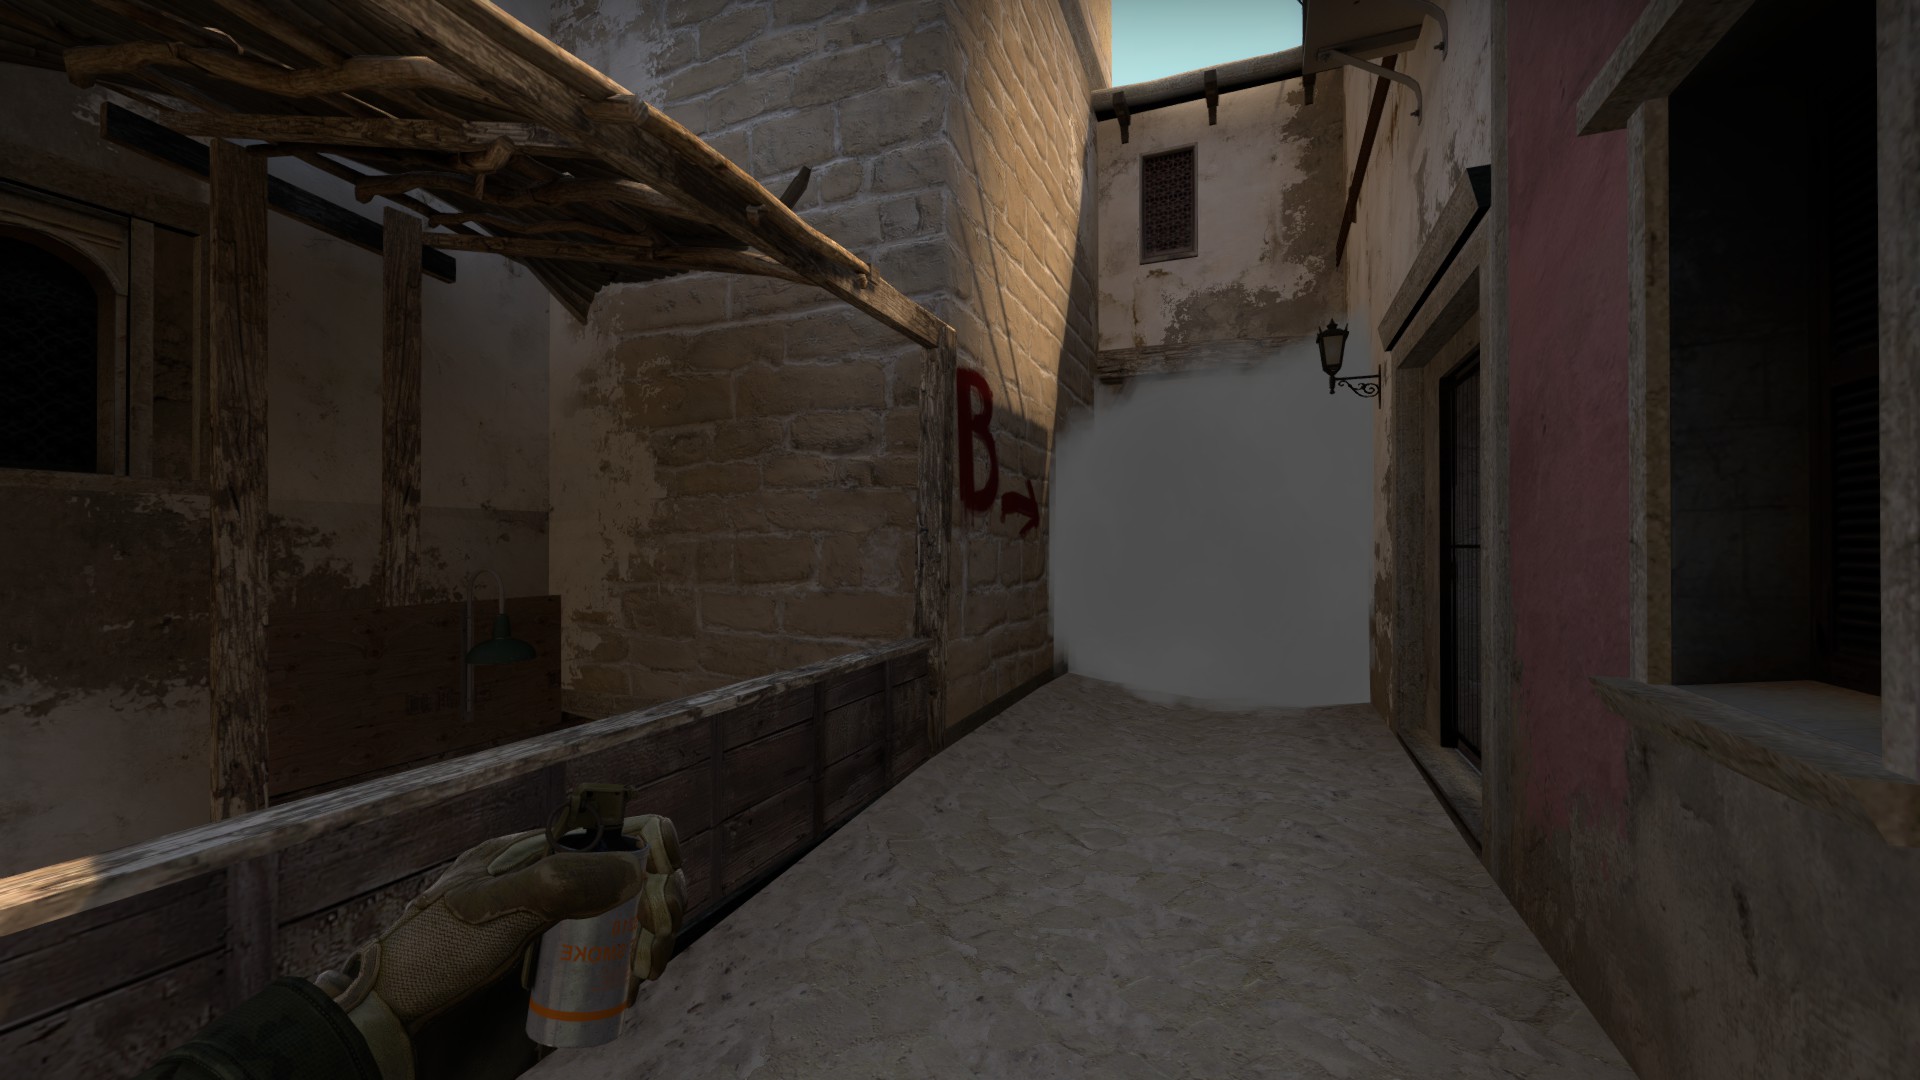
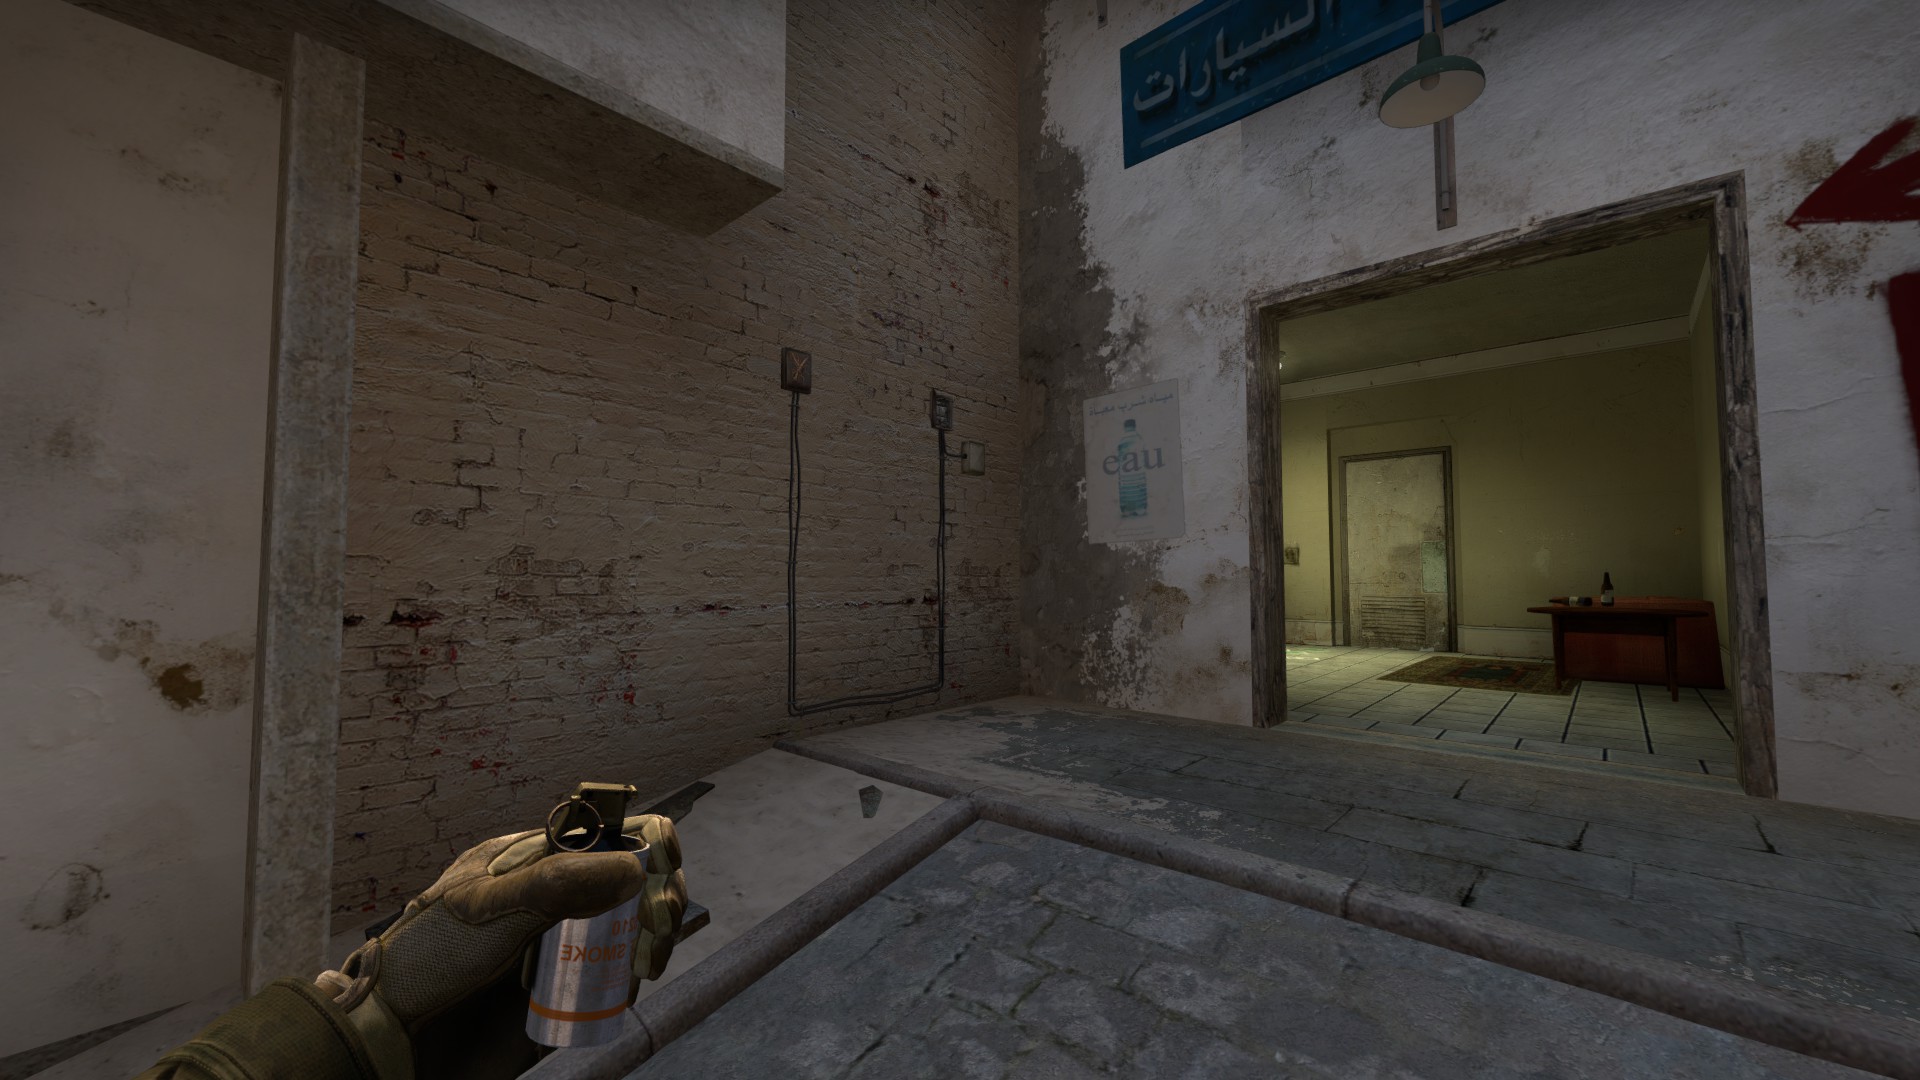
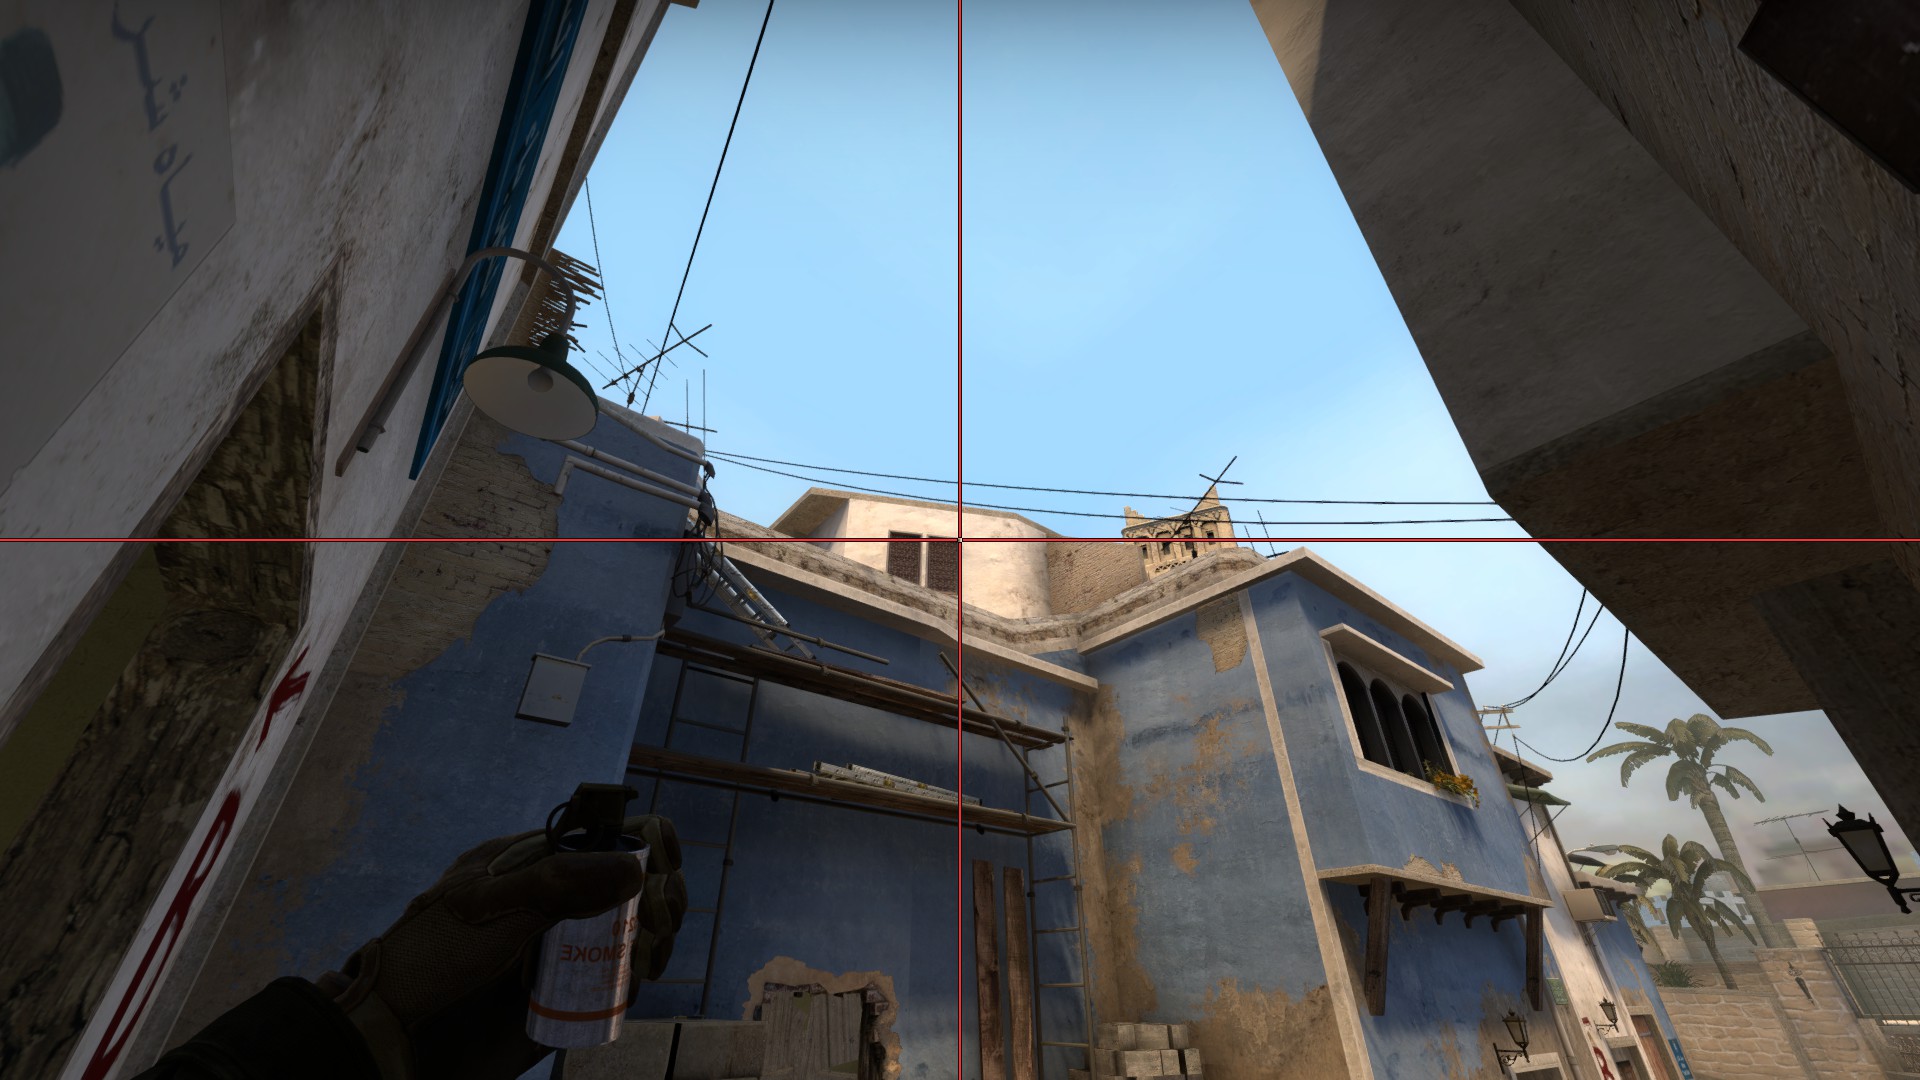
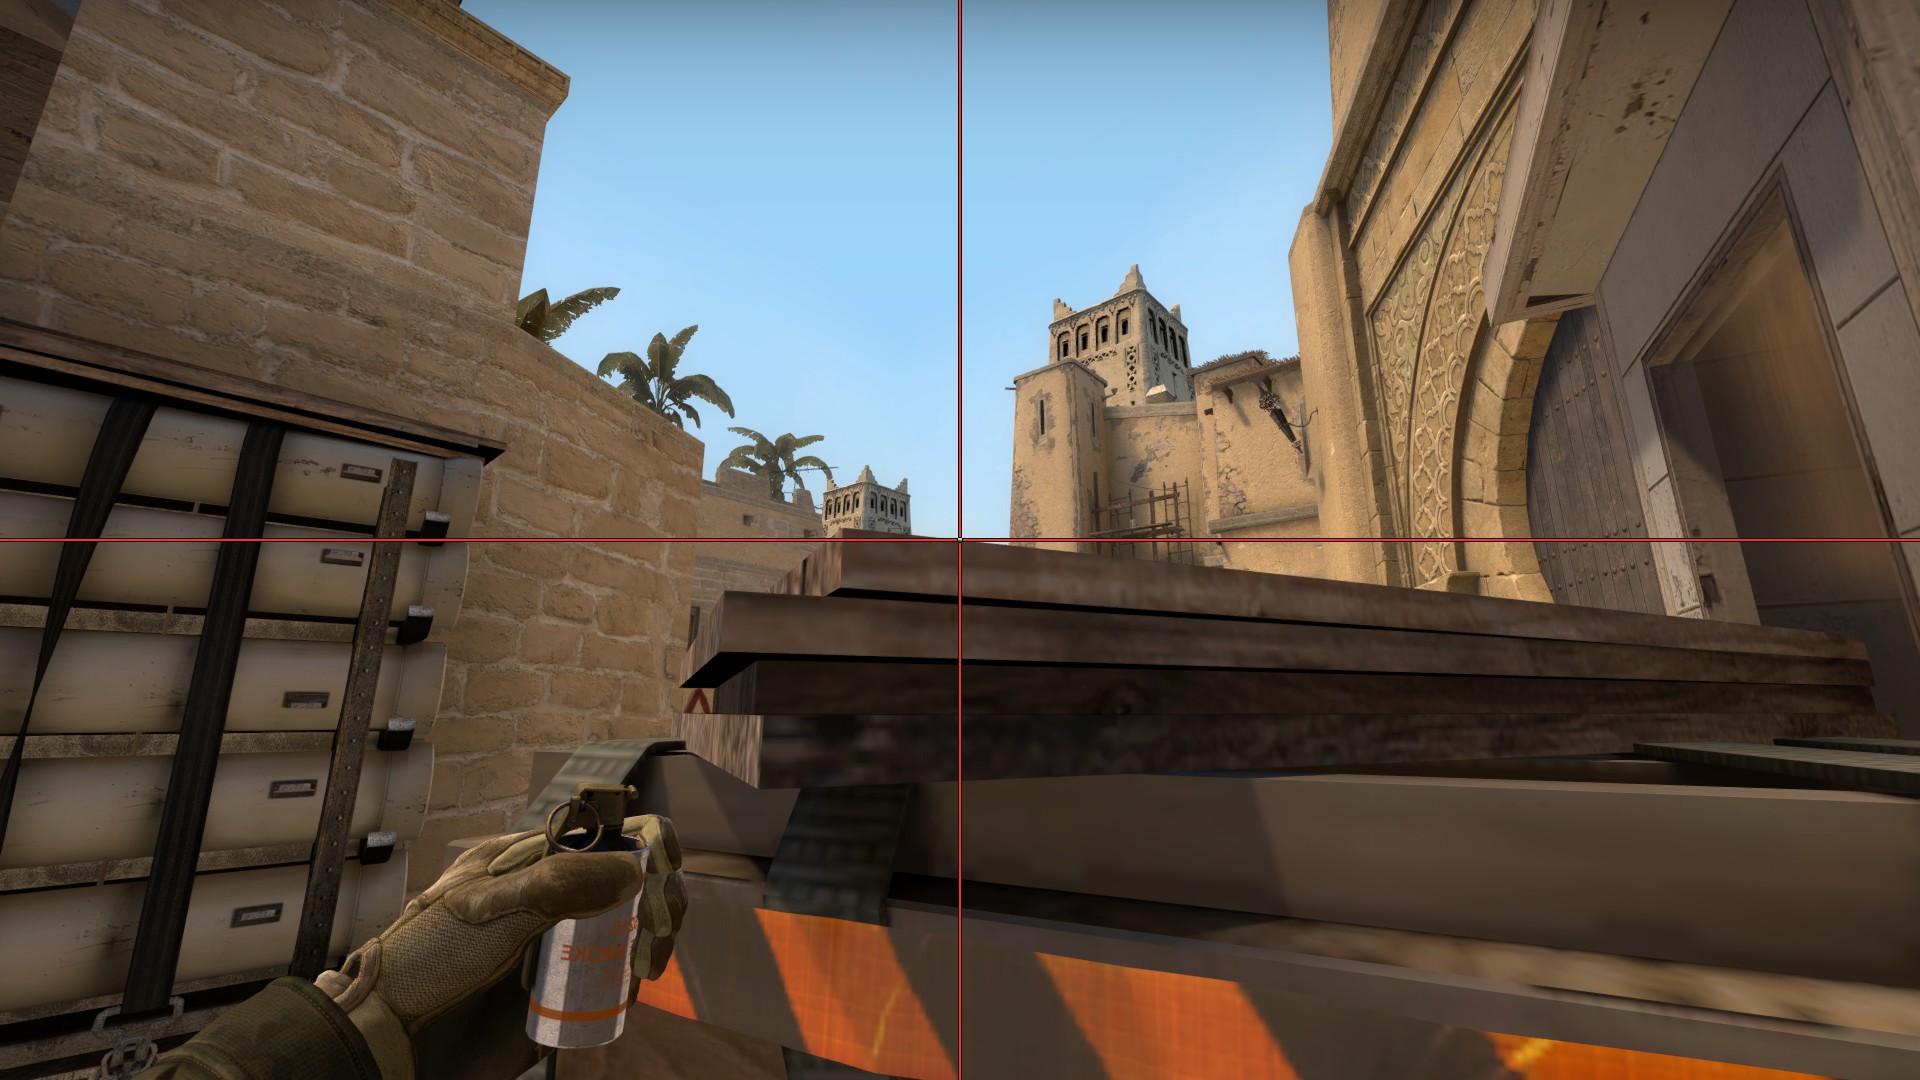
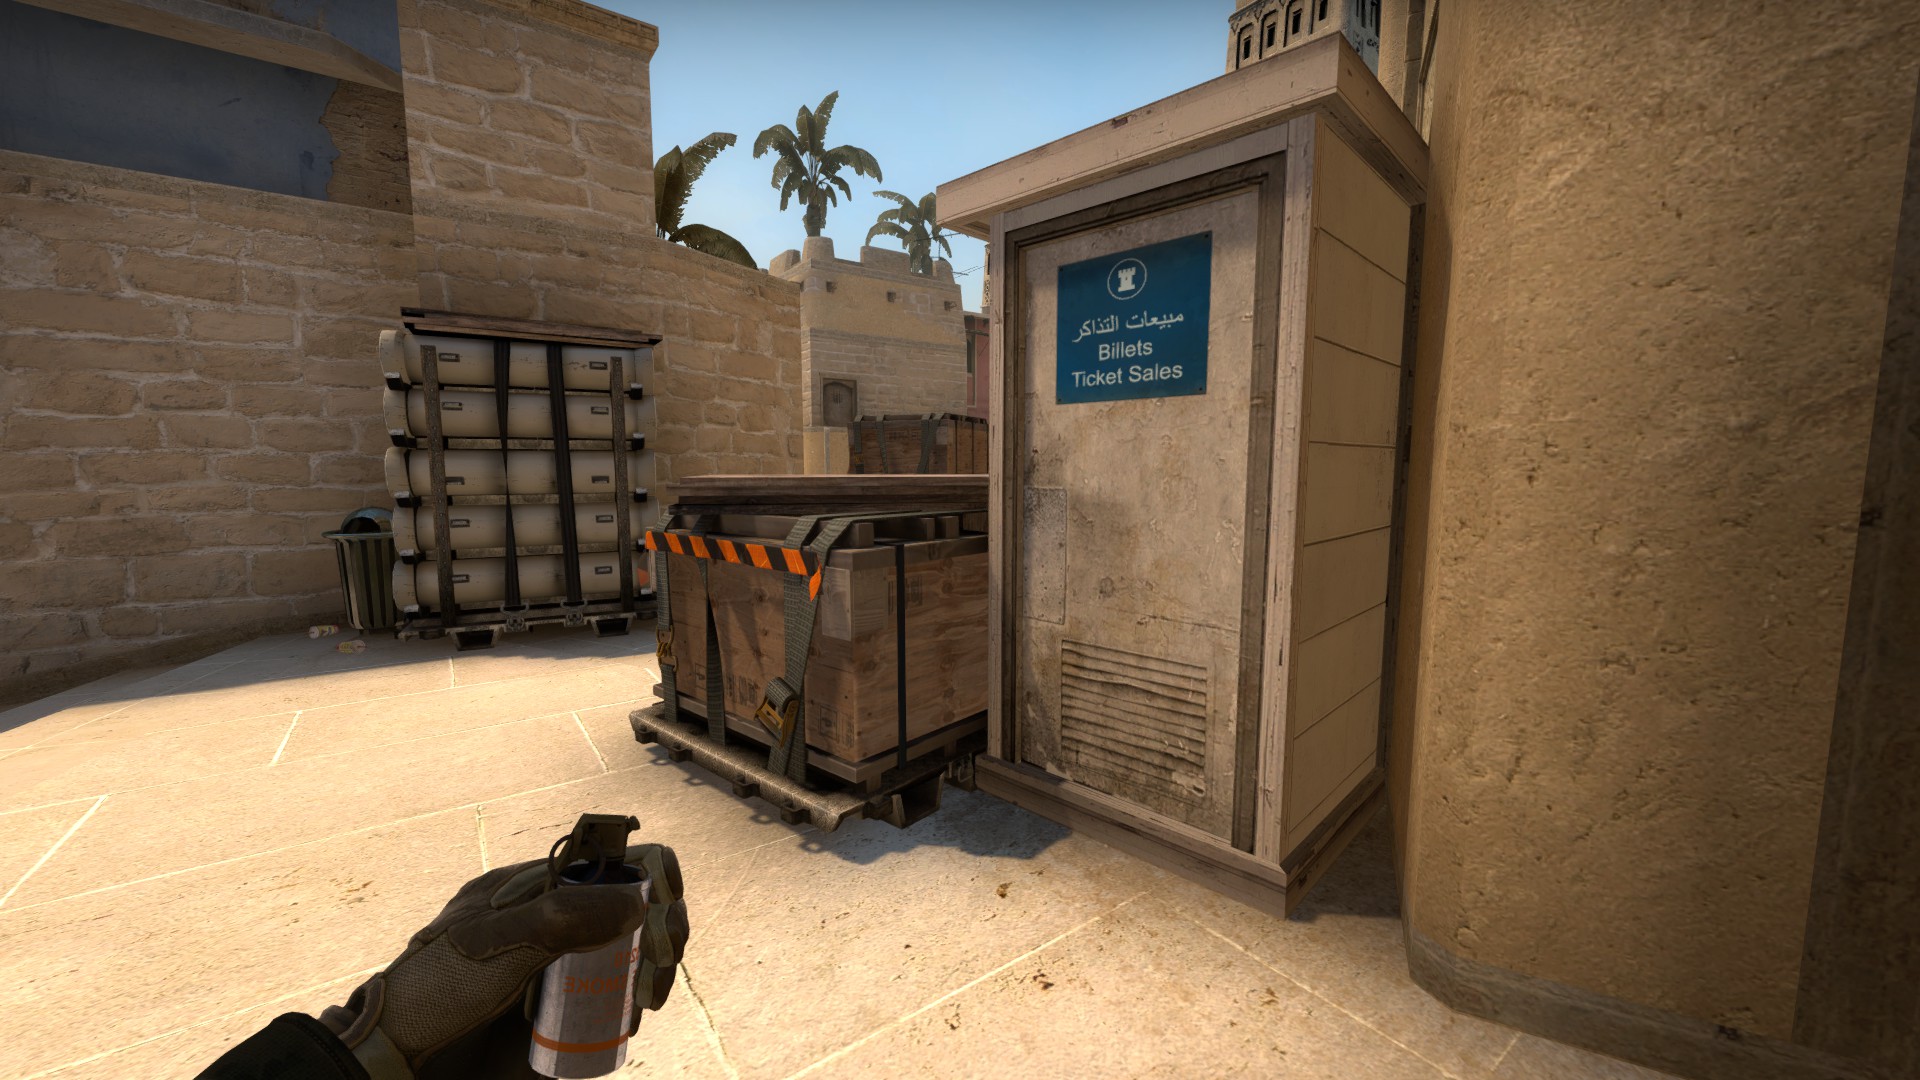
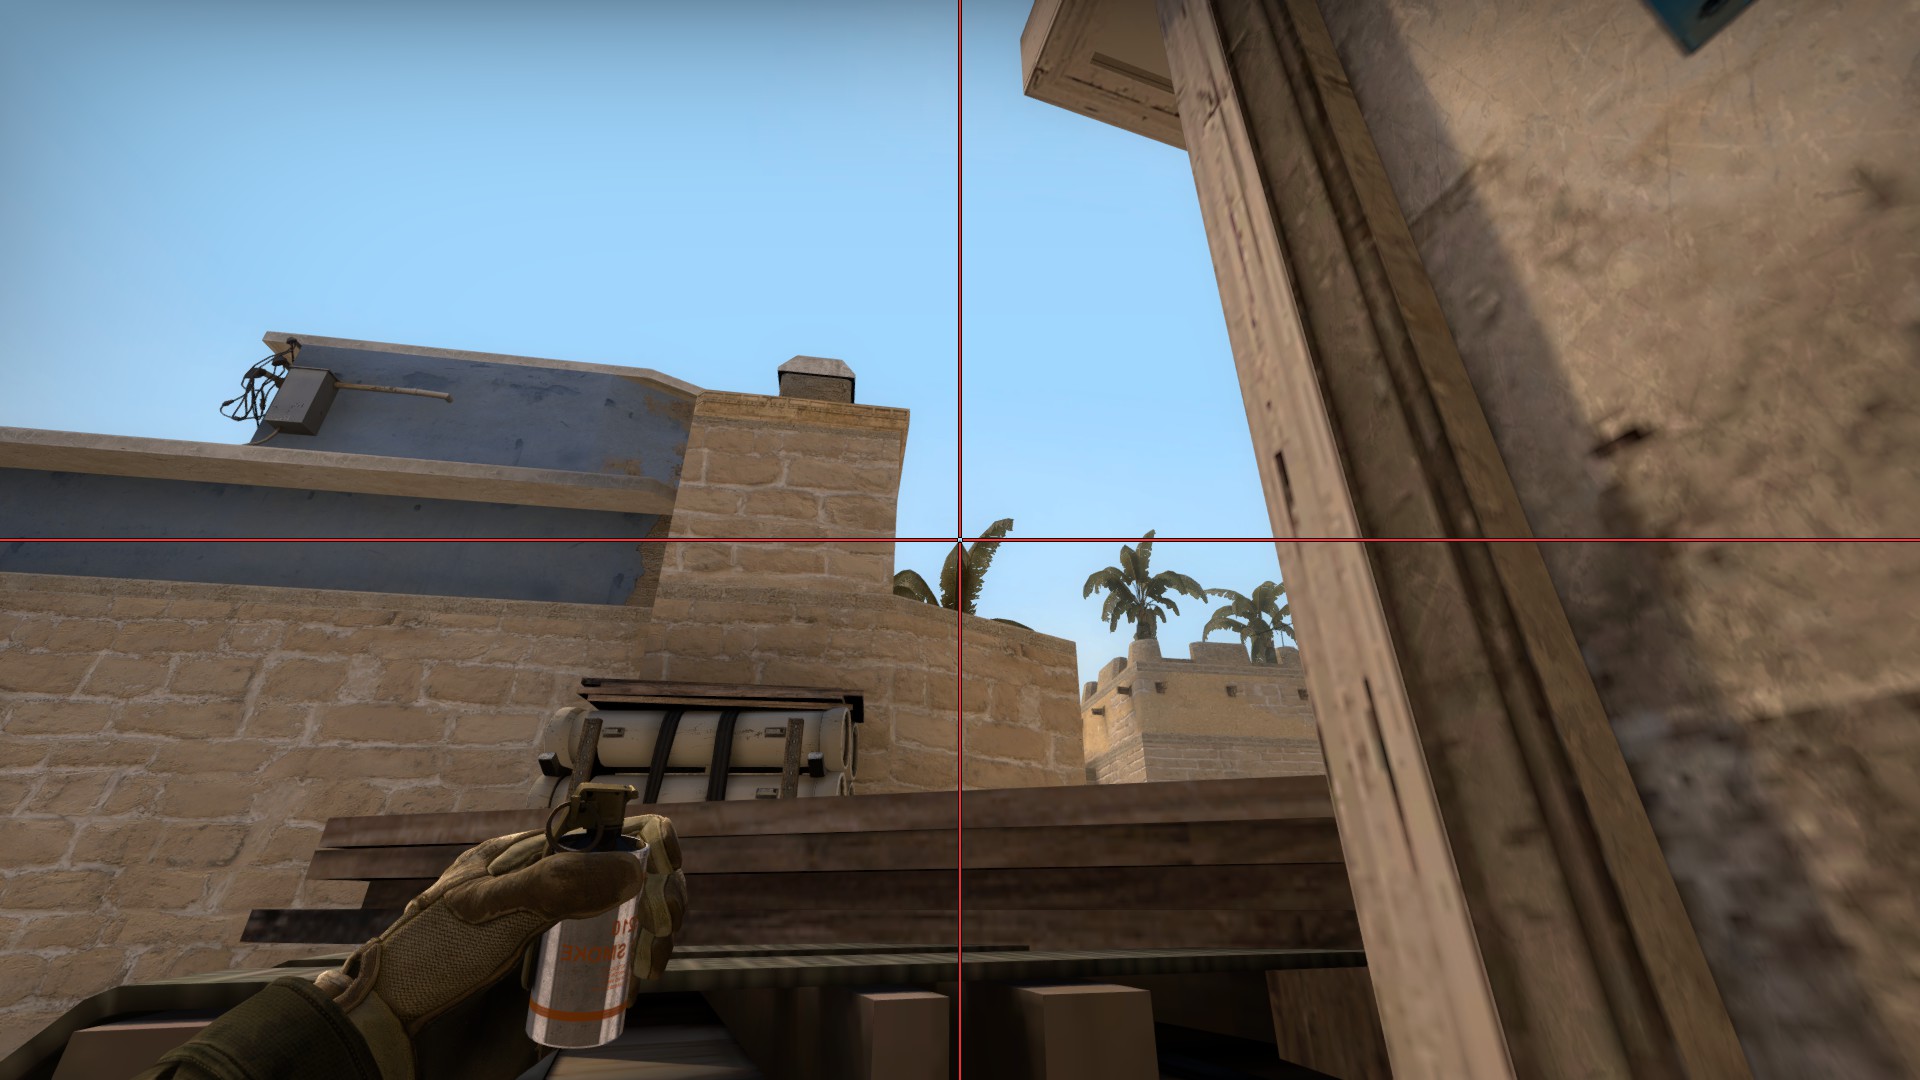
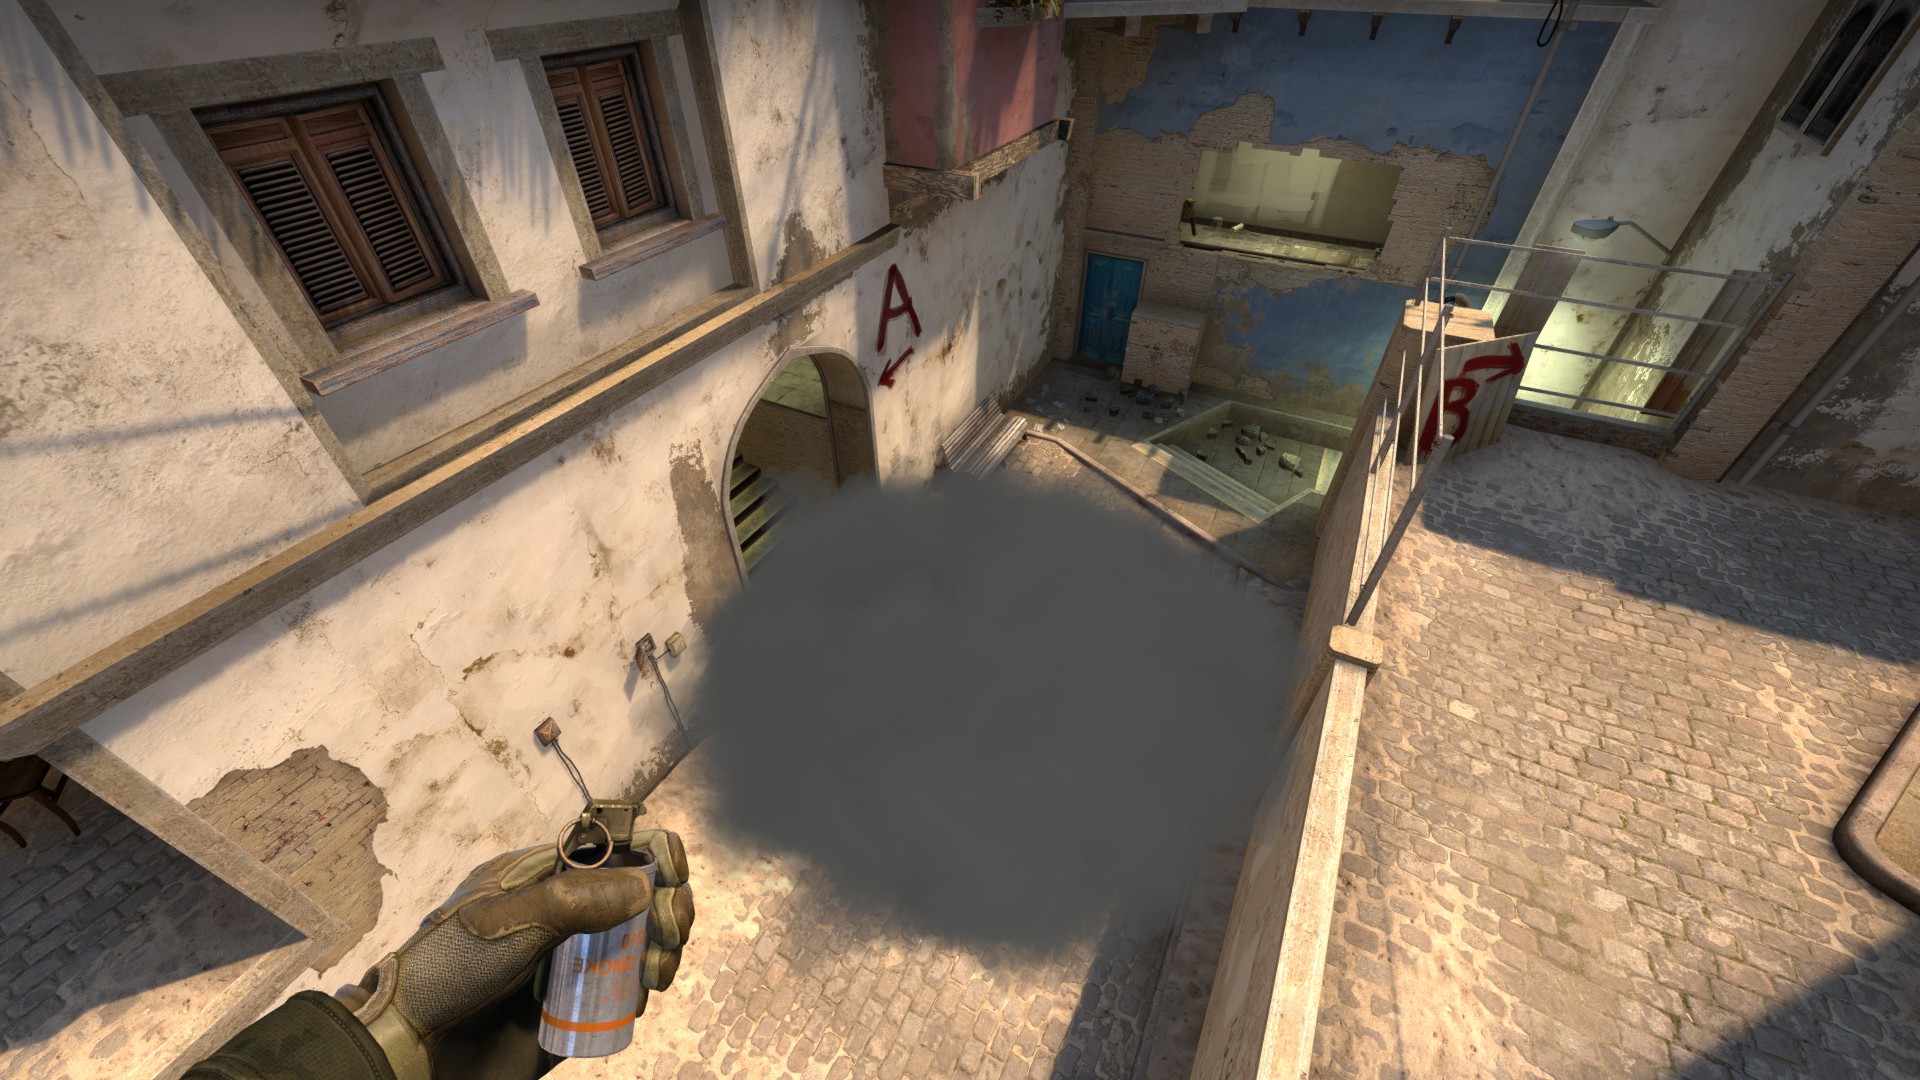
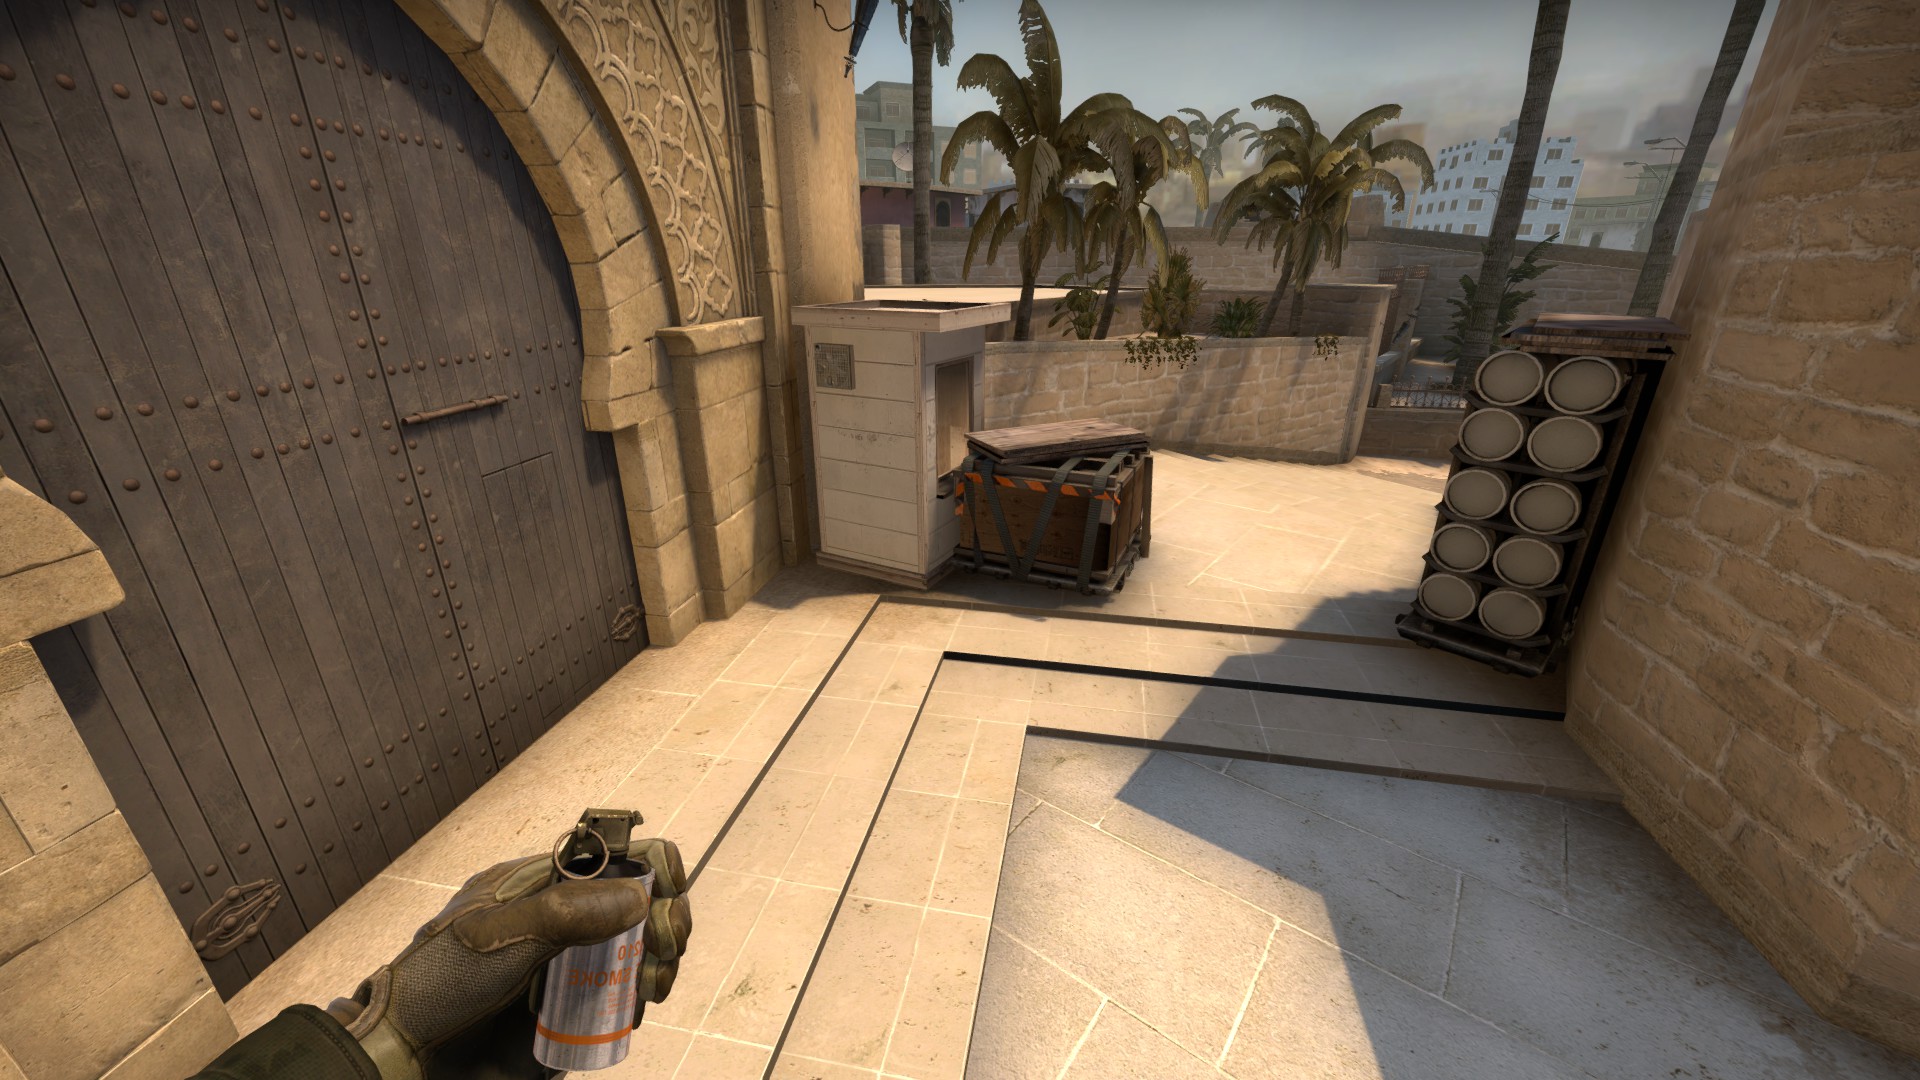
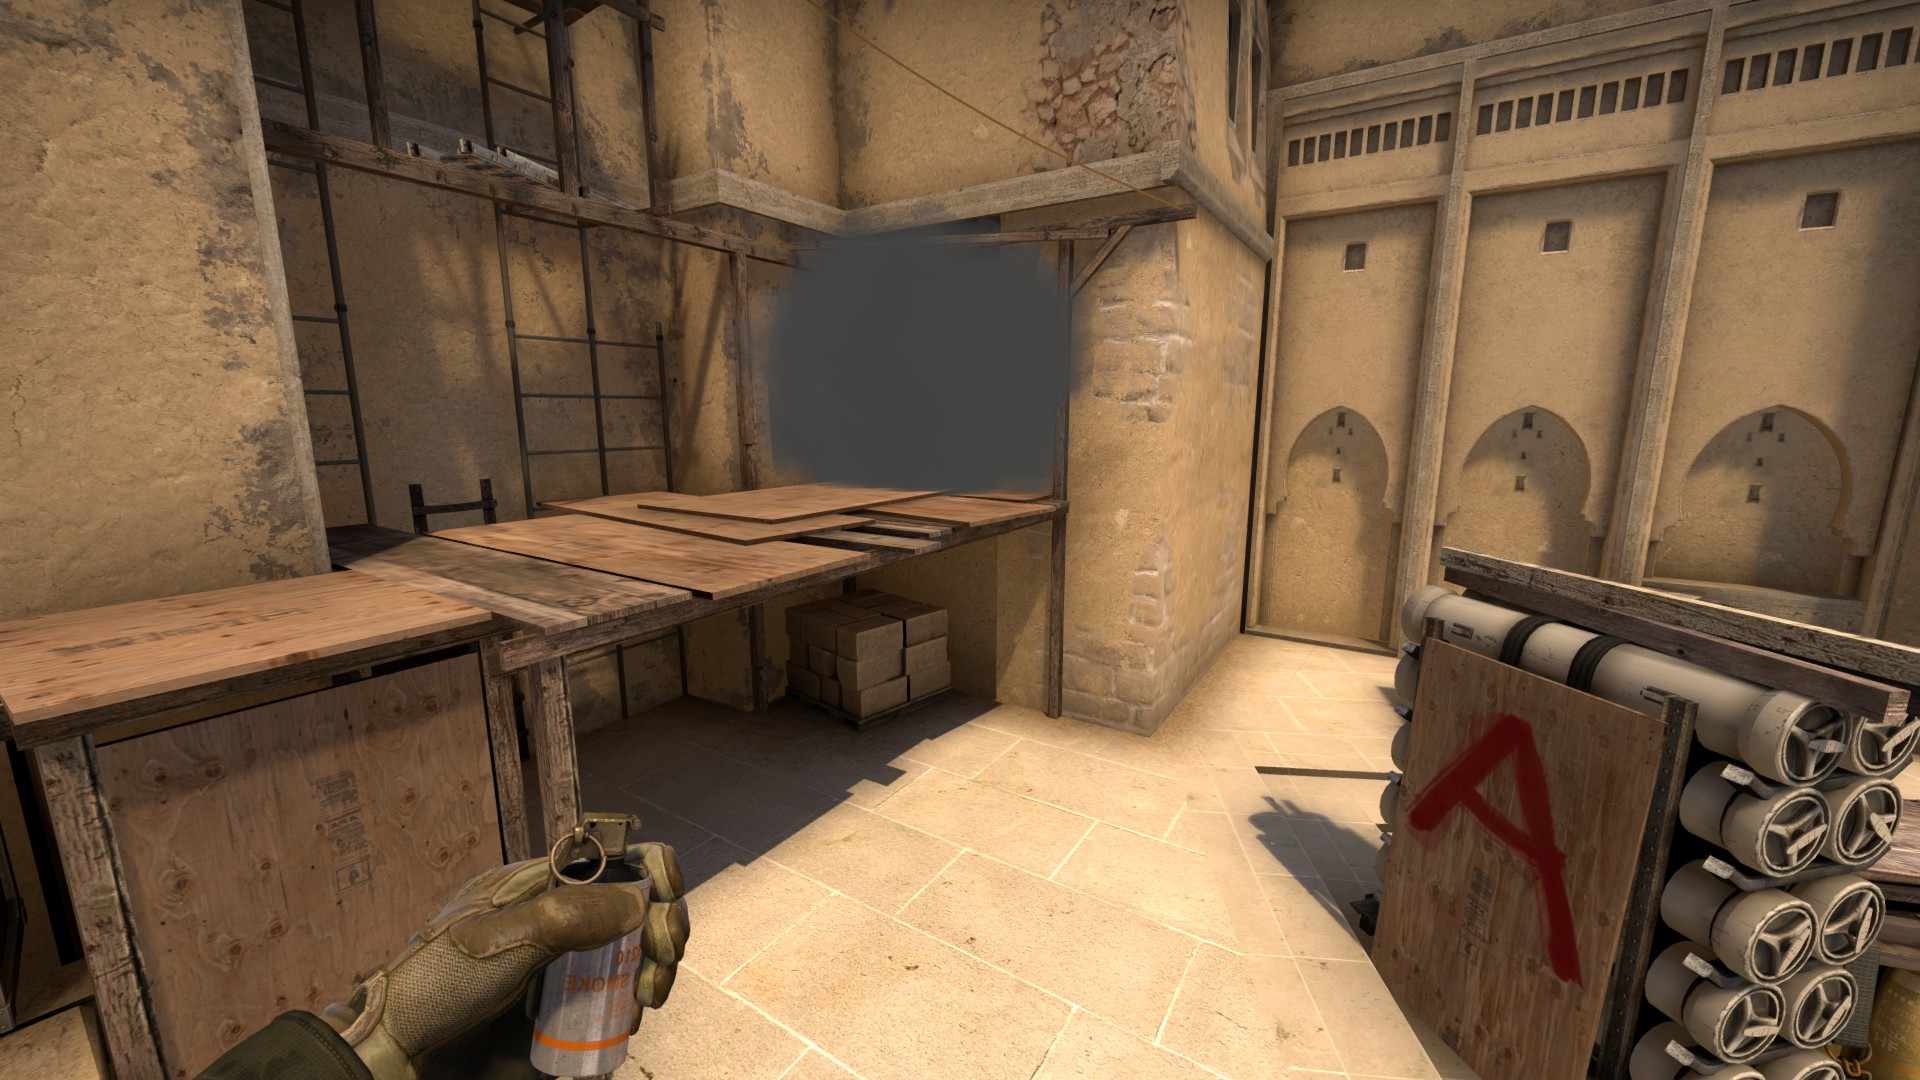
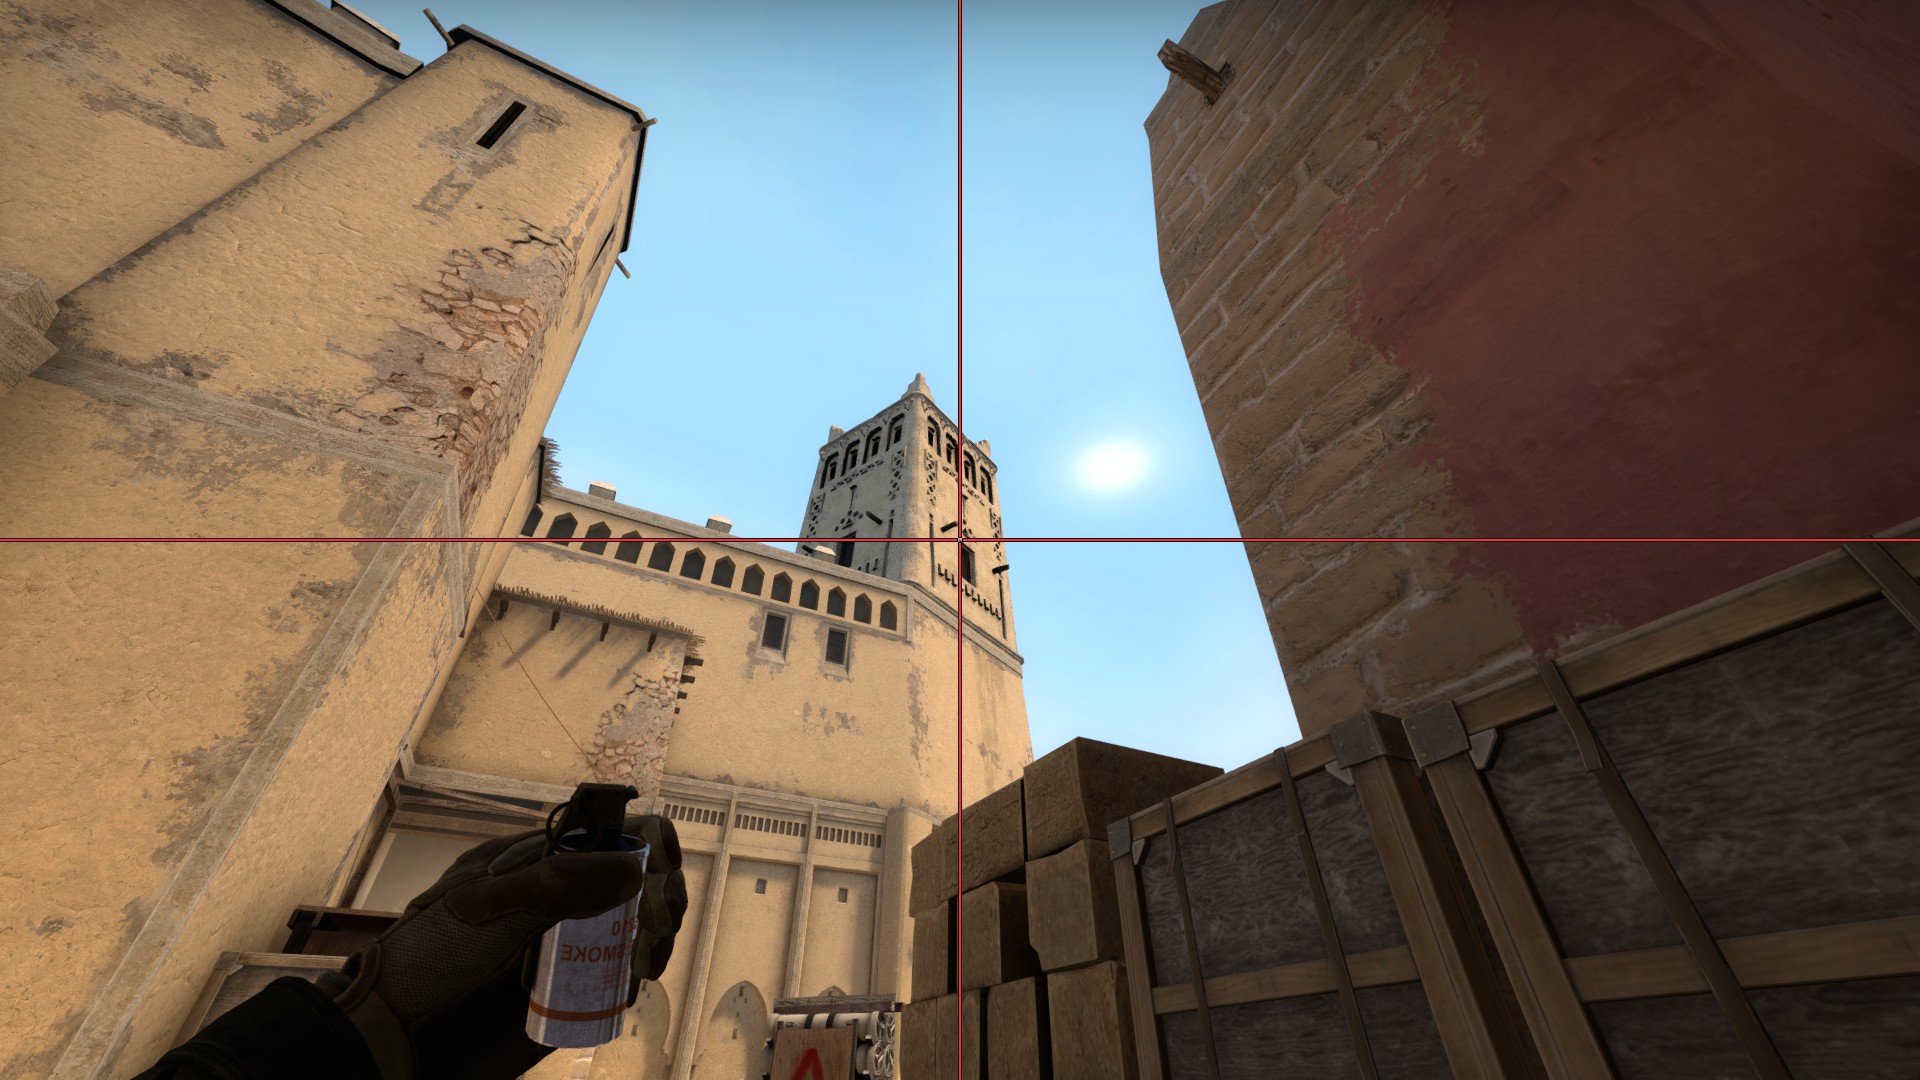
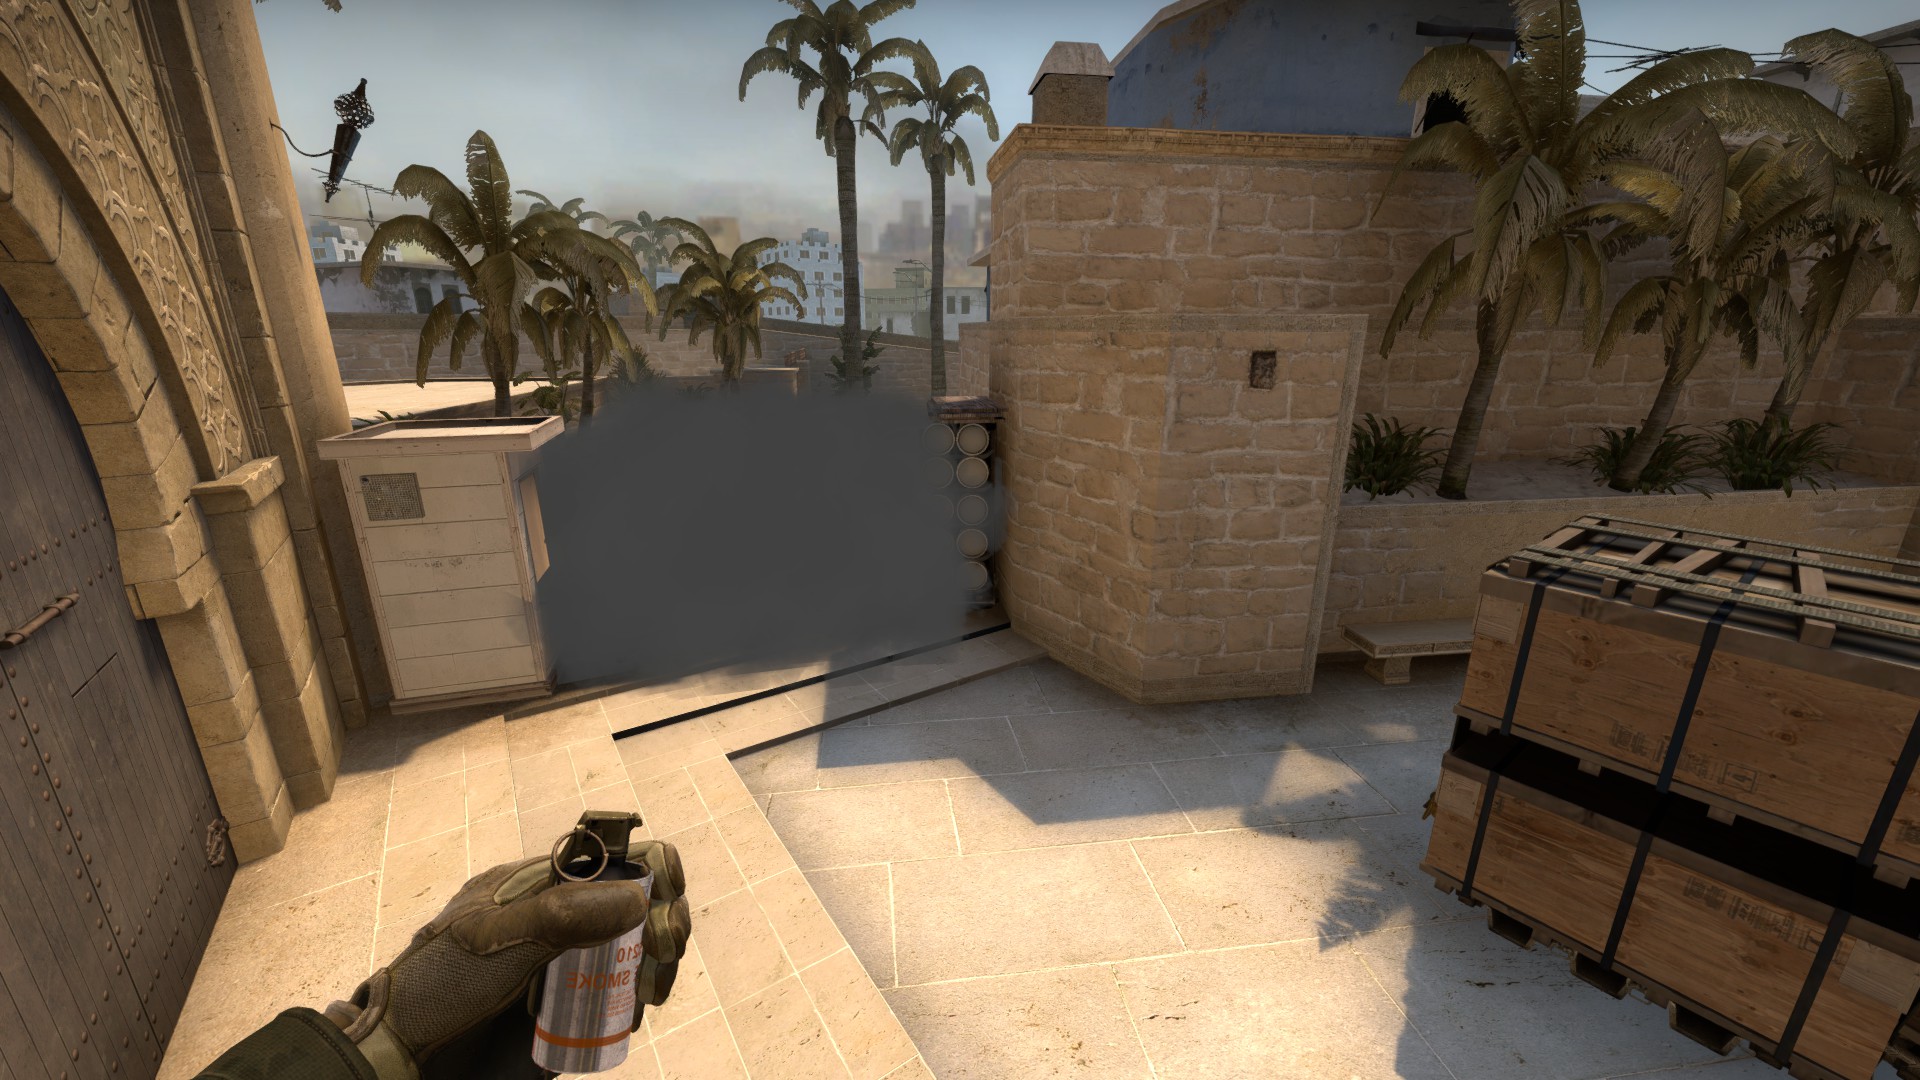
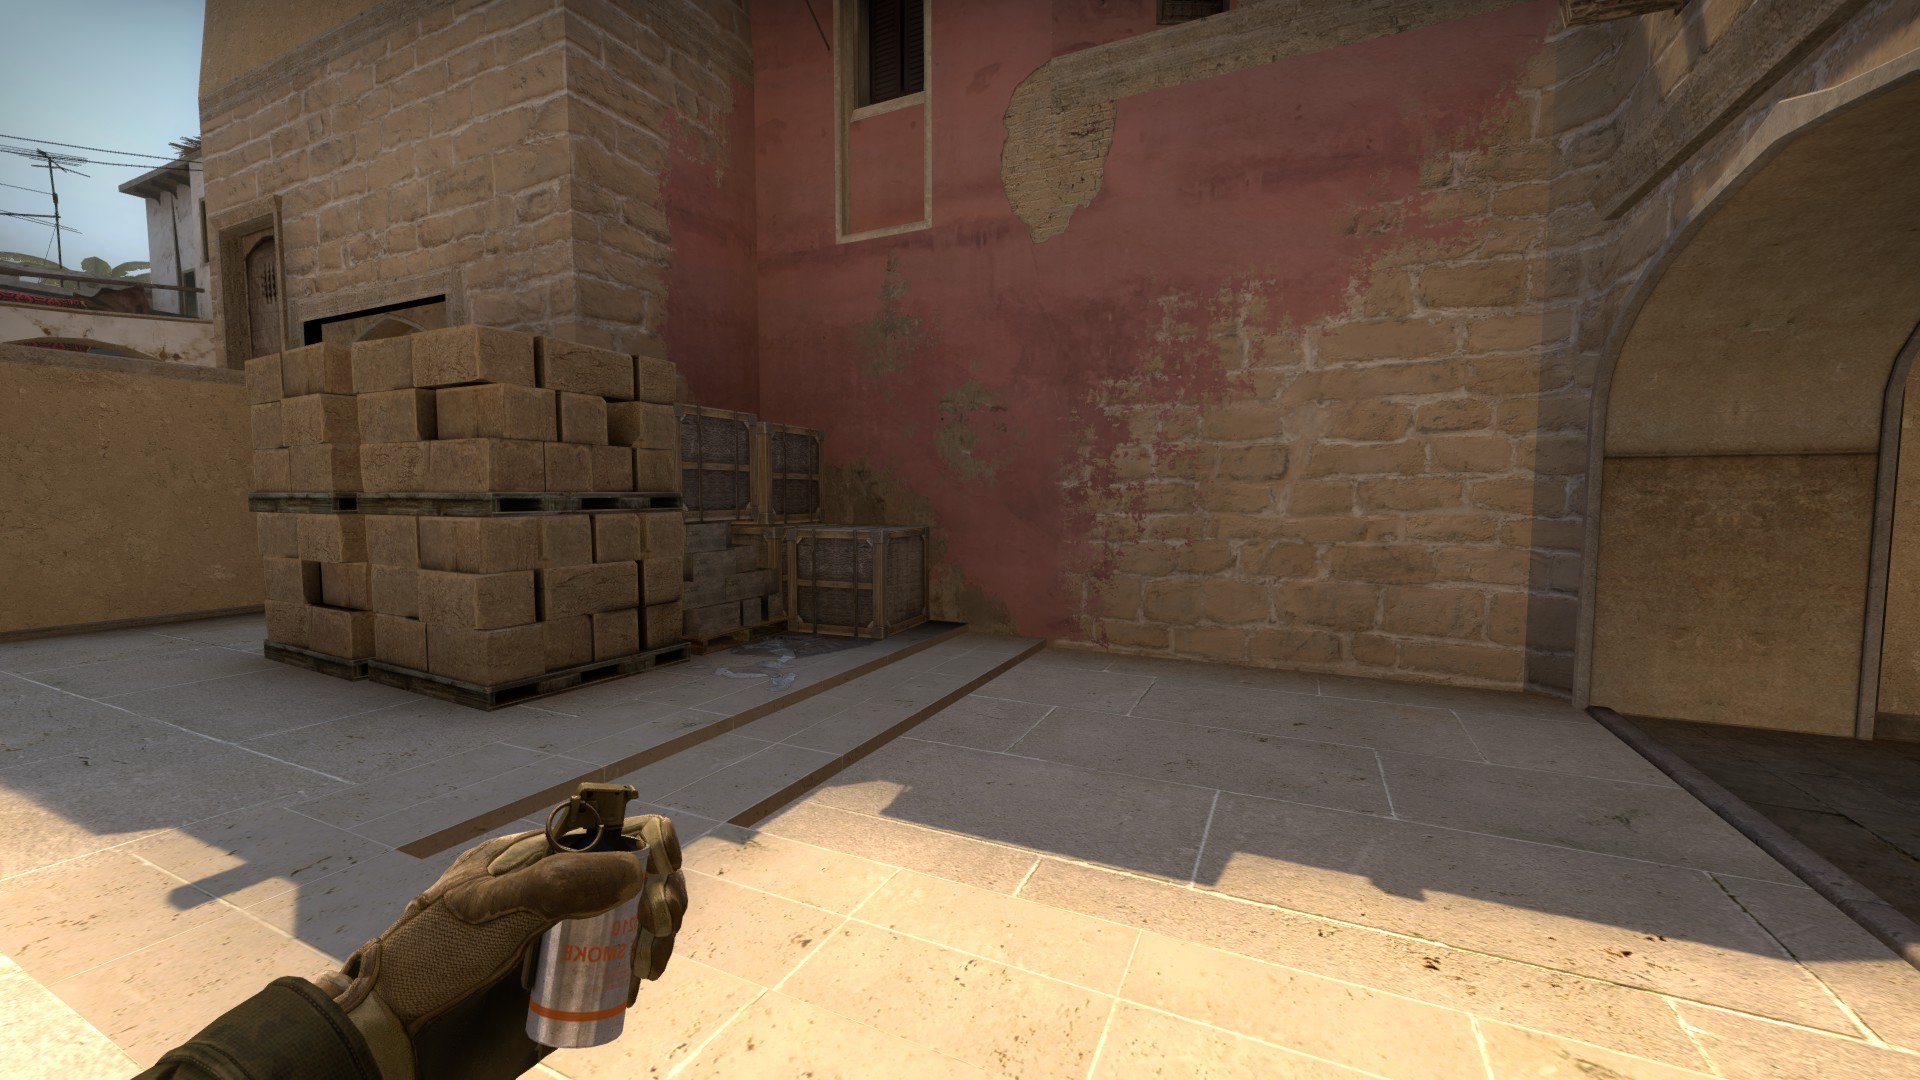
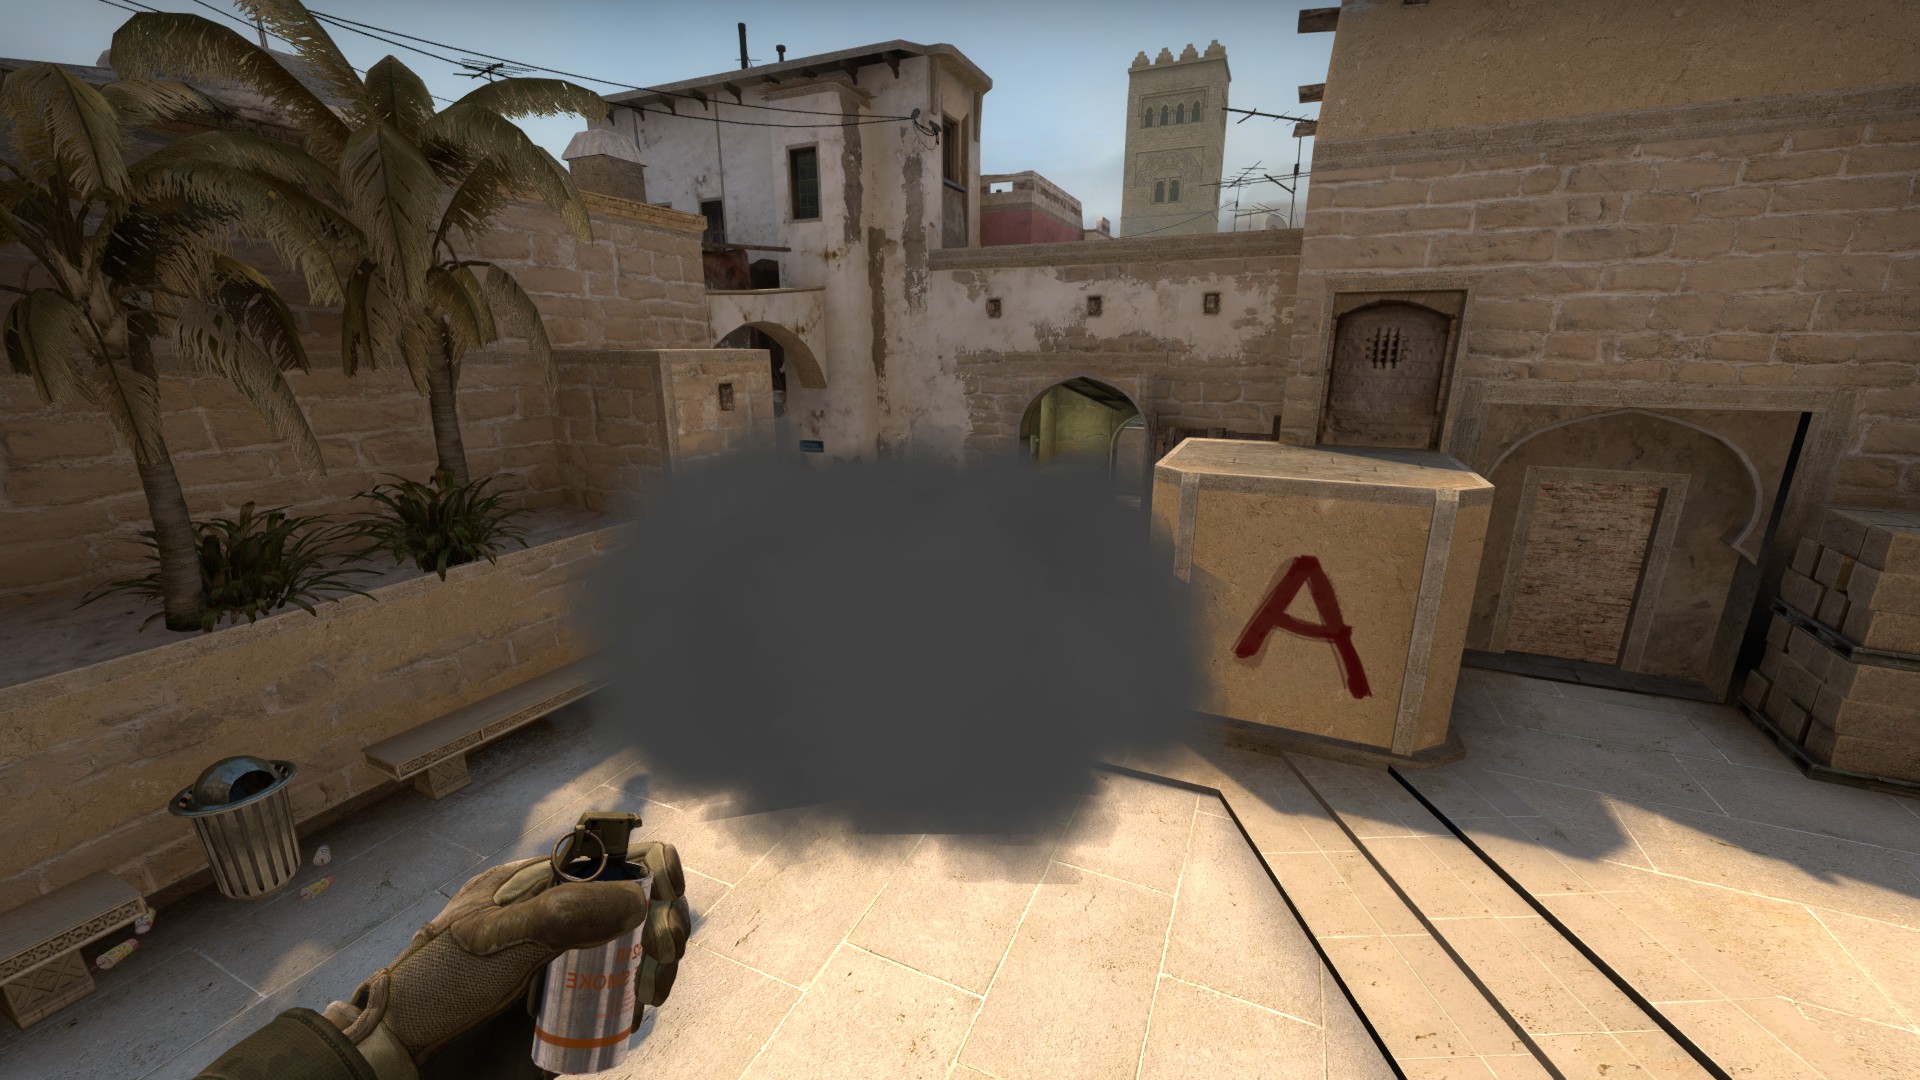
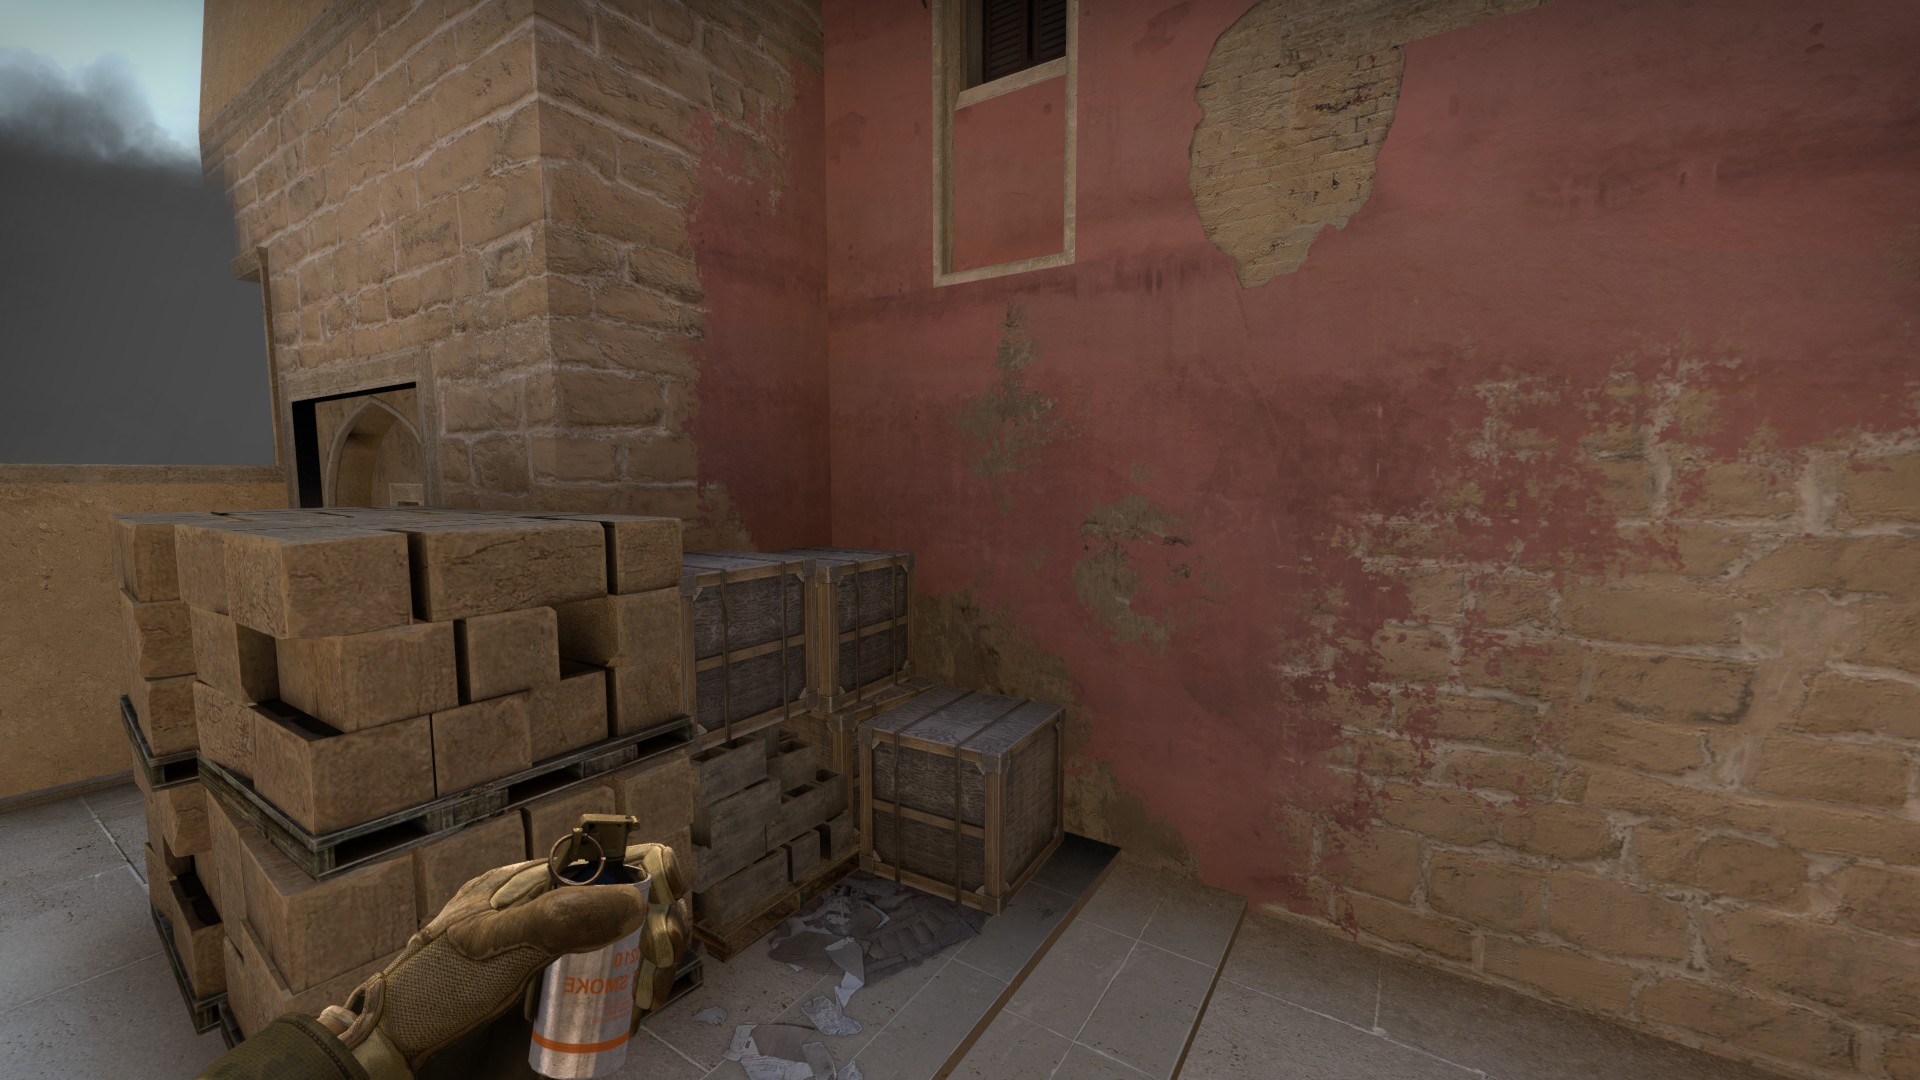
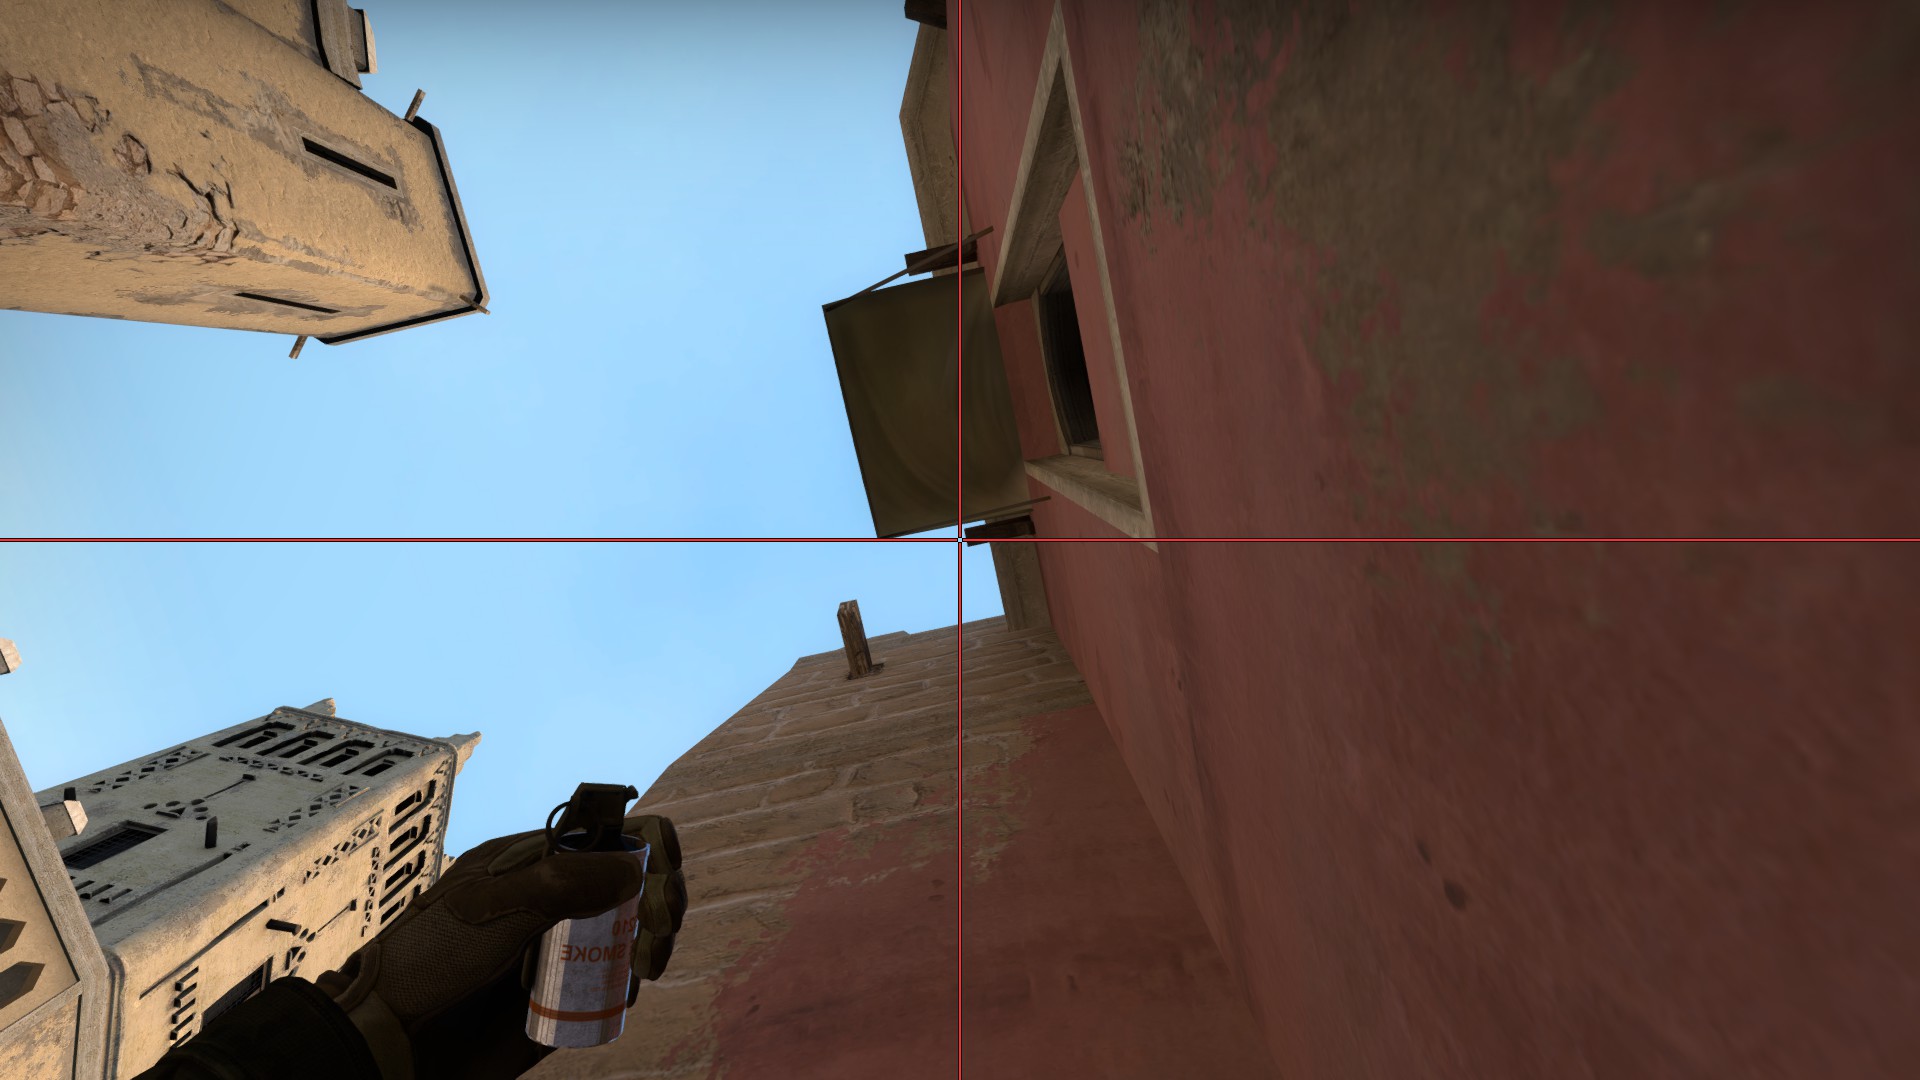
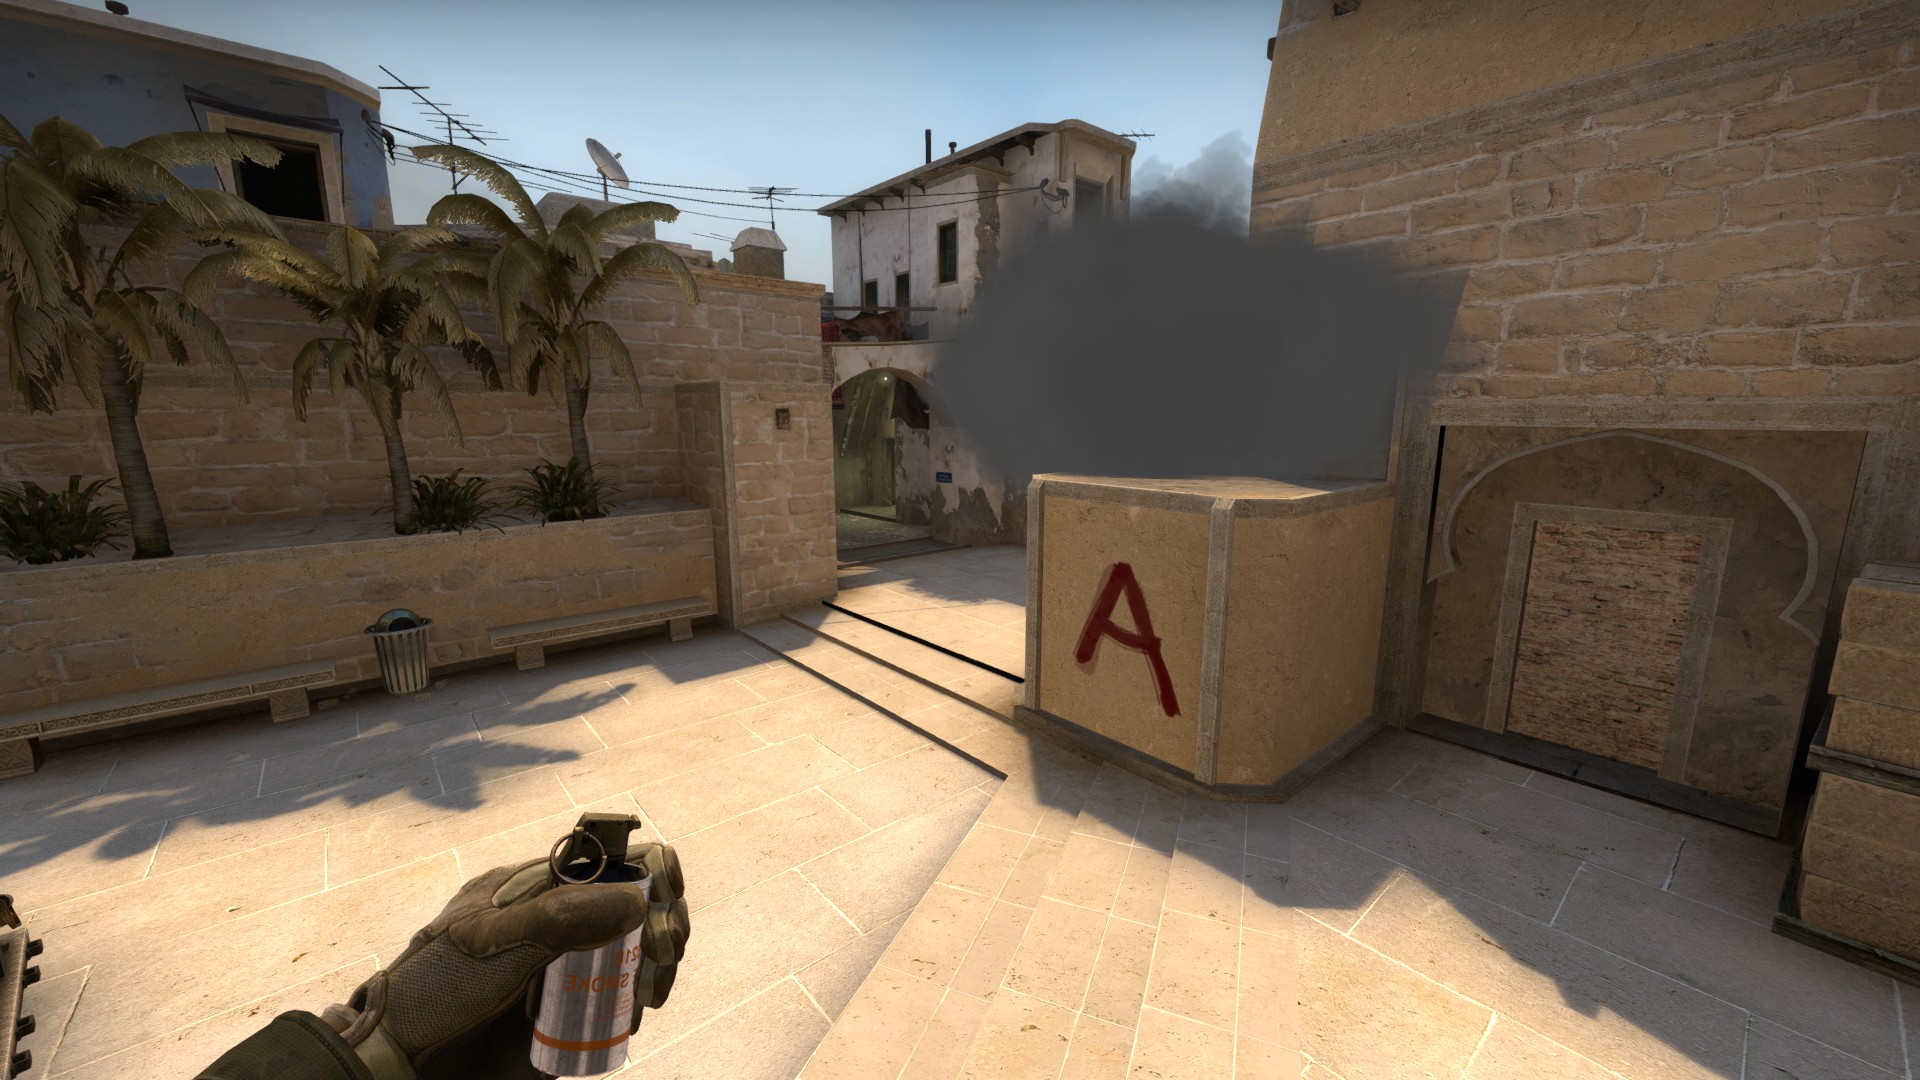
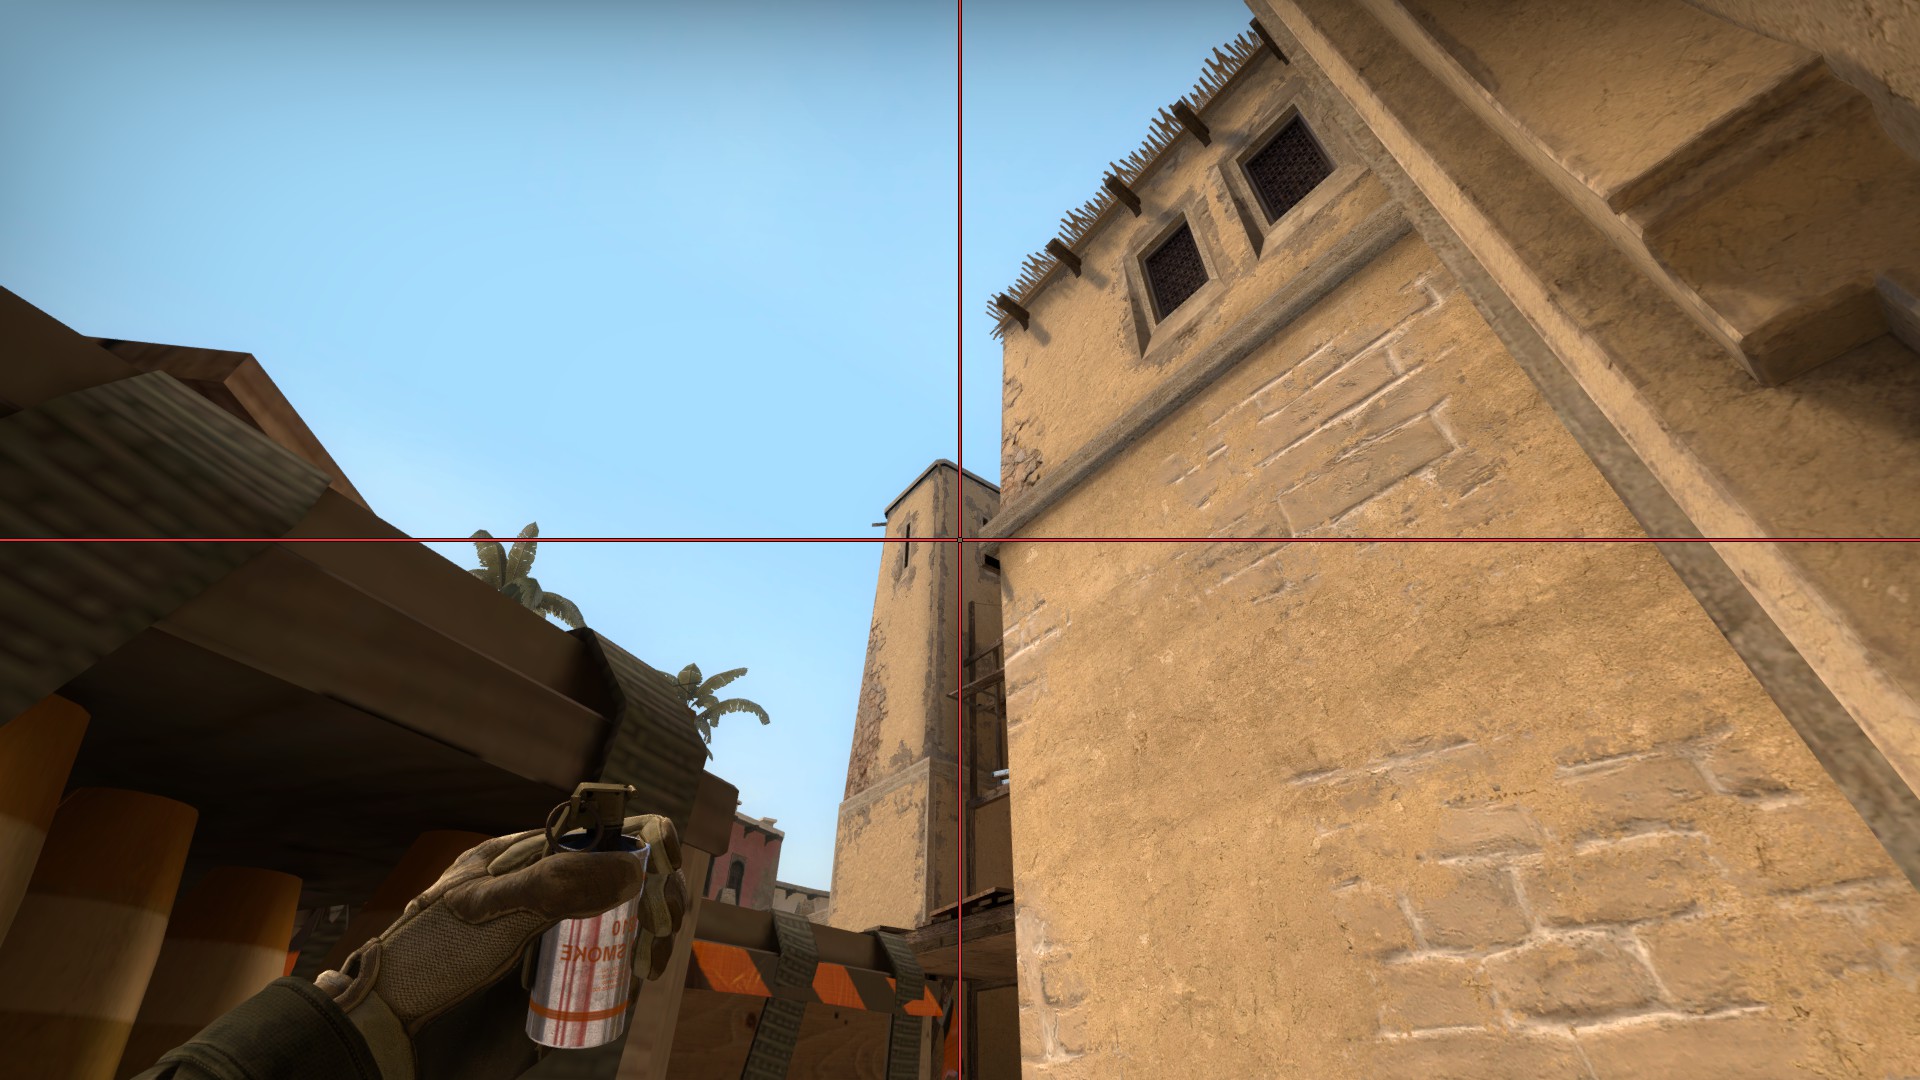
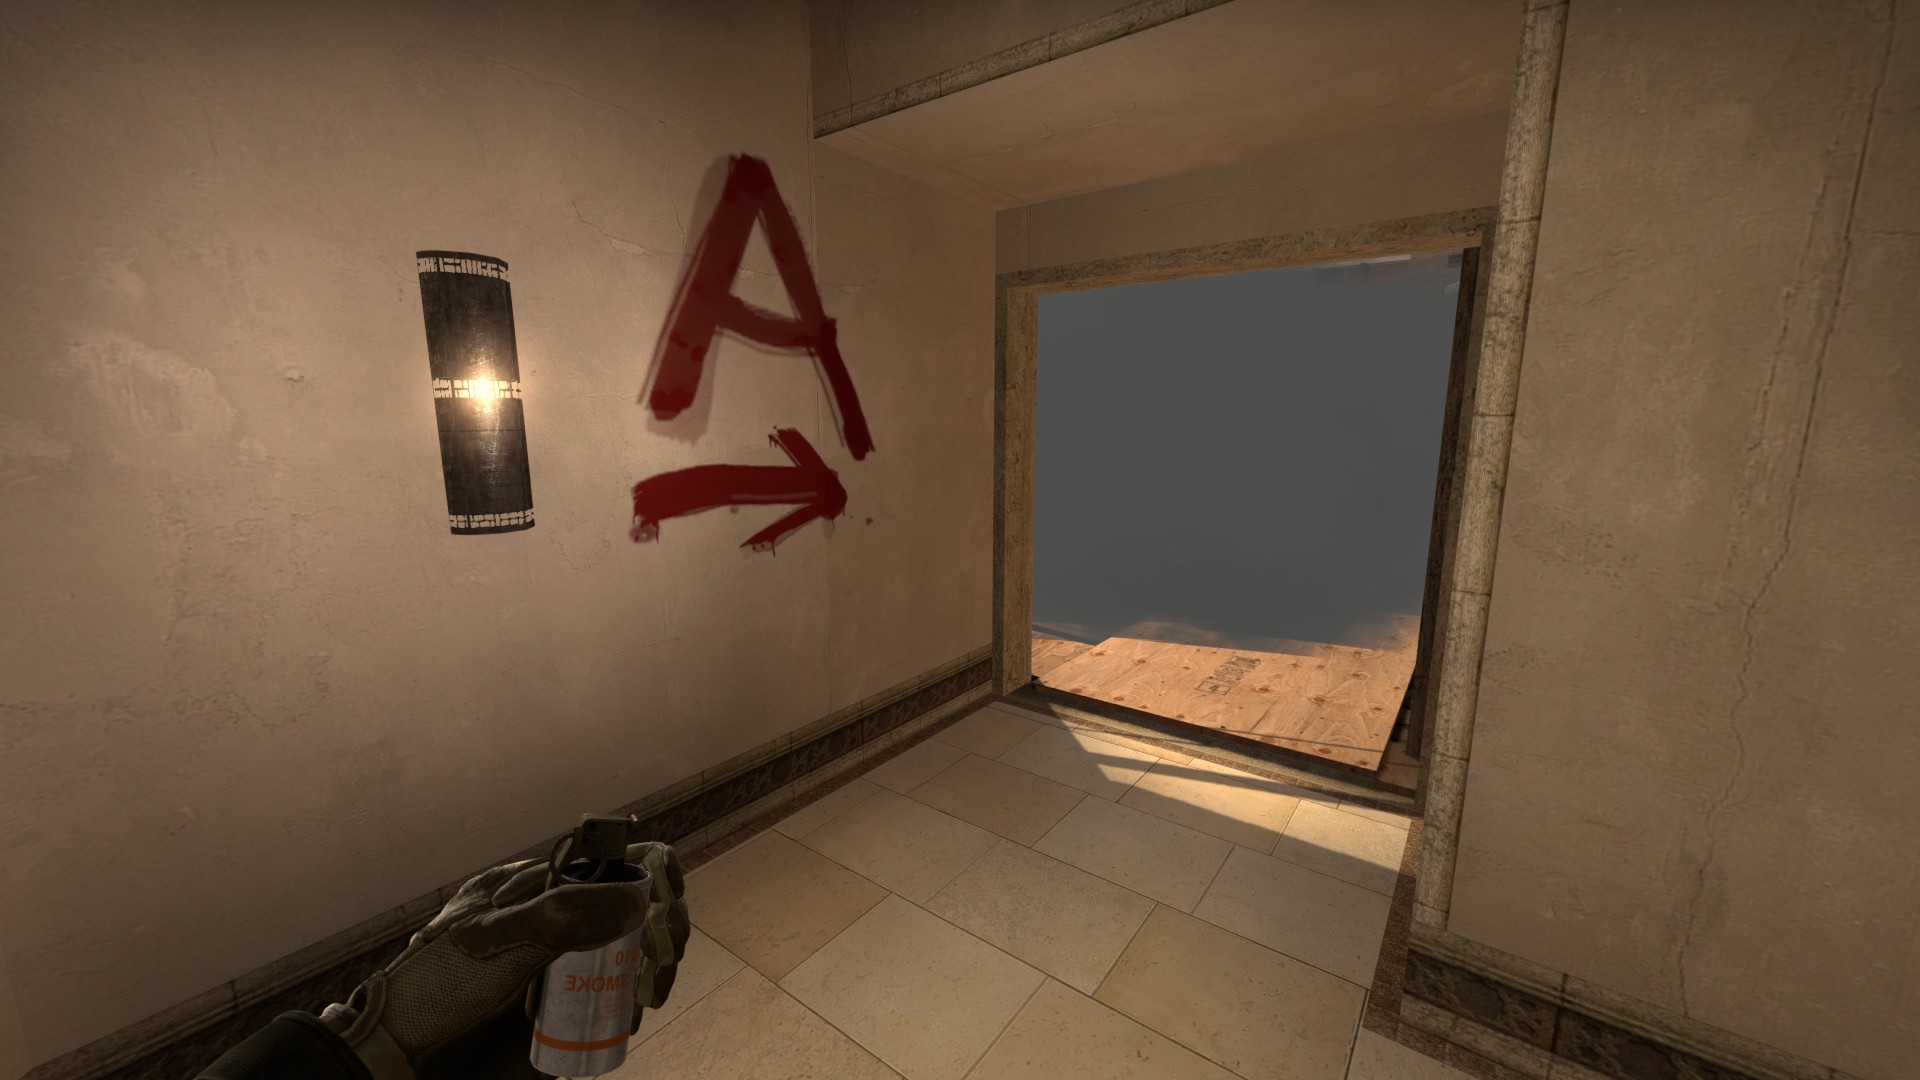
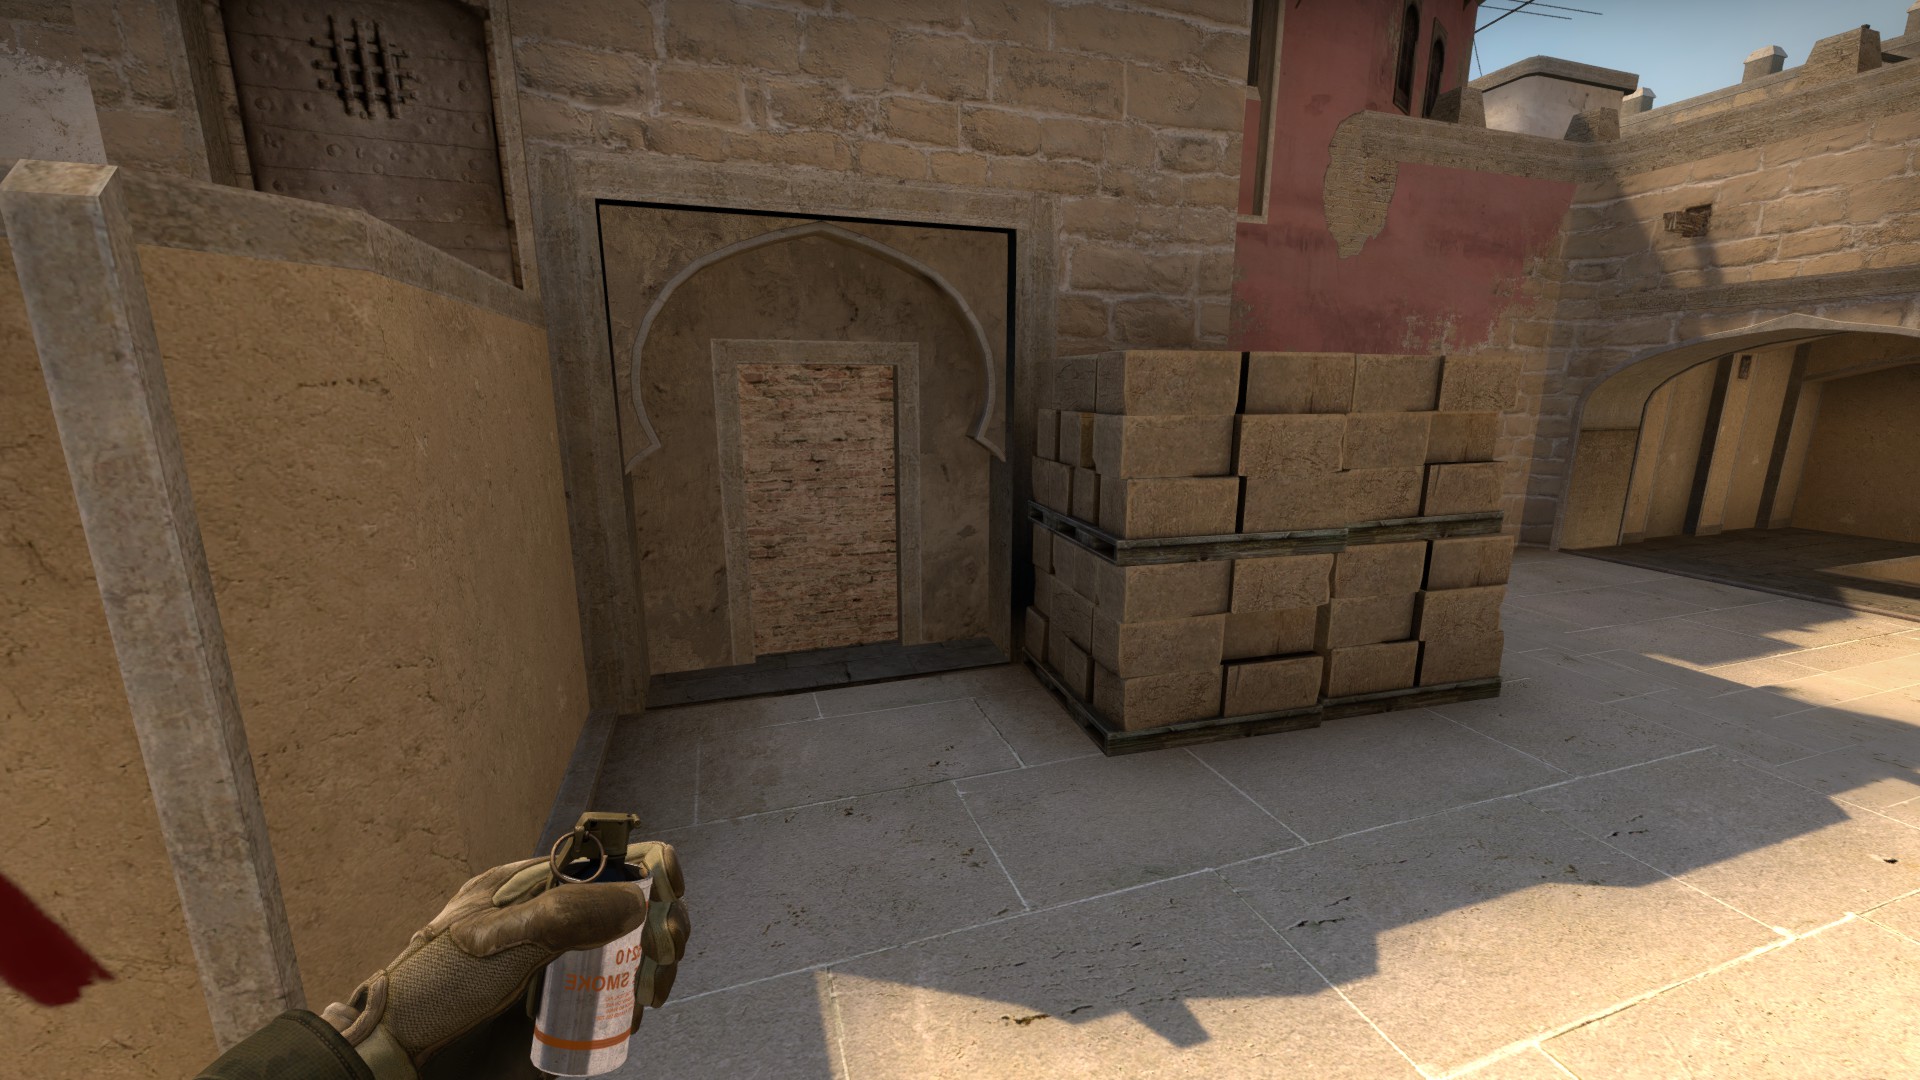
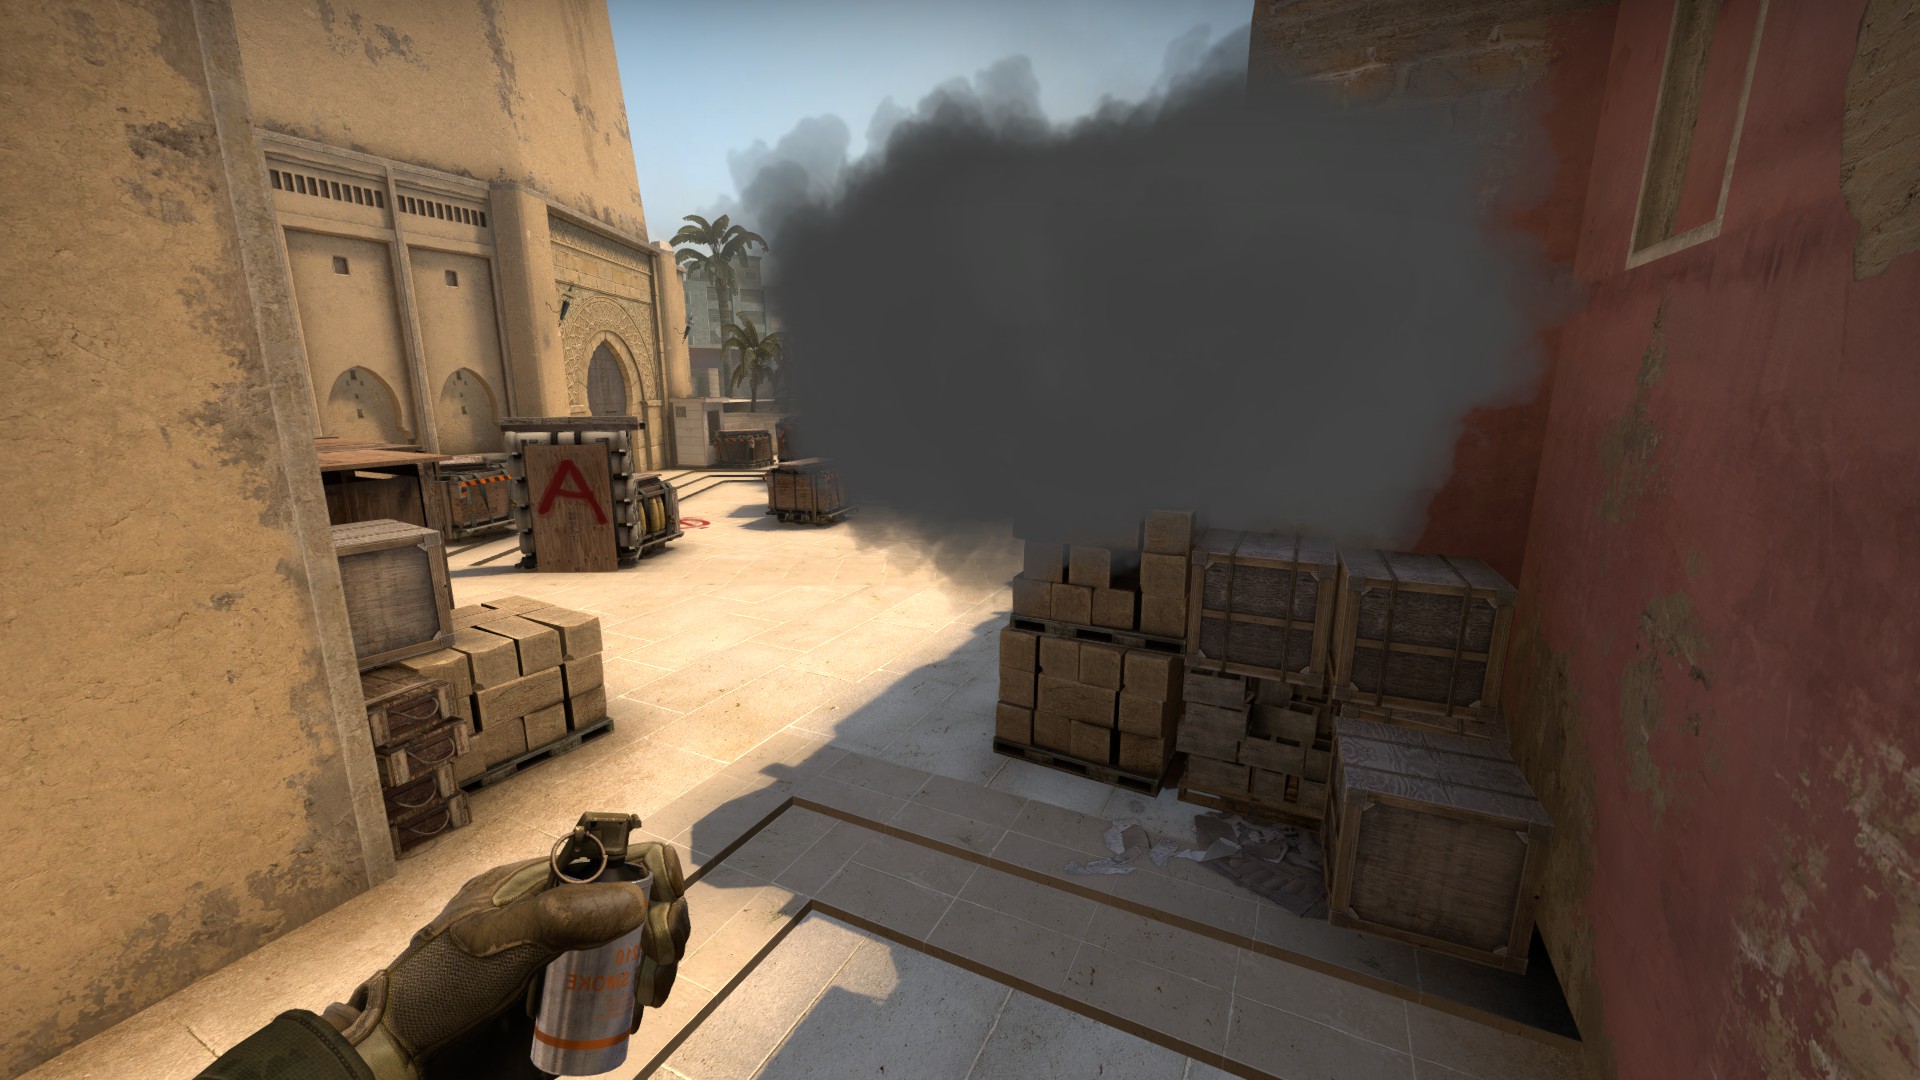
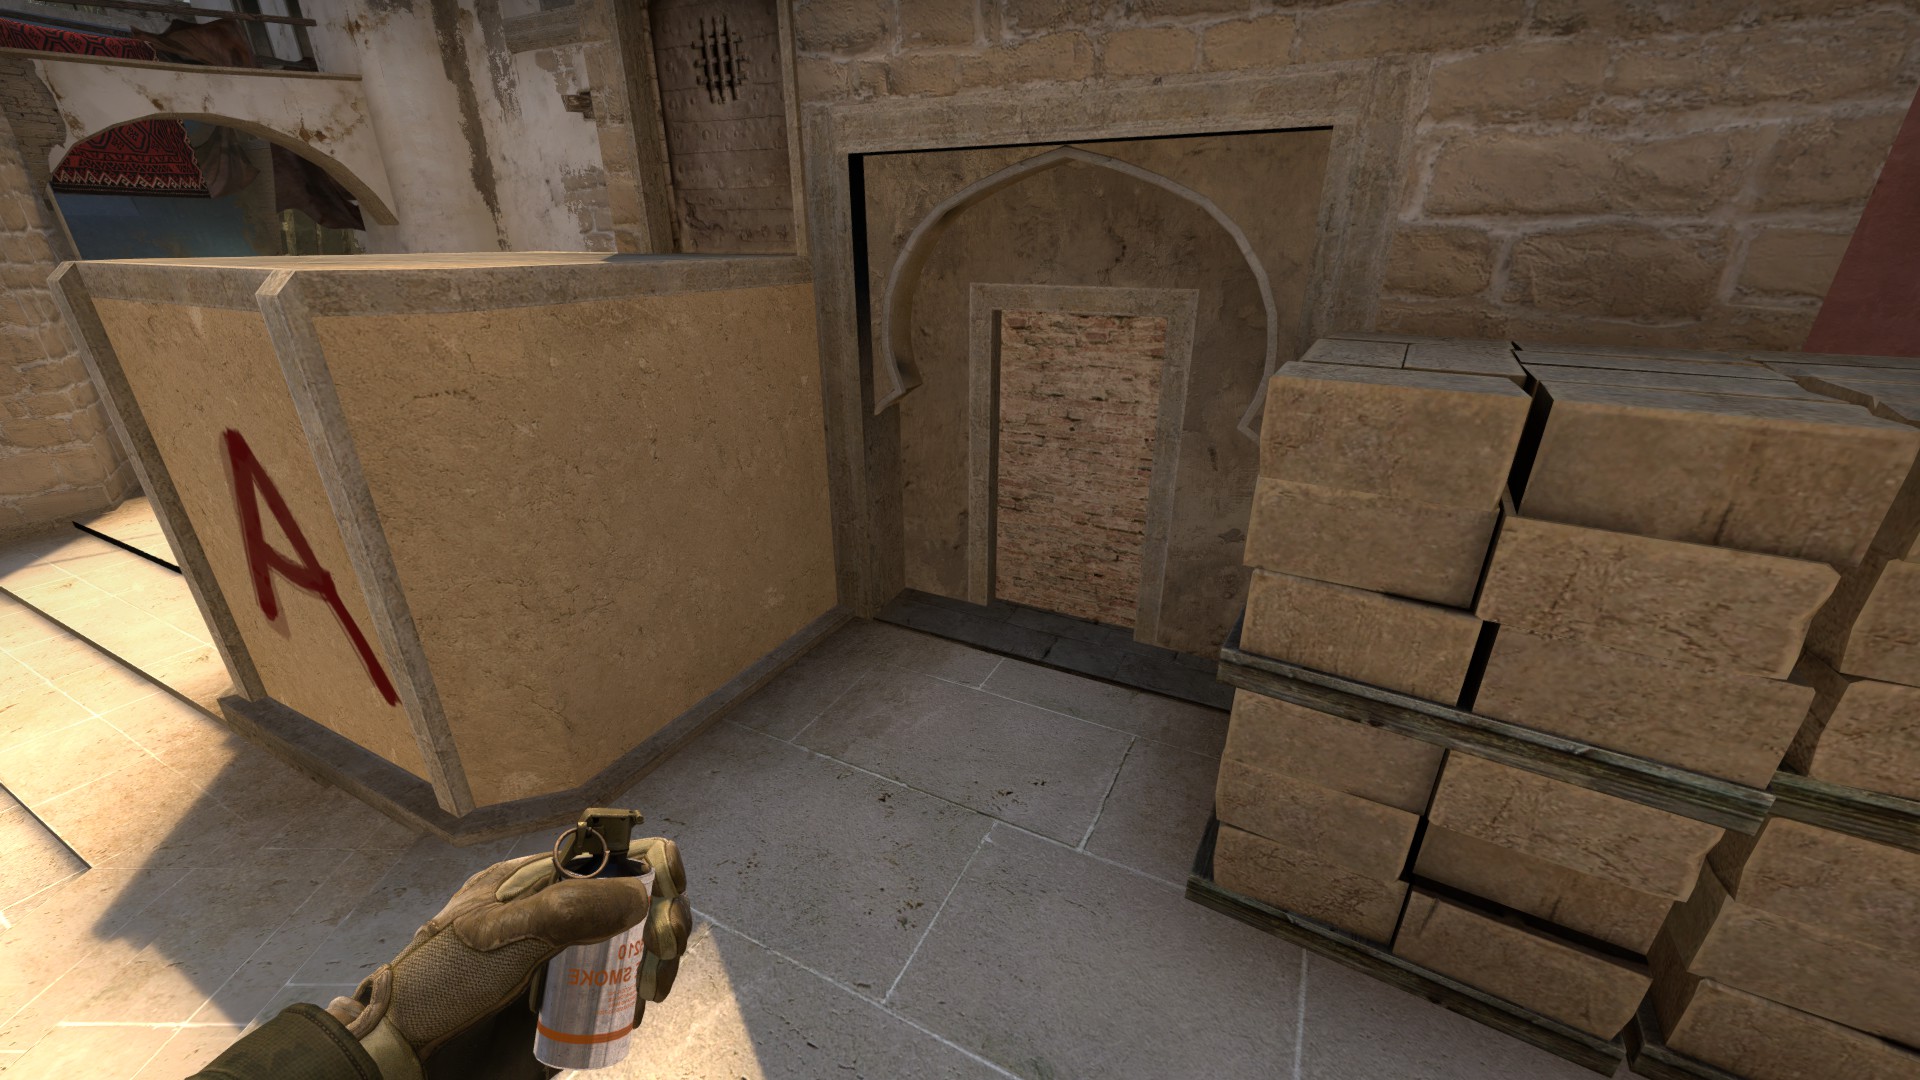
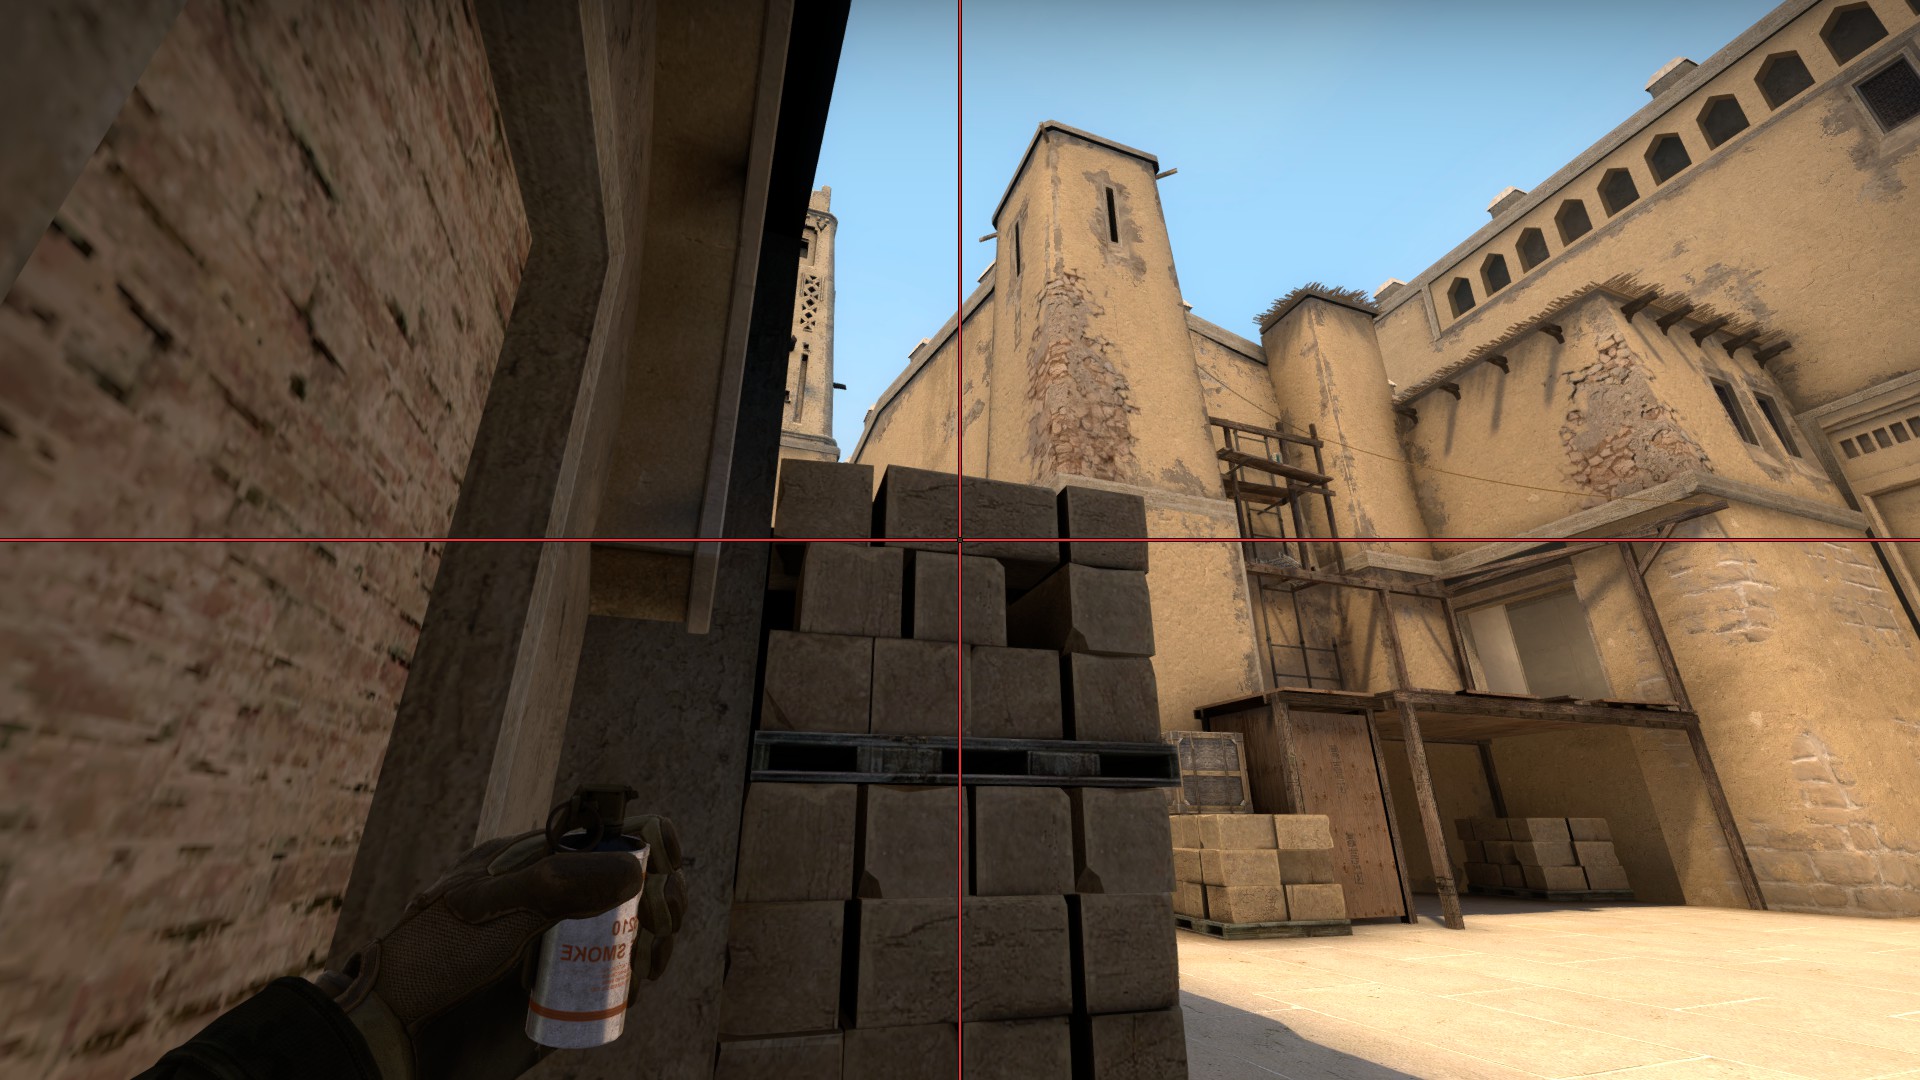
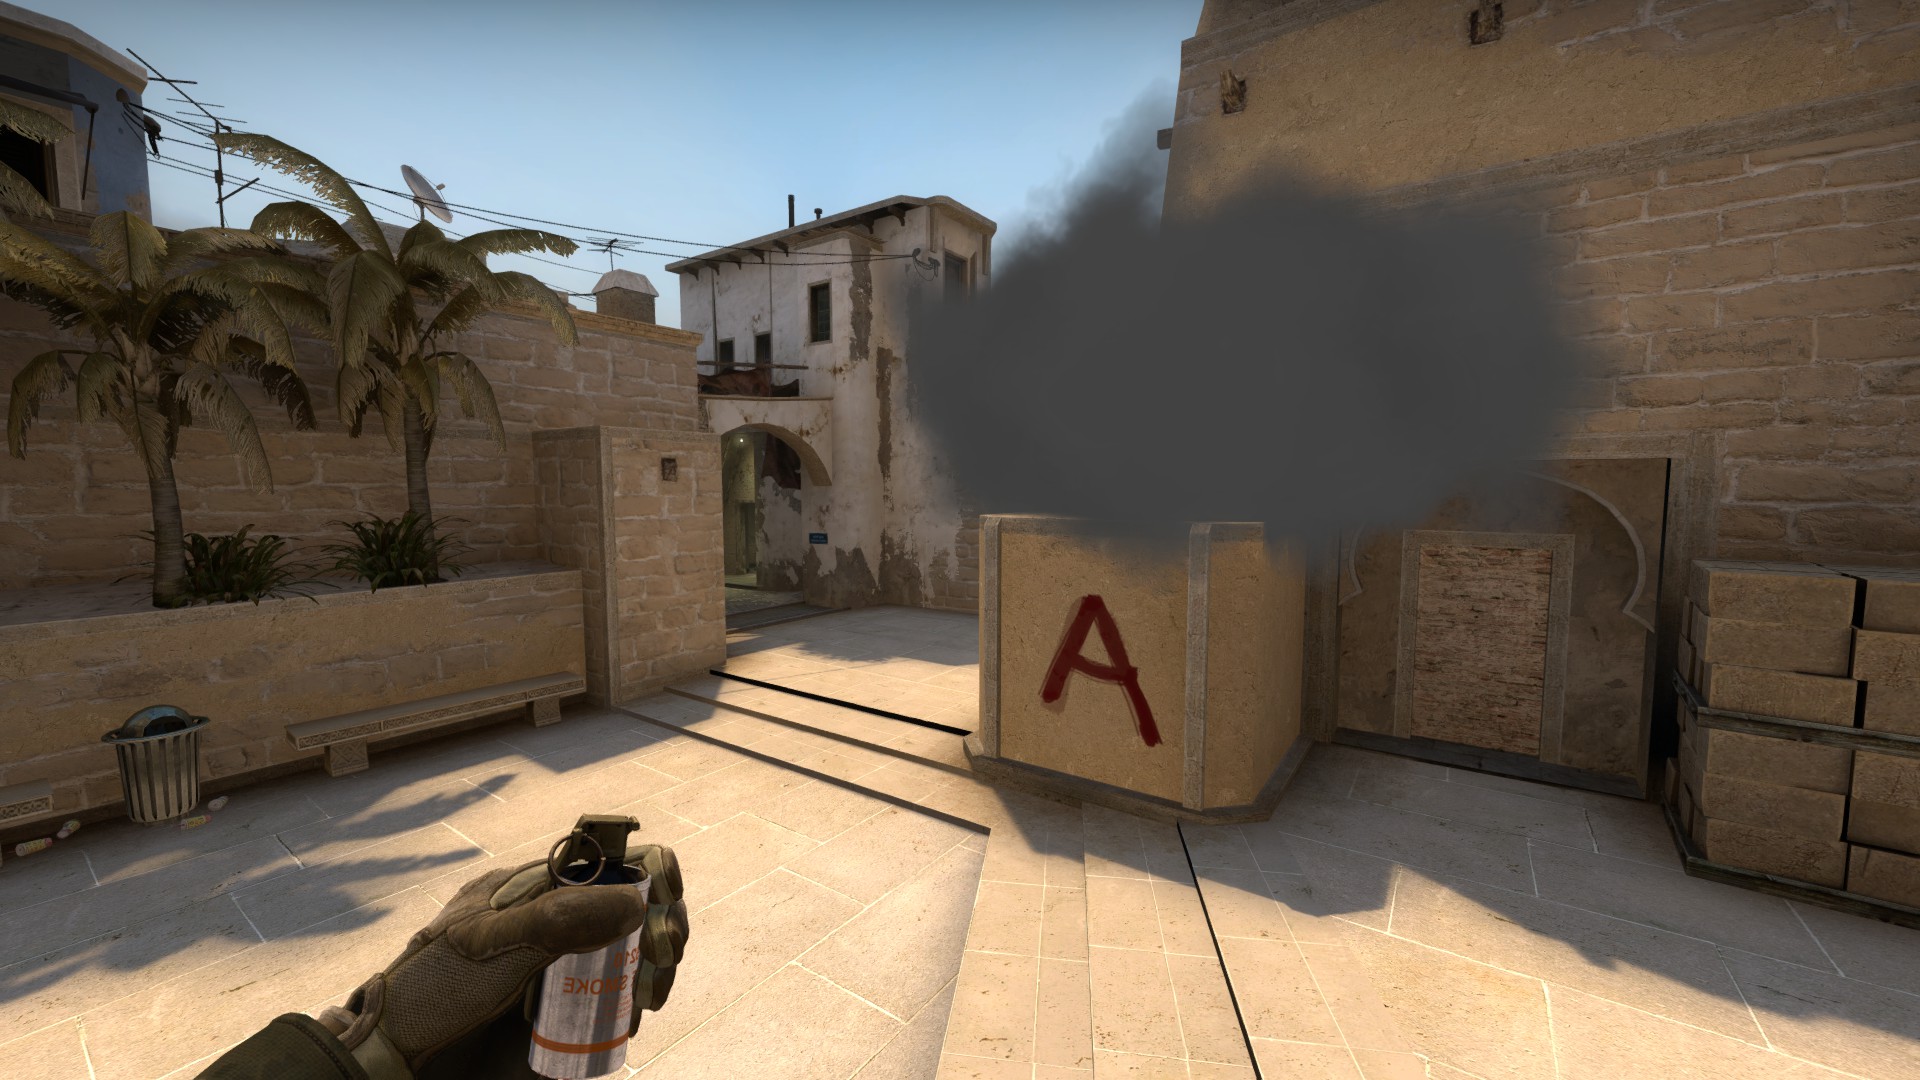
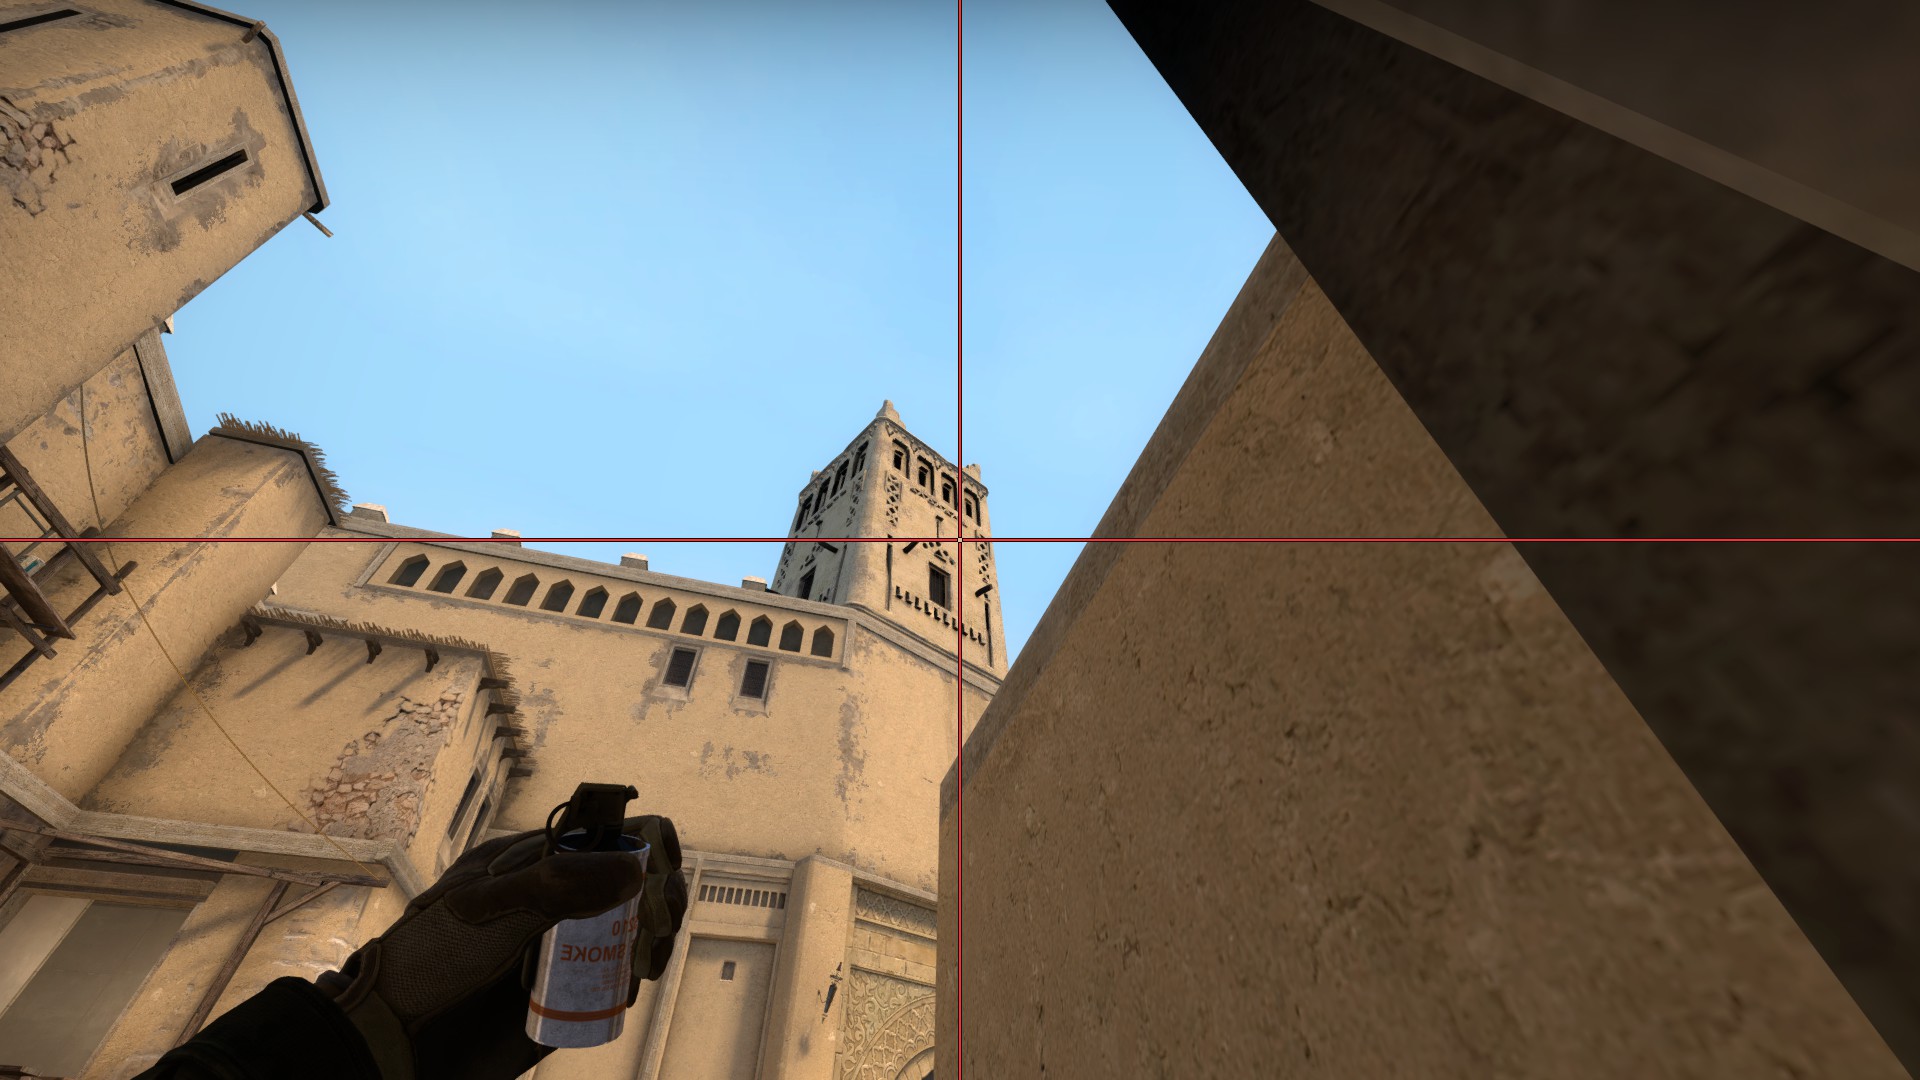
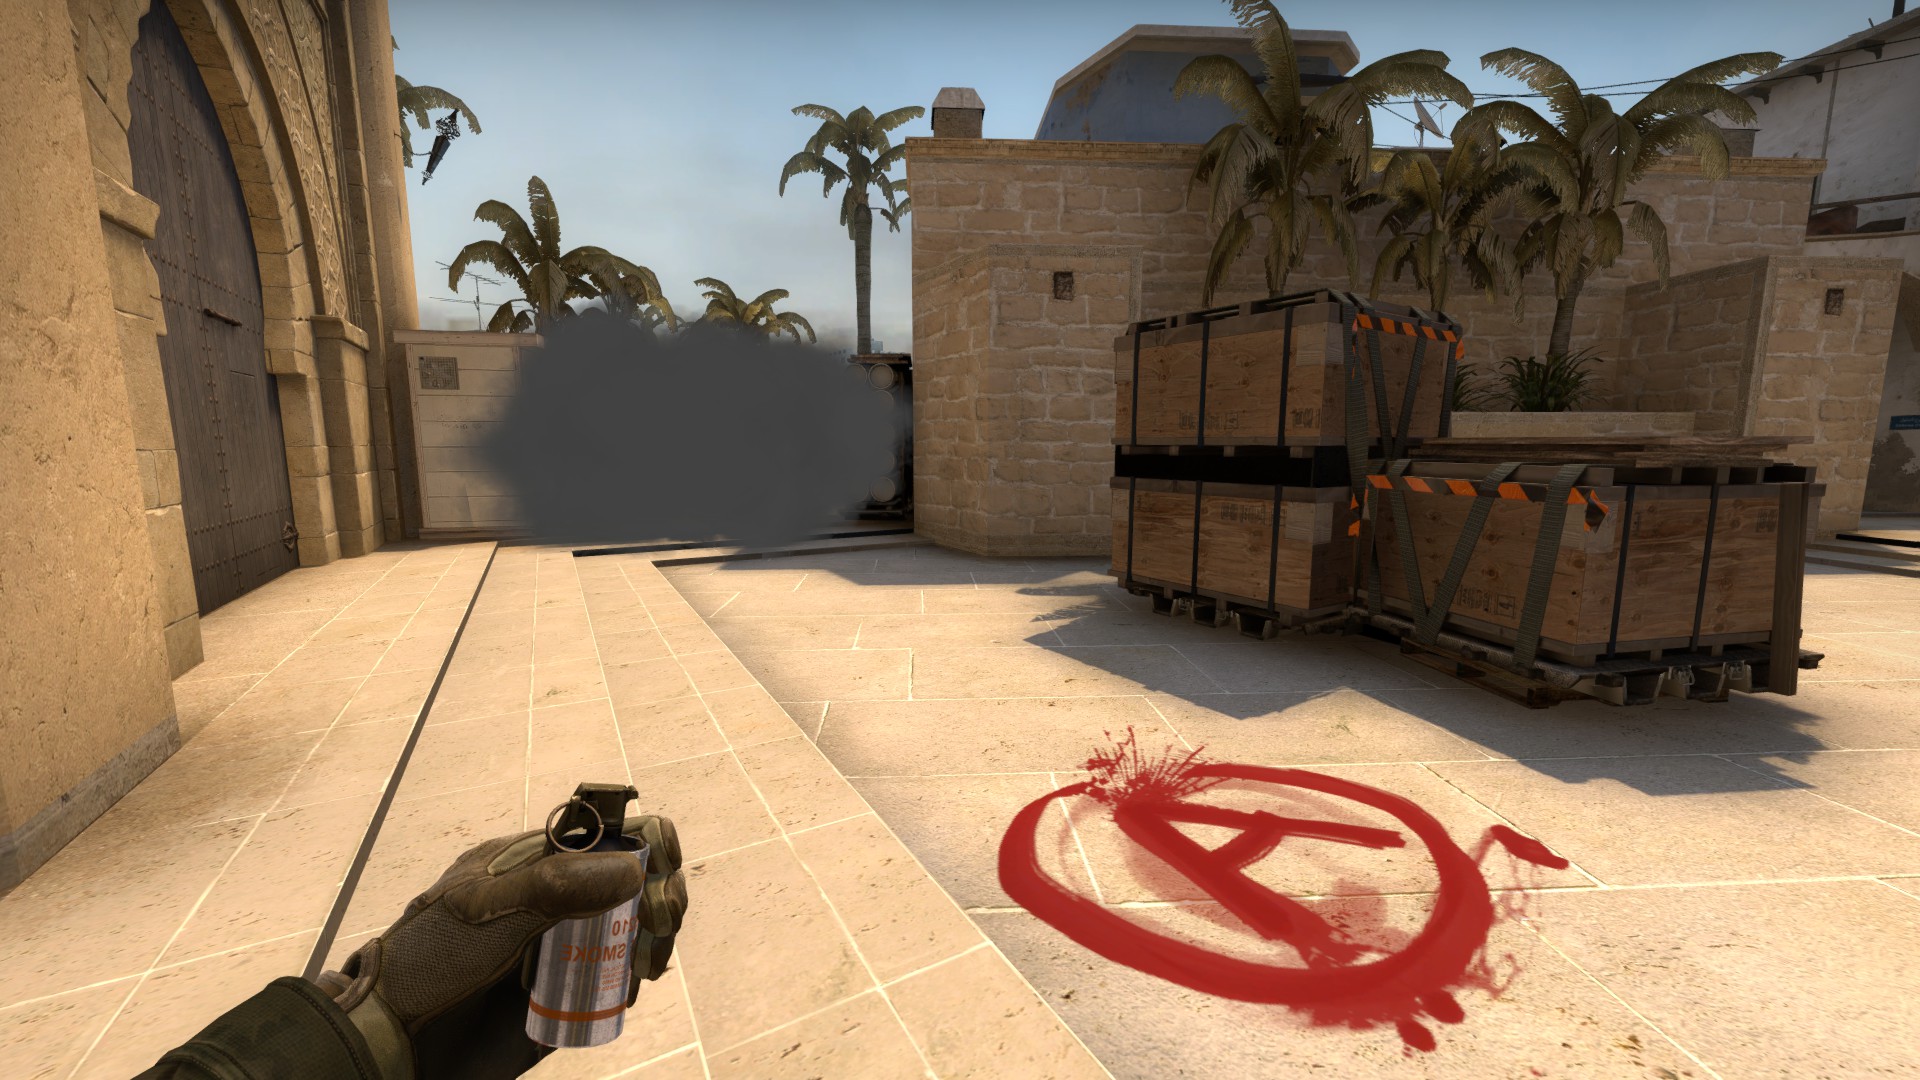
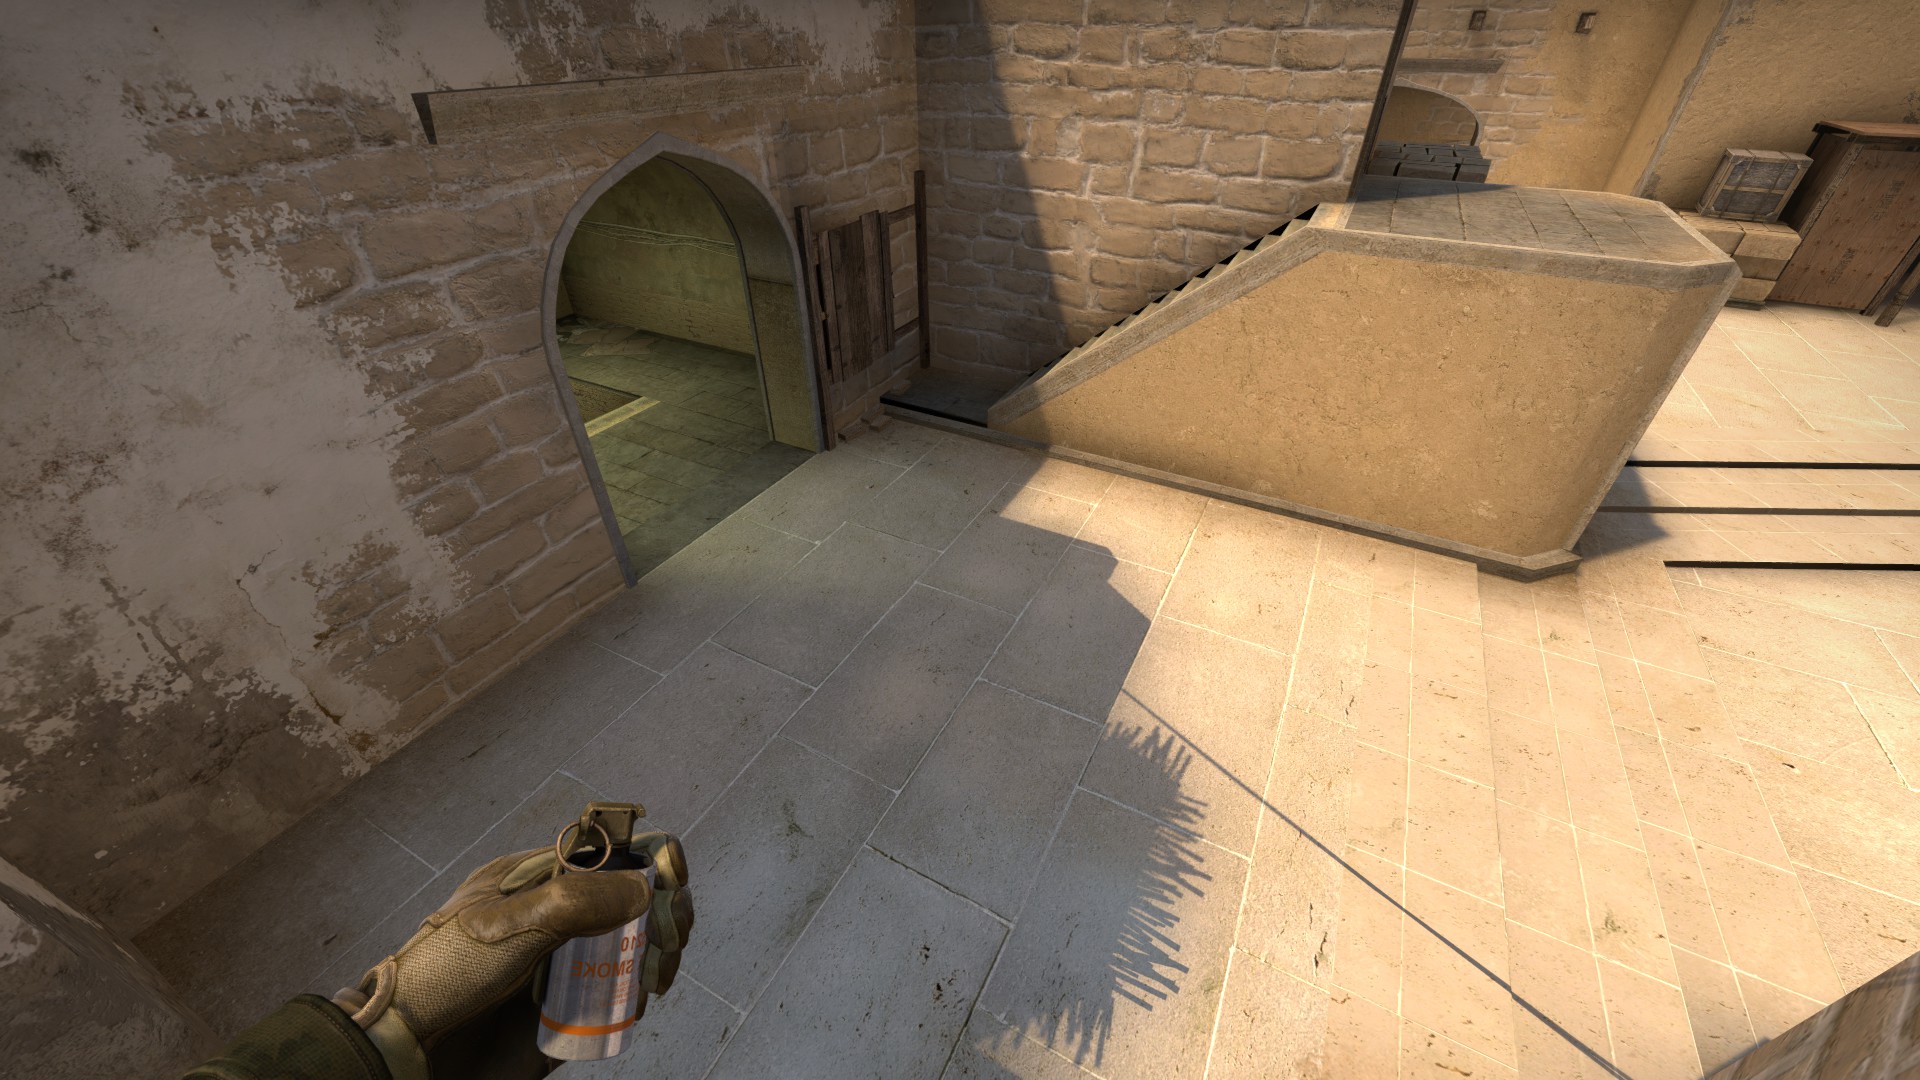
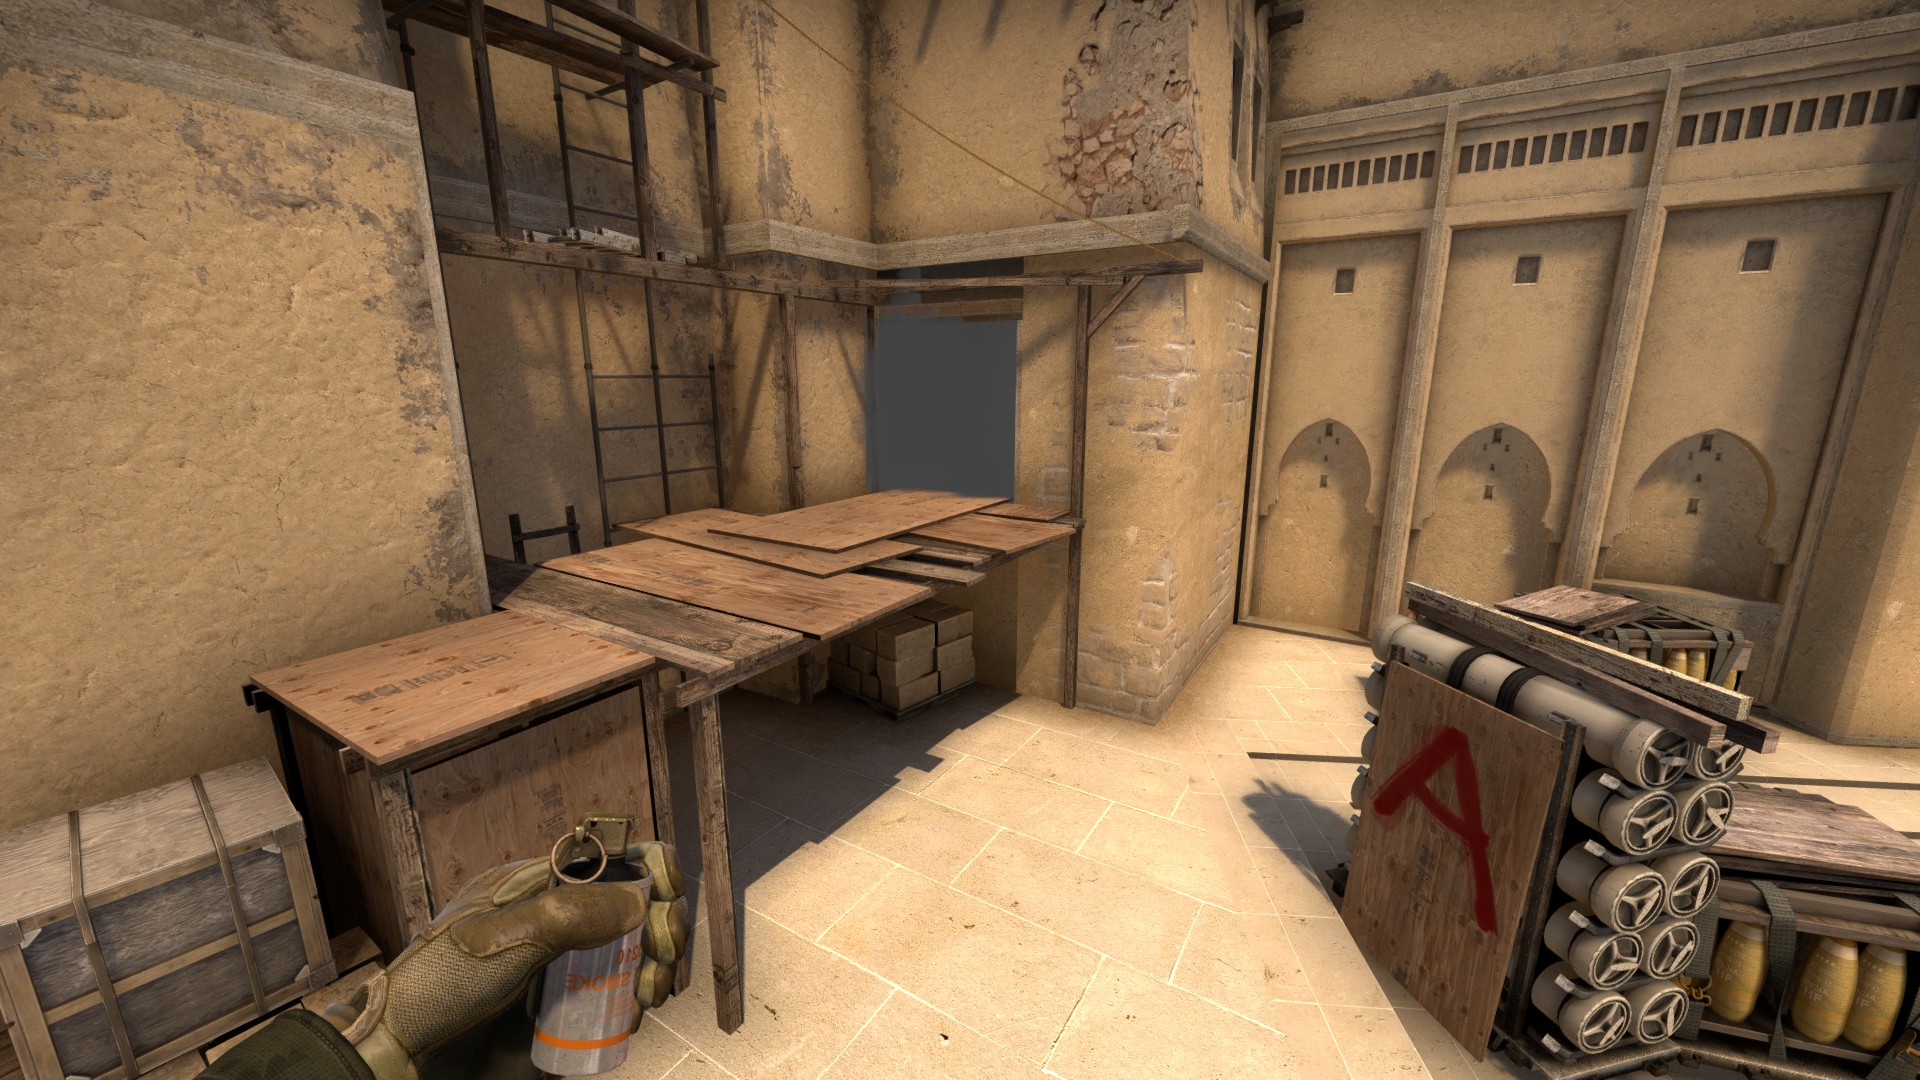
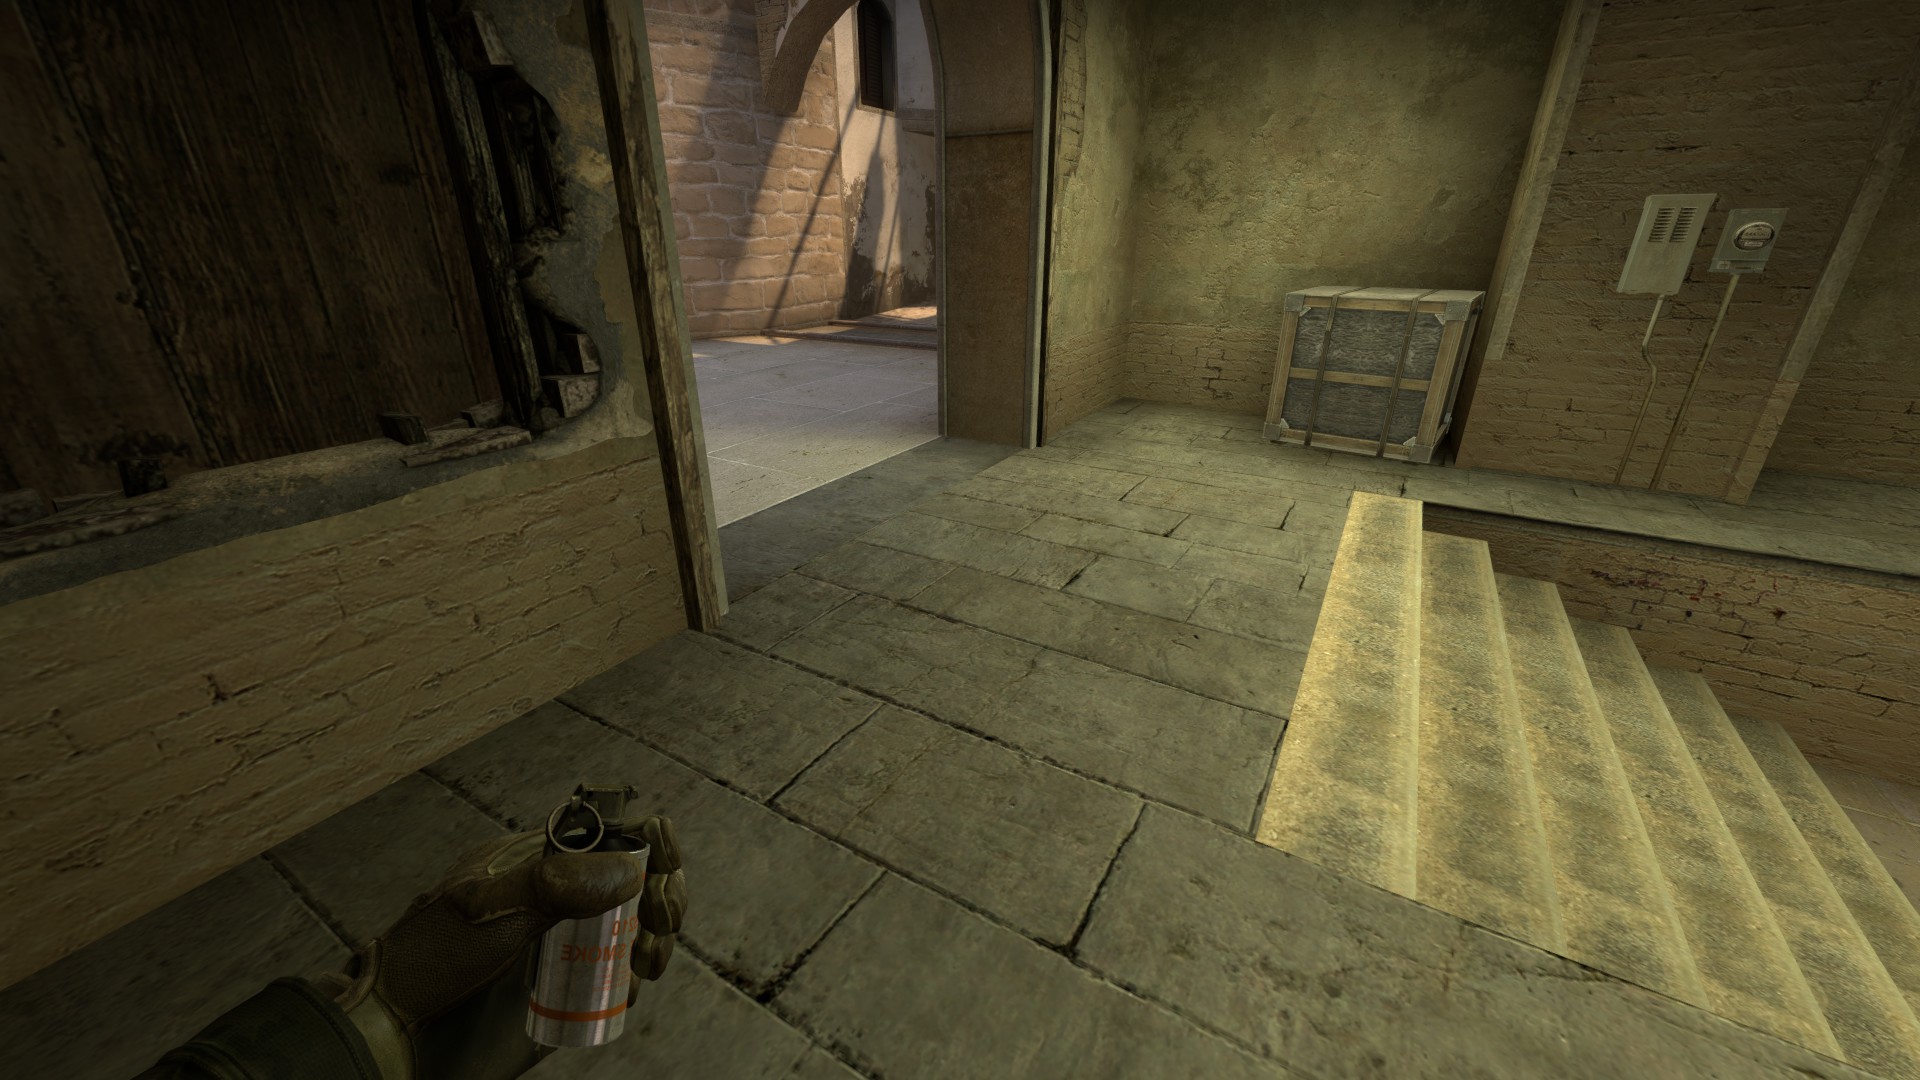
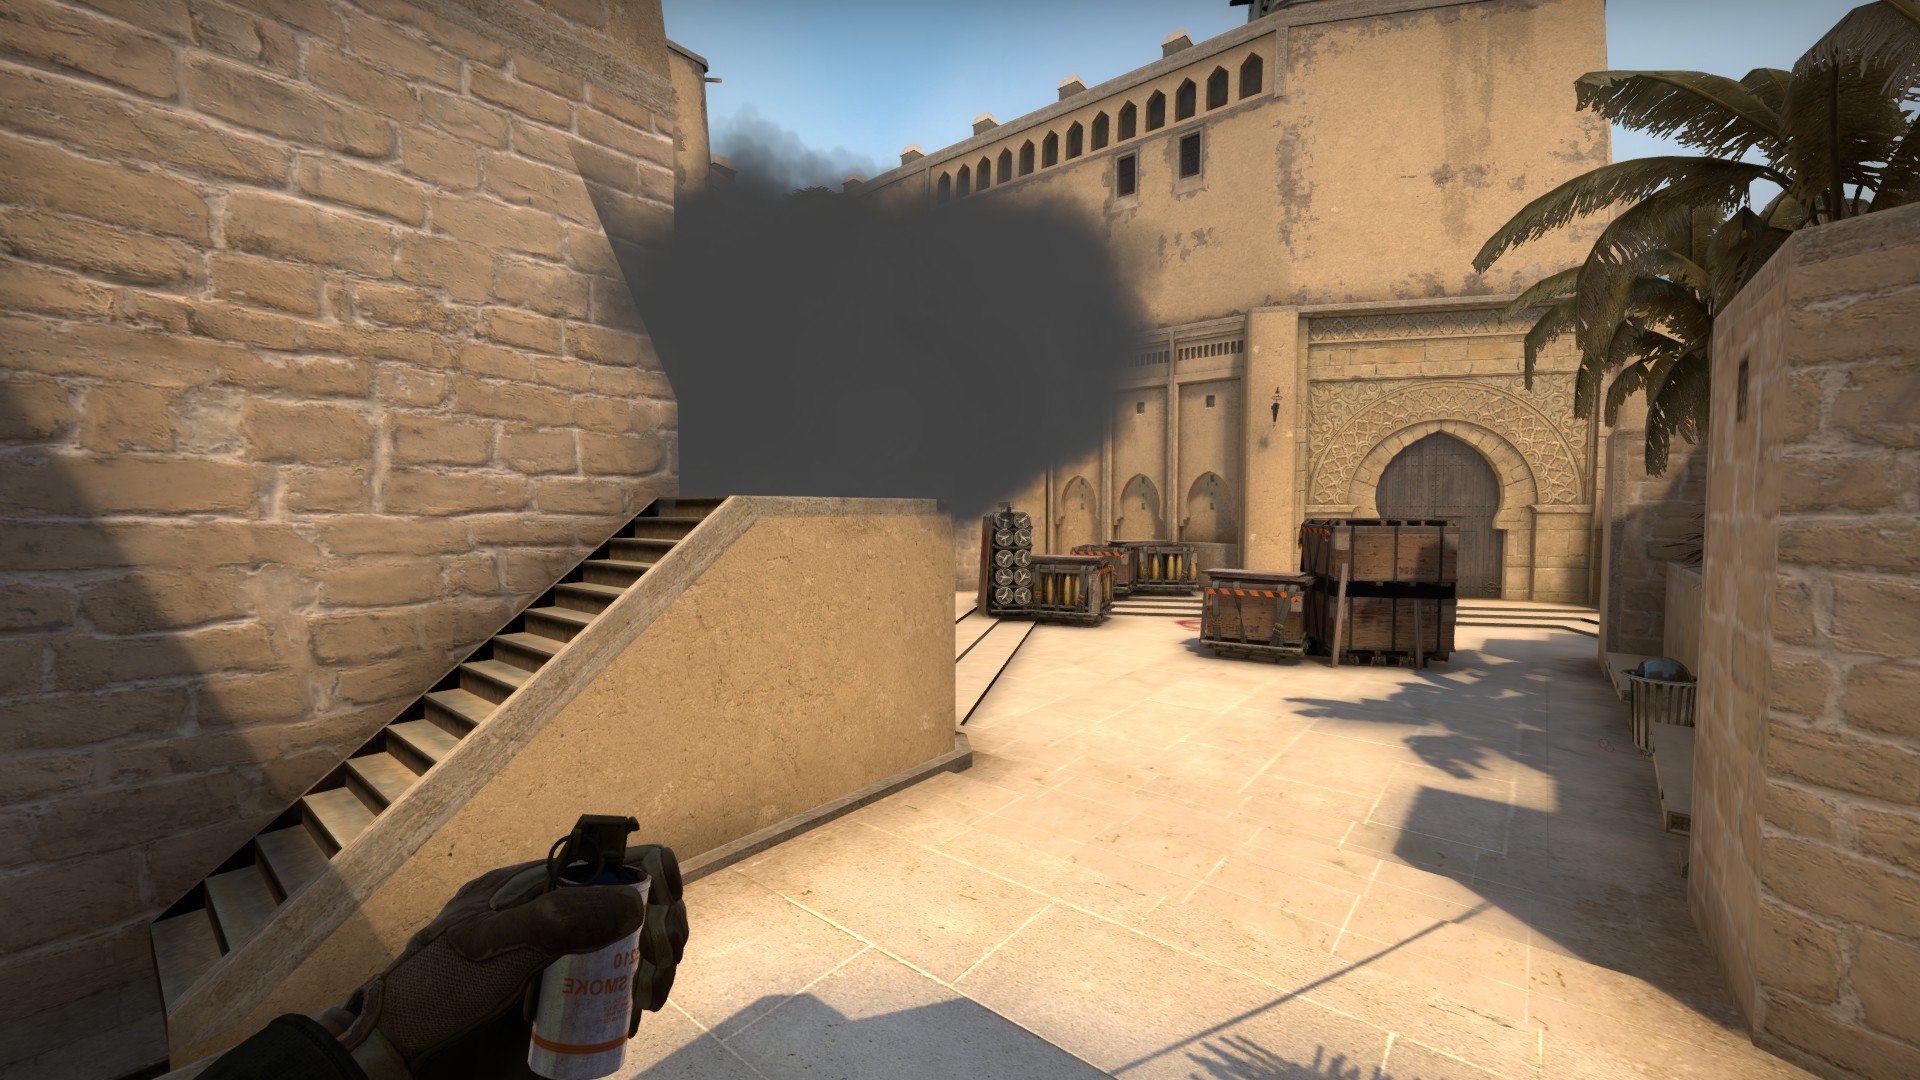
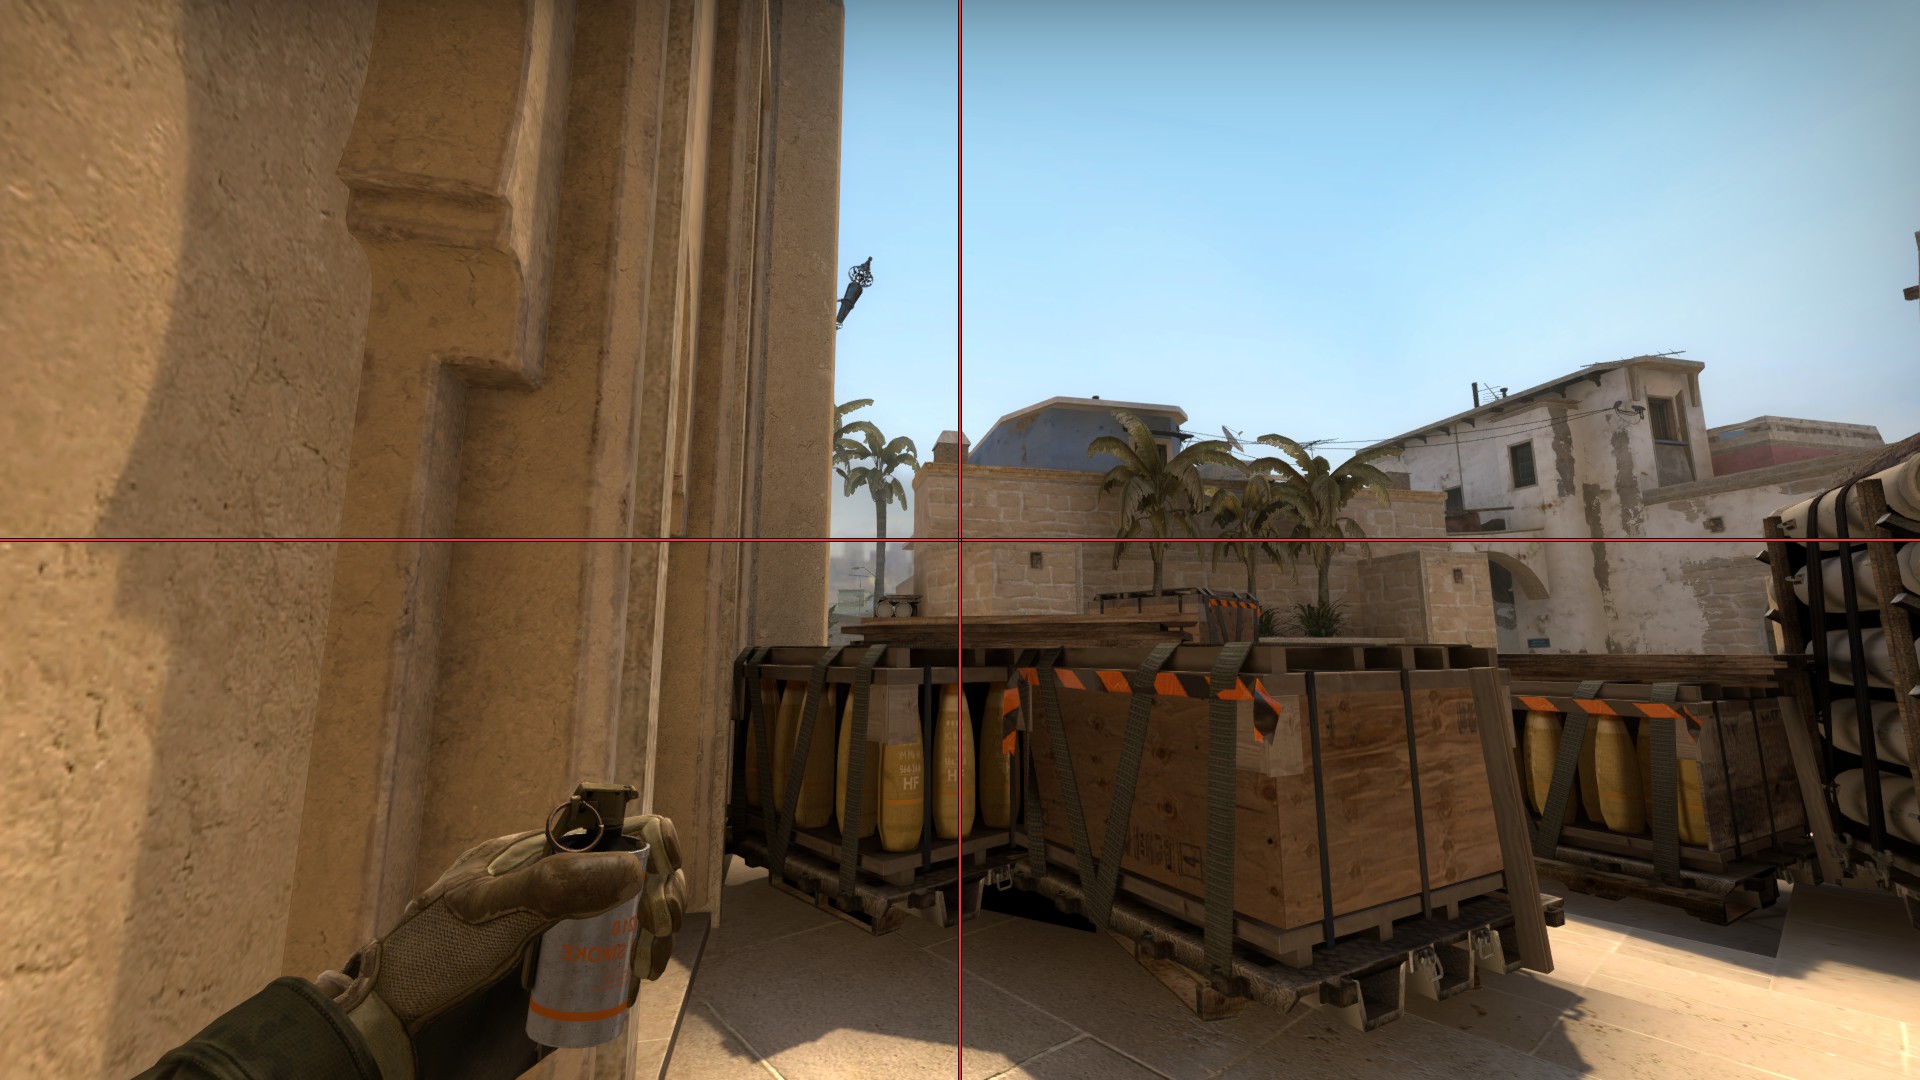
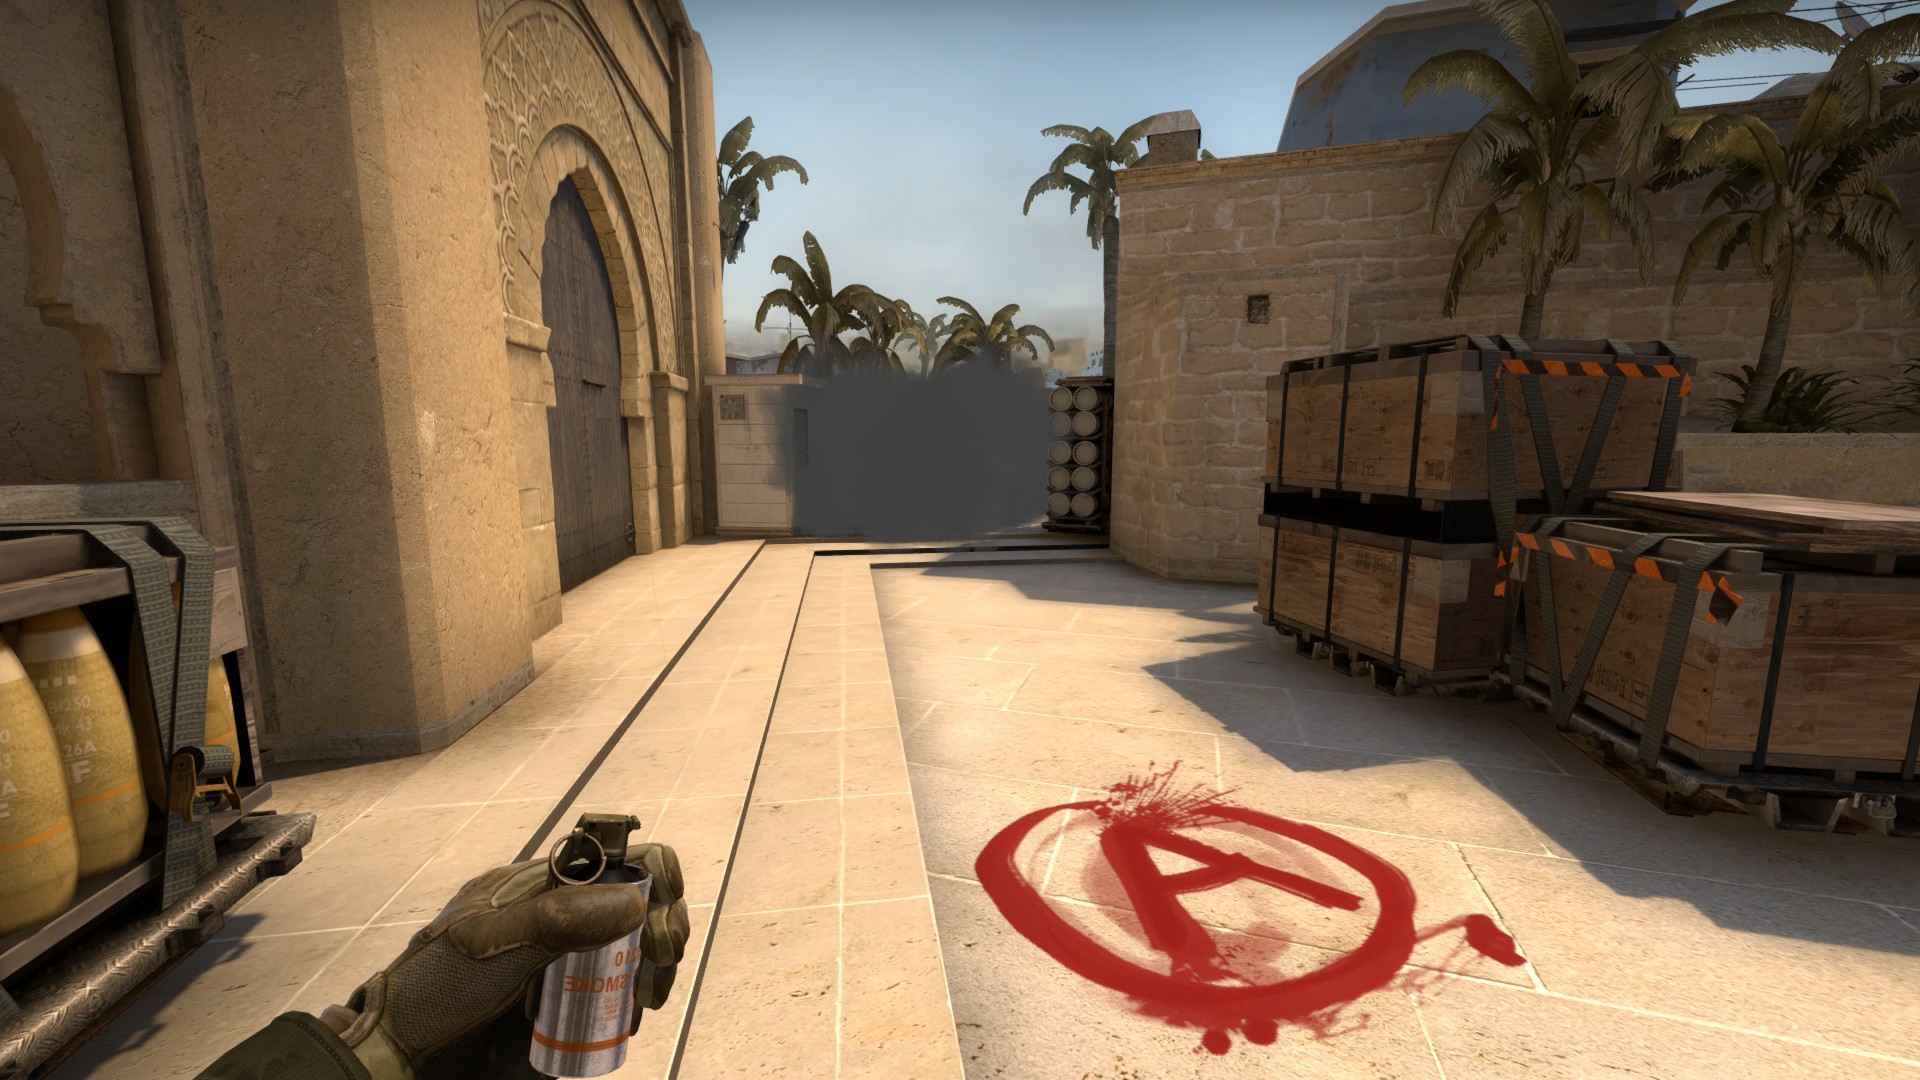
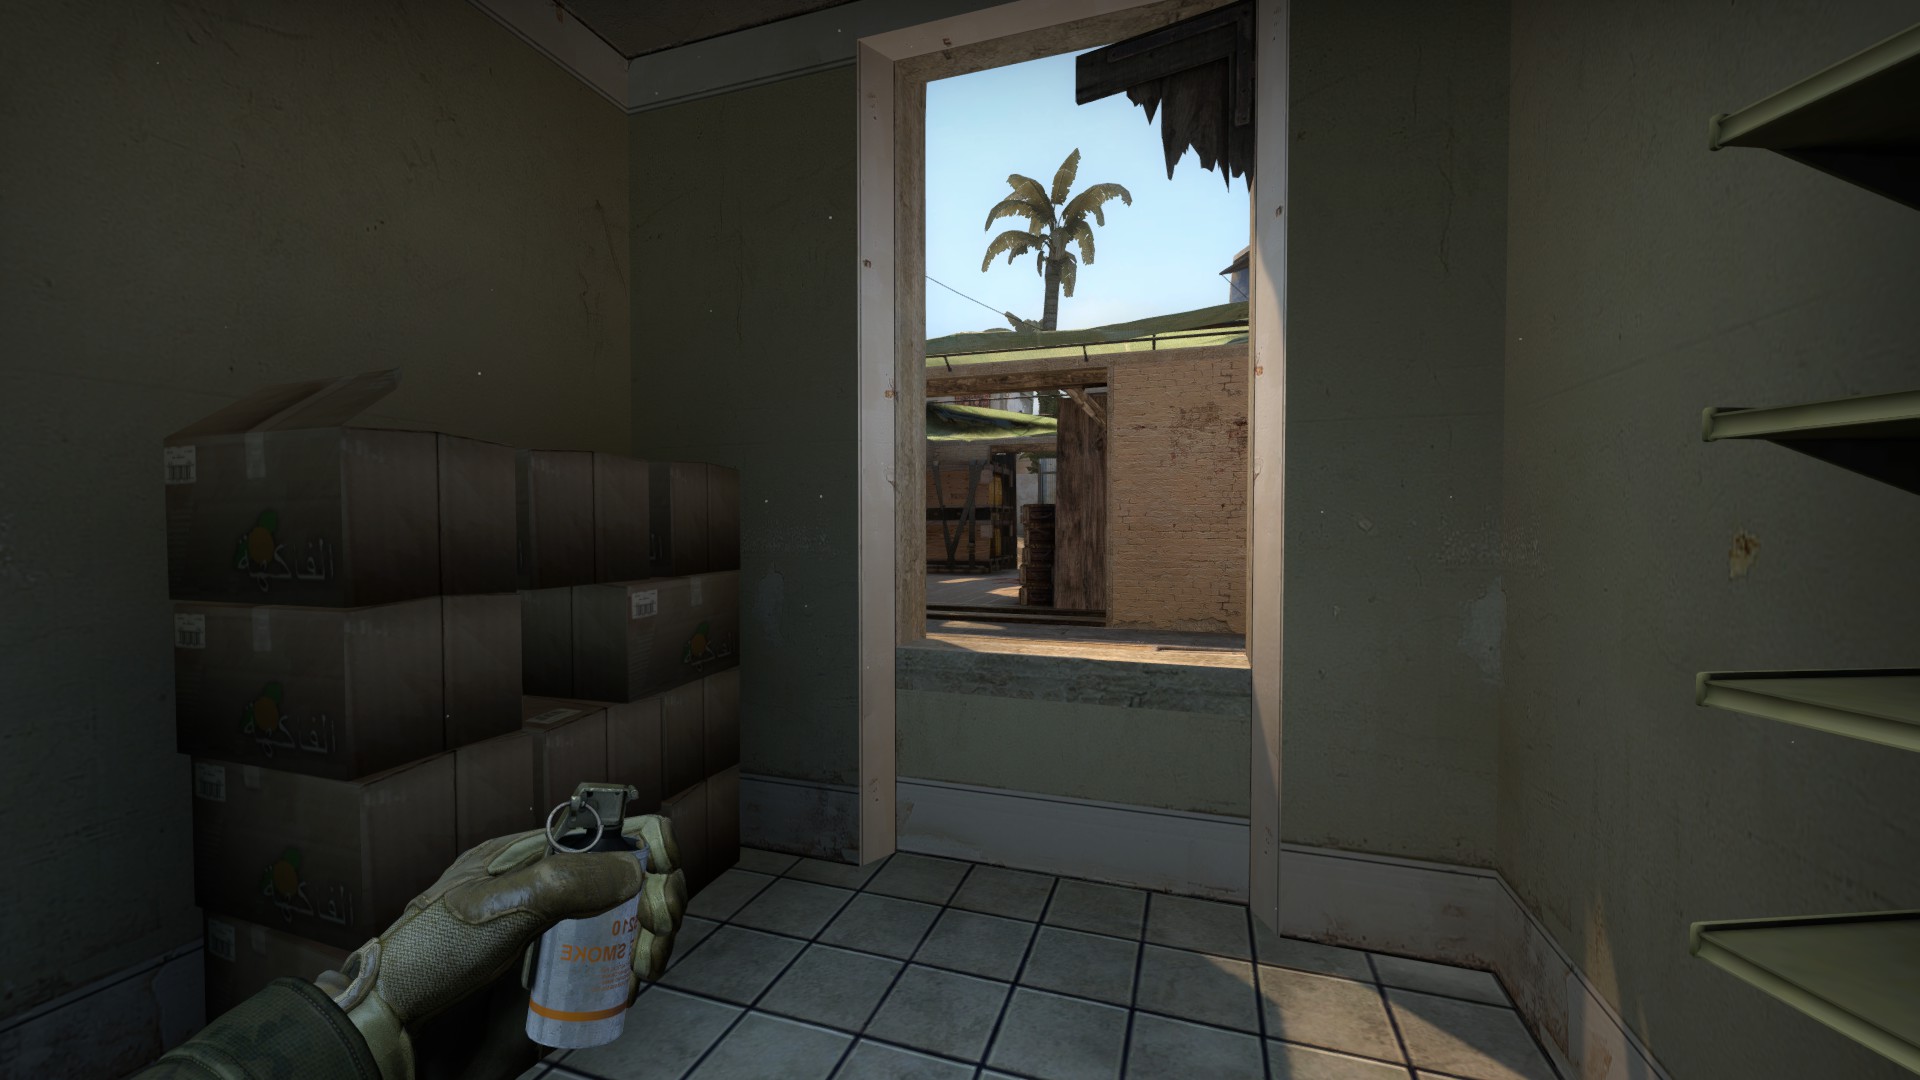
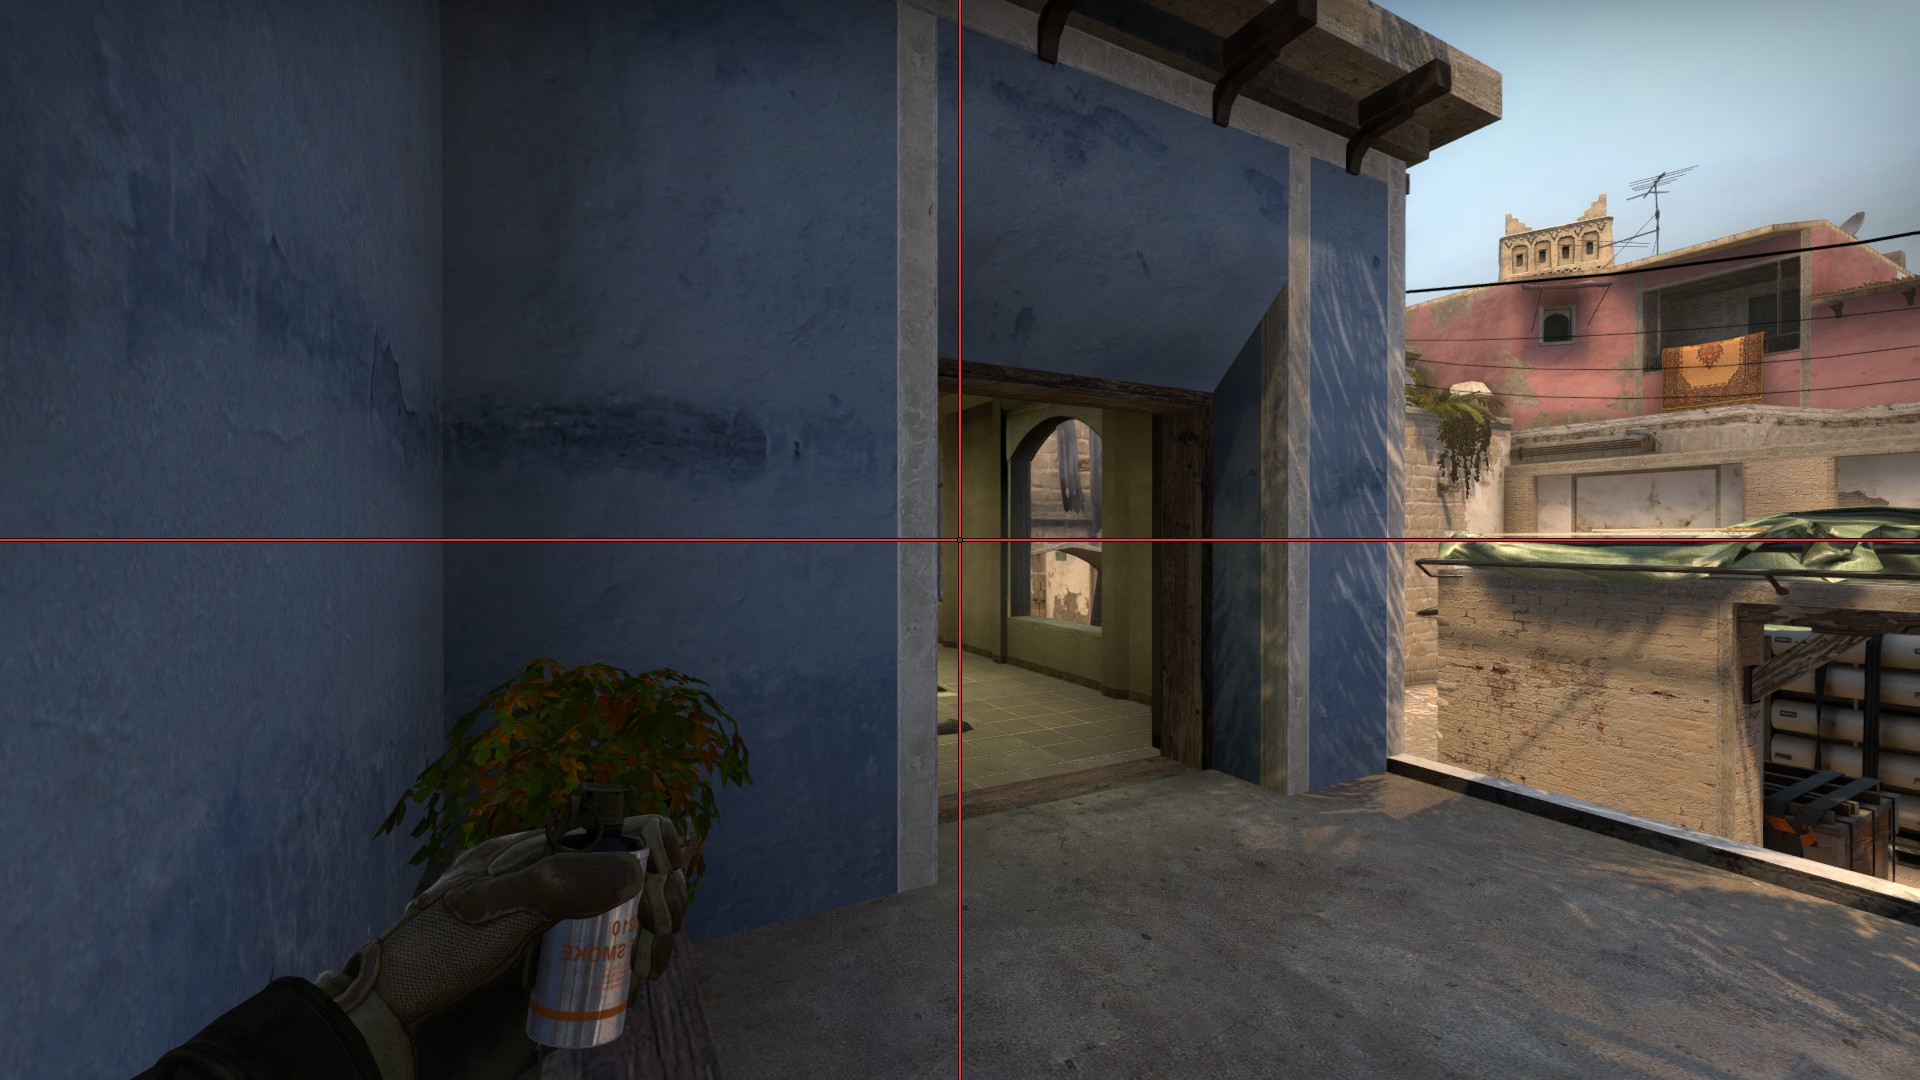
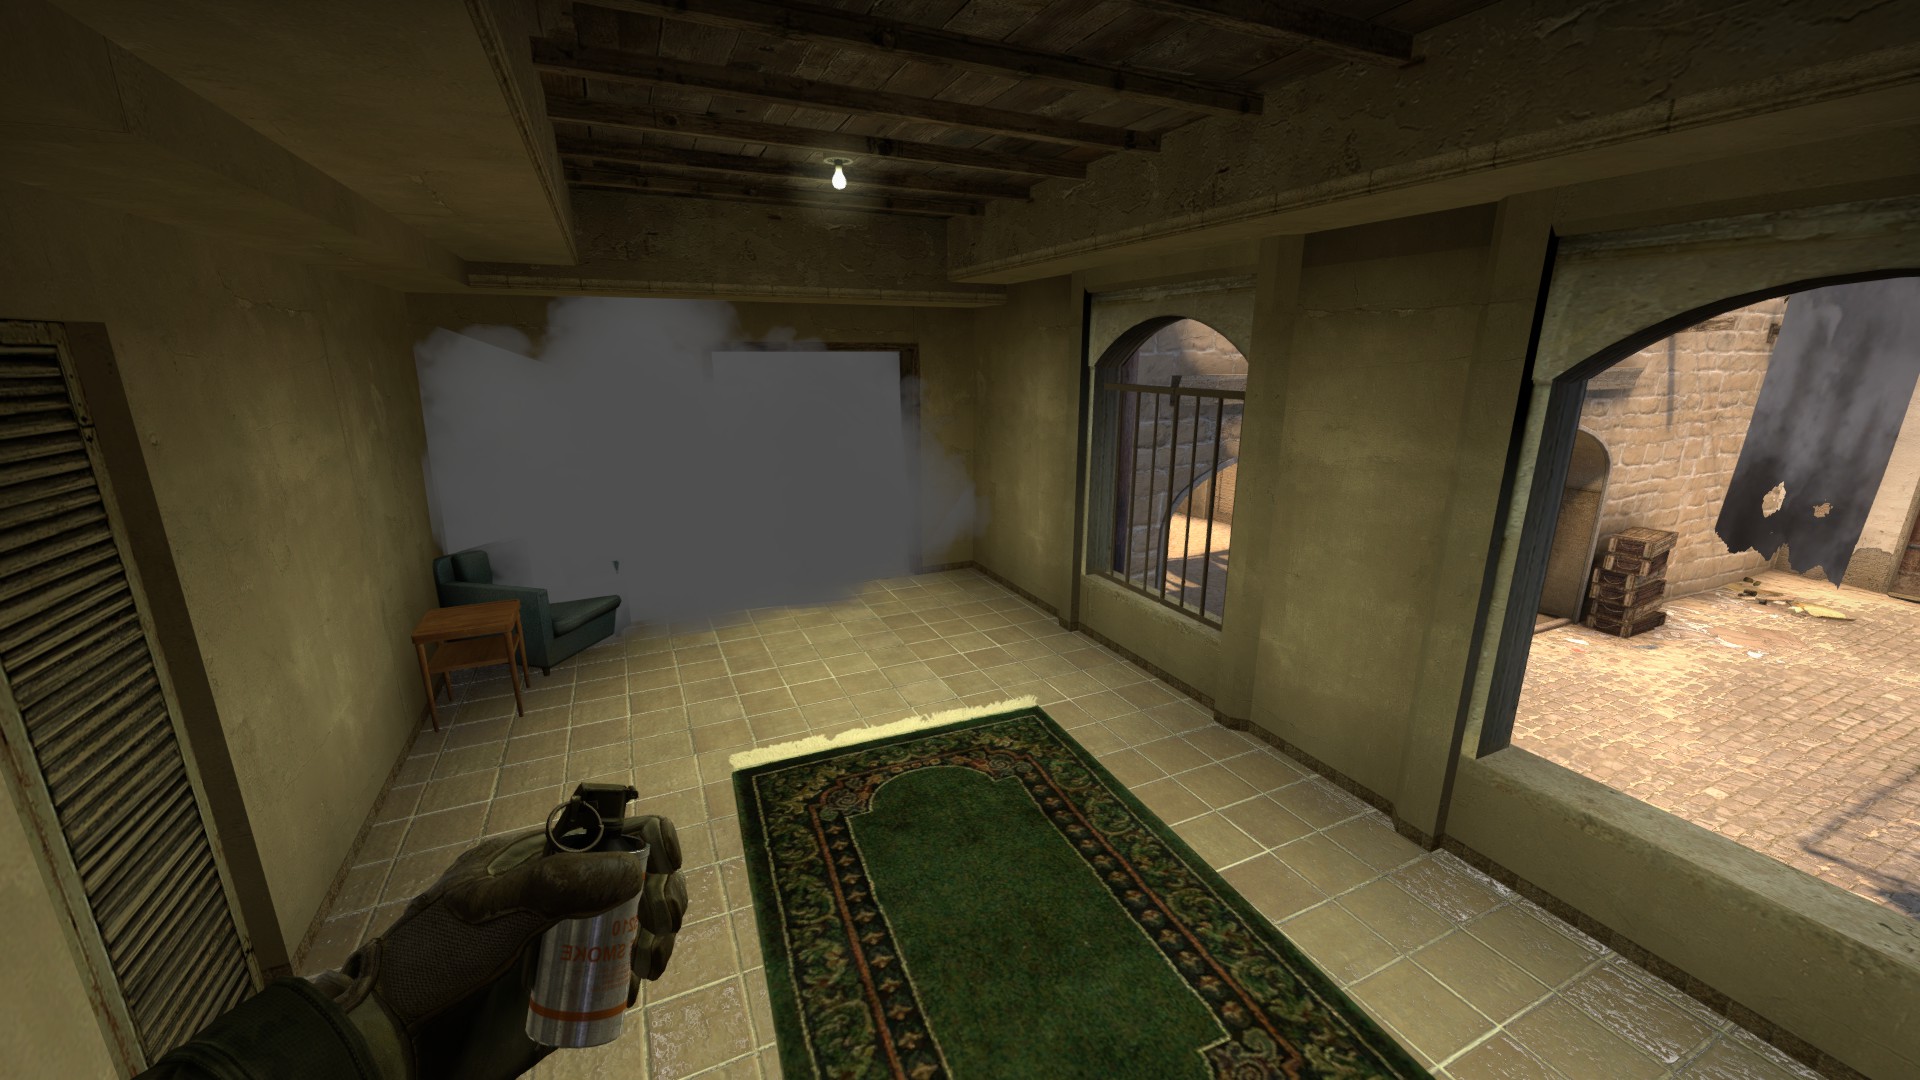
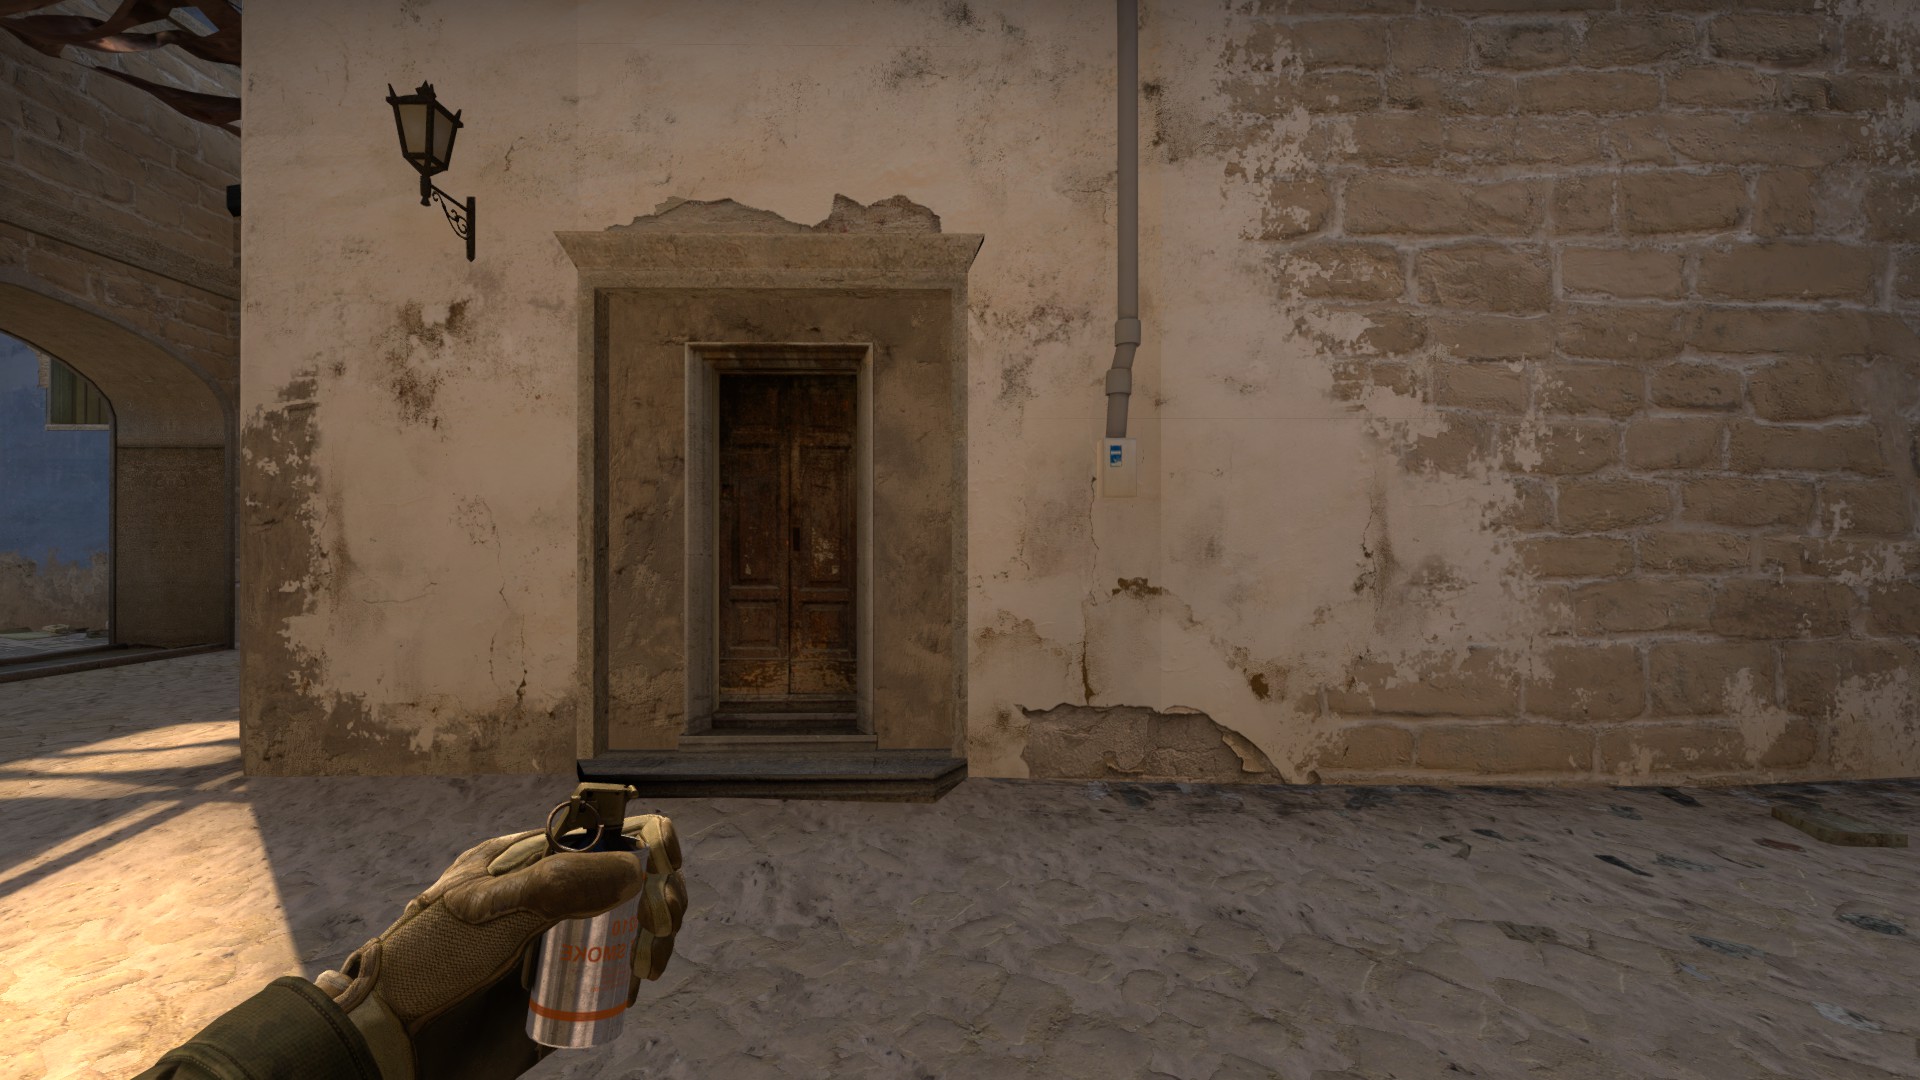
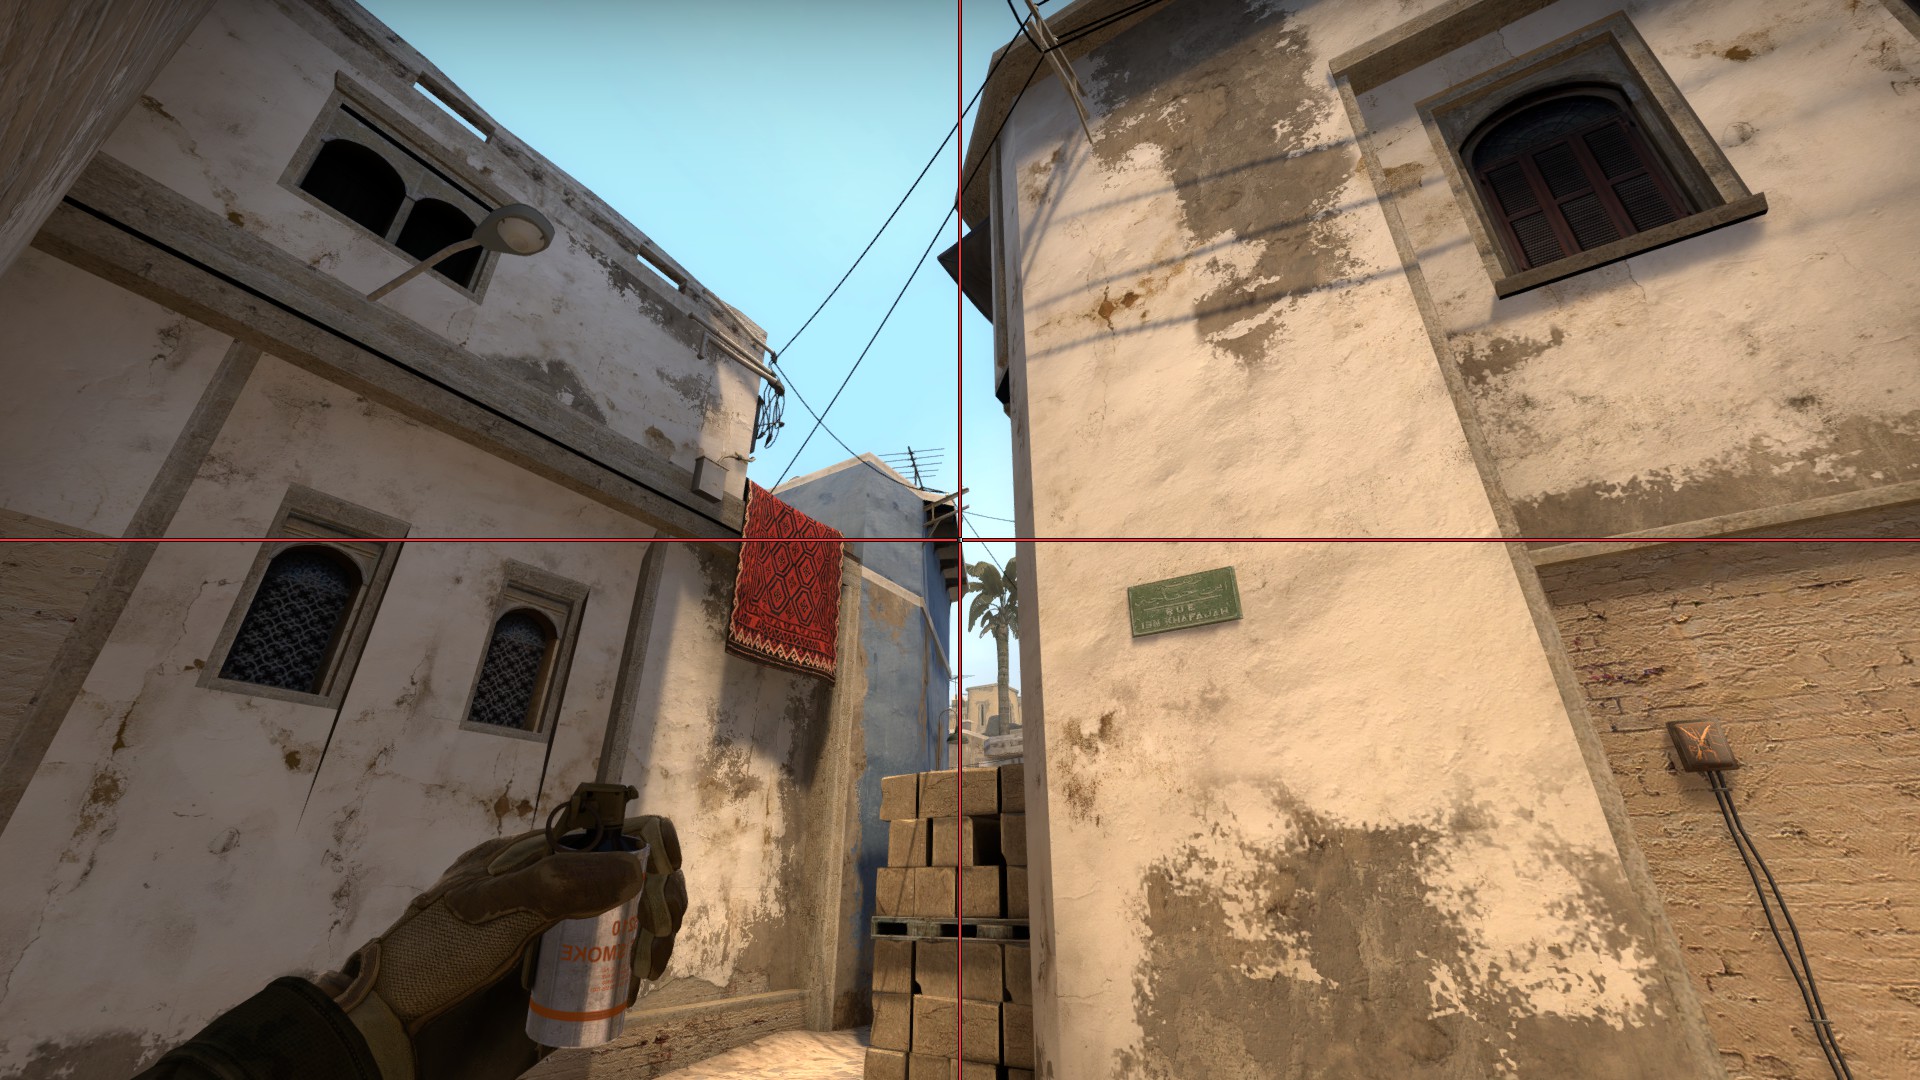
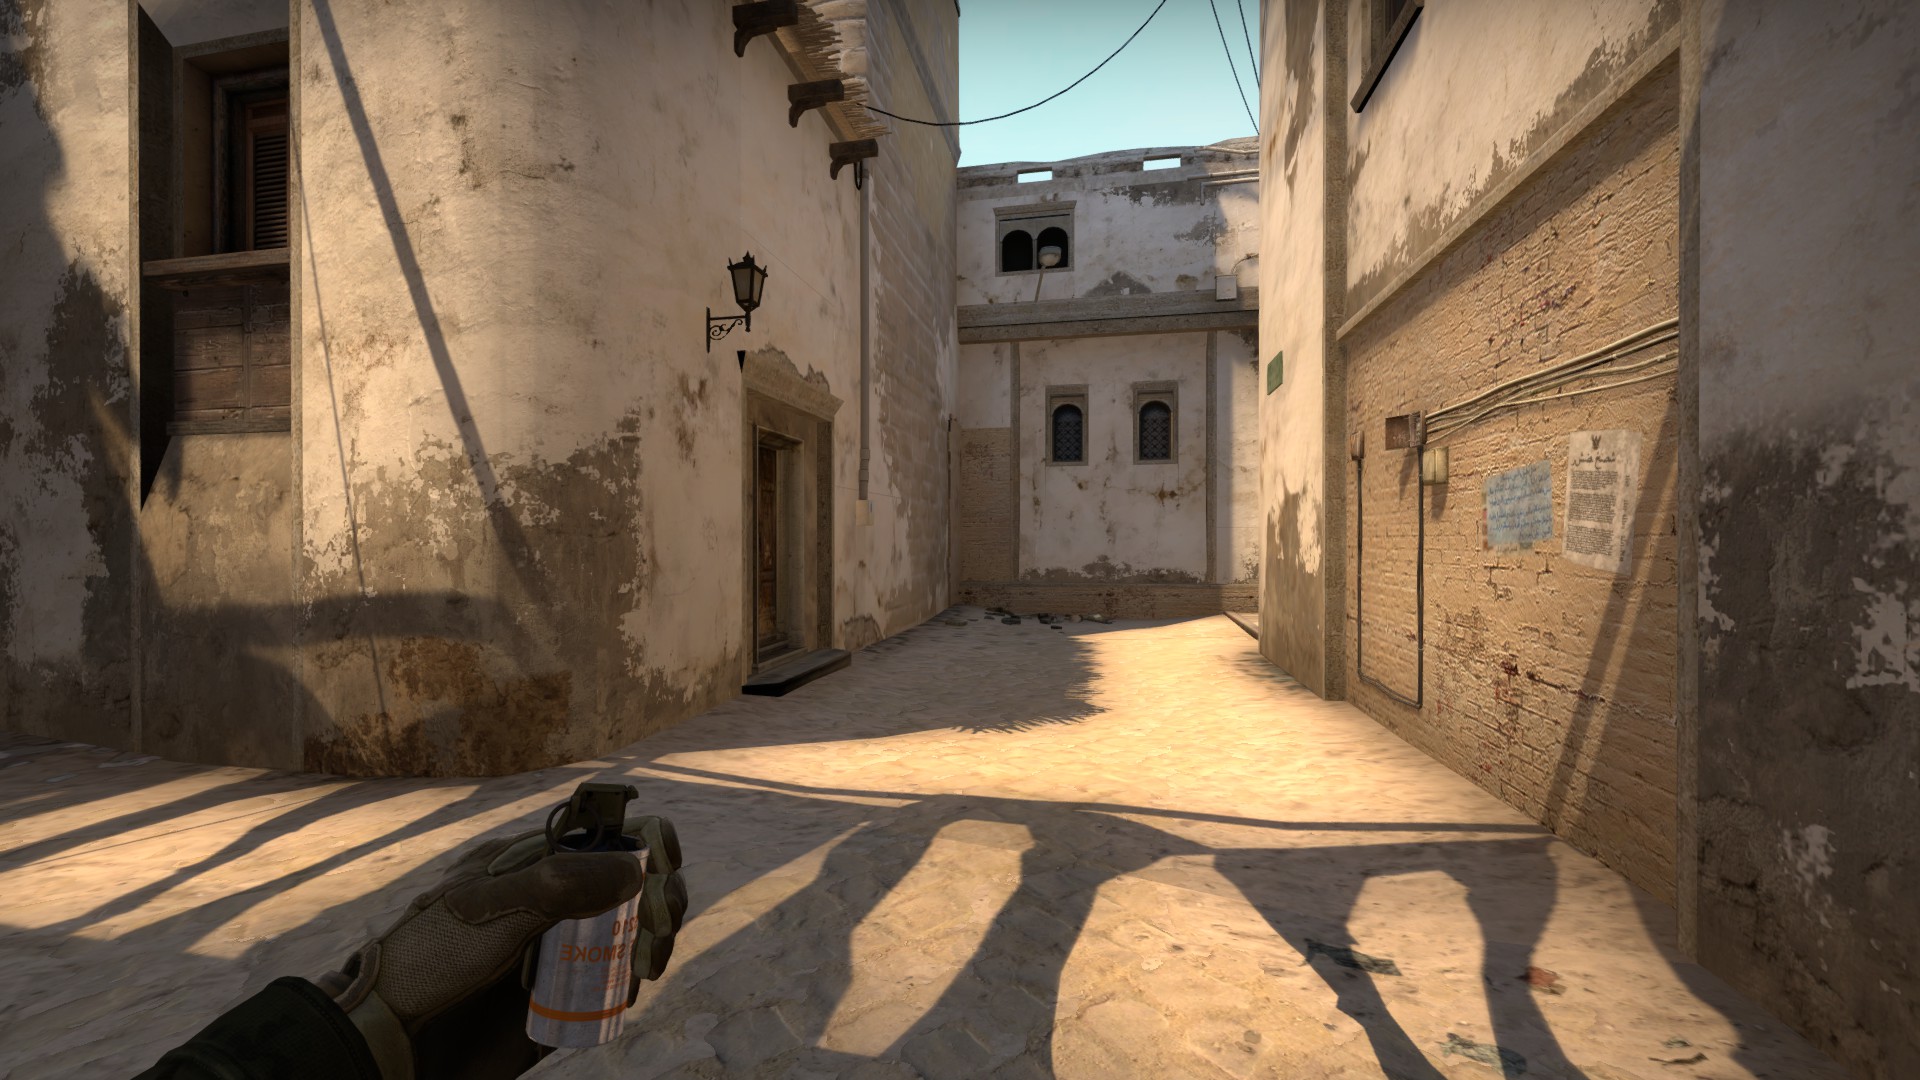
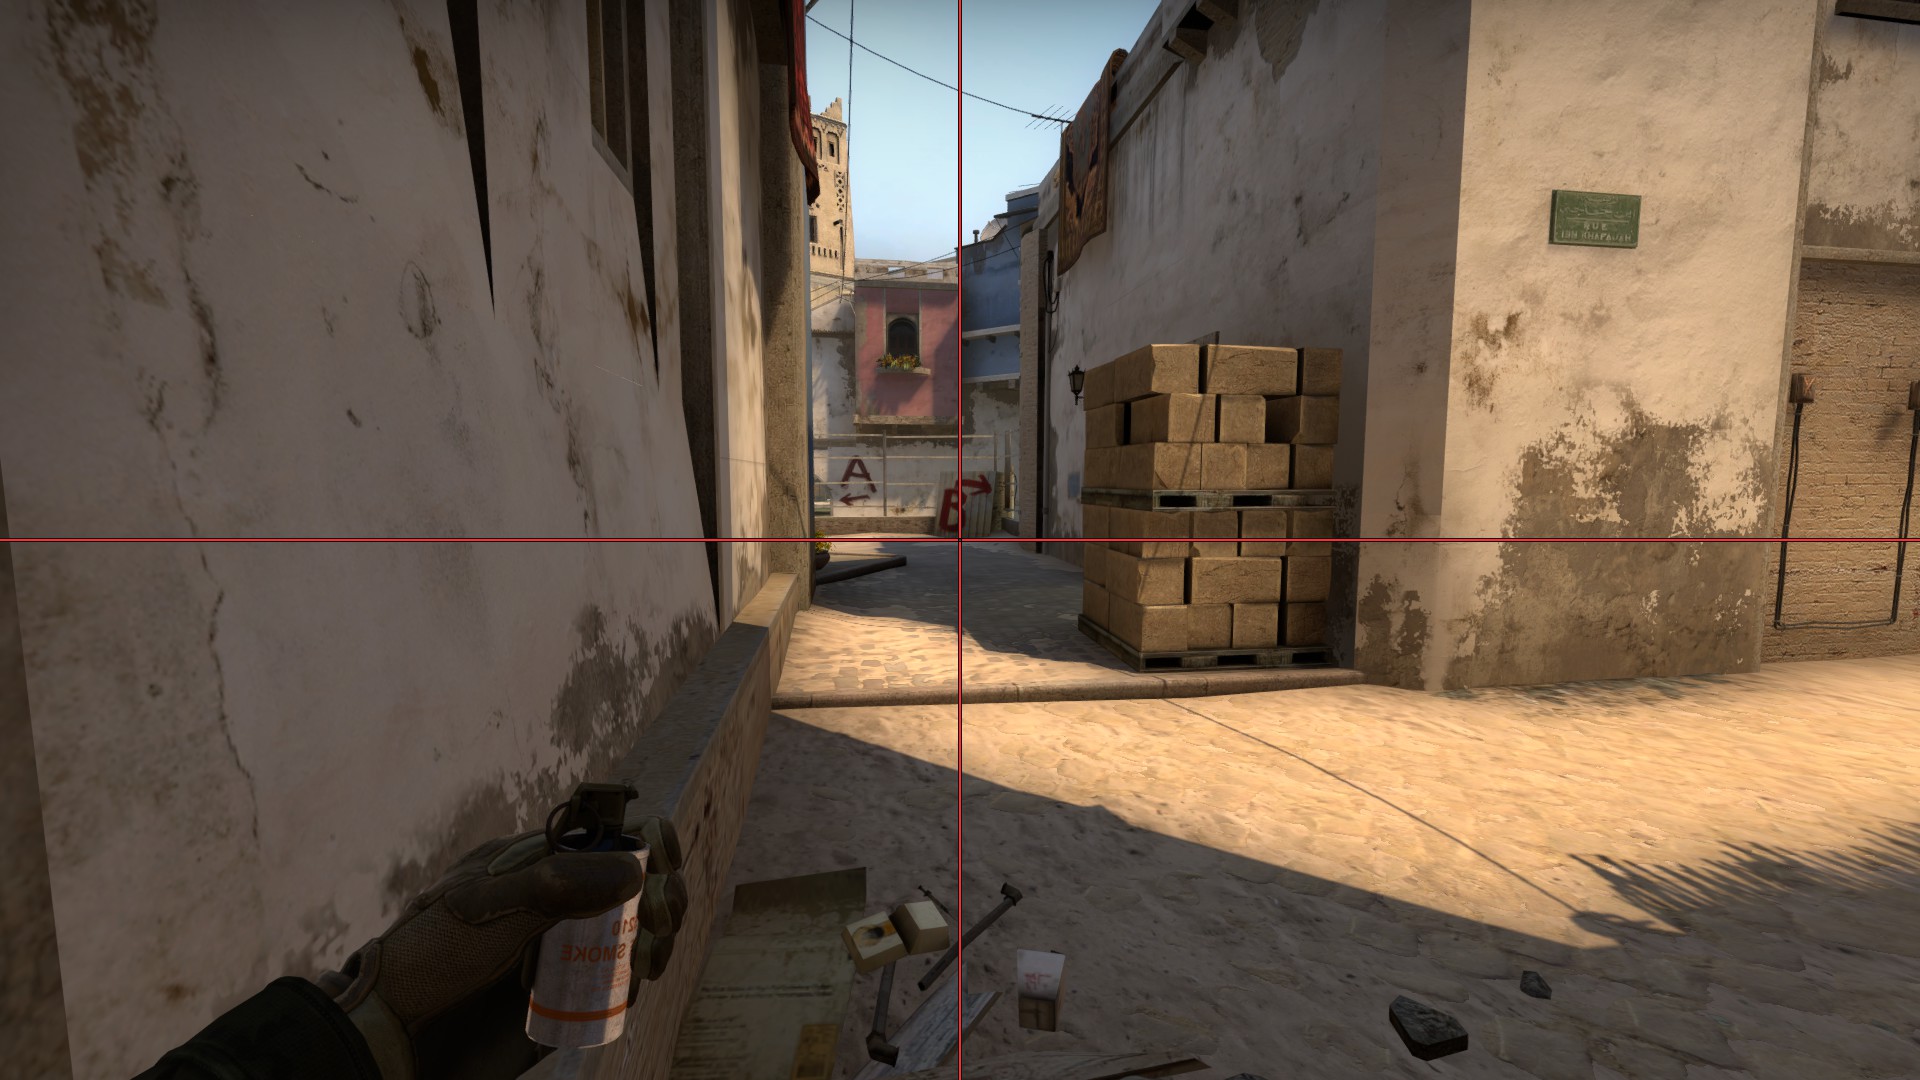
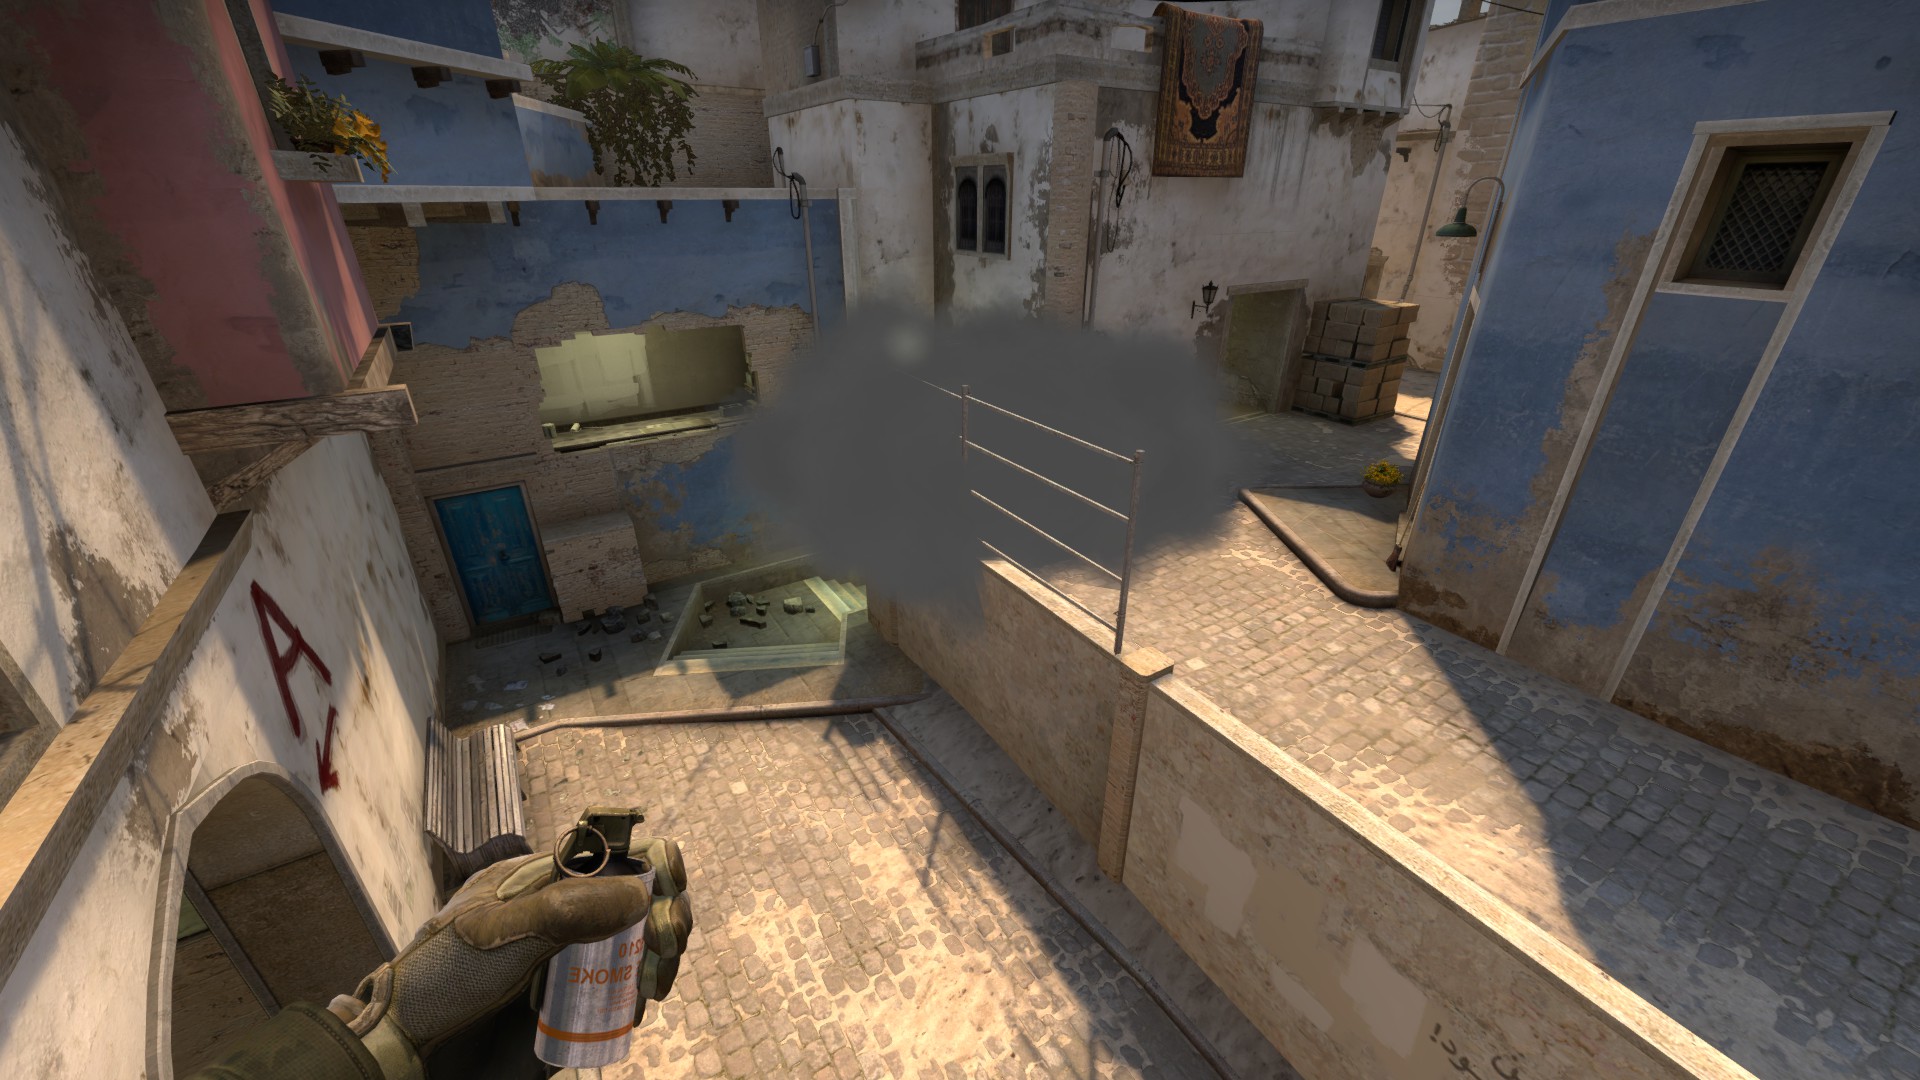
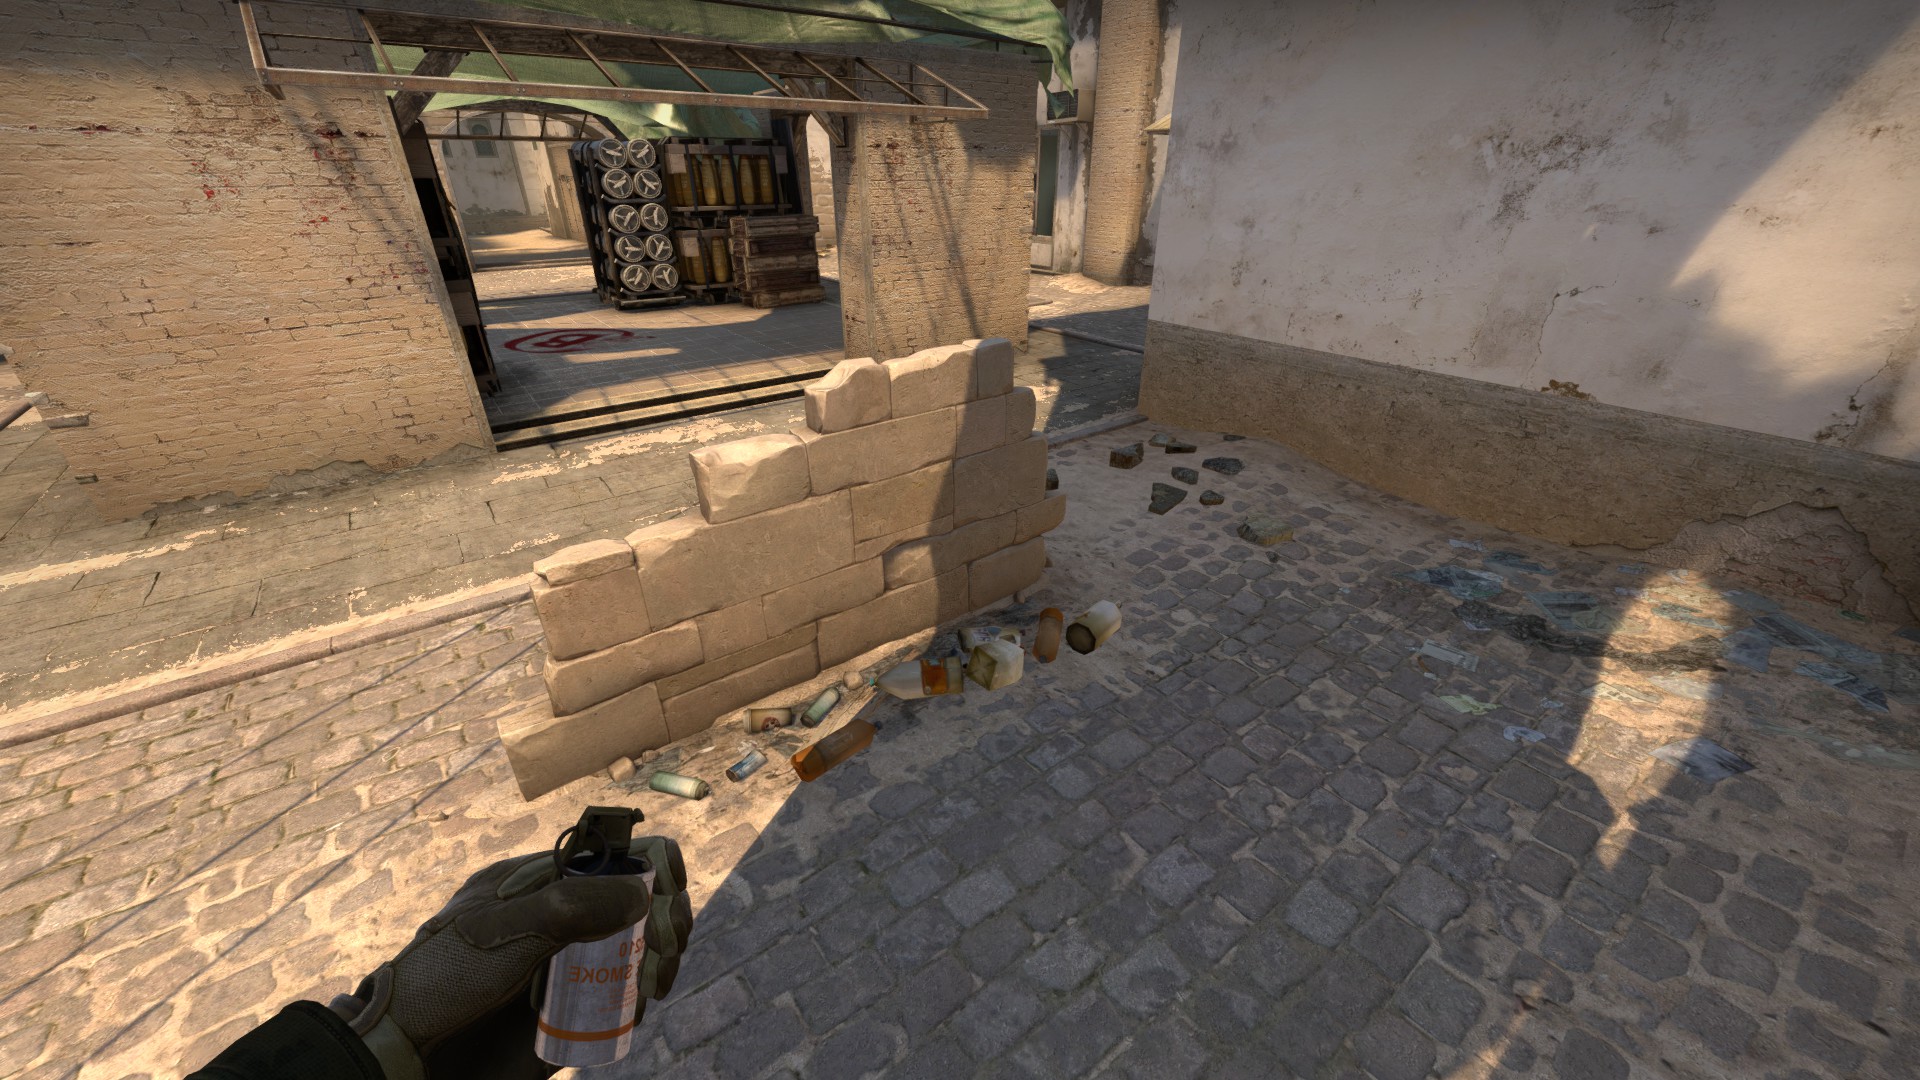
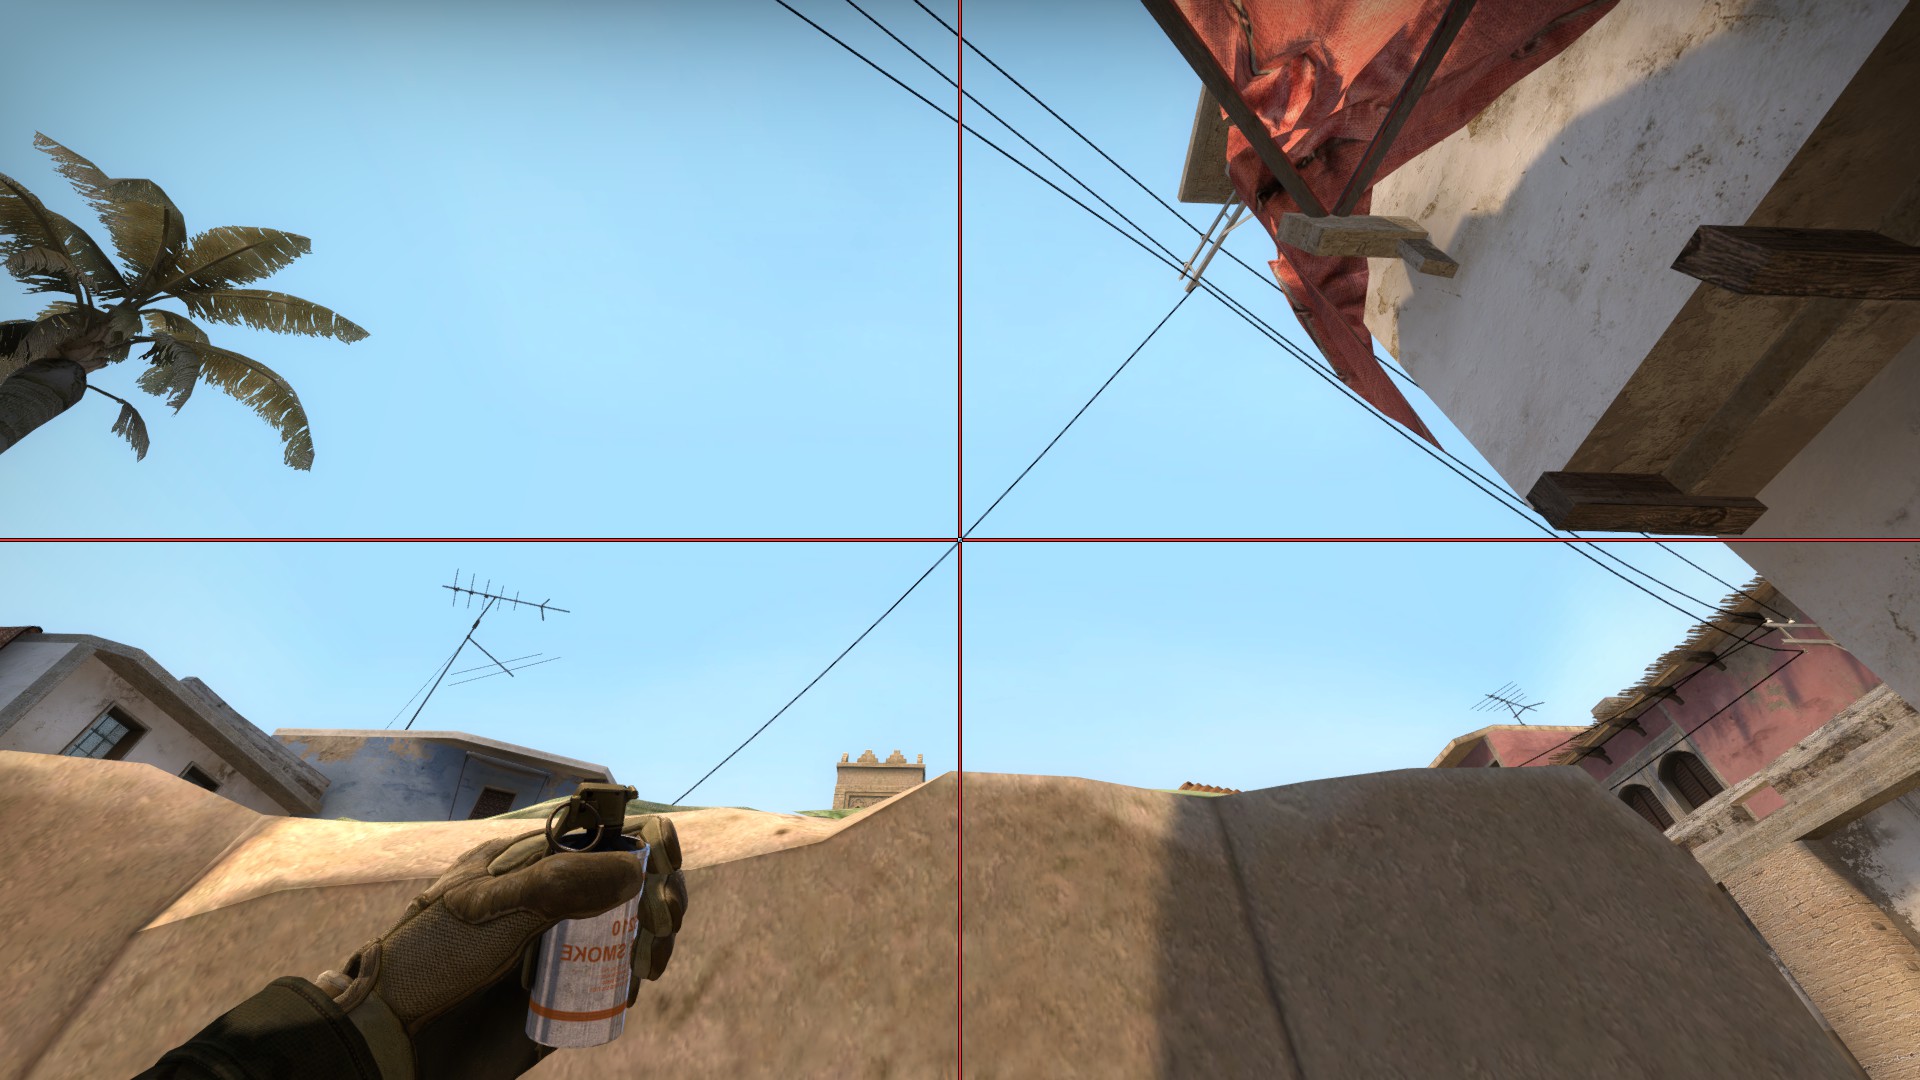
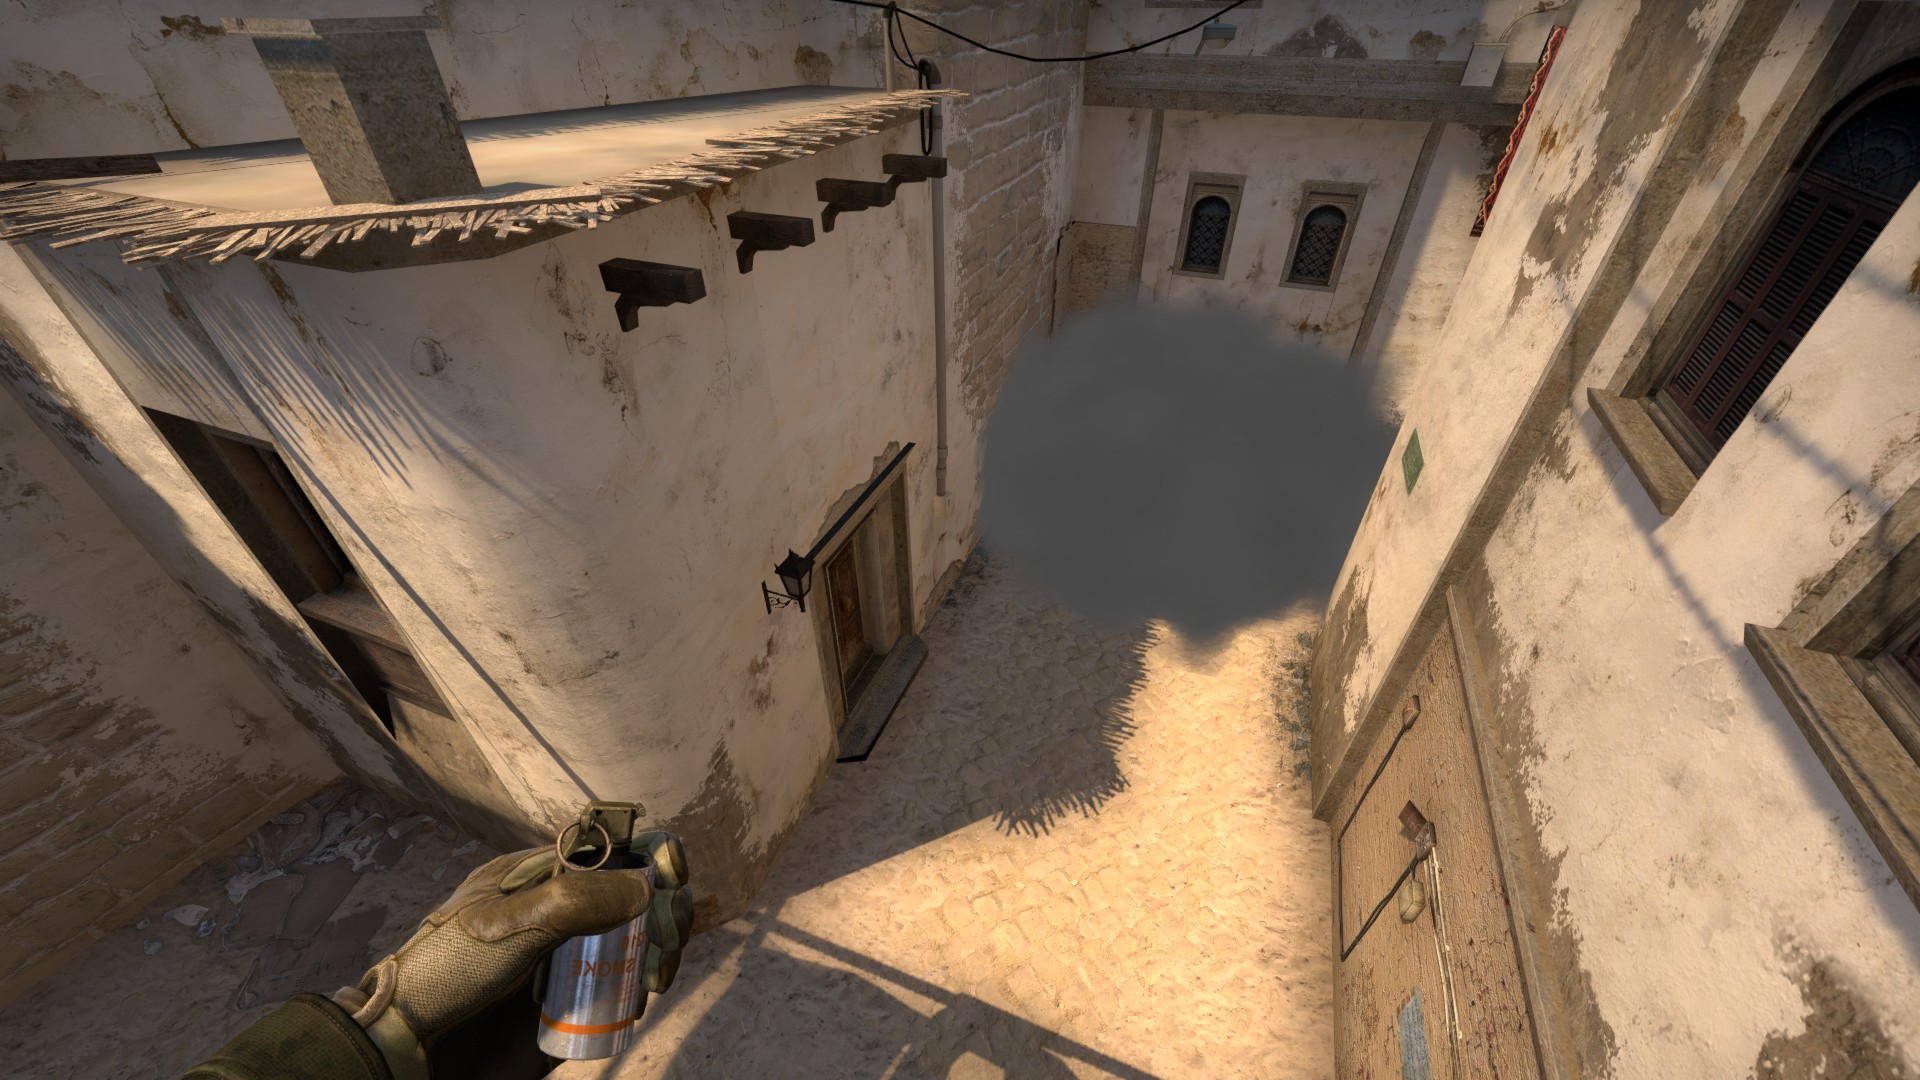
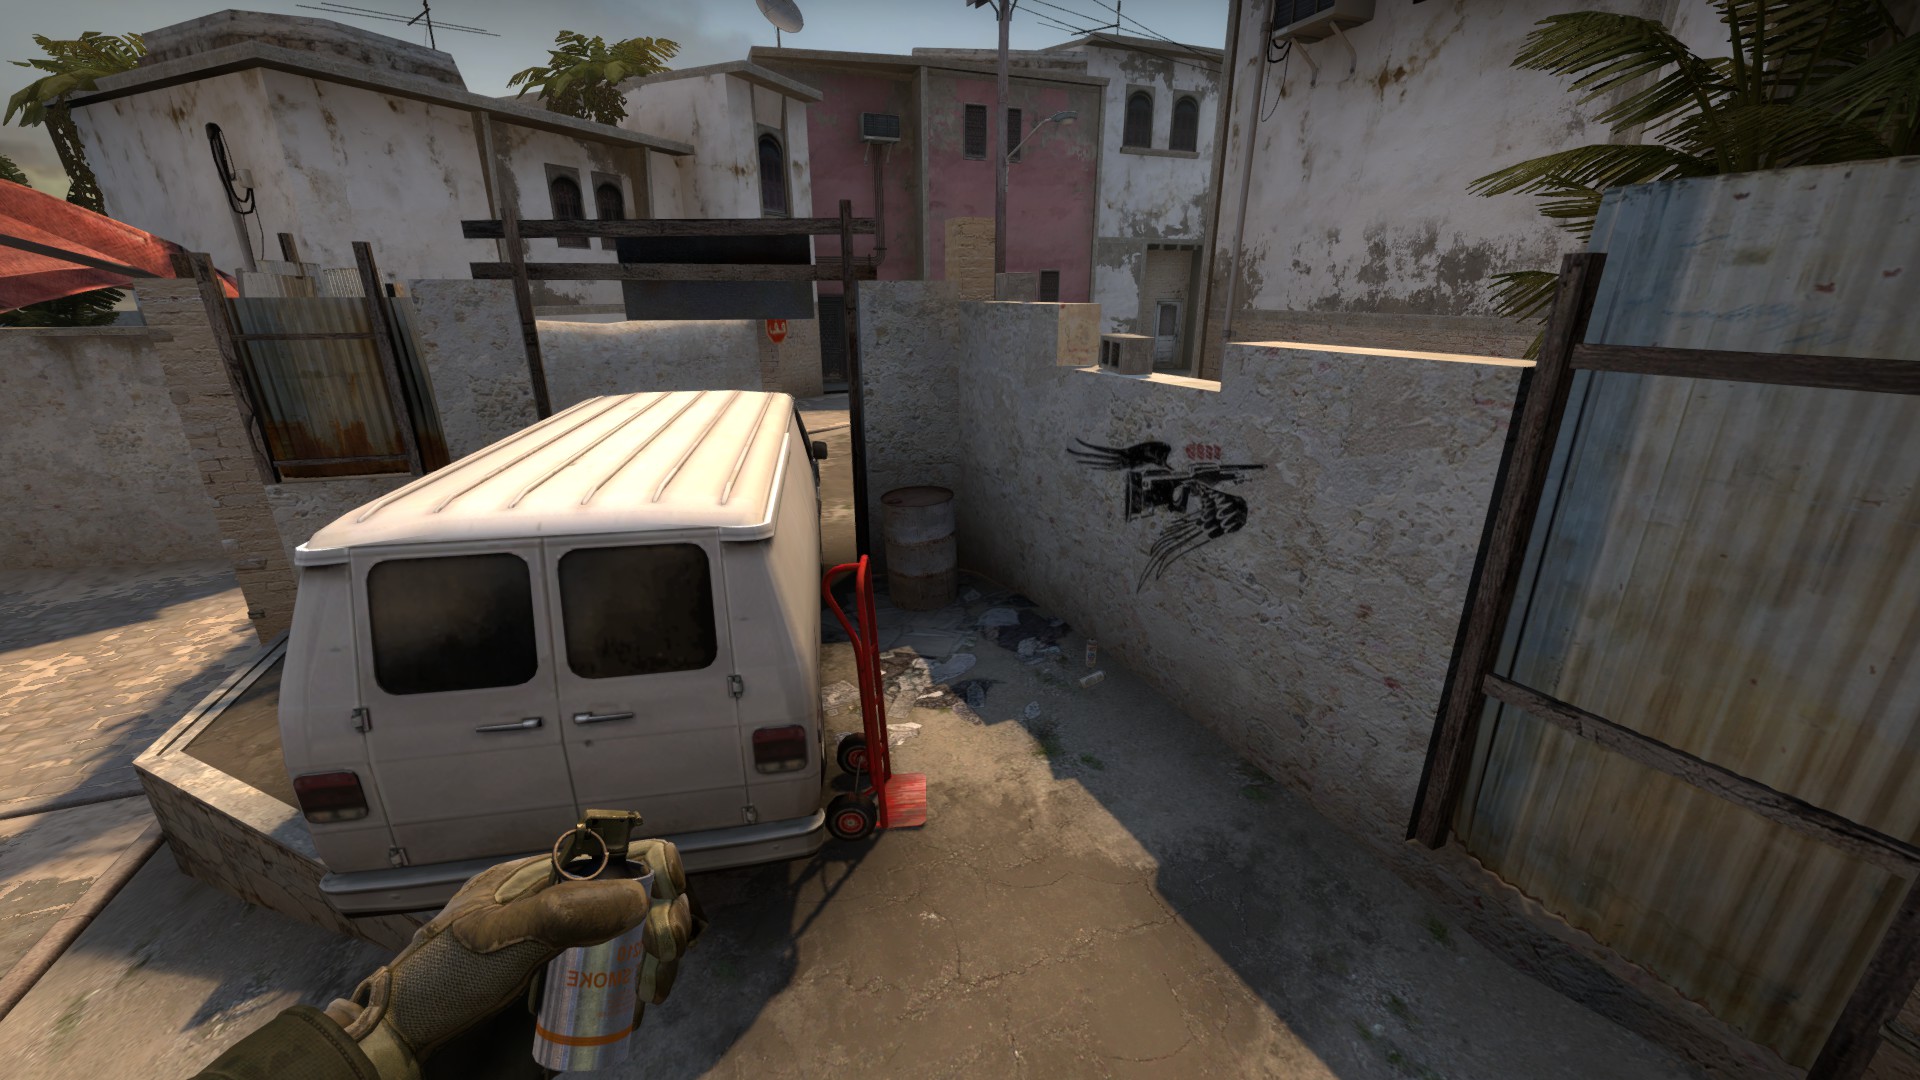
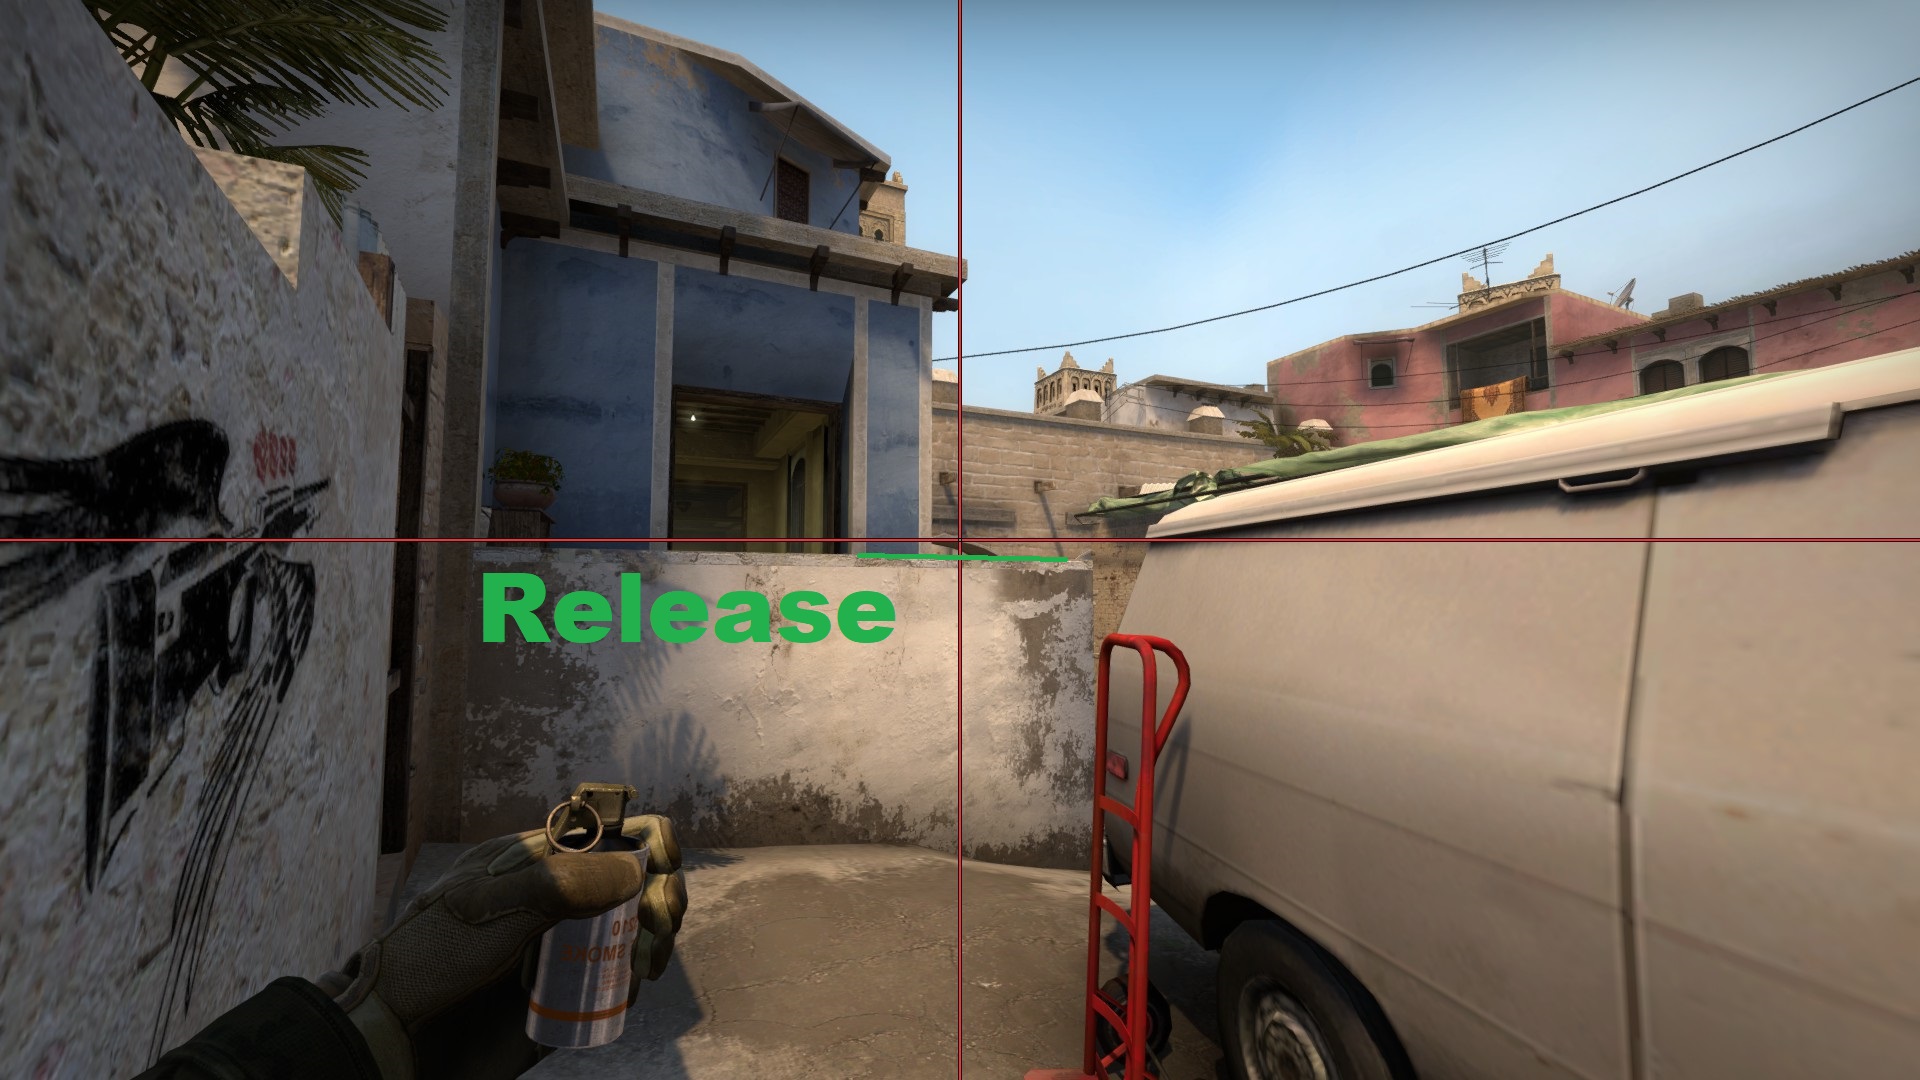
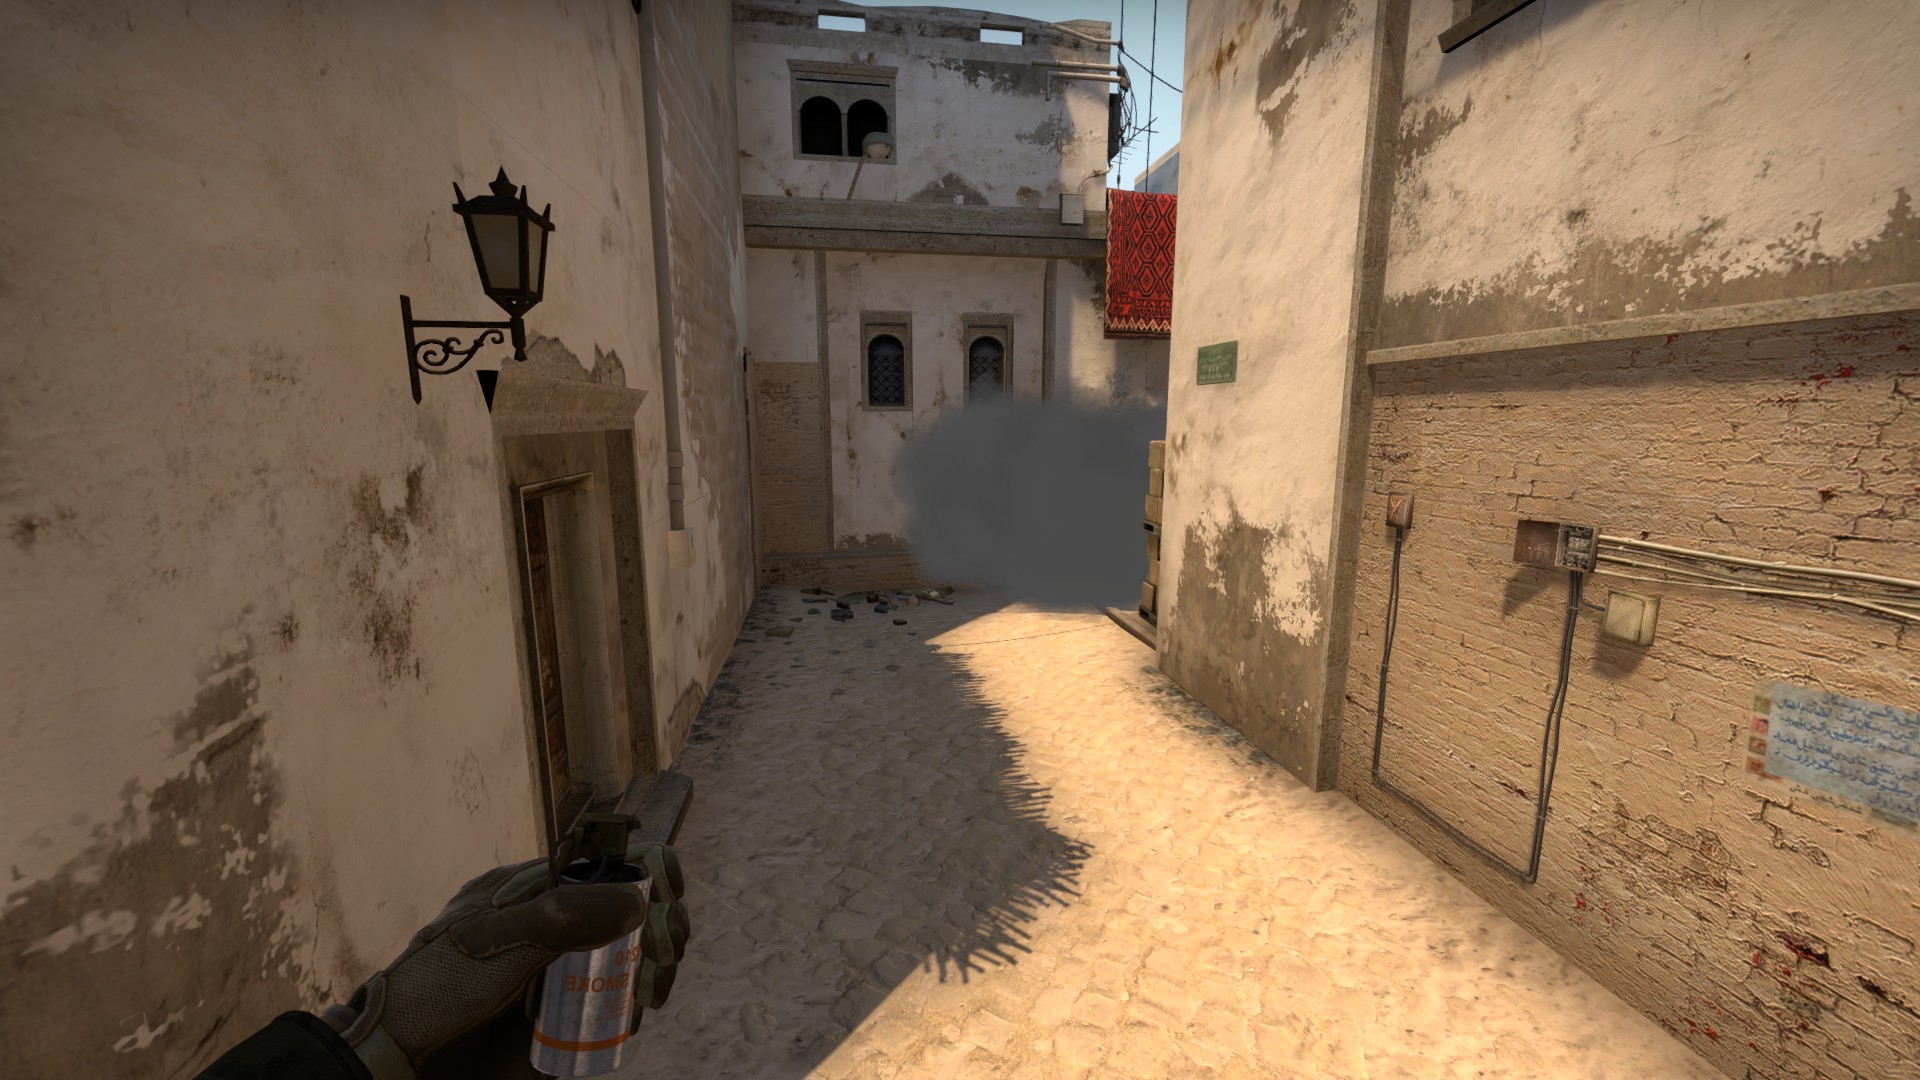
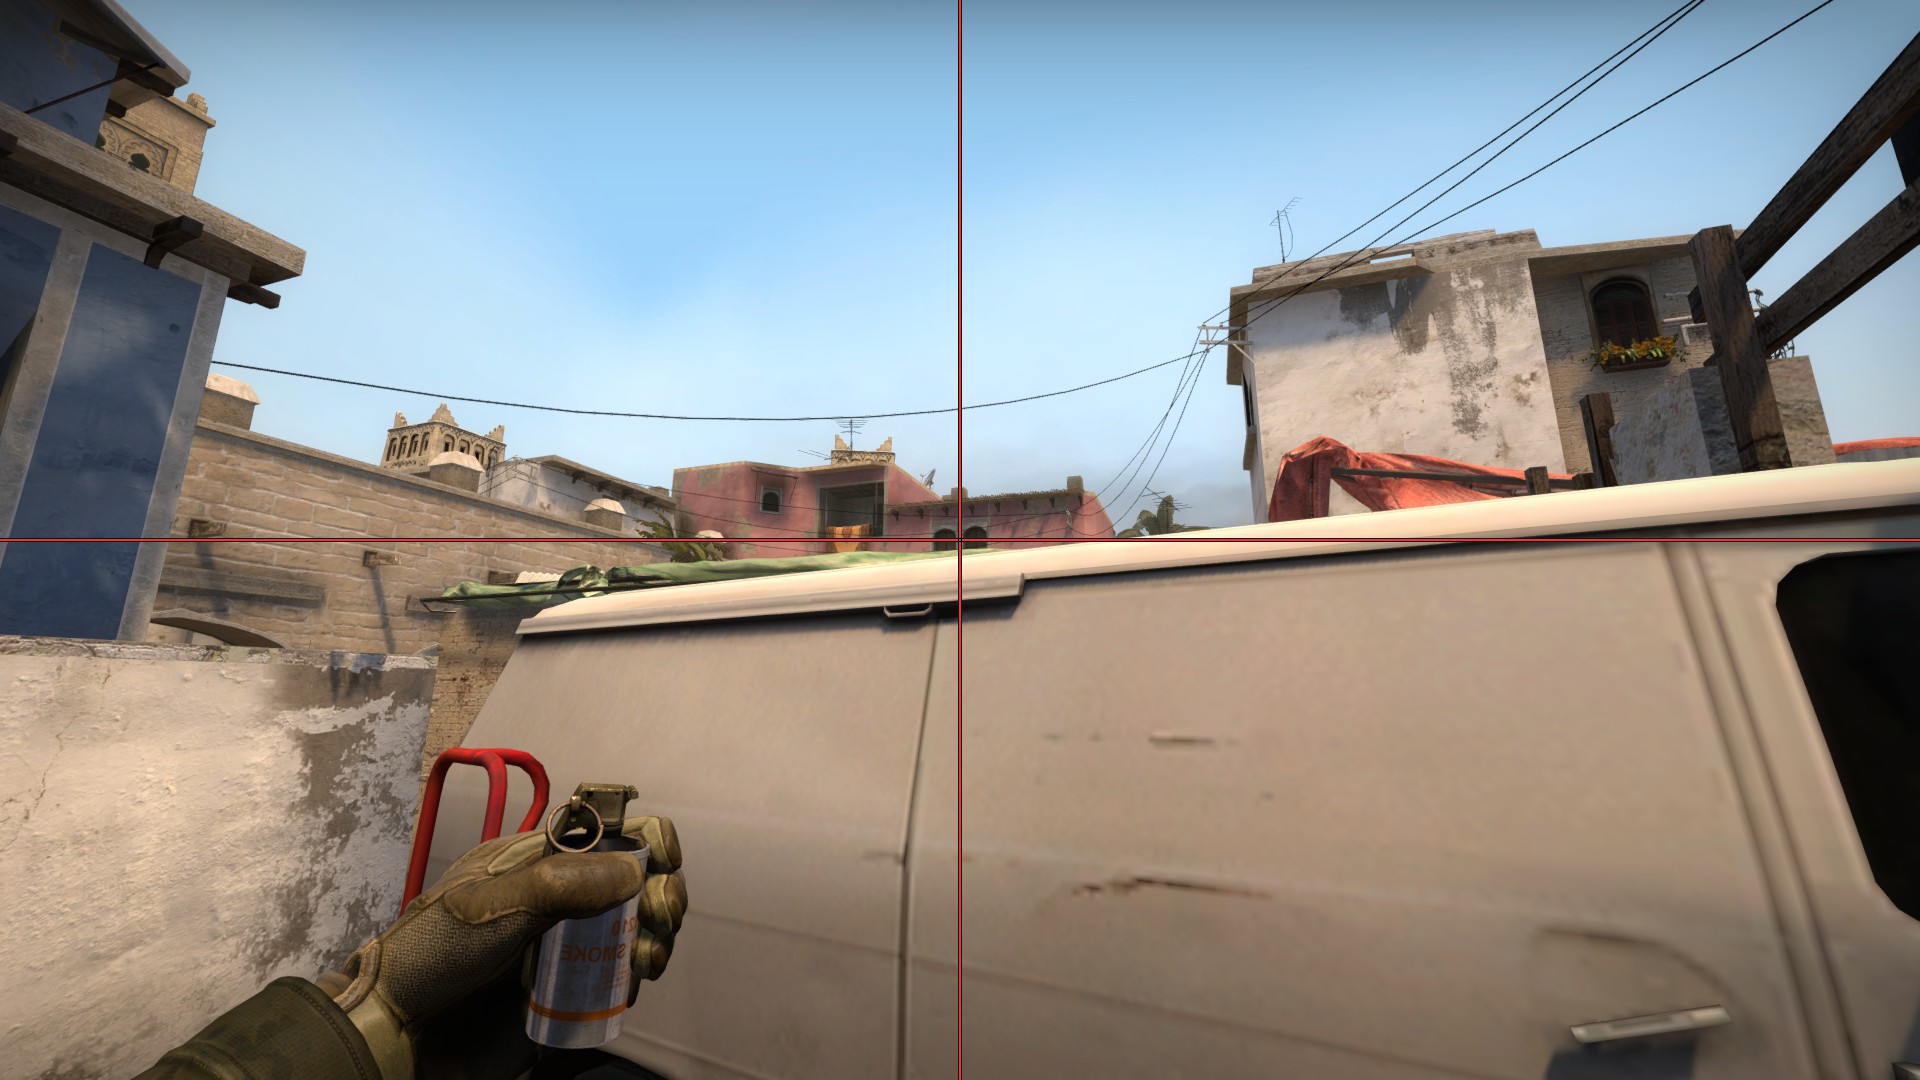
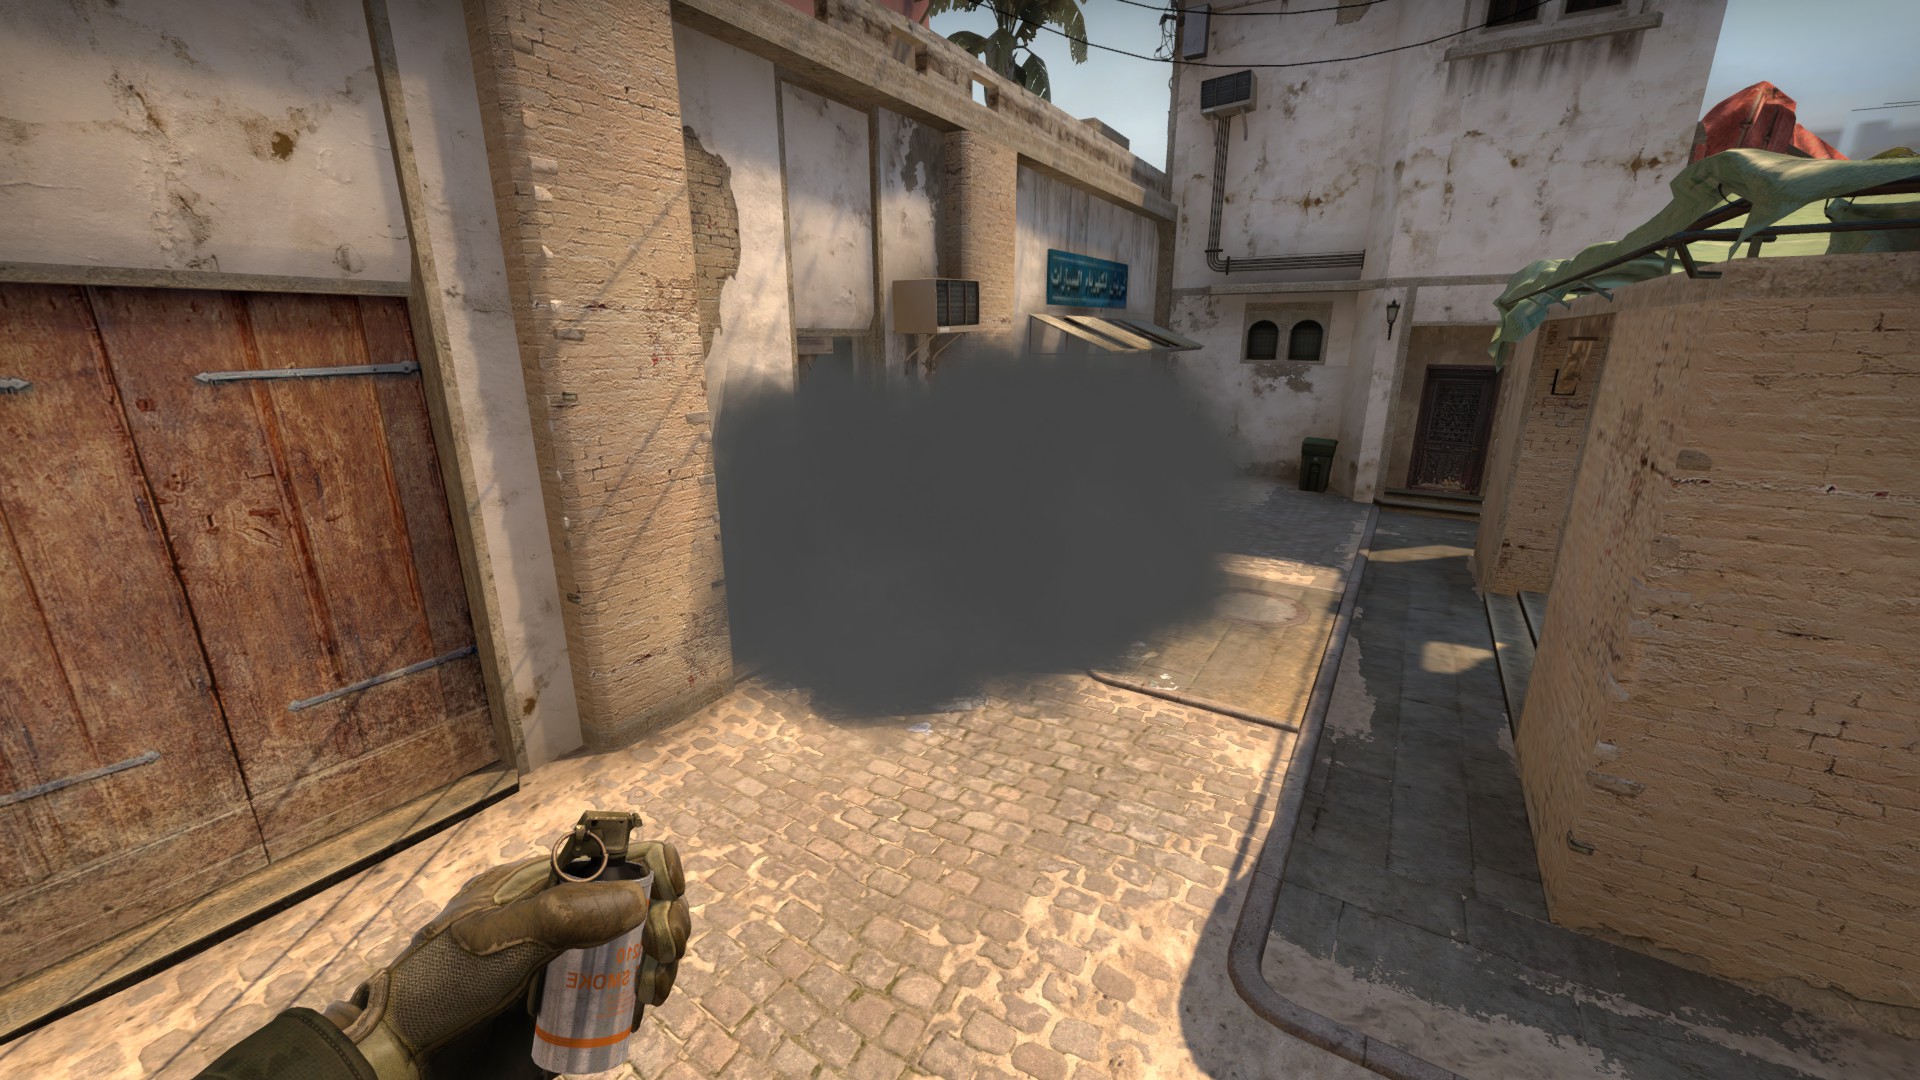
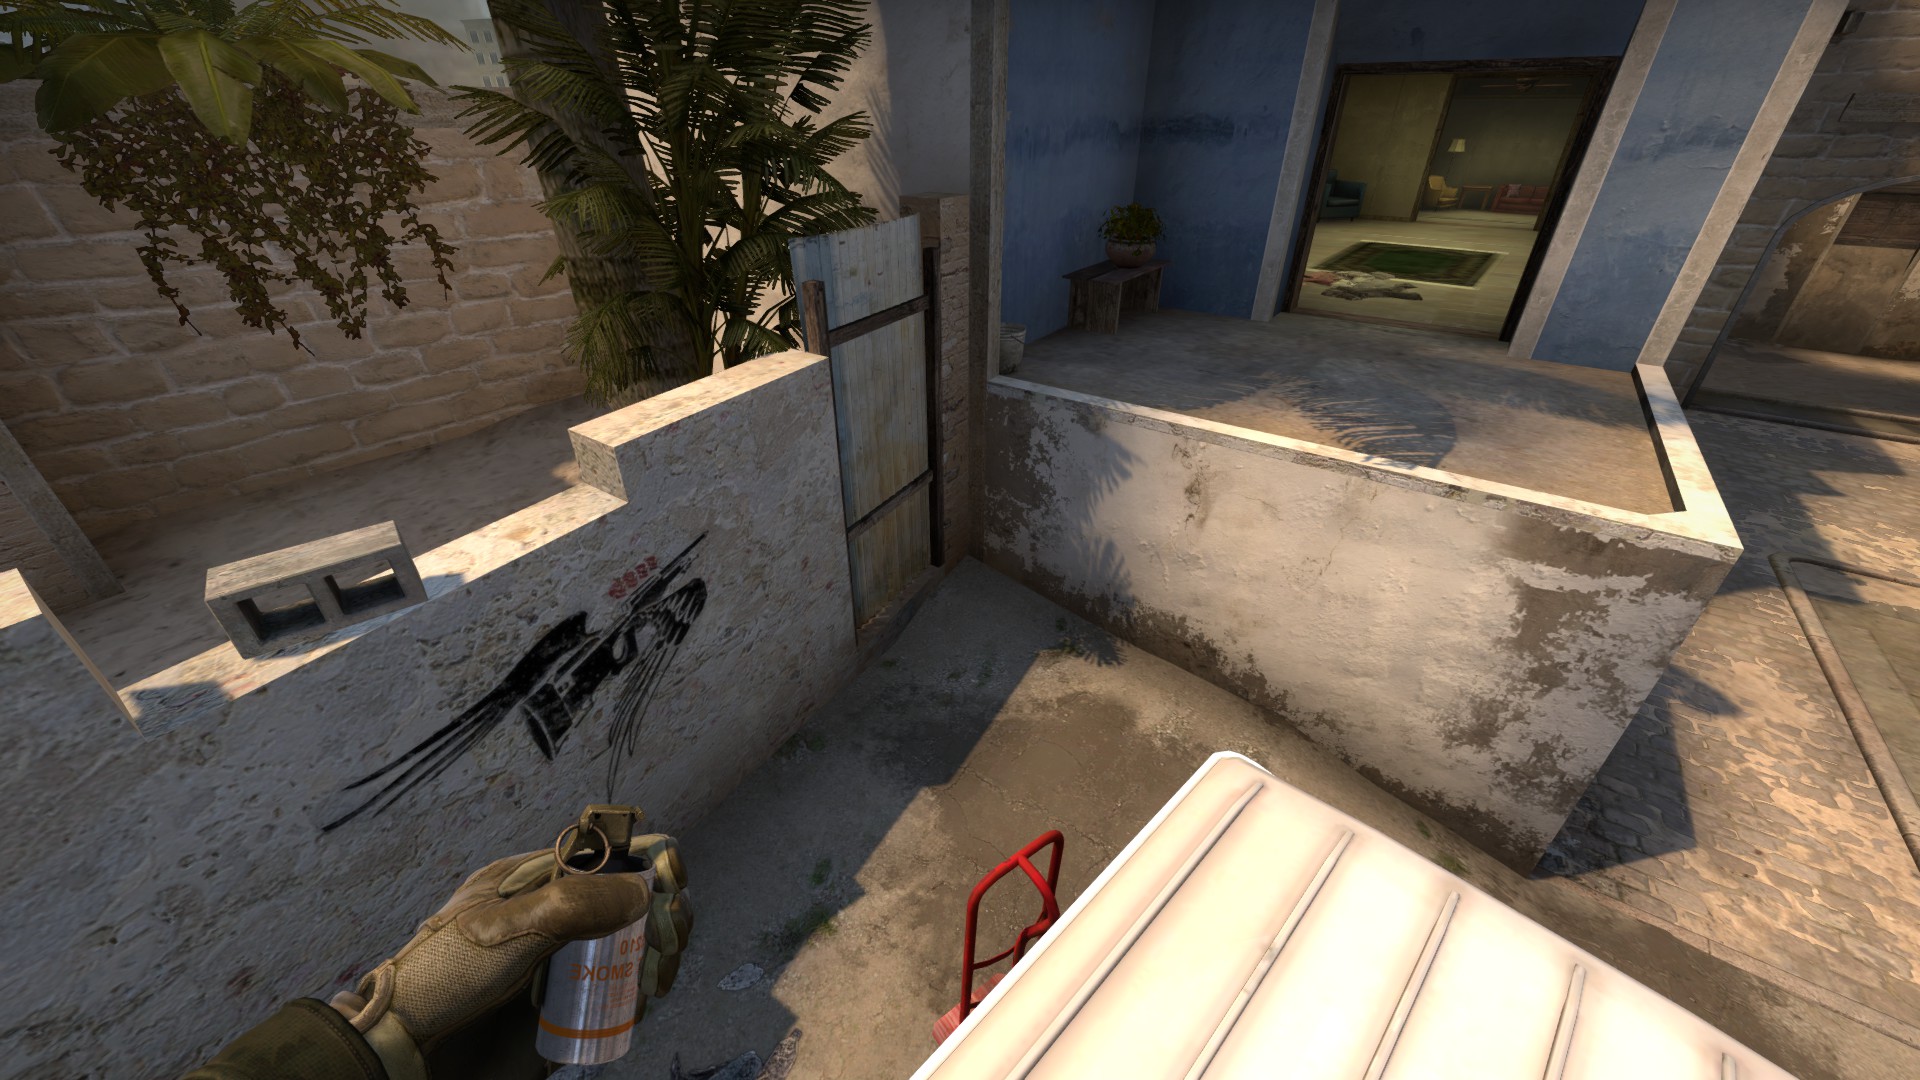
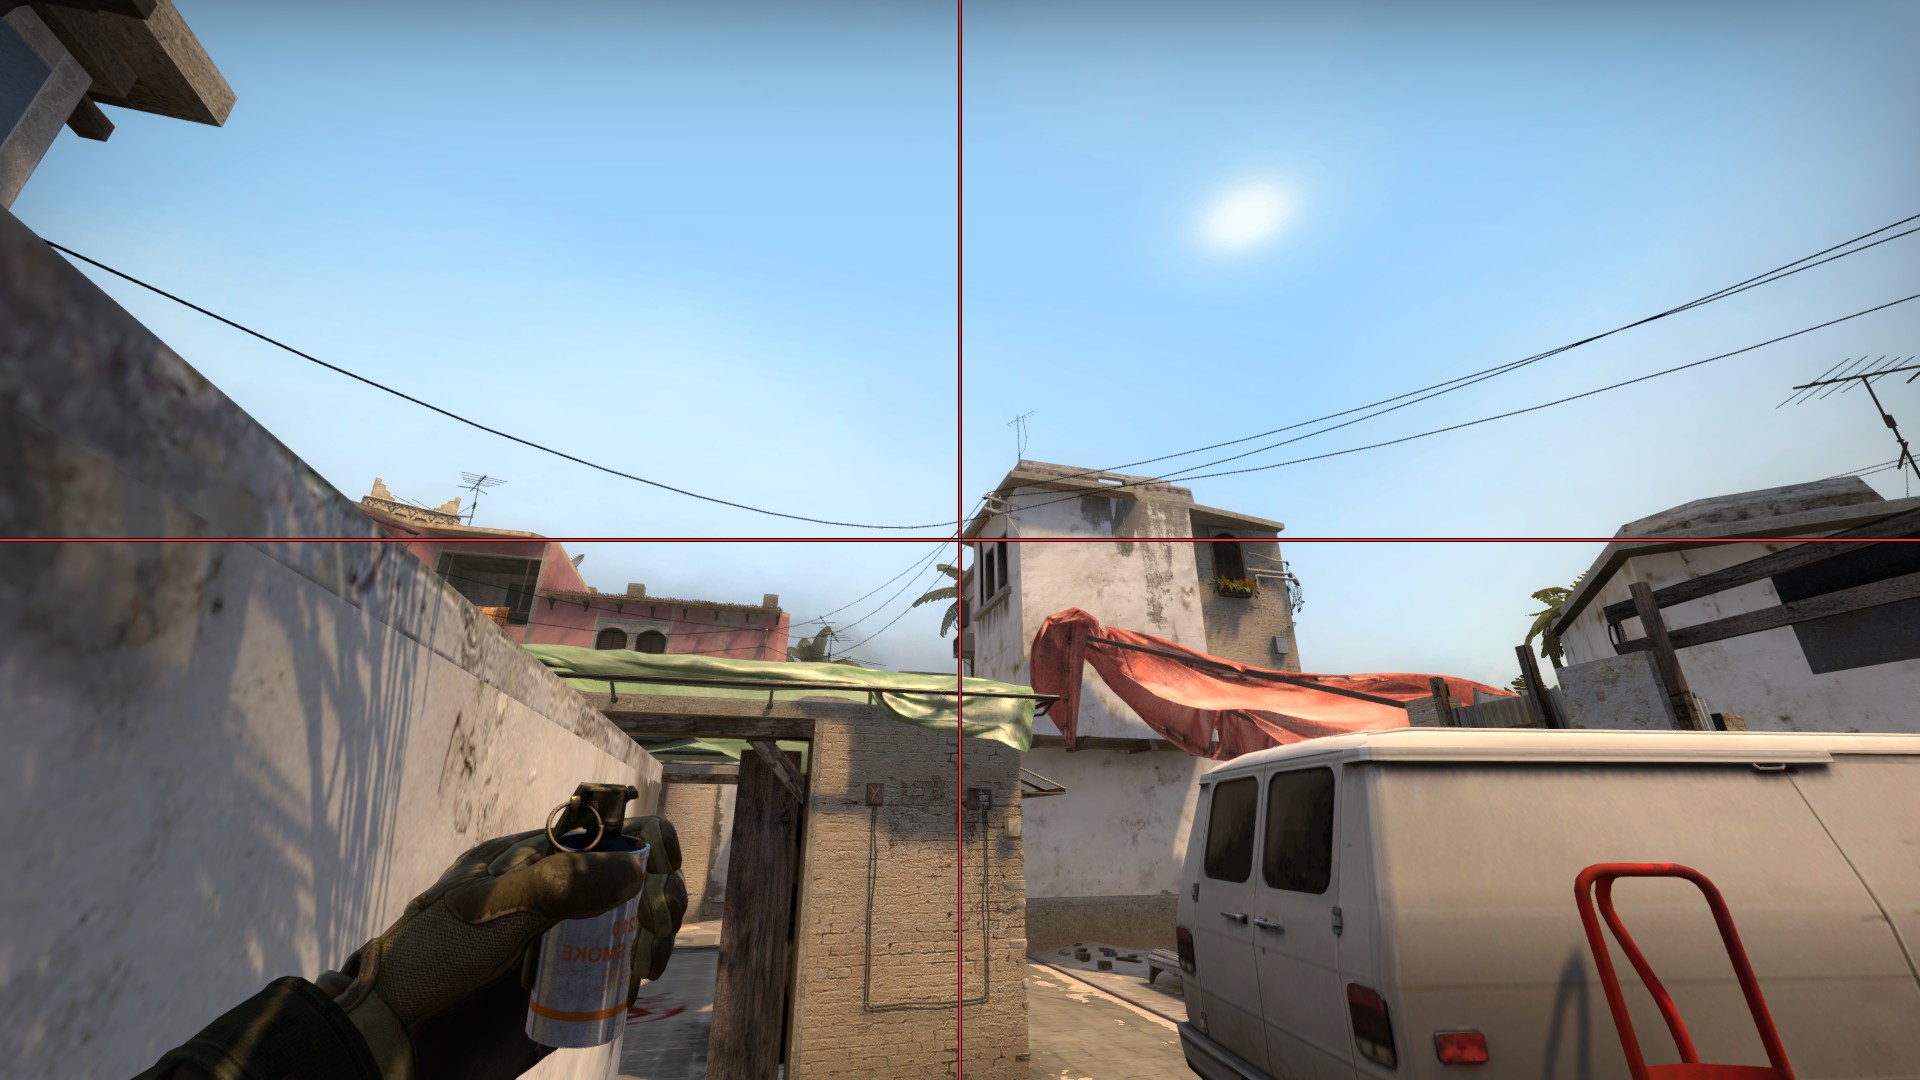
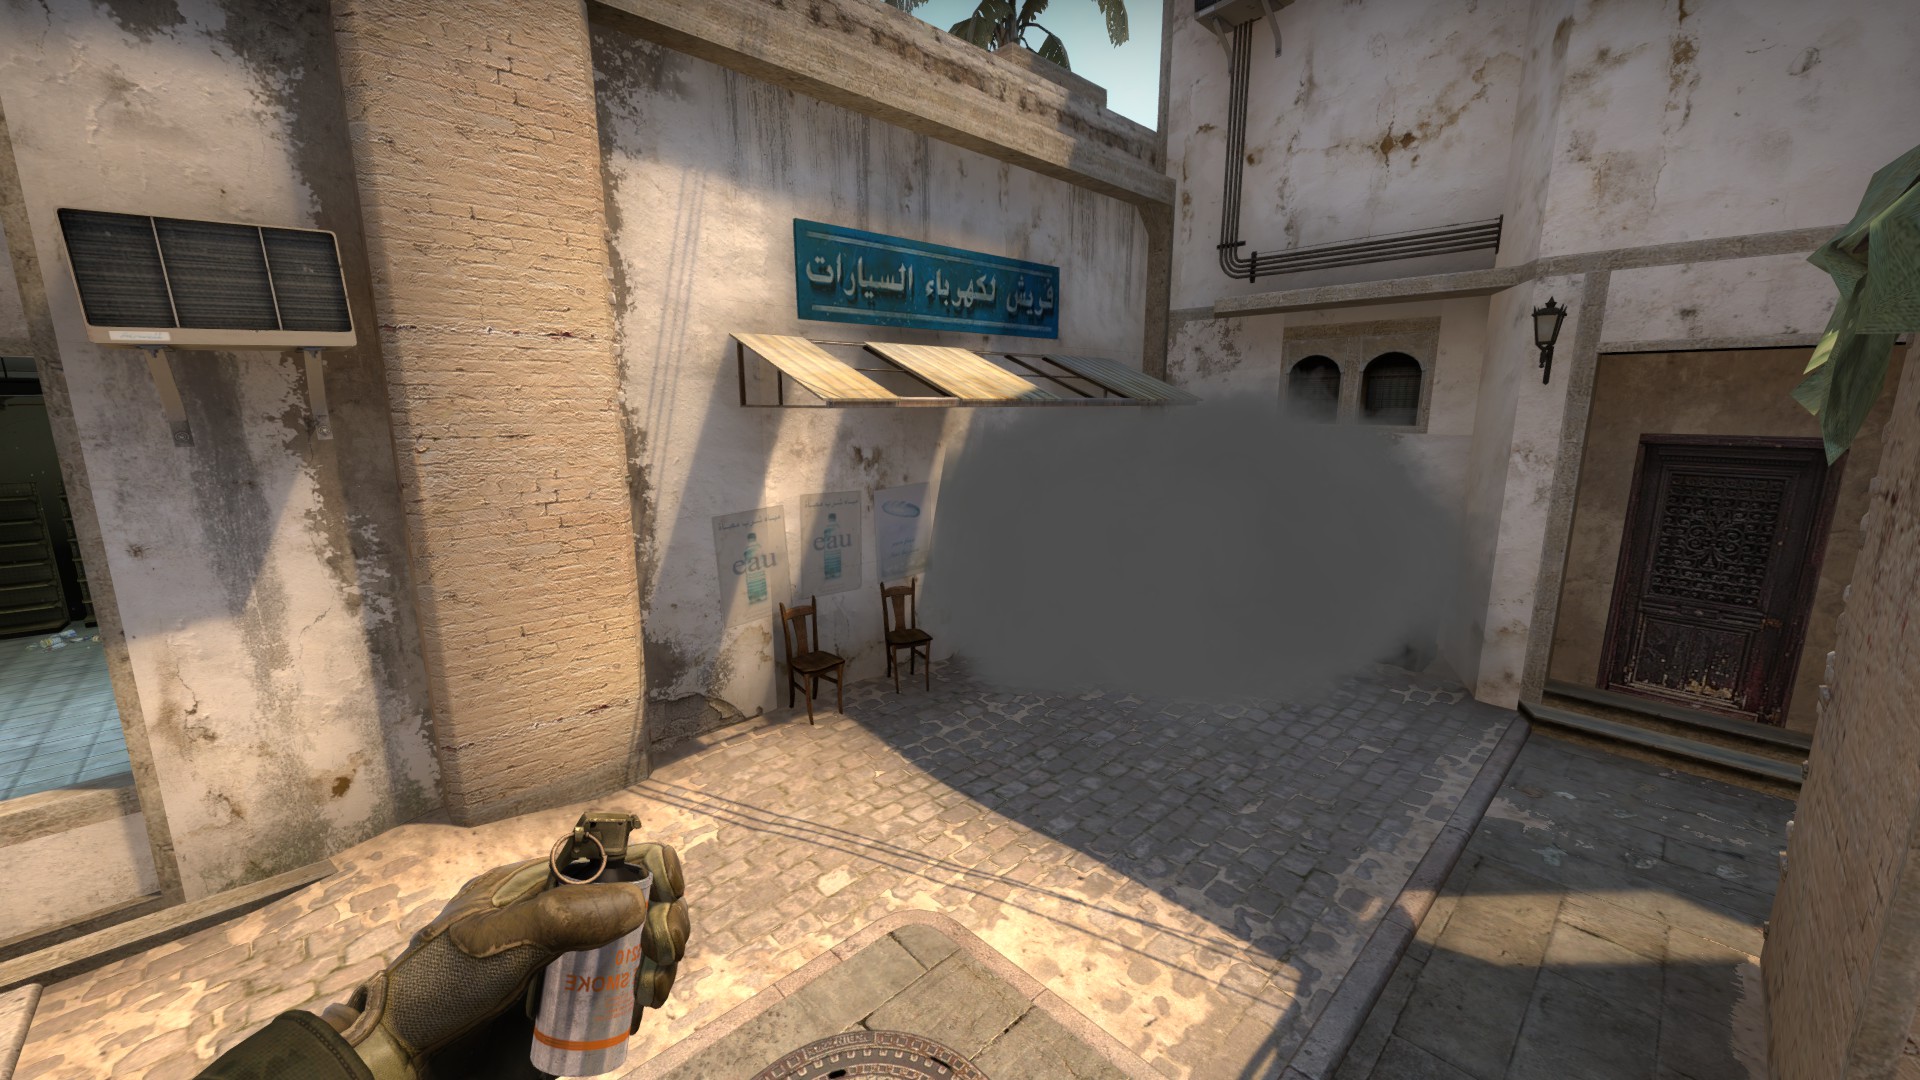
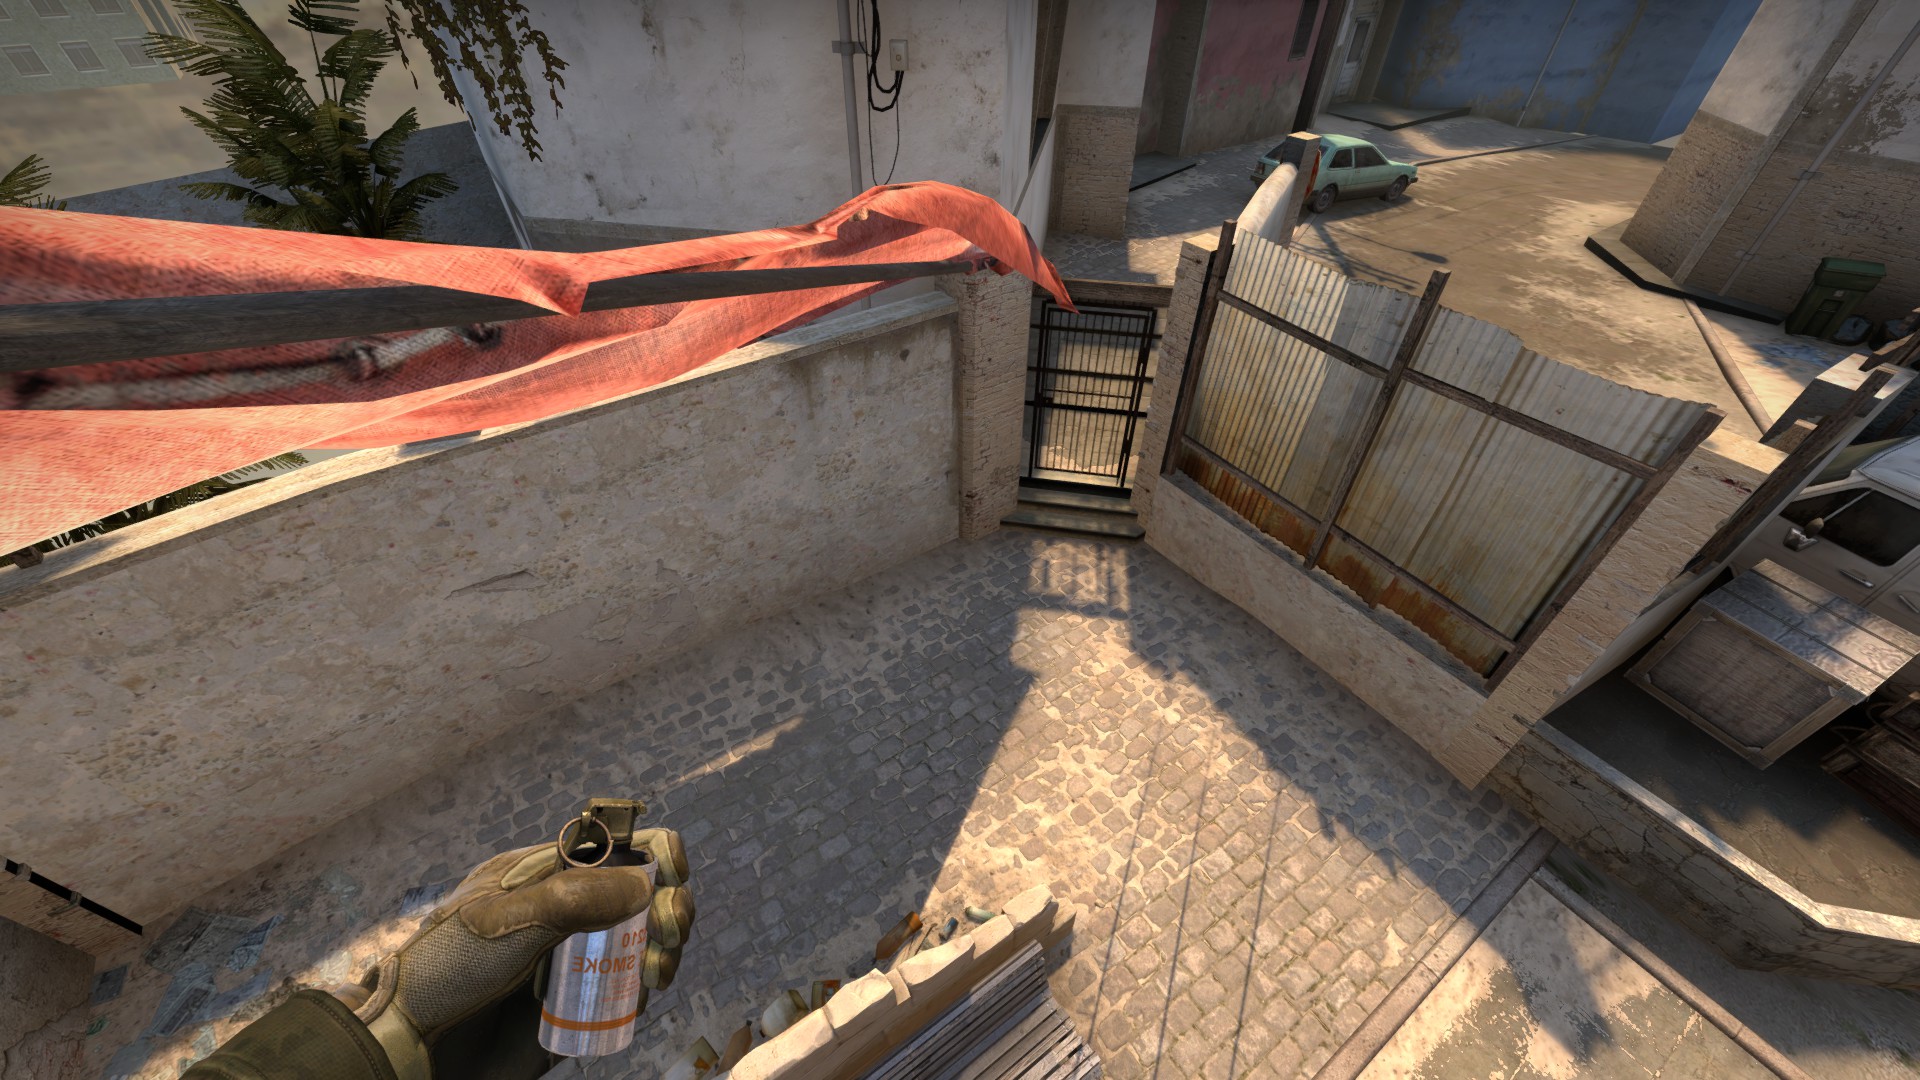
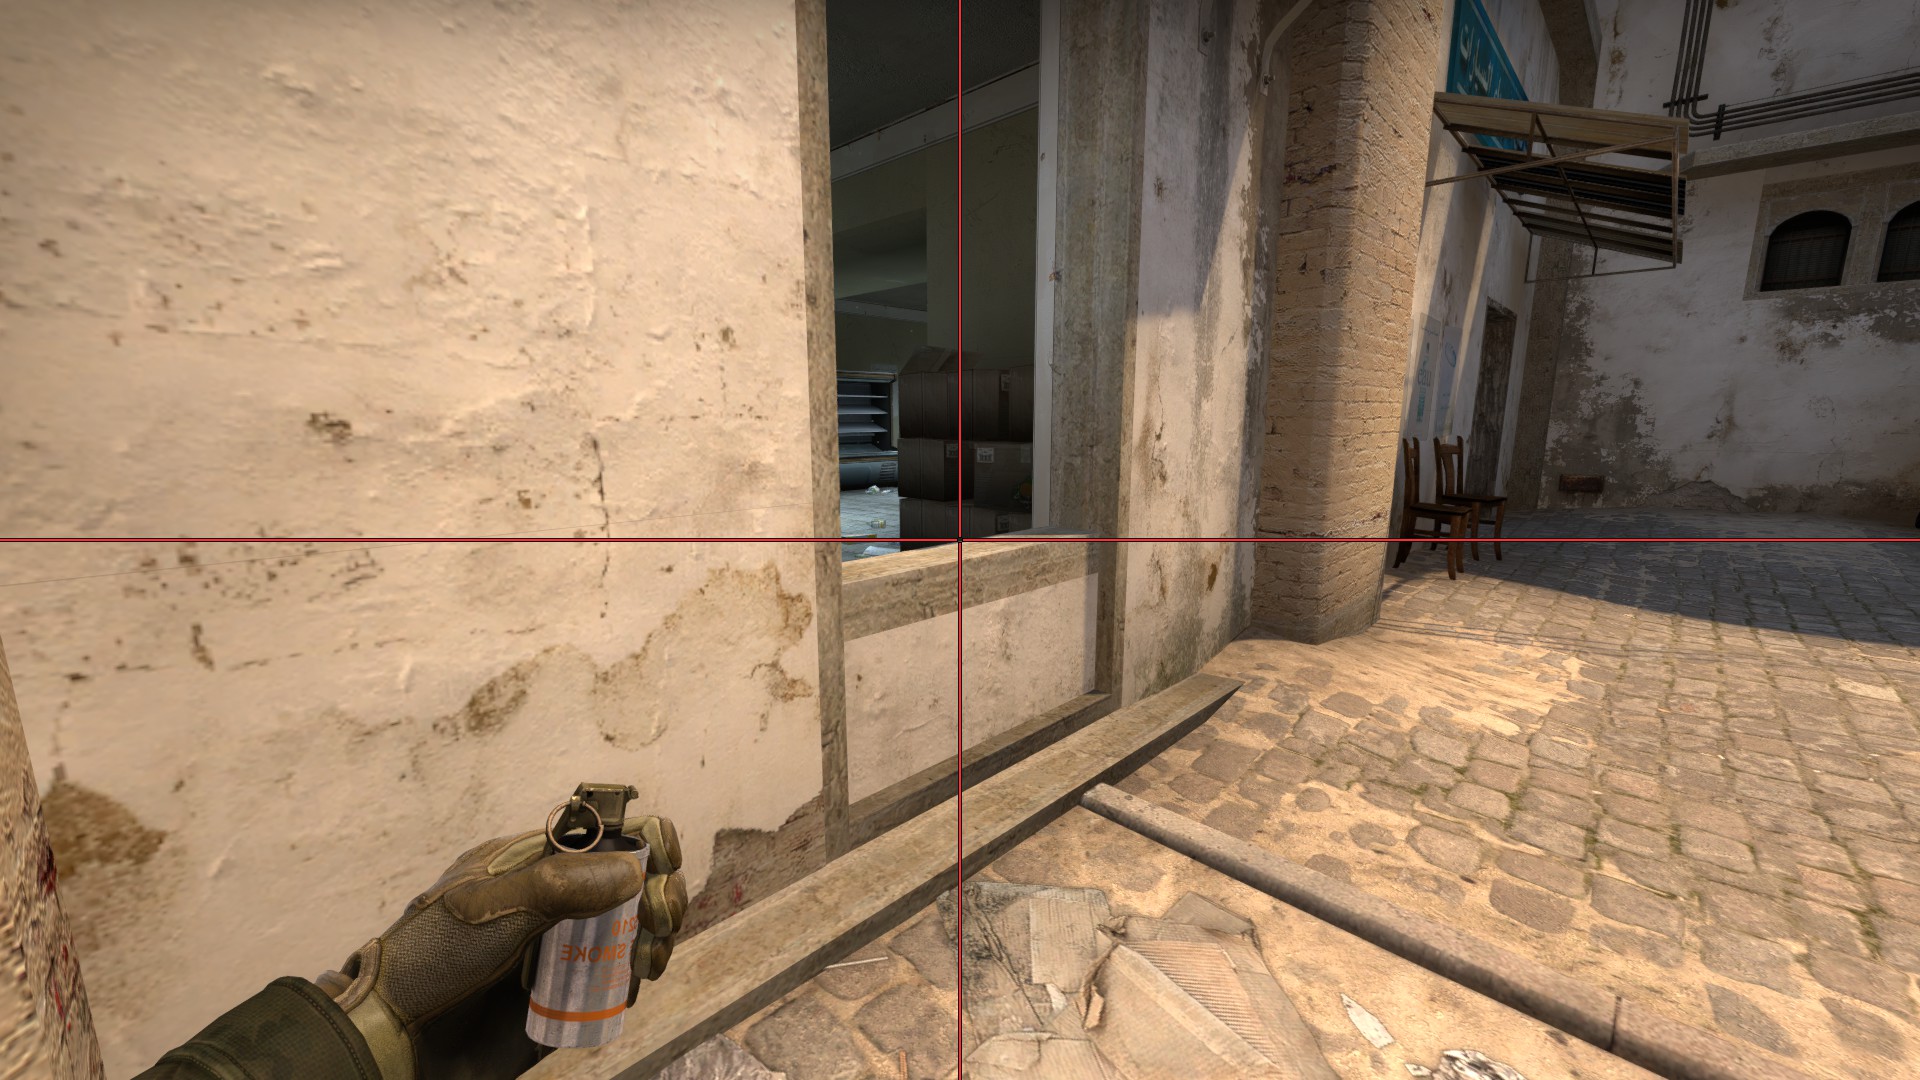
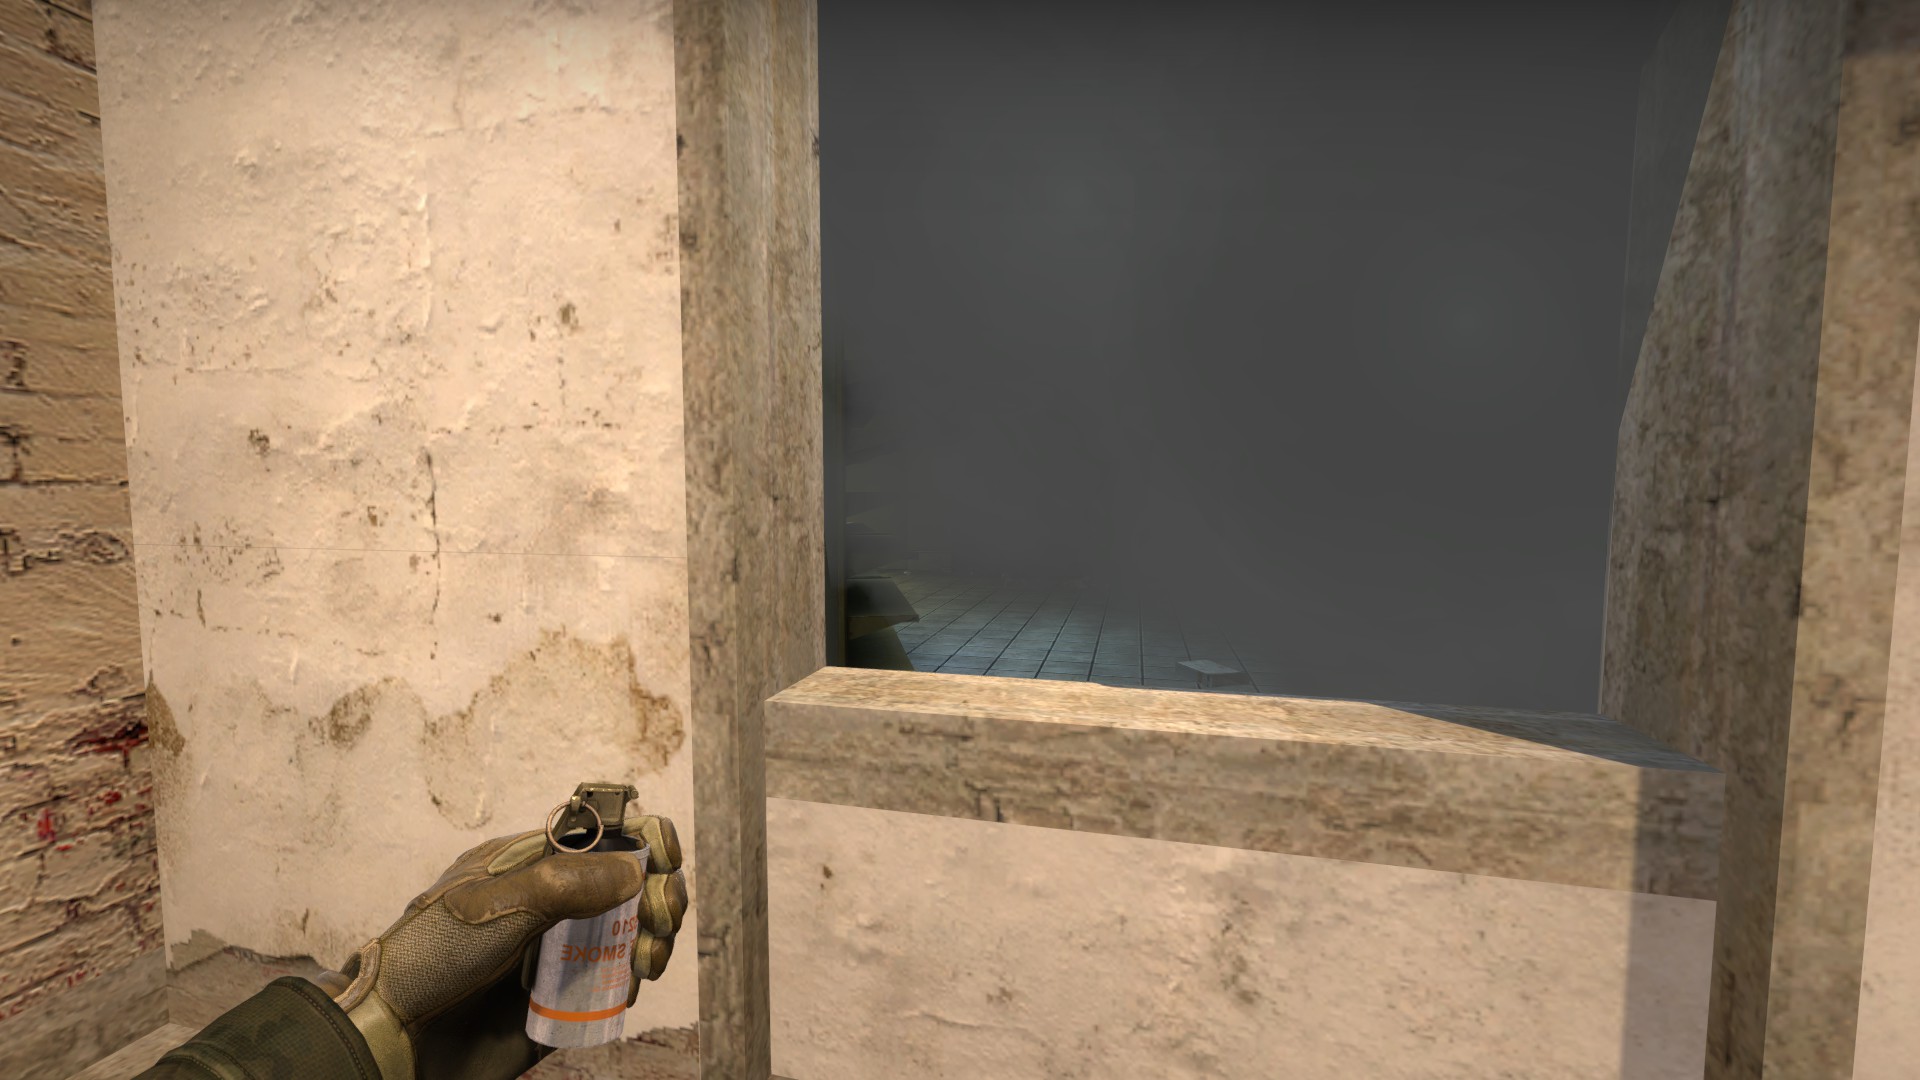
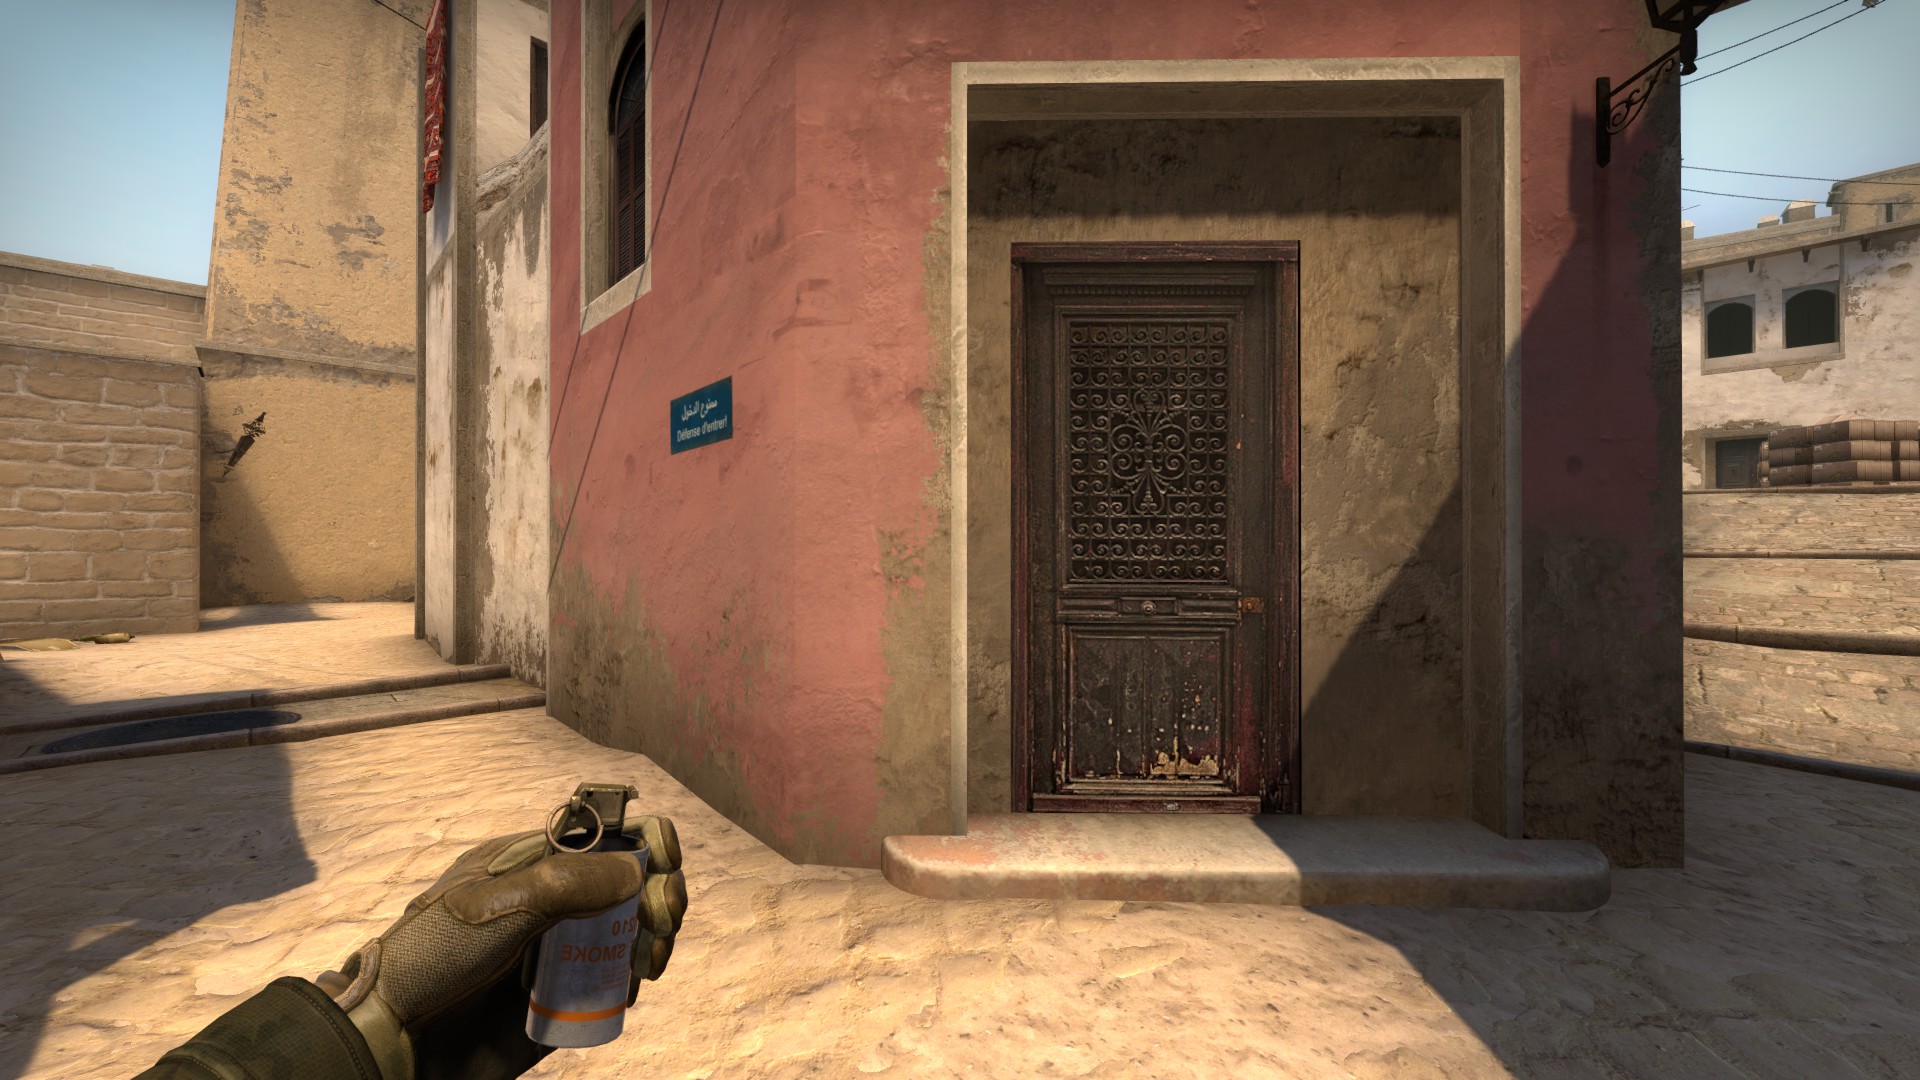
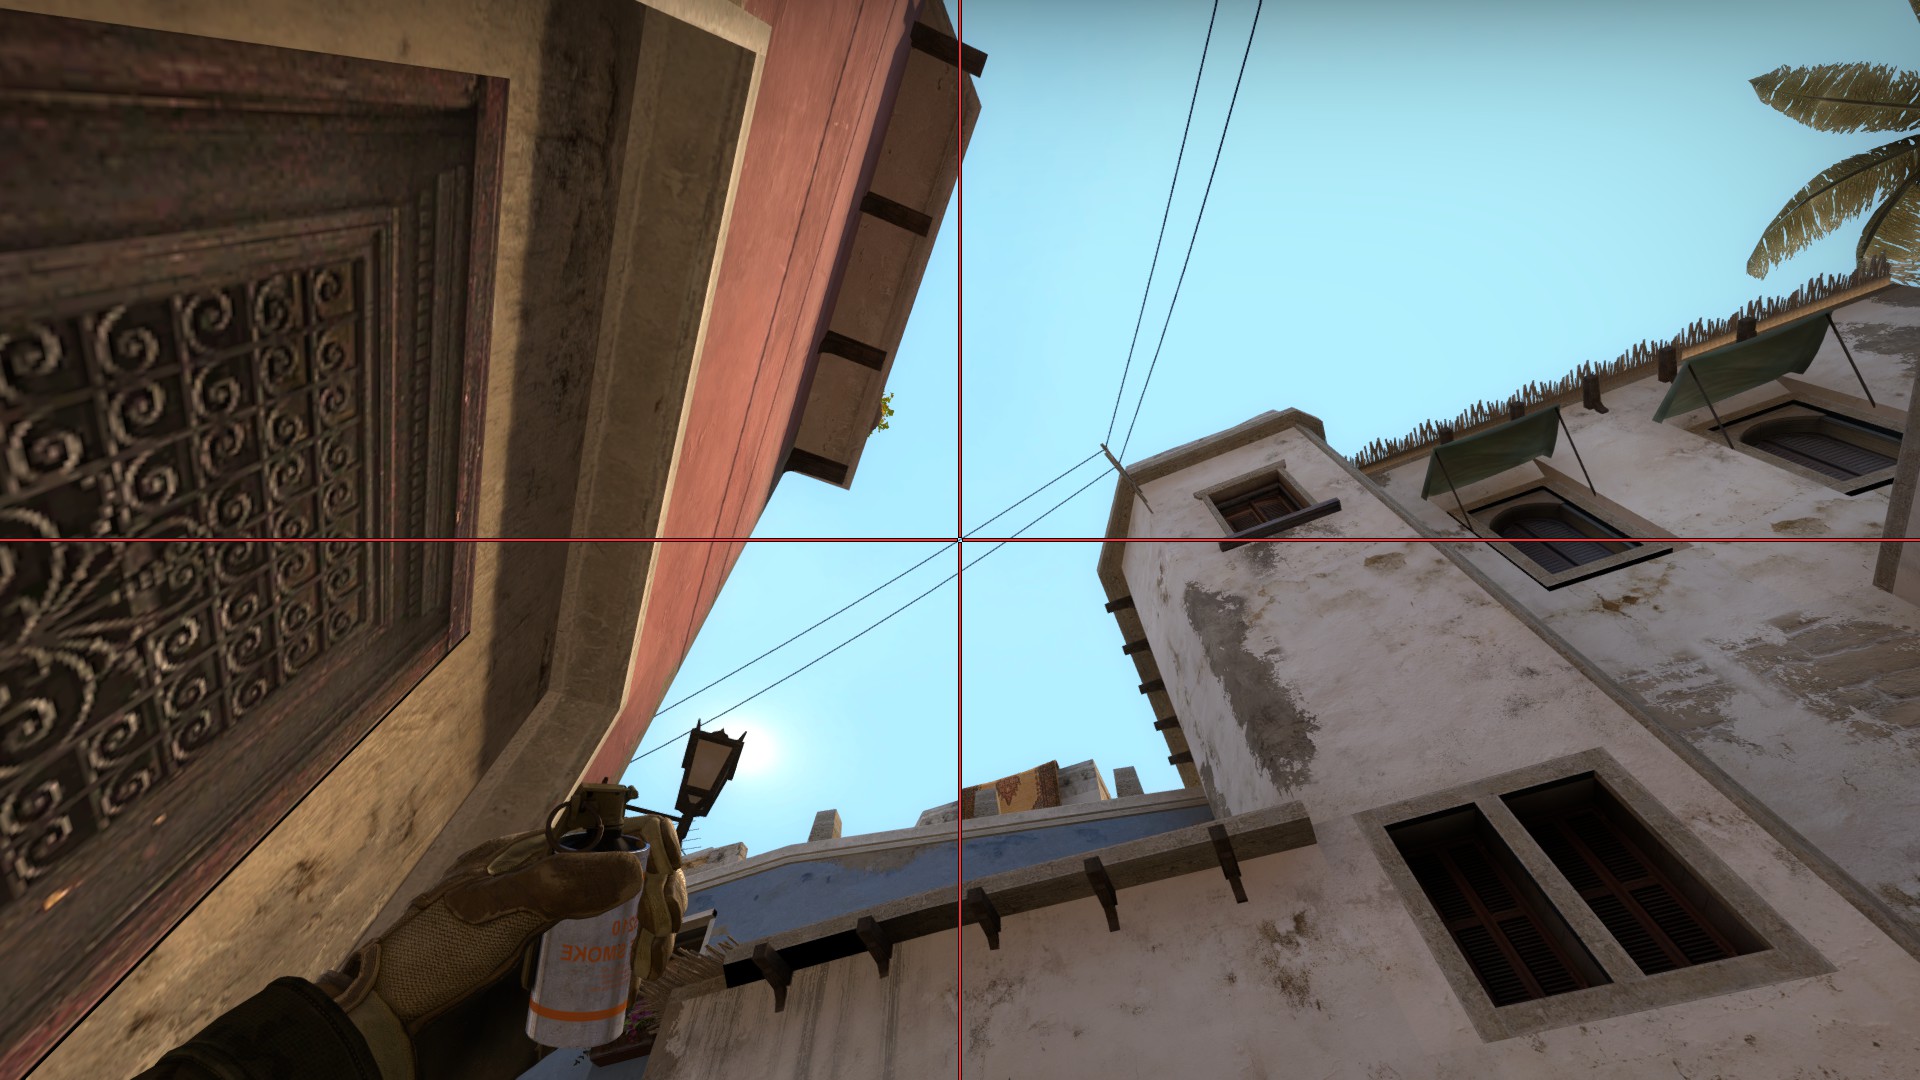
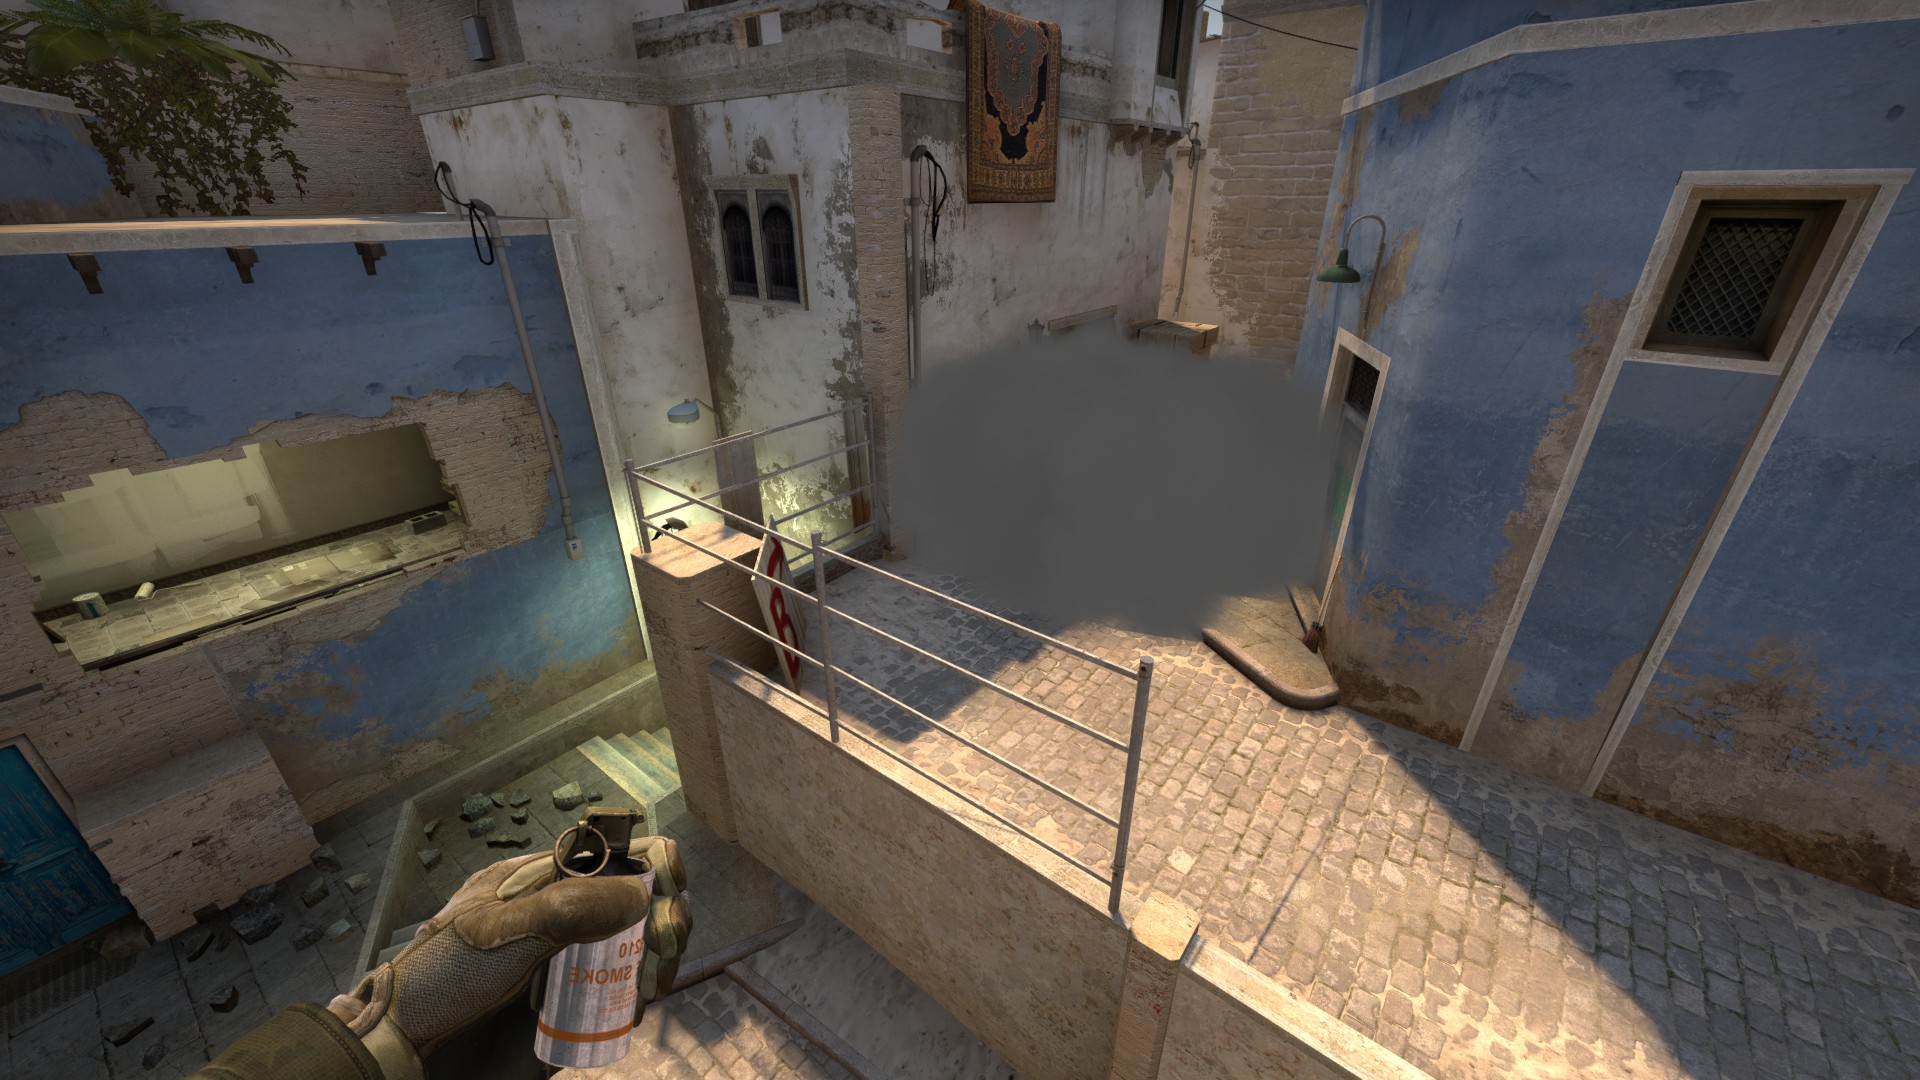
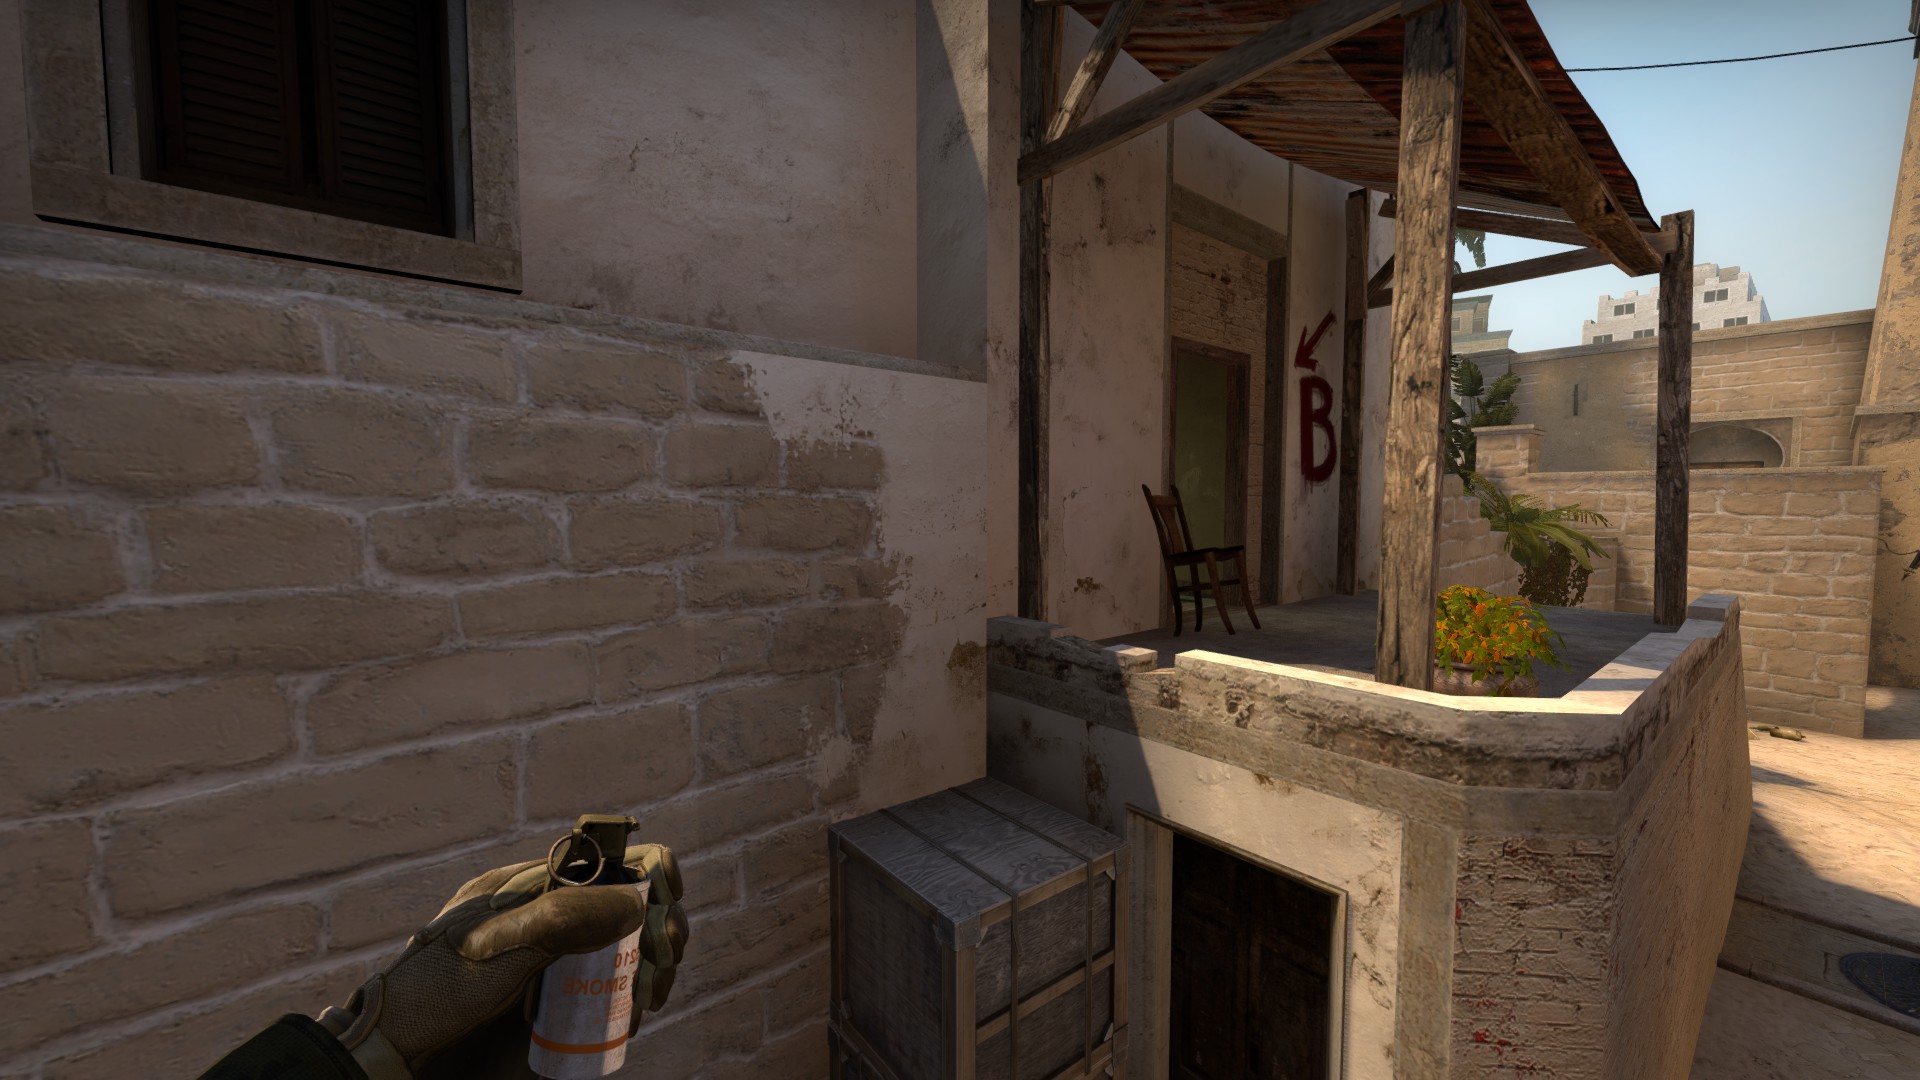
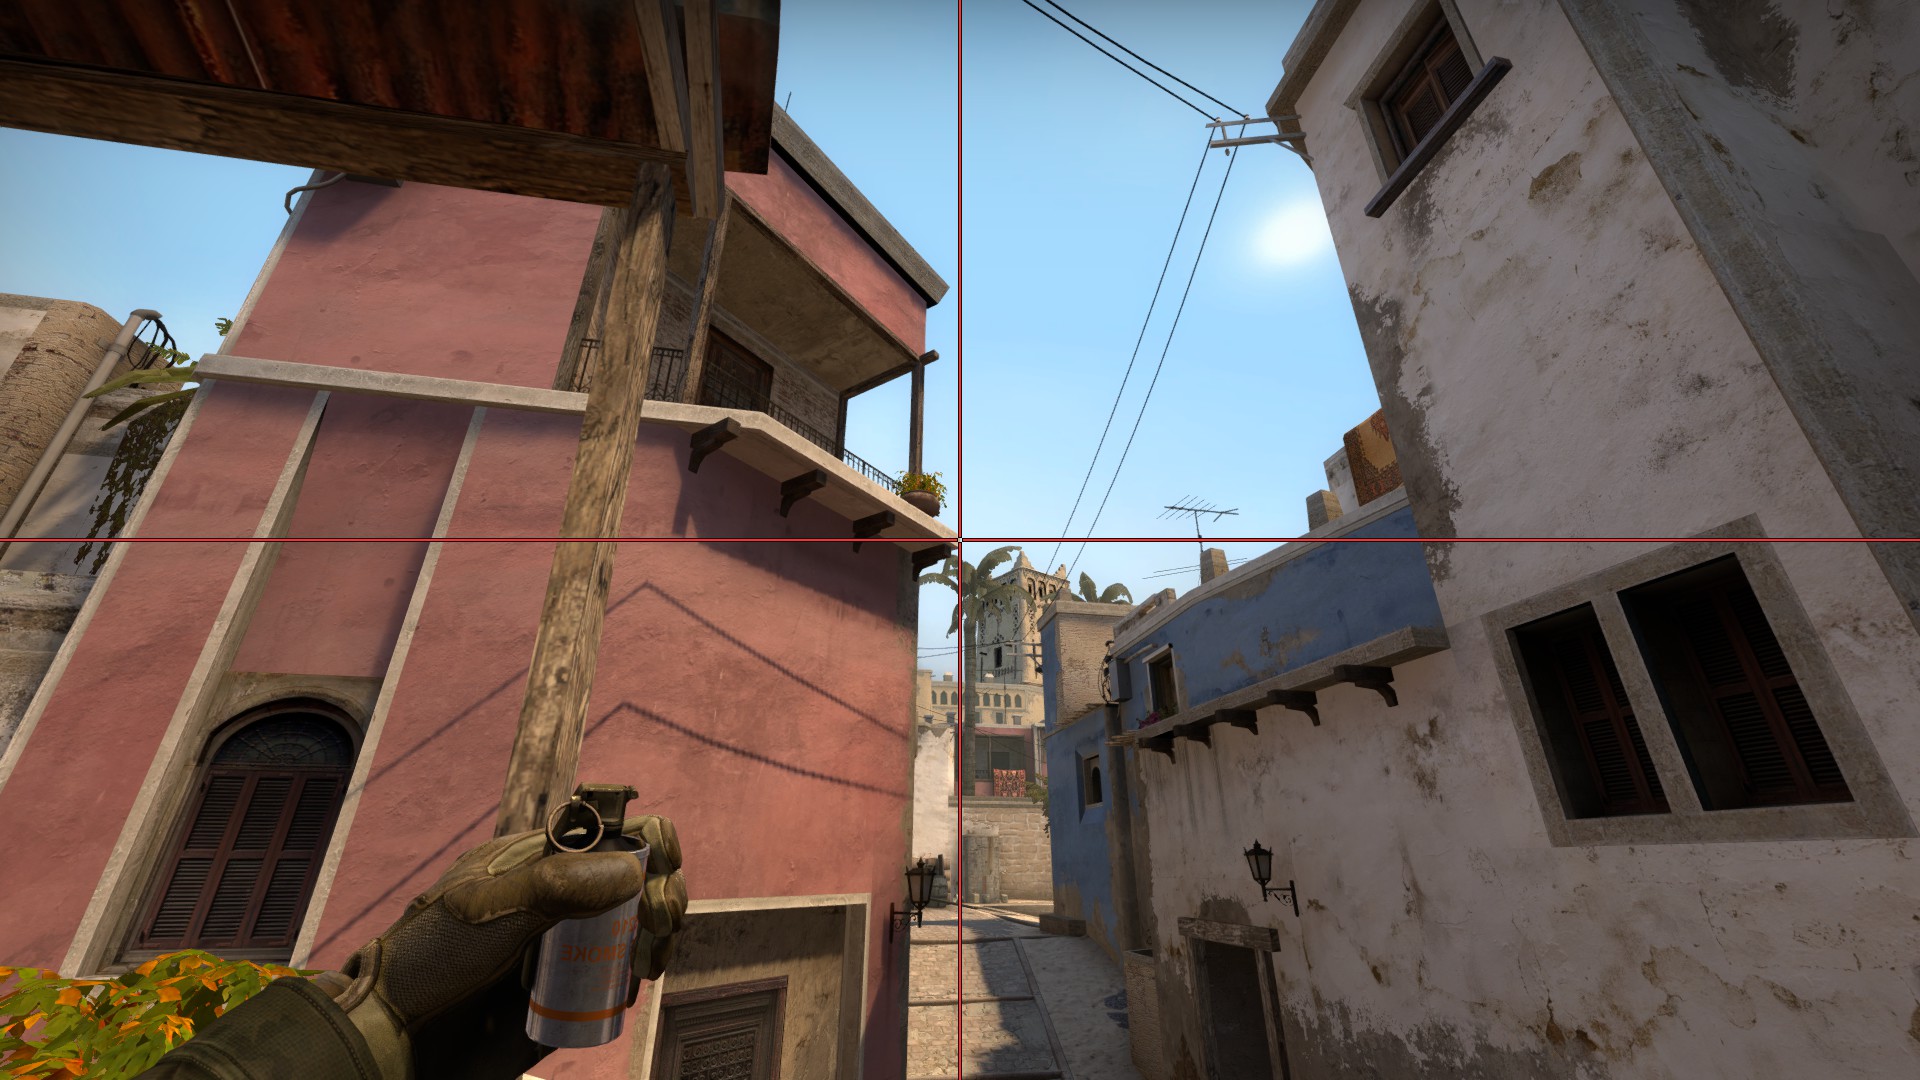
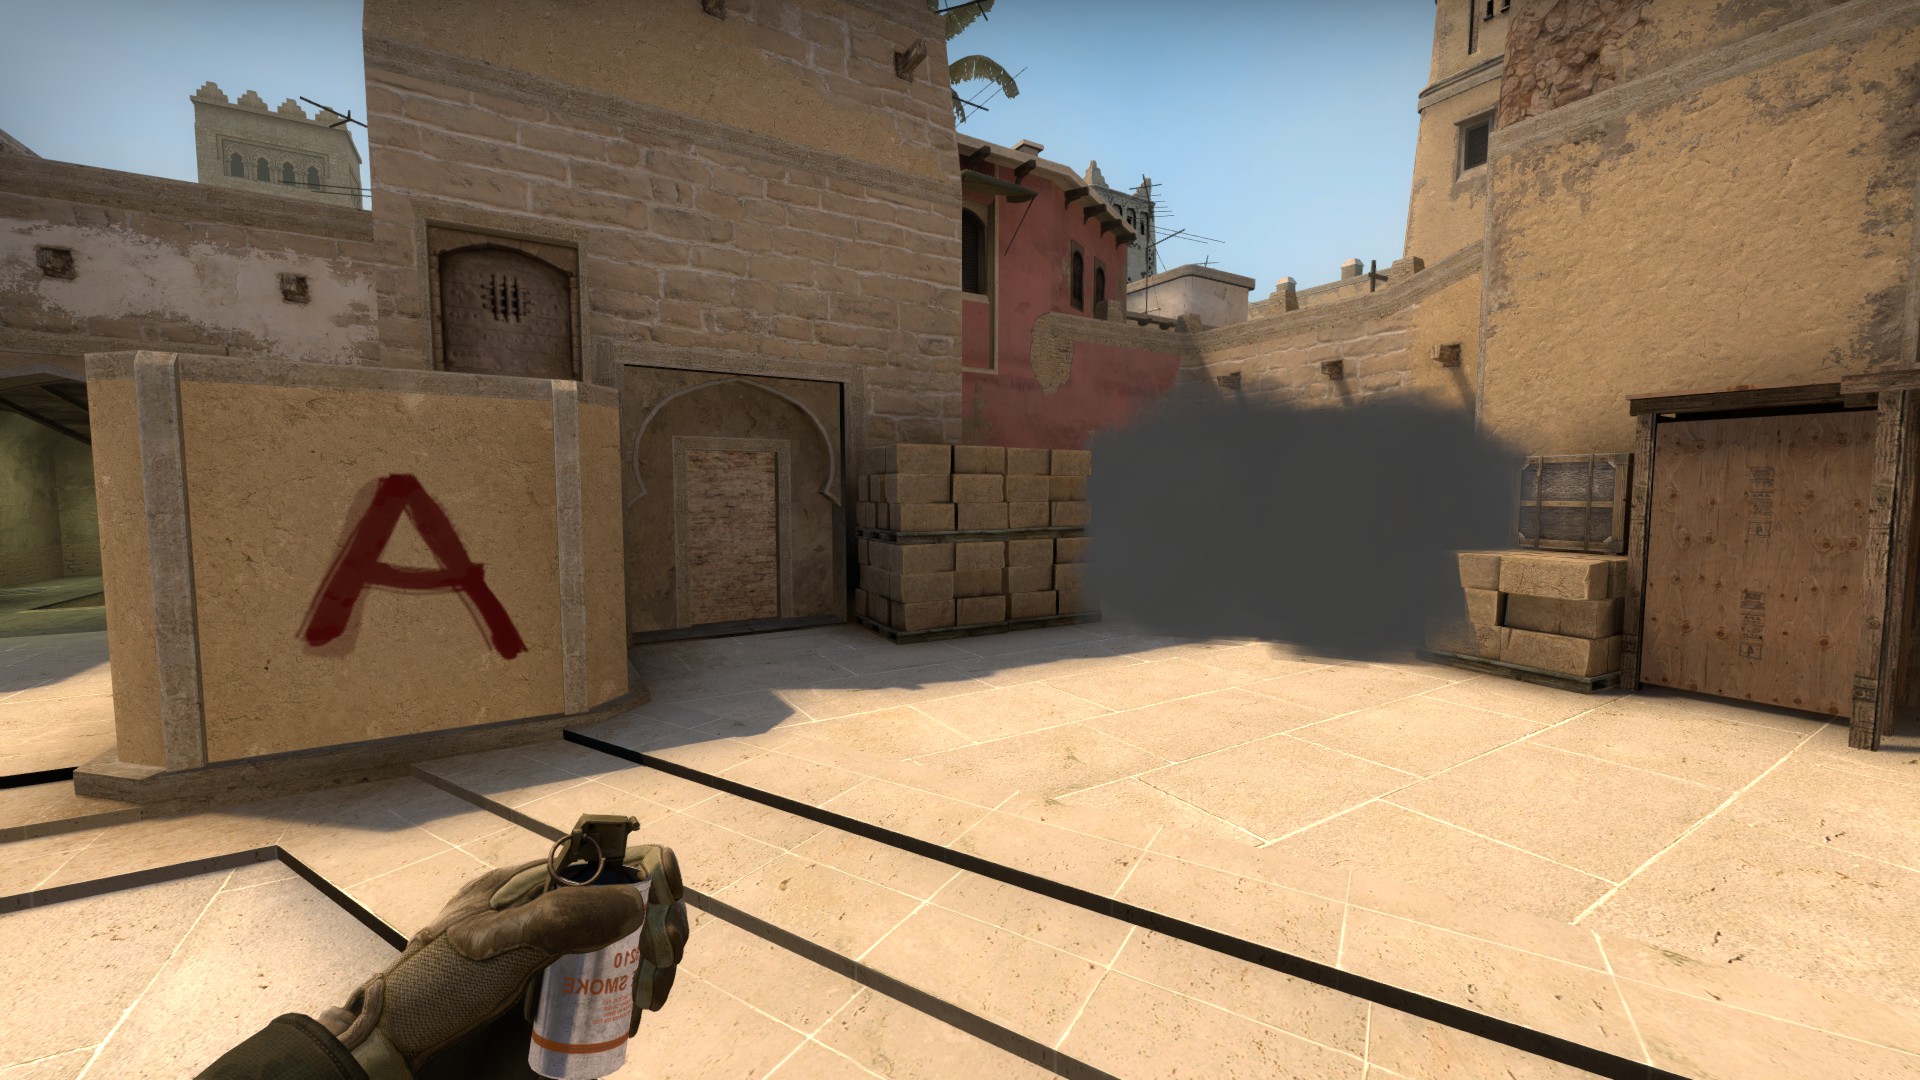
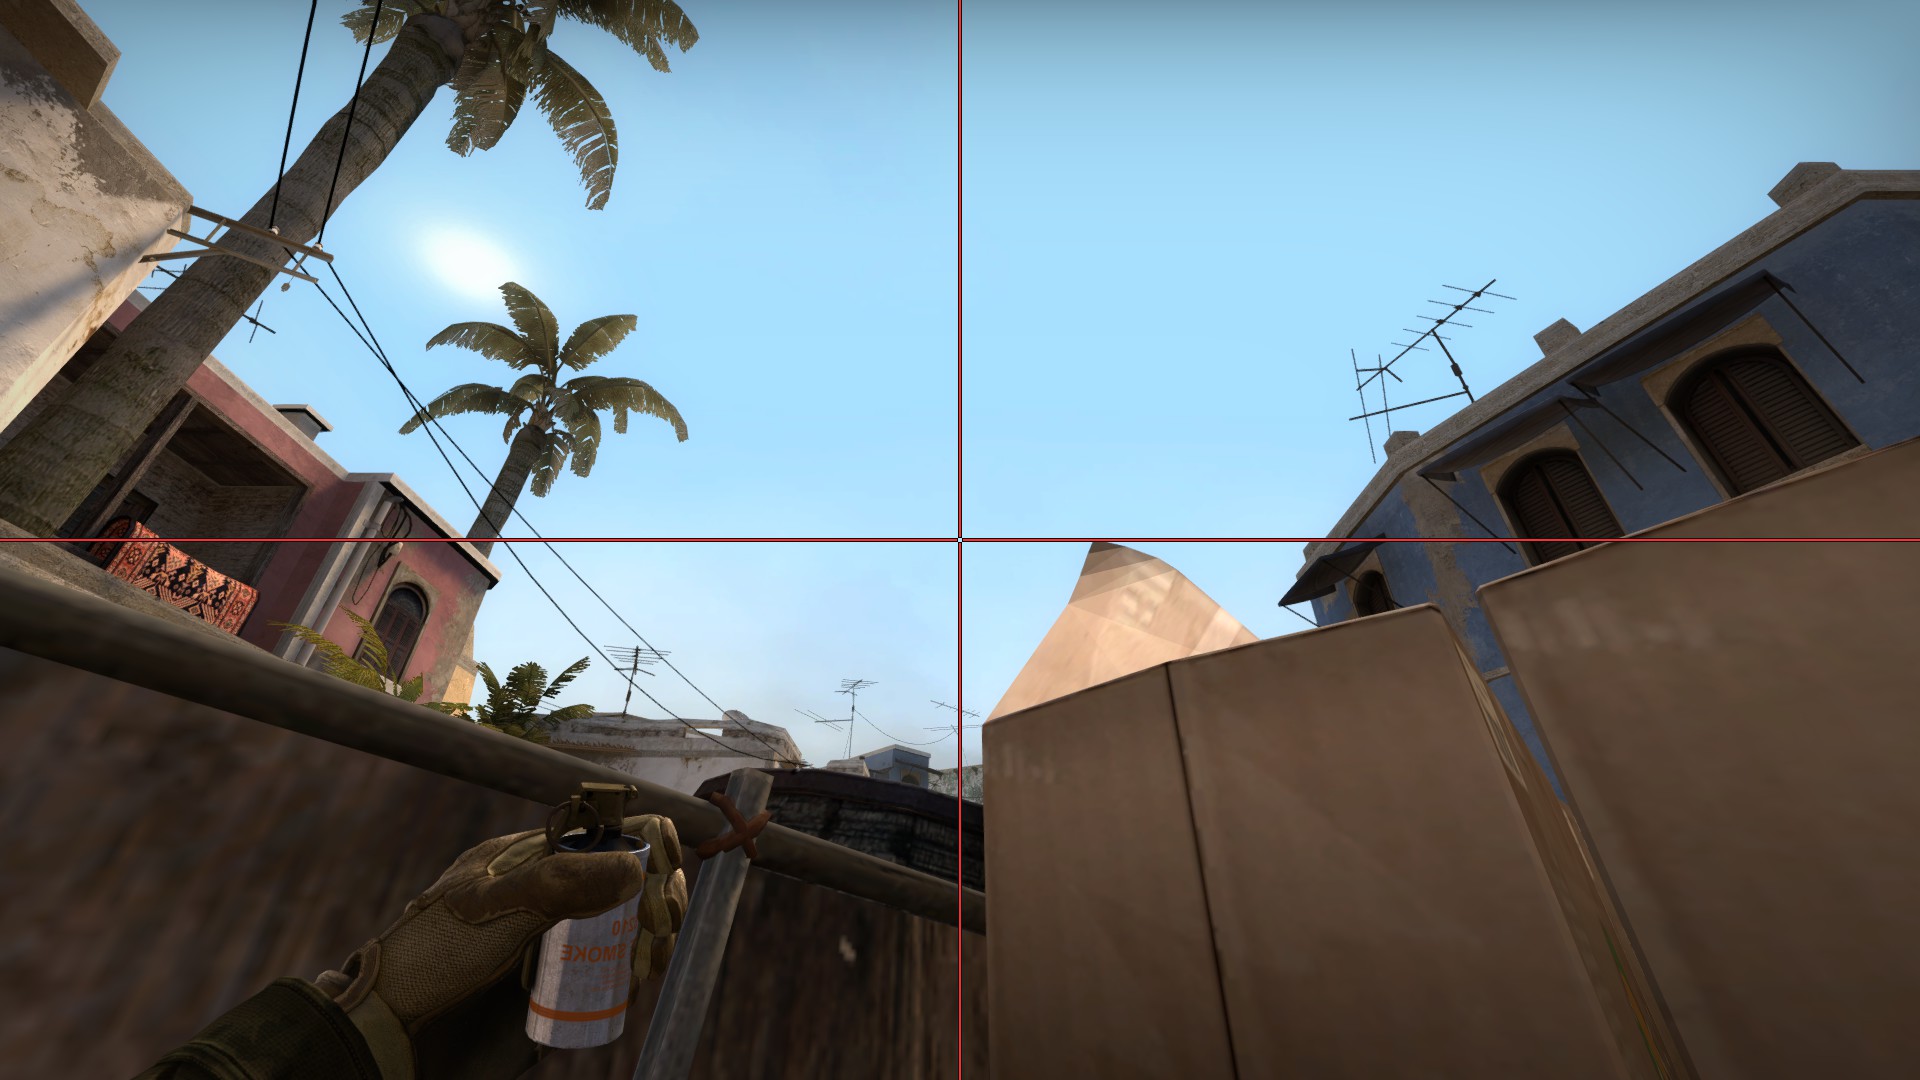
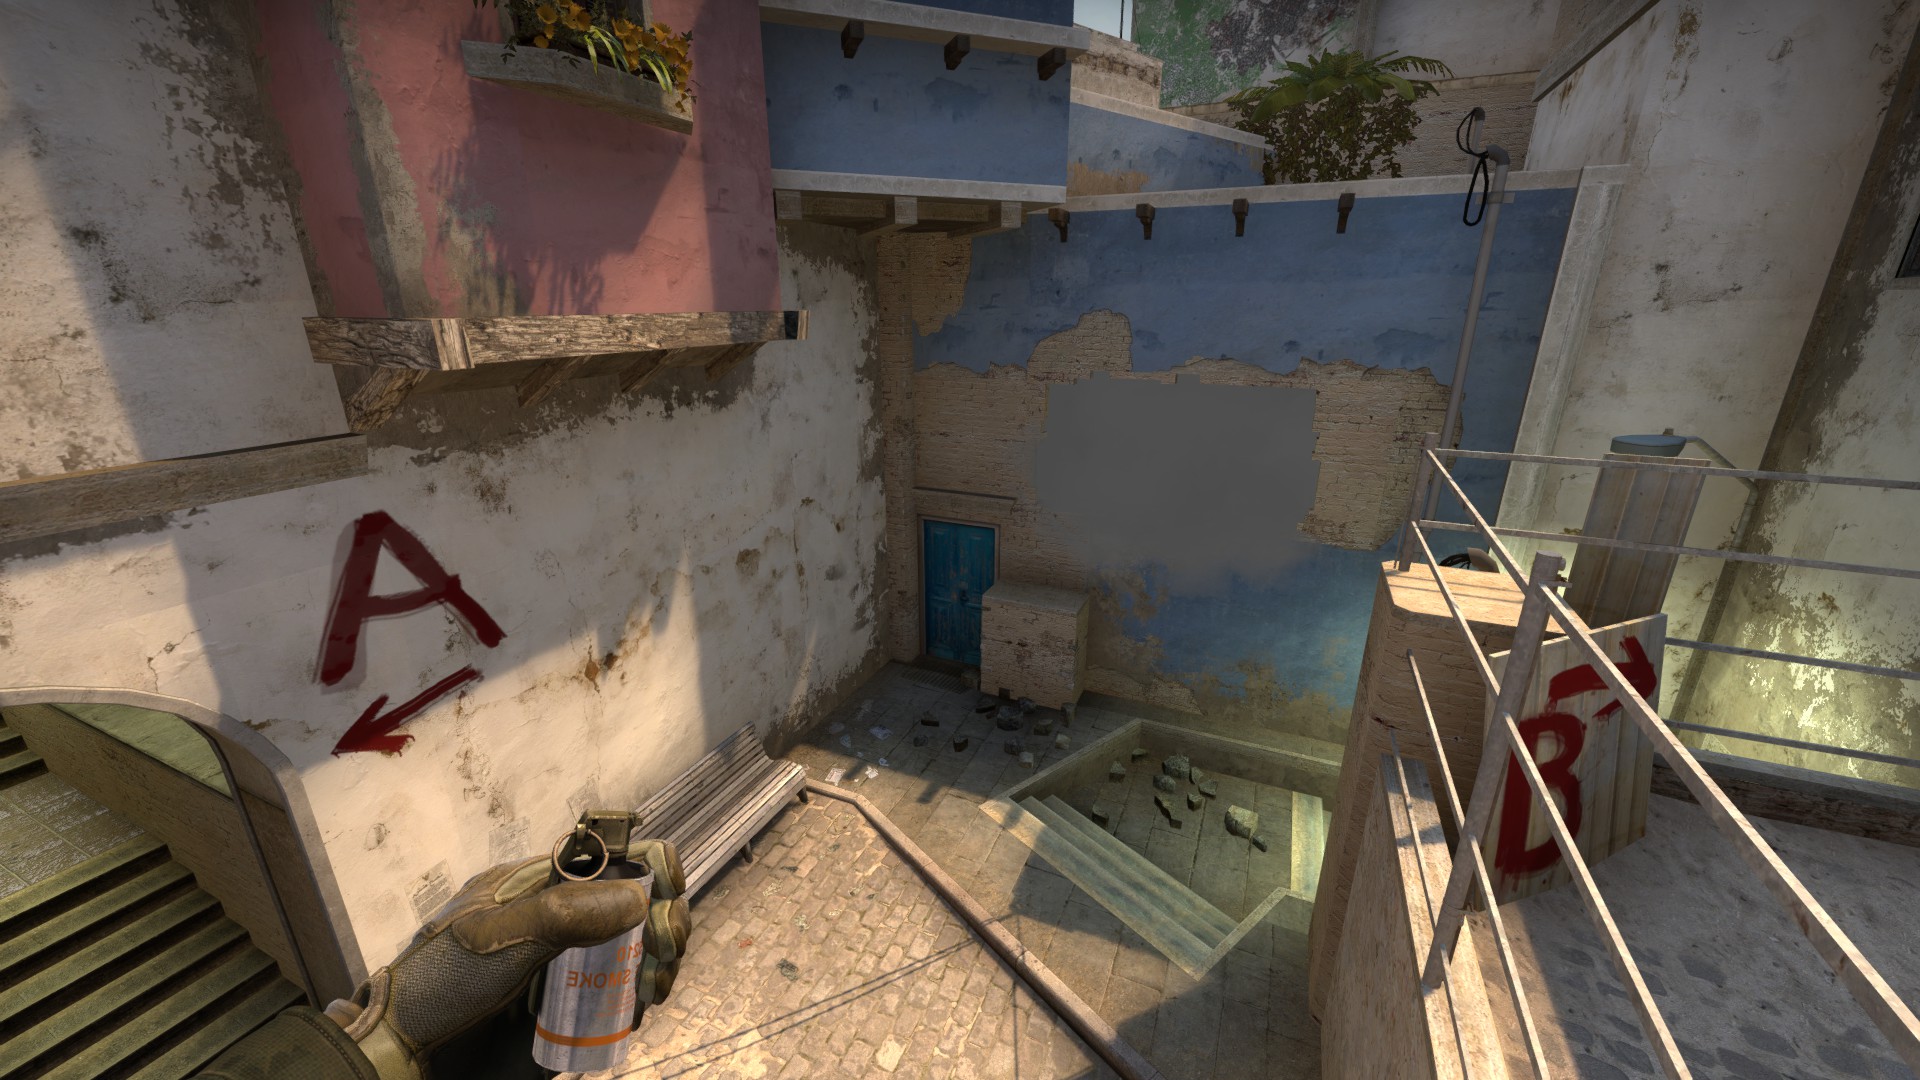
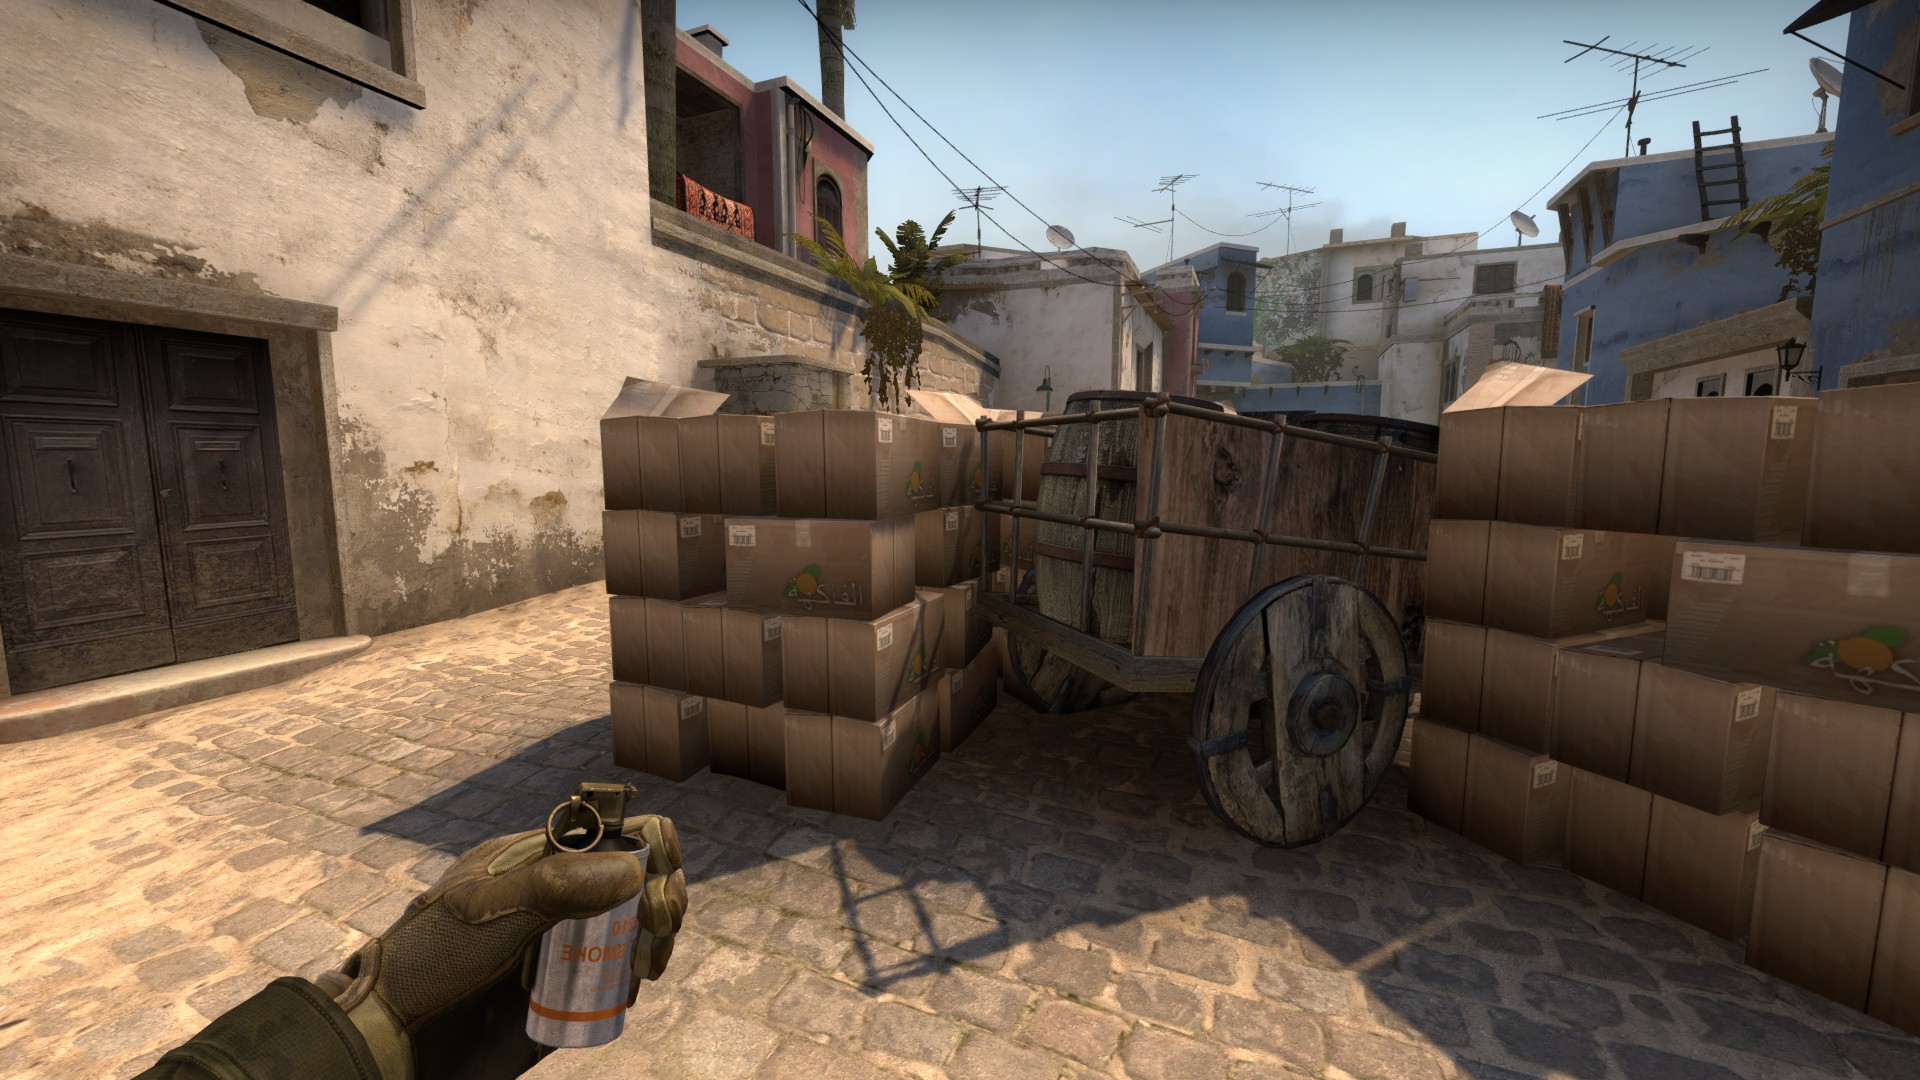
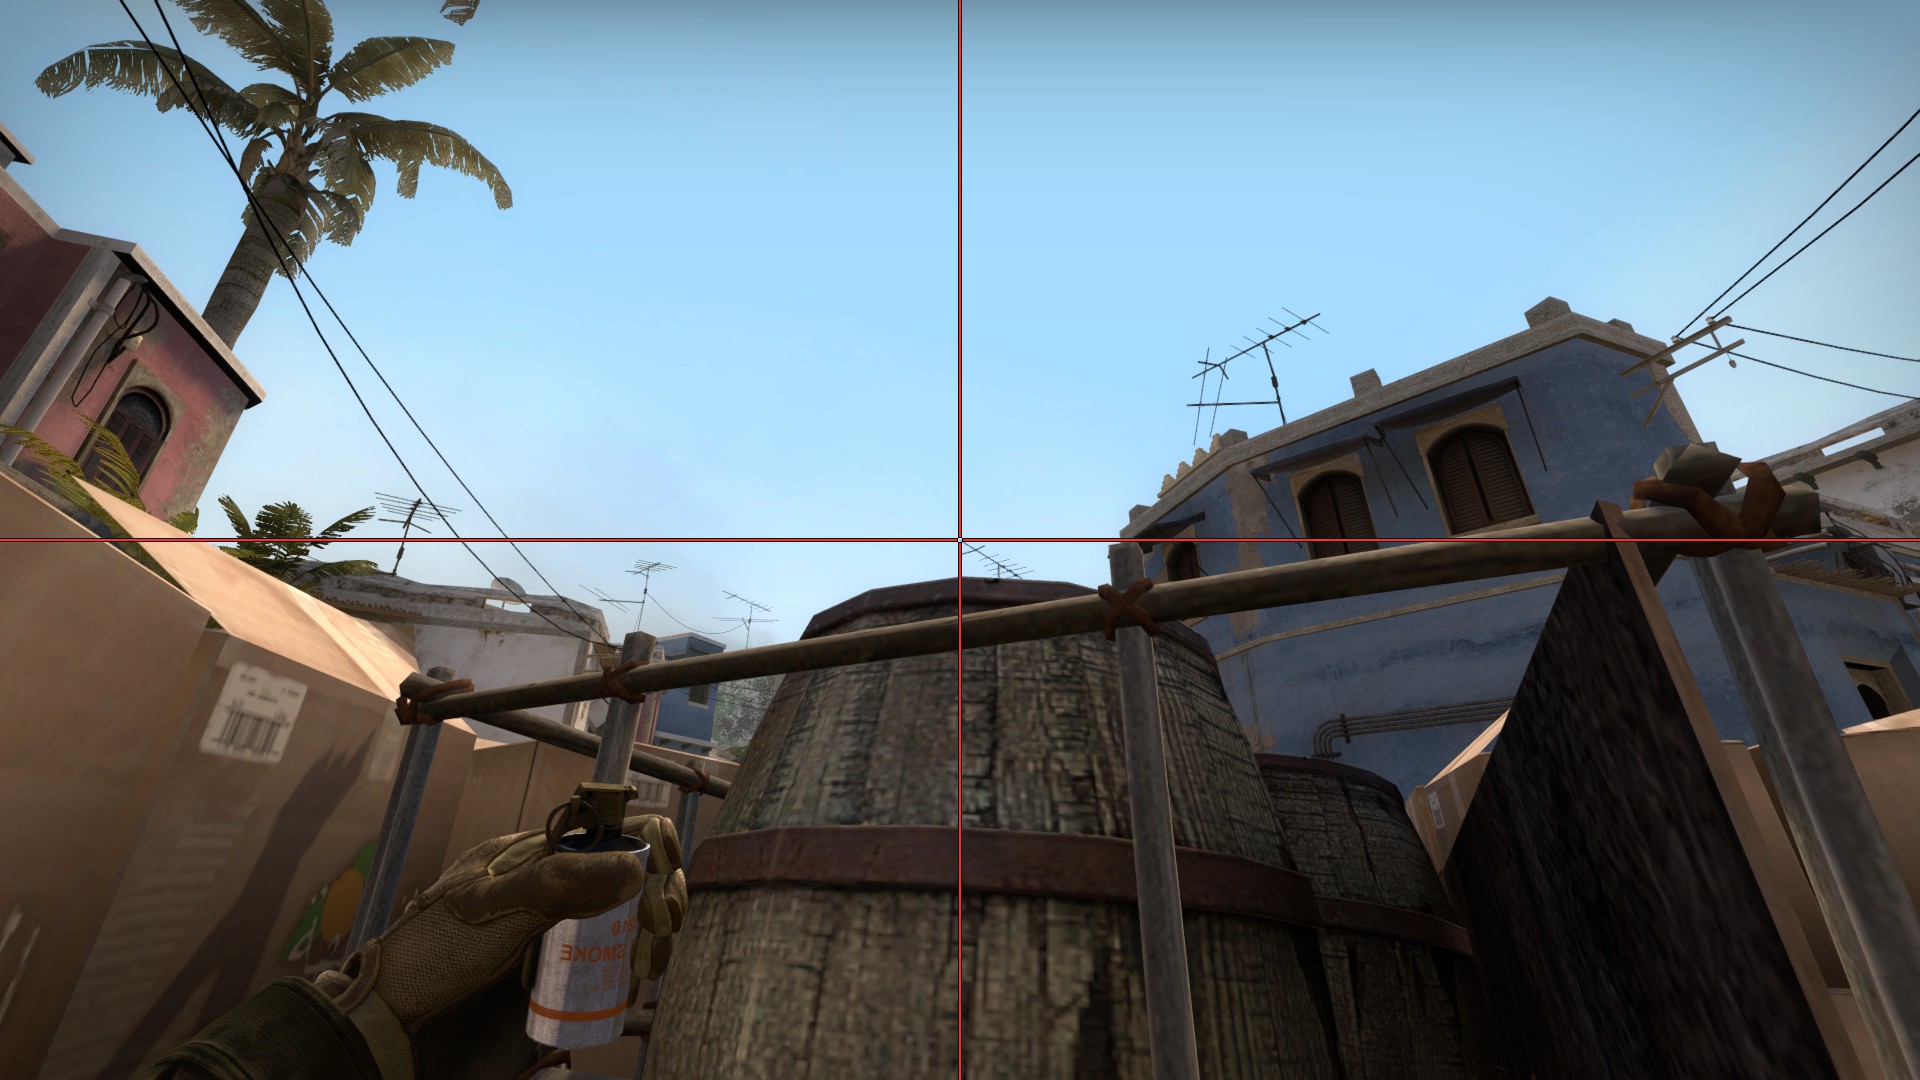
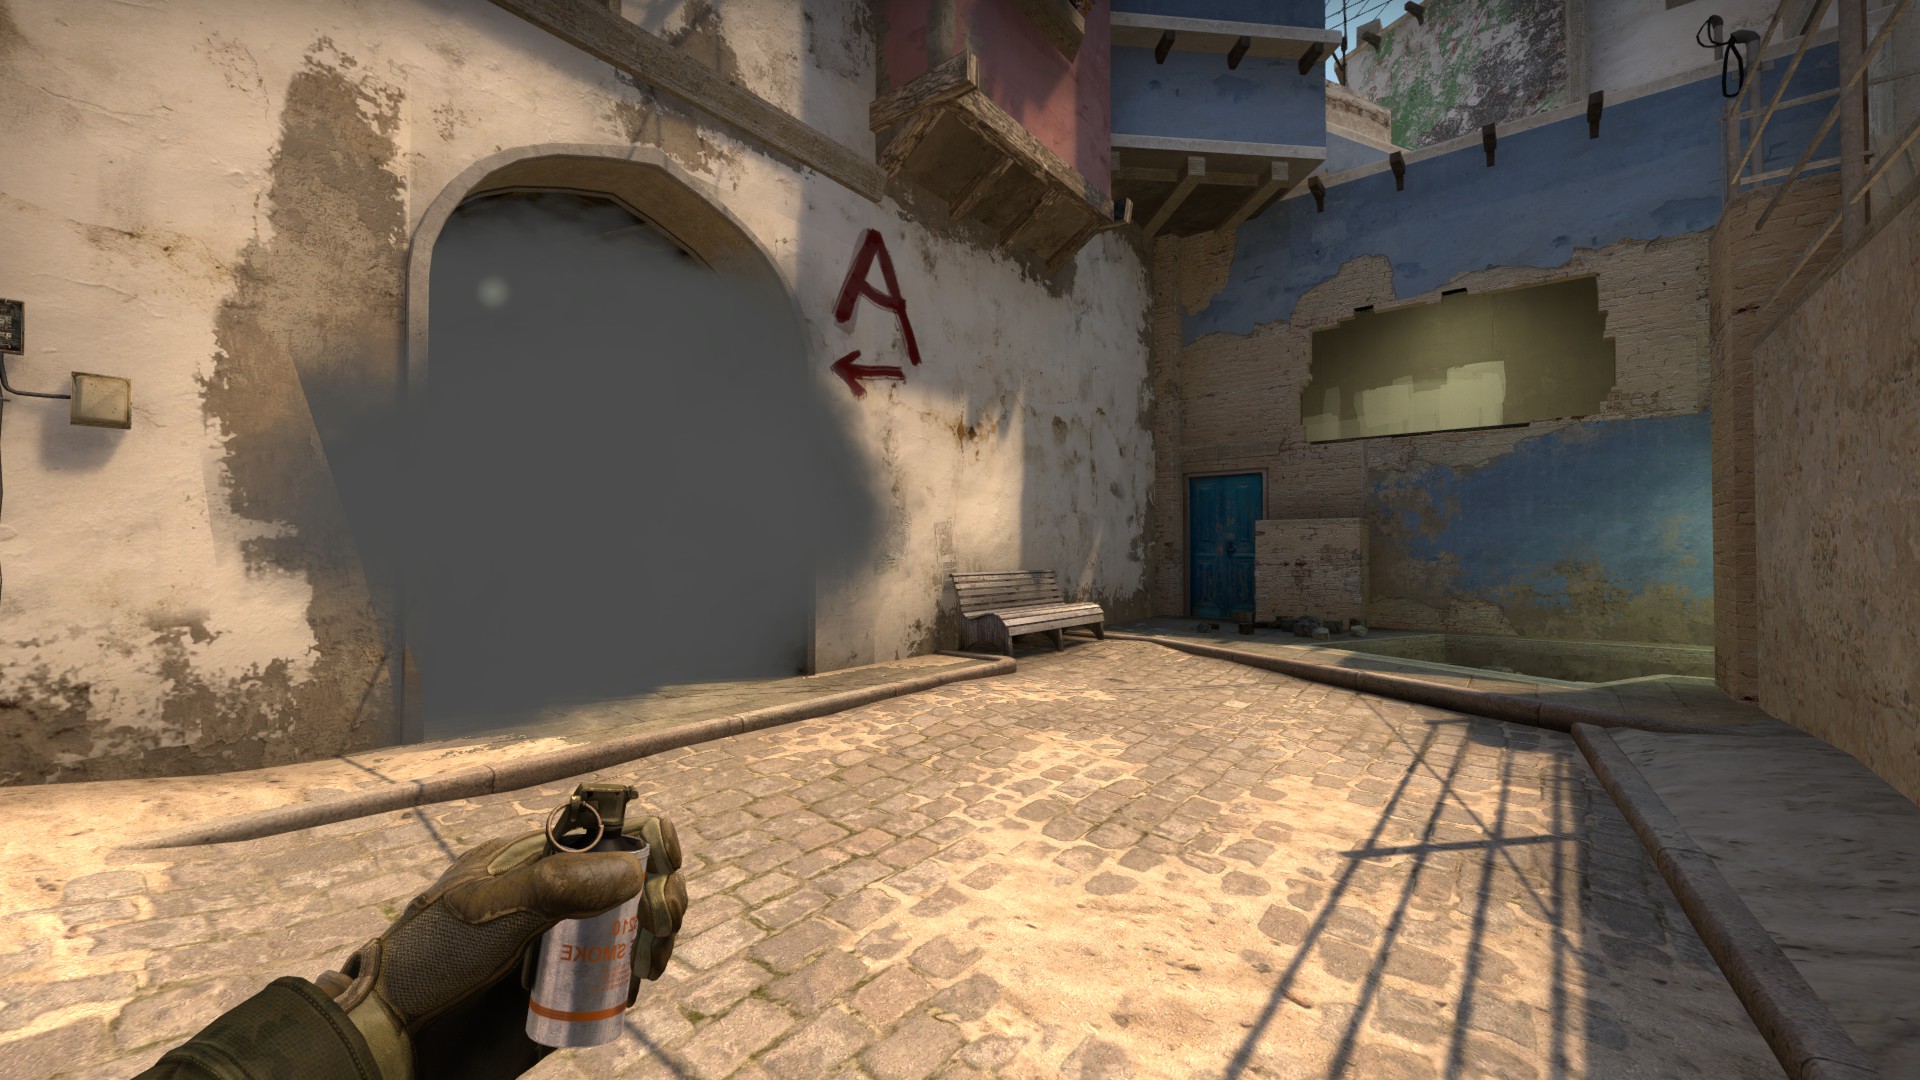
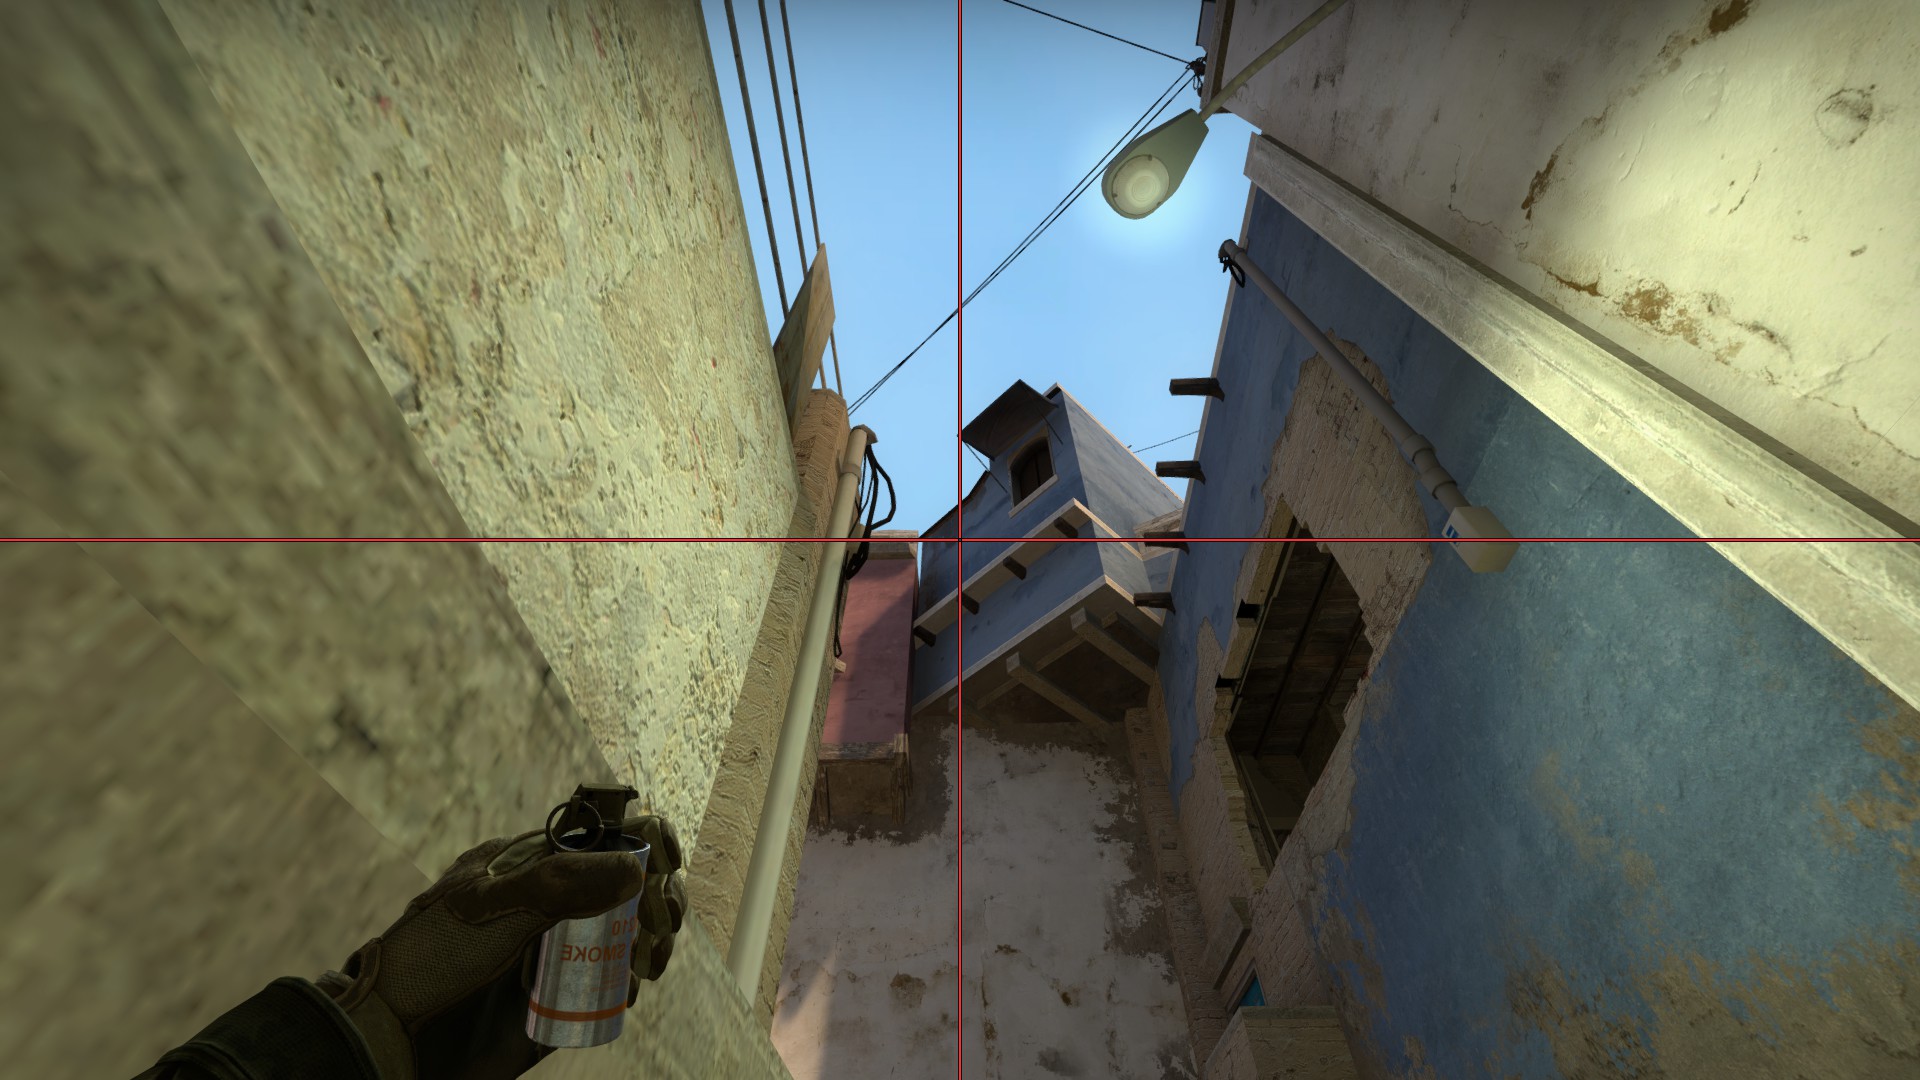
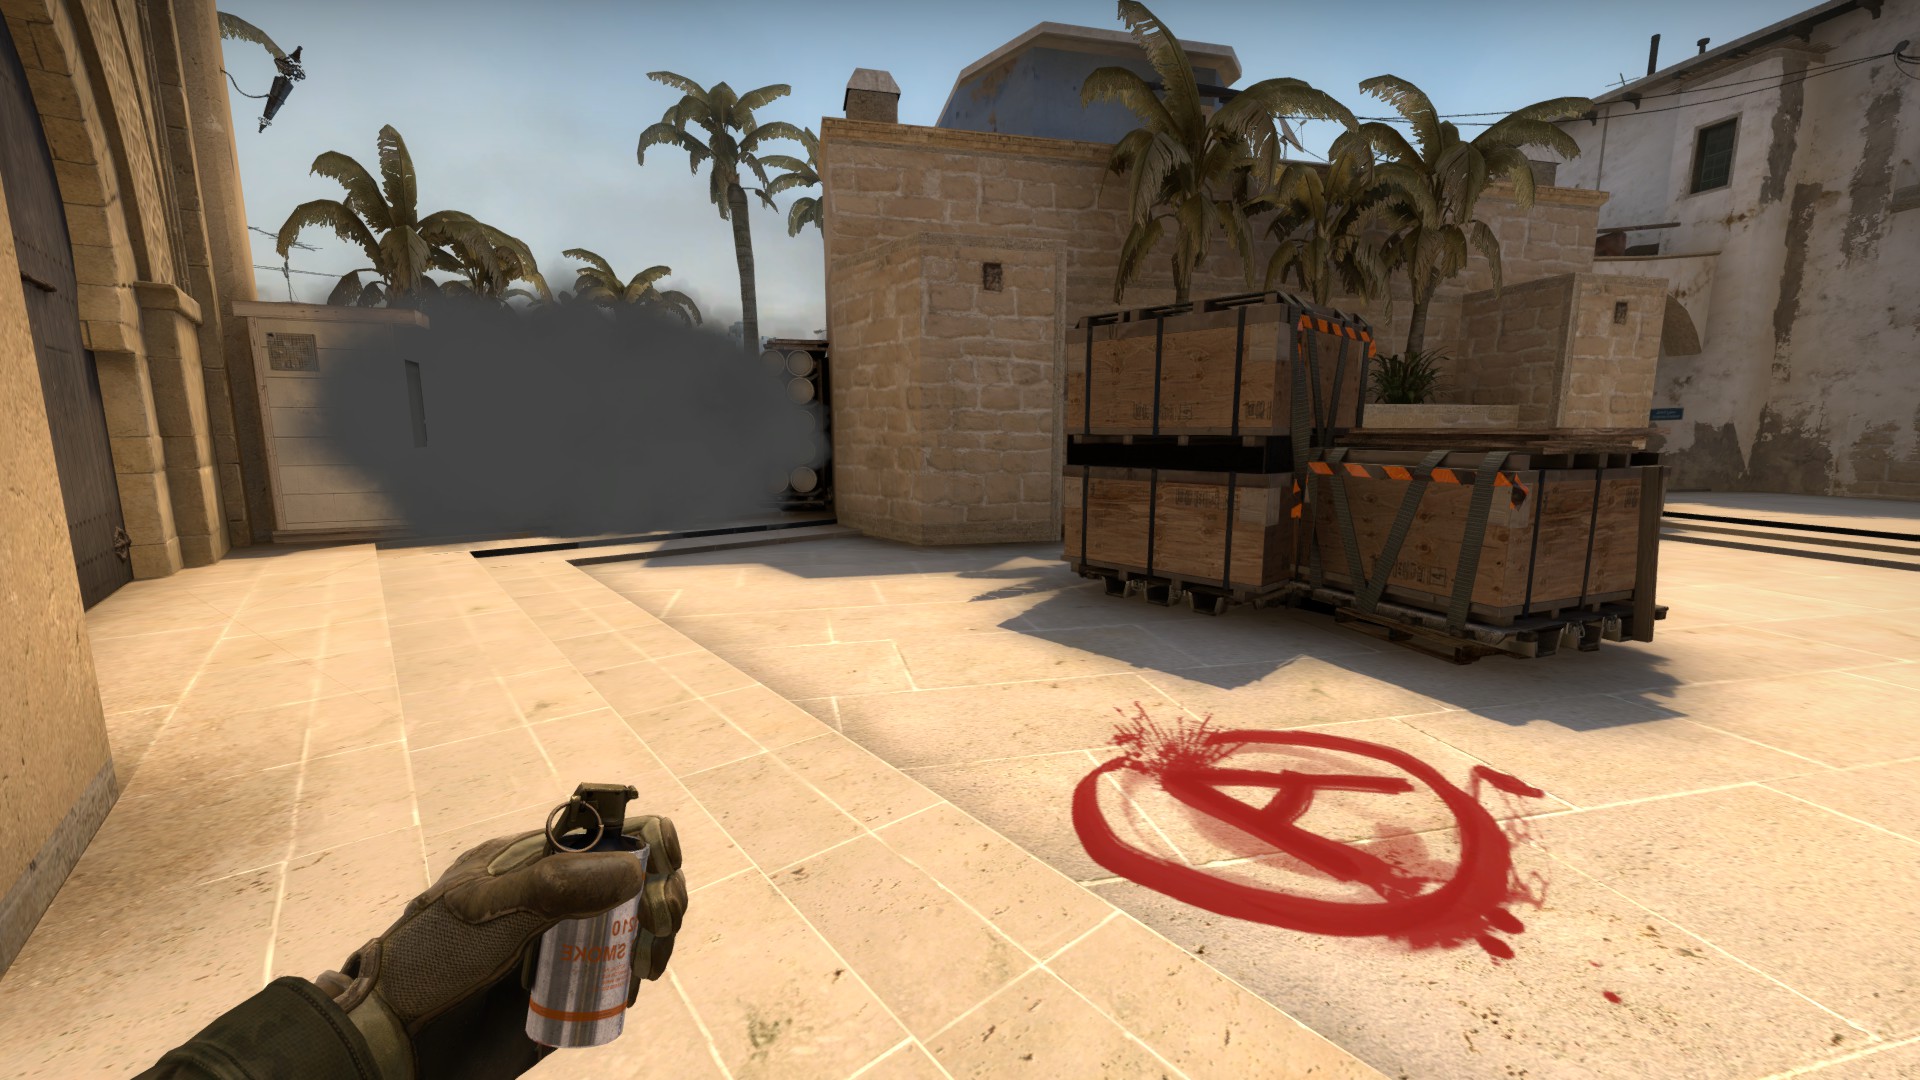
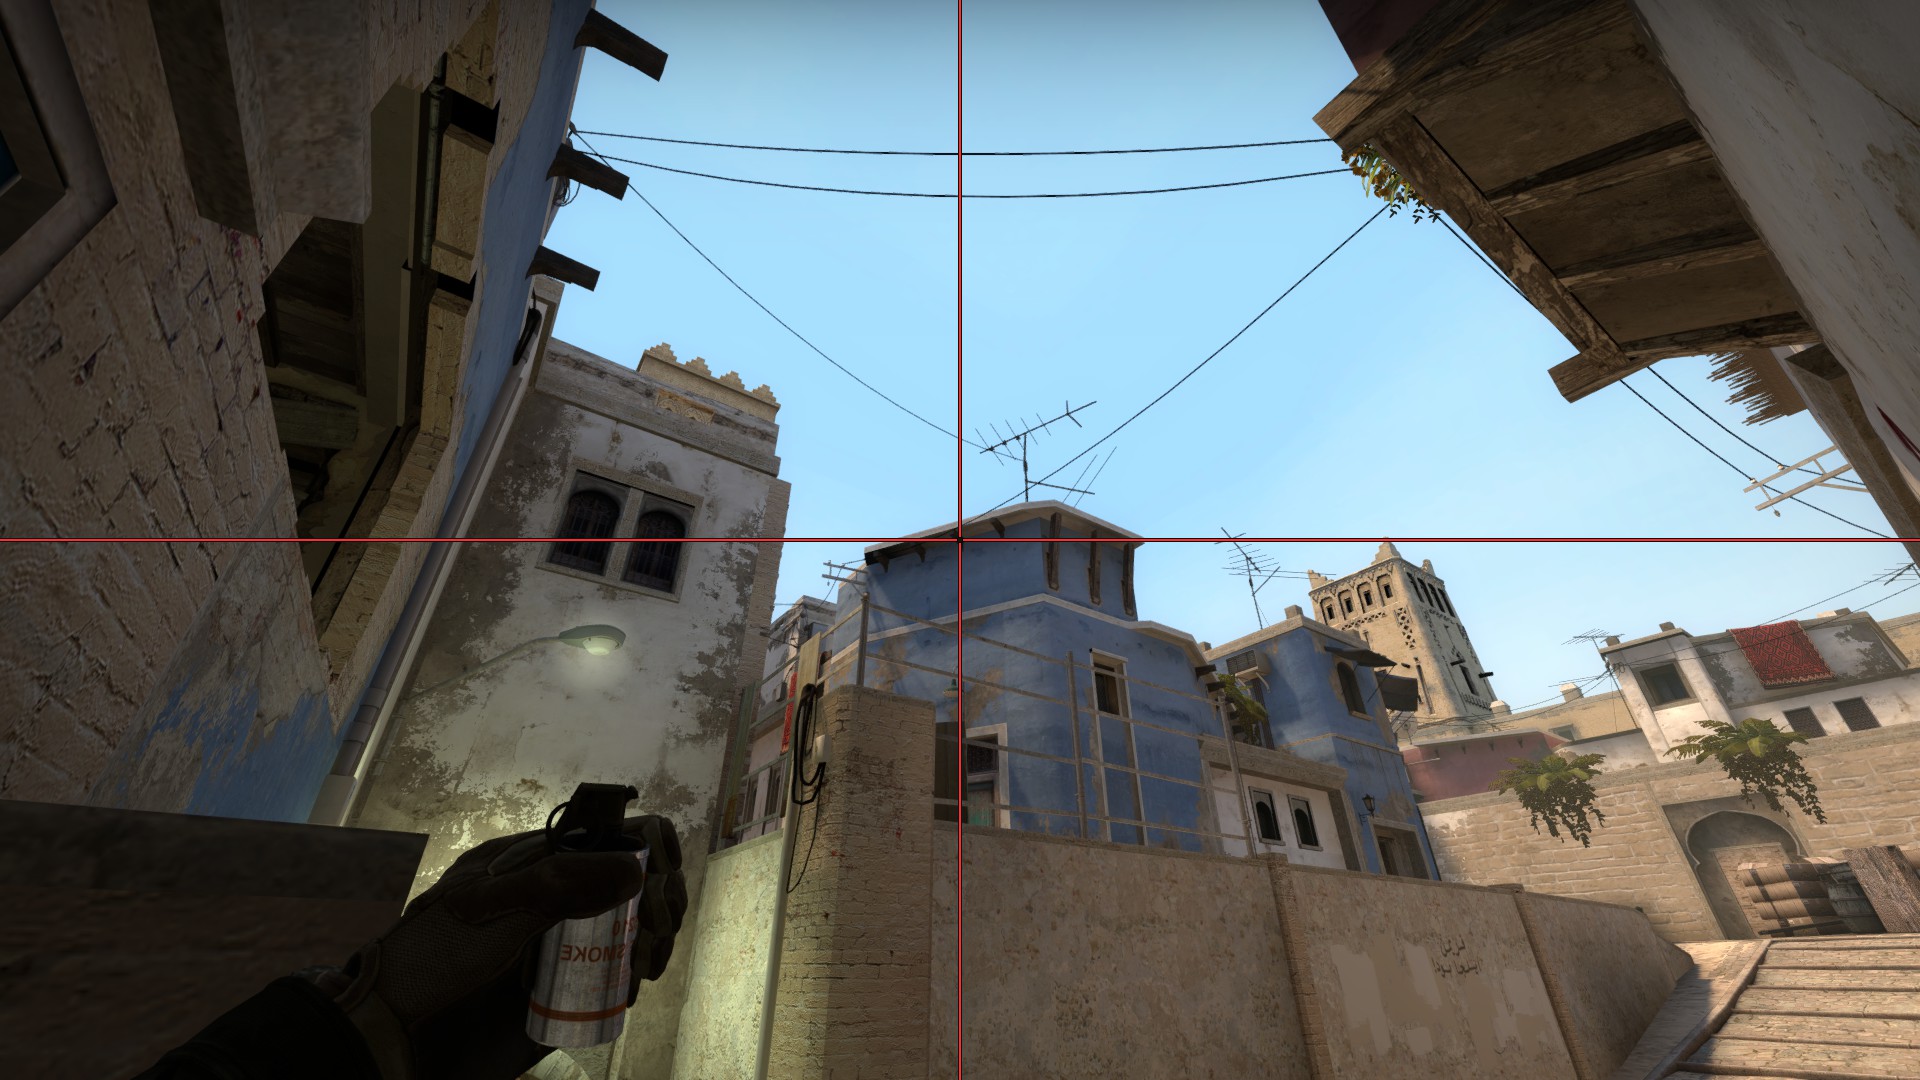
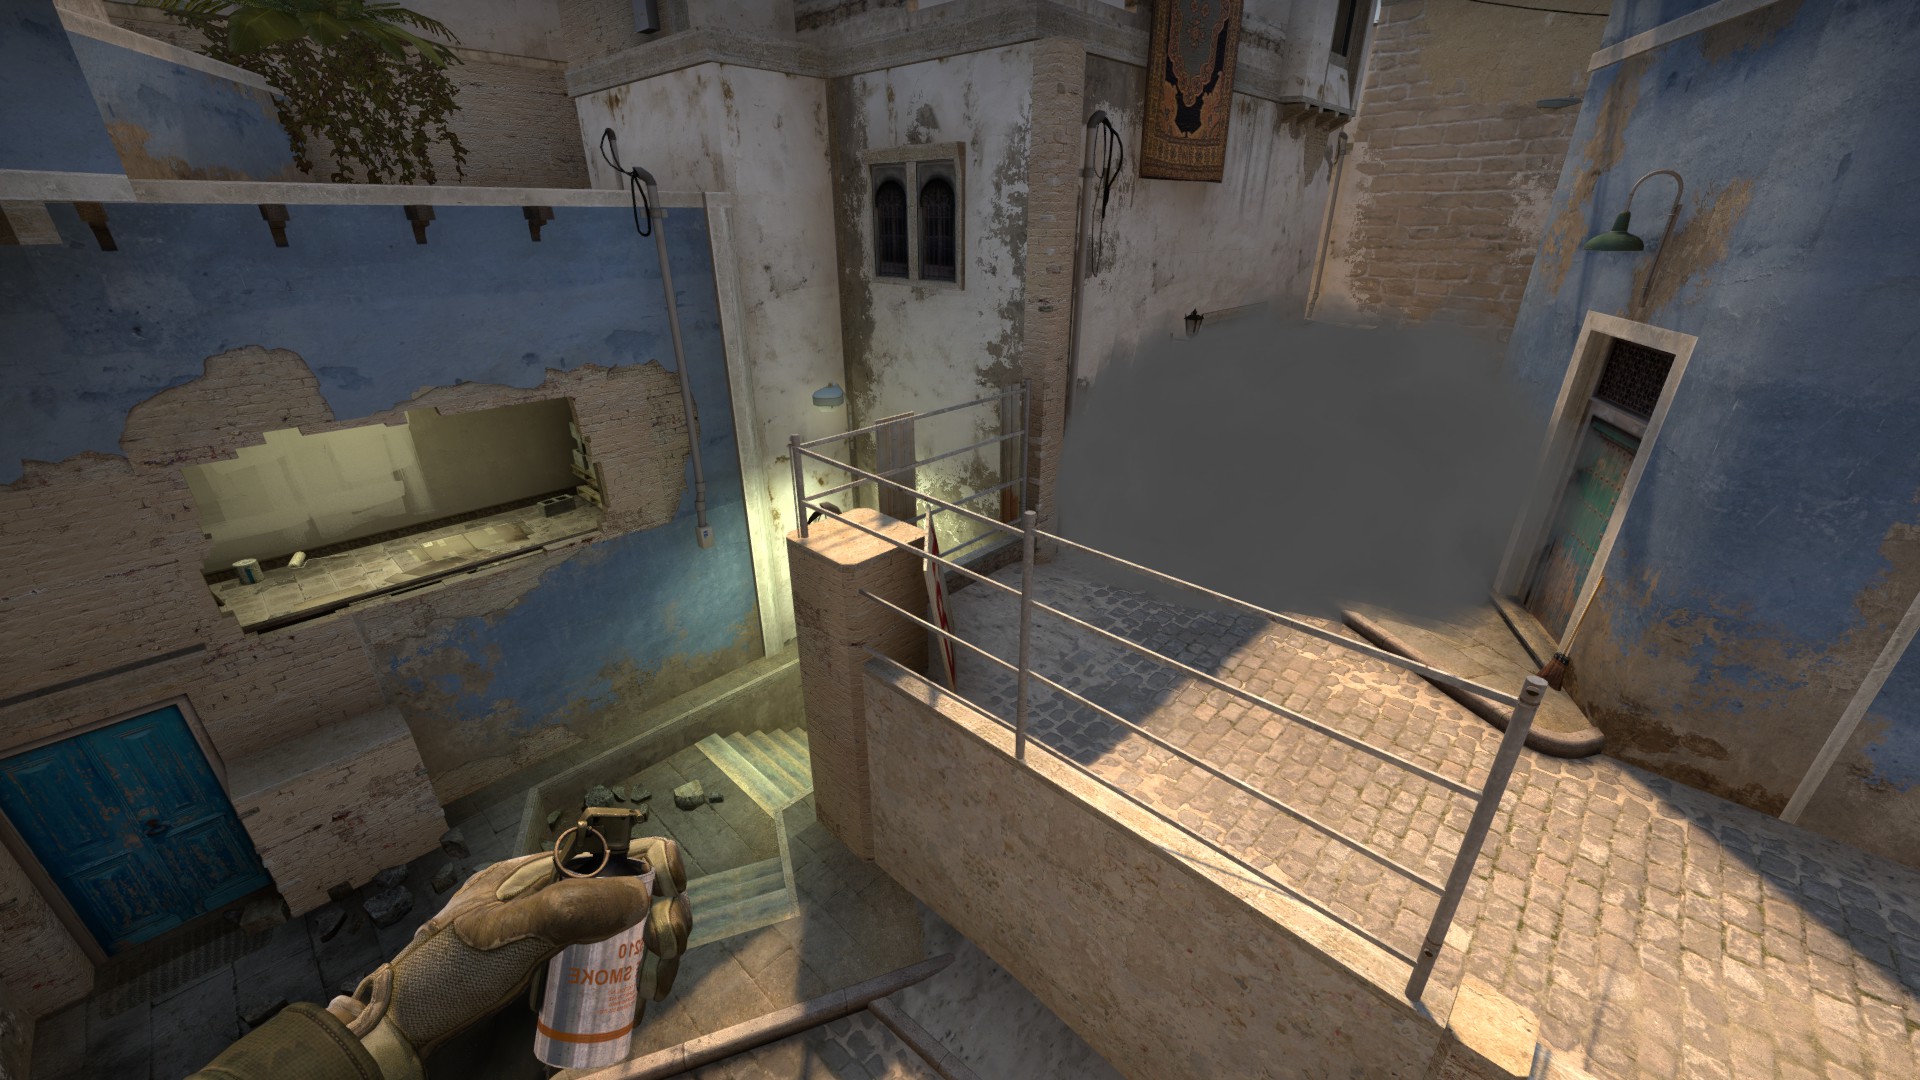
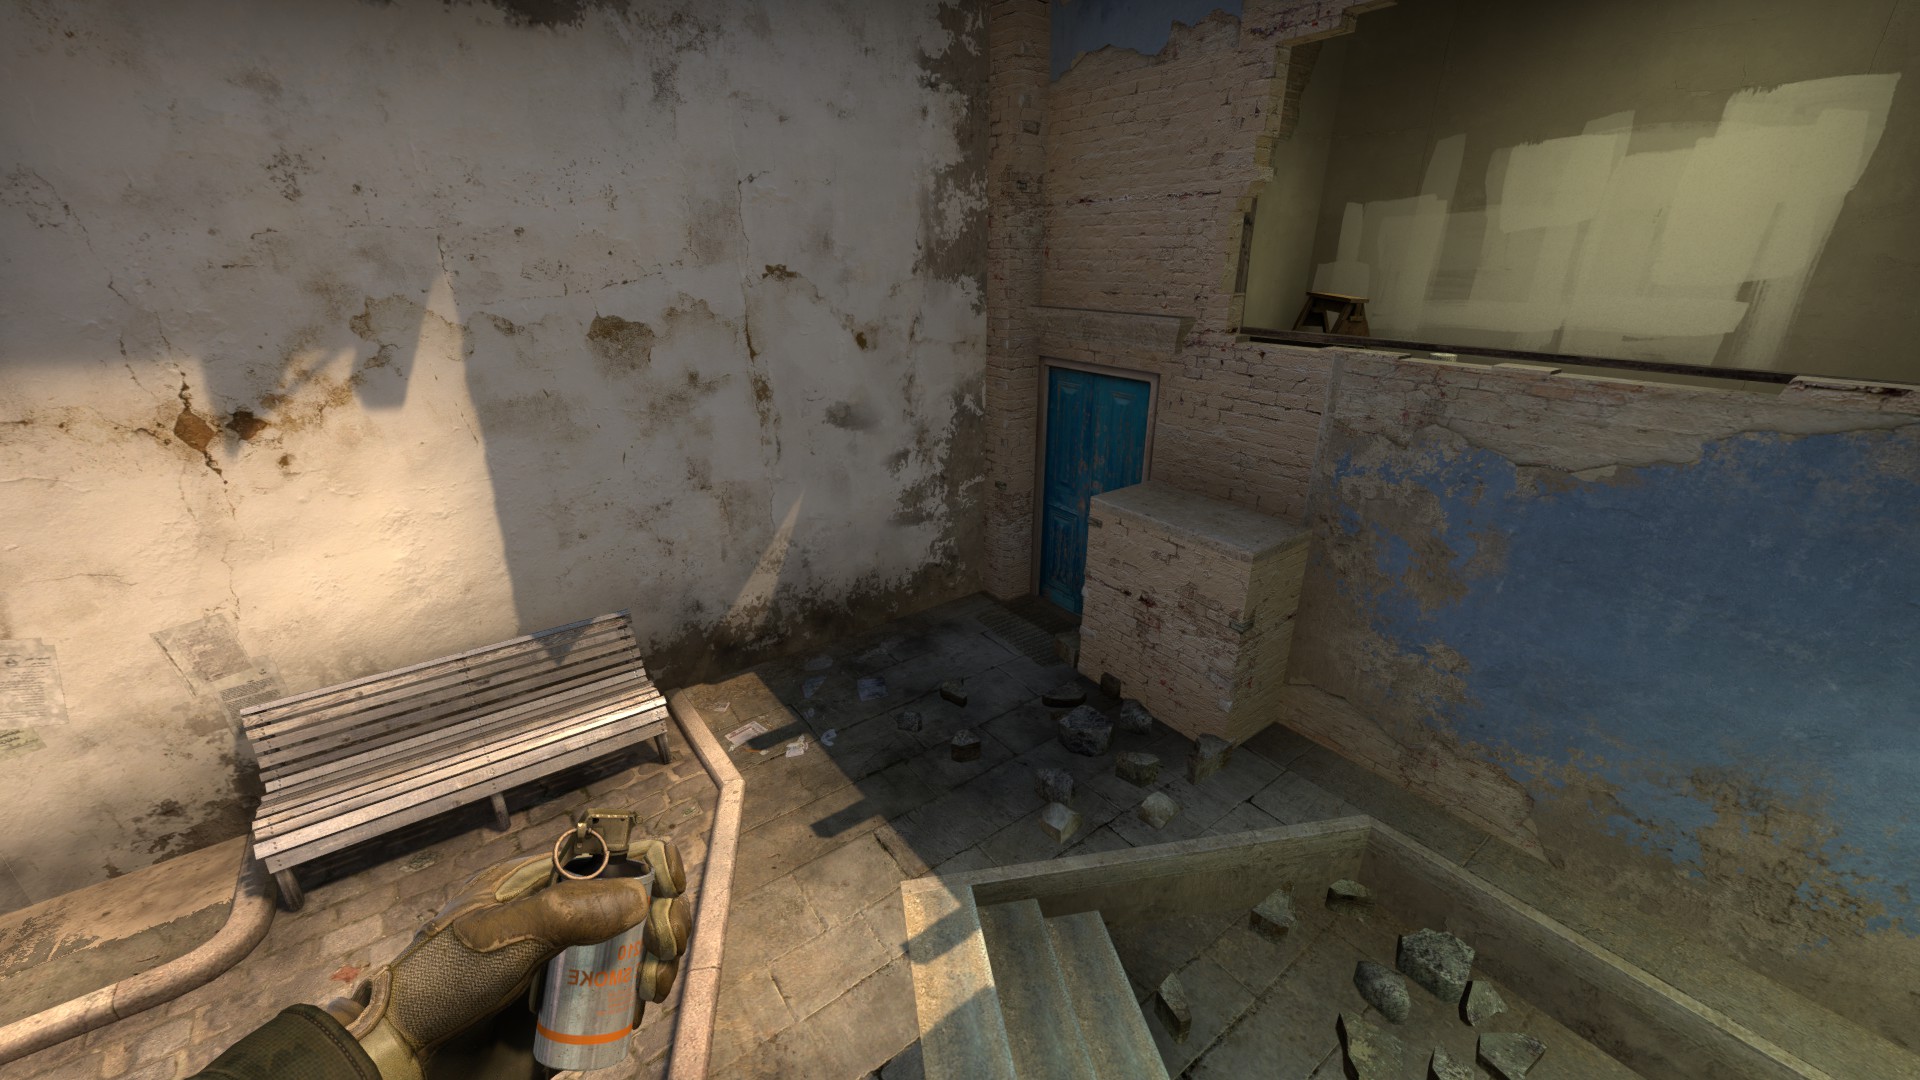
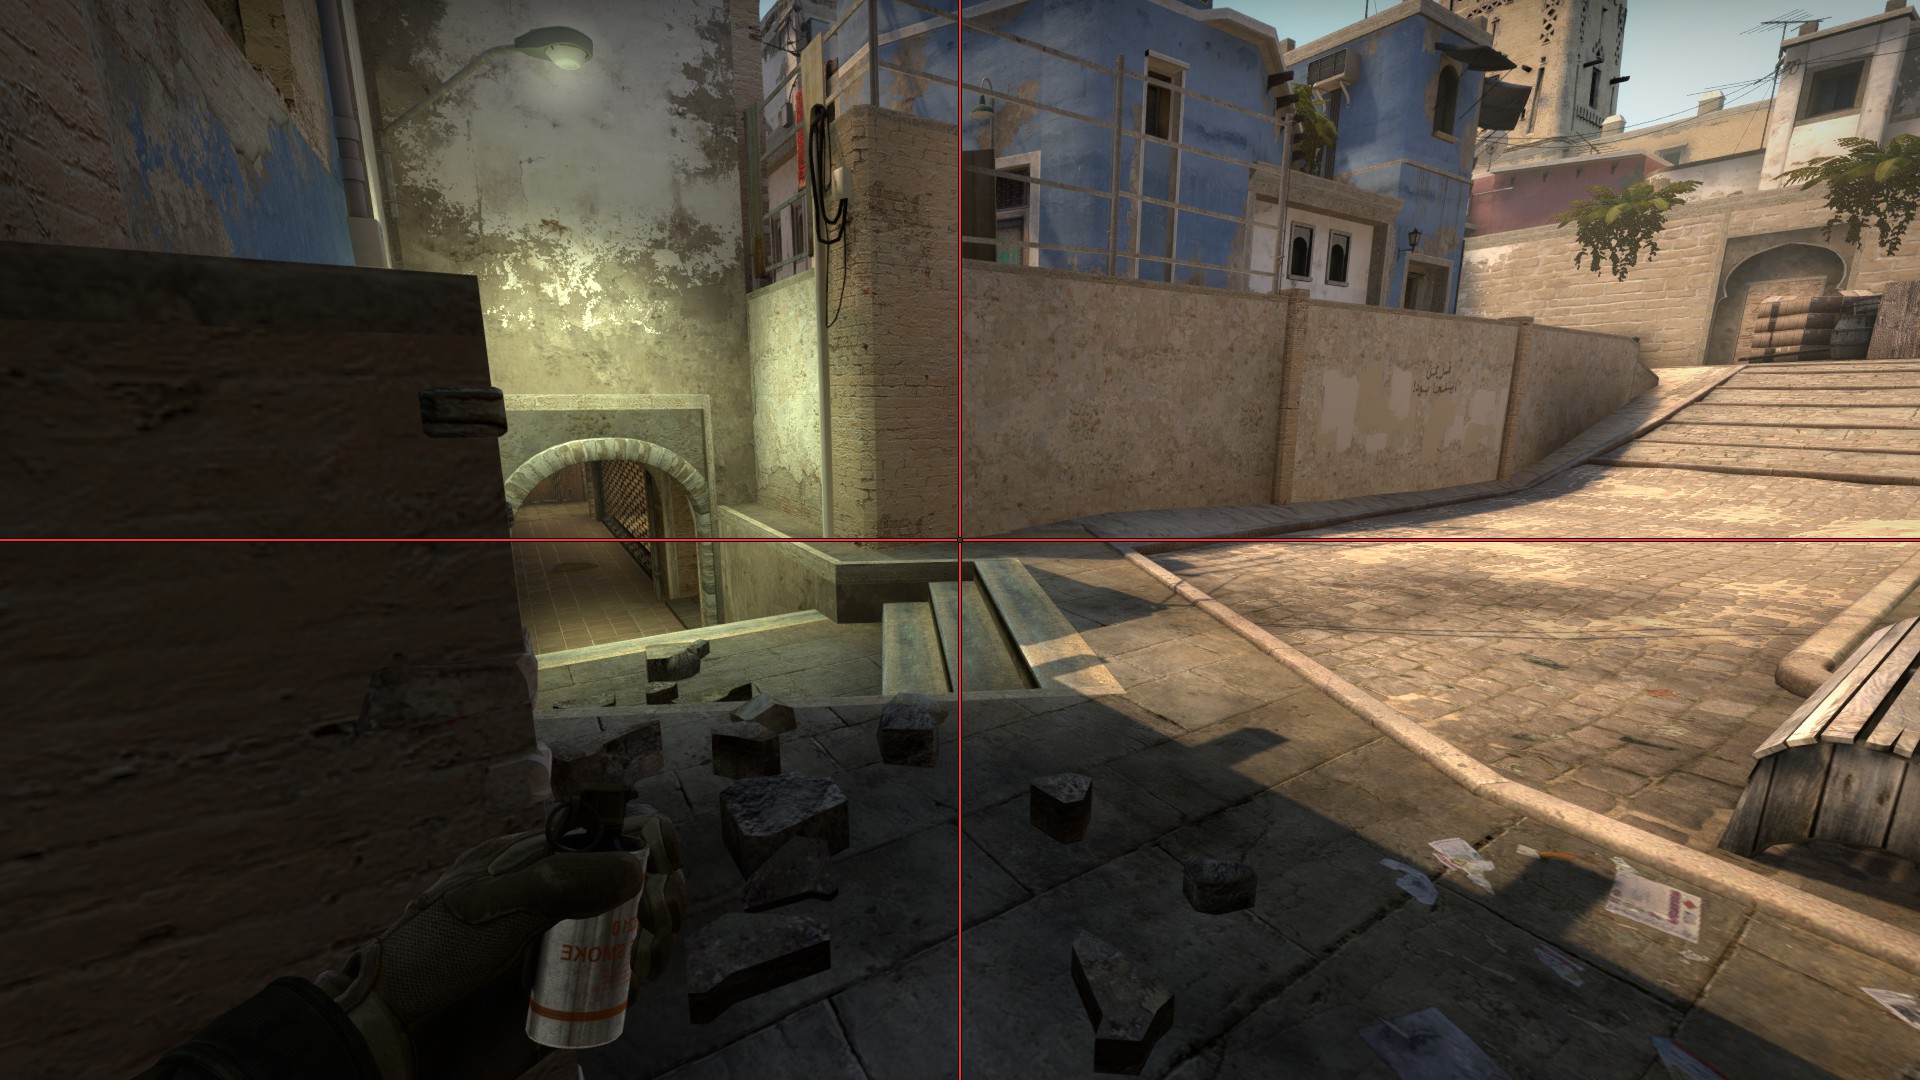
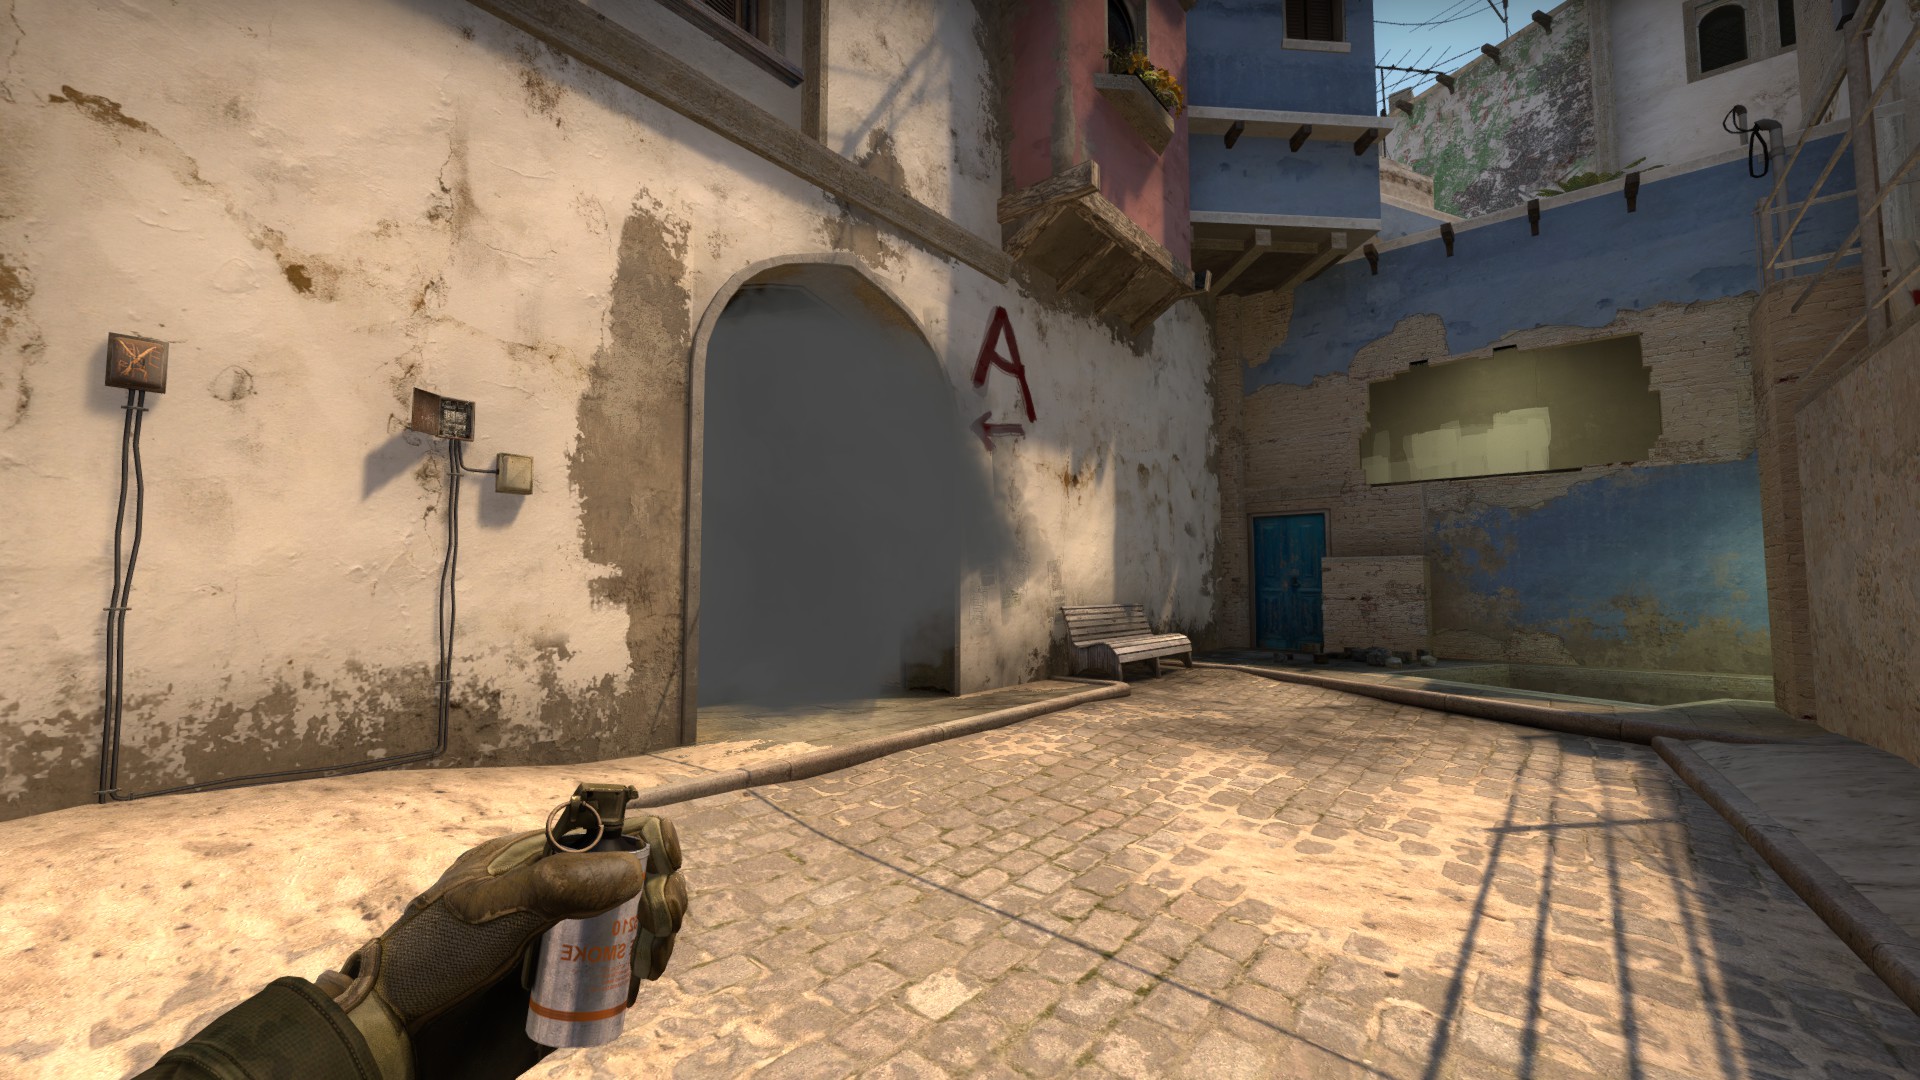
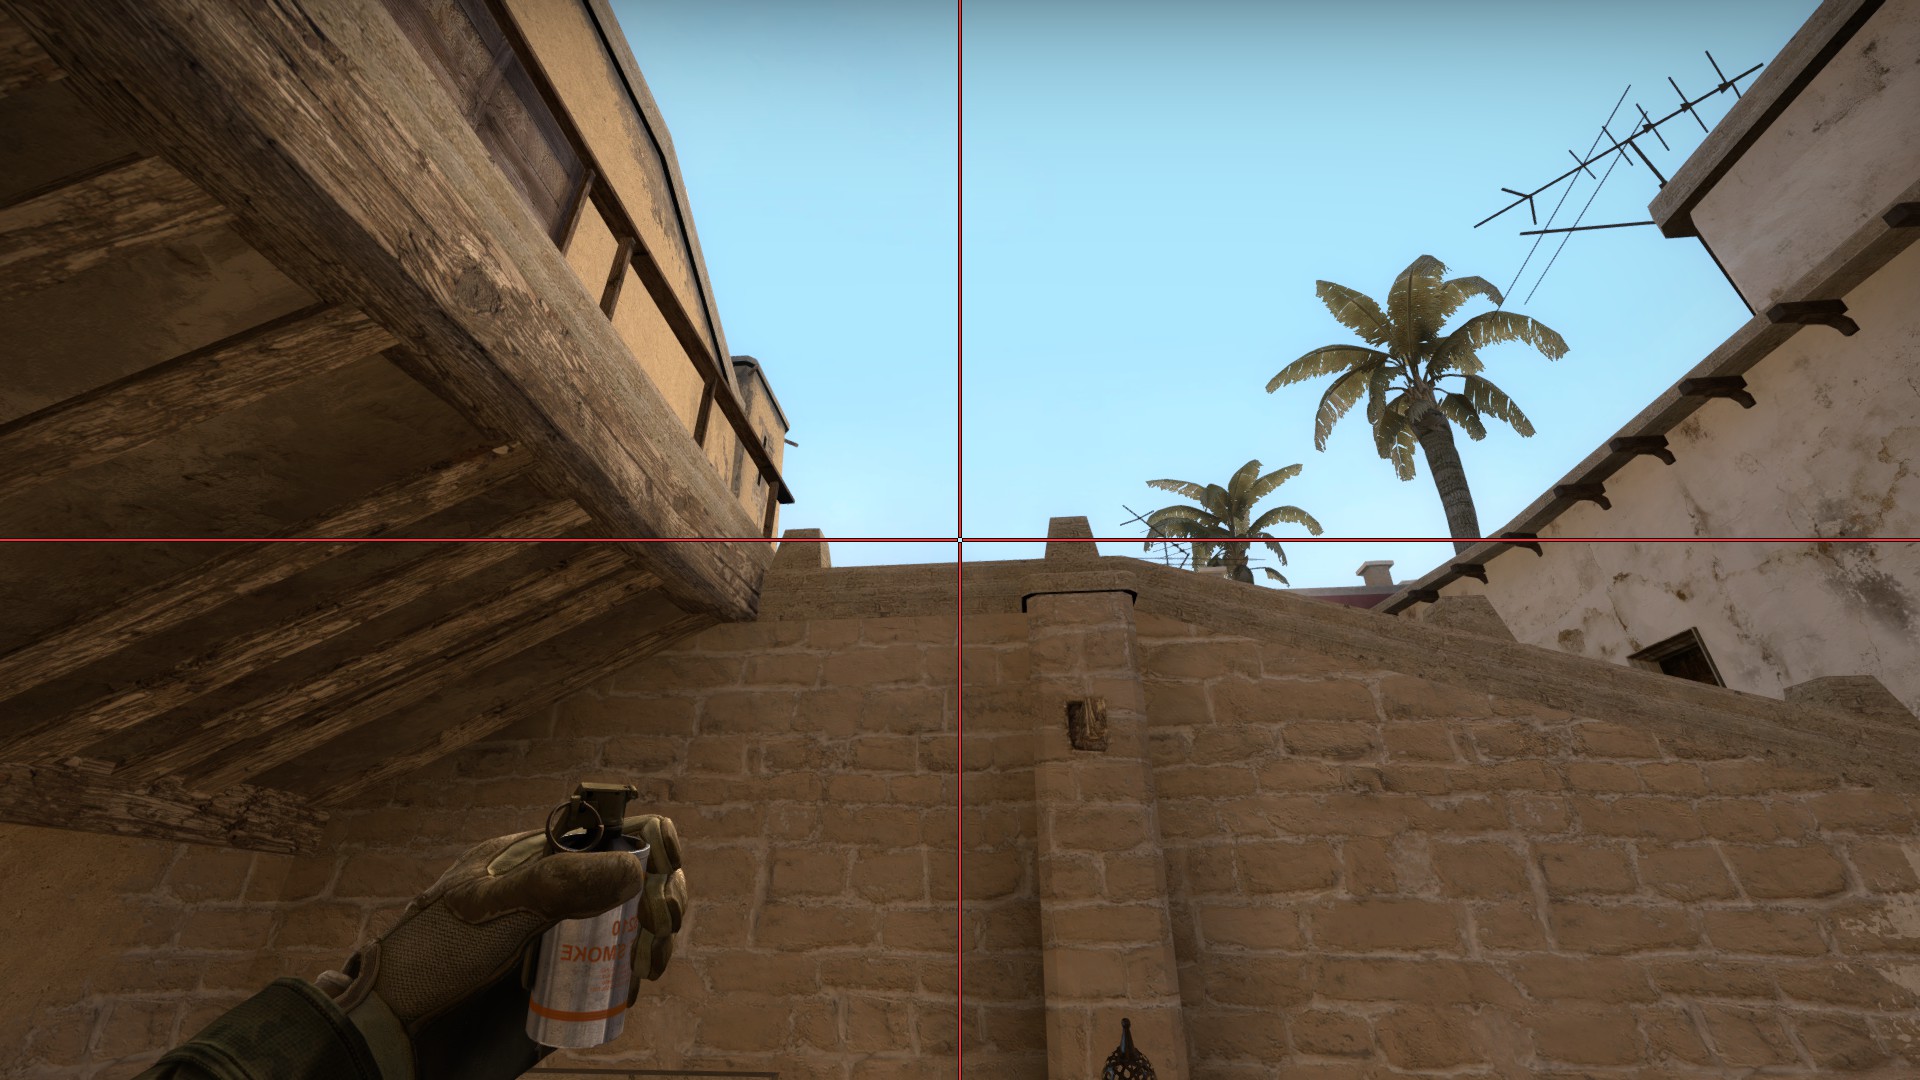
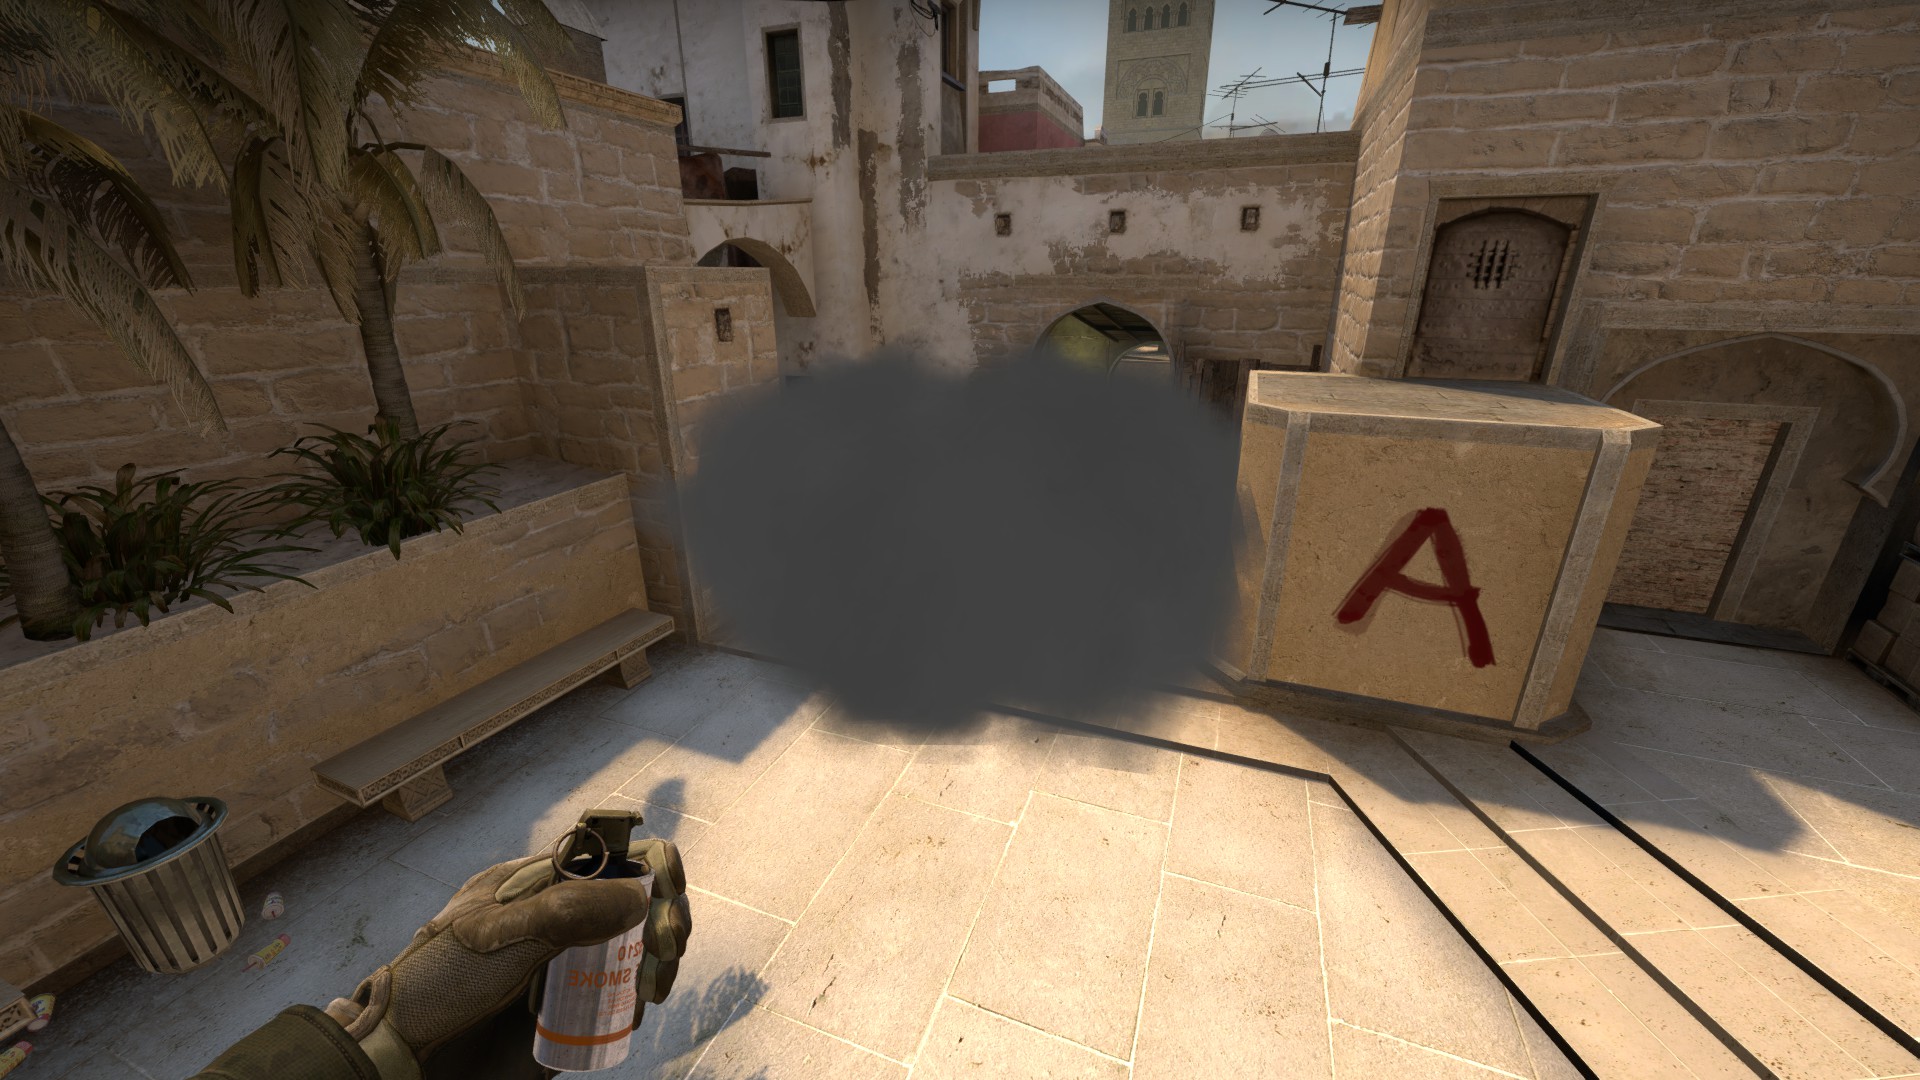
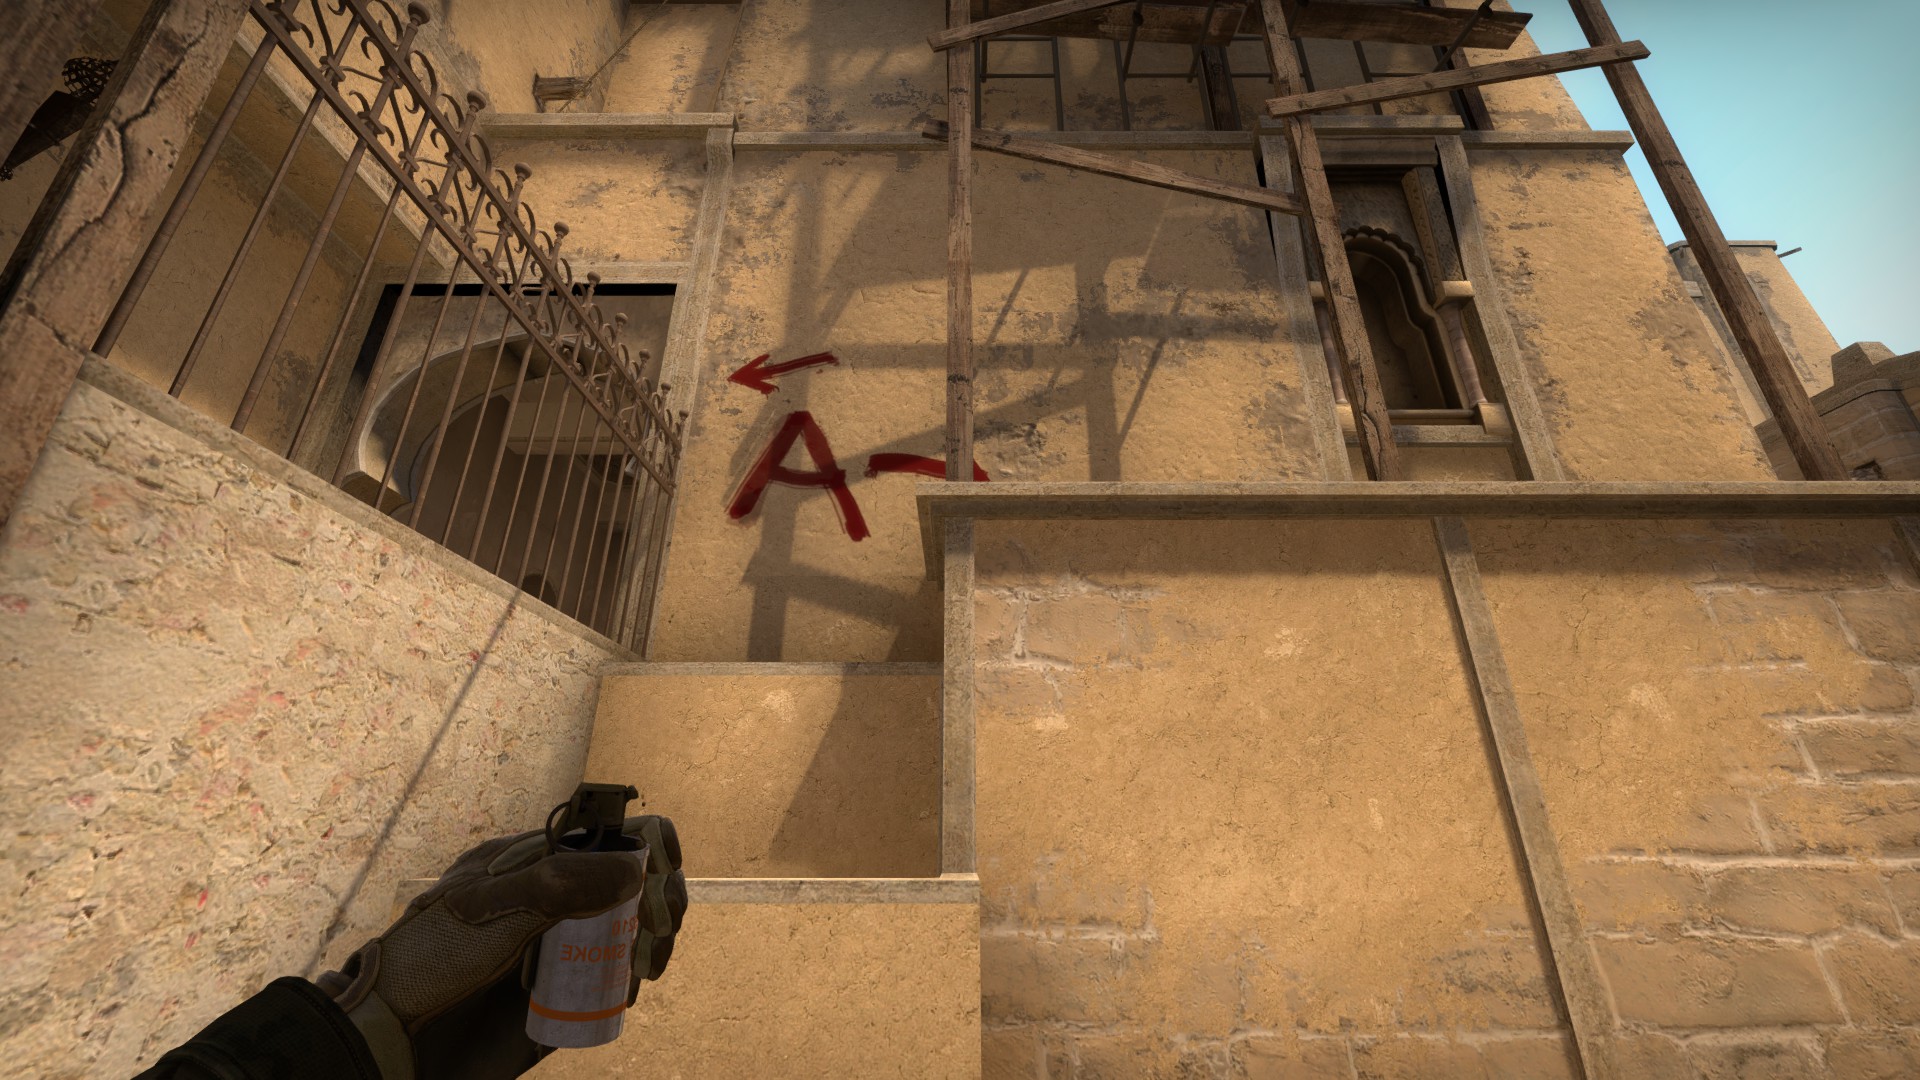
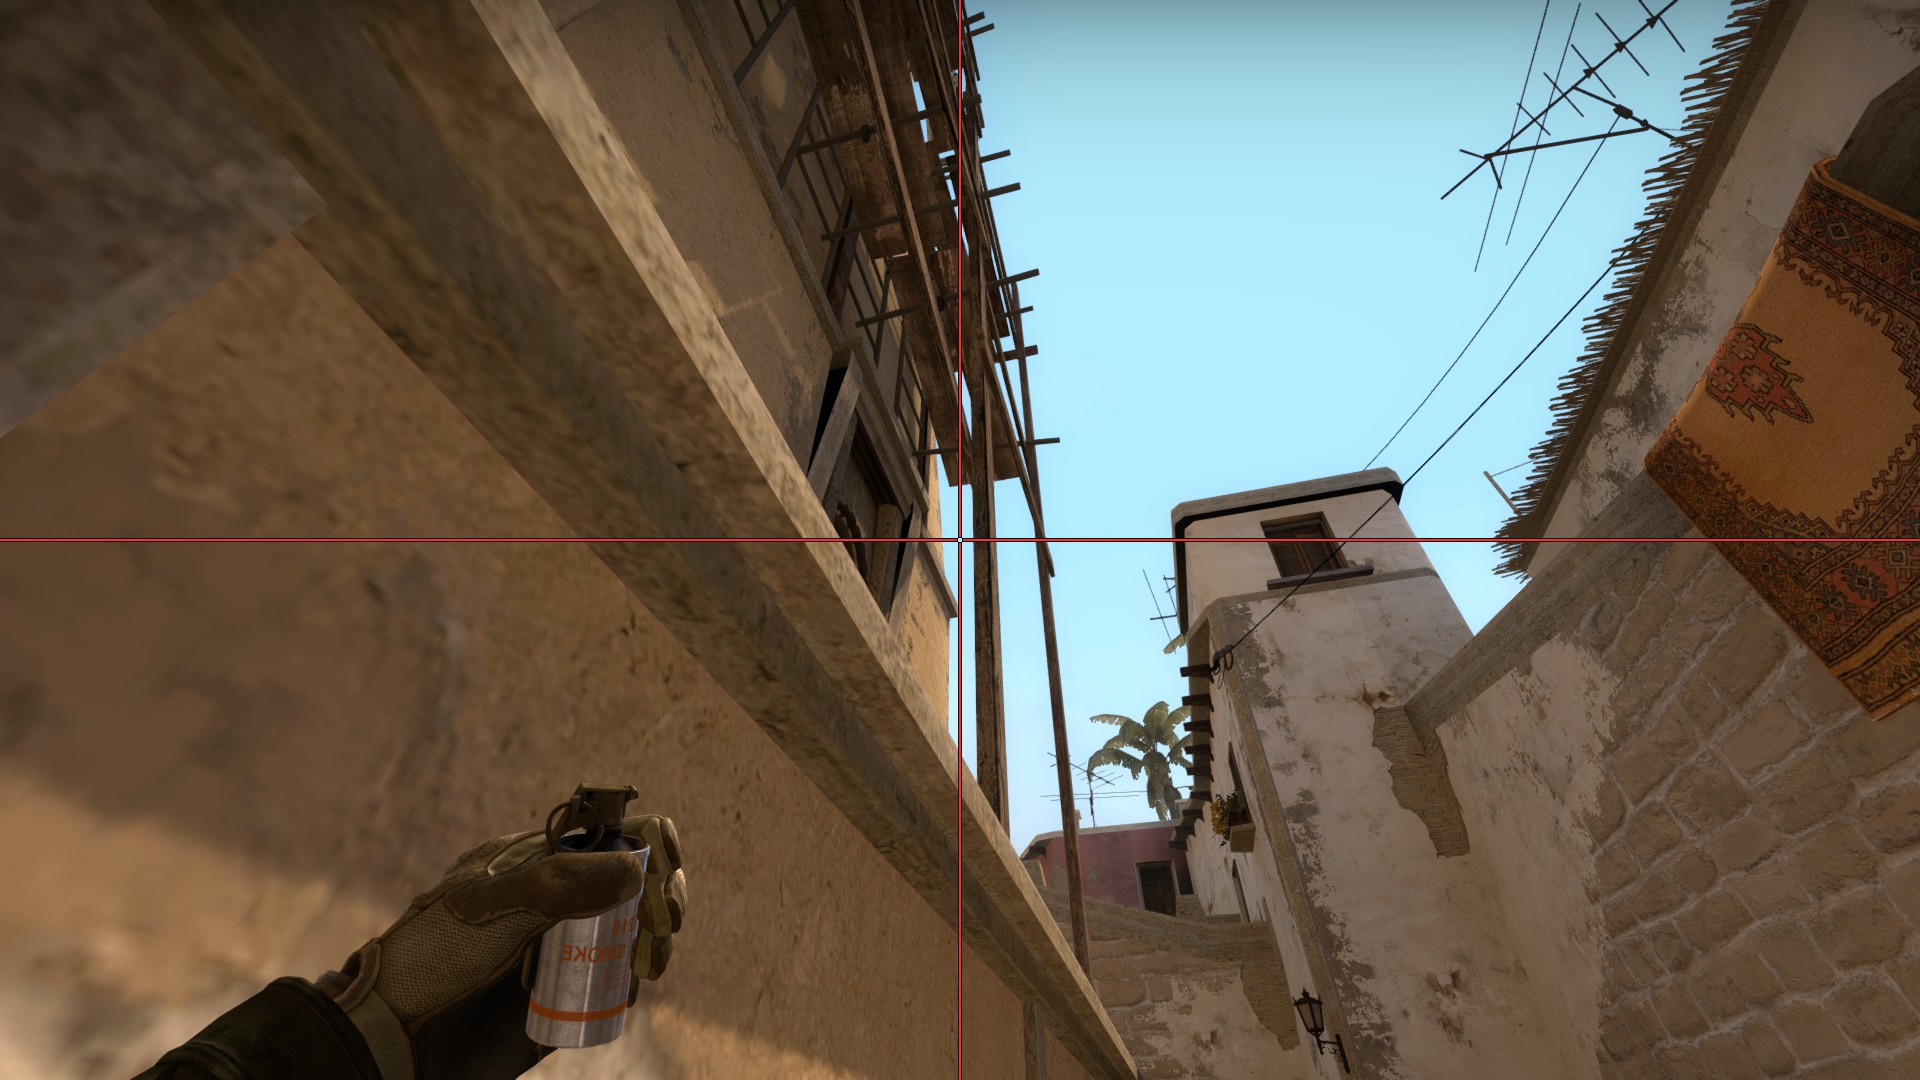
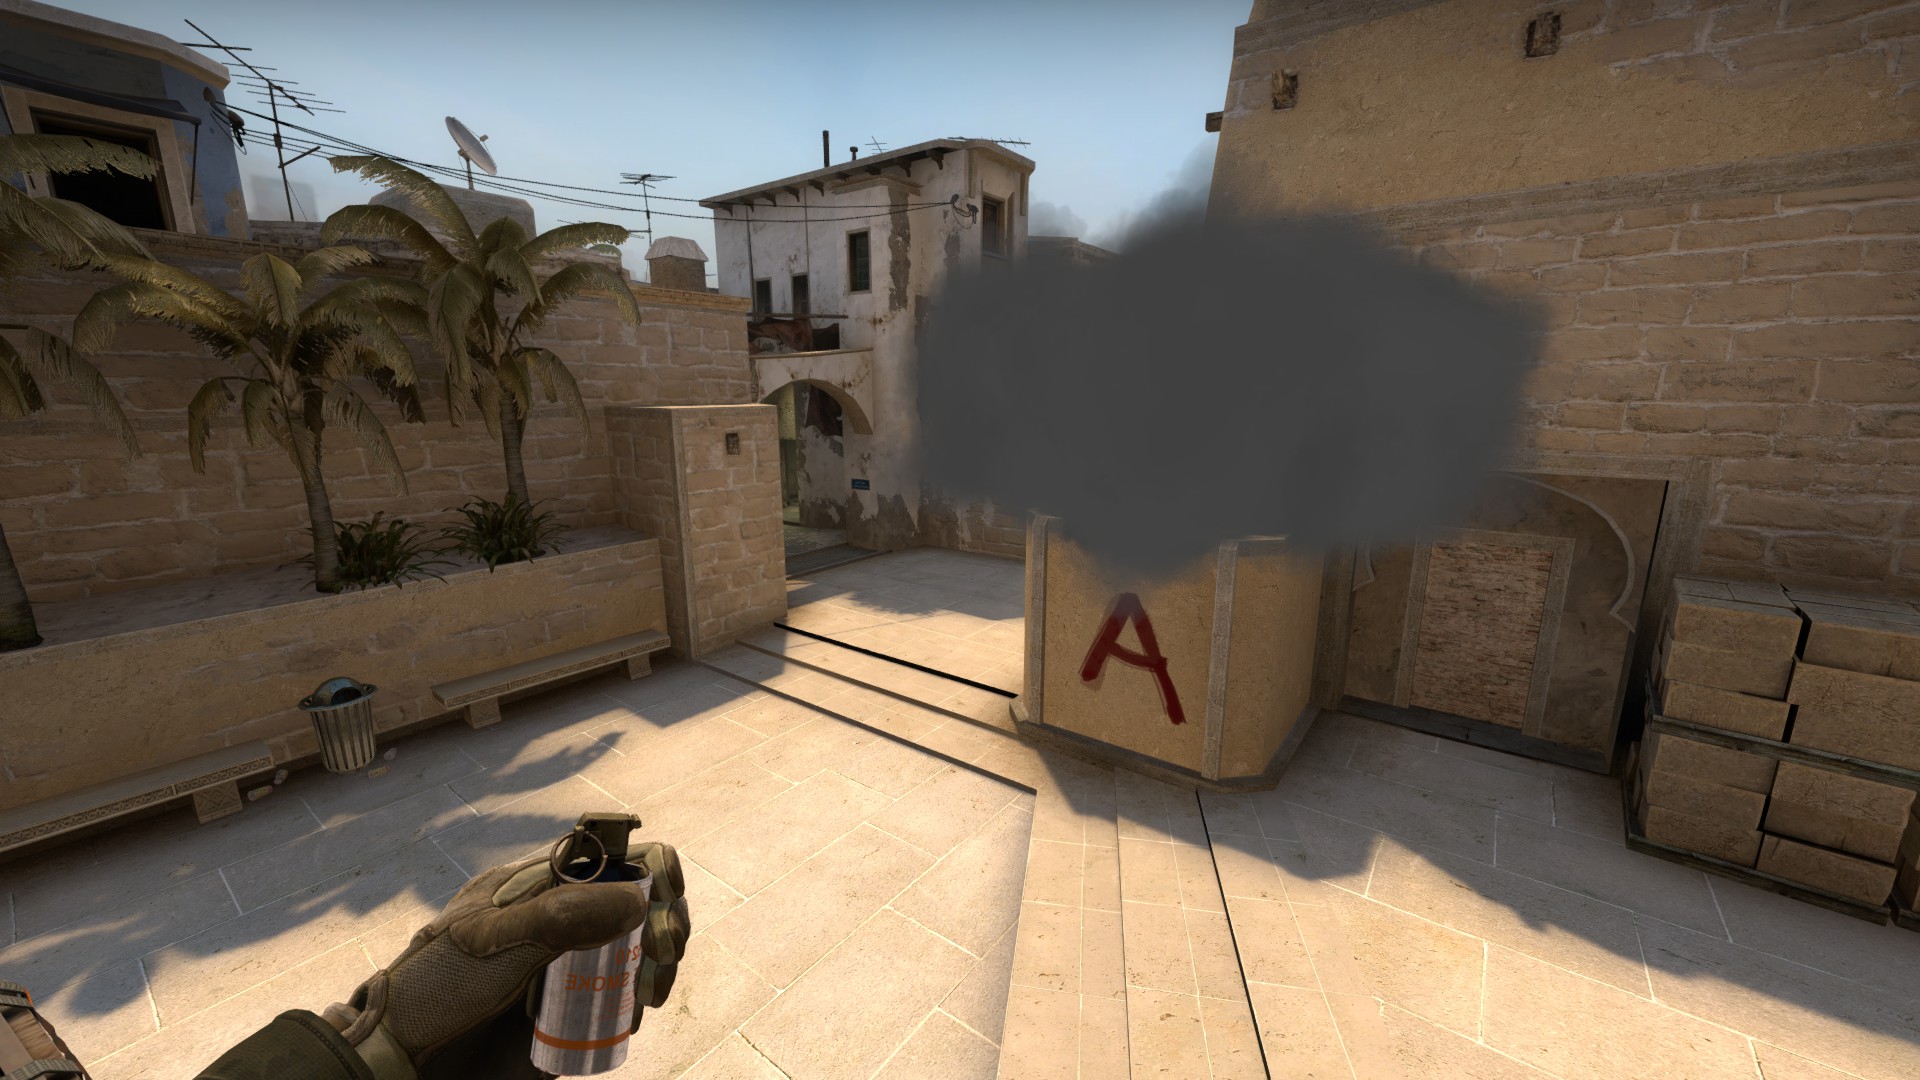
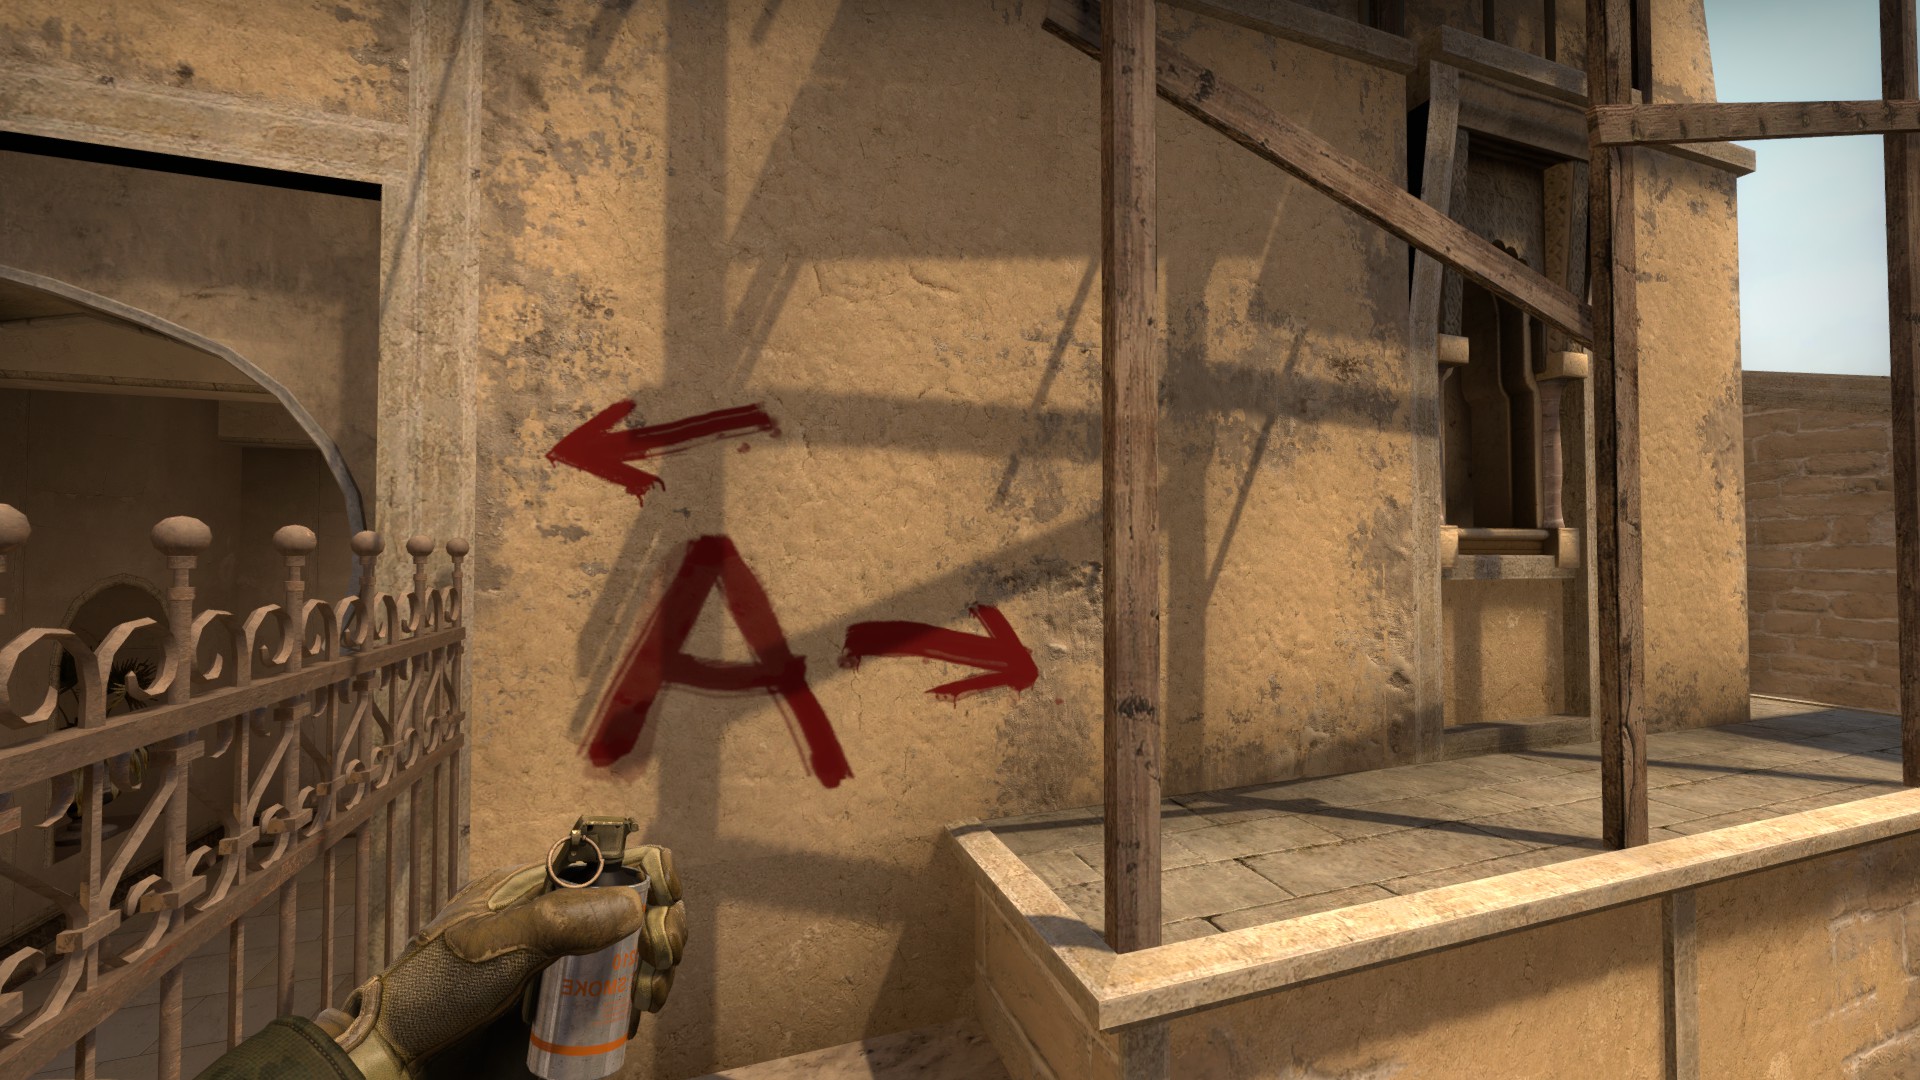
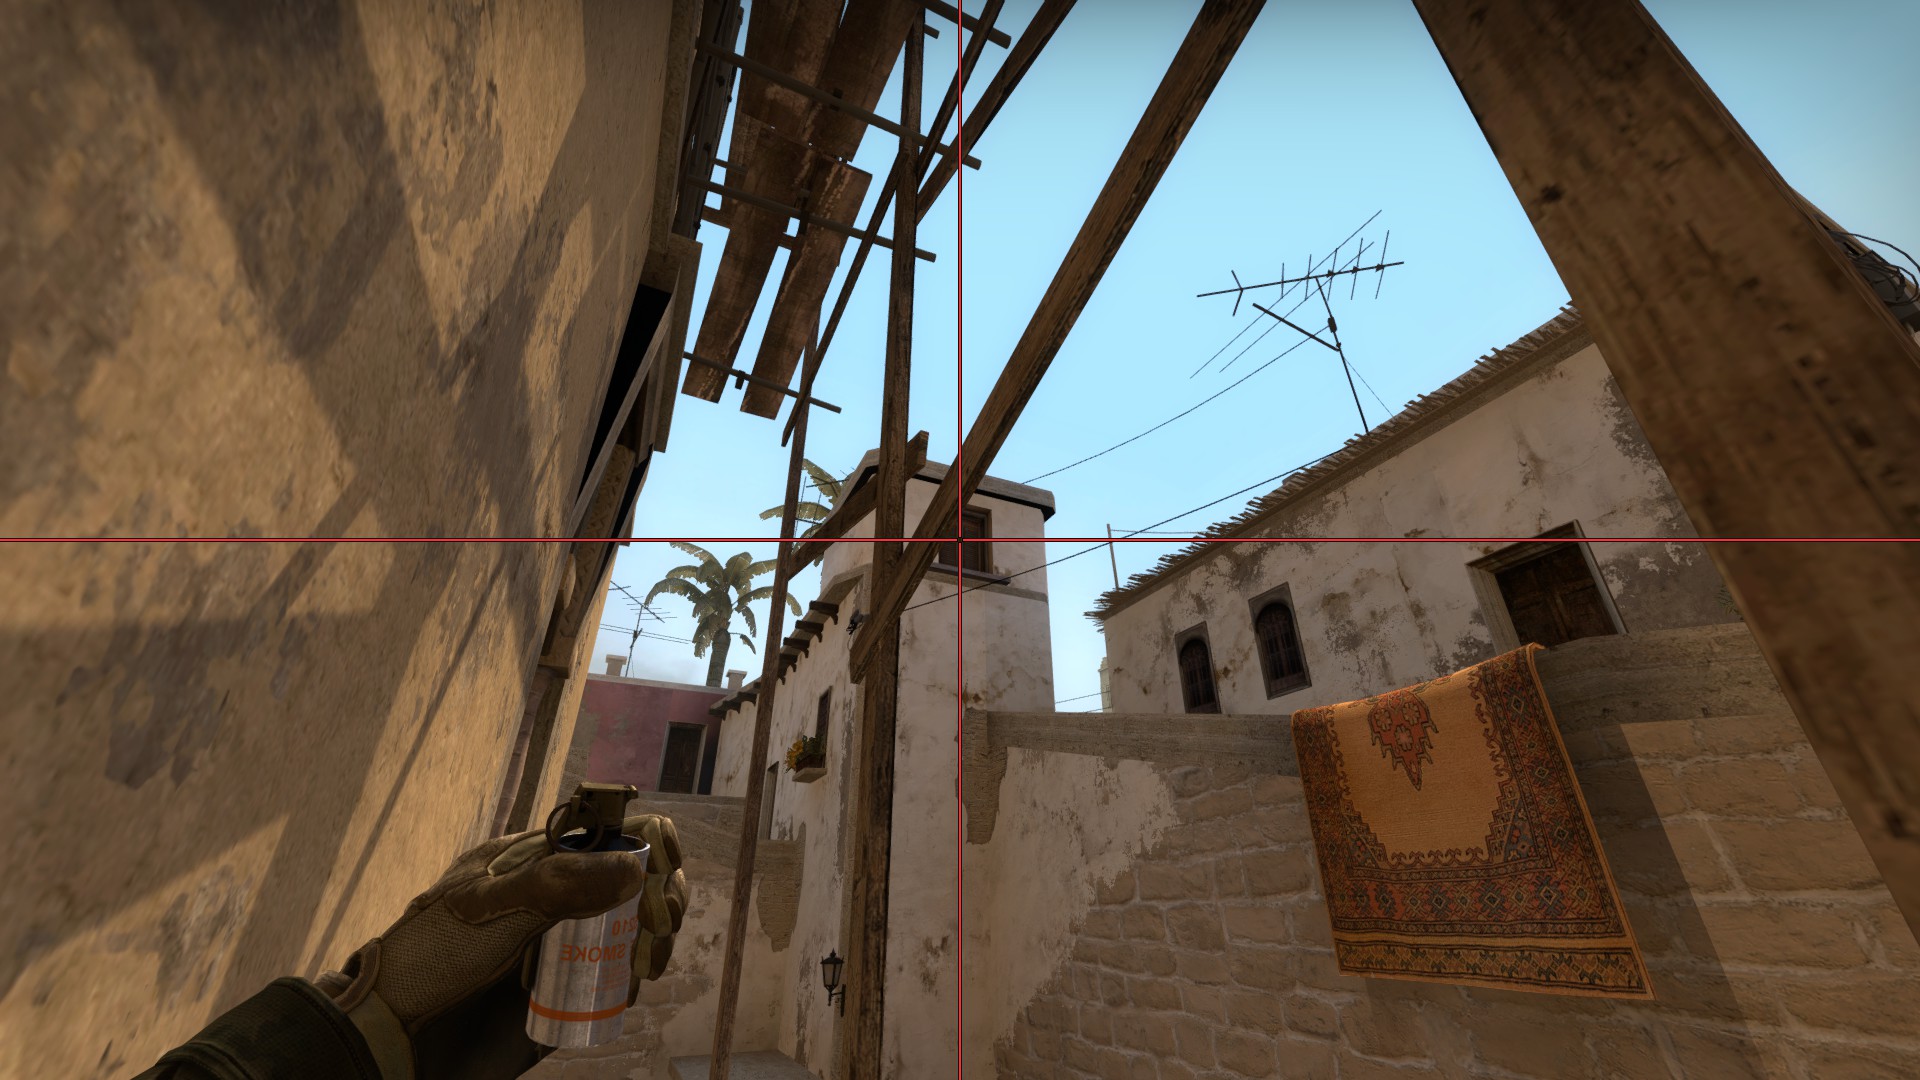
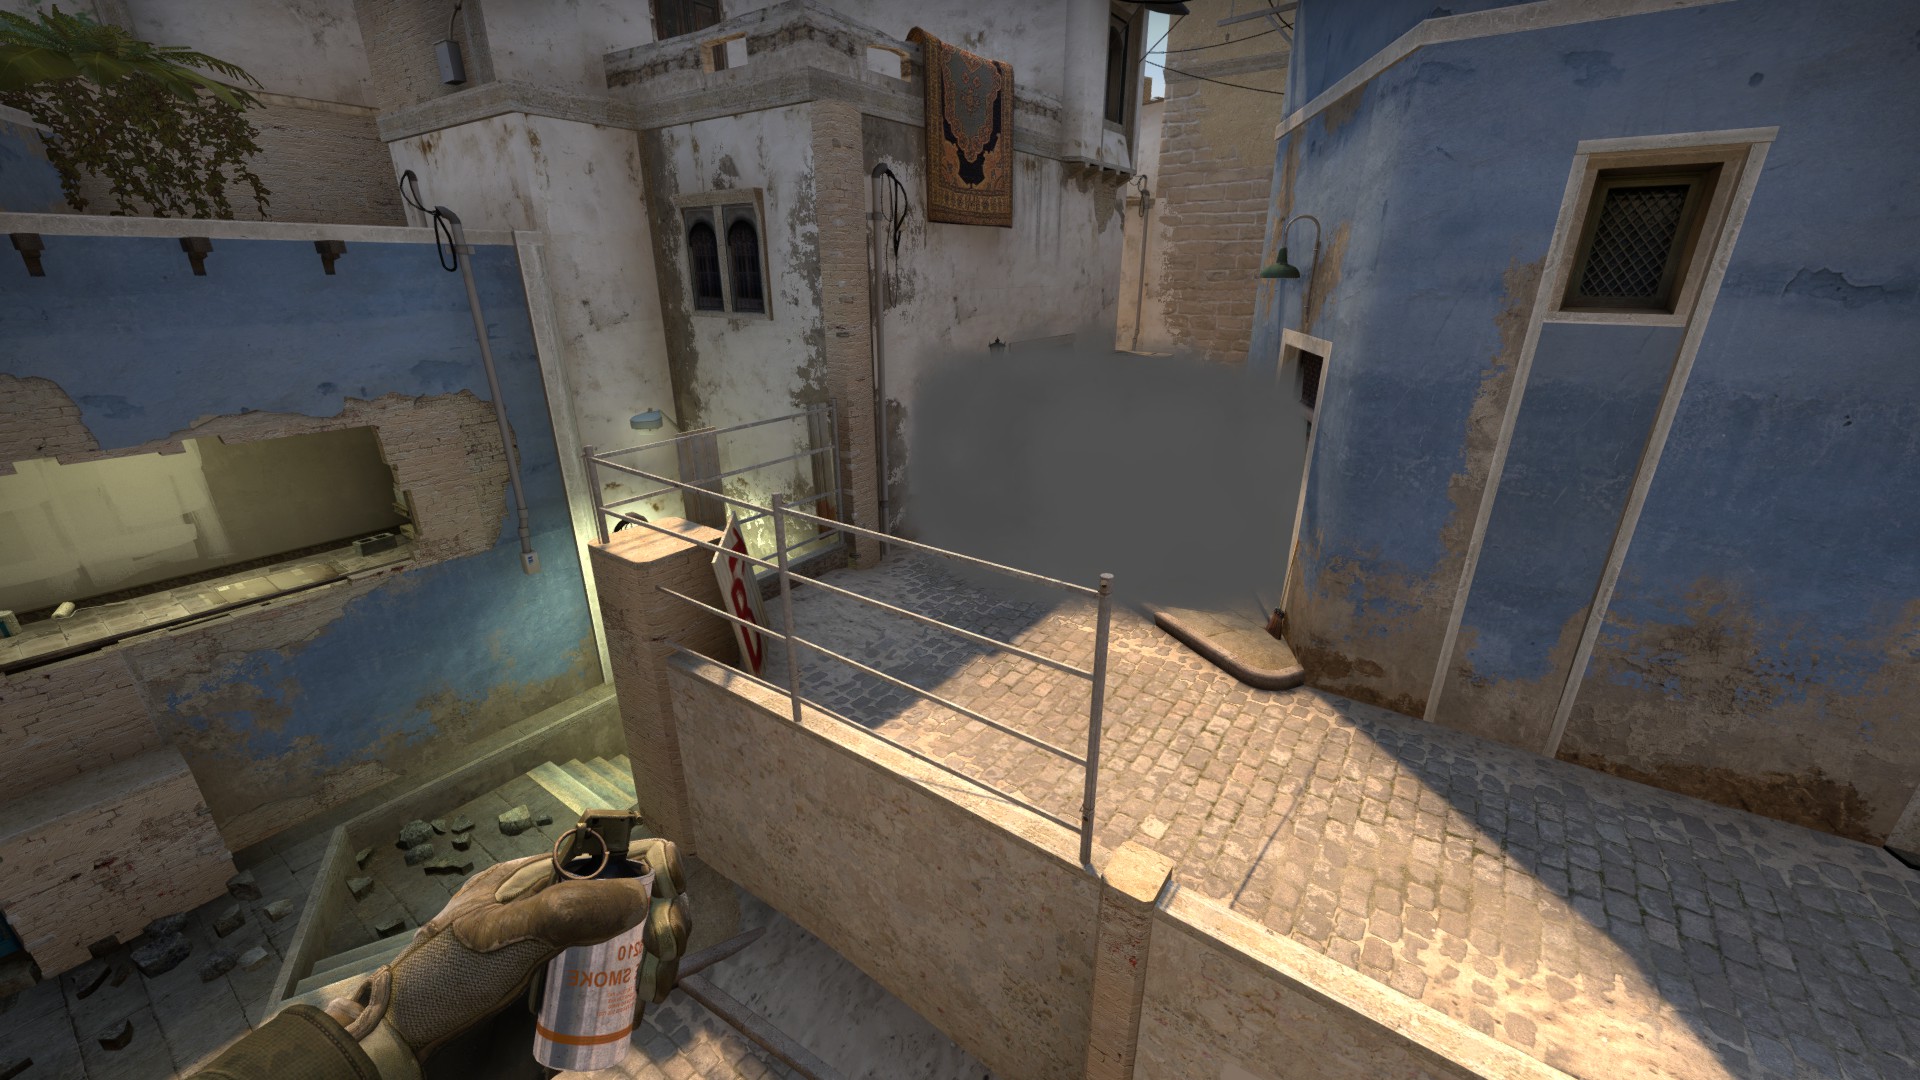
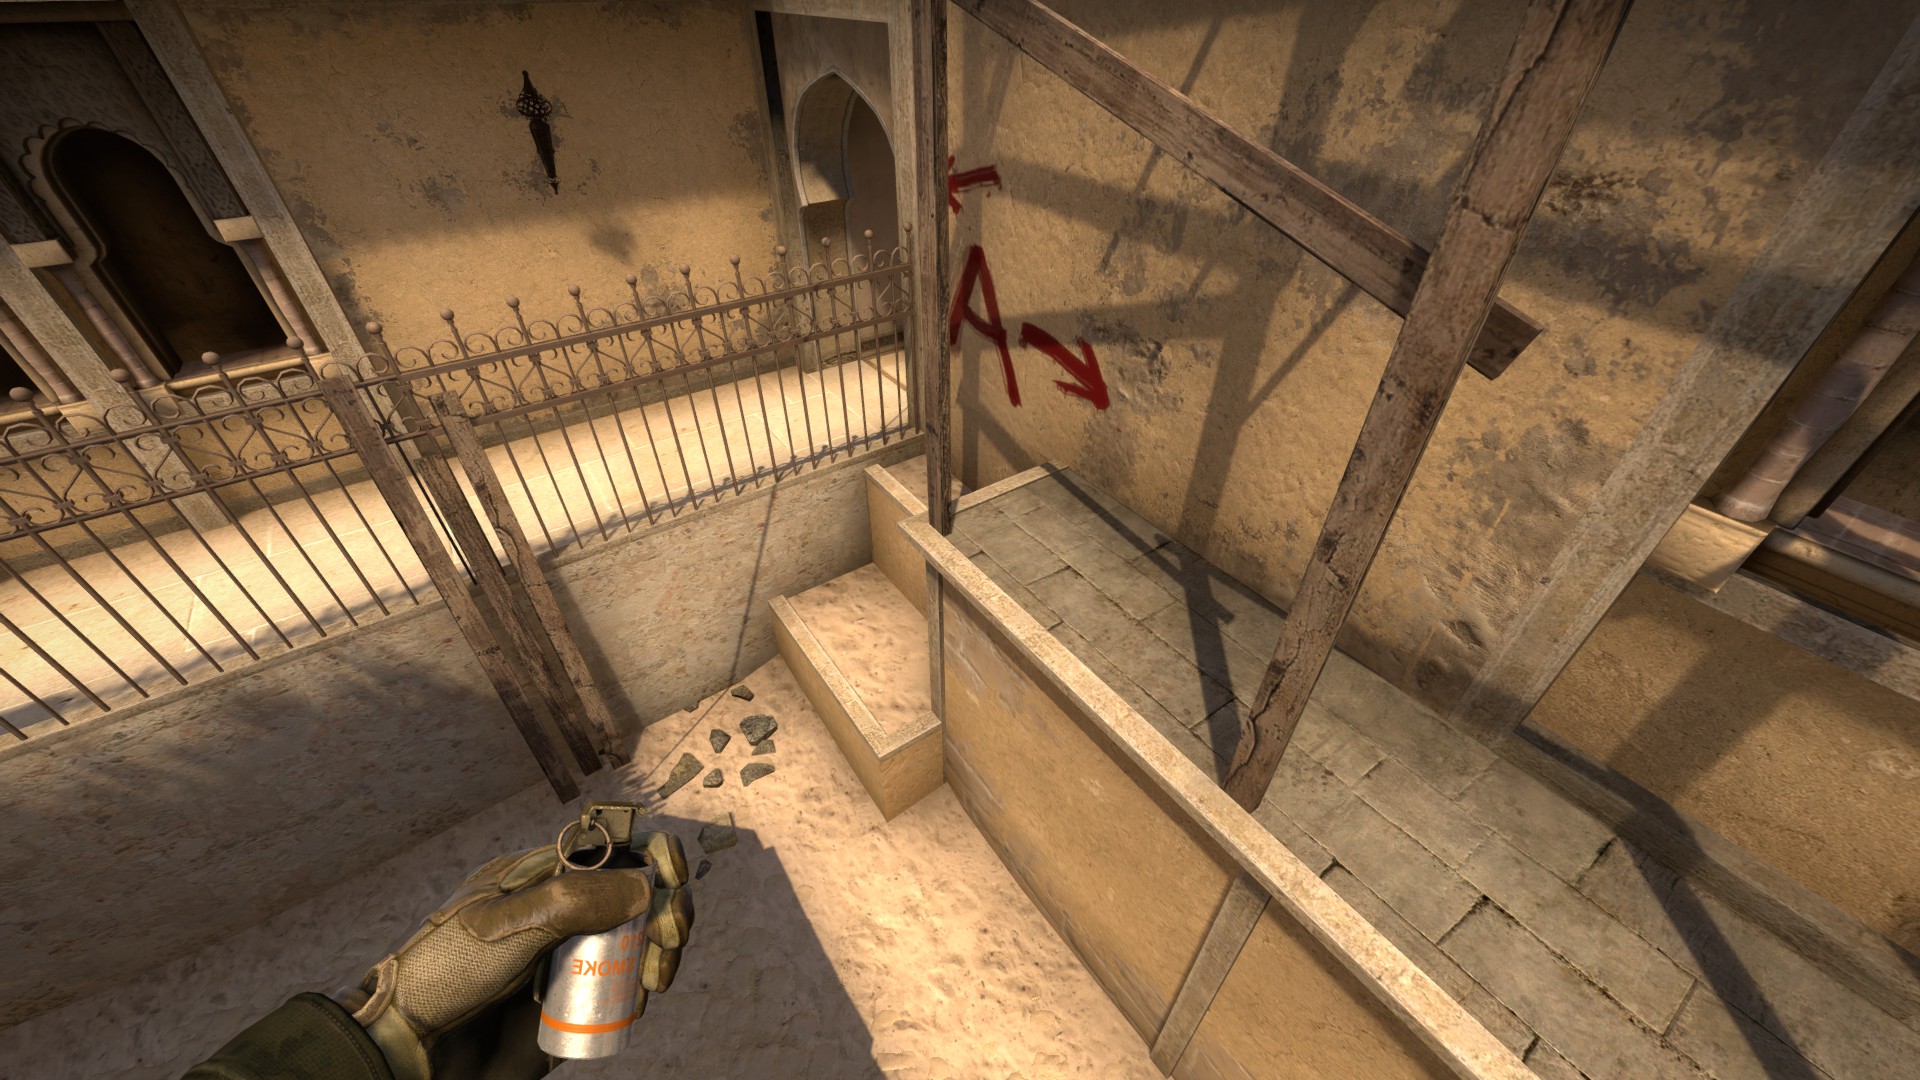
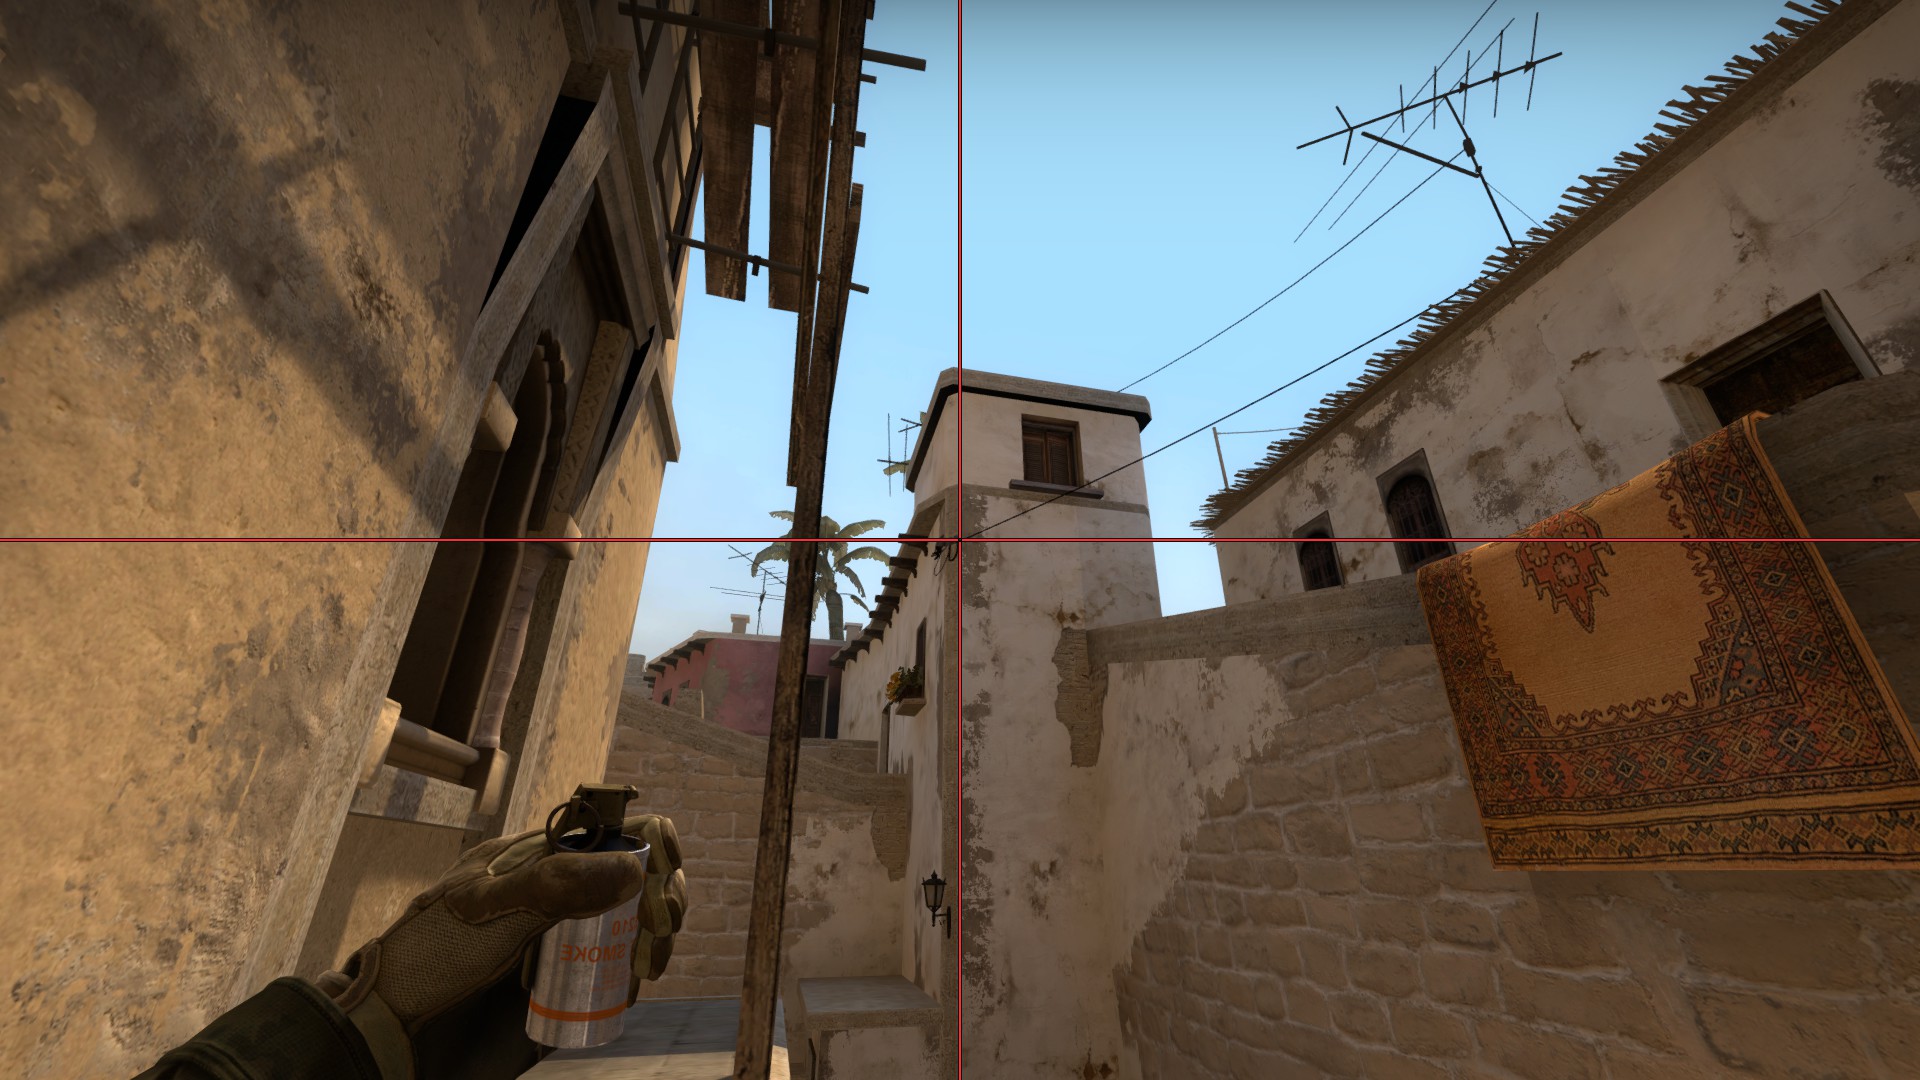
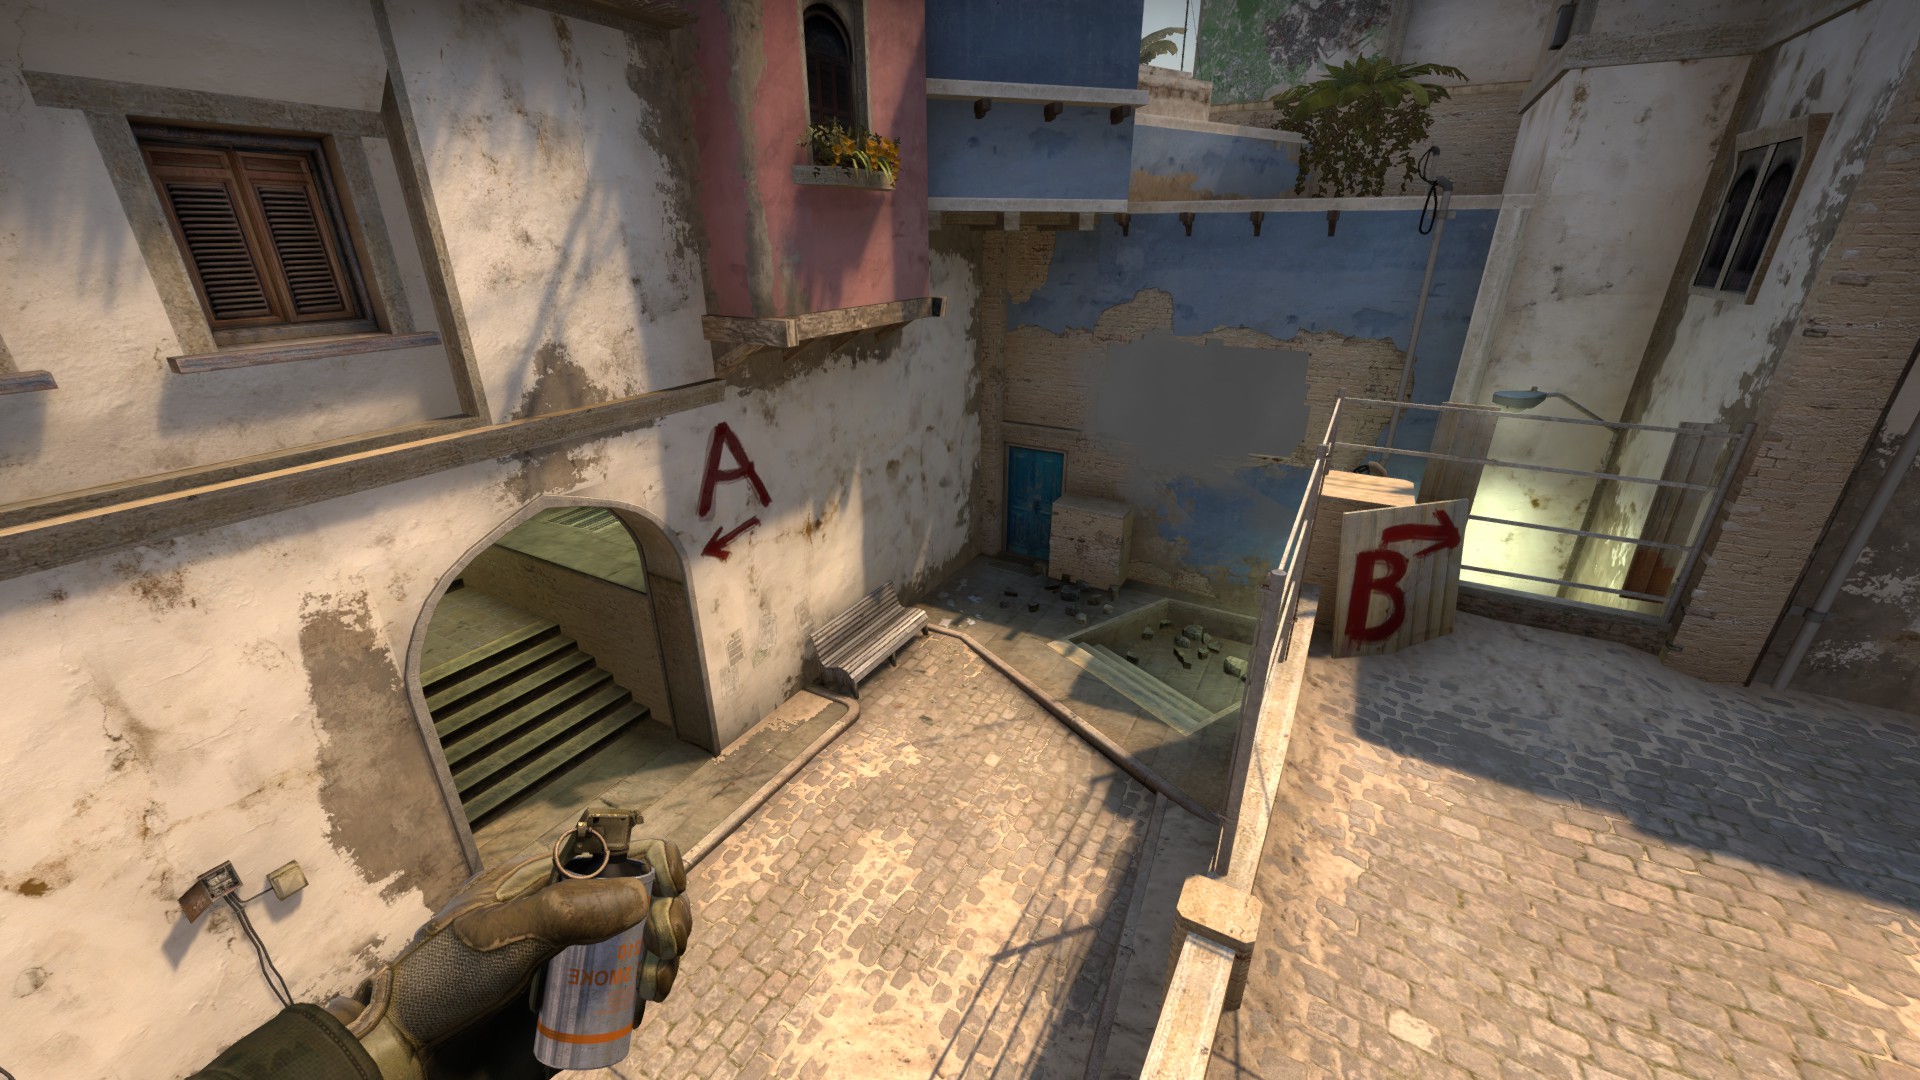
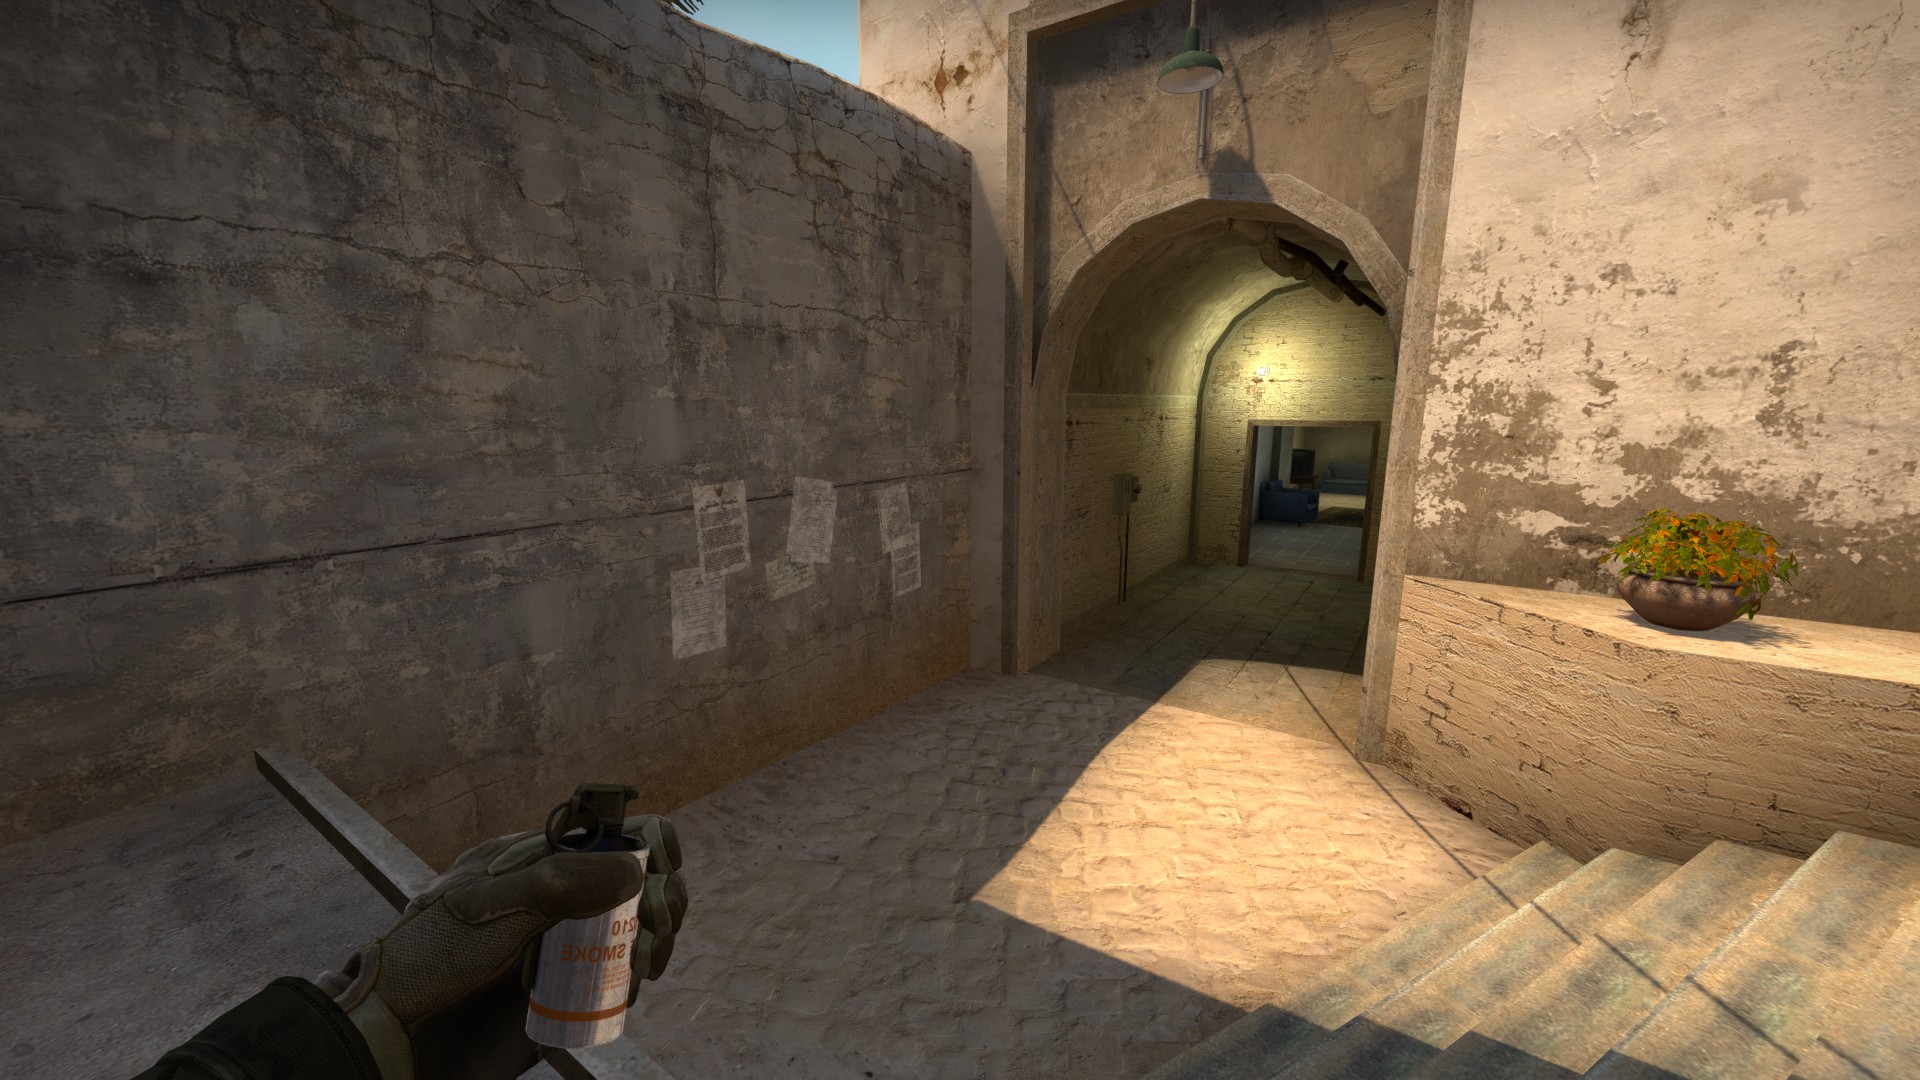
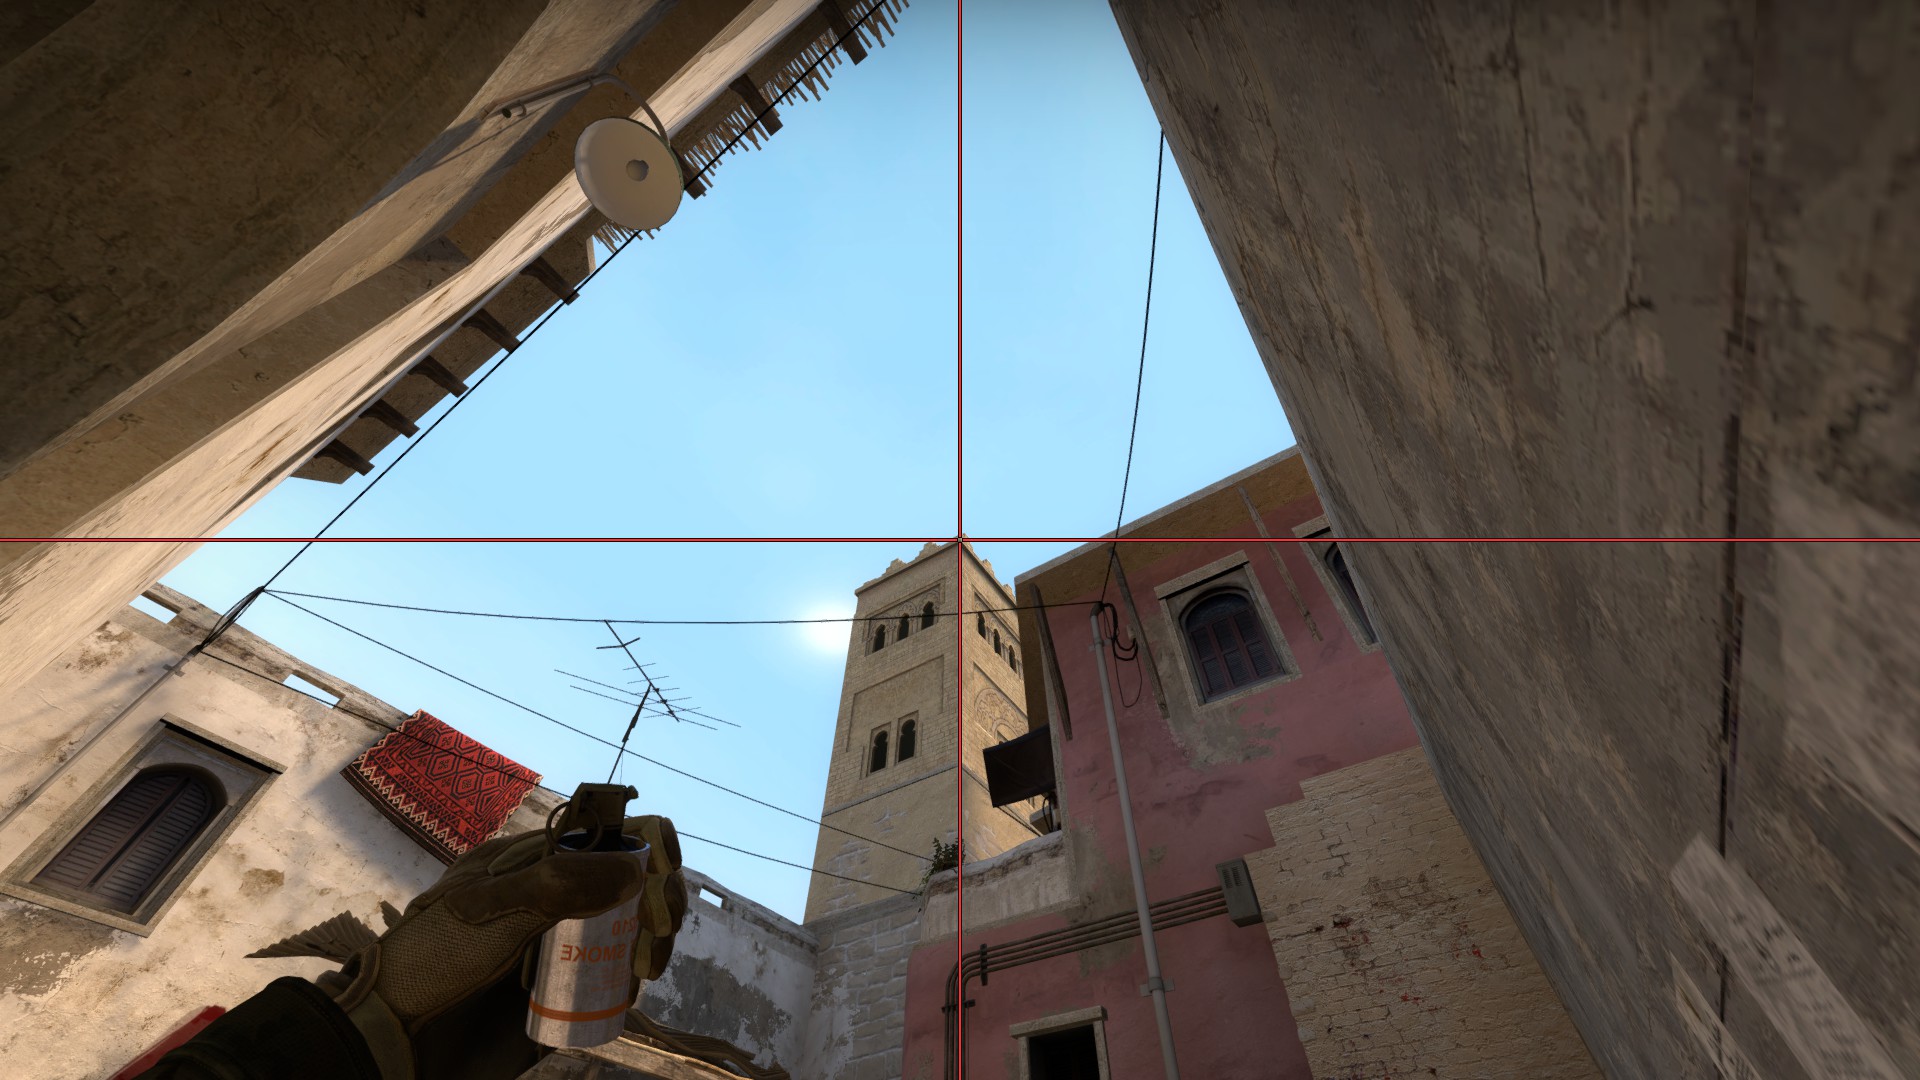
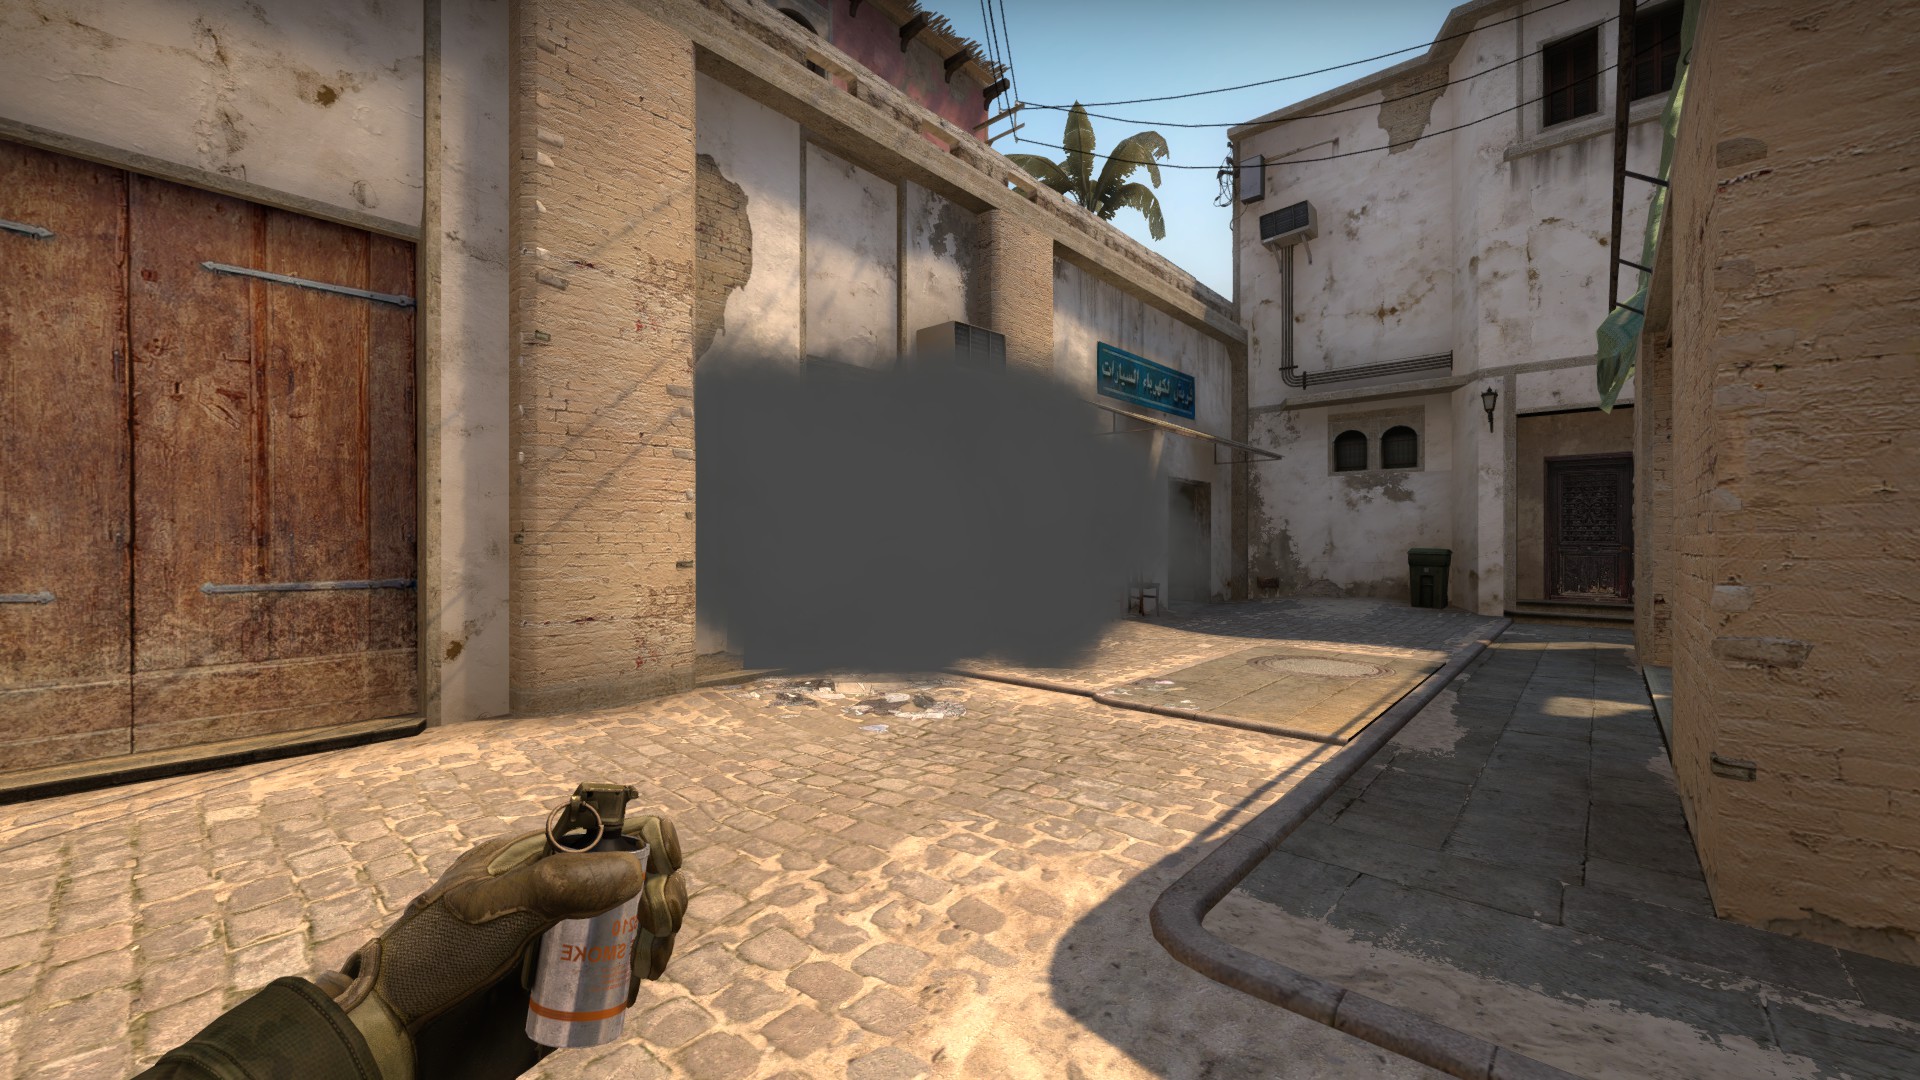
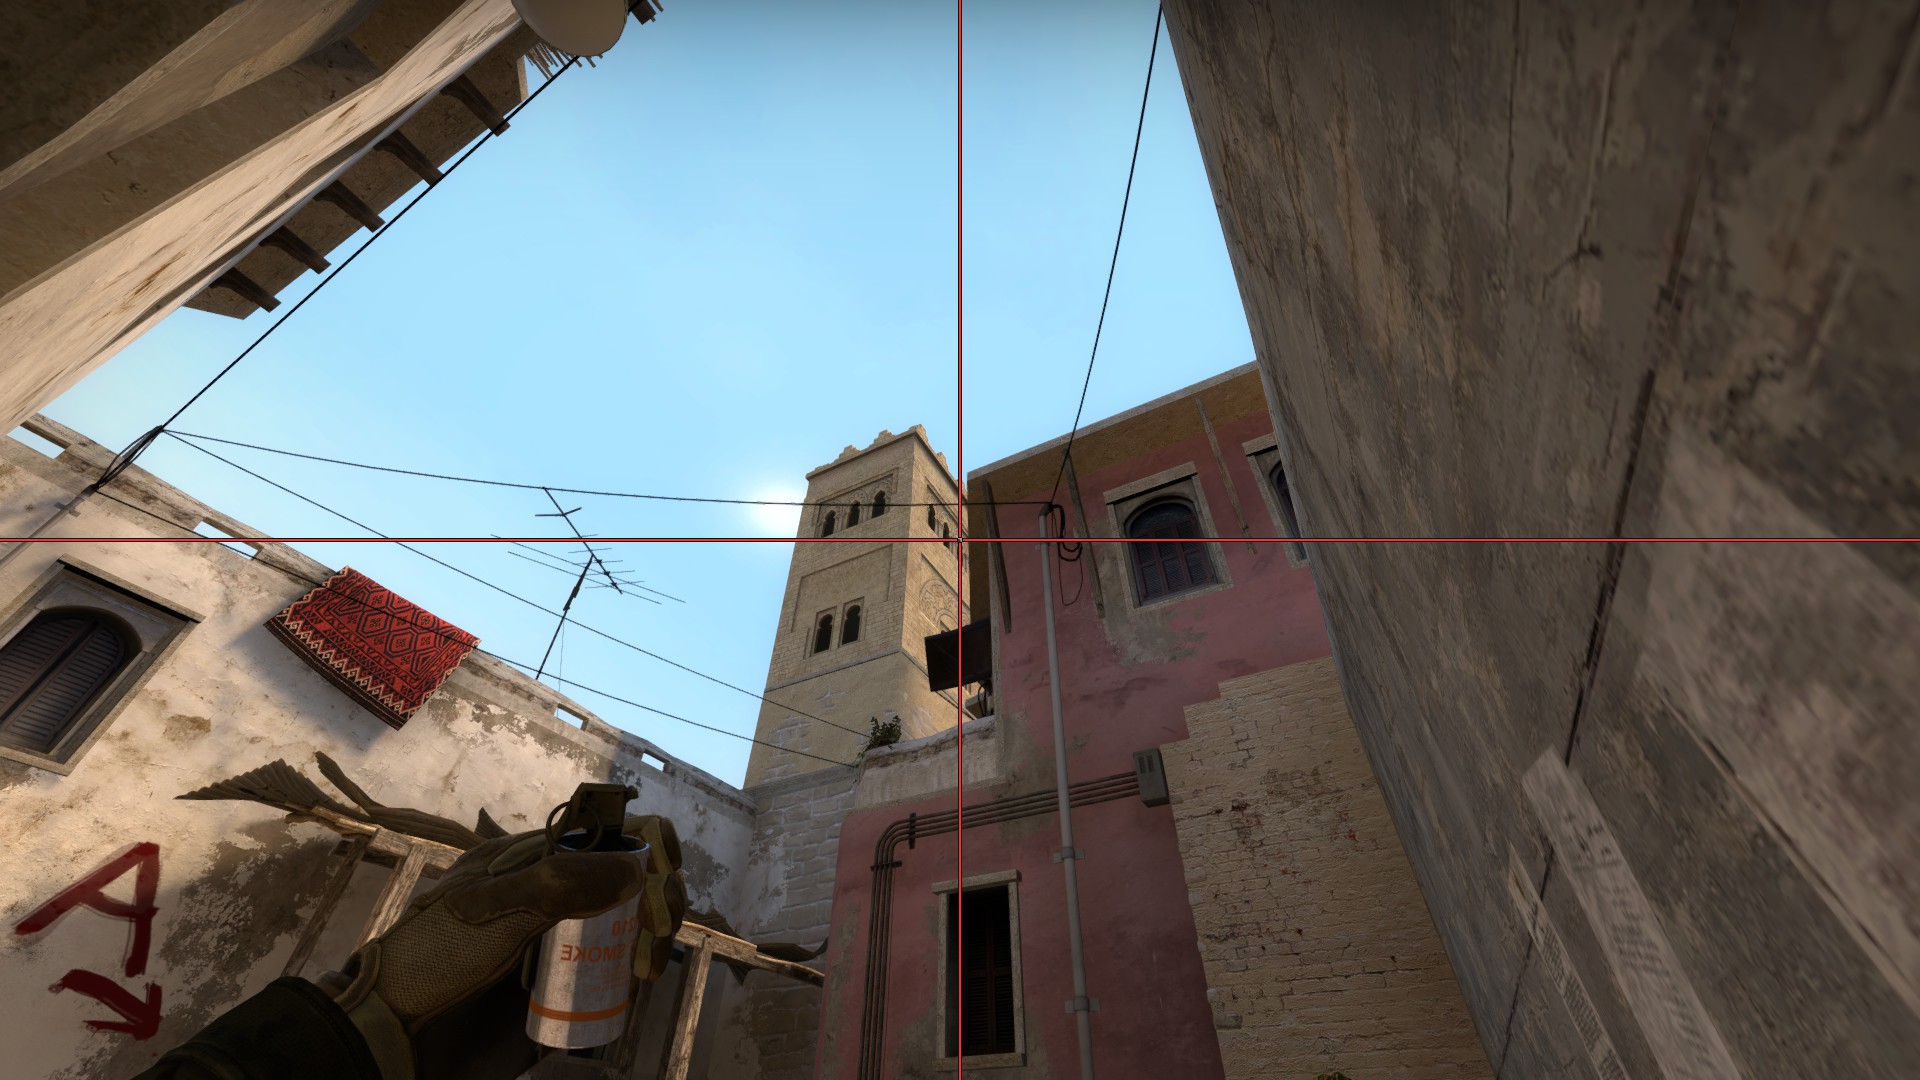
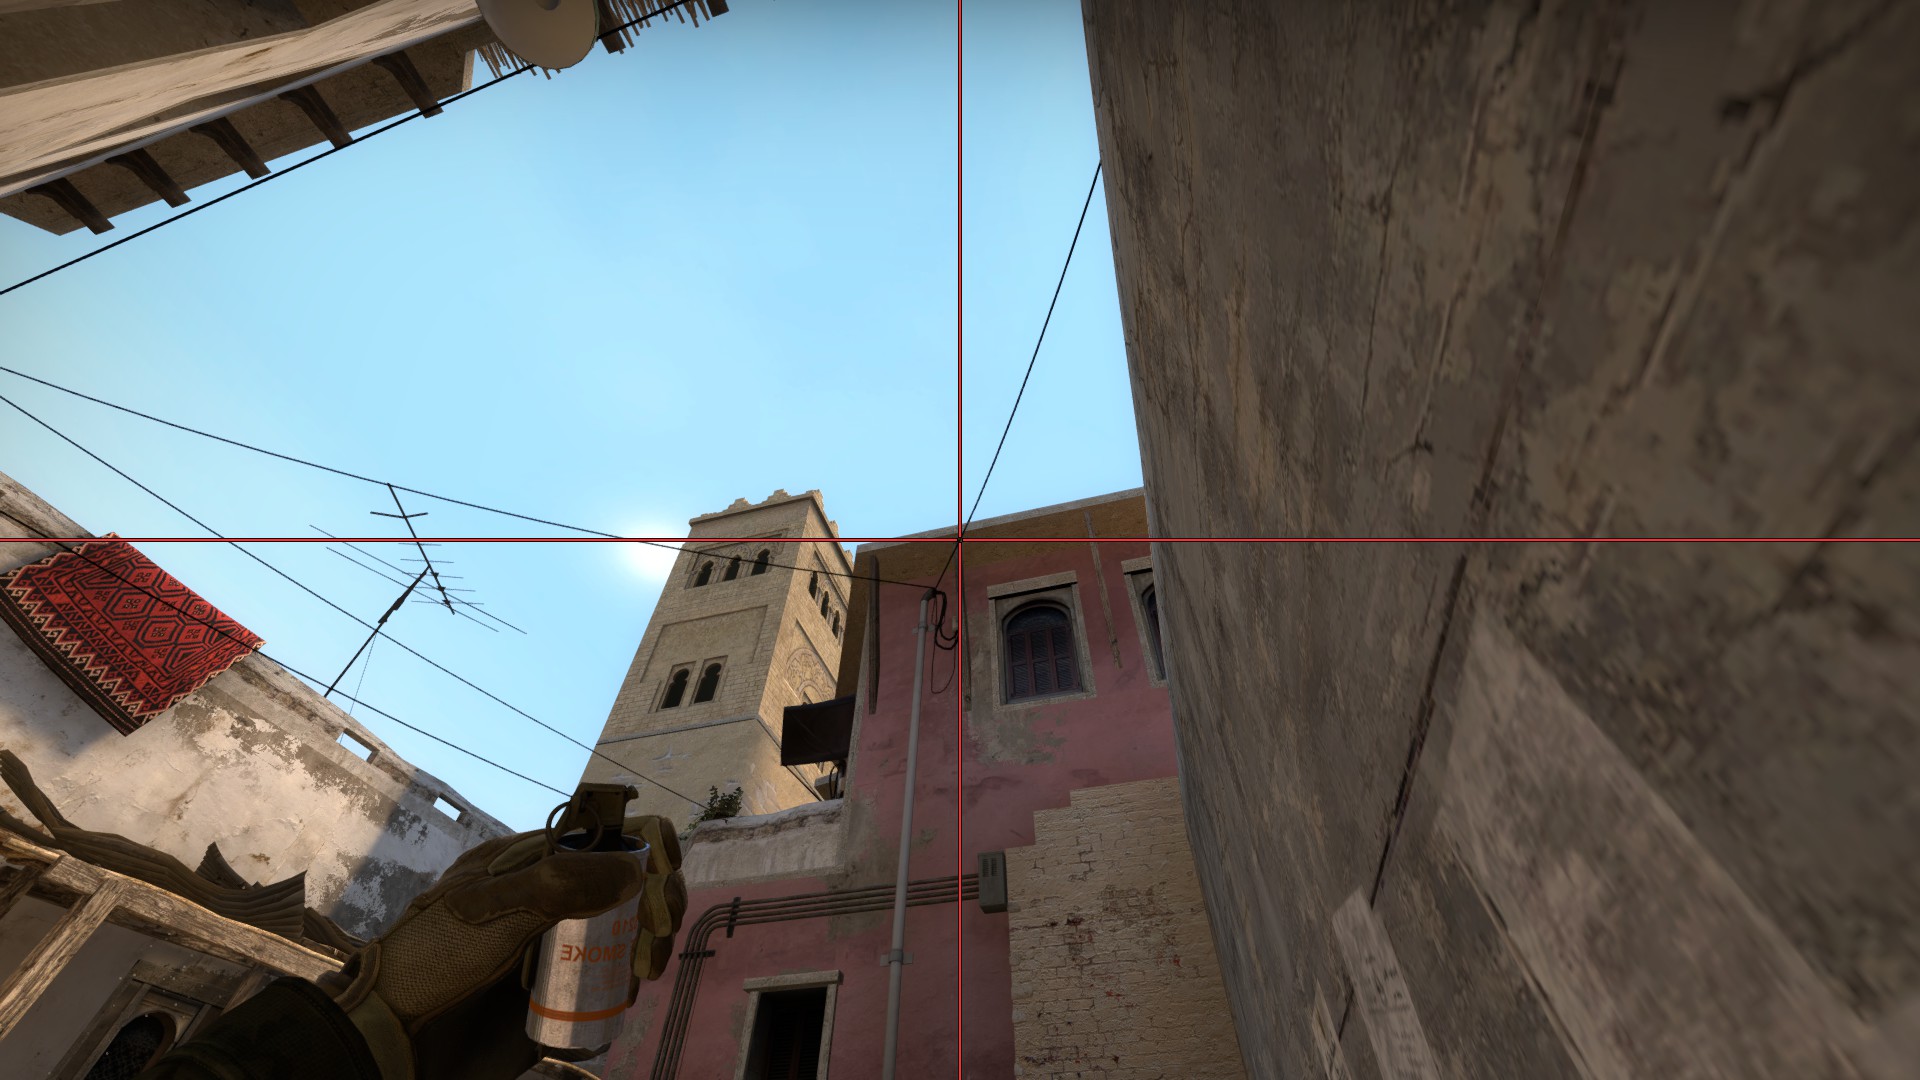
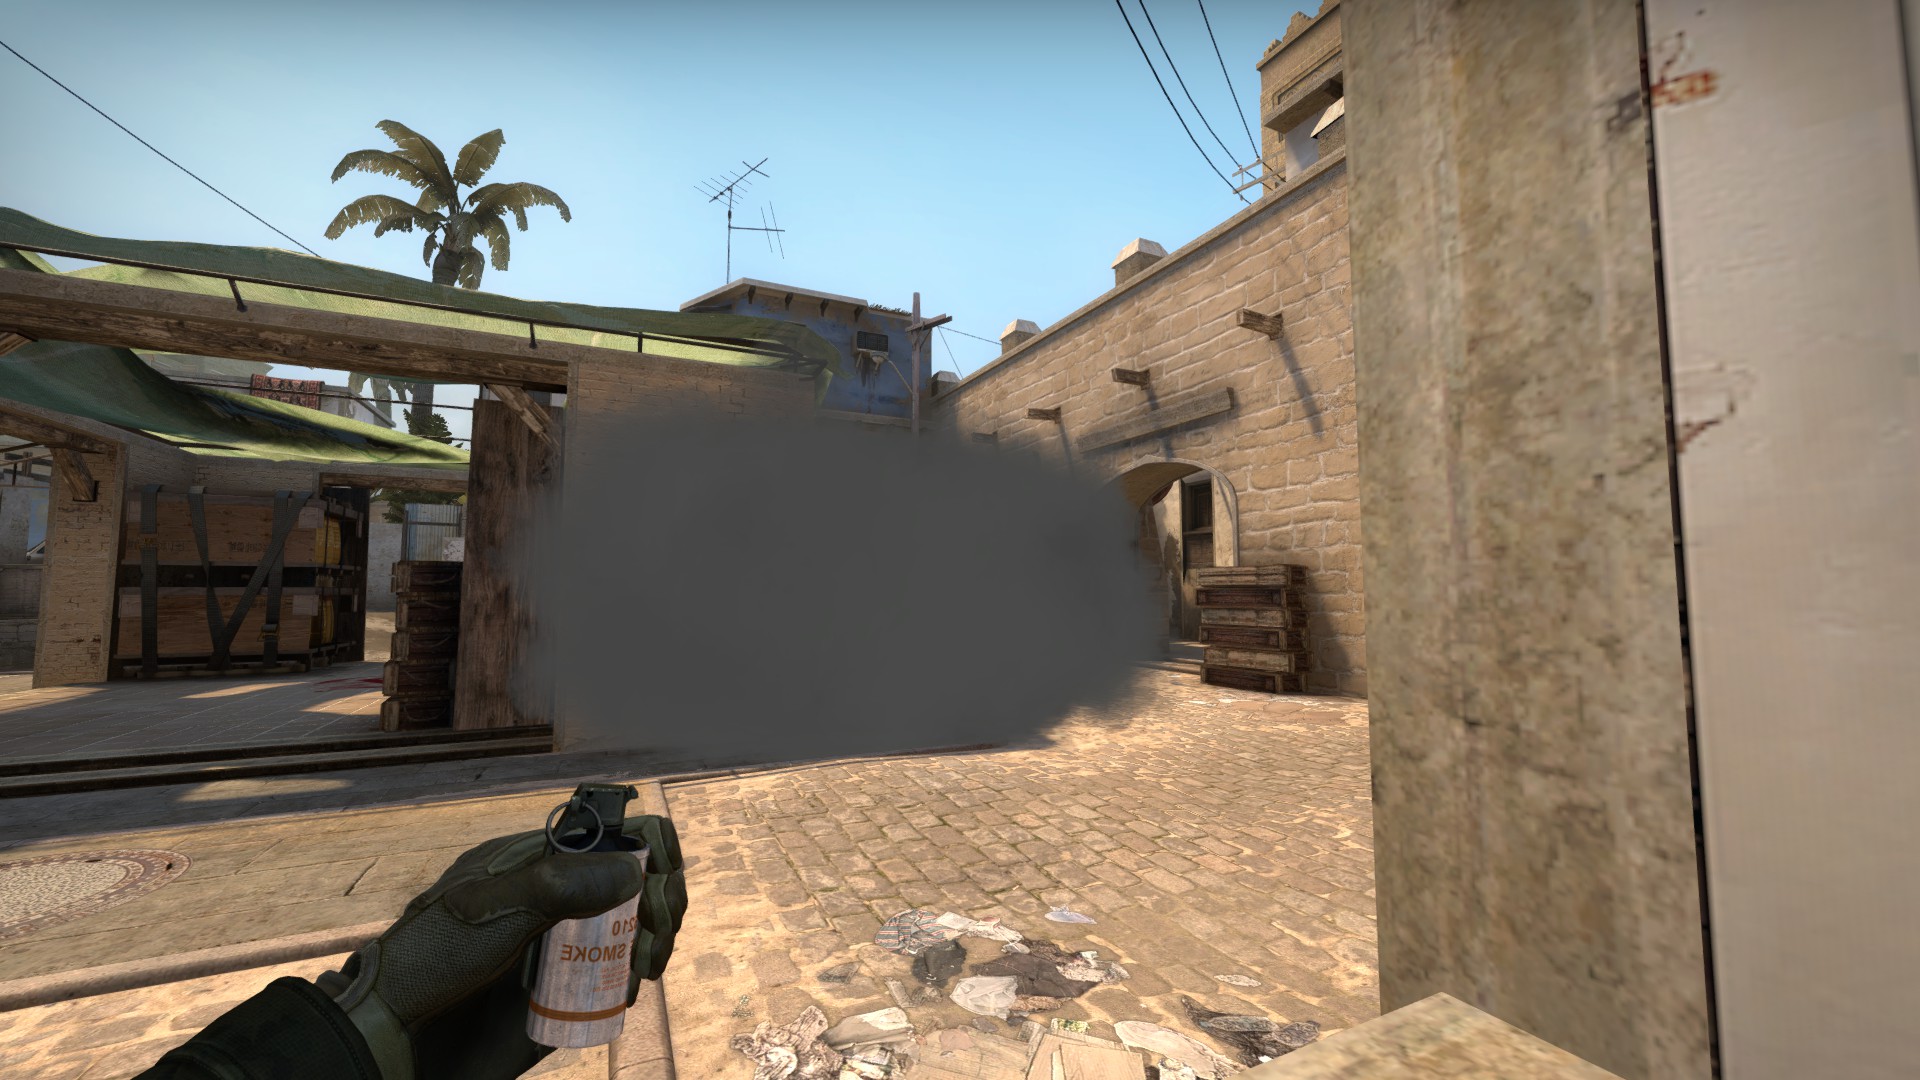
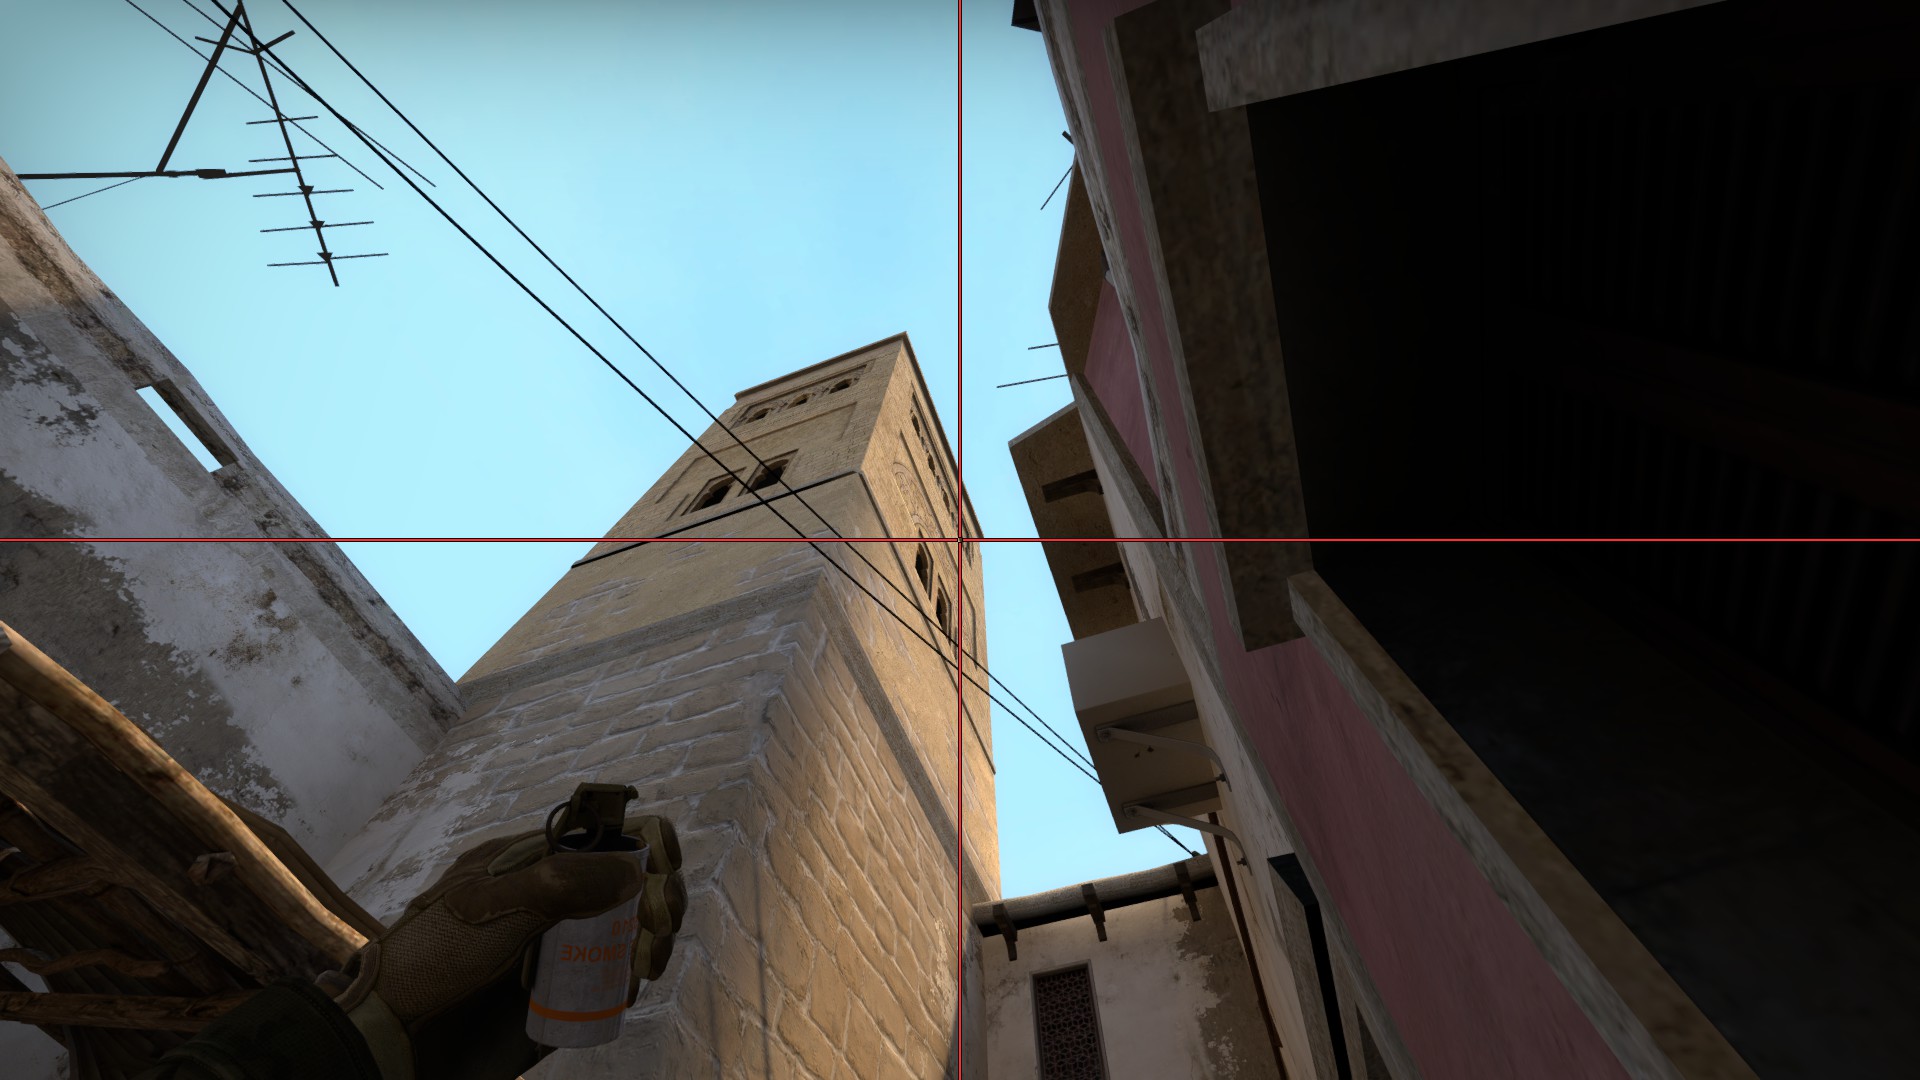
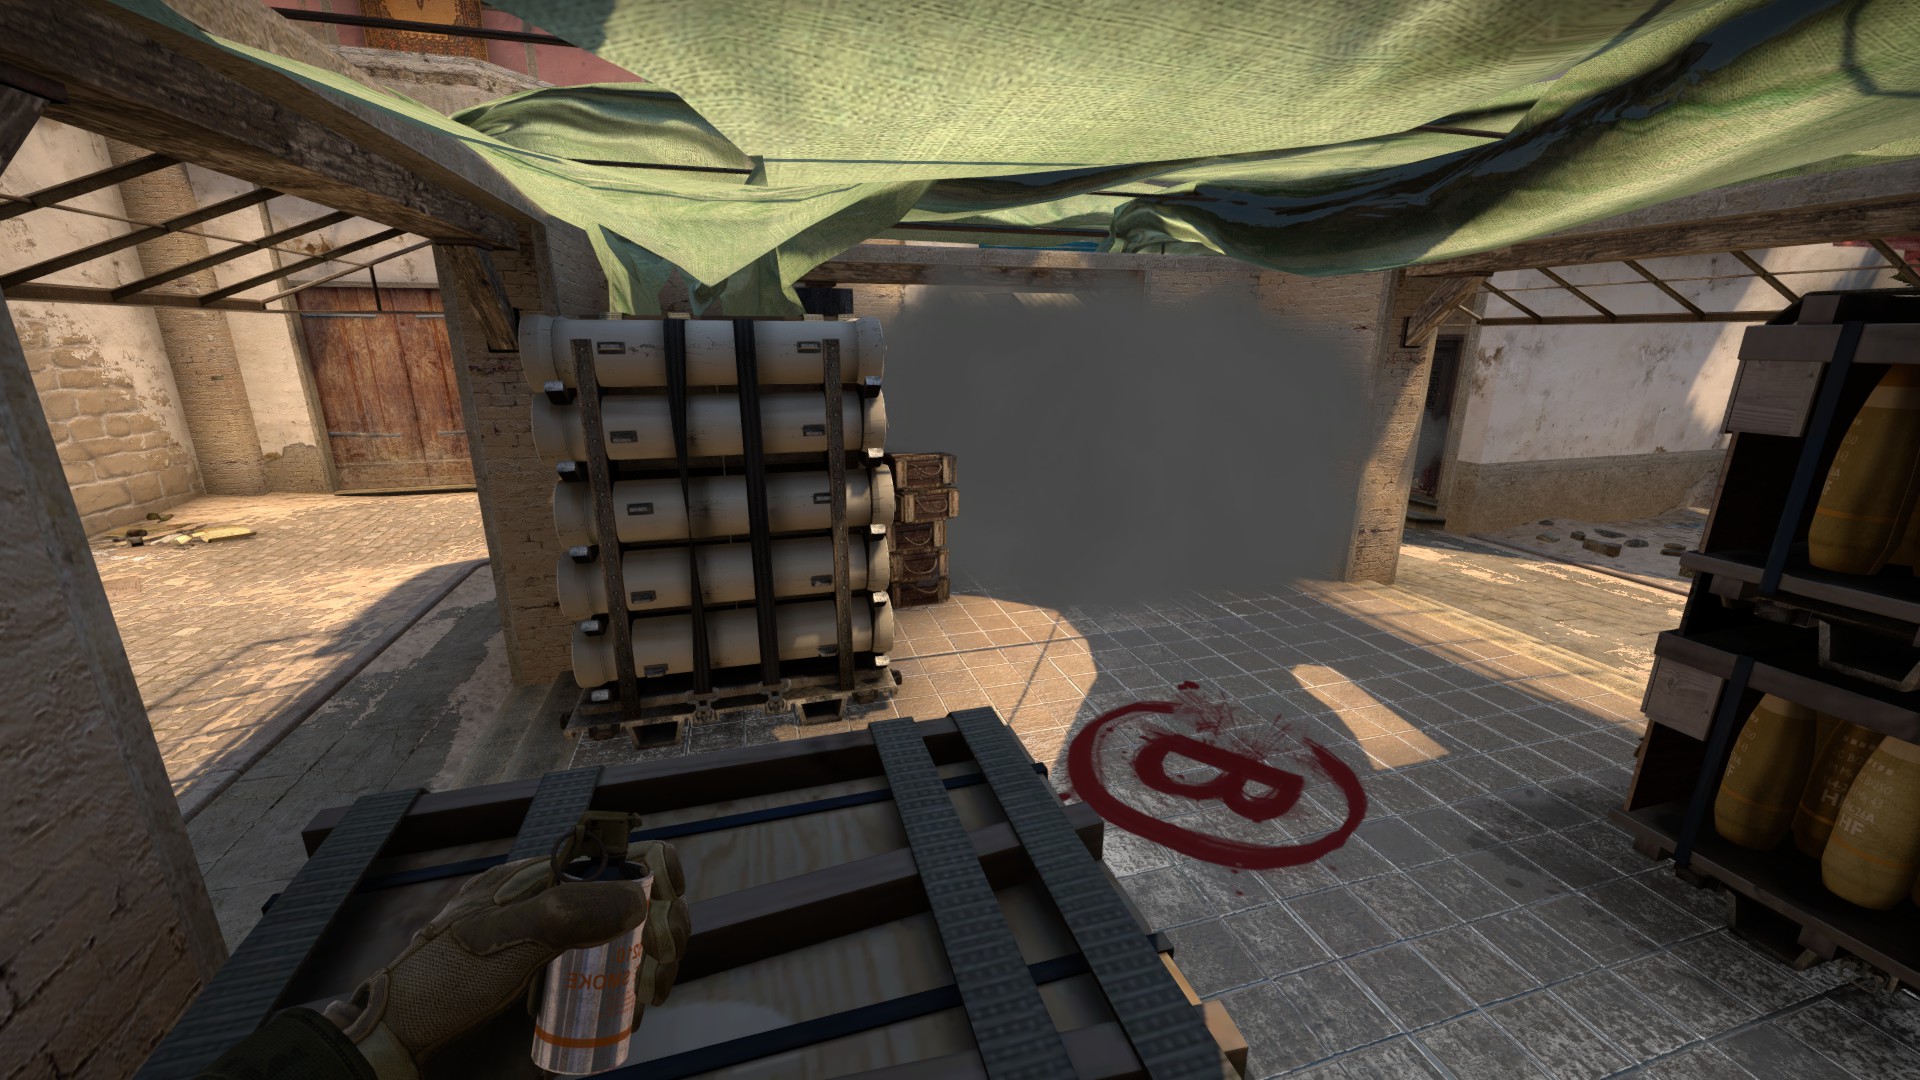
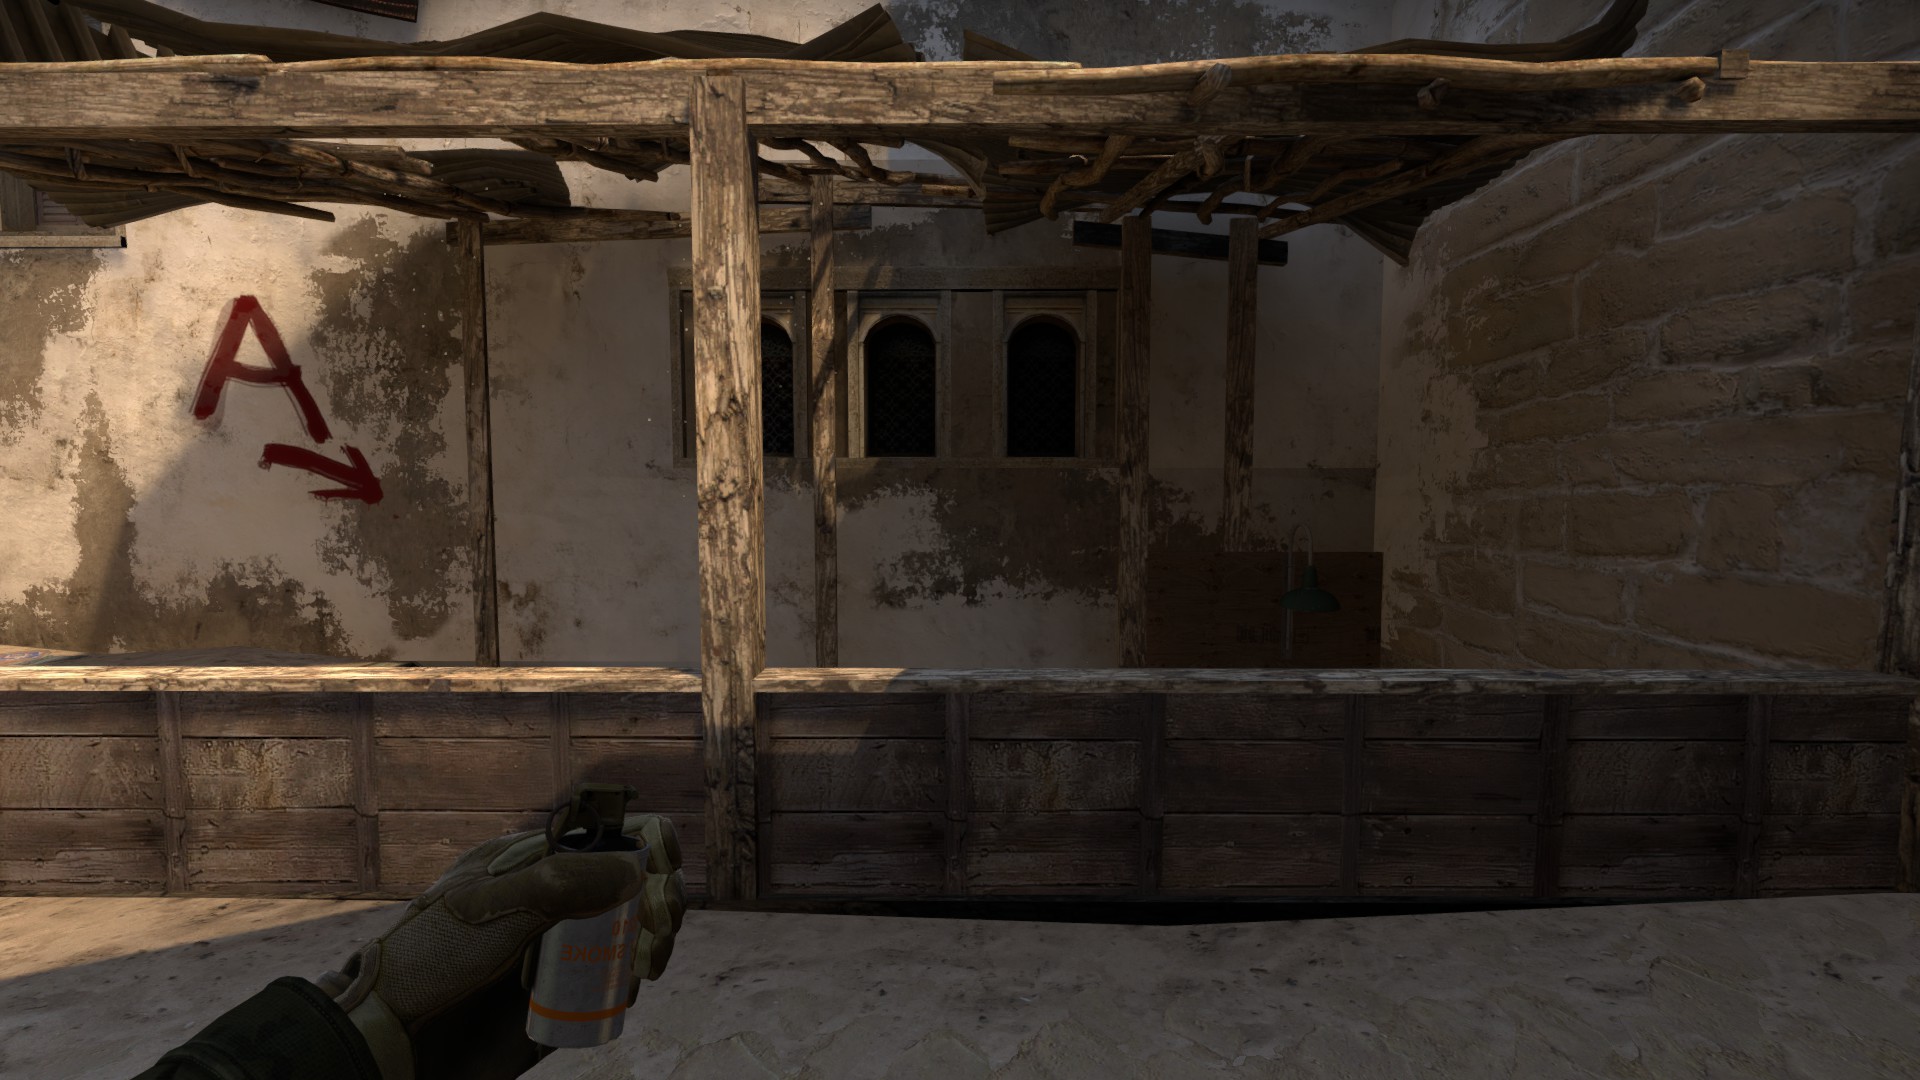
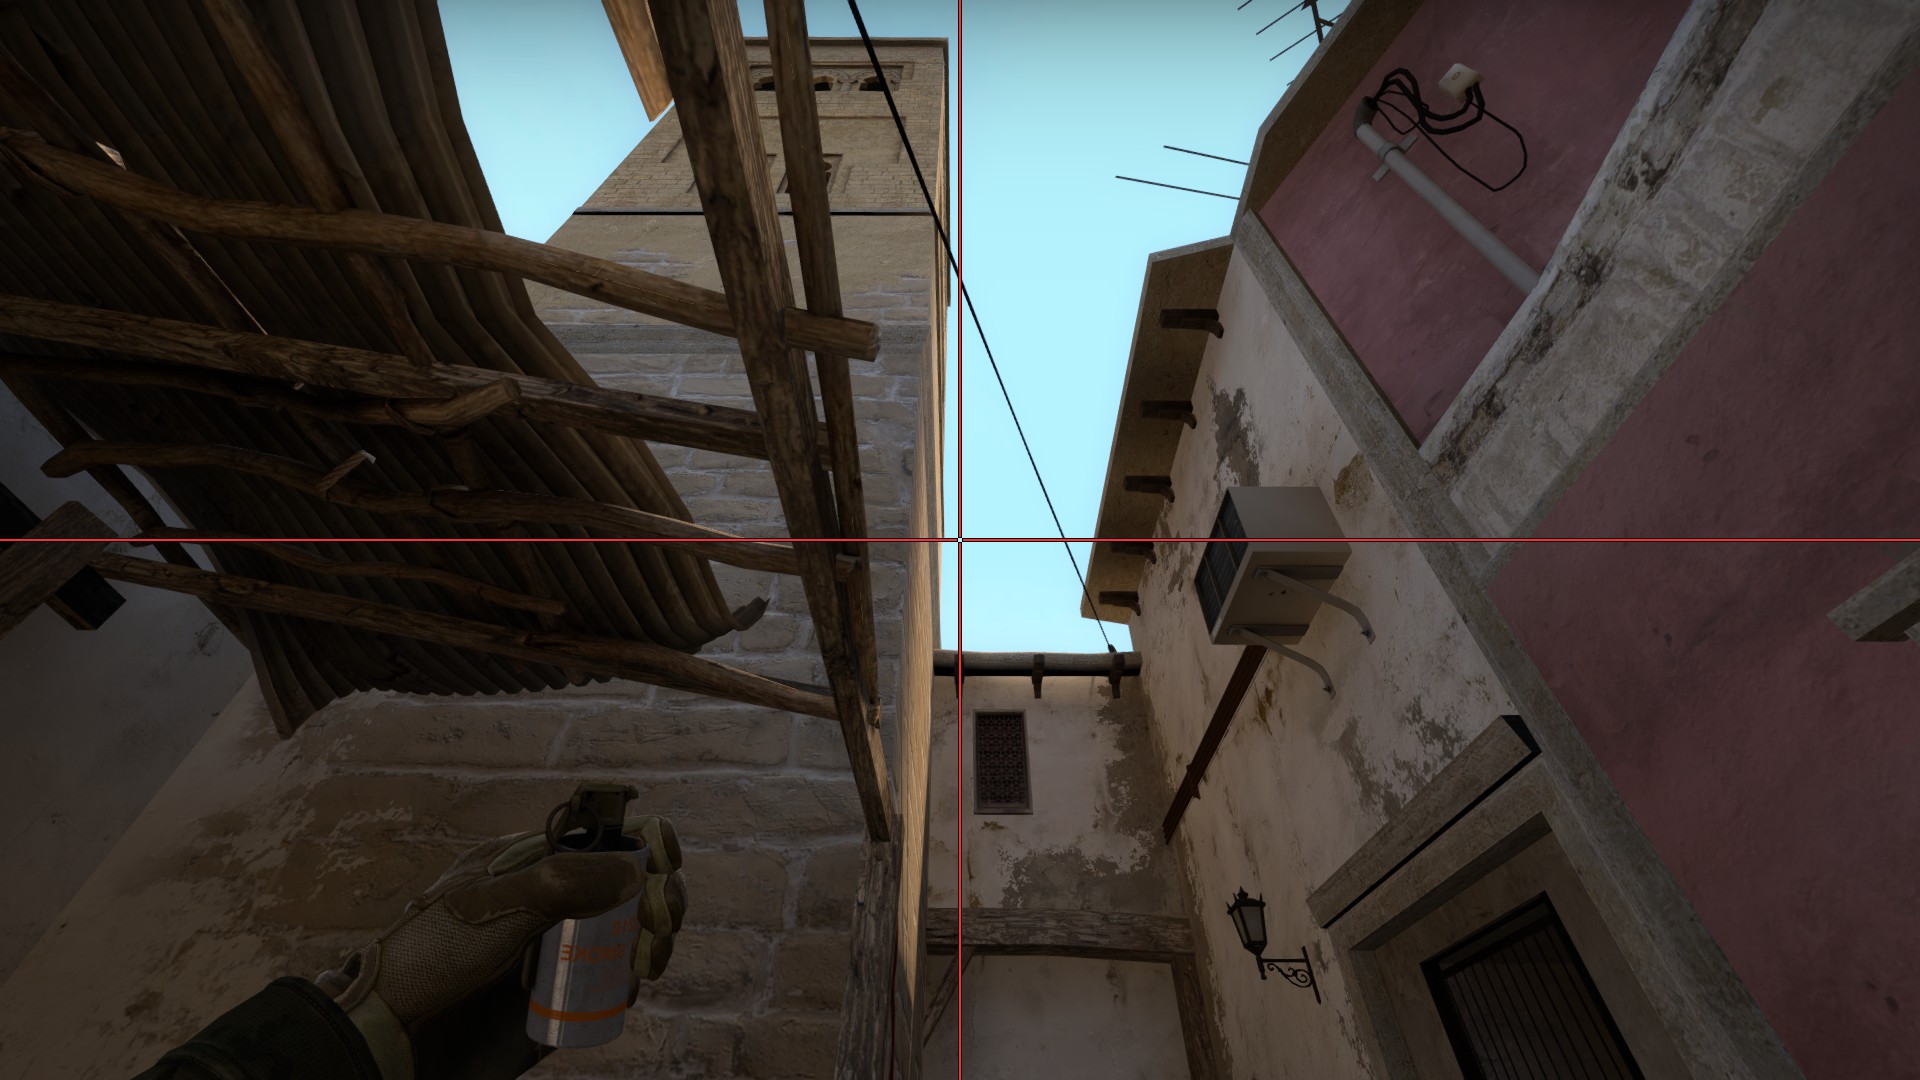
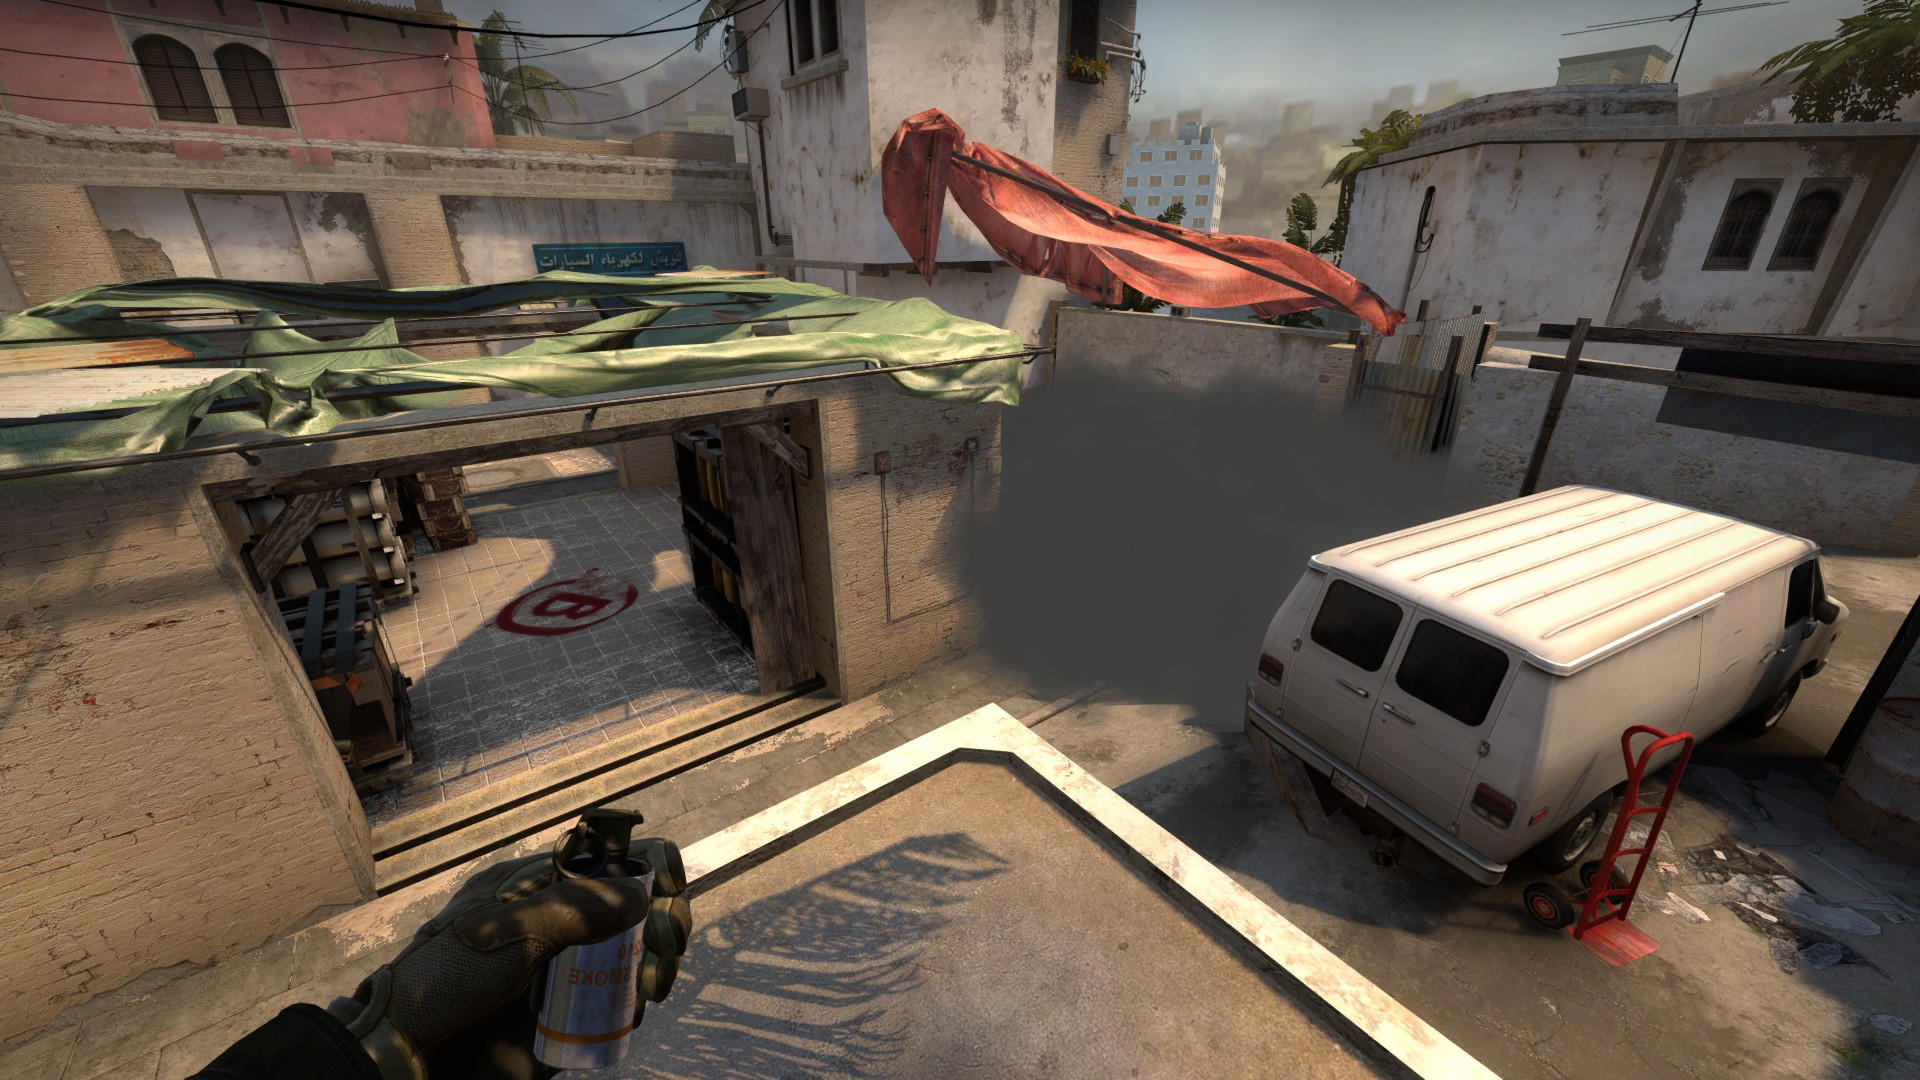
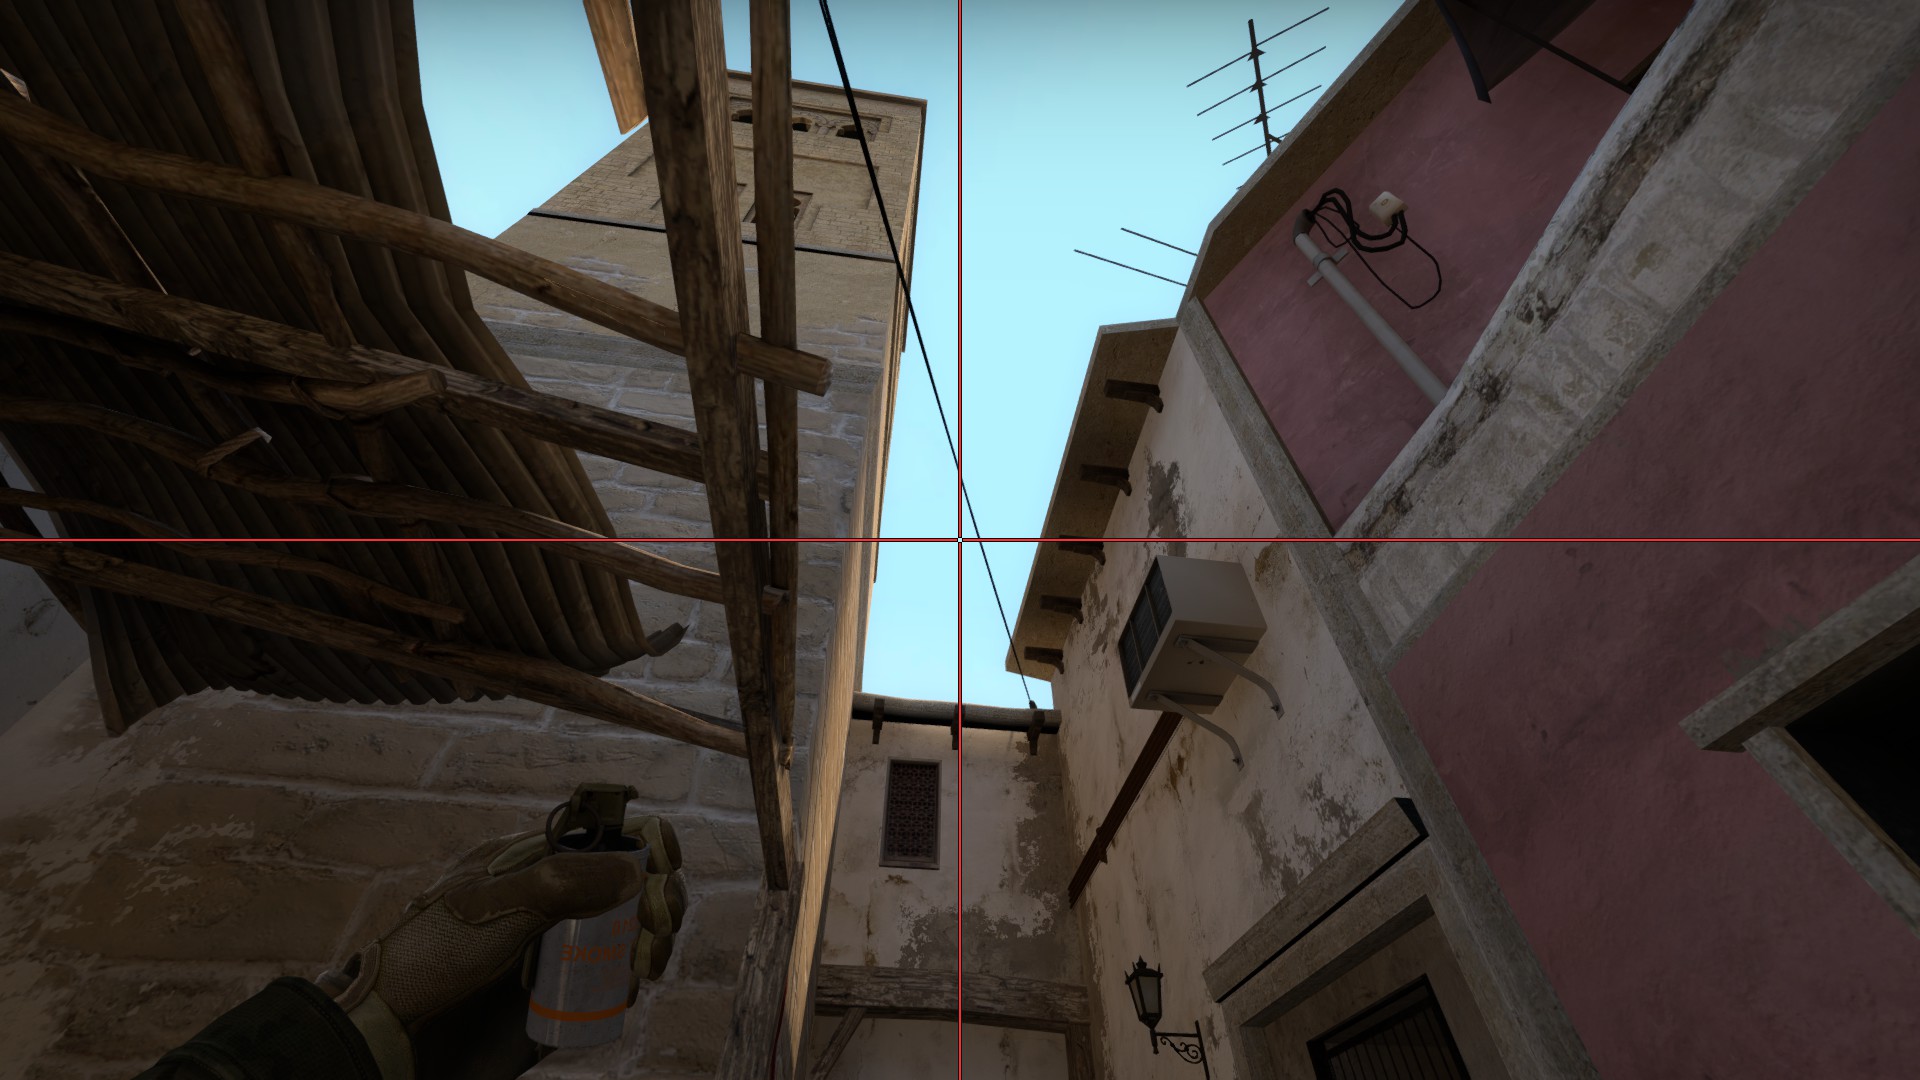
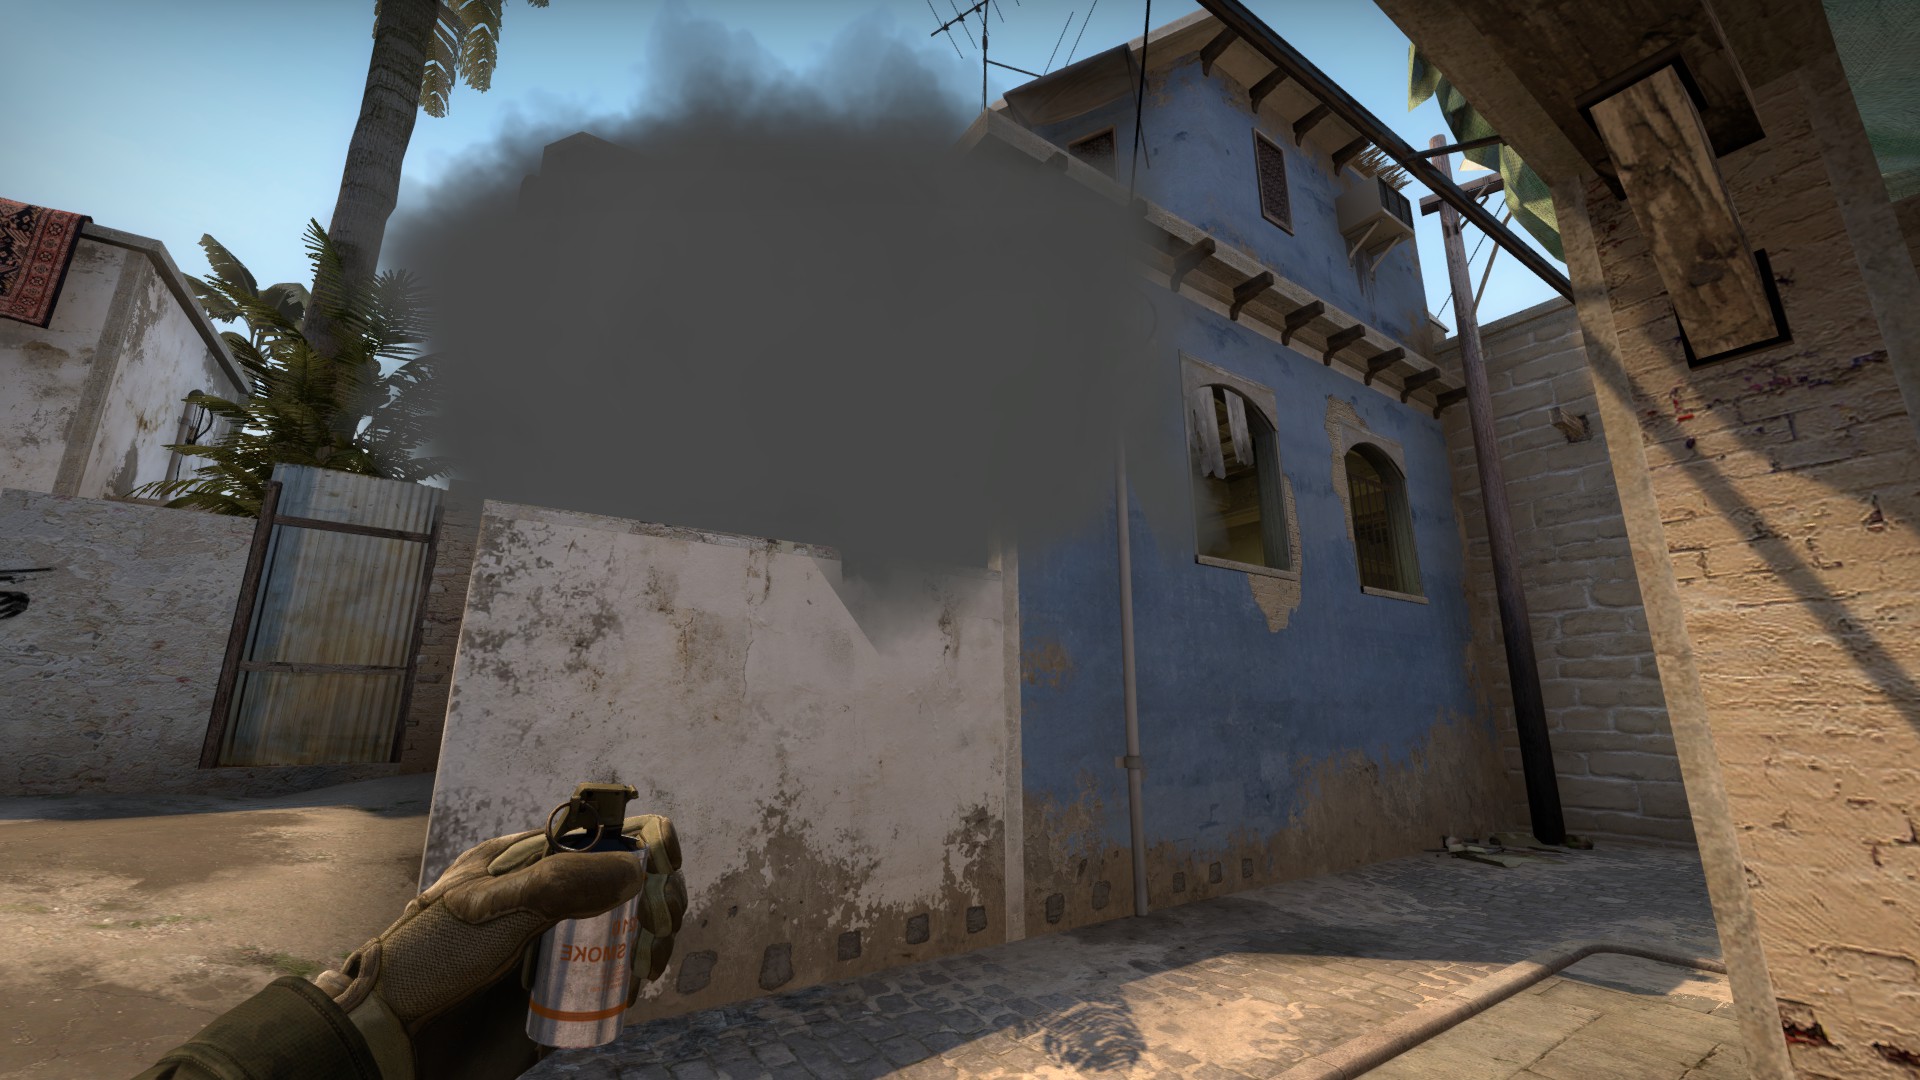
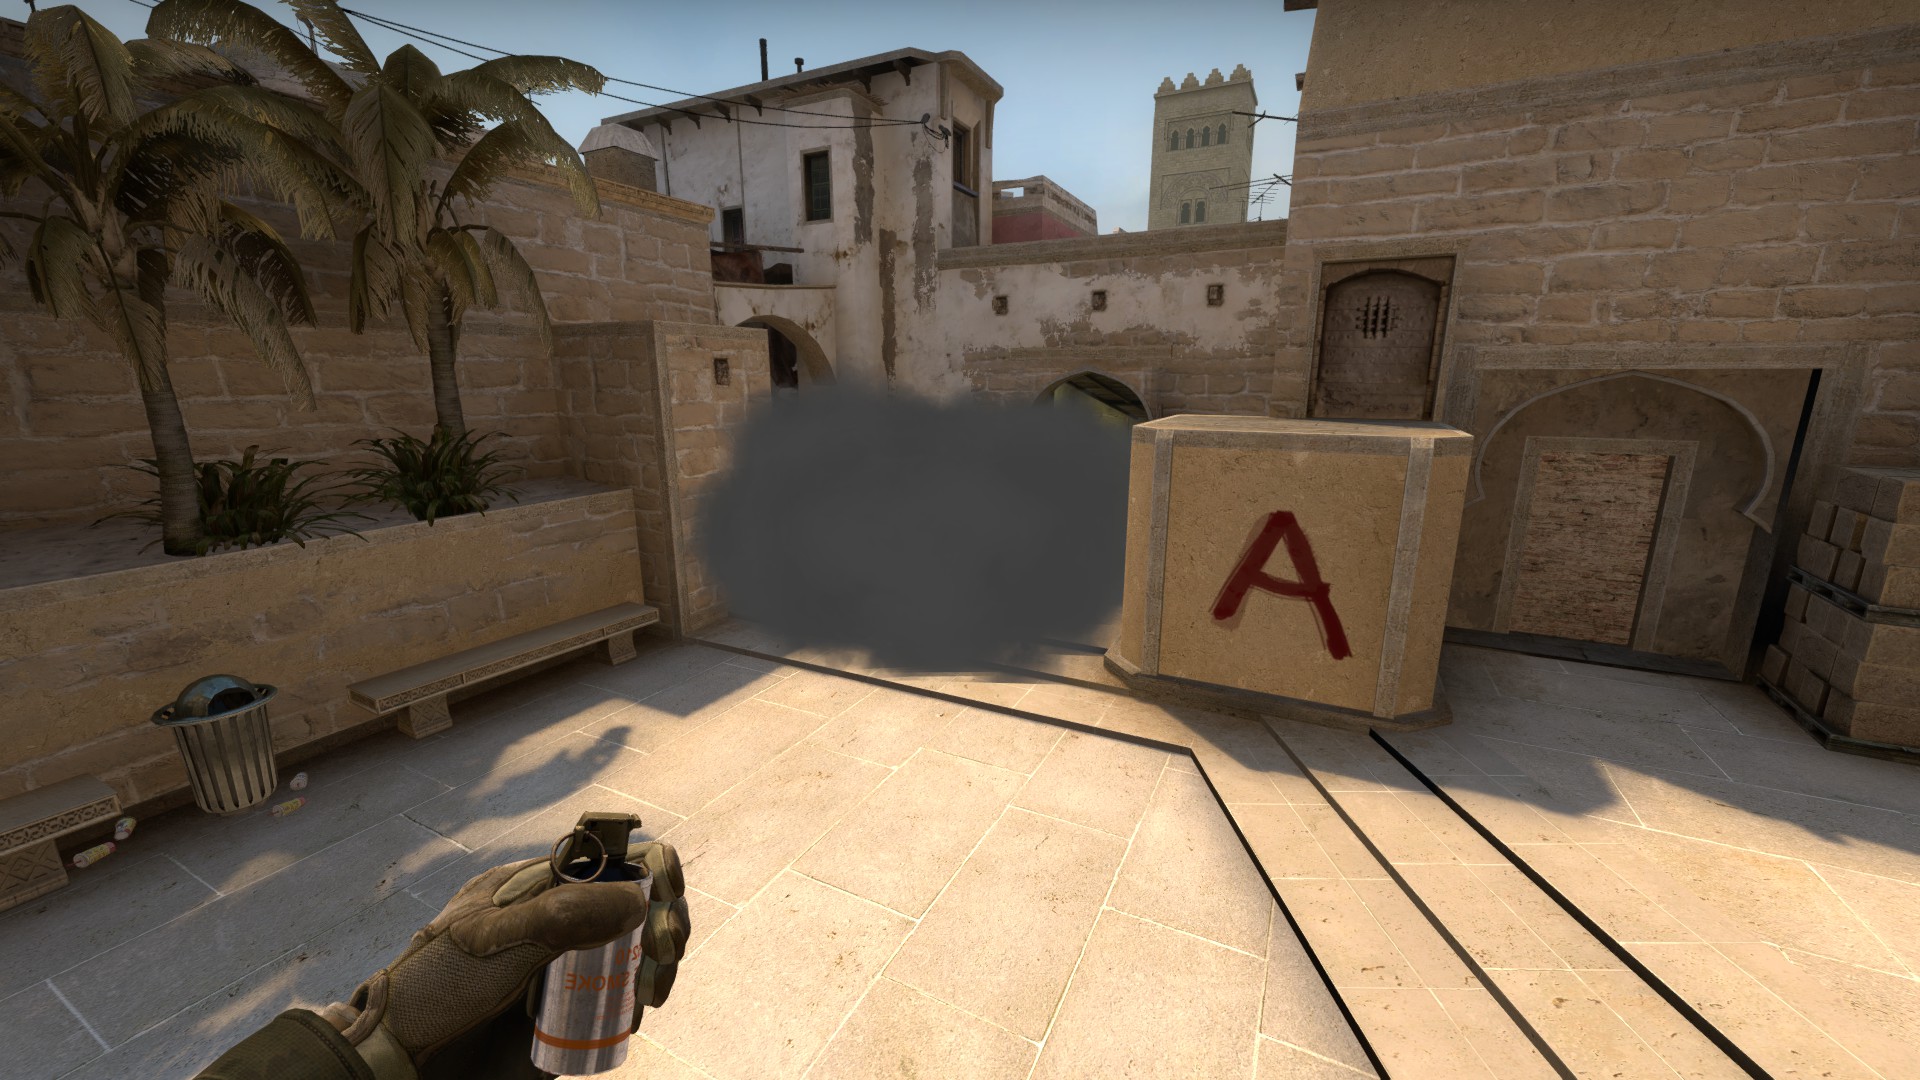
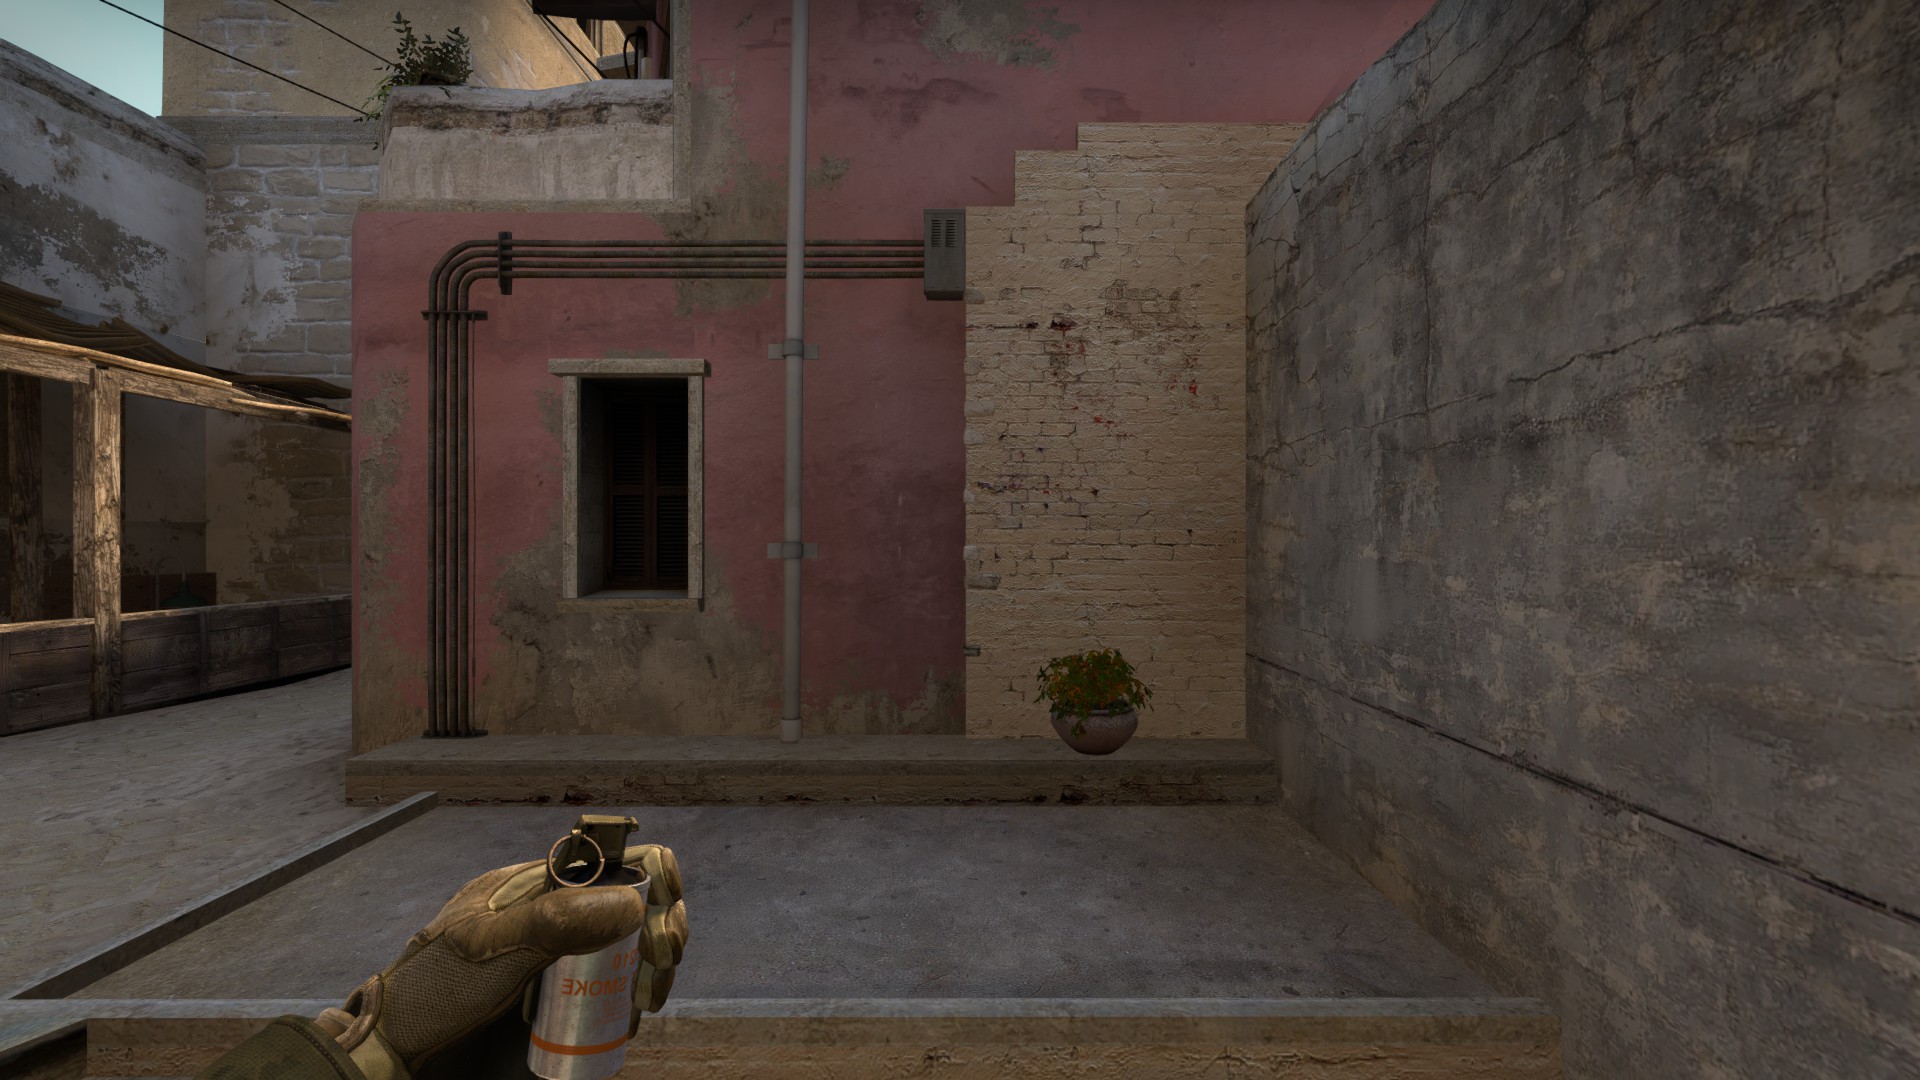
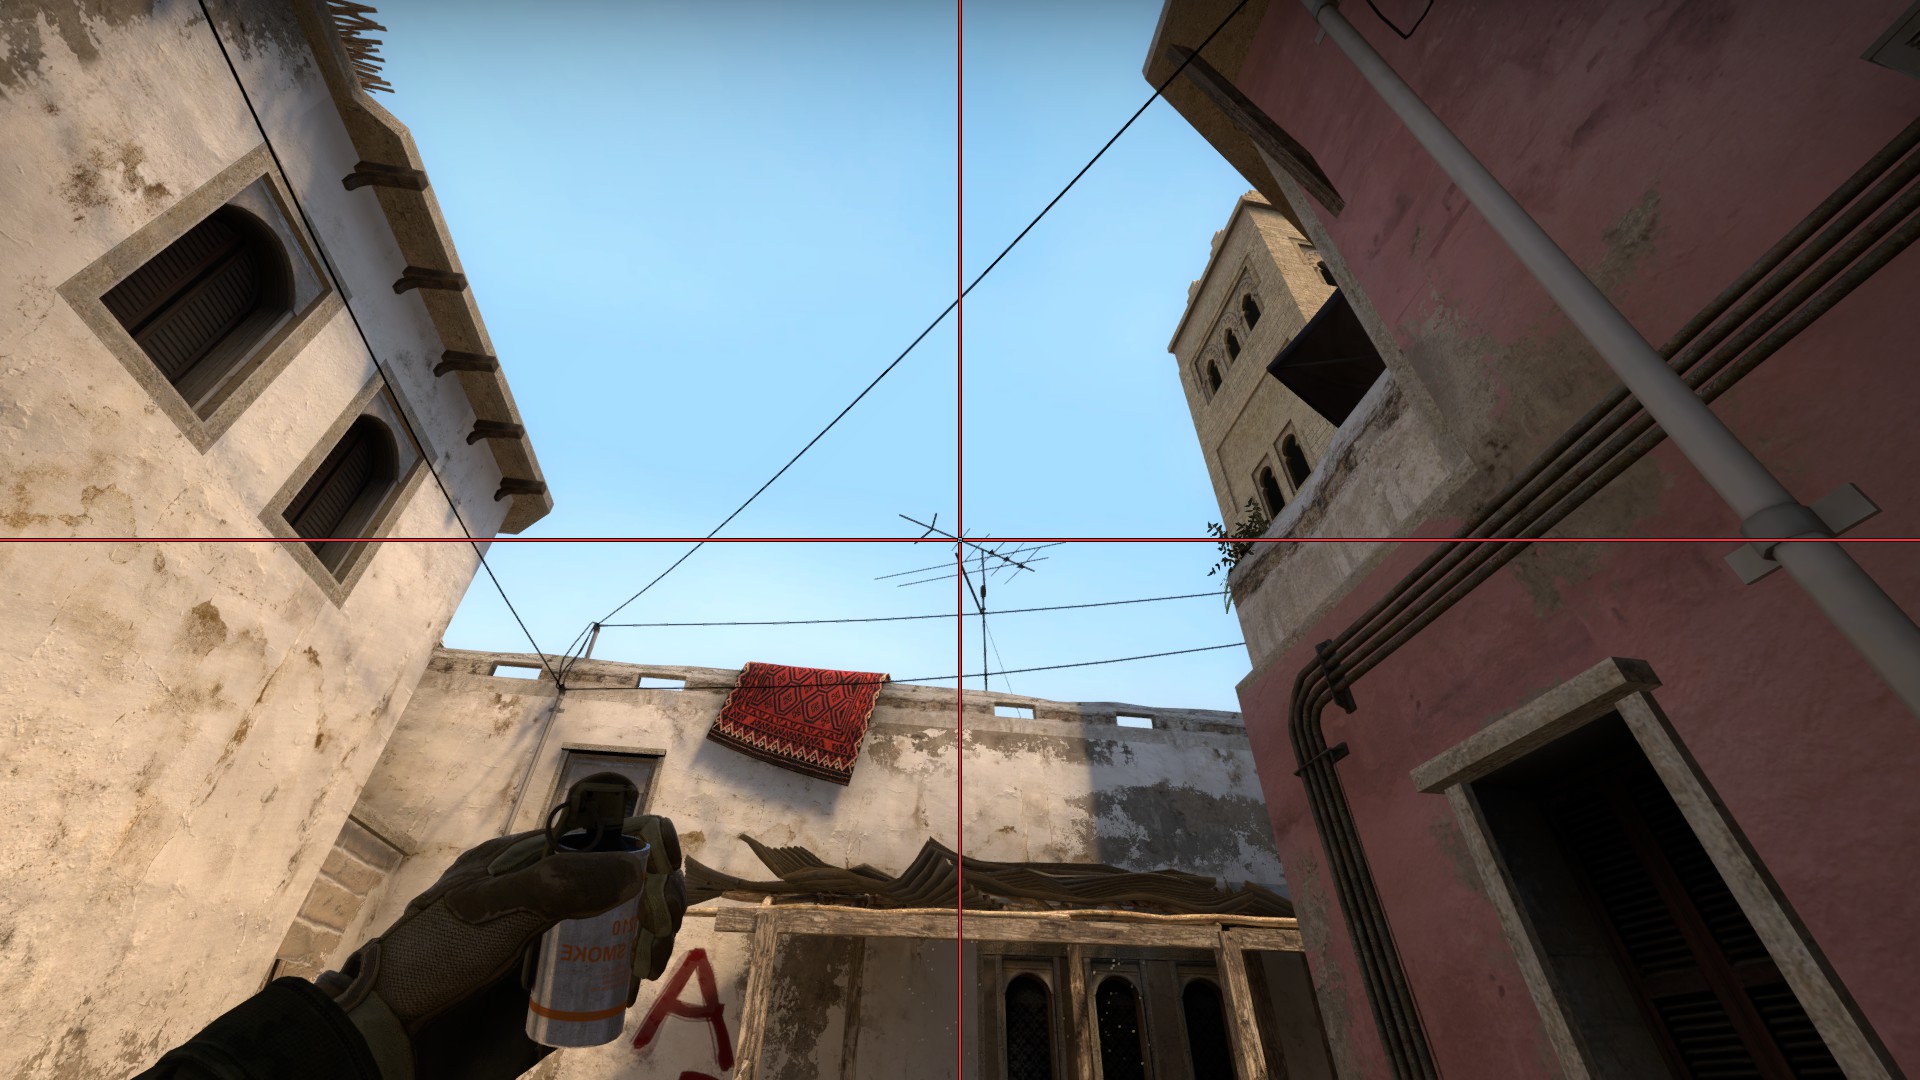
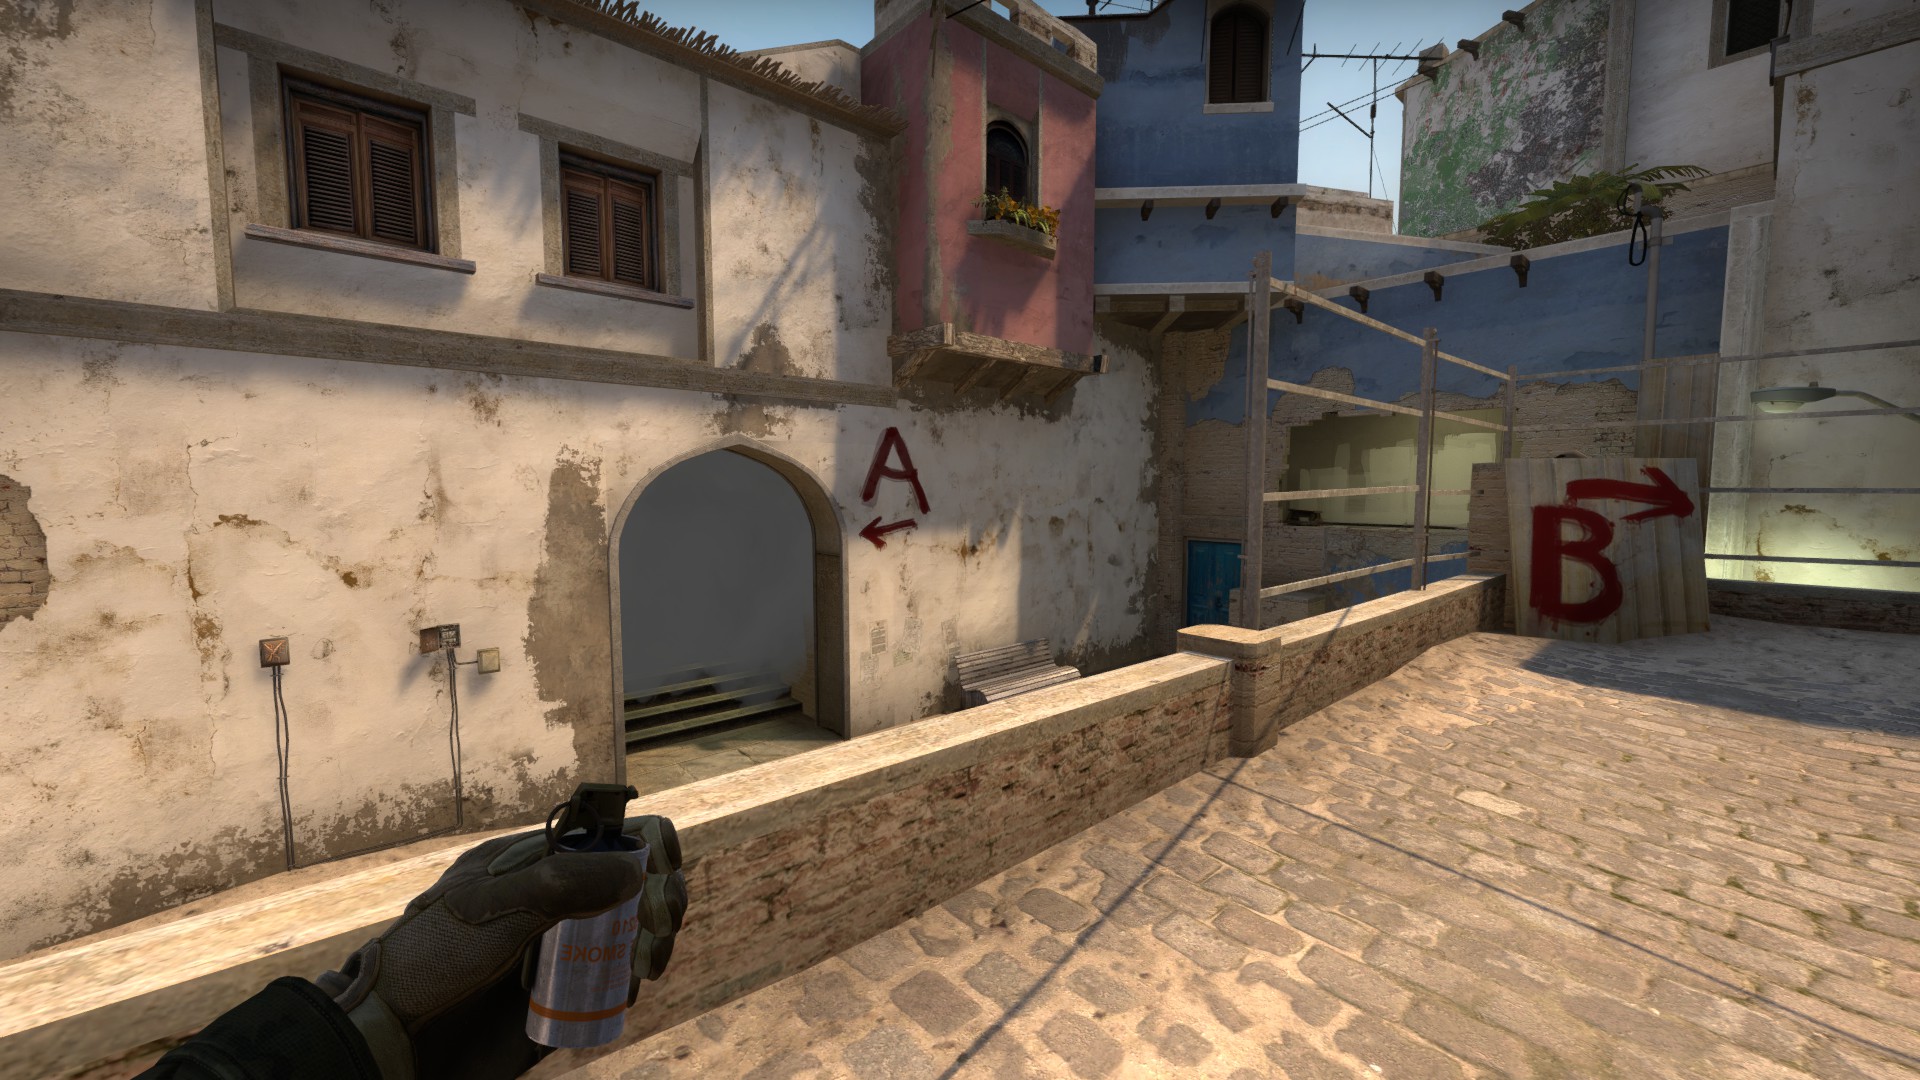
In example, for Mirage: "map de_mirage"

Hope this helps :) :gearthumbsup:
Bc. . 2020. dec. 21., 8:51 
where i can download 64tick map ?
fubuki 2020. nov. 15., 9:26 
nice
wølf  [készítő] 2020. jún. 22., 8:43 
Hello everyone.

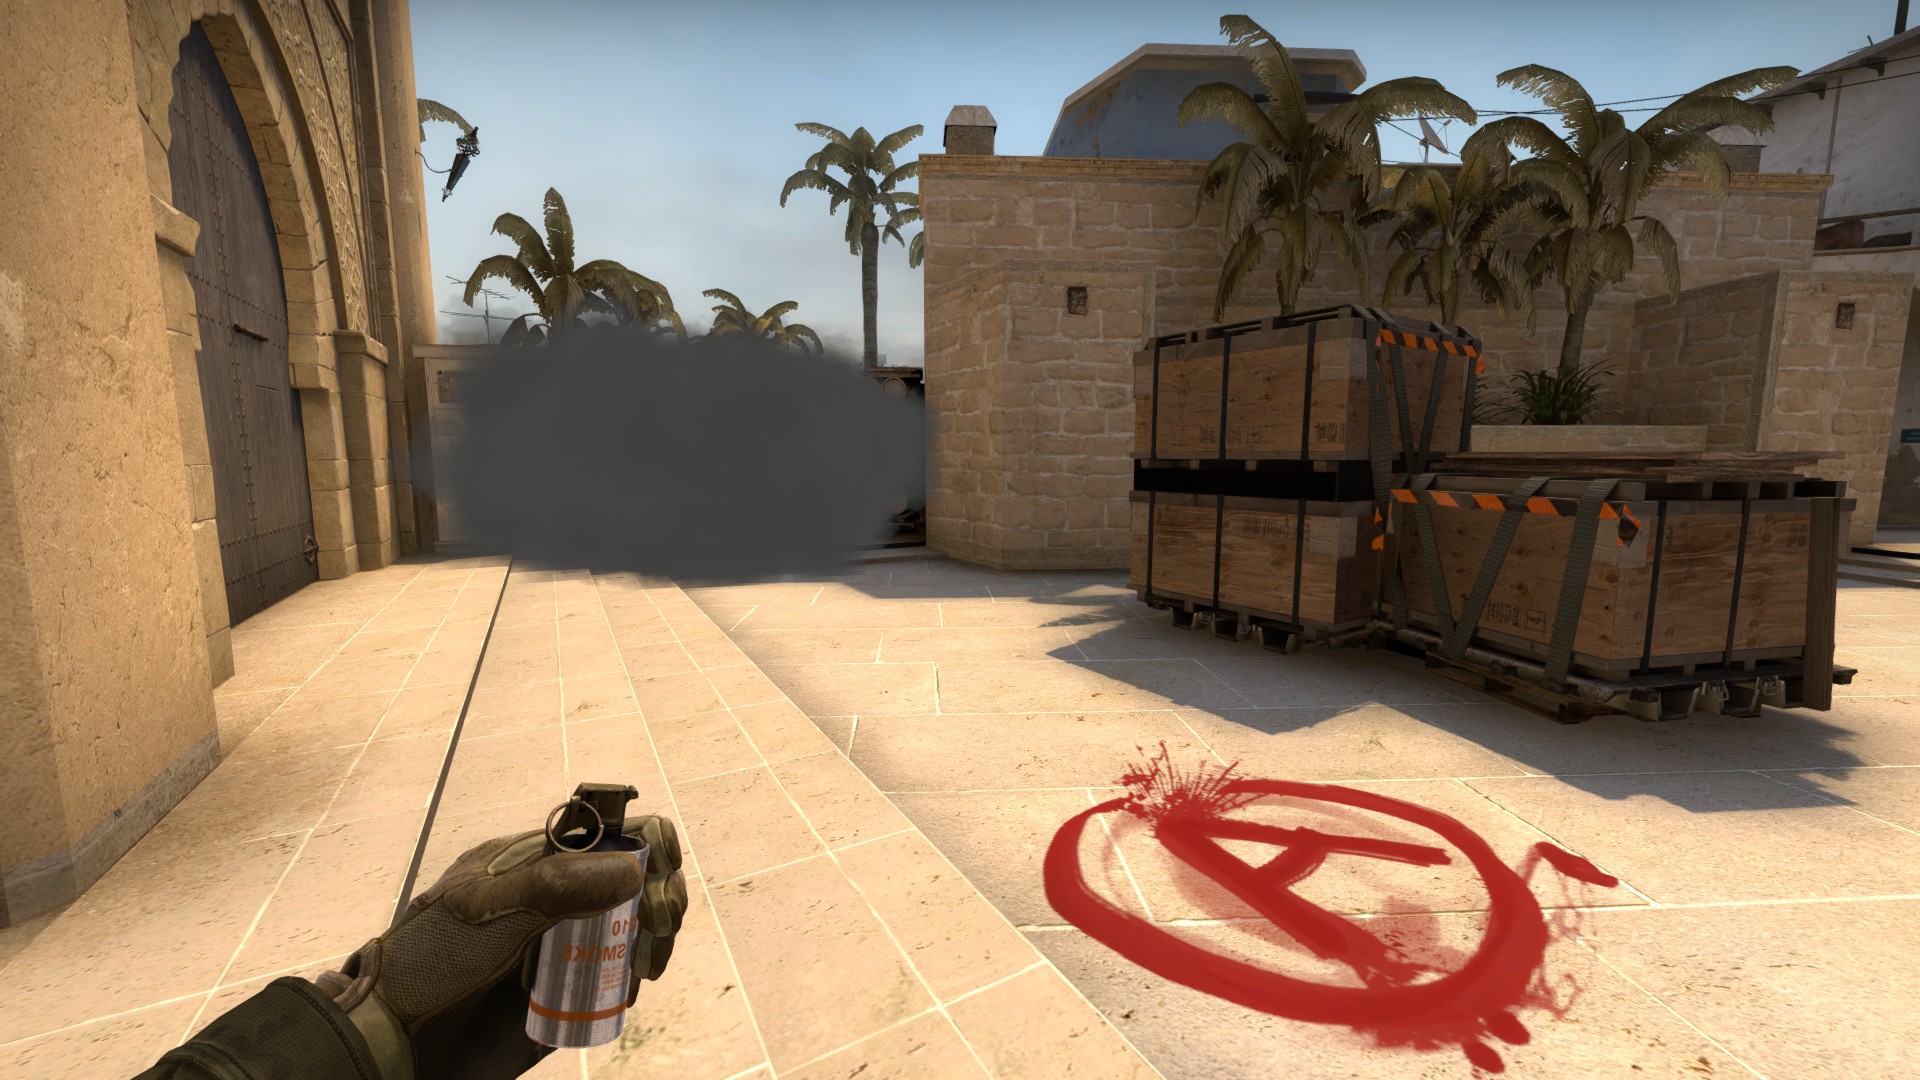
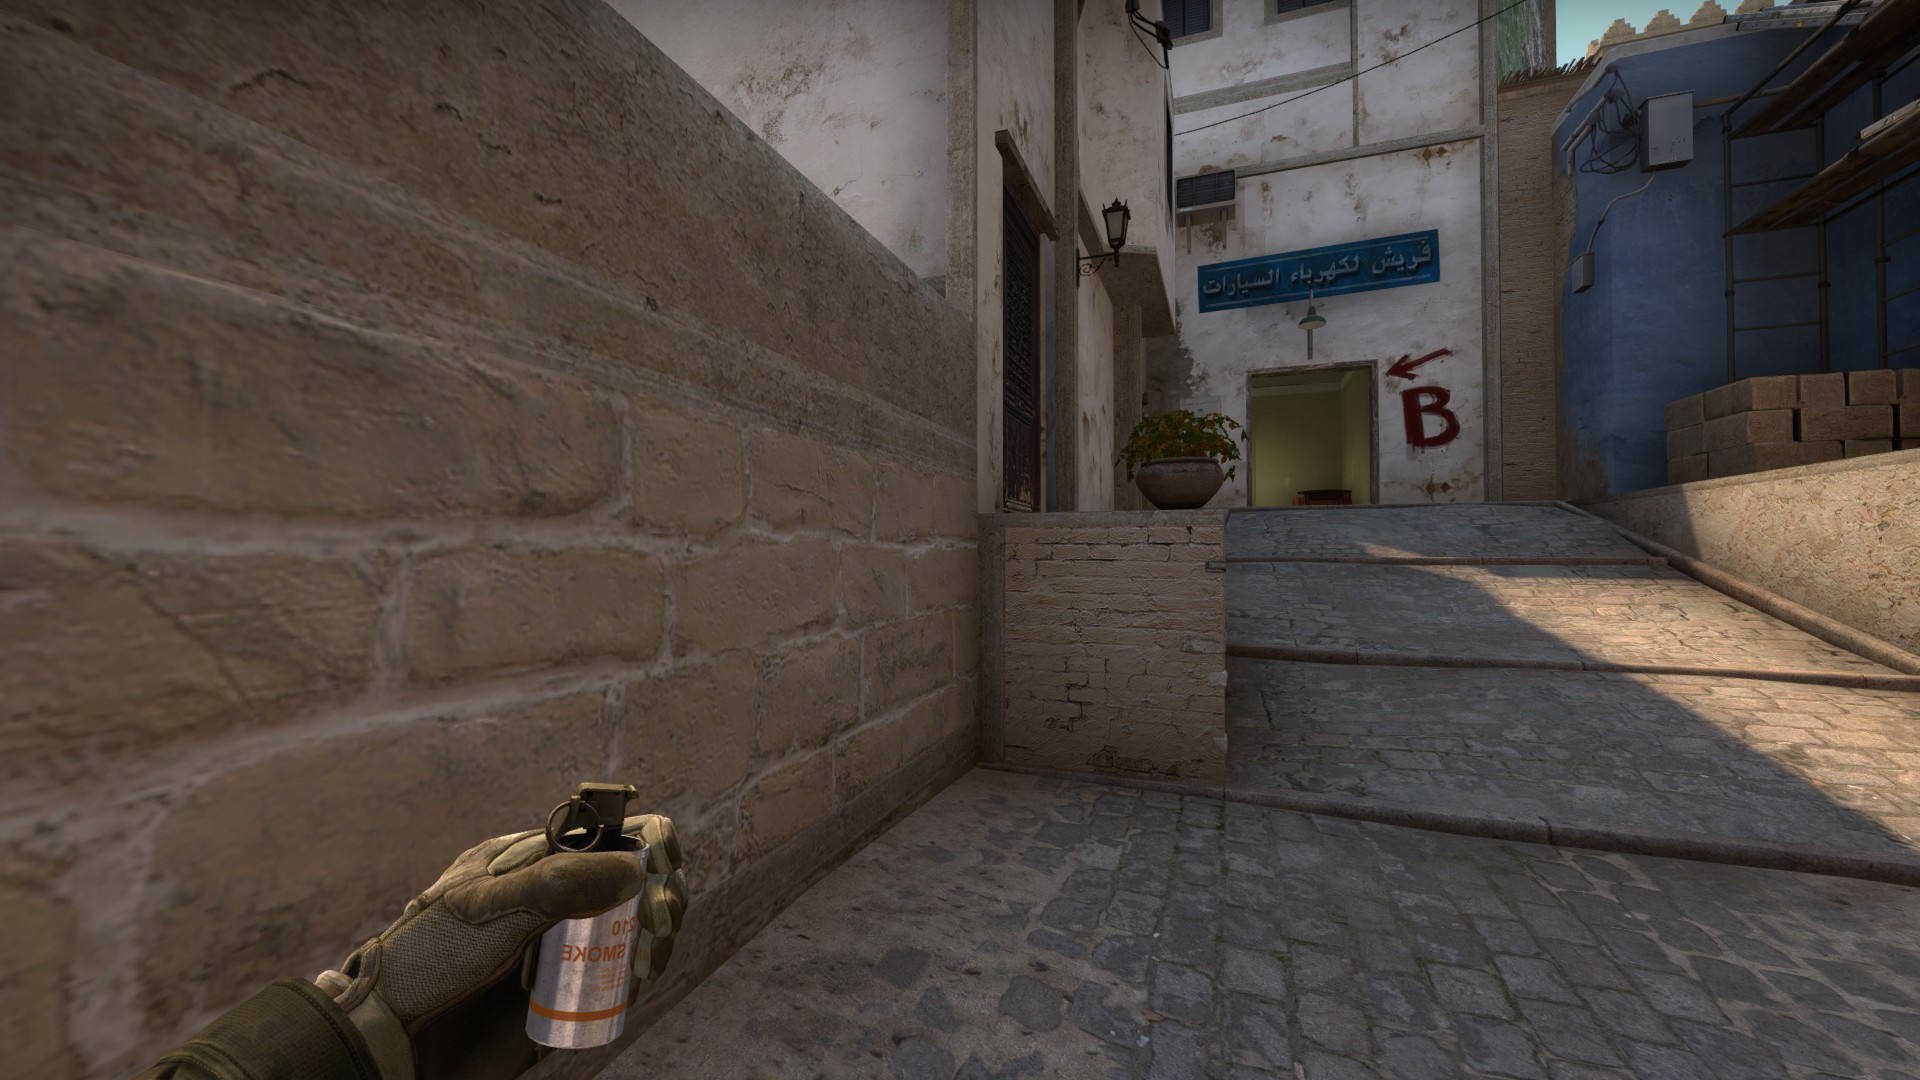
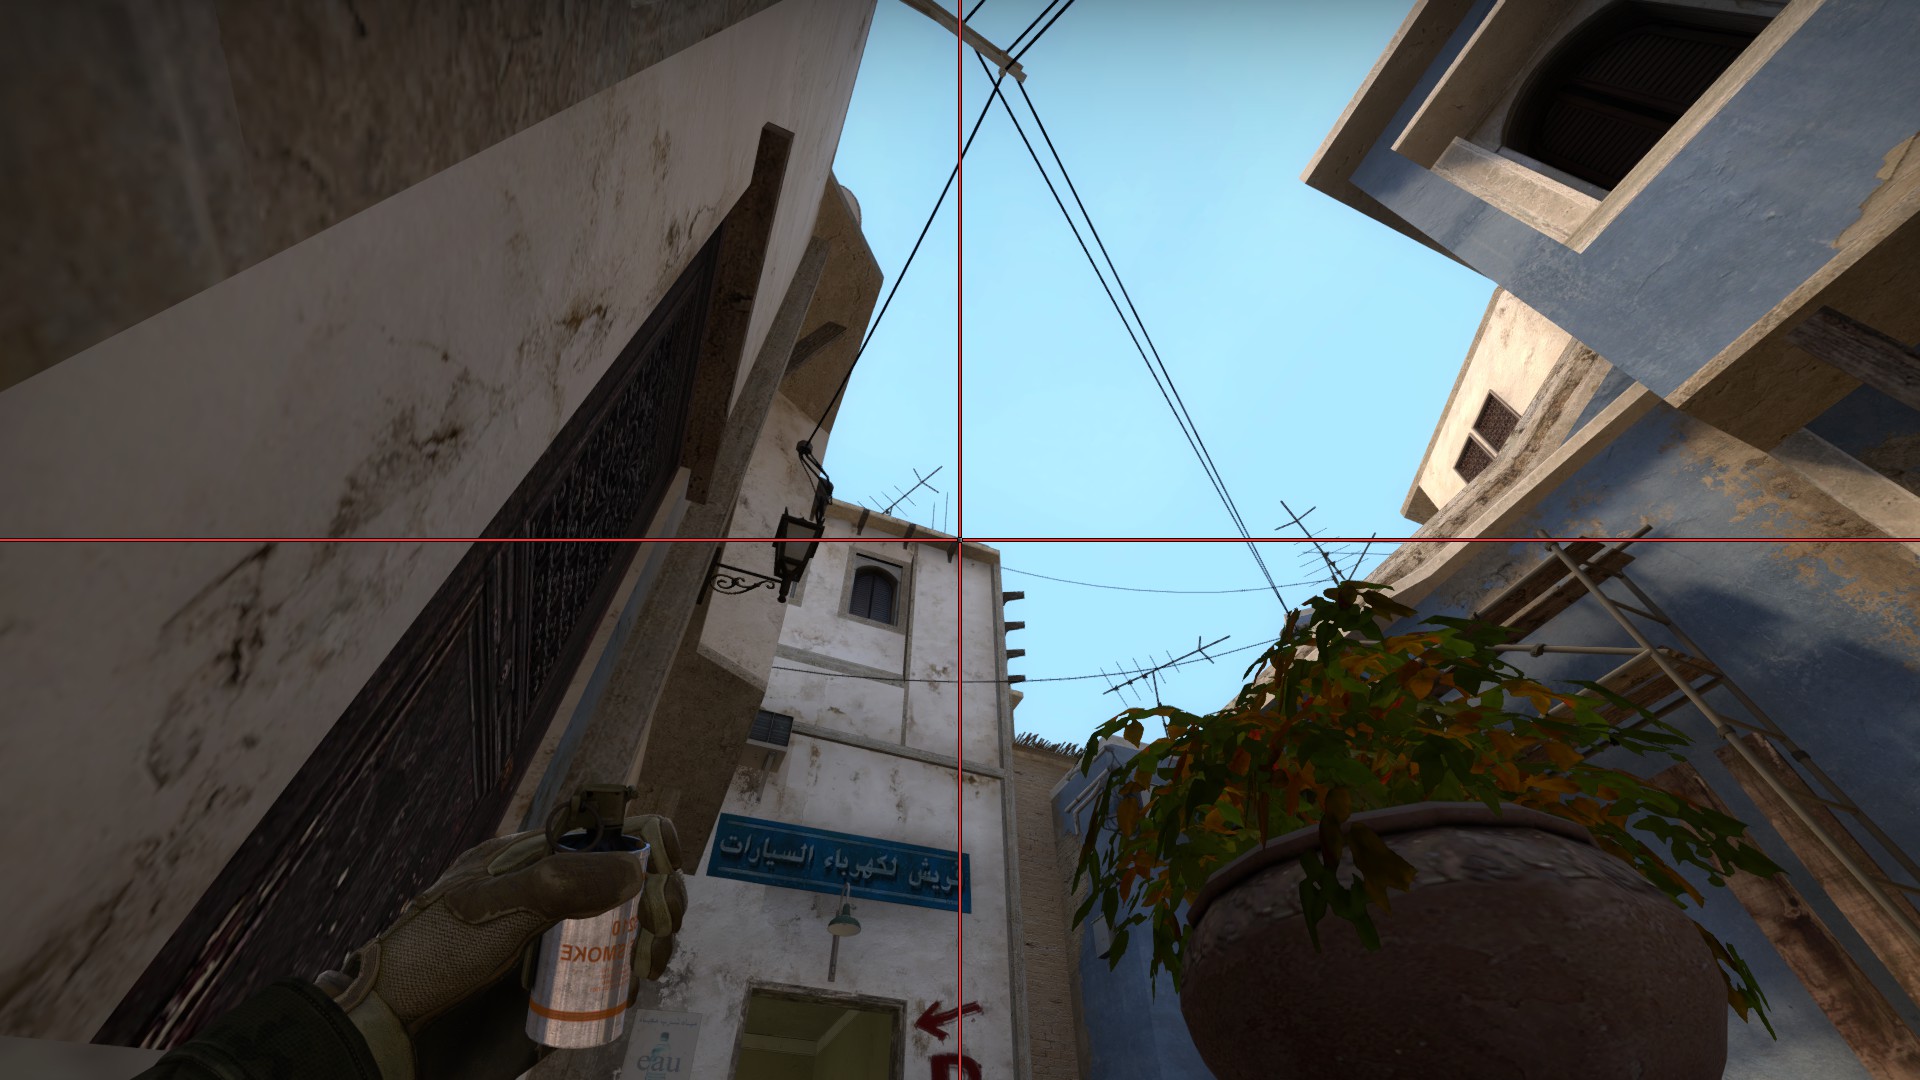
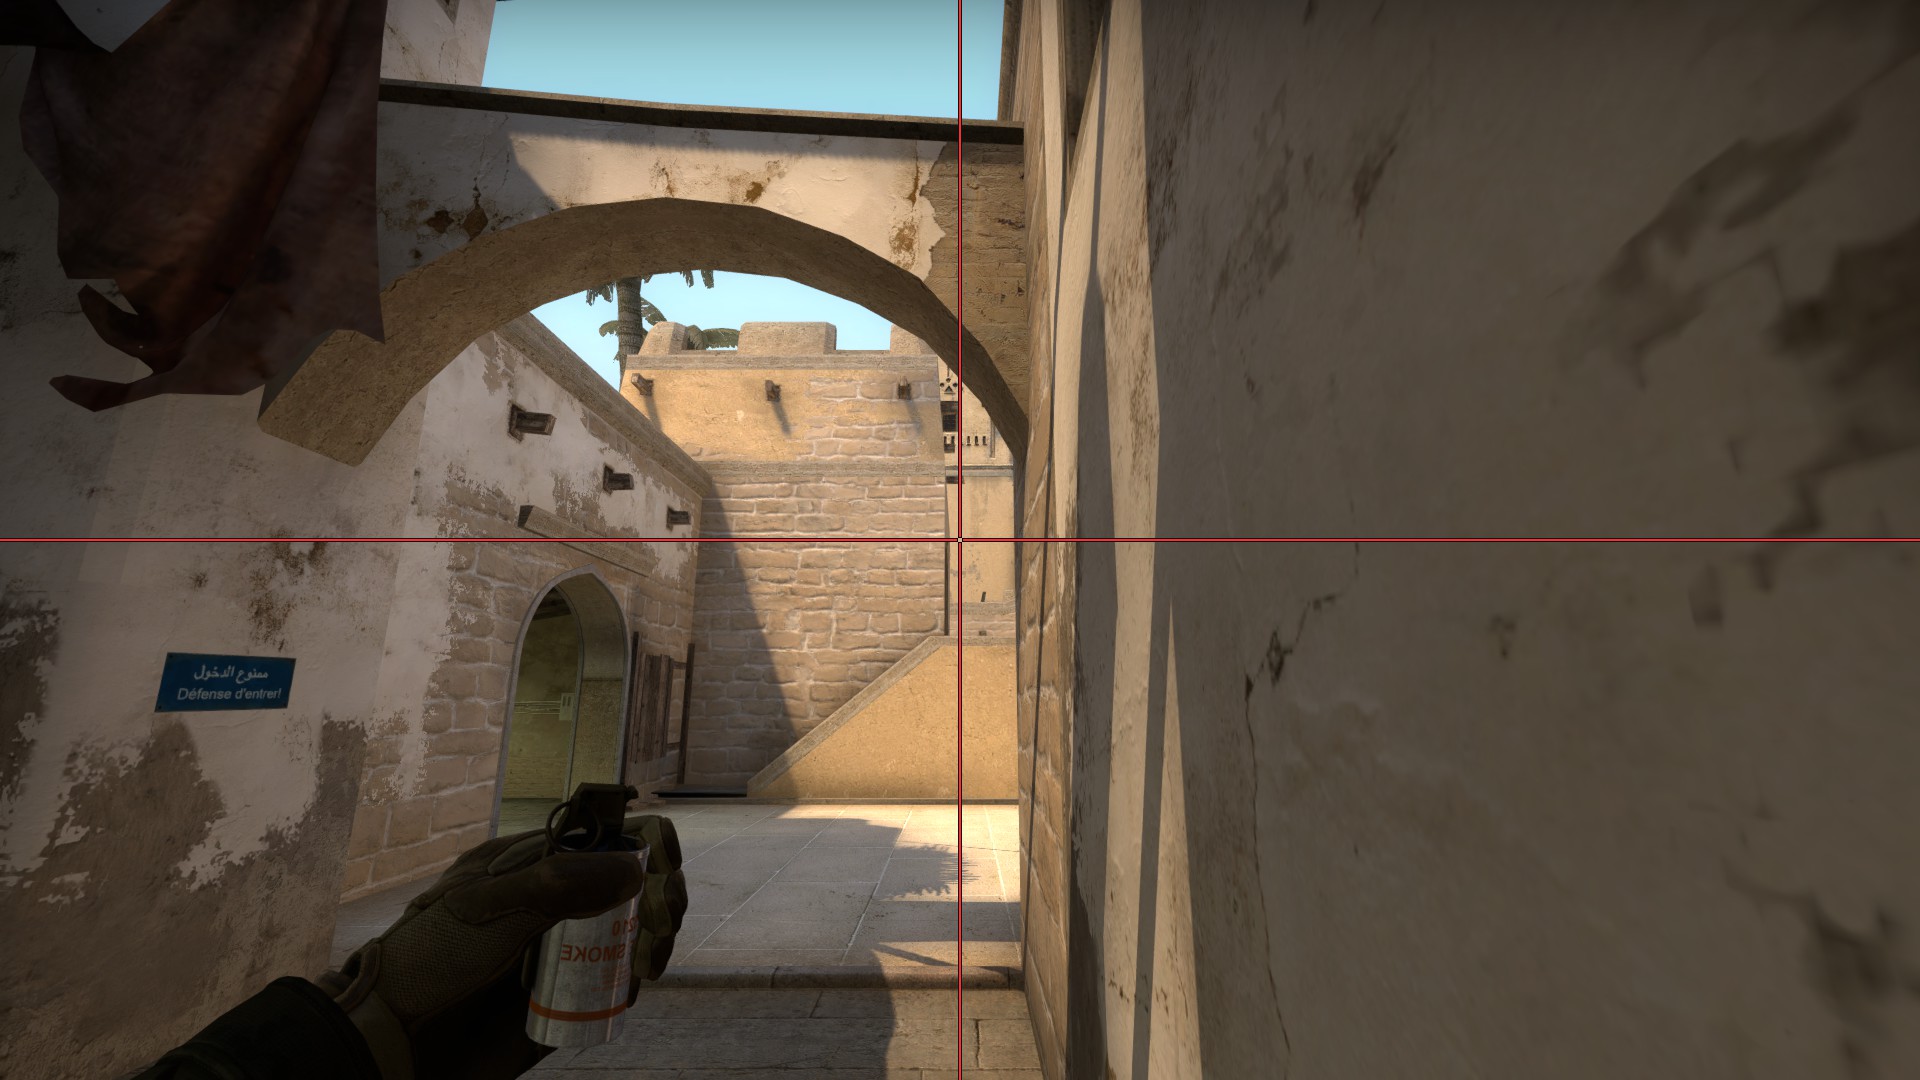
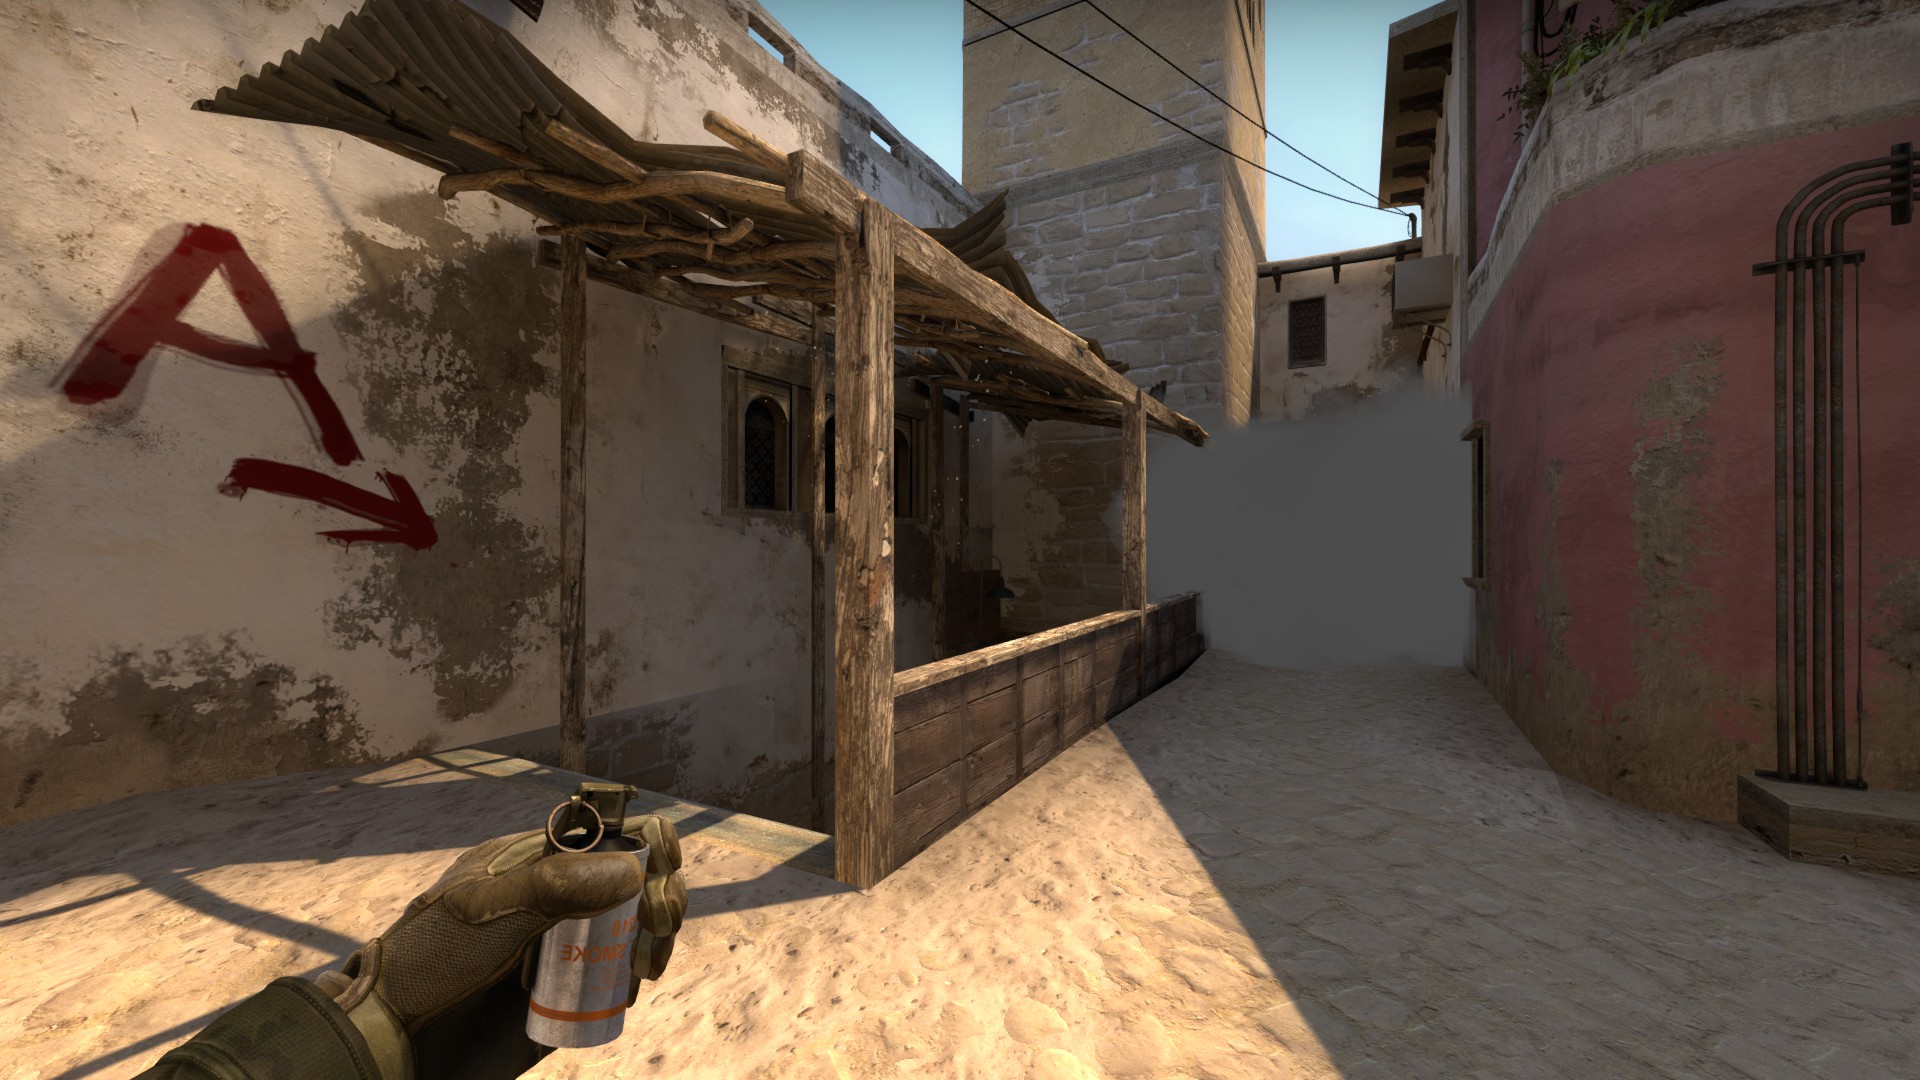
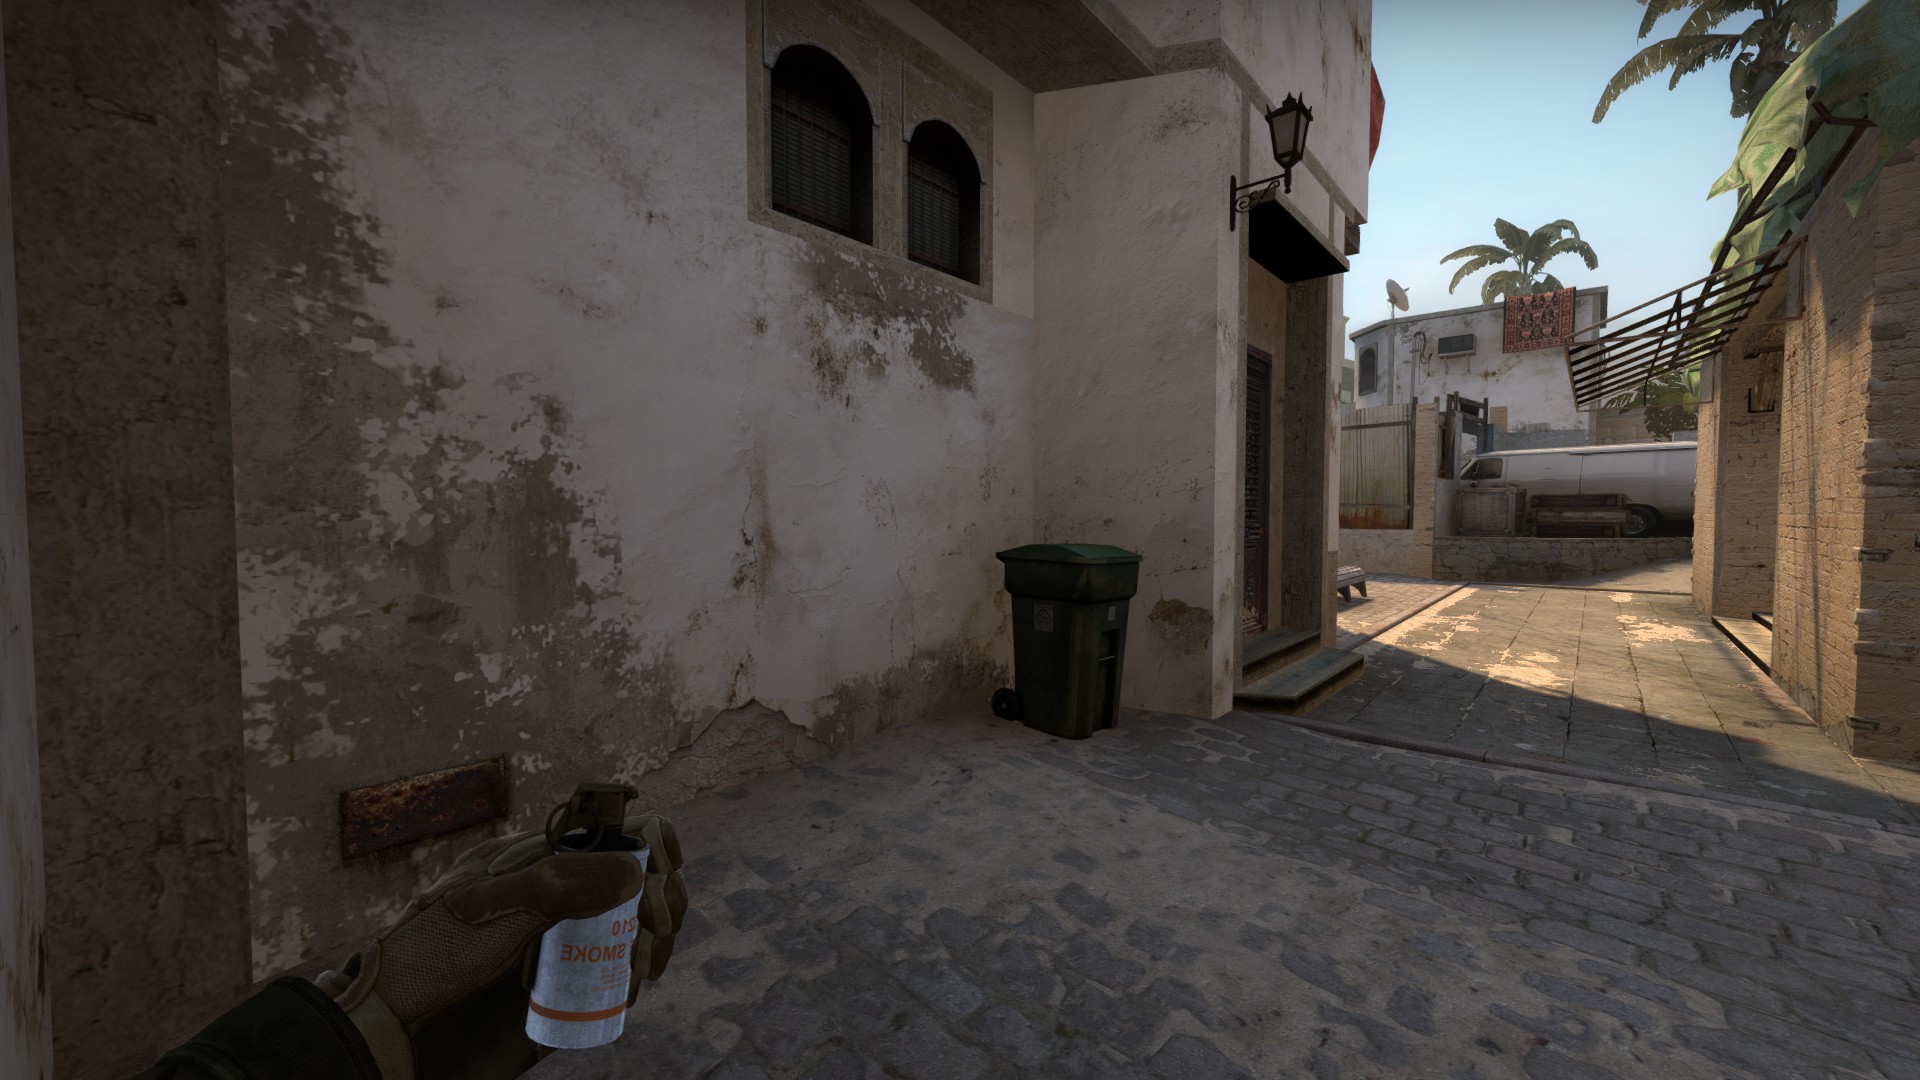
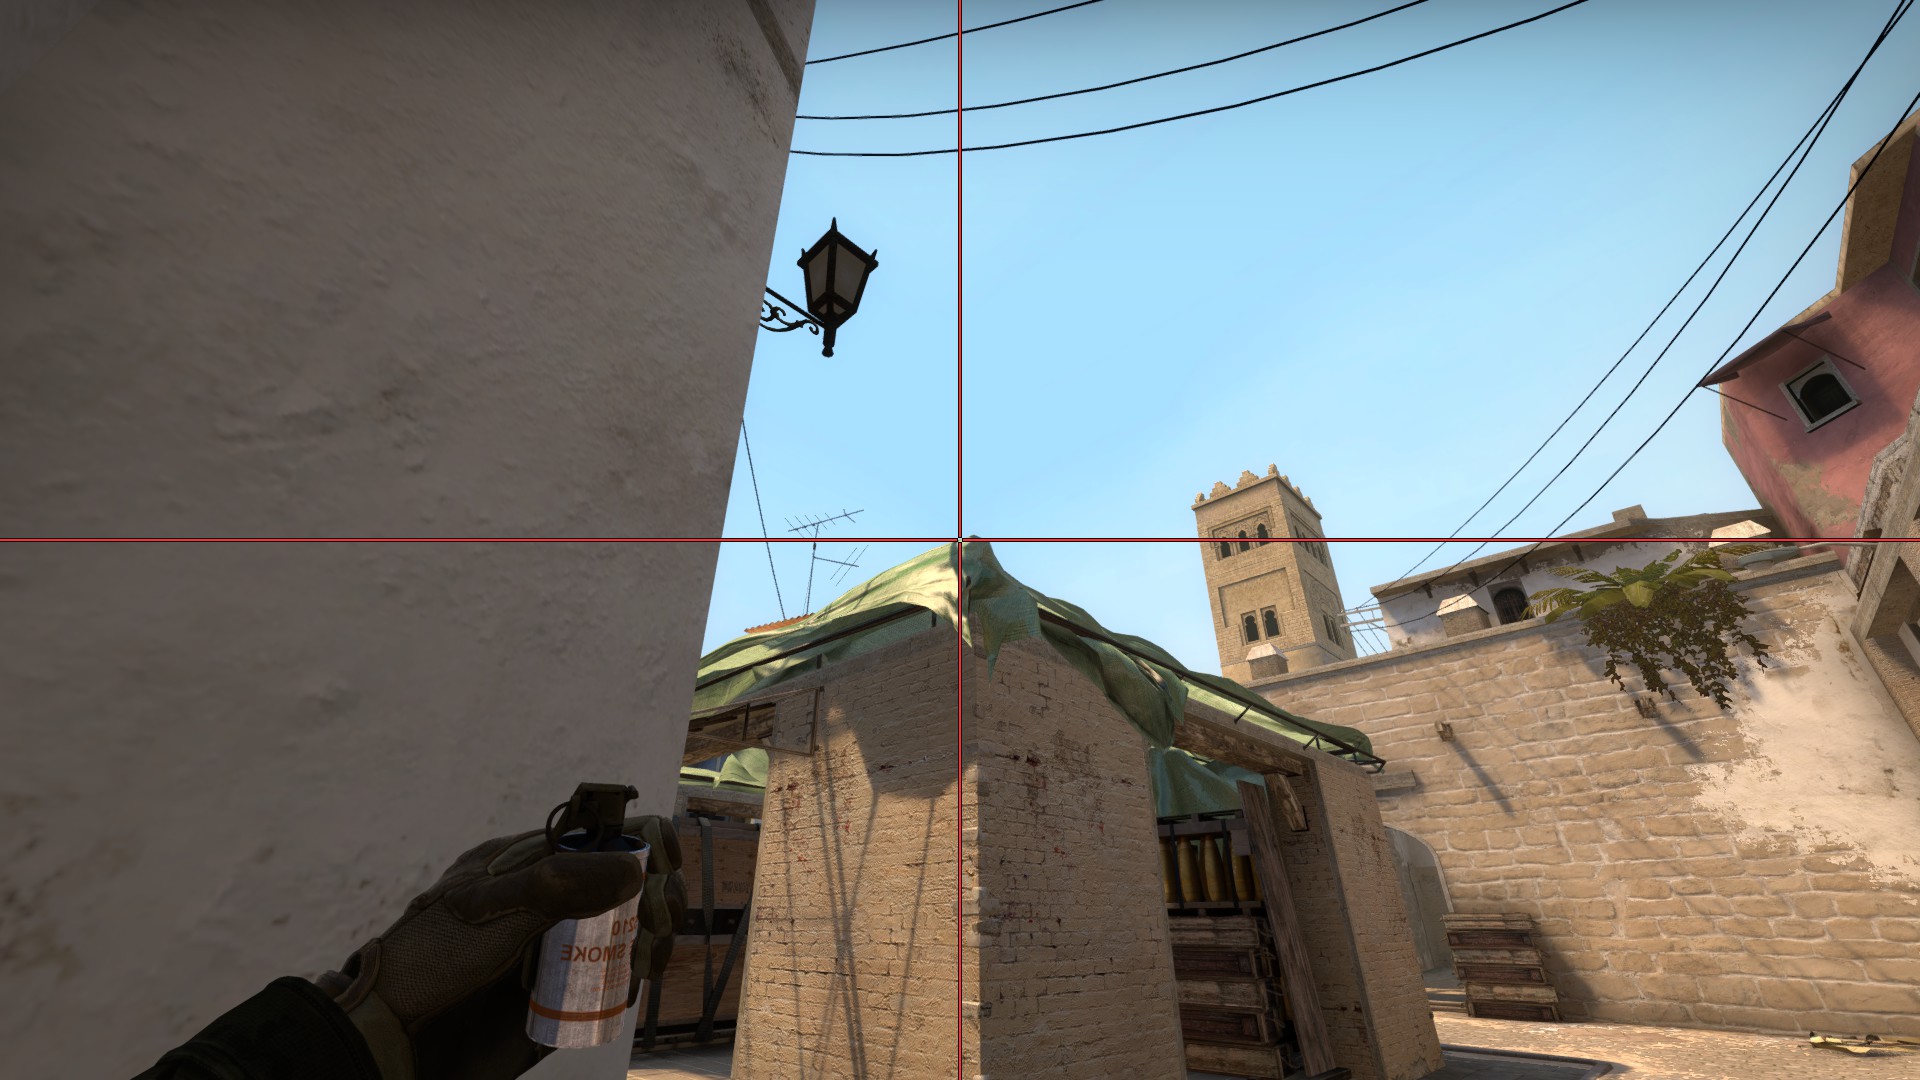
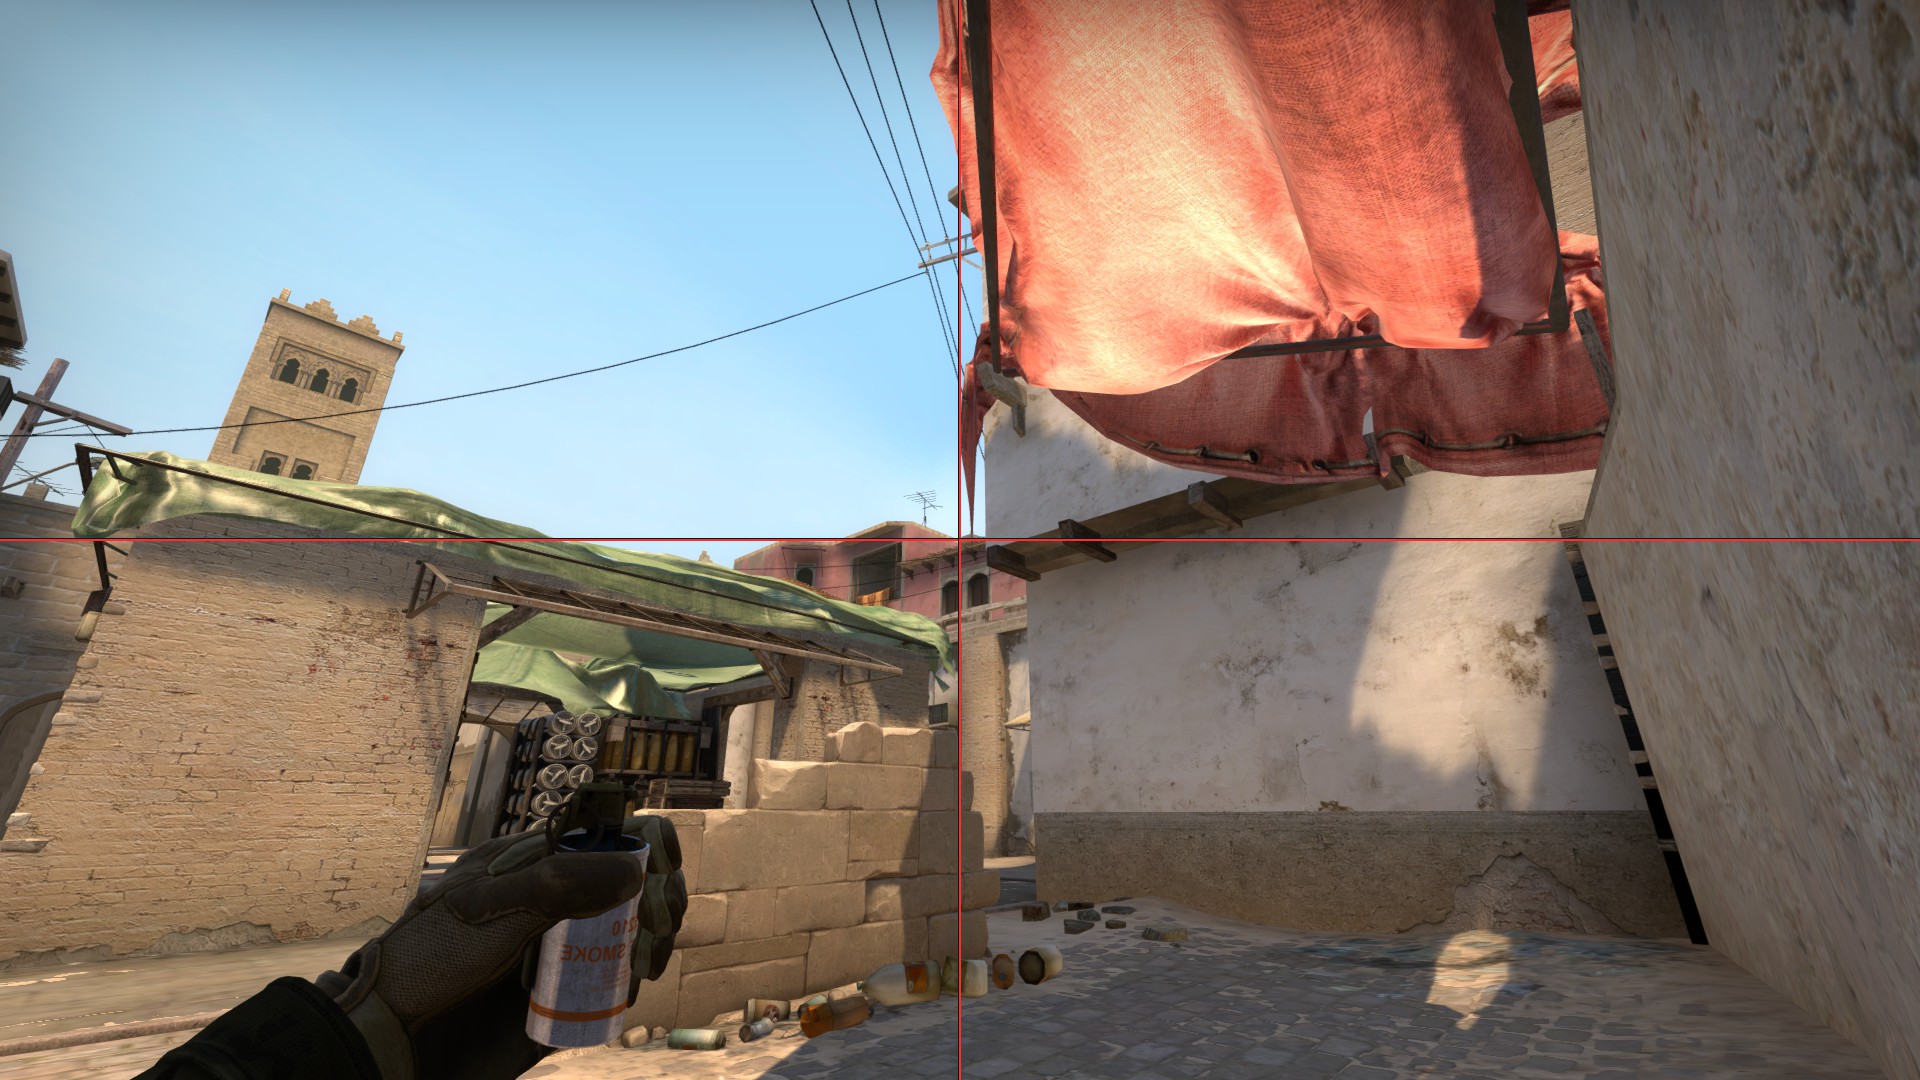
For those that are interested in Mirage smokes for 128-tick servers, check out my new guide here:
https://steamcommunity.com/sharedfiles/filedetails/?id=2137968247

Thank you.
.zeus 2020. máj. 8., 15:53 
ty
yeez 2020. máj. 2., 7:31 
dobry poradnik
Faruk Raval 2020. ápr. 14., 12:40 
Noice