Monster Hunter: World

Monster Hunter: World

37 ratings
[Iceborne] Niko's Wacky Build Warehouse
By Niko
This is less of a dedicated guide to a specific build path and playstyle and more of a documentation of any builds that I've played around with and found, if not powerful in their own right, just interesting to play. I won't promise you that all of them are gonna be winners, but if you like off-meta stuff, then you definitely want to stick around!

I'm experimenting with different stuff as I go, so while there might only be a few builds now, if I find anything (or anything gets requested), I'll post it here if it doesn't need a whole separate page to explain the methods to it.
   
Award
Favorite
Favorited
Unfavorite
Foreword
--SPOILER WARNING--

These builds are made in mind that you've already completed Iceborne. If you're going through the game currently and haven't finished it, if you care about that sort of thing then this is your chance to click off now and go finish the game. Of course, if you don't, then feel free to keep going and seeing what kind of wack-ass builds await you as you careen into endgame.

Or, if you're looking for something that can take you through Iceborne, and don't mind playing a support-style build, maybe take a look at my other guide to the Mushroomancer skill and see how that works out for you:
https://steamcommunity.com/sharedfiles/filedetails/?id=1972836946

--SPOILER WARNING--
[True Gaia's Veil] "Don't Look At Me Without My Mantles" Build


When I finished Iceborne, I immediately ran over to the Smithy to see what kind of fresh hell this rock monster/SoundCloud rapper would have in terms of gear. Boy, was I excited to see a 5-Piece Set Bonus with a monstrously powerful effect. The gears started turning and I decided I wanted to see if I could put together a build that built on all the skills that the set gave, but also worked in mantle usage to maintain True Gaia's Veil with nigh-100% uptime. The results are a very competitive, but still not entirely meta, build that gives you a myriad of defensive and offensive skills to ensure that you're living every hunt and not getting bodied by anyone that decides to get fresh with you. Except for maybe Lunastra and Teostra, you might want to still bring Cool Drinks and eat for Elemental Resist for those.

--WEAPON--
This build doesn't particularly marry itself to any specific weapon, but if I were to recommend one that can fully take advantage of what this build offers, then I picked the following criteria:
  • A weapon with at least 20% Base Affinity
  • A weapon with a non-hidden Element/Status
  • A weapon that enjoys not getting their attacks interrupted by roars, tremors, wind, etc.
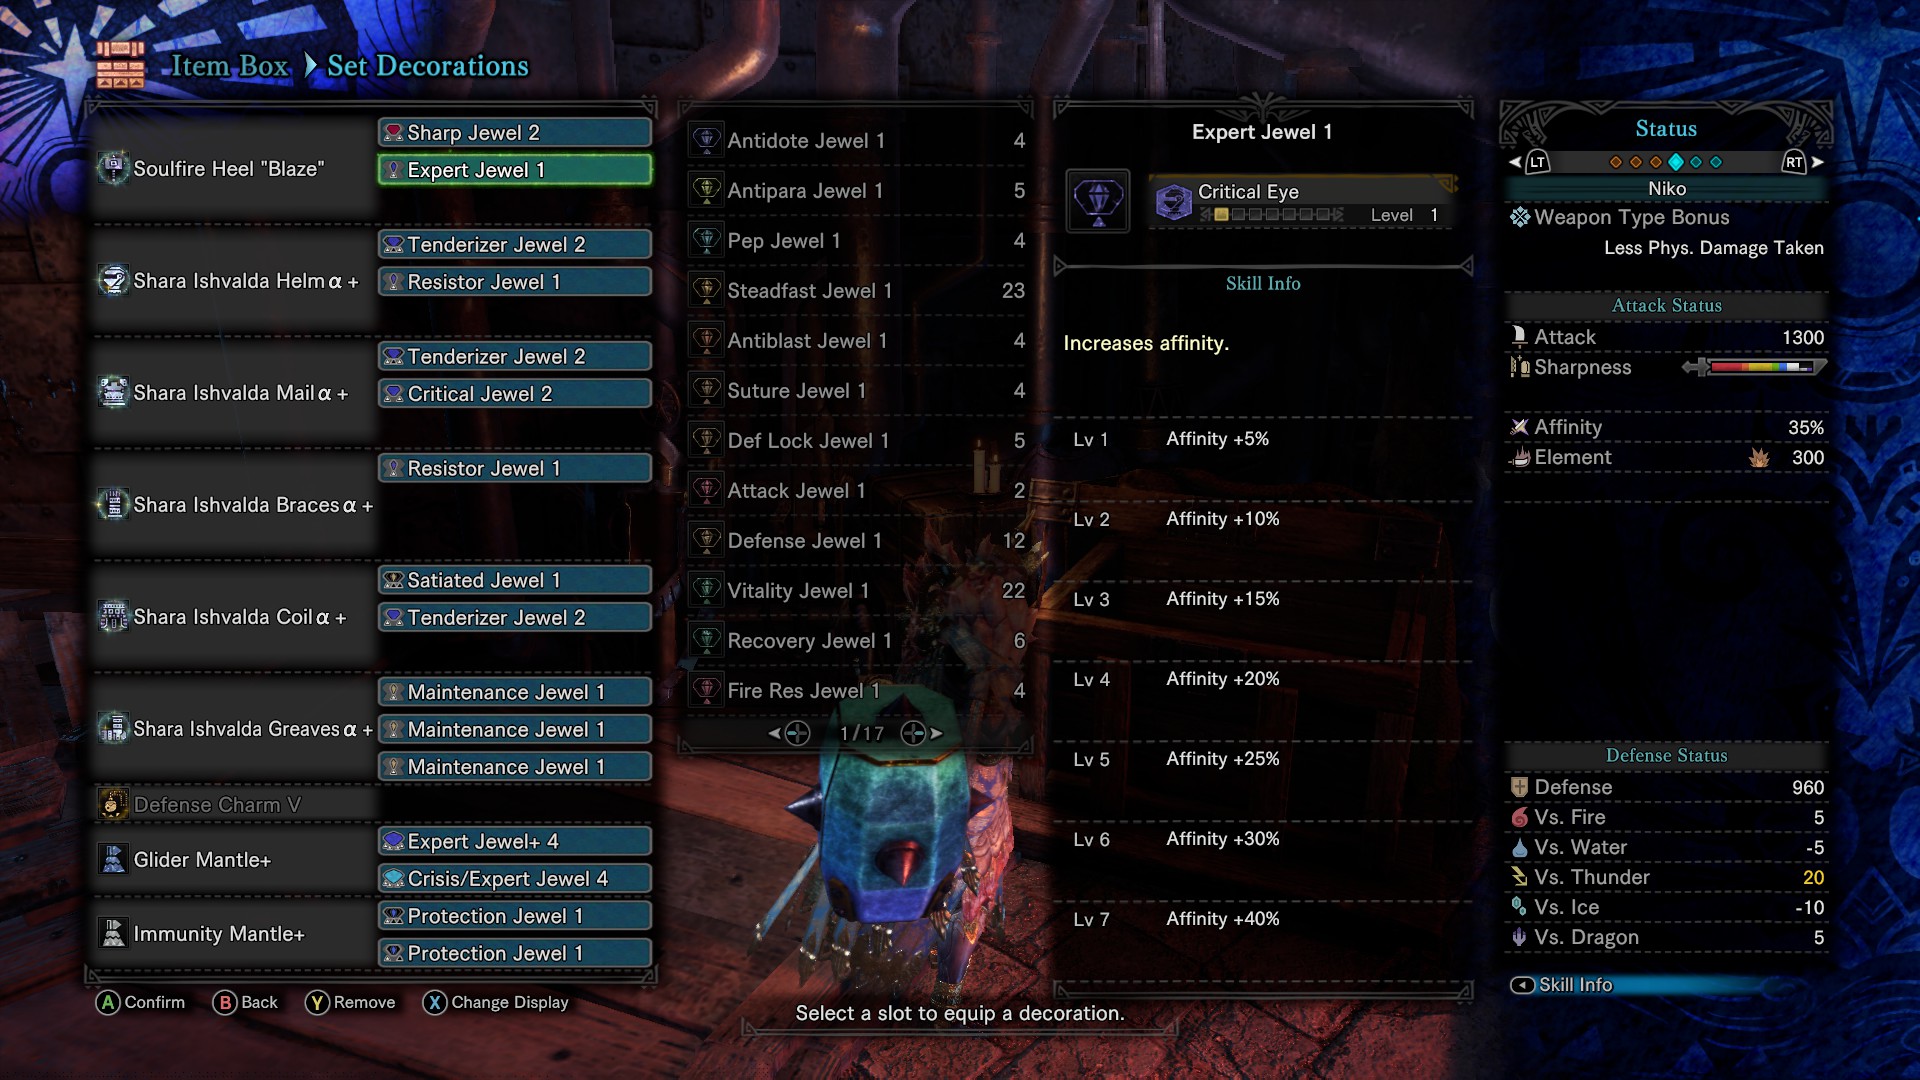
Naturally, Greatsword and Hammer immediately came to mind, but just as well the likes of Charge Blade and Switch Axe could definitely work with this. The weapon I chose specifically was Soulfire Heel "Blaze" from the Lunastra line of weapons because it fit my criteria, gives a nice bonus in the Guts skill which is another emergency defensive skill, and I just like playing Hammer, personally.

--SKILLS--
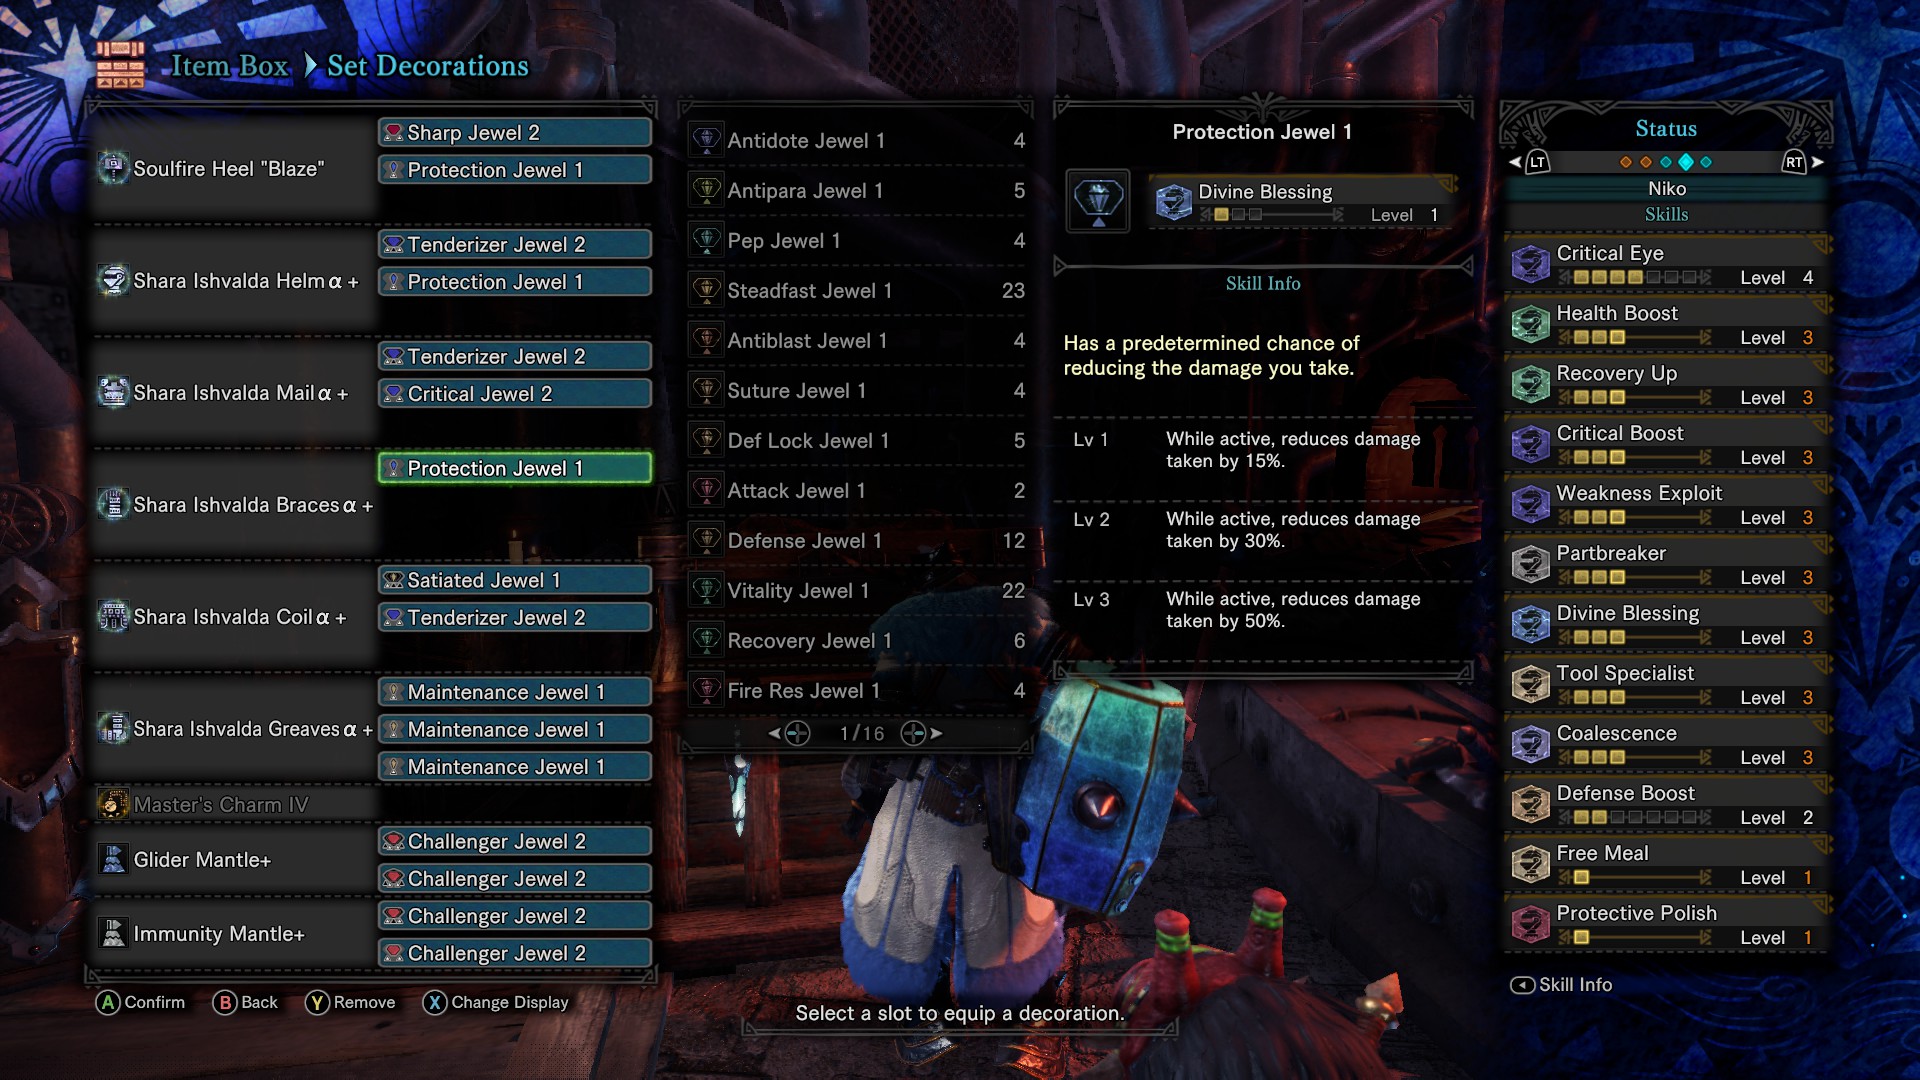
Of course, the main headline of the set is the 5-Piece Bonus, True Gaia's Veil, which grants any Mantle you wear Tremor Resistance 3, Earplugs 5, maximum Windproof, and Flinch Free. This basically turns any mantle into Rocksteady Mantle without the super armor. Because by nature this is a mantle-using build, we want Tool Specialist 3 to reduce the cooldowns of our mantles so we can maintain uptime of this skill. This is basically non-negotiable.
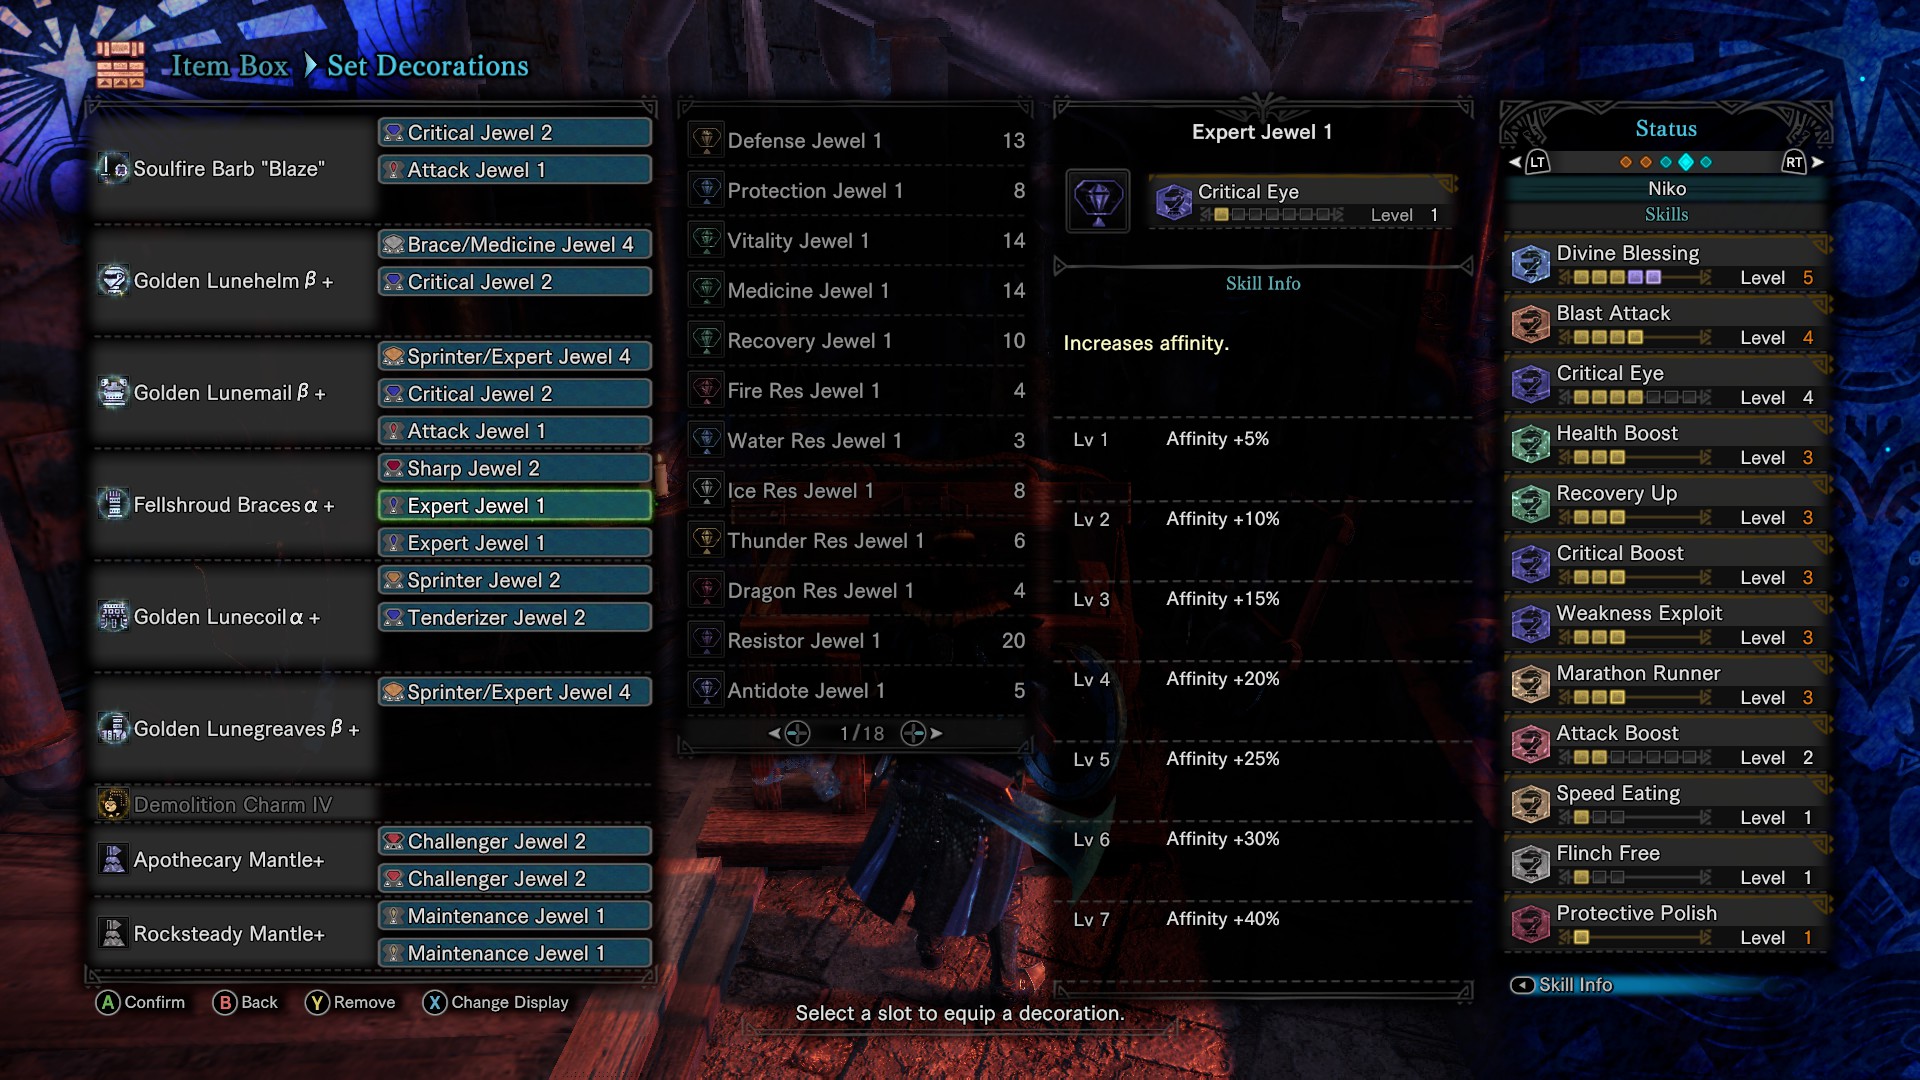
  • Offense-wise, the set by itself gave Critical Boost 2, so that leaned to making a build that does in fact use critical attacks to the best of it's ability. To do this, I maxed out to Critical Boost 3, added Weakness Exploit 3, and spread a Critical Eye 4 on my weapon and Glider Mantle+. With one Affinity Augment on my Hammer, the base affinity goes up to 30%, and your total affinity when hitting a tenderized weakpoint adds up to 100%, which puts you on par with any meta Crit Build. You also have Coalescence 3 which gives +18 Attack Power, +90 Elemental Attack Power, and +15% Status Buildup when you recover from a Blight or otherwise any Abnormal Status which I paired with Blight Resistance 2 to proc faster in case you tunnel-vision too hard and forget to eat a Nulberry, but not immune because you cannot proc Coalescence if you're immune, you need to be able to cure the effect. You could swap it out for Stun Resistance 2, or Effluvia Resistance 2, or whatever you fancy.

  • Defensively, this is where this set shines bright. Health Boost 3 and Recovery Up 3 means you can already take a beating and heal yourself back up more efficiently, and I even snuck in Free Meal so you have a chance to not consume your items to keep fighting. Defense Boost 7 raises your raw defense to ludicrous levels because you're already wearing Rarity 12 Armor and even sneaks in an immunity to Thunderblight from the extra Elemental Resistances. On my second Mantle I threw in Divine Blessing 2 just for ♥♥♥♥♥ and giggles, but you can swap it out for more Damage if you so choose.

  • Utility-wise, you bring Partbreaker 3 to the table, which means you can break parts very fast for your group if you were, say, farming Monster Mantles, or maybe helping some friends get a certain monster's Tenderplates. (Break his head twice in phase 2, you get two guaranteed drops!) Finally, to combat sharpness, we slap on a Protective Polish so you aren't spending most of your hunts contending with it. Any other skills beyond this point are just for filler, like Resuscitate only being on because I needed an extra Critical Eye on my Glider Mantle+.

--SKILLS ADDENDUM--
Yes, Defense Boost 7 is not the most efficient of all survivability skills. I just picked it out because I felt it fit well with the set, what with the Armor giving Defense Boost 2, and the Charm, which you needed Shara Ishvalda parts to make anyway, fit like a glove. If you'd like, you can swap it out for a Critical Eye Charm IV, and drop Blight Resistance 2 and the Critical Eye 1 on your weapon for Divine Blessing 3. That opens up your Mantle Slots for more raw damage through skills like Agitator, or getting more Critical Eye to widen your weapon choices. Or, you could pick up any Elemental Resistance charms to fight different monsters with different elements to shore up your weaknesses, especially to Ice.

A setup like that would look a little something like this (I don't have any Challenger+ gems at the moment, but you'd want to use them on your Glider Mantle+ here):


--ITEMS--
The only consumable items I would deem absolutely necessary are Antidotes, Nulberries, Energy Drinks and Astera Jerky because you need them to proc Coalescence. Ideally you were bringing them anyway, but just in case you needed the reminder, here you are.
Finally there's the subject of your Mantles:
  • Temporal and Rocksteady Mantles don't particularly work for this build because you're relying on your mantles being up to maintain the True Gaia's Veil buff, and get the extra amount of Critical Eye you need to deal maximum damage.
  • Glider Mantle+ and any Elementproof Mantle+ or Immunity Mantle+ are the mantles to bring because they last for full duration regardless of the situation you're in, and have the lowest cooldowns of all mantles, letting you maintain 100% Uptime on them.
  • Glider Mantle+ specifically has 2 Level 4 Gem Slots, makes Mounting easier, and has the lowest cooldown of all mantles in the game, so make sure you're using it like an extra armor piece.
[Long Gunlance] "Indestructible, Until You Aren't" Build


The Gunlance was actually the first weapon I picked up in Monster Hunter: World when I started playing it. I had a friend at the time who was already playing Lance and I wanted to try something at least a little different from it. At first I didn't really get this slow, clunky, and unwieldy weapon, so I decided I'd come back to it later once I got a couple more hours under my belt. Needless to say, this is that time. And while looking up Meta Builds for Gunlance, it struck me that a Long Shelling Gunlance only needed a few skills to reach their maximum damage potential, which left me a whole lot of wiggle room to play around. It was then I decided to beef up my defenses to the point where chip damage doesn't even register because it gets healed automatically.

--WEAPON--
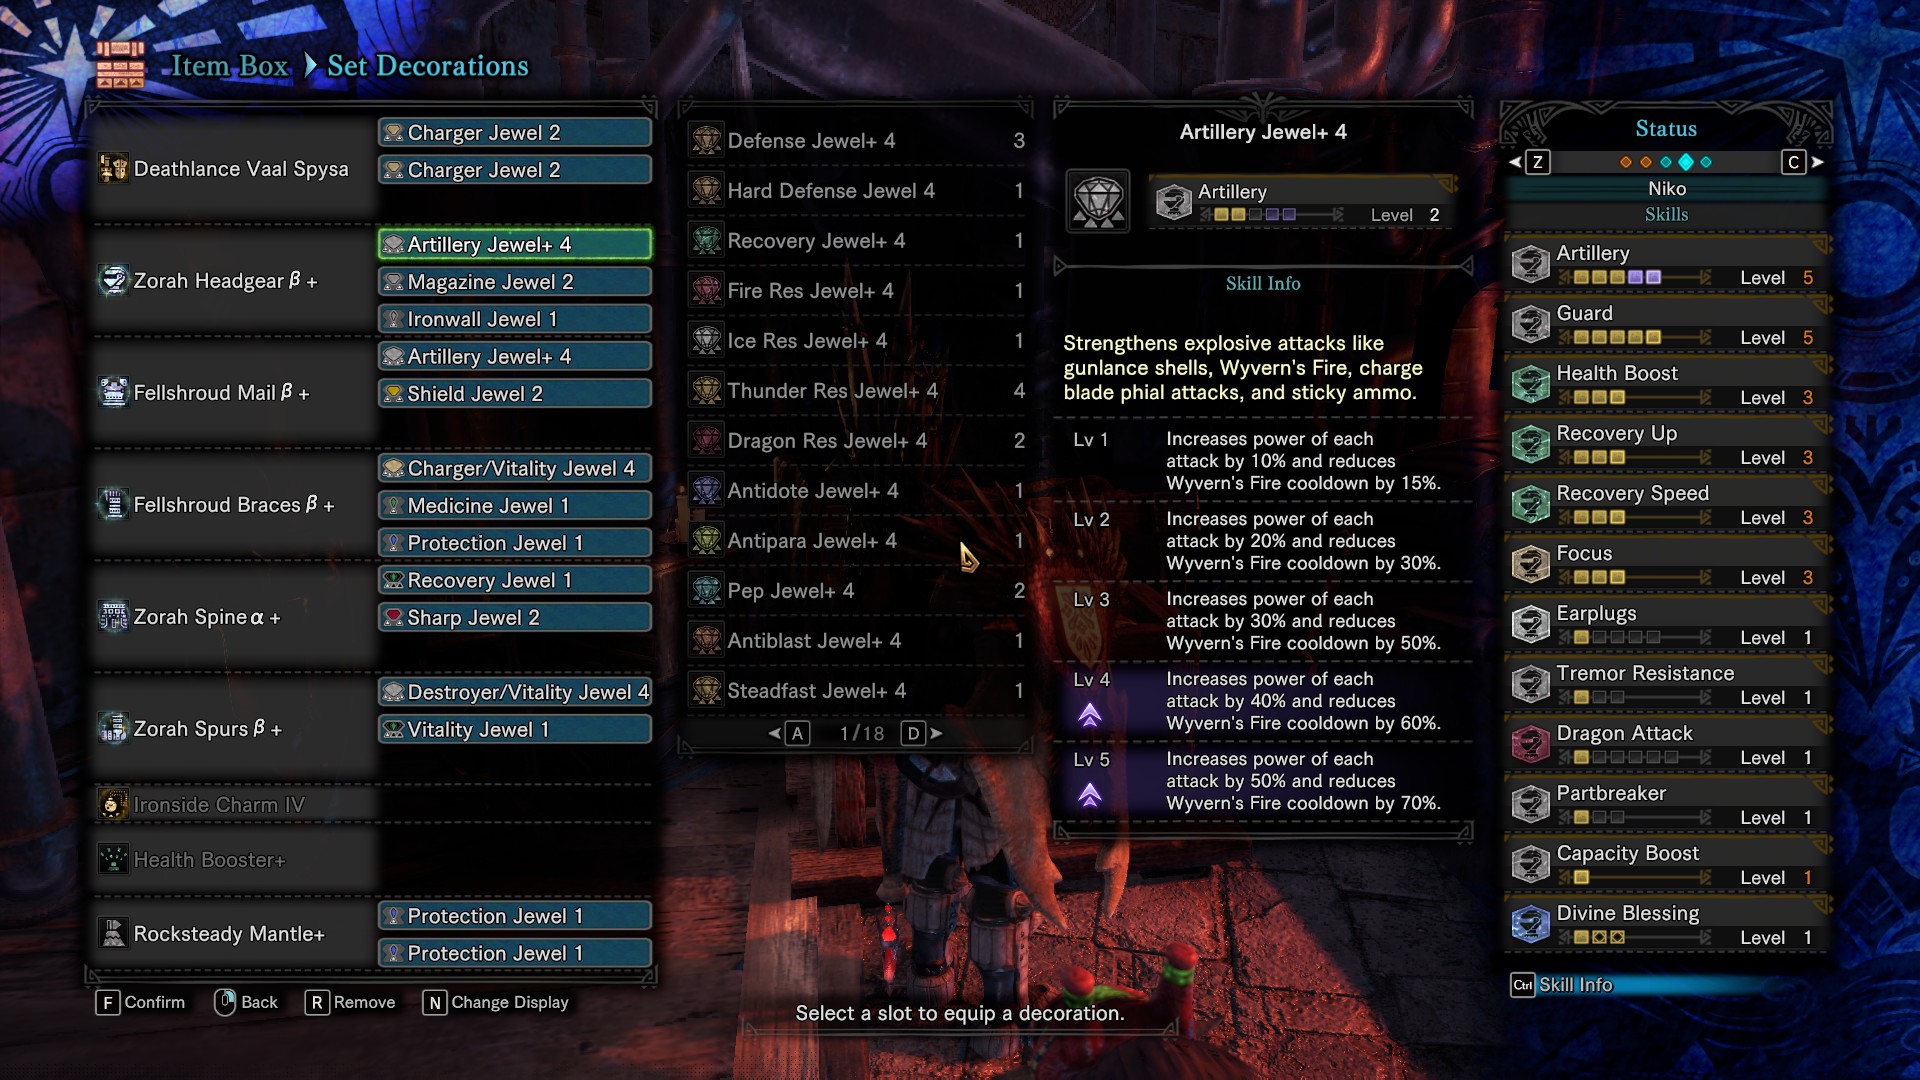
Non-negotiable, this build is specifically designed to work with a Gunlance with Level 6 Long Shelling. Long Shelling Gunlances have the highest Charged Shelling damage of the three types, so they make up the most of your gameplay, along with the odd Wyrmstake Cannon and Wyvern's Fire when the monster you're fighting is immobile and/or asleep. You can also load Slinger Ammo into your Gunlance to use a Wyrmstake Blast instead which procs another large burst of damage whenever you hit the monster with a Shelling. The best one you can probably find is the Deathlance Vaal Spysa.

For Augments, run Defense & Health Regen because Charged Shellings don't get affected by your Raw, Crit, or Elemental Damage, so they're pretty much useless to upgrade on a Gunlance build that mostly focuses on them. Defense Augments give a pseudo-Divine Blessing and Health Regen can be used with Shelling damage so you can be even tankier.

--SKILLS--
  • Offensively speaking, this is pretty much the same song and dance you're probably used to by now. Artillery 5, Focus 3, and Capacity Boost. along with eating for Felyne Bombardier gives you the best damage boost to your Charged Shelling. The only other skill that would increase DPS at this point is Slinger Capacity Boost which only makes your Wyrmstake Blasts last longer so you have a bigger high-damage window.

  • Defensive-wise was where I spent most of my time with this build. With 2 Pieces of Blackveil Vaal Hazak's set, you gain Super Recovery, which causes you to automatically regain health at all times as opposed to just the red portion of your health bar. With that, I grab all of the Health skills in Health Boost 3, Recovery Speed 3, and Recovery Up 3 to maximize not only the healing from Super Recovery, but increase your Natural Regeneration as well which deals with any chip damage that goes through your Shield. Speaking of, Guard 5 and Guard Up give your shield the best possible defenses letting you block basically anything your Stamina Bar allows.

--ITEMS--
Only thing worth of note is your choice of Specialized Tools should you remember to use them. Rocksteady Mantle+ with Divine Protection 2, along with Divine Protection 1 baseline gives us another source of damage reduction adding to the overall tankiness of the build. In case it wasn't obvious enough, this build likes to hunker down in one spot so bringing a Health Booster+ to mark your area of influence gives you some monstrously powerful health regen making you nigh-unkillable.
[Guiding Lands Farming] "Hunter-Gatherer" Build


So if you're like me, you're tired of having to choose between a Gathering Build or a Hunting Build to roam around the Guiding Lands in an endless search for materials. Or perhaps you've found a monster you're looking for and instead of going back to get yourself properly equipped to deal with that threat you're one to just gun in and ask questions later. Well, if that describes you, then this is your build.

--WEAPON--
Dealer's Choice here. Take any weapon that you feel comfortable with because this set is pretty forgiving on stat checking. However, if I were to make any recommendation, go for something that doesn't need Handicraft to do comfortable damage, such as any of the Ruiner Nergigante weapons.

--SKILLS--
  • Our Gathering/Guiding Lands portion of the build lies in a few choice skills that differentiates this from any regular build. Fortify goes on because faints don't matter in the Guiding Lands. It's basically a very large, and very free, damage and defense boost. Geology 3 and Master Gatherer enter this build because you're going to be running around for Bonepiles and Mining Outcrops regardless. Just as well, there seems to be an exploit where shiny drops from monsters can be picked up twice if you have this skill. Regardless of your reasons, this is a great skill to take.
  • Offensive-wise, we bring Critical Eye 7, Weakness Exploit 3, Critical Boost 3, Attack Boost 4 and Agitator 2. This laundry list of usual skill suspects gives us a total of 100% Affinity when attacking tenderized weakpoints of enraged monsters. We want to be able to actually kill/capture monsters with this build before they run away so damage output is going to be important here.
  • Defensively, we have Health Boost 3 and Divine Blessing 1 + 2 from our Rocksteady Mantle+. Flinch Free 1 is a mainstay in case you decide to bring some friends along for a wonderfully murderous expedition. As a bonus, we also get the Ruiner Nergigante 2-Piece, Hasten Recovery, which gives us some extra survivability in the middle of any fight.

--ITEMS--
Besides your usual loadout, take special note to bring Dung Pods and your Ghillie Mantle+ in case you really can't be bothered to fight anything, and put Speed Sharpening 2 on that mantle in case you really can't get a second to sharpen.
[Slugger Draw] "Stun Them With A Sever Weapon" Build
Credits to FlatChestEnthusiast for the idea behind this build


So I didn't know what to make of this when I heard about it. I knew Punishing Draw existed, I knew Slugger Secret existed, but I never thought to think what would happen if you put both of them together and stacked as much Stun Power into a weapon that shouldn't have stun power. Nevertheless, I looked at this at pretty much every ♥♥♥♥♥♥♥♥ angle I could, and I think I'm about satisfied with the results to release this to the public for your everyday memeage.

--WEAPON--
So my weapon criteria was as follows:
  • A weapon type with good Draw Attacks
  • A weapon with Innate White Sharpness
  • A weapon with at least 2 Level 2 Slots
While yes, you can get all the core skills with just armor, to go any further requires more slots than we have to play with, and that's without considering Level 4 Gems. I feel it's a smoke 'em if you got 'em situation, but know there are options if you're not as decoration heavy as other people, and there's even ways to optimize this better than what I have here.

That being said, talking about your weapon types, Great Sword and Long Sword are the clear winners here. Between the two I prefer Great Sword since it's pretty straight forward, but Long Sword can definitely shine because of its Iai Slash attacks functioning as a Special Sheathe, which procs Critical Draw's 100% Affinity and Punishing Draw's Stun. As for specifics, I've boiled it down to a few:
  • For Great Sword: Jagras Deathclaw II > Soulfire Edge "Ruin" > Don Monstro
  • For Long Sword: Soulfire Lash "Ruin" > Deathsword Vaal Grosser
Jagras Deathclaw II gets some extra attention due to the fact it's our only Non-Elemental option and it's particularly easy to access and Augment. For a meme build, this is about the most valuable option. The Soulfire "Ruin" Weapons for both weapon types are your best option if you don't care much for Non-Elemental weapons and think Blast is just better Raw, but just know it's gonna take a while to get to. The Blackveil Vaal Hazak weapons get a mention because they're not as bad to collect as the Lunastra/Nergigante weapons, meet criteria, and at least have Average Elderseal, which if it procs makes regular monsters not Enraged, and removes auras of Elder Dragons. Dragon Damage means your mileage may vary on certain monsters, however.

Finally, Augment-wise, no matter what you pick, just boost your Attack, get Health Regen if you can swing it, and Defense is never a bad option if you have the extra slots. Custom Upgrades go straight to Attack.

--SKILLS--
Our Set Bonuses we're playing with are the Barioth 2-Piece, Punishing Draw, and MR Diablos 3-Piece, Slugger Secret. This of course means we're going for a Critical Draw build, but we're also adding Slugger 5 to it to maximize our chances to Stun the monster. To boost this even further, consider eating for Felyne Slugger and getting an Impact Mantle. Never half-ass your gimmicks.
  • For Offensive skills, we really don't have much to write home about. Because of how little slots we can swing, we only really have room for Critical Boost 3 to raise our Critical Damage to a bonus 40%. We don't have to worry about affinity because our Critical Draw 3 gives us 100% Affinity out of the gate. Quick Sheath 3 lets us put our weapons away faster so we can unsheathe them again to refresh our Critical Draw. I have a Focus Charm since I'm running with Great Sword. If you have the max rank version, use that. If you're using Long Sword, use a Power Prolonger Charm instead. Alternatively, just boost your Raw Attack Damage with an Agitator or Attack Boost Charm if you can deal with the slower/lower time gimmicks. If you're using the Jagras Deathclaw II, bring Non-elemental Boost for that extra bit more damage.
  • Defensive-wise, you just can't leave home without Health Boost 3 and Flinch Free 1. It's a slight bit of comfort, and wouldn't it just suck if you're trying to go for your stuns but you get interrupted by the three other people you decided to bring with you today?
  • Finally, for Utility, I get Protective Polish. We don't have much in the way of maintaining sharpness other than going through the arduous process of using the Whetstone. Yes, there's Whetfish Scales, but who really has a collection of those lying around?
The rest of the skills are just there for filler, but Marathon Runner and Constitution at least help you a little bit in running for your life.

In all, it's still a very inefficient build, but it was a very fun thought experiment! If you want to meme it up and make people wonder where all these stuns are coming from, give it a whirl and try not to get yelled at.
[Kinsect + Palico] The "I Really Wish I Wasn't Here Right Now" Build


So you've seen the videos of Palico Support builds, and I'm sure you've seen the other videos of Kinsect Only Insect Glaives. Well, nether of those builds really need anything other than like one or two skills to get going and the rest of them are just defensive skills. So, because there's so much room to wiggle in, then why not go for the ultimate in non-playing playstyles and combine them both to become the ultimate Pokemon Trainer?

--WEAPON + KINSECT--
There is only one requirement of choice of Insect Glaive and that's that it has Element Boost on it. Ideally your best in slot is going to be Freeze Gale II because of the fact it can take three old Health Regen Augments that add up to a higher percent of lifesteal, but I opted for the easier to farm for Laguna Glaive II because of my skill choices giving us a lot of Health Recovery regardless of augments. However, Health Regen and Defense Augments are the name of your game here.

As for your Kinsect, you want to maximize your Elemental Power and still have a decent speed, so your Kinsect of choice here is going to be Gleambeetle III Velox in the element that the monster you're fighting is most weak to.

--YOUR PALICO--
(Shamelessly copy and pasted from my Mushroomancer Guide on a similar build)
Our first order of business is to detail what weapons your Palico is going to bring to the table. Obviously your Gadget is going to be Meowlotov Cocktail to increase your Palico's DPS dramatically. Just as well, make sure to use your Tailraider Signal to get another Lynian and Small Monster to receive your buffs and healing help you on your quests. However, there are a bunch of options for weapons so here's what I can tell you. I don't know the math to determine which weapon specifically does the most damage, but general good advice is to go for whatever the monster you're fighting is weak to:
  • Raw Melee Damage: Ruinous Claw (100 Melee Damage)
  • Raw Ranged Damage (70 Ranged Damage): Narga Shuriken (Non-elemental, Severing) or Nami Rod (200 Water, Blunt)
  • Highest Affinity: Garon Chainblade (30% Affinity)
  • Fire: Lava Mace (320 Fire)
  • Ice: Legiana Sword (280 Ice)
  • Thunder: Godsblade Zapurr (390 Thunder)
  • Water: Nami Rod (200 Water)
  • Dragon: Gold Chocobo Rod (380 Dragon, Average Elderseal), Ishvalda Orb (300 Dragon, High Elderseal)
I would avoid going for Sleep or Paralysis entirely since you aren't relying on your Palico to proc these statuses to make openings for itself. Blast and Poison are okay, but I feel like raw damage output would be better on your Palico than proccing status for occasional high bursts of damage.

--SKILLS--
  • For the Palico Support part of this build. we're bringing Palico Rally 5 and Wide-Range 5 to increase our Palico's damage and give our furry friends some damage buffs in Mega Demondrugs, Might Seeds, Might Pills and Demonpowders. We also need to keep our pals alive too, so we make sure to bring Speed Eating 3 and Free Meal 3 to keep your stock of supporting items high.
  • Defensive-wise, we have Flinch Free 3, Earplugs 2, and Wind Resist 2. A unique interaction with Flinch Free on the Insect Glaive makes it so if we have our Kinsect Extract buffs on ourself, we get Earplugs 3, Wind Resist 3 and Tremor Resist 3 from Flinch Free 3. Adding Earplugs 2 and Wind Resist 2 makes it so those two skills get buffed up to their max ranks as well so we can mitigate being interrupted as we spam our Kinsect on the Monster's Weakpoints. We also bring Health Boost 3, Recovery Up 3 and Super Recovery to boost our survivability and keep ourselves healthy with how much healing we can output. We have just enough slots leftover for Divine Blessing 1, which is maxed out when wearing our Rocksteady Mantle+.

--ITEMS--
Bring Healing and Damage Increasing Buff Items so you can keep your Tailraiders alive and give them increased damage. You should also consider using the Affinity Booster so you can increase their Affinity by 50% so they can output even more damage.

The long and short of this build is to find your monster, buff up your Palico and Tailraiders, and then go to town with your Kinsect on the Monster's head. Is it the fastest build? No. But it's extremely safe if you know your dodge timings or can find time to heal.
[Rajang 4-Piece] "Mad Max Pajama Sam" Build


Since Rajang has come out for PC, I've done nothing but farm him because I just so enjoy how his armor and weapons look and have to offer. The weapons are very strong contenders for raw damage, but the negative Affinity and tiny bit of Thunder damage means they definitely are not optimal. However, being optimal wasn't the name of the game for this build. It just so happens that with a few decorations we're able to pull something decent off here!

--WEAPONS--
So, if it wasn't obvious enough, this build was made in mind with the Rajang Melee Weapons. They don't have a lot of Thunder, so we're just sticking to their raw damage and shoring up on their negative Affinity. We're able to stack a lot of Affinity giving skills and use an Affinity Augment to reach 100% Affinity anyway. However, on some weapons where you may want some extra supporting skills like Focus or Horn Maestro, we'll have to sacrifice a little damage and affinity (3% Worth, as a matter of fact).

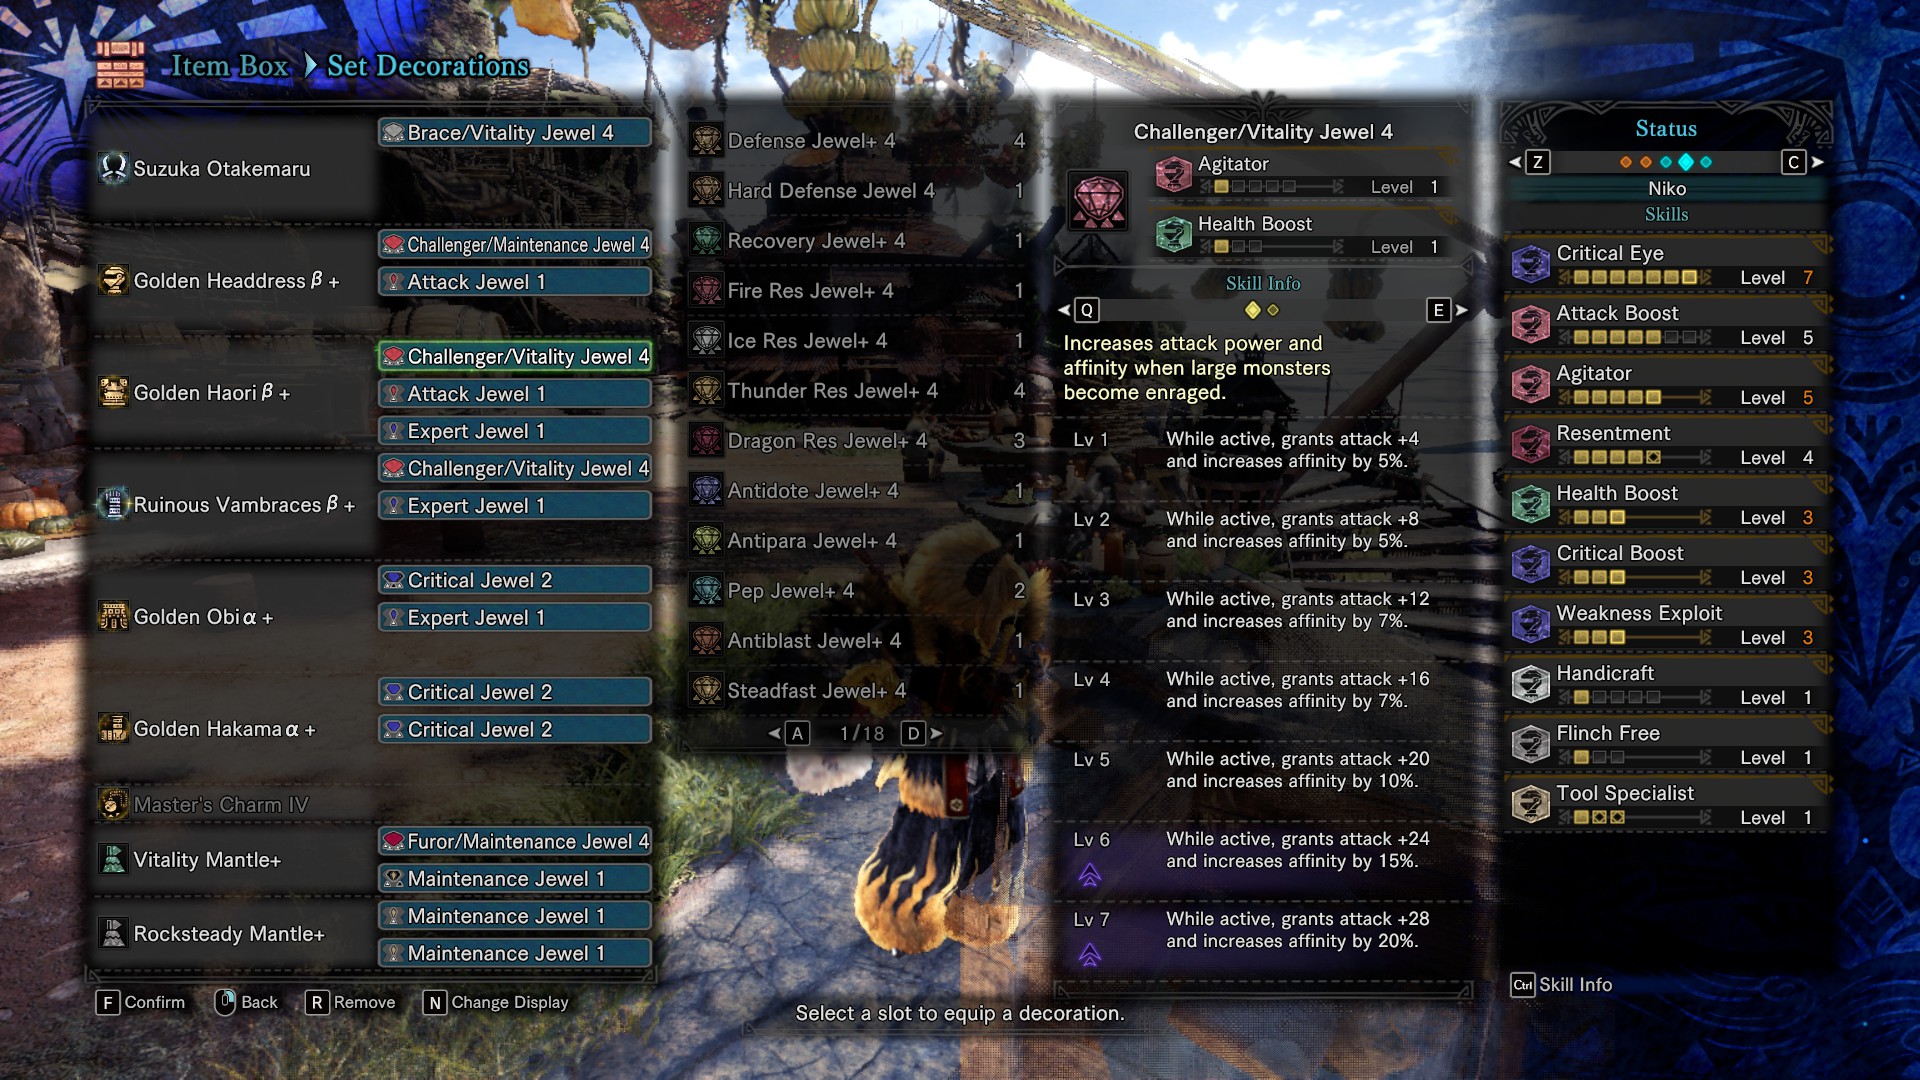
For the sake of this build, I'm using the Dual Blades, Suzuka Otakemaru. They have -10% Affinity baseline as opposed to the -15% of others and don't particularly need much support depending on your skill preferences.

--SKILLS--
We're using the Rajang's Rage set bonuses to get Mind's Eye/Ballistics and Protective Polish. Rajang Weapons start at Blue Sharpness but with only Handicraft 1 we're able to put that right on the cusp of White Sharpness, using Protective Polish to maintain it. For Custom Meal skills in particular for this build, I'd go for Felyne Black Belt and Felyne Polisher to reduce stamina consumption for longer Demon Modes and spending less time sharpening to keep your Protective Polish running.

We start our build off with the holy trinity, Critical Eye 7, Weakness Exploit 3, and Critical Boost 3, and then round out our Crit Chance with Agitator 5 to reach 100% Affinity on Tenderized Weakpoints. Then, we can push for Resentment 4 and Attack Boost 5 to sneak some extra raw damage in. Finally, for comfort's sake, we have Health Boost 3 and Flinch Free 1, along with a bonus of Tool Specialist 1.

Like I've said, if you want to use other weapons with different skills, that's fine. Keep in mind, however that we'll have to drop some of our damage output to make it work. The best way I can think of to mitigate losses is to lower Agitator since dropping it down one or two levels only confers an Affinity loss of 3%.

--ITEMS & MANTLES--
Of course, Dual Blades users want to consider bringing Dash Juices to maintain your Demon Mode more efficiently. Other than that, just bring your general item loadout.

Your choice of Mantles is clearly up to you. For a setup with Resentment 4, I have to give a shoutout to Vitality Mantle+, with a Level 4 Slot we're able to get Resentment 5 and Tool Specialist 3. When you have Red Health, throw on the Vitality Mantle to take more hits while your red health stays the same giving you a good window to keep Resentment active. Rocksteady Mantle+ also gives us Tool Specialist 3 so we can keep our mantles rolling out faster. It also gives us a guaranteed opportunity to Flinch Shot a monster since we don't get knocked off of them.
[True Critical Status] "Guardian Armor Alpha++" Build


This one, admittedly, took me a little more time to fine tune just right to make sure I had all the skills I wanted in the build. But now, finally, I'm able to share this build with those who like Blast Damage more than they realistically should, and just decided dying is for suckers.

--WEAPON--
Due to how Affinity is pretty scarce around this build, this is built around the Soulfire "Blaze" line of Lunastra Weapons because they give 20% Affinity and Innate Blast Damage to work with. Using one Affinity Augment, we can make the difference of base Affinity to reach 100% Affinity with this build and really start stacking Blast Damage, even though the Blast Damage on this line of weapons is relatively low to start.

--SKILLS--
The impetus for this build was the idea around the Guardian Armor Alpha+ set and Defender Weapons that we've come to know and love pre-Iceborne and used for catching up to Iceborne. So, the core skills of this set, much alike the Guardian Armor, are Health Boost 3, Recovery Up 3, Divine Blessing 3, and Marathon Runner 3.
  • In our Offensive corner, we use 4 Pieces of Gold Rathian's Set to get True Critical Status, which increases our status buildup when we critically strike. With that, we make way for Critical Eye 4 and Weakness Exploit 3 to round up our crit chance and get Critical Boost 3 to get just that much more raw damage in. Attack Boost 2 and Agitator 2 on our Apothecary Mantle+ are just there for filler and raw damage.
  • Defensively, since we're using the Gold Rathian set bonuses, we may as well go up to Divine Blessing 5 to get an effective 30% Damage Reduction across the board. This alongside Flinch Free 1 and as a bonus, Speed Eating 1, we're able to deal with a lot of punishment coming our way, even from our allies! From the Soulfire "Blaze" weapons, we get the skill Guts which gives us an extra layer of insurance to make sure that we do not cart ever.

--ITEMS--
Other than your usual fare of general-use items, I wanted to make notice of the Apothecary Mantle+, which gives us even more status buildup while we wear it. Your second mantle is up to personal choice, but I just chose Rocksteady Mantle+ to put Tool Specialist 2 into because we have pretty much any defensive option worth of note covered.
9 Comments
shit owl Feb 6, 2020 @ 2:24am 
bruh the title of this guide is cringe but nice ig^^ also generic toaster comment here
Niko  [author] Feb 4, 2020 @ 8:08pm 
@Qwas I see we both watched the same video on the subject! It's something I'm very interested in taking my own spin of so I'll definitely take a look once I can track down the Gold Rathians/Silver Rathaloses I need to get the armor.
Niko  [author] Jan 30, 2020 @ 4:53am 
@FlatChestEnthusiast That sounds god damn hilarious, I'll definitely have to take a look at some point.
FlatChestEnthusiast Jan 30, 2020 @ 12:52am 
Interesting builds, the guiding lands one is useful.
For wacky 'off-meta' builds, have you tried draw attack Long Sword? The new movies they added count as draw attacks so they benefit from critical draw and punish draw.
Diablos Helm A+
Diablos Mail B+
Barioth Vambraces B+
Barioth Faulds A+
Diablos Greaves A+
This, plus a crit draw gem and two quick sheathe gems gives you critical draw, punishing draw (ko damage) and slugger 5 for 60% more ko damage. Effeciant and viable? Probably not, but it's funny to KO something with a thin katana. Hope you give it a go and maybe do a better job than I do filling in the rest of the gem slots.
Niko  [author] Jan 28, 2020 @ 10:06pm 
@♠ Purps ♠ Defense and Health Regen, since Shellings aren't affected by Raw/Crit/Elemental Damage.
Soliloquy Jan 28, 2020 @ 6:46pm 
What augments (custom upgrades) do you run on the GL build?
Niko  [author] Jan 28, 2020 @ 2:57pm 
@saucey Well, since Shellings can't crit and aren't affected by raw damage, the only useful augments would be Defense for more survivability and a Divine Blessing replacement, and Lifesteal since Shellings can give you health back which is another source of powerful regeneration for this build.
As for tips on how to use the Long Gunlance specifically, your Charged Shelling (Hold your Shelling button after thrusting or using a regular Shelling once) is your bread and butter for damage. Use Wyrmstake Blasts to supplement your Charged Shelling spam. When you run out of ammo, use a Quick Reload and keep spamming Charged Shellings. Use your dashes while unsheathed to move around if your Stamina can handle it, but if you're fighting in a generally smaller area anyway, just hunker down and block until they come back to you.
saucey Jan 28, 2020 @ 7:24am 
That gunlance build sounds insane... I got two quick questions; do you augment health regen for the lifesteal, and if someone was completely new to gunlance what would you recommend for said person (tips, bread-and-butter combos, etc.)?
Koz Jan 28, 2020 @ 12:16am 
remove defence up skill, its useless. better off taking devine blessing or any other defensive skill. the amount the other skills add to your "effective health" or survivability outdoes defence boost by more than enough. you're better off taking specific elemental resistance per monster, it outperforms defence boost by quite a bit.